

Page 1
IFU KRUPS Nafta_Premium_USA_xxxxxxxx 31/05/10 14:33 Pagea1
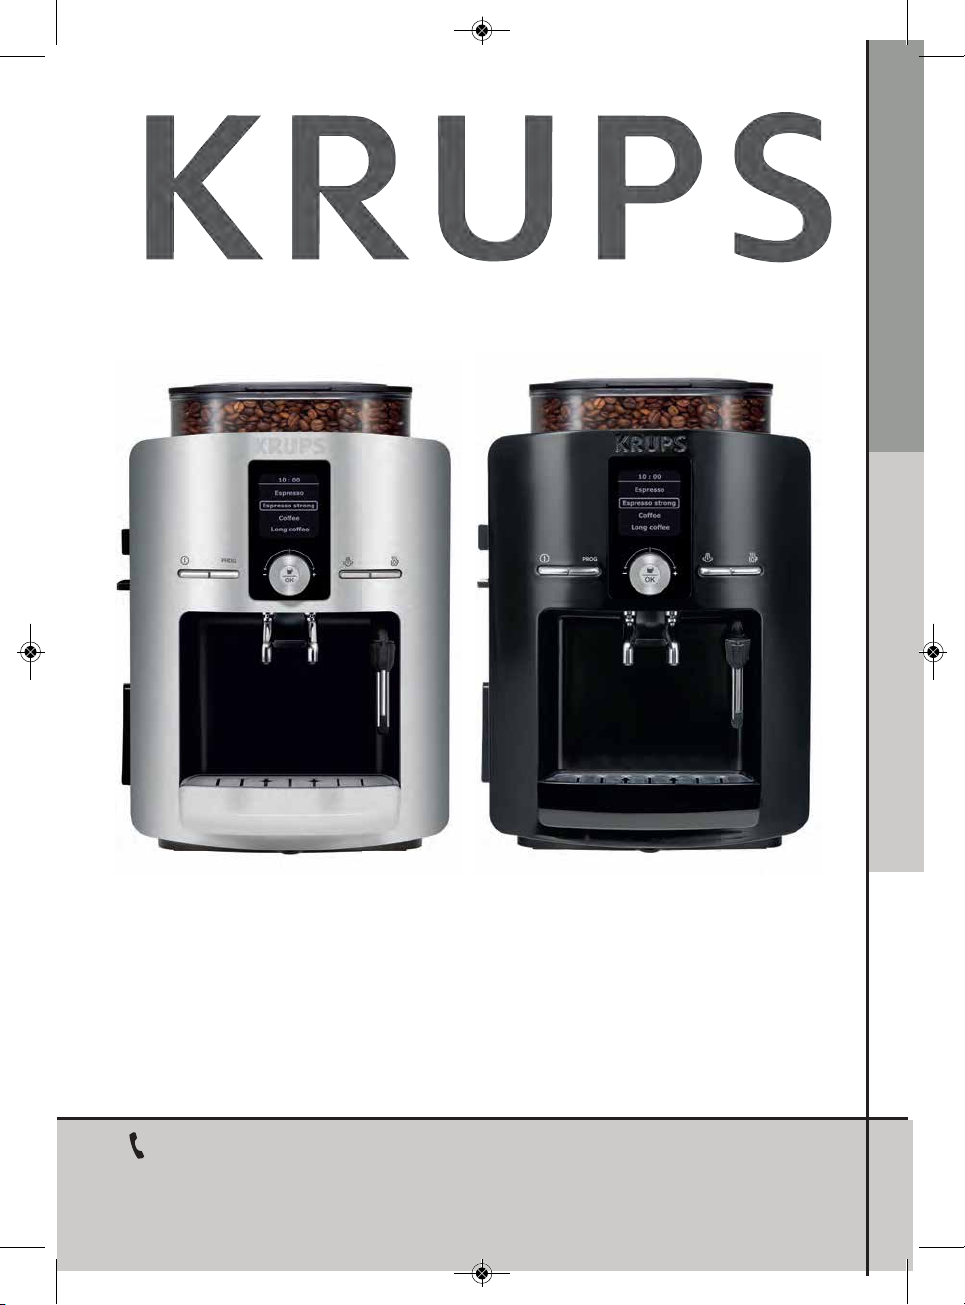
ESPRESSERIA AUTOMATIC PREMIUM
ENGLISH
ESPAÑOL
Household use only
Check warranty card for details of warranty in your country with a maximum of 6.000 cycles for 2 years. This product is for
domestic use only and is not suitable for trade or professional purposes. Any non-household use is not covered by the
manufacturers warranty. The warranty does not apply to damage and faults resulting from careless use, repair of unauthorized
persons as well as non-observance of the instructions for use. Warranty will not be rendered if any operation and maintenance
instructions of Krups have not been observed or if the cleaning or decalcifying agents are used which do not comply with the
original Krups specications. Failure to use the Claris water lter in accordance with Krups instructions. Abnormal wear and
tear of parts (grinding disks, valves, seals) is exempted from the warranty, as well as damages caused by foreign objects in th e
grinding mill (e.g. wood, stones, plastic parts etc.). Actual model may vary slightly from photo.
CONSUMER SERVICE USA : 1-866-668-0325 www.krupsusa.com
Canada : 1-800-418-3325 www.krups.ca
Mexico : 018001128325 www.krups.com.mx
Page 2
PAG E
IMPORTANT SAFEGUARDS
. . . . . . . . . . . . . . . . . . . . . . . . . . . . . . . . . . . . . . . . . . . . . . . . . . . . . . . . . . . . . . . . . . . . . . . . . .2
MACHINE DESCRIPTION
. . . . . . . . . . . . . . . . . . . . . . . . . . . . . . . . . . . . . . . . . . . . . . . . . . . . . . . . . . . . . . . . . . . . . . . . . . . . . .4
WELCOME
. . . . . . . . . . . . . . . . . . . . . . . . . . . . . . . . . . . . . . . . . . . . . . . . . . . . . . . . . . . . . . . . . . . . . . . . . . . . . . . . . . . . . . . . . . . . . . . . . . .5
STORING YOUR BEANS
. . . . . . . . . . . . . . . . . . . . . . . . . . . . . . . . . . . . . . . . . . . . . . . . . . . . . . . . . . . . . . . . . . . . . . . . . . . . . . . .5
LIMITS TO USE
. . . . . . . . . . . . . . . . . . . . . . . . . . . . . . . . . . . . . . . . . . . . . . . . . . . . . . . . . . . . . . . . . . . . . . . . . . . . . . . . . . . . . . . . . . . . .5
BEFORE FIRST USE
. . . . . . . . . . . . . . . . . . . . . . . . . . . . . . . . . . . . . . . . . . . . . . . . . . . . . . . . . . . . . . . . . . . . . . . . . . . . . . . . . . . . .6
MEASURING WATER HARDNESS
CLARIS - AQUA FILTER SYSTEM CARTRIDGE
INSTALLING THE FILTER
PREPARING THE MACHINE FOR FIRST USE
. . . . . . . . . . . . . . . . . . . . . . . . . . . . . . . . . . . . . . . . . . . . . . . . . .7
PROGRAMMING YOUR MACHINE
RINSING OF THE CIRCUITS
ADJUSTING THE GRINDER
PREPARING ESPRESSO AND PRESSURE BREWED COFFEE
. . . . . . . . . . . . . . . . . . . . . . . . . .8
Preparing an espresso (from 0.7 to 2.3 oz / 20 to 70 ml)
Preparing ordinary coffee (from 2.7 to 5.4 oz / 80 to 160 ml)
Preparing a long coffee (from 4.0 oz to 8.0 oz / 120 ml to 240 ml)
TWO-CUP FUNCTION
USING STEAM
. . . . . . . . . . . . . . . . . . . . . . . . . . . . . . . . . . . . . . . . . . . . . . . . . . . . . . . . . . . . . . . . . . . . . . . . . . . . . . . . . . . . . . . . . . . . . .9
FROTHING MILK
AUTO-CAPPUCCINO SET XS6000
PREPARING HOT WATER
. . . . . . . . . . . . . . . . . . . . . . . . . . . . . . . . . . . . . . . . . . . . . . . . . . . . . . . . . . . . . . . . . . . . . . . . . . . .10
MAINTAINING YOUR MACHINE
. . . . . . . . . . . . . . . . . . . . . . . . . . . . . . . . . . . . . . . . . . . . . . . . . . . . . . . . . . . . . . . . . . . .11
EMPTYING THE COFFEE GROUNDS COLLECTOR, THE CLEANING TRAY AND THE DRIP TRAY
CLEANING PROGRAM
DESCALING PROGRAM
GENERAL MAINTENANCE
OTHER FUNCTIONS
. . . . . . . . . . . . . . . . . . . . . . . . . . . . . . . . . . . . . . . . . . . . . . . . . . . . . . . . . . . . . . . . . . . . . . . . . . . . . . . . . . . .13
SERVICES
SETTINGS
PRODUCT INFORMATION
DEMONSTRATION MODE
MOVING THE MACHINE
. . . . . . . . . . . . . . . . . . . . . . . . . . . . . . . . . . . . . . . . . . . . . . . . . . . . . . . . . . . . . . . . . . . . . . . . . . . . . .14
ELECTRICAL OR ELECTRONIC PRODUCT AT END OF SERVICE LIFE
. . . . . . . . . . . . . . .14
TROUBLESHOOTING GUIDE
. . . . . . . . . . . . . . . . . . . . . . . . . . . . . . . . . . . . . . . . . . . . . . . . . . . . . . . . . . . . . . . . . . . . . . .15
KRUPS MANUFACTURER's WARRANTY
. . . . . . . . . . . . . . . . . . . . . . . . . . . . . . . . . . . . . . . . . . . . . . . . . . . . . . .16
RECIPES
. . . . . . . . . . . . . . . . . . . . . . . . . . . . . . . . . . . . . . . . . . . . . . . . . . . . . . . . . . . . . . . . . . . . . . . . . . . . . . . . . . . . . . . . . . . . . . . . . . . .18
CONTENTS
1
IFU KRUPS Nafta_Premium_USA_xxxxxxxx 31/05/10 14:33 Page1
Page 3
IFU KRUPS Nafta_Premium_USA_xxxxxxxx 31/05/10 14:33 Page2
IMPORTANT SAFEGUARDS
When using electrical appliances, basic safety precautions should always be followed to
reduce the risk of re, electric shock, and/or injury to persons including the following :
1. Read all instructions prior to rst use.
2. Do not touch hot surfaces. Use handles or knobs.
3. To protect against re, electric shock and injury to persons, do not immerse cord,
plugs or machine in water or other liquid and keeps hands and utensils out of the
bean container while grinding and when the machine is plugged in.
4. Do not put water into the coee bean container and/or under the servicing ap.
5. Not intended for use by children.
6. Close supervision is necessary when any machine is used near children. Keep
machine out of reach of children.
7. This appliance is not designed to be used by people (including children) with a physical, sensory or mental impairment, or people without knowledge or experience, unless
they are supervised or given prior instructions concerning the use of the appliance by
someone responsible for their safety.
8. Children must be supervised to ensure that they do not play with the
9. Burns can occur from touching hot surfaces, hot water or steam. Exercise caution.
10. Exercise caution when using the steam nozzle as steam can cause scalding.
11. Unplug machine from outlet as soon as you stop using it and when you clean it. Allow
to cool before putting on or taking o parts, before cleaning the machine, and before
storing.
12. All appliances are subjet to stringent quality control. Practical tests using appliances
taken at random are conducted and this may explain any slight marks or coee residue showing prior use.
13. Do not operate any machine with a damaged cord or plug after the machine malfunctions, or has been damaged in any manner. Return machine to the nearest Krups
Service Center for examination, repair or adjustment.
14. To reduce the risk of injury do not drape cord over the counter top or table top where
it can be pulled on by children or tripped over accidentally.
15. Do not let cord hang over edge of table or counter, or touch hot surfaces.
16. The use of accessory attachments not recommended by Krups may result
tric shock or injury to persons.
17. Do not use outdoors.
18. Do not place on or near a hot gas or electric burner, or in a heated oven.
19. To disconnect the machine, turn the control to “o” then remove plug from wall outlet.
Do not yank cord, instead grasp plug and pull to disconnect.
20. Do not use the machine for other than intended use.
21. Do not pour liquids other than water and descaling solutions specied in this manual
into the water tank.
22. Protect the machine against humidity and freezing.
23. This machine is intended for household use only.
appliance.
ENGLISH
in re, elec-
CAUTION
SAVE THESE INSTRUCTIONS
This machine is intended for household use only. Any servicing other than cleaning and
user maintenance should be performed by the nearest authorized Krups Service Center.
Visit our website at www.krupsusa.com
your respective countries Consumer Service department for the service center nearest to you.
To reduce the risk of re or electric shock, do not dismantle the machine. Repair should be
done by an authorized Krups Service Center only.
in the USA or www.krups.ca in Canada or contact
2
Page 4
3
SHORT CORD INSTRUCTIONS
A. We do not recommend using an extension cord with this device.
B. If an extension cord is absolutely necessary,
1) the marked electrical rating of the extension cord should be at least as great
as the electrical rating of the machine.
2) If the appliance is of the grounded type, the extension cord should be a grounding-type 3-wire cord.
3) the longer cord should be arranged so that it will not drape over the counter
top or table top where it can be pulled on by children or tripped over.
C. This machine has a polarized plug (one blade is wider than the other). To reduce
the risk of electric shock, this plug is intended to fit into a polarized outlet only one
way. If the plug does not fit fully into the outlet, reverse the plug. If it still does not
fit, contact a qualified electrician. Do not attempt to modify the plug in any way.
In the interest of improving products, Krups reserves the right to change specifications
without prior notice.
IFU KRUPS Nafta_Premium_USA_xxxxxxxx 31/05/10 14:33 Page3
Page 5
IFU KRUPS Nafta_Premium_USA_xxxxxxxx 31/05/10 14:33 Page4
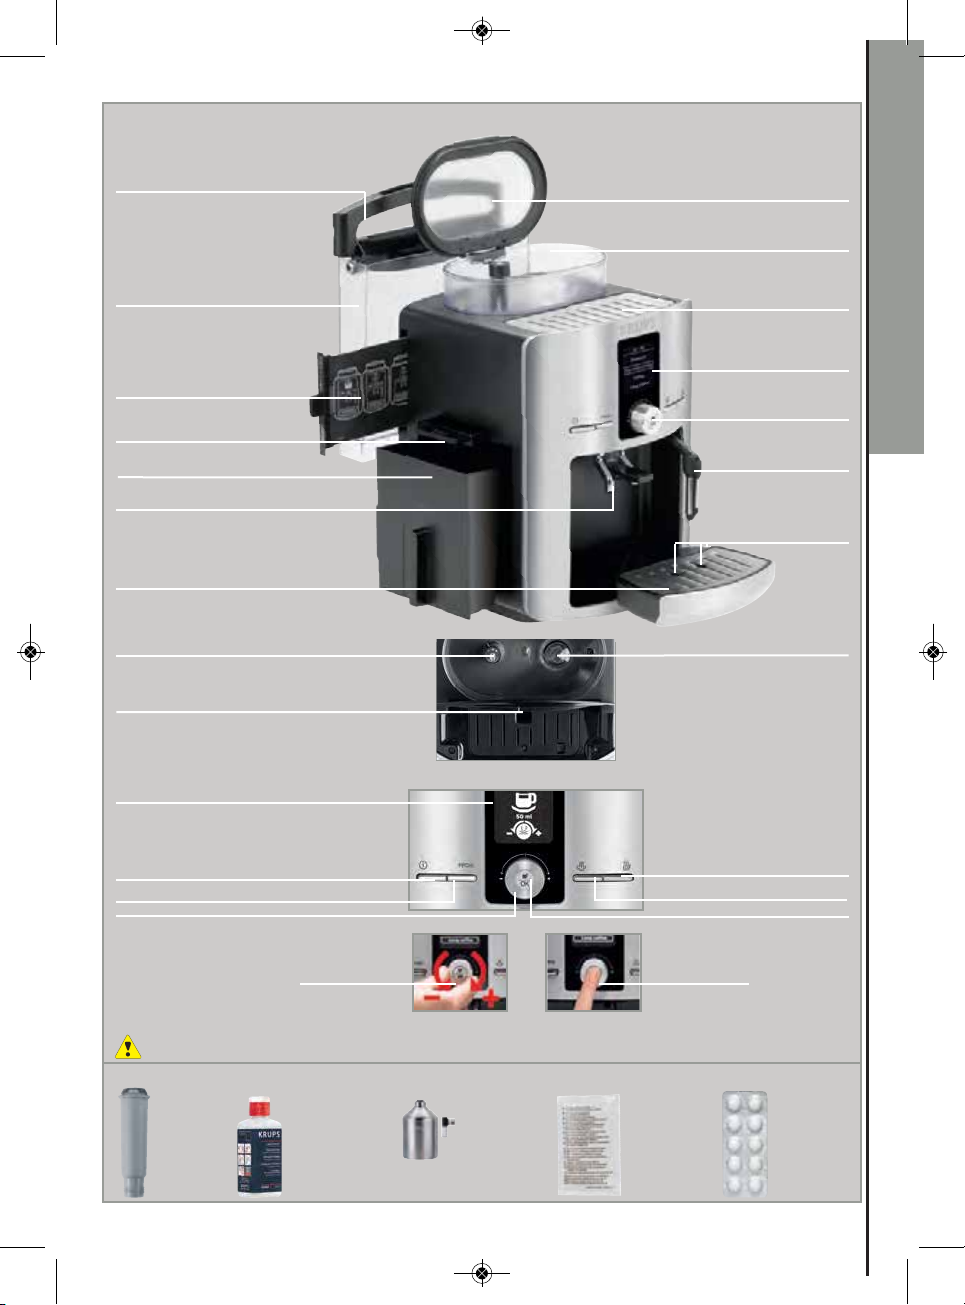
MACHINE DESCRIPTION
Water tank handle/lid
Water tank
Quick reference guide
Cleaning tray
Coee grounds collector
Coee outlets with height adjusting
handles
Drip tray grid
Grinding neness selector knob
Cleaning tablet pipe
Coee bean container lid
Coee bean container
ENGLISH
Cup tray
Digital display
Knob
Steam nozzle
Water level oats
Metal grinding wheel
Top view
Display screen
“On/O” button
Program settings button
Rotating selection knob
Select (Rotate)
Actual model may vary slightly from photos
This machine must only be used with Krups' accessories for the guarantee to be valid.
ACCESSORIES SOLD SEPARATELY
F088
Claris Aqua
lter system
(Included)
XS4000 KRUPS
Cleaning liquid
for auto cappuccino system
(not included)
XS6000
Auto
cappuccino set
(not included)
4
Conrm (Push)
F054
Descaling
powder
(included)
Hot water button
Steam button
OK validation button
XS3000
10 cleaning
tablets
(2 tablets
included)
Page 6
5
Congratulations and thank you for purchasing this Krups Espresseria Automatic espresso
machine. We are confident you will enjoy the versatility of this machine as well as the convenience. Should you have any questions, please contact one of our specially trained consumer
service managers. They are available Monday through Friday from 8:00 am to 6:30 pm (EST)
at 1-866-668-0325 for the US, and Monday through Thursday from 8:30 am to 4:30 pm and
Friday from 8:30 am to 1:30 pm (EST) at 1-800-418-3325 for Canada.
We strongly recommend that you register this product as quickly as possible to ensure that
the warranty program is validated. Please complete your respective countries enclosed registration card or for the USA register online at www.krupsusa.com.
Enclosed in this box is the Krups VIP Exclusive Service Kit. Within this kit, we have included everything you need to get started. Each kit contains 1 packet of descaling powder, 2 cleaning
tablets, water hardness testing strip, a full color instruction manual, and 1 Claris water filter.
WELCOME
STORING YOUR BEANS
LIMITS TO USE
This Espresseria Automatic machine must only be used to prepare espressos or coffee, froth milk
and heat liquids. This product has been designed for domestic use only. Any commercial or professional use, inappropriate use or failure to comply with the instructions will void the warranty.
This appliance is intended to be used in household and similar applications (maximum of 6000
cycles for 2 years).
Store beans in an airtight container in a cool, dark place. We do not recommend storing
beans in the freezer. When using frozen beans, allow beans to completely thaw. This will
prevent unnecessary moisture from entering into the grinder.
There are a variety of coffee and espresso beans available on the market today. Some beans
have a very dry roast while others can be quite oily. Beans may clump together, which could
disrupt the flow of coffee into the grinder. To ensure optimal results, simply stir the beans in
the coffee hopper just prior to using your machine. Never use flavored or other sugar-coated
beans as they will stick to the burrs and clog the machine.
IFU KRUPS Nafta_Premium_USA_xxxxxxxx 31/05/10 14:33 Page5
Page 7
IFU KRUPS Nafta_Premium_USA_xxxxxxxx 31/05/10 14:33 Page6
BEFORE FIRST USE
Before using the machine for the rst time, you will need to complete an initial set up procedure to ensure the machine will
operate properly. You will be asked to set the water hardness level, language, clock, date, and a few other options. The digita l
display will walk you through each step and the initial set up takes just a few minutes. Please note, if you disconnect the
machine from the power source, you will need to complete parts of this process again.
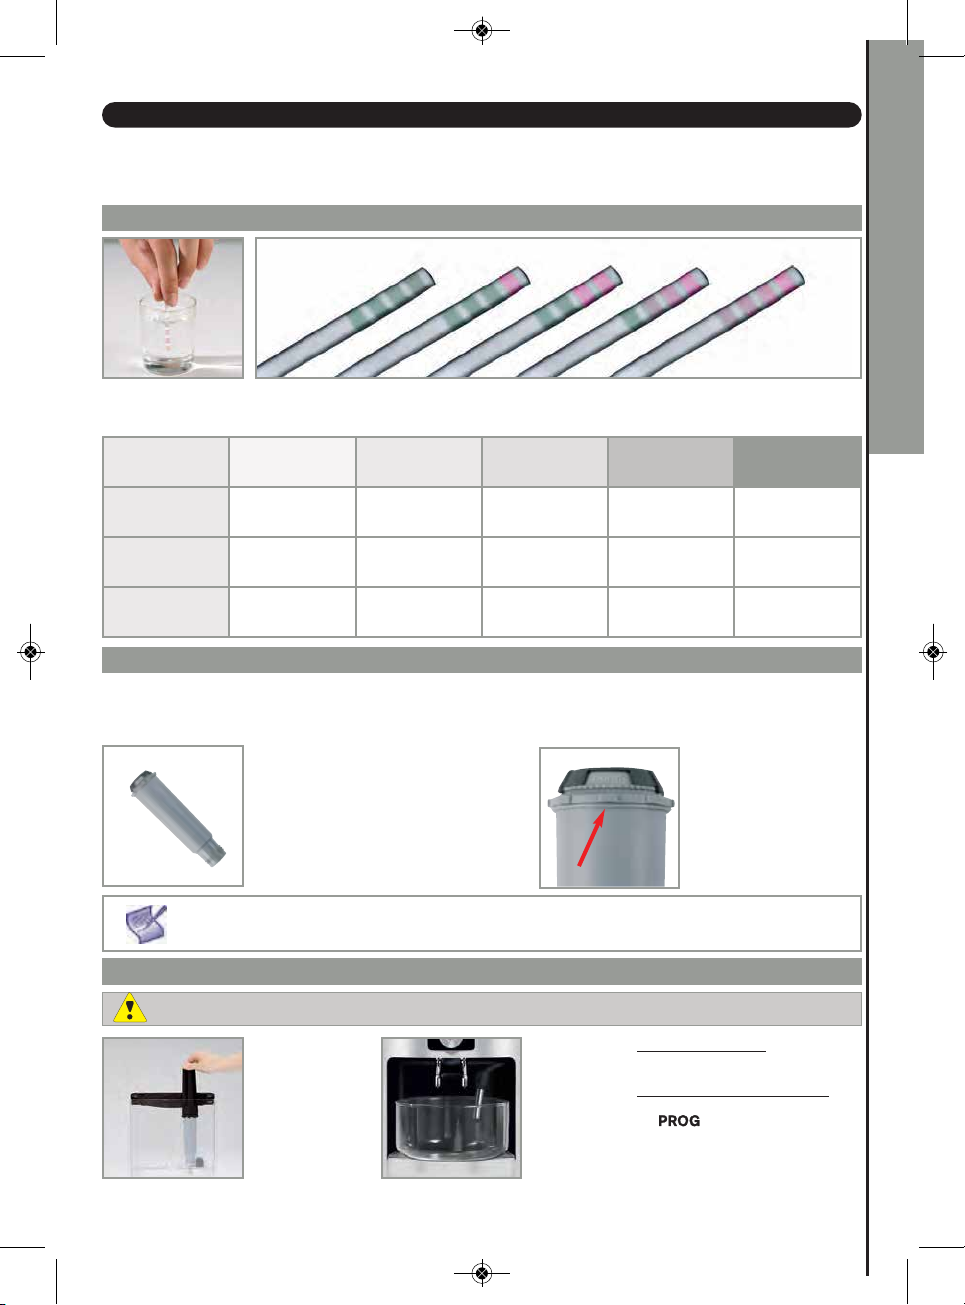
MEASURING WATER HARDNESS
0 1 2
3
4
1 sec.
Fill a glass with the water
you normally use and
immerse the test strip.
Degree of
hardness
° f
° dH
° e
very soft
< 5.4° > 7.2° > 12.6° > 25.2° > 37.8°
< 3° > 4° > 7° > 14° > 21°
< 3.75° > 5° > 8.75° > 17.5° > 26.25°
CLARIS – AQUA FILTER SYSTEM CARTRIDGE F088
To optimize the taste of your coee and the lifetime of your appliance, we recommend that you use the Claris – Aqua Filter
System cartridge sold as an accessory (F088).
It consists of an anti-scale substance and active carbon which reduces the chlorine, impurities, lead, copper and pesticides in
the water. The minerals and trace elements in the water, however, are preserved.
F 088
Your appliance will indicate when the Claris – Aqua Filter System cartridge needs changing by displaying a message. The Claris cartridge needs to be replaced approximately every 13 gallons/50 litres of water or at least every
two months. Set the hardness of the water to 0 if you use a Claris cartridge.
By ltering the water with the
Claris – Aqua Filter System cartridge, you can reduce:
Carbonate hardness – up to 75%*
Chlorine – up to 85%*
Lead – up to 90%*
Copper – up to 95%*
Aluminium – up to 67%*
* indications supplied by the manufacturer
INSTALLING THE FILTER (CLARIS – AQUA FILTER SYSTEM CARTRIDGE)
After 1 minute the hardness measurement will appear.
This is the number you will be asked to program into the machine.
0
soft
1
2
moderately hard
3
hard
Mechanism which memorises the month in which the
cartridge was installed and
changed (after a maximum
of two months).
extremely hard
4
ENGLISH
To prime the cartridge correctly, follow this procedure every time you install the lter.
Installing
the cartridge in
the machine:
Screw the ltering
cartridge into the
bottom of the
water tank using
the spanner
provided.
Put a
17 oz/0.5 l
container
under
the steam
nozzle.
6
Using for the rst time
option in the "Water lter" menu and
follow the instructions on the screen.
To install later or replace the lter
select the "Water lter" menu using
the button: "Services"-OK"Water lter"-OK-"Install" (or
"Change")-OK- and follow the instructions on the screen.
: Choose "YES"
:
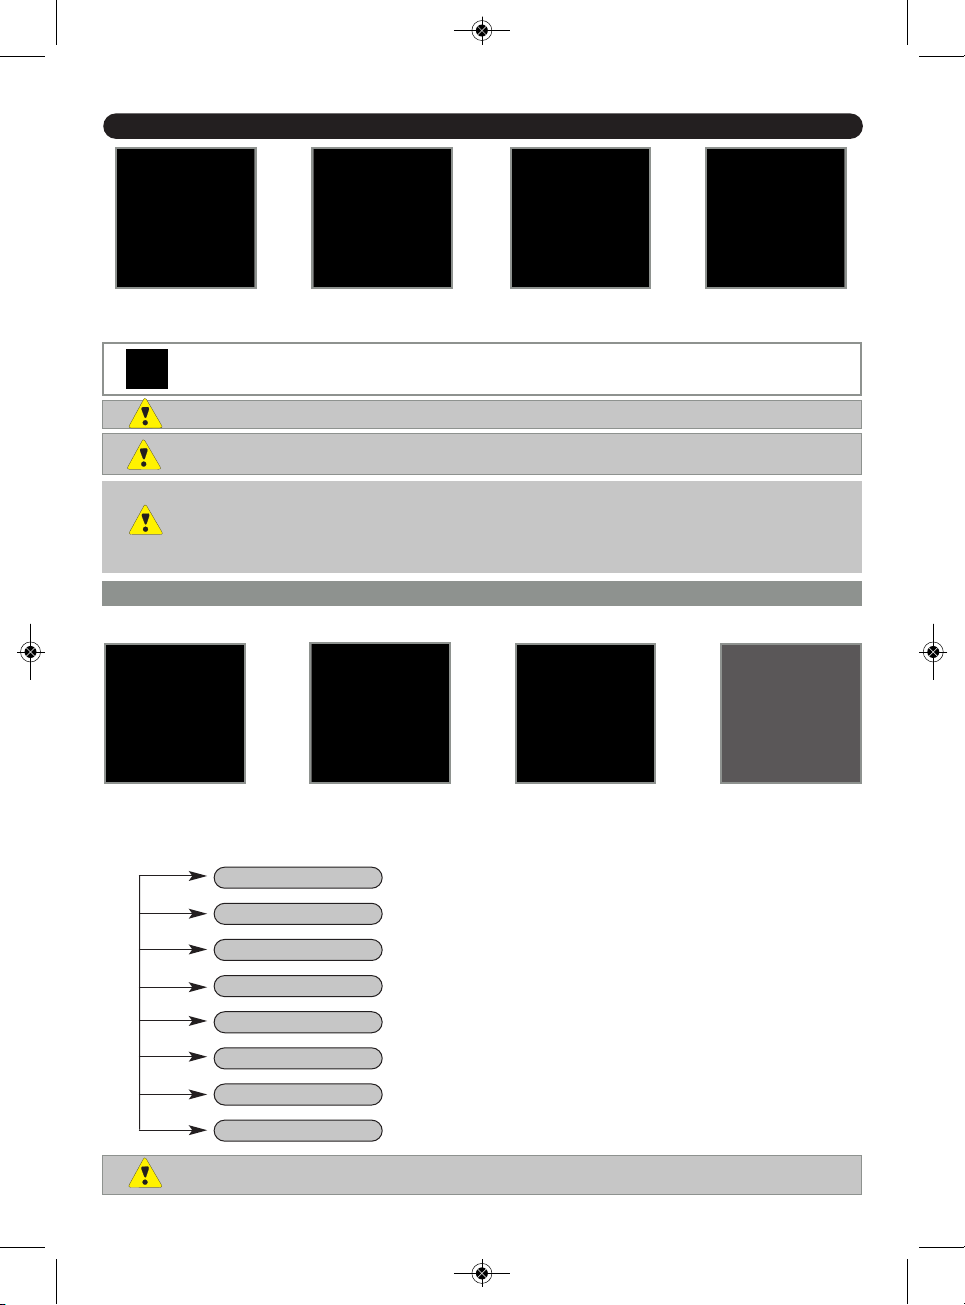
Page 8
7
Pull out and fill the
water tank with fresh
water.
Select (rotate)
Confirm (push)
Replace the tank, press
firmly to insure it’s fitted
properly. Close the lid.
Open the coffee bean
container lid. Add fresh
coffee or espresso beans.
Close the coffee bean
container lid again.
Check that the coffee beans do not contain any foreign particles, as any damage caused by the presence of
foreign particles will void the warranty.
Do not put water into the coffee bean container.
Remember to fit the drip tray to avoid waste water flowing onto the work surface and staining it or scalding you.
Be sure that the drip tray is properly installed to avoid overflow.
Be sure your water tank is clean.
Do not fill the water tank with hot water, milk or any other liquid. If you turn on the machine when the water
tank is not in place or not correctly filled (under the “min.” level,), the “fill water tank” light will come on.
This machine will not operate when the tank is empty.
When you first use your machine, it will ask you to set several parameters. If you disconnect your machine, you will be asked to
reset some of these parameters.
Use the selector knob
to choose a language
(highlighted). Press the
OK key to validate.
Press “On / Off” to turn
your machine on. Follow
the instructions that
appear on the “choice of
language” screen.
Use the selector knob to choose a function and increase
or reduce values. Confirm your choice using the OK key.
PREPARING THE MACHINE FOR FIRST USE
PROGRAMMING YOUR MACHINE
The machine will ask you to set:
Language
Volume unit
Date
Time
Auto-off
Auto-on
Water hardness
Water filter
You can select your desired language from those offered.
Choose either ml or oz as your measurement unit.
You can set the date (mandatory if you use the Claris - Aqua Filter
System cartridge).
You can choose between 12 hour or 24 hour time display.
You can choose the period after which your machine will automatically turn off, from 30 minutes to 4 hours (in 30 minute increments).
You can automatically start pre-heating of your machine at your
chosen time.
You must set your water hardness between 0 and 4. See “Water
Hardness Measurement” section.
You must indicate whether a filter has been installed or not
(Claris - Aqua Filter System cartridge).
We do not recommend the use of oily or sugar coated or flavored espresso/coffee beans.
These types of beans may damage the machine.
NEVER PUT GROUND COFFEE IN THE COFFEE CONTAINER.
When using for the first time, the appliance may request "filling the machine". Follow the
displayed instructions.
IFU KRUPS Nafta_Premium_USA_xxxxxxxx 31/05/10 14:33 Page7
Page 9

IFU KRUPS Nafta_Premium_USA_xxxxxxxx 31/05/10 14:33 Page8
RINSING OF THE CIRCUITS
You should periodically rinse the machine. We recommend rinsing the machine if it has not been used for several days. Use a
large cup, choose the “Yes” option in the rinsing function and follow the instructions on the screen.
Once the
machine has
been turned
on and
pre-heating
has been
completed,
you can
rinse the
coee
circuit.
Press button at any time to display menus to perform rinse menu and then select SERVICES => OK => RINSING => OK.
DO NOT PUT YOUR HANDS UNDER THE OUTLETS WHEN RINSING PROCESS IS IN PROGRESS.
HOT WATER COMES OUT THROUGH THEM AND MAY CAUSE SCALDING.
Rinsing the coee
circuit:
Place a container
under the coee
outlets and steam
nozzle then select
"YES" from the
menu proposed.
The rinsing cycle
will stop
automatically after
about 1.3 oz/40 ml.
Rinsing the
steam circuit:
Press the
key to rinse the
steam circuit.
The rinsing
cycle will stop
automatically.
ADJUSTING THE GRINDER
There are three neness settings on this grinder. You can adjust the neness to select your own personal preferences.
The ner the grind, the stronger the avor. To change the grind, turn the knob during the grinding process.
Turn counterclockwise for
a ner grind.
CHANGE TH E SETTING DURING GRINDING.
NEVER FORCE THE GRINDING FINENESS SETTING BUTTON.
SUGAR COATED, FLAVORED OR OILY COFFEE/ESPRESSO BEANS CAN CLOG THE GRINDER.
Turn clockwise
for a coarser
grind.
ENGLISH
PREPARING ESPRESSO AND PRESSURE BREWED COFFEE
With a simple touch of a button, you can prepare 4 types of beverages: espresso, strong espresso, coee and
long coee.
Amount of water
Espresso 0.7 - 2.3 oz / 20 - 70 ml
Strong Espresso 0.7 - 2.3 oz / 20 - 70 ml
Coee 2.7 - 5.4 oz / 80 - 160 ml
Long Coee 4.0 - 8.0 oz / 120 - 240 ml
The amount of water required for a long coee is between 120 and 240 ml.
The machine automatically carries out a double cycle, do not remove your cup before the process has
ended.
YOUR MACHINE IS DESIGNED TO MAKE COFFEE AND ESPRESSO FROM COFFEE BEANS ONLY.
DO NOT USE OILY, FLAVORED OR SUGAR COATED ESPRESSO / COFFEE BEANS.
When you rst make coee with the machine or after a prolonged period of non-use or a cleaning
or descaling procedures, a little steam and hot water will come out of the steam nozzle (priming).
Splashing or scalding may occur if the coee outlets are set too high in relation to the size of the cups.
8
Page 10
9
When the machine is plugged in, an initializing cycle is processed. Press the on/off button , wait for the end of pre-heating
and perform a rinsing operation if you wish.
You can change the
volume of water at any
time using the rotating
knob.
Use the rotating button
to select your choice
and confirm by pressing
the OK button.
The selection menu will
be displayed.
Please note : The ground coffee is first moistened with a little hot water after the grinding stage. This is called
“pre-brewing” and it optimizes the brewing process by ensuring that the grounds are evenly wet.
A few moments later, the full brewing cycle begins.
You can use your machine to make 2 cups of coffee or espresso for the 3 following recipes: espresso / strong espresso / coffee by cycling the machine twice. Remember not to remove the cups after the first cycle.
Put two cups under the
coffee outlets.
You can lower or raise the
coffee outlets to suit the
size of your cups.
Put a cup under the coffee
outlets.
You can lower or raise the
coffee outlets to suit the
size of your cups.
Select your drink and
confirm by pressing the
OK button twice. A message will appear to tell
you that you have
chosen two cups.
The machine will
automatically
sequence through
two complete cycles.
x 2
TWO-CUP FUNCTION
There is a temperature setting function to control how hot your coffee is (see Settings).
USING STEAM
Steam is used to froth milk (for cappuccino/latte) but can also be used to reheat other liquids. As you need a higher temperature to produce steam than to make an espresso, the machine runs an additional pre-heating phase for steam.
When the screen displays the selection menu, press the “steam” key . The screen will
inform you that the machine is being pre-heated. Once the pre-heating phase has been
completed, a message will ask you to place a container under the steam nozzle. Press the
“steam” key again to start generating steam. A little water will be produced first and
then steam will start. Use the same button to stop steam generation.
CAUTION, STEAM CYCLE DOES NOT STOP IMMEDIATELY
DO NOT REMOVE THE WATER TANK BEFORE THE END OF THE CYCLE (i.e. 15 sec. after coffee stops
flowing).
THE TWO CUP FUNCTION FOR A ‘LONG COFFEE’ IS NOT AVAILABLE
To stop coffee flowing into the cup, you can either press the button again or turn the rotating button to reduce volume.
IFU KRUPS Nafta_Premium_USA_xxxxxxxx 31/05/10 14:33 Page9
Page 11
IFU KRUPS Nafta_Premium_USA_xxxxxxxx 31/05/10 14:33 Page10
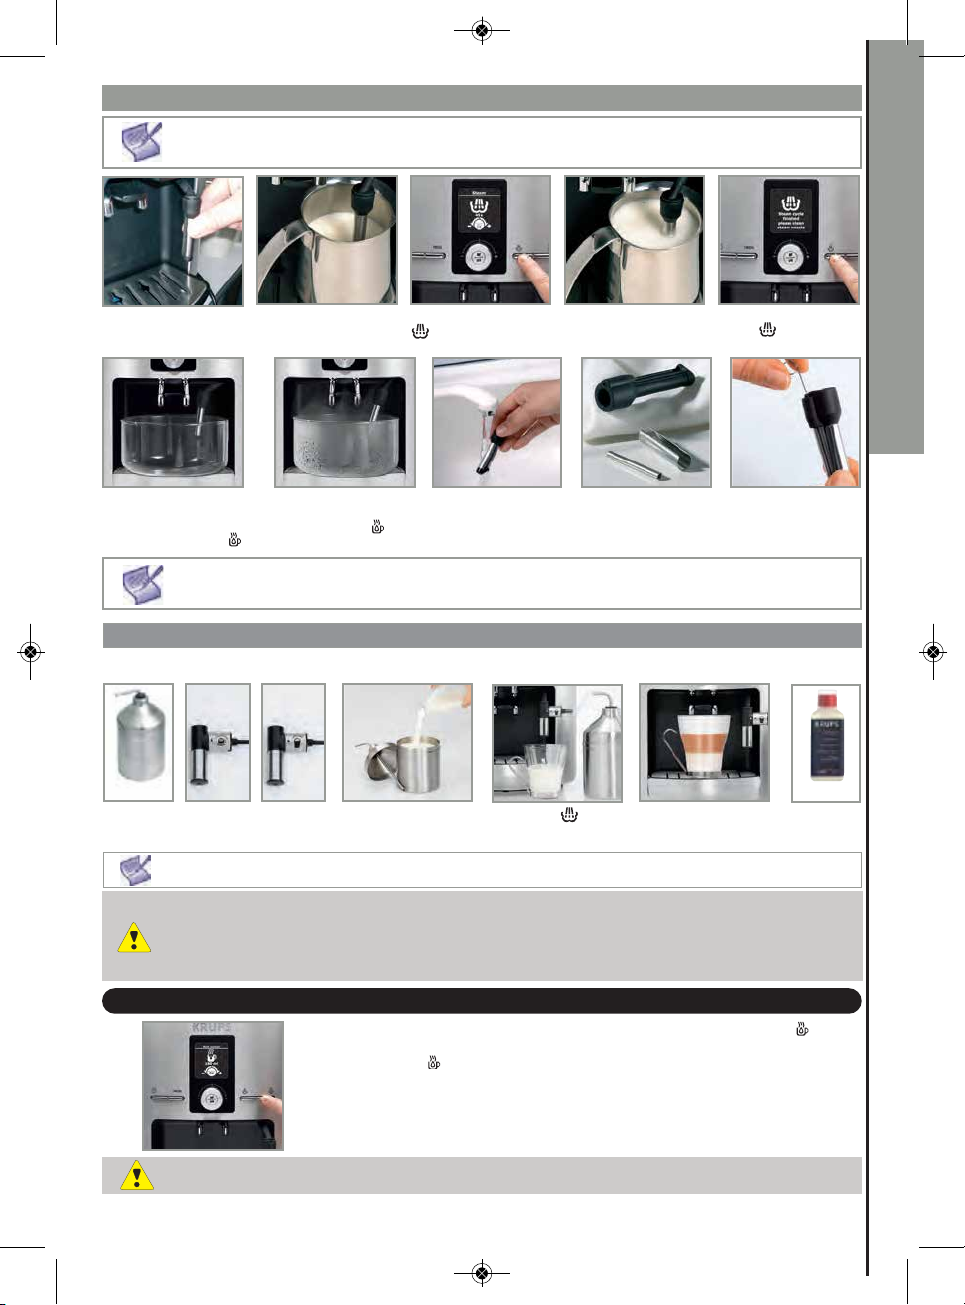
FROTHING MILK
We recommend that you use pasteurised 1 or 2% milk. The milk should be quite cold, ideally between 42° F and 50° F (6 and 10° C). After having used the steam or hot water functions, the nozzle
may be hot, and we recommend that you wait for a few moments before handling it.
Check that the steam
nozzle is correctly
installed.
Fill a frothing pitcher
one-third and immerse
the nozzle in the milk.
Press the “steam” button
and follow the
instructions on the screen.
Once your milk is frothed
to your liking…
press the “steam” button
to stop the cycle.Cycle
does not stop immediately.
ENGLISH
To remove any remaining milk
from the steam nozzle, place a
cup under the nozzle and press
the “ hot water ” button .
To interrupt the steam function, press any button.
If the nozzle is blocked, clean it out with the included needle.
The maximum duration for production of steam per cycle is limited to 2 minutes.
Run for at least 10
seconds, then again
press the button to
stop steam generation.
You can remove the steam nozzle for thorough cleaning. Wash it using a brush
with water and a little non-abrasive dishwashing liquid. Rinse and dry. Before
re-assembly, make certain that the air inlet holes are not clogged by milk residue.
If necessary clean out the holes with the needle included with the machine.
AUTO-CAPPUCCINO SET XS 6000 (SOLD SEPARATELY)
The auto-cappuccino accessory makes it easy to prepare a cappuccino or a cae latte. It is comprised of a special nozzle with
two-positions/markings and a brushed stainless steel milk jug and tubes.
XS 6000
Join the various components to each other.
Choose the cappuccino or cae latte position of the special steam nozzle.
The tube must not be twisted to ensure that the button is held in the correct position.
To prevent the milk drying on and in the auto-cappuccino accessory we strongly recommend that you
immediately:
- put clean water inside the jug and reinstall the dierent components
- run a “steam” cycle
- clean all parts with a moist cloth.
You can also use our special XS 4000 cleaner for milk systems.
Fill in the milk recipient and
place a cup or a glass under
the auto-cappuccino nozzle.
Press the key to launch
and then stop the cycle
.
Place your cup or glass under
the coee outlet and launch
the coee/espresso cycle.
XS 4000
Cleaner for
milk systems.
PREPARING HOT WATER
While the screen displays the drink selection menu, press the “hot water” button .
A message will ask you to place a cup under the steam nozzle. Again press the
“hot water” button to produce hot water.
To interrupt the hot water function, press any button. If the nozzle is blocked, clean it out with the needle
included. The maximum amount of hot water per cycle is limited to 10 oz/300 ml.
10
Page 12

11
If the above message
appears, remove, empty
and clean the drip tray.
The drip tray collects residual water and the coffee grounds collector collects used coffee grounds.
The coffee cleaning tray allows you to eliminate any deposits of coffee grounds above the percolation chamber.
Remove, empty and
clean the coffee
grounds collector.
The drip tray is equipped
with floats to tell you
when to empty it.
The warning message will remain displayed if the coffee grounds collector is not inserted correctly.
If the coffee grounds collector is inserted within less than 6 seconds, the machine will ask you to confirm that you
have correctly emptied it. You cannot make espresso or coffee while the warning message is displayed.
The coffee grounds collector has a capacity of 9 coffee cakes.
MAINTAINING YOUR MACHINE
As soon as you remove the coffee grounds collector, you will have to empty it completely to avoid any overflow.
Remove the coffee
cleaning tray.
Clean it under water
and dry thoroughly
before re-inserting.
EMPTYING THE COFFEE GROUNDS COLLECTOR, THE COFFEE CLEANING TRAY AND THE DRIP TRAY
RINSING THE SYSTEM - SEE “PREPARING THE MACHINE FOR FIRST USE” SECTION (PAGE 8)
CLEANING PROGRAM – TOTAL DURATION: ABOUT 20 MINUTES
RINSING THE COFFEE CIRCUIT: SEE PAGE 8
You should perform the cleaning program after every 360 preparations of espresso or coffee.
The machine will let you know automatically on the display screen.
Caution! To benefit from the warranty conditions, it is essential to perform the machine cleaning
cycle when informed to do so. Be sure to follow the order of operations.
You can continue to use the machine, but you are advised to perform the program as soon as possible.
To perform the cleaning program, you will need a container with a minimum capacity of 21 oz/0.6 l and a Krups XS 3000
cleaning tablet.
The automatic cleaning program
is in three parts – a cleaning
cycle, then 2 rinsing cycles.
This program lasts about 20
minutes.
Press button to perform
cleaning at any time and then
choose SERVICES => OK =>
CLEANING from the menus
displayed.
Press the button
to start the automatic
cleaning program when
the “Cleaning needed”
message is displayed.
Just follow the
instructions
shown on the
screen.
If your machine is unplugged when cleaning or if there is a power outage, the cleaning program will re-start at
the step in progress when the incident occurred. You will not be able to postpone this operation. This is
essential to avoid any ingestion of the cleaning solution. In this case, you will need to use another cleaning
tablet. Be sure to complete the entire cleaning cycle to avoid any risk of irritation (seek medical advice if
cleaning solutions are accidently swallowed). The cleaning cycle is a discontinuous cycle. Do not put your
hands under the coffee outlets during the cycle.
Only use Krups XS 3000 cleaning tablets. We cannot be held responsible for any damage that may result
from the use of tablets from other brands.
You can obtain cleaning tablets from Krups Service Centers.
Make certain to protect your work surface during cleaning cycles, especially if it is made of marble,
stone or wood.
IFU KRUPS Nafta_Premium_USA_xxxxxxxx 31/05/10 14:33 Page11
Page 13

IFU KRUPS Nafta_Premium_USA_xxxxxxxx 31/05/10 14:33 Page12
DESCALING PROGRAM – TOTAL DURATION: ABOUT 22 MINUTES
If your product is equipped with our Claris - Aqua Filter System cartridge F088, please remove this
cartridge before the descaling operation.
The quantity of scale deposited depends on the hardness of the water used. The machine will automatically warn you with a
message when you need to proceed with descaling.
Caution! To benet from the warranty conditions, it is essential to perform the machine descaling
cycle when the machine tells you to do so. Be sure to follow the order of operations.
You can continue to use the machine but you are advised to perform the operation as soon as possible.
To perform the descaling program, you will need a container with minimum capacity of 21 oz/0.6 l and a Krups F 054 (40 g)
descaling powder.
ENGLISH
Press the button to start the automatic
descaling program when this message is
displayed SERVICES => OK => DESCALING
The descaling program is in three parts – a descaling cycle, then 2 rinsing cycles.
Only use Krups descaling products. You can obtain descaling products from Krups Service Centers.
The manufacturer may not be held responsible for damage to the machine through use of cleaners or descalers
not specically recommended.
If a power failure occurs during the cycle, you will have to restart from the beginning.
You will not be able to postpone this operation.
Be sure to complete the entire descaling cycle to avoid any risk of ingestion of the cleaning solution.
Do not put your hands under the coee outlets during the cycle.
Make certain to protect your work surface during descaling cycles, especially if they are made
of marble, stone or wood.
Follow the instructions shown
on the screen, making sure the
powder dissolves fully.
GENERAL MAINTENANCE
Always remove the power supply cord from the socket and let your machine cool down before cleaning it.
Do not use utensils or cleaning products likely to scratch or corrode the machine.
Wipe the body of the machine on the outside using a moist cloth.
Clean the cleaning tray, the drip tray and its grid,
and the coee grounds collector with hot water
and a mild liquid detergent.
Rinse the water tank
with fresh water.
These parts are not designed to go into the dishwasher.
12
Page 14

13
You can use all the following options to start selected programs. Then follow the instructions on screen
Services
Settings
Machine info
Demo mode
Exit
PROG
SERVICES
Rinsing
Cleaning
Water filter
Exit
SERVICES
Press the knob from the beverage selection screen to access the machine’s other menu functions. Use the rotating
button to browse through menus and options for all settings and validate your choice using the OK button. Press the
button to cancel a choice and go back to the beverage selection menu.
To access maintenance
To access settings
To access product information
To access demonstration mode
To quit / exit
To access rinsing
To access cleaning
To access filter mode: install, change or
remove your Claris - Aqua Filter System
cartridge
To return to the previous menu
OTHER FUNCTIONS: KNOB
SETTINGS
Language
Display contrast
Date
Time
Auto-off
Auto-on
Volume unit
Water hardness
Coffee temperature
Exit
SETTINGS
You can select your chosen language from those offered.
You can set screen contrast for better visibility.
You need to set the date, required if using Claris aqua filter.
You can choose between 12 hour or 24 hour time display.
You can choose the period after which your machine will turn
off automatically, from 30 minutes to 4 hours in 30 minute
increments.
You can automatically start pre-heating of your machine at
your chosen time.
Choose either oz or ml as your measurement unit.
You must set your water hardness between 0 and 4. See
“Water hardness measurement” section.
You can set the temperature of your espresso or coffee to one
of three levels.
To return to the previous menu.
IFU KRUPS Nafta_Premium_USA_xxxxxxxx 31/05/10 14:33 Page13
Page 15

IFU KRUPS Nafta_Premium_USA_xxxxxxxx 31/05/10 14:33 Page14
PRODUCT INFORMATION
MACHINE INFO
Coee cycles
Water cycles
Steam cycles
Rinsing
Cleaning
Displays the total number of coees the machine has made.
Displays the total number of hot water cycles the machine has
performed.
Displays the total number of steam cycles the machine has
performed.
Displays the total number of rinsing cycles the machine has
performed.
Last
Next
Clean
Exit
Displays the total number of coees made
since last cleaning.
Displays the number of coees that can be
made before next cleaning.
Starts the cleaning program.
To return to the previous menu
ENGLISH
Descaling
Last
Next
Exit
Water lter
Last
Next
Fit
Exit
* You must have correctly installed a lter through the program accessible via SERVICES => WATER FI LTER =>
INSTALL before being able to access the rst two options of the lter information sub-menu.
Exit
Displays the total number of steam or hot
water cycles made since last scale removal.
Displays the total number of steam or hot water
cycles that can be made before next scale removal.
To return to the previous menu
Displays the date of the last lter change*
and the quantity of water that has run through.
Displays the date for the next lter change*
and the quantity of water to run through.
Starts the lter change procedure.
To return to the previous menu
DEMONSTRATION MODE
When this mode is activated and the
screen displays the drink selection
menu, the machine will scroll through
the various functions available at regular intervals, so you can access them.
Use this sub-menu to disable or activate this function.
MOVING THE MACHINE
Keep the original packaging and reuse it when moving.
If the unpacked machine is dropped, it is advisable to take it to an authorized Krups service center to avoid any
risk of re or electrical problems.
ELECTRICAL OR ELECTRONIC PRODUCT AT END OF SERVICE LIFE
Let’s all help protect the environment!
Your machine contains many recyclable materials that can be re-used.
Dispose of it at your local waste collection point.
14
Page 16

15
TROUBLESHOOTING GUIDE
PROBLEM RECOMMENDATION
The machine fails to turn on when you press
the On/Off key.
Check that the power supply cord plug is correctly inserted in the
socket.
Water or steam comes out unexpectedly
from the steam nozzle
In case of repeated runnings, some drops may flow out from the steam
nozzle.
The espresso or coffee is not hot enough. Change the coffee temperature setting.
Pre-heat the cups by rinsing them in hot water or under the steam
nozzle.
The coffee is too weak or not strong
enough.
Check that the coffee bean container contains sufficient coffee and
that beans are not jammed.
Do not use oily or sugar coated or flavored coffee / espresso beans.
Reduce the volume of coffee selected using the rotating knob.
Turn the grinding fineness button to the left to obtain a finer grind.
Prepare your beverage by dividing it in 2 cycles by choosing the 2-cup
function.
The coffee flows too slowly. Turn the grinding fineness button to the right to obtain a coarser grind
(may depend on the type of coffee used).
Perform one or several rinsing cycles.
The coffee is not creamy enough. Turn the grinding fineness button to the left to obtain a finer grind (may
depend on the type of coffee used).
Change the Claris Aqua Filter System (follow instructions page 6)
Perform one or several rinsing clycles.
The coffee does not come out of the outlet
holes.
An incident has been detected by the machine during the cycle. The
machine automatically runs an initializing cycle and is ready for a new
cycle.
You used ground coffee instead of coffee
beans.
Use your vacuum cleaner to remove the ground coffee in the coffee
bean container.
The grinder makes a strange noise. There may be foreign bodies in the grinder or not enough beans.
Check that the container is full, not jammed and free of foreign bodies.
Contact your Krups Service Center.
The grinder setting button is difficult to turn. Only turn the setting button during grinding.
Steam does not come out of the nozzle. After switching off your appliance and leaving it to cool:
Make sure the tip of the steam nozzle is properly installed. Make sure
the steam nozzle is not clogged at the aerator (if necessary clean the
steam nozzle aerator with the needle supplied). Empty the tank and
remove the Claris filter. Fill the tank with mineral water high in calcium
(> 100 mg/litre or .015 oz/gallon), it may take as many as 5 to 10
cycles of steam at 60 seconds each cycle to achieve a continuous jet
of steam.
Not enough froth on the milk. Check that the steam is able to come out of the nozzle (unclog the
little air outlet upper lever of the steam nozzle if needed).
Use a cold container and freshly opened container of milk.
Change the type (use 1 or 2% milk) or brand of milk as appropriate.
The milk froth is too bubbly. Check that the two ends of the small stainless steel tube are correctly
installed into the steam nozzle flexible part.
The Auto-Cappuccino accessory does not
suck in the milk (accessory sold separately).
Ensure that the tube immersed in the milk is not blocked.
Check that the flexible tube is not twisted and that it is correctly
installed into the accessory to avoid any air being sucked in.
After switching of your appliance and leaving it to cool, unblock the
outlet of the Auto-Cappuccino accessory.
You have filled the water tank, but the
warning message remains displayed.
Check for correct positioning of the tank in the coffee maker.
Check that the float at the bottom of the tank is not stuck.
Rinse the accessory and if necessary remove scale.
The cleaning or descaling program will not
start.
Disconnect the machine for 20 seconds then turn on again.
IFU KRUPS Nafta_Premium_USA_xxxxxxxx 31/05/10 14:33 Page15
Page 17

IFU KRUPS Nafta_Premium_USA_xxxxxxxx 31/05/10 14:33 Page16
You have emptied the coee grounds
collector, but the warning message remains
displayed.
You have washed the cleaning tray, but the
warning message remains displayed.
A power failure occurred during a cycle. The machine will re-initialise automatically when power is turned on
There is water or coee under the machine. The drip tray is overowing. Empty and clean the cleaning tray.
A “Error code XX”” message appears. Unplug the machine for 20 seconds, remove the Claris cartridge if
KRUPS MANUFACTURER'S WARRANTY
Remove the collector, make certain that it is empty, wait for 6 seconds
and then reinstall.
Check that the collector is correctly positioned.
Remove the tray, wait 6 seconds and then reinstall.
Check that the cleaning tray is correctly positioned.
and be ready for a new cycle.
Check for correct positioning of the drip tray.
Do not remove the water tank before the end of the cycle.
required, and turn back on.
If the problem continues, please contact the service center in your
county.
: www.krups.com
With a strong commitment to the environment, most of Krups products are
repairable during and after the warranty period. Before returning any defective
products to the point of purchase, please call Krups consumer service directly
at the phone number below for repair options.
Your help to sustain the environment is appreciated!
The Warranty
This product is guaranteed by Krups for a period of 2 years or maximum 6.000 cycles against any
manufacturing defect in materials or workmanship, starting from the initial date of purchase.
The manufacturer's warranty by Krups is an extra benet which does not aect consumer's
Statutory Rights.
The Krups warranty covers all costs related to restoring the proven defective product so that it
conforms to its original specications, through the repair or replacement of any defective part and
the necessary labor. At Krups’s choice, a replacement product may be provided instead of repairing a defective product. Krups’s sole obligation and your exclusive resolution under this warranty
are limited to such repair or replacement.
ENGLISH
Conditions & Exclusions
The Krups warranty only applies within USA, Canada & Mexico, and is
valid only on presentation
of a proof of purchase. The product can be taken directly in person to an authorized service
centre or must be adequately packaged and returned, by recorded delivery (or equivalent method of
postage), to a Krups authorized service centre. Full address details for each country’s authorized
service centre are listed on the Krups website (www.krups.com) or by calling the appropriate telephone number listed below to request the appropriate postal address.
Krups shall not be obliged to repair or replace any product which is not accompanied by a valid
proof of purchase.
This warranty will not cover any damage which could occur as a result of misuse, negligence, failure to follow Krups instructions, use on current or voltage other than as stamped on the product,
or a modication or unauthorized repair of the product. It also does not cover normal tear and
wear, maintenance or replacement of consumable parts, and the following:
-using the wrong type of water
-scaling (any de-scaling must be carried out according to the instructions for use);
-ingress of water, dust or insects into the product;
-mechanical damages, overloading
16
Page 18

-damages or bad results due to wrong voltage or frequency
-accidents including fire, flood, lightning, etc
-professional or commercial use
-damage to any glass or porcelain ware in the product
This warranty does not apply to any product that has been tampered with, or to damages incurred
through improper use and care, faulty packaging by the owner or mishandling by any carrier.
The Krups manufacturer's warranty applies only for products purchased and used in USA, Canada
& Mexico. Where a product purchased in one country and then used in another one:
a) The Krups guarantee duration is the one in the country of usage of the product, even if
the product was purchased in another listed country with different guarantee duration.
b) The Krups guarantee does not apply in case of non conformity of the purchased product
with the local standards, such as voltage, frequency, power plugs, or other local technical specifications
c) The repair process for products purchased outside the country of use may require a lon-
ger time if the product is not locally sold by Krups
d) In cases where the product is not repairable in the new country, the Krups guarantee is
limited to a replacement by a similar product or an alternative product at similar cost,
where possible.
Consumer Statutory Rights
This Krups manufacturer's warranty does not affect the statutory rights a consumer may have or
those rights that cannot be excluded or limited, nor rights against the retailer from which the
consumer purchased the product. This warranty gives a consumer specific legal rights, and the
consumer may also have other legal rights which vary from State to State or Country to Country or
Province to Province. The consumer may assert any such rights at his sole discretion.
Additional information
Accessories, Consumables and end-user replaceable parts can be purchased, if locally available,
as described in Krups internet site.
: www.krups.com
17
CANADA
GROUPE SEB
CANADA
345 Passmore Avenue
Toronto, ON
M1V 3N8
MEXICO
G.S.E.B. MEXICANA,
S.A. de C.V.
Goldsmith 38 Desp.
401, Col. Polanco
Delegacion Miguel
Hildalgo
11 560 Mexico D.F.
U.S.A.
GROUPE SEB USA
2121 Eden Road
Millville, NJ 08332
1-800-418-3325 01800) 112 83 25 800-526-5377
IFU KRUPS Nafta_Premium_USA_xxxxxxxx 31/05/10 14:33 Page17
Page 19

IFU KRUPS Nafta_Premium_USA_xxxxxxxx 31/05/10 14:33 Page18
RECIPES
Here are some recipes you can make using your Espresseria Automatic:
• Cappuccino
For a cappuccino in the rules of the art, the ideal proportions are as follows: 1/3 hot milk, 1/3 coee, 1/3 milk froth.
• Cae Latte / Latte Macchiatto
To make coee with milk, the ideal proportions are as follows: 3/5 hot milk, 1/5 coee, 1/5 milk froth.
• It is best to use cold milk straight from the refrigerator
(ideally between 6 and 8° C or 43°F znd 46°F).
• To nish o, you can sprinkle with cocoa, ground chocolate, nutmeg or cinnamon.
• Makes a larger volume of conventional espresso.
• Prepare a conventional espresso in a large cup.
• Add a little cream to get a café crème.
• An Italian beverage consisting of a shot of espresso "corrected" with a shot of liquor.*
• Prepare a cup of espresso as usual.
• Then add 1/4 or 1/2 of a liqueur glass of Cognac to taste.
You can also use anisette, brandy, Sambuca, Kirsch or Cointreau.
There are many other ways to give some punch to your espresso. Just use your imagination.
• Coee liqueur*
• Mix 3 cups of espresso,
capacity or 1 liter.
• Leave the mixture to sit for at least 2 weeks, no longer than 4 weeks.
• Shake and serve chilled.
You will obtain a delicious liqueur. A real treat for coee lovers
• Italian style iced coee
4 scoops of vanilla ice-cream, 2 cups of espresso with sugar to taste, 1/2 cup milk, fresh cream, grated chocolate.
• Mix the cold espresso with the milk.
• Scoop the ice cream into the glasses. Pour the coee over the ice cream. Decorate with fresh cream and grated chocolate.
• Coee à la frisonne*
• Add a small glass of rum to a cup of sweetened espresso.
• Decorate with a good layer of fresh cream and serve.
• Flambéed espresso*
2 cups of espresso, 2 small glasses of Cognac, 2 teaspoons of brown sugar, fresh cream.
• Pour the Cognac into heat-resistant glasses, heat and light.
• Add sugar. Mix. Pour in the coee and decorate with fresh cream.
• Espresso parfait*
2 cups of espresso, 6 egg yolks, 3/4 cup sugar
• Beat the egg yolks with the sugar until it forms a thick, frothy mass.
• Add the cold espresso and the orange liqueur.
• Mix in the whipped fresh cream.
• Pour the mix into saucer champagne glasses or ordinary glasses.
• Put the champagne glasses in the freezer until rm.
1 cup of brown sugar and 1/2 litre of Cognac or Kirsch in an empty bottle with at least 3 cups
, 1/2 cup of sweetened fresh cream, 1 small glass of orange liqueur.
ENGLISH
(*: Remember, over-indulgence in alcohol is bad for the health.)
18
Page 20

IFU KRUPS Nafta_Premium_USA_xxxxxxxx 31/05/10 14:33 Page19
Page 21

IFU KRUPS Nafta_Premium_MEX_Mise en page 1 31/05/10 14:28 Pagea1
ESPRESSERIA AUTOMATIC PREMIUM
ENGLISH
Fotos no contractuales
ESPAÑOL
Sólo para uso doméstico
La duración de la garantía depende de la legislación de su país, con un máximo de 6000 ciclos por 2 años.
Este aparato está destinado a un uso doméstico únicamente y no es conveniente usarlo de forma comercial
o profesional. Cualquier uso de esta máquina en un contexto diferente al doméstico no está cubierto por la
garantía del fabricante.
La garantía no se aplica para daños o defectos como resultado de un mal uso, reparación por una persona
no autorizada así como también el no tomar en cuenta las instrucciones de uso. La garantía no se dará si
cualquier instrucción de Krups de operación o mantenimiento no ha sido observada o la limpieza y los
agentes descalcicantes son usados de una manera que no obedezca a las especicaciones originales de
Krups. Incumplimiento de uso del ltro de agua Claris Aqua Filter System de acuerdo con las instrucciones
de Krups. El desgaste anormal de las partes (Molino, válvulas y componentes) está exento de la garantía, así
como también daños causados por objetos que se introduzcan en el molino (ejemplo: madera, piedras,
partes plásticas, ...etc).
Servicio Consumidores Mexico : 018001128325 www.krups.com.mx
Page 22

ÍNDICE
1
PÁGINA
INSTRUCCIONES DE SEGURIDAD
. . . . . . . . . . . . . . . . . . . . . . . . . . . . . . . . . . . . . . . . . . . . . . . . . . . . . . . . . . . . . . . . .2
DESCRIPCIÓN DEL PRODUCTO
. . . . . . . . . . . . . . . . . . . . . . . . . . . . . . . . . . . . . . . . . . . . . . . . . . . . . . . . . . . . . . . . . . . .4
INTRODUCCIÓN DEL PRODUCTO
. . . . . . . . . . . . . . . . . . . . . . . . . . . . . . . . . . . . . . . . . . . . . . . . . . . . . . . . . . . . . . . . . .5
USO DE GRANOS DE CAFÉ CON ALTO CONTENIDO DE GRASA
. . . . . . . . . . . . . . . . . . . . . . .5
LÍMITES DE USO
. . . . . . . . . . . . . . . . . . . . . . . . . . . . . . . . . . . . . . . . . . . . . . . . . . . . . . . . . . . . . . . . . . . . . . . . . . . . . . . . . . . . . . . . . .5
ANTES DE LA PRIMERA UTILIZACIÓN
. . . . . . . . . . . . . . . . . . . . . . . . . . . . . . . . . . . . . . . . . . . . . . . . . . . . . . . . . . . .6
MEDIDA DE LA DUREZA DEL AGUA
CARTUCHO CLARIS - AQUA FILTER SYSTEM
INSTALACIÓN DEL FILTRO DE AGUA
PREPARACIÓN DEL APARATO
. . . . . . . . . . . . . . . . . . . . . . . . . . . . . . . . . . . . . . . . . . . . . . . . . . . . . . . . . . . . . . . . . . . . . . .7
PRIMER USO / PROGRAMACIÓN DE LA MAQUINA
ACLARADO DE LA MÁQUINA (ENJUAGUE)
PREPARACIÓN DEL MOLINO
PREPARACIÓN DE UN ESPRESSO Y DE UN CAFÉ
. . . . . . . . . . . . . . . . . . . . . . . . . . . . . . . . . . . . . . . . . .8
Preparación de un espresso (de 20 a 70 ml)
Preparación de un café (de 80 a 160 ml)
Preparación de un café largo (de 120 a 240 ml)
FUNCIÓN DE DOBLE TAZA
COMO USAR EL VAPOR
. . . . . . . . . . . . . . . . . . . . . . . . . . . . . . . . . . . . . . . . . . . . . . . . . . . . . . . . . . . . . . . . . . . . . . . . . . . . . . . .9
ESPUMADO DE LECHE
SET AUTO-CAPPUCCINO
PREPARACIÓN DEL AGUA CALIENTE
. . . . . . . . . . . . . . . . . . . . . . . . . . . . . . . . . . . . . . . . . . . . . . . . . . . . . . . . . . .10
MANTENIMIENTO DE SU APARATO
. . . . . . . . . . . . . . . . . . . . . . . . . . . . . . . . . . . . . . . . . . . . . . . . . . . . . . . . . . . . . .11
VACIADO DEL DEPÓSITO DE CAFÉ, DE LA BANDEJA DE LIMPIEZA
Y DE LA BANDEJA RECOGEGOTAS
PROGRAMA DE LIMPIEZA AUTOMÁTICA DE LA MÁQUINA
PROGRAMA DE DESCALCIFICACIÓN DE LA MÁQUINA
MANTENIMIENTO GENERAL . . . . . . . . . . . . . . . . . . . . . . . . . . . . . . . . . . . . . . . . . . . . . . . . . . .
OTRAS FUNCIONES
. . . . . . . . . . . . . . . . . . . . . . . . . . . . . . . . . . . . . . . . . . . . . . . . . . . . . . . . . . . . . . . . . . . . . . . . . . . . . . . . . . . .13
SERVICIOS
PROGRAMACIONES
INFORMACIÓN DEL PRODUCTO
MODO DEMOSTRACIÓN
TRANSPORTE DEL APARATO
. . . . . . . . . . . . . . . . . . . . . . . . . . . . . . . . . . . . . . . . . . . . . . . . . . . . . . . . . . . . . . . . . . . . . . .14
PRODUCTO ELÉCTRICO O ELECTRÓNICO EN FIN DE VIDA
. . . . . . . . . . . . . . . . . . . . . . . . . . . .14
GUÍA PARA SOLUCIÓN DE PROBLEMAS
. . . . . . . . . . . . . . . . . . . . . . . . . . . . . . . . . . . . . . . . . . . . . . . . . . . . . .15
KRUPS GARANTÍA DEL FABRICANTE
. . . . . . . . . . . . . . . . . . . . . . . . . . . . . . . . . . . . . . . . . . . . . . . . . . . . . . . . . . .16
RECETAS
. . . . . . . . . . . . . . . . . . . . . . . . . . . . . . . . . . . . . . . . . . . . . . . . . . . . . . . . . . . . . . . . . . . . . . . . . . . . . . . . . . . . . . . . . . . . . . . . . . . .18
IFU KRUPS Nafta_Premium_MEX_Mise en page 1 31/05/10 14:28 Page1
Page 23

IFU KRUPS Nafta_Premium_MEX_Mise en page 1 31/05/10 14:28 Page2
INSTRUCTIVO DE OPERACIÓN
Le invitamos a leer cuidadosamente este instructivo antes de usar su aparato, en él encontrará sus características e instrucciones para el mejor aprovechamiento del mismo.
INSTRUCCIONES DE SEGURIDAD
Cuando utilice aparatos eléctricos debe seguir ciertas instrucciones de seguridad para reducir el
riesgo de choque eléctrico, fuego o daño a la persona que lo utiliza:
1. Lea atentamente el modo de empleo antes del primer uso del aparato y consérvelo: una utilización no adecuada liberaría a Krups de toda responsabilidad.
2. Verique que la tensión de alimentación indicada en la placa del fabricante del aparato corresponde efectivamente a la de su instalación el éctrica.
3. No ponga el aparato sobre una supercie caliente como una placa eléctrica y tampoco lo utilice
cerca de una ama sin protección.
4. Retire inmediatamente la cafetera de la toma de corriente si observa cualquier anomalía durante
el funcionamiento.
5. No tire del cable de alimentación para desconectar el aparato.
6. No deje el cable de alimentación colgar del borde de una mesa ni de una supercie de trabajo.
7. Este aparato no está previsto para que lo utilicen personas (incluso niños) cuya capacidad física,
sensorial o mental esté disminuida, o personas sin experiencia o conocimientos, excepto si pueden recibir a través de otra persona responsable de su seguridad, una vigilancia adecuada o instrucciones previas relativas a la utilización del aparato.
8. Conviene vigilar a los niños para asegurarse de que no juegan con el aparato.
9. No deje su mano o el cable de alimentación sobre las partes metálicas del aparato.
10. Nunca sumerja el aparato , el cable ni la toma eléctrica en agua ni en cualquier otro líquido.
11. Mantenga el aparato fuera del alcance de los niños y no deje colgar el cable.
12. Si el cordón de alimentación o la clavija están dañados, estos deben sustituirse por el fabricante,
por su agente de servicio autorizado o por personal calicado con el n de evitar un peligro.
13. Remítase siempre a las instrucciones para descalcicar el aparato.
14. Proteja el aparato de la humedad y del frío.
15. No utilice el aparato si no funciona correctamente o si ha sufrido un daño. En tal caso, se aconseja hacer examinar el aparato por un centro de servicio autorizado Krups.
16. A excepción de la limpieza y la descalcicación según los procedimientos del modo de empleo
del aparato, toda intervención en el aparato debe efectuarse por un centro de servicio autorizado
Krups.
17. Para su seguridad, utilice para su
18. Todo error de conexión anula la garantía.
19. Desconecte el aparato tan pronto deja de utilizarlo durante un periodo largo o cuando lo limpia.
20. Todos los aparatos se someten a un severo control de calidad. Se realizan pruebas de uso con
aparatos tomados al azar, lo que explica eventuales restos de uso.
21. No se aconseja utilizar tomas múltiples y/o extensiones.
22. No ponga agua en el depósito para café en granos y/o bajo la rejilla de mantenimiento.
23. Preste a tención a la orientación de la boquilla de vapor para evitar cualquier riesgo de quemadura.
24. La garantía pierde su validez en caso de falta de descalcicación, de limpieza o de mantenimiento
constante o por la presencia de cuerpos extraños en el molino.
aparato sólo accesorios y refacciones aprobados por Krups.
ESPAÑOL
GUARDE ESTE INSTRUCTIVO
Este aparato es solamente para uso doméstico. Cualquier servicio salvo limpieza y mantenimiento
debe realizarse por un centro de servicio autorizado Krups.
www.krupsusa.com
en EUA, www.krups.ca en Canadá ó www.krups.com.mx en México.
También puede contactar a su centro de servicio más cercano.
Para reducir el riesgo de incendio o choque eléctrico, no desarme el aparato.
Las reparaciones deberán realizarse por un centro de Servicio Autorizado Krups.
2
Visite nuestra página de internet en:
Page 24

3
INSTRUCCIONES DE CABLE CORTO
A. No se recomienda el uso de extensiones para este aparato
B. Si es absolutamente necesario el uso de una extensión:
1) El rango de tensión de la extensión debe ser el mismo rango de tensión del
aparato.
2) El cable no debe colgar sobre la mesa o superficie para evitar que sea jalado
accidentalmente.
C. Este aparato tiene un contacto polarizado (una pata es más ancha). Para reducir el
riesgo de choque eléctrico, esta clavija esta diseñada para una toma de corriente
polarizada. Si la clavija no entra en el contacto, volteé la clavija. En caso de que no
entre, llame a un eléctrico.
No trate de modificar la clavija de ninguna manera.
Krups se reserva el derecho de cambiar las especificaciones del producto en función de
mejorarlo.
DATOS TECNICOS
Tensión/Frecuencia 120 V AC / 60 Hz
Potencia 1 450 W
IFU KRUPS Nafta_Premium_MEX_Mise en page 1 31/05/10 14:28 Page3
Page 25

IFU KRUPS Nafta_Premium_MEX_Mise en page 1 31/05/10 14:28 Page4
DESCRIPTIVO
Asa del depósito de agua
Depósito de agua
Guía rápida de
mantenimiento
Bandeja de limpieza
Depósito de café utilizado
Salida de café con regulador de altura
Rejilla recolectora de líquidos
Botón de ajuste del grado de molienda
Canal pastilla de limpieza
Tapa del molino de café
ESPAÑOL
Depósito de café en grano
Placa para colocar tazas
Pantalla LCD
Perilla selectora
Boquilla de vapor
Flotadores de nivel
de agua
Molino con muelas de metal
Top view
Pantalla LCD
Interruptor de encendido y apagado
Botón de programación
Perilla
Seleccionar (girar)
El modelo adquirido puede variar ligeramente al de la foto
Con el n de conservar la garantía, utilice únicamente accesorios Krups para esta máquina.
ACCESORIOS VENDIDOS POR SEPARADO
F 088 Cartucho
Claris - Aqua
Filter System
(un cartucho
incluido con la
máquina)
XS 4000
KRUPS Líquido
limpiador para
el sistema
Cappuccino
(no incluido)
XS6000
Set de auto
cappuccino
(no incluido)
4
Conrmar (presionar)
F 054
Polvo de
descalcicación
(incluido)
Botón de agua caliente
Botón de vapor
Botón de conrmación
XS 3000
Tabletas de
10 pastillas
de limpieza
(2 pastillas
incluidas)
Page 26

5
Felicidades y gracias por haber adquirido su cafetera espresso automática.
Estamos seguros que usted disfrutará de la versatilidad y desempeño de este producto.
Si tiene alguna pregunta por favor contacte a nuestro centro de atención a clientes.
Antes de usar el aparato, le rogamos que lea atentamente las presentes instrucciones de uso y
las indicaciones de seguridad.
Incluido en la caja usted encontrará un kit de servicio con todo lo que necesita para comenzar a
utilizar su cafetera. Cada kit contiene 1 paquete de polvo descalcificador,
2 pastillas limpiadoras, un manual de instrucciones a color y un filtro de agua Claris.
Le agradecemos el haber escogido la marca Krups.
BIENVENIDO
Esta cafetera espresso debe ser usada únicamente para preparar expresos o café, para espumar
leche o calentar líquidos. Este producto ha sido diseñado solamente para uso doméstico.
Cualquier uso comercial inapropiado o falla por no seguir el instructivo, el fabricante no acepta
la responsabilidad y la garantía no tendrá efecto.
Este aparato esta diseñado para uso doméstico y aplicaciones similares (máximo de 6000 ciclos
durante 2 años)
LIMITES DE USO
USO DE GRANOS DE CAFÉ CON ALTO CONTENIDO DE GRASA
Si congela los granos de café ( no recomendamos este tipo de almacenaje, es preferible mantener
los granos en un contenedor cerrado, en un lugar fresco y oscuro), por favor asegúrese de que el
grano lleve descongelado por lo menos 4 horas antes de ponerlo en el molino de café. Permitir que
los granos se descongelen con anterioridad puede prevenir que entre humedad en el molino.
Tampoco es recomendable usar granos con cubiertas de azúcar o de sabores, ya que estos pueden
hacer que la máquina se atore y deje de funcionar.
Actualmente tenemos una gran variedad de granos de café espresso en el mercado.
Algunos granos son secos y otros tienen alto contenido en grasas. Los granos con alto contenido
en grasa pueden obstruir el flujo del café al molino. La falta de flujo continuo puede causar que el
resultado del café no sea el adecuado o puede ser que no salga café. Para asegurar resultados óptimos cuando se utilizan granos con alto contenido en grasa, simplemente mueva los granos de café
del depósito antes de usar la máquina.
IFU KRUPS Nafta_Premium_MEX_Mise en page 1 31/05/10 14:28 Page5
Page 27

IFU KRUPS Nafta_Premium_MEX_Mise en page 1 31/05/10 14:28 Page6
ANTES DEL PR IMER USO
Antes de usar su cafetera por primera vez usted necesitará completar algunos ajustes iniciales para asegurar el buen
funcionamiento del aparato. La máquina le solicitará establecer el nivel de dureza del agua, idioma, fecha, hora y algunas otras
opciones. La pantalla digital le llevará de la mano por cada paso, la conguración inicial le tomará solo algunos minutos.
Si usted desconecta la máquina de la corriente eléctrica, necesitará repetir este procedimiento.
MEDIDA DE LA DUREZA DEL AGUA
ESPAÑOL
0 1 2
3
4
1 s.
Llenar un vaso de agua
e introducir en el mismo
una tira.
Grado de dureza
° f < 5,4° > 7,2° > 12,6° > 25,2° > 37,8°
° dH < 3° > 4° > 7° > 14° > 21°
° TH < 3,75° > 5° > 8,75° > 17,5° > 26,25°
0
muy blanda
CARTUCHO CLARIS - AQUA FILTER SYSTEM F 088
Para mejorar el gusto de sus preparaciones y para alargar la vida de su aparato le aconsejamos que utilice el cartucho Claris Aqua Filter System que se vende como accesorio.
Está compuesto de una sustancia anti calcárea de carbón activo que reduce el cloro, las impurezas, el plomo, el cobre, los pesticidas…presentes en el agua. Los minerales y oligoelementos se preservan.
Filtrar el agua con el cartucho
Claris - Aqua Filter System
Le permitirá reducir la dureza en carbonatos Hasta el 75 %*
El cloro - hasta el 85 %*
El plomo - hasta el 90 %*
El cobre - hasta el 95 %*
F 088
Su aparato le indicará cuando reemplazar el cartucho Claris - Aqua Filter System por medio de un mensaje. El cartucho Claris necesita ser reemplazado cada 50 ltros de agua aproximadamente o cada dos meses como mínimo.
Regule la dureza del agua al nivel 0 si utiliza un cartucho Claris.
El aluminio - hasta el 67 %*
* indicaciones suministradas por el fabricante
Transcurrido un minuto, lea el nivel de dureza del agua
Este es el número que le solicitará la cafetera
1
blanda
2
medianamente dura
3
dura
Mecanismo que permite
memorizar el mes de puesta
en marcha Y el cambio del
cartucho (después de un
máximo de dos meses)
4
muy dura
INSTALACIÓN DEL FILTRO (CARTUCHO CLARIS - AQUA FILTER SYSTEM)
Para ajustar correctamente el cartucho, procure seguir el procedimiento de instalación cada vez que coloque uno.
Enrosque
el cartucho
ltrante hasta
el fondo
del depósito
con ayuda
de la llave
proporcionada.
Coloque un recipiente de 0,5L bajo
la boquilla del
vapor.
En la primera puesta en marcha: Elija la
opción "Sí" en la función "ltro" y siga
las indicaciones de la pantalla.
Para una instalación posterior o un
reemplazo: Seleccione el menú "ltro"
con ayuda de el botón :
"Mantenimiento" - OK - Filtro "Colocar" (o cambiar) - OK - y siga las
indicaciones de la pantalla.
6
Page 28

7
Retire y llene el depósito
con agua fresca y
purificada.
Seleccionar (girar)
Confirmar (presionar)
Colocar el tanque de agua
presionando firmemente
para asegurar su correcta
colocación. Cierre la tapa.
Abra la tapa del depósito
para café en granos.
Añada café en grano.
Cierre la tapa del
depósito para café
en granos.
Asegúrese que no penetre ningún cuerpo extraño en el depósito como las pequeñas piedrecitas contenidas en el café en
granos. Se excluye de la garantía todo daño debido a cuerpos extraños que hayan penetrado en el depósito para café. No
poner agua en el depósito para café en granos.
Para evitar que el agua usada ensucie su superficie de trabajo o le queme, no olvide poner la bandeja recoge gotas.
Verifique que el depósito de residuos esté bien colocado para evitar escurrimientos.
Asegúrese que el depósito de agua este limpio.
No llenar el depósito con agua caliente, leche o cualquier otro líquido. Si al encender el aparato, el depósito de
agua no está bien colocado o sin agua suficiente (bajo el nivel “min”), se enciende el indicador “llenar depósito”
y no podrá prepararse ningún café.
Con el perilla selectora,
seleccione un idioma.
Entonces aparece el
idioma subrayado.
Confirme con el botón
“OK”
Encienda el aparato pulsando
el botón “On/Off”. Déjese guiar
por las instrucciones en la pantalla "Elección del idioma".
La perilla selectora le permite seleccionar una función,
aumentar o disminuir los valores. el botón “OK” le permite
confirmar su selección.
PREPARACIÓN DEL APARATO
PROGRAMACIÓN DE LA MÁQUINA
El aparato le solicitará que ajuste
Idioma
Unidad de volumen
Fecha
Hora
Auto-off
Auto-on
Dureza del agua
Filtro del agua
Puede seleccionar el idioma de su elección entre los propuestos.
Puede seleccionar la unidad de medida entre ml y onzas.
Usted puede ajustar la fecha.
Puede visualizar el horario de 12 ó 24 horas.
Puede seleccionar el tiempo en el que su aparato se detendrá de forma automática,
de 30 minutos a 4 horas (por segmentos de 30 minutos).
Puede activar automáticamente el precalentamiento de su aparato a una
hora escogida.
Usted debe ajustar la dureza del agua entre 0 y 4.
Ver capítulo “Medida de la dureza del agua”.
Usted debe indicar si ha colocado un filtro o no (cartucho Claris – Agua
filter System).
En la primera utilización, el aparato le solicitará que ajuste varios parámetros. Si desconecta su aparato, deberá ajustar
nuevamente algunos de estos parámetros.
No recomendamos usar granos con alto contenido en grasa, granos con cubierta de azúcar, o de sabores.
Estos tipos de granos pueden dañar el aparato.
NUNCA PONER CAFÉ MOLIDO EN EL DEPÓSITO PARA CAFÉ.
Cuando utilice la máquina por primera vez, esta puede requerir un "enjuague de la máquina".
Por favor siga las instrucciones como se describen.
IFU KRUPS Nafta_Premium_MEX_Mise en page 1 31/05/10 14:28 Page7
Page 29

IFU KRUPS Nafta_Premium_MEX_Mise en page 1 31/05/10 14:28 Page8
ACLARADO DE LA MÁQUINA (ENJUAGUE)
Necesitará aclarar períódicamente la máquina para remover el agua estancada que pudo quedarse en los ductos de su
Cafetera. La máquina le indicará cuando requiera el aclarado.
Seleccionando la función “SÍ” en la función aclarado, usted debe seguir las instrucciones en la pantalla.
Una vez que
la máquina
esté prendida
y el proceso
de precalentamiento haya
terminado,
puede aclarar
la máquina.
Puede efectuar un aclarado en cualquier momento pulsando para visualizar los menús y seleccionando
MANTENIMIENTO => OK => ACLARADO.
EN LAS OPE RACIONES DE ACLARADO, EL AGUA CALIENTE SALE POR LAS BOQUILLAS.
CUIDE DE NO QUEMARSE.
Función de aclarado
de salidas de café:
Ponga un recipiente
debajo de las salidas
de vapor y de café,
seleccione“SI” del
menú propuesto. El
ciclo de aclarado se
detendrá
automáticamente
después de 40 ml.
PREPARACIÓN DEL MOLINO
Puede ajustar la intensidad de su café regulando el grado de molido de los granos. Mientras más no, más fuerte y
cremoso es el café. Regule el grado del molido girando la perilla de ajuste del grado de molienda.
Hacia la izquierda el
molido es más no.
CAMBIE EL AJUSTE DURANTE LA MOLIENDA.
NUNCA FORZAR EL BOTÓN DE AJUSTE DEL GRADO DE MOLIDO.
GRANOS DE CAFÉ CON CUBIERTA DE AZUCAR, GRANOS DE SABORES O GRANOS CON ALTO CONTENIDO EN GRASA PUEDEN BLOQUEAR EL MOLINO.
Hacia la derecha
el molido es más
grueso.
Aclarado de
salida de
vapor: Presione
el botón
de aclarado de
vapor.
El ciclo se
detendrá
automáticamente
cuando se
acabe el agua.
ESPAÑOL
PREPARACIÓN DE UN ESPRESSO Y UN CAFÉ
Con sólo tocar un botón, usted podrá preparar 4 tipos de espresso: espresso, espresso fuerte, café y café fuerte
Cantidad de agua
Espresso 0,7 - 2,4 oz / 20 - 70 ml
Espresso largo 0,7 - 2,4 oz / 20 - 70 ml
Café 2,7 - 5,4 oz / 80 - 160 ml
Café largo 4,0 - 8,0 oz / 120 - 240 ml
La cantidad de agua para un café largo está comprendida entre 120 y 240 ml. El aparato efectúa
automáticamente un ciclo doble, no levante la taza antes del nal de la preparación.
SU APARATO HA SIDO DISEÑADO EXCLUSIVAMENTE PARA UTILIZAR CAFÉ EN GRANO.
Al preparar su primer café, después de un largo periodo de ausencia o después de un procedimiento
de limpieza o de descalcicación, de la boquilla de vapor saldrá un poco de vapor y agua caliente
(autocebado).
Si las salidas de café están reguladas demasiado altas respecto al tamaño de sus tazas, hay riesgo
de salpicaduras o de quemaduras.
8
Page 30

9
Pulse el botón encendido/apagado , espere el fin del precalentamiento y efectúe, si lo desea, un aclarado.
En todo momento
usted puede regular el
volumen de agua con
el botón rotativo.
Seleccione su opción
con el botón rotativo y
confirme con el botón
OK.
Se visualiza el menú de
selección.
Nota: El café molido se prehumidifica con un poco de agua caliente después de la fase de trituración.
Este procedimiento es llamado percolado y optimiza el proceso de preparación.
Algunos segundos después, continúa la salida del café.
Puede usar su máquina para preparar 2 tazas de café ó espresso para las siguientes 3 recetas: espresso / espresso doble / espresso
largo simplemente con programar el ciclo doble. Recuerde no quitar las tazas después del primer ciclo.
Ponga dos tazas bajo las salidas de café.
Puede bajar o subir las
salidas de café según el
tamaño de sus tazas.
Ponga una taza bajo las
salidas de café.
Puede bajar o subir las salidas de café según el
tamaño de su taza.
Seleccione su bebida y confirme
con una doble pulsación rápida de
el botón “OK”. Un mensaje le indicará que usted ha solicitado dos
tazas.
El aparato encadenará auto-
máticamente
2 ciclos completos de
preparación de café.
Para detener la salida de café, puede volver a pulsar una tecla o disminuir el volumen con el botón rotativo.
x 2
FUNCIÓN DOS TAZAS
Una función le permite ajustar su temperatura de café (Ver programación).
PREPARACIÓN DEL VAPOR
El vapor sirve para hacer espumar la leche (para cappuccino / caffe latte) y también para calentar otros líquidos. Como la producción de vapor necesita una temperatura más elevada que para preparar un espresso, el aparato asegura una fase de precalentamiento suplementaria para el vapor.
Mientras la pantalla visualiza el menú de selección, pulse el botón “vapor” .
Una pantalla le señala el precalentamiento del aparato. Una vez terminada la fase de
precalentamiento, un mensaje le invita a poner un recipiente bajo la boquilla de vapor. Puede
comenzar la producción de vapor pulsando nuevamente el botón “vapor“ . Este botón también
le permite interrumpir la producción de vapor.
LA FUNCIÓN 2 TAZAS EN MODO “CAFÉ LARGO” NO ESTÁ DISPONIBLE.
NO RETIRE EL DEPÓSITO ANTES DEL FINAL DEL CICLO.
(es decir, aproximadamente 15 segundos después del final del goteo del café)
CUIDADO, EL APAGADO DEL CICLO NO ES INMEDIATO.
IFU KRUPS Nafta_Premium_MEX_Mise en page 1 31/05/10 14:28 Page9
Page 31

IFU KRUPS Nafta_Premium_MEX_Mise en page 1 31/05/10 14:28 Page10
ESPUMADO DE LECHE
Recomendamos que use leche pasteurizada entera. La leche debe estar muy fría entre los 6° y 10° C.
Después de haber usado la función de vapor o de agua caliente, la boquilla puede estar caliente,
recomendamos no tocarla y dejar que se enfríe.
ESPAÑOL
Verique que la
boquilla de vapor
está bien instalada.
Para eliminar los restos de
leche en la boquilla de
vapor, ponga una taza
bajo la boquilla y presione
el botón agua caliente .
Para interrumpir la función vapor, basta con pulsar cualquier tecla.
Si la boquilla está obstruida, desobstrúyala con una aguja na.
La duración máxima de producción de vapor por ciclo está limitada a 2 minutos.
Llene el recipiente en donde
vaya a espumar hasta la mitad
y sumerja la pipeta en la leche.
Deje salir vapor por lo
menos 10 segundos,
Después vuelva a
presionar el botón
para detener el vapor.
Pulse el botón vapor
y sigua las instrucciones
de la pantalla.
La boquilla de vapor es desmontable para permitir una limpieza profunda.
Lávela con agua y un poco de detergente no abrasivo para vajilla con un
cepillo. Enjuaguela y séquela. Antes de reinstalar, asegúrese que los oricios
de entrada de aire no están obstruidos por residuos de leche. Si es así, desobstrúyala con una aguja.
Cuando la espuma es
suciente...
Presione nuevamente el
botón para detener el
ciclo.
SET AUTO-CAPPUCCINO XS 6000 (VENDIDO POR SEPARADO)
El accesorio autocappuccino hace fácil la preparación de cappuccinos o lattes.
Está conformado por una boquilla especial con 2 posiciones/marcas y un recipiente y tubos en acero inoxidable.
XS 6000
Seleccione la posición cappuccino o latte en
la boquilla especial.
Una las diferentes partes una con otra.
El tubo no debe estar retorcido para mantener correctamente la posición del botón.
Para prevenir que la leche se seque en o dentro del accesorio auto-cappuccino, le recomendemos que inmediatamente :
- ponga agua limpia dentro del recipiente y vuelva a instalar los demás componentes
- comience un ciclo de espumado
- limpie todas las partes con un paño húmedo.
Puede usar además nuestro limpiador especial para boquilla de vapor XS4000.
Llene el recipiente de leche y
coloque una taza debajo de la
boquilla del autocappuccino.
Presione el botón para
iniciar y después para
detener.
Coloque su taza debajo de
la salida del café e inicie el
ciclo de café espresso.
PREPARACIÓN DEL AGUA CALIENTE
Mientras la pantalla visualiza el menú de selección de las bebidas, pulse el botón "Agua
caliente" . Un mensaje le invita a poner un recipiente bajo la boquilla de vapor.
Puede comenzar la producción de agua caliente pulsando nuevamente el botón “Agua
caliente” .
XS 4000
Limpiador
para boquilla
de vapor.
Para interrumpir la función de agua caliente, basta con pulsar cualquier tecla. Si la boquilla está obstruida-desobstruyala con una aguja na. La cantidad máxima de agua caliente por ciclo está limitada a 300 ml.
10
Page 32

11
Si se visualiza el mensaje
de arriba, retire, vacíe y
limpie la bandeja
recogegotas.
La bandeja recogegotas recibe el agua usada y el depósito de café usado recibe el café molido usado.
La bandeja de limpieza permite eliminar eventuales depósitos de café usado encima de la cámara de percolación.
Retire, vacíe y limpie el
depósito de café
usado.
La bandeja recogegotas
está equipada con
flotadores que le indican en todo momento
cuándo vaciarla.
El mensaje de advertencia permanecerá visualizado si el depósito de café u sado no está instalado correctamente.
Si el depósito de café usado se reinstala en menos de 8 segundos, el aparato le solicitará confirmar que usted ha
vaciado realmente este elemento. Mientras se visualice el mensaje de advertencia, es imposible preparar un espresso
o un café. El depósito d e café usado tiene una capacidad de 9 preparaciones.
MANTENIMIENTO DE SU APARATO
Tan pronto usted retira el depósito de café usado, debe vaciarlo completamente para evitar todo desbordamiento a
continuación.
Retire la bandeja de
limpieza.
Límpiela bajo el agua
y séquela bien antes
de reinstalarla.
VACIADO DEL DEPÓSITO DE CAFÉ UTILIZADO, DE LA BANDEJA DE LIMPIEZA
Y DE LA BANDEJA RECOGEGOTAS
ACLARADO DEL CIRCUITO DE CAFÉ - VER CAPÍTULO “ANTES DE LA PRIMERA UTILIZACIÓN” PÁGINA 8
PROGRAMA DE LIMPIEZA DE LA MÁQUINA - DURACIÓN TOTAL: 20 MINUTOS APROXIMADAMENTE
Debe ejecutar el programa de limpieza aproximadamente cada 360 preparaciones de espresso o de café.
Cuando es necesario proceder a una limpieza, el aparato se lo advierte por la visualización periódica de un mensaje.
¡Atención! Para conservar las condiciones de garantía, es indispensable efectuar el ciclo de limpieza del aparato cuando se lo señala. Seguir bien el orden de las operaciones.
Usted puede continuar utilizando el aparato pero se aconseja ejecutar el programa lo antes posible.
Para efectuar el programa de limpieza, usted necesita un recipiente que pueda contener al menos 0,6 litros y una pastilla de limpieza
KRUPS (XS 3000).
El programa de limpieza automática se
divide en tres partes: el ciclo de limpieza propiamente dicho y dos ciclos
de aclarado. Este programa dura
aproximadamente 20 minutos.
Usted puede efectuar una limpieza en
cualquier momento utilizado
para visualizar los menús y
seleccionando
MANTENIMIENTOS => OK =>
LIMPIEZA.
Cuando se visualiza el
mensaje “Limpieza
necesaria”, usted puede
lanzar el programa
automático pulsando
el botón .
Siga las
instrucciones
visualizadas
en la pantalla.
Si desconecta el aparato durante la limpieza o en caso de avería eléctrica, el programa de limpieza se reiniciará
en la etapa en que se produjo el incidente. No será posible aplazar esta operación. Esto es de gran importancia
para evitar ingerir la solución de limpieza. En este caso, es necesaria una nueva pastilla de limpieza. Realizar bien el
programa de limpieza completo para evitar todo riesgo de intoxicación. Consulte a su médico en caso de ingesta
accidental. El ciclo de limpieza es un ciclo discontinuo, no poner las manos bajo las salidas de café durante el ciclo.
Utilice solamente pastillas de limpieza KRUPS (XS 3000). No habrá responsabilidad alguna por daños que emanen
de la utilización de pastillas de otras marcas.
Usted puede obtener las pastillas de limpieza en el servicio posventa KRUPS.
Tenga el cuidado de proteger bien la superficie de trabajo durante los ciclos de limpieza, en
particular cuando son de mármol, de piedra o de madera.
ENJUAGUE DEL CIRCUITO DE PREPARACIÓN DE CAFÉ: VEA PÁGINA 8
IFU KRUPS Nafta_Premium_MEX_Mise en page 1 31/05/10 14:28 Page11
Page 33

IFU KRUPS Nafta_Premium_MEX_Mise en page 1 31/05/10 14:28 Page12
PROGRAMA DE DESCALCIFICACIÓN AUTOMÁTICA - DURACIÓN TOTAL :
22 MINUTOS APROXIMADAMENTE
Si su producto está equipado con nuestro cartucho Claris - Aqua Filter System F088, Por favor, retírelo
antes de la operación de descalcicación.
La cantidad del depósito de cal depende de la dureza del agua utilizada. Cuando es necesario proceder a una
descalcicación, el aparato se lo advier te automáticamente por la visualización de un mensaje de advertencia.
¡Atención! Para conservar las condiciones de garantía, es indispensable efectuar el ciclo de
descalcicación del aparato cuando se lo señala. Seguir bien las instrucciones visualizadas en la
pantalla. Usted puede continuar utilizando el aparato, pero se aconseja ejecutarlo lo antes posible.
Para efectuar el programa de descalcicación, usted necesita un recipiente que pueda contener al menos 21 oz/0,6 l y un sobre de
polvos descalcicadores KRUPS (40 g) F 054.
Cuando se visualiza el mensaje
“Descalcicación necesaria”,
puede iniciar el programa de
descalcicación automática pulsando el botón .
El ciclo de descalcicación se compone de tres partes: la fase de descalcicación propiamente dicha, seguida de dos fases de
aclarado.
Utilice únicamente productos de descalcicación KRUPS, o ácido cítrico. Los productos de descalcicación se
encuentran disponibles en los centros de Servicio Posventa KRUPS.
No se verá comprometida nuestra responsabilidad en el caso de un daño del aparato por la utilización de limpiadores
o descalcicadores no especícamente recomendados.
Si se produce un corte de corriente durante el ciclo, será necesario reiniciarlo completamente, sin posibilidad
de aplazar esta operación.
Siga las instrucciones
visualizadas en la pantalla
respetando la disolución
del sobre.
ESPAÑOL
Asegurese de terminar el ciclo de descalcicación para evitar cualquier riesgo de ingerir la solución de limpieza.
El ciclo de descalcicación es un ciclo discontinuo, no poner las manos bajo las salidas de café durante el ciclo.
Proteja debidamente su supercie de trabajo durante los ciclos de descalcicación, en particular cuando son
de mármol, de piedra o de madera.
LIMPIEZA GENERAL
Retire siempre el cable de alimentación de la toma y deje enfriar su aparato antes de limpiarlo.
No utilice utensilios ni productos de limpieza que puedan rayar o deteriorar el aparato.
Seque el cuerpo del aparato exteriormente con un paño húmedo.
Lave la charola de limpieza, el ltro y el recolector
de granos de café con agua caliente y detergente
líquido suave.
Estas piezas se pueden lavar en la lavavajillas.
Enjuague el depósito de
agua con agua potable.
12
Page 34

13
Todas estas opciones le permiten usar los programas seleccionados. Luego siga las instrucciones de la pantalla.
Mantenimiento
Ajustes
Información
Modo demo
Salir
PROG
MANTENIMIENTOS
Aclarado
Limpieza
Filtro de agua
Salir
MANTENIMIENTO
El acceso al menú de las otras funciones del aparato se efectúa mediante el botón desde la pantalla de elección de las bebidas. Para todos los ajustes, el botón rotativo permite navegar en los menús y las opciones, el botón OK permite confirmar una
selección, el botón permite anular una elección y volver al menú de selección de las bebidas.
Le permite acceder a los mantenimientos.
Le permite acceder a los parametros.
Le permite acceder a la información del
producto.
Le permite acceder al modo demostración.
Le permite acceder a la salida.
Le permite acceder al aclarado.
Le permite acceder a la limpieza.
Le permite acceder al modo filtro.
Le permite acceder a la salida.
OTRAS FUNCIONES: BOTON
Idioma
Contraste pantalla
Fecha
Hora
Auto-off
Auto-on
Unidad de volumen
Dureza del agua
Temperatura del café
Salir
AJUSTES
PROGRAMACIÓN
Usted puede seleccionar el idioma de su elección entre
los propuestos.
Usted puede ajustar el contraste de la pantalla según su
preferencia.
El ajuste de la fecha es necesario en particular en caso de utilización de un cartucho anticalcáreo.
Usted necesita programar la fecha, necesario si se usa el filtro
de agua Claris.
Puede seleccionar el tiempo en el que su aparato se detendrá automaticamente. De 30 minutos a 4 horas, por segmento de 30 min.
Puede programar automáticamente el precalentamiento de su
aparato a una hora elegida.
Usted puede seleccionar la unidad de medida entre ml
y onzas.
Usted debe ajustar la dureza del agua entre 0 y 4.
Ver capítulo “Medida de la dureza del agua”.
Usted puede ajustar la temperatura de su espresso o de
su café en tres niveles.
Usted puede volver al menú precedente.
IFU KRUPS Nafta_Premium_MEX_Mise en page 1 31/05/10 14:28 Page13
Page 35

IFU KRUPS Nafta_Premium_MEX_Mise en page 1 31/05/10 14:28 Page14
INFORMACIÓN DEL PRODUCTO
INFORMACIÒN
Ciclos café
Ciclos agua
Ciclos vapor
Aclarado
Limpieza
Visualiza la cantidad total de café realizados por la máquina.
Visualiza la cantidad total de ciclos de agua caliente
efectuados por la máquina.
Visualiza la cantidad total de ciclos de vapor efectuados por
la máquina.
Visualiza la cantidad total de aclarados efectuados por la máquina.
Última
Próxima
Limpiar
Salir
Visualiza la cantidad de café realizados
desde la última limpieza.
Visualiza la cantidad de café que se puede
realizar antes de la próxima limpieza.
Iniciar el programa de limpieza
Regresa al menú anterior
ESPAÑOL
Descalcicación
Última
Próxima
Salir
Filtro de agua
Último
Próximo
Instalar
Salir
* Las 2 primeras opciones del submenú ltro sólo se validarán si usted ha instalado correctamente un ltro con
anterioridad, con el programa accesible bajo MANTENIMIENTOS => FILTRO => INSTALAR.
Salir
Visualiza la cantidad de equivalentes vapor o agua
caliente realizados desde la última descalcicación.
Visualiza la cantidad de equivalentes vapor o agua
caliente que pueden realizarse antes de la próxima
descalcicación.
Regresa al menú anterior
Visualiza la fecha del último cambio de
ltro* y la cantidad de agua pasada.
Visualiza la fecha del próximo cambio de ltro* o la cantidad de agua que puede pasar.
Iniciar el procedimiento de reemplazo del ltro.
Regresa al menú anterior
MODO DEMOSTRACIÓN
Cuando este modo se activa y la pantalla
visualiza el menú de selección de las bebidas, el aparato hace deslar a intervalo
regular las diferentes funciones disponibles
así como el acceso a éstas.
En este submenú usted puede seleccionar o
reactivar esta función.
TRANSPORTE DEL APARATO
Guarde el empaque original y utilícelo cuando necesite transportar la máquina.
En caso de caída del aparato fuera del embalaje, es preferible llevarlo a un centro aprobado para evitar todo
riesgo de incendio o problemas eléctricos.
PRODUCTO ELÉCTRICO O ELECTRÓNICO EN FIN DE VIDA
Participemos en la protección del medio ambiente!
Su aparato contiene numerosos materiales reciclables.
Por favor recicle.
14
Page 36

15
GUÍA PARA SOLUCIÓN DE PROBLEMAS
PROBLEMAS ACCIONES CORRECTIVAS
El aparato no se enciende después de haber
presionado el botón “On/Off”.
Compruebe que el enchufe del cable eléctrico está bien conectado a la
toma de corriente.
Agua o vapor salen anormalmente de la
boquilla vapor.
En el caso de usos repetidos, pueden escaparse unas gotas por la boquilla
vapor.
El expresso o el café no están bastante
calientes.
Cambie el ajuste de la temperatura del café.
Caliente las tazas enjuagándolas con agua caliente.
El café sale demasiado claro o no suficientemente fuerte.
Compruebe que el depósito de granos contiene café y que éste pasa correctamente. Evite utilizar café aceitoso, caramelizado o aromatizado. Disminuya el volumen de café por medio del botón central. Gire el botón de la finura de molido
hacia la izquierda para obtener una molienda más fina. Realice su preparación en
dos ciclos utilizando la función 2 tazas.
El café sale muy lento. Gire el botón de la finura de molido hacia la derecha para obtener una
molienda más gruesa (puede depender del tipo de café utilizado).
Realice uno o varios ciclos de aclarado.
El café está poco cremoso. Gire el botón de la finura de molido hacia la izquierda para obtener una
molienda más fina (puede depender del tipo de café utilizado).
Cambiar el cartucho Claris Aqua Filter System (respete el procedimiento de
instalación página 3). Realice uno o varios ciclos de aclarado.
No sale café del aparato. Se ha detectado un incidente durante la preparación. El aparato se encen-
derá de nuevo automáticamente y estará listo para un nuevo ciclo.
Ha utilizado café molido en lugar de café en
grano
Aspire con su aspirador el café pre-molido del depósito de granos.
El triturador emite un ruido anormal. Hay cuerpos extraños en el triturador. Contacte con el Servicio de
Consumidores KRUPS.
El botón de ajuste de la finura de molido se
gira con dificultad.
Modifique el ajuste del triturador únicamente cuando esté en funcionamiento.
El vapor no sale por la boquilla. Tras haber apagado y dejado enfriar el aparato:
Comprobar que la boquilla de vapor está bien conectada en en el tubo de
vapor. Comprobar que la boquilla de vapor no está obstruida (si fuera necesario limpiar la boquilla de vapor y desobstruirla con la aguja incluida).
Vaciar el depósito y retirar el filtro Claris. Llenar el depósito con agua mineral con un alto contenido en calcio (> 100 mg/l ) y repetir sucesivamente
ciclos de vapor (de 5 a 10) en un recipiente hasta obtener un chorro de
vapor continuo.
La cantidad de espuma de leche es insuficiente.
Desobstruya con la aguja suministrada el pequeño orificio de entrada de
aire en la parte superior de la boquilla si fuera necesario. Utilice un recipiente frío y leche recién abierta. Cambie eventualmente de tipo de leche
(ultrapasteurizada o pasteurizada).
La espuma de leche es excesiva. Compruebe que los 2 extremos del pequeño tubo de acero inoxidable
están bien encajados en la parte flexible de la boquilla vapor.
El accesorio Auto-Cappuccino no aspira la
leche (accesorio vendido por separado).
Compruebe que el tubo que se introduce en la leche está bien colocado.
Compruebe que el tubo flexible no esté retorcido y que esté correctamente
instalado en su accesorio. Tras haber apagado y dejado enfriar el aparato,
desobstruya el orificio de salida del accesorio Auto-Cappuccino.
Tras haber llenado el depósito con agua, el
mensaje de advertencia queda visualizado.
Compruebe que el depósito está bien colocado en la cafetera. Compruebe
que el flotador del fondo del depósito se desplaza libremente. Enjuague el
depósito y si fuera necesario descalcifique.
El programa de limpieza o de descalcificación
no comienza.
Desconecte el aparato durante 20 segundos y póngalo de nuevo en marcha.
Después de haber vaciado de recipiente de
café utilizado, el piloto sigue iluminado.
Retire el colector, asegúrese de que está bien vacío, espere 6 segundos y
póngalo de nuevo en su sitio. Compruebe que el colector está correctamente colocado.
Tras haber lavado el depósito de café utilizado,
el mensaje de advertencia queda visualizado.
Retire el depósito de café utilizado, espere 6 segundos y póngalo de
nuevo en marcha. Compruebe que el cajón de limpieza está correctamente
colocado.
Se ha producido un corte de corriente durante
un ciclo.
El aparato se enciende automáticamente cuando se enchufa y está listo
para un nuevo ciclo.
IFU KRUPS Nafta_Premium_MEX_Mise en page 1 31/05/10 14:28 Page15
Page 37

IFU KRUPS Nafta_Premium_MEX_Mise en page 1 31/05/10 14:28 Page16
GUÍA PARA SOLUCIÓN DE PROBLEMAS
Hay agua o café debajo del aparato. El recipiente recoge gotas se ha desbordado: vacíelo y limpie el cajón de
Un mensaje "código de error XX” aparece. Desconecte el aparato durante 20 segundos, retire el cartucho Claris si
limpieza. Compruebe que el recipiente recoge gotas está bien colocado.
No retire el depósito de agua antes de que nalice el ciclo.
llegar el caso, e instálelo de nuevo.
Si el defecto persiste, anote el nº de defecto y contacte con el Servicio de
Consumidores KRUPS.
KRUPS
GARANTÍA DEL FABRICANTE
: www.krups.com
Comprometidos fuertemente con el medio ambiente, la mayoría de los productos Krups
son reparables durante y posteriormente al periodo de garantía, Antes de regresar cual-
quier producto al sitio de venta, por favor llame directamente a servicios al consumidor de
Garantía
Krups garantiza este producto por 2 años contra cualquier defecto de fabricación tanto en materiales
como en mano de obra, a partir de la fecha de compra.
La garantía del fabricante Krups, es un benecio extra que no afecta los derechos legales del consumidor
La garantía Krups cubrirá todos los gastos relacionados con la reparación de los productos defectuosos hasta que cumplan con sus especicaciones originales, mediante la reparación o reemplazo de
cualquier pieza defectuosa y la mano de obra necesaria para ello. A criterio de Krups, en lugar de la
reparación, podría hacer cambio de producto. Incluyendo los gastos de transportación razonablemente
erogados para el cumplimiento de esta garantia, exclusivamente para aquellos sitios donde no se cuente
con un centro de servicio autorizado.
La única obligación de Krups y su exclusiva determinación bajo esta garantía se limita a la reparación o
reemplazo del producto.
Krups, para conocer las opciones de reparación, al número indicado abajo.
¡Apreciamos su ayuda para preservar el medio ambiente!
ESPAÑOL
Condiciones y exclusiones
La garantía Krups, aplica solamente en Estados Unidos, Canadá y México, y será válida solamente con la
presentación del comprobante de compra. El producto puede ser llevado directamente a un centro de
servicio autorizado, o debidamente empacado y devuelto, mediante servicio de mensajería autorizada (o
servicio de paquetería equivalente), al centro de servicio autorizado de Krups. Detalles y dirección completa de los centros de servicio autorizados de cada país, se encuentran listados en la dirección electrónica de Krups (www.krups.com ) o bien llamando al nùmero telefónico de cada país indicado abajo, para
solicitar la dirección correspondiente.
Krups no está obligado a reparar o reemplazar ningún producto el cual no sea acompañado de su comprobante de compra.
Esta garantía no cubre ningún daño que pudiera ocurrir como resultado de mal uso, negligencia, o no
haber seguido las intrucciones de uso establecidas por Krups, uso de corriente o voltaje diferente al indicado en el producto, o una modicación o reparación no auorizada del mismo. Tampoco cubre el desgaste o deterioro normal del producto, ni el reemplazo de componentes consumibles, ni lo siguiente:
16
Page 38

- uso de tipo incorrecto de agua
- sarro (la eliminación de sarro (residuos calcáreos) deberá ser
llevada a cabo de acuerdo a las instrucciones de uso)
- ingreso de agua, polvo o insectos al interior del producto
- daños mecánicos, sobrecargas
- accidentes incluyendo fuego, inundaciones, rayos, etc
- uso comercial o profesional
- daños en componentes de vidrio o cerámicos en el producto
Esta garantía no aplica a ningún producto si ha sido intervenido, o presenta daños derivados de uso o
cuidado incorrecto, mal empacado por el propietario o mal manejo por parte del servicio de paquetería.
La garantía Krups, aplica solo a los productos comprados en Estados Unidos de Norte America, Canadá
y México, cuando un producto es comprado en un país y usado en otro diferente:
a) La duración de la garantía Krups es la correspondiente al país donde se utilice el producto, aún
cuando la duración de la garantía donde haya sido comprado el producto dentro de los paìses
listados, sea diferente.
b) La garantía Krups no aplica en caso de no conformidad del producto comprado con los están-
dares locales, tales como voltaje, frecuencia, contactos eléctricos, u otras especificaciones técnicas.
c) El proceso de reparación de un producto comprado fuera del pais de uso, puede necesitar de un
tiempo mayor si el producto no es vendido localmente
d) En caso de que el producto no sea reparable en el nuevo país, la garantía Krups se limita al reem-
plazo por un producto similar, o un producto alternativo de costo similar, dentro de lo posible.
Derechos establecidos por la ley al Consumidor
Esta garantía Krups, no afecta los derechos establecidos por la ley que el consumidor pudiera tener o
aquellos derechos que no pueden ser excluidos o limitados, tampoco los derechos contra el distribuidor al que el consumidor le haya comprado el producto. Esta garantía proporciona al consumidor derechos legales específicos, y el consumidor podrá tener también otros derechos legales los cuales varian
de Estado a Estado o de País a País o de Provincia a Provincia. El consumidor podrá hacer valer esos
derechos a su discreción.
Informaciòn adiciona
Accesorios, consumibles y piezas reemplazables pueden ser compradas si localmente se encuentran
disponibles, como se describe en el sitio de internet de Krups.
: www.krups.com
CANADA
GROUPE SEB
CANADA
345 Passmore
Avenue
Toronto, ON
M1V 3N8
MEXICO
G.S.E.B. MEXICANA, S.A.
de C.V. Goldsmith
38 Piso 4- 401,
Col. Polanco Chapultepec
Delegacion Miguel Hildalgo
11 560 Mexico D.F.
U.S.A.
GROUPE SEB USA
2121 Eden Road
Millville, NJ 08332
1-800-418-3325 (01800) 112 83 25 800-526-5377
17
FECHA DE COMPRA:
IFU KRUPS Nafta_Premium_MEX_Mise en page 1 31/05/10 14:28 Page17
Page 39

He aquí algunas recetas a realizar con su Espresseria Automatic:
• Cappuccino
Para un cappuccino, las proporciones ideales son las siguientes: 1/3 de leche caliente, 1/3 de café, 1/3 de espuma de
leche.
• Caffe Latte
Para esta preparación, llamada con frecuencia Latte Macchiato, las proporciones son las siguientes: 3/5 de leche caliente,
1/5 de café, 1/5 de espuma de leche.
• Para estas preparaciones a base de leche, utilice de preferencia leche semidesnatada bien fresca (directa del
refrigerador, idealmente entre 6 y 8° C).
• Para terminar, puede espolvorear chocolate en polvo.
• Café con leche
• Prepare un espresso clásico en una taza grande.
• Añada un poco de leche para obtener un café con leche.
• Café corretto*
• Prepare una taza de espresso de forma habitual.
• Corrija a continuación ligeramente el gusto añadiendo 1/4 ó 1/2 copa de licor de coñac.
El anís, el aguardiente de uvas, el Sambuco, el Kirsch y el Cointreau también son adecuados para este fin.
También existen numerosas posibilidades para “ennoblecer” el espresso.
La imaginación es ilimitada
• Licor de café*
• Mezcle en 1 botella vacía de 0,75 litro 3 tazas de espresso, 250 g de azúcar candi moreno, 1/2 litro de coñac o de Kirsch.
• Deje macerar la mezcla durante al menos 2 semanas.
Así obtendrá un delicioso licor, sobre todo para los amantes de café.
• Café helado a la italiana
4 bolas de helado de vainilla, 2 tazas de espresso frío con azúcar, 1/8 l de leche, nata, chocolate rallado.
• Mezcle el espresso frío con leche.
• Reparta las bolas de helado en vasos, vierta el café encima y decórelo con la nata y el chocolate rallado.
• Café à la frisonne*
• Añada un vaso pequeño de ron a una taza de espresso dulce.
• Decórelo con una buena capa de nata y sírvalo.
• Espresso flameado*
2 tazas de espresso, 2 copas pequeñas de coñac, 2 cucharitas de azúcar moreno, nata.
• Vierta el coñac en vasos que resistan el calor, caliente y flamee.
• Añada el azúcar, mezcle, vierta el café y decore con nata.
• Espresso parfait*
2 tazas de espresso, 6 yemas de huevo, 200 g de azúcar, 1/8 litro de nata dulce, 1copa pequeña de licor de naranja.
• Bata las yemas de huevo con el azúcar hasta formar una masa espesa y espumante.
• Añada el espresso frío y el licor de naranja.
• Mezcle a continuación la nata batida.
• Viértalo todo en copas o vasos.
• Ponga las copas en el congelador.
(*: El abuso del alcohol es peligroso para la salud.)
18
RECETAS
IFU KRUPS Nafta_Premium_MEX_Mise en page 1 31/05/10 14:28 Page18
Page 40

www.krups.com
0828 250 - Réalisation : Espace graphique
EN
Consumer service
USA : 1-866-668-0325 www.krupsusa.com
FR
Service à la clientèle Canada : 1-800-418-3325
www.krups.ca
ES
Servicio Consumidores Mexico : 018001128325 www.krups.com.mx
IFU KRUPS Nafta_Premium_MEX_Mise en page 1 02/06/10 10:40 Page19
 Loading...