

Page 1
04/98
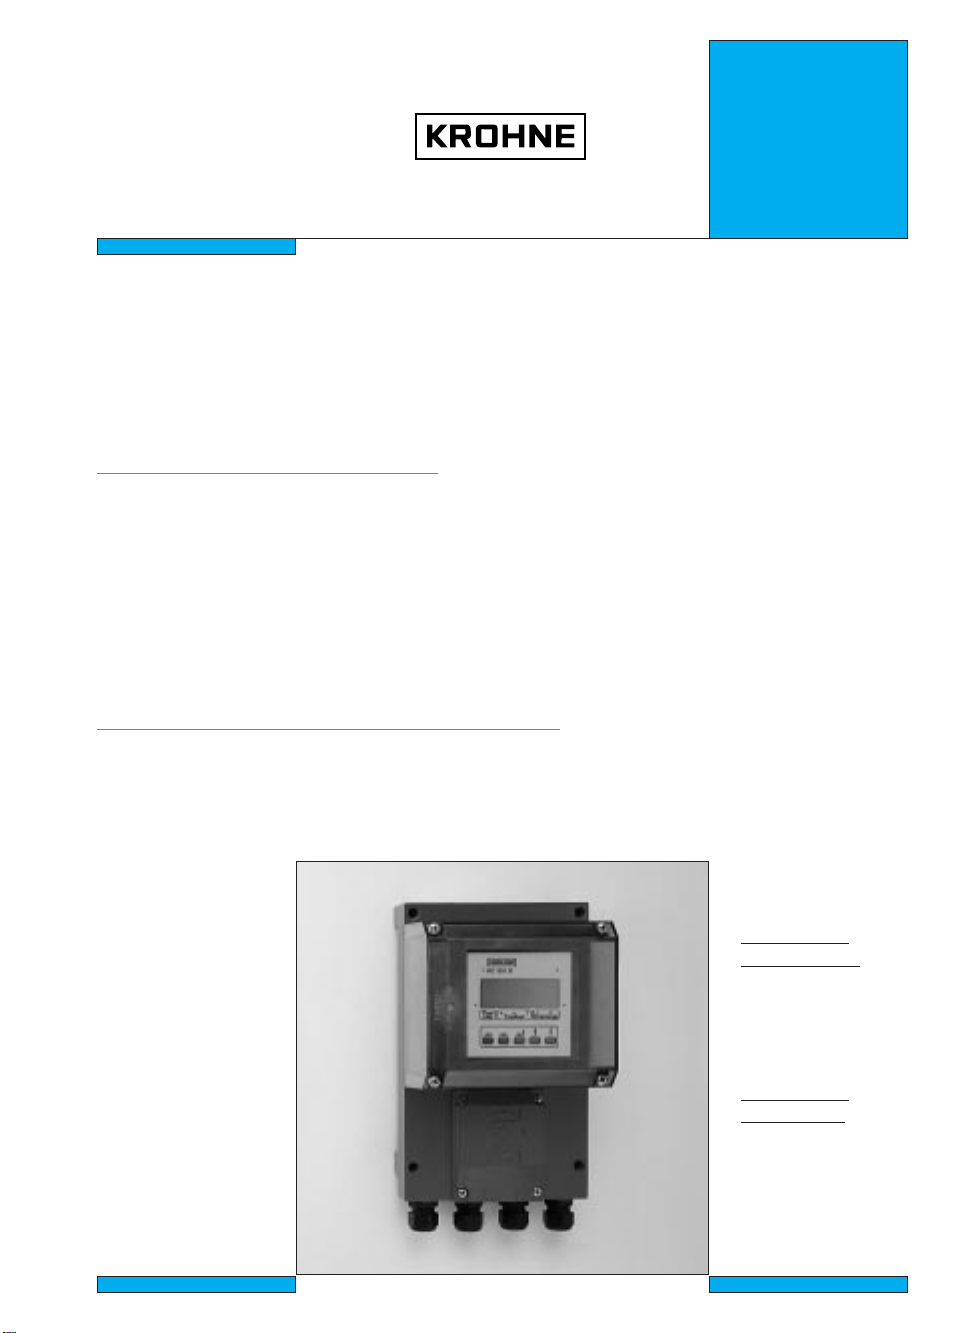
Signal converters
Installation and
operating
intructions
for
electromagnetic flowmeters
IFC 010 K
IFC 010 F
How to use these Instructions
The flowmeters are supplied ready for operation.
The primary head must be installed in the pipeline as described in the installation
instructions inside the packing of the primary head.
- Installation location and connection to power (Section 1) Pages 1/1-1/6
- Electrical connection of outputs and inputs (Section 2) Pages 2/1-2/6
- Factory settings and start-up (Section 3) Pages 3/1-3/2
- Operator control of the signal converter is described in Sections 4 and 5.
Power the flowmeter. THAT’S ALL. The system is operative.
16-page pull-out condensed instructions
are located in the centrefold of these Installation and Operation Instructions.
Contents:
Installation (Sect. 1), electrical connection (Sect. 1 + 2),
start-up (Sect. 3) and operator control of the signal converter (Sect. 4)
Applicable to
Software Versions
••
IFC 010 _/ D
Display version
No. 806325.07
and
No. 317551.02
and higher
••
IFC 010 _/ B
Basic version
operator-controllable
with HHT 010
No. 806323.06
and higher
3.1M61EA4 049821 Order No. 7.02140.34.00
US size: 7.02140.74.00
Page 2

Contents
Versions IFC 010 signal converter 0/3
Items included with supply 0/3
Software history 0/3
System description 0/4
Product liability and warranty 0/4
CE / EMC / Standards / Approvals 0/4
Part A System installation and start-up 1/1-3/2
1 Electrical connection: power supply 1/1-1/6
1.1 Important installation notes – PLEASE NOTE ! 1/1
1.1.1 Location 1/1
1.1.2 Only for separate systems/signal converters (F versions) 1/1
1.1.3 Cable entries 1/1
1.2 Connection to power 1/2
1.3 Electrical connection of separate primary head (F Version) 1/3-1/6
1.3.1 General information on signal cable A and field current cable C 1/3
1.3.2 Grounding of primary head 1/3
1.3.3 Stripping (preparation) of signal converter 1/4
1.3.4 Cable length (max. distance between signal converter and primary head) 1/5
1.3.5 Connection diagrams I and II (power supply, converter and primary head) 1/6
2
2.1 Current output I 2/1
2.2 Pulse output P and status output S 2/1
2.3 Connection diagrams for outputs and inputs 2/2
Electrical connection of outputs 2/1-2/2
3.
3.1 Power-on and measurement 3/1
3.2 Factory settings 3/2
Part B IFC 010
4 Operation of the signal converter 4/1-4/10
4.1 Krohne operator control concept 4/1
4.2 Operating and check elements 4/2
4.3 Function of keys 4/3-4/4
4.4 Table of settable functions 4/5-4/9
4.5 Error messages in measuring mode 4/9
4.6 Reset totalizer and cancel error messages, RESET/QUIT menu 4/10
4.7 Examples of setting the signal converter 4/10
5
5.1 Full-scale range Q100% 5/1
5.2 Time constant 5/1
5.3 Low-flow cutoff 5/2
5.4 Display 5/2-5/3
5.5 Internal electronic totalizer 5/3
5.6 Current output I 5/4
5.7 Pulse output P 5/5-5/6
5.8 Status output S 5/7
5.9 Language 5/8
5.10 Entry code 5/8
5.11 Primary head 5/9
5.12 User-defined unit 5/10
5.13 F/R mode, forward/reverse flow measurement 5/11
5.14 Characteristic of outputs 5/11
5.15 Applications 5/12
5.16 Setting data 5/12
Start-up 3/1-3/2
/D Signal converter 4/1-5/14
Description of functions 5/1-5/12
0/1
Page 3

Part C Special applications, functional checks, service, and order numbers 6/1-9/1
6 Special applications 6/1-6/2
6.1
HHT 010 hand held terminal and RS 232 adapter incl. CONFIG software (options)
6/1
6.2 Stable signal outputs when measuring tube empty 6/2
7
Functional checks 7/1-7/11
7.1 Zero check with IFC 010 /D, signal converter, Fct. 3.03 7/1
7.2 Test of measuring range Q, Fct. 2.01 7/1
7.3 Hardware information and error status, Fct. 2.02 7/2
7.4 Faults and symptoms during start-up and process flow measurement 7/3-7/6
7.5 Test of primary head 7/7
7.6 Test of signal converter 7/8
7.7 Test of signal converter using GS 8A simulator (option) 7/9-7/11
8
Service 8/1-8/6
8.1 Cleaning the signal converter housing 8/1
8.2 Replacement of power fuse(s) 8/1
8.3 Changeover of operating voltage on AC Versions 1, 2 and 3 (not DC Version) 8/2
8.4 Replacement of electronic unit of signal converter 8/2
8.5 Illustrations to Sect. 8.2 to 8.7 8/3
8.6 Turning the display PCB 8/4
8.7 Retrofitting the display unit 8/4
8.8 IFC 080 and SC 80 AS Replacement of electronic unit by IFC 010 8/4
8.9 Illustrations of the PCBs 8/6
9
Order numbers 9/1
Part D Technical data, measuring principle and block diagram 10/1-12/1
10 Technical data 10/1-10/5
10.1 Full-scale range Q
100%
10/1
10.2 Error limits at reference conditions 10/2
10.3 IFC 010 Signal converter 10/3-10/4
10.4 IFC 010 F and ZD dimensions and weights 10/4
10.5 Instrument name plates 10/5
1
1 Measuring principle and function of the system 11/1
12 Block diagram - signal converter 12/1
Part E Index E1-E2
Printed form to accompany flowmeters returned to Krohne E3
0/2
Page 4

Versions IFC 010 signal converter
IFC 010_ / B Basic version (standard)
without local display and control elements.
All operating data factory-set to your order specifications.
Optionally available for operator control:
- RS 232 adapter, incl. software for DOS-PC or
- HHT hand-held terminal
IFC 010_ / D Display version (option)
with local display and control elements.
All operating data factory-set to your order specifications.
IFC 010 K / _ Compact flowmeter
signal converter mounted direct on primary head.
IFC 010 F / _ Signal converter in field housing,
electrical connection to primary head
via field power and signal cables.
Items included with supply
• Signal converter in the version as ordered, see above.
• These installation and operating instructions for the signal converter,
including 16-page pull-out condensed instructions for installation, electrical connection,
start-up and operator control of the signal converter.
• 2 plug connectors for connection of power supply and outputs/inputs
• for separate system version only
signal cable in the version and length as ordered (standard: signal cable A, length 10 m / 30 ft)
Software history
Display & control unit Hand-held HHT 010 CONFIG user software
IFC 010 _ / D IFC 010 _ / B** IMoCom RS 485
Software Status Software Status Software Software
806325.07* current 806328.06 current
replaces
≥ 317551.02* 806325.07 806328.06 current
813269.00*** current Czech user interface ***
813340.00*** current Swedish user interface ***
* At least the same setting ranges and functional scope as preceding versions.
Also, customer- and application-specific add-on equipment possible, which has to be
installed and activated by the factory. Documented by enclosures to these Installation
and Operating Instructions.
** Please note: Connect HHT 010 only to devices without display and operator
control software.
*** Does not contain the functional scope of the currently valid standard version;
this has been taken into account in the documentation of the respective national language.
, F Version:
V 2.00 V 3.15
and higher and higher
0/3
Page 5
System description
Electromagnetic flowmeters with the IFC 010 signal converter are precision instruments designed
for linear flow measurement of liquid products.
The process liquids must be electrically conductive: ≥ 5 µS/cm
(for cold demineralized water ≥ 20 µS/cm).
The full-scale range Q
DN 2.5.- 1000 / 01/10” - 40” Q
can be set as a function of the meter size:
100%
= 0.010 - 34 000 m3/hr = 0.03 - 151 000 US Gal/min
100%
This is equivalent to a flow velocity of 0.3 - 12 m/s or 1 - 40 ft/s.
Product liability and warranty
The electromagnetic flowmeters with the IFC 010 signal converter are designed solely for
measuring the volumetric flowrate of electrically conductive, liquid process products.
These flowmeters are not certified for use in hazardous areas. Other flowmeter series are
available for such applications.
Responsibility as to suitability and intended use of these electromagnetic flowmeters rests solely
with the operator.
Improper installation and operation of the flowmeters (systems) may lead to loss of warranty.
In addition, the “General conditions of sale” forming the basis of the purchase contract are
applicable.
If flowmeters need to be returned to Krohne, please note the information given on the last-but-one
page of these Instructions. Krohne regrets that it cannot repair or check your flowmeter(s) unless
accompanied by the completed form sheet.
CE / EMC / Standards / Approvals
• Electromagnetic flowmeters with the IFC 010 signal converter meet the protection requirements
of Directive 89/336/EEC in conjunction with EN 50081-1 (1992) and EN 50082-2 (1995),
as well as Directives 73/23/EEC and 93/68/EEC in conjunction with EN 61010-1, and bear the
CE marking.
0/4
Page 6
Part A System installation and start-up
1 Electrical connection: power supply
1.1 Important installation notes PLEASE NOTE !
1.1.1 Location
• Electrical connection in accordance with VDE 0100 ”Regulations governing heavy-current
installations with line voltages up to 1000 V” or equivalent national regulations.
• Do not cross or loop cables inside the terminal compartment.
• Use separate cable entries (see below) for power supply, field current cables, signal lines,
outputs and inputs.
• Protect flowmeters or switchgear cabinets with built-in devices from direct sunlight.
Fit a sunshade if necessary.
• When installed in switchgear cabinets, signal converters must be adequately cooled,
e.g. use fans or heat exchangers.
• Do not expose signal converters to intense vibration.
1.1.2 Onl
• Keep distance between primary head and signal converter as short as possible.
Refer to Sect. 1.3.4 for maximum permissible length of signal and field current cables.
• Use the supplied Krohne signal cable A (Type DS), standard length 10 m (33 ft).
• Always calibrate primary head and signal converter together. Therefore, when installing,
ensure primary constant GKL is identical; refer to instrument nameplate for the primary
head. If the GKL is not identical, set the signal converter to the GKL of the primary head.
Refer also to Sections 4.
• Dimensions of signal converter; refer to Section 10.4.
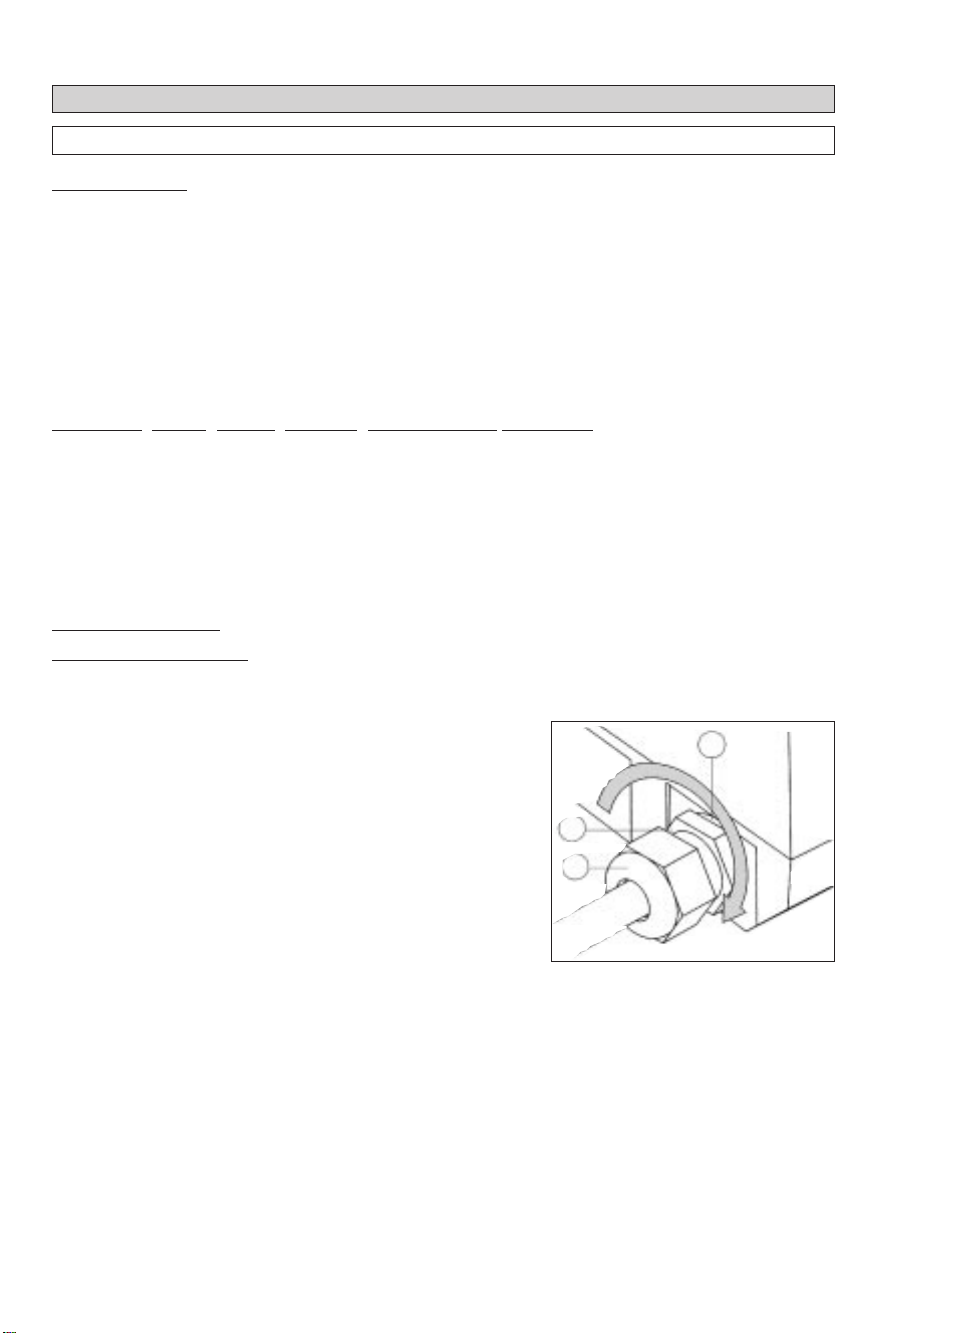
1.1.3 Cable entries
Number of cable entries: 2 for the compact flowmeters
y for separate systems/signal converters (F versions)
4 for the IFC 010 F signal converter
NOTE: Ensure gaskets are fitted correctly and maintain
the following max. torques!
1 Max. torques for PG 13.5,
1/2“ NPT or 1/2“ PF adapters: 4 Nm / 2.8 ft
2 Max. torques for PG 13.5 only: 3 Nm / 2.1 ft
x
lbf
x
lbf
1
3
2
3 Gasket
A) PG 13.5 cable entries
These cable entries may only be used for flexible electrical cables if the relevant electrical
regulations so allow, e.g. National Electric Code (NEC).
Do not fix rigid metal conduits (IMC) or flexible plastic conduits to the PG 13.5 cable entries, refer
to “Point B, C” below (1/2” NPT or PF adapters).
B) 1/2“ NPT adapters C) 1/2“ PF adapters
For most North American systems the regulations require that electrical conductors be laid in
conduits, particularly where power voltages > 100 V AC are concerned.
In such cases, use the 1/2” NPT or 1/2” PF adapters to which flexible plastic conduits can be
screwed. Do not use rigid metal conduits (IMC)!
Lay conduits such that no moisture can penetrate into the converter housing.
Should there be risk of any condensation water forming, fill the cross-section of the conduit
around the cables at these adapters with a suitable sealing compound.
1/1
Page 7

PLEASE NOTE !
Connection to power 1.2
• Rated values:
The flowmeter housings protecting the electronic equipment from dust
and moisture must always be kept closed. The selected creepage distances and
clearances have been dimensioned in conformity with VDE 0110 and IEC 664 for
contamination category 2. Supply circuits and output circuits are designed to meet the
standards of overvoltage classes III and II, respectively.
• Safet
y isolation: the flowmeters (signal converters) must be provided with an
isolating facility.
1. AC V
ersion 2. AC Version
230/240 V AC (200 - 260 V AC) 200 V AC (170 - 220 V AC)
switch-selectable to switch-selectable to
115/120 V AC (100 - 130 V AC) 100 V AC (85 - 110 V AC)
• Note information on instrument nameplate: supply voltage and frequency
• The PE protective ground conductor for the power supply must be connected to the
separate U-clamp terminal in the terminal compartment of the signal converter.
For exceptions (compact systems), refer to installation instructions for the primary head.
• Connection diagrams I and II for electrical connection between primary head and
signal converter: refer to Section 1.3.5.
3. AC V
ersion DC Version
48 V AC (41 - 53 V AC) 24 V DC (11-32 V DC)
switch-selectable to
24 V AC (20 - 26 V AC)
• Note information on instrument nameplate: supply voltage and frequency.
• For measurement reasons, connect an FE functional ground conductor to the separate
U-clamp terminal in the terminal compartment of the signal converter.
• If connected to a functional extra-low voltage source (24 V AC / DC, 48 V AC),
provide for protective separation (PELV) in conformity with VDE 0100 / VDE 0106 or
IEC 364 / IEC 536, or equivalent national regulations.
• Connection diagrams I and II for power supply and electrical connection between primary
head and signal converter: refer to Section 1.3.5.
Connection to power
Power fuse F1
(see Sect. 8.2)
AC: 100 – 240 V
AC: 24 / 48 V
DC: 24 V
Power
LN
1L ∼ 0L∼
L+ L–
for
internal
use only
U-clamp terminal
PE protective conductor
FE
functional ground
}
FE
Warning: Instrument must be properly grounded to avoid personnel shock hazard.
1/2
Page 8

1.3 Electrical connection of separate primary head (F Versions)
1.3.1 General information on signal cable A and field current cable C
Use of the Krohne signal cable A with foil screen and magnetic shield will ensure proper operation
of the equipment.
• Signal cable to be solidly laid.
• Connect shields via stranded drain wires.
• Underwater and underground installation possible.
• Insulating material is flame-retardant to IEC IEC 332.1 / VDE 0742.
• Signal cables are low in halogen, unplasticized, and stay flexible at low temperatures.
Si
gnal cable A (Type DS), with double shielding
2
1 Stranded drain wire, 1st shield, 1.5 mm
2 Insulation
3 Conductor 0.5 mm
2
or AWG 20 (3.1 red / 3.2 white)
or AWG14
4 Special foil, 1st shield
5 Inner sheath
6 Mu-metal foil, 2nd shield
7 Stranded drain wire, 2nd shield, 0.5 mm
2
or AWG20
8 Outer sheath
Field current cable C
with single shielding
Cross-section is dependent on required length of cable, see Table in Sect. 1.3.4.
1.3.2 Grounding of primary head
All flowmeters must be properly grounded.
• The grounding conductor should not transmit any interference voltages.
• Do not ground any other electrical device together with this conductor.
• The primary head is connected to ground by means of an FE functional ground conductor.
• Special information on grounding various primary heads is contained in the separate
installation instructions for primary heads.
• These instructions also contain detailed descriptions on how to use grounding rings and
how to install primary heads in metal or plastic pipes or internally coated pipelines.
1/3
Page 9

Stripping (preparation) of signal cable A 1.3.3
Please note the different lengths given in the table for signal converter and primary head.
Length Converter Primary
head
mm (inch) mm (inch)
a 55 (2.17) 90 (3.60)
b 10 (0.39) 8 (0.30)
c 15 (0.59) 25 (1.00)
d 8 (0.30) 8 (0.30)
Preparation for connection to primary head
Customer-supplied materials
W
X Heat-shrinkable tubing or cable sleeve
Y Wire end sleeve to DIN 41 228: E 1.5-8
Z Wire end sleeve to DIN 41 228: E 0.5-8
Insulation tubing (PVC), Ø 2.0 - 2.5 mm (dia. 1”)
Signal cable A
bending radius
≥ 50 mm (≥ 2“)
Preparation for connection to IFC 010 F signal converter
Signal cable A
bending radius
≥ 50 mm (≥ 2“)
External shielding of signal cable A (Type DS)
Wrap stranded drain wire (7) around the mu-metal foil (6) and clamp under the shield terminal in
the signal converter terminal box (see also diagram in Sect. 1.3.5).
Cable routing in signal converter housing
see illustration in Sect. 10.4.
1/4
Page 10

1.3.4 Cable lengths (max. distance between signal converter and primary head)
Abbreviations and ex
planatory notes
used in the following tables, diagrams and connection diagrams
A Signal cable A (type DS), with double shielding, see diagram for max. length
C Field current cable C, with single shielding,
type and length see Table
2
D High-temperature silicone cable, 3 × 1.5 mm
(14 AWG) Cu, with single shielding,
max. length 5 m (16 ft)
2
E High-temperature silicone cable, 2 × 1.5 mm
(14 AWG) Cu, max. length 5 m (16 ft)
L Cable length
κκ
Electrical conductivity of the process liquid
ZD Intermediate connection box required in connection with cables D and E for primary heads
ALTOFLUX IFS 4000 F, PROFIFLUX IFS 5000 F and VARIFLUX IFS 6000 F in cases where
process temperatures exceed 150 °C (302 °F)
Recommended len
gth of signal cable
for magnetic field frequency ≤ 1/6 × power frequency
Primary head
ECOFLUX IFS 1000 F
AQUAFLUX F
ALTOFLUX IFS 4000 F
PROFIFLUX IFS 5000 F
VARIFLUX IFS 6000 F
Meter size
DN mm
010.0 - 0015
025.5 - 0150
010.0 - 1000
010.0 - 0150
200.0 - 1000
002.5 - 0015
025.0 - 0100
010.5 - 0015
025.5 - 0080
Nennweite
inch
3
/8- 1/
2
1 - 06
3
/8- 40
3
/8- 06
8 - 40
1
/10-1/
2
1 - 04
1
/80- 1/
2
1- 03
Signal cable
A4
A3
A1
A2
A1
A4
A2
A4
A2
Field current cable C: max. length and min. cross-section
Length Type of cable,single shielding
0 - 150 m 5 - 500 ft 2 × 0.75 mm2Cu / 2 × 18 AWG
150 - 300 m 500 - 1000 ft 2 × 1.50 mm2Cu / 2 × 14 AWG
Warning: Instrument must be properly grounded to avoid personnel shock hazard.
1/5
Page 11

Connection diagrams I and II (power supply, converter and primary head) 1.3.5
Im
portant information PLEASE NOTE !
• The figures in brackets indicate the stranded drain wires for the shields,
see cross-sectional drawing of signal cable in Section 1.3.1.
• Electrical connection to VDE 0100 ”Regulations governing heavy-current installations with
line voltages up to 1000 V“ or equivalent national regulations.
• Power supply 24 V AC / DC: functional extra-low voltage with protective separation in
conformity with VDE 0100, Part 410 or equivalent national
regulations.
•PE= protective conductor FE = functional ground conductor
Process temperature < 150°C (302°F) Process temperature > 150°C (302°F)
I II
IFC 010 F IFC 010 F
Primary heads
Connection of shields at the IFC 010
1 Signal cable A
(Type DS)
2 Shield terminal
2
6
1
4
6
3
for shielded
signal cable
3 Field power cable
5
4 Shield terminal
for shielded
field power cable
5 Housing wall,
signal converter
6 Cable entries
Primary heads
1/6
Page 12
2 Electrical connection of outputs
2.1 Current output I
• The current output is galvanically isolated from all input and output circuits.
• Factory-set data and functions can be noted down in Sect. 5.16.
Please also refer to Sect. 3.2 “Factory settings”.
• Typical current output
I+ approx. 15 V DC positive
voltage of current output
I current sink
chassis ground, current output
I⊥
• All operating data and functions can be set.
• Display version: IFC 010 D, see Sect. 4 and 5.6, Fct. 1.05 for operator control
Basic version: IFC 010 B, see Sect. 6.1 for operator control
• The current output can also be used as an internal voltage source for the outputs.
= 15 V DC I = 23 mA when operated without receiver instruments at the current output
U
int
I = 3 mA when operated with receiver instruments at the current output
•
Connection diagrams,
see Sect. 2.3: diagrams 1 2 4 6
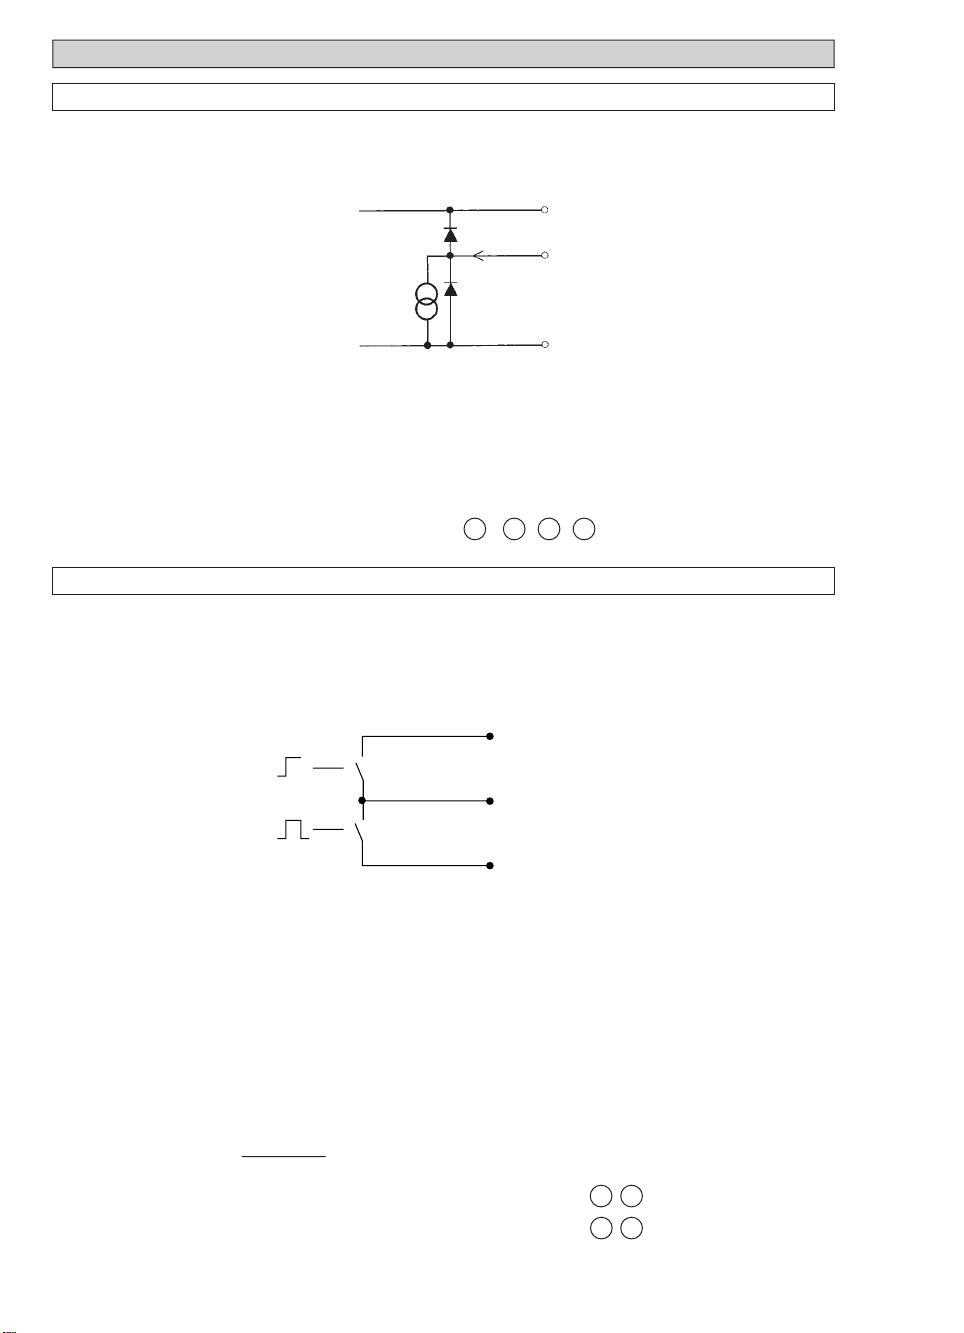
2.2 Pulse output P and status output S
•
The pulse and status outputs are galvanically isolated from the current output and all input circuits.
•
Factory-set data and functions can be noted down in Sect. 5.16.
Please also refer to Sect. 3.2 “Factory settings”.
• Typical pulse and status outputs B1
S status output
P⊥⊥chassis ground
P pulse output
• All operating data and functions can be set:
Display version: IFC 010 D, see Sect. 4 and 5.7, Fct. 1.06 for operator control
Basic version: IFC 010 B, see Sect. 6.1 for operator control
• The pulse and status outputs can be operated in the active or passive mode.
Active mode: The current output is the internal voltage source,
connection of electronic totalizers (EC)
Passive mode: External DC or AC voltage source required, connection of electronic (EC)
or electromechanical (EMC) totalizers
• Digital pulse division, interpulse period is non-uniform. Therefore, if frequency meters or
cycle counters are connected, allow for minimum counting interval:
gate time, counter ≤
1000
P
100% [ Hz]
• Connection diagrams see Sect. 2.3: diagrams - pulse output 3 4
diagrams - status output 5 6
2/1
Page 13

Connection diagrams for outputs 2.3
Milliammeter
Totalizer
– electronic (EC)
– electromechanical (EMC)
Stromausgang
1 2
I
active
U
≤ 15 V DC
ext
I = 0/4 - 20 mA
Ri≤ 500 Ω
Pulse output P
3 4
for electronic (EC) or
electromechanical (EMC) totalizers
Stromausgang
I
passive
U
ext
I = 0/4 - 20 mA
15...20V DC 20...32 VDC
U
ext
Ri0...500 Ω 250...750 Ω
passive
DC voltage,
external power source (U
ext
),
note connection polarity
External voltage source (U
ext
),
DC or AC voltage,
connection polarity arbitrary
Active mode
The current output supplies the power for
operation of the outputs.
Passive mode
External power source required for operation of
the outputs.
Pulse output P
for electronic (EC) totalizers
with and without current output I
active (and current output I
active
)
U
I
max
U
≤ 32V DC/≤ 24 VAC
ext
I
≤ 150 mA
max
(incl. status output)
5
Status output S
Load
ext
passive
U
I
(incl. pulse output)
≤ 32V DC/≤ 24 VAC
ext
≤ 150 mA
max
U
≤ 15V DC from current output
int
Operation with current output:
I
≤ 3 mA
max
Operation without current output:
I
≤ 23 mA
max
15 V
R ≤
I
max
Status output S
6
with and without current output I
active
Load
U
≤ 15V DC
int
from current output
I
≤ 3 mA
max
Operation with
current output
I
≤ 23 mA
max
Operation without
current output
2/2
Page 14

3 Start-up
3.1 Power-on and measurement
• Before powering the system, please check that it has been correctly installed according
to Sect. 1 and 2.
• The flowmeter is delivered ready for operational use. All operating data have
been factory set in accordance with your specifications.
Please refer to Sect. 3.2 “factory settings”.
• Power the unit, and the flowmeter will immediately start process flow
measurement.
Basic version
• A light emitting diode (LED) under the cover of the electronic section shows the
measurement status.
LED flashing . . .
• Refer to Sect. 6.1 for operator control of the “basic version”.
play version, signal converter IFC 010 / D
Dis
• When powered, the display shows in succession: START UP and READY.
This is followed by display of the current flow rate and/or the current totalizer count
on either a continuous or alternating basis, depending on the setting under Fct. 1.04.
• Refer to Sect. 4 and 5 for operator control of the “display version”.
, signal converter IFC 010 / B
green: measurement correct, everything all right.
green/red: momentary overdriving of outputs
and/or A/D converter.
red: fatal error, parameter error or hardware fault,
please consult factory.
3/1
Page 15
Factory settings 3.2
All operating data are factory set according to your order specifications.
If you have not made any particular specifications at the time of ordering, the instruments will be
delivered with the standard parameters and functions listed in the Table below.
To facilitate easy and rapid initial start-up, current output and pulse output are set to process flow
measurement in “2 flow directions”, so that the current flowrate is displayed and the volumetric
flow counted independent of the flow direction. On instruments equipped with a display,
measured values may possibly be shown with a “ – ” sign.
This factory setting for the current and pulse outputs may possibly lead to measuring errors,
particularly in the case of volume flow counting:
for example, if pumps are switched off and a “backflow” occurs which is not within the range of
the low-flow cutoff (SMU), or if separate displays and counts are required for both flow directions.
To avoid faulty measurements, therefore, it may be necessary to change the factory setting of
some or all of the following functions:
– low-flow cutoff SMU, Fct. 1.03, Sect. 5.3
– current output I, Fct. 1.05, Sect. 5.6
– pulse output P, Fct. 1.06, Sect. 5.7
– display (option), Fct. 1.04, Sect. 5.4
Instrument o
peration:
Display versions: IFC 010 _/ D, operation: refer to Sect. 4 and 5.
Basic versions: IFC 010 _/ B, operation: refer to Sect. 6.1.
Standard factory settings
Function Setting
1.01 Full-scale range Q
1.02 Time constant 3 s, for I, S
1.03 Low-flow ON: 1 %
cutoff SMU OFF: 2 %
1.04 Display (option)
flow rate m
totalizer(s) m3 or US Gal
1.05 Current output I
function 2 directions
range 4 - 20 mA
error message 22 mA
1.06 Pulse output P
function 2 directions
pulse value 1 pulse/s
pulse width 50 ms
1.07 Status output P flow direction
100%
see nameplate
and display
3
/hr or US Gal/min
Function Setting
3.01
Language for display only
3.02 Flowmeter
diameter see nameplate
flow direction (see arrow
on primary head)
3.04 Entry code no
3.05 User unit
English
+ direction
}
Liter/hrorUSMGal/day
3/2
Page 16

Teil B IFC 010 _/ D Signal converter
4 Operation of the signal converter
4.1 Krohne operator control concept
1 3 6. 4 9
m3/hr
→
Measuring mode
CodE 1
Menu column Function column Data column
3.00 INSTALL.
When this display appears, press following keys:
→ → → ↵ ↵ ↵ ↑ ↑ ↑
3.05 USER UNIT
3.04 ENTRY CODE
3.03 ZERO SET
3.02 FLOWMETER
3.01 LANGUAGE
2.02 HARDW. INFO
Direction of movement
4/1
2.00 TEST
1.00 OPERATION
↑
↓
2.01 TEST Q
1.07 IND. OUTP. S
1.06 PULS. OUTP. P
1.05 CUR. OUTP. I
1.04 DISPLAY
1.03 L.F. CUTOFF
1.02 TIMECONST.
1.01 FULL SCALE
→
↑
↵
see
↓
→
Sect.
↵
4.4
Page 17

Operating and check elements 4.2
The controls are accessible after unscrewing the 4 screws and
removing the housing cover.
Display, 1st line
Display, 2nd line
Display, 3rd line: arrows to identify display
Flowrate
Totalizer
Overrange
+ totalizer
– totalizer
Σ sum totalizer (+ and –)
I overranging, current output I
P overranging, pulse output P
current flowrate
Keys for operator control of signal converter
Compass field, signals actuation of a key.
4/2
Page 18
4.3 Function of keys
The cursor (flashing part of display) has a grey background in the following descriptions.
o start operator control
T
Measuring mode
Operator control mode
1 3 . 5 7 1
m 3 / h r
PLEASE NOTE: When “YES” is set under Fct. 3.04 ENTRY CODE, “CodE 1 - - - - - - - - -”
appears in the display after pressing the → key.
The 9-keystroke Entry Code 1 must now be entered: → → → ↵ ↵ ↵ ↑ ↑ ↑
(each keystroke acknowledged by “
o terminate operator control
T
Press key ↵ repeatedly until one of the following menus
Fct. 1.00 OPERATION, Fct. 2.00 TEST or Fct. 3.00 INSTALL. is displayed.
F c t . 3. 0 0
INSTALL.
→
”).
*
Press key
↵
↵
F c t . 1. 0 0
O P E R AT I O N
S T O R E Y E S
Store new parameters: acknowledge by
pressing key↵ . Measuring mode continued
with the new parameters.
New parameters not to be stored:
press key ↑ to display
„STORE.NO“.
Measuring mode continued with the „old“
↵
parameters after pressing key
.
4/3
Page 19

To change numbers
increase number
3 9 7. 3 5
↑
m 3 / h r
decrease number
To shift cursor (flashing position)
shift to right
3 9 7. 3 5
→
m 3 / h r
shift to left
To alter texts (units)
For units, the numerical value is
converted automatically.
3. 7 6 9 9
select next text
↑
L i t e r / S e c
select preceding text
To transfer from text (unit) to number setting
Change to number setting
←
3 9 7. 4 5
↓
m 3 / h r
3 9 7. 3 5
m 3/hr
9 3. 3 6 5
↓
U S. G a l / m i n
1 3. 5 7 1
m 3 / h r
→
←
Return to text setting
To transfer to subfunction
Subfunctions do not have a “Fct.No.“ and are identified by a “ → ”.
↵
1 D I R.
To revert to function display
1 0. 3
↵
Sec
1 3. 5 7 1
m 3/hr
→
R A N G E I
F c t. 1. 02
T I M E C O N S T.
4/4
Page 20

4.4 Table of settable functions
Abbreviations used
DN Nominal size, meter size
F
F
F
F
F/R Forward/reverse flow in F/R mode
GKL Primary constant
I Current output
P Pulse output
P
P
Highest frequency of the pulse output
max
Lowest frequency of the pulse output
min
Conversion factor volume for any unit,
M
see Fct. “FACT. VOL.”
Conversion factor time for any unit,
T
see Fct. 3.05 “FACT. Time”
= F
= F
max
min
/ Q
/ Q
100%
100%
max
min
Q actual flowrate
Q
100%
Q
max
Q
min
S Status output, control input
SMU Low-flow cutoff for I and P
v Flow velocity
v
max
v
min
Fct. Text Description and settings
1.00 OPERATION Operations menu
1.01 FULL SCALE Full-scale range for flowrate Q
Select unit
• m3/hr • Liter/Sec • US.Gal/min
• user unit, factory set is “Liter/hr” or “US MGal/day” (see Fct. 3.05)
Press →key to transfer to number setting.
Setting ranges
The ranges are dependent on the meter size (DN) and the flow
π
velocity (v): Q
= DN2x v
min
4
Nom. dia./meter size vmin = 0,3 m/s (1 ft/s) vmax = 12 m/s(40 ft/s)
•
DN 2.5–1000 /
1
/10”–40”: 0.0053 – 033 900 m3/hr
Press ↵key to return to Fct. FULL SCALE.
→ VALUE P Pulse value (Fct. 1.06
“VALUE P”
With the “old” pulse values the output frequency (F)
would have been exceeded or not reached.
P
= F
min
/ Q
100% Pmax
min
1.02 TIMECONST. Time constant
Select:
Press ↵key to transfer to number setting.
• ALL (applies to display and all outputs)
• ONLY I+S (only display, current and status outputs)
Range: • 0.2 – 99.9 Sec
Press ↵key to return to Fct. 1.02 TIMECONST.
1.03 L.F.CUTOFF Low-flow cutoff (SMU)
• OFF (fixed trip points: ON = 0.1% / OFF = 0.2%
for 100 and 1000 Hz, see Fct. 1.06, 1% or 2%)
• PERCENT (variable values) ON OFF
Press →key to transfer to number setting.
Note: Cutoff “off” value must be greater than cutoff “on” value.
Press ↵key to return to Fct. 1.03 L.F. CUTOFF.
100% flow = full scale range
π
= DN2x v
4
at v
max
π
= DN2x v
4
at v
min
Max. flow velocity (12 m/s / 40 ft/s) at Q
Min. flow velocity (0.3 m/s / 1 ft/s) at Q
100%
minQmax
/ max. full-scale range (Q
max
= 12 m/s / 40 ft/s
/ min. full-scale range (Q
min
= 0.3 m/s / 1 ft/s
π
= DN2x v
4
100%
100%
100%
100%
max
0.0237 – 152 000 US.Gal/min
) has been changed.
= F
max
/ Q
Check new values!
100%
1 – 19% 2 – 20%
)
)
4/5
Page 21

Fct. Text Description and settings
1.04 DISPLAY Display functions
→
DISP.FLOW Select flow display
→
DISP.TOTAL. Select totalizer display
→
DISP.MSG. Additional messages required in measuring mode?
1.05 CURRENT I Current output I
→
FUNCT. I Select function for current output I
• NO DISP. •
• m3/hr • PERCENT
• Liter/Sec • BARGRAPH (value and bargraph display in %)
• US.Gal/min
Press ↵key to transfer to subfunction “DISP. TOTAL.”.
• NO DISP. (totalizer switched on but not displayed)
• OFF (totalizer switched off)
• +TOTAL. • –TOTAL. • +/–TOTAL. • SUM (Σ)
• ALL (displaysingle counts or all)
• m3 • Liter •US.Gal
• user unit, factory set is “Liter” or “US MGal” (see Fct. 3.05).
Press →key to transfer to format setting.
Format setting
• Auto (exponent notation)
• # . ####### • ##### . ###
• ## . ###### • ###### . ##
• ### . ##### • ####### . #
• #### . #### • ########
Press ↵key to transfer to subfunction “DISP.MSG”.
• NO •YES (cyclic change with displays of measured values)
Press ↵key to return to Fct. 1.04 DISPLAY.
• OFF (switched off)
• 1 DIR. (1 flow direction)
• 2 DIR. (forward/reverse flow, F/R flow measurement)
user unit, factory set is “Liter/hr” or “US MGal/day (see Fct. 3.05)
Press key ↵, transfer to subfunction
if
“2 DIR.”
→
RANGE I Select measuring range
• 0 - 20 mA • 4 - 20 mA (fixed ranges)
selected, transfer to subfunction
Press key ↵ to transfer to subfunction
→
I ERROR Select error value
• 0 mA • 3.6 mA (only with range 4-20 mA) • 22 mA
Press key ↵to revert to
“RANGE I”;
“REV.RANGE”!
“I ERROR“.
Fct. 1.05 CURRENT. I.
4/6
Page 22

Fct. Text Description and settings
1.06 PULS.OUTP. P Pulse output P
→
FUNCTION P Select function for pulse output P
• OFF (switched off)
• 1 DIR. (1 flow direction)
• 2 DIR. (forward/reverse flow, F/R measurement)
Press
↵
key to transfer to subfunction “SELECT P“.
→
SELECT P Select pulse type
• 100 Hz • PULSE/VOL. (pulses per unit volume, flow rate)
• 1000 Hz • PULSE/TIME (pulses per unit time for 100% flowrate)
Press ↵key to transfer to subfunction “PULSWIDTH“.
When 100 Hz and 1000 Hz selected, return to
Fct. 1.06 PULS.OUTP. P, pulse width 50% cyclic.
→
PULSWIDTH Select pulse width
• 50 mSec • 100 mSec • 200 mSec • 500 mSec • 1 Sec
Press ↵key to transfer to subfunction “VALUE P“.
→
VALUE P Set pulse value per unit volume (appears only when
“PULSE/VOL.“ has been set under “SELECT P“).
• xxxx PulS/m3 • xxxx PulS/Liter • xxxx PulS/US.Gal
• xxxx PulS/ user unit, factory set is “Liter“ or “US MGal“ (see Fct. 3.05).
Setting range „xxxx“ is dependent on the pulse width and the
full-scale range: P
min
= F
Press ↵key to return to Fct. 1.06 “PULS.OUTP. P“.
→
VALUE P Set pulse value per unit time (appears only
when „PULSE/TIME“ has been set under „SELECT P“).
• xxxx PulS/Sec (=Hz) • xxxx PulS/min • xxxx PulS/hr
• xxxx PulS/user unit, factory set is “hr“ or “day“ (see Fct. 3.05)
“xxxx“ setting range is dependent on pulse width, see above.
Press ↵key to return to Fct. 1.06 “PULS.OUTP. P“.
1.07 IND. OUTP. S Status output S
• ALL ERROR • FATAL ERROR • OFF • ON
• F/R INDIC. (F/R indication for forward/reverse measurement)
• TRIP. POINT Setting range: 002 - 115 PERCENT
• EMPTY PIPE (appears only when this option is installed)
(
Press
↵
key to transfer to number setting.)
Press ↵key to return to Fct. 1.07 “IND.OUTP. S“.
min
/ Q
100%Pmax
= F
max
/ Q
100%
Fct. Text Description and settings
2.00 TEST Test menu
2.01 TEST Q Test measuring range Q
Precautionar
• SURE NO
• SURE YES
select value:
y query
Press ↵key to return to Fct. 2.01 “TEST Q”.
Press
↵
key, then use ↑ or ↓ key to
-110 / -100 / -50 / -10 / 0 / +10 / +50 / +100 / +110 PCT.
of set full-scale range Q
Displayed value present at outputs I and P.
Press ↵key to return to Fct. 2.01 “TEST Q”.
2.02 HARDW. INFO Hardware information and error status
Before consulting factory, please note down all 6 codes.
→ MODUL ADC X . X X X X X . X X
Y Y Y Y Y Y Y Y Y Y
Press ↵key to transfer to
→ MODUL IO X .X X X X X . X X
Y Y Y Y Y Y Y Y Y Y
Press ↵key to transfer to
→ MODUL DISP. X . X X X X X . X X
Y Y Y Y Y Y Y Y Y Y
Press ↵key to return to Fct. 2.02
“HARDW. INFO“.
4/7
100%
.
“MODUL IO“.
“MODUL DISP.“.
Page 23

Fct. Text Description and settings
3.00 INSTALL. Installation menu
3.01 LANGUAGE Select language for display texts
• GB / USA (English) • F (French)
• D (German) • others on request
Press ↵key to return to Fct. 3.01
“LANGUAGE”.
3.02 FLOWMETER Set data for primary head
→ DIAMETER Select size from meter size table
• DN 10 - 1000 mm equivalent to 3/8 - 40 inch
Select with
Press
→ FULL SCALE Full-scale range for flow Q
To set, refer to Fct. 1.01 “FULL SCALE” above.
Press
→ VALUE P Pulse value (Fct. 1.06
↑
or
↓
key.
↵
key to transfer to subfunction “FULL SCALE”.
100%
↵ key to transfer to subfunction “GKL VALUE”.
“VALUE P”
) has been changed.
With the “old” pulse values the output frequency (F)
would have been exceeded or not reached.
= F
min
/ Q
100% Pmax
P
min
= F
max
/ Q
100%
→ GKL VALUE Set primary constant GKL
see primary head nameplate.
ge: • 1.0000 - 9.9999
Ran
Press ↵key to transfer to subfunction
“FIELD. FREQ.”.
→ FIELD FREQ. Magnetic field frequency
Values: 1/6 or 1/18
of power frequency, see nameplate.
Press ↵key to transfer to subfunction “FLOW DIR.”;
DC units only: to transfer to subfunction
“LINE FREQ.”.
→ LINE FREQ. Normal line frequency in your country
Please note: This function is only provided for units
with DC power supply to suppress line-frequency interference.
Values:
50 Hz
and
60 Hz
Press ↵key to transfer to subfunction “FLOW DIR.”.
→ FLOW DIR. Define flow direction (in F/R mode: forward flow).
Set according to direction of arrow on primary head:
• + DIR. • – DIR.
Select using
Press ↵key to return to Fct. 3.02 “FLOWMETER”.
3.03 ZERO SET Zero calibration
Note: Carry out only at “0” flow and with completely filled
measuring tube!
Precautionar
• CALIB. NO
• CALIB. YES Press ↵
y query
Press ↵key to return to Fct. 3.03 “ZERO SET”.
key to start calibration.
Duration approx. 15–90 seconds, current flowrate
A “WARNING” sign appears when flowrate “> 0“;
acknowledge by pressing
displayed in the selected unit (see Fct. 1.04 “DISP. FLOW”).
↵
key.
• STORE NO (do not store new zero value)
• STORE YES (store new zero value)
Press ↵key to return to Fct. 3.03 “ZERO SET”.
3.04 ENTRY CODE Entry code required to enter setting mode?
• NO (= entry with → only)
• YES (= entry with → and Code 1: → → → ↵ ↵ ↵ ↑ ↑ ↑ )
Press ↵to return to Fct. 3.04 “ENTRY CODE”.
Check new values!
↑
or
↓
key.
4/8
Page 24

Fct. Text Description and settings
3.05 USER UNIT Set any required unit for flowrate and counting
→ TEXT VOL. Set text for required flowrate unit (max. 5 characters)
Factory-set: “Liter” or “MGal”.
Characters assignable to each place:
• A-Z, a-z, 0-9, or “ – “ (= blank character).
Press ↵key to transfer to subfunction “FACT. VOL.”
→ FACT. VOL. Set conversion factor (FM) for volume
Factory set “1.00000” for “Liter” or “2.64172E-4” for “US MGal”
(exponent notation, here: 1x10³or 2.64172x10⁻⁴).
Factor FM= volume per 1m3.
Setting range • 1.00000 E-9 to 9.99999 E+9 (= 10-9to 10+9)
Press ↵ key to transfer to subfunction “TEXT TIME”.
→ TEXT TIME Set text for required time unit (max. 3 characters)
→ FACT. TIME Set conversion factor (F
Factory-set: “hr” or “day”:
Characters assignable to each place:
• A-Z, a-z, 0-9, or “ – “ (= blank character).
Press
↵ key to transfer to subfunction “FACT. TIME”
) for time
Factory-set: “3.60000 E+3” for “hour” or “8.64000 E+4” for “day”
(exponent notation, here: 3.6 x10³or 8.64 x10⁻⁴).
Set factor FTin seconds.
Setting range
• 1.00000 E-9 to 9.99999 E+9 (= 10-9to 10+9)
T
Press ↵ key to return to Fct. 3.05 “USER UNIT”.
3.06 APPLICAT. Set overload point for A/D converter
→ EMPTY PIPE Switch on “empty tube” identifier option?
(appears only when this option is installed)
• YES • NO
Press ↵key to return to
Select with key ↑or ↓ .
Fct. 3.06 “APPLICAT.“.
4.5 Error messages in measuring mode
The following list gives all errors that can occur during process flow measurement.
Errors shown in display when “YES“ set in Fct. 1.04 DISPLAY, subfunction “DISP. MSG.“.
Error messages Description of error Error clearance
LINE INT. Power failure Note:
no counting during power failure Reset totalizer if necessary.
CUR. OUTP. I Current output overranged. Check and if necessary correct
PULSOUTP. P Pulse output overranged. Check and if necessary correct
Note:
totalizer deviation possible. elimination of cause, error message
ADC Analog / digital Error message deleted automatically
converter overranged after elimination of cause.
FATAL. ERROR Fatal error, all outputs set Please consult factory.
to “min. values“
TOTALIZER Totalizer has been reset Cancel error message in
EMPTY PIPE Pipe has run dry. Fill pipe.
This message appears only when
the “empty pipe identifier”
option is installed and the function
is switched on under Fct. 3.06
APPLICAT., submenu
“EMPTY PIPE”.
Cancel error in RESET/QUIT. menu
instrument parameters. After
elimination of cause, error message
deleted automatically.
instrument parameters. After
deleted automatically.
RESET/QUIT. menu.
4/9
Page 25

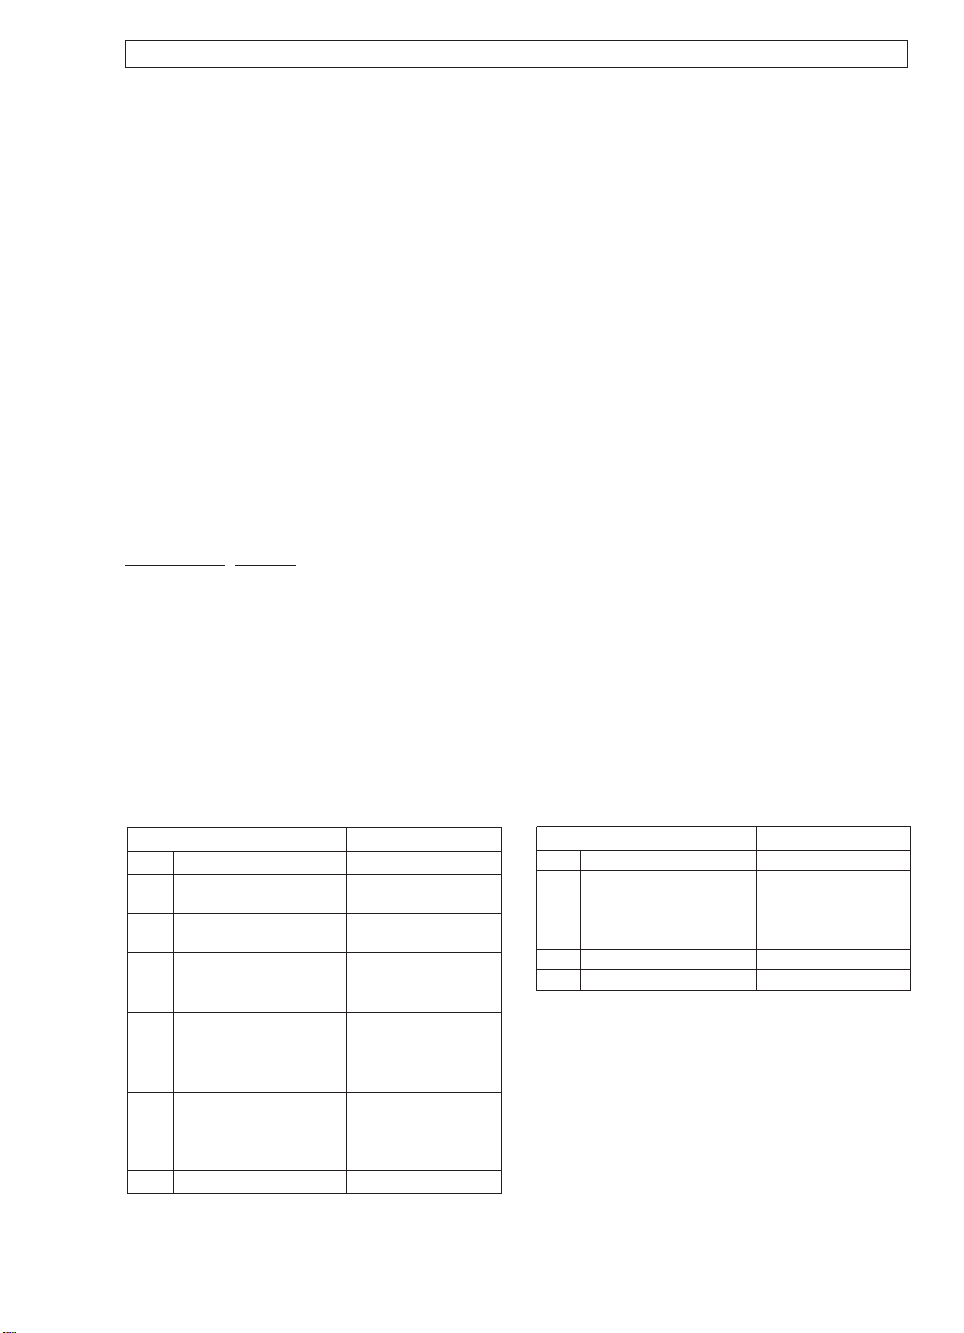
Reset totalizer and cancel error messages, RESET / QUIT menu 4.6
Cancel error messages in RESET / QUIT menu
Key Display Description
↵ CodE 2 - - Key in entry code 2 for RESET/ QUIT
↑ → ERROR QUIT. Menu for error acknowledgement
→ QUIT. NO Do not delete error messages,
↑ QUIT. YES Delete error messages
↵ ERROR QUIT. Error messages deleted
↵ - - - - - - - - - - - - / - - - Return to measuring mode
- - - - - - - - - - - - / - - - Measuring mode
menu: ↑→
press ↵ twice = return to measuring mode
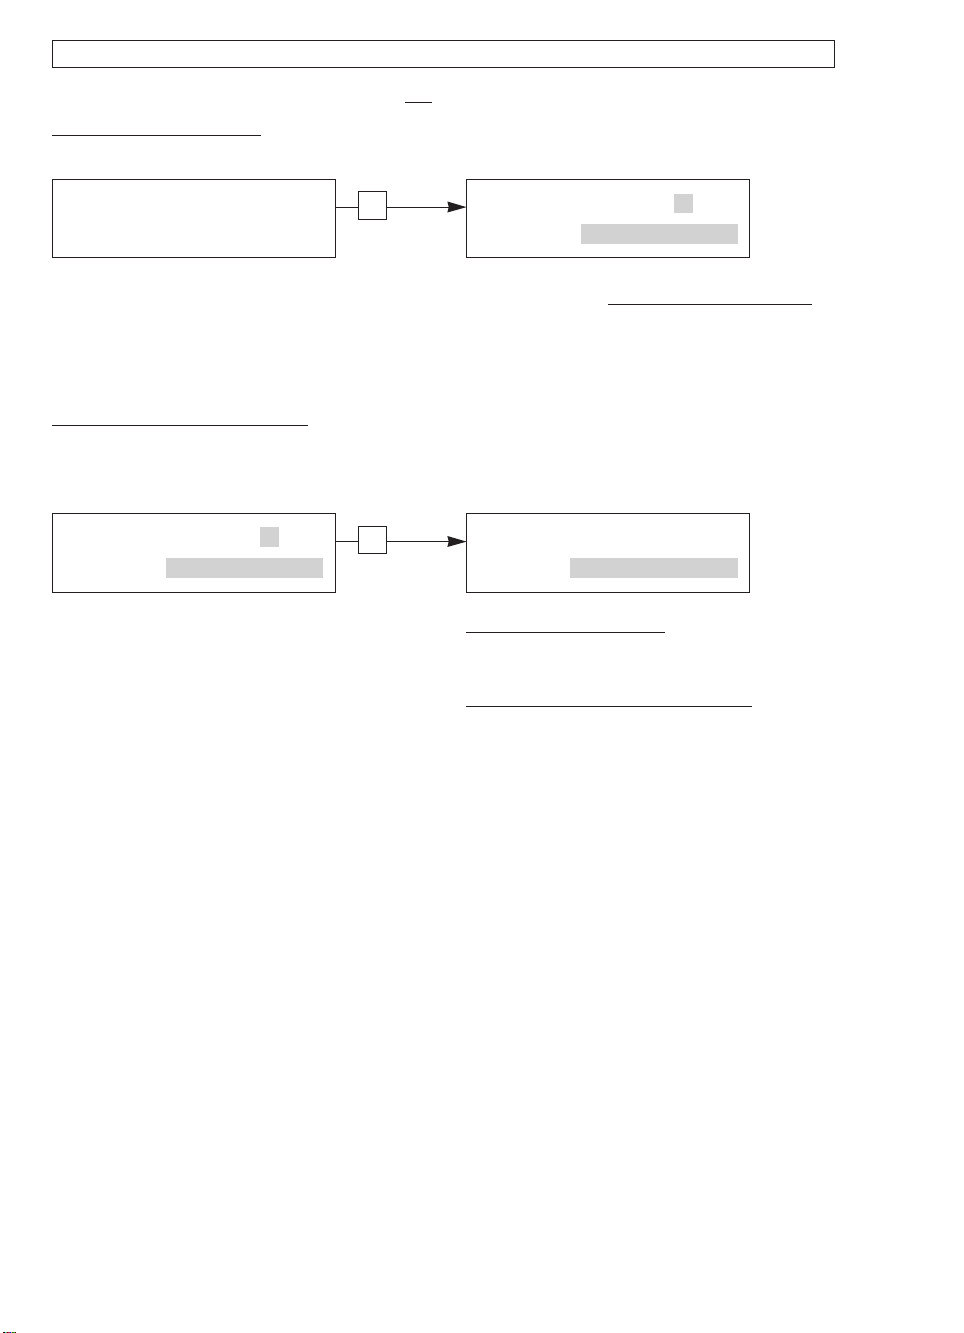
Reset totalizer(s) in RESET / QUIT menu
Key Display Description
↵ CodE 2 - - Key in entry code 2 for RESET/ QUIT
↑ → ERROR QUIT. Menu for error acknowledgement
↑ TOTAL. RESET Menu for resetting totalizer
→ RESET NO Do not reset totalizer,
↑ RESET. YES Reset totalizer
↵ RESET QUIT. Totalizer reset
↵ - - - - - - - - - - - - / - - - Return to measuring mode
- - - - - - - - - - - - / - - - Measuring mode
menu: ↑→
press ↵ twice = return to measuring mode
Examples of setting the signal converter 4.7
The cursor, flashing part of display, is shown below in bold type.
• Change measuring range of current output and value for error messages (Fct. 1.05):
• Change measuring range from 04-20 mA to 00-20 mA
• Change value for error messages from 0 mA to 22 mA
Key Display Description
→ If “YES” set under Fct. 3.04 ENTRY CODE, key in the
Fct. 1.00 OPERATION
→ Fct. 1.01 FULL SCALE
4x ↑ Fct. 1.05 CURRENT I
→ FUNCT. I
→↵ RANGE I If “REV. RANGE” appears here,
→ 04-20 mA Old current range
↑ 00-20 mA New current range
↵ I ERROR
→ 0 mA Old value for error messages
2x ↑ 22 mA New value for error messages
↵ Fct. 1.05 CURRENT I
↵ Fct. 1.00 OPERATION
↵ STORE YES
↵ - - - - - - - - - - - - / - - - Measuring range with new data for the current output
9-keystroke CODE 1 now: → → → ↵ ↵ ↵ ↑ ↑ ↑
press keys → and ↵ again.
4/10
Page 26

5 Description of functions
5.1 Full-scale range Q
100%
Fct. 1.01 FULL SCALE
Press→key.
Choice of unit for full-scale range Q
100%
• m3/hr (cubic metres per hour)
• Liter/Sec (litres per second)
• US.Gal/min (US gallons per minute)
• User-defined unit, factory-set is “Liter/hr“ (litres per hour) or “US MGal/day”, see Sect. 5.12.
Select with ↑or
↓ key.
Use →key to transfer to numerical setting, 1st number (cursor) flashes.
Set full-scale range Q
100%
The setting range is dependent on meter size (DN) and flow velocity (v).
π
Q
= DN2x v
min
4
minQmax
Change flashing number (cursor) with ↑or
π
= DN2x v
4
0.0053 – 33 929 m3/hr
0.00147 – 9 424.5 Liter/Sec
0.00233 – 151 778 US.Gal/min
(refer to flow table in Sect. 10.1)
max
↓ key.
Use →key to shift cursor 1 place to right.
Press
↵
key to return to Fct. 1.01 FULL SCALE
.
Note if “VALUE P” is displayed after pressing ↵ key:
PULSE/VOL. is set under Fct. 1.06 PULS B1, subfunction “SELECT P”. Due to the changed
full-scale range Q
P
= F
min
/ Q
min
, the output frequency (F) of the pulse output will be over- or undershot:
100%
100%
P
= F
max
max
/ Q
100%
Change pulse value accordingly, see Sect. 5.7 pulse output B1, Fct. 1.06.
5.2 Time constant
Fct. 1.02 TIMECONST.
Press →key.
Choice
• ALL (applies to display and all outputs)
• ONLY I+S (applies only to display, current and status output)
Select with ↑or
↓ key.
Transfer to number setting with ↵key. 1st number (cursor) flashes.
Set numerical value
• 0.2 - 99.9 Sec (seconds)
Change flashing number (cursor) with the↑or
↓ key.
Use →key to shift cursor 1 place to right.
Press
↵
key to return to Fct. 1.02 TIMECONST.
5/1
Page 27

Low-flow cutoff 5.3
Fct. 1.03 L.F.CUTOFF
Press →key.
Choice
• OFF (fixed trip points: ON = 0.1 % / OFF = 0.2 %,
• PERCENT (variable tripping points: ON = 1 - 19 % / OFF = 2 - 20 %)
for 100 or 1000 Hz, see Fct. 1.06, 1% or 2%)
Select with ↑or
↓ key.
Transfer to number setting using →key (only if “PERCENT” selected).
1st number (cursor) flashes.
Setting the numerical value when “PERCENT” selected
• 01 to 19 (cutoff “on” value, left of hyphen)
• 02 to 20 (cutoff “off” value, right of hyphen)
Change flashing number (cursor) with the ↑or
↓ key.
Shift cursor 1 place to right using →key.
Press
↵
key to return to Fct. 1.03 L.F.CUTOFF.
Note: The cutoff “off” value must be greater than the cutoff “on” value.
Display 5.4
Fct. 1.04 DISPLAY
Press →key.
→ DISP. FLOW = select unit for display of flowrate,
• NO DISP. (no display)
• m3/hr (cubic metres per hour)
• Liter/Sec (litres per second)
• US.Gal/min (US gallons per minute)
• user-defined unit, factory-set: “Liter/hr” (litres per hour) or “US MGal/day”, see Sect. 5.14
• PERCENT (percentage display)
• BARGRAPH (numerical value and bar graph display in %)
Select with ↑or
↓ key.
press → key
Press ↵key to transfer to subfunction “DISP. TOTAL”.
→ DISP. TOTAL = select unit for totalizer display,
• NO DISP. (no display)
• OFF (internal totalizer switched off)
• + TOTAL. • – TOTAL. • +/– TOTAL. • SUM (ΣΣ) • ALL (sequential)
Select with ↑or
↓ key.
press → key
Transfer to totalizer unit setting using ↵key.
•m3 (cubic metres)
• Liter (litres)
• US.Gal (US gallons)
• user-defined unit, factory-set: “Liter” or “US MGal”, see Sect. 5.14
Select with ↑or
↓ key.
Transfer to totalizer format setting using →key.
Continuation see next page
5/2
Page 28

Setting of totalizer format
• Auto (exponent notation)
• # . ####### • ##### . ###
• ## . ###### • ###### . ##
• ### . ##### • ####### . #
• #### . #### • ########
Select with key↑or
Press
↵ key to transfer to subfunction “DISP. MSG”.
→
DISP. MSG. = additional messages required in measuring mode,
↓ .
press → key
•NO (no other messages)
• YES (display other messages, e.g. errors, in sequence with the measured values)
Select using the ↑or
↓ key.
Press ↵key to return to Fct. 1.04 DISPLAY.
Note: “BUSY” is displayed in the measuring mode when all displays are set to “NO DISP.” or
“NO”. Sequencing of displays is automatic. However, in the measuring mode, manual sequencing
can be carried out with the ↑ key. Return to automatic sequencing after approx. 3 minutes.
Please refer to Sect. 3.2 “factory settings”
5.5 Internal electronic totalizer
The internal electronic totalizer counts in m3, regardless of the unit set under Fct. 1.04,
subfunction “DISP. FLOW”.
The counting range is dependent upon the meter size and has been selected such that the
totalizer will count for a minimum of 1 year without overflow:
Meter size Counting range
DN mm inch in m
3
10 - 50
65 - 200 2
/8- 2 0 - 999 999.99999999 0 - 264 172 052.35800
1
/2- 8 0 - 9 999 999.9999999 0 - 2 641 720 523.5800
3
US Gal equivalent
250 - 600 10 - 24 0 - 99 999 999.999999 0 - 26 417 205 235.800
700 -1000 28 - 40 0 - 999 999 999.99999 0 - 264 172 052 358.00
Only part of the totalizer count is shown in the display because it is not possible to output
a 14-digit number. Unit and format of the display are freely selectable, see Fct. 1.04, subfunction
“DISP. TOTAL” and Sect. 5.4. This determines which part of the count is to be displayed.
Display overflow and totalizer overflow are independent of one another.
Exam
ple
Internal count 0000123 . 7654321 m
3
Format, display unit XXXX . XXXX Liter
Internal count in unit 0123765 . 4321000 Liter
Displayed 3765 . 4321 Liter
5/3
Page 29

Fct. 1.05 CURRENT I
Press →key.
Current output I 5.6
→ FUNCT. I = select function for current output,
• OFF (switched off, no function)
• 1 DIR. (1 flow direction)
• 2 DIR. (2 flow directions, F/R mode, forward/reverse)
Select using ↑or
Transfer to subfunction “RANGE I”
↓ key
.
with ↵key.
press → key
Exception: When “OFF” selected, return to Fct. 1.05 CURRENT I.
→ RANGE I = select measuring range,
• 0 - 20 mA
• 4 - 20 mA
fixed ranges
press → key
Press →key to transfer to number setting.
Select with key
↑
or
↓.
Press key ↵to transfer to subfunction “I ERROR”.
→ I ERROR = set error value,
•0.0 mA
• 3.6 mA (only possible if range ”4-20 mA” selected)
•22.6 mA
press → key
Select using key ↑or ↓.Press →key to transfer to number setting.
Press key
Refer to Sect. 2.3 for connection diagrams, and to Sect. 5.14 for characteristics.
↵
to return to Fct. 1.05 CURRENT I.
Please refer to Sect. 3.2 “Factory settings”.
5/4
Page 30

5.7 Pulse output P
NOTE! Check whether under Fct. 3.07 “HARDWARE” the output terminal “B1” is defined as
pulse output, refer also to Sect. 2.2 and Sect. 5.16.
Fct. 1.06 PULS.OUTP
. P
Press key →.
→ FUNCT. P = select function for pulse output,
press → key
• OFF (switched off, no function)
• 1 DIR. (1 flow direction)
• 2 DIR. (2 flow directions, F/R mode, forward/reverse)
Select with key ↑or ↓.
Press
↵
key to transfer to subfunction “SELECT P”.
Exception: When “OFF” selected, return to Fct. 1.06 PULS B1.
→ SELECT P = select pulse type,
press → key
• 100 Hz
• 1000 Hz
• PULSE/VOL. (pulses per unit volume, flow)
• PULSE/ZEIT (pulses per unit time for 100% flow)
Select using
Transfer to subfunction ”PULSWIDTH”
↑
or ↓ key.
with ↵key.
Note: when 100 Hz or 1000 Hz selected, return to Fct. 1.06 PULS.OUTP. P.
→ PULSWIDTH = set pulse width,
• 50 mSec F
= 10 Hz F
max
press →→ key
= 0.0056 Hz (= 20 Pulse / hr)
min
• 100 mSec = 5 Hz
• 200 mSec = 2.5 Hz
• 500 mSec = 1 Hz
• 501 mSec = 0,5 Hz
Select using
Transfer to subfunction ”V
↑
or ↓ key.
ALUE P” with ↵key or return to Fct. 1.06
PULS.OUT. P, depending on choice of pulse type in subfunction ”SELECT P”.
5/5
Page 31

→ VALUE P = set pulse value per unit volume
(appears only when “PULSE/VOL.” set under “SELECT P”, press →
key.
• XXXX PulS/m3
• XXXX PulS/Liter
• XXXX PulS/US.Gal
• XXXX PulS/ user unit, factory-set: “Liter” or “US MGal”, see Sect. 5.12.
Select using
Transfer to number setting with
↑
or ↓ key.
→
key. 1st digit (cursor) flashes.
Set numerical value
• XXXX (setting range depends on pulse width and
full-scale range: P
Change flashing digit (cursor) with
shift cursor 1 place to right or left with
Press
↵
key to return to Fct. 1.06 PULS.OUTP. P.
min
↑
or ↓ key,
→
= F
key.
min
/ Q
100%
P
= F
max
max
or
→ VALUE P = set pulse value per unit time,
(a
ppears only when ”PULSE/TIME” has been set under “SELECT P”),
• XXXX PulSe/Sec
• XXXX PulSe/min
• XXXX PulSe/hr
• XXXX PulSe/ user unit, factory-set: “hr”, or “day”, see Sect. 5.12.
Select using
Transfer to number setting with
↑
or ↓ key.
→
key, 1st digit (cursor) flashes.
Set numerical value
• XXXX (setting range depends on pulse width)
Change flashing digit (cursor) with
shift cursor 1 place to right or left with
Press
↵
key to return to Fct. 1.06 PULS.OUTP. P.
↑
or ↓ key,
→
key.
/ Q
)
100%
press→key.
Please refer to Sect. 3.2 “factory settings”
Refer to Sect. 2.3 for connection diagrams, and to Sect. 5.14 for characteristics.
5/6
Page 32

5.8 Status output S
Fct. 1.07 IND. OUTP. S
Press key →.
Select function of status outputs,
press → key
• ALL ERROR (indicates all errors)
• FATAL.ERROR (indicates fatal errors only)
• OFF (switched off, no function)
•ON (indicates that flowmeter is operative)
• F/R INDIC. (indicates direction for current and pulse outputs, F/R mode)
• EMPTY PIPE (option ”empty tube identification“)
• TRIP. POINT (setting range: 002 – 115 PERCENT of Q
, full-scale range)
100%
Transfer to number setting with ↵key, 1st digit (cursor) flashes.
Change flashing digit (cursor) with
↑
and ↓keys. Use
→
and ← keys to shift cursor 1 place to right or left.
Press
↵
key to return to Fct. 1.07 IND. OUTP. S.
• Characteristic of status output Switch open Switch closed
OFF (switched off) no function
ON (e.g. operation indicator) power OFF power ON
F/R INDIC. Forward flow Reverse flow
TRIP POINT (limit switch) inactive active
ALL ERROR (all errors) errors no error
FATAL.ERROR (fatal errors only) errors no error
EMPTY PIPE (option) when measuring tube when measuring tube
is empty is full
Please refer to Sect. 3.2 “factory settings”
Refer to Sect. 2.3 for connection diagrams, and to Sect. 5.14 for characteristics.
5/7
Page 33

Language 5.9
Fct. 3.01 LANGUAGE
Press →key.
Select language for texts in display
•D (German)
• GB/USA (English)
•F (French)
• others on request
Select using ↑key.
Press
↵
key to return to Fct. 3.01 LANGUAGE.
Entry code 5.10
Fct. 3.04 ENTRY CODE
Press →key.
Choice
•NO (no code, enter setting mode with → key)
• YES (enter setting mode with → key and Code 1: → → → ↵ ↵ ↵ ↑ ↑ ↑)
Select using ↑key.
Press
↵
key to return to Fct. 3.04 ENTRY CODE.
5/8
Page 34

5.11 Primary head
Fct. 3.02 FLOW METER
Press →key.
→ DIAMETER = set meter size (see instrument nameplate)
press → key
Select size from table of meter sizes:
• DN 2.5 - 1000 mm equivalent to
Select using
↑
or ↓ key.
Transfer to subfunction “FULL SCALE”
→ FULL SCALE = set full-scale range,
1
/10 - 40 inch
with ↵key.
press → key.
Set as described in Sect. 5.1.
Transfer to subfunction “GKL VALUE” with ↵key.
Note: if “VALUE P” is displayed after pressing ↵ key.
PULSE/VOL. is set under Fct. 1.06 PULS.OUTP. P, subfunction “SELECT P”. Because the
full-scale range Q
undershot: P
has been changed, the output frequency (F) of the pulse output is over- or
100%
min
= F
min
/ Q
100%
P
= F
max
max
/ Q
100%
Change pulse value accordingly, see Sect. 5.7 pulse output P, Fct. 1.06.
→
GKL VALUE = set primary constant GK,
press → key.
• 1.0000 - 9.9999 (note information on instrument nameplate, do not change setting !)
Change flashing digit (cursor) with
Shift cursor 1 place to right or left with
Transfer to subfunction “FIELD
→ FIELD FREQ. = set magnetic field frequency,
• 1/6
• 1/18
Select using
(1/6 or 1/18 of power frequency, see instrument nameplate, do not change setting)
}
↑
or ↓ key.
Transfer to subfunction “FLOW DIR.”
↑
or ↓ key.
→
or ← key.
FREQ.” with ↵key.
with ↵key.
press → key
(only for units with DC power supply, transfer to subfunction “LINE FREQ”).
→ LINE FREQ. = normal line frequency in your country,
• 50 Hz
• 60 Hz
→ FLOW DIR. = set flow direction,
Select using the ↑key.
Transfer to subfunction “FLOW DIR.” with ↵ key.
press → key.
press → key.
• + DIR. (for identification of flow direction, see “+” arrow on primary head;
• - DIR. for F/R mode, identifies the “positive” flow direction)
Select using the
Press
↵
key to return to Fct. 3.02 FLOW METER.
↑
or ↓ key.
Zero check, see Fct. 3.03 and Sect. 7.1.
Please refer to Sect. 3.2 “factory settings”
5/9
Page 35

User-defined unit 5.12
Fct. 3.05 USER UNIT
Press → key.
→ TEXT VOL = set text for user-defined unit,
press → key
• Liter (max. 5 characters, factory-set: “Liter” or “US MGal”)
Characters assi
Change flashing place (cursor) using
Use
→
Transfer to subfunction “F
or ← key to shift cursor 1 place to right or left.
ACT. VOL.” with ↵key.
→ FACT. VOL. = set factor FM for volume,
gnable to each place: A-Z, a-z, 0-9, or “–” (= blank character)
↑
or ↓ key.
press → key
• 1.00000 E+3 (factory-set: “103or 2.64172 x 10⁻⁴” / factor FM= volume per 1 m3)
Settin
g range: 1.00000 E-9 to 9.99999 E+9 ( = 10-9to 10+9)
Change flashing place (cursor) using
Use
→
or ← key to shift cursor 1 place to right or left.
Transfer to subfunction “TEXT TIME”
→ TEXT TIME = set text for required time,
↑
or ↓ key..
with ↵key.
press → key
•hr (max. 3 places, factory-set: “hr = hour” or “day”)
Characters assi
Change flashing place (cursor) using
Use
→
Transfer to subfunction “F
or ← key to shift cursor 1 place to right or left.
ACT. TIME” with ↵key.
→ FACT. TIME = set factor FT for time,
gnable to each place: A-Z, a-z, 0-9, or “–” (= blank character)
↑
or ↓ key.
press → key
• 3.60000 E+3 (factory-set: “3.6 x 10³” for hour or “8.64 x 10⁴” for day / set factor FT
in seconds)
Settin
g range: 1.00000 E-9 to 9.99999 E+9 ( = 10-9to 10+9)
Change flashing place (cursor) using
Use
→
Press
or ← key to shift cursor 1 place to right or left.
↵
key to return to Fct. 3.05 USER UNIT.
↑
or ↓ key.
Factors for volume FM(factor FM= volume per 1 m3)
Volumetric unit Text examples Factor F
Cubic metres m3 1.0 1.00000 E+0
Litres Liter 1 000 1.00000 E+3
Hectolitres h Lit 10 1.00000 E+1
Decilitres d Lit 10 000 1.00000 E+4
Centilitres c Lit 100 000 1.00000 E+5
Millilitres m Lit 1 000 000 1.00000 E+6
US gallons USGal 264.172 2.64172 E+2
Millions US gallons USMG 0.000264172 2.64172 E-4
Imperial gallons GBGal 219.969 2.19969 E+2
Mega imperial gallons GBMG 0.000219969 2.19969 E -4
Cubic feet Feet3 35.3146 3.53146 E+1
Cubic inches inch3 61 024.0 6.10240 E+4
US barrels liquid US BaL 8.36364 8.38364 E+0
US barrels ounces US BaO 33 813.5 3.38135 E+4
M
Setting
Factors for time FT(factor FTin seconds)
Time unit Text examples Factor FT (seconds) Setting
Seconds Sec 1 1.00000 E+0
Minutes min 60 6.00000 E+1
Hours hr 3 600 3.60000 E+3
Day DAY 86 400 8.64000 E+4
Year (= 365 days) YR 31 536 000 3.15360 E+7
5/10
Page 36

5.13 F/R mode, forward/reverse flow measurement
• Refer to Sect. 2.6 for electrical connection of outputs.
• Define direction of forward (normal) flow, see Fct. 3.02, subfunction “FLOW DIR.”:
in conjunction with F/R operation, set the direction for the forward flow here.
“+” signifies the same direction as shown by the arrow on the primary head,
“–” signifies the opposite direction.
• Set the status output to ”F/R INDIC.”, see Fct. 1.07.
• Current and/or pulse output must be set to “2 DIR.”, see Fct. 1.05 and 1.06, subfunctions
“FUNCT. I” and “FUNCT. B1”.
5.14 Characteristic of outputs
I Current output
I
0%
I
100%
0 or 4 mA
20 mA
P Pulse output
P
100%
Pulses at Q
, full-scale range
100%
Q
Q
Q
F
R
100%
1 flow direction, forward flow in F/R operation
Reverse flow in F/R operation
Full-scale range
S Status output
switch open
switch closed
1 flow direction 2 flow directions, F/R operation
I
I
max
I
100%
Q
R
%
Q
R
%
I
0%
0
P
P
115%
max
P
100%
P= 0 Hz
0
Q
F
%100 Max
Q
F
%100 Max
Q
%
Q
%
R
R
Max 100
I
I
max
I
100%
I
0%
0
P
P
115%
max
P
100%
P= 0 Hz
0
S
Q
F
%100 MaxMax 100
Q
F
%100 Max
5/11
Q
%
R
Max 100
Q
F
0
%100 Max
Page 37

Fct. 3.07 APPLICAT.
Press key → .
→
EMPTY PIPE,
• YES • NO
Press
↵
key to return to Fct. 3.07 APPLICAT.
Fct. No. Function Settings
1.01 Full-scale range
1.02 Time constant
1.03 Low-flow cut-off - ON: - OFF:
1.04 Display Flow
1.05 Current output I Function
1.06 Pulse output P Function
1.07 Status output S
3.01 Language
3.02 Primary head Meter size
3.04 Entry code required ? - no - yes
3.05 User-defined unit
“function switch on“.
select with ↑ or ↓ key.
Here you can note down the settings of the signal converter !
Totalizer
Messages
Range I
Error
Selection
Pulse width
Value
GKL value
Field frequency
Power frequency
Flow direction
→ → → ↵ ↵ ↵ ↑ ↑ ↑
Application 5.15
Setting data 5.16
5/12
Page 38

Part C Special applications, functional checks,
service, and order numbers
6 Special applications
6.1 HHT 010 hand held terminal and RS 232 adapter incl. CONFIG software (options)
External operator control can be carried out with the following options:
– HHT 010 hand-held terminal only for IFC 010 _/ B signal converter (basic version)
– MS-DOS PC via an RS 232 adapter, incl. CONFIG software for
signal converter IFC 010 _/ B (basic version) and IFC 010 _/ D (display version)
Detailed directions supplied.
Switch off
1) Unscrew the 4 recessed head screws and remove the transparent cover.
2) Plug the HHT connection plug or the RS 232 adapter into the IMoCom Bus socket and
3) Switch on the power.
4) As described in the supplied description, change data, parameters and measured values,
5) Switch off the power.
6) Pull the HHT plug or the RS 232 adapter off the amplifier PCB.
7) Replace transparent cover and tighten down the 4 recessed head screws.
power source before opening the housing !
connect to the PC or laptop, see amplifier PCB in Sect. 8.9.
and have them called up for display.
Please refer to Sect. 3.2 “factory settings”
6/1
Page 39

Stable signal outputs when measuring tube empty 6.2
Output signals can be stabilized to values as for “zero” flow to prevent random output signals
when the measuring tube is empty or when the electrodes are not wetted in the event the
measuring tube is partially full.
Display: 0
Current output: 0 or 4 mA, see setting in Fct. 1.05.
Pulse output: no pulses (= 0 Hz), see setting in Fct. 1.06.
Precondition:
- electrical conductivity of product ≥ 200 µS/cm (µmho/cm),
≥ 500 µS/cm for meter sizes DN 10 - 15 and 3/8“ - 1/2“
- length of signal cable ≤ 10 m / ≤ 30 ft and free of vibration at field
signal converter
- process products are homogeneous, free from solids and gas inclusions,
and do not tend to cause electrical or catalytic reactions.
Chan
ges on amplifier PCB, see illustration in Sect. 8.9.
Switch off power source before opening the housing !
Refer to Sect. 8.5 for Fig. A, B and D.
1) Unscrew the 4 recessed head screws (Fig. A) and remove transparent cover.
2) Unscrew recessed head screw (Fig. B) and remove black plastic cover.
3) Unscrew the 2 recessed head screws (Fig. D) and remove black metal cover.
4) If display unit provided, unscrew the 4 recessed head screws and fold display carefully
to side.
5) Join the two “semicircles” of points S3 and S6 on the amplifier PCB with tin solder,
see figure in Sect. 8.9.
6) Reassemble in reverse order, Items 4) to 2) above.
7) Switch on power.
8) Check setting of the low-flow cutoff SMU, Fct. 1.03, and reset if necessary:
L.F.CUTOFF switched on, range:
Full scale range Q
100%
Cutoff ...... values
... OFF... ... ON ...
> 3 m/s > 10 ft/s >02 % 1 %
1 - 3 m/s 3 -10 ft/s >06 % 4 %
< 1 m/s < 03 ft/s >10 % 8 %
O
perator control:
Display Version: (D), see Sect. 4 and 5.3, Fct. 1.03
Basic Version: (B), see Sect. 6.1.
9) After checking and/or resetting, replace transparent cover and tighten down the 4 recessed
head screws.
6/2
Page 40

7. Functional checks
7.1 Zero check with IFC 010 / D signal converter, Fct. 3.03
Switch off power source before opening the housing
• Set “zero” flow in the pipeline, but make sure that the measuring tube is completely
filled with fluid.
• Switch on the system and wait 15 minutes.
• Press the following keys for zero measurement:
Key Display Description
→ If “YES” set under Fct. 3.04 ENTRY CODE, key in
Fct. 1.00 OPERATION
2x ↑ Fct. 3.00 INSTALL.
→ Fct. 3.01 LANGUAGE
2x ↑ Fct. 3.03 ZERO SET
→ CALIB. NO
↑ CALIB. YES
↵ 0.00 - - - - - / - - - Flowrate displayed in set unit, see Fct. 1.04 DISPLAY,
STORE NO If new value not to be stored, press ↵ key (3x) 4x = return to
↑ STORE YES
↵ Fct. 3.03 ZERO SET Store new zero value.
(2x) 3x ↵ - - - - - - - - - - - - / - - - Measuring mode with new zero.
9-keystroke CODE 1 now: → → → ↵ ↵ ↵ ↑ ↑ ↑
subfunction “DISP. FLOW”.
Zero measurement in progress, duration approx. 50 seconds.
When flow “> 0” “WARNING” notice appears, confirm with ↵ key.
measuring mode.
7.2 Test of measuring range Q, Fct. 2.01
Switch off power source before opening the housing !
• For this test a measured value can be simulated in the range of -110 to +110 percent
of Q
(full-scale range set, see Fct. 1.01 FULL SCALE).
100%
• Switch on the system.
• Press the following keys for this test:
Key Display Description
→ If “YES” set under Fct. 3.04 ENTRY CODE, key in
Fct. 1.00 OPERATION
↑ Fct. 2.00 TEST
→ Fct. 2.01 TEST Q
→ SURE NO
↑ SURE YES
↵ 0 PERCENT Current, pulse and status indication outputs indicate the
± 10 PERCENT
↑ ± 50 PERCENT Select using ↑ or ↓ key
± 100 PERCENT
± 110 PERCENT
↵ Fct. 2.01 TEST Q End of test, actual measured values again present at outputs.
(2x) 3x ↵ - - - - - - - - - - - - / - - - Measuring mode
9-keystroke CODE 1 now: → → → ↵ ↵ ↵ ↑ ↑ ↑
corresponding values.
7/1
Page 41

Hardware information and error status, Fct. 2.02 7.3
Switch off power source before opening the housing !
• Before consulting factory about errors or flow measurement problems, please invoke
Fct. 2.02 HARDW. INFO (hardware information).
• An 8-character and a 10-character status code are stored under this function in
each of 3 “windows”. These 6 status codes allow rapid and simple diagnosis of your
compact flowmeter.
• Switch on system.
• Press the following keys for display of the status codes:
Key Display Description
→ If “YES” set under Fct. 3.04 ENTRY CODE,
Fct. 1.00 OPERATION
↑ Fct. 2.00 TEST
→ Fct. 2.01 TEST Q
↑ Fct. 2.02 HARDW. INFO
→→MODUL ADC -.- - - - -.- - 1st window
- - - - - - - - - Sam
↵→MODUL IO -.- - - - -.- - 2nd window 3.25105.02 ( 8-character code, 1st line)
- - - - - - - - - 3A47F01DB1 (10-character code, 2nd line)
↵→MODUL DISP. -.- - - - -.- - 3rd window
- - - - - - - - -
PLEASE NOTE DOWN ALL 6 STATUS CODES !
↵ Fct. 2.02 HARDW. INFO Terminate hardware information
(2x) 3x ↵ - - - - - - - - - - - - - / - - - Measuring mode
key in the 9-keystroke CODE 1 now: → → → ↵ ↵ ↵ ↑ ↑ ↑
ple status code
If you need to return your flowmeter to Krohne, please refer to last
but one page of these Instructions !
7/2
Page 42

7.4 Faults and symptoms during start-up and process flow measurement
• Most faults and symptoms occurring with the compact flowmeters can be eliminated
with the aid of the following tables.
• For greater clarity, faults and symptoms in the tables are divided into 2 parts and
various groups.
• Part 1
Signal converter IFC 010 B (B = basic version), without display
and without HHT or CONFIG user program (see Sect. 6.1)
Groups: LED LED display (status messages)
I Current output
P Pulse output
LED / I / P LED display, current output and pulse output
• Part 2
Signal converter IFC 010 D (D = display version) and
Signal converter IFC 010 B (B = basic version), without display
but with CONFIG user program (see Sect. 6.1)
Groups: D Display
I Current output
P Pulse output
S Status indication output
D / I / P / S LED display, current output,
status output
Before contacting Krohne Service, please read through the
following tables. THANK YOU !
Part 1 Converter IFC 010 B (B = basic version), without display
Group LED Fault / Symptom Cause Remedial action
LED 1 LED flashes red/green Overranging of A/D converter, Reduce flowrate; if unsuccessful,
LED 2 LED flashes red Fatal Error, hardware and/or Replace signal converter
LED 3 cyclic flashing of red LED, Hardware fault, Watchdog Replace signal converter
LED 4 LED shows red continuously Hardware fault Replace signal converter
and without HHT or CONFIG operator program
current or pulse output test as described in Sect. 7.5.
Measuring tube drained, Fill measuring tube.
A/D converter overranged.
software error (see Sect. 8.4) or contact
Krohne Service.
approx 1 second activated. (see Sect. 8.4) or contact
Krohne Service.
(see Sect. 8.4) or contact
Krohne Service.
7/3
Page 43

Part 1 Converter IFC 010 B (B = basic version), without display
(cont’d) and without HHT or CONFIG operator program
Group I Fault / Symptom Cause Remedial action
I 1 Receiver instrument Connection/polarity incorrect. Connect properly as described
I 2 22 mA present at current Current output I overranged Check device parameters
I 3 22 mA present at current Fatal Error Replace signal converter
I 4 Unsteady display – Process product Increase time constant,
Group P Fault / Symptom Cause Remedial action
P 1 Connected totalizer not Connection/polarity incorrect Connect properly as described
P 2 Unsteady pulse rate – Process product Increase or switch on time
Group LED / I / P Fault / Symptom Cause Remedial action
LED / I / P 1 Red LED flashes, current output Fatal Error, hardware fault Replace signal converter
indicates “0”. in Sect. 2.3.
Receiver instrument Check connecting cables and
defective. receiver instrument, and
Short between current output Check connections and
and pulse output cables, see Sect. 2.3,
Current output defective Replace signal converter
output (fault current) and change if necessary,
output (fault current) (see Sect. 8.4) or contact
and red LED shows. Krohne Service
– conductivity too low, see Sect. 6.1, or contact
– particles/air inclusions Krohne Service.
– too large or inhomogeneous
– Pulsating flow
– Time constant too low
counting any pulses in Sect. 2.3
Totalizer or external Check connection cables,
voltage source defective totalizer and external voltage
Current output is external Check connection and cables
voltage source; short-circuit, (see Sect. 2.3), voltage
or current/pulse output between I+and I⊥ approx.15 V.
defective. Switch off device. Eliminate
Pulse output inactive, Switch on, see Sect. 6.1, or
see Fct. 1.06 and report contact Krohne Service.
on settings.
Fatal Error, red LED shows. Replace signal converter
– conductivity too low, constant, see Sect. 6.1,
– particles/air inclusions or contact Krohne Service.
– too large or inhomogeneous
– Pulsating flow
– Time constant too low
– or switches off
indicates fault current and pulse and/or software error (see Sect. 8.4) or contact
output “0”. Krohne Service.
replace if necessary.
voltage between I+and
I⊥ approx. 15 V. Switch off
device, eliminate short-circuit,
switch device on.
(see Sect. 8.4) or contact
Krohne Service.
see Sect. 6.1, or contact
Krohne Service
source, and replace if necessary.
short-circuit and switch device
on again. If no function then
current or pulse output
defective. Replace signal
converter (see Sect. 8.4) or
contact Krohne Service.
(see Sect. 8.4) or contact
Krohne Service.
7/4
Page 44

Part 2 Signal converter IFC 010 D (D = display version) and
Group D Display shows . . . Cause Remedial action
D 1 LINE INT. Power failure. Delete error message in
D 2 CUR.OUTP. I Current output overranged. Check instrument parameters
D 3 PULS.OUTP. P Pulse output overranged. Check instrument parameters,
D 4 ADC Analog/digital converter Error message deleted
D 5 FATAL. ERROR Fatal Error, Replace signal converter
D 6 TOTALIZER Counts lost Delete error message in
D 7 „STARTUP“ Hardware fault, Replace signal converter
D 8 BUSY Displays for flow, Change setting in
D 9 Unsteady display – Process product Increase time constant,
D 10 No display Power OFF. Switch on power
Group I Fault / Symptom Cause Remedial action
I 1 Receiver instrument Incorrect connection/polarity Connect properly,
I 2 Unsteady display – Process product Increase time constant,
Signal converter IFC 010 B (B = basic version), without display
but with HHT or CONFIG operator program (see Sect. 6.1)
no counting during RESET/QUIT. menu. Reset
Note:
power failure. totalizer(s) if need be.
and correct if necessary.
Error message deleted
automatically after cause
has been eliminated.
totalizer deviation correct if necessary, and reset
Note:
possible totalizer(s). Error message
overranged. automatically after cause
all outputs set to “min.” (see Sect. 8.4) or contact
values. Krohne Service, having
(overflow, data error) RESET/QUIT. menu.
cyclic flashing Watchdog activated. (see Sect. 8.4) or contact
totalizers and errors disabled. Fct. 1.04.
– conductivity too low, see Sect. 6.1, or contact
– particles/air inclusions Krohne Service.
– too large or inhomogeneous
– Pulsating flow
– Time constant too low
Check power fuse(s) Replace if defective
F1 (F1 and F2 with DC). (see Sect. 8.2).
indicates “0”. see Sect. 2.3.
Receiver instrument or current Check output (see Sect. 7.2)
output defective. with new milliammeter:
Current output disabled, Activate under Fct. 1.05.
see Fct. 1.05
Short-circuit between current Check connection and cables,
output and pulse output. see Sect. 2.3. Voltage between
– conductivity too low, see Sect. 6.1, or contact
– particles/air inclusions Krohne Service.
– too large or inhomogeneous
– Pulsating flow
– Time constant too low
deleted automatically
after cause has been
eliminated.
has been eliminated.
first noted down hardware
information and error status,
see Fct. 2.02.
Krohne Service.
est ok, check connection
T
cables and receiver instrument,
replace if necessary.
est faulty, current output
T
defective. Replace signal
converter (see Sect. 8.4)
or contact Krohne Service
I+ and I⊥ approx. 15 V.
Switch off device, eliminate
short-circuit, and switch
device on again.
7/5
Page 45

Part 2 Signal converter IFC 010 D (D = display version) and
(cont’d) Signal converter IFC 010 B (B = basic version), without display
Group P Fault / Symptom Cause Remedial action
P 1 Totalizer connected but does Incorrect connection/polarity Connect properly,
P 2 Unsteady pulse rate – Process product Increase or switch on
P 3 Pulse rate too high or Incorrect setting for Change setting under Fct. 1.06.
Group S Fault / Symptom Cause Remedial action
S 1 No function Incorrect connection/polarity Connect properly,
Group D/I/P/S Fault / Symptom Cause Remedial action
D/I/P/S1 Unsteady display and – Process product Increase time constant,
D/I/P/S 2 No display and no Power OFF Switch power on.
but with HHT or CONFIG operator program (see Sect. 6.1)
not count any pulses see Sect. 2.3
Totalizer or external voltage Check output (see Sect. 7.2)
source defective. with new totalizer:
Current output is external Check connection and cables,
voltage source, short circuit see Sect. 2.3. Voltage between
or current / pulse output I+and I⊥ approx. 15 V.
defective Switch off device, eliminate
Pulse output is deactivated, Switch on under Fct. 1.06.
see Fct. 1.06.
– conductivity too low, time constant,
– particles/air inclusions see Sect. 6.1, or contact
– too large or inhomogeneous Krohne Service.
– Pulsating flow
– Time constant too low
– or switched off
too low. pulse output.
of status display see Sect. 2.3.
Status display or output Set status output under Fct. 1.07
defective or external to “F/R INDIC.“ (flow direction)
voltage source not and check (see Sect. 7.2)
supplying voltage. with new status display:
outputs – conductivity too low, see Sect. 6.1, or contact
– particles/air inclusions Krohne Service.
– too large or inhomogeneous
– Pulsating flow
– Time constant too low
function of outputs
Check power fuse(s) Replace if defective,
F1 (F1 and F2 for DC). see Sect. 8.2.
est ok, check connection
T
cables and previous
totalizers and external voltage
source, and replace if
necessary.
est faulty, pulse output
T
defective, replace signal
converter (see Sect. 8.4)
or contact Krohne Service.
short circuit, switch device
on again. If no function,
then current or pulse
output defective. Replace
signal converter (see Sect.
8.4) or contact Krohne
Service.
est ok, check previous
T
status display and external
voltage source, and replace
if necessary.
est faulty, status output
T
defective, replace signal
converter (see Sect. 8.4) or
contact Krohne Service.
7/6
Page 46

7.5 Test of primary head
Always switch off power source before opening the housing !
Re
quired measuring instruments and tools
- A crosstip screwdriver
- Ohmmeter with at least 6 V range
or
AC voltage/resistance measuring bridge.
Note: Accurate measurements in the area of the electrodes can only be obtained with an
AC voltage/resistance bridge. Also, the measured resistance is very heavily dependent on
the electrical conductivity of the liquid product.
Preparatory work
• Switch off power source.
• Remove transparent cover
(unscrew 4 recessed head screws)
and black plastic cover
7 8 1 2 3 4 5
Blue 9-pin plug
(connection to primary head)
unassigned
(unscrew 1 recessed head screw),
see Fig. A and B in Sect. 8.5.
• Detach blue 9-pin plug,
see Fig. D in Sect. 8.5,
field power supply (pins 7+8)
X1
X4
and signal cables (pins 1, 2, 3, 4 +5).
• Completely fill the measuring tube of the
flowmeter with the process liquid.
Action Typical result Incorrect result =
Resistance measurement flowmeter defective,
at the blue 9-pin plug return to factory for repair,
1 Measure resistance 30 - 150 Ω if lower:
between wires interwinding fault
7 and 8.
2 Measure > 10 MΩ if lower:
resistance between interwinding fault to PE
U-clamp terminal or FE.
in terminal compartment
(PE protective conductor
or FE functional ground)
and wires 7 and 8
3 Measure resistance 1 kΩ - 1 MΩ if lower: drain measuring
between wires 1 and 3 (see “Note” above). tube and repeat
and between 1 and 4 Both values should be measurement; if still
(same measuring lead approx. equal. too low, short-circuit in
always on wire 1 ! ) electrode wires.
Jacks X1 and X4 on amplifier PCB,
see Sect. 8.9
refer to last but one page !
if higher:
wire break
if higher: break in
electrode wires or
electrodes
contaminated.
Values not equal:
break in electrode
wires or electrodes
contaminated.
7/7
Page 47

Test of signal converter 7.6
Always switch off power source before opening the housing !
Re
quired measuring instruments and tools
Multimeter, DC and AC voltage, > 20 kohms / V
Crosstip screwdriver
Preparatory work Measuring and test points on
• Switch off power source. amplifier PCB, see Sect. 8.9
• Remove transparent cover (unscrew 4 MP = measuring point
recessed head screws) and black plastic TP = test point
cover (unscrew 1 recessed head screw), X1 = socket connector, 20-pin
see Fig. A and B in Sect. 8.5. X3, X5 = plug connector
• If provided, remove display PCB,
see Sect. 8.7.
• Switch power source on again.
Please note: When carrying out measurements, do not produce any short-circuits between the
components !
Action Typical result Faulty result
Voltage measurements on
amplifier PCB, see Sect. 8.9
1 between TP 1 (solder pin) 15 . . . 30 V DC
and Pin 11 of X1
2 between TP 1 (solder pin) 30 . . . 40 V DC
and Pin 9 of X1
3 between MP 5 (solder pin) 19 . . . 26 V DC
and Pin 15 of X1
4 between MP 5 (solder pin) -20 . . . -27 V DC
and Pin 18 of X1
5 field current supply > 1.5 V AC
between Pin 7 and Pin 8
of X3
6 input voltage between -10 . . . +10 V DC If outside range, input
MP 1 and MP 5 amplifier overranged,
measuring tube
empty or primary head
defective; check acc.
to Sect. 7.5.
7 Short Pin 1, 2 and 3 -10 . . . +10 V DC If outside range,
of X5, measure input signal converter
voltage between defective.
MP 1 and MP 5
If measured
voltages lower,
signal converter
defective,
replace, see Sect. 8.4,
or contact Krohne
Service.
Note: A thermostatic switch is installed in the transformers of the AC versions.
In the DC version, the PCB is equipped with a thermofuse. All signal converters
contain PTR fusible links (typically 100 overload cycles). This allows cyclic
switching on and off of the signal converter under overload conditions.
The cool-down phase may be anything up to one hour.
7/8
Page 48

7.7 Test of signal converter using GS 8 A simulator (option)
+
0
–
GS 8 A operating elements and accessories
Y
P
20
10
2,5
1,25
20
40
5
80
160
320
D
L
H
Electrical connection
H2
A 5-to-3 pin adapter
for cable C5
B Plug for field power
supply, 2-pin
C3 /C5 Plug for signal cable,
3-pin / 5-pin
D Switch,
flow direction
H Socket for H2 plug
on cable Z
H2 Plug of cable Z
L Power supply ON
P Potentiometer “zero”
X3 Socket for plug B
on amplifier PCB
X5 Socket for plug C3
on amplifier PCB
Y Switch,
measuring ranges
Z Cable between GS 8 A
and signal converter
Z
Power
LN
1L~ 0L~
L+ L-
C 5
B
Connection of milliammeter and
electronic frequency counter,
see Sect. 2.3 “Connection of outputs”.
X 5 X 3
amplifier PCB, see
Sect. 8.9
a) Switch off power source before
opening the housing !
b) Unscrew the 4 recessed head screws, see
Fig. A in Sect. 8.5, and remove transparent
cover from the signal converter housing.
c) Unscrew recessed head screw, see Fig. B in
Sect. 8.5, and remove black plastic cover.
Using GS 8 simulator
Additional adapter is required
between GS 8 and IFC 010 signal converter.
Order No. 2.10764.00.
Outputs U-clamp terminal
I⊥ I I+ P P⊥ S PE
10
Milliammeter, accuracy
A
class 0.1, Ri< 500 ohms,
range 4-20 mA
Electronic frequency
counter, input resistance
approx. 1 kohm, range
0-1 kHz, time base min. 1
second, see connection
diagrams in Sect. 2.3.2.
d) Pull off blue 7-pin plug from the amplifier PCB,
see Sect. 8.9:
socket X3 field power supply and socket X5
signal cables.
e) Connect plug B to socket X3 (2-pin) and
plug C (5-pin) to socket X5 (3-pin) by way
of adapter A (5-to-3pin).
FE
FE
Warning: Instrument must be properly grounded to avoid personnel shock hazard.
7/9
Page 49

Check of set
point display
1) Switch on power source, allow at least 15 minutes’ warm-up time. .
2) Set switch D (front panel of GS 8A) to “0” position.
3) Adjust zero to 0 or 4 mA with the 10-turn potentiometer P (front panel of GS 8A),
depending on setting in Fct. 1.05, deviation <±10 µA.
4) Calculate position of switch Y and displayed setpoints ”I“ and ”f“:
x
Q
K
4.1) X =
100%
2
x
GK
DN
Q
full-scale range (100%) in volumetric unit V per unit time t
100%
GK primary constant, see instrument nameplate
DN meter size DN im mm, not inches, see instrument nameplate
t time in seconds (Sec), minutes (min) or hours (hr)
V volumetric unit
K constant, according to following table
t Sec min hr
V
Liter 25 464 424.4 7.074
m3 25 464 800 424 413 7 074
US gallons 96 396 1 607 26.78
Note:
Sticker on the GS 8 A primary head simulator still gives values for
“inch” flowmeter. Do not use any more !
4.2) Determine position of switch Y: Use table (front panel GS 8A) to determine value Y
which comes closest to factor X and meets condition Y ≤ X.
4.3) Calculate set
4.4) Calculate set
point reading ”I“ for current output: I = I0%+ Y(I
I
0%
I
100%
point reading ”f“ for pulse output: f =
P
X
current (0/4mA) at 0% flowrate
current (20mA) at 100% flowrate
Y
x
P
100%
X
pulses per second (Hz)
100%
100%
in Hz
- I0%) in mA
at 100% flowrate
5) Set switch D (front panel GS 8A) to position “+“ or “-“ (forward/reverse flow).
6) Set switch Y (front panel GS 8A) to the value determined by the method described above.
7) Check setpoint readings I and f, see points 4.3 and 4.4 above.
8) Deviation <1.5% of setpoint. If greater, replace signal converter, see Sect. 8.4.
9) Test of linearity: set lower Y values, readings will drop in proportion to the calculated Y
values.
10) Switch off power source after completing the test.
11) Disconnect the GS 8A.
12) Reassemble in reverse order, see points e) – b) under “electrical connection”,
see illustration in Sect. 8.5.
13) The system is ready for operation after the power source has been switched on.
Exam
ple: see overleaf
7/10
Page 50

Example
Full-scale range Q
= 200 m3/hr (Fct. 1.01)
100%
Meter size DN = 80 mm = 3“ (Fct. 3.02)
Current at Q
Pulses at Q
Q
0%
100%
100%
I
0%
I
100%
P
= 4 mA
= 20 mA
= 280 pulses/hr (Fct. 1.06)
100%
}
(Fct. 1.05)
Primary head constant GKL = 3.571 (see nameplate)
Constant (V in m3)
(t in hr) K = 7074 (see Table)
(DN in mm)
Calculation of “ X ”
Q
x K
100%
X =
GKLxDN23.571 x 80 x 80
and position of “ Y ”
200 x 7074
=
= 61.905
Y = 80, position of switch Y, see front panel GS 8A
(comes closest to X value and is smaller than X).
Calculation of set
I = I0%+Y(I
X 61.905
point readings I and f
- I0%) = 4 mA +
100%
40
(20mA - 4mA) = 14.3 mA
Deviations are permissible between 14.1 and 14.6 mA
f = Yx P
100%
X 61.905
=
40
x pulses / hr = 129.2 pulses/hr
Deviations are permissible between 127.3 and 131.1
If you need to return your flowmeter to Krohne,
please refer to last but one page of these Instructions !
(equivalent to ± 1.5 %).
pulses/hr (equivalent to ± 1.5 %).
7/11
Page 51

Service 8
Cleaning the signal converter housing 8.1
Switch off power source before cleaning !
The housing of the signal converter (material: polycarbonate, PC) may only be cleaned with a
solventless detergent !
Replacement of power fuse(s) 8.2
A) Fuse F1 in AC Versions 1, 2 and 3
Switch off power source before opening the housing !
Refer to Sect. 8.5 for Figs. A and B.
1) Unscrew the 4 recessed head screws (Fig. A), and remove transparent cover from
signal converter housing.
2) Unscrew the recessed head screw (Fig. B) and remove the black plastic cover.
3) Take out old and insert new power fuse F1, on the left next to the green connecting
terminals. Please refer to the following table for fuse rating and order number.
4) Reassemble in reverse order, points 2) – 1) above..
B) Fuse F1 and F2 for the DC V
ersion
Switch off power source before opening the housing !
Refer to Sect. 8.5 for Figs. A to F.
1) Unscrew the 4 recessed head screws (Fig. A), and remove transparent cover.
2) Unscrew the recessed head screw (Fig. B) and remove the black plastic cover.
3) Carefully pull out the green connecting plugs (supply power and outputs) (Fig. C).
4) Unscrew the 2 recessed head screws (Fig. D) and remove the black metal cover.
5) Carefully pull out the blue 9-pin plug (connection to the primary head) (Fig. D).
6) With a screwdriver, carefully remove the 4 metal clips (Fig. E).
7) Remove the electronics unit from the housing (Fig. F) and detach the ground conductor.
8) Replace power fuses F1 and F2 on the power supply PCB, refer to Sect. 8.9 for illustration
of the PCB. Refer to the following table for fuse rating and order number.
10) Reassemble in reverse order, points 7) - 1) above.
Power PCB Supply power Fuse F1 (and F2) Location and position
Rating Order No. of voltage selector
1. AC version 230/240 V AC 125 mA T 5.06627
115/117 V AC 200 mA T 5.05678
2. AC version 200 V AC 125 mA T 5.06627
100 V AC 200 mA T 5.05678
F 1
F 1
F 1
F 1
3. AC version 48 V AC 400 mA T 5.05892
24 V AC 800 mA T 5.08085
DC version 11-32 V DC F1 + F2
1.25 A T 5.09080
F 1
F 1
Warning: Instrument must be properly grounded to avoid personnel shock hazard.
8/1
Page 52

8.3 Changeover of operating voltage on AC Versions 1, 2 and 3 (not DC Version)
Switch off power source before opening the housing !
Refer to Sect. 8.5 for Figs. A-F.
1) Unscrew the 4 recessed head screws (Fig. A), and remove transparent cover.
2) Unscrew the recessed head screw (Fig. B) and remove the black plastic cover.
3) Carefully pull out the green connecting plugs (supply power and outputs) (Fig. C).
4) Unscrew the 2 recessed head screws (Fig. D) and remove the black metal cover.
5) Carefully pull out the blue 9-pin plug (connection to the primary head) (Fig. D).
6) With a screwdriver, carefully remove the 4 metal clips (Fig. E).
7) Remove the electronics unit from the housing (Fig. F) and detach the ground conductor.
8) Transpose voltage selector on the power supply PCB (illustration in Sect. 8.9)
to obtain the required voltage according to the table in Sect. 8.2.
9) Change power fuse F1, see table for fuse ratings.
10) Reassemble in reverse order, points 7) - 1) above.
8.4 Replacement of electronics unit of signal converter
Switch off power source before opening the housing !
Refer to Sect. 8.5 for Figs. A-G.
1) Unscrew the 4 recessed head screws (Fig. A), and remove transparent cover.
2) Unscrew the recessed head screw (Fig. B) and remove the black plastic cover.
3) Carefully pull out the green connecting plugs (power supply and outputs) (Fig. C).
4) Unscrew the 2 recessed head screws (Fig. D) and remove the black metal cover.
5) Carefully pull out the blue 9-pin plug (connection to the primary head) (Fig. D).
6) With a screwdriver, carefully remove the 4 metal clips (Fig. E).
7) Carefully remove the electronics unit from the housing (Fig. F) and detach the
ground conductor.
8) Carefully transpose the DATAPROM (IC 13) on the amplifier PCB (illustration in Sect. 8.9)
from the “old” to the “new” electronics unit (Fig. G). When inserting, note the direction
of the IC 13, see Sect. 8.9 “illustration of the PCBs”.
9) Check supply power and fuse F1 for the new electronics unit, and if necessary change
over or replace as described in Sect. 8.3, points 8) and 9).
10) Reassemble in reverse order, points 7) - 1) above.
8/2
Page 53

Illustrations to Sect. 8.2 to 8.7 8.5
Fig. A
Fig. B
Fig. C
Fig. D
Fig. E
Fig. F
Fig. G
8/3
Page 54

8.6 Turning the display PCB
Switch off power source before opening the housing !
Figs. A, B and D are given in Sect. 8.5.
1) Unscrew the 4 recessed head screws (Fig. A) and remove the transparent cover.
2) Unscrew the recessed head screw (Fig. B) and remove the black plastic cover.
3) Unscrew the 2 recessed head screws (Fig. D) and remove the black metal cover.
4) Unscrew the 4 recessed head screws on the display PCB.
5) Turn display PCB carefully.
6) Fold the ribbon cable as shown in the dia
PLEASE NOTE: The ribbon cable must lie flat between the display and amplifier PCBs
and must not exert any pressure on electronic components.
7) Reassemble in reverse order, points 4) - 1) above.
8.7 Retrofitting the display unit
Switch off power source before opening the housing !
Figs. A, B and D are given in Sect. 8.5.
1) Unscrew the 4 recessed head screws (Fig. A) and remove the transparent cover.
2) Unscrew the recessed head screw (Fig. B) and remove the black plastic cover.
3) Unscrew the 2 recessed head screws (Fig. D) and remove the black metal cover.
4) Insert the foil connector of the display unit into jack X7 on the amplifier PCB, see diagram
in Sect. 8.9. Ensure contact side is correctly positioned..
5) Carefully turn display in the desired direction.
Fold the ribbon cable as shown in the dia
PLEASE NOTE: The ribbon cable must lie flat between the display and amplifier PCBs
and must not exert any pressure on electronic components.
6) Reassemble in reverse order, see points 3) - 2) above.
7) Switch on power source.
8) For operator control and display of measured values, refer to Sect. 4 and 5.
9) Replace transparent cover and tighten down the 4 recessed head screws (Fig. A).
grams in Sect. 8.8
grams in Sect. 8.8
Socket X7 locked Socket X7 unlocked
F
VB
X7
amplifier PCB
F Ribbon cable
VB Locking clip X7
X7 Socket on amplifier PCB
8/4
VB
F
X7
Page 55

Directions for folding the ribbon cable on the display unit 8.8
A Socket X7 on amplifier PCB,
see Sect. 8.9
B Socket on display PCB
C Contact side
D Display
F Ribbon cable
I Insulated side
K 5 keys for operator control
R Reference point, power terminals
90° Bend cables 90° as shown
in drawing
Display
board
Version 2
B
F
A
D
K
I
90°
Version 2 only
F
Amplifier
board
B
F
90°
F
C
A
Version 1 / Standard IFC 010 K/D
Compact flowmeter
R
F
B
Version 3/ Standard IFC 010 F/D
Separate version
F
R
Version 4
R
F
R
B
R
A
D
K
B
A
D
K
A
D
K
8/5
Page 56

8.9 Illustrations of the PCBs
A) Amplifier PCB
IC 13 DATAPROM (sensor), see Sect. 8.4
MP1, MP5 Measuring points, see Sect. 7.6
S3, S6 for “empty tube” cut-out, see Sect. 6.2
TP1 Test point, see Sect. 7.6
X1 20-pin socket connector, see Sect. 7.6 and 7.7
X3 2-pin plug connector, pin 7 and 8, field power supply, see Sect. 7.5 and 7.7
X4 IMoCom Bus, plug connector for connection of RS 232 adapter, see Sect. 6.1
X5 5-pin plug connector, pin 1-5, signal cable, see Sect. 7.5 and 7.7
X7 10-pin socket (A) for foil connector (display unit), see Sect. 8.6 and 8.7.
Solder points S3 and S6
TP 1
18
X 1
15 11 9
1
X3
X5
MP 5
7
8
S4
S3
1
2
3
4
5
S6
S5
MP2MP1
X7
X4
IC13
8/6
Page 57

B) Power supply PCB, AC Versions 1, 2 and 3 C) Power supply PCB, DC Version
SW
Tr
Tr
F1 Power fuse,
see Sect. 8.2 or 9 for ratings
SW Voltage selector, see Sect. 8.3 for
voltage changeover
Tr Transformer
F1
F1,F2 Power fuses,
see Sect. 8.2 or 9 for ratings
Tr Transformer
F2
F1
9 Order numbers
Electronic unit
Power supply unit Supply power Order No.
IFC 010 D IFC 010 B
with display without display
ersion 1 230 / 240 V AC 2.07494.10 2.07494.00
AC V
AC
Version 2 200 V AC 2.07494.12 2.07494.02
AC Version 3 48 V AC 2.07494.34 2.07494.24
ersion 24 V DC 2.07527.10 2.07527.00
DC-V
115 / 117 V AC 2.07494.15 2.07494.05
100 V AC 2.07494.14 2.07494.04
24 V AC 2.07494.58 2.07494.48
(11-32 V DC)
Power fuse F1 for AC and F1 and F2 for DC
Supply power Rating Order No. Fuse type
200 and 230 / 240 V AC 125 mA T 5.06627
100 and 115 / 117 V AC 200 mA T 5.05678 5 x20 G-fuse
48 V AC 400 mA T 5.05892 switching capacity 1500 A
24 V AC 800 mA T 5.08085
11-32 V DC 1.25 A T 5.09080 TR 5, switching capacity 35 A
Display unit, retrofit kit for basic version IFC 010 _/ B
incl. transparent cover and connecting cable: Order No. 1.30915.92
RS 232 adapter incl. English CONFIG operator software,
for operator control of signal converter via MS-DOS PC or laptop: Order No.
HHT hand held terminal for operator control of signal converter Order No.
2.10531.01
2.10591.01
9/1
Page 58

Part D Technical data, measuring principle and
block diagram
10 Technical data
10.1 Full-scale range Q
Full-scale ranges Q
100%
100%
Flow rate Q = 100% 6 liter/h to 33 900 m3/h (0.03 - 156 000 US Gal/min), adjustable as
required, equivalent flow velocity 0.3 - 12 m/s (1 - 40 ft/s)
3
Unit m
/hr, Liter/Sec, US gallons/min. or user-defined unit,
e.g. Liter/day or US MGal/day
Flow tables
v = flow velocity in m/s
Meter size
DN
mm
0002.5
0004
0006
0010
0015
0020
0025
0032
0040
0050
0065
0080
0100
0125
0150
0200
0250
0300
0400
0500
0600
0700
0800
0900
1000
inch
00
001/
001/
003/
001/
003/
01
0-
01
02
0-
03
04
0-
06
08
10
12
16
20
24
28
32
36
40
1
10
/
8
4
8
2
4
1
2
/
Full-scale range
v = 0.3 m/s
(minimum)
000.0053
000.0136
000.0306
000.0849
000.1909
000.3393
000.5302
000.8686
001.358
002.121
003.584
005.429
008.483
013.26
019.09
033.93
053.02
076.35
0135.8
0212.1
0305.4
0415.6
0542.9
0662.8
0848.2
100%
Q
in m3/h
v = 1 m/s
0000.0177
0000.4520
0000.1018
0000.2827
0000.6362
0001.131
0001.767
0002.895
0004.524
0007.069
0011.95
0018.10
0028.27
0044.18
0063.62
0113.1
0176.7
0254.5
0452.4
0706.9
1018
1385
1810
2290
2827
v = 12 m/s
(maximum)
00000.2121
00000.5429
00001.222
00003.392
00007.634
00013.57
00021.20
00034.74
00054.28
00084.82
00143.3
00217.1
00339.2
00530.1
00763.4
01357
02120
03053
05428
08482
12215
16625
21714
26510
33929
v = flow velocity in ft/s
Meter size
DN
mm
0002.5
0004
0006
0010
0015
0020
0025
0032
0040
0050
0065
0080
0100
0125
0150
0200
0250
0300
0400
0500
0600
0700
0800
0900
1000
inch
00
001/
001/
003/
001/
003/
01
01
011/
02
02
03
04
05
06
08
10
12
16
20
24
28
32
36
40
1
10
/
8
4
8
2
4
1
4
/
2
1
2
/
100%
in US Gal/min
Q
v = 1 ft/s
(minimum)
0000.0245
0000.0383
0000.1530
0000.3735
0000.8405
0001.494
0002.334
0003.824
0005.979
0009.339
0015.78
0023.90
0037.35
0058.38
0084.05
0149.43
0233.4
0336.2
0597.9
0933.9
1345
1919
2507
3173
3917
v = 40 ft/s
(maximum)
000000.979
000001.530
000006.120
000014.93
000033.61
000059.75
000093.34
000153.0
000239.0
000373.5
000630.9
000955.6
001493
002334
003361
005975
009334
013442
023899
037345
053781
076760
100272
126904
156672
10/1
Page 59

Error limits at reference conditions 10.2
Pulse output
± F Error in % of flowrate (actual value):
Curve A: DN 10 – 600 / 3/8”- 24”
v ≥ 0.4 m/s or v ≥ 1.3 ft/s : ± 0.5 % of measured value
v ≥ 0.4 m/s or v ≥ 1.3 ft/s : ± 0.002 m/s or 0.0066 ft/s
Curve B: DN 700 – 1000 / 28” – 40”
v ≥ 0.25 m/s or v ≥ 0.8 ft/s : ± 0.8 % of measured value
v ≥ 0.25 m/s or v ≥ 0.8 ft/s : ± 0.002 m/s or 0.0066 ft/s
Q Actual flowrate
QFFlow for error limit vF = 0.25 or 0.8 ft/s (see Flow tables)
v Flow velocity in m/s and ft/s
v
Flow velocity in m/s and ft/s at QF(see Flow tables)
F
Reference conditions
Product Water, 10 to 30°C / 50 to 86°F
Electrical conductivity > 300 µS/cm (µmho/cm)
Power supply (line voltage) U
(± 2%)
N
Ambient temperature 20 to 22°C / 68 to 71.6°F
Warm-up time 30 minutes
Straight inlet run > 10
Straight outlet run > 3
x
DN
x
DN
(DN = meter size)
}
Primary heads properly grounded and centered
± F 3
%
2
F
Q
0.8
0.5
1
QF
0.25 0.4 0.5 0.75 1 10 11 12
(0.8) (1.3) (1.6) (2.4) (3.2) (33) (36) (40)
v
ms
(ft/ sec)
B
A
Current output same as above error limit for pulse output plus ...
0 to 20 mA:
4 to 20 mA:
± 0.05 %
}
± 0.062 %
of full-scale range in each case
}
10/2
Page 60

10.3 IFC 010 Signal converter
Versions
B - version without display / control unit (basic version)
D - version with display / control unit
Add-on equipment (option) - CONFIG software and RS 232 adapter for control via
Current output
Function - all operating data settable, galvanically isolated
Current 0 - 20 mA and 4 - 20 mA
Active output load max. 500 ohms
Passive output external voltage: 15 ... 20 V DC 20 ... 32 V DC
Error identification 0 / 3.6 / 22 mA
Forward/reverse measurement direction identified via status output
Pulse output
Function - all operating data settable
Pulse rate for Q = 100 % 10, 100 or 1000 pulses per second (= Hz), fixed or optionally
Active output: connection: electronic totalizer (EC)
Passive output: connection electromechanical (EMC) or electronic (EC)
Pulse width 50, 100, 200, 500 ms or 1 s,
Forward/reverse measurement direction identified via status output
Status output (passive)
Function settable as indicator for flow direction, errors or trip point
Connection external voltage: U
Time constant 0.2 to 99.9 seconds, settable in increments of 0.1 second
Low-flow cutoff cutoff ”on” value: 1 to 19 % of Q
Local display (D versions only) 3-line LCD
Display functions actual flowrate, forward, reverse and sum totalizers (7-digit)
Display units: actual flowrate settable in liter/s, m
totalizers liter, m3or US gallons and 1 user-defined unit
Language of plain texts English, German, French, others on request
Display: 1st (top) line 8-character, 7-segment numeral and sign display,
2nd (middle) line 10-character, 14-segment text display
3rd (bottom) line 6 markers t to identify display
MS-DOS-PC, connection to IMoCom interface
- Hand-Held-Terminal for control of basic versions
- Other bus and computer interfaces on request
load: min. ... max. 0 ... 500 Ω 250 ... 750 Ω
- galvanically isolated
- digital pulse division, interpulse period non-uniform,
therefore if frequency meters connected allow for minimum
counting interval:
gate time, totalizer ≥
adjustable in pulses per liter, m
P
1000
100%
[Hz]
3
or US gallons
(special version: up to 10 kHz scaling)
internal voltage: approx. 15 V DC, from current output
load rating: I
load rating: I
< 23 mA when operated without current output
max
< 23 mA when operated with current output
max
totalizers
external voltage: U
load current: I
≤ 30 V DC / ≤ 24 V AC
ext
≤ 150 mA
max
selectable with frequencies below 10 Hz
≤ 30 V DC / ≤ 24 V AC
load current: I
cutoff ”off” value: 2 to 20 % 1 % increments
ext.
≤ 150 mA
max
, adjustable in
100%
}
or 25-character bar graph with percent display and
status messages
3
/h, US gallons/min or user-defined unit,
e.g. hectoliter/day or US million gallons/day
(e.g. hectoliter), selectable overflow time
symbols for key acknowledgement
10/3
Page 61

Power supply
1. Rated voltage
tolerance band
2. Rated voltage
tolerance band
Frequency
Power consumption
(incl. primary head)
1. AC-Version 2. AC-Version 3. AC-Version DC-Version
Standard Option Option Option
230 / 240 V 200 V 48 V 24 V
200 – 260 V 170 – 220 V 41 – 53 V 11 – 32 V
115 / 120 V 100 V 24 V –
100 – 130 V 85 – 110 V 20 – 26 V –
48 – 63 Hz –
approx. 5 VA approx. 4.5 W
When connected to a functional extra-low voltage, 11-32 V DC, protective
separation (PELV) must be ensured (VDE 0100/VDE 0106 and IEC 364/IEC 536)
Housing
Material polycarbonate (PC)
Protection category (IEC 529/EN 60 529)
IFC 010 K (compact) IP 67, equivalent to NEMA 6, same as primary head
IFC 010 F (separate) IP 65, equivalent to NEMA 4 / 4X
IFC 010 F and ZD dimensions and weights 10.4
IFC 010 F
weight approx. 3.8 kg / 8.4 lb
160 (6.30”)
144 (5.67”)
9 (0.35”)
1
220 (8.66”)
2
5
34 (1.34”)
120 (4.72”)
3
258 (10.16”)
1
ZD Intermediate
connection box
Weight approx.
0.5 kg/1.1 lbs
1
dia. 9
(0.35”)
4
4
27.5
(1.08”)
dia. 9
(0.35”)
57 (4.02”)
22 (4.02”)
80
(3.15”)
PG 16
1
/2” NPT
68 (2.68”)
125 (4.92”)
1 output cable (see Sect. 2.3)
2 signal cable of primary head
(see Sect. 1.3)
3 field power cable of primary head
(see Sect. 1.3)
4 power supply cable (see Sect. 1.2)
5 internal connection
116 (4.57”)
(ssee Fig. in Sect. 8.9, plug connectors
X3 and X5)
dimensions in mm
10/4
Page 62

10.5 Instrument nameplates
Separate signal converter in rotatable field housing
Altometer
Measuring range
Current output
Tag No.
Primary head constant
Pulse output
Compact flowmeters
Altometer
Measuring range
Current output
Tag No.
Primary head constant
Pulse output
Type designation
Series No.
Holland
Q: 0-150 m
I: 0-20 mA Ri≤ 0.5 kOhm P: 1000 p/s
Tag: 98-FT-096
Q: 0-21.2 m
I: 0-20 mA Ri≤ 0.5 kOhm P: 1000 p/s
Tag:
3
/h GKL: 2.706
Type designation
Series No.
Holland
3
/h GKL: 5.123
ALTOFLUX IFC090F /D/ /6
A96 6008
ALTOFLUX IFM4010K /D/ /6
A94 9872 ISO Kl. E IP 67
DN50/2”-PFA-HC4 PN 40 Bar
Magnetic field frequency
(here: 1/6 of power
supply frequency)
Magnetic field frequency
(here: 1/6 of power
frequency)
Insulation class
of field coils
Protection category
to IEC 529 / EN 60529
Flange pressure rating
or flange class
Electrode material
(see table)
Liner
(see table)
Meter size
DN in mm and
inch equivalent
Abbreviations
Liner
AL Fused aluminium
oxide (99.7% Al2O3)
H Hard rubber
NE Neoprene
PFA Teflon®-PFA
PP Polypropylene
PUI Irethane
T Teflon®-PTFE
W Soft rubber
Teflon®is a registered trademark of Du Pont
10/5
Electrode material
C Conductive rubber compound
HB 2 Hastelloy B2
HC 4 Hastelloy C4
IN Incoloy
M4 Monel 400
Ni Nickel
PT Platinum
TA Tantalum
TI Titanium
V4A Stainless steel 1.4571 (SS 316 Ti)
xx/TC xx with conductive PTFE compound
(xx = base material, e.g. HC4)
Page 63

Measuring principle and function of the system 11
The flowmeter is designed for electrically conductive fluids.
Measurement is based on Faraday’s law of induction, according to which a voltage is induced in
an electrically conductive body which passes through a magnetic field. The following expression
is applicable to the voltage.:
xB xv x
U = K
D
where:
U = induced voltage
K = an instrument constant
B = magnetic field strength
v = mean velocity
D = pipe diameter
Thus the induced voltage is proportional to the mean flow
velocity, when the field strength is constant.
U
B
D
Inside the electromagnetic flowmeter, the fluid passes
through a magnetic field applied perpendicular to the
direction of flow. An electric voltage is induced by the
movement of the fluid (which must have a minimum
U
v
electrical conductivity). This is proportional to the mean
flow velocity and thus to the volume of flow. The induced
voltage signal is picked up by two electrodes which are in
conductive contact with the fluid and transmitted to a signal
converter for a standardized output signal.
This method of measurement offers the following advantages:
1. No pressure loss through pipe constriction or protruding parts.
2. Since the magnetic field passes through the entire flow area, the signal represents a mean
value over the pipe cross-section; therefore, only relatively short straight inlet pipes
x
DN from the electrode axis are required upstream of the primary head.
5
3. Only the tube liner and the electrodes are in contact with the fluid.
4. Already the original signal produced is an electrical voltage which is an exact linear function
of the mean flow velocity.
5. Measurement is independent of the flow profile and other properties of the fluid.
The magnetic field of the primary head is generated by a square wave current fed from the signal
converter to the field coils.
This field current alternates between positive and negative values. Alternate positive and negative
flowrate-proportional signal voltages are generated at the same frequency by the effect of the
magnetic field, which is proportional to the current. The positive and negative voltages at the
primary head electrodes are subtracted from one another in the signal converter. Subtraction
always takes place when the field current has reached its stationary value, so that constant
interference voltages or external or fault voltages changing slowly in relation to the measuring
cycle are suppressed. Power line interference voltages coupled in the primary head or in the
connecting cables are similarly suppressed.
11/1
Page 64

12 Block diagram – signal converter
1 Input amplifier
• overdrive-proof signal processing, rapid and accurate
• digital signal processing and sequence control
• patented, high-resolution A/D converter, digitally controlled and monitored
• high signal-to-noise ratio through low-loss field power supply
2 Field power supply
• the low-loss field power supply generates the pulsed, electronically
controlled DC current for the magnetic coils of the primary head
3 Current output
• galvanically isolated from all other groups
• converts the digital output signal from the µP 3 microprocessor into a proportional current
4 Binary outputs
• galvanically isolated from other groups
• selectable input/output combinations
• pulse output (P), passive FET optocouplers allow connection
of electronic and electromechanical totalizers
• status output (S), for limit value, error identification, or flow direction
in forward/reverse flow mode (F/R)
5 Display/operator control unit (option, D Version)
• large-size illuminated LC display
• 3 keys for operator control of the signal converter
• connection to the internal IMoCom bus
• unit can be retrofitted to basic devices (B Version)
6 IMoCom bus plug connector
for connection of external control and test devices such as:
• HHT handheld terminal (option), display/operator control unit for operation of basic versions
• adapter and CONFIG software for operation via MS-DOS PC
12/1
Page 65

Index Part E
Keyword Section No. Fct. No.
A
Abbreviations 1.3.2, 1.3.4,
Accuracies 10.2
ADC = analog-digital converter 4.5, 12
Ambient temperature 10.3
Application 5.15 3.06
B
Block diagram IFC 010 12
B version (basic) 4, 6.1
C
Cable length 1.3.4
Changeover, power supply 8.3
Characteristics of outputs 5.14
Clearing error messages 4.6
Coding for entry into
setting level 5.10 3.04
CONFIG software 6.1
Connecting & operating points
– front panel 4.2
– PCB power supply 8.9
– PCB signal converter 8.9
Connection diagrams
– GS8A simulator 7.7
– Outputs 2.3
– Power supply 1.2
– primary head/signal converter 1.3.5
Conversion factor
– Quantity (volume) 4.4 + 5.12 3.05
– Time 4.4 + 5.12 3.05
Current output I 2.2, 2.3, 5.6 1.05
D
Data 4.4
Data column 4.1-4-3
Data errors 4.5
Dimensions
– IFC 010 F 10.4
– ZD 10.4
Display 4.2, 5.4, 8.7 1.04
DN = meter size in mm 4.4 3.02
DS, signal cable A 1.3.1 et seq.
E
EC = electronic totalizer 2.3, 5.8 1.06
Electrical connection
– GS8A simulator 7.7
– outputs 2.3
– power supply 1.2
Electromagnetic compatibility page 0/4
EMC = electromechanical totalizer 2.3, 2.6, 5.8 1.06
EN technical standards page 0/4
Error 4.5
Error list 4.5
Error (messages) 4.5
– cancel 4.5
– limits 10.2
– reset / delete 4.6
External totalizers 2.2, 2.3, 5.7 1.06
2.1, 4.4
Keyword Section No. Fct. No.
F
F = forward flow 4.4, 5.3 1.04-1.07
Factory settings 3.2
Fatal error 4.5
FE = functional ground 1.2, 1.3.2
Field power supply 5.11, 10.3, 12 3.02
Flow direction 4.4, 5.1, 5.13 3.02
Flow rate (Q) 4.4, 5.1 3.02
Flow velocity v 4.4, 5.1 3.02
Frequency (pulse output) 2.2, 2.3, 5.7 1.06
Frequency output,
see pulse output P 2.2, 2.3, 5.7 1.06
Full-scale range Q
Function(s) 4.4
Function of keys 4.1-4.3
Functional checks 7.1 et seq.
– hardware info 7.3 2.0.2
– primary head 7.5
– setpoint display values 7.7
– signal converter 7.6, 7.7
– system 7.4
– test full scale range 7.2 2.01
– zero 7.1 3.03
Functional ground FE 1.2, 1.3.2
Functions column 4.1
Fuses (F . . . ) 8.2, 8.3
G
GKL = primary (head) constant 4.4, 5.10 3.02
Grounding primary head 1.3.2
GS 8A = primary (head) simulator 7.7
H
Hand held terminal 6.1
Hardware information 7.3 2.02
I
I = current (analog) output 2.2, 2.3, 5.6 1.05
IEC technical standards page 0/4
IMoCom bus (plug) 6.1, 8.9,12
Initial start-up 3
Input (programming) 4.1 et seq.
Instrument nameplates 10.5
Interface RS 232 6.1, 10.3
Intermediate connection box (ZD) 1.3.5, 10.4
Internal electronic totalizer 2.4, 5.5, 5.7 1.04
K
Keys 4.1-4.3
Keystroke combinations for
– entry into setting level 4.1-4.3 3.04
– error cancellation 4.6
– quitting setting level 4.1-4.3
– totalizer reset 4.6
L
Language of display texts 5.10 3.01
LCD display, see display 4.2, 4.4, 5.4 1.04
Limit message 4.4, 5.8 1.07
Line voltage, see power supply
Low-flow cutoff (SMU) 4.4, 5.3 1.03
100%
4.4, 5.1 1.01, 3.02
E1
Page 66

Keyword Section No. Fct. No.
M
Magnetic field frequency 4.4 + 5.11 3.02
Main menu column 4.1
Main menus 4.1 to 4.3 1.00, 2.00, 3.00
Mass flow measurement,
see user defined unit 4.4, 5.12
Measuring principle 11
Menu 4.1, 4.4
Meter size (DN) 4.4 3.02
N
Numerical format, display 5.4, 5.5 1.04
O
Option = optional equipment 6.1, 10.3
Order numbers 9
Outputs
– characteristics 5.14
– connection diagrams 2.3
– setting 4.4
– – I 5.6 1.05
– – P 5.7 1.06, 3.07
– – S 5.8 1.06, 1.07, 3.07
– voltage stable when
measuring tube empty 6.2
Overflow, display 5.5 1.04
Overranged
– I (current output) 2.1, 2.3, 5.6, 5.8 1.06,1.07
– P (pulse output) 2.2, 2.3, 5.7, 5.8 1.06, 1.07
Overvoltage class 1.2
P
P = pulse output 2.2, 2.3, 4.4, 5.7 1.06
PCB = printed circuit boards 8.9
PC software 6.1
PE = protective conductor 1.2
Power supply (= line voltage)
– changeover 8.3
– connection 1.2, 10.3
– consumption 10.3
– failure 4.5, 7.4
– frequency 1.2, 10.3
– voltage 1.2, 10.3
Primary constant, see GKL 4.4, 5.10 3.02
Primary head
– constant, see GKL 4.4, 5.11 3.02
– simulator GS 8A 7.7
– testing 7.5
Primary simulator, see GS 8A 7.7
Printed circuit boards, see PCB 8.9
Program organization 4.1
Programming = input 4.1-4.3
Programming mode, entry into 4.1-4-3
Protective conductor PE 1.2
Pulse output P 4.4, 5.7 1.06
Pulse width 4.4, 5.7 1.06
Pulses per unit time 4.4, 5.7 1.06
Pulses per unit volume 4.4, 5.7 1.06
Q
Q = flow rate 4.4, 5.1 1.01, 3.02
Q
= full-scale range 4.4, 5.1 1.01, 3.02
100%
R
R = reverse flow 4.4, 5.13 1.04-1.07
Range setting 4.4, 5.1 1.01, 3.02
Replacement
– electronic unit 8.4
– power fuses 8.2
Reset totalizers 4.6
Reverse flow (R) 4.4, 5.13 1.04-1.07
Revert to
– functions column 4.1-4.3
– main menu column 4.1-4.3
– measuring mode 4.1-4.3
– submenu column 4.1-4.3
RS 232 interface 6.1
Keyword Section No. Fct. No.
S
S = Status output 2.2, 2.3, 4.4, 5.7 1.06,1.07
Safety isolation 2.1
Setting level 4.1-4.4 1.00 et seq.,
Signal converter IFC 010
– accuracies 10.2
– cable A 1.3.1
– changeover, power supply 8.2
– connecting & operating points 4.2, 8.9
– connection to power 1.2
– functional checks 7.1-7.7,
– fuses, power 8.2
– mounting location 1.1
– nameplates 10.5
– operator control 4.1-4.3
– power consumption 10.3
– printed circuit boards 8.9
– spare parts 9
– technical data 10
Simulator GS 8A 7.7
SMU = low-flow cutoff 4.4, 5.3 1.03
Software 6.1
Spare parts, see order numbers 9
Status output S 2.2,2.3, 4.4, 5.7 1.06, 1.07
T
T = time constant 5.2 1.02
Technical data
– accuracies 10.2
– dimensions & weights 10.4
– signal converter IFC 010 10.1, 10.3, 10.4
Tests, see functional checks 7.1 et seq.
Time constant (T) 5.2 1.02
Totalizer (internal electronic) 2.2, 5.7 1.06
Trip point 4.4, 5.8 1.06, 1.07
Troubleshooting, see
functional checks 7.1 et seq.
U
Units for
– display 4.4, 5.4 1.04
– flow 4.4, 5.1 1.01
– P 4.4, 5.7 1.06
User-defined unit 4.4, 5.12 3.05
V
v = flow velocity 4.4, 5.1 3.02
VDE standards page 0/4,
W
Weights, see dimensions 10.4
Z
Zero check (adjustment) 7.1 3.03
ZD, intermediate connection box 1.3.5, 10.4
1.1 and 2.1
et seq.
2.00 et seq.,
3.00 et seq.
E2
Page 67

If you need to return flowmeters for testing
or repair to Krohne
Your electromagnetic flowmeter
• has been carefully manufactured and tested by a company
with ISO 9001 certification
• and volumetrically calibrated in one of the world’s most
accurate test rigs.
If installed and operated in accordance with these operating
instructions, your flowmeter will rarely present any problems.
Should you nevertheless need to return a flowmeter for
checkout or repair, please pay strict attention to the following
:
points
Due to statutory regulations concerning protection of the envi-
ronment and the health and safety of our personnel, Krohne
may only handle, test and repair returned flowmeters that
have been in contact with liquids if it is possible to do so without risk to personnel and environment. This means that
Krohne can only service your flowmeter if it is accompanied
by a certificate in line with the following model confirming that
the flowmeter is safe to handle.
If the flowmeter has been operated with toxic, caustic,
flammable or water-endangering liquids, you are kindly
requested
• to check and ensure, if necessary by rinsing or neutralizing, that all cavities in the flowmeter are free from such
dangerous substances.
(Directions on how you can find out whether the primary
head has to be opened and then flushed out or neutralized
are obtainable from Krohne on request.)
• to enclose a certificate with the flowmeter confirming that
the flowmeter is safe to handle and stating the liquid used.
Krohne regret that they cannot service your flowmeter unless
accompanied by such a certificate.
SPECIMEN certificate
Company: Address:
Department: Name:
Tel. No.:
The enclosed electromagnetic flowmeter
Type: Krohne Order No. or Series No.:
has been operated with the following liquid:
Because this liquid is
water-endangering * / toxic * / caustic * / flammable *
we have
– checked that all cavities in the flowmeter are free from such substances *
– flushed out and neutralized all cavities in the flowmeter *
(* delete if not applicable)
We confirm that there is no risk to man or environment through any residual liquid contained in this flowmeter.
Date: Signature:
Company stamp:
E 3
 Loading...