

Page 1

PERSONAL MULTI-EFFECT PROCESSOR
PROCESSUR DE MULTI-EFFETS PERSONNEL
E
1
G
F
Page 2

Precautions
Location
Using the unit in the following locations can result in a malfunction.
• In direct sunlight
Locations of extreme temperature or humidity
•
• Excessively dusty or dirty locations
• Locations of excessive vibration
• Close to magnetic fields
Power supply
Please connect the designated AC adapter to an
AC outlet of the correct voltage. Do not connect
it to an AC outlet of voltage other than that for
which your unit is intended.
Interference with other electrical devices
Radios and televisions placed nearby may experience reception interference. Operate this unit
at a suitable distance from radios and televisions.
2
Handling
To avoid breakage, do not apply excessive force
to the switches or controls.
Care
If the exterior becomes dirty, wipe it with a clean,
dry cloth. Do not use liquid cleaners such as benzene or thinner, or cleaning compounds or flammable polishes.
Keep this manual
After reading this manual, please keep it for later reference.
Keeping foreign matter out of your
equipment
Never set any container with liquid in it near this
equipment. If liquid gets into the equipment, it
could cause a breakdown, fire, or electrical shock.
Be careful not to let metal objects get into the
equipment. If something does slip into the equipment, unplug the AC adapter from the wall outlet. Then contact your nearest Korg dealer or the
store where the equipment was purchased.
Page 3
CE mark for European Harmonized Standards
CE mark which is attached to our company’s products of AC mains operated apparatus until December 31, 1996 means it conforms to EMC Directive
(89/336/EEC) and CE mark Directive (93/68/EEC).
And, CE mark which is attached after January 1,
1997 means it conforms to EMC Directive (89/336/
EEC), CE mark Directive (93/68/EEC) and Low Voltage Directive (73/23/EEC).
Also, CE mark which is attached to our company’s
products of Battery operated apparatus means it
conforms to EMC Directive (89/336/EEC) and CE
mark Directive (93/68/EEC).
THE FCC REGULATION WARNING (for U.S.A)
This equipment has been tested and found to comply
with the limits for a Class B digital device, pursuant to
Part 15 of the FCC Rules. These limits are designed
to provide reasonable protection against harmful interference in a residential installation. This equipment
generates, uses, and can radiate radio frequency energy and, if not installed and used in accordance with
the instructions, may cause harmful interference to
radio communications. However, there is no guarantee that interference will not occur in a particular installation. If this equipment does cause harmful interference to radio or television reception, which can be
determined by turning the equipment off and on, the
user is encouraged to try to correct the interference
by one or more of the following measures:
• Reorient or relocate the receiving antenna.
•Increase the separation between the equipment and
receiver.
•
Connect the equipment into an outlet on a circuit different from that to which the receiver is connected.
• Consult the dealer or an experienced radio/TV technician for help.
Unauthorized changes or modification to this system
can void the user’s authority to operate this equipment.
3
Page 4

Contents
Introduction ............................. 6
Main features .......................... 6
Tur ning on the power ............... 8
Battery Low display ........................... 8
Using the strap holder .............. 8
Controls and connectors ........... 9
LCD screen ....................................... 11
Making connections ............... 12
Initial Settings ........................ 13
Quick Edit ........................................ 13
Play mode ............................. 14
1. Selecting a program ..................... 14
2. Master level ................................. 14
3. Bypass/Mute ............................... 14
4
4. Tuner ........................................... 15
5. Specifying the function of the Value
Dial .............................................. 16
6. Key Lock function .........................17
Rhythm & Bass mode ............. 17
1. Rhythm Pattern ............................ 18
2. Tempo .......................................... 18
3. Bass On/Off & Bass Key .............. 18
4. Rhythm & Bass Reverb Level......... 19
5. Rhythm & Bass Level .................... 19
6. Chain Pattern settings .................. 19
Phrase Trainer mode .............. 20
1. Select the recording mode ............ 20
2. Recording .................................... 22
3. Playback ...................................... 22
4. Pause........................................... 23
Page 5

AUX Pitch mode ..................... 23
Edit mode .............................. 24
1. Select the effect that you wish to edit
........................................................ 25
2. Editing each effect ........................ 25
1) DYNA (Dynamics & Pickup Modeling) 25
2) AMP (Amp Modeling) ...................... 25
3) CAB (Cabinet Modeling).................. 26
4) MOD (Modulation & Filter Effect
Modeling)....................................... 26
5) DLY (Delay Modeling) ...................... 27
6) REV (Reverb Modeling) .................... 27
7) NR (Noise reduction) ....................... 27
8) RENAME ........................................ 27
9) WRITE ............................................ 28
3. Reloading the factory programs ... 28
Troubleshooting ..................... 29
Effect Parameter .................... 30
DYNA (Dynamics & Pickup modeling) 30
AMP (Amp Modeling) ....................... 32
Synth parameters ................................ 36
CAB (Cabinet modeling) ................... 37
MOD (Modulation & Filter Effect
Modeling) ........................................ 39
About the Intelligent Pitch Shifter........... 42
DLY (Delay Modeling) ....................... 43
REV (Reverb Modeling) ..................... 44
Preset Program Name ............ 45
Rhythm Pattern List ................ 46
Specifications ......................... 48
5
Page 6

Introduction
Thank you for purchasing the TONEWORKS
PANDORA PX4D personal multi-effect processor. In order to enjoy your PANDORA PX4D,
please read this owner’s manual carefully and
retain it for future reference.
Main features
The PX4D is a versatile multi-effect unit that
packs an incredible range of guitar/bass amps
and effects into a compact unit which utilizes
Korg's proprietary “
ogy to create detailed and powerful modeling
sounds.
158 types of effect variations with a maximum
of seven effects that can be used simultaneously.
IPE (Integrated Parameter Edit) system allows
easy to adjust effect settings.
6
” modeling technol-
100 user and 100 preset programs
Amp modeling selector and control knobs
The PX4D includes 25 different amp types including 15 types of guitar amp models, 10 types
of bass amp models, plus a synth, each of which
can be edited quickly and easily.
Backlit LCD
The LCD screen can be easily viewed even in
dark locations.
Auto Tuner function
This feature makes tuning fast and easy. You
can also tune without being heard (i.e., while
muted).
Rhythm and Bass function
100 types of rhythm and bass patterns or a metronome can be used. 16 multiple patterns can
also be connected for successive playback.
Page 7

AUX pitch function
You can transpose audio from a CD player or
other device connected to the AUX jack of the
PX4D, and “erase” the bass from a song f or pla y
along purposes with Bass Cancel function.
Phrase Trainer function
Audio from a CD player, guitar or bass can be
recorded (maximum of 31.7 seconds), and then
played back as a loop. The playback speed can
also be slowed down without affecting the pitch
of the audio. The rhythm selected in Rhythm &
Bass mode and the effect output can also be
recorded simultaneously.
TAP button
You can easily set the Delay Time or the tempo
of the Rhythm & Bass function to match the tempo of the song.
Value dial
This lets you rapidly select programs or edit the
effects.
What is ?
(Resonant structure and Electronic
circuit Modeling System) is KORG’s proprietary sound modeling technology which precisely reproduces the complex character and
nature of both acoustic and electric instruments as well as electronic circuits in real
world environments.
variety of sound generation characteristics
including instrument bodies, speakers &
cabinets, acoustic fields, microphones, vacuum tubes, transistors, etc.
emulates a wide
7
Page 8

Turning on the power
Remove the battery cover located
on the bottom of the
PX4D by sliding it in the
direction of the arrow. Insert four AAA alkaline
batteries as shown in
the illustration. Be sure
to insert the batteries
observing the correct polarity.
Battery Low display
When the battery begins to run low, the Low
Battery icon
replace the batteries as soon as possible.
Programs and other data (except for the data
being edited) will not be lost even if the battery
is removed and changed.
Batteries that have run down must be removed
from the PX4D. If you leave dead batteries in
the unit, malfunctions (battery leakage, etc.)
may occur. You should also remove the batteries when you do not expect to use the PX4D
for an extended period of time.
8
will light. When this icon lights,
An AC adapter is not included with this product. It must be purchased separately.
Using the strap holder
1.
Pass your strap through the strap holder.
2. Slide the protrusion (A) of the strap holder
into the attachment slot (B) on the rear of the
PX4D.
A
B
C
Page 9

3. Press in the direction of the
arrow (a) until locking tab (C)
clicks into place.
4. Shake the PX4D lightly to verify that it does not fall off.
Removal
1. Press the strap holder locking
tab (C) in the direction of arrow (b) to release the lock.
2. With the lock released, slide
the PX4D in the opposite direction from when attaching it, and
remove it from the holder.
a
Controls and connectors
1
2
C
3
4
5
6
7
8
17
16
15
14
13
9101112
1. Control knobs
These knobs control the gain, tone, and volume
b
of the amp models and synth parameters.
2. LCD (Liquid Crystal Display)
3. TUNE/BYPASS button
4. EXIT button
This button returns you back to Play mode from
any mode.
9
Page 10

5. ENTER/REC button
This button is used to switch an effect on/off , or to
start recording in Phrase Trainer mode.
6. Input level switch
Use this to adjust the input level depending on the
output level of your guitar or bass.
7. Amp Modeling selector
Selects the amp models.
8. ▲/▼ buttons
Use these buttons to select programs and edit
effects.
9. OUTPUT jack
Connect this jack to your guitar amp, bass amp,
or headphones etc.
10. INPUT jack
Connect your guitar or bass to this jack.
11. AUX jack (stereo)
Connect this jack to a CD player or other audio
source.
12. DC4.5V
The separately sold AC adapter (DC4.5V
should be connected here.
10
13. √/® buttons
Use these buttons to select the parameter that
you wish to edit, and to operate the Phrase Trainer function.
14. Power switch/Backlight switch
This switch turns the power on/off, and also turns
the backlight on/off.
If you are operating the PX4D on batteries, the
operating time will be shorter if the backlight
is on.
15. Value dial
Use this to adjust the master level, edit effects,
and select programs.
16. TAP button
Use this button to set the delay time or the tempo
in Rhythm & Bass mode.
17. Mode buttons
Use these buttons to enter Rhythm & Bass, Phrase
Trainer, or AUX Pitch modes.
)
Page 11

LCD screen
a
b
c
def
a. Effect chain
This area indicates the on/off status of the DYNA,
AMP, CAB, MOD, DLY, and REV effects.
b. Program name/Effect type display
This area shows the program name or effect type.
When the PX4D is bypassed or muted, this will
function as the tuner.
c. Low Battery icon
This icon will light when the batteries run low.
g
d. Mode icons
These icons will light when you are in AUX Pitch,
Phrase Trainer, or Rhythm & Bass modes.
e. Edit/Original icons
The EDIT icon will light when you enter Edit mode .
If the parameter or value being edited matches
the value that is written in the program, the ORIG
icon will light.
f. Program number / value display
This displays the program number.
When you change the Master Level, its value will
be displayed here for several seconds. During
editing, this displays the parameter values.
g. Master/Value icons, bar graph
When MASTER is lit, the master level of the
program is indicated graphically. When VALUE
is lit, the value of the parameter is indicated
graphically.
11
Page 12
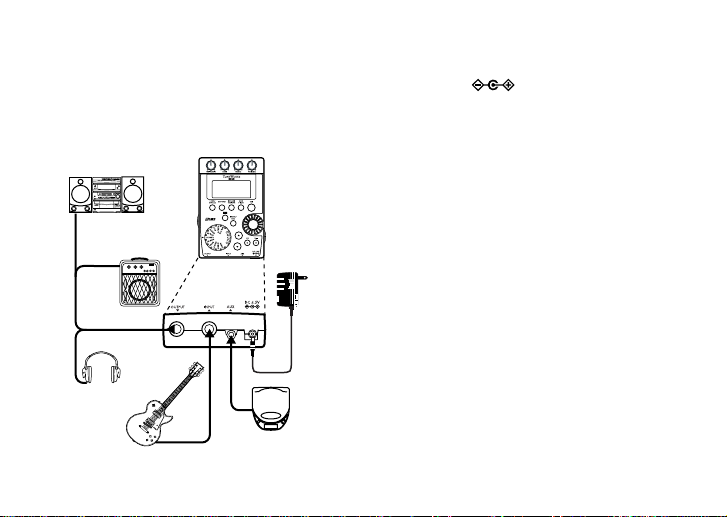
Making connections
When connecting an external device (ie-guitar
amp, bass amp, CD player, ac adapter, etc.) be
sure to turn the unit off.
mini-component /
stereo etc.
guitar amp /bass amp /
12
powered monitor
headphone
*5
*4
*3
guitar or bass
AC adapter
*1
*3
CD player etc.*2
*1 Be sure to use only the specified AC adapt-
er (DC4.5V ).
*2 If a CD player or other audio source is con-
nected to the AUX jack, you can play along
with your guitar or bass. However the volume must be adjusted from the connected
device.
*3 Connecting cables are sold separately.
*4 PX4D’s output jack is stereo. If you use a
standard mono cable to connect it to a gui-
tar or bass amp etc., only the L (left) output
will be heard.
*5
PX4D’s output level and sound quality will vary
depending on which headphones are used.
We recommend using good quality low im-
pedance headphones, 32 Ohms or less with
a sensitivity rating near 100dB/mW or above.
Many headphones sold for use with portable
CD or cassette players will work just fine.
Page 13

Initial Settings
Program selection
Program name
Input level
switch
Amp selection
Amp gain, tone,
and volume
Program
number
Set the
delay time
Master level
adjustment
1. When you finish making connections, set the
power switch to the “ON” position. (This setting is referred to as Play mode.)
Use the ▲/▼ buttons to select a program.
2. Set the input level switch for the output level
of your guitar or bass.
Hi: High-output pickups (e.g., humbucking
pickups or pickups with a preamp)
Lo: Low-output pickups (e.g., single-coil
type pickups)
3. Set the volume control of your guitar or bass
to its usual position. Use the Value dial to
adjust the master level.
Quick Edit
In each mode (except when Mute/Bypass or Ke y
Lock are active), you can use the Amp Model-
ing selector to quickly change the amp modeling type, or use the control knobs to adjust the
gain, tone, or volume of amp modeling. When
you use the amp model selector to change the
amp model type, the cabinet type will automat-
ically change to the recommended type. When
you move a control knob, the parameter name
and value will appear for sev er al seconds in the
value display. If the setting matches the original
setting, the ORIG icon will light.
The Delay Time can also be set by pressing
the TAP button twice at the desired interval (ex-
cept when in Rhythm & Bass mode). To check
the Delay Time that was specified, press and
hold the TAP button for two seconds or longer.
13
Page 14

Settings that you make using Quick Edit will
Master level value
Program number display
Master icon
Value graph
return to the original saved settings if you
change programs or turn off the power before
Writing (see p.28).
Play mode
Play mode is the mode in which you will normally use the PX4D.
1. Selecting a program
You can choose from 100 user programs
(U00...U99) and 100 preset programs
(P00...P99). Use the ▲/▼ buttons to select a
program. Programs can be selected even when
you are in Rhythm & Bass mode, AUX Pitch
mode, or Phrase Trainer mode (except while
recording).
2. Master level
When the MASTER icon is lit, the value graph
will indicate the master level.
When you turn the Value dial to adjust the master level, the master level value will be shown in
14
the program number / value display for several
seconds. The master level is remembered e ven
when the power is turned off.
You can also adjust the settings so that the ▲/
▼ buttons will adjust the master level. (See
p.16)
3. Bypass/Mute
When you press the TUNE/BYP ASS button, the
PX4D will be bypassed, and the original sound
will be dry (no effect).
The effect chain will blink, and the display will indicate “BYPASS” for approximately one second.
If you press and hold the TUNE/BYPASS but-
ton for longer than one second, the output signal will be muted.
Page 15

The effect chain will blink rapidly, and the display
will indicate “MUTE” for approximately one second.
Bypass/mute will be turned off when you press
the TUNE/BYPASS button once again.
You can also return to Play mode by pressing
the EXIT button.
Bypass or Mute can also be entered from modes
other than Play mode.
4. Tuner
The tuner will operate when you bypass or mute.
meter
sharp
note name
calibration
center mark
Play a single string on your guitar or bass. The
LCD will show the note name and the calibration. If the pitch is more than a semitone higher
than the note name, a sharp symbol will appear
at the upper right of the note name.
The display area will act as a meter to show the
pitch.
Tune each string of your guitar or bass so that
the indicator above the center mark is lit.
The tuner (bypass/mute) will be turned off when
you press either the TUNE/BYPASS button.
You can also return to Play mode by pressing
the EXIT button.
Calibration (frequency of the standard A =
440 pitch)
You can use the Value dial to adjust calibr ation
in the range of A = 438 Hz...445 Hz.
The calibration setting you make will be v alid until
the power is turned off. Once the power is turned
off, calibration will be reset to A = 440 Hz.
15
Page 16

5. Specifying the function of the Value
Select a program
Adjust the master level
Dial
You can specify the function that the Value dial
will perform in Play mode. In Play mode, hold
down the EXIT button and press either the √
button or the ® button to assign the following
functions.
● Hold down the EXIT button and press the √
button.
The LCD will indicate “MASTER” for approximately one second.
The Value dial will
and the ▲/▼ buttons will
You can use the Value dial to adjust the master level quickly. Each time the power is turned
on, this setting will be in effect.
16
adjust the master level,
select programs.
Adjust the
master level
Select a program
● Hold down the EXIT button and press the ®
button.
The LCD will indicate “PROGRAM” for approximately one second.
The Value dial will
▲/▼ buttons will
select programs, and the
adjust the master level.
You can use the Value dial to select programs
quickly.
If you want to change the function of the Val-
ue dial so that it will
adjust the master level,
again, hold down the EXIT button once and
press the √ button, or turn on the power.
Page 17

6. Key Lock function
By activating the Key Lock function, you can
disable all operations except for selecting programs. This is a convenient way to prevent
accidental operation during a live performance.
●
Hold down the EXIT button and press the
TUNE/BYPASS button.
The LCD will indicate “KEYLOCK” for approximately one second.
The ▲/▼ buttons will select programs, and the
other buttons and Value dial will not function.
Only program selection is possible
The Key Lock function will be cancelled when
the power is turned off. You can also cancel
the Key Lock function by performing “5.
Specifying the function of the Value Dial.” (p.16).
Rhythm & Bass mode
To enter Rhythm & Bass mode, press the
RHYTHM button once when in Play mode (except for mute/bypass or key lock), AUX Pitch
mode, or Phrase Trainer mode.
When you enter this mode, the Rhythm Pattern
selection screen will appear, the selected rhythm
will start, and the Rhythm & Bass mode icon
will light. The indication of the value graph will
change according to the pattern or tempo.
This mode contains the following five parameters. Use √/® buttons to select parameters,
and use the Value dial and the ENTER/REC
button to set the value of each parameter.
If you select “CHAIN” as the rhythm pattern,
there will be more chain pattern settings. (Refer
to p.19, “Chain pattern settings”)
17
Page 18

Rhythm
pattern
Additional settings when rhythm pattern is "CHAIN"
Chain
pattern
setting
Tempo
Rhythm &
Bass
level
Bass On/Off
and Bass Key
Rhythm &
Bass
reverb level
If you select “JAM” as the recording mode in
Phrase Trainer mode, the rhythm will sound with
the pattern and tempo that you specify here.
The settings you select here are remembered
even when the power is turned off.
1. Rhythm Pattern
Use the Value dial to select the rhythm pattern
(p.46)
Rhythm Pattern
Rhythm & Bass mode icon
18
2. Tempo
Set the tempo in the range of 40–208 bpm.
You can also set the tempo by pressing the TAP
button twice at the desired rhythm.
For a 6/8 time signature, the tempo can be set
in a range of =40–208.
tempo display
3. Bass On/Off & Bass Key
Here you can switch the bass on/off, and specify the key in which the bass will play.
If you press the ENTER/REC button in this screen,
the bass will play in time with the rhythm. Depending on the rhythm pattern that you have selected,
some bass lines will include a chord progression.
When the bass note is on, you can use the Val-
ue dial to set the key in a range of C, C...A, B,
allowing you to practice your guitar or bass in a
scale that matches that key.
Page 19

key display
Key
Pattern location
If “METRONM” – “METRO7”(metronome) is selected as the rhythm pattern, there will be no
bass notes, and this screen will not appear.
When using Chain Patterns, the Bass Key setting will be ignored.
4. Rhythm & Bass Reverb Level
Use the Value dial to set the amount of Reverb
for the Rhythm & Bass.
Reverb level
This uses the same reverb as the program effect. This parameter has no effect if you have
selected a program that does not use reverb
modeling, or if the reverb effect level is “0.”
5. Rhythm & Bass Level
Use the Value dial to set the level of Rhythm &
Bass sound. The bass note will be affected only
if Bass is turned on.
Rhythm & Bass
level
6. Chain Pattern settings
These parameters are added only if you select
“CHAIN” as the rhythm pattern. Press the EN-
TER/REC button to access the Chain Parameter Select screen. Use the √/® buttons to select the location (1...16) for which you want to
change the pattern, and use the Value dial to
select the pattern (p.46) that will be used at that
location. Use the ▲/▼ buttons to specify the
bass key of the selected pattern.
19
Page 20

Up to 16 patterns can be connected. If you want
Recording
mode
Phrase Trainer icon
Recording
time
to create a chain of 15 or fewer patterns, select
“PTN END” for the last pattern.
Press the ENTER/REC button to exit the Chain
Pattern Select screen.
If you change the pattern location by turning
the value dial while holding down the
button, the pattern at which you were located
will be copied to the destination pattern location. This function is con venient when y ou want
to place the same pattern again.
Phrase Trainer mode
An audio source from the AUX jack or a phrase
you play on your guitar or bass can be recorded, and played back repeatedly as a loop.
This provides a convenient way to practice by
playing along with the repeating phrase.
You can slow down the playback speed without
affecting the pitch, which can help you to learn
difficult phrases.
20
√
If you select “JAM” as the recording mode, the
rhythm you specified in Rhythm & Bass mode
will be recorded simultaneously with the guitar
or bass input, and looped.
1. Select the recording mode
In Play mode (except during bypass/mute or k ey
or
®
lock), Rhythm & Bass mode, or A UX Pitch mode,
press the PHRASE TRAINER button to enter
Phrase T rainer mode.
When you enter this mode, the recording mode
and time select screen will appear, and the
Phrase Trainer icon will blink. In this screen,
the PX4D will be ready to record.
The recording mode will cycle through the following choices each time you press the
PHRASE TRAINER button.
Page 21

AUX Records only the AUX input
GTR/BAS Records only the guitar or bass
AUX+G/B Records both the AUX input and
guitar or bass
JAM
Records the guitar or bass together with the rhythm that was last selected in Rhythm & Bass mode
Use the value dial to select the recording time
(for “JAM,” the number of measures).
8 Approximately 7.9 seconds
16 Approximately 15.8 seconds
32 Approximately 31.7 seconds
1, 2, 3… Number of measures
If the recording mode is “JAM,” the recording
quality will be set automatically, based on the
tempo and the specified number of measures.
If you select a long recording time (16 or 32), the
audio quality of the recording will be lower.
If the tempo of the rhythm is extremely slow, it
will not be possible to record a large number
of measures. Please re-specify the tempo in
Rhythm & Bass mode (maximum length is approximately 31.7 seconds)
Start playback on your CD or other audio source,
and at the point where you wish to begin recording, press the ENTER/REC button. Recording will begin.
If the recording mode is “JAM,” recording will
begin after precount.
If, after recording, you want to change the recording mode or recording time, press the
PHRASE TRAINER button while playback is
paused.
The recorded content will be lost when the
power is turned off.
21
Page 22

2. Recording
playback speed(%)
playback
time display
When you begin recording, the recording time
will be indicated as a numerical value and by a
value graph.
Recording
time display
3. Playback
The recorded phrase will playback as a loop.
During playback or while paused, you can use
the ▲/▼ buttons to select programs.
When you want to stop recording, press the EN-
TER/REC button or the [®❙❙]. Recording will
stop, and loop playback will begin automatically. If you do not stop recording, recording will
continue until the selected recording time has
elapsed, and loop playback will begin automatically. If the recording mode is “JAM,” recording
will end automatically at the specified number
of measures, and will switch to loop playback.
The phrase will be recorded and played back
in mono.
22
Rotating the Value dial toward the left will slow
down the playback speed without affecting the
pitch.
You can choose from six levels of playback
speed: 100%, 90%, 80%, 75%, 66%, and 50%.
During playback, you can press the [√√] but-
ton to rewind.
By pressing the PHRASE TRAINER button, you
can hold the sound that was being played at
the moment you pressed the button (the Hold
function). This is convenient when you need to
hear individual notes in a phrase.
Page 23

4. Pause
AUX Pitch icon
Key Transpose only
Bass Cancel turned on
When you press the [®❙❙] button, the playback
will pause. Press the [®❙❙] button once again,
and playback will resume.
Pressing the [√√] button while playback is
paused will return you to the beginning of the
recorded phrase.
If you wish to re-record the phrase, press the
[®❙❙] button to pause playback.
Start the CD or other audio source, and press
the ENTER/REC button at the beginning of the
desired phrase.
If you want to change the recording mode or
time, press the PHRASE TRAINER button
while paused.
AUX Pitch mode
In this mode you can transpose the key (pitch)
of the sound from a CD or other audio source
connected to the AUX jack. You can also apply
the Bass Cancel effect to eliminate the low-frequency range.
Press the AUX PITCH button to enter AUX Pitch
mode and the icon will light.
Each time you press the AUX PITCH button,
you will alternate between Key Transpose Only
and Key Transpose + Bass Cancel.
By setting the Key Transpose setting to 0 and
selecting Key Transpose + Bass Cancel, you can
turn on the Bass Cancel function only.
Press the EXIT button to return to Play mode.
23
Page 24

The output will be mono in AUX Pitch mode.
Before
writing
After
writing
The AUX Pitch setting is remembered even
when the power is turned off.
For some recordings, Bass Cancel may not be
as effective as you would like.
Use the Value dial to specify the amount of key
transposition. The key can be transposed in a
range of +/-1 octave.
Display of
10 cent units
Display of
100 cent units
The value can be adjusted upward and downward for 3 semitones in 10 cent steps, and in
semitone steps (100 cents) for the remainder
of the range.
24
Edit mode
In this mode you can turn each effect on/off,
and edit the effect type, parameter values, and
program name.
In Play mode, press the √ (or ®) button to
access the DYNA effect edit screen.
In any screen of Edit mode, you can use the
control knobs to edit the Amp models, or use
the TAP button to set the delay time.
Press the EXIT button to return to Play mode.
If a program was not written after it was edited, the decimal
point of the program number will
light.
The edited settings will return to the settings
of the original program if you switch programs
or turn off the power without Writing (see p.28).
Page 25

1. Select the effect that you wish to edit
On,
Off
Parameter
value
Type selection
*Operation will be different if SYNTH is
selected as the type.
Amount of distortion*
High range*Low range*
Volume*
On,
Off
Mid range*
Type selection
Each time you press the √/® buttons, you will
cycle through the effects in the order shown below. When an eff ect is selected, its icon will blink.
1)DYNA
(Dynamics & Pickup Modeling)
These are dynamics-type effects such as compressor and auto-wah that modify the tone, and
pickup modeling effects.
2. Editing each effect
For each effect, you can select the effect type
and set its parameter values.
Effects that are turned “OFF” will automatically
be turned on if you press the ENTER/REC but-
ton or use the ▲/▼ buttons to select the effect
type.
For details on the effect types and parameters,
refer to Effect P ar ameters (p.30). Renaming the
program and writing the program are also performed here.
2)AMP (Amp Modeling)
The fifteen types BTQ CLN–FUZZ are guitar amps,
and the ten types VALVE–UKMAJOR are bass amps.
SYNTH is a synth for both guitar and bass.
25
Page 26

The value display will indicate “Gt” for approxi-
Presence
Type selection
On,
Off
On,
Off
Parameter
value
Type selection
mately one second if you’ve selected a guitar
model, or “bA” if you’ve selected a bass model.
The amp type selected by the amp modeling
selector can be selected and edited even without entering Edit mode.
When you use the Amp
Modeling selector to select an amp, the PX4D will
automatically select the most appropriate cabinet
model and turn it on.
The VOLUME control knob can be used to ad-
just the V OLUME even when the amp modeling
effect is “OFF.”
3)CAB (Cabinet Modeling)
This simulates the acoustical characteristics of
the amp’s cabinet. This is especially effective
when you are not using an amp (e.g., when using headphones, or when connecting to a mixer, hard-disk recorder , or audio de vice). The eleven types 1X8TWD–4X12VIN are guitar amp cab-
inets, and the twelve types LA 4X10–COMBI are
bass amp cabinets.
26
The value display will indicate “Gt” for approximately one second if you’ve selected a guitar
amp cabinet, or “bA” if you’ve selected a bass
amp cabinet.
You are free to use a guitar AMP with a bass
CAB, or a bass AMP with a guitar CAB.
4)MOD (Modulation & Filter Effect Modeling)
These are modulation and filter-type effects
such as chorus, flanger, phaser, and pitch
shifter.
Page 27

5)DLY (Delay Modeling)
Adjust the
depth of noise
reduction
Select the
character
Select the
character
location
These are spatial-type effects for which y ou can
set the delay time by the interval at which you
press the TAP button.
Delay
On,
Off
time
Effect
level
Type selection
6)REV (Reverb Modeling)
These are spatial-type effects that add spaciousness to the sound.
On,
Off
Effect
level
Type selection
7)NR (Noise reduction)
Use the Value dial to adjust the depth of the
noise reduction that is applied.
Increasing this value will produce more noise
reduction. Normally you will adjust this so that
you do not hear obtrusive noise when the strings
are lightly muted.
If the NR value is raised excessively, the sound
may be cut off prematurely, depending on the
device that is connected. If this occurs , reduce
the value.
Adjust the NR level as suitable for your guitar,
bass, or pickup.
8)RENAME
Here you can specify a name for each program.
The following characters can be used: space,
0–9, A–Z, “, ‘, ❋, +, -, /.
27
Page 28

9)WRITE
Here you can write (store) a program that you
created.
Use the Value dial to select the writing destination (User programs only). When you do so, the
name of the program that currently occupies the
writing destination will be displayed briefly.
If you decide not to write, press the √ (or ®)
button to select a different screen.
When you press the ENTER/REC button, the edited program will be written into memory.
When the program has been written, the LCD will
indicate “COMPLT” for appro ximately one second.
Write
Select a user program
number as the writing
Program number that currently
occupies the writing destination
Before writing an edited program into a different program number, be sure that you do not mind overwriting the data that is currently in that program number. The program data that is overwritten will be lost.
destination
28
It is not possible to write to a preset program.
3. Reloading the factor y programs
While holding down the RHYTHM button and
the ▲ button, turn on the power. The LCD will
ask “RELOAD?”
If you press the ENTER/REC button, the factory-set programs will be re-loaded into the user
program area. The display will indicate “RE-
LOAD”, “VERIFY”, “COMPLT” for a short time,
and then the power-on screen will appear.
Never turn off the power during the reload operation.
If you decide not to reload, press the EXIT but-
ton while the “RELO AD?” indication is still sho wn.
The factory programs will not be reloaded; the
normal power-on screen will appear, and the
PX4D will be in Play mode.
Be aware that if you reload the factory programs, the user programs and any settings that
are remembered when the power is turned off
(master level etc.) will all be rewritten.
Page 29

Troubleshooting
If the PX4D does not operate as you expect,
please check the follo wing points first. If this does
not resolve the problem, contact your dealer.
1.Power does not turn on.
•Are batteries installed? Alternatively, is the
correct AC adapter connected to an AC outlet?
2.No sound
•Are your guitar or bass, amp and/or headphones connected to the correct jacks?
• Is your amp turned on and set correctly?
• Are any cables broken?
• Is the master level of the PX4D set to “0” or
to a low level?
• The VOLUME control knob may have been
turned down.
• Is the PX4D muted?
Be aware that if all effects are off, the chain
display will disappear, and it will not be possible to distinguish Bypass or Mute from the
LCD display.
• Is the volume of your guitar turned down?
3.The volume from the device connected to
the AUX jack is too loud or too soft, or cannot be heard.
• Adjust the output level of the connected device.
Make connections to the headphone jack of
the device, instead of to its line output.
• Are you in Phrase Trainer mode?
Exit Phrase Trainer mode.
• Are you using a connection cable with a builtin resistor?
4.Effects do not apply
• Is the PX4D bypassed? (the effect chain will
be blinking)
• Are the effects used in the program turned
on?
5.Tuner does not work.
• Is the PX4D bypassed or muted?
29
Page 30

Effect Parameter
DYNA (Dynamics & Pickup modeling)
TYPE (π/† button) VALUE (Value Dial)
COMP This compressor produces consistent levels and sustain.
DYNAEXC This effect dynamically applies an exciter according to your
VOX WAH Models a VOX V847 wah pedal. Adjusts location of a pedal.
WAHUP1
WAHUP2
WAHDWN1
WAHDWN2
SLOWATK
OCTAVE This generates a pitch one octave lower than the original
picking strength. (This is especially eff ective when you want
to give more sparkle to clean sounds.)
Positive-polarity auto-wah that responds sensitively to attacks.
Positive-polarity auto-wah that responds smoothly to attacks.
Negative-polarity auto-wah that responds sensitively to attacks.
Negative-polarity auto-wah that responds smoothly to attacks.
Smooths the attack to create a violin-like effect
sound, and mixes it with the original sound to add a sense
of depth and low end. This effect may not operate correctly if
two or more strings are played simultaneously, or when lowpitched strings are played.
. Specify the attack speed.
30
Adjusts sensitivity. (1.0...10.0)
Adjusts sensitivity. (0...10.0)
(1.0...10.0)
Adjusts sensitivity. (0...10.0)
(1.0...10.0)
Adjusts effect level. (0...10.0)
Page 31

TYPE (π/† button) VALUE (Value Dial)
RING An effect that produces bell-like sounds. (For the cleanest
RINGUP
RINGDWN
AC SIM An effect that simulates the tonal character of an acoustic
HUMSGL Pickup modeling that transforms the sound of a humbucking
SGLHUM Pickup modeling that transforms the sound of a single-coil
HF TONE Pickup modeling that simulates the “half-tone” position
PHASOUT Pickup modeling that simulates the “out of phase” sound
COMP2 A compressor with an emphasized attack. Adjusts sensitivity. (1.0...10.0)
LIMITER A limiter that makes the level more consistent. Specify the compression ratio.
effect, use the neck pickup , turn down the tone control of
your instrument, and play near the 12th fret.)
A ring modulator in which the effect changes dynamically
depending on your picking strength.
guitar.
pickup into the sound of a single-coil pickup.
pickup into the sound of a humbucking pickup .
between two pickups.
when two pickups are connected out of phase.
Specify the frequency.
(1.0...10.0)
Adjusts sensitivity. (0...10.0)
Adjusts tone. (0...10.0)
(0...10.0)
31
Page 32

TYPE (π/† button) VALUE (Value Dial)
B OD Overdrive for bass.*
B DIST Distortion for bass.*
B FUZZ Fuzz for bass.*
PREAMP1 Preamp set to a clear tone for bass.
PREAMP2 Preamp set to a muted tone for bass.
BALANCE Creates the sound of blending the output of two pickups for
LOWCUT
FRETLES
*: This is usually an effect for bass, but you can use it with the SYNTH amp model to produce a thick
sound when using a guitar.
bass.
Filter that cuts the unwanted low-frequency range. Effective for
recording.
Settings that simulate the sound of a fretless bass.
Amount of distortion.
(1.0...10.0)
Adjusts tone. (0...10.0)
Adjusts frequency. (0...10.0)
Adjusts tone. (0...10.0)
AMP (Amp Modeling)
When using Amp Modeling, the control knobs (GAIN/MID, BASS, TREBLE, VOLUME) and Value
dial will be active. The VOLUME knob can still be used even when Amp Modeling is “OFF.”
If SYNTH is selected as the type, the control knobs will control oscillator selection, VCF setting,
direct level, and synth level respectively. Types marked by an asterisk* can also be selected by the
amp modeling selector. In order to take full advantage of the characteristics of Amp Modeling, we
recommend that you use it in conjunction with Cabinet Modeling when listening through headphones or when recording from line output.
32
Page 33

TYPE (π/† button or Amp modeling selector)
BTQ CLN*
BTQ OD
TWD1X12 Combo guitar amp covered in tw eed cloth. (recommended
TWD4X10 4x10 combo guitar amp designed for bass guitar.
BLK2X12* 2x12 combo guitar amp indispensable for country or blues
AC15* VOX AC15 manufactured in 1962. (recommended CAB:
AC30 VOX AC30 modeling. (recommended CAB: 2x12VOX)
AC30TB* Brilliant channel of a VOX AC30TB. (recommended CAB:
UKBLUES UK-manufactured vintage stack guitar amp head.
UK '70S High treble channel of a UK-manufactured 1969 model 100
Clean channel of a high-end 100 W hand made guitar amp.
(recommended CAB: 4x12CLS, 4x12VIN, 4x12MDN)
Overdrive channel of a high-end 100 W hand-made guitar
amp. (recommended CAB: 4x12CLS, 4x12VIN, 4x12MDN)
CAB: 1x12TWD)
(recommended CAB: 4x10TWD)
players. (recommended CAB: 2x12BLK)
1x12VO X)
2x12VO X)
(recommended CAB: 4x12CLS)
W guitar amp head. (recommended CAB: 4x12CLS)
VALUE (Value Dial &
Control Knobs)
GAIN/MID
............
amount of distortion
...................
BASS
.............
TREBLE
VOLUME
Value dial
.............
high range
.......
output volume
mid range (0...10.0)
low range
33
Page 34

TYPE (π/† button or Amp modeling selector)
UK '80S* UK-manufactured 1983 model 100W guitar amp head with
master volume. (recommended CAB: 4x12CLS, 4x12VIN,
4x12MDN)
UK MDN* UK-manufactured 100 W modern guitar amp. (recommend-
ed CAB: 4x12VIN, 4x12MDN)
US HI-G 1991 model 100 W guitar amp head co vered in snake skin.
(recommended CAB: 4x12VIN, 4x12MDN)
US MDN* High-gain guitar amp with eye-catching metal plate.
(recommended CAB: 4x12VIN, 4x12MDN)
FUZZ Vintage fuzz.
VALVE* A vacuum tube bass amp with the ULTRA LO switch turned
ON. (recommended CAB: CLS8X10)
VALVE2 A vacuum tube bass amp ideal for rock. (recommended
CAB: CLS8X10)
CLASSIC A vacuum tube bass amp whose basic character changes
according to the setting of the value dial. (recommended
CAB: COMBI)
SCOOPED A bass amp that is typical of 80’s sounds. (recommended
CAB: MTL4X10)
34
VALUE (Value Dial &
Control Knobs)
GAIN/MID
............
amount of distortion
...................
BASS
.............
TREBLE
VOLUME
Value dial
.............
GAIN/MID
...................
BASS
TREBLE
VOLUME
Value dial
.....
mid-range frequency (1...5)
high range
.......
output volume
mid range (0...10.0)
............
.............
high range
.......
output volume
low range
mid range
low range
Page 35

TYPE (π/† button or Amp modeling selector)
LA STUD* A bass amp that is typical of the LA sound. (recommended
GOLDPNL A bass amp distinctive for its eye-catching gold panel and
JAZZ A combo bass amp favored by jazz bassists. (recommended
STUDIO* A vacuum tube combo bass amp ideal for the Motown
AC100 A 100W vacuum tube bass amp made by Vox. (recommend-
UKMAJOR A 200W vacuum tube bass amp made in the UK.
SYNTH*
CAB: LA 4X10, LA 1X18)
clean sound. (recommended CAB: MDN4X10)
CAB: JAZ1X15)
sound. (recommended CAB: STU1X15)
ed CAB: AC 2X15)
(recommended CAB: UK 4X15, UK 4X12)
Chromatic synth modeling. (recommended CAB:4X12MDN)
VALUE (Value Dial &
Control Knobs)
GAIN/MID
BASS
TREBLE
VOLUME
Value dial
GAIN/MID
BASS
TREBLE
VOLUME
Value dial
Refer to separate Synth
parameters
............
...................
...
mid-range frequency (1...5)
...................
.............
mid range
low range
.............
high range
.......
output volume
..........
gain setting
low range
.............
high range
.......
output volume
mid range (0...10.0)
35
Page 36

Synth parameters
Oscillator selection: 0: Sawtooth wave 2 octaves down 1: Sawtooth wave 1 octave down
0...15 (GAIN/MID knob)
VCF setting: 0…10.0 Voltage Controlled Filter sensitivity adjustment.
(BASS knob)
Direct level: 0...10.0 Adjusts the volume of the guitar or bass.
(TREBLE knob)
Synth level: 0...10.0 Adjusts the volume of the synth.
(VOLUME knob)
Threshold adjustment: Adjusts the sensitivity of the synth in response to the volume of the
1.0...10.0 (Value dial) guitar or bass. Adjust this as appropriate for your guitar, bass, or pickup.
The Synth is effective only when single notes are played. The desired effect will not be obtained if
chords are played.
If your instrument is not tuned correctly, the results may not be as you expect. In this case, re-tune
your instrument.
2: Sine wave 1 octave down 3: Sawtooth wave
4: Sine wave 5: Sawtooth wave 1 octave up
6: Sine wave 1 octave up 7: Sine wave 2 octaves up
Oscillators 8...15 are oscillators 0...7 with portamento turned on.
0...4.7 is sensitivity adjustment in the positive (+) direction, and 5.0...10.0
is sensitivity adjustment in the negative (-) direction.
Set this to 5.0 for a sine wave oscillator.
36
Page 37

CAB (Cabinet modeling)
TYPE (π/† button) VALUE (Value Dial)
1X8TWD This model simulates an open back cabinet with one 8-inch
2X10BLK This model simulates an American open back cabinet with
4X10TWD
1X12TWD This model simulates an open back cabinet with one 12-inch
1X12VO X This model simulates a Vox open back cabinet with one 12-
2X12BLK This model simulates an American open back cabinet with
2X12VO X This model simulates a Vox open back cabinet with two 12-
4X12VO X A closed-back guitar cabinet used in recent VOX amps,
4X12CLS This simulates a closed back cabinet with four 25W 12-inch
4X12MDN This simulates a closed back cabinet with four 75W 12-inch
speaker for guitar.
two 10-inch speakers for guitar .
This simulates an open back cabinet with four 10-inch speakers for guitar.
speaker for guitar typically used for blues.
inch “Blue” speaker f or guitar.
two 12-inch speakers for guitar .
inch “Blue” speakers for guitar.
containing four neodymium speakers
speakers for guitar .
speakers for guitar .
PRESENCE: Adjusts tone of
the high-frequency range.
(0...10.0)
37
Page 38

TYPE (π/† button) VALUE (Value Dial)
4X12VIN This simulates a closed back cabinet with four 30W 12-inch
LA 4X10 Four 10-inch speakers / LA sound cabinet model f or bass.
MDN4X10
MTL4X10 Four 10-inch aluminum-cone speakers / modern cabinet
CLS8X10
UK 4X12 Four 12-inch speakers / UK-manufactured cabinet model for
STU1X15
JAZ1X15 One 15-inch speaker jazz combo cabinet model for bass.
AC 2X15 Two 15-inch speakers / cabinet model for AC100.
US 2X15
UK 4X15 Four 15-inch speakers / UK-manufactured cabinet model for
LA 1X18 One 18-inch speaker / LA sound cabinet model for bass.
COMBI One 12-inch and one 18-inch speaker combination cabinet
speakers for guitar .
Four 10-inch speakers / modern-type cabinet model for bass.
model for bass.
Eight 10-inch speakers / classic-type cabinet model for bass.
bass.
One 15-inch speaker studio combo cabinet model for bass.
Two 15-inch speakers / US-manufactured cabinet model for bass.
bass.
model for bass.
38
PRESENCE: Adjusts tone of
the high-frequency range.
(0...10.0)
Page 39

MOD (Modulation & Filter Effect Modeling)
TYPE (π/† button) VALUE (Value Dial)
CHORUS1 Vintage chorus in which the effect sound is output to the left
CHORUS2 Vintage stereo chorus that inverts the phase of the effect
FLANG1…3
FLANG4 Vintage flanger that inverts the phase of the feedback.
PHASER1 A popular four-stage vintage phaser.
PHASER2 A four-stage vintage phaser with a thick mid-range.
PHASER3 A ten-stage vintage phaser with a mild effect.
U-VIBE1 Simulation of a pedal vibe set to chorus mode.
U-VIBE2 Simulation of a pedal vibe set to vibrato mode.
TREM1 Smooth tremolo.
TREM2 Tremolo built into a guitar amp.
TREM3 Strong and deep tremolo.
and the direct sound to the right.
sound between left and right, creating more spaciousness.
Vintage flanger with a distinctive sound. (1, 2, 3 have
feedback amounts of 0%, 22%, and 60% respectively)
Adjusts modulation speed.
(0.1...10.0 [Hz])
Adjusts modulation speed.
(1.0...10.0 [Hz])
39
Page 40

TYPE (π/† button) VALUE
AT PAN1 Auto Pan. (LFO: square wave )
AT PAN2 Auto Pan. (LFO: sine wave )
ROTARY1 Rotary speaker simulation. Adjusts modulation speed
ROTAR Y2, 3
PITCH1…3 Pitch shifter (PITCH1, 2, 3 differ in the level of the effect).
MAJ3UP Intelligent pitch shifter; a 3rd up in a major key.
MAJ3DWN Intelligent pitch shifter; a 3rd down in a major key.
MIN3UP Intelligent pitch shifter; a 3rd up in a minor key.
MIN3DWN Intelligent pitch shifter; a 3rd down in a minor key.
PER4TH Intelligent pitch shifter; a 4th up in a major key.
PER5TH Intelligent pitch shifter; a 5th up in a major key.
MAJ6TH Intelligent pitch shifter; a 6th up in a major key.
Rotary speaker simulation in which your playing dynamics
control the speed.
2 switches from slow to fast when you play strongly .
3 switches from slow to fast when you play softly.
Adjusts modulation speed.
(0.1...10.0 [Hz])
(1.0...10.0 [Hz])
Specify the level at which
switch rotor speeds.
(1.0...10.0)
Amount of pitch shift (-24, -17,
-12…-1, -d, d, 1…12, 19, 24)
(d = detune)
Specify the key (C, C#…A#, B)
40
(Value Dial)
Page 41

TYPE (π/† button) VALUE
FEEDBK1, 2
FEEDBK3, 4
FILTER Fixed filter effect. Adjusts frequency
FILTUP1 Positive-polarity low-pass filter type auto-wah.
FILTUP2
FILTDWN1 Negative-polarity low-pass filter type auto-wah.
FILTDWN2
TALK 1…4 An effect that simulates a “talking guitar”.
RANDOM 1…4
An effect that artificially generates feedback, and operates
when a note is held for an extended time.
2 generates feedback one octave higher.
An effect that artificially generates feedback, and operates
constantly when sustained.
4 generates feedback one octave higher.
Low-pass filter auto-wah with positive-polarity and a strong peak.
Low-pass filter auto-wah with negative-polarity and fast response.
1:YAH-YAH, 2:U-WAH, 3:YOI-YOI, 4:YEAH
Random step filter that moves a filter randomly.
1, 2, 3, and 4 by changing the frequency band affected by the
filter.
0...4.7 adjusts the effect level.
5.0...10.0 adjusts the vibrato
depth.
(1.0...10.0 [Hz])
Adjusts sensitivity (0...10.0)
Adjusts sensitivity (0.0...10.0)
Adjusts modulation speed
(0.10...10.0 [Hz])
(Value Dial)
41
Page 42

About the Intelligent Pitch Shifter
The Intelligent Pitch Shifter creates musically useful harmonies by varying the amount of pitch
shift according to the note you play and the key in which you are playing. For example if you select
a pitch shift of a 3rd up in a major key (MAJ3UP), the amount of pitch shift will vary automatically
between three semitones (a minor third) and four semitones (a major third).
• When MAJ3UP is used with a key setting of C
The pitch created by the intelligent pitch
shifter is shown in parenthesis ( ).
The PX4D provides seven types of intelligent pitch shifting, with intervals of a 3rd, 4th, 5th, and
6th. (For the 3rd, you can select either the upper or lower part, and a major or minor key.)
If your instrument is not tuned correctly, the results may not be as you expect. In this case, re-tune
your instrument.
The intelligent pitch shifter will function when you play individual notes. It cannot produce the effect
for chords.
42
Page 43
DLY (Delay Modeling)
Each delay type, (1, 2, 3, 4, 5) have different amounts of feedback.
The delay time is set by the interval at which you press the TAP button twice. The specified delay
time can be a maximum of 500 ms for SLAP or a maximum of 2 sec for MULTI, and can be
checked by holding down the TAP button.
TYPE (π/† button) VALUE (Value Dial)
SLAP1…5 Slap-type delay whose delay time is 1/4 of the interval at
DELAY1…5
PPDLY1…5
ECHO1…5 Tape echo simulation with a warm tone.
MULTI1…5 Dual-head tape echo simulation with special stereo design.
which you press TAP.
Stereo delay.
Dual-tapped ping-pong delay that pans the sound left and
right.
(creates a spacious reverberation)
Adjusts effect level (0...10.0)
43
Page 44

REV (Reverb Modeling)
TYPE (π/† button) VALUE
DRYAIR Reverb that produces a sensation of dry air.
WETAIR Reverb that produces a sensation of wet air.
ROOM1 Bright-sounding room reverb.
ROOM2 Mellow-sounding room reverb.
PLATE1 Tight-sounding plate reverb.
PLATE2 Bright-sounding plate reverb.
HALL1 Reverberation of a mid-sized hall.
HALL2 Reverberation of a large hall.
SPRING1 Spring reverb of a guitar amp.
SPRING2 Dense spring reverb.
44
(Value Dial)
Adjusts effect level (0...10.0)
Page 45

Preset Program Name 00…69: Guitar program, 70…99: Bass program
No. Name No. Name No. Name No. Name No. Name
P00 TRAPPED
P01 J-CLEAN
P02 VELVET
P03 PHASCLN
P04 WILD'04
P05 ACOUSTC
P06 ROCK
P07 BUBBLES
P08 JIMI 69
P09 AWHOSTX
P10 NUGLORY
P11 VOXTREM
P12 PUDDLE
P13 FABTONE
P14 ULI JON
P15 50TWEED
P16 EC WAH
P17 TROWER
P18 MR SG
P19 CL FLNG
P20 DARK
P21 BOWATTK
P22 LUCKY
P23 STEVIE
P24 NEMO
P25 MELISSA
P26 POP
P27 JAZZY
P28 UK'80
P29 HUMBLE
P30 G SYNTH
P31 PIEZO
P32 US MDN
P33 ROTARY
P34 FEEDBK
P35 HRM SYN
P36 PASS
P37 BLUES
P38 VOXWAH
P39 US HI-G
P40 SLOWPAN
P41 FILTER
P42 E MINOR
P43 CHORUS
P44 OCTAVE
P45 C MAJOR
P46 SLIPNOT
P47 AC CLN
P48 ZEBRA
P49 COMP CL
P50 SOLOPAN
P51 FLANGE
P52 LINKIN
P53 FLOYD
P54 WHOTOWN
P55 HI SYN
P56 AUDIO
P57 ARPGVIB
P58 STACKED
P59 OCTFILT
P60 SURF
P61 CHARLOT
P62 SUBSYNT
P63 ADD6MOR
P64 PARALIZ
P65 SWEETOD
P66 PAPA
P67 YAH VOC
P68 SHADOWS
P69 RINGER
P70 STUFUNK
P71 STUFING
P72 STUCORD
P73 STUHARM
P74 STUSOLO
P75 BONEHED
P76 TAPROOM
P77 OCTBASS
P78 OVERDRV
P79 STUWAVE
P80 THUMB
P81 COUNTRY
P82 MOTOWN
P83 B JAZZ
P84 B BLUES
P85 FRETLES
P86 B RNB
P87 VALVERY
P88 PICKER
P89 SLAPIT
P90 CANYON
P91 DRIVEN
P92 B CHORS
P93 PHASOLO
P94 THUMPER
P95 TALKER
P96 FAXMAN
P97 DISTORT
P98 FILTERD
P99 B SYNTH
45
Page 46

Rhythm Pattern List
No. Name C P No. Name C P No. Name C P No. Name C P No. Name C P
1 METRONM 1 1
2 METRO2 1 1
3 METRO3 1 1
4 METRO4 1 1
5 METRO5 1 1
6 METRO6 1 1
7 METRO7 1 1
88BEAT1 1 4
98BEAT2 1 1
10 8BEAT3 2 2
11 8BEAT4 1 2
12 8BEAT5* 2 2
13 8BEAT6 1 1
14 8BEAT7 1 1
15 8BEAT8 1 1
16 8BEAT9 2 2
17 8BEAT10 1 1
18 8FILL1* 1 1
19 8FILL2 1 1
20 8FILL3 1 1
C: Number of measures when used in a pattern chain. P: Number of measures.
46
21 8FILL4 1 1
22 8FILL5 1 1
23 8BRK 1 1 1
24 8BRK 2 1 1
25 8SHFL1 1 2
26 8SHFL2 1 1
27 8SHFL3 2 2
28 16BEAT1 2 2
29 16BEAT2 2 2
30 16BEAT3 1 1
31 16BEAT4 2 2
32 16BEAT5 1 1
33 16BEAT6 1 1
34 16BEAT7 1 1
35 16BEAT8 1 1
36 16BEAT9* 1 2
37 16FILL1 1 1
38 16FILL2 1 1
39 16FILL3 1 1
40 16FILL4 1 1
41 16FILL5 1 1
42 16BRK 1 1
43 16SHFL1 1 2
44 16SHFL2 1 1
45 16SHFL3 1 1
46 SHUFILL 1 1
47 3/4 2 2
48 3/4SHFL 2 2
49 6/8 1* 2 4
50 6/8 2* 2 4
51 5/4* 1 1
52 6/4 1 1
53 7/4 1 1 1
54 7/4 2 1 1
55 POP1* 2 4
56 POP2* 1 4
57 ROCK1 1 1
58 ROCK2 1 2
59 70ROCK 1 2
60 METAL1 1 1
61 METAL2 1 1
62 MTLFILL 1 1
63 R'N'B 1 2
64 BLUES* 1 12
65 BLUEFIL 1 1
66 COUNTRY 1 1
67 BALLAD 1 1
68 JAZZ1 2 2
69 JAZZ2* 2 2
70 FASTJAZ* 1 1
71 II-V* 2 8
72 FUNK1 2 2
73 FUNK2 2 2
74 FUNK3 1 1
75 LINEAR 1 1
76 MOTOWN1* 1 2
77 MOTOWN2 1 1
78 SURF1 1 1
79 SURF2* 1 4
80 REGGAE1 2 2
81 REGGAE2* 1 1
82 REGGAE3* 2 2
83 DANCE1 2 2
84 DANCE2 2 2
85 DANCE3 1 1
86 DANCE4* 1 1
87 DISCO1 1 1
88 DISCO2 1 1
89 EURO 1 1
90 NEW RNB* 2 2
91 BOSSA 2 2
92 SAMBA1 1 1
93 SAMBA2 1 1
94 TANGO 1 1
95 AFRO* 1 1
96 LATIN1* 1 1
97 LATIN2* 1 1
98 SONGO 1 1
99 POLY 1 1
100 ONDO 2 2
Page 47

* The bass line of these rhythm patterns follow the chord progressions shown below. (The chord
progressions when used in a pattern chain is shown in parenthesis [ ]. )
12 8BEAT5 I – IV
18 8FILL1 I – V
36 16BEAT9 [ I (m) – V (m) ] – VI – VII
49 6/8 1 [ I – VI m ] – IV – V
50 6/8 2 [ Im – III ] – IV – V
51 5/4 Im – Vm
55 POP1
56 POP2 [ I ] – VIm – IV – V
64 BLUES [ I ] – IV – I – V – IV – I – V
69 JAZZ2 I (m) – IV – VII (m) – III
70 FASTJAZ Im – IV
[ I – V – VIm – V ] – IV – IIIm – IIm – V
71 II – V
76 MOTOWN1 [ I ] – IV
79 SURF2 [ I ] – VIm – IV – V
81 REGGAE2 I – VIm
82 REGGAE3 I – VII
86 DANCE4 I – VII
90 NEW RNB Im – VII – VI – V
95 AFRO I – VII
96 LATIN1 I – IV
97 LATIN2 I – VII
[ Im – IV ] – VIIm – III – VIm – II – V
47
Page 48

Specifications
• Effects: 158 types (Maximum number of effects available simultaneously: 7)
• Number of programs: User: 100, Preset: 100
• Inputs: guitar input (1/4” jack)AUX (mini stereo jack)
• Output: line/headphone dual-purpose output (stereo phone jack)
• Tuner section: detection range: 27.5 Hz–2,093 Hz (A0–C7)
• Rhythm section: 40–208 bpm
• Power supply: four AAA alkaline batteries:
• Dimensions (W x D x H): 76 mm x 112 mm x 27 mm (2.99” x 4.41” x 1.06”)
• Weight (not including batteries): 138g (0.30lbs.)
• Included items:
• Option: AC adapter
Appearance and specifications are subject to change without notice for product improvement.
48
calibration: A = 438 Hz–445 Hz
Allows 10 hours of continuous use (backlight OFF)
Allows 7 hours of continuous use (backlight ON)
separately sold AC adapter (DC4.5V:
Owner’s manual, four AAA alkaline batteries for checking operation, Strap holder
)
Page 49

49
Page 50

Precautions
Emplacement
L’utilisation de cet instrument dans les endroits suivants peut en entrainer le mauvais f onctionnement.
• En plein soleil.
• Endroits tres chauds ou tres humides.
• Endroits sales ou fort poussiereux.
• Endroits soumis a de fortes vibrations.
• A proximite de champs magnetiques.
Alimentation
Branchez l’adaptateur secteur fourni a une prise secteur de tension appropriee. Evitez de brancher l’adaptateur a une prise de courant dont la tension ne correspond pas a celle pour laquelle l’appareil est concu.
Interferences avec d’autres appareils electriques
Les postes de radio et de television situes a proximite peuvent par consequent souffrir d’interferences a la reception. Veuillez des lors faire fonctionner cet appareil a une distance raisonnable de postes de radio et de television.
50
Maniement
Pour e viter de les endommager, manipulez les commandes et les boutons de cet instrument avec soin.
Entretien
Lorsque l’instrument se salit, nettoyez-le avec un
chiffon propre et sec. Ne v ous servez pas d’agents
de nettoyage liquides tels que du benzene ou du
diluant, voire des produits inflammables.
Conservez ce manuel
Apres avoir lu ce manuel, veuillez le conserver soigneusement pour toute reference ulterieure.
Evitez toute intrusion d’objets ou de liquide
Ne placez jamais de recipient contenant du liquide
pres de l’instrument. Si le liquide se renverse ou
coule, il risque de provoquer des dommages, un
court-circuit ou une electrocution.
Veillez a ne pas laisser tomber des objets metalliques dans le boitier (trombones, par e x.). Si cela se
produit, debranchez l’alimentation de la prise de courant et contactez votre revendeur korg le plus proche ou la surface ou vous avez achete l’instrument
Page 51

Marque CE pour les normes europeen-
nes harmonisees
La marque CE apposee sur tous les produits de notre
firme fonctionnant sur secteur jusqu’au 31 decembre 1996 signifie que ces appareils repondent a la
Directive EMC (89/336/CEE) et a la Directive concernant la marque CE (93/68/CEE).
La marque CE apposee apres le 1 janvier 1997 signifie que ces appareils sont conformes a la Directive EMC (89/336/CEE), a la Directive concernant la
marque CE (93/68/CEE) ainsi qu’a la Directive Basse Tension (73/23/CEE).
La marque CE apposee sur tous les produits de notre
firme fonctionnant sur piles signifie que ces appareils repondent a la Directive EMC (89/336/CEE) et
a la Directive concernant la marque CE (93/68/CEE).
51
Page 52

Table des matiére
Introduction.....................................54
Caractéristiques principales ........54
Mise sous tension...........................56
Affichage de pile épuisée .......................56
Utilisation du support pour
bandoulière......................................56
Commandes et connecteurs .........57
Ecran LCD .................................................. 59
Raccordements................................60
Premier essai ................................... 61
Edition rapide ............................................61
Mode de jeu Play............................62
1. Sélection d’un programme .................62
2. Niveau principal ...................................62
3. Contournement/Assourdissement
(Bypass/Mute) .......................................62
52
4. Accordeur ...............................................63
5. Définition de la fonction du disque de
valeurs.....................................................64
6.
Fonction de verrouillage des touches .....
Mode de rythmes et de basses.....65
1. Motif rythmique ...................................66
2. Tempo ......................................................66
3. Activation/Désactivation des basses et
tonalité des basses ...............................66
4. Niveau de réverbération rythmique et
de basse .................................................. 67
5. Niveau de rythmique et de basse ..... 67
6. Réglages des chaînes de motifs.........67
Mode de pratique des phrases ....68
1. Sélection du mode d’enregistrement68
2. Enregistrement ......................................70
3. Reproduction .........................................70
4. Pause........................................................ 71
65
Page 53

Mode de hauteur AUX (Pitch AUX)
............................................................71
Mode d’édition EDIT ....................72
1. Sélectionner l’effet à éditer ................73
2. Edition de chacun des effets ..............73
1) DYNA (Dynamique et modelage du micro)
..................................................................... 73
2) AMP (Modelage de l’ampli) ..................... 73
3) CAB (Modelage de l’enceinte).................. 74
4) MOD (Modulation et modelage de l’effet
de filtre) ...................................................... 75
5) DLY (Modelage du retard) ........................ 75
6) REV (Modelage de la réverbération) ....... 75
7) NR (réduction du bruit) ............................ 75
8) RENAME (Réassignation de nom) .......... 76
9) WRITE (Sauvegarde) ................................. 76
3. Réinitialisation aux programmes
d’usine .................................................... 77
Troubleshooting .............................77
Liste des paramètres des effets ...79
DYNA (Dynamique et modelage du
micro) ......................................................79
AMP (Modelage d’ampli) .......................81
Paramètres des synthé ................................... 85
CAB (Cabinet modeling) ........................ 86
MOD (Modulation et modelage de
l’effet de filtre)......................................88
A propos du Pitch Shifter intelligent ........... 91
DLY (Modelage du retard) ......................92
REV(Reverb Modeling)...........................93
Liste des programmes
présélectionnés ...............................94
Liste des motifs rythmiques ........95
Specifications ..................................97
53
Page 54

Introduction
Merci d’avoir fait l’acquisition d’un processeur
d’effets multiples personnel PANDORA PX4D
de KORG TONEWORKS. Pour lui assurer une
longue vie sans incidents, veuillez lire attentivement le présent manuel et toujours veiller à
utiliser l’appareil correctement. Conserver le
manuel dans un endroit sûr afin de pouvoir s’y
reporter ultérieurement.
Caractéristiques principales
Le PX4D est un multi-effets polyvalent
concentrant une incroyable gamme de sons
d'amplis guitare/basse et d’effets dans un
boîtier compact utilisant la technologie
“
”de modélisation de Korg pour créer
des sons de modélisation réalistes et puissants.
158 variations d’effets pour sept effets au maximum peuvent être utilisées simultanément.
Le système IPE (Integrated Parameter Edit) permet facilement de régler les paramètres d’effets.
54
100 programmes utilisateur et 100 programmes
présélectionnés
Sélecteur de modélisation d’amplificateur et
boutons de contrôle
Le PX4D inclut 25 types d’amplis différents,
dont 15 modèles d’amplis guitare, 10 modèles
d’amplis basse et un synthétiseur, chacun
pouvant être édité rapidement et facilement.
Ecran à cristaux liquides rétroéclairé
L’écran à cristaux liquides (LCD) est très lisible,
même dans des endroits sombres.
Fonction d’accordeur automatique
Cette fonction facilite et accélère l’accordage.
Elle permet également d’accorder l’instrument
sans être entendu (avec le son coupé).
Fonction Rythme and Bass
100 patterns de Rythme and Bass ou un
métronome peuvent être utilisés. 16 patterns
multiples peuvent aussi être ajoutés pour une
lecture successive.
Page 55

Fonction AUX pitch
Vous pouvez transposer le son d’un lecteur CD
ou d’un autre dispositif branché sur la prise
AUX du PX4D et “effacer” le grave d’une
chanson avec la fonction Bass Cancel afin de
pouvoir jouer en même temps.
Fonction Phrase Trainer
Le son d’un CD audio, d’une guitare ou d’une
basse peut être enregistré (31,7 seconde
maximum), puis reproduit en boucle. La vitesse
de lecture peut aussi être ralentie sans changement de la hauteur du son. Le rythme sélectionné en mode Rythme and Bass et l’effet peuvent
également être enregistrés simultanément.
Touche TAP
Permet de régler facilement le temps de retard
(Delay) ou le tempo de la fonction rythmique et
de basse pour qu’il corresponde au tempo du
morceau.
Disque de valeurs
Permet de sélectionner rapidement des
programmes ou d’éditer des effets.
Qu’est-ce que la technologie ?
Le système (de l’anglais Resonant Structure
and Electronic circuit Modeling System) constitue
une technique de modelage du son déposée par Korg
qui reproduit avec précision le caractère complexe et
la nature tant des instruments acoustiques
qu’électriques ainsi que des circuits électroniques
dans des environnements réels. Le émule une
vaste gamme des caractéristiques de génération des
sons y compris des corps d’instruments, des hautparleurs et des enceintes des champs acoustiques, des
microphones, des tubes à vide, des transistors, etc.
55
Page 56

Mise sous tension
Retirer le couvercle du logement
des piles dans le bas
du coffret en le faisant
glisser dans le sens de
la flèche. Introduire 4
piles alcalmes de format AAA comme indiqué sur l’illustration. Veiller à bien respecter les indications de
polarité des piles.
Affichage de pile épuisée
Lorsque la pile s’affaiblit, l’icône de la pile épuisée
s’allume. Dans ce cas, remplacer la pile dès
que possible. Les programmes et les autres données (à l’exception de celles en cours d’édition)
seront conservées même lors du retrait de la pile.
Toujours retirer les piles épuisées du PX4D. Si vous
les laissez dans l’appareil, elles risquent d’être à l’origine de mauvais fonctionnements (dus à des fuites de
produit, etc.). Nous conseillons également de retirer
les piles lorsque vous ne comptez pas utiliser le PX4D
pendant une période prolongée.
56
L’adaptateur secteur n'est pas livré avec l'appareil.
Il doit être acheté séparément.
Utilisation du support pour bandoulière
1 Passer la bandoulière dans le support prévu.
2 Glisser la saillie (A) du support pour
bandoulière dans la fente de fixation (B)
située à l’arrière du PX4D.
A
B
C
Page 57

3 Appuyer dans le sens de la
flèche (a) jusqu’à ce que le
taquet de verrouillage (C) se
mette en place avec un déclic.
4 Agiter légèrement le PX4D
pour voir s’il ne tombe pas.
Retrait
1 Appuyer sur le taquet de
verrouillage du support pour
bandoulière (C) dans le sens
de la flèche (b) pour dégager
le taquet.
2 Lorsque le taquet est dégagé,
glisser le PX4D dans le sens
opposé à celui de la fixation et
le retirer du support.
a
Commandes et connecteurs
1
2
C
3
4
5
6
7
8
9101112
1. Boutons de commandes
Ces boutons permettent de contrôler le gain, la
b
tonalité et le volume des modèles d’amplificateurs ainsi que les paramètres du synthétiseur .
2. LCD (Ecran d’affichage à cristaux liquides)
3. Touche TUNE/BYPAS
4. Touche EXIT
Cette touche permet de quitter n’importe quel
mode pour revenir au mode de reproduction.
17
16
15
14
13
57
Page 58

5. Touche ENTER/REC
Cette touche sert à activer/désactiver un effet
ou à démarrer l’enregistrement en mode de
pratique de phrases.
6. Commutateur de niveau d’entrée
Utilisez ce commutateur pour régler le niveau
d'entrée en fonction du niveau de sortie de votre
guitare ou basse.
7. Sélecteur Amp Modeling
Pour sélectionner les modèles d'amplificateurs.
8. Touches ▲/▼
Ces touches servent à sélectionner des
programmes, à éditer des effets et à régler le
volume général.
9. Prise OUTPUT
Raccorder cette prise à l’ampli de la guitare ou
au casque d’écoute, etc.
10. Prise INPUT
Raccorder cette prise à la guitare ou la basse.
11. Prise AUX (stéréo)
Raccorder cette prise à un lecteur de CD, etc.
58
12. DC4.5V
Sert à raccorder l’adaptateur secteur vendu
séparément (DC4.5V
13. Touches √/®
Ces touches servent à sélectionner le paramètre à
éditer et à activer la fonction de pratique de phrases.
14. Interrupteur d’alimentation/interrupteur
du rétroéclairage
Cet interrupteur sert à éteindre le rétroéclairage.
Quand vous faites fonctionner le PX4D sur piles,
la durée de fonctionnement diminue si le
rétroéclairage est allumé.
15. Disque de valeurs
Sert à régler le volume général, à éditer les effets
et à sélectionner les programmes
16. Bouton TAP
Utilisez ce bouton pour régler le temps du
Delay ou le tempo en mode Rythme and Bass.
17. Touches de mode
Ces touches servent à accéder aux modes
Rhythm & Bass, Phrase trainer ou AUX Pitch.
).
Page 59

Ecran LCD
a
b
c
def
a. Chaîne d’effets
Cette zone indique l’état activé/désactivé des
effets DYNA, AMP, CAB, MOD, DLY et REV.
b. Affichage du nom de programme/des
types d’effets
Cette zone indique le nom du programme ou le
type d’effet utilisé. Lorsque le PX4D est
contourné ou assourdi, cette zone fonctionne
comme indicateur d’accordage.
c. Icône de pile épuisée
Cette icône s’allume lorsque les piles s’affaiblissent.
g
d. Icônes des modes
Ces icônes s’allument lorsque vous accédez aux
modes AUX Pitch, Phrase Trainer ou Rhythm &
Bass.
e. Icônes Edit/Original
L’icône EDIT s’allume lorsque vous accédez au
mode d’édition Edit. Si le paramètre ou la
valeur en cours d’édition correspond à la valeur
écrite dans le programme, l’icône ORIG
s’allume.
f. Affichage du numéro de programme / de
la valeur
Affiche le numéro de programme.
Lorsque vous modifiez le niveau principal
(Level Master), sa valeur s’affiche ici pendant
plusieurs secondes. Pendant l’édition,
l’affichage indique les valeurs des paramètres.
g. Icônes Master/Value, barre graphique
Lorsque MASTER est allumé, le niveau
principal du programme apparaît de manière
graphique. Lorsque VALUE est allumé, la
valeur du paramètre apparaît en chiffres.
59
Page 60

Raccordements
Mettre tous les équipements qui vont être
raccordés hors tension (sur OFF) et baisser leur
volume.
mini-chaîne/
stéréo, etc
ampli /moniteur
sous tension
*4
*3
*3
casque
d'éoute *5
disques
guitare ou basse
60
compacts, etc *2
adaptateur
secteur *1
*1
Si vous faites fonctionner le PX4D sur piles,
l’adaptateur secteur n’est pas nécessaire (DC4.5V
).
*2 Si un lecteur CD ou une autre source audio est
raccordée à la prise AUX, vous pourrez jouer en
même temps avec votre guitare ou votre basse.
Mais le volume devra être réglé à partir du
dispositif raccordé.
*3 Les câbles de connexions ne sont pas fournis
d’origine.
*4 La borne OUTPUT est une borne de sortie
stéréo. Si vous utilisez un câble té lé phonique
mono pour raccorder l’ PX4D à un ampli pour
guitare ou un ampli pour basse, seul le son L
(gauche) sera émis.
*5 Le niveau de sortie du PX4D et sa qualité
sonore varieront en fonction du casque d’écoute
utilisé. Nous conseillons d’utiliser un casque
d’écoute de bonne qualité à faible impédance,
de 32 ohms ou inférieure, avec une sensibilité
estimée à 100 dB/mW ou supérieure. La plupart
des casques d’écoute en vente pour les lecteurs
de CD ou pour les magnétophones portables
feront l’affaire.
Page 61

Premier essai
Sélection des
programmes
Nom du
programme
Commutateur
de niveau
d'entrée
Sélection
d'ampli
Gain, tonalité
et volume
de l'ampli
Numéro du
programme
Règle le
temps de retard
Réglage du
niveau principal
1. Lorsque les raccordements sont terminés,
mettre l’interrupteur d’alimentation sur la
position “ON”. (Nous appelons ce mode le
mode de jeu “Play”.) Utiliser les touches ▲/
▼ pour sélectionner un programme.
2.
Sélectionnez le niveau d’entrée en fonction
du niveau de sortie de votre guitare ou basse.
Hi: Pour un micro avec niveau de sortie
élevé. (par ex., micro double bobinage
ou avec préamplificateur)
Lo: Pour un micro avec niveau de sortie
faible. (par ex., micro simple bobinage)
3. Mettre la commande de volume de la
guitare ou basse sur la position habituelle.
Utiliser le disque de valeurs pour régler le
volume général.
Edition rapide
Dans chacun des modes (sauf lorsque les fonctions d’assourdissement/de contournement (mute/bypass) ou
le verrouillage des touches sont activés), vous pouvez
utiliser le sélecteur de modelage d’amplificateur pour
changer rapidement de type de modelage d’ampli ou
vous pouvez utiliser les boutons de commandes pour
ajuster le gain, la tonalité ou le volume du modelage
d’ampli. Lorsque vous utilisez le commutateur de sélection de modèle d’ampli, le type d’enceinte recommandé sera automatiquement choisi. Lorsque vous déplacez un bouton de commande, le nom du paramètre
et la valeur apparaissent pendant plusieurs secondes
sur l’affichage des valeurs. Si le réglage correspond au
réglage d’origine, l’icône ORIG s’allume. Il est également possible de régler le temps de retard du modelage du retard en appuyant deux fois sur la touche TAP
à l’intervalle souhaité (sauf dans le mode rythmique et
de basse). Pour vérifier le temps de retard assigné, appuyez sur la touche TAP et maintenez-la enfoncée pendant au moins deux secondes.
61
Page 62

Les réglages effectués à l'aide de la fonction d'édition
Valeur du niveau
principal
Affichage du numéro de
programme
Icône Master
Graphique des
valeurs
rapide Quick Edit seront remplacés par les réglages
d'origine du programme si vous changez de
programme ou si vous coupez l'alimentation avant de
les sauvegarder (voir p. 76).
Mode de jeu Play
Le mode de jeu Play est celui que vous utiliserez
normalement avec le PX4D.
1. Sélection d’un programme
Vous pouvez choisir parmi 100 programmes
utilisateur (U00…U99) et 100 programmes
préenregistrés (P00…P99). Utilisez les touches
▲/▼ pour sélectionner un programme. Vous
pouvez même sélectionner ceux-ci en mode
Rhythm & basse, en mode AUX Pitch ou en
mode Phrase Trainer (sauf pendant l’enregistrement).
2. Niveau principal
Lorsque l’icône MASTER est allumée, la valeur
graphique indique le volume principal.
Lorsque vous tournez le disque des valeurs pour
62
régler le volume principal, la valeur du volume
principal apparaît sur l’affichage du numéro de
programme/des valeurs pendant plusieurs
secondes. Le niveau principal est conservé même
lorsque l’appareil est mis hors tension.
Vous pouvez également effectuer des réglages
de sorte que les touches ▲/▼ permettent de
régler le volume principal (voir p.64).
3.Contournement/Assourdissement (Bypass/Mute)
Si vous appuyez sur la touche TUNE/BYPASS,
le PX4D sera contourné et le son d’origine ne
sera pas modifié (pas d’effet).
La chaîne d’effets clignote et l’affichage indique
“BYPASS” pendant environ une seconde.
Page 63

Si vous appuyez sur la touche TUNE/BYPASS
pendant plus d’une seconde, le signal de sortie
sera coupé. La chaîne d’effets se mettra à clignoter rapidement et l’affichage indiquera “MUTE”
pendant environ une seconde.
La fonction Bypass/Mute (contournement/assourdissement) se désactive lorsque vous réappuyez sur la touche TUNE/BYPASS.
Vous pouvez alors revenir en mode de jeu Play
en appuyant sur la touche EXIT. V ous pouvez également accéder aux fonctions Bypass ou Mute à
partir d’autres modes que le mode de jeu.
4. Accordeur
L’accordeur fonctionne lorsque vous contournez
ou que vous assourdissez le son.
Indicateur
Dièse
Nom de la note
Marque centrale
Jouez une seule corde sur la guitare ou la basse.
calibrage
L’écran LCD indiquera le nom de la note et le
calibrage. Si la hauteur est supérieure d’un
demi-ton au nom de la note, le symbole dièse
apparaît à droite du nom.
La zone d’affichage agit comme un indicateur
pour évaluer la déviation de hauteur de la note.
Accorder la corde de la guitare ou la basse de
sorte que le témoin au-dessus de la marque
centrale s’allume.
L’accordeur (fonction bypass/mute) se
désactive lorsque vous réappuyez sur la touche
TUNE/BYPASS. Vous pouvez également
revenir au mode de jeu en appuyant sur la
touche EXIT.
Calibrage (fréquence de la hauteur du La
standard)
Vous pouvez utiliser le disque de valeurs pour
régler le calibrage sur une plage allant de La (A)
= 438 Hz à 445 Hz.
Le réglage de calibrage effectué prévaudra
jusqu’à la mise hors tension de l’appareil. A la
remise sous tension, le calibrage est réinitialisé à
une valeur du La = 440 Hz.
63
Page 64

5. Définition de la fonction du disque
Sélectionner un programme
Régler le niveau principal
de valeurs
Vous pouvez définir la fonction du disque de
valeurs en mode de reproduction.
En mode de reproduction Play, maintenir la
touche EXIT enfoncée et appuyer soit sur la
touche
√, sur la touche ® pour lui assigner
les fonctions suivantes.
● Maintenir la touche EXIT enfoncée et
appuyer sur la touche
“MASTER” pendant environ 1 seconde.
Le disque de valeurs permet de régler le
volume principal alors que les touches ▲/▼
permettent de sélectionner les programmes.
Vous pouvez utiliser le disque de valeurs
pour régler plus rapidement le volume
principal. Chaque fois que l’appareil est mis
sous tension, ce réglage sera opérationnel.
64
√. L’écran affiche
Régler le
niveau
principal
Sélectionner un
programme
● Maintenir la touche EXIT enfoncée et
appuyer sur la touche
L’écran af fiche “PROGRAM” pendant
environ 1 seconde.
Le disque de valeurs permet de sélectionner
les programmes alors que les touches ▲/▼
permettent de régler le volume principal.
Vous pouvez utiliser le disque de valeurs
pour sélectionner plus rapidement les
programmes.
Si vous souhaitez changer la fonction de le
disque de valeurs afin de pouvoir régler le
volume général, appuyez de nouveau sur la
touche
√
tout en maintenant la touche EXIT
enfoncée, ou bien mettez hors tension l’appareil.
®.
Page 65

6. Fonction de verrouillage des touches
L’activation de la fonction de verrouillage des
touches permet de désactiver toutes les opérations,
sauf la sélection des programmes. C’est un moyen
pratique d’éviter toute manipulation accidentelle
pendant une représentation en direct.
● Maintenir la touche EXIT enfoncée et
appuyer sur la touche TUNE/BYPASS.
L’écran affiche “KEYLOCK ” pendant environ 1
seconde. Les touches ▲/▼ vous permettront de
sélectionner les programmes et ni les autres
touches ni la molette Value ne fonctionneront.
Seule la sélection
des programmes
est possible
La fonction de verrouillage des touches s’annule
lorsque l’appareil est mis hors tension. Vous pouvez
également annuler cette fonction par le biais de “5.
Définition de la fonction du disque de valeurs”.
(p.64)
Mode de rythmes et de basses
Pour accéder au mode de rythmes et de basses,
appuyer une fois sur la touche RHYTHM en
mode de reproduction (sauf en cas d’activation de
la fonction d’assourdissement/de contournement
ou du verrouillage des touches), en mode d’pitch
auxiliaire ou en mode de pratique des phrases.
Lorsque vous accédez à ce mode, l’écran de sélection des motifs rythmiques apparaît, le rythme sélectionné démarre et l’icône du mode
Rhythm & Bass s’allume. L ’indication graphique
des valeurs changera en fonction du motif ou du
tempo.
Ce mode contient les cinq paramètres suivants.
Utiliser la touche √/® pour sélectionner les paramètres et le disque des valeurs ainsi que la
touche ENTER/REC pour définir la valeur de
chaque paramètre.
Si vous sélectionnez “CHAIN” en tant que motif
rythmique, d’autres réglages de chaînes de motifs seront disponibles (Voir p.67 “Réglages des
chaînes de motifs”).
65
Page 66

Motif
rythmique
Réglages supplémentaires
lorsque le motif rythmique est "CHAIN"
Réglage
de la chaîne
de motifs
Tempo
Basse activée/
désactivée et
touche de basse
Niveau
de rythmique
et de basse
Niveau
de réverbération
rythmique
et de basse
2. Tempo
Régler le tempo sur une plage allant de 40 à 208 bpm.
Vous pouvez également régler le tempo en appuyant
deux fois sur la touche TAP au rythme souhaité.
Pour une armature de temps 6/8, vous pouvez régler
le tempo sur une plage de +/- 40 à 208.
Si vous sélectionnez “
d'enregistrement en mode de pratique des phrases,
le rythme se fera entendre avec le motif et le tempo
spécifiés ici.
Les réglages sélectionnés à ce stade sont conservés
même lorsque l'appareil est mis hors tension.
JAM
” comme mode
1. Motif rythmique
Utilisez le disque des valeurs pour sélectionner
le motif rythmique (p.95)
Motif
rythmique
Icône du mode Rhythm & Bass
66
Affichage
du tempo
3. Activation/Désactivation des basses
et tonalité des basses
Cette fonction permet d’activer ou de désactiver
les basses et de spécifier la tonalité qui jouera les
basses. Si vous appuyez sur la touche ENTER/
REC lorsque cette page d’écran est affichée, la
basse jouera au même temps que le rythme.
Lorsque la note basse est activée, vous pouvez
utiliser le disque des valeurs pour régler la note
sur une plage Do, Do#…La#, Si pour vous
exercer sur la guitare ou la basse sur une
gamme qui correspond à cette tonalité.
Page 67

Affichage
Indication
de niveau
de la tonalité
Lorsque la fonction “
(métronome) est sélectionnée comme motif rythmique, il
n’y a pas de notes basses et cet écran n’apparaît pas.
Lors de l'utilisation de la fonction de chaînes de motifs
(Chain Patterns), le réglage de la tonalité des basse est
ignoré.
METRONM
” –“
METRO7
”
4. Niveau de réverbération rythmique et de basse
Utilisez le disque des valeurs pour régler la
quantité de Reverb pour Rhythm and Bass.
Niveau de
réverbération
Le même effet que pour la guitare est utilisé pour la
réverbération. Ce paramètre n'a aucun effet si vous
avez sélectionné un programme qui n'utilise pas le
modelage de la réverbération ou si le niveau de
l'effet de réverbération est mis sur “
0
”
5. Niveau de rythmique et de basse
Utilisez le disque des valeurs pour régler le
niveau de rythmique et de basse. Les basses seront
influencées que si le niveau de basse est activé.
6. Réglages des chaînes de motifs
Ces paramètres s’ajoutent uniquement si vous
sélectionnez “CHAIN” comme motif rythmique.
Appuyez sur la touche ENTER/REC pour accéder à
l’écran de sélection des paramètres de chaînes (Chain
Parameter Select). Utilisez les touches √/® pour
sélectionner l’emplacement (1…16) auquel vous
voulez modifier le motif et utilisez le disque de
valeurs pour sélectionner le motif (p.95) qui devra
être utilisé à et emplacement. Utilisez les touches ▲/
▼ pour préciser la tonalité des basse du motif
sélectionné.
67
Page 68

Emplacement
du motif
Vous pouvez connecter jusqu’à 16 motifs. Si
vous souhaitez créer une chaîne de 15 motifs ou
moins, sélectionnez “PTN END” pour le
dernier motif.
Appuyez sur la touche ENTER/REC pour
quitter l’écran de sélection des chaînes de
motifs.
Si vous changez l'emplacement du pattern en tournant
la molette Value tout en maintenant la touche
enfoncée, le pattern sélectionné sera copié vers
l'emplacement de destination du pattern. Cette fonction
est pratique pour appliquer de nouveau le même pattern.
Mode de pratique des phrases
Vous pouvez enregistrer une source audio connectée
à la borne AUX ou une phrase jouée sur la guitare la
ou basse pour la reproduire de manière répétée, sous
68
Tonalité
√
ou
forme de boucle. Il s’agit d’une fonction particulièrement utile pour s’exercer en jouant sur la phrase qui
se répète. Vous pouvez aussi ralentir la vitesse de
reproduction sans affecter la hauteur des notes, afin
d’apprendre plus facilement les phrases difficiles. Si
vous sélectionnez “JAM” comme mode d’enregistrement, le rythme indiqué en mode rythmique et de
basse sera enregistré simultanément avec l’entrée de
la guitare ou la basse et il sera reproduit en boucle.
1. Sélection du mode d’enregistrement
En mode de reproduction (sauf lorsque les
fonctions de contournement/d’assourdissement
ou de verrouillage des touches sont activées), en
mode de rythmes et de basses ou en mode
®
d’effet auxiliaire, appuyer sur la touche
PHRASE TRAINER pour accéder au mode de
pratique des phrases.
Lorsque vous accédez à ce mode, l’écran de
sélection du mode d’enregistrement apparaît et
l’icône du mode de pratique des phrases clignote.
Lorsque cet écran est affiché, le PX4D est prêt
pour l’enregistrement.
Page 69

Mode
d'enregistr
ement
Icône de pratique des phrases
Tem ps
d'enregist
rement
Le mode d’enregistrement présentera dans
l’ordre les choix suivants chaque fois que vous
appuyez sur la touche PHRASE TRAINER.
AUX
Enregistre uniquement l’entrée AUX.
GTR/BAS Pour enregistrer seulement la
guitare ou la basse.
AUX+G/B Pour enregistrer l’entrée AUX et la
guitare ou la basse.
JAM
Enregistre le son de la guitare ou la basse
avec le rythme sélectionné en dernier
dans le mode rythmique et de basse
Utilisez le disque de valeurs pour sélectionner le
temps d’enregistrement (pour “JAM”, le nombre de mesures).
8 Environ 7,9 secondes.
16 Environ 15,8 secondes.
32 Environ 31,7 secondes.
1, 2, 3… Nombre de mesur es.
Si le mode d’enregistrement est “JAM”, la qualité
de l’enregistrement se règlera automatiquement, en
fonction du tempo et du nombre de mesures
spécifié.
Si vous sélectionnez un long temps d'enregistrement (16 ou 32), la qualité audio de l'enregistrement sera moins bonne.
Si le tempo du rythme est extrêmement lent, il ne
sera pas possible d'enregistrer un grand nombre de
mesures. Veuillez dans ce cas respécifier le tempo
en mode rythmique et de basse (la longueur
maximale est d'environ 31,7 secondes)
Démarrer la lecture sur le lecteur de CD ou sur
l’autre source audio et, lorsque vous atteignez le
point auquel vous souhaitez commencer
l’enregistrement, appuyer sur la touche
ENTER/REC. L’enregistrement commence.
En mode d'enregistrement “JAM”, l'enregistrement commencera après le compte préliminaire.
Si, après l’enregistrement, vous souhaitez modifier
le mode d’enregistrement ou le temps d'enregistrement, appuyez sur la touche PHRASE TRAINER
pendant la pause de la reproduction.
69
Page 70

Les données enregistrées sont perdues à la mise
Vitesse de reproduction (%)
Affichage du temps
de reproduction
hors tension de l'appareil.
2. Enregistrement
Lorsque vous commencez l’enregistrement, le
temps d’enregistrement apparaît sous forme de
valeur numérique et de manière graphique.
Affichage du temps
d'enregistrement
La phrase sera enregistrée et reproduite en mono.
3. Reproduction
La phrase enregistrée sera reproduite en boucle.
Pendant la lecture ou pendant la pause, vous
pouvez utiliser les touches
ner les programmes.
▲/▼
pour sélection-
Pour arrêter l’enregistrement, appuyez sur la
touche ENTER/REC ou sur la touche [®❙❙].
L’enregistrement s’arrêtera et la reproduction en
boucle démarrera automatiquement. Si vous
n’arrêtez pas l’enregistrement, celui-ci
continuera jusqu’à ce que le temps d’enregistrement sélectionné soit écoulé et la reproduction
en boucle commencera automatiquement. Si le
mode d'enregistrement “JAM” est sélectionné,
l’enregistrement se terminera automatiquement
après le nombre spécifié de mesures et il passera
à la reproduction en boucle.
70
Tournez le disque des valeurs vers la gauche
pour ralentir la vitesse de reproduction sans
modifier la hauteur.
Vous pouvez choisir parmi six niveaux
différents de vitesse de reproduction: 100%,
90%, 80%,75%, 66% et 50%. Pendant la
reproduction, vous pouvez appuyer sur la
touche [
√√
] pour revenir en arrière.
En appuyant sur la touche PHRASE TRAINER,
vous pouvez arrêter le son en cours de jeu au
moment où vous avez appuyé sur la touche
(fonction Hold).Cette fonction s’avère pratique
Page 71

pour pouvoir écouter des notes individuelles au
Transposition des
touches seule
Icône AUX Pitch
Suppression des
basses activée
sein d’une phrase.
4. Pause
Lorsque vous appuyez sur la touche [®❙❙] , la
reproduction s’arrête provisoirement (elle se
met en pause). Réappuyer sur la touche [®❙❙]
pour reprendre la lecture.
Si vous appuyez sur la touche [
que la reproduction est arrêtée (en pause), vous
reviendrez au début de la phrase enregistrée.
Si vous souhaitez réenregistrer la phrase, appuyez
sur la touche
Démarrer le lecteur de CD ou l’autre source et
appuyer sur la touche ENTER/REC au début de
la phrase souhaitée. Si vous souhaitez changer le
mode ou le temps d’enregistrement, appuyez sur
la touche PHRASE TRAINER pendant la pause.
[
®❙❙]
pour interrompre la lecture.
√√
] pendant
Mode de hauteur AUX (Pitch AUX)
Dans ce mode, vous pouvez transposer la clé
(hauteur) du son d’un CD ou d’une autre source
audio raccordée à la prise AUX. Il permet également
d’appliquer l’effet de suppression des basses pour
éliminer la plage des basses fréquences. Appuyez sur
la touche AUX PITCH pour passer en mode AUX
Pitch. L’icône s’allumera.
A chaque pression de la touche AUX PITCH,
l’appareil alternera entre la transposition des
touches seule et la fonction de transposition de
la clé avec suppression des basses.
En réglant le paramètre Key Transpose sur 0 et en
sélectionnant Key Transpose + Bass Cancel, vous
pouvez activer la fonction Bass Cancel seule.
71
Page 72

Appuyez sur la touche EXIT pour revenir au mode
Avant la
sauvegarde
Après la
sauvegarde
de jeu PLAY.
La sortie se fera en mono en mode AUX Pitch.
Le réglage AUX Pitch sera conservé à la mise hors
tension de l'appareil.
Pour certains enregistrements, Bass Cancel ne sera
pas aussi effectif que vous le souhaitez.
Utilisez le disque des valeurs pour spécifier
l’importance de la transposition des touches
(possibilité de transposition sur une plage de +/
- 1 octave).
Affichage des
centaines de
centièmes
Affichage des
centaines de
centièmes
La valeur peut être adaptée vers le haut et vers
le bas sur 3 demi-tons par pas de 10 centièmes et
par pas de demi-tons (100 centièmes) pour le
reste de la plage.
72
Mode d’édition EDIT
Ce mode permet d’activer/de désactiver chacun
des effets, d’éditer le type d’effet, les valeurs des
paramètres et le nom du programme.
En mode Play, appuyez sur la touche √/® pour
accéder à l’écran DYNA d’édition des ef fets.
Dans tout écran du mode Edit, vous pouvez
utiliser les boutons de contrôle pour éditer les
modèles d’amplis, ou utiliser la touche TAP
pour régler le temps de Delay.
Appuyez sur la touche
EXIT pour revenir en
mode de jeu. Si un
programme n’est pas
sauvegardé après son
édition, le point décimal de
son numéro s’allume.
Les réglages du programme d'origine remplaceront
les réglages édités si vous changez de programme
ou si vous mettez l’appareil hors tension sans
sauvegarder (voir p.76)
Page 73

1. Sélectionner l’effet à éditer
Activé,
désactivé
Valeur du
paramètre
Sélection du
type d'effet
Chaque fois que vous appuyez sur la touches √/®,
vous passez les différents effets en revue, dans l’ordre
indiqué ci-dessous. Lorsqu’un effet est sélectionné,
son icône clignote.
1) DYNA (Dynamique et modelage du micro) Il s’agit d’effets de type dynamiques, comme le compresseur et l’auto-wah, qui modifient la tonalité et les effets de modelage du micro.
2. Edition de chacun des effets
Pour chaque effet, vous pouvez sélectionner le
type d’effet et régler les valeurs de ses paramètres.
Les effets qui sont désactivés (“OFF”) seront automatiquement activés si vous appuyez sur la touche
ENTER/REC ou si vous utilisez les touches ▲/▼ pour
sélectionner le type d’effet. Pour plus de détails sur
les types d’effets et les paramètres, consultez la partie Paramètres des effets (p.79). L’assignation d’un
autre nom au programme et la sauvegarde d’un programme s’effectuent également à ce moment.
2) AMP (Modelage de l’ampli)
Les quinze différents types BTQ CLN à FUZZ
sont des amplis de guitare et les dix types VALVE
à UKMAJOR sont des amplis de basse. SYNTH
est un synthétiseur pour guitare et basse.
Lors de l’utilisation du sélecteur de modèle
d’ampli pour sélectionner un ampli, le PX4D
sélectionne automatiquement le modèle
d’enceinte le plus adéquat et l’active.
73
Page 74

Importance de
Présence
Sélection du
type d'effet
Activé,
désactivé
la distorsion*
Plage des hautes fréquences*
Activé,
désactivé
*L'opération sera différente si vous
sélectionnez SYNTH comme type d'effet.
Volume*
Plage des basses
fréquences*
Plage des
moyennes
fréquences*
Sélection du
type d'effet
L’affichage de la valeur indiquera “Gt” pendant
environ une seconde si vous avez sélectionné un
modèle de guitare, ou “bA” si vous avez sélectionné un
modèle de basse. Il est possible de sélectionner et
d’éditer le type d’effet choisi à l’aide du sélecteur de
modelage d’ampli sans accéder au mode d’édition Edit.
Lors de l’utilisation du sélecteur de modèle d’ampli
pour sélectionner un ampli, le PX4D sélectionne
automatiquement le modèle d’enceinte le plus
adéquat et l’active.
Le bouton de commande du VOLUME peut
également servir à régler le VOLUME même quand
l’effet de modelage de l’ampli est “OFF” (désactivé).
74
3) CAB (Modelage de l’enceinte)
Cet effet simule les caractéristiques acoustiques
de l’enceinte de l’ampli.
Il est particulièrement efficace lorsque vous n’utilisez
pas d’ampli (par ex. lorsque vous utilisez un casque
d’écoute ou lorsque vous branchez la guitare à un
mélangeur, à un enregistreur avec disque dur ou à un
appareil audio). Les onze types 1X8TWD à 4X12VIN
sont des enceintes pour ampli de guitare et les douze
types LA 4X10 à COMBI des enceintes pour ampli de
basse.
L’affichage de la valeur indiquera “ Gt” pendant
environ une seconde si vous avez sélectionné une
enceinte pour ampli de guitare, ou “bA” si vous avez
sélectionné une enceinte pour ampli de basse.
Vous êtes libre d’utiliser une guitare AMP avec une
basse CAB, ou une basse AMP avec une guitare CAB.
Page 75

4)
Niveau
de l'effet
Sélection du
type d'effet
Activé,
désactivé
Réglez l'intensité
de la réduction
du bruit
MOD (Modulation et modelage de l’effet de filtre)
Il s’agit d’effets de modulation et de types de
filtre comme le chorus, le flanger, le phaser et le
pitch shifter
Activé,
désactivé
Valeur du
paramètre
Sélection du
type d'effet
5) DLY (Modelage du retard)
Il s’agit d’effets de type spatiaux pour lesquels
vous pouvez régler le temps de retard en
fonction de l’intervalle auquel vous appuyez
sur la touche T AP.
Temps
Activé,
désactivé
de retard
Niveau
de l'effet
Sélection du
type d'effet
6) REV (Modelage de la réverbération) Il s’agit d’effets de type spatiaux qui ajoutent une impression d’espace au son.
7) NR (réduction du bruit) Utilisez le disque de valeurs pour régler l’intensité de la réduction du bruit appliquée.
L’augmentation de cette valeur produit
davantage de réduction du bruit. Normalement,
il convient de la régler de manière à ne pas
entendre les bruits perturbants lorsque les
cordes sont légèrement assourdies.
Si vous augmentez cette valeur de manière
excessive, le son risque d’être coupé prématurément,
75
Page 76

en fonction de l’équipement raccordé. Pour éviter ce
Numéro de programme
actuellement inscrit sous
la destination de sauvegarde.
Sélectionnez un numéro
de programme utilisateur
comme destination de
sauvegarde.
Sauvegarde
problème, diminuer la valeur de réduction du bruit.
Réglez le niveau de réduction du bruit NR en
fonction de votre guitare ou de votre basse ou de
votre micro.
8) RENAME (Réassignation de nom)
Cotte fonction permet de donner un nom à
chaque programme.
Il est possible d’utiliser les caractères suivants:
espace, 0-9, A-Z, “, ‘, ❋, +, -, /.
9) WRITE (Sauvegarde)
Cette fonction permet d’écrire (de mémoriser)
un programme édité ou un programme que
vous avez créé.
Utiliser le disque de valeurs pour sélectionner la
76
Sélectionnez
le caractère
Sélectionnez
l'emplacement
du caractère
destination d’écriture (valable uniquement pour les
programmes utilisateur). Lorsque vous effectuez
cette opération, le nom du programme qui occupe à
ce moment la destination d’écriture apparaît
brièvement à l’écran.
Si vous décidez de ne pas mémoriser le nouveau
programme, appuyer sur la touche √ (ou ®) pour
sélectionner un autre écran. Lorsque vous appuyez
sur la touche TUNE/BYPASS, le programme édité
est mémorisé. Lorsque l’opération de sauvegarde est
terminée, l’écran indique “COMPLT” pendant
environ une seconde.
Avant de mémoriser un programme édité sous un
autre numéro de programme, vérifier si vous ne
souhaitez pas conserver les données qui se trouvent
déjà sous ce numéro de programme. Les données
Page 77

qui sont remplacées sont en effet irrémédiablement
perdues.
Il n’est pas possible de mémoriser un programme
sous un emplacement de programme présélectionné.
3.
Réinitialisation aux programmes d’usine
Mettre l’appareil sous tension en maintenant
enfoncées la touche RHYTHM et la touche ▲.
L’écran af fichera la question “RELOAD? ”.
Si vous appuyez sur la touche ENTER/REC, les
programmes d’usine seront rechargés dans la
zone réservée aux programmes utilisateur.
L’affichage indique “ RELOAD”, “VERIFY”,
“COMPLT” pendant un court instant puis
l’écran de mise sous tension apparaît.
Ne jamais mettre l'appareil sous tension pendant
une opération de rechargement de données.
Si vous décidez de ne pas recharger les programmes
d’usine, appuyer sur la touche EXIT. Les
programmes d’usine ne seront pas rechargés,
l’écran normal de mise sous tension apparaîtra et le
PX4D s’allumera en mode programme.
Ne pas oublier que si vous rechargez les
programmes préenregistrés d'usine, les
programmes utilisateur et tous les réglages qui sont
normalement conservés à la mise hors tension
(niveau principal etc.) seront tous remplacés.
Troubleshooting
Si le PX4D ne fonctionne pas comme vous
l’espérez, commencer par vérifier les points
suivants. Si, malgré cela, vous ne parvenez pas à
résoudre le problème, veuillez prendr e contact
avec votre revendeur ou avec un centre
technique Korg.
1. L’appareil ne se met pas sous tension.
• Les piles sont-elles mises en place? Ou,
l’adaptateur secteur est-il raccordé à une
prise de courant?
2. No sound
•Votre guitare ou basse, l’ampli ou le casque
d’écoute sont-ils raccordés aux bornes
adéquates?
•L’ampli est-il allumé et réglé correctement?
77
Page 78

• Des câbles sont-ils abîmés?
• Le niveau principal du PX4D est-il mis sur
“0” ou sur un faible niveau?
• Le bouton de commande du VOLUME est
peut être réglé au minimum.
• ILe PX4D est-il assourdi (le son est-il
coupé)?
Ne pas oublier que, si tous les effets sont
désactivés, l’affichage en chaîne disparaît et
l’écran ne permet plus de différencier la
fonction de dérivation de celle d’assourdissement.
• Le volume de la guitare ou la basse est-il
réduit au minimum?
3. Le volume de l’appareil raccordé à la borne
AUX est trop fort ou trop faible ou n’est pas
audible.
• ARégler le volume de sortie de l’appareil
raccordé.
Effectuer les raccordements à la prise pour
casque d’écoute de l’appareil plutôt qu’à sa
sortie de ligne.
78
• Etes-vous en mode de pratique des phrases?
Quitter le mode de pratique des phrases.
4. Les effets ne sont pas appliqués.
• Le PX4D est-il contourné? (Dans ce cas, les
témoins de la chaîne d’effets clignotent).
• Les effets utilisés dans le programme sontils activés?
5. Le tuner ne fonctionne pas.
• Etes-vous en mode Play, avec la fonction de
dérivation ou d’assourdissement activée?
Page 79

Liste des paramètres des effets
DYNA (Dynamique et modelage du micro)
TYPE (Touches π/†)
COMP
DYNAEXC
VOX WAH Reproduit le son d’une pédale wah VOX V847
WAHUP1
WAHUP2
WAHDWN1
WAHDWN2
SLOWATK
OCTAVE
Ce compresseur produit des niveaux consistants et de sustain.
Cet effet applique un exciteur dynamique en fonction de la force
de grattage. (Il s’avère particulièrement efficace lorsque vous
souhaitez donner plus d’éclat pour épurer les sons.)
Wah automatique à polarité positive qui r épond de manière
sensible aux attaques.
Wah automatique à polarité positive qui répond doucement aux attaques.
Wah automatique à polarité négative qui répond de manière sensible aux attaques.
Wah automatique à polarité négative qui répond doucement aux attaques.
Adoucit l’attaque pour créer un effet qui ressemble à celui d’un violon.
Cet effet génère une hauteur de son d’une octave inférieure à celle du son
d’origine et mélange l’effet au son d’origine pour ajouter une impression
de profondeur et de fin en douceur. Cet effet peut ne pas fonctionner
correctement si vous jouez deux ou plusieurs cordes simultanément ou
lors du jeu des cordes de faible hauteur tonale.
VALUER (Disque de valeurs)
Règle la sensibilité.(1.0...10.0)
Règle la sensibilité (0...10.0)
Règle l’emplacement de la pédale
(1.0…10.0)
Règle la sensibilité (0...10.0)
Spécifie la vitesse de l’attaque (1.0...10.0)
Niveau de l’effet (0...10.0)
79
Page 80

TYPE (Touches π/†)
RING
RINGUP
RINGDWN
AC SIM Il s’agit d’un modèle d’effet qui transforme le son d’une
HUMSGL Modelage du micro qui transforme le son d’un micro anti-
SGLHUM Modelage du micro qui transforme le son d’un micro à une
HF TONE Modelage du micro qui simule la position “demi-ton” entre
PHASOUT Modelage du micro qui simule le son “hors phase” lorsque
COMP2 Un compresseur avec une attaque accentuée. Règle la sensibilité (1.0...10.0)
LIMITER Un limiteur qui rend le niveau plus stable. Précise le taux de compres-
Effet qui produit des sons semblables à ceux d’une cloche. (Pour un
effet plus épuré, utilisez le micro du manche, réglez la commande
volume de la guitare sur le minimum et jouez près de la 12ème frette.)
Un modulateur ring dans lequel l’effet change de manière
dynamique en fonction de la force de grattage.
guitare électrique en son de guitare acoustique.
bourdonnements en son de micro à une seule bobine.
seule bobine en son de micro anti-bourdonnements.
deux micros.
deux micro sont raccordés en dehors de la phase.
VALEUR (Disque de valeurs)
Spécifie la fréquence
(1.0...10.0)
Règle la sensibilité (0...10.0)
Règle la tonalité (0...10.0)
sion (0…10.0)
80
Page 81

TYPE (Touchesπ/†)
B OD Surmultiplication pour basse.*
B DIST Distorsion pour basse.*
B FUZZ Fuzz pour basse.*
PREAMP1 Réglage du pré-ampli sur une tonalité claire pour basse.
PREAMP2 Réglage du pré-ampli sur une tonalité assourdie pour basse.
BALANCE
LOWCUT Filtre qui coupe la plage de basses fréquences non souhaitée
FRETLES
Crée le son de mixage de la sortie de deux micros pour basse.
Efficace pour l’enregistrement.
Réglages permettant de simuler le son d’une basse sans frettes.
VALEUR (Disque de valeurs)
Intensité de la distorsion
(1.0...10.0)
Règle la tonalité (0...10.0)
Spécifie la fréquence (0...10.0)
Règle la tonalité. (0...10.0)
* : Il s’agit habituellement d’un effet pour basse, mais vous pouvez l’utiliser avec l’ampli SYNTH
pour produire un son épais quand vous jouez de la guitare.
AMP (Modelage d’ampli)
Lors de l’utilisation du modelage d’ampli, les boutons de commandes (GAIN/MID, BASS, TREBLE,
VOLUME) et le disque de valeurs seront actifs. Le bouton VOLUME peut encore être utilisé lorsque le
modelage d’ampli est désactivé ou sur “OFF”. Si vous sélectionnez SYNTH comme type, les boutons de
commandes contrôleront respectivement la sélection de l’oscillateur, le réglage VCF, le niveau direct et le
niveau de synthé. Les types marqués d’un astérisque * peuvent également être sélectionnés à l’aide du
sélecteur de modelage d’ampli. Afin de tirer le meilleur parti des caractéristiques du modelage d’ampli, nous
vous recommandons de l’utiliser en association avec le modelage d’enceinte lorsque vous écoutez dans un
casque ou lorsque vous enregistrez par la sortie de ligne.
81
Page 82

TYPE (Touchesπ/†ou sélecteur du modelage d’ampli)
BTQ CLN*
BTQ OD
TWD1X12 Ampli de guitare combo recouvert de tweed. (enceinte CAB
TWD4X10 Ampli de guitare combo 4x10 conçu pour une basse.
BLK2X12*
AC15*
AC30
AC30TB* Canal brillant d’un VOX AC30TB. (enceinte CAB
UKBLUES Tête d’ancien ampli de guitare stack fabriqué au Royaume-
UK '70S Canal des hautes fréquences aiguës d’une tête d’ampli de
Canal épuré d’un ampli de guitare fait à la main de 100 W à haute
extrémité (enceinte CAB recommandée: 4x12CLS, 4x12VIN, 4X12MDN)
Canal d’overdrive d’un ampli de guitare high end fait main de 100
W. (enceinte CAB recommandée: 4x12CLS, 4x12VIN, 4x12MDN)
recommandée: 1x12 TWD)
(enceinte CAB recommandée: 4x10TWD)
Ampli
de guitare
country ou de blues. (enceinte CAB recommandée: 2x12BLK)
VOX AC15 fabriqué en 1962. (enceinte CAB recommandée: 1x12VOX)
Modelage du VOX AC30. (enceinte CAB recommandée:2x12VOX)
recommandée: 2x12VOX)
Uni. (enceinte CAB recommandée: 4x12CLS)
guitare de 100W modèle 1969, fabriquée au Royaume-Uni.
(enceinte CAB recommandée: 4x12CLS)
combo 2x12 indispensable pour les joueurs de
82
(Disque de valeurs
VALEUR
et boutons de commande)
GAIN/MID
......
Intensité de la distorsion
BASS
.....
Plage des basses fréquences
TREBLE
.....
Plage des hautes fréquences
VOLUME
....................
Disque de valeurs
..............
fréquences (0...10.0)
Volume de sortie
Plage des moyennes
Page 83

TYPE (Touchesπ/†ou sélecteur du modelage d’ampli)
UK '80S*
US MDN*
US HI-G
UK MDN*
FUZZ Fuzz ancien
VALVE*
VALVE2 Un ampli
CLASSIC Un ampli de basse avec tube à vide dont le caractère de base
Tête d’ampli de guitare de 100 W modèle 1983, fabriqué au
Royaume-Uni avec réglage du volume principal. (enceinte CAB
recommandée: 4x12CLS, 4x12VIN, 4x12MDN)
Un ampli de guitare à haut gain avec plaque métallique
accrocheuse. (enceinte CAB recommandée: 4x12VIN, 4x12MDN)
Tête d’ampli de guitare de 100W modèle 1991 recouverte de peau
de serpent. (enceinte CAB recommandée: 4x12VIN, 4x12MDN)
Un ampli
de guitare
Uni (enceinte CAB recommandée: 4x12VIN, 4x12MDN)
Un ampli de basse à tube avec commutateur ULTRA LO en
position ON. (CAB recommandé : CLS8X10)
(enceinte CAB recommandée: CLS8x10)
change en fonction du réglage du disque de valeurs.
(enceinte recommandée: COMBI)
moderne de 100 W fabriqué au Royaume-
de basse
avec tube à vide idéal pour le rock.
(Disque de valeurs
VALEUR
et boutons de commande)
GAIN/MID
......
Intensité de la distorsion
BASS
.....
Plage des basses fréquences
TREBLE
.....
Plage des hautes fréquences
VOLUME
....................
Disque de valeurs
..............
fréquences (0...10.0)
GAIN/MID
BASS
TREBLE
VOLUME
Disque de valeurs
..............
fréquences. (1…5)
Volume de sortie
Plage des moyennes
..........
............................
moyennes
.......................
..................
Plage des moyennes
basses
hautes
Volume
83
Page 84

TYPE (Touchesπ/†ou sélecteur du modelage d’ampli)
SCOOPED Un ampli de basse typique du son des années 80. (enceinte
LA STUD* Un ampli de basse type du son LA. (enceinte recommandée:
GOLDPNL Un ampli de basse différent à cause de sa face dorée tape à
JAZZ Un ampli de basse combo apprécié des bassistes de jazz.
STUDIO* Un ampli de basse combo avec tube à vide idéal pour un
AC100 Un ampli de basse avec tube à vide de 100W fabriqué par
UKMAJOR Un ampli de basse avec tube à vide de 200W fabriqué au
SYNTH*
recommandée: MTL4x10)
LA4x10, 1x12VOX)
l’œil, avec un son clair. (enceinte recommandée: MDN4x10)
(CAB recommandé : JAZ1X15)
son Motown. (enceinte recommandée: STU1x15)
Vox. (enceinte recommandée: AC2x15)
RU. (enceinte recommandée: UK4x15, UK4x12)
Modelage de synthé de chromatique. (enceinte recommandée: 4X12MDN)
84
(Disque de valeurs
VALEUR
et boutons de commande)
GAIN/MID
BASS
TREBLE
VOLUME
Disque de valeurs
moyennes fréquences. (1…5)
GAIN/MID
.....................
BASS
TREBLE
VOLUME
Disque de valeurs
...............
Consulter le tableau de synthé
de guitare séparé
..........
............................
............................
moyennes
.......................
..................
.....
Réglage du gain
.......................
..................
moyennes (0…10.0)
basses
hautes
Volume
Plage des
basses
hautes
Volume
Page 85

Paramètres des synthé
Sélection de
l’oscillateur: 0...15
(bouton GAIN/MID)
Réglage VCF: 0…10.0 Réglage de la sensibilité du filtre contrôlé par la tension
(bouton BASS)
Niveau direct: 0...10.0 Règle le volume de la guitare ou la basse
(Bouton TREBLE)
Niveau de synthé:
(Bouton de VOLUME)
Réglage du seuil:
(disque de valeurs)
Le synthé de la guitare est uniquement efficace lorsque l'on joue des notes seules. L'effet souhaité ne s'obtient pas
en cas de jeu d'accords.
Si votre instrument n’est pas bien accordé, les résultats risquent de ne pas être ceux attendus. Dans ce cas,
réaccorder l’instrument.
0:
Onde en dents de scie deux octaves vers le bas
2:
Onde sinusoïdale une octave vers le bas
4:
Onde sinusoïdale
6:
Onde sinusoïdale une octave vers le haut
Les oscillateurs 8…15 correspondent aux oscillateurs 0…7 avec le portamento activé.
0…4.7
correspond à un réglage de sensibilité dans le sens positif (+), et
5.0…10.0
correspond à un réglage de sensibilité dans le sens négatif (-).
Réglez ce paramètre sur 5.0 pour un oscillateur à onde sinusoïdale.
0...10.0
Règle le volume du synthé
1.0...10.0
Règle la sensibilité du synthé en réponse au volume de la guitare ou la basse .
Réglez ce paramètre comme il convient pour la guitare , la basse ou le micro.
1:
Onde en dents de scie une octave vers le bas
3:
Onde en dents de scie
5: Onde en dents de scie une octave vers le haut
7:
Onde sinusoïdale deux octaves vers le haut
85
Page 86

CAB (Cabinet modeling)
TYPE (Touchesπ/†)
1X8TWD Ce modèle d’effet simule une enceinte à dos ouvert équipée
2X10BLK
4X10TWD Ce modèle d’effet simule une enceinte à dos ouvert équipée
1X12TWD Ce modèle d’effet simule une enceinte à dos ouvert équipée
1X12VOX Ce modèle d’effet simule une enceinte britannique à dos
2X12BLK Ce modèle simule une enceinte américaine pour guitare à
2X12VOX Ce modèle d’effet simule une enceinte britannique à dos
4X12VOX
4X12CLS Ce modèle d’effet simule une enceinte à dos fermé équipée
4X12MDN Ce modèle d’effet simule une enceinte à dos fermé équipée
d’un haut-parleur de 8 pouces.
Ce modèle d’effet simule une enceinte à dos ouvert équipée de
deux haut-parleurs de 10 pouces et avec une tonalité brillante.
de quatre haut-parleurs de 10 pouces.
d’un haut-parleur de 12 pouces et avec une tonalité blues.
ouvert équipée d’un haut-parleur de 12 pouces.
dos ouvert avec deux haut-parleurs de 12 pouces.
ouvert équipée de deux haut-parleurs de 12 pouces.
Une enceinte pour guitare à dos fermé utilisée dans les amplis
VOX récents, contenant quatre haut-parleurs néodyme.
de quatre haut-parleurs de 12 pouces et de 25 watts.
de quatre quatre haut-parleurs de 12 pouces et de 75 watts.
86
VALEUR (Disque de valeurs)
PRESENCE: Règle la tonalité
de la plage des hautes
fréquences. (0…10.0)
Page 87

TYPE (Touchesπ/†)
4X12VIN Ce modèle d’effet simule une enceinte à dos fermé équipée
LA 4X10
MDN4X10 Modèle d’enceinte de type moderne avec quatre haut-
MTL4X10 Quatre haut-parleurs de 10 pouces en aluminium à cône /
CLS8X10
UK 4X12
STU1X15
JAZ1X15
AC 2X15
US 2X15
UK 4X15
LA 1X18
COMBI Modèle d’enceinte combinant un haut-parleur de 12 pouces
de quatre haut-parleurs de 12 pouces et de 30 watts.
Modèle d’enceinte pour son LA avec quatre haut-parleurs de 10 pouces.
parleurs de 10 pouces.
Enceinte moderne pour basse.
Modèle d’enceinte de type classique avec huit haut-parleurs de 10 pouces.
Modèle d’enceinte fabriqué au RU avec quatre haut-parleurs de 12 pouces.
Modèle d’enceinte combo de studio avec un haut-parleur de 15 pouces.
Modèle d’enceinte combo de jazz avec un haut-parleur de 15 pouces.
Modèle d’enceinte avec deux haut-parleurs de 15 pouces pour AC100.
Modèle d’enceinte fabriqué au RU avec deux haut-parleurs de 15 pouces.
Modèle d’enceinte fabriqué au RU avec quatre haut-parleurs de 15 pouces.
Modèle d’enceinte pour son LA avec un haut-parleur de 18 pouces.
et un haut-parleur de 18 pouces.
VALEUR (Disque de valeurs)
PRESENCE: Règle la tonalité
de la plage des hautes
fréquences. (0...10.0)
87
Page 88

MOD
(Modulation et modelage de l’effet de filtre)
TYPE (Touchesπ/†)
CHORUS1 Ancien chorus dans lequel le son de l’effet est émis vers la
CHORUS2
FLANG 1…3
FLANG4 Ancien flanger qui inverse la phase du feedback.
PHASER1 Un ancien phaser populaire à quatre phases.
PHASER2 Un ancien phaser à quatre phases avec une plage étendue
PHASER3 Un ancien phaser à dix phases avec un effet doux.
U-VIBE1 Simulation d’une pédale vibe réglée en mode chorus.
U-VIBE2 Simulation d’une pédale vibe réglée en mode vibrato.
TREM1 Tremolo doux.
TREM2 Tremolo intégré dans un ampli de guitare.
TREM3 Tremolo fort et profond.
gauche et le son direct vers la droite.
Ancien chorus stéréo qui inverse la phase du son de l’effet entre la
gauche et la droite, pour créer davantage d’impression d’espace.
Ancien flanger avec un son distinct (1, 2, 3 possèdent
respectivement des intensités de feedback de 0%, 22% et 60%).
des moyennes fréquences.
88
VALEUR (Disque de valeurs)
Règle la vitesse de modulation (0.1...10.0 [Hz])
Règle la vitesse de modulation (1.0...10.0 [Hz])
Page 89

TYPE (Touchesπ/†)
AT PAN1
AT PAN2
ROTARY1 Simulation d’un haut-parleur rotatif. Vitesse de modulation
ROTARY2, 3
PITCH1…3 Pitch shifter (PITCH1, 2, 3 diffèrent dans le niveau du son
MAJ3UP
MAJ3DWN
MIN3UP
MIN3DWN
PER4TH
PER5TH
MAJ6TH
Positionnement panoramique automatique (LFO: onde carr ée ).
Positionnement panoramique automatique (LFO: onde sinusoïdale ).
Simulation d’un haut-parleur rotatif dans lequel la
dynamique de jeu change les vitesses du rotor.
2 passe de lent à rapide lorsque vous jouez fort.
3 passe de lent à rapide lorsque vous jouez doucement.
de l’effet)
Pitch Shifter intelligent; une tierce plus élevée dans une tonalité majeure.
Pitch Shifter intelligent; une tierce plus basse dans une tonalité majeure.
Pitch Shifter intelligent; une tierce plus élevée dans une tonalité mineure.
Pitch Shifter intelligent; une tierce plus basse dans une tonalité mineure.
Pitch Shifter intelligent; une quarte plus élevée dans une tonalité majeure.
Pitch Shifter intelligent; une quinte plus élevée dans une tonalité majeure.
Pitch Shifter intelligent; une sixte plus élevée dans une tonalité majeure.
VALEUR (Disque de valeurs)
Vitesse de modulation
(0.1...10.0 [Hz])
(1.0...10.0 [Hz])
Spécifie le niveau auquel la
vitesse change. (1.0...10.0)
Importance du changement
dehauteur (-24, -17, -12…-1, -d, d,
+1…+12, +19, +24) (d=désaccorder)
Définir la tonalité
(Do, Do#…La#, Si)
89
Page 90

TYPE (Touchesπ/†)
FEEDBK1, 2
FEEDBK3, 4
FILTER Filtre passe bas
FILTUP1 Filtre passe bas de type auto-wah à polarité positive.
FILTUP2 Auto-wah à filtre passe-bas avec polarité positive et crête
FILTDWN1 Filtre passe bas de type auto-wah à polarité négative.
FILTDWN2 Auto-wah à filtre passe-bas avec polarité négative et
TALK1…4 Effet qui simule une “guitare parlante”
RANDOM 1…4
Un effet qui génère artificiellement le feedback et s’active
lors du maintien d’une note pendant un long moment.
2 génère un feedback une octave plus haut.
Un effet qui génère artificiellement le feedback et s’active
constamment pendant le sustain.
4 génère un feedback une octave plus haut.
harmonique élevée.
réponse rapide.
1: YAH-YAH, 2: U-WAH, 3: YOI-YOI , 4: YEAH
Filtre à pas aléatoire qui déplace le filtre de manièr e aléatoire.
1, 2, 3 et 4 changent la bande de fréquence affectée au filtre.
90
VALEUR (Disque de valeurs)
Règle le niveau de l’effet
(0...4.7)
Règle l’intensité du vibrato
(5.0...10.0)
Règle la fréquence (1.0...10.0 [Hz])
Règle la sensibilité (0.0...10.0)
Règle la sensibilité (0...10.0)
Règle la vitesse de modulation (0.10...10.0 [Hz])
Page 91

A propos du Pitch Shifter intelligent
Le Pitch Shifter intelligent crée des harmonies musicalement utiles en variant l’importance de
transposition de la hauteur en fonction de la note jouée et de la tonalité enfoncée. Par exemple, si
vous sélectionnez une transposition d’une tierce vers le haut pour une tonalité majeure (MAJ3UP),
l’importance de la transposition de hauteur variera automatiquement entre trois demi-tons (une
tierce mineure) et quatre demi-tons (une tierce majeure).
• Lorsque le paramètre MAJ3UP est utilisé avec un réglage de tonalité sur Do (C).
La hauteur crée par le pitch shifter
intelligent est indiquée entre parenthèses ( ).
Le PX4D fournit sept types de transposition de hauteur intelligents, avec des intervalles de tierces,
de quartes, de quintes et de sixtes. (Pour les tierces, vous pouvez sélectionner la partie inférieure ou
supérieure et une touche mineure ou majeure).
Si votre instrument n’est pas bien accordé, les résultats risquent de ne pas être ceux attendus. Dans ce cas,
réaccorder l’instrument.
Le pitch shifter intelligent fonctionnera uniquement lorsque vous jouez des notes individuelles. Il ne peut pas
produire d’effets pour les accords.
91
Page 92

DLY (Modelage du retard)
Pour chaque type, 1, 2, 3, 4 et 5 possèdent des intensités de feedback différentes.
Le temps de retard est défini par l’intervalle entre les deux pressions de la touche TAP. Le temps de
retard spécifié peut être d’un maximum de 500 ms pour SLAP ou d’un maximum de 2 secondes
pour MULTI; il peut être vérifié en maintenant la touche TAP enfoncée.
TYPE (Touchesπ/†)
SLAP1…5 Retard de type slap dont le temps correspond à 1/4 de
l’intervalle entre les deux pressions de la touche TAP.
DELAY1…5 Retard stéréo.
PPDLY1…5 Retard ping-pong à deux taps qui positionne le son
panoramiquement à gauche et à droite.
ECHO1…5 Simulation d’écho d’enregistrement avec une tonalité
chaleureuse.
MULTI1…5 Simulation d’écho d’enregistrement à deux têtes avec
trait stéréo spécial (crée une réverbération spacieuse).
VALEUR(Disque de valeurs)
Niveau de l’effet (0...10.0)
un
92
Page 93

REV(Reverb Modeling)
TYPE (Touchesπ/†)
DRYAIR Réverbération qui produit une sensation d’air sec.
WETAIR Réverbération qui produit une sensation d’air mouillé.
ROOM1 Réverbération de pièce avec un son brillant.
ROOM2 Réverbération de pièce avec un son doux.
PLATE1 Réverbération de plaque avec un son serré.
PLATE2 Réverbération de plaque avec un son brillant.
HALL1 Réverbération d’une salle de taille moyenne.
HALL2 Réverbération d’une grande salle.
SPRING1 Réverbération à ressort d’un ampli pour guitare.
SPRING2 Réverbération à ressort dense.
VALEUR (Disque de valeurs)
Niveau de l’effet (0...10.0)
93
Page 94

Liste des programmes présélectionnés
00...69 : Programme guitare, 70...99 : Programme basse
No. Name No. Name No. Name No. Name No. Name
P00 TRAPPED
P01 J-CLEAN
P02 VELVET
P03 PHASCLN
P04 WILD'04
P05 ACOUSTC
P06 ROCK
P07 BUBBLES
P08 JIMI 69
P09 AWHOSTX
P10 NUGLORY
P11 VOXTREM
P12 PUDDLE
P13 FABTONE
P14 ULI JON
P15 50TWEED
P16 EC WAH
P17 TROWER
P18 MR SG
P19 CL FLNG
P20 DARK
P21 BOWATTK
P22 LUCKY
P23 STEVIE
P24 NEMO
P25 MELISSA
P26 POP
P27 JAZZY
P28 UK'80
P29 HUMBLE
P30 G SYNTH
P31 PIEZO
P32 US MDN
P33 ROTARY
P34 FEEDBK
P35 HRM SYN
P36 PASS
P37 BLUES
P38 VOXWAH
P39 US HI-G
P40 SLOWPAN
P41 FILTER
P42 E MINOR
P43 CHORUS
P44 OCTAVE
P45 C MAJOR
P46 SLIPNOT
P47 AC CLN
P48 ZEBRA
P49 COMP CL
P50 SOLOPAN
P51 FLANGE
P52 LINKIN
P53 FLOYD
P54 WHOTOWN
P55 HI SYN
P56 AUDIO
P57 ARPGVIB
P58 STACKED
P59 SOLOWAH
P60 SURF
P61 CHARLOT
P62 SUBSYNT
P63 ADD6MOR
P64 PARALIZ
P65 SWEETOD
P66 PAPA
P67 Y AH VOC
P68 SHADOWS
P69 RINGER
P70 STUFUNK
P71 STUFING
P72 STUCORD
P73 STUHARM
P74 STUSOLO
P75 BONEHED
P76 TAPROOM
P77 OCTBASS
P78 OVERDRV
P79 STUWAVE
94
P80 THUMB
P81 COUNTRY
P82 MOTOWN
P83 JAZZ
P84 B BLUES
P85 FRETLES
P86 RNB
P87 VALVERY
P88 PICKER
P89 SLAPIT
P90 CANYON
P91 DRIVEN
P92 B CHORS
P93 PHASOLO
P94 THUMPER
P95 TALKER
P96 FAXMAN
P97 DISTORT
P98 FILTERD
P99 B SYNTH
Page 95

Liste des motifs rythmiques
No. Name C P No. Name C P No. Name C P No. Name C P No. Name C P
1 METRONM 1 1
2 METRO2 1 1
3 METRO3 1 1
4 METRO4 1 1
5 METRO5 1 1
6 METRO6 1 1
7 METRO7 1 1
88BEAT1 1 4
98BEAT2 1 1
10 8BEAT3 2 2
11 8BEAT4 1 2
12 8BEAT5* 2 2
13 8BEAT6 1 1
14 8BEAT7 1 1
15 8BEAT8 1 1
16 8BEAT9 2 2
17 8BEAT10 1 1
18 8FILL1* 1 1
19 8FILL2 1 1
20 8FILL3 1 1
C: Nombre de mesures en cas d’utilisation dans une chaîne de motifs. P: Nombre de mesures.
21 8FILL4 1 1
22 8FILL5 1 1
23 8BRK 1 1 1
24 8BRK 2 1 1
25 8SHFL1 1 2
26 8SHFL2 1 1
27 8SHFL3 2 2
28 16BEAT1 2 2
29 16BEAT2 2 2
30 16BEAT3 1 1
31 16BEAT4 2 2
32 16BEAT5 1 1
33 16BEAT6 1 1
34 16BEAT7 1 1
35 16BEAT8 1 1
36 16BEAT9* 1 2
37 16FILL1 1 1
38 16FILL2 1 1
39 16FILL3 1 1
40 16FILL4 1 1
41 16FILL5 1 1
42 16BRK 1 1
43 16SHFL1 1 2
44 16SHFL2 1 1
45 16SHFL3 1 1
46 SHUFILL 1 1
47 3/4 2 2
48 3/4SHFL 2 2
49 6/8 1* 2 4
50 6/8 2* 2 4
51 5/4* 1 1
52 6/4 1 1
53 7/4 1 1 1
54 7/4 2 1 1
55 POP1* 2 4
56 POP2* 1 4
57 ROCK1 1 1
58 ROCK2 1 2
59 70ROCK 1 2
60 METAL1 1 1
61 METAL2 1 1
62 MTLFILL 1 1
63 R'N'B 1 2
64 BLUES* 1 12
65 BLUEFIL 1 1
66 COUNTRY 1 1
67 BALLAD 1 1
68 JAZZ1 2 2
69 JAZZ2* 2 2
70 FASTJAZ* 1 1
71 II-V* 2 8
72 FUNK1 2 2
73 FUNK2 2 2
74 FUNK3 1 1
75 LINEAR 1 1
76 MOTOWN1* 1 2
77 MOTOWN2 1 1
78 SURF1 1 1
79 SURF2* 1 4
80 REGGAE1 2 2
81 REGGAE2* 1 1
82 REGGAE3* 2 2
83 DANCE1 2 2
84 DANCE2 2 2
85 DANCE3 1 1
86 DANCE4* 1 1
87 DISCO1 1 1
88 DISCO2 1 1
89 EURO 1 1
90 NEW RNB* 2 2
91 BOSSA 2 2
92 SAMBA1 1 1
93 SAMBA2 1 1
94 TANGO 1 1
95 AFRO* 1 1
96 LATIN1* 1 1
97 LATIN2* 1 1
98 SONGO 1 1
99 POLY 1 1
100 ONDO 2 2
95
Page 96

* La ligne de basse pour ces variations rythmiques suit les progressions d’accords décrites ci-
dessous. (Les progressions d’accords utilisées dans une suite de patterns sont indiquées à
l’intérieur de crochets [ ].)
12 8BEAT5 I – IV
18 8FILL1 I – V
36 16BEAT9 [ I (m) – V (m) ] –
49 6/8 1 [ I – VIm ] – IV – V
50 6/8 2 [ Im –
51 5/4 Im – Vm
55 POP1
56 POP2 [ I ] – VIm – IV – V
64 BLUES [ I ] – IV – I – V – IV – I – V
69 JAZZ2 I (m) – IV –
70 FASTJAZ Im – IV
III ] – IV – V
[ I – V – VIm – V ] – IV – IIIm – IIm – V
VII (m) – III
96
VI – VII
71 II – V
76 MOTOWN1 [ I ] – IV
79 SURF2 [ I ] – VIm – IV – V
81 REGGAE2 I – VIm
82 REGGAE3 I –
86 DANCE4 I –
90 NEWRNB Im –
95 AFRO I –
96 LATIN1 I – IV
97 LATIN2 I –
[ Im – IV ] – VIIm – III – VIm – II – V
VII
VII
VII – VI – V
VII
VII
Page 97

Specifications
• Effets: 158 types (Effets simultanés: jusqu’à sept effets)
• Nombre de programmes: User: 100, Preset: 100
• Entrée: entrée pour guitare (prise phone) AUX (mini prise stéréo)
• Sortie: sortie à deux fonctions ligne/casque d’écoute (prise phone stéréo)
• Section accordeur: Plage de détection: 27,5 Hz à 2.093 Hz (La0…Do7)
• Section de rythmes: 40 à 208 bpm
• Alimentation: 4 piles alcalines de format AAA
• Dimensions (LxPxH): 76 mm x 112 mm x 27 mm
• Poids : 138g(piles non comprises)
• Eléments inclus: Manuel d’utilisation, quatre piles alcalines AAA pour vérification du
• Eléments en option: Adaptateur secteur
La finition et les spécifications techniques peuvent être modifiées sans avis préalable, dans un but d’amélioration du produit.
Calibrage: A = 438 à 445 Hz
Permet dix heures d’utilisation continue (le rétroéclairage sont désactivés)
Permet sept heures d’utilisation continue
Adaptateur secteur (DC4.5V:
fonctionnement, Attache Sangle
(le rétroéclairage est activé)
) vendu séparément
97
Page 98

Vorsichtsmaßnahmen
Aufstellungsort
Vermeiden Sie das Aufstellen des Geräts an Orten, an
denen
• es direkter Sonneneinstrahlung ausgesetzt ist;
• hohe Feuchtigkeit oder Extremtemperaturen auftreten können;
• Staub oder Schmutz in großen Mengen vorhanden sind;
• das Gerät Erschütterungen ausgesetzt sein kann.
• in der Nähe eines Magnetfeldes.
Stromversorgung
Schließen Sie das beiliegende Netzteil nur an eine
geeignete Steckdose an. Verbinden Sie es niemals mit
einer Steckdose einer anderen Spannung.
Störeinflüsse auf andere Elektrogeräte
Dieser kann bei in der Nähe aufgestellten Rund-funkempfängern oder Fernsehgeräten Empfangsstörungen
hervorrufen. Betreiben Sie solche Geräte nur in einem geeigneten Abstand von diesem Erzeugnis.
98
Bedienung
Vermeiden Sie bei der Bedienung von Schaltern und
Reglern unangemessenen Kraftaufwand.
Reinigung
Bei auftretender Verschmutzung können Sie das Gehäuse mit einem trockenen, sauberen Tuch abwischen.
Verwenden Sie keinerlei Flüssigreiniger wie beispielsweise Reinigungsbenzin, Verdünnungs- oder Spülmittel. Verwenden Sie niemals brennbare Reiniger.
Bedienungsanleitung
Bewahren Sie diese Bedienungsanleitung gut auf, falls
Sie sie später noch einmal benötigen.
Flüssigkeiten und Fremdkörper
Stellen Sie niemals Behältnisse mit Flüssigkeiten in
der Nähe des Geräts auf. W enn Flüssigkeit in das Gerät
gelangt, können Beschädigung des Geräts, Feuer oder
ein elek-trischer Schlag die Folge sein.
Beachten Sie, daß keinerlei Fremdkörper in das Gerät gelangen. Sollte ein Fremdkörper in das Gerät gelangt sein, so trennen Sie es sofort vom Netz. Wenden Sie sich dann an Ihren KORG-Fachhändler
Page 99

Das CE-Zeichen für die Europäische
Gemeinschaft
Vor dem 31.12.1996 vergebene CE-Zeichen auf unseren
netzgespeisten Geräten zeigen an, daß diese Geräte gemäß der EMC-Richtlinie (89/336/EWG) und der CERichtlinie (93/68/EWG) der EU arbeiten.
Nach dem 01.01.1997 vergebene CE-Zeichen auf unseren
netzgespeisten Geräten zeigen an, daß diese Geräte gemäß der EMC-Richtlinie (89/336/EWG), der CE-Richtlinie (93/68/EWG) und der Niederspannungsstromrichtlinie (73/23/EWG) der EU arbeiten.
Die CE-Zeichen auf unseren batteriegespeisten Geräten
zeigen an, daß diese Geräte gemäß der EMC-Richtlinie
(89/336/EWG) und der CE-Richtlinie (93/68/EWG) der
EU arbeiten.
99
Page 100

Inhalt
Einleitung ................................. 102
Hauptmerkmale....................... 102
Einschalten............................... 104
Batterieanzeige ...................................104
Befestigen der Gurthalterung 104
Bedienelemente und Anschlüsse
................................................... 105
LCD-Display ....................................... 107
Herstellen der Anschlüsse ....... 108
Ausprobieren............................ 109
Quick Edit (Schnellzugriff) ...............109
Play-Modus .............................. 110
1. Programmauswahl .........................110
2. Master-Pegel ................................... 110
3. Bypass/Mute.................................... 110
100
4. T uner................................................ 111
5. Festlegen der Funktion
des Endlosreglers............................112
6. Key Lock-Funktion ........................113
Der Rhythm & Bass-Modus ... 113
1. Rhythmus-Pattern.......................... 114
2. T empo...............................................114
3. Bass On/Off & Bass-Tonart .......... 114
4. Hallanteil Rhythm & Bass ............ 115
5. Rhythm & Bass Level ....................115
6. CHAIN-Pattern .............................. 115
Phrase T rainer-Modus ............ 116
1. Auswahl des Aufzeichnungsmodus116
2. Aufzeichnung................................... 118
3. Wiedergabe......................................118
4. Pausenfunktion ...............................119
AUX Pitch-Modus ................... 119
 Loading...