

Page 1
E G F 1
Page 2

To ensure long, trouble-free operation, please
read this manual carefully.
Precautions
Location
Using the unit in the following locations can result in a malfunction.
• In direct sunlight
• Locations of extreme temperature or humidity
• Excessively dusty or dirty locations
• Locations of excessive vibration
Power supply
Please connect the designated AC adaptor to an
AC outlet of the correct voltage. Do not connect
it to an AC outlet of voltage other than that for
which your unit is intended.
Interference with other electrical devices
This product contains a microcomputer. Radios
and televisions placed nearby may experience
reception interference. Operate this unit at a suitable distance from radios and televisions.
2
Handling
To avoid breakage, do not apply excessive force
to the switches or controls.
Care
If the exterior becomes dirty , wipe it with a clean,
dry cloth. Do not use liquid cleaners such as benzene or thinner, or cleaning compounds or flammable polishes.
Keep this manual
After reading this manual, please keep it for later
reference.
Keeping foreign matter out of your equipment
• Never set any container with liquid in it near
this equipment. If liquid gets into the equipment, it could cause a breakdown, fire, or electrical shock.
• Be careful not to let metal objects get into the
equipment. If something does slip into the
equipment, unplug the AC adaptor from the
wall outlet. Then contact your nearest Korg
dealer or the store where the equipment was
purchased.
Page 3

THE FCC REGULATION WARNING (for U.S.A)
This equipment has been tested and found to comply with the limits for a Class B digital device, pursuant to
Part 15 of the FCC Rules. These limits are designed to provide reasonable protection against harmful interference in a residential installation. This equipment generates, uses, and can radiate radio frequency energy
and, if not installed and used in accordance with the instructions, may cause harmful interference to radio
communications. However, there is no guarantee that interference will not occur in a particular installation. If
this equipment does cause harmful interference to radio or television reception, which can be determined by
turning the equipment off and on, the user is encouraged to try to correct the interference by one or more of
the following measures:
• Reorient or relocate the receiving antenna.
• Increase the separation between the equipment and receiver.
• Connect the equipment into an outlet on a circuit different from that to which the receiver is
connected.
• Consult the dealer or an experienced radio/TV technician for help.
Unauthorized changes or modification to this system can void the user’s authority to operate this equipment.
CE mark for European Harmonized Standards
CE mark which is attached to our company’s products of AC mains operated appar atus until December 31, 1996
means it conforms to EMC Directive (89/336/EEC) and CE mark Directive (93/68/EEC). And, CE mark which is
attached after January 1, 1997 means it conforms to EMC Directive (89/336/EEC), CE mark Directive (93/68/
EEC) and Low Voltage Directive (73/23/EEC).
Also, CE mark which is attached to our company’s products of Battery operated apparatus means it conf orms to
EMC Directive (89/336/EEC) and CE mark Directive (93/68/EEC).
3
Page 4

Um einen langfristigen, einwandfreien
Betrieb zu gewährleisten, lesen Sie bitte
diese Bedienungsanleitung sorgfältig
durch.
Vorsichtsmaßnahmen
Aufstellung
Betreiben Sie das Gerät nicht in folgenden
Umgebungen, da dies zu Fehlfunktionen führen könnte:
• in direktem Sonnenlicht
• bei extremer Temperatur oder Luftfeuch-
tigkeit
• in extrem staubigen oder schmutzigen
Umgebungen
• unter dem Einfluß starker Vibrationen
Stromversorgung
Schließen Sie den mitgelieferten Wechselstromadapter bitte nur an eine Steckdose mit
korrekter Netzspannung an. Schließen Sie den
4
Adapter nicht an eine Netzsteckdose an, die
eine Spannung liefert, für die Ihr Gerät nicht
vorgesehen ist.
Interferenzen bei anderen Elektrogeräten
Dieses Produkt ist mit einem Mikrocomputer ausgerüstet. Bei der Aufstellung in direkter Nähe von Rundfunk-und Fernsehgeräten
kann deren Empfang durch Interferenzen gestört werden. Betreiben Sie dieses Gerät deshalb in ausreichender Entfernung von Rundfunk- und Fernsehempfängern.
Handhabung
Bedienen Sie die Schalter und Regler nicht
mit übermäßiger Kraft, um Beschädigungen
zu vermeiden.
Reinigung
Wenn das Gehäuse verschmutzt ist, reinigen
Sie es mit einem trockenen, weichen Tuch.
Verwenden Sie keine flüssigen Reinigungsmittel, zum Beispiel Leichtbenzin, Verdünner, Lösungsmittel oder brennbare Polituren.
Page 5

Bedienungsanleitung
Nachdem Sie die Bedienungsanleitung gelesen haben, sollten Sie sie für den späteren
Gebrauch gut aufbewahren.
Fremdgegenstände
• Stellen Sie keine Behälter mit Flüssigkeit
in die Nähe dieses Geräts. Wenn Flüssigkeiten in das Gerät gelangen, könnte dies
einen Systemausfall, Brand oder Stromschlag zur Folge haben.
• Achten Sie darauf, daß keine Metallgegenstände in das Gerät gelangen. Sollte dies
dennoch geschehen, ziehen Sie den W echselstromadapter aus der Netzsteckdose.
Setzen Sie sich anschließend mit dem
nächstgelegenen Korg-Fachhändler oder
dem Geschäft in Verbindung, in dem Sie
das Gerät gekauft haben.
* CE-Marke der EG-Norm
Die CE-Marke auf unseren netzgespeisten Geräten deutet auf deren Übereinstimmung mit den
EMC- und CE-Richtilinien der EG (respektive 89/336/EWG und 93/68/EWG) hin. Diese Abzeichen ist bis zum 3. Dezember 1996 gültig.
Die CE-Marke ab 1. Januar 1997 deutet auf Übereinstimmung mit den EMC-, CE- und Niederspannungsstrom-Richtilinien der EG (respektive 89/336/EWG, 93/68/EWG und 93/68/EWG)
hin.
Die CE-Marke auf unseren batteriegespeisten Geräten deutet auf deren Übereinstimmung mit
den EMC- und CE-Richtilinien der EG (respektive 89/336/EWG und 93/68/EWG) hin.
5
Page 6

Précautions à prendre
Emplacement
L’utilisation de l’appareil dans les endroits
suivants risquerait d’être la cause d’un mauvais fonctionnement:
• Sous les rayons directs du soleil
• Dans des endroits de températures extrêmes
ou d’une humidité excessive.
• Dans des endroits excessivement sales ou
poussiéreux.
• Dans des lieux sujets à des vibrations excessives.
Alimentation DC9V
Veuillez raccorder l’adaptateur secteur fourni à une prise de courant fournissant la tension adéquate. Ne jamais le raccorder à une
prise d’un autre voltage que celui prévu pour
l’appareil.
6
Interférences avec d’autres appareils
électriques
Cet instrument contient un micro-ordinateur.
Les postes de radio et de télévision situés à
proximité peuvent par conséquent souffrir
d’interférences à la réception. Veuillez dès
lors faire fonctionner cet appareil à une distance raisonnable de postes de radio et de télévision.
Manipulations
Pour éviter tout dommage, ne jamais exercer
une force excessive sur les interrupteurs ou
les commandes.
Entretien
Essuyer l’extérieur avec un chiffon propre et
sec. Ne jamais utiliser de détergents liquides
comme du benzène ou du thinner ni des composants de nettoyage ou des cires inflammables.
Page 7

Conserver le manuel
Après avoir lu attentivement le présent manuel, veuillez le conserver pour pouvoir le
consulter ultérieurement.
Tenir tout corps étranger à l’écart de
l’instrument:
• Veiller à ce qu’aucun objet métallique ne
tombe dans l’instrument. Si un corps étranger a pénétré dans l’équipement, débrancher
l’adaptateur de la prise secteur puis contacter le représentant Korg le plus proche ou le
magasin où l’équipement a été acheté.
• Ne jamais poser de récipient contenant du
liquide à proximité de l’instrument. La pénétration de liquide dans l’instrument risquerait de provoquer une panne, un incendie ou un court-circuit.
* Marque CE de conformité aux normes de sécurité européennes
La marque CE attachée à nos produits alimentés par secteur indique que ces produits sont conformes à la
directive EMC (89/336/CEE) ainsi qu'à la directive relative à la marque CE (93/68/CEE).Cette marque est
valable jusqu'au 31 décembre 1996.
La marque CE attachée après le 1 janvier 1997 indique que ces produits sont conformes à la directiv e EMC
(89/336/CEE), à la directive relativ e à la marque CE (93/68/CEE) ainsi qu'à la directi v e relati ve au courant
de guitare tension (73/23/CEE).
Enfin, la marque CE attachée à nos produits alimentés par batterie indique que ces produits sont conformes
à la directive EMC (89/336/CEE) ainsi qu'à la directive relative à la marque CE (93/68/EEC).
7
Page 8

Contents
Introduction ................................ 14
Main features.............................. 14
Turning on the power .................. 15
Battery Low display ........................ 15
3.Bypass/Mute .............................. 20
4.Tuner.......................................... 21
Calibration (frequency of the standard A
pitch) ................................................ 22
5.HBB (Hyper Bass Boost) ............... 22
6. Specifying the function of the Value Dial
.................................................. 22
Controls and connectors .............. 16
LCD screen ..................................17
Making connections..................... 18
Try it out ..................................... 19
Play mode .................................. 20
1.Selecting a program.................... 20
2.Master level ................................ 20
8
Rhythm & Bass mode .................. 24
1.Rhythm Pattern ........................... 24
2.Tempo ........................................ 24
3.Bass On/Off & Bass Key ............. 25
4.Rhythm & Bass Level ................... 25
AUX Effect mode ......................... 26
Phrase Trainer mode ................... 27
Page 9

1.Select the recording mode ........... 27
2.Recording ................................... 28
3.Playback .................................... 28
4.Pause ......................................... 29
If you wish to re-record ..................... 29
Edit mode ................................... 30
8) RENAME ....................................... 33
9) WRITE ........................................... 33
3.Reloading the factory programs .. 34
Troubleshooting........................... 35
Effect parameter list..................... 36
About the Intelligent Pitch Shifter........ 38
1.Select the effect that you wish to edit
.................................................. 30
2.Editing each effect....................... 30
1) DRIVE ........................................... 30
2) TONE............................................ 31
3) MOD (modulation)......................... 31
4) AMB (ambience) ............................ 31
5) CR (cabinet resonator) ................... 32
6) NR (noise reduction) ...................... 32
7) LEVEL ............................................ 32
Preset-program list ...................... 40
Rhythm pattern list ...................... 41
Specifications ..............................42
9
Page 10

Inhalt
Einleitung ......................................44
Hauptmerkmale ............................44
3.Bypass/Mute .................................50
4.Tuner (Stimmfunktion)................51
Kalibrierung (Frequenz des Referenz-
tons A).............................................. 51
Einschalten ....................................45
Batterieanzeige .................................45
Bedienelemente und Anschlüsse ..46
LCD-Display ................................. 47
Herstellen der Anschlüsse ............48
Ausprobieren .................................49
Play-Modus ................................... 50
1. Auswahl eines Programms ..........50
2. MASTER LEVEL (Gesamtlautstär -
ke) ..................................................50
10
5.HBB (Hyper Bass Boost) .............52
6.Festlegen der Funktion des Endlos-
reglers............................................52
Der Rhythm & Bass-Modus.........54
1.Rhythm Pattern ............................54
2.Tempo............................................54
3.Bass On/Off & Bass-Tonart.........55
4.Rhythm & Bass Level ..................55
AUX Effect-Modus .......................56
Page 11

Phrase T rainer -Modus.................. 57
1. Auswahl des Aufzeichnungsmodus .
........................................................57
2. Aufzeichnung ................................58
3. Wiedergabe ...................................58
4. Pausenfunktion .............................59
Neuaufzeichnen einer Phrase ............59
Edit-Modus....................................60
1. A uswählen des zu bearbeitenden Ef-
fekts ...............................................60
2. Effektbearbeitung ........................60
1) DRIVE (Drive)................................60
2) TONE (Tone)................................... 61
3) MOD (Modulation) ........................61
4) AMB (Ambience) ............................ 61
5) CR (Cabinet Resonator) ................62
6)NR (Noise Reduction/Rauschunter-
drückung)........................................62
7) LEVEL (Pegel) ............................... 63
8) RENAME (Umbenennung) ...........63
9) WRITE (Speichern) .......................63
3. Wiederherstellen der Werkspro-
gramme .........................................64
Fehlersuche....................................65
Effektparameterliste..................... 67
Der „Intelligente Pitchshifter“ ..........69
Parameterliste der Preset-Program-
me ...................................................71
Auflistung der Rhythmus-Patterns .
........................................................72
Technische Daten ..........................73
11
Page 12

Table des matière
Introduction ..................................74
Caractéristiques principales ........74
Mise sous tension ..........................75
Affichage de pile épuisée .................75
Commandes et connecteurs .........76
Ecran LCD ....................................77
3.Contournement/Assourdissement
(Bypass/Mute)...............................80
4.Accordeur .....................................81
Calibrage (fréquence de la hauteur du
La standard) ................................... 82
5. HBB (Accentuation des extrêmes
graves) ...........................................82
6.Définition de la fonction du disque
de valeurs ......................................82
Raccordements..............................78
Premier essai .................................79
Mode de jeu Play .......................... 80
1. Sélection d’un programme ..........80
2. Niveau de volume général............80
12
Mode de rythmes et de basses...... 84
1.Motif rythmique ...........................84
2.Tempo............................................84
3. Activation/Désactivation des basses
et tonalité des basses ....................85
4. Niveau rythmique et de basse .....85
Page 13

Mode d’effet AUXILIAIRE “AUX
Effect” ............................................86
Mode de pratique des phrases .....87
1. Sélection du mode d’enregistrement
........................................................87
2. Enregistrement .............................88
3. Reproduction ................................89
4) AMB (Ambience) ............................ 92
5) CR (Résonateur de coffret) ........... 92
6) NR (Réduction des bruits) .............93
7) LEVEL (Niveau).............................93
8) RENAME (Réassignation de nom)93
9) WRITE (Sauvegarde) ....................94
3. Réinitialisation aux programmes
d’usine ...........................................94
4. Pause..............................................89
Pour réenregistrer ..............................90
Mode d’édition “Edit”..................90
1. Sélectionner l’effet à éditer..........90
2. Edition de chacun des effets ........91
1) DRIVE (Drive) ................................ 91
2) TONE (Tonalité).............................91
3) MOD (Modulation) ........................91
Guide de dépannage ..................... 95
Liste des paramètres des effets....97
A propos du Pitch Shifter intelligent 99
Liste des programmes présélection-
nés................................................. 101
Liste des motifs rythmiques .......102
Spécifications techniques ...........103
13
Page 14

Introduction
Thank you for purchasing the Korg Tone
Works PANDORA PX3 Personal Multi Effect
Processor. In order to enjoy long and troublefree use, please read this owner’s manual and
use the product correctly. Keep this manual in a
safe place for future reference.
Main features
PANDORA is a multi-function yet compact-sized
effect unit.
56 types of effect variations
A maximum of seven effects can be used simultaneously.
50 user programs and 50 preset programs
IPE (Integrated Parameter Edit) system
Easy to adjust effect settings.
Auto T uner function
This feature makes tuning fast and easy. You can
also tune without being heard (i.e., while muted).
14
Backlit LCD
The LCD screen can be easily viewed even in
dark locations.
Rhythm and Bass function
You can play f orty different rh ythm and bass patterns.
AUX Effect function
The sound of a CD player or other audio source
connected to the AUX jack can be transposed,
or center-cancelled.
Phrase T rainer function
A segment of audio (maximum 16 seconds) recorded from a CD player or other audio source
can be looped for repeated playback. You can
even slow down the playback speed without affecting the pitch.
Cabinet Resonator
Select the desired type of speaker cabinet resonance from six types of guitar amp cabinets.
Page 15

HBB (Hyper Bass Boost)
Boosts low frequency response.
Value dial
This lets you rapidly select programs or edit the
effects.
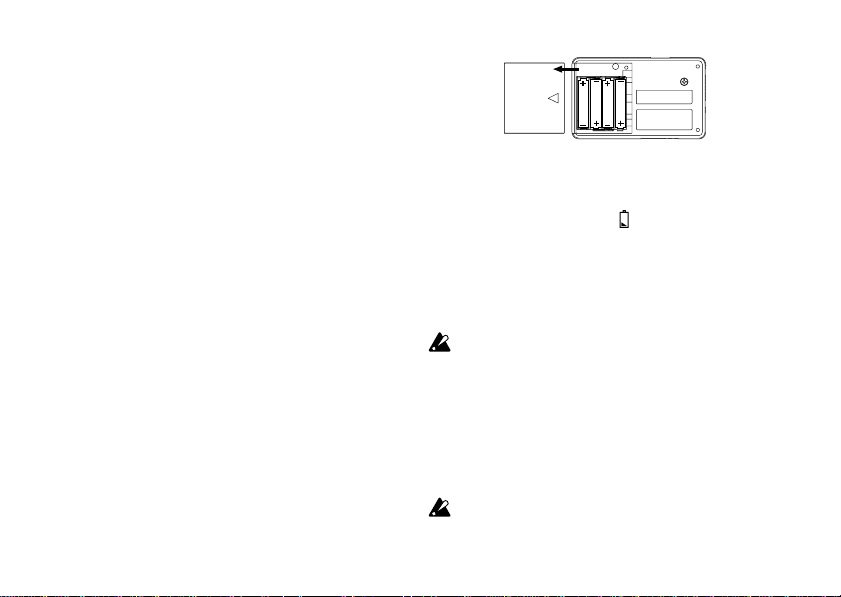
Turning on the power
Remove the battery cover located on the bottom
of the base by sliding it in the direction of the
arrow. Insert four AAA alkaline batteries (sold
separately) as shown in the illustration. Be careful to insert the batteries in the correct orientation.
Battery Low display
When the battery begins to run down, the Low
Battery icon
replace the battery as soon as possible.
Programs and other data (except for the data
being edited) will not be lost even if the battery is
removed.
Batteries that have run down must be removed from the PANDORA. If you leav e dead
batteries in the unit, malfunctions (battery
leakage, etc.) may occur. You should also
remove the batteries when you do not expect to use the PANDORA for an extended
period.
Batteries and an AC adapter are not included with this product. The y must be purchased
separately.
will light. When this icon lights,
15
Page 16
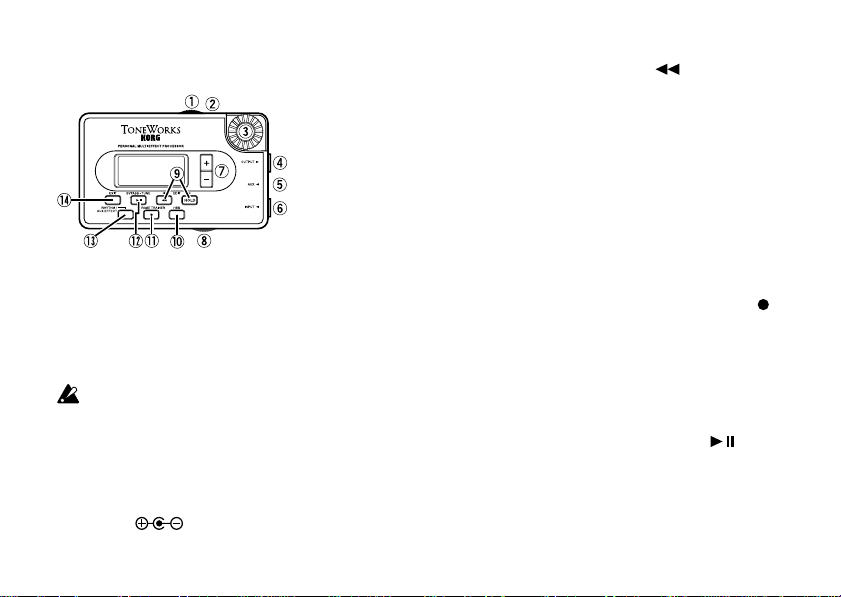
Controls and connectors
1 Power switch/Backlight
switch
This switch turns the power on/
off, and also turns the backlight
on/off.
When batteries are used,
leaving the backlight ON for
an extended period will
shorten battery life.
2 DC9V
The separately sold AC adapter (DC9V
nected here.
16
) can be con-
3 Value dial
Use this to adjust master level,
edit effects, and select programs.
4 OUTPUT jack
Connect this jack to your guitar
amp or headphones etc.
5 AUX jack (stereo)
Connect this jack to a CD player etc.
6 INPUT jack
Connect this jack to your guitar .
7 +/- buttons
Use these buttons to select programs, edit effects, and adjust
the master level.
8 Input level switch
Set this as appropriate for the
output level of your guitar.
9 EDIT √ [
buttons
Use these buttons to select the
parameter that you wish to edit,
and to operate the Phrase Trainer function.
0 HBB (Hyper Bass Boost)
button
This button turns the HBB function on/off.
A PHRASE TRAINER [
button
This button enters Phrase Trainer mode. This is also used to begin recording on the Phrase
Trainer.
B BYPASS·TUNE [
ton
Use this button when you wish
to tune in Play mode. (The
PANDORA will be bypassed or
]/® [HOLD]
] but-
]
Page 17
muted.) This is also used to turn
the effects on/off and to playback/pause the Phrase Trainer.
C RHYTHM/AUX EFFECT
button
This button enters Rhythm &
Bass mode or AUX Eff ect mode.
D EXIT button
This button returns you from
any mode back to Play mode.
This button is also used to assign a function to the V alue dial.
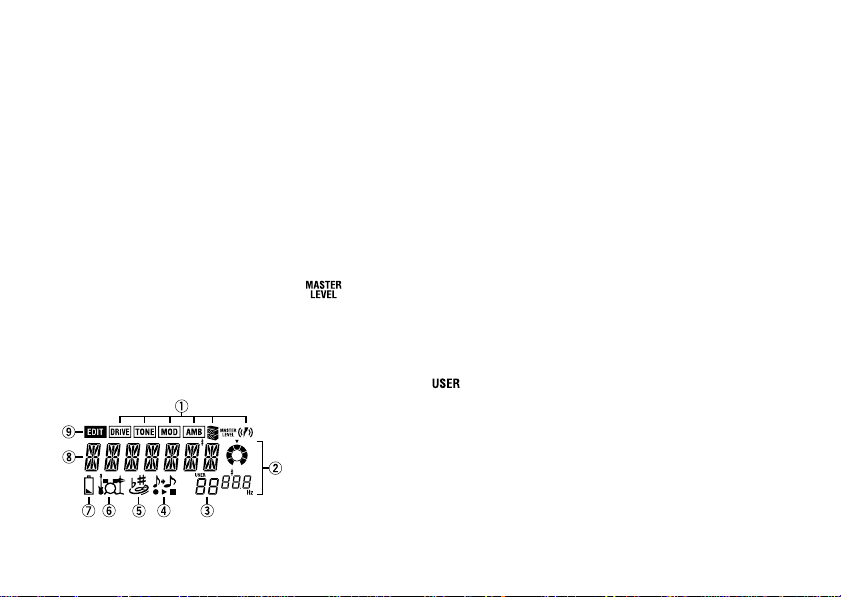
LCD screen
1 Effect chain
This indicates the on/off status
of Drive, Modulation, Ambience,
Cabinet Resonator, and HBB.
2 Value display
This area indicates the master
level or parameter values both
numerically and graphically.
(When the master level is shown,
the MASTER LEVEL indicator
will light.)
3 Program number display
This indicates the program
number. (When a user program
is selected, the
will light.)
4 Phrase Trainer mode icon
This icon will blink when you enter Phrase Trainer mode.
indicator
5 AUX Effect mode icon
This icon will blink when you enter AUX Effect mode.
6 Rhythm & Bass mode icon
This icon will blink when you enter Rhythm & Bass mode.
7 Low Battery icon
This icon will light when the batteries run down.
8 Program name/Effect type
display
This area shows the program
name or effect type. When the
PANDORA is bypassed or muted, this area will function as the
tuning meter.
9 Edit mode icon
This icon will light when you
enter Edit mode.
17
Page 18
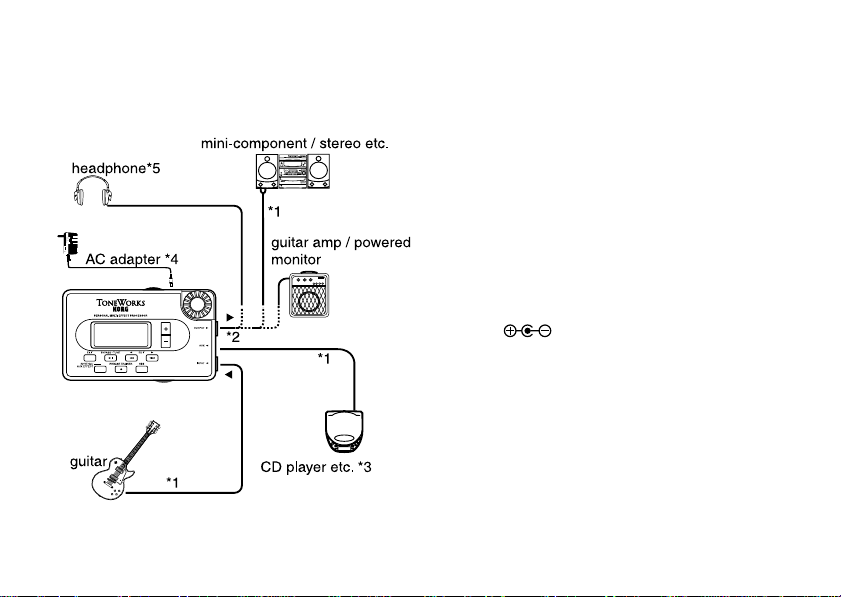
Making connections
For all equipment being connected, turn the power OFF and lower the volume.
18
*1Connecting cables are sold separately.
*2PANDORA’s output jack is stereo. If you use
a standard mono cable to connect it to a guitar amp etc., only the L (left) output will be
heard.
*3If a CD player or other audio source is con-
nected to AUX jack, you can play along on
your guitar with a tape, etc. However the volume must be adjusted on the connected device.
*4Be sure to use only the specified AC adapter
(DC9V
*5PANDORA’s output level and sound quality
will vary depending on which headphones are
used. We recommend using good quality low
impedance headphones, 32 Ohms or less with
a sensitivity rating near 100dB/mW or above.
Many headphones sold for use with portable
CD or cassette players will work just fine.
).
Page 19
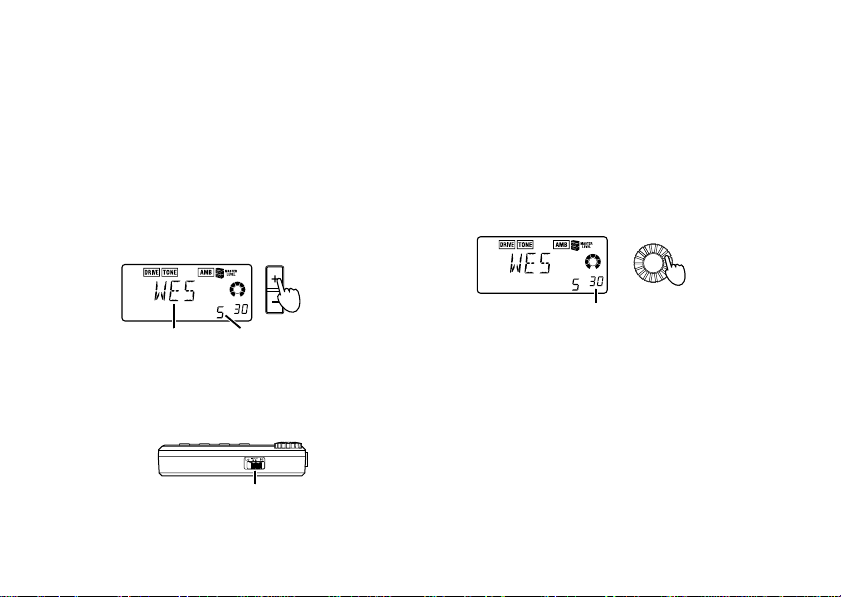
Try it out
1 When you finish making connections, set
the power switch in the “ON” position. (This
setting is referred to as Play mode.)
Use the +/- buttons to select a program.
Select a clean-type program that will be suitable for setting the volume. (As an example
here, we will select Program 5 “WES”.)
Program name
2 Set the input level switch to a position ap-
propriate for the output level of your guitar.
Program number
Input level switch
H: Guitars with a high output le v el (humb ucking pickups) or basses
L: Guitars with a low output level (single coil
pickups)
3 Set the volume control of the guitar to its
usual position.
Use the Value dial to adjust the master le v el.
Value dial
Master level
19
Page 20
Play mode
Play mode is the mode in which you will normally use PANDORA.
2. Master level
When MASTER LEVEL is lit, the master level is
shown in the value display.
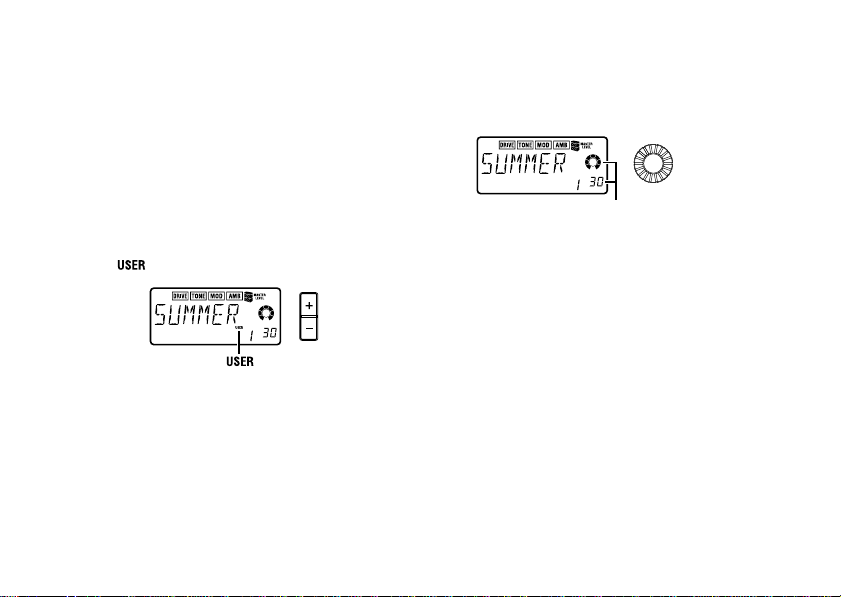
1. Selecting a program
You can select programs (types of sound) from
50 user programs and 50 preset programs. Use
the +/- buttons to select a program.
If a user program is selected, the display will indicate “
Programs can also be selected when you are in
Rhythm & Bass mode, AUX Effect mode, or
Phrase T rainer mode.
20
” above the program number.
Value dial
Value display
Immediately after the power is turned on, you
will be able to adjust the master level using the
Value dial. You can also use the +/- buttons to
adjust the master level. (☞ p.22)
The master level is remembered e ven when the
power is turned off.
3. Bypass/Mute
When you press the BYPASS·TUNE button, the
PANDORA will be bypassed, and the original
sound will not be processed by any effect.
The effect chain will blink, and the display will indicate “BYPASS” for approximately one second.
Page 21
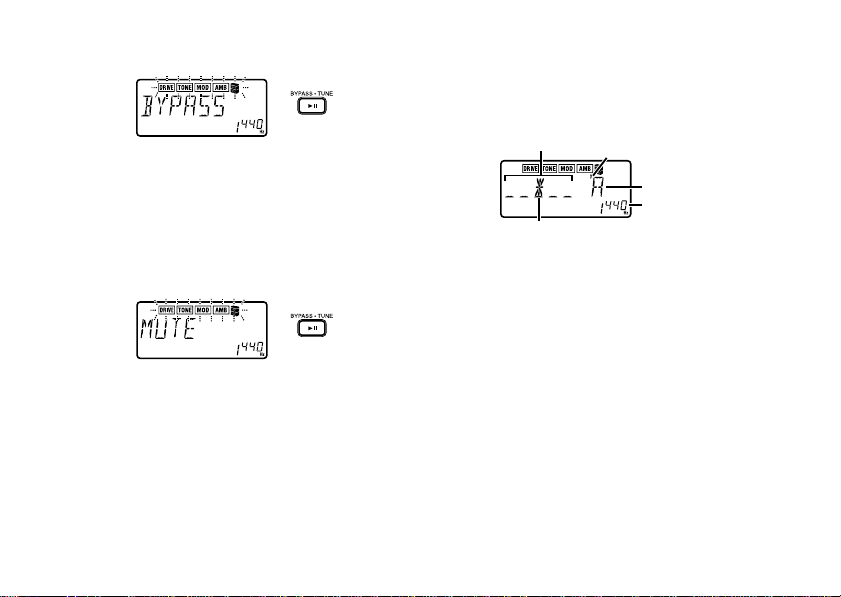
blinking
If you press and hold the BYPASS·TUNE button for longer than one second, the output signal will be muted.
The effect chain will blink rapidly, and the display will indicate “MUTE” for approximately one
second.
rapid blinking
Bypass/mute will be turned off when you either
press the BYPASS·TUNE button once again,
or change the program.
4. Tuner
The tuner will operate when you bypass or mute
in Play mode.
meter
center mark
Play a single string on your guitar. The LCD will
show the note name and the calibration. If the
pitch is more than a semitone higher than the
note name, a sharp symbol will appear at the
upper left of the note name.
The display area will act as a meter to show the
pitch deviation.
Tune the string of your guitar so that the indicator above the center mark is lit.
The tuner (bypass/mute) will be turned off when
you either press the BYPASS·TUNE button or
change the program.
sharp
note name
calibration
21
Page 22
Calibration (frequency of the standard A pitch)
You can use the Value dial to adjust calibration
in the range of A = 438 Hz–445 Hz.
The calibration setting you make will be valid until
the power is turned off. Once the pow er is turned
off, calibration will be reset to A = 440 Hz the
next time the power is turned on.
5. HBB (Hyper Bass Boost)
This function boosts the low-frequency range that
is often insufficient when using small headphones. This function is also effective when the
Pandora is connected to a guitar amp or mixer.
Use the HBB button to switch HBB on/off . When
HBB is on, the HBB icon (
screen.
The HBB on/off setting is remembered even
when the power is turned off. The same setting
will still be in effect the next time the power is
turned on.
It is not possible to switch this function on/off
when the PANDORA is bypassed or muted.
22
) will light in the
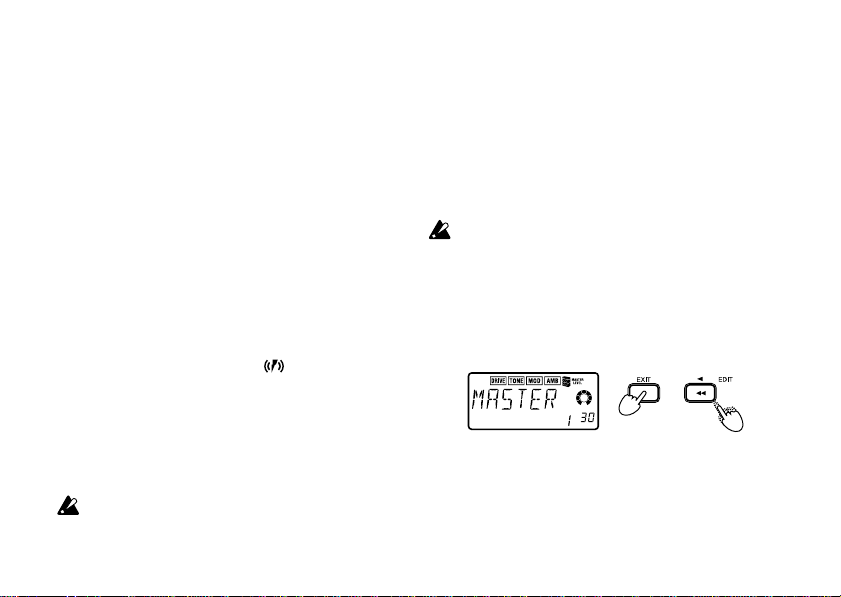
6. Specifying the function of the Value Dial
You can specify the function that the Value dial
will perform in Play mode.
In Play mode, hold down the EXIT button and
press either the EDIT
ton, or the BYPASS·TUNE button to assign the
following functions.
This setting cannot be changed during bypass/mute.
● Hold down the EXIT button and press the
√ button.
EDIT
The LCD will indicate “MASTER” for approx-
imately one second.
The Value dial will adjust the master level, and
the +/- buttons will select progr ams. You can use
the Value dial to adjust the master level quickly.
Each time the power is turned on, this setting
will be in effect.
√ button, the EDIT ® but-
hold down
Page 23
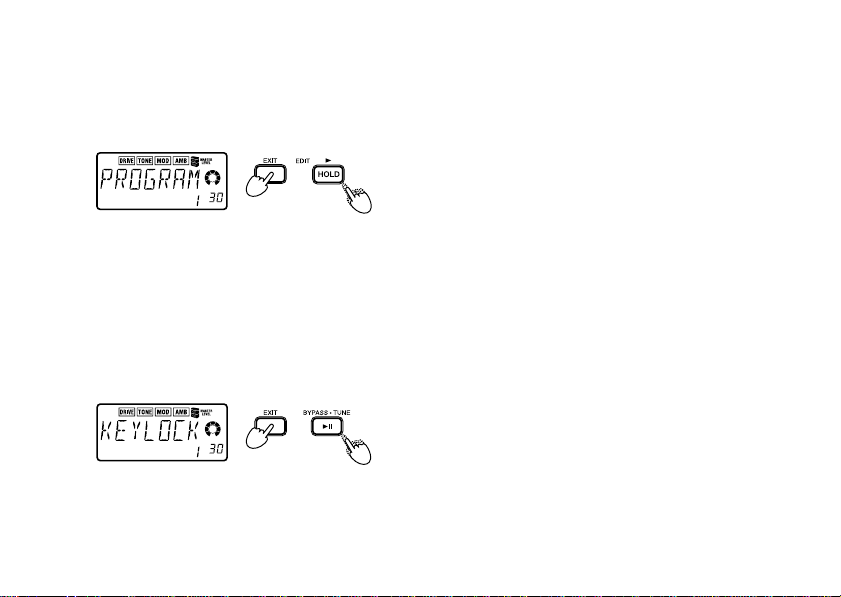
● Hold down the EXIT button and press the
® button.
EDIT
The LCD will indicate “PROGRAM” for approx-
imately one second.
hold down
The Value dial will select programs, and the +/-
buttons will adjust the master level. You can use
the Value dial to select prog r ams quickly .
● Hold down the EXIT button and press the
BYPASS·TUNE button.
The LCD will indicate “KEYLOCK” for approx-
imately one second.
hold down
The +/- buttons will select programs, and other
buttons and the Value dial will not function (i.e .,
“key lock”). In this state, selecting programs is
the only operation you can perform, which can
help prevent inadvertent operation during a live
performance etc.
To change the setting, hold down the EXIT but-
ton and press the button for the desired setting.
23
Page 24
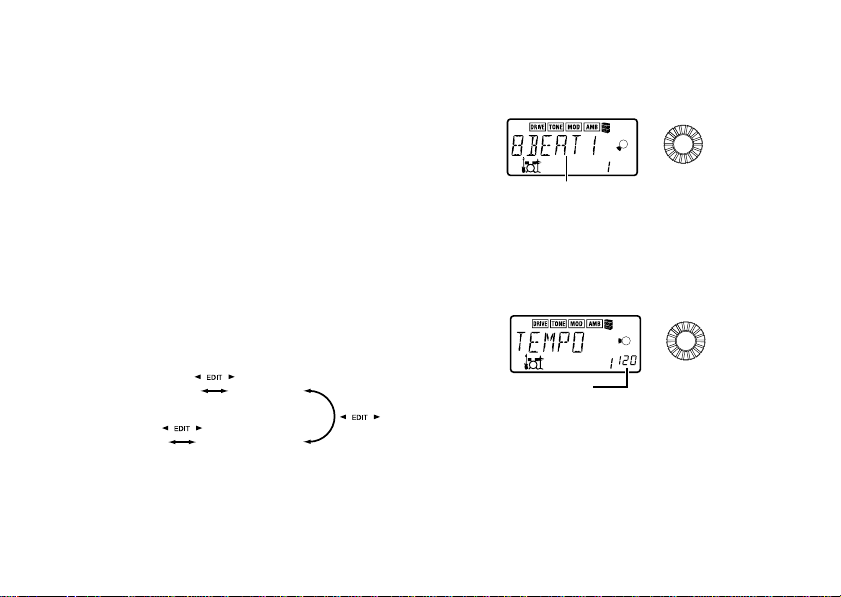
Rhythm & Bass mode
rhythm pattern
To enter Rhythm & Bass mode, press the
RHYTHM/AUX EFFECT button once when in
Play mode (except for mute/bypass or key lock),
AUX Eff ect mode, or Phrase Trainer mode.
When you enter this mode, the selected rhythm
will start, and the Rhythm & Bass mode icon will
blink.
The value display will indicate the pattern or tempo.
This mode contains the following four parameters. Use EDIT
use the Value dial and the BYPASS·TUNE button to set the value of each parameter.
√/® to select parameters, and
1. Rhythm Pattern
You can select from 40 different rh ythm patterns.
• Value dial: Set the rhythm pattern
2. Tempo
Set the tempo in the range of 40–208 bpm.
Rhythm pattern
Rhythm &
Bass level
24
Tempo
Bass on/off &
Bass key
tempo display
• Value dial: Set the tempo
Page 25
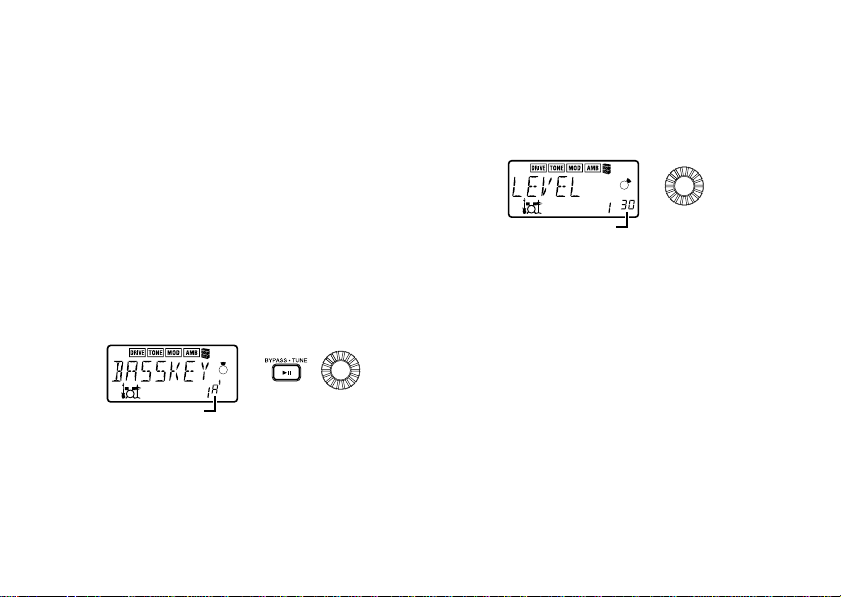
3. Bass On/Off & Bass Key
level indication
Here you can switch the bass on/off, and specify
the key in which the bass will play.
If you press the BYPASS·TUNE button in this
screen, the bass will play in time with the rhythm.
Depending on the rhythm pattern that you have
selected, some bass lines will include a chord
progression.
The bass notes can be set to play in any key
using the Value dial.
For bass lines that include a chord progression,
you can play notes in the selected key to practice soloing along with the bass line.
key display
• BYPASS·TUNE button: Turn the bass note
on/off
• Value dial: Set the key of the bass notes
If “METRONM” (metronome) is selected as the
rhythm pattern, there will be no bass notes, and
this screen will not appear.
4. Rhythm & Bass Level
Here you can set the level of the Rhythm & Bass
sound. The bass note will be aff ected only if Bass
is turned on.
• Value dial: Set the level of the Rhythm &
Bass sound
25
Page 26
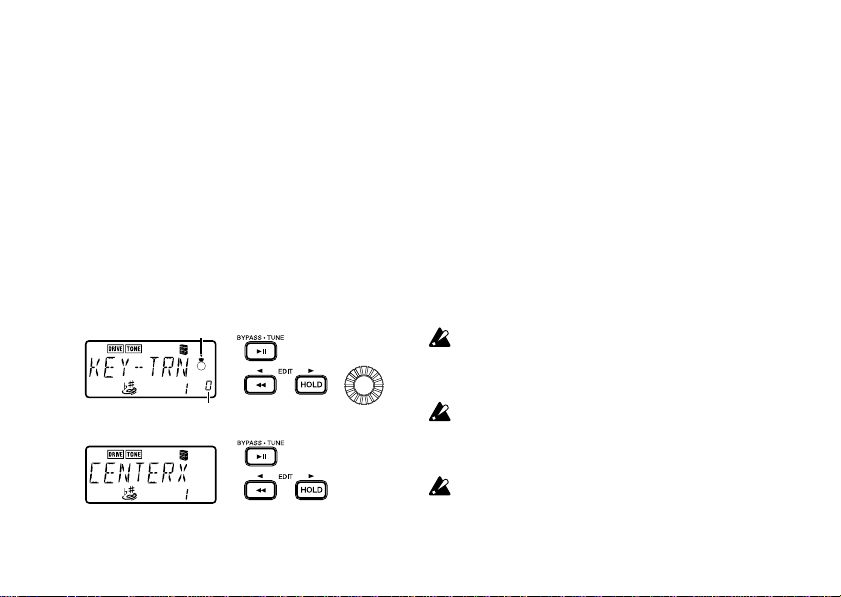
AUX Effect mode
In this mode, the sound from a CD or tape player connected to the AUX jack can be tr ansposed
(KEY-TRN), or center-canceled (CC) to remove
the sound of a guitar or vocal that is panned to
the center.
In Rhythm & Bass mode, press the RHYTHM/
AUX EFFECT button once to enter AUX Effect
mode.
When you enter this mode, the AUX Effect icon
will blink.
KEY-TRN display
10 cent unit display
100 cent unit display
CC display
• EDIT √/® buttons: Switch between KEY-
26
TRN and CC displays
• BYPASS·TUNE button: Switch KEY-TRN or
CC on/off
• Value dial: Set the amount of transposition
• +/- buttons: Select programs
The key transpose setting can be adjusted in the
range of +/-1 octave.
The key can be raised in 10 cent steps for the
first three semitones, and in semitone steps (100
cents) thereafter.
The key can be lowered in 10 cent steps for the
first three semitones, and in semitone steps (100
cents) thereafter.
When KEY-TRN or CC is turned on, the output will be mono. If both KEY-TRN and CC
are off, the output will be stereo.
When you enter this mode, the MOD (modulation) and AMB (ambience) effects will automatically be turned off.
For some input sources (mono recordings,
or when special effects were used during recording), CC may not produce the desired
effect.
Page 27
Phrase Trainer mode
In this mode, you can record a phrase from a
CD or tape connected to the AUX jack, and loop
it (play it back repeatedly). This provides a convenient way to pr actice by playing along with the
repeating phrase.
You can slow down the playback speed without
affecting the pitch, which can help you to learn
difficult phrases.
When you enter this mode, the MOD (modulation), AMB (ambience) and AUX effects will
automatically be turned off.
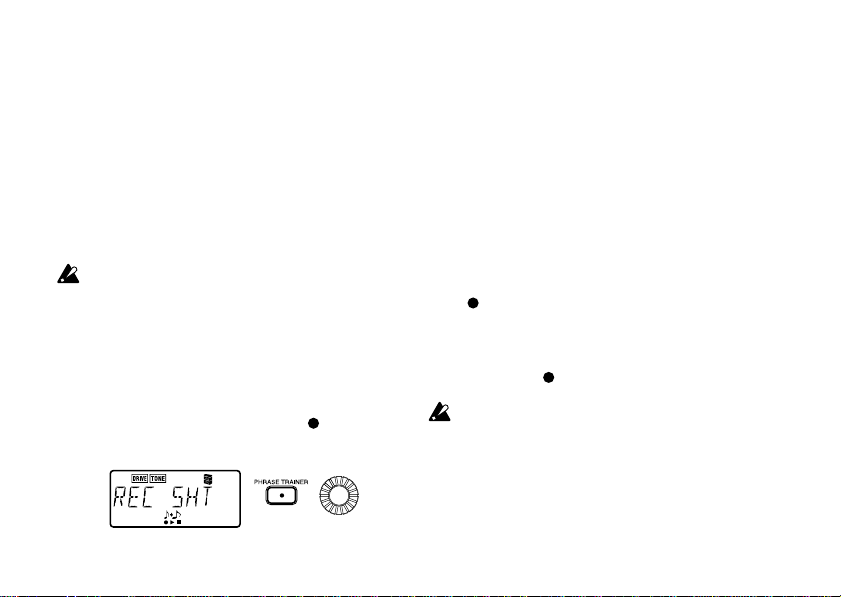
1. Select the recording mode
In Play mode (except during bypass/m ute or ke y
lock), Rhythm & Bass mode, or A UX Eff ect mode,
press the PHRASE TRAINER [
enter Phrase Trainer mode.
] button to
When you enter this mode, the recording mode
select screen will appear, and the Phrase Trainer mode icon will blink. In this screen, the
PANDORA will be ready to record.
Here you can select the recording mode (SHT:
high audio quality, LNG: long recording time).
SHT allows you to record up to eight seconds,
and LNG allows you to record up to sixteen seconds. Select the recording mode as appropriate
for the phrase that you wish to record.
• Value dial: Select the recording mode
] button: Begin recording
• [
Start playback on your CD or other audio source,
and at the point where you wish to begin recording, press the [
Once you record a phrase, it is not possible
to change the recording mode. If you wish to
change the recording mode, you must first
exit to another mode, and once again re-enter Phrase Trainer mode.
] button. Recording will begin.
27
Page 28
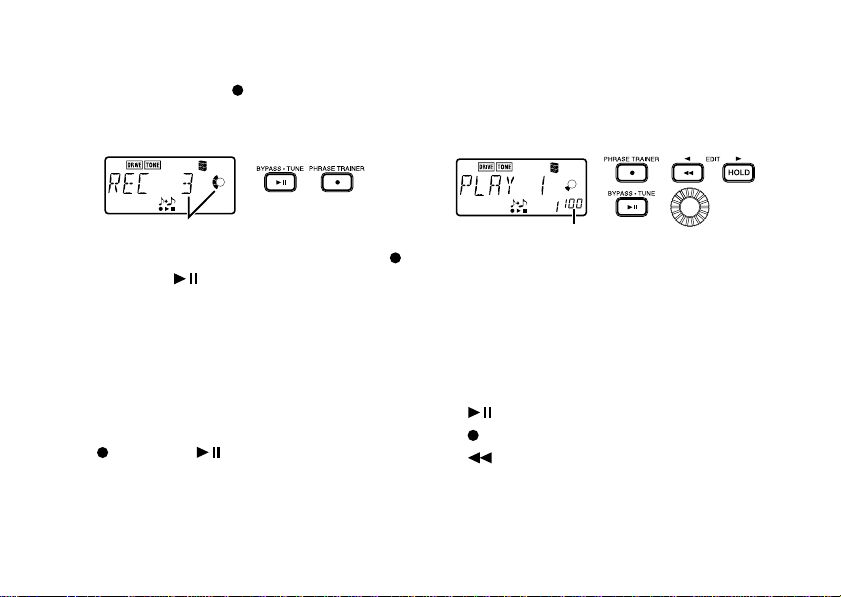
2. Recording
When you press the [ ] button to begin recording, the recording time will be shown as a
numerical value and in the value display.
3. Playback
The recording phrase will playback as a loop.
During playback or while paused, you can use
the +/- buttons to select programs.
recording time display
When you wish to stop recording, press the [ ]
button or the [
When recording ends, loop playback will begin
automatically.
Unless you manually stop recording, recording
will continue as long as permitted for the selected recording mode.
The phrase will be recorded and played back in
mono.
] button/[ ] button: End recording
• [
and begin playback
28
] button.
playback speed (%)
Rotating the Value dial toward the left will slow
down the playback speed without affecting the
pitch.
The playback speed can be adjusted in 5% steps
over a range of 100%, 95%, 90%…25%.
During playback, you can press the [ HOLD] button
to hold the sound at that moment (Hold function).
• [ ] button: Pause/playback
] button: Re-record
• [
] button: Rewind
• [
• [HOLD] button: Switch the Hold function on/
off
• Value dial: Set the playback speed
Page 29
If you press the EXIT button or the RHYTHM/
AUX EFFECT button, the recorded phrase
will be erased.
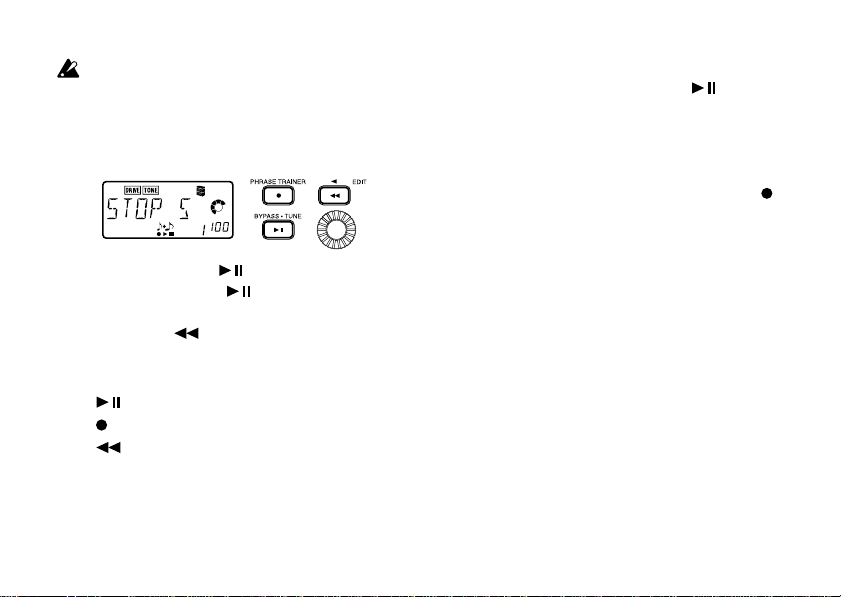
4. Pause
When you press the [ ] button, the playback
will pause. Press the [
and playback will resume.
Pressing the [
paused will return you to the beginning of the
recorded phrase.
] button: Pause/playback
• [
] button: Re-record
• [
] button: To beginning of phrase
• [
• Value dial: Set the playback speed
] button once again,
] button while playback is
If you wish to re-record
To re-record the phrase, press the [ ] button
to pause the playback. While paused, the sound
from the device connected to the AUX jack will
be output. Now set your input source to the beginning of the desired phrase.
Start the CD or other source, and press the [
button at the beginning of the desired phrase.
]
29
Page 30
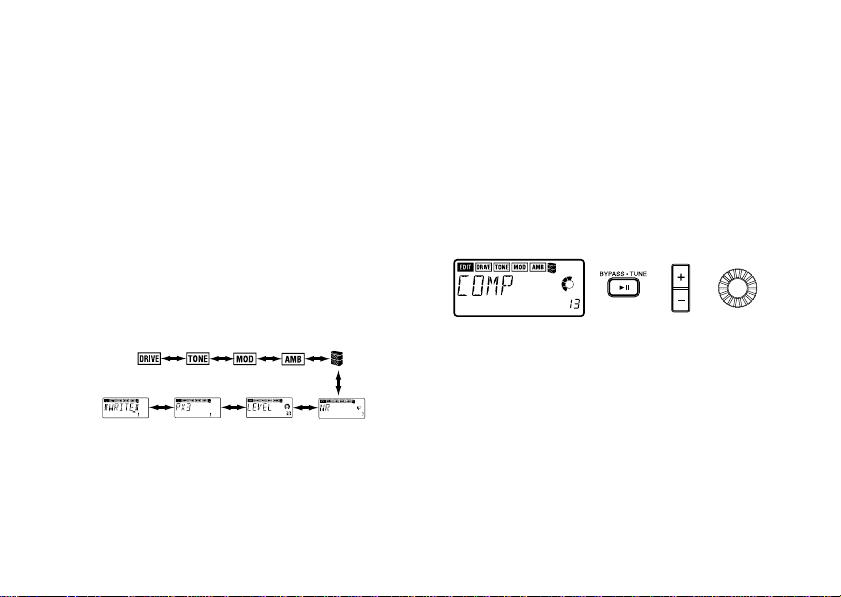
Edit mode
Here you can switch each effect on/off, select
the effect type, modify the parameter v alues, etc.
In Play mode, press the EDIT
Edit mode.
1. Select the effect that you wish to edit
Use the EDIT √/® buttons to select the effect
that you wish to edit.
Each time you press an EDIT
will cycle through the effects in the order shown
below. When an effect is selected, its icon will
blink.
Effects that are turned off cannot be edited.
To turn an effect on, use the EDIT
to select the effect, and press the BYPASS·TUNE
button.
30
® button to enter
√/® button, you
√/® buttons
2. Editing each effect
For each effect, you can select the effect type
and set its parameter values. For details on effect types and their parameters, refer to the Effect Parameter List (☞ p.36).
1) DRIVE
This provides effects such as compressor, and
a variety of overdrives and distortions.
• BYPASS·TUNE button: Turn the effect on/
off
• +/- buttons: Select the effect type
• Value dial: Specify the parameter value.
Page 31

2) TONE
This provides effects which adjust the tonal character.
• BYPASS·TUNE button: Turn the effect on/
off
• +/- buttons: Switch between “LOW G” and
“HIGH G”
• Value dial: Specify the gain
3) MOD (modulation)
This provides modulation-type effects such as
chorus, flanger, pitch-shifter, etc.
• BYPASS·TUNE button: Turn the effect on/
off
• +/- buttons: Select the effect type
• Value dial: Specify the parameter value.
4) AMB (ambience)
This provides spatial effects such as re v erb and
delay.
• BYPASS·TUNE button: Turn the effect on/
off
• +/- buttons: Select the effect type
• Value dial: Specify the effect level
It is not possible to use the Intelligent Pitch
Shifter MOD (modulation) effect simultaneously with the AMB (ambience) effects
“ROOM1–ARENA.” Only the last-selected
effect will be valid. For example if MOD is set
to MAJ3UP–MAJ6TH, setting AMB to
ROOM1 will automatically turn MOD off.
31
Page 32

5) CR (cabinet resonator)
The cabinet resonator (CR) simulates the acoustical characteristics of a guitar amplifier cabinet.
It is particularly effective when you are not using
an amp (e.g., when headphones, mixer , hard disk
recorder, or an audio system is connected.)
• BYPASS·TUNE button: Turn the effect on/
off
• +/- buttons: Select the cabinet size
• Value dial: Specify the depth of the effect
6) NR (noise reduction)
Adjust the depth of noise reduction. Raising this
value will produce more noise reduction. Normally you will adjust this so that you do not hear obtrusive noise when the strings are lightly muted.
32
• Value dial: Adjust the depth of noise reduc-
tion
It is not possible to turn noise reduction off.
If this value is raised excessively, the sound
may be cut off prematurely, depending on the
device that is connected. If this occurs, reduce the value.
7) LEVEL
Adjust the level for each program using the Value dial.
The volume of each program (each tone) will
change depending on the guitar you use. Adjust the level as appropriate for your guitar.
Page 33

8) RENAME
Here you can specify a name for each program.
• +/- buttons: Select the character location (the
selected character will blink)
• Value dial: Select the character
The following characters can be used:
space, 0–9, A–Z, “, ‘, *, +, -, /
9) WRITE
Here you can write (store) an edited program or
a program that you created.
Use the Value dial to select the writing destination (User programs only). When you do so, the
name of the program that currently occupies the
writing destination will be displayed briefly.
If you decide not to write, press the EDIT
ton to select a different screen.
When you press the BYPASS·TUNE button, the
edited program will be written into memory.
When the program has been written, the LCD
will indicate “COMPLT” for approximately one
second.
• BYPASS·TUNE button: Write
• Value dial: Select a user program number
as the writing destination
Before writing an edited program into a dif-
ferent program number, be sure that you do
not mind overwriting the data that is currently in that program number . The program data
that is overwritten will be lost.
It is not possible to write to a preset program.
√ but-
33
Page 34

3. Reloading the factory programs
While holding down the RHYTHM/AUX EFFECT
button and the + button, turn on the power . The
LCD will ask “RELOAD?”
If you decide not to reload the factory programs,
press the +/- buttons. The factory programs will
not be reloaded; the normal power-on screen will
appear, and the PANDORA will be in Program
mode.
If you press the BYPASS·TUNE button, the factory-set programs will be re-loaded into the user
program area. The displa y will indicate “RELOAD”
for a short time, and then the power-on screen
will appear.
34
Be aware that if you reload the factory programs, all user programs will be rewritten.
Page 35

Troubleshooting
If the PANDORA does not operate as you ex-
pect, please check the following points first. If
this does not resolve the problem, contact your
dealer or a Korg service center.
1. Power does not turn on.
• Are batteries installed? Alternatively , is the A C
adapter connected to an AC outlet?
2. No sound
• Are your guitar, amp and headphones con-
nected to the correct jacks?
• Is your amp turned on and set correctly?
• Are any cables broken?
• Is the master level of the PANDORA set to “0”
or to a low level?
• Is the program level of the PANDORA set to
“0” or to a low level?
• Is the PANDORA muted?
Be aware that if all effects are off, the chain
display will disappear , and it will not be possible to distinguish Bypass or Mute from the
LCD display.
• Is the volume of your guitar turned down?
3. The volume from the device connected to
the AUX jack is too loud or too soft, or cannot be heard.
Adjust the output level of the connected device.
Make connections to the headphone jack of
the device, instead of to its line output.
• Are you in Phrase Trainer mode?
Exit Phrase Trainer mode.
4. Effects do not apply
• Is the PANDORA bypassed? (the effect chain
will be blinking)
• Are the effects used in the program turned
on?
There are limitations on the effect types that
can be used simultaneously.
In some modes, certain effects (MOD, AMB)
are not available.
5. Tuner does not work.
• Is the PANDORA bypassed or muted?
35
Page 36

Effect parameter list
DRIVE
COMP Compressor Sensitivity (1…30)
TUBE Vintage-type overdrive
CRUNCH Mild overdrive
SCREAM Overdrive with an edge
HOTBOX Distortion with mid-range overtones
HIGAIN High-gain type distortion Gain (1…30)
VALVE Vintage amp distortion
CRUSH Smooth and sustaining distortion
SCOOP Mid scooped-type distortion
FUZZ Fuzz
TONE
LOWG LOW G (low range) equalizer gain
HIGHG High G (high range) equalizer gain
36
TYPE (+/- buttons) VALUE (Value dial)
TYPE (+/- buttons) VALUE (Value dial)
Gain (-15…15)
Page 37

MOD
CHORUS1 Chorus with effect sound output to left and direct sound to right Effect depth (1…30)
CHORUS2 Chorus (LFO: triangle wave )
CHORUS3 Chorus (LFO: sine wave )
CHORUS4 Doubling chorus
FLANGE1, 2, 3 Flanger (FLANGE1, 2, 3 differ in feedback amount)
FLANGE4 Flanger with inverted feedback
VIB Vibrato with cyclic change in pitch
DLYVIB1, 2
PHASER1 Vintage-type phaser
PHASER2 Phaser with strong peaks
PHASER3 PHASER1 with inverted feedback
PHASER4 PHASER2 with inverted feedback
TREM1 Tremolo (LFO: sine wave )
TREM2 Tremolo (LFO: square wave )
PAN1 Auto pan (LFO: sine wave )
PAN2 Auto pan (LFO: square wave )
AWAH1 Auto wah
AWAH2 Auto wah in opposite from AWAH1
FIXWAH Fixed wah Frequency (1…30)
RANDOM1, 2, 3 Random step filter which moves randomly (RANDOM1, 2, 3 differ in speed) Modulation speed (1…30)
OCTAVE
Delayed vibrato that appears after a time when you play a long note.
(1 and 2 differ in the time until the vibrato will begin.)
Effect that creates a sound one octave lower
* Playing chords may cause malfunction
TYPE (+/- buttons) VALUE (Value dial)
Modulation speed (1…30)
Effect depth (1…30)
Modulation speed (1…30)
Sensitivity (1…30)
Effect level (1…30)
37
Page 38

PITCH1, 2, 3 Pitch shifter (PITCH1, 2, 3 differ in the level of effect sound) Amount of pitch shift (-24, -17, -12…
PITCH4 Pitch shifter with effect sound and dry sound split left, right -1, -d, d, 1…12, 19, 24) (d = detune)
MAJ3UP Intelligent pitch shifter; a 3rd up in a major key
MAJ3DOWN Intelligent pitch shifter; a 3rd down in a major key
MIN3UP Intelligent pitch shifter; a 3rd up in a minor key
MIN3DOWN Intelligent pitch shifter; a 3rd down in a minor key Specify the key (C, C#…A#, B)
PER4TH Intelligent pitch shifter; a 4th up in a major key
PER5TH Intelligent pitch shifter; a 5th up in a major key
MAJ6TH Intelligent pitch shifter; a 6th up in a major key
About the Intelligent Pitch Shifter
The Intelligent Pitch Shifter creates musically useful harmonies by varying the amount of pitch shift
according to the note you play and the key in which you are playing. For example if you select a
pitch shift of a 3rd upward in a major key (MAJ3UP), the amount of pitch shift will v ary automatically between three semitones (a minor third) and four semitones (a major third).
• When MAJ3UP is used with a key setting of C
The pitch created by the intelligent pitch shifter is shown in parentheses ( ).
The PANDORA provides seven types of intelligent pitch shifting, with intervals of a 3rd, 4th, 5th,
and 6th. (For the 3rd, you can select either the upper or lower part, and a major or minor key.)
38
Page 39

If your instrument is not tuned correctly, the results may not be as you expect. In this case, retune your instrument.
The intelligent pitch shifter will function when you play individual notes. It cannot produce the
effect for chords.
AMB
ROOM1 Deep room type reverb
ROOM2 Bright room type reverb
GARAGE1 Garage-type reverb1
GARAGE2 Garage-type reverb2 Effect level (1…30)
HALL Hall type reverb
ARENA Arena-type reverb
DELAY 40…2000 Stereo delay 40…2000 [ms]
TYPE (+/- buttons) VALUE (Value dial)
CR (Cabinet Resonator)
1 x 8 Simulation of a cabinet with one 8-inch speaker
1 x 10 Simulation of a cabinet with one 10-inch speaker
1 x 12 Simulation of a cabinet with one 12-inch speaker
2 x 12 Simulation of a cabinet with two 12-inch speakers
4 x 10 Simulation of a cabinet with four 10-inch speakers
4 x 12 Simulation of a cabinet with four 12-inch speakers
TYPE (+/- buttons) VALUE (Value dial)
Effect depth (1…30)
39
Page 40

NR (Noise Reduction)
NR Noise reduction Effect depth (1…30)
VALUE (Value dial)
Preset-program list
No. Name No. Name No. Name No. Name No. Name
1 SUMMER 11 ANGUS 21 RASTA 31 CHORUS 41 OV-DRV
2S´R´V 12 EDDIE 22 FUNKY 32 FLANGE 42 DIRT
3 OZRIC 13 FLOYD 23 R´N´B 33 PHASED 43 C MAJ3U
4 GOO GOO 14 ROTARY 24 BLUES 34 ARENA 44 C MAJ3D
5 WES 15 HOTROD 25 POP 35 60´S 45 A MIN3U
6J´B 16 SMOKE 26 ROCK 36 70´S 46 A MIN3D
7E´C 17 GARGLE 27 THRASH 37 80´S 47 E PER 4
8 HILLAGE 18 SURF 28 SUBHARM 38 90´S 48 E PER 5
9 JIMI 19 COUNTRY 29 FLOWER 39 COMBO 49 A MAJ 6
10 B´B 20 JAZZ 30 FZ WAH 40 ST ACK 50 OCTA VE
40
Page 41

Rhythm pattern list
No. Name No. Name No. Name No. Name
1 METRONM 11 16 BEAT 4 21 ROCK3 31 MOTOWN2
2 8BEAT1 12 16 SHFL 22 THRASH 32 SURF1
3 8BEAT2 13 3/4 23 *R´N´B 33 *SURF2
4 *8BEAT3 14 3/4 SHFL 24 *BLUES 34 REGGAE 1
5 8BEAT4 15 *6/8 1 25 COUNTRY 35 *REGGAE 2
6 8 BEAT 5 16 *6/8 2 26 JAZZ 1 36 DANCE 1
7 8 SHFL 17 POP1 27 *JAZZ 2 37 DANCE 2
8 16 BEAT 1 18 POP2 28 FUNK1 38 EURO
9 16 BEAT 2 19 ROCK1 29 FUNK 2 39 BOSSA
10 16 BEAT 3 20 ROCK2 30 *MOTOWN1 40 SAMBA
* The bass line of these rh ythm patterns follo w the chord prog ressions (Bass Key = E) shown below.
6 8BEAT5 Em – A
15 6/8 1 E – C#m – A – B
16 6/8 2 Em – G – A – C
17 POP1 E – A – B – E
18 POP2 E – C#m – A – B
23 R´N´BE – A – Am – E – B – A – E – B
24 BLUES E – A – E – B – A – E – B
27 JAZZ2 E – G# – C#m – B – E – A – Am – G#m – G – F#m – B
30 MOTOWN1 E – A
33 SURF2 E – C#m – A – B
35 REGGAE2 Em – D – C – D
41
Page 42

Specifications
• Effects: 56 types (Maximum number of effects available simultaneously: 7)
• Number of programs:
· User: 50
· Preset: 50
• Inputs:
· guitar input (1/4” jack)
· AUX (mini stereo jack)
• Output: line/headphone dual-purpose output (stereo phone jack)
• Tuner section:
· detection range: 27.5 Hz–2,093 Hz (A0–C7)
· calibration: A = 438 Hz–445 Hz
• Rhythm & Bass section: 40–208 bpm
• Power supply:
· four AAA alkaline batteries: Battery life is 9 hours of continuous use. (Backlit off)
· separately sold AC adapter (DC9V)
• Dimensions (W x D x H): 4.7” x 3.0” x 1.1” (119.5 mm x 75.7 mm x 26.9 mm)
• Weight (not including batteries): 0.3 lbs (138g)
Appearance and specifications are subject to change without notice for product improvement.
42
Page 43

43
Page 44

Einleitung
Für den Kauf des Korg Tone Works PANDORA
PX3 Personal Multi Effect Processor möchten wir
uns bedanken.
Um einen langjährigen problemlosen Betrieb des
Gerätes sicherzustellen, sollten Sie dieses Bedienungshandbuch lesen und das Produkt korrekt verwenden. Bewahren Sie das Handbuch für den spä-
teren Gebrauch sicher auf.
Hauptmerkmale
PANDORA ist ein kompaktes Multifunktions-
Effektgerät.
56 Effektvariationstypen
Maximal sieben Effekte lassen sich gleichzeitig
nutzen.
50 User- und 50 Preset-Programme
IPE-System (integrierte Parametereditierung)
einfach vorzunehmende Effekteinstellungen.
44
Auto Tuner-Funktion
Diese Funktion erlaubt einfaches und schnelles
Stimmen der Gitarre. Das Stimmen kann auch bei
stummgeschalteter Audioausgabe (also unhörbar)
vorgenommen werden.
LCD-Anzeige mit LED-Hintergrundbeleuchtung
Die Anzeige ist selbst in dunkler Umgeb ung lesbar.
Rhythm & Bass Funktion
Es lassen sich vierzig verschiedene Rhythmus- und
Baß-Patterns wiedergeben.
AUX Effect-Funktion
Das Signal eines CD-Players oder einer anderen
Klangquelle, die an den A UX-Eingang angeschlossen ist, läßt sich transponieren, oder seine Stereomitte kann unterdrückt werden.
Phrase T rainer -Funktion
Eine maximal 16 Sekunden lange Audiophrase
kann aufgezeichnet und dann in einer Endlosschleife wiedergegeben werden. Die Geschwindigkeit
der aufgezeichneten Phrase läßt sich sogar verringern, ohne daß ihre Tonhöhe beeinflußt wird.
Page 45
Cabinet Resonator
Sie können eine Simulation des akustischen Verhaltens von Gitarrenverstärkern hinzuschalten.
Dabei haben Sie die Auswahl zwischen sechs v er schiedenen Verstärkertypen.
HBB (Hyper Bass Boost)
Diese Funktion hebt die Baßfrequenzen stark an
und erzeugt auf diese Weise Druck.
Endlosregler
Mit diesem Regler können Sie Programme direkt
aufrufen und Effekte zügig editieren.
Einschalten
Batteriedeckel an der Unterseite der Bodenplatte
entfernen, indem Sie ihn in Pfeilrichtung schieben. Legen Sie entsprechend der Abbildung vier
Alkali-Mignonzellen (separat erhältlich) ein. Achten Sie auf die korrekte Polung der Batterien.
Batterieanzeige
Wenn die Batterie nahezu erschöpft ist, leuchtet
die Battery Low-Anzeige (
sem Falle die Batterie möglichst umgehend. Programme und andere Daten (außer den gerade editierten Daten) gehen im Falle eines Batterieaustausches nicht verloren.
Leere Batterien dürfen nicht im PANDORA
verbleiben. Wenn Sie eine solche Batterie längere Zeit im Gerät lassen, können Fehlfunktionen (z. B. aufgrund einer ausgelaufenen
Batterie) auftreten. Sie sollten Batterien auch
entnehmen, wenn Sie den PANDORA für län-
gere Zeit nicht benutzen.
Batterien und Wechselstromadapter gehören
nicht zum Lieferumfang. Sie sind separat erhältlich.
). Ersetzen Sie in die-
45
Page 46

Bedienelemente und
Anschlüsse
1 Netzschalter / Hintergrundbe-
leuchtungsschalter
Mit diesem Schalter K önnen Sie das
Gerät als auch die Hinterg rundbeleuchtung ein-/ausschalten.
Wenn das Ger ät mit Batter ien
betrieben wird, v erkürzt der Betrieb der Hinterg rundbeleuchtung über längere Zeit die Lebensdauer der Batterie.
2 DC9V-Buchse
Schließen Sie hier den optional er-
46
hältlichen Netzteiladapter (DC9V
) an.
3 Endlosregler
Mit diesem Regler stellen Sie den
A usgangspegel und die Eff ekte ein
und wählen die Prog ramme aus .
4 OUTPUT-Buchse
Schließen Sie hier Ihren Gitarren verstär ker, einen K opfhörer o . ä. an.
5 AUX-Buchse (stereo)
Hier können Sie einen CD-Pla yer
o. ä. anschließen.
6 INPUT-Buchse
Schließen Sie hier Ihre Gitarre an.
7 +/–-Tasten
Mit diesen T asten können Sie Program-
me selektieren, Effekte bearbeiten und
die Ausgangslautstärke einstellen.
8 Regler für den Eingangspegel
Stellen Sie diesen Regler entsprechend der A usgangslautstär k e Ihrer
Gitarre ein.
9 EDIT √ [ ]/ ® [HOLD]-
Tasten
Mit diesen Tasten k önnen Sie die
Parameter selektieren, die Sie editieren wollen, und die Phr ase T rainerFunktion bedienen.
0 HBB (Hyper Bass Boost)-T aste
Mit dieser Taste schalten Sie die
HBB-Funktion ein und aus.
A PHRASE TRAINER [ ]-Ta-
ste
Betätigen Sie diese T aste , um den
Phr ase Trainer-Modus aufzur ufen.
A uch der Beginn einer A ufzeichn ung
im Phrase Trainer wird mit dieser
Taste ausgelöst.
B BYPASS • TUNE [ ]-Taste
Betätigen Sie diese T aste , wenn Sie
Ihr Instrument im Play-Modus stimmen w ollen (in diesem F all wird das
PANDORA stummgeschaltet). Die
T aste wird außerdem v erwendet, um
die Effekte ein- und auszuschalten
Page 47

und die Wiedergabe der Phr ase T rainer-Aufzeichn ung zu star ten bzw . zu
unterbrechen.
C RHYTHM/AUX EFFECT-Ta-
ste
Über diese Taste r ufen Sie den
Rhythm & Bass- oder den A UX Effect-Modus auf.
D EXIT-Taste
Wenn Sie diese Taste betätigen, ge-
langen Sie aus jedem beliebigen
Modus zurück in den Play-Modus.
Außerdem kann mit Hilf e dieser T aste dem Endlosregler eine Funktion
zuge wiesen w erden.
LCD-Display
1 Effektkette
Zeigt Ihnen an, ob die Sektionen
Drive, Modulation, Ambience , Cabinet, Resonator , und HBB an oder ausgeschaltet sind.
2 Value Anzeige
Dieses Feld zeigt Ihnen die eingestellten Werte der Gesamtlautstärke
und der Parameter , so wohl graphisch
als auch numerisch an.
(Wenn die Gesamtlautstär ke angezeigt, wird leuchtet das Master Level Symbol auf .)
3 Programm Nummern Anzeige
Zeigt Ihnen die ge wählte Prog ramm
Nummer an. (Wenn ein User Programm ausge wählt wurde , leuchtet
diese Anz eige )
4 Phrase T rainer Modus Symbol
Dieses Symbol blinkt auf, wenn der
Phrase Trainer Modus aktivier t ist.
5 Aux Effect Modus Symbol
Dieses Symbol blinkt auf, wenn der
A ux Effect Modus aktivier t ist.
6 Rhythm & Bass Modus Symbol
Dieses Symbol blinkt auf, wenn der
Rhythm & Bass Modus aktivier t ist.
7 Batteriezustandsanzeige
Dieses Symbol leuchtet auf, wenn die
Batter iespann ung abf ällt.
8 Programm Name / Ef fekt Typ
Anzeige
Dieser Bereich zeigt Ihnen den Programm Namen oder den Eff ekt Typ
an. Im Bypass oder Mute Modus wird
dieses F eld zur Anz eige des integ rierten Stimmgerätes benutzt.
9 Edit Mode Symbol
Dieses Symbol leuchtet auf, wenn Sie
sich im Edit Modus befinden.
47
Page 48

Herstellen der Anschlüsse
Schalten Sie alle anzuschließenden Geräte aus, und
stellen Sie die Lautstärke auf das Minimum ein.
*1Die Anschlußkabel sind separat erhältlich.
48
*2Die Ausgangs-/Kopfhörerbuchse des PANDO-
RA ist in Stereo ausgelegt. Wenn Sie die Ver-
bindung zu einem Gitarrenverstärker usw. Mit
einem üblichen Monokabel herstellen, ist nur
der linke Ausgang (L) hörbar.
*3Wenn Sie einen Cassettenrecorder oder CD-
Player an die A UX IN-Buchse anschließen, k önnen Sie zu der Musik vom Band usw. Gitarre
spielen. Die Lautstärke muß jedoch am angeschlossenen Gerät geregelt werden.
*4Verwenden Sie nur den empfohlenen Wechsel-
stromadapter. (DC9V
*5 Ausgangspegel und Klangverhalten des PAN-
DORA können von der Qualität des verwende-
ten Kopfhörers abhängen. W ir empfehlen hochwertige niederohmige Kopfhörer ( 32 Ohm) mit
einer Empfindlichkeit von 100 dB/mW oder
besser. Mit tragbaren CD-Playern oder Kassettenrekordern mitgelieferte Kopfhörer sind oftmals schon ausreichend.
).
Page 49

Ausprobieren
1 Nachdem Sie alle Anschlüsse her gestellt ha-
ben, stellen Sie den Netzschalter auf „ON”.
(Dies wird als Play-Modus bezeichnet.)
Wählen Sie mit der +/–-Tasten ein relativ un-
verzerrt klingendes Programm, bei dem sich die
Lautstärke problemlos ein-stellen läßt. (Für das
folgende Beispiel wählen wir Programm 5
„WES”.)
H: Geeignet für Gitarren mit hohem Ausgangs-
pegel (Humbucker-Abnehmer) und Baßgitar-
ren.
L: Geeignet für Gitarren mit niedrigem Aus-
gangspegel („Single-Coil“-Abnehmer):
3 Stellen Sie die Lautstärke an der Gitarre wie
gewohnt ein.
Stellen Sie die Gesamtlautstärke mit dem Endlosregler ein.
Endlosregler
Programmname
Programmnummer
2 Stellen Sie den Eingangspegel-Schalter auf
eine für den Ausgangspegel Ihr er Gitarre
geeignetePosition.
Eingangspegel-Schalter
Gesamtlautstärke
49
Page 50

blinken
Play-Modus
Der Play-Modus ist die Betriebsart, in der Sie den
PANDORA normalerweise verwenden.
1. Auswahl eines Programms
Sie können aus den 100 Programmen (jeweils 50
User- und Preset-Programme) mit Hilfe der +/–Tasten eines auswählen. Wenn Sie ein User-Pro-
gramm selektieren, erscheint im Display das Zeichen „ ” über der Programmnummer.
Programme lassen sich auch in den Modi Rhythm
& Bass, AUX Effect und Phrase T rainer akti vieren.
2. MASTER LEVEL (Gesamtlautstärke)
Wenn MASTER LEVEL leuchtet, wird die Gesamtlautstärke im Wertedisplay angezeigt.
50
Endlosregler
Werteanzeige
Unmittelbar nach dem Einschalten des Gerätes
können Sie die Gesamtlautstärke mit dem End-
losregler einstellen. Sie können dies alternativ
auch mit den +/–-T asten tun (☞ S. 52). Diese Lautstärkeeinstellung bleibt auch nach dem Ausschalten erhalten.
3.Bypass/Mute
Wenn Sie die BYPASS·TUNE-Taste betätigen,
wird das PANDORA in den Bypass-Modus ver-
setzt, und das anliegende Eingangssignal wird nicht
durch die Effekte bearbeitet. Die Effekt-LEDs blinken, und im Display erscheint für etwa eine Sekunde die Aufschrift „BYPASS”.
Page 51

Wenn Sie die BYPASS·TUNE-Taste für länger
als eine Sekunde gedrückt halten, wird das Ausgangssignal stummgeschaltet. Die Effektkette
blinkt schnell, und im Display wird für etwa eine
Sekunde die Meldung „MUTE“ angezeigt.
schnell blinkend
Die Stummschaltung wird abgeschaltet, wenn Sie
die BYPASS·TUNE-Taste erneut betätigen oder
das Programm wechseln.
4. Tuner (Stimmfunktion)
Die Stimmfunktion wird aktiviert, wenn im PlayModus die Bypass-Funktion bzw. Stummschaltung
aktiv ist.
Tonhöhenanzeige
Mittelmarkierung
#-Zeichen
Notenname
Kalibrierung
Spielen Sie eine einzelne Saite auf Ihrer Gitarre.
Im Display werden der Notenname und die Stimmung angezeigt. Liegt die Tonhöhe mehr als einen Halbton über der nominellen Tonhöhe, so erscheint das #-Zeichen links oberhalb des Notennamens. Das Display stellt die Tonhöhenabweichung dar. Stimmen Sie die Saite so, daß die Anzeige über der Mittelmarkierung leuchtet.
Der Tuner (Bypass/Stummschaltung) wird entweder durch Betätigung der BYPASS·TUNE-Taste
oder durch Aufrufen eines anderen Programms
abgeschaltet.
Kalibrierung (Frequenz des Referenztons A)
Sie können mit dem Endlosregler die Frequenz
für den Referenzton A (Kalibrierung) in einem Bereiche zwischen A = 438 Hz–445 Hz einstellen.
Die Kalibrierungseinstellung wird gespeichert, bis
das Gerät abgeschaltet wird. Beim nächsten Einschalten wird die Kalibrierung auf A = 440 Hz
zurückgesetzt.
51
Page 52

5. HBB (Hyper Bass Boost)
Diese Funktion hebt den Baßbereich des Audiosignals an, da dieser oft nicht ausreichend wiedergegeben wird, wenn man beispielsweise einen kleinen Kopfhörer benutzt. Die Funktion ist jedoch
auch dann effektiv, wenn man den PANDORA mit
einem Gitarrenverstärker oder Mischpult verbindet. Mit der HBB-Taste können Sie die HBB-
Funktion ein- und ausschalten. Wenn die Funktion aktiv ist, wird im Display das HBB-Zeichen
) angezeigt.
(
Die Einstellung für diese Funktion (ein/aus) bleibt
auch nach dem Ausschalten erhalten, d.h. sie wird
beim nächsten Einschalten automatisch wieder
aufgerufen.
Die Funktion kann allerdings nicht ein- oder
ausgeschaltet werden, wenn das PANDORA
sich im Bypass-Modus befindet oder stummgeschaltet ist.
52
6. Festlegen der Funktion des Endlosr eglers
Sie können die Funktion einstellen, die der Endlosregler im Play-Modus hat. Halten Sie im Play-
Modus die EXIT-Taste gedrückt und betätigen Sie
√√
wahlweise die Tasten EDIT
√, EDIT
√√
BYPASS·TUNE, um eine der nachfolgend beschriebenen Funktionen zuzuweisen.
Die Einstellung kann nicht geändert werden,
wenn das Gerät sich im Bypass-Modus befindet oder stummgeschaltet ist.
● Halten Sie die EXIT-Taste gedrückt und be-
tätigen Sie die EDIT
√-Taste.
Im Display erscheint für etwa eine Sekunde die
Anzeige „MASTER“.
gedrückt halten
Nun können Sie mit dem Endlosregler die Ge-
samtlautstärke einstellen und mit den +/–-Tasten
®®
®, oder
®®
Page 53

die Programme aufrufen. Auf diese Weise haben
Sie über den Endlosregler direkten Zugriff auf die
Lautstärke.
Diese Einstellung bleibt nach dem Ausschalten
erhalten.
● Halten Sie die EXIT-Taste gedrückt und be-
tätigen Sie die BYPASS·TUNE-Taste.
Im Display erscheint für etwa eine Sekunde die
Anzeige „KEYLOCK“.
● Halten Sie die EXIT-Taste gedrückt und be-
tätigen Sie die EDIT
®-Taste.
Im Display erscheint für etwa eine Sekunde die
Anzeige „PROGRAM“.
gedrückt halten
Nun können Sie mit dem Endlosregler die Pro-
gramme aufrufen und mit den +/–-Tasten die Gesamtlautstärke einstellen. Auf diese Weise haben
Sie über den Endlosregler direkten Zugriff auf die
Programme.
gedrückt halten
Nun können Sie mit den +/–-T asten die Programme aufrufen. Der Endlosregler und alle anderen
Funktionen sind deaktiviert. In diesem Modus können Sie ausschließlich Programme selektieren.
Dies ist insbesondere in Live-Situationen praktisch,
um unbeabsichtigte Bedienschritte zu vermeiden.
Um die Einstellung zu ändern, halten Sie die
EXIT-Taste gedrückt und betätigen Sie die Taste
für den gewünschten Modus.
53
Page 54

Der Rhythm & Bass-Modus
Rhythm Pattern
Tempoanzeige
Betätigen Sie im Play-Modus (außer bei Stummschaltung/Bypass oder im Keylock-Modus), im
AUX Effect- oder im Phrase Trainer-Modus die
RHYTHM/AUX EFFECT-Taste, um den Rhythm
& Bass-Modus aufzurufen. Wenn Sie den Modus
aktivieren, startet der selektierte Rhythmus, und
im Display blinkt das Symbol für den Rhythm &
Bass-Modus.
In der Werteanzeige wird das aktuelle Pattern oder
Tempo dargestellt.
Der Modus umfaßt die folgenden vier Parameter:
Betätigen Sie die Tasten EDIT
ter zu selektieren, und den Endlosregler oder die
BYPASS·TUNE-Taste, um den gewünschten Wert
einzustellen.
√/ ®, um Parame-
1.Rhythm Pattern
Sie können aus 40 verschiedenen Rhythmus-Patterns auswählen.
• Endlosregler : Auswahl des gewünschten
Rhythmus-Patterns.
2.Tempo
Das Tempo kann in einem Bereich zwischen 40–
208 BPM eingestellt werden.
54
Rhythm pattern
Rhythm &
Bass level
Tempo
Bass On/Off
& Bass-Tonart
• Endlosregler: Tempoeinstellung.
Page 55

3. Bass On/Off & Bass-Tonart
Pegelanzeige
Hier können Sie den Baß ein- und ausschalten und
die Tonart festlegen, in der der Baß gespielt wird.
Wenn Sie die BYPASS·TUNE-Taste bei Anzeige
dieses Bildschirms betätigen, spielt der Baß im
Takt mit dem selektierten Rhythmus. Abhängig
vom gewählten Rhythmus-P attern können manchmal auch Akkordabfolgen durch den Baß wiedergegeben werden.
Die Baßnoten können mit Hilfe des Endlosreg-
lers so eingestellt werden, daß sie in jeder Tonart
gespielt werden können. Bei Baßlinien, die eine
Akkordfolge enthalten, können Sie die Töne in der
gewünschten Tonart spielen, um Solos passend zur
Baßmelodie zu üben.
Anzeige der Tonart
• BYPASS·TUNE-Taste: Ein-/Ausschalten des
Basses.
• Endlosregler: Einstellen der Tonart für den
Baß.
Wird „METRONM“ (Metronom) als Rhythmus-
Pattern selektiert, so wird dieser Bildschirm nicht
angezeigt, und es werden keine Baßtöne abgespielt.
4.Rhythm & Bass Level
Hier stellen Sie die Lautstärke der Rhythm & BassSektion ein. Der Baß kann nur eingestellt werden,
wenn er aktiviert ist.
• Endlosregler : Einstellen des Pegel für die
Rhythm & Bass-Sektion.
55
Page 56

AUX Effect-Modus
In diesem Modus kann das Signal eines an die
AUX-Buchsen angeschlossenen CD-Players oder
Kassettenrekorders wahlweise transponiert (KEYTRN) oder seine Stereomitte unterdrückt werden
(CC), um den Gitarrensound oder Gesang stummzuschalten, die sich in der Regel in der Stereomitte befinden.
Betätigen Sie im Rhythm & Bass-Modus die
RHYTHM/AUX EFFECT-Taste einmal, um den
AUX Effect-Modus aufzurufen. Wenn Sie den
Modus aktivieren, blinkt das AUX Effect-Symbol.
KEY-TRN-Anzeige
Anzeige in 10-Cent-Schritten
Anzeige in 100-Cent-Schritten
CC-Anzeige
56
• EDIT √/®-Tasten: Umschalten zwischen den
Anzeigen KEY-TRN und CC.
• BYPASS·TUNE-Taste: Ein-/Ausschalten der
Funktionen KEY-TRN oder CC.
• Endlosregler: Einstellen der Transponierung.
• +/–-Tasten: Programmauswahl.
Der Einstellungsbereich der Transponierung beträgt ±1
Oktave. Die Schrittweite beträgt ±10 Cents für die er-
sten drei Halbtöne, danach ±100 Cents (=1 Halbton).
Wenn die Funktionen KEY-TRN oder CC eingeschaltet sind, ist das Ausgangssignal mono.
Sind beide Funktionen deaktiviert, so erfolgt
die Audioausgabe stereo.
Wenn Sie diesen Modus aufrufen, werden
MOD- (Modulation) und AMB- (Ambience)
Effekte automatisch abgeschaltet.
Bei manchen Audiosignalen (z. B. bei Monoaufnahmen oder mit speziellen Effekten aufgezeichneten Aufnahmen) kann es vorkommen, daß die CC-Funktion nicht den gewünschten Effekt hervorruft.
Page 57

Phrase T rainer -Modus
In diesem Modus können Sie eine Phrase von einem an die AUX-Buchsen angeschlossenen CDPlayer oder Kassettenrekorder aufzeichnen und
diese in einer Endlosschleife wiedergeben lassen.
Dies ist ein praktischer Weg, zu der sich wiederholenden Phrase eine schwierige Stelle zu üben.
Die Wiedergabegeschwindigkeit läßt sich ohne
Beeinflussung der Tonhöhe vermindern, um besonders komplizierte Stücke langsam einüben zu
können.
W enn der Modus aktiviert wird, werden MOD(Modulation), AMB- (Ambience) so wie A UXEffekte automatisch abgeschaltet.
1. Auswahl des Aufzeichnungsmodus
Betätigen Sie im Play-Modus (außer bei Stummschaltung/Bypass oder im Keylock-Modus), im
AUX Effect- oder im Rhythm & Bass-Modus die
PHRASE TRAINER [
Trainer-Modus aufzurufen.
]-Taste, um den Phrase
W enn Sie den Modus aufrufen, wird die Auswahlseite für den Aufzeichnungsmodus angezeigt, und
das Phrase Trainer-Symbol blinkt. Bei Anzeige
dieser Displayseite ist das PANDORA aufnahme-
bereit. Sie können hier zwischen den Aufzeichnungsmodi SHT (hochwertigere Aufnahme) und
LNG (längere Aufzeichnungszeit) wählen. Mit
SHT können Sie bis zu acht Sekunden aufzeich-
nen, LNG erlaubt eine Maximallänge von 16 Se-
kunden. Wählen Sie den zur aufzunehmenden
Klangquelle passenden Modus aus.
• Endlosregler: Auswahl des Aufzeichnungs-
modus.
]-Taste: Starten der Aufzeichnung.
• [
Starten Sie die Wiedergabe am angeschlossenen
CD-Player (oder einer anderen Audioquelle) und
betätigen Sie die [
reicht wird, an der die Aufnahme beginnen soll.
Die Aufzeichnung startet nun.
]-Taste, wenn die Stelle er-
57
Page 58

Wenn Sie die Aufzeichnung gestartet haben,
ist es nicht mehr möglich, den Aufzeichnungsmodus zu ändern. Wollen Sie den Modus ändern, so müssen Sie zunächst eine andere Betriebsart und nachfolgend erneut den Phrase
Trainer-Modus aufrufen.
2. Aufzeichnung
W enn Sie durch Betätigung der [ ]-Taste die Auf-
zeichnung starten, wird die Aufzeichnungszeit als
numerischer Wert sowie in der Werteanzeige dargestellt.
Modus voll ausgeschöpft.
Die Phrase wird mono aufgezeichnet und wiedergegeben.
]-Taste/[ ]-Taste: Ende der Aufzeich-
• [
nung und Start der Wiedergabe
3.Wiedergabe
Die aufgezeichnete Phrase wird in einer Endlosschleife wiedergegeben. Während der Wiederga-
be (oder auch bei aktivierter Pausenfunktion) können Sie mit den +/–-Tasten andere Programme
aufrufen.
Anzeige der Aufzeichnungszeit
Wenn Sie die Aufzeichnung beenden wollen, betätigen Sie die [
Nach Ende der Aufzeichnung beginnt die Wiedergabe automatisch in einer Endlosschleife.
Falls Sie die Aufzeichnung nicht manuell stoppen,
wird die Aufnahmekapazität für den selektierten
58
]-Taste oder die [ ]-Taste.
Wiedergabegeschwindigkeit (%)
Wenn Sie den Endlosregler nach links drehen,
wird die Wiedergabegeschwindigkeit langsamer,
ohne daß die Tonhöhe der Phrase geändert wird.
Die Wiedergabe geschwindigk eit läßt sich in 5%Schritte über einen Bereich von 100%, 95%,
Page 59

90%…25% einstellen. Sie können während der
Wiedergabe die [HOLD]-Taste betätigen, um den
Klang „einzufrieren“ (Hold-Funktion).
]-Taste: Pause/Wiedergabe
• [
• [
]-Taste: Neuaufnahme
• [
]-Taste: Zurücksetzen an den Anfang
• [HOLD]-Taste: Ein-/Ausschalten der Hold-
Funktion
• Endlosregler: Einstellen der Wiedergabege-
schwindigkeit
W enn Sie die EXIT-Taste oder die RHYTHM/
AUX EFFECT-Taste betätigen, wird die auf-
gezeichnete Phrase gelöscht.
4. Pausenfunktion
Wenn Sie während der Wiedergabe die [ ]-
Taste betätigen, wird die Wiedergabe unterbro-
chen. Eine erneute Betätigung der [
setzt die Wiedergabe fort.
Eine Betätigung der [ ]-Taste während unter-
brochener Wiedergabe bringt Sie zurück an den
Anfang der aufgezeichneten Phrase.
]-Taste: Pause/Wiedergabe
• [
]-Taste: Neuaufnahme
• [
]-Taste: Zurücksetzen zum Anfang der
• [
Phrase
• Endlosregler: Einstellen der Wiedergabege-
schwindigkeit
]-Taste
Neuaufzeichnen einer Phrase
Wenn Sie eine Phrase erneut aufzeichnen wollen,
betätigen Sie die [
be zu unterbrechen. Bei aktivierter Pause wird das
am AUX-Eingang anliegende Audiosignal wiedergegeben. Setzen Sie nun die angeschlossene Audioquelle an den Anfang der gewünschten Phrase.
Starten Sie den CD-Player (bzw. die angeschlossene Audioquelle) und betätigen Sie die [
ste am Anfang der gewünschten Phrase.
]-Taste, um die Wiederga-
]-Ta-
59
Page 60

Edit-Modus
In diesem Modus können Sie Effekte ein- oder ausschalten, den Effekttyp selektieren, Parameterwerte
ändern usw . Betätigen Sie im Play-Modus die EDIT
®-Taste, um den Edit-Modus aufzurufen.
1. Auswählen des zu bearbeitenden Effekts
Wählen Sie mit den EDIT √/ ®-Tasten den zu
bearbeitenden Effekt aus. Jedesmal, wenn Sie eine
der Tasten EDIT √/ ® betätigen, werden die Ef-
fekte nacheinander in der nachfolgend aufgeführten Reihenfolge selektiert. Wenn ein Effekt selektiert ist, blinkt das zugehörige Symbol. Abgeschaltete Effekte lassen sich nicht editieren.
Um einen Effekt einzuschalten, wählen Sie diesen
zunächst mit Hilfe der EDIT
betätigen dann die BYPASS·TUNE-Taste .
60
√/ ®-Tasten aus und
2. Effektbearbeitung
Für jeden Effekt lassen sich der Effekttyp ausw ählen und die Parameter entsprechend einstellen.
W eitere Informationen zu den Effekttypen und den
zugehörigen Parametern finden Sie in der „Auflistung der Effektparameter“ (☞ S. 67).
1) DRIVE (Drive)
Diese Rubrik bietet Effekte, die den Klangcharakter bearbeiten, z. B. Kompressor, Overdrive und
Distortion.
• BYPASS·TUNE Taste: Schaltet den Effekt
ein/aus
• +/–-Tasten: Wählen den Effekttyp
• Endlosregler: Einstellen des Parameterwertes
Page 61

2) TONE (Tone)
Diese Rubrik bietet Effekte, die den Klangcharakter regeln.
• BYPASS·TUNE Taste: Schaltet den Effekt
ein/aus
• +/–-Tasten: Schalten um zwischen „LOW G”
(Bässeverstärkung) und „HIGH G” (Höhenver -
stärkung)
• Endlosregler: Einstellen des Hubs (Verstär-
kung)
3) MOD (Modulation)
Diese Rubrik bietet Modulationseffekte wie Chorus, Flanger, pich-shifter usw.
• BYPASS·TUNE Taste: Schaltet den Effekt
ein/aus
• +/–-Tasten: Wählen den Effekttyp
• Endlosregler: Einstellen des Parameterwertes
4) AMB (Ambience)
Diese Rubrik bietet Raumeffekte, z. B. Reverb und
Delay.
• BYPASS·TUNE Taste: Schaltet den Effekt
ein/aus
• +/–-Tasten: Wählen den Effekttyp
• Endlosregler: Einstellen des Effektpegels
Es ist nicht möglich, den Effekt Intelligent
Pitch Shifter MOD (Modulation) gemeinsam
mit AMB-Ef fekten (Ambience) zu verwenden.
“ROOM1–ARENA.” Nur der zuletzt selek-
tierte Effekt ist aktiv. Wenn beispielsweise als
MOD-Effekt MAJ3UP–MAJ6TH und nach-
61
Page 62

folgend als AMB-Effekt ROOM1 selektiert
wurde, so wird der MOD-Effekt automatisch
abgeschaltet.
5) CR (Cabinet Resonator)
Cabinet Resonator (CR) simuliert die akustischen
Eigenschaften einer Gitarrenverstärkerbox. Dieser
Effekt ist besonders wirkungsvoll, wenn Sie keinen V erstärker verwenden (z. B. wenn ein Kopfhörer, Mischer, Hard Disk Recorder oder ein Audiosystem angeschlossen ist).
• BYPASS·TUNE Taste: Schaltet den Effekt
ein/aus
• +/–-Tasten: Wählen die Boxengröße
• Endlosregler: Bestimmen die Effektstärke
62
6) NR (Noise Reduction/Rauschunterdrükkung)
Damit regeln Sie die Stärke der Rauschunterdrükkung. Je höher der Wert, desto stärker die Rausch-
unterdrückung. Normalerweise sollten Sie eine
Einstellung wählen, bei der Sie bei leicht abgedämpften Saiten kein störendes Rauschen hören.
• Endlosregler : Bestimmen die Stärke der
Rauschunterdrückung
Die Noise Reduction-Funktion läßt sich nicht
ausschalten.
Wenn Sie diesen Wert übermäßig hoch einstel-
len, wird der Klang – abhängig vom angeschlossenen Gerät – möglicherweise vorzeitig
abgeschnitten. In diesem Fall sollten Sie den
Wert verringern.
Page 63

7) LEVEL (Pegel)
Hier stellen Sie mit Hilfe des Endlosreglers die
Lautstärke eines Programms ein.
Die Lautstärke der einzelnen Programme kann
sich abhängig von der verwendeten Gitarre
ändern. Stellen Sie den für Ihre Gitarre geeigneten Pegel ein.
8) RENAME (Umbenennung)
Hier können Sie für jedes Programm einen Namen
festlegen.
• +/–-Tasten: Wählen die Zeichenposition (das
gewählte Zeichen blinkt)
• Endlosregler: 0 Wählen das Zeichen
Die folgenden Zeichen können verwendet werden:
Leerstelle, 0 - 9, A - Z, ", ', *, -, /
9) WRITE (Speichern)
Hier können Sie ein editiertes oder neu erstelltes
Programm speichern.
Wählen Sie mit dem Endlosregler den gewünsch-
ten Speicherplatz aus (nur User-Programme). Der
Name des Programms, welches zur Zeit auf dem
selektierten Speicherplatz vorhanden ist, wird kurz
im Display angezeigt.
W enn Sie den Speicherv organg abbrechen w ollen,
betätigen Sie die EDIT √-Taste, um eine andere
Displayseite aufzurufen.
Wenn Sie die BYPASS·TUNE-Taste betätigen,
wird das editierte Programm gespeichert. Nach
Ende des Speichervorgangs erscheint im Display
für etwa eine Sekunde die Meldung „COMPLT“.
63
Page 64

• BYPASS·TUNE-Taste: Speichern
• Endlosregler: Auswahl eines User-Programms
als Speicherplatz für das neue Programm.
Bevor Sie ein editiertes Programm speichern,
vergewissern Sie sich, daß Sie nicht v ersehentlich ein wichtiges Programm überschreiben,
welches unter der selektierten Speichernummer vorhanden ist, da die vorhandenen Programmdaten überschrieben werden und verloren gehen.
Es ist nicht möglich, als Speicherplatz ein
Preset-Programm zu selektieren.
3.
Wiederherstellen der W erkspr ogramme
Halten Sie beim Einschalten des Geräts die
RHYTHM/AUX EFFECT-Taste und die +-Taste gedrückt. Im Display erscheint die Meldung
„RELOAD?“.
64
Wenn Sie den Vorgang abbrechen wollen, betäti-
gen Sie eine der +/–-Tasten. In diesem Fall wer-
den die Werksprogramme nicht wiederhergestellt.
Der normale Einschaltbildschirm wird angezeigt,
und das P ANDORA befindet sich im Play-Modus.
Wenn Sie statt dessen die BYPASS·TUNE-Taste
betätigen, werden die Werksprogramme wieder in
den User-Programmbereich geladen. Im Display
erscheint zunächst kurz die Meldung „RELOAD”,
danach wird der normale Einschaltbildschirm angezeigt.
Beachten Sie, daß, wenn Sie die Werksprogramme wiederherstellen, alle User-Programme überschrieben werden.
Page 65

Fehlersuche
Wenn das PANDORA nicht wie erwartet funktioniert, überprüfen Sie bitte zuerst die folgenden
Punkte. Falls sich damit das Problem nicht lösen
läßt, setzen Sie sich mit Ihrem Fachhändler oder
einem Korg Kundendienst in Verbindung.
1. Das Gerät läßt sich nicht einschalten
• Sind Batterien eingelegt? Oder ist der Wechselstromadapter mit einer Netzsteckdose verbunden?
2. Keine Klänge hörbar
• Sind Ihre Gitarre, Ihr Verstärker und/oder Ihre
Kopfhörer an die richtigen Buchsen angeschlossen?
• Ist Ihr Verstärker eingeschaltet und richtig ein-
gestellt?
• Ist ein Kabel defekt?
• Ist Master Level des PANDORA auf „0“ oder
einen niedrigen Pegel eingestellt?
• Ist der Programmpegel des PANDORA auf
„0“ oder einen niedrigen Pegel eingestellt?
• Ist das PANDORA stummgeschaltet?
Wenn alle Effekte ausgeschaltet sind, verschwindet die Effektketten-Anzeige und die
Bypass- und Stummschaltung ist auf dem
LCD-Display nicht mehr erkennbar.
• Ist die Lautstärke Ihres Instruments zurückgedreht?
3. Die Lautstärke des an den AUX-Eingängen angeschlossenen Geräts ist zu hoch
oder niedrig, oder das Signal ist überhaupt
nicht zu hören.
Stellen Sie die Ausgangslautstärk e am angeschlossenen Gerät ein.
Verbinden Sie das Gerät über den Kopfhö-
rerausgang (statt über die Summenausgänge) mit dem PANDORA.
• Ist der Phrase Trainer-Modus aktiviert?
Verlassen Sie den Phrase Trainer-Modus.
65
Page 66

4. Das Signal scheint nicht mit Effekten bearbeitet zu werden.
• Befindet sich das PANDORA im Bypass-Mo-
dus (in diesem Fall blinken die Effekt-LEDs)?
• W erden die gewünschten Effekte im selektier-
ten Programm verwendet?
Es gibt in einigen Modi Einschränkungen
bzgl. der Anzahl gleichzeitig verwendbarer
Effekte. In manchen Modi sind bestimmte
Effekte (MOD, AMB) nicht verfügbar.
5. Der Tuner funktioniert nicht.
• Ist im Play-Modus die Bypass- oder Stumm-
schaltung aktiviert?
66
Page 67

Effektparameterliste
DRIVE
TYPE (+/–-Tasten) VALUE (Endlosregler)
COMP Kompressor Empfindlichkeit (1…30)
TUBE Vintage-Overdrive
CRUNCH dezentes Overdrive
SCREAM Overdrive mit Biß
HOTBOX Verzerrung mit vielen Obertönen im mittleren Frequenzbereich
HIGAIN hochverstärkte Distortion Verstärkung (1…30)
VALVE Verzerrung eines altmodischen Verstärkers
CRUSH ausgewogene Verzerrung mit Sustain
SCOOP Verzerrung mit gefilterten Mitten
FUZZ Fuzz
TONE
LOWG LOW G- (Baß-) Equalizerhub
HIGHG High G- (Höhen-) Equalizerhub
TYPE (+/–-Tasten) VALUE (Endlosregler)
Verstärkung (-15…15)
67
Page 68

MOD
TYPE (+/–-Tasten) VALUE (Endlosregler)
CHORUS1
CHORUS2 Chorus (LFO: Dreieckwelle )
CHORUS3 Chorus (LFO: Sinuswelle )
CHORUS4 Dopplungs-Chorus
FLANGE1, 2, 3
FLANGE4 Flanger mit umgekehrtem Feedback
VIB Vibrato mit zyklischen Tonänderungen
DLYVIB1, 2 e
PHASER1 Vintage-Phaser
PHASER2 Phaser mit starken Wellenspitzen
PHASER3 PHASE1 mit umgekehrtem Feedback
PHASER4 PHASE2 mit umgekehrtem Feedback
TREM1 Tremolo (LFO: Sinuswelle )
TREM2 Tremolo (LFO: Rechteckwelle )
PAN1 Auto-Pan (LFO: Sinuswelle )
PAN2 Auto-Pan (LFO: Rechteckwelle )
AWAH1 Auto-Wah
AWAH2 Auto-Wah in entgegengesetzter Richtung von AWAH1
FIXWAH Fest eingestelltes Wah
RANDOM1, 2, 3
Chorus mit Effektsignal auf linkem und Direktsignal auf rechtem Kanal
Flanger (FLANG1, 2, 3 unterscheiden sich in der Feedbackstärke)
Verzögertes Vibrato, welches, wenn Sie eine lange Note spielen, nach
iniger Zeit eingeblendet wird (die Effekte DLYVIB1 und 2 unterscheiden
sich hinsichtlich der Einsatzzeit des Vibratos).
Ramdom Step Filter, das sich zufallsgesteuert bewegt
RANDOM1, 2, 3 unterscheiden sich in den Frequenzbändern
68
Effektstärke (1…30)
Modulationsgeschwindigkeit (1…30)
Effektsärke (1…30)
Modulationsgeschwindigkeit (1…30)
Empfindlichkeit (1…30)
Frequenz (1…30)
Modulationsgeschwindigkeit (1…30)
Page 69

PITCH1, 2, 3
PITCH4
MAJ3UP Intelligenter Pitchshifter (große Terz höher)
MAJ3DOWN Intelligenter Pitchshifter (große Terz tiefer)
MIN3UP Intelligenter Pitchshifter; (kleine Terz höher)
MIN3DOWN Intelligenter Pitchshifter; (kleine Terz tiefer).
PER4TH Intelligenter Pitchshifter; (Quarte höher) werden (C, C#…A#, B)
PER5TH Intelligenter Pitchshifter; (Quinte höher)
MAJ6TH Intelligenter Pitchshifter; (Sext höher)
Pitch Shifter
(PITCH1, 2, 3 unterscheiden sich im Pegel des Effektklangs)
Pitch Shifter mit Effektsignal auf linkem und Direktsignal auf rechtem Kanal
Stärke der Tonohöhenverschiebung
(-24, -17, -12…-1, -d, d, 1…12, 19, 24)
(d = Verstimmung)
Die Grundtonart muß spezifiziert
Der „Intelligente Pitchshifter“
Der intelligente Pitchshifter erzeugt musikalisch passende Harmonien durch eine Variierung der Tonhöhenverschieb ung im Verhältnis zu gespielten Note und Tonart. Wenn Sie beispielsweise einen Pitchshifter selektieren, der die Harmonie „große Terz höher“ erzeugt (MAJ3UP), wird die Tonhöhenver-
schiebung automatisch je nach gespielter Note zwischen einer kleinen Terz (drei Halbtönen) und einer
großen Terz (vier Halbtönen) variieren.
• Wenn MAJ3UP mit der Grundtonart C verwendet wird:
Die T onhöhe wird in (Klammern) angezeigt.
Das PANDORA bietet sieben verschiedene Typen des intelligenten Pitchshifters mit den Intervallen
Terz (3), Quarte (4), Quinte (5) und Sext (6). Bei der Terz können Sie auswählen, ob eine kleine Terz
(Molltonart) oder eine große Terz (Durtonart) erzeugt werden, und ob der erzeugte Ton tiefer oder
69
Page 70

höher als der Originalton liegen soll.
Wenn Ihr Instrument nicht korrekt gestimmt ist, können die Ergebnisse dieses Effekts unsauber
klingen. Stimmen Sie in diesem Fall Ihr Instrument neu.
Der intelligente Pitchshifter arbeitet nur korrekt, wenn Sie einzelne Noten spielen. Der Effekt ist
nicht für Akkorde verfügbar.
AMB
ROOM1 Tiefer Room Reverb
ROOM2 Heller Room Reverb
GARAGE1 garagenartiger Hall 1
GARAGE2 garagenartiger Hall 2 Effektpegel (1…30)
HALL Hall Reverb
ARENA Hallverhalten in einem Stadion
DELAY 40…2000
Stereo Delay 40…2000 [ms]
TYPE (+/–-Tasten) VALUE (Endlosregler)
CR (Cabinet Resonator)
1 x 8 Simulation eines Gitarrenverstärkers mit einem 8“-Lautsprecher
1 x 10 Simulation eines Gitarrenverstärkers mit einem 10“-Lautsprecher
1 x 12 Simulation eines Gitarrenverstärkers mit einem 12“-Lautsprecher
2 x 12 Simulation eines Gitarrenverstärkers mit zwei 12“-Lautsprechern
4 x 10 Simulation eines Gitarrenverstärkers mit vier 10“-Lautsprechern
4 x 12 Simulation eines Gitarrenverstärkers mit vier 12“-Lautsprechern
70
TYPE (+/–-Tasten) VALUE (Endlosregler)
Effektstärke (1…30)
Page 71

NR (Noise Reduction/Rauschunterdrückung)
VALUE (Endlosregler)
NR Rauschunterdrückung Effektstärke (1…30)
Parameterliste der Preset-Programme
No. Name No. Name No. Name No. Name No. Name
1 SUMMER 11 ANGUS 21 RASTA 31 CHORUS 41 OV-DRV
2S´R´V 12 EDDIE 22 FUNKY 32 FLANGE 42 DIRT
3 OZRIC 13 FLOYD 23 R´N´B 33 PHASED 43 C MAJ3U
4 GOO GOO 14 ROTARY 24 BLUES 34 ARENA 44 C MAJ3D
5 WES 15 HOTROD 25 POP 35 60´S 45 A MIN3U
6J´B 16 SMOKE 26 ROCK 36 70´S 46 A MIN3D
7E´C 17 GARGLE 27 THRASH 37 80´S 47 E PER 4
8 HILLAGE 18 SURF 28 SUBHARM 38 90´S 48 E PER 5
9 JIMI 19 COUNTRY 29 FLOWER 39 COMBO 49 A MAJ 6
10 B´B 20 JAZZ 30 FZ WAH 40 STA CK 50 OCTAVE
71
Page 72

Auflistung der Rhythmus-Patterns
No. Name No. Name No. Name No. Name
1 METRONM 11 16 BEAT 4 21 ROCK3 31 MOTOWN2
2 8BEAT1 12 16 SHFL 22 THRASH 32 SURF1
3 8BEAT2 13 3/4 23 *R´N´B 33 *SURF2
4 *8BEAT3 14 3/4 SHFL 24 *BLUES 34 REGGAE 1
5 8BEAT4 15 *6/8 1 25 COUNTRY 35 *REGGAE 2
6 8 BEAT 5 16 *6/8 2 26 JAZZ 1 36 DANCE 1
7 8 SHFL 17 POP1 27 *JAZZ 2 37 DANCE 2
8 16 BEAT 1 18 POP2 28 FUNK1 38 EURO
9 16 BEAT 2 19 ROCK1 29 FUNK 2 39 BOSSA
10 16 BEAT 3 20 ROCK2 30 *MOTOWN1 40 SAMBA
* Die Baßfigur dieser Rhythmus-Patterns folgt der nachfolgend aufgeführten Akkordabfolge (Baßtonart = E).
6 8BEAT5 Em – A
15 6/8 1 E – C#m – A – B
16 6/8 2 Em – G – A – C
17 POP1 E – A – B – E
18 POP2 E – C#m – A – B
23 R´N´BE – A – Am – E – B – A – E – B
24 BLUES E – A – E – B – A – E – B
27 JAZZ2 E – G# – C#m – B – E – A – Am – G#m – G – F#m – B
30 MOTOWN1 E – A
33 SURF2 E – C#m – A – B
72
35 REGGAE2 Em – D – C – D
Page 73

Technische Daten
• Effektvariation: 56 Effektvariationstypen (maximal 7 Effekte gleichzeitig erzeugbar)
• Programmanzahl:
· User-Programme: 50
· Preset-Programme: 50
• Eingang:
· Gitarreneingang (1/4”-Buchse)
· AUX (Mini-Stereoklinkenbuchse)
• Ausgang: Line/Kopfhörer Mehrzweck-Ausgang (1/4” Stereo-Buchse)
• Tuner-Sektion
· Erkennungsbereich: 27,5 Hz–2.093 Hz (A0…C7)
· Kalibrierung: A = 438–445 Hz
• Rhythm & Bass-Sektion: 40–208 BPM
• Stromversorgung:
vier AAA-Batterien, bis zu 9 Stunden Dauerbetrieb (bei abgeschalteter Hintergrundbeleuchtung)
·
· optional erhältliches Netzgerät (DC9V)
• Abmessungen (BxTxH): 119,5mm x 75,7mm x 26,9mm
• Gewicht: 138g (ohne Batterien)
Änderungen, die dem technischen Fortschritt dienen, Können jederzeit ohne Ankündigung vorge-
nommen werden.
73
Page 74

Introduction
Merci d’avoir fait l’acquisition d’un processeur
d’effets multiples personnel PANDORA PX3 de
Korg Tone Works. Pour lui assurer une longue vie
sans incidents, veuillez lire attentivement le pré-
sent manuel et toujours veiller à utiliser l’appareil
correctement. Conserver le manuel dans un endroit
sûr afin de pouvoir s’y reporter ultérieurement.
Caractéristiques principales
Le PANDORA est un processeur d’effets multi-
fonctionnels et extrêmement compact avec:
56 types de variations d’effets
Vous pouvez utiliser simultanément jusqu’à sept
effets différents.
50 programmes utilisateur et 50 programmes
présélectionnés
Système IPE (de l’anglais “Integrated Parame-
ter Edit” ou édition des paramètres intégrée)
Facilite le réglage des paramètres d’effets.
74
Fonction d’accordeur automatique
Cette fonction facilite et accélère l’accordage. Elle
permet également d’accorder l’instrument sans être
entendu (avec le son coupé).
Ecran à cristaux liquides rétroéclairé
L’écran à cristaux liquides (LCD) est très lisible,
même dans des endroits sombres.
Fonction rythmique et de basse
Vous pouvez jouer quarante motifs rythmiques et
de basse.
Fonction d’effets A UX
Permet de transposer ou d’annuler au centre le son
d’un lecteur de CD ou d’une autre source audio
raccordée à la borne AUX.
Fonction de pratique de phrases
Un segment audio (de 16 secondes maximum) enregistré à partir d’un lecteur CD ou d’une autre sour -
ce audio peut être reproduit en boucle de manière
répétée. Vous pouvez également ralentir la vitesse
de reproduction sans affecter la hauteur des notes.
Page 75

Résonateur d’enceinte
Permet de sélectionner le type d’enceinte souhaité
parmi six types d’enceintes acoustiques pour guitare.
HBB (Hyper Bass Boost ou accentuation des
extrêmes graves)
Stimule la réponse en basse fréquence.
Disque de valeurs
Permet de sélectionner rapidement des programmes ou d’éditer des effets.
Mise sous tension
Retirer le couvercle du logement des piles dans le
bas du coffret en le faisant glisser dans le sens de
la flèche. Introduire 4 piles alcalmes de format
AAA (non fournies) comme indiqué sur l’illustration. V eiller à bien respecter les indications de polarité des piles.
Affichage de pile épuisée
Lorsque la pile s’affaiblit, l’icône de la pile épuisée
s’allume. Dans ce cas, remplacer la pile dès
que possible.
Les programmes et les autres données (à l’exception de celles en cours d’édition) seront conservées même lors du retrait de la pile.
Toujours retirer les piles épuisées du
PANDORA. Si vous les laissez dans l’appareil, elles risquent d’être à l’origine de mauvais fonctionnements (dus à des fuites de produit, etc.). Nous conseillons également de retirer les piles lorsque vous ne comptez pas utiliser le PANDORA pendant une période pro-
longée.
Les piles et l’adaptateur A C ne sont pas inclus a vec
cet appareil. Veuillez les acheter séparément.
75
Page 76

Commandes et connecteurs
1 Interrupteur d’alimentation/
interrupteur du rétroéclairage
Cet interrupteur sert à éteindre le ré-
troéclairage.
Lors du fonctionnement sur piles de l’appareil, éviter de laisser le rétroéclairage allumé trop
longtemps pour ne pas raccourcir la durée de vie des piles.
2 DC9V
ert à raccorder l’adaptateur secteur
vendu séparément (DC9V ).
76
3 Disque de valeurs
Sert à régler le volume général, à édi-
ter les effets et à sélectionner les programmes
4 Prise OUTPUT
Raccorder cette prise à l’ampli de la
guitare ou au casque d’écoute, etc.
5 Prise AUX (stéréo)
Raccorder cette prise à un lecteur de
CD, etc.
6 Prise INPUT
Raccorder cette prise à la guitare.
7 Touches +/-
Ces touches servent à sélectionner
des programmes, à éditer des effets
et à régler le volume général.
8 Commutateur de niveau d’entr ée
Ce commutateur doit être réglé sur
une valeur adéquate en fonction du
niveau de sortie de la guitare.
9 Touches EDIT √ [ ]/®
[HOLD]
Ces touches servent à sélectionner le
paramètre à éditer et à activer la fonc-
tion de pratique de phrases.
0 Touche HBB (accentuation des
extrêmes graves)
Cette touche permet d’activer ou de
désactiver la fonction HBB.
A Touche PHRASE TRAINER [ ]
Cette touche permet d’accéder au
mode de pratique de phrases. Elle sert
également à démarrer l’enregistrement dans la pratique de phrases.
B Touche BYPASS·TUNE [ ]
Cette touche sert à l’accordage en
mode de jeu. (Le P ANDORA est alors
contourné ou assourdi). Cette touche
sert également à activ er ou à désacti-
ver les effets et à démarrer la reproduction dans la pratique de phrases ou
à mettre la fonction en pause.
Page 77

C Touche RHYTHM/AUX EF-
FECT
Cette touche permet d’accéder au
mode de rythmes et de basses ou au
mode d’effet auxiliaire.
D Touche EXIT
Cette touche permet de quitter n’importe quel mode pour revenir au
mode de reproduction. Elle sert éga-
lement à assigner une fonction au
disque de valeurs.
Ecran LCD
1 Chaîne d’effets
Ces touches indiquent l’état activé/
désactivé des ef fets de multiplication
(Drive), de modulation, d’ambiance,
de résonateur d’enceinte et d’accentuation des extrêmes graves (HBB).
2 Affichage des valeurs
Cette zone reprend le niveau du volume général ou les valeurs des paramètres de manière numérique et
graphique. (Lorsque le niveau de volume général apparaît, le témoin de
volume général s’allume.)
3 Affichage des numéros de pro-
grammes
Cette fonction indique le numéro des
programmes. (Lorsqu’un programme
utilisateur est sélectionné, le témoin
s’allume).
4 Icône du mode de pratique des
phrases
Cette icône clignote lorsque vous accédez au mode de pratique des phrases.
5 Icône du mode d’effet auxiliaire
Cette icône clignote lorsque vous accédez au mode d’effet auxiliaire
“AUX Effect”.
6 Icône des rythmes et des basses
Cette icône clignote lorsque vous accédez au mode de rythmes et de basses.
7 Icône de pile épuisée
Cette icône s’allume lorsque les piles s’affaiblissent.
8 Affichage du nom de program-
me/des types d’effets
Cette zone indique le nom du programme ou le type d’effet utilisé.
Lorsque le PANDORA est contourné ou assourdi, cette zone fonctionne comme indicateur d’accordage.
9 Icône du mode d’édition
Cette icône s’allume lorsque vous accédez au mode d’édition.
77
Page 78

Raccordements
Mettre tous les équipements qui vont être raccordés hors tension (sur OFF) et baisser leur volume.
*1 Les câbles de connexions ne sont pas fournis
d’origine.
78
*2 Le jack de sortie/du casque d’écoute du
PANDORA est en stéréo. Si vous utilisez un
câble monophonique standard pour le raccorder à un ampli pour guitare etc., vous pourrez
uniquement écouter la sortie gauche (L).
*3 Si vous raccordez un magnétophone, un ma-
gnétoscope ou un lecteur de disques compacts,
etc. à la borne AUX, vous une cassette, une
bande ou un disque, etc. Vous devrez cependant régler le volume de manière adéquate sur
l’appareil raccordé au PANDORA.
*4 Si vous faites fonctionner le PANDORA sur
piles, l’adaptateur secteur n’est pas nécessaire.
Néanmoins, en cas d’utilisation de ce dernier,
veiller à toujours employer l’adaptateur secteur
spécifié.
*5 Le niveau de sortie du PANDORA et sa quali-
té sonore varieront en fonction du casque
d’écoute utilisé. Nous conseillons d’utiliser un
casque d’écoute de bonne qualité à faible impédance, de 32 ohms ou inférieure, avec une
Page 79
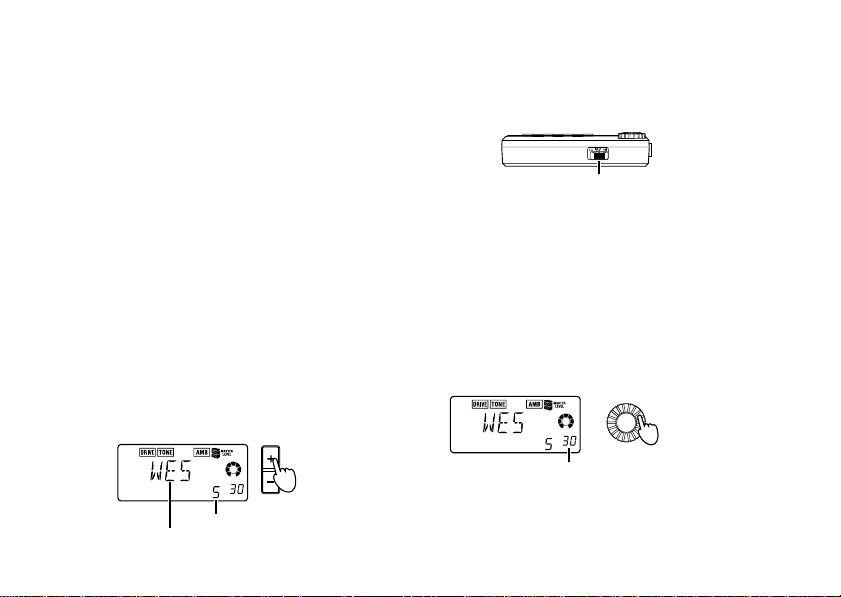
sensibilité estimée à 100 dB/mW ou supérieu-
Commutateur de niveau d'entrée
re. La plupart des casques d’écoute en vente
pour les lecteurs de CD ou pour les magnétophones portables feront l’affaire.
Premier essai
1 Lorsque les raccordements sont terminés,
mettre l’interrupteur d’alimentation sur la
position “ON”. (Nous appelons ce mode le
mode de jeu “Play”.)
Utiliser les touches +/- pour sélectionner un
pr ogramme.
Sélectionner un programme de type “sans effets” adéquat pour effectuer les réglages de
volume. (Dans notre exemple, nous av ons choisi
ici le Programme 5 “WES”).
2 Régler le niveau d’entrée à la position adé-
quate en fonction du niveau de sor tie de la
guitare.
H: Guitares avec un niveau de sortie élevé (mi-
cros anti-bourdonnement) ou basses
L: Guitares avec un faible niveau de sortie (mi-
cros à une seule bobine).
3 Mettre la commande de volume de la guita-
r e sur la position habituelle.
Utiliser le disque de valeurs pour régler le volume général.
Disque de valeurs
Niveau de volume général
Non du programme
Numéro du programme
79
Page 80

Mode de jeu Play
Le mode de jeu Play est celui que vous utiliserez
normalement avec le PANDORA.
1. Sélection d’un programme
Vous pouvez sélectionner des programmes (des
modèles de sons) à partir de 50 programmes utilisateur et de 50 programmes présélectionnés.
Utiliser les touches +/- pour sélectionner un programme. Si vous sélectionnez un programme utilisateur, l’affichage indique “
numéro de programme.
Vous pouvez également sélectionner les programmes lorsque vous trouvez en mode de rythmes et
de basses, en mode d’effet auxiliaire ou en mode
de pratique des phrases.
80
” au-dessus du
2.Niveau de volume général
Lorsque le témoin MASTER LEVEL est allumé,
le niveau du volume général apparaît dans l’affichage des valeurs.
Disque de valeurs
Affichage des valeurs
Immédiatement après la mise sous tension, vous
pourrez régler le volume général à l’aide du disque
des valeurs. V ous pouvez également utiliser les touches +/- pour régler le volume général (voir p.82).
Le réglage de volume général est conservé même
lors de la mise hors tension de l’appareil.
3. Contournement/Assourdissement (By-
pass/Mute)
Lorsque vous appuyez sur la touche BYP ASS·TUNE,
le PANDORA est contourné et le son original n’est
soumis à aucun effet.
La chaîne d’effets clignote et l’affichage indique
Page 81

“BYPASS” pendant environ une seconde.
Clignote
4.Accordeur
L’accordeur fonctionne lors du contournement ou
de l’assourdissement en mode de reproduction.
Indicateur
Dièse
Si vous appuyez sur la touche BYPASS·TUNE
pendant plus d’une seconde, le signal de sortie sera
coupé.
La chaîne d’effets se mettra à clignoter rapidement
et l’affichage indiquera “MUTE” pendant envi-
ron une seconde.
Clignote rapidement
Le contournement/l’assourdissement se désactivent lorsque vous réappuyez sur la touche
BYPASS·TUNE ou lorsque vous changez de programme.
Nom de la note
calibrage
Marque centrale
Jouer une seule corde sur la guitare. L’écran LCD
indiquera le nom de la note et le calibrage. Si la
hauteur se situe plus d’un demi-ton au-dessus du
nom de la note, un symbole de dièse apparaît dans
la partie supérieure gauche du nom de la note.
La zone d’affichage agit comme un indicateur pour
évaluer la déviation de hauteur de la note.
Accorder la corde de la guitare de sorte que le té-
moin au-dessus de la marque centrale s’allume.
L’accordeur (contourné/assourdi) se désactiv e lors-
que vous appuyez sur la touche BYPASS·TUNE
ou lorsque vous changez de programme.
81
Page 82

Calibrage (fréquence de la hauteur du La
standard)
Vous pouvez utiliser le disque de valeurs pour
régler le calibrage sur une plage allant de La (A) =
438 Hz à 445 Hz
Le réglage de calibrage effectué prévaudra jusqu’à
la mise hors tension de l’appareil. A la remise sous
tension, le calibrage est réinitialisé à une valeur
du La = 440 Hz.
5. HBB (Accentuation des extrêmes graves)
Cette fonction permet d’accentuer la plage des basses
fréquences qui se révèle souvent trop faible lors de l’uti-
lisation d’un petit casque d’écoute. Cette fonction se
révèle également pratique lorsque le PANDORA est
raccordé à un ampli pour guitare ou à un mélangeur.
Utiliser la touche HBB pour activer ou désactiver cette
fonction HBB d’accentuation des extrêmes graves.
Lorsque la fonction HBB est activée, l’icône HBB
) s’allume à l’écran.
(
82
Le réglage d’activ ation/de désacti vation de la fonction HBB est conservé même après la mise hors
tension. Cela signifie que le même réglage sera
valide lors de la remise sous tension.
Il n’est pas possible d’activer ou de désactiver
cette fonction lorsque le PANDORA est con-
tourné ou assourdi.
6.Définition de la fonction du disque de
valeurs
Vous pouvez définir la fonction du disque de valeurs en mode de reproduction.
En mode de reproduction Play, maintenir la touche EXIT enfoncée et appuyer soit sur la touche
EDIT √, sur la touche EDIT ® ou sur la touche
BYPASS·TUNE pour lui assigner les fonctions
suivantes.
Ce réglage ne peut pas être modifié en mode
contourné/assourdi.
● Maintenir la touche EXIT enfoncée et ap-
puyer sur la touche EDIT
√.
Page 83

L’écran affiche “MASTER” pendant environ
1 seconde.
Maintenir enfoncé
Le disque de valeurs permet de régler le volume
principal alors que les touches +/- permettent de
sélectionner les programmes. Vous pouvez utiliser
le disque de valeurs pour régler plus rapidement le
volume principal. Chaque fois que l’appareil est mis
sous tension, ce réglage sera opérationnel.
● Maintenir la touche EXIT enfoncée et ap-
puyer sur la touche EDIT
®.
L’écran affiche “PROGRAM” pendant envi-
ron 1 seconde.
Maintenir enfoncé
Le disque de valeurs permet de sélectionner les
programmes alors que les touches +/- permettent
de régler le volume principal. Vous pouvez utiliser
le disque de valeurs pour sélectionner plus rapidement les programmes.
● Maintenir la touche EXIT enfoncée et ap-
puyer sur la touche BYPASS·TUNE.
L’écran affiche “KEYLOCK” pendant envi-
ron 1 seconde.
Maintenir enfoncé
Les touches +/- permettent de sélectionner les program-
mes et les autres touches ainsi que le disque de valeurs
ne fonctionneront pas (c’est-à-dire qu’elles seront “ver-
rouillées”). Dans cette condition, vous pouvez unique-
ment sélectionner les programmes, ce qui permet notamment d’éviter des manipulations accidentelles pendant une représentation en direct, etc.
Pour modifier le réglage, maintenir la touche EXIT
enfoncée et appuyer sur la touche correspondant au
réglage souhaité.
83
Page 84

Mode de rythmes et de basses
Motif rythmique
Affichage du tempo
Pour accéder au mode de rythmes et de basses, appuyer
une fois sur la touche RHYTHM/AUX EFFECT en
mode de reproduction (sauf en cas d’activ ation de la
fonction d’assourdissement/de contournement ou du
verrouillage des touches), en mode d’ef fet auxiliaire ou
en mode de pratique des phrases.
Lorsque vous accédez à ce mode, le rythme sélectionné commence à jouer et l’icône du mode de
rythmes et de basses clignote.
L’affichage des valeurs indique le motif ou le tempo.
Ce mode contient les quatre paramètres suivants.
Utiliser la touche EDIT
les paramètres et le disque des valeurs ainsi que
la touche BYPASS·TUNE pour définir la valeur
de chaque paramètre.
√/ ® pour sélectionner
1.Motif rythmique
Vous avez le choix parmi 40 motifs rythmiques
différents.
• Disque de valeurs: Définir le motif rythmi-
que souhaité
2.Tempo
Régler le tempo sur une plage allant de 40 à 208
bpm.
Motif rythmique
Niveau ryth-
mique et des
basses
84
Tempo
Activation/Désactivation des basses et
tonalité des basses
• Disque de valeurs: Régler le tempo
Page 85

3. Activation/Désactivation des basses et
Indication de niveau
tonalité des basses
Cette fonction permet d’activer ou de désactiver
les basses et de spécifier la tonalité qui jouera les
basses.
Si vous appuyez sur la touche BYPASS·TUNE
lorsque cette page d’écran est affichée, la basse
jouera au même temps que le rythme.
En fonction du motif rythmique sélectionné, certaines lignes de basses comprendront également
une progression d’accords.
Les notes graves (basses) peuvent être déf inies pour
jouer sur n’importe quelle tonalité à l’aide du dis-
que de valeurs.
Pour les lignes de basses qui comprennent une progression d’accords, vous pouvez jouer les notes
dans la clé sélectionnée pour vous exercer en solo
avec la ligne de basses.
• Touche BYPASS·TUNE: Permet d’activer ou
de désactiver la note basse.
• Disque de valeurs: Définit la tonalité des no-
tes basses
Lorsque la fonction “METRONM” (métronome)
est sélectionnée comme motif rythmique, il n’y a
pas de notes basses et cet écran n’apparaît pas.
4. Niveau rythmique et de basse
Cette fonction permet de définir le niveau du son
rythmique et des basses. La note basse sera uniquement affectée si la fonction Basse est activée.
• Disque de valeurs : Règle le niveau du son
rythmique et des basses.
Affichage de la tonalité
85
Page 86

Mode d’effet AUXILIAIRE “AUX
Effect”
Ce mode permet de transposer (KEY-TRN) le son
d’un CD ou d’un lecteur de cassettes raccordé à la
borne AUX ou d’annuler la partie centrale (CC)
pour retirer le son de guitare ou la voix positionnée au centre.
En mode rythmique et des basses, appuyer une fois
sur la touche RHYTHM/AUX EFFECT pour
accéder au mode d’effet auxiliaire.
Dès que vous accédez à ce mode, l’icône d’effet
auxiliaire clignote.
Affichage KEY-TRN
Affichage par 10 centièmes
Affichage par 100 centièmes
Affichage CC
86
√√
• Touche EDIT
®®
√/
®: Permet de commuter en-
√√
®®
tre les affichages KEY-TRN et CC
• Touche BYPASS·TUNE: Permet d’activer ou
de désactiver les fonctions KEY-TRN ou CC
• Disque de valeurs: Règle l’importance de la
transposition
• Touches +/- : Permettent de sélectionner les
programmes
Le réglage de transposition des tonalités peut être
réglé sur une plage de +/- une octave.
La valeur de la tonalité peut être augmentée par
pas de 10 centièmes pour les trois premiers demitons et par pas de demi-tons (100 centièmes) par
la suite.
La valeur de la tonalité peut être abaissée par pas de
10 centièmes pour les trois premiers demi-tons et
par pas de demi-tons (100 centièmes) par la suite.
Lorsqu’une des fonctions KEY-TRN ou CC
est activée, la sortie est monophonique. Si les
deux fonctions KEY-TRN et CC sont désactivées, la sortie se fait en stéréo.
Page 87

Lorsque vous accédez à ce mode, les effets
MOD (modulation) et AMB (ambiance) sont
automatiquement coupés.
Avec certaines sources d’entrée (les enregistrements mono ou en cas d’utilisation d’effets
spéciaux pendant l’enregistrement), la fonction CC risque de ne pas produire l’effet souhaité.
Mode de pratique des phrases
Dans ce mode, vous pouvez enregistrer une phrase à partir d’un lecteur CD ou de cassette raccordé
à la borne AUX et la reproduire en boucle (la jouer
de manière répétitiv e). Il s’agit d’une fonction par ticulièrement utile pour s’exercer en jouant sur la
phrase qui se répète.
Vous pouvez aussi ralentir la vitesse de reproduction sans affecter la hauteur des notes, afin d’apprendre plus facilement les phrases difficiles.
Lorsque vous accédez à ce mode, les effets
MOD (modulation), AMB (ambiance) et les
effets AUX sont automatiquement coupés.
1.Sélection du mode d’enregistrement
En mode de reproduction (sauf lorsque les fonctions
de contournement/d’assourdissement ou de verrouillage des touches sont activées), en mode de rythmes et de basses ou en mode d’effet auxiliaire, appuyer sur la touche PHRASE TRAINER [
accéder au mode de pratique des phrases.
] pour
87
Page 88

Lorsque vous accédez à ce mode, l’écran de sélection du mode d’enregistrement apparaît et l’icône
du mode de pratique des phrases clignote. Lorsque cet écran est affiché, le PANDORA est prêt
pour l’enregistrement.
Cet écran permet de sélectionner le mode d’enregistrement (SHT: qualité audio supérieure, LNG:
enregistrement longue durée). La fonction SHT
permet d’enregistrer des séquences durant jusqu’à
huit secondes alors que la fonction LNG permet
d’enregistrer des séquences allant jusqu’à seize secondes. Sélectionner le mode d’enregistrement
approprié en fonction de la phrase à enregistrer.
• Disque des valeurs : Sélectionner le mode
d’enregistrement
• Touche [
Démarrer la lecture sur le lecteur de CD ou sur
l’autre source audio et, lorsque vous atteignez le
88
]: Démarrer l’enregistrement
point auquel vous souhaitez commencer l’enregistrement, appuyer sur la touche [
ment commence.
Lorsque vous enregistrez la phrase, vous ne
pouvez plus modifier le mode d’enregistre-
ment. Si vous souhaitez changer de mode d’enregistrement, vous devez d’abord quitter ce
mode et en sélectionner un autre puis ré-accé-
der au mode de pratique des phrases.
]. L ’enregistre-
2.Enregistrement
Lorsque vous appuyez sur la touche [ ] pour
démarrer l’enregistrement, le temps d’enregistrement apparaîtra sous forme de valeur numérique
dans l’affichage des valeurs.
Affichage du temps d'enregistrement
Pour arrêter l’enregistrement, appuyer sur la tou-
] ou sur la touche [ ].
che [
Page 89

A la fin de l’enregistrement, la reproduction en
boucle commence automatiquement.
A moins que vous n’arrêtiez l’enregistrement manuellement, celui-ci continuera aussi longtemps que
le permet le mode d’enregistrement sélectionné.
La phrase sera enregistrée et reproduite en mono.
• Touche[
gistrement et démarre la reproduction
]/Touche [ ]: Termine l’enre-
3. Reproduction
La phrase enregistrée se reproduit en boucle. Pendant
la reproduction ou la pause, vous pouvez utiliser les
touches +/- pour sélectionner des programmes.
Vitesse de reproduction (%)
Tourner le disque de valeurs vers la gauche pour
réduire la vitesse de reproduction sans affecter la
hauteur des notes.
Vous pouvez régler la vitesse de reproduction par
pas de 5% sur une plage de 100%, 95%, 90%…25%.
Pendant la reproduction, vous pouvez appuyer sur
la touche [HOLD] pour maintenir le son à ce sta-
de (fonction de maintien “Hold”)
• Touche [
• Touche [
• Touche [
• Disque de valeurs: Règle la vitesse de repro-
duction
Si vous appuyez sur la touche EXIT ou sur la
touche RHYTHM/AUX EFFECT, la phrase
enregistrée s’efface.
]: Pause/Reproduction
]: Ré-enregistrement
]: Retour en arrière
4.Pause
Lorsque vous appuyez sur la touche [ ], la
reproduction s’arrête provisoirement (elle se met
en pause). Réappuyer sur la touche [
] pour
89
Page 90

reprendre la lecture.
Si vous appuyez sur la touche [
la reproduction est arrêtée (en pause), vous reviendrez au début de la phrase enregistrée.
• Touche [
• Touche [
• Touche [
• Disque de valeurs: Règle la vitesse de repro-
duction
]: Pause/Reproduction
]: Ré-enregistrement
]: Retour au début de la phrase
] pendant que
Pour réenregistrer
Pour réenregistrer la phrase, appuyer sur la touche [
duction. Pendant la pause, le son de l’appareil raccordé à la prise AUX est émis. Régler à présent la
source d’entrée au début de la phrase souhaitée.
Démarrer le lecteur de CD ou l’autre source et appuyer sur la touche [
souhaitée.
90
] pour arrêter momentanément la repro-
] au début de la phrase
Mode d’édition “Edit”
Ce mode permet d’activer ou de désactiver chaque effet, de sélectionner le type d’effet, de modifier les valeurs des paramètres, etc. En mode de
reproduction, appuyer sur la touche EDIT ® pour
accéder au mode d’édition.
1.Sélectionner l’effet à éditer
Utiliser les touches EDIT √/ ® pour sélectionner
l’effet à éditer.
Chaque fois que vous appuyez sur la touche tou-
ches EDIT
en revue, dans l’ordre indiqué ci-dessous. Lorsqu’un effet est sélectionné, son icône clignote.
Les effets désactivés ne peuvent pas être édités.
Pour activer un effet, utiliser les touches EDIT
√/ ® pour sélectionner l’effet puis appuyer sur la
touche BYPASS·TUNE.
√/ ®, vous passez les différents effets
Page 91

2. Edition de chacun des effets
Pour chaque effet, vous pouvez sélectionner le type
d’effet et régler les v aleurs de ses paramètres. Pour
plus de détails concernant les types d’effets et leurs
paramètres, se reporter à la liste des paramètres
d’effets (voir p.97).
1) DRIVE (Drive)
Ce type fournit des effets comme le compresseur
et toute une variété de surmultiplications (ov erdrives) et de distorsions.
• Touche BYPASS·TUNE: Active ou désactive
l’effet
• Touche +/- : Sélectionnent le type d’effet
• Disque de valeurs: Spécifie la valeur du para-
mètre
2) TONE (Tonalité)
Ce paramètre fournit des effets qui permettent de
régler le caractère tonal.
• Touche BYPASS·TUNE: Active ou désacti-
ve l’effet
• Touche +/- : Permettent de commuter entre
“LOW G” et “HIGH G”
• Disque de valeurs: Spécifie le gain
3) MOD (Modulation)
Ce type fournit des effets du genre modulation
comme le chorus, le flanger, le pitch-shifter, etc.
• Touche BYPASS·TUNE: Active ou désacti-
ve l’effet
91
Page 92

• Touche +/- : Sélectionnent le type d’effet
• Disque de valeurs: Spécifie la valeur du pa-
ramètre
MAJ6TH, le fait de régler l’effet d’ambiance
AMB sur ROOM1 désactiv e automatiquement
la modulation MOD.
4) AMB (Ambience)
Cette fonction fournit des effets spatiaux comme
la réverbération et le retard.
• Touche BYPASS·TUNE: Active ou désacti-
ve l’effet
• Touche +/- : Sélectionnent le type d’effet
• Disque de valeurs: Spécifie l’intensité de l’ef-
fet
Il n’est pas possible d’utiliser l’effet “Intelli-
gent Pitch Shifter MOD” (modulation) simultanément avec les effets AMB (ambiance)
“ROOM1–ARENA”. Seul le dernier effet sé-
lectionné est valable. Par exemple si la modulation MOD est réglée sur MAJ3UP–
92
5) CR (Résonateur de coffret)
L’effet de résonateur de coffret (CR) simule les
caractéristiques acoustiques du boîtier d’un amplificateur pour guitare. Il s’avère particulièrement
efficace lorsque vous n’utilisez pas d’ampli (par
exemple, lorsque le casque d’écoute, le mélangeur,
l’enregistreur de disque dur ou un système audio
sont raccordés).
• Touche BYPASS·TUNE: Active ou désacti-
ve l’effet
• Touche +/- : Sélectionnent le taille du coffret
• Disque de valeurs: Permettent de définir l’in-
tensité de l’effet
Page 93

6) NR (Réduction des bruits)
Permet de régler la profondeur de la réduction du
bruit. L’augmentation de cette valeur produit da-
vantage de réduction du bruit. Normalement, il
convient de la régler de manière à ne pas entendre
les bruits perturbants lorsque les cordes sont légè-
rement assourdies.
• Disque de valeurs: Permettent de régler l’in-
tensité de la réduction du bruit.
Il n’est pas possible de désactiver la réduction
du bruit.
Si vous augmentez cette valeur de manière
excessive, le son risque d’être coupé prématurément, en fonction de l’équipement raccordé.
Pour éviter ce problème, diminuer la v aleur de
réduction du bruit.
7) LEVEL (Niveau)
Permet de régler le niveau de chaque programme
à l’aide du disque de valeurs.
Le volume de chaque programme (chaque tonalité) change en fonction de la guitare utilisée. Il faut donc régler le volume en fonction
de votre guitare.
8) RENAME (Réassignation de nom)
Cotte fonction permet de donner un nom à chaque
programme.
• Touche +/- : Sélectionnent l’emplacement du
caractère (le caractère sélectionné clignote)
• Disque de valeurs: Sélectionnent le caractère
93
Page 94

Il est possible d’utiliser les caractères suivants:
espace, 0-9, A-Z, “, ‘, *, +, -, /
9) WRITE (Sauvegarde)
Cette fonction permet d’écrire (de mémoriser) un
programme édité ou un programme que vous av ez
créé.
Utiliser le disque de valeurs pour sélectionner la
destination d’écriture (valable uniquement pour les
programmes utilisateur). Lorsque vous effectuez
cette opération, le nom du programme qui occupe
à ce moment la destination d’écriture apparaît brièvement à l’écran.
Si vous décidez de ne pas mémoriser le nouveau
programme, appuyer sur la touche EDIT
sélectionner un autre écran.
Lorsque vous appuyez sur la touche
BYP ASS·TUNE, le programme édité est mémori-
sé. Lorsque l’opération de sauvegarde est terminée,
94
l’écran indique “COMPLT” pendant environ une
seconde.
• Touche BYPASS·TUNE: Permet de mémori-
ser
• Disque de valeurs: Permet de sélectionner un
numéro de programme utilisateur comme destination de sauvegarde
Av ant de mémoriser un programme édité sous
un autre numéro de programme, vérifier si v ous
ne souhaitez pas conserver les données qui se
trouvent déjà sous ce numéro de programme.
Les données qui sont remplacées sont en effet
irrémédiablement perdues.
Il n’est pas possible de mémoriser un programme sous un emplacement de programme pré-
sélectionné.
√ pour
3.Réinitialisation aux programmes d’usine
Mettre l’appareil sous tension en maintenant enfoncées la touche RHYTHM/AUX EFFECT et
la touche +. L’écran affichera la question “RE-
Page 95
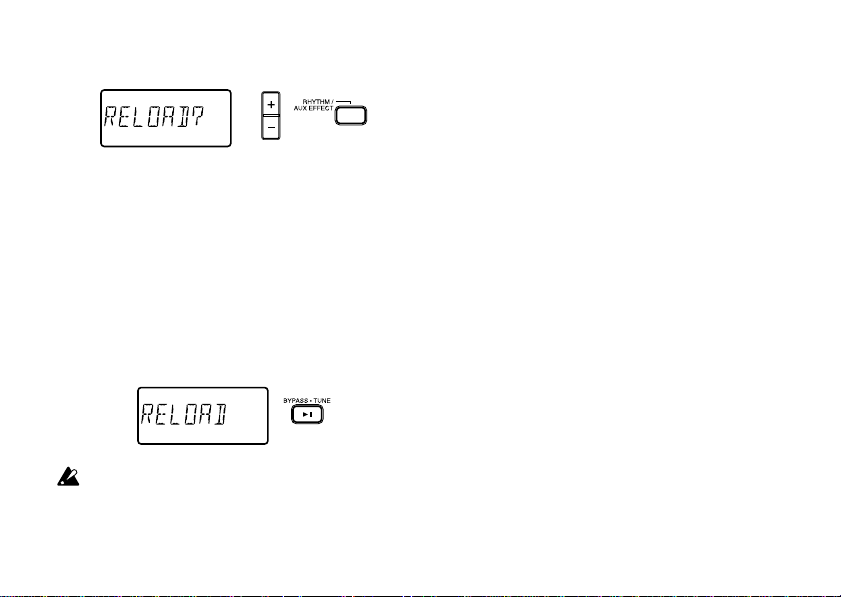
LOAD?”.
Si vous décidez de ne pas recharger les programmes d’usine, appuyer sur la touche +/- . Les programmes d’usine ne seront pas rechargés, l’écran
normal de mise sous tension apparaîtra et le
PANDORA s’allumera en mode programme.
Si vous appuyez sur la touche BYPASS·TUNE,
les programmes d’usine seront rechargés dans la
zone réservée aux programmes utilisateur. L’affi-
chage indiquera “RELOAD” pendant un court ins-
tant puis l’écran de mise sous tension apparaîtra.
Attention: Si vous rechargez les programmes
d’usine, tous les programmes utilisateur seront
effacés.
Guide de dépannage
Si le PANDORA ne fonctionne pas comme vous
l’espérez, commencer par vérifier les points suivants. Si, malgré cela, vous ne parvenez pas à ré-
soudre le problème, veuillez prendre contact avec
votre revendeur ou a v ec un centre technique K or g.
1. L’appareil ne se met pas sous tension.
• Les piles sont-elles mises en place? Ou,
l’adaptateur secteur est-il raccordé à une prise
de courant?
2. Pas de son
• Votre guitare, l’ampli ou le casque d’écoute
sont-ils raccordés aux bornes adéquates?
• L’ampli est-il allumé et réglé correctement?
• Des câbles sont-ils abîmés?
• Le niveau principal du PANDORA est-il mis
sur “0” ou sur un faible niveau?
• Le niveau de programme du PANDORA est-
il mis sur “0” ou sur un faible niveau?
95
Page 96

• Le PANDORA est-il assourdi (le son est-il
coupé)?
Ne pas oublier que, si tous les effets sont
désactivés, l’affichage en chaîne disparaît et
l’écran ne permet plus de différencier la fonc-
tion de dérivation de celle d’assourdissement.
• Le volume de la guitare est-il réduit au minimum?
3. Le volume de l’appareil raccordé à la bor ne A UX est tr op f ort ou trop faible ou n’est
pas audible.
Régler le volume de sortie de l’appareil raccordé.
Effectuer les raccordements à la prise pour
casque d’écoute de l’appareil plutôt qu’à sa
sortie de ligne.
• Etes-vous en mode de pratique des phrases?
Quitter le mode de pratique des phrases.
96
4. Les effets ne sont pas appliqués.
• Le PANDORA est-il contourné? (Dans ce
cas, les témoins de la chaîne d’effets clignotent).
• Les effets utilisés dans le programme sontils activés?
Il existe certaines limites quant aux types
d’effets qui peuvent être utilisés simultanément.
Dans certains modes, certains effets (MOD,
AMB) ne sont pas disponibles.
5. Le tuner ne fonctionne pas.
• Etes-vous en mode Play, avec la fonction de
dérivation ou d’assourdissement activée?
Page 97

Liste des paramètres des effets
DRIVE
COMP Compresseur Sensibilité (1…30)
TUBE Overdrive de type ancien
CRUNCH Léger overdrive
SCREAM Overdrive limité
HOTBOX Distortion avec de nombreuses harmonies de fréquences moyennes
HIGAIN Distortion de type à gain élevé Gain (1…30)
VALVE Distorsion typique des anciens amplificateurs
CRUSH Distortion douce et soutenue
SCOOP Distortion d’amplitude moyenne
FUZZ Fuzz
TONE
LOWG Gain d’égaliseur de type LOW G (plage des basses fréquences)
HIGHG Gain d’égaliseur de type HIGH G (plage des hautes fréquences)
TYPE (Touches + /-) VALEUR (Disque de valeurs)
TYPE (Touches + /-) VALEUR (Disque de valeurs)
Gain (-15…15)
97
Page 98

MOD
CHORUS1
CHORUS2 Chorus (LFO: onde triangulaire )
CHORUS3 Chorus (LFO: onde sinusoïdale )
CHORUS4 Double chorus
FLANGE1, 2, 3
FLANGE4 Flanger avec feedback inversé
VIB Vibrato avec un changement de hauteur cyclique
DLYVIB1, 2
PHASER1 Phaser de type ancien
PHASER2 Phaser avec des pointes fortes
PHASER3 PHASE1 avec feedback inversé
PHASER4 PHASE2 avec feedback inversé
TREM1 Trémolo (LFO: onde sinusoïdale )
TREM2 Trémolo (LFO: onde carrée )
PAN1 Positionnement panoramique automatique (LFO: onde sinusoïdale )
PAN2 Positionnement panoramique automatique (LFO: onde carrée )
AWAH1 Wah automatique
AWAH2 Wah automatique dans le sens opposé à AWAH1
FIXWAH Wah fixe Fréquence (1…30)
RANDOM1, 2, 3
OCTAVE
Chorus avec sortie du son avec effet à gauche et sortie du son direct à droite
Flanger (Les effets FLANG1, 2, 3 diffèrent dans l’importance du feedback)
Vibrato avec retard qui apparaît après un certain temps lorsque vous jouez une note prolongée
(1 et 2 diffèrent dans le temps considéré avant le commencement du vibrato)
Filtre à pas aléatoire qui se déplace de manière aléatoire
(Les effets RANDOM1, 2, 3 diffèrent dans les bandes de fréquences)
Effet qui crée un son d’une octave plus bas
*Le jeu d’accords risque de causer une perte de netteté
TYPE (Touches + /-) VALEUR (Disque de valeurs)
Intensité de l’effet (1…30)
Vitesse de modulation (1…30)
Intensité de l’effet (1…30)
Vitesse de modulation (1…30)
Sensibilité (1…30)
Vitesse de modulation (1…30)
Niveau de l’effet (1…30)
98
Page 99

PITCH1, 2, 3
PITCH4
MAJ3UP Pitch Shifter intelligent; une tierce plus élevée dans une tonalité majeure
MAJ3DOWN Pitch Shifter intelligent; une tierce plus basse dans une tonalité majeure
MIN3UP Pitch Shifter intelligent; une tierce plus élevée dans une tonalité mineure
MIN3DOWN Pitch Shifter intelligent; une tierce plus basse dans une tonalité mineure
PER4TH Pitch Shifter intelligent; une quarte plus élevée dans une tonalité majeure
PER5TH Pitch Shifter intelligent; une quinte plus élevée dans une tonalité majeure
MAJ6TH Pitch Shifter intelligent; une sixte plus élevée dans une tonalité majeure
Pitch shifter
(PITCH1, 2, 3 diffèrent dans le niveau du son de l’effet)
Pitch shifter avec son de l’effet et son direct partagés entre la gauche et la droite
Importance du changement dehauteur
(-24, -17, -12…-1, -d, +d, +1…+12,
+19, +24) (d=désaccorder)
Définir la tonalité (Do, Do#…La#, Si)
A propos du Pitch Shifter intelligent
Le Pitch Shifter intelligent crée des harmonies musicalement utiles en variant l’importance de transposition de la hauteur en fonction de la note jouée et de la tonalité enfoncée. Par exemple, si vous sélectionnez une transposition d’une tierce vers le haut pour une tonalité majeure (MAJ3UP), l’importance
de la transposition de hauteur variera automatiquement entre trois demi-tons (une tierce mineure) et
quatre demi-tons (une tierce majeure).
• Lorsque le paramètre MAJ3UP est utilisé avec un réglage de tonalité sur Do (C).
La hauteur crée par le pitch shifter intelligent est indiquée entre parenthèses ( ).
Le PANDORA fournit sept types de transposition de hauteur intelligents, avec des intervalles de tier-
ces, de quartes, de quintes et de sixtes. (Pour les tierces, vous pouvez sélectionner la partie inférieure
ou supérieure et une touche mineure ou majeure).
99
Page 100

Si votre instrument n’est pas bien accordé, les résultats risquent de ne pas être ceux attendus. Dans
ce cas, réaccorder l’instrument.
Le pitch shifter intelligent fonctionnera uniquement lorsque vous jouez des notes individuelles. Il
ne peut pas produire d’effets pour les accords.
AMB
ROOM1 Réverbération de type pièce intense
ROOM2 Réverbération de type pièce claire
GARAGE1 Réverbération 1 de type garage
GARAGE2 Réverbération 2 de type garage Niveau de l’effet (1…30)
HALL Réverbération de type hall
ARENA Réverbération de type stade
DELAY 40…2000
Retard stéréo 40…2000 (ms)
TYPE (Touches + /-) VALEUR (Disque de valeurs)
CR (Cabinet Resonator)
1 x 8 Simulation d’une enceinte avec un haut-parleur de 8 pouces
1 x 10 Simulation d’une enceinte avec un haut-parleur de 10 pouces
1 x 12 Simulation d’une enceinte avec un haut-parleur de 12 pouces Intensité de l’effet (1…30)
2 x 12 Simulation d’une enceinte avec deux haut-parleurs de 12 pouces
4 x 10 Simulation d’une enceinte avec quatre haut-parleurs de 10 pouces
4 x 12 Simulation d’une enceinte avec quatre haut-parleurs de 12 pouces
TYPE (Touches + /-) VALUE (Disque de valeurs)
100
 Loading...