


7 56OZ
CUPS |
|
|
TASSES |
L |
|
TAZAS |
||
|
FOOD PROCESSOR
INSTRUCTIONS AND RECIPES
ROBOT CULINAIRE
INSTRUCTIONS ET RECETTES
PROCESADOR DE ALIMENTOS
INSTRUCCIONES Y RECETAS
KFP710, KFP715, KFP720, KFP730
USA: 1-800-541-6390 |
|
KitchenAid.com |
Canada: 1-800-807-6777 |
|
KitchenAid.ca |
|
|
|
|
|
|
|
|
|
|
|
|

Proof of Purchase & Product Registration
Always keep a copy of the sales receipt showing the date of purchase of your Food Processor. Proof of purchase will assure you of in-warranty service.
Before you use your Food Processor, please fill out and mail your product registration card packed with the unit. This card will
enable us to contact you in the unlikely event of a product safety notification and assist us in complying with the provisions of the Consumer Product Safety Act. This card does not verify your warranty.
Please complete the following for your personal records:
Model Number ______________________________________________________________
Serial Number _______________________________________________________________
Date Purchased ______________________________________________________________
Store Name and Location ______________________________________________________
Preuve d’achat et enregistrement du produit
Veuillez conserver une copie du coupon de caisse indiquant la date d’achat de votre Robot culinaire. La preuve d’achat vous assure du service après-vente sous garantie.
Avant d’utiliser le Robot culinaire, veuillez remplir et poster la carte d’enregistrement du produit accompagnant l’appareil. Grâce à cette carte, nous pourrons vous
appeler dans l’éventualité improbable d’un avis de sécurité et nous pouvons aussi nous conformer plus facilement aux dispositions de la loi sur la sécurité des produits de consommation. Cette carte ne confirme pas la garantie.
Veuillez remplir ce qui suit pour votre dossier personnel.
Numéro de modèle __________________________________________________________
Numéro d’identification _______________________________________________________
Date d’achat ________________________________________________________________
Nom du magasin et emplacement ______________________________________________
Comprobante de compra y registro del producto
Siempre conserve una copia del recibo de ventas que especifique la fecha de compra de su Procesador de alimentos. El comprobante de compra le asegurará el servicio técnico bajo garantía.
Antes de utilizar el Procesador de alimentos, complete y envíe por correo su tarjeta
de registro del producto que viene junto con la unidad. Esta tarjeta nos permitirá
contactarnos con usted en el improbable caso de notificación de algún problema de seguridad con el producto y nos ayudará a cumplir con las cláusulas de la Consumer Product Safety Act (Ley sobre la seguridad de los productos para el consumidor). Esta tarjeta no asegura su garantía.
Complete lo siguiente para su registro personal:
Número del modelo __________________________________________________________
Número de serie _____________________________________________________________
Fecha de compra ____________________________________________________________
Nombre de la tienda y dirección ________________________________________________

Table of Contents |
|
INTRODUCTION |
|
Proof of Purchase & Product Registration.............................................. |
Inside Front Cover |
Food Processor Safety ..................................................................................................... |
3 |
Important Safeguards ..................................................................................................... |
4 |
Electrical Requirements ................................................................................................... |
5 |
FEATURES AND OPERATION |
|
Food Processor Features ................................................................................................. |
6 |
Preparing the Food Processor for Use |
|
Before First Use ....................................................................................................... |
7 |
Work Bowl Assembly .............................................................................................. |
7 |
Multipurpose Blade Assembly ................................................................................. |
8 |
Reversible Slicing/Shredding Disc Assembly ............................................................. |
9 |
Mini Bowl and Mini Blade Assembly ........................................................................ |
9 |
Citrus Press Assembly and Use .............................................................................. |
10 |
Using the Food Processor |
|
Before Use............................................................................................................. |
11 |
Maximum Liquid Level .......................................................................................... |
11 |
Turning the Food Processor On and Off ................................................................ |
11 |
Using the Pulse Control ........................................................................................ |
11 |
Disassembling the Food Processor ................................................................................ |
12 |
CARE AND CLEANING |
|
Cleaning the Food Processor ......................................................................................... |
13 |
Troubleshooting ........................................................................................................... |
13 |
|
Continued on next page |
ENGLISH
1

ENGLISH
Table of Contents |
|
FOOD PROCESSING TIPS |
|
Using the Multipurpose Blade....................................................................................... |
14 |
Using the Reversible Slicing/Shredding Disc................................................................... |
15 |
Helpful Hints................................................................................................................. |
17 |
RECIPES |
|
Hummus....................................................................................................................... |
19 |
Asian Coleslaw.............................................................................................................. |
20 |
Vegetarian Muffuletta Hoagie....................................................................................... |
20 |
Layered Sausage Eggplant Casserole ............................................................................. |
21 |
Cranberry Orange Oatmeal Scones................................................................................ |
22 |
Lemon Cheesecake........................................................................................................ |
23 |
WARRANTY AND SERVICE INFORMATION |
|
KitchenAid® Food Processor Warranty .......................................................................... |
24 |
Hassle-Free Replacement Warranty – 50 United States and District of Columbia .......... |
25 |
Hassle-Free Replacement Warranty – Canada ............................................................... |
25 |
How to Arrange for Warranty Service in Puerto Rico .................................................... |
25 |
How to Arrange for Service after the Warranty Expires – All Locations ......................... |
26 |
How to Arrange for Service Outside these Locations .................................................... |
26 |
How to Order Accessories and Replacement Parts ........................................................ |
26 |
2

Food Processor Safety
Your safety and the safety of others are very important.
We have provided many important safety messages in this manual and on your appliance. Always read and obey all safety messages.
This is the safety alert symbol.
This symbol alerts you to potential hazards that can kill or hurt you and others.
All safety messages will follow the safety alert symbol and either the word “DANGER” or “WARNING.” These words mean:
You can be killed or seriously DANGER injured if you don’t immediately
follow instructions.
You can be killed or seriously injured WARNING if you don’t follow instructions.
All safety messages will tell you what the potential hazard is, tell you how to reduce the chance of injury, and tell you what can happen if the instructions are not followed.
ENGLISH
3

IMPORTANT SAFEGUARDS
When using electrical appliances, basic safety precautions should always be followed, including the following:
|
1. |
Read all instructions. |
|
||
|
2. |
To protect against risk of electrical shock do not put Food Processor in water or |
ENGLISH |
|
other liquid. |
3. |
before cleaning. |
|
|
Close supervision is necessary when any appliance is used by or near children. |
|
|
4. |
Unplug from the outlet when not in use, before putting on or taking off parts, and |
|
5. |
Avoid contacting moving parts. |
|
6. |
Do not operate any appliance with a damaged cord or plug, or after the appliance |
|
||
|
|
malfunctions, or is dropped or damaged in any manner. Return appliance to |
|
|
the nearest Authorized Service Facility for examination, repair, or electrical or |
|
|
mechanical adjustment. |
|
7. |
The use of attachments not recommended or sold by the manufacturer may cause |
|
|
fire, electric shock or injury. |
|
8. |
Do not use outdoors. |
|
9. |
Do not let cord hang over edge of table or counter. |
|
10. |
Keep hands and utensils away from moving blades or discs while processing food |
|
|
to reduce the risk of severe injury to persons or damage to the Food Processor. A |
|
|
scraper may be used but must be used only when the Food Processor is |
|
|
not running. |
|
11. |
Blades are sharp. Handle carefully. |
|
12. |
To reduce the risk of injury, never place cutting blade or discs on base without first |
|
|
putting bowl properly in place. |
|
13. |
Be certain cover is securely locked in place before operating appliance. |
|
14. |
Never feed food by hand. Always use the food pusher. |
|
15. |
Do not attempt to defeat the cover interlock mechanism. |
|
16. |
This product is designed for household use only. |
SAVE THESE INSTRUCTIONS
4

Electrical Requirements
 WARNING
ENGLISH
Fire Hazard
Do not use an extension cord.
Doing so can result in death or fire.
Volts: 120 V.A.C. only.
Hertz: 60 Hz
NOTE: This Food Processor has a polarized plug (one blade is wider than the other). To reduce the risk of electrical shock, this plug will fit in a polarized outlet only one way. If the plug does not fit fully in the outlet, reverse the plug. If it still does not fit, contact a qualified electrician. Do not modify the plug in any way.
Do not use an extension cord. If the power supply cord is too short, have a qualified electrician or serviceman install an outlet near the appliance.
5
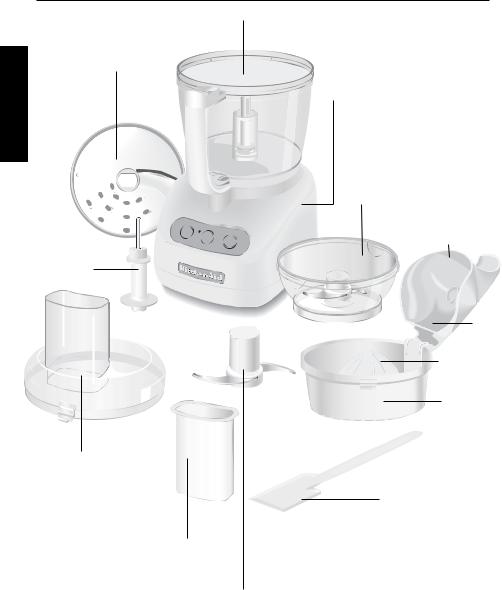
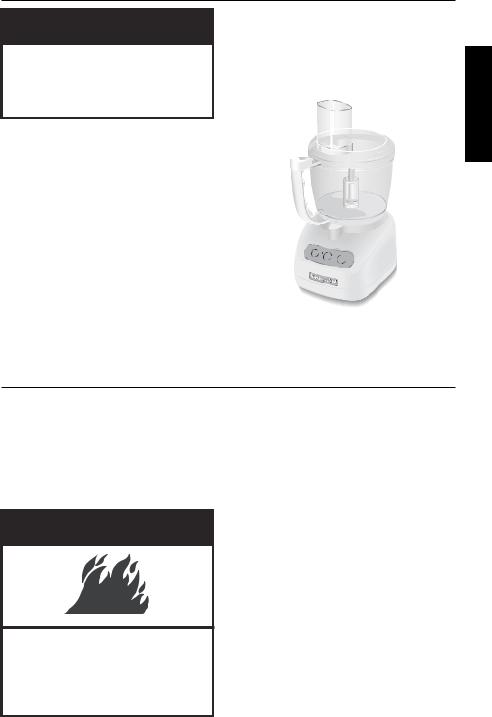
Food Processor Features
Work Bowl
ENGLISH
Reversible Slicing/
Shredding Disc
Heavy-Duty Base
3-Cup (710 ml) Mini Bowl and Mini Blade (models KFP720 and KFP730)
On |
|
Citrus Press |
Off |
|
(model KFP730) |
|
Pulse |
Disc Stem
Lever
Arm
2-Piece Cone
Strainer
Basket
Work Bowl Cover with Feed Tube
Spatula/
Cleaning Tool
Food Pusher
Stainless Steel
Multipurpose Blade
6

Food Processor Features
Work Bowl Cover with Feed Tube
Feed tube accommodates long food items with a minimum of sectioning. Unlike extra-wide feed tubes, there is no pusher interlock system, so the entire length of the tube can be filled with food.
Food Pusher
Moves food through the feed tube smoothly and easily.
7-Cup (1.7 L) Work Bowl
The tough polycarbonate bowl provides ample capacity for most food preparation tasks.
3-Cup (710 ml) Mini Bowl and Mini Blade (models KFP720 and KFP730)
3-cup (710 ml) bowl and stainless steel blade are perfect for small chopping and mixing jobs.
Citrus Press (model KFP730)
Press consists of a Strainer Basket, 2-Piece Cone, and Lever Arm. Use the removable outer cone for larger items, such as grapefruit, and the inner cone 


for lemons and limes.
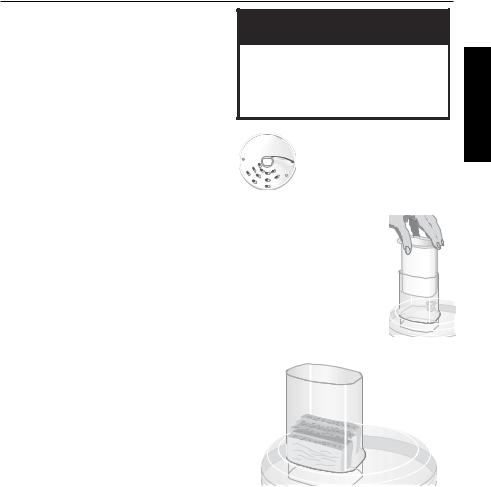
Reversible Slicing/Shredding Disc
This reversible (2 mm) slicing and (4 mm) shredding disc is a precision slicing blade on one side and, when turned over, can produce uniform shreds of most firm fruits, vegetables, and cheese.
Disc Stem
Stem fits over the power shaft on the base and into the bottom of a the Reversible Slicing/Shredding Disc.
Stainless Steel Multipurpose Blade
Versatile blade chops, minces, blends, mixes, and emulsifies in a matter
of seconds.
Heavy-Duty Base
The base features the Off, ON, and Pulse buttons along with the power shaft, which rotates the blades and discs.
Spatula/Cleaning Tool
Special shape facilitates food removal from bowls, discs, and blades.
Preparing the Food Processor for Use
 WARNING
Cut Hazard
Handle blades carefully.
Failure to do so can result in cuts.
Before First Use
Before using your Food Processor for the first time, wash the work bowl, work bowl cover, mini bowl, feed tube pusher, discs, and blades either by hand or in the dishwasher (see “Cleaning the Food Processor” on page 13).
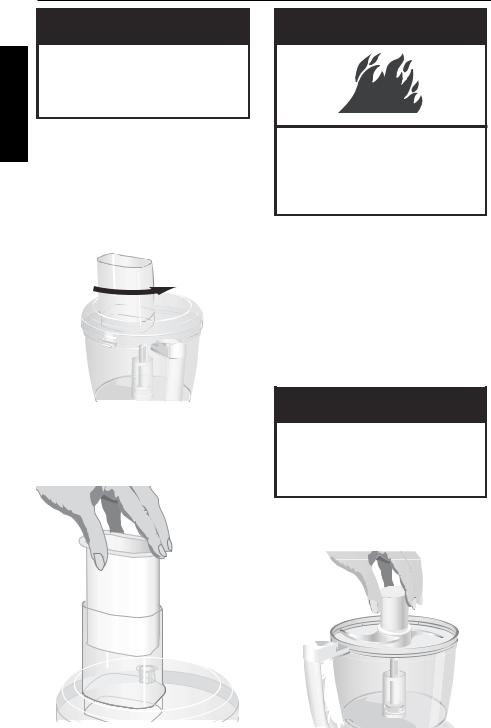
Work Bowl Assembly
1.Place the Food Processor base on a dry, level countertop with the controls facing you. Do not plug in the
Food Proceesor until it is completely assembled.
2.With the handle just to the left of center, place the work bowl on the base, and fit the center opening over the power shaft.
3.Grasp the work bowl handle and
turn the bowl to the right until it locks into position.
Off |
Continued on next page
ENGLISH
7
ENGLISH
Preparing the Food Processor for Use
 WARNING
Cut Hazard
Handle blades carefully.
Failure to do so can result in cuts.
4.Insert the desired blade or disc into the work bowl. See blade or disc assembly instructions.
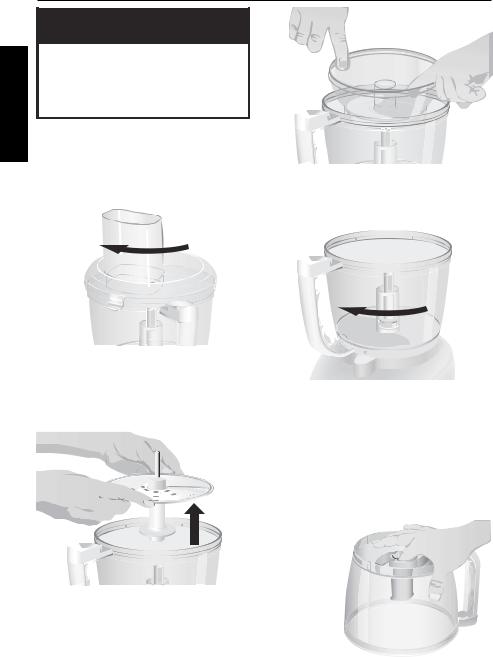
5.Place the work bowl cover on the work bowl with the feed tube just to the left of the work bowl handle. Grasp the feed tube and turn the cover to the right until it locks into place.
NOTE: To avoid damage to the work bowl, do not attach the cover to the work bowl before the work bowl is locked on the base.
6. Fit the food pusher into the feed tube.
 WARNING
Fire Hazard
Do not use an extension cord.
Doing so can result in death or fire.
7. Plug the power cord into an electrical outlet.
NOTE: Your Food Processor will not operate unless the work bowl and work bowl cover are properly locked on
the base.
To avoid damage to the work bowl, do not remove the work bowl from the base without first removing the work
bowl cover.
Multipurpose Blade Assembly
 WARNING
Cut Hazard
Handle blades carefully.
Failure to do so can result in cuts.
1.Place the blade on the power shaft.
2.Rotate the blade so it falls into place on the shaft.
8

Preparing the Food Processor for Use
Reversible Slicing/Shredding
Disc Assembly
 WARNING
Cut Hazard
Handle blades carefully.
Failure to do so can result in cuts.
1.Grasp the disc with fingers away from slicing and shredding blades. For Slicing, position the single raised-blade side up; for Shredding, position the multiple raised-blades side up.
2.Fit center opening of the disc over the disc stem. Turn the stem counterclockwise to lock the disc into place.
3.Place assembled disc and stem on the power shaft. It may be necessary to slightly rotate the disc so that it aligns properly and falls into place.
Mini Bowl and Mini Blade Assembly
1.Place the mini bowl inside the work bowl over the power shaft. Rotate the mini bowl until it falls into place.
 WARNING
Cut Hazard
Handle blades carefully.
Failure to do so can result in cuts.
2.Fit the mini blade on the power shaft. It may be necessary to rotate the blade until it falls into place.
3.To remove the mini bowl after processing, lift the bowl using the two finger grips located along the top edge of the bowl.
ENGLISH
Continued on next page
9
ENGLISH
Preparing the Food Processor for Use
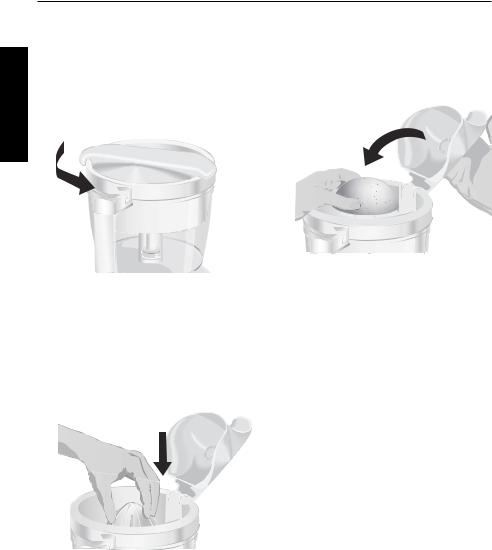
Citrus Press Assembly and Use
1.Position and lock the work bowl on the base.
2.Place the strainer basket in the bowl and position the locking clip to the left of the work bowl handle.
3.Turn the basket counterclockwise until the clip locks into the handle.
8.Close the lid of the strainer basket. Hold the lever arm down firmly with an open palm to maintain even pressure. Operate the citrus press only when the lever arm is in the down position, holding the fruit on the cone.
4.The 2-piece cone offers two sizes. Use the outer cone for grapefruit, oranges and other large fruits. Remove the outer cone to reveal a smaller, inner cone that’s perfect for lemons and limes.
5.Open the lid and place the cone inside the strainer basket, over the power shaft. It may be necessary to rotate the cone until it falls into place.
6.Halve the fruit to be juiced.
7.Place fruit half on the cone.
NOTE: To avoid splatters, use the citrus press with the clip-on lever arm.
9.Operate the citrus press by pressing the ON button or the Pulse button.
10.When juice is fully extracted, press the OFF button.
NOTE: Do not exceed the maximum liquid level line on the work bowl, or juice will leak from the bowl.
11.Unplug Food Processor
12.Unlock the strainer basket by turning it clockwise. Remove juiced fruit, cone, and strainer basket from the work bowl.
13.Remove the work bowl from Food Processor and pour juice into desired container.
14.To detach the clip-on lever arm from the strainer basket for cleaning, pull the clip at the bottom of the basket away from the basket side and remove the lever arm from the basket.
15.When reattaching the lever arm to the strainer basket, make sure the tabs on the clip snap securely into a pair of holes in the bottom of the basket.
10
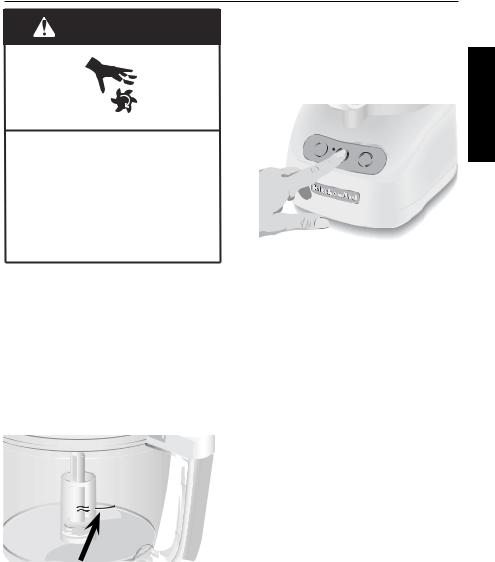
Using the Food Processor
Turning the Food Processor
WARNING |
On and Off |
|
|
|
1. To turn on the Food Processor, press |
|
the ON button. The unit will run |
|
continuously and the indicator light |
|
will glow. |
Rotating Blade Hazard
Always use food pusher.
Keep fingers out of openings.
Keep away from children.
Failure to do so can result in amputation or cuts.
Before Use
Before operating the Food Processor, be sure the work bowl, blades, and work bowl cover are properly assembled to the Food Processor base (see “Preparing the Food Processor for Use” on pages 7-10).
Maximum Liquid Level
This line on the work bowl indicates the maximum level of liquid that can be processed by the Food Processor.
Off
On
Pulse
2.To stop the Food Processor, press the OFF button. The indicator light will go out and an automatic brake will stop the action of the blade or disc within seconds.
3.Wait until the blade or disc comes to a complete stop before removing the work bowl cover. Be sure to turn off
the Food Processor before removing the work bowl cover, or before unplugging the unit.
NOTE: If the unit fails to operate, make sure the work bowl and cover are properly locked on the base (see “Preparing the Food Processor for Use” on pages 7-10).
Using the Pulse Control
The Pulse control allows precise control of the duration and frequency of processing. It’s great for jobs that require a light touch. Just press and hold the Pulse button to start processing, and release it to stop. The indicator light will glow each time the Pulse button is pressed.
ENGLISH
11
ENGLISH
Disassembling the Food Processor
 WARNING
Cut Hazard
Handle blades carefully.
Failure to do so can result in cuts.
1.Press the OFF button.
2.Unplug the Food Processor before disassembling.
3.Turn the work bowl cover to the left and remove.
4.If using the disc, remove it before removing the bowl. Place two fingers under each side of the disc, and lift the disc and stem out of the work bowl.
6.Turn the work bowl to the left to unlock it from the base. Lift
to remove.
7.The multipurpose blade can be removed from the work bowl before the contents are emptied. The blade can also be held in place as you remove food: Grasp the work bowl from the bottom and place one finger through the center opening to grip the blade shaft. Then remove food from the bowl and blade with
a spatula.
5.If using the mini bowl, grasp and remove the bowl using the finger grips located inside the bowl.
12
Cleaning the Food Processor
 WARNING
Cut Hazard
Handle blades carefully.
Failure to do so can result in cuts.
1.Press the OFF button.
2.Unplug the Food Processor before cleaning.
3.Wipe the base and cord with a warm, sudsy cloth, and wipe clean with a damp cloth. Dry with a soft cloth.
Do not use abrasive cleansers or scouring pads.
4.All the other parts of the Food Processor are dishwasher safe. Be sure to load them away from exposed heating elements in the dishwasher. If washing the Food Processor
parts by hand, avoid using abrasive cleansers or scouring pads. These could scratch or cloud the work bowl
and cover. Thoroughly dry all parts after washing.
5.To prevent damage to the bowl interlock system, always store the work bowl and work bowl cover in the unlocked position when not in use.
Off
On
Pulse
6.Wrap the power cord around the work bowl. Secure the plug by
clipping it to the cord.
Troubleshooting
• If your Food Processor should fail to operate, check the following:
–Make sure the work bowl and the work bowl cover are properly locked on the base.
–See if the Food Processor is plugged into a proper electrical outlet. If it is, unplug the Food Processor.
 WARNING
Fire Hazard
Do not use an extension cord.
Doing so can result in death or fire.
–Plug in Food Processor.
–If Food Processor still does not work, check the fuse or circuit breaker on the electrical circuit the Food Processor is connected to and make sure the circuit
is closed.
• If your Food Processor should slice instead of shred (or vice versa) when using the reversible disc:
–Make sure the correct raised-blade side of the disc is positioned face up on the disc stem. For Slicing, position the single raised-blade side up. For Shredding, position the multiple raisedblades side up.
Continued on next page
ENGLISH
13

ENGLISH
Troubleshooting
•If your Food Processor shuts off while it is running:
–The Food Processor may be overheated. If the motor exceeds a certain temperature, it will automatically shut off to prevent damage. This should
be an extremely rare occurrence. If it happens, press the OFF Button and wait 15 minutes for the Food Processor to cool before resuming. If the Food Processor still refuses to run, wait an additional 15 minutes for the Food Processor to cool.
If the problem cannot be fixed with the steps provided in this section, then contact KitchenAid or an Authorized Service Center.
USA/Puerto Rico: 1-800-541-6390,
Canada: 1-800-807-6777,
Mexico: 01-800-024-17-17 (JV Distribuciones) or 01-800-902-31-00 (Industrias Birtman)
See the KitchenAid Warranty and Service section on page 24 for additional details. Do not return the Food Processor to the retailer – they do not provide service.
Food Processing Tips
 WARNING
Cut Hazard
Handle blades carefully.
Failure to do so can result in cuts.
USING THE
MULTIPURPOSE
BLADE
To chop fresh fruits or vegetables:
Peel, core, and remove seeds. Cut food in 1- to 11⁄2 -inch (2.5 to 3.75 cm) pieces. Process food to desired size, using short pulses, 1 to 2 seconds each time. Scrape sides of bowl if necessary.
To puree cooked fruits and vegetables (except potatoes):
Add 1⁄4 cup (60 ml) liquid from recipe per cup (235 ml) of food. Process food using short pulses until finely chopped. Then process continuously until desired texture is achieved. Scrape sides of bowl if necessary.
To prepare mashed potatoes:
Shred hot cooked potatoes using the shredding disc. Exchange shredding disc for multipurpose blade. Add softened butter, milk, and seasonings. Pulse 3 to 4 times, 2 to 3 seconds each time, until smooth and milk is absorbed. Do not over process.
To chop dried (or sticky) fruits:
The food should be cold. Add 1⁄4 cup (60 ml) flour from recipe per 1⁄2 cup (120 ml) dried fruit. Process fruit using short pulses until desired texture
is achieved.
To finely chop citrus peel:
With sharp knife, peel colored portion (without white membrane) from citrus. Cut peel in small strips. Process until finely chopped.
To mince garlic or to chop fresh herbs or small quantities of vegetables:
With processor running, add food through the feed tube. Process until chopped. For best results, make sure work bowl and herbs are very dry
before chopping.
14
Food Processing Tips
To chop nuts or make nut butters:
Process up to 3 cups (710 ml) of nuts to desired texture, using short pulses, 1 to 2 seconds each time. For a coarser
texture, process smaller batches, pulsing 1 or 2 times, 1 to 2 seconds each time. Pulse more often for finer texture. For nut
butters, process continuously until smooth. Store in refrigerator.
To chop cooked or raw meat, poultry or seafood:
The food should be very cold. Cut into 1-inch (2.5 cm) pieces. Process up to 1⁄2 pound (227 g) at a time to desired size, using short pulses, 1 to 2 seconds each time. Scrape sides of bowl if necessary.
To make bread, cookie, or cracker crumbs:
Break food into 11⁄2- to 2-inch (3.75 to
5 cm) pieces. Process until fine. For larger pieces, pulse 2 to 3 times, 1 to 2 seconds each time. Then process until fine.
To melt chocolate for a recipe:
Combine chocolate and sugar from recipe in work bowl. Process until finely chopped. Heat liquid from recipe. With processor running, pour hot liquid through the feed tube. Process until smooth.
To grate hard cheeses, such as Parmesan and Romano:
Never attempt to process cheese that cannot be pierced with the tip of a sharp knife. You can use the multipurpose blade to grate hard cheeses. Cut cheese in 1-inch (2.5 cm) pieces. Place in work bowl. Process using short pulses until coarsely chopped. Process continuously until finely grated. Pieces of cheese can also be added through the feed tube while the processor is running.
 WARNING
Cut Hazard
Handle blades carefully.
Failure to do so can result in cuts.
USING THE REVERSIBLE
SLICING/SHREDDING DISC
To cut julienne or matchstick strips of
vegetables and fruits:
Use the slicing side of the disc. Cut food to fit feed tube horizontally. Position food horizontally in feed tube. Process using even pressure to make plank-like slices. Restack slices and position vertically or horizontally in feed tube. Process using even pressure.
To slice or shred fruits or vegetables that are long and relatively small in diameter, such as celery, carrots, and bananas:
Cut food to fit feed tube vertically or horizontally, and pack feed tube securely to keep food positioned properly. Process using even pressure.
ENGLISH
Continued on next page
15

ENGLISH
Food Processing Tips
To slice or shred round fruits and vegetables, such as onions, apples, and green peppers:
Peel, core, and remove seeds. Cut in halves or quarters to fit feed tube. Position in feed tube. Sometimes it’s easier to remove the work bowl cover and insert large food items into the feed tube from the bottom rather than the top. Replace work bowl cover. Process using even pressure.
To slice or shred small fruits and vegetables, such as strawberries, mushrooms, and radishes:
Position food vertically or horizontally in layers within the feed tube. Fill feed tube in order to keep food positioned properly. Process using even pressure.
To shred spinach and other leaves:
Use the slicing side of the disc. Stack leaves. Roll up and stand up in feed tube. Process using even pressure.
To slice uncooked meat or poultry, such as stir-fry meats:
Cut or roll food to fit feed tube. Wrap and freeze food until hard to the touch, 30 minutes to 2 hours, depending on thickness of food. Check to be sure you can still pierce food with the tip of a sharp knife. If not, allow to thaw slightly. Process using even pressure.
To slice cooked meat or poultry, including salami, pepperoni, etc.:
Food should be very cold. Cut in pieces to fit feed tube. Process food using firm, even pressure.
To shred firm and soft cheeses:
Firm cheese should be very cold. For best results with soft cheeses such as mozzarella, freeze 10 to 15 minutes before processing. Cut to fit feed tube. Process using even pressure.
16

Helpful Hints
 WARNING
Cut Hazard
Handle blades carefully.
Failure to do so can result in cuts.
1.Do not process food that is so hard or firmly frozen that it cannot be pierced with the tip of a sharp knife. Hard food can cause damage to the blade or motor. If a piece of hard food, such as carrot, becomes wedged or stuck on the blade, stop and unplug the processor. Remove the blade and gently remove food from the blade.
2.Do not overfill work bowl or mini bowl. For thin mixtures, fill work bowl up to 1⁄2 to 2⁄3 full. For thicker mixtures, fill work bowl up to 3⁄4 full. For liquids, fill up to the maximum level as described on page 11. For chopping, the work bowl should be no more than 1⁄3 to 1⁄2 full. Use the mini bowl for up to 1 cup (235 ml) of liquid or 1⁄2 cup (120 ml) solids.
3.Position the slicing disc so that the
cutting surface is just to the right of the feed tube. This allows the
blade a full rotation before contacting the food.
4.To capitalize on the speed of
the processor, drop ingredients to be chopped through the feed tube while the processor is running.
5.Different foods require varying degrees of pressure for best shredding and slicing results. In general, use light pressure for soft, delicate foods (strawberries, tomatoes, etc.), moderate pressure for medium-texture foods (zucchini, potatoes, etc.), and firmer pressure for harder foods (carrots, apples, hard cheese, partially frozen meats, etc.).
6.Soft and medium-hard cheese may spread out or roll up on the shredding disc. To avoid this, shred only wellchilled cheese.
7.Sometimes slender foods such as carrots or celery fall over in the feed tube, resulting in an uneven slice. To minimize this, cut food in several pieces and pack the feed tube with the food.
8.When preparing a cake or cookie batter or quick bread, use the multipurpose blade to cream fat and sugar first. Add dry ingredients last. Place nuts and fruit on top of flour mixture to prevent over-chopping. Process nuts and fruits, using short pulses, until blended with other ingredients. Do not over process.
9.When shredded or sliced food piles up on one side of the bowl, stop the processor and redistribute the food using the spatula.
10.When sliced or shredded food in
the work bowl reaches the bottom of the disc, remove the food.
11.A few larger pieces of food may remain on top of the disc after slicing or shredding. If desired, cut these by hand and add to mixture.
12.Organize processing tasks to minimize bowl cleanup. Process dry or
firm ingredients before liquid ingredients.
13.To clean ingredients from the multipurpose blade quickly and easily, empty the work bowl, replace the lid, and pulse for 1 to 2 seconds to spin the blade clean.
14.After removing the work bowl cover, place it upside down on the counter. This will help keep the counter clean.
15.To remove the contents of the work
bowl without
removing the multipurpose  blade, grasp

 the work bowl

 from the bottom
and place one finger
through the center opening to hold the blade in place. Then remove food from the
bowl and blade with the spatula. Continued on next page
ENGLISH
17

ENGLISH
Helpful Hints
16.Your Food Processor is not designed to perform the following functions:
•grind coffee beans, grains, or hard spices
•grind bones or other inedible parts of food
•liquefy raw fruits or vegetables
•slice hard-cooked eggs or unchilled meats
17.If any plastic parts should discolor due to the types of food processed, clean them with lemon juice.
18
Hummus
1-2 medium lemons
1 clove garlic
1tablespoon (15 ml) fresh parsley leaves
2cans (15 oz.
(425 g) each) garbanzo beans (chick peas), drained, reserving liquid
1⁄4 cup (60 ml) olive oil
2tablespoons (30 ml) tahini (toasted sesame paste),
if desired
1teaspoon (5 ml) dark sesame oil
1⁄8-1⁄4 teaspoon (0.5-1 ml) cayenne pepper
1⁄2 teaspoon (2 ml) salt
Position citrus press in work bowl; juice lemons (to equal about 6 tablespoons [90 ml]). Set juice aside. Wipe bowl dry.
Position multipurpose blade in work bowl. With motor running, add garlic. Process until chopped, 5 to 10 seconds. Add parsley; process until chopped, 8 to 10 seconds. Add remaining ingredients and lemon juice. Process until smooth, about 1 minute, scraping sides once or twice if necessary. If needed, add reserved liquid 1 tablespoon (15 ml) at a time, until desired consistency. Serve with pita bread, if desired.
Yield: 18 servings (2 tablespoons [30 ml] per serving).
Per serving: About 70 cal, 2 g pro, 6 g carb, 4 g total fat, 0 g sat fat, 0 mg chol, 190 mg sod.
ENGLISH
19

ENGLISH
Asian Coleslaw
1⁄2 medium (about
1 lb [455 g]) Napa cabbage
1 small red onion
3tablespoons (45 ml) sunflower seeds
1package (3 oz. [85 g]) chicken or oriental flavour ramen noodles
1⁄4 cup (60 ml) vegetable oil
2tablespoons (30 ml) vinegar
2tablespoons (30 ml) sugar
Position reversible slicing/shredding disc in work bowl to slice. Add cabbage and onion, cutting to fit feed tube if necessary. Process to slice. Remove to large serving bowl. Add sunflower seeds.
Remove seasoning packet from noodles. Set aside. Crumble noodles. Add to cabbage mixture.
Exchange mini work bowl and mini blade for slicing/ shredding disc. In mini work bowl, combine oil, vinegar, sugar, and contents of noodle seasoning packet. Process until smooth and thick. Pour over cabbage. Toss to coat.
Yield: 8 servings.
Per serving: About 150 cal, 3 g pro, 13 g carb, 10 g total fat, 1.5 g sat fat, 0 mg chol, 150 mg sod.
Vegetarian Muffuletta Hoagie
1 clove garlic
3large fresh basil leaves or 1 teaspoon (5 ml) dried basil
1⁄4 cup (60 ml) pimiento-stuffed green olives
1⁄4 cup (60 ml) pitted ripe olives
6ounces (170 g) provolone cheese
2large carrots, cut into 21⁄2-inch (6.25 cm) pieces
2-3 tablespoons
(30-45 ml) olive oil, divided
1medium zucchini, cut into 21⁄2-inch
(6.25 cm) pieces
1⁄4 small red onion
1-2 tablespoons
(15-30 ml) balsamic vinegar
1⁄2 teaspoon (2 ml) sugar
2medium plum tomatoes
4hoagie buns,
split and buttered, if desired
Position mini bowl and mini blade in work bowl. With processor running, add garlic and basil through feed tube. Process until finely chopped, about 10 seconds. Add green and ripe olives. Pulse until chopped, 3 to 4 times, about 1 second each. Set aside.
Exchange mini bowl and mini blade for reversible slicing/ shredding disc to shred. Add cheese, cutting to fit feed tube, if necessary. Process to shred. Set aside. Wipe out work bowl, if necessary.
Reverse disc to slice. Add carrots. Process to slice lengthwise.
Heat 1 to 2 tablespoons (15 to 30 ml) oil in large skillet over medium heat. Add carrots. Cook 3 to 5 minutes until crisp-tender, stirring occasionally. Push to edge of skillet.
Meanwhile, add zucchini and onion to feed tube. Process to slice. Add to skillet, adding oil, if necessary. Cook until slightly soft, 1 to 2 minutes. Remove skillet from heat.
Add olive mixture, vinegar, and sugar to skillet. Stir gently. Cover. Let stand 10 minutes to marinate.
Meanwhile, add tomatoes through feed tube. Process to slice. Set aside.
Spoon vegetable mixture into hoagie buns. Top with tomatoes and cheese. Place under broiler 2 to 3 minutes, until cheese is bubbly.
Yield: 4 servings (1 hoagie per serving).
Per serving: About 470 cal, 19 g pro, 44 g carb, 24 total g fat, 11 g sat fat, 30 mg chol, 950 mg sod.
20

Layered Sausage Eggplant Casserole
1pound (455 g) bulk Spray 12 x 8-inch (30.5 x 20.3 cm) baking dish with turkey or pork Italian no-stick cooking spray. Cook sausage over medium-high
sausage*
1⁄4 cup (60 ml) loosely packed parsley leaves
3ounces (85 g) provolone or mozzarella cheese
1medium eggplant, peeled
2ounces (55 g) Parmesan cheese
1cup (235 ml) ricotta cheese
1 egg
1⁄4 teaspoon (1 ml) black pepper
2cups (475 ml) spaghetti sauce
heat in medium skillet, until thoroughly cooked; drain. Set aside.
Position mini bowl and mini blade in work bowl. With processor running, add parsley through feed tube. Process until finely chopped, 8 to 10 seconds. Set aside.
Position reversible slicing/shredding disc in work bowl to shred. Shred provolone cheese. Set aside. Reverse disc to slice. Add eggplant cut to fit feed tube. Process to slice. Set aside.
Position multipurpose blade in work bowl. With machine running, add Parmesan cheese. Process to finely chop, 20 to 30 seconds. Add ricotta, egg, and pepper. Process until well blended, 20 to 30 seconds.
Spread 1⁄2 cup (120 ml) of spaghetti sauce over bottom of baking dish. Cover with half of eggplant and half of sausage. Spread with ricotta cheese mixture. Sprinkle with parsley. Cover with remaining eggplant, sausage, and sauce. Bake uncovered at 350°F (180°C) for 40 minutes. Sprinkle with provolone cheese. Bake 15 to
20 minutes longer or until cheese is melted and eggplant is tender.
Yield: 6 servings.
*If desired, sausage can be omitted for a vegetarian main dish.
Per serving: About 380 cal, 31 g pro, 15 g carb, 22 g total fat, 10 g sat fat, 125 mg chol, 780 mg sod.
ENGLISH
21

ENGLISH
Cranberry Orange Oatmeal Scones
Scones
11⁄2 cups (355 ml) all-purpose flour
3⁄4 cup (175 ml) rolled oats
1tablespoon (15 ml) baking powder
1⁄4 teaspoon (1 ml) nutmeg
1⁄4 teaspoon (1 ml) salt
1tablespoon (15 ml) plus 1 teaspoon
(5 ml) sugar, divided
1⁄3 cup (80 ml) dried cranberries or raisins
1⁄2 teaspoon (2 ml) grated orange peel
1⁄3 cup (80 ml) cold butter or margarine, cut up
1⁄2 cup (120 ml) half and half
1 egg
Glaze
1⁄2 cup (120 ml) powdered sugar
1⁄4 teaspoon (1 ml) grated orange peel
1tablespoon (15 ml) orange juice
Position multipurpose blade in work bowl. Add flour, oats, baking powder, nutmeg, salt, and 1 tablespoon (15 ml) sugar. Process until thoroughly mixed, 5 to 10 seconds. Add dried cranberries and orange peel. Process to coarsely chop cranberries, about 5 seconds. Add butter. Pulse until mixture is crumbly, 5 times, about
2 seconds each.
Add egg to half and half in measuring cup; beat slightly. With processor running, add through feed tube. Process just until dry ingredients are moistened, 5 to 6 seconds.
Turn onto lightly floured surface. With lightly floured hands, knead 2 to 3 times. On greased baking sheet, pat into 7-inch (17.8 cm) circle, 1-inch (2.5 cm) thick. Sprinkle with remaining sugar. With floured knife, cut into 8 wedges. Separate slightly.
Bake at 400°F (204°C) for 15 to 20 minutes, until light golden brown and firm when tapped on top. Cool
5 minutes. Meanwhile, position mini work bowl on processor; add all glaze ingredients. Process until smooth and drizzling consistency, 10 to 15 seconds. If necessary, add additional orange juice 1⁄2 teaspoon (2 ml) at a time to desired consistency. Drizzle over warm scones.
Serve warm.
Yield: 8 scones (1 scone per serving).
Per serving: About 270 cal, 5 g pro, 39 g carb, 11 g total fat, 6 g sat fat, 50 mg chol, 270 mg sod.
22

Lemon Cheesecake
Crust
1821⁄2-inch (6.25 cm) square graham crackers, broken
2tablespoons (30 ml) sugar
1⁄4 cup (60 ml) butter or margarine, melted
Filling
1-2 medium lemons
1cup (235 ml) sugar
2packages (8 oz [225 g] each) cream cheese, softened
2tablespoons (30 ml) flour
4 eggs
Position multipurpose blade in work bowl. Add cracker pieces and 2 tablespoons (30 ml) sugar. Pulse until fine, 3 to 4 times, 8 to 10 seconds each.
Drizzle butter evenly over crumbs. Process until blended, 5 to 10 seconds, scraping sides once if necessary. Press firmly into bottom and 1 inch (2.5 cm) up sides of 9-inch (22.9 cm) springform pan. Bake at 350°F (180°C) for 5 to 6 minutes or until set. Cool completely. (For quick cooling, cool 5 minutes and place in freezer for 10 minutes.) Wipe out work bowl.
With swivel blade vegetable peeler, remove thin yellow peel from 1⁄2 of one lemon in strips; set aside. Position citrus press in work bowl; juice 1 lemon (to equal about 1⁄4 cup [60 ml]). Set juice aside. Wipe bowl dry. Position multipurpose blade in work bowl. Add 1 cup (235 ml) sugar and lemon peel to work bowl. Process until peel is finely chopped, 20 to 25 seconds. Add cream cheese. Process until blended, 20 to 25 seconds, scraping sides
once if necessary. Add flour; pulse to mix, 2 to 3 seconds. Add eggs and lemon juice. Process until smooth, 20 to 25 seconds, scraping sides if necessary.
Pour into pan. Bake at 350°F (180°C) for 35 to 45 minutes, until edges are set and centre is soft-set. Cool 1 to 2 hours on rack. Loosen edges. Refrigerate in pan at least 4 hours.
Yield: 10 to 12 servings.
Per serving: About 370 cal, 7 g pro, 35 g carb, 23 g total fat, 14 g sat fat, 140 mg chol, 260 mg sod.
ENGLISH
23
 Loading...