

Kia Forte Koup 2017 User Manual

Introduction
How to use this manual . . . . . . . . . . . . . . . . . . . . . . 1-2
Fuel requirements . . . . . . . . . . . . . . . . . . . . . . . . . . 1-3
• Gasoline containing alcohol and methanol. . . . . . . . . 1-3
• Do not use methanol . . . . . . . . . . . . . . . . . . . . . . . . . . . 1-5
• Fuel Additives . . . . . . . . . . . . . . . . . . . . . . . . . . . . . . . . 1-5
Vehicle break-in process . . . . . . . . . . . . . . . . . . . . . 1-6
Vehicle data collection and event data recorders. . 1-7
1
Introduction
✽
HOW T O USE THIS MANUAL
We want to help you get the greatest
possible driving pleasure from your
vehicle. Your Owner’s Manual can
assist you in many ways. We strongly recommend that you read the
entire manual. In order to minimize
the chance of death or injury, you
must read the WARNING and CAUTION sections in the manual.
Illustrations complement the words
in this manual to best explain how to
enjoy your vehicle. By reading your
manual, you will learn about features, important safety information,
and driving tips under various road
conditions.
The general layout of the manual is
provided in the Table of Contents.
Use the index when looking for a
specific area or subject; it has an
alphabetical listing of all located in
the back of this manual.
Sections:This manual has eight sections plus an index. Each section
begins with a brief list of contents so
you can tell at a glance if that section
has the information you want.
You will find various types of safety
instructions in this manual. These
instructions were prepared to
enhance your personal safety.
Carefully read and follow ALL procedures and recommendations provided in these instructions.
WARNING
A WARNING indicates a situation
in which harm, serious bodily
injury or death could result if the
warning is ignored.
CAUTION
A CAUTION indicates a situation
in which damage to your vehicle
could result if the caution is
ignored.
NOTICE
A NOTICE indicates interesting or
helpful information is being provided.
21
FUEL REQUIREMENTS
Your new vehicle is designed to use
only unleaded fuel having a pump
octane number ((R+M)/2) of 87
(Research Octane Number 91) or
higher. (Do not use methanol blended fuels.)
Your new vehicle is designed to
obtain maximum performance with
UNLEADED FUEL, as well as minimize exhaust emissions and spark
plug fouling.
Never add any fuel system cleaning
agents to the fuel tank other than
what has been specified.(Consult an
authorized Kia dealer for details.)
• Tighten the cap until it clicks one
time, otherwise the Check Engine
light will illuminate.
WARNING - Refueling
• Do not "top off" after the nozzle automatically shuts off.
Attempts to force more fuel
into the tank can cause fuel
overflow onto you and the
ground causing a risk of fire.
• Always check that the fuel cap
is installed securely to prevent fuel spillage, especially
in the event of an accident.
Introduction
Gasoline containing alcohol and
methanol
Gasohol, a mixture of gasoline and
ethanol (also known as grain alcohol), and gasoline or gasohol containing methanol (also known as
wood alcohol) are being marketed
along with or instead of leaded or
unleaded gasoline.
Pursuant to EPA regulations, ethanol
may be used in your vehicle.
Do not use gasohol containing more
than 15% ethanol, and do not use
gasoline or gasohol containing any
methanol. Ethanol provides less
energy than gasoline and it attracts
water, and it is thus likely to reduce
your fuel efficiency and could lower
your MPG results.
Methanol may cause drivability problems and damage to the fuel system,
engine control system and emission
control system.
13

Introduction
✽
✽
✽
Discontinue using gasohol of any
kind if drivability problems occur.
Vehicle damage or drivability problems may not be covered by the
manufacturer’s warranty if they result
from the use of:
1. Gasoline or gasohol containing
methanol.
2. Leaded fuel or leaded gasohol.
3. Gasohol containing more than 15
percent ethanol
"E85" fuel is an alternative fuel comprised of 85 percent ethanol and 15
percent gasoline, and is manufactured exclusively for use in Flexible
Fuel Vehicles. “E85” is not compatible with your vehicle. Use of “E85”
may result in poor engine performance and damage to your vehicle's
engine and fuel system. Kia recommends that customers do not use
fuel with an ethanol content exceeding 15 percent.
NOTICE
Your New Vehicle Limited Warranty
does not cover damage to the fuel system or any performance problems
caused by the use of “E85” fuel.
NOTICE
Never use any fuel containing
methanol. Discontinue use of any
methanol containing product which
may inhibit proper drivability.
Other fuels
Using fuels that contain Silicone (Si),
MMT (Manganese, Mn), Ferrocene
(Fe), and Other metalic additives,
may cause vehicle and engine damage or cause misfiring, poor acceleration, engine stalling, catalyst melting, clogging, abnormal corrosion,
life cycle reduction, etc.
Also, the Malfunction Indicator Lamp
(MIL) may illuminate.
NOTICE
Damage to the fuel system or performance problem caused by the use
of these fuels may not be covered by
your New Vehicle Limited
Warranty.
41

Introduction
✽
Use of MTBE
Kia recommends avoiding fuels containing MTBE (Methyl Tertiary Butyl
Ether) over 15.0% vol. (Oxygen
Content 2.7% weight) in your vehicle .
Fuel containing MTBE over 15.0%
vol. (Oxygen Content 2.7% weight)
may reduce vehicle perf ormance and
produce vapor lock or hard starting.
NOTICE
Your New Vehicle Limited
Warranty may not cover damage to
the fuel system and any performance problems that are caused by
the use of fuels containing methanol
or fuels containing MTBE (Methyl
Tertiary Butyl Ether) over 15.0%
vol. (Oxygen Content 2.7% weight.)
Gasoline containing MMT
Some gasoline contains harmful manganese-based fuel additives Such as
MMT(Methylcyclopentadienyl
Manganese Tricarbonyl). Kia does not
recommend the use of gasoline containing MMT. This type of fuel can
reduce vehicle performance and affect
your emission control system. The
Malfunction Indicator Lamp on the
cluster may come on.
Do not use methanol
Fuels containing methanol (wood alcohol) should not be used in your vehicle.
This type of fuel can reduce vehicle
performance and damage components
of the fuel system, engine control system and emission control system.
Fuel Additives
Kia recommends that you use good
quality gasolines treated with detergent additives such as TOP TIER
Detergent Gasoline, which help prevent deposit formation in the engine.
These gasolines will help the engine
run cleaner and enhance performance
of the Emission Control System. For
more information on TOP TIER
Detergent Gasoline, please go to the
website (www.toptiergas.com)
For customers who do not use TOP
TIER Detergent Gasoline regularly,
and have problems starting or the
engine does not run smoothly, additives that you can buy separately may
be added to the gasoline.
If T OP TIER Detergent Gasoline is not
available , one bottle of additive should
be added to the fuel tank at every
12,000 km (7,500miles) or every
engine oil change is recommended.
Additives are available from your
authorized Kia dealer along with information on how to use them. Do not
mix other additives.
15

Introduction
Operation in foreign countries
If you are going to drive your vehicle
in another country, be sure to:
• Observe all regulations regarding
registration and insurance.
• Determine that acceptable fuel is
available.
VEHICLE BREAK-IN
PROCESS
No special break-in period is needed.By following a fe w simple precautions for the first 1,000 km (600 miles
) you may add to the performance,
economy and life of your vehicle.
• Do not race the engine.
• While driving, keep your engine
speed (rpm, or revolutions per
minute) between 2,000 rpm and
4,000 rpm.
• Do not maintain a single speed for
long periods of time, either fast or
slow. Varying engine speed is
needed to properly break-in the
engine.
• Avoid hard stops, except in emergencies, to allow the brakes to seat
properly.
• Don't tow a trailer during the first
2,000 km (1,200 miles) of operation.
61

VEHICLE DATA COLLECTION AND EVENT DATA RECORDERS
This vehicle is equipped with an
event data recorder (EDR). The
main purpose of an EDR is to
record, in certain crash or near
crash-like situations, such as an
air bag deployment or hitting a
road obstacle, data that will assist
in understanding how a vehicle's
systems performed. The EDR is
designed to record data related to
vehicle dynamics and safety systems for a short period of time,
typically 30 seconds or less. The
EDR in this vehicle is designed to
record such data as:
* How various systems in your
vehicle were operating;
* Whether or not the driver and
passenger safety belts were
buckled/ fastened;
* How far (if at all) the driver was
depressing the accelerator
and/or brake pedal; and,
* How fast the vehicle was travel-
ing.
These data can help provide a better understanding of the circumstances in which crashes and
injuries occur. NOTE: EDR data
are recorded by your vehicle only
if a non-trivial crash situation
occurs; no data are recorded by
the EDR under normal driving conditions and no personal data (e.g.,
name, gender, age, and crash location) are recorded. However, other
parties, such as law enforcement,
could combine the EDR data with
the type of personally identifying
data routinely acquired during a
crash investigation.
Introduction
To read data recorded by an EDR,
special equipment is required, and
access to the vehicle or the EDR is
needed. In addition to the vehicle
manufacturer, other parties, such
as law enforcement, that have the
special equipment, can read the
information if they have access to
the vehicle or the EDR.
17

Your vehicle at a glance
Exterior overview. . . . . . . . . . . . . . . . . . . . . . . . . . . 2-2
Interior overview . . . . . . . . . . . . . . . . . . . . . . . . . . . 2-4
Instrument panel overview . . . . . . . . . . . . . . . . . . . 2-5
Engine compartment . . . . . . . . . . . . . . . . . . . . . . . . 2-6
2
Your vehicle at a glance
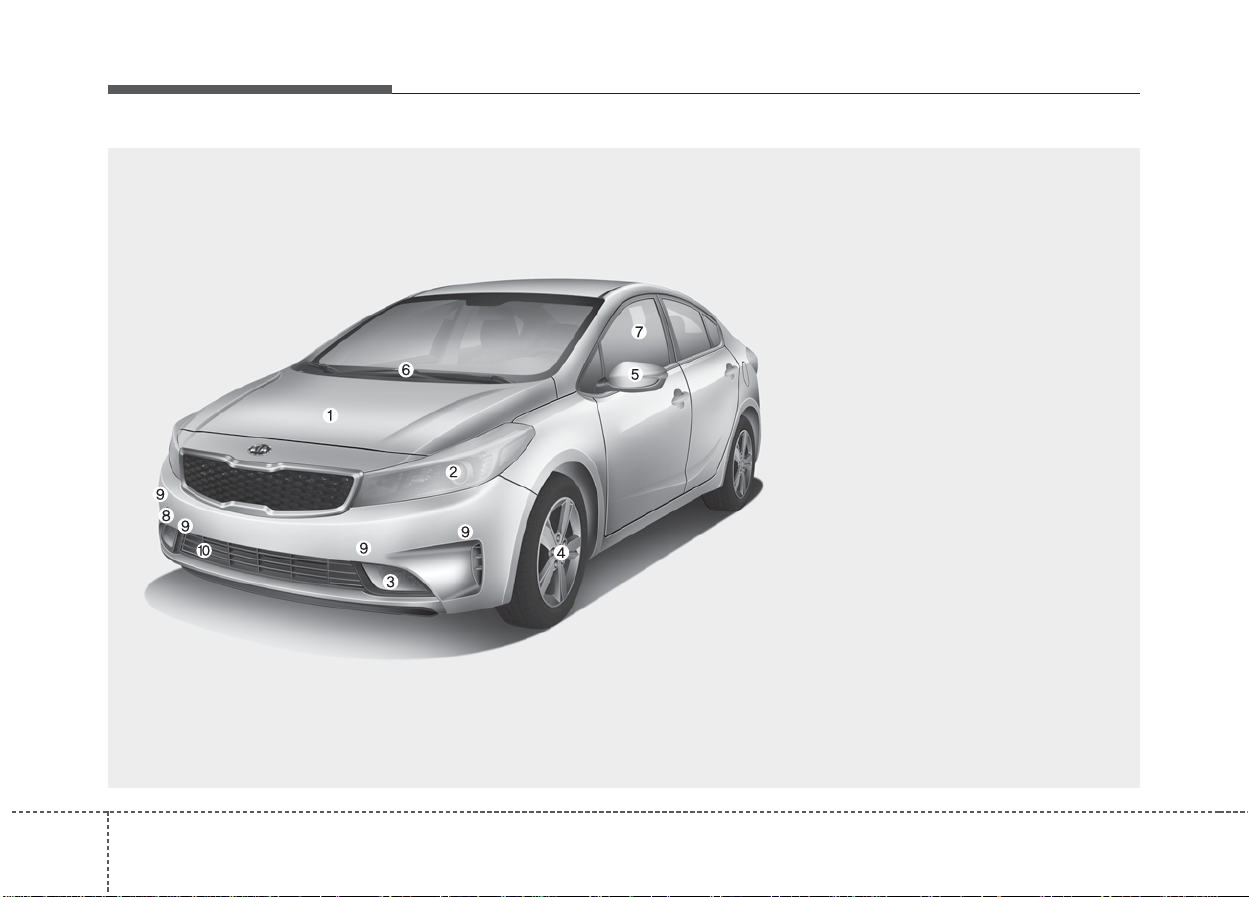
EXTERIOR OVERVIEW
■ Front view
1. Hood...................................................4-35
2. Head lamp ..............................4-100, 7-85
3. Fog lamp .................................4-103, 7-85
4.Wheel and tire.............................7-55, 8-5
5. Outside rearview mirror......................4-54
6. Front windshield wiper blades...4-105, 7-49
7.Windows.............................................4-30
8. Front removable towing hook.............6-23
9. Parking assist system........................4-92
10. Autonomous Emergency
Braking System................................5-45
❈ The actual shape may differ from the illustration.
OYDM016005
22
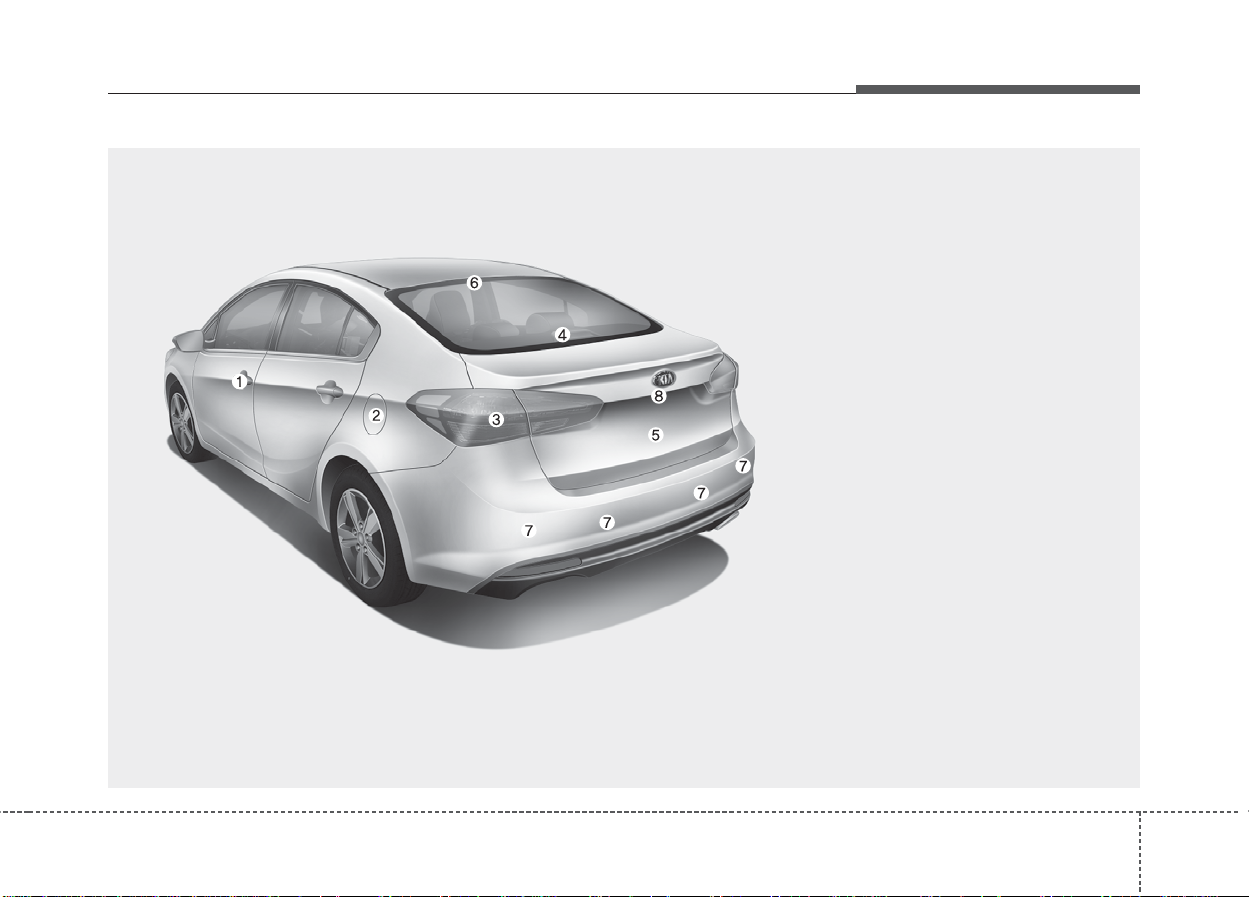
■ Rear view
Your vehicle at a glance
1. Door locks..........................................4-17
2. Fuel filler lid ........................................4-37
3. Rear combination lamp......................7-90
4. High mounted stop lamp....................7-95
5.Tr unk................................4-21, 4-23, 4-27
6. Antenna............................................4-152
7. Parking assist system........................4-92
8. Rear view camera..............................4-98
❈ The actual shape may differ from the illustration.
OYDM016006
23
Your vehicle at a glance
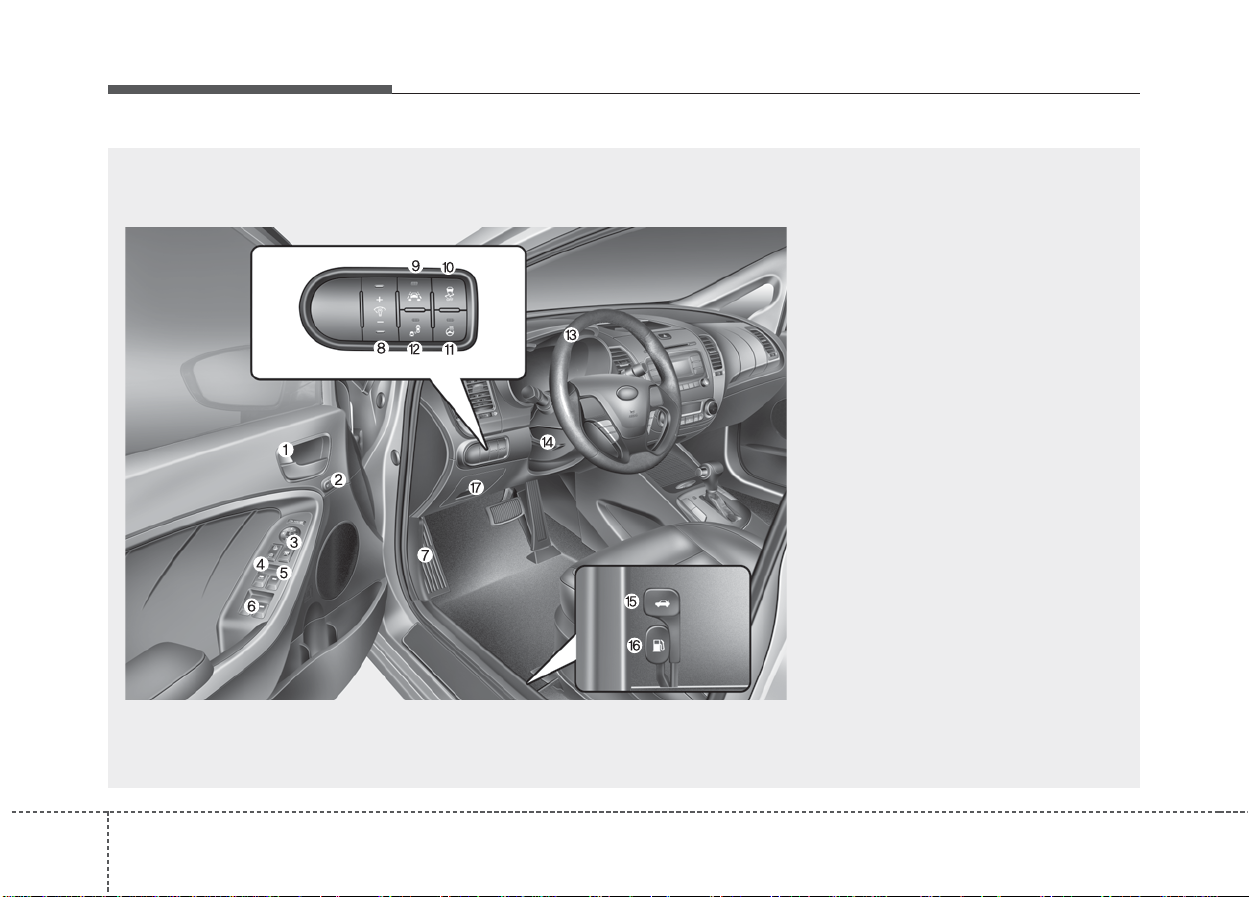
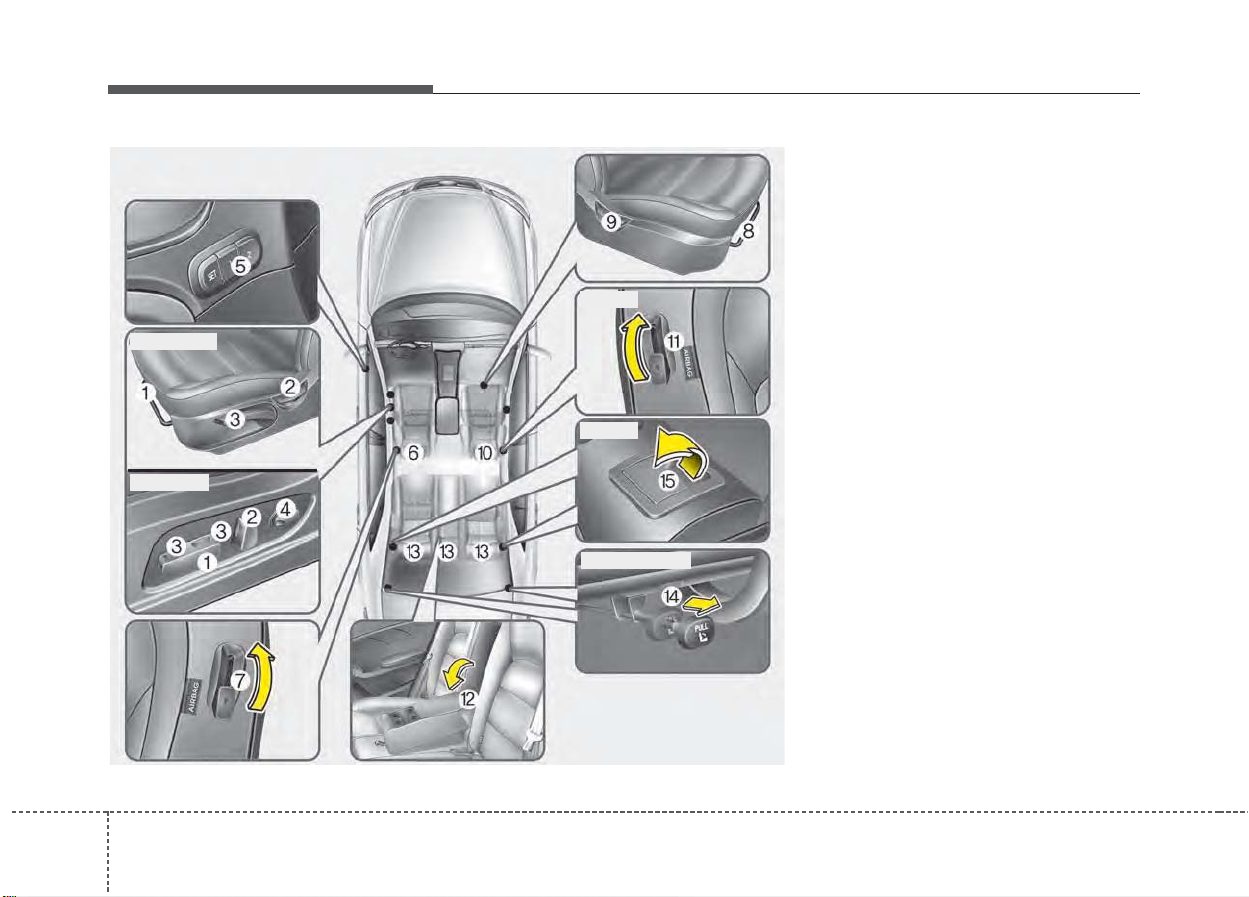
INTERIOR OVERVIEW
1. Inside door handle................................4-17
2. Driver position memory system button...3-8
3. Outside rearview mirror control ............4-55
4. Central door lock switch .......................4-18
5. Power window lock switch ....................4-33
6. Power window switch ............................4-31
7. Hood release lever................................4-35
8. Instrument panel illumination
control switch ........................................4-59
9. LKAS On/Off button..............................5-64
10. ESC off button....................................5-37
11. Steering wheel warmer On/Off
Button .................................................4-46
12. BSD On/Off button..............................5-72
13. Steering wheel....................................4-44
14.Tilt and telescopic steer ing control
lever....................................................4-45
15.Tr unk lid release lever .........................4-21
16. Fuel filler lid release lever...................4-37
17. Fuse box.............................................7-70
❈ The actual shape may differ from the illustration.
42
OYDM016001N
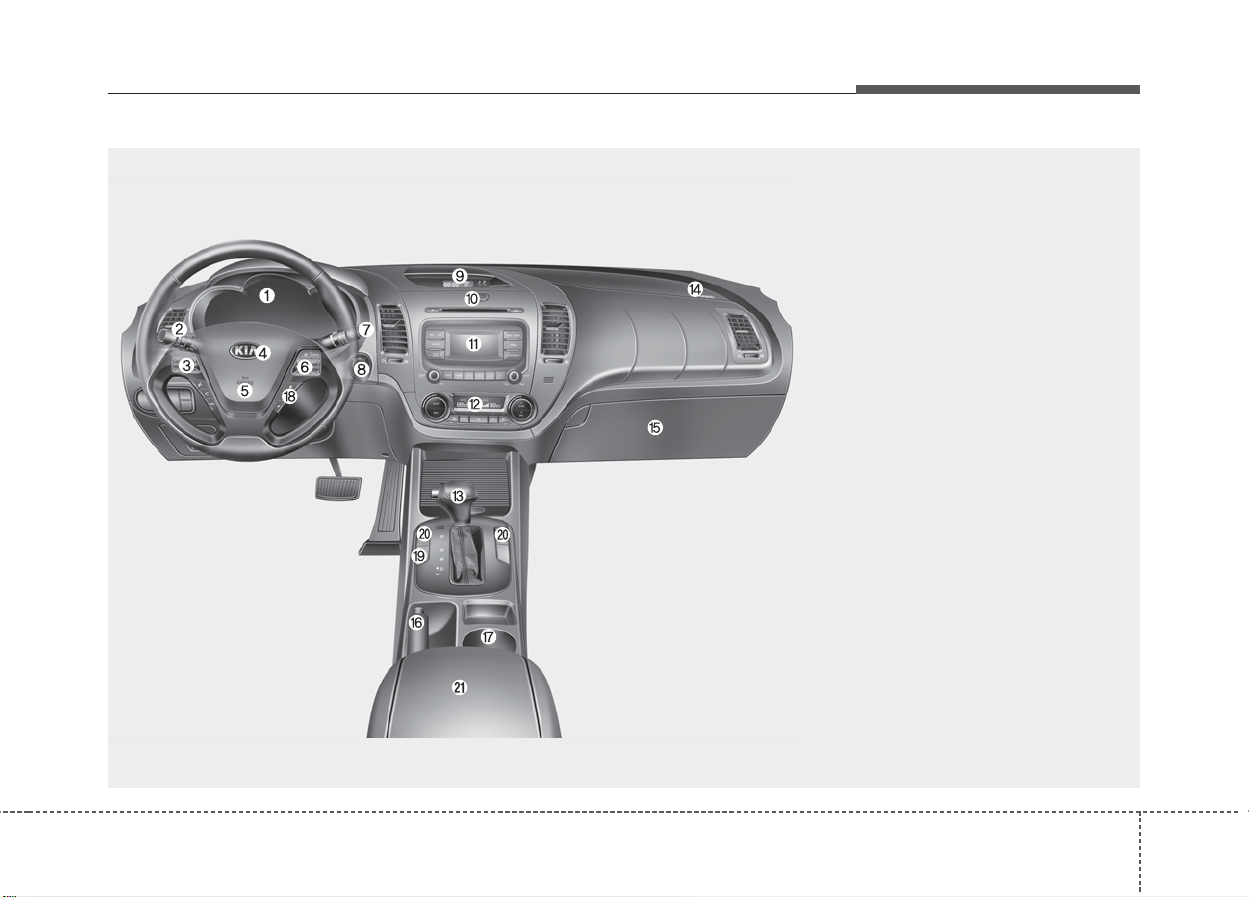
INSTRUMENT PANEL OVERVIEW
❈ The actual shape may differ from the illustration.
Your vehicle at a glance
1. Instrument cluster ................................4-58
2. Lighting control lever.........................4-100
3. Audio remote control buttons............4-153
4. Horn.....................................................4-45
5. Driver's front air bag............................3-46
6. Cruise control button...........................5-56
7.Wiper and washer control lever.........4-105
8. Ignition switch or
Engine start/stop button.................5-6, 5-8
9. Digital clock.......................................4-147
10. Hazard warning flasher .......................6-2
11. Audio....................................4-167, 4-215
12. Climate control system.........4-114, 4-124
13. Shift lever ........................5-14, 5-17, 5-23
14. Passenger's front air bag ..................3-46
15. Glove box........................................4-139
16. Parking brake....................................5-33
17. Cup holder .......................................4-142
18. LCD window control button...............4-59
19. Drive mode button.............................5-61
20. Seat warmer button.........................4-143
Climate control seat.........................4-145
21. Center console storage...................4-139
OYD016002L
25
Your vehicle at a glance
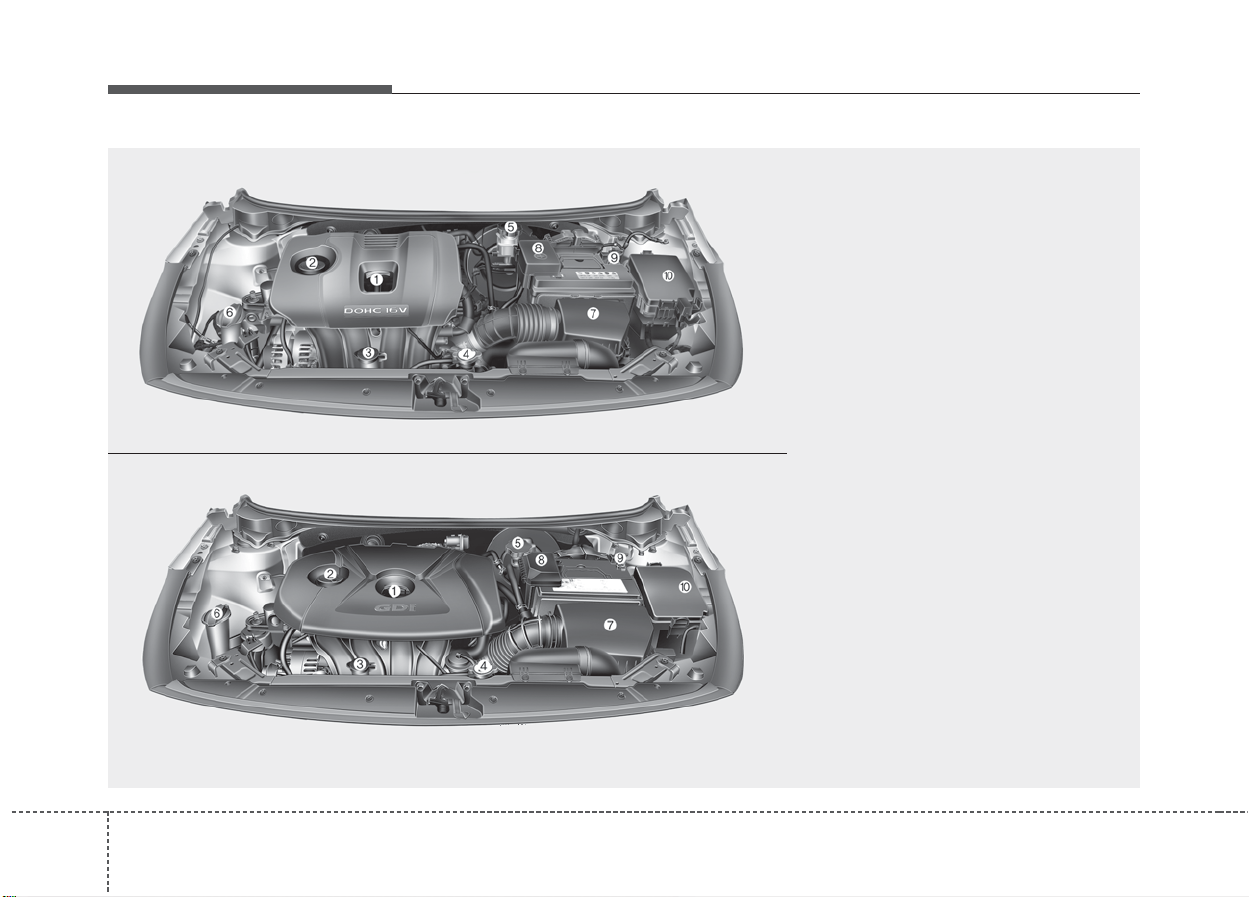
ENGINE COMPARTMENT
■
Gasoline Nu 2.0 MPI Engine
■
Gasoline Nu 2.0 GDI Engine
1. Engine oil dipstick..............................7-36
2. Engine oil filler cap.............................7-37
3. Engine coolant reservoir....................7-38
4. Radiator cap.......................................7-39
5. Brake/clutch fluid reservoir.................7-42
6.Windshield washer fluid reservoir......7-43
7. Air cleaner..........................................7-44
8. Positive battery terminal.....................7-52
9. Negative battery terminal...................7-52
10. Fuse box ..........................................7-72
❈ The actual engine room in the vehicle may differ from the illustration.
62
OYDM076017/OYDM076078N
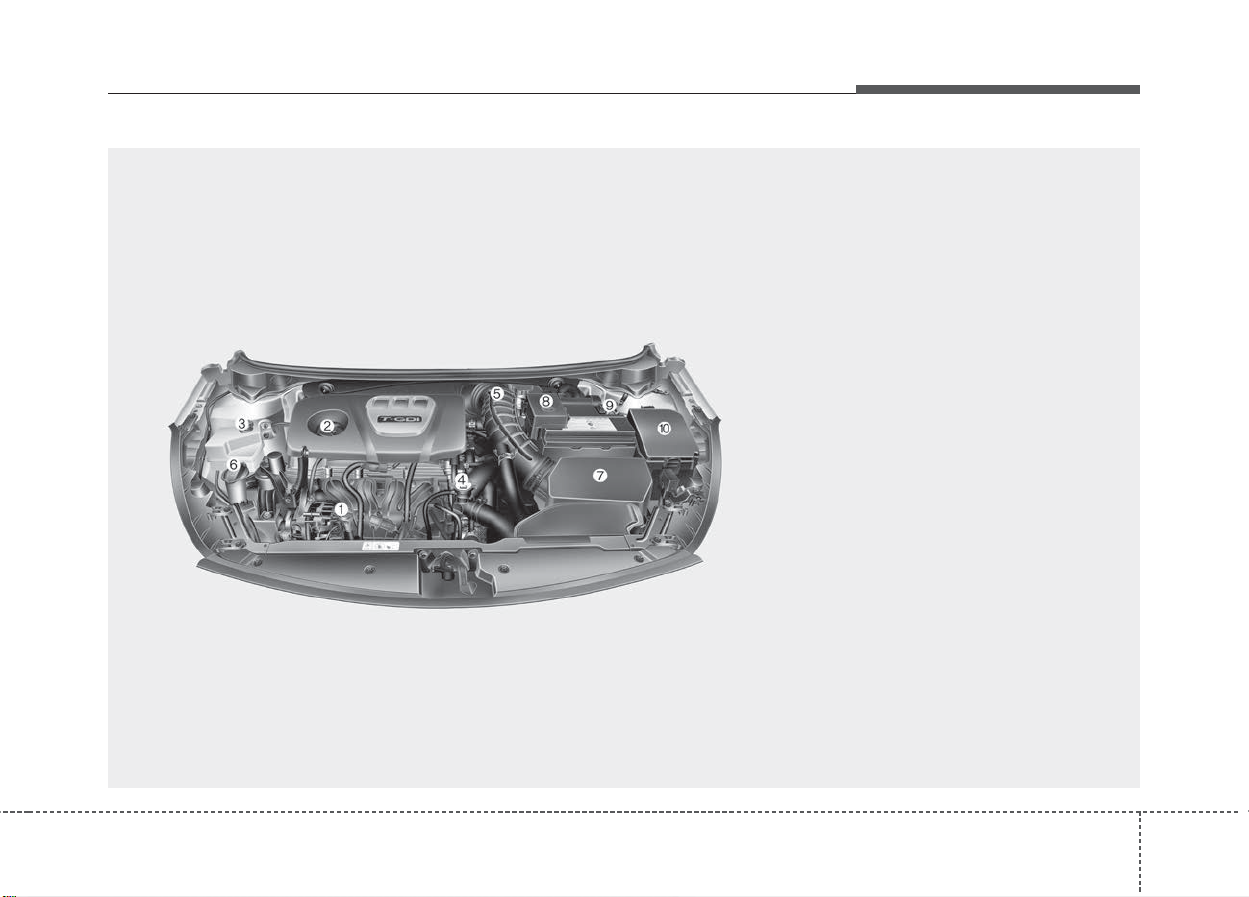
■
Gasoline Gamma 1.6T-GDI Engine
Your vehicle at a glance
1. Engine oil dipstick..............................7-36
2. Engine oil filler cap.............................7-37
3. Engine coolant reservoir....................7-38
4. Radiator cap.......................................7-39
5. Brake/clutch fluid reservoir.................7-42
6.Windshield washer fluid reservoir......7-43
7. Air cleaner..........................................7-44
8. Positive battery terminal.....................7-52
9. Negative battery terminal...................7-52
10. Fuse box ..........................................7-72
❈ The actual engine room in the vehicle may differ from the illustration.
OYD076038N
27

Safety features of your vehicle
Seat. . . . . . . . . . . . . . . . . . . . . . . . . . . . . . . . . . . . . . . 3-2
• Front seat adjustment - manual . . . . . . . . . . . . . . . . . 3-4
• Front seat adjustment - power. . . . . . . . . . . . . . . . . . . 3-6
• Driver position memory system (for power seat). . . . 3-8
• Headrest (for front seat) . . . . . . . . . . . . . . . . . . . . . . . . 3-9
• Rear seat entry (for 2 Door). . . . . . . . . . . . . . . . . . . . 3-12
• Seatback pocket. . . . . . . . . . . . . . . . . . . . . . . . . . . . . . 3-13
• Rear seat adjustment . . . . . . . . . . . . . . . . . . . . . . . . . 3-13
Seat belt. . . . . . . . . . . . . . . . . . . . . . . . . . . . . . . . . . 3-17
• Seat belt restraint system . . . . . . . . . . . . . . . . . . . . . . 3-17
• Shoulder belt extension guide(for 2 Door) . . . . . . . . 3-21
• Pre-tensioner seat belt . . . . . . . . . . . . . . . . . . . . . . . . 3-22
• Seat belt precautions. . . . . . . . . . . . . . . . . . . . . . . . . . 3-24
• Care of seat belts. . . . . . . . . . . . . . . . . . . . . . . . . . . . . 3-26
Child restraint system . . . . . . . . . . . . . . . . . . . . . . 3-27
• Using a child restraint system . . . . . . . . . . . . . . . . . . 3-28
Air bag-supplemental restraint system . . . . . . . . 3-34
• How does the air bag system operate . . . . . . . . . . . . 3-35
• Air bag warning light . . . . . . . . . . . . . . . . . . . . . . . . . 3-38
• SRS components and functions . . . . . . . . . . . . . . . . . 3-38
• Occupant detection system. . . . . . . . . . . . . . . . . . . . . 3-41
• Driver's and passenger's front air bag . . . . . . . . . . . 3-46
• Side air bag . . . . . . . . . . . . . . . . . . . . . . . . . . . . . . . . . 3-49
• Curtain air bag . . . . . . . . . . . . . . . . . . . . . . . . . . . . . . 3-51
• Inflation and non-inflation conditions
of the air bag . . . . . . . . . . . . . . . . . . . . . . . . . . . . . . . 3-52
• SRS Care . . . . . . . . . . . . . . . . . . . . . . . . . . . . . . . . . . . 3-57
• Adding equipment to or modifying your air bag-
equipped vehicle . . . . . . . . . . . . . . . . . . . . . . . . . . . . 3-57
• Air bag warning label. . . . . . . . . . . . . . . . . . . . . . . . . 3-58
3
Safety features of your vehicle
SEAT
Manual seat
Power seat
23
• 2 Door
• 5 Door
• 2 Door, 4 Door
OYD036001N
Driver’s seat
(1) Seat adjustment, forward /
backward
(2) Seatback recliner
(3) Seat adjustment, height
(for driver’s seat)
(4) Lumbar support (for driver’s seat)
(5) Driver position memory system*
(for 4 Door, 5 Door)
(6) Headrest
(7) Walk-in seat (for 2 Door)
Front passenger’s seat
(8) Seat adjustment, forward /
backward
(9) Seatback recliner
(10) Headrest
(11) Walk-in seat (for 2 Door)
Rear seat
(12) Armrest
(13) Headrest
(14) Seatback folding lever
(trunk for 4 Door, 2 Door)*
(15) Seatback folding lever
(for 5 Door)
* : if equipped
Safety features of your vehicle
WARNING - Loose objects
Do not place anything in the driver's foot well or under the front
seats. Loose objects in the driver's foot area could interfere with
the operation of the foot pedals.
WARNING - Uprighting
seat
Do not press the release lever
on a manual seatback without
holding and controlling the
seatback. The seatback will
spring upright possibly impacting you or other passengers.
WARNING - Seat cushion
Occupants should never sit on
aftermarket seat cushions or sitting cushions. The passenger's
hips may slide under the lap portion of the seat belt during an
accident or a sudden stop.
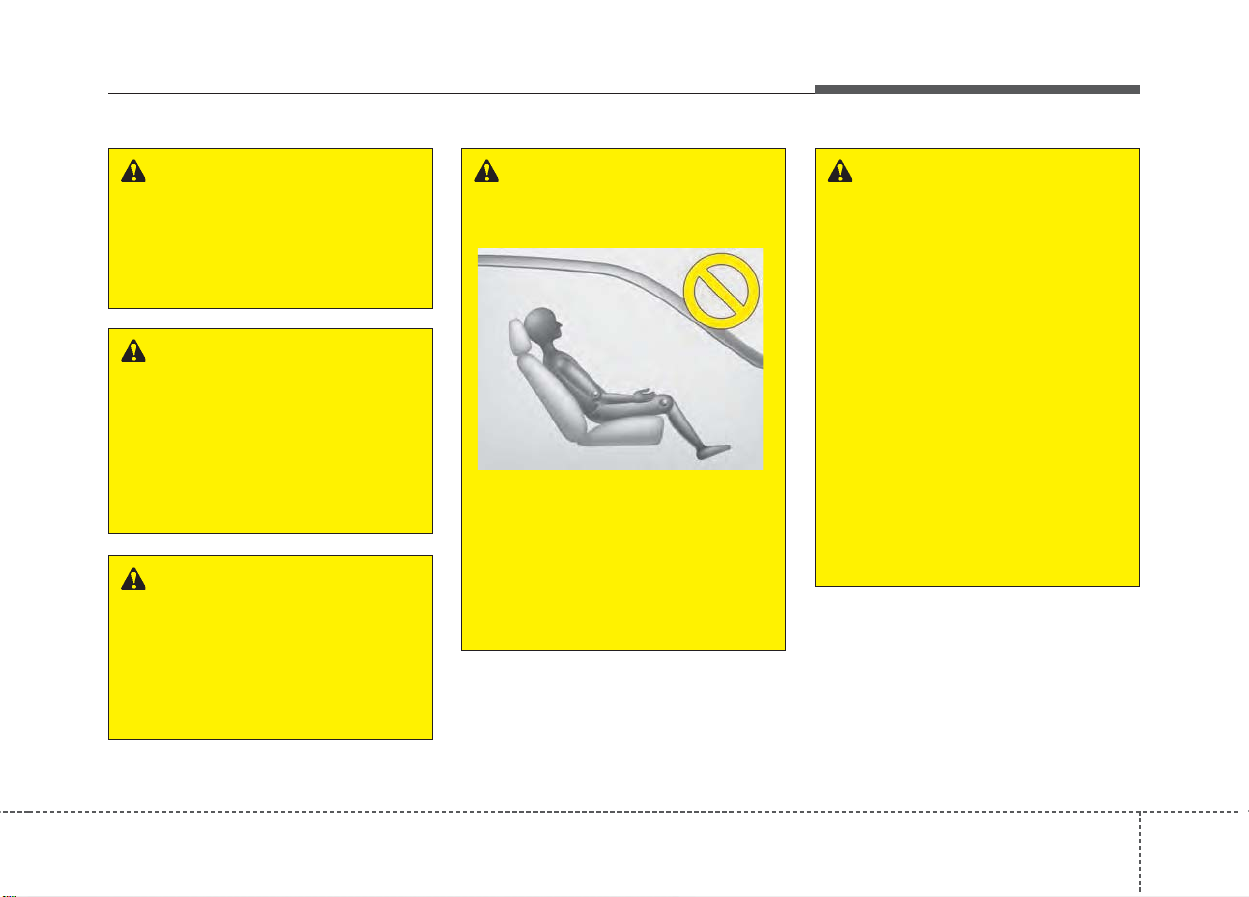
WARNING
- Driver responsibility for
passengers
1KMN3661
The driver must advise the passenger to keep the seatback in
an upright position whenever
the vehicle is in motion. If a seat
is reclined during an accident,
the restraint system's ability to
restrain will be greatly reduced.
WARNING - Driver’s seat
• Never attempt to adjust the
seat while the vehicle is moving. This could result in loss
of control of your vehicle.
• Do not allow anything to interfere with the normal position
of the seatback and seatback
adjustment.
• Sit as far back as possible
from the steering wheel while
still maintaining comfortable
control of your vehicle. A distance of at least 25 cm (10 in.)
from your chest to the steering wheel is recommended.
Failure to do so could result in
air bag inflation injuries to the
driver.
33
Safety features of your vehicle
W ARNING - Seat
adjustment
• Do not adjust the seat while
wearing seat belts. Moving the
seat forward will cause strong
pressure on the abdomen.
• Do not place your hand near
the seat bottom or seat track
while adjusting the seat. Your
hand could get caught in the
seat mechanism.
WARNING - Small Objects
Use extreme caution when picking small objects trapped under
the seats or between the seat
and the center console. Your
hands might be cut or injured
by the sharp edges of the seats
mechanism.
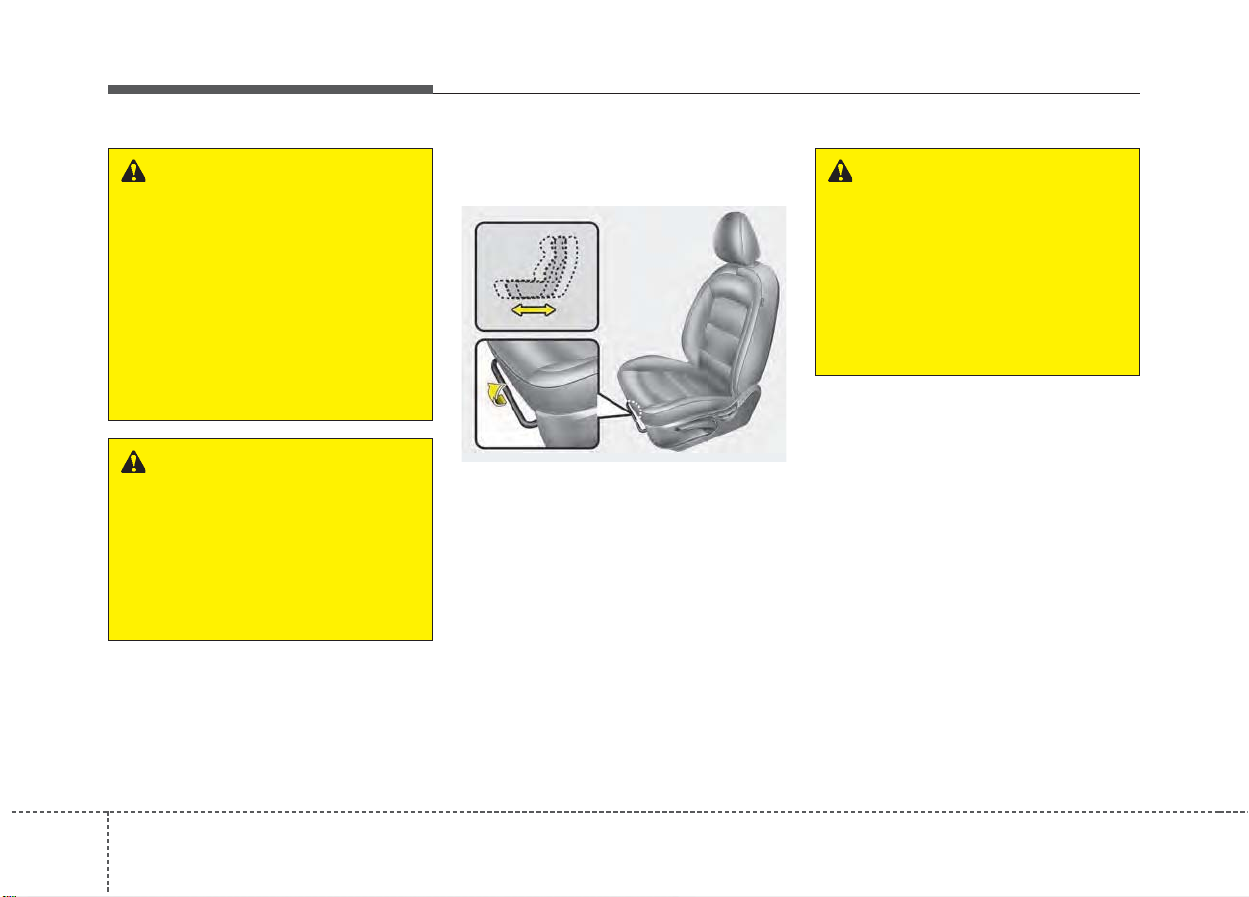
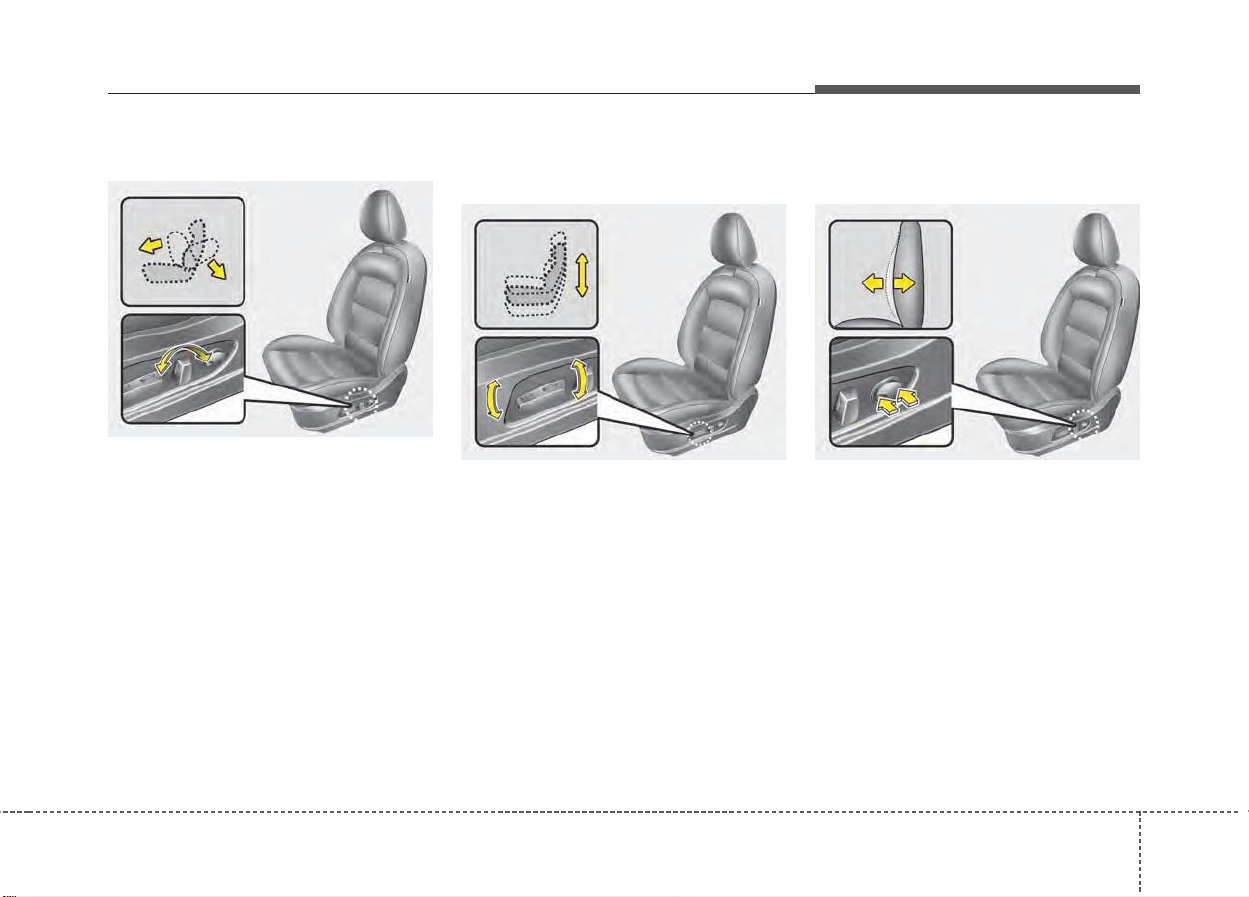
Front seat adjustment - manual
Forward and backward
OYDDSA2002
T o mo ve the seat f orward or backw ard:
1.Pull the seat slide adjustment
lever up and hold it.
2. Slide the seat to the position you
desire.
3. Release the lever and make sure
the seat is locked in place.
Adjust the seat before driving, and
make sure the seat is locked securely
by trying to move forward and backward without using the lever. If the
seat moves, it is not locked properly.
WARNING - Unexpected
seat movement
After adjusting a manual seat,
always check that it is loc ked b y
shifting your weight to the front
and back. Sudden or unexpected movement of the driver's
seat could cause you to lose
control of the vehicle.
43
Safety features of your vehicle
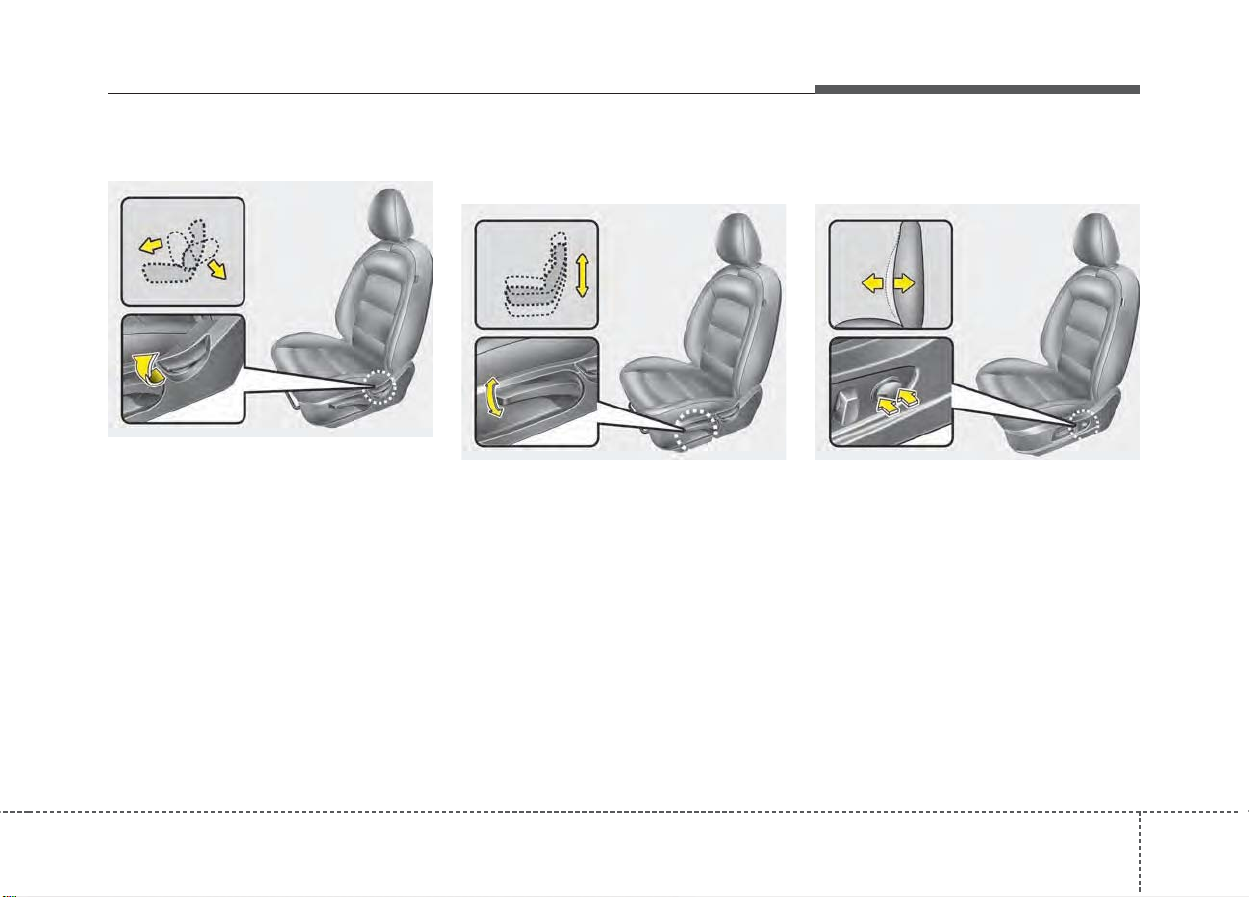
Seatback angle
OYDDSA2003
To recline the seatback:
1. Lean forward slightly and lift up the
seatback recline lever.
2. Carefully lean back on the seat
and adjust the seatback of the
seat to the position you desire.
3. Release the lever and make sure
the seatback is locked in place.
(The lever MUST return to its original position for the seatback to
lock.)
Seat Cushion height
(for driver's seat)
OYDDSA2004
To change the height of the seat
cushion push the lever upwards or
downwards.
• To lower the seat cushion, push the
lever down several times.
• To raise the seat cushion, push the
lever up several times.
Lumbar support
(for driver`s seat, if equipped)
OYDDSA2008
Press the front portion of the switch to
increase support, or the rear por tion
of the switch to decrease support.
35
Safety features of your vehicle
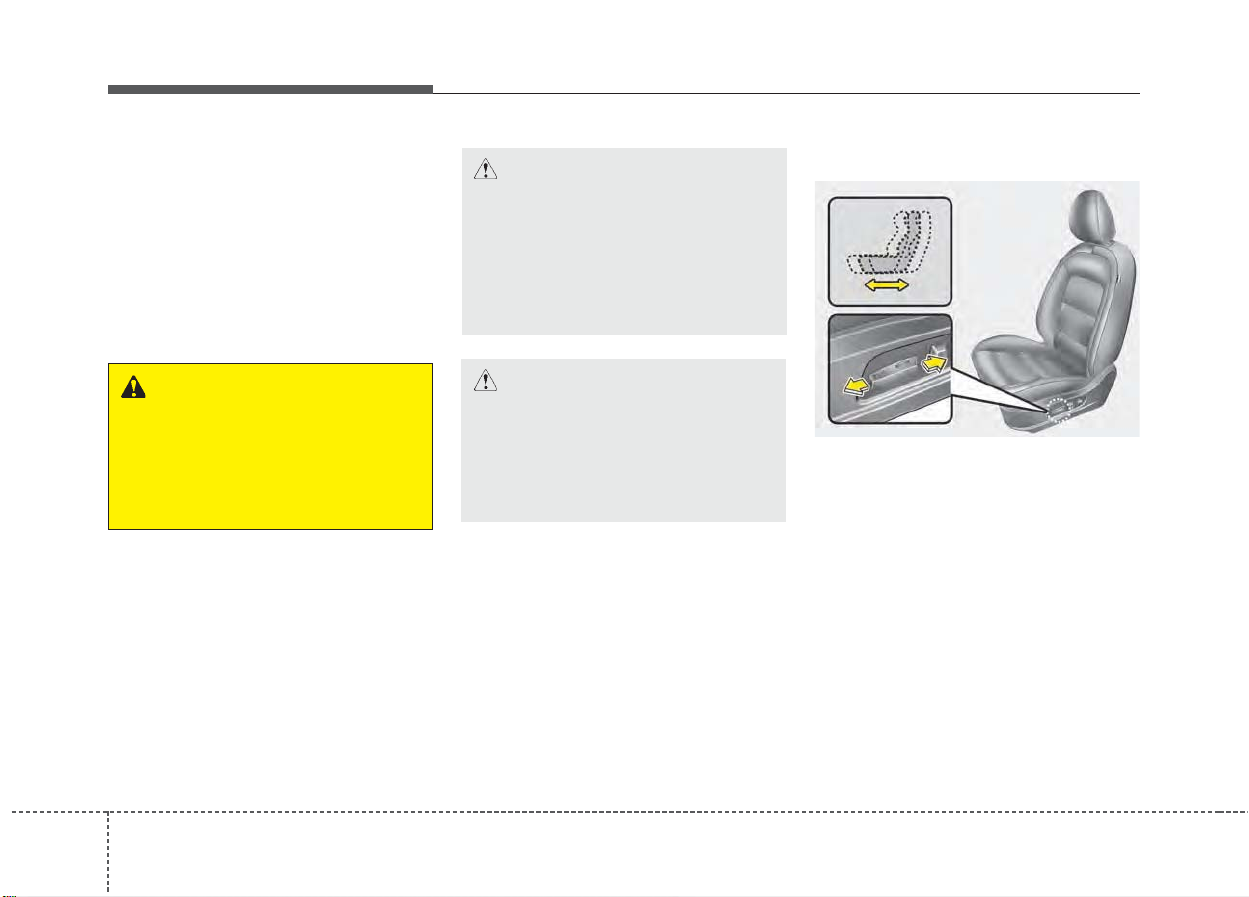
Front seat adjustment - power
(if equipped)
The front seat can be adjusted by
using the control switch located on
the outside of the seat cushion.
Before driving, adjust the seat to the
proper position so as to easily control the steering wheel, pedals and
switches on the instrument panel.
WARNING - Unattended
children
Do not leave children unattended in the vehicle.Children might
operate features of the vehicle
that could injure them.
CAUTION - Power seat
adjustments
The power seating controls
function by electronic motor.
Excessive operation may cause
damage to the electrical equipment.
CAUTION - Power Seating
Do not operate two or more
power seat control switches at
the same time. Doing so may
damage the power seat motor or
electrical components.
When in operation, the power seatconsumes a large amount of electrical power. To prevent unnecessary
charging system drain, don’t adjust
the power seat longer than necessary while the engine is not running.
Forward and backward
OYDDSA2005
Push the control switch forward or
backward to move the seat to the
desired position. Release the switch
once the seat reaches the desired
position.
63
Safety features of your vehicle
Seatback angle
OYDDSA2006
Push the control switch forward or
backward to move the seatback to
the desired angle. Release the
switch once the seat reaches the
desired position.
Seat cushion height
(for driver's side)
OYDDSA2007 OYDDSA2008
Pull the front portion of the control
switch up to raise or down to lower
the front part of the seat cushion. Pull
the rear portion of the control switch
up to raise or down to lower the rear
part of the seat cushion. Release the
switch once the seat reaches the
desired position.
Lumbar support
(for driver’s seat, if equipped)
The lumbar support can be adjusted
by pressing the lumbar support
switch on the side of the driver's
seat. Press the front portion of the
switch to increase support, or the
rear portion of the switch to decrease
support.
37
Safety features of your vehicle
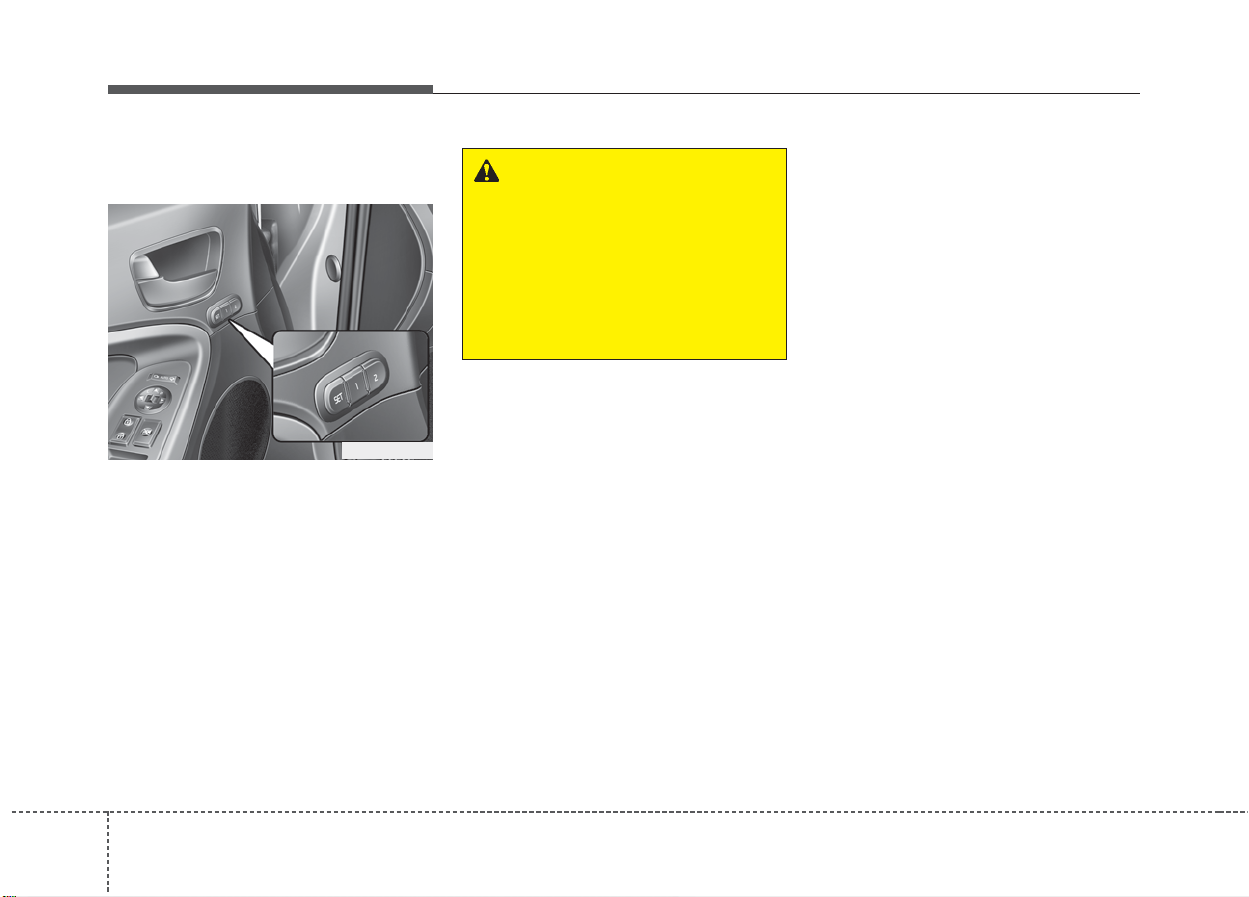
Driver position memory system
(if equipped, for power seat)
OYDDSA2014
A driver position memory system is
provided to store and recall the driver
seat position with a simple button
operation.By saving the desired position into the system memory , diff erent
drivers can reposition the driver seat
based upon their driving preference.
If the battery is disconnected, the
desired seat position memory will
need to be re-saved.
WARNING - Driver posi-
tion memory system
Never attempt to operate the
driver position memory system
while the vehicle is moving.
This could result in loss of control
of your vehicle, and an accident
causing death, or serious injury.
Storing positions into memory
using the buttons on the door
Storing driver’s seat positions
1.Vehicle speed is below 3 km/h (3
mph) and the engine start/stop
button is ON or ignition switch ON.
2. Adjust the driver seat to position
comfortable for the driver.
3. Press SET button on the control
panel.The system will beep once.
4. Press one of the memor y buttons
(1 or 2) within 5 seconds after
pressing the SET button.The system will beep twice when memory
has been successfully stored.
83
Safety features of your vehicle
Recalling positions from memory
1.Vehicle speed is below 3 km/h (3
mph).
2. To recall the position in memory,
press the desired memory button
(1 or 2). The system will beep
once, then the driver seat will
automatically adjust to the stored
positions.
Adjusting the control switch for the
driver seat while the system is recalling the stored position will cause the
movement to stop and move in the
direction that the control switch is
moved.
Easy access function
(if equipped)
With the shift lever in the P position,
the system will move the driver's seat
automatically as follows:
• Without smart key system
- It will move the driver’s seat rearward when the ignition key is
removed and front driver’s door is
opened.
- It will move the driver’s seat forward when the ignition key is
inserted.
• With smart key system
- It will move the driver’s seat rearward when the engine start/stop
button is turned to the OFF position and front driver’s door is
opened.
- It will move the driver’s seat forward when the engine start/stop
button is turned to the ACC or
START position.
You can activate or deactivate this
feature. Refer to "User settings" in
chapter 4.
Headrest (for front seat)
OMG038400
The driver's and front passenger's
seats are equipped with a headrest
for the occupant's safety and comf ort.
The headrest not only provides comfort for the driver and front passenger, but also helps protect the head
and neck in the event of a collision.
39
Safety features of your vehicle
✽
For maximum effectiveness in case
of an accident, the headrest should
be adjusted so the middle of the
headrest is at the same height of the
center of gravity of an occupant's
head. Generally, the center of gravity
of most people's head is similar with
the height of the top of their eyes.
Also, adjust the headrest as close to
your head as possible.
For this reason, the use of a cushion
that holds the body away from the
seatback is not recommended.
WARNING - Headrest
removal/adjustment
• Do not operate the vehicle
with the headrests removed.
Headrests can provide critical
neck and head support in a
crash.
• Do not adjust the headrest
height while the vehicle is in
motion. Driver may lose control of the vehicle.
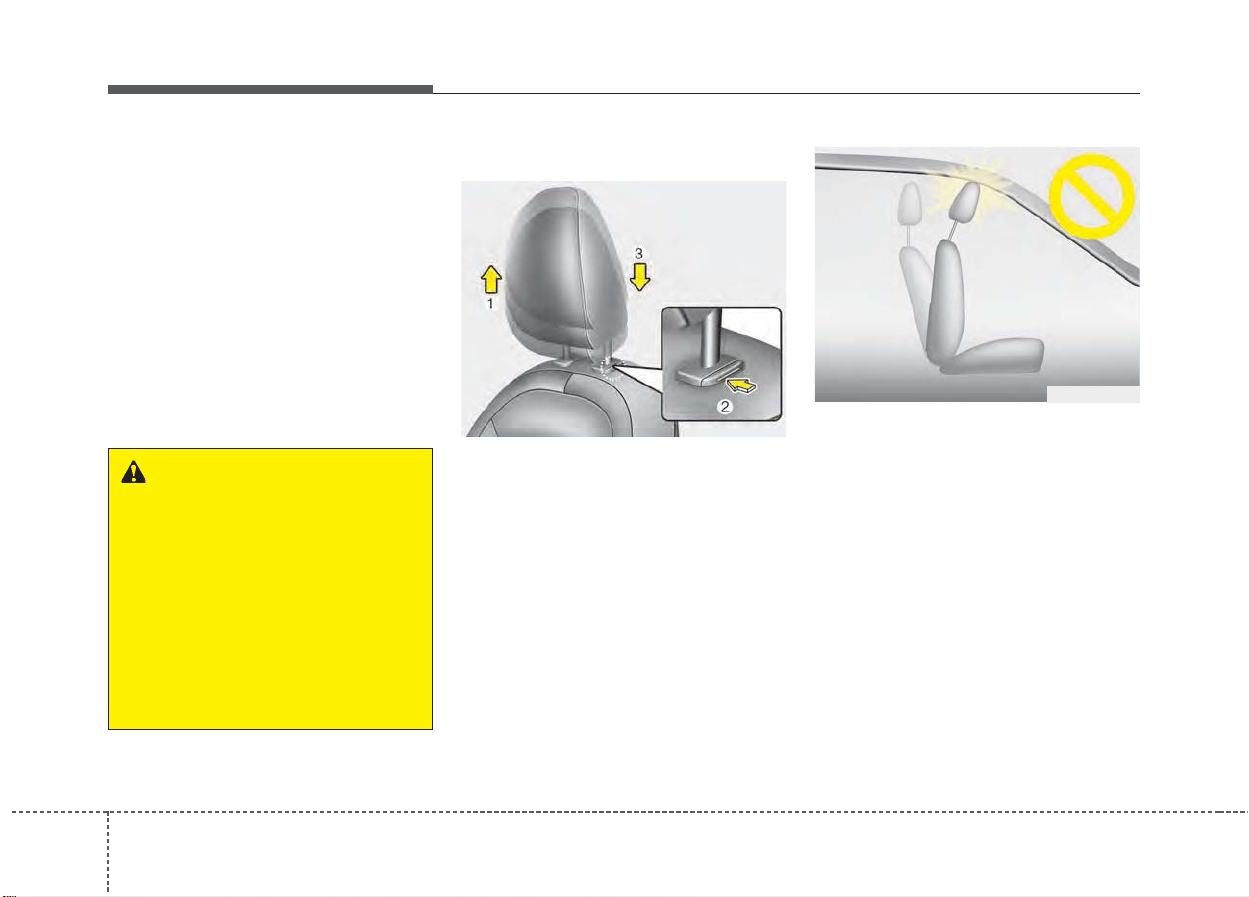
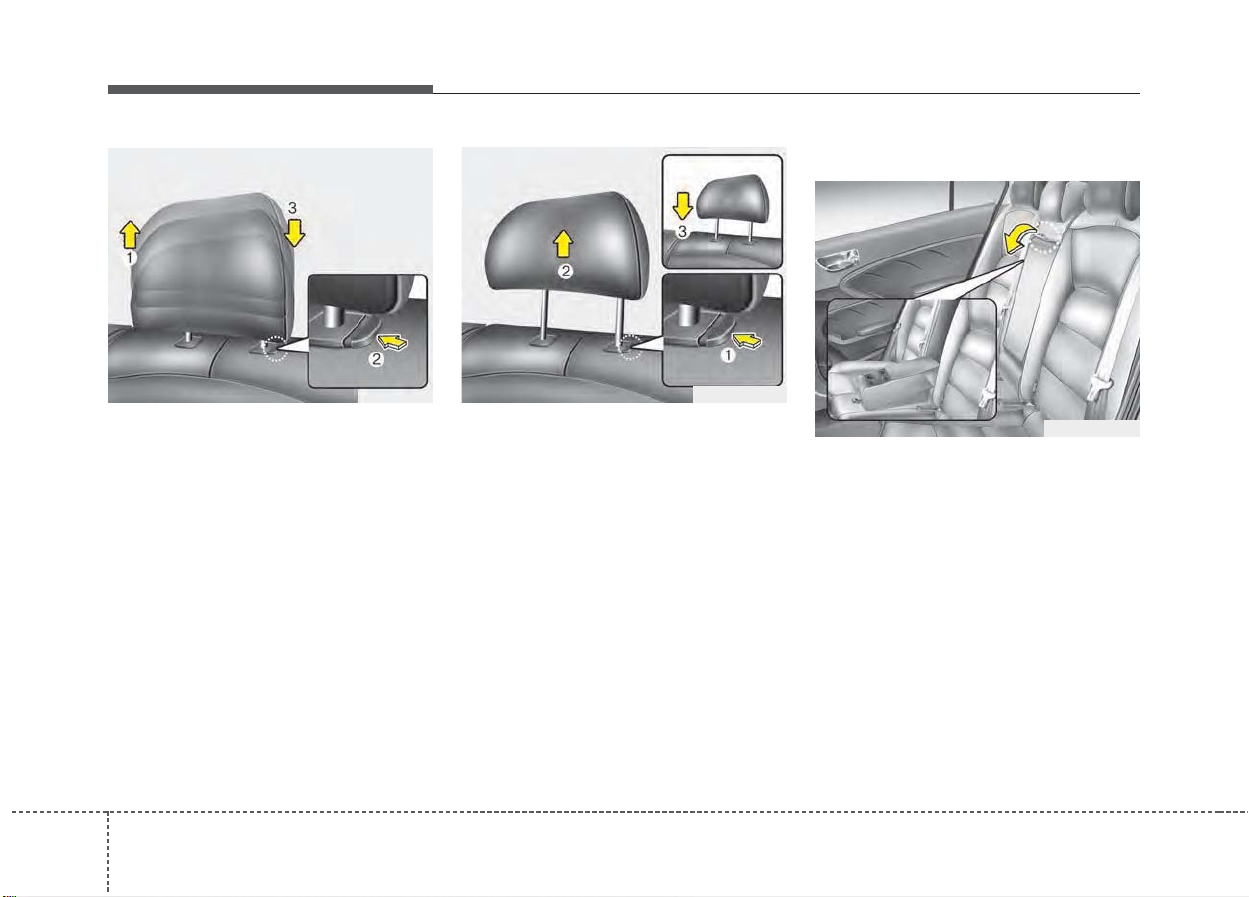
Adjusting the height up and down
OYDDSA2009
To raise the headrest, pull it up to the
desired position (1). To lower the
headrest, push and hold the release
button (2) on the headrest support
and lower the headrest to the desired
position (3).
OYFH034205
NOTICE
If you recline the seatback towards
the front with the headrest and seat
cushion raised, the headrest may
come in contact with the sunvisor or
other parts of the vehicle.
103
Safety features of your vehicle
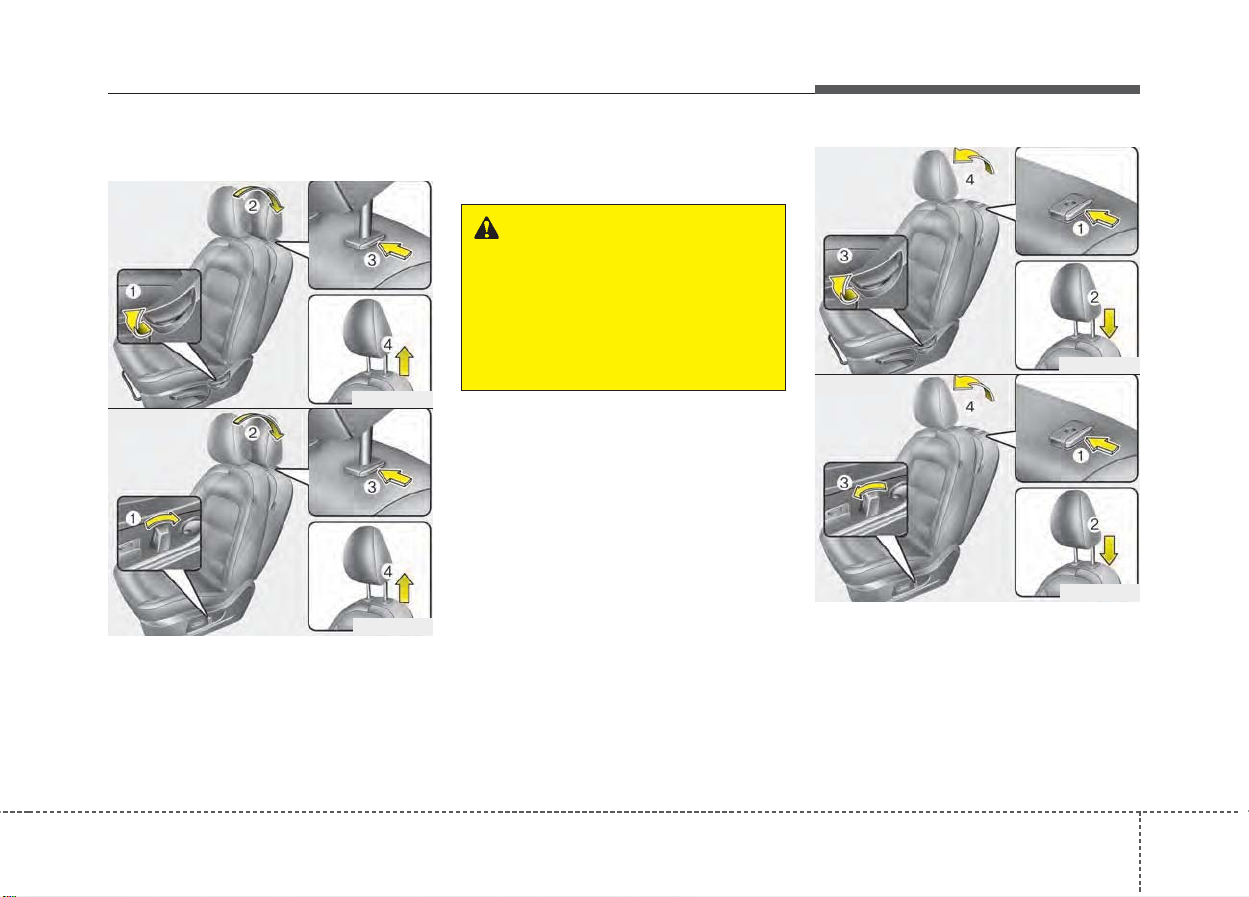
Removal and installation
■ Type A
OYD034100
■ Type B
OYD034102
To remove the headrest:
1. Recline the seatback (2) with the
recline switch (1).
2. Raise headrest as far as it can go.
3. Press the headrest release button
(3) while pulling the headrest up (4).
WARNING - Headrest
Removal
NEVER allow anyone to ride in a
seat with the headrest removed.
Headrests can provide critical
neck and head support in a
crash.
■ Type A
OYD034101
■ Type B
OYD034103
To reinstall the headrest :
1. Put the headrest poles (2) into the
holes while pressing the release
button (1).
2. Recline the seatback (4) with the
recline switch or lever (3).
311
Safety features of your vehicle
3. Adjust the headrest to the appropriate height.
WARNING - Headrest
Reinstallation
T o reduce the risk of injury to the
head or neck, always make sure
the head rest is locked into position and adjusted properly after
reinstalling.
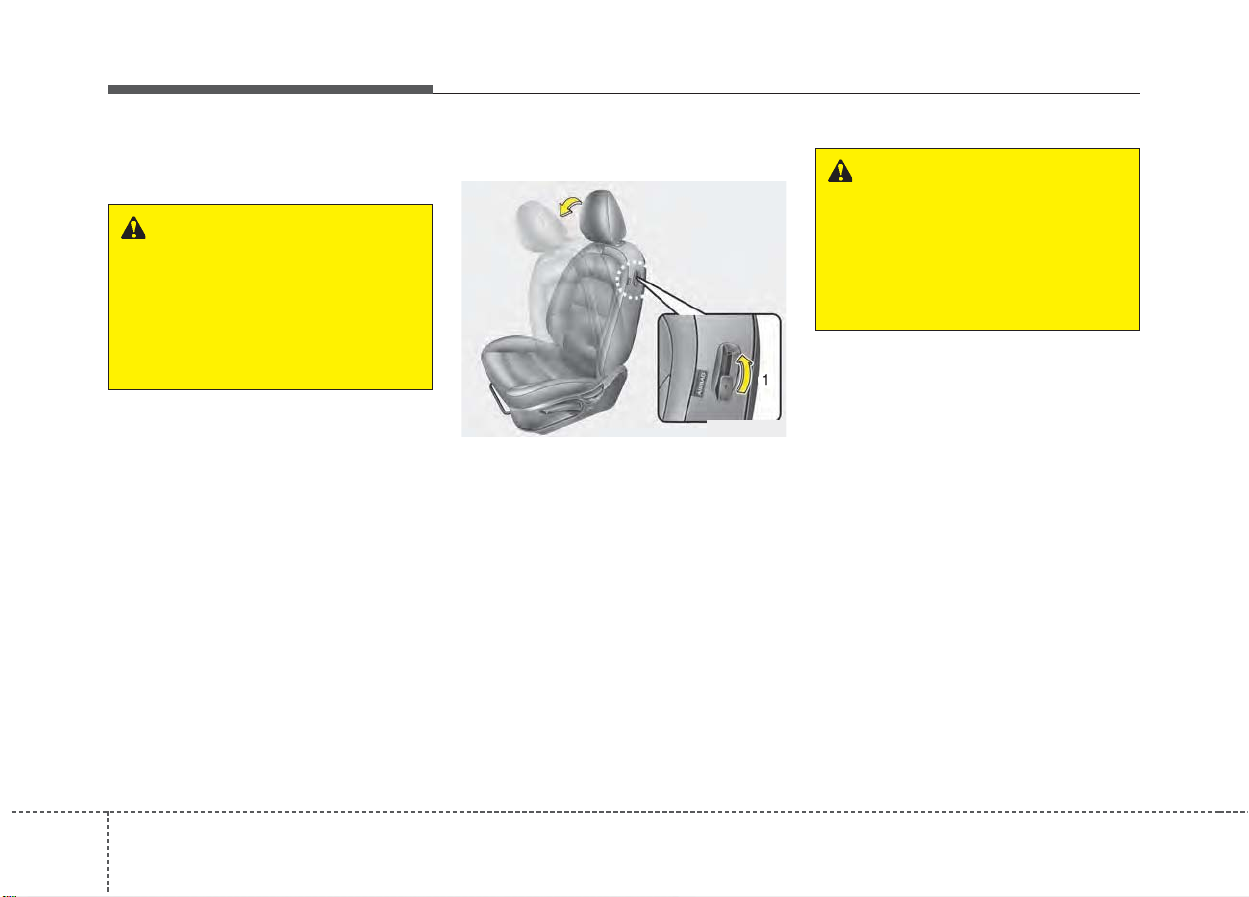
Rear seat entry (for 2 Door)
WARNING
Never attempt to adjust the seat
while the vehicle is moving or
when the passenger's seat is
occupied as the seat may suddenly move and injure the passenger.
OYD033002
The driver and front passenger's
seatback should be tilted to enter the
rear seat.
By pulling up the walk-in seat lev er (1)
on the back of the driver and front
passenger’s seatback, the seatback
will tilt forward.Then push the seat forward to allow the occupants to enter.
By pulling up the seatback, the seatback will recline and return to the
original position.
123
Safety features of your vehicle
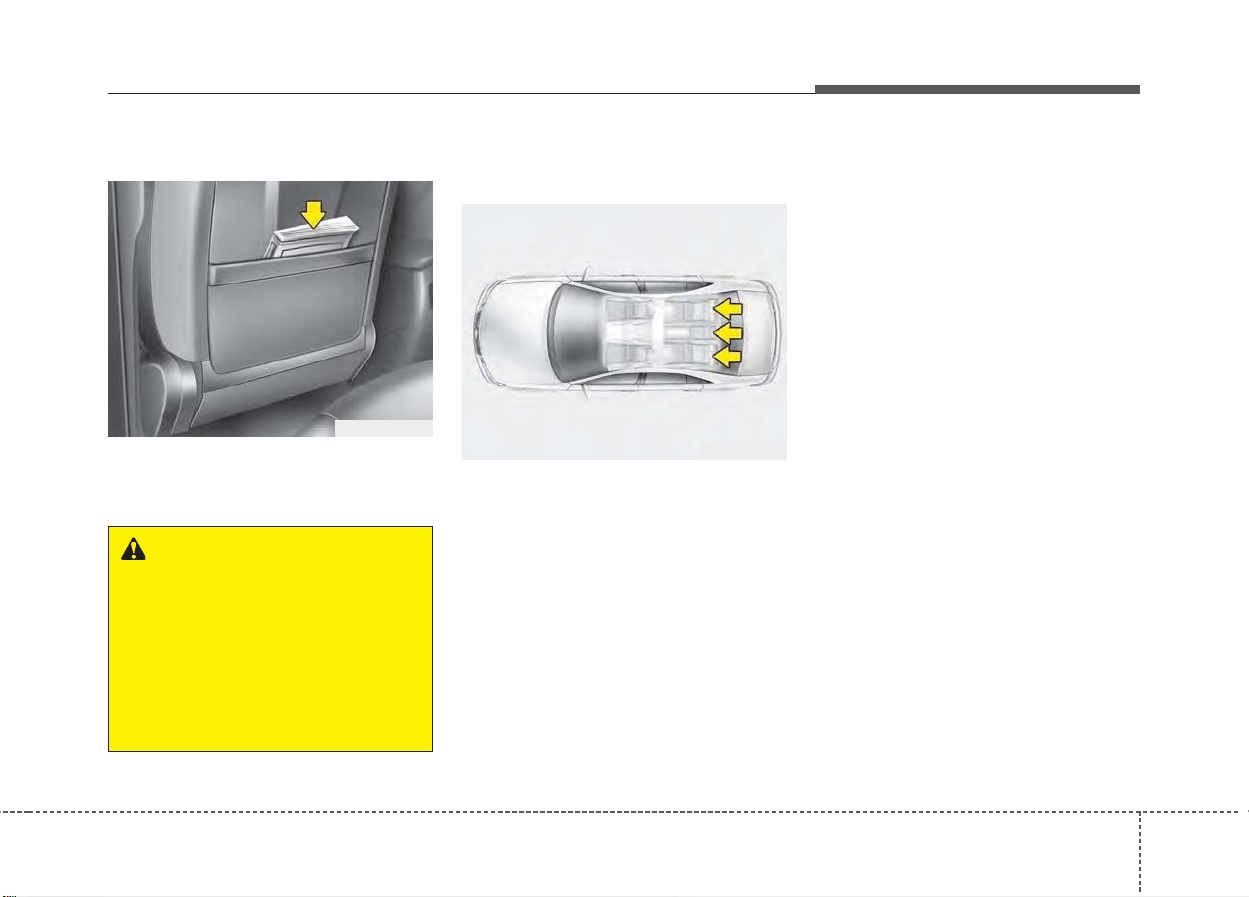
Seatback pocket
OYDDCO2051
The seatback pocket is provided on
the back of the front passenger’s
seatback.
W ARNING- Seatback
pocket
Do not put heavy or sharp
objects in the seatback pocket.
An occupant could contact such
objects in a crash. Heavy
objects in the front passenger
seatback could also interfere
with the air bag sensing system.
Rear seat adjustment
Headrest (for rear seat)
ONF03940I
The rear seat is equipped with headrests in all the seating positions for
the occupant's safety and comfort.
The headrest not only provides comfort for passengers, but also helps
protect the head and neck in the
event of a collision.
For maximum effectiveness in case
of an accident, the headrest should
be adjusted so the middle of the
headrest is at the same height of the
center of gravity of an occupant's
head. Generally, the center of gravity
of most people's head is similar with
the height as the top of their eyes.
Also adjust the headrest as close to
your head as possible. For this reason, the use of a cushion that holds
the body away from the seatback is
not recommended.
313
Safety features of your vehicle
Armrest
OYDDSA2012
Adjusting the height up and down
(if equipped)
To raise the headrest, pull it up to the
desired position (1). To lower the
headrest, push and hold the release
button (2) on the headrest support
and lower the headrest to the desired
position (3).
143
OYDDSA2013
Removal and installation
To remove the headrest, raise it as
far as it can go then press the
release button (1) while pulling the
headrest upward (2).
To reinstall the headrest, put the
headrest poles (3) into the holes
while pressing the release button (1).
Then adjust it to the appropriate
height and ensure that it locks in
position.
OYDDSA2019
To use the armrest, pull it forward
from the seatback.
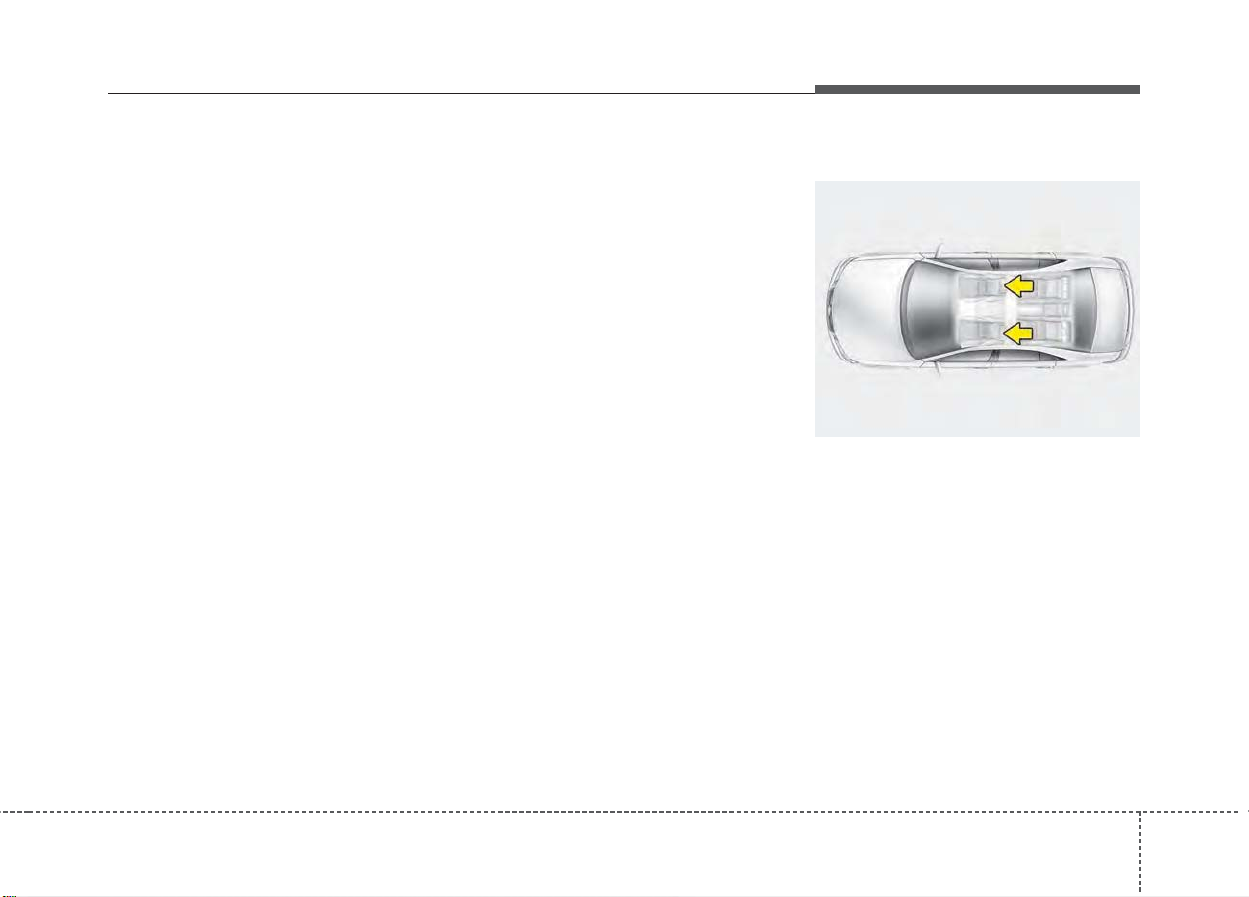
Folding the rear seat
The rear seatbacks may be folded to
facilitate carrying long items or to
increase the luggage capacity of the
vehicle.
WARNING - Folded
Seatback
Never allow passengers to sit
on top of the folded down seatback while the vehicle is moving.This is not a proper seating
position and no seat belts are
available for use. This could
result in serious injury or death
in case of an accident or sudden stop.
WARNING - Objects
Objects carried on the folded
down seatback should not
extend higher than the top of
the front seatbacks. This could
allow cargo to slide forwar d and
cause injury or damage during
sudden stops.
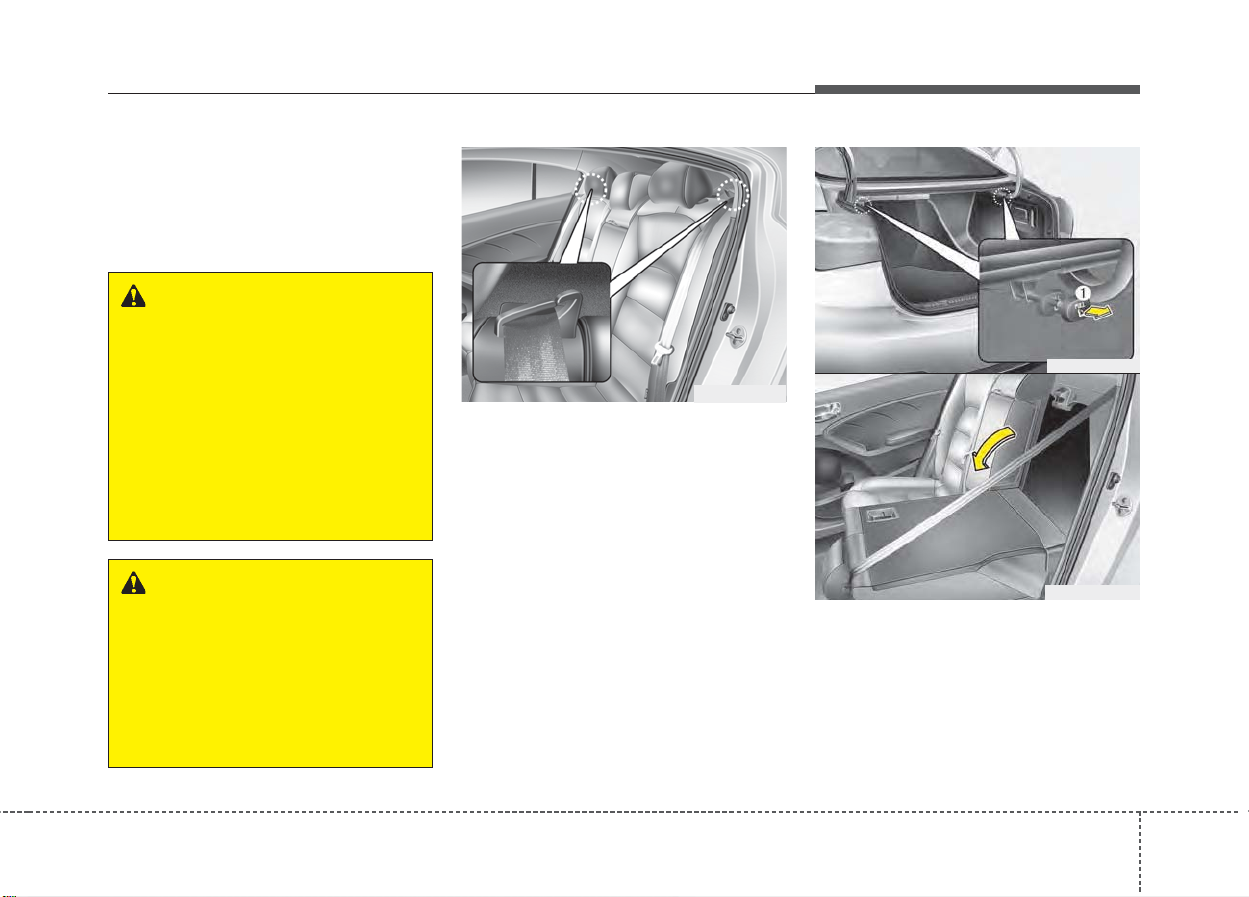
OYDDSA2017
To fold the rear seatback :
• 4 Door, 2Door
1. Make sure the rear seat belt webbing is in the guide to prevent the
seat belt from being damaged.
2. Set the front seatback to the
upright position and if necessary,
slide the front seat forward.
3. Lower the rear headrests to the
lowest position.
4. Open the tr unk.
Safety features of your vehicle
OYDDSA2016
OYDDSA2018
5.Pull the lock release lever (1) and
fold the rear seatback forward and
down firmly.
If the seat belt locks after unfolding
the rear seatback, pull out the
locked seat belt, release it then pull
it out again.
315
Safety features of your vehicle
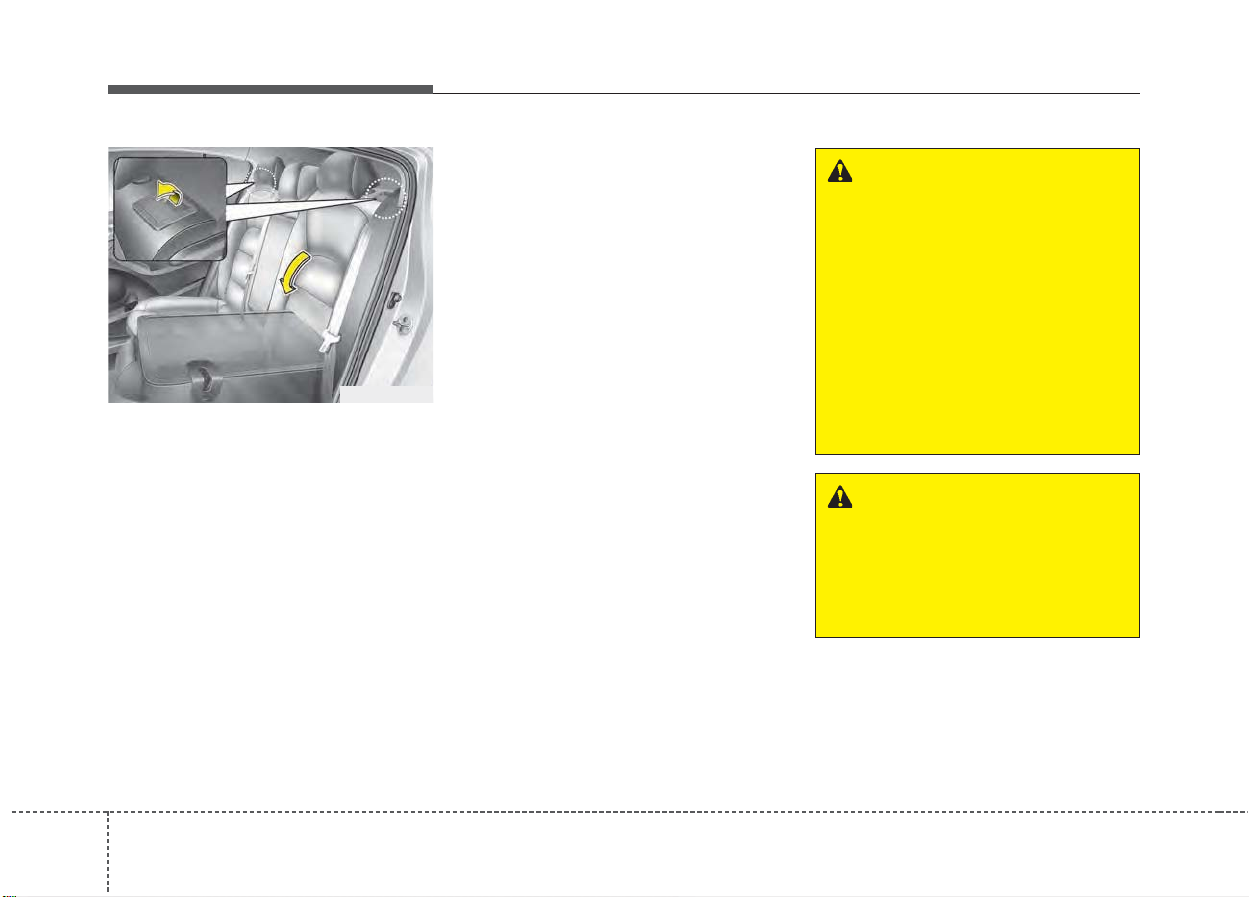
OYDDSA3042
• 5 door
1. Set the front seatback to the upright
position and if necessary, slide the
front seat forward.
2. Lower the rear headrests to lowest
position.
3. Pull the lock release lever (1) and
fold the rear seatback forward and
down firmly.
4.To use the rear seat, lift and pull the
seatback backward. Pull the seatback firmly until it clicks into place.
Make sure the seatback is locked in
place. When you return the seatback to its upright position, always
be sure it has locked into position by
pushing on the top of the seatback.
If you can not see the red line at
the folding lever, it means the seatback is locked completely.
To unfold the rear seat
1. To use the rear seat, lift and pull
the seatback rearward. Pull the
seatback firmly until it clicks into
place. Make sure the seatback is
locked in place. When you return
the seatback to its upright position, always be sure it has locked
into position by pushing on the top
of the seatback.
2. Return the rear seat belt to the
proper position.
3. When the seatback is completely
installed, check the seatback folding lever again.
When returning the rear seatbacks to
the upright position, remember to
return the rear shoulder belts to their
proper position.
W ARNING- Rear seatback
When returning the rear seatback from a folded to an upright
position, hold the seatback and
return it slowly. Ensure that the
seatback is completely locked
into its upright position by
pushing on the top of the seatback. In an accident or sudden
stop, the unlocked seatback
could allow cargo to move forward with great force and enter
the passenger compartment.
WARNING - Cargo
Do not place heavy objects in
the rear seats, since they cannot be properly secured and
may hit vehicle occupants in a
frontal collision.
163
 Loading...