

Page 1

FEATURES & FUNCTIONS GUIDE
www.kia.com
Consumer - Roadside Assistance
1-800-333-4KIA (4542)
See Back Cover for Vehicle Maintenance Schedule
Always check the Owner’s Manual for complete operating information and safety warnings.
Page 2

GETTING TO KNOW YOUR FORTE
Congratulations on Your New Kia Purchase!
Your new Kia vehicle has been designed, engineered and manufactured to provide you with years of
comfortable and dependable driving. Kia is committed to quality, innovation, safety and — above all —
your satisfaction.
Using This Guide
The information contained in this guide is a brief overview that will help you become familiar with the operation and
features of your new Kia vehicle. The flipbook format facilitates information access, while the detailed illustrations
ensure the instructions are easy to follow.
This Features & Functions Guide and the specific operational and safety information it provides is not a substitute
for your Owner’s Manual. In the interest of your safety and that of your family, and to help you avoid risks that
may result in death or serious injury, Kia reminds you to carefully read your Owner’s Manual in order to fully
familiarize yourself with the important information it contains.
While the information contained in this guide is accurate at the time of printing, Kia may change vehicle
specifications without notice in advance or after the fact, and assumes no liability in connection with
such changes.
Page 3

ESSENTIAL FEATURES
Active ECO System* . . . . . . . . . . . . . 06
Air Conditioning / Climate Control . . . . 20
Audio System — Standard . . . . . . . . . 15
Audio System — Navigation System* . . . 18
Audio System — UVO System* . . . . . . . 17
®
Aux/USB/iPod
Bluetooth
Cruise Control* . . . . . . . . . . . . . . . . 14
Digital Clock
Folding Rear Seats* . . . . . . . . . . . . . 26
Fuel Efficiency . . . . . . . . . . . . . . . . 05
Manual Gear Shift* . . . . . . . . . . . . . . 23
PASSENGER AIR BAG OFF Indicator . . . 32
Rear-Camera Display* . . . . . . . . . . . . 31
Smart Key* . . . . . . . . . . . . . . . . . . 29
Tire Pressure Monitoring System (TPMS). 06
Windshield Wipers & Washers . . . . . . . 10
Driving while drowsy or distracted is dangerous
and should be avoided. Drivers should remain
attentive to driving and exercise caution when
using vehicle systems while driving.
FORTE FEATURES & FUNCTIONS GUIDE
Port & Power Outlets* . 19
®
Wireless Technology* . . . . . 12
* . . . . . . . . . . . . . . . . . 19
VIDEOS & QR CODES . . . . . . . . . . . . . 02
INSTRUMENT CLUSTER
Instrument Cluster Overview . . . . . . . . . . 03
Indicators & Warning Lights . . . . . . . . . . . 04
Trip Computer / Tripmeter* . . . . . . . . . . . 05
Fuel Efficiency . . . . . . . . . . . . . . . . . . . 05
Tire Pressure Monitoring System (TPMS) . . . 06
DRIVER’S PANEL
Active ECO System* . . . . . . . . . . . . . . . . 06
Electronic Stability Control (ESC) . . . . . . . . 07
Instrument Panel Dimmer* . . . . . . . . . . . . 07
Heated Steering Wheel* . . . . . . . . . . . . . . 07
Hill-start Assist Control . . . . . . . . . . . . . . 07
Hood Release Lever and Latch . . . . . . . . . 07
Engine Start/Stop Button* . . . . . . . . . . . . 08
Power Windows, Window Lock
& Central Door Lock*. . . . . . . . . . . . . . . . 09
Electric/Folding Mirrors* . . . . . . . . . . . . . 09
Power/Heated Outside Mirrors* . . . . . . . . . 09
Automatic Door Lock/Unlock*. . . . . . . . . . 09
STEERING WHEEL CONTROLS
Headlights & High Beams . . . . . . . . . . . . . 10
Turn Signals & Fog Lights* . . . . . . . . . . . . 10
Windshield Wipers & Washers . . . . . . . . . . 10
LCD Display Control & Modes* . . . . . . . . . . 10
Tilt/Telescopic Steering Wheel* . . . . . . . . . 11
FlexSteer™ Steering Wheel Mode*. . . . . . . . 11
®
Bluetooth
Wireless Technology* . . . . . . . 12
Audio Controls* . . . . . . . . . . . . . . . . . . . 14
Cruise Control* . . . . . . . . . . . . . . . . . . . 14
AUDIO SYSTEM
Standard Audio System Overview/Operation* 15
UVO System* . . . . . . . . . . . . . . . . . . . . 17
Navigation System*. . . . . . . . . . . . . . . . . 18
CENTER PANEL
Digital Clock* . . . . . . . . . . . . . . . . . . . . 19
®
Aux/USB/iPod
Port & Power Outlets*. . . . . 19
Automatic Climate Control*. . . . . . . . . . . . 20
Manual Climate Control*. . . . . . . . . . . . . . 21
®
Automatic Gear Shift / Sportmatic
Shifting*. 22
Manual Gear Shift* . . . . . . . . . . . . . . . . . 23
SEATING
Driver Position Memory System* . . . . . . . . 24
Seat Warmers/Ventilated Seats* . . . . . . . . 24
6-Way Manual Adjustable Driver’s Seat* . . . . 25
Front Seat Headrest Adjustment . . . . . . . . 25
Power Adjustable Driver’s Seat* . . . . . . . . . 25
Folding Rear Seat* . . . . . . . . . . . . . . . . . 26
OTHER KEY FEATURES
Sunroof Operation*. . . . . . . . . . . . . . . . . 28
Map/Room/Dome Lamps* . . . . . . . . . . . . 28
Remote Keyless Entry*. . . . . . . . . . . . . . . 29
Double-Turn Lock / Unlock All . . . . . . . . . . 29
Smart Key* . . . . . . . . . . . . . . . . . . . . . . 29
®
HomeLink
/ Auto-Dimming Rearview Mirror* 30
Sunvisor . . . . . . . . . . . . . . . . . . . . . . . 31
Trunk Release Button* . . . . . . . . . . . . . . . 31
Rear-Camera Display* . . . . . . . . . . . . . . . 31
Fuel Cap / Malfunction Indicator
(Check Engine Light)* . . . . . . . . . . . . . . . 31
SAFETY FEATURES
Seatbelts . . . . . . . . . . . . . . . . . . . . . . . 32
Seatbelts Retractor Inertia Locks . . . . . . . . 32
Occupant Detection System (ODS) /
PASSENGER AIR BAG OFF Indicator. . . . . . 32
Child Safety Locks . . . . . . . . . . . . . . . . . 32
LEGAL DISCLAIMERS
MAINTENANCE (See Back Cover)
(See Back Inside Cover Page)
*IF EQUIPPED
Page 4
VIDEOS & QR CODES - SMARTPHONES, TABLETS AND COMPUTERS
Kia provides a number of video resources at your disposal to assist you with becoming
familiar with the features and functions found in your Kia vehicle. You can access these
resources by snapping the QR Codes with your smartphone/tablet (mobile devices) or by
visiting the following website: www.KuTechVideos.com/yd13/2014. Continue reading for a
more in-depth look at QR Codes and for instructions on how to use them.
What are QR Codes?
A QR Code is a square, 2-dimensional barcode that can be read by mobile devices loaded
with an appropriate barcode or QR Code Reader App. The app reads the barcode image and
then launches/uploads the specific information the code contains, such as URLs, text, photos,
videos and so much more.
How to Use QR Codes
If you have a mobile device with a QR Code Reader App, you
can snap the code with your phone and you’ll be provided a
video with additional information pertaining to the topic. For
example, in the Fuel Cap section, if you would like additional
information, just snap the code with your mobile device to view
the selected Kia Features & Functions Video.
How to snap a QR Code
1. With your mobile
device, download a
QR Code Reader App.
With many devices,
you can do this
through an app store
or marketplace
1.
QUICK TIPS
1. If you’re having trouble scanning codes, check the following:
đŏ The code should be centered and focused in your mobile
device’s camera screen
đŏ Consider moving your device closer to or farther away from
the code
đŏ The code should be well lit, without significant shadow
đŏ Avoid scanning from a significant angle
đŏ Confirm that the device’s app supports 2D QR Code scanning.
Try another QR Code Reader app; not all apps are created equal
2. Open the QR Code Reader App on your mobile
device
3. The app will utilize your device’s camera.
Center the code in the camera viewing area:
đŏ With some apps, as soon as the app recognizes
the code, it will launch the corresponding video
đŏ With other apps, you will have to snap or take
a picture of the code. The app will then launch
the corresponding video
QR CODE
Kia One Click
Fuel Cap Video
To view a video on your
mobile device, SNAP
this QR Code or visit the
listed website.
www.KuTechVideos.com/yd13/2014
2. After scanning, if a “connecting” message appears and then
nothing happens or there’s a “connection error” message, this
typically indicates that your device is having trouble connecting
to the Internet
2
FORTE FEATURES & FUNCTIONS GUIDE
đŏ For operation specifics, refer to the instructions
that come with the QR Code Reader App
REMINDER: When accessing videos on your mobile device, standard
cellular data rates may apply.
*IF EQUIPPED
Page 5
INSTRUMENT CLUSTER
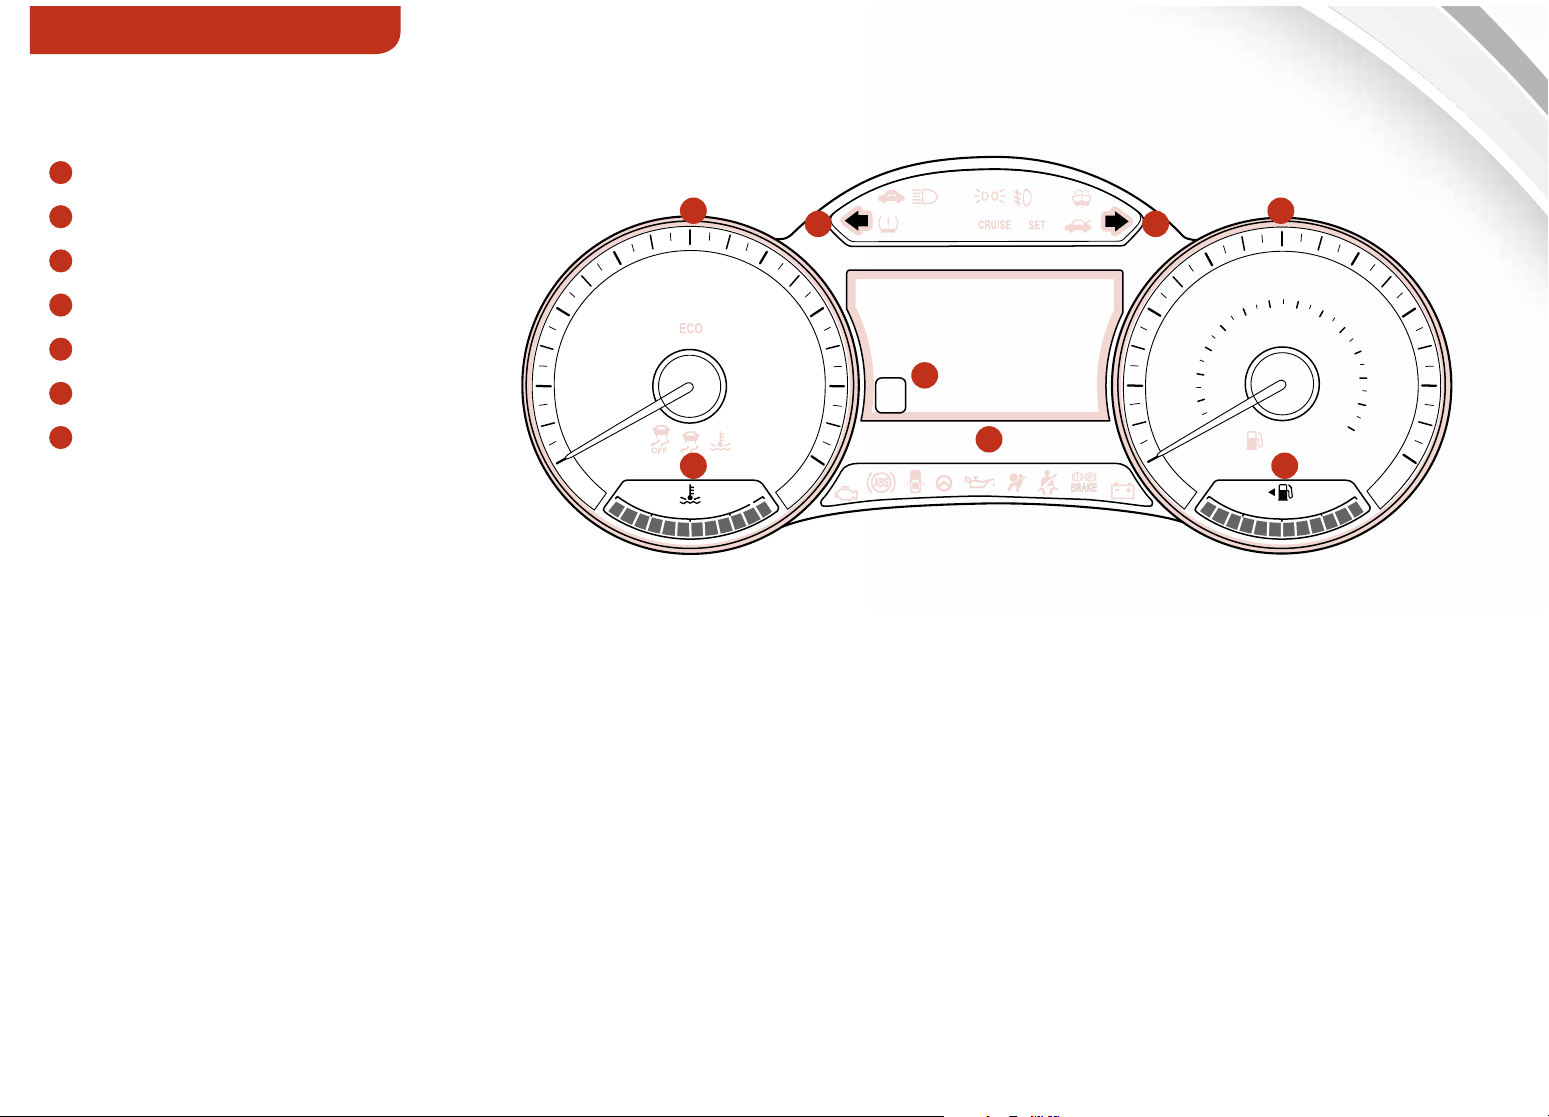
Instrument Cluster Overview
A
Tach omete r
B
Speedometer
A
C C
B
C
Turn Signal Indicators
D
LCD Display/Odometer/Tripmeter*
E
Gear Shift Position Indicator*
F
Fuel Gauge
G
Engine Temperature Gauge
REMINDER: Your vehicle’s instrument cluster
& indicator light locations may dier from
those in the illustrations. See your Owner’s
Manual for more details.
LCD Display Warning Messages*
đŏ.!//ŏ(10$ŏ,! (ŏ0+ŏ/0.0ŏ!*#%*!ĵ
đŏ.!//ŏ.'!ŏ,! (ŏ0+ŏ/0.0ŏ!*#%*!ŏ
đŏ$%"0ŏ0+ŏėĘŏ+.ŏėĘŏ0+ŏ/0.0ŏ!*#%*!ĵŏŏ
đŏ.!//ŏ/0.0ŏ100+*ŏ3%0$ŏ).0ŏ!5ĵ
4
x1000rpm
3
5
2
1
0
đŏ++.ŏ,!*ŏ
đŏ.1*'ŏ,!*ŏ
đŏ1*.++"ŏ,!*ĵŏ
đŏ+3ŏ/$!.ŏ(1% ĵŏ
C
G
H
80
MPH
60
6
7
8
E
D
D
!
(Cluster Type C shown)
40
20
0
100
80
60
40
20
E
120
km/h
F
140
160
100
180
200
220
240
260
F
120
140
160
đŏ!5ŏ*+0ŏ%*ŏ2!$%(!ŏ
đŏ!5ŏ*+0ŏ !0!0! ŏ
đŏ+3ŏ'!5ŏ00!.5ŏ
đŏ$%"0ŏ0+ŏėĘŏ,+/%0%+*ŏ
đŏ.!//ŏ/0.0ŏ100+*ŏ#%*ŏ
REMINDER: For more information on the LCD Display Warning Messages, please refer to the Owner’s Manual.
ALWAYS CHECK THE OWNER’S MANUAL FOR COMPLETE OPERATING INFORMATION AND SAFETY WARNINGS.
đŏ1.*ŏ+*ŏėŏĘĵŏ
*IF EQUIPPED
3
Page 6
INSTRUMENT CLUSTER
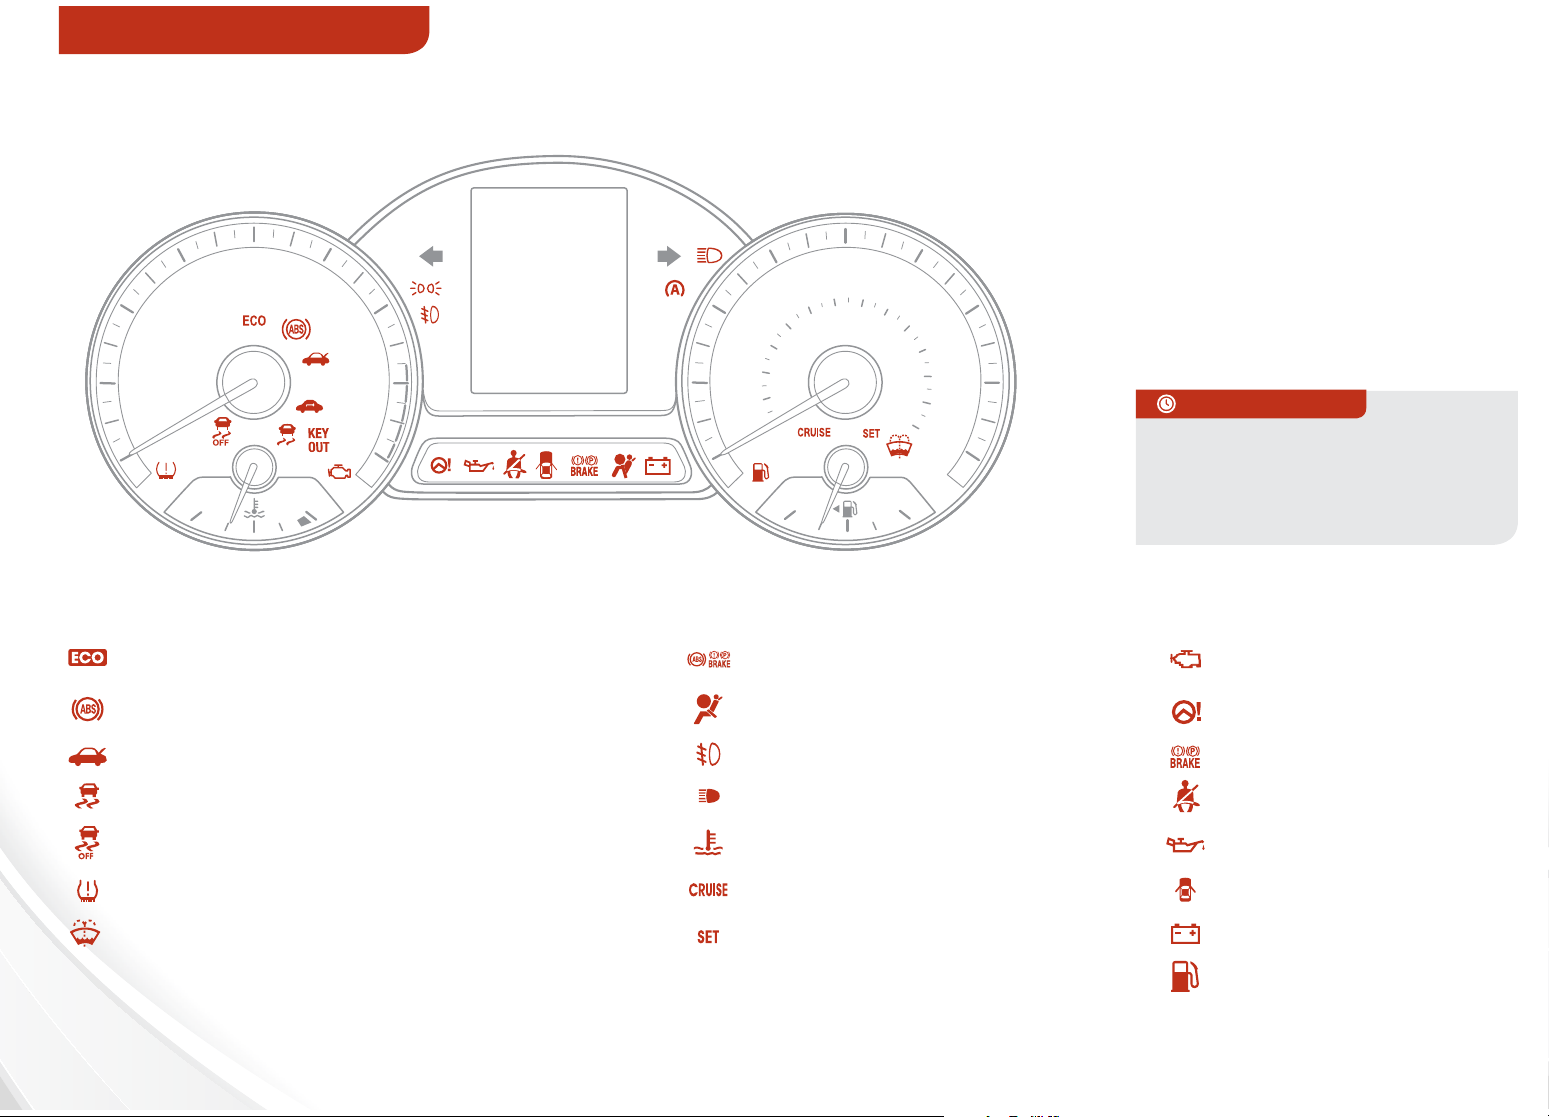
Indicators & Warning Lights
4
3
x1000rpm
2
1
0
C
ECOMINDER™ (ECO) Indicator*
Anti-Lock Brake System (ABS) Warning* Air Bag Warning Indicator
Trunk / H a tch Open Fog Lights Indicator* Parking Brake/Fluid Warning
Electronic Stability Control Warning Indicator High Beam Indicator Safety Belt Warning
Electronic Stability Control OFF Indicator
5
6
7
8
H
(Cluster Type A/B shown)
40
40
20
20
0
Electronic Brake Force (EBD) System
Warning Light
Engine Coolant Temperature Warning
Indicator*
60
60
E
80
MPH
100
120
140
100
80
km/h
160
180
260
200
220
240
120
140
160
REMINDER: Your vehicle’s instrument
cluster & indicator light locations may
dier from those in the illustrations. See
your Owner’s Manual for more details.
QUICK TIPS
For more information on the
function of all indicator and
F
warning lights, please refer to
the Owner’s Manual.
Malfunction Indicator*
Electronic Power Steering
(EPS) Warning Indicator*
Engine Oil Pressure Warning
Low Tire Pressure Indicator / TPMS Malfunction Indicator Cruise Control ON/OFF* Door Ajar Indicator
Low Washer Fluid Level Warning Indicator Cruise Control Set* Charging System Warning
Low Fuel Indicator
4
FORTE FEATURES & FUNCTIONS GUIDE
*IF EQUIPPED
Page 7
INSTRUMENT CLUSTER
Trip Computer / Tripmeter*
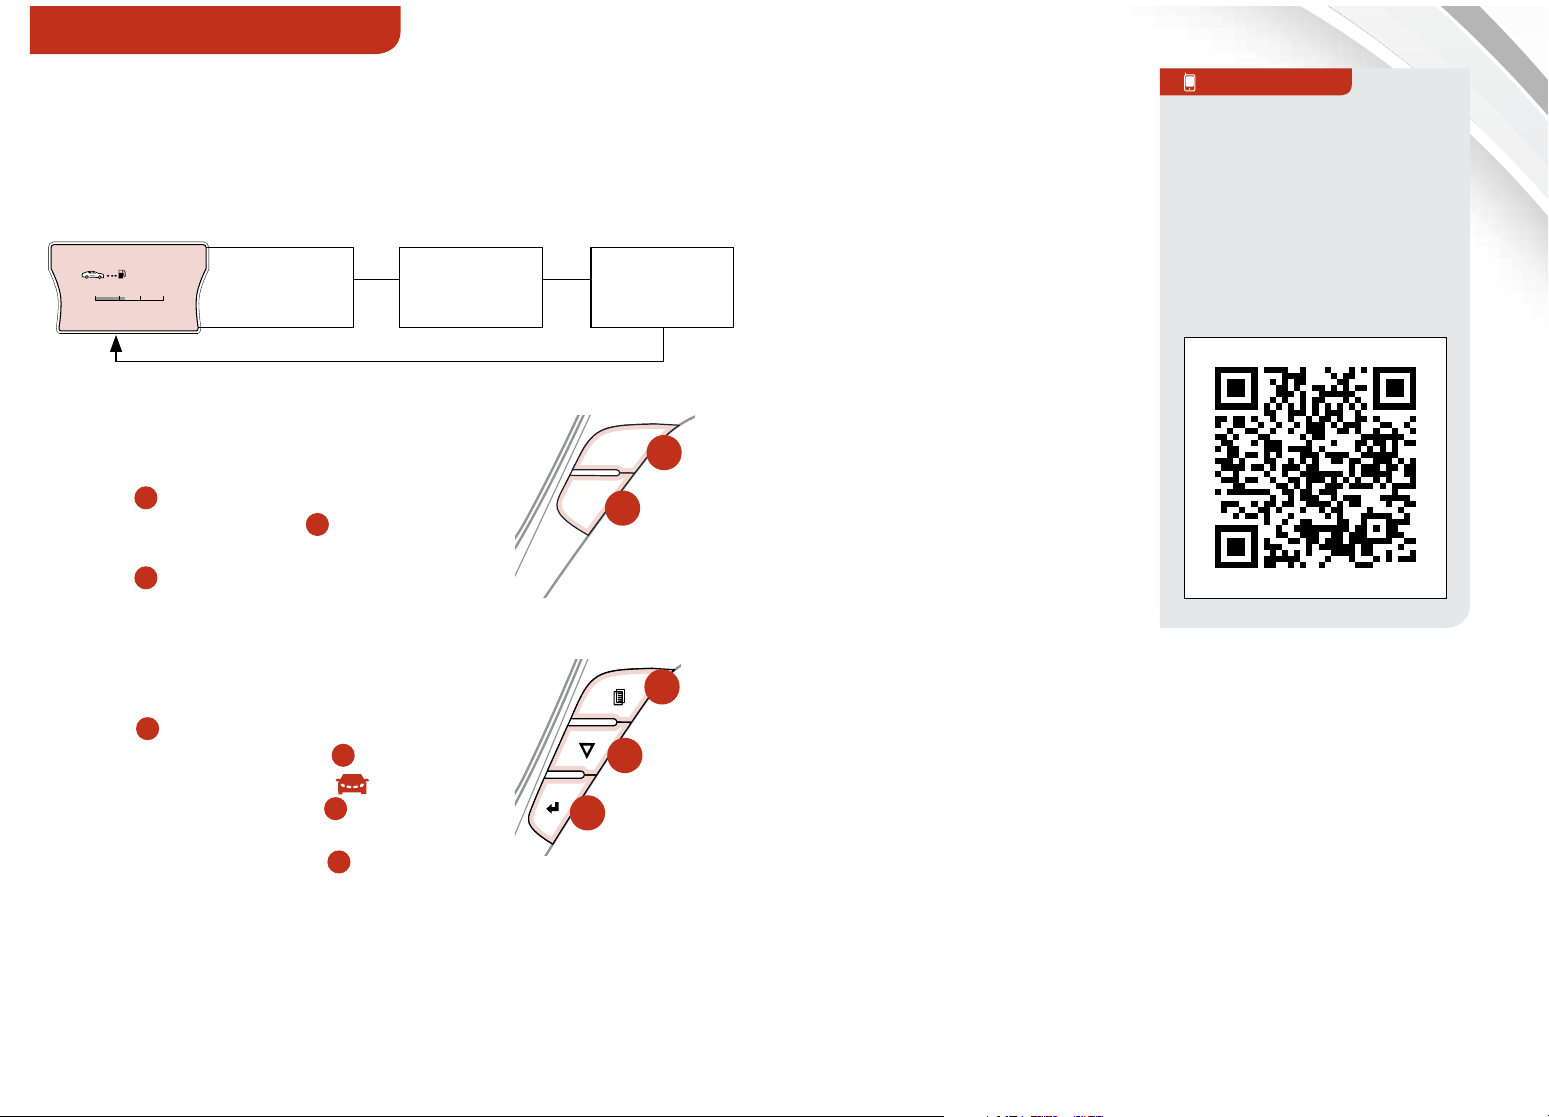
The Trip Computer is a driver information system that
displays information related to driving on the display when
the ignition switch is in the ON position.
RANGE
256
Avg.
6.5 L/
100
km
0
30
10
20
Range
.
Average MPG
.
Instant MPG
Trip Computer First Screen:
.
mi.
.
Trip A
.
Average MPH
.
Elapsed Time (E/T)
Instrument Cluster Type A – To
toggle through the dierent Trip
Computer modes, press the TRIP
button
press the TRIP button
A
. To display the Tripmeter,
A
then select
TRIP A or TRIP B. Press the RESET
button
B
to reset the Tripmeter to
zero.
Instrument Cluster Type B/C – To
toggle through the dierent LCD
Display modes, press the MODE
button
press the MODE button
select TRIP COMPUTER
press the NEXT button
C
. To display the Tripmeter,
C
and
. Then
D
to scroll
to the TRIP A/B screens. Press the
SELECT/RESET button
E
to reset
the Tripmeter to zero.
.
Trip B
.
Average MPH
.
Elapsed Time (E/T)
TRIP
A
RESET
B
(Located on Type
A steering wheel)
C
D
(Located on Type
E
B steering wheel)
Fuel Eciency
Several factors contribute to
your vehicle's fuel eciency,
including maintenance of
your vehicle, driving style,
road and environmental
conditions, vehicle weight
and vehicle aerodynamics.
QR CODE
Fuel Economy Video
To view a video on your
mobile device, SNAP
this QR Code or visit the
listed website.
Refer to page 2 for more
information.
Below are tips on how to
improve fuel eciency:
đŏ Keep your vehicle in good
condition with regular
maintenance
đŏ Don’t let the engine idle
longer than necessary
đŏ Drive at a moderate
speed, accelerating
smoothly and at a
www.KuTechVideos.com/yd13/2014
moderate rate
đŏ Keep tires inflated to the recommended pressure
đŏ Travel lightly, without carrying unnecessary weight in
your vehicle
đŏ Avoid placing large or heavy items on roof racks
đŏ Avoid hilly, winding or poorly maintained roads
REMINDER: Driving range can vary depending on your vehicle’s fuel
tank size, e.g. 12-gal. vs. 24-gal., even though the MPG may be the same.
REMINDER: Appearance of Tripmeter display may dier as equipped.
REMINDER: All stored driving information (except Odometer and
Distance to Empty) is reset if the battery is disconnected.
ALWAYS CHECK THE OWNER’S MANUAL FOR COMPLETE OPERATING INFORMATION AND SAFETY WARNINGS.
For more information on Fuel Economy, you can snap the QR code
above to view a video or refer to the brochure “GETTING MORE OUT
OF EVERY GALLON, FUEL-SAVING TIPS TO DRIVE BY” available at
your local dealership.
*IF EQUIPPED
5
Page 8
INSTRUMENT CLUSTER/DRIVER’S PANEL
Tire Pressure Monitoring System (TPMS)
The indicator functions as both Low Tire
Pressure Light and TPMS Malfunction Indicator.
The TPMS indicator will illuminate if one or more tires
is significantly underinflated, the vehicle has a spare
tire without TPMS installed or the outside temperature
becomes significantly colder.
đŏ Inflate tire(s) to specifications to turn o Low Tire
Pressure Light
pressure gauge. See front driver’s door jamb for PSI
specification
đŏ The TPMS Malfunction Indicator will illuminate after
it blinks for approximately one minute when there is a
problem with the TPMS. See dealer for service
REMINDER: Consult your dealer for service if Low Tire Pressure
Light remains illuminated after inflating your tire(s).
using an accurate digital tire
đŏ
QUICK TIPS
đŏ Even with TPMS, tire pressure
should be checked manually at
least once a month. Only adjust
tire pressure on “cold tires”
đŏ To help ensure proper
maintenance and optimal fuel
economy, maintain recommended
tire inflation pressures and stay
within the load limits and weight
distribution recommended for
your vehicle
đŏ In winter or cold weather, the
TPMS light may illuminate if the
tire pressure was adjusted to
the recommended tire inflation
pressure during warm weather
QR CODE
To view a video on your
mobile device, SNAP
these QR Codes or visit
the listed website.
Refer to page 2 for more
information.
Kia Tire Pressure
Monitoring System Video
Active ECO System*
Active ECO helps improve fuel efficiency by controlling
several vehicle components. When activated, it optimizes
drivetrain operations such as engine power and
transmission to help improve fuel economy.
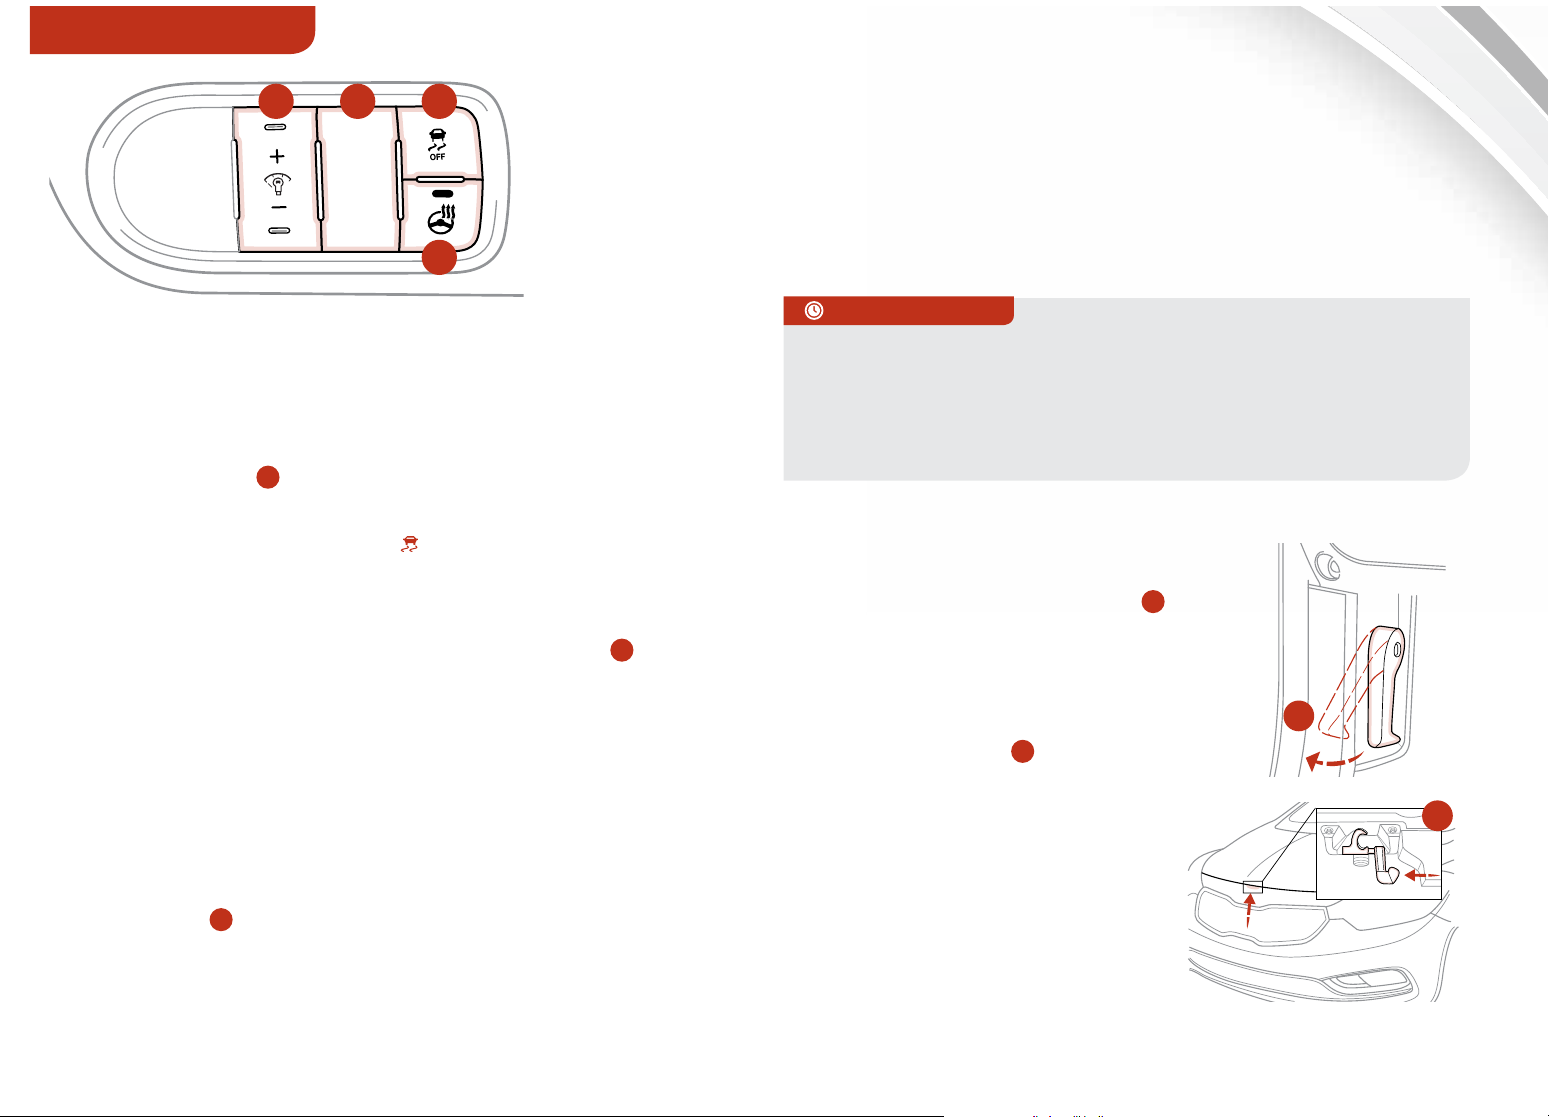
To turn ON, press the Active ECO button B. The button
light will turn on and the green ECO indicator light in the
instrument cluster will illuminate (indicating that you are
getting optimal fuel efficiency). The Active ECO System will
remain on even when the engine is turned off and restarted.
To turn Active ECO OFF, press the button B again.
6
FORTE FEATURES & FUNCTIONS GUIDE
đŏ
QUICK TIPS
To help improve your fuel eciency:
đŏ Drive at a moderate speed,
accelerating smoothly and at a
moderate rate
đŏ Keep tires inflated to the
recommended pressure
đŏ Be sure the wheels are properly
aligned
www.KuTechVideos.com/yd13/2014
Active ECO Indicator Video
www.KuTechVideos.com/yd13/2014
*IF EQUIPPED
Page 9
DRIVER’S PANEL
B
active
ECO
CA
(Located left of
steering wheel)
D
Electronic Stability Control (ESC)
The ESC system is designed to help stabilize the vehicle
during cornering maneuvers. It is a good idea to keep the
ESC turned on for daily driving whenever possible.
Press ESC button
REMINDER: ESC is turned ON at vehicle start-up.
REMINDER: The ESC Indicator Light
lit momentarily whenever the ESC is active.
C
to turn ESC OFF/ON.
In the instrument cluster will be
Instrument Panel Dimmer*
With parking lights/headlights ON, press button A (+) or (-)
to adjust the brightness of the instrument panel illumination.
REMINDER: Door Mood Lamp is a fixed brightness and cannot
be adjusted (not to be confused with Advanced Mood Lighting
Speaker).
REMINDER: The Instrument Panel Dimmer does not adjust
brightness on the Navigation System screen. Use Navigation setup
to adjust brightness on the Navigation System.
Hill-start Assist Control (HAC)*
HAC helps prevent the vehicle from rolling backwards when
accelerating from a stop while on a steep incline. The HAC
automatically activates whether the ESC is OFF or ON but
does NOT activate when the ESC has malfunctioned.
REMINDER: The HAC does not operate when the gear shift is in the P
(Park) or the N (Neutral) position.
QUICK TIPS
đŏ When HAC is active (e.g., during initial acceleration from a stop
on an incline), you may notice that the brakes will momentarily
remain engaged after you depress the accelerator
đŏ HAC provides a 2-second delay before the vehicle may start
rolling backwards
Hood Release Lever and Latch
Opening the Hood:
1
ull the Hood Release Lever
. P
to unlatch the Hood
2. In the front of the vehicle, lift
the Hood slightly, pull the
B
secondary Latch
inside of
the Hood’s center and lift the
Hood
A
A
B
Heated Steering Wheel*
D
Press button
while the Engine Start/Stop Button is in the ON position.
Steering Wheel Heater will turn OFF automatically in 30
to turn ON/OFF Steering Wheel Heater,
Closing the Hood:
Lower the Hood about halfway
and then press down to
securely lock in place.
minutes or when button is pressed again to deactivate.
ALWAYS CHECK THE OWNER’S MANUAL FOR COMPLETE OPERATING INFORMATION AND SAFETY WARNINGS.
*IF EQUIPPED
7
Page 10
DRIVER’S PANEL
Engine Start/Stop Button*
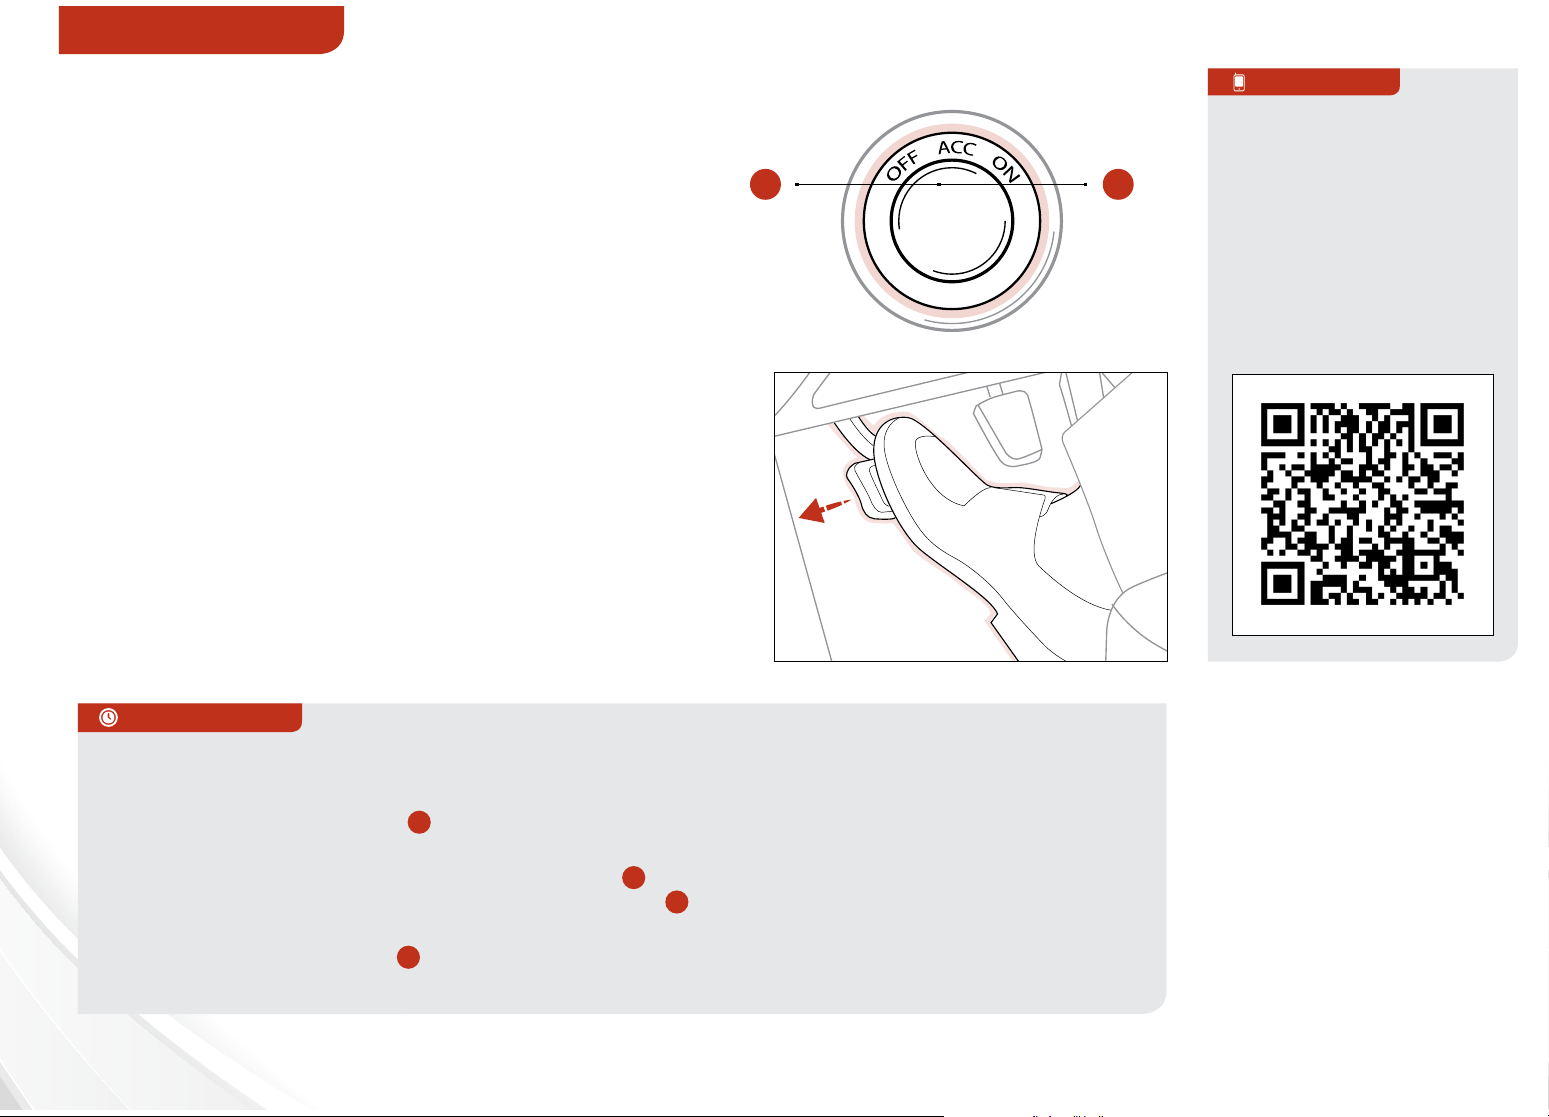
To start the engine:
1. Depress the brake pedal
2. Press the ENGINE START/STOP button
while in Park (or while in Neutral for
Manual Gear Shift)
A
ENGINE
START
STOP
QR CODE
Kia Engine Start/Stop
Button and
B
Smart Key Video
To view a video on your
mobile device, SNAP
this QR Code or visit the
listed website.
To turn the vehicle OFF, press the ENGINE
START/STOP button.
To use the ENGINE START/STOP button, you
must have the Smart Key fob on your person.
REMINDER: In an emergency situation while the
vehicle is in motion, you are able to turn the engine
o and to the ACC position by pressing the ENGINE
START/STOP button for more than 2 seconds or 3
times successively within 3 seconds.
QUICK TIPS
To use electrical accessories:
ACC position
ŏ đŏŏ$!*ŏ%*ŏ0$!ŏŏ,+/%0%+*ŏ* ŏ3%0$+10ŏ !,.!//%*#ŏ0$!ŏ.'!ŏ,! (Čŏ,.!//ŏ0$!ŏŏĥŏ
A
button once (Orange light
ON position
đŏŏ$!*ŏ(.! 5ŏ%*ŏ0$!ŏŏ,+/%0%+*ŏĨ+.*#!ŏ(%#$0ŏ
the ENGINE START/STOP button again (green light B)
ŏ đŏŏ$!*ŏ%*ŏ0$!ŏŏ,+/%0%+*ŏ* ŏ3%0$+10ŏ !,.!//%*#ŏ0$!ŏ.'!ŏ,! (Čŏ,.!//ŏ0$!ŏŏĥŏ
button twice (green light
Keeping the vehicle in ACC or the ON position without driving may discharge the vehicle’s battery
)
A
) and without depressing the brake pedal, press
B
)
Refer to page 2 for more
information.
www.KuTechVideos.com/yd13/2014
*IF EQUIPPED
8
8
FORTE FEATURES & FUNCTIONS GUIDE
FORTE FEATURES & FUNCTIONS GUIDE
*IF EQUIPPED
Page 11
DRIVER’S PANEL
Power Windows, Window Lock & Central Door Lock*
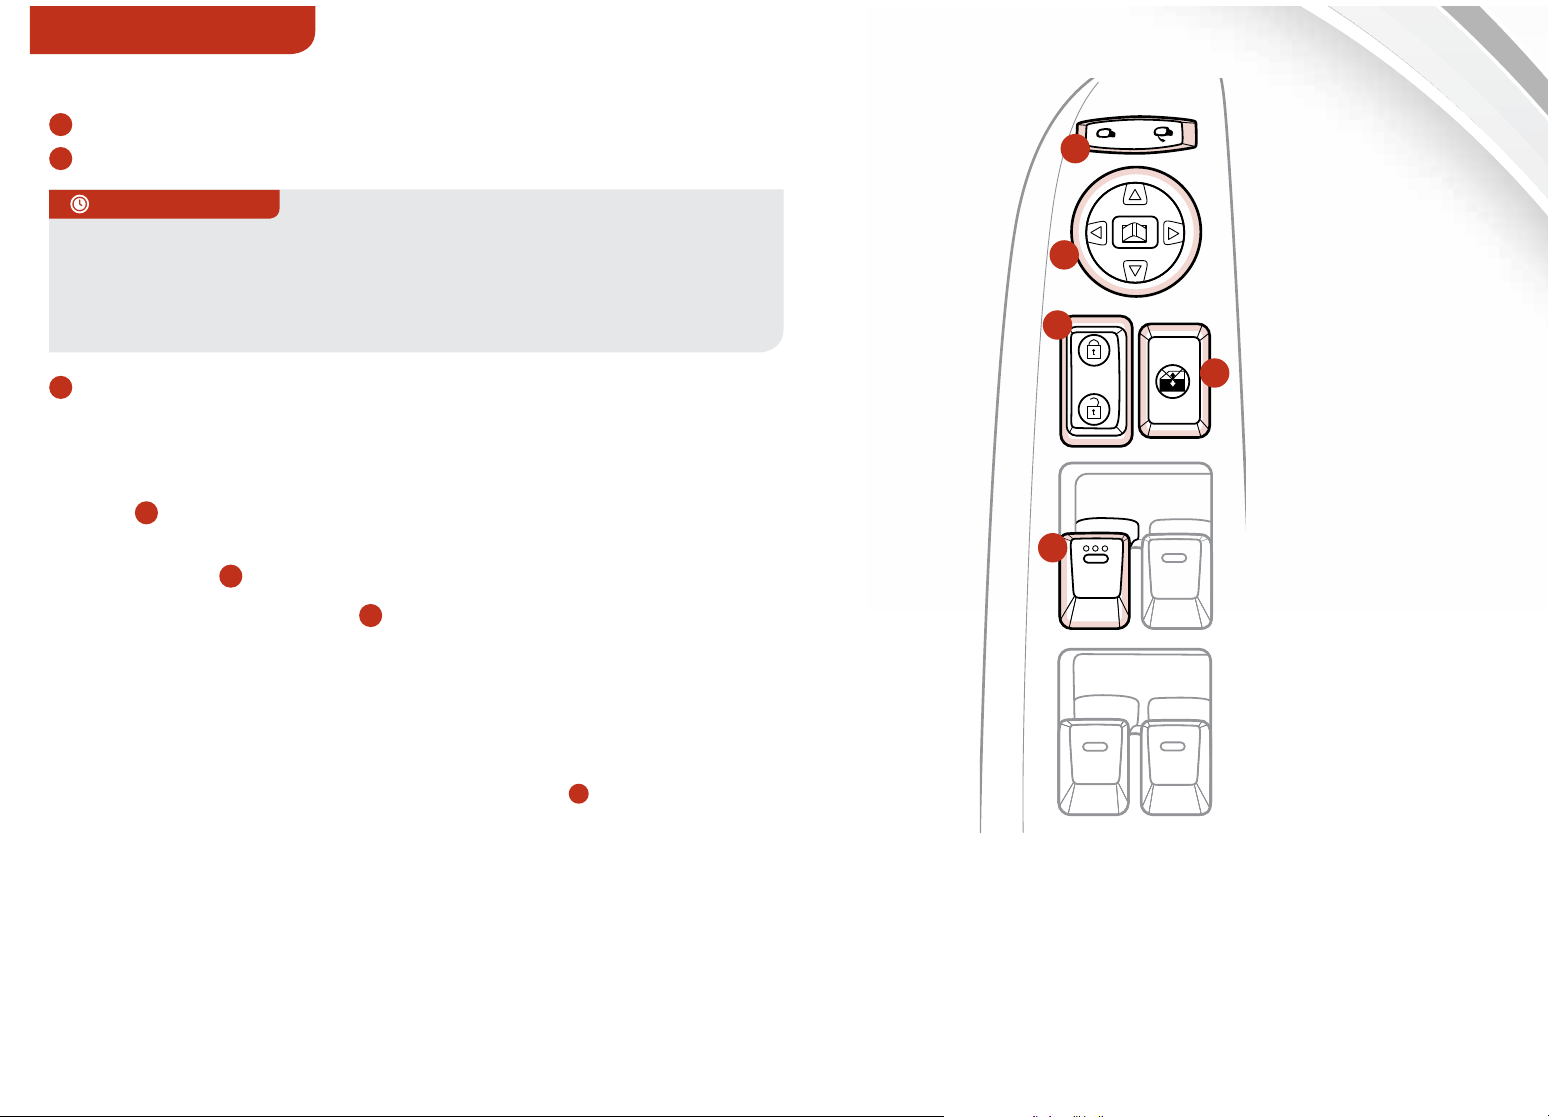
A
Pull/Press to operate Driver’s Window Auto Up/Down*
B
Press to Unlock/Lock All Doors
QUICK TIPS
đŏ Auto Door Lock/Unlock* will engage when gear shift is moved in
to or out of the P (Park) position.
đŏ To turn Auto Door Lock/Unlock* OFF, go to User Settings* in the
LCD display.
AUTO
E
R
L
D
B
C
Press to disable Rear Passenger Windows
REMINDER: Button configuration may vary depending on vehicle model.
C
Electric/Folding Mirrors*
Togg le
adjust mirror position.
Togg le butto n E left/right to unfold/fold the outside rearview mirrors.
Toggle to center of button
đŏ The key fob or Smart Key* Lock/Unlock buttons are pressed
đŏ The door lock/unlock button is pressed (Smart Key* only)
The mirrors will automatically unfold when the Smart Key* is within close
proximity to the vehicle.
REMINDER: To lock position of mirrors, toggle switch
D
left or right to select mirror. Then press one of the points to
E
to fold/unfold mirrors automatically when:
D
to the neutral (center) position.
A
AUTO
AUTO
Power/Heated Outside Mirrors* Automatic Door Lock/Unlock*
Mirror heaters automatically turn ON/OFF at the same
time the Rear Window Defroster is turned ON/OFF. See
page 20/21 for Rear Window Defroster button location.
When the gear shift is moved into or out of P (PARK), all
doors will Lock/Unlock.
ALWAYS CHECK THE OWNER’S MANUAL FOR COMPLETE OPERATING INFORMATION AND SAFETY WARNINGS.
ALWAYS CHECK THE OWNER’S MANUAL FOR COMPLETE OPERATING INFORMATION AND SAFETY WARNINGS.
*IF EQUIPPED
*IF EQUIPPED
9
9
Page 12
MIST
OFF
INT
LO
HI
STEERING WHEEL CONTROLS
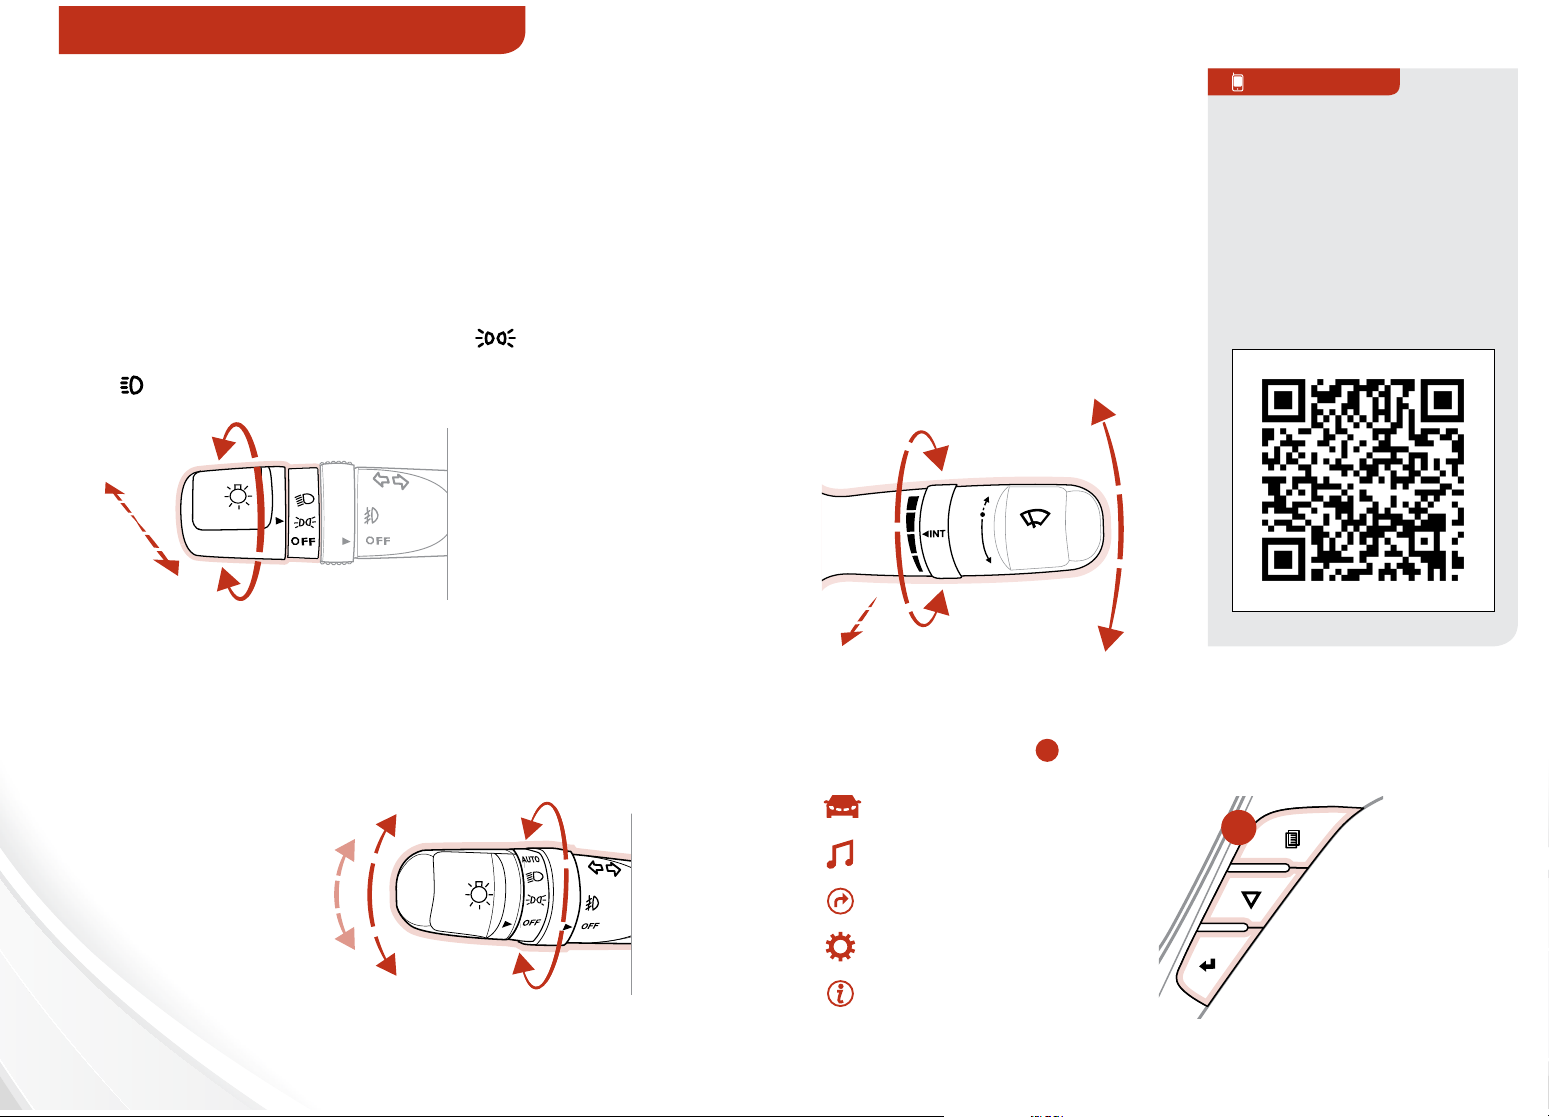
Headlights & High Beams
AUTO Light* function — When the light switch is in the
AUTO Light position, the tail lights and headlights will turn
ON/OFF automatically depending on the amount of light
outside the vehicle.
Rotate lever to change the Headlight function:
AUTO*
Automatic Headlights
position
Headlight position
OFF
Parking light
position
OFF position
Windshield Wipers
& Washers
Move lever Up/Down to change
Wiper modes. Rotate lever to
adjust Intermittent Wipe Speed.
Pull to spray and wipe.
MIST: Single wipe
OFF: Wiper o
INT: Intermittent wipe
LO: Slow wipe
HI: Fast wipe
QR CODE
Forte Windshield Wipers
& Washer Controls Video
To view a video on your
mobile device, SNAP this
QR code or visit the listed
website.
Refer to page 2 for more
information.
AUTO
Push lever to turn High
Beams ON. Pull lever to flash
Headlights/High Beams.
Turn Signals & Fog Lights*
One-Touch Lane Change Signal is activated by slightly
moving the Turn Signal Lever slightly for less than 1 second
and then releasing. The lane change signal will blink 3-7 times.
To change blinking
settings, go to User
Setting* in the LCD
Modes*.
REMINDER: Headlights
must be ON for Fog
Light operation.
Move lever
Up/Down for
Right/Left
Turn Signal.
Slightly move
lever up/down
to activate
One-Touch
Lane Change
Signal.
Faste r
FRONT
Slower
www.KuTechVideos.com/yd13/2014
LCD Display Control and Modes*
A
Press Mode button
Trip Computer Mode
A/V Mode*
Turn- by-Turn Mode*
Service Mode
User Settings Mode
to scroll through the different LCD modes:
A
(button panel
located on Steering
Wheel, Type B)
10
FORTE FEATURES & FUNCTIONS GUIDE
*IF EQUIPPED
Page 13
CRUISE
SET
RES
CANCEL
MUTE
MODE
VOL
VOL
STEERING WHEEL CONTROLS
Tilt/Telescopic Steering Wheel* FlexSteer™ Steering Wheel
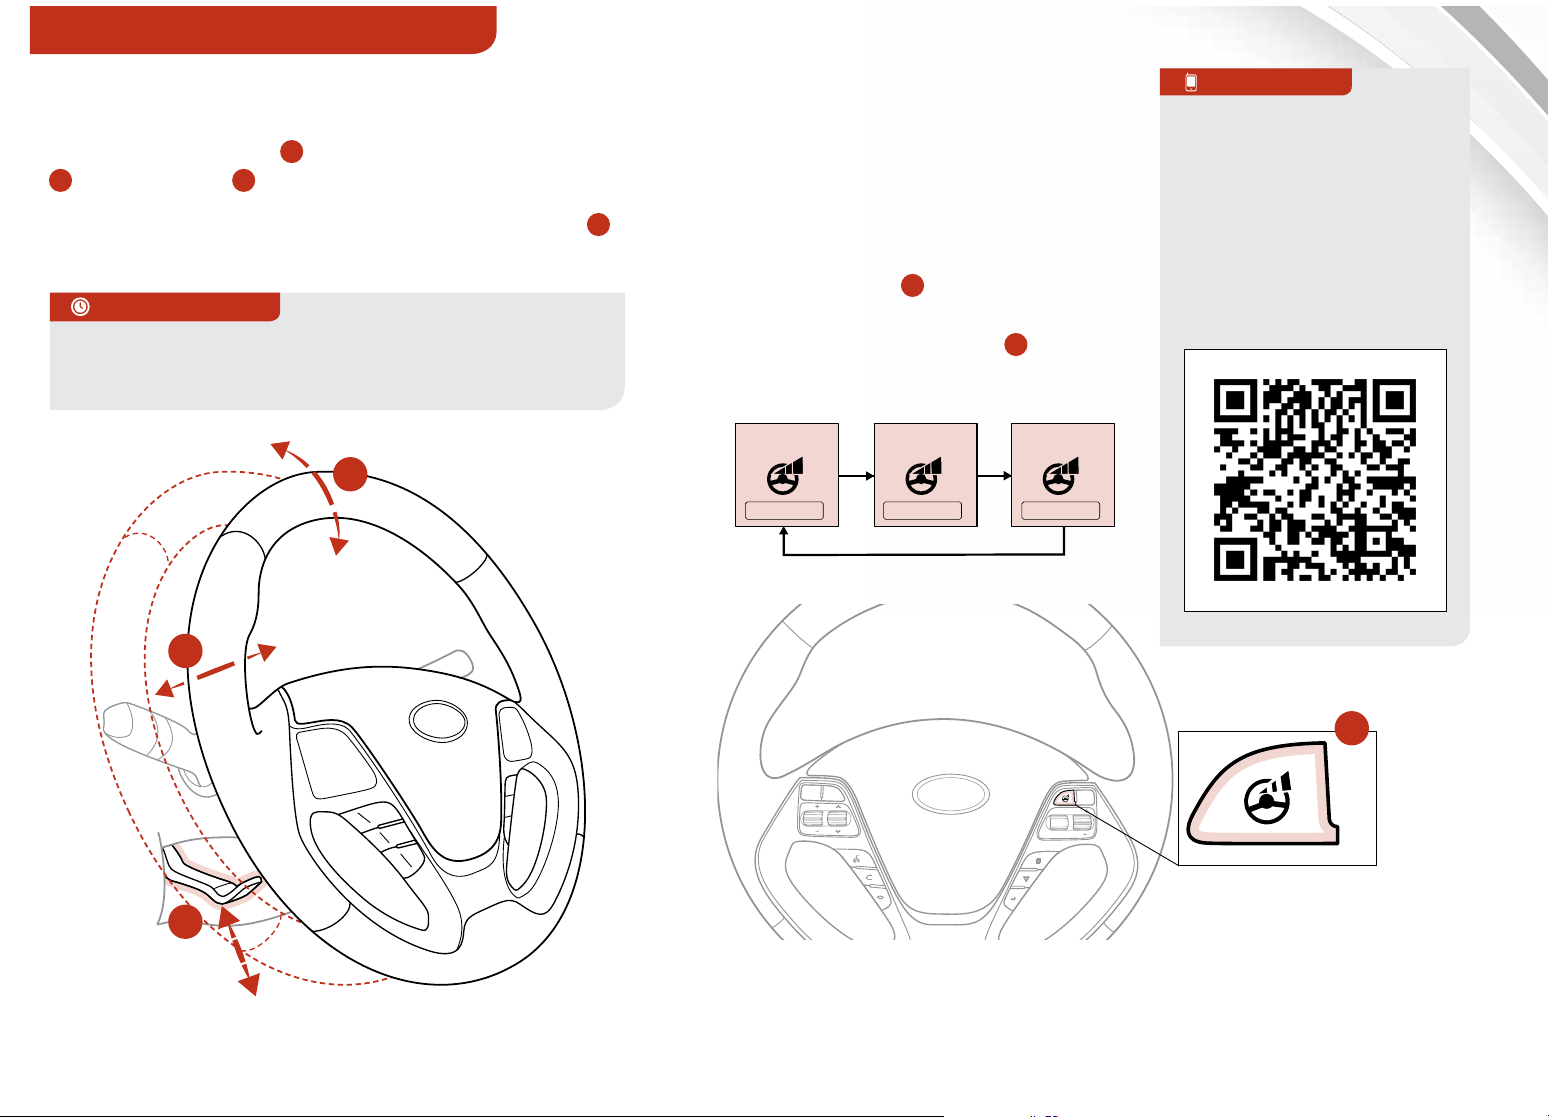
To adjust the Steering Wheel, push down the
Lock-Release Lever A and adjust to desired angle
B
and distance C.
A
When finished, pull up the Lock-Release Lever
to lock Steering Wheel in place.
QUICK TIPS
It may be helpful to pull/push bottom of Steering
Wheel towards/away from you to adjust desired
distance.
B
Mode*
Select the desired steering mode
by toggling through the steering
modes.
đŏ Press FlexSteer™ Steering Wheel
Mode button
steering mode on the LCD display*.
đŏ Then press the button
within 4 seconds to switch modes.
Steering Mode Steering Mode Steering Mode
NORMAL
A
to display the
A
again
SPORT COMFORT
QR CODE
FlexSteer™ Steering
Wheel Mode Video
To view a video on your
mobile device, SNAP
this QR Code or visit the
listed website.
Refer to page 2 for more
information.
C
A
ALWAYS CHECK THE OWNER’S MANUAL FOR COMPLETE OPERATING INFORMATION AND SAFETY WARNINGS.
REMINDER: Your vehicle’s steering wheel buttons may dier from those in the
illustrations. See your Owner’s Manual for more details.
www.KuTechVideos.com/yd13/2014
A
*IF EQUIPPED
11
Page 14
STEERING WHEEL CONTROLS
Bluetooth® Wireless Technology*
B
MUTE
VOL
A
VOL
MODE
C
CANCEL
RES
CRUISE
SET
D
E
A
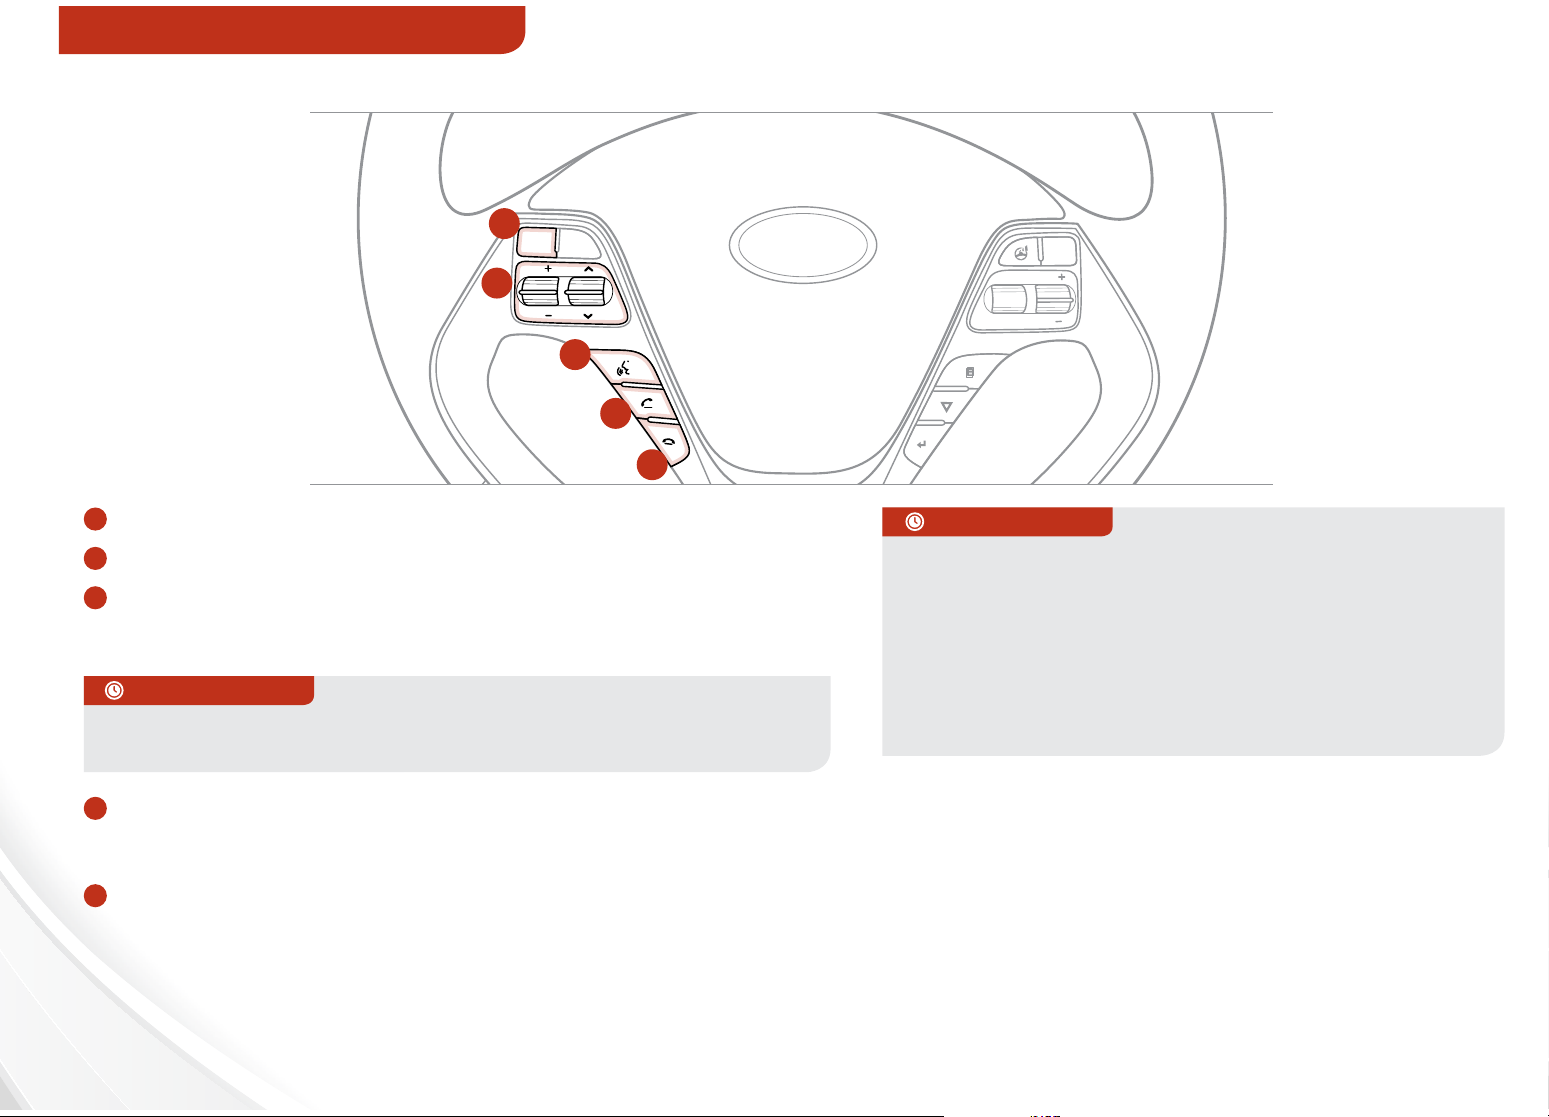
Volume button: Press up/down to raise/lower speaker volume
B
Mute button: Press to mute the microphone during a call
C
Tal k but ton: Press to activate voice recognition/bring up
menus/place calls with minimal voice command prompts from
the system
QUICK TIPS
When using the voice command feature, wait for the system BEEP
đŏ
QUICK TIPS
đŏ Phonebook transfer upload time varies by phone
model and with number of phonebook entries
đŏ Because of dierences in phone quality, service
providers and Bluetooth® Wireless Technology chip
programming, functionality may dier from one
phone to another
đŏ Changing language setting may delete paired phones
before speaking the command.
D
Receive/Place Call button: Press to receive/place/transfer
calls. Press to place a call using voice command prompts from
the system, or to answer an incoming call
E
End Call button: Press to end a call or cancel a function
For more information, if equipped, refer to the Digital Navigation Systems Owner’s Manual or the UVO System User’s Manual. For Bluetooth® Wireless
Technology FAQs, go to www.kia.com, Owners section, or call Consumer Information for Bluetooth
Owner’s Manual for more specific Bluetooth
12
FORTE FEATURES & FUNCTIONS GUIDE
®
Wireless Technology phone pairing and operation instructions.
REMINDER: Your vehicle’s steering wheel buttons may dier from
those in the illustrations. See your Owner’s Manual for more details.
REMINDER: Driving while distracted is dangerous and should
be avoided. Drivers should remain attentive to driving and
always exercise caution when using the steering-wheel-mounted
controls while driving.
®
Technology at (800) 333-4KIA. Refer to your
*IF EQUIPPED
Page 15
STEERING WHEEL CONTROLS
Bluetooth® Wireless Technology
Pairing a Phone
For instructions on how to pair a phone, refer to the audio
system’s user’s guide.
QUICK TIPS
During the pairing process, be sure to accept the connection
requests on the phone for phonebook download and to allow
acceptance of all future Bluetooth connection requests.
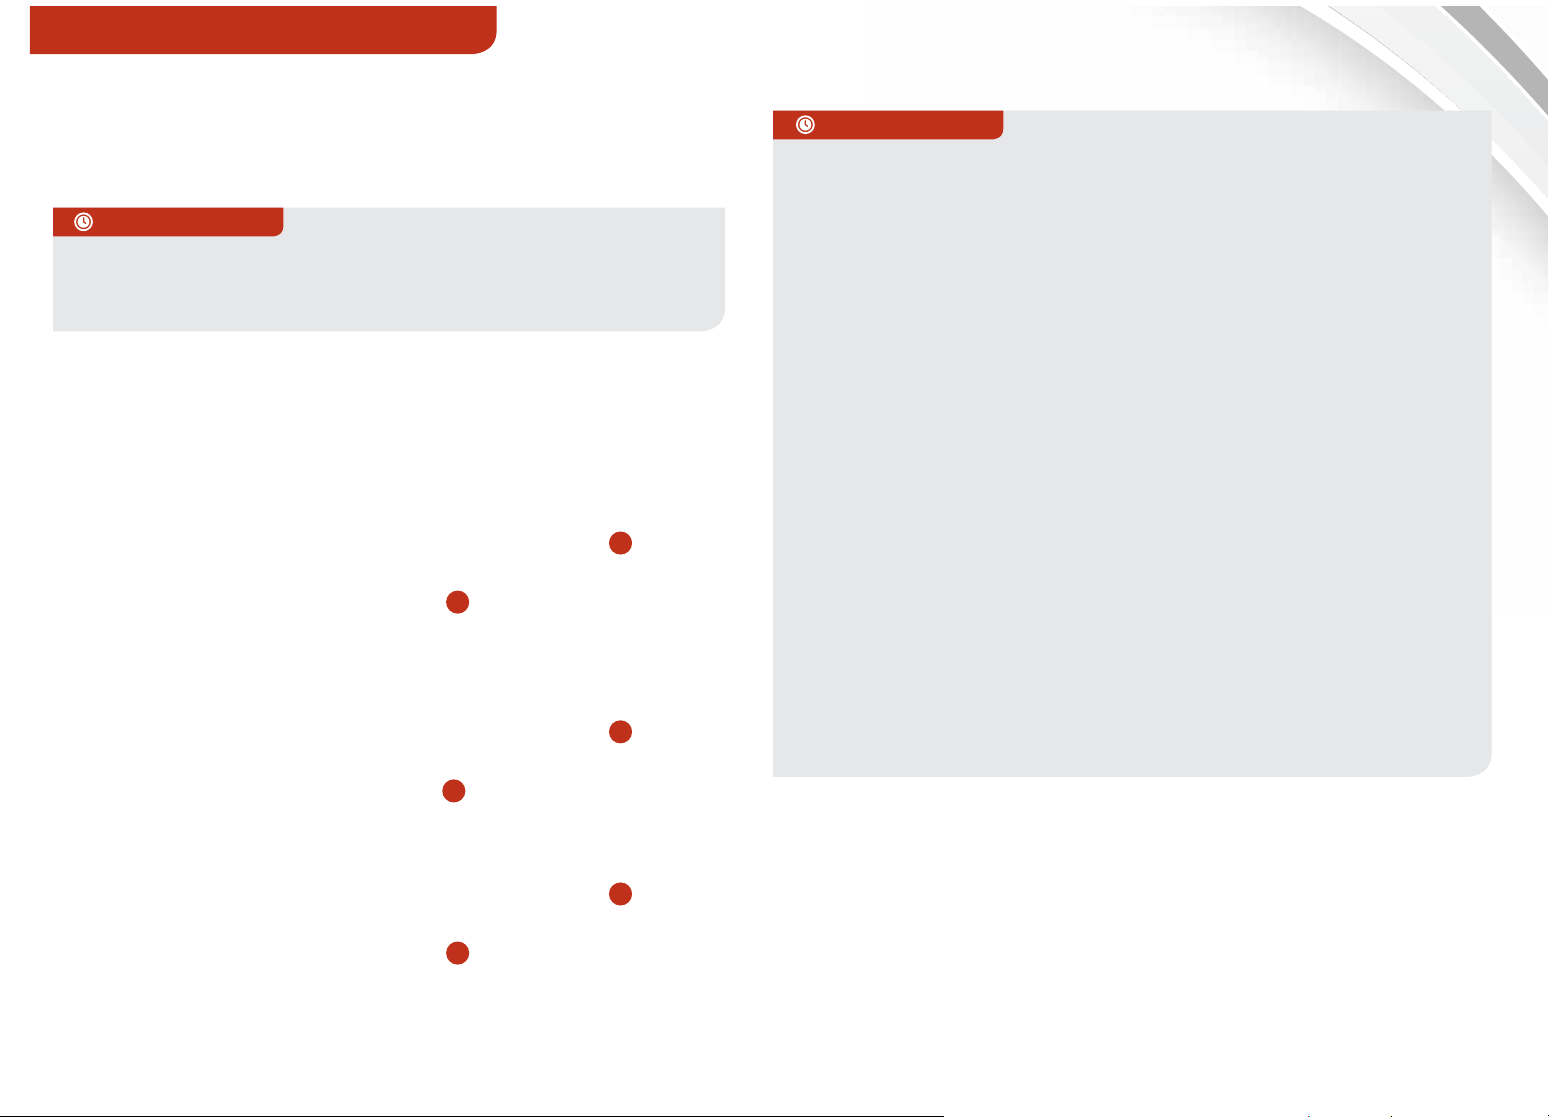
How to Place a Call
When using the voice command feature, wait for the
system BEEP before speaking the command.
There are two options for placing a call:
Standard Audio System
đŏ Option 1: Press the Receive/Place Call button
D
(system will prompt you through call process)
đŏ Option 2: Press the Talk button
C
(system will BEEP
to indicate it is ready for call placement). Then say the
command “Call {name}” or “Dial {number}”
UVO System
đŏ Option 1: Press the Receive/Place Call button
D
(displays the phone screen with number keypad)
đŏ Option 2: Press the Talk button
C
. Then say the
command “Call {name}” or “Dial {number}”
QUICK TIPS
Voice Recognition and Phone Contact Tips
The Kia Voice Recognition System may have diculty
understanding some accents or uncommon names. When using
Voice Recognition to place a call, speak in a moderate tone, with
clear pronunciation.
To maximize the use of Voice Recognition, consider these
guidelines when storing contacts:
đŏ Do not store single-name entries (e.g., "Bob", "Mom", etc.).
Instead, always use full names (including first and last names) for
these contacts
đŏ Do not use special characters (e.g., '@', '-', '*', '&', etc.)
đŏ Do not use abbreviations (i.e., use "Lieutenant" instead of "Lt.") or
acronyms (i.e., use
đŏ "County Finance Department" instead of "C. F. D."; Be sure to say
the name exactly as it is entered in the contacts list
Contacts Sync Tips
đŏ If Contact Sync is set to ON, contacts stored your phone will
download each time your phone is connected. There may be a
delay before the system is available to place a call
đŏ If Contact Sync is set to OFF, your phone contacts will download
only at the initial pairing. This allows you to make calls without
waiting for your phone contact list to download
Navigation System
đŏ Option 1: Press the Receive/Place Call button
D
(displays the phone screen with number keypad)
đŏ Option 2: Press the Talk button
C
. Then say the
command “Call Name” or “Dial Number,” followed by
phonebook name or number
ALWAYS CHECK THE OWNER’S MANUAL FOR COMPLETE OPERATING INFORMATION AND SAFETY WARNINGS.
*IF EQUIPPED
13
Page 16
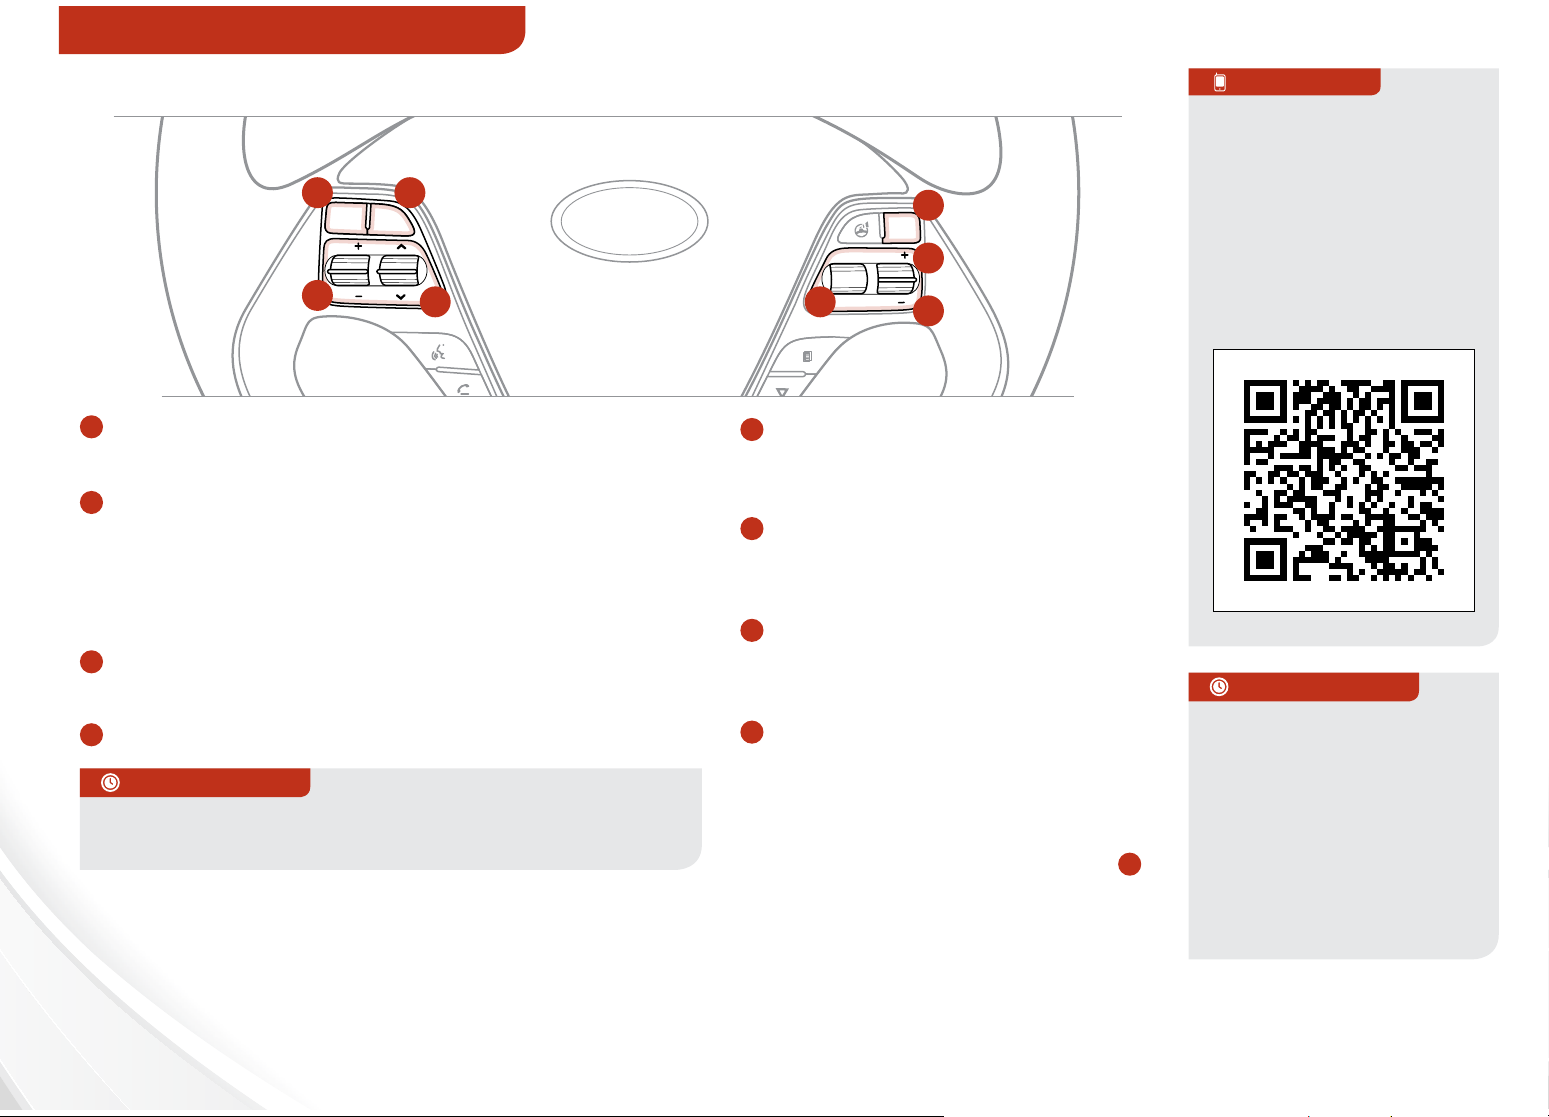
STEERING WHEEL CONTROLS
Audio Controls* Cruise Control*
D
MUTE
VOL
VOL
C
MODE
A
CANCEL
RES
CRUISE
B
E
SET
H
G
QR CODE
Forte Cruise Control Video
To view a video on your
mobile device, SNAP
this QR Code or visit the
F
listed website.
Refer to page 2 for more
information.
A
Audio Mode button: Press to cycle through
FM 1-2/AM/SAT 1-3/CD/USB/Aux/iPod
B
Seek/Preset button:
®
Radio Mode: Press to advance through Preset
Stations. Press and hold to auto seek
®
CD/USB/iPod
Mode: Press to move TRACK UP/
DOWN. Press & hold to FF/REW
C
Volume button: Press up/down to raise/lower
volume
D
Mute button: Press to mute all audio
QUICK TIPS
Pressing the Audio Mode button for more than 1 second
will turn Audio Mode ON/OFF.
REMINDER: Driving while distracted is dangerous and should be
avoided. Drivers should remain attentive to driving and always
exercise caution when using the steering-wheel-mounted controls
while driving.
For further audio system operations, refer to pages 15 - 18.
E
Cruise Control ON/OFF button:
Press to turn the Cruise Control
ON/OFF
F
Resume Cruising Speed button:
Press to resume or increase
Cruising Speed
G
Set Cruising Speed button:
Press to set or decrease Cruising
Speed
H
Cruise Control Cancel button:
To cancel Cruise Control setting,
do one of the following:
đŏ Press the brake pedal
đŏ Press the CANCEL button
REMINDER: Your vehicle’s steering wheel
buttons may dier from those in the
illustrations. See your Owner’s Manual for
more details.
H
www.KuTechVideos.com/yd13/2014
đŏ
QUICK TIPS
đŏ Cruise Control is
designed to function
above 25 mph
đŏ The Cruise Control
system will not activate
until the brake pedal
has been depressed at
least once after ignition
ON or engine start
14
FORTE FEATURES & FUNCTIONS GUIDE
*IF EQUIPPED
Page 17
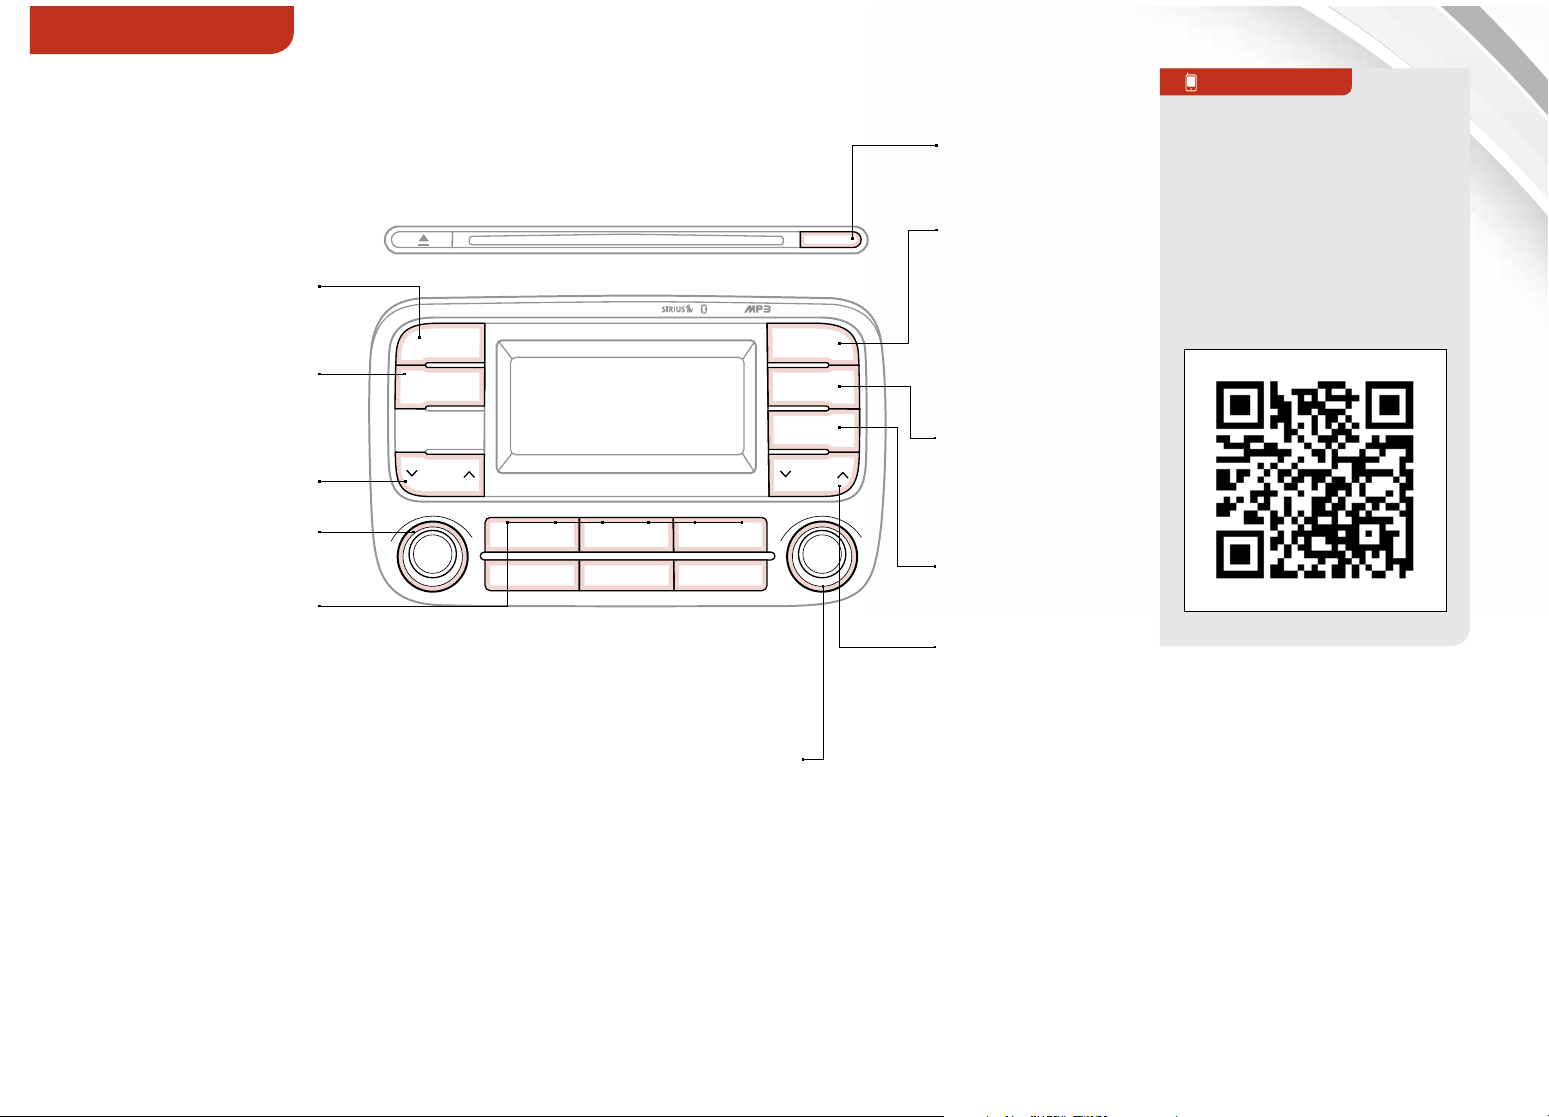
AUDIO SYSTEM
Standard Audio System Overview/Operation —
®
AM/FM/SiriusXM Satellite Radio/CD/iPod
Press to select
FM/AM/SiriusXM Modes
Press to change modes:
CD/USB/iPod
®
/Aux/M y
Music/BT Audio
Press to select previous/
next Radio/SiriusXM station
or CD/USB/iPod
®
/Aux/M y
Music/BT Audio song/file
Press to power ON/OFF.
Rotate to adjust Volume
Press Preset buttons
(1-6) to select Radio/
SiriusXM stations. Press
and hold to save Radio/
SiriusXM stations
Audio System Setup Options
RADIO
MEDIA
PHONE
SEEK
TRACK
PUSH
POWER
1
RPT
45
VOL
Rotate to change Radio/SiriusXM station
or CD/USB/iPod
®
/Aux/My Music/BT Audio
2
RDM
song/file. Press to play CD/USB/iPod
My Music/BT Audio song/file.
/Aux*
%OXHWRRWK
3
6
®
/Aux/
QR CODE
Forte Audio System
Press to
turn display
ON/OFF
DISP
Press to scan
Radio/SiriusXM
Stations and play
®
for 5 seconds.
Press and hold
SCAN
to scan/play
Video
To view a video on your
mobile device, SNAP
this QR Code or visit the
listed website.
Refer to page 2 for more
information.
through Preset
SETUP
MENU
CAT
FOLDER
TUNEFILE
Stations
Press to enter
Setup mode for
Display, Sound,
Phone and
System settings
Press to display
ENTER
menu for the
current mode
Press to search/
http://kutechvideos.com/audio/base_system
select SiriusXM
station/CD/USB/
®
iPod
/Aux/M y
Music/BT Audio
category/folder
REMINDER: Your vehicle’s
audio system may dier from
that in the illustration. See
your Owner’s Manual for more
details.
Press the SETUP button, then use the TUNE knob to cycle through the available settings for each equipped audio option.
Press the TUNE knob to adjust the audio option selected. Audio options may include the following:
đŏ Display Setup - Mode popup,
text scroll, media display
đŏ Sound Setup - Sound settings, speed
dependant volume control, voice
đŏ System Setup - Memory information,
prompt feedback, language
recognition volume
REMINDER: SiriusXM service is not available in AK or HI. For further audio system operations, refer to pages 15 - 18 .
ALWAYS CHECK THE OWNER’S MANUAL FOR COMPLETE OPERATING INFORMATION AND SAFETY WARNINGS.
*IF EQUIPPED
15
Page 18
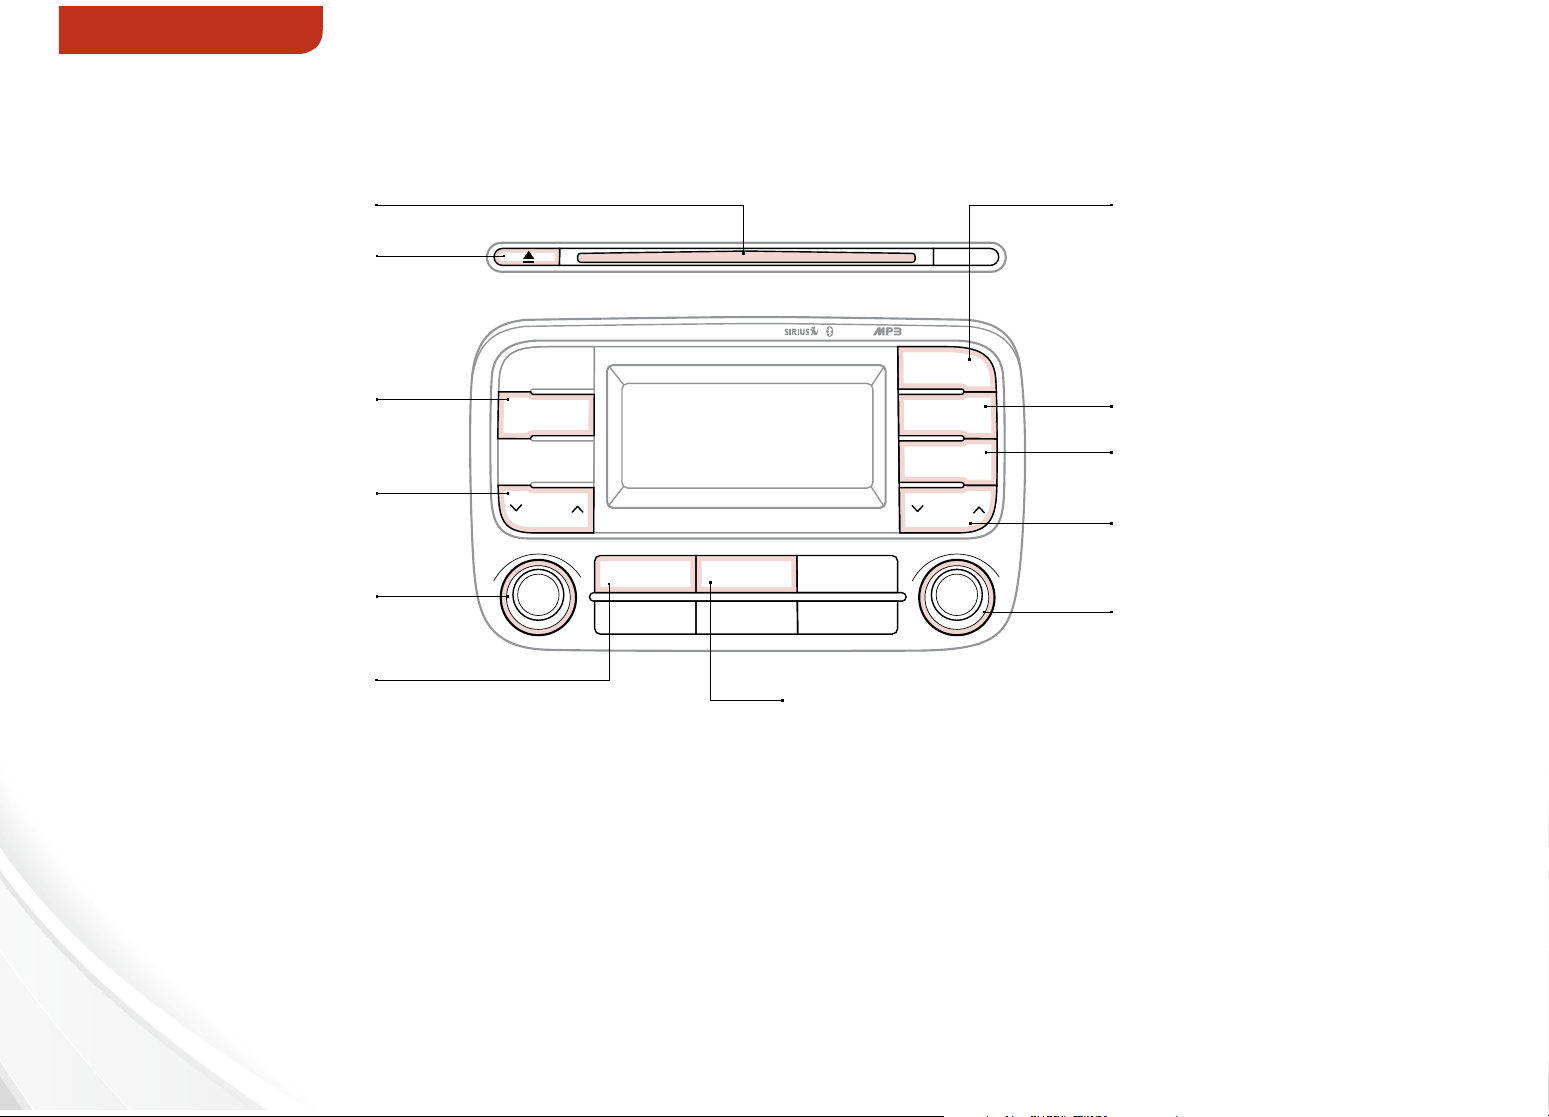
AUDIO SYSTEM
Standard Audio System Operation — CD/USB/iPod®/Aux/My Music/BT Audio*
Insert CD
Press to eject CD
Press to change modes:
CD/USB/iPod
®
/Aux/M y
Music/BT Audio
Press to select CD/USB/
®
/Aux/M y Music/BT
iPod
Audio song/file
Press to power ON/OFF.
Rotate to adjust Volume
While song/file/folder is
playing, press to select
Re
peat playback of all
songs/files/folders. Press
again to turn OFF
PUSH
POWER
RADIO
MEDIA
PHONE
SEEK
TRACK
VOL
1
RPT
45
2
RDM
Press to scan and play CD/
USB/iPod
DISP
Audio song/file for 10 seconds.
Press again to continue playing
current song/file
®
%OXHWRRWK
SCAN
SETUP
MENU
CAT
FOLDER
TUNEFILE
3
6
ENTER
Press to enter Setup mode for Display,
Sound, Phone and System settings
Press to display menus for the
current mode
Press to select CD/USB/
iPod
Audio category/folder
Rotate to change CD/USB/iPod®/
Aux/My Music/BT Audio song/file
While song/file/folder is playing,
press to select Random playback of
all songs/files/folders. Press again to
turn OFF
®
/Aux/M y Music/BT
®
/Aux/M y Music/BT
For further audio system operations, refer to pages 15 - 18 .
16
FORTE FEATURES & FUNCTIONS GUIDE
REMINDER: Your vehicle’s audio system may dier from that in the
illustration. See your Owner’s Manual for more details.
*IF EQUIPPED
Page 19
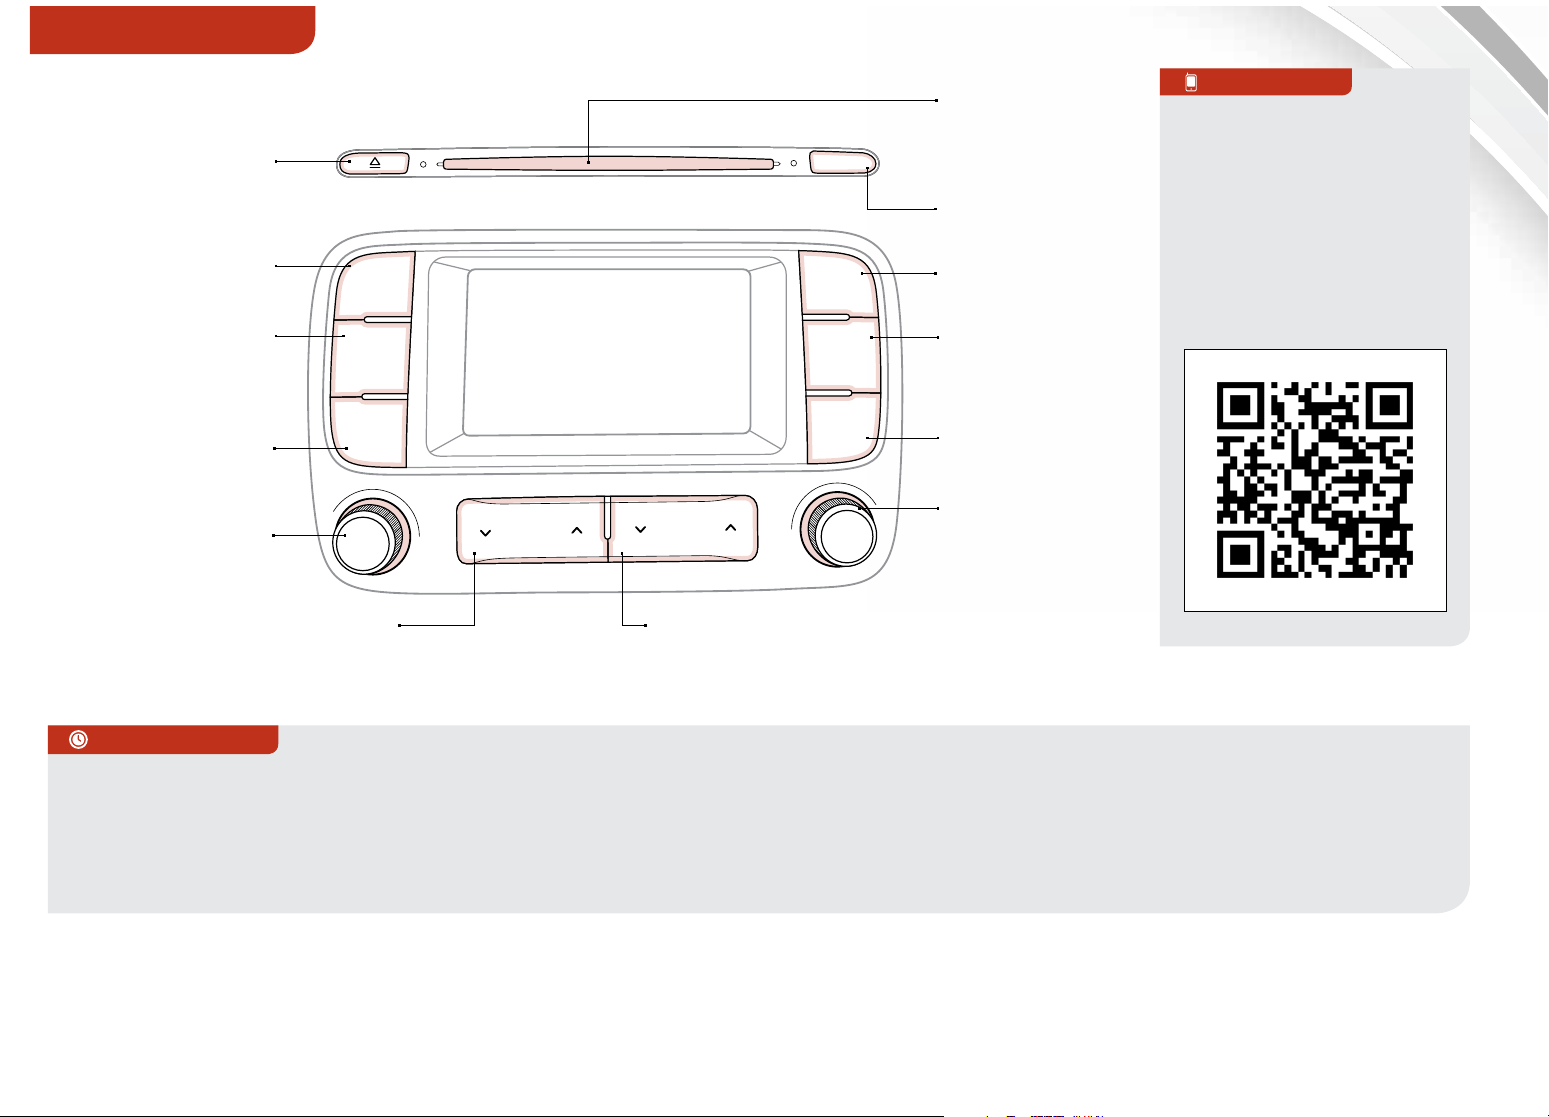
DRIVER’S PANEL
UVO System™*
Press to eject CD
Press to select
FM/AM Modes
FM/AM
DISP
eServices
Insert CD
Press to
turn display
ON/OFF
Press to select
eServices mode
QR CODE
UVO System Videos
To view a video on your
mobile device, SNAP
this QR Code or visit the
listed website.
Refer to page 2 for more
information.
Press to select
SiriusXM Satellite
SAT
Radio Mode
Press to change
modes: CD/USB/
®
iPod
/Aux/BT Audio/
Jukebox/Zune
Press to power
®
PUSH
POWER
MEDIA
SEEK
TRACK
CATEGORY
ON/OFF. Rotate to
adjust Volume
VOL
Press to select previous/next
Radio/SiriusXM station or CD/
USB/iPod
Jukebox/Zune
đŏ
QUICK TIPS
®
/Aux/BT Audio/
®
song/file
đŏ When using the voice command feature, wait for the system
BEEP before speaking the command
đŏ Music can be copied to the UVO Jukebox from MP3, CDs or
USB devices (MP3 or WMA files), but not from iPod, Zune or
commercial CDs, due to copyright restrictions
PHONE
SETUP
FILE
TUNE
Press to select SiriusXM
category
đŏ Prolonged use of the UVO System in ACC mode may drain
the vehicle’s battery
đŏ If equipped, HD RadioTM is available when selecting FM/AM
mode
Press to select
Phone mode
Press to select
Setup mode
Rotate to change
Radio/SiriusXM
station or CD/USB/
®
iPod
/Jukebox
file. Press to play
CD/USB/iPod
Jukebox/Zune
®
/
®
song/file.
http://kutechvideos.com/audio/UVO_eServices
REMINDER: SiriusXM service not available in AK or HI.REMINDER: Your vehicle’s audio system may dier from that in the
illustration. See your Owner’s Manual for more details.
For further UVO system operation, refer to the UVO System User's Manual. For further audio system operations, refer to pages 15 - 18.
ALWAYS CHECK THE OWNER’S MANUAL FOR COMPLETE OPERATING INFORMATION AND SAFETY WARNINGS.
*IF EQUIPPED
17
Page 20
AUDIO SYSTEM
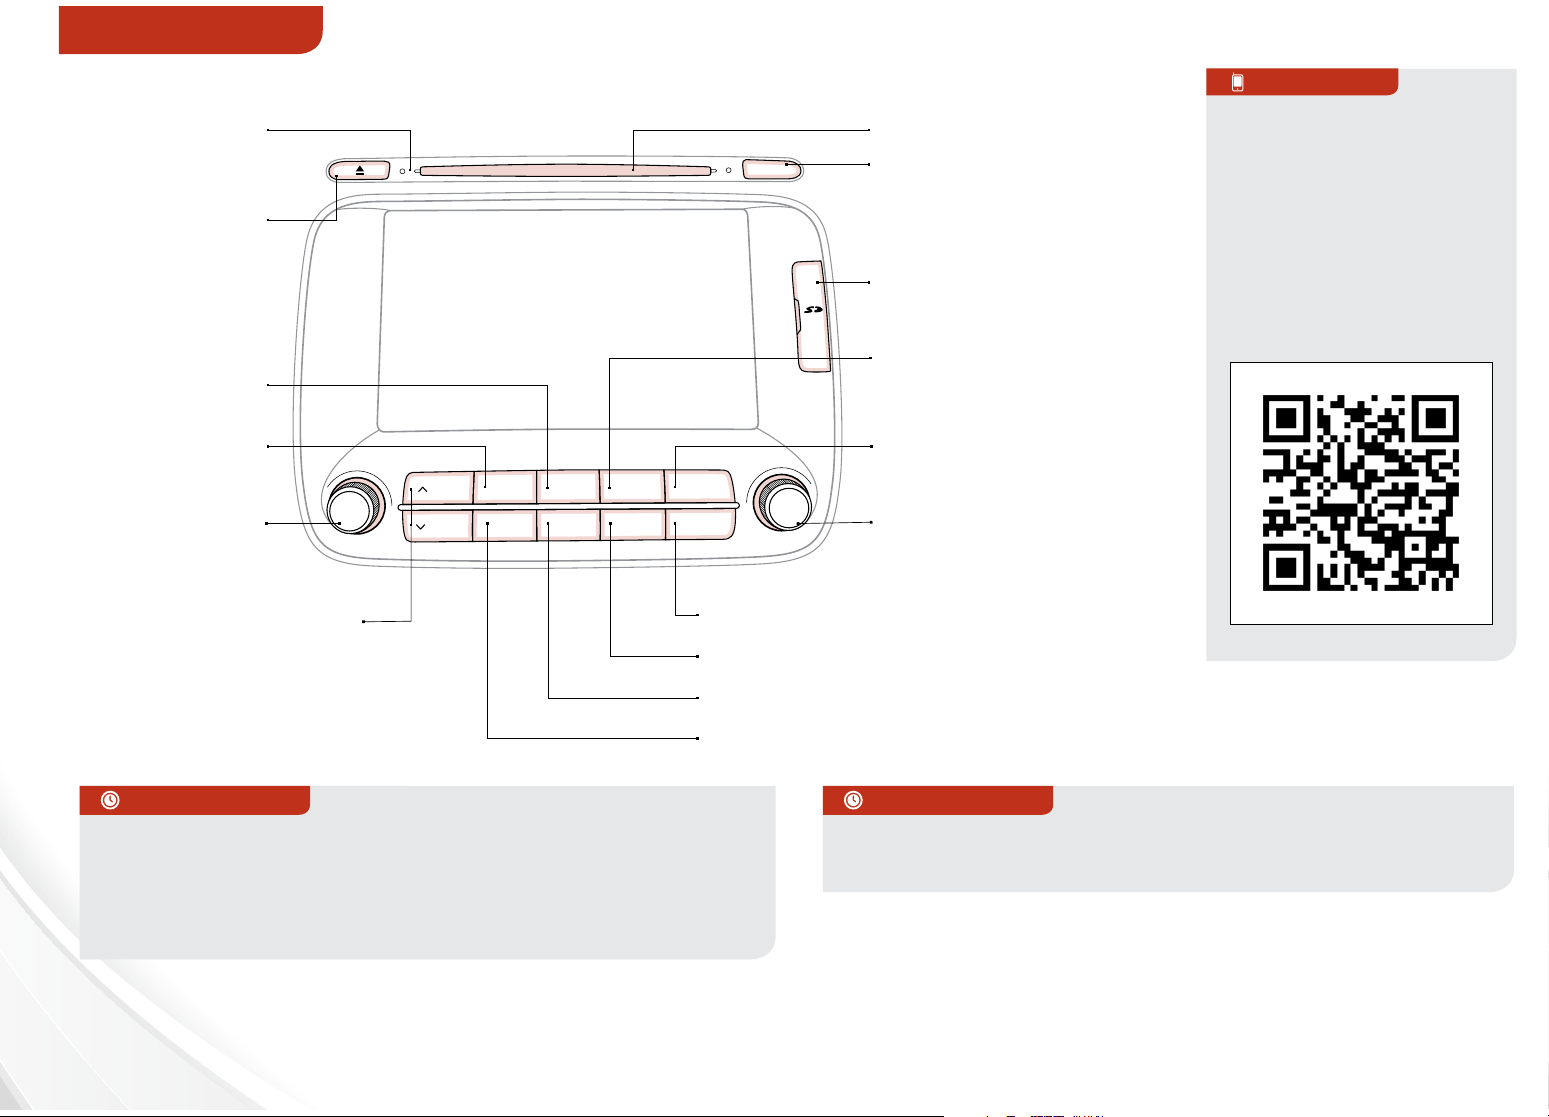
Navigation System with AM/FM/CD/MP3/SiriusXM*
Indicates that
a CD has been
inserted
Press to eject CD
CD-IN
DISP
MAP
Insert CD
Press to turn display
ON/OFF
SD Card Memory
(for
Navigation Map only)
QR CODE
Navigation Audio
System Videos
To view a video on your
mobile device, SNAP
this QR Code or visit the
listed website.
Refer to page 2 for more
information.
Press to select
SiriusXM Modes
Press to select
FM/AM Modes
Press to power
ON/OFF. Rotate
PUSH
POWER
VOL
SEEK
TRACK
FM/AM
MAP
VOICE
MEDIA
SAT
DEST ROUTE
to adjust Volume
Press to select previous/
next Radio/SiriusXM
stations or CD tracks/MP3/
USB/iPod
®
/My Music files.
Press and hold to move
quickly through stations/
tracks/songs/files
QUICK TIPS
Prolonged use of the Navigation System in ACC mode may
drain the vehicle’s battery. A warning screen may appear
periodically to remind users that the Navigation System should
be operated with the engine running to prevent
battery discharge.
Press to select CD/Aux/
USB/iPod
My Music m
FILE/TUNE
Press to display
PHONE mode
PHONE
INFO
SETUP
ENTER
Rotate to change Radio/
SiriusXM Stations or CD/
USB/iPod
Press to display IN
ETUP/eServices mode
FO/S
Press to display ROUTE mode
Press to display DESTINATION mode
Press to display MAP/VOICE mode
QUICK TIPS
When using the voice command feature, wait for the system
BEEP before speaking the command.
REMINDER: Your vehicle’s audio system may dier from that in the
illustration. See your Owner’s Manual for more details.
®
/BT Audio/
ode
®
files
http://kutechvideos.com/audio/nav_eServices
REMINDER: SiriusXM service not available in AK or HI.
For further navigation system operation, refer to the Digital Navigation System User's Manual. For further audio system operations, refer to pages 15 - 18.
18
FORTE FEATURES & FUNCTIONS GUIDE
*IF EQUIPPED
Page 21
CENTER PANEL
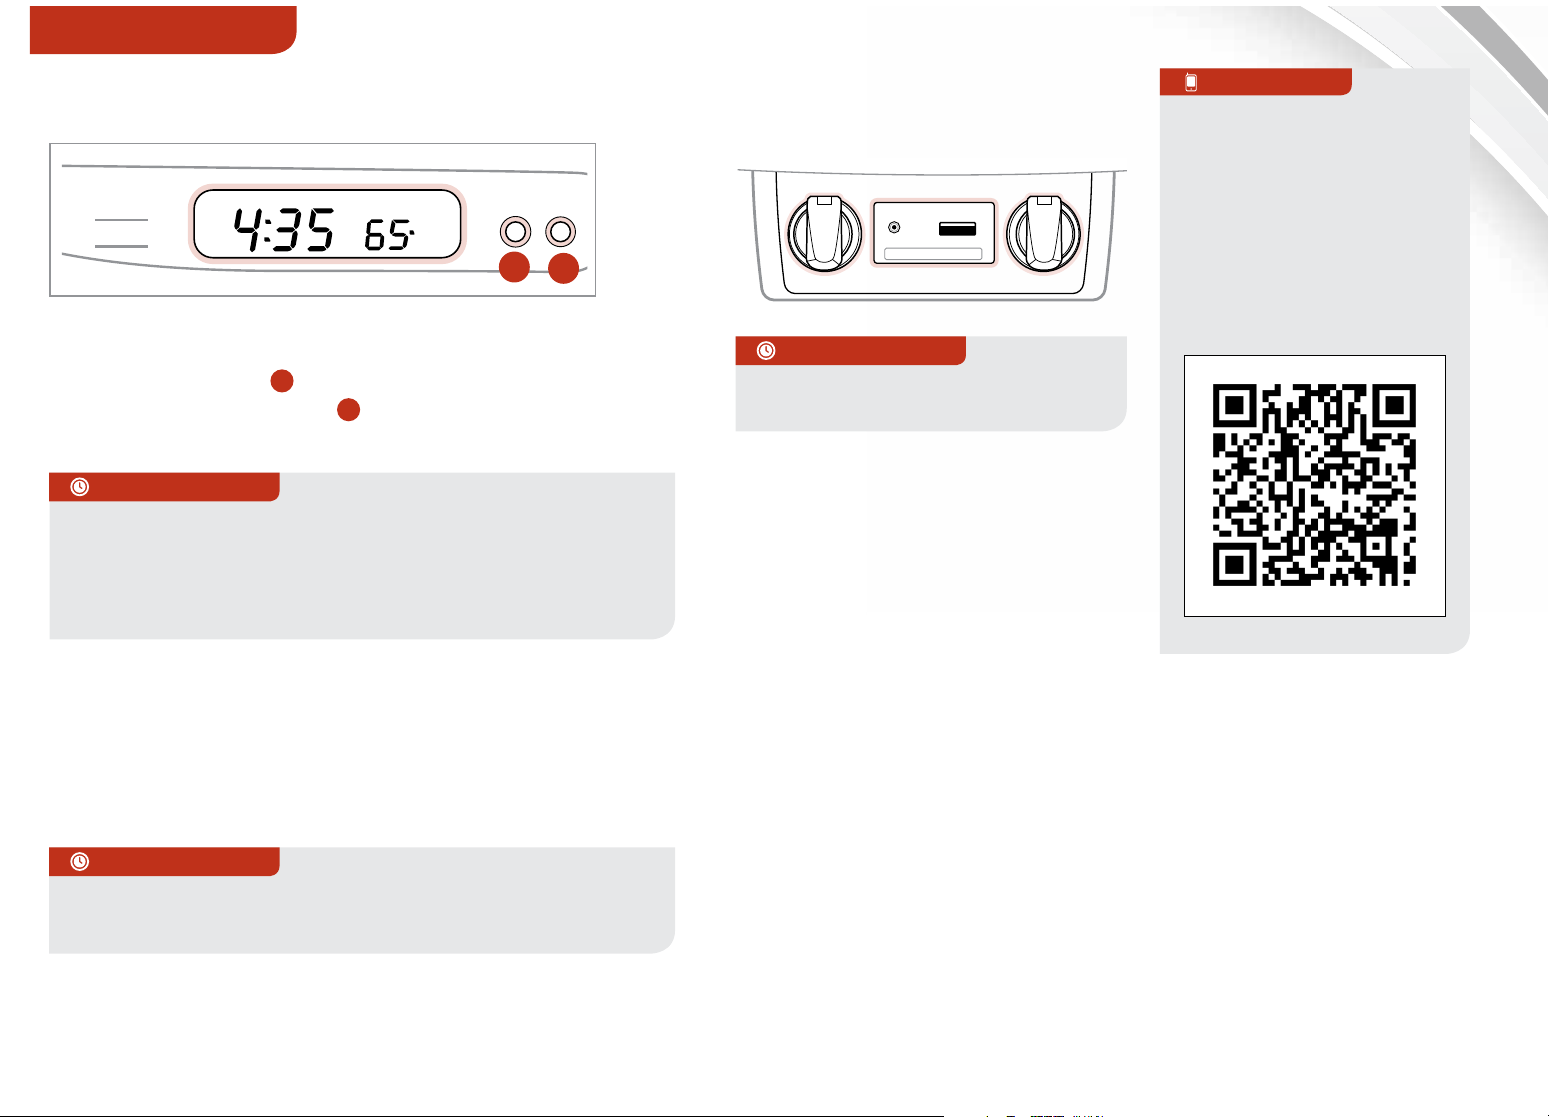
Digital Clock*
PASS
AIR BAG
OFF
OUTSIDE
F
Center Panel Clock and Outside Temperature Setup*:
A
Press the H button
hour. Press the M button
to advance the time by one
B
to advance the time by
one minute.
đŏ
QUICK TIPS
đŏ Press and hold both buttons for more than 5 seconds
to switch from 12- to 24-hour formats.
đŏ Press and hold both buttons for 1-3 seconds to switch
temperature modes (Fahrenheit/Celsius).
HM
A
B
Aux / USB / iPod® Port*
& Power Outlets*
12V
MAX
180W
AUX USB
QUICK TIPS
The power outlets are inactive
when ignition is in the OFF position
12V
MAX
180W
QR CODE
Kia USB Port Video
To view a video on your
mobile device, SNAP
this QR Code or visit the
listed website.
Refer to page 2 for more
information.
www.KuTechVideos.com/yd13/2014
Navigation System Clock Setup*:
Press the Info/Settings button on the Audio Control
Unit. Then press the on-screen SETUP button and
select the clock icon. Use the on-screen buttons to
navigate through setup.
QUICK TIPS
Press the DONE button* on the navigation screen to ensure
changes are saved.
REMINDER: The Center Panel Digital Clock and Navigation
System Clock are not synchronized and may dier slightly.
ALWAYS CHECK THE OWNER’S MANUAL FOR COMPLETE OPERATING INFORMATION AND SAFETY WARNINGS.
*IF EQUIPPED
19
Page 22
CENTER PANEL
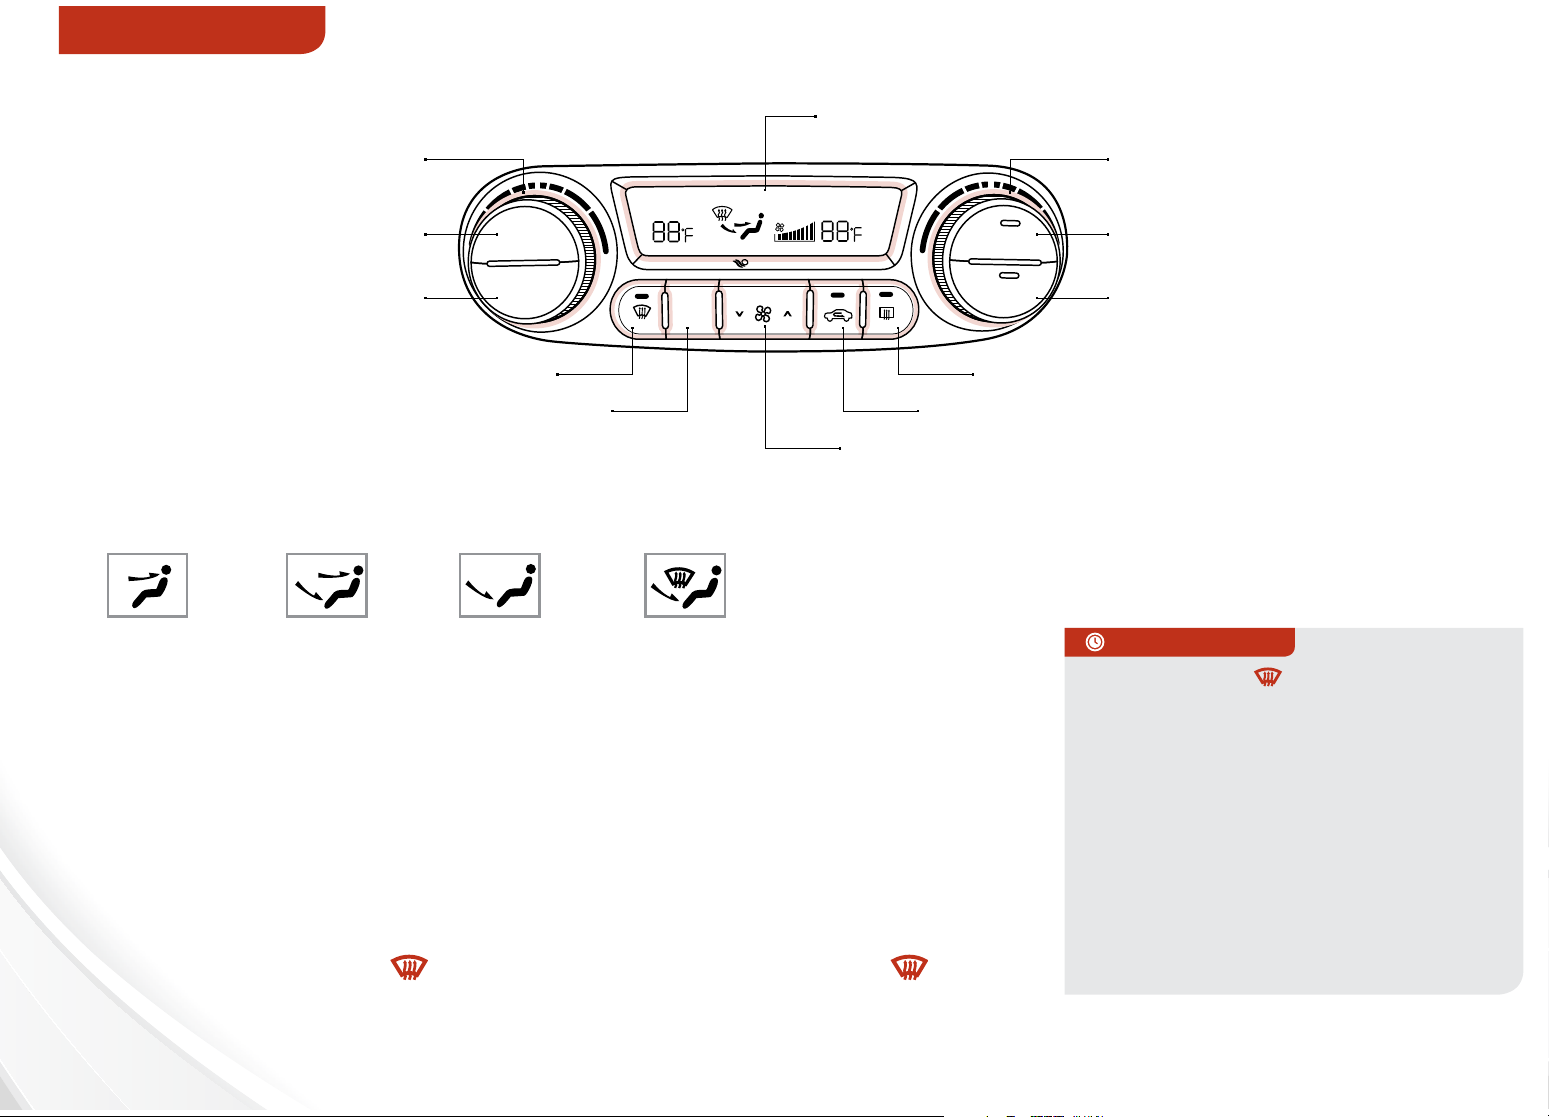
Automatic Climate Control*
Climate control display
Driver or dual temperature control Passenger temperature control
AUTO
Automatic climate control button Dual temperature control mode button
OFF button
AUTO
OFF
FRONT
AUTO
Clean Air
O
DE
M
DUAL
REAR
DUAL
A/C
Air conditioning ON/OFF button
Front windshield defroster button Rear windshield defroster button
Mode Selection button Recirculated air button
Fan speed climate control button
Air Flow Modes
To select Air Flow modes, press the MODE selection button :
Face-Level Floor-Level Floor/Defrost-LevelBi-Level
Climate Control Auto Function
1. Press AUTO to select Full Auto Operation
2. Press MODE button to control which vents air flows through
Defrost Outside Windshield:
1. Set Fan Speed to the highest position
2. Set desired Tem pera ture
3. Press the Defrost button
Defog Inside Windshield:
1. Set Fan Speed to desired position
2. Set desired Temperatur e
3. Press the Defrost button
REMINDER: Your Automatic Climate Control
system may dier from those in the illustrations.
See your Owner’s Manual for more details.
đŏ
QUICK TIPS
đŏ Defrost Mode
activates A/C
and opens Fresh Air Vent to help
dehumidify the air and improve
Defroster performance
đŏ During Auto Operation the A/C indicator
will NOT illuminate. The fan speed, air
intake, air flow and air conditioning may
automatically be engaged at any time to
reach desired temperature and reduce
humidity
đŏ Keep inside glass as clean as possible
to reduce window fogging
20
FORTE FEATURES & FUNCTIONS GUIDE
*IF EQUIPPED
Page 23
CENTER PANEL
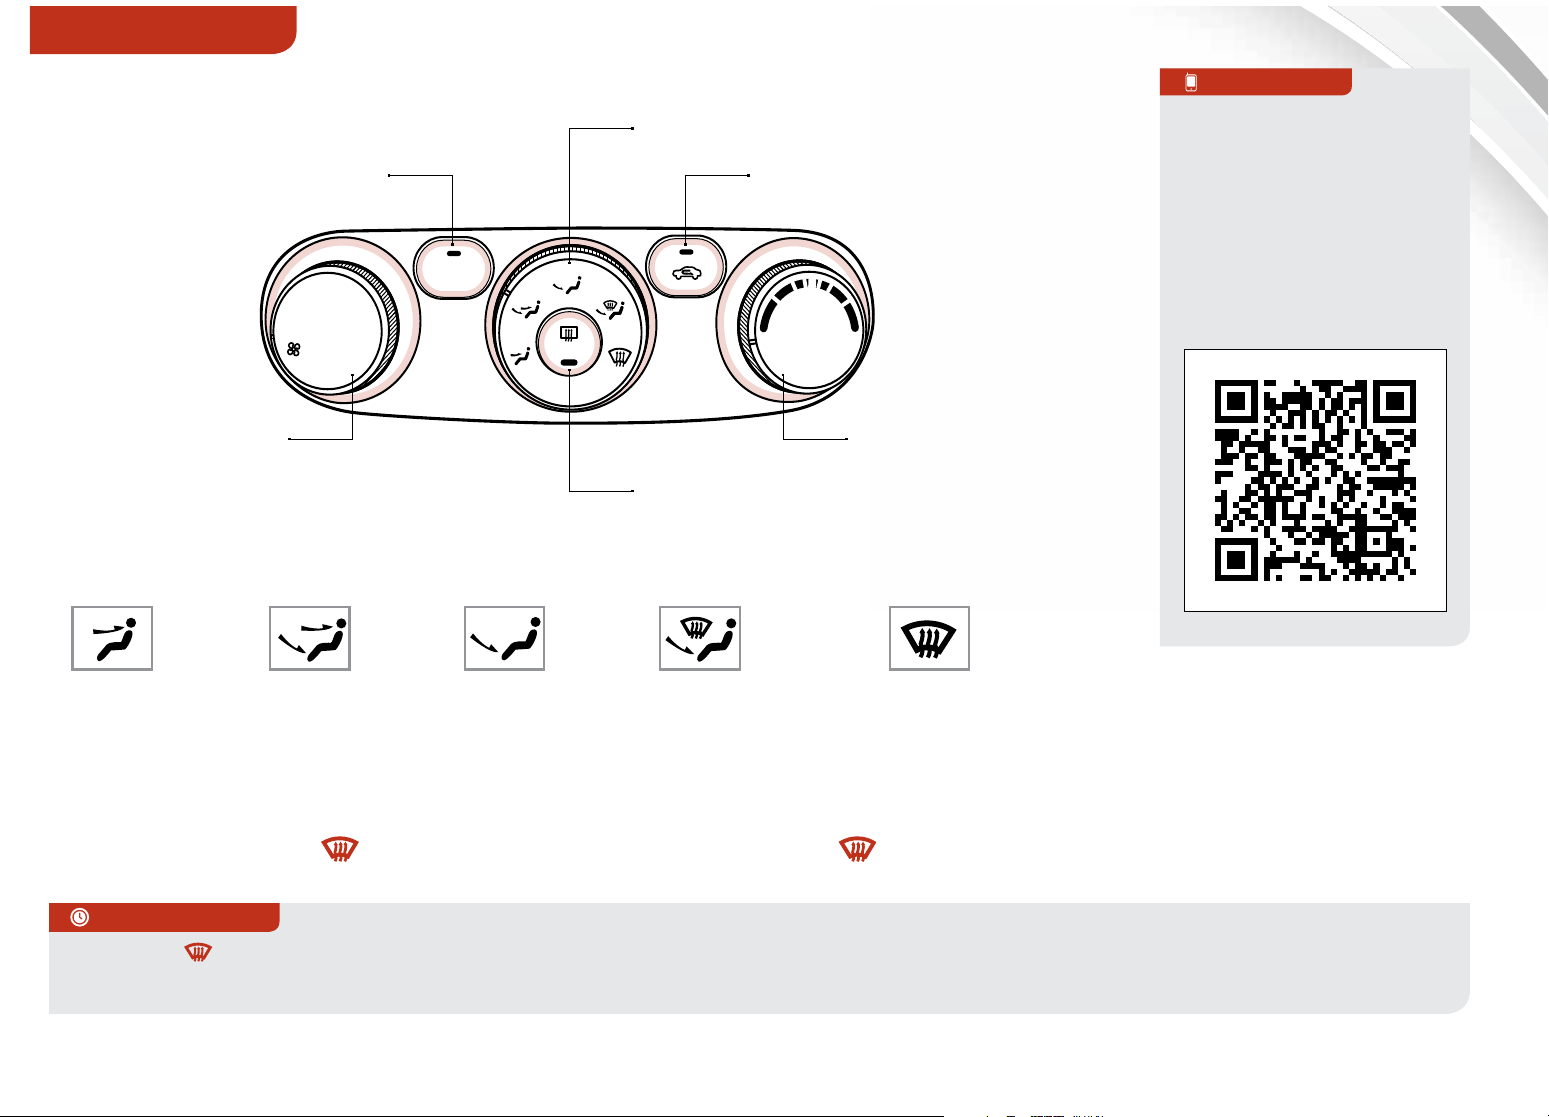
Manual Climate Control*
Mode selection knob
Air conditioning* ON/OFF button Recirculated/fresh air buton
2
1
0
3
4
A/C
REAR
MAX
A/C
QR CODE
Forte Climate Control
Video
To view a video on your
mobile device, SNAP this
QR code or visit the listed
website.
Refer to page 2 for more
information.
Fan speed control
Rear defrost ON/OFF button
Air Flow Modes
To select Air Flow modes, press the MODE selection button :
Face-Level Floor-Level Floor/Defrost-Level Defrost/Defrost-LevelBi-Level
Defrost Outside Windshield:
1. Set Fan Speed to the highest position
2. Set desired Temperatur e
3. Select Defrost mode
đŏ
QUICK TIPS
đŏ Defrost
đŏ MAX A/C Mode automatically engages Recirculated Air
Mode activates A/C and opens Fresh Air Vent
Defog Inside Windshield:
1. Set Fan Speed to desired position
2. Set desired Temperatur e
3. Select Defrost mode
Temperature control
www.KuTechVideos.com/yd13/2014
REMINDER: Your Manual
Climate Control system
may dier from those in the
illustrations. See your Owner’s
Manual for more details.
đŏ Keep inside glass as clean as possible to reduce window
fogging
ALWAYS CHECK THE OWNER’S MANUAL FOR COMPLETE OPERATING INFORMATION AND SAFETY WARNINGS.
*IF EQUIPPED
21
Page 24
P
R
N
D
SHIFT
LOCK
RELEASE
CENTER PANEL
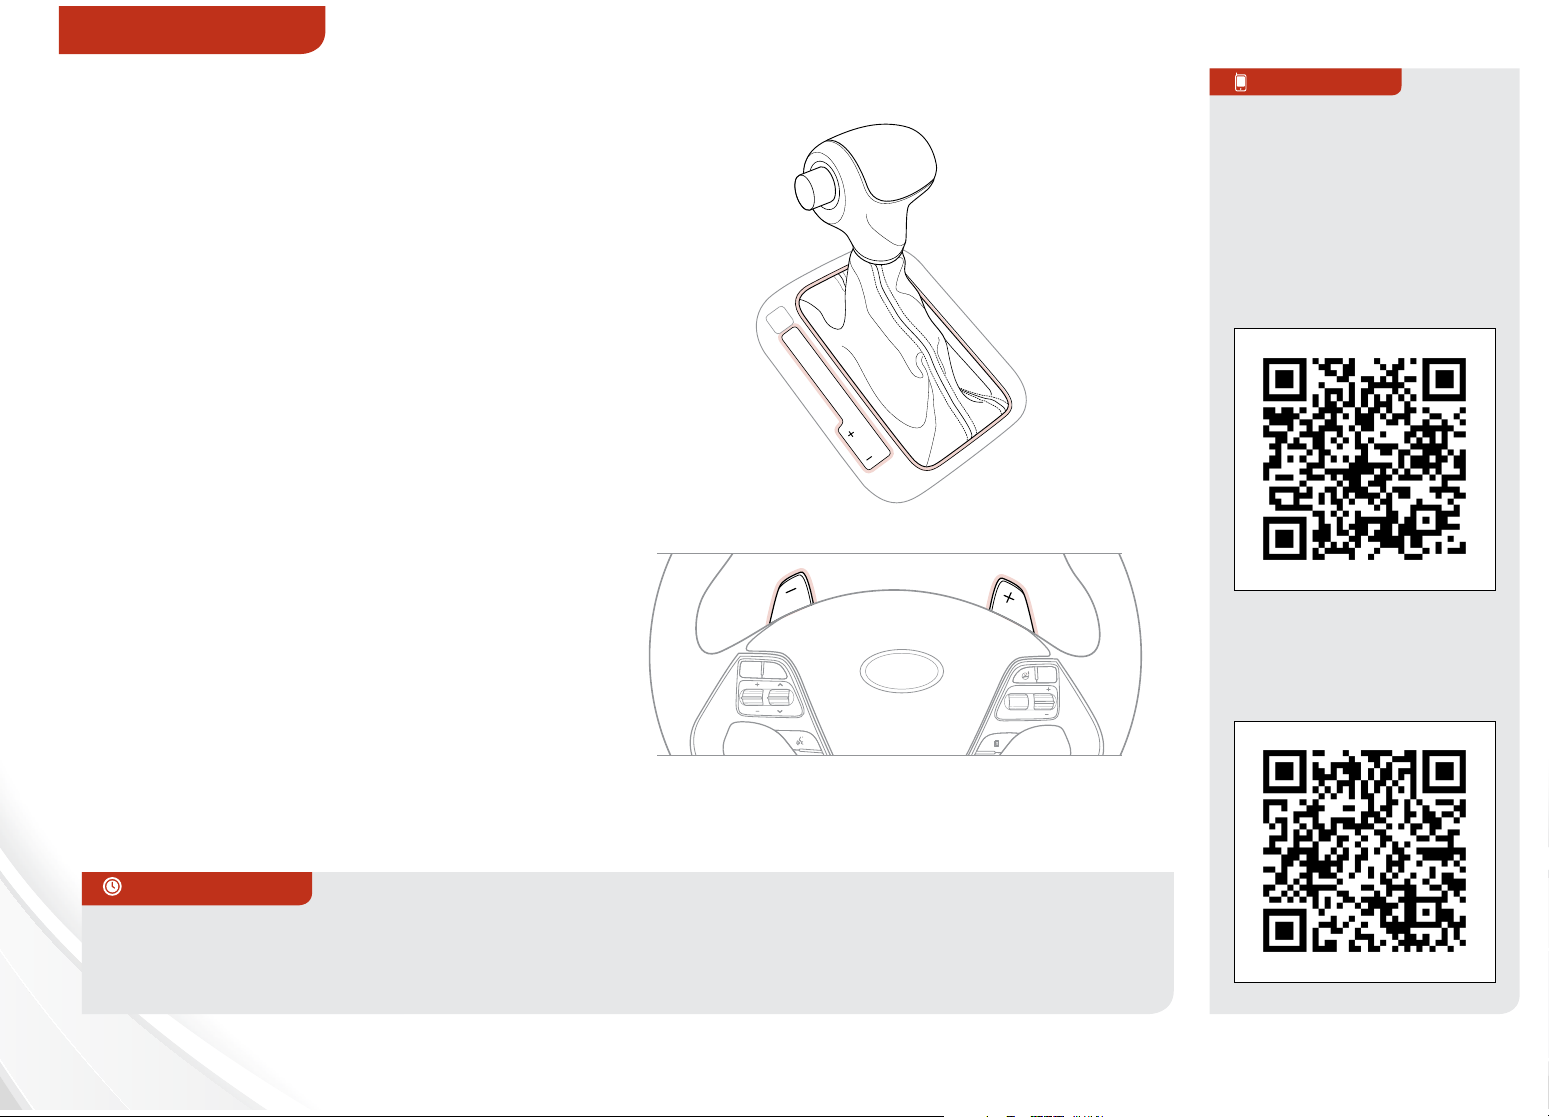
Automatic Gear Shift with Sportmatic® Shifting*
P: Park
R: Reverse
N: Neutral
D: Drive
[+]: Sport Mode Upshift
[–]: Sport Mode Downshift
Sport Mode: To enter Sport Mode,
move shift lever from D to left gate.
Sport Mode Shifting: Move shift
lever up [+] to Upshift or down [–] to
Downshift.
Paddle Shifters*
QR CODE
To view a video on your
mobile device, SNAP
these QR Codes or visit
the listed website.
Refer to page 2 for more
information.
Kia Sportmatic Shifting
Video
Paddle Shifters* are available when
the shift lever is in the D position or in
Sport Mode.
Paddle Shifting: Pull the [+] or [-]
paddle shifter once to shift up or
down one gear.
REMINDER: The Paddle Shifters can be operated
when the vehicle speed is more than 6 mph.
QUICK TIPS
đŏ Press brake pedal and depress release
button to move gearshift from N to P, N to R
or from P to any gear
22
FORTE FEATURES & FUNCTIONS GUIDE
MUTE
MODE
VOL
VOL
CANCEL
RES
CRUISE
SET
REMINDER: When in Sportmatic Mode, pulling the
left and right paddle shifters at the same time will
NOT shift gears.
đŏ Sport Mode downshifts are made
automatically when the vehicle slows
down. When the vehicle stops, 1st gear is
automatically selected
www.KuTechVideos.com/yd13/2014
Kia Paddle Shifters
Video
www.KuTechVideos.com/yd13/2014
*IF EQUIPPED
Page 25
R
1
3
5
2
4
6
CENTER PANEL
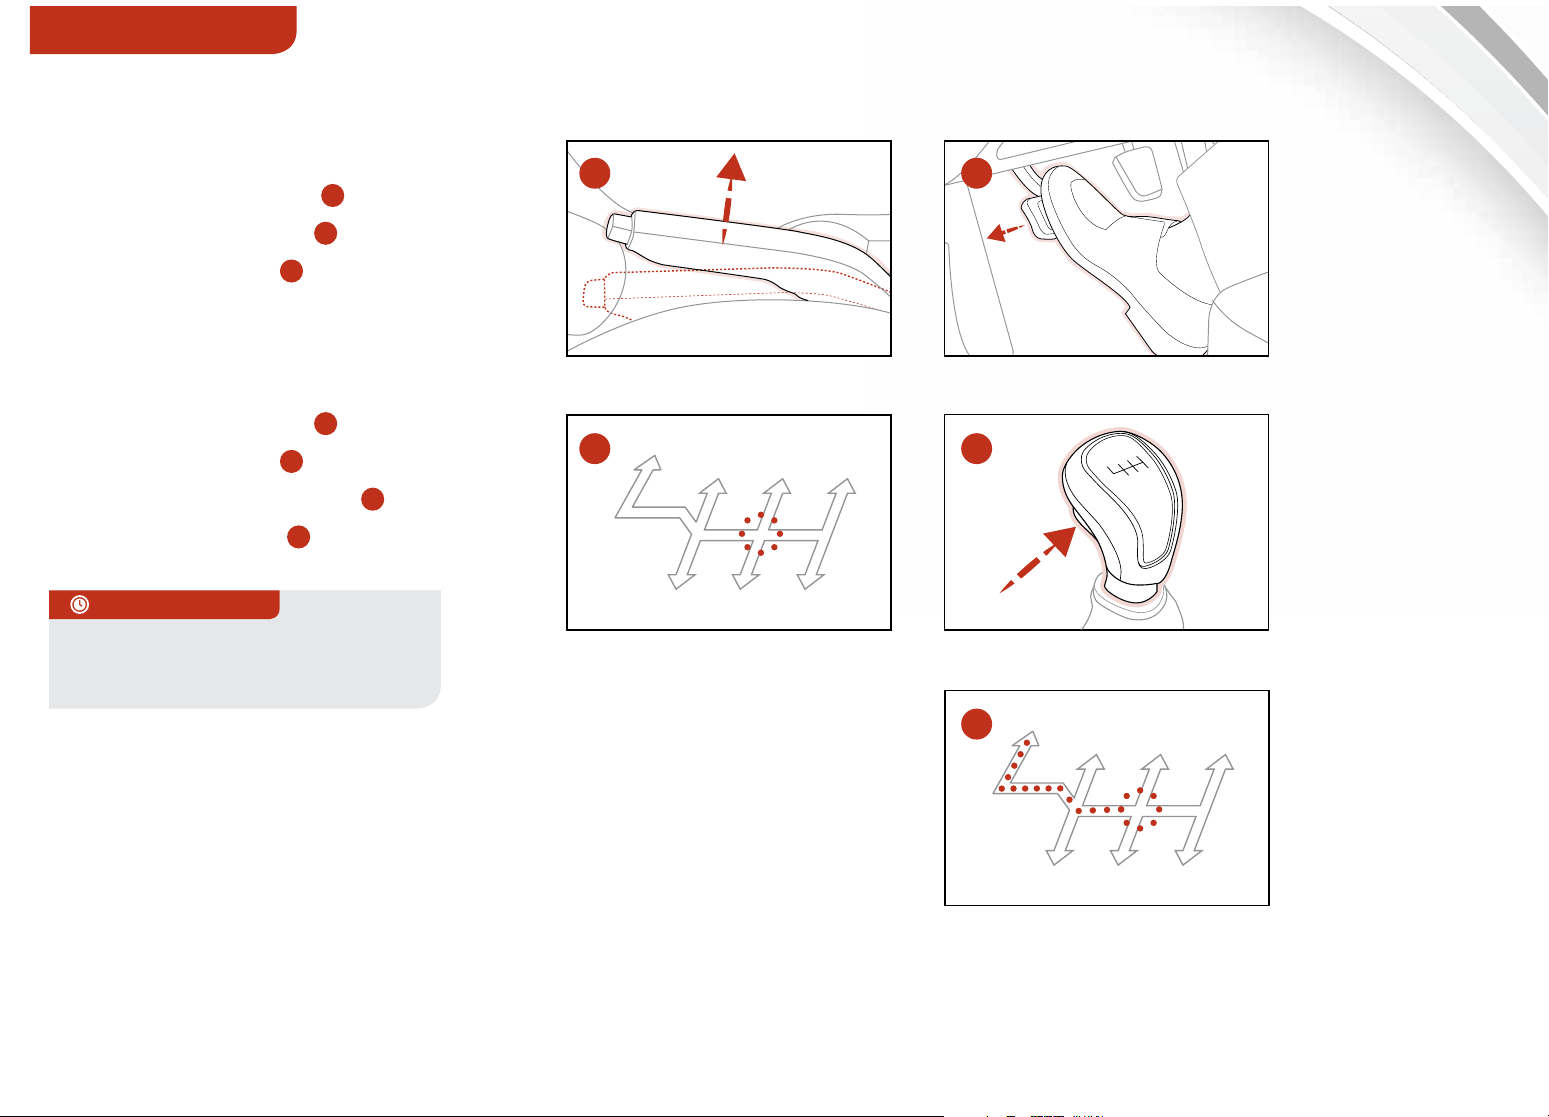
Manual Gear Shift*
Starting the Engine
1. Apply Parking Brake
2. Depress Clutch fully
3. Shift into Neutral
A
B
C
4. Turn Ignition to START
Shifting into Reverse
1. Depress Clutch fully
2. Shift into Neutral
B
C
3. Press Shift Lever button
4. Shift into Reverse
QUICK TIPS
When shifting into gears 1-6, the
Shift Lever can be moved without
pulling the Shift Lever Knob.
E
D
up
A
C
R
135
N
642
B
D
R
E
135
ALWAYS CHECK THE OWNER’S MANUAL FOR COMPLETE OPERATING INFORMATION AND SAFETY WARNINGS.
N
642
*IF EQUIPPED
23
Page 26
SEATING
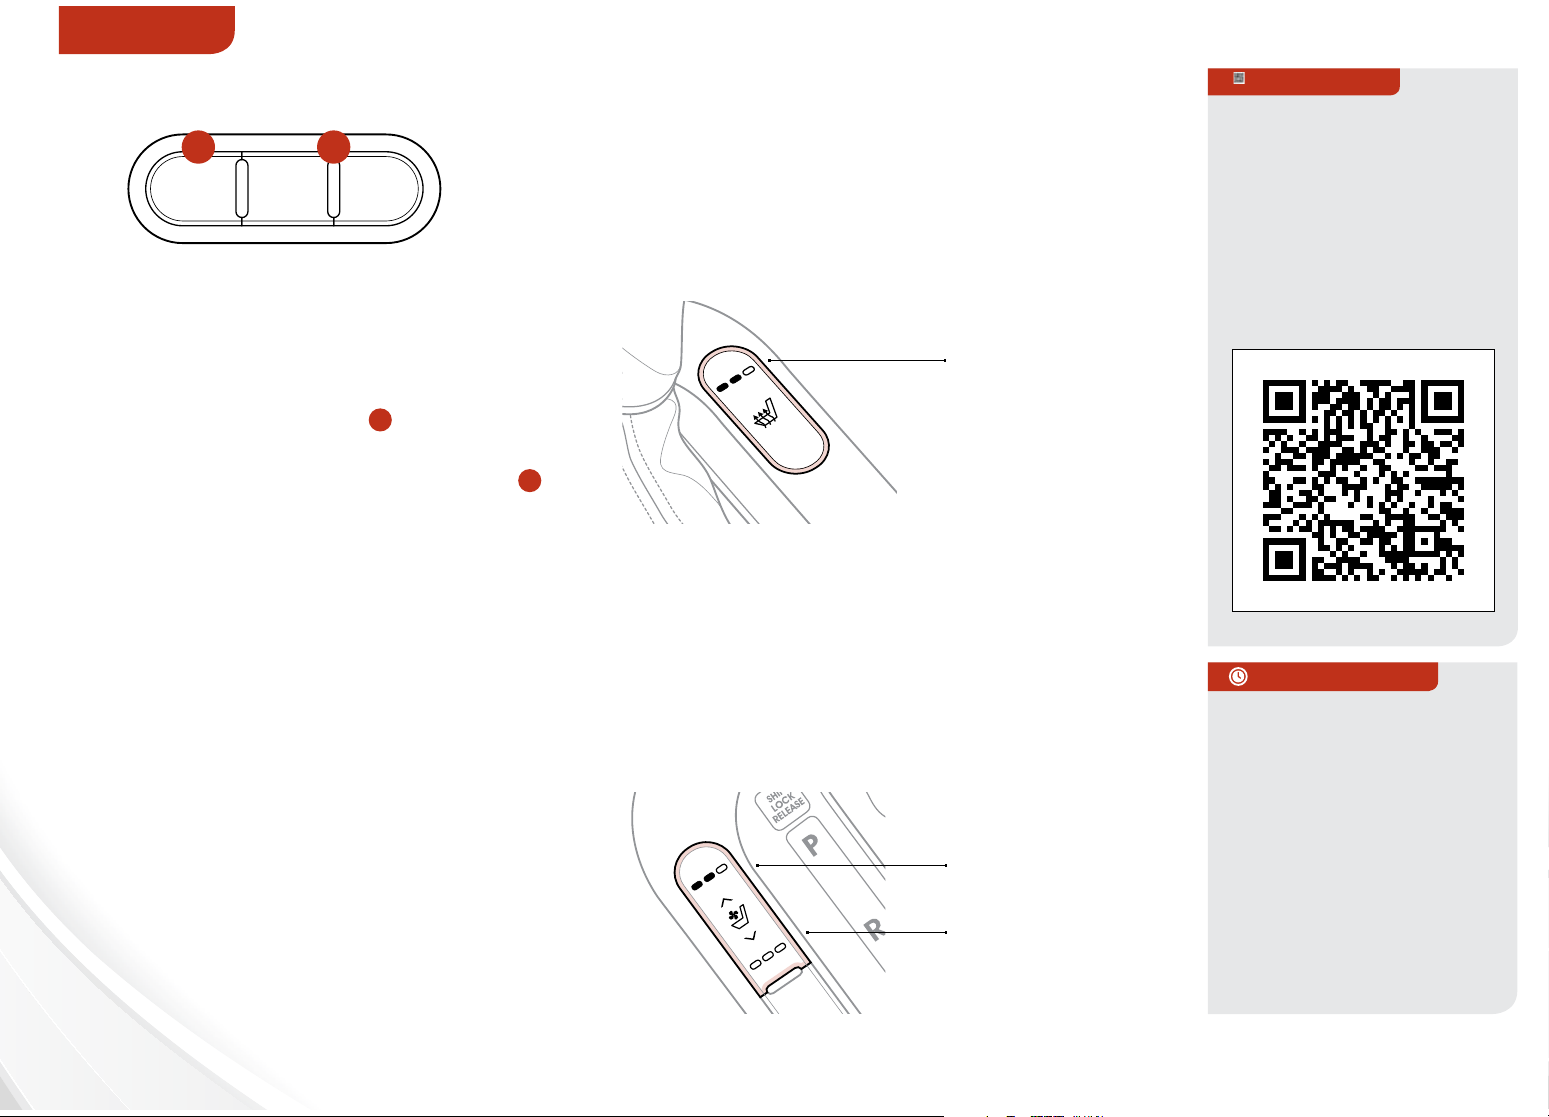
Driver Position Memory System*
A
SET 1 2
To store a seating position into memory,
first place the gear shifter into P (Park)
while the ignition switch is ON. Then:
1. Adjust the driver’s seat
2. Press the SET button A on the
control panel. System will beep once
3. Press one of the memory buttons
within 5 seconds. The system will
beep twice when memory
has been stored
B
B
Seat Warmers / Ventilated Seats*
Seat Warmers button - Press button once for
high setting (3 LEDs lit). Press button twice for
medium setting (2 LEDs lit). Press button a third
time for low setting (1 LED lit) and again to
turn OFF.
Seat Warmers
QR CODE
Seat Warmers and
Ventilated Seats Video
To view a video on your
mobile device, SNAP
this QR Code or visit the
listed website.
Refer to page 2 for more
information.
24
Seat Warmers / Ventilated Seats* button -
Press top/bottom of button once for high
setting (3 LEDs lit). Press button twice for
medium setting (2 LEDs lit). Press a third time
for low setting (1 LED lit) and again to turn OFF.
FORTE FEATURES & FUNCTIONS GUIDE
Warming: Top,
Yellow color
Ventilated: Bottom,
Blue color
www.KuTechVideos.com/yd13/2014
đŏ
QUICK TIPS
đŏ With the seat warmer
switch in the ON
position, the heating
system in the seat turns
o or on automatically
depending on the seat
temperature.
đŏ System does NOT turn
o when ignition is
cycled. To turn o, press
the seat warmer switch
*IF EQUIPPED
Page 27
SEATING
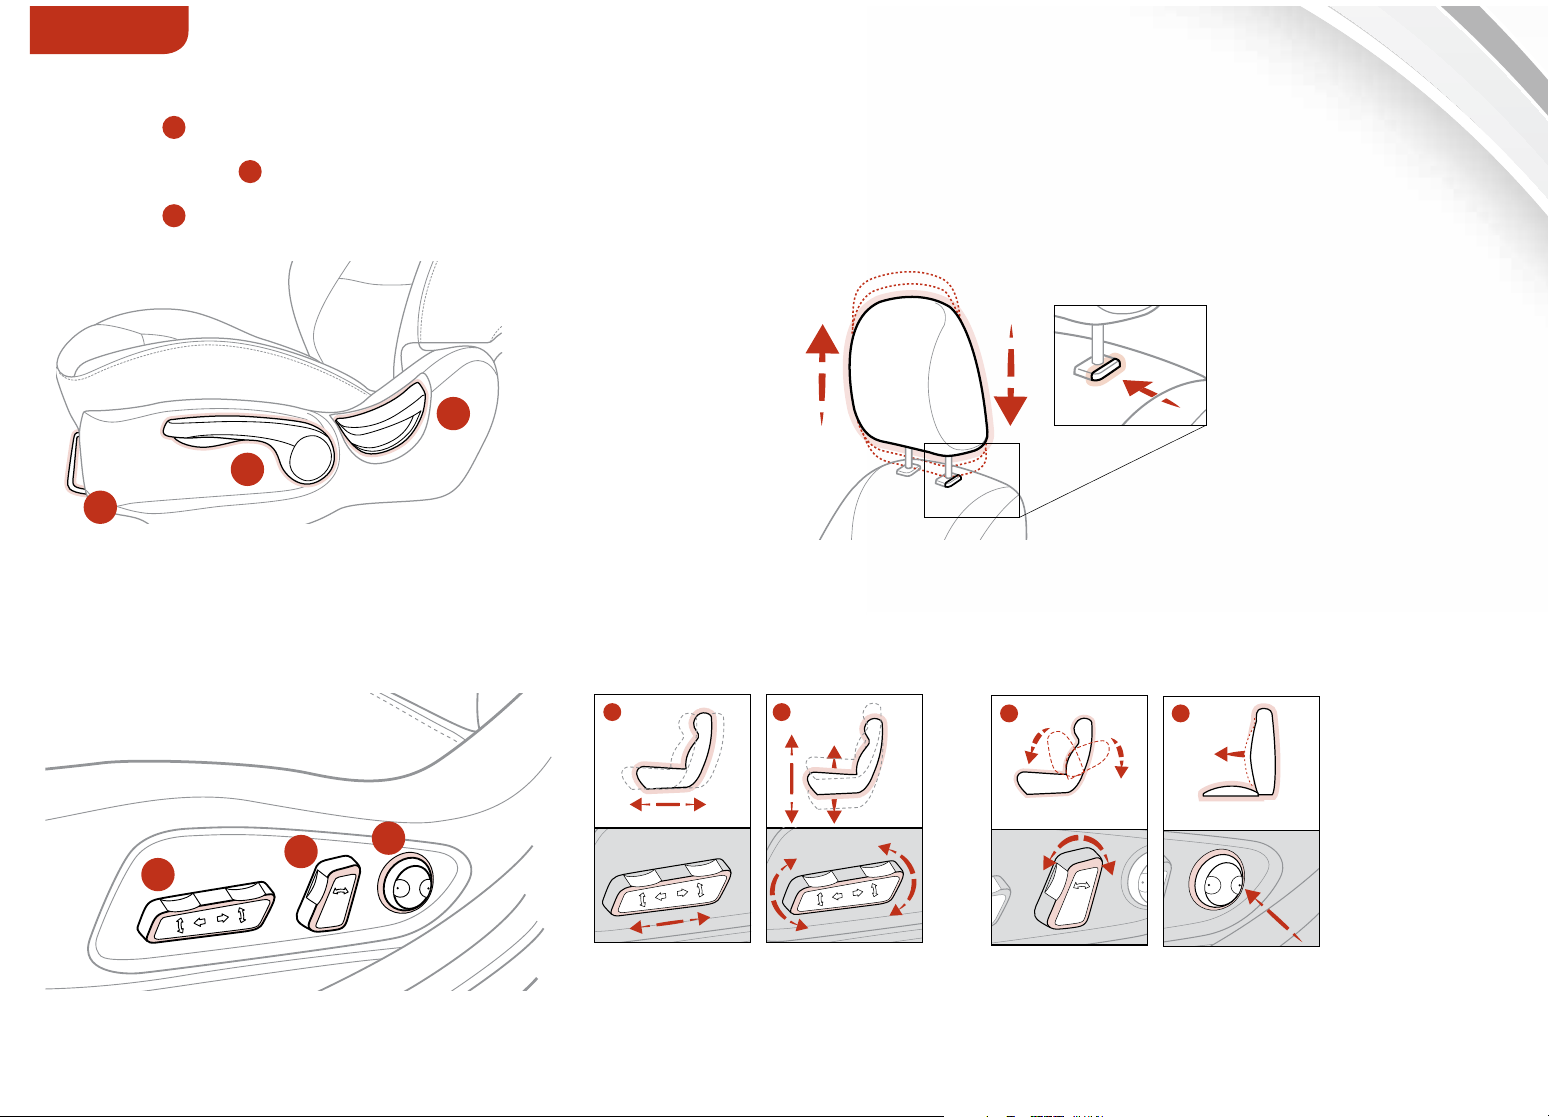
6-Way Manual Adjustable Driver’s Seat
Front Seat Headrest Adjustment
Pull lever A to slide Seat forward/backward
To raise Headrest: Pull Headrest up.
Pull/press lever B to adjust Seat Height
To lower Headrest: Press lock, then press
Pull lever C to adjust Seatback Recline
C
the Headrest down.
PRESS
B
A
Power Adjustable Driver’s Seat*
Move/Press controls to adjust Seat forward/backward, Seat Cushion, Seatback and Lumbar
B
A A
C
B C
A
Seat forward/
backward
ALWAYS CHECK THE OWNER’S MANUAL FOR COMPLETE OPERATING INFORMATION AND SAFETY WARNINGS.
Seat Cushion
Seatback Lumbar
*IF EQUIPPED
25
Page 28
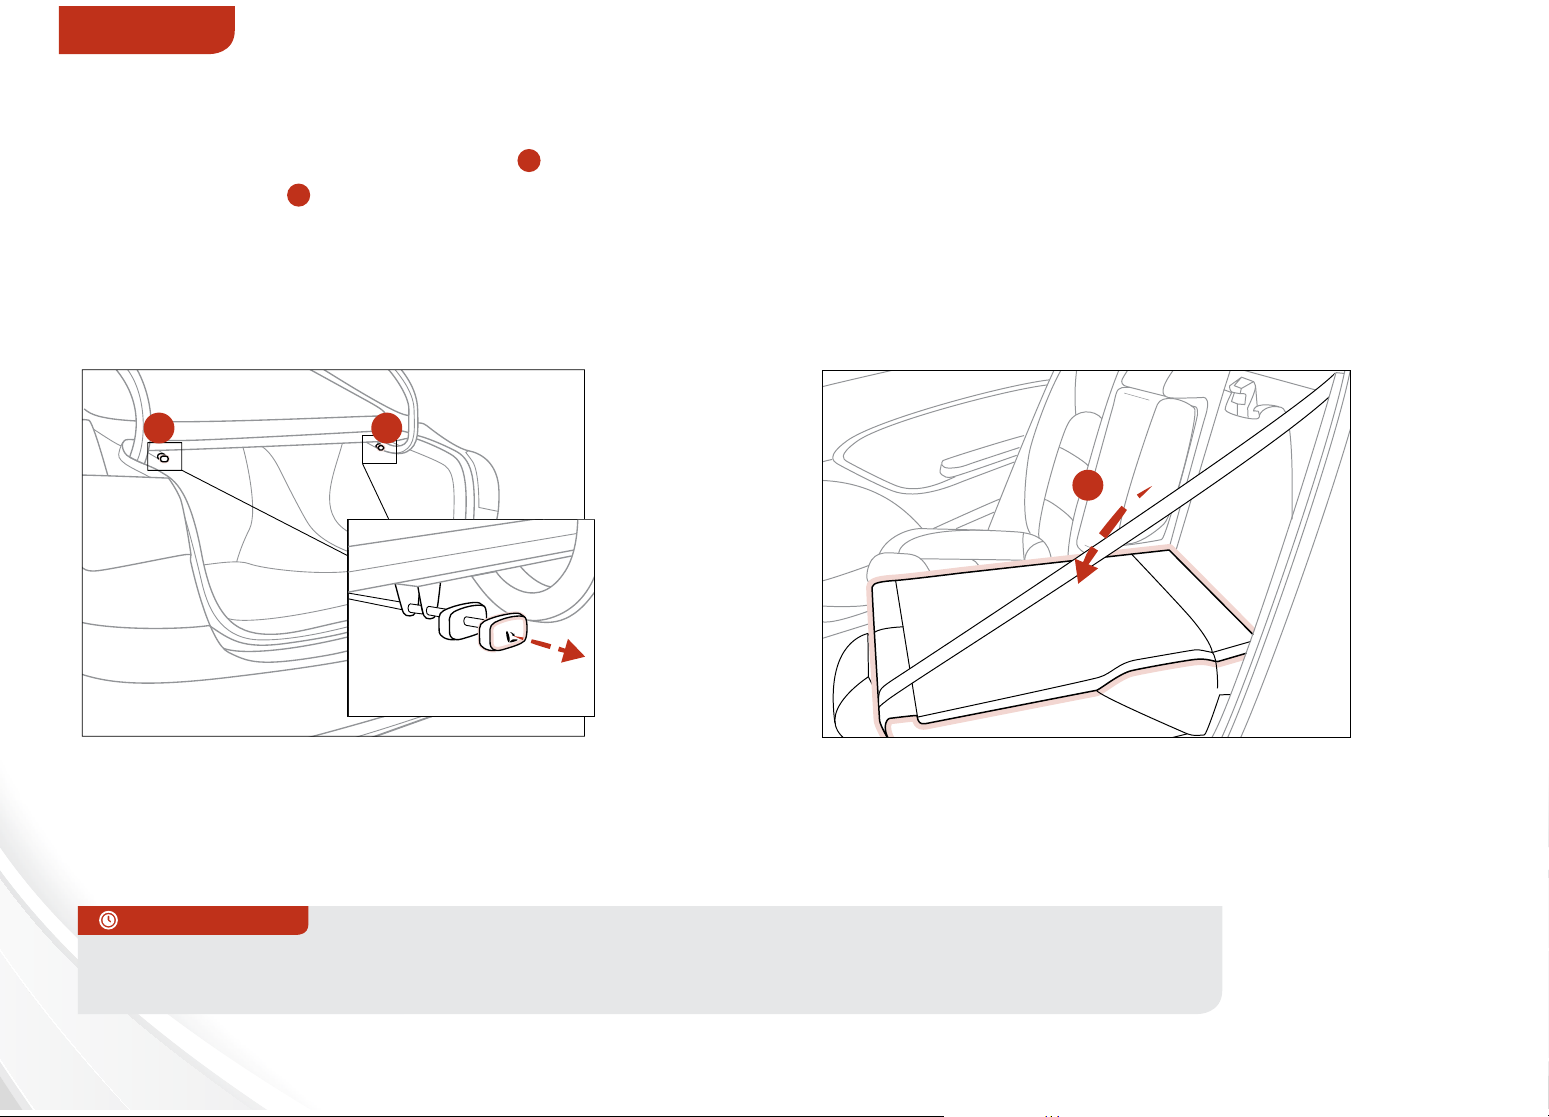
SEATING
PULL
Folding Rear Seat* (2- and 4-door model)
1. Ensure the Rear Seatbelt is secured into the guide
2. Pull Seatback Lock Release Lever
3. Fold Seatback
A A
B
down
A
to release Rear Seatback (Lever located in trunk)
B
PULL
QUICK TIPS
đŏ It may be necessary to adjust the front Seatbacks, by sliding forward, to fully lower rear Seatbacks.
đŏ Lower Rear Headrests to the lowest position.
26
FORTE FEATURES & FUNCTIONS GUIDE
*IF EQUIPPED
Page 29
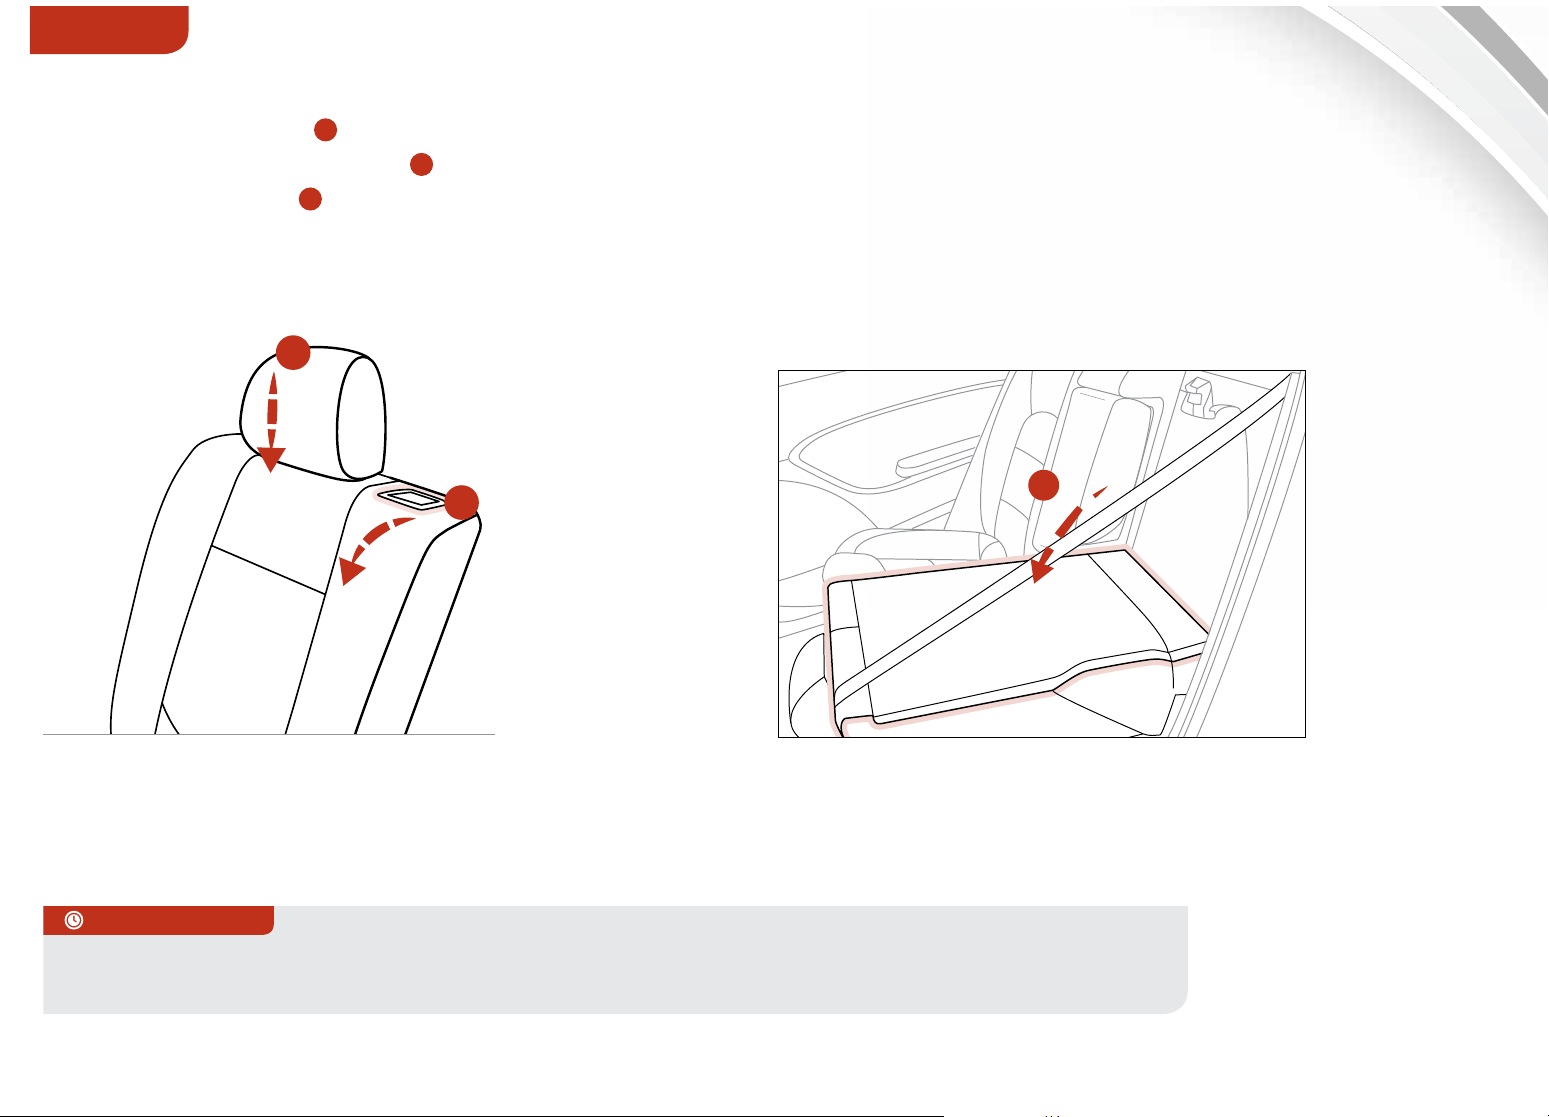
SEATING
Folding Rear Seat* (5-Door Model)
A
1. Lower the headrest
2. Pull the Lock Release Lever
3. Fold the Seatback
to the farthest position
B
, located on Seatback shoulder
C
forward
A
B
B
QUICK TIPS
đŏ It may be necessary to adjust the front Seatbacks, by sliding forward, to fully lower rear Seatbacks.
đŏ Lower Rear Headrests to the lowest position.
ALWAYS CHECK THE OWNER’S MANUAL FOR COMPLETE OPERATING INFORMATION AND SAFETY WARNINGS.
*IF EQUIPPED
27
Page 30
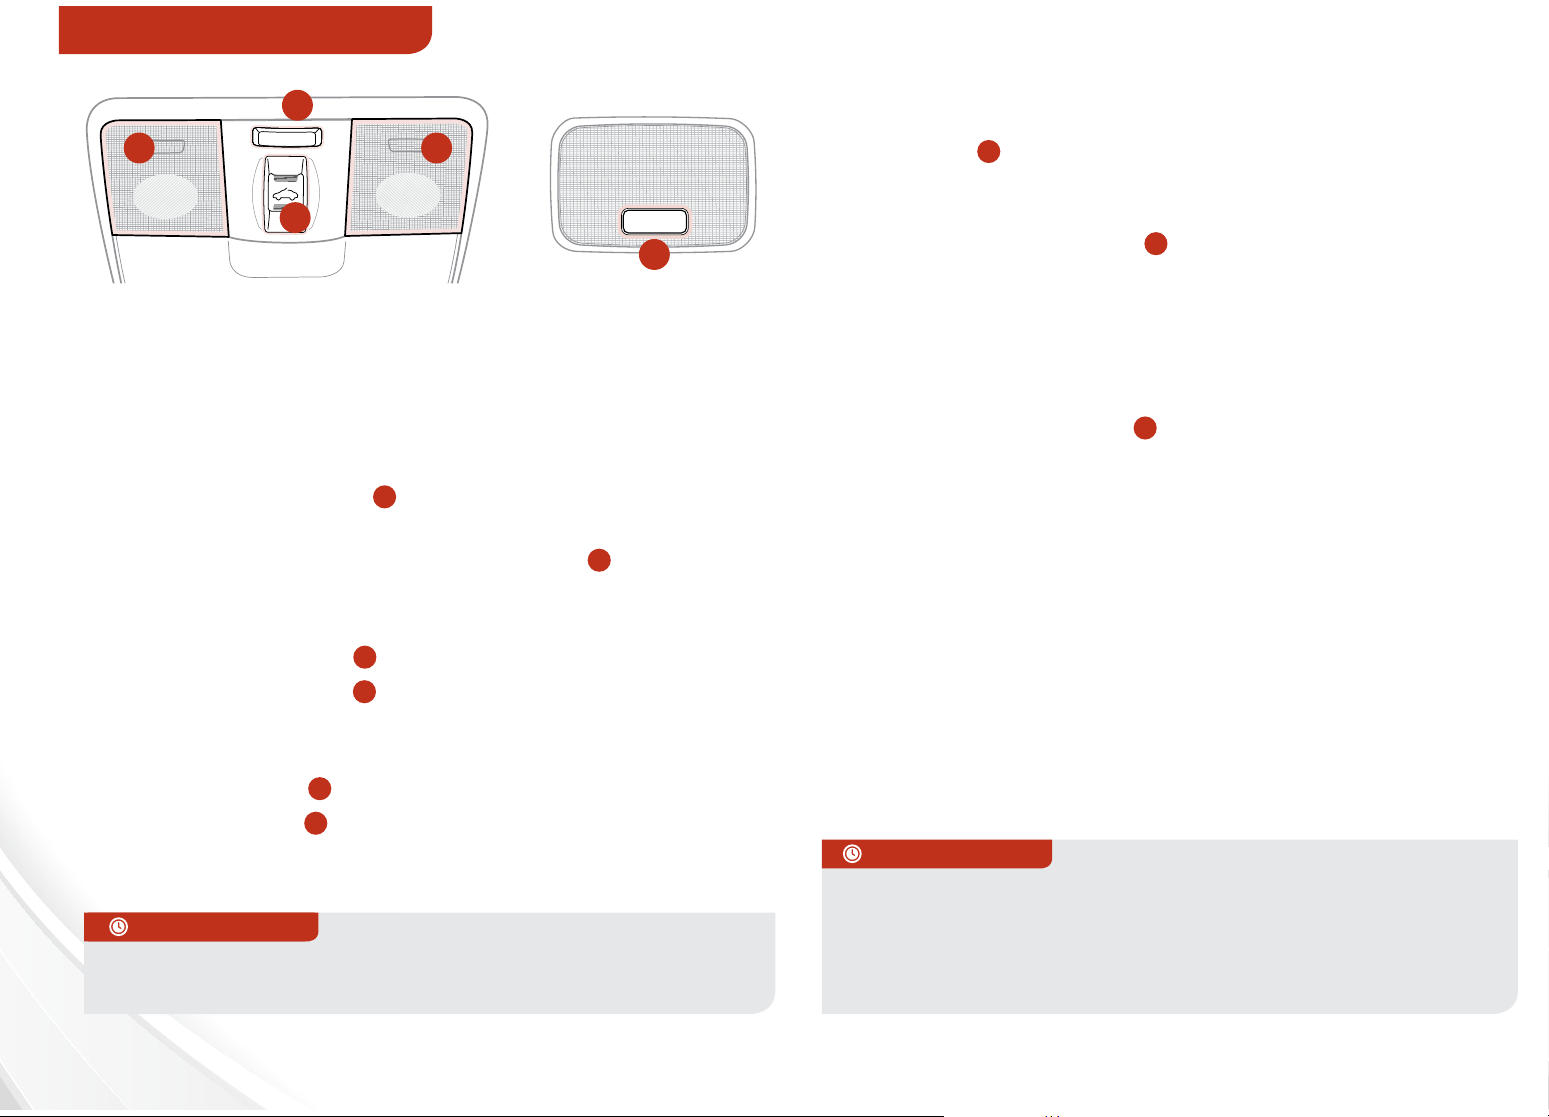
ON
OFF
DOOR
ON
OTHER KEY FEATURES
C
B B
A
D
Sunroof Operation*
The Sunroof and Sunshade operation is controlled through a
multidirectional switch/lever, and the ignition needs to be in
the ON position to operate the Sunroof/Sunshade.
Slide the Sunshade and Sunroof:
đŏ Auto Open: Slide lever
position and release.
đŏ Auto Close (Sunroof only): Slide the lever
the farthest position and release.
Slide the Sunroof (with Sunshade open):
đŏ Open: Slide the lever
đŏ Close: Slide the lever
detent position or pull the lever downward.
Tilt the Sunroof:
đŏ Raise: Push lever
đŏ Lower: Pull lever
REMINDER: Sunshade needs to remain OPEN while Sunroof is open and
vehicle is moving.
QUICK TIPSQUICK TIPS
To stop the Sunroof/Sunshade at any position, push or pull the
Sunroof control lever in any direction
A
A
A
backward to the farthest
A
backward and release.
A
partially forward to the first
upward.
downward.
A
forward to
Map/Room/Dome Lamps
Map/Personal Lamp
Push the lens B to turn the map/personal lamp ON/OFF. This
light produces a spot beam for convenient use as a map lamp
or as a personal lamp for the driver or the front passenger.
Map/Personal Lamp switch
DOOR – In the DOOR position, the lamp turns on when any
door is opened.
ON – In the ON position, the lamps stay on continuously.
OFF – In the OFF position, the lamp is off even if the door is
opened.
Dome/Room Lamp switch
Press the switch to turn Dome/Room Lamp ON/OFF.
If vehicle is not equipped with Map Lamp, the Dome/Room
Lamp will operate as follows:
đŏ The lamp turns ON when any door is opened, and turns
OFF after 30 seconds
đŏ The lamp turns ON, when doors are unlocked with a key
fob or Smart Key
đŏ The lamp stays ON continuously when the ignition is in
the ON position and a door is open
đŏ The lamp stays ON for about 20 minutes when the
ignition is in the ACC or LOCK/OFF position and a door is
open
đŏ
QUICK TIPS
đŏ If your vehicle is equipped with the theft alarm system, the
interior lights automatically turn o approximately 3 seconds
after the system is in armed stage.
đŏ Using interior lights for an extended period of time may
cause battery discharge
C
D
28
FORTE FEATURES & FUNCTIONS GUIDE
*IF EQUIPPED
Page 31
OTHER KEY FEATURES
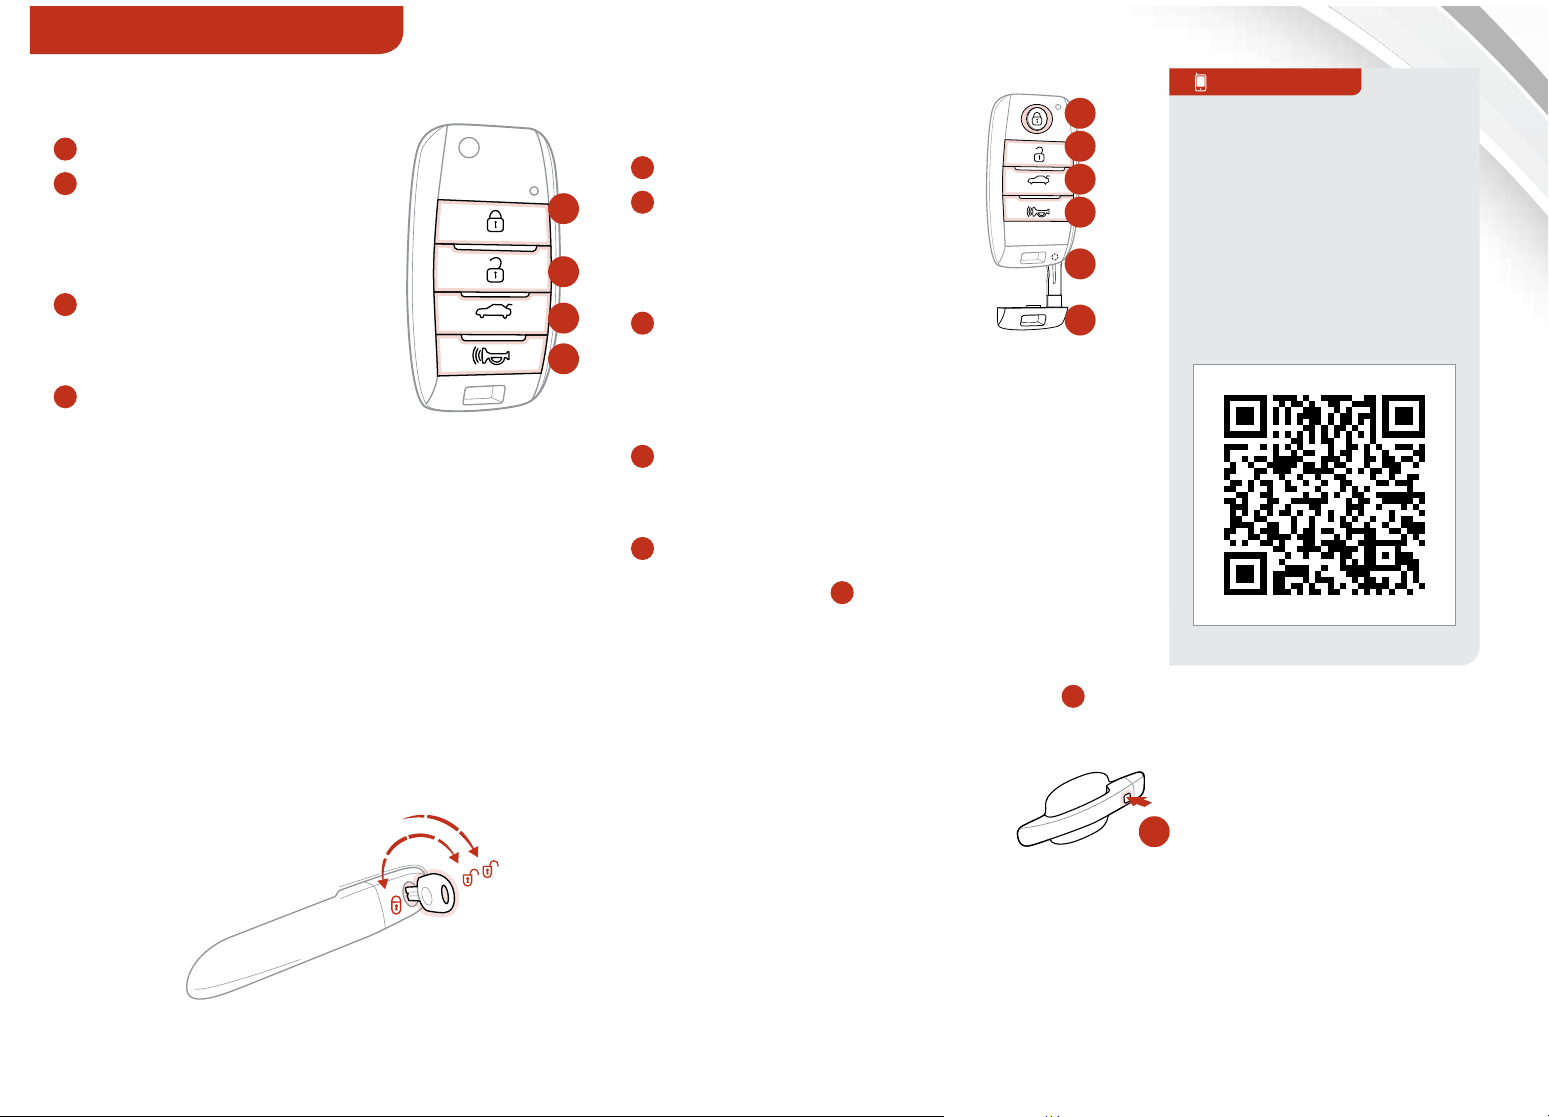
Remote Keyless Entry*
(Type A)
A
Lock All Doors
B
To unlock Driver’s Door,
press once. Press twice
in 4 seconds to unlock
All Doors
C
Press and hold more
than 1 second to unlock
HOLD
Trunk / Rear Hatch*
D
Press and hold more
than 1 second for Panic
Alarm*. To turn o
Alarm, press any button
REMINDER: Remote button configuration may
vary depending on vehicle options.
Double-Turn Lock / Unlock All
(Available only with Power Door Locks)
đŏ Turn clockwise once to unlock
Driver’s Door
đŏ Turn clockwise again within
4 seconds to unlock All Doors
đŏ Turn counterclockwise
once to Lock All Doors
All
All
Driver
Door
ly
On
A
B
C
Smart Key*
Smart Key Fob:
A
Press to lock All Doors
B
Press to unlock Driver’s
Door. Press twice in
4 seconds to unlock
All Doors
C
Press and hold to unlock
D
Trunk / Hatch and manually open
REMINDER: The Trunk/Hatch unlocks when the
Smart Key fob is within close proximity of the vehicle.
D
Press and hold more than 1 second
A
B
C
HOLD
D
E
F
QR CODE
Kia Engine
Start/Stop Button &
Smart Key Video
To view a video on your
mobile device, SNAP
this QR Code or visit the
listed website.
Refer to page 2 for more
information.
for Panic Alarm. To turn off Alarm,
press any button
E
Press to release Mechanical Key
Mechanical Key
đŏ/!ŏ0+ŏ1*(+'ŏ.%2!.Ě/ŏ++.
F
:
www.KuTechVideos.com/yd13/2014
đŏŏ/!ŏ0+ŏ01.*ŏ$%( ŏ"!05ŏ+'/ŏĨ,#!ŏăĂĩ
Driver’s Door Lock/Unlock button
G
:
đŏŏ.!//ŏ100+*ŏ+*!ŏ0+ŏ1*(+'ŏ.%2!.Ě/ŏ++.
đŏŏ.!//ŏ#%*ŏ3%0$%*ŏąŏ/!+* /ŏ
to unlock All Doors
đŏ.!//ŏ#%*ŏ0+ŏ(+'ŏ((ŏ++./
REMINDER: Remote button configuration may vary depending on vehicle options.
G
ALWAYS CHECK THE OWNER’S MANUAL FOR COMPLETE OPERATING INFORMATION AND SAFETY WARNINGS.
*IF EQUIPPED
29
Page 32
OTHER KEY FEATURES
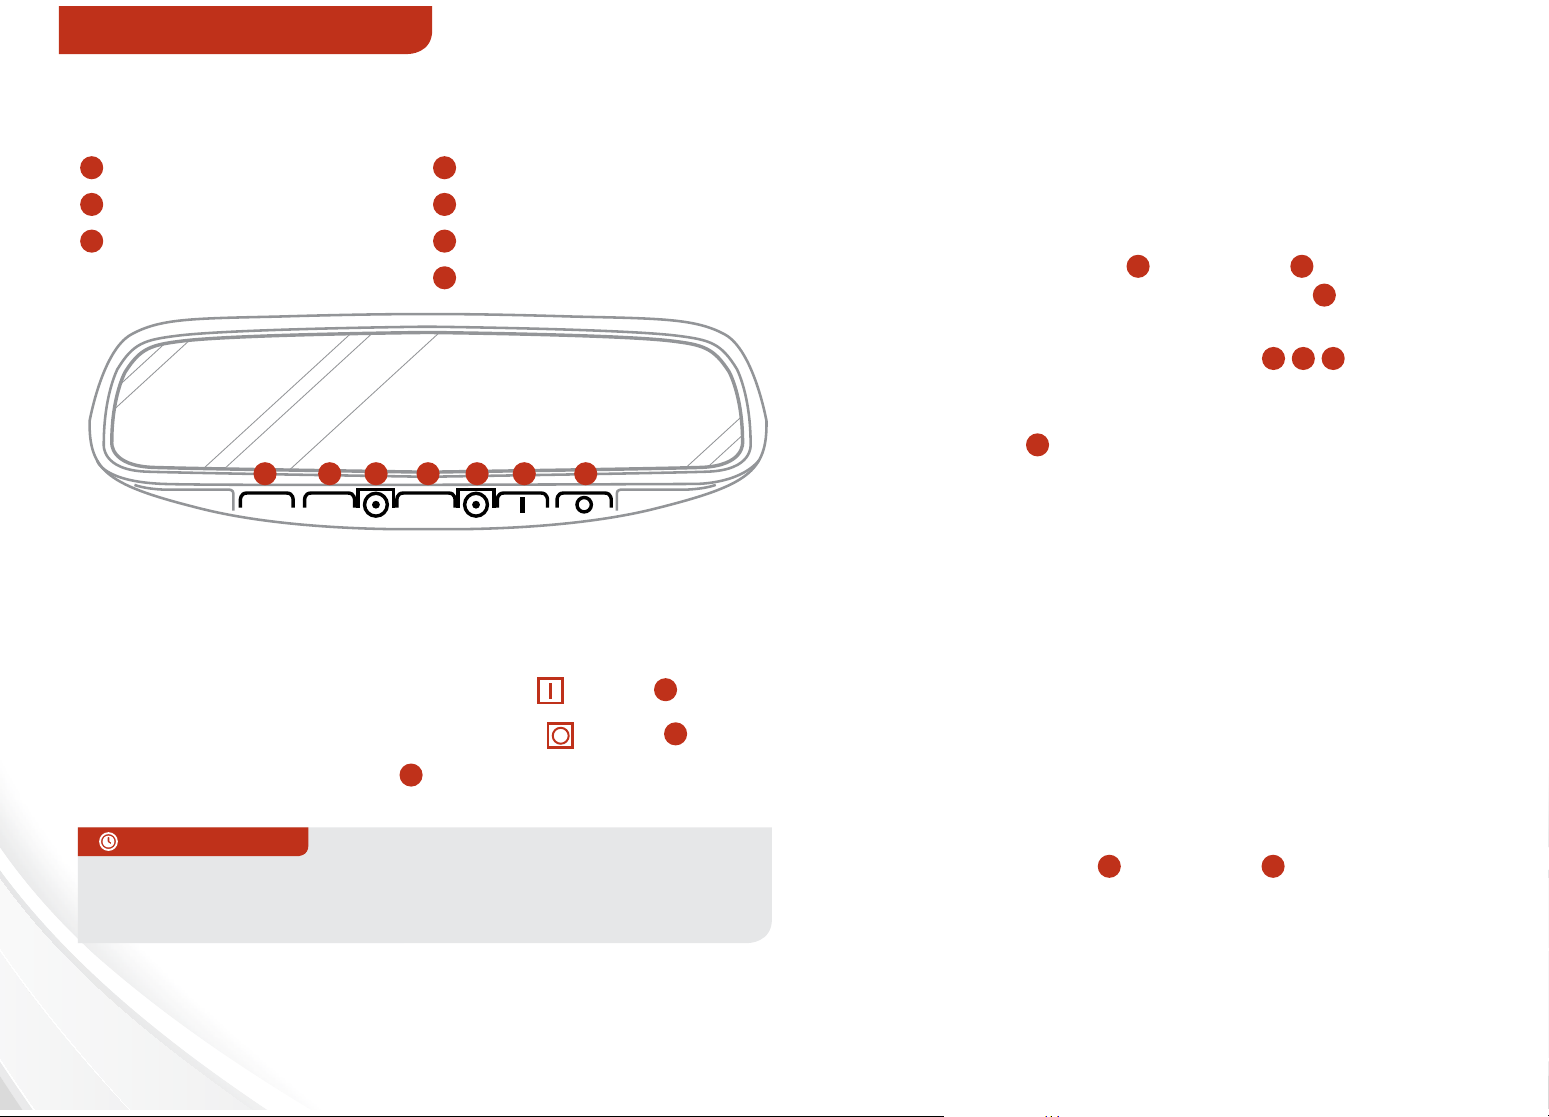
HomeLink® with Auto-Dimming
Rearview Mirror*
A
HomeLink® button
B
HomeLink® button
C
Indicator light
A B C D E F G
The HomeLink® / Auto-Dimming Rearview Mirror* is
designed to reduce glare from a vehicle’s headlights
located in the rear and also connect up to three electronic
transmitters into one location.
đŏŏ+ŏ01.*ŏ10+)0%ŏ %))%*#ŏČŏ,.!//ŏ button
đŏŏ+ŏ01.*ŏ10+)0%ŏ %))%*#ŏČŏ,.!//ŏ button G
REMINDER: Mirror indicator light C will illuminate when automatic
dimming is ON.
đŏ
QUICK TIPS
đŏ You can reprogram a single HomeLink
đŏ Erasing programmed buttons will delete all trained transmitters
D
HomeLink® button
E
Glare detection sensor
F
Automatic dimming ON
G
Automatic dimming OFF
F
®
button by repeating Step 2
How to Sync Transmitter with HomeLink®*
If programming for the first time, begin with Step 1
(repeating this step will delete all information).
To program non-rolling and rolling code garage door
openers and other devices:
1. Press and hold the left
A
and center D buttons
simultaneously until the indicator light C begins to
flash (to reprogram buttons, skip this step)
2. Press and hold the desired button A B D and hold
the button on the transmitter while it is approximately
1 to 3 inches away from the mirror. The HomeLink
Indicator light C will flash rapidly once the frequency
signal has been successfully programmed
To finish programming rolling code garage door openers,
complete these steps:
3. Locate the “learn” or “smart” button on the garage
door’s motor head unit. Press and release the button
and complete Step 4 within 30 seconds
4. Firmly press and release the programmed HomeLink®
button up to three times
®
Operating HomeLink
Press one of the programmed HomeLink
:
®
buttons.
Erasing programmed buttons:
A
Press and hold the left
and center D buttons
simultaneously for approximately 20 seconds,
and then release both buttons within 30 seconds.
®
If your garage door opener was manufactured in 2011 or later, and you’re unable to program your vehicle’s HomeLink
purchase a HomeLink Repeater Kit. For more information, go to www.HomeLink.com or call (800) 355-3515.
30
FORTE FEATURES & FUNCTIONS GUIDE
®
system, you may need to
*IF EQUIPPED
Page 33
OTHER KEY FEATURES
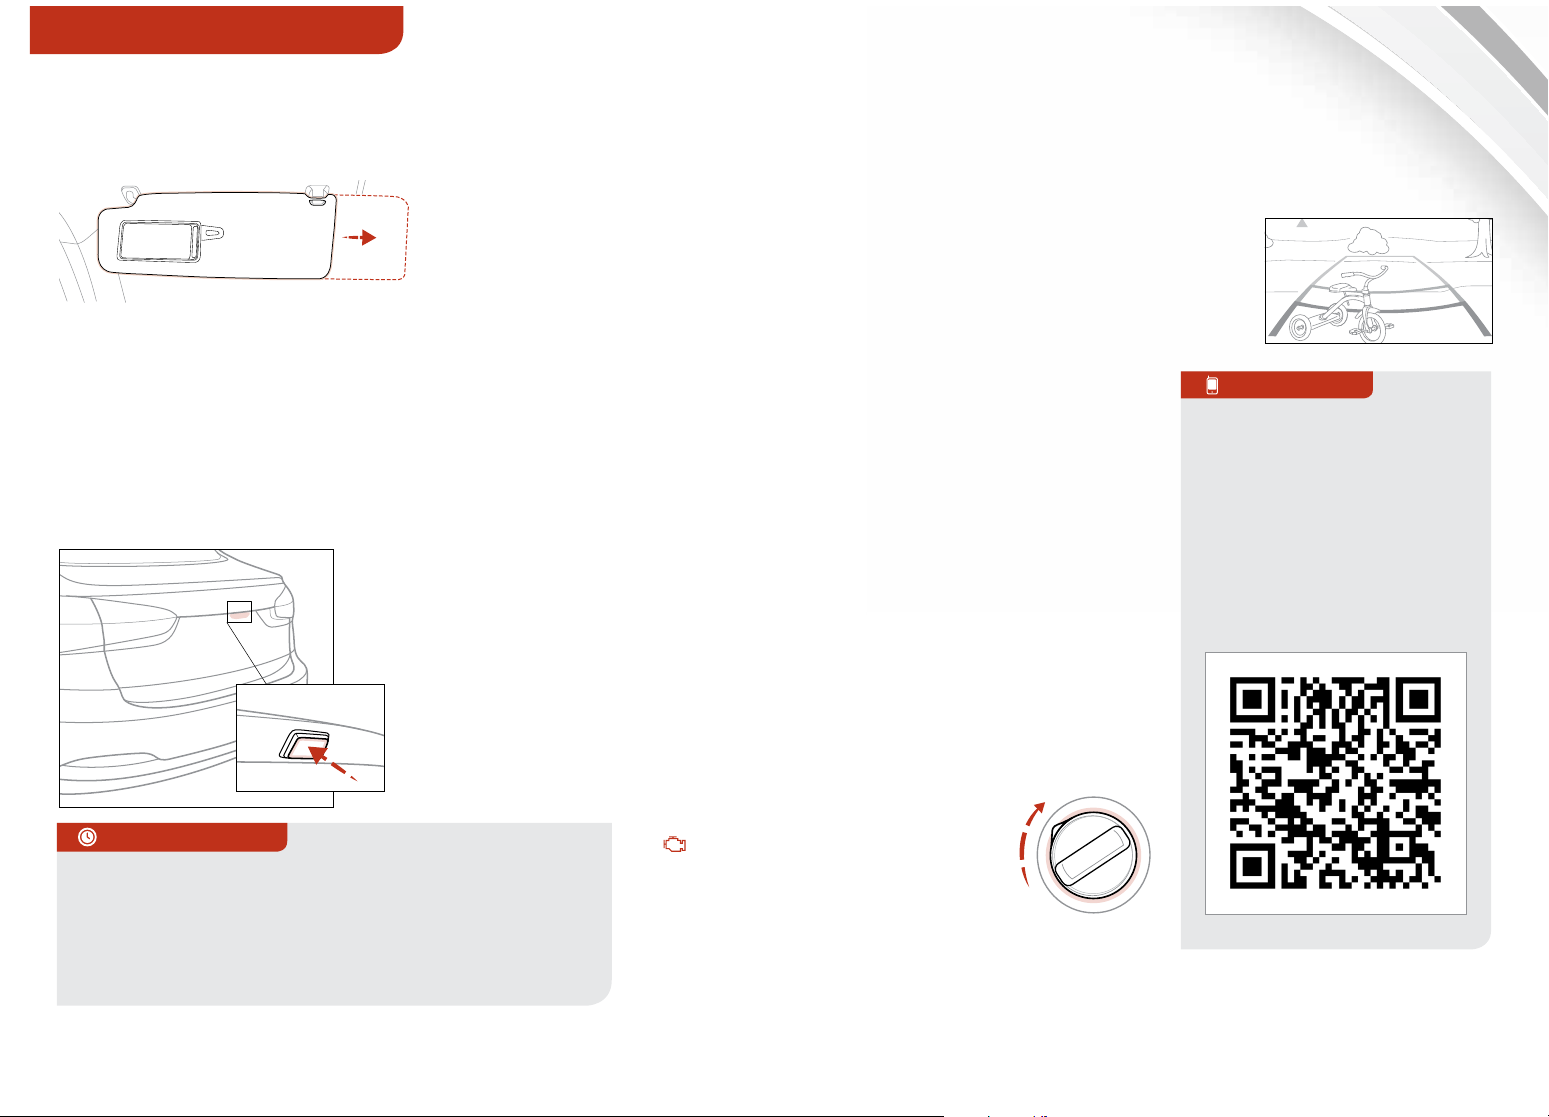
Sunvisor
Use the Sunvisor to shield direct light through
the front or side windows.
REMINDER: Sunvisor may not shield all direct light.
REMINDER: Do not operate the vehicle if Sunvisor is
impairing your visibility.
Trunk Release Button*
Located underneath the Trunk. With Trunk
unlocked, press the Trunk Release Button and
pull the Trunk up by the handle to open.
Rear-Camera Display*
The Rear-Camera Display system is not a safety device. It is a
supplemental system that displays the view behind the vehicle through
the Navigation or UVO System* screen while the vehicle is in Reverse.
The Rear-Camera Display activates when the:
1. Engine Start/Stop* button is in the ON position
(green Light)
2. Gear Shift Lever is in the R (Reverse) position
REMINDER: The Rear-Camera Display is not
a substitute for proper and safe backing-up
procedures. Always drive safely and use caution
when backing up. The Rear-Camera Display may
not detect every object behind the vehicle.
REMINDER: UVO System - While camera is
active, only the volume controls on the Audio
System can be operated.
REMINDER: Navigation System - While camera
is active, only the Audio System can be operated
on the Steering Wheel and Audio Control Unit.
Navigation features are disabled.
Kia One Click
Fuel Cap Video
To view a video on your
mobile device, SNAP
this QR Code or visit the
listed website.
Refer to page 2 for more
information.
QR CODE
Warning! Check your surroundings for safety
Fuel Cap / Malfunction
Indicator (Check Engine Light)
!
K
C
Tighten for ONE CLICK to
prevent Malfunction Indicator
QUICK TIPS
The Trunk must be unlocked before it can be
opened by the Trunk Release Button
Smart Key* - The Trunk unlocks automatically, and
can then be opened manually, when the Smart Key
fob* is within close proximity to the vehicle
ALWAYS CHECK THE OWNER’S MANUAL FOR COMPLETE OPERATING INFORMATION AND SAFETY WARNINGS.
from illuminating.
REMINDER: The Fuel Filler Door
Release lever is located on the
lower part of the driver's door sill.
I
L
C
www.KuTechVideos.com/yd13/2014
*IF EQUIPPED
31
Page 34
SAFETY FEATURES
Seatbelts
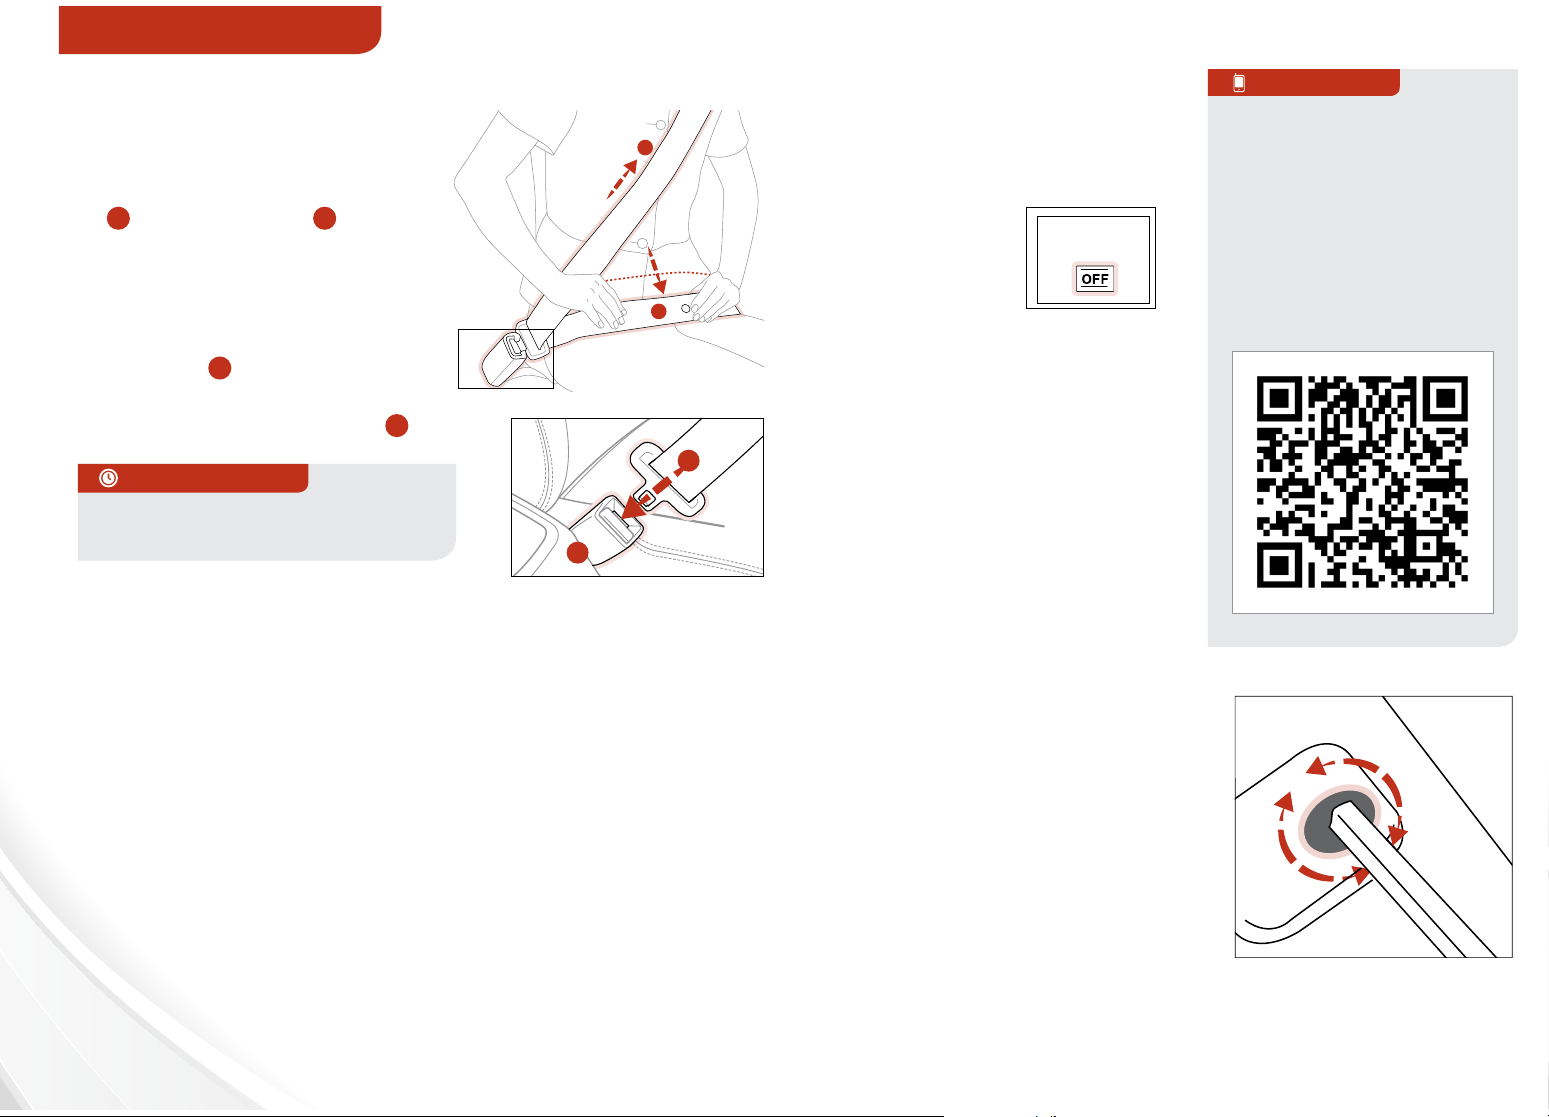
To properly fasten your
safety belts:
1. Insert the tongue belt plate
A
into the buckle B until it
clicks
2. Position the lap portion of
the belt across your lap
as LOW ON THE HIPS as
possible
to a SNUG FIT by pulling up
on the shoulder portion
QUICK TIPS
The Seatbelt warning chime
operates for driver’s seat only.
REMINDER: For maximum protection,
always wear your seatbelt.
C
. Adjust the belt
D
Occupant Detection
System (ODS) /
D
PASSENGER AIR BAG
OFF Indicator
ODS detects the
presence of the
front passenger.
C
Depending on the situation
PASS
AIR BAG
QR CODE
Kia Occupant Detection
System Video
To view a video on your
mobile device, SNAP
this QR Code or visit the
listed website.
Refer to page 2 for more
information.
and type of accident,
the system may:
đŏ Deploy air bag (Adult)
A
đŏ Not deploy the air bag
(Unoccupied)
PRESS
B
If the system determines that
the air bag should not be
deployed, the “PASSENGER
AIR BAG OFF” light will
www.KuTechVideos.com/yd13/2014
illuminate.
Seatbelt Retractor Inertia Locks
Inertia locks allow lap/shoulder safety belts to remain
unlocked during normal vehicle operation for freedom
of movement and increased comfort
During a STRONG STOP, SUDDEN TURN OR CERTAIN
COLLISIONS, seatbelt retractors will automatically lock
the belts
For more detailed information regarding your vehicle’s safety belts, please refer to your Owner’s Manual and the
separate brochure titled “Understanding Your Safety Belt & Supplemental Restraint System.”
32
FORTE FEATURES & FUNCTIONS GUIDE
Child Safety Locks
Locate these locks on the rear
edge of the rear passenger
doors
the LOCK position to disable
the inner door handles from
opening the rear doors.
REMINDER: Child Safety Lock is
located on rear passenger’s door jamb.
. Turn the safety lock to
*IF EQUIPPED
Page 35

NOTES
Legal Disclaimers
UVO eServices System: Warning - Driving while distracted can result in a loss of vehicle control that may lead to an accident, severe personal injury, and death. The driver’s primary
responsibility is in the safe and legal operation of a vehicle, and use of any handheld devices, other equipment, or vehicle systems which take the driver’s eyes, attention and focus away
from the safe operation of a vehicle or which are not permissible by law should never be used during operation of the vehicle.
TPMS: Even with the Tire-Pressure Monitoring System (TPMS), always check your tire pressure on a regular basis.
Rear Camera Display: The Rear-Camera Display system is not a substitute for proper and safe backing-up procedures. The Rear-Camera Display system may not detect every object
behind the vehicle. Always drive safely and use caution when backing up.
®
FlexSteer
Seat Belts: For maximum protection, always wear your seat belt.
Navigation: GPS maps and directions are for information purposes only and Kia does not make any warranties about the accuracy of that information. Kia is not responsible for loss or
delay resulting from the use of the navigation system.
Caution: Do not enter information into the navigation system while the vehicle is moving. Failure to pay attention to travel conditions and vehicle operation while the vehicle is in motion
could result in loss of vehicle control. Operate the system only when it is safe to do so.
At launch, the Apple iPhone
Additional compatible devices expected late 2013.
iPod
The Bluetooth
those of their respective owners. A Bluetooth
SiriusXM service requires a subscription, sold separately, after 3-month trial included with vehicle purchase. If you decide to continue your SiriusXM service at the end of your trial
subscription, the plan you choose will automatically renew and bill at then-current rates until you call Sirius XM at 1-866-635-2349 to cancel. See our Customer Agreement for
complete terms at www.siriusxm.com. Programming subject to change. Sirius satellite service is available only to those at least 18 and older in the 48 contiguous USA, D.C., and PR (with
coverage limitations). Trac information not available in all markets. See www.siriusxm.com/trac for details. Sirius, XM and all related marks and logos are trademarks of Sirius XM
Radio Inc.
Microsoft
zune
HD Radio and the HD Radio logo are proprietary trademarks of iBiquity Digital Corporation.
HomeLink® is a registered trademark of Johnson Controls, Inc.
Steering Wheel Mode: Only change steering wheel modes when safe and legal to do so.
®
will be the only UVO eServices compatible device. iPhone® is a registered trademark of Apple Inc. Apple iOS 6 compatibility expected early 2013.
®
is a registered trademark of Apple Inc. iPod® mobile digital device sold separately.
®
word mark and logos are registered trademarks owned by Bluetooth SIG, Inc. and any use of such marks by Kia is under license. Other trademarks and trade names are
®
is a registered trademark of Microsoft Corporation in the United States and/or other countries.
®
is a registered trademark of Microsoft Corporation in the United States and/or other countries.
®
enabled cell phone is required to use Bluetooth® wireless technology.
Page 36
NORMAL MAINTENANCE SCHEDULE
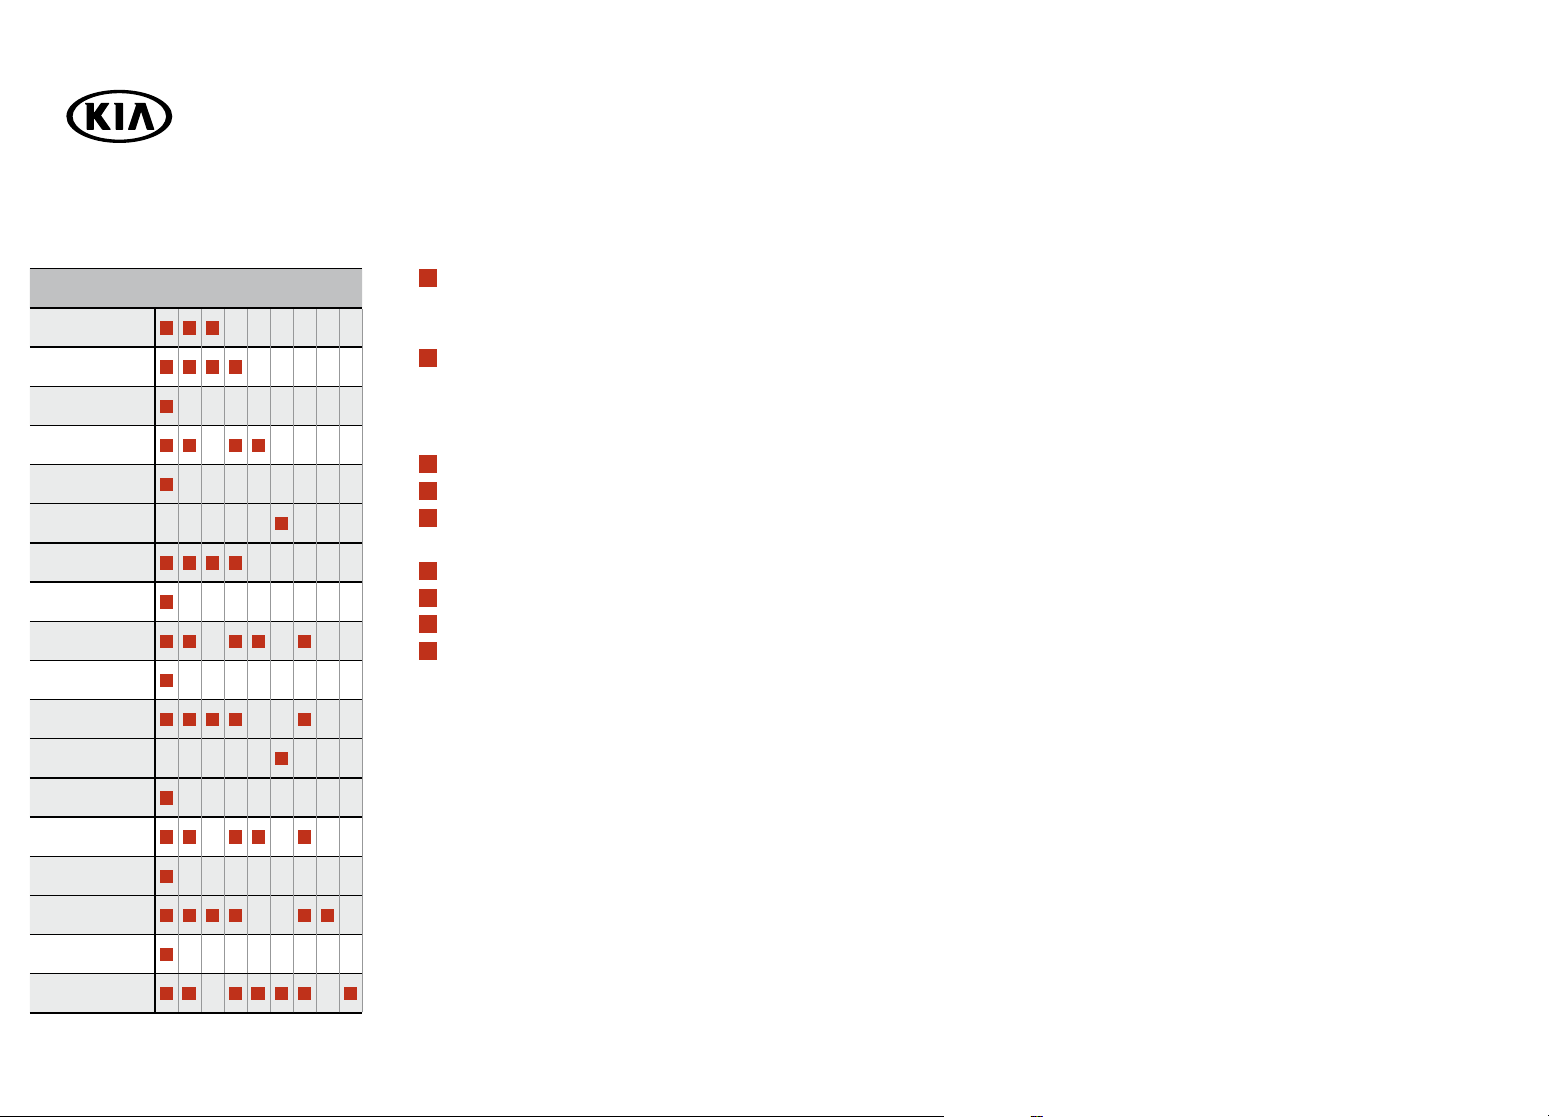
When your vehicle requires service, remember that your dealer knows your vehicle best. Your dealer has factory-trained technicians,
recommended special tools, genuine Kia replacement parts, and is dedicated to your complete satisfaction. For expert advice and
quality service, see your authorized Kia dealer.
A
INTERVAL MAINTENANCE CHART
C
7,500 miles
15,000 miles
22,500 miles
30,000 miles
37,500 miles
40,000 miles
45,000 miles
52,500 miles
60,000 miles
67,500 miles
A B
A BCD
A
A B D E
A
A
B C D
A
A
A
D
B
F
E G
Inspect* — Intercooler, in/out hose and air intake hose (1.6L TGDI)
Replace
Perform
B
Inspect* — Air conditioning compressor, air conditioner refrigerant and performance**, cooling system3, battery
— Engine oil and engine oil filter (1.8L MPI/2.0L GDI)
— Rotate tires; add fuel additive
2
1
condition, brake fluid/clutch** fluid; brake lines, hoses and connections; brake pedal and operation, chassis/body nuts
and bolts, drum brake and linings**, disc brakes and pads**, exhaust pipe and muffler, front suspension ball joints;
parking brakes, steering operation and linkage and suspension mounting bolts
C
Inspect* — Air cleaner element
D
Replace — Climate control air filter**
E
Inspect* — Fuel filter4 and fuel tank air filter4; vapor hose and fuel filler cap
Replace
F
Inspect* — Manual transaxle fluid**
G
Inspect* — Drive belt5 (First 60,000 miles / 72months. After, every 15,000 miles / 24 months)
H
Replace — Spark plugs
I
Replace — Engine coolant
— Air cleaner element
6,7
75,000 miles
80,000 miles
82,500 miles
90,000 miles
97,500 miles
105,000 miles
112,500 miles
120,000 miles
A
A
A
A
A
A
A B
B
C
B D
BCD
D
D
F
E G
F
E
Forte Features & Functions Guide
G
* and, if necessary, adjust, clean, replace or correct
** If equipped
1
1.6L TGDI - At first replace engine oil and oil filter at 3,000 miles or 6 months,
after that, every 5,000 miles or 6 months.
2
If TOP TIER Detergent Gasoline is not available, one bottle of additive is
recommended. Additives are available from your authorized Kia dealer alo ng
with information on how to use th em. Do not mix other ad ditives.
3
Inspect “Water Pump” whe n replacing the drive belt or timing belt.
4
Fuel filte r & fuel tank air filter are considered to be maintenance free but
H
G
periodic inspection is recommended for this maintenance schedule depends
on fuel quality. If there are some impor tant safety matters like fuel flow
restriction, surging, loss of power, hard star ting problem etc., replace the fu el
filte r immediately regardless of maintenance sched ule and consult an authorized
Kia dealer for details .
5
The drive belt should be replaced when cracks occur or tension is reduced excessively.
6
When re placing coolant, use only deionized water or soft water for your vehicle
and never mix hard water in the coolant fi lled at the fac tory. An improper coolant
mix ture can result in serious malfunction or engine damage.
7
For your convenience, it can be re placed prior to it’s interval when you do
maintenance of other items.
Check tire pressure once a month or more.
See your owner’s manual for more details and complete maintenance information, including severe maintenance schedule.
I
G
Warranty may be voided if maintenance schedule is not followed.
Call 1-800-333-4kia (4542) for roadside assistance.
© 2013 Kia Motors America, Inc. All rights reserved. Part Number: UD140-PS-004
Page 37
FORTE CUSTOMER DELIVERY CHECKLIST
R
1
3
5
2
4
6
MIST
OFF
INT
LO
HI
O w n e r’s N am e: _______________________________________V IN : _____________________________Mil ea g e : ____________________
De a l er sh i p N a m e: _____________________________________ S al es C o n sul ta n t: _______________Da te : _______________________
BEFORE DELIVERY
Confirm “Good Battery” with Kia GR8-1299 battery tester
Verify all tire pressures are to spec (see driver’s door label) LF_______ LR_______ RF_______ RR_______
Verify proper operation of Remote Keyless Entry and Smart Key lock/unlock
Ensure floor mats are snapped into place (if applicable)
Verify vehicle is clean (interior and exterior), in good condition and free of chips and scratches
Ensure all key documents are in the vehicle (Owner’s Manual, Warranty and Consumer Information booklet,
Tire Warranty booklet and Features & Functions Guide and any supplemental audio user’s guides)
KEY FEATURE WALKTHROUGH
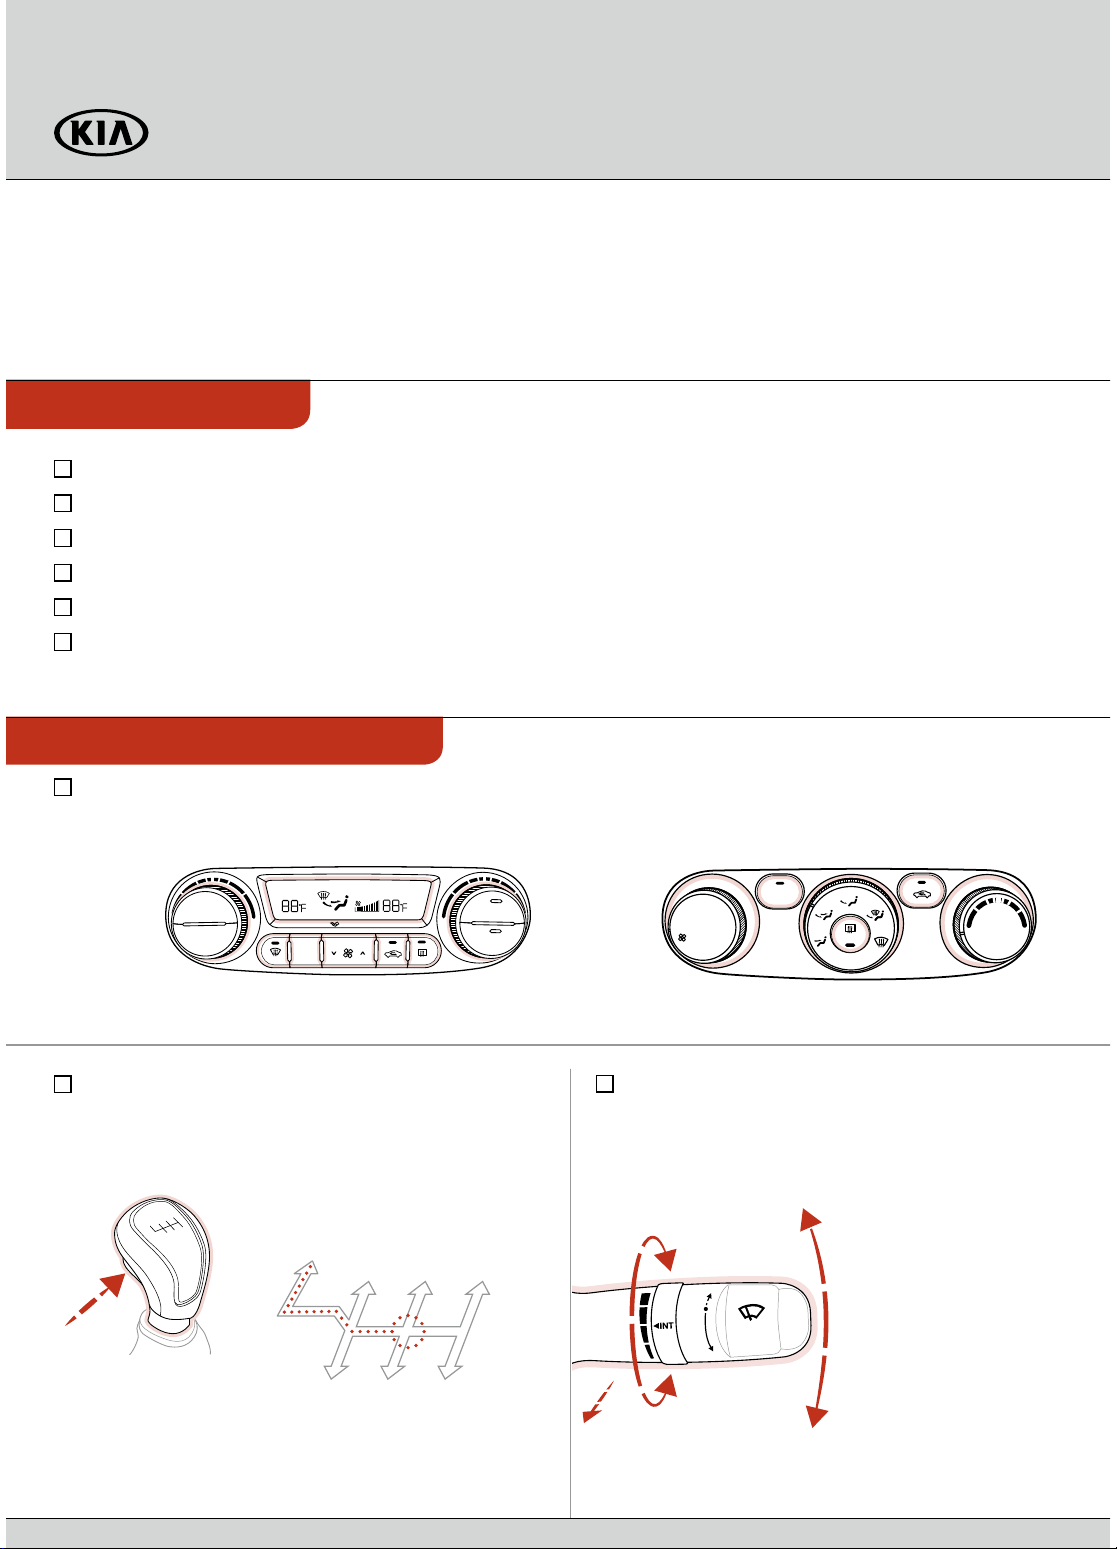
Air Conditioning / Climate Control – pages 20-21
Demonstrate A ir Flow Modes, Defog and Defrosting Windshield
Automatic* Manual*
AUTO
OFF
AUTO
O
DE
M
FRONT
DUAL
AUTO
Clean Air
REAR
DUAL
A/C
Manual Gear Shift* – page 23
Demonstrate pressing button for reverse gear.
Rotate level to adjust
Intermittent Wipe Speed .
R
135
N
2
1
0
A/C
3
4
REAR
Windshield Wipers & Washers - page 10
Faste r
FRONT
MIST: Single wipe
OFF: Wiper o
INT: Intermittent wipe
LO: Slow wipe
MAX
A/C
642
Pull to spray and wipe.
Slower
HI: Fast wi pe
Page 38
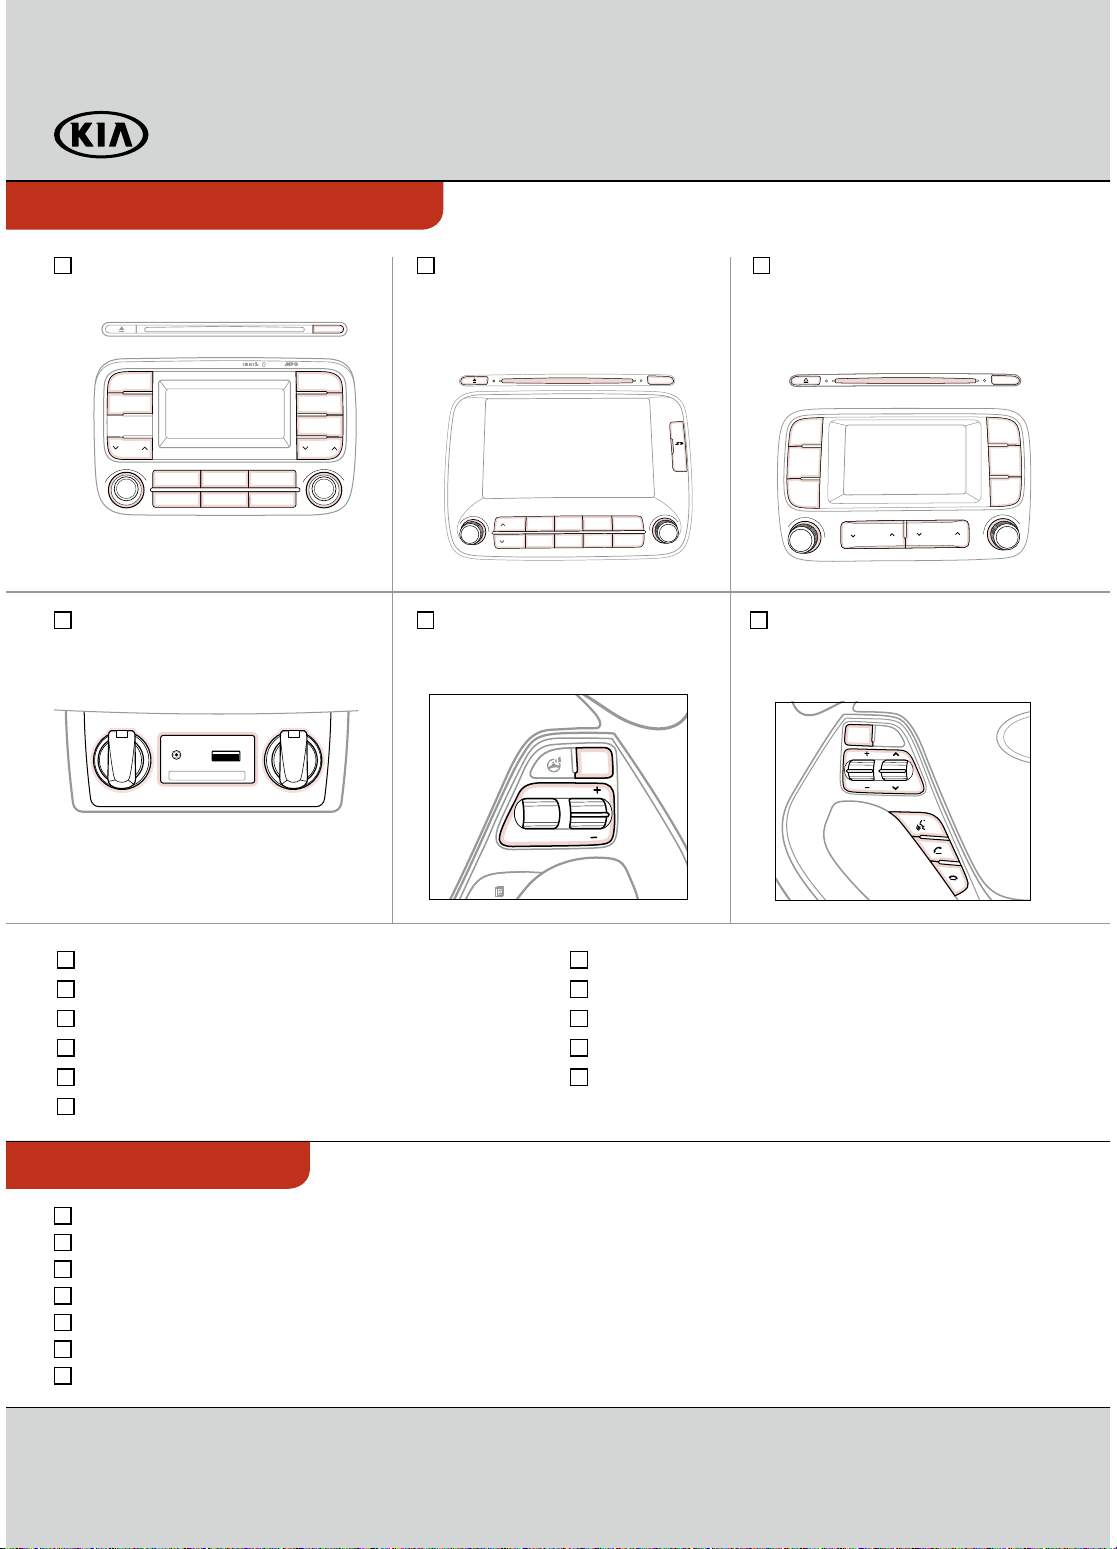
FORTE CUSTOMER DELIVERY CHECKLIST ...continued
KEY FEATURE WALKTHROUGH
S tandard Audio System – pages 15-16 Navigation System*– page 18
DISP
®
RADIO
MEDIA
PHONE
SEEK
TRACK
PUSH
POWER
1
VOL
RPT
45
Aux / USB / iPod® Port – page 19 Bluetooth® Wireless
%OXHWRRWK
SCAN
SETUP
MENU
CAT
FOLDER
2
3
RDM
6
TUNEFILE
ENTER
Demonstrate the following with the customer
For f ur ther Navigation System
operation, refer to the K ia Digital
Navigation System Owner’s Manual.
CD-IN
PUSH
POWER
SEEK
TRACK
VOL
MEDIA
SAT
FM/AM
MAP
DEST ROUTE
VOICE
DISP
MAP
FILE/TUNE
PHONE
INFO
SETUP
ENTER
Cruise Control*– page 14
Demonstrate operation
UVO System*– page 17
For further UVO System information,
refer to the K ia U VO S ys tem User ’s
Manual.
FM/AM
SAT
MEDIA
PUSH
POWER
SEEK
CATEGORY
TRACK
VOL
Technology*– page 12
Demonstrate operation
MUTE
12V
180W
MAX
AUX USB
180W
12V
MAX
CANCEL
RES
CRUISE
SET
MODE
VOL
VOL
FILE
DISP
eServices
PHONE
SETUP
TUNE
Tire Pressure Monitoring System (TPMS) – page 6
Active ECO System* – page 6
Engine Start/Stop Button* – page 8
Digital Clock – page 19
Seat Warmers / Ventilated Seat* – page 24
Sunvisor – page 31
Smart Key* – page 29
HomeLink® with Auto-Dimming Rearview Mirror* – page 30
Rear-Camera Display* – page 31
PASSENGER AIR BAG OFF Indicator – page 32
Folding Rear Seats* – page 26
DURING DELIVERY
*if equipped
Explain first service process and schedule first service appointment
Tour Parts & Service departments, introduce staff and explain value of Kia Par ts and Service
Review recommended maintenance schedule and maintenance requirements to validate warranty
Review business hours and Customer 360° Care
Review the Kia 10-year/100,000-mile warranty program
Ensure 100% satisfaction with sales and delivery process and no problems with the vehicle
Confirm time and best contact number for initial dealer follow-up
Sales Consultant: ____________________________________________________________ D a t e : ____________________
S a l e s M a n a g e r : _______________________________________________________________ D a t e :____________________
C u s to m e r : ____________________________________________________________________ D a t e: ____________________
 Loading...