


DMC-J7R
PORTABLE MINIDISC RECORDER
INSTRUCTION MANUAL
KENWOOD CORPORATION
In regard to the power supply
Do not use a power source other than the specially provided AC adaptor or the optional battery case or the optional car battery adaptor.
TINSE1638AFZZ
A9805.2.2MNS.SM
B60-4023-08 EN
99/12 11 10 9 8 7 6 5 4 3 2 1 98/12 11 10 9 8 7 6 5 4

INTRODUCTION Read this page carefully to ensure safe operation
Unpacking
Unpack the unit carefully and make sure that all accessories are put aside so they will not be lost.
Examine the unit for any possibility of shipping damage. If your unit is damaged or fails to operate, notify your dealer immediately. If your unit was shipped to you directly, notify the shipping company without delay. Only the consignee (the person or company receiving the unit) can file a claim against the carrier for shipping damage.
We recommend that you retain the original carton and packing materials for use should you transport or ship the unit in the future.
Keep this manual handy for future reference.
WARNING NOTICE :
IN MOST CASES IT IS AN INFRINGEMENT OF COPYRIGHT TO MAKE COPIES OF TAPES OR DISCS WITHOUT THE PERMISSION OF THE COPYRIGHT OWNERS. ANYONE WISHING TO SHOULD CONTACT THE MECHANICAL COPYRIGHT PROTECTION SOCIETY LIMITED, OR THE PERFORMING RIGHTS SOCIETY LIMITED.
Before applying power
AC adaptors are designed for operation as follows:
Europe and U.K........................................................................................... |
AC 230 V only |
Safety precautions
WARNING : TO PREVENT FIRE OR ELECTRIC SHOCK, DO NOT EXPOSE THIS APPLIANCE TO RAIN OR MOISTURE.
The marking of products using lasers (Except for some areas).
CLASS 1
LASER PRODUCT
This label is attached to the bottom panel and says that the component uses laser beams that have been classified as Class 1. It means that the unit is utilizing laser beams that are of a weaker class. There is no danger of hazardous radiation outside the unit.
US and foreign patents licensed from Dolby Laboratories Licensing Corporation
2

INTRODUCTION Read this page carefully to ensure safe operation
IMPORTANT SAFEGUARDS
Please read all of the safety and operating instructions before operating this unit. For best results, follow all warnings placed on the unit and adhere to the operating and use instructions. These safety and operating instructions should be retained for future reference.
1.Power sources — The unit should be connected to a power supply only of the type described in the operating instructions or as marked on the appliance.
2.Power-cord protection — Power-supply cords should be routed so that they are not likely to be walked on or pinched by items placed upon or against them, pay particular attention to cords at plugs, convenience receptacles, and the point where they exit from the unit.
3.Enclosure removal — Never remove the enclosure. If the internal parts are touched accidentally, a serious electric shock might occur.
4.Drop — Do not drop the unit or apply strong shock to it. (Damage due to dropping the unit is not covered by the warranty.)
5.Ventilation — Avoid hindering the ventilation of the unit by covering it with a cloth, etc.
6.Abnormal smell — If an abnormal smell or smoke is detected, immediately turn the power OFF and pull out the power cord. Contact your dealer or nearest service center.
7.Heat — Avoid placing the unit under direct sunlight or near a source of heat such as heating equipment. Particularly, never leave it in an automobile or on the dashboard.
8.Temperature — The unit may not function properly if used at extremely low, or freezing temperatures. The ideal ambient temperature is above +5°C (41°F).
9.Water and moisture — The unit should not be used near water for example, near a bathtub, washbowl, kitchen sink, laundry tub, in a wet basement, or near a swimming pool, etc.
10.Dust and moisture — Avoid places where is dusty or where the humidity is high.
11.Vibrations — Avoid placing the unit on an unstable place such as a shelf or in a place subject to vibrations.
3

INTRODUCTION Read this page carefully to ensure safe operation
12.Magnetic fields — Keep the unit away from sources of magnetic fields such as TV sets, speaker systems, radios, motorized toys or magnetized objects.
13.Cleaning — Do not use volatile solvents such as alcohol, paint thinner, gasoline, or benzine, etc. to clean the cabinet. Use a clean dry cloth.
14.Nonuse periods — The power cord of the unit should be unplugged from the outlet when left unused for a long period of time.
15.Damage requiring service — The unit should be serviced by qualified service personnel when:
A.The power-supply cord or the plug has been damaged.
B.Objects have fallen, or liquid has been spilled into the unit.
C.The unit has been exposed to rain.
D.The unit does not appear to operate normally or exhibits a marked change in performance.
E.The unit has been dropped, or the enclosure damaged.
16.Servicing — The user should not attempt to service the unit beyond that described in the operating instructions. All other servicing should be referred to qualified service personnel.
17.CAUTION — TO PREVENT ELECTRIC SHOCK DO NOT USE THE AC PLUG WITH AN EXTENSION CORD, RECEPTACLE OR OTHER OUTLET UNLESS THE BLADES CAN BE FULLY INSERTED TO PREVENT BLADE EXPOSURE.
4

INTRODUCTION
Thank you for purchasing this KENWOOD product. For the best performance, read this manual carefully. It will guide you in operating your KENWOOD product.
CONTENTS
|
Page |
ACCESSORIES ...................................... |
5 |
PRECAUTIONS ................................... |
6-7 |
NAMES OF CONTROLS AND |
|
INDICATORS .................................... |
7-8 |
POWER SOURCE ............................. |
9-10 |
BEFORE RECORDING ................... |
11-12 |
RECORDING USING THE CABLE |
|
INCLUDED WITH THE UNIT........ |
13-14 |
RECORDING USING A SEPARATELY |
|
AVAILABLE DIGITAL CABLE .......... |
15 |
RECORDING FROM THE |
|
MICROPHONE.............................. |
16-17 |
CONVENIENT RECORDING |
|
FUNCTION .................................... |
18-21 |
ABOUT TRACK NUMBERS ................ |
22 |
|
Page |
ABOUT THE TOC................................. |
23 |
PLAYING A MINIDISC ................... |
24-25 |
CONVENIENT PLAYBACK |
|
FUNCTIONS ................................. |
26-28 |
EDITING .......................................... |
29-34 |
USING WITH OTHER EQUIPMENT |
.....35 |
CONVENIENT OPERATION |
|
OF THE UNIT ............................... |
36-38 |
WHAT IS A MINIDISC? ........................ |
39 |
TROUBLESHOOTING .................... |
39-40 |
MINIDISC SYSTEM LIMITATIONS ...... |
41 |
ERROR MESSAGES ............................ |
42 |
MAINTENANCE .................................... |
43 |
SPECIFICATIONS .......................... |
43-44 |
ACCESSORIES
● Headphones x 1 |
● Rechargeable Lithium-Ion Battery |
● Remote Control Unit x 1 |
(NB-L10A) x 1 |
● AC Adaptor x 1 |
● RCA Lead x 1 |
|
● Carrying Bag x 1 |
Note:
Parts and equipment mentioned in this operation manual other than those detailed above are not included.
5

PRECAUTIONS
■ Important
●Do not wear your headphones when you are crossing streets or near traffic.
●Do not use your headphones whilst driving a motor vehicle, it may create a dangerous traffic hazard and may be illegal. Remember to obey all of the safety rules in your area.
●Do not play the unit at a high volume. Hearing experts advise against extended play at high volume levels.
●If you experience ringing in your ears, reduce the volume or discontinue use.
■ Volume setting
Reduce the volume before starting to play. MiniDiscs, compared to ordinary cassette tapes, have very little noise. If the volume is adjusted according to your usual expectations of noise, you may damage your hearing due to the high volume.
■ Concern for others when
listening to MiniDiscs
If you are enjoying listening to music, the sound escaping from your headphones may annoy people around you.
If you are using the unit in particularly crowded places (such as on trains or buses), reduce the volume to avoid annoying people around you.
■ Storing the unit
Avoid using or leaving the unit in the following places.
●Places exposed to direct sunlight for many hours (especially in cars with the doors and windows closed) or near heaters.
(The cabinet may deform, change colour or the unit may malfunction.)
●Places exposed to water.
●Places exposed to excessive dust.
●Places where temperatures are excessively high or low.
●Places (bathrooms) where the humidity is extremely high.
●Places with strong magnetic fields such as TVs or loudspeakers.
●Places exposed to vibration.
●Places where sand can easily enter the inside of the unit (beaches etc.).
●If the unit is used near radio tuners or TVs, noise and/or picture interference may result. If you experience these problems, move the unit away from such devices.
■ Precautions
To avoid accidental electric shock or other possible problems, observe the precautions listed below.
●Do not disassemble or modify the unit.
●Do not drop or subject the unit to shock.
●Do not use the unit near open flames.
●Do not spill liquid on the unit.
●Do not use an external power supply, other than the 5V DC supplied with this unit, as it may damage it.
●KENWOOD is not responsible for damage due to improper use. Refer all servicing to a KENWOOD authorised service centre.
6
■ Notes about the rechargeable battery
●A rechargeable lithium-ion battery is the only kind that can be used.
Even if the battery supplied with the unit is not used, you should charge it at least once every three months because of the special quality of this battery.
●The rechargeable battery can be charged approximately 300 times.
●Do not use any battery other than that specified. Use of other batteries may cause malfunctions.
●When the operating time is reduced to about half the normal amount of time, even after a full charge is performed, replace the battery with a new one.
●When charging or when using the rechar-
geable battery, use it within an ambient temperature range of 5°C to 35°C.
●If the rechargeable battery is used in a cold environment, the operating time will decrease.
Since the rechargeable battery is vulnerable to damage, please note the following.
●Do not carry the battery in your pocket or a bag together with metal objects (keys, coins, jewelry, etc.).
The battery may short out and generate significant amounts of heat.
●Do not short-circuit the terminals as they will become very hot and will damage the battery.
●Do not dip the battery in water, do not dispose of it in a fire, and do not take it apart.
To avoid damaging the battery and shortening its service life, please note the following.
●Do not drop or subject the battery to shock.
●Do not insert objects (metal etc.) into the battery compartment of this product or into the rechargeable battery. Do not get the terminals dirty. If the rechargeable terminals are dirty, the operating time may be shortened or it may not be possible to charge the battery.
●After the rechargeable battery is charged or used, it will get slightly warm. This is normal.
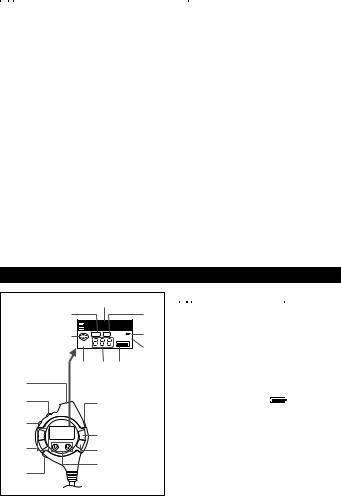
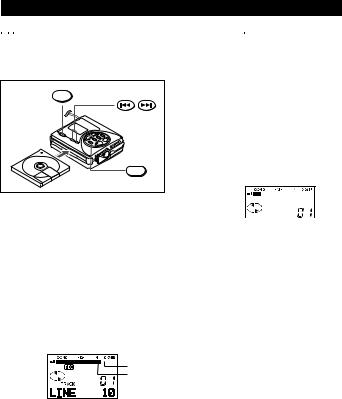
NAMES OF CONTROLS AND INDICATORS
|
2 |
|
|
■ Remote control unit |
|
1 |
|
3 |
1. Synchro Recording Indicator |
||
|
|
||||
|
|
2. Character/Time Information |
|||
|
|
|
|
||
6 |
SYNC REC |
1 |
4 |
|
Indicator |
|
RANDOM |
3. Record Indicator |
|||
TOTAL |
|
|
5 |
||
|
|
|
4. Repeat Indicator: P |
||
7 |
8 |
9 |
|
5. Random Indicator |
|
|
6. Disc Mode Indicator |
||||
10 |
|
|
|
7. Total Track Number Display |
|
|
|
|
8. Track Number Indicator |
||
|
|
|
|
||
11 |
15 |
|
|
9. Battery Indicator: |
|
|
|
|
|
10. |
Headphones Socket |
12 |
|
|
|
11. |
Hold Switch |
16 |
|
|
12. |
Play Mode Button |
|
|
|
|
|||
|
|
|
13. |
Volume Buttons: +, – |
|
|
|
|
|
||
13 |
17 |
|
|
14. |
Bass Button |
|
18 |
|
|
15. |
Display Button |
14 |
|
|
16. |
Play/Pause Button: 38 |
|
|
|
|
|||
|
|
|
17. |
Stop/Power Off Button: ■ |
|
|
|
|
|
||
|
|
|
|
18. |
Fast Reverse / Fast Forward |
|
|
|
|
|
Buttons: 4 / ¢ |
7
1 |
2 |
|
3 4 |
5 |
10 |
|
|
|
6 |
|
|
|
7 |
|
11 |
|
|
|
|
|
|
|
8 |
|
12 |
|
|
|
|
|
|
|
|
|
13 |
|
|
|
9 |
|
14 |
15 |
||
16 |
17 |
18 19 20 21 |
||
|
|
|
|
EJECT |
22 |
23 |
24 |
25 26 27 |
|
29 |
|
|
30 |
|
28 |
|
|
|
|
31 |
|
|
|
34 |
32 |
|
|
|
33 |
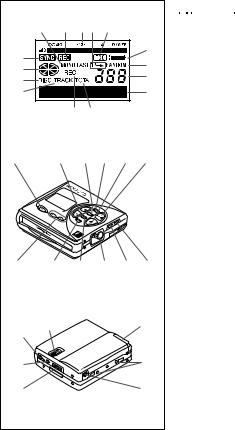
■Main unit
1.Monaural Long-Play Mode Indicator
2.Record Indicator
3.Level Meter
4.Repeat Indicator: P
5.TOC Indicator
6.Battery Indicator: 
7.Random Indicator
8.Track Number Indicator
9.Character/Time Information Indicator
10.Synchro Recording Indicator
11.Disc Mode Indicator
12.Disc Name Indicator
13.Track Name Indicator
14.Remaining Recording Time Indicator
15.Total Track Number Display
16.Record/Track Mark Button
17.Volume/Name Select Buttons: +, –
18.Display/Lowercase Characters Button
19.Character Button
20.Stop/Power Off/Charge Button: ■ / OFF
21.Play/Pause Button: 38
22.Fast Reverse/Fast Forward/Recording Level Control/Cursor Buttons:
4 / ¢
23.Enter/Fast Play/Synchro Button
24.Edit/Auto Mark Button
25.Eject Lever
26.Bass/Delete Button
27.Mode/Insert Button
28.Microphone Input Socket
29.Hold Switch
30.Rechargeable Lithium-lon Battery Compartment
31.Optical/Line Input Socket
32.Headphones Socket
33.5V DC Input Socket
34.Battery Case Connection Terminals
8
POWER SOURCE
This unit can be used with 4 different power sources: a rechargeable battery, an AC adaptor, a separately available battery case, and a separately available car adaptor (DC-C70).
1 |
|
|
2 |
|
Mark |
5 |
|
|
OFF |
|
|
DC IN 5V |
|
|
To the |
Insert |
4 |
DC IN 5V |
||
socket |
securely, |
|
|
all the |
|
|
way in. |
|
|
AC 230V, 50 Hz |
|
Notes:
●After charging has been completed, the AC adaptor may be left connected. (For example, when charging at night)
●The battery will not be charged whenever the power to the main unit is turned on.
●If the AC adaptor is removed from the main unit or from the AC socket whilst charging, “  ” will not disappear for about 1 minute. This is normal.
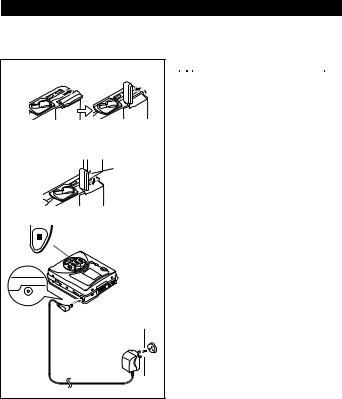
■ Rechargeable battery power
When the rechargeable battery is used for the first time or when you want to use it after a long period of disuse, be sure to charge it fully.
1 Open the rechargeable battery compartment cover.
2 Insert the rechargeable battery. ● Insert the side with the arrow first.
3 Close the rechargeable battery compartment cover.
4 Plug the AC adaptor into the AC socket, and then insert the plug on the AC adaptor lead into the DC IN 5V socket.
5 Press the ■ / OFF button twice to begin charging.
●“  ” will appear, and the battery will begin charging.
●Battery charging will be complete in 3.0 hours. When the charging is complete, “  ” will go out.
●Do not force open the rechargeable battery cover too wide.
●Do not fit the separately available battery case when charging the internal battery.
9
1 |
Back of the |
2 MD recorder |
2 |
LOCK RELEASE |
LOCK RELEASE |
Cautions:
●Whilst you are using the rechargeable battery and the alkaline batteries at the same time, do not remove either of them. If you do, when the unit is in the play mode, playback will stop. When in the recording mode, the recorded contents will be erased, and the power may be disconnected.
●Do not replace the batteries or the rechargeable battery during operation.
●Do not use rechargeable batteries (nickel-cadmium battery etc.) in the battery case.
●If the unit is not used for a long period of time, remove the batteries. (Even if the power is turned off, the batteries will be drained slowly but continuously.)
●Be sure to hold the plug when removing it. If you pull on the lead, it may break, or the unit may malfunction.
●Do not use any car adaptor except for the separately available DC-C70.
●For information about the battery life, see the battery item in the SPECIFICATIONS on page 43.
●This unit should only be used within the range of 0°C and 40°C.
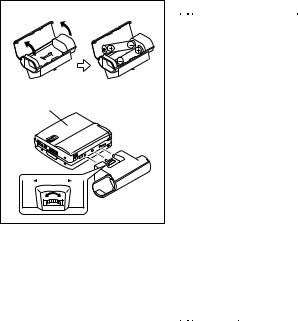
■ Alkaline battery power
If you use the separately available battery case and the rechargeable battery at the same time, the MD can play much longer than with only one source of battery power.
●Use two, commercially available alkaline batteries (LR6, “AA” size).
1 Insert the batteries into the battery case.
(1)Open the case cover.
(2)Insert the batteries according to the polarity marked on the inside of the battery case. Then, close the case cover.
2 Attach the battery case to the main unit.
(1)Match the convex part of the battery case to the concave area in the main unit.
(2)Turn the screw in the direction marked “LOCK” to secure the battery case.
Note:
●The battery case is only sold in certain areas. For more details, please ask your dealer.
■ AC power
Plug the AC adaptor into the AC socket, and then insert the plug on the AC adaptor lead into the DC IN 5V socket.
Notes:
●When there is thunder or lightning in your vicinity, unplug the AC adaptor from the AC socket.
●When the unit is not in use for extended periods, remove the AC adaptor from the AC socket.
●Never use an AC adaptor other than the one specified. Otherwise, problems or serious hazards may be created.
●Do not bend, twist or tie the power lead or put heavy objects on top of it.
10

BEFORE RECORDING
■ Type of recording
Two types of recording are possible: “Digital recording” and “Analogue recording”. There are different cables and connections for each type of recording, depending on the sockets on the equipment being connected to the unit.
(1) Analogue recording
Connect the unit to equipment that has a line output socket, using the cable included with this unit.
●Main equipment: CD player, MD player, radio cassette player, etc.
●Cable required: Connecting cable included with this unit
REC OUT
Playback side
R |
L |
|
RIGHT |
LEFT |
To the line output |
|
|
|
|
|
sockets on a stereo |
Connecting cable included with this unit |
|
Recording side |
|
|
|
|
|
To the OPTICAL/LINE |
|
|
IN socket |
(2) Digital recording
Connect the unit to equipment that has an optical output socket using an optical digital cable (available separately). Using an optical signal to transfer the music to a MiniDisc allows very high quality recording.
●Main equipment: CS/BS tuner, CD player, MD player, etc.
●Cable required: Optical digital cable
Note:
●The optical digital cable is only sold in certain areas. For more details, please ask your dealer.
Recording side
To the OPTICAL/
LINE IN socket
Digital cable
DIGITAL OUT
OPTICAL OUT 

Playback side
To the optical output socket (square shaped socket) on a stereo etc.
Playback side
To the optical output socket (round shaped socket) on an MD player etc.
11
■ Types of discs
There are two types of discs: playback-only and recordable discs.
● Playback-only MiniDisc: |
● Recordable MiniDisc: |
This type of MiniDisc usually contains commercially available pre-recorded music. This is the same kind of optical disc as CDs. Playback is performed using an optical pickup.
(Recording and editing are not possible.)
There will only be a shutter on
one side (the back).
This is a “raw disc” on which recording can be performed. This is a magnetooptical disc.
Recordings are made using a laser and a modulated magnetic field. Repeated recording is possible.
Shutters can be seen on both sides of this type of disc.
■ To prevent recorded discs from being erased accidentally |
Slide the accidental erase prevention tab, |
located on the side of the disc, in the di- |
rection indicated by the arrow. |
● The disc will then be protected against |
accidental erasure. |
● To add a recording to such a disc, slide |
the accidental erase prevention tab |
back to its original position. |
Protected against |
accidental erasure |
Notes: |
●When making important recordings, it is recommended that you use the AC adaptor. A fully charged rechargeable battery should be loaded into the unit. Then, even if a power failure occurs, the power source will switch over to the rechargeable battery automatically.
●When using the rechargeable battery or the alkaline batteries, if the headphones volume level is set to “0", the bat-
tery consumption will be less than when listening to the recording whilst it is being made.
●Insert each plug firmly. If the connections are poor, the recording may not be made properly. Always keep the plugs clean. If the plugs are dirty, electrical noise may be recorded.
12
RECORDING USING THE CABLE INCLUDED WITH THE UNIT
■ Recording from CDs or MDs (Synchro recording)
●Synchro recording is a method that detects the playback sound from the source equipment. When sound is present, it automatically starts the recording. When the source is silent, the recording will be paused.
RECORDING |
REC LEVEL |
/CURSOR |
SYNC/F.PLAY |
ENTER |
1 Connect the external equipment. (See page 11.)
2 Insert a recordable MiniDisc.
3 Press the RECORDING button.
●To record from a tuner, first tune in a broadcast.
●To record from a CD, first start playing the track you want to record.
4 Whilst playing sound from the external equipment connected to this unit, press the 4 or ¢ button to adjust the recording level.
0dB -4dB
●Adjust the recording level so that the maximum sound volume from the source makes the reading swing somewhere between -4 dB and 0 dB.
●To record from a CD, first adjust the recording level. Then put the equipment connected to this unit into the playback stand-by mode.
5 Press the ENTER/SYNC/F.PLAY button.
Flashing 


6 Begin playback on the source equipment.
● Recording will begin automatically.
To interrupt recording:
●When the source equipment is stopped, the unit will enter the synchro recording stand-by mode. When playback is resumed, a recording will be resumed.
●If a silence lasts for 3 seconds or more, the recording will be paused.
●Pressing the 38 button on this unit (when in this mode) will cause the unit to enter the recording stand-by mode and cancel the synchro recording mode.
13

To stop recording: |
automatically. (For details about the |
|
Press the ■ / OFF button. |
TOC, see page 23.) |
|
● If the unit is left alone after the recor- |
To remove the MiniDisc: |
|
ding has stopped, the power will be |
||
Turn off the power and move the EJECT |
||
turned off about 2 minutes later. |
||
lever in the direction indicated by the ar- |
||
After recording: |
||
row. |
||
Press the ■ / OFF button whilst in the stop |
|
|
mode. |
|
|
● After the track number has been written |
|
|
on the disc, the power will be turned off |
|
■ Recording from a tuner or a CD (Manual recording)
● Manual recordings can be started and stopped as you like.
1 Put the unit in the recording stand-by mode. (Perform steps 1 - 4 in the “Synchro recording” section.)
2 Press the 38 button.
●Recording will start.
●To record from a CD, press the 38 button, and then start playback on the equipment connected to this unit.
●Track numbers can be created whilst recording. (Page 20)
To interrupt recording:
Press the 38 button whilst recording.
●The unit will enter the recording standby mode.
●To resume recording, press the 38 button again.
The track number will be increased by one each time you interrupt a recording.
Recordings can not be made in the |
● Depending on the strength and type |
following situations: |
of playback signal in the original re- |
● Recording on a playback-only Mini- |
cording, the new recording may not |
Disc (commercially available music) |
begin or pause at the correct point |
● If a Minidisc is protected against ac- |
when in the synchro mode. If this |
cidental erasure (page 12) |
happens, try making a manual recor- |
About the recording level: |
ding. |
|
|
● If the recording level is too low, the |
Precautions when inserting a Mini- |
playback sound volume may be too |
Disc: |
low to hear well. If it is too high, the |
● To insert a Minidisc, push on the |
playback sound may be greatly dis- |
middle of the edge of the disc whilst |
torted. Since digitally recorded CDs |
holding it parallel to the main unit. |
have a large dynamic range (the vo- |
● If any resistance is felt, do not try to |
lume can vary tremendously from |
force the MiniDisc into the unit. It |
very soft to extremely loud), do not |
may cause more problems. If resis- |
set the recording level any higher |
tance is felt, remove the MiniDisc |
than is necessary. |
and try reloading it. |
Precautions when recording: |
Notes: |
● Do not jar or bump the main unit |
● Whenever any button is pressed, the |
whilst recording. Otherwise, the re- |
remote control display will light for |
cording may be unusable. |
about 4 seconds. |
|
● The RECORDING button does not |
|
light. |
14
 Loading...