

Page 1
QUICKSTART
BR 40/10 C
Start up
Warning
These are only brief instructions! Please read and comply with these instructions prior to using or servicing your
appliance.
The non-compliance of the operating and safety instructions may lead to damages of the appliance and to dangers
for the operator and other persons.
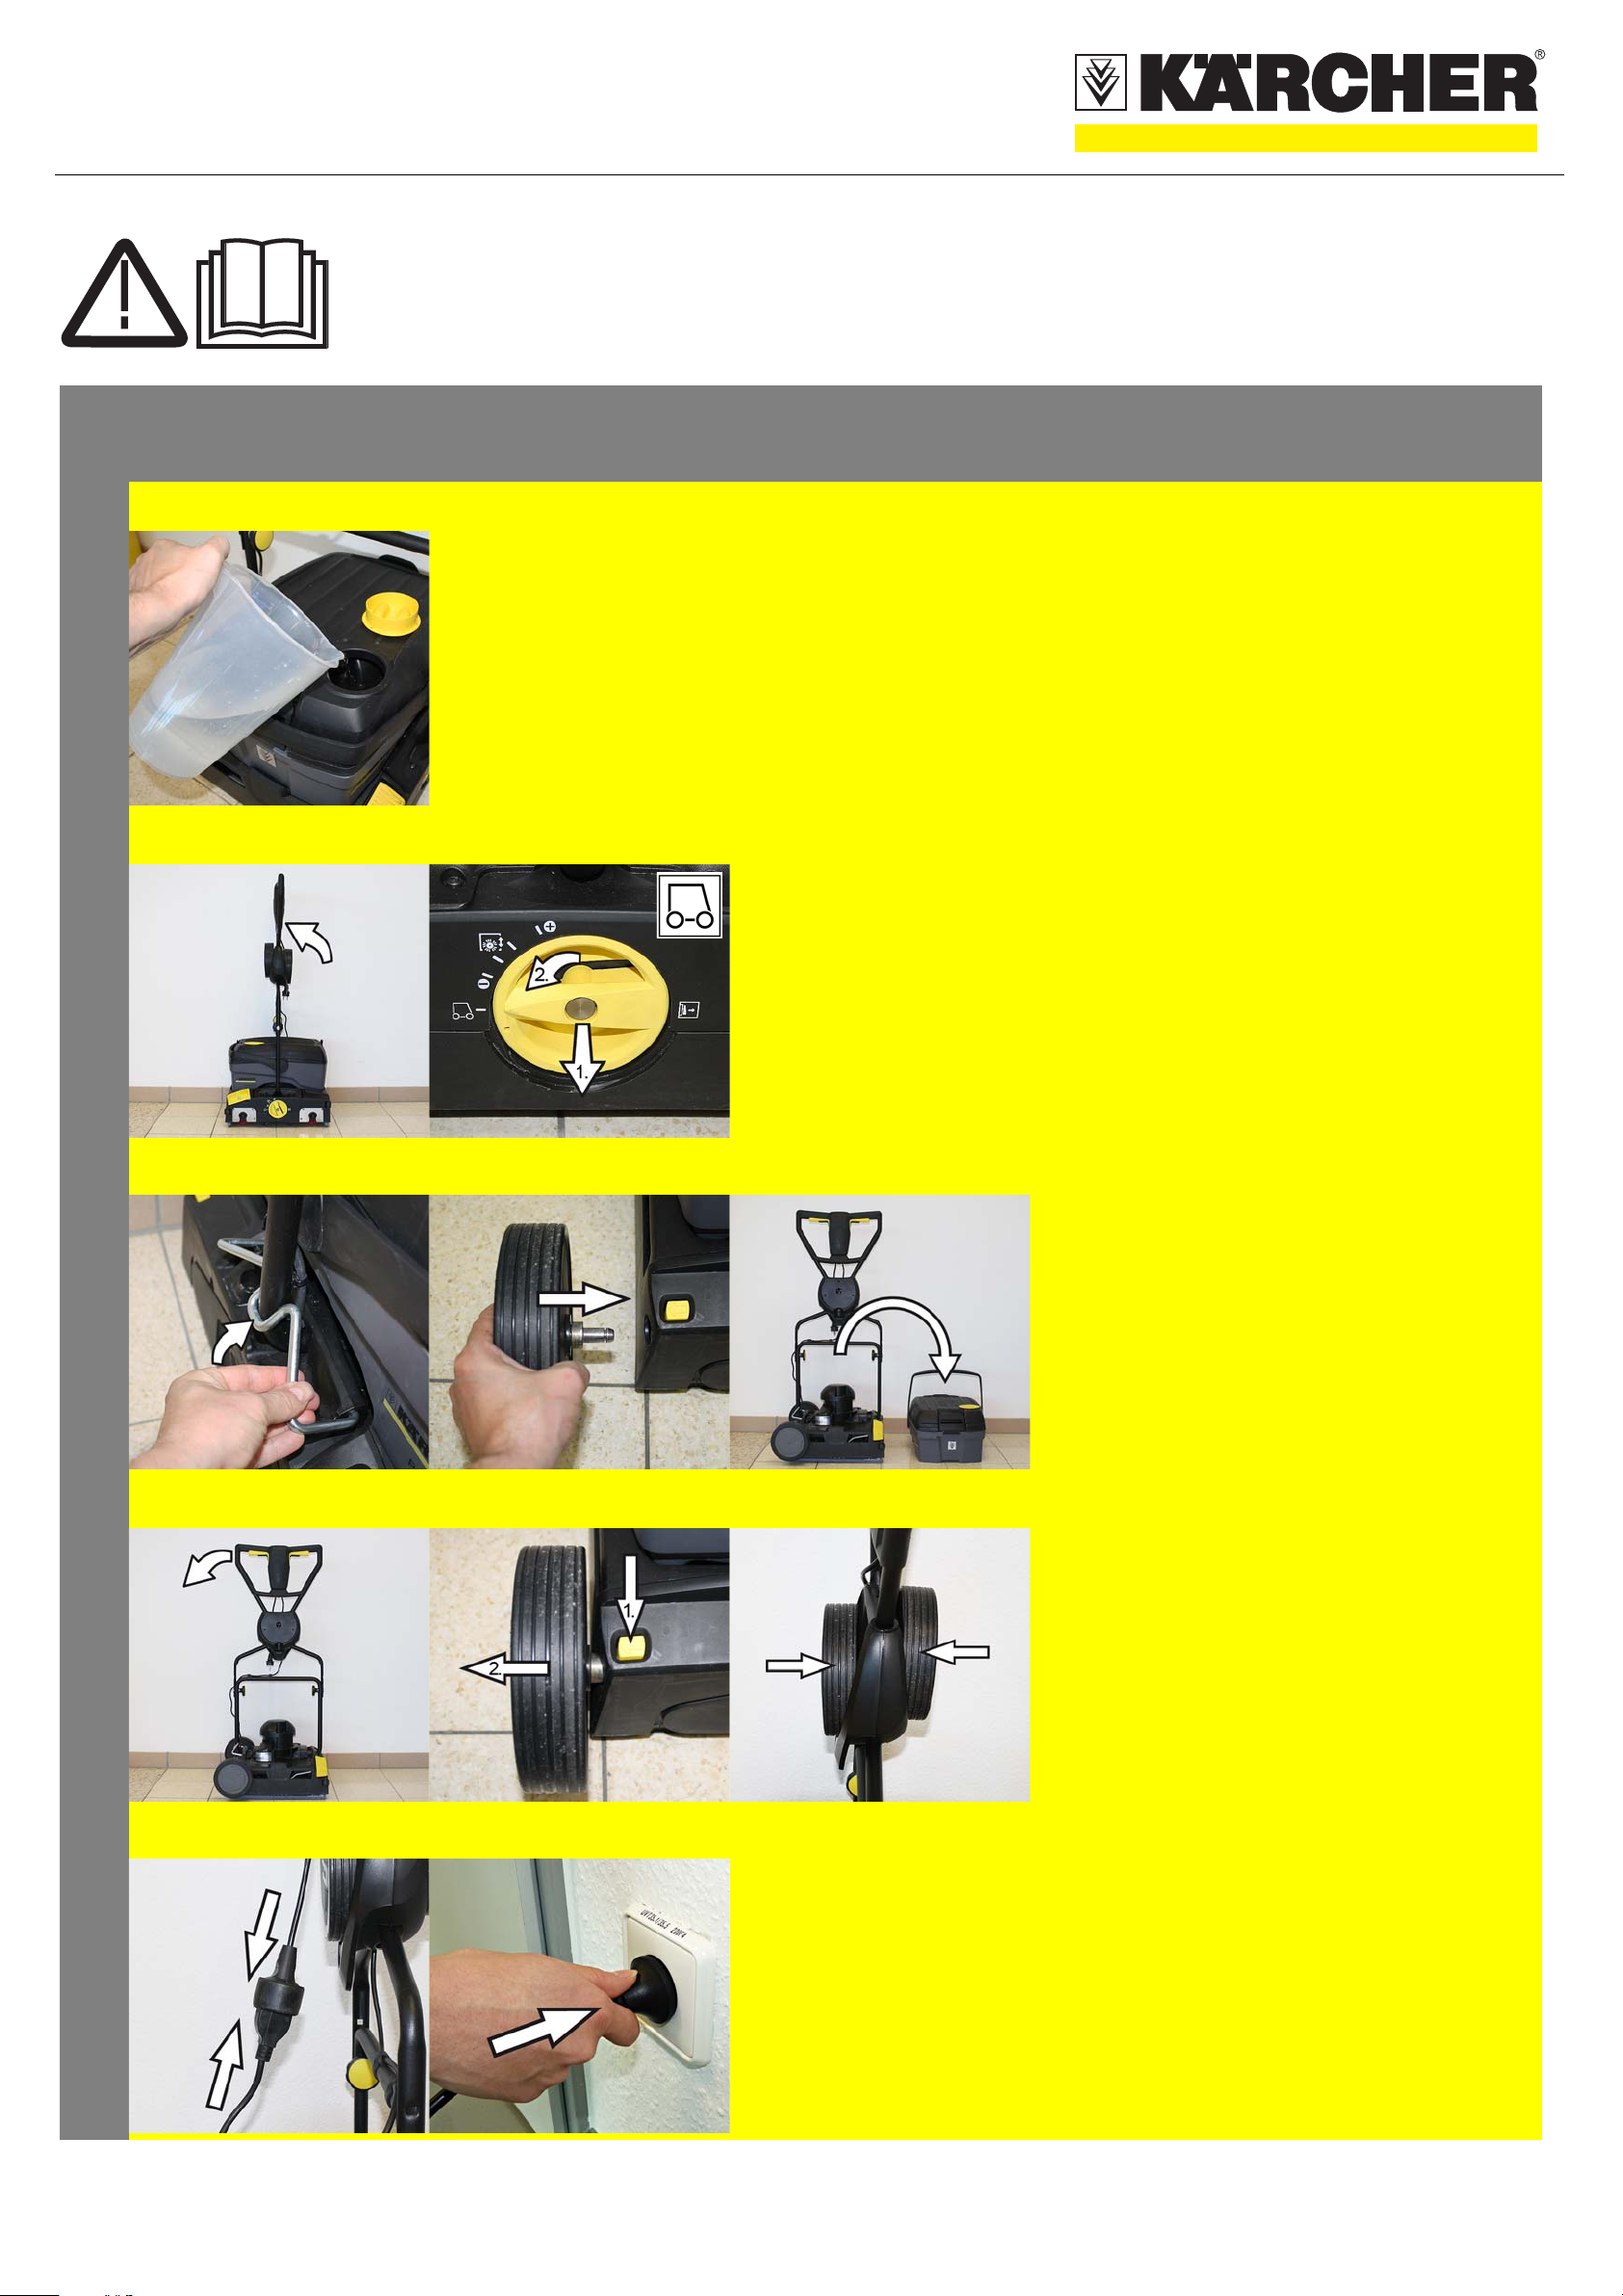
1
A
b C
Caution
Risk of damage. Only use the recommended
detergents. With respect to different detergents
the operator bears the increased risk regarding
the operational safety, accident risk and reduced
product life of the appliance. Only use detergents
that are free from solvents, hydrochloric acid and
hydrofluoric acid.
Follow the safety instructions for using detergents.
Note
Do not use highly foaming detergents. Observe
the dosing notes.
A Open the cover of the fresh water reservoir.
Pour in water/detergent mixture. Maximum
temperature of the liquid 50 °C.
Close the cover of the fresh water reservoir.
Short distances on level grounds
B Place the slider vertically.
C Pull out the rotary handle for the brush con-
tact pressure and set it to the drive position.
Use the pushing handle to push the appliance
to the place of use.
2
A
D
B
E
C
F
Long distances, uneven grounds
A Place the slider vertically and tilt the lock up.
B Install the transport wheels.
Caution
Danger of damage due to leaking water. Remove
the waste water and fresh water reservoirs before
tilting the appliance.
C Remove the filled waste and fresh water
reservoirs from the appliance and transport
them separately.
D Tilt the appliance to the side and drive it to the
place of use on its transport wheels.
If the transport wheels hinder the use of the
appliance:
E Press the transport wheel release button and
pull the transport wheel out.
F Insert the transport wheels into their holder
until they stop.
A B A Connect an extension cable with a sufficient
3
cross section.
Always unwind extension cord completely
Insert the end of the extension cable as a loop
in the strain relief clamp.
B Plug in the main plug.
5.964-029.0 11/12
Page 2
QUICKSTART
1
Operation
A Adjust the brush contact pressure
A Place the slider vertically.
Pull out the rotary handle of the brush contact
pressure and set it to the desired value.
Note
Carry out the initial cleaning attempts with less
contact pressure. Increase contact pressure
step-by-step until the desired cleaning result is
achieved. The correct setting of the contact pressure reduces the wear and tear of the brushes.
The brush drive is switched off when there is
overload.
When cleaning with microfibre rollers, the contact
pressure must not be adjusted higher than the
position mentioned below. With a higher contact
pressure, there is a danger of destroying the microfibre rollers.
2
A
D
B C Cleaning
Danger
Risk of injury on account of electric shock caused
by a damaged mains cable. Do not let the mains
cable come in contact with the rotating brushes or
pads.
Caution
Risk of damage. When cleaning close to a wall,
position the appliance so that the deflection
rollers point towards the wall.
A If the detergent solution is to be vacuumed off
after the cleaning process:
Check that all vacuum bars are inserted into
the appliance
B Press the pedal to lower the vacuum bar.
Place the slider vertically.
C T urn on the brush irrigation by using the
switch for the detergent solution.
Turn on the brushes by using the switch for
the brush drive.
D Swivel the slider toward the operator - the
chassis is retracted and the brushes touch
the floor.
Move the appliance over the surface to be
processed by the slider.
Caution
Risk of damage to the floor covering.
Do not operate the appliance on the spot.
3
A B Polishing
A Press the push-button for the vacuum bar
change toward the inside - the vacuum bar
will release.
Remove both vacuum bars from the appliance.
Place the slider vertically.
B Turn on the brushes by using the switch for
the brush drive.
Swivel the slider toward the operator - the
chassis is retracted and the brushes touch
the floor.
Move the appliance over the surface to be
processed by the slider.
Caution
Risk of damage to the floor covering.
Do not operate the appliance on the spot.
Note
To polish underneath furniture, the fresh water
and wastewater reservoirs can be removed.
5.964-029.0 11/12
Page 3

QUICKSTART
Finish operation
1
A
D
B C Shutting Down the Appliance
A Release the switch for detergent solution.
Push the appliance forward for another 1-2 m
to draw off residual water.
Release the brush drive button.
B Press the pedal to lower the vacuum bar.
C Place the slider vertically - the brushes are
elevated.
D Pull out the mains plug.
Caution
Danger of deforming the brushes. When switching off the appliance, take the load off the appliance by placing the slider vertically.
2
3
A B C Emptying the Fresh Water Tank
몇 Warning
Please observe the local provisions regarding the
wastewater treatment.
A Open the locks for the fresh water reservoir.
B Tilt the carrying hanlde for the wastewater
reservoir towards the side.
Lift up the fresh water reservoir and carry it to
the disposal site.
C Remove the cover of the fresh water reser-
voir and pour out the liquid via the notch.
Rinse the fresh water tank with clear water.
A B Emptying the Dirt Water Reservoir
Note
If the dirt water reservoir is full the float closes the
suction channel. The suction operation is interrupted. Empty the dirt water reservoir.
몇 Warning
Please observe the local provisions regarding the
wastewater treatment.
A Remove the fresh water reservoir from the
appliance.
B Lift up the wastewater reservoir and carry it to
the disposal site.
Pour out dirty water.
Rinse the dirty water tank with clear water.
5.964-029.0 11/12
Page 4

QUICKSTART
Maintenance and care
1
A
C
B
D
A Fill the fresh water tank with clear
water and rinse the appliance to
avoid residue buildup.
B Check the seal in the ball valve in
the fresh water reservoir.
C Check the fluff filter, clean if re-
quired.
D Clean the vacuum lips, check for
wear and replace the vacuum bar if
required.
E Check the brushes for wear,
replace if required.
F Clean the water distribution bars
above the brushes, remove if
necessary and flush with water.
G Let the reservoirs dry prior to clos-
ing them to prevent odor creation.
H Clean the outside of the appliance
with a damp cloth which has been
soaked in mild detergent.
daily
monthly
Kärcher Customer Service
2
E
A B A Check the condition of the seals
F
between the appliance and the
wastewater reservoir; replace if
required.
B Clean the brush tunnel.
3
Have annual customer service work
performed.
5.964-029.0 11/12
 Loading...