

Page 1
KD-A845BT / KD-R840BT / KD-R740BT
ENGLISH
ESPAÑOL
FRANÇAIS
CD RECEIVER
INSTRUCTION MANUAL
RECEPTOR CON CD
MANUAL DE INSTRUCCIONES
RÉCEPTEUR CD
MANUEL D’INSTRUCTIONS
Please read all instructions carefully before operation to obtain the
best possible performance from the unit.
Por favor lea detenidamente este manual para comprender a fondo
todas las instrucciones y obtener un máximo disfrute de esta unidad.
Veuillez lires les instructions attentivement avant d’utiliser l’appareil
afin d’obtenir les meilleures performances possibles de l’appareil.
For customer Use:
Enter below the Model No. and Serial No. which are located on
the top or bottom of the cabinet. Retain this information for future
reference.
Model No.
Serial No.
GET0842-001A [J]
Page 2
CONTENTS
BEFORE USE
BEFORE USE 2
BASICS 3
GETTING STARTED 4
RADIO 5
CD / USB / iPod 6
AUX 7
ILLUMINATION
(
KD-A845BT
/
KD-R840BT
only)
Pandora® 8
SiriusXM™
(
KD-A845BT / KD-R840BT
only)
BLUETOOTH® 10
AUDIO SETTINGS 15
MORE INFORMATION 16
TROUBLESHOOTING 17
Warning
Do not operate any function that takes your attention away from safe driving.
Caution
Volume setting:
• Adjust the volume so that you can hear sounds outside the car to prevent accident.
• Lower the volume before playing digital sources to avoid damaging the speakers by the sudden increase of
the output level.
General:
• Avoid using the USB device or iPod/iPhone if it might hinder driving safety.
• Make sure all important data has been backed up. We shall bear no responsibility for any loss of recorded data.
• Never put or leave any metallic objects (such as coins or metal tools) inside the unit, to prevent a short circuit.
7
8
• If a disc error occurs due to condensation on the laser lens, eject the disc and wait for the moisture to evaporate.
Remote control (RM-RK52):
• Do not leave the remote control in hot places such as on the dashboard.
• The Lithium battery is in danger of explosion if replaced incorrectly. Replace it only with the same or
equivalent type.
• The battery pack or batteries shall not be exposed to excessive heat such as sunshine, fire or the like.
• Keep battery out of reach of children and in original package until ready to use. Dispose of used batteries
promptly. If swallowed, contact a physician immediately.
For USA-California Only:
This product contains a CR Coin Cell Lithium Battery which contains Perchlorate Material—special handling
may apply. See www.dtsc.ca.gov/hazardouswaste/perchlorate
Maintenance
Cleaning the unit: Wipe off dirt on the faceplate with a dry silicon or soft cloth.
SPECIFICATIONS 19
INSTALLATION / CONNECTION 20
How to read this manual
• Operations explained mainly using buttons
on the faceplate of
• [XX] indicates the selected items.
•
(« XX)
indicates references are available on
the stated page number.
KD-R740BT
.
Cleaning the connector: Detach the faceplate and clean the connector with a
cotton swab gently, being careful not to damage the connector.
Handling discs:
• Do not touch the recording surface of the disc.
• Do not stick tape etc. on the disc, or use a disc with tape stuck on it.
• Do not use any accessories for the disc.
• Clean from the center of the disc and move outward.
• Clean the disc with a dry silicon or soft cloth. Do not use any solvents.
• When removing discs from this unit, pull them out horizontally.
• Remove burrs from the center hole and disc edge before inserting a disc.
2
Connector (on the reverse
side of the faceplate)
Page 3

BASICS
Faceplate
KD-A845BT
KD-R840BT
KD-R740BT
Detach button
Volume knob
(turn/press) Loading slot
Display window
Attach
Detach
How to reset
Your preset adjustments will
also be erased.
Remote control (RM-RK52)
Remote sensor
(Do not expose to bright sunlight.)
Pull out the insulation sheet
when using for the first time.
How to replace the battery
To Do this (on the faceplate) Do this (on the remote control)
Turn on the power Press and hold L SOURCE.
• Press and hold to turn off the power.
Adjust the volume Turn the volume knob. Press VOL + or VOL –.
Press the volume knob to mute the sound or pause playback.
• Press again to cancel.
Select a source • Press L SOURCE repeatedly.
• Press L SOURCE, then turn the volume knob within 2 seconds.
Change the display
information
Press DISP repeatedly.
• Press and hold to scroll the current display information.
(« 16)
3
( not available )
Press
• Press again to cancel.
Press SOURCE repeatedly.
( not available )
to mute the sound or pause playback.
ENGLISH
Page 4

GETTING STARTED
1
Cancel the demonstration
1
Press and hold
2
Press the volume knob to select
3
Turn the volume knob to select
4
Press
MENU
2
Set the clock
1
Press and hold
2
Turn the volume knob to select
3
Turn the volume knob to select
4
Turn the volume knob to select the day, then press the knob.
5
Turn the volume knob to adjust the hour, then press the knob.
6
Turn the volume knob to adjust the minute, then press the knob.
7
Press
MENU
3
Set the basic settings
1
Press and hold
2
Turn the volume knob to make a selection (see the following table),
then press the knob.
3
Press
MENU
To return to the previous hierarchy, press G.
MENU
to exit.
MENU
to exit.
MENU
to exit.
.
[DEMO]
.
[DEMO OFF]
.
[CLOCK]
[CLOCK SET]
.
, then press the knob.
, then press the knob.
, then press the knob.
CLOCK
CLOCK ADJ
CLOCK DISP
DIMMER
DIMMER SET
BRIGHTNESS
DISPLAY
2
*
SCROLL
TAG DISPLAY
3
USB *
(
KD-A845BT
DRIVECHANGE Selects to change the drive when a multiple drives device is connected to the USB input
IPOD SWITCH
HEAD MODE: Controls music playback only from this unit. ; IPOD MODE: Controls music playback from both
the unit and iPod/iPhone. ; EXT MODE: Controls music playback only from the iPod/iPhone.
AUDIOBOOKS
NORMAL / FASTER / SLOWER: Selects the playback speed of the Audiobooks sound file in your iPod/iPhone.
(Default:
SRC SELECT
AM
PANDORA
AUX
1
*
The illumination control wire connection is required. («
2
*
Some characters or symbols will not be shown correctly (or will be blanked).
3
*
Displayed only when the source is USB FRONT or USB REAR.
4
*
Displayed only when the source is USB-IPOD.
5
*
Not displayed when the corresponding source is selected.
Depends on your iPod/iPhone setting.)
5
*
5
*
AUTO: The clock time is automatically set using the Clock Time (CT) data in FM Radio
Broadcast Data System signal. ; OFF: Cancels.
ON: The clock time is shown on the display even when the unit is turned off. ; OFF: Cancels.
Selects the display and button illumination adjusted in the [BRIGHTNESS] setting.
AUTO: Changes between the day and night adjustments when you turn off or on the car
headlights. *
Sets the display and button brightness for day and night separately.
1
DAY/ NIGHT: Select day or night.
2
Select the zone for setting.
3
Set the brightness level (00 to 31). (Default: DAY: 31 ; NIGHT: 15)
ONCE: Scrolls the display information once. ; AUTO: Repeats scrolling at 5-second
intervals. ; OFF: Cancels.
ON: Shows the TAG information while playing MP3/WMA/WAV files. ; OFF: Cancels.
/
KD-R840BT
terminal (front/rear).
4
*
*3 (
KD-A845BT
ON: Enables AM in source selection. ; OFF: Disables.
5
*
ON: Enables PANDORA in source selection. ; OFF: Disables.
ON: Enables AUX in source selection. ; OFF: Disables.
1
; ON: Selects the night adjustments. ; OFF: Selects the day adjustments.
KD-A845BT
KD-R740BT
/
KD-R840BT
/
KD-R840BT
: BUTTON ZONE / DISP ZONE
only)
: BTN ZONE 1/ 2/ 3 / DISP ZONE / VOL ZONE (« 7)
only)
21)
Default:
XX
4
Page 5
RADIO
“ST” lights up when
receiving an FM stereo
broadcast with sufficient
signal strength.
Search for a station
1 Press L SOURCE to select FM or AM.
2 Press E / F (or 2 / 3 on RM-RK52) to search for a station automatically.
(or)
Press and hold E / F (or 2 / 3 on RM-RK52) until “M” flashes, then press
repeatedly to search for a station manually.
Store a station
You can store up to 18 stations for FM and 6 stations for AM.
While listening to a station....
Press and hold one of the number buttons (1 to 6) to store.
(or)
1 Press and hold the volume knob until “PRESET MODE” flashes.
2 Turn the volume knob to select a preset number, then press the knob.
The preset number flashes and “MEMORY” appears.
Select a stored station
Press one of the number buttons (1 to 6).
(or)
1 Press MENU.
2 Turn the volume knob to select a preset number, then press the knob.
Search for your favorite program (PTY Search)
Available only for FM Radio Broadcast Data System stations.
1 Press and hold G.
2 Turn the volume knob to select a PTY code (see the right column), then press
the knob to start searching.
If there is a station broadcasting a program of the same PTY code as you have
selected, that station is tuned in.
Other settings
1 Press and hold MENU.
2 Turn the volume knob to select
[TUNER]
, then press the knob.
3 Turn the volume knob to make a selection (see the following table), then
press the knob.
4 Press MENU to exit.
Default:
SSM SSM 01 – 06 / SSM 07 – 12 / SSM 13 – 18: Automatically presets up to 18
stations for FM. “SSM” stops flashing when the first 6 stations are stored. Select
SSM 07 – 12 / SSM 13 – 18 to store the following 12 stations.
AREA
MONO
IF BAND
RADIO TIMER
PTY code: NEWS, INFORM (information), SPORTS, TALK, ROCK, CLS ROCK (classic rock), ADLT HIT
(adult hits), SOFT RCK (softrock), TOP 40, COUNTRY, OLDIES, SOFT, NOSTALGA (nostalgia), JAZZ,
CLASSICL (classical), R & B (rhythm and blues), SOFT R&B (soft rhythm and blues), LANGUAGE,
REL MUSC (religious music), REL TALK (religious talk), PERSNLTY (personality), PUBLIC, COLLEGE,
HABL ESP (Spanish talk), MUSC ESP (Spanish music), HIP HOP, WEATHER
AREA US: For North/Central/South America, AM/FM intervals: 10 kHz/200 kHz. ;
AREA EU: For any other areas, AM/FM intervals: 9 kHz/50 kHz. ; AREA SA: For
some South American countries, AM/FM intervals: 10 kHz/50 kHz.
Displayed only when the source is FM.
MONO ON: Improves the FM reception, but the stereo effect will be lost. ;
MONO OFF: Cancels.
AUTO: Increases the tuner selectivity to reduce interference noises from adjacent
stations. (Stereo effect may be lost.) ; WIDE: Subjects to interference noises from
adjacent stations, but sound quality will not be degraded and the stereo effect will
remain.
Turns on the radio at a specific time regardless of the current source.
1
ONCE/ DAILY/ WEEKLY/ OFF: Select how often the timer will be turned on.
2
FM/ AM: Select the FM or AM band.
3
01 to 18 (for FM)/ 01 to 06 (for AM): Select the preset station.
4
Set the activation day and time.
M
” lights up when complete.
• “
Radio Timer will not activate for the following cases.
• The unit is turned off.
• [OFF] is selected for [AM] in [SRC SELECT] after Radio Timer for AM is selected.
«
4)
(
XX
5
ENGLISH
Page 6
CD / USB / iPod
Start playback
CD
Label side
The source changes to CD and playback starts.
• To eject a disc, press 0.
USB
USB input terminal
USB 2.0 cable
*1
(commercially available)
and/ or
USB cable from the rear of the unit
(KD-A845BT / KD-R840BT only)
The source changes to USB FRONT, USB REAR or
USB and playback starts.
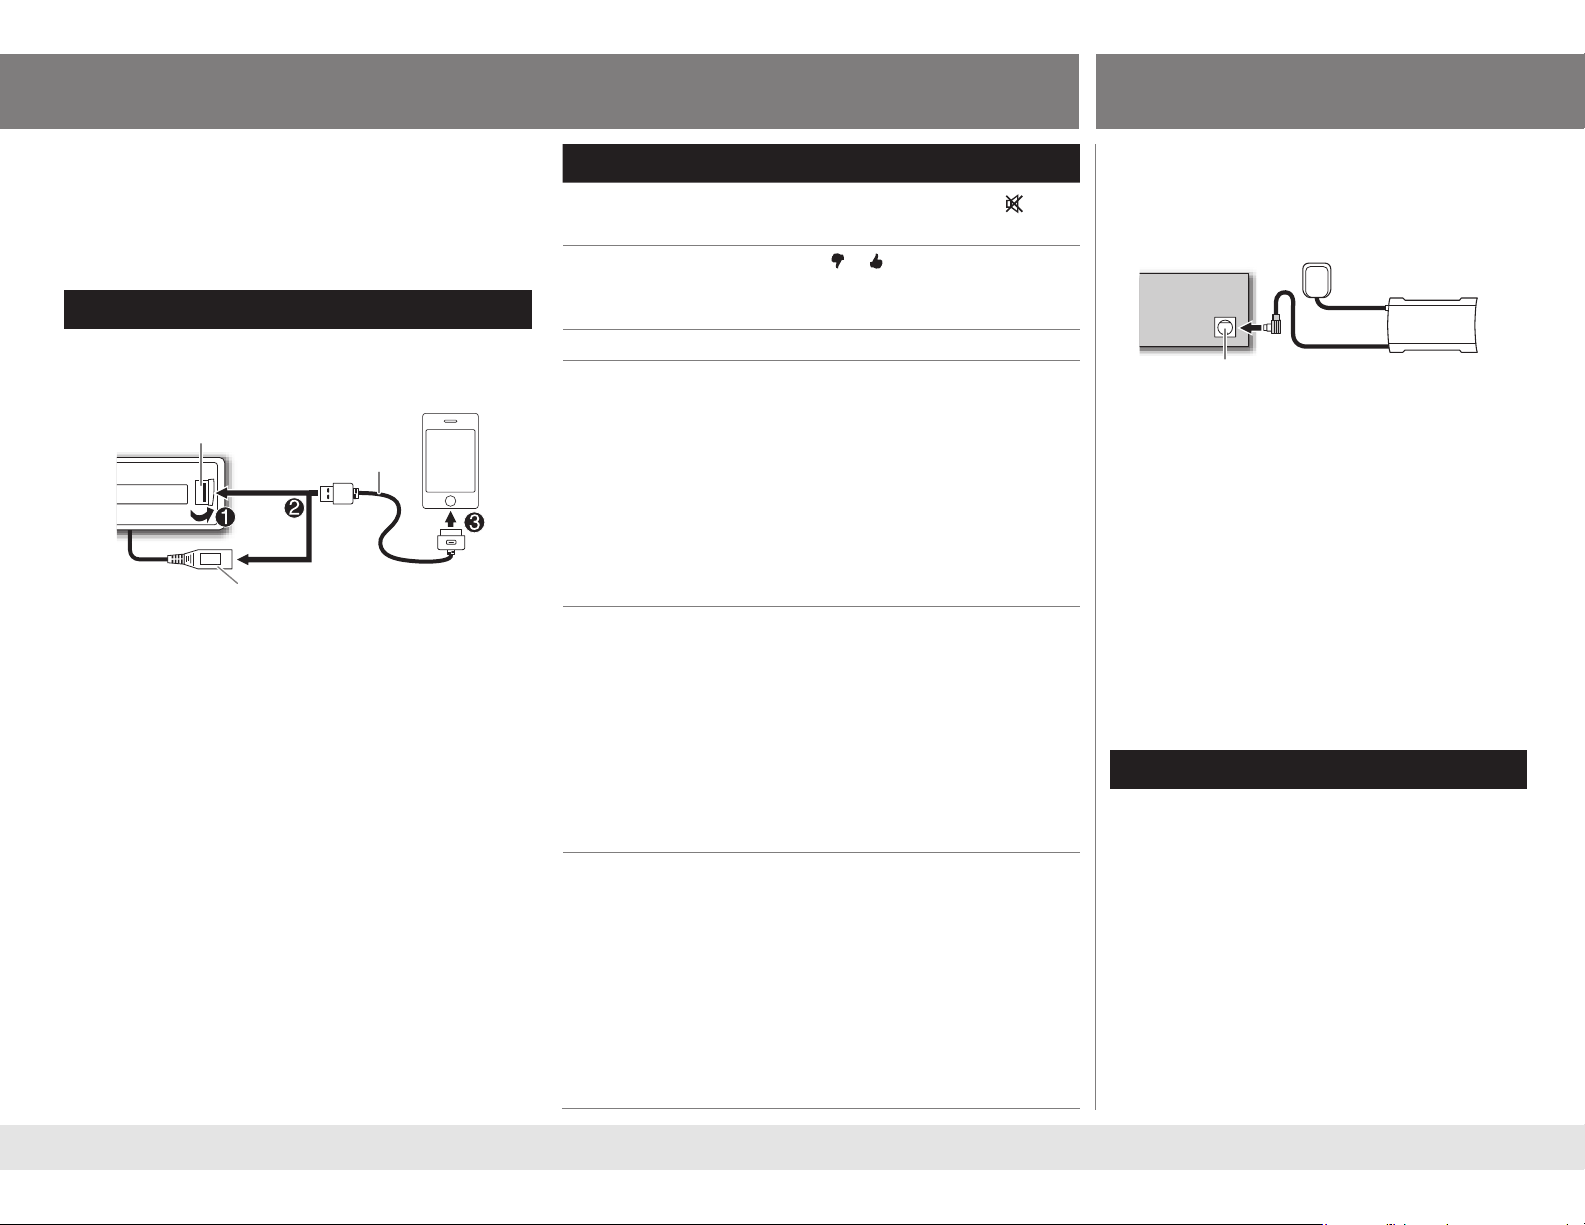
iPod/iPhone
USB input terminal
USB 2.0 cable*
(accessory of the
1
iPod/iPhone)
and/ or
Note:
WAV files are playable only for
KD-A845BT / KD-R840BT
in USB source.
: Applicable
— : Not applicable
To Do this CD USB iPod
Select a track/file Press E / F (or 2 / 3 on RM-RK52).
Select a folder
Press 1 ∞ / 2 5 (or 5 / ∞ on RM-RK52).
(MP3/WMA/WAV)
Reverse/Fast-forward Press and hold E / F (or 2 / 3 on RM-RK52).
Select a track/file
from a list
1 Press MENU
2 Turn the volume knob to make a selection, then press the knob.
• MP3/WMA/WAV file: Select the desired folder, then a file.
3
• iPod or JVC Playlist Creator (JPC) / JVC Music Control (JMC) file*
: Select
the desired file from the list (PLAYLISTS, ARTISTS, ALBUMS, SONGS,
PODCASTS*
4
, GENRES, COMPOSERS*4 , AUDIOBOOKS*5).
• To return to the previous hierarchy, press G.
• To cancel, press MENU.
Note: Turn the volume knob quickly to fast-search or use
(« 7)
Character search
.
Repeat play Press 6 B repeatedly to make a selection.
• Audio CD or JPC / JMC file: TRACK RPT, RPT OFF
• MP3/WMA/WAV file: TRACK RPT, FOLDER RPT, RPT OFF
• iPod: ONE RPT, ALL RPT
—
2
*
2
*
6
*
6
*
USB cable from the rear of the unit
(KD-A845BT / KD-R840BT only)
The source changes to
USB-IPOD
and
playback starts.
Press 4 iPod MODE repeatedly to select the
control mode (
[EXT MODE]
• See also
) directly.
[IPOD SWITCH]. (« 4)
[HEAD MODE]
/
[IPOD MODE]
/
Random play Press 5 A repeatedly to make a selection.
• Audio CD: ALL RND, RND OFF
• MP3/WMA/WAV file or JPC / JMC file: FOLDER RND, ALL RND, RND OFF
7
*
• iPod: SONG RND, ALBUM RND
1
*
Do not leave the cable inside the car when not using.
2
*
Applicable under
3
*
Only for files registered in the database created with JPC / JMC. («
4
*
Only for iPod.
[HEAD MODE]
and
[IPOD MODE]
only. («
, RND OFF
4)
16)
6
5
*
KD-A845BT / KD-R840BT
6
*
Applicable under
7
*
Not applicable for some iPod/iPhone.
only.
[HEAD MODE]
only. («
4)
6
*
Page 7
CD / USB / iPod
Character search
(
KD-A845BT
If you have many folders or tracks/files, you can search through
them quickly according to the first character (A to Z, 0 to 9 and
OTHERS).
• “OTHERS” appear if the first character is other than A to Z, 0 to
9.
1 Press MENU .
2 For iPod: Turn the volume knob to select the desired list,
then press the knob.
For MP3/WMA/WAV: Go to step
3 Press 1 ∞ / 2 5 to select the desired character.
4 Turn the volume knob to select the desired folder or
track/file, then press the knob.
/
KD-R840BT
only)
3.
ILLUMINATION
(
KD-A845BT
/
KD-R840BT
only)
1 Press and hold MENU.
2 Turn the volume knob to select
[COLOR]
or
[COLOR SETUP]
, then press the knob.
3 Turn the volume knob to make a selection (see the following table), then press the knob.
4 Press MENU to exit.
COLOR
: Select a color for each zone separately.
Default:
XX
AUX
Use a portable audio player
1 Connect a portable audio player (commercially available).
3.5 mm (1/8") stereo mini plug with “L” shaped
connector (commercially available)
Auxiliary input jack
2 Select
[ON]
for
[AUX]
in
3 Press L SOURCE to select AUX.
4 Turn on the portable audio player and start playback.
Use a 3-core plug head stereo mini plug for
optimum audio output.
Portable audio player
[SRC SELECT]. (« 4)
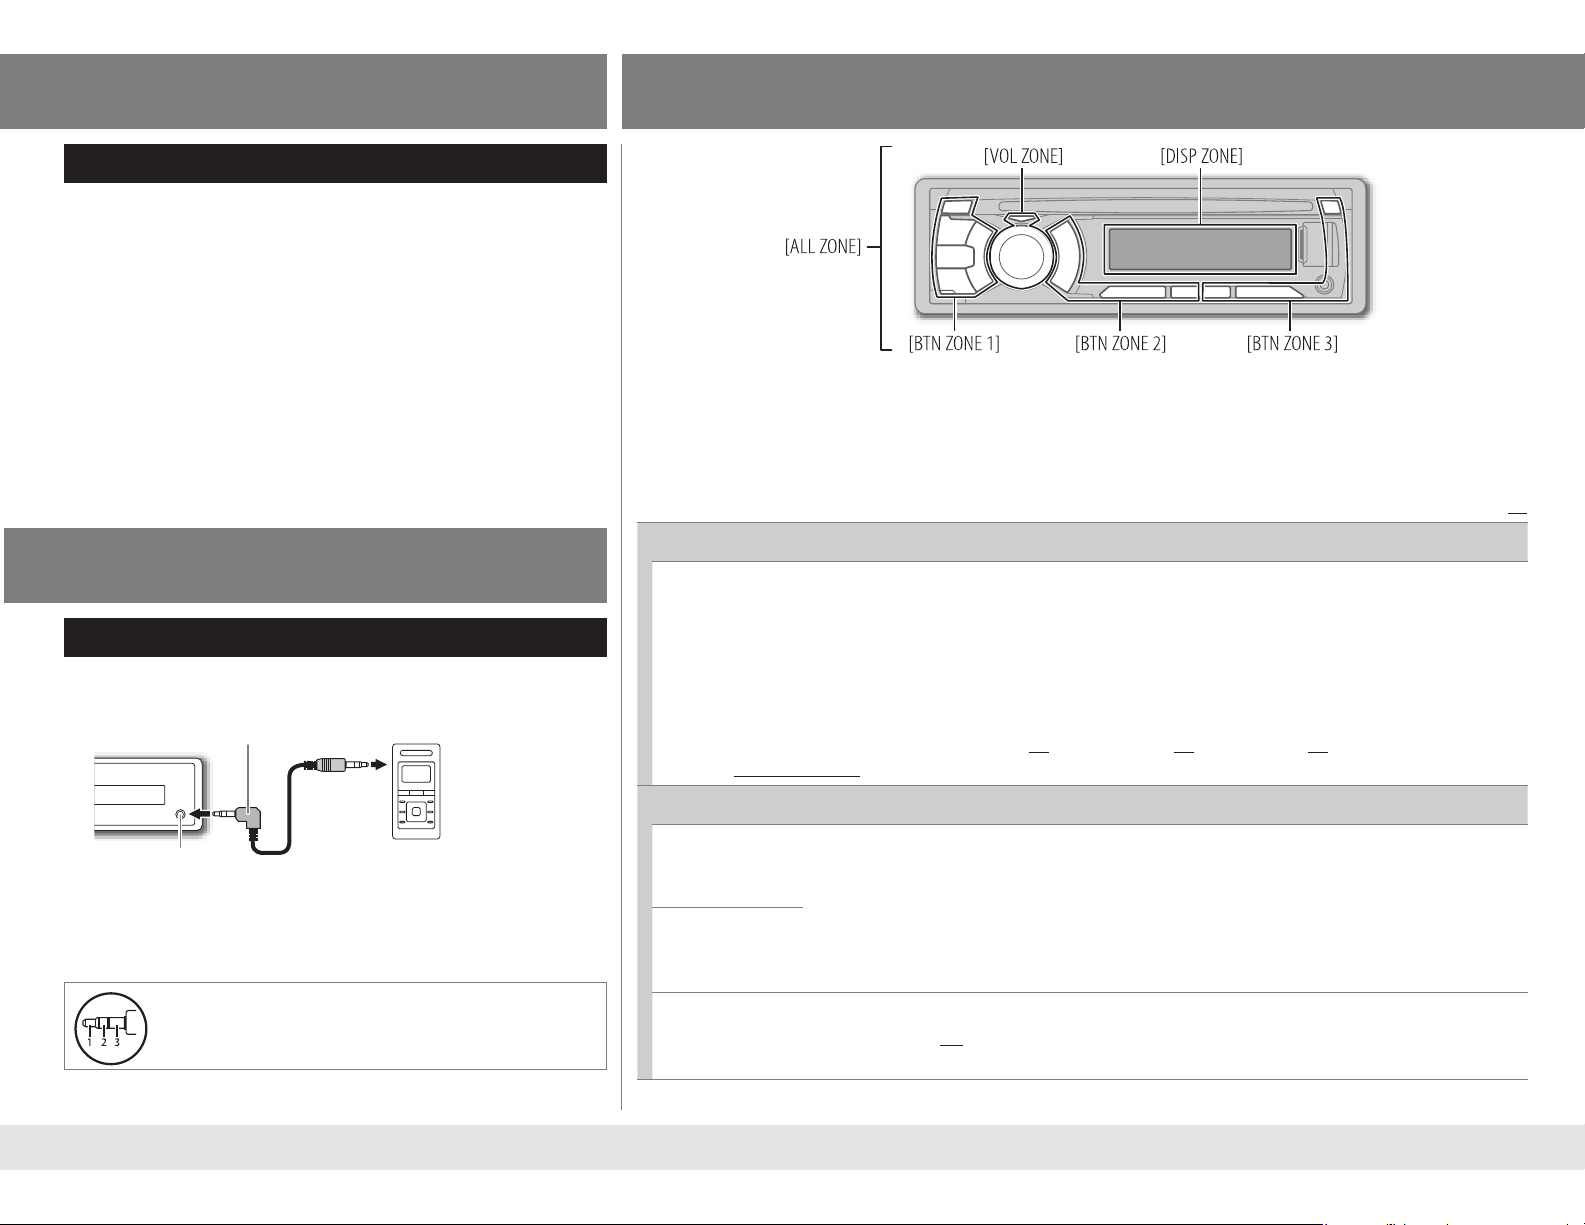
1
BTN ZONE 1 / BTN ZONE 2 / BTN ZONE 3 / DISP ZONE / VOL ZONE / ALL ZONE: Select a zone.
2
COLOR 01 to COLOR 29: Select a color.
USER: Select a user color (created in [COLOR SETUP]).
COLOR FLOW 01 to COLOR FLOW 03: Select a color changes pattern/speed.
SPECTRUM / GROOVE / TECHNO / EMOTION / RELAX / NIGHTSWEEP: (Selectable only if [ALL ZONE] is selected in
step
1
.)
(Default:
COLOR SETUP
DAY COLOR
NIGHT COLOR
COLOR GUIDE
[NIGHT COLOR]
BTN ZONE 1 / BTN ZONE 2 / ALL ZONE: [06] ; BTN ZONE 3: [27] ; DISP ZONE: [01] ; VOL ZONE:
[COLOR FLOW 02])
: Store your own day and night colors for each zone separately.
1
BTN ZONE 1 / BTN ZONE 2 / BTN ZONE 3 / DISP ZONE / VOL ZONE: Select a zone.
2
RED / GREEN / BLUE: Select a primary color.
3
00 to 31: Select the level.
or
[DAY COLOR]
7
Repeat steps
• Your setting is stored to [USER] in [COLOR].
• If [00] is selected for all primary colors for [DISP ZONE], nothing appears on the display.
OFF: Changes the display and buttons illumination to white when settings are performed on menu
and list search. ; ON: Display and buttons illumination remain the same even in menu and list search
operation.
2
and 3 for all the primary colors.
is changed by turning on or off your car’s headlight.
ENGLISH
Page 8
Pandora®
SiriusXM™
(
KD-A845BT /
KD-R840BT
only)
Preparation:
Install the latest version of the Pandora application
into your device (iPhone/iPod touch), then log in and
create an account with Pandora.
[ON]
for
• Select
Start listening
[PANDORA]
in
[SRC SELECT]. (« 4)
1 Open the Pandora application on your device.
2 Connect your device to the USB input terminal.
USB input terminal
USB 2.0 cable*
(accessory of the
iPhone/iPod touch)
and/ or
USB cable from the rear of the unit
(KD-A845BT / KD-R840BT only)
The source changes to PANDORA and broadcast
starts.
* Do not leave the cable inside the car when not
using.
About Pandora
• Pandora is only available in the US.
• Because Pandora is a third-party service, the
specifications are subject to change without
prior notice. Accordingly, compatibility may be
impaired or some or all of the services may become
unavailable.
• Some functions of Pandora cannot be operated from
this unit.
• For issues using the application, please contact
Pandora at pandora-support@pandora.com.
• If the version of the OS of the connected iPhone is
earlier than 4.0, start the Pandora application before
selecting the PANDORA source.
To Do this
Pause or resume
playback
Thumbs up or
thumbs down
Skip a track Press F (or 3 on RM-RK52).
Create a new
station
Press the volume knob (or
RM-RK52).
Press 1
/ 2 .
• If thumbs down is selected, the
current track is skipped.
1 Press MENU.
2 Turn the volume knob to select
[NEW STATION]
knob.
, then press the
3 Turn the volume knob to select
[FROM TRACK]
then press the knob.
or
[FROM ARTIST]
A new station is created based on
the current song or artist.
Search for a
registered
station
1 Press MENU.
2 Turn the volume knob to make a
selection, then press the knob.
[BY DATE]
registered date.
[A–Z]
: According to the
: Alphabetical order.
3 Turn the volume knob to select
the desired station, then press the
knob.
Bookmark a
song or artist
information
1 Press and hold the volume knob.
2 Turn the volume knob to select
[THIS TRACK]
press the knob.
or
[THIS ARTIST]
“BOOKMARKED” appears and the
information is stored to your device.
The bookmark is available on your
Pandora account but not on this
unit.
on
,
, then
Preparation:
1
Connect the optional SiriusXM Connect
Vehicle Tuner (commercially available).
Expansion port on the rear panel
Antenna
SiriusXM Connect
Vehicle Tuner
2 Activate the subscription through
www.siriusxm.com/activatenow or call
1-866-635-2349.
The Radio ID is required to activate the
SiriusXM Connect Vehicle Tuner.
The Radio ID is located on the label of the
SiriusXM Connect Vehicle Tuner and can also
be shown on the unit’s display window when
you select “Channel 0” after SiriusXM Connect
Vehicle Tuner is connected.
3 Press L SOURCE to select SIRIUS XM to
start updating.
Start listening
1 Press L SOURCE to select SIRIUS XM.
2 Press MENU.
3 Turn the volume knob to select CATEGORY,
then press the knob.
4 Turn the volume knob to select a category
from the list, then press the knob.
If “ALL CHANNEL” is selected, all the available
channels will be shown.
8
Page 9
SiriusXM™
5 Turn the volume knob to select a channel, then press the knob.
(or)
Press E / F to search for a channel manually.
• Pressing and holding E / F changes the channel rapidly.
If a locked channel or a mature channel (
pass code input screen appears. Enter the pass code to receive the channel.
[MATURE CH]
• To store a channel: You can store up to 18 channels.
is set to
(« 5)
[ON]
) is selected, a
• To select a stored channel: Press one of the number buttons (1 to 6).
(or)
1 Press MENU.
2 Turn the volume knob to select PRESET, then press the knob.
3
Turn the volume knob to select a preset number, then press the knob.
(or)
Press 5 / ∞ on RM-RK52.
Replay
1 Press the volume knob.
“ ” lights up and the unit memorize this paused position.
2 Press the volume knob to start Replay.
Replay starts from the paused position in step 1.
During Replay...
• To pause or resume playback, press the volume knob.
• To skip the current song backward/forward, press E / F (or 2 / 3 on RM-RK52).
• To rewind/fast-forward, press and hold E / F (or 2 / 3 on RM-RK52).
• To exit from Replay and go to live, press G.
CH LOCK To unlock settings:
1
Turn the volume knob to select a number.
2
Press E / F to move to the entry position.
3
Repeat steps 1 and 2 to enter the current pass code. (Initial pass code is
0000.)
4
Press the volume knob to confirm.
CODE SET
CH EDIT
CH CLEAR
MATURE CH
SIGNAL LVL
BUF USAGE
*
1
Turn the volume knob to select a number.
2
Press E / F to move to the entry position.
3
Repeat steps 1 and 2 to enter a new 4-digit pass code.
4
Press the volume knob to confirm.
5
Repeat steps 1 to 4 to reconfirm the new pass code.
• Make a note of the new pass code to enter channel lock settings from next time.
1 T
urn the volume knob to select a category, then press the knob.
2 T
urn the volume knob to select a channel you want to lock, then press the
knob.
“L” appears in front of the channel number.
3
Press G to exit.
*
YES: Clears all the locked channels. ; NO: Cancels.
ON: Turns on the Sirius XM-defined lock setting (mature channel). ; OFF: Turns off.
• If [ON] is selected, your setting (CH EDIT) is temporary ignored.
NO SIGNAL/ WEAK/ GOOD/ STRONG: Shows the strength of the current
received signal.
0% — 100% (0): Shows the memory usage for Replay buffer.
Default:
XX
Other settings
1 Press and hold MENU.
2 Turn the volume knob to select
[SIRIUS XM]
, then press the knob.
3 Turn the volume knob to make a selection (see the following table), then
press the knob.
4 Press MENU to exit.
* Displayed only when
9
[MATURE CH]
is set to
[OFF]
.
ENGLISH
Page 10

BLUETOOTH®
You can operate Bluetooth devices using this unit.
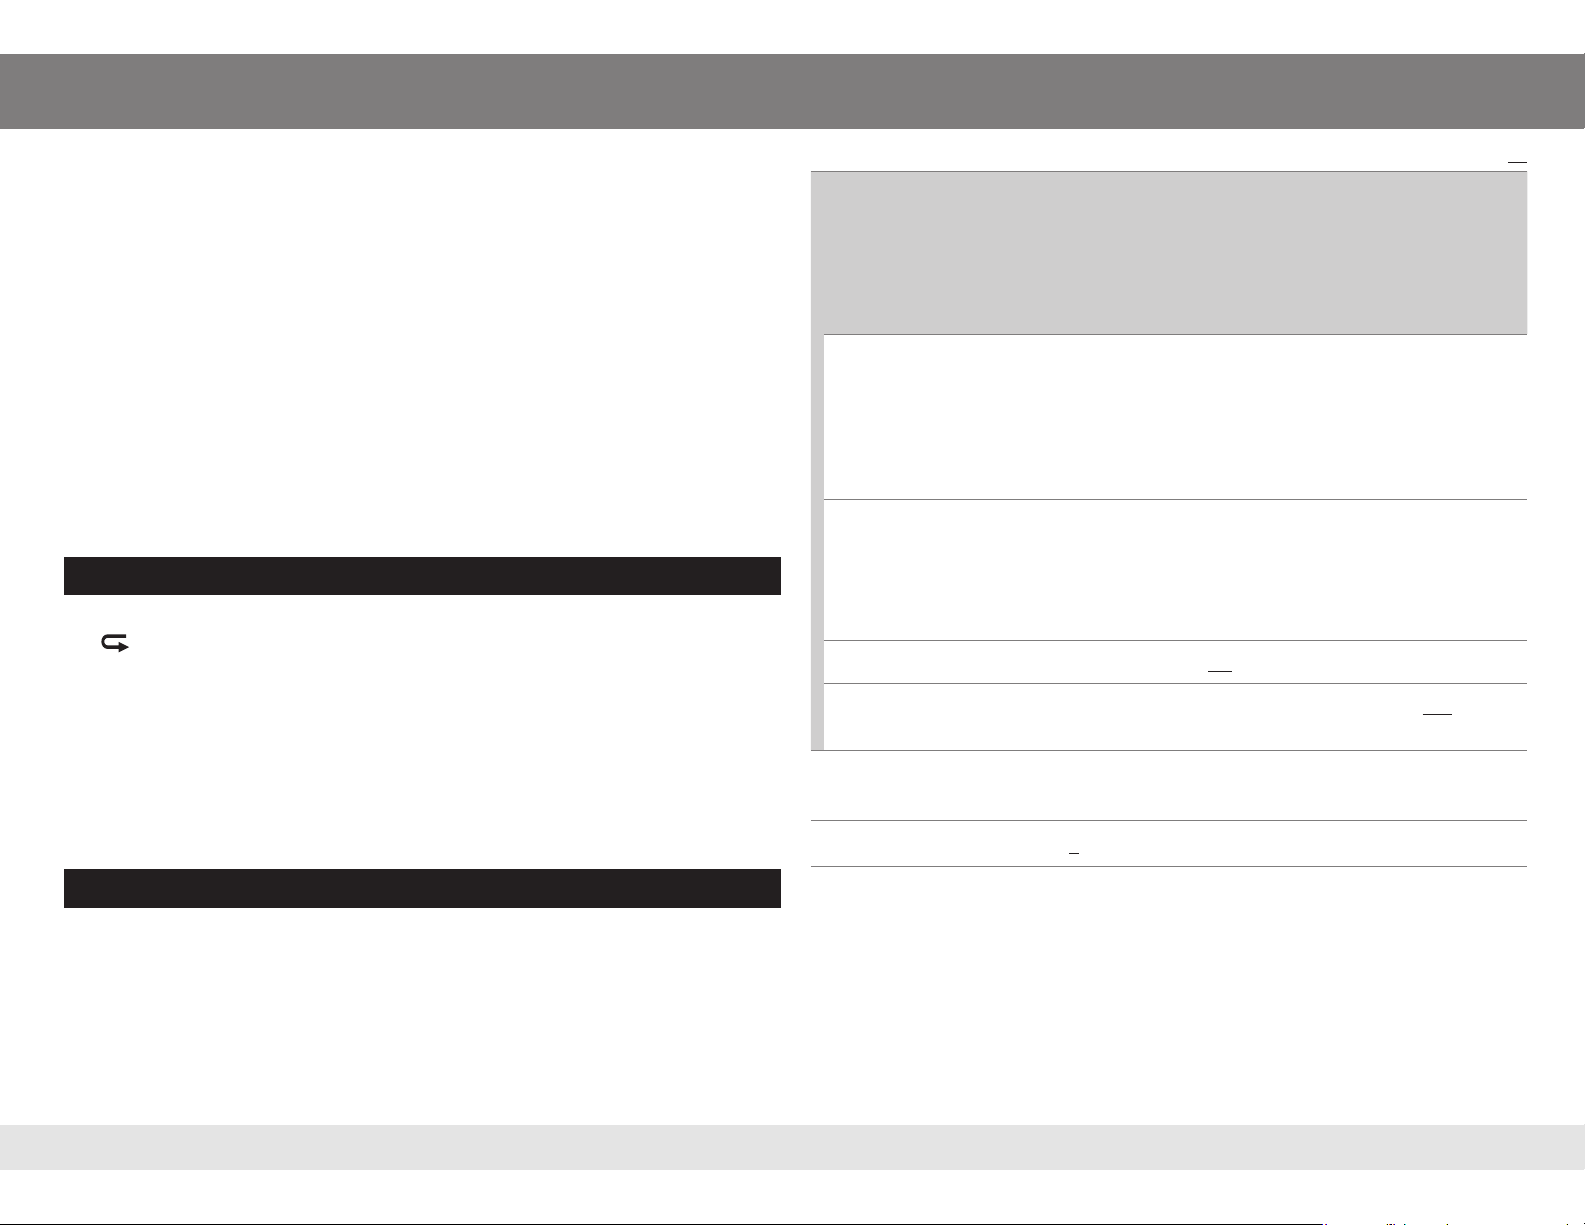
Connect the microphone
MIC (Microphone
input terminal)
Rear panel
If you turn off the unit or detach the control panel during a phone
call conversation, the Bluetooth connection is disconnected.
Continue the conversation using your mobile phone.
Supported Bluetooth profiles
• Hands-Free Profile (HFP 1.5)
• Object Push Profile (OPP 1.1)
• Phonebook Access Profile (PBAP 1.0)
• Advanced Audio Distribution Profile (A2DP 1.2)
• Audio/Video Remote Control Profile (AVRCP 1.3)
Microphone (supplied)
Secure using
cord clamps
(not supplied)
if necessary.
Adjust the
microphone angle
Pair a Bluetooth device
When connecting a Bluetooth device to the unit for the first time, perform pairing between the unit
and the device. Once the pairing is completed, the Bluetooth device will remain registered in the unit
even if you reset the unit.
Up to five devices can be registered (paired) in total.
•
•
A maximum of two Bluetooth phones and one Bluetooth audio device can be connected at any
time.
This unit supports Secure Simple Pairing (SSP).
•
• Some Bluetooth devices may not automatically connect to the unit after pairing. Connect the device
to the unit manually. Refer to the instruction manual of the Bluetooth device for more information.
1 Press and hold L SOURCE to turn on the unit.
2 Search and select “JVC UNIT” on the Bluetooth device.
“BT PAIRING” flashes on the display.
• For some Bluetooth devices, you may need to enter the Personal Identification Number (PIN)
code immediately after searching.
3 Perform (A) or (B) depending on what scrolls on the display.
• For some Bluetooth devices, pairing sequence may vary from the steps described below.
(A) “[Device Name]” ] “XXXXXX” ] “VOL – YES” ] “BACK – NO”
• “XXXXXX” is a 6-digit passkey randomly generated during each pairing.
1 Ensure that the passkey which appears on the unit and Bluetooth device is the same.
2 Press the volume knob to confirm the passkey.
3 Operate the Bluetooth device to confirm the passkey.
(B) “[Device Name]” ] “VOL – YES” ] “BACK – NO”
1 Press the volume knob to start pairing.
2 • If “PAIRING” ] “PIN 0000” scrolls on the display, enter the PIN code “0000” into the
Bluetooth device. (You can change to a desired PIN code before pairing.
(« 14)
)
• If only “PAIRING” appears, operate the Bluetooth device to confirm pairing.
“PAIRING COMPLETED” appears when pairing is completed and “
connection is established.
” will light up when a Bluetooth mobile phone is connected.
• “
” will light up when a Bluetooth audio player is connected.
• “
See page 13 for Bluetooth compatibility check mode operation.
10
” will light up when Bluetooth
Page 11

BLUETOOTH®
Bluetooth mobile phone
To Do this
Receive a call
KD-A845BT
(Green area)
KD-R740BT
On RM-RK52: Press 5 / ∞ / 2 / 3 / SOURCE.
Reject an incoming
call
• When
[AUTO ANSWER]
unit answers incoming call automatically.
KD-A845BT
MENU / E / F / G. (Red area)
KD-R740BT
On RM-RK52: Press and hold 5 / ∞ / 2 / 3 / SOURCE.
End a call
Press and hold or the volume knob.
On RM-RK52: Press and hold 5 / ∞ / 2 / 3 / SOURCE.
KD-A845BT
Receiving a call Talking
/
KD-R840BT
Flashes in green Lights up in red
:
/
KD-R840BT
: Press or the volume knob.
/
KD-R840BT
: Press and hold or the volume knob.
: Press the volume knob.
is set to the selected time, the
(« 12)
: Press / L SOURCE /
After ending a
call
To Do this
Activate or deactivate
hands-free mode
Adjust the phone
volume
Press the volume knob during a call.
• Operations may vary according to the connected
Bluetooth mobile phone.
Turn the volume knob during a call.
Phone volume:
• This adjustment will not affect the volume of the
other sources.
Adjust the
microphone’s
sensitivity level
Set the echo
cancellation delay time
Text message
notification
Press 1 ∞ / 2 5 during a call.
Sensitivity level:
Press E / F during a call.
Delay time:
When the phone receives a text message, the
unit rings and “RCV MESSAGE” ] [Device name]
appears.
•
[MSG NOTICE]
• You cannot read, edit, or send a message through
the unit.
• To clear the message, press any button.
Switch between two
connected phones
• To enter 1st phone’s hands-free menu:
Press .
• To enter 2nd phone’s hands-free menu:
Press twice.
• To return to 1st phone’s hands-free menu:
Press G.
[00]
to
[50]
[01]
to
[03]
[01]
to
[10]
(Default:
must be set to
(Default:
(Default:
[04]) (« 12)
[ON]. (« 12)
[15]
)
[02]) (« 12)
Flashes in red Return to [COLOR]
setting’s color (
«
7)
Return to [COLOR]
setting’s color (« 7)
11
ENGLISH
Page 12

BLUETOOTH®
Hands-free menu operations
1 Press .
2 Turn the volume knob to make a selection (see the following table), then
press the knob.
Repeat step 2 until the desired item is selected.
• To return to the previous hierarchy, press G.
• To cancel, press MENU.
RECENT CALL
PHONEBOOK
DIAL NUMBER
1
Turn the volume knob to select a name or a phone number.
• “>” indicates call received, “<“ indicates call made, “M” indicates call
missed.
• “NO HISTORY” appears if there is no recorded call history.
2
Press the volume knob to call.
1
Turn the volume knob to select a name, then press the knob.
2
Turn the volume knob to select a phone number, then press the knob to call.
• If the phonebook contains many numbers, you can fast search for the
desired number by turning the control dial quickly, or use Character Search.
«
13)
(
• “NO DATA” appears if no entries are found in the Bluetooth device’s
phonebook.
• “SEND P.BOOK MANUALLY” appears if [P.BOOK SEL] is set to
[PB IN UNIT] or the phone does not support PBAP.
1
Turn the volume knob to select a number (0 to 9) or character ( , #, +).
2
Press
E / F
to move the entry position.
Repeat steps 1 and 2 until you finish entering the phone number.
3
Press the volume knob to call.
SETTINGS
*
P.BOOK SEL
AUTO ANSWER
RING TONE
RING COLOR
ECHO CANCEL
MIC LEVEL
MSG NOTICE
* Selectable only when the connected phone supports PBAP.
PB IN PHONE: The unit browses the phonebook of the connected phone. ;
PB IN UNIT: The unit browses the phonebook registered in the unit. (You can
copy the phonebook memory using [P.BOOK WAIT]). (
03 SEC / 05 SEC / 10 SEC: The unit answers incoming calls automatically in
3 / 5 / 10 seconds. ; OFF: Cancels.
IN UNIT: The unit rings to notify you when a call/text message comes in.
(Default ring tone is different according to the paired device.)
• CALL: Select your preferred ring tone (TONE 1 — 5) for incoming calls.
• MESSAGE: Select your preferred ring tone (TONE 1 — 5) for incoming text
messages. ;
IN PHONE: The unit uses the connected phones’ ring tone to notify you when
a call/text message comes in. (The connected phone will ring if it does not
support this feature.)
KD-A845BT / KD-R840BT:
COLOR 01 — COLOR 29 (COLOR 06): Display zone will change to the
selected color during a call or when a text message comes in. ; Off : Cancels.
01 — 10 (04): Adjust the echo cancellation delay time until the least echo is
being heard during a phone conversation.
01 — 03 (02): The sensitivity of the microphone increases as the number
increased.
ON: The unit rings and “RCV MESSAGE”
you of an incoming text message. ; OFF: Cancels.
]
[Device Name] appears to notify
«
14)
Default:
XX
VOICE
Activate Voice Recognition of this phone. (
«
13)
12
Page 13

BLUETOOTH®
Character search
You can search through the contacts quickly according to the first character (A to Z,
0 to 9, and OTHERS).
“OTHERS” appear if the first character is other than A to Z, 0 to 9.
•
1 Press .
2 Turn the volume knob to select
[PHONEBOOK]
, then press the knob.
3 Press 1 ∞ / 2 5 to select the desired character.
4
Turn the volume knob to select the desired contact, then press the knob to call.
Use Voice Recognition
1 Press and hold to enter Voice Recognition mode.
If two phones are connected, turn the volume knob to select the desired phone,
then press the knob.
2 Speak the name of the contact you want to call or the voice command to
control the phone functions.
• Supported Voice Recognition features vary for each phone. Refer to the instruction
manual of the connected phone for details.
• This unit also supports the intelligent personal assistant function of iPhone.
Store a contact in memory
You can store up to 6 contacts.
1 Press .
2 Turn the volume knob to select
then press the knob.
[RECENT CALL], [PHONEBOOK]
, or
[DIAL NUMBER]
,
3 Turn the volume knob to select a contact or enter a phone number.
4 Press and hold one of the number buttons (1 to 6).
“MEMORY PX” flashes when the contact is stored.
To erase a contact from the preset memory, select
a blank number.
[DIAL NUMBER]
in step 2 and store
Make a call from memory
1 Press .
2 Press one of the number buttons (1 to 6).
3 Press the volume knob to call.
“NO PRESET” appears if there are no contacts stored.
Delete a contact
Only when
[P.BOOK SEL]
is set to
[PB IN UNIT]. (« 12)
1 Press .
2 Turn the volume knob to select
knob.
[RECENT CALL]
or
[PHONEBOOK]
, then press the
3 Turn the volume knob to select a contact or enter a phone number.
4 Press and hold G.
5 Turn the volume knob to select
DELETE
: Selected name or phone number in step 3 is deleted.
DELETE ALL
deleted.
Bluetooth compatibility check mode
You can check the connectivity of the supported profile between the Bluetooth
device and the unit.
: All names or phone numbers from the selected menu in step 2 is
[DELETE]
or
[DELETE ALL]
, then press the knob.
1 While pressing and holding , press and hold the volume knob for about
3 seconds.
“BLUETOOTH” Ô “CHECK MODE” appears.
2 Search and select “JVC UNIT” on the Bluetooth device within 3 minutes.
“PAIRING OK” appears and Bluetooth compatibility check starts.
The connectivity result flashes on the display for 30 seconds.
• “H.FREE OK” Ô “[Device Name]” : Compatible with Hands-Free Profile (HFP)
• “A. STREAM OK” Ô “[Device Name]” : Compatible with Advanced Audio
Distribution Profile (A2DP)
• “CONNECT FAIL” Ô “TRY CONNECT” : Not compatible
• To exit, turn off the unit by pressing and holding L SOURCE.
13
ENGLISH
Page 14

BLUETOOTH®
Bluetooth audio player
Operations and display indications may differ according to their
availability on the connected device.
To Do this
Playback
1 Press L SOURCE to select BT AUDIO.
2 Operate the Bluetooth audio player to
start playback.
Pause or resume
playback
Select group or folder
Reverse/forward skip
Reverse/fast-forward
Repeat play Press 6 B repeatedly to make a
Press MENU (or
Press 1 ∞ / 2 5 (or 5 / ∞ on RM-RK52).
Press E / F (or 2 / 3 on RM-RK52).
Press and hold E / F (or 2 / 3 on
RM-RK52).
selection.
on RM-RK52).
TRACK RPT, ALL RPT, RPT OFF
Random play Press 5 A repeatedly to make a
selection.
GROUP RND, ALL RND, RND OFF
Listen to Pandora through Bluetooth
You can listen to Pandora on your smart phone (Android OS or RIM OS)
through Bluetooth on this unit.
1 Open the Pandora application on your device.
2 Connect to Bluetooth audio player.
(« 10, 14
right column
)
3 Press L SOURCE to select PANDORA.
The source switches and broadcast starts automatically.
• You can operate Pandora in the same way as Pandora for iPod/iPhone.
(« 8)
Bluetooth settings
1 Press and hold MENU.
2 Turn the volume knob to select
[BLUETOOTH]
, then press the knob.
3 Turn the volume knob to make a selection (see the following table), then press the knob.
Repeat step 3 until the desired item is selected.
4 Press MENU to exit.
Default:
1
*
PHONE
AUDIO
APPLICATION
DELETE PAIR Selects the registered (paired) device to delete.
P.BOOK WAIT
SET PINCODE
AUTO CNNCT
INITIALIZE
INFORMATION
1
*
[CONNECT]
2
*
JVC Smart Music Control is designed to view JVC car receiver status and perform simple
control operations on Android smart phones.
For JVC Smart Music Control operations, visit JVC website:
<http://www3.jvckenwood.com/english/car/index.html> (English website only).
3
*
Displayed only when a Bluetooth phone/audio player/application is connected.
14
CONNECT / DISCONNECT: Connects or disconnects the Bluetooth phone or Bluetooth audio
player.
2
CONNECT / DISCONNECT: Connects or disconnects the JVC Smart Music Control
phone.
Copies up to 400 numbers from the phonebook memory of a connected phone to the unit via OPP.
Changes the PIN code (up to 6 digits). (Default PIN code: 0000)
1
Turn the volume knob to select a number.
2
Press
E / F
to move the entry position.
Repeat steps 1 and 2 until you finish entering the PIN code.
3
Press the volume knob to confirm.
ON: Connects automatically with the Bluetooth device when the unit is turned on. ; OFF: Cancels.
YES: Initializes all the Bluetooth settings (including stored pairing, phonebook, and etc.). ;
NO: Cancels.
3
PH CNNT DEV / AU CNNT DEV / APP CNT DEV
device name. ; MY BT NAME: Displays the unit name (JVC UNIT). ; MY ADDRESS: Shows address
of this unit. ; BT VERSION: Shows the Bluetooth version of this unit.
will not be displayed if two Bluetooth phones are connected at the same time.
*
: Displays connected phone/audio/application
*
in the smart
XX
Page 15

AUDIO SETTINGS
KD-A845BT
/
KD-R840BT
:
To Do this
Select a
preset
equalizer
Store your
own sound
settings
Default: (00)
Press EQ repeatedly.
FLAT (default), NATURAL, DYNAMIC, VOCAL BOOST,
BASS BOOST, USER
1 Press and hold EQ.
2
Turn the volume knob to make a selection, then press the knob.
SUB.W: –08 to +08 / BASS LVL: –06 to +06 /
MID LVL: –06 to +06 / TRE LVL: –06 to +06
• The setting is stored to [USER] in EQ.
• To return to the previous item, press
• To exit, press EQ.
G
.
Other settings
1 Press and hold MENU.
2 Turn the volume knob to make a selection (see the following table), then
press the knob.
Repeat step 2 until the desired item is selected.
3 Press MENU to exit.
Default:
EQ SETTING
EQ PRESET
EASY EQ
PRO EQ
1
*
1
*
FLAT / NATURAL / DYNAMIC / VOCAL BOOST / BASS BOOST /
USER: Selects a preset equalizer.
1
*
Adjust your own sound settings.
SUB.W*
2
: –08 to +08 (00)/ BASS LVL: –06 to +06 (00)/
MID LVL: –06 to +06 (00)/ TRE LVL: –06 to +06 (00)
• The setting is stored to [USER] in [EQ PRESET].
3
*
1
BASS / MIDDLE / TREBLE: Select a sound tone.
2
Adjust the sound elements of the selected sound tone.
BASS Frequency: 60/ 80/ 100/ 200 Hz Default: (80 Hz)
Level: –06 to +06 (00)
Q: Q1.0/ Q1.25/ Q1.5/ Q2.0 (Q1.0)
MIDDLE Frequency: 0.5/ 1.0/ 1.5/ 2.5 kHz Default: (1.0 kHz)
Level: –06 to +06 (00)
Q: Q0.75/ Q1.0/ Q1.25 (Q1.25)
TREBLE Frequency: 10.0/ 12.5/ 15.0/ 17.5 kHz Default: (10.0 kHz)
Level: –06 to +06 (00)
Q: Q FIX (Q FIX)
• The setting is stored to [USER] in [EQ PRESET].
XX
AUDIO
4
5
*
*
FADER
BALANCE
BASS BOOST
LOUD
*
R06 — F06 (00): Adjusts the front and rear speaker output balance.
5
L06 — R06 (00): Adjusts the left and right speaker output balance.
+01 / +02: Selects your preferred bass boost level. ; OFF: Cancels.
LOW / HIGH: Boosts low or high frequencies to produce a well-balanced sound
at low volume. ; OFF: Cancels.
VOL ADJUST
–05 — +05 (00): Presets the volume adjustment level of each source
(compared to the FM volume level). Before adjustment, select the source you
want to adjust. (“VOL ADJ FIX” appears if FM is selected.)
1
*
L/O MODE
SUB.W / REAR: Selects whether rear speakers or a subwoofer are connected
to the REAR/SW line out terminals on the rear panel (through an external
amplifier).
SUB.W
SUB.W
LPF
ON / OFF: Turns on or off the subwoofer output.
7
*
THROUGH: All signals are sent to the subwoofer. ; LOW 55Hz / MID 85Hz /
6
*
HIGH 120Hz: Audio signals with frequencies lower than 55 Hz/ 85 Hz/ 120 Hz
are sent to the subwoofer.
7
SUB.W LEVEL
HPF
*
–08 — +08 (00): Adjusts the subwoofer output level.
8
*
LOW 100Hz / MID 120Hz / HIGH 150Hz: Audio signals with frequencies
lower than 100 Hz/ 120 Hz/ 150 Hz are cut off from the front/rear speakers. ;
OFF: All signals are sent to the front/rear speakers.
BEEP
AMP GAIN
ON / OFF: Activates or deactivates the keypress tone.
LOW POWER: Limits the maximum volume level to 30. (Select if the maximum
power of each speaker is less than 50 W to prevent damaging the speakers.) ;
HIGH POWER: The maximum volume level is 50.
1
*
KD-R740BT
2
*
Displayed only when
3
*
KD-A845BT
only.
/
KD-R840BT
[L/O MODE]
is set to
[SUB.W]
and
: You can enter this item directly after entering the setting
menu.
4
*
If you are using a two-speaker system, set the fader level to
5
*
This adjustment will not affect the subwoofer output.
6
*
Displayed only when
7
*
Displayed only when
8
*
KD-A845BT
/
KD-R840BT
[L/O MODE]
[SUB.W]
is set to
only.
is set to
[ON]
[SUB.W]
.
.
[SUB.W]
is set to
[00]
.
[ON]
.
15
ENGLISH
Page 16

MORE INFORMATION
About discs and audio files
• This unit can only play the following CDs:
• This unit can play back multi-session discs; however, unclosed
sessions will be skipped during playback.
• Unplayable discs :
- Discs that are not round.
- Discs with coloring on the recording surface or discs that are dirty.
- Recordable/ReWritable discs that have not been finalized.
- 8 cm CD. Attempting to insert using an adapter may cause
malfunction.
• DualDisc playback: The Non-DVD side of a “DualDisc” does
not comply with the “Compact Disc Digital Audio” standard.
Therefore, the use of Non-DVD side of a DualDisc on this product
cannot be recommended.
• Playable files :
- File extensions: MP3 (.mp3), WMA (.wma), WAV (.wav)
-
Bit rate
(kbps)
Sampling
frequency
(kHz)
- Codec: WAV
*1: Linear PCM
- Sampling size: WAV
- Sound channel: WAV
KD-A845BT /
KD-R840BT
MP3 32 — 320 8 — 320
WMA 16 — 320 32 — 192
MP3 48, 44.1, 32, 24, 22.05, 16,
12, 11.025, 8
WMA 8 — 48 32 — 48
WAV
*148, 44.1
*1: 16 bit
*1: Mono/Stereo
KD-R740BT
–
- Variable bit rate (VBR) files.
• Maximum number of characters for file/folder name:
It depends on the disc format used (includes 4 extension
characters—<.mp3>, <.wma> or <.wav>
*1).
KD-A845BT /
KD-R840BT
KD-R740BT
ISO 9660 Level 1 and 2 32 64
Romeo 32 64
Joliet 32 32
Windows long file name 32 64
About USB device s
• This unit can play MP3/WMA/WAV
*1 files stored on a USB mass
storage class device.
• You cannot connect a USB device via a USB hub and Multi Card Reader.
• Connecting a cable whose total length is longer than 5 m may
result in abnormal playback.
• The maximum number of characters for:
KD-A845BT /
KD-R840BT
KD-R740BT
Folder names 64 63
File names 64 63
MP3 Tag 64 60
WMA Tag 64 60
WAV
*1 Tag 64 60
• This unit can recognize a total of 65 025 files, 255 folders (255 files per
folder including folder without unsupported files), and of 8 hierarchies.
1
*
• This unit cannot recognize a USB device whose rating is other
than 5 V and exceeds 1 A.
About iPod/iPhone
• Made for
- iPod touch (1st, 2nd, 3rd, and 4th generation)
- iPod classic
- iPod with video (5th generation)
- iPod nano (1st
*2, 2nd, 3rd, 4th, 5th and 6th generation)
2
*
- iPhone, iPhone 3G, 3GS, 4, 4S
• It is not possible to browse video files on the “Videos” menu in
[HEAD MODE].
• The song order displayed on the selection menu of this unit may
differ from that of the iPod/iPhone.
• If some operations are not performed correctly or as intended,
visit: <http://www3.jvckenwood.com/english/car/index.html>
(English website only).
About Bluetooth
• Depending on the Bluetooth version of the device, some
Bluetooth devices may not be able to connect to this unit.
• This unit may not work with some Bluetooth devices.
• Signal conditions vary, depending on the surroundings.
• For more information about Bluetooth, visit the following JVC
website: <http://www3.jvckenwood.com/english/car/index.
About JVC Playlist Creator and JVC Music Control
• This unit supports the PC application JVC Playlist Creator and
TM
Android
application JVC Music Control.
• When you play audio file with song data added using the JVC
Playlist Creator or JVC Music Control, you can search for audio file
by Genres, Artists, Albums, Playlists, and Songs.
• JVC Playlist Creator and JVC Music Control are available from the
following web site: <http://www3.jvckenwood.com/english/
car/index.html> (English website only).
Display information
FM or AM Station name (PS)*3 = Frequency =
3
= Title*3*4 =
5
= Track title*5 =
=
Day/Clock =
Day/Clock = (back to the
CD or USB FRONT /
USB REAR / USB or
BT AUDIO
USB FRONT /
USB REAR /
USB-IPOD
Programme type (PTY)*
Day/Clock
=
(back to the beginning)
Album title/Artist*
Track no./Playing time
(back to the beginning)
[HEAD MODE] or [IPOD MODE]: Album
5
title/Artist*
Playing time
= Track title*5 = Track no./
=
beginning)
[EXT MODE]: EXT MODE
=
PANDORA Station name
Track title
=
(back to the beginning)
Album title/Artist =
=
Playing time = Day/Clock
SiriusXM Channel no./Channel name
Song title
Category name
=
Content information
=
Day/Clock = (back to
Day/Clock
=
Artist =
=
the beginning)
AUX AUX
1
*
KD-A845BT / KD-R840BT in USB source only.
2
*
[IPOD MODE]/ [EXT MODE] are not applicable.
3
*
For FM Radio Broadcast Data System stations only.
4
*
Title information shown is dependent on the broadcast station. If
Day/Clock
unavailable, “NO TEXT” appears.
5
*
“NO NAME” appears for conventional CDs or if not recorded.
html> (English website only).
16
Page 17

TROUBLESHOOTING
Symptom Remedy
Sound cannot be heard. • Adjust the volume to the optimum level.
• Check the cords and connections.
• Be sure the rear ground terminal connected to the car’s
chassis are using shorter and thicker cords.
“MISWIRING CHK WIRING THEN
RESET UNIT” / “WARNING CHK
WIRING THEN RESET UNIT”
appears and no operations can
be done.
Source cannot be selected.
Radio reception is poor. / Static
noise while listening to the radio.
Correct characters are not
displayed.
“PLEASE” and “EJECT” appear
alternately.
“IN DISC” appears. Make sure nothing is blocking the loading slot when you
Disc cannot be ejected. Press and hold
Playback order is not as intended. The playback order is determined by the file name (USB) or
Elapsed playing time is not
correct.
Check to be sure the terminals of the speaker wires are
insulated properly, then reset the unit. If this does not solve
the problem, consult your nearest service center.
«
Check the [SRC SELECT] setting. (
• Connect the antenna firmly.
• Pull the antenna out all the way.
This unit can only display uppercase letters, numbers, and a
limited number of symbols.
0
Press
This depends on the recording process earlier.
, then insert the disc correctly.
eject the disc.
0
to forcibly eject the disc. Be careful not to
drop the disc when it is ejected.
the order in which files were recorded (disc).
4)
Symptom Remedy
The iPod/iPhone does not turn on
or does not work.
“ADD ERROR” / “SEARCH ERR” New station creation is unsuccessful.
“CHK DEVICE” Check the Pandora application on your device.
“NO SKIPS” The skip limit has been reached.
“NO STATIONS” No registered station is found.
Pandora
“STATION LIM” The number of registered stations has reached it’s limit.
“UPGRADE APP” Make sure you have installed the latest version of the
“CH LOCKED” The selected channel is locked. Enter the correct pass code
“CHAN UNSUB” The selected channel is unsubscribed. Call 1-866-635-
“CHAN UNAVAIL” The selected channel is unavailable.
“CHK ANTENNA” Check the antenna and its connection are in good
SiriusXM™
“CHECK TUNER” Make sure the SiriusXM Connect Vehicle Tuner is
“NO SIGNAL” Make sure the antenna is mounted outside the vehicle.
• Check the connection between this unit and iPod/iPhone.
• Detach and reset the iPod/iPhone using hard reset.
• Check whether the [IPOD SWITCH] setting is
«
«
4)
9)
appropriate. (
Retry after deleting an unnecessary station in your device.
Pandora application on your device.
to unlock. (
2349 to subscribe.
condition.
connected to the unit.
“NOT SUPPORT” appears and
track skips.
“CANNOT PLAY” flashes and/
or connected device cannot be
detected.
“READING” keeps flashing. • Do not use too many hierarchical levels and folders.
Check whether the track is a playable format. (
• Check whether the connected device is compatible with this
unit and ensure the files are in supported formats. (
• Reattach the device.
• Reload the disc or reattach the USB device.
«
16)
«
16)
17
“SUBSCRIPTN UPDATED –
ENTER TO CONTINUE.”
“WRONG CODE”
Your subscription is updated. Press the volume knob to
continue.
Make sure you have entered the correct pass code. (
ENGLISH
«
9)
Page 18

TROUBLESHOOTING
Symptom Remedy
No Bluetooth device is
detected.
Pairing cannot be made. • Make sure you have entered the same PIN code to both the
“PAIRING FULL” appears. The number of registered devices has reached its limit. Retry
“PLEASE WAIT” appears. The unit is preparing to use the Bluetooth function. If the
“ERROR CNNCT” appears. The device is registered but the connection has failed.
“BT DEVICE NOT FOUND”
appears.
Bluetooth®
Echo or noise occurs.
Phone sound quality is poor. • Reduce the distance between the unit and the Bluetooth
• Search from the Bluetooth device again.
«
• Reset the unit. (
unit and Bluetooth device.
• Delete pairing information from both the unit and the
Bluetooth device, then perform pairing again.
after deleting an unnecessary device.
message does not disappear, turn off and turn on the unit,
then connect the device again.
Connect the device manually. (
The unit failed to search for the registered Bluetooth devices
during [AUTO CNNCT]. Turn on Bluetooth from your device
and connect manually. (
• Adjust the microphone unit’s position. (
• Check the [ECHO CANCEL] setting. (
device.
• Move the car to a place where you can get a better signal
reception.
3)
«
14)
«
14)
«
«
12)
10)
Symptom Remedy
The unit does not respond
when you try to copy the
phonebook to the unit.
Sound is being interrupted or
skipped during playback of a
Bluetooth audio player.
Bluetooth®
The connected Bluetooth
audio player cannot be
controlled.
“HW ERROR” appears. Reset the unit and try the operation again. If “HW ERROR”
You may have tried to copy the same entries (as stored) to
DISP
the unit. Press
• Reduce the distance between the unit and the Bluetooth
audio player.
• Turn off, then turn on the unit and try to connect again.
• Other Bluetooth devices might be trying to connect to the
unit.
• Check whether the connected Bluetooth audio player
supports Audio/Video Remote Control Profile (AVRCP).
(Refer to the instructions of your audio player.)
• Disconnect and connect the Bluetooth player again.
appears again, consult your nearest service center.
or G to exit.
If you have any troubles, try the following:
1 Check TROUBLESHOOTING
2 Reset the unit (
« 3)
3 Contact (USA only)
Call: 1-800-252-5722 ( or ) visit: http://www.jvc.com
Voice calling method is not
successful.
“NOT SUPPORT” appears. The connected phone does not support Voice Recognition
“ERROR” appears. Try the operation again. If “ERROR” appears again, check if
• Use voice calling method in a more quiet environment.
• Reduce the distance from the microphone when you speak
the name.
• Make sure the same voice as the registered voice tag is used.
feature.
the device supports the function you have tried.
18
Page 19

SPECIFICATIONS
Power Output 20 W RMS × 4 Channels at 4 Ω
and ≤ 1% THD+N
Load Impedance 4 Ω (4 Ω to 8 Ω allowance)
Frequency Response 40 Hz to 20 000 Hz
Signal-to-Noise Ratio 80 dB A (reference: 1 W into 4 Ω)
Line-Out, Subwoofer-Out Level/
Impedance
Audio amplifier
Output Impedance ≤ 600 Ω
FM Frequency Range 87.9 MHz to 107.9 MHz (200 kHz step)
Usable Sensitivity 9.3 dBf (0.8 μV/75 Ω)
50 dB Quieting Sensitivity 16.3 dBf (1.8 μV/75 Ω)
Alternate Channel Selectivity 65 dB (at 400 kHz)
Tuner
Frequency Response 40 Hz to 15 000 Hz
Stereo Separation 40 dB
AM Frequency Range 530 kHz to 1 700 kHz (10 kHz step)
Sensitivity/Selectivity 20 μV/40 dB
Signal Detection System Non-contact optical pickup (semiconductor laser)
Number of Channels 2 channels (stereo)
Frequency Response 5 Hz to 20 000 Hz
CD player
Signal-to-Noise Ratio 105 dB
Wow and Flutter Below measurable limit
KD-A845BT / KD-R840BT:
4.8 V/10 kΩ load (full scale)
KD-R740BT:
2.5 V/10 kΩ load (full scale)
87.5 MHz to 108.0 MHz (50 kHz step)
531 kHz to 1 611 kHz (9 kHz step)
USB Standard USB 1.1, USB 2.0
Data Transfer Rate (Full Speed) Max. 12 Mbps
Compatible Device s Mass storage class
Compatible File System s FAT 32/16/12
USB
Playable Audio Format s KD-A845BT / KD-R840BT: MP3/WMA /WAV
KD-R740BT: MP3/WMA
d
Maximum Supply Current DC 5 V
Version Bluetooth 2.1 certified (+EDR)
Power Class Class 2 Radio
Service Area 10 m
BLUETOOTH
Profile HFP 1.5, OPP 1.1, A2DP 1.2, AVRCP 1.3, PBAP 1.0
Power Requirements (Operating Voltage)
Grounding System Negative ground
Allowable Operating Temperature 0°C to +40°C (32°F to 104°F)
Dimensions
(W × H × D)
General
Weight (excluding accessories)
Subject to change without notice.
Installation Size
(approx.)
Panel Size (approx.) KD-A845BT / KD-R840BT:
DC 14.4 V (11 V to 16 V allowance)
182 mm × 53 mm × 159 mm
(7-3/16" × 2-1/8" × 6-5/16")
188 mm × 59 mm × 10 mm
(7-7/16" × 2-3/8" × 7/16")
KD-R740BT:
188 mm × 59 mm × 13 mm
(7-7/16" × 2-3/8" × 9/16")
KD-A845BT / KD-R840BT: 1.3 k
KD-R740BT: 1.2 k
1 A
g
(2.7 lbs)
g
(3 lbs)
19
ENGLISH
Page 20

Warning
•
The unit can only be used with a 12 V DC power supply, negative ground.
•
Disconnect the battery’s negative terminal before wiring and mounting.
• Do not connect Battery wire (yellow) and Ignition wire (red) to the car
chassis or Ground wire (black) to prevent a short circuit.
• Insulate unconnected wires with vinyl tape to prevent a short circuit.
• Be sure to ground this unit to the car’s chassis again after installation.
Caution
• For safety’s sake, leave wiring and mounting to professionals. Consult
the car audio dealer.
• Install this unit in the console of your vehicle. Do not touch the metal
parts of this unit during and shortly after use of the unit. Metal parts
such as the heat sink and enclosure become hot.
·
• Do not connect the
(black), or in parallel.
• Connect speakers with a maximum power of more than 50 W. If the
maximum power of the speakers is lower than 50 W, change the
[AMP GAIN] setting to avoid damaging the speakers. (
• Mount the unit with the angle of 30° or less.
• If your vehicle wiring harness does not have the ignition terminal,
connect Ignition wire (red) to the terminal on the vehicle’s fuse box
which provides 12 V DC power supply and is turned on and off by the
INSTALLATION / CONNECTION
ignition key.
• After the unit is installed, check whether the brake lamps, blinkers,
wipers, etc. on the car are working properly.
• If the fuse blows, first make sure the wires are not touching car’s
chassis, then replace the old fuse with one that has the same rating.
wires of speaker to the car chassis, Ground wire
«
15)
Installing the unit (in-dash mounting)
Bend the appropriate tabs to hold
the sleeve firmly in place.
Make sure the direction of
the trim plate.
When installing without the mounting sleeve
Flat or round head screws (not supplied)
M5 × 8 mm (M5 × 3/8")
Do the required wiring.
«
21)
(
How to remove the unit
Basic procedure
1
Remove the key from the ignition switch, then
disconnect the · terminal of the car battery.
2 Connect the wires properly.
See Wiring connection.
(« 21)
3 Install the unit to your car.
See Installing the unit (in-dash mounting).
4 Connect the · terminal of the car battery.
5 Reset the unit.
(« 3)
Pocket
Bracket (not supplied)
20
Page 21

Wiring connection
KD-A845BT / KD-R840BT KD-R740BT
Subwoofer output
Front output
Rear output
Vehicle dashboard
Factory wiring harness
(vehicle)
Blue: To power antenna
Blue/white: To amplifier
MIC (Microphone input terminal)
«
10)
(
Recommended
connection
Front output
Rear/subwoofer output
Rear ground terminal
To the steering wheel
remote control adapter
Join the same color wires together.
Blue/white: Remote (200 mA max.)
Orange/white: Illumination
(Not used) Insulate to prevent short circuit
Yellow: Battery 12 V
Antenna terminal
Light blue/yellow
STEERING
WHEEL
REMOTE
Signal cord (not supplied)
USB cable (approx.
1.2 m/4 feet)
Fuse (10 A)
JVC Amplifier
«
8)
(
Ignition switch
Remote wire
(not supplied)
Part list for installation
A
Faceplate
( ×1 )
B
Mounting sleeve
( ×1 )
C
Trim plate
( ×1 )
D
Wiring harness
Vehicle-specific Wiring Harness
(separately purchased)
Red: Ignition 12 V
Black: Ground
White: Front speaker (left)
White/black
Gray: Front speaker (right)
Gray/black
Green: Rear speaker (left)
Green/black
Purple: Rear speaker (right)
Purple/black
For more information:
Metra Electronics:
Scosche Industries:
21
Car fuse block
Separate red wire
Make this connection if
your vehicle factory wiring
harness does not have “12 V
ignition switch” wire.
www.metraonline.com
www.scosche.com
E
Extraction key
( ×1 )
( ×2 )
ENGLISH
Page 22

CAUTION
Use of controls or adjustments or performance of procedures other than those specified
herein may result in hazardous radiation exposure.
In compliance with Federal Regulations, following are reproductions of labels on, or
inside the product relating to laser product safety.
JVC KENWOOD Corporation
2967-3, ISHIKAWA-MACHI,
HACHIOJI-SHI, TOKYO, JAPAN
THIS PRODUCT COMPLIES WITH DHHS RULES 21CFR
SUBCHAPTER J IN EFFECT AT DATE OF MANUFACTURE.
Location : Bottom Plate
FCC WARNING
This equipment may generate or use radio frequency energy. Changes or modifications
to this equipment may cause harmful interference unless the modifications are
expressly approved in the instruction manual. The user could lose the authority to
operate this equipment if an unauthorized change or modification is made.
FCC NOTE
This equipment has been tested and found to comply with the limits for a Class B
digital device, pursuant to Part 15 of the FCC Rules. These limits are designed to
provide reasonable protection against harmful interference in a residential installation.
This equipment may cause harmful interference to radio communications, if it is not
installed and used in accordance with the instructions. However, there is no guarantee
that interference will not occur in a particular installation. If this equipment does
cause harmful interference to radio or television reception, which can be determined
by turning the equipment off and on, the user is encouraged to try to correct the
interference by one or more of the following measures:
• Reorient or relocate the receiving antenna.
• Increase the separation between the equipment and receiver.
• Connect the equipment into an outlet on a circuit different from that to which the
receiver is connected.
• Consult the dealer or an experienced radio/TV technician for help.
• Microsoft and Windows Media are either registered trademarks or trademarks of
Microsoft Corporation in the United States and/or other countries.
• “Made for iPod,” and “Made for iPhone” mean that an electronic accessory has
been designed to connect specifically to iPod, or iPhone, respectively, and has
been certified by the developer to meet Apple performance standards. Apple is
not responsible for the operation of this device or its compliance with safety and
regulatory standards. Please note that the use of this accessory with iPod or iPhone
may affect wireless performance.
• iPhone, iPod, iPod classic, iPod nano, and iPod touch are trademarks of Apple Inc.,
registered in the U.S. and other countries.
• Pandora, the Pandora logo, and the Pandora trade dress are trademarks or registered
trademarks of Pandora Media, Inc., used with permission.
• Sirius, XM and all related marks and logos are trademarks of Sirius XM Radio Inc. All
rights reserved.
• Android is trademark of Google Inc.
• The Bluetooth® word mark and logos are registered trademarks owned by Bluetooth
SIG, Inc. and any use of such marks by JVC KENWOOD Corporation is under license.
Other trademarks and trade names are those of their respective owners.
Información acerca de la eliminación de equipos eléctricos y electrónicos
al final de la vida útil (aplicable a los países que hayan adoptado sistemas
independientes de recogida de residuos)
Los productos con el símbolo de un contenedor con ruedas
tachado no podrán ser desechados como residuos domésticos. Los
equipos eléctricos y electrónicos al final de la vida útil, deberán
ser reciclados en instalaciones que puedan dar el tratamiento
adecuado a estos productos y a sus subproductos residuales
correspondientes. Póngase en contacto con su administración local
para obtener información sobre el punto de recogida más cercano.
Un tratamiento correcto del reciclaje y la eliminación de residuos
ayuda a conservar los recursos y evita al mismo tiempo efectos
perjudiciales en la salud y el medio ambiente.
Para cumplimiento de la COFETEL:
“La operación de este equipo está sujeta a las siguientes dos condiciones:
(1) es posible que este equipo o dispositivo no cause interferencia perjudicial y
(2) este equipo o dispositivo debe aceptar cualquier interferencia, incluyendo la que
pueda causar su operación no deseada”
IC (Industry Canada) Notice
This device complies with Industry Canada licence-exempt RSS standard(s).
Operation is subject to the following two conditions:
(1) This device may not cause interference, and
(2) this device must accept any interference, including interference that may cause
undesired operation of the device.
The term “IC: ” before the certification/ registration number only signifies that the
Industry Canada technical specification were met.
Note de IC (Industrie Canada)
Le présent appareil est conforme aux CNR d’Industrie Canada applicables aux appareils
radio exempts de licence.
L’exploitation est autorisée aux deux conditions suivantes:
(1) l’appareil ne doit pas produire de brouillage, et
(2) l’utilisateur de l’appareil doit accepter tout brouillage radioélectrique subi, même si
le brouillage est susceptible d’en compromettre le fonctionnement.
L’expression “IC:” avant le numéro d’homologation/ enregistrement signifie seulement
que les specifications techniques d’Industrie Canada ont été respectées.
CAUTION
This equipment complies with FCC/IC radiation exposure limits set forth for an
uncontrolled environment and meets the FCC radio frequency (RF) Exposure Guidelines
in Supplement C to OET65 and RSS-102 of the IC radio frequency (RF) Exposure rules.
This equipment has very low levels of RF energy that it deemed to comply without
maximum permissive exposure evaluation (MPE). But it is desirable that it should be
installed and operated keeping the radiator at least 20cm or more away from person’s
body (excluding extremities: hands, wrists, feet and ankles). Under Industry Canada
regulations, this radio transmitter may only operate using an antenna of a type and
maximum (or lesser) gain approved for the transmitter by Industry Canada. To reduce
potential radio interference to other users, the antenna type and its gain should be so
chosen that the equivalent isotropically radiated power (e.i.r.p.) is not more than that
necessary for successful communication.
ATTENTION
Cet équipement est conforme aux limites d’exposition aux rayonnements énoncées
pour un environnement non contrôlé et respecte les règles d’exposition aux fréquences
radioélectriques (RF) CNR-102 de l’IC. Cet équipement émet une énergie RF très faible
qui est considérée conforme sans évaluation de l’exposition maximale autorisée.
Cependant, cet équipement doit être installé et utilisé en gardant une distance de 20
cm ou plus entre le dispositif rayonnant et le corps (à l’exception des extrémités : mains,
poignets, pieds et chevilles). Conformément à la réglementation d’Industrie Canada,
le présent émetteur radio peut fonctionner avec une antenne d’un type et d’un gain
maximal (ou inférieur) approuvé pour l’émetteur par Industrie Canada. Dans le but de
réduire les risques de brouillage radioélectrique à l’intention des autres utilisateurs, il
faut choisir le type d’antenne et son gain de sorte que la puissance isotrope rayonnée
équivalente (p.i.r.e.) ne dépasse pas l’intensité nécessaire à l’établissement d’une
communication satisfaisante.
© 2012 JVC KENWOOD Corporation
• Contains Bluetooth Module FCC ID: XQN-BTR60X
• Contains Bluetooth Module IC: 9688A-BTR601
1012DTSMDTJEIN
Page 23

WHEN
IT
IS
NOT
REQUIRED
TO
PANEL
USE
ATTACHTHECONTROLPANELTO
THE
DETACH
FROM
THE
MAIN
PROVIDED
THE
THE
UNIT.
FRONT
MAIN
SCREWTO
CONTROL
UNIT,
GE40401-001
A
Page 24

CANADA
ONLY
JVC
,..
OWNER'S
COPIE D'ENREGISTREMENT
DU
PROPRIETAIRE
(Save sales
La facture et cette garantie sont vos preuves de
MODEL
MODELE.
Purchase from.
Achete chez
Dealer's Address
Adresse du
City or Town
Ville
Owner's
Nom du Proprietaire ............
Owner's
Adresse du Proprietaire·
City
or Town
Ville
BT-52009-1
(0912)
Product Registration/Enregistrement
We
suggest that you register your product since it
to
contact you
condition in your product.
You can register
Nous
vous
conseillons
contacter
si
jamais
produit.
Vous
directement
elle
pouvez
est
vous
COPY
docket together with this warran
.
.
. .
H • • • • • • •
·
............
Vendeur'
Name
Address
directly
at
http://www.jvc.ca/www/Support/Warranty.aspx
No.
No
OF
WARRANTY
..
...
..
.... .
..
....
...
...
. ..
····
·
·····
········
No.
No
if
it is
d'enregistrer
necessaire
inscrire
pour
a
http://www.jvc.ca/www/Support/Warranty.aspx
DE
ty
•••••
••
•
··
····
··
··
··
Prov.
Prov.
···
···
·
·H···
Prov.
Prov.
ever
necessary
votre
corriger
LA
GARANTIE
card,
as
Ia
date d'achat;
SERIAL NO.
NO
DE
SERlE
sire;;i·
·
Rue
Stre
Rue
produit,
un
probleme
CARD
a proof of date
rangez-les.)
. . . ..
Date purchased .
Date achete
et
to
correct a safety
car
il
lie
CANADA
SEULEMENT
of
purchase.
.. . . . .
H
....
·
Postal Code
Code Postal
Apt.
App.
Postal Code
Code Postal
Printed
in
Indonesia
du
produit
will enable us
nous
permettra
a
Ia
securite
.
..
de
de
related
vous
votre
WARRANT
GAR
6070
kes
tr
el
TEL:
(905)
670-3381 FAX:
JVC
CANADA
the
followi
product distributed
by
an
au
JVC
warrants that this
normal
material
terms and conditions:
1.
To
(a) JVC Product
(b
) The
2. Limitation:
This Warranty
(a) Repair or
(b)
(c)
(d)
INC. (hereafter ca
ng
express warranty for each new
in
thorized
use and maintenance, from any defects in
and workmanship subject to the
Obtain
Presented
JVC
service to
batteries,
nas, dust covers, knobs, speaker
speaker cones, projection screens,
screen savers, and
Any
defects
result
of misuse, abusive operation,
gence, improper
Any defect caused or repairs required as
a
result
the operation
Any
JVC
or repaired by any party other than
authorized JVC Service Centre
Canada by
JVC deale
JVC
Warranty
requiri
together with
product must be brought in for
an
authori
shall
not
replacement of any cabinets,
plates,
connection cords, anten-
caused
use
of not followi
manual.
product tamper
ll
r.
product is free,
Serv
ice:
ng
service must be
Proof
z
ed
JVC Service
apply to:
all
accessories.
or
repairs
and
/or insufficient
ng
the instructions
ed
A
JVC CANADA
Road,
Missisa
http:
//
www.jvc.ca
ed "JVC
")
gives
and
un
following
Centre
grills,
projection
neg
care.
th
,
ad
justed
JVC
personnel.
JVC
sold
der
as
.
a
li-
in
or
JVC
of purchase.
required
wi
Y
NT
INC.
u
ga
,
Ontario
(905)670-7244
JVC
CANADA
emonce
nouveau produit
et vendu par
JVC vous garantit que ce produit est deg
utilisation et
materiel
modalites
1.
Pour
(a)
Les produits j
et
(b)
Le produit
service chez un centre de service
autorise.
2. Restrictions:
Cette garantie ne s'applique
(a)
Reparation
cabinet, batteries, panneau avant, cordons
de raccord, antennes, housses de
protection, boutons, couverts de
parleur, cones
projection, protecteurs d'ecran de projection
et to
(b) Tous defauts occasionnes
requises suite
mauvaise,
incorrecte.
(c) Tous def
requises suite
recommandations du manuel
(d)
Tout
tout autre en
de service
autorise JVC.
II
,
L5T 1 S8
Ia
garantie expresse suivante pour tout
un
detaillant JVC
en
et de fabrication sous reserve des
et conditions
obtenir
re presentee
us
les
au
prod
u
Canada
INC.
( ci-apres
JVC
distribue
tr
etien
un
se
vc
avec
JVC
ou r
accessoires.
negligente
ts occasionnes ou reparations
it
JVC al
tr
eprise que
d'
au
Canada par
auto
ri
normal,
suivantes :
rv
ice de
necessitant un service doit
doit etre apporte pour
emp
de haut-parleur, ecrans de
a
une utilisation abusive,
a
!'omission de suivre les
tere,
entretien ou de service
de tout defaut
ga
Ia
prenve d'achat
pas
l
acement
et/ou une
ajuste
JVC
appe
iE
~
"JVC")
se.
ag
e,
rantie :
aux :
de tou t
haut-
ou
reparations
utilisation
d'instruction.
ou
repare
ou
un centre
JVC
sous
JVC
par
Page 25

(e) Any
(f)
(g) Conversion to foreign
(h)
(
i ) Any JVC products used for
( j ) Any JVC product which has been resold
(k) Product purchased from
JVC
num-ber has been defaced, modified or
removed.
Maintenance,
frequency.
Any
Electrical
institutional,
Parts
Labour ...
no longer
"bankruptcy" or
products
JVC
product without
Safety
rental, or
......
1
year (except video head -
days)
90
owned by the
WARRANTVTERM
CONDITIONS
on
cleaning
or
or
domestic
Regulations ID.
display
days
original purchaser.
"liquidator".
DE
GARANTIE
which the
periodic check-up
voltage
the
Canadian
commercial
purposes.
"outside Canada",
(VALID FROM
PRODUCT
PRODUIT
Projection TV In-Home Service
Colour
TV
In-Home
(25"
D-ILA
Rear
LCD
Ecrans
Ecrans
TV projection arriere D-ILA Service
Ecrans
• In-home
Where it
packing, shipment
JVC
*
Service
S'il n'y a pas
coOts
l'equipement
Receivers and
Projection
Recepteurs
Avant et Audio d'Auto
Projection
TV
In-Home Service (25"
de
projection
de
TV
Couleur Service
de
LCD
service
is
not
available,
Authorized
a
domicile fourni par
de
pour
un
emballage
chez et depuis
Home
and
Car
et Hauts-Parleurs
and above)
In
-Home Service
and
a
Domicile
a
Domicile
above)
Service
a
Service
a
Domicile
to
be
provided where
the
and
all
Service Centre.
costs associated with the delivery of the equipment
service
JVC disponible
Speakers purchased
Audio "ARSENAL" Series
de
Serie "
(25"
Purchaser
un
detaillant disponible.
adequat, !'expedition, ainsi
le
detaillant JVC
achetes
ARSENAL
Domicile
et
available
must assume
separement, Projecteur
serial
or
or
90
and
THE DATE
(VALABLE
(25"
et
plus)
plus)
a
proximite,
autorise
separately,
"
(e) Tout produit
ete altere,
(f) L'entretien, les
nettoyage.
(g)
La
conversion
tension
(h)
Tout
d'identification
electriques
(i)
Pour
commerciales, institutionnelles,
ou utilise
Pieces.. .
Main
G)
Tout produit
n'
est
(k) Produit achete
provenant d'une
OF
a
PARTIR DE LA DATE D' ACHAT)
the
responsibility
l'acheteur
que
tous les
le
plus pres
Front
JVC
dont le numero
modifie ou
etrangere ou domestique.
produit
Canadiennes
tout
a
des fins
....
d'reuvre .. .
JVC
plus Ia propriete
enleve.
verifications periodiques et
a
une
frequence
JVC
n'ayant
conforme
d'etalage.
1
An (Excepte
video-
90
Jours
ayant
de
a
"l'exterieur
"faillite"
(GSA).
utilise
90
ete
l'acheteur
ou d'un
produit
.....
PURCHASE)
PARTS
(Years)
PIECES
(
annees)
1 1
and
expense for the proper
doit assumer
coOts
pour
associes
un
service d'entretien.
2 2
to
Labour
MAIN-D
and
from
Ia
responsabilite et
a
de
ou
pas
le
aux
normes
a
des
de
location
les tetes
jours)
revendu et qui
or
du Canada",
"liquidateur".
(Years)
'
OEUVE
R (a
the
closest
Ia
les
livraison
serie
une
sigle
fins
iginal.
nne
es)
de
a
(I)
Any defects caused by fire,
power surge,
control
(m)
FOR
AUTO
Warranty does not cover
static
of head, adjustments, or
removal
repai
r.
3.
Standards:
If any defects
within the
shall
be made at no cost
parts or
labour
such defects are due to
manship.
4.
Exclusion
This
wa
rranty constitutes the entire express
wa
rranty given
no dealer
its or their agent or employee
rized to extend or
half
ofJVC.
5.
Discla
i
mer
To
the extent
any
responsibility
product,
indirect,
inconvenience.
transportation
incidental
or
of
JVC.
PRODUCTS
or
electrical
or
reinstallation
should
applicable
when
of
All
Other
by
JVC
or
service centre
enlarge
of
Consequentia
the
law permits
for
or conseq uential
other eve
be found in a
terms, necessary repairs
JVC
loss
flood, lightning,
nt
s beyond the
elimination
interferences,
labour
cost for the
of
the unit for
JVC
to
the
purchaser for
acknowledges
faulty material
Express
for
Warranties:
JVC
products and
personnel
is,
or
l
Damage:
JVC
time
,
or
are autho-
disclaims
or
use
any
damage or
this warranty on be-
of
costs
of car
cleaning
product
that
or
work-
or his,
of
its
other
(I) Tout
(m)
3.
Criteres
Si un produit JVC s'averait defectueux,
conditions
necessaires seront effectues sans
additionnels
main
defectuosites sont
de
4. Exclusion
Cette garantie constitue
donnee par
representant ou employe
service d'entretien n'est autorise
garantie
5.
Denegation
Dans
responsabilite
ses produits, des
dommage ou inconvenient indirect,
consequent.
dommage
inondation, un
autre
evenement
POUR
LES
La
garantie
d'interferences statiques ou electriques
Ia
vo
i
ture
ajustements et
assoc
i
es
reinstallation
:
a
d'reuvre lorsque
materiel
ou de fabrication.
de
toutes a
JVC
cause
ec
lair, une surte nsion ou
PRODUITS
ne
, le
nettoyage
l
es
a
l
'enlevement
de
!'unite
app
lic
ab
l'acheteur
JVC
ca
usees par une defectuosite
ut
po
ur
par
hors du
con
D'
c
ouvre
l
es
r
AUTOMOB
pas !'elimin
coOts
de
pour reparation.
, les
pour
les pieces et
reconnait que
es
garanties expresses :
l'entiere
garant
les
produits JVC.
d'
un
detaillant
a
au
nom de
JV
C.
des
do
m
mages
Ia
mesure permise par
pour
pe
rl
co
Ot
e
s
indirects
Ia
loi,
de temps ou d'usage de
de transport ou tout au
le feu , une
trole
de
ma
prolon
JVC nie toute
accidental
de
te
te, l
in
d'
ou
selon les
repa
rations
de
ie
ex
ou d'un
ge
to
JV
C.
I
at
re
u
a
coO
te
pr
r cette
:
ut
LE
ion
de
es
vr
Ia
ts
Ia
ll
es
ess
Nul
tr
et
e
e
JVC CANADA INC.
AC
Adapters,
Projector
Adaptateurs
et
Lampe
Wood
Enceinte
All Other Categories
Toutes
Remote
Lamps
AC,
Telecommande,
de
Projecteur
Cone
Speakers
a
Cone
en
les
autres categories
Controls,
Bois
Headphones, Microphones and
Casque
D'ecoute, Microphones
90
DAYS
90JOURS 90JOURS
5 5
1 1
90
DAYS
Service
E-mail:service@jvc.ca
toll
free
# :
1-800-964-2650
Page 26

• The
countries
where
you
may
use
the
JVC
• Die Lander, in denen
Pays
ou
•
• De Ianden waar u
• Paises en los
• Paesi nei
• Lander
• Lande,
• Land
• Maat, joissa
• Paises
• Paises
• Ot xwpt:c;
CTpaHbl,
•
• Zeme, ve kterych muzete
• Azok az orszagok, amelyekben hasznalhatjuk a Bluetooth®-funkci6t
• Kraje, w
• Drzave, kjer
• Krajiny, v
• Valstis,
• Salys, kuriose
•
11-pajji:Zi
• Lond
• Riigid, kus
• Bluetooth®
•
tl'l~Lflftfl'¥11'1-Hn:~-~Tnll~
•
Na
• Lanner an denen
• 0
nhfrng
•
Els
• Zemlje u kojima
• Zemlje u kojima mozete
• Zemlje u kojima
•
3eMjM
•
CTpaHMTe, B KOMTO
• Tarile
• Die Iande waar u
• Amazwe
• Ang mga bansa
• Negara-negara yang
• Negara-negara yang anda
•
c)"
~T
•
1~fi~{!}jifffl
•
1mtm~uem
• Bluetooth® :JI:;
vous pouvez utiliser
que
quali
dar
du
hvor
du
hvor
du
voi
onde
onde
t:>ar
tiortha
pa"isos
KaAe
in
~
pode
voce
6nou
rAe
MO>KHO
kt6rych
lahko
ktorych
kur
jus
fejn
tista' tuza 1-funzjoni Bluetooth®
sem hcegt
on
fonksiyonunu
d.
inar
quoc
on
podra
MO>KeTe
care
puteti
lapho
3fTQ"
Bluetooth®
Bluetooth®
Bluetooth®
Sie
die
Bluetooth® Funktion verwenden konnen
Ia
de
Bluetooth®-functie
se
puede
utilizar
e possibile utilizzare
kan anvanda Bluetooth®-funktionen
kan
bruge
kan
bruke
kayttaa Bluetooth®-toimintoa
usar a
pode
IJnOpt:iT£
socnonb30BaTbCR
mozna uzywac
uporabljate
mozete
varat
galite
voimalik
izmantot
naudotis
er
.,
feidir
I eat
der
gia
fer
je
dozvoljena
je
dopusteno
Aa
MO>KeTe
utiliza
die
Bluetooth®-funksie kan
ungasebenzisa khona
kung
Bluetooth®
~
A·~~~
Bluetooth®-funktionen
Bluetooth®-funksjonen
fun~ao
usar a
aa
kasutada Bluetooth®
Bluetooth®
d'Biuetooth® Funktioun benotze kennt.
ma
servir
ja
saan maaari kang
memperbolehkan
fun~ao
va
XPI10liJOnOlrl0£T£
vyuzivat
vyuzivaffunkciu
,Biuetooth®'' funkcija
nota
kullanabileceginiz ulkeler
feidhmiu
b~n
Ia
koristiti
KOpMCTMTe
Aa
functia
boleh
m-amar
Ijjfi~8{]1@~
Ihfmfl9[il)~
function
fonction
Ia
Bluetooth®
funkci Bluetooth®
funkcji
funkcijo
Bluetooth®
Bluetooth®
co
th~
funci6
upotreba
Bluetooth®
koristiti
non3BaTe
Bluetooth®
menggunakan
~:::
~
Bluetooth®
mag
funci6n
Ia
funzione
Bluetooth®
<I>YHK4Me171
Bluetooth®
Bluetooth®
funkciju
d'cl,
lf~n~'U
Bluetooth® a usaid
Slr
d~ng
Bluetooth®
Bluetooth® funkcije.
Bluetooth®.
<I>YHK4MjaTa
<I>YHK4MRTa
uhlelo
gumamit
penggunaan fungsi Bluetooth®
Cffl"
~:J~
Bluetooth®
gebruiken
Bluetooth®
Bluetooth®
Ttl At:lTOUpyia Bluetooth®
Bluetooth®
funktsiooni
ch(rc
funkciju
gebruik
lwe-Biuetooth®
fungsi Bluetooth®
3Qli,Ji CJl{
Bluetooth®
nang
Bluetooth®
Bluetooth®
ng
Bluetooth®
~
~9
~f~~;
Bluetooth®
function
~
,
..
,
.~,;
<
G!
~f
J9~f
•
Page 27

Andorra
Australia
Osterreich
Bosna i Hercegovina
Belgien
Bel
Brasil
Canada
Schweiz
Suisse
Chile
Kunpo~
K1bns
Ceska
Deutschland
Dan mark
Eesti
Es
Suomi
Finland
fla
re
blika
Ireland
~ire
India
m«r
Island
ltalia
Lichtenstein
Lietuva
Luxemburg
Luxembourg
U~tzeb
Latvija
Monaco
Crna
Gora
MaKe.QOHIIl
Malta
Malaysia
Nederland
No e
New Zealand
Peru
a
Singapore
iJTJ.mf&:
apura
Slovenija
Slovensko
TGrki
United
Venezuela
Vietnam
Vi
South
ENingizimu Afrika
Suid-Afrika
t
Nam
States
Africa
of
America
France
United Kin
EAA6oa
Hong Kong
~~
~~
Hrvatska
rorszag
Indonesia
om
Philippines
Pili
inas
Polska
Portu
Republica Oriental del
Uruguay
Romania
Srbia
Pocc111R
al
II
GET0820-001A
Page 28

CONNECT
BLACK
WIRE
(<l)GND)
TO GROUND FIRST.
~CAUTION
INCORRECT CONNECTION CAUSES SERIOUS DAMAGE TO THIS UNIT
PLEASE READ INSTALLATION/CONNECTION
CONNECT GROUND FIRST
OTHERWISE, DAMAGE TO
CD
METALLIC
OF THE
r;)\
~
BODY
CAR
CONNECT ANTENNA TERMINAL
OR
CHASSIS
@
YOUR
MANUAL
CONNECT OTHER WIRES
CONNECT POWER CORD TO
UNIT MAY OCCUR.
CAREFULLY.
THE UNIT
Page 29

TO
OUR VALUED CUSTOMER
THANK YOU FOR PURCHASING THIS JVC PRODUCT.
WE WANT TO HELP
NEED HELP ON HOW TO HOOK UP?
NEED
NEED
ASSISTANCE ON HOW TO OPERATE?
TO LOCATE A JVC SERVICE CENTER?
LIKE TO PURCHASE ACCESSORIES?
JVC IS HERE TO HELP!
TOLL
FREE: 1 {800)252-5722
http://www.jvc.com
YOU
ACHIEVE A PERFECT EXPERIENCE.
Remember
----
We
suggest
to
contact
condition
You can
Please
during
to
retain
Do
not
Caution
To
prevent
There
Please
that
you
in
your
register
note
that
the
warranty
your
Bill
of
Sale
attempt
electrical shock,
are
no
refer to qualified
you
directly
product.
at
www.register.jvc.com
failure
period.
to
service the
user
serviceable
PRODUCT REGISTRATION
register
if
to
your
it
is
ever
register
for
Warranty
do
service
product
necessary
does
Service.
product
not
open
parts inside.
personnel
not
the
since
to
diminish
yourself
cabinet.
for
repairs.
it
will
enable
correct a safety
any
of
us
your
related
rights
BT-51018-7
(0812)
Printed in Indonesia
Page 30

******************************************************************************
* *
i JVC
: I
* JVC Americas Corp. (JVC) warrants this product and all parts thereof, except as set forth below ONLY TO THE *
: ORIGINAL RETAIL PURCHASER to
* original purchase for the period shown below. ("The Warranty Period") *
* *
: I
* 1
* *
*THIS
* *
:
:
; If this product is found to be defective within the warranty period, JVC will repair or replace defective parts with new or ;
* rebuilt equivalents at
; during normal business hours at JVC authorized service centers. Parts used for replacement are warranted only for the ;
* remainder of the Warranty Period.
* Color televisions with a screen size
; come to your home and either repair the TV there or remove and return it if it cannot be repaired
:
* Please do
; Instead, return your product
* center, please be sure to package
; the problem(s). Please call 1-800-252-5722 to locate the nearest
* can also
* representative
* *
; If you have any questions concerning your JVC Product, please contact our Customer Care Center at 800-252-5722 ;
LIMITED
IN
THE
WHAT
WHAT
WARRANTY
COMMONWEALTH
WE
WILL
DO:
YOU
MUST
DO
not
return your product to the retailer *
be
obtained from our website http://www.jvc.com.
will
require clear
IS
OF
no
charge to the original owner. Such repair and replacement services shall
FOR
WARRANTY
to
LIMITED
ONL V FOR
be
FREE
PARTS
VALID
ONLY
PUERTO
the
access
RICO.
All
products may
of
37"class or greater qualify for in-home service.
SERVICE:
JVC
authorized service center nearest you.
it
carefully, preferably
to the product. *
PRODUCT
FROM
DEFECTIVE MATERIALS
YR
IN
THE
FIFTY
be
WARRANTY
PURCHASED
I
LABOR
(50)
brought to a JVC authorized servi
in
the original packaging, and include a brief description of *
If
IN
U.S.A.!
AND
WORKMANSHIP from the date of :
1
YR
UNITED
your product qualifies for in-home service, the service *
STATES,
JVC
authorized service center. Service locations ;
THE
DISTRICT
ce
center
In
such cases, a technician will *
If
shipping the product to the service ;
1-1
I
OF
COLUMBIA
be
rendered
on
a carry-in basis. *
in
your home. ;
USA
ONLY
AND
by
JVC *
I i
:
:
*
*
:
:
:
* *
*
WHAT
IS
NOT
; This limited warranty provided by JVC does not cover: ;
*
1.
; installation, lack of reasonable care, or if repaired or serviced by anyone other than a service facility authorized
* JVC to render such serv ice, or if affixed to any attachment not provided with the products, or if the model or seri
* number has been altered, tampered with, defaced or removed; *
;
*
;
*
; 6.
*
*
; 9. Products used for commercial purposes, includi
*
Products which have been subject to abuse, accident, alteration, modification, tampering, negligence, misuse,
2.
Initial installation, installation and removal from cabinets or mounting systems. ;
3.
Operational adjustments covered
4.
Damage that occurs
5.
Signal reception problems and failures due to line power surge; *
User
7.
Accessones; *
8.
Batteries (except that Rechargeable Batteries are covered for 90 days from the date of purchase); *
10.
Loss of data resultant from malfunction of hard drive or other data storage device; *
* * ; There are
THE
:
* LIMITED TO THE DURATION OF
* *
* JVC SHALL NOT
: DAMAGES, WHETHER DIRECT, INCIDENTAL
*DAMAGE
DURATION
COVERED:
in
in
shipment, due to act of
Removal
no
TO TAPES, RECORDS
Memory
express warranties except as listed above. ;
OF
BE
Devices/Video
ANY IMPLIED WARRANTIES, INCLUDING THE IMPLIED WARRANTY
THE
LIABLE FOR ANY LOSS OF
OR
the Owner's Manual, normal maintenance, video and audio head cleaning; *
Pick-up
EXPRESS WARRANTY HEREIN. *
DISCS) RESULTING
God,
and cosmetic damage; ;
Tubes/CCD
ng,
but not limited to rental. ;
USE
OR
CONSEQUENTIAL (INCLUDING, WITHOUT LIMITATION, :
Image
Sensors
OF THE PRODUCT, INCONVENIENCE, OR ANY OTHER *
FROM
are
covered
THE USE OF THIS PRODUCT,
for
90
days
from
OF
MERCHANTABILITY,
the
date
of
purchase;;
OR
ARISING OUT *
*
faulty*
by;
al*
IS
:
* OF ANY BREACH OF THIS WARRANTY. ALL EXPRESS AND IMPLIED WARRANTIES, INCLUDING THE *
:WARRANTIES
: WARRANTY PERIOD SET FORTH ABOVE. :
;
Some
states
* implied warranty lasts,
; legal rights and you may also have other rights which vary from state to state. ;
*
* *
;
*
* *
******************************************************************************
REFURBISHED PRODUCTS CARRY A SEPARATE WARRANTY, THIS WARRANTY DOES NOT APPLY.
OF
REFURBISHED PRODUCT WARRANTY, PLEASE
INFORMATION
OF MERCHANTABILITY AND FITNESS FOR PARTICULAR PURPOSE, ARE LIMITED TO THE :
do
not
allow
the
so
PACKAGED
exclusion
these
WITH
limitations
EACH
of
incidental
or
1700
JVC
Valley
REFURBISHED
or
exclusions
Road, Wayne,
http://www.jvc.com
consequential
may
AMERICAS
REFER
PRODUCT.
not
CORP.
New
Jersey 07470 ;
TO
damages
apply to you.
THE
REFURBISHED PRODUCT WARRANTY
or
limitations
This
warranty gives you specific *
on
how
FOR
long
DETAIL
an
;
*
*
For
customer
Enter below the Model No. and Serial No. which is located either on the rear, bottom
Retain this information for future reference.
Model
Purchase date : Name of dealer
use:
No.:
Serial
No.:
or
side of the cabinet.
:
 Loading...