


S 250 HCS 21
1


english
français
deutsch
svenska
español
suomi

english
Contents
Introduction 3
Connecting the system 4
Connecting antennas 5
Connecting TV-System 5
Connecting audio 5
System Setup 7
General Setup 7
Speaker Setup 8
Audio Setup 8
Preference Setup 8
Remote layout 11
Input selectors - Clock Setup 12
Frequently used Advanced
Function buttons 13
Using and setup of Radio 14
Playing back files from
Disc and USB 15
Troubleshooting 16
Service and Warranty 17
2
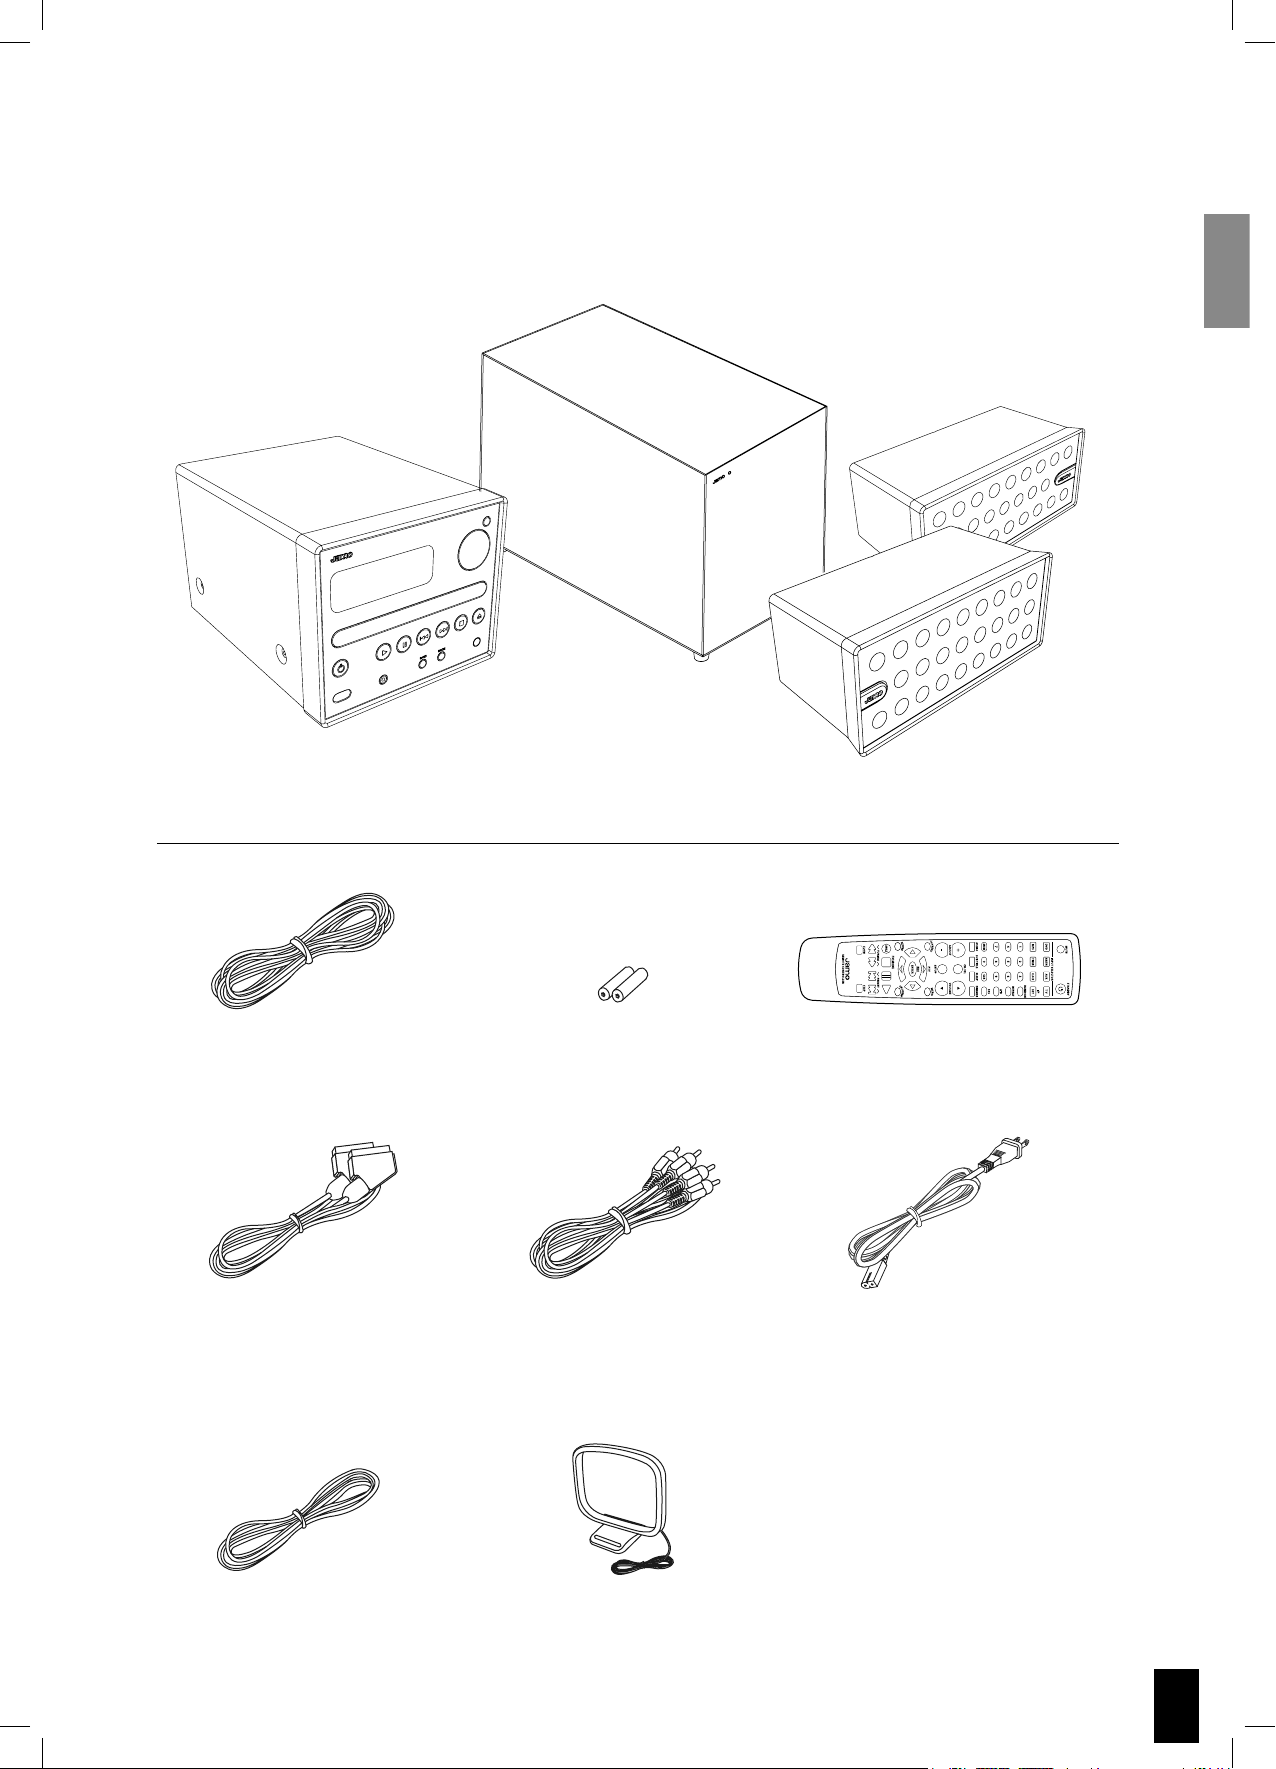
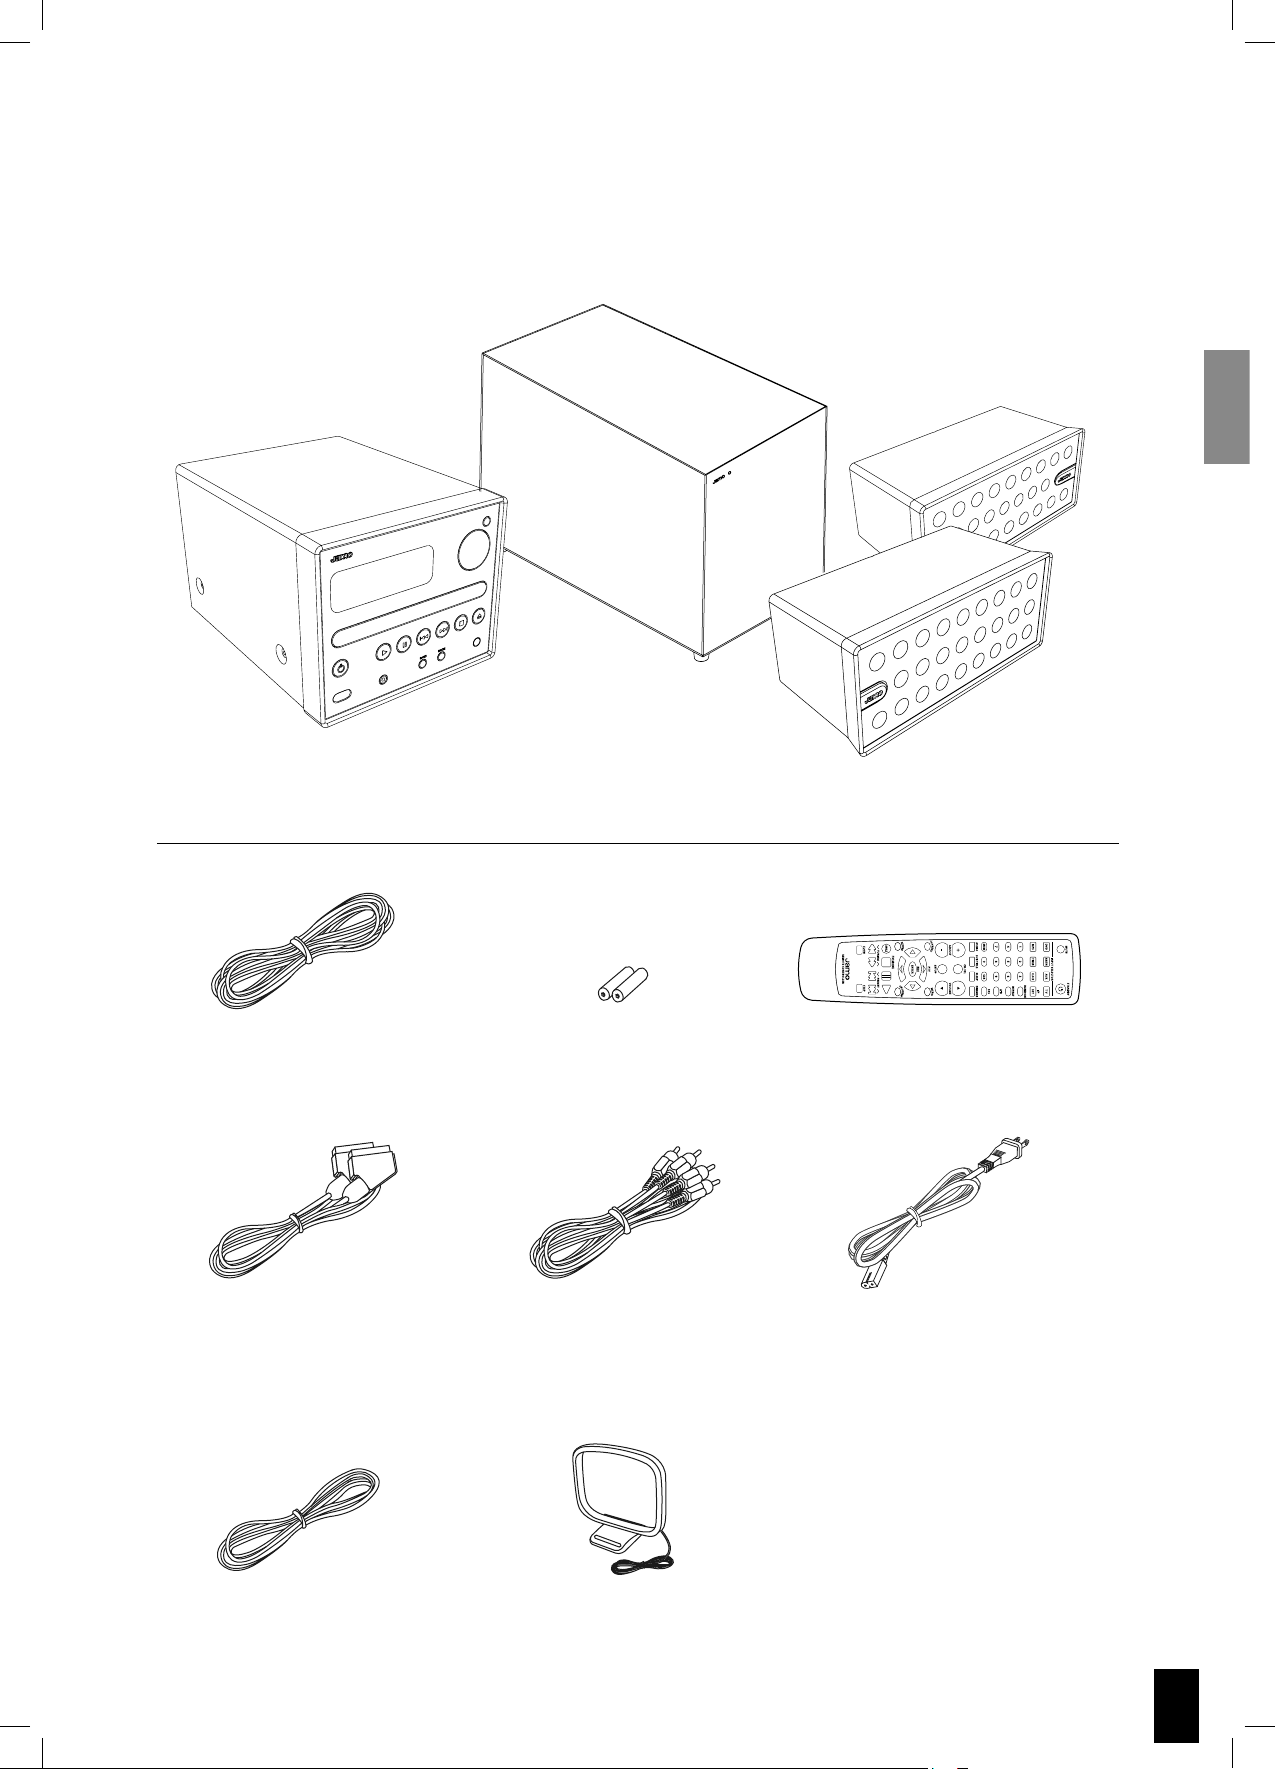
Introduction
Make sure the following accessories are included with your system.
S VSR 25
8m / 26ft
speaker cable
SCART
SUB 200
Batteries
for the remote control
Audio cable /
Composite Video
2 x S 250
Remote control
S VSR 25
Power Cable
FM Antenna
AM Antenna
3
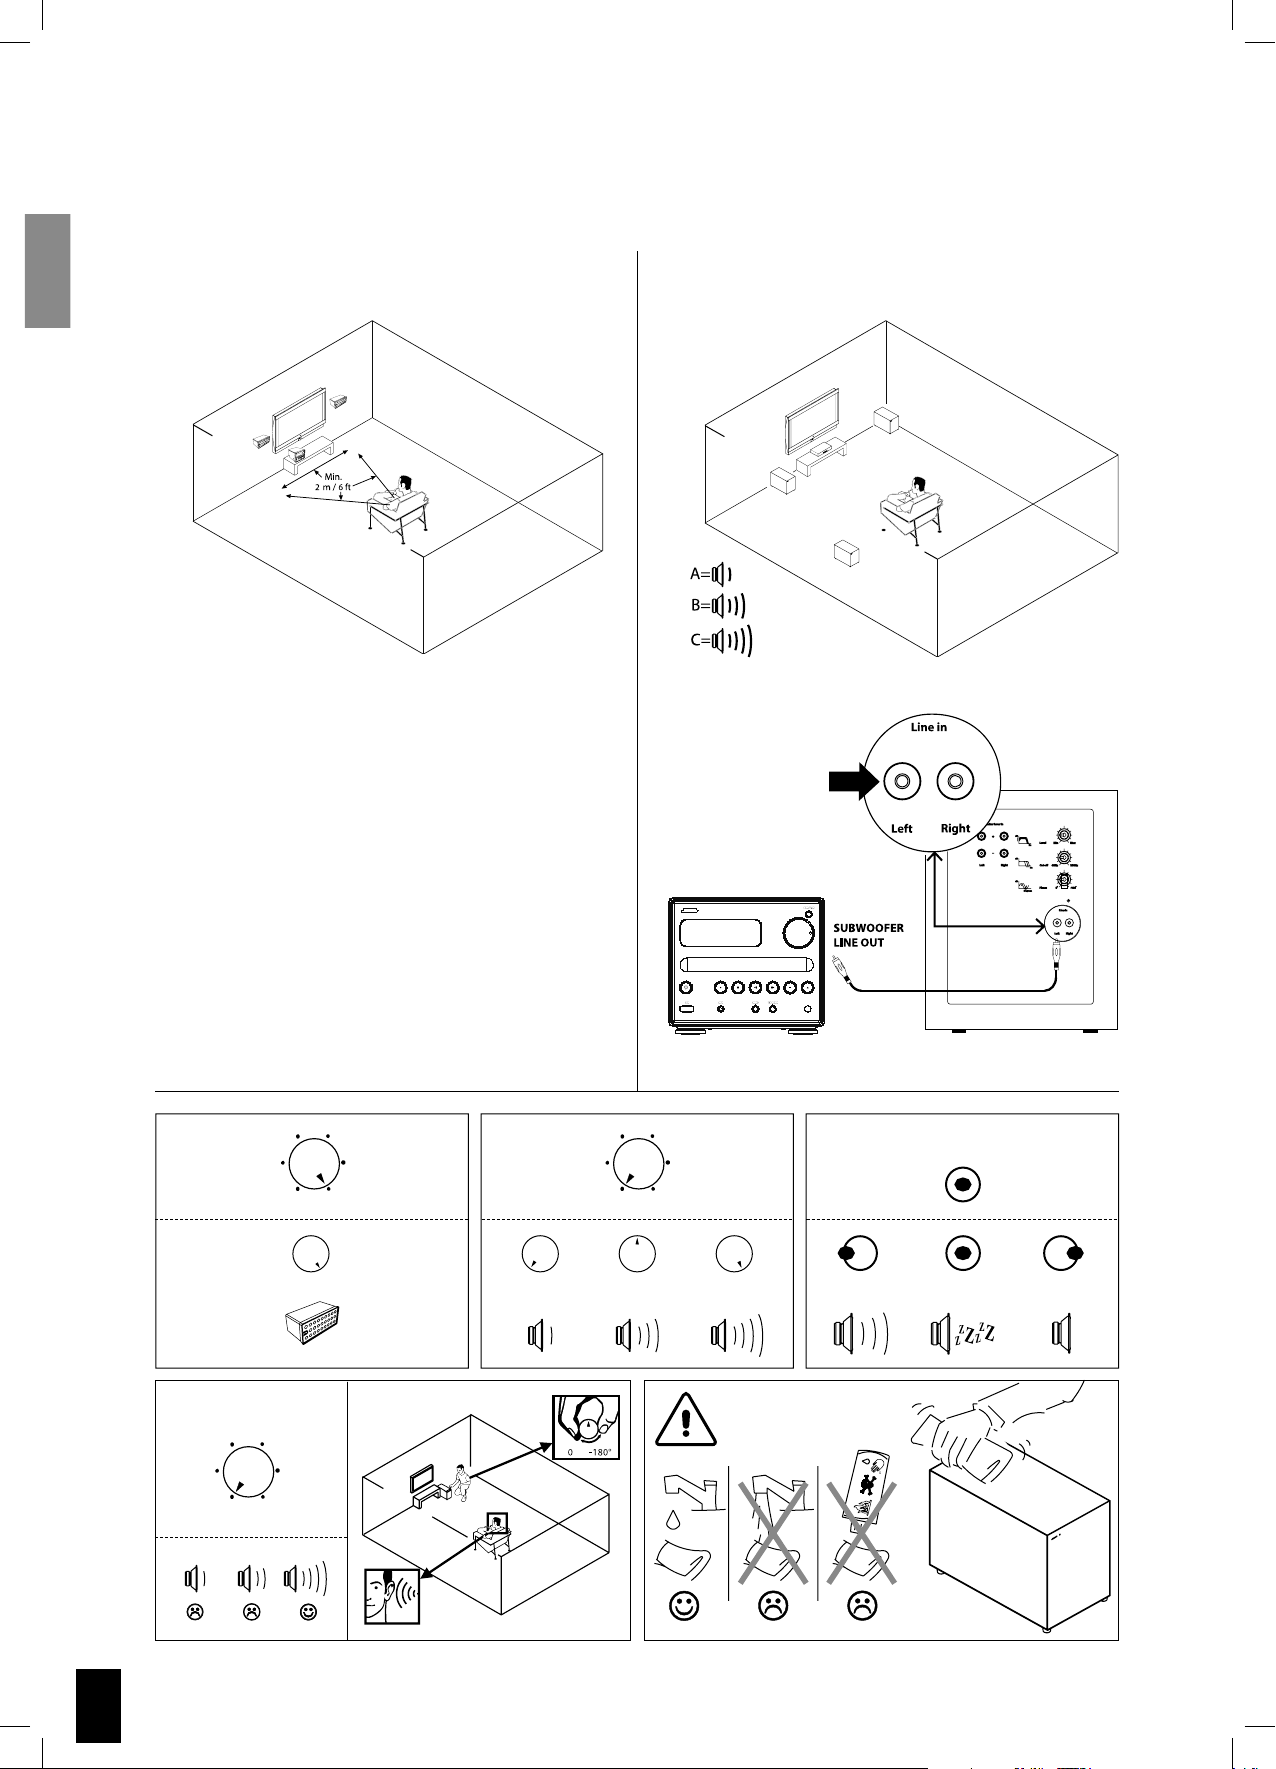
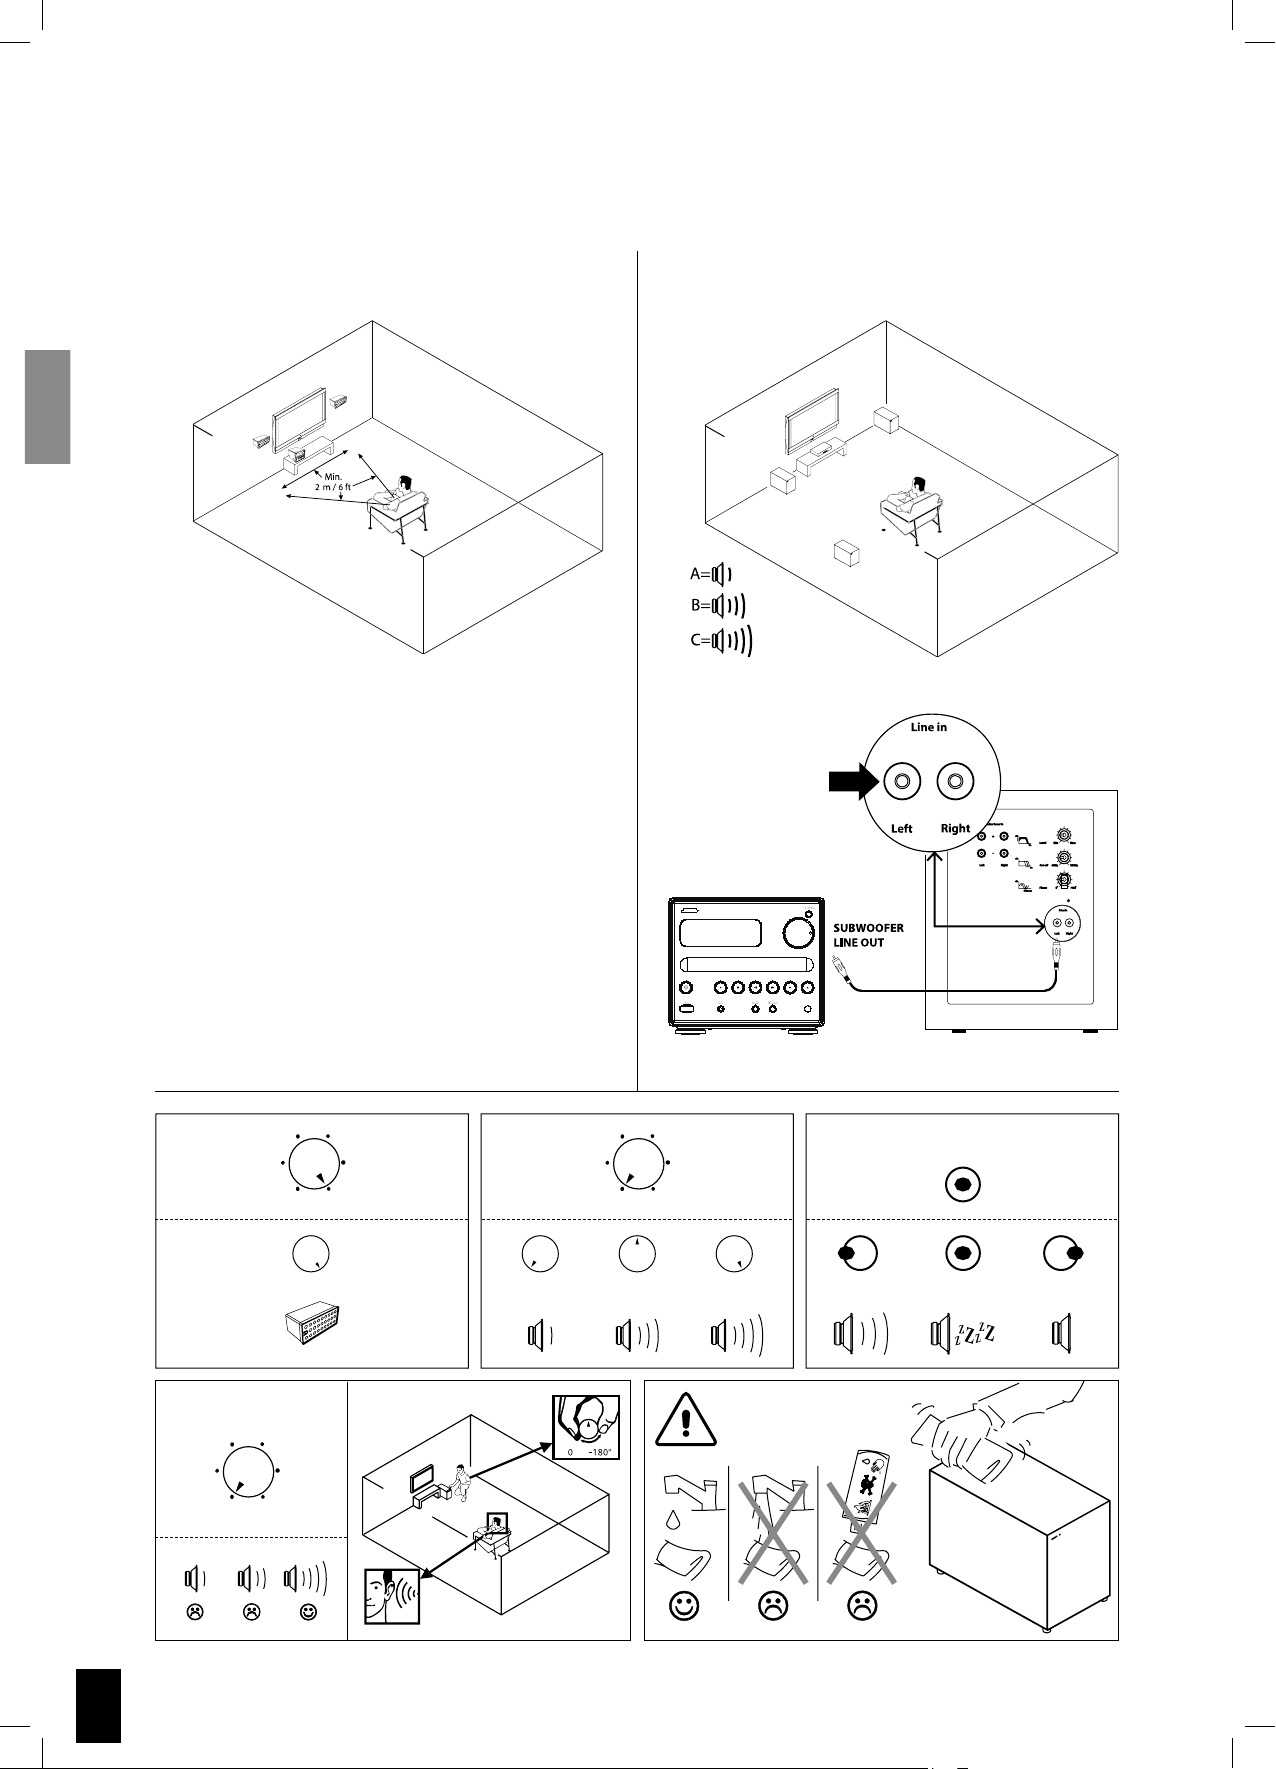
Connecting the system
On AuAu
to OfOf
Refer to these illustrations to connect speakers, subwoofer, antennas and TV-system.
S 250 SUB 200
B
A
C
Cut off
Frequency
Phase
Level On / Auto / Off
40 Hz 150 Hz Min Max
On
ON AUTO OFF
to
f
0˚ -180˚
4
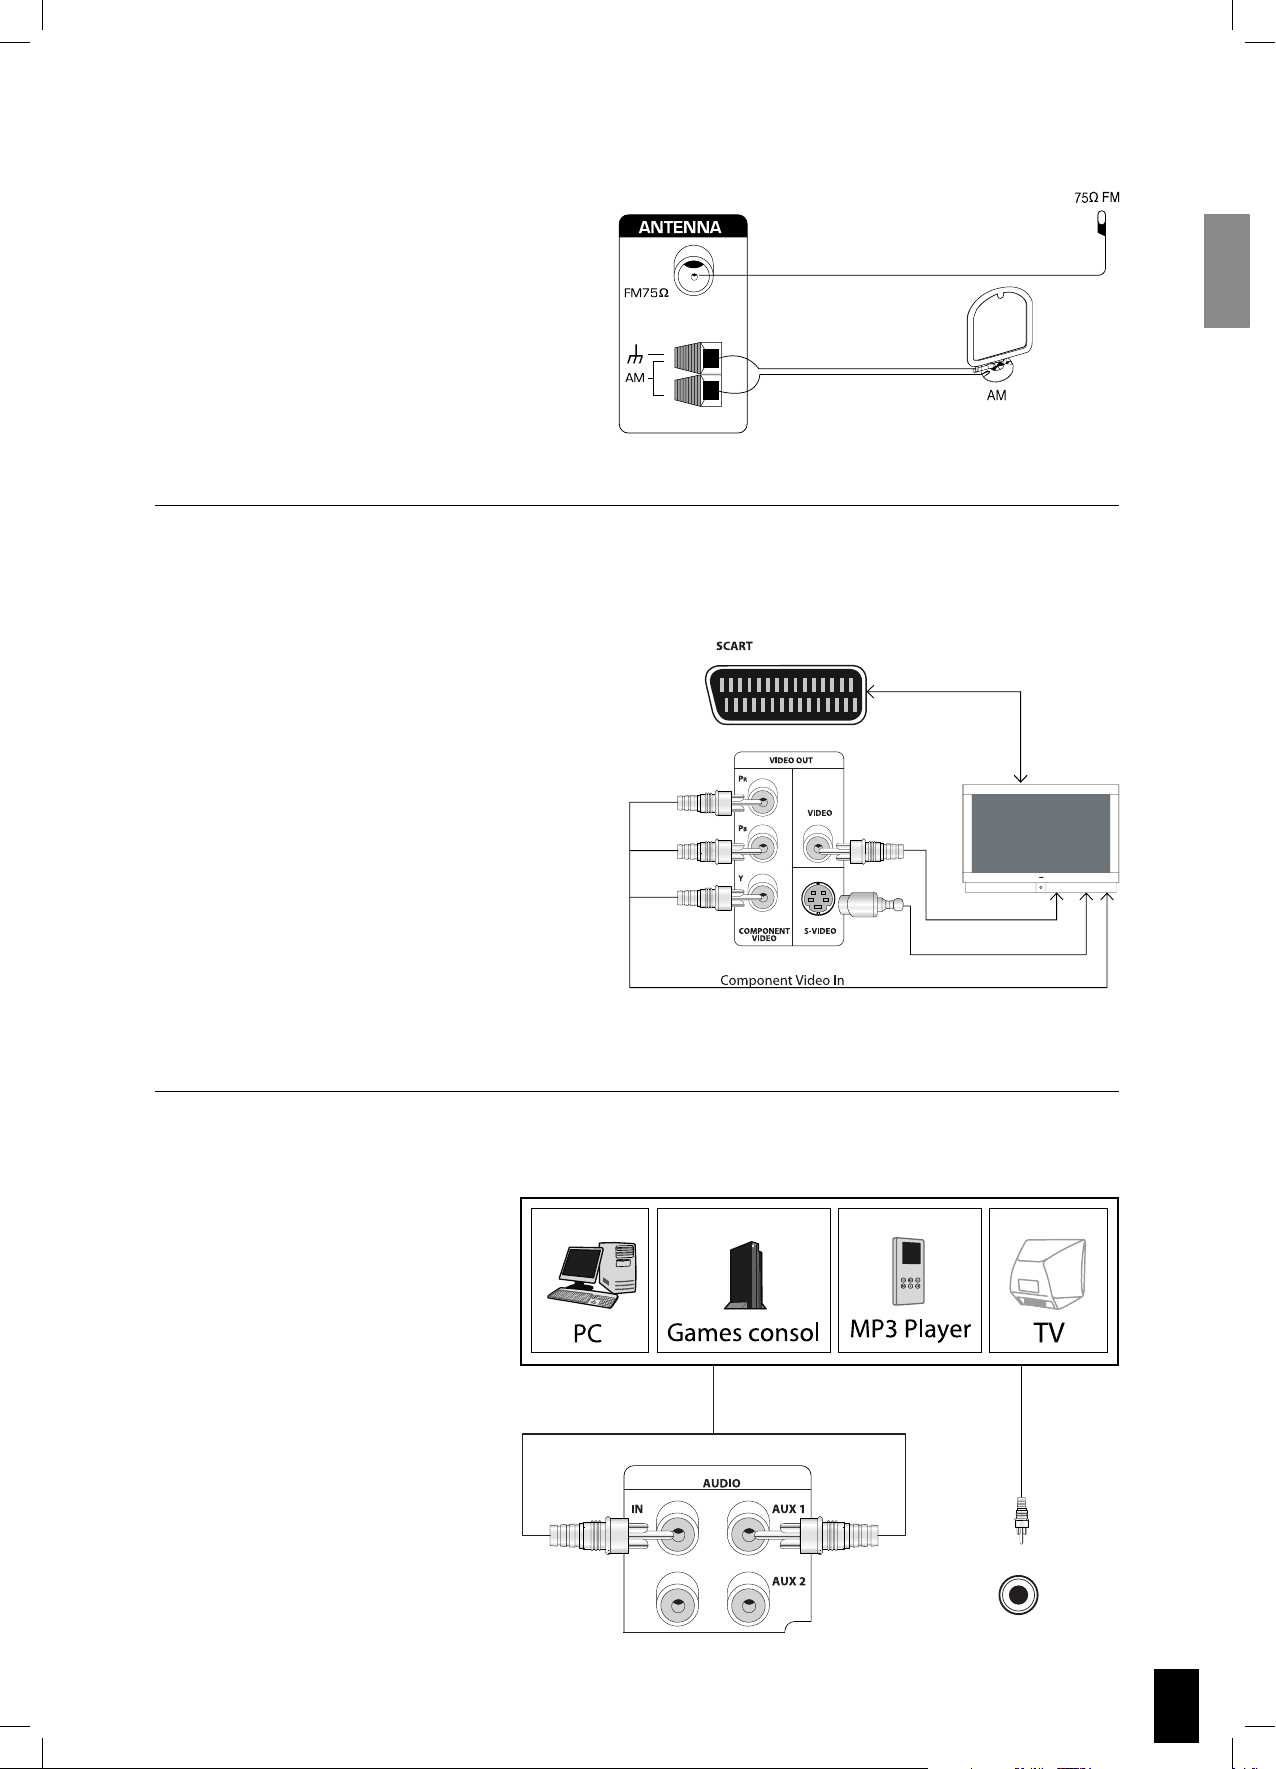
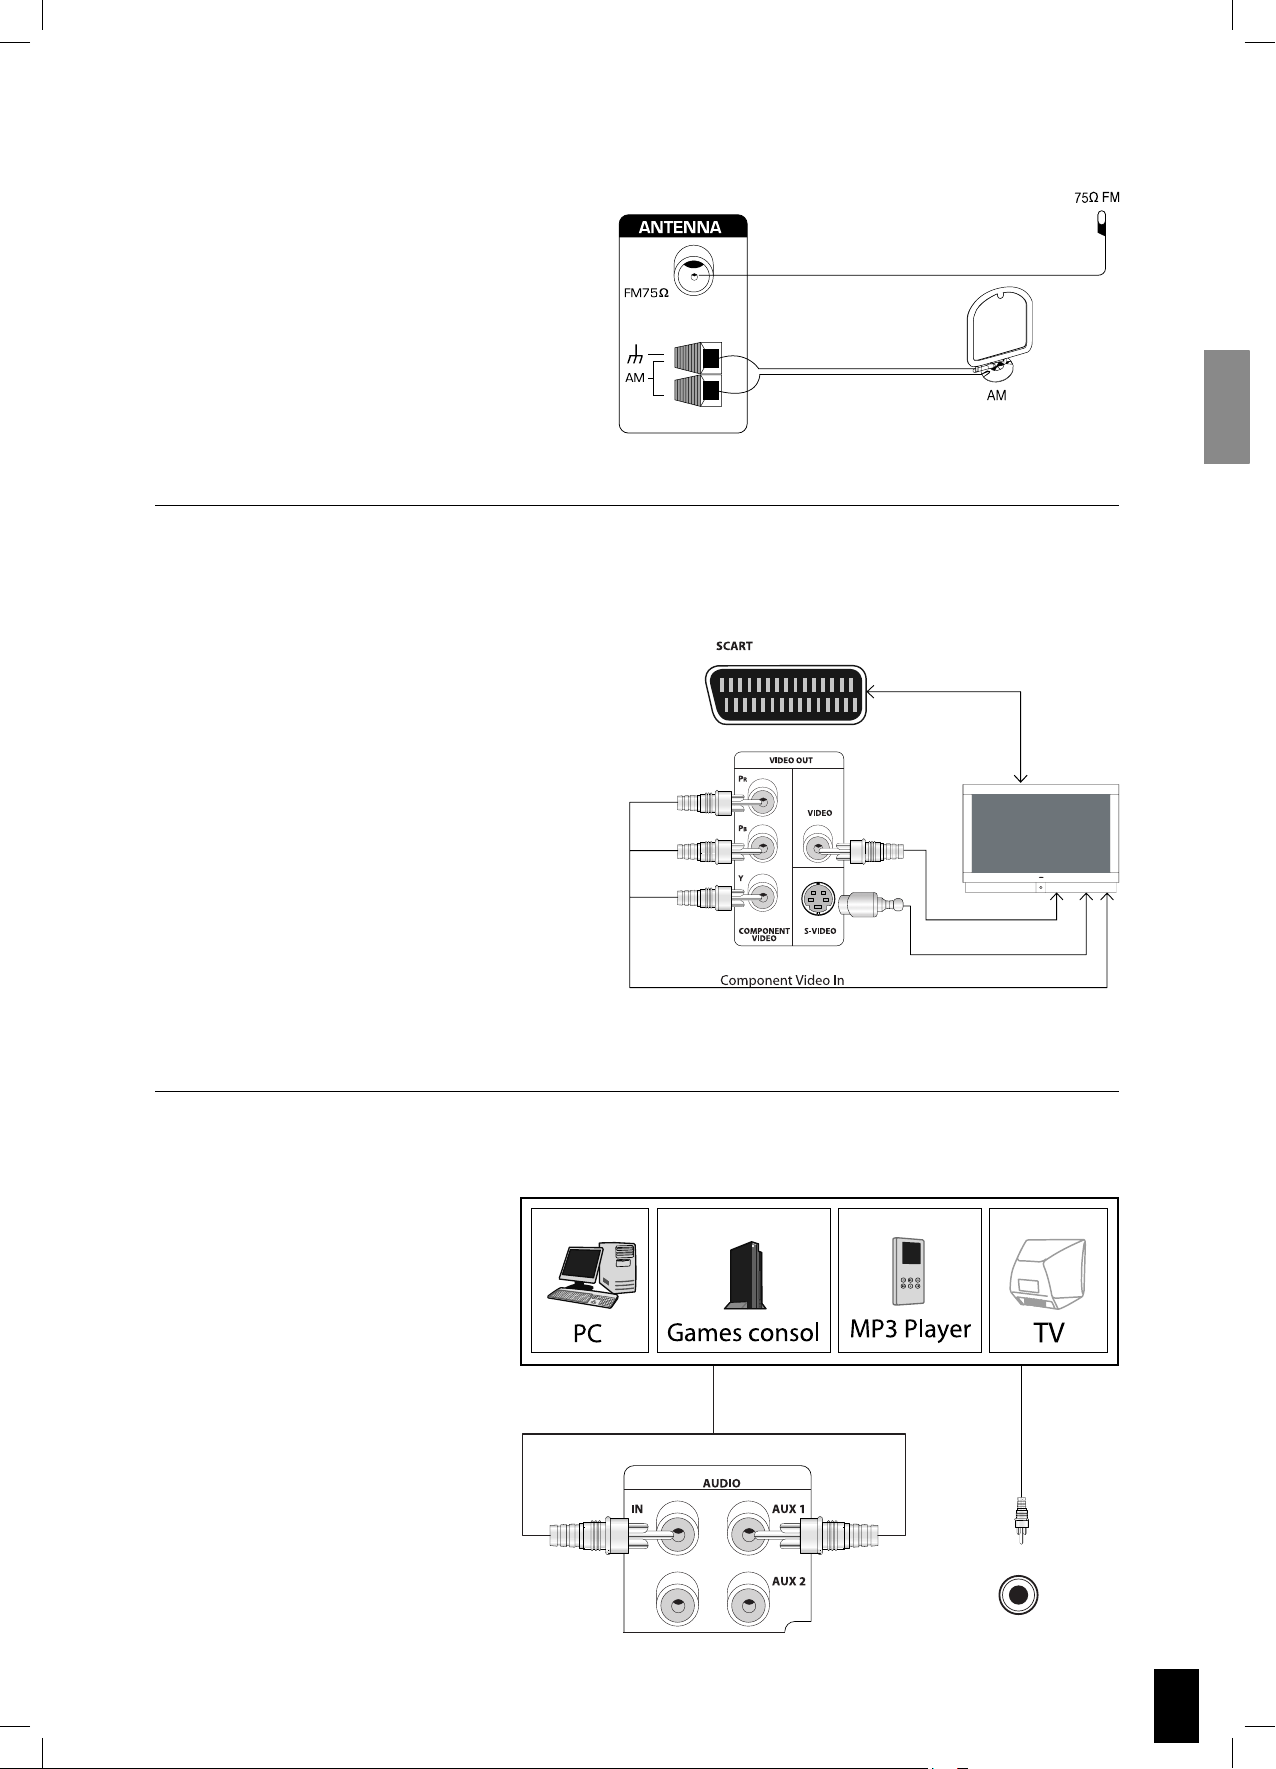
Connecting antennas
You will need to tune into an FM/AM radio
station and adjust the position of the FM/AM
antenna to achieve the best possible reception.
Connecting TV-System
SCART video configuration
Both audio and video are passed through
the SCART cable. Most TVs will automatically
send the audio to the S VSR 25.
S-Video configuration
Video is connected through the S-Video
cable (not supplied) to the TV. Remember to
connect the audio from the TV to the S VSR
25. Set Video Output to YPbPr (see page 9)
Component video configuration
The Component video output can be connected to plasma and LCD displays. Remember to connect the audio from the TV to the
S VSR 25.
Connecting audio
If a PC, Games consol, MP3 player,
TV or similar has analogue audio
output, you can connect it directly
to the S VSR 25.
MP3
5
R
3 632
$6$ 2%#%)6%2
-!.5&!#452%$5.$%2 ,)#%.3%
&2/-$/,"9 ,!"/2!4/2)%3 h$/,"9v
!.$4(% $/5",%$ 39-"/,!2%
42!$%-!2+3/& $/,"9 ,!"/2!4/2)%3
h530!4%.4 ./3
!.$ v
3#!24
/04)#!,
$)')4!,
/54
6)$%/ /54
2
0
0
"
9
#/-0/.%.4
6)$%/
6
6)$%/
36)$%/
).
/54
!5$)/
!58
8
!58
9
35"7//&%2
,
2
02%/54
30%!+%23
2
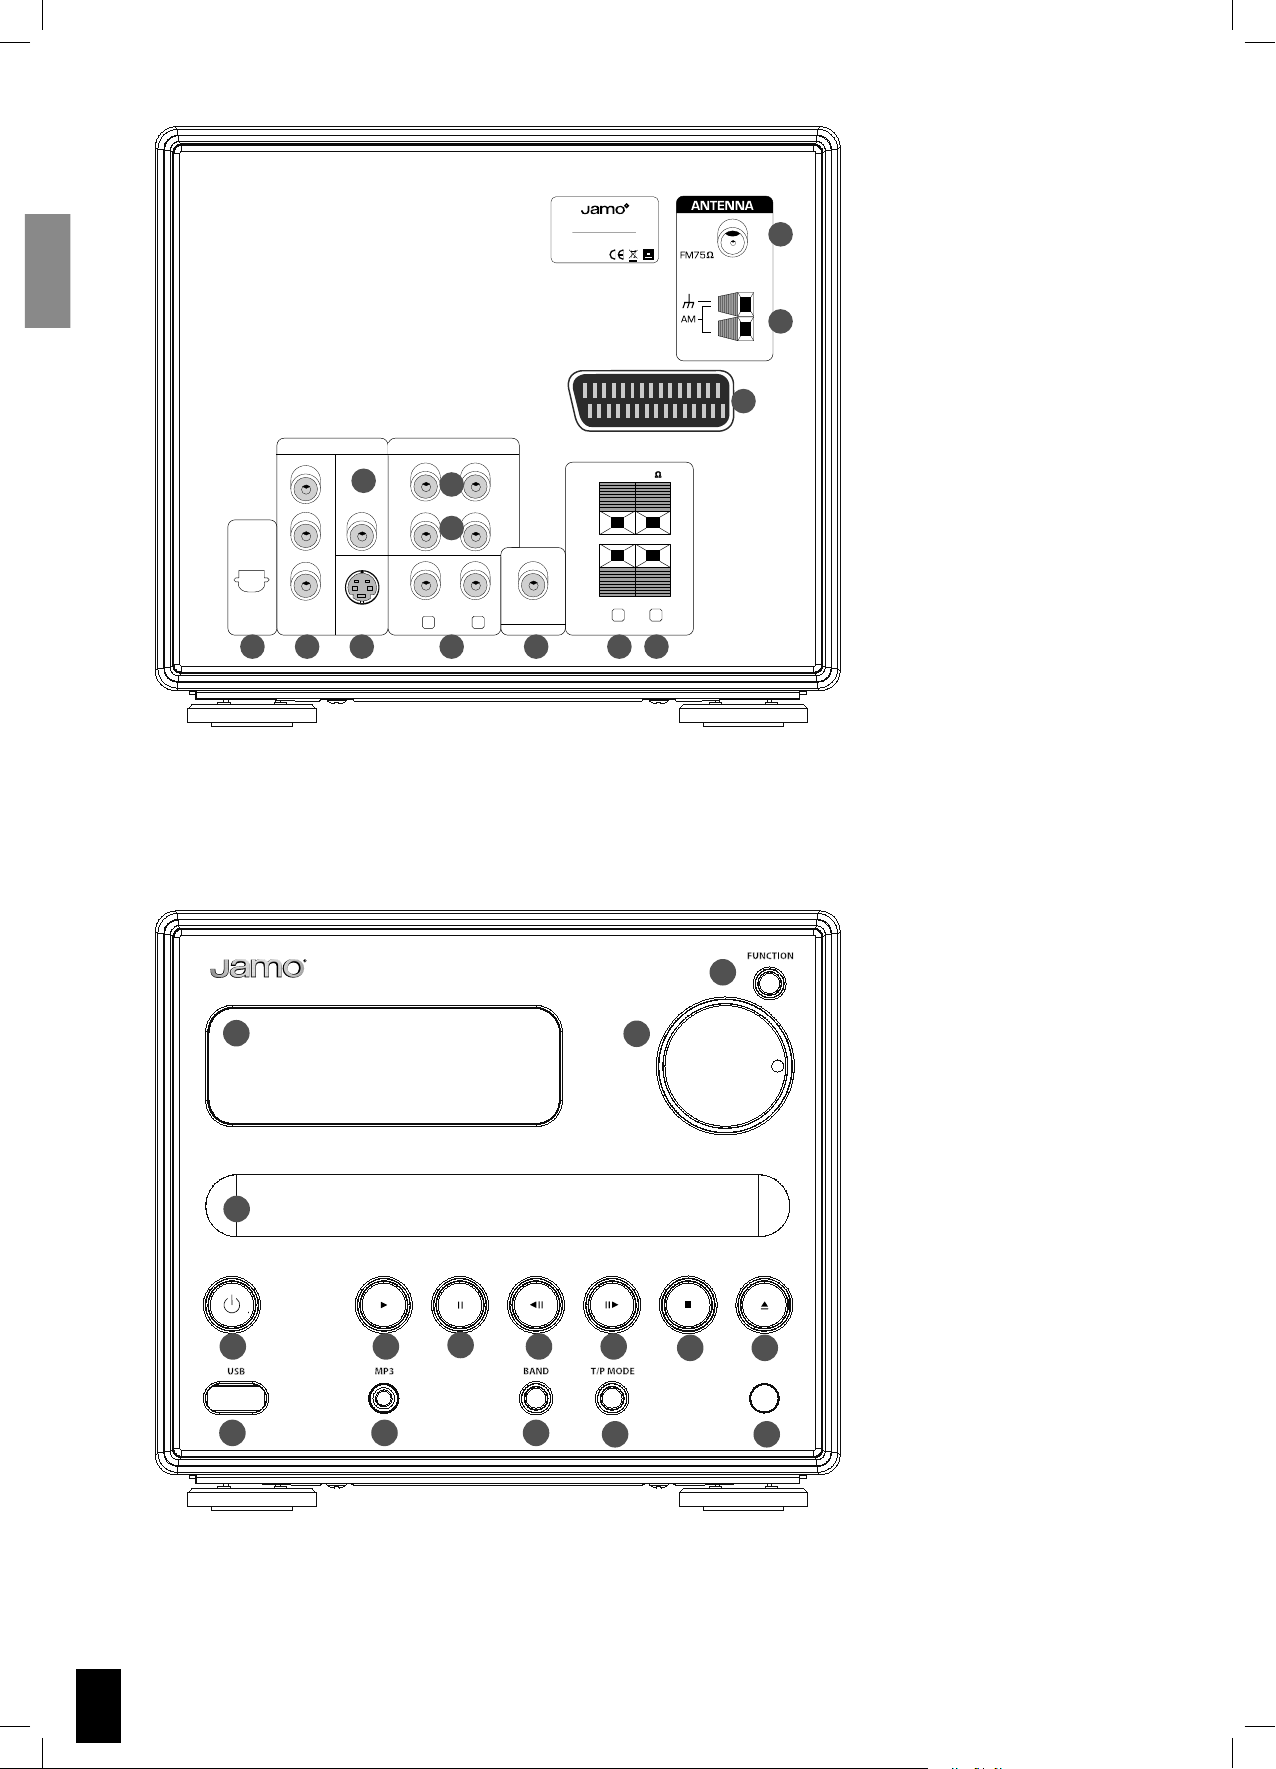
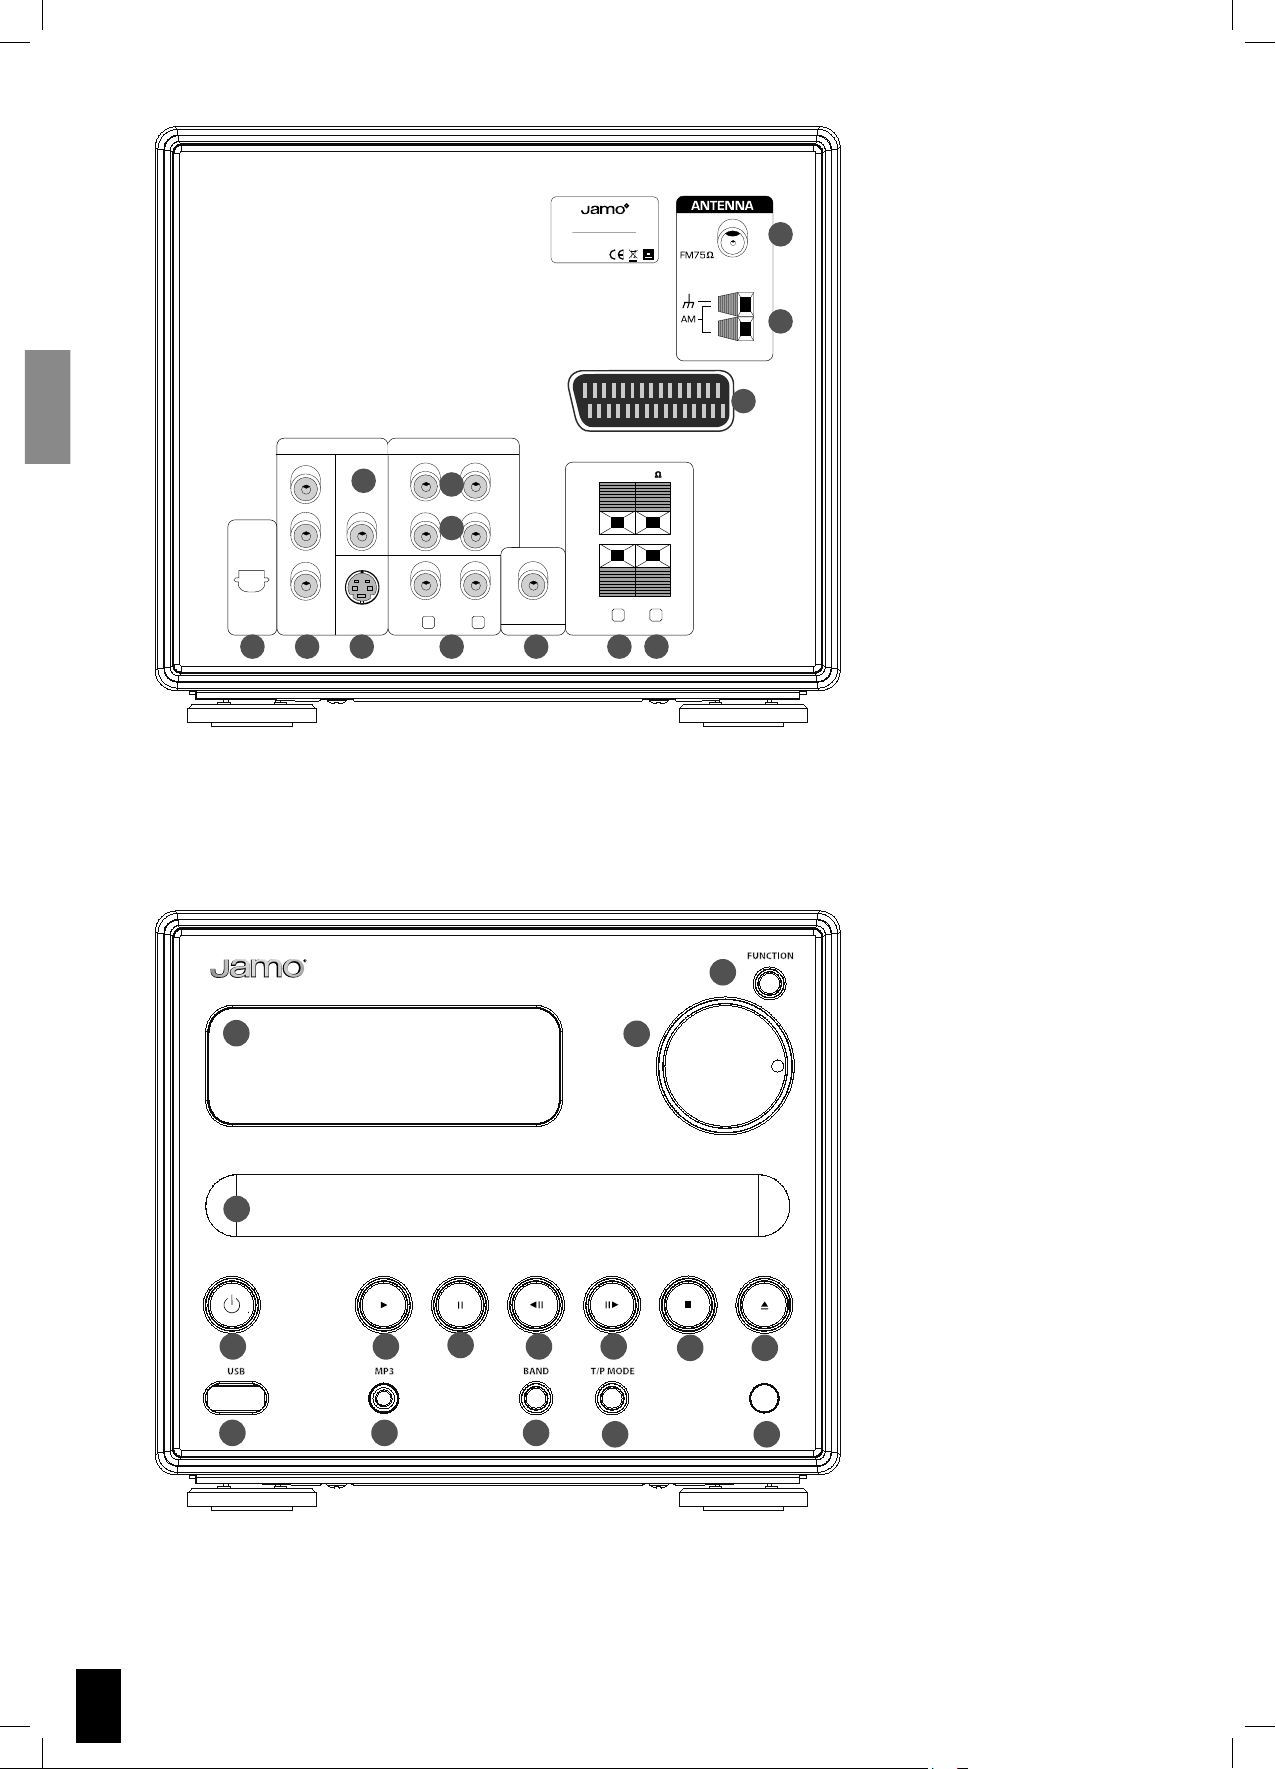
4 5 7 10 11 12 13
1. FM antenna
2. AM antenna
3. SCART In/Out
4. Digital Out (Optical)
1
5. Component Video Out
6. Composite Video Out
7. S-Video Video Out
8. Analogue Audio In - AUX 1
2
9. Analogue Audio In - AUX 2
10. Analogue Audio Out
11. Subwoofer Pre Output
3
12. Right Speaker Out
13. Left Speaker Out
,
1
4
5 6
12
1. Display
2. Function
2
3. Volume
4. Disc Tray
5. Standby / On
3
6. Play
7. Pause
8. Previous chapter/track/program
9. Next chapter/track/program
10. Stop
11. Open/Close
12. USB Connector
13. Audio Input
14. Band
15. Tuner Select/Preset Select
16. Remote Control Sensor
7
8
1413
9
15
10
11
16
6
System Setup
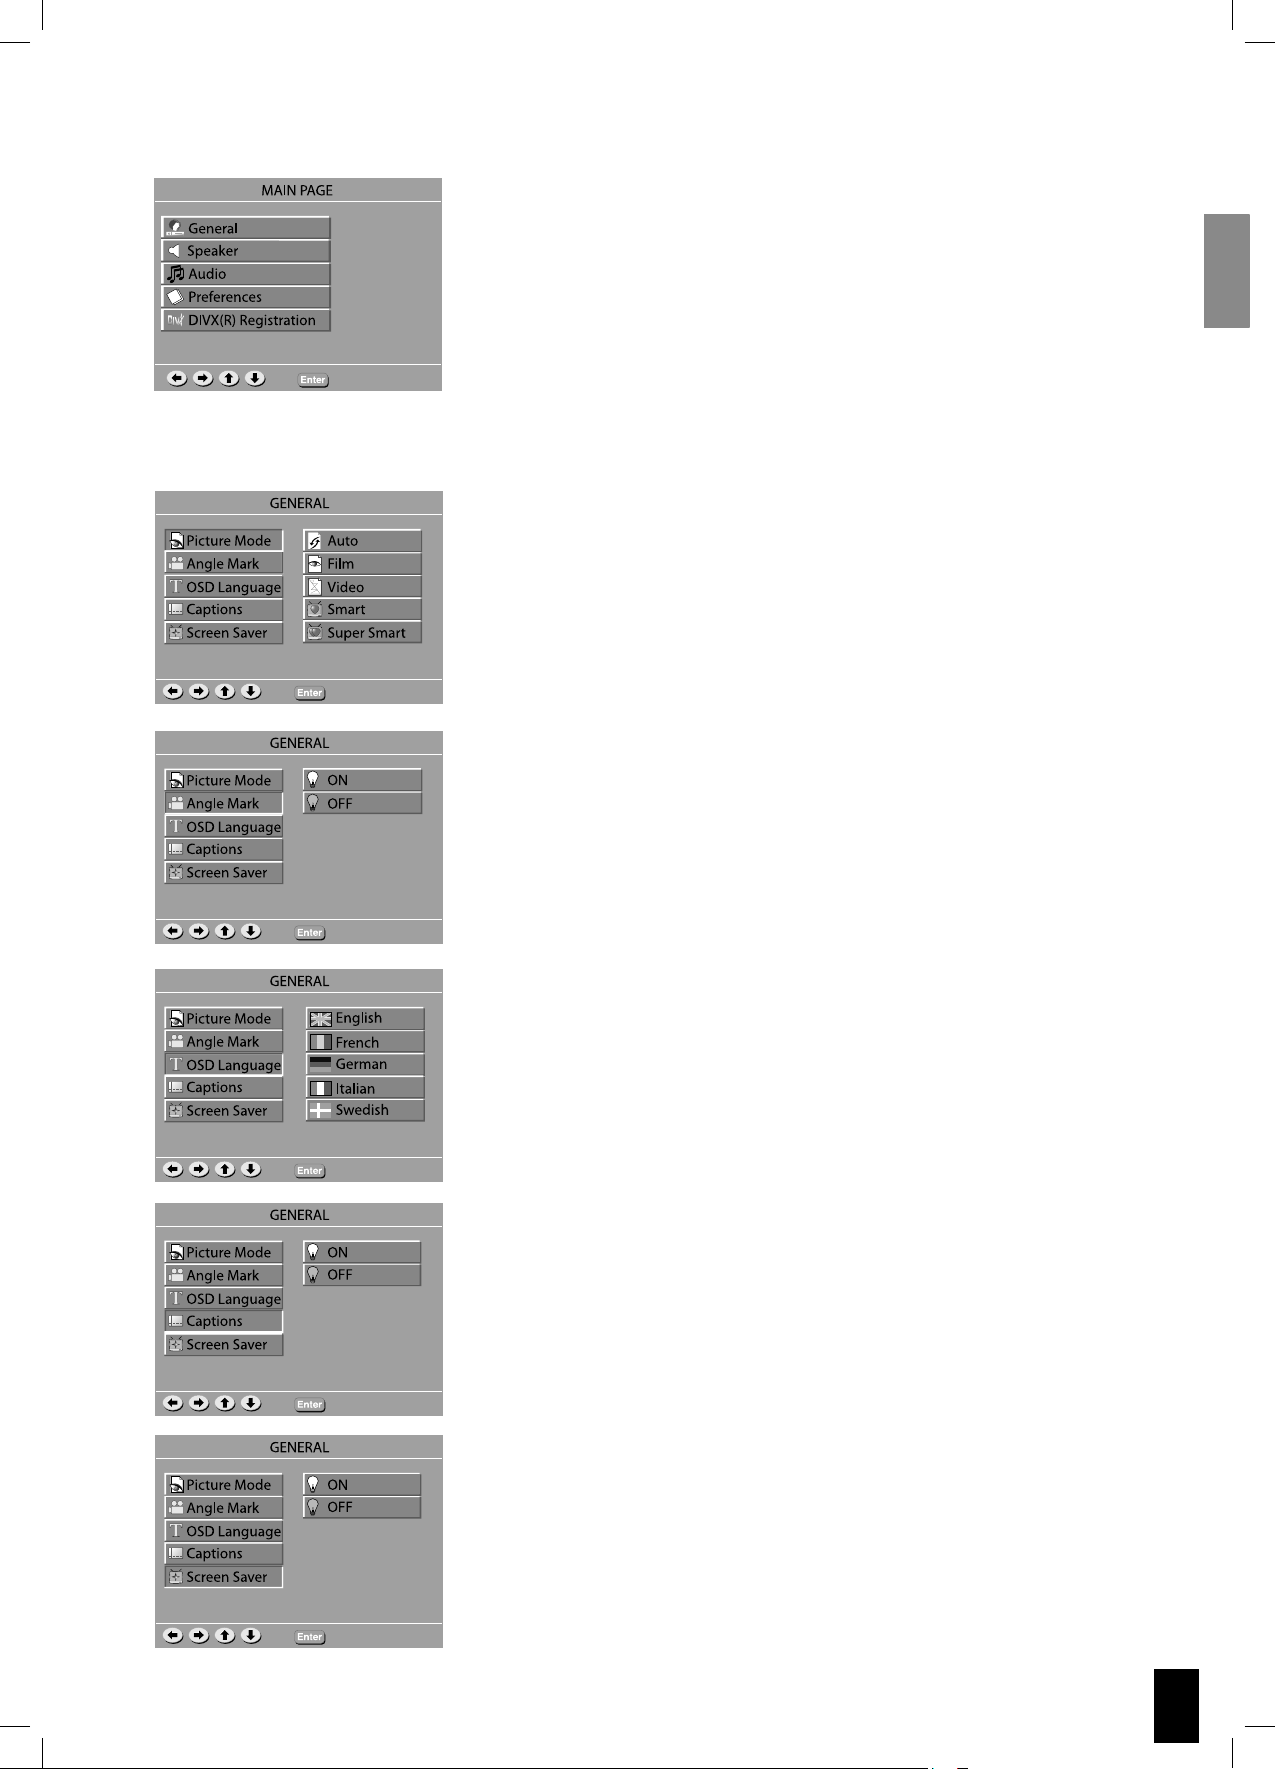
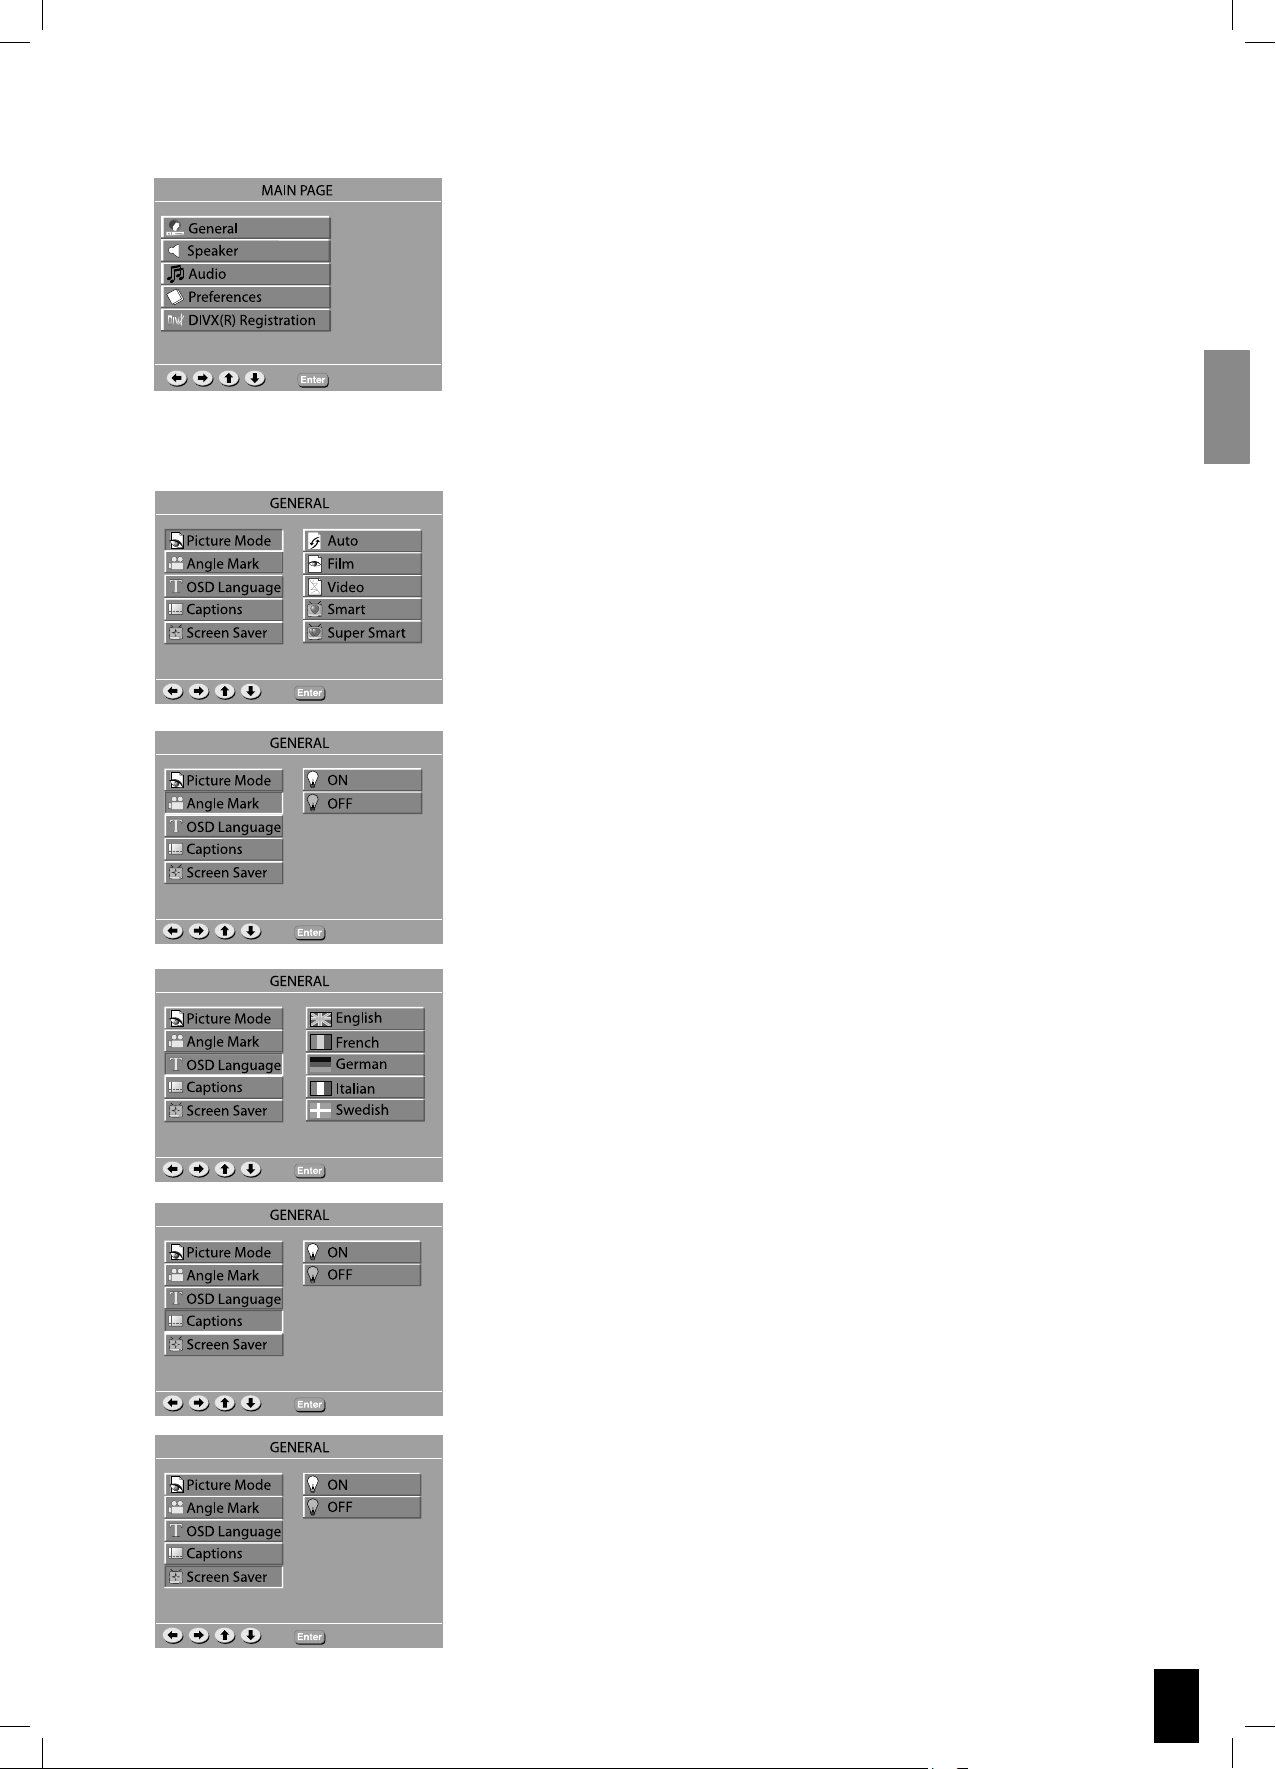
General Setup
To access the S VSR 25 setup menu, press “SETUP” on the remote.
Use to browse through the menus, and press “ENTER” to select
an item.
To exit System Setup, press “SETUP”.
Picture Mode
- Auto Mode - The picture quality is adjusted automatically.
- Film - Choose this setting to show the picture quality of film material.
- Video Mode - Choose to show the picture quality of video material.
- Smart Mode - Choose to show progressive and interlaced materials with
limited motion.
- Super Smart - Choose to show progressive and interlaced materials with
motion.
Angle Mark
If available on the DVD, this will show if multiple angles can be displayed.
OSD Language
This sets the OnScreen Display language for the S VSR 25.
Captions
If available subtitles will be show automatically.
Screen Saver
Turns screen saver ON and OFF.
7
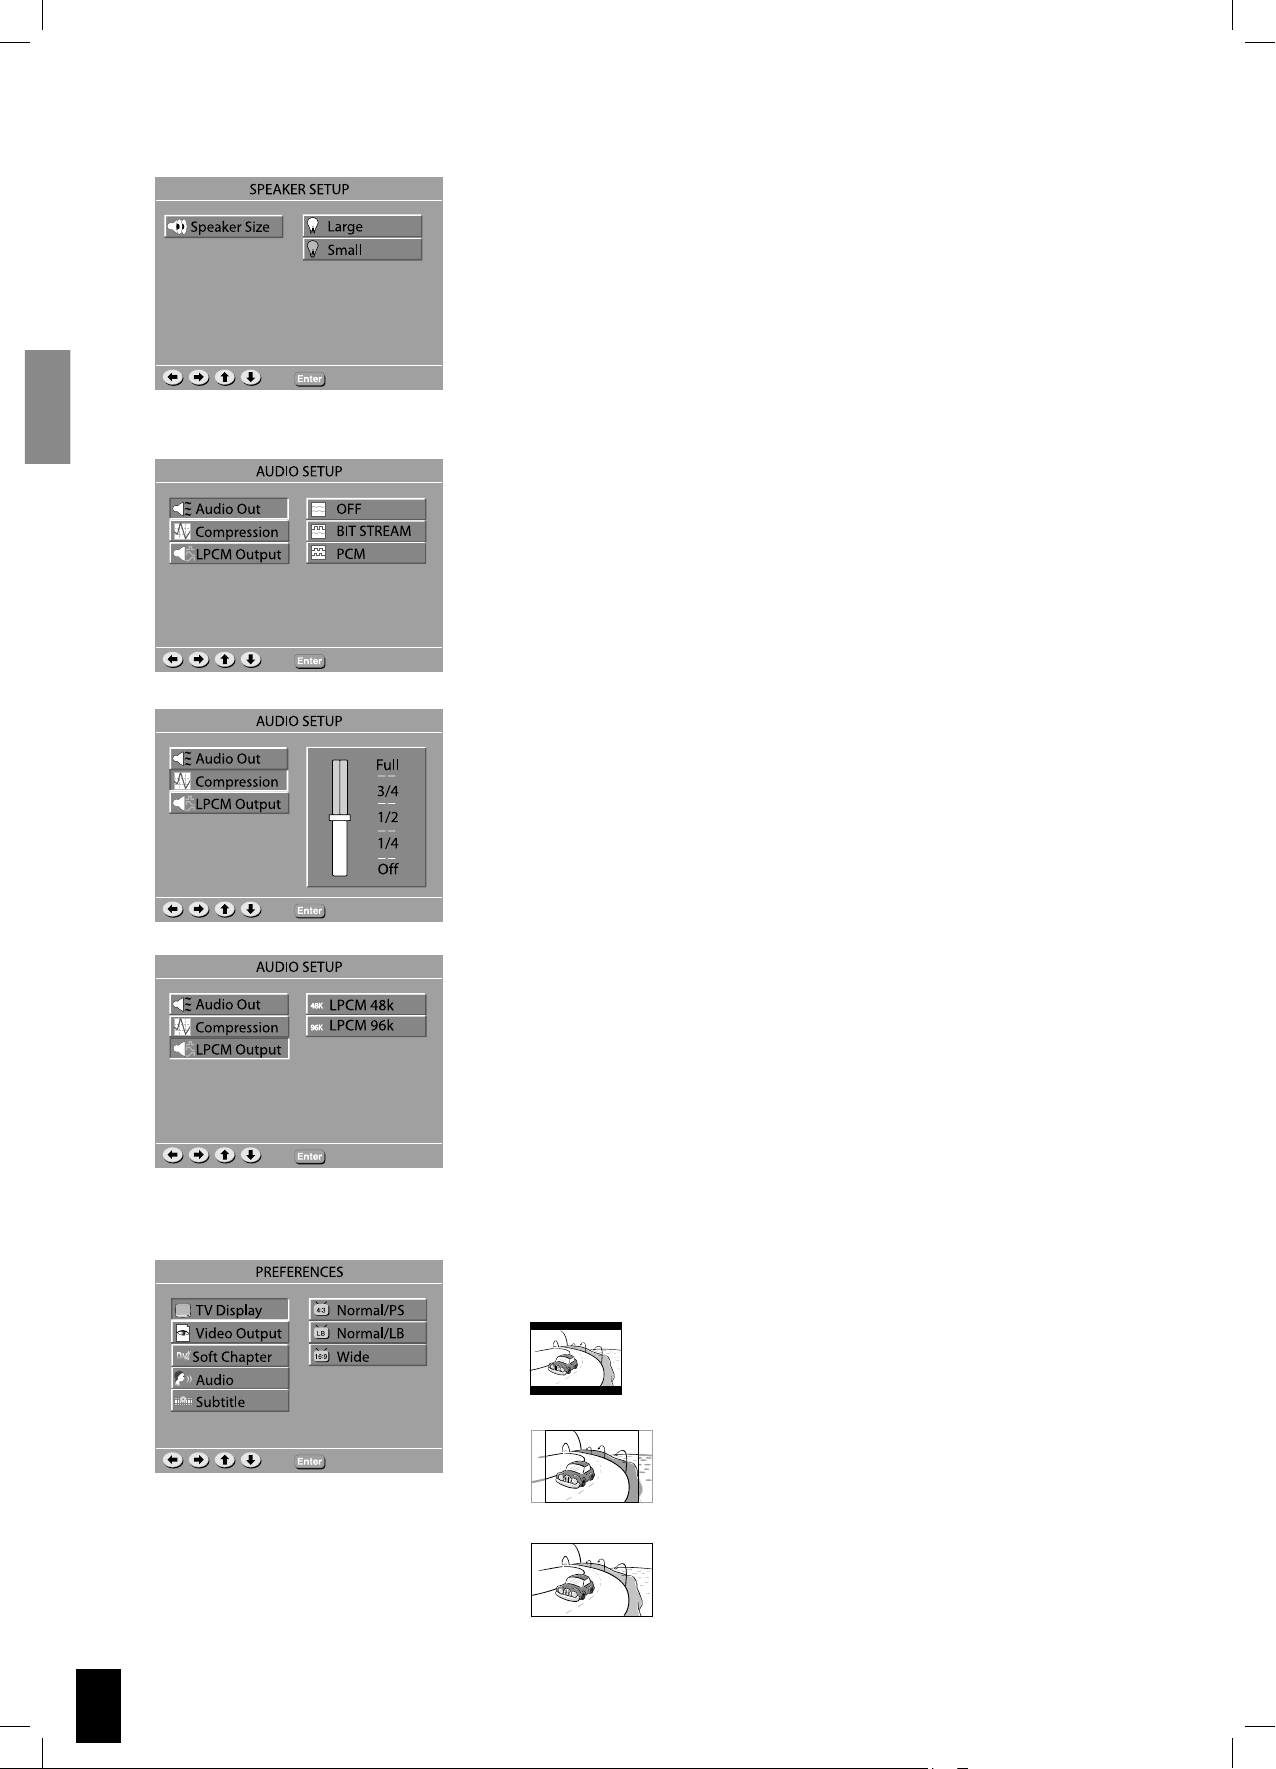
Speaker Setup
Audio Setup
Speaker Setup
Large – If you have large floorstand speakers, select large.
Small – If you have compact or bookshelf speakers, select small.
Select “Small” for the S 250 speakers.
Audio Out
If an external AV Receiver with DD and DTS decoder is connected
through the DIGITAL OUT, select BIT STREAM.
If an external AV Receiver without DD and DTS decoder is connected
through the DIGITAL OUT, select PCM.
Compression
If you want to watch a movie without disturbing others in the house,
you can reduce the dynamics (loud sounds) by activating the dynamic range function.
Preference Setup
LPCM Output
Sets Linear Pulse-Code Modulation sample frequency rate for Digital
Output.
Check your external receiver to see which sampling rate it can decode.
TV Display
You can select the aspect ratio that is appropriate for your TV display.
• 4:3 LB - If you have a conventional ‘square’ set and
would like to see the DVD picture in its full format, use
this setting. Wide bands will be displayed on the upper
and lower portions of the TV screen.
• 4:3 PS - If you have a conventional TV set and would
like to see the DVD picture fill your TV screen then use
this setting. A wide picture is displayed on the whole TV
screen with a portion automatically out off.
• 16:9 - If you have a widescreen TV set, use this setting (you must also set your widescreen TV to it’s 16:9
mode.).
8
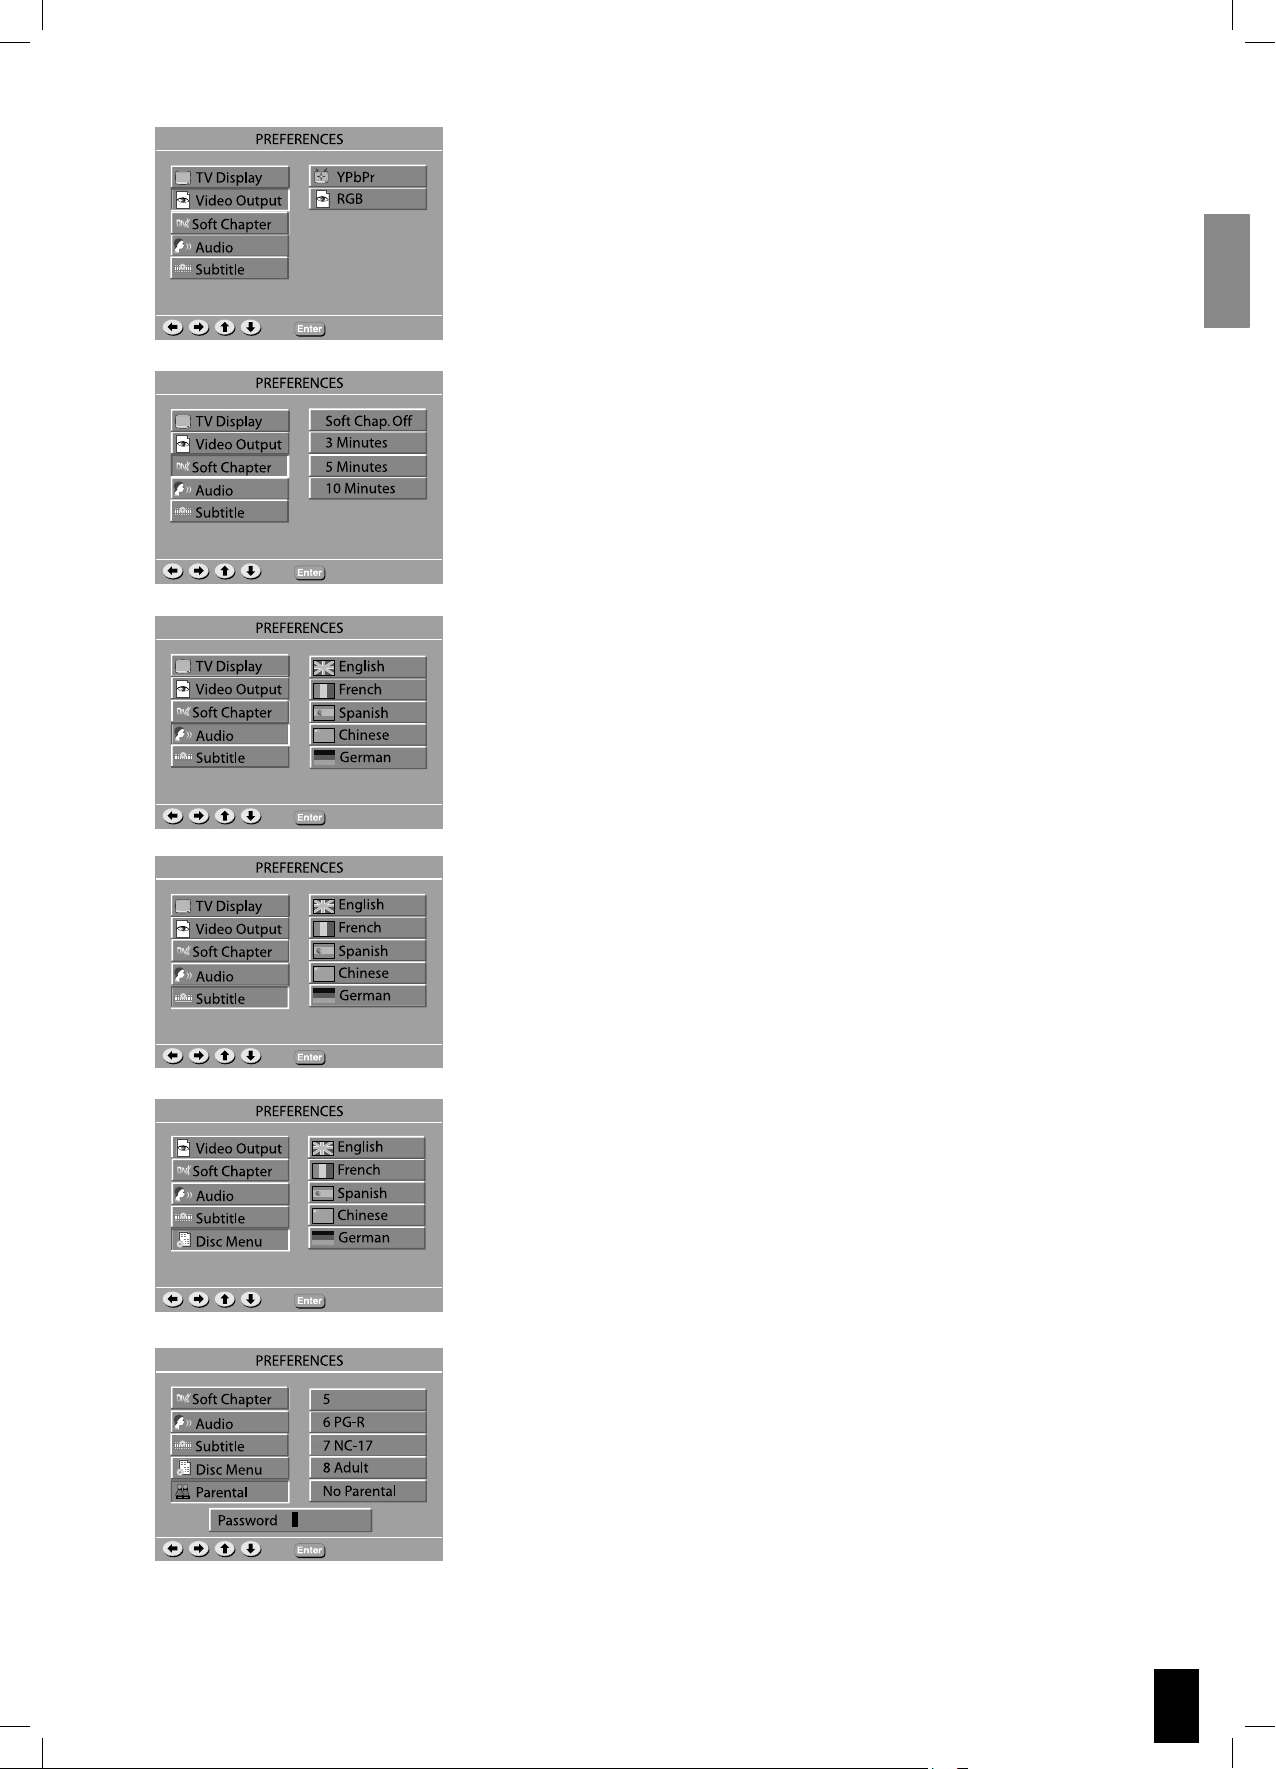
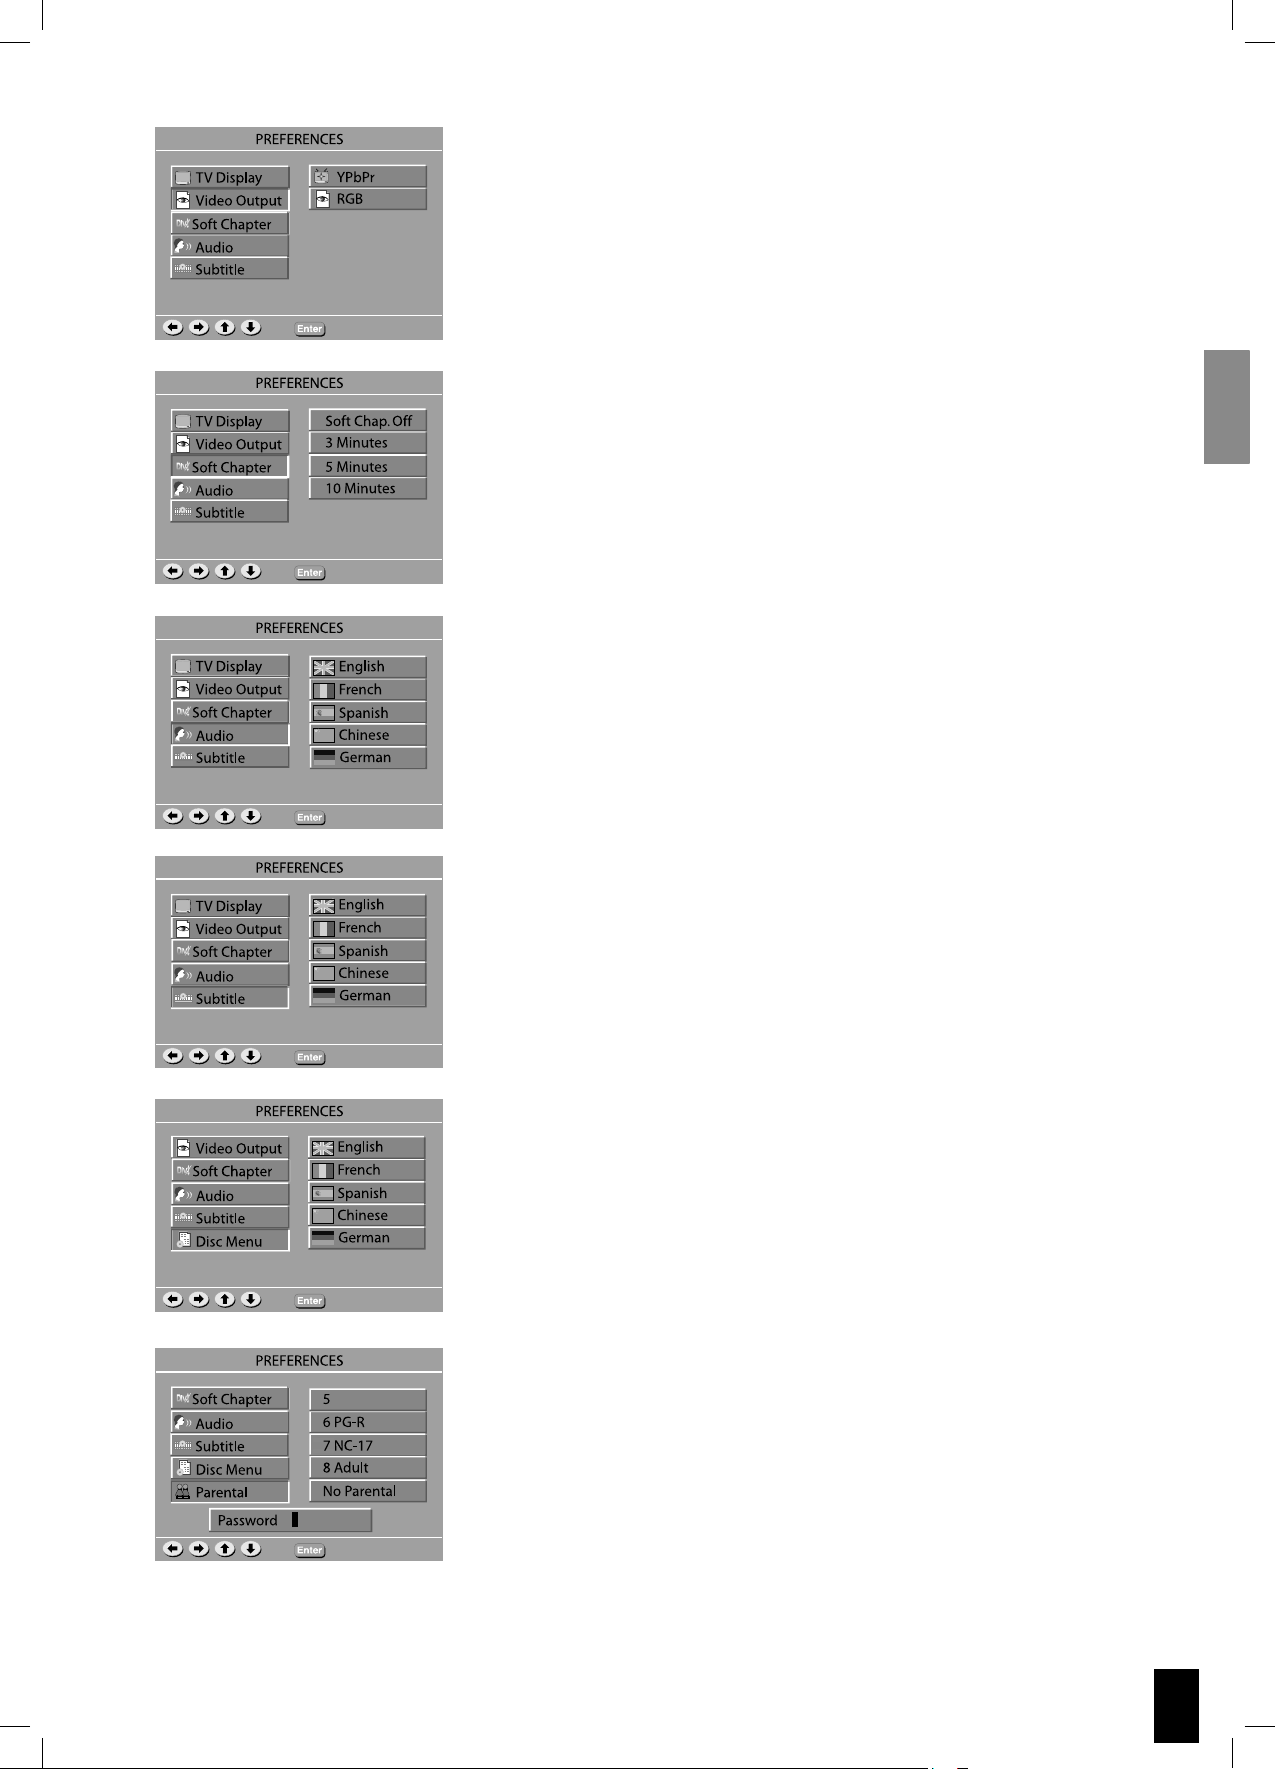
Video Output
Video output selection enables you to choose the type of video output
suitable for your DVD system.
Soft Chapter
Sets how many minutes you want to Skip Forward/Back in a DivX file
when pressing /.
Note:
Only works with DivX CDs.
Audio
If available on the DVD, this function allows you to select the
preferred audio language.
Subtitle
If available on the DVD, this function allows you to select the
preferred subtitle language.
Disc Menu
If available on the DVD, this function allows you to select the
desired Menu language.
Parental
This function allows you to restrict viewing of unsuitable DVDs,
useful where younger viewers have access to the S VSR 25.
Note:
Before changing the parental control level, you must enter the
preset password (4-digital code) to unlock this function. If the
entered password is incorrect, you will not be able to change the level.
9
DivX Registration Page
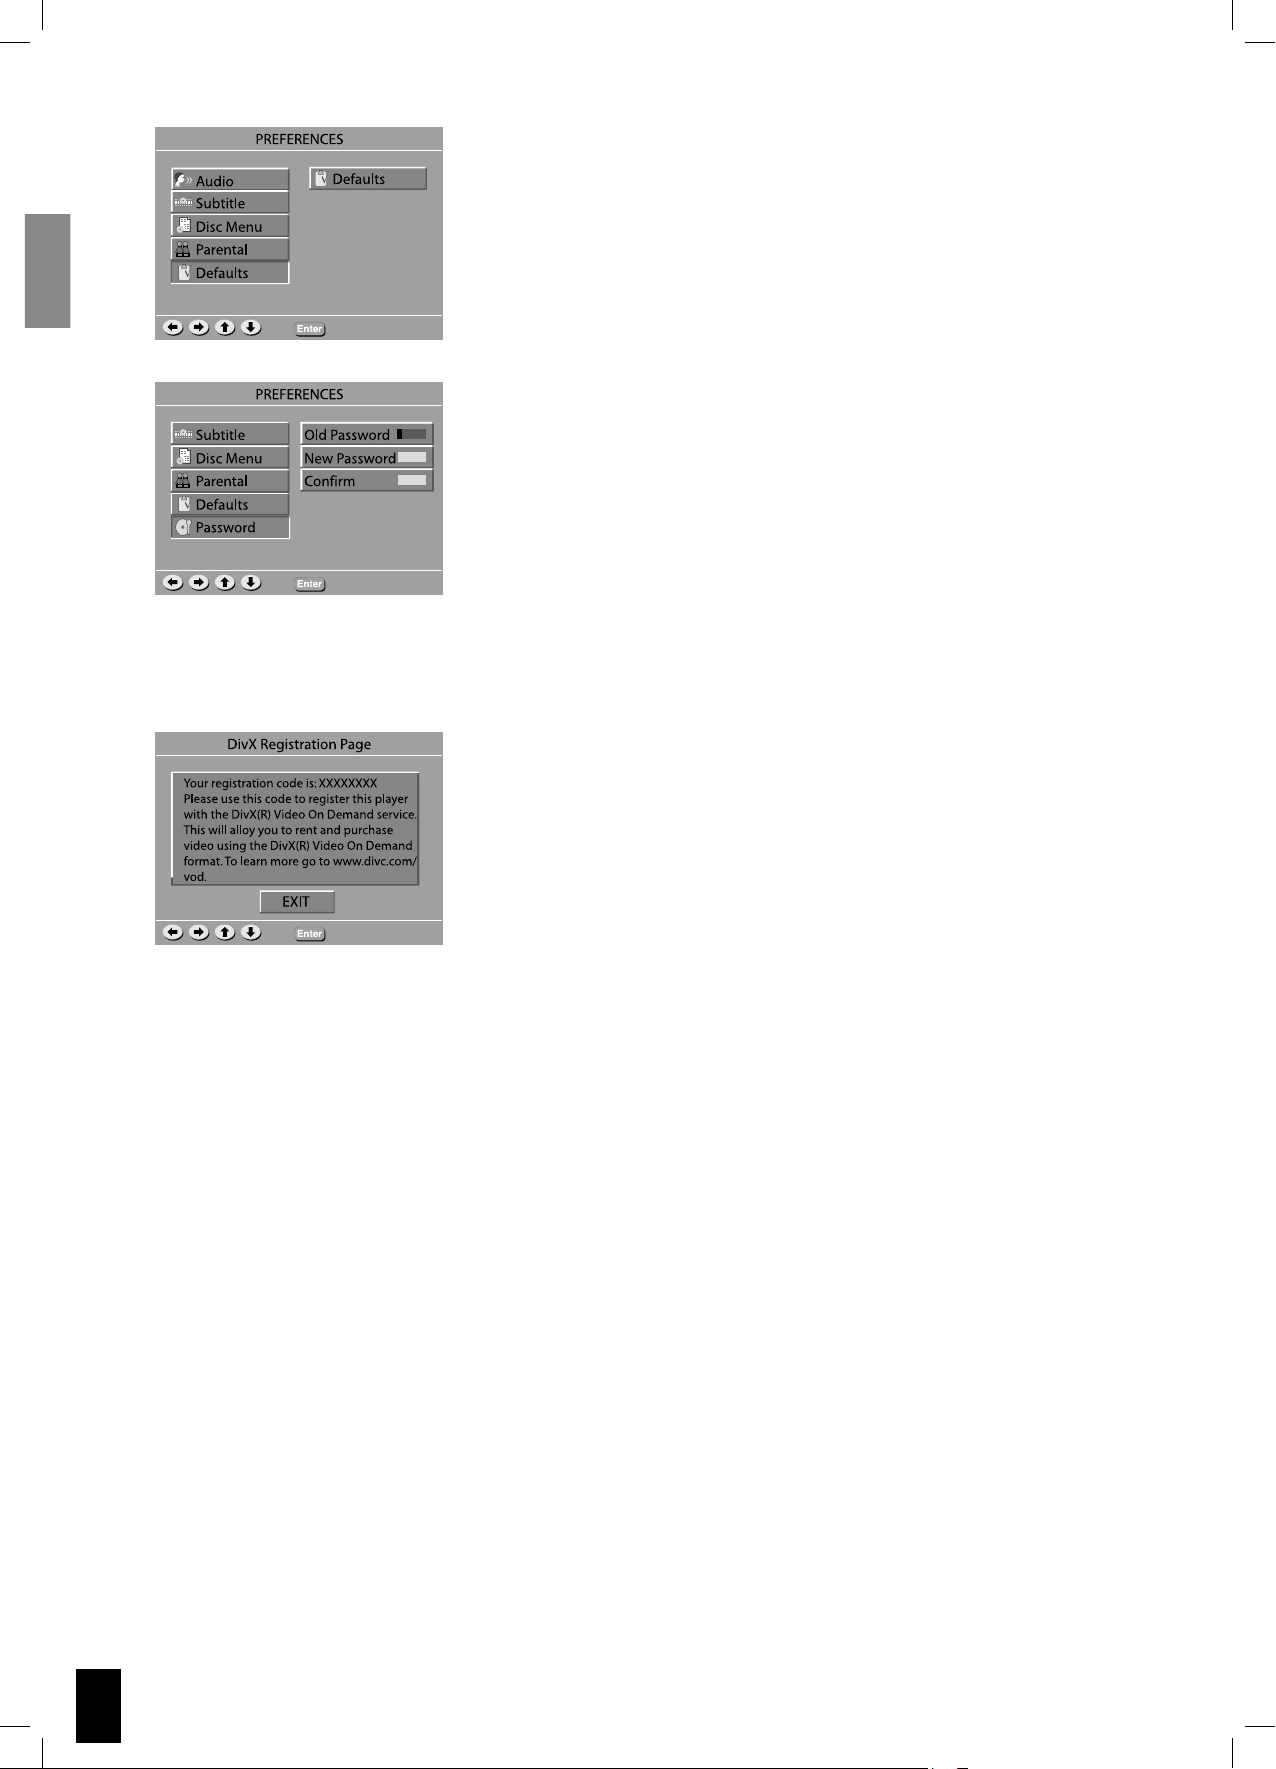
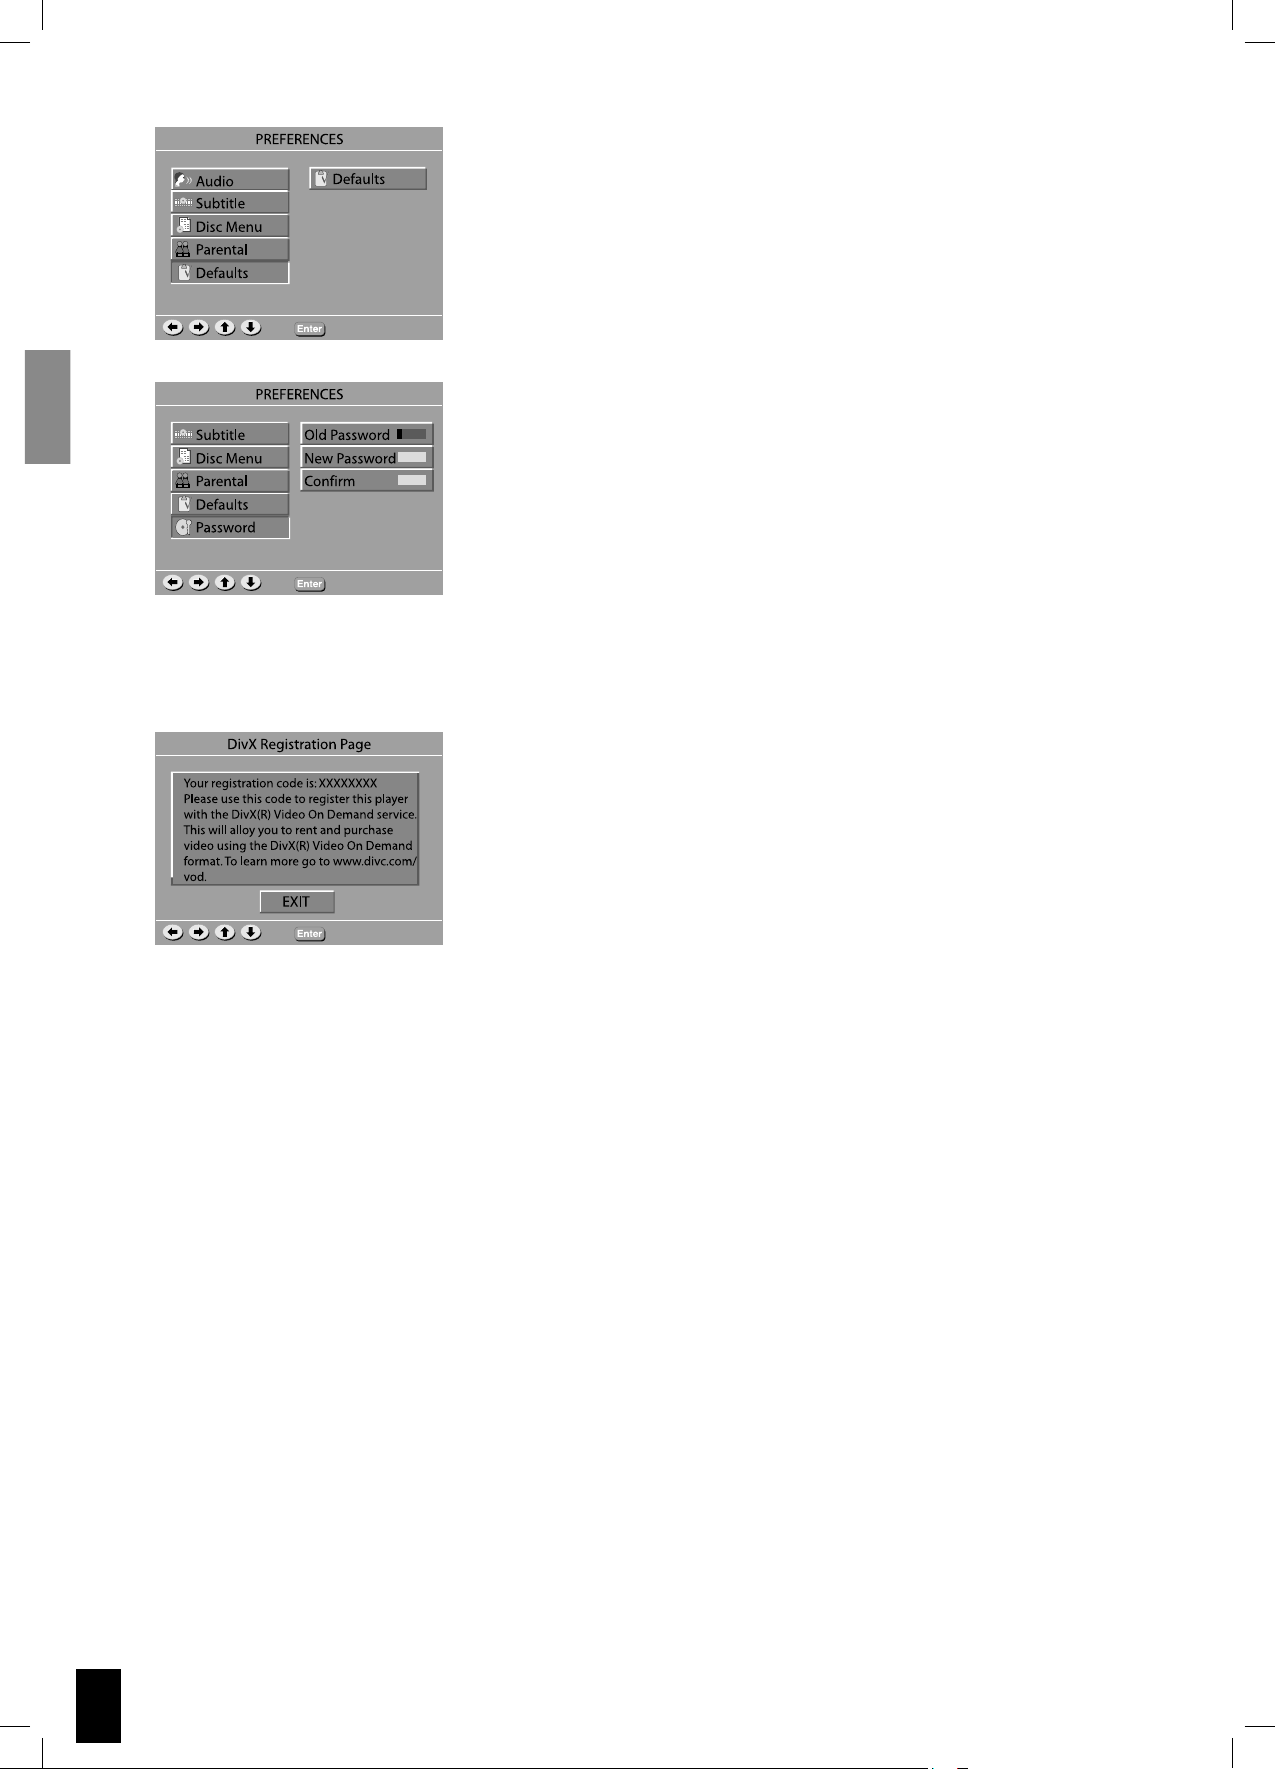
Defaults
If you select this function, all of the functions will be restored to their
defaults.
Password
The password is used to change the parental control level.
Setting a Password
Press the numeric buttons to enter old password (Default is
0000), and press the numeric buttons to create a new 4-digit
password, and then the numeric buttons to confirm the new password.
DivX Registration Page
This is a unique code which you can use to register your player.
This will allow you to rent and purchase DivX Video On Demand files.
10
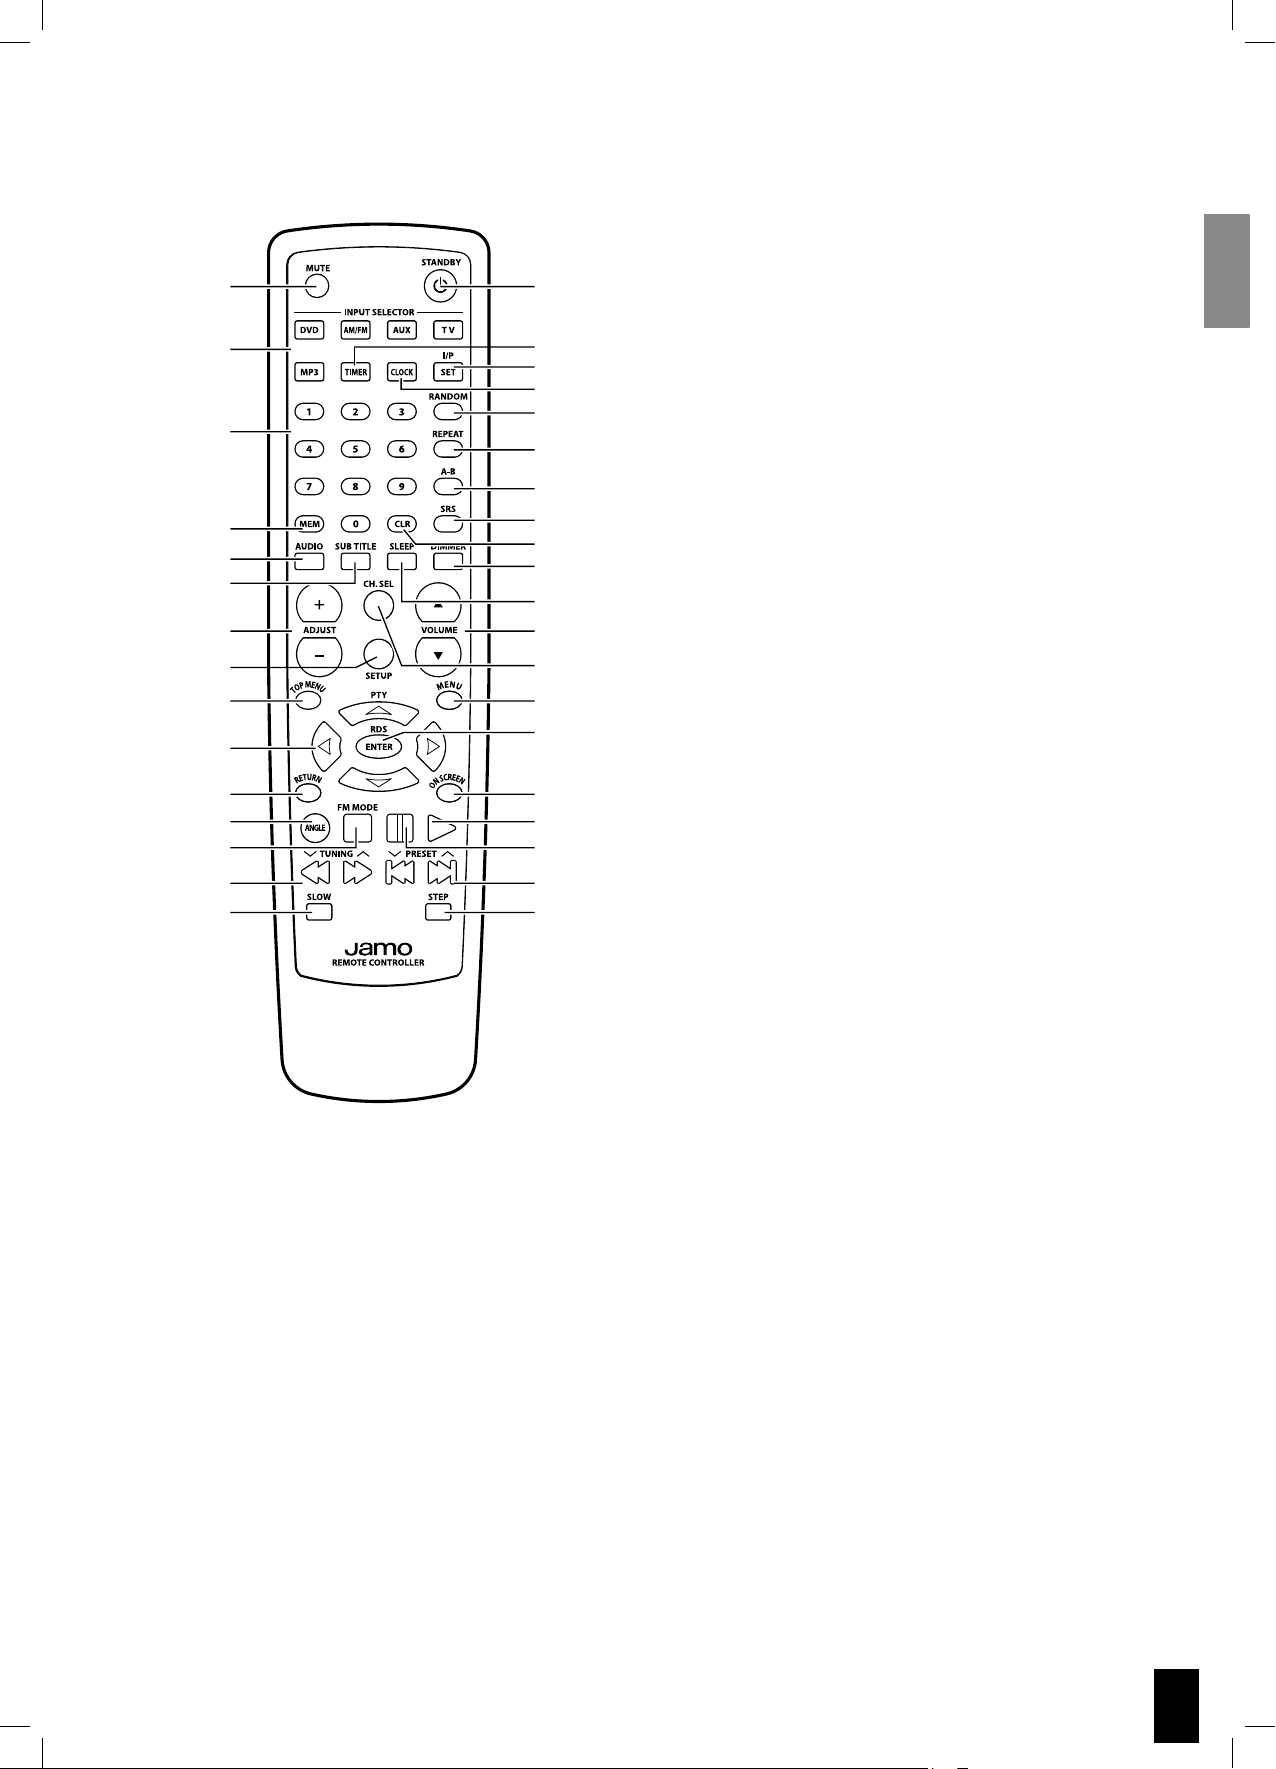
Remote layout
1
2
3
4
5
6
7
8
9
10
11
12
13
14
15
16
17
17
18
19
20
21
22
23
24
25
26
27
28
29
30
31
32
33
34
35
1. Mute
2. Input Selector
3. Numerical keys
4. Memory
5. Audio
6. Subtitle
7. Channel, time, adjust buttons.
8. Setup
9. Top Menu
10. Cursor Left, Right, Up, Down.
11. Return
12. Angle
13. FM mode
14. Forward/rewind
15. Slow
16. Standby
17. Timer
18. Interlace/Progreesive, Timer set
19. Clock
20. Random
21. Repeat
22. A-B playback
23. Surround Mode
24. Clear
25. Display Dimmer
26. Sleep
27. Volume Up, Down
28. Channel Select
29. Menu/PBC
30. Enter
31. On Screen
32. Play
33. Pause
34. Previous/Next Chapter/Track/Program
35. Step
11
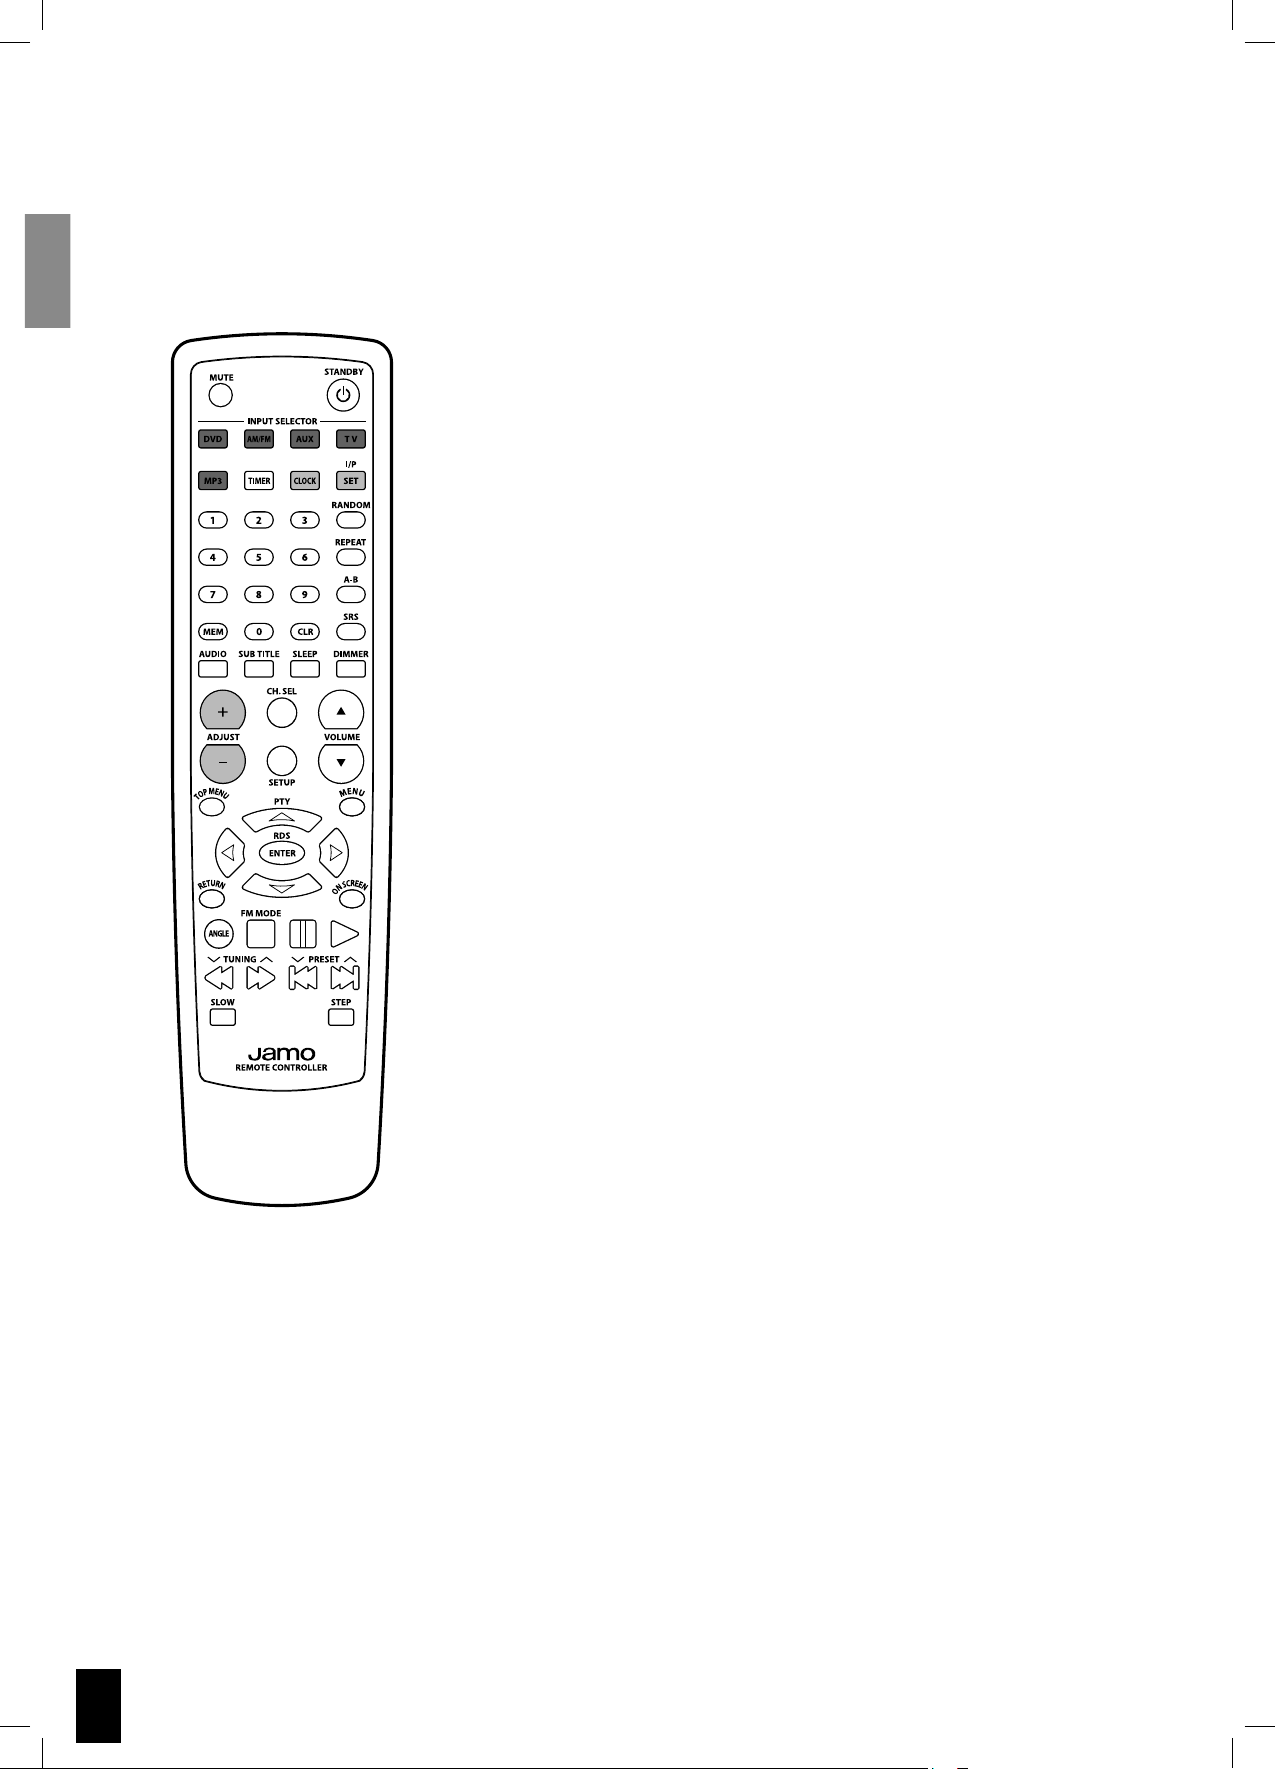
Input selectors - Clock Setup
Input Selector Buttons
Press DVD button to start playing a disc.
Press AUX buttons to toggle between auxillery inputs.
Press AM/FM button will activate and toggle between the FM/AM
radio tuner.
To set clock:
- Press and hold “CLOCK” for 3 seconds.
- Press “+” or “-” ADJUST buttons.
- Press “SET” to change between hours and minutes.
12
Frequently used Advanced Function buttons
Here’s a brief description of the Advanced Function buttons.
Please note that not all functions are available on all media.
TIMER
Press button to access Timer functions. You adjust the timer settings by
pressing “+” and “-” ADJUST buttons, switch between timer setting by
pressing the “I/P SET” button.
I/P SET
Changes video output between Interlaced and Progressive scan.
NOTE: Not all TV-screens can show Progressive scan.
RANDOM
When activated tracks are played in random order.
REPEAT
You can play the current title/disc or a chapter/track continuously by
activating repeat.
A-B
Press the A-B button at the start of the segment to be repeated, press again
at the end of the segment.
SRS
Press this button to toggle between stereo and Virtual Surround sound
modes.
AUDIO
Use this function to choose between the available audio tracks on the fi lm.
Normally you can also choose Audio on the DVD menu.
SUBTITLE
Use this function to choose from the subtitles available on the DVD.
Normally you can also choose the subtitle on the DVD menu.
SLEEP
Press to toggle between sleep modes.
DIMMER
Press to dim light in the display.
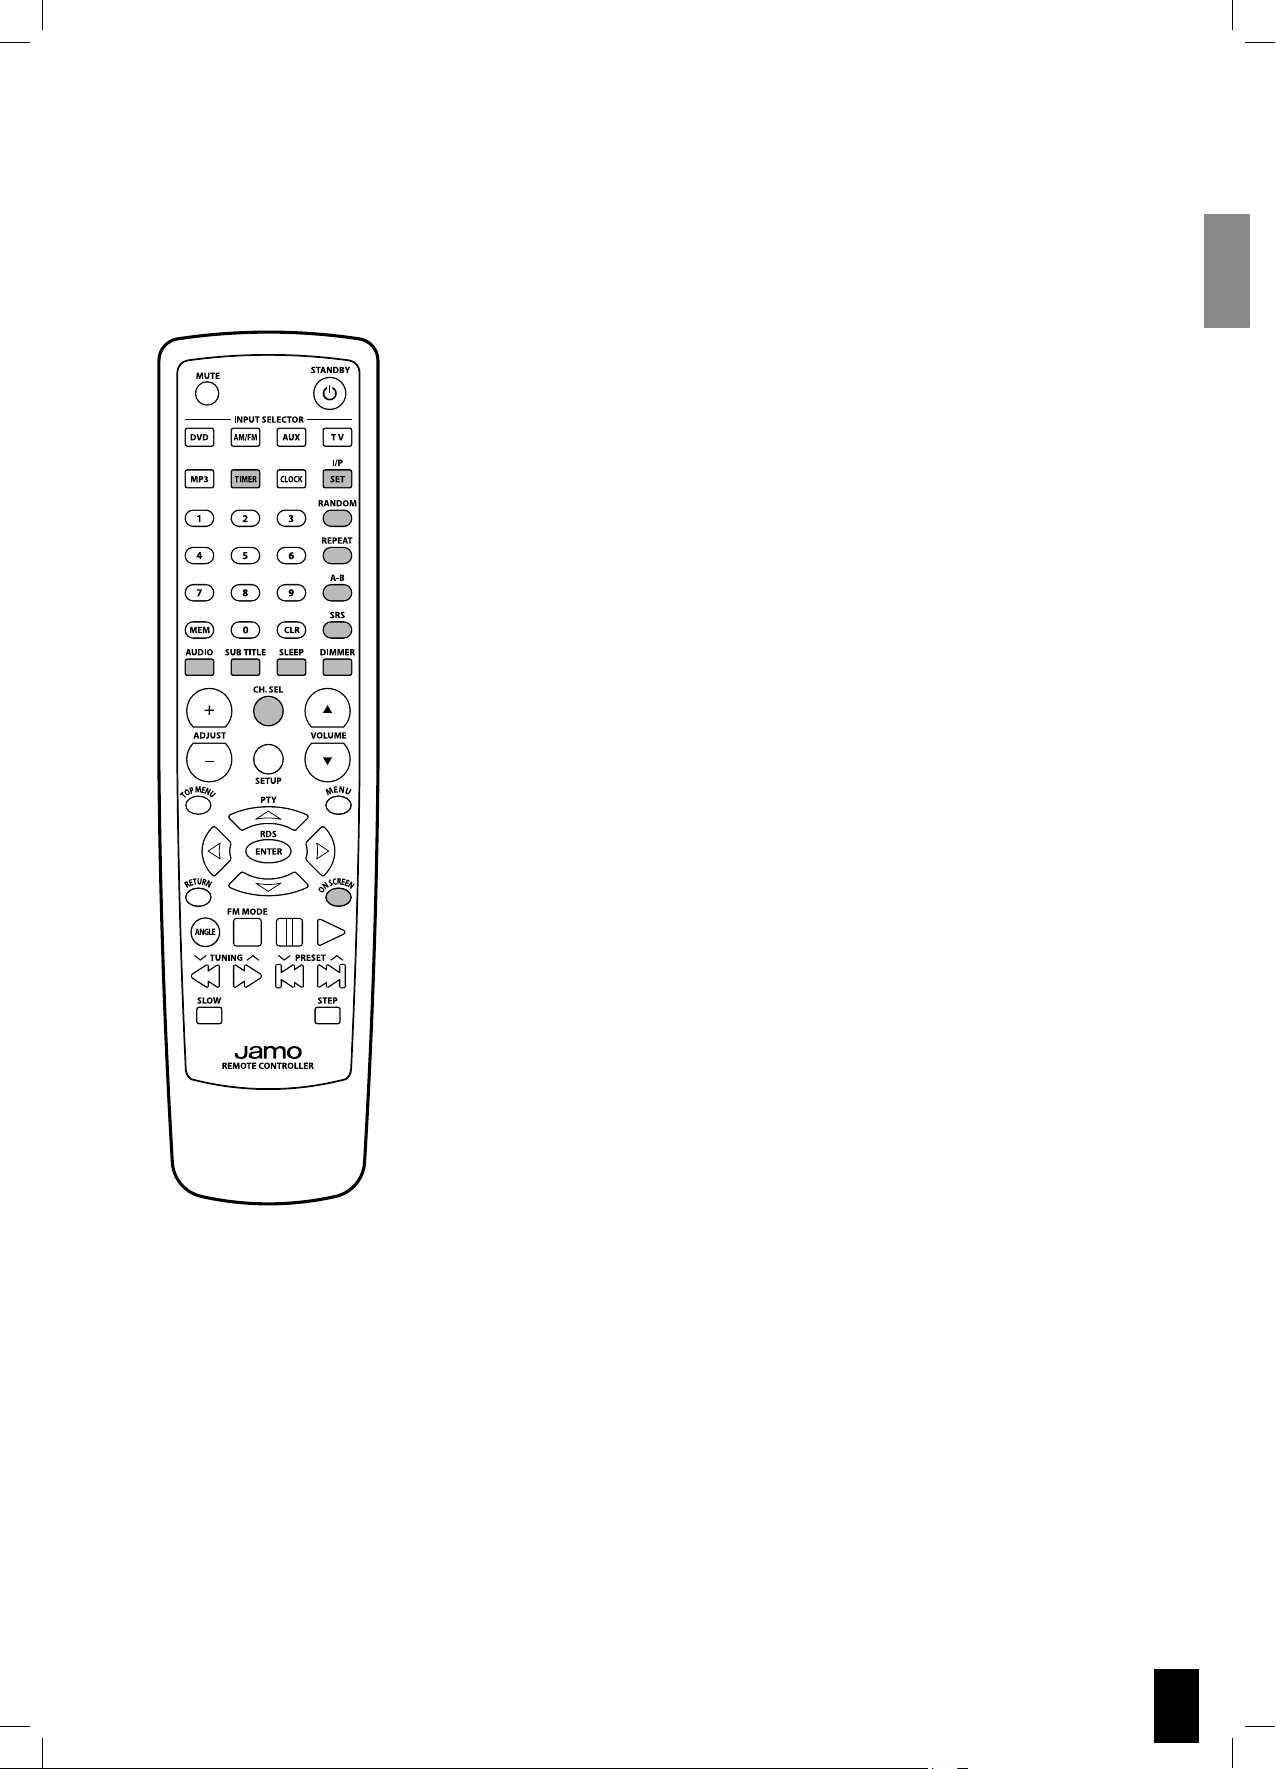
CH. SEL
Press to toggle between channel adjustment for Left and Right Speaker.
Press “+” or “-” ADJUST buttons to adjust volume.
ON SCREEN
You can check information about the media you are watching, such as the
total number of the titles or chapters or tracks or time, using the On Screen
function.
The information will appear on the TV screen.
13
Using and setup of Radio
Find a radio station
Press the AM/FM button and make sure the S VSR 25 is in “Stereo” mode. Press
the FM MODE/STOP button and look at the display to determine which mode
the S VSR 25 is in.
To fi nd a radio station, press and hold or until the frequency indicator
starts to change, then release.
The system automatically tunes to the next strong radio station.
Store a radio station
To store a radio station, do the following:
After completing “Find a radio station“, press “MEM“ followed by a number
between 01-40.
Switching between radio stations
After completing “Store a radio station“, press or to move between the
preset stations.
RDS station service
RDS (Radio Data System) is an additional information system provided by most
FM stations.
If a RDS station is being received, you can see programme information on the S
VSR 25 display by pressing the RDS / ENTER button on the remote.
14

Playing back files from Disc and USB
If you insert a Disc or USB device with mp3-, wma-, jpg-, DivX-, XviD-files, (DivX and XviD playback does not
work from USB device) your S VSR 25 will switch to File Playback mode.
Navigating
When in File Playback mode, you will be able to browse through the
fi les by usingfollowed by ENTER to select fi le or enter/exit
a library.
Note, you must STOP playback if you want to navigate the fi les.
15

Troubleshooting
If the S VSR 25 appears to be faulty, first consult this troubleshooting guide before calling for service.
Refer also to the corresponding instructions in this manual.
WARNING
Under no circumstances should you attempt to repair the system yourself.
Symptom Possible cause Correction
No picture. • The TV can not show Progressive
Scan
• The TV is switched OFF.
• The TV is not connected correctly.
Disc can’t be played. • The disc is placed upside down.
• The disc is empty or the format is
not supported by S VSR 25.
• The disc is dirty or defect.
• The disc is not placed within the disc
tray guide.
• Press “I/P SET” button on remote.
• Turn ON the TV.
• Connect the TV correctly.
• Ensure the disc label is facing up.
• Remove the disc and try another.
• Clean the disc or dispose of it.
• Place the disk within the proper guide
on the disc tray.
No sound. • The VOLUME is set to 0.
• Speaker cords are not connected
correctly.
The unit does
not respond to
commands from the
remote control.
Power is not
supplied even
though the power
cable is connected.
The unit does
not respond to
some operating
commands during
playback
• No batteries are inserted in the
remote control.
• The batteries are worn out.
• The remote controller is not pointed
at the remote sensor of the S VSR 25.
• The remote controller is too far from
the S VSR 25.
• The power plug is not securely
connected.
• The wall plug is not turned ON.
• Operations may not be permitted by
the disc.
• Turn up the VOLUME.
• Connect them correctly.
• Insert new batteries.
• Replace with new batteries.
• Point the remote controller at the
remote sensor of the unit
• Operate the remote controller
within 5 m.
• Connect the power plug securely.
• Turn ON the wall plug.
• Read the instructions on the disc.
16
Forgotten or
misplaced password.
• Open disc tray
• Hold down “STOP” on the front panel
while holding down “TOP MENU” on
the remote. Be careful to point the
remote at the Remote Control Sensor
• The TV screen now displays software
version.
• Turn the S VSR 25 OFF on the front
panel and turn it ON again after 10
seconds.
• The password should now be reset

Service and Warranty
Environmental information
• The system is made of recyclable materials which can be re-used if disassembled by authorised personnel.
• Please follow local regulations for the disposal of packaging materials, used batteries and discarded units.
Copyright
This product contains copyright technology which is protected pursuant to patents that are the property of Macrovision Corporation and other copyright holders. Any use of this copyright technology must be approved by Macrovision Corporation. The
technology is intended for use in the home unless otherwise approved by Macrovision Corporation. Breakdown and disassembly
are prohibited.
Made under license from Dolby Laboratories. “Dolby” and the double “D” symbol are trademarks of Dolby Laboratories. “DTS”
and “DTS Digital Out” are trademarks of Digital Theater Systems, Inc.
Service
In case of warranty enquiries, please contact your dealer. In case of request for service under warranty, please enclose your
original receipt. Important: Never send the product to be repaired without prior agreement. If the DVD player is STILL UNDER
WARRANTY, Jamo will pay freight costs back and forth between the dealer and the Jamo authorised service centre. Any other
freight must be paid for by the customer. The product must always be packed properly, otherwise the product warranty will be
discontinued. If the DVD player is NOT UNDER WARRANTY, all costs must be paid for by the customer.
Warranty certificate
Jamo provides a twenty-four (24) month warranty from the date of purchase against material and manufacturing defects. For
defects covered by the warranty, the product must be returned to the dealer that sold the product. The expected time of repair,
excluding transport, is approximately five working days.
If any problems arise, information from our authorised service centres is available at the following address, or from the dealer
who sold the product.
Terms of Warranty
1. The warranty is only valid on presentation of the original sales receipt, and if the serial number on the product is fully legible.
2.The obligations of Jamo are limited either to repair or replacement of defective components. The repair or replacement of
defective components is based on an assessment by Jamo.
Exchange is only possible if the repair cannot be performed.
3.Warranty repairs must be carried out by an authorised Jamo dealer, or an authorised service centre. No remuneration is provided for repairs performed by unauthorised workshops. Any repairs or damage to the product caused by unauthorised intervention are not covered by this warranty.
4.This product will not be considered as being defective, either in materials or in manufacture, if adaptation to national, local,
technical or safetyrelated requirements is required in countries other than the specific country for which the product was originally designed and manufactured.
5.This warranty does not cover these types of adaptations, and no remuneration will be offered for these types of adaptations or
for any consequential damages. The warranty does not cover the following:
a) Periodic inspection, maintenance and repair or replacement of parts resulting from normal wear.
b) Costs connected to transport, disassembly or installation of the product.
c) Mis-use, including use for purposes other than was intended, or faulty installation.
d) Damage caused by lightning, water, fire, natural catastrophes, war, insurrection, incorrect line voltage, insufficient ventilation,
transport or other causes outside of the control of Jamo.
6.This warranty applies to every legal owner of the product during the warranty period.
Packaging
If possible, use the original packing material for any shipping. Otherwise, re-pack the S VSR 25 using:
• A reinforced cardboard box, strong enough to carry the weight of the product.
• At least 6 cm / 2.36 inches of shock-absorbing material around the product.
• Non-abrasive dust-free material for the other parts.
• Non-abrasive wrapping for the product. (Dust and dirt cover)
• Re-pack the product in such a way as to ensure that it cannot shift in the box during transport.
Information we must receive before repairing the product:
Model name:
Serial no.:
Fault description:
Copy of the invoice or sales receipt
The dealer’s name, address and phone no.
Personal information: Name, address, post code/city, phone no. and e-mail address (optional).
Your signature
Dealer’s stamp and signature
Date
17

français
Sommaire
Introduction 19
Installation du système 20
Connexion des antennes 21
Connexion du Système TV 21
Connexion audio 21
Configuration Système 23
Configuration Générale 23
Installation des enceintes 24
Configuration Audio 24
Configuration des Préférences 24
Page d’Enregistrement DivX 26
Présentation de la télécommande 27
Sélection de la source
– Configuration de l’horloge 28
Boutons fréquemment utilisés de
Fonctions Avancées 29
Utilisation et Configuration de la Radio 30
Lecture de fichiers contenus sur un
CD ou via USB 31
Dépannage 32
Service et Garantie 33
18
Introduction
Votre système doit contenir les accessoires suivants :
S VSR 25
Câble (8m)
pour haut-parleur
SCART
SUB 200
Piles pour la
télécommande
Câble audio
2 x S 250
Télécommande
S VSR 25
Câble d’alimentation
Antenne FM
Antenne AM
19
Installation du système
On AuAu
to OfOf
Reportez-vous aux schémas ci-dessous pour l’installation des enceintes, caissons de grave, antennes et système TV.
S 250 SUB 200
C
B
A
Cut off
Frequency
Phase
Level On / Auto / Off
40 Hz 150 Hz Min Max
On
ON AUTO OFF
to
f
20
0˚ -180˚
Connexion des antennes
Vous devrez trouver sur une station radio
FM/AM puis régler la position de l’antenne
afin d’obtenir la meilleure réception.
Connexion du Système TV
Configuration Vidéo Péritel
Tous les signaux, audio et vidéo, passent par
le câble péritel. La plupart des téléviseurs
enverront automatiquement les signaux
audio au S VSR 25.
Configuration S-Vidéo
Le système vidéo est raccordé au téléviseur
via le câble S-Vidéo (non fourni). Veillez à
connecter le câble audio du téléviseur au S
VSR 25.
Configuration vidéo Composant
La sortie vidéo Composant peut être
branchée aux écrans plasma et LCD. Veillez
à connecter le câble audio, du téléviseur au
S VSR 25.
Connexion audio
Si un PC, une console de jeux, un
lecteur MP3, un téléviseur ou un
produit similaire possède une sortie
audio analogique, vous pouvez le
brancher directement au S VSR 25.
MP3
21
R
3 632
$6$ 2%#%)6%2
-!.5&!#452%$5.$%2 ,)#%.3%
&2/-$/,"9 ,!"/2!4/2)%3 h$/,"9v
!.$4(% $/5",%$ 39-"/,!2%
42!$%-!2+3/& $/,"9 ,!"/2!4/2)%3
h530!4%.4 ./3
!.$ v
3#!24
/04)#!,
$)')4!,
/54
6)$%/ /54
2
0
0
"
9
#/-0/.%.4
6)$%/
6
6)$%/
36)$%/
).
/54
!5$)/
!58
8
!58
9
35"7//&%2
,
2
02%/54
30%!+%23
2
4 5 7 10 11 12 13
1. Antenne FM
2. Antenne AM
3. Péritel Entrée/Sortie
4. Sortie numérique (Optique)
1
5. Sortie Vidéo Composant
6. Sortie Vidéo Composite
7. Sortie Vidéo S-Vidéo
8. Entrée Audio Analogique - AUX 1
2
9. Entrée Audio Analogique - AUX 2
10. Sortie Audio Analogique
11. Pré Sortie Caisson de grave
3
12. Sortie Enceinte Droite
13. Sortie Enceinte Gauche
,
1
4
5 6
12
1. Écran
2. Fonction
2
3. Volume
4. Plateau CD
5. Veille / ON
3
6. Lecture
7. Pause
8. Titre précédent / Retour rapide
9. Titre suivant / Avance rapide
10. Arrêt
11. Ouvrir/Fermer
12. Prise USB
13. Entrée Audio
14. Bande (AM/FM)
15. Sélection Radio/Station préréglée
16. Capteur Télécommande
7
8
1413
9
15
10
11
16
22
Configuration Système
Configuration Générale
Pour accéder au menu de configuration du S VSR 25, appuyez sur le bouton
“SETUP” de la télécommande.
Utilispour naviguer dans les menus, et appuyez sur “ENTER” pour
effectuer votre sélection.
Pour sortir du menu Configuration Système, appuyez sur “SETUP”.
Picture Mode (Mode Image)
- Mode Auto : la qualité de l’image est automatiquement réglée.
- Mode Film : donne à l’image une qualité de film.
- Mode Vidéo : donne à l’image une qualité vidéo.
- Mode Smart : affiche des images progressives et entrelacées avec des
mouvements limités.
- Mode Super Smart : affiche des images progressives et entrelacées en
mouvement.
Angle Mark (Marque d’angle)
Si l’option est disponible sur le DVD, les différents angles disponibles
s’afficheront.
OSD Language (Langue Affichage)
Configuration de la langue affichée par le S VSR 25.
Captions (Sous-titres)
Si l’option est disponible, les sous-titres s’afficheront automatiquement.
Screen Saver (Economiseur d’écran)
Active et désactive l’économiseur d’écran.
23
Installation des enceintes
Configuration Audio
Speaker Setup
Large : si vous possédez de grandes colonnes, sélectionnez « Large ».
Small : si vous possédez des enceintes compactes ou bibliothèques,
sélectionnez « Small ».
Sélectionnez « Small » pour les enceintes S 250.
Audio Out (Sortie Audio)
Si un Récepteur AV externe avec décodeur DTS et DD est connecté via
le port DIGITAL OUT (sortie numérique), sélectionner BIT STREAM (flux
binaire).
Si un Récepteur AV externe sans décodeur DTS et DD est connecté via
le port DIGITAL OUT (sortie numérique), sélectionner PCM (modulation
par impulsions codées).
Compression
Si vous souhaitez regarder un film sans déranger les autres personnes se trouvant dans la maison, vous pouvez réduire les dynamiques (sons forts) en activant la fonction de plage dynamique.
Configuration des
Préférences
Sortie LPCM
Règle le taux de fréquence de l’échantillon sur LPCM (Linear PulseCode Modulation – Modulation par Impulsion et Codage Linéaire)
pour la sortie numérique.
Vérifiez les taux d’échantillonnage pris en charge par votre récepteur
externe.
TV Display (Affichage TV) Vous pouvez choisir le rapport hauteur/largeur
le mieux adapté à votre téléviseur.
• 4:3 LB -Si vous possédez un téléviseur « carré » traditionnel et que vous souhaitez regarder un DVD dans son format intégral, utilisez cette configuration. De larges bandes
noires apparaîtront en bas et en haut de votre écran.
• 4:3 PS - Si vous possédez un téléviseur traditionnel et
que vous souhaitez adapter l’image d’un DVD à votre
écran, utilisez cette configuration. Une image grand
format s’affichera en plein écran sur votre téléviseur,
coupant automatiquement une partie de l’image.
24
• 16:9 - Si vous possédez un téléviseur grand écran,
utilisez cette configuration (vous devrez également
paramétrer votre téléviseur en mode 16:9).
Video Output (Sortie Vidéo)
Cette option vous permet de choisir le type de sortie vidéo adapté à
votre système DVD.
Chapitre optionnel
Règle le nombre de minutes que vous souhaitez attribuer à la fonction
/lors de la lecture d’un fichier DivX.
Remarque :
Ne fonctionne que pour les CD de type DivX.
Audio
Si cette option est disponible sur le DVD, elle vous permet de
sélectionner la langue utilisée par défaut par le système audio.
Subtitle (Sous-titres)
Si cette option est disponible sur le DVD, elle vous permet de
sélectionner vos préférences en matière de sous-titres.
Disc Menu (Menu CD)
Si cette option est disponible sur le DVD, elle vous permet de
sélectionner la langue du Menu.
Parental (Contrôle parental)
Cette fonction vous permet de contrôler l’accès à certains DVD, fonction très pratique lorsque des enfants sont amenés à utiliser le S VSR 25.
Remarque :
Avant toute modification du niveau de contrôle parental, vous devez
saisir un mot de passe prédéfini (code à 4 chiffres) afin de verrouiller
cette fonction. Si le mot de passe saisi s’avère incorrect, vous ne pourrez pas modifier le niveau.
25
Page d’Enregistrement
DivX
Defaults (Paramètres par défaut)
Si vous sélectionnez cette option, toutes les fonctions seront réinitialisées à leurs valeurs par défaut.
Password (Mot de passe)
Le mot de passe est nécessaire pour modifier le niveau de contrôle
parental.
Définir un mot de passe
Appuyez sur les touches numériques pour saisir l’ancien mot de passe
(par défaut 0000), puis saisissez votre nouveau mot de passe à 4 chiffres. Saisissez-le à nouveau pour le confirmer.
Page d’Enregistrement DivX
Ce code est unique et vous sera utile pour l’enregistrement de votre
lecteur. Il vous permettra de louer et acheter des vidéos au moyen du
service Vidéos à la demande DivX.
26
Présentation de la télécommande
1
2
3
4
5
6
7
8
9
10
11
12
13
14
15
16
17
17
18
19
20
21
22
23
24
25
26
27
28
29
30
31
32
33
34
35
1. Muet
2. Sélection source
3. Touches numériques
4. Mémoire
5. Audio
6. Sous-titres
7. Boutons de réglage (canal, heure)
8. Configuration
9. Top Menu
10. Curseurs (Gauche, Droite, Haut, Bas)
11. Retour
12. Angle
13. Mode FM
14. Avance/retour rapide
15. Ralenti
16. Veille
17. Temporisateur
18. Réglage (entrelacé, progressif, temporisateur)
19. Horloge
20. Aléatoire
21. Répétition
22. Lecture A-B
23. Mode Surround
24. Effacer
25. Contraste Affichage
26. Minuterie d’arrêt
27. Contrôle du volume
28. Sélection des canaux
29. Menu/PBC
30. Entrée
31. Affichage Ecran
32. Lecture
33. Pause
34. Précédent/Suivant (Chapitre/Piste/Programme)
35. Etape
27
Sélection de la source – Configuration de l’horloge
Boutons de sélection de la source
Appuyez sur le bouton DVD pour lancer la lecture d’un CD.
Appuyez sur les boutons AUX pour basculer entre les différentes
sources auxiliaires.
Appuyez sur le bouton AM/FM pour activer la radio et basculer entre
les modes FM et AM.
Pour régler l’heure :
- Maintenez le bouton “CLOCK” enfoncé pendant 3 secondes.
- Appuyez sur les boutons de REGLAGE (ADJUST) “+” or “-”.
- Appuyez sur “SET” pour passer du réglage des heures à celui des
minutes.
28

Boutons fréquemment utilisés de Fonctions Avancées
Description générale des boutons de Fonctions Avancées
Remarque : toutes les fonctions ne sont pas disponibles sur tous les appareils.
TIMER (TEMPORISATEUR)
Appuyez sur ce bouton pour accéder aux fonctions de temporisation. Les
paramètres se règlent grâce aux boutons de REGLAGE (ADJUST) “+” et “-”. Le
bouton “I/P SET” permet de basculer entre les différents paramètres.
I/P SET
Bascule la sortie vidéo entre Interlaced Scan (Balayage Entrelacé) et Progressive Scan (Balayage Progressif).
REMARQUE : tous les téléviseurs ne permettent pas l’affi chage en Progressive Scan (Balayage Progressif).
RANDOM (ALEATOIRE)
Lorsque cette fonction est activée, les pistes sont jouées selon un ordre
aléatoire.
REPEAT (REPETITION)
Vous pouvez lire le titre/CD actuel, un chapitre ou une piste en boucle en
activant la fonction de répétition.
A-B
Appuyez sur le bouton A-B au début du segment que vous souhaitez répéter, puis appuyez de nouveau à la fi n du segment.
SRS
Appuyez sur ce bouton pour basculer entre les modes Stéréo et Virtual
Surround.
AUDIO
Utilisez cette fonction pour sélectionner les pistes audio disponibles pour
un fi lm. Normalement, cette fonction est également disponible à partir du
menu DVD.
SUBTITLE (SOUS-TITRES)
Utilisez cette fonction pour sélectionner les sous-titres disponibles pour un
DVD. Normalement, les sous-titres sont également accessibles à partir du
menu DVD.
SLEEP (MINUTERIE D’ARRET)
Appuyez sur ce bouton pour basculer en mode Minuterie d’arrêt.
CONTRASTE
Appuyez sur ce bouton pour régler le contraste de l’affi chage.
CH. SEL
Appuyez sur ce bouton pour basculer entre le réglage de canaux des enceintes gauche et droite. Appuyez sur les boutons de réglage (ADJUST) “+”
or “-” pour régler le volume.
ON SCREEN (AFFICHAGE ECRAN)
Grâce à cette fonction, vous pouvez vérifi er les informations concernant
votre support, telles que le nombre total de titres, de chapitres, de pistes ou
sa durée totale.
Ces informations s’affi cheront à l’écran.
29

Utilisation et Configuration de la Radio
Trouver une station radio
Pour trouver une station, maintenez le bouton ou enfoncé jusqu’à ce
que le témoin de fréquence commence à changer, puis relâchez. Le système
s’arrête automatiquement lorsqu’il capte une station.
Enregistrer une station radio
Pour enregistrer une station, procédez de la manière suivante :
Après avoir effectué la procédure « Trouver une station radio », appuyez sur le
bouton « MEM » puis sur un nombre compris entre 01 et 40.
Sélectionner une station préréglée
Après avoir effectué la procédure « Enregistrer une station radio », appuyez sur
le bouton uo pour sélectionner la station préréglée de votre choix.
30

Lecture de fichiers contenus sur un CD ou via USB
Si vous insérez un CD, ou un appareil relié au port USB, contenant des fi chiers mp3, wma, jpg, DivX ou XviD,
votre S VSR 25 passera automatiquement en mode Lecture Fichier.
Navigation
En mode Lecture Fichier, vous pourrez naviguer parmi les fi chiers
grâce aux commandesvous suffi ra ensuite d’appuyer sur
ENTREE pour sélectionner un fi chier, pour entrer ou sortir d’une
arborescence.
31

Dépannage
Si vous rencontrez un problème avec le S VSR 25, reportez-vous tout d’abord à ce guide de dépannage avant
de vous adresser au service après-vente. Reportez-vous également aux instructions contenues dans ce manuel.
AVERTISSEMENT
En aucun cas vous ne devez essayer de réparer vous-même le système.
Symptôme Cause possible Solution
Aucune image. • Votre téléviseur ne prend pas en
charge le mode Progressive Scan.
• Le téléviseur est éteint.
• Le téléviseur n’est pas correctement
branché.
Le CD ne peut être lu. • Le CD a été inséré avec l’étiquette en
bas.
• Le CD est vierge ou le format n’est
pas pris en charge par le S VSR 25.
• Le CD est sale ou présente des
défauts.
• Le CD n’est pas correctement placé
sur le plateau.
Aucun son. • Le VOLUME est réglé sur 0.
• Les enceintes ne sont pas branchées
correctement.
Le système ne répond pas
à la télécommande.
• Aucune pile n’est insérée dans la
télécommande.
• Les piles sont déchargées.
• La télécommande n’est pas dirigée
vers le capteur du S VSR 25.
• La télécommande est trop loin du S
VSR 25.
• Appuyez sur le bouton I/P SET de la
télécommande.
• Allumez le téléviseur.
• Branchez correctement le téléviseur.
• Assurez-vous de placer l’étiquette vers
le haut.
• Retirez le CD et essayez avec un autre
CD.
• Nettoyez le CD ou jetez-le.
• Replacez correctement le CD sur le
plateau.
• Augmentez le VOLUME.
• Rebranchez-les correctement.
• Introduisez des piles neuves.
• Remplacez-les par des piles neuves.
• Dirigez la télécommande vers le
capteur du système.
• Utilisez la télécommande dans un
rayon de 5 m.
32
Aucune alimentation
même si le câble
d’alimentation est
branché.
Le système ne répond pas
à certaines commandes
lors de la lecture.
• La fi che d’alimentation n’est pas
correctement branchée.
• La prise murale n’est pas activée.
• Ces commandes peuvent ne pas
être prises en charge par le CD.
• Branchez correctement la fi che
d’alimentation.
• Activez la prise murale.
• Lisez les instructions du CD.

Service et Garantie
Information relative à l’environnement
• Le système est composé de matériaux recyclables qui peuvent être réutilisés après avoir été
désassemblés par du personnel agréé.
• Respectez la réglementation locale en vigueur pour vous débarrasser de l’emballage, des piles usagées et
des appareils à mettre au rebut.
Copyright
Ce produit contient une technologie protégée par copyright, basée sur des brevets appartenant à Macrovision Corporation et
à d’autres détenteurs de copyright. Toute utilisation de cette technologie protégée par copyright doit faire l’objet d’une approbation par Macrovision Corporation. Cette technologie est destinée à un usage uniquement domestique, sauf autorisation
préalable de Macrovision Corporation. Tout démontage ou désassemblage est interdit. Fabriqué sous licence de Dolby Laboratories. “Dolby” et le symbole double “D” sont des marques de Dolby Laboratories. “DTS” et “DTS Digital Out” sont des marques de
Digital Theater Systems, Inc.
Service
Pour toute demande concernant la garantie, veuillez vous adresser au revendeur du matériel. En cas de demande d’intervention
pendant la période de garantie, joignez votre facture originale. Important : n’envoyez jamais le produit en réparation sans
accord préalable. Si le produit est TOUJOURS SOUS GARANTIE, Jamo assumera les frais de port entre le revendeur et le centre
d’assistance agréé. Tout autre frais de transport sera à la charge du client. Le produit doit être emballé convenablement, sinon la
garantie sera résiliée. Si le produit n’est PAS SOUS GARANTIE, tous les frais sont à la charge du client.
Certificat de garantie Jamo fournit une garantie de vingt-quatre (24) mois à compter de la date d’achat. Cette garantie couvre les
défauts de fabrication et le matériel. En présence de vices couverts par la garantie, il convient de retourner le produit au revendeur auprès duquel il a été acheté. La durée de réparation, transport compris, est généralement estimée à quinze jours ouvrables
environ.
Termes de garantie
1. La garantie n’est valable que sur présentation du justificatif d’achat original, et que si le numéro de série est parfaitement lisible sur le produit.
2. Les seules obligations de Jamo se limitent à réparer les composants défectueux ou à les remplacer. C’est Jamo, à sa seule et
unique appréciation, qui décide du remplacement ou de la réparation des composants défectueux.
Un échange n’est possible que si l’appareil ne peut pas être réparé.
3. Les réparations d’un appareil sous garantie doivent être effectuées par un revendeur Jamo ou par un centre de réparation
agréé. Les réparations effectuées par des centres non agréés ne donneront lieu à aucune indemnisation. Les réparations ou les
dommages causés au produit suite à une intervention non autorisée ne sont pas couverts par cette garantie.
4. Ce produit ne sera pas considéré comme défectueux, ni au niveau du matériel, ni au niveau de la fabrication, si une adaptation a été effectuée pour répondre à des exigences nationales, locales, techniques ou sécuritaires d’un pays autre que celui pour
lequel le produit a été initialement conçu et fabriqué.
5. Cette garantie ne couvre pas ces types d’adaptations, et aucune indemnisation n’aura lieu pour effectuer ces types
d’adaptations ni pour réparer les dommages qui en résulteraient. La garantie ne couvre pas non plus les éléments suivants:
a) Inspection périodique, maintenance et réparation ou remplacement des pièces ayant subi une usure normale.
b) Coûts liés au transport, au désassemblage ou à l’installation du produit.
c) Utilisation impropre, y compris l’utilisation à des fins autres que celles pour lesquelles le produit a été conçu, ou installation
incorrecte.
d) Dommages causés par la foudre, l’eau, le feu, les catastrophes naturelles, la guerre, les insurrections, une tension inadéquate,
une aération insuffisante ou toute autre cause échappant au contrôle de Jamo.
6. Cette garantie s’applique au propriétaire légal du produit, pendant la période de couverture.
Emballage
Utilisez si possible les matériaux d’emballage d’origine pour toute expédition. Sinon, emballez le
S VSR 25 en utilisant :
• Une boîte en carton rigide, assez solide pour supporter le poids de l’appareil.
• Au moins 6 cm / 2,36 pouces de matériau de protection contre les chocs autour de l’appareil.
• Une matière non abrasive et exempte de poussière pour les autres pièces.
• Un emballage non abrasif pour le produit. (Pour le protéger contre la poussière et la saleté)
• Reconditionnez le produit de sorte qu’il ne puisse pas bouger à l’intérieur du carton pendant le
transport.
Informations dont nous avons besoin pour procéder à la réparation du produit :
Nom du modèle :
N° de série :
Description de la panne :
Copie de la facture ou de la preuve d’achat
Nom, adresse et n° de téléphone du revendeur
Vos informations personnelles : nom, adresse, code postal, ville, numéro de téléphone et adresse e-mail (facultatif)
Votre signature
Cachet et signature du revendeur
Date
33

Inhalt
deutsch
Einleitung 35
Anschließen des Systems 36
Antennenanschluss 37
Anschließen des TV-Systems 37
Audio-Anschluss 37
System-Setup 39
Allgemeines Setup 39
Lautsprecher-Setup 40
Audio-Setup 40
Bevorzugte Einstellungen 40
DivX Registration Page 42
Fernbedienung 43
Wahl des Eingangs - Einrichten der Uhr 44
Tasten für die häufig genutzten
erweiterten Funktionen 45
Nutzung und Setup der Radiofunktion 46
Wiedergabe von Dateien von Disks oder
über den USB-Anschluss 47
Störungsbehebung 48
Kundendienst und Garantie 49
34

Einleitung
Überprüfen Sie, ob Ihrem System das folgende Zubehör beiliegt.
S VSR 25
8 m Lautsprecherkabel
SCART-Kabel
SUB 200
Batterien für die Fernbedienung
Audiokabel
2 x S 250
Fernbedienung
S VSR 25
Netzkabel
FM-Antenne
AM-Antenne
35

Anschließen des Systems
On AuAu
to OfOf
Bitte beachten Sie beim Anschluss der Lautsprecher, des Subwoofers, der Antennen und des TV-Systems die unten
stehenden Abbildungen.
S 250 SUB 200
C
B
A
Cut off
Frequency
Phase
Level On / Auto / Off
40 Hz 150 Hz Min Max
On
ON AUTO OFF
to
f
36
0˚ -180˚

Antennenanschluss
Sie müssen über den Tuner einen FM/AMRadiosender wählen und die Position der
FM-/AM-Antenne anpassen, bis Sie den
bestmöglichen Empfang erzielt haben.
Anschließen des TV-Systems
Anschluss über die SCART-Buchse
Sowohl Audio- als auch Video-Signale
werden über das SCART-Kabel geführt. Die
meisten TV-Geräte werden die Audio-Signale
automatisch an den S VSR 25 senden.
Anschluss über den S-Video-Anschluss
Der Video-Anschluss an das TV-Gerät erfolgt
über das S-Videokabel (nicht beiliegend).
Vergessen Sie nicht, den Audio-Ausgang des
TV-Geräts mit dem S VSR 25 zu verbinden.
Anschluss über Component-Video-Anschluss
Der Component-Video-Ausgang kann an
Plasma- und LCD-TV-Geräte angeschlossen
werden. Vergessen Sie nicht, den AudioAusgang des TV-Geräts mit dem S VSR 25 zu
verbinden.
Audio-Anschluss
Wenn ein PC, eine Spielekonsole,
ein MP3-Player oder ein ähnliches
Gerät über einen analogen Ausgang
verfügt, kann dieser direkt an den S
VSR 25 angeschlossen werden.
MP3
37

R
3 632
$6$ 2%#%)6%2
-!.5&!#452%$5.$%2 ,)#%.3%
&2/-$/,"9 ,!"/2!4/2)%3 h$/,"9v
!.$4(% $/5",%$ 39-"/,!2%
42!$%-!2+3/& $/,"9 ,!"/2!4/2)%3
h530!4%.4 ./3
!.$ v
3#!24
/04)#!,
$)')4!,
/54
6)$%/ /54
2
0
0
"
9
#/-0/.%.4
6)$%/
6
6)$%/
36)$%/
).
/54
!5$)/
!58
8
!58
9
35"7//&%2
,
2
02%/54
30%!+%23
2
4 5 7 10 11 12 13
1. FM-Antenne
2. AM-Antenne
3. SCART In/Out
4. Digitaler Ausgang (optisch)
1
5. Component-Video-Ausgang
6. Composite-Video-Ausgang
7. S-Video Video-Ausgang
8. Analog Audio In - AUX 1
2
9. Analog Audio In - AUX 2
10. Analog Audio Out
11. Subwoofer Pre Output
3
12. Rechter Lautsprecherausgang
13. Linker Lautsprecherausgang
,
1
4
5 6
12
1. Display
2. Funktion
2
3. Lautstärke
4. Disk-Schublade
5. Standby / On
3
6. Wiedergabe
7. Pause
8. Zurück Springen/Suchen
9. Vorwärts Springen/Suchen
10. Stopp
11. Öffnen/Schließen
12. USB-Anschluss
13. Audio-Eingang
14. Band
15. Auswahl / Vorauswahl Tuner
16. Sensor Fernbedienung
7
8
1413
9
15
10
11
16
38

System-Setup
Allgemeines Setup
Durch das Drücken der Taste „SETUP“ auf der Fernbedienung gelangen Sie
in das Setup-Menü des S VSR 25.
Benutzen Sieum sich durch die Menüs zu bewegen, und
drücken Sie „Enter“, um einen Menüpunkt auszuwählen.
Um das Menü für das System-Setup zu verlassen, drücken Sie „SETUP”.
Picture Mode (Bildmodus)
- Auto - Die Bildqualität wird automatisch eingestellt.
- Film - Wählen Sie diese Einstellung, um Filme mit optimaler Bildqualität
wiederzugeben.
- Video - Wählen Sie diese Einstellung, um Videos mit optimaler Bildqualität
wiederzugeben.
- Smart - Wählen Sie diese Einstellung, um Quellenmaterial im
Zeilensprungverfahren (Interlaced) oder Vollbildverfahren (Progressive
Scan) mit eingeschränkter Bewegung wiederzugeben.
- Super Smart - Wählen Sie diese Einstellung, um Quellenmaterial im
Zeilensprungverfahren (Interlaced) oder Vollbildverfahren (Progressive
Scan) mit Bewegung wiederzugeben.
Angle Mark (Kamerawinkel)
Falls diese Funktion auf der DVD verfügbar ist, wird über diese Einstellung
angezeigt, ob eine Wiedergabe aus verschiedenen Kamerawinkeln möglich
ist.
OSD Language (OSD-Sprache)
Über diese Funktion wird die Sprache für das OnScreen-Display für den S
VSR 25 eingestellt.
Captions (Untertitel)
Falls verfügbar werden Untertitel automatisch angezeigt.
Screen Saver (Bildschirmschoner)
Zum Ein- (ON) und Ausschalten (OFF) des Bildschirmschoners.
39

Lautsprecher-Setup
Audio-Setup
Large - Wenn Sie große Standlautsprecher haben, wählen Sie die Einstellung „Large“.
Small - Wenn Sie Kompaktlautsprecher oder Regallautsprecher haben,
wählen Sie die Einstellung „Small“.
Beim Anschluss der S 250 Lautsprecher, wählen Sie bitte „Small“.
Audio Out (Audio-Ausgang)
Wenn ein externer AV-Receiver mit DD- und DTS-Dekoder über den
digitalen Ausgang DIGITAL OUT angeschlossen ist, wählen Sie BIT
STREAM.
Wenn ein externer AV-Receiver ohne DD- und DTS-Dekoder über den
digitalen Ausgang DIGITAL OUT angeschlossen ist, wählen Sie PCM.
Compression (Kompression)
Wenn Sie einen Film ansehen möchten, ohne andere Personen in
der Wohnung zu stören, können Sie die dynamischen Effekte (laute
Geräusche) reduzieren, indem Sie die Funktion Dynamikbereich
aktivieren.
Bevorzugte
Einstellungen
LPCM Output
Legt die LPCM-Abtastfrequenz (Linear Pulse-Code Modulation) für
den Digitalausgang fest.
Überprüfen Sie an Ihrem externen Receiver, welche Abtastrate er
dekodieren kann.
TV-Display (TV-Anzeige)
Sie können das für Ihren TV-Bildschirm passende Bildseitenverhältnis
wählen.
• 4:3 Letterbox Wenn Sie einen herkömmlichen „quadratischen“ Fernseher haben und ein DVD-Bild in vollem
Format sehen möchten, wählen Sie diese Einstellung.
Am oberen und unteren Rand des TV-Bildschirms
werden breite Ränder dargestellt.
• 4:3 Panscan Wenn Sie einen herkömmlichen Fernseher
haben und möchten, dass das DVD-Bild Ihren gesamten
TV- Bildschirm ausfüllt, wählen Sie diese Einstellung.
Es wird ein breites Bild auf der gesamten Fläche Ihres
TV-Bildschirms wiedergegeben, wobei ein Teil des
Bildes automatisch abgeschnitten ist.
40
• 16:9 Wenn Sie ein TV-Gerät mit Breitbildformat haben,
wählen Sie diese Einstellung (Sie müssen auch Ihren
Breitbildfernseher in den 16:9-Modus schalten).

Video Output (Bildausgabe)
Über die Funktion der Bildausgabe können Sie die Art der Bildausgabe,
die für Ihr DVD- System passend ist, auswählen.
Chapitre optionnel
Règle le nombre de minutes que vous souhaitez attribuer à la fonction
/ lors de la lecture d’un fichier DivX.
Remarque :
Ne fonctionne que pour les CD de type DivX.
Audio
Falls auf der DVD verfügbar kann über diese Funktion die bevorzugte
Sprache der Tonspur gewählt werden.
Untertitel
Falls auf der DVD verfügbar kann über diese Funktion die bevorzugte
Sprache für die Untertitel gewählt werden.
Disc Menu (Disk-Menü)
Falls auf der DVD verfügbar kann über diese Funktion die gewünschte Sprache für das Menü gewählt werden.
Parental (Kindersicherung)
Über diese Funktion können Sie die Wiedergabe ungeeigneter DVDs
kontrollieren, was sehr nützlich ist, wenn auch jüngere Zuschauer Zugang zum S VSR 25 haben.
Bitte beachten Sie:
Vor dem Ändern der Kindersicherungsstufe müssen Sie das vorgegebene Passwort (4-stelliger Code) eingeben, um diese Funktion zu
entsperren.
Wenn das eingegebene Passwort nicht richtig ist, können Sie keine
Änderung der Stufe vornehmen.
41

DivX Registration Page
Defaults (Standardeinstellungen)
Wenn Sie diese Funktion auswählen, werden alle Funktionen auf ihre
Standardeinstellungen zurückgesetzt.
Password (Passwort)
Das Passwort dient zur Änderung der Kindersicherungsstufe.
Passwortvergabe
Drücken Sie die Zifferntasten, um das alte Passwort einzugeben (der
Standardwert ist 0000), und drücken Sie dann die Zifferntasten, um
ein neues vierstelliges Passwort zu erzeugen und anschließend die
Zifferntasten, um das neue Passwort zu bestätigen.
DivX Registration Page
Dies ist ein nur einmal vergebener Code, den Sie benutzen können, um
Ihren Player zu registrieren.
Die Registrierung eröffnet Ihnen die Möglichkeit, DivX Video-On-Demand-Dateien zu mieten und zu kaufen.
42

Fernbedienung
1
2
3
4
5
6
7
8
9
10
11
12
13
14
15
16
17
17
18
19
20
21
22
23
24
25
26
27
28
29
30
31
32
33
34
35
1. Stummschaltung
2. Wahl des Eingangs
3. Zifferntasten
4. Speicher
5. Audio
6. Untertitel
7. Tasten für Kanal- und Zeiteinstellung
8. Setup
9. Top-Menü
10. Cursor links, rechts, nach oben, nach unten.
11. Zurück
12. Winkel
13. FM-Modus
14. Vorlauf/Rücklauf
15. Langsam
16. Standby
17. Timer
18. Interlaced/Progressive, Timer-Einstellung
19. Uhrzeit
20. Zufallswiedergabe
21. Wiederholen
22. Wiedergabe A-B
23. Surround-Modus
24. Löschen
25. Display-Dimmer
26. Sleep-Funktion
27. Lauter/Leiser
28. Kanalauswahl
29. Menü/PBC
30. Ok
31. On Screen
32. Wiedergabe
33. Pause
34. Vorheriges/Nächstes Kapitel/Track/Programm
35. Step
43

Wahl des Eingangs - Einrichten der Uhr
Tasten für die Wahl des Eingangs
Drücken Sie die DVD-Taste, um mit dem Abspielen einer Disk zu beginnen.
Drücken Sie die AUX-Tasten, um zwischen den AUX-Eingängen umzuschalten.
Durch das Drücken der AM/FM-Taste wird der FM/AM-Radiotuner eingeschaltet und zwischen FM und AM umgeschaltet.
Einstellen der Uhrzeit:
- Halten Sie die Taste „CLOCK“ drei Sekunden lang gedrückt.
- Drücken Sie die Einstelltasten (ADJUST) „+“ oder „-“.
- Drücken Sie die Taste „SET“, um von Stunden auf Minuten umzuschalten.
44

Tasten für die häufig genutzten erweiterten Funktionen
Im Folgenden fi nden Sie eine kurze Beschreibung der Tasten für die erweiterten Funktionen.
Bitte beachten Sie, dass nicht alle Funktionen für alle Medien verfügbar sind.
TIMER
Drücken Sie diese Taste, um auf die Timer-Funktionen zuzugreifen. Sie
können über die ADJUST-Tasten „+“ und „-“ die Timer-Einstellungen
verändern und durch das Drücken der Taste „I/P SET“ zwischen den TimerEinstellungen wechseln.
I/P SET
Schaltet die Bildausgabe zwischen Interlaced und Progressive Scan um.
BITTE BEACHTEN SIE: Nicht alle TV-Geräte können Progressive Scan
darstellen.
ZUFALLSWIEDERGABE
Wenn die Zufallswiedergabe aktiviert ist, werden die Tracks in zufälliger
Reihenfolge wiedergegeben.
WIEDERHOLEN
Durch das Aktivieren der Wiederhol-Funktion können Sie den/die aktuelle/n
Titel/Disk oder ein Kapitel/Track endlos wiederholen
A-B
Drücken Sie jeweils am Anfang und am Ende des zu wiederholenden
Segments die Taste A-B.
SRS
Drücken Sie diese Taste, um zwischen Stereo- und Surround-Sound-Modi zu
wechseln.
AUDIO
Über diese Funktion können Sie zwischen den verschiedenen Tonspuren,
die für einen Film verfügbar sind, wählen. Normalerweise können Sie die
Tonspur auch im DVD-Menü auswählen.
UNTERTITEL
Über diese Funktion können Sie zwischen den auf der DVD verfügbaren
Untertiteln wählen. Normalerweise können Sie die Untertitel auch im DVDMenü auswählen.
SLEEP-FUNKTION
Drücken Sie diese Taste, um zwischen den verschiedenen Sleep-Modi
umzuschalten.
DIMMER
Drücken Sie diese Taste, um die Beleuchtung des Displays zu dimmen.
CH. SEL
Drücken Sie diese Taste, um zwischen der Kanalauswahl für den linken und
den rechten Lautsprecher umzuschalten. Drücken Sie die ADJUST-Tasten „+“
und „-“, um die Lautstärke einzustellen.
ON SCREEN
Über die On-Screen-Funktion können Sie Informationen über das Medium,
das Sie gerade abspielen, wie z.B. die Gesamtzahl der Titel, Kapitel oder Tracks
oder die Spieldauer, abrufen.
Die Informationen werden auf dem TV-Bildschirm angezeigt.
45

Nutzung und Setup der Radiofunktion
Radiosender suchen
Um einen Radiosender zu fi nden, halten Sie die Taste oder gedrückt, bis
die Frequenzanzeige sich zu verändern beginnt, und lassen Sie die Taste dann
los. Das System sucht nun automatisch nach dem nächsten klar zu empfangenden Radiosender.
Radiosender speichern
Um einen Sender zu speichern, gehen Sie bitte folgendermaßen vor:
Nachdem Sie den Punkt „Radiosender suchen“ abgeschlossen haben, drücken
Sie die Taste „MEM“ und anschließend eine Zahl zwischen 01 und 40.
Umschalten zwischen Radiosendern
Nachdem Sie den Punkt „Radiosender speichern“ abgeschlossen haben,
drücken Sie die Taste oder , um zwischen den gespeicherten Sendern zu
wechseln.
46

Wiedergabe von Dateien von Disks oder über den USB-Anschluss
Wenn Sie eine Disk mit MP3-, WMA-, JPG-, DivX- oder XviD-Dateien einlegen bzw. über den USB-Anschluss
ein Gerät mit diesen Dateitypen anschließen, wird Ihr S VSR 25 automatisch in den Dateiwiedergabemodus
schalten.
Navigation
Im Dateiwiedergabemodus können Sie über die Tasten
durch die Dateien blättern und durch das anschließende Drücken
von ENTER eine Datei auswählen oder einen Ordner öffnen oder
schließen.
47

Störungsbehebung
Wenn Sie den Eindruck haben, dass der S VSR 25 nicht fehlerfrei arbeitet, gehen Sie zuerst diesen Leitfaden zur
Störungsbehebung durch, bevor Sie sich an den Kundendienst wenden.
Bitte beachten Sie auch die entsprechenden Anweisungen in diesem Handbuch.
ACHTUNG
Auf gar keinen Fall sollten Sie den Versuch unternehmen, das System selbst zu reparieren.
Fehler Mögliche Ursache Behebung
Kein Bild. • Das TV-Gerät kann Progressive Scan
nicht darstellen.
• Das TV-Gerät ist ausgeschaltet.
• Das TV-Gerät ist nicht korrekt
angeschlossen.
Disk kann nicht gespielt
werden.
Kein Ton. • Die LAUTSTÄRKE ist auf 0 eingestellt.
Das Gerät reagiert nicht
auf Befehle von der
Fernbedienung.
• Die Disk wurde verkehrt herum
eingelegt.
• Die Disk ist leer oder das Format
wird vom S VSR 25 nicht unterstützt.
• Die Disk ist verschmutzt oder defekt.
• Die Disk wurde nicht in die Führung
der Disk-Schublade eingelegt.
• Lautsprecherkabel sind nicht korrekt
angeschlossen.
• In die Fernbedienung wurden keine
Batterien eingelegt.
• Die Batterien sind leer.
• Die Fernbedienung wurde nicht auf
den Fernbedienungssensor des S
VSR gerichtet.
• Die Fernbedienung ist zu weit vom
S VSR 25 entfernt.
• Drücken Sie die Taste „I/P SET” auf der
Fernbedienung.
• Schalten Sie das TV-Gerät ein.
• Schließen Sie das TV-Gerät korrekt an.
• Stellen Sie sicher, dass das Label der
Disk nach oben zeigt.
• Entfernen Sie die Disk und versuchen
Sie es mit einer anderen.
•
Säubern Sie die Disk oder entsorgen
Sie sie.
• Legen Sie die Disk richtig in die
Führung der Disk-Schublade ein.
• Stellen Sie die LAUTSTÄRKE höher.
• Schließen Sie sie richtig an.
• Legen Sie neue Batterien ein.
• Durch neue Batterien ersetzen.
• Richten Sie die Fernbedienung auf den
Fernbedienungssensor des Geräts
• Benutzen Sie die Fernbedienung in
einer Entfernung von höchstens 5 m.
48
Es liegt keine
Netzspannung am Gerät
an, obwohl das Netzkabel
angeschlossen ist.
Das Gerät reagiert
bei der Wiedergabe
nicht auf einige der
Bedienungsbefehle.
• Das Netzkabel ist nicht richtig
eingesteckt.
• Die Wandsteckdose ist nicht
eingeschaltet.
• Die Funktionen sind eventuell für die
Disk nicht verfügbar.
• Stecken Sie das Netzkabel richtig ein.
• Schalten Sie die Wandsteckdose ein.
• Lesen Sie bitte die Anweisungen auf
der Disk.

Kundendienst und Garantie
Umweltinformationen
• Das System ist aus recyclingfähigen Materialien gefertigt, die nach der Demontage durch befugte Personen wiederverwertet
werden können.
• Bitte beachten Sie die nationalen Bestimmungen für die Entsorgung von Verpackungsmaterialien, leeren Batterien und Altgeräten.
Copyright
Dieses Produkt enthält durch Copyright geschützte Technologie, die durch Patente, die sich im Besitz von Macrovision Corporation und anderer Copyright-Inhaber befinden, geschützt ist. Jedweder Einsatz dieser durch Copyright geschützten Technologie
muss von Macrovision Corporation genehmigt werden. Die Technologie ist für den Einsatz in Privathaushalten gedacht, sofern
keine andere Genehmigung von Macrovision Corporation erteilt wurde. Die Demontage und Zerlegung ist untersagt.
Unter Lizenz der Dolby Laboratories hergestellt. „Dolby“ und das Doppel-“D“-Symbol sind Warenzeichen der Dolby Laboratories.
„DTS“ und „DTS Digital Out“ sind Warenzeichen von Digital Theater Systems, Inc.
Kundendienst
Wenden Sie sich bei Garantie-Anfragen bitte an Ihren Händler. Legen Sie bei Kundendienst-Anfragen im Rahmen der Garantie
bitte Ihre Originalquittung bei. Wichtig: Versenden Sie nie ein Produkt, für das eine Reparatur erforderlich ist, ohne vorherige Vereinbarung. Wenn sich der DVD-Player noch innerhalb des Garantiezeitraums befindet, wird Jamo die Frachtkosten für die Wege
zwischen dem Händler und dem autorisierten Kundendienst-Center tragen. Sämtliche anderen Frachtkosten sind vom Kunden
zu zahlen. Das Produkt muss immer angemessen verpackt werden, andernfalls erlischt die Garantie. Wenn sich der DVD-Player
nicht mehr innerhalb des Garantiezeitraums befindet, sind sämtliche Kosten vom Kunden zu tragen.
Garantieschein
Jamo gibt eine Garantie von vierundzwanzig (24) Monaten ab Kaufdatum auf Material- und Fertigungsfehler. Bei Fehlern, die unter die Garantie fallen, muss das Produkt an den Händler zurückgegeben werden, bei dem es gekauft wurde. Die zu erwartende
Reparaturzeit beträgt, ohne Transport, ungefähr fünf Arbeitstage.
Beim Auftreten jedweder Probleme sind Informationen bei unseren autorisierten Kundendienst-Centern unter der folgenden
Adresse oder bei dem Händler, der das Produkt verkauft hat, verfügbar.
Garantiebedingungen
1. Die Garantie gilt nur bei Vorlage des Original-Kaufbelegs und wenn die Seriennummer des Produkts vollständig lesbar ist.
2. Die Verpflichtung von Jamo ist auf die Reparatur bzw. den Ersatz defekter Komponenten beschränkt. Die Reparatur bzw. der
Ersatz von defekten Komponenten erfolgt auf der Grundlage einer Bewertung durch Jamo.
Der Austausch erfolgt nur, wenn eine Reparatur nicht möglich ist.
3. Reparaturen im Rahmen der Garantie müssen von einem autorisierten Jamo Händler oder einem autorisierten KundendienstCenter durchgeführt werden. Es erfolgt keine Vergütung für Reparaturen, die von nicht autorisierten Werkstätten durchgeführt
werden. Jedwede Reparatur oder Beschädigung des Produkts infolge eines unautorisierten Eingriffs werden von dieser Garantie
nicht abgedeckt.
4. Technische Anforderungen oder Anforderungen im Zusammenhang mit der Sicherheit sind in anderen Ländern als dem, für
die das Produkt ursprünglich gestaltet und hergestellt wurde, zu erfüllen.
5. Diese Garantie erstreckt sich nicht auf diese Arten von Anpassungen, und es wird keinerlei Vergütung für diese Arten von Anpassungen oder beliebige auf sie zurückzuführende Schäden angeboten. Diese Garantie erstreckt sich nicht auf folgende Punkte:
a) Regelmäßige Inspektion, Wartung und Reparatur oder Austausch von Teilen infolge normalen Verschleißes. b) Kosten im
Zusammenhang mit dem Transport, der Zerlegung oder der Installation des Produktes.
c) Missbräuchliche Verwendung einschließlich der Verwendung für andere als die beabsichtigten Zwecke oder fehlerhafte Installation.
d) Schäden infolge von Blitzschlag, Wasser, Feuer, Naturkatastrophen, Krieg, Aufruhr, nicht korrekter Netzspannung, unzureichender Belüftung, Transport oder anderen Gründen, die sich dem Einfluss von Jamo entziehen.
6. Diese Garantie gilt für jeden rechtmäßigen Eigentümer des Produktes während des Garantiezeitraums.
Verpackung
Benutzen Sie für jeden Versand nach Möglichkeit die Originalverpackung. Verpacken Sie den S VSR 25 andernfalls bitte folgendermaßen:
• Ein Karton aus verstärkter Pappe, der fest genug ist, das Gewicht des Produkts zu tragen.
• Mindestens 6 cm stoßdämpfendes Material um das Produkt herum.
• Nicht scheuerndes und staubfreies Material für die anderen Teile.
• Nicht scheuernde Umhüllung für das Produkt. (Staub- und Schmutzschutz)
• Verpacken Sie das Produkt so, dass ein Verrutschen im Karton während des Transports ausgeschlossen ist.
Informationen, die wir benötigen, bevor wir das Produkt reparieren: Name des Modells:
Seriennummer:
Fehlerbeschreibung
Kopie der Rechnung oder Kaufquittung
Name, Adresse und Telefonnummer des Händlers
Informationen zu Ihrer Person Name, Adresse, Postleitzahl/Ort, Telefonnummer und E-Mail-Adresse (optional). Ihre Unterschrift
Stempel und Unterschrift des Händlers
Datum
49

svenska
Innehåll
Inledning 51
Ansluta systemet 52
Ansluta antenner 53
Ansluta tv-system 53
Ansluta ljud 53
Systemkonfiguration 55
Allmän konfiguration 55
Speaker Setup 56
Ljudkonfigurering 56
Favoritinställning 56
DivX Registration Page 58
Översikt fjärrkontroll 59
Ingångsväljare – Klockinställning 60
Avancerade funktionsknappar som
används ofta 61
Användning och konfigurering av radio 62
Spela upp filer från skiva och USB 63
Felfunktioner 64
Service och garanti 65
50

Inledning
Kontrollera att följande tillbehör följer med ditt system.
S VSR 25
8m / 26ft högtalarkabel
Scartkabel
SUB 200
Batterier till fjärrkontrollen
Ljudkabel
2 x S 250
Fjärrkontroll
S VSR 25
Strömkabel
FM-antenn
AM-antenn
51

Ansluta systemet
On AuAu
to OfOf
Dessa illustrationer hjälper dig att ansluta högtalare, subwoofer, antenner och tv-system.
S 250 SUB 200
C
B
A
Cut off
Frequency
Phase
Level On / Auto / Off
40 Hz 150 Hz Min Max
On
ON AUTO OFF
to
f
52
0˚ -180˚

Ansluta antenner
För bästa möjliga mottagning behöver du
ställa in en FM-/AM-radiostation och justera
FM-/AM-antennens position.
Ansluta tv-system
Konfigurering av video via scart
Både ljud och bild går genom scartkabeln.
De flesta tv-apparater skickar automatiskt
ljud till S VSR 25.
Konfigurering av S-Video
Videon är ansluten via S-Videokabeln
(medföljer ej) till TV:n. Kom ihåg att ansluta
ljudet från TV:n till S VSR 25.
Konfigurering av komponentvideo
Komponentvideo kan anslutas till plasmaoch LCD-skärmar. Kom ihåg att ansluta ljud
från tv:n till S VSR 25.
Ansluta ljud
Om en persondator, spelkonsol,
MP3-spelare, tv eller liknande har
analog ljudutgång kan du ansluta
den direkt till S VSR 25.
MP3
53

R
3 632
$6$ 2%#%)6%2
-!.5&!#452%$5.$%2 ,)#%.3%
&2/-$/,"9 ,!"/2!4/2)%3 h$/,"9v
!.$4(% $/5",%$ 39-"/,!2%
42!$%-!2+3/& $/,"9 ,!"/2!4/2)%3
h530!4%.4 ./3
!.$ v
3#!24
/04)#!,
$)')4!,
/54
6)$%/ /54
2
0
0
"
9
#/-0/.%.4
6)$%/
6
6)$%/
36)$%/
).
/54
!5$)/
!58
8
!58
9
35"7//&%2
,
2
02%/54
30%!+%23
2
4 5 7 10 11 12 13
1. FM-antenn
2. AM-antenn
3. Scart In/Ut
4. Digital Ut (Optisk)
1
5. Uttag för komponentvideo
6. Uttag för kompositvideo
7. S-Video Ut
8. Analogt ljud In - AUX 1
2
9. Analogt ljud In - AUX 2
10. Analogt ljud Ut
11. Subwoofer Pre Uttag
3
12. Höger högtalare Ut
13. Vänster högtalare Ut
,
1
4
5 6
12
1. Display
2. Funktion
2
3. Volym
4. Skivfack
5. Standby/På
3
6. Spela
7. Paus
8. Hoppa över/Sök bakåt
9. Hoppa över/Sök framåt
10. Stopp
11. Öppna/Stäng
12. USB-anslutning
13. Ljud Ineffekt
14. Band
15. Tuner, val/snabbval
16. Sensor, fjärrkontroll
7
8
1413
9
15
10
11
16
54

Systemkonfiguration
Allmän konfiguration
För att komma till menyn för S VSR 25 trycker du på “SETUP” på fjärrkontrollen. Anvä för att bläddra genom menyerna och tryck på ”ENTER”
för att välja. När du är färdig trycker du en gång till på “SETUP”.
Picture Mode - bildinställning
- Auto – Bildkvaliteten justeras automatiskt.
- Film – Välj denna inställning för att visa bilden i filmkvalitet.
- Video – Välj denna inställning för att visa bilden i videokvalitet.
- Smart – Välj denna inställning för att visa progressivt och sammanflätat
(interlaced) material med liten rörelse.
- Super Smart – Välj denna inställning för att visa progressivt och sammanflätat (interlaced) material med rörelse.
Angle Mark - vinkelmarkering
Visar flera vinklar om detta är möjligt på dvd:n.
OSD Language – språk på skärmen
Ställer in displayspråk för S VSR 25.
Captions (Untertitel)
Falls verfügbar werden Untertitel automatisch angezeigt.
Screen Saver - skärmsläckare
Stänger AV och slår PÅ skärmsläckaren.
55

Speaker Setup
Ljudkonfigurering
Speaker Setup (Högtalarinstallation)
Large – Om du har stora golvhögtalare väljer du “Large”.
Small – Om du har kompakta högtalare eller bokhyllehögtalare väljer
du “Small”.
Välj “Small” för S 250-högtalarna.
Audio Out - ljud ut
Om en extern AV-mottagare med DD- och DTS-dekoder är ansluten via
DIGITAL UT väljer du BIT STREAM.
Om en extern AV-mottagare utan DD- och DTS-dekoder är ansluten
genom - DIGITAL UT väljer du PCM.
Compression - komprimering
Om du vill titta på en film utan att störa andra kan du reducera dynamiken (höga ljud) genom att aktivera dynamikfunktionen.
Favoritinställning
LPCM Output (LPCM-utgång)
Ställer in samplingshastigheten för LPCM (Linear Pulse-Code Modulation) för det digitala uttaget.
Kontrollera din externa mottagare för att se vilken samplingshastighet den kan avkoda.
TV Display - bildformat
Du kan välja det bildformat som passar din tv-skärm.
• 4:3 LB - Om du har en vanlig “fyrkantig” tv och vill se
dvd.-filmen i fullformat använder du denna inställning.
Breda svarta band visas längst upp och ner på tv-skärmen.
• 4:3 PS - Om du har en vanlig “fyrkantig” tv och vill att
dvd-filmen ska fylla tv-skärmen använder du denna
inställning. En bred bild visas på hela tv-skärmen. En del
av ursprungsbilden skärs då bort.
56
• 16:9 - Om du har en widescreen-tv använder du denna
inställning (du måste även ställa in din widescreen-tv
på 16:9).

Video Output
Med denna funktion kan du välja den typ av video output som passar ditt
dvd-system.
Soft Chapter
Ställer in hur många minuter du vill hoppa framåt/bakåt i en DivX-fil
när du trycker och .
Obs!
Fungerar endast med DivX-CD-skivor.
Audio - ljud
Om denna funktion finns på dvd-spelaren kan du ställa in önskat språk för
ljud.
Subtitle - text
Om denna funktion finns på dvd-spelaren kan du ställa in önskat
textspråk.
Disc Menu - skivmeny
Om denna funktion finns på dvd-spelaren kan du välja önskat menyspråk.
Parental - spärrfunktion
Med denna funktion kan du spärra olämpliga filmer, vilket är praktiskt
om barn har tillgång till S VSR 25.
Observera:
Innan du ändrar spärrfunktionsnivån måste du ange det förinställda
lösenordet (4-siffrig kod) för att låsa upp funktionen. Om du anger fel
lösenord kan du inte justera nivån.
57

DivX Registration Page
Defaults - förinställning
Om du väljer denna funktion kommer samtliga funktioner att återgå
till fabriksinställningarna.
Password - lösenord
Lösenordet används för att ändra spärrfunktionsnivån.
Välja lösenord
Tryck på sifferknapparna för att ange det gamla lösenordet (förinställt
på 0000), och tryck sedan på sifferknapparna igen för att skapa ett
nytt 4-siffrigt lösenord. Bekräfta ditt val genom att ange lösenordet en
gång till.
DivX Registration Page (sida för registrering)
Det här är en engångskod som du kan använda för att registrera din
spelare. Den ger dig möjlighet att hyra och köpa DivX VOD-filer (Video
On Demand).
58

Översikt fjärrkontroll
1
2
3
4
5
6
7
8
9
10
11
12
13
14
15
16
17
17
18
19
20
21
22
23
24
25
26
27
28
29
30
31
32
33
34
35
1. Inget ljud
2. Inputväljare
3. Sifferknappar
4. Minne
5. Ljud
6. Text
7. Kanal, tid, justeringsknappar
8. Konfigurering
9. Huvudmeny
10. Markör Vänster, Höger, Upp, Ned
11. Återgå
12. Vinkel
13. FM-läge
14. Framåt/tillbaka
15. Ultrarapid
16. Standby
17. Timer
18. Interlace/Progressiv, Timerinställning
19. Klocka
20. Slumpval
21. Upprepa
22. A-B uppspelning
23. Surroundläge
24. Avbryt
25. Displaydimmer
26. Insomningstimer
27. Volym Upp, Ned
28. Kanalval
29. Meny/PBC
30. Enter
31. Skärmdisplay
32. Spela upp
33. Paus
34. Föregående/Nästa avsnitt/Spår/Program
35. Step (stega bild för bild)
59

Ingångsväljare – Klockinställning
Valknappar för Input
Tryck på DVD-knappen för att spela upp en skiva.
Tryck på AUX-knapparna för att växla mellan analoga ljudingångar.
Tryck på AM/FM-knappen för att aktivera och växla mellan FM-/AM-radio.
Ställa in klockan:
- Tryck ner och håll “CLOCK” nertryckt i 3 sekunder.
- Tryck på knapparna “+” eller “-” för JUSTERING.
- Tryck på “SET” för att ändra mellan timmar och minuter.
60

Avancerade funktionsknappar som används ofta
Nedan följer en kort beskrivning av knapparna för avancerade funktioner.
Observera att samtliga funktioner inte fi nns på alla media.
TIMER
Tryck på knappen för att komma till timerfunktionerna. Du ställer in timern
genom att trycka på justeringsknapparna “+” och “-” (ADJUST) samt växlar
mellan timerinställning genom att trycka på knappen
“I/P SET”.
I/P SET
För att växla mellan sammanfl ätad (interlaced) och progressiv skanning.
OBSERVERA: Alla tv-skärmar kan inte visa progressiv skanning.
RANDOM
För att spela upp aktiverade spår i slumpmässig följd.
REPEAT
Du kan upprepa pågående titel/skiva eller kapitel/spår fl era gånger med
denna funktion.
A-B
Tryck på A-B-knappen vid segmentets början för att upprepa, tryck igen när
segmentet slutar.
SRS
Tryck på knappen för att växla mellan stereo- och Virtual Surround-läge.
AUDIO
Använd denna funktion för att välja mellan tillgängliga ljudspår på fi lmen.
I normalfallet kan du även välja ljud på dvd-menyn.
SUBTITLE
Använd denna funktion för att välja önskad textning till fi lmen.
I normalfallet kan du även välja textning på dvd-menyn.
SLEEP
För att växla mellan insomningsfunktioner.
DIMMER
Tryck på knappen för att dämpa ljuset på displayen.
CH.SEL
Tryck på knappen för att växla mellan kanaljustering för vänster och höger
högtalare. Tryck på justeringsknapparna “+” eller “-” (ADJUST) för att justera
volymen.
ON SCREEN
Med denna funktion kan du läsa information om produkten du tittar på,
t.ex. totalt antal titlar, kapitel, spår eller total tid. Informationen visas på tvskärmen.
61

Användning och konfigurering av radio
Söka radiostationer
För att söka efter en radiostation trycker du ner någon av knapparna eller
och håller knappen nertryckt tills frekvensindikatorn ändrar läge. Släpp då
upp knappen. Systemet söker automatiskt upp nästa starka radiostation.
Lagra en radiostation
Gör följande för att lagra en station:
När du har hittat stationen (se ovan) trycker du på “MEM“ och knappar sedan
in ett nummer mellan 01-40.
Växla mellan radiostationer
När du har lagrat stationer (se ovan) trycker du på eller för att växla mellan de lagrade stationerna.
62

Spela upp filer från skiva och USB
Om du lägger i en skiva eller kopplar in en USB-enhet med mp3-, wma-, jpg-, DivX- eller XviD-fi ler kommer
din S VSR 25 att växla till läget för uppspelning av fi ler.
Navigering
När du spelar upp fi ler kan du bläddra mellan dem genom att
använda följt av ENTER för att välja fi l eller välja/gå ut från
ett bibliotek.
63

Felfunktioner
Om S VSR 25 inte fungerar som tänkt bör du först konsultera denna lista innan du kontaktar kundservice.
Följ även de aktuella anvisningarna i denna manual.
VARNING
Försök under inga omständigheter att reparera detta system själv.
Symtom Möjlig orsak Gör så här
Ingen bild. • Tv:n kan inte visa progressiv
skanning.
• Tv:n är avstängd.
• Tv:n är inte korrekt inkopplad.
Skivan kan inte spelas. • Skivan ligger upp och ned.
• Skivan är tom eller innehåller ett
format som inte stöds av S VSR 25.
• Skivan är smutsig eller defekt.
• Skivan ligger inte korrekt i skivfacket.
Inget ljud. • VOLYMEN är inställd på 0.
•
Högtalarkablarna är inte korrekt
anslutna.
Ingenting händer när du
trycker på fjärrkontrollen.
• Inga batterier i fjärrkontrollen.
• Uttjänta batterier i fjärrkontrollen.
• Fjärrkontrollen riktas inte mot
sensorn på S VSR 25.
• Fjärrkontrollen är för långt borta från
enheten.
• Tryck på knappen “I/P SET” på
fjärrkontrollen.
• Slå på tv:n.
• Anslut tv:n på korrekt sätt.
• Se till att skivan ligger med etiketten
uppåt.
• Ta ut skivan och försök med en annan.
• Rengör skivan eller släng den.
• Placera skivan korrekt i skivfacket.
• Vrid upp VOLYMEN.
• Anslut kablarna på rätt sätt.
•
Lägg i batterier.
•
Lägg i nya batterier.
• Rikta fjärrkontrollen mot sensorn på
S VSR 25.
• Fjärrkontrollen bör användas max. 5
meter från enheten.
64
Ingen elektricitet trots att
elkabeln är ansluten.
Enheten svarar inte på
vissa kommandon vid
uppspelning.
• Väggkontakten sitter inte i
ordentligt.
• Strömkontakten är inte PÅ.
• Alla kommandon kan inte användas
på alla skivor.
• Sätt i väggkontakten ordentligt.
• Slå PÅ strömkontakten.
• Läs instruktionerna på skivan.

Service och garanti
Miljöinformation
• Systemet är tillverkat av återvinningsbart material som kan återvinnas om det monteras ned av auktoriserad personal.
• Följ lokala regler för bortskaffning av förpackningsmaterial, använda batterier och gamla enheter.
Upphovsrätt
Den här produkten innehåller upphovsrättsskyddad teknik som skyddas av patent som tillhör Macrovision Corporation och
andra upphovsrättsinnehavare. All användning av den här upphovsrättsskyddade tekniken måste godkännas av Macrovision
Corporation. Tekniken är avsedd att användas för hemmabruk, om inte annan användning godkänts av Macrovision Corporation.
Det är förbjudet att ta isär och montera ned produkten.
Tillverkas på licens av Dolby Laboratories. ”Dolby” och dubbel-”D”-symbolen är varumärken som tillhör Dolby Laboratories. ”DTS”
och ”DTS Digital Out” är varumärken som tillhör Digital Theater Systems, Inc.
Service
Kontakta din återförsäljare om du har frågor om garantin. Om du behöver service under garantiperioden ska du skicka med
originalkvittot. Viktigt! Skicka aldrig produkten för reparation utan tidigare överenskommelse. Om DVD-spelaren fortfarande har
GILTIG GARANTI betalar Jamo fraktkostnader till och från återförsäljaren och Jamos auktoriserade servicecenter. All annan frakt
betalas av kunden. Produkten måste alltid vara korrekt förpackad annars återkallas produktgarantin. Om DVD-spelaren inte har
giltig garanti betalas alla kostnader av kunden.
Garanticertifikat
Jamo erbjuder tjugofyra (24) månaders garanti från inköpsdatumet gällande material- och tillverkningsfel. För fel som täcks av
garantin, måste produkten lämnas tillbaka till återförsäljaren som sålde produkten. Förväntad reparationstid, exklusive transport,
är ca fem arbetsdagar.
Om det skulle uppstå några problem finns information från våra auktoriserade servicecentra på följande adress, eller från återförsäljaren som sålde produkten.
Garantivillkor
1. Garantin är endast giltig om det ursprungliga kvittot kan uppvisas och om serienumret på produkten är helt läsligt.
2. Jamos åtaganden är begränsade till att antingen reparera eller ersätta felaktiga komponenter. Reparation eller ersättning av
felaktiga komponenter baseras på en utvärdering gjord av Jamo.
Ersättning är endast möjligt då det inte går att reparera produkten.
3. Garantireparationer måste utföras av en auktoriserad Jamo-återförsäljare eller av ett auktoriserat servicecenter. Inga ersättningar betalas ut för reparationer som utförs av icke auktoriserade verkstäder. Alla reparationer som utförs och skador som orsakas
på produkten av någon icke auktoriserad täcks inte av den här garantin.
4. Den här produkten anses inte felaktig, vare sig i material eller tillverkning om anpassning till nationella, lokala, tekniska eller
säkerhetsrelaterade åtgärder krävs i länder andra än det landet produkten ursprungligen formgivits och tillverkats för.
5. Den här garantin täcker inte dessa typer av anpassning, och ingen ersättning erbjuds för dessa typer av anpassningar eller för
eventuella följdskador. Garantin täcker inte följande:
a) Regelbunden inspektion, underhåll och reparation eller ersättning av delar som utsätts för normalt slitage.
b) Kostnader i anslutning till transport, nedmontering eller installation av produkten.
c) Felanvändning, inklusive användning till andra syften än de avsedda, eller felaktig installation.
d) Skador orsakade av åsknedslag, vatten, eld, naturkatastrofer, krig, uppror, felaktig nätspänning, otillräcklig ventilation, transport eller andra orsaker utanför Jamos kontroll.
6. Den här garantin gäller alla lagliga ägare av produkten under garantiperioden.
Förpackning
Om möjligt ska du använda det ursprungliga förpackningsmaterialet för eventuell frakt. Om inte ska du packa in S VSR 25 med:
• En förstärkt kartong, stark nog att bära produktens vikt.
• Åtminstone 6 cm stötabsorberande material runt produkten.
• Ej skrovligt dammfritt material för de andra delarna.
• Ej skrovligt emballage för produkten. (Damm- och smutsskydd)
• Förpacka om produkten på ett sådant sätt att den inte kan flytta sig i kartongen under transport.
Information som vi måste få innan produkten kan repareras: Modellnamn:
Serienummer:
Felbeskrivning:
Kopia av fakturan eller säljkvittot
Återförsäljarens namn, adress och telefonnummer.
Personlig information: Namn, adress, postnummer, telefonnummer, och e-postadress (valfritt). Din underskrift
Återförsäljarens stämpel och underskrift
Datum
65

español
Sumario
Introducción 67
Conexión de los altavoces 68
Conexión de las antenas 69
Conexión al Televisor 69
Conexión de audio 69
Configuración del Sistema 71
Configuración General 71
Configuración de los altavoces 72
Configuración de Audio 72
Configuración de Preferencias 72
Página de Registro DivX 74
Disposición del mando a distancia 75
Selectores de entradas – Ajuste del reloj 76
Funciones Avanzadas de uso frecuente 77
Funcionamiento y configuración de la Radio 78
Lectura de ficheros de disco y USB 79
Solución de problemas 79
Servicio y garantía 81
66

Introducción
Por favor, compruebe que con su sistema ha recibido los siguientes accesorios.
S VSR 25
8 m de cable de altavoces
Euroconector
SUB 200
Pilas para el mando a distancia
Cable de audio
2 x S 250
Mando a distancia
S VSR 25
Cable de red
Antena de FM
Antena de AM
67

Conexión de los altavoces
On AuAu
to OfOf
Consulte las ilustraciones para conectar los altavoces, el subwoofer, las antenas y el televisor.
S 250 SUB 200
C
B
A
Cut off
Frequency
Phase
Level On / Auto / Off
40 Hz 150 Hz Min Max
On
ON AUTO OFF
to
f
68
0˚ -180˚

Conexión de las antenas
Sintonice una emisora de FM y una de AM
y ajuste la posición de cada antena hasta
conseguir la mejor recepción.
Conexión al Televisor
Configuración de vídeo con euroconector
El cable con euroconectores transporta
tanto el audio como el vídeo. La mayoría de
televisores enviarán automáticamente el
audio al S VSR 25.
Configuración con S-Video
La señal de video se conecta al televisor
mediante el cable S-Video (no suministrado).
Recuerde conectar el audio del televisor al S
VSR 25.
Configuración con video por componentes
La salida de vídeo por componentes se
puede conectar a pantallas de plasma y LCD.
Recuerde conectar el audio del televisor al S
VSR 25.
Conexión de audio
Si lo desea, puede conectar a su
S VSR 25 un ordenador personal,
una consola de videojuegos, un
reproductor MP3, un televisor o
cualquier otro dispositivo que
disponga de salida de audio
analógica.
MP3
69

R
3 632
$6$ 2%#%)6%2
-!.5&!#452%$5.$%2 ,)#%.3%
&2/-$/,"9 ,!"/2!4/2)%3 h$/,"9v
!.$4(% $/5",%$ 39-"/,!2%
42!$%-!2+3/& $/,"9 ,!"/2!4/2)%3
h530!4%.4 ./3
!.$ v
3#!24
/04)#!,
$)')4!,
/54
6)$%/ /54
2
0
0
"
9
#/-0/.%.4
6)$%/
6
6)$%/
36)$%/
).
/54
!5$)/
!58
8
!58
9
35"7//&%2
,
2
02%/54
30%!+%23
2
4 5 7 10 11 12 13
1. Antena de FM
2. Antena de AM
3. Euroconector E/S
4. Salida digital (óptica)
1
5. Salida de vídeo por componentes
6. Salida de vídeo compuesto
7. Salida de S-Video
8. Entrada de audio analógica – AUX 1
2
9. Entrada de audio analógica – AUX 2
10. Salida de audio analógica
11. Salida de subwoofer
3
12. Salida de altavoz derecho
13. Salida de altavoz izquierdo
,
1
4
5 6
12
1. Pantalla indicadora
2. Función
2
3. Volumen
4. Bandeja portadiscos
5. En espera/Encendido
3
6. Lectura
7. Pausa
8. Pista/Búsqueda hacia atrás
9. Pista/Búsqueda hacia adelante
10. Parada
11. Abrir/Cerrar
12. Conector USB
13. Entrada de audio
14. Banda
15. Selección de Radio/Selección de
Presintonía
16. Sensor para mando a distancia
7
8
1413
9
15
10
11
16
70

Configuración del Sistema
Configuración General
Para acceder al menú de configuración del S VSR 25, pulse la función
“SETUP” del mando a distancia. Utilice para recorrer los menús, y
pulse “ENTER” para seleccionar una opción.
Para salir de la configuración del sistema, pulse “SETUP”.
Ajustes de la imagen
- Auto Mode - La calidad de la imagen se ajusta automáticamente.
- Film – Elija esta opción para visualizar imágenes de calidad cinematográfica.
- Video Mode – Elija esta opción para visualizar imágenes de calidad de video.
- Smart Mode – Elija esta opción para visualizar imágenes progresivas y entrelazadas de poca acción.
- Super Smart – Elija esta opción para visualizar imágenes progresivas y entrelazadas de acción.
Ángle Mark - Ángulo
Si esta disponible en el DVD, está función permite visualizar la imagen
desde distintos ángulos.
OSD Language – Idioma de los menús en pantalla
Selecciona el idioma de los menús en pantalla del S VSR 25.
Captions - Subtítulos
Si hay subtítulos disponibles, se visualizarán automáticamente.
Screen Saver - Salvapantallas
Activa y desactiva el salvapantallas.
71

Configuración de los altavoces
Configuración de Audio
Configuración de los altavoces
Large – Si sus altavoces son de tamaño grande o de suelo, seleccione
Large.
Small – Si sus altavoces son de tamaño pequeño o de estantería, seleccione Small.
Seleccione “Small” para los altavoces S 250.
Audio Out – Salida de Audio
Para conectar un Receptor AV externo con descodificador DD y DTS a
través de la SALIDA DIGITAL, seleccione BIT STREAM.
Para conectar un Receptor AV externo que no disponga de descodificador DD y DTS a través de la SALIDA DIGITAL, seleccione BIT PCM.
Compression - Compresión
Para ver películas sin molestar a las demás personas de la casa,
puede reducir la dinámica (los sonidos más fuertes) activando la
función de rango dinámico.
Configuración de
Preferencias
Salida LPCM
Permite ajustar la frecuencia de muestreo LPCM para la Salida Digital.
Revise su aparato receptor para conocer con qué frecuencia de
muestreo puede trabajar.
TV Display – Pantalla del televisor
Elija la proporción correspondiente a la pantalla de su televisor.
• 4:3 LB - Si tiene usted un TV convencional ‘cuadrado’
y desea ver la imagen del DVD en todo su formato,
elija esta opción. La imagen se mostrará en la pantalla
enmarcada con franjas negras por encima y por debajo.
• 4:3 PS - Si tiene usted un TV convencional y desea que
la imagen del DVD llene toda la pantalla, utilice esta
opción. La imagen ocupará toda la pantalla del TV, quedando automáticamente recortada una parte.
72
• 16:9 - Si su TV es panorámico, utilice esta opción (tendrá también que activar la modalidad 16:9 del televisor
panorámico).

Video Output – Salida de Video
La selección de salida de vídeo permite elegir el tipo de salida de vídeo más
adecuada para su sistema de DVD.
Soft Chapter
Determina los minutos que desea Avanzar/Retroceder en un archivo DivX al
pulsar y .
Nota:
Funciona únicamente con grabaciones DivX.
Audio – Idioma del Audio
Si el DVD ofrece esta posibilidad, esta función permite elegir el idioma de
audio preferido.
Subtitle – Idioma de los Subtítulos
Si el DVD ofrece esta posibilidad, esta función sirve para elegir el idioma de subtítulos preferido.
Disc Menu – Idioma de los Menús
Si el DVD ofrece esta posibilidad, esta función sirve para elegir el idioma preferido de los menús.
Parental – Nivel de control paterno
Esta función sirve para restringir el visionado de DVD inadecuados y es
útil cuando los espectadores más jóvenes tienen acceso al S VSR 25.
Nota:
Antes de cambiar el nivel de control paterno, es preciso introducir la
contraseña predeterminada (código de 4 cifras) para desbloquear esta
función. Si se introduce una contraseña incorrecta, no se podrá cambiar
el nivel.
73

Página de Registro DivX
Defaults – Por defecto
Si se elige esta opción, todas las funciones recuperarán sus valores por
defecto.
Password - Contraseña
La contraseña sirve para cambiar el nivel de control paterno.
Para introducir una contraseña:
Escriba la contraseña existente (Old Password) mediante el teclado
numérico (0000 por defecto) y escriba a continuación los 4 números
de la nueva contraseña (New Password). Escriba una vez más la nueva
contraseña y pulse la opción de confirmación (Confirm).
Página de Registro DivX
Es un código único que puede utilizar para registrar su reproductor.
Ello le permitirá alquilar y comprar archivos de video DivX sobre demanda (DivX Video On Demand).
74

Disposición del mando a distancia
1
2
3
4
5
6
7
8
9
10
11
12
13
14
15
16
17
17
18
19
20
21
22
23
24
25
26
27
28
29
30
31
32
33
34
35
1. Mute
2. Selector de fuentes
3. Teclas numéricas
4. Memoria
5. Audio
6. Subtítulos
7. Canal, tiempo, botones de ajuste.
8. Configuración
9. Menú superior
10. Cursor Izquierda, Derecha, Arriba, Abajo.
11. Retorno
12. Ángulo
13. Modo FM
14. Avance/rebobinado
15. Lectura lenta
16. Reposo
17. Temporizador
18. Entrelazado/Progresivo, Ajuste Temporizador
19. Reloj
20. Al azar
21. Repetición
22. Lectura A-B
23. Modo Mode
24. Borrar
25. Luminosidad de la pantalla indicadora
26. Sleep (Dormir)
27. Subir, Bajar Volumen
28. Seleccionar canal
29. Menú/PBC
30. Enter
31. En pantalla
32. Lectura
33. Pausa
34. Capítulo/Pista/Programa Previo/Siguiente
35. Step
75

Selectores de entradas – Ajuste del reloj
Teclas de selección de fuentes
Pulse la tecla DVD para iniciar la lectura de un disco.
Pulse sucesivamente la tecla AUX para alternar entre entradas auxiliares.
Pulse la tecla AM/FM para activar el sintonizador de radio. Vuelva a pulsarla
para cambiar entre bandas AM y FM.
Ajuste del reloj:
- Pulse y mantenga pulsada la tecla “CLOCK” durante 3 segundos.
- Pulse las teclas de AJUSTE “+” o “-” .
- Pulse “SET” para alternar entre horas y minutos.
76

Funciones Avanzadas de uso frecuente
A continuación le ofrecemos una descripción breve de las teclas de funciones avanzadas.
Recuerde que no todas las funciones se encuentran disponibles para todos los soportes.
TIMER - Temporizador
Pulse esta tecla para acceder al temporizador.
Para el ajuste pulse las teclas de AJUSTE “+” o “-” e “I/P SET” para alternar entre
horas y minutos.
I/P SET
Cambia la salida de video de Entrelazado a Progresivo.
NOTA: No todos los televisores aceptan exploración progresiva.
RANDOM – Al azar
Cuando la función está activada, las pistas se reproducen en orden aleatorio.
REPEAT - Repetición
Activar la función de repetición para leer de forma ininterrumpida el título/
disco en curso o bien un capítulo/pista determinado.
A-B
Pulse el botón A-B al principio y al fi nal del segmento que desee repetir.
SRS – Sonido envolvente
Al pulsar esta tecla se alterna entre la modalidad estéreo y las diferentes
modalidades de sonido envolvente (Virtual Surround).
AUDIO - Audio
Esta función sirve para elegir entre las pistas de sonido disponibles en la
película.
Generalmente, también se puede elegir a través del menú del DVD.
SUBTITLE - Subtítulos
Utilice esta función para elegir entre los subtítulos disponibles en la película.
Generalmente, también se puede elegir a través del menú del DVD.
SLEEP - Dormir
Pulse sucesivamente esta tecla para elegir entre las distintas posibilidades.
DIMMER
Pulse esta tecla para disminuir la luminosidad de la pantalla indicadora.
CH. SEL – Selección de canal
Pulse sucesivamente esta tecla para alternar entre el canal a ajustar, Izquierdo
o Derecho.
Pulse las teclas de AJUSTE “+” o “-” para ajustar el volumen.
ON SCREEN – En pantalla
Mediante esta función puede consultar la información del soporte que
está visionando, como número total de títulos, capítulos, pistas o tiempo. La
información aparecerá en la pantalla del televisor.
77

Funcionamiento y configuración de la Radio
Buscar una emisora de radio
Para buscar una emisora de radio pulsar y mantener pulsa o hasta que el
indicador de frecuencias empiece a cambiar, y entonces soltar el botón.
El sistema sintonizará automáticamente la siguiente emisora que se reciba con
suficiente intensidad.
Memorización de emisoras de radio
Para memorizar las emisoras de radio haga lo siguiente:
Una vez sintonizada una emisora pulse la tecla “MEM“ seguida de un número
entre 01 al 40.
Cambio de emisoras
Una vez memorizadas las emisoras pulse
o para cambiar entre las emisoras presintonizadas.
78

Lectura de ficheros de disco y USB
Al introducir un disco o dispositivo USB que contenga fi cheros mp3, wma, jpg, DivX o XviD, el S VSR 25
pasará automáticamente a la modalidad de lectura de fi cheros.
Navegación
Dentro de la modalidad de lectura podrá desplazarse a través de
los fi cheros utilizando las tecla seguidas de ENTER para
seleccionar un fi chero o entrar/salir de una carpeta.
79

Solución de problemas
Si el S VSR 25 parece funcionar mal, sírvase consultar esta guía de solución de problemas antes de solicitar la
intervención del servicio técnico.
Consulte también las instrucciones correspondientes de este manual.
ATENCIÓN
No debe usted tratar de reparar el equipo usted mismo bajo ninguna circunstancia.
Síntoma Causa posible Corrección
No se ve la imagen • El TV está apagado
• El TV no está bien conectado
• El televisor no acepta Progressive
Scan (Exploración Progresiva)
No se puede leer el disco • Se ha colocado el disco al revés
• Disco vacío o de formato
incompatible con el S VSR 25.
• Disco sucio o defectuoso.
• Disco no colocado dentro de la guía
de la bandeja portadiscos.
No se oye el sonido • El VOLUMEN está a 0.
• Los cables de los altavoces no están
bien conectados.
El S VSR 25 no responde a
las órdenes del mando a
distancia
• El mando a distancia no tiene pilas.
• Las pilas están agotadas.
• El mando no está orientado hacia el
sensor de control remoto del S VSR
25.
• El mando está demasiado lejos del S
VSR 25.
• Encender el televisor
• Conectar correctamente el televisor
• Pulsar la función “I/P SET” del mando a
distancia
• Comprobar que la etiqueta del disco
queda hacia arriba.
• Retirar el disco y probar con otro.
• Limpiar el disco o descartarlo.
• Colocar el disco correctamente en las
guías de la bandeja.
• Subir el VOLUMEN.
• Conectar los cables correctamente.
• Introducir pilas nuevas
• Sustituir las pilas por otras nuevas.
• Orientar el mando hacia el sensor de
control remoto del S VSR 25.
• Utilizar el mando a menos de 5 m de
distancia.
80
El equipo no se enciende
pese a estar enchufado
El S VSR 25 no responde
a algunas órdenes de
manejo durante el
funcionamiento
• La clavija no está bien introducida
en el enchufe.
• El enchufe de la pared no tiene
corriente eléctrica.
• Las operaciones solicitadas no están
permitidas en el disco.
• Introducir la clavija totalmente en el
enchufe.
• Aplicar corriente eléctrica al enchufe.
• Consultar las instrucciones del disco.

Servicio y garantía
Información medioambiental
• El equipo está fabricado con materiales reciclables, que pueden ser reutilizados si el desmontaje corre a cargo de personal
autorizado
• Sírvase observar la normativa local sobre desecho de materiales de embalaje, pilas usadas y equipos.
Copyright
Este producto contiene tecnología de protección de copyright, sujeta a patentes propiedad de Macrovision Corporation y de
otros titulares. Cualquier uso de esta tecnología de protección de copyright deberá ser aprobada por Macrovision
Corporation. La tecnología se proporciona para uso doméstico, a menos que Macrovision Corporation autorice otros usos.
Quedan prohibidos la intrusión y el desmontaje.
Fabricado bajo licencia de Dolby Laboratories. “Dolby” y el símbolo de la doble “D” son marcas comerciales de Dolby
Laboratories. “DTS” y “DTS Digital Out” son marcas comerciales de Digital Theater Systems, Inc.
Servicio
Para cualquier consulta sobre la garantía, sírvase dirigirse al establecimiento donde adquirió el equipo. En caso de solicitar
intervenciones de servicio en garantía, sírvase incluir el comprobante original de compra. Importante: no envíe nunca el
producto a reparar sin haberlo acordado previamente. Si el reproductor de DVD TODAVÍA ESTÁ EN PERIODO DE GARANTÍA,
Jamo se hará cargo de los costes de envío y devolución entre el establecimiento y el centro de servicio autorizado de Jamo.
Cualesquiera otros costes de transporte correrán a cargo del cliente. El producto deberá ir siempre bien embalado; de lo
contrario, la garantía quedará sin efecto. Si el reproductor NO ESTÁ EN PERIODO DE GARANTÍA, todos los costes correrán a
cargo del cliente.
Certificado de garantía
Jamo proporciona una garantía de veinticuatro (24) meses, a contar desde la fecha de adquisición, contra defectos de
materiales y de fabricación. En caso de defectos cubiertos por la garantía, el producto deberá ser devuelto al establecimiento
donde fue adquirido. El tiempo aproximado de reparación, sin contar el transporte, es de unos cinco días laborables.
En caso de surgir problemas, encontrará información sobre nuestros centros de servicio autorizados, o bien consultando al
establecimiento donde adquirió usted el producto.
Condiciones de garantía
1. La garantía únicamente será válida si se presenta el comprobante original de la compra y el número de serie del
producto es perfectamente legible.
2. Las obligaciones de Jamo se limitan a la reparación o sustitución de los componentes defectuosos. La elección entre
reparación o sustitución de dichos componentes defectuosos queda a discreción de Jamo.
Únicamente se sustituirá el equipo por otro en caso de que no sea posible repararlo.
3. Las reparaciones en garantía deben ser efectuadas por un distribuidor autorizado de Jamo o por un centro de
servicio autorizado. No se proporcionará remuneración alguna en concepto de reparaciones efectuadas por talleres
no autorizados. La garantía no cubre cualesquiera reparaciones o desperfectos del producto producidos por
intervenciones no autorizadas.
4. Este producto no será considerado defectuoso, ya sea en materiales o en fabricación, si fuera necesario adaptarlo a
la normativa nacional, local, técnica o de seguridad vigente en países distintos del país para el cual el producto fue
diseñado y fabricado.
5. Esta garantía no cubre dicho tipo de adaptaciones, y no se proporcionará remuneración alguna por dicho tipo de
adaptaciones ni por cualesquiera desperfectos consiguientes. La garantía no cubre las intervenciones siguientes:
a. Inspección, mantenimiento y reparación o sustitución periódicos de componentes como consecuencia del
desgaste normal
b. Costes relativos al transporte, el desmontaje o la instalación del producto
c. Uso indebido, incluidos el uso para fines distintos al previsto y la instalación incorrecta
d. Desperfectos producidos por relámpagos, inundaciones, incendios, catástrofes naturales, guerras,
insurrecciones, tensión eléctrica incorrecta, ventilación insuficiente, transporte u otras causas que escapen
al control de Jamo.
6. Esta garantía se aplica a cualquier propietario legal del producto durante el periodo de vigencia de la garantía
Embalaje
Si es posible, utilice el material de embalaje original para cualquier envío. De lo contrario, vuelva a embalar el
usando:
• Una caja de cartón reforzado, lo bastante robusta como para soportar el peso del producto
• Al menos 6 cm / 2,36 pulgadas de material absorbente de golpes alrededor del producto
• Material no abrasivo, exento de polvo, para los demás componentes
• Envoltorio no abrasivo para el producto (funda contra el polvo y la suciedad)
• Embale el producto de manera que no se pueda mover dentro de la caja durante el transporte
Antes de reparar el producto, debemos recibir la información siguiente:
Modelo:
Número de serie:
Descripción de la avería:
Copia de la factura o comprobante de compra
Nombre, domicilio y nº de teléfono del establecimiento
Información personal: Nombre, domicilio, código postal/población, nº de teléfono y dirección de correo-e (opcional). Firma
Sello y firma del establecimiento
Fecha
81

suomi
Sisältö
Johdanto 83
Järjestelmän liittäminen 84
Antennien liittäminen 85
TV-järjestelmän liittäminen 85
Audioliitännät 85
Järjestelmäasetukset 87
Yleisasetukset 87
Kaiutinasetukset 88
Audioasetukset 88
Suosikkiasetukset 88
Kauko-ohjain 91
Tulolähdevalitsimet/kellon asetus 92
Toistuvasti käytettävät
toimintopainikkeet 93
Radiolähetysten vastaanotto 94
Levy- ja USB-tiedostojen toisto 95
Vianetsintä 96
82

Johdanto
Tarkista, että seuraavat varusteet ovat mukana pakkauslaatikossa.
S VSR 25
Kaiutinkaapeli (8 m)
SCART
SUB 200
Paristot
Composite Video
audiokaapeli
2 x S 250
Kauko-ohjain
Virtajohto
FM-antenni
AM-antenni
83

Järjestelmän liittäminen
On AuAu
to OfOf
Liitä kaiuttimet, subwooferi, antennit ja TV seuraavien piirrosten esittämällä tavalla.
S 250 SUB 200
B
A
C
Cut off
Frequency
Phase
40 Hz 150 Hz
Level On / Auto / Off
Min Max
ON AUTO OFF
On
to
f
84
0˚ -180˚

Antennien liittäminen
Viritä laite jollekin FM/AM-asemalle ja säädä
FM/AM-antenni parasta mahdollista vastaanottoa
varten.
TV-järjestelmän liittäminen
SCART-videokonfigurointi SCART-kaapeli
soveltuu sekä audio- että videosignaalien
siirtämiseen. Useimmat TV-vastaanottimet
lähettävät audiosignaalit automaattisesti
S 250 HCS 21-järjestelmään.
S-videokonfigurointi S-videokaapelia
(lisävaruste) voidaan käyttää videosignaalien
syöttämiseksi TV-vastaanottimeen. Muista
tehdä audioliitännät TV-vastaanottimesta S
250 HCS 21-järjestelmään. Valitse video-lähdön (Video Output) asetukseksi YPbPr (katso
sivu XX
Component-videolähtö voidaan liittää
plasma- ja LCD-näyttöihin. Muista tehdä
audioliitännät TVvastaanottimesta
S 250 HCS 21-järjestelmään.
Audioliitännät
Voit liittää tietokoneen , pelikonsolin, MP3- soittimen tai vastaavan
laitteen suoraan S VSR 25-järjestelmään, jos kyseinen laite on varustettu analogisilla audiolähdöillä.
MP3
85

R
3 632
$6$ 2%#%)6%2
-!.5&!#452%$5.$%2 ,)#%.3%
&2/-$/,"9 ,!"/2!4/2)%3 h$/,"9v
!.$4(% $/5",%$ 39-"/,!2%
42!$%-!2+3/& $/,"9 ,!"/2!4/2)%3
h530!4%.4 ./3
!.$ v
3#!24
/04)#!,
$)')4!,
/54
6)$%/ /54
2
0
0
"
9
#/-0/.%.4
6)$%/
6
6)$%/
36)$%/
).
/54
!5$)/
!58
8
!58
9
35"7//&%2
,
2
02%/54
30%!+%23
2
4 5 7 10 11 12 13
1 FM-antenni
2 AM-antenni
3 SCART-liitäntä (tulo/lähtö)
4 Digitaalilähtö (optinen)
1
5 Component-videolähtö
6 Composite-videolähtö
7 S-videolähtö
8 Analoginen audiotulo (AUX 1)
2
9 Analoginen audiotulo (AUX 2)
10 Analoginen audiolähtö
11 Subwooferin esivahvistinlähtö
3
12 Kaiutinliitäntä (oikea)
13 Kaiutinliitäntä (vasen)
,
1
4
5 6
12
1 Näyttö
2 Function-painike
2
3 Voimakkuussäädin
4 Levykelkka
5 Valmiustila-/virtapainike
3
6 Toistopainike
7 Taukopainike
8 Edellinen kappale-/raita-/
ohjelmapainike
9 Seuraava kappale-/raita-/
ohjelmapainike
10 Pysäytyspainike
11 Levykelkan avaus-/sulkupainike
12 USB-liitäntä
13 Audiotulo
14 Aaltoaluevalitsin
15 Virittimen/esiasetettujen asemien
valintapainike
7
8
1413
9
15
10
11
16
16 Kauko-ohjaussignaalien tunnistin
86

Järjestelmä-asetukset
Yleisasetukset
Valitse S 250 HCS 21 asetusvalikko (MAIN PAGE) painamalla
SETUP-painiketta kauko-ohjaimesta.
Käytä sitten painikkeita valikoiden selailuun ja paina
ENTER-painiketta haluamasi asetuksen valintaa varten.
Paina SETUP-painiketta uudelleen, kun haluat sulkea asetusvalikon.
Picture Mode (kuvatoiminto)
• Auto Mode: Kuvanlaatu säätyy automaattisesti.
• Film: valitse tämä asetus tarkistaaksesi filmimateriaalin
kuvalaadun.
• Video Mode: valitse tämä asetus tarkistaaksesi filmimateriaalin
kuvalaadun.
• Smart Mode: valitse tämä asetus katsellaksesi progressiveja
interlaced-materiaalia, jonka liike on rajoitettua.
• Super Smart: valitse tämä asetus liikkuvan progressive-
Angle Mark (kulmamerkki)
Kulmamerkki syttyy näyttöön, kun toistetaan monikulmaäänitettyjä
DVD-levyjä (voit katsella samaa otosta useammasta eri
kamerakulmasta).
OSD Language (kuvaruutukieli)
Valikkoa käytetään kuvaruutukielen asettamiseen.
Captions
Näyttää tekstityksen automaattisesti, jos toistettaan levyn äänitys
sisältää tekstiä.
Screen saver (ruudunsäästäjä)
Aktivoi tai peruuttaa ruudunsäästäjän.
ON = aktivoitu
OFF = peruutettu
87

Kaiutinasetukset
Audioasetukset
Speaker Setup (kaiutinasetukset)
Large: valitse tämä asetus, jos käytössäsi on lattialle sijoitettavat
isot kaiuttimet
Small: valitse tämä asetus, jos käytössäsi on pienet esim. kirjahyllyyn
sijoitettavat kaiuttimet.
Valitse ”Small” asetus S 250-tyypin kaiuttimille.
Audio Out (audiolähtö)
Valitse ”BIT STREAM”, jos liität järjestelmään DD- ja DTSdekooderilla
varustetun erillisen AV-viritinvahvistimen.
Valitse ”PCM” ellei liitettävässä erillisessä AV-viritinvahvistimessa
ole DD- tai DTS-dekooderia
Compression (dynamiikka-alueen kaventaminen)
Voit vaimentaa voimakkaita ääniä aktivoimalla dynamiikka-aluetta
kaventavan Compression-toiminnon. Tällöin voit kuunnella musiikkia
tai katsella jotain filmiä vaikka yöllä naapureitasi häiritsemättä.
Suosikkiasetukset
LPCM Output (LPCM-lähtö)
Käytetään LPCM (Linear Pulse-Code-Modulaation) näytteenottotaajuuden
asettamiseksi digitaalilähtöä (Digital Output) varten.
Tarkista erillisen viritinvahvistimen näytteenottotaajuutta koskevat
purkuasetukset.
TV Display (kuvaruutusuhde)
TV Display-asetus mahdollistaa TV-vastaanottimellesi sopivan kuvasuhteen
valinnan.
• 4:3 LB - valitse tämä asetus, jos käytössäsi on tavallinen
TV-vastaanotin ja haluat katsella DVD-kuvaa täydessä
formaatissa. TV-ruudun ylä- ja alareunaan ilmestyy
mustat raidat.
• 4:3 PS - valitse tämä asetus, jos käytössäsi on tavallinen
TV-vastaanotin ja haluat, että toistettava DVD-kuva
täyttää koko TV-ruudun Laajakuva täyttää koko ruudun,
mutta osa siitä leikkautuu automaattisesti pois.
88
• 16:9 - käytä tätä asetusta, jos TV-vastaanottimesi on
laajakuvatyyppiä (muista valita 16:9-toiminto laajakuvaTVvastaanotinta varten).

Video Output (videolähtö)
Video Output mahdollistaa DVD-järjestelmällesi sopivan videolähtötyypin
valinnan.
Soft Chapter (aikaohjattu haku)
Soft Chapter-toiminnon avulla voit asettaa, kuinka monta
minuuttia haluat hypätä eteen- tai taaksepäin toistaessasi
DivX-tiedostoa. Paina painiketta hyppäyksen käynnistämiseksi.
Huomautus!
Toimii ainoastaan DivX CD-levyillä.
Audio (ääni)
Käytä Audio-toimintoa haluamasi audiokielen valintaan (edellyttäen,
että sellainen on äänitetty DVD-levylle).
Subtitle (tekstitys)
Käytä Subtitle-toimintoa haluamasi tekstikielen valintaan (edellyttäen, että sellainen on äänitetty DVD-levylle.
Disc Menu (levyvalikko)
Käytä levyvalikkoa haluamasi valikkokielen (Menu Language)
valintaan (edellyttäen sellainen on äänitetty DVD-levylle).
Parental (lapsilukko)
Voit käyttää tätä toimintoa estääksesi lapsilta niille sopimattomien
DVD-ohjelmien (esim. aikuisviihde) katselun.
Huomautus!
Tämä toiminto on avattava ennen lapsilukkotason muuttamista.
Syötä tätä varten esiasetettu salasana (4-numeroinen koodi)
Lapsilukon tasoa ei voi muuttaa, jos syötetty salasana on väärä.
89

DivX-rekisteröintisivu
Defaults (perusasetukset)
Tämän toiminnon avulla voit palauttaa kaikki toiminnot tehtaan
tekemille perusasetuksille.
Password (salasana)
Käytä salasanaa lapsilukkotason muuttamiseksi. Salasanan asettaminen
Syötä vanha salasana painamalla numeropainikkeita (perussalasana
on 0000). Syötä sitten uusi 4-numeroinen salasana painamalla numeropainikkeita. Vahvista uusi salasana painamalla numeropainikkeita
uudelleen.
DivX Registration Page (DivX-rekisteröintisivu)
Tämä on ainutlaatuinen koodi, jota voit käyttää soittimesi rekisteröimiseen.
Koodin avulla voit vuokrata tai ostaa DivX Video On
Demand-tiedostoja.
90

Kauko-ohjain
1
2
3
4
5
6
7
8
9
10
11
12
13
14
15
16
17
17
18
19
20
21
22
23
24
25
26
27
28
29
30
31
32
33
34
35
1 Äänen mykistys (Mute)
2 Tulolähdevalitsimet (Input Selector)
3 Numeropainikkeet
4 Muistipainike (Mem)
5 Audiopainike
6 Tekstipainike (Subtitle)
7 Kanava-/kellonaika-/säätöpainikkeet
8 Asetuspainike (Setup)
9 Top Menu-painike
10 Nuolipainikkeet (vasen, oikea, ylös, alas)
11 Paluupainike (Return)
12 Kamerakulman valintapainike (Angle)
13 FM-vastaanottotoiminto
14 Pikahaku eteen-/taaksepäin
15 Hidastuspainike (Slow)
16 Valmiustilapainike
17 Ajastin (Timer)
18 Interlace-/Progressive-/ajastimen asetuspainike
19 Kellopainike (Clock)
20 Hajatoistopainike (Random)
21 Kertauspainike (Repeat)
22 A-B-jakson kertauspainike
23 Surround Mode-painike
24 Pyyhintäpainike (Clear)
25 Näytön himmennyspainike (Display Dimmer)
26 Nukahtamisajastinpainike (Sleep)
27 Voimakkuuspainikkeet (ylös, alas)
28 Kanavanvalintapainike (CH. SEL)
29 Valikko-/toisto-ohjauspainike (Menu/PBC)
30 Enter-painike
31 Kuvaruutupainike (On Screen)
32 Toistopainike (Play)
33 Taukopainike (Pause)
34 Edellinen/seuraava kappale/raita/ohjelma
35 Askelluspainike (Step)
91

Tulolähdevalitsimet/kellon asetus
Tulolähdevalitsimet
Käynnistä levytoisto painamalla DVD-painiketta.
Voit vaihtaa AUX-tuloja painamalla AUX-painikkeita.
Käytä AM/FM-painiketta virittimen aktivoimista ja FM/AM-lähetysten
vaihtamista varten.
Kellon asettaminen
• Pidä CLOCK-painiketta alaspainettuna 3 sek.
• Paina ADJUST-painiketta + tai -.
• Paina SET-painiketta tuntien ja minuuttien välistä vaihtoa varten.
92

Toistuvasti käytettävät toimintopainikkeet
TIMER-PAINIKE
Painiketta käytetään ajastintoimintojen valintaan. Voit säätää ajastimen
painamalla ADJUST-painiketta + tai -.
I/P SET-PAINIKE
Painike vaihtaa videolähtöä Interlaced- ja Progressive scan-toimintojen
välillä.
HUOMAUTUS!
Kaikki TV-ruudut eivät ole Progressive scan-yhteensopivia.
RANDOM-PAINIKE
Soittoraidat toistuvat satunnaisessa järjestyksessä painaessasi Randompainiketta.
REPEAT-PAINIKE
Aktivoi toiston kertaustoiminto painamalla Repeat-painiketta.
Soitin toistaa valitun otsikon/levyn tai kappaleen/raidan kertautuvasti.
A-B-PAINIKE
Painike mahdollistaa A-B-jakson välisen toiston kertaamisen.
Paina A-B-painiketta kerrattavaksi haluamasi jakson alkukohdassa.
Paina A-B-painiketta uudelleen kerrattavan jakson loppupisteessä.
SRS-PAINIKE
Painiketta käytetään stereo- ja Virtual surround-toimintojen vaihtamiseen.
AUDIO-PAINIKE
Painiketta käytetään käytettävissä olevien fi lmiääniraitojen valintaan.
Painiketta voidaan normaalisti käyttää audiovalintaan myös DVD-valikossa.
SUBTITLE-PAINIKE
Painiketta käytetään DVD-levyn sisältämien tekstivaihtoehtojen valintaan.
SLEEP-PAINIKE
Painiketta käytetään nukahtamisajastimen toimintatilojen vaihtamiseen.
DIMMER-PAINIKE
Painiketta käytetään LCD-näytön kirkkauden himmentämiseen.
CH. SEL-PAINIKE
Painiketta käytetään voimakkuussäädön vaihtamiseen vasenta ja oikeaa
kaiutinkanavaa varten. Säädä voimakkuus painamalla ADJUST + tai painiketta.
ON SCREEN-PAINIKE
On Screen-painikkeella voit tarkistaa katselemasi mediaa koskevat tiedot
(nimiotsikoiden, kappaleiden, raitojen lukumäärä tai aika).
Valitut tiedot ilmestyvät TV-ruutuun.
93

Radiolähetysten vastaanotto
Radioasemien haku
Paina AM/FM-painiketta ja varmista, että S 250 HCS 21 on ”stereo”
tilassa.
Paina FM Mode/Stop-painiketta ja tarkista S 250 HCS 21-laitteen
toimintatila näytöstä.
Käynnistä asemahaku painamalla tai painiketta, kunnes asemataajuus
alkaa vaihtua näytössä. Vapauta painike.
Hakutoiminto etsii seuraavan aseman automaattisesti, jolla on riittävän
voimakas signaali.
Radioasemien esiasettaminen
Voit taltioida radioasemia muistiin toimimalla seuraavasti.
Viritä haluamasi asema kuunneltavaksi suorittamalla toimenpiteet kohdasta
”Radioaseman haku”. Paina sitten Mem-painiketta ja jotain numeroa
01 - 40 väillä.
Esiasetettujen asemien selailu
Voit selata esiasetettuja asemia painamalla tai painiketta.
RDS-vastaanotto
RDS (Radio Data System) on useimpien FM-asemien käyttämä järjestelmä,
joka tarjoaa ylimääräisiä tietoja yhdessä normaalien radiolähetysten
kanssa.
Voit tarkistaa viritetyn RDS-aseman ohjelmatiedot S 250 HCS 21-laitteen
näytössä painamalla RDS/ENTER-painiketta kauko-ohjaimesta.
94

Levy- ja USB-tiedostojen toisto
S 250 HCS 21 vaihtaa tiedostotoistotilaan, jos laitteeseen ladataan mp3-, wma-, jpg-, DivX, XviD-tiedostoja
sisältävä levy tai USB-laite (DivX ja XviD-toisto ei toimi USB-laitteen kanssa).
Navigointi
Käytä painikkeita tiedostojen selailua varten
tiedostotoistotilassa. Paina sitten Enter-painiketta tiedoston
valintaa varten tai avataksesi/sulkeaksesi kirjaston.
Huomautus!
Paina Stop-painiketta toiston lopettamiseksi, jos haluat
selata tiedostoja.
95

Vianetsintä
Jos Jamo S 250 HCS 21-järjestelmässä ilmenee jokin ongelma, tarkista alla oleva vianetsintälista ennen kuin otat
yhteyttä huoltoon.
Tutustu myös tämän käyttöohjeen vastaaviin ohjeisiin.
Varoitus!
Älä missään tapauksessa yritä korjata järjestelmää itse!
Oire Possible cause Mahdollinen syy
Kuvaa ei näy. • TV ei ole Progressive Scan
yhteensopiva.
• TV-vastaanottimesta on katkaistu
virta.
• TV on kytketty väärin.
Levyä ei voi toistaa. • Levy on ladattu ylösalaisin.
• Levy on tyhjä tai sen formaatti ei
ole yhteensopiva S 250 HCS 21järjestelmän kanssa.
• Levy on likainen tai viallinen.
• Levyä ei ole ladattu oikealla tavalla
levylevyohjaimien väliin.
• Paina I/P SET-painiketta
kaukoohjaimesta.
• Kytke virta TV-vastaanottimeen.
• Kytke TV oikein.
• Varmista, että levy on ladattu
etikettipuoli ylöspäin.
• Poista levy ja kokeile jotain toista
levyä.
• Puhdista levy tai vaihda se toiseen.
• Aseta levy oikealla tavalla
levylevohjaimien väliin.
Ääntä ei kuulu. • Voimakkuus on säädetty nollaan.
• Kaiutinjohdot on liitetty väärin.
Laite ei vastaa
kauko-ohjaimen
komentoihin.
Virransyöttö ei toimi
vaikka verkkojohto
on liitetty.
Laite ei vastaa
kaikkiin komentoihin
Salasana on
unohtunut tai se on
väärä.
• Kauko-ohjaimessa ei ole paristoja.
• Paristot ovat loppuunkuluneet.
• Kauko-ohjainta ei ole suunnattu
kohti laitteen kauko
ohjaustunnistinta.
• Kauko-ohjainta käytetään liian
etäällä laitteesta.
• Verkkojohto on liitetty huonosti.
• Pistorasiassa ei ole jännitettä.
• Levyn rajoitukset estävät kyseiset
toiminnot.
• Säädä voimakkuus sopivaksi.
• Liitä kaiutinjohdot oikein.
• Asenna kauko-ohjaimeen paristot.
• Vaihda tilalle uudet paristot.
• Suuntaa kauko-ohjain kohti kaukoohjaustunnistinta.
• Käytä kauko-ohjainta enintään 5 m
etäisyydellä laitteesta.
• Liitä verkkojohto kunnolla
pistorasiaan.
• Lue levyn mukana seuraavat ohjeet.
• Avaa levykelkka.
• Pidä STOP-painiketta alaspainettuna
etupaneelista samalla, kun pidät
TOP MENU-painiketta kaukoohjaimesta alhaalla. Suuntaa
kauko-ohjain huolella kohti kaukoohjaustunnistinta.
• TV-ruutu ilmaisee käytetyn
ohjelmaversion.
• Katkaise S 250 HCS 21-järjestelmäst
virta painamalla etupaneelin
valmiustila /virtapainiketta.
Odota 10 sek. ja kytke sitten virta
uudelleen.
• Salasana nollautuu.
96

Huolto ja takuu
Ympäristön suojelu
• Järjestelmä on valmistettu kierrätettävistä materiaaleista, jotka voidaan käyttää uudelleen mikäli laite puretaan asianmukaisesti.
• Hävitä pakkausmateriaalit, käytöstä poistetut paristot ja laite asianmukaisella tavalla.
Tekijänoikeudet
Laitteessa on tekijänoikeuslailla suojattua tekniikkaa, joka on turvattu patentein ja joiden oikeudet omistaa Macrovision Corporation ja
muut oikeudenomistajat. Tekijänoikeuslailla suojatun tekniikan käyttöön tarvitaan Macrovision Corporationin lupa. Tekniikka on tarkoitettu
ainoastaan kotikäyttöön ellei Macrovision Corporation ole myöntänyt lupaa muunlaiseen käyttöön. Jälkikäyttö ja purkaminen kielletään.
Dolby-tekniikka on valmistettu Dolby Laboratories -yhtiön luvalla. Dolby ja kaksois-D-symboli ovat tuotemerkkejä, jotka omistaa Dolby
Laboratories. DTS ja DTS Digital Out ovat tuotemerkkejä, jotka omistaa Digital Theater Systems, Inc.
Huolto
Takuuseen liittyvissä asioissa ota yhteyttä laitteen myyjään. Säilytä ostokuitti takuuaikana mahdollisesti tehtäviä korjauksia ja huoltotoimenpiteitä varten. Tärkeää: älä lähetä laitetta huoltoon sopimatta siitä etukäteen. Takuun ollessa voimassa Jamo vastaa rahtikustannuksista
myyjäliikkeen ja valtuutetun huollon välillä. Muista kuljetuskustannuksista vastaa laitteen ostaja. Kuljetusta varten laite on pakattava asianmukaisesti. Muutoin takuu raukeaa. Takuuajan päätyttyä laitteen ostaja vastaa kaikista kustannuksista.
Takuutodistus
Jamo myöntää laitteelle kahden (2) vuoden takuun, joka kattaa materiaali- ja valmistusviat. Mikäli laitteessa ilmenee vikaa, se tulee toimittaa
viipymättä laitteen myyneeseen liikeeseen. Arvioitu huoltoaika ilman rahtiin kuluvaa aikaa on noin viisi arkipäivää.
Takuuehdot
1. Laitteen myyjä on vastuussa laitteen takuukorjaamisesta.
2.Jamon vastuu rajoittuu joko korjaamaan viallisen osan tai vaihtamaan sen uuteen. Korjaamisesta tai vaihtamisesta uuteen päättää Jamo.
Vaihtaminen uuteen tulee kysymykseen vain silloin, kun korjaus ei ole mahdollinen.
3.Takuuhuollon voi tehdä ainoastaan valtuutettu Jamo-kauppias tai -huoltokorjaamo. Jamo ei vastaa eikä korvaa valtuuttamattomissa
huoltoliikkeissä tehtyjä korjauksia tai niissä tapahtuneita virheitä.
4.Tekniset tai turvallisuuteen liittyvät vaatimukset on otettava huomioon mikäli laitetta aiotaan käyttää sellaisessa maassa, johon sitä ei alun
perin ole tarkoitettu.
5.Takuu ei kata em. tapauksissa aiheutuneita vikoja tai vammoja eikä mitään välillisiä vahinkoja. Takuu ei myöskään kata seuraavaa:
a) Normaalista kulumisesta aiheutuvia vikoja, laitteen ylläpitoa tai tarkistuksia.
b) Kuljetuksiin, purkamiseen tai asennukseen liittyviä kustannuksia.
c) Väärinkäytöstä, muusta kuin tässä ohjeessa opastetusta käytöstä tai väärästä asennuksesta aiheutuneita vikoja.
6.Takuu koskee jokaista laitteen laillista omistajaa takuuaikana.
Pakkaus
Käytä laitteen kuljetuksessa mahdollisuuksien mukaan laitteen alkuperäistä pakkausta. Muussa tapauksessa pakkaa laite näin:
• Käytä tukevaa, laitteen painon kestävää pahvilaatikkoa.
• Pane laitteen ympärille vähintään 6 cm tärinöitä vaimentavaa materiaalia.
• Täytä tyhjä tila naarmuttamattomalla ja nukkaamattomalla materiaalilla.
• Pane laite muovipussiin tai vastaavaan, joka suojaa laitetta lialta ja pölyltä.
• Varmista, ettei laite pääse liikkumaan laatikossa.
Laitteen korjauksessa tarvittavat tiedot:
Valmistusnumero (Serial no.):
Kuvaus viasta:
Kopio laskusta tai ostokuitista
Myyjän nimi, osoite ja puhelinnumero.
Henkilötietosi: nimi, katuosoite, postinumero, kaupunki, puhelinnumero ja mahdollisen sähköpostiosoite.
Allekirjoitus
Myyjän nimikirjoitus ja leima
Päivämäärä
97

www.jamo.com
 Loading...