

ION FILM 2 PC User Manual [en, de, es, fr, it]

USER GUIDE
ENGLISH ( 3 – 12 )
GUÍA DEL USUARIO
ESPAÑOL ( 13 – 22 )
GUIDE D’UTILISATION
FRANÇAIS ( 23 – 32 )
GUIDA UTENTE
ITALIANO ( 33 – 42 )
BEDIENUNGSANLEITUNG
DEUTSCH ( 43 – 52 )
GEBRUIKERSHANDLEIDING
NEDERLANDS ( 53 – 62 )


WELCOME
Thank you for purchasing FILM 2 PC film and slide scanner. Please take a moment to read through this
manual in order to get the most out of your FILM 2 PC.
PRECAUTIONS
Before using FILM 2 PC, please ensure that you read and understand the safety precautions described
below. Always ensure that the FILM 2 PC is operated correctly:
Never operate FILM 2 PC inside of an aircraft or anywhere else where operation of such devices is
restricted. Improper use creates the risk of serious accident.
Do not try to open the case of FILM 2 PC or attempt to modify FILM 2 PC in any way. High-voltage
internal components create the risk of electric shock when exposed. Maintenance and repairs should
be performed only by authorized service providers.
Keep FILM 2 PC away from water and other liquids. Do not use FILM 2 PC with wet hands. Never use
FILM 2 PC in the rain or snow. Moisture creates the danger of fire and electric shock.
Keep FILM 2 PC and its accessories out of the reach of children and animals to prevent accidents or
damage to the image copier.
If you notice smoke or a strange odor coming from FILM 2 PC, turn the power off immediately. Take
FILM 2 PC to the nearest authorized service center for repair. Never attempt to repair FILM 2 PC on
your own.
Use only the recommended power accessories. Use of power sources not expressly recommended for
FILM 2 PC may lead to overheating, distortion of the equipment, fire, electrical shock or other hazards.
FILM 2 PC may become slightly warm during use. This does not indicate malfunction.
If the exterior of FILM 2 PC needs cleaning, wipe it with a soft, dry cloth.
FCC NOTICE
This equipment has been tested and found to comply with the limits for a Class B digital device, pursuant to
Part 15 of the FCC Rules. These limits are designed to provide reasonable protection against harmful
interference in a residential installation. This equipment generates, uses and can radiate radio frequency
energy. If not installed and used in accordance with the instruction, it may cause harmful interference to radio
communication. However, there is no guarantee that interference will not occur in a particular installation. If
this equipment does cause harmful interference to radio or television reception, which can be determined by
turning the equipment on the off, the user is encouraged to try to correct the interference by one or more the
following suggestion:
Reorient or relocate the receiving antenna.
Increase the distance between the equipment and the receiver.
Connect the equipment to a different power outlet other than the one where the receiver is connected.
Consult an experienced television or radio technician for help.
CAUTION: To comply with the limits for a Class B digital device, pursuant to Part 15 of the FCC
Rules, this device must only be installed on computer equipment certified to comply with the
Class B limits.
3
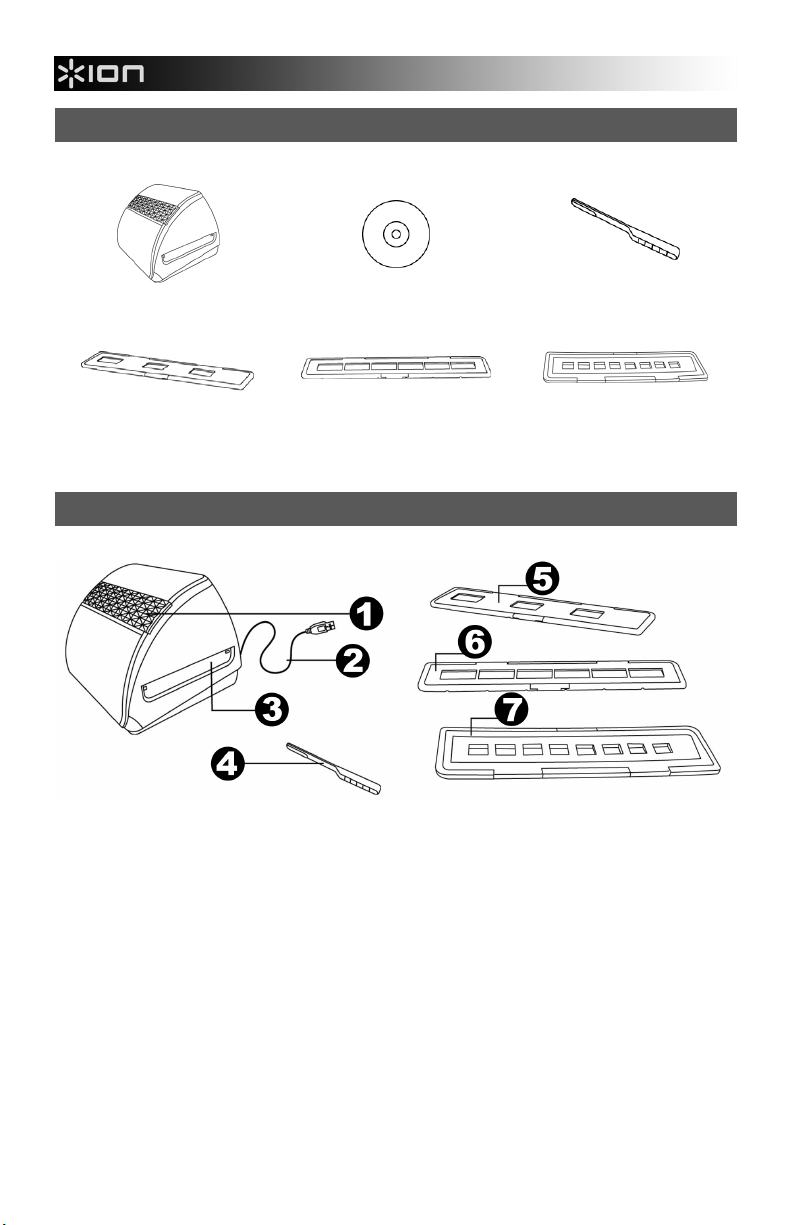
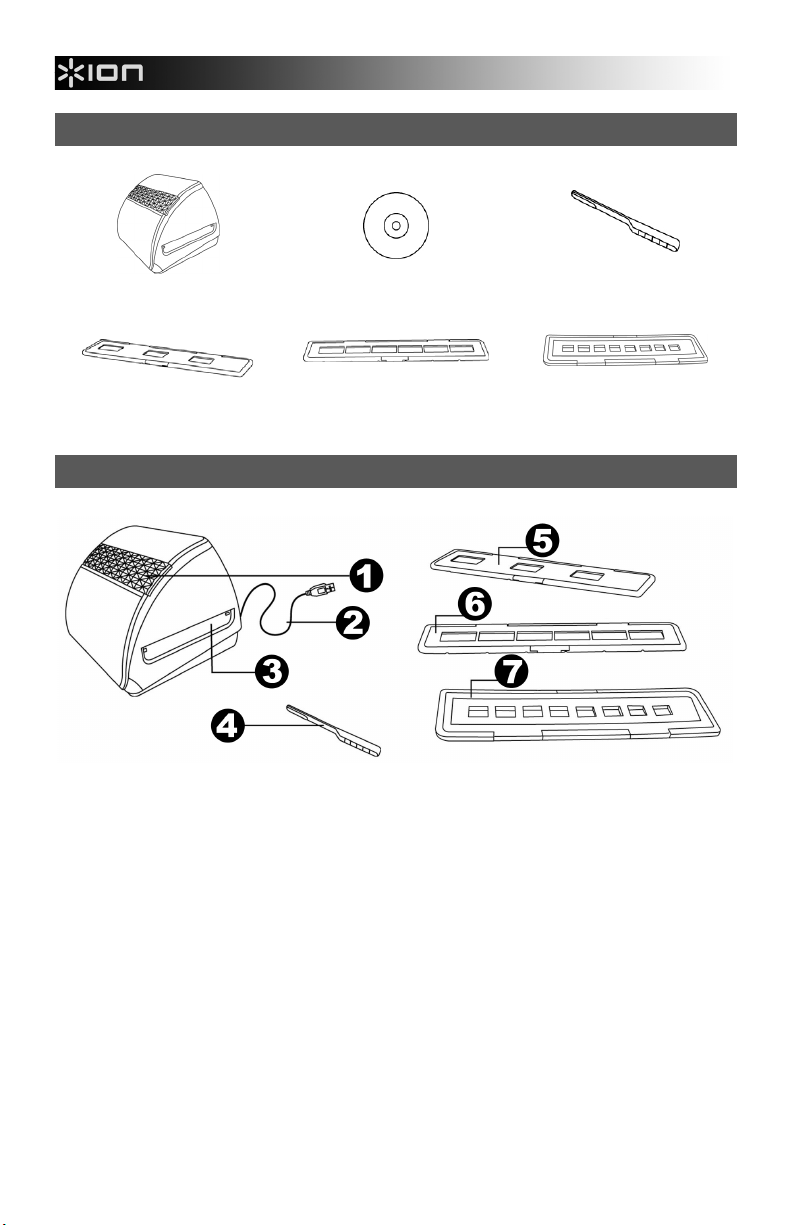
BOX CONTENTS
FILM 2 PC
POSITIVE SLIDE HOLDER
NEGATIVE FILM HOLDER
SOFTWARE CD
CLEANING BRUSH
110 FILM HOLDER
FILM 2 PC FEATURES
1. POWER LED
2. USB CABLE
3. FILM / SLIDE HOLDER SLOT
4. CLEANING BRUSH
Note: We strongly suggest using a clean, dry, non-alcohol cotton swab to insert into the image copier slot and
clean the glass surface periodically to produce a clear image. Please make sure your film negatives/
mounted slides and cover trays are clean before inserting into the copier as well. Dust or dirt from the
negatives and cover trays will affect the quality of your scanned images.
5. POSITIVE SLIDE HOLDER
6. NEGATIVE FILM HOLDER
7. 110 FILM HOLDER
4
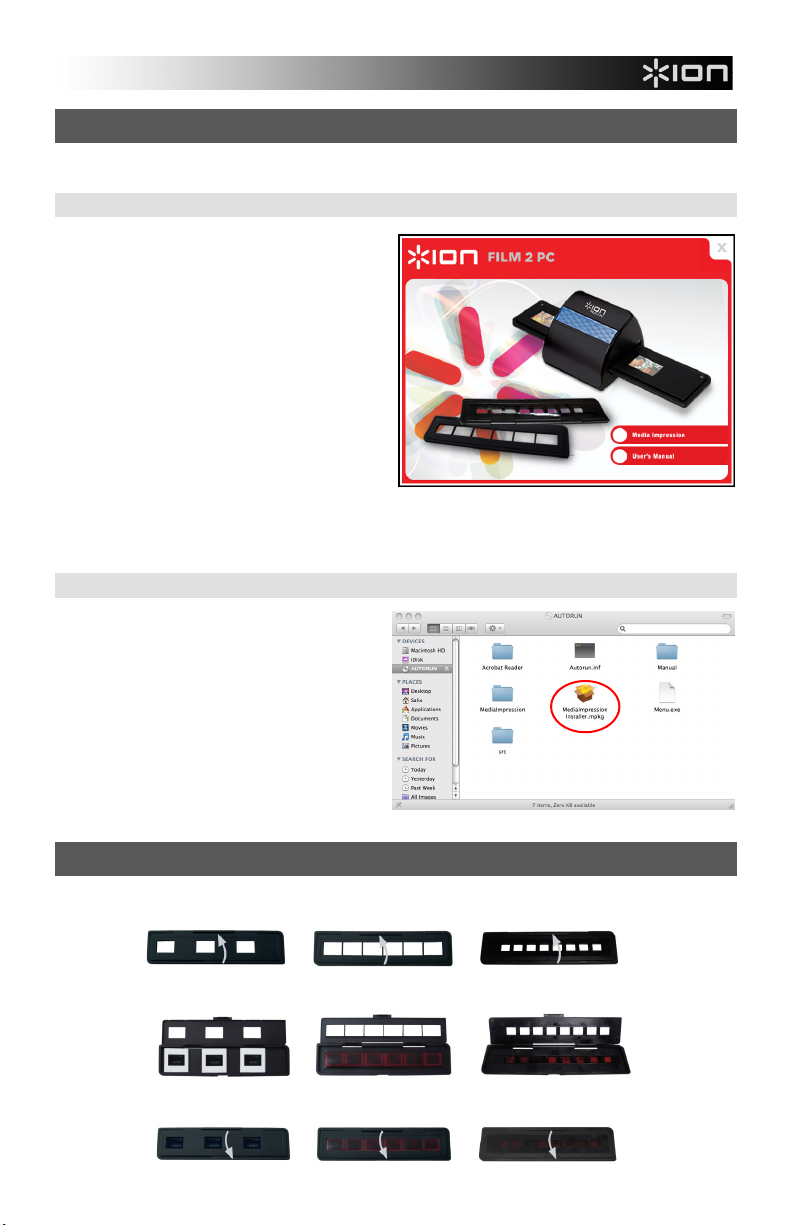
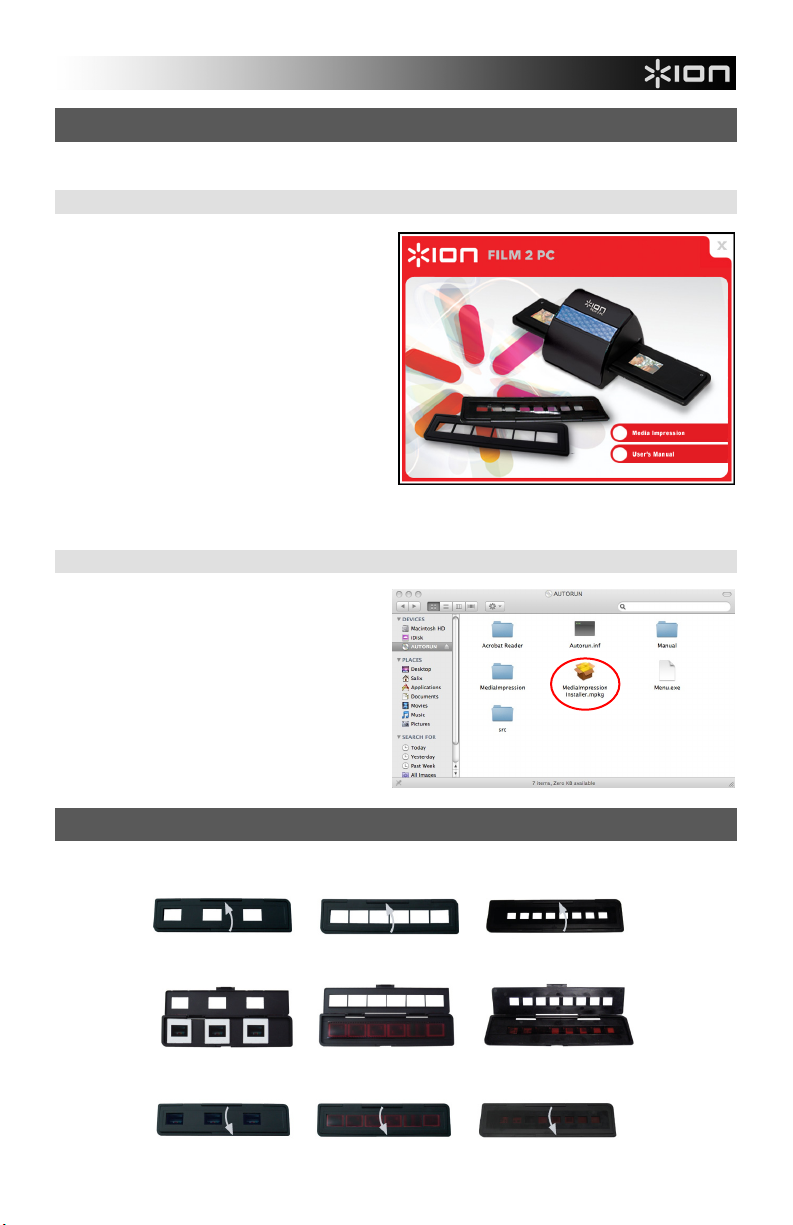
SOFTWARE INSTALLATION
To use the FILM 2 PC you must install ArcSoft MediaImpression in advance.
SOFTWARE INSTALLATION (WINDOWS)
Note: Please "REMOVE" any prior version of
MediaImpression before installing this version.
1. Insert the installation CD into the CD-ROM
drive and the installation CD menu should
appear.
2. When you see the following screen, choose
"Install MediaImpression" to install the
software.
3. Follow the on-screen instructions.
4. The installed software will automatically
create a MediaImpression logo on your
desktop.
5. Restart the computer.
SOFTWARE INSTALLATION (MAC)
1. Insert the installation CD into the CD-ROM
drive and the click the CD icon.
2. Double-click "MediaImpression Installer."
3. Follow the on-screen instructions.
USING THE INCLUDED HOLDERS
1. Open the holder as Illustrated.
2. Put a negative film / positive slide into holder as shown.
3. Close the holder and please make sure the holder closes properly.
5
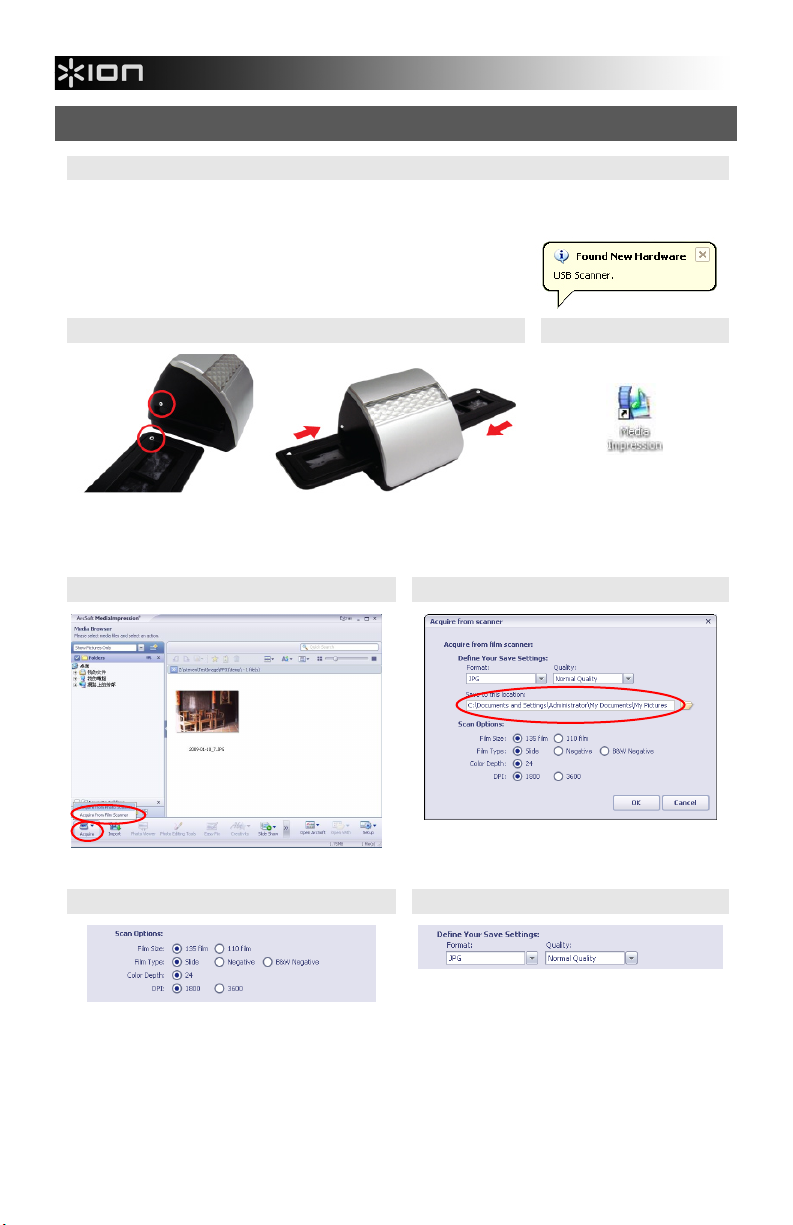
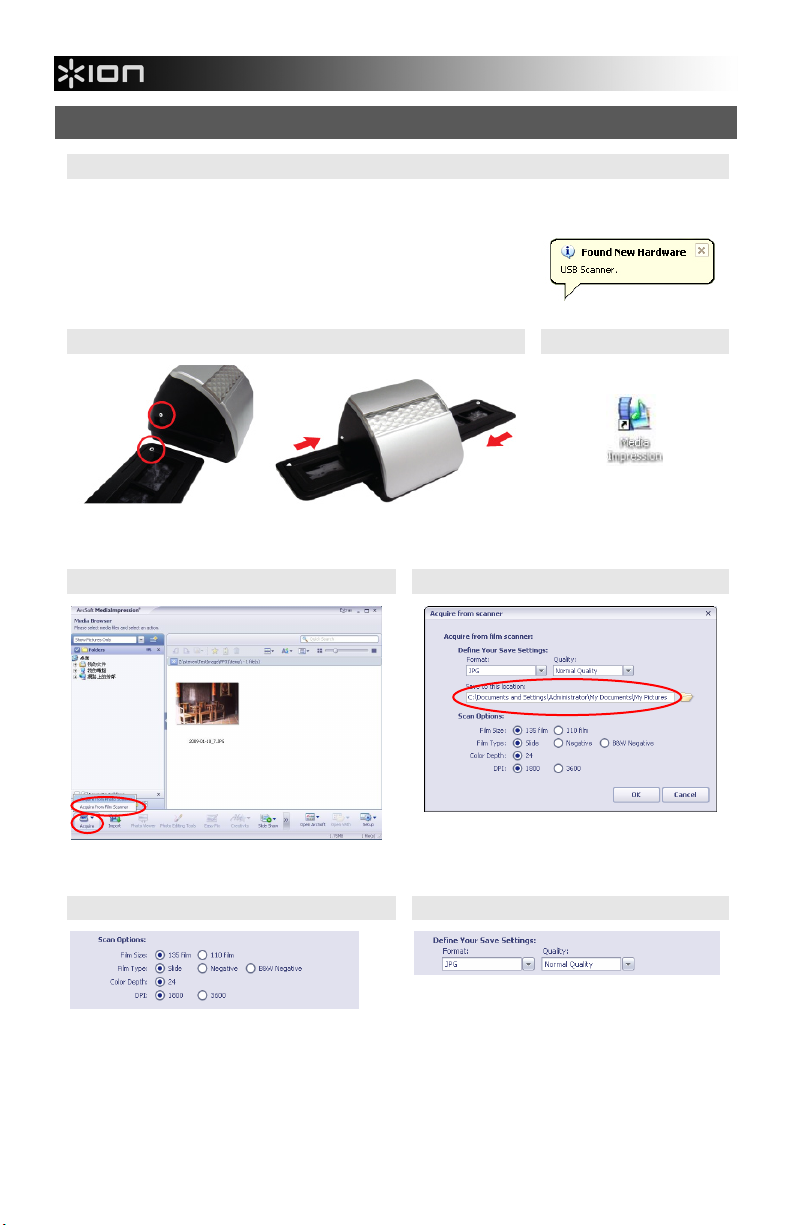
USING THE FILM 2 PC
1
Plug the USB cable of the FILM 2 PC into your computer’s USB port. Once connected, the power LED
light will be blue.
Note: The first time you connect FILM 2 PC to your computer, wait a few
seconds until you see a dialog box that says "Found New Hardware" (this
means the computer recognizes the FILM 2 PC). After you see this,
FILM 2 PC is ready to use.
2
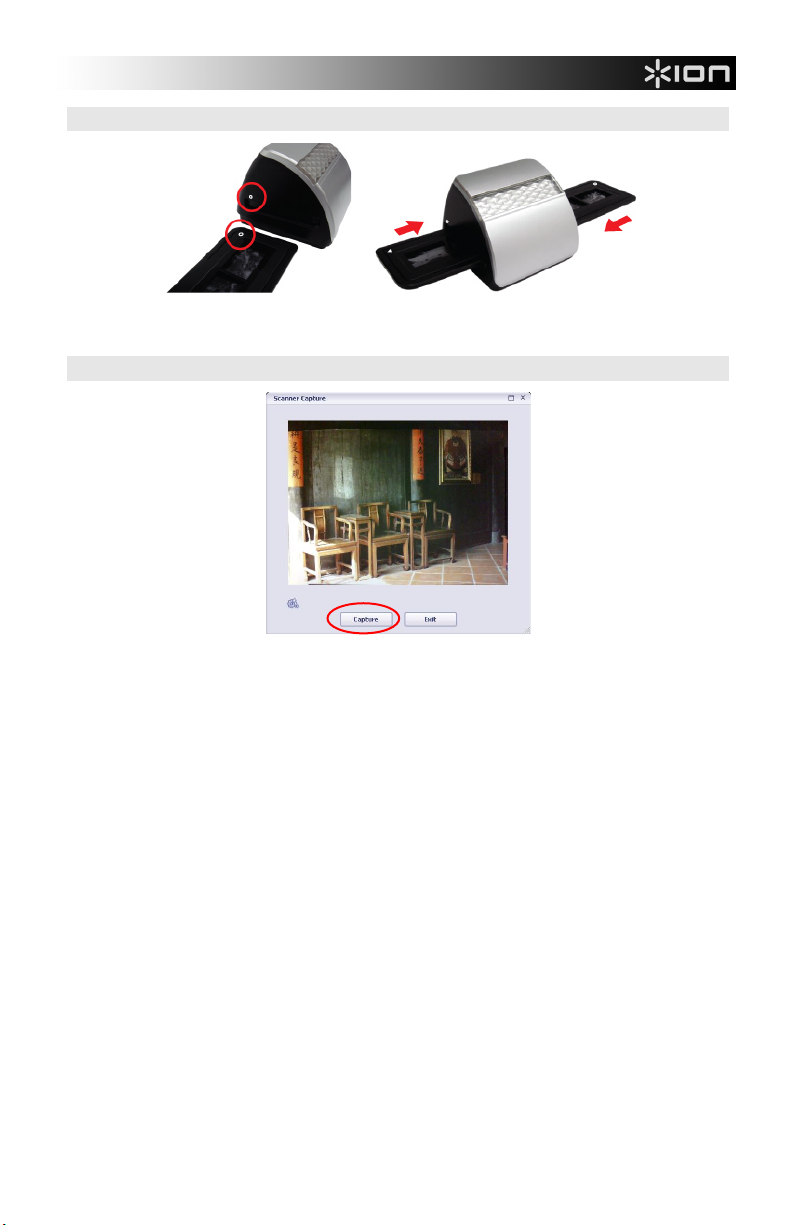
Insert the loaded film / slide holder properly into the slot as shown.
(Insert through front entrance)
4
Click "Acquire" and choose "Acquire from Scanner."
5b
5a
Select the location to save your pictures.
5c
3
Click on the
MediaImpression icon on the
desktop and you will see the
following.
Select the proper film size and film type.
Select the format in which you want to save your
images: JPG or TIF. (You can also select the
image quality.)
6
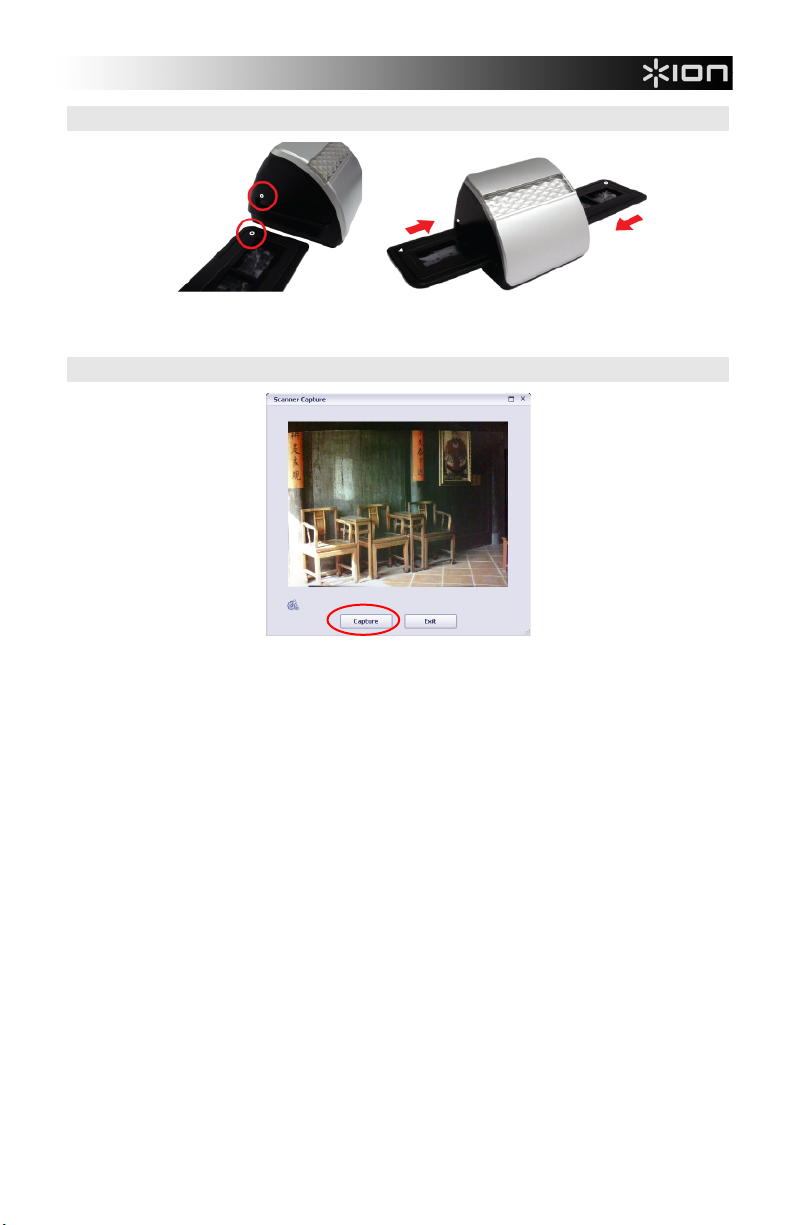
6
You can adjust the location of the film by moving the film holder; the film holder can be moved in both
directions. (Insert through rear entrance.)
7
Press the "Capture" button to transfer or save selected pictures to your computer. Press "Exit" to exit.
Note1: To ensure the best image quality, please allow about 5 seconds between snapshots and transfers
for white balance enhancement.
Note2: Please do not minimize the window of scanning screen after transferring the pictures. If you want
to see the scanned pictures, click EXIT and you will see the picture you scanned before.
7

EDITING YOUR PICTURES
First, click on the picture to select it; then use the ArcSoft tools to edit the pictures as you wish. The Photo
Editing Tools module includes a complete set of photo enhancement, editing and retouching controls. The
windows can be stretched to provide a large size view of the active photo. Double click the module’s tool bar
to maximize the window to fill the computer screen. In addition to the large photo workspace, the Photo
Editing Tools module includes five distinct sets of controls:
ADJUST
ENHANCE – The Enhance feature includes two types of controls:
AUTO ENHANCE –
pictures with a single click.
MANUAL FIX - For precise image enhancement control, adjust the brightness, contrast and sharpen
sliders.
How to enhance a photo manually:
1. Move the sliders to adjust the level of brightness, contrast, saturation, hue and sharpen for
adjustment.
2. Use the zoom slider to get a closer look at how the adjustment affects the photo.
3. Click "Apply" if you like the result. Click "Cancel" if you do not.
COLOR – This feature is designed to fix digital photos that have unnatural color or appear too dark. It’s also
great for fixing scanned versions of old prints that have faded or whose colors have changed after many
years.
How to fix the color of a photo:
1. Drag the color balance sliders to make the photo color appear more natural. Add red or yellow to
make the photo warmer. Add blue or green to make the photo cooler.
2. Drag the Lighter/Darker slider to the left to reveal details hidden in a dark photo or to the right to
make a faded photo look new again.
3. Click "Apply" if you like the result. Clock "Cancel" if you do not.
RED-EYE – This feature makes it easy for you to fix a red-eye – a common problem in flash photography.
There are two ways to fix red-eye:
AUTO FIX
1. Simply click the "Fix Red-Eye" button to automatically find the fix all red-eye.
2. If not all of the red eye is fixed, use the "Click to Fix" method.
MANUAL FIX
1. Use the zoom slider on the toolbar to zoom in on the photo.
2. Drag the small white box inside the zoom navigator to move over a red eye.
3. Place your cursor directly over the red eye and click.
4. Repeat the process until all the red eyes are fixed.
5. Click "Undo" if you make a mistake or don’t like the result.
Click the "Auto Enhance" button to improve the overall quality of your
8

CROP – This feature enables you to trim photos for a dramatic effect or cut off the distracting parts of a
picture. This feature enables you to trim photos for dramatic effect or cut off the distracting parts of a picture.
How to use the crop function:
1. Choose the crop orientation (portrait or landscape).
2. Select a fixed proportion for the crop rectangle (4:6, 5:7, 8:10) or choose "Custom" if you want to
use a different proportion.
3. Resize the crop rectangle by clicking and dragging the red lines.
4. Move the crop rectangle into position by clicking and dragging inside the red box.
5. Click "Crop". The area inside the rectangle will be kept, the area outside will be trimmed away.
6. Click "Undo" if you make a mistake or don’t like the result.
STRAIGHTEN – This feature enables you to fix photos that appear to be tilted.
How to use Straighten:
1. Move the slider (or click the rotate buttons) until the photo appears straight.
2. Use the superimposed grid lines for vertical and horizontal reference.
3. Click "Apply" if you like the result. Click "Cancel" if you do not.
BLUR BACKGROUND – This feature can be used in subtle way – to tone down un-important background
details, or for dramatic effect by making the main subject of a photo "pop out" of the picture.
How to use the Blur Background function:
1. With your cursor, trace a line around the person or object you want to strand out. When you
release the mouse button, the area outside the traced line will become slightly blurred.
2. Drag the first slider to make the transition between the blurred and non blurred area sharp or
smooth.
3. Drag the second slider to increase or decrease the amount of blur.
4. Click "Apply" if you like the result. Click "Cancel" if you do not.
SAVING YOUR RESULTS – When you’re done editing a photo, click "Save as" to save your results. You can
choose to overwrite the original file or save a new one. Click "Close" to exit the Photo Editing Module.
9

RETOUCH
HEALING BRUSH – The Healing Brush is good for fixing dust, scratches and removing skin
blemishes.
How to use the Healing Brush to fix a skin blemish:
1. Establish a source point for the Healing Brush by holding the Shift key and clicking on an area of
the skin that is close in color and texture to the area you want to heal.
2. Use the zoom control to zoom in on the blemish.
3. Adjust the size of the healing brush so the cursor (circle) is only slightly larger than the blemish.
4. Paint over the blemish. The area will be concealed. Click "Undo" if you make a mistake or don’t
like the result.
CLONE – The Clone tool is good for the removing unwanted elements from a photo. It can also
be used for a fun effect, like moving a nose from one person t another.
How to use the Clone tool to remove a telephone pole from the background of a photo:
1. Establish a source point for the Clone tool by holding the Shift key and clicking on an area of the
sky that you want to use to paint over the telephone pole.
2. Adjust the brush size so the cursor (circle) is only slightly larger than the widest part of the
telephone pole.
3. Click and hold your mouse button and carefully paint over the telephone pole. Do not release the
mouse button until the job is done. The sky will be cloned into place.
4. Click "Undo" if you make a mistake or don’t like the result.
LIGHTEN/DARKEN – The Light/Darken tool is good for adjusting specific areas of a photo.
SMUDGE – Simulate the smearing of wet paint. Please click and drag the sliders below to
change the brush size and sharpness.
SHARPEN – Sharpen blurry areas. Click and drag the sliders below to change the brush size and
transparency.
BLUR – Smooth out rough areas. Click and drag the sliders below to change the brush size and
intensity.
PAINT BRUSH – Allows you to "paint" on your image when you click and drag the mouse. Click
and drag the sliders below to change the brush size and transparency.
LINE – Draw a straight line in the photo. Click and drag the sliders below to change the line width
and transparency.
ERASER – Simulate an eraser, removing the image painting by paintbrush and line tools from
your photo. Click and drag the sliders below to change the eraser size and effect.
CLIPBOARD
Clip the pictures by selecting Rectangular, Elliptical, Freehand, Magic want and Magnetic.
Note: For more detailed information, please refer to the [Help section] of program.
10

x
p
p
)
x
APPENDIX
SPECIFICATIONS
Image Sensor 1/4" 3 mega CMOS sensor,
Lens Specification F=2.8, f=3.42, 4P
Color Balance Automatic
E
osure Control Automatic
Supported film size auto-cropping 135 film (36mm x 24mm)
Supported film size auto-convertingSlide; color negative film; black/white negative film
Frame Rate 2592x1680 pixels @7.5 fps
Focus Range Fixed focus
PC interface USB 2.0
Scan High Resolution 1,120 dpi (enhances to 1,800/3,600 dpi via interpolation)
Data Conversion 24-bit RGB color channel (48-bit color depth option in software)
Light Source Back Light 3 white LED
Power From USB
Dimension 10(L
Bundled Software ArcSoft MediaImpression
Specifications are subject to change withoutprior notice.
SYSTEM REQUIREMENTS
PC:
Pentium® 4 1.6 GHz or equivalent AMD
Athlon
Free USB2.0 port
512MB RAM internal memory minimum
500MB free hard disk space
800 x 600 color monitor
CD-ROM drive
NVIDIA Geforce MX400 or above, AMD (ATI)
Radeon 9200 or above
Direct X 9.0 or higher
Windows XP Service Pack 2 or Vista
UVC (driver-free)
110 film (17mm x 13mm)
ort
7.65 (H) x 9.25 (W) cm
MAC:
Power PC G5 or Intel Core Duo processor
recommended
Free USB2.0 port
768MB RAM internal memory minimum
500MB free hard disk space
800 x 600 color monitor
CD-ROM drive
Direct X 9.0 or higher
Mac OS X 10.4.3 or higher
11
TROUBLESHOOTING
ISSUE POSSIBLE CAUSE RESOLUTION
My computer does not
recognize the FILM 2 PC.
I get a Windows message
that reads "device not
recognized"
I have a USB 2.0 port on my
computer, but my computer
still won't recognize my
image copier
My installation disc will not
auto start
Warning from Windows that
device "has not passed
Microsoft logo testing".
My FILM 2 PC is working but
some of my slides or
negatives look overexposed.
There is a black border
around the edge of the
image.
This symbol on the product or in the instructions means that your electrical and electronic
equipment should be disposed at the end of its life separately from your household waste.
There are separate collection systems for recycling in the EU. For more information, please
contact the local authority or your retailer where you purchased the product.
FILM 2 PC not plugged
into a high-speed USB
port.
All ports on your computer
may not be high speed.
May be a problem with
your CD drive.
This is normal. OK to
continue.
Time for auto exposure
varies according to your
computer configuration.
The slide or film might not
be properly inserted in the
holder, or the holder might
not be fully inserted into
the FILM 2 PC.
Your computer must have a USB 2.0 to
communicate with your FILM 2 PC. Check to
see if USB 2.0 is installed on your computer. If
you do not have a USB 2.0 installed on your
computer you can upgrade your USB ports.
This hardware is available at most electronic
stores.
Even though you may have USB 2.0 installed,
all of your USB ports may not be USB 2.0
compatible. Check all your USB ports to find
the 2.0 compatible ports.
Check to see if your CD drive is operating
properly. If possible, check another
computer to see if the disc is recognized.
If you are able to browse the contents of the
CD but the installation does not start
automatically, please double-click on
Install.exe.
Choose "Continue anyway".
The image copier will not harm your computer.
(Windows certification is in process for this
software)
The image copier self adjusts to your
slide/negative exposure. Wait for the live
view window to stop adjusting for exposure
and then click "Capture."
Check your slides or negatives to see if they
may have been overexposed when originally
developed. Several photo adjusting software
applications are available to "clean-up" your
newly digitized picture.
Remove the holder from FILM 2 PC and make
sure the slide or film is placed correctly in the
holder. Reinsert the holder into FILM 2 PC (it
should click into place when inserted
properly).
If you still see a black border, you can use the
software to crop the photo (see "Editing Your
Pictures").
12

BIENVENIDO
Gracias por adquirir un escáner de películas y diapositivas FILM 2 PC. Tómese un momento para leer este
manual a fin de obtener lo máximo de su FILM 2 PC.
PRECAUCIONES
Antes de usar el FILM 2 PC, asegúrese de leer y entender las precauciones de seguridad descritas a
continuación. Asegúrese siempre de operar correctamente el FILM 2 PC:
Nunca opere el FILM 2 PC dentro de una aeronave ni en ningún otro lugar donde la operación de tales
dispositivos esté restringida. El uso incorrecto crea el riesgo de graves accidentes.
No trate de abrir la cubierta del FILM 2 PC ni intente modificarlo de ninguna manera. Los componentes
internos de alta tensión crean el riesgo de electrocución cuando están expuestos. El mantenimiento y
las reparaciones deben realizarlos únicamente proveedores de servicio autorizados.
Mantenga el FILM 2 PC lejos del agua y de otros líquidos. No use el FILM 2 PC con las manos
mojadas. Nunca use FILM 2 PC en la lluvia o la nieve. La humedad crea el peligro de incendio y
electrocución.
Mantenga el FILM 2 PC y sus accesorios fuera del alcance de los niños y los animales, a fin de prevenir
accidentes o daños a la copiadora de imágenes.
Si nota que sale humo o un olor extraño del FILM 2 PC, apáguelo inmediatamente. Lleve el FILM 2 PC
a centro de servicio autorizado más cercano para que lo reparen. Nunca intente reparar el FILM 2 PC
usted mismo.
Use únicamente los accesorios de alimentación recomendados. El uso de fuentes de alimentación no
recomendadas expresamente para el FILM 2 PC puede causar recalentamiento, deformación del
equipo, incendio, electrocución u otros riesgos.
El FILM 2 PC puede calentarse ligeramente durante el uso. Esto no indica falla
Si el exterior del FILM 2 PC necesita limpieza, pásele un paño blando y seco.
AVISO DE LA FCC
Este equipo fue probado y se comprobó que cumple los límites correspondientes a un dispositivo digital
clase B, según la Parte 15 de las reglamentaciones de la FCC. Estos límites están diseñados para
proporcionar una razonable protección contra las interferencias perjudiciales en una instalación residencial.
Este equipo genera, usa y puede irradiar energía de radiofrecuencia. Si no se instala y usa de acuerdo con
las instrucciones, puede causar interferencias perjudiciales a las radiocomunicaciones. No obstante, no
existe garantía de que no se produzcan interferencias en una instalación particular. Si este equipo causa
interferencias perjudiciales a la recepción de radio o televisión, lo que puede comprobarse encendiendo y
apagando el equipo, se recomienda al usuario intentar corregir la interferencia mediante una o más de las
siguientes medidas:
Reorientar o cambiar de posición la antena receptora.
Aumentar la separación entre el equipo y el receptor.
Conectar el equipo a un tomacorriente diferente al que está conectado el receptor.
Consultar a un técnico experimentado de televisión o radio para solicitar asistencia.
PRECAUCIÓN: Para cumplir con los límites correspondientes a un dispositivo digital clase B, de
acuerdo a la Parte 15 de las Reglas de la FCC, este dispositivo debe instalarse sólo en equipos
de computación certificados en cuanto al cumplimiento de los límites de la clase B.
13
CONTENIDO DE LA CAJA
FILM 2 PC
SOPORTE DE DIAPOSITIVAS
CD DE SOFTWARE
SOPORTE DE PELICULA
CEPILLO DE LIMPIEZA
SOPORTE DE PELICULA 110
CARACTERÍSTICAS DEL FILM 2 PC
1. LED DE ENCENDIDO
2. CABLE USB
3. RANURA PARA EL SOPORTE DE PELÍCULA O
DIAPOSITIVAS
Nota: Recomendamos especialmente usar un hisopo de algodón seco, sin alcohol, para insertar en la ranura
de la copiadora de imágenes y limpiar la superficie de vidrio periódicamente, a fin de lograr imágenes claras.
Asegúrese de que sus negativos y diapositivas montadas y las bandejas estén limpias antes de insertarlas
en la copiadora. El polvo o la suciedad de los negativos y las bandejas pueden afectar a la calidad de las
imágenes escaneadas.
4. CEPILLO DE LIMPIEZA
5. SOPORTE DE DIAPOSITIVAS
6. SOPORTE DE PELICULA
7. SOPORTE DE PELICULA 110
14
INSTALACIÓN DEL SOFTWARE
Para usar el FILM 2 PC, debe instalar previamente el programa ArcSoft MediaImpression.
INSTALACIÓN DEL SOFTWARE (WINDOWS)
Nota: "BORRE" cualquier versión anterior de
MediaImpression antes de instalar esta versión.
1. Inserte el CD de instalación en el lector de
CD-ROM —debe aparecer el menú de
instalación del CD.
2. Cuando vea la pantalla siguiente, seleccione
"Install MediaImpression" para instalar el
software.
3. Siga las instrucciones de la pantalla.
4. El software instalado creará automáticamente
un logotipo de MediaImpression en su
escritorio.
5. Reinicie la computadora.
INSTALACIÓN DEL SOFTWARE (MAC)
1. Inserte el CD de instalación en el lector de
CD-ROM y haga clic en el icono del CD.
2. Haga doble clic en "MediaImpression
Installer".
3. Reinicie la computadora.
CÓMO USAR LOS SOPORTES INCLUIDOS
1. Abra el soporte de negativos / diapositivas como se ilustra.
2. Coloque una película de negativos o diapositiva en el soporte como se muestra.
3. Cierre el soporte asegurándose de que cierre correctamente.
15
CÓMO USAR EL FILM 2 PC
1
Enchufe el cable USB del FILM 2 PC en el puerto USB de su computadora. Una vez conectado, el LED
de encendido se ilumina con luz azul.
Nota: La primera vez que conecte FILM 2 PC a la computadora, espere
algunos segundos hasta ver un cuadro de diálogo que diga "Found New
Hardware" (Encontrado nuevo hardware) (esto significa que la
computadora reconoce el FILM 2 PC). Cuando lo vea, FILM 2 PC está
listo para usar.
2
Inserte el soporte de película / diapositivas cargado correctamente en la
ranura, como se muestra. (Insértelo a través de la entrada delantera).
4
Haga clic en "Acquire" (Adquirir) y seleccione
"Acquire from Scanner" (Adquirir del escáner).
5b
5a
Seleccione el lugar donde guardará sus
fotografías.
5c
3
Haga clic en el icono de
MediaImpression del
escritorio y verá lo siguiente.
Seleccione el tamaño y tipo de película apropiados.
Seleccione el formato en el que desea guardar
sus imágenes: JPG o TIF. (También puede
seleccionar la calidad de imagen.)
16
6
Puede ajustar la ubicación de la película moviendo el soporte, que se puede desplazar en ambos
sentidos). (Insértelo a través de la entrada trasera).
7
Pulse el botón "Capture" para transferir o guardar las fotografías seleccionadas en su computadora.
Pulse "Exit" para salir.
Nota 1: Para asegurar la mejor calidad de imagen, espere 5 segundos entre instantáneas y
transferencias, para mejorar el balance de blancos.
Nota 2: No minimice la ventana de la pantalla de escaneo después de transferir las fotografías. Si desea
ver las fotografías escaneadas, haga clic en EXIT y verá la que escaneó previamente.
17

CÓMO EDITAR LAS FOTOGRAFÍAS
En primer lugar, haga clic en la fotografía para seleccionarla y luego use las herramientas ArcSoft para
editarla como desee. El módulo Photo Editing Tools incluye un conjunto completo de controles de mejora,
edición y retoque de fotografías. Las ventanas se pueden ampliar para brindar una vista de gran tamaño de
la foto activa. Haga doble clic en la barra de herramientas del módulo para maximizar la ventana y llenar la
pantalla de la computadora. Además del amplio espacio de trabajo con las fotos, el módulo Photo Editing
Tools incluye cinco conjuntos distintos de controles:
AJUSTE
ENHANCE (Mejora) – Esta función incluye dos tipos de controles:
AUTO ENHANCE (Mejora automática) – Haga clic en el botón
mejorar la calidad general de sus fotografías con un solo clic.
MANUAL FIX (Arreglo manual) – Para lograr un control preciso de la mejora de imagen ajuste los
cursores de brillo, contraste y nitidez.
Cómo mejorar manualmente una fotografía:
1. Mueva los cursores para ajustar el nivel de brillo, contraste, saturación, tinte y nitidez.
2. Use el cursor de zoom para lograr una vista más cercana de cómo afectan los controles a la foto.
3. Haga clic en "Apply" (Aplicar) si le gusta el resultado. Haga clic en "Cancel" (Cancelar) si no le
gusta.
COLOR – Esta función está diseñada para reparar las fotos digitales que tienen colores poco naturales o
son demasiado oscuras. Es también ideal para reparar versiones escaneadas de viejas impresiones que se
han descolorido o cuyos colores cambiaron después de muchos años.
Cómo reparar el color de una foto:
1. Arrastre los cursores de balance de color para hacer que el color de la foto parezca más natural.
Agregue rojo o amarillo para hacer la foto más cálida. Agregue azul o verde para hacerla más
fría.
2. Arrastre el cursor de aclarar/oscurecer a la izquierda para revelar detalles ocultos en una foto
3. Haga clic en "Apply" (Aplicar) si le gusta el resultado. Haga clic en "Cancel" (Cancelar) si no le
RED-EYE (Ojos rojos) – Esta función permite reparar fácilmente los ojos rojos, un problema común de la
fotografía con flash. Hay dos maneras de reparar los ojos rojos:
REPARACIÓN AUTOMÁTICA
1. Simplemente haga clic en el botón "Fix Red-Eye" para encontrar y reparar automáticamente
2. Si no se reparan todos los ojos rojos, use el método "Click to Fix" (Hacer clic para reparar).
oscura o a la derecha para hacer que una foto descolorida parezca otra vez nueva.
gusta.
todos los ojos rojos.
"Auto Enhance" para
18

REPARACIÓN MANUAL
1. Use el cursor de zoom de la barra de herramientas para acercar la foto.
2. Arrastre el recuadro blanco pequeño que está dentro del navegador de zoom para llevarlo sobre
el ojo rojo.
3. Coloque su cursor directamente sobre el ojo rojo y haga clic.
4. Repita el proceso hasta que repare todos los ojos rojos.
5. Haga clic en "Undo" (Deshacer) si comete un error o no le gusta el resultado.
CROP (Recortar) – Esta función le permite recortar las fotos para lograr un efecto destacado o cortar las
partes innecesarias de una imagen. Esta función le permite recortar las fotos para lograr un efecto
destacado o cortar las partes innecesarias de una imagen. Cómo usar la función de recorte:
1. Elija la orientación del recorte (vertical o apaisada).
2. Seleccione una proporción fija para el rectángulo de recorte (4:6, 5:7 ó 8:10) o elija "Custom"
(Personalizado) si desea usar una proporción diferente.
3. Redimensione el rectángulo de recorte haciendo clic y arrastrando las líneas rojas.
4. Mueva el rectángulo de recorte a su posición haciendo clic y arrastrando adentro del recuadro
rojo.
5. Haga clic en "Crop" (Recortar). Se mantendrá el área interior del rectángulo y se recortará la
exterior.
6. Haga clic en "Undo" (Deshacer) si comete un error o no le gusta el resultado.
STRAIGHTEN (Enderezar) – Esta función le permite reparar las fotos que parecen estar inclinadas. Cómo
usar la función de enderezar:
1. Mueva el cursor (o haga clic en los botones de girar) hasta que la foto parezca derecha.
2. Use las líneas de grilla superpuestas como referencia vertical y horizontal.
3. Haga clic en "Apply" (Aplicar) si le gusta el resultado. Haga clic en "Cancel" (Cancelar) si no le
gusta.
BLUR BACKGROUND (Borrosidad del fondo) – Esta función se puede usar de manera sutil —para bajar el
tono de los detalles sin importancia del fondo o para lograr un efecto destacado, haciendo que el objeto
principal de una foto "salte" de la imagen. Cómo usar la función de borrosidad del fondo:
1. Con el cursor, trace una línea alrededor de la persona u objeto que desea destacar. Cuando
suelte el botón del mouse, el área exterior de la línea trazada se pondrá ligeramente borrosa.
2. Arrastre el primer cursor para hacer que la transición entre el área borrosa y no borrosa sea
nítida o suave.
3. Arrastre el segundo cursor para aumentar o disminuir la magnitud de la borrosidad.
4. Haga clic en "Apply" (Aplicar) si le gusta el resultado. Haga clic en "Cancel" (Cancelar) si no le
gusta.
CÓMO GUARDAR LOS RESULTADOS – Cuando termine de editar la foto, haga clic en "Save as" (Guardar
como) para guardar sus resultados. Puede elegir sobreescribir el archivo original o guardar uno nuevo. Haga
clic en "Close" (Cerrar) para salir del módulo de edición de fotos.
19

RETOQUE
HEALING BRUSH ("Curita") – La bandita o "curita" es ideal para reparar polvo, rayaduras y
eliminar manchas de la piel. Cómo usar la bandita para reparar una mancha de la piel:
1. Establezca un punto fuente para la bandita manteniendo pulsada la tecla Shift y haciendo clic en
un área de la piel que sea de color y textura simulares a los del área que desea reparar.
2. Use el control de zoom para acercar la mancha.
3. Ajuste el tamaño de la bandita de modo que el cursor (círculo) sea sólo ligeramente más grande
que la mancha.
4. Pinte sobre la mancha. El área quedará oculta. Haga clic en "Undo" (Deshacer) si comete un
error o no le gusta el resultado.
CLONE – La herramienta Clone es útil para remover los elementos no deseados de una foto.
También se puede usar para efectos divertidos, como pasar una nariz de una persona a otra.
Cómo usar la herramienta Clone para sacar un poste telefónico del fondo de una foto:
1. Establezca un punto fuente para la herramienta Clone manteniendo pulsada la tecla Shift y
haciendo clic en un área del cielo que desea usar para pintar sobre el poste telefónico.
2. Ajuste el tamaño del pincel de modo que el cursor (círculo) sea sólo ligeramente mayor que la
parte más ancha del poste telefónico.
3. Haga clic y mantenga pulsado el botón del mouse y pinte cuidadosamente sobre el poste
telefónico. No suelte el botón del mouse hasta que el trabajo esté terminado. El cielo se clonará
en el sitio.
4. Haga clic en "Undo" (Deshacer) si comete un error o no le gusta el resultado.
LIGHTEN/DARKEN (Aclarar/oscurecer) – La herramienta de aclarar/oscurecer es útil para
ajustar áreas específicas de la foto.
SMUDGE (Mancha) – Simula la mancha de la pintura fresca. Haga clic y arrastre los cursores de
abajo para cambiar el tamaño y la nitidez de la mancha.
SHARPEN (Nitidez) – Aumenta la nitidez de las áreas borrosas. Haga clic y arrastre los cursores
de abajo para cambiar el tamaño y la transparencia del área.
BLUR (Borronear) – Suavizar las áreas ásperas. Haga clic y arrastre los cursores de abajo para
cambiar el tamaño y la intensidad del área.
PAINT BRUSH (Pincel) – Permite "pintar" sobre su imagen cuando hace clic y arrastra el mouse.
Haga clic y arrastre los cursores de abajo para cambiar el tamaño y la transparencia del pincel.
LINE (Línea) – Dibuja líneas rectas en la foto. Haga clic y arrastre los cursores de abajo para
cambiar el ancho y la transparencia de la línea.
ERASER (Goma de borrar) – Simula una goma de borrar, eliminando lo pintado en la imagen con
el pincel y las herramientas de líneas de su foto. Haga clic y arrastre los cursores de abajo para
cambiar el tamaño y el efecto de la goma de borrar.
PORTAPAPELES
Recorte las fotos seleccionando Rectangular, Elíptica, Mano libre, Varita mágica y Magnético.
Nota: Para más información, consulte la [sección Ayuda] del programa.
20
 Loading...