

Page 1

COPY CAT
HANDHELD DOCUMENT SCANNER
QUICKSTART GUIDE
::: ENGLISH ( 2 – 8 ) :::
MANUAL DE INICIO RÁPIDO
::: ESPAÑOL ( 9 – 15 ) :::
GUIDE D’UTILISATION RAPIDE
::: FRANÇAIS ( 16 – 22 ) :::
::: ITALIANO ( 23 – 29 ) :::
::: DEUTSCH ( 30 – 36 ) :::
::: NEDERLANDS ( 37 – 43 ) :::
GUIDA RAPIDA
KURZANLEITUNG
SNELSTARGIDS
Page 2
9
2
10
2
* Note: Though COPY CAT can be
used on both PCs and Macs,
ABBYY Screenshot Reader
software is PC-compatible only.
1
BOX CONTENTS
COPY CAT Bag
2 AA batteries Software CD *
USB cable Quickstart Guide
Cleaning cloth Safety Instructions & Warranty Information
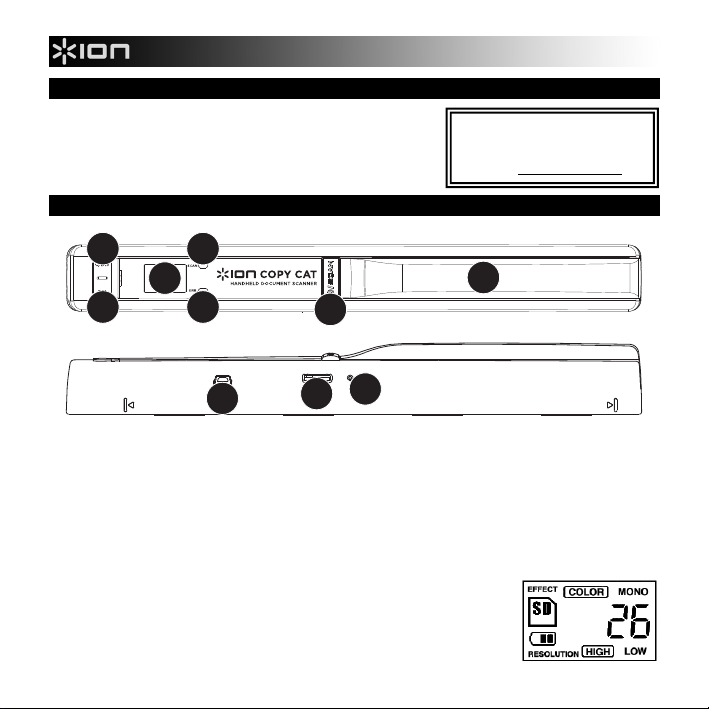
FEATURES
6
3
5
7
4
8
1. BATTERY COMPARTMENT – Slide and remove the handle's plastic cover to reveal the battery
compartment. Use 2 AA batteries to power COPY CAT. Be sure to insert them in the correct direction in
the compartment.
2. POWER / SCAN BUTTON – Press and hold this button to turn COPY CAT on or off. To scan a document,
press the button once so the green SCAN LIGHT turns on, drag COPY CAT steadily across the document
you want to scan, then press the button again to the SCAN LIGHT turns off. See HOW TO SCAN A
DOCUMENT for more information.
3. SCAN LIGHT – This light will illuminate green when COPY CAT is scanning a document.
4. ERROR LIGHT – This light will illuminate red if the document was being scanned too quickly. If this
happens, scan your document again more slowly.
5. LCD – Displays COPY CAT's status information. "EFFECT" refers to the
C/BW BUTTON setting ("COLOR" or "MONO"). An SD icon will appear
when a microSD card is inserted in the SD CARD SLOT. The battery icon
tells you how much battery power is remaining. The number shown tells you
how many scanned documents are on the microSD card. "RESOLUTION"
refers to the DPI BUTTON setting ("HIGH" or "LOW").
Page 3

6. C/BW BUTTON – Press this button to select whether your scans will be in color or black and white. The
LCD will show the current mode: "COLOR" or "MONO" (black and white).
7. DPI BUTTON – Press this button to select the resolution ("dpi" or "dots per inch") of your scans. The LCD
will show "LOW" (300dpi) or "HIGH" (600dpi).
8. USB CONNECTION – Connect this jack to a free USB port on your computer using the included USB
cable. Once connected and powered on, COPY CAT will act as an SD card reader so you can transfer
your scans to your computer. See HOW TO TRANSFER SCANS for more information.
Note: When connected to your computer, COPY CAT will be powered by the USB connection, which will
not drain its batteries.
9. microSD CARD SLOT – Gently insert a microSD card
into this slot until it clicks into place. Your scans will be
saved to the card. To eject the card, push it all the way
into the slot until it clicks, then pull it out. When
connected to your computer, COPY CAT will act as an SD card reader so you can transfer your scans to
your computer. See HOW TO TRANSFER SCANS for more information.
10. FORMAT BUTTON – Press this button to format an inserted microSD card. (This will erase its contents.)
HOW TO SCAN A DOCUMENT
To scan a document, follow these steps:
1. Press and hold down the SCAN BUTTON to turn on
COPY CAT. You will see information displayed on the
LCD when COPY CAT is powered on.
2. Place COPY CAT on top of your document. Be sure the
scanning lens on the bottom is fully on the document
and not tilted or obstructed.
3. Press the SCAN BUTTON once to start the scanning
process. The green SCAN LIGHT will turn on when
scanning has begun.
4. Steadily drag COPY CAT across the length of the document, top to bottom. We recommend holding the
document firmly in place so it does not shift around while being scanned. (If the red ERROR LIGHT turns
on during the process, it means the document was scanned too quickly. Press the SCAN BUTTON once
and start again from Step #2.)
5. Once you have reached the end of the document, press the SCAN BUTTON once. The green SCAN
LIGHT will turn off.
6. If you want to scan more documents, repeat Steps #2 – 5. If you want to transfer your scans to your
computer, see the HOW TO TRANSFER SCANS section. Otherwise, press and hold down the SCAN
BUTTON to turn off COPY CAT.
To use COPY CAT, you will need to
purchase a microSD card.
To use COPY CAT, you will need to
purchase a microSD card separately.
For tips onacquiring the clearest scans
and achieving the best results using the
text recognition feature in the software,
please see the TEXT RECOGNITION
TIPS section in this manual.
3
Page 4

HOW TO TRANSFER SCANS
When COPY CAT is connected to your computer, it functions as a microSD card-reader, allowing you to transfer
your scans from a microSD card to your computer. Follow these steps to do this:
1. Connect the small end of the included USB cable to COPY CAT's USB CONNECTION jack and connect
the other end to a free USB port on your computer. (Make sure your computer is on and a microSD card is
inserted into the microSD CARD SLOT.)
2. Press and hold down the SCAN BUTTON to turn on COPY CAT. You will see "USB" displayed on the LCD
when COPY CAT is powered on and functioning as a microSD card-reader.
3. If you are using a PC, a window will appear asking you how you want to access your files. Select "Open
folder to view files" to access the contents of COPY CAT's microSD card. (Once you are conncted,
COPY CAT will also be listed as a drive in "My Computer" (XP and Vista) or in "Computer" (Windows 7).)
If you are using a Mac, double-click the "Untitled" drive icon that appears on the Mac's Desktop to access
the contents of COPY CAT's microSD card.
4. Double-click the "DCIM" folder, then double-click the "100MEDIA" folder. Your scans are all saved to the
microSD card as .JPGs. Click and drag these files onto your computer. (You can also delete files from the
microSD card as you would normally delete files from your computer.)
5. When you are done transferring your scans, close the window and press and hold down the SCAN
BUTTON to turn off COPY CAT. When COPY CAT is turned off, you may disconnect it from your
computer.
HOW TO USE THE SOFTWARE (PC ONLY)*
COPY CAT comes with ABBYY Screenshot Reader, a software
application that can take screenshots of your computer and recognize
text within an image, allowing you to copy and paste it elsewhere.
This means you can use COPY CAT to scan a page of text, transfer it
to your computer, then use ABBYY Screenshot Reader to copy the
text so you can paste it into an e-mail, text file, Microsoft Word
document, etc.
First, install ABBYY Screenshot Reader:
1. Insert the included software CD into your computer's CD drive.
2. Open My Computer and double-click the ScreenshotReader disc.
3. In the window that appears, select your language from the drop-down menu and click OK.
4. Follow the on-screen instructions.
* Note: Though COPY CAT can be
used on both PCs and Macs,
ABBYY Screenshot Reader
software is PC-compatible only.
4
Page 5
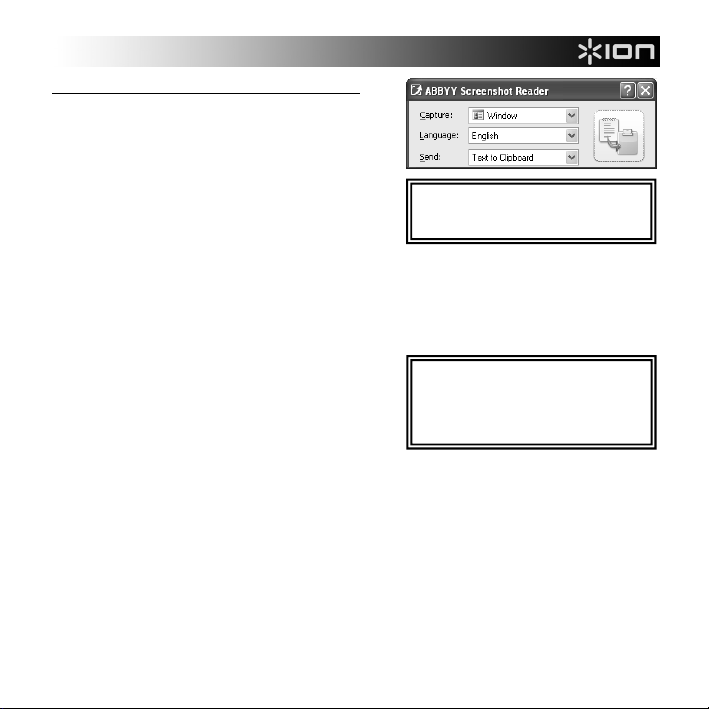
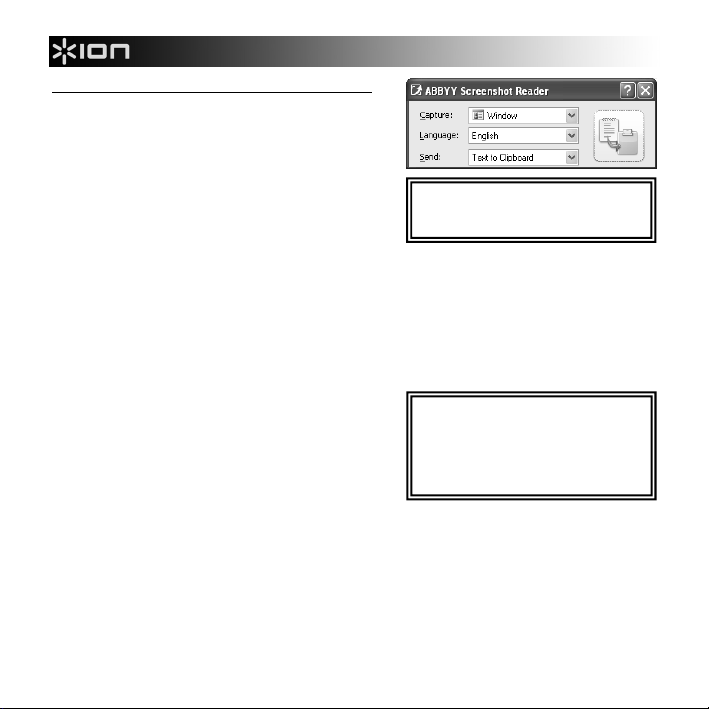
Follow these steps to use ABBYY Screenshot Reader:
1. Go to Start Menu f All Programs f ABBYY
Screenshot Reader.
2. From the Capture drop-down menu, select what section
of the screen you want to capture in your screenshot:
• Area: Select this option to capture only a certain
area of your screen, which you can select by
clicking and dragging the mouse (see below).
• Window: Select this option to capture only a
certain window shown on your screen, which you
can select by placing and clicking the mouse (see
below).
• Screen: Select this option to capture the entire computer screen (see below).
• Timed Screen: Select this option to capture the entire computer screen but with a 5-second delay
3. From the Language drop-down menu, select what language the software will recognize when it reads text
4. From the Send drop-down menu, select what part of the scanned document will be captured in the
(see below).
in the screenshot.
screenshot and where it will be sent.
• Text to Clipboard: Text pulled from the
screenshot will be sent to your Clipboard, where
it can be pasted elsewhere.
• Text to Microsoft Word: Text pulled from the
screenshot will be automatically pasted to a new
document in Microsoft Word.
• Text to File: Text pulled from the screenshot will be automatically pasted to a new document you
select. (You will be prompted to select the document after taking the screenshot.)
• Table to Clipboard: A table (and its text) pulled from the screenshot will be sent to your Clipboard,
where it can be pasted elsewhere.
• Table to Microsoft Excel: A table (and its text) pulled from the screenshot will be automatically
pasted to a new document in Microsoft Excel.
• Table to File: A table (and its text) pulled from the screenshot will be automatically pasted to a new
document you select. (You will be prompted to select the document after taking the screenshot.)
• Image to Clipboard: The whole screenshot will be sent to your Clipboard, where it can be pasted
elsewhere.
• Image to File: The screenshot will be automatically pasted to a new document you select. (You will
be prompted to select the document after taking the screenshot.)
• Image to E-mail: The screenshot will be automatically saved as a .bmp file and attached to a new
e-mail message.
For more information on ABBYY
Screenshot Reader, refer to the software's
help file by pressing F1.
For tips onacquiring the clearest scans
and achieving the best results using the
text recognition feature in the software,
please see the TEXT RECOGNITION
TIPS section in this manual.
5
Page 6

5. When you have set these settings how you want, you can capture your screenshot:
• If you selected Area as your Capture setting, click the Clipboard icon on the right-hand side of the
window. The mouse's cursor will change. Click and drag a rectangle around the part of the screen
you want to capture, then release the mouse button to capture it.
• If you selected Window as your Capture setting, click the Clipboard icon on the right-hand side of
the window. The mouse's cursor will change. Move the cursor over the window you want to capture,
which will be outlined in red. Click the mouse button to capture it.
• If you selected Screen as your Capture setting, click the Clipboard icon on the right-hand side of
the window to capture the entire screen.
• If you selected Timed Screen as your Capture setting, click the Clipboard icon on the right-hand
side of the window. Within the next five seconds, prepare your screen to be captured as a
screenshot. After five seconds, the entire screen will be captured automatically. (This feature is
6. Once you have captured your screenshot:
7. If you want to continue taking more screenshots, repeat Steps 2-6.
8. When you are finished using ABBYY Screenshot Reader, you can close the software by pressing Ctrl + Q
similar to taking a picture using your camera's timer.)
• If you selected "_____ to Clipboard" as your Send setting, you can open an application to paste it
into a document.
• If you selected "_____ to Microsoft Word / Microsoft Excel / File / E-mail" as your Send setting,
the corresponding file will be opened and the screenshot will be automatically pasted into the file.
or right-clicking the ABBYY icon in the Notification Area of the Toolbar and selecting "Exit."
6
Page 7

TEXT RECOGNITION TIPS
When capturing screenshots of your scans, ABBYY Screenshot Reader software can recognize text within an
image, allowing you to extract just the text from a scanned image and paste it into an e-mail, Microsoft Word, or
any other program that lets you paste text. To achieve the best possible scans of text documents – or if you find
ABBYY Screenshot Reader is having trouble recognizing text in your scans – keep the following tips in mind:
• Set COPY CAT's resolution to the higher setting by pressing the DPI BUTTON so the LCD displays
"HIGH." Higher-resolution scans are easier for the software to "read."
• Scan your documents on a flat surface and be careful not to bump or lift COPY CAT as you are scanning.
Disturbances in light or movement can cause a distorted scan.
• Scan the document slowly. This can help create a clearer, more accurate scan. (If the red ERROR LIGHT
turns on as you are scanning, try scanning again more slowly.)
• When possible, scan only black text on white backgrounds or white text on black backgrounds. Other color
schemes contrast less, which decreases the accuracy of text recognition.
• When possible, scan only uninterrupted blocks of text. Text that is broken up by pictures or illustrations,
unconventional layouts, dramatic differences in font size, etc. may not be properly recognized.
• When using ABBYY Screenshot Reader, make the image you are capturing as large as possible on the
computer screen. You can do this by enlarging or maximizing the window of the scan.
• When using ABBYY Screenshot Reader to extract text, select "Area" as your Capture setting and create
the rectangle as small and "tight" as possible around the area of text you want to capture.
HOW TO CALIBRATE COPY CAT
If you find your scanned images are too dark or too bright, COPY CAT's white light balance may need adjustment.
In this case, we recommend calibrating COPY CAT, which is a quick and simple process:
1. Place COPY CAT on the white paper area of the included calibration paper. Press and hold the SCAN
BUTTON to turn on COPY CAT.
2. Press and hold the C/BW BUTTON then press the SCAN BUTTON once to enter the auto-calibration
mode. The SD symbol will flash on the LCD.
3. When the SD symbol stops flashing, the green SCAN LIGHT and red ERROR LIGHT will both turn on. Do
not move COPY CAT during this process.
4. When the red ERROR LIGHT turns off, start scanning the white section of the paper until the green SCAN
LIGHT turns off. (You may slide COPY CAT backwards if necessary.)
5. When the green SCAN LIGHT turns off, calibration is complete.
6. Press and hold the SCAN BUTTON to turn off COPY CAT.
7
Page 8
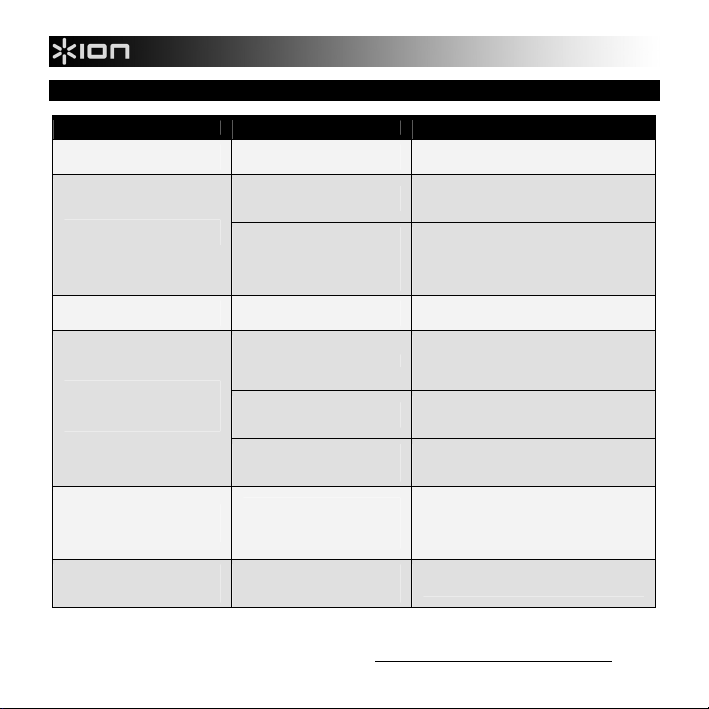
TROUBLESHOOTING
PROBLEM CAUSE SOLUTION
The red ERROR LIGHT keeps
turning on when I am scanning.
My scans are blurry or
smudged.
My scans are too light or too
dark.
My computer does not
recognize COPY CAT as a
microSD card reader when I
connect it.
I cannot install ABBYY
Screenshot Reader on my
computer.
ABBYY Screenshot Reader is
having trouble recognizing text
in my screenshots.
The document was scanned too
quickly.
COPY CAT's lens may be dirty
or dusty.
The document may not have
been scanned steadily enough.
Changes in the scanning
direction or pausing while
scanning can also affect this.
COPY CAT's white light
balance needs adjustment.
COPY CAT is turned off.
The USB cable is not fully
connected.
The microSD card is not fully
inserted into COPY CAT's
microSD CARD SLOT.
Your computer may not support
the software. (ABBYY
Screenshot Reader is PCcompatible only.)
The circumstances of the scan
or screenshot process may not
have been ideal.
Try scanning your document more slowly
and steadily.
Use the included cleaning cloth to wipe the
glass surface on the underside of COPY
CAT.
Try scanning your document again more
slowly and steadily. (Try holding the
document with one hand.)
See the HOW TO CALIBRATE COPY CAT
instructions.
Press and hold the POWER / SCAN
BUTTON to turn COPY CAT on. (If it is
correctly connected to your computer, "USB"
will be shown on COPY CAT's LCD.)
Unplug then reconnect the USB cable to the
COPY CAT and to your computer's USB
port.
Make sure the microSD card is pushed all
the way into the slot. (It should "click" into
place once it is completely inserted.)
Because COPY CAT saves scans as .JPGs,
they can be used with any kind of screenshot
or OCR (text recognition) software
applications, many of which are available for
free or for purchase online.
See TEXT RECOGNITION TIPS in this
manual.
For additional support, please visit www.ionaudio.com/copycat
8
Page 9
9
2
10
*Nota: Si bien COPY CAT se puede
usar tanto en PC como en Mac, el
software ABBYY Screenshot Reader
es sólo compatible con PC.
1
CONTENIDO DE LA CAJA
COPY CAT Bolsa
2 baterías AA CD de software *
Cable USB Guía de inicio rápido
Paño de limpieza Instrucciones de seguridad e
CARACTERÍSTICAS
6
información sobre la garantía
3
5
7
4
8
1. COMPARTIMIENTO DE BATERÍAS – Deslice y retire la cubierta plástica de la manija para destapar el
compartimiento de baterías. Use 2 baterías AA para alimentar el COPY CAT. Asegúrese de colocarlas en
el compartimiento en el sentido correcto.
2. BOTÓN DE ENCENDIDO / ESCANEO – Pulse y retenga este botón para encender y apagar el COPY
CAT. Para escanear un documento, pulse el botón una vez de modo que se encienda la LUZ SCAN
verde, pase el COPY CAT firmemente por el documento que desea escanear y luego pulse el botón
nuevamente de modo que la LUZ SCAN se apague. Para más información, consulte CÓMO ESCANEAR
UN DOCUMENTO.
3. LUZ DE ESCANEO – Esta luz se enciende con luz verde cuando COPY CAT está escaneando un
documento.
4. LUZ DE ERROR – Esta luz se enciende con luz roja si el documento se escaneó demasiado rápidamente.
En este caso, escanéelo otra vez más lentamente.
5. LCD – Muestra la información de estado del COPY CAT. "EFFECT" se refiere a
la posición del BOTÓN C/BW ("COLOR" o "MONO"). Cuando se inserta una
tarjeta microSD en la RANURA PARA TARJETA SD, aparece el icono de SD.
El icono de batería le indica cuánta energía remanente tienen las baterías. El
número mostrado indica cuántos documentos escaneados hay en la tarjeta
microSD. "RESOLUTION" (Resolución) se refiere a la posición del BOTÓN DE
DPI ("HIGH" (Alta) o "LOW" (Baja)).
9
Page 10

j
j
o
6. BOTÓN C/BW – Pulse este botón para seleccionar escaneos a color o blanco y negro. La LCD muestra
el modo actual: "COLOR" o "MONO" (blanco y negro).
7. BOTÓN DE DPI – Pulse este botón para seleccionar la resolución ("dpi" o "puntos por pulgada") del
escaneo. La LCD indica "LOW" (300 dpi) o "HIGH" (600 dpi).
8. CONEXIÓN USB – Conecte este conector a un puerto USB libre de la computadora usando el cable USB
incluido. Una vez conectado y alimentado, el COPY CAT funciona como lector de tarjetas SD, de modo
que es posible transferir los escaneos a su computadora. Para más información, consulte CÓMO
TRANSFERIR ESCANEOS.
Nota: Cuando se conecta a la computadora, el COPY CAT se alimenta por la conexión USB, de modo que
no se consumen las baterías.
9. TARJETA PARA RANURA microSD – Coloque
delicadamente en esta ranura una tarjeta microSD
hasta que calce en su sitio con un clic. Los escaneos
se guardan en la tarjeta. Para expulsar la tarjeta,
empújela en la ranura hasta que haga un clic y luego extráigala. Cuando se conecta a la computadora, el
COPY CAT funciona como lector de tarjetas SD, de modo que es posible transferir los escaneos a la
misma. Para más información, consulte CÓMO TRANSFERIR ESCANEOS.
10. BOTÓN DE FORMATO – Pulse este botón para formatear la tarjeta microSD insertada. (Con esta
operación se borra su contenido.)
CÓMO ESCANEAR UN DOCUMENTO
Para escanear un documento, siga estos pasos:
1. Pulse y retenga el BOTÓN SCAN para encender el
COPY CAT. Cuando se encienda, verá información en
la LCD.
2. Coloque el COPY CAT sobre el documento. Asegúrese
de que la lente de escaneo de la parte inferior esté
totalmente sobre el documento y no inclinada ni
obstruida.
3. Pulse el BOTÓN SCAN una vez para iniciar el proceso
de escaneo. Cuando comienza el escaneo, se
enciende la LUZ SCAN con luz verde.
4. Pase firmemente el COPY CAT a lo largo del
documento, de arriba hacia abajo. Recomendamos sostener firmemente el documento en su sitio, de
modo que no se mueva mientras se escanea. (Si se enciende la LUZ ERROR roja durante el proceso,
significa que el documento se escaneó demasiado rápido. Pulse el BOTÓN SCAN una vez y comience
nuevamente desde el paso Nº 2.)
5. Una vez alcanzado el final del documento, pulse el BOTÓN SCAN una vez. La LUZ SCAN verde se
apaga.
6. Si desea escanear más documentos, repita los pasos Nº 2 a 5. Si desea transferir los escaneos a la
computadora, consulte la sección CÓMO TRANSFERIR ESCANEOS. De lo contrario, pulse y retenga el
BOTÓN SCAN para apagar el COPY CAT.
Para usar Copy Cat, usted tendrá que com prar
eta microSD por separado.
una tar
Para usar Copy Cat, usted tendrá que com prar
eta microSD por separad
una tar
Consulte en la sección CONSEJOS PARA
EL RECONOCIMIENTO DE TEXTO de
este manual los consejos para adquirir los
escaneos más claros y lograr los mejores
resultados usando la función de
reconocimiento de texto del software.
.
10
Page 11

a
:
CÓMO TRANSFERIR ESCANEOS
Cuando el COPY CAT está conectado a la computadora, funciona como lector de tarjetas microSD y le permite
transferir los escaneos desde la tarjeta a la computadora. Para hacerlo, siga estos pasos:
1. Conecte el extremo pequeño del cable USB incluido al conector USB del COPY CAT y el otro extremo a
un puerto USB libre de la computadora. (Asegúrese de que la computadora esté encendida y que una
tarjeta microSD esté insertada en la RANURA PARA TARJETA microSD.)
2. Pulse y retenga el BOTÓN SCAN para encender el COPY CAT. Cuando el COPY CAT está encendido y
funcionando como lector de tarjetas microSD, aparece "USB" en la LCD.
3. Si usa una PC, aparece una ventana que le pregunta cómo desea acceder a sus archivos. Seleccione
"Open folder to view files" (Abrir carpeta para ver los archivos) a fin de acceder al contenido de la tarjeta
microSD del COPY CAT. (Una vez conectado, el COPY CAT se incluye en la lista de unidades de "My
Computer" (Mi PC) (XP y Vista) o en "Computer" (PC) (Windows 7).)
Si usa una Mac, haga doble clic en el icono de la unidad "Untitled" (Sin título) que aparece en el escritorio
de la Mac a fin de acceder al contenido de la tarjeta microSD del COPY CAT.
4. Haga doble clic en las carpetas "DCIM" y luego "100MEDIA". Todos sus escaneos se guardan en la
tarjeta microSD como .JPG. Haga clic y arrastre estos archivos a la computadora. (También es posible
eliminar archivos de la tarjeta microSD de la misma manera que se eliminan normalmente de la
computadora.)
5. Cuando termine de transferir sus escaneos, cierre la ventana y pulse y retenga el BOTÓN SCAN para
apagar el COPY CAT. Cuando se apaga, puede desconectar el COPY CAT de la computadora.
CÓMO USAR EL SOFTWARE (PC ÚNICAMENTE)
El COPY CAT viene con ABBYY Screenshot Reader, una aplicación
que puede tomar instantáneas de la computadora y reconocer el texto
incluido en una imagen, lo que le permite copiarlo y pegarlo en otro
lugar. Esto significa que es posible usar el COPY CAT para escanear
páginas de texto, transferirlas a la computadora y usar luego ABBYY
Screenshot Reader para copiarlo de modo de poder pegarlo en un
mensaje de correo electrónico, archivo de texto, documento de
Microsoft Word, etc.
Primero, instale ABBYY Screenshot Reader:
1. Inserte el CD de software incluido en el lector de CD de la computadora.
2. Abra My Computer (Mi PC) y haga doble clic en el disco de ScreenshotReader.
3. En la ventana que aparece, seleccione el idioma en el menú desplegable y haga clic en OK (Aceptar).
4. Siga las instrucciones de la pantalla.
*Not
Si bien COPY CAT se
puede usar tanto en PC como en
Mac, el software ABBYY
Screenshot Reader es sólo
11
Page 12
y
Para usar ABBYY Screenshot Reader, siga estos pasos:
1. Vaya a Start Menu (Menú Inicio) f All Programs
(Todos los programas) f ABBYY Screenshot Reader.
2. En el menú desplegable Capture (Captura) seleccione
la sección de la pantalla que desea capturar en su
instantánea:
• Area (Área): Seleccione esta opción para
capturar sólo cierta área de la pantalla, que
puede seleccionar haciendo clic y arrastrando el
mouse (consulte más abajo).
• Window (Ventana): Seleccione esta opción para
capturar sólo cierta ventana de la pantalla, que puede seleccionar haciendo clic y arrastrando el
mouse (consulte más abajo).
• Screen (Pantalla): Seleccione esta opción para capturar la pantalla completa de la computadora
(consulte más abajo).
• Timed Screen (Pantalla con retardo): Seleccione esta opción para capturar la pantalla completa de
3. En el menú desplegable Language, seleccione el idioma que debe reconocer el software cuando lea el
4. En el menú desplegable Send (Enviar), seleccione la parte del documento escaneado a capturar en la
la computadora pero con un retardo de 5 segundos (consulte más abajo).
texto de la instantánea.
instantánea y el lugar adonde se enviará.
• Text to Clipboard (Texto al portapapeles): El
texto extraido de la instantánea se envía al
portapapeles, desde donde puede pegarse en
cualquier lugar.
• Text to Microsoft Word (Texto a Microsoft
Word): El texto extraido de la instantánea se
pega automáticamente en un documento nuevo
de Microsoft Word.
• Text to File (Texto a archivo): El texto extraido de la instantánea se pega automáticamente en un
documento nuevo que usted selecciona. (Se le solicitará que seleccione el documento después de
tomar la instantánea.)
• Table to Clipboard (Tabla al portapapeles): La tabla extraida de la instantánea (y su texto) se
envía al portapapeles, desde donde puede pegarse en cualquier lugar.
• Table to Microsoft Excel (Tabla a Microsoft Excel): La tabla extraida de la instantánea (y su texto)
se pega automáticamente en un documento nuevo de Microsoft Excel.
• Table to File (Tabla a archivo): La tabla extraida de la instantánea (y su texto) se pega
automáticamente en un documento nuevo que usted selecciona. (Se le solicitará que seleccione el
documento después de tomar la instantánea.)
Para más información acerca de ABBYY
Screenshot Reader, consulte el archivo de
a
uda del software pulsando F1.
Consulte en la sección CONSEJOS PARA
EL RECONOCIMIENTO DE TEXTO de
este manual los consejos para adquirir los
escaneos más claros y lograr los mejores
resultados usando la función de
reconocimiento de texto del software.
12
Page 13

• Image to Clipboard (Imagen al portapapeles): La instantánea completa se envía al portapapeles,
desde donde puede pegarse en cualquier lugar.
• Image to File (Imagen a archivo): La instantánea se pega automáticamente en un documento
nuevo que usted selecciona. (Se le solicitará que seleccione el documento después de tomar la
instantánea.)
• Image to E-mail (Imagen a correo electrónico): La instantánea se guarda automáticamente como
5. Cuando haya ajustado los parámetros cómo desea, puede capturar la instantánea.
6. Una vez que haya capturado la instantánea:
7. Si desea continuar tomando instantáneas, repita los pasos 2 a 6.
8. Cuando haya terminado de usar ABBYY Screenshot Reader, debe cerrar el software pulsando Ctrl + Q o
archivo .bmp y se adjunta a un mensaje nuevo de correo electrónico.
• Si seleccionó Área como parámetro de Captura, haga clic en el icono del Portapapeles del lado
derecho de la ventana. Cambia el cursor del mouse. Haga clic y arrastre un rectángulo alrededor
de la parte de la pantalla que desea capturar y suelte el botón del mouse para capturarla.
• Si seleccionó Ventana como parámetro de Captura, haga clic en el icono del Portapapeles del
lado derecho de la ventana. Cambia el cursor del mouse. Mueva el cursor sobre la ventana que
desea captura, que se recuadrará en rojo. Haga clic con el botón del mouse para capturarla.
• Si seleccionó Pantalla como parámetro de Captura, haga clic en el icono del Portapapeles del
lado derecho de la ventana para capturar la pantalla completa.
• Si seleccionó Pantalla con retardo como parámetro de Captura, haga clic en el icono del
Portapapeles del lado derecho de la ventana. Dentro de los cinco segundos siguientes, prepare la
pantalla a capturar como instantánea. Después de los cinco segundos, se captura
automáticamente la pantalla completa. (Esta función es similar a la de tomar una fotografía con el
temporizador de una cámara.)
• Si seleccionó "_____ al portapapeles" como parámetro de Enviar, puede abrir una aplicación para
pegarla en un documento.
• Si seleccionó "_____ a Microsoft Word / Microsoft Excel / Archivo / Correo electrónico" como
parámetro de Enviar, se abre el archivo correspondiente y la instantánea se pega automáticamente
en el mismo.
haciendo clic derecho en el icono ABBYY del área Notification (Notificación) de la barra de herramientas y
seleccionando "Exit" (Salir).
13
Page 14

CONSEJOS PARA EL RECONOCIMIENTO DE TEXTO
Cuando se capturan imágenes de los escaneos, el software ABBYY Screenshot Reader puede reconocer texto
dentro de una imagen, permitiéndole extraer únicamente el texto de la imagen escaneada y pegarlo en un
mensaje de correo electrónico, en Microsoft Word o cualquier otro programa que le permita pegar texto. Para
lograr los mejores escaneos posibles de documentos de texto —o si ABBYY Screenshot Reader tiene problemas
para reconocer texto en sus escaneos— tenga en cuenta lo siguiente:
• Configure la resolución del COPY CAT al valor más alto pulsando el BOTÓN DE DPI de modo que
aparezca "HIGH" en la LCD. Para el software, es más fácil “leer” los escaneos de alta resolución.
• Escanee los documentos sobre una superficie plana y tenga cuidado de no golpear o levantar el COPY
CAT mientras escanea. Las perturbaciones de la luz o el movimiento pueden deformar el escaneo.
• Escanee el documento lentamente. De esta forma, ayuda a crear un escaneo más claro y exacto. (Si se
enciende la LUZ ERROR roja mientras está escaneando, intente escanear otra vez más lentamente.)
• Cuando sea posible, escanee sólo texto negro sobre fondos blancos o texto blanco sobre fondos negros.
Los demás esquemas de colores producen menos contraste y disminuyen la exactitud del reconocimiento
de texto.
• Cuando sea posible, escanee sólo bloques de texto ininterrumpidos. Es posible que no se reconozca
correctamente el texto que está interrumpido por fotos o ilustraciones, con disposiciones no
convencionales o grandes diferencias de tamaño de fuente, etc,
• Cuando use ABBYY Screenshot Reader, agrande lo más posible la imagen que está capturando en la
pantalla de la computadora. Puede hacerlo agrandando o maximizando la ventana de escaneo.
• Cuando use ABBYY Screenshot Reader para extraer texto, seleccione "Área" como parámetro de
Captura y cree el rectángulo lo más pequeño y "ceñido" posible alrededor del área de texto que desea
capturar.
CÓMO CALIBRAR EL COPY CAT
Si observa que las imágenes escaneadas son demasiado oscuras o brillantes, es posible que deba ajustar el
balance de luz blanca del COPY CAT. En este caso, recomendamos calibrarlo, con este proceso rápido y
sencillo:
1. Coloque el COPY CAT en el área de papel blanco del panel de calibración incluido. Pulse y retenga el
BOTÓN SCAN para encender el COPY CAT.
2. Pulse y retenga el BOTÓN C/BW y luego el BOTÓN SCAN una vez para activar el modo de
autocalibración. Destella el símbolo SD en la LCD.
3. Cuando el símbolo SD deja de destellar, se encienden al mismo tiempo las luces SCAN (verde) y ERROR
(roja). No mueva el COPY CAT durante este proceso.
4. Cuando se apague la LUZ ERROR roja, comience a escanear la sección blanca del panel hasta que se
apague la LUZ SCAN verde. (Puede deslizar el COPY CAT hacia atrás si es necesario.)
5. Cuando se apaga la LUZ SCAN verde, la calibración ha terminado.
6. Pulse y retenga el BOTÓN SCAN para apagar el COPY CAT.
14
Page 15

SOLUCIÓN DE PROBLEMAS
PROBLEMA CAUSA SOLUCIÓN
La LUZ ERROR roja se mantiene
encendida mientras estoy
escaneando.
Mis escaneos son borrosos o
manchados.
Mis escaneos son demasiado
claros u oscuros.
Mi computadora no reconoce al
COPY CAT como lector de
tarjetas microSD cuando lo
conecto.
No puedo instalar ABBYY
Screenshot Reader en mi
computadora.
ABBYY Screenshot Reader tiene
problemas para reconocer el texto
de las instantáneas.
El documento se escaneó
demasiado rápido.
La lente del COPY CAT puede
estar sucia o tener polvo.
Es posible que el documento no
se haya escaneado con suficiente
firmeza. Los cambios en la
dirección de escaneo o las
pausas durante el mismo también
pueden afectarlo.
Es necesario ajustar el balance de
luz blanca del COPY CAT.
El COPY CAT está apagado
El cable USB no está conectado
completamente.
La tarjeta microSD no está
insertada completamente en la
RANURA PARA TARJETA
microSD del COPY CAT.
Es posible que su computadora
no soporte el software. (ABBYY
Screenshot Reader es compatible
sólo con PC.)
Las circunstancias del proceso de
escaneo o toma de instantáneas
pueden no haber sido ideales.
Pruebe otra vez escaneando su documento
más lenta y firmemente.
Use el paño de limpieza incluido para limpiar la
superficie de vidrio de la parte inferior del
COPY CAT.
Pruebe otra vez escaneando más lenta y
firmemente. (Trate de sostener el documento
con una mano.)
Consulte las instrucciones CÓMO CALIBRAR
EL COPY CAT.
Pulse y retenga el BOTÓN POWER / SCAN
para encender el COPY CAT. (Si está
conectado correctamente a la computadora,
aparece "USB" en la LCD del COPY CAT.)
Desenchufe y luego reconecte el cable USB al
COPY CAT y al puerto USB de la
computadora.
Asegúrese de que la tarjeta microSD esté
introducida completamente en la ranura.
(Debe hacer un “clic” cuando esté insertada
completamente en su sitio.)
Puesto que el COPY CAT guarda los escaneos
como archivos .JPG, se pueden usar con
cualquier tipo de aplicaciones para
instantáneas u OCR (reconocimiento de texto),
muchas de las cuales están disponibles gratis
o para comprar por Internet.
Consulte CONSEJOS PARA EL
RECONOCIMIENTO DE TEXTO en este
manual.
Para obtener soporte adicional, visite www.ionaudio.com/copycat
15
Page 16

CONTENU DE LA BOÎTE
*
COPY CAT Sac de rangement
2 piles de format AA Logiciel *
Câble USB Guide d’utilisation simplifié
Chiffon pour le nettoyage Consignes de sécurité et information
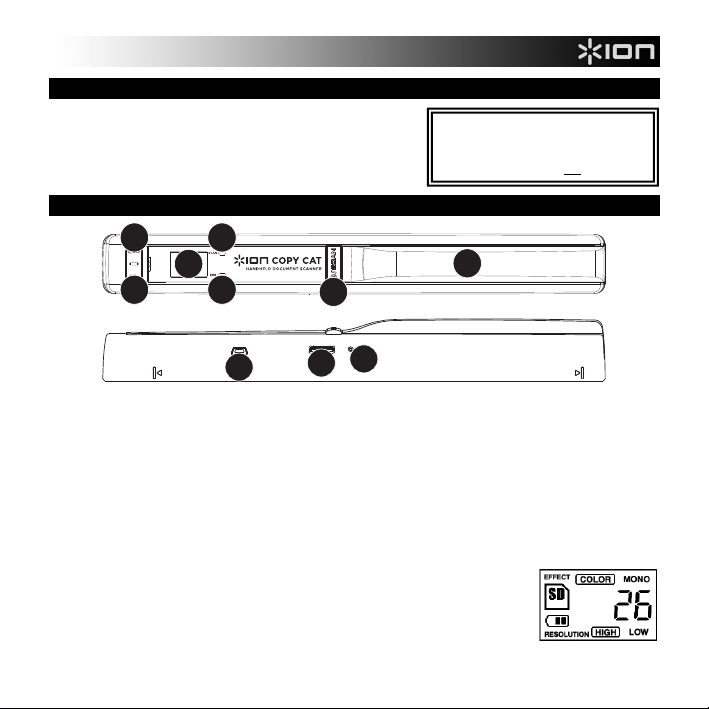
CARACTÉRISTIQUES
concernant la garantie
6
3
5
7
4
8
1. COMPARTIMENT DES PILES – Faites glisser puis retirez le couvercle en plastique de la poignée afin
d’ouvrir le compartiment. Deux piles de format AA sont requises pour alimenter le COPY CAT. Insérez les
piles dans le compartiment en vous assurant de les placer selon la polarité indiquée.
2. TOUCHE POWER/SCAN – Maintenez cette touche enfoncée afin de mettre le COPY CAT sous et hors
tension. Enfoncez la touche une fois afin que le voyant SCAN LIGHT s’allume et faites glisser le COPY
CAT sur le document que vous désirez numériser, puis enfoncez à nouveau la touche afin d’éteindre le
voyant SCAN LIGHT une fois terminé. Voir la section « NUMÉRISATION D’UN DOCUMENT » pour plus
d’information.
3. Voyant SCAN – Ce voyant passe au vert lorsque le COPY CAT numérise un document.
4. Voyant ERROR – Ce voyant passe au rouge lorsque la numérisation s’est faite trop rapidement. Lorsque
ceci se produit, vous devez renumériser le document plus lentement.
5. Écran ACL – Affiche les détails concernant l’état de fonctionnement du COPY
CAT. « EFFECT » indique les paramètres de la touche C/BW (COLOR (en
couleur) ou MONO (monochrome)). L’icône SD s’affiche lorsqu’une carte
microSD est insérée dans le logement. L’indicateur de pile indique la charge
restante des piles. Le numéro indique combien il y a de documents numérisés
sur la carte microSD. « RESOLUTION » indique les paramètres de la touche
DPI (HIGH (ppp élevé) ou LOW (ppp faible)).
6. TOUCHE C/BW – Cette touche permet de sélectionner l’effet couleur de la numérisation (couleur ou en
noir et blanc). L'écran ACL indique le mode en cours : « COLOR » (couleur) ou « MONO » (noir et blanc).
Remarque : Bien que le COPY CAT
soit compatible avec PC et Mac, le
logiciel ABBYY Screenshot Reader
ne fonctionne que sur PC.
1
2
10
9
16
Page 17

g
7. TOUCHE DPI – Cette touche permet de sélectionner la résolution (ppp ou points par pouce) de la
numérisation. L’écran indique « LOW » (faible, 300 ppp) ou « HIGH » (600 ppp).
8. CONNEXION USB – Branchez le câble USB fourni dans cette sortie et l'autre extrémité dans le port USB
d'un ordinateur. Une fois branché et mis sous tension, le COPY CAT devient un lecteur de cartes microSD
afin que vous puissiez transférer vos numérisations à votre ordinateur. Voir la section « TRANSFERT DE
NUMÉRISATIONS » pour plus d’information.
Remarque : Lorsque le COPY CAT est branché à votre ordinateur, il est alimenté par la connexion USB,
permettant ainsi d’économiser les piles.
9. LOGEMENT CARTE microSD – Insérez doucement une
carte microSD jusqu’à ce que vous entendiez un clic. Vos
numérisations seront sauvegardées sur la carte mémoire.
Pour éjecter la carte, enfoncez-la simplement dans la
fente jusqu’à ce que vous entendiez un clic, puis retirez-la doucement. Une fois branché à votre ordinateur,
le COPY CAT devient un lecteur de cartes mémoire afin que vous puissiez transférer vos numérisations à
votre ordinateur. Voir la section « TRANSFERT DE NUMÉRISATIONS » pour plus d’information.
10. TOUCHE FORMAT – Cette touche permet de reformater la carte microSD dans le logement. (Le contenu
de la carte sera écrasé.)
NUMÉRISATION DE DOCUMENT
Voici les étapes à suivre pour numériser un document :
1. Appuyez et maintenez la touche SCAN enfoncée afin de
mettre le COPY CAT sous tension. Losque le COPY CAT
est sous tension, l’écran s'allume.
2. Placez le COPY CAT sur le document à numériser.
Assurez-vous que la fenêtre de numérisation en dessous
est bien positionnée à plat sur le document et non
obstruée.
3. Appuyez une fois sur la touche SCAN pour lancer le
processus de numérisation. Le voyant SCAN passe au
vert lorsque le processus de numérisation est commencé.
4. Faites glisser le COPY CAT sur le document de haut en
bas de manière constante. Nous vous conseillons de bien maintenir le document en place afin qu’il ne soit
pas déplacé durant la numérisation. (Si le voyant ERROR passe au rouge lors de la numérisation, c’est
que la numérisation a été faite trop rapidement. Appuyez une fois sur la touche SCAN, puis recommencez
le processus de numérisation à partir de l’étape 2.
5. Une fois que vous avez atteint la fin du document, appuyez une fois sur la touche SCAN. Le voyant SCAN
devrait s’éteindre.
6. Si vous avez d’autres documents à numériser, répétez les étapes 2 à 5. Pour transférer vos numérisations
à votre ordinateur, reportez-vous à la section « TRANSFERT DE NUMÉRISATIONS ». Autrement,
appuyez et maintenez la touche SCAN enfoncée afin de mettre le COPY CAT hors tension.
Pour utiliser Copy Cat, vous devrez
acheter une carte microSD séparément.
Pour utiliser Copy Cat, vous devrez
acheter une carte microSD séparément.
Voir la section CONSEILS POUR UNE
MEILLEURE RECONNAISSANCE de ce
guide d’utilisation afin obtenir des
conseils pour faire de meilleures
numérisations et optimiser l’utilisation du
lo
iciel de reconnaissance de texte.
17
Page 18

*
TRANSFERT DE NUMÉRISATIONS
Une fois branché à votre ordinateur, le COPY CAT devient un lecteur de cartes mémoire vous permettant de
transférer vos numérisations sauvegardées sur une carte microSD à votre ordinateur. Commencez par suivre les
étapes suivantes :
1. Utilisez le câble USB inclus pour brancher le COPY CAT à un port USB de votre ordinateur. Veuillez vous
assurer que l’ordinateur est sous tension et qu'une carte microSD est bien insérée dans le logement.
2. Appuyez et maintenez la touche SCAN enfoncée afin de mettre le COPY CAT sous tension. L’icône
« USB » devrait s’afficher lorsque le COPY CAT est sous tension et qu’il fonctionne comme lecteur de
cartes microSD.
3. Si vous utilisez un PC, une fenêtre devrait s’afficher vous demandant comment vous désirez accéder à
vos fichiers. Sélectionnez l’option « Open folder to view files » afin d’accéder au contenu de la carte
microSD du COPY CAT. (Une fois que le COPY CAT est branché, il sera affiché comme lecteur dans
« Poste de travail » (XP et Vista) ou dans « Ordinateur » (Windows 7)).
Si vous utilisez un Mac, double-cliquez sur le lecteur « non identifié » qui s’affiche sur le bureau afin
d’accéder au contenu de la carte microSD du COPY CAT.
4. Double-cliquez sur le dossier « DCIM », puis sur le dossier « 100MEDIA ». Vos numérisations seront
sauvegardées sur la carte mémoire en format .JPG. Cliquez et faites glisser ces fichiers sur votre
ordinateur. (Vous pouvez également supprimer les fichiers de la carte microSD comme vous le feriez pour
supprimer des fichiers sur votre ordinateur.)
5. Une fois que vous avez transféré toutes vos numérisations, fermez la fenêtre et appuyez et maintenez la
touche SCAN enfoncée afin de mettre le COPY CAT hors tension. Une fois le COPY CAT hors tension,
vous pouvez le débrancher de votre ordinateur.
UTILISATION DU LOGICIEL (PC SEULEMENT)*
Le COPY CAT vous est livré avec le logiciel de reconnaissance
optique de caractères ABBYY Screenshot Reader qui vous permet de
reconnaître du texte dans des captures d'écran puis de le copier-coller
n’importe où. Vous pouvez donc, numériser une page de texte à l’aide
du COPY CAT, le transférer à votre ordinateur, utiliser ensuite le
ABBYY Screenshot Reader afin de copier le texte et le coller dans un
courriel, un fichier texte, document Microsoft Word, et ainsi de suite.
Vous devez commencer par installer le ABBYY Screenshot Reader :
1. Insérez le CD d'installation inclus dans le lecteur CD de votre ordinateur.
2. Ouvrez « Poste de travail » et double-cliquez sur ScreenshotReader.
3. Dans la nouvelle fenêtre, sélectionnez la langue à partir du menu déroulant et cliquez sur OK.
4. Suivez ensuite les instructions à l’écran.
Remarque : Bien que le
COPY CAT soit compatible avec
PC et Mac, le logiciel ABBYY
Screenshot Reader ne fonctionne
que sur PC.
18
Page 19

Voici les étapes à suivre pour utiliser le ABBYY
Screenshot Reader :
1. Cliquez sur Démarrer f Programmes f ABBYY
Screenshot Reader.
2. À partir du menu déroulant du champ Capturer,
sélectionnez le type de section à capturer :
• Zone : Sélectionnez cette option afin de capturer
seulement une section de votre écran, que vous
pouvez sélectionner en cliquant-glissant avec la
souris (voir ci-dessous).
• Fenêtre : Sélectionnez cette option afin de
capturer une fenêtre sur votre écran, que vous
pouvez sélectionner en positionnant le curseur sur la fenêtre en question et en cliquant avec la
souris (voir ci-dessous).
• Écran : Sélectionnez cette option afin de capturer tout votre écran (voir ci-dessous).
• Retarder la capture : Sélectionnez cette option afin de capturer tout votre écran après un délai de
3. À partir du menu déroulant du champ Langue, sélectionnez une langue de reconnaissance.
4. À partir du menu déroulant du champ Envoyer, sélectionnez l'application de destination vers laquelle la
5 secondes (voir ci-dessous).
capture d'écran ou le texte reconnu doit être envoyé.
• Texte vers Presse-papiers : Le texte reconnu
sera envoyé au presse-papiers, d’où il pourra
ensuite être copier-coller ailleurs.
• Texte vers Microsoft Word : Le texte reconnu
sera envoyé à un nouveau document dans
Microsoft Word.
• Texte vers fichier : Le texte reconnu sera
envoyé à un nouveau document que vous devez spécifier. Vous serez invité à sélectionner le
document une fois que la capture d’écran a été effectuée.
• Tableau vers Presse-papiers : Le tableau reconnu, ainsi que son contenu, sera envoyé au presse-
papiers, d’où il pourra ensuite être copier-coller ailleurs.
• Tableau vers Microsoft Excel : Le tableau reconnu, ainsi que son contenu, sera envoyé à un
nouveau document dans Microsoft Excel.
• Tableau vers fichier : Le tableau reconnu, ainsi que son contenu, sera envoyé à un nouveau
document que vous devez spécifier. Vous serez invité à sélectionner le document une fois que la
capture d’écran a été effectuée.
• Image vers Presse-papiers : La capture d’écran reconnue sera envoyée au presse-papiers, d’où il
pourra ensuite être copier-coller ailleurs.
Pour de plus amples informations,
veuillez consulter le menu d'aide du
ABBYY Screenshot Reader en cliquant
F1.
Voir la section CONSEILS POUR UNE
MEILLEURE RECONNAISSANCE de ce
guide d’utilisation afin obtenir des conseils
pour faire de meilleures numérisations et
optimiser l’utilisation du logiciel de
reconnaissance de texte.
19
Page 20

• Image vers fichier : La capture d’écran reconnue sera automatiquement envoyée à un nouveau
document que vous devez spécifier. Vous serez invité à sélectionner le document une fois que la
capture d’écran a été effectuée.
• Image vers courriel : La capture d’écran reconnue sera automatiquement enregistrée en tant que
5. Une fois les paramètres configurés comme désirés, vous pouvez lancer la capture d’écran :
6. Une fois la capture d’écran effectuée :
7. Si vous avez d’autres captures d’écran à effectuer, répétez les étapes 2 à 6.
8. Lorsque vous avez terminé d’utiliser le ABBYY Screenshot Reader, vous n’avez qu’à fermer l'application
fichier .bmp et sera joint à un nouveau courrier électronique.
• Si vous avez sélectionné Zone comme méthode de capture, cliquez sur le Presse-papier à droite
de la fenêtre. La forme du curseur devrait changer. En maintenant le bouton gauche de la souris
enfoncé, sélectionnez la zone souhaitée sur l'écran.
• Si vous avez sélectionné Zone comme méthode de capture, cliquez sur le Presse-papier à droite
de la fenêtre. La forme du curseur devrait changer. Pointez le curseur de la souris vers la zone
souhaitée et lorsqu'un cadre rouge apparaît, appuyez sur le bouton gauche de la souris.
• Si vous avez sélectionné Écran comme méthode de capture, cliquez sur le Presse-papier à droite
de la fenêtre afin de capturer tout l’écran.
• Si vous avez sélectionné Retarder la capture comme méthode de capture, cliquez sur le Presse-
papier à droite de la fenêtre. Vous avez cinq secondes pour préparer votre écran pour la capture.
Après cinq secondes, la capture d'écran est créée automatiquement. (Cette fonction s’apparente à
la fonction minuterie de votre appareil photo.)
• Si vous avez sélectionné « _____ vers Presse-papier » comme paramètre Envoyer, vous pouvez
ouvrir l’application de votre choix pour le coller.
• Si vous avez sélectionné « _____ vers Microsoft Word / Microsoft Excel / Fichier / Courriel »
comme paramètre Envoyer, le fichier correspondant s’ouvrira et la capture d’écran sera
automatiquement coller dans le fichier.
en appuyant sur Ctrl + Q ou en cliquant avec le bouton droit sur l'icône ABBYY Screenshot Reader dans la
barre des tâches et en sélectionnant « Fermer ».
20
Page 21

CONSEILS POUR UNE MEILLEURE RECONNAISSANCE
Lors de la capture d’écran de vos numérisations, l’application ABBYY Screenshot Reader peut reconnaître du
texte dans une image, vous permettant d’extraire du texte à partir d’une image numérisée et de le coller dans un
courriel, document Microsoft Word, ou d’un logiciel qui vous permet de coller du texte. Afin d’obtenir une meilleure
reconnaissance des documents texte – ou si vous trouvez que le ABBYY Screenshot Reader a de la difficulté à
reconnaître le texte de vos numérisations – voici quelques conseils.
• Réglez le paramètre de résolution du COPY CAT au plus élevé en appuyant sur la touche DPI afin
d'afficher le réglage « HIGH ». Les numérisations effectuées à haute résolution sont plus facile à lire par
l’application.
• Numérisez vos documents à partir d'une surface plate et assurez-vous de ne pas soulever ou accrocher le
COPY CAT lors du processus. Des perturbations au niveau de l’éclairage ou dans le mouvement de
balayage peuvent cause de la distorsion.
• Prenez votre temps lors du balayage. Ceci permettra une numérisation plus nette, plus précise. (Si le
voyant ERROR passe au rouge lors de la numérisation, essayez de balayer plus lentement.)
• Précognisez, lorsque possible, les textes foncés sur fonds pâles ou encore pâles sur fonds foncés. Les
autres couleurs contrastent moins, diminuant la précision de la reconnaissance du texte.
• Précognisez, lorsque possible, des blocs de texte continue. Des textes qui sont divisés par des images ou
des illustrations, qui contiennent des mises en page complexes, des polices de caractères différentes, etc.,
peuvent être plus difficiles à reconnaître.
• Lorsque vous utilisez le ABBYY Screenshot Reader, assurez-vous d’agrandir au maximum l’image que
vous désirez capturer sur l’écran. Vous n’avez qu’à agrandir l’image en maximisant la taille de la fenêtre.
• Lorsque vous utilisez le ABBYY Screenshot Reader pour extraire du texte, sélectionnez Zone comme
méthode de capture d’écran et restreignez la taille du rectangle à la même taille que le pourtour du texte à
capturer.
ÉTALONNAGE DU COPY CAT
Si les images numérisées sont trop foncées ou trop claires, il est possible que l'équilibre des blancs doive être
l'étalonné. Voici comment faire pour étalonner rapidement et simplement le COPY CAT :
1. Placez le COPY CAT sur la partie blanche du papier d’étalonnage inclus. Appuyez et maintenez la touche
SCAN enfoncée afin de mettre le COPY CAT sous tension.
2. Appuyez et maintenez la touche C/BW enfoncée, puis appuyez une fois sur la touche SCAN afin d’entrer
en mode d’étalonnage automatique. Le symbole SD clignote à l’écran.
3. Lorsque le symbole SD arrête de clignoter, le voyant SCAN vert et le voyant ERROR rouge s’allumeront.
Ne déplacez pas le COPY CAT durant ce processus.
4. Lorsque le voyant ERROR rouge s’éteint, commencez à numériser la partie blanche du papier
d’étalonnage jusqu'à ce que le voyant SCAN vert s’éteigne. (Vous pouvez balayer vers l'arrière au besoin.)
5. Lorsque le voyant SCAN vert s’éteint, l’étalonnage est terminé.
6. Appuyez et maintenez la touche SCAN enfoncée afin de mettre le COPY CAT hors tension.
21
Page 22

GUIDE DE DÉPANNAGE
PROBLÈME CAUSE SOLUTION
Le voyant ERROR s’allume durant
la numérisation.
Mes numérisations sont floues ou
maculées
Mes numérisations sont trop
claires ou trop foncées.
Mon ordinateur ne reconnait pas le
COPY CAT comme lecteur de
cartes micro SD.
Je ne parviens pas à installer le
ABBYY Screenshot Reader sur
mon ordinateur.
Le ABBYY Screenshot Reader a
de la difficulté à reconnaître le
texte de mes captures d'écran.
La numérisation s’est faite trop
rapidement.
La lentille du COPY CAT peut être
sale ou poussiéreuse.
Il se peut que le balayage n’ait pas
été fait de manière constante.
Avoir fait des changements de
direction ou des pauses lors du
balayage peut également être la
cause de ses problèmes.
L’équilibre des blancs doit être
étalonné.
Le COPY CAT est hors tension.
Le câble USB n’est pas
correctement branché.
La carte microSD n’est pas bien
insérée dans le logement.
Il se peut que le logiciel ne soit pas
pris en charge par votre système.
(Le logiciel ABBYY Screenshot
Reader ne fonctionne que sur PC.)
Il est possible que les
numérisations aient été faites dans
de mauvaises conditions.
Essayez de renumériser le document plus
lentement et de manière plus constante.
Utilisez le chiffon de nettoyage pour essuyer la
surface de la vitre sous le COPY CAT.
Essayez de renumériser le document plus
lentement et de manière plus constante.
(Essayez de tenir le document avec une main.)
Voir les instructions ÉTALONNAGE DU COPY
CAT.
Appuyez et maintenez la touche POWER/SCAN
enfoncée afin de mettre le COPY CAT sous
tension. Lorsque le COPY CAT est
CORRECTEMENT branché à votre ordinateur, le
symbole « USB » s’affiche sur l’écran du COPY
CAT.
Débranchez, puis rebranchez le câble USB du
COPY CAT et de votre ordinateur.
Veuillez vous assurer la carte microSD est bien
insérée dans le logement. (Il devrait se produire
un clic une fois qu’elle est bien enfoncée.)
Le COPY CAT enregistre les numérisations en
format .JPG, elles peuvent donc être utilisées par
toutes les applications de reconnaissance
d’image et de texte. Il est possible d’acheter un
logiciel ou encore de s’en procurer un
gratuitement en ligne.
Voir la section CONSEILS POUR UNE
MEILLEURE RECONNAISSANCE de ce guide.
Pour de plus amples informations, veuillez visiter le site
www.ionaudio.com/copycat
22
Page 23

CONTENUTI DELLA CONFEZIONE
COPY CAT Borsa
2 batterie AA CD recante il software *
Cavo USB Guida rapida
Panno per la pulizia Istruzioni di sicurezza e garanzia
CARATTERISTICHE
6
3
5
7
4
8
1. SCOMPARTO BATTERIE – Far scorrere e rimuovere il coperchio di plastica dell’impugnatura per rivelare
lo scomparto batterie. Per alimentare il COPY CAT, servirsi di 2 batterie AA. Assicurarsi di inserirle nella
giusta direzione, secondo quanto indicato all’interno delo scomparto.
2. TASTO ALIMENTAZIONE / SCANSIONE – Tenere premuto questo tasto per accendere o spegnere il
COPY CAT. Per effettuare la scansione di un documento, premere il tasto una volta in modo che la spia
verde SCAN LIGHT si accenda, trascinare saldamente il COPY CAT attraverso il documento che si
desidera scannerizzare, quindi premere nuovamente il tasto fino a quando la spia di scansione SCAN
LIGHT non si spegne. Per maggiori informazioni, si veda il paragrafo COME SCANNERIZZARE UN
DOCUMENTO.
3. SCAN LIGHT (spia di scansione) – Questa spia si illumina di verde quando il COPY CAT sta efettuando
la scansione di un documento.
4. ERROR LIGHT (spia di errore) – Questa spia si illumina di rosso se il documento è stato scannerizzato
troppo rapidamente. Se ciò accade, ripetere la scansione del documento, più lentamente.
5. LCD – Mostra a display le informazioni relative allo stato del COPY CAT.
"EFFECT" (effetti) fa riferimento all’impostazione del TASTO C/BW ("A
COLORI" o "In BIANCO E NERO"). Quando viene inserita una scheda SD
nell’apposito slot per schede SD, appare un’icona SD. L’icona della batteria
indica quanta carica è rimasta. Il numero illustrato indica quanti documenti
scannerizzati sono presenti sulla scheda microSD. "RESOLUTION"
(risoluzione) si riferisce alla configurazione del TASTO DPI ("HIGH" (elevato) o
"LOW" (basso)).
* Nota bene: sebbene il COPY CAT possa
essere utilizzato sia con PC che con Mac, il
software ABBYY Screenshot Reader è
unicamente compatibile con i PC. only.
1
2
10
9
23
Page 24

p
p
6. TASTO C/BW – Premere questo tasto per indicare se le scansioni saranno a colori o in bianco e nero. Lo
schermoLCD mostrerà la modalità corrente: "COLOR" (a colori) o "MONO" (bianco e nero).
7. TASTO DPI – Premere questo tasto per selezionare la risoluzione ("dpi" o "dots per inch") delle scansioni.
Lo schermo LCD mostrerà "LOW" (basso: 300 dpi) oppure "HIGH" (elevato: 600 dpi).
8. COLLEGAMENTO USB – Collegare questo jack ad una porta USB libera del computer servendosi del
cavo USB in dotazione. Una volta collegato e alimentato, il COPY CAT agirà come un lettore di schede SD
in modo da poter trasferire le scansioni effettuate al computer. Per maggiori informazioni, si veda il
paragrafo COME TRASFERIRE LE SCANSIONI.
Nota bene: quando è collegato al computer, il COPY CAT sarà alimentato dal collegamento USB, quindi
non consumerà le batterie.
9. SLOT SCHEDE microSD – Inserire delicatamente una
scheda microSD in questo slot fino a quando non scatta
in posizione. Le scansioni verranno salvate sulla scheda.
Per espellere la scheda, spingerla verso l’interno dello
slot, quindi estrarla. Una volta collegato e alimentato, il COPY CAT agirà come un lettore di schede SD in
modo da poter trasferire le scansioni effettuate al computer. Per maggiori informazioni, si veda il paragrafo
COME TRASFERIRE LE SCANSIONI.
10. TASTO FORMAT (formattazione) – Premere questo tasto per formattare la scheda microSD inserita.
(Questo ne cancellerà i contenuti.)
COME SCANNERIZZARE UN DOCUMENTO
Per scannerizzare un documento, procedere come segue:
1. Tenere premuto il tasto SCAN per accendere il COPY
CAT. Quando il COPY CAT viene acceso, le informazioni
compaiono sullo schermo LCD.
2. Collocare il COPY CAT sul documento. Assicurarsi che la
lente di scansione sulla parte inferiore dell'aparecchio sia
completamente appoggiata sul documento e non inclinata
né ostruita.
3. Premere una volta il TASTO SCAN per avviare il
processo di scansione. La spia verde di SCANSIONE si
accende quando la scansione ha inizio.
4. Trascinare uniformemente il COPY CAT per tutta la lunghezza del documento, da cima a fondo. Si
raccomanda di tenere fermo il documento per evitare che ruoti mentre viene scannerizzato. Se la spia
rossa di ERRORE si accende nel corso del processo, significa che il documento è stato scannerizzato
troppo rapidamente. Premere nuovamente il TASTO SCAN e ricominciare dalla Fase 2.
5. Una volta raggiunta la fine del documento, premere una volta il tasto SCAN. La spia verde di SCANSIONE
si spegne.
6. Se si desidera effettuare la scansione di più documenti, ripetere i passaggi da 2 a 5. Se si desidera
trasferire le scansioni al computer, si veda il paragrafo COME TRASFERIRE LE SCANSIONI. In caso
contrario, tenere premuto il tasto SCAN per spegnere il COPY CAT.
Per utilizzare COPY CAT, sarà necessario
acquistare una memory card microSD
se
aratamente.
Per utilizzare COPY CAT, sarà necessario
acquistare una memory card microSD
se
aratamente.
Per consigli su come acquisire scansioni n itide e
ottenere i migliori risultati utilizzando la funz ione
di riconoscimento testuale del software, si ved a il
paragrafo CONSIGLI SUL RICONOSCIMENTO
DI TESTO diquesto manuale.
24
Page 25

COME TRASFERIRE LE SCANSIONI
Una volta collegato al computer, il COPY CAT agirà come un lettore di schede SD in modo da poter trasferire le
scansioni effettuate da una scheda microSD al computer. Per farlo, procedere come segue:
1. Collegare il cavo piccolo del cavo USB in dotazione al jack di CONNESSIONE USB del COPY CAT e
collegare l’altro capo ad una porta USB del computer. (Assicurarsi che il computer sia acceso e che una
scheda microSD sia inserita nello SLOT per schede microSD.)
2. Tenere premuto il tasto SCAN per accendere il COPY CAT. Quando il COPY CAT è acceso e in funzione
come lettore di schede microSD, sullo schermo LCD compare la scritta "USB".
3. Se si utilizza un PC, apparirà una finestra che richiede come si desidera accedere ai file. Selezionare
"Apri cartella per visualizzare i file" per accedere ai contenuti della scheda microSD del COPY CAT.
(Una volta collegato, il COPY CAT verrà elencato come drive in "Risorse del computer" (XP e Vista) o in
"Computer" (Windows 7).)
Se si utilizza un Mac, fare doppio clic sull’icona del drive "senza nome" che appare sul Desktop del Mac
per accedere ai contenuti della scheda microSD del COPY CAT.
4. Fare doppio clic sulla cartella "DCIM" e quindi sulla cartella "100MEDIA". Tutte le scansioni vengono
salvate sulla scheda microSD come .JPG. Cliccare su questi file e trascinarli sulcomputer. (Si possono
anche cancellare file dalla scheda microSD come si cancellerebbero normalmente file dal computer.)
5. Una volta finito di trasferire le scansioni, chiudere la finestra e tenere premuto il TASTO SCAN per
spegnere il COPY CAT. Quando il COPY CAT è spento,è possibile scollegarlo dal computer.
COME SI UTILIZZA IL SOFTWARE (SOLO PC)*
Il COPY CAT è dotato di ABBYY Screenshot Reader, un’applicazione
software in grado di fare screenshots del computer e riconoscere il
testo nell’ambito di un’immagine, pernettendo di copiarlo e incollarlo
altrove. Ciò significa che si può utilizzare il COPY CAT per effettuare
la scansione di una pagina di testo, trasferirla sul computer e quindi
servirsi di ABBYY Screenshot Reader per copiare il testo in modo da
poterlo incollare in un’e-mail, file di testo, documento di Microsoft
Word ecc.
Innanzitutto, installare ABBYY Screenshot Reader:
1. Inserire il CD recante il software nel lettore CD del computer.
2. Aprire Risorse del computer e fare doppio clic sul disco ScreenshotReader.
3. Nella finestra che compare, selezionare la propria lingua dal menu a cascata e cliccare su OK.
4. Seguire le istruzioni su schermo.
* Nota bene: sebbene il COPY
CAT possa essere utilizzato sia su
PC che su Mac, il software ABBYY
Screenshot Reader è unicamente
compatibile con PC.
25
Page 26

a
g
Per utilizzare ABBYY Screenshot Reader procedere come
segue:
1. Recarsi su Start f Tutti i programmi f ABBYY
Screenshot Reader.
2. Dal menu a discesa Capture (acquisisci), selezionare
quale parte dello schermo si desidera acquisire nella
propria screenshot:
• Area: selezionare questa opzione per acquisire
solo una determinate area dello schermo,
selezionabile cliccando e trascinando il mouse
(vedi sotto).
• Window: selezionare questa opzione per acquisire solo una determinate finestra dello schermo,
selezionabile collocando il mouse nel punto desiderato e cliccando (vedi sotto).
• Screen: selezionare questa opzione per acquisire l’intero schermo del computer (vedi sotto).
• Timed Screen: selezionare questa opzione per acquisire l’intero schermo del computer, ma con un
3. Dal menu a discesa Language, selezionare quale lingua dovrà riconoscere il software quando leggerà il
4. Dal menu a discesa Send, selezionare quale parte del documento scannerizzato sarà acquisita nello
ritardo di 5 secondi (vedi sotto).
testo nello screenshot.
screenshot e dove sarà inviata.
• Text to Clipboard: il testo tratto dallo screenshot
sarà inviato alla Clipboard,da dove potrà essere
incollato altrove.
• Text to Microsoft Word: il testo tratto dallo
screenshot sarà incollato automaticamente in un
nuovo documento in Microsoft Word.
• Text to File: il testo tratto dallo screenshot sarà
incollato automaticamente in un nuovo
documento selezionato dall’utente (dopo aver
preso lo screenshot verrà richiesto di selezionare il documento).
• Table to Clipboard: una tabella (e il relativo testo) tratta dallo screenshot sarà inviata alla
Clipboard,da dove potrà essere incollata altrove.
• Table to Microsoft Excel: una tabella (e il relativo testo) tratta dallo screenshot sarà incollata
automaticamente in un nuovo documento in Microsoft Excel.
• Table to File: una tabella (e il relativo testo) tratta dallo screenshot sarà incollata automaticamente
in un nuovo documento selezionato dall’utente (dopo aver preso lo screenshot verrà richiesto di
selezionare il documento).
Per m
giori informazioni su ABBYY
Screenshot Reader, fare riferimento al file
di aiuto del software premendo F1.
Per consigli sull’acquisizione di scansioni
nitide e su come ottenere i migliori risultati
servendosi della funzione di
riconoscimento di testo del software, si
veda il paragrafo CONSIGLI SUL
RICONOSCIMENTO DI TESTO in questo
manuale.
26
Page 27

• Image to Clipboard: l’intero screenshot sarà inviato alla Clipboard, da dove potrà essere incollato
altrove.
• Image to File: lo screenshot sarà incollato automaticamente in un nuovo documento selezionato
dall’utente (dopo aver preso lo screenshot verrà richiesto di selezionare il documento).
• Image to E-mail: lo screenshot verrà automaticamente salvato come file .bmp e allegato ad un
5. Una volta regulate queste configurazioni come desiderato, si può acquisire lo screenshot.
6. Una volta acquisito lo screenshot:
7. Se si desidera acquisire ulteriori screenshot, ripetere i passaggi 2-6.
8. Un volta finito di utilizzare ABBYY Screenshot Reader, si può chiudereil software premendo Ctrl + Q o
nuovo messaggio e-mail.
• Se nelle configurazioni di acquisizione (Capture) è stata selezionata Area, cliccare sull’icona
Clipboard sul lato destro della finestra. Il cursore del mouse cambia. Cliccare e trascinare un
rettangolo attorno alla parte dello schermo che si desidera acquisire, quindi lasciare la pressione dal
tasto del mouse per acquisirla.
• Se nelle configurazioni di acquisizione (Capture) è stata selezionata Window, cliccare sull’icona
Clipboard sul lato destro della finestra. Il cursore del mouse cambia. Spostare il cursore sulla
finestra che si desidera acquisire, che sarà delineata in rosso. Cliccare col mouse per acquisirla.
• Se nelle configurazioni di acquisizione (Capture) è stato selezionato Screen, cliccare sull’icona
Clipboard sul lato destro della finestra per acquisire l’intero schermo.
• Se nelle configurazioni di acquisizione (Capture) è stato selezionato Timed Screen, cliccare
sull’icona Clipboard sul lato destro della finestra. Entro i successivi 5 secondi, preparare lo
schermo da acquisire come screenshot. Dopo 5 secondi, l’intero schermo verrà acquisito
automaticamente. (Questa funzione è simile all’autoscatto delle machine fotografiche.)
• Se come configurazione di invio (Send) è stato selezionato "_____ to Clipboard", si può aprire
un’applicazione per incollarlo in un documento.
• Se come configurazione di invio (Send) è stato selezionato "_____ to Microsoft Word / Microsoft
Excel / File / E-mail", il file corrispondente verrà aperto e lo screenshot verrà incollato
automaticamente nel file.
facendo clic con il tasto destro del mouse sull’icona di ABBYY nell’area di notifica della barra degli
strumenti e selezionando "Exit" (esci).
27
Page 28

CONSIGLI PER IL RICONOSCIMENTO DEL TESTO
Quando si acquisiscono screenshot delle proprie scansioni, il software ABBYY Screenshot Reader è in grado di
riconoscere il testo contenuto in un’immagine, consentendo di estrarlo e di incollarlo in un’e-mail, un file di
Microsoft Word o qualsiasi altro programma che consenta di incollare testo. Per ottenere le migliori scansioni
possibili di documenti di testo, o se si nota che ABBYY Screenshot Reader sta avendo difficoltà nel riconoscere il
testo all’interno delle scansioni, tenere conto dei seguenti consigli:
• Impostare la risoluzione del COPY CAT sulla configurazione più elevata premendo il TASTO DPI in modo che
sullo schermo LCD compaia la scritta "HIGH". Scansioni di risoluzione più elevate sono più facili da “leggere”
per il software.
• Effettuare la scansione dei documenti su una superficie piana e prestare attenzione a non urtare o sollevare il
COPY CAT mentre si effettua la scansione stessa. Disturbi sotto forma di luce o movimento puossono
causare una scansione distorta.
• Effettuare la scansione del documento lentamente. Questo può aiutare a creare una scansione più nitida e
precisa. (Se durante la scansione si accende la spia rossa di errore (ERROR), provare ad effettuare
nuovamente la scansione più lentamente.)
• Quando possible, scannerizzare unicamente testo nero su sfondo bianco o testo bianco su sfondo nero. Altri
schemi di colore garantiscono un minor contrasto, con una minore precisione del riconoscimento del testo.
• Quando possible, scannerizzare unicamente blocchi continui di testo. Testi interrotti da fotografie o
illustrazioni, layout inusuali, notevoli differenze nella dimensione del carattere, ecc. potrebbero non essere
riconosciuti adeguatamente.
• Quando si utilizza ABBYY Screenshot Reader, rendere l’immagine che si sta acquisendo il più grande
possibile sullo schermo del computer. Ciò può essere fatto ingrandendo o massimizzando la finestra della
scansione.
• Quando si utilizza ABBYY Screenshot Reader per estrarre testo, selezionare "Area" come configurazione di
acquiszione Capture e creare il rettangolo il più piccolo e “stretto” possibile attorno all’area che si desidera
acquisire.
COME CALIBRARE IL COPY CAT
Se si riscontra che le immagini scannerizzate sono troppo scure o troppo chiare, l’equilibrio del bianco del COPY
CAT potrebbe richiedere una regolazione. In questo caso, si raccomanda di calibrare il COPY CAT, un processo
facile e veloce:
1. Collocare il COPY CAT sull’area bianca del foglio di calibrazione in dotazione. Tenere premuto il tasto
2. Tenere premuto il tasto C/BW, quindi premere una volta il tasto SCAN per entrare in modalità di
3. Quando il simbolo SD smette di lampeggiare, entrambe le spie verde SCAN e rossa ERROR si
4. Quando la luce rossa ERROR si spegne, iniziare la scansionedella sezione bianca del foglio fino a quando
5. Quando la spia verde SCAN si spegne, la calibrazione è completa.
6. Tenere premuto il tasto SCAN per spegnere il COPY CAT.
SCAN per accendere il COPY CAT.
calibrazione automatica. Il simbolo SD lampeggia sullo schermo LCD.
accenderanno. Non spostare il COPY CAT durante questo procedimento.
la luce verde SCAN non si spegne. (Se necessario, si può far scorrere il COPY CAT all’indietro.)
28
Page 29

RISOLUZIONE DI PROBLEMI
PROBLEMA CAUSA SOLUZIONE
La spia rossa ERROR continua
ad accendersi mentre effettuo la
scansione.
Le scansioni sono sfuocate o
indistinte.
Le scansioni sono troppo
luminose o troppo scure.
Il mio computer non riconosce il
COPY CAT come lettore di
schede microSD quando lo
college.
Non riesco a installare ABBYY
Screenshot Reader sul mio
computer.
ABBYY Screenshot Reader ha
difficoltà nel riconoscere il testo
negli screenshot.
Il documento è stato
scannerizzato troppo in fretta.
La lente del COPY CAT potrebbe
essere sporca o polverosa.
Il documento potrebbe non essere
stato scannerizzato in maniera
sufficientemente uniforme.
Cambiamenti nella direzione di
scansione o pause durante la
scansione può anche influenzare
il risultato.
Occorre regolare l’equilibrio del
bianco del COPY CAT.
Il COPY CAT è spento.
Il cavo USB non è collegato a
fondo.
La scheda microSD non è inserita
a fondo nello SLOT di schede
microSD del COPY CAT.
Il computer potrebbe non
supportare il software. (ABBYY
Screenshot Reader è compatibile
unicamente con i PC.)
Le circostanze della scansione o
dello screenshot potrebbero non
essere state ideali.
Provare a scannerizzare il documento in
maniera più lenta e uniforme.
Servirsi del panno in dotazione per pulire la
superficie di vetro sul lato inferiore del COPY
CAT.
Provare a scannerizzare nuovamente il
documento in maniera più lenta e uniforme.
(Cercare di tenere fermo il documento con una
mano.)
Si vedano le istruzioni su COME CALIBRARE
IL COPY CAT.
Tenere premuto il tasto POWER / SCAN per
accendere il COPY CAT. (Se è collegato
correttamente al computer, sullo schermo LCD
del COPY CAT compare lascritta “USB”.)
Scollegare il cavo USB del COPY CAT e
ricollegarlo alla porta USB del computer.
Assicurarsi che la scheda microSD sia inserita
a fondo nello slot. (Deve cliccare in posizione
una volta inserito a fondo.)
Poiché il COPY CAT salva le scansioni sotto
forma di file .JPG, questi possono essere
utilizzati con qualsiasi tipo di screenshot o di
applicazione software OCR (di riconoscimento
di testo), molti dei quali sono disponibili
gratuitamente o acquistabili online.
Si veda il paragrafo “CONSIGLI SUL
RICONOSCIMENTO DEL TESTO” di questo
manuale.
Per ulteriore assistenza, recarsi alla pagina www.ionaudio.com/copycat
29
Page 30

2
de
C
k
ompatibe
10
* Hinweis: Obwohl COPY CAT sowohl für
PC und Mac geeignet ist, das ABBYY
Screenshot Reader Programm ist nur mit
m P
l.
1
SCHACHTELINHALT
COPY CAT Tasche
2 Batterien, Grösse AA Programm-CD *
USB-Kabel Schnellanleitung
Reinigungstuch Sicherheits- & Garantiehinweise
BEDIENUNGSELEMENTE
6
3
5
7
1. BATTERIEFACH – Das Batteriefach wird geöffnet, indem man die am Griff befindliche Plastikabdeckung
zurückschiebt und abnimmt. Der COPY CAT wird mt zwei Batterien der Grösse AA betrieben. Diese
müssen richtig herum in das Batteriefach eingelegt werden.
2. POWER / SCAN TASTE – Mit dieser Taste wird der COPY CAT ein- oder ausgeschaltet. Um ein
Dokument zu scannen, die Taste einmal drücken, sodass das grüne SCAN-LICHT aufleuchtet, den COPY
CAT gleichmäßig über das zu scannende Dokument bewegen und dann die Taste erneut drücken, damit
das SCAN-LICHT erlischt. Weitere Informationen hierzu können im Abschnitt DOKUMENT SCANNEN
gefunden werden.
3. SCAN-LICHT – Dieses leuchtet grün auf, wenn mit dem COPY CAT ein Dokument gescannt wird.
4. FEHLERLICHT – Dieses leuchtet rot auf, wenn das Dokument zu schnell gescannt wurde. Kommt dies
vor, Dokument noch einmal langsamer scannen.
5. LCD – Statusanzeige des COPY CAT. "EFFECT" bezieht sich auf die
Einstellung der C/BW-TASTE ("COLOR" oder "MONO"). Ein Schaubild mit
der Anzeige SD erscheint, wenn eine Mikro-SD Karte in den dafür
vorgesehenen Schlitz eingelegt wird. Die Batterieanzeige gibt an, wann
neue Batterien eingelegt werden müssen. Die Zahl gibt an, wieviele
gescannte Dokumente sich auf der Mikro-SD Karte befinden.
"RESOLUTION" bezieht sich auf die Einstellung der DPI-TASTE ("HIGH"
oder "LOW").
4
8
9
30
Page 31

D
-
D
-
6. C/BW-TASTE – Taste zur Auswahl, ob Dokument in Farbe oder schwarz-weiss gescannt werden soll. Die
LCD-Anzeige zeigt den augenblicklich gewählten Modus an: "COLOR" oder "MONO" (schwarz-weiss).
7. DPI-TASTE – Taste zur Auswahl der Auflösung ("dpi" oder "dots pro inch") des Scans. In der LCD-
Anzeige erscheint "LOW" (300dpi) oder "HIGH" (600dpi).
8. USB-ANSCHLUSS – Diesen Anschluss mit dem beiliegenden USB-Kabel an einen freien USB-Anschluss
am PC anschließen. Auf diese Weise angeschlossen und eingeschaltet, fungiert COPY CAT als SDKartenleser und gescannte Dokumente können auf den Computer transferiert werden. Weitere Information
hierzu können im Abschnitt ÜBERTRAGUNG VON GESCANNTEN DOKUMENTEN gefunden werden.
Hinweis: Wenn der COPY CAT an den Computer angeschlossen ist, wird dieser über die USBVerbindung mit Strom versorgt, d. h. die Batterien werden in dieser Zeit geschont.
9. MikroSD-Kartenschlitz – MikroSD-Karte in diesen
Schlitz einschieben, bis diese einrastet. Alle Scans
werden auf dieser Karte gespeichert. Um die Karte zu
entfernen, ganz in den Schlitz hineinschieben, bis ein
Klickgeräusch vernommen wird, dann ganz
herausziehen. Wenn an den Computer angeschlossen und eingeschaltet, fungiert COPY CAT als SDKartenleser und gescannte Dokumente können auf den Computer transferiert werden. Weitere Information
hierzu können im Abschnitt TRANSFER VON GESCANNTEN DOKUMENTEN gefunden werden.
10. FORMAT-TASTE – Mit dieser Taste kann eine eingelegte MikroSD-Karte formattiert werden. (Dies führt
zur Löschung sämtlicher Inhalte der Karte.)
DOKUMENT SCANNEN
Um ein Dokument zu scannen, folgendermassen vorgehen:
1. SCAN TASTE des COPY CAT drücken und festhalten,
um diesen einzuschalten. Das eingeschaltete Gerät
zeigt Informationen in der LCD-Anzeige an.
2. COPY CAT oben auf das Dokument legen. Die
Scanlinse an der Unterseitze des Geräts muss völlig auf
dem Dokument aufliegen und sich nicht im falschen
Winkel befinden oder anderweitig beeinträchtigt sein.
3. SCAN-TASTE einmal drücken um das Scannen zu
beginnen. Das grüne SCAN-LICHT schaltet sich ein,
sobald das Scannen beginnt.
4. COPY CAT gleichmäßig über die gesamte Dokumentlänge ziehen, von oben nach unten. Es empfiehlt
sich, das Dokument während des Scans festzuhalten, sodass dieses sich nicht verschiebt. (Falls das rote
FEHLERLICHT während des Vorgangs aufleuchtet, bedeutet dies, dass das Dokument zu schnell
gescannt wurde. In diesem Fall SCAN-TASTE erneut drücken und noch einmal von Schritt 2 beginnen.)
5. Ist das Ende des Dokuments erreicht, die SCAN-Taste einmal drücken. Das grüne SCAN-LICHT erlischt.
6. Falls mehrere Dokumente gescannt werden sollen, Schritte 2 – 5 wiederholen. Falls die Scans an einen
Computer übertragen werden sollen, im Abschnitt ÜBERTRAGUNG VON GESCANNTEN DOKUMENTEN
wetierlesen. Anderenfalls die SCAN-TASTE drücken und festhalten, um den COPY CAT auszuschalten.
So verwenden Sie Copy Cat, müssen Sie eine
microS
Karte separat erwerben.
So verwenden Sie Copy Cat, müssen Sie eine
Karte separat erwerben.
microS
Für Hinweise, wie die besten Scans und die
besten Ergebnisse mit der Texterkennungsfunk tion
des Programms erhalten werden können, bitt e
unter dem Abschnitt HINWEISE ZUR
TEXTERKENNUNG in dieser Anlei tung
nachsehen.
31
Page 32

ÜBERTRAGUNG VON GESCANNTEN DOKUMENTEN
Wenn an den Computer angeschlossen und eingeschaltet, fungiert COPY CAT als SD-Kartenleser und gescannte
Dokumente können von der Karte auf den Computer transferiert werden. Folgendermassen vorgehen:
1. Den kleinen Stecker des beiliegenden USB-Kabels an den USB-ANSCHLUSS DES COPY CAT und das
andere Ende an einen verfügbaren USB-Anschluss des Computers anschließen. (Sicherstellen, dass der
Computer eingeschaltet ist und eine MikroSD-Karte in den MikroSD-KARTENSCHLITZ eingelegt ist.)
2. SCAN TASTE des COPY CAT drücken und festhalten, um diesen einzuschalten. "USB" erscheint in der
LCD-Anzeige, wenn der COPY CAT eingeschaltet wird und als MikroSD-Kartenleser fungiert.
3. Falls ein PC verwendet wird, erscheint ein Dialogfenster mit der Frage, wie auf die Dateien zugegriffen
werden soll. "Verzeichnis öffnen und Dateien anzeigen " wählen, um auf die Inhalte der im COPY CAT
befindlichen MikroSD-Karte zuzugreifen. (Sobald eine Verbindung besteht, wird der COPY CAT auch als
Laufwerk unter "Arbeitsplatz" (XP und Vista) oder unter "Computer" (Windows 7) angezeigt).
Bei Verwendung eines Mac das mit "NO NAME" bezeichnete Laufwerk-Schaubild auf der
Benutzeroberfläche des Mac zweimal anklicken, um auf die Inhalte der im COPY CAT befindlichen
MikroSD-Karte zuzugreifen.
4. Zweimal auf das Verzeichnis "DCIM", dann zweimal auf das Verzeichnis "100MEDIA" klicken. Alle Scans
werden auf der MikroSD-Karte im JPG-Format gespeichert. Dateien anklicken und auf den Computer
ziehen. (Die Dateien können auch von der MikroSD-Karte gelöscht werden, genau wie Dateien
normalerweise von PC gelöscht werden.)
5. Ist das Übertragen der Scans beendet, Verzeichnisfenster schließen und die SCAN-TASTE
herunterdrücken und festhalten, um den COPY CAT auszuschalten. Wenn der COPY CAT ausgeschaltet
ist, kann er vom Computer ausgesteckt werden.
PROGRAMMANWENDUNG (NUR PC ONLY)*
COPY CAT wird mit ABBYY Screenshot Reader, einem Programm,
das Screenshots des Computerbildschirms anfertigen und Text in
einem Bild erkennt, welcher dann in andere Programme kopiert
werden kann. Dies bedeutet, dass COPY CAT kann dazu verwendet
werden, eine Textseite zu scannen, auf den Computer zu übertragen
und mit ABBYY Screenshot Reader dann den Text zu kopieren,
sodass dieser in einer Email, einer andere Textdatei, einem Microsoft
Word-Dokument usw. verwendet werden kann.
Zunächst ABBYY Screenshot Reader wie folgt installieren:
1. Beiliegende CD in das Laufwerk des PC einlegen.
2. Arbeitplatz öffnen und zweimal auf die ScreenshotReader-Disc klicken.
3. Im nun erscheinenden Dialogfenster die Sprache aus der Auswahlliste wählen und OK klicken.
4. Bildschirmanweisungen folgen.
* Hinweis: Obwohl COPY CAT
sowohl für PC und Mac geeignet
ist, das ABBYY Screenshot
Reader Programm ist nur mit dem
PC kompatibel.
32
Page 33

ABBYY Screenshot Reader wie folgt anwenden:
1. Über das Menü Start f Alle Programme f ABBYY
Screenshot Reader aufrufen.
2. Über die Auswahlliste Capture auswählen, welche
Sektion des Bildschirms im Screenshot festgehalten
werden soll:
• Area: Diese Option wählen, wenn lediglich ein
bestimmter Bereich des Bildschirms, der mit
Klicken und Ziehen der Maus bestimmt wird,
erfasst werden soll (siehe unten).
• Window: Diese Option wählen, wenn nur ein
bestimmtes Fenster auf dem Bildschirm, welches
durch Platzieren Klicken mit der Maus bestimmt werden kann, erfasst werden soll (siehe unten).
• Screen: Diese Option wählen, wenn der gesamte Bildschirm erfasst werden soll (siehe unten).
• Timed Screen: Diese Option wählen, wenn der gesamte Bildschirm, allerdings mit einer
3. Über die Auswahlliste Language wählen, welche Sprache das Programm erkennen soll, wenn es den im
4. Über die Auswahlliste Send wählen, welcher Teil des gescannten Dokuments erfasst und wohin dieser
Verspätung von 5 Sekunden erfasst werden soll (siehe unten).
Screenshot enthaltenen Text liest.
geschickt werden soll.
• Text to Clipboard: Text aus dem Screenshot
wird in die Zwischenablage des Computers
gestellt, von wo aus dieser in anderen
Programmen verwendet werden kann.
• Text to Microsoft Word: Text aus dem
Screenshot wird automatisch in ein neues
Microsoft Word Dokument gestellt.
• Text to File: Text aus dem Screenshot wird
automatisch in ein neues Dokument eigener
Wahl gestellt. (Eine Aufforderung, ein Dokument zu wählen erfolgt nach dem Screenshot.)
• Table to Clipboard: Eine Tabelle (und deren Text) aus dem Screenshot wird in die Zwischenablage
gestellt, von wo aus diese in anderen Anwendungen verwendet werden kann.
• Table to Microsoft Excel: Eine Tabelle (und deren Text) aus dem Screenshot wird automatisch in
ein neues Microsoft Excel Dokument gestellt.
• Table to File: Eine Tabelle (und deren Text) aus dem Screenshot wird automatisch in ein neues
Dokument eigener Wahl gestellt. (Eine Aufforderung, ein Dokument zu wählen erfolgt nach dem
Screenshot.)
• Image to Clipboard: Der gesamte Screenshot wird in die Zwischenablage gestellt, von wo aus
dieser in anderen Anwendungen verwendet werden kann.
Weitere Informationen über das ABBYY
Screenshot Reader Programm sind im
programmeigenen Hilfsmenü (F1)
verfügbar.
Für Hinweise, wie die bestenScans und
die besten Ergebnisse mit der
Texterkennungsfunktion des Programms
erhalten werden können, bitte unter dem
Abschnitt HINWEISE ZUR
TEXTERKENNUNG in dieser Anleitung
nachsehen.
33
Page 34

• Image to File: Der Screenshot wird automatisch in ein neues Dokument eigener Wahl gestellt.
(Eine Aufforderung, ein Dokument zu wählen erfolgt nach dem Screenshot.)
• Image to E-mail: Der Screenshot wird automatisch als bmp-Datei gespeichert und an eine neue
5. Nachdem diese Einstellungen wie gewünscht vorgenommen wurden, kann der Screenshot erstellt werden:
6. Nachdem der Screenshot erfolgt ist, geschieht entsprechend den Einstellungen folgendes:
7. Falls weitere Screenshots angefertigt werden sollen, Schritte 2-6 wiederholen.
8. Wenn die Arbeit mit dem ABBYY Screenshot Reader Programm beendet ist, dieses mit Ctrl + Q oder
Email angehängt.
• Falls Area als Einstellung in Capture gewählt wurde, das Schaubild Zwischenablage rechts im
Fenster anklicken. Der Cursor wechselt. Klicken und ein Rechteck um den Teil des Bildschirms
ziehen, der erfasst werden soll, dann die Maustaste los lassen, um diesen zu erfassen.
• Falls Window als Einstellung in Capture gewählt wurde, das Schaubild Zwischenablage rechts im
Fenster anklicken. Der Cursor wechselt. Den Cursor über das zu erfassende Fenster bewegen,
welches in rot gekennzeichnet wird und mit Mausklick erfassen.
• Falls Screen als Einstellung in Capture gewählt wurde, das Schaubild Zwischenablage rechts im
Fenster anklicken um den gesamten Bildschirm zu erfassen.
• Falls Timed Screen als Einstellung in Capture gewählt wurde, das Schaubild Zwischenablage
rechts im Fenster anklicken. Innerhalb der nächsten fünf Sekunden den Bildschirm für den
Screenshot vorbereiten. Nach fünf Sekunden wird der gesamte Bildschirm automatisch erfasst.
(Diese Funktion entspricht dem verzögerten Auslöser eines Fotoapparats.)
• Falls "_____ to Clipboard" als Einstellung in Send gewählt wurde, kann ein Programm geöffnet und
der Inhalt in ein Dokument eingefügt werden.
• Falls "_____ to Microsoft Word / Microsoft Excel / File / E-mail" als Einstellung in Send gewählt
wurde, wird die entsprechende Datei geöffnet und der Screenshot automatisch in die Datei
eingefügt.
einem Rechtsklick auf das ABBYY Schaubild in der Statusleiste und Anklicken des Menüs "Exit"
schließen.
34
Page 35

HINWEISE ZUR TEXTERKENNUNG
Beim Anfertigen von Screenshots von vorher gescanntem Material kann das ABBYY Screenshot Reader
Programm Text innerhalb eines Bildes erkennen und es damit ermöglichen, diesen Text aus einem gescannten
Bild herauszukopieren und in eine Email, eine Microsoft Word Datei oder jegliche Programme einzufügen, die
Texteingabe zulassen. Um von Textdokumenten die besten Scans anzufertigen – oder falls das ABBYY
Screenshot Reader Programm im Scan enthaltenen Text nur schwer oder nicht erkennt – die folgenden Hinweise
beachten:
• Bildauflösung in COPY CAT höher einstellen - DPI TASTE drücken bis die LCD-Anzeige "HIGH" anzeigt.
Scans mit höherer Auflösung können vom Programm leichter „gelesen“ werden.
• Dokument zum Scannen auf eine flache Oberfläche legen und beim Scannen den COPY CAT weder
stossen noch anheben. Störungen des Lichteinfalls oder plätzliche Bewegungen können zu einem
ungleichmäßigen Scan führen.
• Dokument langsam scannen. Dies führt zu einem klareren, genaueren Scan. (Falls das rote
FEHLERLICHT während des Scannens aufleuchtet, erneut, diesmal langsamer zu Scannen versuchen.)
• Nach Möglichkeit nur schwarzen Text auf weissem Hintergrund oder weissen Text auf schwarzem
Hintergrund scannen. Andere Farbkombinationen weisen weniger Kontrast auf, was zu einer verringerten
Genauigkeit beim Erkennen des Textes führt.
• Nach Möglichkeit nur vollständige Textblöcke scannen. Text, der durch Bilder oder Illustrationen
unterbrochen wird, ungewöhnliche Anordnung, erhebliche Änderung der Schriftgröße usw. werden unter
Umständen nicht sauber erkannt.
• Beim Gebrauch des ABBYY Screenshot Reader Programms das zu erfassende Bild auf dem Bildschirm so
groß wie möglich machen. Dies kann durch Vergrößern oder Maximieren des zu scannenden Fensters
geschehen.
• Wird das ABBYY Screenshot Reader Programm dazu verwendet, Text herauszufiltern, "Area" als
Einstellung in Capture wählen und das Rechteck so klein und eng wie möglich um den Textbereich, der
erfasst werden soll, einstellen.
FEINABSTIMMUNG VON COPY CAT
Falls die gescannten Bilder zu dunkel oder zu hell erscheinen, muss unter Umständen die Weisslichtbalance
eingestellt werden. In diesem Fall wird empfohlen, COPY CAT zu kalibrieren, ein schneller und einfacher
Vorgang:
1. COPY CAT auf den weissen Bereich des beiliegenden Kalibrationsblattes legen. SCAN TASTE drücken
und festhalten, um COPY CAT einzuschalten.
2. Die C/BW TASTE drücken und festhalten, dann die SCAN TASTE einmal drücken, um in den AutoKalibrationsmodus zu gelangen. Das SD-Symbol in der LCD-Anzeige blinkt auf.
3. Sobald das SD-Symbol aufhört zu blinken, leuchten das grüne SCAN LICHT und das rote FEHLERLICHT
zusammen auf. Den COPY CAT während dieses Vorgangs nicht bewegen.
4. Sobald das rote FEHLERLICHT erlischt, den weißen Bereich des Blattes scannen, bis das grüne SCAN
LICHT erlischt. (Der COPY CAT kann in diesem Fall auch in die andere Richtung bewegt werden.)
5. Sobald das grüne SCAN LICHT erlischt, ist die Abstimmung erfolgt.
6. SCAN TASTE drücken und festhalten, um den COPY CAT auszuschalten.
35
Page 36

FEHLERDIAGNOSE
PROBLEM URSACHE LÖSUNG
Das rote FEHLERLICHT leuchtet
beim Scannen auf.
Scans sind verschwommen oder
verschmiert.
Scans sind zu hell oder zu dunkel.
Computer erkennt COPY CAT
nicht als MikroSD-Kartenleser,
wenn dieser angeschlossen ist.
Das ABBYY Screenshot Reader
Programm kann auf dem
Computer nicht installiert werden.
Das ABBYY Screenshot Reader
Programm erkennt Text in
Screenshots nur sehr schwer.
Dokument wurde zu schnell
gescannt.
Linse des COPY CAT ist
möglicherweise verschmutzt oder
verstaubt.
Dokument wurde möglicherweise
ungleichmäßig gescannt.
Richtungswechsel oder Pausieren
während des Scannens kann zu
unklaren Scans führen.
Die Weisslichtbalance des
COPY CAT muss Unter
Umständen eingestellt werden.
COPY CAT ist ausgeschaltet.
Das USB-Kabel ist nicht richtig
angeschlosssen.
Die MikroSD-Karte ist nicht
vollständig in den MikroSDKartenschlitz des COPY CAT
eingeschoben.
Der Computer unterstützt dieses
Programm unter Umständen nicht.
(Das ABBYY Screenshot Reader
Programm ist nur mit PCs
kompatibel.)
Problematischer Scan oder
Screenshot aufgrund von
Vorgang, Quelle, usw.
Dokument erneut langsamer und
gleichmäßiger scannen.
Die Glasfläche auf der Unterseite des COPY
CAT mit dem beiliegenden Reinigungstuch
abwischen.
Dokument erneut langsamer und
gleichmäßiger scannen. (Dokument unter
Umständen mit einer Hand festhalten.)
Bitte die Anweisungen im Abschnitt
FEINABSTIMMUNG VON COPY CAT lesen
und durchführen.
Die POWER / SCAN TASTE drücken und
festhalten, um den COPY CAT einzuschalten.
(Wenn vorschriftsmäßig angeschlossen, zeigt
die LCD-Anzeige des COPY CAT "USB" an.)
USB-Kabel sowohl am COPY CAT als auch am
USB-Anschluss des Computers ausstecken,
dann wieder einstecken.
Sicherstellen, dass die MikroSD-Karte richtig in
den Schlitz eingeschoben ist. (Diese sollte
"einklicken", wenn sie vollständig eingeschoben
ist.)
Da COPY CAT Scans im JPG-Format
speichert, können diese mit vielen Screenshotoder OCR- (Texterkennung) Programmen
verwendet werden, viele davon sind umsonst
verfügbar oder können online erworben
werden.
Im Abschnitt HINWEISE ZUR
TEXTERKENNUNG enthaltene Informationen
lesen und ggf. befolgen.
Weitere Informationen und Hilfe gibt es auf www.ionaudio.com/copycat
36
Page 37

2
10
*N.B.: Hoewel COPY CAT gebruikt
kan worden op zowel PC's als Macs,
is de ABBYY Screenshot Reader-
software alleen compatibel met PC's.
1
INHOUD VERPAKKING
COPY CAT Tas
2 AA-batterijen Software-CD *
USB-kabel Snelstartgids
Reinigingsdoekje Veiligheidsinstructies en garantie-informatie
FUNCTIES
6
3
5
7
1. BATTERIJCOMPARTIMENT – Verschuif het plastic deksel van de handgreep en verwijder deze om het
batterijcompartiment toegankelijk te maken. Gebruik 2 AA-batterijen om COPY CAT van stroom te voorzien. Zorg ervoor dat ze in de juiste richting in het compartiment worden geplaatst.
2. KNOP STROOM / SCANNEN – Houd deze knop ingedrukt om de COPY CAT in of uit te schakelen. Om
een document te scannen wordt eenmaal op de knop gedrukt zodat het groene SCANLAMPJE aan gaat,
versleep COPY CAT gelijkmatig over het document dat u wilt scannen heen, druk daarna opnieuw op de
knop om het SCANLAMPJE uit te laten gaan. Raadpleeg HET SCANNEN VAN EEN DOCUMENT voor
meer informatie.
3. SCANLAMPJE – Dit lampje zal groen oplichten wanneer COPY CAT een document aan het scannen is.
4. FOUTLAMPJE – Dit lampje zal rood oplichten als het document te snel gescand is. Als dit gebeurt, scan
het document dan nogmaals, maar langzamer.
5. LCD – Geeft statusinformatie van COPY CAT weer. "EFFECT" verwijst naar
de instelling voor knop C/BW (C = "KLEUR", BW - "ZWART-WIT"). Er
verschijnt een pictogram SD wanneer een micro-SD-kaart in de SLEUF
VOOR SD-KAART wordt geplaatst. Pictogram batterij geeft aan hoeveel
batterijvermogen er resteert. Het getoonde cijfer geeft aan hoeveel gescande
documenten er op de micro-SD-kaart staan. "RESOLUTIE" verwijst naar de
instelling voor knop DPI ("HOOG" of "LAAG").
4
8
9
37
Page 38

6. KNOP C/BW – Druk op deze knop om te selecteren of er in kleur of in zwart-wit gescand zal worden. Het
LCD-scherm zal de huidige modus aangeven: "COLOR" (kleur) of "MONO" (zwart-wit).
7. KNOP DPI – Druk op deze knop om de resolutie ("dpi" of "dots per inch") voor de scans te selecteren. Het
LCD-scherm zal "LOW"(300dpi) of "HIGH" (600dpi) aangeven.
8. USB-AANSLUITING – Sluit deze stekker aan op een vrije USB-poort van uw computer met de
meegeleverde USB-kabel. Nadat de COPY CAT is aangesloten en ingeschakeld, fungeert deze als SDkaartlezer zodat de scans naar de computer kunnen worden overgezet. Raadpleeg HET OVERZETTEN
VAN SCANS voor meer informatie.
N.B.: Wanneer de COPY CAT is aangesloten op de computer, wordt deze door de USB-aansluiting van
stroom voorzien, waardoor de batterijen niet leeg zullen lopen.
9. SLEUF voor MICRO-SD-KAART – Plaats een microSD-kaart voorzichtig in deze sleuf tot deze op zijn plek
'klikt'. Uw scans zullen op de kaart worden opgeslagen.
Om de kaart uit te werpen, wordt deze geheel in de
sleuf gedrukt tot deze 'klikt'; daarna kan de kaart uit het apparaat getrokken worden. Wanneer de COPY
CAT is aangesloten op de computer, fungeert deze als SD-kaartlezer zodat de scans naar de computer
kunnen worden overgezet. Raadpleeg HET OVERZETTEN VAN SCANS voor meer informatie.
10. KNOP FORMATTEREN – Druk op deze knop om een geplaatste micro-SD-kaart te formatteren. (Hiermee
wordt de inhoud gewist).
HET SCANNEN VAN EEN DOCUMENT
Om een document te scannen, volgt u deze stappen:
1. Houd knop SCAN ingedrukt om de COPY CAT in te
schakelen. Wanneer de COPY CAT is ingeschakeld,
wordt er informatie getoond op het LCD-scherm.
2. Plaats de COPY CAT boven uw document. Zorg ervoor
dat de lens voor het scannen aan de onderkant
helemaal op het document ligt en niet gekanteld of
bedekt is.
3. Druk eenmaal op knop SCAN om te beginnen met
scannen. Het groene SCANLAMPJE zal aan gaan
wanneer het scannen begonnen is.
4. Versleep de COPY CAT rustig over de lengte van het document, van boven naar beneden. Het wordt
aanbevolen het document goed op zijn plek te houden zodat het niet verschuift tijdens het scannen. (Als
het rode FOUTLAMPJE aan gaat tijdens het proces, betekent dit dat het document te snel gescand is.
Druk eenmaal op knop SCAN en begin opnieuw vanaf stap 2.)
5. Als het eind van het document bereikt is, druk dan eenmaal op knop SCAN. Het groene SCANLAMPJE zal
uit gaan.
6. Als u meer documenten wilt scannen, herhaal dan stappen 2 t/m 5. Als u uw scans wilt overzetten naar de
computer, raadpleeg dan sectie HET OVERZETTEN VAN SCANS. Houd anders knop SCAN ingedrukt om
de COPY CAT uit te schakelen.
Om gebruik te maken COPY CAT, moet u een
microSD-kaart apart worden aangeschaft.
Om gebruik te maken COPY CAT, moet u een
microSD-kaart apart worden aangeschaft.
Raadpleeg voor tips over het verwerv en van de
meest duidelijke scans en het bereiken van de
beste resultaten met functie tekstherkenning in de
software hoofdstuk TIPS VOOR TEKST HERKEN-
NING in deze handleiding.
38
Page 39

so
HET OVERZETTEN VAN SCANS
Wanneer de COPY CAT is aangesloten op de computer, fungeert deze als micro-SD-kaartlezer, waardoor uw
scans van een micro-SD-kaart naar de computer kunnen worden overgezet. Volg onderstaande stappen om dit te
doen:
1. Sluit het kleine uiteinde van de meegeleverde USB-kabel aan op de USB-aansluiting van de COPY CAT
en het andere uiteinde aan een vrije USB-poort op uw computer. (Zorg ervoor dat de computer aan staat
en dat een micro-SD-kaart in de SLEUF VOOR SD-KAART geplaatst is.)
2. Houd knop SCAN ingedrukt om de COPY CAT in te schakelen. Het LCD-scherm laat "USB" zien wanneer
COPY CAT ingeschakeld wordt en werkt als micro-SD-kaartlezer.
3. Bij gebruik van een PC zal een venster verschijnen waarin gevraagd hoe u toegang wilt verkrijgen tot de
bestanden. Selecteer "Open folder to view files" voor toegang tot de inhoud van de micro-SD-kaart van
COPY CAT. (Nadat verbinding gemaakt is, wordt de COPY CAT ook weergegeven als schijfstation in "Mijn
Computer" (XP en Vista) of "Computer" (Windows 7)).
Bij gebruik van een Mac wordt dubbelgeklikt op het pictogram voor "Naamloos" schijfstation dat op het
bureaublad van de Mac verschijnt voor toegang tot de inhoud van de micro-SD-kaart van de COPY CAT.
4. Dubbelklik op map "DCIM" en dubbelklik daarna op map "100MEDIA". Alle scans worden als .JPG-bestand
opgeslagen op de micro-SD-kaart. Klik en versleep de bestanden naar een locatie op de computer. (Het is
ook mogelijk bestanden van de micro-SD-kaart te verwijderen zoals ze normaal ook van de computer
verwijderd worden.)
5. Wanneer alle scans overgezet zijn, kan het venster worden gesloten en wordt op knop SCAN gedrukt om
de COPY CAT uit te schakelen. Wanneer de COPY CAT uitgeschakeld is, kan het apparaat worden
losgekoppeld van de computer.
HET GEBRUIKEN VAN DE SOFTWARE (ALLEEN VOOR PC)*
De COPY CAT wordt geleverd met ABBYY Screenshot Reader, een
softwaretoepassing die schermafdrukken kan maken en tekst
binnen een afbeelding kan herkennen, waardoor deze elders
gekopieerd en geplakt kan worden. Hiermee kan COPY CAT een
pagina met tekst scannen, waarna deze wordt overgezet naar de
computer; daarna kan de tekst met ABBYY Screenshot Reader
worden gekopieerd zodat deze in een e-mail, tekstbestand, Microsoft Word-document enz. geplakt kan worden.
Als eerste wordt ABBYY Screenshot Reader geïnstalleerd:
1. Plaats de meegeleverde software-CD in het CD-station van de PC.
2. Open Mijn Computer en dubbelklik op schijf Screenshot Reader.
3. Selecteer uw taal uit het vervolgkeuzemenu in het venster dat verschijnt en klik op OK.
4. Volg de instructies op het scherm.
*N.B.: Hoewel COPY CAT gebruikt
kan worden op zowel PC's als Macs,
is de ABBYY Screenshot Reader-
ftware alleen compatibel met PC's.
39
Page 40

Volg deze stappen om ABBYY Screenshot Reader te
gebruiken:
1. Ga naar Startmenu f Alle programma's f ABBYY
Screenshot Reader.
2. Selecteer uit vervolgkeuzemenu Capture welk gedeelte
van het scherm u vast wilt leggen in de schermafdruk:
• Tip: Selecteer deze optie om slechts een
gedeelte van het scherm vast te leggen; u kunt
het gedeelte selecteren door met de muis te
klikken en te verslepen (zie hieronder).
• Venster: Selecteer deze optie om slechts een
gedeelte van het venster dat op uw scherm getoond wordt, vast te leggen; u kunt het gedeelte selecteren door de muis te plaatsen en te klikken
(zie hieronder).
• Scherm: Selecteer deze optie om het gehele scherm van de PC vast te leggen (zie hieronder).
• Screen met timing: Selecteer deze optie om het gehele scherm van de PC vast te leggen, maar
3. Uit vervolgkeuzemenu Language wordt de taal geselecteerd die de software zal herkennen wanneer tekst
4. Uit vervolgkeuzemenu Send wordt het gedeelte van het gescande document geselecteerd dat vastgelegd
met een vertraging van 5 seconden (zie hieronder).
uit de schermafdruk wordt gelezen.
zal worden in de schermafdruk en waar het heen verstuurd zal worden.
• Tekst naar klembord: Tekst die uit de scherm-
afdruk wordt gehaald, wordt naar het Klembord
gekopieerd, waarna deze elders geplakt kan
worden.
• Tekst naar Microsoft Word: Tekst die uit de
schermafdruk wordt gehaald, zal automatisch in
een nieuw Microsoft Word-document worden
geplakt.
• Tekst naar bestand: Tekst die uit de schermafdruk wordt gehaald, zal automatisch in een nieuw,
door gebruiker te selecteren, document. (er zal worden gevraagd het document te selecteren nadat
de schermafdruk is gemaakt.)
• Tabel naar klembord: Een tabel (en de tekst daarin) die uit de schermafdruk wordt gehaald, wordt
naar het Klembord gekopieerd, waarna deze elders geplakt kan worden.
• Tabel naar Microsoft Excel: Een tabel (en de tekst daarin) die uit de schermafdruk wordt gehaald,
zal automatisch in een nieuw Microsoft Excel-document worden geplakt.
• Tabel naar bestand: Een tabel (en de tekst daarin) die uit de schermafdruk wordt gehaald, zal
automatisch in een nieuw, door gebruiker geselecteerd, document worden geplakt. (er zal worden
gevraagd het document te selecteren nadat de schermafdruk is gemaakt.)
Voor meer informatie over ABBYY
Screenshot Reader raadpleegt u het
helpbestand van de software door op toets
F1 te drukken.
Raadpleeg voor tips over het verwerven
van de meest duidelijke scans en het bereiken van de beste resultaten met functie
tekstherkenning in de software hoofdstuk
TIPS VOOR TEKSTHERKENNING in
deze handleiding.
40
Page 41

• Afbeelding naar klembord: De gehele schermafdruk wordt naar het Klembord gekopieerd, waarna
deze elders geplakt kan worden.
• Afbeelding naar bestand: De schermafdruk wordt automatisch in een nieuw, door gebruiker te
selecteren, document geplakt. (er zal worden gevraagd het document te selecteren nadat de
schermafdruk is gemaakt.)
• Afbeelding naar e-mail: De schermafdruk wordt automatisch opgeslagen als .bmp-bestand en
5. Wanneer u deze instellingen naar uw keuze heeft ingesteld, kan de schermafdruk worden vastgelegd:
6. Nadat de schermafdruk is vastgelegd:
7. Als nog meer schermafdrukken moeten worden gemaakt, herhaal dan stappen 2-6.
8. Wanneer u klaar bent met het gebruik van ABBYY Screenshot Reader kunt u de software afsluiten door op
toegevoegd aan een nieuw e-mailbericht.
• Als Area is geselecteerd als instelling voor Capture, klik dan op pictogram Clipboard aan de
rechterkant van het venster. De cursor van de muis zal veranderen. Klik en versleep zodat rond dat
deel van het scherm dat vastgelegd moet worden, een rechthoek ontstaat; laat daarna de muisknop
los om dit gedeelte vast te leggen.
• Als Window is geselecteerd als instelling voor Capture, klik dan op pictogram Clipboard aan de
rechterkant van het venster. De cursor van de muis zal veranderen. Verplaats de cursor naar het
venster dat vastgelegd moet worden; het venster wordt roodomlijnd. Klik op de muisknop om het
venster vast te leggen.
• Als Screen is geselecteerd als instelling voor Capture, klik dan op pictogram Clipboard aan de
rechterkant van het venster om het gehele scherm vast te leggen.
• Als Timed Screen is geselecteerd als instelling voor Capture, klik dan op pictogram Clipboard
aan de rechterkant van het venster. In de volgende vijf seconden wordt het scherm voorbereid voor
vastlegging als schermafdruk. Na vijf seconden wordt het gehele scherm automatisch vastgelegd.
(Deze functie is vergelijkbaar met het nemen van een foto met de timer van een camera.)
• Als _____ to Clipboard" is geselecteerd als instelling bij Send, kan een toepassing worden
geopend om in een document te plakken.
• Als "_____ to Microsoft Word / Microsoft Excel / File / E-mail" is geselecteerd als instelling bij
Send, zal het overeenkomstige bestand worden geopend en wordt de schermafdruk automatisch in
het bestand geplakt.
Ctrl + Q te drukken of rechts te klikken op het pictogram voor ABBYY in het informatiegedeelte van de
Werkbalk en "Exit" te selecteren.
41
Page 42

TIPS VOOR TEKSTHERKENNING
Bij het vastleggen van schermafdrukken van uw scans kan de ABBYY Screenshot Readersoftware tekst binnen
een afbeelding herkennen, waardoor alleen de tekst uit een gescande afbeelding kan worden gehaald die dan
geplakt kan worden in een e-mail, Microsoft Word of een ander programma waarin tekst geplakt kan worden. Om
de best mogelijke scans van tekstdocumenten te bereiken - of wanneer u vindt dat ABBYY Screenshot Reader
moeite heeft met het herkennen van tekst in uw scans - denk dan aan de volgende tips:
• Stel de resolutie van de COPY CAT naar de hogere instelling door op knop DPI te drukken zodat het LCDscherm "HIGH" weergeeft. Scans op een hogere resolutie zijn gemakkelijker te "lezen" voor de software.
• Scan uw documenten in op een vlak oppervlak en zorg ervoor dat de COPY CAT tijdens het scannen niet
opgetild wordt of ergens tegenaan stoot. Verstoringen in licht of beweging kunnen leiden tot een
verstoorde scan.
• Scan het document langzaam in. Dit kan helpen een heldere, meer nauwkeurige scan te maken. (Als het
rode FOUTLAMPJE aan gaat tijdens het scannen, probeer dan opnieuw, maar langzamer, te scannen.)
• Scan, indien mogelijk, alleen zwarte tekst op witte achtergrond of witte tekst op zwarte achtergrond.
Andere kleurenschema's hebben minder contrast, wat de nauwkeurigheid van tekstherkenning beïnvloedt.
• Scan, indien mogelijk, alleen ononderbroken tekstblokken. Tekst die onderbroken wordt door plaatjes of
illustraties, ongebruikelijke indelingen, dramatische verschillen in lettergrootte e.d. kunnen minder
nauwkeurig herkend worden.
• Maak bij gebruik van ABBYY Screenshot Reader het vast te leggen plaatje zo groot als mogelijk op het
computerscherm. Dit kunt u doen door het venster van de scan te vergroten of te maximaliseren.
• Selecteer, bij gebruik van ABBYY Screenshot Reader, "Area" als instelling voor Capture en maak de
rechthoek zo smal en "nauw aansluitend" als mogelijk rond het stuk tekst dat u wilt vastleggen.
HET KALIBREREN VAN DE COPY CAT
Als de gescande afbeeldingen er te donker of te licht uitzien, kan het nodig zijn de balans voor wit licht van de
COPY CAT af te stellen. In dit geval wordt aangeraden de COPY CAT te kalibreren, een snel en eenvoudig
proces:
1. Plaats de COPY CAT op het witte gebied van het meegeleverde kalibratiepapier. Houd knop SCAN
ingedrukt om de COPY CAT in te schakelen.
2. Houd knop C/BW ingedrukt en druk dan eenmaal op knop SCAN om naar automatische kalibratiemodus te
schakelen. Op het LCD-scherm zal het symbool voor SD knipperen.
3. Wanneer het symbool voor SD niet langer knippert, zullen zowel het SCANLAMPJE als het FOUTLAMPJE
aan gaan. Beweeg de COPY CAT niet tijdens dit proces.
4. Wanneer het FOUTLAMPJE uit gaat, begin dan met het scannen van de witte sectie van het papier tot het
groene SCANLAMPJE uit gaat. (De COPY CAT mag, indien nodig, achterwaarts bewogen worden.)
5. Wanneer het groene SCANLAMPJE uit gaat, is de kalibratie volledig.
6. Houd knop SCAN ingedrukt om de COPY CAT uit te schakelen.
42
Page 43

PROBLEEMOPLOSSING
PROBLEEM OORZAAK OPLOSSING
Het rode FOUTLAMPJE blijft aan
gaan tijdens het scannen.
De scans zijn onduidelijk of bevatten vegen.
De scans zijn te licht of te donker.
De computer herkent de COPY
CAT niet als micro-SD-kaartlezer
wanneer het apparaat aangesloten wordt.
ABBYY Screenshot Reader wordt
niet geïnstalleerd op de computer.
ABBYY Screenshot Reader heeft
moeite met het herkennen van
tekst in mijn schermafdrukken.
Het document is te snel gescand.
De lens van de COPY CAT kan
vuil zijn of stof bevatten.
Het kan zijn dat het document niet
solide genoeg gescand is.
Veranderingen in de scanrichting
of pauzeren tijdens het scannen
kunnen hier ook op van invloed
zijn.
De balans voor wit licht van de
COPY CAT behoeft afstelling.
De COPY CAT is niet ingeschakeld.
De USB-kabel is niet juist aangesloten.
De micro-SD-kaart is niet volledig
in de SLEUF VOOR MICRO-SDKAART van de COPY CAT
geplaatst.
Het kan zijn dat de computer de
software niet ondersteunt.
(ABBYY Screenshot Reader is
alleen compatibel met PC's.)
De omstandigheden voor de scan
of de schermafdruk kunnen minder dan optimaal geweest zijn.
Probeer het document langzamer en met vaste
hand te scannen.
Gebruik het meegeleverde reinigingsdoekje om
het glasoppervlak aan de onderkant van de
COPY CAT schoon te vegen.
Probeer het document langzamer en met vaste
hand te scannen. (Probeer het document met
een hand vast te houden.)
Raadpleeg de instructies onder
HET KALIBREREN VAN DE COPY CAT.
Houd knop STROOM / SCAN ingedrukt om de
COPY CAT in te schakelen. (Als het apparaat
juist is aangesloten op de computer, geeft het
LCD-scherm van de COPY CAT "USB" weer.)
Koppel de USB-kabel los en sluit deze opnieuw
aan op de COPY CAT en de USB-poort van de
computer.
Zorg ervoor dat de micro-SD-kaart helemaal in
de sleuf geduwd is. (De kaart dient vast te
"klikken" wanneer deze volledig ingestoken is.)
Omdat de COPY CAT scans opslaat als .JPGbestanden, kunnen ze gebruikt worden met
elke soort softwaretoepassing voor OCR
(tekstherkenning), waarvan veel varianten
bestaan die gratis zijn of online gekocht kunnen
worden.
Raadpleeg TIPS VOOR TEKSTHERKENNING
in deze handleiding.
Voor aanvullende ondersteuning bezoekt u www.ionaudio.com/copycat
43
Page 44

SPECIFICATIONS
Maximum scanning speed
Image Sensor:
Number of sensors:
Resolution: Low: 300 dpi (default); High: 600 dpi
(A4-size documents):
Approximate capacity
(A4-size documents):
Scan width:
Scan length: Low-res.: 50" maximum; High-res.: 25" maximum
File format:
Power:
Memory:
System Requirements:
COPY CAT
A4 Color Contact Image Sensor
5136 dots (1st~5104 dots available)
Low-res. / Mono: 2 seconds; Low-res. / Color: 3 seconds
High-res. / Mono: 6 seconds; High-res. / Color: 13 seconds
Low-res. / Mono: ~1280 scans; Low-res. / Color: ~780 scans
High-res. / Mono: ~290 scans; High-res. / Color: ~220 scans
8.27"
JPEG (.jpg)
2 AA batteries
Automatic power-off in 3 minutes
External microSD card (not included)
Windows: XP (SP 2), Vista or 7 / Mac: OS 10.4 or above *
CPU: Pentium II or above
RAM: 64MB minimum
Interface: USB 2.0
* Note: Though COPY CAT can be
used on both PCs and Macs,
ABBYY Screenshot Reader
software is PC-compatible only.
www.ionaudio.com
MANUAL VERSION 1.1
 Loading...