

Page 1

Complete LP
Quickstart Guide English ( 2 – 7 )
Guía de inicio rápido Español ( 8 – 14 )
Guide d'utilisation rapide Français ( 15 – 22 )
Guida rapida Italiano ( 23 – 29 )
Schnellstart-Anleitung Deutsch ( 30 – 36 )
Snelstartgids Nederlands ( 37 – 43 )
Page 2
Quickstart Guide (English)
Box Contents
Complete LP
Felt Slipmat
45 RPM Adapter
Quickstart Guide
Safety & Warranty Manual
Support
For the latest information about this product (system requirements, compatibility information,
etc.) and product registration, visit ionaudio.com.
• A minimum distance of 6 inches must be maintained to provide sufficient ventilation of
the rear bass ports.
• Do not stand it on a thick pile carpet, or install it in a place with poor air flow.
• Place the unit on a flat even surface, away from vibrating sources.
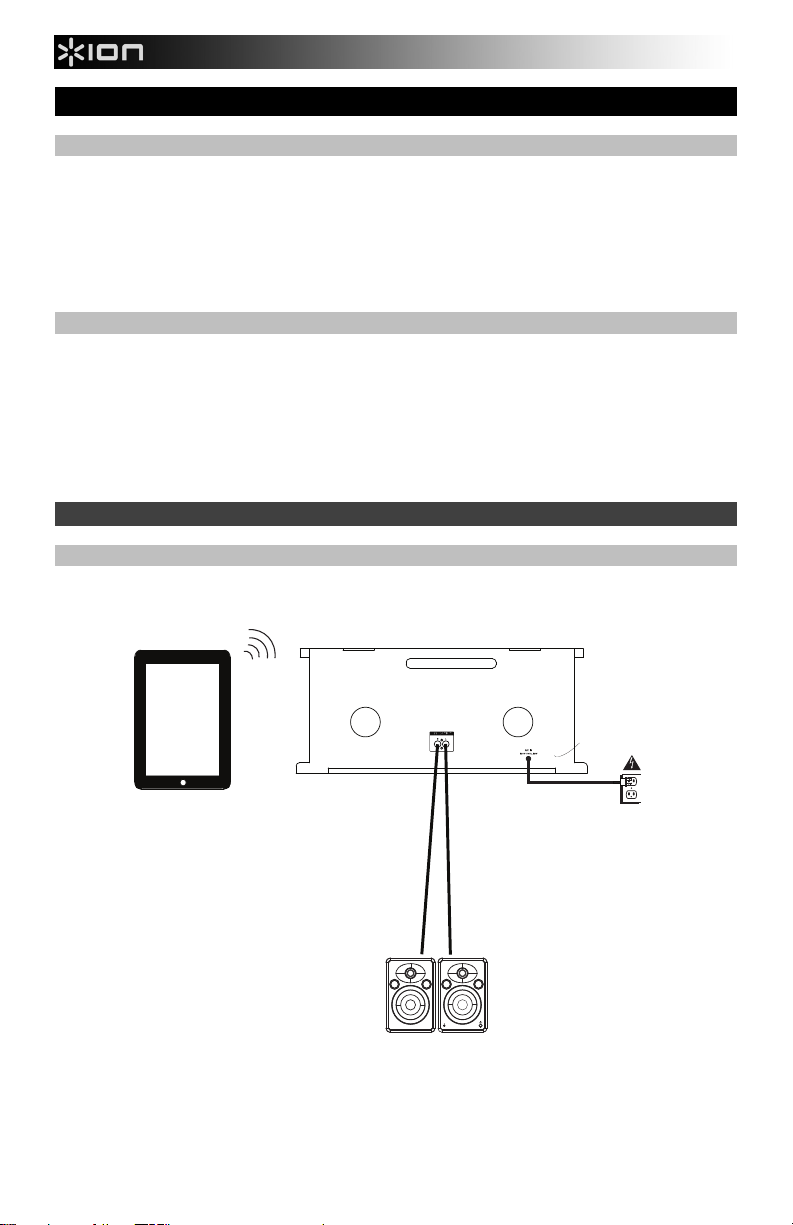
Quick Setup
Connection Diagram
Items not listed under the Box Contents are sold separately.
FM ANT
Tablet
Speakers
(optional)
2
Power
Page 3
20
21
22
15
16
17
18
19
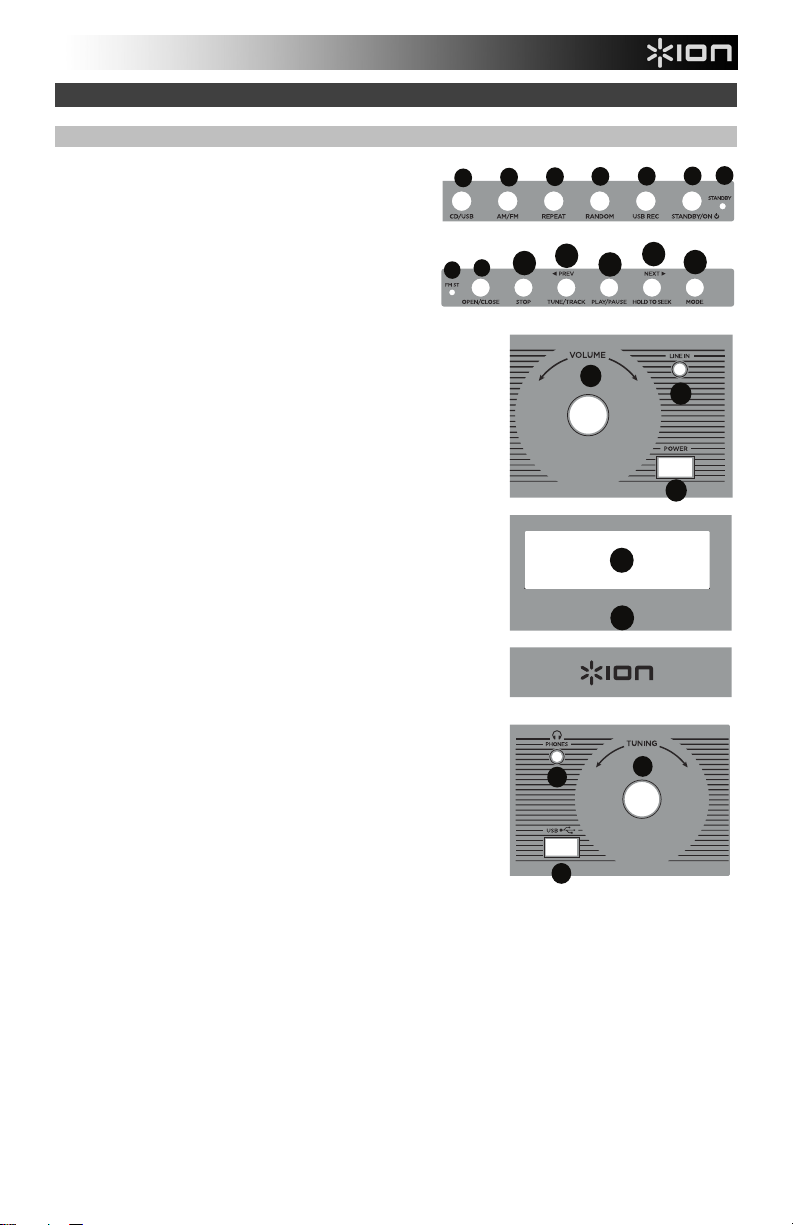
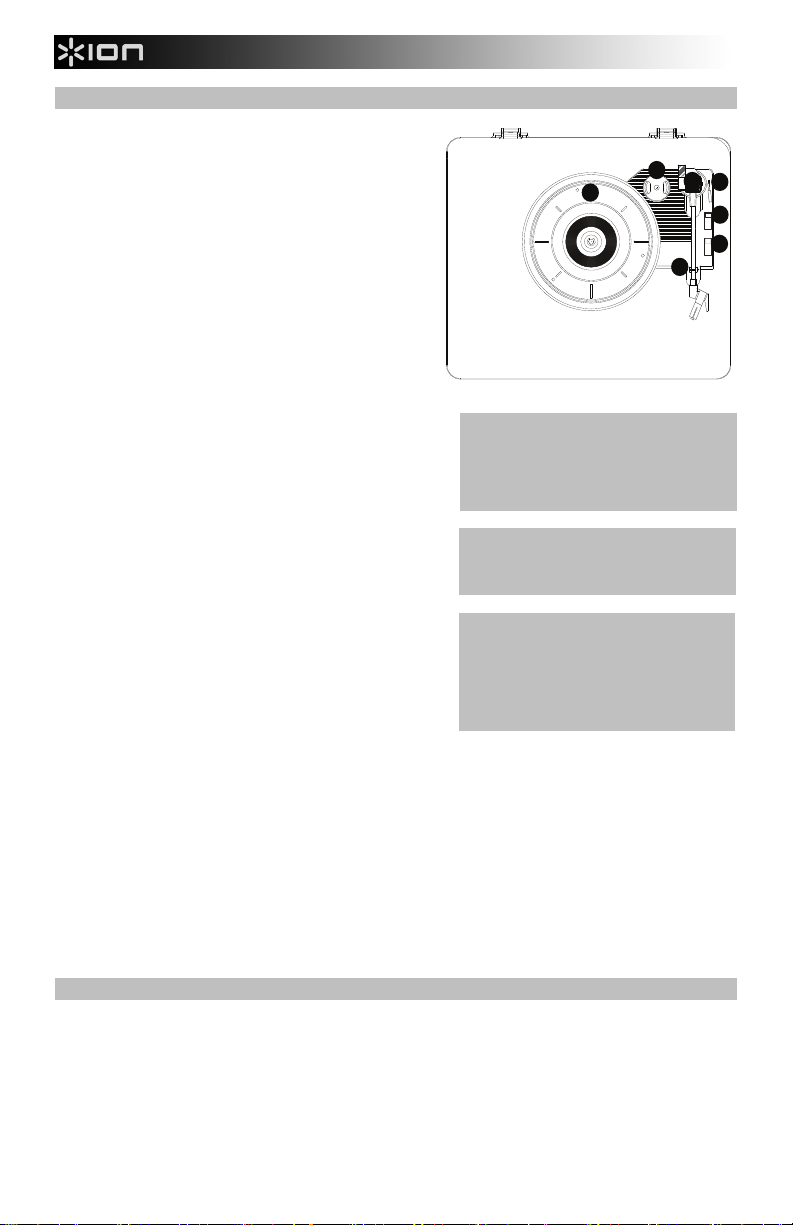
Features
Front Panel
1. CD/USB: Toggles the source from CD to
USB.
2
1
4
3
2. AM/FM: Press and release to switch between
the AM and FM radio bands when Tuner has
been selected as the mode.
3. Repeat: Repeats a single track or the whole
disc of a CD.
9
8
10
11
12
4. Random: Plays a random track on a CD.
5. USB Rec: Press to go to USB recording
mode if a USB flash drive is connected.
6. Standby/On (EU/UK units only): On EU/UK models,
the Standby button powers the unit on/off.
7. Standby LED (EU/EK units only): Indicates you are in
Standby mode. Complete LP will go to sleep and
illuminate this LED after 60 minutes of inactivity, unless
music is playing via Bluetooth or the radio.
8. FM ST: This illuminates when station is being received
in stereo.
9. Open/Close: Opens/closes the CD tray.
10. Stop: Press to end the recording to the USB flash
drive.
11. Prev / Tune/Track / Seek: Press to go to the previous
USB file, radio station, or CD track. Hold to “seek”
backwards (jump to the strongest radio station signal).
12. Play/Pause: Starts or pauses playback of a CD, USB
file, or Bluetooth track. When in Tuner mode, press for
2 seconds to “scan” through the radio stations. When
in Bluetooth mode, hold Play/Pause for 2 seconds to
disconnect a currently paired Bluetooth device.
13. Next / Tune/Track / Seek: Press to go to the next
USB file, radio station, or CD track. Hold to “seek”
(jump to the next strongest radio station signal).
14. Mode: Switches from BT/AUX/TUNER/CD/TAPE/USB/
PHONO modes.
15. Volume: Adjusts the sound level for the internal
speakers as well as the headphone output.
16. Line In: Connect the output from a line-level device to
this input, such as from a smartphone, media player,
tablet, etc.
17. Power: Press to power the unit on/off.
Note (EU/UK units only): To fully power on Complete LP, also press Standby.
18. Display: Shows the current mode, track number, track time, and radio station.
Note: The display and surrounding buttons include a plastic protector on it. Remove
these for optimal viewing.
19. CD Tray: Press the Open/Close button to eject the tray and place a CD here. This unit is
designed to play commercially available CDs, properly burned and finalized CD-Rs, CDRW’s, and MP3 CDs. Due to variances on the specification of certain CD burners and
CDs, we recommend burning CDs at the minimum speed possible for the best playback
performance.
20. Headphone Output: When headphones are connected, the internal speaker is muted.
21. Tuning: Adjust this to go to another radio station.
22. USB: Playback tracks from your USB flash drive or record to the USB flash drive.
5
13
6
14
7
3
Page 4

Rear Panel
2
3
3
4
1
1. Line Output: Connect external speakers to this output.
2. Speakers: These internal speakers output the music.
3. Bass Ports: These provide extended bass for the music. Position these away from walls
or other obstructions for best sound quality.
4. Tapedeck: Insert a cassette tape here.
5. Power Input: The integrated power cable is connected here.
6. FM Antenna: Adjust this wire for better FM radio reception. For AM reception, rotate the
unit until the best reception is found.
5
2
FM ANT
6
Recording
Note: It is not possible to record from the AM/FM radio.
When in BT/TAPE/PHONO/AUX mode:
1. Connect your USB flash drive to Complete LP.
2. Press USB REC.
3. Press USB REC to begin recording.
4. Once the display shows “REC”, USB flashes in the top left corner of the display,
recording will begin.
5. Press STOP to end recording and it will save the audio file to your USB flash drive.
When in CD/MP3 mode:
1. Connect your USB flash drive to Complete LP.
2. Press USB REC.
3. Press NEXT/PREV to toggle between these options:
• REC ONE (record one track)
• REC DIR (record all songs from the current folder)
• REC ALL (record all the songs)
4. Press USB REC to begin recording. Once the display shows “READING”, USB will flash
on the screen and begin recording.
5. Press STOP to end recording and it will save the audio file to your USB flash drive.
4
Page 5
Playback
Bluetooth Mode
1. Turn on your Bluetooth device.
2. Press the Mode button until BT AUX is seen on the display. It will automatically go into
pairing mode to search for Bluetooth devices.
3. Navigate to your Bluetooth device’s setup screen, find “Complete LP”, and connect.
Note: If your Bluetooth device prompts for a pairing code, enter “0000”.
Tape Player Mode
1. Press the Mode button until TAPE is seen on the display.
2. Insert the tape with the thicker side of the tape facing to the right of tape tray.
3. Push the Eject/Fast Forward button 1/2 way down to toggle between fast forward and
play mode.
4. Push the Eject/Fast Forward button completely down to eject the tape.
Note: Remove your 1/8” (3.5 mm) cable from the Line In before going to Tuner mode in order
to hear the station.
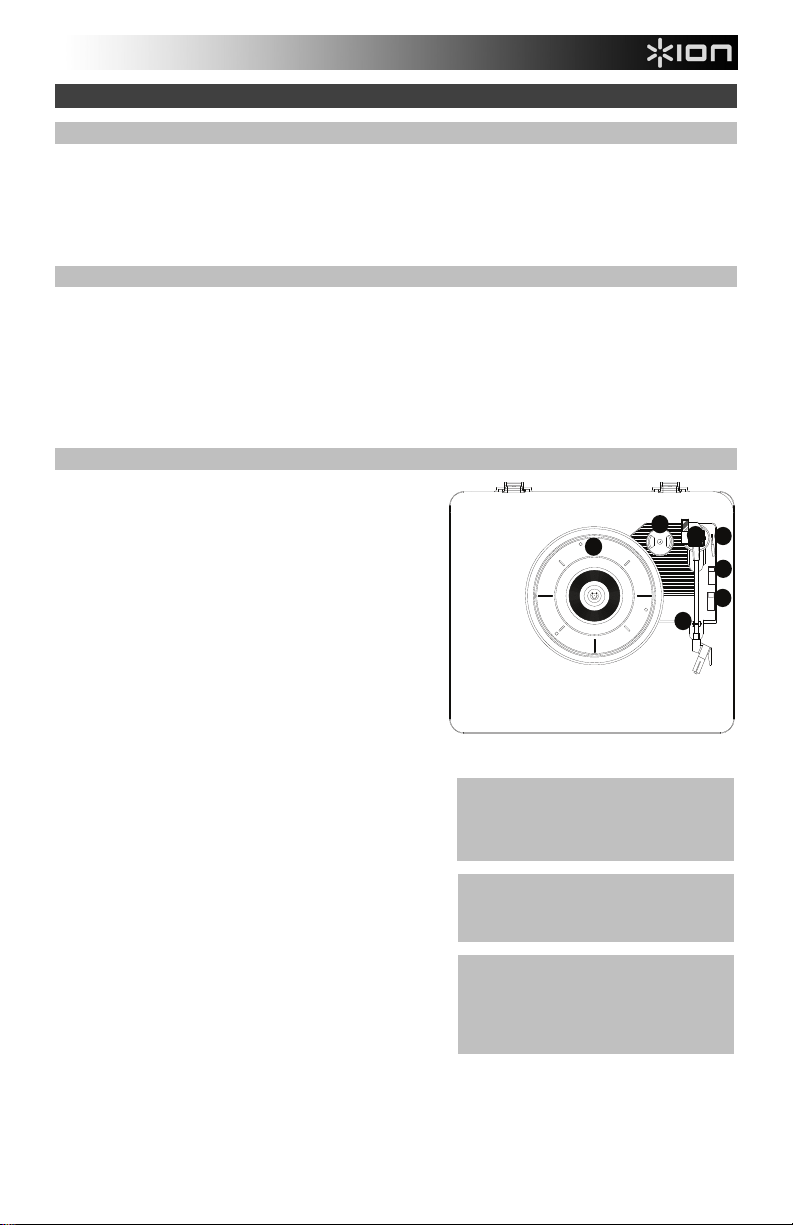
Vinyl Mode
1. Platter – Place your record here.
2. 45 RPM Adapter Holder – Holds the included
45 RPM adapter. When not using the adapter,
please place it in this holder.
3. Tonearm – The fixed tonearm can be raised
and lowered by hand, or by pressing the raise
/ lower lever.
4. Arm Clip – This specially designed arm clip
secures the tonearm while at rest or when not
in use. The arm clip has been designed to
remain in the up position while unlocked.
5. Raise / Lower Lever – Raises and lowers the
tonearm.
6. 33 / 45 / 78 Switch – This switch controls the
speed of the turntable platter.
Note: For best results when playing 78 RPM
vinyl records, use a 78 stylus (sold separately).
Only use a 78 stylus with 78 RPM vinyl records.
7. Autostop switch – This switch turns autostop
on or off. When autostop is on, the platter will
start spinning when the tonearm is placed over
the record and stop spinning when the record
has reached the end. (When Autostop is off, the
platter will always spin regardless of the
position of the tonearm.)
Note: If your vinyl record stops before it
reaches the end of the music, turn Autostop to
the off position for this particular record. This is
generally recommended for 45 RPM records.
1
IMPORTANT: Place the included felt
slipmat on the platter; then place your
record on the felt slipmat to carefully hold
your records.
IMPORTANT: Remove the plastic
cartridge cover (needle cover) before
operating the turntable.
*WARNING: The RCA outputs are LINE
level. Please only connect these to LINE
level inputs. You may damage your
receiver if you plug in a LINE level device
into a PHONO level input.
2
3
5
6
7
4
5
Page 6
Playing your records:
1. Press the Mode button until PHONO is seen on the display.
2. Set the Speed Control switch to the desired speed (33 1/3, 45, 78 rpm).
3. Place the record on the platter and adjust the tonearm on the record to begin playback.
4. Adjust the Volume knob on Complete LP.
Note: Remove your 1/8” (3.5 mm) cable from the Line In before going to Tuner mode in order to hear the station.
Aux Mode
1. Connect your device to the Line In using a stereo 1/8” (3.5mm) cable.
2. Press the Mode button until BT AUX is seen on the display.
3. Adjust the volume from your output device.
CD Mode
1. Press the Open/Close button to insert a MP3, CD-R, or CD-RW into the CD tray.
2. Press the Mode button until CD is seen in the display.
3. Press PREV/NEXT to select a different track.
4. Press PLAY/PAUSE to play or pause a track.
Note: Remove your 1/8” (3.5 mm) cable from the Line In before going to Tuner mode in order to hear the station.
USB Mode
1. Connect a USB flash drive to the unit.
2. Press the CD/USB button until USB is seen on the display. It will automatically start playback of the songs on
the USB flash drive.
3. Press PREV/NEXT to select a different track.
4. Press PLAY/PAUSE to play or pause a track.
Note: Remove your 1/8” (3.5 mm) cable from the Line In before going to Tuner mode in order to hear the station.
Tuner Mode
1. Press AM/FM to toggle between the AM and FM bands.
2. Adjust the TUNE knob to select the channel you want.
3. Hold either the PREV or NEXT button to go to the strongest radio station signal.
Note: Remove your 1/8” (3.5 mm) cable from the Line In before going to Tuner mode in order to hear the station.
To save a radio station as a preset:
1. Press the OPEN/CLOSE button.
2. Change the preset slot by pressing the PREV or NEXT button while the preset slot number is still flashing.
3. Press OPEN/CLOSE to confirm your save.
4. Toggle between saved presets using the PREV or NEXT button when in Tuner mode.
Troubleshooting
I am playing a record but do not hearing any audio:
• If you are playing music from vinyl:
o Make sure that Complete LP is powered on and that the needle is on the record.
o If headphones are connected to Complete LP, disconnect the headphones in order to hear sound from
My record is not playing at the correct speed; its pitch is too high or too low:
I am connected to a Bluetooth speaker but do not hear any audio.
I am not hearing the radio station.
6
the internal speakers.
o Ensure the 33 / 45 / 78 switch is set to the correct speed for your record.
o Turn Complete LP off and then on again, and then try pairing it again.
o Use the volume knob on Complete LP to turn up the Bluetooth output level.
o If headphones are connected to Complete LP, disconnect the headphones in order to hear sound from
the internal speakers.
o Remove your 1/8” (3.5 mm) cable from the Line In before going to Tuner mode in order to hear the radio
station.
Page 7
Technical Specifications
Speaker Output Power
Supported Bluetooth Profile
Bluetooth Range
Power
Cartridge Type
Cartridge and Stylus CZ-800-10
Voltage
Power Consumption
Dimensions
(width x depth x height)
Weight
Radio Frequency Range US: EUROPE: JAPAN:
Specifications are subject to change without notice.
* Bluetooth range is affected by walls, obstructions, and movement. For optimal performance, place the product in the center
of the room so it is unobstructed by walls, furniture, etc.
Trademarks and Licenses
ION Audio is a trademark of ION Audio, LLC, registered in the U.S. and other countries.
The Bluetooth word mark and logos are owned by the Bluetooth SIG, Inc. and any use of such marks by
ION Audio is under license.
All other product or company names are trademarks or registered trademarks of their respective owners.
8W (peak)
4.0
30 feet (10 meters) or better
12W
ceramic
120V, 60 Hz (US)
230V, 50 Hz (EU)
240V, 50 Hz (UK)
≤ 19W
11.75" x 19.75" x 9.2"
29.8 cm x 50.1 cm x 23.4 cm
17.2 lbs.
7.8 kg
AM 520 – 1710 kHz AM 522 – 1629 kHz AM 520 – 1710
FM 87.5 – 107.9 MHz FM 87.5 – 108 MHz FM 75.5 – 90.5
7
Page 8
Guía de inicio rápido (Español)
Contenido de la caja
Complete LP
Almohadillas antideslizantes de fieltro
Adaptador para 45 rpm
Guía de inicio rápido
Manual sobre la seguridad y garantía
Soporte
Para obtener la información más reciente acerca de este producto (requisitos de sistema,
información de compatibilidad, etc.) y registrarlo, visite ionaudio.com:
• Se debe mantener una distancia mínima de 6 pulg. para proveer la ventilación suficiente
de los puertos de graves traseros.
• No lo apoye sobre una alfombra gruesa o en un lugar con poco flujo de aire.
• Coloque la superficie sobre una superficie plana y pareja, alejada de fuentes de
vibraciones.
Instalación rápida
Diagrama de conexión
Los elementos que no se enumeran en Contenido de la caja se venden por separado.
FM ANT
Tableta
Suministro
eléctrico
Altavoces
(opcional)
8
Page 9
Características
Panel frontal
1. CD/USB: Alterna la fuente entre CD y USB.
2. AM/FM: Pulse y suelte este interruptor para
alternar entre las bandas de radio AM y FM
cuando se selecciona el modo sintonizador
de radio.
3. Repeat (Repetir): Repite una pista individual
o el disco entero de un CD.
4. Random (Aleatorio): Reproduce una pista
aleatoria de un CD.
5. USB Rec (Grabación de USB): Pulse para entrar al
modo de grabación de USB si está conectada una
memoria flash USB.
6. Standby/On (Espera/encendido) (sólo las
unidades de UE/Reino unido): En los modelos de
la UE/Reino Unido, el botón de espera apaga y
enciende la unidad.
7. Standby LED (LED de espera) (sólo las unidades
de EU/Reino unido): Indica que se encuentra en
modo de espera. Complete LP entrará en modo
hibernación y se encenderá este LED luego de 60
minutos de inactividad, a menos que se esté
reproduciendo música a través de Bluetooth o la
radio.
8. FM ST: Se enciende cuando la estación se está
recibiendo en estéreo.
9. Open/Close (Abrir/Cerrar): Abre/cierra la bandeja
del CD.
10. Stop (Parar): Púlselo para finalizar la grabación al
dispositivo flash USB.
11. Prev / Tune / Track / Seek (Anterior / sintonizar /
pista / buscar): Púlselo para ir al archivo USB,
estación de radio o pista de CD anterior. Mantenga
pulsado para "buscar" hacia atrás (saltar a la
estación de radio con señal más fuerte).
12. Reproducir/Pausa: Comienza o pone en pausa la
reproducción de un CD, archivo USB o pista
Bluetooth.
segundos para "recorrer" las emisoras de radio. En modo Bluetooth, mantenga pulsado
Play/Pause (reproducir/pausa) para desconectar un dispositivo Bluetooth apareado
actualmente.
13. Next / Tune / Track / Seek (Siguiente / sintonizar / pista / buscar): Púlselo para ir al
archivo USB, estación de radio o pista de CD siguiente. Mantenga pulsado para "buscar"
hacia adelante (saltar a la siguiente estación de radio con señal más fuerte).
14. Mode (Modo): Alterna entre los modos BT/AUX/TUNER/CD/TAPE/USB/PHONO
(BT/AUX/RADIO/CD/CASETE/USB/FONOGRÁFICO).
15. Volumen: Ajusta el nivel de sonido de los altavoces internos así como también la salida
para auriculares.
16. Line In (Entrada de línea): Conecte a esta entrada la salida de un dispositivo de nivel de
línea, como por ejemplo un smartphone (teléfono inteligente), reproductor de medios,
tableta, etc.
17. Power (Encendido): Pulse este botón para encender y apagar la unidad.
Nota (sólo las unidades de UE/Reino unido): Para encender completamente el
Complete LP, pulse también Standby.
En modo Sintonizador, pulse durante 2
1
9
8
3
2
11
10
15
20
22
5
4
13
12
18
19
21
17
16
6
14
7
9
Page 10
18. Pantalla: Muestra el modo, número de pista, tiempo de pista y estación de radio
actuales.
Nota: La pantalla y los botones que la rodean incluyen un protector de plástico adherido.
Retírelo para una mejor visualización.
19. Bandeja de CD: Pulse el botón Open/Close para expulsar la bandeja y colocar aquí un
CD. Esta unidad está diseñada para reproducir CD que están disponibles
comercialmente y CD-R, CD-RW y CD de MP3 que hayan sido grabados y finalizados
correctamente. Debido a las variaciones en las especificaciones de ciertas grabadoras
de CD y CD, recomendamos grabar los CD a la mínima velocidad posible para obtener la
mejor reproducción.
20. Salida para auriculares: Cuando se conectan auriculares, el altavoz interno se silencia.
21. Tuning (Sintonización de radio): Ajuste esta perilla para pasar a otra estación de radio.
22. USB: Reproduzca pistas desde su unidad flash USB o grabe en la unidad flash USB.
Panel trasero
2
3
4
1
3
5
2
FM ANT
6
1. Salida de línea: Conecte altavoces externos a esta salida.
2. Altavoces: Estos altavoces internos emiten la música.
3. Puerto de graves: Estos puertos proveen graves extendidos para la música. Colóquelos
lejos de paredes y otras obstrucciones para obtener la mejor calidad de sonido.
4. Reproductor de casetes: Inserte aquí un casete.
5. Entrada de corriente: El cable de corriente integrado se conecta aquí.
6. Antena de FM: Ajuste de cable para una mejor recepción de radio FM. Para mejorar la
recepción de AM, gire la unidad hasta encontrar la mejor recepción.
10
Page 11

Grabación
Nota: No es posible grabar la radio AM/FM.
Estando en modo BT/TAPE/PHONO/AUX:
1. Conecte su unidad flash USB al Complete LP.
2. Pulse USB REC.
3. Pulse USB REC para comenzar a grabar.
4. Una vez que la pantalla muestra “REC”, parpadeará USB en la esquina superior izquierda
de la pantalla y comenzará la grabación.
5. Pulse STOP para finalizar la grabación y se grabará el archivo de audio en su unidad
flash USB.
Estando en modo CD/MP3:
1. Conecte su unidad flash USB al Complete LP.
2. Pulse USB REC.
3. Pulse NEXT/PREV para alternar entre estas opciones:
• REC ONE (grabar una pista)
• REC DIR (grabar todas las canciones de la carpeta actual)
• REC ALL (grabar todas las canciones)
4. Pulse USB REC para comenzar a grabar. Una vez que la pantalla muestra “READING”,
parpadeará USB en la pantalla y comenzará la grabación.
5. Pulse STOP para finalizar la grabación y se grabará el archivo de audio en su unidad
flash USB.
Reproducción
Modo Bluetooth
1. Encienda su dispositivo Bluetooth.
2. Pulse el botón de modo hasta que aparezca BT AUX en la pantalla. Entrará
automáticamente al modo de apareamiento para buscar dispositivos Bluetooth.
3. Navegue a la pantalla de configuración de su dispositivo Bluetooth, busque “Complete
LP” y conéctese a él.
Nota: Si su dispositivo Bluetooth solicita un código de apareamiento, ingrese "0000".
Modo de reproducción de casetes
1. Pulse el botón de modo hasta que aparezca TAPE en la pantalla.
2. Inserte el casete con su lado más grueso hacia la derecha de la bandeja.
3. Pulse el botón Eject/Fast-Forward hasta la mitad para alternar entre el modo de avance
rápido y el modo de reproducción.
4. Pulse el botón Eject/Fast-Forward completamente hasta abajo para expulsar el casete.
Nota: Retire su cable de 3,5 mm (1/8 pulg.) de la entrada Line In antes de pasar al modo
sintonizador a fin de escuchar la estación.
11
Page 12
Modo vinilo
1. Plato – Coloque aquí su disco.
2. Soporte del adaptador para 45 rpm –
Sostiene el adaptador para 45 RPM incluido.
Cuando no use el adaptador, póngalo en este
soporte.
3. Brazo – El brazo fijo se puede subir y bajar a
mano o presionando la palanca de subir /
bajar.
4. Clip del brazo – Este clip diseñado
1
2
3
5
6
7
4
especialmente fija el brazo mientras está en
reposo o no se usa. El clip ha sido diseñado
para que permanezca hacia arriba mientras
está desbloqueado.
5. Palanca de subir / bajar – Sube y baja el
brazo.
6. Conmutador de 33 / 45 / 78 – Este conmutador
controla la velocidad del plato del giradiscos.
Nota: Para obtener los mejores resultados al
reproducir discos de vinilo de 78 RPM, use una
púa para 78 (que se vende por separado). Use
sólo una púa para 78 con los discos de vinilo de
IMPORTANTE: Coloque la almohadilla
antideslizante de fieltro incluida sobre el
plato y coloque su disco encima de ella
para que sus discos queden sostenidos
cuidadosamente.
78 RPM.
7. Interruptor de parada automática – Este
interruptor activa y desactiva la parada
automática. Cuando la parada automática está
IMPORTANTE: Retire la cubierta plástica
de la cápsula (cubierta de la púa) antes
de hacer funcionar el giradiscos.
activada, el plato comienza a girar cuando el
brazo se coloca sobre el disco y se detiene
cuando llega al final del mismo. (Si está
desactivada, el plato gira siempre,
independientemente de la posición del brazo).
Nota: Si su disco de vinilo se detiene antes de
llegar al final de la música, gire Autostop a la
*ADVERTENCIA: Las salidas RCA son
para nivel de LÍNEA. Conéctelas sólo a
las entradas de nivel de línea (LINE).
Puede dañar el receptor si enchufa un
dispositivo de nivel de línea en una
entrada de nivel fonográfico (PHONO).
posición de desactivado para este disco en
particular. Esto se recomienda en general para los
discos de 45 RPM.
Cómo reproducir sus discos:
1. Pulse el botón de modo hasta que aparezca PHONO en la pantalla.
2. Ajuste el interruptor de control de velocidad a la velocidad deseada (33 1/3, 45, 78 rpm).
3. Coloque el disco en el plato y posicione el brazo sobre el disco para comenzar la
reproducción.
4. Ajuste la perilla de volumen del Complete LP.
Nota: Retire su cable de 3,5 mm (1/8 pulg.) de la entrada Line In antes de pasar al modo
sintonizador a fin de escuchar la estación.
Modo auxiliar
1. Conecte su dispositivo a la entrada Line In utilizando un cable estéreo de 3,5 mm (1/8
pulg.)
2. Pulse el botón de modo hasta que aparezca BT AUX en la pantalla.
3. Ajuste el volumen de su dispositivo de salida.
12
Page 13

Modo CD
1. Pulse el botón Open/Close para insertar un MP3, CD-R o CD-RW en la bandeja de CD.
2. Pulse el botón de modo hasta que aparezca CD en la pantalla.
3. Pulse PREV/NEXT para seleccionar una pista diferente.
4. Pulse PLAY/PAUSE para reproducir o poner en pausa la pista.
Nota: Retire su cable de 3,5 mm (1/8 pulg.) de la entrada Line In antes de pasar al modo sintonizador a fin
de escuchar la estación.
Modo USB
1. Conecte una unidad flash USB a la unidad.
2. Pulse el botón CD/USB hasta que aparezca USB en la pantalla. Comenzará la reproducción
automáticamente de las canciones presentes en la unidad flash USB.
3. Pulse PREV/NEXT para seleccionar una pista diferente.
4. Pulse PLAY/PAUSE para reproducir o poner en pausa la pista.
Nota: Retire su cable de 3,5 mm (1/8 pulg.) de la entrada Line In antes de pasar al modo sintonizador a fin
de escuchar la estación.
Modo sintonizador de radio
1. Pulse AM/FM para alternar entre las bandas AM y FM.
2. Ajuste la perilla TUNE para seleccionar el canal que desea.
3. Mantenga pulsado el botón PREV o el botón NEXT para pasar a la estación de radio con señal más
fuerte.
Nota: Retire su cable de 3,5 mm (1/8 pulg.) de la entrada Line In antes de pasar al modo sintonizador a fin
de escuchar la estación.
Para guardar una emisora de radio como preset:
1. Pulse el botón OPEN/CLOSE (cerrar/abrir).
2. Cambie la ubicación del preset pulsando los botones PREV (anterior) o NEXT (siguiente) mientras el
número de ubicación del preset aún esté parpadeando.
3. Pulse OPEN/CLOSE (abrir/cerrar) para confirmar el guardado del preset.
4. Alterne entre los presets guardados utilizando los botones PREV o NEXT en modo Sintonizador.
Solución de problemas
Estoy reproduciendo un disco pero no escucho ningún audio:
• Si está reproduciendo la música de un vinilo:
o Asegúrese de que el Complete LP esté encendido y que la púa esté sobre el disco.
o Si hay auriculares conectados al Complete LP, desconéctelos a fin de escuchar el sonido por
Mi disco no se reproduce a la velocidad correcta. Su tono es demasiado alto o bajo:
Estoy conectado con un altavoz Bluetooth pero no escucho ningún audio.
No consigo escuchar las estaciones de radio.
los altavoces internos.
o Asegúrese de que el interruptor 33 / 45 / 78 esté colocado en la velocidad correcta para su
disco.
o Apague y encienda nuevamente el Complete LP y luego intente aparearlo nuevamente.
o Utilice la perilla de volumen del Complete LP para aumentar el nivel de salida de Bluetooth.
o Si hay auriculares conectados al Complete LP, desconéctelos a fin de escuchar el sonido por
los altavoces internos.
o Retire su cable de 3,5 mm (1/8 pulg.) de la entrada Line In antes de pasar al modo sintonizador
a fin de escuchar la estación de radio.
13
Page 14

Especificaciones técnicas
Potencia de salida de los altavoces
Perfil de Bluetooth soportado
Alcance de Bluetooth
Suministro eléctrico
Tipo de cápsula:
Cápsula y púa CZ-800-10
Voltaje
Consumo
Dimensiones
(ancho x profundidad x alto)
Peso
Gama de frecuencias de radio EE.UU.: EUROPA: JAPÓN:
Especificaciones sujetas a cambio sin previo aviso.
* El alcance de Bluetooth se ve afectado por paredes, obstrucciones y movimiento. Para lograr un rendimiento óptimo,
coloque el producto en el centro de la sala donde no esté obstaculizado por paredes, muebles, etc.
8 W (pico)
4,0
30 pies (10 metros) o más
12W
Cerámica
120 V, 60 Hz (EE.UU.)
230 V, 50 Hz (UE)
240 V, 50 Hz (Reino Unido)
≤ 19 W
11,75 x 19,75 x 9,2 pulg.
29,8 x 50,1 x 23,4 cm
17,2 lbs.
7,8 kg
AM 520 – 1710 kHz AM 522 – 1629 kHz AM 520 – 1710
FM 87,5 – 107,9 MHz FM 87,5 – 108 MHz FM 75,5 – 90,5
14
Page 15

Guide d’utilisation rapide (Français)
Contenu de la boîte
Complete LP
Tapis en feutrine
Adaptateur pour 45 tr/min
Guide d’utilisation rapide
Consignes de sécurité et informations concernant la garantie
Assistance technique
Pour les toutes dernières informations concernant ce produit (configuration système,
compatibilité, etc.), veuillez visiter le site ionaudio.com.
• Une distance minimale de 6 pouces doit être maintenu à l’arrière de l’appareil afin
d’assurer une ventilation suffisante des évents bass-reflex.
• Ne pas le déposer sur une moquette épaisse, ou l'installer dans un endroit où il y a une
mauvaise circulation d'air.
• Placez l'appareil sur une surface plane et stable, loin des sources de vibration.
Installation
Schéma de connexion
Les articles qui ne figurent pas dans l’encadré Contenu de la boîte sont vendus séparément.
Tablette
FM ANT
Alimentation
Enceintes
(facultatif)
15
Page 16

Caractéristiques
Panneau avant
1. CD/USB : Cette touche permet de basculer
3
2
1
5
4
entre le lecteur CD et le port USB.
2. AM/FM : Cet interrupteur permet de
basculer entre les bandes radio AM et FM
lorsque le mode syntoniseur (Tuner) a été
sélectionné.
11
10
9
8
12
13
3. REPEAT : Cette touche permet de répéter
une piste ou tout le CD.
4. RANDOM : Cette touche permet de faire la lecture
aléatoire d’une piste sur le CD.
5. USB REC : Cette touche permet de passer en
15
mode d'enregistrement USB lorsqu’un
périphérique USB est branché.
6. STANDBY/ON (modèles européens/du
Royaume-Uni) : Sur les modèles européens/du
Royaume-Uni, cette touche permet la mise sous et
hors tension de l’appareil.
7. DEL STANDBY/ON (modèles européens/du
Royaume-Uni) : Indique que l’appareil est en mode
veille. Après 60 minutes d'inactivité, le Complete LP
se met en mode veille et cette DEL s’allume.
18
8. DEL FM ST : Cette DEL s'allume lorsque le signal
de la station est reçu en stéréo.
19
9. OPEN/CLOSE : Cette touche d'ouvrir et de fermer
le plateau du lecteur CD.
10. STOP : Cette touche permet d’arrêter
l'enregistrement sur le périphérique USB.
11. PREV/TUNE/TRACK : Cette touche permet de
passer au fichier USB précédent, à la station radio
précédente ou à la piste CD précédente. Maintenez
cette touche enfoncée afin de syntoniser la station
20
21
précédente ayant un signal fort.
12. PLAY/PAUSE : Cette touche permet de lancer ou
d’arrêter la lecture d’un disque compact, d’un fichier
USB ou d’une piste Bluetooth. En mode Tuner,
appuyez sur cette touche pendant 2 secondes afin
de parcourir les stations de radio. En mode
22
Bluetooth, maintenez la touche pour
lancer/interrompre la lecture enfoncée pendant 2 secondes afin de supprimer la
connexion à l’appareil Bluetooth connecté.
13. NEXT/HOLD TO SEEK : Cette touche permet de passer au fichier USB suivant, à la
station radio suivante ou à la piste CD suivante. Maintenez cette touche enfoncée afin de
syntoniser la prochaine station ayant un signal fort.
14.
MODE : Cette touche permet basculer entre les différents modes de fonctionnement
BT/AUX/TUNER/CD/TAPE/USB/PHONO.
15. VOLUME : Cette touche permet de régler le niveau sonore des enceintes internes ainsi
que de la sortie casque.
16. LINE IN : Branchez la sortie à niveau ligne d'un appareil, tel que smartphone, tablette,
lecteur multimédia, etc., à cette entrée.
17. POWER : Cette touche permet de mettre l’appareil sous et hors tension.
Remarque (modèles européens/du Royaume-Uni) : Pour mettre le Complete LP sous
tension, appuyez également sur la touche Standby.
17
16
6
14
7
16
Page 17

18. Écran : Cet écran indique le mode, le numéro et la durée de la piste, et la station de radio
sélectionnée.
Remarque : Une pellicule de protection en plastique recouvre l’écran et les touches tes.
Veuillez le retirer afin d’optimiser le visionnement.
19. Plateau CD : Utilisez la touche d’ouverture/fermeture pour ouvrir le plateau et placez un
CD. Cet appareil est conçu pour faire la lecture de disques compacts vendus
commercialement et des formats CD-R, CD-RW et MP3 correctement gravés et finalisés.
En raison des variations sur la spécification de certains graveurs CD et CD, nous vous
recommandons de graver les CD à la vitesse minimale afin obtenir les meilleures
performances de lecture.
20. Sortie casque d'écoute : Lorsqu’un casque d’écoute est branché, les enceintes internes
sont désactivées.
21. TUNING : Ce bouton permet de syntoniser une station radio.
22. Port USB : Ce connecteur permet de faire la lecture ou l’enregistrement de pistes sur
périphérique USB.
Panneau arrière
2
3
4
1. Sortie ligne : Cette sortie ligne permet de brancher des enceintes externes.
2. Enceintes : Le son est diffusé par ces enceintes internes.
3. Évents bass-reflex : Ces évents procurent une réponse en basses étendue. Assurezvous de laisser suffisamment d’espace entre ces évents et les murs ou autres obstacles,
afin obtenir une qualité sonore optimale.
4. Lecteur de cassettes : Insérez une cassette dans ce lecteur.
5. Entrée d'alimentation : Le câble d'alimentation intégré.
6. Antenne FM : Ajustez ce câble pour une meilleure réception radio FM. Pour la réception
AM, tournez l'appareil de sorte à obtenir une meilleure réception.
1
3
5
2
FM ANT
6
17
Page 18

Enregistrement
Remarque : Il n'est pas possible d'enregistrer la radio AM/FM.
En mode BT/TAPE/PHONO/AUX :
1. Branchez un périphérique USB dans le port USB du Complete LP.
2. Appuyez sur la touche USB REC.
3. Appuyez de nouveau sur la touche USB REC pour lancer l'enregistrement.
4. Une fois que « REC » s’affiche, USB clignotera dans le coin supérieur gauche de l'écran
et l'enregistrement commencera.
5. Appuyez sur STOP pour arrêter l’enregistrement et sauvegarder le fichier audio sur votre
périphérique USB.
En mode CD/MP3 :
1. Branchez un périphérique USB au port USB du Complete LP.
2. Appuyez sur la touche USB REC.
3. Appuyez sur la touche NEXT ou PREV pour basculer entre les options suivantes :
• REC ONE (enregistrement d’une piste)
• REC DIR (enregistrement de toutes les pistes du dossier sélectionné)
• REC ALL (enregistrement de toutes les pistes)
4. Appuyez sur la touche USB REC pour lancer l'enregistrement. Une fois que « READING »
s’affiche, USB clignotera à l'écran et l'enregistrement commencera.
5. Appuyez sur la touche STOP pour arrêter l’enregistrement et sauvegarder le fichier audio
sur votre périphérique USB.
Lecture
Lecture Bluetooth
1. Veuillez mettre votre appareil Bluetooth sous tension.
2. Appuyez sur la touche Mode jusqu'à ce que BT AUX s’affiche. L’appareil passera
automatiquement en mode jumelage afin de rechercher les appareils Bluetooth.
3. Accédez à l'écran de configuration de votre appareil Bluetooth, recherchez
« Complete LP » et lancez le jumelage.
Remarque : Si votre périphérique Bluetooth vous demande d’entrer un code de
jumelage, entrez « 0000 ».
Lecture de cassettes
1. Appuyez sur la touche Mode jusqu'à ce que TAPE s’affiche.
2. Insérer la cassette côté plus épais du côté droit du logement de cassettes.
3. Enfoncez la touche d’éjection/avance rapide du lecteur de cassette à moitié pour
basculer entre les modes d'avance rapide et de lecture.
4. Enfoncez la touche d’éjection/avance rapide complètement pour éjecter la cassette.
Remarque : Retirez le câble 3,5 mm de l'entrée ligne avant de passer au mode Tuner afin
d'entendre le signal de la station.
18
Page 19

Lecture de disques vinyles
1. Plateau – Placez le disque vinyle à cet
endroit.
2. Rangement pour adaptateur 45 tr/min –
Cet emplacement permet de ranger
1
l'adaptateur 45 tr/min lorsqu’il n’est pas
utilisé. Lorsqu’il n’est pas utilisé, veuillez
mettre l'adaptateur dans cet emplacement.
3. Bras de lecture – Le bras de lecture peut
être lever ou abaisser manuellement ou en
utilisant le bouton du levier de commande.
4. Serre-bras – Ce serre-bras est conçu
spécialement afin de maintenir en place le
bras de lecture lorsque la platine n’est pas
utilisée. Le serre-bras a été conçu pour rester en
position élevée lorsqu’il est déverrouillé.
5. Levier de commande – Ce levier permet de
lever ou d’abaisser le bras de lecture.
6. Sélecteur de vitesse (33/45/78) – Ce sélecteur
IMPORTANT : Retirez le couvercle de
plastique de la cartouche (qui protège la
pointe de lecture) avant d’utiliser la
platine.
régit la vitesse de rotation du plateau.
Remarque : Pour de meilleurs résultats lors de
la lecture de disques vinyles de 78 tr/min,
utilisez une pointe de lecture 78 (vendu
séparément). Utilisez uniquement une pointe de
IMPORTANT : Placez le tapis de feutrine
fourni sur le plateau ; placez ensuite votre
disque sur le tapis afin de le maintenir en
place.
lecture 78 pour les disques vinyles de 78 tr/min.
7. Autostop – Ce commutateur permet d'activer et
de désactiver la fonction autostop. Lorsqu’elle
est activée, le plateau commence à tourner dès
que le bras de lecture est placé au-dessus du
disque et s’arrête lorsque l’aiguille a atteint la fin
du disque. (Lorsqu'elle est désactivée, le plateau
*MISE EN GARDE : Les sorties RCA sont
de niveau ligne. Veuillez ne les raccorder
qu’à des entrées à niveau ligne. Vous
pourriez endommager votre récepteur si
un appareil À NIVEAU LIGNE est branché
à une entrée PHONO.
tourne, peu importe l’emplacement du bras de
lecture.)
Remarque : Si le disque s'arrête avant la fin de la musique, désactivez la fonction
Autostop pour ce disque. Ceci est généralement recommandé pour disques de
45 tr/min.
Lecture d’un disque :
1. Appuyez sur la touche Mode jusqu'à ce que PHONO s’affiche.
2. Réglez le sélecteur de vitesse à la vitesse désirée (33 1/3, 45, 78 tr/min).
3. Placez le disque sur le plateau et placez le bras de lecture sur le disque pour commencer
la lecture.
4. Réglez le bouton Volume du Complete LP.
Remarque : Retirez le câble 3,5 mm de l'entrée ligne avant de passer au mode Tuner afin
d'entendre le signal de la station.
2
3
5
6
7
4
19
Page 20

Entrée auxiliaire
1. Branchez votre appareil à l'entrée ligne à l'aide d'un câble stéréo 3,5 mm.
2. Appuyez sur la touche Mode jusqu'à ce que BT AUX s’affiche.
3. Réglez le volume de votre appareil Bluetooth au niveau souhaité.
Lecture de disques compacts
1. Appuyez sur la touche Open/Close pour ouvrir le plateau et insérez un disque compact
MP3, CD-R ou CD-RW.
2. Appuyez sur la touche Mode jusqu'à ce que CD s’affiche.
3. Appuyez sur la touche PREV ou NEXT pour sélectionner une autre piste.
4. Appuyez sur la touche PLAY/PAUSE pour lancer ou interrompre la lecture de la piste.
Remarque : Retirez le câble 3,5 mm de l'entrée ligne avant de passer au mode Tuner afin
d'entendre le signal de la station.
Lecture USB
1. Branchez un périphérique USB dans le port USB de l’appareil.
2. Appuyez sur la touche CD/USB jusqu'à ce que USB s’affiche. La lecture des pistes sur le
périphérique USB débutera automatiquement.
3. Appuyez sur la touche PREV ou NEXT pour sélectionner une autre piste.
4. Appuyez sur la touche PLAY/PAUSE pour lancer ou interrompre la lecture de la piste.
Remarque : Retirez le câble 3,5 mm de l'entrée ligne avant de passer au mode Tuner afin
d'entendre le signal de la station.
Radio
1. Appuyez sur la touche AM/FM pour basculer entre les bandes AM et FM.
2. Sélectionnez la station radio avec le bouton TUNE.
3. Maintenez la touche PREV enfoncée afin de syntoniser la station précédente ayant un
signal fort, ou NEXT pour faire une recherche avant afin de syntoniser la prochaine
station ayant un signal fort.
Remarque : Retirez le câble 3,5 mm de l'entrée ligne avant de passer au mode Tuner afin
d'entendre le signal de la station.
Pour programmer une station radio à un numéro de préréglage :
1. Appuyez sur la touche d’OUVERTURE/FERMETURE.
2. Modifiez l'emplacement du préréglage en appuyant sur la touche précédente ou
suivante, alors que le numéro d’emplacement du préréglage clignote.
3. Appuyez sur la touche d’OUVERTURE/FERMETURE afin de confirmer l'enregistrement
du préréglage.
4. Basculer entre les préréglages programmés en utilisant la touche précédente ou
suivante en mode Tuner.
20
Page 21

Dépannage
La musique joue, mais je n’entends pas de signal audio :
• Si vous faites la lecture à partir d’un vinyle :
o Assurez-vous que le Complete LP est sous tension et que l’aiguille est bien sur le
disque.
o Si un casque d’écoute est branché au Complete LP, débranchez-le afin d'entendre
Mon disque ne joue pas à la bonne vitesse, la tonalité est trop haute ou trop basse :
L’enceinte Bluetooth est connectée, mais il n’y a aucun signal audio.
Je n'entends pas le signal de la station de radio.
le son provenant des enceintes internes.
o Veuillez vous assurer que le sélecteur de vitesse 33/45/78 est réglé sur la bonne
vitesse pour votre disque.
o Éteignez le Complete LP, puis rallumez-le et relancer le processus de jumelage.
o Utilisez le bouton Volume du Complete LP afin d’augmenter le niveau de sortie
Bluetooth.
o Si un casque d’écoute est branché au Complete LP, débranchez-le afin d'entendre
le son provenant des enceintes internes.
o Retirez le câble 3,5 mm de l'entrée ligne avant de passer au mode Tuner afin
d'entendre le signal de la station.
21
Page 22

Spécifications techniques
Sortie enceinte
Profils Bluetooth pris
en charge
Portée Bluetooth
Alimentation
Type de cartouche
Cartouche et pointe de lecture
Tension
Consommation électrique
Dimensions
(largeur x profondeur x hauteur)
Poids
Plage de fréquence radio Amérique du Nord : Europe : Japon :
Toutes les spécifications sont susceptibles d'être modifiées sans préavis.
* La portée Bluetooth est affectée par les murs, les obstacles et le mouvement. Pour une performance optimale, placez le
produit dans le centre de la pièce afin qu'il n’y ait aucune obstruction créée par des murs, des meubles, etc.
8 W (crête)
4.0
10 m (30 pi) ou mieux
12W
Céramique
CZ-800-10
120 V, 60 Hz (Amérique du Nord)
230 V, 50 Hz (Europe)
240 V, 50 Hz (Royaume-Uni)
≤ 19 W
29,8 cm x 50,1 cm x 23,4 cm
11,75 po x 19,75 po x 9,2 po
7,8 kg
17,2 lb
AM 520 – 1710 kHz AM 522 – 1629 kHz AM 520 – 1710
FM 87,5 – 107,9 MHz FM 87,5 – 108 MHz FM 75,5 – 90.5
22
Page 23

Guida rapida (Italiano)
Contenuti della confezione
Complete LP
Tappetino in feltro
Adattatore 45 giri
Guida rapida
Istruzioni di sicurezza e garanzia
Assistenza
Per le ultime informazioni in merito a questo prodotto (requisiti di sistema, informazioni sulla
compatibilità, ecc.) e per la registrazione del prodotto, recarsi alla pagina ionaudio.com.
• Una distanza minima di 6" deve essere mantenuta per garantire una ventilazione
sufficiente delle porte posteriori del basso.
• Non collocarlo su un tappeto spesso o in un luogo dalla scarsa di ventilazione.
• Collocare l'apparecchio su una superficie pianeggiante e uniforme, lontano da fonti di
vibrazioni.
Configurazione rapida
Schema dei collegamenti
Elementi non elencati sotto Contenuti della confezione sono venduti separatamente.
Tablet
FM ANT
Alimentazione
Casse
(opzionale)
23
Page 24

Caratteristiche
Pannello anteriore
1. CD/USB: fa commutare la fonte da CD a
3
2
1
5
4
USB.
2. AM/FM: premere e rilasciare questo
comando per commutare tra le bande radio
AM ed FM quando "Sintonizzatore" (Tuner) è
stato scelto come modalità.
11
10
9
8
12
13
3. Repeat (Ripeti): ripete una singola traccia o
l'intero CD.
4. Random (Riproduzione casuale): riproduce una
traccia presente su un CD in maniera casuale.
5. USB Rec: premere questo comando per passare
15
alla modalità di registrazione USB quando è
collegato un drive flash USB.
6. Standby/On (solo apparecchi EU/UK): nei
modelli EU/UK il tasto Standby accende o spegne
l'apparecchio.
7. LED Standby (solo apparecchi EU/UK): indica
che l'apparecchio si trova in modalità di Standby.
Il Complete LP si ferma e questo LED si illumina
dopo 60 minuti di inattività, a meno che non venga
riprodotta musica tramite Bluetooth o la radio.
18
8. FM ST: si illumina quando la stazione è ricevuta in
stereo.
19
9. Open/Close: apre/chiude il vassoio porta-CD.
10. Stop: premere questo comando per fermare la
registrazione sul drive flash USB.
11. Prev / Tune/Track / Seek: premere questo
comando per passare al file USB, alla stazione
radio o alla traccia CD precedente. Tenerlo premuto
per “cercare” all'indietro (passando al segnale di
stazione radio più forte).
20
21
12. Play/Pause: avvia o interrompe momentaneamente
la riproduzione di un CD, un file USB o di una
traccia Bluetooth. In modalità di sintonia Tuner,
premere per 2 secondi questo comando per
effettuare una “scansione” delle stazioni radio. In
22
modalità Bluetooth, tenere premuto Play/Pause per
2 secondi per scollegare un dispositivo Bluetooth attualmente collegato.
13. Next / Tune/Track / Seek: premere questo comando per passare al file USB, alla
stazione radio o alla traccia CD successivi. Tenerlo premuto per “cercare” in avanti
(passando al segnale di stazione radio successivo più forte).
14. Modalità: commuta tra le modalità BT/AUX/TUNER/CD/TAPE/USB/PHONO.
15. Volume: regola il livello dell'audio degli altoparlanti interni, lotre che dell'uscita cuffie.
16. Ingresso di linea:
collegare l'uscita da un dispositivo a livello di linea a questo ingresso
(quali uno smartphone, un media player. un tablet, ecc.)
17. Alimentazione (Power): premere questo comando per accendere/spegnere
l'apparecchio.
Nota bene (solo apparecchi EU/UK): per accendere interamente il Complete LP,
premere anche Standby.
24
17
16
6
14
7
Page 25

18. Display: mostra la modalità corrente, il numero di traccia, la durata della traccia e la
stazione radio.
Nota bene: il display e i tasti circostanti sono coperti da una protezione in plastica.
Rimuovere quest'ultima per una visualizzazione ottimale.
19. Vassoio porta-CD: premere il tasto Open/Close per espellere il vassoio e collocarvi un
CD. L'apparecchio è stato concepito per riprodurre i CD disponibili in commercio, CD-R
masterizzati adeguatamente e finalizzati, CD-RW e CD MP3. A causa della variabilità
delle specifiche di determinati masterizzatori CD e CD, si consiglia di masterizzare i CD
stessi alla velocità minima disponibile per ottenere i migliori risultati di riproduzione.
20. Uscita cuffie: quando le cuffie sono inserite, l'altoparlante interno viene silenziato.
21. Sintonia (tuning): regolare questo comando per passare a un'altra stazione radio.
22. USB: riproduce le tracce dal drive flash USB o le registra sullo stesso.
Pannello posteriore
2
3
4
1
3
5
2
FM ANT
6
1. Uscita di linea: collegare altoparlanti esterni a questa uscita.
2. Casse: queste casse interne emettono la musica.
3. Porte dei bassi: garantiscono bassi estesi per la musica. Posizionarli lontani dalle pareti
o da altre ostruzioni per ottenere la massima qualità sonora.
4. Mangiacassette: inserire una cassetta a questo livello.
5. Ingresso di alimentazione: il cavo di alimentazione integrato va collegato a questo
livello.
6. Antenna FM: regolare questo filo per migliorare la ricezione della radio FM. Per la
ricezione AM, ruotare l'apparecchio fino a trovare la ricezione migliore.
25
Page 26

Registrazione
Nota bene: non è possibile registrare dalla radio AM/FM.
Quando in modalità BT/TAPE/PHONO/AUX:
1. Collegare il drive flash USB al Complete LP.
2. Premere USB REC.
3. Premere nuovamente USB REC per iniziare a registrare.
4. Quando a display compare “REC”, USB lampeggia nell'angolo superiore sinistro del
display e la registrazione avrà inizio.
5. Premere STOP per concludere la registrazione salvando il file audio al drive flash USB.
Quando in modalità CD/MP3:
1. Collegare il drive flash USB al Complete LP.
2. Premere USB REC.
3. Premere NEXT/PREV per commutare tra le seguenti opzioni:
• REC ONE (registra una traccia)
• REC DIR (registra tutte le canzoni presenti nella cartella corrente)
• REC ALL (registra tutte le canzoni)
4. Premere USB REC per iniziare a registrare. Quando a display compare “READING”, USB
lampeggia sullo schermo e inizia la registrazione.
5. Premere STOP per concludere la registrazione salvando il file audio al drive flash USB.
Riproduzione
Modalità Bluetooth
1. Accendere il dispositivo Bluetooth.
2. Premere il tasto Mode fino a quando BT AUX non compare a display. Entrerà
automaticamente in modalità di accoppiamento per cercare dispositivi Bluetooth.
3. Navigare nella schermata di configurazione del dispositivo Bluetooth, trovare “Complete
LP” e collegarlo.
Nota bene: se il dispositivo Bluetooth richiede un codice, digitare ‘0000’.
Modalità tape player
1. Premere il tasto Mode fino a quando TAPE non compare a display.
2. Inserire il nastro con il lato più spesso rivolto verso il lato destro del vassoio porta-nastro.
3. Premere il tasto Espelli/Avanzare a metà per commutare tra avanzamento rapido e
riproduzione.
4. Premere per intero il tasto Espelli/Avanzare per espellere il nastro.
Nota bene: rimuovere il cavo da 1/8” (3,5 mm) dall'ingresso di linea prima di passare in
modalità Tuner per sentire la stazione.
26
Page 27

Modalità vinile
1. Piatto – Il disco va collocato qui.
2. Supporto adattatore 45 giri – Regge
l’incluso adattatore per 45 giri. Quando
l'adattatore non è in uso, può essere
1
collocato a questo livello.
3. Braccio – Il braccio fisso può essere alzato e
abbassato a mano, oppure premendo la
levetta di sollevamento / abbassamento.
4. Fermabraccio – Questo fermabraccio dal
design speciale fissa il braccio quando è a
riposo o quando non è in uso. Il fermabraccio
è stato progettato in modo che resti sollevato
quando sbloccato.
5. Levetta di sollevamento / abbassamento –
Alza e abbassa il braccio.
6. Interruttore 33 / 45 / 78 – Controlla la velocità
del piatto del giradischi.
IMPORTANTE: collocare il tappetino in
feltro in dotazione sul piatto; quindi
posizionare il disco sul tappetino in modo
che venga retto in maniera accurata.
Nota bene: per i migliori risultati durante la
riproduzione di dischi in vinile a 78 giri, servirsi
di una puntina 78 (venduta separatamente).
Servirsi unicamente di una puntina 78 con
IMPORTANTE: rimuovere il cappuccio
della cartuccia (copripuntina) prima di
utilizzare il giradischi.
dischi in vinile a 78 giri.
7. Interruttore Autostop – Accende o spegne la
funzione "autostop". Quando la funzione
"autostop" è attiva, il piatto inizia a girare
quando il braccio è posato sul disco e smette di
girare quando il disco arriva alla fine. (Quando la
funzione autostop è disattiva, il piatto
*AVVERTENZA: le uscite RCA sono a
livello di LINEA. Collegarle unicamente a
ingressi a livello di LINEA. Si rischia di
danneggiare il ricevitore collegando un
dispositivo a livello di LINEA in un
ingresso PHONO.
continuerà a girare, indipendentemente dalla
posizione del braccio.)
Nota bene: se il vinile si ferma prima di raggiungere la fine della musica, spegnere la
funzione Autostop per quel particolare disco. Di solito, ciò è consigliato per i dischi a 45
giri.
Riproduzione dei dischi:
1. Premere il tasto Mode fino a quando PHONO non compare a display.
2. Impostare l'interruttore di controllo della velocità sulla velocità desiderata (33 1/3, 45, 78
giri).
3. Collocare il disco sul piatto e posizionare il braccio sul disco per avviare la riproduzione.
4. Regolare la manopola Volume sul Complete LP.
Nota bene: rimuovere il cavo da 1/8” (3,5 mm) dall'ingresso di linea prima di passare in
modalità Tuner per sentire la stazione.
Modalità Aux
1. Collegare il dispositivo all'ingresso di linea servendosi di un cavo stereo da 1/8” (3,5 mm).
2. Premere il tasto Mode fino a quando BT AUX non compare a display.
3. Regolare il volume sul dispositivo di uscita.
2
3
5
6
7
4
27
Page 28

Modalità CD
1. Premere il tasto Open/Close per inserire un disco MP3, CD-R, o CD-RW nel vassoio CD.
2. Premere il tasto Mode fino a quando CD non compare a display.
3. Premere PREV/NEXT per selezionare una traccia diversa.
4. Premere PLAY/PAUSE per riprodurre o interrompere momentaneamente la tracciak.
Nota bene: rimuovere il cavo da 1/8” (3,5 mm) dall'ingresso di linea prima di passare in
modalità Tuner per sentire la stazione.
Modalità USB
1. Collegare un drive flash USB all'apparecchio.
2. Premere il tasto CD/USB fino a quando USB non compare a display. Inizierà
automaticamente la riproduzione delle canzoni presenti sul drive flash USB.
3. Premere PREV/NEXT per selezionare una traccia diversa.
4. Premere PLAY/PAUSE per riprodurre o interrompere momentaneamente la tracciak.
Nota bene: rimuovere il cavo da 1/8” (3,5 mm) dall'ingresso di linea prima di passare in
modalità Tuner per sentire la stazione.
Modalità di sintonia (Tuner)
1. Premere AM/FM per commutare tra le bande AM ed FM.
2. Regolare la manopola TUNE per selezionare il canale desiderato.
3. Tenere premuto il tasto PREV o NEXT per passare alla stazione dal segnale radio più
forte.
Nota bene: rimuovere il cavo da 1/8” (3,5 mm) dall'ingresso di linea prima di passare in
modalità Tuner per sentire la stazione.
Per salvare una stazione radio come preset:
1. Premere il tasto OPEN/CLOSE.
2. Cambiare lo slot preset premendo il tasto PREV o NEXT quando il numero dello slot
preset sta ancora lampeggiando.
3. Premere OPEN/CLOSE per confermare il salvataggio.
4. Commutare tra i preset salvati servendosi del tasto PREV o NEXT quando in modalità di
sintonia Tuner.
Risoluzione di problemi
Sto riproducendo un disco, ma non sento alcun audio.
• Se si riproduce musica da vinile:
o Assicurarsi che il Complete LP sia acceso e che la puntina sia sul disco.
o Se le cuffie sono collegate al Complete LP, scollegarle per sentire l'audio dagli
altoparlanti interni.
Il mio disco non suona alla giusta velocità; il pitch è troppo alto o troppo basso:
o Assicurarsi che l'interruttore 33 / 45 / 78 sia impostato sulla velocità giusta per il
disco specifico.
Sono collegato a un altoparlante Bluetooth, ma non sento alcun audio.
o Spegnere e riaccendere il Complete LP, quindi provare a collegarlo nuovamente.
o Servirsi della manopola volume sul Complete LP per alzare il volume dell'uscita
Bluetooth.
o Se le cuffie sono collegate al Complete LP, scollegarle per sentire l'audio dagli
altoparlanti interni.
Non sento la stazione radio.
o Rimuovere il cavo da 1/8” (3,5 mm) dall'ingresso di linea prima di passare in
modalità Tuner per sentire la stazione radio.
28
Page 29

Specifiche tecniche
Potenza di uscita altoparlante
Profilo Bluetooth supportato
Portata Bluetooth
Alimentazione
Tipo di cartuccia
Cartuccia e puntina CZ-800-10
Tensione
Consumo
Dimensioni
(larghezza x profondità x altezza)
Peso
Gamma di frequenza radio Stati Uniti: EUROPA: GIAPPONE:
Le specifiche tecniche possono variare senza preavviso.
* La portata del Bluetooth è influenzata da pareti, ostacoli e movimento. Per ottenere prestazioni ottimali, collocare il prodotto
al centro della stanza in modo che non sia ostacolato da pareti, mobili, ecc.
8W (picco)
4,0
10 metri o più
12W
Ceramica
120V, 60 Hz (US)
230V, 50 Hz (EU)
240V, 50 Hz (UK)
≤ 19W
11,75" x 19,75" x 9,2"
29,8 cm x 50,1 cm x 23,4 cm
17,2 lb.
7,8 kg
AM 520 – 1710 kHz AM 522 – 1629 kHz AM 520 – 1710
FM 87.5 – 107.9 MHz FM 87.5 – 108 MHz FM 75.5 – 90.5
29
Page 30

Schnellstart-Anleitung (Deutsch)
Lieferumfang
Complete LP
Filz-Slipmat
45 RPM Adapter
Schnellstart-Anleitung
Sicherheitshinweise und Garantieinformationen
Kundendienst
Für die neuesten Informationen zu diesem Produkt (Systemanforderungen, Informationen zur
Kompatibilität etc.) und für die Produktregistrierung besuchen Sie ionaudio.com.
• Ein Mindestabstand von 6 Zoll muss eingehalten werden, um eine ausreichende
Belüftung der hinteren Bassreflexöffnung zu gewährleisten.
• Stellen Sie das Gerät nicht auf einen dicken Teppichboden oder an einen schlecht
belüfteten Ort.
• Stellen Sie das Gerät auf eine flache, ebene Oberfläche, fernab von jeglichen
Vibrationsquellen.
Schnelles Einrichten
Anschlussdiagramm
Teile, die nicht im Lieferumfang angegeben sind, sind separat erhältlich.
30
Tablet
FM ANT
Stromversorgung
Lautsprecher
(optional)
Page 31

Funktionen
Vorderseite
1. CD/USB: Schaltet die Quelle von CD auf
3
2
1
5
4
USB.
2. AM/FM: Drücken Sie kurz auf diese Taste,
um zwischen den AM- und FM-Funkbändern
zu wechseln, wenn der Tuner als Modus
ausgewählt wurde.
11
10
9
8
12
13
3. Wiederholen: Wiederholt einen einzelnen
Track oder die gesamte CD.
4. Zufallswiedergabe: Spielt einen zufällig
ausgewählten Track einer CD.
5. USB Rec: Drücken Sie diese Taste, um zum USBAufnahmemodus zu wechseln, wenn ein USB-
15
Stick angeschlossen ist.
6. Standby/Ein (nur für Geräte in der EU/UK): Bei
EU/UK-Modellen schaltet die Standby-Taste das
Gerät ein/aus.
7. Standby-LED (nur für Geräte in der EU/UK):
Zeigt an, dass Sie sind im Standby-Modus
befinden. Complete LP wechselt in den
Energiesparmodus und schaltet diese LED nach 60
Minuten Inaktivität ein, es sein denn, es wird Musik
18
über Bluetooth oder über das Radio
wiedergegeben.
8. FM ST: Leuchtet, wenn ein Sender in Stereo
19
empfangen wird.
9. Öffnen/Schließen: Öffnet/schließt das CD-Fach.
10. Stopp: Drücken Sie diese Taste, um die Aufnahme
auf den USB-Stick zu beenden.
11. Vorherige / Tune/Track / Suchen: Drücken Sie
diese Taste, um zur/zum vorherigen USB-Datei,
Radiosender oder CD-Track zu springen. Halten Sie
20
21
"Suchen" gedrückt, um rückwärts zu suchen
(springt zum stärksten Signal eines Radiosenders).
12. Wiedergabe/Pause: Startet oder pausiert die
Wiedergabe einer CD, USB-Datei oder eines
Bluetooth-Tracks. Wenn Sie sich im Tuner-Modus
befinden, können Sie diese Taste 2 Sekunden lang
22
drücken, um durch die Radiosender zu "scannen".
Wenn Sie sich im Bluetooth-Modus befinden, halten
Sie Wiedergabe/Pause 2 Sekunden lang gedrückt, um ein derzeit gekoppeltes BluetoothGerät zu trennen.
13. Nächste / Tune/Track / Suchen: Drücken Sie diese Taste, um zur/zum nächsten USB-
Datei, Radiosender oder CD-Track zu springen. Halten Sie "Suchen" gedrückt, (um zum
nächsten, stärksten Signal eines Radiosenders zu springen).
14. Modus: Wechselt zwischen den Modi BT/AUX/TUNER/CD/TAPE/USB/PHONO.
15.
Lautstärke: Stellt die Lautstärke für die internen Lautsprecher und den
Kopfhörerausgang ein.
16. Line In: Verbinden Sie den Ausgang eines Line-Level-Geräts mit diesem Eingang,
beispielsweise von einem Smartphone, Media-Player, Tablet etc.
17. Stromversorgung: Drücken Sie diese Taste, um das Gerät ein-/auszuschalten.
Hinweis (EU/UK-Geräte): Um das Complete LP komplett mit Strom zu versorgen,
drücken Sie auch die Taste Standby.
17
16
6
7
14
31
Page 32

18. Display: Zeigt den aktuellen Modus, Tracknummer, Track-Zeit und Radiosender.
Hinweis: Das Display und die umliegenden Tasten haben einen Plastikschutz. Entfernen
Sie diesen Schutz für eine optimale Anzeige.
19. CD-Fach: Drücken Sie die Taste Öffnen/Schließen, um das Fach zu öffnen und die CD
einzulegen. Dieses Gerät ist auf die Wiedergabe von im Handel erhältlichen CDs, richtig
gebrannten und finalisierten CD-Rs, CD-RWs und MP3-CDs ausgelegt. Durch
Abweichungen bei den Spezifikationen von bestimmten CD-Brennern und CDs,
empfehlen wir Ihnen, CDs mit der geringsten Geschwindigkeit zu brennen, um die
optimale Wiedergabequalität zu gewährleisten.
20. Kopfhörerausgang: Wenn Kopfhörer angeschlossen sind, wird der interne Lautsprecher
stumm geschaltet.
21. Tuning: Verwenden Sie diesen Regler, um einen anderen Sender einzustellen.
22. USB: Spielen Sie Tracks von Ihrem USB-Stick oder nehmen Sie auf Ihren USB-Stick auf.
Rückseite
2
3
4
1. Line-Ausgang: Schließen Sie externe Lautsprecher an diesen Ausgang an.
2. Lautsprecher: Diese internen Lautsprecher geben die Musik wieder.
3. Bassreflexöffnungen: Diese bieten eine erweiterte Basswiedergabe. Für die optimale
Klangqualität positionieren Sie sie in einigem Abstand von Wänden oder anderen
Hindernissen.
4. Tapedeck: Legen Sie hier eine Kassette ein.
5. Stromversorgung: Das integrierte Netzkabel wird hier angeschlossen.
6. FM-Antenne: Passen Sie diese Antenne an, um den optimalen FM-Radioempfang zu
erzielen. Für den AM-Empfang drehen Sie die Antenne bis Sie den besten Empfang
gefunden haben.
1
3
5
2
FM ANT
6
32
Page 33

Aufnahme
Anmerkung: Es ist nicht möglich, vom AM/FM-Radio aufzuzeichnen.
Wenn Sie sich im BT/TAPE/PHONO/AUX-Modus befinden:
1. Schließen Sie Ihr USB-Laufwerk an das Complete LP an.
2. Drücken Sie zwei Mal USB REC, um mit der Aufnahme zu beginnen.
3. Drücken Sie USB REC, um mit der Aufnahme zu beginnen.
4. Sobald die Anzeige "REC" anzeigt, beginnt USB in der oberen linken Ecke der Anzeige zu
blinken und die Aufnahme beginnt.
5. Drücken Sie STOPP, um die Aufnahme zu beenden und Ihre Audio-Datei auf Ihren USBStick zu speichern.
Wenn Sie sich im CD/MP3-Modus befinden:
1. Schließen Sie Ihren USB-Stick an das Complete LP an.
2. Drücken Sie zwei Mal USB REC.
3. Drücken Sie NÄCHSTE/VORHERIGE, um zwischen diesen Optionen hin- und her zu
schalten:
• REC ONE (Aufnahme einer Spur)
• REC DIR (Aufnahme aller Songs aus dem aktuellen Ordner)
• REC ALL (Aufnahme aller Songs)
4. Drücken Sie USB REC, um mit der Aufnahme zu beginnen. Sobald die Anzeige "LESEN"
anzeigt, beginnt USB am Bildschirm zu blinken und die Aufnahme beginnt.
5. Drücken Sie STOPP, um die Aufnahme zu beenden und Ihre Audio-Datei auf Ihren USBStick zu speichern.
Wiedergabe
Bluetooth-Modus
1. Schalten Sie Ihr Bluetooth-Gerät ein.
2. Drücken Sie die Modus-Taste, bis BT AUX am Display zu sehen ist. Das Gerät wechselt
automatisch in den Koppel-Modus, um nach Bluetooth-Geräten zu suchen.
3. Navigieren Sie zum Setup-Bildschirm Ihres Bluetooth-Geräts, suchen "Complete LP" und
verbinden die Geräte.
Hinweis: Wenn Ihr Bluetooth-Gerät die Eingabe eines Koppel-Codes anfordert, geben
Sie "0000" ein.
Kassettenspieler-Modus
1. Drücken Sie die Modus-Taste, bis TAPE am Display zu sehen ist.
2. Legen Sie die Kassette mit der breiteren Kassettenseite nach rechts zeigend in das
Kassettenfach.
3. Drücken Sie die Taste Auswerfen/Schnell zur Hälfte herunter, um zwischen dem Vorspulund Wiedergabemodus umzuschalten.
4. Drücken Sie die Taste Auswerfen/Schnell Vorspulen ganz herunter, um die Kassette
auszuwerfen.
Hinweis: Entfernen Sie Ihr 1/8" (3,5 mm) Kabel vom Line In bevor Sie in den Tuner-Modus
wechseln, um den Sender zu hören.
33
Page 34

Vinyl-Modus
1. Plattenteller - Hier platzieren Sie Ihre
Schallplatte.
2. 45 RPM-Adapterhalterung - Sichert den
mitgelieferten 45 RPM-Adapter. Wenn Sie
den Adapter nicht verwenden, legen Sie ihn
bitte in diese Haltevorrichtung.
3. Tonarm - Der Tonarm kann mit der Hand
oder durch Drücken des entsprechenden
1
2
3
5
6
7
4
Hebels angehoben und abgesenkt werden.
4. Arm-Clip - Dieser speziell entworfene ArmClip sichert den Tonarm, wenn er nicht
verwendet wird. Der Arm-Clip wurde so
designt, dass er in der oberen Position bleibt,
wenn er entsperrt ist.
5. Hebel - Hebt und senkt den Tonarm.
6. 33 / 45 / 78 RPM-SCHALTER - Regelt die
Geschwindigkeit des Plattentellers.
Hinweis: Für die Wiedergabe von 78 RPM
WICHTIG: Legen Sie die mitgelieferte
Filz-Slipmat auf den Plattenteller.
Anschließend legen Sie Ihre Platte auf die
Filz-Slipmat, um einen sicheren Sitz zu
gewährleisten.
Schallplatten verwenden Sie idealerweise eine
78 RPM-Nadel (separat erhältlich). Verwenden
Sie für 78 RPM Schallplatten ausschließlich 78
RPM-Nadeln.
7. Autostop-Schalter - Dieser Schalter schaltet
WICHTIG: Entfernen Sie die
Plastikabdeckung des Tonabnehmers
(Nadelabdeckung) bevor Sie den
Plattenspieler verwenden.
Autostop ein oder aus. Wenn Autostop
eingeschaltet ist, wird der Plattenteller zu
rotieren beginnen, sobald der Tonarm über die
Schallplatte gelegt wird und stoppen, wenn die
Platte das Ende erreicht hat. (Wenn Autostop
ausgeschaltet ist, wird sich der Plattenteller
immer und unabhängig von der Position des
*WARNUNG: Die Cinch-Ausgänge sind
LINE-Level. Bitte schließen Sie sie nur an
LINE-Level-Eingänge an. Sie können
Ihren Receiver beschädigen, wenn Sie ein
LINE-Level-Gerät an einen PHONOLevel-Eingang anschließen.
Tonarms drehen.)
Hinweis: Wenn Ihre Schallplatte stoppt, bevor sie das Ende des Songs erreicht hat,
bringen Sie Autostop für diese spezielle Schallplatte in die Position AUS. Dies wird in der
Regel für 45 RPM Schallplatten empfohlen.
Wiedergabe Ihrer Schallplatten:
1. Drücken Sie die Modus-Taste, bis PHONO am Display zu sehen ist.
2. Stellen Sie den Pitch-Regler auf die gewünschte Geschwindigkeit (33 1/3, 45, 78 rpm).
3. Legen Sie die Schallplatte auf den Plattenteller und setzen den Tonarm auf die Platte, um
mit der Wiedergabe zu beginnen.
4. Stellen Sie den Lautstärkeregler auf Complete LP.
Hinweis: Entfernen Sie Ihr 1/8" (3,5 mm) Kabel vom Line In bevor Sie in den Tuner-Modus
wechseln, um den Sender zu hören.
Aux-Modus
1. Schließen Sie Ihr Gerät mit einem 1/8" (3,5 mm) Stereokabel an Line In an.
2. Drücken Sie die Modus-Taste, bis BT AUX am Display zu sehen ist.
3. Stellen Sie die Lautstärke über das Ausgabegerät ein.
34
Page 35

CD-Modus
1. Drücken Sie die Öffnen/Schließen-Taste, um eine MP3-CD, CD-R oder CD-RW in das CD-Fach
einzulegen.
2. Drücken Sie die Modus-Taste, bis CD am Display zu sehen ist.
3. Drücken Sie VORHERIGE/NÄCHSTE, um einen anderen Track auszuwählen.
4. Drücken Sie WIEDERGABE/PAUSE, um den Track wiederzugeben oder zu pausieren.
Hinweis: Entfernen Sie Ihr 1/8" (3,5 mm) Kabel vom Line In bevor Sie in den Tuner-Modus wechseln, um
den Sender zu hören.
USB-Modus
1. Schließen Sie ein USB-Laufwerk an das Gerät an.
2. Drücken Sie die CD/USB-Taste bis USB am Display zu sehen ist. Das Gerät wird automatisch mit der
Wiedergabe der Songs am USB-Laufwerk starten.
3. Drücken Sie VORHERIGE/NÄCHSTE, um einen anderen Track auszuwählen.
4. Drücken Sie WIEDERGABE/PAUSE, um den Track wiederzugeben oder zu pausieren.
Hinweis: Entfernen Sie Ihr 1/8" (3,5 mm) Kabel vom Line In bevor Sie in den Tuner-Modus wechseln, um
den Sender zu hören.
Tuner-Modus
1. Drücken Sie AM/FM, um zwischen den AM- und FM-Bändern umzuschalten.
2. Passen Sie den TUNE-Regler an, um den gewünschten Kanal zu wählen.
3. Halten Sie entweder die Taste VORHERIGE oder NÄCHSTE gedrückt, um zum stärksten
Sendersignal zu springen.
Hinweis: Entfernen Sie Ihr 1/8" (3,5 mm) Kabel vom Line In bevor Sie in den Tuner-Modus wechseln, um
den Sender zu hören.
So speichern Sie einen Radiosender als Preset:
1. Drücken Sie die Taste ÖFFNEN/SCHLIESSEN.
2. Ändern Sie den Preset-Slot, indem Sie die Taste VORHERIGE oder NÄCHSTE drücken, während die
Slot-Nummer des Preset noch blinkt.
3. Drücken Sie ÖFFNEN/SCHLIESSEN, um den Speichervorgang zu bestätigen.
4. Wechseln Sie zwischen den gespeicherten Presets mit der Taste VORHERIGE oder NÄCHSTE, wenn
Sie sich im Tuner-Modus befinden.
Fehlerbehebung
Ich spiele eine Schallplatte ab, kann aber keinen Ton hören:
• Wenn Sie eine Vinylplatte abspielen:
o Stellen Sie sicher, dass Complete LP eingeschaltet ist und die Nadel auf der Schallplatte ist.
o Wenn Kopfhörer an das Complete LP angeschlossen sind, ziehen Sie die Kopfhörer ab, um den
Meine Schallplatte wird nicht mit der richtigen Geschwindigkeit wiedergegeben. Die Tonlage ist zu
hoch oder zu tief:
Ich bin mit einem Bluetooth-Lautsprecher verbunden, höre aber keinen Ton.
Ich kann den Radiosender nicht hören.
Ton über die internen Lautsprecher wiederzugeben.
o Stellen Sie sicher, dass der 33/45/78-Schalter für diese Schallplatte auf die entsprechende
Geschwindigkeit eingestellt ist.
o Schalten Sie das Complete LP aus und wieder ein. Drücken Sie anschließend die Bluetooth-
Taste, um erneut zu versuchen, eine Verbindung herzustellen.
o Verwenden Sie den Lautstärkeregler am Complete LP, um den Bluetooth-Ausgangspegel
anzupassen.
o Wenn Kopfhörer an das Complete LP angeschlossen sind, ziehen Sie die Kopfhörer ab, um den
Ton über die internen Lautsprecher wiederzugeben.
o Entfernen Sie Ihr 1/8" (3,5 mm) Kabel vom Line In bevor Sie in den Tuner-Modus wechseln, um
den Radiosender zu hören.
35
Page 36

Technische Daten
Lautsprecherausgangsleistung
Unterstützte Bluetooth-Profile
Bluetooth-Reichweite
Stromversorgung
Tonabnehmerart
Tonabnehmer und Nadel CZ-800-10
Spannung
Stromverbrauch
Abmessungen
(Breite x Tiefe x Höhe)
Gewicht
Funkfrequenzbereich US: EUROPA: JAPAN:
Die Spezifikationen können ohne Ankündigung geändert werden.
* Die Bluetooth-Reichweite wird durch Wände, Hindernisse und Bewegungen beeinflusst. Um eine optimale Leistung zu
erzielen, platzieren Sie das Gerät am besten in der Raummitte, damit es nicht durch Wände, Möbel usw. behindert wird.
8W (Peak)
4.0
30 Fuß (10 Meter) oder besser
12W
Keramik
120V, 60 Hz (US)
230V, 50 Hz (EU)
240V, 50 Hz (UK)
≤ 19W
11,75" x 19,75" x 9,2"
29,8 cm x 50,1 cm x 23,4 cm
17,2 Pfund
7,8 kg
AM 520 – 1710 kHz AM 522 – 1629 kHz AM 520 – 1710 kHz
FM 87.5 – 107.9 MHz FM 87.5 – 108 MHz FM 75.5 – 90.5 MHz
36
Page 37

Snelstartgids (Nederlands)
Inhoud van de doos
Complete LP
Deklaag van vilt
45 RPM Adapter
Snelstartgids
Veiligheids- & Garantiehandleiding
Ondersteuning
Voor de laatste informatie over dit product (systeemvereisten, compatibiliteitsinformatie, etc.)
en product registratie, bezoek ionaudio.com.
• Er dient een minimum afstand van 6 inches te zijn om voldoende ventilatie te voorzien
aan de achterste baspoorten.
• Zet deze niet op een hoogpolig tapijt of op een plek met een zwakke luchtstroom.
• Plaats het toestel op een platte egale oppervlakte, verwijderd van vibrerende bronnen.
Snelle installatie
Aansluitschema
Items die niet vermeld worden onder Inhoud van de doos worden apart verkocht.
FM ANT
Toestel
Stroomaansluiting
Luidsprekers
(optioneel)
37
Page 38

Functionaliteiten
Voorpaneel
1. CD/USB: Verandert de bron van CD naar
5
4
3
2
1
7
6
USB.
2. AM/FM: Deze knop indrukken en loslaten
om te wisselen tussen AM en FM
frequenties wanneer Tuner geselecteerd is
als stand.
11
10
9
8
12
13
14
3. Herhaal: Herhaalt een enkel nummer of de
hele CD.
4. Willekeurig: Speelt een willekeurig nummer op
een CD.
5. USB Rec: Deze knop indrukken om naar de USB
opneemstand te gaan indien een USB-stick is
15
16
verbonden.
6. Stand-by/Aan (alleen EU/UK toestellen): Op
EU/UK versies zet de Stand-by knop het toestel
aan/uit.
7. Stand-by LED (alleen EU/UK toestellen): Geeft
aan dat u in de Stand-by stand bent. De Complete
17
LP zal in sluimer gaan en deze LED wordt verlicht
na 60 minuten van inactiviteit, tenzij er muziek wordt
afgespeeld via Bluetooth of de radio.
18
8. FM ST: Deze verlicht wanneer er een radio station
wordt ontvangen via de stereo.
9. Open/Sluit: Opent/sluit de CD-lade.
19
10. Stop: Druk deze in om het opnemen naar de USBstick te beëindigen.
11. Vorige / Stem af / Zoek: Druk deze in om naar het
vorige USB bestand, radio station of CD-nummer te
gaan. Houdt deze ingedrukt om achterwaarts te
“zoeken” (spring naar het radio station met het
sterkste signaal).
12. Speel af/Pauzeer: Begint of pauzeert het afspelen
20
21
van een CD, USB bestand of Bluetooth nummer.
Wanneer het apparaat zich in de Tuner-modus
bevindt, voor 2 seconden indrukken om door de
radiostations te “scannen”. Wanneer het zich
bevindt in de Bluetooth-modus, houdt
22
Afspelen/Pauzeren voor 2 seconden ingedrukt om
de verbinding met het gekoppelde Bluetooth-apparaat te verbreken.
13. Volgende / Stem af / Zoek: Druk deze in om naar het volgende USB bestand, radio
station of CD-nummer te gaan. Houdt deze ingedrukt om te “zoeken” (spring naar het
volgende radio station met het sterkste signaal).
14. Stand: Wisselt tussen de BT/AUX/TUNER/CD/CASSETTE/USB/PHONO standen.
15. Volume: Past het geluidsniveau van de interne luidsprekers en de hoofdtelefoon-uitgang
aan.
16. Lijningang: Verbind de uitgang van een toestel via kabel naar deze ingang, bv. van een
smartphone, media speler, tablet, etc.
17. Power: Druk deze in om het toestel aan/uit te zetten.
Opmerking (alleen EU/UK toestellen): Om Complete LP volledig aan te zetten, druk ook
op Stand-by.
18. Scherm: Toont de huidige stand, nummer, afspeeltijd en radio station.
Opmerking: Het scherm en de aangrenzende knoppen hebben een plastiek
beschermlaag. Verwijder deze voor optimale weergavekwaliteit.
38
Page 39

19. CD-lade: Druk de Open/Sluit knop in om de lade te openen en om er een CD in te
plaatsen. Dit toestel is ontworpen om commercieel beschikbare CDs, correct gebrande
en gefinaliseerde CD-Rs en MP3 CDs af te spelen. Wegens variaties tussen verschillende
CD branders en CDs, raden we aan om CDs op de laagst mogelijke snelheid te branden
voor de beste afspeel kwaliteit.
20. Hoofdtelefoon-uitgang: Wanneer een hoofdtelefoon is verbinden, worden de interne
luidsprekers gedempt.
21. Afstemmen: Pas dit aan om naar een ander radio station te gaan.
22. USB: Speel nummers van u USB-stick af of neem op naar de USB-stick.
Achter paneel
2
3
4
1
3
5
2
FM ANT
6
1. Lijningang: Verbind externe luidsprekers naar deze uitgang.
2. Luidsprekers: Deze interne luidsprekers spelen de muziek af.
3. Baspoorten: Deze zorgen voor een verlengde bas tijdens de muziek. Positioneer deze
weg van de muur of andere obstakels voor de beste geluidskwaliteit.
4. Cassettedeck: Plaats hier een cassette.
5. Vermogen: De geïntegreerde stroomkabel is hier verbonden.
6. FM Antenne: Pas deze draad aan voor betere FM radio receptie. Voor AM receptie,
roteer het toestel tot dat de beste receptie is gevonden.
Opnemen
Opmerking: Het is niet mogelijk om op te nemen van de AM/FM radio.
Wanneer in BT/CASSETTE/PHONO/AUX stand:
1. Verbind uw USB-stick met de Complete LP.
2. Druk USB REC in.
3. Selecteer USB REC om te beginnen opnemen.
4. Eens het scherm “REC” aangeeft en de USB flikkert in de linker bovenhoek van het
scherm, zal het opnemen beginnen.
5. Druk op STOP om het opnemen te stoppen en het zal het audiobestand opslaan naar uw
USB-stick.
39
Page 40

Wanneer in CD/MP3 stand:
1. Verbind uw USB-stick met de Complete LP.
2. Druk USB REC in.
3. Druk op VOLGENDE/VORIGE om tussen deze opties te wisselen:
• REC ONE (neem een nummer op)
• REC DIR (neem alle nummers van de huidige map op)
• REC ALL (neem alle nummers op)
4. Druk op USB REC om te beginnen opnemen. Eens op het scherm “LEZEN” verschijnt,
zal USB op het scherm flikkeren en beginnen opnemen.
5. Druk op STOP om het opnemen te stoppen en het zal het audiobestand opslaan naar uw
USB-stick.
Afspelen
Bluetooth Stand
1. Activeer uw Bluetooth toestel.
2. Druk op de Stand knop tot BT AUX op het scherm verschijnt. Deze zal automatisch de
verbindingsstand activeren om Bluetooth toestellen te zoeken.
3. Navigeer naar het instelscherm van uw Bluetooth toestel, vind “Complete LP” en verbind.
Opmerking: Indien uw Bluetooth toestel naar een koppelcode vraagt, gebruik “0000”.
Cassettespeler Stand
1. Druk de stand knop in tot CASSETTE te zien is op het scherm.
2. Steek de cassette met de dikkere zijde naar de rechterkant van de cassette lade in.
3. Druk de uitwerpen/fast-forward knop halverwege in om te af te wisselen tussen
doorspoelen en de afspeelstand.
4. Druk de uitwerpen/fast-forward knop volledig in om de cassette volledig te verwijderen.
Opmerking: Verwijder uw 1/8” (3.5 mm) kabel van de lijningang voor naar de Tuner stand te
gaan om zo de post te horen.
40
Page 41

Vinyl Stand
1. Draaitafel – Plaats hier uw schijf.
2. 45 RPM Adapter Houder – Houdt de 45
RPM adapter bij. Wanneer de adapter niet
gebruikt wordt, gelieve deze in de houder te
1
plaatsen.
3. Toonarm – De gefixeerde toonarm kan
manueel omhoog en omlaag gebracht
worden of door te duwen op de
omhoog/omlaag hendel.
4. Arm Clip – Deze speciaal ontworpen arm clip
bevestigt de toonarm wanneer deze niet
wordt gebruikt. De arm clip werd ontworpen
om in de omhoog positie te blijven terwijl
deze ontgrendeld is.
5. Omhoog / Omlaag Hendel – Brengt de
toonarm omhoog en omlaag.
6. 33 / 45 / 78 schakelaar – Deze schakelaar
BELANGRIJK: Plaats de meegeleverde
deklaag van vilt op de draaitafel; plaats
daarna uw schijf hierop om voorzichtig
uw schijven te bevestigen.
bepaalt de snelheid van de draaitafel.
Opmerking: Voor de beste resultaten bij 78
RPM vinyl schijven, gebruik een 78 stylus (apart
verkocht). Gebruik alleen een 78 stylus met 78
BELANGRIJK: Verwijder de plastiek
naald bedekking voor de draaitafel te
bedienen.
RPM vinyl schijven.
7. Autostop schakelaar – Deze schakelaar zet
autostop aan of uit. Wanneer autostop aan
staat, zal de draaitafel beginnen draaien
wanneer de toonarm op de schijf wordt
geplaatst en stoppen wanneer het einde van de
schijf wordt bereikt. (Wanneer Autostop uit staat
*WAARSCHUWING: De RCA uitgangen
zijn op LINE niveau. Verbind deze alleen
met LINE niveau ingangen. U kan uw
ontvanger beschadigen indien u een LINE
niveau toestel in een PHONO niveau
ingang steekt.
zal de draaitafel altijd draaien ongeacht de
positie van de toonarm.)
Opmerking: Indien uw vinyl schijf stopt voor het einde van de muziek te bereiken, zet
Autostop op de uit positie voor deze schijf. Dit is aangeraden voor 45 RPM schijven.
Uw schijven afspelen:
1. Druk op de Stand knop tot PHONO is te zien op het scherm.
2. Zet de Snelheidsbesturing schakelaar op de gewenste snelheid (33 1/3, 45, 78 rpm).
3. Plaats de schijf op de draaitafel en zet de toonarm op de schijf om te beginnen afspelen.
4. Pas de volume knop aan op de Complete LP.
Opmerking: Verwijder uw 1/8” (3.5 mm) kabel van de lijningang voor naar de Tuner stand te
gaan om zo de post te horen.
Aux Stand
1. Verbind uw toestel met de lijningang door middel van een stereo 1/8” (3.5mm) kabel.
2. Druk op de Stand knop tot BT AUX op het scherm verschijnt.
3. Pas het volume van uw toestel aan.
2
3
5
6
7
4
41
Page 42

CD Stand
1. Druk op de Open/Sluit knop om een MP3, CD-R of CD-RW in de CD-lade te zetten.
2. Druk op de Stand knop tot CD op het scherm verschijnt.
3. Druk op VORIGE/VOLGENDE om een ander nummer te selecteren.
4. Druk op SPEEL AF/PAUZEER om een nummer af te spelen of te pauzeren.
Opmerking: Verwijder uw 1/8” (3.5 mm) kabel van de lijningang voor naar de Tuner stand te
gaan om zo de post te horen.
USB Stand
1. Verbind een USB-stick met het toestel.
2. Druk op de CD/USB knop tot USB op het scherm verschijnt. Het zal automatisch
nummers op de USB-stick beginnen afspelen.
3. Druk op VORIGE/VOLGENDE om een ander nummer te kiezen.
4. Druk op SPEEL AF/PAUZEER om een nummer af te spelen of te pauzeren.
Opmerking: Verwijder uw 1/8” (3.5 mm) kabel van de lijningang voor naar de Tuner stand te
gaan om zo de post te horen.
Tuner Stand
1. Druk op AM/FM om te wisselen tussen AM/FM frequenties.
2. Pas de STEM AF knop aan om het gewenste kanaal te selecteren.
3. Houd de VORIGE of VOLGENDE knop ingedrukt om naar het radio station met het
sterkste signaal te gaan.
Opmerking: Verwijder uw 1/8” (3.5 mm) kabel van de lijningang voor naar de Tuner stand te
gaan om zo de post te horen.
Een radiostation opslaan als voorkeuze:
1. Druk op de OPENEN/SLUITEN knop.
2. Wijzig de voorkeuzepositie door op de VORIGE of VOLGENDE knop te drukken terwijl
het nummer van de voorkeuzepositie nog steeds knippert.
3. Druk op OPENEN/SLUITEN om het opslaan te bevestigen.
4. Wissel tussen de opgeslagen voorkeuzes met de VORIGE of VOLGENDE knop in de
Tuner-modus.
Probleemoplossing
Ik ben een schijf aan het afspelen maar hoor geen geluid:
• Indien u muziek speelt van een vinyl:
o Zorg ervoor dat Complete LP aan staat en dat de naald zich op de schijf bevindt.
o Indien een hoofdtelefoon verbonden is met de Complete LP, ontkoppel de
hoofdtelefoon om geluid te horen via de interne luidsprekers.
Mijn schijf speelt niet op de correcte snelheid; de toon is te hoog of te laag:
o Bevestig dat de 33 / 45 / 78 op de correcte snelheid staat voor uw schijf.
Ik ben verbonden met een Bluetooth luidspreker maar hoor geen geluid.
o Zet de Complete LP uit en dan weer aan. Probeer deze nogmaals te koppelen.
o Gebruik de volume knop van de Complete LP om het Bluetooth geluidsniveau te
vermeerderen.
o Indien een hoofdtelefoon verbonden is met de Complete LP, ontkoppel de
hoofdtelefoon om geluid te horen via de interne luidsprekers.
Ik hoor het radio station niet.
o Verwijder uw 1/8” (3.5 mm) kabel van de lijningang voor naar de Tuner stand te gaan
om zo de post te horen.
42
Page 43

Technische Specificaties
Luidspreker Uitgangsvermogen
Ondersteund Bluetooth Profiel
Bluetooth Bereik
Voeding
Cartridge Type
Cartridge en Stylus CZ-800-10
Voltage
Stroomverbruik
Dimensies
(breedte x diepte x hoogte)
Gewicht
Radio Frequentie Bereik US: EUROPE: JAPAN:
Specificaties kunnen veranderen zonder waarschuwing.
* Bluetooth bereik wordt beïnvloed door muren, obstakels en beweging. Voor optimale prestatie, plaats het prodcut in het
midden van de kamer zodat deze niet gestoord wordt door muren, tafels etc.
8W (hoogste punt)
4.0
30 voet (10 meter) of meer
12W
keramisch
120V, 60 Hz (US)
230V, 50 Hz (EU)
240V, 50 Hz (UK)
≤ 19W
11.75" x 19.75" x 9.2"
29.8 cm x 50.1 cm x 23.4 cm
17.2 lbs.
7.8 kg
AM 520 – 1710 kHz AM 522 – 1629 kHz AM 520 – 1710
FM 87.5 – 107.9 MHz FM 87.5 – 108 MHz FM 75.5 – 90.5
43
Page 44

ionaudio.com
Manual Version 1.1
 Loading...