

Page 1
User Manual
Questions?
Need Some Help?
This manual should help you
understand your new product.
If you still have questions,
visit our website: www.ioncamera.com
MAC software website link:
www.ioncamera.com/ion/Firmware-Updates.html
Like Us:
www.facebook.com/ioncamera
Tweet Us:
www.twitter.com/ioncamera
Page 2
FCC STATEMENT
IMPORTANT REGULATORY INFORMATION
This device complies with Part 15 of the FCC Rules: Operation is subject to the
following two conditions:
1. This device may not cause harmful interference
2. This device must accept any interference that is received, including any interference that
may cause undesired operation.
WARNING:
Changes or modifications to this unit not expressly approved by the party responsible for
compliance could void the user’s authority to operate the equipment.
Changes or modifications not expressly approved by the party responsible for compliance
could void the user’s authority to operate the equipment.
NOTE: This equipment has been tested and found to comply with the limits for a Class B digital
device, pursuant to Part 15 of the FCC Rules. These limits are designed to provide reasonable
protection against harmful interference in a residential installation.
This equipment generates uses and can radiate radio frequency energy and, if not installed and
used in accordance with the instructions, may cause harmful interference to radio
communications. However, there is no guarantee that interference will not occur in a particular
www.ioncamera.com EN - 2
Page 3
installation. If this equipment does cause harmful interference to radio or television reception,
which can be determined by turning the equipment off and on, the user is encouraged to try
to correct the interference by one or more of the following measures:
-- Reorient or relocate the receiving antenna.
-- Increase the separation between the equipment and receiver.
-- Connect the equipment into an outlet on a circuit different from that to which the receiver is
connected.
-- Consult the dealer or an experienced radio/TV technician for help.
For EU only
www.ioncamera.com EN - 3
Page 4

Trademark Information
© 2012 World Wide Licenses Limited.
® The iON logo is a registered trademark of World Wide Licenses Limited.
CamLOCK, PODZ, Shoot/Share and Speed - Pro and their respective logos are trademarks
or registered trademarks of World Wide Licenses Limited in the United States and other
countries. Copyright © 2012. All Rights Reserved.
Microsoft® and Windows® are U.S. registered trademarks of Microsoft Corporation.
Pentium® is a registered trademark of Intel Corporation.
iPhone, iPad, Macintosh is a trademark of Apple Inc.
MicroSDTM is a trademark.
Other names and products may be trademarks or registered trademarks of their respective
owners.
Product Information
Product design and specifications are subject to change without notice. This includes primary
product specifications, software, and user's manual. This User Manual is a general reference
guide for the product.
The product and accessories that come with your iON camera may be different from those
described in this manual. This is due to the fact that different retailers often specify slightly
different product inclusions and accessories to suit their market requirements, customer
demographics, and geographical preferences. Products very often vary between retailers
especially with accessories such as chargers, memory cards, cables, pouches, mounting
accessories and language support. Occasionally a retailer will specify a unique product color
and appearance. Contact your dealer for precise product definition and included accessories.
The illustrations in this manual are for the purpose of explanation and may differ from the
actual design of your iON
The manufacturer assumes no liability for any errors or discrepancies in this user manual.
camera.
www.ioncamera.com EN - 4
Page 5

SAFETY INSTRUCTIONS
Read all Warnings and Cautions before using this product.
Warnings:
__________________________________________
Make sure the PODZ is completely sealed before use. If foreign objects or
water have entered the camera, turn the power off.
Continued use may cause an injury or damage to the camera. Please call our
customer services team for assistance.
__________________________________________
If the camera has been dropped or its case has been damaged, turn the power
off.
Continued use may cause an injury. Please call our customer services team for
assistance.
__________________________________________
There are no user serviceable parts for the camera: DO NOT DISASSEMBLE!
For repair, please call our customer service for assistance.
__________________________________________
Do not place the camera on unstable surfaces.
This may cause the camera to fall or tilt over, causing damage.
__________________________________________
www.ioncamera.com EN - 5
Page 6

Cautions:
__________________________________________
A camera is a precision instrument. Do not drop, strike, or use excessive
force when handling the camera.
This may cause damage to the camera.
__________________________________________
Do not use the camera in humid, steamy, smoky, or dusty places.
This may cause fire or electric shock.
__________________________________________
Do not leave the camera in places where the temperature may rise
significantly such as inside a car.
This may adversely affect the case or the parts inside.
__________________________________________
Disconnect all cords and cables before moving the camera.
Failure to do so may damage cords, cables and the camera.
__________________________________________
This is an extreme sports video product.
Please be careful when using the product, take care not to fall on the camera as this
may cause bodily injury and damage to the camera.
__________________________________________
www.ioncamera.com EN - 6
Page 7
CONTENT
INTRODUCTION................................................................................................. 8
Overview..................................................................................................... 10
Package Contents ...................................................................................... 11
GETTING TO KNOW YOUR CAMERA............................................................ 11
GETTING STARTED ........................................................................................ 12
Charging the Battery................................................................................... 12
Inserting MicroSD Card .............................................................................. 13
Setting Date & Time……………………………………………………… ....... 14
Installing the Camera PODZ....................................................................... 15
Power On & Power Off ............................................................................... 15
Recording Videos ....................................................................................... 15
Taking Photos............................................................................................. 16
Reset the Camera....................................................................................... 17
Using PODZ…………………………………………………………… ............. 17
Using CamLOCK Mount System ................................................................ 18
Auto Rotation .............................................................................................. 19
SEALING YOUR CAMERA TO PREVENT WATER DAMAGE....................... 20
CONNECTING CAMERA TO A COMPUTER .................................................. 21
Running the iON Software .......................................................................... 21
Browsing the Files & Transferring Them to A PC ....................................... 21
Changing the Camera Settings................................................................... 22
Linking to iON Websites and Cloud Service ............................................... 25
Firmware Update & Installation................................................................... 25
CONNECTIING YOUR CAMERA TO A HDTV ................................................ 27
Taking Photos w/ HDTV ............................................................................. 28
Recording Video w/ HDTV.......................................................................... 28
Playing Back Photo Files w/ HDTV............................................................. 29
Playing Back Video Files w/ HDTV............................................................. 30
Change HDTV Language ........................................................................... 30
Deleting Photos / Video Files w/HDTV ...................................................... 31
Formatting MicroSD Card w/ HDTV............................................................ 32
SIGN UP FOR FREE iON CLOUD STORAGE ................................................ 33
SPECIFICATION .............................................................................................. 34
SYSTEM REQUIREMENTS ............................................................................. 36
TROUBLESHOOTING...................................................................................... 37
www.ioncamera.com EN - 7
Page 8
INTRODUCTION
Overview
Thank you for purchasing the iON Speed-Pro HD sports video camera.
The iON Speed-Pro can be mounted with the Helmet & Bike Kit (sold separately) for the
ultimate adventure HD recording experience.
HD recording – Up to 1080p resolution
Waterproof to 10m or 30ft
Long battery life approx. 2 hrs when fully charged at 720p/60fps
180 degree wide-angle lens
About 4.51 ounces or 128g.
Captures high resolution photos
8GB FREE iON Cloud storage
www.ioncamera.com EN - 8
Page 9
Equipped with a microphone jack for connection with an external
microphone*
* When an external microphone (not included) is connected, audio will not
be recorded through the built-in microphone.
www.ioncamera.com EN - 9
Page 10
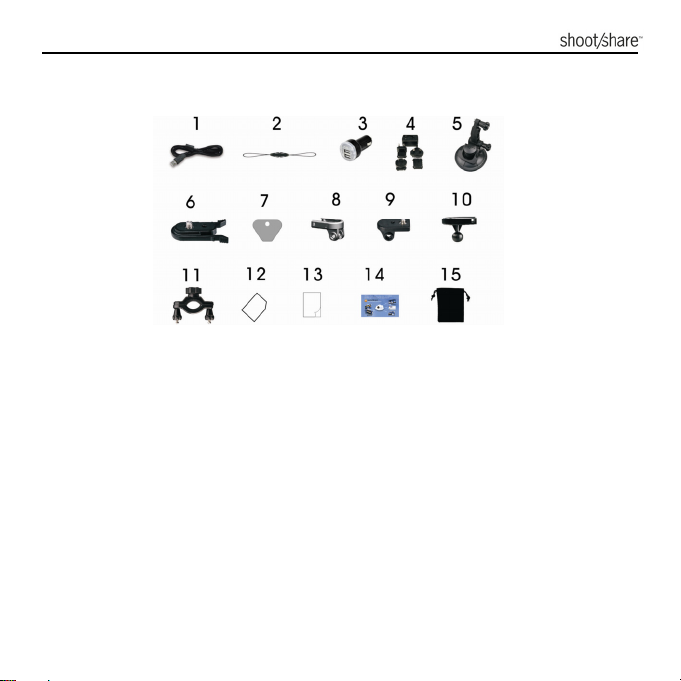
Package Contents
Carefully unpack the iON Speed-Pro and ensure that you have the following items
1. USB Cable
2. Secure Strap
3. Dual USB Car Adapter
4. Universal Power Adapter
5. Suction Mount
6. CamLOCK
7. CamLOCK Key
8. CamLOCK Slot-Action
9. Fix Screw
10. Short Ball Joint
11. Bike Mount
12. Warranty Card
13. Quick User Guide
14. Mi-media Card
15. Pouch
www.ioncamera.com EN - 10
Page 11
Required Accessory:
MicroSD or MicroSDHC card up to 32 GB (Class 6 or higher recommended.)
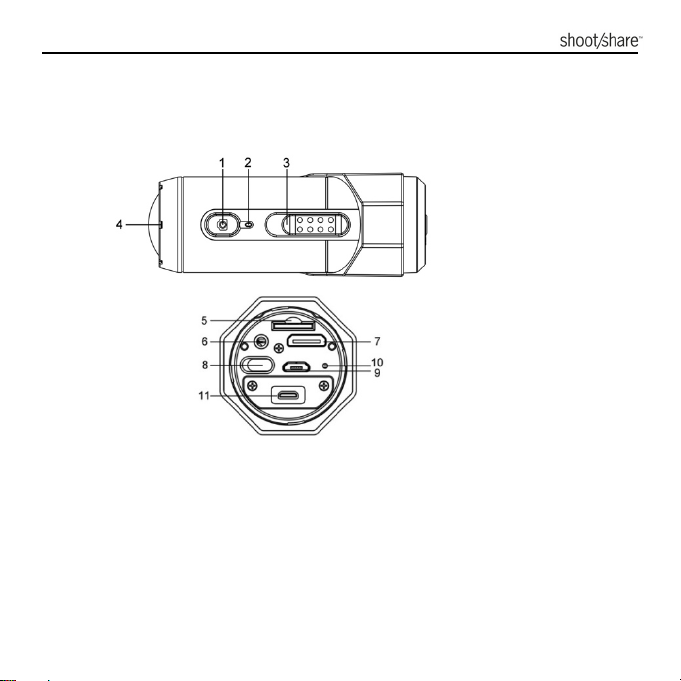
GETTING TO KNOW YOUR CAMERA
1. Power
2. LED Indicator
3. Recording Slide Switch
4. Lens
5. MicroSD Card Slot
6. Mic jack
7. Mini HDMI Port
8. Video Resolution Switch
www.ioncamera.com EN - 11
9. USB Port
10. Reset Button
11. PODZ Socket
Page 12
GETTING STARTED
Charging the Battery
The embedded 1200mAh Li-Polymer Battery in the Speed-Pro camera can be
recharged quickly allowing you hours of recording time.
To charge the battery
1. Charge the camera with either the USB cable or AC/DC adapter.
2. The Red LED remains ON while the battery is charging.
3. The Red LED will turn OFF when the battery is fully charged. A full charge
takes approximately 3 hours.
When the battery power is low, the camera will vibrate three times to indicate the
battery is low.
The camera will vibrate for 2 seconds to indicate it’s out of power. The camera
will automatically save the file if it is recording and turn off.
If the camera does not charge, please contact our help line for assistance as you
should not attempt to remove the internal battery. Doing so, will void your
warranty and possibly damage the camera.
www.ioncamera.com EN - 12
Page 13

Inserting MicroSD Card (not included)
Speed-Pro supports a MicroSD card up to 32GB (Class 6 or higher cards are
recommended) which allows you to take Full High Definition (FHD) Video for
approximately 4 hours (1080p 30 fps or 720p 60 fps). If there is no MicroSD card in
the camera, the Red and Green LED will flash
alternatively and continuously.
To insert a MicroSD card
Insert a MicroSD card (not included) before using
your camera. Ensure that the camera power is
turned OFF before inserting the card into the slot.
The MicroSD card will click into the slot once it is
fully inserted.
There is only one correct direction as shown in the illustration to insert the
MicroSD card into the slot. Do not force the card into the card slot, or it may
damage both the camera and the MicroSD card.
A new MicroSD card should be formatted before use. For instructions on how to
format the card see section “Formatting MicroSD Card w/HDTV”
www.ioncamera.com EN - 13
Page 14

Setting Date & Time
You can set the camera’s clock with the iON software to ensure that your video and
photo files are saved with the correct date/ time information.
To set up the camera clock
1. Connect your camera to a computer with the USB cable. Open iON.exe in your
MicroSD card folder.
2. Find the “Date and Time” and click “SET”.
3. Adjust the date and time or click “Sync with PC” to set with your PC clock.
4. Click “Ok” to save the settings.
User interface may vary with further firmware upgrades.
www.ioncamera.com EN - 14
Page 15

Installing the PODZ
1. Attach the PODZ to the back of the camera and
rotate clockwise until the two dots are aligned
2. Slide the latch on the PODZ down to lock it.
Power On & Power Off
To power ON the camera:
Press and hold the Power
will turn on.
To power OFF the camera:
Press and hold the Power
the Green LED will turn off.
button. The camera will vibrate and the Green LED
button. The camera will vibrate for two seconds and
Recording Videos
Before you start recording, select the video resolution by switching the Video
Resolution Switch
or 720p 30fps) and FHD (Full HD 1080p 30fps or 960p 30fps). You can change the
resolution by changing the settings with iON software.
There are two methods for starting the video recording function. When the camera
starts recording, there will be a short vibration which indicates recording has started.
The LED indicator illuminates RED throughout the recording.
1. Whether the camera power is ON or OFF, simply slide the Recording Slide
Switch
2. When your camera is OFF and the Recording Slide
. There are two HD options to select from: HD (720p 60fps
from STOP to REC to start recording.
is at REC
www.ioncamera.com EN - 15
Page 16

location, press and hold the Power button to turn the camera ON and it will
start recording.
Move the Recording Slide Switch
from REC to STOP to stop recording.
The camera will vibrate and the LED indicator will illuminate GREEN to indicate the
recording has stopped. The camera will then enter Standby mode.
An additional option is to hold the Power
button to stop the recording and turn
the camera off. The camera will vibrate for two seconds and the Red LED light will
turn off.
An additional 432x240 (w/ 1080p/720p) or 320x240 (w/ 960p) video file will be
created simultaneously with the recording of an HD/FHD video file. The smaller
video file size allows for more efficient uploading of content to social media sites
and email.
Changing video resolution is disabled during video recording.
There will be around a 1-2 second delay before the camera starts recording
The various video resolution options for HD and FHD can be changed under the
“Settings” menu in the iON software.
Ensure there is sufficient memory available on the MicroSD card. If the card is
full, the camera will vibrate for five seconds and the Green LED will flash
continuously.
Taking Photos
iON Speed-Pro camera allows you to take 14 Mega Pixel resolution high quality still
images.
To capture a still image
1. Turn on the camera
www.ioncamera.com EN - 16
by pressing the Power button. Move the Recording
Page 17

Slide Switch to STOP if the camera is in video recording.
2. After the camera power has been turned on, press the Power
button to
take a photo. A short vibration and a flash of Green LED indicate the action
was successful.
The still photo function is disabled during video recording.
The default photo mode is “single photo”. Burst mode gives you continuous 10
photo shots to capture that “can’t miss” moment. Time Lapse mode can be
utilized to take a series of photos at 5, 10, 30 or 60-second intervals. To change
the mode, please refer to the section “Changing the camera settings”
If the card is full, the camera will vibrate for five seconds and the Green LED will
flash continuously.
Reset the Camera
Press the Reset button with a thin and blunt object to reset the camera.
Using PODZ
PODZ is a series of accessories that work with your camera and provide additional
functions and enhance your cameras functionality. Insert the PODZ into the PODZ
socket of the camera and you can use it immediately.
PODZ
– Basic back cover to seal your camera
Wi-Fi PODZ* – Provide wireless capability to your camera
Remote PODZ*
Battery PODZ* – Extend battery time of your camera.
*Sold separately
www.ioncamera.com EN - 17
– Control your camera via the remote
Page 18

Please note a PODZ must be inserted and correctly locked to ensure your camera
is waterproof. Without a PODZ attached your camera is at risk of damage.
Using CamLOCK Mount System
iON’s versatile CamLOCK Mount System allows you to attach the camera to any
type of Automobile and handlebar of bicycles, jet skis, 4x4 ATVs , motorcycles and
ski poles.
Please refer to the specific mounting guides for instructions on how to install your
mounts with your camera for particular activities.
Visit the iON website (www.ioncamera.com
accessory
products.
) to get the latest news regarding
www.ioncamera.com EN - 18
Page 19

Auto Rotation
The camera has a built-in G-sensor which is able
to detect the camera orientation. By rotating your
camera to 90
position (refer to the picture), the recorded view will
be rotated in the same angle. This allows the user
to mount the camera in various orientations without
recording a rotated or inverted view. The video
resolution will be adjusted for 90
The feature is available for video capture only, not for still photos.
Adjust your camera orientation before you start the video recording. The rotation
feature will not be activated throughout the recording.
You can disable the auto rotation function in the “General settings” with the iON
software
o
, 180o or 270o from the default
o
and 270o.
Video Resolution 0
o
or 180o 90o or 270o
1080P 1920x1080 608x1088
960P 1280x960 720x960
720P 1280x720 416x720
www.ioncamera.com EN - 19
Page 20

SEALING YOUR CAMERA TO PREVENT WATER
DAMAGE
The Waterproof Housing (PODZ) allows you to operate the camera up to 10 meters
or 30 feet under water. You must seal the camera with the PODZ in order to protect
the camera when using it in wet or moist conditions.
The rubber seal on the PODZ forms the waterproof barrier to protect the camera
in wet and underwater conditions. You must keep this seal clean as a single
strain of hair or grain of sand can cause a leak into the product.
After every use in salt water, you will need to rinse the outside of the product and
the seal with non-salt water and dry. Not doing this can cause corrosion in the
product or failure in the seal, in turn, damaging the product.
Warning:
Please make sure to install and lock the PODZ correctly before using the
camera to avoid water damage. Failure to properly seal your camera can
result in leaks that damage or destroy your camera. Your warranty does not
cover water damage resulting from user error.
on the Podz must be aligned and the lock switch down.
To seal your camera the dots
www.ioncamera.com EN - 20
Page 21

CONNECTING YOUR CAMERA TO A COMPUTER
Running the iON Software
1. Insert a MicroSD card with at least 2MB free space into your camera.
2. Connect your camera to a PC via the USB cable included.
3. Press the Power
4. Open the MicroSD card folder inside the file manager, you will find the file
“iON.exe”.
If you cannot find iON.exe at your MicroSD folder, you can unplug the cable from
the PC and turn the camera on and off once and connect to the PC again.
If you are a Mac user, visit the iON website (www.ioncamera.com) to download
the software in Mac version.
Double click the file to open.
button to turn on the camera
Browsing Files & Transferring Them to A PC
1. Click the “Browse Files” icon and the file folder will pop up. The saved photo
and video files will be displayed on the browser.
2. Double click a photo or video file to preview the content.
3. Copy or Move the files to your PC to store them on your computer or share
them with social media websites or via email.
www.ioncamera.com EN - 21
Page 22

The FHD/HD video files will be saved as, e.g. iONX0001.mp4. The 432x240 or
320x240 video recorded at the same time will be saved as iONX0001_thm.mp4.
Changing the Camera Settings
The iON Speed-Pro camera settings can
be changed by utilizing the iON software.
Simply click on the options in the Photo,
Video or General menus.
Set up: Photo menu
Click “Photo” menu to select the desired
photo resolution and mode. The active
mode will be highlighted.
Mode
Options
Photo Resolution 16MP(Software Enhanced), 14MP, 5MP,
Photo Mode Single Shot, Burst, Time Lapse
Time Lapse 5, 10, 30, 60 seconds
VGA
www.ioncamera.com EN - 22
Page 23

Set up: Video menu
Click the “Video” menu to select the desired
video resolution. The active mode will be
highlighted.
Mode
Options
FHD Resolution 1080p: 1920x1080 pixels (16:9), 30 fps (default)
960p: 1280X960 pixels (4:3), 30 fps
HD Resolution 720p: 1280x720 pixels (16:9), 60 fps (default)
720p: 1280x720 pixels (16:9), 30 fps
www.ioncamera.com EN - 23
Page 24

Set up: General menu
Click “General” menu to change various
general settings for the camera. The active
mode will be highlighted.
Mode
Option
TV Type PAL, NTSC
Language
Auto Power Off Off, 1, 3 Minutes
Auto Rotation Off ,On
Date & Time Date, Time, Sync with PC
English, Italian, German, Spanish,
French, Japanese, Korean, Chinese
(Simplified and Traditional)
www.ioncamera.com EN - 24
Page 25

To reset the camera to the default settings:
Clicking “Reset All” will return to default settings.
Linking to iON Websites and Cloud Service
You can access more iON information by clicking the icons within the software.
iON Official Website
iON Cloud Website
iON Facebook Page
iON Twitter Page
Firmware Update and Installation
In order to keep your iON camera performing at its best, regularly check for new
firmware updates and install them onto your camera. Before you update the
firmware, make sure you connect your camera to an internet accessible computer.
To perform a firmware check and update
1. Before doing a firmware check or update, put the MicroSD with at least 15MB
free space in the camera.
2. Click the “Firmware Check” button.
3. Click the “Check” button.
4. The iON software will automatically determine if there is a new firmware
version available. A notification will be given if a new firmware version has
been detected. The new version number and enhancement details will be
displayed.
www.ioncamera.com EN - 25
Page 26

5. Click the “Download” button and the new firmware version will be downloaded
to the MicroSD card. A notification will be given indicating that the download
has been successfully transferred to the card.
6. Click the “Install” button to confirm that you want to install the newer firmware
version.
7. Unplug the USB cable from the back of the camera and the camera will
automatically install the latest firmware version. The Green LED illuminates
and flashes to show that the firmware is installing. The process will take
approximately 20 seconds. Do not turn off the camera during the update
process.
8. The Green LED will turn off once the installation of the new firmware is
completed.
9. The camera will turn off when the upgrade is done. You can power on the
camera and the new firmware will be effective.
Place your camera in a stable position during the full firmware update process
Ensure you don’t reset or remove the MicroSD card before the full update
process has been completed, the interruption will lead to potential damage to the
camera.
Any abnormal conditions such as the sudden interruption of the power supply
will cause the camera to potentially be damaged due to the firmware update
interruption.
www.ioncamera.com EN - 26
Page 27

CONNECTING THE CAMERA TO A HDTV
Connect your iON camera to an HDTV with an HDMI cable (not included). Once it is
connected, the HDTV menu as shown in the picture below will pop up. You can
preview files, playback, delete files and format the MicroSD card through your
HDTV screen.
In order to turn off the Speed-Pro camera, you will first need to disconnect the
camera from the HDTV
Ensure there is a MicroSD card in the camera or no card will be displayed on the
HDTV screen.
No files will be displayed on the HDTV screen if you don’t have any files on the
MicroSD card.
www.ioncamera.com EN - 27
Page 28

Taking Photos w/ HDTV
1. Press and hold the Power button until
the HDTV menu appears.
2. Press the Power
select the Preview mode.
3. Slide the Recording Slide Switch
to STOP
4. Press the Power
5. Press the Power
button briefly to
button twice to enter Photo Preview mode.
button to take photos.
Recording Video w/ HDTV
1. Press and hold the Power button until
the HDTV menu appears.
2. Press the Power
select the Preview mode.
3. Slide the Recording Slide Switch
to REC
4. Press the Power
5. Press the Power
recording videos, or slide the Recording Slide Switch
stop recording and enter into the Photo mode
button briefly to
button twice to enter Video Preview mode.
button to start recording, and press it again to stop
to STOP to
You can use to change between Video and Photo Preview mode.
www.ioncamera.com EN - 28
Page 29

View Files w/ HDTV
1. Press and hold button until the HDTV
menu appears.
2. Press
Photo mode.
3. Press
Photo mode.
4. Select the desired photo file you want to
view:
a) Slide
b) Slide
5. Press
6. Press and hold
button briefly to select the Play
button twice to enter the Play
to REC and press button briefly to view the
previous file;
to STOP and press button briefly to view the next
file.
button twice to start the slide show and press it again to stop.
button to enter the Edit menu.
www.ioncamera.com EN - 29
Page 30

Playing Back Video Files w/ HDTV
1. Press and hold button until the HDTV
menu appears.
2. Press
Video mode.
3. Press
Video mode.
4. Select the desired video file you want to
view:
a) Slide
b) Slide
5. Press
6. During video playback, press
once again to continue.
7. Press and hold
button briefly to select the Play
button twice to enter the Play
to REC and press button briefly to view the
previous file;
to STOP and press button briefly to view the next
file.
button twice to start playing back the video
button briefly to pause and press button
button to enter the Edit menu.
Change HDTV Language
There are 9 different languages for you to choose
from.
To change the setting
1. Press and hold
menu appears.
www.ioncamera.com EN - 30
button until the HDTV
Page 31

2. Press button briefly to select Language mode.
3. Press
4. Press
5. Press
button twice to enter the language setting mode.
button briefly to select the desired language.
button twice to enter HDTV menu and the language will be changed
Deleting Photo / Video Files w/ HDTV
You can delete a single and all photo or video file(s) in the MicroSD card.
To delete the files
1. Press and hold
menu appears.
2. Press
or Video mode.
3. Press
Video Playback mode.
4. Select the desired photo or video file to be
deleted.
5. Press and hold
6. Press the
7. Press the
8. Press
9. Press
button briefly to select Play Photo
button twice to enter the Photo or
button briefly to select “Yes”.
button twice to confirm.
button until the HDTV
button to enter the Edit menu.
button briefly to select “Delete This Image/Video” or “All”.
twice to enter to “Delete This Image/Video” or “All”.
www.ioncamera.com EN - 31
Page 32

Formatting MicroSD Card w/ HDTV
1. Press and hold button until the HDTV
menu appears.
2. Press
Photo or Video mode
3. Press button twice to enter either the
Photo or Video Playback mode.
4. Press and hold
menu.
5. Press
6. Press
7. Press
formatting. The MicroSD will be formatted.
button briefly to select Play
button to enter the Edit
button briefly to select “Format”
button twice to enter “Format” interface
button briefly to select “YES” and press button twice to confirm
www.ioncamera.com EN - 32
Page 33

SIGN UP FOR FREE iON CLOUD STORAGE
8GB of free Cloud storage will be provided for storing and sharing of video and
photo content. You can visit www.ioncamera.com/ioncloud
member.
and sign up as a free
www.ioncamera.com EN - 33
Page 34

SPECIFICATION
Sensor 14 Mega pixel sensor
Lens 180º super wide angle field of view
Focus range 0.4m - ∞
1080p: 1920x1080 pixels (16:9), 30 fps
960P*: 1280x960 pixels (4:3), 30 fps
Video
Photo
Audio Built-in high quality microphone
www.ioncamera.com EN - 34
720p: 1280x720 pixels (16:9), 60 fps
720p *: 1280x720 pixels (16:9), 30 fps
Format: H.264 compression, saved as MPEG4 (.mp4) file
Dual video files for easy sharing
16.0 Mega Pixels:(4608x3456)
14.0 Mega Pixels(4384 x3288)
5.0 Mega Pixels: (2592x1944)
VGA:(640 x480)
Format: JPEG
Capture Modes: Single, Burst-shot*, Time lapse*
Page 35

2.5mm External microphone (not included)
AAC Compression, Automatic Gain Control
MicroSD/MicroSDHC with minimum Class 6 up to 32GB (not
Storage
Connection
Power
Housing
Dimension 40 x 40 x 108 mm
Weight ~127.8(w/ PODZ),
included)
Average Recording Times: about 4 hours (using 32GB
MicroSD card in 1080p30/720p60)
USB2.0 (for data connection and battery charging)
HDMI
External Microphone
Built-in 1200 mAH Rechargeable Li-Polymer Battery
Battery Life: Approx. 2 hrs
High quality Aluminum barrel and rubberized finishing
Depth up to 30 feet / 10 meters
* Settings can be changed through PC connection or via the iON app.
www.ioncamera.com EN - 35
Page 36

SYSTEM REQUIREMENTS
Operating system Windows® 7/XP SP3 /Vista and Mac 10.5 or above
CPU Pentium III or above
RAM At least 64MB
Interface USB port
www.ioncamera.com EN - 36
Page 37

TROUBLESHOOTINGS
Problems Causes Solutions
1. LED flashes and
camera turns off
2. Cannot turn on the
iON camera
Red LED flashes during
recording
Cannot take photos or
video (Green LED
flashes)
Cannot take photos or
video (Green and Red
LED flashes
alternatively)
Cannot find removable
disk after connecting the
camera to the computer.
www.ioncamera.com EN - 37
Battery is depleted Recharge the camera
Low battery Recharge the camera
Memory full
1. MicroSD card is not
inserted
2. MicroSD card has not
been formatted
properly.
Connection failure.
Replace with a memory
card with space available
for contents
1. Insert a MicroSD card
2. Format the MicroSD
card at PC or on TV
1. Make sure all cable
connections are secured
and restart the computer
if necessary
2. Try a different USB port
on the computer
 Loading...