

Page 1

Quick Start Guide
Page 2

1. Introduction
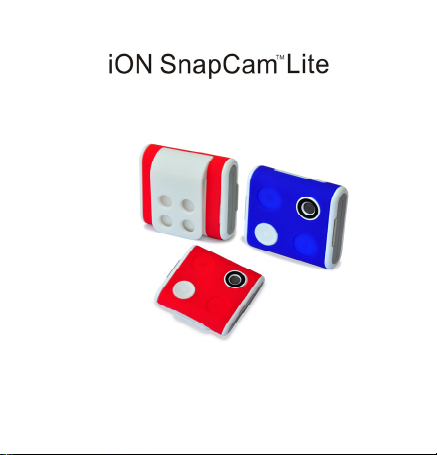
iON SnapCam Lite is a mini wearable camera. It allows users to
take photos and video record life’s moments by simply pressing
one button.
2. Key Features
y Ultra slim and light-weight
y Take high quality photo and HD video
y Detachable clip to mount on clothes
y G-sensor to detect the orientation and rotate the view
EN-2
Page 3

3. Functional Parts
EN-3
Page 4

1 MicroSD Card
Slot
2 Status LED ¾ Show the camera status.
3 Wide Angle Lens ¾ Capture the live view.
4 Reset Button ¾ Reset the camera.
5 Silicon Cover ¾ Shield the camera from water
6 Capture Button ¾ Take a single photograph.
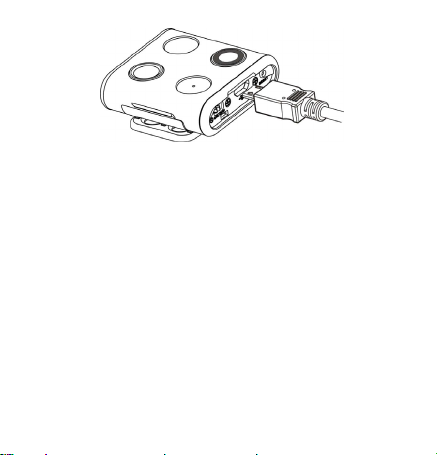
7 Micro USB Port ¾ Connect to an external power
8 Time Lapse
Switch
¾ MicroSD card storage location.
and dust.
¾ Start/Stop video recording.
supply for charging.
¾ Connect to a computer for data
transfer.
¾ Switch to turn the Time Lapse
function on or off.
4. First Time Use
4.1. Charging your SnapCam Lite
EN-4
Page 5
Charge the built-in battery before starting to use your camera.
The camera will take approximately 2 hours to fully charge from
flat.
The LED will turn solid RED once the camera is fully charged.
Note:
y Ensure your camera is charged before each use.
y For charging your camera more efficiently, make sure the
Time Lapse switch is at the OFF position.
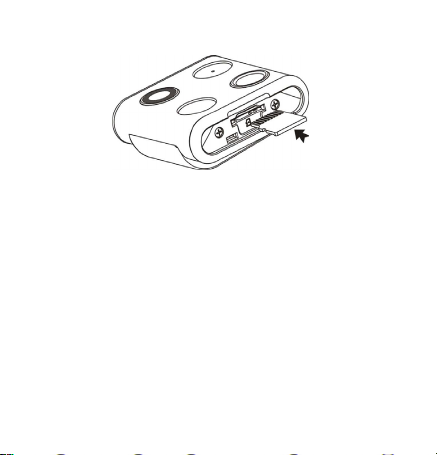
4.2. Inserting a MicroSD Memory Card
EN-5
Page 6
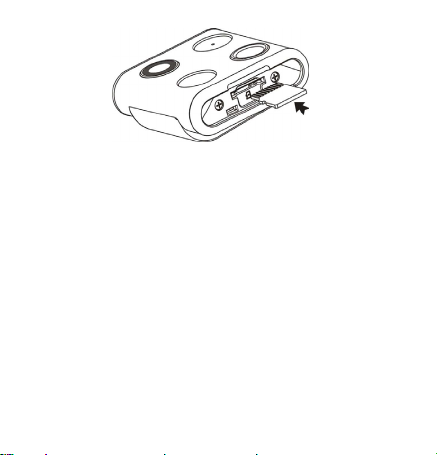
You must insert a MicroSD card (not supplied) before using the
camera. The camera supports MicroSD card from 2GB to 32GB
(Class 6 or higher is recommended).
Notes:
y There is only one direction to insert the MicroSD memory
card into the slot. Do not force the MicroSD card into the
slot as this may damage both the camera and the
MicroSD memory card.
y The MicroSD memory card must be formatted before use.
4.3. Setting Date & Time
When the camera is used for the first time, or it has been restored
to default settings, you need to set the camera’s clock to ensure
that your video and photo files are saved with the correct date/
EN-6
Page 7

time information.
To set up the camera clock:
1. Insert a MicroSD card to the camera.
2. Connect the camera to a PC to enter into USB mode
(Refer to section 5.5).
3. Open the MicroSD file folder, create a file in any format
(e.g. txt file) and name it with the format “set-YYYYMMDDHHMM”
YYYY, MM, DD, HH, MM represent the year, month and
day, hour, minute of existing time.
4. Disconnect the camera from your PC, press the Capture
button, the camera will scan the file and write it to the
system clock.
EN-7
Page 8
5. Using the Camera
5.1. Wearing your SnapCam Lite
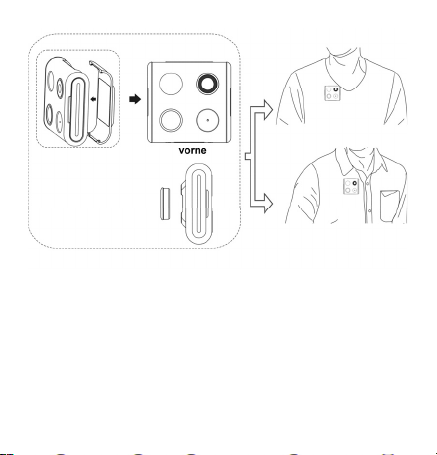
5.1.1. Mounting with Clip Holder
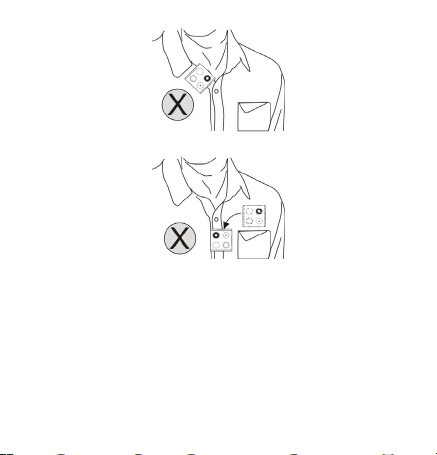
Note:
This method is suitable for wearing your camera on a
jacket or relatively thick clothes. Wear your camera
vertically, otherwise, the camera may slip and produce a
tilted view.
EN-8
Page 9

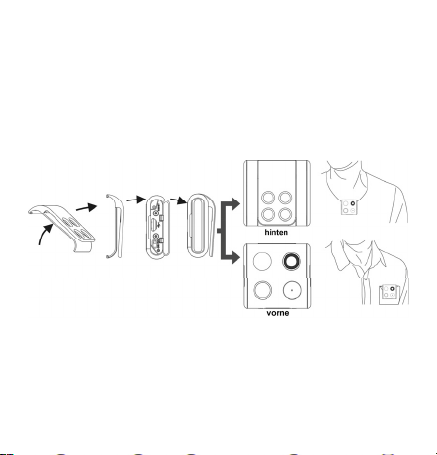
1. Install the clip holder on your camera.
2. Clip your camera in a vertical position where you wish.
5.1.2 Mounting with Magnet Clip
EN-9
Page 10

Note:
Magnet Clip not included – sold separately. This method is
suitable for wearing your camera on relatively thin clothes.
Wear your camera vertically, otherwise, the camera may
slip and produce a tilted view.
EN-10
Page 11
1. Detach the magnet sheet from the magnet clip socket.
2. Install the magnet clip to your camera.
3. Attach the magnet clip with camera to an area outside your
clothing while putting the magnet sheet inside the
corresponding area of your clothing. The magnetic field will
help the two pieces lock into place.
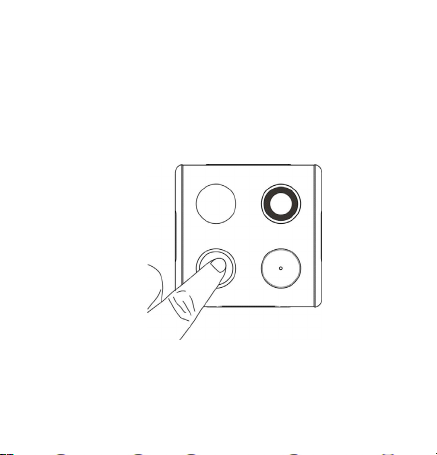
5.2. Taking a Single Photo
Press the Capture button very briefly to take a photo. A short
beep and a flash of Blue LED indicates the action was successful.
Be aware to not block the camera lens with your finger, or it will
EN-11
Page 12

shield the camera view.
Note:
When your camera battery is low, the status LED will flash
in red. You need to recharge your camera. (Refer to
section 4.1)
5.3. Taking Time Lapse photos
Time Lapse mode captures a series of photos at 30 second
intervals.
To Start Time Lapse:
Slide the Time Lapse switch to ON position to enter the Time
Lapse mode, the camera will initiate a countdown. The Blue LED
will flash each time a photo is taken.
Note
:
When your camera battery is low, the status LED will flash
in red. You need to recharge your camera. (Refer to
section 4.1)
To Stop Time Lapse:
Slide the Time Lapse switch to OFF position to exit the Time
Lapse mode.
Notes:
y You can also take single photos and record videos during
Time Lapse mode. After the single photo is captured or
the video is recorded, the camera will resume to Time
EN-12
Page 13

Lapse mode.
y Turn off the Time Lapse mode when you want to exit the
mode, or the camera will continue taking photos until the
battery depletes or the Time Lapse button is switched to
OFF.
5.4. Recording Videos
Press and hold the Capture button to start recording, the camera
will beep twice indicating recording has started. The LED indicator
illuminates Blue throughout recording.
To stop Recording, press and hold the Capture button again, the
camera will beep for 1 second and the LED will turn off.
Notes:
y The Still Photo function is disabled during video recording.
y When the memory card is full, the camera will beep 3 times
twice and the LED will flash Blue and Red alternately for 5
seconds.
y When your camera battery is low, the status LED will flash
in red. You need to recharge your camera. (Refer to section
4.1)
Notes:
During operation, please do not release MicroSD card from the
card slot as this may damage saved files or cause camera
malfunction.
EN-13
Page 14
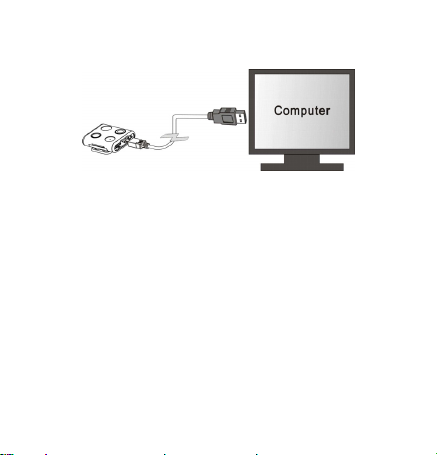
5.5. Connecting your Camera to a
Computer
The camera can be connected to a computer as a mass storage
device and transfer your photo/video files fo r storage.
1. Connect your camera to a computer via the USB cable
included.
2. Press the Capture button to enter into mass storage mode.
When the camera is connected to the computer as a mass
storage device, you can:
1. Open the folder and browse the files saved on the memory
card.
2. Format the MicroSD card.
3. Set the camera clock. (Refer to section 4.3)
EN-14
Page 15

6. Specifications
Lens Wide angle lens
Water Resistance Splash proof (IPX4)
Still Image resolution 5MP
Video Resolution 720P @ 30fps
Video Format MPEG4 (H.264) .AVI File
Photo Format JPG
Memory Slot MicroSD card
Support System Windows XP, Vista, 7 and 8;
Microphone Built-in
Battery Life Approximately 120 minutes
Dimension (L x H x W) 42 x 42 x 13.4 mm
Weight 25.6g
Operation Temperature
Storage Temperature
Mac OS X 10.6 and later
continuous recording
-10℃ ~ 40℃
-30℃ ~ 80℃
EN-15
Page 16

7. Troubleshooting
Problem Cause Solution
Unable to
record videos
or photos
Cannot find
removable
disk after
connecting the
camera to the
computer
1. MicroSD
card is not
inserted
2. Memory full
3. Camera
malfunction
Connection
failure
1. Insert a MicroSD card
2. Replace with a memory card with
space available for contents
3. Reset the camera
1. Make sure all cable connections
are secured
2. Restart the computer if necessary
Blurry images
The lens of
camera is dirty
Clean the lens with soft and dry
cloth
EN-16
Page 17

FCC Statement
Warning: Changes or modifications to this unit not expressly approved by
the party responsible for compliance could void the user’s authority to
operate the equipment.
NOTE: This equipment has been tested and found to comply with the
limits for a Class B digital device, pursuant to Part 15 of the FCC
Rules. These limits are designed to provide reasonable protection against
harmful interference in a residential installation. This equipment
generates, uses and can radiate radio frequency energy and, if not
installed and used in accordance with the instructions, may cause harmful
interference to radio communications.
However, there is no guarantee that interference will not occur in a
particular installation. If this equipment does cause harmful interference
to radio or television reception, which can be determined by turning the
equipment off and on, the user is encouraged to try to correct the
interference by one or more of the following measures:
• Reorient or relocate the receiving antenna.
• Increase the separation between the equipment and receiver.
• Connect the equipment into an outlet on a circuit different from that to
which the receiver is connected.
• Consult the dealer or an experienced radio/ TV technician for
help.
This device complies with Part 15 of the FCC Rules. Operation
is subject to the following two conditions:
(1) This device may not cause harmful interference.
(2)This device must accept any interference received, including
interference that may cause undesired operation.
Shielded cables must be used with this unit to ensure compliance with the
Class B FCC limits
EN-17
Page 18

TRADEMARK INFORMATION
© 2015 World Wide Licenses Limited.
® The iON logo is a registered trademark of World Wide Licenses Limited
Questions?
Need Some Help?
This manual
should help you
understand your
new product.
If you still have
questions,
visit our website:
www.ioncamera.com
EN-18
Like Us:
www.facebook.com/ioncamera
Tweet Us:
www.twitter.com/ioncamera
Page 19

Learn more.
Learn more about iON camera features at http://www.ioncamera.com
For instructions and safety information, see the iON User Guide. Download
the PDF at http://www.ioncamera.com/ion/User-Guides.html
Get support. (i.e. Warranty)
Visit http://www.ioncamera.com/ion/Support.html
support. If you are located in the United States of America, please contact
Customer Service at 855-411-4466. If you are located in Canada, please
contact Customer Service at 905-513-7733.
for all iON camera
.
EN-19
Page 20
Schnellstartanleitung
Page 21

1. Einleitung
iON SnapCam Lite ist eine mini tragbare Kamera. Es erlaubt dem
Benutzer, Fotos und Videos des Lebens vereinfacht
aufzunehmen durch einen Knopfdruck.
2. Hauptmerkmale
y Ultra dünn und leicht.
y Nehmen Sie hochwertige Fotos und HD-Videos auf.
y Abnehmbarer Clip zur Befestigung an der Kleidung.
y G-Sensor, um die Orientierung zu erkennen und die
Ansicht zu drehen.
DE-2
Page 22

3. Funktionsteile
DE-3
Page 23

1 MicroSD-
Kartensteckplatz.
2 Status-LED. ¾ Anzeige des
3 Weitwinkelobjektiv. ¾ Erfassen Sie die Live-
4 Reset-Taste. ¾ Die Kamera
5 Silikon-Abdeckung. ¾ Schirmen Sie die
6 Aufnahmetaste. ¾ Nehmen Sie ein
7 Micro USB Anschluss. ¾ Verbindung mit einem
8 Zeitraffer-Schalter. ¾ Schalter, um die
¾ MicroSD-Karten
Speicherplatz.
Kamerastatus.
Ansicht.
zurücksetzen.
Kamera vor Wasser
und Staub ab.
einziges Foto.
Start / StopVideoaufnahme.
externen Netzteil zum
Aufladen.
¾ Schließen Sie einen
Computer für die
Datenübertragung an.
Zeitraffer-Funktion einoder auszuschalten.
DE-4
Page 24

4. Erstbenutzer
4.1. laden Sie Ihre SnapCam Lite auf.
Laden Sie den eingebauten Akku, bevor Sie Ihre Kamera
benutzen. Die Kamera wird ca. 2 Stunden benötigen um voll
aufzuladen.
Die LED wird rot leuchten sobald die Kamera voll aufgeladen ist.
Hinweis:
y Achten Sie darauf, Ihre Kamera vor jedem Gebrauch
aufzuladen.
y Zum Laden der Kamera stellen Sie sicher, dass der
Zeitraffer-Schalter auf AUS steht.
DE-5
Page 25

4.2. Einlegen einer microSD-Speicherkarte
Sie müssen eine MicroSD-Karte (nicht mitgeliefert), vor
Benutzung der Kamera einsetzen. Die Kamera unterstützt
MicroSD-Karten von 2GB bis 32GB (Klasse 6 oder höher wird
empfohlen).
Hinweis:
y Es gibt nur eine richtige Richtung, um die microSD-
Speicherkarte in den Steckplatz zu stecken. Stecken Sie
die MicroSD-Karte nicht mit Gewalt in den Steckplatz, da
dies sowohl den Scanner und die microSD-Speicherkarte
beschädigen kann.
y Die MicroSD-Speicherkarte muss vor dem Gebrauch
formatiert werden.
DE-6
Page 26

4.3. Einstellen von Datum und Uhrzeit.
Wenn die Kamera zum ersten Mal verwendet wird, oder
zurückgesetzt wurde, müssen Sie die Uhr der Kamera einstellen,
um sicherzustellen, dass Ihre Video- und Foto-Dateien mit der
richtigen Datum / Zeit-Informationen gespeichert werden.
So richten Sie die Uhr der Kamera ein.:
1. Legen Sie eine microSD-Karte in die Kamera.
Schließen Sie die Kamera an einen PC an, um in den
USB-Modus zu gelangen (siehe Abschnitt 5.5).
2. Öffnen Sie den MicroSD-Datei Ordner, erstellen Sie eine
Datei in einem beliebigen Format (z.B. txt-Datei) und
benennen Sie es mit dem Format "Set-YYYYMMTTHHMM".
3. Mit YYYY, MM, DD, HH, MM stellen Sie Jahr, Monat und
4. Trennen Sie die Kamera von Ihrem PC und drücken Sie
Tag, Stunde, Minute der vorhandenen Zeit ein.
die Aufnahmetaste. Dadurch scannt die Kamera die Datei
und schreibt Sie auf den Systemtakt.
DE-7
Page 27
5. Verwendung der Kamera
5.1.1. Tragen Sie Ihre SnapCam Lite
5.1.2. Montage mit Clip Holder
Hinweis:
Diese Methode ist geeignet für das Tragen Ihrer Kamera auf einer
Jacke oder relativ dicker Kleidung. Tragen Sie Ihre Kamera
vertikal, sonst kann die Kamera abrutschen und eine gekippte
Ansicht aufnehmen.
DE-8
Page 28
1. Installieren Sie die Clip-Halterung an der Kamera.
2. Befestigen Sie die Kamera vertikal an einer gewünschten
Position.
5.1.2 Befestigung mit Magnet-Clip
DE-9
Page 29
Note:
Magnet Clip nicht im Lieferumfang enthalten - separat
erhältlich. Diese Methode ist geeignet für das Tragen
Ihrer Kamera an relativ dünner Kleidung.
Kamera vertikal, sonst kann die Kamera abrutschen und
eine gekippte Ansicht aufnehmen.
1. Lösen Sie das Magnetblech aus der Magnetclip-Buchse.
2. Befestigen Sie den Magnet-Clip an Ihrer Kamera.
3. Befestigen Sie den Magnet-Clip mit der Kamera auf einen
DE-10
Tragen Sie Ihre
Page 30
geeigneten Bereich außerhalb Ihrer Kleidung während Sie
die Magnetplatte im Inneren des entsprechenden Bereichs
Ihrer Kleidung befestigen. Das magnetische Feld wird
dazu beitragen, die beiden Stücke einrasten zu lassen.
5.2. Aufnahme eines Einzelfotos
Drücken Sie die Aufnahmetaste ganz kurz, um ein Foto
aufzunehmen. Ein kurzer Piepton und ein aufleuchten der blauen
LED bestätigt diese Aktion. Seien Sie sich bewusst die
DE-11
Page 31

Kameralinse mit dem Finger nicht zu blockieren ansonsten ist die
Kameraansicht bedeckt.
Hinweis:
Wenn Ihr Kamera Akku fast leer ist, wird die Status-LED
rot blinken. Sie müssen Ihre Kamera aufladen. (Siehe
Abschnitt 4.1).
5.3. Aufnahme von Zeitraffer Fotos
Zeitraffer-Modus erfasst eine Reihe von Fotos in 30 SekundenIntervallen.
So starten Sie im Zeitraffer:
Stellen Sie den Zeitraffer-Schalter in die Position AN um in den
Zeitraffer-Modus zu gelangen. Die Kamera startet einen
Countdown. Die blaue LED wird jedesmal, wenn ein Foto
aufgenommen wird blinken.
Hinweis:
Wenn Ihr Kamera Akku fast leer ist, wird die Status-LED
rot blinken. Sie müssen Ihre Kamera aufladen. (Siehe
Abschnitt 4.1).
Zeitraffer-Modus beenden:
Stellen Sie den Zeitraffer-Schalter in die Position AUS um in den
Zeitraffer-Modus zu beenden.
DE-12
Page 32

Hinweis:
y Sie können auch einzelne Fotos und Videos aufnehmen
während des Zeitraffer-Modus. Nachdem die einzelnen
Fotos eingefangen oder das Video aufgezeichnet wird,
schaltet die Kamera zurück in den Zeitraffer-Modus.
y Schalten Sie den Zeitraffer-Modus aus wenn Sie den
Modus verlassen möchten, oder die Kamera wird
durchgehend Fotos aufnehmen, bis die Batterie erschöpft
ist oder die Zeitraffer-Taste auf AUS geschaltet wird.
5.4. Aufnehmen von Videos
Halten Sie die Aufnahmetaste um die Aufnahme zu starten. Die
Kamera piept zweimal um anzuzeigen, dass die Aufnahme
begonnen hat. Die LED-Anzeige leuchtet blau während der
gesamten Aufnahme.Um die Aufnahme zu beenden, drücken und
halten Sie die Aufnahme-Taste erneut. Die Kamera piept 1-mal
und die LED erlischt.
Hinweis:
y Die Standbild-Funktion wird während der Videoaufnahme
deaktiviert.
y Wenn die Speicherkarte voll ist, wird die Kamera 2 mal 3
Signaltöne abgeben und die LED blinkt abwechselnd blau
und rot für 5 Sekunden.
y Wenn die Batterie schwach ist, wird die Status-LED rot
DE-13
Page 33

aufleuchten. Sie müssen Ihre Kamera aufladen. (Siehe
Abschnitt 4.1).
Im Betrieb, Entfernen Sie niemals die Speicherkarte aus dem
Gerät, kann es zu Datenverlusten und/oder Schäden an der
Speicherkarte oder am Gerät.
5.5. Anschließen Ihrer Kamera an einen Computer
Die Kamera kann an einem Computer als Massenspeichergerät
angeschlossen werden und kann Ihre Foto / Video-Dateien für die
Lagerung speicher.
1. Schließen Sie die Kamera an einen Computer über das
enthaltende USB-Kabel an.
2. Drücken Sie die Aufnahmetaste, um in den
Massenspeichermodus zu gelangen..
DE-14
Page 34

Wenn die Kamera an den Computer als Massenspeichergerät
angeschlossen ist, können Sie:
1. Den MicroSD-Ordner öffnen und einige der in der Kamera
gespeicherten Dateien durchschauen.
2. Formatieren der MicroSD-Karte.
3. Die Uhr der Kamera einstellen. (Siehe Abschnitt 4.3).
6. Technische Daten
Objektiv Weitwinkelobjektiv
Wasserbeständigkeit Spritzwassergeschützt (IPX4)
Standbildauflösung 5MP
Video-Auflösung 720P @ 30fps
Videoformat MPEG4 (H.264) .AVI File
Foto Format JPG
Speicherkartensteckplatz MicroSD Karte
Computer-Betriebssystem
Mikrofon Eingebaut
Batterielebensdauer
Abmessungen (L x H x B) 42 x 42 x 13.4 mm
Windows XP, Vista, 7 und 8; Mac OS
X 10.6 oder später
Ca. 120 Minuten kontinuierliche
Aufzeichnung
DE-15
Page 35

Gewicht 25.6g
Betriebs-Temperatur
Lagertemperatur
-10℃ ~ 40℃
-30℃ ~ 80℃
7. Fehlerbehebung
Problem Ursache Lösung
Video- oder
Fotoaufnahme nicht
möglich
1. MicroSD-Karte ist
nicht eingelegt
2. Speicher ist voll
3. Fehlfunktion der
Kamera
DE-16
1. Legen Sie eine SDKarte ein.
2. Setzen Sie eine
Speicherkarte mit
Platz für Inhalte ein.
3. Setzen Sie die
Kamera zurück.
Page 36

Die Kamera kann
nicht gefunden
werden, nachdem
sie an dem
Computer
angeschlossen
wurde.
verschwommene
Bilder
Verbindungsfehler
Die Linse der Kamera
ist verschmutzt
DE-17
1. Stellen Sie sicher,
dass alle Kabel
richtig
angeschlossen sind
2. Starten Sie den
Computer
gegebenenfalls neu
Reinigen Sie das
Objektiv mit einem
weichen und
trockenen Tuch
Page 37

FCC Statement
Warning: Changes or modifications to this unit not expressly approved by
the party responsible for compliance could void the user’s authority to
operate the equipment.
NOTE: This equipment has been tested and found to comply with the
limits for a Class B digital device, pursuant to Part 15 of the FCC
Rules. These limits are designed to provide reasonable protection against
harmful interference in a residential installation. This equipment
generates, uses and can radiate radio frequency energy and, if not
installed and used in accordance with the instructions, may cause harmful
interference to radio communications.
However, there is no guarantee that interference will not occur in a
particular installation. If this equipment does cause harmful interference
to radio or television reception, which can be determined by turning the
equipment off and on, the user is encouraged to try to correct the
interference by one or more of the following measures:
• Reorient or relocate the receiving antenna.
• Increase the separation between the equipment
and receiver.
• Connect the equipment into an outlet on a circuit different from that to
which the receiver is connected.
• Consult the dealer or an experienced radio/ TV technician for help.
This device complies with Part 15 of the FCC Rules. Operation is subject
to the following two conditions:
(1) This device may not cause harmful interference.
(2) This device must accept any interference received, including
DE-18
Page 38

interference that may cause undesired operation.
Shielded cables must be used with this unit to ensure compliance with the
Class B FCC limits.
TRADEMARK INFORMATION
© 2015 World Wide Licenses Limited.
® The iON logo is a registered trademark of World Wide Licenses
Limited.
Haben Sie
Fragen?
Brauchen Sie
Hilfe? Dieses
Handbuch soll
Ihnen helfen, Ihr
neues Produkt zu
verstehen.
Wenn Sie noch Fragen
haben,
besuchen Sie unsere
Website:
www.ioncamera.com
Drücken Sie gefällt mir: :
www.facebook.com/ioncamera
Twittern Sie uns:
www.twitter.com/ioncamera
DE-19
Page 39

Erfahren Sie mehr über die iON Kamera Eigenschaften auf
http://www.ioncamera.com
Für Anweisungen und Sicherheitshinweise finden Sie in der iON
Benutzerhandbuch.
Herunterladen das PDF auf http://www.ioncamera.com/ion/User-Guides.html
Holen Sie sich Unterstützung.
Besuchen http://www.ioncamera.com/ion/Support.html
Kamera-Unterstützung
für alle Ihre iON
DE-20
Page 40

Guide de démarrage rapide
Page 41

1. Introduction
La caméra iON SnapCam Lite est une mini caméra portative. Elle
vous permet de prendre des photos et vidéos d'une simple
pression sur le bouton de capture.
2. Caractéristiques principales
y Ultra fine et très légère
y Prends des photos de haute qualité et des vidéos HD
y Clip détachable pour attacher la caméra à vos vêtements
y Capteur-G pour détecter l'orientation et ajuster le point de
vue
FR-2
Page 42

3. Composants fonctionnels
1 Compartiment pour
carte MicroSD
2 LED de statut ¾ Indique le statut de la
3 Lentille Grand
Angle
¾ Emplacement de la
carte mémoire.
caméra.
¾ Pour la capture des
FR-3
photos et vidéos.
Page 43

4 Bouton Reset ¾ Pour réinitialiser la
5 Protection silicone ¾ Protège la caméra de
6 Bouton de capture ¾ Prends une photo.
7 Port Micro USB ¾ Connectez à une
8 Mode Time Lapse ¾ Active/ Désactive la
caméra.
l'eau et de la
poussière.
¾ Commence/ Termine
l'enregistrement vidéo.
source d'alimentation
externe pour charger
la batterie de la
caméra.
¾ Connectez à un
ordinateur pour
transférer vos fichiers
photo et vidéo.
fonction Time Lapse.
4. Prise en main
4.1. Charger votre SnapCam Lite
FR-4
Page 44

Chargez la batterie intégrée avant la première utilisation. Le
temps de charge est d'environ 2 heures si la batterie est vide.
La LED devient ROUGE en continu une fois que la batterie est
complètement chargée.
Remarques:
y Assurez-vous que votre caméra est chargée avant chaque
utilisation.
y Pour optimiser le chargement de la batterie, assurez-vous
que le mode Time Lapse est en position OFF.
4.2. Insérer une carte mémoire MicroSD
FR-5
Page 45
Vous devez insérer une carte MicroSD (non fournie) avant
d'utiliser votre caméra. La caméra supporte les cartes MicroSD
de 2GB à 32GB (carte mémoire de Class 6 ou supérieure
recommandée).
Remarques:
y Il n'y a qu'un sens d'insertion de la carte mémoire dans le
compartiment prévu à cet effet. Ne forcez pas, cela
pourrait endommager la caméra et la carte mémoire.
y Votre carte MicroSD doit être formatée avant utilisation.
4.3. Régler la Date & Heure
Lors de la première utilisation ou lorsque les paramètres par
défaut ont été restaurés, vous devez régler la date et l'heure de
FR-6
Page 46

votre caméra pour que vos photos et vidéos soient sauvegardées
avec les bonnes informations temporelles.
Pour régler la Date & Heure de la caméra:
1. Insérez une carte MicroSD dans la caméra.
2. Connectez la caméra à un PC pour entrer en mode USB
(voir section 5.5).
3. Ouvrez le dossier de la carte mémoire, créez un fichier
dans n'importe quel format (par exemple un fichier txt) et
renommez le avec le format suivant "set-AAAAMMJJHHMM" où AAAA, MM, JJ, HH et MM représentent
respectivement l'année, le mois, le jour, l'heure et les
minutes du moment où vous réglez la caméra.
4. Débranchez la caméra de votre ordinateur puis appuyez
sur le bouton de capture pour que la caméra scanne le
fichier créé et enregistre les modifications dans le système.
5. Utiliser votre camera
5.1. Attacher votre SnapCam Lite
5.1.1. Fixation à l'aide du Clip
Remarque:
FR-7
Page 47

Cette méthode convient pour porter votre caméra sur
une veste ou des vêtements suffisament larges.
Attachez la caméra verticalement, sinon elle risque de
pencher et de produire une image inclinée.
FR-8
Page 48

1. Fixez le clip sur votre caméra.
2. Clipez la caméra en position verticale à l'endroit désiré.
5.1.2 Fixation à l'aide du clip magnétique
FR-9
Page 49

Remarque:
Clip magnétique non inclut - vendu séparément. Cette
méthode convient pour porter votre caméra sur des
vêtements légers. Attachez la caméra verticalement,
sinon elle risque de pencher et de produire une image
inclinée.
1. Séparez l'attache magnétique du clip magnétique.
2. Installez le clip magnétique sur votre caméra.
FR-10
Page 50

3. Fixez le clip magnétique monté sur la caméra sur
l'éxtérieur de votre vêtement et insérez l'attache
magnétique de l'autre côté, à l'intérieur du vêtement. Le
champ magnétique permet aux deux fixations de ne faire
qu'une.
5.2. Prendre une photo
Appuyez sur le bouton de capture de manière brève pour prendre
une photo. Un court bip et un flash bleu de la LED indiquent que
la prise de photo a réussi. Attention à ne pas bloquer l'angle de
vue de la lentille de la caméra avec votre doigt, cela peut affecter
le résultat.
FR-11
Page 51

Remarque:
Lorsque le niveau de chargement de la batterie de votre
caméra est faible, la LED va flasher en rouge. Vous devez
donc recharger votre caméra (voir section 4.1).
5.3. Prendre des photos Time Lapse
Le mode Time Lapse capture une série de photos avec des
intervalles de 30 secondes.
Pour démarrer le mode Time Lapse:
Faites glisser le bouton Time Lapse vers le mode ON. La caméra
va commencer un compte à rebours. La LED va flasher en bleu
chaque fois qu'une photo est prise.
Remarque:
Lorsque le niveau de chargement de la batterie de votre
caméra est faible, la LED va flasher en rouge. Vous devez
donc recharger votre caméra (voir section 4.1).
Pour arrêter le mode Time Lapse:
Faites glisser le bouton Time Lapse vers le mode OFF.
Remarques:
y Vous pouvez également prendre des photos et enregistrer
des vidéos lorsque que le mode Time Lapse est activé.
Une fois que la photo/vidéo a été capturée, la caméra va
revenir au mode Time Lapse.
FR-12
Page 52

y Arrêtez le mode Time Lapse lorsque vous voulez quitter
ce mode, sinon la caméra va continuer à prendre des
photos jusqu`à épuisement de la batterie.
5.4. Enregistrer des vidéos
Appuyez et maintenez le bouton de capture pour commencer
l'enregistrement, la caméra va bipper deux fois pour indiquer le
l'enregistrement a commencé. La LED est bleue durant tout
l'enregistrement.
Pour terminer l'enregistrement, appuyez et maintenez de
nouveau le bouton de capture, la caméra va bipper pendant 1
seconde et la LED va s'éteindre.
Remarques:
y La fonction Photo est désactivée durant l'enregistrement
vidéo.
y Lorsque la carte mémoire est pleine, la caméra va bipper 3
fois et la LED va flasher rouge et bleu successivement
pendant 5 secondes.
y Lorsque le niveau de chargement de la batterie de votre
caméra est faible, la LED va flasher en rouge. Vous devez
donc recharger votre caméra (voir section 4.1).
Attention!
Lorsque la caméra est allumée, ne retirez pas la carte mémoire
de son compartiment car cela pourrait endommager les fichiers
enregistrés ainsi que provoquer le mauvais fonctionnement de
FR-13
Page 53

l'appareil.
5.5 Connecter votre caméra à un ordinateur
La caméra peut être connectée à un ordinateur en tant
qu'appareil de stockage de masse et vous permet de transférer
vos fichiers photo et vidéo.
1. Connectez votre caméra à un ordinateur grâce au câble
USB fourni.
2. Appuyez sur le bouton de capture pour entrer dans le mode
de stockage de masse.
Lorsque la caméra est connectée à l'ordinateur en tant
qu'appareil de stockage de masse, vous pouvez:
1. Ouvrir le dossier et voir les fichiers sauvegardés sur la
carte mémoire.
2. Formater la carte mémoire.
3. Mettre à jour la Date & Heure de la caméra (voir section
4.3).
FR-14
Page 54

6. Spécifications
Lentille Lentille Grand Angle
Résistance à l'eau Résistante aux éclaboussures
Résolution photo 5MP
Résolution vidéo 720P @ 30ips
Format Vidéo MPEG4 (H.264) Fichier .AVI
Format Photo JPG
Compartiment pour carte
mémoire
Système requis Windows XP, Vista, 7 and 8;
Microphone Intégré
Durée de vie de la batterie Environ 2 heures en
Dimensions (L x H x l) 42 x 42 x 13.4 mm
Poids 25.6g
Températures d'utilisation
Températures de stockage
Mac OS X 10.6 ou plus récent
(IPX4)
Carte MicroSD
enregistrement continu
-10℃ ~ 40℃
-30℃ ~ 80℃
FR-15
Page 55

7. Dépannage
Problème Cause Solution
Impossible de
prendre des
photos ou vidéos
Impossible de
trouver le disque
éjectable après
avoir connecté la
caméra à
l'ordinateur
Images floues
1. Aucune carte
mémoire
2. Mémoire
pleine
3. Panne caméra
Erreur de
connexion
La lentille de la
caméra est sale
1. Insérez une
carte MicroSD
2. Insérez une
carte mémoire
avec de l'espace
disponible
3. Réinitialisez la
caméra
1. Assurez-vous
que tous les
câbles soient OK
2. Redémarrez
votre ordinateur
si besoin
Nettoyez la lentille
avec un chiffon
propre et sec
FR-16
Page 56

Déclaration de la FCC
Avertissement : Les changements ou modifications à cet appareil non
expressément approuvés par la partie responsable de la conformité
pourraient annuler l'autorité de l'utilisateur à utiliser cet appareil.
Ce périphérique est conforme à l'article 15 des règles de la FCC. Son
utilisation est sujette aux deux conditions suivantes :
(1) cet équipement ne doit pas créer d'interférences
dangereuses.
(2) Cet équipement doit accepter toute interférence reçue,
incluant celles pouvant entraîner un mauvais
REMARQUE : Cet équipement à été testé et est conforme aux limites
d'un appareil de Classe B, selon l'article 15 des Règles FCC. Ces limites
ont étés mises en place pour offrir une protection raisonnable contre les
interférences dans un complexe résidentiel. Cet équipement génère,
utilise et contient de l'énergie de fréquence radio, si inutilisé
incorrectement pourrait créer des interférences dangereuses pour les
communications radio.
Mais il n'existe aucune garantie que des interférences ne seront pas
produites dans une installation particulière. Si cet équipement crée des
interférences pour la réception radio ou télévisuelle, ce qui peut être
constaté en l'allumant et en l'éteignant, alors il vous est conseillé d'y
remédier d'une des manières suivantes :
fonctionnement.Instruction Statement
y Réorientez ou déplacez l'antenne réceptrice.
FR-17
Page 57
y Augmentez la distance entre l'équipement et le récepteur.
y Connectez l'équipement à une prise ou circuit différent de celui du
récepteur.
Consultez le distributeur ou un technicien radio ou TV d'expérience pour
de l'assistance.
INFORMATION DE MARQUE DEPOSÉE
© 2015 World Wide Licenses Limited.
® Le logo iON est une marque déposée de World Wide Licenses Limited.
Des questions ?
Besoin d'aide ?
Ce manuel vous
aidera à
comprendre
votre nouveau
produit
Si vous avez des questions
supplémentaires,
visitez notre site web :
www.ioncamera.com
Likez nous :
www.facebook.com/ioncamera
Suivez nous :
www.twitter.com/ioncamera
FR-18
Page 58

Informations complémentaires.
Pour plus d'informations sur les caractéristiques iON Camera,
visitez http://www.ioncamera.com
Pour les instructions et les informations de sécurité, reportez-vous au manuel
d'utilisateur iON. Téléchargez le document PDF à l'adresse
suivante: http://www.ioncamera.com/ion/User-Guides.html
Assistance / Garantie
Rendez-vous sur http://www.ioncamera.com/ion/Support.html pour toute
l'assistance iON Camera. Si vous résidez aux États-Unis
d'Amérique, veuillez contacter le Service Client au 855-411-4466. Si vous
résidez au Canada, veuillez contacter le Service Client au 905-513-7733.
FR-19
Page 59

Guida rapida
Page 60

1. Introduzione
iON SnapCam Lite è una mini fotocamera indossabile che
consente all'utente di scattare fotografie ed effettuare video dei
momenti più importanti semplicemente premendo un pulsante.
2. Caratteristiche principali
y Ultra fine e leggera
y Foto di alta qualità e video HD
y Clip removibile per il fissaggio ai vestiti
y Sensore G per rilevare l'orientamento e ruotare la vista
IT-2
Page 61

3. Parti funzionali
IT-3
Page 62

1 Vano per scheda
2 Spia LED di stato ¾ Mostra lo stato della
3 Lente grandangolare ¾ Per catturare dal vivo.
4 Tasto di ripristino ¾ Ripristina la
5 Coperchio in silicone ¾ Protegge la fotocamera
6 Pulsante
7 Porta micro USB ¾ Per il collegamento a
8 Interruttore Ripresa
MicroSD
Acquisizione
temporizzata
¾ Alloggio per scheda
MicroSD.
fotocamera.
fotocamera.
da acqua e polvere.
¾ Scatta una foto singola.
¾ Avvia/arresta la
registrazione video.
una fonte di
alimentazione esterna
per la ricarica.
¾ Per il collegamento a un
computer per il
trasferimento dati.
¾ Interruttore per attivare
o disattivare la funzione
Ripresa temporizzata.
IT-4
Page 63

4. Primo utilizzo
4.1. Ricarica della SnapCam Lite
Ricaricare la batteria integrata prima di utilizzare la fotocamera.
Occorrono circa 2 ore per ricaricare completamente una batteria
scarica.
Il LED diventa ROSSO fisso quando la fotocamera è
completamente carica.
Nota:
y Assicurarsi che la fotocamera sia completamente carica
prima di ogni utilizzo.
y Per caricare la fotocamera in maniera più efficiente,
accertarsi che l'interruttore Ripresa temporizzata sia in
posizione OFF.
IT-5
Page 64

4.2. Inserimento di una scheda di memoria
MicroSD
Inserire una scheda MicroSD (non in dotazione) prima di
utilizzare la fotocamera. La fotocamera supporta schede MicroSD
da 2 GB a 32 GB (si consiglia Classe 6 o superiore).
Note:
y Esiste un'unica direzione secondo cui inserire la scheda di
memoria MicroSD nel vano. Non forzare la scheda
MicroSD nel vano poiché ciò potrebbe danneggiare sia la
fotocamera sia la scheda di memoria MicroSD.
y Prima dell'uso, la scheda di memoria MicroSD deve
essere formattata.
4.3. Impostazione di data e ora
Quando la fotocamera è usata per la prima volta oppure è stata
ripristinata alle impostazioni predefinite, è necessario impostare
IT-6
Page 65

l'orologio della fotocamera in modo che le foto e i video siano
salvati con le informazioni di data/ora corrette.
Come configurare l’orologio della fotocamera
1. Inserire una scheda MicroSD nella fotocamera.
2. Collegare la fotocamera a un PC per accedere alla
modalità USB (fare riferimento alla sezione 5.5).
3. Aprire la cartella del file MicroSD, creare un file in
qualsiasi formato (ad es. file txt) e rinominarlo con il
formato "imposta-AAAAMMGG-HHMM”.
AAAA, MM, GG, HH, MM rappresentano anno, mese,
giorno, ora e minuto dell'ora corrente.
4. Scollegare la fotocamera dal PC, premere il pulsante
Acquisizione e la fotocamera scansionerà il file e lo
salverà nell'orologio del sistema.
5. Utilizzo della fotocamera
5.1. Come indossare SnapCam Lite
5.1.1. Fissaggio con il supporto a clip
IT-7
Page 66

Nota:
Questo metodo è ideale per fissare la fotocamera su
una giacca o abiti abbastanza grossi. Indossare la
fotocamera in verticale; in caso contrario potrebbe
scivolare e produrre una visualizzazione inclinata
IT-8
Page 67

1. Installare il supporto a clip sulla fotocamera.
2. Fissare la fotocamera in posizione verticale dove
desiderato.
5.1.2 Fissaggio con clip a magnete
IT-9
Page 68

Nota:
Clip a magnete non in dotazione, venduto separatamente.
Questo metodo è ideale per fissare la fotocamera su
abiti abbastanza fini.
Indossare la fotocamera in verticale; in caso contrario
potrebbe scivolare e produrre una visualizzazione
inclinata.
1. Rimuovere la placchetta dalla clip a magnete.
2. Installare la clip a magnete sulla fotocamera.
IT-10
Page 69

3. Fissare la clip a magnete su un'apposita zona degli abiti,
sistemando la placchetta in corrispondenza all'interno
degli abiti. Il campo magnetico terrà i due pezzi bloccati in
posizione.
5.2. Scattare una foto
Premere brevemente il pulsante Acquisizione per scattare una
foto. Una breve "bip" e un flash dell’indicatore LED blu indicano
l’avvenuta esecuzione dell’azione. Assicurarsi di non ostruire la
lente della fotocamera con il dito per evitare di coprire la visuale
della fotocamera.
IT-11
Page 70

Nota:
Quando la batteria della fotocamera è in esaurimento, il
LED di stato lampeggia in rosso. È necessario ricaricare la
fotocamera (consultare la sezione 4.1).
5.3. Scattare una foto con Ripresa temporizzata
La modalità Ripresa temporizzata scatta una serie di foto a
intervalli di 30 secondi.
Per avviare la Ripresa temporizzata:
Far scorrere l'interruttore Ripresa temporizzata sulla posizione
ON per accedere alla modalità Ripresa temporizzata; la
fotocamera avvia un conto alla rovescia. La spia LED blu
lampeggia ogni volta che viene scattata una foto.
Nota:
Quando la batteria della fotocamera è in esaurimento, il
LED di stato lampeggia in rosso. È necessario ricaricare la
fotocamera (consultare la sezione 4.1).
Per interrompere la Ripresa temporizzata:
Far scorrere l'interruttore Ripresa temporizzata sulla posizione
OFF per uscire dalla modalità Ripresa temporizzata.
Note
:
y È anche possibile scattare singole foto e registrare video
durante la modalità Ripresa temporizzata. Una volta
scattata la foto o registrato il video, la fotocamera riprende
la modalità Ripresa temporizzata.
IT-12
Page 71

y Disattivare la modalità Ripresa temporizzata quando si
desidera uscire dalla modalità; in caso contrario la
fotocamera continuerà a scattare foto fino all'esaurimento
della batteria o fino a quando il pulsante della Ripresa
temporizzata viene impostato su OFF.
5.4. Registrare video
Tenere premuto il tasto Acquisizione per avviare la registrazione;
la fotocamera emette due "bip" per indicare l'avvio della
registrazione. La spia LED rimane fissa in blu per tutto il tempo
della registrazione.
Per interrompere la registrazione, tenere premuto nuovamente il
pulsante di Acquisizione; la fotocamera emette un "bip" per un
secondo e il LED si spegne.
Note:
y La funzione di fermo immagine è disabilitata durante la
registrazione video.
y Quando la scheda di memoria è piena, la fotocamera
emette 3 "bip" per due volte e il LED lampeggia in blu e
rosso alternativamente per 5 secondi.
y Quando la batteria della fotocamera è in esaurimento, il
LED di stato lampeggia in rosso. È necessario ricaricare la
fotocamera (consultare la sezione 4.1).
IT-13
Page 72

Nota:
durante l'operazione non rimuovere la scheda SD dall'apposito
vano in quanto ciò potrebbe danneggiare i file salvati o causare
malfunzionamenti alla fotocamera.
5.5. Collegamento della videocamera a un
computer
La fotocamera può essere connessa a un computer come
dispositivo di archiviazione di massa e per trasferire file
video/fotografici per la memorizzazione.
1. Connettere la fotocamera a un computer mediante il cavo
USB in dotazione.
2. Premere il pulsante di Acquisizione per accedere alla
modalità di archiviazione di massa.
Quando la fotocamera è collegata al computer come dispositivo
IT-14
Page 73

di archiviazione di massa è possibile:
1. Aprire la cartella e visualizzare i file salvati sulla scheda di
memoria.
2. Formattare la Scheda MicroSD.
3. Impostare l'orologio della fotocamera (consultare la sezione
4.3).
6. Specifiche
Lente Lente grandangolare
Resistenza all'acqua Resistenza agli schizzi (IPX4)
Risoluzione immagine 5 megapixel
Risoluzione video 720 P @ 30 fps
Formato video MPEG4 (H.264) File .AVI
Formato foto JPG
Slot scheda di memoria Scheda MicroSD
Sistemi supportati
Microfono Integrato
Durata della batteria
Dimensioni (L x A x P) 42 x 42 x 13,4 mm
Peso 25,6 g
Windows XP, Vista, 7 e 8;
Mac OS X 10.6 e successive
Circa 120 minuti di registrazione
continua
IT-15
Page 74

Temperatura di esercizio
Temperatura di conservazione
Da -10℃ a 40℃
Da -30℃ a 80℃
7. Risoluzione dei problemi
Problema Causa Soluzione
Impossibile
registrare video o
scattare foto.
1. La scheda MicroSD
non è inserita
2. Memoria piena
3. Malfunzionamento
della fotocamera
1. Inserire una
scheda MicroSD
2. Sostituire la
scheda di
memoria con una
avente spazio
disponibile per
l’aggiunta di
contenuti
3. Ripristinare la
fotocamera
IT-16
Page 75

1. Assicurarsi che
Impossibile
trovare il disco
rimovibile dopo
aver connesso la
fotocamera al
computer
Immagini sfocate
Connessione non
riuscita
La lente della
fotocamera è sporca
tutte le
connessioni
siano corrette
2. Avviare
nuovamente il
computer se
necessario
Pulire la lente con
un panno soffice e
asciutto
Dichiarazione FCC
Avvertenza: cambi o modifiche all'unità non approvati espressamente
dall'ente responsabile della conformità possono annullare l'autorità
dell'utente a mettere in funzione il dispositivo.
NOTA: il presente dispositivo è stato testato ed è risultato conforme ai
limiti per un dispositivo digitale di Classe B, ai sensi della Parte 15
delle norme FCC. Tali limiti sono stati ideati per fornire un'adeguata
protezione nei confronti di interferenze dannose in installazioni
residenziali. Il presente dispositivo genera, utilizza e può irradiare
energia a radio frequenza e, se non installato e utilizzato
conformemente alle istruzioni, può causare interferenze dannose alle
radiocomunicazioni.
IT-17
Page 76

Tuttavia, non vi è alcuna garanzia che l’interferenza non si verifichi in
una particolare installazione. Nel caso in cui il presente dispositivo
causi interferenze dannose alla ricezione radio o televisiva, il che
potrebbe essere determinato dall'accensione e spegnimento del
dispositivo, l'utente è incoraggiato a tentare di correggere l'interferenza
mediante una o più delle misure seguenti:
• Riorientare o riposizionare l’antenna di ricezione.
• Aumentare la distanza tra il dispositivo e il ricevitore.
• Collegare il dispositivo a una presa su un circuito diverso da quello a
cui è collegato il ricevitore.
• Consultare il rivenditore o un tecnico radio/TV esperto per
l’assistenza.
Il presente dispositivo è conforme alla Parte 15 delle Norme FCC.
L'utilizzo è soggetto alle seguenti due condizioni:
(1) Non deve causare interferenze dannose.
(2) Il presente dispositivo deve accettare qualsiasi interferenza
ricevuta, comprese le interferenze che potrebbero causare un
funzionamento non desiderato
Utilizzare cavi schermati con l'unità per garantire la conformità ai limiti
FCC di Classe B.
IT-18
Page 77

INFORMAZIONI SUL MARCHIO
© 2015 World Wide Licenses Limited.
® Il logo iON è un marchio registrato di World Wide Licenses Limited.
Domande?
Bisogno
d’aiuto?
Il presente
manuale
aiuterà nella
comprensione
del nuovo
prodotto.
In caso di domande,
visita il nostro sito
web:
www.ioncamera.com
IT-19
Seguici su Facebook:
www.facebook.com/ioncamera
Seguici su Twitter:
www.twitter.com/ioncamera
Page 78

Maggiori informazioni
Maggiori informazioni sulle caratteristiche della fotocamera iON sono
disponibili su http://www.ioncamera.com
Per istruzioni e informazioni sulla sicurezza, consultare la Guida utente iON.
Scaricare il PDF da http://www.ioncamera.com/ion/User-Guides.html
Per assistenza (ad es. garanzia):
visitare http://www.ioncamera.com/ion/Support.html
fotocamera iON. Se vi trovate negli Stati Uniti d'America, contattare il Servizio
clienti al numero 855-411-4466. Se vi trovate in Canada, contattare il Servizio
clienti al numero 905-513-7733.
.
per assistenza sulla
IT-20
Page 79

Guía de inicio rápido
Page 80

1. Introducción
iON SnapCam Lite es una minicámara portable. Permite al
usuario capturar fotografías y grabar video de los momentos de la
vida con solo pulsar un botón.
2. Características principales
y Ultra delgada y ligera
y Captura fotografías de alta calidad y video HD
y Clip desmontable para fijar a la ropa
y Sensor G para detectar la orientación y girar el plano
ES-2
Page 81

3. Piezas funcionales
ES-3
Page 82

1 Ranura de tarjeta
2 LED de estado ¾ Muestra el estado de
3 Lente gran angular ¾ Captura de vista en
4 Botón de reinicio ¾ Reiniciar la cámara
5 Tapa de silicona ¾ Protege la cámara del
6 Botón de captura ¾ Tomar una fotografía.
7 Puerto Micro USB ¾ Conectar a
8 Interruptor de lapso
microSD
temporal
¾ Ubicación de la tarjeta
ES-4
Micro SD.
la cámara
directo.
agua y el polvo.
¾ Iniciar/detener la
grabación de video.
alimentación externa
para cargar.
¾ Conectar a un
ordenador para
transferir datos.
¾ Interruptor para
encender o apagar la
función de lapso
temporal.
Page 83

4. Primer uso
4.1. Cargar la SnapCam Lite
Cargue la batería integrado antes de comenzar a usar la cámara.
La cámara tardará aproximadamente 2 horas en cargarse por
completo si está totalmente gastada.
El LED se pondrá rojo fijo cuando la cámara esté totalmente
cargada.
Nota:
y Asegúrese de que la cámara está cargada antes de cada
uso.
y Para cargar la cámara con mayor eficiencia, asegúrese de
que el interruptor de lapso temporal esté en la posición
APAGADO.
ES-5
Page 84

4.2. Introducir una tarjeta de memoria MicroSD
Introduzca una tarjeta MicroSD (no incluida) antes de usar la
cámara. La cámara soporta tarjetas MicroSD entre 2GB y 32GB
(recomendada clase 6 o superior).
Notas:
y La tarjeta de memoria MicroSD solamente puede
introducirse en la ranura en una orientación. No fuerce la
tarjeta MicroSD en la ranura, podría dañar tanto la cámara
como la tarjeta de memoria MicroSD.
y Debe formatearse la tarjeta MicroSD antes de usarla.
4.3. Configuración de fecha y hora
Cuando se usa la cámara por primera vez o se haya restablecido
ES-6
Page 85

la configuración por defecto, deberá configurar el reloj de la
cámara para garantizar que los archivos de video y fotografías se
guarden con la información de fecha/hora correctas.
Para configurar el reloj de la cámara:
1. Introduzca una tarjeta MicroSD en la cámara.
2. Conecte la cámara a un PC para acceder al modo USB
(consulte la sección 5.5).
3. Abra la carpeta de archivos de la MicroSD, cree un
archivo en cualquier formato (como un archivo txt), y
póngale como nombre “set-AAAAMMDD-HHMM”.
AAAA, MM, DD, HH, MM representan el año, mes y día,
horas y minutos de la hora actual.
4. Desconecte la cámara de su PC, pulse el botón de
captura, la cámara explorará el archivo y escribirá los
datos en el reloj del sistema.
5. Usar la cámara
5.1. Ponerse la SnapCam Lite
5.1.1. Montaje con soporte de clip
Nota:
Este método es adecuado para llevar la cámara en una
chaqueta o prendas de ropa relativamente
ES-7
Page 86

gruesas. Lleve la cámara vertical, o en caso contrario la
cámara podría desplazarse y causar una imagen
inclinada.
ES-8
Page 87

1. Instale el soporte de clip en la cámara.
2. Fije la cámara en posición vertical en el lugar deseado.
ES-9
Page 88

5.1.2 Montaje con clip magnético
Nota:
Clip magnético no incluido – se comercializa por separado.
Este método es adecuado para llevar la cámara con prendas
relativamente delgadas.
Lleve la cámara vertical, o en caso contrario la cámara
podría desplazarse y causar una imagen inclinada.
ES-10
Page 89

1. Separe la tira magnética de la toma del clip magnético.
2. Instale el clip magnético en la cámara.
3. Fije el clip magnético con la cámara en una zona
adecuada del exterior de la ropa a la vez que coloca la tira
magnética en el interior de la zona correspondiente de su
ropa. El campo magnético ayudará a que las dos piezas
queden fijas en posición.
5.2. Capturar una fotografía
Pulse brevemente el botón de captura para tomar una fotografía.
Un breve pitido y el parpadeo del LED azul indicarán que la
acción ha tenido éxito. Tenga cuidado para evitar obstruir la lente
de la cámara con el dedo, o impedirá su campo de visión.
ES-11
Page 90

Nota:
Cuando la batería de la cámara esté baja, el LED de
estado parpadeará en rojo. Deberá recargar la cámara.
(Consulte la sección 4.1)
5.3. Capturar fotografías con lapso temporal
El modo de lapso temporal captura una serie de fotografías con
intervalos de 30 segundos.
Para iniciar el lapso temporal:
Deslice el interruptor de lapso temporal a la posición
ENCENDIDO para acceder al modo de lapso temporal y la
cámara iniciará una cuenta atrás. El LED azul parpadeará cada
vez que se capture una foto.
Nota:
Cuando la batería de la cámara esté baja, el LED de
estado parpadeará en rojo. Deberá recargar la cámara.
(Consulte la sección 4.1)
Para detener el lapso temporal:
Deslice el interruptor de lapso temporal a posición APAGADO
para salir del modo de lapso temporal.
:
Notas
ES-12
Page 91

y También puede capturar fotografías independiente y
grabar video durante el modo de lapso temporal. Cuando
se haya capturado una fotografía o grabado video, la
cámara continuará en el modo de lapso temporal.
y Apague el modo de lapso temporal cuando quiera salir del
modo, o la cámara seguirá tomando fotografías hasta que
se vacíe la batería o el botón de lapso temporal se ponga
en APAGADO.
5.4. Grabar video
Presione y mantenga el botón de captura para iniciar la grabación,
la cámara emitirá dos pitidos indicando que la grabación ha
comenzado. El testigo LED se enciende en azul durante toda la
grabación.
Para detener la grabación, presione y mantenga de nuevo el
botón de captura, la cámara emitirá un pitido durante 1 segundo y
el LED se apagará.
Notas:
y La función de fotografía fija está desactivada durante la
grabación de video.
ES-13
Page 92

y Cuando la tarjeta de memoria se llene, la cámara emitirá 3
pitidos y el LED parpadeará en azul y rojo alternativamente
durante 5 segundos.
y Cuando la batería de la cámara esté baja, el LED de
estado parpadeará en rojo. Deberá recargar la cámara.
(Consulte la sección 4.1)
Observación:
Durante el uso, no suelte la tarjeta SD de la ranura de tarjeta,
podría dañar los archivos guardados o provocar un
funcionamiento incorrecto de la cámara.
5.5. Conectar la cámara a un ordenador
La cámara puede conectarse al ordenador como dispositivo de
almacenamiento masivo y transferir archivos de foto/video para
su almacenamiento.
1. Conecte la cámara a un ordenador con el cable USB
incluido.
ES-14
Page 93

2. Pulse el botón de captura para acceder al modo de
almacenamiento masivo.
Cuando la cámara esté conectada al ordenador como dispositivo
de almacenamiento masivo, puede:
1. Abra la carpeta y explore los archivos guardados en la
tarjeta de memoria.
2. Formatear la tarjeta MicroSD.
3. Configure el reloj de la cámara. (Consulte la sección 4,3)
6. Especificaciones
Lente Lente gran angular
Resistencia al agua Resistente a salpicaduras (IPX4)
Resolución de imagen fija 5MP
Resolución video 720P @ 30fps
Formato de video Archivo MPEG4 (H.264) .AVI
Formato de fotografía JPG
Ranura de memoria Tarjeta MicroSD
Sistemas soportados
Windows XP, Vista, 7 y 8;
Mac OS X 10.6 y posterior
ES-15
Page 94

Micrófono Integrado
Duración de batería
Dimensiones (L x A x P)
Peso 25,6g
Temperatura de funcionamiento
Temperatura de almacenaje
Aproximadamente 120 minutos de
grabación continua
42 x 42 x 13,4 mm
-10℃ ~ 40℃
-30℃ ~ 80℃
ES-16
Page 95

7. Solución de problemas
Problema Causa Solución
No pueden
registrarse videos o
fotografías
No se encuentra el
disco extraíble tras
conectar la cámara al
ordenador
Imágenes borrosas
1. Tarjeta MicroSD no
introducida
2. Memoria llena
3. Avería de cámara
Fallo de conexión
Lente de la cámara
sucia
ES-17
1. Introduzca una
tarjeta microSD
2. Cambie la tarjeta
por otra con espacio
disponible
3. Reinicie la cámara
1. Asegúrese de que
todas las
conexiones de cable
sean firmes
2. Reinicie el
ordenador si es
necesario
Limpie la lente con
una gamuza suave
seca
Page 96

ES-18
Page 97

Declaración FCC
Advertencia: Los cambios o modificaciones de esta unidad no aprobadas
explícitamente por la parte responsable del cumplimiento pueden anular
la autoridad del usuario de usar el equipo.
NOTA: Este equipo ha sido comprobado y cumple con los límites de un
dispositivo digital de clase B, de acuerdo con el apartado 15 de las
normas FCC. Estos límites han sido diseñados para ofrecer una
protección razonable contra interferencias perjudiciales en una
instalación residencial. Este equipo genera, usa y puede emitir energía
de radiofrecuencia y, si no se instala y utiliza de acuerdo con las
instrucciones, puede causar interferencias perjudiciales en las
comunicaciones por radio.
Sin embargo, no existen garantías de que este equipo no causará
interferencias en una instalación concreta. Si este equipo causa
interferencias dañinas en la recepción de radio o televisión, lo que puede
determinarse apagando y encendiendo el equipo, se recomienda al
usuario intentar corregir las interferencias con una o varias de las
medidas siguientes:
• Reorientar o recolocar la antena receptora.
• Aumentar la separación entre el equipo y el receptor.
• Conectar el equipo a una toma de un circuito distinto al que esté
conectado el receptor.
• Consultar al vendedor o aun técnico experimentado de radio/TV para
obtener ayuda.
y Réorientez ou déplacez l'antenne réceptrice.
y Augmentez la distance entre l'équipement et le récepteur.
y Connectez l'équipement à une prise ou circuit différent de celui du
récepteur.
• Consultar al vendedor o aun técnico experimentado de radio/TV para
ES-19
Page 98

obtener ayuda.
Este dispositivo cumple con el apartado 15 de las normas FCC. Su uso
está sujeto a las dos condiciones siguientes:
(1) Este dispositivo no puede causar interferencias dañinas, y
(2) Este dispositivo debe aceptar cualquier interferencia recibida,
incluyendo interferencias que puedan causar un funcionamiento no
deseado.
Con esta unidad deben usarse cables aislados para garantizar el
cumplimiento de los límites FCC de clase B.
ES-20
Page 99

INFORMACIÓN DE MARCA COMERCIAL
©2015 World Wide Licenses Limited.
®El logo iON es una marca comercial registrada de World Wide
Licenses Limited.
¿Preguntas?
¿Necesita ayuda?
Este manual le
ayudará a
comprender su
nuevo producto
Si tiene dudas,
visite nuestro sitio
web:
www.ioncamera.com
Like:
www.facebook.com/ioncamera
Twitter:
www.twitter.com/ioncamera
ES-21
Page 100

Saber más.
Puede saber más de las funciones de la cámara iON en
http://www.ioncamera.com
Para obtener instrucciones e información de seguridad, consulte la guía del
usuario iON. Descargue el PDF en
http://www.ioncamera.com/ion/User-Guides.html
Obtenga soporte.
Visite http://www.ioncamera.com/ion/Support.html
su cámara iON. Si se encuentra en Estados Unidos de América, contacte con
el servicio al cliente en el 855-411-4466. Si se encuentra en Canadá,
contacte con el servicio al cliente en el 905-513-7733.
.
para obtener soporte con
ES-22
 Loading...