

Page 1
Quick Start Guide
1. Getting to Know Your Camera
Thank you for purchasing the ion AIR PRO HD sports video camera. The ion
AIR PRO can be mounted with the Bike & Helmet Kit or the BOARD Kit
for the ultimate adventure HD recording experience.
Getting to know your AIR PRO camera
AIR PRO is a Professional, High Quality Digital Video Recorder that
records in Full HD video by using an easy slide switch
It also has the latest 5 Mega Pixel Sensor for you to take great digital
photographs
Your camera supports a MicroSD card up to 32GB, which allows you to
take video in 1080p with 30 frames per second for about 4 Hours.
The embedded 1200mAh Li-ion Battery can be recharged quickly.
The Waterproof Housing lets the camera perform up to 10 meters under
water.
AIR PRO is lighter than 4.5 ounces or 123g.
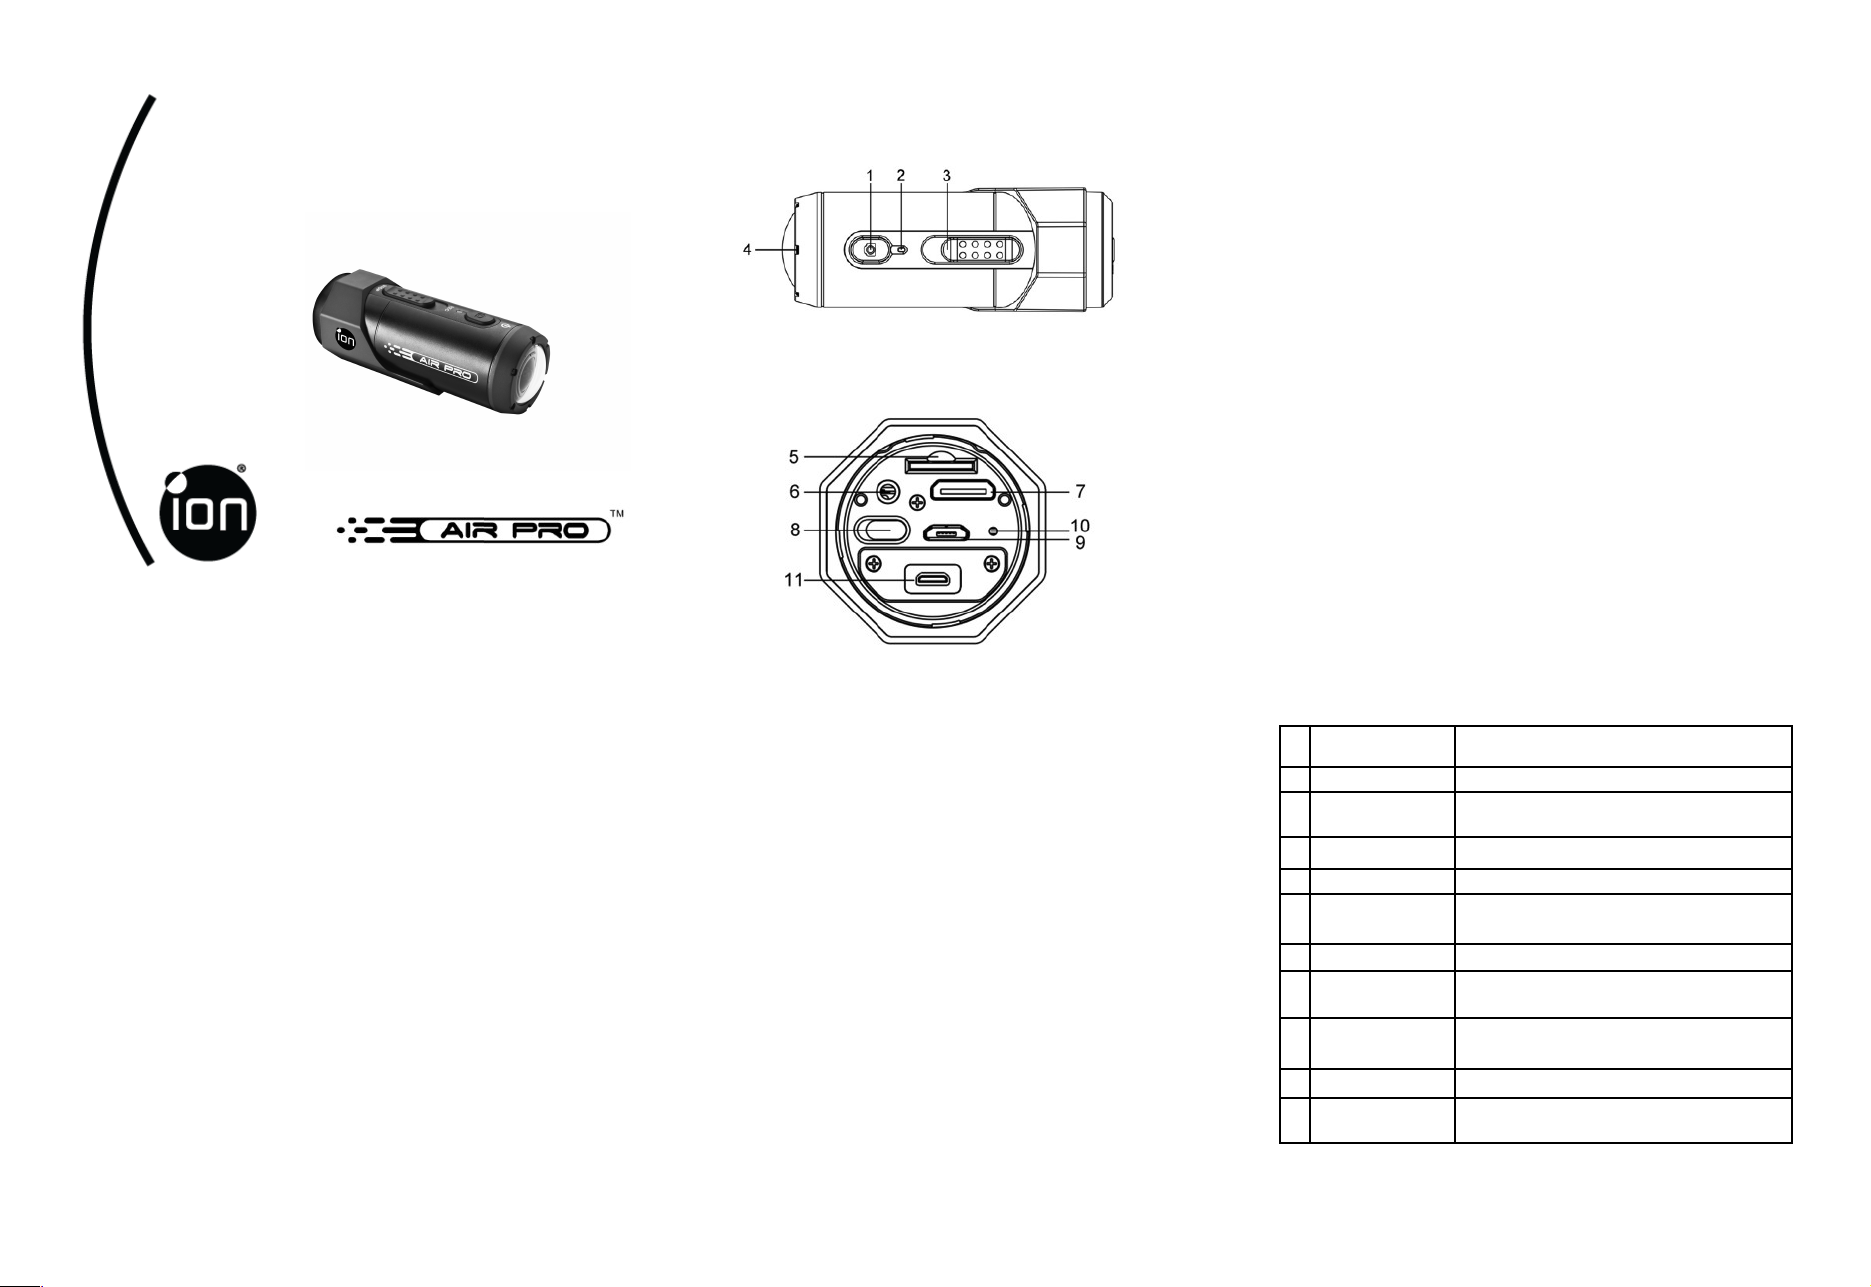
1
2
3
4
5
6
7
8
9
10 Reset button Reset the camera
11
Power
LED indicator Show the camera status
Recording Slide
Switch
Lens High quality lens
MicroSD card slot MicroSD card storage location.
AV port Connect the camera to TV via Composite cable
Mini HDMI Port Connect the camera to TV via HDMI cable
Video Resolution
Switch
USB Port
PODZ Socket
1. Turn the camera on or off
2. Take single photograph
Slide to start or stop video recording
Select video resolution: FHD (Full HD) or HD.
1. Connect to computer for data transfer or
camera setup
2. Charge your camera
Connect PODZ to the camera to achieve
additional function
2. Using Your Camera
Page 2
2.1 Charging up Your Camera
Charge your camera with either the USB cable or AC/DC adapter. The red LED lights up
to indicate the camera is charging and turns off as soon as the camera has been fully
charged. It takes about 3 hours to fully charge the camera.
2.2 Inserting a Memory Card
Insert a MicroSD card (not included) before using your camera. Assure that the camera
power is turned OFF before inserting the card to the slot.
Notes
1. There is only one correct direction to insert the MicroSD card into the slot. Do not force
the card into the card slot as it may damage both the camera and the MicroSD card.
2. A new MicroSD card should be formatted before using. For more information, please
see section 3.1 and 3.2
2.3 Set up Date and Time
Connect your camera to a computer and run the ion software from the MicroSD card
folder. You can set date and time on the camera through the settings page. Please see
section 3.1 to open ion software
2.4 Recording Video
Before starting recording, select the video resolution by switching the Video Resolution
Switch
There are two methods available for starting the video record function. When starting a
video recording, a short vibration indicates recording started. The LED indicator
illuminates RED throughout the recording.
1. Whether the camera power is ON or OFF, simply slide the Recording Slide Switch
from STOP to REC to start recording.
2. When your camera is OFF and the Recording Slide Switch is at REC location,
press and hold the Power button to turn the camera ON and it will start recording.
Move the Recording Slide Switch from REC to STOP to stop recording. The
camera will vibrate and the LED indicator will illuminate GREEN to indicate the recording
has stopped. The camera will then enter Standby mode.
An additional option is to hold the Power button to stop the recording and turn the
camera off. The camera will vibrate two seconds and the Green LED light will turn off.
Notes
1. An additional WQVGA (432x240) video file will be created simultaneously with the
recording of an HD/FHD video file. The smaller WQVGA file size allows for more efficient
uploading of content to social media sites and email.
2. Changing video resolution is disabled during video recording.
3. There will be around 1-2 seconds delay before the camera starts recording.
4. The various video resolution options for HD and FHD can be changed under the
“Settings” selection in the ion software.
2.5 Taking Photos
1. Turn on the camera by pressing the Power button.
2. After the camera power has been turned on, press the Power button to take a
photo. A short vibration and a flash of Green LED indicate the action was successful.
Notes
1.The Still Photo function is disabled during video recording.
2 Change photo resolutions and shot mode (Single Shot, Burst Mode and Time Lapse)
through the “Settings” section on the ion software.
2.6 CamLOCK Mount System
ion’s versatile CamLOCK Mount System allows you to attach the AIR PRO camera to any
type of helmet (bike, motorcycle, ski, skydive etc.), pole, board (surf, skate, ski etc) and
handlebar (bike and motorcycle).
Please refer to the specific mounting guides for instructions on how to install your mounts
with your camera for particular activities.
3. Connecting Your Camera
3.1 Connecting Your Camera to a PC
To open the ion software,
1. Inserted a MicroSD card into your camera and make sure there is at least 2MB free
space.
2. Connect your camera to a PC via the USB cable included.
3. Press the Power button to turn the camera
4. Open the MicroSD folder and you will find the file “ion.exe”.
5. Double click the file to open
Once you open the software you can:
1. Browse the files saved in the camera
2. Change the camera setting
3. Link to the ion website and cloud service
4. Check the firmware update
Notes
1. If you cannot find ion.exe at your MicroSD folder, you can unplug the cable from PC
and turn the camera on and off once and connect the PC again.
2. If you are a Mac user, visit the ion website (www.iontheaction.com) to download the
software in Mac version.
3.2 Connecting Your Camera to a TV/HDTV
You can connect your camera to a TV or HDTV via the Composite RGB (included) or an
HDMI cable (not included). Once you are connected you can:
1. Take photos or videos by using your TV as a viewfinder
2. Playback any photo or video files saved in the camera
3. Delete any files saved in the camera
4. Format the MicroSD Card
3.3 Sign up for Free ion Cloud Storage
You can sign up 8GB of free Cloud storage for storing and sharing of video and photo
content. Enter www.iontheaction.co.uk/ioncloud to sign up.
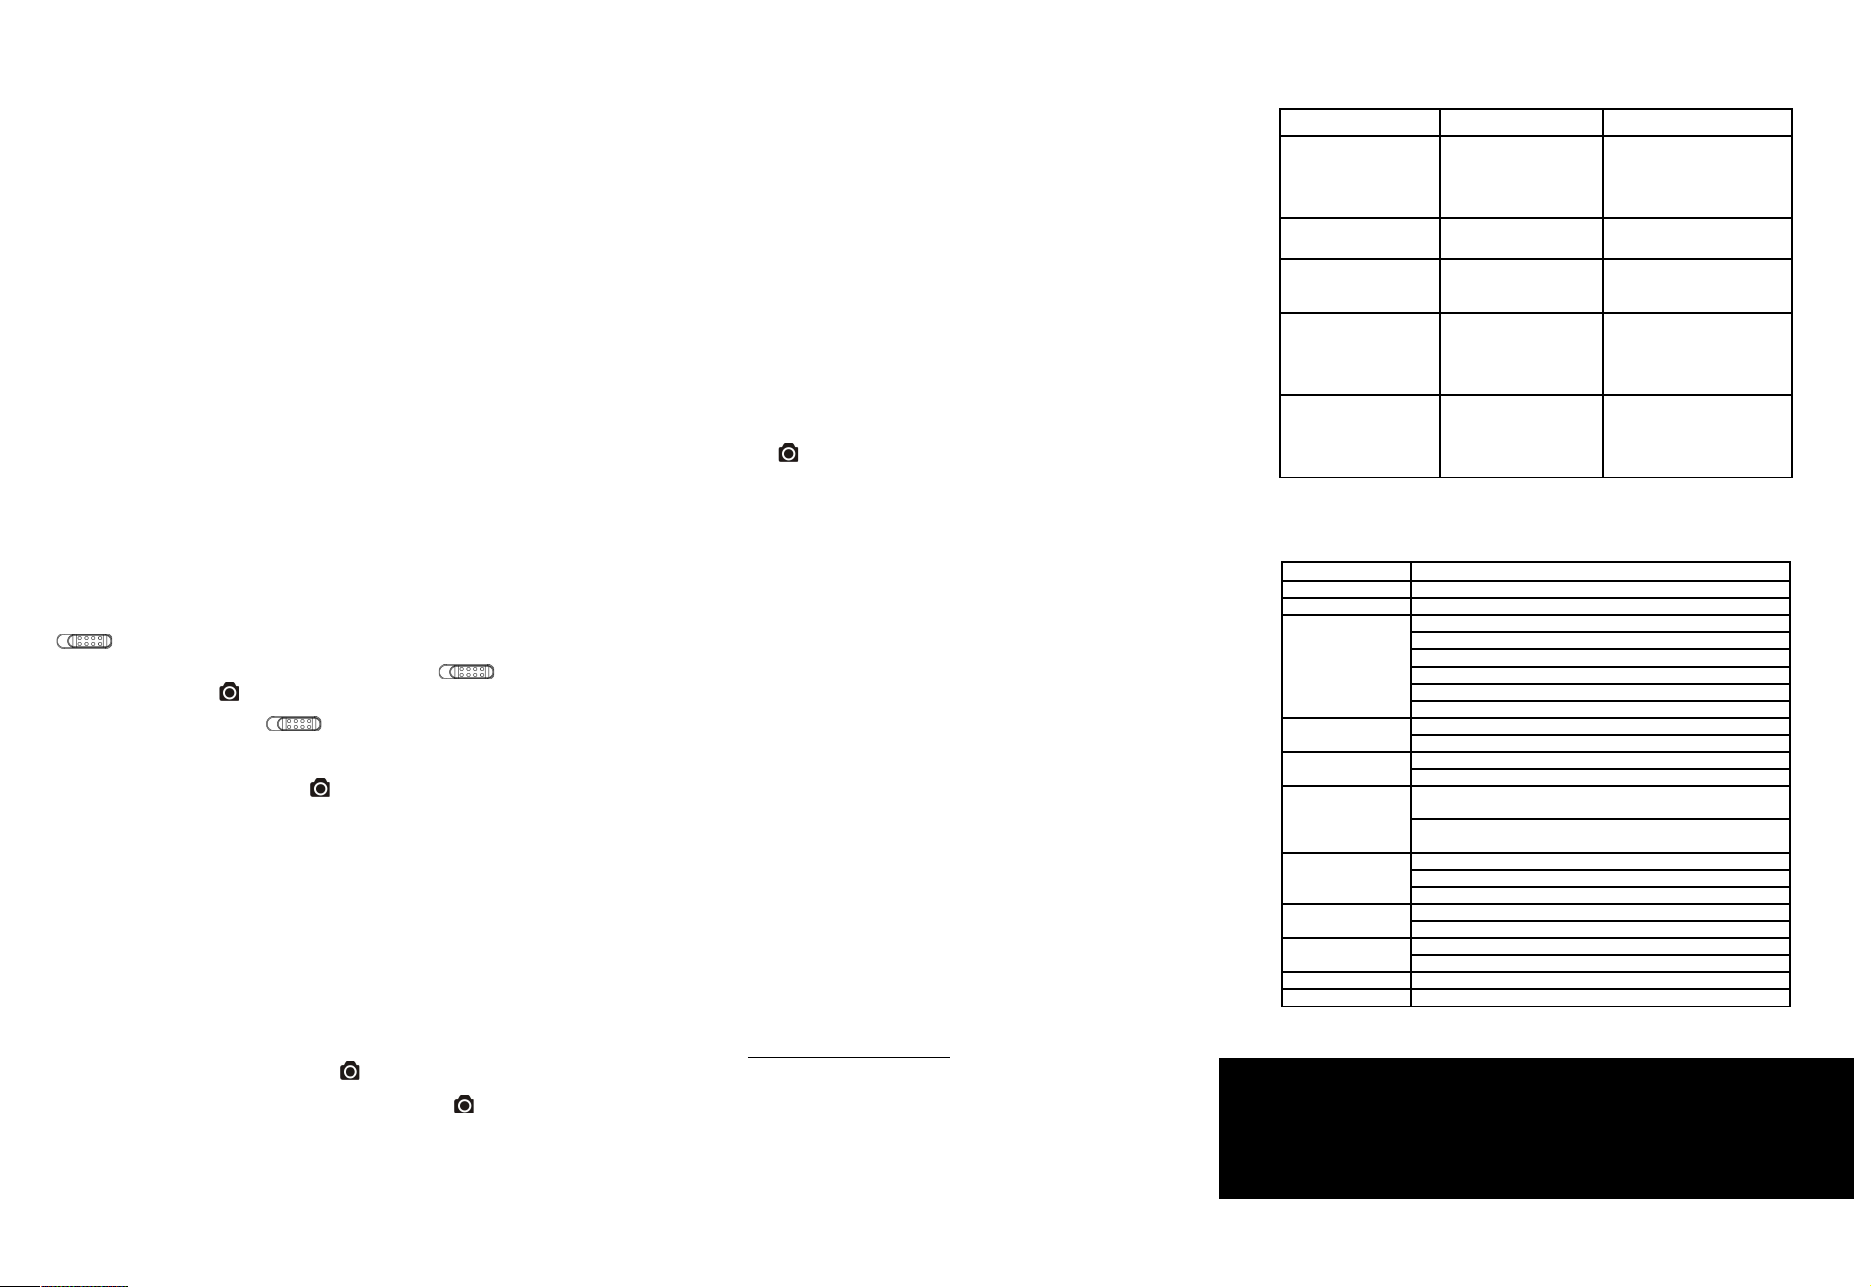
4. Troubleshooting
Problems Causes Solutions
1. LED flashes and
camera turns off
2. Cannot turn on the iON
camera
Red LED flashes during
recording
Cannot take photos or
video (Green LED
flashes)
Cannot take photos or
video (Green and Red
LED flashes alternatively)
Cannot find removable
disk after connecting the
camera to the computer.
Battery is depleted Recharge the camera
Low battery Recharge the camera
Memory full
1. MicroSD card is not
inserted
2. MicroSD card has not
been formatted properly.
Connection failure.
5. Specification
Sensor 5 Mega pixel CMOS sensor
Lens 170º ultra wide angle field of view
Focus range
Video
Photo
Audio
Storage
Connection
Power
Housing
Dimension 40 x 40 x 107 mm
Weight 4.3oz(123g)
* Settings can be changed through ion software
Questions?
Need Some Help?
This manual should help
you understand your new
product.
0.5m - ∞
1080p: 1920x1080 pixels (16:9), 30 fps
960P*: 1280x960 pixels (4:3), 30 fps
720p: 1280x720 pixels (16:9), 60 fps
720p *: 1280x720 pixels (16:9), 30 fps
Format: H.264 compression, saved as MPEG4 (.mp4) file
Dual Video files for easy sharing
Resolution: 5 Mega Pixel in JPEG format
Capture Modes: Single, Burst-shot*, Time lapse*
Built-in high quality microphone
AAC Compression, Automatic Gain Control
MicroSD/MicroSDHC with minimum Class 4 up to 32GB
(not included)
Average Recording Times: about 4 hours (using 32GB
mSD card in 1080p30/720p60)
USB2.0 (for data connection and battery charging)
HDMI
AV / Composite
Build-in 1200 mAH Rechargeable Li-ion Battery
Battery Life: Approx. 2.5 hrs / 1 hr (w/ WiFi)
High quality Aluminum barrel and rubberized finishing
Depth up to 30 feet / 10 meters
If you still have questions,
visit our website:
www.iontheaction.co.uk
Replace with a memory card
with space available for
contents
1. Insert a SD card
2. Format the MicroSD card
at PC
1. Make sure all cable
connections are secured and
restart the computer if
necessary.
2. Try a different USB port.
Like Us:
www.facebook.com/iontheaction
Tweet Us:
www.twitter.com/iontheaction
Page 3

6. System Requirements
Operating system Windows® 7/XP SP3 /Vista and Mac 10.4.11 or above
CPU Pentium III or above
RAM At least 64MB
Interface USB port
CD 4x speed CD ROM or above
IMPORTANT
• Keep the lens clean. Dirt and fingerprints will affect the quality of the
picture.
• Close the PODZ properly for best water sealing. Do not open it under water.
• Rinse the camera with clean water after used and keep it dry for storage.
• You can refer to the detail operation instruction at the user manual
TRADEMARK INFORMATION
© 2012 World Wide Licenses Limited.
® The ion logo is a registered trademark of World Wide Licenses Limited.
CamLOCK, PODZ, Shoot/Share and AIR PRO and their respective logos are
trademarks or registered trademarks of World Wide Licenses Limited in the
United States and other countries. Copyright © 2012. All Rights Reserved.
FCC Statement
Caution Statement
“Modifications not approved by the party responsible for compliance could void the user’s authority
to operate the equipment.”
Instruction Statement
NOTE: This equipment has been tested and found to comply with the limits for a Class B digital
device, pursuant to Part 15 of the FCC Rules. These limits are designed to provide reasonable
protection against harmful interference in a residential installation. This equipment generates, uses
and can radiate radio frequency energy and, if not installed and used in accordance with the
instructions, may cause harmful interference to radio or television reception, which can be
determined by turning the equipment off and on, the user is encouraged to try to correct the
interference by one or more of the following measures:
• Reorient or relocate the receiving antenna.
• Increase the separation between the equipment and receiver.
• Connect the equipment into an outlet on a circuit different from that to which the receiver is
connected.
• Consult the dealer or an experienced radio/ TV technician for help.
WARNING: THE MANUFACTURER IS NOT RESPONSIBLE FOR ANY RADIO OR TV
INTERFERENCE CAUSED BY UNAUTHORIZED MODIFICATIONS TO THE DEVICE. ANY SUCH
MODIFICATIONS COULD VOID THE USER’S AUTHORITY TO OPERATE THE EQUIPMENT.
For EU only
 Loading...