

Page 1

iON 4K
WATERPROOF 4K ACTION CAMERA
Quick Start Guide
EN-1
Page 2
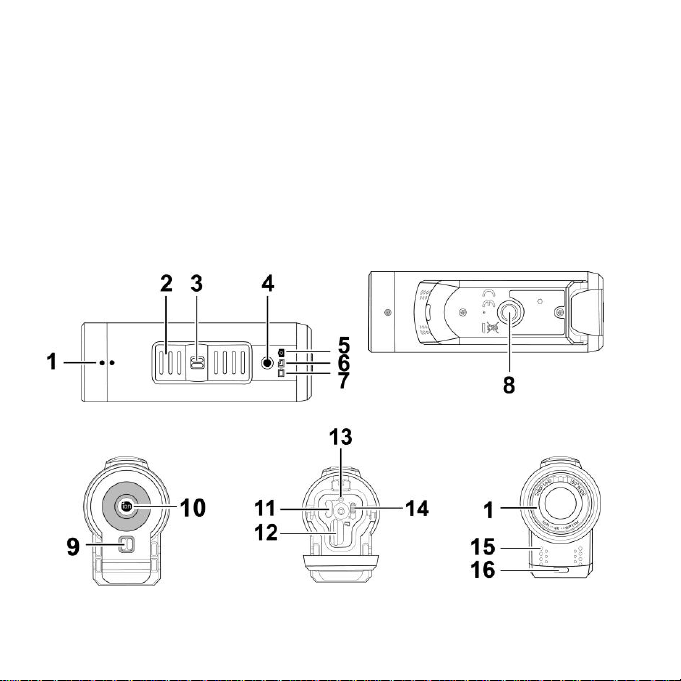
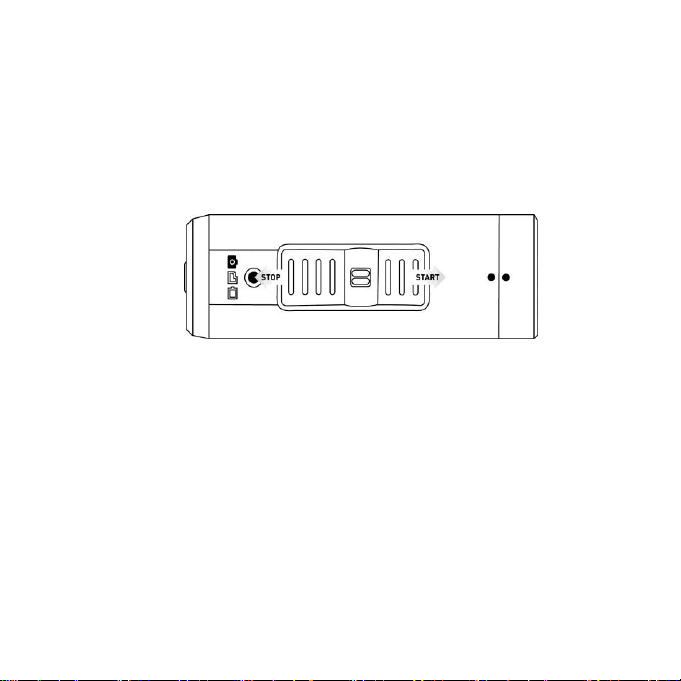
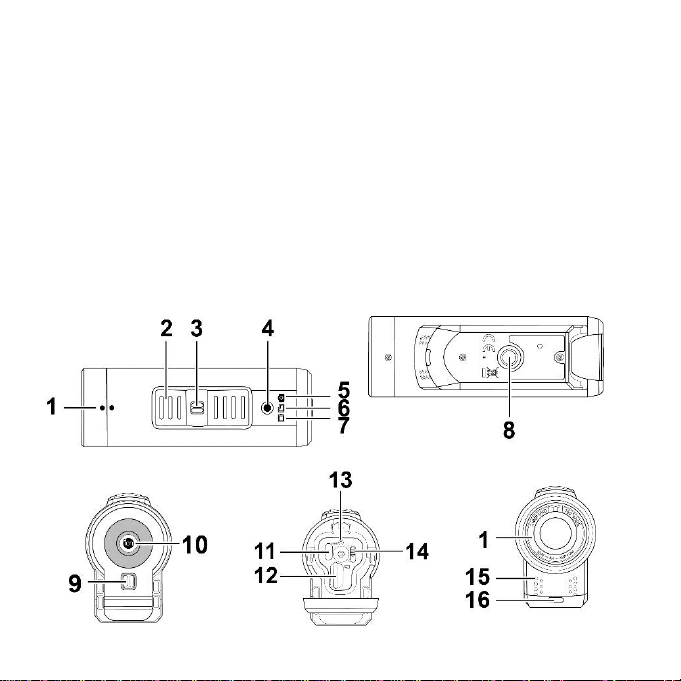
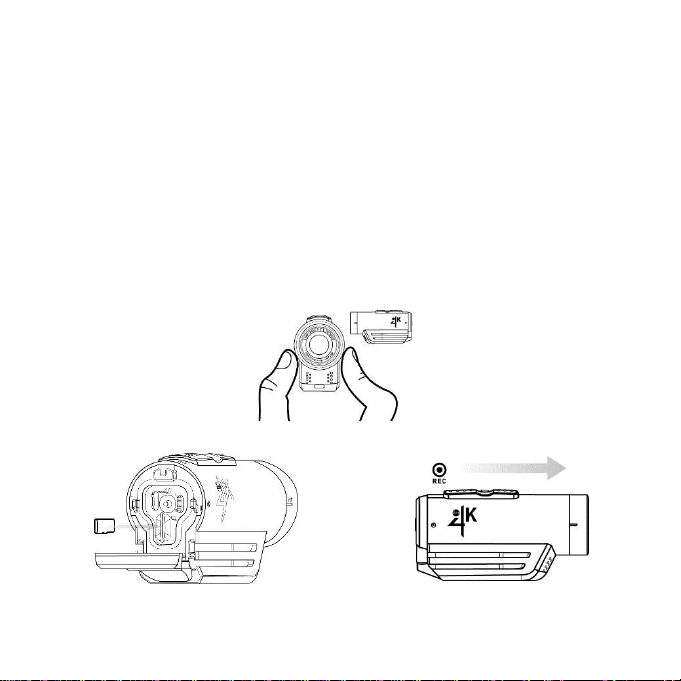
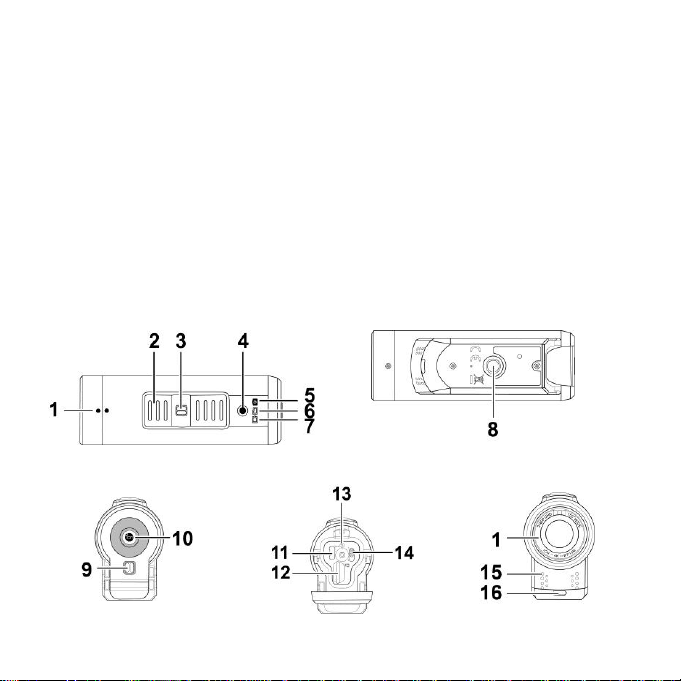
1
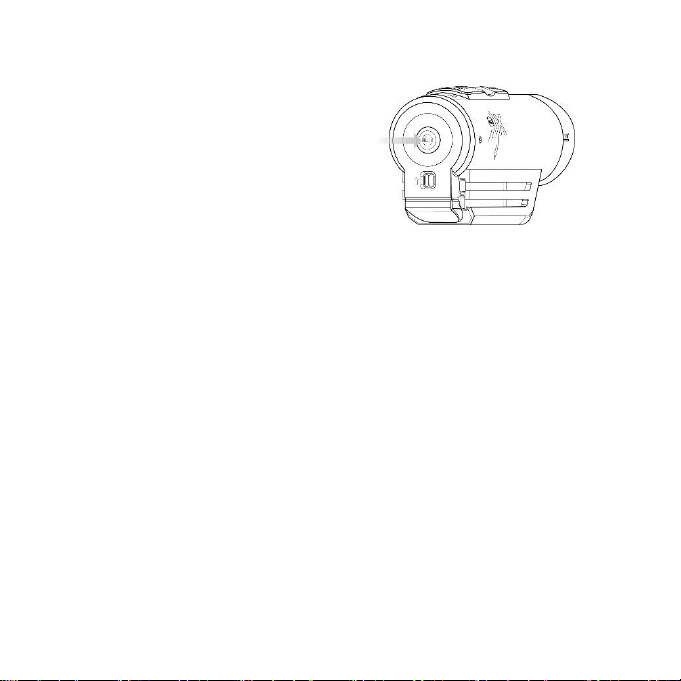
Rotating Lens
7
Battery Status
13
Reset Button
2
Record Slider
8
Tripod hole
14
1-2 Settings Switch
3
Record Slider Lock
9
Door Lock
15
Microphone
4
Recording Indicator
10
Status Button
16
Laser Line & Recording Indicator
5
Photo Mode Status
11
USB
6
Memory Status
12
microSD Card Slot
1. CAMERA DIAGRAM KEY
EN-2
Page 3
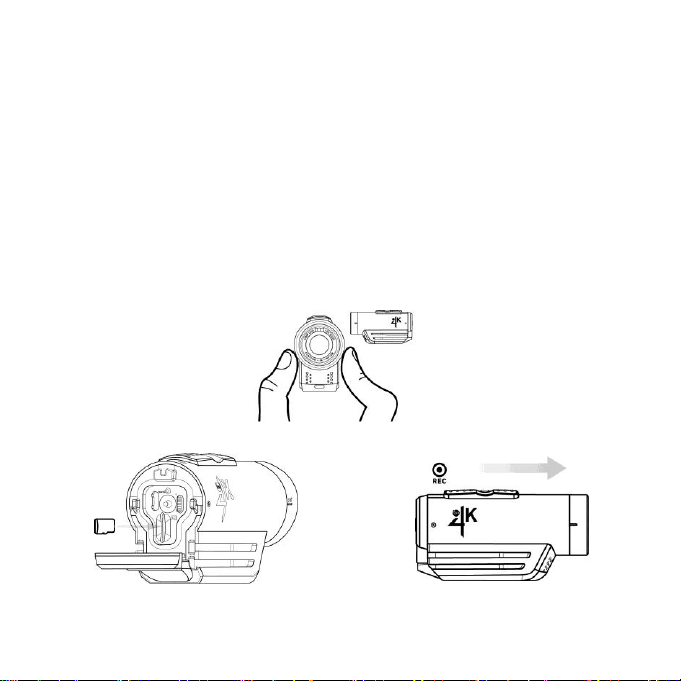
1
Slide the Door Lock to the left so the red
square isn’t showing
5
Slide the Door Lock to the right to lock it
closed
2
Slide the camera door up to open
6
Slide the Record Slider forward to record.
Slide it back to stop recording
3
Insert the microSD Card(not included)
7
Hold status button for three seconds to
engage photo mode
4
Close the camera door.
1
2 3
2. QUICK START
EN-3
Page 4

Caution: formatting the card will erase everything on it
3. SETTING UP
Download the iON 4K App for your iOS/Android device from the relevant App Store.
Your camera can connect to a mobile device using Bluetooth & Wi-Fi connection.
Open the application and follow the on screen instructions in order to connect your device.
Once connected, you will be able to customize your cameras settings to your preference as well as use
your camera remotely.
PLEASE NOTE: Wi-Fi connectivity distance can reach up to 10 metres without interference.
Please ensure that your camera Firmware is up to date prior to use.
All updates will be made available for download with instructions from the following webpage:
www.ioncamera.com/drivers
4. CHARGING THE BATTERY
– Slide the door up to open.
– Connect your camera to a PC/Mac using the supplied USB Cable.
– The Battery Status LED indicates the charge level of the battery. It will change colors from red
to green as the battery charges.
– Charge is fully complete when the Battery Status LED turns green and LED will eventually
switch off.
PLEASE NOTE: It can take up to three hours for the camera to fully charge.
5. FORMATTING THE microSD CARD
Format the microSD Card prior to recording so your camera is able to properly read and write to it.
Windows:
– Connect your iON 4K camera to your PC. (You may need to press camera status button for
computer to recognize device.
EN-4
Page 5

– Go to “My PC” and Right-Click “Removable Disk”.
– Make sure that the card is formatting to FAT32 type and select “Quick Format”.
Your Memory Card is now formatted and ready to use.
Mac:
– Connect your iON 4K camera to your PC. (You may need to press camera status button for
computer to recognize device).
– Go to Search
– Launch Disk Utility.
– Click the icon for your external hard drive in the sidebar on the left.
– Click the Erase tab along the top of the window.
It will ask you what format you want to format the disk.
Please ensure this is “FAT32” Or “FAT”.
– Select Format.
Your Memory Card is now formatted and ready to use.
The iON 4K is compatible with:
SDXC (standard capacity) 4GB class 4 card minimum.
SDHC (high capacity) class 4, 6, or 10 microSD Cards up to a maximum capacity of 64GB.
An SD card is required to operate the camera, not included.
EN-5
Page 6
Pressing the Status Button will:
Activate the Laser Line for 15 seconds.
Display the current battery and memory
status.
MEMORY STATUS LED
BATTERY STATUS LED
Green: 51% or more
Green: 51% or more
Yellow: 20 to 50%
Yellow: 20 to 50%
Red: 20% or less
Red: 20% or less
6. CAMERA STATUS
ERROR CONDITIONS
Battery LED flashes red: the battery is almost empty.
Memory LED flashes and there are continuous beeps: the microSD Card cannot be accessed
because there is no memory card inserted, a card error, a format error, Memory card is full,
incompatible card or a folder cannot be created.
7. ACCESSING PHOTOS & VIDEOS
Power on the camera by pressing and holding the status button for 3-5 seconds.
Using the USB cable provided, connect your camera to your PC/MAC.
Via My PC (Windows) or Finder (MAC), you will now be able to view the removable disk drive which
contains the photo/video files to play back through various media players.
8. USING THE iON 4K MOBILE APP
In order to get the most out of your camera, it is advised you download the iON 4K mobile app
(available on iOS and Android devices),
With the iON 4K app, you can customize the way that your camera functions as well as use the camera
remotely with live view. It is also possible to view/download files directly from the camera to your mobile
device.
EN-6
Page 7
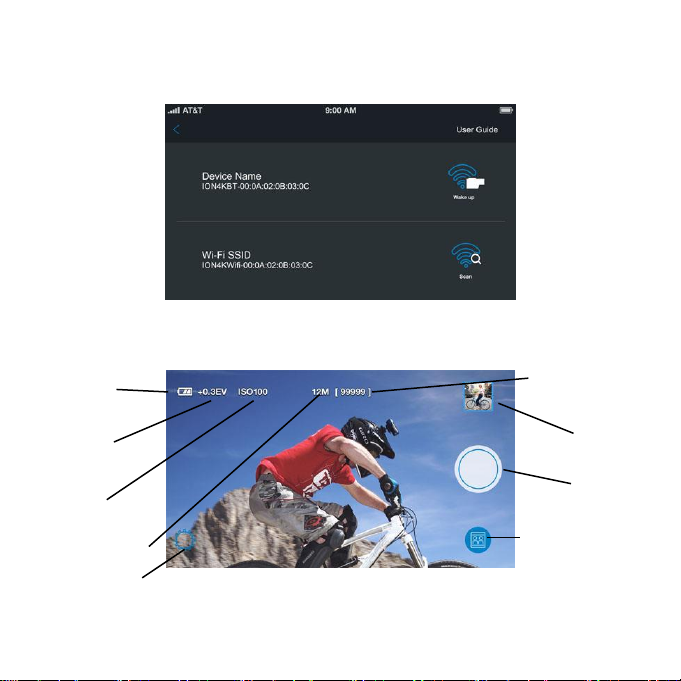
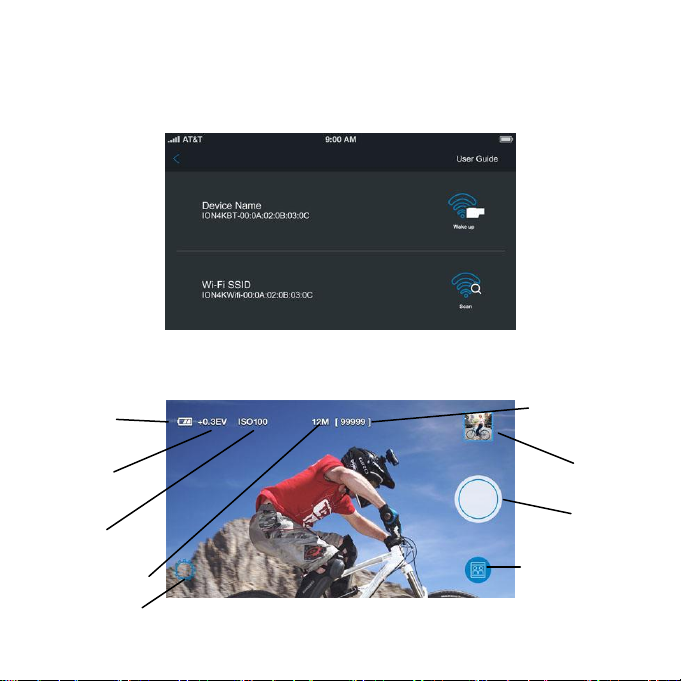
Remaining Photos /
Recording Time.
Access
Media
Gallery
Capture
Button
Mode Menu (Single,
Burst, Time lapse,
Video)
Photo/Video Resolution
Image Sensitivity
Exposure Value
Battery Level
Enter Camera Settings
When initially starting up the app, you will be prompted to pair your iON 4K with your device through the
connection options menu. Please ensure that your Bluetooth and Wi-Fi connection enabled.
Once these settings have been confirmed and your camera is connected to your device, you will now
be able to access Live View and use your camera remotely.
EN-7
Page 8

9. CAMERA SETTINGS
To adjust the settings on your camera, download and install the iON 4K app to your iOS/Android Device
With the camera connected to your mobile device, go to the Live View and enter the Settings menu
within the iON 4K mobile app.
Video:
2160p video at 30/25 frames per second
1080p video at 120/60/30/100/50/25 frames per second
720p video at 120/60/30/100/50/25 frames per second
WVGA (480p) at 240/30/200/25 frames per second
Continuous Photo Mode (with photos taken single shot, burst (2, 5, 10 and 10/2 seconds))
Photo:
12MP, 8MP, 5MP, 2MP
Burst Shot
Time Lapse Interval
1-2 Switch
The 1-2 Switch on the back of your camera allows you to preset your iON 4K with two different
configurations that can be easily changed in the field. The settings for each switch position can be
set-up using iON 4K Mobile App.
Within the Settings menu you can also format your memory card, change network settings and turn off
the cameras beeping functions.
EN-8
Page 9
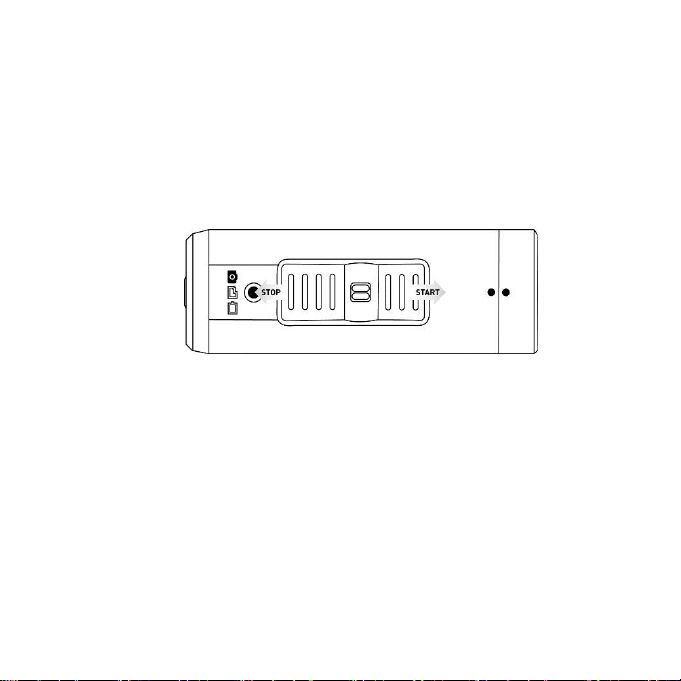
10. RECORDING
Start Recording: Move the Record Slider Lock to the left to unlock, red square should not show,
Slide the Record Slider forward to record. Your camera will power on, beep twice and the
Record Status LED will turn red, indicating that the camera is now recording a video.
Stop Recording: Slide the Record Slider back. Your camera will beep three times, and the
Record Status LED will switch off, indicating that your camera has stopped recording and is
powered off.
EN-9
Page 10

Record Slider Lock: The small switch on top of the Record Slider is used to keep the Record
Slider from turning on or off. To move the Record Slider forward or back, have the Record
Slider Lock moved so that the red square is not showing.
11. PHOTO MODE
Activate Instant Photo Mode: Press and hold the Status Button for three seconds. You will
hear two beeps and see the photo LED will turn green, indicating that Instant Photo Mode has
been activated.
Taking a Single Photo: press the Status Button can take a single photo. You will hear a beep
and the photo LED will flash to indicate that a photograph has been taken.
Turn off Instant Photo Mode: Turn off Instant Photo Mode by pressing and holding the status
button for two to four seconds. The camera will beep three times and the photo LED will flash
and then turn off, indicating that Instant Photo Mode is turned off.
The camera will shut down automatically if no photo has been taken within 60 seconds.
12. MOUNTING
Getting the best shot depends only on your creativity. iON offers a wide range of mounts that let you put
the camera just about anywhere, so be creative.
Remember that your iON 4K has a wide-angle lens and objects that are far away will seem smaller than
you expect in your videos.
13. ALIGNMENT
Your iON 4K has a Laser Line that helps ensure you have the horizon properly aligned in your videos.
To use, activate the Laser Line by pressing the Status Button; place your hand in front of the Laser Line
or aim it on to a flat surface a few feet in front of you and rotate the lens (up to 270°) until the Laser Line
is horizontal. When mounting the camera on your helmet or goggles, you may discover that you look
down more than you thought. It may take a few practice videos to find the right alignment.
EN-10
Page 11
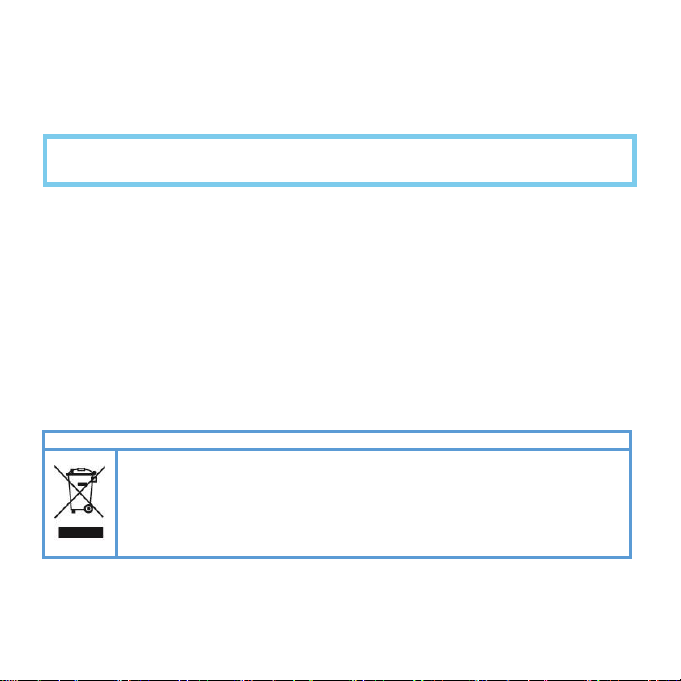
Correct Disposal of this product
This marking indicates that this product should not be disposed with other household
wastes throughout the U.S. To prevent possible harm to the environment or human
health from uncontrolled waste disposal, recycle it responsibly to promote the
sustainable reuse of material resources. To return your used device, please use
proper return and collection systems or contact the retailer where the product was
purchased. They can take this product for environmental safe recycling.
Read all safety information below and operating instructions
before using iON 4K camera to avoid injury
14. ADHESIVE MOUNTS
Clean and dry the mounting surface before applying an adhesive mount. We suggest cleaning the
surface with a small amount of alcohol and applying the mount at room temperature. Let the adhesive
cure for 24 hours before use.
WATERPROOF
Your iON 4K is waterproof to a depth of 10 meters (30 feet) without the use of a waterproof case.
CAUTIONS AND WARRANTY
This Important Product Information Guide contains regulatory, safety, handling, disposal and recycling
information, as well as the 1 year limited warranty for your iON 4K camera. Read all safety information
below and operating instructions before using iON 4K camera to avoid injury.
WARNING: Failure to follow these safety instructions could result in fire, electric shock, or other injury
or damage.
BATTERY AND HANDLING
iON 4K uses a non-removable, non-changeable, rechargeable lithium-ion, 3.7V, 1500mAh battery. The
battery may present a hazard if mistreated. Do not disassemble or crush the camera. To charge, only
use the USB Cable with a high power USB port on a computer or other device that is compliant with the
USB 2.0 or 1.1 standards, car, or battery charger.
EN-11
Page 12

FCC Statement
This equipment has been tested and found to comply with the limits for a Class B
digital device, pursuant to part 15 of the FCC Rules.
These limits are designed to provide reasonable protection against harmful interference in a
residential installation. This equipment generates uses and can radiate radio frequency energy
and, if not installed and used in accordance with the instructions, may cause harmful interference to
radio communications. However, there is no guarantee that interference will not occur in a
particular installation. If this equipment does cause harmful interference to radio or television
reception, which can be determined by turning the equipment off and on, the user is encouraged to
try to correct the interference by one or more of the following measures:
--Reorient or relocate the receiving antenna.
--Increase the separation between the equipment and receiver.
--Connect the equipment into an outlet on a circuit different from that to which the receiver is
connected.
--Consult the dealer or an experienced radio/TV technician for help.
DISPOSAL INFORMATION
Do not dispose of the iON 4K camera in a fire. Dispose of the camera and its internal battery in
accordance with local laws and regulations.
SAFETY STRAP USE: DO NOT ATTACH THE SAFETY STRAP TO THE CAMERA WHEN THE
CAMERA IS MOUNTED ON HELMET OR GOGGLES, WHEN THE CAMERA WILL BE USED IN
HIGH WINDS OR AT HIGH VELOCITIES, OR IN ANY OTHER CIRCUMSTANCES WHEREBY THE
CAMERA COULD CAUSE INJURY OR HARM IN THE EVENT THAT IT COMES LOOSE FROM THE
MOUNT AND REMAINS TETHERED BY THE SAFETY STRAP. BY ATTACHING THE SAFETY
STRAP TO THE CAMERA, YOU AGREE TO WAIVE ANY CLAIMS AGAINST iON, INC. AND ANY OF
ITS AFFILIATES, AGENTS, EMPLOYEES, OFFICERS OR DIRECTORS ARISING FROM THE USE
OF THE SAFETY STRAP. ANY CLAIMS AGAINST iON, INC. ANY OF ITS AFFILIATES, AGENTS,
EMPLOYEES, OFFICERS OR DIRECTORS ARISING FROM THE USE OF THE SAFETY STRAP.
EN-12
Page 13
FCC Radiation Exposure Statement
This device complies with FCC SAR exposure limits set forth for an uncontrolled environment.
This device complies with Part 15 of the FCC Rules. Operation is subject to the following two
conditions: (1) this device may not cause harmful interference, and (2) this device must accept any
interference received, including interference that may cause undesired operation.
Caution!
Any changes or modifications not expressly approved by the party responsible for compliance
could void the user's authority to operate the equipment.
CE: Hereby, World Wide Licenses Limited declares that this device is in
compliance with the essential Requirements and other relevant provisions of
Directive 1999/5/EC. The full text of the EU declaration of conformity is
available at
The following internet address: www.ioncamera.com
CE SAR:
RF exposure (SAR): The device can safely be used with a distance of 0 mm to the human body.
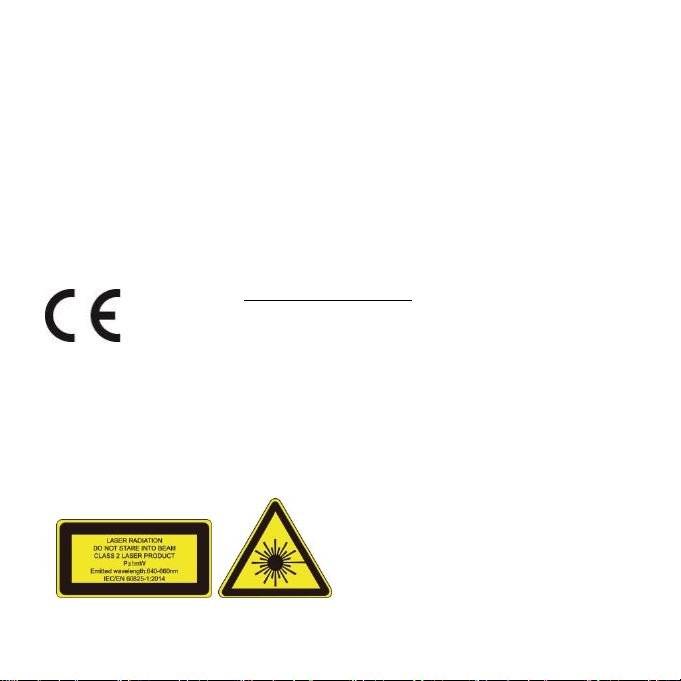
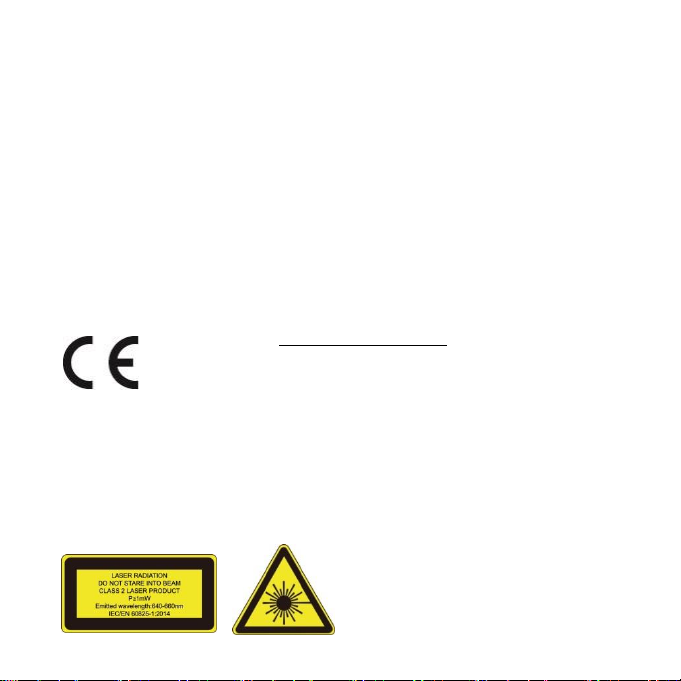
“Complies with 21 CFR 1040.10 and 1040.11 except for deviations pursuant to Laser Notice No.50
dated June 24 2007”
iON America LLC
Model Name: 1088
Made in China
Year of manufacture: 2016
EN-13
Page 14

Web: www.ioncamera.com
EN-14
Page 15

iON 4K
WASSERDICHTE 4K ACTION KAMERA
Kurzanleitung
DE-1
Page 16
1
Drehbares Objektiv
7
Akkustatus
13
Reset-Taste
2
Aufnahmeschieber
8
Stativ-Bohrung
14
1-2 Regelschalter
3
Arretierung des
Aufnahmeschiebers
9
Klappenverriegelung
15
Mikrofon
4
Aufnahmeanzeige
10
Statustaste
16
Laserlinien- und
Aufnahmeanzeige
5
Fotomodusstatus
11
USB
6
Speicherstatus
12
microSD-Kartensteckpl
atz
1. KAMERATASTEN
DE-2
Page 17
1
Die Klappenverriegelung so weit nach links
schieben, bis das rote Quadrat nicht mehr
zu sehen ist
5
Die Klappenverriegelung zum Verriegeln
nach rechts schieben
2
Die Kameraklappe zum Ö ffnen nach oben
schieben
6
Schieben Sie den Aufnahmeschiebeschalter
zum Aufnehmen nach vorne. Schieben Sie
den Schalter zum Beenden der Aufzeichnung
nach hinten.
3
Die microSD-Karte (nicht enthalten)
einsetzen
7
Die Statustaste für drei Sekunden gedrückt
halten, um den Fotomodus zu aktivieren
4
Schließen Sie die Kameraklappe.
1
2 3
2. KURZANLEITUNG
DE-3
Page 18

Vorsicht:Beim Formatieren der Karte werden alle Inhalte gelöscht.
3. EINRICHTEN
Laden Sie die iON 4K App für Ihr iOS/Android-Gerät aus dem entsprechenden AppStoreherunter.
Ihre Kamera kann via Bluetooth oder WLAN mit einem Mobilgerät verbinden.
Ö ffnen Sie die Anwendung und befolgen Sie die Schritte in der Anleitung auf dem Bildschirm, um Ihr
Gerät zu verbinden.
Nach dem Verbinden können Sie die Kameraeinstellungen anpassen, sowie die Kamera fernsteuern.
HINWEIS: Ohne Hindernisse liegt die WLAN-Reichweite bei bis zu zehn Metern.
Bitte vergewissern Sie sich vor Gebrauch, ob die Kamera-Firmware auf dem neuesten Stand ist.
Auf folgender Internetseite sind alle Updates und dazugehörige Anleitungen erhältlich.
www.ioncamera.com/drivers
4. DEN AKKU AUFLADEN
– Das Fach aufschieben.
– Schließen Sie Ihre Kamera über das beigefügte USB-Kabel an einen PC/Mac an.
– Die LED für den Akkustatus zeigt den Energiestand an. Wird der Akku aufgeladen, ändern sich
die Farben von rot auf grün.
– Der Akku ist vollständig aufgeladen, wenn die LED für den Akkustatus grün leuchte und
schließlich erlischt.
HINWEIS: Das Aufladen der Kamera kann bis zu drei Stunden dauern.
5. Die microSD-KARTE FORMATIEREN
Formatieren Sie die microSD-Karte bitte vor Gebrauch, damit Ihre Kamera Inhalte lesen und
beschreiben kann.
Windows:
– Verbinden Sie Ihre iON 4K mit Ihrem PC. (Wahrscheinlich müssen Sie auf die
Kamerastatustaste drücken, damit der Computer das Gerät erkennt.)
DE-4
Page 19

– Ö ffnen Sie "Computer" und klicken Sie mit der rechten Maustaste auf "Wechseldatenträger".
– Stellen Sie sicher, dass die Karte auf den Typ FAT32 formatiert wird und wählen Sie "Schnelles
Formatieren".
Ihre Speicherkarte ist nun formatiert und kann verwendet werden.
Mac:
– Verbinden Sie Ihre iON 4K mit Ihrem PC. (Wahrscheinlich müssen Sie auf die
Kamerastatustaste drücken, damit der Computer das Gerät erkennt.)
– Suche öffnen
– Starten Sie Dienstprogramm.
– Klicken Sie in der linken Leiste auf das Symbol für externes Laufwerk.
– Klicken Sie oben im Fenster auf den Löschen-Reiter.
Hier können Sie das Format auswählen.
Stellen Sie bitte sicher, dass "FAT32" oder "FAT" ausgewählt ist.
– Formatieren auswählen.
Ihre Speicherkarte ist nun formatiert und kann verwendet werden.
Die iON 4K ist kompatibel mit:
SDXC (Standardkapazität) 4GB mindestens der Klasse 4.
SDHC (hohe Kapazität) microSD-Karten der Klasse 4, 6, oder 10 mit bis zu 64GB.
Die Kamera kann nur mit SD-Karte (nicht enthalten) verwendet werden.
DE-5
Page 20
Statustaste:
Die Laserlinie wird für 15 Sekunden
aktiviert.
Der tatsächliche Akku- und Speicherstatus
wird angezeigt.
LED für den
SPEICHERSTATUS
LED für den AKKUSTAND
Grün: 51% oder mehr
Grün: 51% oder mehr
Gelb: 20 bis 50%
Gelb: 20 bis 50%
Rot: 20% oder weniger
Rot: 20% oder weniger
6. KAMERA STATUS
FEHLERHAFTE ZUSTÄ NDE
Die LED für den Akku blinkt rot: der Akku ist fast leer.
Die LED für den Speicher blinkt und es werden kontinuierlich Signaltöne ausgegeben: Auf die
microSD-Karte kann nicht zugegriffen werden, da entweder keine Speicherkarte eingesetzt ist,
ein Kartenfehler vorliegt, die Speicherkarte voll bzw. nicht kompatibel ist oder ein Ordner nicht
erstellt werden kann.
7. AUF FOTOS UND VIDEOS ZUGREIFEN
Schalten Sie die Kamera ein, indem Sie die Statustaste fünf Sekunden lange gedrückt halten.
Verbinden Sie die Kamera über das enthaltene USB-Kabel mit Ihrem PC/MAC.
Via Mein PC (Windows) oder Finder (MAC) sehen Sie nun den Wechseldatenträger mit den
Foto-/Video-Dateien, die Sie mit verschiedenen Playern abspielen können.
8. DIE iON 4K MOBILE APP NUTZEN
Damit Sie Ihre Kamera optimal nutzen können, empfehlen wir Ihnen, die iON 4K mobile App (verfügbar
für iOS- und Android-Geräte) herunterzuladen.
Mithilfe der iON 4K App können Sie alle Kamerafunktionen personalisieren, sowie die Kamera
DE-6
Page 21
Verbleibende
Fotos/Aufnahmezeit.
Galerie
öffnen
Aufnahme
taste
Modusmenü
(Einzel,Burst,Zeitr
affer,Video)
Foto-/Video-Auflösung
Bildempfindlichkeit
Belichtungswert
Ladezustand
der Batterie
Kameraeinstellungen
öffnen
fernsteuern. Dateien können auch direkt von der Kamera auf Ihr Mobilgerät herunterladen bzw. dort
angezeigt werden.
Beim ersten Start der App, müssen sie Ihre iON 4K im Menü Verbindungsoptionen mit Ihrem Gerät
koppeln. Bitte stellen Sie sicher,dass Bluetooth und WLAN aktiviert sind.
Sobald diese Einstellungen bestätigt sind und Ihre Kamera mit Ihrem Gerät verbunden ist, können Sie
auf Live View zugreifen und Ihre Kamera fernsteuern.
DE-7
Page 22

9. Kamera-Einstellungen
Zum Anpassen der Einstellungen in der Kamera, die iON 4K App auf Ihr iOS-/Android-Geräte
herunterladen und dort installieren.
Bei mit dem Mobilgerät verbundener Kamera auf Live View gehen und das Menü Einstellungen in der
iON 4K mobile App öffnen.
Video:
2160p Video bei 30/25 Bilder pro Sekunde
1080p Video bei 120/60/30/100/50/25 Bilder pro Sekunde
720p Video bei 120/60/30/100/50/25 Bilder pro Sekunde
WVGA (480p) bei 240/30/200/25 Bilder pro Sekunde
Kontinuierlicher Fotomodus (mit Einzelaufnahmen, Burst (2, 5, 10 und 10/2 Sekunden)
Foto:
12MP, 8MP, 5MP, 2MP
Burst-Aufnahme
Zeitrafferintervall
1-2 Schalter
Der 1-2 Schalter auf der Rückseite der Kamera bietet für Ihre iON 4K zwei verschiedene
Konfigurationen, die während des Einsatzes schnell geändert werden können. Die Einstellungen für
jede Schalterposition kann mithilfe der iON 4K Mobile App eingerichtet werden.
Im Menü Einstellungen kann auch die Speicherkarte formatiert, die Netzwerkeinstellungen geändert
und die Signaltonfunktion der Kamera ausgeschaltet werden.
DE-8
Page 23
10. AUFNAHME
Aufzeichnung starten: Bringen Sie die Arretierung des Aufnahmeschiebers zum Entriegeln
nach links, bis das rote Quadrat nicht mehr zu sehen ist und den Aufnahmeschieber dann
nach vorne. Ihre Kamera schaltet ein, gibt zwei Signaltöne aus und die LED für den
Aufnahmestatus leuchtet rot. Die Kamera nimmt jetzt ein Video auf.
Aufnahme beenden: Schieben Sie den Aufnahmeschieber zurück. Ihre Kamera gibt drei
Signaltöne aus und die LED des Aufnahmestatus erlischt. Die Kamera hat die Aufnahme
beendet und schaltet ab.
DE-9
Page 24

Arretierung des Aufnahmeschiebers: Der kleine Schalter oben am Aufnahmeschieber soll
verhindern, dass der Aufnahmeschieber selbstständig ein- oder ausschaltet. Damit Sie den
Aufnahmeschieber vor und zurück bewegen können, müssen Sie seine Arretierung so
verschieben, dass das rote Quadrat nicht mehr zu sehen ist.
11. FOTOMODUS
Fotomodus aktivieren: Die Statustaste für drei Sekunden gedrückt halten. Sie hören zwei
Signaltöne und die LED leuchtet grün. Der Fotomodus ist nun aktiviert.
Eine Einzelaufnahme machen: Drücken Sie zum Aufnehmen eines Fotos auf die Statustaste.
Ein Signalton erklingt und die Foto-LED blinkt als Zeichen dafür, dass das Foto
aufgenommen wurde.
Den Fotomodus deaktivieren: Drücken Sie zum Deaktivieren des Fotomodus für zwei bis fünf
Sekunden auf die Statustaste. Die Kamera gibt drei Signaltöne aus, die Foto-LED blinkt und
erlischt. Der Fotomodus ist nun deaktiviert.
Die Kamera schaltet automatisch ab, wenn innerhalb von 60 Sekunden kein Foto
aufgenommen wird.
12. MONTIERUNG
Wie gut Ihre Fotos werden, hängt natürlich von Ihrer Kreativität ab. iON bietet jedoch eine breite Palette
an Montierungen, mit denen Sie Ihre Kamera so gut wie überall aufstellen können. Lassen Sie Ihre
Fantasie spielen.
Bedenken Sie, dass Ihre iON 4K über ein Weitwinkelobjektiv verfügt und entfernte Objekte im Video
daher kleiner als erwartet ausfallen.
13. AUSRICHTUNG
Ihre iON 4K verfügt über eine Laserlinie, mit der Sie den Horizont korrekt anvisieren können. Aktivieren
Sie die Laserlinie über die Statustaste. Halten Sie Ihre Hand nun vor die Laserlinie oder richten Sie die
Kamera auf eine ebene Fläche vor Ihnen und drehen Sie das Objektiv (bis zu 270 °), bis die Laserlinie
waagerecht ist. Ist die Kamera an Helm oder Brille montiert, werden Sie feststellen, dass Sie Ihren Kopf
überraschend weit nach unten neigen müssen. Nach ein paar Ü bungsvideos haben Sie den Dreh
bestimmt raus.
DE-10
Page 25
Ordnungsgemäße Entsorgung dieses Produkts
Diese Kennzeichnung weist darauf hin, dass das Produkt in den gesamten USA nicht
im unsortierten Hausmüll entsorgt werden darf. Recyceln Sie es
verantwortungsbewusst, um schädliche Auswirkungen auf Umwelt und Gesundheit
durch unsachgemäße Entsorgung zu verhindern und, um die nachhaltige
Wiederverwendung von Rohstoffen zu fördern. Nutzen Sie zur Rückgabe Ihres
Altgeräts bitte die Rückgabe- und Sammelsysteme oder wenden Sie sich an den
Händler, bei dem Sie dieses Gerät erworben haben. Dieser kann das Gerät
umweltschonend entsorgen.
Alle untenstehenden Hinweise zu Sicherheit und Bedienung lesen,
bevor Sie die iON 4K verwenden. Dadurch werden Verletzungen vermieden.
14. KLEBEHALTERUNGEN
Vor dem Anbringen einer Klebehalterung muss die Oberfläche gesäubert und getrocknet werden. Wir
empfehlen die Oberfläche mit etwas Alkohol zu reinigen und die Klebehalterung bei Raumtemperatur
anzubringen. Lassen Sie den Klebstoff vor dem Einsatz 24 Stunden aushärten.
WASSERDICHT
Ihre iON 4K ist wasserdicht bis zu einer Wassertiefe von 10 Metern (30 Fuß) und benötigt dafür keine
wasserfeste Hülle.
VORSICHTSMASSNAHMEN UND GARANTIE
Dieses Produkthandbuch enthält wichtige Informationen zu rechtlichen Hinweisen, Sicherheit,
Handhabung, Entsorgung und Recycling sowie über die eingeschränkte 1-Jahres-Garantie für Ihre iON
4K Kamera. Lesen Sie zur Vermeidung von Verletzungen vor Gebrauch der iON 4K alle
untenstehenden Anweisungen.
WARNUNG: Die Nichtbeachtung der aufgeführten Anweisungen könnte zu Brand, Stromschlag und
schweren Verletzungen bzw. Schäden führen.
AKKU UND HANDHABUNG
Die iON 4K verwendet einen nicht entnehmbaren, nicht austauschbaren, wiederaufladbaren
Lithium-Ionen-Akku mit den Leistungsdaten 3,7 V und 1500 mAh. Bei unsachgemäßer Verwendung
kann der Akku Schaden nehmen. Die Kamera darf nicht demontiert und keinen Stößen ausgesetzt
werden. Laden Sie die Kamera nur mit dem USB-Kabel über einen leistungsstarken USB-Port an
Ihrem Computer oder einem entsprechenden Gerät mit USB 2.0 oder 1.1 Standards, einem Auto oder
einem Ladegerät auf.
DE-11
Page 26

FCC-Erklärung
Dieses Gerät wurde getestet und entspricht den Grenzwerten für digitale Geräte
der Klasse B in Ü bereinstimmung mit Artikel 15 der FCC-Bestimmungen.
Diese Grenzwerte sollen einen angemessenen Schutz vor Störungen in Wohngegenden
bieten.Diese Ausrüstung erzeugt, verwendet und kann Funkfrequenzenergie aussenden, und falls
nicht in Ü bereinstimmung mit den Anweisungen installiert und verwendet, können schädliche
Interferenzen im Funkverkehr verursacht werden.Es kann jedoch nicht garantiert werden, dass in
einer bestimmten Einrichtung keine Störungen auftreten. Falls dieses Gerät Störungen des Radiooder Fernsehempfangs verursacht, was durch ein vorübergehendes Ausschalten des Geräts
festgestellt werden kann, wird der Benutzer dazu angehalten, die Störung durch eine oder mehrere
der nachstehenden Maßnahmen zu beheben:
-- Die Empfangsantenne verlegen oder neu ausrichten.
-- Vergrößerung des Abstands zwischen dem Gerät und dem Empfänger.
-- Das Gerät an eine andere Steckdose auf einem anderen Stromkreis als dem des Empfängers
anschließen.
-- Den Händler oder einen erfahrenen Radio- und Fernsehtechniker um Hilfe ersuchen.
ENTSORGUNG
Werden Sie die iON 4K nicht in ein Feuer. Kamera und internen Akku in Ü bereinstimmung mit den
örtlichen Gesetzen und Vorschriften entsorgen.
SICHERHEITSRIEMEN: BRINGEN SIE DEN SICHERHEITSRIEMEN NICHT AN DER KAMERA AN,
WENN DIESE AN EINEN HELM ODER EINE BRILLE MONTIERT IST, WENN DIE KAMERA BEI
STARKEM WIND ODER HOHEN GESCHWINDIGKEITEN EINGESETZT ODER ANDERE
UMSTÄNDE VORLIEGEN, UNTER DENEN ES ZU VERLETZUNGEN KOMMEN KÖ NNTE, SOLLTE
SICH DIE KAMERA VON HELM ODER BRILLE LÖ SEN, JEDOCH AM SICHERHEITSRIEME
HÄNGEN BLEIBEN. DURCH DAS ANBRINGEN DES SICHERHEITSRIEMENS STIMMEN SIE ZU,
AUF JEDWEDE ANSPRÜ CHE, DIE SICH AUS DER VERWENDUNG DES
SICHERHEITSSTREIFENS ERGEBEN KÖ NNTEN GEGEN ION, INC. UND VERBUNDENE
UNTERNEHMEN, AGENTEN, MITARBEITER, LEITENDE ANGESTELLTEN ODER DIREKTOREN
ZU VERZICHTEN. SÄMTLICH ANSPRÜ CHE GEGEN iON, INC. UND VERBUNDENE
UNTERNEHMEN, AGENTEN, MITARBEITER, LEITENDE ANGESTELLTEN ODER DIREKTOREN
ZU VERZICHTEN.
DE-12
Page 27
FCC-Strahlungsbelastungserklärung
Diese Ausrüstung stimmt mit den FCC SAR-Belastungsgrenzwerten überein, die für eine
unkontrollierte Umgebung festgelegt wurden.
Dieses Gerät entspricht Artikel 15 der FCC-Regeln. Der Betrieb unterliegt folgenden zwei
Einschränkungen: (1) DIESES GERÄ T KÖ NNTE STÖ RUNGEN VERURSACHEN UND (2)
DIESES GERÄT MUSS JEGLICHE EMPFANGENE STÖ RUNG HINNEHMEN,
EINSCHLIESSLICH STÖ RUNGEN, DIE ZU UNERWÜ NSCHTEN BETRIEBSBEDINGUNGEN
FÜ HREN.
Vorsicht!
Änderungen oder Modifikationen, die von der für die Einhaltung verantwortlichen Partei nicht
ausdrücklich bewilligt wurden, könnten die Genehmigung des Benutzers, das Gerät zu betreiben,
ungültig machen.
CE: Hiermit erklärt World Wide Licenses Limited, dass dieses Produkt den
grundlegenden Anforderungen und anderen relevanten Bestimmungen der
Richtlinie 1999/5EG entspricht. Der vollständige Text der
EU-Konformitätserklärung ist einsehbar auf
der folgenden Internetadresse: www.ioncamera.com
CE SAR:
RF-Belastungsangaben (SAR): Das Gerät kann sicher in einer Entfernung von 0 mm vom
menschlichen Körper verwendet werden.
"Entspricht 21 CFR 1040.10 und 1040.11 mit Ausnahme von Abweichungen gemäß der Laser
Notice No. 50 vom 24. Juni 2007"
iON America LLC
Modellbezeichnung: 1088
Hergestellt in China
Jahr der Herstellung: 2016
DE-13
Page 28

Website: www.ioncamera.com
DE-14
Page 29

iON 4K
CAMÉRA ACTION É TANCHE 4K
Guide de démarrage rapide
FR-1
Page 30
1
Lentille rotative
7
État de la batterie
13
Bouton de réinitialisation
2
Bouton coulissant
8
Port du trépied
14
Sélecteur de réglage 1-2
3
Verrou du bouton
coulissant
d'enregistrement
9
Verrou du capot
15
Microphone
4
Voyant indicateur
d'enregistrement
10
Bouton d'état
16
Voyant indicateur de ligne laser
et d'enregistrement
5
État du mode photo
11
USB
6
État de la mémoire
12
Emplacement pour
carte microSD
1. DESCRIPTION DES BOUTONS DE LA CAMÉRA
FR-2
Page 31

1
Faites glisser le verrou du capot vers la
gauche jusqu'à ce que le carré rouge soit
invisible
5
Faites glisser le verrou du capot vers la droite
pour verrouiller
2
Faites glisser le capot de la caméra vers le
haut pour l'ouvrir
6
Faites glisser le bouton coulissant
d'enregistrement vers l'avant pour
enregistrer. Faites glisser vers l'arrière pour
arrêter l'enregistrement.
3
Insérer la carte microSD (non fournie)
7
Maintenez le bouton d'état pendant 3
secondes pour activer le mode photo
4
Fermez le capot de la caméra.
1
2 3
2. DÉMARRAGE RAPIDE
FR-3
Page 32

Attention :Le formatage de la carte en effacera tout le contenu
3. MISE EN ROUTE
Téléchargez l'application iON 4K pour votre appareil iOS/Android depuis la boutique
d'applicationscorrespondante.
Votre caméra peut se connecter à votre appareil mobile via Bluetooth et Wi-Fi.
Lancez l'application et suivez les instructions à l'écran pour connecter votre appareil.
Une fois la connexion effectuée, vous pouvez personnaliser les paramètres de votre caméra selon vos
préférences, et l'utiliser à distance.
NOTER : La connexion Wi-Fi est effective jusqu'à 10 mètres sans interférence.
Assurez-vous que le micrologiciel de votre caméra est à jour avant utilisation.
Toutes les mises à jour pour votre caméra sont disponibles pour le téléchargement avec les
instructions correspondantes sur la page web suivante :
www.ioncamera.com/drivers
4. CHARGER LA BATTERIE
– Faites glisser le capot de la caméra vers le haut pour l'ouvrir.
– Connectez votre caméra à un PC/MAC avec le câble USB inclus.
– Le voyant DEL d'état indique le niveau de charge de la batterie. Il passera du rouge au vert au
cours de la charge.
– La charge est terminée lorsque le voyant d'état DEL de la batterie passe au vert, puis qu'il
s'éteint.
NOTER : La batterie se recharge complètement en 3 heures au maximum.
5. FORMATER LA CARTE MICROSD.
Formatez la carte microSD avant d'enregistrer avec votre caméra pour garantir qu'elle puisse la lire et y
écrire correctement.
Windows :
– Connectez votre caméra iON 4K au PC. (Il peut être nécessaire d'appuyer sur le bouton d'état
de la caméra pour que l'ordinateur la reconnaisse).
FR-4
Page 33

– Rendez-vous dans « Mon PC » et cliquez droit sur « Périphérique de stockage amovible ».
– Assurez-vous que votre caméra est formatée selon le système FAT32 puis sélectionnez «
Formatage rapide ».
Votre carte mémoire est maintenant formatée et prête à l'utilisation.
Mac :
– Connectez votre caméra iON 4K au PC. (Il peut être nécessaire d'appuyer sur le bouton d'état
de la caméra pour que l'ordinateur la reconnaisse).
– Recherche Aller à :
– Lancez l'utilitaire de disque.
– Cliquez sur le bouton de votre disque dur externe dans la barre latérale de gauche.
– Cliquez sur l'onglet « Effacer » situé sur le haut de la fenêtre.
Il vous sera demandé quel type de système de fichiers vous désirez formater avec.
Assurez-vous de sélectionner soit « FAT32 » ou « FAT ».
– Sélectionnez Formater.
Votre carte mémoire est maintenant formatée et prête à l'utilisation.
iON 4K est compatible avec :
SDXC (capacité standard) 4 Go de classe 4 au minimum.
SDHC (haute capacité) de classe 4, 6, ou 10 d'une capacité maximum de 64 Go.
Une carte SD est requise pour utiliser la caméra, non incluse.
FR-5
Page 34

Appuyez sur le bouton d'état pour :
Activez la ligne laser pendant 15 secondes.
Affiche le niveau actuel de la batterie et l'état
de la mémoire.
DEL D'ÉTAT DE LA MÉ MOIRE
DEL D'ÉTAT DE LA BATTERIE
Vert : 51 % ou plus
Vert : 51 % ou plus
Jaune : 20 à 50 %
Jaune : 20 à 50 %
Rouge : 20 % ou moins
Rouge : 20 % ou moins
6. ÉTAT DE LA CAMÉRA
TYPES D'ERREUR
Le voyant DEL clignote en rouge : la batterie est presque vide.
Le voyant de mémoire DEL clignote et un bip continu se fait entendre : la carte Micro SD ne
peut être utilisée, car aucune carte n'est présente, la carte est défaillante, la carte n'est pas
correctement formatée, la carte mémoire est pleine, une carte mémoire incompatible est
insérée ou les dossiers ne peuvent être créés.
7. ACCÉDER AUX PHOTOS ET AUX VIDÉOS
Allumez la caméra en maintenant appuyé le bouton d'état pendant 3-5 secondes.
Branchez la caméra à un PC/MAC avec le câble USB inclus.
Vous pourrez parcourir le contenu du périphérique de stockage amovible pour lire le contenu
photo/vidéo via Mon PC (Windows) ou Finder (MAC).
8. UTILISATION DE L'APPLICATION MOBILE ION 4K
Pour tirer le meilleur parti de votre caméra, il est recommandé de télécharger l'application mobile iON
4K (disponible sur iOS et Android).
Avec l'application iON 4K, vous personnaliser les fonctions de votre caméra ainsi que la contrôler à
distance via Live View. Il est également possible de visualiser/télécharger les fichiers directement
depuis votre caméra sur votre appareil mobile.
FR-6
Page 35

Capacité de
Photos/Durée
d'enregistrement
restante.
Accéder à la
galerie média
Bouton de
capture
Menu Mode
(Unique,Rafale,Ra
lenti,Vidéo)
Résolution des
photos/vidéos
Sensibilité
d'image
Valeur
d'exposition
Niveau de la
batterie
Entrez dans les
paramètres de
caméra
Lorsque vous lancez l'application initialement, il vous sera demandé d'associer votre iON 4K avec votre
appareil via les options du menu de connexion. Assurez-vousque les fonctions Bluetooth et Wi-Fi sont
activées.
Une fois ces paramètres confirmés et que votre caméra est connectée à votre appareil, il vous sera
possible d'utiliser votre appareil comme viseur avec Live View et de contrôler la caméra à distance.
FR-7
Page 36

9. PARAMÈTRES DE CAMÉ RA
Pour modifier les paramètres de votre caméra, téléchargez et installez l'application iON 4K sur votre
appareil iOS/Android
Une fois la caméra connectée à votre appareil mobile, rendez-vous dans Live View et entrez dans le
menu des Paramètres dans l'application mobile iON 4K.
Vidéo :
Vidéo 2160p à 30/25 images par seconde
Vidéo 1080p à 120/60/30/100/50/25 images par seconde
Vidéo 720p à 120/60/30/100/50/25 images par seconde
Vidéo WVGA (480p) à 240/30/200/25 images par seconde
Mode de photo continu (prise de photos uniques ou en rafale (2, 5, 10/2 secondes))
Photo :
12MP, 8MP, 5MP, 2MP
Rafale
Intervalle de capture en accéléré
Sélecteur 1-2
Le Sélecteur 1-2 situé à l'arrière de votre caméra vous permet de prédéfinir deux types de
configurations pour votre iON 4K, et de basculer aisément de l'un à l'autre sur le terrain. Les
paramètres de chaque position peuvent être configurés dans l'application mobile iON 4K.
Depuis le menu des Paramètres, vous pouvez également formater la carte mémoire, modifier les
paramètres du réseau et coupez la fonction de notification sonore.
FR-8
Page 37

10. ENREGISTREMENT
Commencer l'enregistrement : Faites glisser le bouton coulissant d'enregistrement vers la
gauche pour déverrouiller. Le carré rouge doit alors être invisible, puis faites glisser le bouton
vers l'avant pour enregistrer. Votre caméra s'allume, émet un double bip et le voyant DEL
d'état d'enregistrement s'illumine en rouge pour indiquer que la caméra est en cours
d'enregistrement.
Arrêter l'enregistrement : Faites glisser le bouton coulissant d'enregistrement vers l'arrière.
Votre caméra émet trois bips, et le voyant DEL d'état d'enregistrement s'éteint pour indiquer
que l'enregistrement est terminé et que la caméra est éteinte.
FR-9
Page 38

Verrou du bouton coulissant d'enregistrement : Le petit bouton sur le dessus du bouton
d'enregistrement permet d'empêcher que ce dernier puis s'activer ou se désactiver. Pour
pouvoir faire coulisser le bouton d'enregistrement vers l'avant ou vers l'arrière, faites glisser
le verrou de manière à ce que le carré rouge soit invisible.
11. MODE PHOTO
Activer le mode de photo instantanée : Maintenez le bouton d'état enfoncé pendant trois
secondes. La caméra émet deux bips et le voyant DEL de photo s'illumine en vert, pour
indiquer que le mode de photo instantané est activé.
Prendre une photo unique : appuyez sur le bouton d'état pour prendre une photo
unique.Vous entendrez un bip et le voyant DEL de photo clignote pour indiquer qu'un cliché a
été effectué.
Désactiver le mode photo instantanée : Maintenez le bouton d'état enfoncé pendant deux à
quatre secondes. La caméra émet trois bips et le voyant DEL de photo clignote avant de
s'éteindre, pour indiquer que le mode de photo instantanée est désactivé.
La caméra s'éteindra automatiquement si aucune photo n'est prise dans les 60 secondes
suivantes.
12. MONTURE
Votre créativité est le moteur des meilleures photos et vidéos. iON offre une large gamme de types de
montures vous permettant de monter votre caméra presque partout, alors soyez créatif !
Souvenez-vous que la caméra iON 4K est équipée d'une lentille à angle large, ce qui veut dire que les
objets lointains sembleront plus éloignés de vous que vous ne le pensez dans les vidéos.
13. ALIGNEMENT
Votre iON 4K est équipée d'une ligne laser qui permet de garantir que l'horizon est correctement aligné
dans vos vidéos. Pour l'utiliser, activez la ligne laser en appuyant sur le bouton d'état. Placez votre
main devant la ligne laser ou visez sur une surface plate à vos pieds, devant vous puis faites tourner la
lentille (jusqu'à 270°) jusqu'à ce que la ligne laser soit horizontale. Lorsque vous montez la caméra sur
votre casque ou vos lunettes de protection, vous pourriez remarquer que vous regardez vers le bas
plus que vous ne le pensez. Nous vous conseillons de faire quelques vidéos d'entraînement pour
obtenir le bon alignement.
FR-10
Page 39

Mise au rebut correcte du produit.
Ce symbole indique que ce produit ne doit pas être mis au rebut avec les déchets
ménagers normaux aux USA, pour éviter d'impacter négativement l'environnement ou
la santé humaine. Il est donc nécessaire d'en disposer de manière à pouvoir le
recycler et réutiliser les ressources matérielles autant que possible. Pour ce faire,
apportez cet appareil dans un point de collecte approprié, utilisez le système de
collecte à votre disposition ou prenez contact avec le revendeur en cas de doute. Ce
dernier peut vous aider à recycler le produit de manière sûre pour l'environnement.
Lisez toutes les informations de sécurité ci-dessous ainsi que les instructions d'utilisation
avant d'utiliser iON 4K pour éviter les accidents.
14. MONTURES AVEC ADHÉSIFS
Nettoyez puis séchez la surface de monture avant d'y fixer la monture sur adhésifs. Nous vous
suggérons de nettoyer la surface cible avec une petite quantité d'alcool avant d'appliquer la monture à
température tempérée. Laissez l'adhésif reposer pendant 24 heures avant de l'utiliser.
ÉTANCHÉ ITÉ
Votre iON 4K est étanche jusqu'à une profondeur de 10 mètres (30 pieds) sans le boîtier étanche.
PRÉCAUTIONS ET AVERTISSEMENTS
Ce guide d'informations sur le produit comporte des informations sur la réglementation, la sécurité, la
manipulation ainsi que les informations de mise au rebut et de recyclage. Il comporte également les
informations de garantie limitée de 1 ans accompagnant votre iON 4K. Lisez toutes les informations de
sécurité ci-dessous ainsi que les informations d'utilisation avant d'utiliser votre caméra iON 4K pour
éviter les blessures.
AVERTISSEMENT : Le non-respect de ces instructions de sécurité peut entraîner un incendie, une
électrocution, d'autres types de blessure ou des dommages matériels.
STOCKAGE ET MANIPULATION
iON 4K est équipée d'une batterie au lithium-ion non amovible ou remplaçable de, 3,7V, 1500mAh. La
batterie peut être dangereuse en cas de mauvaise manipulation. Ne pas démonter ni écraser la
caméra. Pour la recharger, utilisez uniquement le câble USB en le branchant à un port USB haute
puissance d'ordinateur ou à un dispositif respectant les normes USB 2.0 ou 1.1, comme par exemple
un chargeur secteur ou de voiture.
FR-11
Page 40

Déclaration de la FCC
Cet équipement a été testé et est déclaré conforme aux limites d'un appareil de
Classe B, selon l'article 15 des Règles FCC.
Ces limites ont étés mises en place pour offrir une protection raisonnable contre les interférences
dans un complexe résidentiel.Cet équipement génère, utilise et contient de l'énergie de fréquence
radio, si inutilisé incorrectement pourrait créer des interférences dangereuses pour les
communications radio.Mais il n'existe aucune garantie que des interférences ne seront pas
produites dans une installation particulière. Si cet équipement crée des interférences pour la
réception radio ou télévisuelle, ce qui peut être constaté en l'allumant et en l'éteignant, alors il vous
est conseillé d'y remédier d'une des manières suivantes :
--Réorientez ou déplacez l'antenne réceptrice.
--Augmentez la distance séparant l'équipement et le récepteur.
--Connectez l'équipement à une prise ou à un circuit différent de celui du récepteur.
--Contactez le revendeur ou un technicien radio ou TV d'expérience pour obtenir de l'assistance.
MISE AU REBUT
ne pas jeter la caméra iON 4K au feu. Jetez la caméra et sa batterie intégrée dans le respect des lois et
réglementations locales.
UTILISATION DE LA SANGLE DE SÉCURITÉ : NE PAS ATTACHER LA SANGLE DE SÉCURITÉ À
LA CAMÉRA LORSQUE CETTE DERNIÈ RE EST MONTÉE SUR UN CASQUE OU SUR DES
LUNETTES DE PROTECTION, LORSQUE LA CAMÉ RA POURRAIT ÊTRE UTILISÉ E EN
CONDITION DE GRAND VENT OU À GRANDE VITESSE, OU TOUTE SITUATION DANS
LAQUELLE LA CAMÉRA RISQUE DE SE DÉTACHER DE LA MONTURE MAIS RESTER ATTACHÉ E
À LA SANGLE. EN ATTACHANT LA SANGLE À LA CAMÉRA, VOUS ACCEPTEZ DE RENONCER À
TOUTE ACTION LÉGALE CONTRE ION, INC. SES AFFILIÉ S, AGENTS, EMPLOYÉS OU MEMBRES
DE LA DIRECTION EN CAS DE PROBLÈ ME DÉ COULANT DE L'UTILISATION DE LA SANGLE DE
SÉCURITÉ . TOUTE ACTION LÉGALE CONTRE ION, INC. SES AFFILIÉS, AGENTS, EMPLOYÉ S
OU MEMBRES DE LA DIRECTION EN CAS DE PROBLÈ ME DÉCOULANT DE L'UTILISATION DE
LA SANGLE DE SÉCURITÉ .
FR-12
Page 41

Déclaration sur l'exposition aux radiations de la FCC.
Cet appareil est conforme aux limites de radiation de la FCC SAR comme indiquées pour un
environnement non contrôlé
Cet appareil respecte la Partie 15 des règles de la FCC. Son utilisation est sujette aux deux
conditions suivantes : (1) Cet équipement ne doit pas créer d'interférences dangereuses, et (2) cet
appareil doit accepter toute interférence reçue, incluant celles pouvant entraîner un mauvais
fonctionnement.
Attention !
Tout changement ou modification effectuée sans l'approbation du fabricant de l'équipement pourrait
annuler son autorité sur le bon fonctionnement de cet équipement.
CE : Par la présente, World Wide Licenses Limited, déclare que cet appareil
est en conformité avec les exigences essentielles et autres dispositions
pertinentes de la Directive 1999/5/EC. Le texte complet de la déclaration de
conformité de l'UE est disponible à
l'adresse Internet suivante : www.ioncamera.com
CE SAR (DAS) :
Exposition aux RF (DAS) : Cet appareil peut être utilisé en toute sécurité à une distance de 0 mm
du corps humain.
« Respecte 21 CFR 1040.10 et 1040.11 à l'exception des déviations indiquées dans la Laser Notice
No.50 datée du 24 juin 2007 »
iON America LLC
Nom du modèle: 1088
Fabriqué en Chine
Année de fabrication : 2016
FR-13
Page 42

Web : www.ioncamera.com
FR-14
Page 43

iON 4K
VIDEOCAMERA SPORTIVA 4K IMPERMEABILE
Guida rapida
IT-1
Page 44

1
Rotazione delle lenti
7
Stato della
batteria
13
Tasto di ripristino
2
Interruttore a scorrimento di
registrazione
8
Foro treppiede
14
1.-2 Impostazione
interruttore
3
Blocco interruttore a
scorrimento di
registrazione
9
Blocco porta
15
Microfono
4
Indicatore di registrazione
10
Tasto di stato
16
Linea laser e indicatore di
registrazione
5
Modalità foto
11
USB
6
Stato memoria
12
Vano per scheda
Micro SD
1. SCHEDA DIAGRAMMA VIDEOCAMERA
IT-2
Page 45

1
Far scorrere il blocco porta verso sinistra in
modo che non si veda il riquadro rosso
5
Far scorrere il blocco porta verso destra per
chiuderlo
2
Far scorrere lo sportello della videocamera
verso l'alto per aprire
6
Far scorrere l’interruttore a scorrimento di
registrazione in avanti per registrare. Far
scorrere l'interruttore verso la parte posteriore
per interrompere la registrazione.
3
Inserimento di una scheda microSD (non
inclusa)
7
Tenere premuto il tasto di stato per tre
secondi per attivare la modalità foto
4
Chiudere lo sportellino della fotocamera.
1
2 3
2. AVVIO RAPIDO
IT-3
Page 46

Avvertenza:la formattazione della scheda cancellerà tutti i dati presenti
3. CONFIGURAZIONE
Scaricare l'App iON 4K per dispositivi iOS/Android dal relativo AppStore.
E' possibile connettere la videocamera a dispositivi mobili tramite connessione Wi-Fi e Bluetooth.
Aprire l'applicazione e seguire le istruzioni sullo schermo per collegare il dispositivo.
Una volta connesso, sarà possibile personalizzare le impostazioni della videocamera secondo le
proprie esigenze ed utilizzarla da remoto.
N.B.: La connettività Wi-Fi può raggiungere una distanza massima di 10 metri senza subire
interferenze.
Assicurarsi che il Firmware della videocamera sia aggiornato prima dell'uso.
Tutti gli aggiornamenti saranno resi disponibili per il download con le istruzioni sulla seguente pagina
web:
www.ioncamera.com/drivers
4. CARICAMENTO DELLA BATTERIA
– Far scorrere lo sportello verso l'alto per aprire.
– Connettere la videocamera a un PC/Mac mediante il cavo USB in dotazione.
– Il LED di stato della batteria indica il livello di carica della batteria. Cambierà colore dal rosso al
verde, quando la batteria sarà carica.
– La ricarica sarà completa quando il LED di stato della batteria diventa verde ed il LED si
spegne.
N.B.: Per caricarsi completamente la videocamera può impiegare fino a tre ore.
5. Formattazione della scheda MicroSD
Formattazione della scheda MicroSD prima di avviare la registrazione così da esperire correttamente
i processi di lettura e scrittura.
IT-4
Page 47

Windows:
– Collegare la videocamera iON 4K al PC. (Potrebbe essere necessario premere il tasto di stato
della videocamera perché il computer riconosca il dispositivo.
– Vai su "Il mio PC" e fare clic destro "Disco rimovibile".
– Assicurarsi che la scheda venga formattata in FAT32 e selezionare "formattazione veloce".
La scheda di memoria è ora formattata e pronta all'uso.
Mac:
– Collegare la videocamera iON 4K al PC. (Potrebbe essere necessario premere il tasto di stato
della videocamera perché il computer riconosca il dispositivo).
– Vai a Ricerca
– Avviare Utilità Disco.
– Cliccare sull'icona del disco rigido esterno nella barra laterale sulla sinistra.
– Fare clic sulla scheda Cancella sulla parte superiore della finestra.
Verrà richiesto in quale formato si desidera formattare il disco.
Verificare che sia "FAT"/"FAT32"
– Selezionare il formato
La scheda di memoria è ora formattata e pronta all'uso.
iON 4K è compatibile con:
Scheda SDXC (capacità standard) classe 4 da 4GB minimo.
Scheda MicroSD SDHC (capacità elevata) classe 4, 6 o 10 fino a max 64GB.
Per utilizzare la videocamera si necessita una scheda SD, non inclusa.
IT-5
Page 48

Premendo il tasto di stato:
si attiverà la linea laser per 15 secondi.
verrà visualizzato lo stato della batteria e
della memoria corrente.
INDICATORE STATO MEMORIA
INDICATORE STATO BATTERIA
Verde: 51% o più
Verde: 51% o più
Giallo: Da 20 a 50%
Giallo: Da 20 a 50%
Rosso: 20% o meno
Rosso: 20% o meno
6. Stato videocamera
CONDIZIONI DI ERRORE
L'indicatore della batteria lampeggia in rosso: la batteria è quasi scarica.
L'indicatore di memoria lampeggia e vengono emessi segnali acustici continui: la scheda
microSD non è accessibile perché non vi è alcuna scheda di memoria inserita, errore scheda,
errore formato, scheda di memoria piena, scheda non compatibile o non è possibile creare
cartelle.
7. ACCESSO FOTO e VIDEO
Accendere la videocamera tenendo premuto il tasto di stato per 3-5 secondi.
Collegare la videocamera al PC/MAC, utilizzando il cavo USB in dotazione.
Tramite il Mio PC (Windows - Esplora risorse) o Finder (MAC), sarà possibile visualizzare l'unità disco
rimovibile contenente i file foto/video e riprodurli attraverso i vari lettori multimediali.
8. UTILIZZO DELL'APP MOBILE iON 4K
Per ottenere il massimo dalla propria videocamera, si consiglia di scaricare l'applicazione mobile iON
4K (disponibile per dispositivi iOS e Android), Con quest’app, è possibile personalizzare le funzioni
della videocamera ed utilizzarla da remoto con Live View. Si potranno visualizzare/scaricare i file
direttamente dalla videocamera sul dispositivo mobile.
IT-6
Page 49

Foto restanti/Tempo
di registrazione.
Accesso alla
galleria
multimediale
Tasto
Acquisizione
Menu Modalità
(Singola,SequenzaTi
me lapse,Video)
Risoluzione foto/video
Sensibilità immagini
Valore di
esposizione
Livello batteria
Inserire le impostazioni
della videocamera
Al primo avvio dell'app, verrà richiesto di associare iON 4K con il dispositivo tramite il menu opzioni di
connessione. Verificareche le connessioni Wi-Fi e Bluetooth siano attive
Una volta confermate le impostazioni e collegata la videocamera al dispositivo, sarà possibile accedere
a Live View ed utilizzarla da remoto.
IT-7
Page 50

9. IMPOSTAZIONI VIDEOCAMERA
Per regolare le impostazioni della videocamera, scaricare e installare l'applicazione iON 4K sui
dispositivi iOS/Android
Collegando la videocamera al dispositivo mobile, vai a Live View ed immettere le impostazioni del
menu all'interno dell'app mobile iON 4K.
Video:
video 2160p a 30/25 fotogrammi al secondo
video 1080p a 120/60/30/100/50/25 fotogrammi al secondo
video 720p a 120/60/30/100/50/25 fotogrammi al secondo
WVGA (480p) a 240/30/200/25 fotogrammi al secondo
Modalità Foto continua (scattando foto singole, in successione (2, 5, 10 e 10/2 secondi))
Foto:
12MP, 8MP, 5MP, 2MP
Scatto continuo
Intervallo Time-lapse
1-2 Interruttore
L'interruttore 1-2 sul retro della videocamera permette di predisporre iON 4K con due diverse
configurazioni facilmente modificabili su campo. E' possibile configurare ciascuna impostazione
dell'interruttore utilizzando l'app mobile iON 4K.
All'interno del menu Impostazioni è anche possibile formattare la scheda di memoria, modificare le
impostazioni di rete e spegnere le funzioni acustiche della videocamera.
IT-8
Page 51

10. REGISTRAZIONE
Avvia Registrazione: Spostare il blocco interruttore a scorrimento di registrazione a sinistra per
sbloccare, il riquadro rosso non si deve vedere, e quindi farlo scorrere in avanti per registrare.
La videocamera si accende, emette due volte un segnale acustico e l'indicatore di stato di
registrazione diventa rosso, indicando sta registrando il video.
Fine registrazione: Spostare il blocco interruttore a scorrimento di registrazione indietro. La
videocamera emette un segnale acustico per tre volte, e l'indicatore di stato di registrazione si
spegnerà, indicando che la registrazione è terminata e si spegne.
IT-9
Page 52

Blocco interruttore a scorrimento di registrazione: Il piccolo interruttore sulla parte superiore
del cursore a scorrimento di registrazione viene utilizzato per mantenerlo da acceso a spento.
Per spostare l'interruttore a scorrimento di registrazione in avanti o indietro, spostarlo in
modo che non si veda il riquadro rosso.
11. MODALITA’ FOTO
Attivare la modalità Foto istantanea: Tenere premuto il tasto di stato per tre secondi.
Verranno emessi due segnali acustici e l'indicatore foto diventa verde, a indicare che la
modalità Foto Istantanea è stata attivata.
Scattare una foto singola: premere il tasto di stato per scattare una foto singola.Viene
emesso un segnale acustico e l'indicatore foto lampeggia per indicare che la foto è stata
scattata.
Spegnere la modalità Foto istantanea: Spegnere la modalità Foto istantanea tenendo
premuto il tasto di stato per due/quattro secondi. La videocamera emette un segnale acustico
tre volte e l'indicatore foto lampeggia e per poi spegnersi, indicando che la modalità Foto
istantanea è spenta.
La videocamera si spegne automaticamente se non si scattano più foto nei successivi 60
secondi.
12. MONTAGGIO
Come catturare lo scatto migliore dipende solo dalla vostra creatività. iON offre una vasta gamma di
supporti che permettono di sistemare la videocamera un pò ovunque, per favorire la creatività.
Si ricorda che iON 4K ha un obiettivo grandangolare e gli oggetti lontani sembreranno molto più piccoli
nei video.
13. ALLINEAMENTO
iON 4K possiede una linea laser che consente di assicurarsi di avere l'orizzonte correttamente allineato
nei video. Per utilizzarla, attivare la linea laser premendo il tasto di stato; mettere la mano davanti alla
linea laser o puntare su di una superficie piana di fronte a voi e ruotare l'obiettivo (fino a 270°) fino a
quando la linea laser sarà orizzontale. Quando si monta la videocamera sul casco o sugli occhiali, si
può scoprire quanto più in basso è possibile guardare. Per trovare l'allineamento giusto si dovrà fare
qualche video di pratica.
IT-10
Page 53

Corretto smaltimento del prodotto
Questo marchio indica che il prodotto non deve essere smaltito con altri rifiuti
domestici negli Stati Uniti. Per evitare eventuali danni all'ambiente o alla salute umana
causati da smaltimento dei rifiuti, riciclarlo in maniera responsabile per favorire il
riutilizzo sostenibile delle risorse materiali. Per restituire il dispositivo usato, utilizzare
un apposito centro di smaltimento e riciclaggio oppure contattare il rivenditore del
prodotto, che può inserire il prodotto in un ciclo di riciclaggio a favore dell'ambiente.
Leggere tutte le informazioni di sicurezza riportate qui sotto e le istruzioni per l'uso
prima di usare la videocamera iON 4K per evitare lesioni
14. SUPPORTI ADESIVI
Pulire e asciugare la superficie di montaggio prima di applicare un supporto adesivo. Si consiglia di
pulire la superficie con una piccola quantità di alcool, applicando il supporto a temperatura ambiente.
Lasciate aderire l'adesivo per 24 ore prima dell'uso.
IMPERMEABILE
iON 4K è impermeabile fino ad una profondità di 10 metri (30 piedi), senza la necessità di utilizzare la
custodia impermeabile.
AVVERTENZE E GARANZIA
La Guida Importanti informazioni sul prodotto contiene informazioni sui sistemi normativi, sicurezza,
gestione, smaltimento e riciclaggio, nonché la garanzia limitata di 1 anno per la videocamera iON 4K.
Leggere tutte le informazioni di sicurezza riportate qui sotto e le istruzioni per l'uso prima di usare la
videocamera iON 4K per evitare lesioni.
ATTENZIONE: La mancata osservanza delle istruzioni di sicurezza potrebbe provocare incendi,
scosse elettriche o altre lesioni o danni.
USO DELLA BATTERIA
iON 4K utilizza una batteria 3.7 V, da 1500mAh, non rimovibile, non modificabile, ricaricabile agli ioni di
litio. La batteria potrebbe presentare un pericolo, se maltrattata. Non smontare o schiacciare la
videocamera. Per caricare, utilizzare solo il cavo USB con una porta USB ad alta potenza con un
computer o altro dispositivo compatibile con gli standard USB 2.0 o 1.1, in auto o caricabatterie.
IT-11
Page 54

Dichiarazione FCC
La presente apparecchiatura è stata testata ed è risultata conforme ai limiti
imposti per i dispositivi digitali di Classe B, ai sensi della Parte 15 delle
Normative FCC.
Tali limiti sono stati ideati per fornire un'adeguata protezione nei confronti di interferenze dannose
in installazioni residenziali. La presente apparecchiatura genera, utilizza e può irradiare energia in
radio frequenza e, se non installata e utilizzata in conformità alle istruzioni, può causare
interferenze dannose alle comunicazioni radio.Tuttavia, non vi è alcuna garanzia che l’interferenza
non si verifichi in una particolare installazione. Nel caso in cui il presente dispositivo causi
interferenze dannose alla ricezione radio o televisiva, il che potrebbe essere determinato
dall'accensione e spegnimento del dispositivo, l'utente è incoraggiato a tentare di correggere
l'interferenza mediante una o più delle misure seguenti:
- Orientare o posizionare nuovamente l’antenna di ricezione.
- Aumentare la distanza tra il dispositivo e il ricevitore.
- Collegare il dispositivo a una presa su un circuito diverso da quello a cui è collegato il ricevitore.
- Consultare il rivenditore o un tecnico radio/TV esperto per l’assistenza.
INFORMAZIONI SULLO SMALTIMENTO
Non smaltire la videocamera iON 4K in un incendio. Smaltire la videocamera e la batteria interna in
conformità alle leggi e alle normative locali.
USO DELLE CINTURE DI SICUREZZA: NON APPLICARE LA CINTURA DI SICUREZZA ALLA
VIDEOCAMERA QUANDO È MONTATA SU CASCO O OCCHIALI, QUANDO LA SI UTILIZZA IN
PRESENZA DI FORTI VENTI O AD ALTE VELOCITÀ , O IN QUALSIASI ALTRA CIRCOSTANZA IN
CUI LA SI POTREBBERO PROVOCARE LESIONI O DANNI NEL CASO IN CUI DOVESSE
STACCARSI DAL SUPPORTO E RESTARE APPESA ALLA CINTURA DI SICUREZZA.
COLLEGANDO LA CINTURA DI SICUREZZA ALLA VIDEOCAMERA, SI DICHIARA DI RINUNCIARE
A QUALSIASI RIVENDICAZIONE NEI CONFRONTI ION, INC E DELLE SUE AFFILIATE, AGENTI,
DIPENDENTI, FUNZIONARI O AMMINISTRATORI COLLEGATI ALL'USO DELLA CINTURA DI
SICUREZZA. QUALSIASI RIVENDICAZIONE NEI CONFRONTI DI ION, INC. E DELLE SUE
AFFILIATE, AGENTI, DIPENDENTI, FUNZIONARI O AMMINISTRATORI RELATIVI ALL'UTILIZZO
DELLE CINTURE DI SICUREZZA.
IT-12
Page 55

Dichiarazione FCC relativa all’Esposizione a Radiazioni:
Il dispositivo è conforme ai limiti FCC SAR in materia di Esposizione a Radiazioni stabiliti per un
ambiente non controllato.
Il presente dispositivo è conforme alla Parte 15 delle Norme FCC. L'utilizzo è soggetto alle seguenti
due condizioni: (1) il presente dispositivo non può causare interferenze dannose, e (2) il presente
dispositivo deve accettare qualsiasi interferenza ricevuta, incluse le interferenze che potrebbero
causare un funzionamento indesiderato.
Attenzione!
Cambi o modifiche non approvati espressamente dall'ente responsabile della conformità possono
annullare l'autorità dell'utente a mettere in funzione l'apparecchiatura.
CE: Con la presente, World Wide Licenses Limited dichiara che il dispositivo è
conforme ai requisiti essenziali e alle altre disposizioni rilevanti della Direttiva
1999/5/CE. Il testo integrale della dichiarazione di conformità UE è disponibile
al
seguente indirizzo web: www.ioncamera.com
CE SAR:
Esposizione alle radiazioni (SAR): Il dispositivo può tranquillamente essere utilizzato ad una
distanza di 0 mm dal corpo umano.
"Conforme alla 21 CFR 1040.10 e 1040.11 tranne per le deviazioni relative all' avviso sui Laser
No.50 del 24 giugno 2007”
iON America LLC
Nome modello: 1088
Prodotto in Cina
Anno di produzione: 2016
IT-13
Page 56

Sito web: www.ioncamera.com
IT-14
Page 57

iON 4K
RESISTENTE Y SUMERGIBLE 4K ACTION CAMERA
Manual del usuario.
SP-1
Page 58

1
Lente Giratoria
7
Battery Status
13
Reset Button
2
Deslizador para
grabado
8
Bloqueo de puerta
14
1-2 Ajustes
del interruptor
3
Bloqueo del deslizador
para grabado
9
Cierre de la estrucutra
15
Micrófono
4
Luz indicadora de
grabación
10
Status Button
16
La línea láser e indicador
de grabación
5
Modalidad fotografia
11
USB
6
Duración de la pila
12
Ranura de tarjeta
micro SD
1. DIAGRAMA DE LAS TECLAS DE LA CAMARA
SP-2
Page 59

1
Deslice el bloqueo de la puerta a la
izquierda hasta que el cuadro rojo no sera
visible
5
Deslice el bloqueo de la puerta hacia la
derecha para bloquearla
2
Deslice la tapa de la cámara para abrir
6
Deslice el boton de Grabar hacia adelante
para comenzar la grabación. Deslice de
nuevo para detener la grabación.
3
Inserte la tarjeta microSD (no incluida)
7
Mantenga pulsado el botón de estado
durante tres segundos para activar el modo
foto. 4 Cierre la puerta de la cámara.
2 3
2. CONCEPTOS BÁSICOS
SP-3
Page 60

Precaución: al formatear la tarjeta se borrará todo su contenido
3. CONFIGURACIÓ N
Descarga la App de ION 4K para su dispositivo iOS / Android desde la libreria de aplicaciones
relevantes a su dispositivo
La cámara puede conectarse a un dispositivo móvil con conexión Bluetooth y Wi-Fi.
Abra la aplicación y siga las instrucciones en la pantalla con el fin de conectar el dispositivo.
Una vez conectado, usted será capaz de personalizar la configuración de la cámara a sus preferencias,
así como utilizar la cámara de forma remota.
NOTA: la conectividad a distancia via Wi-Fi puede alcanzar hasta 10 metros sin interferencias.
Por favor asegúrese de que el firmware de la cámara esta actualizado hasta la fecha antes de su uso.
Todas las actualizaciones estan disponibles para su descarga a las instrucciones de la siguiente
página web:
www.ioncamera.com/drivers
4. CARGA DE LA BATERÍA
- Deslizar la puerta hacia arriba para abrir.
- Conectar la cámara a un PC / Mac mediante el cable USB anteriormente suministrado.
- El LED de estado de la batería indica el nivel de carga de la batería. Cambiaran los colores de rojo a
verde mientras se carga la batería.
- La carga estara completa cuando el LED de estado de la batería se ilumina en verde y el LED se
apagará con el tiempo.
NOTA: Puede tardar hasta tres horas para que la cámara se cargue completamente.
5. FORMATEO DE LA TARJETA MICROSD
Es aconsejable formatear la tarjeta micro SD antes de la grabación para que la cámara sea capaz de
leer y escribir de forma adecuada.
SP-4
Page 61

Windows:
– Conecte la cámara iON 4K a su PC. (Es posible que tenga que pulsar el botón estado de la cámara
para ordenador reconozca el dispositivo.
– Vaya a "Mi PC" y haga clic en "Disco extraíble".
– Asegúrese de que la tarjeta se formatea con el tipo FAT32 y seleccione "Formato rápido".
La tarjeta de memoria está ahora formateado y listo para usar.
Mac:
– Conecte la cámara iON 4K a su PC. (Es posible que tenga que pulsar el botón estado de la
cámara para ordenador reconozca el dispositivo).
– Ir a la búsqueda
– Poner en marcha la Utilidad de Discos.
– Haga clic en el icono de su disco duro externo en la barra lateral de la izquierda.
– Haga clic en la pestaña Borrar lo largo de la parte superior de la ventana.
Se le preguntará qué formato desea formatear el disco.
Por favor asegúrese de que esto es "FAT32" o "sin grasa".
– Seleccionar el formato.
La tarjeta de memoria está ahora formateado y listo para usar.
El ion 4K es compatible con:
SDXC (capacidad estándar) Clase 4 GB mínimo 4 tarjeta
SDHC (alta capacidad) de clase 4, 6, o 10 tarjetas microSD de hasta una capacidad máxima
de 64 GB.
Se requiere una tarjeta SD para utilizar la cámara, no incluida.
SP-5
Page 62

Al pulsar el botón de estado hará:
.
Activar el láser de línea durante 15
segundos
Muestra el estado de la batería y la
memoria actual.
LED ESTADO DE MEMORIA
LED ESTADO BATERÍA
Verde: 51% o más
Verde: 51% o más
Amarillo: 20 to 50%
Amarillo: 20 to 50%
Rojo: 20% or less
Rojo: 20% or less
6. Estado de la cámara
LAS POSIBLES CONDICIONES DE ERRORES
Battery LED flashes red: the battery is almost empty.
Memoria parpadea y hay pitidos continuos: no se puede acceder a la tarjeta microSD no se
puede acceder porque no hay ninguna tarjeta de memoria insertada, un error de tarjeta, un
error de formato, la tarjeta de memoria está llena, la tarjeta no es compatible o una carpeta no
se pueden crear.
7. ACCESO A FOTOS Y VÍDEOS
Encienda la cámara pulsando y manteniendo pulsado el botón de estado durante 3-5 segundos.
Con el cable USB suministrado, conecte la cámara a su PC / MAC.
A través de Mi PC (Windows) o el Finder (MAC), ahora será capaz de ver la unidad de disco extraíble
que contiene los archivos de foto / vídeo para reproducir a través de diversos reproductores
multimedia.
8. USING THE iON 4K MOBILE APP
Con el fin de sacar el máximo partido a la cámara, se recomienda que descargue la aplicación móvil
iON 4K (disponible en iOS y dispositivos Android),
Con la aplicación iON 4K, puede personalizar las funciones de la cámara, así como el uso de la misma
SP-6
Page 63

Fotos restantes /
tiempo de grabación.
Acceso a la
galería
Tecnica
Botón de
captura
Menú de la MOD
(Individual, Burst, Lapso
de tiempo, vídeo)
Foto/Resolución de
vídeo
Sensibilidad imagen
Valor de exposición
Nivel de bateria
Introducir ajustes de la
cámara
de forma remota con la visualización en vivo. También es posible ver / descargar archivos
directamente desde la cámara a su dispositivo móvil.
Cuando se proceda a la puesta en marcha de la aplicación, se le pedirá que vincular el iON 4K con su
dispositivo a través del menú de opciones de conexión. Por favor asegúrese de que la conexión
Bluetooth y Wi-Fi estan activadas.
Una vez que estos ajustes han sido confirmadas y la cámara está conectada al dispositivo, ahora
podrán acceder a la vista en vivo y utilizar su cámara de forma remota.
SP-7
Page 64

9. CAMERA SETTINGS
Para ajustar la configuración de la cámara, descargar e instalar la aplicación iON 4K a su iOS / Android
de dispositivos
Con la cámara conectada a su dispositivo móvil, vaya a la visión en vivo y entre en el menú de
configuración dentro de la aplicación móvil iON 4K.
Vídeo:
de vídeo 2160p a 30/25 cuadros por segundo
de vídeo 1080p a 120/60/30/100/50/25 fotogramas por segundo
de vídeo de 720p a 120/60/30/100/50/25 fotogramas por segundo
WVGA (480p) a 240/30/200/25 fotogramas por segundo
El modo de foto continua (con solo una foto) ráfaga (2, 5, 10 y 10/2 segundos))
Foto:
12MP, 8MP, 5 MP, 2 MP
Ráfaga de disparos
Lapso de tiempo de intervalo
1-2 Interruptor
El interruptor de 1-2 en la parte posterior de la cámara le permite establecer su iON 4K con dos
configuraciones diferentes que se pueden cambiar fácilmente en el momento. Los ajustes para cada
posición del interruptor puede ser puesta en marcha si utiliza la aplicación móvil. ION 4K.
Dentro del menú de configuración también se puede formatear la tarjeta de memoria, cambiar la
configuración de red y apagar los pitidos de la cámaras .
10. GRABACIÓ N
Iniciar la grabación: posiciona el elemento deslizante de bloqueo a la izquierda para
desbloquear, el cuadrado rojo no debe estar visible y, a continuación, arrastra el regulador de
registro hacia delante para grabar. La cámara se enciende, dos pitidos y el LED de estado de
SP-8
Page 65

grabación se iluminará en rojo, lo que indica que la cámara está grabando un vídeo.
Para finalizar la grabación, deslice el regulador de registro de nuevo. La cámara emitirá un
pitido tres veces, y el LED de estado de grabación se apagará, lo que indica que la cámara ha
dejado de grabar y está apagado.
Registro deslizante de bloqueo: El pequeño interruptor en la parte superior del registro
deslizante se utiliza para mantener el ajustado tanto encendido o apagado. Para mover el
deslizador de Grabar hacia adelante o hacia atrás, tiene el control deslizante de bloqueo
de registro desplaza de manera que el cuadrado rojo no sea visible.
SP-9
Page 66

11. MODO FOTO
Activar el modo de foto instantánea: Pulse y mantenga pulsado el botón de estado durante
tres segundos. Se oirán dos pitidos y ver la luz del LED que cambiará a verde, lo que indica
que el modo de foto instantánea se ha activado.
Tomar una sola foto: al pulsar el botón Estado puede tomar una sola foto. Se oirá un pitido y la
luz LED parpadea para indicar que una fotografía ha sido tomada.
Desactivar el modo de foto instantánea: desactivar el modo de foto instantánea pulsando y
manteniendo pulsado el botón de estado de dos a cuatro segundos. La cámara emitirá un
pitido tres veces , el LED parpadeará y luego se apagará, lo que indica que el modo de foto
instantánea se apaga.
La cámara se apagará automáticamente si no hubo ninguna foto tomada dentro de los 60
segundos siguientes.Taking a Single Photo: press the Status Button can take a single photo.
You will hear a beep and the photo LED will flash to indicate that a photograph has been taken.
12. MONTAJE
Obténer la mejor fotografía depende sólo de su creatividad. iON ofrece una amplia gama de soportes
que le permiten poner la cámara en cualquier lugar, así pueda ser lo mas creative possible.
Recuerde que su iON 4K tiene una lente de gran angulo y los objetos que están lejos puedan parecer
más pequeños de lo esperado en sus vídeos.
13. ALINEACIÓ N
Su iON 4K tiene un láser de línea que le ayuda a asegurarse de que tiene el horizonte alineado
correctamente en sus vídeos. Para utilizar, activar el láser de línea pulsando el botón de estado;
coloque su mano delante de la línea de láser o apuntar a una superficie plana de unos centímetros
delante de usted y gire el objetivo (hasta 270 °) hasta que el láser de línea este de forma horizontal. Al
montar la cámara en su casco o gafas, puede descubrir que si mira hacia abajo más de lo que
pensaba. Puede llevarle un par de vídeos de práctica para encontrar la alineación perfecta para sus
gustos.
SP-10
Page 67

Eliminación correcta de este producto
Este marcado indica que este producto no debe desecharse con otros residuos
domésticos. Para evitar los posibles daños al medio ambiente oa la salud humana
que representa la eliminación incontrolada de residuos, reciclar correctamente para
promover la reutilización sostenible de recursos materiales. Para devolver el
dispositivo utilizado, por favor utilice los sistemas de devolución y recogida
adecuados o póngase en contacto con el establecimiento donde se adquirió el
producto. Ellos pueden ayudarle para un reciclaje seguro ambiental.
Lea toda la información de seguridad a continuación y las instrucciones de
funcionamiento
14. SOPORTES ADHESIVOS
Limpiar y secar la superficie de montaje antes de aplicar un adhesivo de montaje. Se aconseja limpiar
la superficie con una pequeña cantidad de alcohol y la aplicación de la montura a temperatura
ambiente. Permita que el adhesivo seque durante 24 horas antes de su uso.
IMPERMEABLE
Su iON 4K es resistente al agua hasta una profundidad de 10 metros (30 pies) sin el uso de un estuche
estanco al agua.
PRECAUCIONES Y GARANTÍA
Esta guía del producto contiene información reguladora, de seguridad, manejo, desecho y reciclaje, así
como la garantía limitada de 1 año para su cámara iON 4K. Lea toda la información de seguridad a
continuación y las instrucciones de funcionamiento antes de utilizar la cámara iON 4K para evitar
lesiones.
ADVERTENCIA: El incumplimiento de estas instrucciones de seguridad puede provocar un incendio,
descargas eléctricas u otras lesiones o daños.
BATERÍA Y MANIPULACIÓ N
iON 4K utiliza un 3.7V no desmontable, no es modificable, recargable de litio-ion, batería de 1500mAh.
La batería puede presentar un peligro si no se trata adecuadamente. No desarme ni aplaste la cámara.
Para cargar, utilice únicamente el cable USB con un puerto USB de alta potencia de una computadora
u otro dispositivo compatible con USB 2.0 o 1.1 normas, coche, o cargador de batería.
SP-11
Page 68

DISPOSAL INFORMATION
No se deshaga de la cámara iON 4K mediate fuego. Disponer de la cámara y su batería interna de
conformidad con las leyes y reglamentos locales.
USO DE LA CORREA DE SEGURIDAD: NO UNIR LA CORREA DE SEGURIDAD A LA CÁ MARA
CUANDO LA CÁMARA ESTÁ MONTADA EN EL CASCO O GAFAS, CUANDO LA CÁ MARA SE
UTILIZARÁ EN VIENTOS FUERTES O A ALTAS VELOCIDADES, O EN CUALQUIER OTRA
CIRCUNSTANCIAS EN LAS QUE LA CÁMARA PODRÍA ORIGINAR LESIÓ N O DAÑ O EN CASO DE
QUE SE AFLOJE DE LA MONTAÑ A Y PERMANECE ATADA POR LA CORREA DE SEGURIDAD.
POR COLOCACIÓ N DE LA CORREA SEGURIDAD A LA CÁMARA, USTED ACEPTA RENUNCIAR A
CUALQUIER RECLAMACIÓ N CONTRA ION, INC. Y CUALQUIERA DE SUS AFILIADOS, AGENTES,
EMPLEADOS, FUNCIONARIOS O DIRECTORES DERIVADOS DE LA UTILIZACIÓ N DE LA
CORREA DE SEGURIDAD. LAS RECLAMACIONES CONTRA IONES, INC. CUALQUIERA DE SUS
AFILIADOS, AGENTES, EMPLEADOS, FUNCIONARIOS O DIRECTORES DERIVADOS DE LA
UTILIZACIÓ N DE LA CORREA DE SEGURIDAD.
SP-12
Page 69

DECLARACIÓ N DE LA FCC
Este equipo ha sido probado y cumple con los límites para un dispositivo digital
de Clase B, según la parte 15 de las normas de la FCC.
Este equipo ha sido evaluado y cumple con las restricciones de un dispositivo digital de Clase B, de
conformidad con la Parte 15 de la normativa FCC. Dichas restricciones se han diseñado para
ofrecer una protección razonable contra las interferencias perjudiciales en una instalación
residencial. Este equipo genera, utiliza y puede irradiar energía de radiofrecuencia y, si no se instala
y utiliza de acuerdo con las instrucciones, puede causar interferencias perjudiciales en las
comunicaciones de radio. Sin embargo, no hay garantía de que no se produzcan interferencias en
una instalación particular. Si este equipo ocasionara interferencias perjudiciales en la recepción de
señales de radio o televisión, lo cual puede evaluarse apagándolo y encendiéndolo, se recomienda
al usuario que trate de corregir la interferencia aplicando al menos una de las siguientes medidas:
• Reorienta o reubica la antena receptora.
• Aumenta la separación entre el equipo y el receptor.
• Conecta el equipo a una toma de corriente en un circuito distinto de aquel al que está conectado el
receptor.
• Consulta a tu distribuidor o a un técnico de radio/televisión para obtener ayuda.
SP-13
Page 70

Leyes FCC de exposición a las radiacións
Este dispositivo ha sido evaluado y cumple con los requisitos de exposición a radiofrecuencia (RF).
Los estándares de exposición a dispositivos inalámbricos emplean una unidad de medida conocida
como la Tasa Específica de Absorción o SAR.
El funcionamiento está sujeto a las dos condiciones siguientes: (1) este dispositivo no puede
ocasionar interferencias perjudiciales, y (2) este dispositivo debe aceptar cualquier interferencia
recibida, incluidas aquellas interferencias que puedan ocasionar un funcionamiento indebido.
Cuidado!
Cualquier cambio o modificación no aprobados expresamente por la parte responsable del
cumplimiento podrían anular la autoridad del usuario para operar el equipo.
CE: Por la presente, la World Wide Licencias Limited declara que este
dispositivo cumple con los requisitos esenciales y otras disposiciones
relevantes de la Directiva 1999/5 / CE. El texto completo de la declaración de
conformidad de la UE está disponible en
Dirección Sitio Web: www.ioncamera.com
CE SAR:
La exposición a RF (SAR): El dispositivo de seguridad se puede utilizar con una distancia de 0 mm
al cuerpo humano.
"Cumple con la norma 21 CFR 1040.10 y 1040.11 excepto por desviaciones de acuerdo con el
aviso de láser N ° 50 del 24 de junio 2007"
iON America LLC
Model Name: 1088
Made in China
Year of manufacture: 2016
SP-14
Page 71

Web: www.ioncamera.com
SP-15
Page 72

iON 4K
CÂ MARA DE AÇÃ O 4K À PROVA DE Á GUA
Guia de iniciação rápida
PT-1
Page 73

1
Lente rotativa
7
Estado da bateria
13
Botão de reinicialização
2
Botão deslizante do
gravador
8
Orifício para o
tripé
14
Definições do botão 1-2
3
Bloqueio do botão
deslizante do gravador
9
Fecho da tampa
15
Microfone
4
Indicador de gravação
10
Botão de estado
16
Linha laser e indicador de gravação
5
Estado do modo de
fotografia
11
USB 6 Estado da memória
12
Ranhura do cartão
MicroSD
1. DIAGRAMA DOS BOTÕ ES DA CÂ MARA
PT-2
Page 74

1
Deslize o fecho da tampa para a esquerda
de modo que o quadrado vermelho fique
oculto
5
Deslize o fecho da tampa para a direita para
fechar a tampa
2
Deslize a tampa da câmara para cima para
abrir
6
Deslize o botão deslizante do gravador para
a frente para gravar Deslize para trás para
parar de gravar
3
Insira o cartão MicroSD (não incluído)
7
Mantenha o botão de estado pressionado
durante 3 segundos para ativar o modo de
fotografia
4
Feche a tampa da câmara
1
2 3
2. INICIAÇÃ O RÁ PIDA
PT-3
Page 75

Atenção:a formatação do cartão apaga todos os dados que tenha gravados
3. CONFIGURAÇÃ O
Descarregue a aplicação iON 4K para o seu dispositivo iOS/Android a partir da AppStore relevante.
Pode ligar a câmara a um dispositivo móvel através da ligação Bluetooth e Wi-Fi.
Para ligar o seu dispositivo, abra a aplicação e siga as instruções apresentadas no ecrã.
Depois de ligado, pode personalizar as definições da câmara conforme as suas preferências, bem
como utilizar a câmara remotamente.
TENHA EM ATENÇ ÃO: a distância da ligação Wi-Fi pode atingir os 10 metros sem interferência.
Certifique-se de que o Firmware da câmara está atualizado antes da utilização.
Todas as atualizações serão disponibilizadas para transferência com instruções na seguinte página
Web:
www.ioncamera.com/drivers
4. CARREGAMENTO DA BATERIA
– Deslize a tampa para cima para abrir.
– Ligue a sua câmara a um computador/Mac utilizando o cabo USB fornecido.
– O LED de estado da bateria indica o nível de carga da bateria. Muda de vermelho para verde à
medida que a bateria carrega.
– O carregamento está completo quando o LED de estado da bateria fica verde. O LED apaga-se
eventualmente.
TENHA EM ATENÇ ÃO: a câmara pode demorar até 3 horas a carregar totalmente.
5. FORMATAÇÃ O DO CARTÃO MICROSD
Formate o cartão MicroSD antes de gravar para que a câmara consiga ler e escrever adequadamente
no cartão.
PT-4
Page 76

Windows:
– Ligue a câmara iON 4K ao computador (pode ser necessário pressionar o botão de estado da
câmara para o computador reconhecer o dispositivo).
– Aceda a "O meu computador" e clique com o botão direito do rato em "Disco amovível".
– Certifique-se de que o cartão está a ser formatado para o tipo FAT32 e selecione "Formatação
rápida".
O cartão de memória está agora formatado e pronto a usar.
Mac:
– Ligue a câmara iON 4K ao computador (pode ser necessário pressionar o botão de estado da
câmara para o computador reconhecer o dispositivo).
– Aceda a Pesquisa.
– Execute o Utilitário de disco.
– Clique no ícone da unidade de disco rígido externa na barra lateral à esquerda.
– Clique no separador Apagar na parte superior da janela.
Terá de escolher o formato com que pretende formatar o disco.
Certifique-se de que o formato é "FAT32" ou "FAT".
– Selecione Formatar.
O cartão de memória está agora formatado e pronto a usar.
A câmara iON 4K é compatível com:
Cartão SDXC (capacidade normal) Classe 4 de 4 GB, no mínimo.
Cartão MicroSD SDHC (capacidade alta) Classe 4, 6 ou 10, até uma capacidade máxima de 64
GB.
É necessário um cartão SD (não incluído) para trabalhar com a câmara.
PT-5
Page 77

Ao pressionar o botão de estado, irá:
Ativar a linha laser durante 15 segundos.
Apresentar o nível de bateria atual e o
estado da memória.
LED DE ESTADO DA MEMÓ RIA
LED DE ESTADO DA BATERIA
Verde: 51% ou mais
Verde: 51% ou mais
Amarelo: 20 a 50%
Amarelo: 20 a 50%
Vermelho: 20% ou menos
Vermelho: 20% ou menos
6. ESTADO DA CÂMARA
CONDIÇ Õ ES DE ERRO
O LED da bateria está vermelho intermitente: a bateria está quase gasta.
O LED da memória está intermitente e a câmara emite bips contínuos: não é possível aceder
ao cartão MicroSD porque não está inserido nenhum cartão de memória, o cartão tem erro,
existe um erro de formato, o cartão de memória está cheio, o cartão é incompatível ou não é
possível criar uma pasta.
7. ACESSO ÀS FOTOGRAFIAS E VÍDEOS
Ligue a câmara mantendo o botão de estado pressionado durante 3 a 5 segundos.
Com o cabo USB fornecido, ligue a câmara ao computador/Mac.
Em O meu computador (Windows) ou Localizador (Mac), pode agora ver a unidade de disco amovível
que contém os ficheiros de imagem/vídeo a reproduzir com os diversos leitores multimédia.
8. UTILIZAÇÃ O DA APLICAÇÃ O iON 4K PARA
DISPOSITIVOS MÓ VEIS
Para aproveitar ao máximo a câmara, recomendamos que descarregue a aplicação iON 4K para
dispositivos móveis (disponível para dispositivos iOS e Android).
A aplicação iON 4K permite personalizar o funcionamento da câmara e utilizar a câmara remotamente
PT-6
Fotografias
restantes/Tempo de
gravação
Page 78

Aceder à
galeria
multimédia
Botão de
captação
Menu dos modos
(Ú nico,Rajada,Time
Lapse,Vídeo)
Resolução da
fotografia/vídeo
Sensibilidade da
imagem
Valor da
exposição
Nível da
bateria
Aceder às definições
da câmara
com a opção Imagem ao vivo. Também é possível ver/descarregar ficheiros diretamente a partir da
câmara para o dispositivo móvel.
Ao executar a aplicação pela primeira vez, é solicitado que emparelhe a câmara iON 4K com o
dispositivo através do menu de opções de ligação. Certifique-sede que a ligação Bluetooth e Wi-Fi
está ativada.
Assim que confirmar estas definições e ligar a câmara ao dispositivo, pode aceder à Imagem ao vivo e
utilizar a câmara remotamente.
PT-7
Page 79

9. DEFINIÇÕ ES DA CÂMARA
Para ajustar as definições da câmara, descarregue e instale a aplicação iON 4K no seu dispositivo
iOS/Android.
Com a câmara ligada ao seu dispositivo móvel, aceda à Imagem ao vivo e entre no menu Definições
na aplicação iON 4K para dispositivos móveis.
Vídeo:
Vídeo em 2160p a 30/25 fotogramas por segundo
Vídeo em 1080p a 120/60/30/100/50/25 fotogramas por segundo
Vídeo em 720p a 120/60/30/100/50/25 fotogramas por segundo
Vídeo em WVGA (480p) a 240/30/200/25 fotogramas por segundo
Modo de fotografia contínua (fotografias tiradas com disparo único e em rajada (2, 5, 10 e 10/2
segundos))
Fotografia:
12MP, 8MP, 5MP, 2MP
Disparo em rajada
Intervalo do Time Lapse
Botão 1-2
O botão 1-2 na parte posterior da câmara permite predefinir a câmara iON 4K com duas configurações
diferentes que podem ser alteradas facilmente no campo. As definições para cada posição do botão
podem ser configuradas com a aplicação iON 4K para dispositivos móveis.
No menu Definições, também pode formatar o cartão de memória, alterar as definições da rede e
desligar as funções de avisos sonoros da câmara.
PT-8
Page 80

10. GRAVAÇÃ O
Começar a gravar: coloque o botão deslizante do gravador para a esquerda para desbloquear
(o quadrado vermelho deve estar oculto) e, em seguida, coloque o botão deslizante do
gravador para a frente para gravar. A câmara liga-se, emite 2 bips e o LED de estado da
gravação acende-se a vermelho, indicando que a câmara está a gravar um vídeo.
Parar de gravar: coloque o botão deslizante do gravador para trás. A câmara emite 3 bips e o
LED de estado da gravação desliga-se, indicando que a câmara parou de gravar e está
desligada.
PT-9
Page 81

Bloqueio do botão deslizante do gravador: o pequeno botão em cima do botão deslizante do
gravador é utilizado para impedir que o botão deslizante do gravador se ligue ou desligue.
Para mover o botão deslizante do gravador para a frente/trás, coloque este botão de modo
que o quadrado vermelho fique oculto.
11. MODO DE FOTOGRAFIA
Ativar o modo de fotografia instantânea: mantenha o botão de estado pressionado durante 3
segundos. Irá ouvir 2 bips e o LED de fotografia acende-se a verde, indicando que o modo
de fotografia instantânea foi ativado.
Tirar uma fotografia única: pressione o botão de estado para tirar uma fotografia única.Irá
ouvir um bip e o LED de fotografia fica intermitente para indicar que tirou uma fotografia.
Desligar o modo de fotografia instantânea: mantenha o botão de estado pressionado durante
2 a 4 segundos. A câmara emite 3 bips e o LED de fotografia fica intermitente e depois
desliga-se, indicando que o modo de fotografia instantânea está desligado.
A câmara desliga-se automaticamente se não tirar nenhuma fotografia no intervalo de 60
segundos.
12. MONTAGEM
Tirar boas fotografias depende apenas da sua criatividade. A iON disponibiliza uma vasta gama de
suportes que permitem que coloque a câmara em praticamente qualquer lado, por isso, seja criativo.
Lembre-se de que a câmara iON 4K tem uma lente grande angular e que os objetos distantes irão
parecer nos vídeos mais pequenos do que o previsto.
13. ALINHAMENTO
A câmara iON 4K tem uma linha laser que permite garantir que a linha do horizonte está corretamente
alinhada nos vídeos. Para utilizar, ative a linha laser pressionando o botão de estado. Coloque a mão à
frente da linha laser ou aponte-a para uma superfície plana a alguns metros à sua frente e rode a lente
(até 270°) até a linha laser ficar na horizontal. Ao montar a câmara no capacete ou óculos, pode
verificar que olha mais para baixo do que esperaria. Pode ter de fazer alguns vídeos de experiência
até encontrar o alinhamento perfeito.
PT-10
Page 82

Eliminação correta do produto
Este símbolo indica que este produto não pode ser eliminado com outros resíduos
domésticos nos EUA. Para prevenir potenciais danos nocivos ao ambiente ou à
saúde humana devido à eliminação não controlada de resíduos, recicle o produto de
forma responsável de modo a promover a reutilização sustentável dos recursos
materiais. Para devolver o dispositivo usado, utilize os sistemas de devolução e
recolha adequados ou contacte o distribuidor onde o produto foi adquirido. O
distribuidor pode receber o produto para a realização da reciclagem ambientalmente
segura.
Leia todas as informações de segurança e instruçõ es de funcionamento abaixo
antes de utilizar a câmara iON 4K de modo a evitar lesões
14. SUPORTE ADESIVO
Limpe e seque a superfície de montagem antes de aplicar um suporte adesivo. Recomendamos limpar
a superfície com um pouco de álcool e aplicar o suporte à temperatura ambiente. Permita que o
adesivo seque durante 24 horas antes de utilizar.
ESTANQUIDADE
A câmara iON 4K é à prova de água até uma profundidade de 10 metros sem a utilização de uma
caixa estanque.
AVISOS E GARANTIA
Este importante guia de informações do produto contém informações regulamentares, de segurança,
manuseamento, eliminação e reciclagem, bem como a garantia limitada de 1 ano para a câmara iON
4K. Leia todas as informações de segurança e instruções de funcionamento abaixo antes de utilizar a
câmara iON 4K de modo a evitar lesões.
AVISO: o incumprimento destas instruções de segurança pode resultar em incêndio, choques elétricos
ou outras lesões ou danos.
BATERIA E MANUSEAMENTO
A câmara iON 4K utiliza uma pilha recarregável de iões de lítio de 3,7 V e 1500 mAh, não removível e
não modificável. A bateria pode representar um perigo se não for manuseada corretamente. Não
desmonte nem esmague a câmara. Para carregar, utilize somente o cabo USB com uma entrada USB
de elevada potência num computador ou outro dispositivo compatível com as normas USB 2.0 ou 1.1,
veículo ou carregador de baterias.
PT-11
Page 83

Declaraçã o FCC
Este equipamento foi testado e considera-se que cumpre os limites de um
dispositivo digital de Classe B, em conformidade com o Parágrafo 15 das
Diretrizes da FCC.
Estes limites foram definidos para oferecer uma proteção razoável contra interferências
prejudiciais numa instalação residencial.Este equipamento produz, utiliza e pode emitir energia de
radiofrequência e, se não for instalado e utilizado de acordo com as instruções, pode causar
interferências prejudiciais nas comunicações de rádio.Contudo, não existe a garantia de que não
irão ocorrer interferências numa instalação específica. Se este equipamento causar interferências
prejudiciais na receção de rádio ou de televisão, o que pode ser determinado desligando e
voltando a ligar o equipamento, o utilizador deve tentar corrigir as interferências mediante uma ou
mais das medidas seguintes:
-- Alterar a orientação/localização da antena de receção.
-- Aumentar a distância entre o equipamento e o recetor.
-- Ligar o equipamento a uma tomada num circuito diferente do circuito a que o recetor está ligado.
-- Contactar o distribuidor ou um técnico especializado em rádio/televisão e solicitar assistência.
INFORMAÇ Õ ES SOBRE A ELIMINAÇ Ã O
Não elimine a câmara iON 4K numa fogueira. Elimine a câmara e respetiva pilha de acordo com as leis
e regulamentos locais.
UTILIZAÇ Ã O DA FITA DE SEGURANÇ A: NÃO COLOQUE A FITA DE SEGURANÇ A NA CÂMARA
QUANDO ESTA ESTIVER MONTADA NO CAPACETE OU Ó CULOS E FOR UTILIZADA COM
VENTOS FORTES, A ALTA VELOCIDADE OU EM QUALQUER OUTRA CIRCUNSTÂNCIA EM QUE
A CÂMARA POSSA PROVOCAR LESÕ ES OU DANOS CASO SE SOLTE DO SUPORTE E FIQUE
PRESA PELA FITA DE SEGURANÇ A. AO COLOCAR A FITA DE SEGURANÇ A NA CÂMARA,
CONCORDA EM RENUNCIAR A QUAISQUER RECLAMAÇ Õ ES CONTRA A iON, INC. E
RESPETIVAS FILIAIS, AGENTES, COLABORADORES, FUNCIONÁ RIOS OU DIRETORES
RESULTANTES DA UTILIZAÇ ÃO DA FITA DE SEGURANÇ A. QUAISQUER RECLAMAÇ Õ ES
CONTRA A iON, INC. E RESPETIVAS FILIAIS, AGENTES, COLABORADORES, FUNCIONÁ RIOS
OU DIRETORES RESULTANTES DA UTILIZAÇ ÃO DA FITA DE SEGURANÇ A.
PT-12
Page 84

Declaraçã o de exposição à radiação da FCC
Este dispositivo respeita os limites de exposição SAR da FCC definidos para um ambiente não
controlado.
Este dispositivo está em conformidade com o Parágrafo 15 das Diretrizes da FCC. O
funcionamento está sujeito às duas condições seguintes: (1) este dispositivo não pode causar
interferências prejudiciais e (2) este dispositivo tem de aceitar quaisquer interferências recebidas,
incluindo interferências que possam causar o funcionamento não pretendido.
Atenção!
Quaisquer alterações ou modificações não aprovadas expressamente pelo fabricante responsável
pela conformidade podem invalidar a autoridade que o utilizador tem para trabalhar com o
equipamento.
CE: por conseguinte, a World Wide Licenses Limited declara que este
dispositivo está em conformidade com os requisitos básicos e outras
disposições relevantes da Diretiva 1999/5/EC. O texto completo da
declaração de conformidade da UE está disponível
no seguinte endereço da Internet: www.ioncamera.com
SAR CE:
Exposição a RF (SAR): o dispositivo pode ser utilizado em segurança a uma distância de 0 mm do
corpo humano.
"Em conformidade com 21 CFR 1040.10 e 1040.11, exceto desvios conforme aviso sobre o laser
N.º 50, de 24 de junho de 2007."
iON America LLC
Nome do modelo: 1088
Fabricado na China
Ano de fabrico: 2016
PT-13
Page 85

Web: www.ioncamera.com
PT-14
Page 86

iON 4K
防水 4K 运动摄像头
快速入门指南
SC-1
Page 87

1
旋转透镜
7
电池状态
13
重置按钮
2
录制滑块
8
三角架安装孔
14
1-2 设置开关
3
录制滑块锁
9
门锁
15
麦克风
4
录制指示器
10
状态按钮
16
激光线与录制指示器
5
照片模式状态
11
USB
6
存储状态
12
microSD 卡插槽
1.摄像头图表说明
SC-2
Page 88

1
将门锁滑动到左侧,让红色方框不显示
5
将门锁滑动到右侧以将它锁定为关闭
2
将摄像头门向上滑动以打开
6
将录制滑块向前滑动以开始录制。将它向后滑
动以停止录制
3
插入 microSD 卡(未包括)
7
按住状态按钮三秒钟以进入照片模式
4
关闭摄像头门。
1 2 3
2.快速开始
SC-3
Page 89

注意:使卡格式化将擦除卡上的所有内容
3.设置
从相应的应用市场下载适合 iOS/Android 设备的 iON 4K 应用。
您的摄像头可使用蓝牙和 Wi-Fi 连接到移动设备。
打开应用程序并按照屏幕上的说明来连接您的设备。
连接之后,您将能够根据您的偏好自定义摄像头设置以及远程使用摄像头。
请注意:Wi-Fi 连接距离在没有干扰的情况下可远达 10 米。
请在使用之前确保您的摄像头固件是最新的。
所有更新均可在以下网页下载,并附有说明:
www.ioncamera.com/drivers
4.为电池充电
– 将门向上滑动以打开。
– 使用随附的 USB 电缆将摄像头连接至 PC/Mac。
– 电池状态 LED 指示电池的电量水平。在电池充电过程中它将从红色变为绿色。
– 当电池状态 LED 变为绿色时充电完成,且最终 LED 将熄灭。
请注意:摄像头完全充满电需要长达三小时。
5.格式化 microSD 卡
在录制之前格式化 microSD 卡,让您的摄像头能够从卡中正确读取和写入。
Windows:
– 将 iON 4K 摄像头连接到 PC。(您可能需要按摄像头的状态按钮才能让计算机识别设备。)
SC-4
Page 90

– 转至“我的电脑”,使用鼠标右键单击“可移动磁盘”。
– 确保卡被格式化为 FAT32 类型并选择“快 速格式化”。
您的存储卡现在已格式化,可立即使用。
Mac:
– 将 iON 4K 摄像头连接到 PC。(您可能需要按摄像头的状态按钮才能让计算机识别设备。)
– 转至“搜索”
– 启动“磁盘工具”。
– 点击左侧的侧边栏中的外部硬盘的图标。
– 点击窗口顶部的“擦除”选项卡。
系统会询问您想要将磁盘格式化为何种格式。
请确保格式为“FAT32”或“FAT”。
– 选择“格式化”。
您的存储卡现在已格式化,可立即使用。
iON 4K 与以下存储卡兼容:
最低为 SDXC(标准容量)4GB class 4 存储卡。
SDHC(大容量)class 4、6 或 10 microSD 卡,最大容量为 64GB。
需要有 SD 卡才能使用摄像头,未包括在 内。
SC-5
Page 91

按状态按钮将发生以下情况:
让激光线激活 15 秒。
显示当前电池和存储状态。
存储状态 LED
电池状态 LED
绿色:51% 或更多
绿色:51% 或更多
黄色:20 至 50%
黄色:20 至 50%
红色:20% 或更少
红色:20% 或更少
6.摄像头状态
错误状况
电池 LED 呈红色闪烁:电池电量几乎已耗尽。
存储 LED 闪烁且发出连续哔哔声:因为未插入存储卡、卡错误、格式错误、存储卡已满、卡不
兼容或无法创建文件夹,所以无法访问 microSD 卡。
7.访问照片和视频
按住状态按钮 3-5 秒打开摄像头。
使用随附的 USB 电缆将摄像头连接到 PC/MAC。
您可通过“我的电脑”(Windows) 或 Finder (MAC) 查看包含照片/视频文件的可移动磁盘,并可通过各种
媒体播放器来播放。
8.使用 iON 4K 移动应用
为了发挥摄像头的最大功效,建议您下载 iON 4K 移动应用(在 iOS 和 Android 设备上可用)。
使用 iON 4K 应用,您可自定义摄像头的工作方式,也可以利用实时取景远程使用摄像头。也可以直接
SC-6
Page 92

剩余拍照/录制时间。
访问媒体库
拍摄按钮
模式菜单(单张、
连拍、定时拍摄、
视频)
照片/视频分辨率
图像灵敏度
曝光值
电池电量
进入摄像头设置
从摄像头查看文件/将文件下载到移动设备。
最初启动应用时,系统会提示您通过连接选项菜单将您的 iON 4K 与设备配对。请确保您的蓝牙和 Wi-Fi
连接已启用。
一旦已确认这些 设置且摄像头已连
接到设备,您即可访问“实时取景”和远程使用摄像头。
9.摄像头设 置
要调节摄像头的设置,请下载 iON 4K 应用并将它安装到 iOS/Android 设备上
SC-7
Page 93

在摄像头连接到移动设备的情况下,转至“实时取景”并进入 iON 4K 移动应用内的“设置”菜单。
视频:
30/25 帧/秒下的 2160p 视频
120/60/30/100/50/25 帧/秒下的 1080p 视频
120/60/30/100/50/25 帧/秒下的 720p 视频
240/30/200/25 帧/秒下的 WVGA (480p)
连续照片模式(通过单次、连拍 [2、5、10 和 10/2 秒] 拍摄的照片)
照片:
12MP、8MP、5MP、2MP
急速连拍
定时拍摄间隔
1-2 开关
您可以使用摄像头背面的 1-2 开关为 iON 4K 预先设置两个不同的配置,它们可在现 场轻松地更改。每
个开关位置的设置均可使用 iON 4K 移动应用来设置。
还可以使用“设置”菜单来格式化存储卡、更改网络设置和关闭摄像头哔哔声功能。
10.录制
开始录制:将录制滑块锁移至左侧以解锁,红色方框应不会显示,然后向前滑动录制滑块开始录
SC-8
Page 94

制。您的摄像头将开启,发出两次哔哔声,且录制状态 LED 将变红,指明摄像头现在正在录制
视频。
停止录制:向后滑动录制滑块。您的摄像头将发出三次哔哔声,且录制状态 LED 将熄灭,指明
摄像头已停止录制并关闭。
SC-9
Page 95

录制滑块锁:录制滑块顶部的小开关用于防止录制滑块打开或关闭。要向前或向后移动录制滑
块,请移动录制滑块锁,让红色方框不显示。
11.照片模式
激活即拍模式:按住状态按钮三秒钟。您将听到两声哔哔声并看到照片 LED 变为绿色,指明
即拍模式已激活。
拍摄单张照片:按状态按钮拍摄单张照片。您将听到一声哔哔声且照片 LED 将闪烁,指明照
片已拍摄。
关闭即拍模式:按住状态按钮两至四秒种关闭即拍模式。摄像头将发出三声哔哔声且照片 LED
将闪烁,然后熄灭,指明即拍模式已关闭。
如果在 60 秒内没有拍摄任何照片,摄像头将自动关闭。
12.安装
要获得最佳拍摄效果只取决于您的创造力。iON 提供范围广泛的安装选项,让您可将摄像头安装在任何
地方,所以要有创造力。
请记住,您的 iON 4K 配备广角镜头,遥远的物体在视频中看起来比预计的要更小。
13.对准
iON 4K 有激光线,可帮助确保在视频中适当对准地平线。如需使用,请按状态按钮激活激光线;将您的
手放在激光线的前面或将它瞄准您前面几英尺的平面并旋转镜头(最大 270°),直至激光线变为水平。
在头盔或护目镜上安装摄像头时,您可能会发现您会比自己认为的更常往下看。可能需要拍摄几个练习
视频才能找到正确的对准。
SC-10
Page 96

本产品的正确处置
此标记表示在整个美国,本产品不得与其他家庭垃圾一起处置。为防止不受控制的废物
处理可能对环境或人体健康造成的损害,请负责任地回收废物以推动物质资 源的可持续
重利用。要退回已使用的设备,请使用适合的退回和收集系统或联系出售您所购产品的
零售商。他们可收回此产品以环保方式回收。
在使用 iON 4K 摄像头之前,请先阅读下面的
所有安全信息和操作说明以避免受伤
14.粘合安装
在进行粘合安装之前,先清洁并擦干安装表面。我们建议使用少量酒精来清洁表面,并且在室温下进行
安装。在使用前让胶黏剂固化 24 小时。
防水
iON 4K 在 10 米(30 英尺)深的水中不使用防水外壳的情况下可防水。
注意事项和保修
这份重要的产品信息指南包含监管、安全、搬运、处置和回收信息,还包括 iON 4K 摄像头的 1 年有限
保修。在使用 iON 4K 摄像头之前,请先阅读下面的所有安全信息和操作说明以避免受伤。
警告:如果不遵守这些安全说明会导致火灾、电击或其他伤害或损失。
电池和处理
iON 4K 使用不可拆卸、不可更换、可充电锂离子 3.7V、1500mAh 电池。如果使用不当,电池可能存
在危险。请勿拆开或压坏摄像头。如需充电 ,只需使用 USB 电缆连接到计算机或与 USB 2.0 或 1.1 标
准兼容的其他设备上的高功率 USB 端口、汽车或电池充电器。
SC-11
Page 97

FCC 声明
此设备依照 FCC 规则第 15 部分进行测试,已被证明符合 B 类数字器件的限
制。
这些限制旨在提供合理的保护,确保此设备在居住地区使用时可防止有害干扰。此设备会生成、使用
和传播射频能量,如果未依照说明安装和使用,可能会对无线电通信产生有害干扰。然而,在特殊安
装情况下,不能保证不会发生干扰。如果此设备确实对无线电或电视接收造成有害干扰(可通过关闭
和打开设备来确定),用户应尝试通过以下一种或多种措施来消除干扰:
-- 重定向或重新放置接收天线。
-- 增大设备和接收器之间的间隔。
-- 将设备连接到与接收器不同的电路插座。
-- 咨询经销商或经验丰富的无线电/电视技术员以寻求帮助。
处置信息
请勿将 iON 4K 摄像头放入火中。摄像头及其内部电池的处置应依照当地法律和法规。
安全带使用:当摄像头安装在头盔或护目镜上、摄像头将在大风或高速环境中使用或者在摄像头从底座
上脱落且仍被安全带系住时会导致受伤或伤害的任何其他情况下,请勿系上安全带。将安全带系在摄像
头上时,即表示您同意放弃因使用安全带而引起的任何问题对 iON,INC.及其任何子公司、代理商、员工、
高管或董事提出任何索偿。
SC-12
Page 98

FCC 辐射曝露声明
本设备符合为不受控制环境规定的 FCC SAR 曝露限度。
本设备符合 FCC 规则的第 15 部分。运行时需符合以下两个条件:(1) 本设备不会引起有害干扰;
且 (2) 本设备必须能抵抗受到的任何干扰,包括可能引起不适当操作的干扰。
小心!
未经负责合规方的明确批准而作出任何更改或修改可能会使用户运行设备的权限失效。
CE:World Wide Licenses Limited 特此声明,本设备符合 1999/5/EC 指令的
基本要求及其他相关条款。EU 符合性声明的完整文本在以下网站提供
以下互联网地址:www.ioncamera.com
CE SAR:
射频曝露 (SAR):本设备可在距离人体 0 mm 的位置安全地使用。
“符合 21 CFR 1040.10 和 1040.11 的 要求,不符合 2007 年 6 月 24 日发布的第 50 号激光公告
的要求除外”
iON America LLC
型号名称:1088
中国制造
制造年份:2016
SC-13
Page 99

网站:www.ioncamera.com
SC-14
Page 100

iON 4K
防水 4K 運動攝影機
快速使用指南
TC-1
 Loading...