

Page 1

Archive LP
Quickstart Guide
English ( 3 – 6 )
Guía de inicio rápido
Español ( 7 – 10 )
Guide d'utilisation rapide
Français ( 11 – 14 )
Guida rapida
Italiano (15 – 18 )
Kurzanleitung
Deutsch ( 19 – 22 )
Snelstartgids
Nederlands ( 23 – 26 )
Page 2

Page 3
pp
Quickstart Guide (English)
Box Contents
Make sure that the items listed below are included in the box:
• Archive LP
• Power Adapter
• USB cable
• Pre-Mounted Slipmat
• 45 RPM Adapter
• Software CD
• Quickstart Guide
• Safety & Warranty Manual
READ SAFETY INSTRUCTION BOOKLET BEFORE USING THE PRODUCT
Support
• For the most up to date system requirements, compatibility information, and product registration, visit the
ION website: ionaudio.com
• For the latest information about this product, visit ionaudio.com/archivelp
• For additional product support, visit ionaudio.com/support
• For safety/warranty information, visit ionaudio.com/warranty
Connection Diagram
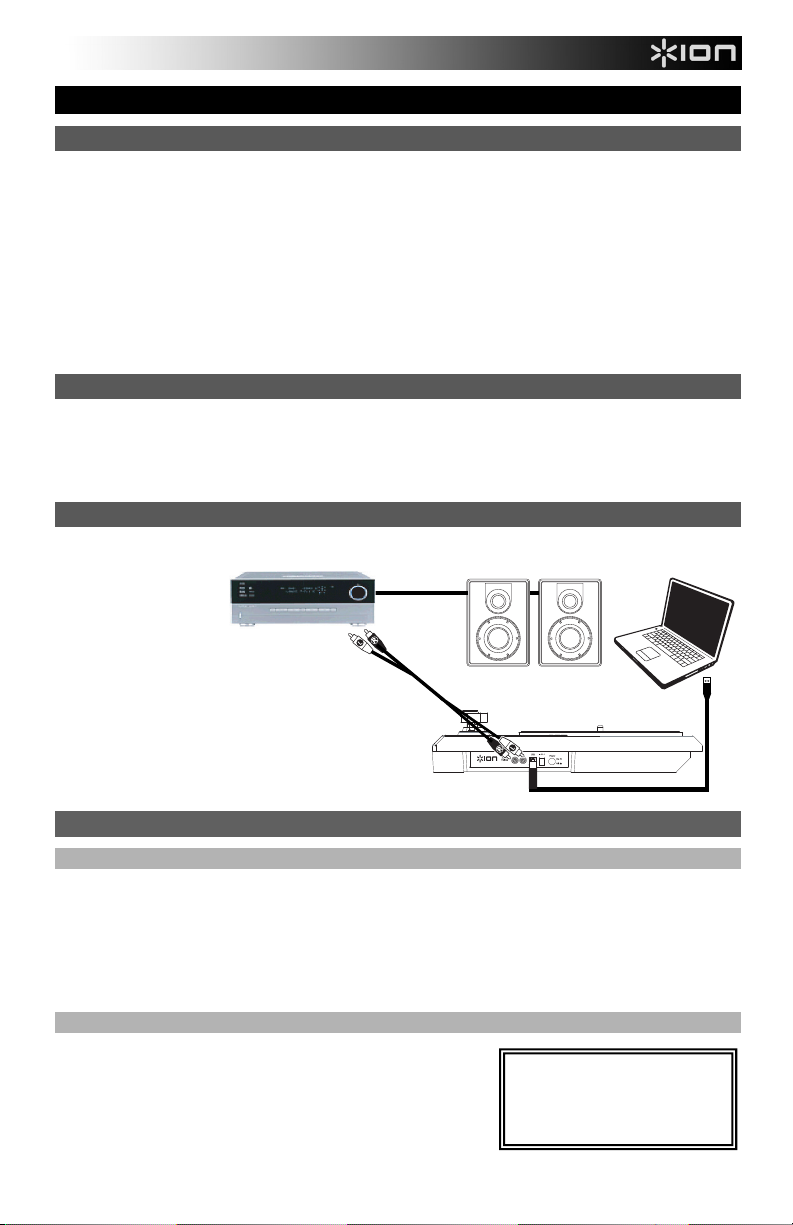
Since Archive LP has
built-in speakers, it is not
necessary to connect
speakers in order to listen
to your vinyl records.
However, if you want to
connect your own
speakers, please see the
following diagram.
Using Archive LP With Your Computer
Playback
There are 3 ways to listen to your vinyl records with Archive LP!
1. You can simply listen to your music using Archive LP’s internal speakers.
2. If you prefer to use your own stereo speakers, you can connect Archive LP's RCA outputs to a stereo system or
to powered speakers. Do not connect them to phono-level inputs; Archive LP's RCA outputs are line-level and
could damage a device with phono-level inputs. (Any other standard input type, such as CD, Aux In, or Tape is
acceptable).
3. You can listen through your computer using your own external speakers, or through headphones connected to
your computer. (Archive LP cannot be used as a playback device for your computer's audio.)
Recording
To record music to your computer, you can use ION EZ Vinyl/Tape
Converter. EZ Vinyl/Tape Converter makes it easy to turn your music into
digital files. After you finish converting your vinyl, you can then burn to
CD or load onto portable media devices.
To install the software, insert the included CD into your computer, and
follow the on-screen instructions.
RECEIVER
(not included)
SPEAKERS
(not included)
Visit ionaudio.com/ezvc to
download the latest version of EZ
Vinyl/Tape Converter software or for
helpful troubleshooting guide and
additional su
COMPUTER
(not included)
ort.
3
Page 4
p
p
1. With EZ Vinyl/Tape Converter installed on your computer, use the included USB cable to connect Archive LP's
USB port to an available USB port on your computer.
2. On your computer, you can open EZ Vinyl/Tape Converter by going to Start Menu All Programs (Windows)
or the Applications menu (Mac).
3. Follow the on-screen instructions to set up your recording. When prompted to play your music, move Archive
LP's tonearm over the record to start playback.
Note: To listen to a record while it's playing, listen through your computer's speakers, or connect Archive LP's
RCA outputs to a stereo system or powered speakers. Archive LP must be connected to the computer in order
for EZ Vinyl/Tape Converter to advance to the next step.
4. When you have finished recording, raise Archive LP's tonearm from the record and return it to its arm clip.
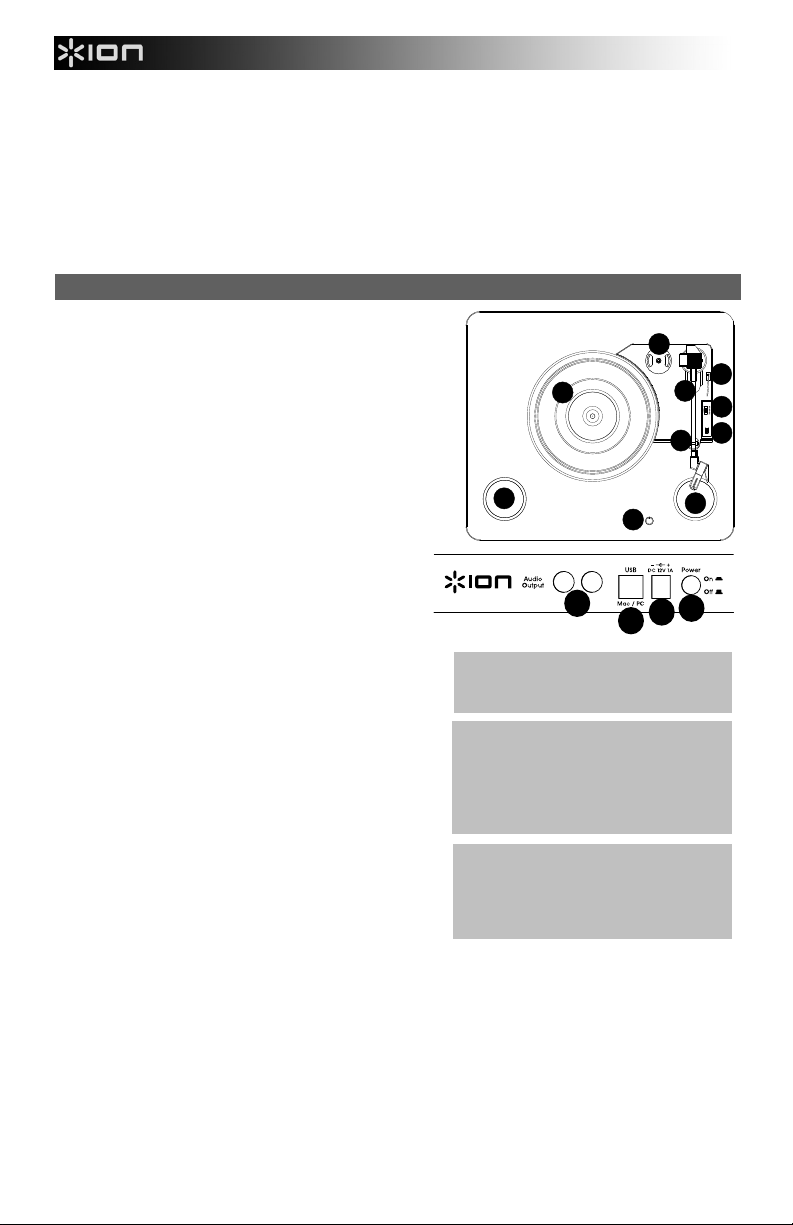
Features
1. Platter – Place your record here.
2. Tonearm* – The tonearm can be raised and lowered by
hand, or by pressing the raise / lower lever. Please note
that the tonearm needs to be moved away from resting
position (on the arm clip) for the turntable motor to
activate. When the tonearm is placed back in its resting
position, the turntable motor will deactivate if Autostop
has been turned on.
3. Arm Clip – This specially designed arm clip secures the
tonearm while at rest or when not in use. The arm clip
has been designed to remain in the up position while
unlocked.
4. Raise / Lower Lever – Raises and lowers the tonearm.
5. 33 / 45 / 78 Switch – This switch controls the RPM
of the turntable platter.
6. 45 RPM Adapter Holder – Holds the included 45
RPM adapter. When not using the adapter, please
place it in this holder.
7. Autostop Switch – This switch turns autostop on or
off. When autostop is on, the platter will start spinning
when the tonearm is placed over the record and stop
spinning when the record has reached the end. (When
autostop is off, the platter will always spin regardless
of the position of the tonearm.)
Note: If your vinyl record stops before it reaches the
end of the music, turn Autostop to the off position for
this particular record. This is generally recommended
for 45 RPM records.
8. Speakers – Listen to the audio from your playing vinyl
record.
9. Volume – Controls the audio output from the internal
speakers but does not affect the RCA output sound
level or the USB signal level.
10. RCA Output** – The audio from a playing vinyl record
is sent to this line-level coaxial audio output. This must
not be connected to phono level devices. (If you do not
already have an RCA cable, this can be found at a local electronics retailer.)
11. USB Audio Output – Use the included USB cable to connect your turntable to your computer. The USB
connection will send audio from the turntable to your computer. Please see the Using Archive LP With
Your Computer section of this manual for information.
12. Power – Use the included adapter to connect to wall power.
13. Power Button – Press this button to turn Archive LP on/off.
6
4
1
8
10
11
IMPORTANT: Remove the plastic
cartridge cover (needle cover) before
erating the turntable.
o
* IMPORTANT: If the turntable's stylus
becomes worn, purchase a replacement at
ionaudio.com/ict09rs. If you play 78
RPM records, we recommend using a 78
RPM stylus, which you can purchase at
ionaudio.com/ict06rs.
** WARNING: The RCA outputs are LINE
level. Please only connect these to LINE
level inputs. You may damage your
receiver if you plug in a LINE level device
into a PHONO level in
ut.
2
5
ON OFF
AUTO STOP
7
3
12
8
13
9
4
Page 5

Troubleshooting
If you experience any difficulties, please refer to the troubleshooting steps below as well
as those in the EZ Vinyl/Tape Converter manual included with this product.
I'm not hearing any audio when recording music to a computer:
o Make sure that Archive LP is powered on and that the needle is on the record.
o Make Archive LP is selected as your computer's default recording device (see the instructions below).
o Disconnect then reconnect the USB cable connecting Archive LP to your computer. Make sure the
computer speakers are turned up and the volume is not muted. Try turning up the volume on the Archive
LP's built-in speakers using the volume knob on the top panel of Archive LP.
o If you are listening through your computer's speakers, make sure those speakers are selected as your
computer's default playback device (see the instructions below). Alternatively, you could connect Archive
LP's RCA outputs to a stereo system or powered speakers. Do not connect them to phono-level inputs;
Archive LP's RCA outputs are line-level and could damage a device with phono-level inputs.
(Note: The RCA outputs monitor the signal coming out of the turntable, not the signal coming from your
I'm not hearing any audio when playing music:
I am hearing a hum through my speaker or laptop when using the turntable:
My turntable is not making any sound, or music is muffled:
The turntable belt fell off:
My turntable is not spinning:
My record is not playing at the correct speed; its pitch is too high or too low:
computer.)
• If you are playing music from vinyl:
o Make sure that Archive LP is powered on and that the needle is on the record.
o Connect Archive LP's RCA outputs to a stereo system or powered speakers. (Do not connect them to
phono-level inputs; Archive LP's RCA outputs are line-level and could damage a device with phono-level
inputs.)
o Make sure to adjust the volume knob on the turntable in order to hear your vinyl record playing through
the built-in speakers.
• If you are playing music from your computer:
o Make sure your software music player's volume is turned up.
o Make sure your computer's volume is turned up.
o Make sure your computer's speakers are selected as your computer's default playback device (see the
instructions below). (Archive LP cannot be used as a playback device for your computer's audio.)
• If you are recording to a laptop:
o Please connect the laptop to a grounded power supply (3 prong)
• If you are playing through a speaker:
o Ensure you are using the 12V 1A power adapter that was included with your product.
o If your volume is on max, try turning it down until the hum stops.
o Take the cover off the stylus.
o Please re-attach the belt to the turntable. For details on how to do this, see the guide located at
ionaudio.com/turntablebelt.
o Ensure the turntable is powered on (power switch in the back).
o Ensure autostop is turned on and the tonearm is placed over record (if auto stop is off it should always be
spinning when power is on).
o If the above steps do not help, you may need to re-attach your turntable belt. For details on how to do
this, see the guide located at ionaudio.com/turntablebelt.
o Ensure the 33 / 45 / 78 switch is set to the correct speed for your record.
o If the 33 / 45 / 78 switch is set correctly and the speed it still slightly off, do the following:
1. On the underside of Archive LP, find the rubber pad with the RPM speed you want to adjust, and
gently lift up the rubber pad to remove it.
2. Push through the rubber seal, and tighten/loosen the screw using a Phillips-head screwdriver to
fine-tune the RPM speed.
5
Page 6

Setting Your Computer's Soundcard as the Default Playback Device
• Windows XP: Click Start Menu Control Panel (or Settings Control Panel in Classic View) Sound and
Audio Devices. Click the Audio tab and under Sound playback, select your computer's soundcard as the
default device.
• Windows Vista: Click Start Menu Control Panel (or Settings Control Panel in Classic View) Hardware
and Sound Sound. Click the Playback tab and select your computer's soundcard as the default device.
• Windows 7: Click Start Menu Control Panel Sound. Click the Playback tab and select your computer's
soundcard as the default device.
• Windows 8: From the Start menu, click the lower-left corner of the screen to bring yourself to the Desktop. In
the bottom-right corner of the Taskbar, locate the Volume Control "Speaker" icon. Right-click the speaker and
select Playback Devices. The Windows Sound control panel should appear set on the Playback tab. If your
computer’s soundcard does not have a green "check mark" symbol next to it, right-click it and select "Set as
Default Device".
• Mac: Click the upper-left "apple" icon then click System Preferences Sound. Click the Output tab. From the
menu, select Internal Speakers if you are using the computer's internal speakers or select Headphones if you
are using speakers or headphones attached to the computer's 1/8" headphone output.
Setting Archive LP as the Default Recording Device
• Windows XP: Click Start Menu Control Panel (or Settings Control Panel in Classic View) Sound and
Audio Devices. Click the Audio tab and under Sound recording, select Archive LP as the default device.
• Windows Vista: Click Start Menu Control Panel (or Settings Control Panel in Classic View) Hardware
and Sound Sound. Click the Recording tab and select Archive LP as the default device.
• Windows 7: Click Start Menu Control Panel Sound. Click the Recording tab and select Archive LP as
the default device.
• Windows 8: From the Start menu, click the lower-left corner of the screen to bring yourself to the Desktop. In
the bottom-right corner of the Taskbar, locate the Volume Control "Speaker" icon. Right-click the speaker and
select Playback Devices. In the Windows Sound control panel select the Recording tab. If Archive LP does
not have a green "check mark" symbol next to it, right-click it and select "Set as Default Device".
• Mac: Click the upper-left "apple" icon then click System Preferences Sound. Click the Input tab. From the
menu, select Archive LP as the device.
BEFORE RETURNING THE PRODUCT, please contact ION Audio for technical at
ionaudio.com/support.
6
Page 7
p
Guía de Inicio Rápido (Español)
Contenido de la caja
Asegúrese de que todos los elementos abajo indicados estén incluidos en la caja.
• Archive LP
• Adaptador de alimentación
• Cable USB
• Pre-montado Slipmat
• Adaptador para 45 RPM
• CD de software
• Guía de inicio rápido
• Manual sobre la seguridad y garantía
LEA EL FOLLETO DE INSTRUCCIONES DE SEGURIDAD ANTES DE UTILIZAR EL PRODUCTO.
Soporte
• Para obtener información completa sobre requisitos del sistema, compatibilidad y registro del producto, visite
el sitio web de ION: ionaudio.com
• Para obtener la información más completa acerca de este producto, visite ionaudio.com/archivelp
• Para soporte adicional del producto, visite ionaudio.com/support
• Para información acerca de la seguridad y la garantía, visite ionaudio.com/warranty
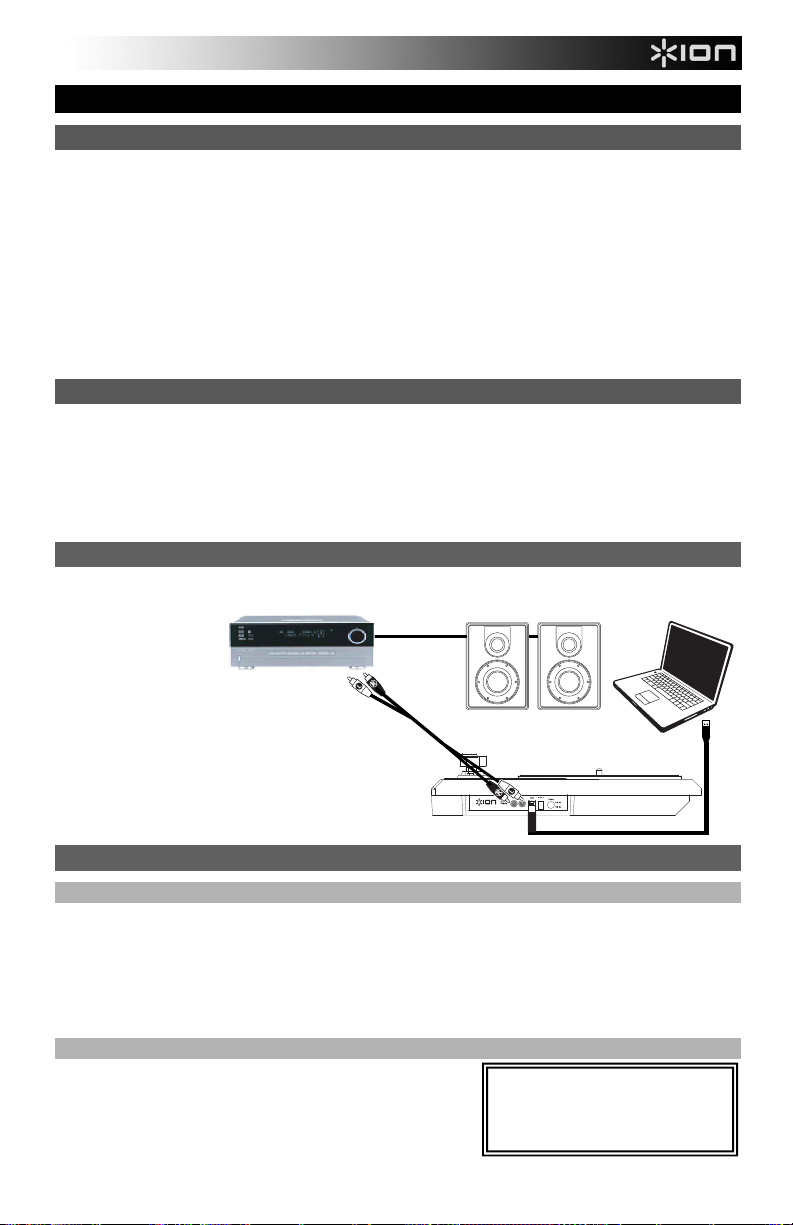
Diagrama de Conexión
Puesto que el Archive LP
tiene altavoces integrados,
no es necesario conectar
altavoces a fin de
escuchar sus discos de
vinilo. No obstante, si
desea conectar sus
propios altavoces, vea el
diagrama siguiente.
RECEPTOR
(no incluido)
ALTAVOCES
(no incluido)
COMPUTADORA
(no incluido)
Cómo Usar el Archive LP con su Computadora
Reproducción
¡Hay 3 maneras de escuchar sus discos de vinilo con Archive LP!
1. Puede escuchar simplemente su música con los altavoces internos de Archive LP.
2. Si prefiere usar sus propios altavoces estéreo, puede conectar las salidas RCA de Archive LP a un sistema estéreo o a
altavoces alimentados. No las conecte a entradas de nivel fonográfico —las salidas RCA del Archive LP son de nivel de
línea y podrían dañar un dispositivo con entradas de nivel fonográfico. (Cualquier otro tipo de entrada estándar, tal como
CD, entrada Aux o Cinta, es aceptable).
3. Puede escuchar a través de su computadora usando sus propios altavoces externos, o a través de auriculares conectados
a su computadora. (Archive LP no se puede usar como dispositivo de reproducción para el audio de su computadora.)
Cómo Grabar
Para grabar música en su computadora, puede usar el EZ Vinyl/Tape
Converter de ION. EZ Vinyl/Tape Converter facilita la conversión de su
música en archivos digitales. Después de terminar de convertir su vinilo,
puede quemarlo en CD o cargarlo en dispositivos de medios portátiles.
Visite ionaudio.com/ezvc para descargar
la versión más reciente de EZ Vinyl/Tape
Converter software o para obtener una
guía útil de solución de problemas y
so
orte adicional.
7
Page 8
Para instalar el software, inserte el CD incluido en su computadora y siga las instrucciones de la pantalla.
1. Con EZ Vinyl/Tape Converter instalado en su computadora, use el cable USB incluido para conectar el puerto USB del
Archive LP a un puerto USB disponible de su computadora.
2. En su computadora, puede abrir EZ Vinyl/Tape Converter yendo al menú Start All Programs (Inicio Todos los
programas) (Windows) o al menú Applications (Aplicaciones) (Mac).
3. Siga las instrucciones de la pantalla para preparar su grabación. Cuando se le indique que reproduzca su música, lleve
el brazo del Archive LP sobre el disco para iniciar la reproducción.
Nota: Para escuchar el disco mientras se reproduce, óigalo por los altavoces de su computadora o conecte las salidas
RCA del Archive LP a un sistema estéreo o altavoces alimentados. El Archive LP debe conectarse a la computadora a
fin de que EZ Vinyl/Tape Converter avance al paso siguiente.
4. Cuando termine de grabar, levante el brazo del Archive LP del disco y colóquelo en su clip.
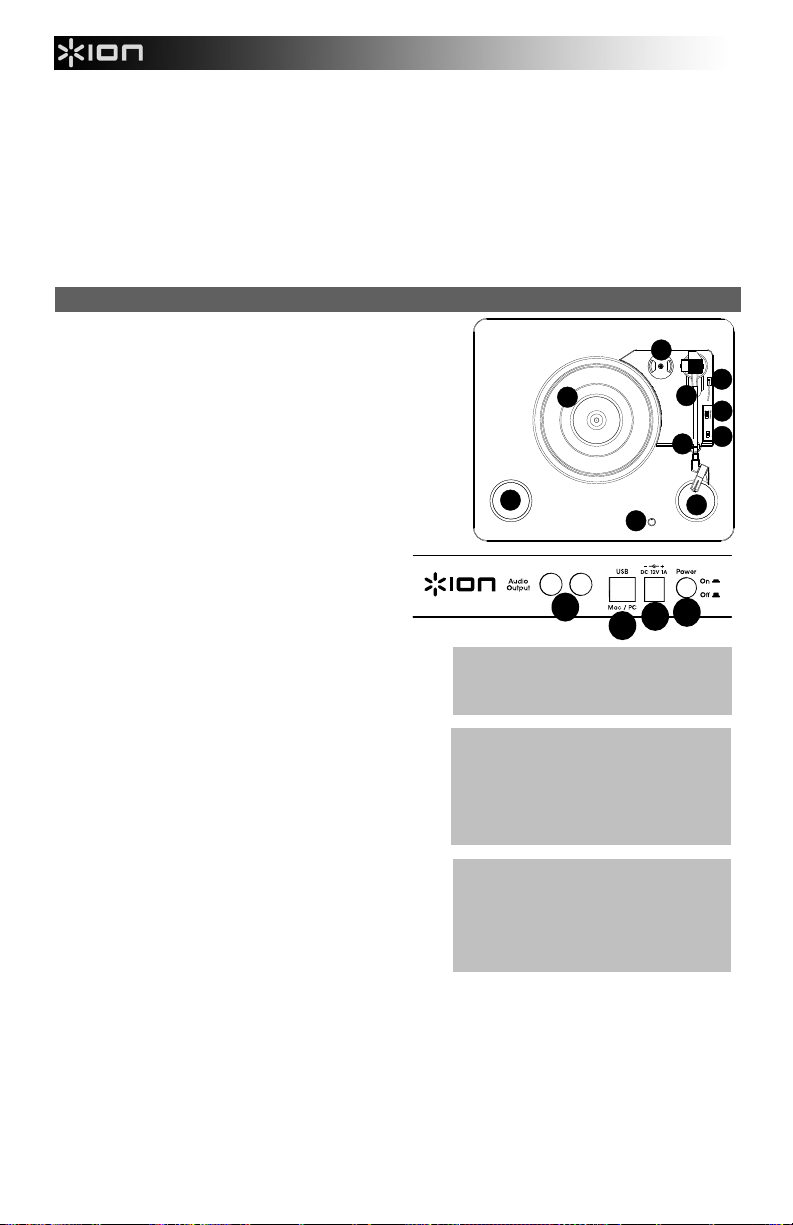
Características
1. Plato – Coloque aquí su disco.
2. Brazo* – El brazo se puede subir y bajar a mano o
presionando la palanca de subir / bajar. Tenga en cuenta
que es necesario sacar el brazo de la posición de reposo
(sobre el clip del brazo) para que se active el motor del
giradiscos. Cuando el brazo se coloca de nuevo en su
posición de reposo, el motor del giradiscos se desactiva.
Cuando el brazo se coloca de nuevo en su posición de
reposo, el motor del giradiscos se desactiva si Autostop
está activado.
3. Clip del brazo – Este clip diseñado especialmente fija el
brazo mientras está en reposo o no se usa. El clip ha
sido diseñado para que permanezca hacia arriba
mientras está desbloqueado.
4. Palanca de subir / bajar – Sube y baja el
brazo.
5. Conmutador de 33 / 45 / 78 RPM – Este
conmutador controla las RPM del plato del
giradiscos.
IMPORTANTE: Si se gasta la púa del giradiscos,
adquiera un reemplazo en ionaudio.com/ict05rs. Si
reproduce discos de 78 RPM, recomendamos usar
una púa para 78 RPM, que puede adquirir en
ionaudio.com/ict06rs.
6. Soporte del Adaptador Para 45 Rpm – Sostiene el
adaptador para 45 RPM incluido. Cuando no use el
adaptador, póngalo en este soporte.
7. Interruptor de parada automática – Este interruptor
activa y desactiva la parada automática. Cuando la
parada automática está activada, el plato comienza a
girar cuando el brazo se coloca sobre el disco y se
detiene cuando llega al final del mismo. (Si está
desactivada, el plato gira siempre,
independientemente de la posición del brazo.)
Nota: Si su disco de vinilo se detiene antes de llegar
al final de la música, gire Autostop a la posición de
desactivado para este disco en particular. Esto se
recomienda en general para los discos de 45 RPM.
8. Altavoces – Escuche el audio de su disco de vinilo.
9. Volumen – Controla la salida de audio proveniente de los altavoces internos pero no afecta al nivel de
sonido de la salida RCA o el nivel de señal USB.
10. Salida RCA** – El audio del disco de vinilo que se está reproduciendo se aplica a esta salida de audio
coaxial de nivel de línea. Esta salida no debe conectarse a dispositivos de nivel fonográfico. (Si no tiene
aún un cable RCA, puede encontrarlo en una tienda de electrónica local).
6
4
1
8
10
11
IMPORTANTE: Retire la cubierta plástica
de la cápsula (cubierta de la púa) antes
de hacer funcionar el giradiscos.
* IMPORTANTE: Si se gasta la púa del
giradiscos, adquiera un reemplazo en
ionaudio.com/ict09rs. Si reproduce
discos de 78 RPM, recomendamos usar
una púa para 78 RPM, que puede adquirir
en ionaudio.com/ict06rs.
** ADVERTENCIA: Las salidas RCA son
para nivel de LÍNEA. Conéctelas sólo a
las entradas de nivel de línea (LINE).
Puede dañar el receptor si enchufa un
dispositivo de nivel de línea en una
entrada de nivel fonográfico (PHONO).
2
5
ON OFF
AUTO STOP
7
3
8
9
13
12
8
Page 9

11. Salida de audio USB – Use el cable USB incluido para conectar el giradiscos a su computadora. La
conexión USB envía audio desde el giradiscos a su computadora. Para obtener información, consulte la
sección CÓMO USAR EL Archive LP CON SU COMPUTADORA.
12. Alimentación eléctrica – Use el adaptador incluido para conectarlo al tomacorriente de pared.
13. Botón de encendido – Pulse este botón para encender y apagar el Archive LP.
Solución de Problemas
Si experimenta alguna dificultad, consulte los pasos de solución de problemas que se
indican a continuación, como también el manual de EZ Vinyl/Tape Converter incluido con
este producto.
No oigo ningún audio cuando grabo música en una computadora:
o Asegúrese de que el Archive LP esté encendido y que la púa esté sobre el disco.
o Haga que el Archive LP esté seleccionado como dispositivo de grabación predeterminado de su
computadora (consulte las instrucciones de más abajo).
o Desconecte y vuelva a conectar el cable USB entre el Archive LP y la computadora. Asegúrese de que
los altavoces de la computadora estén encendidos y el volumen no esté silenciado. Trate de subir el
volumen de los altavoces integrados de Archive LP usando la perilla de volumen del panel superior del
Archive LP.
o Si está escuchando por los altavoces de la computadora, asegúrese de que estos estén seleccionados
como dispositivo de reproducción predeterminado de la misma (consulte las instrucciones de más abajo).
Como alternativa, puede conectar las salidas RCA del Archive LP a un sistema estéreo o altavoces
alimentados. No las conecte a entradas de nivel fonográfico —las salidas RCA del Archive LP son de
nivel de línea y podrían dañar un dispositivo con entradas de nivel fonográfico.
(Nota: Las salidas RCA monitorean la señal proveniente del giradiscos y no la señal proveniente de su
No oigo ningún audio cuando reproduzco la música:
Oigo un zumbido en mi altavoz o portátil cuando se usa el giradiscos:
Mi giradiscos no produce ningún sonido o la música está amortiguada.
Se salió la correa del giradiscos:
Mi giradiscos no gira:
computadora.)
• Si está reproduciendo la música de un vinilo:
o Asegúrese de que el Archive LP esté encendido y que la púa esté sobre el disco.
o Conecte las salidas RCA del Archive LP a un sistema estéreo o altavoces alimentados. (No las conecte a
entradas de nivel fonográfico —las salidas RCA del Archive LP son de nivel de línea y podrían dañar un
dispositivo con entradas de nivel fonográfico.)
o Asegúrese de ajustar la perilla de volumen del giradiscos a fin de oír su disco de vinilo que se reproduce
por los altavoces integrados.
• Si está reproduciendo la música de la computadora:
o Asegúrese de que el volumen del reproductor de música del software esté ajustado a un valor alto.
o Asegúrese de que el volumen de su computadora esté ajustado a un valor alto.
o Asegúrese de que los altavoces de su computadora estén seleccionados como dispositivo de
reproducción predeterminado de la misma (consulte las instrucciones de más abajo). (El Archive LP no
se puede usar como dispositivo de reproducción para el audio de su computadora.)
• Si está grabando en una laptop:
o Conecte la laptop a un suministro eléctrico con conexión a tierra (de 3 patas)
• Si está reproduciendo por un altavoz:
o Asegúrese de usar el adaptador de alimentación de 12 V 1 A que se incluyó con su producto.
o Si su volumen está al máximo, trate de disminuirlo hasta que cese el zumbido.
o Retire la cubierta de la púa.
o Vuelva a colocar la correa en el giradiscos. Para saber en detalle cómo hacerlo, consulte la guía que se
encuentra en ionaudio.com/turntablebelt.
o Asegúrese de que el giradiscos esté encendido (interruptor de encendido de la parte trasera).
o Asegúrese de que autostop esté activado y que el brazo esté colocado sobre el disco (si autostop está
desactivado, debe girar siempre cuando está encendido).
o Si los pasos precedentes no dieron resultado, es posible que necesite volver a colocar la correa del
giradiscos. Para saber en detalle cómo hacerlo, consulte la guía que se encuentra en
ionaudio.com/turntablebelt.
9
Page 10

Mi disco no se reproduce a la velocidad correcta. Su tono es demasiado alto o bajo:
o Asegúrese de que el interruptor 33 / 45 / 78 esté colocado en la velocidad correcta para su disco.
o Si el interruptor 33 / 45 / 78 está colocado correctamente y la velocidad aún está desajustada, haga lo
siguiente:
1. Del lado de abajo del Archive LP, busque la almohadilla de goma con la velocidad en RPM que
desea ajustar y levántela cuidadosamente para extraerla.
2. Empuje a través del sello de goma y apriete o afloje el tornillo con un destornillador Phillips para
realizar el ajuste fino de la velocidad en RPM.
Cómo Configurar la Tarjeta de Sonido de su Computadora Como Dispositivo de
Reproducción Predeterminado
• Windows XP: Haga clic en el menú Start Control Panel (Inicio Panel de control (o Settings Control
Panel (Configuración Panel de control) en la vista clásica) Sound and Audio Devices (Dispositivos de
sonido y audio). Haga clic en la pestaña Audio y bajo Sound playback (Reproducción de sonido), seleccione
la tarjeta de sonido de su computadora como dispositivo predeterminado.
• Windows Vista: Haga clic en el menú Start Control Panel (Inicio Panel de control) (o Settings Control
Panel (Configuración Panel de control) en la vista clásica) Hardware and Sound (Hardware y sonido)
Sound (Sonido). Haga clic en la pestaña Playback (Reproducción) y seleccione la tarjeta de sonido de su
computadora como dispositivo predeterminado.
• Windows 7: Haga clic en el menú Start Control Panel Sound (Inicio Panel de control Sonido).
Haga clic en la pestaña Playback (Reproducción) y seleccione la tarjeta de sonido de su computadora como
dispositivo predeterminado.
• Windows 8: Desde el menú Start (Inicio), haga clic en la esquina inferior izquierda de la pantalla para entrar al
escritorio. En la esquina inferior derecha de la barra de tareas, localice el icono del "Altavoz" de control de
volumen. Haga clic derecho en el altavoz y seleccione Playback Devices (Dispositivos de reproducción). El
panel de control Windows Sound (Sonido de Windows) debe aparecer ubicado en la pestaña Playback
(Reproducción). Si la tarjeta de sonido de su computadora no tiene el símbolo de la "marca de verificación"
verde junto a ella, haga clic derecho en la misma y seleccione Set as Default Device (Configurar como
dispositivo predeterminado).
• Mac: Haga clic en el icono superior izquierdo de la "manzana" y luego en System Preferences Sound
(Preferencias del sistema Sonido). Haga clic en la pestaña Output (Salida). En el menú, seleccione Internal
Speakers (Altavoces internos) si va a usar los altavoces internos de la computadora o Headphones
(Auriculares) si va a usar altavoces o auriculares conectados a la salida para auriculares de 1/8" de la
computadora.
Cómo Configurar el Archive LP Como Dispositivo De Grabación Predeterminado
• Windows XP: Haga clic en el menú Start Control Panel (Inicio Panel de control (o Settings Control
Panel (Configuración Panel de control) en la vista clásica) Sound and Audio Devices (Dispositivos de
sonido y audio). Haga clic en la pestaña Audio y bajo Sound recording (Grabación de sonido), seleccione el
Archive LP como dispositivo predeterminado.
• Windows Vista: Haga clic en el menú Start Control Panel (Inicio Panel de control) (o Settings Control
Panel (Configuración Panel de control) en la vista clásica) Hardware and Sound (Hardware y sonido)
Sound (Sonido). Haga clic en la pestaña Recording (Grabación) y seleccione el Archive LP como dispositivo
predeterminado.
• Windows 7: Haga clic en el menú Start Control Panel Sound (Inicio Panel de control Sonido).
Haga clic en la pestaña Recording (Grabación) y seleccione el Archive LP como dispositivo predeterminado.
• Windows 8: Desde el menú Start (Inicio), haga clic en la esquina inferior izquierda de la pantalla para entrar al
escritorio. En la esquina inferior derecha de la barra de tareas, localice el icono del "Altavoz" de control de
volumen. Haga clic derecho en el altavoz y seleccione Playback Devices (Dispositivos de reproducción). En el
panel de control Windows Sound (Sonido de Windows), seleccione la pestaña Recording (Grabación). Si
Archive LP no tiene el símbolo de la "marca de verificación" verde junto a él, haga clic derecho en el mismo y
seleccione Set as Default Device (Configurar como dispositivo predeterminado).
• Mac: Haga clic en el icono superior izquierdo de la "manzana" y luego en System Preferences Sound
(Preferencias del sistema Sonido). Haga clic en la pestaña Input (Entrada). En el menú, seleccione el
Archive LP como dispositivo.
ANTES DE DEVOLVER EL PRODUCTO, comuníquese con Ion Audio para solicitar
soporte técnico.
10
Page 11

r
Guide d’utilisation Rapide (Français)
Présentation
Assurez-vous que tous les articles énumérés dans le contenu de la boîte de ce guide sont inclus dans la boîte:
• Archive LP
• Adaptateur d’alimentation
• Câble USB
• pré-monté Slipmat
• Adaptateur 45 t/min
• CD logiciel
• Guide d’utilisation rapide
• Consignes de sécurité et informations concernant la garantie
VEUILLEZ LIRE LES CONSIGNES DE SÉCURITÉ AVANT D'UTILISER LE PRODUIT.
Assistance technique
• Pour tous les renseignements concernant la configuration système minimale requise, la compatibilité et
l’enregistrement du produit, veuillez visiter le site Internet d’ION : ionaudio.com
• Pour les toutes dernières informations concernant ce produit, veuillez visiter le site ionaudio.com/archivelp
• Pour de l’assistance supplémentaire, veuillez visiter le site ionaudio.com/support
• Pour de plus amples informations concernant les consignes de sécurité/la garantie, veuillez visiter le site
ionaudio.com/warranty
Schéma de Connexion
Puisque Le Archive LP
dispose de haut-parleurs
internes, il n’est pas
nécessaire de branche
des enceintes externes afin
d’écouter vos disques
vinyles. Toutefois, si vous
souhaitez le raccorder à
vos propres enceintes,
veuillez consulter le
diagramme suivant.
RÉCEPTEUR
(non inclus)
HAUTPARLEURS
(non inclus)
Utilisation du Archive LP Avec un Ordinateur
Lecture
Il y a 3 façons d'écouter les disques vinyles avec Archive LP.
1. Vous pouvez tout simplement écouter votre musique en utilisant les haut-parleurs internes du Archive LP.
2. Si vous préférez utiliser vos propres enceintes stéréo, branchez les sorties RCA du Archive LP à un système stéréo ou à
des enceintes amplifiées. (Ne tentez pas de les brancher à des entrées phono, car les sorties RCA du Archive LP sont à
niveau ligne et cela pourraient endommager un appareil phono (tout autre type d’entrée standard, comme CD, auxiliaire et
cassette est acceptable).
3. Vous pouvez également utiliser des enceintes externes ou un casque d’écoute reliés à votre ordinateur. Le Archive LP ne
peut être utilisé comme appareil de lecture pour transmettre le signal audio de votre ordinateur.
ORDINATEUR
(non inclus)
11
Page 12

Enregistrement
Pour enregistrer de la musique sur votre ordinateur, vous pouvez utiliser
l'application EZ Vinyl/Tape Converter de ION. Le logiciel EZ Vinyl/Tape
Converter permet de simplifier le processus de conversion de votre
musique en fichiers numériques.
Une fois la conversion du vinyle terminée, vous pouvez graver les
fichiers sur CD ou les transférer sur des lecteurs multimédia.
Insérez le CD d’installation de l’application dans votre ordinateur, puis suivez les instructions à l’écran pour continuer
l’installation.
1. Une fois l’application EZ Vinyl/Tape Converter installée sur votre ordinateur, connectez le port USB du Archive
LP au port USB de votre ordinateur à l’aide du câble USB inclus.
2. Sur votre ordinateur, vous pouvez lancer l’application EZ Vinyl/Tape Converter en allant dans le menu
Démarrer Tous les programmes (Windows) ou dans le menu Applications (Mac).
3. Suivez ensuite les instructions à l’écran afin de configurer l’enregistrement. Lorsque vous êtes invité à faire
jouer votre musique, déplacez le bras de lecture du Archive LP sur le disque afin de démarrer la lecture.
Remarque : Pour écouter un disque durant la lecture, vous pouvez utiliser les haut-parleurs de votre
ordinateur, ou encore brancher les sorties RCA du Archive LP à une chaîne stéréo ou à des haut-parleurs. Le
Archive LP doit être branché à l'ordinateur afin que le logiciel EZ Vinyl/Tape Converter puisse passer à l'étape
suivante.
4. Une fois l’enregistrement terminé, soulevez le bras de lecture et remettez-le sur le serre-bras.
Caractéristiques
1. Plateau – Veuillez placer le disque sur ce plateau.
2. Bras de lecture* – Le bras de lecture peut être lever ou
abaisser manuellement ou en utilisant le bouton du levier de
commande. Veuillez noter que le bras de lecture doit être
déplacé du support (sur le serre-bras) afin que le moteur de la
platine soit activé. Lorsque le bras de lecture est à nouveau
sur le support, le moteur se désactive. Lorsque le bras de
lecture est à nouveau sur le support, le moteur du plateau
s’arrête lorsque la fonction Autostop a été activée.
3. Serre-bras – Ce serre bras est conçu spécialement afin de
maintenir en place le bras de lecture lorsque la platine n’est
pas utilisée. Le serre-bras a été conçu pour rester en position
élevée lorsqu’il est déverrouillé.
4. Levier de commande – Permet de lever ou d’abaisser le
bras de lecture.
5. Sélecteur de vitesse (33/45/78) – Ce sélecteur régit la
vitesse de rotation du plateau.
IMPORTANT : Si la pointe de lecture de la platine tourne-
disque est usée, veuillez en acheter une de rechange sur
le site ionaudio.com/ict05rs. Si vous faites jouer des
disques 78 tours, nous vous recommandons d'utiliser une
pointe de lecture pour 78 tr/min, que vous trouverez sur le
site ionaudio.com/ict06rs.
6. Rangement Pour Adaptateur 45 Tr/Min – Il permet de
ranger l'adaptateur 45 tr/min lorsqu’il n’est pas utilisé.
Lorsqu’il n’est pas utilisé, veuillez mettre l'adaptateur dans
cet emplacement.
7. Autostop – Ce commutateur permet d'activer et de
désactiver la fonction autostop. Lorsqu’elle est activée, le
plateau commence à tourner dès que le bras de lecture
est placé au-dessus du disque et s’arrête lorsque l’aiguille
a atteint la fin du disque. (Lorsqu'elle est désactivée, le
plateau tourne, peu importe l’emplacement du bras de
lecture.)
Remarque : Si le disque s'arrête avant la fin de la
musique, désactivez la fonction Autostop pour ce disque.
Ceci est généralement recommandé pour disques de 45
tours.
8. Haut-parleurs – Ceux-ci permettent d’écouter la musique
provenant du disque vinyle.
Visitez le site ionaudio.com/ezvc afin
de télécharger la toute dernière version
du logiciel EZ Vinyl/Tape Converter, ou
afin d’accéder au guide de dépannage
ou d’obtenir de l’aide supplémentaire.
6
4
9
11
12
3
2
13
5
ON OFF
AUTO STOP
7
8
1
8
10
IMPORTANT: Retirez le couvercle de
plastique de la cartouche (protège aiguille)
avant d’utiliser la platine.
* IMPORTANT : Si la pointe de lecture de la
platine tourne-disque est usée, veuillez en
acheter une de rechange sur le site
ionaudio.com/ict09rs. Si vous faites jouer des
disques 78 tours, nous vous recommandons
d'utiliser une pointe de lecture pour 78 tr/min, que
vous trouverez sur le site ionaudio.com/ict06rs.
** MISE EN GARDE: Les sorties RCA sont à
niveau ligne. Veuillez ne les brancher à des
entrées à niveau ligne. Vous pourriez
endommager votre récepteur si un appareil À
NIVEAU LIGNE est branché à une entrée
PHONO.
12
Page 13

9. Volume – Ce réglage permet de contrôler la sortie audio provenant des haut-parleurs internes, mais n'affecte
pas les niveaux de la sortie RCA ou de la sortie USB.
10. Sortie RCA** – L'audio provenant du disque vinyle est envoyé à cette sortie audio coaxiale à niveau ligne. Elle
ne doit pas être branchée aux appareils phono. (Vous pouvez vous procurer un câble RCA chez un détaillant
électronique local si vous n'en avez pas déjà.)
11. Sortie audio USB – Utilisez le câble USB inclus pour brancher la platine tourne-disque à un ordinateur. La
connexion USB permet d’acheminer l’audio de la platine tourne disque à votre ordinateur. Veuillez consulter la
section Utilisation du Archive LP Avec un Ordinateur de ce manuel pour de plus amples informations.
12. Entrée d'alimentation – Utilisez le câble d’alimentation inclus pour brancher le Archive LP dans une prise
d’alimentation.
13. Interrupteur d’alimentation – Cette touche permet de mettre le Archive LP sous et hors tension.
Guide de Dépannage
Si vous éprouvez des difficultés, veuillez consulter les consignes de dépannage ci-dessous ainsi que celles
dans le guide du EZ Vinyl/Tape Converter inclus avec ce produit.
Je n’entends pas de signal audio lors de l’enregistrement sur ordinateur :
o Assurez-vous que le Archive LP est allumé et que l’aiguille est bien sur le disque.
o Assurez-vous que le Archive LP est sélectionné comme périphérique d'enregistrement par défaut de votre
ordinateur (voir les instructions ci-dessous).
o Essayez de débrancher le câble USB branché au Archive LP et à votre ordinateur, puis de le rebrancher. Veuillez
vous assurer que le volume des haut-parleurs de l'ordinateur soit assez élevé et qu’il n’est pas en sourdine.
Essayez d'augmenter le volume des haut-parleurs internes du Archive LP en utilisant le réglage volume du
panneau supérieur du Archive LP.
o Si vous écoutez la musique via les haut-parleurs de votre ordinateur, assurez-vous que ces haut-parleurs sont
sélectionnés comme dispositif de lecture par défaut de votre ordinateur (voir les instructions ci-dessous). Vous
pourriez également brancher les sorties RCA du Archive LP à une chaîne stéréo ou à des haut-parleurs. Ne
tentez pas de les brancher à des entrées phono; les sorties RCA du Archive LP sont à niveau ligne et pourraient
endommager un appareil phono. (Remarque : Les sorties RCA contrôlent le signal sortant de la platine tourne-
Je n’entends pas de signal audio lors de la lecture :
Il y a un bourdonnement provenant de mon haut-parleur, ordinateur portable ou appareil iOS lorsque j’utilise la platine
tourne-disque :
Aucun son ne provient de ma platine tourne-disque, ou le son de la musique est étouffé :
La courroie de la platine tourne-disque s’est détachée :
Le plateau ne tourne pas :
disque, mais pas le signal provenant de votre ordinateur).
• Si vous faites la lecture à partir d’un vinyle :
o Assurez-vous que le Archive LP est allumé et que l’aiguille est bien sur le disque.
o Branchez les sorties RCA du Archive LP à une chaîne stéréo ou à des haut-parleurs. (Ne tentez pas de les
brancher à des entrées phono; les sorties RCA du Archive LP sont à niveau ligne et pourraient endommager un
appareil phono.
o Veuillez vous assurer de régler le bouton volume sur la platine tourne-disque afin d’entendre le son à travers les
haut-parleurs intégrés.
• Si vous faite la lecture à partir de votre ordinateur :
o Assurez-vous que le niveau du volume de l’application soit assez élevé.
o Assurez-vous que le niveau du volume de l'ordinateur soit assez élevé.
o Assurez-vous que les haut-parleurs de votre ordinateur soient sélectionnés comme dispositif de lecture par défaut
de votre ordinateur (voir les instructions ci-dessous). (Le Archive LP ne peut être utilisé comme périphérique de
lecture pour votre ordinateur.)
• Si vous enregistrez sur un ordinateur :
o Veuillez brancher l’ordinateur à un câble d’alimentation avec mise à la terre (3 broches).
• Si vous utilisez un haut-parleur :
o Veuillez vous assurer que vous utiliser bien l'adaptateur d’alimentation 12 V 1 A fourni avec votre produit.
o Si le volume est au maximum, essayez de le diminuer jusqu'à l'arrêt du ronflement.
o Retirez le couvercle de la pointe de lecture.
o Veuillez réinstaller la courroie sur la platine tourne-disque. Pour plus d'informations sur comment procéder,
veuillez consulter le guide sur le site ionaudio.com/turntablebelt.
o Veuillez vous assurer que la platine tourne-disque est sous tension (interrupteur à l'arrière).
o Veuillez vous assurer que la fonction autostop est activée et que le bras de lecture est placé sur le disque (lorsque
la fonction autostop est désactivée, le plateau devrait toujours tourner lorsqu’il est sous tension).
o Si le plateau ne tourne toujours pas après avoir effectué les étapes ci-dessus, il se peut que vous deviez
réinstaller la courroie du plateau.Pour plus d'informations sur comment procéder, veuillez consulter le guide sur le
site ionaudio.com/turntablebelt.
13
Page 14

Mon disque ne joue pas à la bonne vitesse, la tonalité est trop haute ou trop basse :
o Veuillez vous assurer que le sélecteur de vitesse 33 / 45 / 78 est réglé sur la bonne vitesse pour votre disque.
o Si le sélecteur de vitesse 33 / 45 / 78 est correctement réglé et que la vitesse n’est toujours pas bonne, procédez
comme suit :
1. Sur le dessous du Archive LP, trouvez le pad en caoutchouc qui correspond à la vitesse que vous désirez
modifier, et soulevez-le délicatement pour l'enlever.
2. Introduisez un tournevis cruciforme dans le joint en caoutchouc et serrez/desserrez la vis pour ajuster la
vitesse tr/min.
Configuration de la Carte Son de L’ordinateur Comme Périphérique de Lecture Audio Par
Défaut
• Windows XP: Clicquez sur Démarrer Panneau de configuration (ou Paramètres Panneau de configuration en
Affichage classique) Sons et périphériques audio. Cliquez sur l’onglet Audio et sélectionnez la carte son de
l’ordinateur comme périphérique de lecture audio par défaut.
• Windows Vista: Cliquez sur Démarrer Panneau de configuration (ou Paramètres Panneau de configuration en
Affichage classique) Matériel et audio Son. Cliquez sur l'onglet Lecture et sélectionnez la carte son de l’ordinateur
comme périphérique de lecture audio par défaut.
• Windows 7: Cliquez sur Démarrer Panneau de configuration Son. Cliquez sur l'onglet Lecture et sélectionnez la
carte son de l’ordinateur comme périphérique de lecture audio par défaut.
• Windows 8 : Dans le menu Démarrer, cliquez sur le coin inférieur gauche de l'écran pour afficher le bureau. Dans le
coin inférieur droit de la barre des tâches, recherchez l’icône de la commande de volume « haut-parleur ». Faites un clic
droit sur l’icône du haut-parleur et sélectionnez Périphériques de lecture. L'onglet Lecture du panneau de configuration
Sons doit apparaître comme étant configuré. Si la carte son de votre ordinateur ne dispose pas d’un crochet, faites un
clic droit et sélectionnez Définir comme périphérique par défaut.
• Mac: Cliquez sur la pomme (logo Apple) située dans le coin supérieur gauche de l’écran et sélectionnez Préférences
Système Sons. Cliquez sur l’onglet Sortie. À partir du menu, sélectionnez Haut-parleurs internes si vous utilisez les
haut-parleurs internes de l’ordinateur, ou sélectionnez Écouteurs si vous utilisez des haut-parleurs ou un casque
d’écoute branchés à la sortie casque (1/8 po) de votre ordinateur.
Configurez le Archive LP Comme l’appareil d’enregistrement Par Défaut
• Windows XP: Cliquez sur Démarrer Panneau de configuration (ou Paramètres Panneau de configuration en
Affichage classique) Sons et périphériques audio. Cliquez sur l’onglet Audio et sous Enregistrement audio
sélectionnez Archive LP comme appareil par défaut.
• Windows Vista: Cliquez sur Démarrer Panneau de configuration (ou Paramètres Panneau de configuration en
Affichage classique) Matériel et audio Son. Cliquez sur l’onglet Enregistrement et sélectionnez Archive LP
comme appareil par défaut.
• Windows 7: Cliquez sur Démarrer Panneau de configuration Son. Cliquez sur l’onglet Enregistrement et
sélectionnez Archive LP comme appareil par défaut.
• Windows 8 : Dans le menu Démarrer, cliquez sur le coin inférieur gauche de l'écran pour afficher le bureau. Dans le
coin inférieur droit de la barre des tâches, recherchez l’icône de la commande de volume « haut-parleur ». Faites un clic
droit sur l’icône du haut-parleur et sélectionnez Périphériques de lecture. Sélectionnez l'onglet Enregistrement dans le
haut de la fenêtre du panneau de configuration Son. Si Archive LP ne dispose pas d’un crochet, faites un clic droit et
sélectionnez Définir comme périphérique par défaut.
• Mac: Cliquez sur la pomme (logo Apple) située dans le coin supérieur gauche de l’écran et sélectionnez Préférences
Système Sons. Cliquez sur l’onglet Entrée. À partir du menu, sélectionnez Archive LP comme appareil par défaut.
AVANT DE RETOURNER CE PRODUIT, veuillez communiquer avec le service technique
de ION Audio pour de l’assistance.
14
Page 15

Guida rapida (Italiano)
Introduzione
Assicurarsi che gli elementi elencati di seguito siano contenuti nella confezione:
• Archive LP
• Adattatore di alimentazione
• Cavo USB
• Pre-Mounted Slipmat
• Adattatore 45 giri
• CD recante il software
• Guida rapida
• Istruzioni di sicurezza e garanzia
LEGGERE ATTENTAMENTE IL LIBRETTO DI ISTRUZIONI PRIMA DI UTILIZZARE IL PRODOTTO
Assistenza
• Per conoscere i requisiti di sistema completi, ottenere informazioni in merito alla compatibilità e per la registrazione
del prodotto, recarsi al sito Web di ION: ionaudio.com
• Per conoscere le ultime informazioni in merito a questo prodotto, recarsi alla pagina ionaudio.com/archivelp
• Per ulteriore assistenza, recarsi alla pagina ionaudio.com/support
• Per informazioni sulla sicurezza/garanzia, recarsi alla pagina ionaudio.com/warranty
Schema dei Collegamenti
Poiché il Archive LP ha
altoparlanti incorporati,
non è necessario
collegare altoparlanti per
ascoltare i propri vinili.
Ciò nonostante, se si
desidera collegare i
propri altoparlanti,
seguire lo schema
seguente.
RICEVITORI
(non in
dotazione)
ALTOPARLANTI
(non in
dotazione)
COMPUTER
(non in
dotazione)
Uso dell'Archive LP con Il Computer
Riproduzione
Ci sono 3 modi per ascoltare i propri dischi in vinile con il Archive LP!
1. Si può ascoltare la musica servendosi semplicemente degli altoparlanti interni del Archive LP.
2. Se invece si preferisce utilizzare i propri altoparlanti stereo, è possibile collegare le uscite RCA del Archive LP a
un impianto stereo o agli altoparlanti Non collegarli a ingressi a livello phono; le uscite RCA del Archive LP sono a
livello di linea e potrebbero danneggiare un dispositivo dotato di ingressi a livello phono (qualsiasi altro tipo di
ingresso standard quale CD, Aux In o Tape è accettabile).
3. Si può ascoltare tramite il computer utilizzando i propri altoparlanti esterni o tramite cuffie collegate al computer.
(Il Archive LP non può essere utilizzato come dispositivo di riproduzione dell'audio del computer).
15
Page 16

AUTO STOP
ON OFF
1
2
4
3
5
7
8
8
9
6
g
Registrazione
Per registrare musica sul computer, è possibile utilizzare l'ION EZ
Vinyl/Tape Converter. L'EZ Vinyl/Tape Converter rende facile
trasformare la propria musica in file digitali.
Una volta terminato di convertire il vinile, lo si può masterizzare su un
CD o caricare su dispositivi media portatili.
Per installare il software, inserire il CD in dotazione nel computer e
seguire le istruzioni su schermo.
1. Una volta installato l'EZ Vinyl/Tape Converter sul computer, servirsi del cavo USB in dotazione per collegare la porta
USB dell'Archive LP ad una porta USB disponibile del computer.
2. Sul computer, è possibile aprire l'EZ Vinyl/Tape Converter recandosi su Start Tutti i programmi (Windows) o su
Applicazioni (Mac).
3. Seguire le istruzioni su schermo per configurare la registrazione. Quando viene richiesto di riprodurre la musica, muovere
il braccio dell'Archive LP sul disco per iniziare la riproduzione.
Nota bene: per ascoltare un disco mentre viene riprodotto, servirsi degli altoparlanti del computer o collegare le uscite
RCA dell'Archive LP a un impianto stereo o a delle casse. Il Archive LP deve essere collegato al computer affinché l'EZ
Vinyl/Tape Converter avanzi alla fase successiva.
4. Una volta terminato di registrare, alzare il braccio dell'Archive LP dal disco e riportarlo sul poggiabraccio.
Caratteristiche
1. Piatto – Il disco va collocato qui.
2. Braccio* – Il braccio può essere alzato e abbassato a mano, premendo
la levetta di sollevamento / abbassamento. Va notato che il braccio deve
essere allontanato dalla posizione di riposo (sul fermabraccio) affinché il
motore del giradischi si attivi. Quando il braccio viene nuovamente
collocato in posizione di riposo, il motore si disattiva. Quando il braccio
viene nuovamente collocato in posizione di riposo, il motore del
giradischi si disattiva se l'Autostop è stato acceso.
3. Fermabraccio – Questo fermabraccio dal design speciale fissa il braccio
quando è a riposo o quando non è in uso. Il fermabraccio è stato
progettato in modo da restare sollevato quando sbloccato.
4. Levetta di sollevamento / abbassamento – Alza e abbassa il braccio.
5. Interruttore 33 / 45 / 78 giri – Questo interruttore regola i GIRI del
piatto del giradischi.
IMPORTANTE: se la puntina del giradischi si usura, acquistare un
ricambio alla pagina ionaudio.com/ict05rs. Se si riproducono dischi
a 78 giri, consigliamo l'uso di una puntina a 78 giri, acquistabile alla
pagina ionaudio.com/ict06rs.
6. Supporto Adattatore 45 Giri – Regge l’incluso adattatore per
45 giri. Quando l'adattatore non è in uso, può essere collocato a
questo livello.
7. Interruttore Autostop – Questo interruttore accende o spegne
la funzione di arresto automatico. Quando la funzione "autostop"
è attiva, il piatto inizia a girare quando il braccio è posato sul
disco e smette di girare quando il disco arriva alla fine. (Quando
la funzione autostop è disattiva, il piatto continuerà a girare,
indipendentemente dalla posizione del braccio.)
Nota bene: Se il vinile si ferma prima di raggiungere la fine della
musica, spegnere la funzione Autostop per quel particolare
disco. Di solito, ciò è consigliato per i dischi a 45 giri.
8. Altoparlanti – Per ascoltare l'audio del disco in vinile riprodotto.
9. Volume – Controlla l'uscita audio degli altoparlanti interni, ma
non influisce sul livello dell'audio delle uscite RCA o il livello di
segnale USB.
10. Uscita RCA** – L'audio di un vinile riprodotto è inviato a questa
uscita audio coassiale a livello di linea. Questa non va collegata
a dispositivi a livello phono. (Se ancora non si dispone di un cavo
RCA, questo può essere trovato presso un rivenditore locale di
elettronica.)
11. Uscita Audio USB – Servirsi del cavo USB in dotazione per collegare il giradischi al computer. Il collegamento USb
invierà audio dal giradischi al computer. Si veda il paragrafo Uso Dell'Archive LP Col Computer di questo manuale per
maggiori informazioni.
12. Power – Servirsi dell'adattatore in dotazione per collegarsi ad una presa a parete.
13. Interruttore di alimentazione – Premere questo tasto per accendere o spegnere l'Archive LP.
Recarsi alla pagina ionaudio.com/ezvc per
scaricare l'ultima versione dei software EZ
Vinyl/Tape Converter oppure per ottenere
un'utile guida alla risoluzione dei problemi o
ulteriore assistenza.
10
IMPORTANTE: rimuovere il cappuccio della
cartuccia (copripuntina) prima di utilizzare il
iradischi.
11
12
13
* IMPORTANTE: se la puntina del
giradischi si usura, acquistare un ricambio
alla pagina ionaudio.com/ict09rs. Se si
riproducono dischi a 78 giri, consigliamo
l'uso di una puntina a 78 giri, acquistabile
alla pagina ionaudio.com/ict06rs.
**AVVERTENZA: le uscite RCA sono a livello
di LINEA. Collegarle unicamente a ingressi a
livello di LINEA. Si rischia di danneggiare il
ricevitore collegando un dispositivo a livello di
LINEA in un ingresso PHONO.
16
Page 17

Risoluzione di Problemi
In caso di problemi, fare riferimento alle fasi di risoluzione dei problemi indicate qui di seguito, nonché a
quanto indicato nel manuale dell'EZ Vinyl/Tape Converter in dotazione con il presente prodotto.
Non sento alcun audio durante la registrazione di musica su un computer:
o Assicurarsi che l'Archive LP sia acceso e che la puntina sia sul disco.
o Assicurarsi che sia selezionato come periferica di registrazione predefinita del computer (si vedano le
istruzioni qui di seguito).
o Scollegare e ricollegare inoltre il cavo USB che unisce l'Archive LP al computer. Assicurarsi che gli
altoparlanti del computer siano accesi e che il volume non sia silenziato. Provare ad alzare il volume degli
altoparlanti incorporati del Archive LP servendosi della manopola di regolazione del volume presente a
livello del pannello superiore del Archive LP.
o Se si ascolta tramite le casse del computer, assicurarsi che queste siano selezionate come periferica di
riproduzione predefinita del computer (si vedano le istruzioni qui di seguito). Alternativamente, collegare
le uscite RCA dell'Archive LP ad un impianto stereo o ad altoparlanti. Non collegarle a ingressi a livello
phono: le uscite RCA dell'Archive LP sono a livello di linea e potrebbero danneggiare un dispositivo con
ingressi a livello phono. (Nota bene: le uscite RCA monitorano il segnale che esce dal giradischi, non
Non sento alcun audio durante la riproduzione di musica:
Durante l'uso del giradischi sento un ronzio tramite l'altoparlante o il portatile.
Il giradischi non emette alcun suono o la musica è ovattata:
La cinghia del giradischi è caduta:
Il giradischi non gira:
Il mio disco non suona alla giusta velocità; il pitch è troppo alto o troppo basso:
quello proveniente dal computer.)
• Se si riproduce musica da vinile:
o Assicurarsi che l'Archive LP sia acceso e che la puntina sia sul disco.
o Collegare le uscite RCA dell'Archive LP ad un impianto stereo o ad altoparlanti. (Non collegarle a ingressi
a livello phono: le uscite RCA dell'Archive LP sono a livello di linea e potrebbero danneggiare un
dispositivo con ingressi a livello phono.)
o Regolare la manopola del volume sul giradischi per sentire il disco suonare tramite gli altoparlanti
incorporati.
• Se si riproduce musica dal computer:
o Assicurarsi che il volume del lettore musicale software sia acceso.
o Assicurarsi che il volume del computer sia acceso.
o Assicurarsi che le casse del computer siano selezionate come periferica di riproduzione predefinita del
computer (si vedano le istruzioni qui di seguito). (L'Archive LP non può essere utilizzato come periferica
di riproduzione per l'audio del computer.)
• Se si sta registrando su un computer portatile:
o collegare il computer ad un'alimentazione con messa a terra (3 denti)
• Se si sta riproducendo musica con un altoparlante:
o Assicurarsi di utilizzare l'adattatore di alimentazione da 12V 1A incluso con il prodotto.
o Se il volume è al massimo, provare ad abbassarlo fino a quando il ronzio non cessa.
o Togliere il coperchio dalla puntina.
o Fissare nuovamente la cinghia al giradischi. Per maggiori dettagli su come eseguire questa operazione, si
veda la guida all'indirizzo ionaudio.com/turntablebelt.
o Assicurarsi che il giradischi sia acceso (interruttore di alimentazione sul retro dell'apparecchio).
o Assicurarsi che la funzione autostop sia accesa e che il braccio sia posizionato sul disco (se l'autostop è
spento deve girare sempre quando l'alimentazione è accesa).
o Se quanto sopra non è di aiuto, può essere necessario ricollegare la cinghia del giradischi. Per maggiori
dettagli su come eseguire questa operazione, si veda la guida all'indirizzo ionaudio.com/turntablebelt.
o Assicurarsi che l'interruttore 33 / 45 / 78 sia impostato sulla velocità giusta per il disco specifico.
o Se l'interruttore 33 / 45 / 78 è impostato correttamente e la velocità è ancora leggermente errata,
procedere come segue:
1. Sul lato inferiore del Archive LP trovare il pad in gomma con la velocità in giri che si desidera
regolare e sollevarlo delicatamente per rimuoverlo.
2. Spingere il sigillo in gomma e stringere/allentare la vite servendosi di un cacciavite con testa a
croce per affinare la velocità in giri.
17
Page 18

Configurazione Della Scheda Audio del Computer Come Dispositivo di Riproduzione
Predefinito
• Windows XP: Cliccare su Start Pannello di controllo (o Impostazioni Pannello di controllo in
visualizzazione classica) Suoni e periferiche audio. Cliccare sulla scheda Audio e sotto Riproduzione
audio, selezionare la scheda audio del computer come periferica predefinita.
• Windows Vista: Cliccare su Start Pannello di controllo (o Impostazioni Pannello di controllo in
visualizzazione classica) Hardware e suoni Audio. Cliccare sulla scheda Riproduzione e selezionare la
scheda audio del computer come periferica predefinita.
• Windows 7: Cliccare su Start Pannello di controllo Audio. Cliccare sulla scheda Riproduzione e
selezionare la scheda audio del computer come periferica predefinita.
• Windows 8: Nel menu Start, cliccare sull'angolo inferiore sinistro dello schermo per passare al Desktop.
Nell'angolo inferiore destro della Barra delle applicazioni, individuare l'icona "Speaker" di controllo del Volume.
Fare click col tasto destro del mouse e selezionare Dispositivi di riproduzione. Il pannello di controllo Audio
di Windows dovrebbe comparire sulla scheda Riproduzione. Se la scheda audio del computer non presenta
un segno di spunta verde, fare click col destro e selezionare Imposta come dispositivo predefinito.
• Mac: Cliccare sull'icona della "mela" in alto a sinistra, quindi cliccare su Preferenze di sistema Audio.
Cliccare sulla scheda Output. Nel menu, selezionare Internal Speakers se si utilizzano le casse interne del
computer o Cuffie se si utilizzano casse o cuffie collegate all'uscita cuffie da 1/8" del computer.
Configurare l'Archive LP Come Dispositivo di Registrazione Predefinito
• Windows XP: Cliccare su Start Pannello di controllo (o Impostazioni Pannello di controllo in
visualizzazione classica) Suoni e periferiche audio. Cliccare sulla scheda Audio e sotto Registrazione
audio, selezionare l'Archive LP come periferica predefinita.
• Windows Vista: Cliccare su Start Pannello di controllo (o Impostazioni Pannello di controllo in
visualizzazione classica) Suoni e periferiche audio. Cliccare sulla scheda Registrazione e selezionare
l'Archive LP come periferica predefinita.
• Windows 7: Cliccare su Start Pannello di controllo Audio. Cliccare sulla scheda Registrazione e
selezionare l'Archive LP come periferica predefinita.
• Windows 8: Nel menu Start, cliccare sull'angolo inferiore sinistro dello schermo per passare al Desktop.
Nell'angolo inferiore destro della Barra delle applicazioni, individuare l'icona "Speaker" di controllo del Volume.
Fare click col tasto destro del mouse e selezionare Dispositivi di riproduzione. Nel pannello di controllo
Audio di Windows selezionare la scheda Registrazione. Se il Archive LP non presenta un segno di spunta
verde, fare click col destro e selezionare Imposta come dispositivo predefinito.
• Mac: Cliccare sull'icona della "mela" in alto a sinistra, quindi cliccare su Preferenze di sistema Audio. Fare
clic sulla scheda Input. Dal menu, selezionare l'Archive LP come periferica.
PRIMA DI RENDERE QUESTO PRODOTTO, contattare ION Audio per ricevere
assistenza tecnica.
18
Page 19

j
k
Kurzanleitung (Deutsch)
Einführung
Vergewissern Sie sich, dass alle hier angeführten Komponenten in der Schachtel enthalten sind:
• Archive LP
• Netzteil
• USB-Kabel
• Vormontierte Slipmat
• 45 RPM Adapter
• Software-CD
• Kurtzanleitung
• Sicherheitshinweise und Garantieinformationen
LESEN SIE DIE SICHERHEITSHINWEISE, BEVOR SIE DAS PRODUKT VERWENDEN.
Kundendienst
• Für die vollständigen Systemanforderungen, Kompatibilitätsdetails und die Registrierung Ihres Produkts besuchen Sie
bitte die ION Website: ionaudio.com
• Die neuesten Informationen zu diesem Produkt finden Sie auf ionaudio.com/archivelp
• Für zusätzlichen Produkt-Support besuchen Sie ionaudio.com/support
• Für Informationen zur Sicherheit/Garantie, besuchen Sie ionaudio.com/warranty
Anschlüssubersicht
Da Archive LP über
eingebaute Lautsprecher
verfügt, ist es nicht
notwendig, Lautsprecher
anschließen, um Ihre
Vinyl-Schallplatten
anzuhören. Wenn Sie
edoch Ihre eigenen
Lautsprecher
anschließen möchten,
werfen Sie einen Blic
auf die folgende
Abbildung.
So Verwenden sie Archive LP Mit Ihrem Computer
Wiedergabe
Es gibt 3 Möglichkeiten, um Ihre Schallplatten mit Archive LP anzuhören!
1. Sie können Ihre Musik einfach über die internen Lautsprecher des Archive LP anhören.
2. Wenn Sie Ihre eigenen Stereo-Lautsprecher verwenden möchten, können Sie die Archive LP Cinch-Ausgänge
mit einer Stereoanlage oder Aktivlautsprechern verbinden. Verbinden Sie sie nicht mit Phono-Eingängen; Die
Cinch-Ausgänge des Archive LP sind Line-Verbindungen und könnten ein Gerät mit Phono-Eingängen
beschädigen. (Jeder andere standardmäßige Eingangstypus wie CD, Aux In oder Tape ist akzeptabel).
3. Sie können die Musik über Ihren Computer mit Ihren eigenen externen Lautsprechern hören oder über Kopfhörer,
die an Ihren Computer angeschlossen sind. (Archive LP kann nicht als Abspielgerät für Audio Ihres Computers
verwendet werden.)
EMPFÄNGER
(nicht mitgeliefert)
LAUTSPRECHER
(nicht mitgeliefert)
COMPUTER
(nicht mitgeliefert)
19
Page 20

Aufnahme
Sie können den ION EZ Vinyl/Tape Converter verwenden, um Musik mit
Ihrem Computer aufzunehmen. Mit EZ Vinyl/Tape Converter ist es ganz
einfach, Ihre Musik in digitale Dateien zu verwandeln.
. Nachdem Sie Ihre Schallplatten konvertiert haben, können Sie sie auf CD
brennen oder auf tragbare Mediengeräte laden.
Zur Installation der Software legen Sie einfach die mitgelieferte CD in Ihren
Computer ein und folgen den Anweisungen auf dem Bildschirm.
1. Wenn Sie EZ Vinyl/Tape Converter auf Ihrem Computer installiert haben, verwenden Sie das mitgelieferte USB-Kabel,
um den USB-Port des Archive LP mit einem freien USB-Port Ihres Computers zu verbinden.
2. Um EZ Vinyl/Tape Converter auf Ihrem Computer zu öffnen, wählen Sie Startmenü > Alle Programme (Windows) oder
das Anwendungen-Menü (Mac).
3. Befolgen Sie die Anweisungen auf dem Bildschirm, um Ihre Aufnahme vorzubereiten. Wenn Sie aufgefordert werden,
Ihre Musik zu spielen, bringen Sie den Tonarm des Archive LP über die Platte und starten die Wiedergabe.
Hinweis: Um sich eine Platte während der Wiedergabe anzuhören, können Sie die Lautsprecher Ihres Computers
verwenden oder die Cinch-Ausgänge des Archive LP an eine Stereoanlage oder Aktivlautsprecher anschließen. Archive
LP muss mit dem Computer verbunden sein, damit Sie mit EZ Vinyl/Tape Converter zum nächsten Schritt übergehen
können.
4. Wenn Sie die Aufnahme beendet haben, heben Sie den Archive LP-Tonarm von der Platte und setzen ihn zurück in den
Arm-Clip.
Funktionen
1. Plattenteller – Hier platzieren Sie Ihre Schallplatte.
2. Tonarm* – Der Tonarm kann mit der Hand oder
durch Drücken des entsprechenden Hebels
angehoben und abgesenkt werden. Bitte beachten
Sie, dass der Tonarm aus der Ruhestellung (auf dem
Arm-Clip) entfernt werden muss, damit der
Drehtellermotor aktiviert wird. Wenn der Tonarm
wieder in seine Ruheposition gebracht wird, schaltet
sich der Motor des Drehtellers aus. Wenn Autostop
aktiviert ist und der Tonarm wieder in seine
Ruheposition gebracht wurde, schaltet sich der Motor
des Drehtellers aus.
3. Arm-Clip – Dieser speziell entworfene Arm-Clip
sichert den Tonarm, wenn er nicht verwendet wird.
Der Arm-Clip wurde so entwickelt, dass er in der
oberen Position bleibt, wenn er entsperrt ist.
4. Hebel – Hebt und senkt den Tonarm.
5. 33 / 45 / 78 RPM-Schalter – Regelt die
Geschwindigkeit (RPM) des Plattentellers.
WICHTIG: Wenn das Tonabnehmersystem abgenutzt
ist, können Sie ein Ersatzprodukt auf
ionaudio.com/ict05rs erwerben. Wenn Sie 78 RPM
Platten spielen, empfehlen wir die Verwendung einer 78
RPM Nadel, die Sie auf ionaudio.com/ict06rs
erwerben können..
6. 45 RPM-Adapterhalterung – Sichert den mitgelieferten 45
RPM-Adapter. Wenn Sie den Adapter nicht verwenden, legen
Sie ihn bitte in diese Haltevorrichtung.
7. Autostop-Schalter – Dieser Schalter schaltet Autostop an
oder aus. Wenn Autostop eingeschaltet ist, wird der
Plattenteller zu rotieren beginnen, sobald der Tonarm über
die Schallplatte gelegt wird und stoppen, wenn die Platte
das Ende erreicht hat. (Wenn Autostop ausgeschaltet ist,
wird sich der Plattenteller immer und unabhängig von der
Position des Tonarms drehen.)
Hinweis: Wenn Ihre Schallplatte stoppt, bevor sie das Ende
des Songs erreicht hat, bringen Sie Autostop für diese
spezielle Schallplatte in die Position AUS. Dies wird in der
Regel auch für 45 RPM Schallplatten empfohlen.
* WICHTIG: Wenn das Tonabnehmersystem
abgenutzt ist, können Sie ein Ersatzprodukt
auf ionaudio.com/ict09rs erwerben. Wenn
Sie 78 RPM Platten spielen, empfehlen wir
die Verwendung einer 78 RPM Nadel, die
Sie auf ionaudio.com/ict06rs erwerben
können.
Besuchen Sie ionaudio.com/ezvc, um
die neueste Version der EZ Vinyl/Tape
Converter Software herunter zu laden
oder um eine hilfreiche Anleitung zur
Fehlerbehebung und zusätzliche
Unterstützung zu erhalten.
6
4
1
2
5
ON OFF
AUTO STOP
7
3
8
8
9
10
11
WICHTIG: Entfernen Sie die
Kunststoffabdeckung des Tonabnehmers
(Nadelabdeckung) bevor Sie den
Plattenspieler verwenden.
12
13
20
Page 21

8. Lautsprecher - Hören Sie die Musik Ihrer gespielten
Schallplatte.
9. Lautstärke - Steuert die Audioausgabe der internen
Lautsprecher. Die Lautstärke der Cinch-Ausgänge oder der
USB-Signalpegel werden davon jedoch nicht beeinflusst.
10. Cinch-Ausgang** – Die Audiosignale von einer Vinyl-
Schallplatte, die gerade abgespielt wird, wird an diesen Line-
Level-Koaxial-Ausgang gesendet. Dieser darf nicht mit PhonoLevel-Geräten verbunden werden. (Wenn Sie kein Cinch-Kabel
haben, können Sie dies beim lokalen Elektronikfachhändler erwerben.)
11. USB-Audioausgang – Schließen Sie Ihren Plattenspieler mit dem mitgelieferten USB-Kabel an Ihren Computer an. Die
USB-Verbindung sendet das Audiosignal vom Plattenspieler an Ihren Computer. Bitte beachten Sie den Abschnitt So
Verwenden Sie Archive LP Mit Ihrem Computer in diesem Handbuch für weitere Informationen.
12. Stromversorgung- Verwenden Sie den mitgelieferten Adapter, um ihn mit einer Steckdose zu verbinden.
13. Ein-/Ausschalter - Drücken Sie diese Taste, um Archive LP ein- oder auszuschalten.
Fehlerbehebung
Wenn Sie Schwierigkeiten mit dem Produkt haben, lesen Sie bitte die unten aufgeführten Schritte zur
Fehlerbehebung und das mitgelieferte EZ Vinyl/Tape Converter Handbuch.
Ich höre keinen Ton beim Aufnehmen von Musik auf einen Computer:
o Stellen Sie sicher, dass Archive LP eingeschaltet und die Nadel auf der Schallplatte ist.
o Stellen Sie sicher, dass Archive LP in Ihrem Computer als standardmäßiges Aufnahmegerät ausgewählt ist (siehe
Anleitung unten).
o Stecken Sie auch das USB-Kabel, das den Archive LP mit Ihrem Computer verbindet, zuerst ab und anschließend
wieder ein. Stellen Sie sicher, dass die Computer-Lautsprecher eingeschaltet sind und die Lautstärke nicht
stummgeschaltet ist. Versuchen Sie, die Lautstärke der eingebauten Lautsprecher mit dem Lautstärkeregler auf
der Oberseite des Archive LP zu erhöhen.
o Wenn Sie die Lautsprecher Ihres Computers verwenden, stellen Sie sicher, dass diese Lautsprecher
als standardmäßige Wiedergabe-Geräte Ihres Computer ausgewählt sind (siehe Anleitung unten). Alternativ
können Sie die Cinch-Ausgänge des Archive LP an eine Stereoanlage oder an Aktivlautsprecher anschließen.
Verbinden Sie sie nicht mit Phono-Eingängen; Die Cinch-Ausgänge des Archive LP sind Line-Verbindungen und
könnten ein Gerät mit Phono-Eingängen beschädigen. (Hinweis: Die Cinch-Ausgänge überwachen das Signal
Ich kann bei der Musikwiedergabe nichts hören:
Wenn ich den Plattenspieler verwende, höre ich ein Summen durch meine Lautsprecher, oder meinen Laptop
Mein Plattenspieler gibt keinen Ton aus bzw. der Ton klingt dumpf:
Der Riemen des Plattenspielers hat sich gelöst:
vom Plattenspieler, nicht das Signal Ihres Computers.)
• Wenn Sie Vinylplatten spielen:
o Stellen Sie sicher, dass Archive LP eingeschaltet und die Nadel auf der Schallplatte ist.
o Verbinden Sie die Cinch-Ausgänge des Archive LP mit einer Stereoanlage oder mit Aktivlautsprechern.
(Verbinden Sie sie nicht mit Phono-Eingängen; Die Cinch-Ausgänge des Archive LP sind Line-Verbindungen und
könnten ein Gerät mit Phono-Eingängen beschädigen.)
o Stellen Sie den Lautstärkeregler am Plattenteller so ein, dass Sie die Wiedergabe Ihrer Platten durch die
eingebauten Lautsprecher hören können.
• Wenn Sie Musik von Ihrem Computer spielen:
o Achten Sie darauf, dass die Lautstärke Ihres Musik-Players aufgedreht ist.
o Achten Sie darauf, dass die Lautstärke Ihres Computers aufgedreht ist.
o Achten Sie darauf, dass die Lautsprecher Ihres Computers als standardmäßiges Wiedergabe-Gerät für Ihren
Computer ausgewählt sind (siehe Anleitung unten). (Archive LP kann nicht als Abspielgerät für Audio Ihres
Computers verwendet werden.)
• Wenn Sie mit einem Laptop aufnehmen:
o Bitte verbinden Sie den Laptop an eine geerdete Stromquelle (3 polig)
• Wenn Sie über einen Lautsprecher spielen:
o Stellen Sie sicher, dass Sie das 12V 1A Netzteil verwenden, das mit Ihrem Produkt ausgeliefert wurde.
o Wenn Sie die maximale Lautstärke eingestellt haben, versuchen Sie die Lautstärke zu reduzieren, bis das
Brummgeräusch verschwindet.
o Entfernen Sie die Abdeckung von der Nadel.
o Bitte bringen Sie den Riemen wieder am Plattenteller an. Eine genaue Anleitung dazu erhalten Sie auf
ionaudio.com/turntablebelt.
** WARNUNG: Die Cinch-Ausgänge sind
line-pegel. Bitte nur verbinden um linepegel Eingängen. Sie könnten
beschädigen Ihre Empfänger wenn Sie
Verbindung Die Cinch-Ausgänge des
Archive LP sind zu einem PhonoEingängen.
21
Page 22

Mein Plattenspieler dreht sich nicht:
o Stellen Sie sicher, dass der Plattenspieler eingeschaltet ist (Netzschalter auf der Rückseite).
o Stellen Sie sicher, dass Autostop eingeschaltet ist und der Tonarm über der Schallplatte positioniert
wurde (wenn die Funktion Autostop ausgeschaltet ist, sollte sich der Plattenteller immer drehen, wenn er
eingeschaltet ist).
o Wenn die oben genannten Schritte nicht helfen, müssen Sie den Riemen des Plattenspielers wieder
Meine Schallplatte wird nicht mit der richtigen Geschwindigkeit wiedergegeben. Die Tonlage ist zu hoch oder
zu tief:
So Stellen sie die Soundkarte ihres Computers Alsstandard-Wiedergabegerät ein.
Archive LP als Standard-Aufnahmegerät Einstellen
anbringen. Einzelheiten darüber entnehmen Sie der Anleitung auf ionaudio.com/turntablebelt.
o Stellen Sie sicher, dass der 33/45/78-Schalter für diese Schallplatte auf die entsprechende
Geschwindigkeit eingestellt ist.
o Wenn der 33/45/78-Schalter richtig eingestellt ist, aber die Geschwindigkeit immer noch nicht ganz
stimmt, gehen Sie folgendermaßen vor:
1. Heben Sie das Gummipolster mit der anzupassenden RPM-Geschwindigkeit auf der Unterseite
des Archive LP ab, um es zu entfernen.
2. Drücken Sie die Gummidichtung durch. Ziehen Sie die Schraube fester an oder lösen Sie die
Schraube etwas mit einem Kreuzschlitzschraubendreher, um die RPM-Geschwindigkeit genau
abzustimmen.
• Windows XP: Klicken Sie auf Startmenü Systemsteuerung (oder Einstellungen Systemsteuerung in der
klassischen Ansicht) Sound und Audiogeräte. Klicken Sie auf die Registerkarte Audio und wählen unter
Soundwiedergabe Ihre Computer-Soundkarte als Standardgerät.
• Windows-Vista: Klicken Sie Startmenü Systemsteuerung (oder Einstellungen Systemsteuerung in der
klassischen Ansicht) Hardware und Sound Ton. Klicken Sie auf die Registerkarte Wiedergabe und wählen Sie
Ihre Computer-Soundkarte als Standardgerät aus.
• Windows 7: Wählen Sie Startmenü Systemsteuerung Ton. Klicken Sie auf die Registerkarte Wiedergabe und
wählen Sie Ihre Computer-Soundkarte als Standardgerät aus.
• Windows 8: Klicken Sie im Startmenü auf die linke untere Ecke des Bildschirms, um zum Desktop zu gelangen. Klicken
Sie in der rechten unteren Ecke der Taskleiste auf das "Lautsprechersymbol". Klicken Sie mit der rechten Maustaste auf
den Lautsprecher und wählen Wiedergabegeräte. Die Windows-Systemsteuerung für Sound sollte nun unter der
Registerkarte Wiedergabe aufscheinen. Wenn neben der Soundkarte Ihres Computers kein grünes "Häkchen"-Symbol
aufscheint, klicken Sie mit der rechten Maustaste auf die Soundkarte und wählen Als Standardgerät festlegen.
• Mac: Klicken Sie auf das obere linke "Apfel"-Symbol und klicken dann auf Systemeinstellungen Ton. Klicken Sie auf
die Registerkarte Ausgabe. Aus dem Menü wählen Sie Interne Lautsprecher, wenn Sie die internen
Computerlautsprecher verwenden oder Kopfhörer, wenn Sie Lautsprecher oder Kopfhörer verwenden, die über den
1/8"-Kopfhörerausgang an den Computer angeschlossen sind.
• Windows XP: Klicken Sie auf Startmenü Systemsteuerung (oder Einstellungen Systemsteuerung in der
klassischen Ansicht) Sound und Audiogeräte. Klicken Sie auf die Registerkarte Audio unter Aufnahme und wählen
Sie Archive LP als Standard-Gerät aus.
• Windows-Vista: Klicken Sie Startmenü Systemsteuerung (oder Einstellungen Systemsteuerung in der
klassischen Ansicht) Hardware und Sound Ton. Klicken Sie auf die Registerkarte Aufnahme und wählen Sie
Archive LP als Standard-Gerät.
• Windows 7: Wählen Sie Startmenü Systemsteuerung Ton. Klicken Sie auf die Registerkarte Aufnahme und
wählen Sie Archive LP als Standard-Gerät.
• Windows 8: Klicken Sie im Startmenü auf die linke untere Ecke des Bildschirms, um zum Desktop zu gelangen.
Klicken Sie in der rechten unteren Ecke der Taskleiste auf das "Lautsprechersymbol". Klicken Sie mit der rechten
Maustaste auf den Lautsprecher und wählen Wiedergabegeräte. In der Windows-Systemsteuerung für Sound wählen
Sie die Registerkarte Aufnahme. Wenn neben Archive LP kein grünes "Häkchen"-Symbol angezeigt wird, klicken Sie mit
der rechten Maustaste auf Archive LP und wählen Als Standardgerät festlegen.
• Mac: Klicken Sie auf das obere linke "Apfel"-Symbol und klicken dann auf Systemeinstellungen Ton. Klicken Sie auf
die Registerkarte Input. Wählen Sie Archive LP im Menü als Gerät aus.
BEVOR SIE DIESES PRODUKT EINSENDEN, kontaktieren Sie bitte ION Audio für
technischen Support.
22
Page 23

Snelstartgids (Nederlands)
Inleiding
Controleer of de doos de onderstaande onderdelen bevat:
• Archive LP
• Stroomadapter
• USB-kabel
• Pre-Mounted Slipmat
• 45 TPM adapter
• Software-cd
• Snelstartgids
• Veiligheidsvoorschriften en handleiding
LEES DE VEILIGHEIDSVOORSCHRIFTEN VOORALEER HET PRODUCT TE GEBRUIKEN
Ondersteuning
• Surf voor volledige systeemvereisten, compatibiliteitsinformatie en productregistratie naar de website van ION:
ionaudio.com
• Bezoek voor de laatste informatie over dit product ionaudio.com/archivelp
• Bezoek voor bijkomende productondersteuning ionaudio.com/support
• Surf voor informatie over veiligheid/garantie naar ionaudio.com/warranty
Aansluitingendiagram
Aangezien Archive LP
ingebouwde luidsprekers
heeft, is het niet
noodzakelijk om
luidsprekers te verbinden
om naar uw vinylplaten
te luisteren. Als u echter
uw luidsprekers wilt
aansluiten, raadpleeg
dan de volgende grafiek.
Gebruik van Archive LP met uw Computer
Afspelen
Er zijn 3 manieren om met Archive LP naar uw vinylplaten te luisteren!
1. U kunt gewoon naar uw muziek luisteren met de interne
luidsprekers van Archive LP.
2. Als u verkiest uw eigen stereo luidsprekers te gebruiken, dan kunt
u de RCA-uitgangen van Archive LP aansluiten op een
stereoketen of actieve luidsprekers. Sluit ze niet aan op phonoingangen; de RCA-uitgangen van Archive LP zijn ingesteld op
lijnniveau en kunnen een apparaat met ingangen op phono-niveau beschadigen. (Alle andere standaard
ingangen, zoals CD, Aux In of Tape zijn aanvaardbaar.)
3. U kunt luisteren via de externe luidsprekers van uw computer of door een aangesloten hoofdtelefoon. (Archive LP
kan niet worden gebruikt als een afspeelapparaat voor audio van uw computer.)
ONTVANGER
(niet meegeleverd)
LUIDSPREKERS
(niet meegeleverd)
COMPUTER
(niet meegeleverd)
Surf naar ionaudio.com/ezvc om de
laatste versie te downloaden van EZ
Vinyl/Tape Converter en voor een
handige probleemoplossingsgids en
bijkomende ondersteuning.
23
Page 24
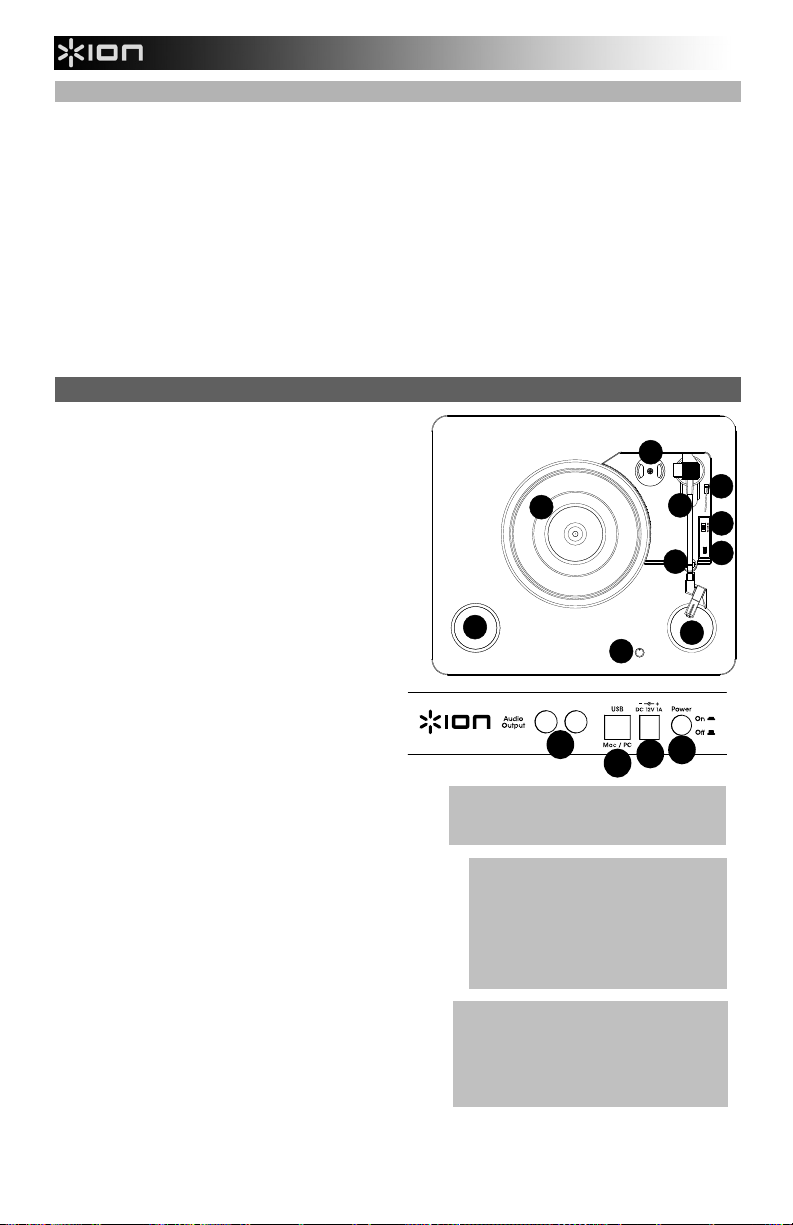
Opnemen
Voor het opnemen van muziek op uw computer, kunt u gebruik maken van de ION EZ Vinyl/Tape Converter. Met EZ Vinyl/Tape
Converter kunt u op een eenvoudige manier uw muziek omzetten in digitale bestanden.
Na het omzetten van uw vinylplaten, kunt u ze op cd branden of opladen op draagbare muziekspelers.
Om de software te installeren: plaats de meegeleverde cd in uw computer en volg de instructies op het scherm.
1. Wanneer EZ Vinyl/Tape Converter op uw computer is geïnstalleerd, gebruikt u de meegeleverde USB-kabel om de USB-
poort van de Archive LP aan te sluiten op een vrije USB-poort op uw computer.
2. Op uw computer kunt de EZ Vinyl/Tape Converter openen door te klikken op Startmenu Alle programma's
(Windows) of op het menu Toepassingen (Mac).
3. Volg de instructies op het scherm voor het instellen van de opname. Wanneer u wordt gevraagd om uw muziek af te
spelen, beweegt u de toonarm van de Archive LP over de plaat om het afspelen te starten.
Opmerking: Om tijdens het afspelen te luisteren naar een plaat: luister via de luidsprekers van uw computer of sluit de
RCA-uitgangen van de Archive LP aan op een stereo-installatie of actieve luidsprekers.
4. Wanneer u klaar bent met de opname, heft u de toonarm van de Archive LP van de plaat en plaatst u hem terug op de
armsteun.
Kenmerken
1. Draaitafel: leg hierop uw plaat.
2. Toonarm*: de toonarm kan met de hand of met de hendel
zakken/opheffen naar omhoog of omlaag worden bewogen.
Let op: de toonarm moet uit rustpositie worden verplaatst
(op de armsteun) om de motor van de draaitafel te
activeren. Wanneer de toonarm terug in rustpositie wordt
geplaatst, valt de motor van de draaitafel uit. Wanneer de
toonarm terug in rustpositie wordt geplaatst, valt de motor
van de draaitafel uit als Autostop is ingeschakeld.
3. Armsteun: deze speciaal ontworpen armsteun beveiligt de
toonarm in rustpositie of wanneer hij niet wordt gebruikt. De
armsteun werd ontworpen om in de hoogste positie te
blijven wanneer hij ontgrendeld is.
4. Hendel zakken/opheffen: heft de toonarm op en laat hem
zakken.
5. Schakelaar 33 / 45 / 78 Toeren: deze schakelaar
controleert het toerental van de draaitafel.
BELANGRIJK: Als de naald van de draaitafel slijtage
vertoont, kunt u een vervangnaald aanschaffen op
ionaudio.com/ict05rs. Als u 78-toerenplaten afspeelt,
dan raden wij u aan een naald voor 78-toerenplaten te
kopen op ionaudio.com/ict06rs.
6. Houder 45-toerenadapter: houder voor de
meegeleverde 45- toerenadapter. Plaats de adapter in
de houder wanneer u hem niet gebruikt.
7. Autostop-schakelaar: deze schakelaar zet autostop aan of uit.
Wanneer autostop aan staat, begint de draaitafel te draaien
van zodra de toonarm zich boven de plaat bevindt en stopt ze
met draaien wanneer de plaat haar einde heeft bereikt. (Wanneer
autostop afstaat, blijft de draaitafel altijd draaien, ongeacht de
positie van de toonarm.)
Opmerking: Als uw vinylplaat stopt voor het einde van de muziek
is bereikt, schakel Autostop dan uit voor deze plaat. Dit wordt
aanbevolen voor de meeste 45-toerenplaten.
8. Luidsprekers: luister naar de audio van de vinylplaat die u
afspeelt.
9. Volume: Past het geluidsniveau aan van de interne luidsprekers,
maar beïnvloedt het uitgangsniveau van de RCA-uitgangen of
de USB-uitgang niet.
10. RCA-uitgang**: de audio van een spelende vinylplaat wordt
gestuurd naar deze coaxiale audio-uitgang op lijnniveau. Hij
mag niet op apparaten met phononiveau worden aangesloten.
(Als u nog niet over een RCA-kabel beschikt, dan kunt u die
vinden in een plaatselijke elektronicawinkel.)
6
4
1
2
5
ON OFF
AUTO STOP
7
3
8
8
9
10
11
BELANGRIJK: Verwijder het plastic kapje
van de naald (naaldbescherming) voor de
draaitafel aan te zetten.
* BELANGRIJK: Als de naald van de
draaitafel slijtage vertoont, kunt u een
vervangnaald aanschaffen op
ionaudio.com/ict09rs. Als u 78toerenplaten afspeelt, dan raden wij u
aan een naald voor 78-toerenplaten te
kopen op ionaudio.com/ict06rs.
** WAARSCHUWING: De RCA-uitgangen
zijn op LIJNNIVEAU. Verbind deze enkel met
ingangen op LIJNNIVEAU. U kunt uw
receiver beschadigen indien u een apparaat
op LIJNNIVEAU aansluit op een PHONOingang.
12
13
24
Page 25

11. USB-audiouitgang: gebruik de meegeleverde USB-kabel om uw draaitafel op uw computer aan te sluiten. De USB-
verbinding verstuurt het audiosignaal van de draaitafel naar uw computer. Zie hoofdstuk Gebruik Archive LP met uw
Computer van deze handleiding voor informatie.
12. Voeding: gebruik de meegeleverde stroomadapter om het apparaat aan te sluiten op het stroomnet.
13. Aan/Uit-schakelaar: druk op deze knop om de Archive LP aan of uit te zetten.
Problemen Oplossen
Als u problemen ondervindt, raadpleeg dan de onderstaande stappen voor probleemoplossing
evenals die in de handleiding van de EZ Vinyl/Tape Converter bij dit product.
Ik hoor geen audio wanneer ik muziek op een computer opneem:
o Zorg ervoor dat de Archive LP is ingeschakeld en dat de naald op de plaat staat.
o Zorg ervoor dat Archive LP op uw computer als standaard opname-apparaat staat ingesteld (zie de
instructies hieronder).
o U dient ook de USB-kabel die de Archive LP met uw computer verbindt eerst te ontkoppelen en daarna
weer aan te sluiten. Controleer of de luidsprekers van de computer aan staan en of het volume niet is
gedempt. Probeer het volume op de ingebouwde luidsprekers van de Archive LP te verhogen met behulp
van de volumeknop op het bovenpaneel van Archive LP.
o Als u luistert via de luidsprekers van uw computer, zorg er dan voor dat die luidsprekers op uw computer
als standaard afspeelapparaat zijn ingesteld (zie de instructies hieronder). U kunt ook de RCA-uitgangen
van de Archive LP aansluiten op een stereosysteem of actieve luidsprekers. Verbind ze niet met phono-
ingangen; de RCA-uitgangen van de Archive LP staan ingesteld op lijnniveau en kunnen een apparaat
met ingangen op phono-niveau beschadigen. (Opmerking: de RCA-uitgangen monitoren het signaal dat
Ik hoor geen geluid wanneer ik muziek afspeel:
Ik hoor een bromtoon door mijn speaker of laptop bij gebruik van de draaitafel:
Mijn draaitafel maakt geen geluid of de muziek klinkt gedempt:
De riem van de draaitafel is losgeraakt:
Mijn draaitafel draait niet:
Mijn plaat draait niet aan de correcte snelheid; de klank is te hoog of te laag:
uit de draaitafel komt, niet het signaal dat uit uw computer komt.)
• Als u muziek afspeelt vanaf vinyl:
o Zorg ervoor dat de Archive LP is ingeschakeld en dat de naald op de plaat staat.
o Sluit de RCA-uitgangen van de Archive LP aan op een stereo-installatie of actieve luidsprekers. (Verbind
ze niet met phono-ingangen; de RCA-uitgangen van de Archive LP staan ingesteld op lijnniveau en
kunnen een apparaat met ingangen op phono-niveau beschadigen.)
o Zorg ervoor de volumeknop op de draaitafel te verhogen om uw vinylplaat te horen afspelen door de
ingebouwde luidsprekers.
• Als u muziek afspeelt vanaf uw computer:
o Zorg ervoor dat de volumeknop van het programma dat uw muziek afspeelt hoog genoeg staat.
o Zorg ervoor dat de volumeknop van uw computer hoog genoeg staat.
o Zorg ervoor dat de luidsprekers van uw computer als standaard afspeelapparaat zijn ingesteld (zie de
instructies hieronder). (Archive LP kan niet worden gebruikt als afspeelapparaat voor het geluid van uw
computer.)
o Als u opneemt op een laptop:
o Sluit de laptop aan op een geaard stopcontact (drie draden)
o Als u de plaat afspeelt door een speaker:
o Controleer of u de stroomadapter van 12 V en 1 A gebruikt die met het product is meegeleverd.
o Als uw volume op het maximum staat, probeer het dan te verlagen tot het bromgeluid stopt.
o Haal de beschermingskap van de naald.
o Maak de riem terug vast aan de draaitafel. Raadpleeg voor meer details hierover de gids op
ionaudio.com/turntablebelt.
o Controleer of de draaitafel aan staat (aan-/uitschakelaar aan de achterkant).
o Controleer of Autostop ingeschakeld is en of de toonarm zich op de plaat bevindt (als Autostop is
uitgeschakeld, dan moet de plaat blijven draaien wanneer de draaitafel aanstaat).
o Als de stappen hierboven niet helpen, moet u mogelijk de riem van uw draaitafel opnieuw
vastmaken. Raadpleeg voor meer details hierover de gids op ionaudio.com/turntablebelt.
o Controleer of de schakelaar 33/45/78 op de correcte snelheid voor uw plaat staat.
o Als de schakelaar 03/45/78 in de correcte stand staat en als de snelheid lichtjes afwijkt, doe dan het
volgende:
1. Zoek aan de onderkant van de Archive LP het rubberen kussentje met de draaisnelheid die u wilt
aanpassen en hef het voorzichtig op om het te verwijderen.
2. Doorprik de rubberen verzegeling en draai de schroef aan of maak ze losser met een
kruiskopschroevendraaier om de draaisnelheid bij te regelen.
25
Page 26

De Geluidskaart Van uw Computer Instellen als Standaard Afspeelapparaat
• Windows XP: Klik op Start Bedieningspaneel (of Instellingen Bedieningspaneel in Klassieke weergave) Geluid
en audio-apparaten. Klik op het tabblad Geluid en selecteer onder Geluid afspelen de geluidskaart van uw computer
als standaardapparaat.
• Windows Vista: Klik op Start Bedieningspaneel (of Instellingen Bedieningspaneel in Klassieke weergave)
Hardware en geluid Geluid. Klik op het tabblad Afspelen en selecteer de geluidskaart van uw computer als
standaardapparaat.
• Windows 7: Klik op Start Bedieningspaneel Geluid. Klik op het tabblad Afspelen en selecteer de geluidskaart
van uw computer als standaardapparaat.
• Windows 8: Klik in het Startmenu op de hoek links onderaan het scherm om het bureaublad te openen. Zoek in de hoek
onderaan rechts van de Taakbalk het pictogram met de luidspreker voor de volumeregeling. Klik met de rechtermuisknop
op de luidspreker en selecteer Afspeelapparaten. In het tabblad Afspelen moet het configuratiescherm Geluid
verschijnen. Als naast de geluidskaart van uw computer geen groen 'vinkje' staat, klik er dan op met de rechtermuisknop
en selecteer Als standaardapparaat instellen.
• Mac: Klik op het “Apple”-pictogram in de linkerbovenhoek en klik op Systeemvoorkeuren Geluid. Klik op het tabblad
Uitvoer. Selecteer Interne luidsprekers in het menu als u gebruik maakt van de interne luidsprekers van uw computer
of selecteer Hoofdtelefoon als u luidsprekers of een hoofdtelefoon gebruikt die zijn aangesloten op de 1/8”koptelefoonuitgang van de computer.
Archive LP Instellen als Standaard Opnameapparaat
• Windows XP: Klik op Start Bedieningspaneel (of Instellingen Bedieningspaneel in Klassieke weergave) Geluid
en audio-apparaten. Klik op het tabblad Geluid en selecteer onder Geluid opnemen de Archive LP als
standaardapparaat.
• Windows Vista: Klik op Start Bedieningspaneel (of Instellingen Bedieningspaneel in Klassieke weergave)
Hardware en geluid Geluid. Klik op het tabblad Opnemen en selecteer de Archive LP als standaardapparaat.
• Windows 7: Klik op Start Bedieningspaneel Geluid. Klik op het tabblad Opnemen en selecteer de Archive LP als
standaardapparaat.
• Windows 8: Klik in het Startmenu op de hoek links onderaan het scherm om het bureaublad te openen. Zoek in de
hoek onderaan rechts van de Taakbalk het pictogram met de luidspreker voor de volumeregeling. Klik met de
rechtermuisknop op de luidspreker en selecteer Afspeelapparaten. Selecteer het tabblad Opnemen in het
configuratiescherm Geluid. Als naast de Archive LP geen groen 'vinkje' staat, klik er dan op met de rechtermuisknop en
selecteer Als standaardapparaat instellen.
• Mac: Klik op het “Apple”-pictogram in de linkerbovenhoek en klik op Systeemvoorkeuren Geluid. Klik op het tabblad
Invoer. Selecteer in het menu de Archive LP als het apparaat.
Neem contact op met ION Audio technische ondersteuning VOORALEER DIT PRODUCT
TERUG TE ZENDEN.
26
Page 27

Specifications
Power: 12V DC, 1A, center pin-positive, tip-negative
Dimensions: 13.75” x 16” x 3.46"; 360 mm x 406 mm x 88 mm
Weight: 5.9 lbs; 2.68 kg
Cartridge Type: Ceramic cartridge
Stylus Tip: Diamond tip
Track Force: 5 grams nominal (4-6 grams)
Output Voltage: ( at 1 kHz=3.54 cm/sec) 200-300 mV
Channel Balance: ( at 1 kHz) <=3dB
Channel Separation: ( at 1 kHz) >=15dB
Frequency Response: 80-10,000Hz (+-7dB)
Stylus: iCT09RS (diamond-tipped) included, also available at ionaudio.com/ict09rs
78 RPM stylus sold separately at ionaudio.com/ict06rs
Trademarks and Licenses
iTunes is a trademark of Apple, Inc., registered in the U.S.A. and other countries.
Phillips is a registered trademark of the Phillips Screw Company in the United States and other
countries.
All other product or company names are trademarks or registered trademarks of their respective
owners.
27
Page 28

www.ionaudio.com
Manual Version 1.1
 Loading...