

Page 1

HP ZCentral Remote Boost User Guide
SUMMARY
HP ZCentral Remote Boost brings added security, performance, mobility, and collaboration to your workstation
deployment. With HP ZCentral Remote Boost, you can use a lower-powered desktop, notebook, or thin client to
remotely connect to a powerful workstation and use your graphics-intensive workstation programs wherever you go.
Page 2

Copyright and License
Trademark Credits
Third-party software notice
© Copyright 2020-2021 HP Development
Company, L.P.
Condential computer software. Valid license
from HP required for possession, use or
copying. Consistent with FAR 12.211 and
12.212, Commercial Computer Software,
Computer Software Documentation, and
Technical Data for Commercial Items are
licensed to the U.S. Government under vendor's
standard commercial license.
The information contained herein is subject to
change without notice. The only warranties for
HP products and services are set forth in the
express warranty statements accompanying
such products and services. Nothing herein
should be construed as constituting an
additional warranty. HP shall not be liable for
technical or editorial errors or omissions
contained herein.
Third Edition: February 2021
First Edition: February 2020
Document Part Number: L85268-003
macOS is a trademark of Apple Inc. Linux® is
the registered trademark of Linus Torvalds in
the U.S. and other countries. Microsoft and
Windows are either registered trademarks or
trademarks of Microsoft Corporation in the
United States and/or other countries. NVIDIA is
a trademark and/or a registered trademark of
NVIDIA Corporation in the U.S. and other
countries. Red Hat and Red Hat Enterprise
Linux are trademarks of Red Hat, Inc. in the
United States and other countries. VMware and
VMware vSphere are registered trademarks or
trademarks of VMware, Inc. in the United States
and/or other jurisdictions.
Third-party source code and licenses are
redistributed, if required, with HP ZCentral
Remote Boost.
Page 3

User input syntax key
Text that you must enter into a user interface is indicated by fixed-width font.
Table -1 User input syntax key
Item Description
Text without brackets or braces
<Text inside angle brackets>
[Text inside square brackets]
{Text inside braces}
|
...
Items you must type exactly as shown
A placeholder for a value you must provide; omit the brackets
Optional items; omit the brackets
A set of items from which you must choose only one; omit the braces
A separator for items from which you must choose only one; omit the vertical bar
Items that can or must repeat; omit the ellipsis
iii
Page 4

iv User input syntax key
Page 5

Table of contents
1 HP ZCentral Remote Boost overview ................................................................................................................ 1
Features ................................................................................................................................................................. 2
Interoperability between dierent versions of HP ZCentral Remote Boost ......................................................... 3
Software compatibility with HP ZCentral Remote Boost ...................................................................................... 3
HP ZCentral Remote Boost Sender licensing ......................................................................................................... 4
Finding more information ...................................................................................................................................... 4
2 Getting started ............................................................................................................................................. 5
3 Installation ................................................................................................................................................... 6
Installing HP ZCentral Remote Boost Receiver (Windows) ................................................................................... 6
Performing a custom HP ZCentral Remote Boost Receiver installation using the installer
wizard .................................................................................................................................................. 6
Performing a custom HP ZCentral Remote Boost Receiver installation on the command line ......... 7
Installing HP ZCentral Remote Boost Sender (Windows) ...................................................................................... 9
Installer wizard installation ................................................................................................................ 9
Command-line installation ............................................................................................................... 10
Installing HP ZCentral Remote Boost Receiver (Linux) ....................................................................................... 11
Installing HP ZCentral Remote Boost Sender (Linux) .......................................................................................... 12
Installing HP ZCentral Remote Boost Receiver (macOS) ..................................................................................... 12
Installer wizard installation .............................................................................................................. 12
Command-line installation ............................................................................................................... 12
4 HP ZCentral Remote Boost Receiver overview ................................................................................................. 14
Opening HP ZCentral Remote Boost Receiver ..................................................................................................... 14
Opening HP ZCentral Remote Boost Receiver on Windows .............................................................. 14
Opening HP ZCentral Remote Boost Receiver on Linux .................................................................... 14
Opening HP ZCentral Remote Boost Receiver on macOS ................................................................. 14
HP ZCentral Remote Boost Receiver GUI (Windows/Linux) ................................................................................ 14
HP ZCentral Remote Boost Receiver GUI (macOS) .............................................................................................. 15
Starting an HP ZCentral Remote Boost session .................................................................................................. 15
HP ZCentral Remote Boost Receiver window GUI (Windows/Linux) ................................................................... 16
HP ZCentral Remote Boost Receiver toolbar GUI (Windows/Linux) ................................................. 16
HP ZCentral Remote Boost Receiver window GUI (macOS) ................................................................................. 18
Setup Mode .......................................................................................................................................................... 18
Changing the Setup Mode hotkey sequence ..................................................................................... 19
v
Page 6

HP ZCentral Remote Boost Receiver settings ..................................................................................................... 19
Connection ......................................................................................................................................... 20
Performance ...................................................................................................................................... 20
Gestures (Windows touch-capable devices only) ............................................................................. 21
Mapping a hotkey sequence to a gesture ....................................................................... 21
Unmapping a hotkey sequence from a gesture ............................................................. 21
Audio .................................................................................................................................................. 21
Network ............................................................................................................................................. 22
Hotkeys .............................................................................................................................................. 22
Logging .............................................................................................................................................. 23
Statistics (Windows/Linux only) ........................................................................................................ 23
HP ZCentral Remote Boost Receiver command-line options .............................................................................. 24
5 HP ZCentral Remote Boost Sender overview ................................................................................................... 25
HP ZCentral Remote Boost Sender overview (Windows) .................................................................................... 25
HP ZCentral Remote Boost Sender overview (Linux) .......................................................................................... 25
HP ZCentral Remote Boost Sender command-line options (Windows) .............................................................. 25
HP ZCentral Remote Boost Sender command-line options (Linux) .................................................................... 26
HP ZCentral Remote Boost Sender notication icon (Windows only) ................................................................. 27
HP ZCentral Remote Boost Sender event logging (Windows only) ..................................................................... 27
Filtering access to HP ZCentral Remote Boost Senders ...................................................................................... 27
Filtering by user name ....................................................................................................................... 27
Filtering by network identiers ......................................................................................................... 28
6 Conguring certicates ................................................................................................................................ 29
Sender verication ............................................................................................................................................... 29
Certicate Verication Error Policy ................................................................................................... 29
End-user verication of a sender certicate .................................................................................... 29
Using a certicate signed by a CA ........................................................................................................................ 30
Conguring the sender to use a certicate signed by a CA .............................................................. 30
Modifying the sender Ice conguration le .................................................................... 30
Modifying the sender conguration le ......................................................................... 30
Modifying the receiver Ice conguration le .................................................................. 30
Modifying the receiver conguration le ....................................................................... 31
Conguring the receiver to use a certicate signed by a CA ............................................................. 31
Modifying the receiver Ice conguration le .................................................................. 31
Modifying the sender Ice conguration le .................................................................... 32
Removing a certicate ......................................................................................................................................... 32
Windows ............................................................................................................................................ 32
Linux .................................................................................................................................................. 32
macOS ................................................................................................................................................ 32
vi
Page 7

Troubleshooting the certicate conguration .................................................................................................... 33
7 Using HP ZCentral Remote Boost features ...................................................................................................... 34
HP ZCentral Remote Boost Advanced Features .................................................................................................. 34
Advanced Video Compression (Windows/Linux only) ....................................................................... 34
HP Velocity ......................................................................................................................................... 34
Authentication ..................................................................................................................................................... 35
Authentication methods ................................................................................................................... 35
Standard authentication ................................................................................................. 35
Using Kerberos Authentication ....................................................................................... 36
Easy Login ....................................................................................................................... 36
Single Sign-on ................................................................................................................. 36
Smart card redirection ...................................................................................................................... 36
Using smart card redirection .......................................................................................... 36
Conguring Remote USB for smart card redirection ...................................................... 37
Limitations ...................................................................................................................... 37
Collaboration ....................................................................................................................................................... 37
Collaboration invitations ................................................................................................................... 39
Display ................................................................................................................................................................. 39
Display resolution and layout matching ........................................................................................... 39
Multi-monitor overview .................................................................................................. 39
Matching display resolution and layout methods .......................................................... 40
Matching display resolution and layout (Windows-based sender) ................................ 42
Testing the resolution .................................................................................. 42
Additional conguration on the sender ....................................................... 42
NVIDIA resolution-matching (Windows-based senders with NVIDIA
graphics only) ............................................................................................... 43
EDID les ....................................................................................................... 43
Creating and applying an EDID le ............................................................... 44
Adding custom resolutions ........................................................................... 44
Matching display resolution and layout (Linux-based sender) ...................................... 45
Conguring the X server ............................................................................... 45
Creating an EDID le ..................................................................................... 46
Using display properties to set resolution and layout ..................................................................... 46
Sender screen blanking ..................................................................................................................... 48
Input ..................................................................................................................................................................... 48
Wacom solution ................................................................................................................................. 48
Adjusting tablet properties ............................................................................................. 48
Windows and Mac receiver solution ............................................................................... 49
ThinPro receiver solution ................................................................................................ 49
Linux receiver solution (non-ThinPro) .......................................................... 49
vii
Page 8

Windows sender solution ............................................................................................... 49
Linux sender solution ..................................................................................................... 50
Using touch features (Windows touch-capable devices only) .......................................................... 50
Game Mode (Windows only) .............................................................................................................. 51
Supported keyboard layouts ............................................................................................................. 51
Remote Audio ...................................................................................................................................................... 51
HP ZCentral Remote Boost audio path ............................................................................................. 51
Using Remote Audio (Windows-based sender) ................................................................................. 52
Using Remote Audio (Linux-based sender) ....................................................................................... 52
PulseAudio ...................................................................................................................... 52
ALSA ................................................................................................................................ 53
Remote Clipboard ................................................................................................................................................ 54
Remote USB (Windows and ThinPro only) ........................................................................................................... 54
Conguring the remoting behavior of individual USB devices (Windows only) ............................... 55
USB microphones .............................................................................................................................. 55
Remote USB Access Control List ....................................................................................................... 56
Determining USB device information (Windows) .............................................................................. 57
Determining USB device information (Linux) ................................................................................... 57
Enabling Remote USB on HP ThinPro ................................................................................................ 57
Directory Mode ..................................................................................................................................................... 57
Directory le format .......................................................................................................................... 58
Starting HP ZCentral Remote Boost Receiver in Directory Mode (Windows) ................................... 58
Verifying the HP ZCentral Remote Boost connection ..................................................... 58
Bringing a specic HP ZCentral Remote Boost Receiver window to the front ............... 58
Starting HP ZCentral Remote Boost Receiver in Directory Mode (macOS) ....................................... 59
8 Conguration tools and properties ............................................................................................................... 60
HP ZCentral Remote Boost Receiver setting override hierarchy ........................................................................ 60
HP ZCentral Remote Boost Receiver Conguration tool (Windows and Linux Only) .......................................... 60
Using the HP ZCentral Remote Boost Receiver Conguration tool .................................................. 60
General .............................................................................................................................................. 61
Image and Display ............................................................................................................................. 63
Audio .................................................................................................................................................. 64
Network ............................................................................................................................................. 65
HP Velocity ......................................................................................................................................... 66
USB (Windows / ThinPro only) ........................................................................................................... 67
Hotkeys .............................................................................................................................................. 67
Logging .............................................................................................................................................. 68
Activation ........................................................................................................................................... 69
HP ZCentral Remote Boost Sender setting override hierarchy ........................................................................... 69
HP ZCentral Remote Boost Sender Conguration tool (Windows/Linux only) ................................................... 69
viii
Page 9

Using the HP ZCentral Remote Boost Sender Conguration tool ..................................................... 70
General .............................................................................................................................................. 70
Authentication (Windows only) ......................................................................................................... 71
Image and Display ............................................................................................................................. 71
Network ............................................................................................................................................. 72
HP Velocity ......................................................................................................................................... 73
USB .................................................................................................................................................... 74
Collaboration ..................................................................................................................................... 74
Logging .............................................................................................................................................. 75
Diagnostics ........................................................................................................................................ 75
Certicates ......................................................................................................................................... 75
Setting HP ZCentral Remote Boost properties manually .................................................................................... 76
Property syntax ................................................................................................................................. 76
Setting property values in a conguration le ................................................................................. 76
Setting property values on the command line ................................................................................. 77
Making a property immutable ........................................................................................................... 77
Automation API restriction control ................................................................................................... 77
Other properties .................................................................................................................................................. 78
Other global properties ..................................................................................................................... 78
Per-session properties (HP ZCentral Remote Boost Receiver only) ................................................. 80
Window location and size properties (per-session) ....................................................... 81
Clipboard properties (per-session) ................................................................................. 81
Auto-launch properties ..................................................................................................................... 82
9 Performance optimization ............................................................................................................................ 84
General ................................................................................................................................................................. 84
Network ............................................................................................................................................................... 84
Forcing a network speed (Windows) ................................................................................................. 85
Forcing a network speed (Linux) ....................................................................................................... 85
10 Troubleshooting ........................................................................................................................................ 86
Failed connection attempts ................................................................................................................................. 86
Receiver checklist .............................................................................................................................. 86
Sender checklist ................................................................................................................................ 86
Kerberos ............................................................................................................................................ 87
Sender network interface binding .................................................................................................... 87
Reconguring network interface binding manually ....................................................... 88
Reconguring network interface binding using the HP ZCentral Remote Boost
Sender Conguration tool ............................................................................................... 88
Determining the number that corresponds to the network interface ......... 88
Conguring the HP ZCentral Remote Boost Sender settings ...................... 89
ix
Page 10

Network timeouts ................................................................................................................................................ 89
The HP ZCentral Remote Boost Receiver window repeatedly dims and displays a connection
warning message .............................................................................................................................. 89
The HP ZCentral Remote Boost Receiver window dims, and HP ZCentral Remote Boost
Receiver disconnects and displays a connection error, but you can connect again immediately ... 89
When connecting to a Linux-based sender, the PAM authentication dialog on the receiver
does not display long enough for credentials to be entered ............................................................ 90
When connecting to the sender, the authorization dialog is not displayed long enough for the
user to respond to it
The HP ZCentral Remote Boost Receiver window is not updating ................................................... 90
Increasing the error timeout value of HP ZCentral Remote Boost Receiver does not appear to
have an eect, and HP ZCentral Remote Boost Receiver still disconnects ...................................... 90
Graphical issues (Linux) ....................................................................................................................................... 90
Full-screen crosshair cursors ............................................................................................................ 90
Gamma correction on the receiver .................................................................................................... 91
Black or blank HP ZCentral Remote Boost Receiver window ........................................................... 91
High DPI display issues ........................................................................................................................................ 91
Disabling or enabling support for high DPI displays ........................................................................ 91
Input issues .......................................................................................................................................................... 91
Keystrokes are repeated when connected to Linux Sender ............................................................. 92
Remote Audio issues ........................................................................................................................................... 92
HP ZCentral Remote Boost Receiver is not producing audio ............................................................ 92
Audio is disrupted .............................................................................................................................. 92
Audio causes continuous network traic ......................................................................................... 92
There is no audio on a sender or a receiver with multiple audio devices ......................................... 93
Remote USB issues .............................................................................................................................................. 93
Smart card redirection issues .............................................................................................................................. 93
Mouse Cursor issues on servers and blades (Windows Sender) ......................................................................... 94
.......................................................................................................................... 90
Appendix A Switching between HP ZCentral Remote Boost and Remote Desktop Connection (Windows only) ......... 95
Appendix B Creating an agent for remote application termination (Windows only) .............................................. 96
Viewing the HPRemote log .................................................................................................................................. 96
HPRemote log format .......................................................................................................................................... 96
Agent design guidelines .................................................................................................................................... 100
Desktop session logout ................................................................................................................... 100
Selective environment shutdown ................................................................................................... 100
Wrapping applications of interest ................................................................................................... 100
Administrator alerts ........................................................................................................................ 101
Anticipating user disconnects and reconnects ............................................................................... 101
General agent design guidelines .................................................................................................... 101
x
Page 11

Recovery settings for the HP ZCentral Remote Boost Sender service ........................................... 101
Sample agent ..................................................................................................................................................... 102
Appendix C Uninstalling HP ZCentral Remote Boost ......................................................................................... 107
Uninstalling HP ZCentral Remote Boost Receiver or HP ZCentral Remote Boost Sender (Windows) .............. 107
Uninstalling HP ZCentral Remote Boost Receiver (Linux) ................................................................................. 107
Red Hat Enterprise Linux ................................................................................................................ 107
Ubuntu ............................................................................................................................................. 107
HP ThinPro ....................................................................................................................................... 107
Uninstalling HP ZCentral Remote Boost Sender (Linux) ................................................................................... 108
Red Hat Enterprise Linux ................................................................................................................ 108
Ubuntu ............................................................................................................................................. 108
Uninstalling HP ZCentral Remote Boost Receiver (macOS) .............................................................................. 109
Index ........................................................................................................................................................... 110
xi
Page 12

xii
Page 13
1 HP ZCentral Remote Boost overview
HP ZCentral Remote Boost brings added security, performance, mobility, and collaboration to your
workstation deployment. With HP ZCentral Remote Boost, you can use a lower-powered desktop, notebook,
or thin client to remotely connect to a powerful workstation and use your graphics-intensive workstation
programs wherever you go.
Your programs run natively on the remote workstation and take full advantage of its graphics resources. The
desktop of the remote workstation is transmitted over a standard network to your local computer using
advanced image compression technology specically designed for digital imagery, text, and high frame rate
video applications.
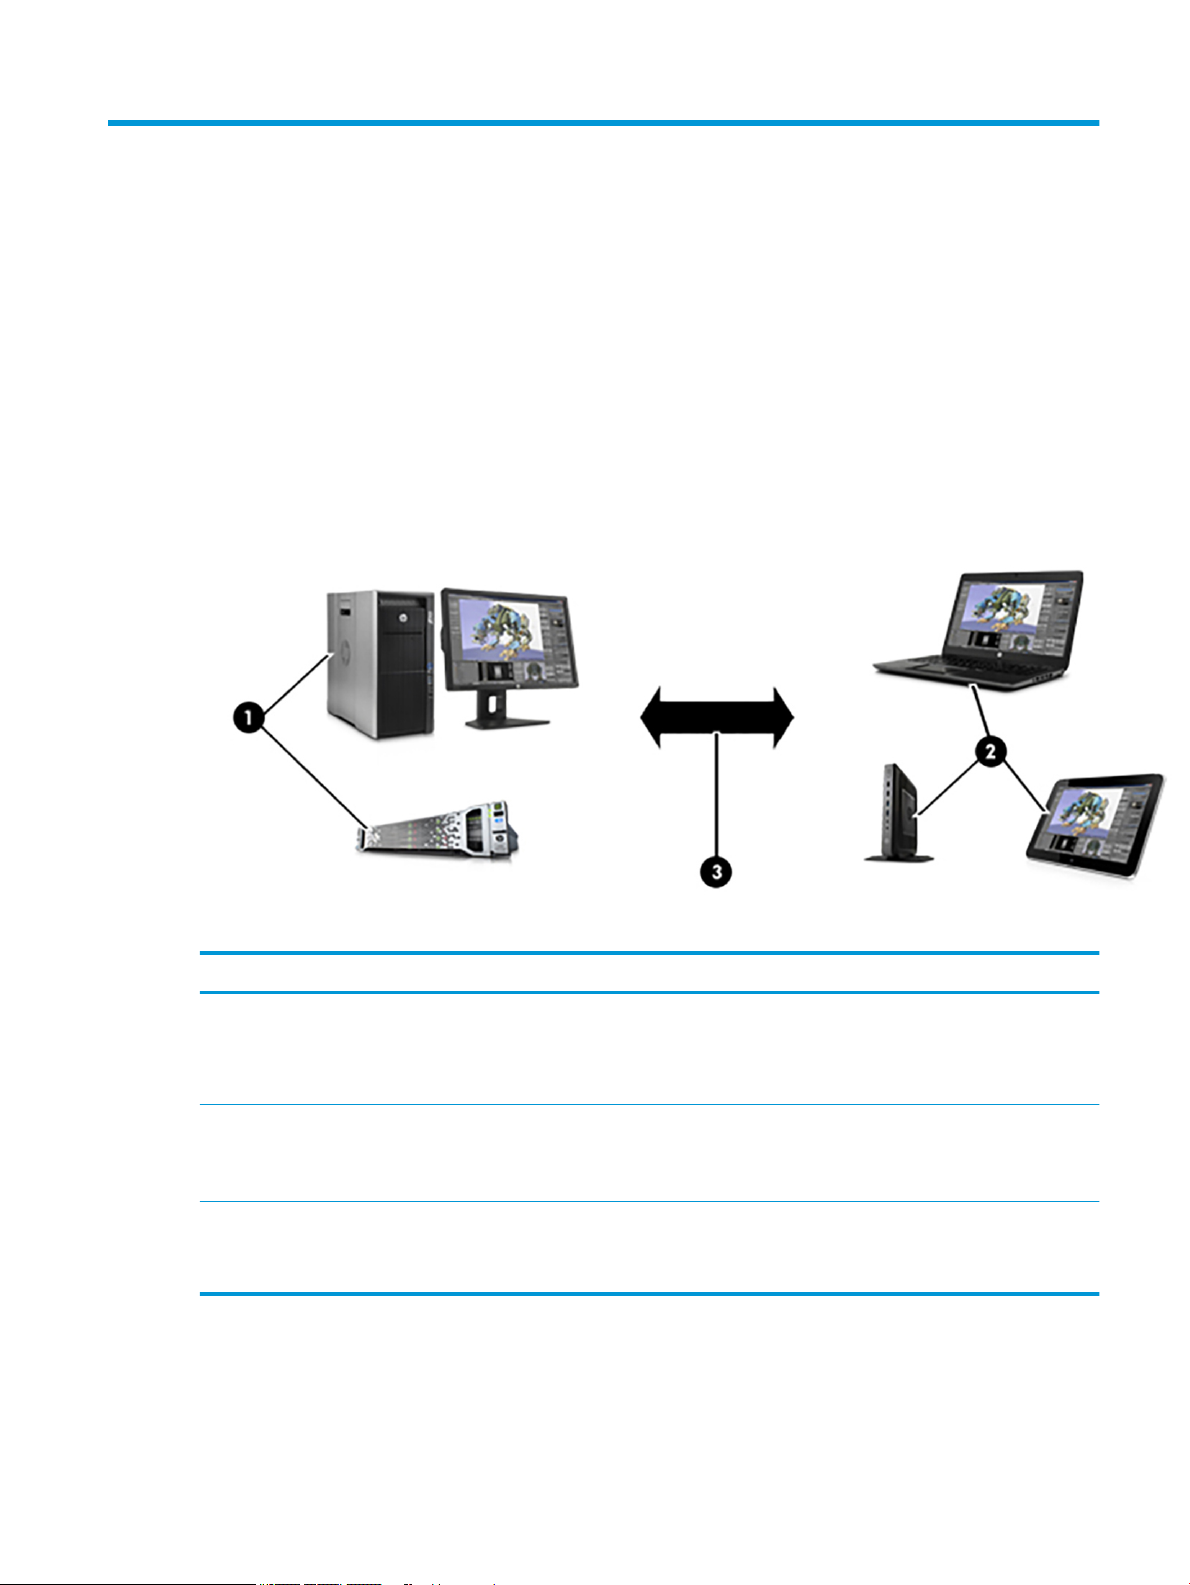
The following image and table demonstrate a typical HP ZCentral Remote Boost deployment.
Table 1-1 HP ZCentral Remote Boost deployment components
Item Description
1 The sender is typically a high-performance workstation, virtual workstation, blade, or server that hosts your software. HP
ZCentral Remote Boost Sender is installed on the sender and transmits graphics, audio, and USB data to the receiver. The
sender receives input and USB data from the receiver.
NOTE: A monitor does not necessarily have to be connected to the sender.
2 The receiver is typically a desktop, notebook, tablet, or thin client with HP ZCentral Remote Boost Receiver installed. You
establish the Remote Boost connection from the receiver side. The desktop of the sender is displayed inside the HP
ZCentral Remote Boost Receiver window on the receiver, and Remote Boost Receiver transmits input to the sender so
that you can interact with your programs remotely.
3 A TCP/IP network serves as the communication link between the sender and the receiver.
IMPORTANT: The sender and receiver must be on the same network for a Remote Boost connection to be established
between them.
1
Page 14

NOTE: HP ZCentral Remote Boost software and documentation might also refer to the sender and the
receiver as the remote computer and the local computer respectively.
HP ZCentral Remote Boost system requirements, such as hardware and operating system support, are not
discussed in this document. Some HP ZCentral Remote Boost features might have additional system
requirements. System requirements are described in the QuickSpecs (see Finding more information
on page 4).
Features
HP ZCentral Remote Boost includes a variety of features, including the ones described in the following table.
NOTICE: Some features are not supported by certain operating systems.
Table 1-2 HP ZCentral Remote Boost features and their descriptions
Feature Description
3D graphics API support Provides workstation-class performance for software based on OpenGL or Direct X
NOTICE: See Software compatibility with HP ZCentral Remote Boost on page 3 for
information about the types of programs and congurations that HP does and does not
recommend for use with HP ZCentral Remote Boost.
Advanced Video Compression (Windows®/
Linux® only)
Authentication methods Support varied deployment scenarios and preferences, including smart card redirection
Collaboration Lets multiple receivers connect to the same sender simultaneously, allowing multiple
Directory Mode Lets a single receiver connect to multiple senders simultaneously
Display resolution and layout matching Adjusts the display resolution and display layout of the sender to match those of the
HP Velocity Improves performance within a wide area network (WAN)
Pixel Mode Enables you to view the remote desktop in two dierent ways. 1:1 mode displays the
Remote Audio Transmits smooth, continuous, low-latency, high-quality audio from the sender to the
Reduces the network bandwidth needed for high-quality video streams
See Advanced Video Compression (Windows/Linux only) on page 34 for more
information.
See Authentication on page 35 for more information.
users to view and interact with the same desktop session and programs
See Collaboration on page 37 for more information.
See Directory Mode on page 57 for more information.
receiver or user-dened properties, even when you use multiple monitors
See Display resolution and layout matching on page 39 for more information.
See HP Velocity on page 34 for more information.
remote desktop as is. Scaled mode scales the remote desktop up or down to ll the the
HP ZCentral Remote Boost Receiver window.
receiver
Remote Clipboard Lets you cut, copy, and paste data between the sender and the receiver or between two
Remote USB (Windows/ThinPro only) Lets receiver-side USB devices be mounted to and accessed by the sender through the HP
2 Chapter 1 HP ZCentral Remote Boost overview
See Remote Audio on page 51 for more information.
senders
See Remote Clipboard on page 54 for more information.
ZCentral Remote Boost connection
Page 15
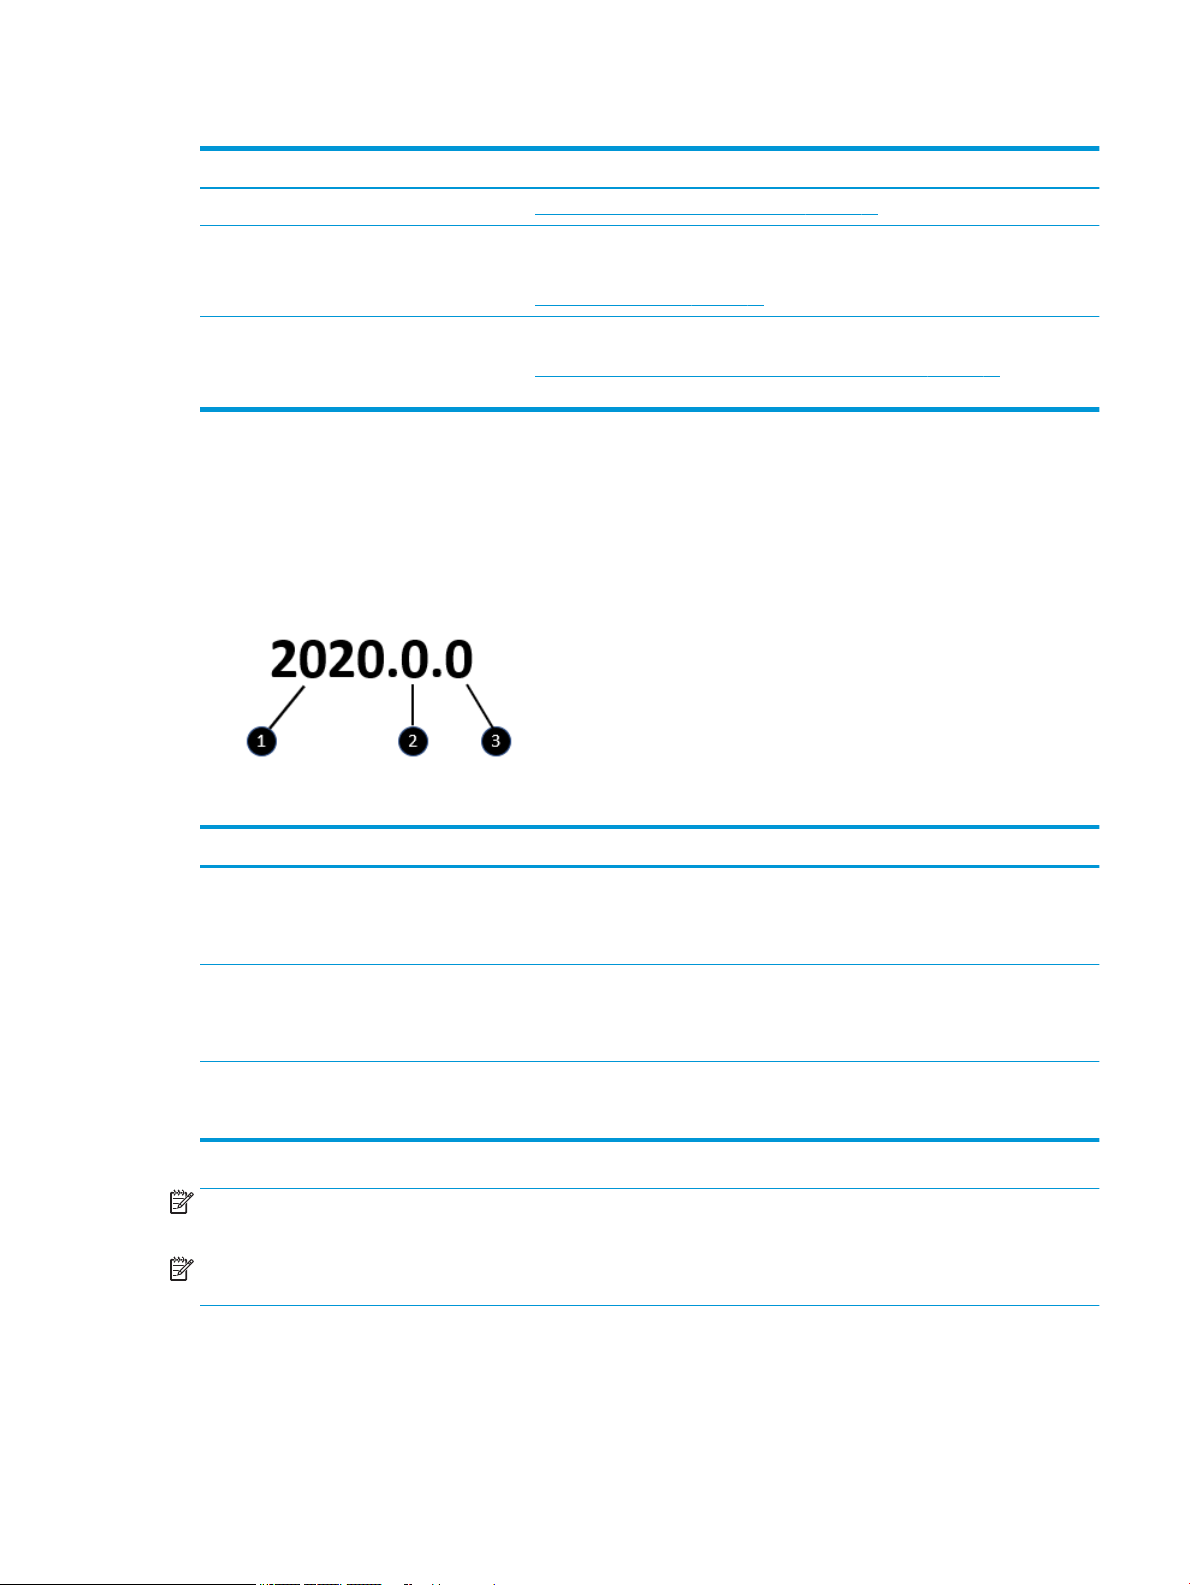
Table 1-2 HP ZCentral Remote Boost features and their descriptions (continued)
Feature Description
See Remote USB (Windows and ThinPro only) on page 54 for more information.
Sender screen blanking Blanks the screen of the sender monitor (if one is connected) so that the desktop session
is not visible on the sender monitor
See Sender screen blanking on page 48 for more information.
Touch features (Windows only) Lets you control your remote desktop with touch input and congure custom gestures
See Using touch features (Windows touch-capable devices only) on page 50 for more
information.
Interoperability between dierent versions of HP ZCentral
Remote Boost
Interoperability is supported between dierent versions of HP ZCentral Remote Boost Sender and HP ZCentral
Remote Boost Receiver only if they have the same primary version number.
Table 1-3 HP ZCentral Remote Boost version number items and their descriptions
Item Description
1 Primary version number: A primary release typically contains upgrades and changes signicant enough that
interoperability with previous primary releases is not guaranteed by HP. For example, a connection between dierent
primary releases of HP ZCentral Remote Boost Sender and HP ZCentral Remote Boost Receiver might not function at an
acceptable quality, or at all.
2 Minor version number: When this number is zero, it represents a minor release, which typically introduces new features or
enhances existing functionality, as well as including changes from any previous patch releases. A connection between
dierent minor releases (but the same primary release) of HP ZCentral Remote Boost Sender and HP ZCentral Remote
Boost Receiver should function at an acceptable level of quality.
3 Patch version number: When this number is zero, it represents a patch release, which is typically only for xing major
security issues or defects. A connection between dierent patch releases (but the same primary release) of HP ZCentral
Remote Boost Sender and HP ZCentral Remote Boost Receiver should function at an acceptable quality.
NOTE: Each release of HP ZCentral Remote Boost is a complete release of the entire product, regardless of
which components have changed.
NOTE: The version numbering changed between HP Remote Graphics Software (RGS) and HP ZCentral
Remote Boost. The last version of RGS is 7.7.x and the rst version of Remote Boost is 2020.0.
Software compatibility with HP ZCentral Remote Boost
HP ZCentral Remote Boost works with most software that runs in windowed mode, including those based on
OpenGL and Direct X. Some exceptions include:
Interoperability between dierent versions of HP ZCentral Remote Boost 3
Page 16

● The installation of HP ZCentral Remote Boost Sender disables video overlay surfaces on the sender.
Most OpenGL-based software will adjust to this and still work correctly, but in some cases, the following
could happen as a result:
– Some OpenGL-based software might display incorrectly.
– Media players that use video overlay surfaces might display incorrectly.
If these types of issues occur, likely the software is still trying to use video overlay surfaces even though
they are disabled. You can sometimes resolve this issue if the software has an option to disable the use
of video overlay surfaces.
NOTICE: HP ZCentral Remote Boost Sender does not support programs in full-screen exclusive mode. This
means that HP ZCentral Remote Boost is not suitable for most full-screen games.
HP ZCentral Remote Boost Sender licensing
HP ZCentral Remote Boost Sender is included with HP Z workstations, HP ZBook mobile workstations, and HP
VR backpack workstations. A separate license purchase is not required for HP ZCentral Remote Boost Sender
on these products.
HP ZCentral Remote Boost Sender requires a license if installed on any other computer. Further information
can be found in the Licensing Guide (see Finding more information on page 4).
NOTE: An HP ZCentral Remote Boost connection can be established without a license; however, a warning
message about the missing license is displayed over the HP ZCentral Remote Boost Receiver window, blocking
a signicant portion of the Sender desktop.
NOTE: HP ZCentral Remote Boost Receiver is a free download for all devices.
Finding more information
The following table can be used to nd more information about HP ZCentral Remote Boost.
Table
1-4 Resources and their contents
Resource Contents
HP ZCentral Remote Boost website
http://hp.com/ZCentralRemoteBoost
HP ZCentral Remote Boost at HP
Support Center
http://www.hp.com/support/rgs
● More HP ZCentral Remote Boost documentation, including the following:
● User guides for some previous versions of HP ZCentral Remote Boost. Select HP
● Worldwide support
– Licensing Guide—Describes how to obtain and install licensing for HP ZCentral
Remote Boost Sender.
– QuickSpecs—Describes HP ZCentral Remote Boost system requirements.
ZCentral Remote Boost.
– Online chat with an HP technician
– Support telephone numbers
NOTE: If your phone call is answered by a voice recognition system and you are
asked to say the name of the product, say "ZCentral Remote Boost."
4 Chapter 1 HP ZCentral Remote Boost overview
Page 17

2 Getting started
The following procedure is a high-level description of how to get started using HP ZCentral Remote Boost:
1. Install HP ZCentral Remote Boost Sender and HP ZCentral Remote Boost Receiver.
2. Open HP ZCentral Remote Boost Receiver.
3. Start an HP ZCentral Remote Boost session with the sender.
a. On the Home panel of HP ZCentral Remote Boost Receiver, enter the host name or IP address of the
sender, and then press the Enter key or select the Connect button.
b. In the HP ZCentral Remote Boost authentication window that appears, enter the credentials of a
user account that resides on the sender, and then select OK.
If authentication is successful, the HP ZCentral Remote Boost session starts, and the sender desktop
appears inside the HP ZCentral Remote Boost Receiver window that opens on the receiver.
NOTE: If the sender desktop was in a locked state when you started the HP ZCentral Remote Boost
session, you must unlock the desktop by entering the credentials again, this time into the logon screen
on the sender.
5
Page 18

3 Installation
Follow the installation instructions for your operating system.
NOTE: Although RGS has a new name, HP ZCentral Remote Boost, the installation parameter names, folders
and executable names have not changed.
Installing HP ZCentral Remote Boost Receiver (Windows)
The installer wizard for the HP ZCentral Remote Boost Receiver allows for both Typical and Custom
installations. The Typical installation installs Remote USB and Remote Clipboard. The Typical installation
should be suitable for most deployments.
The Custom installation type lets you choose whether you want to install certain features, as well as specify
proxy settings. You can perform a custom installation on the command line as well.
IMPORTANT: Windows administrator privileges are required to perform the installation.
NOTE: If the software is already installed, installing a newer version will perform an update. Attempting to
install the same version or an older version will cause the installer to exit without making changes to the
system.
NOTE: During the installation process, the installer creates a log le named
rgreceiverInstaller.log in the location specied by the Windows TEMP environment variable.
Performing a custom HP ZCentral Remote Boost Receiver installation using the installer wizard
To perform a custom installation of HP ZCentral Remote Boost Receiver on Windows using the installer
wizard:
1. Run ReceiverSetup64.exe, follow the on-screen instructions until you are prompted to choose a
setup type, select Custom, and then select Next.
2. On the Remote USB Conguration page, select the appropriate installation setting for the Remote USB
feature from the following options, and then select Next.
● USB devices are Local—Remote USB is not installed on the receiver, and all receiver-side USB
devices always mount to the receiver only, even during an HP ZCentral Remote Boost session.
● USB devices are Remote—Remote USB is installed, and all receiver-side USB devices always
mount to the sender only, which means the USB devices are accessible only during an HP ZCentral
Remote Boost session. The USB devices cannot mount to the receiver at any time, regardless of the
HP ZCentral Remote Boost connection state.
● USB devices are Local/Remote—Remote USB is installed, and each USB device has its access set
individually to either the receiver or the sender, depending on when the USB device is plugged in to
the receiver.
– If a USB device is plugged in to a USB port on the receiver while HP ZCentral Remote Boost
Receiver is disconnected, the USB device becomes accessible by the receiver only.
– If a USB device is plugged in to a USB port on the receiver while HP ZCentral Remote Boost
Receiver is connected, the USB device becomes accessible by the sender only.
6 Chapter 3 Installation
Page 19

You can switch access to a particular device by removing it and then re-inserting it while the HP
ZCentral Remote Boost Receiver is in the opposite connection state.
NOTE: This setting controls whether Remote USB components are installed. To change this setting
after installation, you must uninstall and reinstall HP ZCentral Remote Boost Receiver. If installed,
Remote USB can be disabled (and re-enabled) later using HP ZCentral Remote Boost Receiver or the HP
ZCentral Remote Boost Receiver Conguration tool.
Alternatively, you can override the Remote USB installation setting for individual devices (without a
reinstallation) with an advanced option that the installer does not oer (see Conguring the remoting
behavior of individual USB devices (Windows only) on page 55).
3. On the Remote Clipboard Conguration page, select whether you want the Remote Clipboard feature
installed, and then select Next.
NOTE: This setting controls whether Remote Clipboard components are installed. To change this
setting after installation, you must uninstall and reinstall HP ZCentral Remote Boost Receiver. If
installed, Remote Clipboard can be disabled (and re-enabled) later using HP ZCentral Remote Boost
Receiver or the HP ZCentral Remote Boost Receiver Conguration tool.
4. If the next page of the wizard is titled Proxy Conguration, select the appropriate setting from the
following list, and then select Next. If the next page prompts you to start the installation next, then HP
ZCentral Remote Boost automatically detected and used the proxy settings from Internet Explorer, and
you can skip this step.
● If the receiver accesses the internet through a proxy server, select Use this proxy and enter the
proxy address and port.
● If the receiver does not access the internet through a proxy server, leave Do not use a proxy
selected.
IMPORTANT: Proxy server settings must be congured correctly to activate HP ZCentral Remote Boost
Advanced Features. See HP ZCentral Remote Boost Advanced Features on page 34 for more
information.
5. Select Install to start the installation process.
6. When prompted, restart the computer to complete the installation.
Performing a custom HP ZCentral Remote Boost Receiver installation on the command line
HP ZCentral Remote Boost command-line options must be preceded by a /z ag and be enclosed in double
quotes, with no space before or after the opening double quote and no space before the closing double quote.
If you use multiple commands, separate them with a single space. See the following example:
ReceiverSetup64.exe /z"/autoinstall /agreetolicense"
If you need to include a double quote as part of a parameter (such as for a folder path), then you should
precede each of those double quotes with a backwards slash like in the following example:
ReceiverSetup64.exe /z"/autoinstall /agreetolicense /folder=\"C:\RGS
Receiver""
NOTE: This command must be issued from the location of the ReceiverSetup64.exe installation le.
Unless a folder path is specied, HP ZCentral Remote Boost is installed in the folder: C:\Program Files
\HP\Remote Graphics Receiver.
The following table describes the installation-related command-line options.
Installing HP ZCentral Remote Boost Receiver (Windows) 7
Page 20

IMPORTANT: The options /autoinstall and /agreetolicense are always required when
performing the installation on the command line.
Table 3-1 Installation options and their descriptions
Option Description
Initiates the installation
/autoinstall
Accepts the license agreement
/agreetolicense
/folder=\"<folder path>\"
/usb={local|remote|localRemote}
/clipboard
/noreboot
/proxy=<IP address>:<port>
Species the folder path to install to, which is the following by default if not
specied:
C:\Program Files\HP\Remote Graphics Receiver
NOTE: The folder path C:\Program Files\HP\Remote Graphics
Receiver applies to 64-bit versions of Windows. On 32-bit versions of
Windows, the folder path is C:\Program Files\Hewlett-Packard
\Remote Graphics Receiver.
Sets the Remote USB installation option, which is localRemote by default if
not specied
For a description of each option, see Performing a custom HP ZCentral Remote
Boost Receiver installation using the installer wizard on page 6.
Installs the Remote Clipboard feature
Prevents the computer from restarting at the end of the installation process
Congures proxy settings to allow for activation of HP ZCentral Remote Boost
Advanced Features.
IMPORTANT: Activation of HP ZCentral Remote Boost Advanced Features
does not work through a proxy server if the proxy settings are not congured
correctly. See HP ZCentral Remote Boost Advanced Features on page 34 for
more information.
The following table describes additional command-line options for the installer.
NOTE: If either /help or /viewlicense is used, all other options are ignored.
Table 3-2 Installation options and their descriptions
Option Description
/help
/viewlicense
/autoremove
8 Chapter 3 Installation
Displays the valid command line options
Displays the EULA (End User License Agreement)
Initiates an uninstallation
NOTE: The option /noreboot can be used in conjunction with this option.
Page 21

Installing HP ZCentral Remote Boost Sender (Windows)
The installer wizard for the HP ZCentral Remote Boost Sender allows for both Typical and Custom
installations. The Typical installation installs Remote USB and Remote Clipboard but not smart card
redirection. The Typical installation should be suitable for most deployments.
The Custom installation lets you choose whether or not to install certain features. A custom installation can
be performed on the command line as well.
IMPORTANT: Windows administrator privileges are required to perform the installation.
NOTE: If an older version of the software is already installed, installing a newer version will perform an
update. Attempting to install the same version or an older version will cause the installer to exit without
making changes to the system.
NOTE: During the installation process, the installer creates a log le named rgsenderInstaller.log
in the location specied by the Windows TEMP environment variable.
Installer wizard installation
To perform a custom installation of HP ZCentral Remote Boost Sender on Windows using the installer wizard:
NOTE: The installer wizard might contain additional options not discussed below regarding installation of
beta features. Do not install these features unless instructed to by HP.
1. Run SenderSetup64.exe, follow the on-screen instructions until you are prompted to choose a
setup type, select Custom, and then select Next.
2. On the Remote Boost Sender Conguration page, select whether you want the Remote USB, smart card
redirection, and Remote Clipboard features installed, and then select Next.
NOTE: These settings control whether the features are installed. To change these settings after
installation, you must uninstall and reinstall HP ZCentral Remote Boost Sender. If installed, Remote
Clipboard can be disabled (and re-enabled) later using the HP ZCentral Remote Boost Sender
Conguration tool.
3. On the Single Sign-On / Easy Login Conguration page, select an authentication method, and then
select Next.
TIP: You can change the authentication method after installation. See Authentication on page 35 for
more information and for a description of each of the authentication methods.
NOTE: If you select Do not enable either, then the standard authentication method will be used.
4. If the next page of the wizard is titled Remote Boost Sender Licensing, complete this step. If the next
page prompts you to start the installation next, then an HP ZCentral Remote Boost Sender license is
either already installed or is not required, and you can skip this step.
On the Remote Boost Sender Licensing page, select the appropriate option depending on if you have an
HP ZCentral Remote Boost Sender license le ready to install, select Next.
If you chose to install a license le, follow the on-screen instructions to complete that procedure before
proceeding to the next step.
NOTE: For a brief overview of HP ZCentral Remote Boost Sender licensing requirements, see HP
ZCentral Remote Boost Sender licensing on page 4. For detailed information and instructions about HP
ZCentral Remote Boost Sender licensing, see Finding more information on page 4 to locate the Licensing
Guide.
Installing HP ZCentral Remote Boost Sender (Windows) 9
Page 22

5. You will be prompted to restart your computer after the HP ZCentral Remote Boost Sender installation is
complete. Select Yes when asked to restart the system.
6. Select Install to start the installation process.
7. When prompted, restart the computer to complete the installation.
Command-line installation
HP ZCentral Remote Boost command-line options must be preceded by a /z ag and be enclosed in double
quotation marks, with no space before or after the opening quotation mark and no space before the closing
quotation mark. If using multiple commands, separate them with a single space, as in the following example:
SenderSetup64.exe /z"/autoinstall /agreetolicense"
If you need to include a quotation mark as part of a parameter (such as for a folder path), then precede each
quotation mark with a forward slash like in the following example:
SenderSetup64.exe /z"/autoinstall /agreetolicense /folder="C:RGS Sender""
The following table describes the installation-related command-line options.
NOTE: This command must be issued from the location of the SenderSetup64.exe installation le.
NOTE: Unless a folder path is specied, HP ZCentral Remote Boost is installed in the folder C:\Program Files
\HP\Remote Graphics Sender.
IMPORTANT: The options /autoinstall and /agreetolicense are always required when you install
from the command line.
Table 3-3 Installation options and their descriptions
Option Description
/autoinstall
/agreetolicense
/folder=\"<folder path>\"
/usb
/clipboard
/el
—or—
/sso
/rgslicenseserver=[<port>@]<host>
—or—
/rgslicensefile=\"<file path>\"
Initiates the installation
Accepts the license agreement
Species the folder path to install to, which is the following by default:
C:\Program Files\HP\Remote Graphics Sender
NOTE: The folder path C:\Program Files\HP\Remote Graphics Sender applies
only to 64-bit versions of Windows. On 32-bit versions of Windows, the folder
path is C:\Program Files\Hewlett-Packard\Remote Graphics Sender.
Installs the Remote USB feature
Installs the Remote Clipboard feature
Enables Easy Login or Single Sign-on
NOTE: If neither option is specied, the standard authentication method will
be used.
IMPORTANT: You can use either /rgslicenseserver or /
rgslicensefile but not both. If neither is used, HP ZCentral Remote Boost
Sender is installed without a license.
/rgslicenseserver—Species the license server that HP ZCentral
Remote Boost Sender should acquire a license from during installation
NOTE: If a port is not specied, the default port of the host is used.
10 Chapter 3 Installation
Page 23

Table 3-3 Installation options and their descriptions (continued)
Option Description
/rgslicensefile—Species the location of a license le on the local
system
/noreboot
/smartcard
/enableLegacySecurity
Prevents the computer from restarting at the end of the installation process.
Installs the smart card redirection feature.
Allows the use of legacy security settings, enabling HP RGS 7.4 and earlier
receivers to connect without conguring certicates. Not recommended for
highest security.
The following table describes additional command-line options for the installer.
NOTE: If you use either /help or /viewlicense, all other options are ignored.
Table 3-4 Installation options and their descriptions
Option Description
/help
/viewlicense
/autoremove
Displays the valid command line options
Displays the EULA (End User License Agreement)
Initiates an uninstallation
NOTE: You can use the option /noreboot with this option.
Installing HP ZCentral Remote Boost Receiver (Linux)
These instructions describe how to install HP ZCentral Remote Boost Receiver on Linux®.
1. Log in as root.
2. Go to the download directory for the HP ZCentral Remote Boost Receiver, and unpack the HP ZCentral
Remote Boost package. HP ZCentral Remote Boost for Linux includes installers specic to Linux
distributions. Change to the directory that matches your distribution.
3. Execute the following command:
./install.sh
TIP: Optionally, add the directory /opt/hpremote/rgreceiver to your PATH environment
variable.
4. Enter any of the following installation-related command-line options.
Option Description
-agreeToLicense Accepts the license agreement.
-[no]legacyWacom Enables the previous Wacom pen solution.
NOTE: When this option is provided, the Wacom
pen solution works only with a Linux receiver.
-h
Displays help message.
Installing HP ZCentral Remote Boost Receiver (Linux) 11
Page 24

Option Description
—or—
-help
Installing HP ZCentral Remote Boost Sender (Linux)
These instructions describe how to install HP ZCentral Remote Boost Sender on Linux.
1. Log in as root.
2. Go to the download directory for the HP ZCentral Remote Boost Sender, and unpack the HP ZCentral
Remote Boost package. HP ZCentral Remote Boost for Linux includes installers specic to Linux
distributions. Change to the directory that matches your distribution.
3. Execute the following command:
./install.sh
4. Enter any of the following installation-related command-line options.
Option Description
-agreeToLicense Accepts the license agreement.
-[no]smartcard Enables smart card support without prompting.
-nolicenseconfig Skips the license conguration.
-enableLegacySecurity Allows connections from older RGS Receivers.
-h
—or—
-help
5. If the sender has the pcsc-lite package installed, the installer gives you the option to install smart card
redirection. By default, this feature does not install.
Displays help message.
Installing HP ZCentral Remote Boost Receiver (macOS)
On macOS®, you can install HP ZCentral Remote Boost Receiver using the installer wizard or on the command
line.
NOTE: If the software is already installed, the installation process overwrites it.
Installer wizard installation
You can use the wizard to install HP ZCentral Remote Boost Receiver.
1. Log in as an administrator (or be able to provide administrator credentials).
2. Run HP RGS Receiver.pkg, and then follow the on-screen instructions.
Command-line installation
Execute the following command:
12 Chapter 3 Installation
Page 25

sudo installer -pkg “HP\RGS\Receiver.pkg” -target /
NOTE: To install HP ZCentral Remote Boost Receiver in a location other than the root of the boot volume,
enter /Volumes/OtherDrive instead of / at the end of the command.
Installing HP ZCentral Remote Boost Receiver (macOS) 13
Page 26

4 HP ZCentral Remote Boost Receiver
overview
The HP ZCentral Remote Boost Receiver runs locally.
Opening HP ZCentral Remote Boost Receiver
To open HP ZCentral Remote Boost Receiver, use one of the following procedures.
Opening HP ZCentral Remote Boost Receiver on Windows
To open HP ZCentral Remote Boost Receiver on Windows:
▲ Perform the action in the following table that corresponds to the operating system of the receiver.
Table 4-1 Windows operating systems and their procedures
Operating system Procedure
Windows 10 Select Start , type HP ZCentral Remote Boost, and then select HP HP ZCentral
Remote Boost Receiver from the search results.
Opening HP ZCentral Remote Boost Receiver on Linux
To open HP ZCentral Remote Boost Receiver on Linux:
▲ Run the executable le /opt/hpremote/rgreceiver/rgreceiver.sh.
– or –
Select either the Applications or Activities menu, and then select HP ZCentral Remote Boost Receiver.
Opening HP ZCentral Remote Boost Receiver on macOS
To open HP ZCentral Remote Boost Receiver on macOS:
▲ Select the HP Remote Boost icon in Launchpad.
TIP: HP ZCentral Remote Boost Receiver can alternatively be started on the command line (see HP ZCentral
Remote Boost Receiver command-line options on page 24).
HP ZCentral Remote Boost Receiver GUI (Windows/Linux)
Several items are displayed on the GUI.
14 Chapter 4 HP ZCentral Remote Boost Receiver overview
Page 27

Table 4-2 GUI items and their descriptions
Item Description
1 Enter the host name or IP address of the sender in this eld.
TIP: The drop-down list contains recent entries.
2 Initiates the connection.
3 Opens the Settings panel (see HP ZCentral Remote Boost Receiver settings on page 19 for more information).
4 Opens the Info panel, which contains version information and the End User License Agreement (EULA) for HP ZCentral
Remote Boost, as well as third-party acknowledgments.
5 Opens the User Guide (this document).
HP ZCentral Remote Boost Receiver GUI (macOS)
Several items are displayed on the GUI.
Table
4-3 GUI items and their descriptions
Item Description
1 Enter the host name or IP address of the sender in this eld.
TIP: The drop-down list contains recent entries.
2 Initiates the connection.
Starting an HP ZCentral Remote Boost session
To start an HP ZCentral Remote Boost session:
1. On the Home panel of HP ZCentral Remote Boost Receiver, enter the host name or IP address of the
sender, and then press the Enter key or select the Connect button.
2. This step depends on the authentication method you are using (see Authentication on page 35).
Enter the credentials as required by the authentication method.
HP ZCentral Remote Boost Receiver GUI (macOS) 15
Page 28

If authentication is successful, the HP ZCentral Remote Boost session starts, and the sender desktop appears
inside the HP ZCentral Remote Boost Receiver window that opens on the receiver.
Note the following additional information about creating an HP ZCentral Remote Boost connection:
● You cannot connect to more than one sender at a time using the GUI of HP ZCentral Remote Boost
Receiver. If an attempt is made to connect to a second sender, the connection to the rst sender is
terminated. For information about how to connect to more than one sender at a time, see Directory
Mode on page 57.
HP ZCentral Remote Boost Receiver window GUI (Windows/ Linux)
Several items are displayed on the GUI.
Table 4-4 GUI items and their descriptions
Item Description
1 The HP ZCentral Remote Boost Receiver toolbar provides easy access to the most frequently used options (see HP
ZCentral Remote Boost Receiver toolbar GUI (Windows/Linux) on page 16 for more information).
2 Scroll bars appear if the resolution of the sender is larger than the size of the HP ZCentral Remote Boost Receiver window.
HP ZCentral Remote Boost Receiver toolbar GUI (Windows/Linux)
Several icons are displayed in the GUI.
16 Chapter 4 HP ZCentral Remote Boost Receiver overview
Page 29
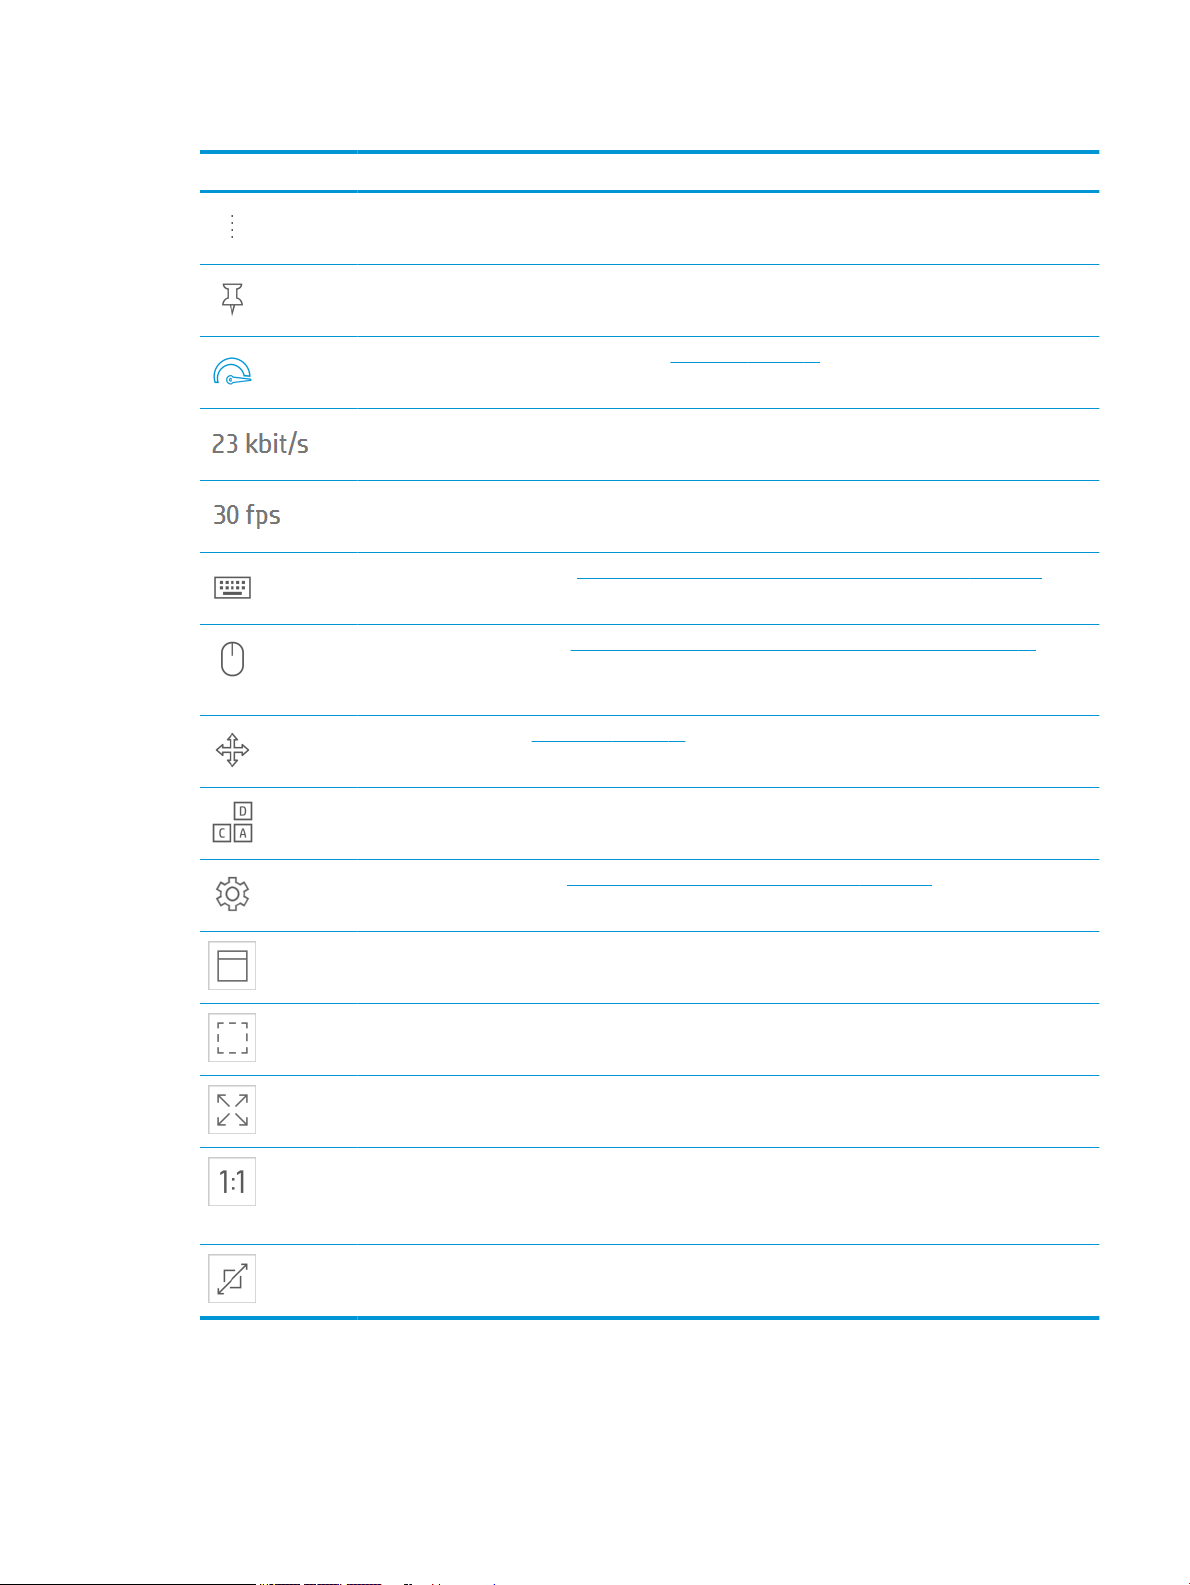
Table 4-5 Icons and their descriptions
Icon Description
By clicking and holding the left mouse button while moving the mouse, the toolbar may be moved horizontally.
Allows the toolbar to be pinned or unpinned to the Receiver window. If it is unpinned, it will hide when not in
use. To unhide the toolbar, hover the mouse near the top of the Receiver window.
Displays the current status of HP Velocity (see HP Velocity on page 34 for more information).
Displays the current network bandwidth consumed by the connection.
Displays the number of image updates in frames-per-second.
Opens the virtual keyboard (see Using touch features (Windows touch-capable devices only) on page 50 for
more information).
Enables the virtual mouse (see Using touch features (Windows touch-capable devices only) on page 50 for
more information).
TIP: The virtual mouse also can be enabled and disabled using the 4-nger tap gesture.
Toggles Setup Mode (see Setup Mode on page 18).
Sends a virtual Ctrl+Alt+Del command to the sender.
Opens the Settings panel (see HP ZCentral Remote Boost Receiver settings on page 19 for more information).
Adds borders to the HP ZCentral Remote Boost Receiver window, allowing it to be moved and resized.
Removes borders from the HP ZCentral Remote Boost Receiver window.
Makes the HP ZCentral Remote Boost Receiver window expand to ll the boundaries of the current active
monitor screen.
Enables 1:1 Pixel Mode, which causes the remote desktop to be displayed at the exact same size on the HP
ZCentral Remote Boost Receiver window. If the remote desktop is larger than the HP ZCentral Remote Boost
Receiver window, scroll bars are added to the window. If the remote desktop is smaller, a black area is added
around the desktop.
Enables Scaled Pixel Mode, which causes the remote desktop to be scaled to ll the HP ZCentral Remote Boost
Receiver window. Black bars might be added either horizontally or vertically to keep the same aspect ratio.
HP ZCentral Remote Boost Receiver window GUI (Windows/Linux) 17
Page 30

HP ZCentral Remote Boost Receiver window GUI (macOS)
Several items are displayed on the GUI.
Table 4-6 GUI items and their descriptions
Item Description
1
2 Displays the number of image updates in frames-per-second.
3 Scroll bars appear if the resolution of the sender is larger than the size of the HP ZCentral Remote Boost Receiver window,
Setup Mode
In Setup Mode, transmission of keyboard and mouse input to the sender is suspended. Instead, the keyboard
and mouse can be used to interact with the HP ZCentral Remote Boost Receiver window on the receiver. In
this mode, you can do the following:
The HP ZCentral Remote Boost Receiver menu bar provides easy access to the most frequently used options via the
following menus:
● HP ZCentral Remote Boost Receiver: Lets you view version information, change settings (see HP ZCentral Remote
Boost Receiver settings on page 19), and quit HP ZCentral Remote Boost Receiver.
NOTE: HP ZCentral Remote Boost settings are also known as preferences on macOS.
● Connection: Lets you enable Setup Mode (see Setup Mode on page 18), send a virtual Ctrl+Alt+Del command to the
sender, and disconnect from the sender.
● View: Lets you select 1:1 Pixel Mode or Scaled Pixel Mode. Also, lets you switch among windowed, borderless, or full-
screen window modes.
● Image Quality: Lets you set the image quality (see Performance on page 20 for more information).
● Help: Lets you open the User Guide (this document).
or when the Receiver window is adjusted below the size of the sender resolution.
● Move an HP ZCentral Remote Boost Receiver window that has its title bar and borders hidden
● Select (bring to the front) a specic HP ZCentral Remote Boost Receiver window that might be obscured
by another HP ZCentral Remote Boost Receiver window in Directory Mode
● The following Setup Mode HotKeys can be used to control the HP ZCentral Remote Boost Receiver
application:
M: Display the HP ZCentral Remote Boost Receiver Settings window.
18 Chapter 4 HP ZCentral Remote Boost Receiver overview
Page 31

N: Minimize the Receiver window.
C: Close the Receiver window.
G: Toggle Game Mode.
H: Hide the toolbar.
F: Fit the Receiver window size to the Sender desktop size.
Setup Mode can be activated in two ways:
● Select the Setup Mode button (Windows/Linux) or menu item (macOS) on the HP ZCentral Remote Boost
Receiver toolbar to toggle the state of Setup Mode.
● Type the default hotkey sequence as follows:
Press and hold down Left Shift. While pressing Left Shift, press and release Space. Setup Mode will
remain active as long as Left Shift is held down.
NOTE: The default hotkey sequence can be changed (see Changing the Setup Mode hotkey sequence
on page 19).
Changing the Setup Mode hotkey sequence
To change the Setup Mode hotkey sequence:
HP ZCentral Remote Boost allows you to change the Setup Mode hotkey sequence from its default value of
Left Shift press, Space press, and Space release.
When dening a new Setup Mode hotkey sequence, the following keys can be used:
● Left Ctrl, Right Ctrl, Ctrl—Species a left, right, or side-insensitive Ctrl key, respectively.
● Left Alt, Right Alt, Alt—Species a left, right or side-insensitive Alt key, respectively.
● Shift
● Space
Every sequence must begin with Ctrl, Alt, or Shift. Two actions are associated with each key:
● Down: Species a key press.
● Up: Species a key release.
1. In the Hotkeys panel of the HP ZCentral Remote Boost Receiver settings, select Set.
2. Press and hold the rst key that you want to use in the sequence.
3. Press and release the other keys that you want to use in the sequence.
4. Release the initial key.
Select Reset restores the Setup Mode hotkey sequence to its default values.
HP ZCentral Remote Boost Receiver settings
This section describes the settings available in HP ZCentral Remote Boost Receiver, which are divided into the
following categories:
HP ZCentral Remote Boost Receiver settings 19
Page 32

Connection
The following table describes the settings available in the Connection panel.
Table 4-7 Settings and their descriptions
Setting Description
Prompt for user name and password Forces the authentication prompt to display when you start an HP ZCentral Remote
Do not change the Sender display(s) Do not change the resolution or layout of the sender’s displays.
Boost connection.
In certain scenarios, HP ZCentral Remote Boost does not prompt you to enter a domain,
user name, and password when starting an HP ZCentral Remote Boost connection. If you
need to enter a domain, user name, and password, then select this box.
TIP: This is advantageous when you use HP ZCentral Remote Boost in Directory Mode,
where each session has dierent connection needs.
Set Sender display(s) to match Receiver
display(s)
Set Sender display(s) to match display
properties
Automatically hide the menu bar and dock
when in borderless mode
NOTE: macOS only
Enable remote USB
NOTE: Windows/HP ThinPro only
Select Sender Becomes active when Directory Mode is enabled. Allows the user to remote USB devices
Certicate Verication Failure Policy Species what the HP ZCentral Remote Boost Receiver does if the verication of the
Attempts to set the sender’s display resolution and layout to match the receiver’s display
resolution and layout.
For example, if the receiver has two monitors side-by-side and an overall display
resolution of 2560 × 1024, HP ZCentral Remote Boost attempts to set the same
resolution and layout on the sender’s displays. If that fails, HP ZCentral Remote Boost
attempts to set a resolution of 2560 × 1024 on a single sender display.
NOTE: This option is not supported on Linux by default. You must congure the X
Server with the proper modelines, metamodes, or both for this option to work. See
Matching display resolution and layout (Linux-based sender) on page 45 for more
information.
Attempts to set the sender’s display resolution and layout to match the specied display
properties. See Image and Display on page 63 for more information.
NOTE: This option is not available if no display properties are found in the
conguration le.
If enabled, hides the menu bar and dock when the Receiver window is in borderless
mode, similar to what happens when full-screen window mode is used.
Enables Remote USB.
to a sender selected from the drop-down list.
sender certicate fails.
Enable remote clipboard Enables Remote Clipboard.
Performance
The performance settings allow you to improve the interactive experience. Typically, these adjustments will
be made when working with highly interactive applications (such as a CAD application) in a low-bandwidth or
high-latency network environment.
The following table describes the settings available in the Performance panel.
20 Chapter 4 HP ZCentral Remote Boost Receiver overview
Page 33

Table 4-8 Settings and their descriptions
Setting Description
Enable HP Velocity Enables HP Velocity.
Advanced Video Compression on Sender
NOTE: Windows/Linux only
Image Quality Sets the maximum image quality.
Enable adaptive image quality
Increase text rendering quality
Minimum image quality
Target update rate
TIP: See Performance optimization on page 84 for more information about ways to optimize HP ZCentral Remote Boost
performance.
Enables Advanced Video Compression.
When not using Adaptive image quality, HP ZCentral Remote Boost will maintain the
image quality specied by this option. When selecting Adaptive image quality, HP
ZCentral Remote Boost will use this option’s setting as the target image quality when the
updates-per-second value allows.
When Enable adaptive image quality is selected, HP ZCentral Remote Boost will begin to
degrade the image quality down to the Minimum image quality setting (from 0–100)
anytime the updates-per-second value falls below the Target update rate (from 0–30
updates per second).
When Increase text rendering quality is selected, HP ZCentral Remote Boost uses
dierent encoding for areas of the sender's display with few colors (areas with mostly
text) to increase the quality when those areas are displayed on the receiver. In videocentric or bandwidth-constrained environments, disabling this option might improve HP
ZCentral Remote Boost performance.
NOTE: These options are disabled when Advanced Video Compression is enabled.
Gestures (Windows touch-capable devices only)
You can use the gesture settings to map hotkey sequences to the gestures that are not used by HP ZCentral
Remote Boost by default.
For a list of the gestures that you can customize, see Using touch features (Windows touch-capable devices
only) on page 50.
Mapping a hotkey sequence to a gesture
To map a hotkey sequence to a gesture:
1. Select the pencil icon in the row of the gesture that you want.
2. Enter the key sequence.
3. Optionally select Enable sticky gesture if you want the gesture to mimic the continual press of the
hotkey sequence until the same gesture is used to disable the sequence.
4. Select Save.
Unmapping a hotkey sequence from a gesture
To unmap a hotkey sequence from a gesture:
▲ Select the X icon in the row of the gesture that you want.
Audio
The following table describes the settings available in the Audio panel.
HP ZCentral Remote Boost Receiver settings 21
Page 34

Network
Table 4-9 Audio settings and their descriptions
Setting Description
Stream audio from Sender Enables the sending of the audio stream to the receiver
Stereo Enables stereo audio for the audio stream sent from the sender to the receiver.
NOTE: Stereo audio requires more network bandwidth.
Quality Sets the quality for the audio stream being transmitted by the sender.
NOTE: Higher-quality audio requires more network bandwidth.
Audio allows focus Enables audio to play only from the HP ZCentral Remote Boost Receiver window that has
focus. When disabled, audio from all HP ZCentral Remote Boost Receiver windows will be
combined.
Volume Controls the volume level on the receiver.
NOTE: This option is for Windows and Linux only. On macOS, use the system volume
control instead.
The following table describes the settings available in the Network panel.
Table
4-10 Network settings and their descriptions
Hotkeys
Setting Description
Error Sets the time in seconds that HP ZCentral Remote Boost Receiver will wait before ending
the connection after failing to detect HP ZCentral Remote Boost Sender.
Warning Sets the time in seconds that HP ZCentral Remote Boost Receiver will wait before
displaying a warning dialog to the local user after failing to detect HP ZCentral Remote
Boost Sender.
Dialog Sets the time in seconds that HP ZCentral Remote Boost Receiver will wait for a response
to a dialog being displayed on the sender (such as an authentication dialog). The request
will be canceled if there is no response.
Use a proxy server for your LAN
Address
Port
Enables the use of a proxy server with HP ZCentral Remote Boost.
If you use a proxy server, conguring these settings is required to activate HP ZCentral
Remote Boost Advanced Features such as Advanced Video Compression and HP Velocity.
See HP ZCentral Remote Boost Advanced Features on page 34 for more information.
The following table describes the settings available in the Hotkeys panel.
4-11 Hotkeys settings and their descriptions
Table
Setting Description
Send First Key Forces the rst key of a local hotkey sequence to be transmitted to the sender.
By default, if a key press matches the rst key of a local Setup Mode sequence, all key events are
held until HP ZCentral Remote Boost determines whether the next keys pressed are completing
the sequence. If it is not a Setup Mode sequence, all key press events are then transmitted to the
sender.
22 Chapter 4 HP ZCentral Remote Boost Receiver overview
Page 35

Table 4-11 Hotkeys settings and their descriptions (continued)
Setting Description
However, commands for some remote applications might require that the rst key press event
arrive separately for them to function correctly. Enabling this option will ensure the immediate
transmission of the rst key press.
NOTE: In addition to transmitting the rst key press to the sender, the key is also still processed
by the receiver.
Logging
Send CTRL-ALT-END key sequence
as CTRL-ALT-DEL
Key Repeat Enables the processing of key repeats for when the Shift key is held down.
Setup Mode Sequence Sets the hotkey sequence for switching to Setup Mode.
Enables the use of a Ctrl+Alt+End key sequence as a Ctrl+Alt+Delete sequence for the sender.
This is useful when logging into the sender because, on some computers, the local operating
system will interrupt the standard Ctrl+Alt+Delete key sequence and bring up local Windows
security options instead.
TIP: The Ctrl+Alt+Del sequence can also be sent using the HP ZCentral Remote Boost Receiver
toolbar.
By default, key repeat processing is disabled by HP ZCentral Remote Boost, but some remote
applications might require this functionality.
NOTE: If this option is enabled, the default Setup Mode hotkey sequence will not trigger unless
it is typed fast enough.
For more information, see Changing the Setup Mode hotkey sequence on page 19.
The following table describes the settings available in the Logging panel.
Table
4-12 Logging settings and their descriptions
Setting Description
Enable message logging Enables logging.
Log le path Species the path of the log le.
Log level Determines the level of information that is logged.
Max logle size (KB) Limits the size of the log le.
Clear Log Clears the contents of the log le.
View Log Displays the contents of the log le.
Restore Defaults Resets all logging settings to the default values.
Statistics (Windows/Linux only)
The following table describes the information displayed in the Statistics panel.
For example, if WARN is selected, the log le will contain information of the type WARN
and also anything more serious than that type (ERROR and FATAL).
To log all information generated by HP ZCentral Remote Boost Receiver, select DEBUG.
HP ZCentral Remote Boost Receiver settings 23
Page 36

Table 4-13 Statistics settings and their descriptions
Item Description
Total network usage (Mbits/sec) Displays the combined network traic received from all connections.
Image updates per second Displays the combined number of image updates per second received from
all connections.
Image compression Displays the compression ratio of the update stream.
In a multi-connection environment, the value is from the HP ZCentral
Remote Boost Receiver window that currently has the keyboard focus. If
none of the HP ZCentral Remote Boost Receiver windows have focus, the
value will be zero. In a single-connection environment, the value will be
always available even if the HP ZCentral Remote Boost Receiver window
does not have focus.
Current network loss with HP Velocity
Current network loss without HP Velocity
Peak network loss without HP Velocity
These items display statistics about HP Velocity when it is activated and in
use.
HP ZCentral Remote Boost Receiver command-line options
The following table describes the valid command-line options for the Windows executable rgreceiver.exe,
the Linux shell script rgreceiver.sh, and the macOS executable HP ZCentral Remote Boost Receiver.
NOTE: These commands must be issued from the HP ZCentral Remote Boost receiver installation directory.
Table 4-14 Command-line options and their descriptions
Option Description
-config <file name>
-directory <file name>
-nosplash
Species the conguration le to use for the instance of HP ZCentral Remote Boost Receiver
being opened
NOTE: See Setting property values in a conguration le on page 76 for more information.
Opens HP ZCentral Remote Boost Receiver in Directory Mode using the conguration from the
specied directory le
NOTE: See Directory Mode on page 57 for more information.
Disables the splash screen that displays by default when HP ZCentral Remote Boost Receiver is
opened
-{version|ver|v}
-{help|h|?}
-<property name>=<value>
Displays version information for HP ZCentral Remote Boost Receiver
Displays the valid command line options
Sets the specied HP ZCentral Remote Boost Receiver property to the specied value
NOTE: See Setting property values on the command line on page 77 for more information.
24 Chapter 4 HP ZCentral Remote Boost Receiver overview
Page 37

5 HP ZCentral Remote Boost Sender overview
The HP ZCentral Remote Boost Sender runs remotely.
HP ZCentral Remote Boost Sender overview (Windows)
To stop, start, or restart the rgsender service:
HP ZCentral Remote Boost Sender for Windows is comprised of three processes:
● rgsendersvc.exe—Runs as a Windows service named rgsender that starts automatically (by
default) when Windows starts and also starts the other two processes
● rgsender.exe—The main process for HP ZCentral Remote Boost Sender
● rgsender_gui.exe—The notication icon, which can be found in the Windows notication area
If Windows is already started, there is no additional action required to start HP ZCentral Remote Boost Sender
(unless you have manually disabled automatic startup for the rgsender service).
The rgsender service must be active for the other two processes to be running, so if you want to completely
disable HP ZCentral Remote Boost Sender, stop the rgsender service.
▲ On the Services panel of Windows Task Manager, right-click rgsender, and then select an option.
HP ZCentral Remote Boost Sender overview (Linux)
HP ZCentral Remote Boost Sender for Linux is started as a service named rgsender. This service is
automatically enabled and started during installation and automatically restarts in the event of a failure.
On a system supporting systemd for system services, the you can run the following commands as root to
restart, stop, or get the status of the rgsender service:
● systemctl restart rgsender
● systemctl stop rgsender
● systemctl status rgsender
On a system supporting SysV init for system services, the following commands can be run as root to restart,
stop, or get the status of the rgsender service:
● service rgsender restart
● service rgsender stop
● service rgsender status
HP ZCentral Remote Boost Sender command-line options (Windows)
To apply command-line options to the HP ZCentral Remote Boost Sender service:
HP ZCentral Remote Boost Sender overview (Windows) 25
Page 38

Command-line options for HP ZCentral Remote Boost Sender can be applied to the rgsservice by modifying a
registry key.
1. Open the Registry Editor tool in Windows.
2. Navigate to and select the following registry key:
HKEY_LOCAL_MACHINE\SYSTEM\CurrentControlSet\services\rgsender
3. Add the command-line options to the ImagePath value.
C:\Program Files\HP\Remote Graphics Sender\rgsendersvc.exe -nocollab
IMPORTANT: The folder path C:\Program Files\HP\Remote Graphics Sender
\rgsendersvc.exe -nocollab applies to 64 bit versions of Windows. On 32 bit versions of
Windows, the folder path is C:\Program Files\Hewlett Packard\Remote Graphics
Sender\rgsendersvc.exe -nocollab.
4. Restart the rgsender service.
The following table describes the valid command-line options.
Table 5-1 Command-line options and their descriptions
Command Description
-nocollab
-timeout <value>
-authtimeout <value>
-{version|ver|v}
-{help|h|?}
-<property name>=<value>
Disables collaboration
Species the timeout value, in milliseconds, after which HP ZCentral Remote
Boost Sender disconnects an inactive connection
Species the timeout value, in milliseconds, that the collaboration
authentication dialog is shown before the request is denied automatically
Displays version information for HP ZCentral Remote Boost Sender
Displays the valid command line options
Sets the specied HP ZCentral Remote Boost Sender property to the
specied value
NOTE: See Setting property values on the command line on page 77 for
more information.
HP ZCentral Remote Boost Sender command-line options (Linux)
Command-line options for HP ZCentral Remote Boost Sender can be applied to the shell script
rgssender.sh. The following table describes the valid command-line options.
Table
5-2 Command-line options and their descriptions
Command Description
-{version|ver|v}
Displays version information for HP ZCentral Remote Boost Sender
-{help|h|?}
Displays the valid command line options
26 Chapter 5 HP ZCentral Remote Boost Sender overview
Page 39

HP ZCentral Remote Boost Sender notication icon (Windows
only)
The notication icon for HP ZCentral Remote Boost Sender is located in the Windows notication area and
animates if there is an active HP ZCentral Remote Boost session.
You can use the notication icon to do the following:
● Left-click the notication icon to open the HP ZCentral Remote Boost Collaborators window (see
Collaboration on page 37 for more information).
● Right-click the notication icon for quick access to the About and Disconnect options.
HP ZCentral Remote Boost Sender event logging (Windows only)
In addition to standard logging, HP ZCentral Remote Boost Sender logs events.
This information is output to a log named HPRemote, which is viewable in the Event Viewer tool in Windows,
and can be useful in several dierent ways:
● Troubleshooting—Event log information can help diagnose HP ZCentral Remote Boost connection
issues.
● Remote application termination—See Creating an agent for remote application termination (Windows
only) on page 96 for more information.
● Other automated actions—The basic principle behind using the event log for remote application
termination can be used to create an agent that performs other automated actions.
Filtering access to HP ZCentral Remote Boost Senders
You can lter access to HP ZCentral Remote Boost Senders using either user names or network identiers.
Filtering by user name
You can restrict HP ZCentral Remote Boost connections by conguring the Sender userlter.txt le to specify
the user names, or regular expressions to match the user names, that are allowed to make a connection. If
the provided user name does not match one of the lters, the connection is denied. By default, the
userlter.txt le allows all user names.
IMPORTANT: The userlter.txt le must allow all user names when Easy Login is enabled. Remote Boost
cannot lter connections by user name when using Easy Login because the rst authentication step is
skipped.
The le userlter.txt is located in the installation folder on Windows and in /etc/opt/hpremote/rgsender on
Linux.
NOTE: Administrator privileges are required to read or write to this le.
User name entries in the userlter.txt le are not case sensitive.
Filtering is performed only on the user name portion of a user's credentials. This means a domain account
with the same user name as a local account is treated as the same user name.
As an example, if james is added to the userlter.txt le on a sender system, connections from both the
domain user corp.net\james and the local user james are allowed.
HP ZCentral Remote Boost Sender notication icon (Windows only) 27
Page 40

Filtering by network identiers
You can restrict HP ZCentral Remote Boost connections by conguring the Sender iplter.txt le to specify the
IP addresses, subnet masks, and the fully qualied computer and domain names of the receiver systems that
are allowed to make a connection. If a receiver does not match one of the lters, the connection will be
denied.
The le iplter.txt is located in the installation folder on Windows and in /etc/opt/hpremote/
rgsender on Linux.
Connection ltering based on host name and domain name requires DNS to be congured to allow reverse
DNS lookup. For example, if the receiver IP address is 10.13.19.1, the command nslookup 10.13.19.1
returns a host name and domain name. HP ZCentral Remote Boost similarly uses reverse look up for host
name and domain name ltering.
As an example, adding the following lines to the iplter.txt le on a sender system that allows only
connections from receiver systems computername1 and computername2:
HOSTNAME:computername1.networkdomain.name
HOSTNAME:computername2.networkdomain.name
Filtering on the domain name compares the text after the rst period in the domain name. For example, if
DNS reverse lookup returns james.auth.corp.net, the lter compares auth.corp.net against
domain name entries in the
You can combine lter types in one iplter.txt le. After a match is made with a lter specied in the iplter.txt
le, HP ZCentral Remote Boost stops processing the le and allows the connection to be made. By default, the
iplter.txt le does not lter out any connections. If the receiver connects to the sender over VPN or through
another process that causes the IP address to be translated, HP ZCentral Remote Boost might prevent
connections that users expect to work. For additional information, review the iplter.txt le on a system
where the HP ZCentral Remote Boost Sender has been installed.
iplter.txt le to determine whether to allow connections from the receiver.
28 Chapter 5 HP ZCentral Remote Boost Sender overview
Page 41

6 Conguring certicates
By default, HP ZCentral Remote Boost Receiver attempts to verify the identity of the sender by verifying the
sender public-key infrastructure (PKI) certicate before a connection is made. By default, HP ZCentral Remote
Boost Sender creates a self-signed certicate, but you can congure it to use a certicate signed by a
Certicate Authority (CA).
Sender verication
When the receiver attempts to connect to the sender, a warning is displayed if the certicate verication fails.
The certicate verication can fail for the following reasons:
● The sender presented a self-signed certicate. This user can compare the certicate ngerprint to the
ngerprint available in the Certicate panel of the HP ZCentral Remote Boost Sender Conguration tool.
See End-user verication of a sender certicate on page 29.
NOTE: This is the most common failure, because HP ZCentral Remote Boost Sender generates a self-
signed certicate by default.
● The sender address typed into the receiver window does not match the hostname on the sender
certicate. This failure occurs if the user connects with an IP address instead of using the sender
hostname. The user must be sure that the IP address resolves to the hostname on the sender certicate
before connecting to that sender. Alternatively, the user can reconnect using the hostname on the
sender certicate.
● The certicate is expired. If self-signed certicates are used, this error does not occur because a new
self-signed certicate is generated when the current certicate approaches expiration.
Certicate Verication Error Policy
The Certicate Verication Error Policy determines how the receiver performs if the identity of the sender
cannot be veried.
This setting can be congured in the HP ZCentral Remote Boost Receiver Conguration tool (see HP ZCentral
Remote Boost Receiver Conguration tool (Windows and Linux Only) on page 60).
If the verication fails, the HP ZCentral Remote Boost Receiver can be congured to do one of the following:
● Accept: Certicate errors are ignored, and the receiver connects to the sender.
● Prompt to accept (default): A warning prompt is displayed, and the user can choose to connect despite
the failure. An SHA-256 ngerprint of the sender certicate is displayed with the error message. To
verify the identity of the sender, compare the ngerprint displayed with the error message to the
ngerprint presented in the Certicate panel of the HP ZCentral Remote Boost Sender Conguration
tool. An administrator can provide the ngerprint to the user if they do not have access to the HP
ZCentral Remote Boost Sender Conguration tool.
● Deny: The receiver does not connect to the sender.
End-user verication of a sender certicate
If the receiver cannot verify the sender certicate and the Certicate Verication Error Policy is congured to
prompt to accept, the user can verify that the ngerprint of the certicate displayed in the verication error
Sender verication 29
Page 42

message matches the ngerprint displayed in the HP ZCentral Remote Boost Sender Conguration tool on the
sender. An administrator can provide the ngerprint from the HP ZCentral Remote Boost Sender
Conguration tool, if necessary.
Using a certicate signed by a CA
For ease in deployment, HP ZCentral Remote Boost creates a self-signed certicate for the sender. For greater
security, HP ZCentral Remote Boost can be congured to use a certicate signed by a CA.
To use a certicate signed by a CA, the CA certicate and key les must be present on the sender and receiver
system.
Conguring the sender to use a certicate signed by a CA
You can congure the sender to use a certicate signed by a CA.
For more information about setting HP ZCentral Remote Boost properties manually, see Setting HP ZCentral
Remote Boost properties manually on page 76.
Modifying the sender Ice conguration le
Use the following procedure to modify the sender Ice conguration le.
1. Open the config le. On Windows, the le is located in the HP ZCentral Remote Boost Sender
installation directory. On Linux, the
le is located in /etc/opt/hpremote/rgsender.
NOTE: This le is congured to be only root/admin accessible.
2. Add the following settings to this le:
● IceSSL.DefaultDir=<certificate and key files directory>
● IceSSL.CertFile=<program certificate file>
This le might contain the private key, encoded using the P12 format, in addition to the program
certicate. This certicate must be signed by the CA certicate identied by the IceSSL.CertAuthFile
setting.
Modifying the sender conguration le
To modify the sender conguration le:
1. Open the rgsenderconfig le. On Windows, the le is located in the HP ZCentral Remote Boost
Receiver installation directory. On Linux, the le is located in /etc/opt/hpremote/rgreceiver.
2. Remove the comment from the following line and change the value to 0:
Rgsender.Network.GenerateCertificate=0
After this procedure is complete, HP ZCentral Remote Boost does not generate new certicates or use a selfsigned certicate for sender verication.
You must delete any existing HP ZCentral Remote Boost certicates from the le system. See Removing a
certicate on page 32.
Modifying the receiver Ice conguration le
To modify the receiver Ice conguration le:
30 Chapter 6 Conguring certicates
Page 43

1. If you provide a certicate signed by a CA to verify the sender, the receiver must verify that certicate
when a connection is attempted. Add the following setting to enable the receiver to verify the sender
certicate:
IceSSL.VerifyPeer={0 | 1}
● 0: Do not verify the sender certicate.
● 1: Require a sender certicate and verify it.
2. If you congure a certicate signed by a CA for the sender, you must make sure that the receiver can
access the same CA root certicate that is used to sign the sender certicate. Add the following setting:
IceSSL.CAs=<file containing the certificate of a trusted CA>
The le must be encoded using the P12 format.
Modifying the receiver conguration le
To modify the receiver conguration le:
1. Open the rgreceiverconfig le. On Windows, the le is located in the HP ZCentral Remote Boost
Receiver or HP ZCentral Remote Boost Receiver installation directory. On Linux, the le is located
in /etc/opt/hpremote/rgreceiver or /etc/opt/hpremote/rgreceiver. On macOS, this
le is named iceconfig and is located in /Library/Application Support/HP/
rgreceiver.
2. Remove the comment from the following line and change the value to 0:
Rgreceiver.Network.VerifyCertificates=0
After this procedure is complete, HP ZCentral Remote Boost does not use the default self-signed certicate.
Conguring the receiver to use a certicate signed by a CA
You can congure the receiver to use a certicate signed by a CA.
For more information about setting HP ZCentral Remote Boost properties manually, see Setting HP ZCentral
Remote Boost properties manually on page 76.
Modifying the receiver Ice conguration le
Use the following procedure to modify the receiver Ice conguration le.
1. Open the config le. On Windows, the le is located in the HP ZCentral Remote Boost Receiver or HP
ZCentral Remote Boost Sender installation directory. On Linux, the le is located in /etc/opt/
hpremote/rgreceiver or /etc/opt/hpremote/rgsender. On macOS, this le is named
iceconfig and is located in /Library/Application Support/HP/rgreceiver.
NOTE: This le is congured to be only root/admin accessible.
2. Add the following settings to this le:
● IceSSL.DefaultDir=<certificate and key files directory>
● IceSSL.CertFile=<program certificate file>
This le might contain the private key, encoded using the P12 format, in addition to the program
certicate. This certicate must be signed by the CA certicate identied by the IceSSL.CertAuthFile
setting.
Using a certicate signed by a CA 31
Page 44

Modifying the sender Ice conguration le
By default, HP ZCentral Remote Boost does not create or use a receiver certicate. However, you can modify
the sender Ice conguration le to verify the certicate that identies the receiver.
1. You can also congure the sender to verify a certicate that identies the receiver. Add the following
setting to enable the sender to verify the receiver certicate:
IceSSL.VerifyPeer={0 | 1 | 2}
● 0: Do not verify the receiver certicate.
● 1: Verify the receiver certicate if it is provided, but do not require a receiver certicate.
● 2: Require a receiver certicate and verify it.
2. If you congure the sender to require a receiver certicate, you must make sure that the sender can
access the same CA root certicate that is used to sign the receiver certicate. Add the following setting:
IceSSL.CAs=<file containing the certificate of a trusted CA>
The le must be encoded using the P12 format.
Removing a certicate
If certicate verication fails, the user can accept the certicate and connect when prompted.
If the Don’t ask about this certicate again check box is selected, HP ZCentral Remote Boost Receiver stores
the end-user verication of the hostname and certicate. If a user tries to reconnect to the same hostname
and the same certicate is presented by the sender, HP ZCentral Remote Boost Receiver automatically accepts
or rejects the certicate based on the previous choice. This information is stored locally on the receiver. To
stop automatically accepting or rejecting the certicate, you must remove the certicate from where it is
stored.
Windows
Linux
macOS
To remove a certicate on Windows:
1. Open the Registry Editor and nd the folder HKEY_CURRENT_USER/Software/HP/KnownSenders.
2. To clear all certicates, delete the KnownSenders folder. To remove a specic certicate, in the
KnownSenders folder, delete the subfolder that matches the hostname of the certicate.
To remove a certicate on Linux:
1. Go to the le named $HOME/.cong/HP/KnownSenders.conf.
2. To clear all certicates, delete the KnownSenders.conf le. To remove a specic certicate, open the
KnownSenders.conf le, and then delete the entry that starts with the hostname of the certicate.
To remove a certicate on macOS:
1. Go to the le named $HOME/Library/Preferences/com.hp.KnownSenders.plist.
2. To clear all certicates, delete the KnownSenders.plist le.
3. Restart the computer.
32 Chapter 6 Conguring certicates
Page 45

Troubleshooting the certicate conguration
To troubleshoot the certicate conguration, use the following procedure.
To diagnose network or certicate conguration issues, set the Log level to DEBUG and set Ice properties in
the sender or receiver Ice conguration les.
1. Open the config le. On Windows, the le is located in the RGS Receiver or RGS Sender installation
directory. On Linux, the le is located in /etc/opt/hpremote/rgreceiver or /etc/opt/
hpremote/rgsender. On macOS, this le is named iceconfig and is located in /Library/
Application Support/HP/rgreceiver.
2. Add the following settings:
● IceSSL.Trace.Security={0 | 1}
– 0: Security tracing is disabled.
– 1: Security tracing is enabled.
● Ice.Trace.Network={0 | 1 | 2 | 3}
– 0: Network tracing is disabled.
– 1: Network tracing is enabled during connection establishment and closure.
– 2: Network tracing is enabled during connection establishment and closure, with more detail
logged.
– 3: Network tracing is enabled during connection establishment and closure, with more detail
and data transfer logged.
● Ice.Trace.Protocol={0 | 1}
– 0: Protocol message tracing is disabled.
– 1: Protocol message tracing is enabled.
Troubleshooting the certicate conguration 33
Page 46

7 Using HP ZCentral Remote Boost features
This chapter describes HP ZCentral Remote Boost features and topics.
HP ZCentral Remote Boost Advanced Features
This section discusses HP ZCentral Remote Boost Advanced Features.
Advanced Video Compression (Windows/Linux only)
Advanced Video Compression is an HP ZCentral Remote Boost Feature that enables the AVC (H.264) codec,
instead of the HP3 codec, to reduce the network bandwidth for use cases like video where large desktop areas
are changing frequently.
Advanced Video Compression is ideal for video or 3D applications in textured mode. HP does not recommend
it for use with wireframes or ne lines, because screen artifacts might appear when in motion. Advanced
Video Compression can be enabled in the Performance panel of the HP ZCentral Remote Boost Receiver
settings.
IMPORTANT: Advanced Video Compression requires a one-time activation that occurs on the receiver when
the rst HP ZCentral Remote Boost connection is established, and this activation requires internet access. If
using a proxy server for your LAN, be sure that your proxy settings are congured correctly (see Network
on page 22). Activation does not work with a proxy autoconguration (PAC) le or with the Web Proxy Auto-
Discovery (WPAD) protocol.
The activation process uses https access to the activation.rgs.ext.hp.com URL (15.0.92.201). So you must
congure your proxy or rewall to allow it.
For thin clients with a write lter, HP recommends disabling the write lter before the rst HP ZCentral
Remote Boost connection so that the les created during activation are permanently written to the hard drive.
The write
System requirements for Advanced Video Compression might be higher than the base HP ZCentral Remote
Boost system requirements, all of which are described in the QuickSpecs (see Finding more information
on page 4).
NOTICE: The performance of Advanced Video Compression for resolutions larger than full HD (1920x1080)
varies depending on the content.
HP Velocity
HP Velocity is an HP ZCentral Remote Boost Advanced Feature that improves performance within a wide area
network (WAN).
HP Velocity status is displayed on the HP ZCentral Remote Boost Receiver toolbar:
● Blue: HP Velocity is monitoring network loss and is ready to be used.
● Green: HP Velocity is actively working to improve network conditions.
● Grey: HP Velocity has not been activated.
NOTE: HP Velocity might increase network bandwidth usage.
lter should be re-enabled afterward.
34 Chapter 7 Using HP ZCentral Remote Boost features
Page 47

NOTE: Certain system congurations might prevent HP Velocity from working. In that situation, HP Velocity
is disabled. On macOS, HP Velocity needs the value of the system setting maxsockbuf to be at least 3 MB
(3145728). You can check the current value by running the command sysctl -n
kern.ipc.maxsockbuf on a terminal. If the current value is lower than 3145728, you can increase it by
running the command sudo sysctl -w kern.ipc.maxsockbuf=3145728 on a terminal.
Authentication
HP ZCentral Remote Boost supports several authentication methods and smart card redirection.
Authentication methods
There are three dierent authentication methods available for an HP ZCentral Remote Boost connection.
● Standard authentication: Supported for HP ZCentral Remote Boost Sender on Windows and Linux.
● Easy Login: Supported for HP ZCentral Remote Boost Sender on Windows and Linux.
● Single Sign-on: Supported for HP ZCentral Remote Boost Sender on Windows only.
On Windows, the authentication method is selected during installation of HP ZCentral Remote Boost Sender
and can be changed later using the HP ZCentral Remote Boost Sender Conguration tool (see HP ZCentral
Remote Boost Sender Conguration tool (Windows/Linux only) on page 69). Smart card redirection is
supported for standard authentication and Easy Login (see Smart card redirection on page 36).
On Linux, Easy Login can be enabled during installation and disabled using an HP ZCentral Remote Boost
Sender property (see Other global properties on page 78).
Standard authentication
To use standard authentication:
Standard authentication is the process by which a local user attempts to connect to a sender that has neither
Single Sign-on nor Easy Login enabled.
In normal operation, users are required to authenticate twice when establishing an HP ZCentral Remote Boost
connection from a receiver to a sender. The two steps are as follows:
1. The rst authentication step is from HP ZCentral Remote Boost Receiver to HP ZCentral Remote Boost
Sender. The dialog for this authentication step is generated and displayed by HP ZCentral Remote Boost
Receiver on the receiver.
2. The second authentication step is when logging in to or unlocking the sender desktop session. The login
or unlock dialog is generated by the sender and is displayed in the HP ZCentral Remote Boost Receiver
window on the receiver.
NOTE: If another user is already logged in to the sender, the second authentication step does not take
place. Instead, the currently logged-in user receives an authorization prompt to allow or deny the new
user access to join the existing desktop session (see Collaboration on page 37 for more information).
When a Windows Receiver and Windows Sender are in the same workgroup and the same user name and
password are used on both systems, the rst authentication step will be accomplished using a secure token.
The user will not be required to enter a password. To connect as a dierent user, enable the prompt for user
name and password setting (for more information, see HP ZCentral Remote Boost Receiver settings
on page 19.)
Authentication 35
Page 48

Using Kerberos Authentication
When a Windows or Linux Sender is connected to a Windows domain, the rst authentication step can be
accomplished using Kerberos when using a Windows Receiver connected to the same domain.
The user is not be required to enter a password. Kerberos authentication to a Linux Sender requires a
hostname to be entered as the Sender identier. Kerberos authentication to a Linux Sender will not work with
an IP address. To connect as a dierent user, enable the Prompt for user name and password setting (see HP
ZCentral Remote Boost Receiver settings on page 19).
Easy Login
If you use Easy Login, the rst authentication step (HP ZCentral Remote Boost authentication) is skipped.
NOTE: At the login screen, you might see an additional user account named HP ZCentral Remote Boost ELO.
Do not use this account to log in. Use your normal user account.
NOTE: There are several issues that can prevent an Easy Login authentication. The Diagnostics panel of the
HP ZCentral Remote Boost Sender Conguration tool can help troubleshoot these issues. See HP ZCentral
Remote Boost Sender Conguration tool (Windows/Linux only) on page 69 for more details.
Single Sign-on
With Single Sign-on, the second (System) authentication is skipped. When connecting, the user will be
prompted for user name a password. Upon verication, the user will be connected directly to the sender’s
desktop.
NOTE: Single Sign-on does not support smart card or ActivKey authentication.
NOTE: If you lock the desktop, you might see an additional user account named HP ZCentral Remote Boost
SSO. Do not use this account to log in. Use your normal user account.
Smart card redirection
When smart card redirection is enabled, both the receiver and sender can access the same smart card that
physically exists on the receiver-side only. This means that you can unlock the receiver desktop using the
smart card, connect to the sender, and then use the same smart card with the sender desktop.
NOTE: Smart card redirection is supported on Windows-based receivers and Windows-based and Linux-
based senders only.
On Windows-based and ThinPro-based receivers, smart cards can be remoted using Remote USB. See Remote
USB (Windows and ThinPro only) on page 54.
NOTE: Smart card redirection can be used with standard authentication or Easy Login only. It cannot be
used with Single Sign-on.
Using smart card redirection
To use smart card redirection:
1. Enable smart card redirection during the installation of both HP ZCentral Remote Boost Receiver and HP
ZCentral Remote Boost Sender (see Installation on page 6).
2. Install the vendor driver for the smart card reader on the receiver.
3. Install the vendor driver for the smart card on both the receiver and sender.
4. If Remote USB is enabled, see Conguring Remote USB for smart card redirection on page 37.
36 Chapter 7 Using HP ZCentral Remote Boost features
Page 49

NOTE: If the smart card removal policy has been set on the receiver, the receiver desktop is locked if the
smart card is removed. If the smart card removal policy has been set on the sender, the sender desktop is
locked when the HP ZCentral Remote Boost connection is ended or when the smart card is removed.
Conguring Remote USB for smart card redirection
To prevent the smart card reader from being remoted:
Smart card readers typically connect to the system via USB, so you must prevent the smart card reader from
being remoted by the Remote USB feature to use the smart card redirection feature.
▲ If you used the default Remote USB installation option USB devices are Local/Remote when installing
HP ZCentral Remote Boost Receiver, connect the smart card reader to the receiver before starting an HP
ZCentral Remote Boost session, and do not disconnect the smart card reader during the session.
– or –
Set the remoting behavior of the smart card reader to local (see Conguring the remoting behavior of
individual USB devices (Windows only) on page 55).
Limitations
Consider the following limitations when using smart card redirection:
● Smart card redirection is limited to the primary user.
● Smart card redirection is limited to the rst smart card detected by the receiver. If there are two or more
smart cards, including virtual smart cards, enabled on the receiver, smart card redirection might not be
predictable.
● Disconnecting and reconnecting a smart card reader during an HP ZCentral Remote Boost session causes
the smart card reader to be remoted via Remote USB. In this situation, the receiver no longer sees the
smart card reader or smart card. If the smart card removal policy is enabled, the receiver desktop locks.
Collaboration
HP ZCentral Remote Boost enables the primary user to share their desktop session with several users
simultaneously. This feature can be used in a variety of collaborative scenarios including classroom
instruction, design reviews, and technical support.
A collaboration session is created when one or more users are authorized by the primary user to connect to
the primary user’s desktop session. This allows all users to view and interact with the primary user’s desktop.
Collaboration 37
Page 50
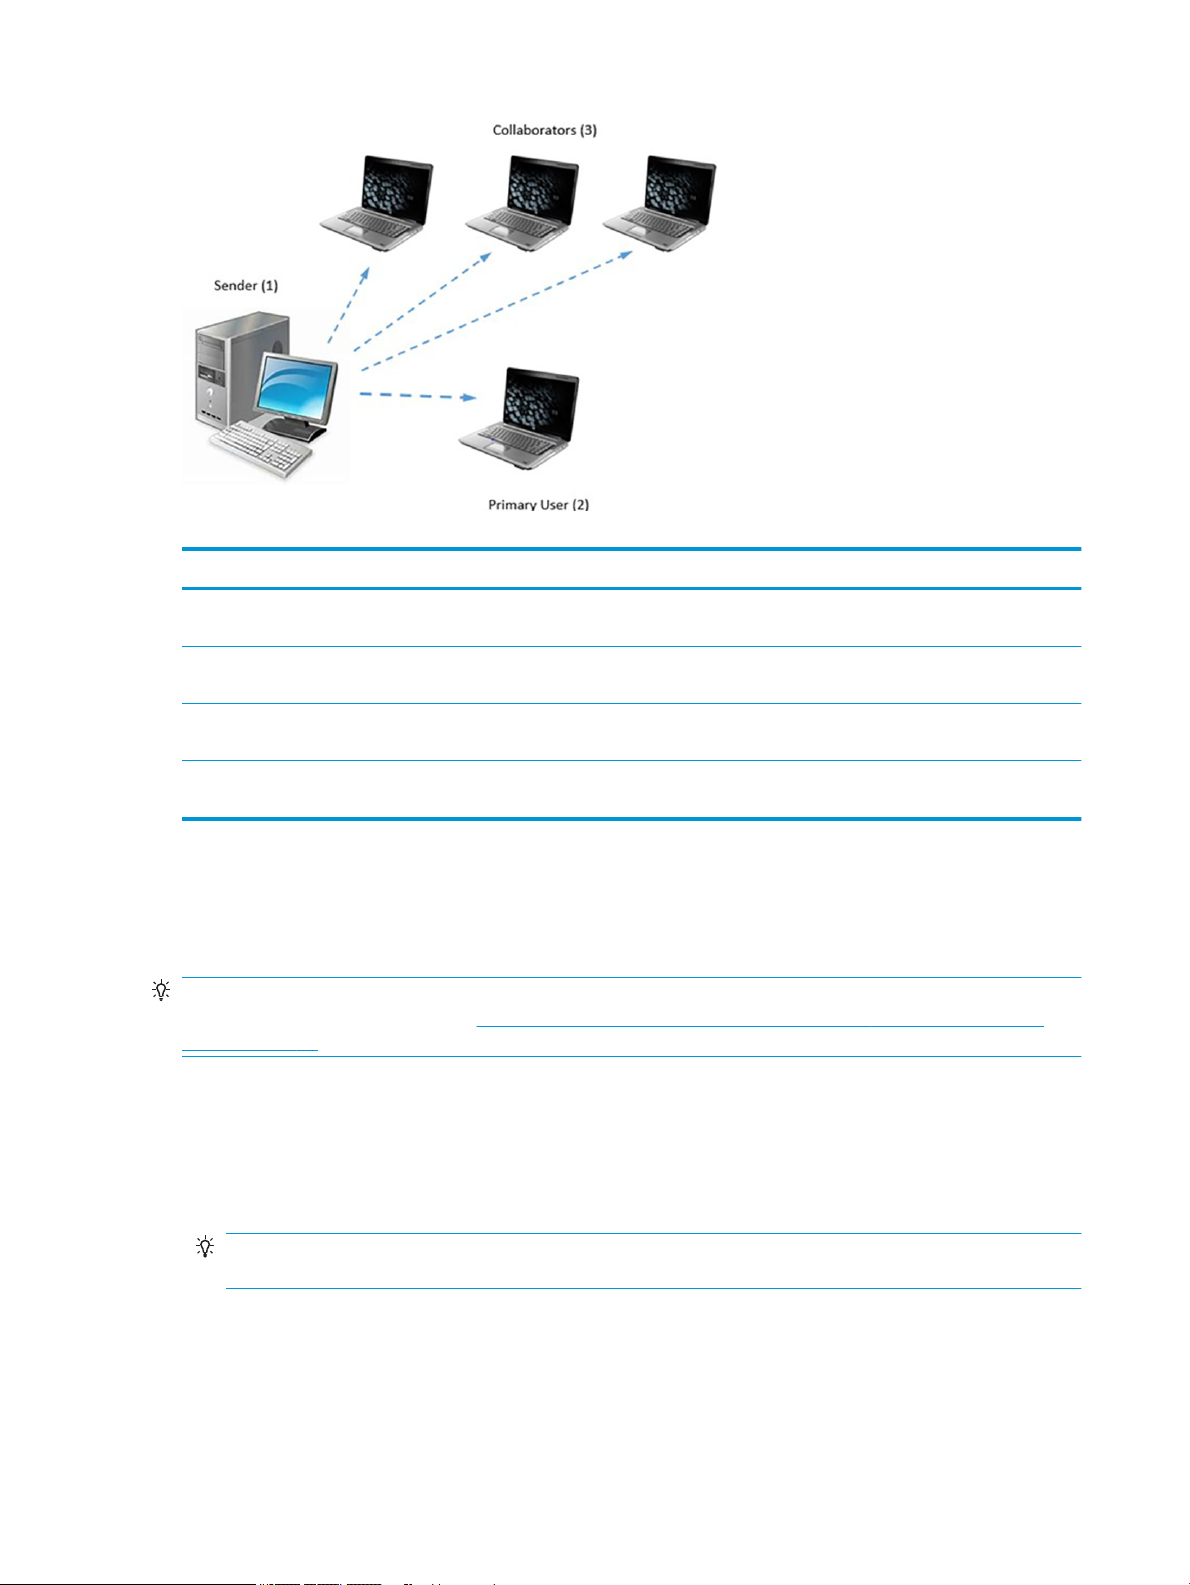
Table 7-1 Collaboration session items and their descriptions
Item Description
1 Sender: Hosts HP ZCentral Remote Boost Sender, which transmits the sender desktop session to HP ZCentral Remote
Boost Receiver on each receiver.
2 Primary user: The primary user is logged into the sender and has control over the session. The primary user authorizes
who can join and actively participate in the session.
3 Collaborators: Collaborators, once authorized, can view the sender’s desktop and make changes as permitted by the
primary user.
NOTE: The image above is just an example of one possible conguration. Any combination of hardware supported by HP ZCentral
Remote Boost Receiver can be used by the primary user and collaborators.
The user currently controlling the mouse and keyboard is called the oor owner. Only one user, the oor
owner, can interact with the desktop at a time. To transition the oor owner, the current oor owner must
cease using the keyboard or mouse for 0.5 seconds. If another user uses the mouse or keyboard while the
current oor owner is inactive after this period, oor ownership transfers to the new user.
TIP: The delay’s value of 0.5 seconds can be changed using the HP ZCentral Remote Boost Sender
Conguration tool on Windows (see HP ZCentral Remote Boost Sender Conguration tool (Windows/Linux
only) on page 69 for more information).
Click the HP ZCentral Remote Boost Sender notication icon in the Windows notication area to open the HP
HP ZCentral Remote Boost Collaborators window, which allows you to do the following:
● View who the primary user and collaborators are
● Enable or disable collaborator input for individual collaborators or all collaborators at once by clicking
the appropriate mouse pointer icon
TIP: Individual collaborator input can also be enabled when authorizing the collaborator to connect by
selecting Enable Input for this user in the authorization dialog.
● Disconnect individual collaborators or all collaborators at once by clicking the appropriate X icon
38 Chapter 7 Using HP ZCentral Remote Boost features
Page 51

Note the following additional information about collaboration:
● Collaboration requires unique login credentials on the sender for each participant.
● If guest accounts are enabled in Windows, a collaborator can join by using "Guest" as the user name and
leaving the password blank. However, only one guest collaborator can join at a time. If another guest
collaborator joins, the rst one will be kicked out of the session.
● On Windows, if the primary user disconnects, the desktop is locked, but all collaborators will remain
connected. On Linux, if the primary user disconnects, the desktop is locked, and all collaborators are
disconnected.
● The update rate of all collaborators is limited by the lowest update rate of any one collaborator.
Collaborators with low update rates can use the Performance panel in the HP ZCentral Remote Boost
Receiver settings to improve their update rate, which will improve the experience for all collaborators.
● To collaborate in a session that has Advanced Video Compression or HP Velocity enabled, each
collaborator must have the same Advanced Video Compression and HP Velocity settings on their HP
ZCentral Remote Boost Receiver, or the connection will be refused.
Collaboration invitations
You can invite other users to either new collaboration sessions or sessions in progress.
Collaboration invitations can be generated in the HP ZCentral Remote Boost Collaborators window by
selecting the copy to clipboard button. Invitations are copied to the clipboard and can be pasted into an email
or messaging app to send them to the other users.
Invitations contain brief instructions to help the invited users connect to the sender, including the hostname
of the sender machine and a list of IP addresses that can be used.
By default, only global addresses are displayed. To change this default behavior, modify the value of the HP
ZCentral Remote Boost Sender sender_gui.Invitation.FilterPrivateAddresses conguration
property (see Setting HP ZCentral Remote Boost properties manually on page 76). Setting this property to 1
(the default) lters private addresses. Setting it to 0 displays private addresses in the list.
Display
You can congure several display settings.
Display resolution and layout matching
Many HP ZCentral Remote Boost scenarios require that the resolution and display layout transmitted by the
sender match the display conguration on the receiver. The following sections describe how to congure the
sender if HP ZCentral Remote Boost is unable to match the resolution and display layout by default.
Multi-monitor overview
During an HP ZCentral Remote Boost connection, HP ZCentral Remote Boost transmits the sender’s entire
desktop area to the receiver. If the sender has more monitors or higher-resolution monitors than the
receiver, scroll bars appear in the HP ZCentral Remote Boost Receiver window so that you can view the
sender’s entire desktop area.
If the sender has multiple monitors, it might be benecial to use the options described in Matching display
resolution and layout (Windows-based sender) on page 42 or Matching display resolution and layout (Linuxbased sender) on page 45.
Display 39
Page 52

Multiple monitors on the receiver are also useful for a many-to-one connection. If the receiver is connected to
two senders, each sender frame buer can be displayed on its own monitor if the receiver has two monitors
(see the following image).
NOTE: On macOS, to allow a Receiver window to span multiple monitors, HP recommends that you do not
select the Displays have separate Spaces OS option. To change this setting, open System Preferences, and
then select the Mission Control preference pane.
NOTE: On macOS, selecting the following settings can improve the usability of the Receiver, especially if the
Receiver window covers the entire screen. Under System Preferences, select Dock, and then select
Automatically hide and show the Dock. Then, under System Preferences, select General, and then select
Automatically hide and show the menu bar.
Matching display resolution and layout methods
There are four ways to have HP ZCentral Remote Boost automatically congure the sender’s display
resolution and layout:
● Per-session preferred resolution properties: These properties, if enabled, set the preferred width and
height of the resolution for session number <n>.
40 Chapter 7 Using HP ZCentral Remote Boost features
Page 53

– Rgreceiver.Session.<n>.VirtualDisplay.IsPreferredResolutionEnabled
– Rgreceiver.Session.<n>.VirtualDisplay.PreferredResolutionHeight
– Rgreceiver.Session.<n>.VirtualDisplay.PreferredResolutionWidth
NOTE: If IsPreferredResolutionEnabled is true for any session, HP ZCentral Remote Boost
disables all other display resolution and layout matching methods.
● Per-session display properties: Per-session display properties can be set in the conguration le or
used in an auto-launch le. See Auto-launch properties on page 82. The per-session display properties
can be used to describe the resolution, position, and orientation of one or more displays. Each display
has the following elds where <n> is the session number and <x> is a display number:
– Rgreceiver.Session.<n>.Display.<x>.X
– Rgreceiver.Session.<n>.Display.<x>.Y
– Rgreceiver.Session.<n>.Display.<x>.Width
– Rgreceiver.Session.<n>.Display.<x>.Height
– Rgreceiver.Session.<n>.Display.<x>.Orientation
NOTE: For more information about these properties and their expected values, see Using display
properties to set resolution and layout on page 46.
NOTE: If any per-session display property is in the conguration le, HP ZCentral Remote Boost
disables the Set Sender display(s) to match Receiver display(s) and the Set Sender display(s) to
match display properties settings.
● Set Sender display(s) to match Receiver display(s): If the Set Sender display(s) to match Receiver
display(s) setting is enabled, HP ZCentral Remote Boost automatically tries to set the resolution and
display layout of the sender to match that of the receiver.
You can also control this function with the following properties:
– Rgreceiver.IsMatchReceiverResolutionEnabled
– Rgreceiver.IsMatchReceiverPhysicalDisplaysEnabled
NOTE: By default IsMatchReveiverPhysicalDisplaysEnabled is enabled when the Set
Sender display(s) to match Receiver display(s) setting is enabled.
● Set Sender display(s) to match display properties: If the Set Sender display(s) to match display
properties setting is enabled, HP ZCentral Remote Boost automatically tries to set the resolution and
display layout of the sender to match the specied display properties.
NOTE: The Set Sender display(s) to match display properties option is disabled if no display
properties were found in the conguration le.
The display properties can be used to describe the resolution, position, and orientation of one or more
displays. Each display has the following elds where <x> is a display number:
– Rgreceiver.Display.<x>.X
– Rgreceiver.Display.<x>.Y
– Rgreceiver.Display.<x>.Width
Display 41
Page 54

– Rgreceiver.Display.<x>.Height
– Rgreceiver.Display.<x>.Orientation
NOTE: For more information about these properties and their expected values, see Using display
properties to set resolution and layout on page 46.
You can also enable the Set Sender display(s) to match display properties with the
Rgreceiver.UseDisplayProperties property.
Matching display resolution and layout (Windows-based sender)
When attempting to match the resolution and display layout, the most important thing to remember is that
the sender must support the same resolution and layout as the receiver.
Testing the resolution
To avoid possible resolution-matching problems, test the resolution in advance using the following
procedure:
1. Establish an HP ZCentral Remote Boost connection with the Do not change the sender display(s)
setting enabled.
2. When the connection is established, manually attempt to set the sender’s resolution to match the
receiver’s resolution.
If you can match the resolution, then HP ZCentral Remote Boost can also do it for you automatically.
Additional conguration on the sender
Depending on the NVIDIA® GPU and driver you are using, you might need to perform additional conguration
on the sender. The required congurations can vary depending on the hardware, described as follows:
● Blade workstation: If the sender is a blade workstation, then its NVIDIA driver exposes all display
outputs to the operating system as if they have monitors attached. The resolutions provided by the
NVIDIA driver cover a broad range of settings and should meet most user needs. If the resolution you
want is not available, see Adding custom resolutions on page 44.
● Virtual workstation: If the sender is a virtual workstation with a hypervisor, the NVIDIA driver presents
a single display to the operating system. The resolutions provided by the NVIDIA driver cover a broad
range of settings and should meet most user needs. If you are using a single display at the receiver, no
further action is required. If you need to congure additional resolutions and/or make additional
displays available, see NVIDIA resolution-matching (Windows-based senders with NVIDIA graphics only)
on page 43.
● Traditional workstation: If the sender is a traditional workstation, then its NVIDIA driver expects to nd
a display attached to one or more outputs. When it does, it queries the EDID (Extended Display
Information Data) information from the display for its supported resolutions and makes the display and
resolutions available to the operating system. On Windows 7, if there is not a display attached, the
NVIDIA driver reverts to a single VGA output with basic display resolutions. For servers, rack-mounted
workstations, and non-NVIDIA graphics, use an EDID emulator device or create an EDID le to allow
resolution matching. See Creating and applying an EDID le on page 44 and Matching display resolution
and layout (Windows-based sender) on page 42 for more information. Alternatively, HP ZCentral Remote
Boost will load EDID les automatically. See NVIDIA resolution-matching (Windows-based senders with
NVIDIA graphics only) on page 43.
● Headless workstation:When connecting to a workstation that has no physical displays connected, HP
ZCentral Remote Boost requires that an EDID be loaded rst. HP ZCentral Remote Boost can be
42 Chapter 7 Using HP ZCentral Remote Boost features
Page 55

congured to automatically load a custom EDID which supports most resolutions up to 4k. To enable
automatic EDID loading on headless workstations with Nvidia GPU:
1. In rgsenderconfig, set Rgsender.Compatibility.Displays.ForceEdidOnHeadless
to 1.
2. Restart the HP ZCentral Remote Boost Sender service.
– or –
Restart the sender.
NOTE: This property will only apply an EDID to a system if it is headless when the HP ZCentral Remote
Boost Sender service starts. If the workstation is not headless when the HP ZCentral Remote Boost
Sender service starts, then no EDID will be loaded.
NVIDIA resolution-matching (Windows-based senders with NVIDIA graphics only)
NVIDIA resolution-matching provides the following additional features over the default resolution-matching
method:
● Automatic loading and unloading of EDID les to allow a sender with fewer monitors than the receiver to
"fake" displays
NOTE: This is especially useful for virtual workstations where the hypervisor typically provides only
one display.
● Rotated monitors on virtualized systems (specically, Citrix and VMware® virtual machines)
EDID les
● Automatic application of custom resolutions on virtualized systems
NOTE: If NVIDIA resolution-matching fails to match the requested resolution/resolutions, HP ZCentral
Remote Boost attempts the default resolution-matching method.
To enable NVIDIA resolution-matching:
1. In rgsenderconfig, set
Rgsender.Compatibility.Displays.AllowNvidiaResolutionMatching to 1.
2. Restart the HP ZCentral Remote Boost Sender service.
– or –
Restart the sender.
NOTE: For more information about setting the property, see Setting property values in a conguration le
on page 76.
NOTE: NVIDIA resolution-matching is enabled by default on Windows 10 Redstone 1 and later but must be
enabled on Windows 7, Windows 8.1, and Windows 10 pre-Redstone.
Extended Display Identication Data (EDID) data is a standardized means for a display to communicate its
capabilities, such as resolution and video characteristics, to a source device.
This allows the source device (PC, graphics card) to generate the necessary graphics that match the needs of
the system. EDIDs provide a powerful and convenient method for HP ZCentral Remote Boost to manage
complex customer requirements.
Display 43
Page 56

Creating and applying an EDID le
There are software tools available to create and edit an EDID le, but the easiest method is to use an existing
monitor from the receiver, temporarily attaching it to the sender and using the NVIDIA Control Panel to export
the EDID le.
If you have several dierent displays that you use on the receiver, HP recommends that you capture the EDID
information of the monitor that has the highest display resolution. This will address all other resolution
needs.
Creating an EDID le
To create an EDID le:
1. Attach a monitor to the sender or the receiver.
NOTE: This is not possible with blade workstations that use MXM graphics.
2. Open the NVIDIA Control Panel and select View system topology.
3. Find and select EDID for the connected monitor.
4. The Manage EDID dialog box opens. Select the tab labeled Export.
5. Select a display and select Export EDID and save the output to a le. This le can be imported on the
sender system.
Importing an EDID le
To import an EDID le:
1. On the sender system, under View system topology select EDID on the connector port you want to use.
2. In the Manage EDID dialog box , select the Load tab and then Browse and select the EDID le you
created.
3. Under Connector select the port (DVI, DisplayPort) that you want to use for the EDID monitor.
4. Select Load EDID. The EDID information is applied.
5. Select OK and then select cancel to close the Manage EDID dialog box.
NOTE: If you apply the le to multiple DisplayPort connectors, HP ZCentral Remote Boost can able to
support multi-display congurations.
Under the View System Topology screen of the NVIDIA Control Panel, you should now be able to see that an
EDID le has been applied to the DisplayPort connectors that you selected. HP ZCentral Remote Boost can
now match the specied display resolution and display layout.
Adding custom resolutions
To add a resolution that is not already supported by the NVIDIA driver:
1. Open the NVIDIA Control Panel and select Change Resolution.
2. Select Customize.
3. Select the Enable resolutions not exposed by the display check box, and then select Create Custom
Resolution.
NOTE: If a warning appears, accept it.
4. Add the custom resolutions.
44 Chapter 7 Using HP ZCentral Remote Boost features
Page 57

Matching display resolution and layout (Linux-based sender)
When attempting to match the resolution and display layout, the sender must support the same resolution
and layout as the receiver. If the resolution is not supported, HP ZCentral Remote Boost instead uses the
preferred resolution of the sender from the le xorg.conf.
For example, if the receiver has dual monitors set at a 1280 ×1024 resolution, HP ZCentral Remote Boost asks
the sender to set its resolution to 2560 ×1024. If the resolution is not supported, HP ZCentral Remote Boost
instead uses the preferred resolution of the sender from the le xorg.conf.
The easiest way to check whether the sender can match the receiver resolution is to attempt to set the
resolution on the sender manually. If you can set the resolution manually, then HP ZCentral Remote Boost can
do it for you automatically. If you cannot set the resolution manually, you must modify the
to support the additional required resolutions.
To test whether you can match the resolution manually, establish an HP ZCentral Remote Boost connection
with the Do not change the sender display(s) setting enabled.
After you establish an HP ZCentral Remote Boost session, open an X terminal window and use the xrandr
tool to list all the currently supported resolutions for the X server. You can also use the tool to congure the X
server display settings, including size and orientation.
Previous releases of the X Window System used the le /etc/X11/xorg.conf to store initial setup
information. When a change occurred with the monitor or video card, you were required to edit the le
manually. Although current releases of Red Hat® Enterprise Linux® (RHEL) have largely automated the
process, you still need to edit the le to support congurations where no monitor is attached or where you
want the X server to simulate that it has a dierent monitor attached to it with dierent resolution
capabilities. Similarly, this is also the case when you want to match the receiver’s resolution in an HP ZCentral
Remote Boost session where the X server cannot determine the capabilities of the receiver’s monitors.
le xorg.conf
NOTE: Some window managers (such as GNOME) allow you to modify display preferences, which can
sometimes result in the creation of the following le:
$HOME/.config/monitors.xml
When you log in to the system and a window manager starts a session, it uses information from this le to set
the current desktop resolution. This can reverse the resolution matching performed by HP ZCentral Remote
Boost and cause the desktop to be set to an inappropriate resolution.
For example, if you set the desktop resolution of the sender to 1024 × 768 using a window manager, that
resolution is stored in monitors.xml. If an HP ZCentral Remote Boost connection is then established with
display resolution matching enabled on a receiver with a resolution of 1920 × 1200, the sender display
resolution changes to 1920 × 1200 and then to 1024 × 768. There is no
request failed (because it did not).
To avoid this behavior, avoid setting the resolution using window manager controls. It is safe to delete
monitors.xml to restore display resolution matching functionality. See the documentation for your
operating system or window manager for more information about where and how it manages display
settings.
Conguring the X server
The X server can be congured in several dierent ways.
Scenario 1: All receivers have the same conguration
If all receivers have the same conguration, then using the Virtual entry under the Screen section of the le
xorg.conf is the easiest method.
notication that the resolution match
Display 45
Page 58

For example, if all receivers have four monitors congured at 1280x1024 each, congure the X server to run
at a resolution of 5120x1024 by making the following additions to the le xorg.conf.
Add the following under the Device section:
Option "UseDisplayDevice" "none"
Option "UseEDID" "false"
Add the following under the Screen section:
SubSection "Display"
Virtual 5120 1024
Depth 24
EndSubSection
Now the X server is congured to have a single screen running at a resolution of 5120 × 1024, which covers all
four of the receiver’s monitors. You can use this method to support a very large virtual display limited only by
frame buer memory.
Scenario 2: Some receivers have dierent congurations
In the more likely scenario where you need to support many display resolution and monitor congurations,
you can congure the X server to think it has the monitor with the highest resolution used on any of the
receivers. This allows the X server to support as many display resolutions as possible.
You do this by capturing the EDID information from the monitor (see Creating an EDID le on page 46) and
making the following additions to the le xorg.conf.
The following example uses dual HP LP2465 displays. The following text is added under the Device section of
xorg.conf:
Option "ConnectedMonitor" "DFP-0,DFP-1"
Option "CustomEDID" "DFP-0:/etc/X11/lp2465edid.bin;DFP-1:/etc/X11/
lp2465edid.bin"
To see which ports to use to handle higher resolutions, see the Xorg.0.log. If you have AMD graphics or the
EDID le sent to the X server fails, you can use an EDID emulator.
Creating an EDID le
To create an EDID le:
▲ Use the NVIDIA tool nvidia-settings to create an EDID le in either .bin or .txt format.
IMPORTANT: A physical display must be attached before you can use the NVIDIA tool.
TIP: You can also use the method for Windows described in Creating and applying an EDID le on page 44
and copy the EDID le to the Linux system.
Using display properties to set resolution and layout
You can use the display properties to describe the resolution, position, and orientation of one or more
displays.
You can congure each display using the following elds:
46 Chapter 7 Using HP ZCentral Remote Boost features
Page 59

● X: The X position of the upper-left corner of the display.
● Y: The Y position of the upper-left corner of the display.
● Width: The width of the display.
● Height: The height of the display.
● Orientation: The orientation of the display. Can be one of the following values:
– 0: Landscape
– 1: Portrait
– 2: Landscape (ipped)
– 3: Portrait (ipped)
NOTE: If a eld is not specied, the default value is 0.
For the display properties to be valid, the following conditions must be met:
● There must be at least one display specied.
● Display numbers must start at 1 and be sequential.
● One display must be at the origin where X=0 and Y=0.
● Each display’s width and height must be greater than 0.
● A display’s width must be greater than its height when its orientation is Landscape or Landscape
(ipped).
● A display’s height must be greater than its width when its orientation is Portrait or Portrait (ipped).
When more than one display is specied, the additional conditions must be met:
● No display can overlap another display.
● All displays must be adjacent to at least one other display. This means that all displays must be one X or
Y position away from another display along one of the display edges.
The display properties are validated during the connection attempt. If this validation fails, an error dialog box
is displayed and the connection uses the sender’s current conguration.
For example, see the following display properties. These properties dene two 1920 × 1200 displays that are
positioned side by side.
Rgreceiver.Display.1.X=0
Rgreceiver.Display.1.Y=0
Rgreceiver.Display.1.Width=1920
Rgreceiver.Display.1.Height=1200
Rgreceiver.Display.1.Orientation=0
Rgreceiver.Display.2.X=1920
Rgreceiver.Display.2.Y=0
Rgreceiver.Display.2.Width=1920
Rgreceiver.Display.2.Height=1200
Rgreceiver.Display.2.Orientation=0
Display 47
Page 60

Sender screen blanking
HP ZCentral Remote Boost Sender, by default, blanks the screen of the sender monitor (if one is connected) so
that the desktop session is not visible on the sender side.
IMPORTANT: Screen blanking is not supported if the sender is a virtual machine.
The default behavior is that the sender screen, with the exception of the cursor, blanks to black when you
start an HP ZCentral Remote Boost session. The sender screen is displayed after the HP ZCentral Remote
Boost session is ended.
See the following additional information about HP ZCentral Remote Boost Sender screen blanking:
● There might be a delay of up to 2 seconds after an HP ZCentral Remote Boost session is started before
the sender screen is blanked.
● If, for any reason, HP ZCentral Remote Boost Sender is unable to blank the sender screen, a warning
dialog is displayed on the receiver.
● If the sender is an HP workstation, then most input from any physically connected keyboards or mice at
the sender side is blocked while screen blanking is occurring. When HP ZCentral Remote Boost Sender
receives keyboard or mouse input from HP ZCentral Remote Boost Receiver, the sender monitor enters a
power-saving mode, which blanks the cursor as a result.
● The ctrl + alt + del key sequence is not blocked by HP ZCentral Remote Boost Sender for any physically
connected keyboards at the sender side. When this sequence is input into the sender using a physicallyconnected keyboard, the Windows logon screen of the remote desktop is displayed at the receiver side in
the HP ZCentral Remote Boost Receiver window. The sender monitor remains blank while this occurs,
but the monitor will exit its power-saving mode, and sender keyboard input is not blocked until the
logon screen is closed.
● Screen blanking can be disabled using the HP ZCentral Remote Boost Sender Conguration tool (see HP
ZCentral Remote Boost Sender Conguration tool (Windows/Linux only) on page 69).
Input
Supported input devices and methods include Wacom, Gestures (Windows touch capable devices only), Game
Mode (Windows only), and all keyboard layouts.
Wacom solution
The HP Remote Boost Receiver (Windows, macOS, RHEL, and Ubuntu) now supports Wacom pen displays and
pen tablets when used with a Remote Boost Sender.
Adjusting tablet properties
You can make adjustments to Wacom display mapping, Express Key buttons, and pen buttons on the receiver
system.
Use the following on the receiver to adjust settings and to verify that the pen is working properly:
● Windows: Wacom Tablet Properties application.
● macOS: Wacom Tablet controls under System Preferences.
● Linux: Wacom Tablet controls under the Devices section of Settings.
48 Chapter 7 Using HP ZCentral Remote Boost features
Page 61

Windows and Mac receiver solution
Wacom drivers must be installed on the receiver system.
Consider disabling the Remote USB feature on the receiver. If the Wacom USB connection is made after the
Remote Boost connection is established, the Wacom device is captured and exported to the sender. HP does
not recommend this setup, because it bypasses the Remote Boost Wacom solution.
You can use Wacom Tablet controls to specify application-specic behavior on the receiver. This feature is not
supported for sender applications, because Wacom controls are not available on the sender. Changing Wacom
Tablet controls on the receiver will apply to all sender applications.
Consider disabling touch (if supported) on the Wacom device. Having touch enabled can cause the receiver to
use the touch interface, or it might cause interference with pen events.
ThinPro receiver solution
The ThinPro 7.1 receiver can allow a Wacom device to be virtually attached to a Linux sender. For best results,
the receiver and sender should have a single display with matching resolutions.
The usage of Remote USB and the usage of a Wacom pen are mutuallly exclusive. To enable the usage of a
Wacom pen, open USB Manager as a privileged user in the ThinPro Control Panel and set the USB protocol to
Local.
To allow the receiver access to the Wacom devices, you must copy the rgs-pen-tablet.rules le from /opt/
hpremote/rgsreceiver/rules into the /etc/udev/rules.d folder. After copying the le, you must unplug the
Wacom device from the receiver system or restart the receiver system.
After plugging in the Wacom device, the pen should be able to move the cursor on the receiver system before
establishing a remote connection. After the receiver is connected to a Linux sender, the Wacom input devices
are captured. To verify that the device is exported to the sender system, enter the command xinput list
on the sender system. When the Wacom devices are exported correctly, the output shows a list of Wacom
devices.
You can use the Wacom input devices within HP ZCentral Remote Boost receiver window. You need a mouse to
interact with the receiver interface and the local desktop.
NOTE: A Wacom pen does not respect oor control in a collaboration session. Multiple users attempting to
simultaneously provide any kind of input might experience unwanted behavior.
Linux receiver solution (non-ThinPro)
When installing the Remote Boost receiver, do not use the -legacyWacom installer ag or answer yes when
prompted to enable Legacy Wacom support. These commands enable the older Linux Wacom solution, which
works only from Linux receivers to Linux senders.
NOTE: This does not include ThinPro. See ThinPro receiver solution on page 49 for more information.
Windows sender solution
Wacom drivers are not required on the sender system. If they are installed, the Wacom Tablet controls do not
show the device as being connected. You must make any adjustments to the Wacom device on the receiver
system.
Congure applications on the sender using Windows Ink. Some applications use only the Wacom Wintab API
rather than Windows Ink and do not work with this solution. Most pen-enabled applications use Windows Ink
by default or can be congured to use Windows Ink. Updated versions of pen-aware applications tend to have
better support for Windows Ink.
Input 49
Page 62

When using the pen for input on the sender, the cursor is often displayed as as small dot. This is expected
behavior.
Windows has a setting to hide the pen cursor. Use Pen & Windows Ink controls in Windows Settings to
specify denite behavior.
Linux sender solution
Wacom Tablet controls on the sender do not show the device as being connected. Make adjustments to the
Wacom device on the receiver system.
Some GTK-based applications require manual conguration to enable the virtual Wacom device. It appears on
conguration menus as Remote Boost Wacom Tablet. One common application where this is necessary is the
image manipulation program GIMP.
1. To enable the virtual Wacom device in GIMP, select Edit►Input Devices.
2. From the popup window that appears, select Remote Boost Wacom Tablet eraser and set the mode to
Screen.
3. Repeat the previous step for the Remote Boost Wacom Tablet stylus.
NOTE: Setting the device mode to Window could result in a cursor oset.
This conguration step should only be necessary the rst time you use the virtual with this applicaton.
Other applications might have dierent menus to enable the virtual device.
Using touch features (Windows touch-capable devices only)
HP ZCentral Remote Boost supports the following touch features.
NOTE: HP ZCentral Remote Boost does not support touch features for Windows 7.
● Gestures—See the following table for more information.
● Virtual keyboard and virtual mouse—You can access the virtual keyboard and virtual mouse from the
HP ZCentral Remote Boost Receiver toolbar. The virtual mouse provides a visual indication of the remote
cursor position, which is normally not present in the tablet GUI. The virtual mouse is useful when precise
cursor positioning or hovering is required.
TIP: The virtual mouse can also be enabled and disabled using the four-nger tap gesture.
● Hotkey sequence mapping—See Gestures (Windows touch-capable devices only) on page 21 for more
information.
The following table describes the gestures supported by HP ZCentral Remote Boost.
IMPORTANT: A press is 0.5 seconds or more, and a tap is less than 0.5 seconds.
Table 7-2 Gestures and their descriptions
Gesture Description
1-nger tap Left-click
1-nger double tap Double-click
1-nger press and drag Left-click and drag
2-nger tap Right-click
2-nger press and drag Right-click and drag
50 Chapter 7 Using HP ZCentral Remote Boost features
Page 63

Table 7-2 Gestures and their descriptions (continued)
Gesture Description
2-nger pinch/spread Zoom out/in
NOTE: The zoom snaps to 100% if you close it after you lift your ngers.
2-nger drag Pan (when zoomed in)
3-nger swipe or drag Scroll wheel
4-nger tap Enable or disable the virtual mouse
4-nger press and drag Center-click and drag
1-nger press
1-nger swipe left
1-nger swipe right
1-nger swipe up
1-nger swipe down
3-nger tap
3-nger press
4-nger press
TIP: For a graphical demonstration of these gestures, select the Gestures panel in the HP ZCentral Remote Boost Receiver settings,
and then select See gestures tutorial.
NOTE: Some gestures are disabled when the virtual mouse is enabled.
Game Mode (Windows only)
Game Mode lets you lock the cursor inside the HP ZCentral Remote Boost Receiver window to perform
functions that rely on relative cursor movements, such as 3D environment interaction. If Game Mode is not
enabled, such interactions might cause erratic cursor behavior.
You can set the default state of Game Mode (enabled or disabled) with the HP ZCentral Remote Boost Receiver
Conguration tool or Receiver Conguration File. You can toggle game mode on and o while HP ZCentral
Remote Boost Receiver is in Setup Mode by pressing the G key.
These gestures can be customized. See Gestures (Windows touch-capable devices
only) on page 21 for more information.
Supported keyboard layouts
All keyboard layouts and languages are supported.
Remote Audio
Remote Audio allows audio generated by the sender to play back on the speakers of the receiver.
HP ZCentral Remote Boost audio path
The following sequence describes the path taken by audio during an HP ZCentral Remote Boost connection:
1. Software on the sender generates audio output.
2. The audio output is routed to HP ZCentral Remote Boost Sender using a physical or virtual audio device.
Remote Audio 51
Page 64

3. HP ZCentral Remote Boost Sender encodes and transmits the audio output to HP ZCentral Remote Boost
Receiver on each receiver.
4. HP ZCentral Remote Boost Receiver decodes and sends the audio output to the audio mixer of the
operating system.
5. The audio mixer of the operating system sends the audio to the default audio playback device.
6. The audio device plays the audio output on a connected audio peripheral, such as a speaker.
NOTE: Sounds that play through an internal speaker, such as the ToggleKeys sound on Windows, are not
captured by HP ZCentral Remote Boost.
For information about the audio settings in HP ZCentral Remote Boost Receiver, see Audio on page 21.
For Remote Audio troubleshooting tips, see Remote Audio issues on page 92.
Using Remote Audio (Windows-based sender)
On Windows, Remote Audio works by default.
If the sender has an audio device, the HP ZCentral Remote Boost Sender installation process detects it. If the
sender does not have an audio device (or if you disable all audio devices before installation of HP ZCentral
Remote Boost Sender), then the HP Remote Audio virtual audio device is also installed during the HP
ZCentral Remote Boost Sender installation process and is used by HP ZCentral Remote Boost instead.
Using Remote Audio (Linux-based sender)
On Linux, some manual conguration might be required for Remote Audio depending on the audio capture
method you intend to use.
If the sender has an audio device, HP ZCentral Remote Boost supports two dierent methods of audio
capture:
● PulseAudio: See PulseAudio on page 52.
● Advanced Linux Sound Architecture (ALSA): See ALSA on page 53.
The following property species which audio capture method will be used (see Other global properties
on page 78 for more information):
Rgsender.Audio.Linux.RecorderApi
NOTE: Some audio device drivers might not have the capability to capture application-generated audio.
PulseAudio
Any audio device that is congured for PulseAudio can be used. PulseAudio provides a software interface
similar to the Stereo Mix capability for ALSA. PulseAudio also provides a dummy device that allows the audio
system to function when no hardware audio devices are available.
When using PulseAudio to capture audio, HP ZCentral Remote Boost Sender attempts to detect and connect
to the monitor of the default playback device of the sender automatically. Explicit control of the PulseAudio
capture device is available through the following property (see Other global properties on page 78 for more
information):
Rgsender.Audio.Linux.DeviceName
If this property is set, HP ZCentral Remote Boost Sender attempts to connect to the device specied by this
property. The command pactl list is useful for determining the PulseAudio device names. To capture
52 Chapter 7 Using HP ZCentral Remote Boost features
Page 65

ALSA
from a specic device, specify the corresponding PulseAudio monitor source string (such as
alsa_output.pci-0000_00_1b.0.analog-stereo.monitor).
PulseAudio allows the user to congure and control the audio devices in the system. Changing the output
device during an HP ZCentral Remote Boost session results in a loss of audio. To restore audio, either reselect
the original device or stop and start the audio stream using the audio settings in HP ZCentral Remote Boost
Receiver.
When using the ALSA audio system to capture audio, an audio device must be installed on the sender for
application-generated audio to be sent to the receiver. Furthermore, the audio device installed in the sender
must have the ability to record from a control that is the mix of all audio signals. On a Windows computer, by
way of comparison, this control is often called Stereo Mix. Linux, however, does not follow a standard naming
convention for this control, hence the need to evaluate individual audio devices to determine their suitability
for use on Linux.
The audio devices on Linux are not consistent in the naming conventions of the audio controls. The HP
ZCentral Remote Boost Sender installer will attempt to adjust volume levels for known audio devices to allow
audio to be captured. This section describes how to adjust volume levels for the supported audio devices. This
information may be helpful for conguring audio devices that are not currently supported by the HP ZCentral
Remote Boost Sender installer.
Volume levels can typically be adjusted through the Volume Control application. This is usually found in the
gnome panel or the system preferences menu. The Volume Control application may not show all available
volume controls. The preferences for the Volume Control application may need to be adjusted to allow access
to hidden volume controls.
The alsamixer is a command-line tool for adjusting volume. This application will not hide audio controls like
its GUI counterpart; however, it is not as intuitive. Press the h key after running alsamixer to get additional
information about how to control capture volumes.
Unsupported PCI audio devices are known to allow capture of application generated audio. The names of the
controls that need to be adjusted are not consistent. Names of controls that might need to be adjusted
include PCM, Capture, and Mix.
You must specify the device where the audio is recorded by using the following property:
Rgsender.Audio.Linux.DeviceName
Run the command:
cat /proc/asound/devices
From this, you can see a list of the audio devices that looks something like this:
0: [ 0] : control
1: : sequencer
8: [ 0- 0]: raw midi
16: [ 0- 0]: digital audio playback
17: [ 0- 1]: digital audio playback
24: [ 0- 0]: digital audio capture
32: [ 1] : control
33: : timer
48: [ 1- 0]: digital audio playback
Remote Audio 53
Page 66

56: [ 1- 0]: digital audio capture
Use an audio device only if it contains the word capture (device number 24 or 56 in the previous example).
Between each pair of square brackets, the rst number is the sound card and the second number is the mixer
device.
Use the following syntax to set the audio capture device, where <c> is the sound card number and <d> is the
mixer device number:
Rgsender.Audio.Linux.DeviceName=plughw:<c>,<d>
Using the previous example, you could specify audio device number 24 like in the following example:
Rgsender.Audio.Linux.DeviceName=plughw:0,0
You could alternatively specify audio device number 56 like in the following example:
Rgsender.Audio.Linux.DeviceName=plughw:1,0
Remote Clipboard
Remote Clipboard allows you to cut, copy, and paste data between the receiver and the sender or between
two dierent senders.
Copying, cutting, and pasting text is supported on Windows, Linux, and macOS. Copying, cutting, and pasting
an image is only supported between a Windows-based sender and Windows-based receiver. In addition,
copying, cutting, and pasting images is only supported for individual images. You cannot copy, cut, or paste
groups of images or image and text combinations.
On Windows, Remote Clipboard must be enabled during both the HP ZCentral Remote Boost Sender and HP
ZCentral Remote Boost Receiver installations (see Installation on page 6).
On Linux, Remote Clipboard is installed by default.
On Windows, Linux, and macOS, Remote Clipboard must also be enabled in HP ZCentral Remote Boost
Receiver (see Connection on page 20).
TIP: Setting the logging level of HP ZCentral Remote Boost Receiver or HP ZCentral Remote Boost Sender to
DEBUG enables Remote Clipboard log information.
Remote USB (Windows and ThinPro only)
Remote USB allows USB devices physically attached to the receiver to be virtually attached (mounted) to the
sender. This gives the sender direct access to the USB devices, as if the devices were physically attached to it.
See the following list for information about Remote USB support:
● The sender must be Windows-based.
● The receiver can be either Windows-based or ThinPro-based.
● A receiver’s physically-attached USB devices can be collectively attached to a single sender. The devices
cannot be split between multiple senders, nor can they be collectively attached to multiple senders.
● HP ZCentral Remote Boost supports all four USB data transfer types (bulk, isochronous, interrupt, and
control).
● USB devices that adhere to the USB 1.x or 2.x standard should work. However, webcams and devices that
are sensitive to timing might experience decreased performance, or they might not function at all. HP
recommends thoroughly testing any USB device intended for use with HP ZCentral Remote Boost.
54 Chapter 7 Using HP ZCentral Remote Boost features
Page 67

● USB 1.x and USB 2.x devices are supported on USB 3.x ports, but USB 3.x devices are not supported.
● File copies might take longer due to the additional overhead of the network protocol on top of the USB
protocol.
Conguring the remoting behavior of individual USB devices (Windows only)
The remoting behavior for individual USB devices can be altered from what was set globally during
installation.
IMPORTANT: This conguration requires modications to the Windows registry on the receiver. Registry
modications should be made with extreme caution, and you should always make a backup of the registry
prior to making any changes.
To congure the remoting behavior of a USB device:
1. Find the vendor ID and device ID for the USB device (see Determining USB device information (Windows)
on page 57).
2. Open the Registry Editor and create the following registry key:
HKEY_LOCAL_MACHINE\SYSTEM\CurrentControlSet\Services\hprpusbh
\Parameters\Device
3. Create the following registry key:
HKEY_LOCAL_MACHINE\SYSTEM\CurrentControlSet\Services\hprpusbh
\Parameters\Device\VID_VendorID&PID_ProductID
4. For the key you just created, create a string value named Mode.
5. Set the value of Mode to auto, local, or remote.
NOTE: If set to auto, the USB device switches its mounted location between the sender and the
receiver at the start and end of an HP ZCentral Remote Boost connection respectively. If set to remote,
you must physically disconnect the USB device from the receiver after the HP ZCentral Remote Boost
session ends and then reconnect the USB device for it to be usable on the receiver.
USB microphones
The Remote USB driver (on the receiver) supports the USB isochronous data type, which is commonly used for
streaming data such as that generated by audio and video devices. This enables certain isochronous USB
microphones to be accessed directly by the sender in the same manner as other USB devices.
To remotely attach USB microphones to the sender, either of these Remote USB Conguration settings can be
selected:
● USB devices are Remote—If selected, a USB microphone can be accessed anytime by the sender.
● USB devices are Local/Remote—If selected, how the USB microphone can be accessed by the sender
depends on when the microphone is connected to the receiver relative to establishment of the HP
ZCentral Remote Boost connection:
– If the microphone is connected to the receiver after establishment of an HP ZCentral Remote Boost
connection, the microphone will be a remote device only and can be accessed directly by the
sender.
TIP: The Windows Recording devices dialog in the sender allows the user to set the default
sound recording device (microphone).
Remote USB (Windows and ThinPro only) 55
Page 68

Remote USB Access Control List
HP ZCentral Remote Boost Sender supports an Access Control List (ACL) le that contains rules that specify
whether to allow a Remote USB connection from a USB device on the receiver side.
Each rule in the ACL le has a type of allow or deny. The rules are evaluated for each Remote USB
connection request as described:
● If any rule indicates the USB connection should be denied, the connection is denied, regardless of any
other rule.
● If any rule indicates the USB connection should be allowed, and if there are no rules that deny the
connection, the connection is allowed.
● If no rules match at all, the connection is denied.
The ACL le is implemented in XML format and is accompanied by an XSD (XML Schema Denition) le that
denes the XML elements. The default ACL le hprDefaultUsbAcl.xml and the XSD le
hprUsbAcl.xsd are both in the HP ZCentral Remote Boost Sender installation directory.
TIP: You can specify dierent les using the HP ZCentral Remote Boost Sender Conguration tool (see HP
ZCentral Remote Boost Sender Conguration tool (Windows/Linux only) on page 69).
The default ACL le contains the following contents, which allows all USB connections to be made:
<hprUsbAcl> <ruleset> <rule type="allow"> <name>Allow all USB devices (HP
default)</name> </rule> </ruleset></hprUsbAcl>
Rules can contain the lters described in the following table.
TIP: See hprUsbAcl.xsd for examples of using lters.
Table 7-3 Filter commands and their descriptions
Filter Description
bDeviceClass
bDeviceSubclass
bDeviceProtocol
idVendor
idProduct
bcdDevice
manufacturer
product
serialNumber
peerAddress
group
IMPORTANT: Filtering by manufacturer, product, or serialNumber is not reliable because the manufacturer is not required
to ll in those values.
The device class
The device subclass
The device protocol
The vendor ID
The product ID
The device version number
The manufacturer name
The product name
The product serial number
The IP address of the receiver
The domain group of the user logged on to the receiver
56 Chapter 7 Using HP ZCentral Remote Boost features
Page 69

Determining USB device information (Windows)
To determine USB device information:
1. Open Device Manager and nd the USB device under Universal Serial Bus controllers.
2. Double-click the USB device, and then select the Details tab in the window that appears.
3. Determine the vendor ID, product ID, class, subclass, and protocol.
a. Select Hardware Ids from the drop-down menu. The vendor ID and product ID are displayed in the
following format:
USB\VID_<vendor ID>&PID_<product ID>
In the following example, the vendor ID is 1234 and the device ID is 5678:
USB VID_1234&PID_5678
b. Select Compatible Ids from the drop-down menu. The class, subclass, and protocol are
represented by numerical codes and are displayed in the following format:
USB\Class_<class code>&SubClass_<subclass code>&Prot_<protocol
code>
In the following example, the class code is 08, the subclass code is 06, and the protocol code is 50:
USB Class_08&SubClass_06&Prot_50
Determining USB device information (Linux)
You can use open-source software to determine USB information about Linux.
To determine USB device information, use an open source program named USBView, which is available at
http://sourceforge.net/projects/usbview.
Enabling Remote USB on HP ThinPro
Remote USB can be enabled for HP ZCentral Remote Boost Receiver on HP ThinPro if the sender is Windowsbased.
To enable Remote USB on HP ThinPro:
1. In HP ThinPro, open the USB Manager and set the USB protocol to HP ZCentral Remote Boost.
2. Restart the thin client.
3. Ensure that Enable remote USB is enabled in HP ZCentral Remote Boost Receiver.
Directory Mode
Directory Mode lets you connect to multiple senders simultaneously from a single receiver. When you start HP
ZCentral Remote Boost Receiver in Directory Mode, it looks for a directory le containing user names and
computer names. HP ZCentral Remote Boost Receiver reads this le and attempts to connect to each specied
sender automatically.
The default directory le is directory.txt in the HP ZCentral Remote Boost Receiver installation
directory.
NOTE: This le contains examples that are commented out using the number sign (#) character.
Directory Mode 57
Page 70

Directory le format
The directory le is often a common le for a group, department, organization, or an entire company. The
directory le can manage and administer the senders for any number of users. HP recommends that you save
the directory le on a readily accessible network le share or mapped drive so it can be shared by multiple
receivers.
The directory le is a text le with the following format for each user:
<domain name> <user name> <computer name> [<computer name> ...]
The domain name of a Windows-based receiver depends on the environment. For a domain account, using the
example
The following example directory le species the senders for user1 and user2 in a domain account
environment:
worldwide user1 RC_1 RC_2 RC_3
worldwide user2 RC_4 RC_5 RC_6
For a local account, using the example user1_computer\user1, the domain name used for Directory
Mode would be user1_computer.
The following example directory le species the senders for user1 and user2 in a local account environment:
user1_computer user1 RC_1 RC_2 RC_3
user2_computer user2 RC_4 RC_5 RC_6
worldwide\user1, the domain name used for Directory Mode would be worldwide.
For Linux-based receiver, use UNIX as the domain name.
The domain name does not apply when using the directory le for Linux users. Instead, use the keyword
UNIX in place of the domain name. For example:
UNIX user1 RC_1 RC_2 RC_3
If the user name contains white-space characters, the name can be enclosed in double-quotes as shown:
domain1 "user1 user" RC_1 RC_2 RC_3
domain1 "user2 user" RC_4 RC_5 RC_6
Starting HP ZCentral Remote Boost Receiver in Directory Mode (Windows)
You can verify the HP ZCentral Remote Boost Receiver connection and then start Directory Mode.
Verifying the HP ZCentral Remote Boost connection
Before you attempt a connection in Directory Mode for the rst time, HP recommends that you rst verify that
HP ZCentral Remote Boost can connect to each computer individually.
▲ Windows 10: Select Start , type HP ZCentral Remote Boost, and then select HP ZCentral
Remote Boost Receiver Directory Mode from the search results.
Bringing a specic HP ZCentral Remote Boost Receiver window to the front
To bring a specic HP ZCentral Remote Boost Receiver window to the front:
1. Enable Setup Mode using the hotkey sequence (see Setup Mode on page 18).
2. Press Tab to open the HP ZCentral Remote Boost Receiver window selector, and then select an HP
ZCentral Remote Boost Receiver window.
58 Chapter 7 Using HP ZCentral Remote Boost features
Page 71

Starting HP ZCentral Remote Boost Receiver in Directory Mode (macOS)
To start Directory Mode:
▲ Run either of the following commands on the command line:
open -a "HP ZCentral Remote Boost Receiver" --args -directory Filename
open -a "HP ZCentral Remote Boost Receiver" --args -directory
If a le name is specied after -directory, HP ZCentral Remote Boost Receiver uses that le as the
directory
le.
le. If no le name is specied, you are prompted to specify the path and name of the directory
Directory Mode 59
Page 72

8 Conguration tools and properties
On Windows and Linux, HP ZCentral Remote Boost Receiver and HP ZCentral Remote Boost Sender each
include a conguration tool that allows you to modify some of the more advanced HP ZCentral Remote Boost
settings. Most of the options in the conguration tools correspond to one of the properties in the
rgreceiverconfig and rgsenderconfig les respectively.
On macOS, properties must be set manually by editing the le /Library/Application Support/HP/
rgreceiverconfig.
This chapter discusses the following topics:
NOTE: When settings are changed using the conguration tools, the process described in Setting property
values in a conguration le on page 76 is automated. Manual editing of the conguration les is not
necessary unless you want to add or modify properties that do not have a corresponding option in one of the
conguration tools, such as the per-session properties of HP ZCentral Remote Boost Receiver.
See Setting HP ZCentral Remote Boost properties manually on page 76 and Other properties on page 78 for
more information.
HP ZCentral Remote Boost Receiver setting override hierarchy
In the following hierarchy, settings congured using methods higher on the list override settings congured
using methods lower on the list (with 1 being the highest and 5 being the lowest).
Options changed during the lifetime of the receiver, via the UI of the receiver, will override any value
previously set using HP ZCentral Remote Boost Receiver Conguration tool (or by manually editing the
properties in the rgreceiverconfig le). If an administrator wants to prevent previously saved values
from taking
1. Settings congured in HP ZCentral Remote Boost Receiver
2. Settings congured on the command line
3. Settings that were persisted the last time HP ZCentral Remote Boost Receiver was closed.
4. Settings congured using the HP ZCentral Remote Boost Receiver Conguration tool (or by manually
5. Default settings
eect, they must mark the property as immutable (see below).
editing the properties in the rgreceiverconfig le)
HP ZCentral Remote Boost Receiver Conguration tool (Windows
and Linux Only)
The HP ZCentral Remote Boost Receiver includes the HP ZCentral Remote Boost Receiver Conguration tool.
Using the HP ZCentral Remote Boost Receiver Conguration tool
These instructions describe how to use the HP ZCentral Remote Boost Receiver Conguration tool.
1. Start the tool:
60 Chapter 8 Conguration tools and properties
Page 73

General
● On Windows, navigate to the HP ZCentral Remote Boost Receiver installation directory and run the
following executable:
receiverConfigApp.exe
● On Linux, select the Applications or Activities menu, and then either select HP ZCentral Remote
Boost Receiver Conguration or open a command line and execute the following command:
/usr/bin/rgreceiverconfig
2. Congure the options the options that you want.
NOTE: See the tables in the following sections for descriptions of each of the options.
3.
TIP: To restore all default HP ZCentral Remote Boost Receiver Conguration settings, be sure that HP
ZCentral Remote Boost Receiver is not running, and then select Restore to default in the lower-left
corner of the HP ZCentral Remote Boost Receiver Conguration tool. Alternatively, uninstalling and then
reinstalling HP ZCentral Remote Boost Receiver restores all default settings.
Select Save to save your changes.
The following table describes the options available in the General panel of the HP ZCentral Remote Boost
Receiver Conguration tool. The corresponding property in the rgreceiverconfig le is noted for
reference.
Table
8-1 General options and their descriptions
Option Description
Snap the Receiver window when close to the edge
of the screen
Enable the Receiver window Toolbar Enables the HP ZCentral Remote Boost Receiver toolbar.
Display a warning that disconnecting from HP
ZCentral Remote Boost while logged in will not log
the user out of the remote system
Network disruption warning color Use the Color and Transparency controls to set the color that overlays the HP
When enabled, the HP ZCentral Remote Boost Receiver window will snap when
close to the top or left edge of the screen.
Conguration le property (Windows/Linux only):
Rgreceiver.IsSnapEnabled
Conguration le property (Windows/Linux only):
Rgreceiver.IsMenubarEnabled
When enabled, HP ZCentral Remote Boost Receiver will display a warning that
disconnecting an HP ZCentral Remote Boost connection will not automatically
log them out of the sender.
Conguration le property (Windows/Linux/macOS):
Rgreceiver.IsDisconnectWarningEnabled
ZCentral Remote Boost Receiver window when HP ZCentral Remote Boost
Receiver detects a network disruption.
Conguration le property (Windows/Linux/macOS):
Rgreceiver.ConnectionWarningColor
Enable HP ZCentral Remote Boost to communicate
mouse cursor snaps
HP ZCentral Remote Boost Receiver Conguration tool (Windows and Linux Only) 61
When enabled, mouse cursor snaps (such as to the default button of a dialog
box) will be communicated by HP ZCentral Remote Boost.
Conguration le property (Windows/Linux/macOS):
Rgreceiver.IsMouseSyncEnabled
Page 74

Table 8-1 General options and their descriptions (continued)
Option Description
Number of recent remote connections listed Sets the number of recent remote connections to list in HP ZCentral Remote
File used for Directory Mode Species the le to use for Directory Mode.
Always prompt for the domain, user name, and
password when establishing a connection
Certicate Verication Failure Policy Species what HP ZCentral Remote Boost Receiver does if the verication of the
Allow user to modify Certicate Verication Failure
Policy
Boost Receiver.
Conguration le property (Windows/Linux/macOS):
Rgreceiver.MaxSenderListSize
Conguration le property (Windows/Linux/macOS):
Rgreceiver.Directory
When enabled, HP ZCentral Remote Boost Receiver will always prompt for the
domain, user name, and password when establishing a connection.
Conguration le property (Windows/Linux only):
Rgreceiver.IsAlwaysPromptCredentialsEnabled
sender certicate fails. Select Accept, Prompt to accept, or Deny.
Conguration le property (Windows/Linux/macOS):
Rgreceiver.Network.Certificate.VerificationPolicy={Acce
pt | Prompt to accept | Deny}
Enables the user to change the Certicate Verication Failure Policy setting.
Conguration le property (Windows/Linux/macOS):
Rgreceiver.Network.Certificate.VerificationPolicy.IsMut
able={0 | 1}
Allow user to set whether the Remote Clipboard is
enabled
Enable Remote Clipboard by default Enables Remote Clipboard by default.
Remote Clipboard lters IMPORTANT: This property is for advanced users only. It should only be
When enabled, a user can modify the Enable remote clipboard setting in HP
ZCentral Remote Boost Receiver .
Conguration le property (Windows/Linux/macOS):
Rgreceiver.Clipboard.IsMutable
Conguration le property (Windows/Linux/macOS):
Rgreceiver.Clipboard.IsEnabled
changed from its default value if Remote Clipboard does not support the
clipboard format required by your application.
The Selected lters window species the clipboard formats that are allowed to
be transferred using Remote Clipboard. By default, all lters are selected, but
lters can be removed by moving them to the Available lters window.
NOTE: For more information about clipboard formats, go to
http://msdn2.microsoft.com/en-us/library/ms649013.aspx.
Conguration le property (Windows only):
Rgreceiver.Clipboard.FilterString
62 Chapter 8 Conguration tools and properties
Page 75

Image and Display
The following table describes the options available in the Image and Display panel of the HP ZCentral Remote
Boost Receiver Conguration tool. The corresponding property in the rgreceiverconfig le is noted for
reference.
Table 8-2 Image and Display options and their descriptions
Option Description
Enable Advanced Video Compression on Sender Enables Advanced Video Compression by default.
Advanced Video Compression encoding Sets whether Advanced Video Compression encoding should be handled by the
Maximum number of cores Sets the maximum number of CPU cores on the receiver that can be used for
Conguration le property (Windows/Linux only):
Rgreceiver.ImageCodec.IsH264Enabled
sender’s GPU or CPU.
Conguration le property (Windows/Linux only):
Rgreceiver.ImageCodec.UseGPU
decoding.
NOTE: This option is not available if Advanced Video Compression is enabled.
Conguration le property (Windows/Linux/macOS):
Rgreceiver.Decoder.ThreadPoolSize
Increase text rendering quality Improves image quality for images containing signicant amounts of text or
lines.
Conguration le property (Windows/Linux/macOS):
Rgreceiver.ImageCodec.IsBoostEnabled
Enable image quality slider When enabled, the image quality slider can be adjusted by a user, either in HP
ZCentral Remote Boost Receiver or on the HP ZCentral Remote Boost Receiver
toolbar.
Conguration le property (Windows/Linux/macOS):
Rgreceiver.ImageCodec.IsMutable
Image Quality by default Sets the default image quality (from 0 to 100).
Conguration le property (Windows/Linux/macOS):
Rgreceiver.ImageCodec.Quality
Enable adaptive image quality by default When enabled, HP ZCentral Remote Boost will use the Adaptive image quality
settings by default.
Conguration le property (Windows/Linux/macOS):
Rgreceiver.Experience.Mode
Minimum image quality Sets the default value for the Minimum image quality setting.
Conguration le property (Windows/Linux/macOS):
Rgreceiver.Experience.MinImageQuality
Target update rate Sets the default value for the Target update rate setting.
Conguration le property (Windows/Linux/macOS):
Rgreceiver.Experience.MinUpdateRate
HP ZCentral Remote Boost Receiver Conguration tool (Windows and Linux Only) 63
Page 76

Table 8-2 Image and Display options and their descriptions (continued)
Option Description
Max number of image update requests This property provides performance optimization in high-latency network
Force full screen image updates Enables the Force full screen image updates option in HP ZCentral Remote
Set Sender display(s) to match Receiver display(s)
by default
environments by setting the maximum number of image updates HP ZCentral
Remote Boost Sender can send across the network without hearing back from
HP ZCentral Remote Boost Receiver. Increasing this value might help increase
the frame rate at the expense of increased network bandwidth consumption.
Conguration le property (Windows/Linux/macOS):
Rgreceiver.MaxImageUpdateRequests
Boost Receiver by default.
Conguration le property (Windows/Linux only):
Rgreceiver.IsGlobalImageUpdateEnabled
Enables the Set Sender display(s) to match Receiver display(s) option in HP
ZCentral Remote Boost Receiver by default.
Conguration le property (Windows/Linux/macOS):
Rgreceiver.IsMatchReceiverResolutionEnabled
NOTE: This property is mutually exclusive with
Rgreceiver.UseDisplayProperties.
NOTE: This property cannot be used when any
Rgreceiver.Session.<n>.VirtualDisplay.IsPreferredResolu
tionEnabled property is enabled or any per-session display properties are
specied.
Audio
Enable Match Receiver display layout by default Enables the Match Receiver display layout option in HP ZCentral Remote Boost
Receiver by default.
Conguration le property (Windows/Linux/macOS):
Rgreceiver.IsMatchReceiverPhysicalDisplaysEnabled
Set Sender display(s) to match display properties
by default
Enables the Set Sender display(s) to match display properties option in HP
ZCentral Remote Boost Receiver by default.
Conguration le property (Windows/Linux/macOS):
Rgreceiver.UseDisplayProperties
NOTE: This property is mutually exclusive with
Rgreceiver.IsMatchReceiverResolutionEnabled.
NOTE: This property cannot be used when any
Rgreceiver.Session.<n>.VirtualDisplay.IsPreferredResolu
tionEnabled property is enabled or any per-session display properties are
specied.
The following table describes the options available in the Audio panel of the HP ZCentral Remote Boost
Receiver Conguration tool. The corresponding property in the rgreceiverconfig le is noted for
reference.
64 Chapter 8 Conguration tools and properties
Page 77

Table 8-3 Audio options and their descriptions
Option Description
Allow user to modify audio settings When enabled, a user can modify the audio settings in HP ZCentral Remote
Enable Remote Audio by default Enables Remote Audio by default.
Enable stereo audio by default Enables stereo audio by default.
Audio quality Sets the default audio quality.
Only play audio from current Receiver window When enabled, audio will play only from the HP ZCentral Remote Boost Receiver
Boost Receiver .
Conguration le property (Windows/Linux/macOS):
Rgreceiver.Audio.IsMutable
Conguration le property (Windows/Linux/macOS):
Rgreceiver.Audio.IsEnabled
Conguration le property (Windows/Linux/macOS):
Rgreceiver.Audio.IsInStereo
Conguration le property (Windows/Linux/macOS):
Rgreceiver.Audio.Quality
window that has focus. When disabled, audio from all HP ZCentral Remote Boost
Receiver windows will be combined.
Conguration le property (Windows/Linux/macOS):
Rgreceiver.Audio.IsFollowsFocusEnabled
Network
The following table describes the options available in the Network panel of the HP ZCentral Remote Boost
Receiver Conguration tool. The corresponding property in the rgreceiverconfig le is noted for
reference.
Table
8-4 Network options and their descriptions
Option Description
Allow user to modify network timeout settings When enabled, a user can modify the network settings in HP ZCentral Remote
Boost Receiver .
Conguration le property (Windows/Linux/macOS):
Rgreceiver.Network.Timeout.IsMutable
Enable the warning dialog for when the HP ZCentral
Remote Boost connection is about to time out
Error timeout (seconds) Sets the time in seconds that HP ZCentral Remote Boost Receiver will wait
Enables the warning dialog for when the HP ZCentral Remote Boost connection
is about to time out due to the inability to contact HP ZCentral Remote Boost
Sender.
Conguration le property (Windows/Linux/macOS):
Rgreceiver.Network.Timeout.IsGuiEnabled
before ending the connection after failing to detect HP ZCentral Remote Boost
Sender.
Conguration le property (Windows/Linux/macOS):
HP ZCentral Remote Boost Receiver Conguration tool (Windows and Linux Only) 65
Page 78

Table 8-4 Network options and their descriptions (continued)
Option Description
Rgreceiver.Network.Timeout.Error
Warning timeout (seconds) Sets the time in seconds that HP ZCentral Remote Boost Receiver will wait
before displaying a warning dialog to the local user after failing to detect HP
ZCentral Remote Boost Sender.
Conguration le property (Windows/Linux/macOS):
Rgreceiver.Network.Timeout.Warning
Dialog timeout (seconds) Sets the time in seconds that HP ZCentral Remote Boost Receiver will wait for a
response to a dialog being displayed on the sender (such as an authentication
dialog).
NOTE: The request will be canceled if there is no response.
Conguration le property (Windows/Linux/macOS):
Rgreceiver.Network.Timeout.Dialog
HP ZCentral Remote Boost Sender network port Species the port to use for communication between HP ZCentral Remote Boost
Receiver and HP ZCentral Remote Boost Sender.
IMPORTANT: This setting must match the port setting on HP ZCentral Remote
Boost Sender.
Conguration le property (Windows/Linux/macOS):
Rgreceiver.Network.Port
HP Velocity
The following table describes the options available in the HP Velocity panel of the HP ZCentral Remote Boost
Receiver Conguration tool. The corresponding property in the rgreceiverconfig le is noted for
reference.
NOTE: See HP Velocity documentation for more information about HP Velocity settings.
Table 8-5 HP Velocity options and their descriptions
Option Description
Enable HP Velocity Enables HP Velocity.
Operational Mode Sets whether HP Velocity should correct network loss (Active Mode) or just monitor it
Target loss rate (10k packet sample) Sets the amount of network loss that HP Velocity will tolerate before adding packet-
Conguration le property:
Rgreceiver.Network.HPVelocity.Enabled
(Monitor Mode).
Conguration le property:
Rgreceiver.Network.HPVelocity.LiveUdpMode
protection redundancy to the data ow.
Conguration le property:
Rgreceiver.Network.HPVelocity.LiveUdpTargetLossRate
Level of congestion control Sets the level of congestion control, where Standard handles the eects of a high-latency
network and Friendly uses the standard TCP-like congestion-control algorithm.
66 Chapter 8 Conguration tools and properties
Page 79

Table 8-5 HP Velocity options and their descriptions (continued)
Option Description
USB (Windows / ThinPro only)
The following table describes the options available in the USB panel of the HP ZCentral Remote Boost
Receiver
reference.
Table 8-6 USB options and their descriptions
Option Description
Allow user to modify Remote USB settings When enabled, a user can modify the Remote USB settings in HP ZCentral
Enable Remote USB by default Enables Remote USB by default.
Conguration tool. The corresponding property in the rgreceiverconfig le is noted for
Conguration le property:
Rgreceiver.Network.HPVelocity.LiveUdpCongestionControlAlgorithm
Remote Boost Receiver .
Conguration le property:
Rgreceiver.Usb.IsMutable
Conguration le property:
Rgreceiver.Usb.IsEnabled
Hotkeys
USB active session Species which sender to attach USB devices to for Directory Mode.
Conguration le property:
Rgreceiver.Usb.ActiveSession
The following table describes the options available in the Hotkeys panel of the HP ZCentral Remote Boost
Receiver Conguration tool. The corresponding property in the rgreceiverconfig le is noted for
reference.
Table
8-7 Hotkeys options and their descriptions
Option Description
Allow user to modify hotkey settings When enabled, a user can modify the hotkey settings in HP ZCentral Remote Boost
Receiver .
Conguration le property (Windows/Linux/macOS):
Rgreceiver.Hotkeys.IsMutable
Enable the Send Ctrl+Alt+End key sequence as
Ctrl+Alt+Del option by default
Enables the Send CTRL-ALT-END key sequence as CTRL-ALT-DEL option in HP
ZCentral Remote Boost Receiver by default.
Conguration le property (Windows/Linux/macOS):
Rgreceiver.Hotkeys.IsSendCtrlAltEndAsCtrlAltDeleteEnabled
Process a Ctrl+Alt+Delete sequence on both the
local and remote computers
HP ZCentral Remote Boost Receiver Conguration tool (Windows and Linux Only) 67
When enabled, both the receiver and the sender will process a Ctrl+Alt+Delete
sequence. When disabled, only the receiver will process a Ctrl+Alt+Delete sequence.
Page 80

Table 8-7 Hotkeys options and their descriptions (continued)
Option Description
Conguration le property (Windows only):
Rgreceiver.Hotkeys.IsCtrlAltDeletePassThroughEnabled
Enable the Setup Mode hotkey sequence Enables the Setup Mode hotkey sequence.
Conguration le property (Windows/Linux/macOS):
Rgreceiver.Hotkeys.IsSetupModeEnabled
Setup Mode sequence Species the Setup Mode hotkey sequence.
Conguration le property (Windows/Linux/macOS):
Rgreceiver.Hotkeys.SetupModeSequence
Enable the Send First Key option by default Enables the Send First Key option in HP ZCentral Remote Boost Receiver by default.
Conguration le property (Windows/Linux/macOS):
Rgreceiver.Hotkeys.IsSendFirstKeyInSequenceEnabled
Enable the Key Repeat option by default Enables the Key Repeat option in HP ZCentral Remote Boost Receiver by default.
Conguration le property (Windows/Linux/macOS):
Rgreceiver.Hotkeys.IsKeyRepeatEnabled
Enable Game Mode Enables Game Mode functionality. To toggle Game Mode, press the G key while the
HP ZCentral Remote Boost Receiver is in Setup Mode.
Conguration le property (Windows only):
Rgreceiver.Hotkeys.IsGameModeEnabled
Logging
The following table describes the options available in the Logging panel of the HP ZCentral Remote Boost
Receiver Conguration tool. The corresponding property in the rgreceiverconfig le is noted for
reference.
Table
8-8 Logging options and their descriptions
Option Description
Allow user to modify logging settings When enabled, a user can modify the logging settings in HP ZCentral Remote
Boost Receiver.
Conguration le property (Windows/Linux/macOS):
Rgreceiver.Log.IsMutable
Enable HP ZCentral Remote Boost Receiver logging
by default
Log Level Sets the lowest level of output to log. The specied level and anything more
Enables logging for HP ZCentral Remote Boost Receiver by default.
Conguration le property (Windows/Linux/macOS):
Rgreceiver.Log.IsFileLoggerEnabled
serious will be logged in the HP ZCentral Remote Boost Receiver log le.
Conguration le property (Windows/Linux/macOS):
Rgreceiver.Log.Level
68 Chapter 8 Conguration tools and properties
Page 81

Table 8-8 Logging options and their descriptions (continued)
Option Description
Log le path Species the path to the HP ZCentral Remote Boost Receiver log le.
Max logle size (KB) Sets the maximum size the HP ZCentral Remote Boost Receiver log le can be in
Activation
The following table describes the options available in the Activation panel of the HP ZCentral Remote Boost
Receiver Conguration tool. The corresponding property in the rgreceiverconfig le is noted for
reference.
Table 8-9 Activation options and their descriptions
Option Description
Conguration le property (Windows/Linux/macOS):
Rgreceiver.Log.Filename
kilobytes (KB).
Conguration le property (Windows/Linux/macOS):
Rgreceiver.Log.MaxFileSize
Use a proxy server when activating HP ZCentral
Remote Boost Advanced Features
Proxy server address Species the proxy server address to use for activation of HP ZCentral Remote
Proxy port Species the proxy server port to use for activation of HP ZCentral Remote Boost
Enables the use of a proxy server for activation of HP ZCentral Remote Boost
Advanced Features.
Conguration le property:
Rgreceiver.Network.ProxyEnabled
Boost Advanced Features.
Conguration le property:
Rgreceiver.Network.ProxyAddress
Advanced Features.
Conguration le property:
Rgreceiver.Network.ProxyPort
HP ZCentral Remote Boost Sender setting override hierarchy
To override default settings in HP ZCentral Remote Boost Sender:
▲ Use the HP ZCentral Remote Boost Sender Conguration tool or manually edit the properties in the
rgsendercong le.
HP ZCentral Remote Boost Sender Conguration tool (Windows/
Linux only)
HP ZCentral Remote Boost Sender includes the HP ZCentral Remote Boost Sender Conguration tool.
HP ZCentral Remote Boost Sender setting override hierarchy 69
Page 82

Using the HP ZCentral Remote Boost Sender Conguration tool
These instructions describe how to use the HP ZCentral Remote Boost Sender Conguration tool.
1. Start the tool:
● On Windows, navigate to the HP ZCentral Remote Boost Sender installation directory and run the
following executable:
senderConfigApp.exe
● On Linux, select the Applications or Activities menu, and then either select HP ZCentral Remote
Boost Sender Conguration or open a command line and execute the following command:
/usr/bin/rgsenderconfig
2. Congure the options that you want.
NOTE: See the tables in the following sections for descriptions of each of the options.
3. Select Save to save your changes.
TIP: To restore all default HP ZCentral Remote Boost Sender Conguration settings, make sure the HP
ZCentral Remote Boost Sender service is stopped, and then select Restore to default in the lower-left corner
of the HP ZCentral Remote Boost Sender Conguration tool. Alternatively, uninstalling and then reinstalling
HP ZCentral Remote Boost Sender restores all default settings.
NOTE: You can also change authentication settings via the command line. When you use the tool with
command line arguments, the tool's GUI is not displayed. See Authentication (Windows only) on page 71 for
details.
General
The following table describes the options available in the General panel of the HP ZCentral Remote Boost
Sender Conguration tool. The corresponding property in the rgsenderconfig le is noted for reference.
Table
8-10 General options and their descriptions
Option Description
End the HP ZCentral Remote Boost session and
disconnect all collaborators when the primary user
logs out
Enable session reconnection after logout or fast
user switching.
Enable monitor blanking on Sender when a remote
user connects
When enabled, HP ZCentral Remote Boost Sender ends the HP ZCentral Remote
Boost connection and disconnects all collaborators when the primary user logs
out.
NOTE: On Linux, the HP ZCentral Remote Boost connection always ends when
the primary user logs out.
Conguration le property (Windows only):
Rgsender.IsDisconnectOnLogoutEnabled
Enables session reconnection after logout or fast user switching.
Conguration le property (Windows only):
Rgsender.IsReconnectOnConsoleDisconnectEnabled
When enabled, the sender’s screen will blank and its keyboard and mouse will
disable when a remote user connects.
Conguration le property (Windows/Linux):
Rgsender.IsBlankScreenAndBlockInputEnabled
Enable Remote Audio Enables Remote Audio.
70 Chapter 8 Conguration tools and properties
Page 83

Table 8-10 General options and their descriptions (continued)
Option Description
Conguration le property (Windows/Linux):
Rgsender.Audio.IsEnabled
Enable Remote Clipboard Enables Remote Clipboard.
Conguration le property (Windows/Linux):
Rgsender.Clipboard.IsEnabled
Allow connections from RGS 7.4 and earlier
receivers
Authentication (Windows only)
The Authentication panel of the HP ZCentral Remote Boost Sender Conguration tool can be used to choose
between standard authentication, Easy Login, or Single Sign-on.
NOTE: This panel replaces the HP ZCentral Remote Boost Admin tool previously included with HP ZCentral
Remote Boost Sender on Windows.
TIP: Authentication settings can also be changed via the command line. The following commands are
supported:
Enable Standard Authentication: senderConfigApp.exe –enableStandardLogin
Enable Single Sign-on: senderConfigApp.exe -enableSSO
Enable Easy Login: senderConfigApp.exe -enableEasyLogin
Display the current selected method: senderConfigApp.exe –status
Display usage message: senderConfigApp.exe -h
When enabled, allows the use of legacy security settings, enabling HP RGS 7.4
and earlier receivers to connect without conguring certicates. Not
recommended for highest security.
Conguration le property (Windows/Linux):
Rgsender.EnableLegacySecurity
Image and Display
The following table describes the options available in the Image and Display panel of the HP ZCentral Remote
Boost Sender Conguration tool. The corresponding property in the rgsenderconfig le is noted for
reference.
Table
8-11 Image and display options and their descriptions
Option Description
Preferred display methods Sets the order of methods to detect image changes. If a method is not currently
supported with the system, the next method in the list will be tried. The
available methods are as follows:
● GPU: Uses the GPU hardware to quickly compare one full screen to a
previous full screen
● ChangeList: Uses the HP ZCentral Remote Boost mirror-driver on
Windows and the HP ZCentral Remote Boost X server extension on Linux to
detect display changes
HP ZCentral Remote Boost Sender Conguration tool (Windows/Linux only) 71
Page 84

Table 8-11 Image and display options and their descriptions (continued)
Option Description
● Comparitron: Uses the system's CPU to compare one full screen to a
previous full screen
NOTE: This option has no eect if Advanced Video Compression is enabled.
Conguration le property (Windows and Linux):
Rgsender.PreferredDisplayMethods
Maximum number of cores Sets the maximum number of CPU cores on the sender that can be used for
encoding.
Conguration le property (Windows and Linux):
Rgsender.Encoder.ThreadPoolSize
Maximum image update rate Sets the maximum number of image updates per second. If set to 0, the update
rate will be unlimited.
Conguration le property (Windows and Linux):
Rgsender.MaxImageUpdateRate
Image codec Sets the order of codecs to use for all transmitted image data. If a codec is not
currently supported with the system, the next codec in the list will be tried. The
available codecs are as follows:
● HP3: This codec has been the default since RGS 5.0.
Network
● Lossless JPEG-LS: This codec is mathematically lossless.
NOTE: This option has no eect if Advanced Video Compression is enabled.
Conguration le property (Windows and Linux):
Rgsender.ImageCodec.Preferred
NOTE: Chroma subsampling for HP3 and AVC is as follows:
● Chroma sampling for HP3 is 4:4:4
● Chroma subsampling for AVC is 4:2:0
The following table describes the options available in the Network panel of the HP ZCentral Remote Boost
Sender Conguration tool. The corresponding property in the rgsenderconfig le is noted for reference.
Table
8-12 Network options and their descriptions
Option Description
Error timeout (seconds) Sets the time in seconds that HP ZCentral Remote Boost Sender will wait
before ending the connection after failing to detect HP ZCentral Remote
Boost Receiver.
Conguration le property (Windows and Linux):
Rgsender.Network.Timeout.Error
Listen for HP ZCentral Remote Boost connections on all
network interfaces
72 Chapter 8 Conguration tools and properties
When enabled, HP ZCentral Remote Boost Sender will listen for
connections on all network interfaces.
Conguration le property (Windows and Linux):
Page 85

Table 8-12 Network options and their descriptions (continued)
Option Description
Rgsender.Network.IsListenOnAllInterfacesEnabled
Listen to a specic network interface Species which network interfaces HP ZCentral Remote Boost Sender
will listen for connections on.
See Sender network interface binding on page 87 for more information
about how to determine the value that corresponds with each network
interface.
NOTE: This option is not available if the Listen for HP ZCentral
Remote Boost connections on all network interfaces option is
enabled.
Conguration le property (Windows and Linux):
Rgsender.Network.Interface.<n>.IsEnabled
NOTE: If setting the property manually, replace <n> with the number
of the network interface.
Listen to a specic range of IP addresses Species the range of IP addresses that HP ZCentral Remote Boost
Sender listens to for connections on. A network interface must be
enabled using the Listen to a specic network interface option, and its
IP address must be in the specied range.
NOTE: This option is not available if the Listen for HP ZCentral
Remote Boost connections on all network interfaces option is
enabled.
Conguration le property (Windows and Linux):
Rgsender.Network.AllowIpAddressSubnet
HP ZCentral Remote Boost Sender network port Species the port to use for communication between HP ZCentral
HP Velocity
The following table describes the options available in the HP Velocity panel of the HP ZCentral Remote Boost
Sender Conguration tool. The corresponding property in the rgsenderconfig le is noted for reference.
NOTE: See HP Velocity documentation for more information about HP Velocity settings.
Table 8-13 HP Velocity options and their descriptions
Option Description
Enable HP Velocity Enables HP Velocity.
Remote Boost Sender and HP ZCentral Remote Boost Receiver.
IMPORTANT: This setting must match the port setting on HP ZCentral
Remote Boost Receiver.
Conguration le property (Windows and Linux):
Rgsender.Network.Port
Conguration le property (Windows/Linux only):
Rgsender.Network.HPVelocity.Enabled
HP ZCentral Remote Boost Sender Conguration tool (Windows/Linux only) 73
Page 86

USB
The following table describes the options available in the USB panel of the HP ZCentral Remote Boost Sender
Conguration tool. The corresponding property in the rgsenderconfig le is noted for reference.
Table 8-14 USB options and their descriptions
Option Description
ACL le name (XML) Species the name of the XML le that implements the Remote USB Access Control
List (ACL).
Conguration le property (Windows and Linux only):
Rgsender.Usb.Acl.RulesetPath
ACL schema le (XSD) Species the name of the schema le that accompanies the Remote USB XML le.
Conguration le property (Windows and Linux):
Rgsender.Usb.Acl.SchemaPath
Amount of time that the HP ZCentral Remote
Boost Sender will wait before disconnecting
all USB devices if the USB ACL le becomes
inaccessible (milliseconds)
Collaboration
The following table describes the options available in the Collaboration panel of the HP ZCentral Remote
Boost Sender Conguration tool. The corresponding property in the rgsenderconfig le is noted for
reference.
Table
8-15 Collaboration options and their descriptions
Option Description
Display list of users connected to the remote
computer
Sets the amount of time in milliseconds that HP ZCentral Remote Boost Sender will
wait before disconnecting all USB devices if the USB ACL le disappears or becomes
inaccessible.
NOTE: If the le is restored before expiration of the timeout period, the USB devices
remain connected.
Conguration le property (Windows and Linux):
Rgsender.Usb.Acl.RulesetErrorTimeout
Enables the collaboration notication dialog.
IMPORTANT: This option should normally remain enabled. When disabled,
neither remote users nor local users are notied who is participating in a
collaboration session. The warning dialog that is displayed when the sender is
unable to blank its monitor is also prevented from being displayed.
Conguration le property (Windows/Linux):
Rgsender.IsCollaborationNotificationEnabled
Automatically give permission for authorized
collaborators to join the session
Collaboration request timeout (milliseconds) Sets the amount of time in milliseconds that the collaboration authentication
74 Chapter 8 Conguration tools and properties
When enabled, collaborators will always be accepted without having to be
authorized by the primary user.
Conguration le property (Windows/Linux):
Rgsender.Collaboration.AlwaysAcceptCollaborators
dialog is shown before the request is denied automatically.
NOTE: Set the value to be equal to or less than
Rgreceiver.Network.Timeout.Dialog for all collaborating receivers.
See Network on page 65 for more information.
Page 87

Table 8-15 Collaboration options and their descriptions (continued)
Option Description
Conguration le property (Windows/Linux):
Rgsender.CollabUI.Dialog.Timeout
Logging
Delay before another user can take oor control
when active user stops giving input
Sets the delay in milliseconds after the active user stops making inputs before
another user can take control of the oor in a collaboration session. The value
can range from 500 milliseconds (0.5 seconds) to 15000 milliseconds (15
seconds).
Conguration le property (Windows/Linux):
Rgsender.RequestFloorControlTime
The following table describes the options available in the Logging panel of the HP ZCentral Remote Boost
Sender Conguration tool. The corresponding property in the rgsenderconfig le is noted for reference.
Table 8-16 Logging options and their descriptions
Option Description
Log Level Sets the lowest level of output to log. The specied level and anything more
serious will be logged in the HP ZCentral Remote Boost Sender log le.
Conguration le property (Windows/Linux/macOS):
Rgsender.Log.Level
Log le path Species the path to the HP ZCentral Remote Boost Sender log le.
Conguration le property (Windows/Linux/macOS):
Rgsender.Log.Filename
Max logle size (KB) Sets the maximum size of the HP ZCentral Remote Boost Sender log le (in
Diagnostics
The Diagnostics panel of the HP ZCentral Remote Boost Sender Conguration tool can be used to detect
potential issues that might prevent a remote connection.
Certicates
The Certicates panel of the HP ZCentral Remote Boost Sender Conguration tool provides information about
the self-signed certicate generated by the HP ZCentral Remote Boost Sender.
Table
Section Description
File Location Identies the le location of the certicate used by the HP ZCentral Remote
kilobytes).
Conguration le property (Windows/Linux/macOS):
Rgsender.Log.MaxFileSize
8-17 Certicates options and their descriptions
Boost Sender.
HP ZCentral Remote Boost Sender Conguration tool (Windows/Linux only) 75
Page 88

Table 8-17 Certicates options and their descriptions (continued)
Section Description
Expiration Identies the expiration date of the certicate by the HP ZCentral Remote Boost
Fingerprint Identies the SHA256 ngerprint of the certicate being used by the HP ZCentral
Sender.
Remote Boost Sender.
Setting HP ZCentral Remote Boost properties manually
You can congure HP ZCentral Remote Boost properties manually.
Property syntax
The following example shows the HP ZCentral Remote Boost property syntax:
Rgreceiver.Network.Timeout.Warning=10000
In this example, the name of the property is Rgreceiver.Network.Timeout.Warning, and the value
of the property is
milliseconds (10 seconds) before displaying a warning dialog that indicates that it is no longer able to
communicate with HP ZCentral Remote Boost Sender. This particular setting is duplicated in the Network
panel of the HP ZCentral Remote Boost Receiver settings.
A property could also be set to an empty value like in the following example:
Rgreceiver.Browser.Name=
10000. This setting species that HP ZCentral Remote Boost Receiver will wait 10,000
Properties with empty values reset to their default values:
● If the value of the property is of type string, the value will be set as an empty string.
● If the value of the property is of type int, int vector, or bool, the value will be set to 0.
IMPORTANT: No user notication is provided if a property name is misspelled, and the property will not take
eect. If you specify a property in a conguration le or on the command line and it does not take eect,
verify that the property name is spelled correctly (including uppercase and lowercase usage).
Setting property values in a conguration le
HP ZCentral Remote Boost property values can be set in a conguration le. The Receiver conguration le is
named rgreceiverconfig and the Sender conguration le is named rgsenderconfig. On Windows,
the les are located in the HP ZCentral Remote Boost Receiver or the HP ZCentral Remote Boost Sender
installation directory. On Linux, the les are located in /etc/opt/hpremote/rgreceiver
or /etc/opt/hpremote/rgsender. On macOS, the rgreceivercong le is located in /Library/
Application Support/HP/rgreceiver.
The conguration les contain one property per line. All properties in the conguration les are initially
commented out with the # character. To set a property in a conguration le, rst delete the number sign ( #)
character preceding the property name, and then set the property to the appropriate value. For HP ZCentral
Remote Boost Receiver, once a property is uncommented in the conguration le, the property's setting is
persisted when HP ZCentral Remote Boost Receiver is closed.
IMPORTANT: After an HP ZCentral Remote Boost Receiver property is persisted, commenting out the
property in the conguration le again will not reset its value to default. To reset a value to default, set the
property back to its default value in the conguration le, and leave the line uncommented.
76 Chapter 8 Conguration tools and properties
Page 89

NOTE: If a property is listed more than once, the value of the last entry is used.
NOTE: HP ZCentral Remote Boost properties set in a conguration le might not take eect until the
computer is restarted.
Setting property values on the command line
Property values for HP ZCentral Remote Boost Receiver on Windows and Linux, and for HP ZCentral Remote
Boost Sender on Windows, can be set on the command line.
For examples, see HP ZCentral Remote Boost Receiver command-line options on page 24 and HP ZCentral
Remote Boost Sender command-line options (Windows) on page 25.
NOTE: Per-session property values cannot be set on the command line.
Making a property immutable
The following section describes how to make properties immutable.
Every property can be locked down to prevent changing its value via one of the following sources:
● Inside the application
● User launch le
● Command Line
● Automation API restriction
NOTE: In order to lock a property with Automation API restriction its mutability must be set to zero.
This is done manually by adding the IsMutable variation of any property to the administrator cong
le.
The following is an example of the syntax for locking a property:
The property to lock:
Rgreceiver.Network.Timeout.Warning=10000
The properties IsMutable variant:
Rgreceiver.Network.Timeout.Warning.IsMutable=0
Once a property has been set to immutable its value and mutability state cannot be changed by any of the
sources listed above.
Automation API restriction control
The following section describes how to change the restriction state for the automation API.
The default conguration of the Receiver initializes the automation API to be in a restricted state. This means
that if a property is made Immutable, any requests on the automation API will not be initiated. This behavior
can be changed via the property:
Rgreceiver.Properties.AutomationApi.UnRestricted
This property can only be changed using the administrator conguration le. If this property is set to “1” any
requests on the automation API to change the value or mutability of a property will be initiated.
Setting HP ZCentral Remote Boost properties manually 77
Page 90

IMPORTANT: The automation API is accessible to the local user. Therefore, by enabling the property above,
any property may be changed by utilizing the automation API. This means there is a path for nonadministrator users to bypass any properties the administrator has made immutable.
Other properties
This section describes the HP ZCentral Remote Boost properties that do not have a corresponding option in
the conguration tools and can only be set via the conguration le or on the command line.
Other global properties
Global properties persist through multiple sessions.
Table 8-18 Other global properties and their descriptions
Property Description
Rgreceiver.WindowMode
Rgreceiver.WindowMode.IsMutable
Rgreceiver.IsScalingEnabled
Rgreceiver.IsScalingEnabled.IsMutable
Rgreceiver.Smartcard.IsEnabled
Rgsender.Smartcard.IsEnabled
Rgreceiver.IsSendCtrlLeftMouseClickAsRightMou
seClickEnabled
Rgreceiver.Experience.IsMutable
This property sets the initial HP ZCentral Remote Boost Receiver
window state after a connection is established. Possible values
are bordered, borderless, maximized, and fullscreen.
When enabled, allows the user to modify the current HP ZCentral
Remote Boost Receiver window state.
This property sets the initial Pixel Mode after a connection is
established. If set to true, Scaled Pixel Mode is used. If set to
false, 1:1 Pixel Mode is used instead.
When enabled, allows the user to switch between the two Pixel
Modes: Scaled and 1:1.
When enabled, the receiver uses smart card redirection with
senders that have smart card redirection installed and enabled.
When enabled and smart card redirection is installed, the receiver
is allowed to use smart card redirection.
NOTE: macOS only
When enabled, if you simultaneously press and hold ctrl and click
the left mouse button, the combination is translated to a rightclick and sent to the sender.
When disabled, if you simultaneously press and hold ctrl and click
the left mouse button, the combination is sent to the sender with
no modication.
When enabled, a user can modify the settings under the
Experience heading in HP ZCentral Remote Boost Receiver.
Rgreceiver.Audio.Linux.DeviceName
Rgreceiver.Registration.ServerAddresses
Rgreceiver.Touch.IsNoDelayModeEnabled
78 Chapter 8 Conguration tools and properties
NOTE: Linux only
This property species the name of the audio device that is to be
used.
IMPORTANT: Do not modify this setting unless instructed by HP.
Species the URL of the HP servers used for activation of HP
ZCentral Remote Boost Advanced Features.
NOTE: Windows only
When enabled, there is no delay when dragging using touch input.
However, most customizable gestures do not work, except for the
three-nger press and four-nger press gestures. Most default
Page 91

Table 8-18 Other global properties and their descriptions (continued)
Property Description
gestures like pinch (zoom), two-nger swipe (pan) and threenger swipe (scroll) still work.
Rgsender.ConsoleLogonTimeout
Rgsender.IsClassicEasyLogonEnabled
Rgsender.Audio.Linux.DeviceName
Rgsender.Audio.Linux.RecorderApi
Rgsender.Audio.Linux.IsVolumeMonitorEnabled
Rgsender.PreferredLicenseOrder
Rgsender.Compatibility.Displays.ConfigureVmwa
reDisplaysForBestPerformance
This property sets the time in seconds to wait for a system login
event to complete. If the login does not occur within this limit, the
sender will be shut down.
For Windows, this property enables multiple users to connect to a
locked desktop before logon. For Linux, this property enables
Easy Login.
NOTE: Linux only
This property species the name of the audio device that is to be
used.
NOTE: Linux only
If set to pulse (the default), audio is captured using PulseAudio.
If set to alsa, audio is captured using the ALSA audio system.
NOTE: Linux only
When enabled, HP ZCentral Remote Boost Sender tracks volume
changes on the sender side, and HP ZCentral Remote Boost
Receiver adjusts its volume level automatically in response.
This property sets the preferred order in which HP ZCentral
Remote Boost will look for each license type.
NOTE: For VMware® with a Windows guest operating system
only
When enabled, this property disables the VMware SVGA 3D display
at the start of an HP ZCentral Remote Boost connection, enables
any available NVIDIA displays, and forces the GPU display method
to be used.
NOTE: If this property is enabled, you cannot access any
VMware virtual machines via the VMware vSphere® console,
because that function requires the VMware SVGA 3D display. To
re-enable the VMware SVGA 3D display when an HP ZCentral
Remote Boost connection ends, use the property
Rgsender.Compatibility.Displays.ReEnableVmwar
eDisplaysOnRGSDisconnect.
The VMware SVGA 3D display can also be re-enabled by logging
out of Windows. This ensures that the vSphere console is
accessible when no users are logged on.
Rgsender.Compatibility.Displays.ReEnableVmwar
eDisplaysOnRGSDisconnect
Rgsender.Compatibility.Displays.AllowNvidiaRe
solutionMatching
NOTE: For VMware with a Windows guest operating system only
When enabled, this property causes the VMware SVGA 3D display
to be re-enabled when an HP ZCentral Remote Boost connection
ends. This allows you to access a VMware virtual machine via the
vSphere console without having to log out of Windows rst.
NOTE: HP recommends disabling this setting if you do not use
the vSphere console, because Windows might rearrange your
application windows between HP ZCentral Remote Boost
connections.
NOTE: For Windows-based senders with NVIDIA graphics only
Other properties 79
Page 92

Table 8-18 Other global properties and their descriptions (continued)
Property Description
When enabled, HP ZCentral Remote Boost Sender attempts
NVIDIA resolution-matching before attempting the default
resolution-matching method.
Rgsender.Compatibility.Displays.ForceEdidOnHe
adless
Rgsender.Compatibility.Cursor.PreferredCursor
Method
Rgsender.KerberosLogon
NOTE: For Windows-based senders with NVIDIA graphics only
When enabled, HP ZCentral Remote Boost Sender attempts to
load an EDID, if the system is determined not to be connected to a
monitor.
NOTE: To use this property, there must not be any monitors
connected to the sender when the HP ZCentral Remote Boost
Sender service starts; otherwise, the system is not considered
headless and no EDID is loaded.
NOTE: The EDID remains loaded until this property is disabled.
NOTE: For Windows 7-based VMs with NVIDIA graphics only
Enables the cursor when ESXi is in use. If the cursor is not
displayed, set the property to generic.
generic: Use a generic cursor method.
NOTE: Linux only
Allows a Kerberos HP ZCentral Remote Boost authentication ticket
to be used for login. You must select the user name or enter it
manually. Possible value are as follows:
Off: The Kerberos ticket will not be used for login.
On: The Kerberos ticket will be used for login.
Persist: The Kerberos ticket can be used for login and will
continue to be available for the lifetime of the HP ZCentral
Remote Boost connection. The ticket can potentially be used for
other authentication activities such as unlocking the desktop.
Rgreceiver.Registration.IsEnabled
Rgsender.Network.HPVelocity.LiveUdpMode
Rgsender.Network.HPVelocity.LiveUdpTargetLoss
Rate
Rgsender.Network.HPVelocity.LiveUdpCongestion
ControlAlgorithm
Rgsender_gui.Invitation.FilterPrivateAddresse
s
Enables activation of HP ZCentral Remote Boost Advanced
Features.
Sets whether HP Velocity should correct network loss (Active
Mode) or just monitor it (Monitor Mode).
Sets the amount of network loss that HP Velocity will tolerate
before adding packet-protection redundancy to the data ow.
Sets the level of congestion control, where Standard handles the
eects of a high-latency network and Friendly uses the standard
TCP-like congestion-control algorithm.
When enabled, collaboration invitations do not list private
addresses.
NOTE: If the sender only listens on private addresses, private
addresses are listed regardless of this setting.
Per-session properties (HP ZCentral Remote Boost Receiver only)
The per-session properties of HP ZCentral Remote Boost Receiver, which are applicable to Directory Mode
only, let you specify settings for each HP ZCentral Remote Boost session individually.
80 Chapter 8 Conguration tools and properties
Page 93

NOTE: When typing per-session properties, replace <n> with the number of the session. The rst session is
0, the second session is 1, and so on.
Window location and size properties (per-session)
The following properties determine the window location and size.
Table 8-19 Window location and size properties and their descriptions
Property Description
Rgreceiver.Session.<n>.RemoteDisplayWindow.X
Rgreceiver.Session.<n>.RemoteDisplayWindow.Y
Rgreceiver.Session.<n>.RemoteDisplayWindow.He
ight
Rgreceiver.Session.<n>.RemoteDisplayWindow.Wi
dth
Rgreceiver.Session.<n>.VirtualDisplay.IsPrefe
rredResolutionEnabled
This property sets the horizontal position of the HP ZCentral
Remote Boost Receiver window for session number <n>, as
measured from the left edge of the primary screen. The default is
0.
This property sets the vertical position of the HP ZCentral Remote
Boost Receiver window for session number <n>, as measured
from the top edge of the primary screen. The default is 0.
NOTE: On Windows 10, the window might have a small oset
from the specied position. This can be adjusted by decreasing
the value of RemoteDisplayWindows.X and/or
RemoteDisplayWindows.Y by 7.
This property sets the height of the HP ZCentral Remote Boost
Receiver window for the session number <n>. If this is set to 0,
the window uses the height of the sender display. The default is
0.
This property sets the width of the HP ZCentral Remote Boost
Receiver window for session number <n>. If this is set to 0, the
window uses the width of the sender display. The default is 0.
1=Enables the preferred resolution properties for session number
<n>. If the sender is unable to match the resolution preference of
the receiver, a warning dialog is displayed on the receiver.
0=Disables the preferred resolution properties for session
number <n> (default).
Rgreceiver.Session.<n>.VirtualDisplay.Preferr
edResolutionHeight
Rgreceiver.Session.<n>.VirtualDisplay.Preferr
edResolutionWidth
Clipboard properties (per-session)
These clipboard properties are per-session.
NOTE: The per-session preferred resolution properties override
the global property
Rgreceiver.IsMatchReceiverResolutionEnabled
and any display properties.
This property sets the preferred height of the resolution for
session number <n>.
This property sets the preferred width of the resolution for
session number <n>.
Other properties 81
Page 94

Table 8-20 Clipboard properties and their descriptions
Property Description
Rgreceiver.Session.<n>.Clipboard.IsEnabled
Auto-launch properties
Auto-launch les for HP ZCentral Remote Boost Receiver have the extension .rgreceiver and use the
same syntax for setting property values as rgreceiverconfig.
Use a text editor to create an auto-launch le. You can customize your auto-launch le for your environment
using both the properties described in this section and other Receiver properties described throughout this
guide.
See Setting HP ZCentral Remote Boost properties manually on page 76.
When an auto-launch le is opened, HP ZCentral Remote Boost Receiver starts automatically and attempts to
establish a connection to a single sender, as congured in the le.
NOTE: Auto-launch les do not support starting HP ZCentral Remote Boost connections to multiple senders.
For information about connecting to multiple senders, see Directory Mode on page 57.
The following table describes the auto-launch properties. Because you can auto-launch only one connection
at a time, the session number should always be 0.
1=Enables Remote Clipboard for session number <n> (default).
The global property Rgreceiver.Clipboard.IsEnabled
must be enabled for this to have any eect.
0=Disables Remote Clipboard for session number <n>.
Table
8-21 Auto-launch properties and their descriptions
Property Description
Rgreceiver.Session.0.IsConnectOnStartup
Rgreceiver.Session.0.Hostname
Rgreceiver.Session.0.Username
Rgreceiver.Session.0.Password
Rgreceiver.Session.0.PasswordFormat
If this property is enabled, HP ZCentral Remote Boost Receiver will
attempt to auto-launch the connection when the auto-launch le
is opened.
This property sets the hostname or IP address for the auto-launch
connection.
This property sets the user name for the auto-launch connection
as a UTF-8 encoded string.
This property sets the password for the auto-launch connection
as a UTF-8 encoded string.
Encrypted=This password format is supported on Windows
only and is the hexadecimal string representation of the password
encrypted using the Windows command CryptProtectData.
See http://msdn.microsoft.com/en-us/library/
aa380261(VS.85).aspx for more information.
XOR=This password format is the hexadecimal string
representation of a password encrypted using an XOR cipher
using a key of 129.
Settings from the auto-launch le take precedence over any property settings from the HP ZCentral Remote
Boost Receiver Conguration tool (or the rgreceiverconfig le).
82 Chapter 8 Conguration tools and properties
Page 95

See the following for an example.
Rgreceiver.Session.0.IsConnectOnStartup=1
Rgreceiver.Session.0.Hostname=192.168.0.47
Rgreceiver.Session.0.Username=MyUserName
Rgreceiver.Session.0.Password=MyPassword
Rgreceiver.Session.0.PasswordFormat=Encrypted
Rgreceiver.Network.Timeout.Error=60000
Rgreceiver.Network.Timeout.Warning=4000
Rgreceiver.Network.Timeout.Dialog=30000
Rgreceiver.WindowMode=bordered
Other properties 83
Page 96

9 Performance optimization
Use the general and network suggestions to optimize performance.
General
The following suggestions apply to all operating systems:
● Enable HP Velocity (see HP Velocity on page 34 for more information).
● Set the sender desktop background to a solid color to minimize the amount of image data that needs to
be sent.
● Set both the receiver and the sender display depth to 32 bits per pixel.
● Lower the sender’s display resolution.
● Increase the Max Image Update rate from 30 to 60 using the HP ZCentral Remote Boost Sender
Conguration tool.
● Reduce the Remote Audio quality setting in HP ZCentral Remote Boost Receiver, or disable Remote Audio
if it is not needed.
The following suggestion applies to Windows only:
● Adjust the Windows system performance settings in Control Panel. The Adjust for best performance
Network
HP ZCentral Remote Boost depends on low network latency and reasonably high network bandwidth. There
are several methods to test and measure the network bandwidth, latency, and the number of hops between
the receiver and the sender:
● Use the ping command to measure network latency.
● Use the Traceroute (Linux) or tracert (Windows) command, which will report the number of hops
● Use the tools NTttcp Utility, ipref, or something similar, which are available at
After you characterize your network performance, you can decide if improvement is required.
The network interface will auto-negotiate the network speed with the network switches on the local network.
Most modern network interfaces and switches will negotiate the highest possible speed available. However,
unless the network has been carefully designed for maximum throughput, the network interfaces and
switches might auto-negotiate to a suboptimal speed.
If the network interface and switches are congured to auto-negotiate properly, you can leave the settings to
auto-negotiate. If you want to force the network to operate at a particular speed, the settings in the network
interface and switches can be hard-coded. You must be careful with these settings, however. If the network
interface and switch settings don’t complement each other, the network will have poor performance.
option will minimize the bandwidth requirements for HP ZCentral Remote Boost.
it takes to reach a computer in addition to the network latency.
https://gallery.technet.microsoft.com/NTttcp-Version-528-Now-f8b12769.
84 Chapter 9 Performance optimization
Page 97

Forcing a network speed (Windows)
To congure a network interface to force a particular network speed on Windows:
1. In Control Panel, select Device Manager.
2. Expand Network adapters.
3. Right-click the network adapter that you want to congure, and then select Properties.
4. Select the Advanced tab.
5. In the list of properties, locate the property that controls the speed and duplex setting. The name can
vary, but it is usually something like
6. From the Value drop-down list, select the fastest speed your network can support, and be sure to select
the Full Duplex version of that speed.
Forcing a network speed (Linux)
To congure a network interface to force a particular network speed on Linux:
▲ As root, use a command like in the following example. This example sets network interface 0 as a 100
Mb/sec connection running full duplex mode:
$ /usr/local/sbin/ethtool -s eth0 speed 100 duplex full autoneg off
Your network is now congured.
Speed & Duplex or Link Speed & Duplex.
If you are not satised with your network performance, look at the log les on your network switch (if the
receiver is connected to one). A signicant number of errors on the switch port may indicate that the
computer or network is not congured correctly. Work with your IT organization to optimize your computer
and network conguration.
Network 85
Page 98

10 Troubleshooting
If you are experiencing an issue with HP ZCentral Remote Boost, use the relevant troubleshooting section.
Failed connection attempts
This section describes the most common issues that cause HP ZCentral Remote Boost connection attempts to
fail.
Receiver checklist
Use the following checklist to troubleshoot failed connection attempts from the receiver side:
1. Verify that you are entering the correct hostname or IP address for the sender.
If you changed the port that HP ZCentral Remote Boost Sender listens on from its default of 42966, you
must specify the port number along with the hostname or IP address like in the following examples:
MyHostName:12345
192.168.0.10:12345
2. Verify that the receiver is on the same network as the sender.
3. Verify that the receiver can ping the sender.
4. If the receiver is behind a rewall, verify that the rewall supports network address translation (NAT).
Sender checklist
Use the following checklist to troubleshoot failed connection attempts from the sender side:
NOTE: After going through this checklist, be sure that you log out of the sender before attempting an HP
ZCentral Remote Boost connection again.
1. Verify the credentials for the user account you are trying to access from the receiver. The account
password cannot be blank.
2. Verify that HP ZCentral Remote Boost Sender has started on the sender (see HP ZCentral Remote Boost
Sender overview on page 25 for more information).
3. Verify that all tests pass on the Diagnostics panel of the HP ZCentral Remote Boost Sender Conguration
tool.
4. If the sender is behind a rewall, verify that the rewall supports network address translation (NAT) and
port forwarding.
5. If you changed the network interface binding of HP ZCentral Remote Boost Sender from its default of
listening to all network interfaces, verify that the sender is listening on the correct network interface
(see Sender network interface binding on page 87 for more information).
6. (Windows only)
Verify that the sender is not using Automatic Private IP Addressing (APIPA) by typing the following in a
command window:
86 Chapter 10 Troubleshooting
Page 99

Kerberos
netstat -n -a
If the IP address associated with the HP ZCentral Remote Boost Sender listening port (42966 by default)
is private, APIPA is the likely cause. For information about how to disable APIPA, go to
http://support.microsoft.com/kb/220874.
7. (Linux only)
a. Verify that the sender is not using an X desktop started on the command line. The rgsender service
waits for an X server to be started by the system display manager. The rgsender service logs
information to the /var/opt/hpremote/rgsender/rg-svc.log le. Examine this le for
error messages.
b. Linux systems joined to a Windows domain might require les to be congured in the /etc/sssd
folder. After joining the system to the domain, install the HP ZCentral Remote Boost Sender after
to allow these les to be created with proper values.
Kerberos authentication is available only on a Windows receiver. The receiver must be connected to the same
Windows domain as the Windows or Linux sender. Kerberos authentication requires that the HP ZCentral
Remote Boost Receiver and HP ZCentral Remote Boost Sender systems have synchronized clocks. Some
tolerance is allowed for clock dierences. The tolerance is dependent on parameters setup on the domain
controller. In order to allow the Kerberos ticket to be used for login on the sender, the
Rgsender.KerberosLogon property needs to be set and the domain controller needs to have delegation
enabled for the computer. This feature may not be congured for all services. Other PAM services may be able
to authenticate with the Kerberos ticket by adding auth sufficient pam_rg.so to the associated PAM
service in
system-auth, or common-auth.
/etc/pam.d. This must be added before the authentication line that includes password-auth,
A Linux sender must be identied by the hostname and not an IP address in order for the receiver to obtain
the necessary service ticket. The service ticket for a host with the name hostname.example.com can be
seen by running the command line program klist on the receiver. This ticket will be listed with the server
name
host/hostname.example.com.
Sender network interface binding
HP ZCentral Remote Boost Sender is set by default to listen to all network interfaces present on the sender. If
this is undesirable, the network interface binding can be manually recongured.
There are three methods to recongure HP ZCentral Remote Boost Sender network interface binding:
● Disable the network interfaces that you do not want HP ZCentral Remote Boost Sender to listen to, and
then restart the sender. HP ZCentral Remote Boost Sender will then bind to the remaining enabled
network interface. The disadvantage of this method is that the other network interfaces will no longer
be usable.
● Manually congure the network interface that you want to use to be the one listened to by HP ZCentral
Remote Boost Sender. See Reconguring network interface binding manually on page 88 for more
information.
● Use the HP ZCentral Remote Boost Sender Conguration tool to specify which network interface to listen
to. See Reconguring network interface binding using the HP ZCentral Remote Boost Sender
Conguration tool on page 88 for more information.
If you enter a host name instead of an IP address when establishing an HP ZCentral Remote Boost connection,
it is possible that the host name resolves to the IP address of an incorrect network interface. This could be
caused by a number of factors, including how your DHCP and DNS servers are congured.
Failed connection attempts 87
Page 100

If the host name resolves to the IP address of an incorrect network interface, do one of the following:
● Enter the IP address that HP ZCentral Remote Boost Sender is bound to instead of the host name when
establishing an HP ZCentral Remote Boost connection.
● Recongure your DHCP and DNS servers so that the host name resolves to the correct IP address.
● Use the nslookup command to determine the IP address that the host name resolves to, and then
follow the steps in Reconguring network interface binding manually on page 88 to set the
corresponding network interface to be listed rst in the list of connections.
Reconguring network interface binding manually
To manually congure which network interface the sender binds to:
1. Disable the Listen for HP ZCentral Remote Boost connections on all network interfaces option in the
HP ZCentral Remote Boost Sender Conguration tool.
NOTE: See HP ZCentral Remote Boost Sender Conguration tool (Windows/Linux only) on page 69 for
more information.
2. Select the network icon in the Windows notication area, and then select Open Network and Sharing
Center.
3. Select Change adapter settings in the left pane.
4. Press the Alt key to show the menu bar, select Advanced, and then select Advanced Settings.
5. In the Adapter and Bindings panel, use the arrow buttons next to the Connections pane to move the
network interface that you want to the top of the list.
The network interface at the top of the list will be the one listened to by HP ZCentral Remote Boost
Sender.
Reconguring network interface binding using the HP ZCentral Remote Boost Sender
Conguration tool
To recongure the network interface binging using the HP ZCentral Remote Boost Sender Conguration tool,
you must determine the number that corresponds to the network interface and then congure the
appropriate settings.
Determining the number that corresponds to the network interface
Before conguring options in the HP ZCentral Remote Boost Sender Conguration tool, you must determine
the number that corresponds to the network interface you want HP ZCentral Remote Boost Sender to listen
to. To do this, follow these steps:
1. Select the network icon in the Windows notication area, and then select Open Network and Sharing
Center.
2. Select Change adapter settings in the left pane.
3. Press the Alt key to show the menu bar, select Advanced, and then select Advanced Settings.
4. In the Adapter and Bindings panel, look at the list of network interfaces in the Connections pane.
The number that corresponds to the network interface at the top of the list is 0. The number for the next
network interface in the list is 1, and so on.
88 Chapter 10 Troubleshooting
 Loading...