

HP Photosmart C5200 All-in-One series
Basics Guide
Guide d’utilisation
Guia de conceitos básicos
Hewlett-Packard Company notices
The information contained in this document is subject to change without notice.
All rights reserved. Reproduction, adaptation, or translation of this material is prohibited without prior written permission of Hewlett-Packard, except
as allowed under copyright laws. The only warranties for HP products and services are set forth in the express warranty statements accompanying
such products and services. Nothing herein should be construed as constituting an additional warranty. HP shall not be liable for technical or editorial
errors or omissions contained herein.
© 2007 Hewlett-Packard Development Company, L.P.
Windows, Windows 2000, and Windows XP are U.S. registered trademarks of Microsoft Corporation.
Windows Vista is either a registered trademark or trademark of Microsoft Corporation in the United States and/or other countries.
Intel and Pentium are trademarks or registered trademarks of Intel Corporation or its subsidiaries in the United States and other countries.
Avis publiés par la société Hewlett-Packard
Les informations contenues dans ce document peuvent faire l'objet de modifications sans préavis.
Tous droits réservés. La reproduction, l'adaptation ou la traduction de ce matériel est interdite sans l'accord écrit préalable de Hewlett-Packard, sauf
dans les cas permis par la législation relative aux droits d'auteur. Les seules garanties relatives aux produits et services HP sont décrites dans les
déclarations de garantie expresse accompagnant lesdits produits et services. Aucun élément de ce document ne constitue une garantie
supplémentaire. Hewlett-Packard ne saurait être tenu pour responsable des erreurs ou omissions techniques ou rédactionnelles de ce document.
© 2007 Hewlett-Packard Development Company, L.P.
Windows, Windows 2000 et Windows XP sont des marques déposées de Microsoft Corporation aux Etats-Unis.
Windows Vista est une marque déposée ou une marque de Microsoft Corporation aux Etats-Unis et/ou dans d'autres pays.
Intel et Pentium sont des marques ou des marques déposées d'Intel Corporation ou de ses filiales aux Etats-Unis et dans d'autres pays.
Avisos da Hewlett-Packard Company
As informações contidas neste documento estão sujeitas a alterações sem aviso prévio.
Todos os direitos reservados. É proibida a reprodução, adaptação ou tradução deste material sem a permissão prévia por escrito da
Hewlett-Packard, exceto quando permitido pelas leis de direitos autorais. As únicas garantias aos produtos e serviços da HP são aquelas descritas
nas declarações de garantia expressa que acompanham os respectivos produtos e serviços. Nada aqui contido deve ser interpretado como garantia
adicional. A HP não se responsabiliza por erros técnicos ou editoriais nem por omissões aqui contidos.
© 2007 Hewlett-Packard Development Company, L.P.
Windows, Windows 2000 e Windows XP são marcas registradas da Microsoft Corporation nos Estados Unidos e/ou em outros países.
Windows Vista é uma marca comercial ou marca registrada da Microsoft Corporation nos Estados Unidos e/ou em outros países.
Intel e Pentium são marcas comerciais ou marcas registradas da Intel Corporation ou suas subsidiárias nos Estados Unidos e/ou em outros países.

HP Photosmart C5200
All-in-One series
Basics Guide
English

Contents
1 HP All-in-One overview
The HP All-in-One at a glance....................................................................................................5
Control panel features................................................................................................................6
English
Find more information.................................................................................................................7
Load originals and load paper....................................................................................................8
Avoid paper jams......................................................................................................................10
Print directly onto a CD/DVD....................................................................................................10
View, select, and print photos...................................................................................................12
Scan an image..........................................................................................................................13
Make a copy.............................................................................................................................14
Replace the print cartridges......................................................................................................14
Clean the HP All-in-One...........................................................................................................17
2 Troubleshooting and support
Uninstall and reinstall the software...........................................................................................19
Hardware setup troubleshooting...............................................................................................19
Clear paper jams......................................................................................................................22
CD/DVD print troubleshooting..................................................................................................22
Print cartridge troubleshooting..................................................................................................25
Support process.......................................................................................................................26
3 Technical information
System requirements................................................................................................................27
Product specifications...............................................................................................................27
Energy Star® notice.................................................................................................................27
Print cartridge yield...................................................................................................................28
Regulatory notices....................................................................................................................28
Warranty...................................................................................................................................29
4 HP Photosmart C5200 All-in-One series
1 HP All-in-One overview
Use the HP All-in-One to quickly and easily accomplish tasks such as making a copy,
scanning documents, or printing photos from a memory card. You can access many
HP All-in-One functions directly from the control panel, without turning on your computer.
NOTE: This guide introduces basic operations and troubleshooting, as well as
provides information for contacting HP support and ordering supplies.
The onscreen Help details the full range of features and functions, including use of
the HP Photosmart software that came with the HP All-in-One.
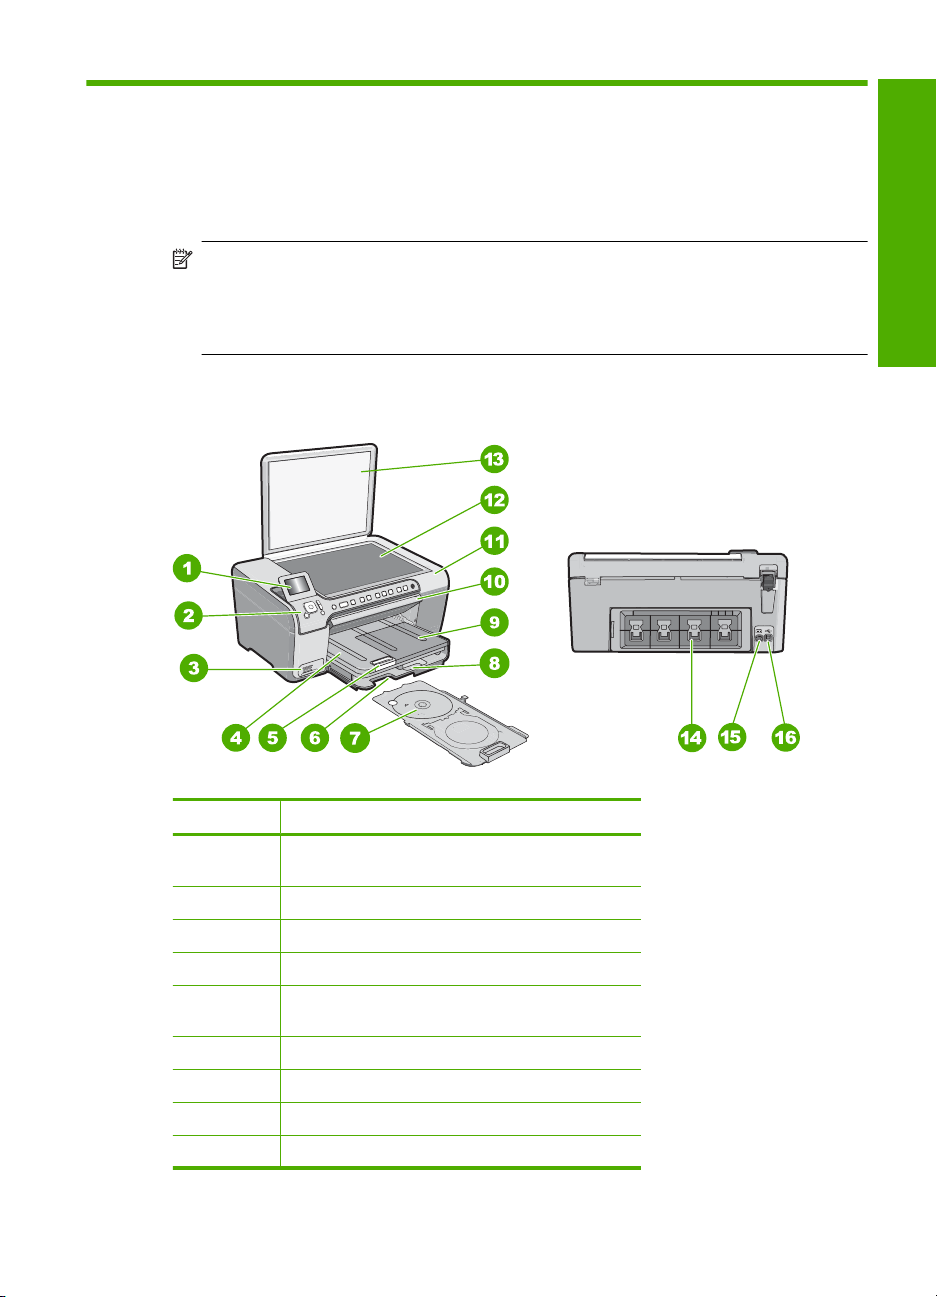
The HP All-in-One at a glance
English
Label Description
1 Color graphics display (also referred to as the
display)
2 Control panel
3 Memory card slots and Photo light
4 Output tray
5 Paper tray extender (also referred to as the tray
extender)
6 CD/DVD holder storage
7 CD/DVD holder
8 Main input tray (also referred to as the input tray)
9 Photo tray
HP All-in-One overview 5
Chapter 1
(continued)
Label Description
10 CD/DVD access door
11 Print cartridge door
12 Glass
13 Lid
14 Rear door
English
15 Power connection
16 Rear USB port
* Use only with the power adapter supplied by HP.
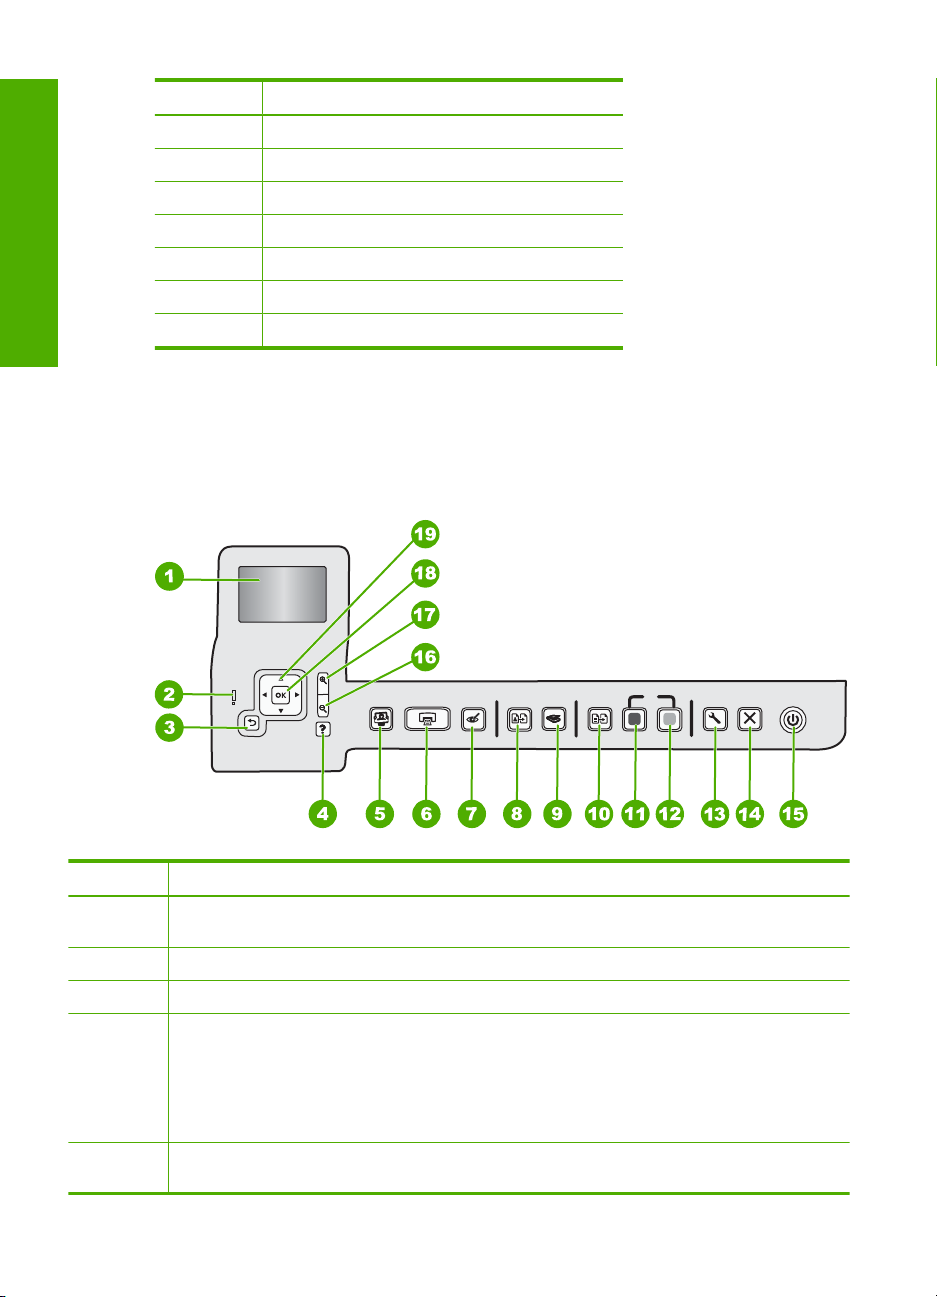
Control panel features
The following diagram and related table provide a quick reference to the HP All-in-One
control panel features.
*
Label Name and Description
1 Display: Displays menus, photos, and messages. The display can be pulled up and angled for
2 Attention light: Indicates a problem occurred. See the display for more information.
3 Back: Returns to the previous screen on the display.
4 Help: Opens the Help menu on the display where you can select a topic to learn more about it.
5 Photo Menu: Launches the Photosmart Express menu for printing, saving, editing, and
6 HP Photosmart C5200 All-in-One series
better viewing.
From the idle state, pressing Help lists a menu of items for which the user can obtain help.
Depending on the topic you select, the topic will appear on your display or on your computer
screen. When viewing screens other than Idle, the Help button provides context sensitive help.
From the idle state, pressing Help lists a menu of items for which the user can obtain help. When
viewing screens other than Idle, Help button provides context sensitive help.
sharing photos.

(continued)
Label Name and Description
6 Print Photos: Depending on whether you access your photos from the View, Print, or Create
menu, the Print Photos button will display the Print Preview screen or it will print any selected
photo(s). If no photos are selected, a prompt appears asking if you want to print all the photos
on your card.
7 Red Eye Removal: Turns the Red Eye Removal feature On or Off. By default, this feature is
turned off. When the feature is turned on, the HP All-in-One automatically corrects red eye
coloring in the photo currently shown on the display.
8 Reprints: Enables you to make a copy of an original photo placed on the glass.
9 Scan Menu: Opens the Scan Menu where you can select a destination for your scan.
10 Copy Menu: Opens the Copy Menu where you can select copy options, such as number of
copies, paper size, and paper type.
11 Start Copy Black: Starts a black-and-white copy.
12 Start Copy Color: Starts a color copy.
13 Setup: The Setup menu provides a variety of reports, device settings and maintenance
functions.
14 Cancel: Stops the current operation.
15 On: Turns the HP All-in-One on or off. When the HP All-in-One is off, a minimal amount of power
is still supplied to the device. You can further reduce power supply by holding down the On
button for 3 seconds. This will put the unit in Standby/Off state. To completely remove power,
turn the HP All-in-One off, and then unplug the power cord.
16 Zoom out - (magnifying glass icon): Zooms out to show more of a photo. If you press this button
when a photo is shown on the display at 100%, the Fit to Page feature is applied to the photo
automatically.
17 Zoom in + (magnifying glass icon): Zooms in to enlarge the image on the display. You can also
use this button together with the arrows on the directional pad to adjust the crop box for
printing.
18 OK: Selects a menu setting, value, or photo on the display.
19 Directional pad: Allows you to navigate through photos and menu options by pressing the up,
down, left, or right arrow buttons.
If you are zooming in on a photo, you can also use the arrow buttons to pan around the photo
and select a different area to print.
English
Find more information
A variety of resources, both printed and onscreen, provide information about setting up
and using the HP All-in-One.
Find more information 7
Chapter 1
• Setup Guide
The Setup Guide provides instructions for setting up the HP All-in-One and installing
software. Make sure you follow the steps in the Setup Guide in order.
If you have problems during setup, see Troubleshooting in the last section of the
English
Setup Guide, or see “
• Onscreen Help
The onscreen Help provides detailed instructions on features of the HP All-in-One
that are not described in this User Guide, including features that are only available
using the software you installed with the HP All-in-One.
•
www.hp.com/support
If you have Internet access, you can get help and support from the HP Web site. This
Web site offers technical support, drivers, supplies, and ordering information.
Troubleshooting and support” on page 19 in this guide.
Load originals and load paper
You can copy or scan up to letter- or A4-size originals by loading them on the glass.
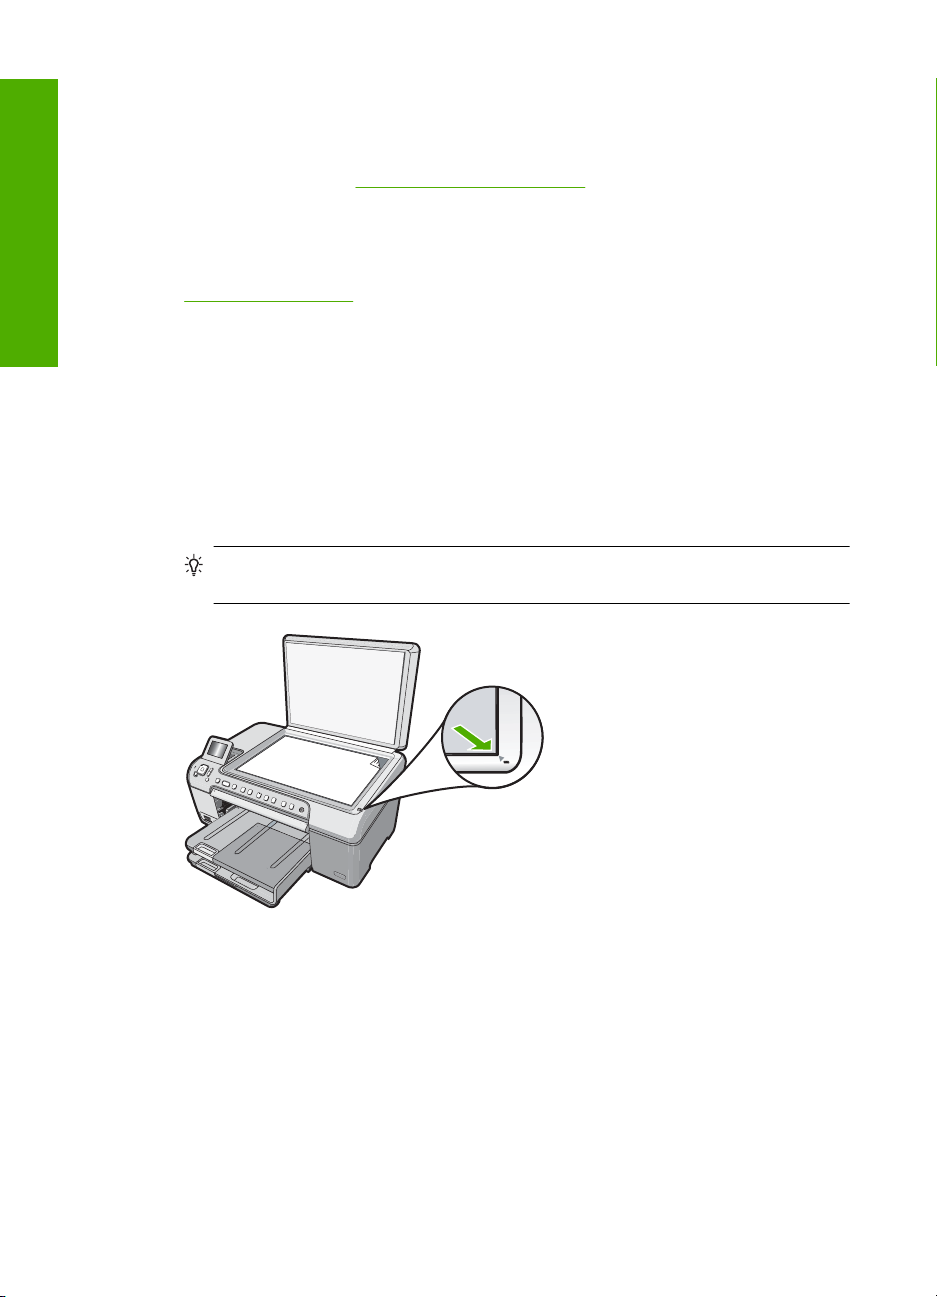
To load an original on the scanner glass
1. Lift the lid on the HP All-in-One.
2. Load your original print side down on the right front corner of the glass.
TIP: For more help on loading an original, refer to the engraved guides along the
edge of the glass.
3. Close the lid.
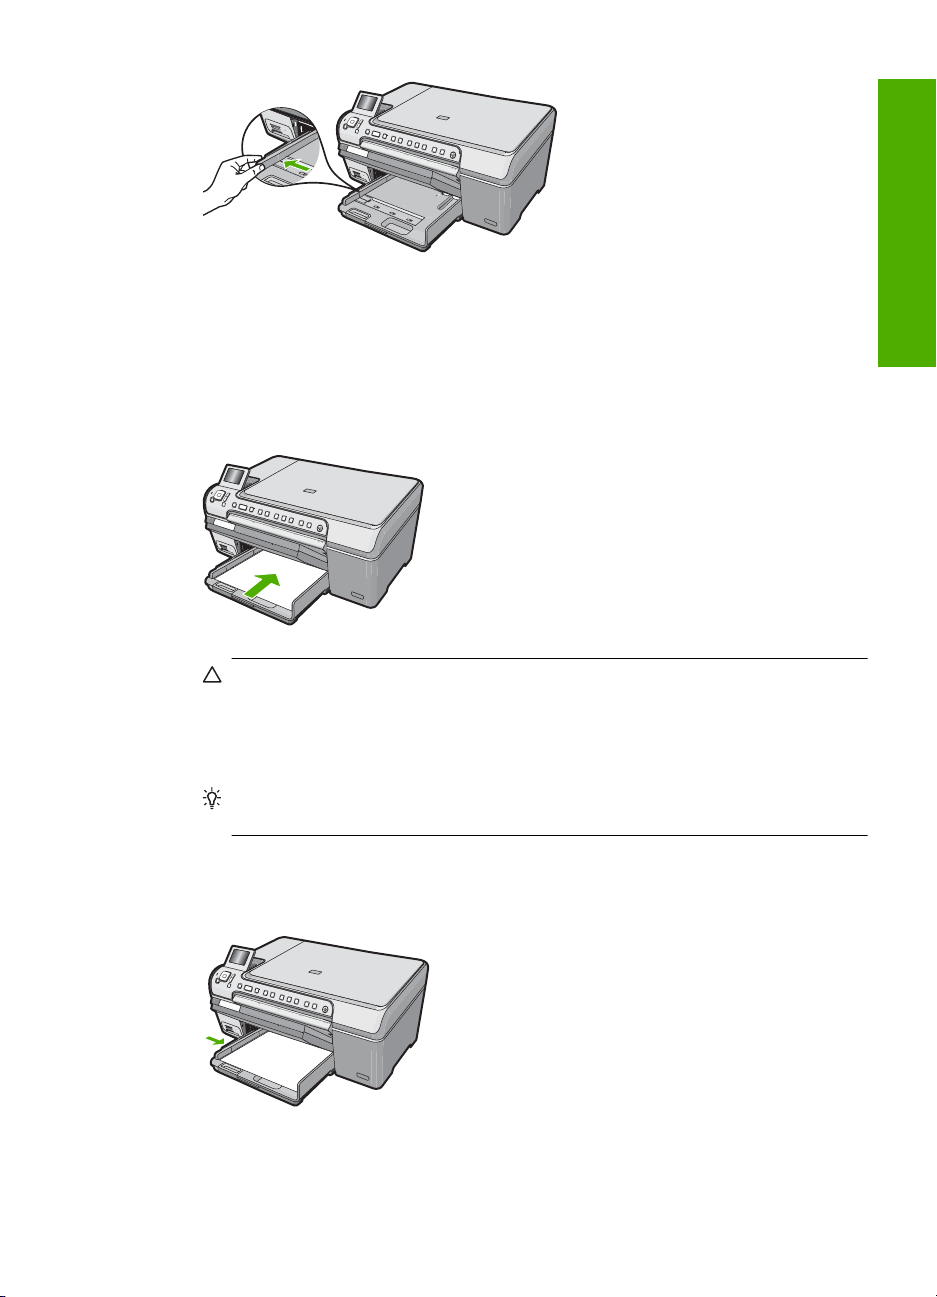
To load full-size paper
1. Raise the output tray to load paper into the main input tray.
2. Slide the paper-width guide to its outermost position.
8 HP Photosmart C5200 All-in-One series
3. Tap a stack of paper on a flat surface to align the edges, and then check the paper
for the following:
• Make sure it is free of rips, dust, wrinkles, and curled or bent edges.
• Make sure all the paper in the stack is the same size and type.
4. Insert the stack of paper into the main input tray with the short edge forward and the
print side down. Slide the stack of paper forward until it stops.
CAUTION: Make sure that the HP All-in-One is idle and silent when you load
paper into the main input tray. If the HP All-in-One is servicing the print cartridges
or otherwise engaged in a task, the paper stop inside the device might not be in
place. You could push the paper too far forward, causing the HP All-in-One to
eject blank pages.
TIP: If you are using letterhead, insert the top of the page first with the print side
down.
5. Slide the paper-width guide inward until it stops at the edge of the paper.
Do not overload the main input tray; make sure the stack of paper fits within the main
input tray and is no higher than the top of the paper-width guide.
English
Load originals and load paper 9
English
Chapter 1
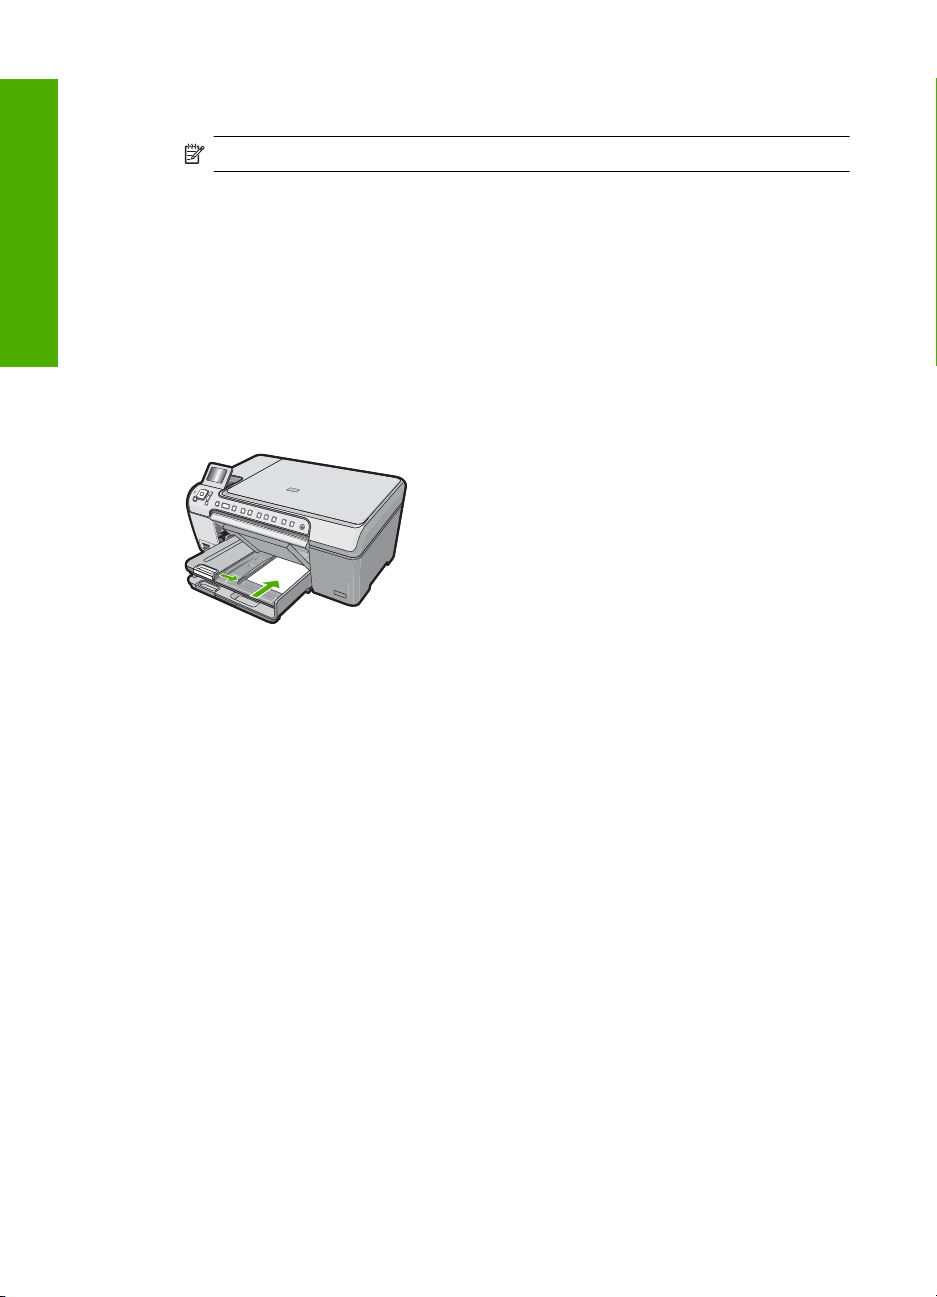
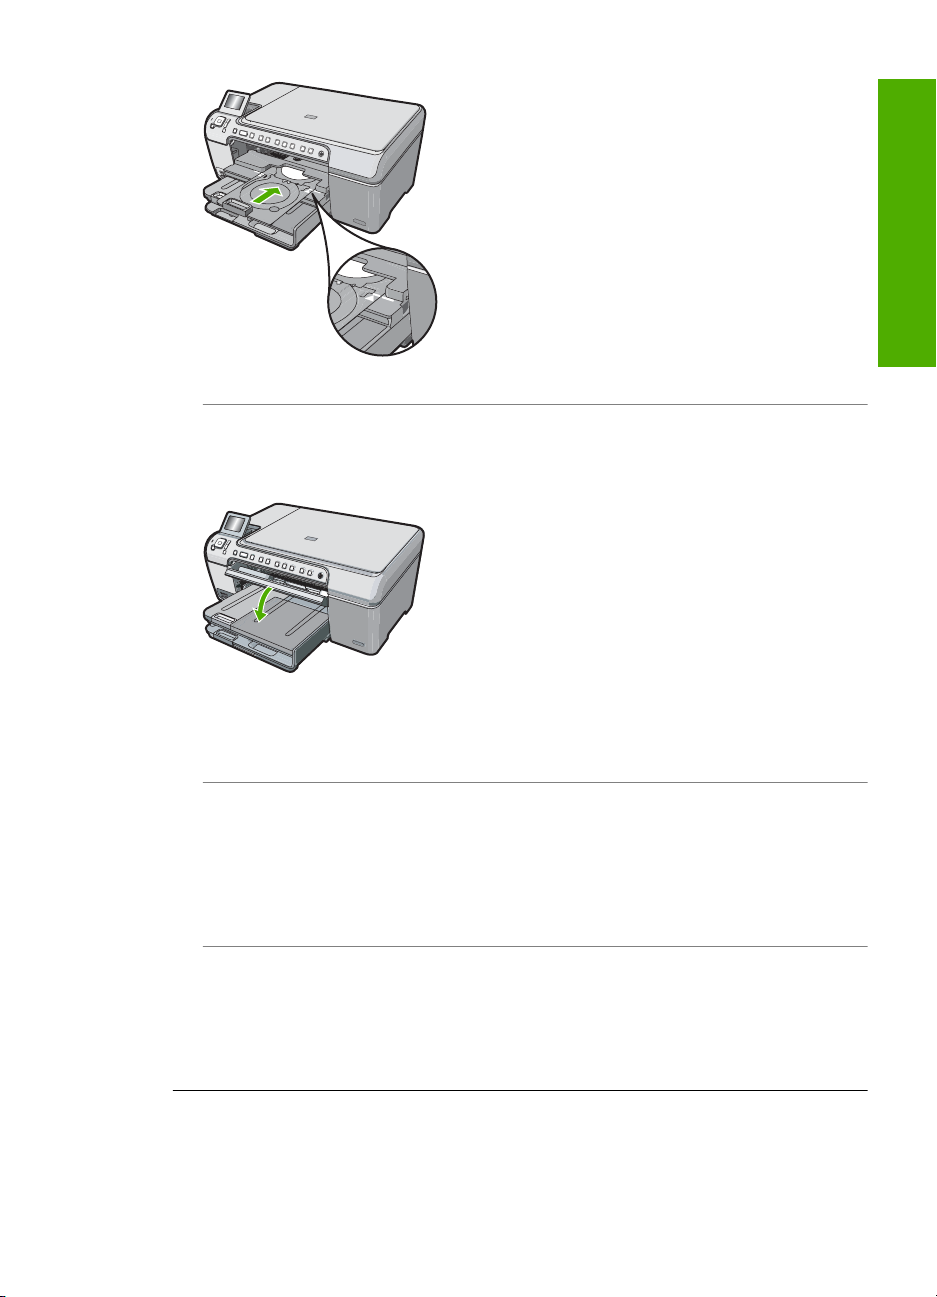
6. Lower the output tray.
7. Pull the output tray extender towards you, as far as it will go.
NOTE: When you use legal-size paper, leave the output tray extender closed.
To load up to 13 x 18 cm (5 x 7 inch) photo paper in the photo tray
1. Raise the photo tray lid to load photo paper in the photo tray.
2. Insert the stack of photo paper into the photo tray with the short edge forward and the
print side down. Slide the stack of photo paper forward until it stops.
If the photo paper you are using has perforated tabs, load the photo paper so that the
tabs are closest to you.
3. Slide the paper-width guide inward against the stack of photo paper until the guide
stops.
Do not overload the photo tray; make sure the stack of photo paper fits within the
photo tray and is no higher than the top of the paper-width guide.
4. Lower the photo tray lid.
Avoid paper jams
To help avoid paper jams, follow these guidelines.
• Remove printed papers from the output tray frequently.
• Prevent curled or wrinkled paper by storing all unused paper flat in a resealable bag.
• Ensure that paper loaded in the input tray lays flat and the edges are not bent or torn.
• Do not combine different paper types and paper sizes in the input tray; the entire stack
of paper in the input tray must be the same size and type.
• Adjust the paper-width guide in the input tray to fit snugly against all paper. Make sure
the paper-width guide does not bend the paper in the input tray.
• Do not force paper too far forward in the input tray.
• Use paper types that are recommended for the HP All-in-One.
Print directly onto a CD/DVD
1. Use the software that came with the HP All-in-One to create and print a CD/DVD label.
2. When prompted, carefully remove the CD/DVD holder that came with the
HP All-in-One.
The CD/DVD holder is stored below the main input tray.
10 HP Photosmart C5200 All-in-One series
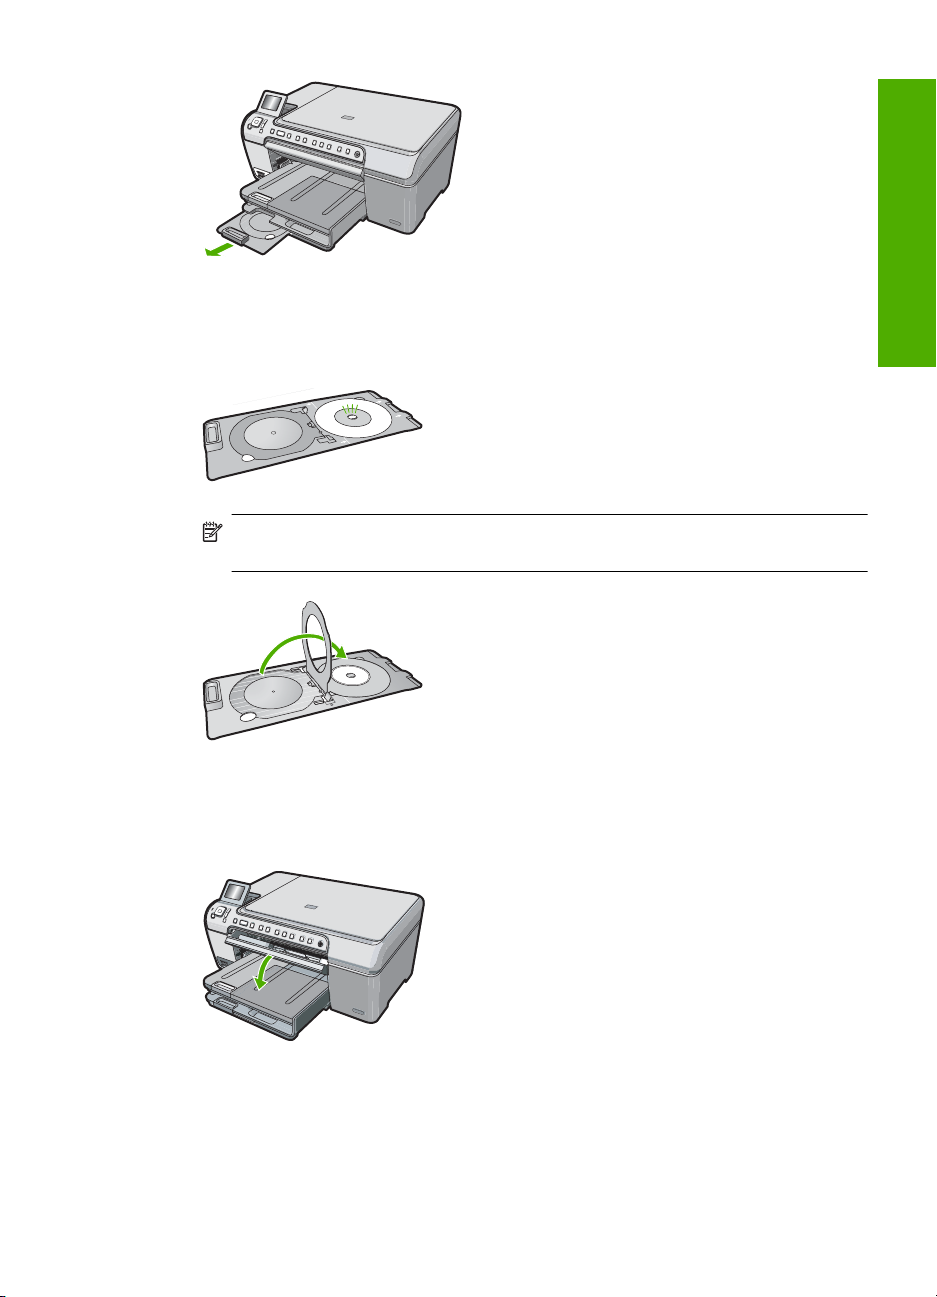
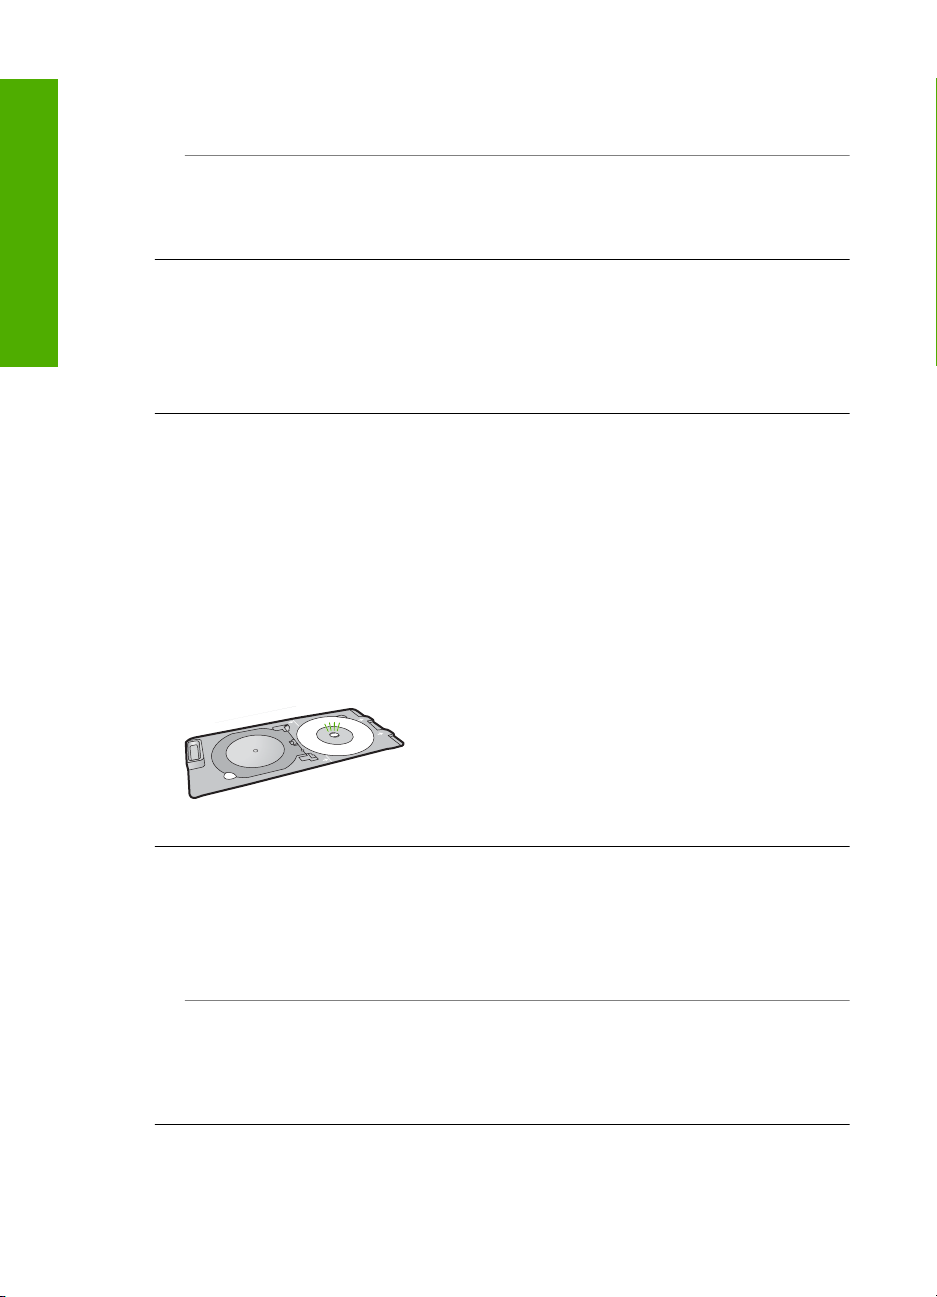
3. Securely snap the inkjet printable media onto the CD/DVD holder with the printable
side up. The CD/DVD should be placed on the ring at the end of the holder with the
arrows.
NOTE: If you are using a smaller-sized media, flip the CD/DVD holder ring over
the CD/DVD.
4. Lower the CD/DVD access door to access the CD/DVD tray.
The CD/DVD access door is located just below the control panel. When in its lowered
position, the CD/DVD tray sits on top of the output tray.
English
5. Push the CD/DVD holder into the HP All-in-One until the lines on the CD/DVD holder
line up to the white lines on the CD/DVD tray.
Print directly onto a CD/DVD 11
Chapter 1
English
NOTE: The HP All-in-One pulls the CD/DVD holder while printing on the media.
The CD/DVD holder might protrude about 7.5 cm (3 inches) at the back of the
device. If the HP All-in-One is placed close to a wall, move it at least 3 inches
away from the wall.
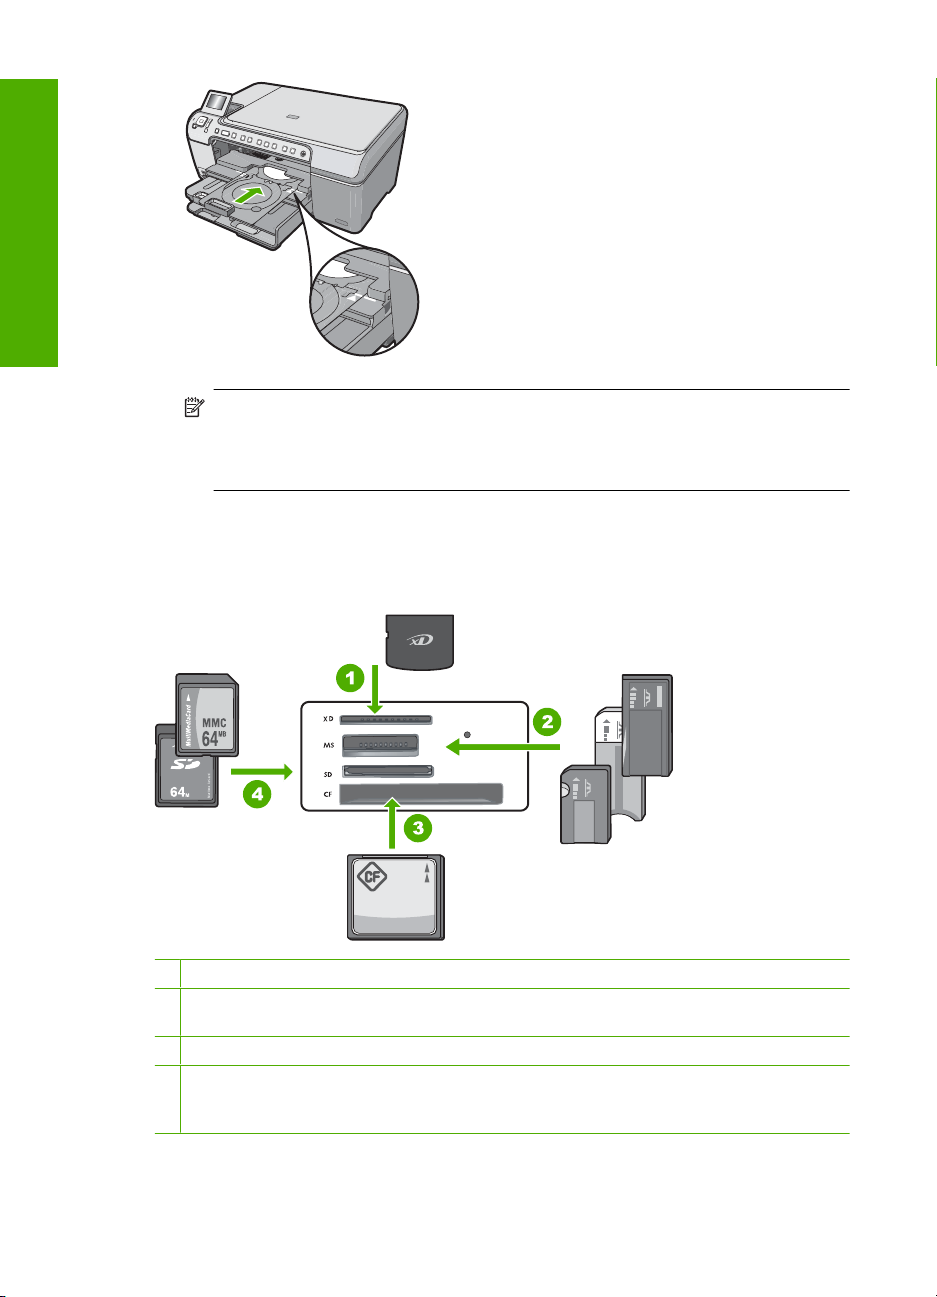
View, select, and print photos
You can view and select photos on your memory card before or while printing them.
1 xD-Picture Card
2 Memory Stick, Memory Stick Pro, Memory Stick Select, Memory Stick Magic Gate, Memory
Stick Duo or Duo Pro (adapter optional), or Memory Stick Micro (adapter required)
3 CompactFlash (CF) types I and II
4 Secure Digital (SD), Secure Digital Mini (adapter required), Secure Digital High Capacity
(SDHC), MultiMediaCard (MMC), MMC Plus, MMC Mobile (RS-MMC; adapter required),
TransFlash MicroSD Card, or Secure MultiMedia Card
12 HP Photosmart C5200 All-in-One series

To view and select photos
1. Insert a memory card into the appropriate slot on the HP All-in-One.
The Photosmart Express menu appears, with the most recent photo shown on the
display.
2. Load up to 13 x 18 cm (5 x 7 inch) photo paper in the photo tray or full-size photo
paper in the main input tray.
3. Press
The View Photos screen appears.
4. Press
5. When the thumbnail of the photo you want to view is highlighted, press OK.
6. When the photo appears by itself on the display, press OK again.
The Photo Options screen appears.
7. With Print Preview highlighted, press OK.
The Print Preview screen appears, showing how your photo will look when printed.
8. If you want to select additional photos to view and print, press
More, press OK, and repeat steps 4-6.
Or, once you're in the Add Photos screen, the quickest way to select multiple photos
(if you don't need the option to edit them) is to press
press
9. (Optional) If you want to check and/or modify any of your print settings, press
highlight Settings and press OK.
10. To print the photo(s), use
button on the control panel).
A print status screen displays the number of pages to print and the estimated time to
complete.
until View is highlighted, and then press OK.
or to scroll through the thumbnails of your photos.
to highlight Add
to select a photo, and then
or to scroll through more photos to select.
or to highlight Print Now (or press the Print Photos
English
to
Scan an image
You can start a scan from your computer or from the control panel of the HP All-in-One.
This section explains how to scan from the control panel of the HP All-in-One only.
NOTE: You can also use the software you installed with the HP All-in-One to scan
images. Using this software, you can edit a scanned image and create special projects
using a scanned image.
Scan an original to a computer
You can scan originals placed on the glass by using the control panel.
To scan to a computer
1. Load your original print side down on the right front corner of the glass.
2. Press Scan Menu.
3. Press OK to select the default application to receive the scan, or press
different application, and then press OK.
A preview image of the scan appears on your computer, where you can edit it.
4. Make any edits to the preview image, and then click Accept when you are finished.
to select a
Scan an image 13

Chapter 1
Scan an original to a memory card
You can send the scanned image as a JPEG image to the memory card that is currently
inserted. This enables you to use the photo print options to print borderless prints and
album pages from the scanned image.
To save a scan to a memory card
1. Make sure your memory card is inserted into the appropriate slot on the HP All-in-One.
2. Load your original print side down on the right front corner of the glass.
English
3. Press the Scan Menu button.
4. Press
The HP All-in-One scans the image and saves the file to the memory card in the JPEG
format.
to highlight Scan to Memory Card, and then press OK.
Make a copy
You can make quality copies from the control panel.
To make a copy from the control panel
1. Make sure you have paper loaded in the input tray.
2. Load your original print side down on the right front corner of the glass.
3. Press Start Copy Black or Start Copy Color to begin copying.
Replace the print cartridges
Follow these instructions when you need to replace print cartridges.
NOTE: When the ink level for the print cartridge is low, a message appears on the
display. You can also check the ink levels by using the Printer Toolbox available
through the HP Photosmart Software on your computer or through the Print
Properties dialog box on your computer.
If you do not already have replacement print cartridges for the HP All-in-One, you can
order them by clicking the Shop for HP Supplies icon on your computer. On a Windows
computer this is located in the HP folder in the Start menu.
For more information see
To replace the print cartridges
1. Make sure the HP All-in-One is on.
CAUTION: If the HP All-in-One is off when you open the print cartridge door to
access the print cartridges, the HP All-in-One will not release the cartridges for
changing. You might damage the HP All-in-One if the print cartridges are not
docked safely when you try to remove them.
2. Open the print cartridge door.
The print carriage moves to the far right side of the HP All-in-One.
www.hp.com/buy/supplies.
14 HP Photosmart C5200 All-in-One series
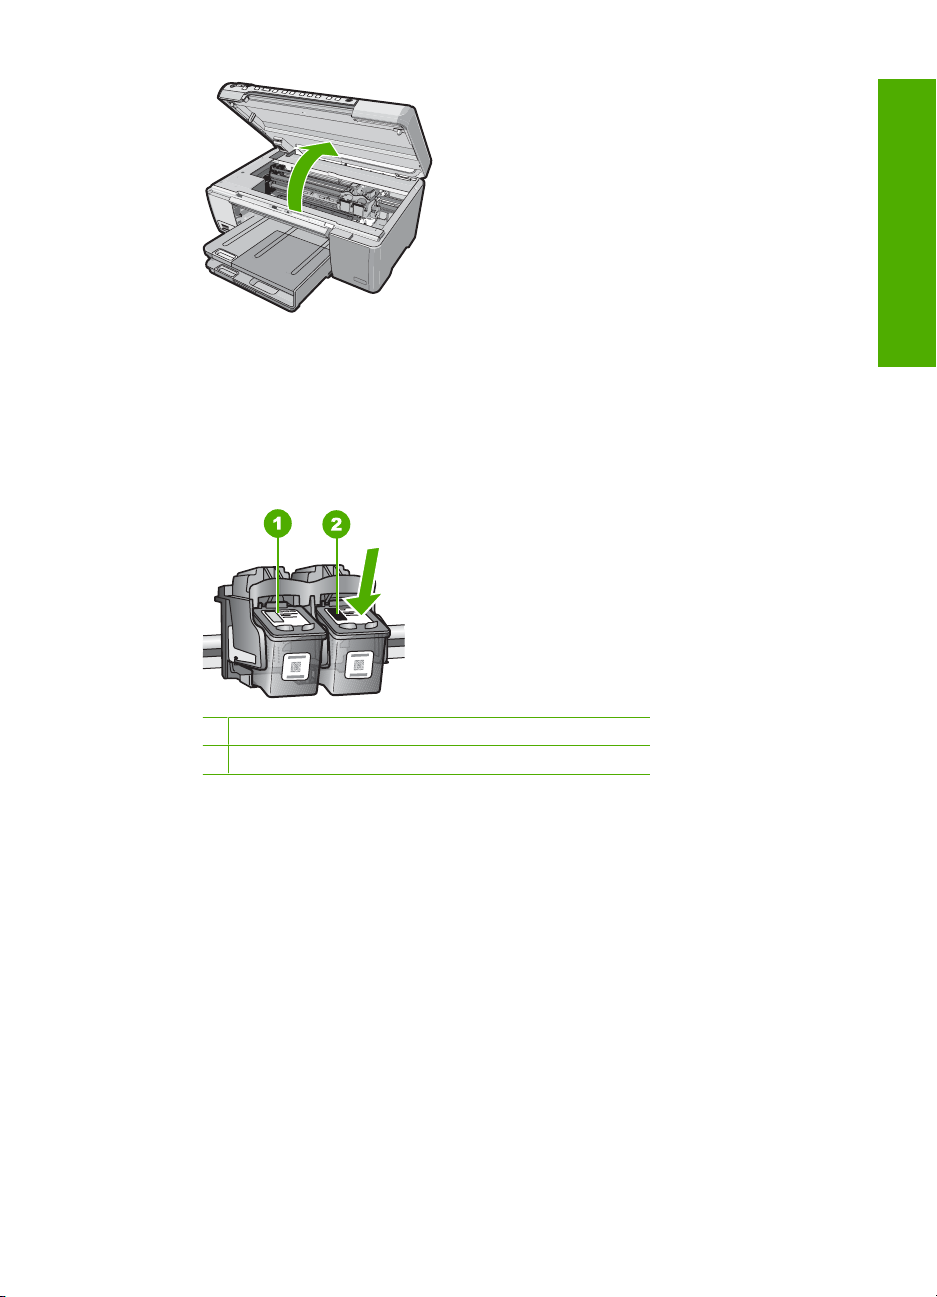
3. Wait until the print carriage is idle and silent, and then lightly press down on a print
cartridge to release it.
If you are replacing the tri-color print cartridge, remove the print cartridge from the
slot on the left.
If you are replacing the black, photo, or gray photo print cartridge, remove the print
cartridge from the slot on the right.
1 Print cartridge slot for the tri-color print cartridge
2 Print cartridge slot for the black and photo print cartridges
4. Pull the print cartridge toward you out of its slot.
5. If you are removing the black print cartridge in order to install the photo or gray photo
print cartridge, store the black print cartridge in the print cartridge protector or an
airtight plastic container.
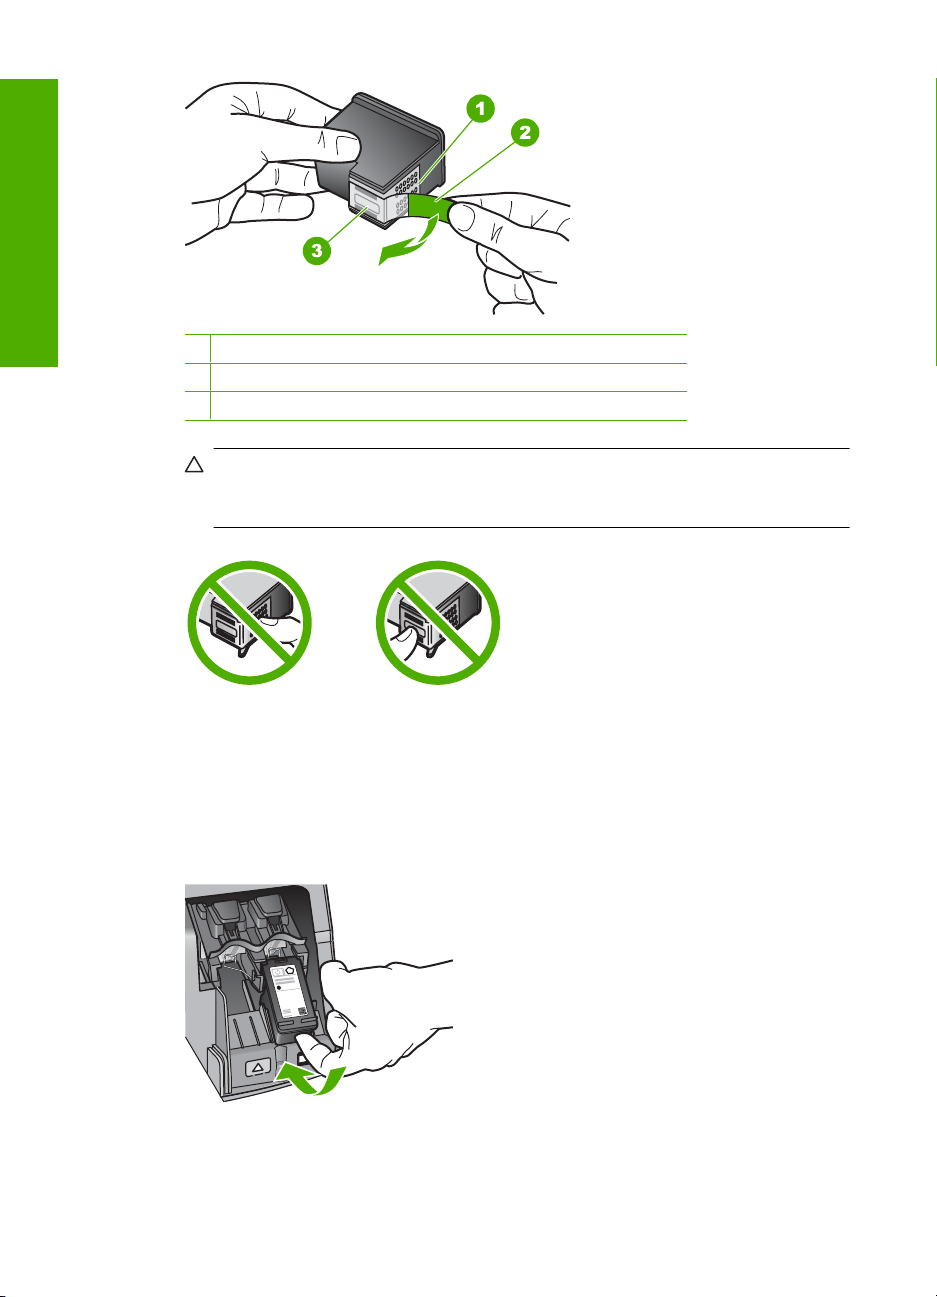
6. Remove the new print cartridge from its packaging and, being careful to touch only
the black plastic, gently remove the plastic tape by using the pink pull tab.
English
Replace the print cartridges 15
English
Chapter 1
1 Copper-colored contacts
2 Plastic tape with pink pull tab (must be removed before installing)
3 Ink nozzles under tape
CAUTION: Do not touch the copper-colored contacts or ink nozzles. Also, do
not re-tape the print cartridges. Doing so can result in clogs, ink failure, and bad
electrical connections.
7. Hold the print cartridge with the HP logo on top, and insert the new print cartridge into
the empty cartridge slot. Make sure you push the print cartridge in firmly until it snaps
into place.
If you are installing the tri-color print cartridge, slide it into the left slot.
If you are installing a black, photo, or gray photo print cartridge, slide it into the right
slot.
8. Close the print cartridge door.
16 HP Photosmart C5200 All-in-One series
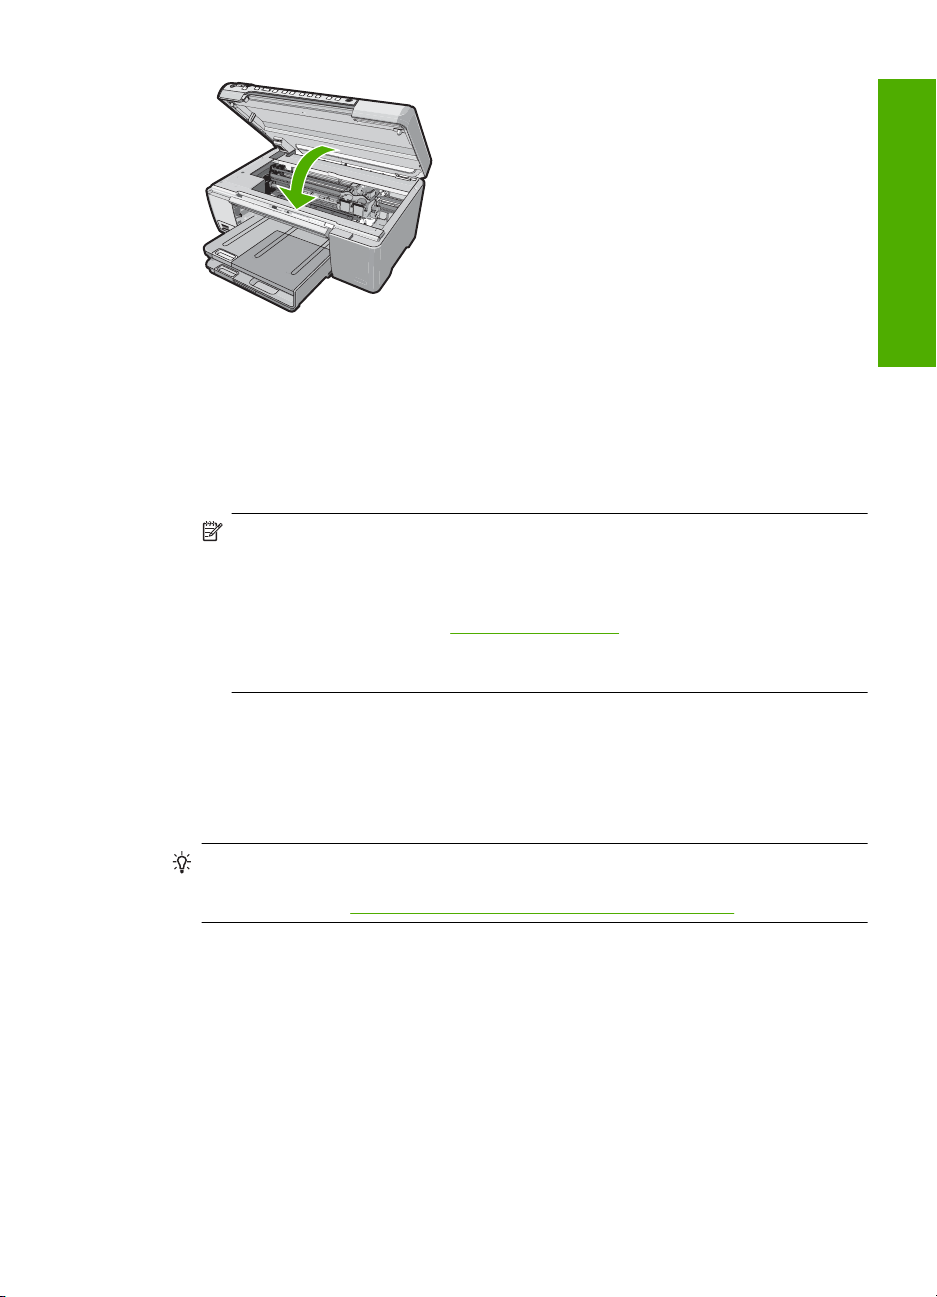
If you installed a new print cartridge, the HP All-in-One prints a print cartridge
alignment page.
9. When prompted, ensure plain white paper is loaded in the input tray, then press
OK.
10. The HP All-in-One prints a test page, aligns the print head, and calibrates the printer.
Recycle or discard the page.
A success or failure message appears.
NOTE: If you have colored paper loaded in the input tray when you align the print
cartridges, the alignment will fail. Load unused plain white paper into the input
tray, and then try the alignment again.
If the alignment fails again, you might have a defective sensor or print cartridge.
Contact HP Support. Go to
country/region, and then click Contact HP for information on calling for technical
support.
11. Press OK to continue.
Clean the HP All-in-One
To ensure that your copies and scans remain clear, you might need to clean the glass
and lid backing. You might also want to dust the exterior of the HP All-in-One.
TIP: You can purchase an HP Cleaning Kit for Inkjet Printers and All-in-Ones
(Q6260A) that provides everything needed to safely clean your HP device. For more
information, go to:
www.shopping.hp.com/accessories-store/printer.
English
www.hp.com/support. If prompted, choose your
Clean the glass
Fingerprints, smudges, hair, and dust on the main glass surface slow down performance
and affect the accuracy of the copy and scan features.
Clean the HP All-in-One 17

Chapter 1
To clean the glass
1. Turn off the HP All-in-One, unplug the power cord, and raise the lid.
2. Clean the glass with a soft cloth or sponge slightly moistened with a nonabrasive
glass cleaner.
3. Dry the glass with a dry, soft, lint-free cloth to prevent spotting.
English
4. Plug in the power cord, and then turn on the HP All-in-One.
Clean the lid backing
Minor debris can accumulate on the white document backing located underneath the lid
of the HP All-in-One.
To clean the lid backing
1. Turn off the HP All-in-One, unplug the power cord, and raise the lid.
2. Clean the white document backing with a soft cloth or sponge slightly moistened with
a mild soap and warm water.
Wash the backing gently to loosen debris. Do not scrub the backing.
3. Dry the backing with a dry, soft, lint-free cloth.
4. If further cleaning is needed, repeat the previous steps using isopropyl (rubbing)
alcohol, and wipe the backing thoroughly with a damp cloth to remove any residual
alcohol.
CAUTION: Do not use abrasives, acetone, benzene, or carbon tetrachloride on
the glass, since they can damage it. Do not place or spray liquid directly on the
glass. The liquid might seep under the glass and damage the device.
CAUTION: Do not use paper-based wipes, as these might scratch the backing.
CAUTION: Be careful not to spill alcohol on the glass or exterior of the
HP All-in-One, as this might damage the device.
5. Plug in the power cord, and then turn on the HP All-in-One.
18 HP Photosmart C5200 All-in-One series

2 Troubleshooting and support
This chapter contains troubleshooting information for the HP All-in-One. Specific information is
provided for installation and configuration issues, and some operational topics. For more
troubleshooting information, see the onscreen Help that came with your software.
Many issues are caused when the HP All-in-One is connected to the computer using a USB cable
before the HP All-in-One software is installed on the computer. If you connected the HP All-in-One
to your computer before the software installation screen prompts you to do so, you must follow these
steps:
Troubleshooting common setup issues
1. Disconnect the USB cable from the computer.
2. Uninstall the software (if you have already installed it).
3. Restart your computer.
4. Turn off the HP All-in-One, wait one minute, then restart it.
5. Reinstall the HP All-in-One software.
CAUTION: Do not connect the USB cable to the computer until prompted by the software
installation screen.
For support contact information, see the inside back cover of this guide.
Uninstall and reinstall the software
If your installation is incomplete, or if you connected the USB cable to the computer before prompted
by the software installation screen, you might need to uninstall and then reinstall the software. Do
not simply delete the HP All-in-One application files from your computer. Make sure to remove them
properly using the uninstall utility provided when you installed the software that came with the
HP All-in-One.
To uninstall from a Windows computer and then reinstall
1. On the Windows taskbar, click Start, Settings, Control Panel.
2. Double-click Add/Remove Programs.
3. Select the HP All-in-One, and then click Change/Remove.
Follow the onscreen instructions.
4. Disconnect the HP All-in-One from your computer.
5. Restart your computer.
English
NOTE: It is important that you disconnect the HP All-in-One before restarting your
computer. Do not connect the HP All-in-One to your computer until after you have reinstalled
the software.
6. Insert the HP All-in-One CD-ROM into your computer’s CD-ROM drive and then start the Setup
program.
7. Follow the onscreen instructions and the instructions provided in the Setup Guide that came
with the HP All-in-One.
Hardware setup troubleshooting
Use this section to solve any problems you might encounter while setting up the HP All-in-One
hardware.
The HP All-in-One will not turn on
Cause: The HP All-in-One is not properly connected to a power supply.
Troubleshooting and support 19
English
Chapter 2
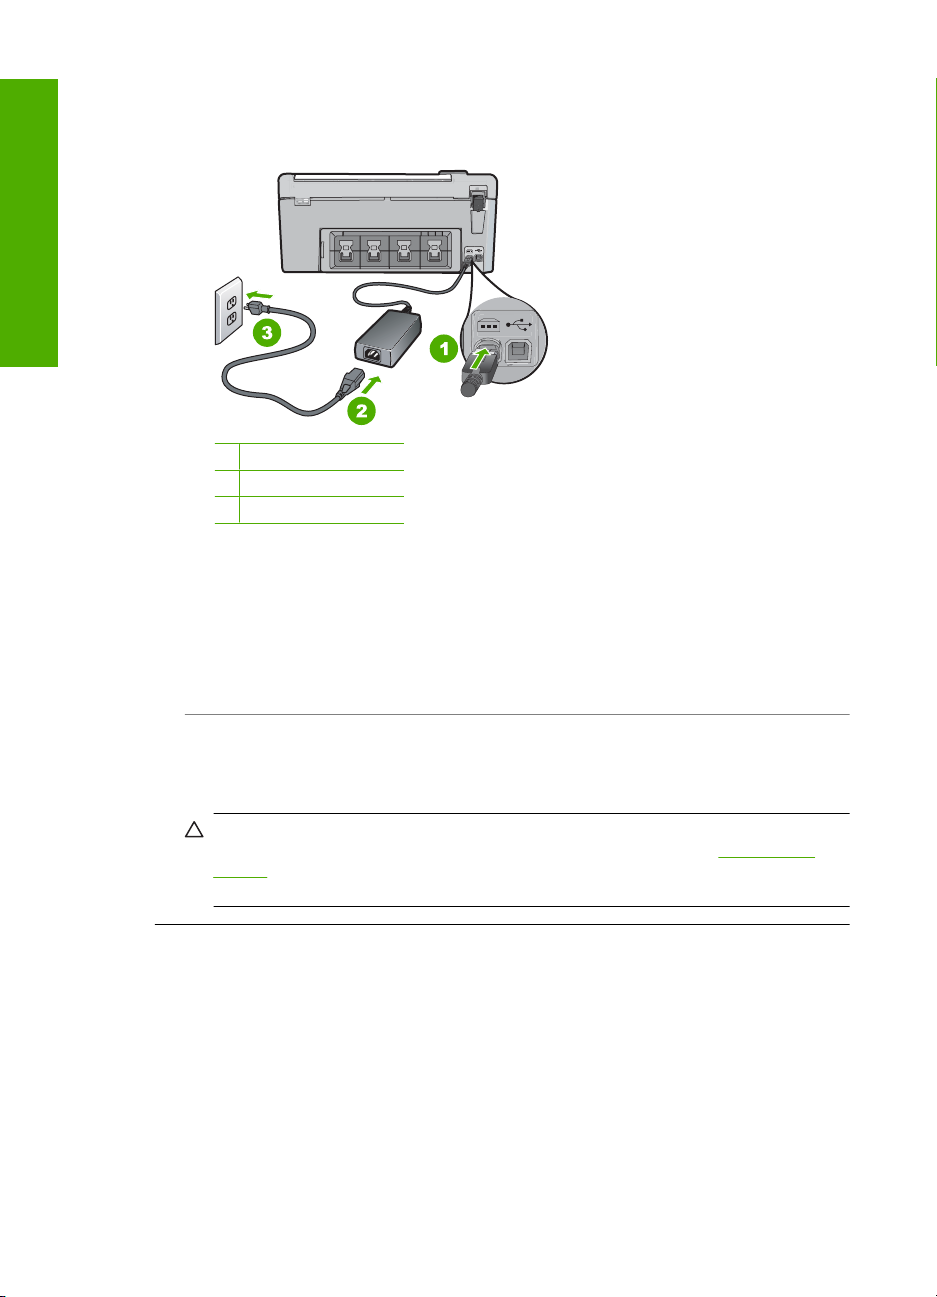
Solution
• Make sure the power cord is firmly connected to both the HP All-in-One and the power
adapter. Plug the power cord into a power outlet, surge protector, or power strip.
1 Power connection
2 Power cord and adapter
3 Power outlet
• If you are using a power strip, make sure the power strip is on. Or, try plugging the
HP All-in-One directly into a power outlet.
• Test the power outlet to make sure it is working. Plug in an appliance that you know works,
and see if the appliance has power. If not, then there might be a problem with the power
outlet.
• If you plugged the HP All-in-One into a switched outlet, make sure the switch is on. If it is
switched to on but still does not work, then there might be a problem with the power outlet.
Cause: You pressed the On button too quickly.
Solution: The HP All-in-One might not respond if you press the On button too quickly. Press
the On button once. It might take a few minutes for the HP All-in-One to turn on. If you press
the On button again during this time, you might turn the device off.
CAUTION: If the HP All-in-One still does not turn on, it might have a mechanical failure.
Unplug the HP All-in-One from the power outlet and contact HP. Go to:
support. If prompted, choose your country/region, and then click Contact HP for information
on calling for technical support.
I connected the USB cable, but I am having problems using the HP All-in-One with
my computer
Cause: The USB cable was connected before the software was installed. Connecting the USB
cable before prompted can cause errors.
Solution: You must first install the software that came with the HP All-in-One before
connecting the USB cable. During installation, do not plug in the USB cable until prompted by
the onscreen instructions.
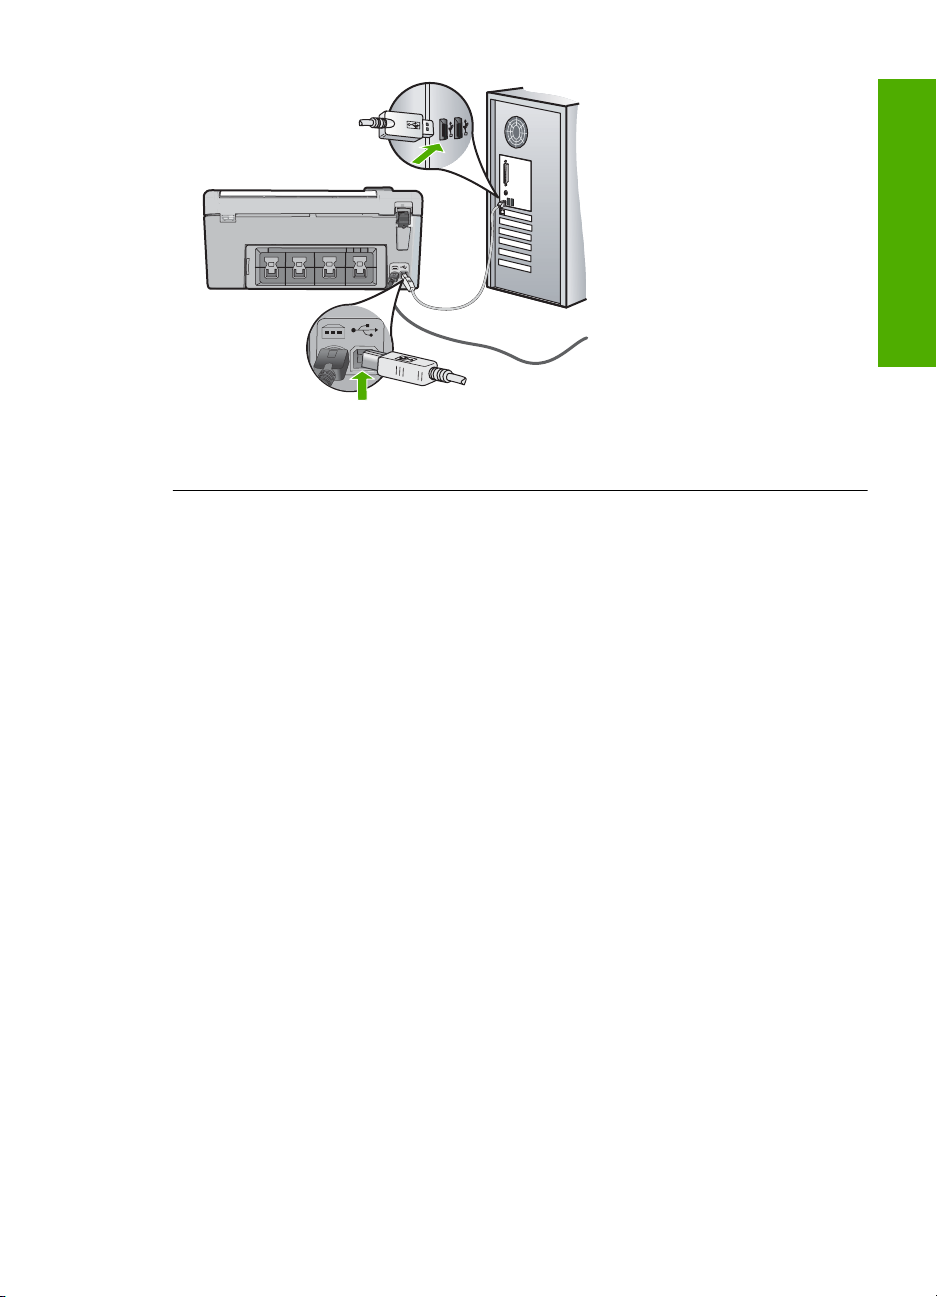
Once you have installed the software, connecting your computer to the HP All-in-One with a
USB cable is straightforward. Simply plug one end of the USB cable into the back of your
computer and the other into the back of the HP All-in-One. You can connect to any USB port on
the back of your computer.
20 HP Photosmart C5200 All-in-One series
www.hp.com/
For more information on installing the software and connecting the USB cable, see the Setup
Guide that came with the HP All-in-One.
The HP All-in-One does not print
Solution: If the HP All-in-One and computer are not communicating with each other, try the
following:
• Look at the On light located on the front of the HP All-in-One. If it is not lit, the HP All-in-One
is turned off. Make sure the power cord is firmly connected to the HP All-in-One and plugged
into a power outlet. Press the On button to turn on the HP All-in-One.
• Make sure the print cartridges are installed.
• Make sure you have paper loaded in the input tray.
• Check that the HP All-in-One does not have a paper jam.
• Check that the print carriage is not jammed.
Open the print cartridge door to access the print carriage area. Remove any objects that
are blocking the print carriage, including any packing materials. Turn the HP All-in-One off
and then turn it on again.
• Check that the HP All-in-One print queue is not paused (Windows) or stopped (Mac). If it
is, choose the appropriate setting to resume printing. For more information about accessing
the print queue, see the documentation that came with the operating system installed on
your computer.
• Check the USB cable. If you are using an older cable, it might not be working properly. Try
connecting it to another product to see if the USB cable works. If you experience problems,
the USB cable might need to be replaced. Also verify that the cable does not exceed 3
meters (9.8 feet) in length.
• Make sure your computer is USB ready. Some operating systems, such as Windows 95
and Windows NT, do not support USB connections. Check the documentation that came
with your operating system for more information.
• Check the connection from the HP All-in-One to your computer. Verify that the USB cable
is securely plugged into the USB port on the back of the HP All-in-One. Make sure the other
end of the USB cable is plugged into a USB port on your computer. After the cable is
connected properly, turn the HP All-in-One off and then on again.
• If you are connecting the HP All-in-One through a USB hub, make sure the hub is turned
on. If the hub is on, try connecting directly to your computer.
• Check other printers or scanners. You might need to disconnect older products from your
computer.
English
Hardware setup troubleshooting 21
Chapter 2
• Try connecting the USB cable to another USB port on your computer. After you check the
• If the HP All-in-One is offline, turn the HP All-in-One off and on again. Start a print job.
• If necessary, remove and then install the software you installed with the HP All-in-One again.
For more information on setting up the HP All-in-One and connecting it to your computer, see
the Setup Guide that came with the HP All-in-One.
Clear paper jams
English
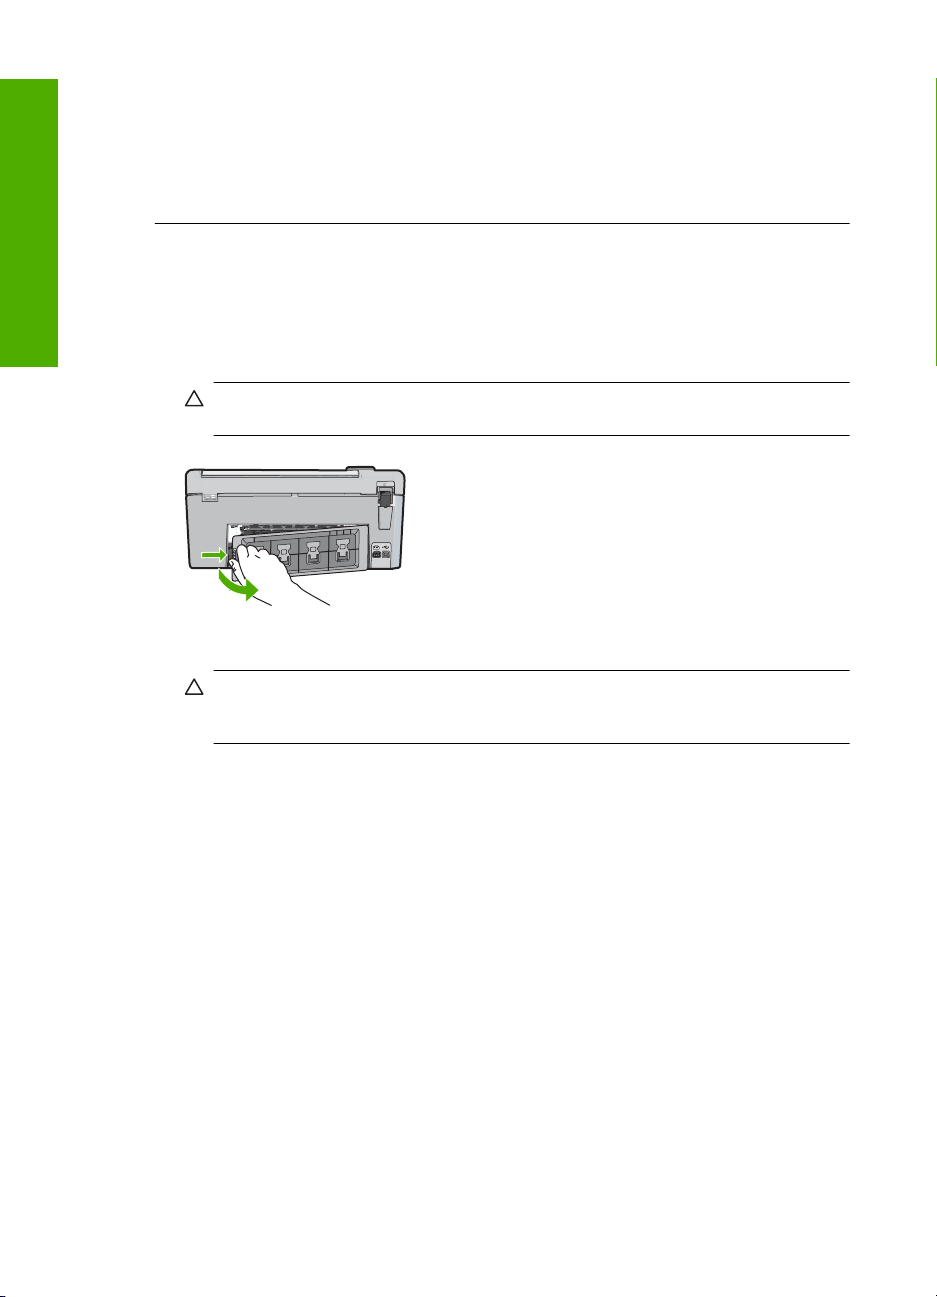
If the HP All-in-One has a paper jam, check the rear door.
To clear a paper jam from the rear door
1. Press in the tab on the left side of the rear door to release the door. Remove the door by pulling
it away from the HP All-in-One.
connections, try restarting your computer. Turn the HP All-in-One off and then on again.
CAUTION: Trying to clear a paper jam from the front of the HP All-in-One can damage the
print mechanism. Always access and clear paper jams through the rear door.
2. Gently pull the paper out of the rollers.
CAUTION: If the paper tears when you are removing it from the rollers, check the rollers
and wheels for torn pieces of paper that might be remaining inside the device. If you do not
remove all the pieces of paper from the HP All-in-One, more paper jams are likely to occur.
3. Replace the rear door. Gently push the door forward until it snaps into place.
4. Press OK to continue the current job.
CD/DVD print troubleshooting
Use this section to solve any problems you might encounter while printing on CD/DVD surfaces with
the HP All-in-One.
The HP All-in-One does not detect the CD/DVD holder
Cause: You might not have pushed the CD/DVD holder far enough into the CD/DVD tray.
Solution: Push the CD/DVD holder forward into the CD/DVD tray until the lines on the holder
line up to the white lines on the tray. The end of the holder marked with arrows goes into the
CD/DVD tray first.
22 HP Photosmart C5200 All-in-One series
Cause: You might have inserted the CD/DVD holder back into the storage area.
Solution: Remove the CD/DVD holder from the storage area below the main input tray. Lower
the CD/DVD access door (located below the control panel) to access the CD/DVD tray.
Make sure you loaded a printable disc onto the CD/DVD holder with the printable side up. Push
the CD/DVD holder forward into the CD/DVD tray until the lines on the holder line up to the white
lines on the tray. The end of the holder marked with arrows goes into the CD/DVD tray first.
Cause: You might have inserted the disc directly into the CD/DVD tray without placing it on
the CD/DVD holder.
Solution: Remove the CD/DVD holder from the storage area below the main input tray.
Remove the printable disc from the CD/DVD tray and load it onto the CD/DVD holder with the
printable side up. Push the holder forward into the CD/DVD tray until the lines on the holder line
up to the white lines on the tray. The end of the holder marked with arrows goes into the CD/
DVD tray first.
English
Cause: The HP All-in-One prompts you to insert the next disc when printing multiple CD/DVDs
in a print job.
Solution: Remove the CD/DVD holder from the CD/DVD tray. Remove the printed CD/DVD
from the holder. Load the next disc onto the CD/DVD holder with the printable side up and
reinsert the holder into the CD/DVD tray until the lines on the holder line up to the white lines
on the tray. When the HP All-in-One detects the holder, the prompt disappears.
The HP All-in-One does not detect a CD/DVD on the holder
Cause: You inserted the CD/DVD holder into the CD/DVD tray without loading a CD/DVD onto
the holder.
CD/DVD print troubleshooting 23
Chapter 2
Solution: Remove the CD/DVD holder from the CD/DVD tray. Load a printable disc onto the
CD/DVD holder with the printable side up and reinsert the holder into the CD/DVD tray until the
lines on the holder line up to the white lines on the tray.
Cause: You might have loaded the CD/DVD upside down on the holder.
Solution: Remove the CD/DVD holder from the CD/DVD tray. Load a printable disc onto the
CD/DVD holder with the printable side up and reinsert the holder into the CD/DVD tray until the
lines on the holder line up to the white lines on the tray.
English
The HP All-in-One stalled while printing a CD/DVD
Cause: The HP All-in-One pulls the CD/DVD holder through the device while printing on the
CD/DVD. The holder can protrude about 7.5 cm (3 inches) from the back of the device. If there
is not sufficient space behind the HP All-in-One, the holder stops and printing stalls.
Solution: Ensure that there is at least 7.5 cm (3 inches) of space behind the HP All-in-One.
Also, make sure that the slot on the back of the HP All-in-One is not blocked.
The image on my printed disc is cropped and there is ink on the CD/DVD holder
Cause: You loaded the CD/DVD onto the CD/DVD holder incorrectly.
Solution: If you are loading a regular-size (120 mm) CD/DVD onto the CD/DVD holder to be
printed, do not flip the blue ring over the disc. The blue ring should only be used if you are
printing on a small-size (80 mm) CD/DVD.
Before trying again, clean the CD/DVD holder to remove ink from the holder. This avoids ink
contamination within the device, as well as protects your discs, hands, and clothing from stains
later.
After the CD/DVD holder is clean and dry, load a new printable disc onto the holder with the
printable side up. Leave the blue ring in its original location on the opposite side of the holder
from your disc, as shown below. Reinsert the holder into the CD/DVD tray until the lines on the
holder line up to the white lines on the tray and try your print again.
The HP All-in-One is printing on a non-printable area of my disc
Cause: Your design is not the correct size for the CD/DVD you loaded.
Solution: Make sure the design you are printing is appropriate for the size of the media loaded
in the CD/DVD holder, including the diameter of the inner and outer rings. Change the software
settings accordingly to center and size your design for the disc you are using. Refer to the
documentation or the online help of the software you are using for additional information.
Cause: You might have loaded the CD/DVD upside down on the holder.
Solution: If you have already burned your content onto the CD/DVD, you might need to burn
your contents again onto a new disc. Load the new disc onto the CD/DVD holder with the
printable side up. Reinsert the holder into the CD/DVD tray until the lines on the holder line up
to the white lines on the tray and try your print again.
The design is not centered on my disc
Cause: Your design settings might not be correct.
24 HP Photosmart C5200 All-in-One series

Solution: Change the software settings to center and size your design for the disc you are
using. Refer to the documentation or the online help of the software you are using for additional
information.
The ink on the CD/DVD is not drying
Cause: The surface of the disc is not compatible for printing.
Solution: Make sure that the CD/DVD you use is compatible for inkjet printing. Inkjet printable
discs normally have a white printing surface. (Some discs also have a silver printing surface.)
Cause: You might have loaded the CD/DVD upside down on the holder.
Solution: If you have already burned your content onto the CD/DVD, you might need to burn
your contents again onto a new disc. Load the new disc onto the CD/DVD holder with the
printable side up. Reinsert the holder into the CD/DVD tray until the lines on the holder line up
to the white lines on the tray and try your print again.
The HP All-in-One reports a CD/DVD size mismatch error
Cause: The size of the CD/DVD currently loaded on the CD/DVD holder does not match the
size you specified when you started the print job from the computer.
Solution: Cancel the print job and replace the CD/DVD currently loaded on the CD/DVD
holder with a CD/DVD that is the same size as specified in the print job, or change the print
settings in the software.
The CD/DVD holder is stuck in the storage area
Cause: You might have inserted the CD/DVD holder back into the storage area with a CD/
DVD loaded and the blue ring flipped over the disc.
Solution: Pull the CD/DVD holder out as far as possible, until you feel resistance. Then, insert
a flat blunt object (such as a butter knife or screwdriver) into the left corner of the storage slot
and push down on the blue ring. With the blue ring pressed down, you should be able to pull the
CD/DVD holder out of the storage slot.
English
Print cartridge troubleshooting
If you are experiencing problems with printing, you might have a problem with one of the print
cartridges. For more information, see “
• Keep all print cartridges in the original sealed packages until they are needed.
• Store print cartridges at room temperature (15.6°-26.6° C or 60°-78° F).
• Do not reattach the protective tape once it has been removed from the print cartridge.
Reattaching the plastic tape might damage the print cartridge. Place the print cartridge in the
HP All-in-One immediately after removing the plastic tape. If this is not possible, store it in a print
cartridge protector or airtight plastic container.
• HP recommends that you do not remove the print cartridges from the HP All-in-One until you
have replacement print cartridges available to install.
• Turn off the HP All-in-One from the control panel. Do not turn off the device by turning off a
power strip or unplugging the power cord from the HP All-in-One. If you improperly turn off the
HP All-in-One, the print carriage does not return to the correct position and the print cartridges
can dry out.
• Do not open the print cartridge door unless necessary. This exposes the print cartridges to air,
which reduces the life of the print cartridges.
NOTE: If you leave the print cartridge door open for a long period of time, the HP All-in-One
will recap the print cartridges to protect them from exposure to air.
Replace the print cartridges” on page 14 in this guide.
Print cartridge troubleshooting 25

Chapter 2
• Clean the print cartridges when you notice a significant decrease in print quality.
• Do not clean the print cartridges unnecessarily. This wastes ink and shortens the life of the
• Handle print cartridges carefully. Dropping, jarring, or rough handling during installation can
English
Support process
If you have a problem, follow these steps:
1. Check the documentation that came with the HP All-in-One.
2. Visit the HP online support Web site at
3. Call HP support. Support options and availability vary by device, country/region, and language.
TIP: You might notice a decrease in print quality if the print cartridges have not been used
for a long time.
cartridges.
cause temporary printing problems. If print quality is poor right after cartridge installation, allow
half an hour for the print cartridge to recover.
www.hp.com/support. HP online support is available to
all HP customers. It is the fastest source for up-to-date device information and expert assistance
and includes the following features:
• Fast access to qualified online support specialists
• Software and driver updates for the HP All-in-One
• Valuable HP All-in-One and troubleshooting information for common problems
• Proactive device updates, support alerts, and HP newsgrams that are available when you
register the HP All-in-One
For a list of support phone numbers, see the printed documentation that came with the device.
26 HP Photosmart C5200 All-in-One series
3 Technical information
The technical specifications and international regulatory information for the HP All-in-One are
provided in this section.
System requirements
Software system requirements are located in the Readme file.
Product specifications
For product specifications, go to the HP Web site at www.hp.com/support.
Paper specifications
• Main input tray capacity: Plain paper sheets: Up to 125 (20 lb./75 gsm. paper)
• Output tray capacity: Plain paper sheets: Up to 50 (20 lb./75 gsm. paper)
• Photo tray capacity: Photo paper sheets: Up to 20
NOTE: For a complete list of supported media sizes, see the printer software.
Physical specifications
• Height: 21.6 cm (8.5 inches)
• Width: 45.2 cm (17.8 inches)
• Depth: 38.5 cm (15.2 inches)
• Weight: 6.8 kg (15 pounds)
Power specifications
• Power consumption: 25 watts maximum (average printing)
• Input voltage: AC 100 to 240 V ~ 600 mA 50-60 Hz
• Output voltage: DC 32 V===375 mA, 16 V===500 mA
English
NOTE: Use only with the power adapter supplied by HP.
Environmental specifications
• Recommended operating temperature range: 15º to 32º C (59º to 90º F)
• Allowable operating temperature range: 5º to 35º C (41º to 95º F)
• Humidity: 15% to 80% RH non-condensing
• Non-operating (Storage) temperature range: -40º to 60º C (-4º to 122º F)
• In the presence of high electromagnetic fields, it is possible the output from the HP All-in-One
may be slightly distorted
• HP recommends using a USB cable less than or equal to 3 m (10 feet) in length to minimize
injected noise due to potential high electromagnetic fields
Energy Star® notice
This product is designed to reduce power consumption and save natural resources without
compromising product performance. It has been designed to reduce total energy consumption both
during operation and when the device is not active. This product qualifies for ENERGY STAR® which
is a voluntary program established to encourage the development of energy-efficient office products.
Technical information 27

Chapter 3
ENERGY STAR is a U.S. registered service mark of the U.S. EPA. As an ENERGY STAR partner,
HP has determined that this product meets ENERGY STAR guidelines for energy efficiency.
For more information on ENERGY STAR guidelines, go to the following Web site:
www.energystar.gov
Print cartridge yield
Ink from the cartridges is used in the printing process in a number of different ways, including in the
initialization process, which prepares the device and cartridges for printing, and in printhead
servicing, which keeps print nozzles clear and ink flowing smoothly. In addition, some residual ink
English
is left in the cartridge after it is used. For more information, see
www.hp.com/pageyield for more information on estimated cartridge yields.
Visit
Regulatory notices
The HP All-in-One meets product requirements from regulatory agencies in your country/region. For
a complete listing of regulatory notices, see the onscreen Help.
Regulatory model identification number
For regulatory identification purposes, your product is assigned a Regulatory Model Number. The
Regulatory Model Number for your product is SDGOB-0731. This regulatory number should not be
confused with the marketing name (HP Photosmart C5200 All-in-One series, etc.) or product
numbers (Q8320A, etc.).
www.hp.com/go/inkusage.
28 HP Photosmart C5200 All-in-One series

Warranty
A. Extent of limited warranty
1. Hewlett-Packard (HP) warrants to the end-user customer that the HP products specified above will be free from defects
2. For software products, HP’s limited warranty applies only to a failure to execute programming instructions. HP does not
3. HP's limited warranty covers only those defects that arise as a result of normal use of the product, and does not cover
a. Improper maintenance or modification;
b. Software, media, parts, or supplies not provided or supported by HP;
c. Operation outside the product's specifications;
d. Unauthorized modification or misuse.
4. For HP printer products, the use of a non-HP cartridge or a refilled cartridge does not affect either the warranty to the
5. If HP receives, during the applicable warranty period, notice of a defect in any product which is covered by HP's
6. If HP is unable to repair or replace, as applicable, a defective product which is covered by HP's warranty, HP shall,
7. HP shall have no obligation to repair, replace, or refund until the customer returns the defective product to HP.
8. Any replacement product may be either new or like-new, provided that it has functionality at least equal to that of the
9. HP products may contain remanufactured parts, components, or materials equivalent to new in performance.
10. HP's Limited Warranty Statement is valid in any country where the covered HP product is distributed by HP. Contracts
B. Limitations of warranty
C. Limitations of liability
1. To the extent allowed by local law, the remedies provided in this Warranty Statement are the customer's sole and
2. TO THE EXTENT ALLOWED BY LOCAL LAW, EXCEPT FOR THE OBLIGATIONS SPECIFICALLY SET FORTH IN
SUCH DAMAGES.
D. Local law
1. This Warranty Statement gives the customer specific legal rights. The customer may also have other rights which vary
2. To the extent that this Warranty Statement is inconsistent with local law, this Warranty Statement shall be deemed
a. Preclude the disclaimers and limitations in this Warranty Statement from limiting the statutory rights of a consumer
(e.g., the United Kingdom);
b. Otherwise restrict the ability of a manufacturer to enforce such disclaimers or limitations; or
c. Grant the customer additional warranty rights, specify the duration of implied warranties which the manufacturer
3. THE TERMS IN THIS WARRANTY STATEMENT, EXCEPT TO THE EXTENT LAWFULLY PERMITTED, DO NOT
Dear Customer,
You will find below the name and address of the HP entity responsible for the performance of the HP Limited Warranty in your
country.
You may have additional statutory rights against the seller based on your purchase agreement. Those rights are not
in any way affected by this HP Limited Warranty.
Ireland: Hewlett-Packard Ireland Ltd. 30 Herbert Street IRL-Dublin 2
United Kingdom: Hewlett-Packard Ltd, Cain Road, Bracknell, GB-Berks RG12 1HN
HP product Duration of limited warranty
Software Media 90 days
Printer 1 year
Print or Ink cartridges Until the HP ink is depleted or the “end of warranty” date printed
on the cartridge has been reached, whichever occurs first. This
Accessories 1 year unless otherwise stated
in materials and workmanship for the duration specified above, which duration begins on the date of purchase by the
customer.
warrant that the operation of any product will be interrupted or error free.
any other problems, including those that arise as a result of:
customer or any HP support contract with the customer. However, if printer failure or damage is attributable to the use of
a non-HP or refilled cartridge or an expired ink cartridge, HP will charge its standard time and materials charges to
service the printer for the particular failure or damage.
warranty, HP shall either repair or replace the product, at HP's option.
within a reasonable time after being notified of the defect, refund the purchase price for the product.
product being replaced.
for additional warranty services, such as on-site service, may be available from any authorized HP service facility in
countries where the product is distributed by HP or by an authorized importer.
TO THE EXTENT ALLOWED BY LOCAL LAW, NEITHER HP NOR ITS THIRD PARTY SUPPLIERS MAKES ANY
OTHER WARRANTY OR CONDITION OF ANY KIND, WHETHER EXPRESS OR IMPLIED WARRANTIES OR
CONDITIONS OF MERCHANTABILITY, SATISFACTORY QUALITY, AND FITNESS FOR A PARTICULAR
PURPOSE.
exclusive remedies.
THIS WARRANTY STATEMENT, IN NO EVENT SHALL HP OR ITS THIRD PARTY SUPPLIERS BE LIABLE FOR
DIRECT, INDIRECT, SPECIAL, INCIDENTAL, OR CONSEQUENTIAL DAMAGES, WHETHER BASED ON
CONTRACT, TORT, OR ANY OTHER LEGAL THEORY AND WHETHER ADVISED OF THE POSSIBILITY OF
from state to state in the United States, from province to province in Canada, and from country to country elsewhere in
the world.
modified to be consistent with such local law. Under such local law, certain disclaimers and limitations of this Warranty
Statement may not apply to the customer. For example, some states in the United States, as well as some governments
outside the United States (including provinces in Canada), may:
cannot disclaim, or allow limitations on the duration of implied warranties.
EXCLUDE, RESTRICT, OR MODIFY, AND ARE IN ADDITION TO, THE MANDATORY STATUTORY RIGHTS
APPLICABLE TO THE SALE OF THE HP PRODUCTS TO SUCH CUSTOMERS.
warranty does not cover HP ink products that have been refilled,
remanufactured, refurbished, misused, or tampered with.
HP Limited Warranty
English
Warranty 29

Tout-en-un HP Photosmart
série C5200
Guide d'utilisation
Français

Sommaire
1 Présentation de l'appareil HP Tout-en-un
L'appareil HP Tout-en-un en un coup d'œil................................................................................3
Fonctions du panneau de commande........................................................................................4
Recherche d'informations supplémentaires................................................................................6
Chargement du papier et des originaux.....................................................................................6
Prévention des bourrages papier...............................................................................................8
Impression directe sur un CD/DVD.............................................................................................9
Affichage, sélection et impression de photos...........................................................................10
Numérisation d'une image .......................................................................................................12
Création d'une copie.................................................................................................................13
Remplacement des cartouches d'impression...........................................................................13
Nettoyage de l'appareil HP Tout-en-un....................................................................................16
2 Dépannage et assistance
Désinstallation et réinstallation du logiciel................................................................................18
Dépannage de la configuration du matériel..............................................................................18
Français
Elimination de bourrages papier...............................................................................................21
Dépannage de l'impression sur CD/DVD.................................................................................21
Dépannage relatif aux cartouches d'impression.......................................................................24
Procédure d’assistance............................................................................................................25
3 Renseignements techniques
Configurations système minimales...........................................................................................26
Spécifications de produits.........................................................................................................26
Notification - Energy Star®.......................................................................................................26
Rendement des cartouches d'impression.................................................................................27
Déclarations de conformité.......................................................................................................27
Garantie....................................................................................................................................28
2 Tout-en-un HP Photosmart série C5200

1 Présentation de
l'appareil HP Tout-en-un
L'appareil HP Tout-en-un vous permet de réaliser des tâches telles que la copie, la
numérisation de documents ou l'impression de photos à partir d'une carte mémoire avec
rapidité et facilité. Vous pouvez accéder directement à de nombreuses fonctions de
l'appareil HP Tout-en-un à partir du panneau de commande, sans allumer votre
ordinateur.
Remarque Le présent guide décrit le fonctionnement et les opérations de résolution
des incidents de base, et contient des informations pour entrer en contact avec le
service d'assistance HP et commander des consommables.
L'aide visible à l'écran détaille la totalité des fonctionnalités, y compris l'utilisation du
logiciel HP Photosmart fourni avec l'appareil HP Tout-en-un.
L'appareil HP Tout-en-un en un coup d'œil
Français
Etiquette Description
1 Ecran graphique couleur (aussi appelé écran)
2 Panneau de configuration
3 Logements pour carte mémoire et voyant Photo
4 Bac de sortie
5 Rallonge du bac d'alimentation (également
6 Stockage du support de CD/DVD.
7 Support de CD/DVD
appelée rallonge du bac)
Présentation de l'appareil HP Tout-en-un 3

Chapitre 1
(suite)
Etiquette Description
8 Bac d'alimentation principal (également appelé
9 Bac photo
10 Porte d'accès au CD/DVD.
11 Capot d'accès aux cartouches d'impression
12 Vitre
13 Capot
14 Porte arrière
15 Raccordement électrique
16 Port USB arrière
Utilisez exclusivement l'adaptateur secteur fourni par HP.
*
bac d'entrée)
*
Fonctions du panneau de commande
Le schéma et le tableau associé suivants décrivent brièvement les caractéristiques du
Français
panneau de commande de l'appareil HP Tout-en-un.
Etiquette Nom et description
1 Écran : affiche les menus, les photos et les messages. Vous pouvez réhausser l'écran et
2 Voyant Attention : indique qu'un problème est survenu. Pour plus d'informations, reportez-vous
3 Page précédente : revient à l'écran précédent.
4 Aide : ouvre le menu Aide à l'écran, vous permettant ainsi de sélectionner une rubrique pour
4 Tout-en-un HP Photosmart série C5200
l'orienter pour optimiser l'affichage.
à l'écran.
obtenir des informations supplémentaires. Une pression sur Aide depuis l'état inactif dresse la
liste des éléments pour lesquels l'utilisateur peut obtenir de l'aide. En fonction de la rubrique

(suite)
Etiquette Nom et description
que vous sélectionnez, celle-ci apparaît à l'écran ou sur votre ordinateur. Lors de l'affichage
d'écrans autres que l'état inactif, le bouton Aide affiche une aide contextuelle.
Une pression sur Aide depuis l'état inactif dresse la liste des éléments pour lesquels l'utilisateur
peut obtenir de l'aide. Lors de l'affichage d'écrans autres que l'état inactif, le bouton Aide affiche
une aide contextuelle.
5 Menu Photo : lance le menu Photosmart Express pour l'impression, la sauvegarde, l'édition
et le partage de photos.
6 Imprimer photos : Selon que vous accédez à vos photos via le menu Affichage, Imprimer ou
Créer, le bouton Imprimer photos affiche l'écran Aperçu av. impression ou imprime toute
photo sélectionnée. Si aucune photo n'a été sélectionnée, une invite vous demande si vous
souhaitez imprimer toutes les photos situées sur votre carte.
7 Suppression de l'effet yeux rouges : active ou désactive la fonctionnalité Suppression de
l'effet yeux rouges. Par défaut, cette fonction est activée. Lorsque la fonction est activée,
l'appareil HP Tout-en-un corrige automatiquement l'effet yeux rouges sur la photo actuellement
affichée à l'écran.
8 Réimpressions : Permet d'effectuer une copie de photo originale exposée sur la vitre.
9 Menu Numérisation : ouvre le Menu Numérisation dans lequel vous pouvez sélectionner une
destination pour votre numérisation.
10 Menu Copie : ouvrez l'option Menu Copie, qui vous permet de sélectionner des options de
copie, telles que le nombre de copies, le format du papier et le type de papier.
11 Copier, Noir : lance une copie noir et blanc.
12 Copier, Couleur : lance une copie couleur.
13 Installation : Le menu Installation permet de générer des rapports et modifier les paramètres
du périphérique, ainsi que les fonctions de maintenance.
14 Effacer : interrompt l'opération en cours.
15 Allumé : met l'appareil HP Tout-en-un sous tension ou hors tension. Lorsque l'appareil
HP Tout-en-un est hors tension, une quantité minimale de courant continue à être fournie. Vous
pouvez réduire encore l'alimentation électrique en maintenant le bouton Allumé appuyé
pendant 3 secondes. L'unité est alors placée en mode d'attente ou désactivée. Pour supprimer
toute alimentation, mettez l'appareil HP Tout-en-un hors tension, puis débranchez le cordon
d'alimentation.
16 Zoom arrière - (icône de loupe) : Le zoom arrière permet d'augmenter la portion affichée d'une
photo. Si vous appuyez sur ce bouton alors qu'une photo est affichée à 100 % à la surface de
l'écran, la fonction Largeur page est automatiquement appliquée à la photo.
17 Zoom avant + (icône de loupe) : Permet d'effectuer un zoom avant afin d'agrandir l'image sur
l'écran. Vous pouvez également utiliser ce bouton en combinaison avec les flèches de direction
afin de recadrer l'image avant impression.
18 OK : permet de sélectionner un paramètre de menu, une valeur ou une photo affiché(e) à
l'écran.
19 Pavé directionnel : permet de parcourir les photos et les options de menu en appuyant sur les
touches fléchées vers le haut, vers le bas, vers la gauche ou vers la droite.
Si vous effectuez un zoom avant sur une photo, vous pouvez également utiliser les touches
fléchées pour faire glisser cette photo et sélectionner une zone d'impression différente.
Français
Fonctions du panneau de commande 5

Chapitre 1
Recherche d'informations supplémentaires
Diverses ressources, imprimées et en ligne, fournissent des informations sur la
configuration et l'utilisation de votre appareil HP Tout-en-un.
• Guide de configuration
Le guide de configuration fournit des instructions sur la configuration de l'appareil
HP Tout-en-un et l'installation du logiciel. Assurez-vous de suivre les instructions du
Guide de configuration dans l'ordre indiqué.
Si vous rencontrez des problèmes lors de la configuration, consultez les conseils de
dépannage dans la dernière section du Guide de configuration ou reportez-vous au
chapitre «
• Aide en ligne
L'aide en ligne fournit des instructions détaillées relatives aux fonctionnalités de
l'appareil HP Tout-en-un qui ne sont pas décrites dans le présent Guide de
l'utilisateur, notamment les fonctionnalités uniquement disponibles via le logiciel que
vous avez installé avec l'appareil HP Tout-en-un.
•
www.hp.com/support
Si vous disposez d'un accès Internet, vous pouvez obtenir de l'aide sur le site Web
HP. Vous y trouverez une assistance technique, des pilotes, des fournitures et des
informations pour passer des commandes.
Chargement du papier et des originaux
Français
Vous pouvez copier ou numériser des originaux jusqu'au format A4 ou Lettre en les
chargeant sur la vitre.
Dépannage et assistance, » page 18 du présent guide.
Positionnement d'un original sur la vitre du scanner
1. Soulevez le capot de l'appareil HP Tout-en-un.
2. Chargez l'original, face à imprimer vers le bas, dans l'angle avant droit de la vitre.
Conseil Des guides sont gravés sur le bord de la vitre pour vous aider à
positionner correctement votre original.
3. Fermez le capot.
6 Tout-en-un HP Photosmart série C5200

Pour charger du papier au format standard
1. Soulevez le bac de sortie pour charger du papier dans le bac d'alimentation principal.
2. Faites glisser le guide de réglage de largeur du papier jusqu'à sa position extrême.
3. Taquez la pile de papier sur une surface plane pour aligner les bords des feuilles,
puis procédez aux vérifications suivantes :
• Vérifiez que le papier n'est pas froissé ou ondulé, qu'il n'est pas couvert de
poussière et que les bords ne sont pas cornés.
• Vérifiez que toutes les feuilles sont du même format et du même type.
4. Insérez la pile de papier dans le bac d'alimentation principal dans le sens de la
longueur et face à imprimer vers le bas. Faites-la glisser en avant jusqu'à ce qu'elle
soit calée.
Français
Attention Assurez-vous que l'appareil HP Tout-en-un est inactif et silencieux
quand vous chargez du papier dans le bac d'alimentation principal. Si
l'appareil HP Tout-en-un est en cours d'entretien des cartouches d'impression ou
s'il effectue une tâche, le dispositif d'arrêt du papier risque de ne pas être en place.
Vous risqueriez d'enfoncer le papier trop profondément et l'appareil
HP Tout-en-un éjecterait des pages vierges.
Conseil Si vous utilisez du papier à en-tête, insérez le haut de la page en
premier, face à imprimer vers le bas.
5. Faites glisser le guide de largeur de façon à ce qu'il touche le bord du papier.
Ne remplissez pas trop le bac d’alimentation principal ; assurez-vous que la pile de
papier tient dans le bac d'alimentation principal et ne dépasse pas le haut du guide
de largeur.
Chargement du papier et des originaux 7

Français
Chapitre 1
6. Abaissez le bac de sortie.
7. Tirez l'allonge du bac de sortie vers vous, aussi loin que possible.
Remarque Si vous utilisez du papier au format Légal, laissez la rallonge du bac
de sortie fermée.
Pour charger du papier photo jusqu'au format 13 x 18 cm dans le bac d'alimentation
photo
1. Soulevez le couvercle du bac de sortie pour charger le papier photo dans le bac photo.
2. Insérez la pile de papier photo dans le bac d'alimentation photo dans le sens de la
longueur et face à imprimer vers le bas. Faites-la glisser jusqu'à ce qu'elle soit calée.
Si le papier photo utilisé est perforé, chargez-le de manière à ce que les perforations
soient le plus près de vous.
3. Faites glisser le guide de largeur vers l'intérieur jusqu'à ce qu'il soit calé contre la pile
de papier photo.
Ne surchargez pas le bac photo. Assurez-vous que la pile de papier tient dans le bac
photo et ne dépasse pas le haut du guide de largeur.
4. Abaissez le couvercle du bac photo.
Prévention des bourrages papier
Pour éviter les bourrages papier, respectez les principes suivants :
• Retirez fréquemment le papier imprimé du bac de sortie.
• Evitez que le support ne se froisse ou n'ondule en le stockant à plat dans un sachet
étanche.
• Assurez-vous que le papier chargé dans le bac d'alimentation repose à plat et que
les bords ne sont pas cornés ou déchirés.
• Ne mélangez pas des papiers de types et de formats différents dans le bac
d'alimentation ; chargez un seul type et un seul format de papier à la fois.
8 Tout-en-un HP Photosmart série C5200

• Ajustez le guide de largeur du bac d'alimentation pour qu'il se cale contre le papier
chargé. Assurez-vous que le guide de largeur ne courbe pas le papier chargé dans
le bac d'alimentation.
• Ne poussez pas le papier trop loin dans le bac d'alimentation.
• Utilisez les types de papier recommandés pour l'appareil HP Tout-en-un.
Impression directe sur un CD/DVD
1. Utilisez le logiciel fourni avec l'appareil HP Tout-en-un pour créer et imprimer une
étiquette de CD/DVD.
2. Lorsque vous y êtes invité, retirez avec précaution le plateau à CD/DVD fourni avec
l'appareil HP Tout-en-un.
Le plateau à CD/DVD est logé sous le bac d'alimentation principal.
3. Insérez et fixez le support d'impression jet d'encre dans le support de CD/DVD, face
à imprimer orientée vers le haut. Le CD/DVD doit être placé sur l'anneau situé à
l'extrémité du support comportant des flèches.
Remarque Si vous utilisez un support de plus petite taille, retournez l'anneau
du support de CD/DVD et positionnez-le sur le dessus.
4. Abaissez la porte d'accès au CD/DVD afin d'accéder au plateau de CD/DVD.
La porte d'accès au CD/DVD est située juste en dessous du panneau de commande.
Lorsque le plateau de CD/DVD est en position basse, il surplombe le bac de sortie.
Français
Impression directe sur un CD/DVD 9

Français
Chapitre 1
5. Poussez le support de CD/DVD dans l'appareil HP Tout-en-un jusqu'à ce qu'il soit
aligné sur les lignes blanches figurant sur le plateau de CD/DVD.
Remarque L'appareil HP Tout-en-un tire le support de CD/DVD lors de
l'impression sur le support. Le plateau à CD/DVD peut sortir de 7,5 cm (3 pouces)
à l'arrière du périphérique. Si l'appareil HP Tout-en-un est placé près d'un mur,
éloignez-le d'au moins 10 cm de celui-ci.
Affichage, sélection et impression de photos
Vous pouvez afficher et sélectionner les photos sur votre carte mémoire avant ou pendant
leur impression.
10 Tout-en-un HP Photosmart série C5200

1 xD-Picture Card
2 Memory Stick, Memory Stick Pro, Memory Stick Select, Memory Stick Magic Gate, Memory
Stick Duo ou Duo Pro (adaptateur optionnel), ou Memory Stick Micro (adaptateur requis)
3 CompactFlash (CF) types I et II
4 Secure Digital (SD), Secure Digital Mini (adaptateur requis), Secure Digital High Capacity
(SDHC), MultiMediaCard (MMC), MMC Plus, MMC Mobile (RS-MMC ; adaptateur requis),
TransFlash MicroSD Card ou Secure MultiMedia Card
Pour afficher et sélectionner des photos
1. Insérez la carte mémoire dans l'emplacement correspondant de votre appareil
HP Tout-en-un.
Le menu Photosmart Express s'ouvre sur la photo affichée la plus récente.
2. Chargez le papier photo jusqu'au format 13 x 18 cm dans le bac photo, ou le papier
plein format dans le bac principal.
3. Appuyez sur
jusqu'à ce que Affichage soit mis en surbrillance, puis appuyez sur
OK.
L'écran Afficher les photos s'affiche.
4. Appuyez sur
ou pour parcourir les miniatures de vos photos.
5. Lorsque la miniature correspondant à la photo que vous souhaitez afficher est mise
en surbrillance, appuyez sur OK.
6. Lorsque la photo apparaît à l'écran, appuyez de nouveau sur OK.
L'écran Options photo s'affiche.
7. L'option Aperçu av. impression étant mise en surbrillance, appuyez sur OK.
L'écran Aperçu av. impression s'affiche et indique l'aspect de la photo lors de
l'impression.
8. Pour sélectionner d'autres photos à afficher et à imprimer, appuyez sur
pour mettre
l'option Ajouter plus en surbrillance, puis appuyez OK et répétez les étapes 4 à 6.
Une fois que l'écran Ajout de photos s'affiche, le moyen le plus rapide de
sélectionner plusieurs photos (si vous n'avez pas besoin d'utiliser l'option d'édition)
est d'appuyer sur
pour sélectionner une photo, puis d'appuyer sur ou pour
parcourir les autres photos à sélectionner.
Français
Affichage, sélection et impression de photos 11

Chapitre 1
9. (Facultatif) Si vous souhaitez vérifier et/ou modifier les paramètres d'impression,
appuyez sur
OK.
10. Pour imprimer une ou plusieurs photos, appuyez sur
surbrillance l'option Imprimer maintenant (ou appuyez sur le bouton Imprimer
photos du panneau de commande).
Un écran d'état de l'impression indique le nombre de pages à imprimer, ainsi que le
temps nécessaire avant la fin du processus d'impression.
pour mettre l'option Paramètres en surbrillance, puis appuyez sur
Numérisation d'une image
Vous pouvez démarrer une numérisation à partir de l'ordinateur ou du panneau de
commande de l'appareil HP Tout-en-un. Cette rubrique explique uniquement la marche
à suivre à partir du panneau de configuration de l'appareil HP Tout-en-un.
Remarque Vous pouvez également numériser des images à partir du
logiciel installé avec l'appareil HP Tout-en-un. Ce logiciel vous permet de modifier
une image numérisée et de créer des projets spéciaux à partir d'une image
numérisée.
Numérisation d'un original vers un ordinateur
Français
Vous pouvez numériser des originaux placés sur la vitre en utilisant le panneau de
commande.
ou pour mettre en
Pour numériser vers un ordinateur
1. Chargez l'original, face à imprimer vers le bas, dans l'angle avant droit de la vitre.
2. Appuyez sur Menu Numérisation.
3. Appuyez sur OK pour sélectionner l'ordinateur par défaut ou appuyez sur
sélectionner un ordinateur différent, puis appuyez sur OK.
Un aperçu de l'image numérisée s'affiche sur l'ordinateur. Vous pouvez la modifier à
cet endroit.
4. Apportez les modifications nécessaires à l'image numérisée et cliquez ensuite sur
Accepter lorsque vous avez terminé.
Numérisation d'un original vers une carte mémoire
Vous pouvez envoyer l'image numérisée en tant que fichier JPEG vers la carte mémoire
insérée. Ceci vous permet d'utiliser les options d'impression photo pour effectuer des
impressions sans bordures et imprimer des pages d'album à partir de l'image numérisée.
Pour enregistrer une image numérisée sur une carte mémoire
1. Assurez-vous que votre carte mémoire est insérée dans le logement approprié de
votre appareil HP Tout-en-un.
2. Chargez l'original, face à imprimer vers le bas, dans l'angle avant droit de la vitre.
3. Appuyez sur le bouton Menu Numérisation.
4. Appuyez sur
OK.
L'appareil HP Tout-en-un numérise l'image et enregistre le fichier sur la carte
mémoire au format JPEG.
pour sélectionner Numériser sur carte mémoire, puis appuyez sur
pour
12 Tout-en-un HP Photosmart série C5200

Création d'une copie
Vous pouvez réaliser des copies de qualité à partir du panneau de commande.
Pour créer une copie à partir du panneau de configuration
1. Assurez-vous que le bac d'alimentation contient du papier.
2. Chargez l'original, face à imprimer vers le bas, dans l'angle avant droit de la vitre.
3. Appuyez sur Copier, Noir ou sur Copier, Couleur pour démarrer la copie.
Remplacement des cartouches d'impression
Suivez ces instructions lorsque vous devez remplacer des cartouches d'impression.
Remarque Lorsque le niveau d'encre de la cartouche d'impression est bas, un
message apparaît sur l'écran. Vous pouvez également vérifier les niveaux d'encre
depuis votre ordinateur, par le biais de la Boîte à outils accessible à partir du
logiciel HP Photosmart ou via la boîte de dialogue Propriétés d'impression.
Si vous ne disposez pas de cartouches d'impression de rechange pour l'appareil
HP Tout-en-un, vous pouvez les acquérir en cliquant sur l'icône Achat de
consommables HP de votre ordinateur. Sur un ordinateur Windows, cette icône se situe
dans le dossier HP du menu Démarrer.
Pour plus d'informations, voir
www.hp.com/buy/supplies.
Pour remplacer les cartouches d'impression
1. Assurez-vous que l'appareil HP Tout-en-un est sous tension.
Attention Si l'appareil HP Tout-en-un est hors tension lorsque vous ouvrez le
capot d'accès aux cartouches d'impression pour changer les cartouches,
l'appareil HP Tout-en-un ne les libère pas. Vous risquez d'endommager
l'appareil HP Tout-en-un si les cartouches d'impression ne sont pas correctement
positionnées lorsque vous essayez de les retirer.
2. Ouvrez le capot d'accès aux cartouches d'impression.
Le chariot d'impression se trouve à l'extrémité droite de l'appareil HP Tout-en-un.
Français
Création d'une copie 13

Français
Chapitre 1
3. Attendez que le chariot soit bien arrêté et silencieux, puis appuyez doucement sur
une cartouche d'impression pour la libérer.
Si vous remplacez la cartouche couleur, retirez la cartouche située dans le logement
de gauche.
Si vous remplacez une cartouche d'impression noire, photo ou grise, retirez la
cartouche située dans le logement de droite.
1 Logement de la cartouche couleur
2 Logement des cartouches noire et photo
4. Tirez la cartouche d'impression vers vous afin de l'extraire de son logement.
5. Si vous retirez la cartouche d'impression noire pour installer la cartouche photo ou
grise, placez la cartouche noire dans l'étui de protection ou dans une pochette en
plastique hermétiquement fermée.
6. Retirez la nouvelle cartouche d'impression de son emballage en prenant garde de ne
toucher que le plastique noir et retirez délicatement l'adhésif plastique en tirant sur
la languette rose.
1 Contacts en cuivre
2 Adhésif plastique avec sa languette rose (à retirer avant l'installation)
3 Buses d'encre sous le ruban adhésif
Attention Ne touchez pas les contacts en cuivre ni les buses d'encre. En outre,
ne replacez pas la bande adhésive des cartouches d'impression. Vous risqueriez
d'entraîner des obstructions, d'empêcher l'encre de s'écouler et de créer des
problèmes de connexion électrique.
14 Tout-en-un HP Photosmart série C5200

7. Maintenez la cartouche d'impression de sorte que le logo HP soit orienté vers le haut,
puis insérez la nouvelle cartouche d'impression dans son logement. Veillez à bien
enfoncer les cartouches d'impression jusqu'à ce qu'elles s'enclenchent.
Si vous installez la cartouche d'impression couleur, faites-la glisser dans
l'emplacement de gauche.
Si vous installez une cartouche noire, photo ou grise, faites-la glisser dans
l'emplacement de droite.
8. Fermez le capot d'accès aux cartouches d'impression.
Français
Si vous avez installé une nouvelle cartouche d'impression, l'appareil HP Tout-en-un
imprime une page d'alignement des cartouches.
9. Lorsque vous y êtes invité, assurez-vous que du papier blanc ordinaire est chargé
dans le bac d'alimentation, puis appuyez sur OK.
Remplacement des cartouches d'impression 15

Chapitre 1
10. L'appareil HP Tout-en-un imprime une page de test, aligne la tête d'impression et
étalonne l'imprimante. Recyclez ou jetez cette page.
Un message de réussite ou d'échec s'affiche.
Remarque Si le bac d'alimentation contient du papier couleur, l'alignement
échoue. Chargez du papier blanc ordinaire vierge dans le bac d'alimentation, puis
relancez l'alignement.
Si l'alignement échoue à nouveau, il se peut qu'un détecteur ne fonctionne plus
ou que la cartouche d'impression soit défectueuse. Contactez le centre
d'assistance HP. Accédez au site
sélectionnez votre pays/région, puis cliquez sur Contacter HP pour savoir
comment contacter l'assistance technique.
11. Appuyez sur OK pour continuer.
www.hp.com/support. Si vous y êtes invité,
Nettoyage de l'appareil HP Tout-en-un
Nettoyez au besoin la vitre et le capot pour assurer la propreté des copies et des
numérisations. Pensez aussi à enlever la poussière sur l'extérieur de votre
appareil HP Tout-en-un.
Conseil Vous pouvez acheter un kit de nettoyage pour imprimantes jet d'encre et
Français
appareils Tout-en-un HP (Q6260A). Ce kit contient tout le nécessaire pour nettoyer
en toute sécurité votre périphérique HP. Pour des informations complémentaires,
voir :
www.shopping.hp.com/accessories-store/printer.
Nettoyage de la vitre
Des empreintes, des taches, des cheveux et de la poussière sur la vitre principale
réduisent les performances et affectent la précision des fonctions de copie et de
numérisation.
Nettoyage de la vitre
1. Mettez l'appareil HP Tout-en-un hors tension, débranchez le cordon d'alimentation
et soulevez le capot.
2. Nettoyez la vitre avec un tissu doux ou une éponge légèrement humidifiée avec un
nettoyeur de verre non abrasif.
Attention N'utilisez pas de liquide abrasif, d'acétone, de benzène ou de
tétrachlorure de carbone sur la vitre : ces produits risquent de l'endommager.
Evitez de verser ou de vaporiser du liquide directement sur la vitre. Le liquide
pourrait s'infiltrer sous la vitre et endommager le périphérique.
3. Essuyez la vitre à l'aide d'un chiffon sec, doux et non pelucheux pour éviter les traces.
4. Branchez le cordon d'alimentation et allumez l'appareil HP Tout-en-un.
Nettoyage du capot
Des résidus peuvent s'accumuler sur la partie blanche interne située sous le capot de
l'appareil HP Tout-en-un.
16 Tout-en-un HP Photosmart série C5200

Pour nettoyer le fond blanc du capot
1. Mettez l'appareil HP Tout-en-un hors tension, débranchez le cordon d'alimentation
et soulevez le capot.
2. Nettoyez la partie blanche interne avec un tissu doux ou une éponge légèrement
humidifiée avec du savon doux et de l'eau chaude.
Lavez délicatement l'intérieur du couvercle pour détacher les résidus. Ne frottez pas
énergiquement.
3. Essuyez l'intérieur du couvercle à l'aide d'un chiffon sec, doux et non pelucheux.
Attention N'utilisez pas d'essuie-tout, au risque de rayer l'intérieur du couvercle.
4. Si le couvercle n'est toujours pas propre, répétez les étapes précédentes en utilisant
de l'alcool isopropylique et essuyez bien le support avec un tissu humide pour éliminer
les résidus d'alcool.
Attention Veillez à ne pas renverser d'alcool sur la vitre ou l'extérieur de
l'appareil HP Tout-en-un, car cela risque de l'endommager.
5. Branchez le cordon d'alimentation, puis allumez l'appareil HP Tout-en-un.
Français
Nettoyage de l'appareil HP Tout-en-un 17

2 Dépannage et assistance
Ce chapitre contient des informations de dépannage relatives à l'appareil HP Tout-en-un. Il fournit
notamment des renseignements sur les problèmes liés à l'installation, à la configuration et à certains
aspects de l'utilisation. Pour plus d'informations sur le dépannage, consultez l'aide en ligne fournie
avec votre logiciel.
De nombreux problèmes surviennent lorsque l'appareil HP Tout-en-un est connecté à l'ordinateur
au moyen d'un câble USB alors que le logiciel correspondant n'est pas installé sur l'ordinateur. Si
vous avez connecté l'appareil HP Tout-en-un à votre ordinateur avant d'avoir été invité à le faire par
le biais de l'écran d'installation du logiciel, procédez comme suit :
Dépannage des problèmes courant rencontrés pendant l'installation
1. Débranchez le câble USB de l'ordinateur.
2. Désinstallez le logiciel (si vous l'avez déjà installé).
3. Redémarrez l'ordinateur.
4. Mettez l'appareil HP Tout-en-un hors tension, attendez une minute, puis redémarrez-le.
5. Réinstallez le logiciel de l'appareil HP Tout-en-un.
Attention Ne branchez pas le câble USB avant d'y avoir été invité par le biais de l'écran
d'installation du logiciel.
Pour plus d'informations pour contacter le support, reportez-vous à la troisième de couverture de ce
Français
Désinstallation et réinstallation du logiciel
guide.
Si l'installation est incomplète ou que vous avez connecté le câble USB à l'ordinateur avant d'y être
invité par l'écran d'installation du logiciel, il peut être nécessaire de désinstaller, puis de réinstaller
le logiciel. Ne supprimez pas simplement les fichiers de l'application de l'appareil HP Tout-en-un de
votre ordinateur. Assurez-vous de les désinstaller à l'aide de l'utilitaire prévu à cet effet, lequel est
fourni lors de l'installation du logiciel associé à l'appareil HP Tout-en-un.
Pour désinstaller puis réinstaller sur un ordinateur sous Windows
1. Dans la barre des tâches de Windows, cliquez sur Démarrer, Paramètres, Panneau de
configuration.
2. Cliquez deux fois sur Ajout/Suppression de programmes.
3. Sélectionnez l'appareil HP Tout-en-un, puis cliquez sur Modifier/Supprimer.
Suivez les instructions qui s'affichent à l'écran.
4. Déconnectez l'appareil HP Tout-en-un de l'ordinateur.
5. Redémarrez l'ordinateur.
Remarque Il est important de déconnecter l'appareil HP Tout-en-un avant de redémarrer
l'ordinateur. Ne connectez pas l'appareil HP Tout-en-un à l'ordinateur avant d'avoir réinstallé
le logiciel.
6. Insérez le CD-ROM de l'appareil HP Tout-en-un dans le lecteur de CD-ROM de votre ordinateur,
puis lancez le programme d'installation.
7. Suivez les instructions à l'écran et celles fournies dans le Guide de configuration livré avec
l'appareil HP Tout-en-un.
Dépannage de la configuration du matériel
Reportez-vous à cette section pour résoudre les problèmes rencontrés lors de la configuration de
l'appareil HP Tout-en-un.
18 Tout-en-un HP Photosmart série C5200

L'appareil HP Tout-en-un ne s'allume pas
Cause: L'appareil HP Tout-en-un n'est pas correctement connecté à la prise d'alimentation.
Solution
• Assurez-vous que le cordon d'alimentation est correctement branché à l'appareil
HP Tout-en-un et à l'adaptateur secteur. Branchez le cordon d'alimentation à une prise de
courant, à un parasurtenseur ou à une prise multiple.
1 Branchement de l'alimentation
2 Cordon d'alimentation et adaptateur secteur
3 Prise de courant
• Si vous utilisez une prise multiple, assurez-vous que l'interrupteur dont elle est équipée est
en position marche. Vous pouvez aussi brancher l'appareil HP Tout-en-un directement à
une prise secteur.
• Testez la prise d'alimentation pour vérifier qu'elle est en bon état. Branchez un appareil dont
vous être sûr du bon fonctionnement et vérifiez s'il est alimenté. Si ce n'est pas le cas, la
prise d'alimentation est très certainement défectueuse.
• Si vous avez branché l'appareil HP Tout-en-un sur une prise à interrupteur, assurez-vous
que l'interrupteur est en position de marche. S'il est sous tension mais ne fonctionne toujours
pas, il se peut que la prise de courant ait un problème.
Cause: Vous avez appuyé sur le bouton Allumé trop vite.
Solution: L'appareil HP Tout-en-un peut ne pas répondre si vous appuyez trop rapidement
sur le bouton Allumé. Appuyez sur le bouton Allumé une fois. Il faut parfois quelques minutes
pour mettre l'appareil HP Tout-en-un sous tension. Si vous appuyez à nouveau sur le bouton
Allumé pendant cette attente, vous risquez de mettre le périphérique hors tension.
Attention Si l'appareil HP Tout-en-un ne démarre toujours pas, il est possible que le
problème soit d'origine mécanique. Débranchez l'appareil HP Tout-en-un et contactez HP.
Visitez le site : www.hp.com/support. Sélectionnez votre pays/région si vous y êtes invité et
cliquez sur Contacter HP pour plus d'informations sur l'obtention de l'assistance technique.
J'ai branché le câble USB mais je rencontre des problèmes d'utilisation de
l'appareil HP Tout-en-un avec mon ordinateur
Cause: Le câble USB a été connecté avant l'installation du logiciel. La connexion du câble
USB avant l'invite peut engendrer des erreurs.
Français
Dépannage de la configuration du matériel 19

Français
Chapitre 2
Solution: Vous devez installer le logiciel fourni avec l'appareil HP Tout-en-un avant de
brancher le câble USB. Durant l'installation, ne branchez pas le câble USB avant d'y être invité
par les instructions affichées à l'écran.
Une fois le logiciel installé, il est très simple de connecter votre ordinateur à l'appareil
HP Tout-en-un via un câble USB. Branchez simplement une extrémité du câble USB à l'arrière
de l'ordinateur et l'autre à l'arrière de l'appareil HP Tout-en-un. Vous pouvez effectuer la
connexion sur n'importe quel port USB à l'arrière de votre ordinateur.
Pour plus d'informations sur l'installation du logiciel et la connexion du câble USB, reportez-vous
au Guide de configuration fourni avec l'appareil HP Tout-en-un.
L'appareil HP Tout-en-un n'imprime pas
Solution: Si l'appareil HP Tout-en-un et l'ordinateur ne communiquent pas l'un avec l'autre,
procédez comme suit :
• Vérifiez le voyant Allumé situé à l'avant de l'appareil HP Tout-en-un. S'il n'est pas allumé,
l'appareil HP Tout-en-un est hors tension. Assurez-vous que le cordon d'alimentation est
bien connecté à l'appareil HP Tout-en-un et branché à une prise de courant. Appuyez sur
le bouton Allumé pour mettre l'appareil HP Tout-en-un sous tension.
• Assurez-vous que les cartouches d’impression sont installées.
• Assurez-vous que le bac d'alimentation contient du papier.
• Vérifiez qu'il n'y a aucun bourrage papier dans l'appareil HP Tout-en-un.
• Vérifiez que le chariot d'impression n'est pas bloqué.
Ouvrez la porte d'accès au chariot d'impression. Retirez les objets qui bloquent le chariot,
y compris les éventuels matériaux d'emballage. Mettez l'appareil HP Tout-en-un hors
tension, puis à nouveau sous tension.
• Assurez-vous que la file d'attente de l'appareil HP Tout-en-un n'est pas interrompue
(Windows) ou arrêtée (Mac). Si c'est le cas, choisissez le paramètre approprié pour relancer
l'impression. Pour plus d'informations sur l'accès à la file d'attente d'impression, consultez
la documentation fournie avec le système d'exploitation installé sur votre ordinateur.
• Vérifiez le câble USB. Si vous utilisez un vieux câble, il se peut qu'il ne fonctionne pas
correctement. Connectez-le à un autre appareil pour vérifier son bon fonctionnement. En
cas de problème, vous devez remplacer le câble USB. Vérifiez que la longueur du câble ne
dépasse pas 3 mètres.
• Vérifiez que votre ordinateur est compatible USB. Certains systèmes d'exploitation, comme
Windows 95 et Windows NT, ne prennent pas en charge les connexions USB. Pour plus
d'informations, consultez la documentation fournie avec votre système d'exploitation.
20 Tout-en-un HP Photosmart série C5200

• Vérifiez la connexion de l'appareil HP Tout-en-un à l'ordinateur. Vérifiez que le câble USB
est correctement branché au port USB à l'arrière de l'appareil HP Tout-en-un. Assurez-vous
que l'autre extrémité du câble USB est branchée à un port USB de votre ordinateur. Une
fois le câble correctement branché, mettez l'appareil HP Tout-en-un hors tension, puis à
nouveau sous tension.
• Si vous branchez l'appareil HP Tout-en-un via un concentrateur USB, assurez-vous que ce
dernier est sous tension. Le cas échéant, essayez de le connecter directement à
l'ordinateur.
• Vérifiez les autres imprimantes ou numériseurs. Il se peut que vous deviez déconnecter les
produits plus anciens de votre ordinateur.
• Essayez de brancher le câble USB à un autre port USB de votre ordinateur. Une fois les
connexions vérifiées, redémarrez l'ordinateur. Mettez l'appareil HP Tout-en-un hors tension,
puis à nouveau sous tension.
• Si l'appareil HP Tout-en-un est hors tension, éteignez l'appareil HP Tout-en-un, puis
rallumez-le. Lancez une tâche d’impression.
• Si nécessaire, désinstallez le logiciel installé avec l'appareil HP Tout-en-un et réinstallez-
le.
Pour plus d'informations sur la configuration de l'appareil HP Tout-en-un et sa connexion à votre
ordinateur, reportez-vous au Guide de configuration fourni avec l'appareil HP Tout-en-un.
Elimination de bourrages papier
Si un bourrage papier est survenu dans l'appareil HP Tout-en-un, vérifiez d'abord la porte arrière.
Pour éliminer un bourrage papier dans la porte arrière
1. Appuyez sur le loquet situé à gauche de la porte arrière afin de libérer la porte. Retirez la porte
de l'appareil HP Tout-en-un.
Attention Vous risquez d'endommager le mécanisme d'impression si vous tentez
d'éliminer un bourrage papier par l'avant de l'appareil HP Tout-en-un. Dégagez toujours les
bourrages papier en passant par la porte arrière.
Français
2. Tirez avec précaution sur le papier pour le dégager des rouleaux.
Attention Si le papier se déchire lorsque vous l'enlevez des rouleaux, assurez-vous qu'il
ne reste pas de morceaux de papier dans les rouleaux et les roues du périphérique. Si vous
ne retirez pas tous les morceaux de papier de l'appareil HP Tout-en-un, d'autres bourrages
papier risquent de se produire.
3. Replacez la porte arrière. Poussez-la doucement vers l'avant jusqu'à ce qu'elle s'enclenche.
4. Appuyez sur OK pour continuer le travail en cours.
Dépannage de l'impression sur CD/DVD
Cette section contient des instructions permettant de résoudre les problèmes rencontrés lors de
l'impression à la surface de CD/DVD à l'aide de l'appareil HP Tout-en-un.
Elimination de bourrages papier 21

Français
Chapitre 2
L'appareil HP Tout-en-un ne détecte pas le support de CD/DVD
Cause: Le support de CD/DVD n'est probablement pas inséré à fond dans le tiroir.
Solution: Poussez le support de CD/DVD dans le tiroir jusqu'à ce que les repères linéaires
figurant sur le support soient alignés sur les lignes blanches du tiroir. Le côté du support
comportant les flèches est celui qui doit être inséré en premier dans le tiroir de CD/DVD.
Cause: Le support de CD/DVD a probablement été inséré dans la zone de stockage.
Solution: Retirez le support de CD/DVD de la zone de stockage située sous le bac
d'alimentation principal. Abaissez la porte d'accès au CD/DVD (située sous le panneau de
commande) afin d'accéder au tiroir de CD/DVD.
Assurez-vous d'avoir chargé un disque imprimable dans le support de CD/DVD, face à imprimer
orientée vers le haut. Poussez le support de CD/DVD dans le tiroir jusqu'à ce que les repères
linéaires figurant sur le support soient alignés sur les lignes blanches du tiroir. Le côté du support
comportant les flèches est celui qui doit être inséré en premier dans le tiroir de CD/DVD.
Cause: Vous avez probablement inséré un disque directement dans le tiroir de CD/DVD sans
l'avoir placé sur le support de CD/DVD.
Solution: Retirez le support de CD/DVD de la zone de stockage située sous le bac
d'alimentation principal. Retirez le disque imprimable du tiroir de CD/DVD et chargez-le sur le
support de CD/DVD, face à imprimer orientée vers le haut. Poussez le support de CD/DVD dans
le tiroir jusqu'à ce que les repères linéaires figurant sur le support soient alignés sur les lignes
blanches du tiroir. Le côté du support comportant les flèches est celui qui doit être inséré en
premier dans le tiroir de CD/DVD.
Cause: L'appareil HP Tout-en-un vous invite à insérer le disque suivant, lors de l'impression
de plusieurs CD/DVD.
Solution: Retirez le support de CD/DVD du plateau à CD/DVD. Retirez le CD/DVD imprimé
de son support. Chargez le disque suivant sur le support de CD/DVD, face à imprimer orientée
22 Tout-en-un HP Photosmart série C5200

vers le haut, et réinsérez le support de CD/DVD jusqu'à ce que les repères linéaires figurant sur
le support soient alignés sur les lignes blanches du tiroir. Lorsque l'appareil HP Tout-en-un
détecte le support, l'affichage de l'invite cesse.
L'appareil HP Tout-en-un ne détecte aucun CD/DVD sur le support
Cause: Vous avez inséré le support de CD/DVD dans le tiroir sans charger de CD/DVD sur
le support.
Solution: Retirez le support de CD/DVD du plateau à CD/DVD. Chargez un disque imprimable
sur le support de CD/DVD, face à imprimer orientée vers le haut, jusqu'à ce que les repères
linéaires figurant sur le support soient alignés sur les lignes blanches du tiroir.
Cause: Le CD/DVD est chargé à l'envers sur le support.
Solution: Retirez le support de CD/DVD du plateau à CD/DVD. Chargez un disque imprimable
sur le support de CD/DVD, face à imprimer orientée vers le haut, jusqu'à ce que les repères
linéaires figurant sur le support soient alignés sur les lignes blanches du tiroir.
Un blocage s'est produit dans l'appareil HP Tout-en-un durant l'impression d'un
CD/DVD
Cause: L'appareil HP Tout-en-un tire le support de CD/DVD à l'intérieur du périphérique lors
de l'impression sur le CD/DVD. Le support peut dépasser de 7,5 cm (3 pouces) à l'arrière de
l'imprimante. Si l'espace à l'arrière de l'appareil HP Tout-en-un est insuffisant, le support s'arrête
et l'impression est bloquée.
Solution: Veillez à ménager un espace d'au moins 7,5 cm (3 pouces) à l'arrière de l'appareil
HP Tout-en-un. Assurez-vous également que l'interstice situé à l'arrière de l'appareil
HP Tout-en-un n'est pas obstrué.
L'image est tronquée sur le disque imprimé et de l'encre s'est écoulée sur le
support de CD/DVD
Cause: Le CD/DVD n'a pas été correctement inséré sur son support.
Solution: Si vous chargez un CD/DVD de taille normale (120 mm) sur le support de CD/DVD
à imprimer, ne retournez pas l'anneau bleu sur le disque. L'utilisation de l'anneau bleu est
nécessaire uniquement lors de l'impression sur un CD/DVD de petite taille (80 mm).
Avant d'effectuer une nouvelle tentative, nettoyez l'encre qui s'est écoulée sur le support de CD/
DVD. Ceci permet d'éviter une contamination par l'encre l'intérieur du périphérique et protège
à la fois vos disques, vos mains et vos vêtements des salissures.
Une fois que le support de CD/DVD est propre est sec, chargez un disque imprimable sur le
support, face à imprimer orientée vers le haut. Laissez l'anneau bleu à son emplacement
d'origine, sur le côté du support opposé au disque, comme indiqué ci-dessous. Réinsérez le
support de CD/DVD dans le tiroir jusqu'à ce que les repères linéaires figurant sur le support
soient alignés sur les lignes blanches du tiroir.
L'appareil HP Tout-en-un imprime sur une portion non imprimable de mon disque
Cause: Le motif de conception sélectionné n'est pas d'un format adapté au CD/DVD chargé.
Solution: Assurez-vous que le motif que vous imprimé est d'une taille appropriée pour le CD/
DVD chargé sur le support, notamment au niveau du diamètre et des anneaux interne et externe.
Français
Dépannage de l'impression sur CD/DVD 23

Chapitre 2
Modifiez les paramètres du logiciel de manière à centrer et redimensionner le motif en fonction
du disque utilisé. Pour plus d'informations, reportez-vous à la documentation ou à l'aide en ligne
du logiciel utilisé.
Cause: Le CD/DVD est peut-être chargé à l'envers sur le support.
Solution: Si vous avez déjà gravé le contenu du CD/DVD, il vous faut probablement
renouveler la gravure sur un autre disque. Chargez ensuite le nouveau disque sur le support
de CD/DVD, face à imprimer orientée vers le haut. Réinsérez le support de CD/DVD dans le
tiroir jusqu'à ce que les repères linéaires figurant sur le support soient alignés sur les lignes
blanches du tiroir.
Le motif n'est pas centré sur mon disque
Cause: Les paramètres du motif que vous utilisez sont probablement incorrects.
Solution: Modifiez les paramètres du logiciel de manière à centrer et redimensionner le motif
en fonction du disque utilisé. Pour plus d'informations, reportez-vous à la documentation ou à
l'aide en ligne du logiciel utilisé.
L'encre imprimée sur le CD/DVD ne sèche pas
Cause: La surface du disque n'est pas compatible avec l'impression.
Solution: Assurez-vous que le CD/DVD que vous utilisez est compatible avec l'impression jet
d'encre. Les disques imprimables par technique jet d'encre ont généralement une surface de
couleur blanche. Dans certains cas, la surface d'impression est de couleur argentée.
Français
Cause: Le CD/DVD est peut-être chargé à l'envers sur le support.
Solution: Si vous avez déjà gravé le contenu du CD/DVD, il vous faut probablement
renouveler la gravure sur un autre disque. Chargez ensuite le nouveau disque sur le support
de CD/DVD, face à imprimer orientée vers le haut. Réinsérez le support de CD/DVD dans le
tiroir jusqu'à ce que les repères linéaires figurant sur le support soient alignés sur les lignes
blanches du tiroir.
L'appareil HP Tout-en-un signale une erreur liée à une non-correspondance de la
taille de CD/DVD
Cause: La taille du CD/DVD actuellement chargé dans le support de CD/DVD ne correspond
pas à celle spécifiée au démarrage de la tâche d'impression à partir de l'ordinateur.
Solution: Annulez le travail d'impression et remplacez le CD/DVD actuellement chargé dans
le support de CD/DVD par un disque compatible avec la taille spécifiée pour ce travail, ou bien
modifiez les paramètres d'impression dans le logiciel.
Le support de CD/DVD est bloqué dans la zone de stockage.
Cause: Le support de CD/DVD a probablement été inséré dans la zone de stockage alors
qu'un CD/DVD était chargé et que l'anneau bleu était retourné sur le disque.
Solution: Tirez le support de CD/DVD au maximum jusqu'à ce que vous sentiez une
résistance. Insérez ensuite un objet plat et pointu (tel qu'une pointe de couteau plat ou un
tournevis) dans le coin gauche de l'emplacement de stockage, et extrayez l'anneau bleu en le
poussant vers le bas. Une fois que l'anneau bleu a été extrait, vous devez normalement pouvoir
tirer le support de CD/DVD hors de l'emplacement de stockage.
Dépannage relatif aux cartouches d'impression
Si vous rencontrez des problèmes d'impression, l'une des cartouches en est probablement la cause.
Pour plus d’informations à ce sujet, reportez-vous à la section «
d'impression, » page 13 de ce manuel.
Remplacement des cartouches
24 Tout-en-un HP Photosmart série C5200

• Conservez toutes les cartouches d'impression dans leur emballage d'origine fermé jusqu'à
utilisation.
• Les cartouches doivent être stockées à température ambiante (entre 15,6 et 26,6 °C ou 60 et
78 °F).
• Une fois la bande adhésive de protection retirée de la cartouche d'impression, ne la recollez
pas. Cela risque d'endommager la cartouche d'impression. Placez la cartouche d'impression
dans l'appareil HP Tout-en-un immédiatement après avoir enlevé l'adhésif plastique. Si ce n'est
pas possible, rangez-la dans un étui de protection de cartouche d'impression ou dans un boîtier
en plastique étanche à l'air.
• HP recommande de ne pas retirer les cartouches d'impression de l'appareil HP Tout-en-un tant
que les cartouches de rechange ne sont pas prêtes à être installées.
• Eteignez l'appareil HP Tout-en-un à partir du panneau de configuration. N'éteignez pas l'appareil
à partir d'une prise multiple ou en débranchant son cordon d'alimentation. Si vous n'éteignez
pas l'appareil HP Tout-en-un correctement, le chariot d'impression ne reprend pas sa position
correcte et les cartouches risquent de sécher.
• N'ouvrez le capot d'accès aux cartouches d'impression qu'en cas de besoin. L'exposition des
cartouches d'impression à l'air réduit leur durée de vie.
Remarque Si vous laissez la porte d'accès du chariot d'impression ouverte pendant
longtemps, l'appareil HP Tout-en-un referme les cartouches d'impression pour les protéger
de l'air.
• Nettoyez les cartouches d'impression lorsque vous observez une diminution significative de la
qualité d'impression.
Conseil Vous pouvez remarquer une diminution de la qualité d'impression si les
cartouches d'impression n'ont pas été utilisées pendant un laps de temps prolongé.
• Ne nettoyez pas les cartouches si cela n'est pas nécessaire. Une telle intervention est un
gaspillage d'encre et réduit la durée de vie des cartouches.
• Manipulez les cartouches d'impression avec précaution. Une manipulation trop brutale (chute,
secousses etc.) peut provoquer des problèmes d'impression temporaires. Si la qualité
d'impression est médiocre après l'installation de la cartouche, attendez une demi-heure avant
d'utiliser l'appareil.
Français
Procédure d’assistance
Si vous rencontrez un problème, procédez comme suit :
1. Consultez la documentation fournie avec l'appareil HP Tout-en-un.
2. Visitez le site Web de service et d'assistance en ligne de HP à l'adresse suivante
support. L'assistance en ligne HP est disponible pour tous les clients HP. L'assistance HP
constitue le moyen le plus rapide d'obtenir des informations à jour sur les périphériques et
l'assistance de spécialistes. Elle offre les services suivants :
• Un accès rapide à des spécialistes de l’assistance en ligne compétents
• Des mises à jour du logiciel et du pilote pour l'appareil HP Tout-en-un
• Des informations pertinentes sur les produits HP Tout-en-un et la résolution des problèmes
les plus courants
• Des mises à jour proactives de périphérique, des alertes d'assistance et des communiqués
HP disponibles lors de l'enregistrement de l'appareil HP Tout-en-un
3. Appelez l'assistance HP. Les options d'assistance et la disponibilité varient selon le produit, le
pays/la région, ainsi que la langue.
Pour obtenir la liste des numéros de l'assistance téléphonique, consultez la documentation
imprimée fournie avec l'appareil.
www.hp.com/
Procédure d’assistance 25

3 Renseignements techniques
Cette section contient les spécifications techniques et les informations légales internationales de
l'appareil HP Tout-en-un.
Configurations système minimales
La configuration requise concernant le logiciel est incluse dans le fichier Readme.
Spécifications de produits
Pour obtenir des spécifications de produits, visitez le site Web HP à l'adresse www.hp.com/
support.
Spécifications relatives au papier
• Capacité du bac d'entrée principal : Feuilles de papier ordinaire : Jusqu'à 125 (papier de 75 g/
m²)
• Capacité du bac de sortie : Feuilles de papier ordinaire : Jusqu'à 50 (papier de 75 g/m²)
• Capacité du bac photo Feuilles de papier photo : Jusqu'à 20
Remarque Pour obtenir la liste complète des formats de support pris en charge, reportez-vous
au logiciel d'impression.
Français
Spécifications physiques
• Hauteur : 21,6 cm
• Largeur : 45,2 cm
• Profondeur : 38,5 cm
• Poids : 6,8 kg
Spécifications électriques
• Consommation électrique : 25 watts maximum (impression moyenne)
• Tension d'entrée : 100 à 240 V CA ~ 600 mA 50 à 60 Hz
• Tension de sortie : CC 32 V===375 mA, 16 V===500 mA
Remarque Utilisez uniquement l'adaptateur secteur fourni par HP.
Conditions d'exploitation
• Plage de température de fonctionnement recommandée : 15 à 32ºC (59 à 90ºF)
• Plage de température de fonctionnement acceptable : de 5 à 35 ºC (41 à 95 ºF)
• Humidité : de 15 à 80 % d'humidité relative sans condensation
• Plage de température hors fonctionnement (stockage) : -40 à 60 ºC (-4 à 122 ºF)
• En présence de champs électromagnétiques, la sortie de l'appareil HP Tout-en-un peut être
légèrement déformée.
• HP recommande d'utiliser un câble USB de 3 mètres (10 pieds) au maximum afin de réduire le
bruit provoqué par les champs électromagnétiques élevés qui peuvent se produire.
Notification - Energy Star®
Ce produit est conçu pour réduire la consommation d'énergie et préserver l'environnement, sans
sacrifier les performances. Il est conçu pour réduire la consommation totale d'énergie à la fois durant
le fonctionnement et les périodes d'inactivité du périphérique. Ce produit est conforme à la norme
ENERGY STAR®, programme volontaire mis en œuvre afin d'encourager le développement de
produits bureautiques utilisant au mieux les sources d'énergie.
26 Tout-en-un HP Photosmart série C5200

ENERGY STAR est une marque déposée aux Etats-Unis de U.S EPA. En tant que partenaire
ENERGY STAR, HP déclare que ce produit répond aux normes ENERGY STAR relatives à
l'éconergie.
Pour plus d'informations sur les normes ENERGY STAR, visitez le site Web suivant :
www.energystar.gov
Rendement des cartouches d'impression
L'encre contenue dans les cartouches est utilisée de différentes manières au cours du processus
d'impression, y compris lors de l'initialisation, qui prépare le périphérique et les cartouches en vue
de l'impression, ou encore lors de l'entretien des têtes d'impression, qui permet de nettoyer les buses
et assurer que l'encre s'écoule en douceur. En outre, une certaine quantité d'encre demeure dans
la cartouche après utilisation. Pour plus d'informations, voir
Visitez le site Web
cartouches estimés.
www.hp.com/pageyield pour plus d'informations sur les rendements de
Déclarations de conformité
L'appareil HP Tout-en-un respecte les exigences définies par les organismes de réglementation de
votre pays/région. Pour une liste complète des déclarations de conformité aux réglementations,
reportez-vous à l'aide en ligne.
Numéro d'identification réglementaire de modèle
Un numéro de modèle réglementaire a été attribué à votre produit dans un souci d'identification et
de respect de la réglementation. Le numéro de modèle réglementaire de votre produit est le
SDGOB-0731. Vous ne devez pas confondre ce numéro réglementaire avec le nom commercial du
produit (Tout-en-un HP Photosmart série C5200, etc.) ou le numéro du produit (Q8320A, etc.).
www.hp.com/go/inkusage.
Français
Rendement des cartouches d'impression 27

Chapitre 3
Garantie
Produit HP Durée de la garantie limitée
Supports logiciels 90 jours
Imprimante 1 an
Cartouches d'encre Jusqu'à épuisement de l'encre HP ou jusqu'à expiration de la
Accessoires 1 an, sauf indication contraire
A. Extension de garantie limitée
1. Hewlett-Packard (HP) garantit au client utilisateur final que les produhits HP décrits précédemment sont exempts de défauts de matériaux
et malfaçons pendant la durée indiquée ci-dessus, à compter de la date d'achat par le client.
2. Pour les logiciels, la garantie limitée HP est valable uniquement en cas d'impossibilité d'exécuter les instructions de programmation. HP ne
garantit pas que le fonctionnement du logiciel ne connaîtra pas d'interruptions ni d'erreurs.
3. La garantie limitée HP ne couvre que les défauts qui apparaissent dans le cadre de l'utilisation normale du produit et ne couvre aucun
autre problème, y compris ceux qui surviennent du fait :
a. d'une mauvaise maintenance ou d'une modification ;
b. de logiciels, de supports, de pièces ou de consommables non fournis ou non pris en charge par HP ;
c. du fonctionnement du produit hors de ses caractéristiques ; ou
d. d'une modification non autorisée ou d'une mauvaise utilisation.
4. Pour les imprimantes HP, l'utilisation d'une cartouche d'un autre fournisseur ou d'une cartouche rechargée n'entraîne pas la résiliation de la
garantie ni d'un contrat de support HP. Toutefois, si la panne ou les dégâts peuvent être attribués à l'utilisation d'une cartouche d'un autre
fournisseur, d'une cartouche rechargée ou d'une cartouche périmée, HP facturera les montants correspondant au temps et au matériel
nécessaires à la réparation de l'imprimante.
5. Si, pendant la période de garantie applicable, HP est informé d'une défaillance concernant un produit couvert par la garantie HP, HP
choisira de réparer ou de remplacer le produit défectueux.
6. Si HP est dans l'incapacité de réparer ou de remplacer, selon le cas, un produit défectueux couvert par la garantie HP, HP devra, dans un
délai raisonnable après avoir été informé du défaut, rembourser le prix d'achat du produit.
7. HP ne sera tenu à aucune obligation de réparation, de remplacement ou de remboursement tant que le client n'aura pas retourné le
produit défectueux à HP.
8. Tout produit de remplacement peut être neuf ou comme neuf, pourvu que ses fonctionnalités soient au moins équivalentes à celles du
produit remplacé.
9. Les produits HP peuvent contenir des pièces, des composants ou des matériels reconditionnés équivalents à des neufs en termes de
Français
Cher client,
Vous trouverez, ci-après, les coordonnées de l’entité HP responsable de l'exécution de la garantie fabricant relative à votre matériel HP dans votre pays.
En vertu de votre contrat d’achat, il se peut que vous disposiez de droits légaux supplémentaires à l’encontre de votre vendeur. Ceux-ci ne sont aucunement affectés par la présente garantie du
fabricant HP.
En particulier, si vous êtes un consommateur domicilié en France (départements et territoires d’outre-mer (DOM-TOM) inclus dans la limite des textes qui leur sont applicables), le vendeur reste tenu à
votre égard des défauts de conformité du bien au contrat et des vices rédhibitoires hhdans les conditions prévues aux articles 1641 à 1649 du Code civil.
Code de la consommation :
"Art. L. 211-4. - Le vendeur est tenu de livrer un bien conforme au contrat et répond des défauts de conformité existant lors de la délivrance.
Il répond également des défauts de conformité résultant de l'emballage, des instructions de montage ou de l'installation lorsque celle-ci a été mise à sa charge par le contrat ou a été réalisée sous sa responsabilité."
"Art. L. 211-5. - Pour être conforme au contrat, le bien doit :
1° Etre propre à l'usage habituellement attendu d'un bien semblable et, le cas échéant correspondre à la description donnée par le vendeur et posséder les qualités que celui-ci a présentées à l'acheteur sous forme
d'échantillon ou de modèle ;
- présenter les qualités qu'un acheteur peut légitimement attendre eu égard aux déclarations publiques faites par le vendeur, par le producteur ou par son représentant, notamment dans la publicité ou l'étiquetage ;
2° Ou présenter les caractéristiques définies d'un commun accord par les parties ou être propre à tout usage spécial recherché par l'acheteur, porté à la connaissance du vendeur et que ce dernier a accepté.p"
Code civil :
"Code civil Article 1641 : Le vendeur est tenu de la garantie à raison des défauts cachés de la chose vendue qui la rendent impropre à l’usage auquel on la destine, ou qui diminuent tellement cet usage, que
l’acheteur ne l’aurait pas acquise, ou n’en aurait donné qu’un moindre prix, s’il les avait connus.
"Code civil Article 1648 : L’action résultant des vices rédhibitoires doit être intentée par l’acquéreur dans un délai de deux ans à compter de la découverte du vice."
France : Hewlett-Packard France, SAS, 80, rue Camille Desmoulins, 92788 Issy les Moulineaux Cedex 9
Belgique : Hewlett-Packard Belgium BVBA/SPRL, 1, rue de l'Aéronef, B-1140 Brussels
Luxembourg : Hewlett-Packard Luxembourg SCA, 7a, rue Robert Stümper, L-2557 Luxembourg-Gasperich
performances.
10. La garantie limitée HP est valable dans tout pays dans lequel le produit HP couvert est distribué par HP. Des contrats apportant des
services de garantie supplémentaires, tels que la réparation sur site, sont disponibles auprès des services de maintenance agréés par HP
dans les pays dans lequel le produit est distribué par HP ou par un importateur agréé.
B. Restrictions de garantie
DANS LA MESURE OÙ LES LOIS LOCALES L'AUTORISENT, HP OU SES FOURNISSEURS TIERS NE FONT AUCUNE AUTRE
GARANTIE OU CONDITION, EXPRESSE OU IMPLICITE, EN CE QUI CONCERNE LES PRODUITS HP ET NIENT TOUTE GARANTIE
IMPLICITE DE COMMERCIALISATION, DE QUALITÉ SATISFAISANTE OU D'ADAPTATION À UN BUT PARTICULIER.
C. Restrictions de responsabilité
1. Dans la mesure où les lois locales l'autorisent, les recours énoncés dans cette déclaration de garantie constituent les recours exclusifs du
client.
2. DANS LA MESURE OÙ LES LOIS LOCALES L'AUTORISENT, EXCEPTION FAITE DES OBLIGATIONS SPÉCIFIQUEMENT ÉNONCÉES
DANS LA PRÉSENTE DÉCLARATION DE GARANTIE, HP OU SES FOURNISSEURS TIERS NE POURRONT ÊTRE TENUS POUR
RESPONSABLES DE DOMMAGES DIRECTS, INDIRECTS, SPÉCIAUX OU ACCIDENTELS, QU'ILS SOIENT BASÉS SUR UN
CONTRAT, UN PRÉJUDICE OU TOUTE AUTRE THÉORIE LÉGALE, QUE CES DOMMAGES SOIENT RÉPUTÉS POSSIBLES OU
NON.
D. Lois locales
1. Cette déclaration de garantie donne au client des droits juridiques spécifiques. Le client peut également posséder d'autres droits selon les
états des Etats-Unis, les provinces du Canada, et les autres pays ou régions du monde.
2. Si cette déclaration de garantie est incompatible avec les lois locales, elle sera considérée comme étant modifiée pour être conforme à la
loi locale. Selon ces lois locales, certaines renonciations et limitations de cette déclaration de garantie peuvent ne pas s'appliquer au client.
Par exemple, certains états des Etats-Unis, ainsi que certains gouvernements hors des Etats-Unis (y compris certaines provinces du
Canada), peuvent :
a. exclure les renonciations et limitations de cette déclaration de garantie des droits statutaires d'un client
(par exemple au Royaume-Uni);
b. restreindre d'une autre manière la possibilité pour un fabricant d'imposer ces renonciations et limitations ; ou
c. accorder au client des droits de garantie supplémentaires, spécifier la durée des garanties implicites que le fabricant ne peut nier, ou
ne pas autoriser les limitations portant sur la durée des garanties implicites.
3. EXCEPTÉ DANS LA MESURE AUTORISÉE PAR LA LÉGISLATION, LES TERMES DE LA PRÉSENTE DÉCLARATION DE GARANTIE
N'EXCLUENT, NE LIMITENT NI NE MODIFIENT LES DROITS STATUTAIRES OBLIGATOIRES APPLICABLES À LA VENTE DES
PRODUITS HP AUXDITS CLIENTS, MAIS VIENNENT S'Y AJOUTER.
date de garantie imprimée sur la cartouche (selon le cas qui se
produira en premier). Cette garantie ne couvre pas les produits
utilisant de l'encre HP qui ont été reconditionnés, mal utilisés ou
altérés.
Garantie du fabricant HP
28 Tout-en-un HP Photosmart série C5200

HP Photosmart
C5200 All-in-One series
Guia de conceitos básicos
Português

Conteúdo
1 Visão geral da HP All-in-One
Visão geral do HP All-in-One......................................................................................................3
Recursos do painel de controle..................................................................................................4
Obter mais informações..............................................................................................................5
Carregar originais e papéis........................................................................................................6
Evitar congestionamentos de papel...........................................................................................8
Imprimir diretamente em um CD/DVD........................................................................................9
Exibir, selecionar e imprimir fotos.............................................................................................10
Digitalizar uma imagem............................................................................................................12
Tirar uma cópia.........................................................................................................................12
Substituir os cartuchos de impressão.......................................................................................13
Limpar o HP All-in-One.............................................................................................................16
2 Solução de problemas e suporte
Desinstalar e reinstalar o software...........................................................................................18
Solução de problemas na configuração do hardware..............................................................18
Eliminar congestionamentos de papel......................................................................................21
Solução de problemas na impressão de CD/DVD...................................................................21
Resolução de problemas no cartucho de impressão...............................................................24
Processo de suporte.................................................................................................................25
3 Informações técnicas
Requisitos do sistema..............................................................................................................26
Especificações do produto.......................................................................................................26
Notificação da Energy Star®....................................................................................................26
Rendimento do cartucho de impressão....................................................................................27
Notificações sobre regulamentação.........................................................................................27
Garantia....................................................................................................................................28
Português
2 HP Photosmart C5200 All-in-One series

1 Visão geral da HP All-in-One
Use o HP All-in-One para realizar de maneira rápida e fácil tarefas, como copiar,
digitalizar documentos ou imprimir fotos de um cartão de memória. Muitas funções do
HP All-in-One podem ser acessadas diretamente do painel de controle, sem a
necessidade de ligar o computador.
Nota Este guia apresenta as operações e solução de problemas básicas, assim
como informações para contatar o suporte HP e encomendar suprimentos.
A Ajuda na tela detalha toda a gama de recursos e funções, incluindo o uso do
software HP Photosmart que veio com o HP All-in-One.
Visão geral do HP All-in-One
Legenda Descrição
1 Visor gráfico colorido (também chamado de visor)
2 Painel de controle
3 Slots para cartões de memória e luz Foto
4 Bandeja de saída
5 Extensão da bandeja de papel (também
conhecida como extensão da bandeja)
6 Armazenagem do suporte para CD/DVD
7 Suporte para CD/DVD
8 Bandeja de entrada principal (também citada
como bandeja de entrada)
9 Bandeja para fotos
Visão geral da HP All-in-One 3
Português

Capítulo 1
(continuação)
Legenda Descrição
10 Porta de acesso do CD/DVD
11 Porta dos cartuchos de impressão
12 Vidro
13 Tampa
14 Porta traseira
15 Conexão de alimentação
16 Porta USB traseira
* Use apenas com o adaptador de alimentação fornecido pela HP.
*
Recursos do painel de controle
O diagrama a seguir e a tabela relacionada fornecem uma referência rápida aos recursos
do painel de controle do HP All-in-One.
Português
Legenda Nome e descrição
1 Luz: exibe menus, fotos e mensagens. O visor pode ser puxado para cima e ter seu ângulo
2 Luz de atenção: indica um problema ocorrido. Verifique o visor para obter mais informações.
3 Voltar: retorna para a tela anterior do visor.
4 Ajuda: abre o menu Ajuda no visor, no qual você pode selecionar um tópico sobre o qual queira
4 HP Photosmart C5200 All-in-One series
mudado, para uma melhor visualização.
saber mais. No estado ocioso, pressionar Ajuda lista um menu de itens para os quais o usuário
pode obter ajuda. Dependendo do tópico selecionado, ele será exibido no visor ou na tela do
computador. Ao visualizar telas que não a Ociosa, o botão Ajuda oferece ajuda sensível ao
contexto.
No estado ocioso, pressionar Ajuda lista um menu de itens para os quais o usuário pode obter
ajuda. Ao visualizar telas que não a Ociosa, o botão Ajuda oferece ajuda sensível ao contexto.

(continuação)
Legenda Nome e descrição
5 Menu Foto: ativa o menu Photosmart Express para imprimir, salvar, editar e compartilhar
fotos.
6 Imprimir fotos: dependendo de onde você acessa suas fotos - do menu Exibir, Imprimir ou
Criar -, o botão Imprimir fotos exibirá a tela Visualizar impressão ou imprimirá quaisquer
fotos selecionadas. Caso nenhuma foto esteja selecionada, aparece um aviso perguntando se
você deseja imprimir todas as fotos do cartão de memória.
7 Corrigir olhos vermelhos: ativa ou desativa o recurso Corrigir olhos vermelhos. Por padrão,
esse recurso permanece desativado. Quando esse recurso está ativado, o HP All-in-One
automaticamente corrige olhos vermelhos na foto exibida no visor.
8 Reimpressões: possibilita fazer uma cópia de uma foto original colocada no vidro.
9 Menu Digitalizar: abre o Menu Digitalizar, onde você pode selecionar o destino da
digitalização.
10 Menu Copiar: abre o Menu Copiar, no qual é possível selecionar opções de cópia, como o
número de cópias, o tamanho e o tipo do papel.
11 Iniciar cópia em preto: inicia uma cópia em preto-e-branco.
12 Iniciar cópia colorida: inicia uma cópia colorida.
13 Configurar: o menu Configurar oferece diversos relatórios, configurações do dispositivo e
funções de manutenção.
14 Cancelar: interrompe a operação atual.
15 Ligar: liga e desliga o HP All-in-One. Quando o HP All-in-One está desligado, uma quantidade
mínima de energia continua sendo fornecida ao dispositivo. É possível reduzir ainda mais o
fornecimento de energia pressionando o botão Ligar por três segundos. Essa ação colocará a
unidade em espera ou no estado desativado. Desligue o HP All-in-One e desconecte o cabo
de alimentação para interromper totalmente a alimentação.
16 Menos zoom - (ícone da lupa): Diminui o zoom para mostrar mais aspectos de uma foto. Se
você pressionar esse botão quando uma foto estiver sendo exibida a 100%, o recurso Ajustar
à Página será aplicado à foto automaticamente.
17 Mais zoom + (ícone da lupa): Aumenta o zoom para ampliar a imagem no visor. É possível
usar esse botão com as setas do teclado direcional para ajustar a caixa de corte para
impressão.
18 OK: seleciona uma configuração de menu, um valor ou uma foto no visor.
19 Seta direcional: permite navegar pelas fotos e opções do menu, pressionando os botões das
setas para cima, para baixo, para a esquerda ou para a direita.
Se você estiver aplicando o zoom em uma foto, também poderá usar os botões de setas para
mover em torno da foto e selecionar uma área diferente a ser impressa.
Português
Obter mais informações
Uma variedade de recursos, tanto impressos quanto na tela, fornecem informações
sobre a configuração e uso do HP All-in-One.
Obter mais informações 5

Capítulo 1
• Guia de configuração
O Guia de configuração contém instruções sobre como instalar o HP All-in-One e o
software. Certifique-se de seguir na ordem as etapas do Guia de configuração.
Se você encontrar problemas durante a configuração, consulte Resolução de
problemas na última seção do Guia de configuração, ou consulte “
problemas e suporte” na página 18 neste guia.
• Ajuda na tela
A Ajuda na tela fornece instruções detalhadas sobre os recursos do HP All-in-One
que não estão descritos neste Guia do usuário, incluindo recursos que estão
disponíveis apenas com o uso do software instalado com o HP All-in-One.
•
www.hp.com/support
Se você tiver acesso à Internet, poderá conseguir ajuda e suporte no site da HP.
Esse site oferece suporte técnico, drivers, suprimentos e informações sobre como
fazer pedidos.
Carregar originais e papéis
Você pode copiar ou digitalizar originais até o tamanho carta ou A4, carregando-os no
vidro.
Para carregar um original no vidro do scanner
1. Levante a tampa no HP All-in-One.
2. Carregue o original com o lado de impressão voltado para baixo, no canto frontal
direito do vidro.
Solução de
Português
Dica Para obter mais ajuda sobre como carregar um original, consulte as guias
fixadas junto à margem do vidro.
3. Feche a tampa.
Para carregar papel de tamanho grande
1. Levante a bandeja de saída para colocar papel na bandeja de entrada principal
2. Deslize a guia de largura do papel até sua posição de abertura máxima.
6 HP Photosmart C5200 All-in-One series

3. Bata uma pilha de papel em uma superfície plana para alinhar as margens e verifique
as seguintes condições do papel:
• Verifique se ele não apresenta rasgos, poeira, amassados e margens enroladas
ou curvadas.
• Verifique se todo o papel da pilha é do mesmo tamanho e tipo.
4. Insira a pilha de papel na bandeja de entrada principal com a borda curta para a
frente e o lado de impressão voltado para baixo. Deslize a pilha de papel para a frente
até que pare.
Cuidado Verifique se o HP All-in-One está inativo e silencioso quando você
colocar papel na bandeja de entrada principal. Se o HP All-in-One estiver
executando uma tarefa de manutenção dos cartuchos de impressão ou qualquer
outra tarefa, talvez a parada de papel localizada dentro do dispositivo não esteja
no lugar. Empurre o papel para que o HP All-in-One ejete as páginas em branco.
Dica Se você estiver usando papel timbrado, insira a parte superior da página
primeiro com o lado de impressão voltado para baixo.
5. Deslize para dentro a guia de comprimento de papel até que pare nas bordas do
papel.
Não sobrecarregue a bandeja de entrada principal; verifique se a pilha de papel cabe
na bandeja de entrada principal e se ela não é mais alta do que a parte superior da
guia de largura de papel.
Português
Carregar originais e papéis 7

Capítulo 1
6. Abaixe a bandeja de saída.
7. Puxe o extensor da bandeja de saída em sua direção, o máximo que puder.
Nota Deixe o extensor da bandeja de saída fechado quando usar papel Ofício.
Para carregar papel fotográfico de 13 x 18 cm na bandeja para fotos
1. Levante a tampa da bandeja para fotos para colocar papel fotográfico na bandeja.
2. Insira a pilha de papel fotográfico na bandeja para fotos com a borda curta para a
frente e o lado de impressão voltado para baixo. Deslize a pilha de papel fotográfico
para a frente até que pare.
Se o papel fotográfico tiver abas picotadas, carregue-o de forma que as abas fiquem
mais próximas de você.
3. Deslize a guia de largura do papel para dentro contra a pilha de papel fotográfico até
que ela pare.
Não sobrecarregue a bandeja para fotos; verifique se a pilha de papel fotográfico
cabe na bandeja para fotos e se ela não é mais alta do que a parte superior da guia
de largura de papel.
Português
4. Abaixe a tampa da bandeja para fotos.
Evitar congestionamentos de papel
Para ajudar a evitar congestionamentos de papel, siga estas orientações:
• Remova papéis impressos da bandeja de saída com freqüência.
• Para que o papel não fique enrolado ou amassado, armazene todo o papel não
utilizado na horizontal em uma embalagem que possa ser fechada novamente.
• Verifique se o papel carregado na bandeja de entrada está na horizontal e se as
bordas não estão dobradas ou rasgadas.
• Não combine tipos e tamanhos de papel diferentes na bandeja de entrada. A pilha
de papel na bandeja de entrada deve ser toda do mesmo tipo e tamanho.
8 HP Photosmart C5200 All-in-One series

• Ajuste a guia de comprimento de papel na bandeja de entrada para que encoste
suavemente no papel. Certifique-se de que a guia de comprimento de papel não
dobre o papel na bandeja de entrada.
• Não force o papel muito para a frente na bandeja de entrada.
• Use tipos de papel recomendados para o HP All-in-One.
Imprimir diretamente em um CD/DVD
1. Use o software que acompanha o HP All-in-One para criar e imprimir uma etiqueta
de CD/DVD.
2. Ao ser solicitado, remova com cuidado o suporte para CD/DVD fornecido com o
HP All-in-One.
O suporte para CD/DVD está abaixo da bandeja de entrada principal.
3. Insira a mídia imprimível a jato de tinta no suporte para CD/DVD com o lado a ser
impresso voltado para cima. O CD/DVD deve ser colocado na alça na extremidade
do suporte com as setas.
Nota Se estiver usando uma mídia menor, coloque a alça do suporte em cima
do CD/DVD.
4. Abaixe a porta de acesso do CD/DVD para obter acesso à bandeja de CD/DVD.
A porta de acesso do CD/DVD está localizada abaixo do painel de controle. Quando
está abaixada, a bandeja de CD/DVD fica acima da bandeja de saída.
Imprimir diretamente em um CD/DVD 9
Português

Capítulo 1
5. Empurre o suporte para CD/DVD no HP All-in-One até que as linhas no suporte
estejam no mesmo nível das linhas brancas da bandeja de CD/DVD.
Nota O HP All-in-One puxa o suporte para CD/DVD ao imprimir na mídia. O
suporte para CD/DVD pode ficar projetado aproximadamente 7,5 cm (3
polegadas) na parte traseira do dispositivo. Se o HP All-in-One estiver perto de
uma parede, afaste-o pelo menos 7,5 cm (3 polegadas).
Exibir, selecionar e imprimir fotos
Português
10 HP Photosmart C5200 All-in-One series
É possível visualizar e selecionar fotos no cartão de memória antes de imprimi-las.

1 xD-Picture Card
2 Memory Stick, Memory Stick Pro, Memory Stick Select, Memory Stick Magic Gate, Memory
Stick Duo ou Duo Pro (adaptador é opcional), ou Memory Stick Micro (adaptador é necessário)
3 CompactFlash (CF) tipos I e II
4 Secure Digital (SD), Secure Digital Mini (adaptador é necessário), Secure Digital High
Capacity (SDHC), MultiMediaCard (MMC), MMC Plus, MMC Mobile (RS-MMC, adaptador é
necessário), TransFlash MicroSD Card ou Secure MultiMedia Card
Para exibir e selecionar fotos:
1. Insira um cartão de memória no slot apropriado do HP All-in-One.
O menu Photosmart Express aparece e exibe a foto mais recente no visor.
2. Carregue folhas de papel fotográfico 13 x 18 cm na bandeja para fotos ou papel
fotográfico de tamanho máximo na bandeja de entrada principal.
3. Pressione
até realçar Exibir, depois pressione OK.
A tela Exibir fotos será exibida.
4. Pressione
ou para percorrer as miniaturas das fotos.
5. Quando a miniatura do foto que deseja exibir estiver realçada, pressione OK.
6. Quando a foto aparecer no visor, pressione OK novamente.
A tela Opções de foto será exibida.
7. Com Visualizar impressão realçado, pressione OK.
A tela Visualizar impressão aparece e mostra como a foto ficará depois de
impressa.
8. Se quiser selecionar fotos adicionais para exibir e imprimir, pressione
para realçar
Adicionar mais , pressione OK e repita as etapas 4 a 6.
Como você está na tela Adicionar mais fotos, uma alternativa rápida para
selecionar várias fotos, caso não precise editá-las, é pressionar
uma foto e, em seguida, pressionar
ou para percorrer as fotos e selecioná-las.
para selecionar
Português
Exibir, selecionar e imprimir fotos 11

Capítulo 1
9. (Opcional) Se quiser verificar e/ou modificar as configurações de impressão,
pressione
10. Para imprimir a(s) foto(s), use
botão Imprimir fotos no painel de controle).
Uma tela de status da impressão exibe o número de páginas a ser impressas e o
tempo estimado para tanto.
para realçar Configurações e pressione OK.
ou para realçar Imprimir agora (ou pressione o
Digitalizar uma imagem
É possível iniciar uma digitalização usando o computador ou o painel de controle do
HP All-in-One. Esta seção explica como digitalizar apenas pelo painel de controle do
HP All-in-One.
Nota Também é possível usar o software instalado no HP All-in-One para digitalizar
imagens. Utilizando este software, você pode editar uma imagem digitalizada e criar
projetos especiais usando uma imagem digitalizada.
Digitalizar um original para um computador
Você pode digitalizar os originais colocados no vidro usando o painel de controle.
Para digitalizar para um computador
1. Carregue o original com o lado de impressão voltado para baixo, no canto frontal
direito do vidro.
2. Pressione Menu Digitalizar.
3. Pressione OK para selecionar o aplicativo padrão que receberá a digitalização ou
pressione
Uma prévia da digitalização é exibida no computador, onde você poderá editá-la.
4. Faça qualquer alteração na imagem prévia e, em seguida, clique em Aceitar quando
terminar.
para selecionar outro aplicativo e, depois, pressione OK.
Digitalizar originais para um cartão de memória
É possível enviar digitalizações como imagens JPEG para o cartão de memória inserido.
Com isso, você pode usar as opções de impressão de fotos para imprimir fotos sem
Português
borda e páginas de álbuns a partir da imagem digitalizada.
Para salvar digitalizações em um cartão de memória
1. Certifique-se de que o cartão de memória esteja inserido no slot apropriado do
HP All-in-One.
2. Carregue o original com o lado de impressão voltado para baixo, no canto frontal
direito do vidro.
3. Pressione o botão Menu Digitalizar.
4. Pressione
OK.
O HP All-in-One digitalizará a imagem e salvará o arquivo no cartão de memória no
formato JPEG.
para realçar Digitalizar para cartão de memória, depois pressione
Tirar uma cópia
É possível tirar cópias com qualidade usando o painel de controle.
12 HP Photosmart C5200 All-in-One series

Para fazer uma cópia usando o painel de controle
1. Certifique-se de que haja papel na bandeja de entrada.
2. Carregue o original com o lado de impressão voltado para baixo, no canto frontal
direito do vidro.
3. Pressione Iniciar cópia em preto ou Iniciar cópia colorida para iniciar a cópia.
Substituir os cartuchos de impressão
Siga estas instruções quando precisar substituir os cartuchos de impressão.
Nota Quando o nível de tinta do cartucho de impressão estiver baixo, uma
mensagem será exibida no visor. Você pode verificar os níveis de tinta usando a
Caixa de Ferramentas da Impressora disponível no software HP Photosmart, ou a
caixa de diálogo Propriedades de Impressão no seu computador.
Se você ainda não tiver substituído os cartuchos de impressão do HP All-in-One, é
possível solicitá-los clicando no ícone Comprar suprimentos HP no computador. Em
um computador com Windows, tal ícone está na pasta HP no menu Iniciar.
Para mais informações, consulte
Para substituir os cartuchos de impressão
1. Certifique-se de que o HP All-in-One está ligado.
Cuidado Se o HP All-in-One estiver desligado quando você abrir a porta do
cartucho de impressão para acessar os cartuchos de impressão, o HP All-in-One
não liberará os cartuchos para troca. Você poderá danificar o HP All-in-One se
os cartuchos de impressão não estiverem encaixados com segurança quando
você tentar removê-los.
2. Abra a porta dos cartuchos de impressão.
O carro de impressão move-se para o lado direito do HP All-in-One.
www.hp.com/buy/supplies.
3. Espere até que o carro de impressão pare de se movimentar e fique silencioso e,
então, pressione delicadamente para baixo um dos cartuchos de impressão para
soltá-lo.
Se você estiver substituindo o cartucho de impressão colorido, remova o cartucho
de impressão do slot à esquerda.
Se você estiver substituindo o cartucho de impressão preto, fotográfico ou cartucho
fotográfico cinza, remova o cartucho do slot à direita.
Substituir os cartuchos de impressão 13
Português

Capítulo 1
1 Slot do cartucho de impressão colorido
2 Slot do cartucho de impressão preto e de foto
4. Puxe o cartucho de impressão que está no slot em sua direção.
5. Se você estiver removendo o cartucho de impressão preto para instalar o cartucho
de impressão de foto ou o cartucho fotográfico cinza, guarde o cartucho preto no
protetor do cartucho de impressão ou em uma embalagem plástica hermeticamente
fechada.
6. Remova o novo cartucho de impressão de sua embalagem e, tomando cuidado para
tocar somente no plástico preto, remova cuidadosamente a fita plástica utilizando a
aba rosa de puxar.
Português
1 Contatos de cor cobre
2 Fita plástica com aba rosa de puxar (deve ser removida antes da instalação)
3 Bicos de tinta sob a fita adesiva
Cuidado Não toque nos contatos cor de cobre ou nos bicos injetores de tinta.
Além disso, não coloque a fita novamente nos cartuchos de impressão. Fazer
isso poderá causar obstruções, falhas de tinta e problemas nas conexões
elétricas.
14 HP Photosmart C5200 All-in-One series

7. Segure o cartucho de impressão com o logotipo da HP para cima e insira o novo
cartucho de impressão no slot vazio. Empurre os cartuchos de impressão com
firmeza até que se encaixem.
Se você estiver instalando o cartucho colorido, deslize-o no slot esquerdo.
Caso esteja instalando um cartucho de impressão preto, fotográfico ou cartucho
fotográfico cinza, deslize-o no slot direito.
8. Feche a porta dos cartuchos de impressão.
Se você tiver instalado um novo cartucho de impressão, o HP All-in-One imprimirá
uma folha de alinhamento do cartucho.
9. Quando solicitado, certifique-se de que papel branco comum está carregado na
bandeja de entrada e pressione OK.
Substituir os cartuchos de impressão 15
Português

Capítulo 1
10. O HP All-in-One imprime uma página de teste, alinha o cabeçote de impressão e
calibra a impressora. Recicle ou descarte a página.
Uma mensagem de falha ou êxito será exibida.
Nota Se houver papel colorido carregado na bandeja de entrada quando você
alinhar os cartuchos de impressão, ocorrerá um erro de alinhamento. Carregue
papel branco comum não usado na bandeja de entrada e tente executar o
alinhamento novamente.
Se o alinhamento falhar novamente, é possível que o sensor ou o cartucho de
impressão estejam com defeito. Entre em contato com o Suporte da HP. Vá para
www.hp.com/support. Caso solicitado, selecione seu país/região e, em seguida,
clique em Entre em contato com a HP para obter informações sobre como ligar
para o suporte técnico.
11. Pressione OK para continuar.
Limpar o HP All-in-One
Para que suas cópias e digitalizações permaneçam limpas, talvez você precise limpar o
vidro e o revestimento da tampa. Talvez também seja necessário remover a poeira da
parte externa do HP All-in-One.
Dica Você pode adquirir o kit de limpeza para impressoras a jato de tinta e para
All-in-Ones (Q6260A), o qual oferece todo o material necessário para limpar
adequadamente seu dispositivo HP. Para obter mais informações, visite:
www.shopping.hp.com/accessories-store/printer.
Limpar o vidro
Impressões digitais, manchas, fios de cabelo e poeira na superfície do vidro principal
prejudicam o desempenho e afetam a precisão dos recursos de cópia e digitalização.
Para limpar o vidro
1. Desligue o HP All-in-One, desconecte o cabo de força e levante a tampa.
Português
2. Limpe o vidro com um pano ou esponja macia, levemente umedecida em um produto
de limpeza que não seja abrasivo.
Cuidado Não use produtos abrasivos, acetona, benzina ou tetracloreto de
carbono no vidro; esses produtos podem danificá-lo. Não coloque nem pulverize
líquidos diretamente sobre o vidro. O líquido pode penetrar no vidro e danificar o
dispositivo.
3. Seque o vidro com um pano seco, macio e sem fiapos para evitar manchas.
4. Conecte o cabo de alimentação e, em seguida, ligue o HP All-in-One.
Limpar o revestimento da tampa
Pequenas partículas podem acumular-se no apoio de documentos na parte posterior da
tampa do HP All-in-One.
16 HP Photosmart C5200 All-in-One series

Para limpar o revestimento da tampa
1. Desligue o HP All-in-One, desconecte o cabo de alimentação e levante a tampa.
2. Limpe o apoio de documentos branco com um pano macio ou com uma esponja
levemente umedecida com sabão neutro e água morna.
Limpe o apoio com cuidado para que as partículas se soltem. Não o esfregue.
3. Seque o apoio com um pano seco, macio e sem fiapos.
Cuidado Não use limpadores à base de papel, pois podem arranhar o apoio.
4. Se for necessária uma limpeza adicional, repita as etapas anteriores usando álcool
isopropílico e limpe todo o apoio com um pano úmido para remover qualquer resíduo
de álcool.
Cuidado Tenha cuidado para não derramar álcool sobre o vidro ou o exterior
do HP All-in-One, pois isso poderá danificar o dispositivo.
5. Conecte o cabo de alimentação e, em seguida, ligue o HP All-in-One.
Limpar o HP All-in-One 17
Português

2 Solução de problemas e suporte
Este capítulo contém informações sobre solução de problemas do HP All-in-One. São fornecidas
informações específicas sobre problemas de instalação e configuração, e alguns tópicos
operacionais. Para obter mais informações sobre a solução de problemas, consulte a Ajuda na tela
que acompanha o software.
Muitos problemas ocorrem porque o HP All-in-One foi conectado ao computador usando um cabo
USB antes de o software HP All-in-One ser instalado no computador. Se você conectou o
HP All-in-One ao computador antes de a tela de instalação do software solicitar que isso fosse feito,
siga este procedimento:
Solução de problemas comuns de configuração
1. Desconecte o cabo USB do computador.
2. Remova a instalação do software (se você já o tiver instalado).
3. Reinicie o computador.
4. Desligue o HP All-in-One, aguarde um minuto e ligue-o novamente.
5. Reinstale o software do HP All-in-One.
Cuidado Não conecte o cabo USB ao computador até que seja solicitado pela tela de
instalação do software.
Para obter informações sobre como entrar em contato com o suporte, consulte a contracapa interna
deste guia.
Desinstalar e reinstalar o software
Se a instalação estiver incompleta ou se você conectou o cabo USB ao computador antes de isso
ser solicitado pela tela de instalação do software, talvez seja necessário desinstalar e reinstalar o
software. Não basta excluir os arquivos dos aplicativos HP All-in-One do computador. Os arquivos
devem ser removidos de maneira adequada usando o utilitário de desinstalação fornecido na
instalação do software do HP All-in-One.
Para desinstalar a partir de um computador com Windows e reinstalar novamente.
1. Na barra de tarefas do Windows, clique em Iniciar, Configurações, Painel de controle.
2. Clique duas vezes em Adicionar ou remover programas.
3. Selecione o HP All-in-One e, em seguida, clique em Alterar/remover.
Português
Siga as instruções na tela.
4. Desconecte o HP All-in-One do computador.
5. Reinicie o computador.
Nota É importante desconectar o HP All-in-One antes de reiniciar o computador. Não
conecte o HP All-in-One ao computador até que a instalação do software tenha sido
concluída.
6. Insira o CD-ROM do HP All-in-One na unidade de CD-ROM do seu computador e, em seguida,
inicie o Programa de configuração.
7. Siga as instruções na tela e as instruções fornecidas no Guia de configuração fornecido com o
HP All-in-One.
Solução de problemas na configuração do hardware
Use esta seção para resolver os problemas que podem aparecer durante a configuração do
hardware do HP All-in-One.
O HP All-in-One não pode ser ativado
Causa: O HP All-in-One não está conectado corretamente a uma fonte de alimentação.
18 HP Photosmart C5200 All-in-One series

Solução
• Verifique se o cabo de alimentação está conectado firmemente tanto ao HP All-in-One
quanto ao adaptador de alimentação. Ligue o cabo de alimentação a uma tomada, um
estabilizador ou um filtro de linha.
1 Conexão de força
2 Cabo e adaptador de alimentação
3 Tomada
• Se estiver usando um filtro de linha, certifique-se de que ele esteja ligado. Ou tente conectar
o HP All-in-One diretamente à tomada.
• Teste a tomada para verificar se está funcionando. Conecte um aparelho que você sabe
que funciona e verifique se ele está ligado. Do contrário, a tomada pode estar com
problemas.
• Se você conectou o HP All-in-One a uma tomada com interruptor, certifique-se de que ele
esteja ligado. Se ele estiver ligado mas, mesmo assim, não funcionar, a tomada pode estar
com problemas.
Causa: Você pressionou o botão Ligar muito rapidamente.
Solução: O HP All-in-One pode não responder se você pressionar o botão Ligar rápido
demais. Pressione o botão Ligar uma vez. Pode levar alguns minutos para que o HP All-in-One
seja ligado. Se você pressionar o botão Ligar novamente durante esse tempo, o dispositivo
poderá desligar.
Cuidado Se o HP All-in-One ainda não ligar, ele pode ter uma falha mecânica.
Desconecte o HP All-in-One da tomada e entre em contato com a HP. Acesse:
www.hp.com/support. Escolha seu país/região, se isso for solicitado, e clique em Fale com
a HP para informações sobre como chamar o suporte técnico.
Conectei o cabo USB, mas não consigo usar o HP All-in-One com meu
computador
Causa: O cabo USB foi conectado antes de o software ter sido instalado. A conexão do cabo
USB antes que isto seja solicitado pode provocar erros.
Solução: Antes de conectar o cabo USB, instale o software fornecido com o HP All-in-One.
Durante a instalação, não conecte no cabo USB até que seja solicitado pelas instruções de tela.
Uma vez que você instalou o software, a conexão do computador ao HP All-in-One com um
cabo USB é direta. Basta conectar uma das extremidades do cabo USB na parte de trás do
computador e a outra na parte de trás do HP All-in-One. Você pode conectar em qualquer porta
USB na parte traseira do seu computador.
Solução de problemas na configuração do hardware 19
Português

Português
Capítulo 2
Para obter mais informações sobre a instalação do software e a conexão do cabo USB, consulte
o Guia de configuração que acompanha o HP All-in-One.
O HP All-in-One não imprime
Solução: Se o HP All-in-One e o computador não estiverem se comunicando, tente o
seguinte:
• Observe a luz Ligar localizada na parte frontal do HP All-in-One. Se ela não estiver acesa,
o HP All-in-One está desligado. Certifique-se de que o cabo de alimentação esteja
conectado com segurança ao HP All-in-One e a uma tomada. Pressione o botão Ligar para
ligar o HP All-in-One.
• Verifique se os cartuchos de impressão estão instalados.
• Certifique-se de que haja papel na bandeja de entrada.
• Verifique se o HP All-in-One não apresenta um congestionamento de papel.
• Verifique se o carro de impressão não está preso.
Abra a porta do cartucho de impressão para acessar a área do carro de impressão. Remova
os objetos que estiverem bloqueando o carro de impressão, inclusive qualquer material de
embalagem. Desligue o HP All-in-One e, em seguida, ligue-o novamente.
• Verifique se a fila de impressão do HP All-in-One não está pausada (Windows) ou parada
(Mac). Se estiver, escolha a configuração adequada para continuar a impressão. Para obter
mais informações sobre como acessar a fila de impressão, consulte a documentação
fornecida com o sistema operacional instalado no seu computador.
• Verifique o cabo USB. Se estiver usando um cabo antigo, talvez ele não esteja funcionando
corretamente. Tente conectá-lo a outro produto para verificar se o cabo USB funciona. Se
ocorrerem problemas, pode ser necessário substituir o cabo USB. Verifique também se o
cabo não tem mais de 3 metros de comprimento.
• Certifique-se de que o computador é compatível com USB. Alguns sistemas operacionais,
como Windows 95 e Windows NT, não são compatíveis com conexões USB. Para obter
mais informações, verifique a documentação enviada com o sistema operacional.
• Verifique a conexão do HP All-in-One com o computador. Verifique se o cabo USB está
firmemente conectado à porta USB na parte posterior do HP All-in-One. Verifique se a outra
extremidade do cabo USB está conectada a uma porta USB do computador. Quando o
cabo estiver conectado corretamente, desligue o HP All-in-One e ligue-o novamente.
• Se você estiver conectando o HP All-in-One por meio de um hub USB, verifique se o hub
está ligado. Se o hub estiver ligado, tente estabelecer a conexão diretamente ao
computador.
20 HP Photosmart C5200 All-in-One series

• Verifique se há outras impressoras ou scanners. Talvez seja necessário desconectar os
produtos mais antigos do computador.
• Tente conectar o cabo USB à outra porta USB do computador. Depois de verificar as
conexões, tente reinicializar o computador. Desligue o HP All-in-One e, em seguida, ligueo novamente.
• Se o HP All-in-One estiver off-line, desligue o HP All-in-One e, em seguida, ligue-o
novamente. Inicie um trabalho de impressão.
• Se necessário, remova e reinstale o software instalado com o HP All-in-One.
Para obter mais informações sobre como configurar o HP All-in-One e conectá-lo ao
computador, consulte o Guia de configuração que acompanha o HP All-in-One.
Eliminar congestionamentos de papel
Se HP All-in-One tiver um congestionamento de papel, verifique a porta traseira.
Para eliminar um congestionamento de papel da porta traseira
1. Pressione a lingüeta no lado esquerdo da porta traseira para liberar a porta. Remova a porta
puxando-a para fora do HP All-in-One.
Cuidado Tentar eliminar um congestionamento de papel a partir da frente do
HP All-in-One pode danificar o mecanismo de impressão. Sempre acesse e elimine
congestionamentos de papel pela porta de acesso traseira.
2. Puxe o papel com cuidado, retirando-o dos rolos.
Cuidado Se o papel se rasgar quando estiver sendo removido dos rolos, verifique se nos
rolos e nas rodas há pedaços de papel que ainda possam estar no dispositivo. Se você não
remover todos os pedaços de papel do HP All-in-One, provavelmente ocorrerão mais
congestionamentos de papel.
3. Recoloque a porta traseira. Empurre cuidadosamente a porta para a frente até que ela se
encaixe no lugar.
4. Pressione OK para continuar o trabalho atual.
Solução de problemas na impressão de CD/DVD
Use esta seção para solucionar qualquer problema que tenha ao imprimir em superfícies de CD/
DVD com o HP All-in-One.
O HP All-in-One não detectou o suporte para CD/DVD
Causa: É possível que você não tenha empurrado o suporte totalmente na bandeja de CD/
DVD.
Solução: Empurre o suporte na bandeja de CD/DVD até que as linhas do suporte estejam no
mesmo nível das linhas brancas da bandeja de CD/DVD. A extremidade do suporte marcada
com setas entra na bandeja para CD/DVD primeiro.
Eliminar congestionamentos de papel 21
Português

Capítulo 2
Causa: Você pode ter colocado o suporte para CD/DVD de volta à área de armazenamento.
Solução: Retire o suporte para CD/DVD da área de armazenamento abaixo da bandeja de
entrada principal. Abaixe a porta de acesso do CD/DVD (abaixo do painel de controle) para
obter acesso à bandeja de CD/DVD.
Verifique se há um disco imprimível no suporte para CD/DVD com o lado a ser impresso voltado
para cima. Empurre o suporte na bandeja de CD/DVD até que as linhas do suporte estejam no
mesmo nível das linhas brancas da bandeja de CD/DVD. A extremidade do suporte marcada
com setas entra na bandeja para CD/DVD primeiro.
Causa: Talvez você tenha colocado o disco diretamente na bandeja de CD/DVD, sem colocá-
Português
lo no suporte.
Solução: Retire o suporte para CD/DVD da área de armazenamento abaixo da bandeja de
entrada principal. Retire o disco imprimível da bandeja de CD/DVD e coloque-o no suporte com
o lado a ser impresso voltado para cima. Empurre o suporte na bandeja de CD/DVD até que
as linhas do suporte estejam no mesmo nível das linhas brancas da bandeja de CD/DVD. A
extremidade do suporte marcada com setas entra na bandeja para CD/DVD primeiro.
Causa: O HP All-in-One solicita que insira o disco seguinte ao imprimir vários CD/DVDs em
um trabalho de impressão.
Solução: Remova o suporte da bandeja de CD/DVD. Retire o CD/DVD impresso do suporte.
Coloque o disco seguinte no suporte para CD/DVD com o lado a ser impresso voltado para
cima e reinsira o suporte na bandeja de CD/DVD até que as linhas no suporte estejam no mesmo
nível que as linhas brancas na bandeja. Quando o HP All-in-One detectar o suporte, o aviso
desaparecerá.
O HP All-in-One não detectou CD/DVD no suporte
Causa: Você inseriu o suporte na bandeja de CD/DVD sem carregar um CD/DVD.
22 HP Photosmart C5200 All-in-One series

Solução: Remova o suporte da bandeja de CD/DVD. Coloque um disco imprimível no suporte
para CD/DVD com o lado a ser impresso voltado para cima e reinsira o suporte na bandeja de
CD/DVD até que as linhas no suporte estejam no mesmo nível que as linhas brancas na
bandeja.
Causa: Talvez você tenha colocado o CD/DVD no suporte com o lado errado voltado para
cima.
Solução: Remova o suporte da bandeja de CD/DVD. Coloque um disco imprimível no suporte
para CD/DVD com o lado a ser impresso voltado para cima e reinsira o suporte na bandeja de
CD/DVD até que as linhas no suporte estejam no mesmo nível que as linhas brancas na
bandeja.
O HP All-in-One pára enquanto imprime um CD/DVD
Causa: O HP All-in-One move o suporte pelo dispositivo ao imprimir no CD/DVD. O suporte
pode se projetar aproximadamente 7,5 cm (3 polegadas) a partir da parte traseira do dispositivo.
Se não houver espaço suficiente atrás do HP All-in-One, o suporte e a impressão param.
Solução: Verifique se há um espaço de pelo menos 7,5 cm (3 polegadas) atrás do
HP All-in-One. Observe também se o slot na parte traseira do HP All-in-One não está bloqueado.
A imagem no meu disco impresso está cortada e há tinta no suporte para CD/DVD
Causa: Você colocou o CD/DVD no suporte incorretamente.
Solução: Se você estiver carregando no suporte um CD/DVD de tamanho regular (120 mm)
para ser impresso, não coloque a alça azul sobre o disco. Ela só deve ser usada na impressão
de um CD/DVD pequeno (80 mm).
Antes de tentar novamente, limpe o suporte para remover a tinta. Isso evita que o dispositivo
fique com tinta, assim como protege discos, mãos e roupas de manchas.
Depois de limpar e secar o suporte para CD/DVD, carregue um novo disco imprimível no suporte
com o lado a ser impresso voltado para cima. Deixe a alça azul em sua localização original, no
lado oposto do suporte de seu disco, como mostrado abaixo. Recoloque o suporte na bandeja
de CD/DVD até que as linhas do suporte estejam no mesmo nível das linhas brancas da bandeja
de CD/DVD e tente imprimir novamente.
O HP All-in-One está imprimindo em uma área não imprimível do meu disco
Causa: Seu projeto não deve estar no tamanho correto para o CD/DVD carregado.
Solução: Verifique se o projeto que está imprimindo é apropriado ao tamanho da mídia
carregada no suporte para CD/DVD, incluindo o diâmetro das alças internas e externas. Altere
as configurações no software para centralizar e ajustar o projeto para o disco em uso. Para
informações adicionais, consulte a documentação ou a ajuda on-line do software que está
sendo utilizado.
Causa: Talvez você tenha colocado o CD/DVD no suporte com o lado errado voltado para
cima.
Solução: Se você já gravou o conteúdo no CD/DVD, é preciso fazê-lo novamente, em um
outro disco. Coloque um disco novo no suporte para CD/DVD com o lado a ser impresso voltado
Solução de problemas na impressão de CD/DVD 23
Português

Capítulo 2
para cima. Recoloque o suporte na bandeja de CD/DVD até que as linhas do suporte estejam
no mesmo nível das linhas brancas da bandeja de CD/DVD e tente imprimir novamente.
O projeto não está centralizado no meu disco
Causa: É possível que as configurações do projeto não estejam corretas.
Solução: Altere as configurações no software para centralizar e ajustar o projeto para o disco
em uso. Para informações adicionais, consulte a documentação ou a ajuda on-line do software
que está sendo utilizado.
A tinta no CD/DVD não seca
Causa: A superfície do disco não é compatível com a impressão.
Solução: Verifique se o CD/DVD em uso é compatível com a impressão a jato de tinta. Discos
imprimíveis a jato de tinta geralmente têm uma superfície de impressão branca. (Alguns discos
também têm uma superfície de impressão prateada.)
Causa: Talvez você tenha colocado o CD/DVD no suporte com o lado errado voltado para
cima.
Solução: Se você já gravou o conteúdo no CD/DVD, é preciso fazê-lo novamente, em um
outro disco. Coloque um disco novo no suporte para CD/DVD com o lado a ser impresso voltado
para cima. Recoloque o suporte na bandeja de CD/DVD até que as linhas do suporte estejam
no mesmo nível das linhas brancas da bandeja de CD/DVD e tente imprimir novamente.
O HP All-in-One comunica um erro de incompatibilidade no tamanho do CD/DVD
Causa: O tamanho do CD/DVD que está no suporte não condiz com o tamanho especificado
quando você iniciou o trabalho de impressão a partir do computador.
Solução: Cancele o trabalho de impressão e substitua o CD/DVD em uso no suporte por um
CD/DVD do mesmo tamanho especificado no trabalho de impressão ou altere as configurações
de impressão no software.
O suporte para CD/DVD está emperrado na área de armazenamento
Causa: Talvez você tenha colocado o suporte de volta à área de armazenamento com um
CD/DVD carregado e a alça azul em cima do disco.
Solução: Afaste o suporte para CD/DVD o quanto for possível, até que você sinta resistência.
Em seguida, insira um objeto achatado e sem corte (como uma pequena espátula ou uma chave
de fenda) no canto esquerdo do slot de armazenamento e empurre-o para baixo em cima da
Português
alça azul. Com a alça azul para baixo, você deve conseguir puxar o suporte para CD/DVD do
slot de armazenamento.
Resolução de problemas no cartucho de impressão
Se você não estiver conseguindo imprimir, um dos cartuchos de impressão pode estar com
problemas. Para mais informações, consulte “
neste guia.
• Mantenha todos os cartuchos de impressão nas embalagens fechadas originais até o momento
de serem utilizados.
• Armazene os cartuchos em temperatura ambiente (15,6°-26,6° C ou 60°-78° F).
• Não cole novamente a fita de proteção depois que ela for removida do cartucho de impressão.
Colar a fita plástica novamente pode danificar o cartucho de impressão. Coloque o cartucho de
impressão no HP All-in-One imediatamente após remover a fita plástica. Se não for possível,
armazene-o em um protetor de cartucho de impressão ou em um recipiente plástico vedado.
• A HP recomenda que você não remova os cartuchos de impressão do HP All-in-One até que
os cartuchos de impressão estejam disponíveis para serem instalados.
24 HP Photosmart C5200 All-in-One series
Substituir os cartuchos de impressão” na página 13,

• Desligue o HP All-in-One no painel de controle. Não desligue o dispositivo desligando o filtro
de linha ou desconectando o cabo de alimentação do HP All-in-One. Se você não desligar o
HP All-in-One adequadamente, o carro de impressão não retornará à posição correta e os
cartuchos poderão secar.
• Não abra a porta do cartucho de impressão, a não ser que seja necessário. Isso expõe os
cartuchos de impressão ao ar, o que reduz sua vida útil.
Nota Se você deixar a porta do cartucho de impressão aberta por um longo período, o
HP All-in-One fechará os cartuchos de impressão novamente para protegê-los contra a
exposição ao ar.
• Limpe os cartuchos de impressão quando notar uma diminuição significativa na qualidade de
impressão.
Dica Você poderá notar uma diminuição na qualidade de impressão se os cartuchos de
impressão não forem usados por muito tempo.
• Não limpe os cartuchos de tinta sem necessidade. A limpeza gasta tinta e reduz a vida útil dos
cartuchos.
• Manuseie os cartuchos de impressão com cuidado. A queda, o choque ou o manuseio incorreto
dos cartuchos durante a instalação pode causar problemas de impressão temporários. Se a
qualidade de impressão for baixa após a instalação do cartucho, deixe o cartucho de impressão
se recuperar por meia hora.
Processo de suporte
Se tiver um problema, siga essas etapas:
1. Consulte a documentação fornecida com o HP All-in-One.
2. Visite o suporte online da HP no website
disponível para todos os clientes HP. Esta é a fonte mais rápida para a obtenção de informações
atualizadas sobre dispositivos e inclui os seguintes recursos:
• Acesso rápido a especialistas de suporte online qualificados.
• Atualizações de software e drivers para o HP All-in-One
• Valiosas informações e soluções de problemas comuns do HP All-in-One
• Atualizações proativas de dispositivos, alertas de suporte e boletins HP que estão
disponíveis quando você registra o HP All-in-One
3. Ligue para o suporte HP. A disponibilidade e as opções de suporte variam dependendo do
dispositivo, país/região e idioma.
Para obter uma lista dos números de telefone do suporte, consulte a documentação impressa
que acompanha o dispositivo.
www.hp.com/support. O suporte online da HP está
Processo de suporte 25
Português

3 Informações técnicas
As especificações técnicas e as informações sobre regulamentações internacionais para o
HP All-in-One são fornecidas nessa seção.
Requisitos do sistema
Os requisitos do software do sistema estão localizados no arquivo Readme.
Especificações do produto
Para mais informações, visite o site da HP, em www.hp.com/support.
Especificações de papel
• Capacidade da bandeja de entrada principal: Folhas de papel comum: Até 125 (papel de 75 g/
m2 / 20 libras)
• Capacidade da bandeja de saída: Folhas de papel comum: Até 50 (papel de 75 g/m2 / 20 libras)
• Capacidade da bandeja para fotos: Folhas de papel fotográfico: Até 20
Nota Para uma lista completa dos tamanhos de mídia compatíveis, consulte o software da
impressora.
Especificações físicas
• Altura: 21,6 cm
• Largura: 45,2 cm
• Profundidade: 38,5 cm
• Peso: 6,8 kg
Especificações de energia
• Consumo de energia: máximo de 25 W (impressão média)
• Voltagem de entrada: AC 100 a 240 V ~ 600 mA 50-60 Hz
• Voltagem de saída: DC 32 V===375 mA, 16 V===500 mA
Nota Use apenas com o adaptador de alimentação fornecido pela HP.
Especificações ambientais
Português
• Variação de temperatura operacional recomendada: 15º a 32º C (59º a 90º F)
• Faixa de temperatura de operação permitida: 5º a 35º C (41º a 95º F)
• Umidade: umidade relativa sem condensação de 15 a 80%
• Faixa de temperatura não operacional (armazenamento): -40° a 60° C (-4° a 122° F)
• Na presença de campos eletromagnéticos altos, é possível que a saída do HP All-in-One seja
levemente distorcida
• A HP recomenda a utilização de um cabo USB menor do que 3 m (10 pés) de comprimento
para minimizar o ruído injetado devido aos campos eletromagnéticos altos potenciais
Notificação da Energy Star®
Este produto foi projetado para reduzir o consumo de energia e preservar recursos naturais, sem
prejuízo de desempenho. Ele foi projetado para reduzir o consumo total de energia tanto durante a
operação como na inatividade. Este produto está qualificado para o ENERGY STAR®, um programa
voluntário criado para incentivar o desenvolvimento de produtos para escritório que economizam
energia.
26 HP Photosmart C5200 All-in-One series

ENERGY STAR é uma marca de serviço registrada do EPA dos EUA. Como um parceiro ENERGY
STAR, a HP determinou que este produto atenda às diretrizes do ENERGY STAR para economia
de energia.
Para obter mais informações sobre as diretrizes ENERGY STAR, visite o seguinte Web site:
www.energystar.gov
Rendimento do cartucho de impressão
A tinta dos cartuchos é usada no processo de impressão de várias maneiras, como no processo de
inicialização, que prepara o dispositivo e os cartuchos para a impressão, e na manutenção do
cabeçote de impressão, que mantém os injetores de tinta limpos e a tinta fluindo com facilidade.
Além disso, um pouco de tinta residual é mantido no cartucho após o uso. Para mais informações,
consulte
Acesse
www.hp.com/go/inkusage.
www.hp.com/pageyield para mais informações sobre o rendimento estimado dos cartuchos.
Notificações sobre regulamentação
O HP All-in-One atende aos requisitos de produto de órgãos reguladores do seu país/região. Para
obter uma lista completa de notificações sobre regulamentação, consulte a Ajuda na tela.
Número de identificação do modelo de regulamentação
Para fins de identificação de regulamentação, foi atribuído ao seu produto um Número de Modelo
de Regulamentação. O Número de Modelo de Regulamentação do seu produto é SDGOB-0731.
Esse número de regulamentação não deve ser confundido com o nome comercial (HP Photosmart
C5200 All-in-One series, etc.) ou os números do produto (Q8320A, etc.).
Rendimento do cartucho de impressão 27
Português

A
A
Capítulo 3
Garantia
Produto HP Duração da garantia limitada
Mídia de software 90 dias
Impressora 1 ano
Cartuchos de impressão ou de tinta Até que a tinta HP acabe ou até a data do “fim da garantia”
Acessórios 1 ano, a não ser que haja outra indicação
. Extensão da garantia limitada
1. A Hewlett-Packard (HP) garante ao cliente final que os produtos HP especificados acima estarão livres de defeitos de
materiais e fabricação pelo período mencionado acima, que se inicia na data da compra pelo cliente.
2. No caso de produtos de software, a garantia limitada HP cobre apenas falhas de execução de instruções de
programação. A HP não garante que a operação de qualquer produto será ininterrupta ou livre de erros.
3. A garantia limitada HP cobre somente os defeitos surgidos como resultado de uso normal do produto, e não cobre
outros problemas, incluindo os que surgirem como resultado de:
Português
a. Manutenção ou modificação inadequada;
b. Software, mídia, peças ou suprimentos não fornecidos ou aceitos pela HP;
c. Operação fora das especificações do produto;
d. Modificação não autorizada ou uso indevido.
4. Para produtos de impressoras HP, o uso de um cartucho não-HP ou de um cartucho recondicionado não afeta a
garantia ao cliente nem qualquer contrato de suporte HP com o cliente. No entanto, se uma falha ou um dano da
impressora puderem ser atribuídos ao uso de um cartucho não-HP ou recondicionado ou a um cartucho de tinta
expirado, a HP cobrará suas taxas padrão referentes a tempo e materiais para fazer a manutenção na impressora
quanto à falha ou ao dano em questão.
5. Se a HP for informada, durante o período de garantia aplicável, sobre um defeito em qualquer produto coberto pela
garantia HP, poderá optar por substituir ou consertar o produto.
6. Se a HP não puder consertar ou substituir o produto defeituoso coberto pela garantia HP, como for aplicável, ela irá,
dentro de um período de tempo razoável após a notificação do defeito, ressarcir o valor pago pelo produto.
7. A HP não tem obrigação de consertar, substituir ou ressarcir o valor pago até o cliente retornar o produto
defeituoso à HP.
8. Qualquer produto de reposição pode ser novo ou em estado de novo, desde que a sua funcionalidade seja ao menos
igual àquela do produto que está sendo substituído.
9. Os produtos HP podem conter peças manufaturadas, componentes, ou materiais equivalentes a novos no
desempenho.
10. A Declaração de garantia limitada da HP é válida em qualquer país onde o produto coberto HP for distribuído pela HP.
Contratos para serviços de garantia adicionais, como serviços nas instalações do cliente, podem estar disponíveis em
qualquer representante de serviços HP em países onde o produto é distribuído pela HP ou por importador autorizado.
B. Limitações da garantia
DENTRO DOS LIMITES PERMITIDOS PELAS LEIS LOCAIS, NEM A HP NEM OS SEUS FORNECEDORES FAZEM
QUALQUER OUTRA GARANTIA OU CONDIÇÃO DE QUALQUER NATUREZA, EXPRESSA OU IMPLÍCITA,
GARANTIAS OU CONDIÇÕES IMPLÍCITAS DE COMERCIABILIDADE, QUALIDADE SATISFATÓRIA E
ADEQUAÇÃO A UM PROPÓSITO PARTICULAR.
C. Limitações de responsabilidade
1. Para a extensão permitida pela lei local, as soluções fornecidas nesta Declaração de Garantia são as únicas e
exclusivas do cliente.
2. DENTRO DOS LIMITES PERMITIDOS PELAS LEIS LOCAIS, EXCETO PELAS OBRIGAÇÕES ESPECIFICAMENTE
MENCIONADAS NESTA DECLARAÇÃO DE GARANTIA, EM HIPÓTESE ALGUMA A HP OU OS SEUS
FORNECEDORES SERÃO RESPONSÁVEIS POR DANOS DIRETOS, INDIRETOS, ESPECIAIS, INCIDENTAIS OU
CONSEQÜENCIAIS, SEJAM ELES BASEADOS EM CONTRATO, AÇÃO DE PERDAS E DANOS OU QUALQUER
OUTRO RECURSO JURÍDICO, MESMO QUE HP TENHA SIDO AVISADA DA POSSIBILIDADE DE TAIS DANOS.
D. Lei local
1. Esta Declaração de Garantia fornece ao cliente direitos legais específicos. O cliente pode também ter outros direitos
que podem variar de estado para estado nos Estados Unidos, de província para província no Canadá e de país para
país em outros lugares no mundo.
2. Na medida em que esta declaração de garantia for inconsistente com as leis locais, deve ser considerada emendada
para se tornar consistente com tais leis. Sob elas, certas limitações desta declaração e isenções de responsabilidade
podem não ser aplicáveis ao cliente. Por exemplo, alguns estados dos Estados Unidos, assim como alguns governos
fora dos EUA (incluindo províncias canadenses), poderão:
a. Impedir que isenções de responsabilidades e limitações nesta Declaração de garantia limitem os direitos legais de
um consumidor (por exemplo, Reino Unido);
b. Ou restringir a capacidade de um fabricante para impor tais renúncias ou limitações; ou
c. Conceder ao cliente direitos de garantia adicionais, especificar a duração de garantias implícitas das quais
fabricantes não podem isentar-se ou permitir limitações na duração de garantias implícitas.
3. OS TERMOS DESTA DECLARAÇÃO DE GARANTIA, EXCETO PARA OS LIMITES LEGALMENTE PERMITIDOS,
NÃO EXCLUEM, RESTRIGEM OU SE MODIFICAM, E SÃO UM ACRÉSCIMO AOS DIREITOS LEGAIS APLICÁVEIS
À VENDA DE PRODUTOS HP A TAIS CLIENTES.
Estimado Cliente,
nexa à presente declaração encontra-se uma lista das empresas HP de entre as quais consta o nome e morada da empresa
responsével pela prestação da Garantia Limitada da HP (garantia do fabricante) no- seu país.
Além da referida garantia do fabricante prestada pela HP, poderá também. Beneficiar, nos termos da legislação em
vigor, de outros direitos adicionais de garantia, perante o vendedor, ao abrigo do respectivo Contrato de Compra
e Venda.
Portugal: Hewlett-Packard Portugal, Lda., Edificio D. Sancho I, Quinta da Fonte, Porto Salvo, 2780-730 Paco de Arcos,
P-Oeiras
Informações relativas à Garantia Limitada da HP
impressa no cartucho, o que ocorrer primeiro. Esta garantia não
cobre produtos de tinta HP que tenham sido reabastecidos,
refabricados, recondicionados, adulterados ou utilizados de
forma incorreta.
28 HP Photosmart C5200 All-in-One series

ﻲﺑﺮﻋ
HP Photosmart C5200
All-in-One series
ﻞﻴﻟد تﺎﻴﺳﺎﺳﻷا

تﺎﻳﻮﺘﺤﻤﻟا
ﺔﺤﻤﻟ ﺔﻌیﺮﺳ ﻦﻋ زﺎﻬﺟ HP All-in-One...................................................................................................٣
تاﺰﻴﻡ ﺔﺡﻮﻟ ﻢﻜﺤﺘﻟا..............................................................................................................................٤
لﻮﺼﺤﻟا ﻰﻠﻋ ﺪیﺰﻤﻟا ﻦﻡ تﺎﻡﻮﻠﻌﻤﻟا............................................................................................................٥
ﻞﻴﻤﺤﺕ ﺦﺴُﻨﻟا ﺔﻴﻠﺹﻷا ﻞﻴﻤﺤﺕو قرﻮﻟا...........................................................................................................٥
ﺐﻨﺠﺕ رﺎﺸﺤﻥا قرﻮﻟا.............................................................................................................................٧
ﺔﻋﺎﺒﻄﻟا ةﺮﺵﺎﺒﻤﻟا ﻰﻠﻋ صﺮﻘﻟا طﻮﻐﻀﻤﻟا/صﺮﻗ ﻮیﺪﻴﻔﻟا ﻲﻤﻗﺮﻟا..............................................................................٨
ضﺮﻋ رﻮﺼﻟا ﺎهﺪیﺪﺤﺕو ﺎﻬﺘﻋﺎﺒﻃو.............................................................................................................٩
ﺢﺴﻡ ةرﻮﺼﻟا...................................................................................................................................١١
ﻞﻤﻋ ﺔﺨﺴﻥ......................................................................................................................................١١
لاﺪﺒﺘﺳا تﺎﺵﻮﻃﺮﺥ ﺔﻋﺎﺒﻄﻟا ..................................................................................................................١١
ﻒﻴﻈﻨﺕ HP All-in-One...................................................................................................................١٤
ءﺎﻐﻟإ ﺖﻴﺒﺜﺕ ﺞﻡﺎﻥﺮﺒﻟا ﻢﺙ ةدﺎﻋإ ﻪﺘﻴﺒﺜﺕ...........................................................................................................١٦
ﻞﺡ تﻼﻜﺸﻡ ﻖﻠﻌﺘﺕ داﺪﻋﺈﺏ ةﺰﻬﺟﻷا...........................................................................................................١٦
ﺮیﺮﺤﺕ تارﺎﺸﺤﻥا قرﻮﻟا.......................................................................................................................١٩
فﺎﺸﻜﺘﺳا تﻼﻜﺸﻡ ﺔﻋﺎﺒﻃ صﺮﻗ طﻮﻐﻀﻡ/صﺮﻗ ﻮیﺪﻴﻓ ﻲﻤﻗر ﺎﻬﺡﻼﺹإو.................................................................١٩
ﻞﺡ تﻼﻜﺸﻡ ﻖﻠﻌﺘﺕ تﺎﺵﻮﻃﺮﺨﺏ ﺔﻋﺎﺒﻄﻟا.....................................................................................................٢٢
ﺔﻴﻠﻤﻋ ﻢﻋﺪﻟا.....................................................................................................................................٢٢
تﺎﺒﻠﻄﺘﻡ مﺎﻈﻨﻟا.................................................................................................................................٢٣
تﺎﻔﺹاﻮﻡ ﺞﺘﻨﻤﻟا...............................................................................................................................٢٣
رﺎﻌﺵإ Energy Star®.....................................................................................................................٢٣
ﺔﻋﺎﺒﻄﻟا.....................................................................................................................٢٤
ﺔﻴﺟﺎﺘﻥإ ﺔﺵﻮﻃﺮﺥ
تارﺎﻌﺵﻹا ﺔﻴﻤﻴﻈﻨﺘﻟا...........................................................................................................................٢٤
نﺎﻤﻀﻟا.........................................................................................................................................٢٥
١ةﺮﻜﻓ ﺔﻡﺎﻋ ﻦﻋ HP All-in-One
ﻲﺑﺮﻋ
٢ﻞﺡ تﻼﻜﺸﻤﻟا ﻢﻋﺪﻟاو
٣تﺎﻡﻮﻠﻌﻤﻟا ﺔﻴﻨﻔﻟا
٢

١ةﺮﻜﻓ ﺔﻡﺎﻋ ﻦﻋ HP All-in-One
مﺪﺨﺘﺳا HP All-in-One ﺬﻴﻔﻨﺘﻟ مﺎﻬﻡ ﻞﺜﻡ ﻞﻤﻋ ﺔﺨﺴﻥ ,ﺢﺴﻡ تاﺪﻨﺘﺴﻡ ,وأ ﺔﻋﺎﺒﻃ رﻮﺹ ﺔﻋﺮﺴﺏ ﺔﻟﻮﻬﺳو ﻦﻡ لﻼﺥ ﺔﻗﺎﻄﺏ
ةﺮآاﺬﻟا .ﻦﻜﻤی لﻮﺹﻮﻟا ﻰﻟإ ﺮﻴﺜﻜﻟا ﻦﻡ ﻒﺋﺎﻇو HP All-in-One ًة ﺮ ﺵ ﺎ ﺒ ﻡ ﻦﻡ ﺔﺡﻮﻟ ﻢﻜﺤﺘﻟا ,نود ﻞﻴﻐﺸﺕ ﺮﺕﻮﻴﺒﻤﻜﻟا.
ﺔﻈﺡﻼﻡمﻮﻘی اﺬه ﻞﻴﻟﺪﻟا ﻢیﺪﻘﺘﺏ تﺎﻴﻠﻤﻋ ﺔﻴﺳﺎﺳأ تﺎﻡﻮﻠﻌﻡو لﻮﺡ ﻞﺡ تﻼﻜﺸﻤﻟا ,ﺎﻤآ ﺮﻓﻮی تﺎﻡﻮﻠﻌﻡ لﻮﺡ لﺎﺼﺕﻻا
ﻢﻋﺪﺏ HP ﺐﻠﻃو تﺎﻡﺰﻠﺘﺴﻤﻟا.
ﻒﺼﺕ تﺎﻤﻴﻠﻌﺘﻟا ةﺮهﺎﻈﻟا ﻰﻠﻋ ﺔﺵﺎﺸﻟا ﻞﻴﺼﻔﺘﺏ قﺎﻄﻨﻟا ﻞﻡﺎﻜﻟا تاﺰﻴﻤﻠﻟ ﻒﺋﺎﻇﻮﻟاو ,ﺎﻤﺏ ﻲﻓ ﻚﻟذ ماﺪﺨﺘﺳا ﺞﻡﺎﻥﺮﺏ
HP Photosmart دوﺰﻤﻟا ﻊﻡ زﺎﻬﺟ HP All-in-One.
ﻲﺑﺮﻋ
ﺔﺤﻤﻟ ﺔﻌﻳﺮﺳ ﻦﻋ زﺎﻬﺟ HP All-in-One
ﺔﻗﺎﻄﺒﻟا ﺔﻘﺻﻼﻟاﻒﺻﻮﻟا
1ﺔﺵﺎﺵ تﺎﻡﻮﺳﺮﻟا ﺔﻥﻮﻠﻤﻟا) رﺎﺸی ﺎﻬﻴﻟإ ﺎًﻀیأ ﺔﺵﺎﺸآ ضﺮﻌﻟا(
2ﺔﺡﻮﻟ ﻢﻜﺤﺘﻟا
3تﺎﺤﺘﻓ تﺎﻗﺎﻄﺏ ةﺮآاﺬﻟا حﺎﺒﺼﻡو رﻮﺼﻟا
4ﺔیوﺎﺡ جاﺮﺥﻹا
5ةادأ ﺔﻟﺎﻃإ ﺔیوﺎﺡ قرﻮﻟا) رﺎﺸی ﺎﻬﻴﻟإ ﺎًﻀیأ ةادﺄآ ﺔﻟﺎﻃإ ﺔیوﺎﺤﻟا(
6ﺔﻘﻄﻨﻡ ﻦیﺰﺨﺕ ﻞﻡﺎﺡ صاﺮﻗﻷا ﺔﻃﻮﻐﻀﻤﻟا/صاﺮﻗأ ﻮیﺪﻴﻔﻟا ﺔﻴﻤﻗﺮﻟا
7ﻞﻡﺎﺡ صاﺮﻗﻷا ﺔﻃﻮﻐﻀﻤﻟا/صاﺮﻗأ ﻮیﺪﻴﻔﻟا ﺔﻴﻤﻗﺮﻟا
8ﺔیوﺎﺡ لﺎﺥدﻹا ﺔﻴﺴﻴﺋﺮﻟا) رﺎﺸُی ﺎﻬﻴﻟإ ﺎًﻀیأ ﺔیوﺎﺤآ لﺎﺥدﻹا(
9ﺔیوﺎﺡ رﻮﺼﻟا
10بﺎﺏ لﻮﺹﻮﻟا ﻰﻟإ صاﺮﻗﻷا ﺔﻃﻮﻐﻀﻤﻟا/صاﺮﻗأ ﻮیﺪﻴﻔﻟا ﺔﻴﻤﻗﺮﻟا
11بﺎﺏ ﺔﺵﻮﻃﺮﺥ ﺔﻋﺎﺒﻄﻟا
٣ HP Photosmart C5200 All-in-One series

ﺔﻗﺎﻄﺒﻟا ﺔﻘﺻﻼﻟاﻒﺻﻮﻟا
12ﺢﻄﺴﻟا ﻲﺟﺎﺟﺰﻟا
13ءﺎﻄﻏ
14بﺎﺏ ﻲﻔﻠﺥ
*
15ﻞﻴﺹﻮﺕ ﺔﻗﺎﻄﻟا
16ﺬﻔﻨﻡ USB ﻲﻔﻠﺨﻟا
.ﻂﻘﻓ HP ﻦﻣ ﻚﻟ ﻩﺮﻴﻓﻮﺗ ﻢﺗ يﺬﻟا ﺔﻗﺎﻄﻟا لﻮﺤﻣ مﺪﺨﺘﺳا
)ﻊﺏﺎﺕ(
تاﺰﻴﻡ ﺔﺡﻮﻟ ﻢﻜﺤﺘﻟا
ﺮﻓﻮی ﻢﺳﺮﻟا ﻲﻟﺎﺘﻟا لوﺪﺠﻟاو ﻖﻠﻌﺘﻤﻟا ﻪﺏ ﺔﻌﺟاﺮﻡ ﺔﻌیﺮﺳ تاﺰﻴﻤﻟ ﺔﺡﻮﻟ ﻢﻜﺤﺘﻟا زﺎﻬﺠﻟ HP All-in-One.
ﺔﻗﺎﻄﺒﻟا ﺔﻘﺻﻼﻟاﻢﺳﻹا ﻒﺻﻮﻟاو
تﺎﺵﺎﺵ ﺮﻴﻏ تﺎﺵﺎﺵ ،نﻮﻜﺴﻟا ﺮﻓﻮی
اذإ ﺖﻨآ ﺪیﺮﺕ ﺔﻋﺎﺒﻃ ﺔﻓﺎآ رﻮﺼﻟا
،نﻮﻜﺴﻟا يدﺆی ﻂﻐﺽ Help) تﺎﻤﻴﻠﻌﺘﻟا( ﻰﻟإ ضﺮﻋ ﺔﻤﺋﺎﻗ ﺮﺹﺎﻨﻌﻟﺎﺏ ﻲﺘﻟا ﻦﻜﻤی مﺪﺨﺘﺴﻤﻠﻟ لﻮﺼﺤﻟا ﻰﻠﻋ تﺎﻤﻴﻠﻌﺘﻟا ﺔﺹﺎﺨﻟا ﺎﻬﺏ.
ﺮﻬﻈی عﻮﺽﻮﻤﻟا ﻰﻠﻋ ﺔﺵﺎﺵ ضﺮﻌﻟا وأ ﺔﺵﺎﺵ ،ﺮﺕﻮﻴﺒﻤﻜﻟا ﺎًﻌﺒﺕ عﻮﺽﻮﻤﻠﻟ يﺬﻟا ﻩدﺪﺤﺕ .ﺪﻨﻋ ضﺮﻋ
رﺰﻟا Help) تﺎﻤﻴﻠﻌﺘﻟا( تﺎﻤﻴﻠﻌﺕ ﻊﺒﺘﺕ قﺎﻴﺴﻟا.
ﻦﻡ ﻊﺽو ،نﻮﻜﺴﻟا يدﺆی ﻂﻐﺽ Help) تﺎﻤﻴﻠﻌﺘﻟا( ﻰﻟإ ضﺮﻋ ﺔﻤﺋﺎﻗ ﺮﺹﺎﻨﻌﻟﺎﺏ ﻲﺘﻟا ﻦﻜﻤی مﺪﺨﺘﺴﻤﻠﻟ لﻮﺼﺤﻟا ﻰﻠﻋ تﺎﻤﻴﻠﻌﺘﻟا
ﺔﺹﺎﺨﻟا ﺎﻬﺏ .ﺪﻨﻋ ضﺮﻋ تﺎﺵﺎﺵ ﺮﻴﻏ تﺎﺵﺎﺵ ،نﻮﻜﺴﻟا ﺮﻓﻮی رﺰﻟا Help) تﺎﻤﻴﻠﻌﺘﻟا( تﺎﻤﻴﻠﻌﺕ ﻊﺒﺘﺕ قﺎﻴﺴﻟا.
)ﺔﻋﺎﺒﻃ( وأ Create) ءﺎﺸﻥإ(، ضﺮﻌی رﺰﻟا Print Photos) ﺔﻋﺎﺒﻃ رﻮﺼﻟا( ﺔﺵﺎﺵ Print Preview) ﺔﻨﻳﺎﻌﻡ ﺔﻋﺎﺒﻄﻟا( وأ
مﻮﻘی ﺔﻋﺎﺒﻄﺏ ﺔیأ رﻮﺹ ﻢﺕ ﺎهﺪیﺪﺤﺕ .ﻲﻓ ﺔﻟﺎﺡ مﺪﻋ ﺪیﺪﺤﺕ ﺔیأ ،رﻮﺹ ﺮﻬﻈﺕ ﻚﻟ ﺔﺒﻟﺎﻄﻡ ﻚﻟﺄﺴﺕ ﺎﻡ
ةدﻮﺟﻮﻤﻟا ﻰﻠﻋ ﻚﺘﻗﺎﻄﺏ.
ﻲﺑﺮﻋ
1ضﺮﻌﻟا :ضﺮﻋ ﻢﺋاﻮﻘﻟا ,رﻮﺼﻟا ﻞﺋﺎﺳﺮﻟاو .ﻦﻜﻤی ﺐﺤﺳ ﺔﺵﺎﺵ ضﺮﻌﻟا ﻰﻟإ ﻰﻠﻋﻷا ﺎﻬﻴﻃو ﻦﻡ ﻞﺟأ ﻦﻴﺴﺤﺕ ضﺮﻌﻟا.
2حﺎﺒﺼﻡ ﻪﻴﺒﻨﺘﻟا :ةرﺎﺵﻺﻟ ﻰﻟإ ثوﺪﺡ ﺔﻠﻜﺸﻡ .ﻊﺟار ﺔﺵﺎﺵ ضﺮﻌﻟا لﻮﺼﺤﻠﻟ ﻰﻠﻋ ﺪیﺰﻤﻟا ﻦﻡ تﺎﻡﻮﻠﻌﻤﻟا.
3Back) ﻰﻟإ ﻒﻠﺨﻟا( :ةدﻮﻌﻠﻟ ﻰﻟإ ﺔﺵﺎﺸﻟا ﺔﻘﺏﺎﺴﻟا ﻰﻠﻋ ﺔﺵﺎﺵ ضﺮﻌﻟا.
4Help) تﺎﻤﻴﻠﻌﺘﻟا( :ﺢﺘﻓ ﺔﻤﺋﺎﻗ Help) تﺎﻤﻴﻠﻌﺘﻟا( ﻰﻠﻋ ﺔﺵﺎﺵ ضﺮﻌﻟا ﺚﻴﺡ ﻚﻨﻜﻤی ﺪیﺪﺤﺕ ﺪﺡأ ﻊﻴﺽاﻮﻤﻟا فﺮﻌﺘﻠﻟ ﻪﻴﻠﻋ .ﻦﻡ ﻊﺽو
5Photo Menu) ﺔﻤﺋﺎﻗ رﻮﺼﻟا( :ﻞﻴﻐﺸﺘﻟ ﺔﻤﺋﺎﻗ Photosmart Express ﺔﻋﺎﺒﻄﻟ رﻮﺼﻟا ,،ﺎﻬﻈﻔﺡ ﺎهﺮیﺮﺤﺕ ﺎﻬﺘآرﺎﺸﻡو.
6Print Photos) ﺔﻋﺎﺒﻃ رﻮﺼﻟا( :ﺎًﻘﻓو ﺔﻘیﺮﻄﻠﻟ ﻲﺘﻟا ﻪﻡﺪﺨﺘﺴﺕ لﻮﺹﻮﻠﻟ ﻰﻟإ رﻮﺼﻟا ءاﻮﺳ ﻦﻡ ﺔﻤﺋﺎﻘﻟا View) ضﺮﻋ( وأ Print
تاﺰﻴﻡ ﺔﺡﻮﻟ ﻢﻜﺤﺘﻟا ٤

ﻞﺼﻔﻟا ١
)ﻊﺏﺎﺕ(
ﺔﻗﺎﻄﺒﻟا ﺔﻘﺻﻼﻟاﻢﺳﻹا ﻒﺻﻮﻟاو
ﻲﺑﺮﻋ
HP All-in-One ﺢﻴﺤﺼﺘﺏ ناﻮﻟأ ﻦﻴﻌﻟا ءاﺮﻤﺤﻟا ﺎًﻴﺋﺎﻘﻠﺕ ﻲﻓ رﻮﺼﻟا ﺔﺽوﺮﻌﻤﻟا ﺎًﻴﻟﺎﺡ ﻰﻠﻋ ﺔﺵﺎﺵ ضﺮﻌﻟا.
فﺎﻘیإ ﻞﻴﻐﺸﺕ .ﻞﺼﻔﻟ ﺔﻗﺎﻄﻟا ،ًﺎﻡﺎﻤﺕ ﻢﻗ فﺎﻘیﺈﺏ ﻞﻴﻐﺸﺕ زﺎﻬﺟ
HP All-in-One، ﻢﺙ ﻞﺼﻓا ﻚﻠﺳ ﺔﻗﺎﻄﻟا ﻦﻡ رﺪﺼﻡ ﺔﻗﺎﻄﻟا.
ﺎﻬﻠﻴﻐﺸﺕ .ﺎًﻌﺒﺕ تاداﺪﻋﻺﻟ ،ﺔﻴﺽاﺮﺘﻓﻻا نﻮﻜﺕ ﻩﺬه ةﺰﻴﻤﻟا ﻲﻓ ﻊﺽو فﺎﻘیإ ﻞﻴﻐﺸﺘﻟا .ﺪﻨﻋ ﻞﻴﻐﺸﺕ ﻩﺬه ،ةﺰﻴﻤﻟا مﻮﻘی زﺎﻬﺟ
قرﻮﻟا عﻮﻥو قرﻮﻟا.
ﺔﻴﻤآ ﻰﻥدأ ﻦﻡ ﺔﻗﺎﻄﻟا زﺎﻬﺠﻠﻟ .ﻚﻨﻜﻤی ﻞﻴﻠﻘﺕ ﺔﻴﻤآ ﺔﻗﺎﻄﻟا ﻲﺘﻟا ﻢﺘی ﺪیوﺰﺕ زﺎﻬﺠﻟا ﺎﻬﺏ ﻦﻡ لﻼﺥ ﻂﻐﺽ رﺰﻟا On) ﻞﻴﻐﺸﺕ( راﺮﻤﺘﺳﻻاو ﻲﻓ
ﻂﻐﻀﻟا ةﺪﻤﻟ 3 ناﻮﺙ .يدﺆیو ﻚﻟذ ﻰﻟإ لﺎﻘﺘﻥا زﺎﻬﺠﻟا ﻰﻟإ ﻊﺽو داﺪﻌﺘﺳا/
ﺔﺵﺎﺵ ضﺮﻌﻟا ،ﻞﻡﺎﻜﻟﺎﺏ ﻢﺘی ﻖﻴﺒﻄﺕ ةﺰﻴﻡ Fit to Page) ﺔﻡءﻼﻡ ﺔﺤﻔﺼﻟا( ﻰﻠﻋ ةرﻮﺼﻟا ﺎًﻴﺋﺎﻘﻠﺕ.
ﺔﺡﻮﻟ ﻪﻴﺟﻮﺘﻟا ﻂﺒﻀﻟ ﻊﺏﺮﻡ صﺎﺼﺘﻗﻻا.
اذإ ﺖﻨآ مﻮﻘﺕ ﺮﻴﺒﻜﺘﺏ موﺰﻟا ﻰﻠﻋ ،ةرﻮﺼﻟا ﻚﻨﻜﻤﻴﻓ ﺎًﻀیأ ماﺪﺨﺘﺳا رارزأ ﻢﻬﺳﻷا كﺮﺤﺘﻠﻟ لﻮﺡ ةرﻮﺼﻟا ﺪیﺪﺤﺕو ﺔﻘﻄﻨﻡ ﺔﻔﻠﺘﺨﻡ ﺎﻬﺘﻋﺎﺒﻄﻟ.
7Red Eye Removal) ﺔﻟازإ نﻮﻴﻌﻟا ءاﺮﻤﺤﻟا( :ﻞﻴﻐﺸﺕ ةﺰﻴﻡ Red Eye Removal) ﺔﻟازإ نﻮﻴﻌﻟا ءاﺮﻤﺤﻟا( وأ فﺎﻘیإ
8Reprints) ﺦﺴُﻥ دﺎﻌﻡ ﺎﻬﺘﻋﺎﺒﻃ( :ﺢﻴﺘی ﻚﻟ ﺔﻴﻥﺎﻜﻡإ ﻞﻤﻋ ﺔﺨﺴﻥ ﻦﻡ ةرﻮﺹ ﺔﻴﻠﺹأ ﺔﻋﻮﺽﻮﻡ ﻰﻠﻋ ﺢﻄﺴﻟا ﻲﺟﺎﺟﺰﻟا.
9Scan Menu )ﺔﻤﺋﺎﻗ ﺢﺴﻤﻟا( :ﺢﺘﻔﻟ Scan Menu )ﺔﻤﺋﺎﻗ ﺢﺴﻤﻟا( ﺚﻴﺡ ﻚﻨﻜﻤی ﺪیﺪﺤﺕ ﺔﻬﺟو ﺢﺴﻤﻠﻟ.
10Menu Copy) ﺔﻤﺋﺎﻗ ﺦﺴﻨﻟا( :ﺢﺘﻓ Menu Copy) ﺔﻤﺋﺎﻗ ﺦﺴﻨﻟا( ﺚﻴﺡ ﻚﻨﻜﻤی ﺪیﺪﺤﺕ تارﺎﻴﺥ ﺦﺴﻨﻟا ﻞﺜﻡ دﺪﻋ ﺦﺴُﻨﻟا ﻢﺠﺡو
11Start Copy Black) ءﺪﺑ ﺦﺴﻨﻟا دﻮﺳﻷﺎﺑ( :ءﺪﺒﻟ ﺔﻤﻬﻡ ﺦﺴﻥ ﺾﻴﺏﻷﺎﺏ دﻮﺳﻷاو.
12Start Copy Color) ءﺪﺑ ﺦﺴﻨﻟا ناﻮﻟﻷﺎﺑ( :ءﺪﺒﻟ ﺔﻤﻬﻡ ﺦﺴﻥ ناﻮﻟﻷﺎﺏ.
13Setup) داﺪﻋإ( :ﺮﻓﻮﺕ ﺔﻤﺋﺎﻘﻟا Setup) داﺪﻋإ( ﺔﻋﻮﻤﺠﻡ ﺔﻋﻮﻨﺘﻡ ﻦﻡ ﺮیرﺎﻘﺘﻟا تاداﺪﻋإو زﺎﻬﺠﻟا ﻒﺋﺎﻇوو ﺔﻥﺎﻴﺼﻟا.
14Cancel) ءﺎﻐﻟإ ﺮﻡﻷا( :فﺎﻘیإ ﺔﻴﻠﻤﻌﻟا ﺔﻴﻟﺎﺤﻟا.
15On) ﻞﻴﻐﺸﺕ( :مﻮﻘی ﻞﻴﻐﺸﺘﺏ زﺎﻬﺟ HP All-in-One وأ فﺎﻘیﺈﺏ ﻪﻠﻴﻐﺸﺕ .ﺪﻨﻋ فﺎﻘیإ ﻞﻴﻐﺸﺕ زﺎﻬﺟ HP All-in-One، ﻢﺘی ﺮﻴﻓﻮﺕ
16ﺮﻴﻐﺼﺕ - ) ﺰﻡر ﺔﺳﺪﻌﻟا ةﺮﺒﻜﻤﻟا :(ﺮﻴﻐﺼﺕ موﺰﻟا ضﺮﻌﻟ ﺪیﺰﻤﻟا ﻦﻡ ةرﻮﺼﻟا .اذإ ﺖﻤﻗ ﻂﻐﻀﺏ اﺬه رﺰﻟا ءﺎﻨﺙأ ضﺮﻋ ةرﻮﺹ ﻰﻠﻋ
17ﺮﻴﺒﻜﺕ+ ) ﺰﻡر ﺔﺳﺪﻌﻟا ةﺮﺒﻜﻤﻟا : :(ﺮﻴﺒﻜﺕ موﺰﻟا ﺮﻴﺒﻜﺘﻟ ةرﻮﺼﻟا ﻰﻠﻋ ﺔﺵﺎﺵ ضﺮﻌﻟا .ﻚﻨﻜﻤی ماﺪﺨﺘﺳا اﺬه رﺰﻟا ﻊﻡ ﻢﻬﺳﻷا ةدﻮﺟﻮﻤﻟا ﻰﻠﻋ
18OK) ﻖﻓاﻮﻡ( :ﺪیﺪﺤﺕ داﺪﻋإ ﺔﻤﺋﺎﻗ وأ ﺔﻤﻴﻗ وأ ةرﻮﺹ ﻰﻠﻋ ﺔﺵﺎﺵ ضﺮﻌﻟا.
19ﺔﺡﻮﻟ ﻪﻴﺟﻮﺘﻟا :ﺢﻴﺘی ﻚﻟ لﺎﻘﺘﻥﻻا ﺮﺒﻋ رﻮﺼﻟا تارﺎﻴﺥو ﺔﻤﺋﺎﻘﻟا ﻦﻋ ﻖیﺮﻃ ﻂﻐﺽ رارزأ ﻢﻬﺳﻷا ،ﻰﻠﻋﻷ ،ﻞﻔﺳﻷ ،رﺎﺴﻴﻠﻟ وأ ﻦﻴﻤﻴﻠﻟ.
ﻢﺴﻗ ﻦﻡ ﻞﻴﻟد داﺪﻋﻹا ,وأ ﻊﺟار ”ﻞﺡ
٥ HP Photosmart C5200 All-in-One series
ﻪﻡاﺪﺨﺘﺳاو.
ﺮﻓﻮی ﻞﻴﻟد داﺪﻋﻹا تادﺎﺵرإ لﻮﺡ داﺪﻋإ زﺎﻬﺟ HP All-in-One ﺖﻴﺒﺜﺕو ﺞﻡﺎﻥﺮﺒﻟا .ﺪآﺄﺕ ﻦﻡ عﺎﺒﺕا تاﻮﻄﺨﻟا ةدﻮﺟﻮﻤﻟا
ﻲﻓ ﻞﻴﻟد داﺪﻋﻹا ﺐﺴﺡ ﺐﻴﺕﺮﺘﻟا.
ﺪﻨﻋ ضﺮﻌﺘﻟا ﻰﻟإ تﻼﻜﺸﻡ ءﺎﻨﺙأ ﺔﻴﻠﻤﻋ داﺪﻋﻹا ,ﻊﺟار ﻞﺡ تﻼﻜﺸﻤﻟا ﻲﻓ ﺮﺥﺁ
تﻼﻜﺸﻤﻟا ﻢﻋﺪﻟاو“ ﻲﻓ ﺔﺤﻔﺹ ١٦ ﻲﻓ اﺬه ﻞﻴﻟﺪﻟا.
ﺮﻓﻮﺕ تﺎﻤﻴﻠﻌﺘﻟا ةﺮهﺎﻈﻟا ﻰﻠﻋ ﺔﺵﺎﺸﻟا تادﺎﺵرإ ﺔﻠﺼﻔﻡ لﻮﺡ تاﺰﻴﻡ زﺎﻬﺟ HP All-in-One ﻲﺘﻟا ﻻ ﻢﺘی ﺎﻬﻔﺹو ﻲﻓ
ﻞﻴﻟﺪﻟا مﺪﺨﺘﺴﻤﻟا اﺬه ,ﺎﻤﺏ ﻲﻓ ﻚﻟذ تاﺰﻴﻤﻟا ةﺮﻓﻮﺘﻤﻟا ﻂﻘﻓ ﺪﻨﻋ ماﺪﺨﺘﺳا ﺞﻡﺎﻥﺮﺒﻟا ﺖﺒﺜﻤﻟا ﻊﻡ HP All-in-One.
www.hp.com/support
ﺪﻨﻋ ﺔﻴﻥﺎﻜﻡإ لﻮﺹﻮﻟا ﻰﻟإ ﺔﻜﺒﺵ ،ﺖﻥﺮﺘﻥﻹا ﻚﻥﺎﻜﻡﺈﺒﻓ لﻮﺼﺤﻟا ﻰﻠﻋ ﻢﻋﺪﻟا ﻦﻡ ﻊﻗﻮﻡ ﺐیﻮﻟا ـﻟ HP .ﺮﻓﻮی ﻊﻗﻮﻡ ﺐیﻮﻟا اﺬه
ﻢﻋﺪﻟا ﻲﻨﻔﻟا ﺞﻡاﺮﺏو ﻞﻴﻐﺸﺘﻟا تﺎﻡﺰﻠﺘﺴﻤﻟاو تﺎﻡﻮﻠﻌﻡو ﺐﻠﻃ تﺎﺠﺘﻨﻤﻟا.
لﻮﺼﺤﻟا ﻰﻠﻋ ﺪﻳﺰﻤﻟا ﻦﻡ تﺎﻡﻮﻠﻌﻤﻟا
ﺮﻓﻮﺕ ﺔﻠﻴﻜﺸﺕ ﺔﻋﻮﻨﻡ ﻦﻡ ردﺎﺼﻤﻟا ﺔﻴﻌﺟﺮﻤﻟا ,ﺔﻋﻮﺒﻄﻡ ةﺮهﺎﻇو ﻰﻠﻋ ﺔﺵﺎﺸﻟا ,تﺎﻡﻮﻠﻌﻡ لﻮﺡ داﺪﻋإ زﺎﻬﺟ HP All-in-One
•Setup Guide) ﻞﻴﻟد داﺪﻋﻹا(
•تﺎﻤﻴﻠﻌﺘﻟا ةﺮهﺎﻈﻟا ﻰﻠﻋ ﺔﺵﺎﺸﻟا
•
ﻞﻴﻤﺤﺕ ﺦﺴُﻨﻟا ﺔﻴﻠﺻﻷا ﻞﻴﻤﺤﺕو قرﻮﻟا
ﻚﻨﻜﻤی ﺦﺴﻥ ﺦﺴُﻥ ﺔﻴﻠﺹأ ﻢﺠﺤﺏ letter وأ A4 وأ ﺎﻬﺤﺴﻡ ﻦﻡ لﻼﺥ ﺎﻬﻠﻴﻤﺤﺕ ﻰﻠﻋ ﺢﻄﺴﻟا ﻲﺟﺎﺟﺰﻟا.

ﻞﻴﻤﺤﺘﻟ ﺔﺨﺴﻥ ﺔﻴﻠﺻأ ﻰﻠﻋ ﺢﻄﺴﻟا ﻲﺟﺎﺟﺰﻟا ﺔﺤﺳﺎﻤﻠﻟ
١.ﻊﻓرا ءﺎﻄﻏ زﺎﻬﺟ HP All-in-One.
٢.ﻢﻗ ﻞﻴﻤﺤﺘﺏ ﺔﺨﺴﻨﻟا ﺔﻴﻠﺹﻷا ﻊﻡ ﻪﻴﺟﻮﺕ ﻪﺟﻮﻟا ﺺﺼﺨﻤﻟا ﺔﻋﺎﺒﻄﻠﻟ ﻰﻟإ ﻞﻔﺳﻷا ﻰﻠﻋ ﺔیواﺰﻟا ﺔﻴﻡﺎﻡﻷا ﻰﻨﻤﻴﻟا ﺢﻄﺴﻠﻟ
ﻲﺟﺎﺟﺰﻟا.
ﺢﻴﻤﻠﺕﺪیﺰﻤﻠﻟ ﻦﻡ تﺎﻤﻴﻠﻌﺘﻟا لﻮﺡ ﻞﻴﻤﺤﺕ ﺔﺨﺴﻨﻟا ﺔﻴﻠﺹﻷا ,ﻊﺟار ﺔﻟدﻷا ةرﻮﻔﺤﻤﻟا ﻰﻠﻋ فﺮﻃ ﺢﻄﺴﻟا ﻲﺟﺎﺟﺰﻟا.
ﻲﺑﺮﻋ
٣.ﻖﻠﻏأ ءﺎﻄﻐﻟا.
ﻞﻴﻤﺤﺘﻟ قرو ﻢﺠﺤﺑ ﻞﻡﺎآ
١.ﻊﻓرا ﺔیوﺎﺡ جاﺮﺥﻹا ﻞﻴﻤﺤﺘﻟ قرﻮﻟا ﻲﻓ ﺔیوﺎﺡ لﺎﺥدﻹا ﺔﻴﺴﻴﺋﺮﻟا.
٢.ﻊﻓدا ﻞﻴﻟد ضﺮﻋ قرﻮﻟا ﻰﺘﺡ ﺮﺥﺁ ىﺪﻡ ﻪﻟ.
٣.ﻢﻗ بﺮﻀﻟﺎﺏ ﻰﻠﻋ قرﻮﻟا ﻰﻠﻋ ﺢﻄﺳ ٍﻮﺘﺴﻡ ةاذﺎﺤﻤﻟ ،تﺎﻓﺎﺤﻟا ﻢﺙ ﺺﺤﻓا قرﻮﻟا ﺔﻓﺮﻌﻤﻟ ﺎﻡ ﻲﻠی:
•ﺪآﺄﺕ ﻦﻡ ﻩﻮﻠﺥ ﻦﻡ تﺎﻘﻘﺸﺘﻟا ﺔﺏﺮﺕﻷاو تاﺪﻌﺠﺘﻟاو تﺎﻓﺎﺤﻟاو ﺔﻴﻨﺤﻨﻤﻟا وأ ﺔﻴﻨﺜﻨﻤﻟا.
•ﺪآﺄﺕ ﻦﻡ ﻖﺏﺎﻄﺕ ﻢﺠﺡ عﻮﻥو ﻊﻴﻤﺟ قرﻮﻟا دﻮﺟﻮﻤﻟا ﻲﻓ ﺔﻡزﺮﻟا.
مﺎﻡﻸﻟ ﻪﺟوو ﺔﻋﺎﺒﻄﻟا ﻞﻔﺳﻷ .ﻢﻗ ﺔﻟﺎﻡﺈﺏ ﺔﻡزر
٤.ﻞﺥدأ ﺔﻡزر قرﻮﻟا ﻰﻟإ ﺔیوﺎﺡ لﺎﺥدﻹا ﺔﻴﺴﻴﺋﺮﻟا ﻊﻡ ﻞﻌﺟ ﺔﻓﺎﺤﻟا ةﺮﻴﺼﻘﻟا
قرﻮﻟا مﺎﻡﻸﻟ ﻰﺘﺡ ﻒﻗﻮﺘﺕ.
ﻞﻴﻤﺤﺕ ﺦﺴُﻨﻟا ﺔﻴﻠﺹﻷا ﻞﻴﻤﺤﺕو قرﻮﻟا ٦

ﻲﺑﺮﻋ
ﻞﺼﻔﻟا ١
ﻪﻴﺒﻨﺕ ﺪآﺄﺕ ﻦﻡ دﻮﺟو زﺎﻬﺟ HP All-in-One ﺪﻴﻗ لﻮﻤﺨﻟا ﺎًﺘﻡﺎﺹو ﺪﻨﻋ ﻞﻴﻤﺤﺕ قرﻮﻟا ﻲﻓ ﺔیوﺎﺡ لﺎﺥدﻹا
ﺔﻴﺴﻴﺋﺮﻟا .ﺎﻡﺪﻨﻋ مﻮﻘی زﺎﻬﺟ HP All-in-One ﺔﻥﺎﻴﺼﺏ تﺎﺵﻮﻃﺮﺥ ﺔﻋﺎﺒﻄﻟا وأ يرﺎﺟ ﺬﻴﻔﻨﺕ ﺔیأ ﺔﻤﻬﻡ ,ﺪﻘﻓ ﻻ
نﻮﻜی ﺰﺟﺎﺡ قرﻮﻟا ﻲﻓ ﻪﻌﺽﻮﻡ .ﻚﻥإ ﺪﻗ ﻊﻓﺪﺕ قرﻮﻟا ﻰﻟإ ﺮﺥﺁ ىﺪﻡ ﻪﻟ ,ﺎﻤﻡ يدﺆی ﻰﻟإ جوﺮﺥ تﺎﺤﻔﺹ ﺔﻏرﺎﻓ ﻦﻡ
زﺎﻬﺟ HP All-in-One.
ﺢﻴﻤﻠﺕاذإ ﺖﻨآ مﺪﺨﺘﺴﺕ قرو ﻪﻴﻠﻋ ناﻮﻨﻋ ﺔآﺮﺸﻟا ,ﻞﺥدﺄﻓ ءﺰﺠﻟا يﻮﻠﻌﻟا ﻦﻡ ﺔﺤﻔﺼﻟا ًﻻ و أ ﻊﻡ ﻪﻴﺟﻮﺕ ﻪﺟﻮﻟا
ﺺﺼﺨﻤﻟا ﺔﻋﺎﺒﻄﻠﻟ ﻰﻟإ ﻞﻔﺳﻷا.
٥.ﻢﻗ ﻚیﺮﺤﺘﺏ ﻞﻴﻟد ضﺮﻋ قرﻮﻟا ﻞﺥاﺪﻠﻟ ﻰﺘﺡ ﻒﻗﻮﺘی ﺪﻨﻋ ﺔﻓﺎﺡ قرﻮﻟا.
ﻻ ﻢﻘﺕ ﻞﻴﻤﺤﺘﺏ ﺔیوﺎﺡ لﺎﺥدﻹا ﺔﻴﺴﻴﺋﺮﻟا ﺮﺜآأ ﻦﻡ مزﻼﻟا .ﺪآﺄﺕ ﻦﻡ نأ ﺔﻡزر قرﻮﻟا ﺐﺳﺎﻨﺕ ﺔیوﺎﺡ لﺎﺥدﻹا ﺔﻴﺴﻴﺋﺮﻟا نأو
ﺎﻬﻋﺎﻔﺕرا ﻻ ﺪیﺰی ﻰﻠﻋ عﺎﻔﺕرا ءﺰﺠﻟا يﻮﻠﻌﻟا ﻞﻴﻟﺪﻟ ضﺮﻋ قرﻮﻟا.
٦.لﺰﻥأ ﺔیوﺎﺡ جاﺮﺥﻹا.
٧.ﺐﺤﺳا ةادأ ﺔﻟﺎﻃإ ﺔیوﺎﺡ جاﺮﺥﻹا ﻚهﺎﺠﺕ ﻰﺼﻗﺄﺏ رﺪﻗ ﺢﻤﺴﺕ ﻪﺏ.
ﺔﻈﺡﻼﻡ ﺪﻨﻋ ماﺪﺨﺘﺳا قرو ﻢﺠﺤﺏ legal ,عد ةادأ ﺔﻟﺎﻃإ ﺔیوﺎﺡ جاﺮﺥﻹا ًﺔﻘﻠﻐﻡ.
٧ HP Photosmart C5200 All-in-One series
ﻞﻴﻤﺤﺘﻟ قرو رﻮﺻ ﻢﺠﺤﺑ 13 × 18 ﻢﺳ ﻲﻓ ﺔﻳوﺎﺡ رﻮﺼﻟا
١.ﻊﻓرا ءﺎﻄﻏ ﺔیوﺎﺡ جاﺮﺥﻹا ﻞﻴﻤﺤﺘﻟ قرو رﻮﺼﻟا ﺔﻴﻓاﺮﻏﻮﺕﻮﻔﻟا ﻰﻟإ ﺔیوﺎﺡ رﻮﺼﻟا.
٢.ﻢﻗ لﺎﺥدﺈﺏ ﺔﻡزر قرﻮﻟا ﻰﻟإ ﺔیوﺎﺡ رﻮﺼﻟا ﻊﻡ ﻪﻴﺟﻮﺕ ﺔﻓﺎﺤﻟا ةﺮﻴﺼﻘﻟا مﺎﻡﻸﻟ ﻪﺟﻮﻟاو ﺺﺼﺨﻤﻟا ﺔﻋﺎﺒﻄﻠﻟ ﻰﻟإ ﻞﻔﺳﻷا .ﻢﻗ
ﺔﻟﺎﻡﺈﺏ ﺔﻡزر قرو رﻮﺼﻟا مﺎﻡﻸﻟ ﻰﺘﺡ ﻒﻗﻮﺘﺕ.
يﺬﻟا ﻪﻡﺪﺨﺘﺴﺕ ﻪﺏ بﻮﻘﺙ ﻢﻗ ﻞﻴﻤﺤﺘﺏ قرو رﻮﺼﻟا ﺚﻴﺤﺏ نﻮﻜﺕ بﻮﻘﺜﻟا ﻲﻓ ﺔﻬﺠﻟا ﺔﺒیﺮﻘﻟا ﻚﻨﻡ.
ﻰﻠﻋ ﻰﻠﻋأ عﺎﻔﺕرا ﻞﻴﻟﺪﻟ ضﺮﻋ قرﻮﻟا.
اذإ نﺎآ قرو رﻮﺼﻟا
٣.ﻢﻗ ﻚیﺮﺤﺘﺏ ﻞﻴﻟد ضﺮﻋ قرﻮﻟا ﻰﻟإ ﻞﺥاﺪﻟا ﻩﺎﺠﺕ ﺔﻡزر قرو رﻮﺼﻟا ﻰﺘﺡ ﻒﻗﻮﺘی.
ﻻ ﻢﻘﺕ ةدﺎیﺰﺏ ﻞﻴﻤﺤﺕ ﺔیوﺎﺡ رﻮﺼﻟا ,ﻚﻴﻠﻋ ﺪآﺄﺘﻟا ﻦﻡ نأ ﺔﻡزر قرو رﻮﺼﻟا ﻦﻜﻤی ﺎﻬﺘﻴﺒﺜﺕ ﻞﺥاد ﺔیوﺎﺡ رﻮﺼﻟا نأو
ﺎﻬﻋﺎﻔﺕرا ﻻ ﺪیﺰی
٤.ﻢﻗ لاﺰﻥﺈﺏ ءﺎﻄﻏ ﺔیوﺎﺡ رﻮﺼﻟا.
ﺐﻨﺠﺕ رﺎﺸﺤﻥا قرﻮﻟا
ةﺪﻋﺎﺴﻤﻠﻟ ﻲﻓ ﺐﻨﺠﺕ تارﺎﺸﺤﻥا ،قرﻮﻟا ﻊﺒﺕا تﺎﻬﻴﺟﻮﺘﻟا ﺔﻴﻟﺎﺘﻟا.

•جﺮﺥأ قرﻮﻟا عﻮﺒﻄﻤﻟا ﻦﻡ ﺔیوﺎﺡ جاﺮﺥﻹا ةرﻮﺼﺏ ةرﺮﻜﺘﻡ.
•ﻊﻨﻡا ﺪﻌﺠﺕ قرﻮﻟا وأ ﻪﻴﻨﺙ ﻦیﺰﺨﺘﺏ ﻊﻴﻤﺟ قرﻮﻟا ﺮﻴﻏ مﺪﺨﺘﺴﻤﻟا ﻞﻜﺸﺏ ٍﻮﺘﺴﻡ ﻲﻓ ﺲﻴآ ﻦﻜﻤی ةدﺎﻋإ مﺎﻜﺡإ ﻪﻗﻼﻏإ.
•ﺪآﺄﺕ ﻦﻡ نأ قاروﻷا ﻲﺘﻟا ﻢﺕ ﺎﻬﻠﻴﻤﺤﺕ ﻲﻓ ﺔیوﺎﺡ لﺎﺥدﻹا ﻲﻓ ﻊﺽو ٍﻮﺘﺴﻡ نأو فاﻮﺤﻟا ﻢﻟ ﻢﺘی ﺎﻬﻴﻨﺙ وأ ﺎﻬﻘیﺰﻤﺕ.
قاروأ عاﻮﻥﺄﺏ مﺎﺠﺡأو ﺔﻔﻠﺘﺨﻡ ﻲﻓ ﺔیوﺎﺡ ؛لﺎﺥدﻹا ﺚﻴﺡ ﺐﺠی نأ نﻮﻜﺕ ﺔﻡزر قرﻮﻟا ةدﻮﺟﻮﻤﻟا ﻲﻓ ﺔیوﺎﺡ
لﺎﺥدﻹا ﻞﻡﺎﻜﻟﺎﺏ ﻦﻡ ﺲﻔﻥ عﻮﻨﻟا ﻢﺠﺤﻟاو.
•ﻻ ﻊﻀﺕ
•ﻂﺒﺽا ﻞﻴﻟد ضﺮﻋ قرﻮﻟا ﻲﻓ ﺔیوﺎﺡ لﺎﺥدﻹا ﺚﻴﺤﺏ ﻢﺘی ﺎﻬﺘﻴﺒﺜﺕ مﺎﻜﺡﺈﺏ ﻰﻠﻋ ﻊﻴﻤﺟ عاﻮﻥأ قرﻮﻟا .ﺪآﺄﺕ ﻦﻡ نأ ﻞﻴﻟد ضﺮﻋ
قرﻮﻟا ﻻ مﻮﻘی ﻲﻄﺏ قرﻮﻟا ﻞﺥاد ﺔیوﺎﺡ لﺎﺥدﻹا.
ﻻ مﺪﺨﺘﺴﺕ ةﻮﻘﻟا لﺎﺥدﻹ قرﻮﻟا ﺔﻓﺎﺴﻤﻟ ةﺪﻴﻌﺏ ًا ﺪ ﺟ ﻲﻓ ﺔیوﺎﺡ لﺎﺥدﻹا.
•
•ﻢﻗ ماﺪﺨﺘﺳﺎﺏ عاﻮﻥأ قرﻮﻟا ﻰﺹﻮﻤﻟا ﺎﻬﺏ زﺎﻬﺠﻟ HP All-in-One.
ﺔﻋﺎﺒﻄﻟا ةﺮﺵﺎﺒﻤﻟا ﻰﻠﻋ صﺮﻘﻟا طﻮﻐﻀﻤﻟا/صﺮﻗ ﻮﻳﺪﻴﻔﻟا ﻲﻤﻗﺮﻟا
١.مﺪﺨﺘﺳا ﺞﻡﺎﻥﺮﺒﻟا ﻖﻓﺮﻤﻟا ﻊﻡ HP All-in-One ءﺎﺸﻥﻹ ﺔﻗﺎﻄﺏ ﺔﻥﻮﻨﻋ صﺮﻘﻟ طﻮﻐﻀﻡ/صﺮﻗ ﻮیﺪﻴﻓ ﻲﻤﻗر ﺎﻬﺘﻋﺎﺒﻃو.
٢.ﻢﻗ ﺔﻟازﺈﺏ ﻞﻡﺎﺡ صاﺮﻗﻷا ﺔﻃﻮﻐﻀﻤﻟا/صاﺮﻗأ ﻮیﺪﻴﻔﻟا ﺔﻴﻤﻗﺮﻟا )CD/DVD (دراﻮﻟا ﻊﻡ HP All-in-One صﺮﺤﺏ
ﻚﻟذو ﺪﻨﻋ ﻚﺘﺒﻟﺎﻄﻡ ﻚﻟﺬﺏ.
ﻢﺘی ﻦیﺰﺨﺕ ﻞﻡﺎﺡ صاﺮﻗﻷا ﺔﻃﻮﻐﻀﻤﻟا/صاﺮﻗأ ﻮیﺪﻴﻔﻟا ﺔﻴﻤﻗﺮﻟا ﻞﻔﺳأ ﺔیوﺎﺡ لﺎﺥدﻹا ﺔﻴﺴﻴﺋﺮﻟا.
ﻲﺑﺮﻋ
٣.ﻢﻗ ﺖﻴﺒﺜﺘﺏ ﻂﺋﺎﺳﻮﻟا ﻲﺘﻟا ﻦﻜﻤی ﺔﻋﺎﺒﻄﻟا ﺎﻬﻴﻠﻋ ﻰﻠﻋ صﺮﻘﻟا طﻮﻐﻀﻤﻟا/صﺮﻗ ﻮیﺪﻴﻔﻟا ﻲﻤﻗﺮﻟا ﻲﻓ ﻞﻡﺎﺡ صاﺮﻗﻷا
ﺔﻃﻮﻐﻀﻤﻟا/صاﺮﻗأ ﻮیﺪﻴﻔﻟا ﺔﻴﻤﻗﺮﻟا ﻊﻡ ﻞﻌﺟ ﺐﻥﺎﺠﻟا يﺬﻟا ﻢﺘﺕ ﺔﻋﺎﺒﻄﻟا ﻪﻴﻠﻋ ﻰﻠﻋﻷ .ﺐﺠی نأ ﻢﺘی ﻊﺽو صﺮﻘﻟا
طﻮﻐﻀﻤﻟا/صﺮﻗ ﻮیﺪﻴﻔﻟا ﻲﻤﻗﺮﻟا ﻰﻠﻋ ﺔﻘﻠﺤﻟا ةدﻮﺟﻮﻤﻟا ﻲﻓ ﺔیﺎﻬﻥ ﺔﻈﻓﺎﺤﻟا ﻊﻡ ةﺎﻋاﺮﻡ تﺎهﺎﺠﺕا ﻢﻬﺳﻷا.
ﺔﻈﺡﻼﻡاذإ ﺖﻨآ مﺪﺨﺘﺴﺕ ﻂﺋﺎﺳو ةﺮﻴﻐﺹ ،ﻢﺠﺤﻟا ﻢﻗ ﺐﻠﻘﺏ ﺔﻘﻠﺤﻟا ةدﻮﺟﻮﻤﻟا ﻲﻓ ﺔﻘﻠﺡ صاﺮﻗﻷا ﺔﻃﻮﻐﻀﻤﻟا/صاﺮﻗأ
ﻮیﺪﻴﻔﻟا ﺔﻴﻤﻗﺮﻟا قﻮﻓ صﺮﻘﻟا طﻮﻐﻀﻤﻟا/صﺮﻗ ﻮیﺪﻴﻔﻟا ﻲﻤﻗﺮﻟا.
ﺔﻋﺎﺒﻄﻟا ةﺮﺵﺎﺒﻤﻟا ﻰﻠﻋ صﺮﻘﻟا طﻮﻐﻀﻤﻟا/صﺮﻗ ﻮیﺪﻴﻔﻟا ﻲﻤﻗﺮﻟا ٨

ﻲﺑﺮﻋ
ﻞﺼﻔﻟا ١
٤.ﻢﻗ ﺾﻔﺨﺏ بﺎﺏ لﻮﺹﻮﻟا ﻰﻟإ CD/DVD لﻮﺹﻮﻠﻟ ﻰﻟإ ﺔیوﺎﺡ صاﺮﻗﻷا ﺔﻃﻮﻐﻀﻤﻟا/صاﺮﻗأ ﻮیﺪﻴﻔﻟا ﺔﻴﻤﻗﺮﻟا.
ﺪﺟﻮی بﺎﺏ لﻮﺹﻮﻟا ﻰﻟإ صاﺮﻗﻷا ﺔﻃﻮﻐﻀﻤﻟا/صاﺮﻗأ ﻮیﺪﻴﻔﻟا ﺔﻴﻤﻗﺮﻟا ﻞﻔﺳأ ﺔﺡﻮﻟ ﻢﻜﺤﺘﻟا ةﺮﺵﺎﺒﻡ .ﺎﻡﺪﻨﻋو نﻮﻜی بﺎﺏ
لﻮﺹﻮﻟا ﻰﻟإ صاﺮﻗﻷا ﺔﻃﻮﻐﻀﻤﻟا/صاﺮﻗأ ﻮیﺪﻴﻔﻟا ﺔﻴﻤﻗﺮﻟا ،ﺎ ًﻀﻔﺨﻨﻡ ﺮﻘﺘﺴﺕ ﺔیوﺎﺡ صاﺮﻗﻷا ﺔﻃﻮﻐﻀﻤﻟا/صاﺮﻗأ ﻮیﺪﻴﻔﻟا
جاﺮﺥﻹا.
ﺔﻴﻤﻗﺮﻟا ﻰﻠﻋ ءﺰﺠﻟا يﻮﻠﻌﻟا ﻦﻡ ﺔیوﺎﺡ
٥.ﻊﻓدا ﻞﻡﺎﺡ صاﺮﻗﻷا ﺔﻃﻮﻐﻀﻤﻟا/صاﺮﻗأ ﻮیﺪﻴﻔﻟا ﺔﻴﻤﻗﺮﻟا ﻞﺥاد زﺎﻬﺟ HP All-in-One ﻰﺘﺡ ﺢﺒﺼﺕ طﻮﻄﺨﻟا
ةدﻮﺟﻮﻤﻟا ﻰﻠﻋ ﻞﻡﺎﺡ صاﺮﻗﻷا ﺔﻃﻮﻐﻀﻤﻟا/صاﺮﻗأ ﻮیﺪﻴﻔﻟا ﺔﻴﻤﻗﺮﻟا ﺔیذﺎﺤﻡ طﻮﻄﺨﻠﻟ ءﺎﻀﻴﺒﻟا ةدﻮﺟﻮﻤﻟا ﻰﻠﻋ ﺔیوﺎﺡ
صاﺮﻗﻷا ﺔﻃﻮﻐﻀﻤﻟا/صاﺮﻗأ ﻮیﺪﻴﻔﻟا ﺔﻴﻤﻗﺮﻟا.
٩ HP Photosmart C5200 All-in-One series
ﺔﻈﺡﻼﻡمﻮﻘی زﺎﻬﺠﻟا HP All-in-One ﺐﺤﺴﺏ ﻞﻡﺎﺡ صاﺮﻗﻷا ﺔﻃﻮﻐﻀﻤﻟا/صاﺮﻗأ ﻮیﺪﻴﻔﻟا ﺔﻴﻤﻗﺮﻟا ءﺎﻨﺙأ
ﺔﻋﺎﺒﻄﻟا ﻰﻠﻋ ﻂﺋﺎﺳﻮﻟا .ﺪﻗ زﺮﺒی ﻞﻡﺎﺡ صاﺮﻗﻷا ﺔﻃﻮﻐﻀﻤﻟا/صاﺮﻗأ ﻮیﺪﻴﻔﻟا ﺔﻴﻤﻗﺮﻟا ﻲﻟاﻮﺡ 7.5 ﻢﺳ )3 ﺔﺹﻮﺏ(
ﻦﻡ ءﺰﺠﻟا ﻲﻔﻠﺨﻟا زﺎﻬﺠﻠﻟ .اذإ ﻢﺕ ﻊﺽو زﺎﻬﺟ HP All-in-One بﺮﻘﻟﺎﺏ ﻦﻡ ﺪﺡأ ،ﻂﺋاﻮﺤﻟا ﻢﻗ ﻪﻜیﺮﺤﺘﺏ ﻲﻟاﻮﺡ 3
تﺎﺹﻮﺏ ﻰﻠﻋ ﻞﻗﻷا اًﺪﻴﻌﺏ ﻦﻋ ﻂﺋﺎﺤﻟا.
ضﺮﻋ رﻮﺼﻟا ﺎهﺪﻳﺪﺤﺕو ﺎﻬﺘﻋﺎﺒﻃو
ﻦﻜﻤی ضﺮﻋ رﻮﺹ ﻦﻡ ﻰﻠﻋ ﺔﻗﺎﻄﺏ ةﺮآاﺬﻟا وأ ﺎهﺪیﺪﺤﺕ ﻞﺒﻗ وأ ءﺎﻨﺙأ ﺎﻬﺘﻋﺎﺒﻃ.

ﻲﺑﺮﻋ
١xD-Picture Card
٢ﺔﻗﺎﻄﺏ ةﺮآاﺬﻟا Memory Stick Pro وأ Memory Stick Select وأ Memory Stick Magic Gate وأ Memory
Stick Duo وأ Duo Pro) لﻮﺤﻡ يرﺎﻴﺘﺥا(، وأ Memory Stick Micro) لﻮﺤﻡ ﻲﻡاﺰﻟإ(.
٣CompactFlash (CF (عﻮﻨﻟا I وII
٤ﺔﻗﺎﻄﺏ ةﺮآاﺬﻟا Secure Digital (SD (وأ Secure Digital Mini) لﻮﺤﻡ ﻲﻡاﺰﻟإ (وأ Secure Digital High Capacity
(SDHC (وأ MultiMediaCard (MMC (وأ MMC Plus وأ MMC Mobile (RS-MMC؛) لﻮﺤﻡ ﻲﻡاﺰﻟإ (وأ ﺔﻗﺎﻄﺏ
TransFlash MicroSD وأ ﺔﻗﺎﻄﺏ Secure MultiMedia
ضﺮﻌﻟ رﻮﺼﻟا ﺎهﺪﻳﺪﺤﺕو
١.ﻞﺥدأ ﺔﻗﺎﻄﺏ ةﺮآاﺬﻟا ﻲﻓ ﺔﺤﺘﻔﻟا ﺔﺒﺳﺎﻨﻤﻟا ﻲﻓ زﺎﻬﺟ HP All-in-One.
ﺮﻬﻈﺕ ﺔﻤﺋﺎﻘﻟا Photosmart Express ﻢﺘیو ضﺮﻋ ثﺪﺡأ ةرﻮﺹ ﻰﻠﻋ ﺔﺵﺎﺵ ضﺮﻌﻟا.
٢.ﻢﻗ ﻞﻴﻤﺤﺘﺏ قرو رﻮﺹ ﺔﻴﻓاﺮﻏﻮﺕﻮﻓ ﻰﺘﺡ 13 × 18 ﻢﺳ ﻲﻓ ﺔیوﺎﺡ رﻮﺼﻟا وأ قرو ﻢﺠﺤﺏ ﻞﻡﺎآ ﻲﻓ ﺔیوﺎﺡ لﺎﺥدﻹا
ﺔﻴﺴﻴﺋﺮﻟا.
ﻰﺘﺡ ﻢﺘی ﻞﻴﻠﻈﺕ View) ضﺮﻋ( ,ﻢﺙ ﻂﻐﺽا ﻰﻠﻋ OK) ﻖﻓاﻮﻡ(.
٣.ﻂﻐﺽا ﻰﻠﻋ
ﺮﻬﻈﺘﺳ ﺔﺵﺎﺵ View Photos) ضﺮﻋ رﻮﺻ(.
وأ ﻰﻠﻋ ﺮیﺮﻤﺘﻠﻟ لﻼﺥ ضوﺮﻌﻟا ةﺮﻐﺼﻤﻟا رﻮﺼﻠﻟ.
٤.ﻂﻐﺽا ﻰﻠﻋ
٥.اذإ ﻢﺕ ﻞﻴﻠﻈﺕ ضﺮﻌﻟا ﺮﻐﺼﻤﻟا ةرﻮﺼﻠﻟ ﻲﺘﻟا ﺪیﺮﺕ ،ﺎﻬﺽﺮﻋ ﻂﻐﺽا OK) ﻖﻓاﻮﻡ(.
٦.ﺎﻡﺪﻨﻋ ﺮﻬﻈﺕ ةرﻮﺼﻟا ﺎهﺪﺡو ﻰﻠﻋ ﺔﺵﺎﺵ ،ضﺮﻌﻟا ﻂﻐﺽا OK) ﻖﻓاﻮﻡ( ةﺮﻡ ىﺮﺥأ.
ﺮﻬﻈﺘﺳ ﺔﺵﺎﺵ Photo Options) تارﺎﻴﺥ ةرﻮﺼﻟا(.
٧.ﺎﻡﺪﻨﻋ ﻢﺘی ﻞﻴﻠﻈﺕ Print Preview) ﺔﻨﻳﺎﻌﻡ ﺔﻋﺎﺒﻄﻟا(، ﻂﻐﺽا OK) ﻖﻓاﻮﻡ(.
ﺔﺵﺎﺸﻟا Print Preview) ﺔﻨﻳﺎﻌﻡ ﺔﻋﺎﺒﻄﻟا(، ضﺮﻌﺕو ﺔﻴﻔﻴﻜﻟا ﻲﺘﻟا وﺪﺒﺘﺳ ﺎﻬﻴﻠﻋ ةرﻮﺼﻟا ﺪﻨﻋ ﺎﻬﺘﻋﺎﺒﻃ.
ﺮﻬﻈﺕ
ﻞﻴﻠﻈﺘﻟ Add More) ﺔﻓﺎﺽإ ﺪﻳﺰﻤﻟا(، ﻢﺙ ﻂﻐﺽا
٨.اذإ ﺖﻨآ ﺪیﺮﺕ ﺪیﺪﺤﺕ رﻮﺹ ﺔﻴﻓﺎﺽإ ﺎﻬﺽﺮﻌﻟ ،ﺎﻬﺘﻋﺎﺒﻃو ﻂﻐﺽا
OK) ﻖﻓاﻮﻡ(، رﺮآو تاﻮﻄﺨﻟا ﻦﻡ 4 ﻰﻟإ 6.
وأ ﺪﻨﻋ لﻮﺥﺪﻟا ﻰﻟإ ﺔﺵﺎﺵ Add Photos) ﺔﻓﺎﺽإ رﻮﺻ(، ﺮﺒﺘﻌﺕ عﺮﺳأ ﺔﻘیﺮﻃ ﺪیﺪﺤﺘﻟ ﺞﻴﺠﻌﻟا ﻦﻡ رﻮﺼﻟا) اذإ ﺖﻨآ
ﺪیﺪﺤﺘﻟ ةرﻮﺹ ﺎﻡ ﻢﺙ ﻂﻐﺽا وأ ﺮیﺮﻤﺘﻠﻟ لﻼﺥ ﺪیﺪﻌﻟا ﻦﻡ رﻮﺼﻟا ﺪیﺪﺤﺘﻠﻟ ﻦﻡ ﺎﻬﻨﻴﺏ.
ﻞﻴﻠﻈﺘﻟ Settings
ﻻ ﺪیﺮﺕ ﺎهﺮیﺮﺤﺕ(، ﻂﻐﺽا
٩.)يرﺎﻴﺘﺥا (اذإ ﺖﻨآ ﺪیﺮﺕ ﻖﻘﺤﺘﻟا ﻦﻡ و/وأ ﻞیﺪﻌﺕ يأ داﺪﻋإ ﻦﻡ تاداﺪﻋإ ،ﺔﻋﺎﺒﻄﻟا ﻂﻐﺽا
)تاداﺪﻋﻹا( ﻢﺙ ﻂﻐﺽا OK) ﻖﻓاﻮﻡ(.
وأ ﻞﻴﻠﻈﺘﻟ Print Now) ﺔﻋﺎﺒﻃ نﻵا() وأ ﻂﻐﺽا رﺰﻟا Print Photos) ﺔﻋﺎﺒﻃ
١٠.ﺔﻋﺎﺒﻄﻟ ،رﻮﺼﻟا مﺪﺨﺘﺳا
رﻮﺼﻟا( ﻦﻡ ﺔﺡﻮﻟ ﻢﻜﺤﺘﻟا(
ضﺮﻌﺕ ﺔﺵﺎﺵ ﺔﻟﺎﺡ ﺔﻋﺎﺒﻄﻟا دﺪﻋ تﺎﺤﻔﺼﻟا بﻮﻠﻄﻤﻟا ﺎﻬﺘﻋﺎﺒﻃ ﺖﻗﻮﻟاو رﺪﻘﻤﻟا مﺎﻤﺕﻹ ﺔﻤﻬﻡ ﺔﻋﺎﺒﻄﻟا.
ضﺮﻋ رﻮﺼﻟا ﺎهﺪیﺪﺤﺕو ﺎﻬﺘﻋﺎﺒﻃو ١٠

ﻞﺼﻔﻟا ١
ﺢﺴﻡ ةرﻮﺼﻟا
ﻚﻨﻜﻤی ءﺪﺏ ﺢﺴﻤﻟا ﻦﻡ زﺎﻬﺟ ﺮﺕﻮﻴﺒﻤﻜﻟا وأ ﻦﻡ ﺔﺡﻮﻟ ﻢﻜﺤﺘﻟا ﺔﺹﺎﺨﻟا زﺎﻬﺠﺏ HP All-in-One .ﺢﺽﻮی اﺬه ﻢﺴﻘﻟا ﺔﻘیﺮﻃ
ﺢﺴﻤﻟا ﻦﻡ ﺔﺡﻮﻟ ﻢﻜﺤﺘﻟا زﺎﻬﺠﻟ HP All-in-One ﻂﻘﻓ.
ﺔﻈﺡﻼﻡﻚﻨﻜﻤی ﺎًﻀیأ ماﺪﺨﺘﺳا ﺞﻡﺎﻥﺮﺒﻟا يﺬﻟا ﺖﻤﻗ ﻪﺘﻴﺒﺜﺘﺏ ﻊﻡ HP All-in-One ﺢﺴﻤﻟ رﻮﺼﻟا .ﻦﻡ لﻼﺥ ماﺪﺨﺘﺳا
اﺬه ﺞﻡﺎﻥﺮﺒﻟا ,ﻦﻜﻤی ﺮیﺮﺤﺕ ةرﻮﺹ ﺔﺡﻮﺴﻤﻡ ءﺎﺸﻥإو ﻊیرﺎﺸﻡ ﺔﺹﺎﺥ ماﺪﺨﺘﺳﺎﺏ ةرﻮﺼﻟا ﺔﺡﻮﺴﻤﻤﻟا.
ﺢﺴﻡ ﺔﺨﺴﻥ ﺔﻴﻠﺻأ ﻰﻟإ زﺎﻬﺟ ﺮﺕﻮﻴﺒﻤﻜﻟا
ﻦﻜﻤی ﺢﺴﻡ ﺦﺴُﻨﻟا ﺔﻴﻠﺹﻷا ﺔﻋﻮﺽﻮﻤﻟا ﻰﻠﻋ ﺢﻄﺴﻟا ﻲﺟﺎﺟﺰﻟا ماﺪﺨﺘﺳﺎﺏ ﺔﺡﻮﻟ ﻢﻜﺤﺘﻟا.
ﻲﺑﺮﻋ
ءاﺮﺟﻹ ﺢﺴﻤﻟا ﻰﻟإ زﺎﻬﺟ ﺮﺕﻮﻴﺒﻤﻜﻟا
١.ﻢﻗ ﻞﻴﻤﺤﺘﺏ ﺔﺨﺴﻨﻟا ﺔﻴﻠﺹﻷا ﻊﻡ ﻪﻴﺟﻮﺕ ﻪﺟﻮﻟا ﺺﺼﺨﻤﻟا ﺔﻋﺎﺒﻄﻠﻟ ﻰﻟإ ﻞﻔﺳﻷا ﻰﻠﻋ ﺔیواﺰﻟا ﺔﻴﻡﺎﻡﻷا ﻰﻨﻤﻴﻟا ﺢﻄﺴﻠﻟ
ﻲﺟﺎﺟﺰﻟا.
٢.ﻂﻐﺽا ﻰﻠﻋ Scan Menu )ﺔﻤﺋﺎﻗ ﺢﺴﻤﻟا(.
لﺎﺒﻘﺘﺳا ،ﺢﺴﻤﻟا وأ ﻂﻐﺽا ﻰﻠﻋ ﺪیﺪﺤﺘﻟ ﻖﻴﺒﻄﺕ ،ﺮﺥﺁ ﻢﺙ
٣.ﻂﻐﺽا ﻰﻠﻋ OK) ﻖﻓاﻮﻡ( ﺪیﺪﺤﺘﻟ ﻖﻴﺒﻄﺕ ﻲﺽاﺮﺘﻓا ﻦﻡ ﻞﺟأ
ﻂﻐﺽا ﻰﻠﻋ OK) ﻖﻓاﻮﻡ(.
ﺮﻬﻈﺘﺳ ةرﻮﺹ ﺔﻨیﺎﻌﻡ ﺢﺴﻤﻠﻟ ﻰﻠﻋ ﺔﺵﺎﺵ ﺮﺕﻮﻴﺒﻤﻜﻟا ,كﺎﻨه ﻦﻜﻤی ﺎهﺮیﺮﺤﺕ.
٤.ﻢﻗ ﻞﻤﻌﺏ ﺔیأ تاﺮیﺮﺤﺕ ةرﻮﺼﻟ ﺔﻨیﺎﻌﻤﻟا ,ﻢﺙ ﺮﻔﻥا قﻮﻓ Accept) لﻮﺒﻗ( ﺪﻨﻋ ءﺎﻬﺘﻥﻻا.
ﺢﺴﻡ ﺔﺨﺴﻥ ﺔﻴﻠﺻأ ﻰﻟإ ﺔﻗﺎﻄﺑ ةﺮآاذ
ﻚﻨﻜﻤی لﺎﺳرإ ةرﻮﺼﻟا ﺔﺡﻮﺴﻤﻤﻟا ةرﻮﺼآ JPEG ﻰﻟإ ﺔﻗﺎﻄﺏ ةﺮآاﺬﻟا ﺔﺒآﺮﻤﻟا ﺎﻴﻟﺎﺡ .ﻚﻨﻜﻤی ﻚﻟذ ﻦﻡ مﺪﺨﺘﺳا تارﺎﻴﺥ ﺔﻋﺎﺒﻃ
رﻮﺼﻟا ﺔﻋﺎﺒﻄﻟ تﺎﻋﻮﺒﻄﻡ نوﺪﺏ دوﺪﺡ تﺎﺤﻔﺹو مﻮﺒﻟأ ﻦﻡ ةرﻮﺼﻟا ﺔﺡﻮﺴﻤﻤﻟا.
ﻆﻔﺤﻟ ﺪﻨﺘﺴﻡ حﻮﺴﻤﻡ ﻰﻟإ ﺔﻗﺎﻄﺑ ةﺮآاذ
١.ﺪآﺄﺕ ﻦﻡ لﺎﺥدإ ﺔﻗﺎﻄﺏ ةﺮآاﺬﻟا ﻲﻓ ﺔﺤﺘﻔﻟا ﺔﺒﺳﺎﻨﻤﻟا ﻲﻓ HP All-in-One.
ﺺﺼﺨﻤﻟا ﺔﻋﺎﺒﻄﻠﻟ ﻰﻟإ ﻞﻔﺳﻷا ﻰﻠﻋ ﺔیواﺰﻟا ﺔﻴﻡﺎﻡﻷا ﻰﻨﻤﻴﻟا ﺢﻄﺴﻠﻟ
ﻲﺟﺎﺟﺰﻟا.
ﺰﻴﻴﻤﺘﻟ Scan to Memory Card) ﺢﺴﻡ ﻰﻟإ ﺔﻗﺎﻄﺑ ةﺮآاﺬﻟا(، ﻢﺙ ﻂﻐﺽا ﻰﻠﻋ OK) ﻖﻓاﻮﻡ(.
٢.ﻢﻗ ﻞﻴﻤﺤﺘﺏ ﺔﺨﺴﻨﻟا ﺔﻴﻠﺹﻷا ﻊﻡ ﻪﻴﺟﻮﺕ ﻪﺟﻮﻟا
٣.ﻂﻐﺽا ﻰﻠﻋ رز Scan Menu )ﺔﻤﺋﺎﻗ ﺢﺴﻤﻟا(.
٤.ﻂﻐﺽا ﻰﻠﻋ
ﺢﺴﻤی زﺎﻬﺟ HP All-in-One ةرﻮﺼﻟا ﺎﻴﺋﻮﺽ ﻆﻔﺤیو ﻒﻠﻤﻟا ﻲﻓ ﺔﻗﺎﻄﺏ ةﺮآاﺬﻟا ﻖﻴﺴﻨﺘﺏ JPEG.
ﻞﻤﻋ ﺔﺨﺴﻥ
ﻚﻨﻜﻤی ﻞﻤﻋ ﺦﺴُﻥ ةدﻮﺠﺏ ﺔﻴﻟﺎﻋ ﻦﻡ لﻼﺥ ﺔﺡﻮﻟ ﻢﻜﺤﺘﻟا.
ءﺪﺑ ﺦﺴﻨﻟا ناﻮﻟﻷﺎﺑ(
١١ HP Photosmart C5200 All-in-One series
ﻞﻤﻌﻟ ﺔﺨﺴﻥ ﻦﻡ لﻼﺥ ﺔﺡﻮﻟ ﻢﻜﺤﺘﻟا
١.ﺪآﺄﺕ ﻦﻡ ﻚﻠﻴﻤﺤﺕ قرﻮﻠﻟ ﻲﻓ ﺔیوﺎﺡ لﺎﺥدﻹا.
٢.ﻢﻗ ﻞﻴﻤﺤﺘﺏ ﺔﺨﺴﻨﻟا ﺔﻴﻠﺹﻷا ﻊﻡ ﻪﻴﺟﻮﺕ ﻪﺟﻮﻟا ﺺﺼﺨﻤﻟا ﺔﻋﺎﺒﻄﻠﻟ ﻰﻟإ ﻞﻔﺳﻷا ﻰﻠﻋ ﺔیواﺰﻟا ﺔﻴﻡﺎﻡﻷا ﻰﻨﻤﻴﻟا ﺢﻄﺴﻠﻟ
ﻲﺟﺎﺟﺰﻟا.
٣.ﻂﻐﺽا ﻰﻠﻋ Start Copy Black) ءﺪﺑ ﺦﺴﻨﻟا دﻮﺳﻷﺎﺑ( وأ ﻰﻠﻋ Start Copy Color)
ءﺪﺒﻟ ﺦﺴﻨﻟا.
لاﺪﺒﺘﺳا تﺎﺵﻮﻃﺮﺥ ﺔﻋﺎﺒﻄﻟا
ﻊﺒﺕا ﻩﺬه تﺎﻤﻴﻠﻌﺘﻟا ﺎﻡﺪﻨﻋ جﺎﺘﺤﺕ ﻲﻟإ لاﺪﺒﺘﺳا تﺎﺵﻮﻃﺮﺥ ﺔﻋﺎﺒﻄﻟا.

ﺔﻈﺡﻼﻡﺪﻨﻋ ضﺎﻔﺨﻥا ىﻮﺘﺴﻡ ﺮﺒﺤﻟا ﻲﻓ ﺔﺵﻮﻃﺮﺥ ،ﺔﻋﺎﺒﻄﻟا ﺮﻬﻈﺕ ﺔﻟﺎﺳر ﻰﻠﻋ ﺔﺵﺎﺸﻟا .ﻦﻜﻤی ﺎًﻀیأ ﺺﺤﻓ تﺎیﻮﺘﺴﻡ
ﺮﺒﺤﻟا ماﺪﺨﺘﺳﺎﺏ Printer Toolbox) قوﺪﻨﺻ تاودأ ﺔﻌﺑﺎﻄﻟا( ﺮﻓﻮﺘﻤﻟا ﻦﻡ لﻼﺥ ﺞﻡﺎﻥﺮﺏ HP Photosmart ﻲﻓ
زﺎﻬﺟ ﺮﺕﻮﻴﺒﻤﻜﻟا وأ ﻦﻡ لﻼﺥ ﻊﺏﺮﻡ راﻮﺤﻟا Print Properties) ﺺﺋﺎﺼﺥ ﺔﻋﺎﺒﻄﻟا( ﻲﻓ زﺎﻬﺟ ﺮﺕﻮﻴﺒﻤﻜﻟا.
اذإ ﻢﻟ ﻦﻜی ﻚیﺪﻟ ﻞﻌﻔﻟﺎﺏ تﺎﺵﻮﻃﺮﺥ ﺔﻋﺎﺒﻃ ﺔﻠیﺪﺏ زﺎﻬﺠﻟ HP All-in-One، ﻚﻨﻜﻤی ﺎﻬﺒﻠﻃ ﻦﻡ لﻼﺥ ﺮﻘﻨﻟا قﻮﻓ ﺰﻡﺮﻟا قﻮﺴﺘﻟا
ءاﺮﺸﻟ تﺎﻡﺰﻠﺘﺴﻡ HP) Shop for HP Supplies( ﻰﻠﻋ ﺮﺕﻮﻴﺒﻤﻜﻟا .ﺪﺟﻮیو اﺬه ﺰﻡﺮﻟا ﻰﻠﻋ ةﺰﻬﺟأ ﺮﺕﻮﻴﺒﻤﻜﻟا ﻲﺘﻟا
ﻞﻤﻌﺕ مﺎﻈﻨﺏ ﻞﻴﻐﺸﺘﻟا Windows ﻲﻓ ﺪﻠﺠﻤﻟا HP ﻲﻓ ﺔﻤﺋﺎﻘﻟا Start) أﺪﺑا(.
www.hp.com/buy/supplies.
ﺪیﺰﻤﻠﻟ ﻦﻡ تﺎﻡﻮﻠﻌﻤﻟا ﻊﺟار
لاﺪﺒﺘﺳﻻ تﺎﺵﻮﻃﺮﺥ ﺔﻋﺎﺒﻄﻟا
١.ﺪآﺄﺕ ﻦﻡ ﻞﻴﻐﺸﺕ زﺎﻬﺟ HP All-in-One.
ﻪﻴﺒﻨﺕﻲﻓ ﺔﻟﺎﺡ فﺎﻘیإ ﻞﻴﻐﺸﺕ HP All-in-One اذإ ﺖﻨآ ﺢﺘﻔﺕ بﺎﺏ ﺔﺵﻮﻃﺮﺥ ﺔﻋﺎﺒﻄﻟا لﻮﺹﻮﻠﻟ ﻰﻟإ تﺎﺵﻮﻃﺮﺥ
ﺔﻋﺎﺒﻄﻟا ,ﻻ مﻮﻘی HP All-in-One ﺮیﺮﺤﺘﺏ تﺎﺵﻮﻃﺮﺨﻟا ﻦﻡ ﻞﺟأ ﺎﻬﻟاﺪﺒﺘﺳا .ﺪﻗ ﺮﻀﺕ زﺎﻬﺟ HP All-in-One
اذإ ﻢﻟ ﻢﺘی ﺖﻴﺒﺜﺕ تﺎﺵﻮﻃﺮﺥ ﺔﻋﺎﺒﻄﻟا نﺎﻡﺄﺏ ﺎﻡﺪﻨﻋ لوﺎﺤﺕ ﺎﻬﺘﻟازإ.
ﻲﺑﺮﻋ
٢.ﺢﺘﻓا بﺎﺏ ﺔﺵﻮﻃﺮﺥ ﺔﻋﺎﺒﻄﻟا.
كﺮﺤﺘﺕ ﺔﺏﺮﻋ ﺔﻋﺎﺒﻄﻟا ﻰﻟإ ﻰﺼﻗأ ﺐﻥﺎﺠﻟا ﻦﻤیﻷا ﻦﻡ زﺎﻬﺟ HP All-in-One.
٣.ﺮﻈﺘﻥا ﻰﺘﺡ ﻒﻗﻮﺘﺕ ﺔﺏﺮﻋ ﺔﻋﺎﺒﻄﻟا ﻦﻋ ﻞﻤﻌﻟا ﻢﺙ ﻂﻐﺽا ﻞﻔﺳﻷ ﻖﻓﺮﺏ ﻰﻠﻋ ﺔﺏﺮﻋ ﺔﻋﺎﺒﻄﻟا ﺎهﺮیﺮﺤﺘﻟ.
اذإ ﺖﻤﻗ لاﺪﺒﺘﺳﺎﺏ ﺔﺵﻮﻃﺮﺥ ﺔﻋﺎﺒﻄﻟا ﺔﻴﺙﻼﺙ ،ناﻮﻟﻷا ﻢﻘﻓ جاﺮﺥﺈﺏ ﺔﺵﻮﻃﺮﺥ ﺔﻋﺎﺒﻄﻟا ﻦﻡ ﺔﺤﺘﻔﻟا ةدﻮﺟﻮﻤﻟا ﻰﻠﻋ رﺎﺴﻴﻟا.
ﻲﻓ ﺔﻟﺎﺡ لاﺪﺒﺘﺳا ﺔﺵﻮﻃﺮﺥ ﺔﻋﺎﺒﻄﻟا نﻮﻠﻟﺎﺏ دﻮﺳﻷا ,ﺔﺵﻮﻃﺮﺥ ﺔﻋﺎﺒﻃ رﻮﺼﻟا ,وأ ﺔﺵﻮﻃﺮﺥ ﺔﻋﺎﺒﻃ رﻮﺼﻟا نﻮﻠﻟﺎﺏ
ﺔﻋﺎﺒﻄﻟا ﻦﻡ ﺔﺤﺘﻔﻟا ةدﻮﺟﻮﻤﻟا ﻰﻠﻋ ﻦﻴﻤﻴﻟا.
،يدﺎﻡﺮﻟا ﻢﻘﻓ ﺔﻟازﺈﺏ ﺔﺵﻮﻃﺮﺥ
١ﺔﺤﺘﻓ ﺔﺵﻮﻃﺮﺥ ﺔﻋﺎﺒﻄﻟا ﺔﺹﺎﺨﻟا ﺔﺵﻮﻃﺮﺨﺏ ﺔﻋﺎﺒﻄﻟا ﺔﻴﺙﻼﺙ ناﻮﻟﻷا
٢ﺔﺤﺘﻓ ﺔﺵﻮﻃﺮﺥ ﺔﻋﺎﺒﻄﻟا ﺔﺹﺎﺨﻟا ﺔﺵﻮﻃﺮﺨﺏ ﺔﻋﺎﺒﻄﻟا نﻮﻠﻟﺎﺏ دﻮﺳﻷا ﺔﺵﻮﻃﺮﺥو ﺔﻋﺎﺒﻃ رﻮﺼﻟا
لاﺪﺒﺘﺳا تﺎﺵﻮﻃﺮﺥ ﺔﻋﺎﺒﻄﻟا ١٢

ﻲﺑﺮﻋ
ﻞﺼﻔﻟا ١
٤.ﺐﺤﺳا ﺔﺵﻮﻃﺮﺥ ﺔﻋﺎﺒﻄﻟا ﻚهﺎﺠﺕ ﺎﻬﺟاﺮﺥﻹ ﻦﻡ ﺎﻬﺘﺤﺘﻓ.
٥.ﻲﻓ ﺔﻟﺎﺡ ﺔﻟازإ ﺔﺵﻮﻃﺮﺥ ﺔﻋﺎﺒﻄﻟا نﻮﻠﻟﺎﺏ دﻮﺳﻷا ﻦﻡ ﻞﺟأ ﺖﻴﺒﺜﺕ ﺔﺵﻮﻃﺮﺥ ﺔﻋﺎﺒﻃ رﻮﺼﻟا وأ ﺔﺵﻮﻃﺮﺥ ﺔﻋﺎﺒﻃ رﻮﺼﻟا
نﻮﻠﻟﺎﺏ ،يدﺎﻡﺮﻟا ﻢﻘﻓ ﻦیﺰﺨﺘﺏ ﺔﺵﻮﻃﺮﺥ ﺔﻋﺎﺒﻄﻟا نﻮﻠﻟﺎﺏ دﻮﺳﻷا ﻲﻓ ةﺪﺡو ﺔیﺎﻤﺡ ﺔﺵﻮﻃﺮﺥ ﺔﻋﺎﺒﻄﻟا وأ ﻲﻓ ةﻮﺒﻋ ﺔﻴﻜﻴﺘﺳﻼﺏ
ﺔﻤﻜﺤﻡ قﻼﻏﻹا.
ﺎﻬﻥﺎﻜﻡ لزأو ﻂیﺮﺸﻟا ﻲﻜﻴﺘﺳﻼﺒﻟا ﺔﻔﺨﺏ ماﺪﺨﺘﺳﺎﺏ ﻂیﺮﺸﻟا يدرﻮﻟا يﺬﻟا ﻢﺘی ﻪﺒﺤﺳ
٦.ﻢﻗ ﺔﻟازﺈﺏ ﺔﺵﻮﻃﺮﺥ ﺔﻋﺎﺒﻄﻟا ةﺪیﺪﺠﻟا ﻦﻡ
ﻊﻡ ةﺎﻋاﺮﻡ مﺪﻋ ﺲﻤﻟ يأ ءﻲﺵ ىﻮﺳ ﻚﻴﺘﺳﻼﺒﻟا دﻮﺳﻷا.
١طﺎﻘﻥ ﺲﻡﻼﺘﻟا ﺔﻴﺳﺎﺤﻥ نﻮﻠﻟا
٢ﻂیﺮﺸﻟا ﻲﻜﻴﺘﺳﻼﺒﻟا ﻊﻡ ﻂیﺮﺵ ﺐﺤﺴﻟا يذ نﻮﻠﻟا يدرﻮﻟا) ﺐﺠی ﻪﺘﻟازإ ﻞﺒﻗ ﺖﻴﺒﺜﺘﻟا(
٣تﺎﺤﺘﻓ ﺮﺒﺤﻟا ﺖﺤﺕ ﻂیﺮﺸﻟا
ﻪﻴﺒﻨﺕ ﻻ ﺲﻤﻠﺕ طﺎﻘﻥ ﺲﻡﻼﺘﻟا ﺔﻴﺳﺎﺤﻥ نﻮﻠﻟا وأ تﺎﺤﺘﻓ ﺮﺒﺤﻟا ﻻو لوﺎﺤﺕ ﺎًﻀیأ ةدﺎﻋإ قﺎﻓرإ ﻂیﺮﺸﻟا تﺎﺵﻮﻃﺮﺨﺏ
ﺔﻋﺎﺒﻄﻟا .ذإ ﺪﻗ ﻢﺠﻨی ﻦﻋ مﺎﻴﻘﻟا ﻚﻟﺬﺏ ثوﺪﺡ داﺪﺴﻥا ﻒﻠﺕو ﺮﺒﺤﻠﻟ ﻒﻌﺽو تﻼﻴﺹﻮﺘﻟا ﺔﻴﺋﺎﺏﺮﻬﻜﻟا.
٧.ﻚﺴﻡا ﺔﺵﻮﻃﺮﺥ ﺔﻋﺎﺒﻄﻟا ﺚﻴﺤﺏ ﻪﺠﺘی رﺎﻌﺵ HP ﻰﻟإ ﻰﻠﻋﻷا ,ﻢﺙ ﻞﺥدأ ﺔﺵﻮﻃﺮﺥ ﺔﻋﺎﺒﻄﻟا ةﺪیﺪﺠﻟا ﻞﺥاﺪﺏ ﺔﺤﺘﻓ
ﺔﺵﻮﻃﺮﺨﻟا ﺔﻏرﺎﻔﻟا .ﺪآﺄﺕ ﻦﻡ ﻊﻓد ﺔﺵﻮﻃﺮﺥ ﺔﻋﺎﺒﻄﻟا مﺎﻜﺡﺈﺏ ﻰﺘﺡ ﺮﻘﺘﺴﺕ ﻲﻓ ﺎﻬﻥﺎﻜﻡ تﺎﺒﺜﺏ.
ﻲﻓ ﺔﻟﺎﺡ ﺖﻴﺒﺜﺕ ﺔﺵﻮﻃﺮﺥ ﺔﻋﺎﺒﻄﻟا ﺔﻴﺙﻼﺙ ناﻮﻟﻷا ,ﻢﻗ ﺎﻬﻌﻓﺪﺏ ﻰﻟإ ﺔﺤﺘﻔﻟا ىﺮﺴﻴﻟا.
رﻮﺼﻟا ,وأ ﺔﺵﻮﻃﺮﺥ ﺔﻋﺎﺒﻃ رﻮﺼﻟا نﻮﻠﻟﺎﺏ
ﻲﻓ ﺔﻟﺎﺡ ﺖﻴﺒﺜﺕ ﺔﺵﻮﻃﺮﺥ ﺔﻋﺎﺒﻄﻟا نﻮﻠﻟﺎﺏ دﻮﺳﻷا ,ﺔﺵﻮﻃﺮﺥ ﺔﻋﺎﺒﻃ
يدﺎﻡﺮﻟا ,ﻢﻗ ﺎﻬﻌﻓﺪﺏ ﻰﻟإ ﺔﺤﺘﻔﻟا ﻰﻨﻤﻴﻟا.
١٣ HP Photosmart C5200 All-in-One series

٨.ﻖﻠﻏأ بﺎﺏ ﺔﺵﻮﻃﺮﺥ ﺔﻋﺎﺒﻄﻟا.
ﻲﺑﺮﻋ
اذإ ﺖﻨآ ﺪﻗ ﺖﻤﻗ ﺖﻴﺒﺜﺘﺏ ﺔﺵﻮﻃﺮﺥ ﺔﻋﺎﺒﻃ ةﺪیﺪﺟ ,مﻮﻘﻴﻓ زﺎﻬﺟ HP All-in-One ﺔﻋﺎﺒﻄﺏ ﺔﺤﻔﺹ ةاذﺎﺤﻡ ﺔﺵﻮﻃﺮﺨﻟ
ﺔﻋﺎﺒﻄﻟا.
٩.ﺪﻨﻋ ﺔﺒﻟﺎﻄﻤﻟا ,ﺪآﺄﺕ ﻦﻡ ﻞﻴﻤﺤﺕ قرو ﺾﻴﺏأ يدﺎﻋ ﻲﻓ ﺔیوﺎﺡ لﺎﺥدﻹا ,ﻢﺙ ﻂﻐﺽا ﻰﻠﻋ OK) ﻖﻓاﻮﻡ(.
١٠.مﻮﻘی زﺎﻬﺟ HP All-in-One ﺔﻋﺎﺒﻄﺏ ﺔﺤﻔﺹ رﺎﺒﺘﺥا ,ةاذﺎﺤﻡ سأر ﺔﻋﺎﺒﻄﻟا ةﺮیﺎﻌﻡو ﺔﻌﺏﺎﻄﻟا .ﻢﻗ ةدﺎﻋﺈﺏ ﺮیوﺪﺕ ﺔﺤﻔﺼﻟا
ﺎﻬﻨﻡ.
ﺔﻈﺡﻼﻡاذإ ﺖﻤﻗ ﻞﻴﻤﺤﺘﺏ قرو نﻮﻠﻡ ﻲﻓ ﺔیوﺎﺡ لﺎﺥدﻹا ﺪﻨﻋ ﻚﺕاذﺎﺤﻡ تﺎﺵﻮﻃﺮﺨﻟ ،ﺔﻋﺎﺒﻄﻟا ﻦﻠﻓ ﺢﺠﻨﺕ ﺔﻴﻠﻤﻋ
ةاذﺎﺤﻤﻟا .ﻢﻗ ﻞﻴﻤﺤﺘﺏ قرو ﺾﻴﺏأ يدﺎﻋ ﺮﻴﻏ مﺪﺨﺘﺴﻡ ﻲﻓ ﺔیوﺎﺡ ،لﺎﺥدﻹا ﻢﺙ ﺪﻋأ ﺔﻟوﺎﺤﻡ ةاذﺎﺤﻤﻟا.
www.hp.com/support .ﺪﻨﻋ ﺔﺒﻟﺎﻄﻤﻟا ,ﻢﻗ رﺎﻴﺘﺥﺎﺏ ﺪﻠﺒﻟا/،ﺔﻘﻄﻨﻤﻟا ﻢﺙ ﺮﻘﻥا قﻮﻓ Contact HP) لﺎﺼﺕا
وأ ﺺﻠﺨﺘﻟﺎﺏ
ﺮﻬﻈﺕ ﺔﻟﺎﺳر حﺎﺠﻥ وأ ﻞﺸﻓ.
اذإ ﺖﻠﺸﻓ ةاذﺎﺤﻤﻟا ةﺮﻡ ،ىﺮﺥأ ﺎﻤﺏﺮﻓ ﻪﺟاﻮﺕ ﺎًﺒﻄﻋ زﺎﻬﺠﺏ سﺎﺴﺡﻹا وأ ﺔﺵﻮﻃﺮﺥ ﺔﻋﺎﺒﻄﻟا .ﻞﺼﺕا ﻢﻋﺪﺏ HP .رز
ـﺑHP( لﻮﺼﺤﻠﻟ ﻰﻠﻋ تﺎﻡﻮﻠﻌﻡ لﻮﺡ لﺎﺼﺕﻻا ﻢﻋﺪﻟﺎﺏ ﻲﻨﻔﻟا.
١١.ﻂﻐﺽا ﻰﻠﻋ OK) ﻖﻓاﻮﻡ( ﺔﻌﺏﺎﺘﻤﻠﻟ.
ﻒﻴﻈﻨﺕ HP All-in-One
ﺪآﺄﺘﻠﻟ ﻦﻡ ءﺎﻘﺏ ﻚﺨﺴﻥ ﻚﺕاﺪﻨﺘﺴﻡو ﺔﺡﻮﺴﻤﻤﻟا ،ﺔﺤﺽاو ﺪﻗ جﺎﺘﺤﺕ ًﺎﻥﺎﻴﺡأ ﻰﻟإ ﻒﻴﻈﻨﺕ ﺢﻄﺴﻟا ﻲﺟﺎﺟﺰﻟا ءﺎﻄﻐﻟاو .ﺪﻗ ﺐﻏﺮﺕ ﻲﻓ
ﻒﻴﻈﻨﺕ رﺎﺒﻐﻟا ﻦﻡ ءﺰﺠﻟا ﻲﺟرﺎﺨﻟا ـﻟHP All-in-One.
ﺢﻴﻤﻠﺕﻚﻨﻜﻤی ءاﺮﺵ ﺔﻋﻮﻤﺠﻡ تاودأ ﻒﻴﻈﻨﺘﻟا ـﻟ HP) HP Cleaning Kit (تﺎﻌﺏﺎﻄﻟ Inkjet Printers
وAll-in-Ones) Q6260A (ﻲﺘﻟاو ﺮﻓﻮﺕ ﻞآ تاودﻷا ﺔﺏﻮﻠﻄﻤﻟا ﻒﻴﻈﻨﺘﻟ زﺎﻬﺟ HP نﺎﻡﺄﺏ .ﺪیﺰﻤﻟ ﻦﻡ ،تﺎﻡﻮﻠﻌﻤﻟا
www.shopping.hp.com/accessories-store/printer.
ﻞﻘﺘﻥا ﻰﻟإ:
ﻒﻴﻈﻨﺕ HP All-in-One ١٤

ﻲﺑﺮﻋ
ﻞﺼﻔﻟا ١
ﻒﻴﻈﻨﺕ ﺢﻄﺴﻟا ﻲﺟﺎﺟﺰﻟا
تﺎﻤﺼﺏ ﻊﺏﺎﺹﻷا خﺎﺳوﻷاو ﺮﻌﺸﻟاو ﺔﺏﺮﺕﻷاو ﻰﻠﻋ ﺢﻄﺴﻟا ﻲﺟﺎﺟﺰﻟا ﻲﺴﻴﺋﺮﻟا يدﺆﺕ ﻰﻟإ ءﺎﻄﺏإ ءادﻷا ﺮﺙﺆﺕو ﻰﻠﻋ ﺔﻗد ﺦﺴﻨﻟا
ﺢﺴﻤﻟاو.
ﻒﻴﻈﻨﺘﻟ ﺢﻄﺴﻟا ﻲﺟﺎﺟﺰﻟا
١.ﻢﻗ فﺎﻘیﺈﺏ ﻞﻴﻐﺸﺕ زﺎﻬﺟ HP All-in-One ,ﻞﺼﻓا ﻚﻠﺳ ﺔﻗﺎﻄﻟا ,ﻢﺙ ﻊﻓرا ءﺎﻄﻐﻟا.
.
٢.ﻒﻈﻥ ﺢﻄﺴﻟا ﻲﺟﺎﺟﺰﻟا ﺔﻌﻄﻘﺏ شﺎﻤﻗ ﺔﻤﻋﺎﻥ وأ ﺔﻌﻄﻗ ﺞﻨﻔﺳإ ﺔﻠﻠﺒﻡ ﻞﻴﻠﻘﺏ ﻦﻡ ﻒﻈﻨﻡ جﺎﺟﺰﻟا يﺬﻟا ﻻ ﺐﺒﺴی شﺪﺨﻟا
ﻪﻴﺒﻨﺕﻻ مﺪﺨﺘﺴﺕ داﻮﻤﻟا ﺔﺵدﺎﺨﻟا وأ نﻮﺘﻴﺳﻷا وأ ناﺰﻨﺒﻟا وأ ﻊﺏار ﺪیرﻮﻠآ نﻮﺏﺮﻜﻟا ﻰﻠﻋ ﺢﻄﺴﻟا ﻲﺟﺎﺟﺰﻟا ,نﻷ ﻩﺬه
داﻮﻤﻟا ﻩﺮﻀﺕ .ﻻ ﻊﻀﺕ وأ شﺮﺕ ﻞﺋاﻮﺴﻟا ًة ﺮ ﺵ ﺎ ﺒ ﻡ ﻰﻠﻋ ﺢﻄﺴﻟا ﻲﺟﺎﺟﺰﻟا ,ﺪﻘﻓ بﺮﺴﺘﺕ ﻞﺋاﻮﺴﻟا ﺖﺤﺕ ﺢﻄﺴﻟا ﻲﺟﺎﺟﺰﻟا
يدﺆﺕو ﻰﻟإ ﻪﻔﻠﺕ.
٣.ﻒﻔﺟ ﺢﻄﺴﻟا ﻲﺟﺎﺟﺰﻟا ﺔﻌﻄﻘﺏ شﺎﻤﻗ ﺔﻓﺎﺟ ,ﺔﻤﻋﺎﻥ ,ﺔﻴﻟﺎﺥ ﻦﻡ طﻮﻴﺨﻟا ﻊﻨﻤﻟ ثوﺪﺡ ﻊﻘﺏ.
٤.ﻢﻗ ﻞﻴﺹﻮﺘﺏ ﻚﻠﺳ ﺔﻗﺎﻄﻟا ,ﻢﺙ ﻞّﻐﺵ زﺎﻬﺟ HP All-in-One.
ﻒﻴﻈﻨﺕ ﺮﻬﻇ ءﺎﻄﻐﻟا
ﺪﻗ ﻢآاﺮﺘﺕ خﺎﺳوﻷا ﺔﻄﻴﺴﺒﻟا ﻰﻠﻋ ءﺎﻄﻏ تاﺪﻨﺘﺴﻤﻟا ﺾﻴﺏﻷا دﻮﺟﻮﻤﻟا ﻞﻔﺳأ ءﺎﻄﻏ زﺎﻬﺟ HP All-in-One.
ﻒﻴﻈﻨﺘﻟ ﺮﻬﻇ ءﺎﻄﻐﻟا
١.ﻢﻗ فﺎﻘیﺈﺏ ﻞﻴﻐﺸﺕ زﺎﻬﺟ HP All-in-One ,ﻞﺼﻓا ﻚﻠﺳ ﺔﻗﺎﻄﻟا ,ﻢﺙ ﻊﻓرا ءﺎﻄﻐﻟا.
٢.ﻒﻈﻥ ءﺎﻄﻏ تاﺪﻨﺘﺴﻤﻟا ﺾﻴﺏﻷا ﺔﻌﻄﻘﺏ شﺎﻤﻗ ﺔﻤﻋﺎﻥ وأ ﺔﻌﻄﻗ ﺞﻨﻔﺳإ ﺔﻠﻠﺒﻡ ًﻼ ﻴ ﻠ ﻗ نﻮﺏﺎﺼﺏ ﻂﺳﻮﺘﻡ ﺰﻴآﺮﺘﻟا ءﺎﻡو ﺊﻓاد.
ﻻ شﺪﺨﺕ ءﺎﻄﻐﻟا.
ﻒﻈﻥ ءﺎﻄﻐﻟا ﻖﻓﺮﺏ ﺔﻟازﻹ خﺎﺳوﻷا .
٣.ﻒﻔﺟ ءﺎﻄﻐﻟا ﺔﻌﻄﻘﺏ شﺎﻤﻗ ﺔﻓﺎﺟ ,ﺔﻤﻋﺎﻥ ,ﺔﻴﻟﺎﺥ ﻦﻡ طﻮﻴﺨﻟا.
ﻪﻴﺒﻨﺕﻻ مﺪﺨﺘﺴﺕ اًداﻮﻡ ﺢﺴﻤﻠﻟ ﺔﻋﻮﻨﺼﻡ ﻦﻡ قرﻮﻟا ﺎﻬﻥﻷ ﺪﻗ شﺪﺨﺕ ءﺎﻄﻐﻟا.
٤.اذإ ﺖﻥﺎآ كﺎﻨه ﺔﺟﺎﺡ ﻰﻟإ ﺪیﺰﻤﻟا ﻦﻡ ،ﻒﻴﻈﻨﺘﻟا رﺮآ تاﻮﻄﺨﻟا ﺔﻘﺏﺎﺴﻟا ماﺪﺨﺘﺳﺎﺏ لﻮﺤآ ﻞﻴﺏوﺮﺏﻮﺴیﻷا) ﺢﺴﻤﻠﻟ (ﺢﺴﻡاو
ءﺎﻄﻐﻟا اًﺪﻴﺟ ﺔﻌﻄﻘﺏ شﺎﻤﻗ ﺔﻠﻠﺒﻡ ﺔﻟازﻹ يأ ﺎیﺎﻘﺏ لﻮﺤآ.
ﻪﻴﺒﻨﺕصﺮﺡا ﻰﻠﻋ مﺪﻋ ﺐﻜﺳ لﻮﺤآ ﻰﻠﻋ ﺢﻄﺴﻟا ﻲﺟﺎﺟﺰﻟا وأ ﻰﻠﻋ ءﺰﺠﻟا ﻲﺟرﺎﺨﻟا ﻦﻡ زﺎﻬﺟ
HP All-in-One، ﺪﻘﻓ يدﺆی ﻚﻟذ ﻰﻟإ فﻼﺕإ زﺎﻬﺠﻟا.
٥.ﻢﻗ ﻞﻴﺹﻮﺘﺏ ﻚﻠﺳ ﺔﻗﺎﻄﻟا ,ﻢﺙ ﻞّﻐﺵ زﺎﻬﺟ HP All-in-One.
١٥ HP Photosmart C5200 All-in-One series
 Loading...