

从这里开始
电缆用户: 请勿在执行步骤
前连接
电缆。
安装手册
疑难排解
USB
电缆用户: 请勿在执行步骤 A2
Start Here
前连接 USB
电缆。
1
使用本指南安装硬件并将 HP All-in-One 连接到您的计算机或工作网络上。如果在安装期间遇到问题,请参阅本指南
后面的
Use this guide to set up the hardware and connect the HP All-in-One to either your computer or a working network.
If you have problems during setup, see Troubleshooting later in the guide.
疑难排解 。
USB cable users: Do not connect the USB cable until step A2.
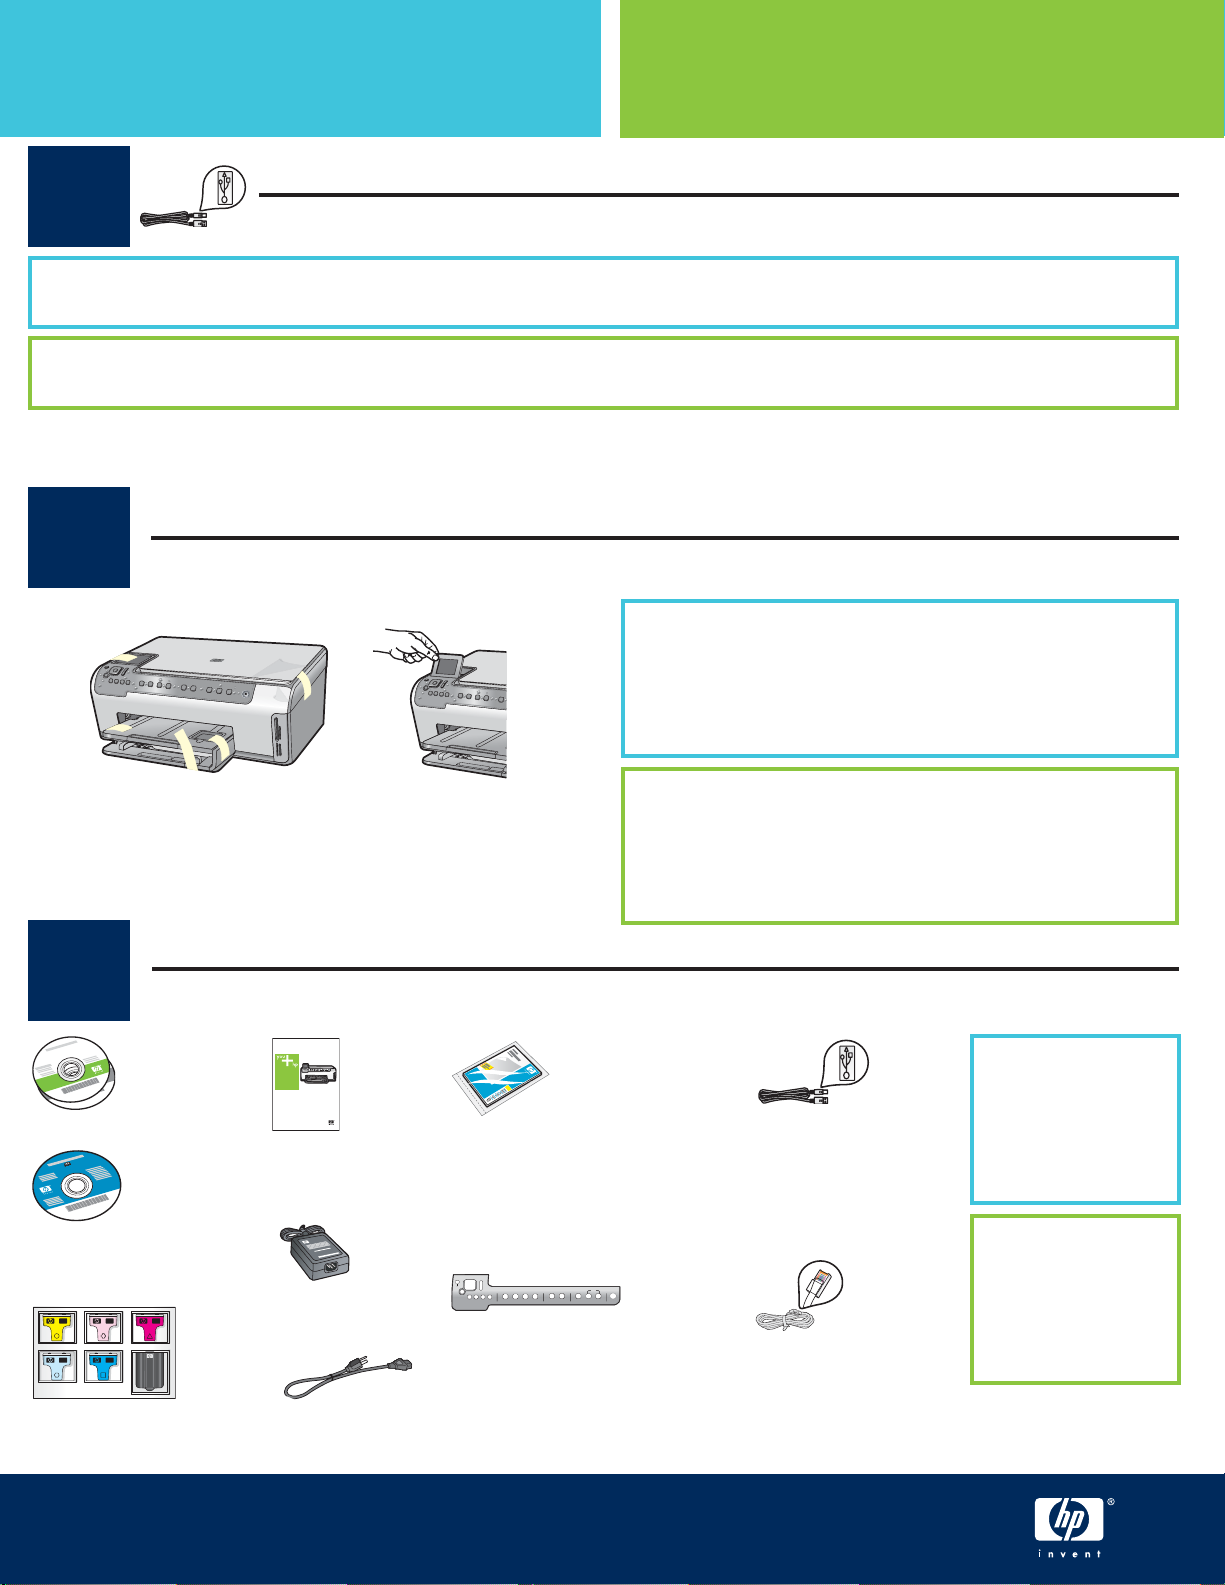
取下所有的胶带和抬起显示屏
2
Remove all tape and lift display
ab
a 取下盖子上和设备前面及背面的所有胶带和保护膜。
b
抬起彩色图形显示屏,取下保护膜。 您可以将显示
屏的高度调整到适于观察的位置。
a Remove all tape and protective film from the lid and
from the front and back of the device.
b Lift the color graphics display and remove the
protective film. You can adjust the height of the
display to a position suitable for viewing.
查找组件
3
Locate components
HP Photosmart C5100 All-in-One series
Basics Guide
Windows/Mac CD
使用手册
Basics Guide
**文档 CD
**Documentation CD
适配器
Adapter
墨盒
Ink Cartridge
HP Photosmart C5100 All-in-One series
HP Photosmart C5100 All-in-One series Setup Guide
电源线
Power Cord
安装手册
4 x 6 英寸 (10 x 15 cm)
照片纸
4 x 6 in
(10 x 15 cm) photo paper
控制面板贴片(可能已预
安装)
Control panel faceplate
(may be pre-attached)
USB 电缆
USB cable
Ethernet 电缆
Ethernet cable
**包装盒内的物品
可能有所不同。
其它网络设备将在
本指南后面进行说
明。
**The contents of
your box may differ.
Additional network
equipment specified
later in the guide.
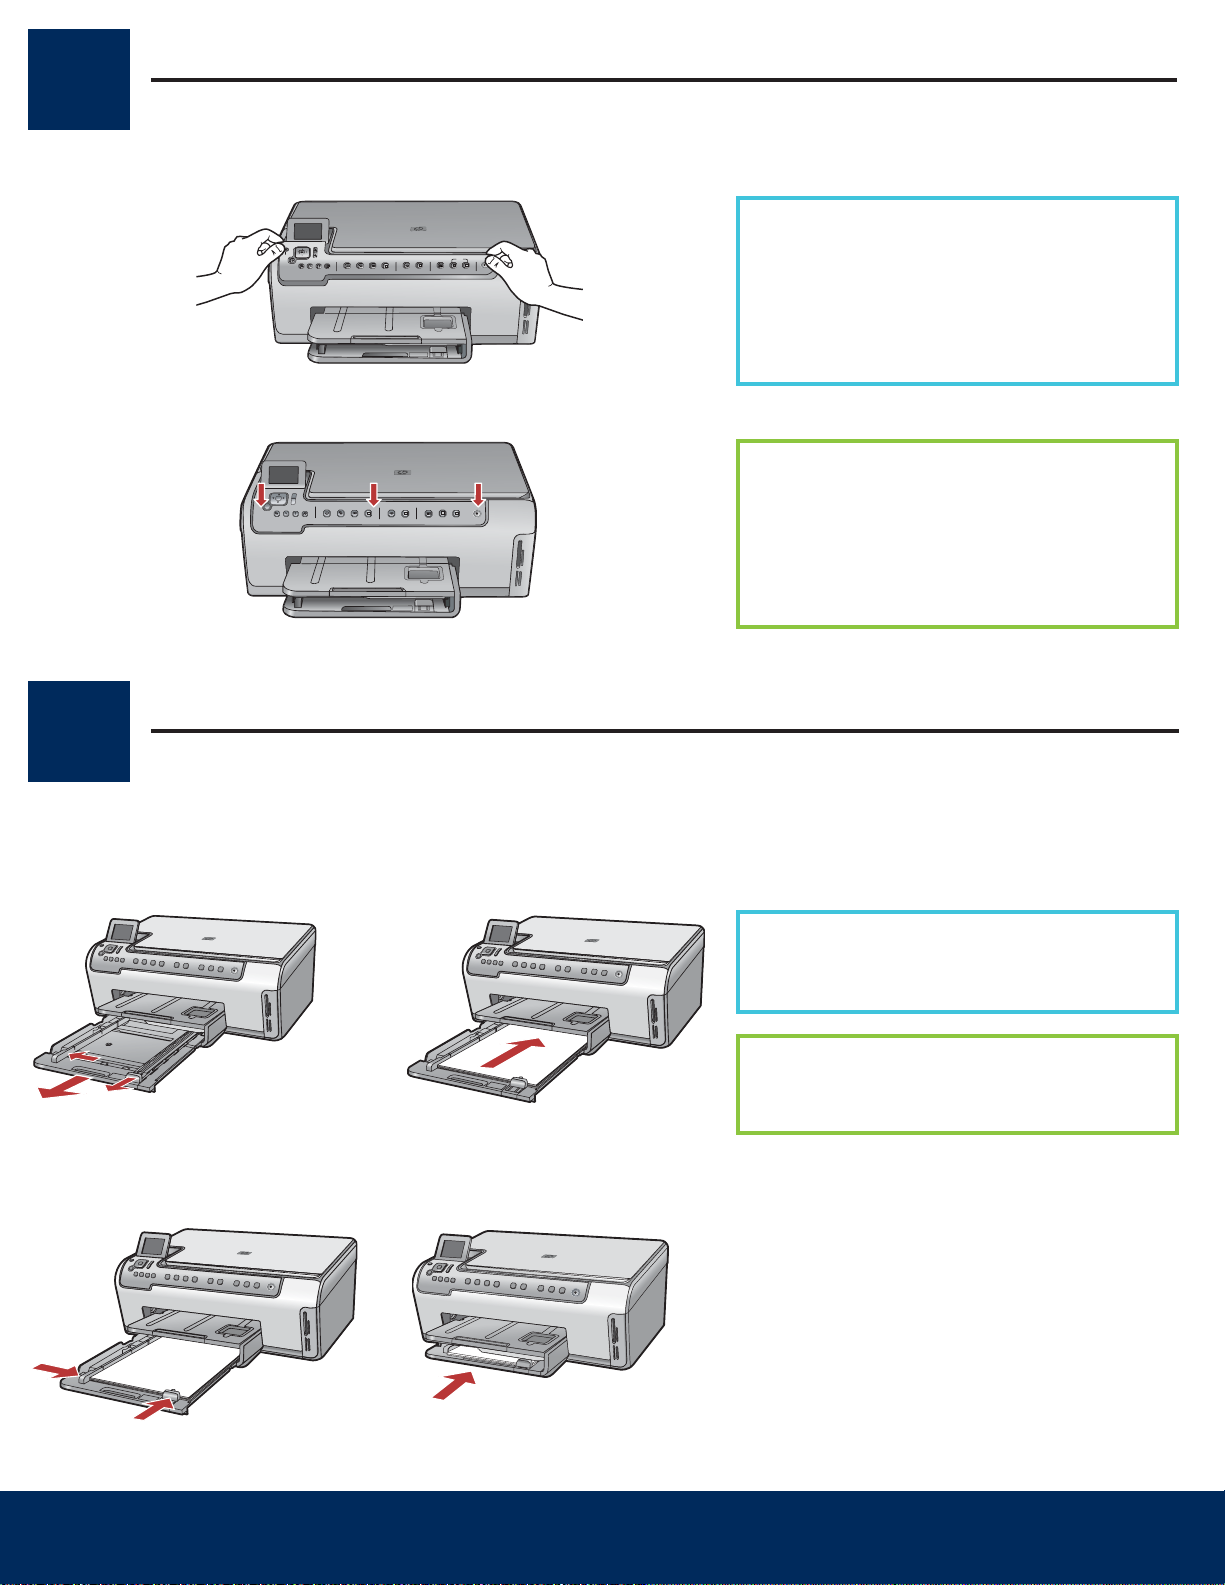
安装控制面板贴片(如果尚未安装)
b
主纸盒:
4
Attach the control panel faceplate (if not attached)
a
b
a 将控制面板贴片放在设备的按钮上。
用力按压该面板盖的各边,使其固定。
请确保可以看见所有的按钮且按钮未受
阻碍。
a Position the control panel faceplate over
the buttons on the device.
b Press down firmly on all edges of the
overlay to secure it. Make sure all buttons
are visible and not blocked.
将纸张装入两个纸盒内
5
主纸盒:
Main tray:
ab
c
Load paper into both trays
d
在底部纸盒上装入普通白纸。校准时需要用
普通纸。
Load plain white paper in the bottom paper
tray. Plain paper is needed for alignment.
2 • HP All-in-One
h i
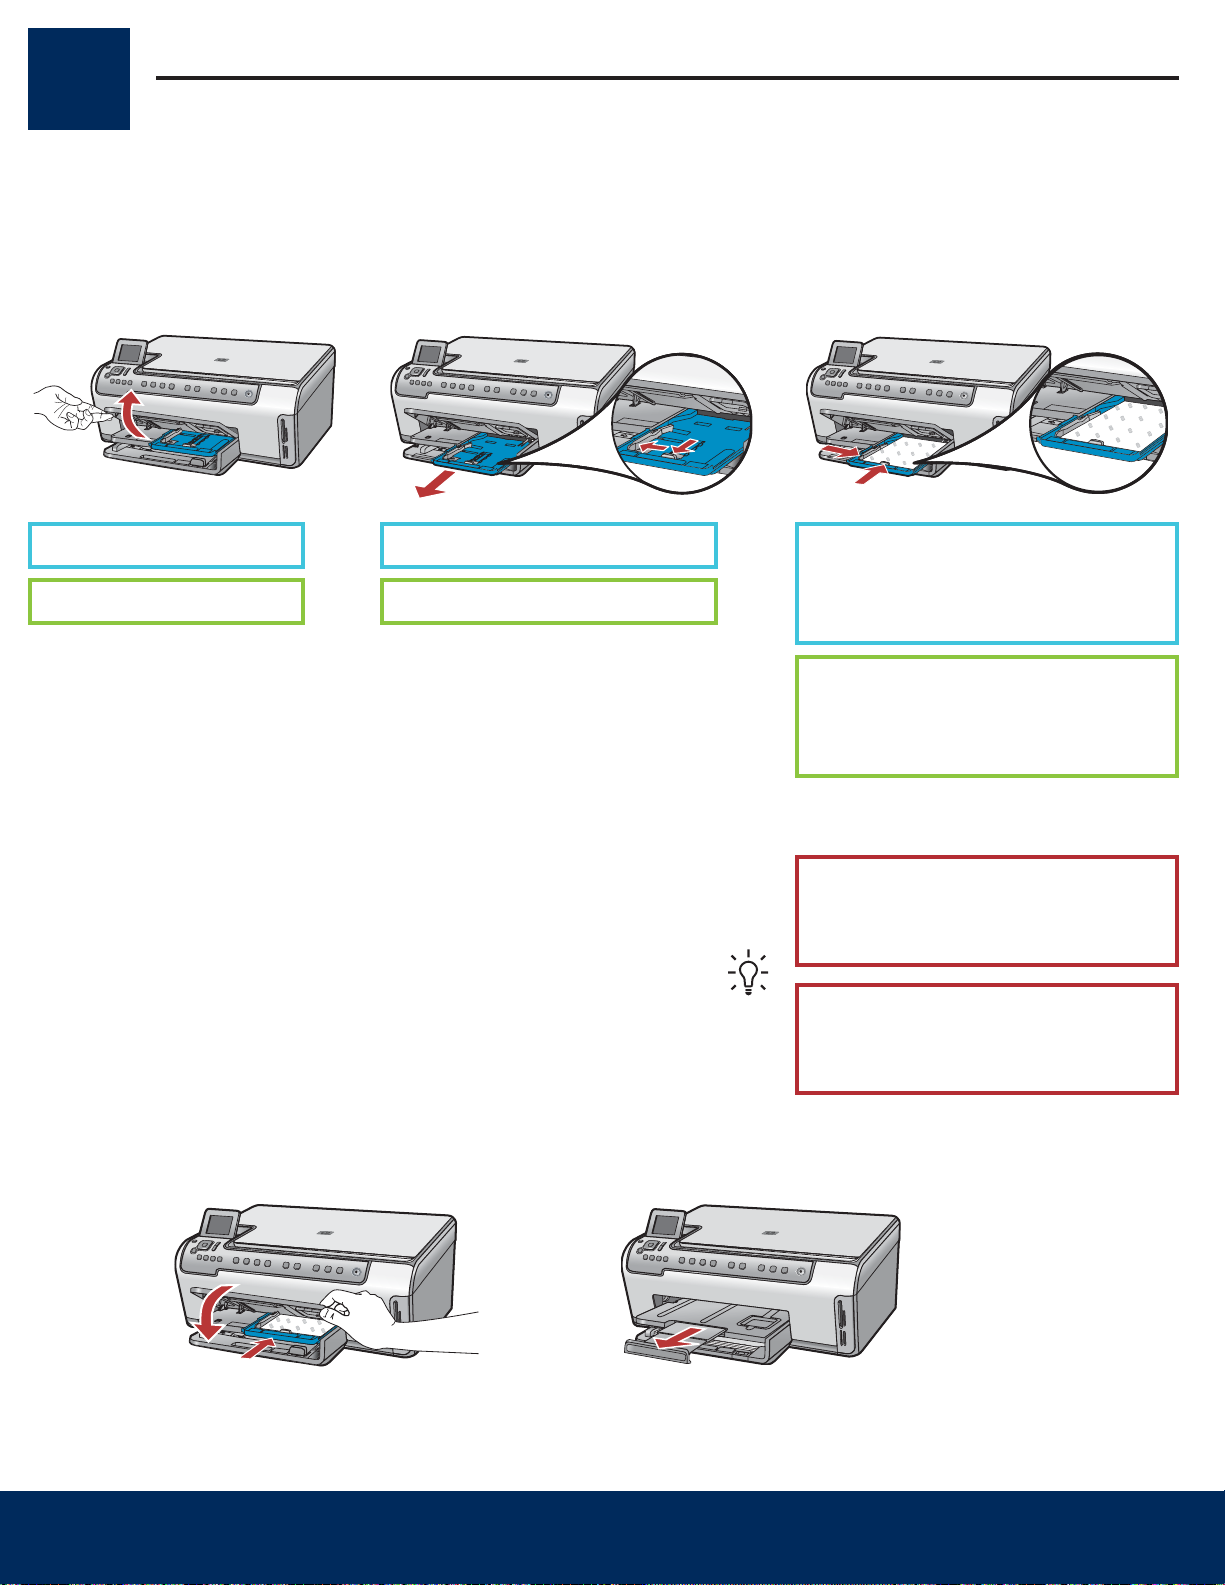
将纸张装入两个纸盒内
照片纸盒:
提示:
5
照片纸盒:
Photo paper tray:
e f g
e 抬起出纸盒。 f 拉出照片盒。
e Lift the output tray. f Pull out the photo tray.
Load paper into both trays
g 从样品包装内取出 4 x 6 英寸
(10 x 15 cm) 照片纸装入,使照
片盒的光滑面向下。
g Load the 4 x 6 inch (10 x 15 cm)
photo paper from the sample pack
with the glossy side down in to the
photo tray.
提示: 如果纸张被拉住,请确保拉
片朝向您。
Tip: If the paper is tabbed, make
sure the tab is towards you.
HP All-in-One • 3
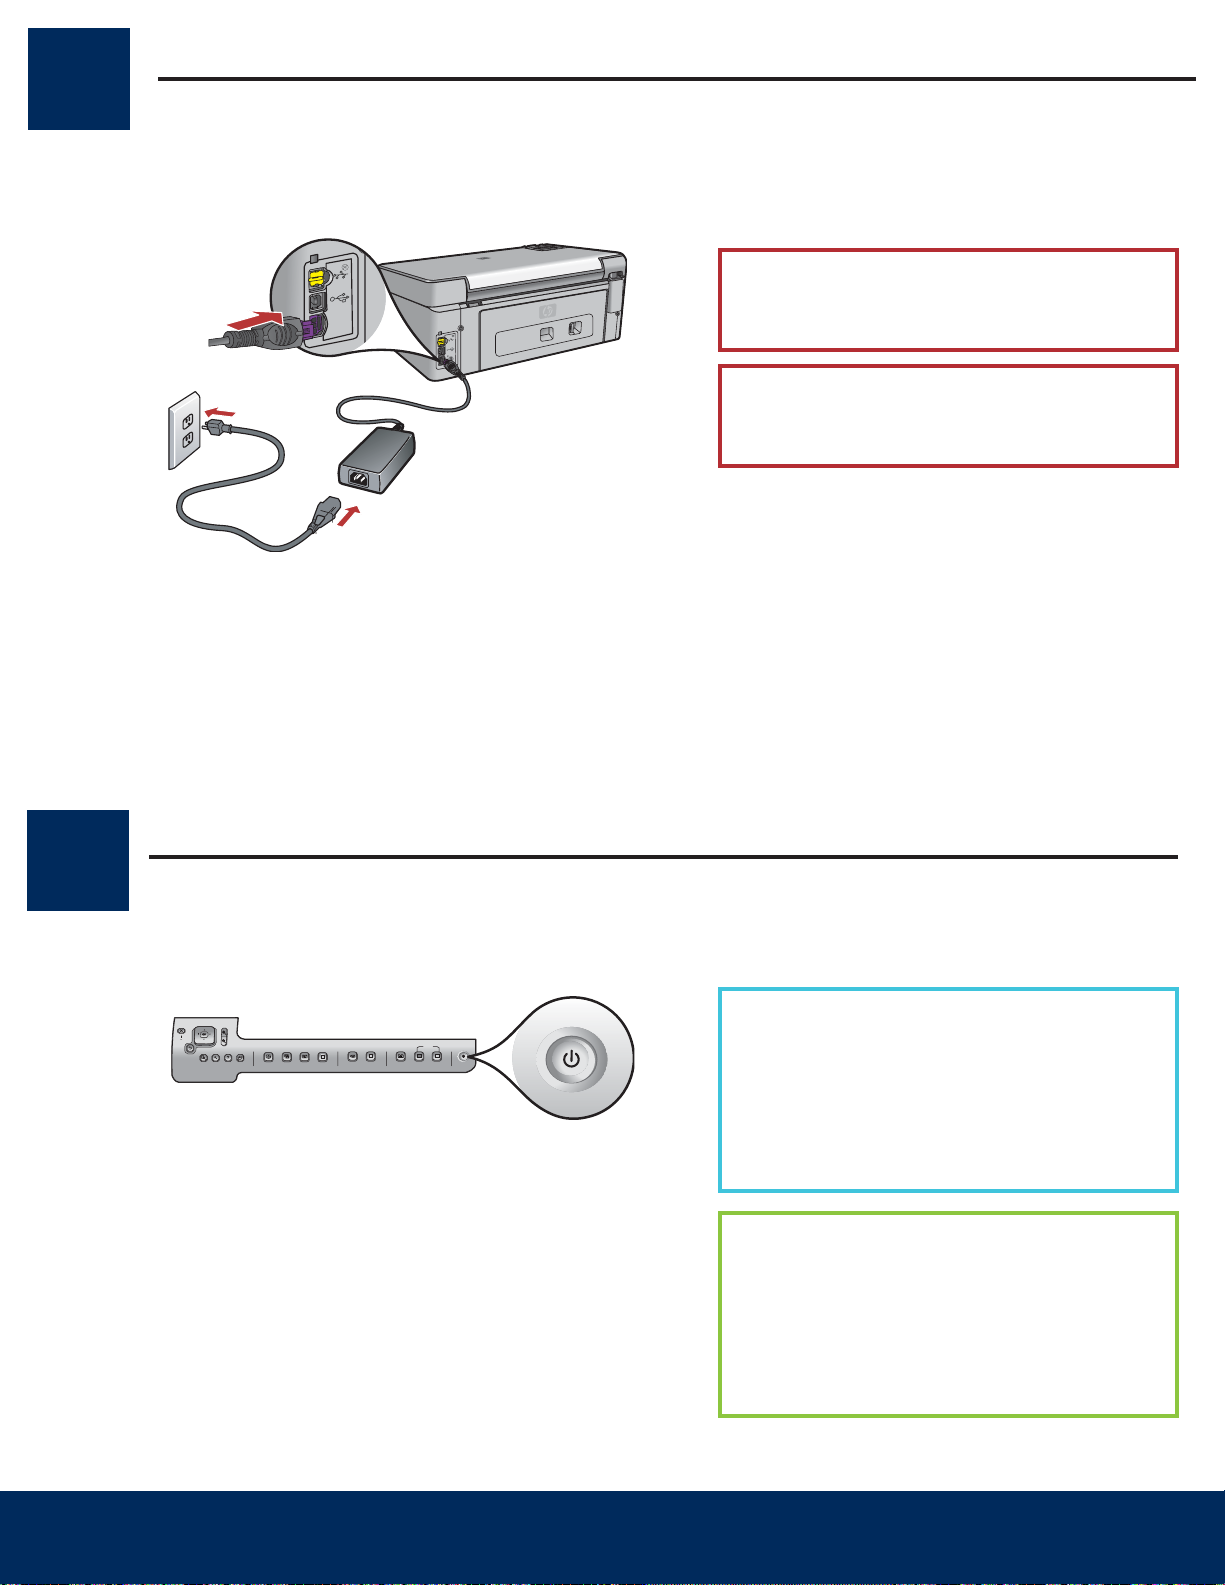
开/关机
b
OK
电缆用户:
连接电源线和适配器
6
Connect the power cord and adapter
USB
电缆用户: 除非本指南后面指示可以连
接 USB 电缆,否则不要使用这类电缆。
USB cable users: Do not connect the USB
cable until instructed later in this guide.
7
按下“开/关机”按钮
Press the On button
a 按下
a After you press the On button, wait for the
b To set the language for the display, use the
开/关机 按钮后,等待出现语言提示,
然后继续操作。
要设置显示屏上的语言,使用箭头键选
择您想要的语言,然后按下
并进行确认。 使用箭头键选择相应的国
家/地区,然后按下 OK (确定)并进行确
认。
language prompt before continuing.
arrow keys to select your language, press
OK , and then confirm. Use the arrow keys
to select your country/region, press OK ,
and then confirm.
(确定)
4 • HP All-in-One

打开检修门
8
Open the access door
a
b
9
抬起设备内部的插销
Lift latches inside of the devise
a
b
a 挤压每个插销的底部,将其释放,然后抬起插销。
b
抬起全部六个插销。
a Squeeze the bottom of each latch to release it, and then
lift the latch.
b Lift all six latches.
HP All-in-One • 5

放入全部六个墨盒
注:
10
a
b
Insert all six ink cartridges
将墨盒的颜色与图案同打印支架的颜色与图案匹配。
a
将黑色墨盒推入到左边的第一个插槽中。关闭插销。
b
重复以上操作,安装其它彩色墨盒。
c
确保每个插销安装牢固。
注: 请仅使用打印机随附的墨盒。这些墨盒中的墨是专
门用于初次安装时与打印头组件中的墨相混合。
Match the color and pattern of the ink cartridge to the
color and pattern on the print carriage.
a Push the black ink cartridge in to the first slot on the left.
Close the latch.
b Repeat with each of the color ink cartridges.
c Make sure each latch is secure.
c
Note: Use only the ink cartridges that came with the
printer. The ink in these cartridges is specially formulated
to mix with the ink in the print head assembly at first-time
setup.
6 • HP All-in-One

关闭检修门和按照提示操作
注意:
OK
b
11
a
b
Close the access door and follow the prompts
a 关闭检修门后,会出现装入普通白纸的提示。请确保纸
张已装入,然后按下
设备初始化墨盒并校准打印机。这大约需要 5 分钟。
当打印出校准页后,校准即已完成。检查显示屏状态,
然后按下 OK (确定)。回收或丢弃校准页
a After you close the access door, a prompt appears to
load plain white paper. Make sure paper is loaded,
and then press OK to start the process.
The device initializes the ink cartridges and aligns the
printer. This takes approximately 5 minutes.
b After the alignment page is printed, alignment is
complete. Check the display for status, then press OK .
Recycle or discard the alignment page
(确定)开始此过程。
12
启动计算机
Turn on your computer
注意: 在此期间,请勿断开或关闭 HP All-in-One。您可
能会听见设备发出噪音。
CAUTION: Do not disconnect or turn off the HP All-in-One
during this time. You may hear the device making noises.
a 启动计算机,根据需要进行登录,然后等待桌面出现。
b
关闭任何已打开的程序。
a Turn on your computer, login if necessary, and then
wait for the desktop to appear.
b Close any open programs.
HP All-in-One • 7

选择“一种”连接类型(A 或 B)
(请勿在执行步骤
前连接
电缆。)
关于
连接,请参阅
部分(第
页)以获取说明。
连接 - 还未连接
关于
电缆连接,请参阅
部分(第
页)以获取说
明。
(有线)网络
13
A: USB
Choose ONE connection type (A or B)
连接 - 还未连接
A: USB Connection - Do not connect yet
如果您要将设备直接连接至一台计算机,请使用这种连接类型。
(请勿在执行步骤 A2
所需设备:USB 电缆。
关于 USB
Use this connection type if you want to connect the device directly
to one computer. (Do not connect the USB cable until step A2.)
Equipment needed: USB cable.
For a USB connection, go to Section A (page 9) for instructions.
连接,请参阅 A
前连接 USB
部分(第 9
电缆。)
页)以获取说明。
B: Ethernet
(有线)网络
B: Ethernet (Wired) Network
如果您要在设备和网络之间使用 Ethernet 电缆连接,请使用这种
连接类型。
所需设备:集线器/路由器/交换机和 Ethernet 电缆。
关于 Ethernet
明。
Use this connection type if you want an Ethernet cable connection
between the device and your network.
Equipment needed: hub/router/switch and Ethernet cable.
For an Ethernet cable connection, go to Section B (page 11) for
instructions.
电缆连接,请参阅 B
部分(第 11
页)以获取说
8 • HP All-in-One

A 部分:
部分:USB
连接
注:
“我
的电脑”
“
连接类型
直接到此计算机
d
Section A: USB Connection
选择相应的 CD
连接
A1
Choose the correct CD
Windows: Mac:
注: 如果没有出现启动
屏幕,请依次双击
的电脑” 、带有 HP 徽
标的 “ “CD-ROM” ” 图标和
“setup.exe” ” 。
Note: If the startup
screen does not appear,
double-click My
Computer , double-click
the CD-ROM icon with
the HP logo, and then
double-click setup.exe .
“我
a 找到 HP All-in-One Mac CD。
继续转入下一页。
b
a Locate the HP All-in-One Mac CD.
b Continue to the next page.
a 放入 HP All-in-One Windows CD。
按照屏幕上的说明安装软件。
b
在
连接类型 屏幕上,确保选中
c
项。
继续转入下一页。
a Insert the HP All-in-One Windows CD.
b Follow the onscreen instructions to install the
software.
c On the Connection Type screen, make sure to select
directly to this computer .
d Continue to the next page.
直接到此计算机 选
HP All-in-One • 9

连接 USB 电缆
任意的
端口
A2
Connect the USB cable
Windows:
a 按照屏幕上的说明进行操作,直到系统提示您连接
USB 电缆。(这可能需要几分钟的时间。)
出现上述提示后,请将 USB 电缆的一端连接到
HP All-in-One 背面的端口中,然后将另一端连接
到计算机上
a Follow the onscreen instructions until you see the
prompt to connect the USB cable. (This may take
several minutes.)
Once the prompt appears, connect the USB cable
to the port on the back of the HP All-in-One, and
then to any USB port on your computer.
任意的 USB
端口 中。
Mac:
a 将 USB 电缆从计算机上连接到本设备背面的 USB
端口中。
a Connect the USB cable from your computer to the
USB port on the back of the device.
b 按照屏幕上的说明完成软件安装。
b 双击 “ “HP All-in-One Installer” ” 图标。
确保已完成所有屏幕上的操作,其中包括“Setup
c
Assistant”(安装帮助)。
b Double-click the HP All-in-One Installer icon.
c Make sure you complete all screens, including the
Setup Assistant.
b Follow the onscreen instructions to complete the
software installation.
转到本安装手册背面的步骤 16。
A3
10 • HP All-in-One
Go to step 17 at the back of this setup guide.

B 部分:
部分:Ethernet
(有线)网络
c
e
注意:
Section B: Ethernet (wired) Network
连接 Ethernet 电缆
(有线)网络
B1
a
b
Connect the Ethernet cable
a 找到您单独购买的 Ethernet 电缆。
拔下设备背面的黄色插头。
b
将 Ethernet 电缆的一端连接到本设备背面的 Ethernet 端口中。
将 Ethernet 电缆的另一端连接到集线器/路由器/交换机上。
d
继续转入下一页。
a Locate the Ethernet cable that you purchased separately.
b Remove the yellow plug from the back of the device.
c Connect one end of the Ethernet cable to the Ethernet port on the
d Connect the other end of the Ethernet cable to the hub/router/
e Continue to the next page.
back of the device.
switch.
注意: 请勿将 Ethernet 电缆连接至电缆调制解调器。
您必须有一个工作网络。如果您已连接 USB 电缆,请勿连接
Ethernet 电缆。
c
IMPORTANT: Do not connect the Ethernet cable to a cable modem.
You must have a working network. If you already connected the USB
cable, do not connect the Ethernet cable.
HP All-in-One • 11

解锁
接受
注:
“我的电脑”
“
连接类型
通过网络
问题:
防火墙
选择相应的 CD
B2
Windows:
a 放入 HP All-in-One Windows CD。
按照屏幕上的说明进行操作。
b
在
连接类型 屏幕上,确保选中
c
幕上的说明进行操作。
a Insert the HP All-in-One Windows CD.
b Follow the onscreen instructions.
c On the Connection Type screen, make sure to select
through the network . Follow the onscreen instructions.
Choose the correct CD
注: 如果没有出现启动屏幕,请依次
“我的电脑” 、带有 HP 徽标的
双击
“CD-ROM” ” 图标和 “ “setup.exe” ” 。
Note: If the startup screen does not
appear, double-click My Computer ,
double-click the CD-ROM icon with the
HP logo, and then double-click setup.
exe .
通过网络 选项。 按照屏
Mac:
a 放入 HP All-in-One Mac CD。
双击 “ “HP All-in-One installer” ” 图标。
b
a Insert the HP All-in-One Mac CD.
b Double-click the HP All-in-One installer icon.
c 确保已完成所有屏幕上的操作,其中包括“Setup
Assistant”(安装帮助)。 要在其它计算机上安
装软件,转到步骤 14。
c Make sure you complete all screens, including the
d 您必须选择
击涉及防火墙信息的任何屏幕上的 Next (下一步)按
钮进行操作。按照屏幕上的所有说明进行操作。 要在
其它计算机上安装软件,转到步骤 14。
d You must choose unlock or accept all firewall messages
by clicking Next on any screen that refers to a firewall.
Follow all onscreen instructions. To install software on
additional computers, go to step 14.
问题: 防病毒、反间谍或防火墙程序可能会阻碍软件安装。有关详细信息,请访问 www.hp.com/support ,输入
Photosmart C5100 ,然后搜索
Questions: Anti-virus, Anti-Spyware, or firewall programs can block software installation.
For details, go to www.hp.com/support , enter Photosmart C5100 , and then search for Firewalls .
解锁 或
接受 所有防火墙信息,这可以通过单
防火墙 。
Setup Assistant. To install software on additional
computers, go to step 14.
转到本安装手册背面的步骤 16。
B3
Go to step 17 at the back of this setup guide.
12 • HP All-in-One

14
疑难排解
问题:
添加硬件
解决办法:
“取消”
在其它计算机上安装软件
Install software on additional computers
如果您的网络中有其它计算机,请在每台计算机上安装 HP All-in-One
软件。每次安装时选择相应的 HP All-in-One CD。
按照屏幕上的说明进行操作。确保您选择了网络和 HP All-in-One
(而非您的计算机和网络)之间的连接类型。
If you have additional computers on your network, install the
HP All-in-One software on each computer. Choose the correct
HP All-in-One CD for each installation.
Follow the onscreen instructions. Make sure that you choose the
connection types between the network and your HP All-in-One (not
between your computer and the network).
转到本安装手册背面的步骤 16。
15
Go to step 17 at the back of this setup guide.
疑难排解
Troubleshooting
问题: 出现 Microsoft
解决办法: 单击
Windows CD。 请参阅 A 部分。
Problem: The Microsoft Add Hardware screen appears.
Action: Click Cancel . Unplug the USB cable, and then insert the
HP All-in-One Windows CD. Refer to Section A.
添加硬件 屏幕。
“取消” 。拔掉 USB 电缆,然后放入 HP All-in-One
HP All-in-One • 13

问题:
未找到打印机
解决办法:
有线 (
) 网络用户:
请参阅《使用手册》获取更多疑难排解信息和其它安装信息。
疑难排解续
疑难排解续
Troubleshooting Continued
问题: 出现
解决办法: 首先确保与设备的连接正常工作。检查彩色图形显示屏上的图标。如果您没
有看到图标,请返回至连接类型部分(A 或 B)。
如果连接正常,请尝试以下步骤:
• 关闭设备,等待 30 秒,然后再打开。
• 尝试暂时断开防火墙。
有线 (Ethernet
• 检查路由器和设备之间的电缆。
• 检查计算机和设备之间的电缆。
• 确保您的局域网卡安装正确。
未找到打印机 信息。
) 网络用户:
HP Photosmart C5100 All-in-One series
Basics Guide
Problem: The Printer Not Found message appears.
Action: First make sure that you have an active connection with the device. Check your
color graphics display for an icon. If you do not see an icon, go back to your connection
type Section (A or B).
If you have an active connection, try the following:
• Turn your device off, wait 30 seconds, and then turn it back on.
• Try temporarily disconnecting your firewall.
Wired (Ethernet) network users:
• Check the cable between the router and the device.
• Check the cable between your computer and the device.
• Make sure your LAN card is set up properly.
请参阅《使用手册》获取更多疑难排解信息和其它安装信息。
14 • HP All-in-One
See the Basics Guide for more troubleshooting and additional set up information.

16
提示:
提示:
视图&打印
打印照片
打印一张 4 x 6 英寸的照片
a
a 将相机内存卡插入相应的内存卡插槽,按下 “ “Photosmart
Express” ” 按钮。
Photosmart Express 菜单出现在彩色图形显示屏上。
b
按下 OK (确定)选择
卡中最近存储的照片。
视图&打印 。 显示屏上将出现您内存
c
d
按下箭头按钮,选择另一张图片,然后按下 OK (确定)。
c
持续按下 OK (确定)可打印照片。
d
如果您在显示屏上看到一张照片,按下
快速打印出一张 4 x 6 英寸 (10 x 15 cm) 的照片。
HP All-in-One 可打印出您内存卡中的照片。
提示: 要了解有关如何通过内存卡打印照片以及其它功能的信
息,请参阅《使用手册》和联机帮助。 有关其它帮助信息,请
参阅 www.hp.com/support 。
打印照片 按钮,即可
提示: 您可以使用“重新打印”按钮,得到原始照片的副本。
© Copyright 2006 Hewlett-Packard Development Company, L.P.

17
Print a 4 x 6 inch photo
a
c
a Insert the memory card from your camera into the appropriate
memory card slot and press the Photosmart Express button.
The Photosmart Express menu appears on the color graphics
display.
b Press OK to select View & Print . The most recent photo on
your memory card appears on the display.
c Press the arrow buttons to select a different picture, then press
OK .
d
© Copyright 2006 Hewlett-Packard Development Company, L.P.
d Keep pressing OK to print your photo.
If you are looking at a photo on the display, you could quickly
print a 4 x 6 inch (10 x 15 cm) photo by pressing the Print
Photos button.
The HP All-in-One makes a print of the photo on your memory
card.
Tip: To learn about printing photos from memory cards, and
other features, see the Basics Guide and online help. For
additional help, see www.hp.com/support .
Tip: You could use the Reprint button to make a copy of an
original photo.
*Q8211-90272*
*Q8211-90272*
Q8211-90272
 Loading...