

Page 1
HP Photosmart C4600 All-in-One series
1
EN
FR
Start Here
Commencez ici
PT
AR
Commencez ici
ﺎﻨﻫ ﺃﺪﺑﺍ
EN
IMPORTANT: Do not connect the USB cable
until prompted in Step 11 .
FR
IMPORTANT : Ne connectez pas le câble USB
avant d’y être invité à l’Étape 11 .
PT
IMPORTANTE:
Não conecte o cabo USB até ser solicitado na Etapa 11 .
AR
ﻲﻓ ﻚﻟﺬﺑ ﻚﺘﺒﻟﺎﻄﻣ ﻢﺘﺗ ﻥﺃ ﻰﻟﺇ USB ﻞﺑﺎﻛ ﻞﻴﺻﻮﺘﺑ ﻢﻘﺗ ﻻ :ﻡﺎﻫ
. 11 ﺓﻮﻄﺨﻟﺍ
2
abc
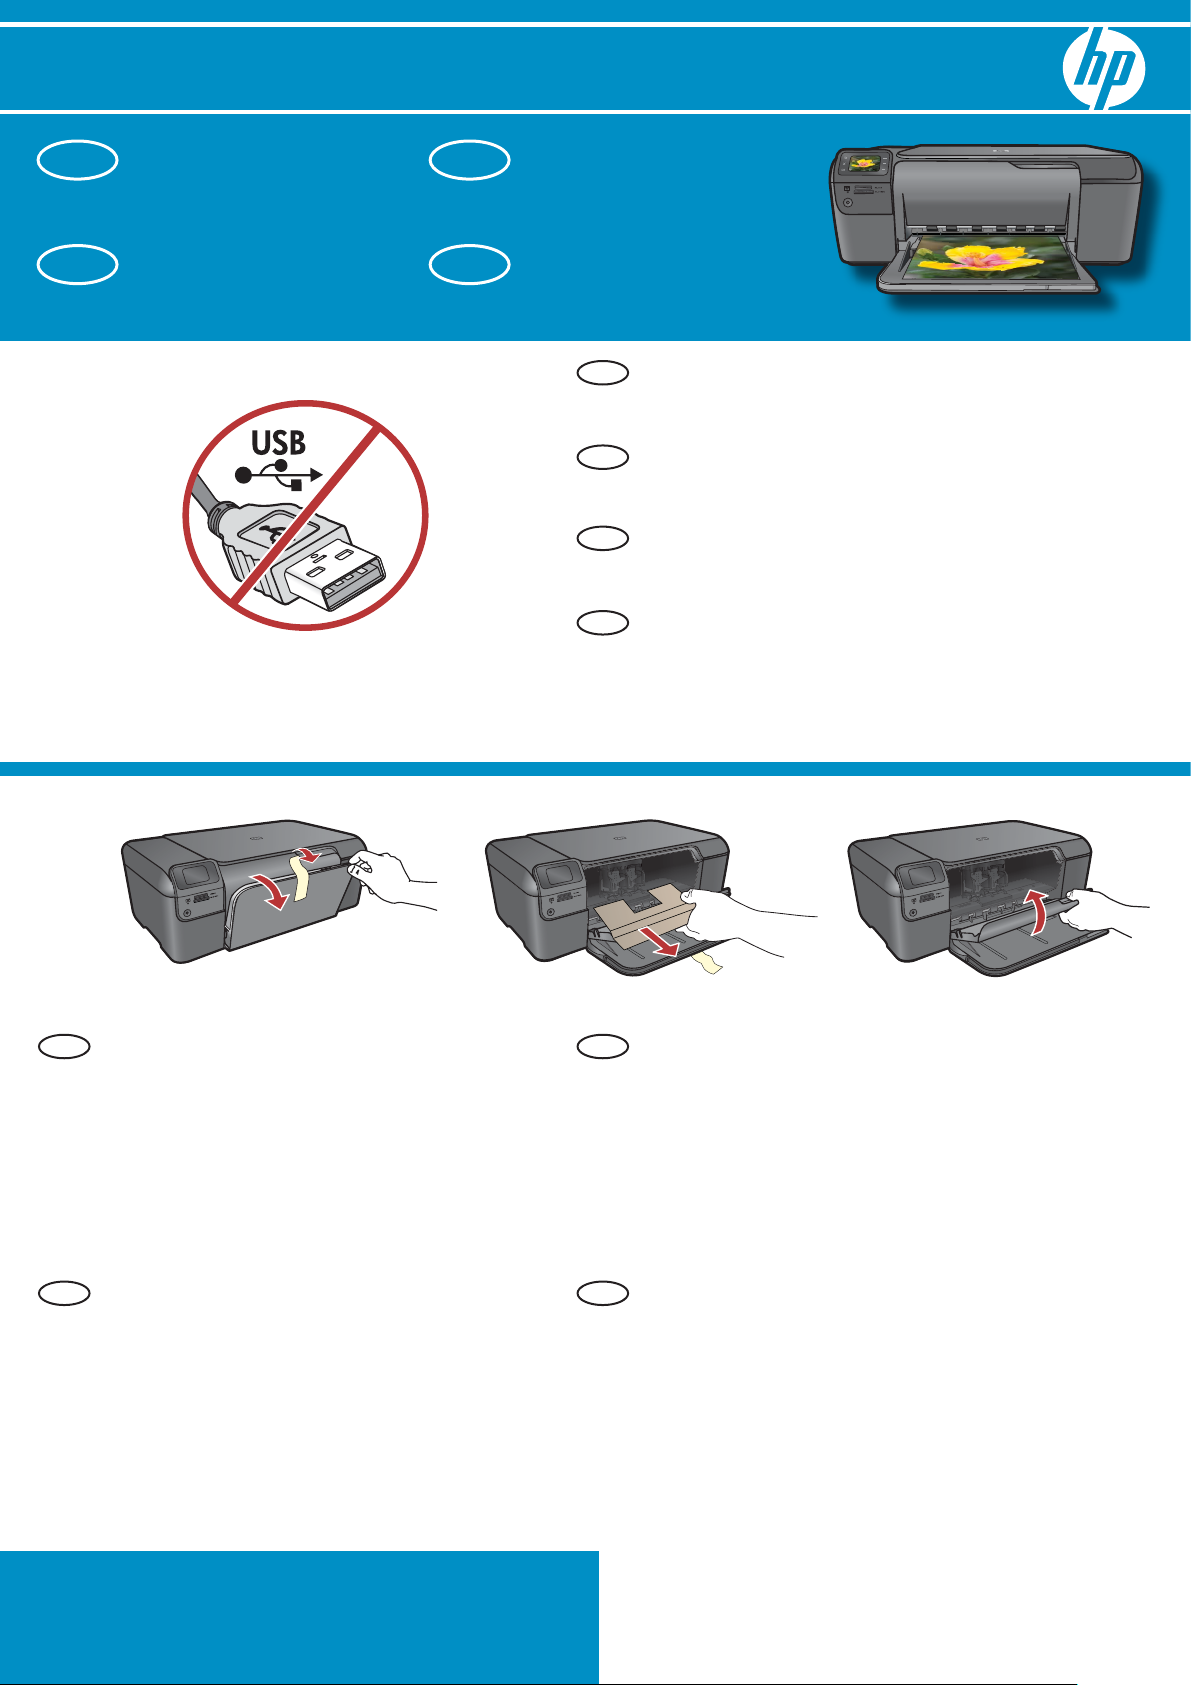
Lower both the paper tray and the print
a.
cartridge door.
Remove all packing material and protective
b.
film from the device. If there is a sticker on
the color graphics display, remove it.
Close the print cartridge door.
c.
FR
Abaissez le bac d’alimentation du papier
a.
et ouvrez la porte d’accès aux cartouches
d’impression.
Retirez tout matériel d’emballage ou de
b.
protection du périphérique. Si un autocollant
est placé sur l’écran graphique couleur, ôtez-le.
Fermez la porte d’accès aux cartouches
c.
d’impression.
PTEN
AR
Abaixe a bandeja de papel e a porta dos
a.
cartuchos de impressão.
Remova todo o material de embalagem e o filme
b.
protetor do dispositivo. Se houver um adesivo no
visor gráfico colorido, remova-o.
Feche a porta do cartucho de impressão.
c.
.ﺔﻋﺎﺒﻄﻟﺍ ﺔﺷﻮﻃﺮﺧ ﺏﺎﺑﻭ ﻕﺭﻮﻟﺍ ﺝﺭﺩ ﻦﻣ ٍﻞﻛ ﺾﻔﺨﺑ ﻢﻗ
ﺩﻮﺟﻭ ﺔﻟﺎﺣ ﻲﻓ .ﺯﺎﻬﺠﻟﺍ ﻦﻣ ﻲﻗﺍﻮﻟﺍ ءﺎﺸﻐﻟﺍﻭ ﻒﻴﻠﻐﺘﻟﺍ ﺩﺍﻮﻣ ﺔﻓﺎﻛ ﺔﻟﺍﺯﺈﺑ ﻢﻗ
.ﻪﺘﻟﺍﺯﺈﺑ ﻢﻗ ،ﺔﻧﻮﻠﻤﻟﺍ ﺔﻴﻣﻮﺳﺮﻟﺍ ﺔﺷﺎﺸﻟﺍ ﻰﻠﻋ ﻖﺼﻠﻣ
.ﺔﻋﺎﺒﻄﻟﺍ ﺔﺷﻮﻃﺮﺧ ﺏﺎﺑ ﻖﻠﻏﺃ
.a
.b
.c
*Q8418-90031*
*Q8418-90031*
*Q8418-90031*
Page 2
3
Verify the box contents. The contents of your box may differ.
EN
*Purchase a USB cable and photo paper separately if it is not included.
FR
Vérifiez le contenu du carton. Le contenu du carton peut varier.
*Achetez un câble USB et du papier photo séparément si ces éléments ne sont pas inclus.
PT
Verifique o conteúdo da caixa. O conteúdo da sua caixa pode ser diferente do descrito aqui.
*Adquira um cabo USB e papel fotográfico separadamente, caso não estejam incluídos.
4
*
*
AR
.ﻚﻳﺪﻟ ﻕﻭﺪﻨﺼﻟﺍ ﺕﺎﻳﻮﺘﺤﻣ ﻒﻠﺘﺨﺗ ﺪﻗ .ﻕﻭﺪﻨﺼﻟﺍ ﺕﺎﻳﻮﺘﺤﻣ ﻦﻣ ﻖﻘﺤﺗ
.ﻕﻭﺪﻨﺼﻟﺍ ﻲﻓ ﺓﺮﻓﻮﺘﻣ ﺮﺻﺎﻨﻌﻟﺍ ﻩﺬﻫ ﻦﻜﺗ ﻢﻟ ﺍﺫﺇ ﺓﺪﺣ ﻰﻠﻋ ﺔﻴﻓﺍﺮﻏﻮﺗﻮﻔﻟﺍ ﺭﻮﺼﻠﻟ ﻕﺭﻭﻭ USB ﻞﺑﺎﻛ ءﺍﺮﺸﺑ ﻢﻗ*
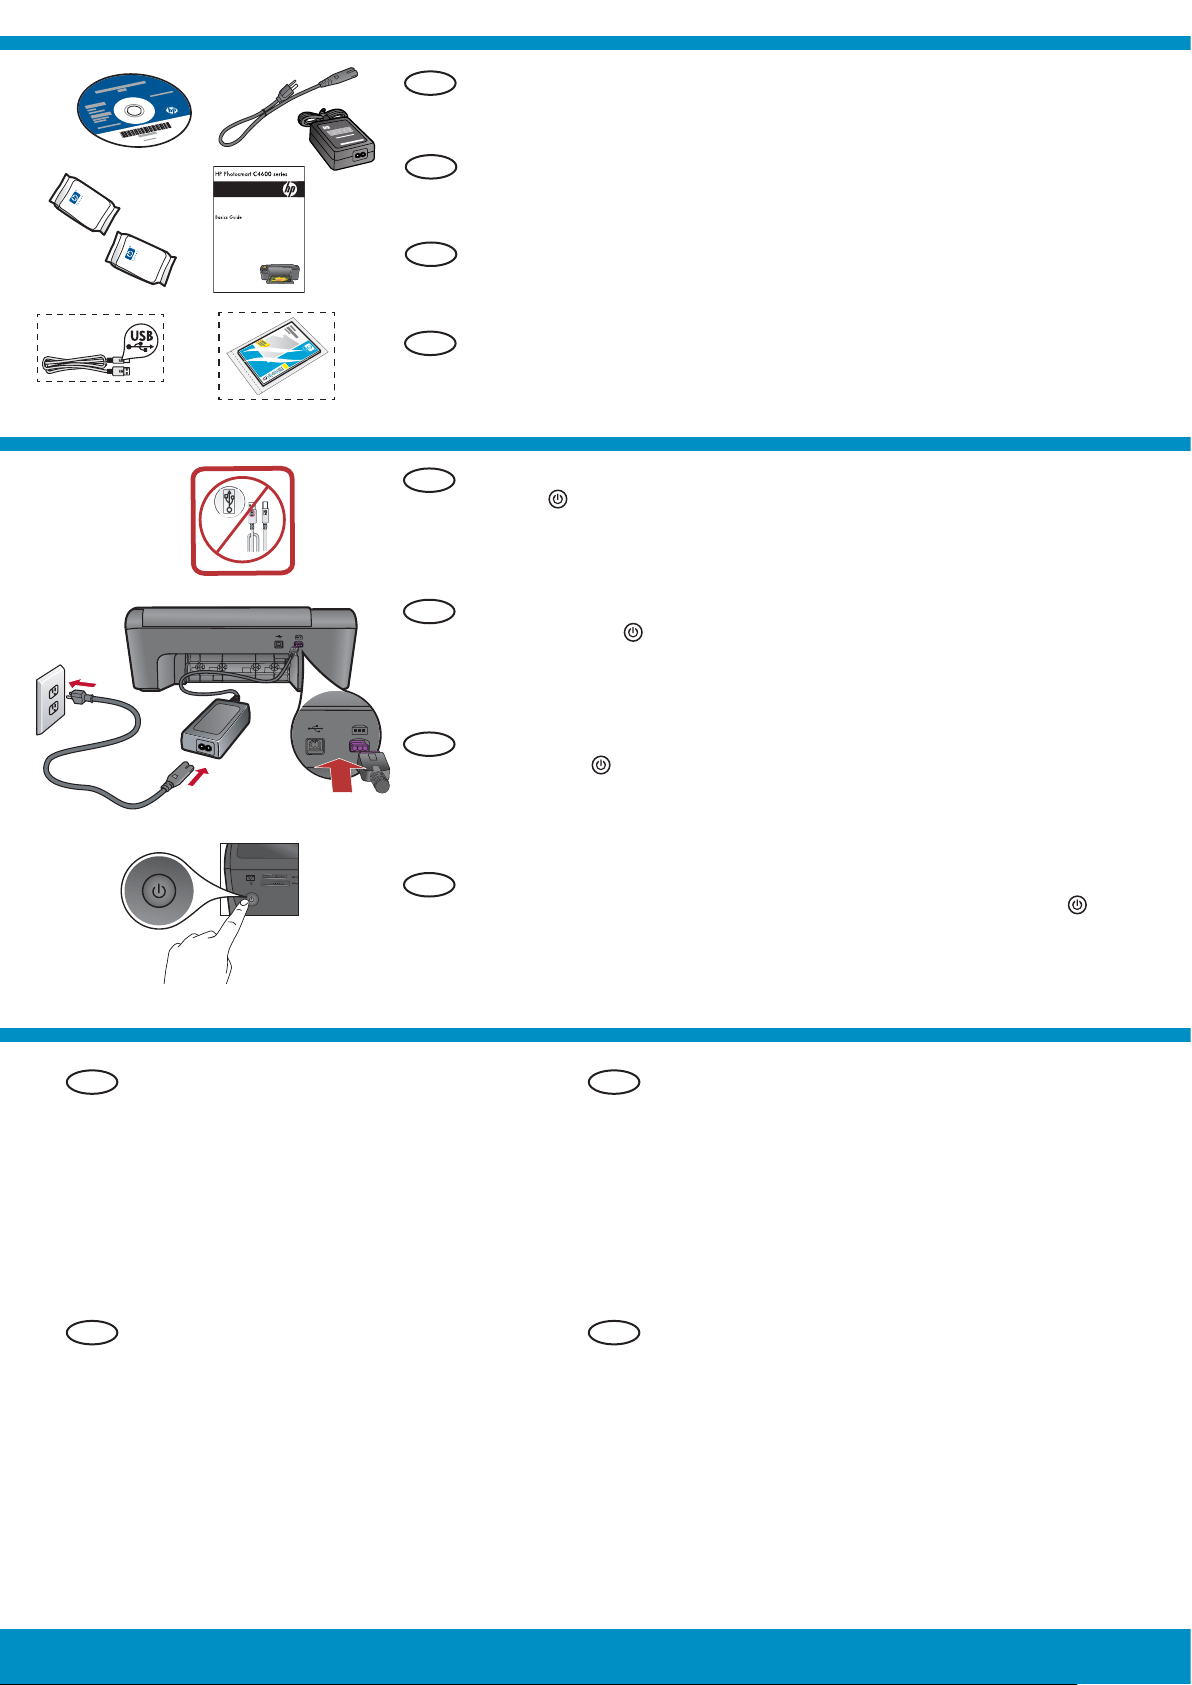
Connect the power cord and adapter. Do not connect the USB cable.
a.
EN
Press
b.
USB
FR
a
NOTE: Pay attention to the helpful messages in the display during the
setup process.
Connectez le cordon d’alimentation et l’adaptateur. Ne branchez pas le câble USB.
a.
Appuyez sur pour mettre sous tension l’appareil HP tout-en-un.
b.
REMARQUE: Soyez attentif aux messages d’aide à l’écran lors de la
to turn on the HP All-in-One.
configuration.
PT
Conecte o cabo de alimentação e o adaptador. Não conecte o cabo USB.
a.
Pressione para ligar o HP All-in-One.
b.
NOTA: Observe as mensagens de ajuda que são exibidas no visor
durante o processo de instalação.
b
AR
.USB ﻞﺑﺎﻛ ﻞﻴﺻﻮﺘﺑ ﻢﻘﺗ ﻻ .ﻝﻮﺤﻤﻟﺍﻭ ﺔﻗﺎﻄﻟﺍ ﻚﻠﺳ ﻞﻴﺻﻮﺘﺑ ﻢﻗ
. HP All-in-One ﺯﺎﻬﺟ ﻞﻴﻐﺸﺘﻟ
.ﺩﺍﺪﻋﻹﺍ ﺔﻴﻠﻤﻋ ءﺎﻨﺛﺃ ﺔﺷﺎﺸﻟﺍ ﻰﻠﻋ ﺮﻬﻈﺗ ﻲﺘﻟﺍ ﺓﺪﻋﺎﺴﻤﻟﺍ ﻞﺋﺎﺳﺮﻟﺍ ﺓءﺍﺮﻗ ﻰﻠﻋ ﺹﺮﺣﺍ
:ﺔﻈﺣﻼﻣ
ﻂﻐﺿﺍ
.a
.b
5
FR
country/region. Use the arrows to select your
language from the list of languages, then press
OK to confirm. Select your country/ region, and
press OK to confirm. To change the language or
country/region, use the Back button.
Follow the prompt to install print cartridges, then
•
go to the next step in this guide.
Suivez l’invite pour configurer la langue et le pays ou
•
Follow the prompt to set the language and
•
EN
la région. Sélectionnez la langue dans la liste à l’aide
des flèches, puis appuyez sur OK pour confirmer.
Sélectionnez votre pays/région, puis appuyez sur OK
pour confirmer. Pour changer la langue ou le pays/la
région, appuyez sur le bouton Retour.
Suivez l’invite pour installer les cartouches
•
d’impression, puis passez à l’étape suivante
du présent manuel.
2 • HP Photosmart C4600 All-in-One series
PT
Siga as instruções na tela para definir o idioma e
•
o país/região. Use as setas para selecionar seu
idioma, na lista de idiomas, e pressione OK para
confirmar. Selecione seu país/região e pressione
OK para confirmar. Para alterar o idioma ou país/
região, use o botão Voltar.
Siga as instruções para instalar os cartuchos de
•
impressão e siga para a próxima etapa deste
guia.
ﻚﺘﻐﻟ ﺪﻳﺪﺤﺘﻟ ﻢﻬﺳﻷﺍ ﻡﺪﺨﺘﺳﺍ .ﺔﻘﻄﻨﻤﻟﺍ/ﺪﻠﺒﻟﺍﻭ ﺔﻐﻠﻟﺍ ﺩﺍﺪﻋﻹ ﺕﺎﺒﻟﺎﻄﻤﻟﺍ ﻊﺒﺗﺍ
AR
ﺔﻘﻄﻨﻤﻟﺍ/ﺪﻠﺒﻟﺍ ﺩﺪﺣ .ﺪﻴﻛﺄﺘﻠﻟ (ﻖﻓﺍﻮﻣ) OK ﻂﻐﺿﺍ ﻢﺛ ,ﺕﺎﻐﻠﻟﺍ ﺔﻤﺋﺎﻗ ﻦﻣ
ﻭﺃ ﺔﻐﻠﻟﺍ ﺮﻴﻴﻐﺘﻟ .ﺪﻴﻛﺄﺘﻠﻟ (ﻖﻓﺍﻮﻣ) OK ﻂﻐﺿﺍ ﻢﺛ ،ﺎﻬﺑ ﻢﻴﻘﺗ ﻲﺘﻟﺍ
.(ﻖﺑﺎﺴﻟﺍ) Back ﺭﺯ ﻡﺪﺨﺘﺳﺍ , ﺔﻘﻄﻨﻤﻟﺍ/ﺪﻠﺒﻟﺍ
ﺓﻮﻄﺨﻟﺍ ﻰﻟﺇ ﻞﻘﺘﻧﺍ ﻢﺛ ,ﺔﻋﺎﺒﻄﻟﺍ ﺕﺎﺷﻮﻃﺮﺧ ﺖﻴﺒﺜﺘﻟ ﺕﺎﺒﻟﺎﻄﻤﻟﺍ ﻊﺒﺗﺍ
/ HP Photosmart C4600 All-in-One series
•
•
.ﻞﻴﻟﺪﻟﺍ ﺍﺬﻫ ﻲﻓ ﺔﻣﺩﺎﻘﻟﺍ
Page 3
6
Open the print cartridge door. Make sure the printer
EN
carriage moves to the center. If it does not move to
the center, turn the device off, then turn it back on
again.
IMPORTANT: The device must be turned on to insert
cartridges.
FR
Ouvrez la trappe d’accès aux cartouches
d’impression. Assurez-vous que le chariot d’impression
se déplace bien vers la partie centrale. Si ce n’est pas
le cas, éteignez le périphérique, puis rallumez-le.
IMPORTANT:
Le périphérique doit être sous tension
pour permettre l’insertion des cartouches d’impression.
PT
Abra a porta dos cartuchos de impressão. Verifique
se o carro de impressão se move para o centro. Se
isso não acontecer, desligue o dispositivo e ligue-o
novamente.
IMPORTANTE: Para inserir os cartuchos de
impressão, o dispositivo deve estar ligado.
7
AR
ﻰﻟﺇ ﻙﺮﺤﺘﺗ ﺔﻌﺑﺎﻄﻟﺍ ﺔﺑﺮﻋ ﻥﺃ ﻦﻣ ﺪﻛﺄﺗ .ﺔﻋﺎﺒﻄﻟﺍ ﺔﺷﻮﻃﺮﺧ ﺏﺎﺑ ﺢﺘﻓﺍ
ﺪﻋﺃ ﻢﺛ ،ﺯﺎﻬﺠﻟﺍ ﻞﻴﻐﺸﺗ ﻑﺎﻘﻳﺈﺑ ﻢﻘﻓ ،ﻂﺳﻮﻟﺍ ﻰﻟﺇ ﻙﺮﺤﺘﺗ ﻢﻟ ﺍﺫﺇ .ﻂﺳﻮﻟﺍ
.ﻯﺮﺧﺃ ﺓﺮﻣ ﻪﻠﻴﻐﺸﺗ
.ﺕﺎﺷﻮﻃﺮﺨﻟﺍ ﺐﻴﻛﺮﺘﻟ ﺯﺎﻬﺠﻟﺍ ﻞﻴﻐﺸﺗ ﺐﺠﻳ
EN
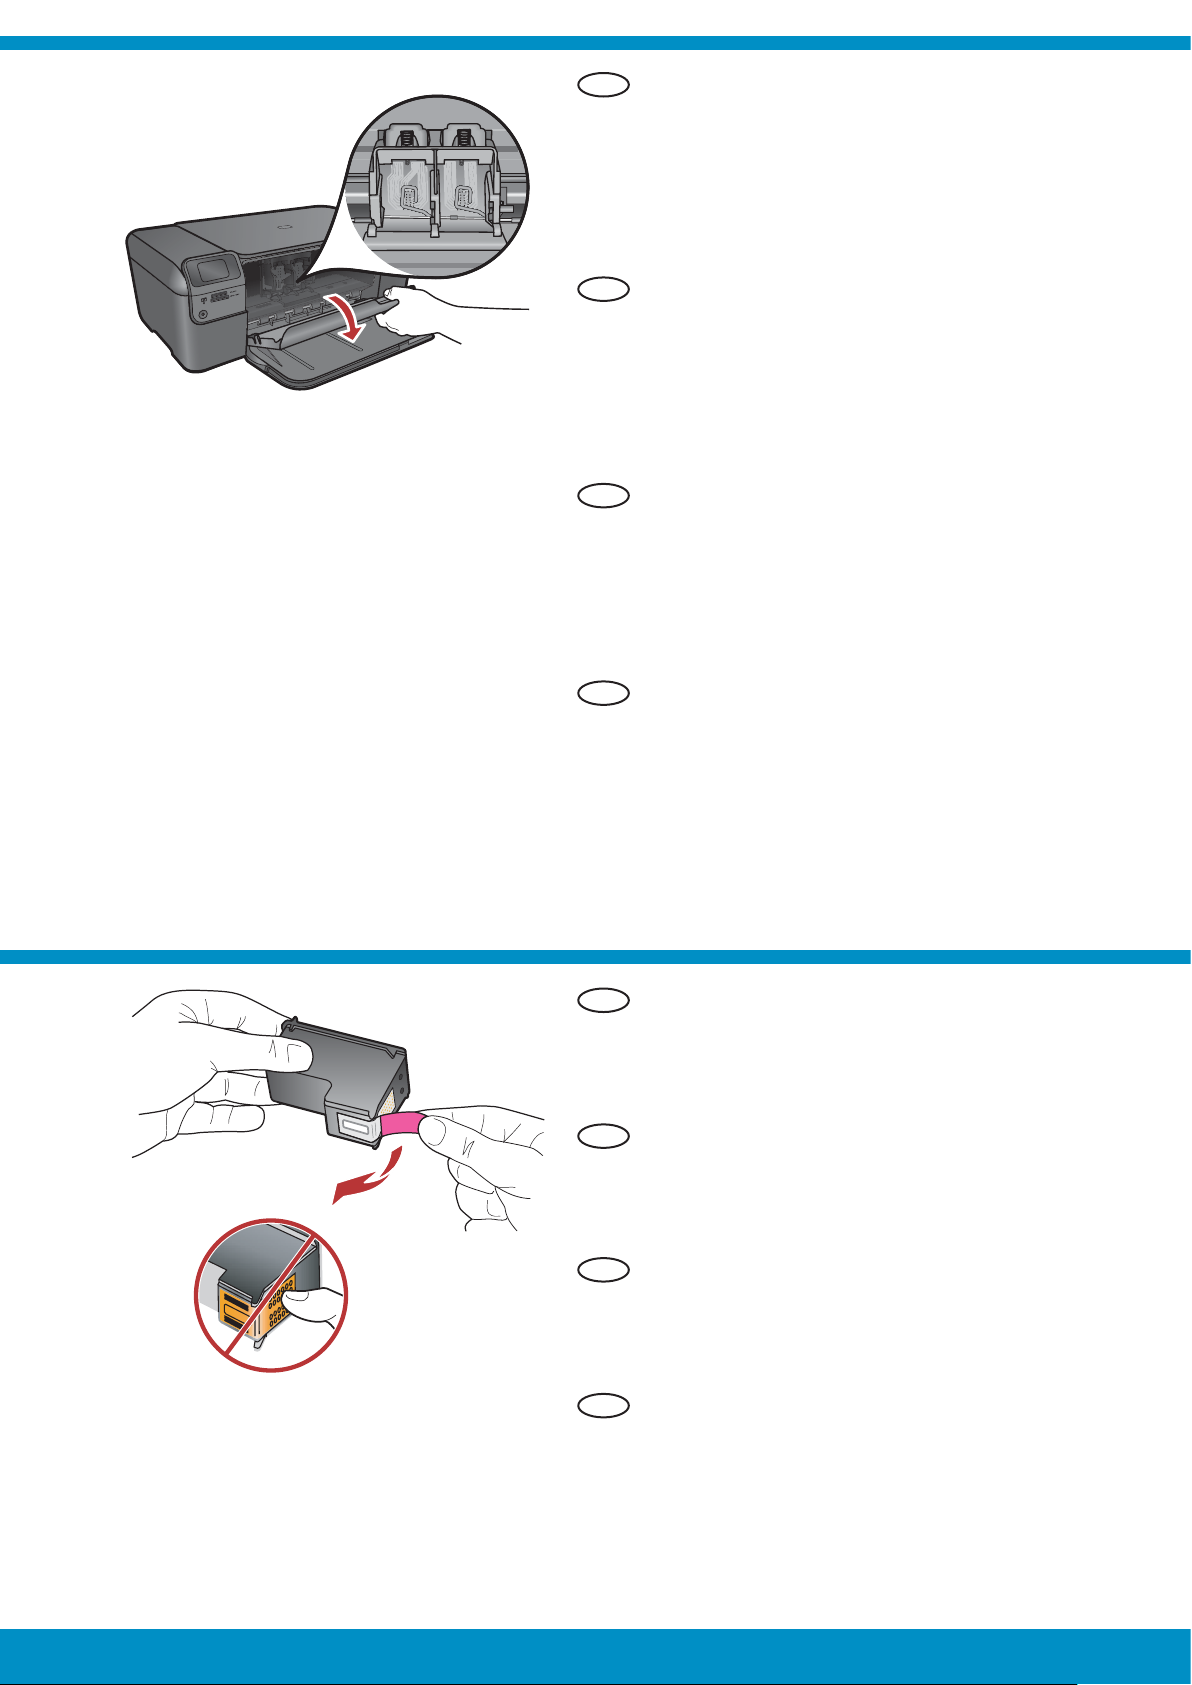
Remove the tape from both cartridges.
CAUTION:
Do not touch the copper-colored contacts
or re-tape the cartridges.
FR
Retirez le ruban adhésif des deux cartouches.
ATTENTION: Ne touchez pas les contacts en cuivre et
ne replacez pas le ruban adhésif sur les cartouches.
PT
Remova a fita de ambos os cartuchos.
CUIDADO: Não toque nos contatos cor de cobre
nem recoloque a fita nos cartuchos.
:ﻡﺎﻫ
AR
ﻰﻠﻋ ﻂﻳﺮﺸﻟﺍ ﻖﺼﻟ ﺓﺩﺎﻋﺇ ﻭﺃ ﻥﻮﻠﻟﺍ ﺔﻴﺳﺎﺤﻧ ﺕﻼﺻﻮﻤﻟﺍ ﺲﻤﻟ ﺐﻨﺠﺗ
HP Photosmart C4600 All-in-One series /
.ﻦﻴﺘﺷﻮﻃﺮﺨﻟﺍ ﻼﻛ ﻦﻣ ﻂﻳﺮﺸﻟﺍ ﺔﻟﺍﺯﺈﺑ ﻢﻗ
:ﻪﻴﺒﻨﺗ
.ﻦﻴﺘﺷﻮﻃﺮﺨﻟﺍ
HP Photosmart C4600 All-in-One series • 3
Page 4

a
EN
Hold the cartridges with the HP logo on top.
a.
Insert the tri-color cartridge in the left cartridge slot
b.
and the black cartridge in the right cartridge slot .
Make sure you push the cartridges in firmly until
c.
they snap into place .
Repeat steps a, b and c to insert black ink cartridge
d.
in the right cartridge slot.
Close the print cartridge door.
e.
Press OK when prompted to confirm the installation
f.
of genuine HP print cartridges.
b
FR
a.
Tenez les cartouches de manière à ce que le logo
HP soit vers le haut.
b.
Insérez la cartouche trichromique dans le logement
pour cartouche gauche et la cartouche d’encre noire
dans le logement pour cartouche droit .
c.
Veillez à exercer une pression ferme sur les
cartouches jusqu’à ce qu’elles se mettent en place .
Répétez les étapes (a), (b) et (c) pour insérer la cartouche
d.
d’encre noire dans le logement pour cartouche côté droit.
e.
Fermez la porte d’accès aux cartouches d’impression.
f.
Appuyez sur OK lorsque vous y êtes invité afin de confirmer
l’installation des cartouches d’impression HP authentiques.
c
PT
Segure os cartuchos com o logotipo da HP voltado
a.
para cima.
Insira o cartucho colorido no slot de cartucho da
b.
esquerda e o cartucho preto no slot de cartucho da
direita .
Verifique se empurrou os cartuchos firmemente até
c.
eles se encaixarem no lugar .
Repita as etapas a, b e c para inserir o cartuho de
d.
tinta preto no slot da direita.
d
Feche a porta do cartucho de impressão.
e.
Pressione OK quando for solicitado a confirmar a
f.
instalação dos cartuchos de impressão HP originais.
AR
.ﻰﻠﻋﻷ HP ﺭﺎﻌﺷ ﻥﻮﻜﻳ ﺚﻴﺤﺑ ﻦﻴﺘﺷﻮﻃﺮﺨﻟﺍ ﻚﺴﻣﺃ
ﻯﺮﺴﻴﻟﺍ ﺔﺷﻮﻃﺮﺨﻟﺍ ﺔﺤﺘﻓ ﻲﻓ ﻥﺍﻮﻟﻷﺍ ﺔﻴﺛﻼﺛ ﺔﺷﻮﻃﺮﺨﻟﺍ ﺐﻴﻛﺮﺘﺑ ﻢﻗ
. ﻰﻨﻤﻴﻟﺍ ﺔﺷﻮﻃﺮﺨﻟﺍ ﺔﺤﺘﻓ ﻲﻓ ﺩﻮﺳﻷﺍ ﺮﺒﺤﻟﺎﺑ ﺔﻋﺎﺒﻄﻟﺍ ﺔﺷﻮﻃﺮﺧﻭ
. ﺎﻤﻬﻧﺎﻜﻣ ﻲﻓ ﺍﺮﻘﺘﺴﺗ ﻰﺘﺣ ﻡﺎﻜﺣﺈﺑ ﻦﻴﺘﺷﻮﻃﺮﺨﻟﺍ ﻊﻓﺩ ﻦﻣ ﺪﻛﺄﺗ
ﺔﺤﺘﻓ ﻰﻟﺇ ﺩﻮﺳﻷﺎﺑ ﺔﻋﺎﺒﻄﻟﺍ ﺔﺷﻮﻃﺮﺧ ﻝﺎﺧﺩﻹ c ﻭ a, b ﺕﺍﻮﻄﺨﻟﺍ ﺭﺮﻛ
e
HP ﺔﻋﺎﺒﻃ ﺕﺎﺷﻮﻃﺮﺧ ﺖﻴﺒﺜﺗ ﺪﻴﻛﺄﺘﺑ ﻚﺘﺒﻟﺎﻄﻣ ﺪﻨﻋ (ﻖﻓﺍﻮﻣ) OK ﻂﻐﺿﺍ
4 • HP Photosmart C4600 All-in-One series8/ HP Photosmart C4600 All-in-One series
.ﻰﻨﻤﻴﻟﺍ ﺔﺷﻮﻃﺮﺨﻟﺍ
.ﺔﻋﺎﺒﻄﻟﺍ ﺔﺷﻮﻃﺮﺧ ﺏﺎﺑ ﻖﻠﻏﺃ
.ﺔﻴﻠﺻﻷﺍ
.a
.b
.c
.d
.e
.f
Page 5

9
EN
Pull out the tray extender, and then load plain white
paper. Press OK .
FR
Déployez la rallonge du bac et chargez du papier
blanc ordinaire. Appuyez sur OK .
PT
Retire o extensor da bandeja e coloque papel
branco simples. Pressione OK .
10
AR
a
OK ﻂﻐﺿﺍ .ﺎﻳﺩﺎﻋ ﺾﻴﺑﺃ ﺎًﻗﺭﻭ ﻞّﻤﺣ ﻢﺛ ﺝﺭﺎﺨﻠﻟ ﺝﺭﺪﻟﺍ ﺔﻟﺎﻃﺇ ﺓﺍﺩﺃ ﺐﺤﺳﺍ
. (ﻖﻓﺍﻮﻣ)
b
Follow the instructions on the display to print
a.
the alignment page.
Lift the lid. Place the top of the alignment
b.
page face down in the front right corner of
the glass. Close the lid.
Press OK .
c.
FR
Suivez les instructions affichées à l’écran
a.
pour imprimer la page d’alignement.
Soulevez le couvercle. Placez le haut de la
b.
page d’alignement, face vers le bas, dans
l’angle avant droit de la vitre. Refermez le
couvercle.
Appuyez sur OK .
c.
HP Photosmart C4600 All-in-One series /
PTEN
AR
Siga as instruções exibidas no visor para imprimir
a.
a página de alinhamento.
Levante a tampa. Coloque o topo da página de
b.
alinhamento voltado para baixo no canto frontal
direito do vidro. Feche a tampa.
Pressione OK .
c.
.ﺓﺍﺫﺎﺤﻤﻟﺍ ﺔﺤﻔﺻ ﺔﻋﺎﺒﻄﻟ ﺔﺷﺎﺸﻟﺍ ﻰﻠﻋ ﺮﻬﻈﺗ ﻲﺘﻟﺍ ﺕﺍﺩﺎﺷﺭﻹﺍ ﻊﺒﺗﺍ
ﻪﻬﺟﻭﻭ ﺓﺍﺫﺎﺤﻤﻟﺍ ﺔﺤﻔﺻ ﻦﻣ ﻱﻮﻠﻌﻟﺍ ءﺰﺠﻟﺍ ﻊﺿ .ءﺎﻄﻐﻟﺍ ﻊﻓﺮﺑ ﻢﻗ
ﻕﻼﻏﺈﺑ ﻢﻗ .ﻲﺟﺎﺟﺰﻟﺍ ﺢﻄﺴﻟﺍ ﻦﻣ ﺔﻴﻣﺎﻣﻷﺍ ﻰﻨﻤﻴﻟﺍ ﺔﻳﻭﺍﺰﻟﺍ ﻲﻓ ﻞﻔﺳﻸﻟ
.ءﺎﻄﻐﻟﺍ
. (ﻖﻓﺍﻮﻣ) OK ﻂﻐﺿﺍ
HP Photosmart C4600 All-in-One series • 5
.a
.b
.c
Page 6

11 - Windows
A B
EN
NOTE: Do not connect the USB cable until
prompted.
Turn on your computer, login if necessary, and
then wait for the desktop to appear. Insert the
blue CD and follow the onscreen instructions.
IMPORTANT: If the startup screen does not
appear, double-click My Computer , double-click
the CD-ROM icon with the HP logo, and then
double-click setup.exe .
FR
REMARQUE: ne connectez pas le câble USB
avant d’y être invité.
Allumez l’ordinateur, connectez-vous si nécessaire
et attendez que le bureau s’affiche. Insérez le CD
de couleur bleue et suivez les instructions à l’écran.
IMPORTANT: Si l’écran de démarrage n’apparaît
pas, double-cliquez sur Poste de travail , puis
double-cliquez sur l’icône du CD-ROM comportant
le logo HP et double-cliquez sur setup.exe .
PT
NOTA: Não conecte o cabo USB até ser
solicitado.
Ligue o computador, faça login (se necessário) e
aguarde a exibição da área de trabalho. Insira o
CD azul e siga as instruções exibidas na tela.
IMPORTANTE: Se a tela inicial de instalação
não for exibida, clique duas vezes em Meu
Computador , duas vezes no ícone de CD-ROM
com o logotipo da HP e duas vezes em setup.exe .
EN
FR
PT
Once the USB prompt appears, connect the
a.
USB cable to the port on the back of the
HP All-in-One, and then to any USB port on
the computer.
Follow the onscreen instructions to complete
b.
the software installation.
Lorsque l’invite USB s’affiche, connectez
a.
le câble USB au port situé à l’arrière de
l’appareil HP Tout-en-un, puis à n’importe quel
port USB de l’ordinateur.
Suivez les instructions à l’écran pour compléter
b.
l’installation du logiciel.
Assim que o prompt USB for exibido, conecte
a.
o cabo USB à porta na parte posterior do
HP All-in-One e a qualquer porta USB no
computador.
Siga as instruções exibidas na tela para
b.
concluir a instalação do software.
AR AR
ﺮﻈﺘﻧﺍ ﻢﺛ ،ﺮﻣﻷﺍ ﻡﺰﻟ ﺍﺫﺇ ﻝﻮﺧﺪﻟﺍ ﻞﻴﺠﺴﺗﻭ ﺮﺗﻮﻴﺒﻤﻜﻟﺍ ﺯﺎﻬﺟ ﻞﻴﻐﺸﺘﺑ ﻢﻗ
ﻕﻮﻓ ﺎًﺟﻭﺩﺰﻣ ﺍًﺮﻘﻧ ﺮﻘﻧﺍ ،ﻞﻴﻐﺸﺘﻟﺍ ءﺪﺑ ﺔﺷﺎﺷ ﺭﻮﻬﻇ ﻡﺪﻋ ﺔﻟﺎﺣ ﻲﻓ
ﺎًﺟﻭﺩﺰﻣ ﺍًﺮﻘﻧ ﺮﻘﻧﺍ ﻢﺛ ،HP ﺭﺎﻌﺷ ﻞﻤﺤﻳ ﻱﺬﻟﺍ ﻁﻮﻐﻀﻤﻟﺍ ﺹﺮﻘﻟﺍ ﺰﻣﺭ
6 • HP Photosmart C4600 All-in-One series
.ﻚﻟﺫ ﻚﻨﻣ ﺐﻠﻄُﻳ ﻰﺘﺣ USB ﻞﺑﺎﻛ ﻞﻴﺻﻮﺘﺑ ﻢﻘﺗ ﻻ :ﺔﻈﺣﻼﻣ
ﻊﺒﺗﺍﻭ ﻕﺭﺯﻷﺍ ﻁﻮﻐﻀﻤﻟﺍ ﺹﺮﻘﻟﺍ ﻞﺧﺩﺃ .ﺐﺘﻜﻤﻟﺍ ﺢﻄﺳ ﺮﻬﻈﻳ ﻰﺘﺣ
.ﺔﺷﺎﺸﻟﺍ ﻰﻠﻋ ﺮﻬﻈﺗ ﻲﺘﻟﺍ ﺕﺍﺩﺎﺷﺭﻹﺍ
:ﻡﺎﻫ
ﻕﻮﻓ ﺎًﺟﻭﺩﺰﻣ ﺍًﺮﻘﻧ ﺮﻘﻧﺍ ﻢﺛ ، (ﺮﺗﻮﻴﺒﻤﻜﻟﺍ ﺯﺎﻬﺟ) My Computer
. setup.exe ﻕﻮﻓ
/ HP Photosmart C4600 All-in-One series
ﺬﻔﻨﻤﻟﺎﺑ USB ﻞﺑﺎﻛ ﻞﻴﺻﻮﺘﺑ ﻢﻗ ،USB ﺔﺒﻟﺎﻄﻣ ﺭﻮﻬﻇ ﺪﻌﺑ
ﻢﻗ ﻢﺛ ،HP All-in-One ﺯﺎﻬﺟ ﻦﻣ ﻲﻔﻠﺨﻟﺍ ءﺰﺠﻟﺍ ﻰﻠﻋ ﺩﻮﺟﻮﻤﻟﺍ
.ﺮﺗﻮﻴﺒﻤﻜﻟﺍ ﺯﺎﻬﺟ ﻰﻠﻋ USB ﺬﻔﻨﻣ ﻱﺄﺑ ﻪﻠﻴﺻﻮﺘﺑ
.ﺞﻣﺎﻧﺮﺒﻟﺍ ﺖﻴﺒﺜﺗ ﻝﺎﻤﻛﻹ ﺔﺷﺎﺸﻟﺍ ﻰﻠﻋ ﺮﻬﻈﺗ ﻲﺘﻟﺍ ﺕﺍﺩﺎﺷﺭﻹﺍ ﻊﺒﺗﺍ .a.b
Page 7

11 - Mac
BA
EN
Connect the USB cable to the port on the back of
the HP All-in-One, and then to any USB port on the
computer.
FR
Connectez le câble USB au port situé à l’arrière du
périphérique HP Tout-en-un, puis à n’importe quel
port USB de l’ordinateur.
PT
Conecte o cabo USB à porta na parte posterior
do HP All-in-One e a qualquer porta USB no
computador.
EN
FR
PT
Insert the blue CD.
a.
Double-click the HP Photosmart CD icon on the
b.
desktop.
Double-click the HP Installer icon. Follow the
c.
onscreen instructions.
Complete the Setup Assistant screen.
d.
Insérez le CD de couleur bleue .
a.
Double-cliquez sur l’icône du CD
b.
HP Photosmart située sur le bureau.
Double-cliquez sur l’icône Programme
c.
d’installation HP . Suivez les instructions
affichées à l’écran.
Renseignez l’écran de l’ Assistant de
d.
configuration .
Insira o CD azul .
a.
Clique duas vezes no ícone do CD do HP
b.
Photosmart na área de trabalho.
Clique duas vezes no ícone do HP Installer .
c.
Siga as instruções exibidas na tela.
Conclua as etapas exibidas na tela do
d.
Assistente de Instalação .
ﺯﺎﻬﺟ ﻦﻣ ﻲﻔﻠﺨﻟﺍ ءﺰﺠﻟﺍ ﻰﻠﻋ ﺩﻮﺟﻮﻤﻟﺍ ﺬﻔﻨﻤﻟﺎﺑ USB ﻞﺑﺎﻛ ﻞﻴﺻﻮﺘﺑ ﻢﻗ
AR AR
ﺯﺎﻬﺟ ﻰﻠﻋ USB ﺬﻔﻨﻣ ﻱﺄﺑ ﻪﻠﻴﺻﻮﺘﺑ ﻢﻗ ﻢﺛ ،HP All-in-One
.ﺮﺗﻮﻴﺒﻤﻜﻟﺍ
HP Photosmart C4600 All-in-One series /
. ﻕﺭﺯﻷﺍ ﻁﻮﻐﻀﻤﻟﺍ ﺹﺮﻘﻟﺍ ﻞﺧﺩﺃ
ﻁﻮﻐﻀﻤﻟﺍ ﺹﺮﻘﻟﺍ ﺰﻣﺭ ﻕﻮﻓ ﺎًﺟﻭﺩﺰﻣ ﺍًﺮﻘﻧ ﺮﻘﻧﺍ
.ﺐﺘﻜﻤﻟﺍ ﺢﻄﺳ ﻰﻠﻋ ﺩﻮﺟﻮﻤﻟﺍ HP Photosmart
ﺕﺍﺩﺎﺷﺭﻹﺍ ﻊﺒﺗﺍ . HP Installer ﺰﻣﺭ ﻕﻮﻓ ﺎًﺟﻭﺩﺰﻣ ﺍًﺮﻘﻧ ﺮﻘﻧﺍ
.ﺔﺷﺎﺸﻟﺍ
ﻰﻠﻋ ﺮﻬﻈﺗ ﻲﺘﻟﺍ
. (ﺩﺍﺪﻋﻹﺍ ﺪﻋﺎﺴﻣ) Setup Assistant ﺔﺷﺎﺷ ﻝﺎﻤﻜﺘﺳﺎﺑ ﻢﻗ
HP Photosmart C4600 All-in-One series • 7
.a
.b
.c
.d
Page 8

Troubleshooting
PTEN
Solução de problemas
FR
Résolution des problèmes
AR
EN
Problem: (Windows) The Microsoft Add Hardware screen appears.
ﺕﻼﻜﺸﳌﺍ ﻞﺣ
www.hp.com/support
Action: Cancel all screens. Unplug the USB cable, and then insert the
blue HP All-in-One CD.
FR
Problème: (Windows) L’écran Ajout de matériel de Microsoft s’affiche.
Action: Cliquez sur Annuler pour tous les écrans affichés. Débranchez le
câble USB, puis introduisez le CD HP Tout-en-un de couleur bleue.
PT
Problema: (Windows) A tela Adicionar Hardware da Microsoft é exibida.
Ação: Cancele todas as telas. Desconecte o cabo USB e insira o CD
azul do HP All-in-One.
AR
.Microsoft ـﻟ (ﺓﺰﻬﺟﺃ ﺔﻓﺎﺿﺇ) Add Hardware ﺔﺷﺎﺷ ﺭﻮﻬﻇ (Windows ﻞﻴﻐﺸﺗ ﺔﻤﻈﻧﺃ) :ﺔﻠﻜﺸﻤﻟﺍ
ﻁﻮﻐﻀﻤﻟﺍ HP All-in-One ﺹﺮﻗ ﻞﺧﺩﺃ ﻢﺛ ، USBـﻟﺍ ﻞﺑﺎﻛ ﻞﺼﻓﺍ .ﺕﺎﺷﺎﺸﻟﺍ ﺔﻓﺎﻛ ءﺎﻐﻟﺈﺑ ﻢﻗ :ﻞﻤﻌﻟﺍ
.ﻕﺭﺯﻷﺍ
EN
Problem: (Windows only) The Device Setup Has Failed To Complete
screen appears.
Action: Unplug the device and plug it in again. Check all connections.
Make sure the USB cable is plugged into the computer. Do not plug the
USB cable into a keyboard or a non-powered USB hub.
FR
Problème: (Windows uniquement) L’écran La configuration du
périphérique a échoué s’affiche.
Action: Débranchez le périphérique, puis rebranchez-le. Vérifiez
toutes les connexions. Assurez-vous que le câble USB est branché à
l’ordinateur. Ne branchez pas le câble USB sur un clavier ni sur un
concentrateur USB non doté de sa propre alimentation.
PT
Problema: (Somente Windows) A tela A configuração do dispositivo não
foi concluída é exibida.
Ação: Desconecte o dispositivo e conecte-o novamente. Verifique todas
as conexões. Verifique se o cabo USB está conectado ao computador.
Não conecte o cabo USB a um teclado ou hub USB sem energia.
AR
Device Setup Has Failed To ﺔﺷﺎﺷ ﺭﻮﻬﻇ (ﻂﻘﻓ Windows ﻞﻴﻐﺸﺗ ﺔﻤﻈﻧﺃ) :ﺔﻠﻜﺸﻤﻟﺍ
. (ﺯﺎﻬﺠﻟﺍ ﺩﺍﺪﻋﺇ ﻝﺎﻤﻜﺘﺳﺍ ﻞﺸﻓ) Complete
ﻦﻣ ﺪﻛﺄﺗ .ﺕﻼﻴﺻﻮﺘﻟﺍ ﺔﻓﺎﻛ ﺺﺤﻔﺑ ﻢﻗ .ﻯﺮﺧﺃ ﺓﺮﻣ ءﺎﺑﺮﻬﻜﻟﺎﺑ ﻪﻠﻴﺻﻮﺗ ﺪﻋﺃ ﻢﺛ ،ﺯﺎﻬﺠﻟﺍ ﻞﺼﻓﺍ :ﻞﻤﻌﻟﺍ
ﺔﺣﻮﻠﺑ ﻭﺃ ﺢﻴﺗﺎﻔﻤﻟﺍ ﺔﺣﻮﻠﺑ USBـﻟﺍ ﻞﺑﺎﻛ ﻞﻴﺻﻮﺘﺑ ﻡﻮﻘﺗ ﻻ .ﺮﺗﻮﻴﺒﻤﻜﻟﺍ ﺯﺎﻬﺠﺑ ﻞﺼﺘﻣ USB ﻞﺑﺎﻛ ﻥﺃ
.ﺔﻗﺎﻄﻟﺍ ﺎﻬﻴﻟﺇ ﻞﺼﺗ ﻻ ﻲﺘﻟﺍ USB ﺕﻼﻴﺻﻮﺗ
© 2008 Hewlett-Packard Development Company, L.P.
Printed in (English)
 Loading...