

HP PhotoSmart 850 User Manual

hp
photosmart
850
digital
camera
user's manualuser's manual
user's manual


Trademark and copyright information
© Copyright 2002 Hewlett-Packard Company
All rights are reserved. No part of this document may be photocopied,
reproduced, or translated to another language without the prior written
consent of Hewlett-Packard Company.
The information contained in this document is subject to change
without notice. Hewlett-Packard shall not be liable for errors contained
herein or for consequential damages in connection with the furnishing,
performance, or use of this material.
Microsoft® and Windows® are U.S. registered trademarks of
Microsoft Corporation.
Apple, Macintosh, and Mac are registered trademarks of Apple
Computer, Inc.
The SD logo is a trademark of the SD Card Association.
Materials disposal
This HP product contains the following materials that might require
special handling at end-of-life:
z Mercury in the fluorescent lamp in the image LCD.
z Alkaline manganese dioxide-zinc or lithium-iron disulfide AA
batteries.
z Lead in the solder and some component leads.
Disposal of this material can be regulated because of environmental
considerations. For disposal or recycling information, please contact
your local authorities or the Electronic Industries Alliance (EIA)
(www.eiae.org).


Table of Contents
Chapter 1:
Getting started . . . . . . . . . . . . . . . . . . . . . . . . . . . .9
Camera parts . . . . . . . . . . . . . . . . . . . . . . . . . . . . . 10
Setup . . . . . . . . . . . . . . . . . . . . . . . . . . . . . . . . . . . 14
Attaching the lens cap tether . . . . . . . . . . . . . . 14
Attaching the neck strap . . . . . . . . . . . . . . . . . . 15
Installing the batteries . . . . . . . . . . . . . . . . . . . 15
Installing the memory card . . . . . . . . . . . . . . . . 16
Turning on power . . . . . . . . . . . . . . . . . . . . . . 16
Choosing the language . . . . . . . . . . . . . . . . . . 17
Setting the date and time . . . . . . . . . . . . . . . . . 17
Installing the software . . . . . . . . . . . . . . . . . . . 18
Windows . . . . . . . . . . . . . . . . . . . . . . . . . 18
Macintosh . . . . . . . . . . . . . . . . . . . . . . . . 19
Camera states and menus . . . . . . . . . . . . . . . . . . . . 19
Restoring previous settings . . . . . . . . . . . . . . . . . . . 20
Chapter 2:
Taking pictures and recording video clips . . . .21
Using the displays . . . . . . . . . . . . . . . . . . . . . . . . . 21
Using the diopter control . . . . . . . . . . . . . . . . . . . . . 23
Taking still pictures . . . . . . . . . . . . . . . . . . . . . . . . . 23
Using still mode . . . . . . . . . . . . . . . . . . . . . . . . 23
Using self-timer mode . . . . . . . . . . . . . . . . . . . 24
Using instant review . . . . . . . . . . . . . . . . . . . . . 25
Using the focus brackets . . . . . . . . . . . . . . . . . . 25
Using focus lock . . . . . . . . . . . . . . . . . . . . . . . 26
Using the focus settings . . . . . . . . . . . . . . . . . . 27
Using exposure compensation . . . . . . . . . . . . . 28
Using the pop-up flash . . . . . . . . . . . . . . . . . . . 29
Recording audio . . . . . . . . . . . . . . . . . . . . . . . 31
Recording video clips . . . . . . . . . . . . . . . . . . . . . . . 32

Using zoom . . . . . . . . . . . . . . . . . . . . . . . . . . . . . .33
Optical zoom . . . . . . . . . . . . . . . . . . . . . . . . . .33
Digital zoom . . . . . . . . . . . . . . . . . . . . . . . . . .33
Using the capture menu . . . . . . . . . . . . . . . . . . . . . .34
Exposure mode . . . . . . . . . . . . . . . . . . . . . . . .35
White balance . . . . . . . . . . . . . . . . . . . . . . . . .36
AE metering . . . . . . . . . . . . . . . . . . . . . . . . . . .38
ISO speed . . . . . . . . . . . . . . . . . . . . . . . . . . . .39
Color . . . . . . . . . . . . . . . . . . . . . . . . . . . . . . . .39
Resolution . . . . . . . . . . . . . . . . . . . . . . . . . . . .40
Compression . . . . . . . . . . . . . . . . . . . . . . . . . .40
Setup . . . . . . . . . . . . . . . . . . . . . . . . . . . . . . . .41
Chapter 3:
Reviewing images and video clips . . . . . . . . . . 43
Using playback . . . . . . . . . . . . . . . . . . . . . . . . . . . .43
Using the playback menu . . . . . . . . . . . . . . . . . . . . .45
Play . . . . . . . . . . . . . . . . . . . . . . . . . . . . . . . . .47
Delete . . . . . . . . . . . . . . . . . . . . . . . . . . . . . . .48
Magnify . . . . . . . . . . . . . . . . . . . . . . . . . . . . . .48
Setup . . . . . . . . . . . . . . . . . . . . . . . . . . . . . . . .49
Chapter 4:
Using hp instant share . . . . . . . . . . . . . . . . . . . 51
Using the share menu . . . . . . . . . . . . . . . . . . . . . . .52
Using hp instant share to
print pictures . . . . . . . . . . . . . . . . . . . . . . . . . . . . . .53
Using the hp instant share e-mail service . . . . . . . . . .54
Adding, modifying, and removing
e-mail addresses . . . . . . . . . . . . . . . . . . . . . .54
Selecting images to be e-mailed . . . . . . . . . . . .56
Windows . . . . . . . . . . . . . . . . . . . . . . . . .57
Macintosh . . . . . . . . . . . . . . . . . . . . . . . . .57
hp photosmart 850 user’s manual

Chapter 5:
Unloading, printing, and displaying images . . .59
Unloading to a computer . . . . . . . . . . . . . . . . . . . . 59
Printing images . . . . . . . . . . . . . . . . . . . . . . . . . . . 60
Displaying images on a TV . . . . . . . . . . . . . . . . . . . 61
Chapter 6:
Adjusting the camera settings . . . . . . . . . . . . . .63
Using the setup menu . . . . . . . . . . . . . . . . . . . . . . . 63
Audio record . . . . . . . . . . . . . . . . . . . . . . . . . 64
Instant review . . . . . . . . . . . . . . . . . . . . . . . . . 65
Camera sounds . . . . . . . . . . . . . . . . . . . . . . . . 65
Eye-Start . . . . . . . . . . . . . . . . . . . . . . . . . . . . . 66
Date & time . . . . . . . . . . . . . . . . . . . . . . . . . . . 66
USB configuration . . . . . . . . . . . . . . . . . . . . . . 67
TV configuration . . . . . . . . . . . . . . . . . . . . . . . 68
Language . . . . . . . . . . . . . . . . . . . . . . . . . . . . 68
Chapter 7:
Troubleshooting and support . . . . . . . . . . . . . . .69
Problems and solutions . . . . . . . . . . . . . . . . . . . . . . 69
Error messages . . . . . . . . . . . . . . . . . . . . . . . . . . . . 75
Getting assistance . . . . . . . . . . . . . . . . . . . . . . . . . 82
Finding help on the web . . . . . . . . . . . . . . . . . . 82
HP product support . . . . . . . . . . . . . . . . . . 82
HP photosmart website . . . . . . . . . . . . . . . 82
HP accessibility website . . . . . . . . . . . . . . . 82
Contacting hp customer support . . . . . . . . . . . . 82
How hp can help . . . . . . . . . . . . . . . . . . . 82
Before you call . . . . . . . . . . . . . . . . . . . . . 83
Obtaining support in the United States . . . . . . . 83
Free telephone support for one year . . . . . . 83
After the first year . . . . . . . . . . . . . . . . . . . 83
Upgraded warranty options . . . . . . . . . . . 84
Obtaining support worldwide . . . . . . . . . . . . . . 84

Hewlett-Packard limited warranty statement . . . . . . . .88
Regulatory information . . . . . . . . . . . . . . . . . . . . . .90
Appendix A:
Batteries and camera accessories . . . . . . . . . . 91
Managing batteries . . . . . . . . . . . . . . . . . . . . . . . . .91
Extending battery life . . . . . . . . . . . . . . . . . . . .92
Rechargeable batteries . . . . . . . . . . . . . . . . . . .92
Power conservation . . . . . . . . . . . . . . . . . . . . .93
Purchasing camera accessories . . . . . . . . . . . . .93
Appendix B:
Camera dock . . . . . . . . . . . . . . . . . . . . . . . . . . . 95
Unloading images to a computer using the dock . . . .97
Printing images using the dock . . . . . . . . . . . . . . . . .97
Displaying images on a TV using the dock . . . . . . . .98
Appendix C:
Specifications . . . . . . . . . . . . . . . . . . . . . . . . . . . 99
Memory card capacity . . . . . . . . . . . . . . . . . . . . . .102
hp photosmart 850 user’s manual

Chapter 1: Getting started
The HP Photosmart 850 digital camera is a 4.1 Megapixel
camera with 8x optical zoom and 7x digital zoom. This
camera has an exciting new feature called HP Instant Share
technology.
With HP Instant Share, you can select images to print or e-mail
automatically the next time you connect the camera to your
computer. You can also bypass the computer altogether and
print the selected pictures directly to any HP Deskjet or
Photosmart printers that are USB-enabled.
You can enhance your experience by purchasing an
HP Photosmart 8881 Camera Dock. The Camera Dock allows
you to easily download images to a computer, send images to
a printer or television, recharge the camera batteries, and
provide a convenient home for your camera.
NOTE A Dock Insert is included in
your camera box. This Dock
Insert enables your camera
(and others of the same model)
to use the HP Camera Dock.
Please do not use it without the
Camera Dock and DO NOT
discard it. Instructions for its use
are included with the Camera Dock as well as in
Appendix B of this manual, starting on page 95.
Chapter 1: Getting started 9
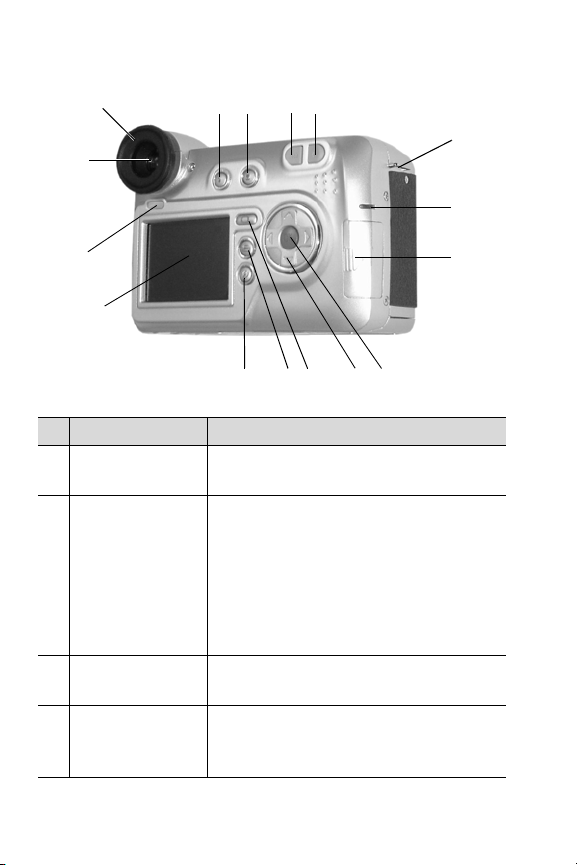
Camera parts
12
11
13
14
15
16
1
2
10
9
8
7
6
# Name Description
1Neck strap
mount
2 Power/Memory
light
3Memory card
door
4 Menu/OK button Allows you to display the Capture
10 hp photosmart 850 user’s manual
Allows you to attach a neck strap (a
mount is on each side of camera)
Solid green—camera is on
Blinking green—camera is off and is
charging the batteries
Blinking red—camera has insufficient
power and is shutting down
Solid amber—camera is reading from
or writing to the memory card
Allows access to insert or remove the
memory card
and Playback menus and to select
menu options
4
5
3

# Name Description
5
Controller
with and
buttons
6
Display
button
7
Play button
8
Share button
Allows you to move through menus
and images on the Image Display, or
through the Capture menu in the
viewfinder microdisplay
Turns Live View on the Image Display
on and off
Turns Playback on and off
Turns the Share menu on and off
9 Image Display Allows you to frame pictures and video
clips using Live View and review them
afterward in Playback, and to view all
the menus
10 Eye-start sensor Turns on the microdisplay in the
viewfinder when it detects that you are
looking into the viewfinder
11 Viewfinder with
microdisplay
Allows you to frame pictures and video
clips using Live View, and to view the
Capture menu
12 Diopter control Adjusts the focus in the microdisplay.
(It does NOT affect the focus of the
image or video clip that you capture.)
13
Flash button
Selects the flash setting when the popup flash assembly is activated
14
Focus button
Turns Macro focus on (for taking closeup pictures) and off
15
Zoom Out
button
16
Zoom In button
Zooms out the lens to the wide angle
position
Zooms in the lens to the telephoto
position
Chapter 1: Getting started 11

1
2
3
5
4
# Name Description
1 Shutter button Takes a picture or starts and stops
recording a video clip
2 OFF/Mode
selector
Turns the camera power on and off,
and sets the camera mode to Still ,
Self-Timer , or Video
3 Speaker Plays camera sounds and audio clips
4
Pop-up flash
Pops up the flash assembly
release
5Pop-up flash
assembly
Provides additional light to improve
picture-taking
12 hp photosmart 850 user’s manual

10
1
2
3
4
5
9
8
7
6
# Name Description
1 Self-Timer light Blinks during the 10-second
countdown before taking a picture
when using Self-Timer mode. Also
turns on in low light conditions to
improve auto focus.
2Neck strap
mount
Allows you to attach a neck strap and
a lens cap tether
3 USB connector Allows you to connect a USB cable
from the camera to a USB-enabled
computer or printer
4 TV connector Allows you to connect an optional
Audio/Video cable from the camera to
a TV
5 Power adapter
connector
Allows you to connect an optional HP
AC power adapter to the camera to
operate the camera without batteries
Chapter 1: Getting started 13
# Name Description
6 Lens cap tether
mount
7 Tripod mount Allows you to mount the camera to
8 Camera Dock
connector
9 Battery door Allows access to insert and remove
10 Microphone Records audio clips
Allows you to attach a tether to the
lens cap
a tripod
Allows you to connect the camera to
the optional HP Camera Dock
the batteries
Setup
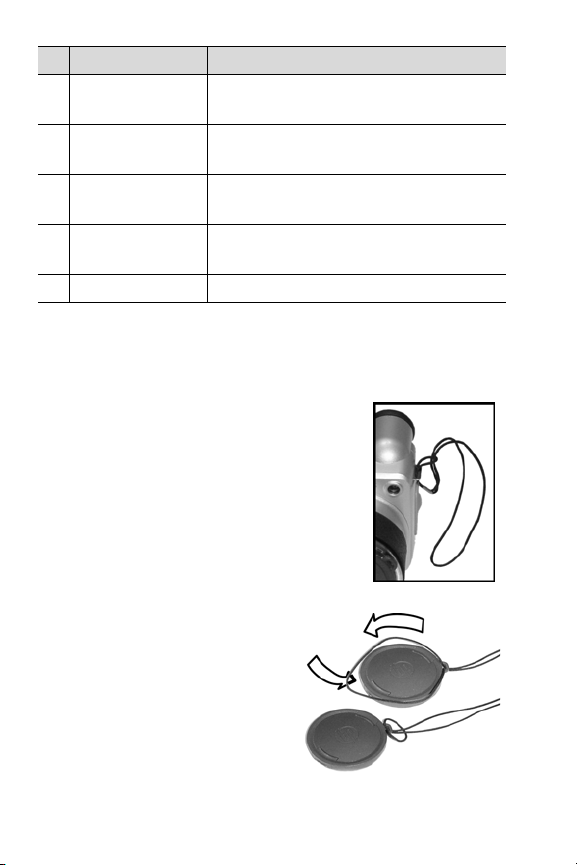
Attaching the lens cap tether
1 With the front of the camera facing
you, insert the small loop of the lens
cap tether through the neck strap
mount on the right side of the camera.
2 Insert the long loop of the tether
through the small loop and pull to
tighten the knot.
3 Insert the long loop of the tether
through the lens cap tether mount.
4 Pull the long loop over the
sides of the lens cap and then
under the lens cap, as shown.
Pull to tighten the knot.
14 hp photosmart 850 user’s manual
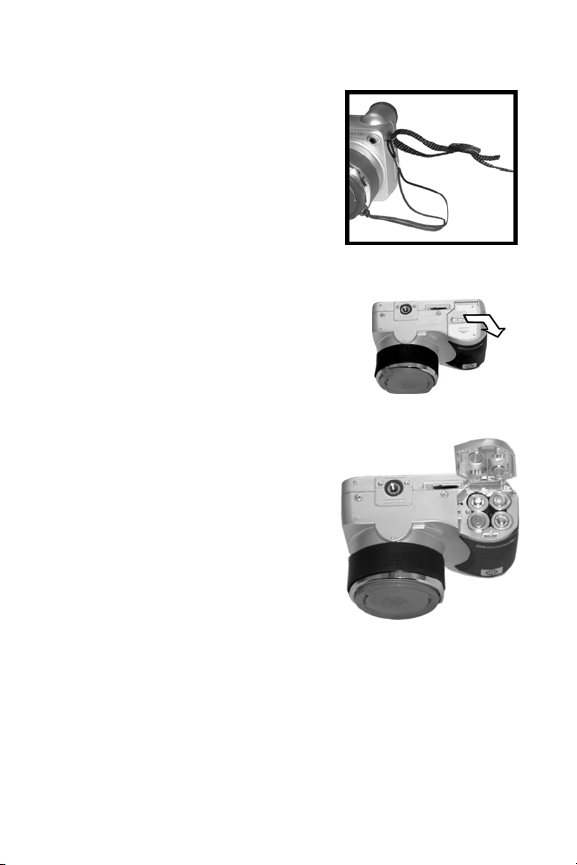
Attaching the neck strap
Insert one end of the neck strap
through a neck strap mount. Then
thread the neck strap through the
plastic tab to secure it.
Repeat to attach the other end of
the neck strap to the other neck
strap mount.
Installing the batteries
1 With the front of the camera
facing you, open the battery
door on the bottom of the
camera by sliding the latch to
the right and pulling the door
toward you.
2 Insert the batteries as
indicated inside the door.
3 Close the battery door by
pushing the door toward
the back of the camera and
sliding the latch to the left.
NOTE For more information
about batteries, see
Managing batteries on
page 91.
Chapter 1: Getting started 15

Installing the memory card
1 With the camera turned off and
the back of the camera facing
you, open the memory card door
by sliding the door to the right.
2 Insert the memory card, making
sure that it snaps into place.
3 Close the memory card door.
To remove the memory card, first
make sure the camera is turned off.
Open the memory card door, then
push the memory card in and it will
spring from the camera.
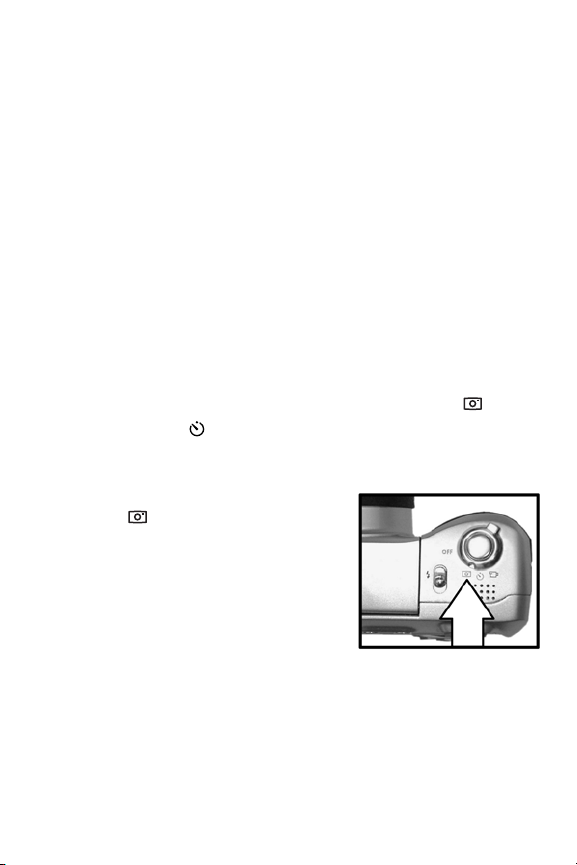
Turning on power
Turn the camera on by rotating the
OFF/Mode selector to the mode
you want to use:
z —Still mode
z —Self-Timer mode
z —Video mode
The lens extends, the Image Display turns on briefly, and the
Power/Memory light turns on solid green.
NOTE If the Power/Memory light is blinking red, the batteries
are very low, and the camera will shut down soon.
Replace or recharge the batteries, or use an optional HP
AC adapter to power the camera. For more information
about the HP AC adapter, see Purchasing camera
accessories on page 93.
16 hp photosmart 850 user’s manual

Choosing the language
The first time you turn the camera on, the following screen
appears and prompts you to choose a language.
1 Scroll to the language that you
want by using the buttons
on the Controller .
2 Press the blue Menu/OK button in
the center of the Controller to
select the highlighted language.
Setting the date and time
The camera has a clock that records the date and time at which
you take each picture. The first time you turn the camera on, the
following screen appears after you choose the language.
1 Adjust the value of the highlighted
selection by using the
buttons on the Controller .
2 Press the buttons on the
Controller to move to the
other selections.
Repeat steps one and two until the correct date, time, and
date/time format are set.
NOTE In the date/time format, mm=month, dd=day, and
yyyy=year.
3 Press the Menu/OK button when the proper values are
entered. The Image Display then turns off.
Chapter 1: Getting started 17

Installing the software
The camera software allows you to unload images from the
camera, view them, print them, and e-mail them. It also allows
you to configure the Share menu on the camera.
See Chapter 4: Using hp instant share on page 51 for
information about configuring the Share menu on the camera,
and Chapter 5: Unloading, printing, and displaying images on
page 59 for information about connecting the camera to a
computer or printer.
Windows
NOTE For Windows computers, the HP Instant Share
component of the HP Photo & Imaging software needs at
least Internet Explorer 5.01 to function properly.
1 Insert the HP Photo & Imaging software CD into the CD
drive of your computer. The installation window
automatically appears.
NOTE If the installation window does not appear, click Start,
and then click Run. Type X:\Setup.exe, where X
letter of your CD drive.
2 Click Next, and then follow the on-screen instructions to
install the software.
Your CD may also include bonus software from other
manufacturers. To install any bonus software:
1 Click Start, click Run, and in the Open box, type
X:\Bonus\setup.exe (where X is the letter of your CD drive).
2 Click OK, and then follow the on-screen instructions to
install the bonus software.
is the
18 hp photosmart 850 user’s manual

Macintosh
1 Insert the HP Photo & Imaging software CD into the CD
drive of your computer.
2 Double-click the CD icon on the computer desktop.
3 Double-click the installer icon, and then follow the on-screen
instructions to install the software.
Your CD may also include bonus software from other
manufacturers. To install any bonus software:
1 Double-click the Bonus folder icon.
2 Double-click the installer icon for the bonus software.
3 Follow the on-screen instructions to install the software.
Camera states and menus
Your camera has three main states that allow you to complete
certain tasks. Each of these states has an associated menu you
can use to adjust camera settings or perform tasks in that state.
z Capture—Allows you to take still pictures and record video
clips. For information on using Capture, see Chapter 2:
Taking pictures and recording video clips on page 21.
z Playback—Allows you to review the still images and video
clips that you capture. For information on using Playback,
see Chapter 3: Reviewing images and video clips on
page 43.
z Share—Allows you to use the HP Instant Share technology
to select images in the camera that will be automatically
processed later when the camera is connected to your
computer or to a USB-enabled HP printer. For information
on using Share, see Chapter 4: Using hp instant share on
page 51.
Chapter 1: Getting started 19

Your camera also has a fourth menu, the Setup menu, which
allows you to adjust a number of camera settings. For
information on using the Setup menu, see Chapter 6: Adjusting
the camera settings on page 63.
Restoring previous settings
Some of the settings that you can change in the camera menus
do not remain set after you turn the camera off. However, you
can restore the settings from the last time the camera was on
and had at least one non-default setting (which could actually
be several power cycles ago) by holding down the blue Menu/
OK button while rotating the OFF/Mode selector to turn the
camera on.
Chapter 1: Getting started 20

Chapter 2: Taking pictures and recording video clips
Using the displays
Your camera has two displays:
z Microdisplay in the viewfinder—Allows you to frame
pictures and video clips using Live View, and to view the
Capture menu
z Image Display—Allows you to frame pictures and video
clips using Live View, review images and video clips in
Playback, and to view all the menus
NOTE Using the Image Display consumes a lot of battery
power. To preserve batteries, use the microdisplay instead.
To activate Live View on the:
z Microdisplay, simply look through the viewfinder. The
eye-start sensor below the viewfinder detects that you are
looking through the viewfinder and automatically turns on
the microdisplay.
z Image Display, press the Display button.
NOTE If the microdisplay does not turn on automatically when
you look through the viewfinder, you may need to change
the Eye-Start setting in the Setup menu. See Eye-Start on
page 66. To adjust the focus in the microdisplay, see
Using the diopter control on page 23.
Chapter 2: Taking pictures and recording video clips 21
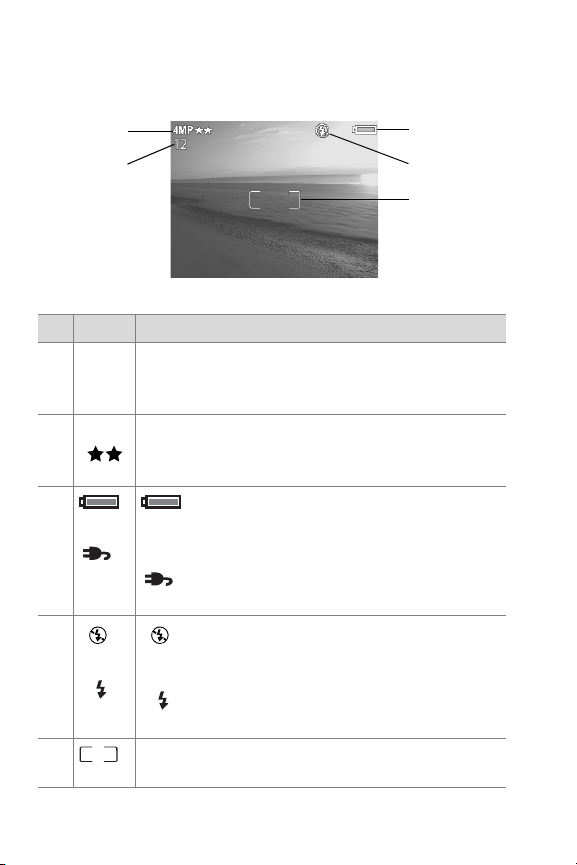
The following table describes the information that is displayed
A
A
in the Live View screen of the active display when the camera
settings are at their default values.
2
1
3
4
5
# Icon Description
1 12 Remaining pictures count or video clip recording
time (depends on how much space is remaining
on the memory card)
2 4 MP Resolution setting (default is 4 MP - 2272 x
1712 pixels) and Compression setting (default is
Better, which is indicated by the two stars)
3
or
—Battery level when using batteries
(actual icon shown depends on the state of your
camera batteries)
—AC power when using the optional HP
AC adapter or Camera Dock
4
or
—Flash Off when the pop-up flash is not
activated
—Auto (default flash setting) when the
pop-up flash is activated
5 Focus brackets (see Using the focus brackets on
page 25)
22 hp photosmart 850 user’s manual
NOTE If you change other camera settings in the Capture
menu, icons for those settings will also be displayed
across the top and bottom of the Live View screen. For
more information, see Using the capture menu on
page 34.
Using the diopter control
The rubber eye piece on the viewfinder is a diopter control that
you can turn to adjust the focus in the microdisplay. However,
the diopter control has NO effect on the actual picture you take
or video clip you record.
Taking still pictures
You can take a picture almost any time the camera is on,
regardless of what is being shown on the active display. Your
camera has two modes for taking still pictures: Still mode
and Self-Timer mode.
Using still mode
1 Rotate the OFF/Mode selector to
Still mode.
2 Frame the subject for your
picture in the active display.
3 Hold the camera steady and
press the Shutter button
halfway down. The camera
measures and then locks the
focus and exposure.
4 Press the Shutter button all the way down to take the picture.
The image is displayed for several seconds in Instant Review
on the active display. See Using instant review on page 25.
Chapter 2: Taking pictures and recording video clips 23

Using self-timer mode
In Self-Timer mode, the camera takes the picture 10 seconds
after you press the Shutter button all the way down.
1 Secure the camera to a tripod or
set it on a stable surface.
2 Rotate the OFF/Mode selector to
Self-Timer mode.
3 Frame the subject for your picture
in the active display.
4 Press the Shutter button halfway
down. The camera measures and then locks the focus and
exposure. The camera will hold these settings for the 10
seconds until it takes the picture.
NOTE If you immediately press the Shutter button all the way
down instead, the camera locks focus and exposure just
before the end of the 10-second countdown. This is useful
when one or more subjects will be entering the picture
during the 10-second countdown period.
5 Press the Shutter button all the way down. A 10-second
countdown appears on the active display. The Self-Timer
light on the front of the camera blinks slowly for 7 seconds
and then quickly for the final 3 seconds before the camera
takes the picture.
After the picture is taken, the image is displayed for several
seconds in Instant Review on the active display. See Using
instant review on page 25.
24 hp photosmart 850 user’s manual

Using instant review
After you take a still picture, the active display shows the image
for several seconds in Instant Review while the image is being
saved to the memory card. You can delete the image during
Instant Review by pressing the Menu/OK button.
You c an exte nd Instant Review by holding down the Shutter
button after you take the picture. You can also set how long
Instant Review is displayed or turn it off with the Instant Review
option in the Setup menu. For more information, see Instant
review on page 65.
You c an also use Playback to review the images you have
taken. See Using playback on page 43.
Using the focus brackets
The two brackets in the middle of the active display screen
show the focus region for the picture you are taking or the
video clip you are recording. When you press the Shutter
button halfway down, the camera measures and then locks the
focus using this region. The focus brackets turn green when the
image is in focus and the camera can lock the focus, but turn
red when the camera is unable to focus.
If the focus brackets turn red, release the Shutter button,
re-frame the subject for your picture or video clip, and then
press the Shutter button halfway down again. If the focus
brackets continue to turn red after several tries, the lighting may
be too low, or there may not be enough contrast in the focus
region. Try using Focus Lock. See Using focus lock on page 26.
Chapter 2: Taking pictures and recording video clips 25

If the focus brackets turn red and the Macro icon is blinking
on the active display, either the camera is set to Macro focus
but detects the focus is further away than the macro (close-up)
range, or the camera is set to Normal focus but detects the
focus is closer than the normal range. For more information on
the focus settings and their respective distance ranges, see
Using the focus settings on page 27.
NOTE When set to Macro focus, the camera will not take a
picture if it cannot find focus. However, when set to
Normal focus (the default), the camera will still take a
picture if it cannot find focus.
Using focus lock
Focus Lock allows you to focus on a subject that is not in the
center of the picture, or to capture action shots more quickly by
pre-focusing in the area where action will occur. You can also
use Focus Lock to help achieve focus in low lighting or low
contrast situations.
1 Frame the subject for your picture within the focus brackets
in the active display.
2 Press the Shutter button halfway down to lock the exposure
and focus.
3 Continue to hold the Shutter button halfway down while you
re-frame or adjust your subject for proper positioning.
4 Press the Shutter button all the way down to take the picture.
26 hp photosmart 850 user’s manual

Using the focus settings
You c an use the Macro focus
setting on the camera for taking
close-up pictures.
The Focus button lets you toggle
between the Normal and Macro
focus settings. Normal is the
default focus setting on the camera.
Icon Setting Description
None Normal Use when taking pictures of subjects greater
than 0.8 m (31.5 inches) away. Auto focus
is limited to a distance range of 0.8 m (31.5
inches) to infinity.
Macro Use when taking close-up pictures of
subjects less than 0.8 m (31.5 inches) away.
Auto focus is limited to a distance range of
0.1 - 0.8 m (4 - 31.5 inches), and zoom
position is limited to a range of 1x to 3.5x.
NOTE If the camera is zoomed in past 3.5x when you set the
camera to Macro focus, the camera will automatically
zoom back to 3.5x. See Using zoom on page 33.
NOTE When set to Macro focus, the camera will not take a
picture if it cannot find focus (the focus brackets turn red in
the center of the active display). However, when set to
Normal focus, the camera will still take a picture if it
cannot find focus.
Chapter 2: Taking pictures and recording video clips 27

Using exposure compensation
In difficult lighting conditions, you can use Exposure
Compensation to override the automatic exposure setting that
the camera makes. Exposure Compensation settings range
from -3.0 EV (Exposure Value) to reduce the exposure of the
image (darkening it), to +3.0 EV to increase the exposure of
the image (brightening it).
By default, Exposure Compensation
is set to 0 (zero) and no indication is
given on the active display. When
Live View is turned on and you press
the buttons on the Controller ,
a meter appears in the middle of the
active display, and the Exposure
Compensation value is shown on the
bottom of the display.
When you have not changed
Exposure Compensation for
2 seconds, the meter disappears,
but the value remains at the bottom
of the screen flanked by arrows
(unless it has been set to 0).
28 hp photosmart 850 user’s manual

Using the pop-up flash
A
NOTE You cannot use the flash while recording video clips.
The flash on your camera is turned
off and the flash will not fire until
you manually pop it up by sliding
the pop-up flash release on top of
the camera. When the flash is
popped-up, it begins to charge
and is automatically set to the Auto
flash setting.
To change the flash setting, press
the Flash button on the back of
the camera until the desired setting
appears on the active display.
The following table describes the
different flash settings.
NOTE If you change the flash setting, the camera will remain
in that setting until you change it or turn off the camera.
Icon Setting Description
Auto The camera measures light and uses the
flash if necessary.
A
Auto with
Red-eye
Reduction
The camera measures light and uses the
flash with red-eye reduction if necessary.
Chapter 2: Taking pictures and recording video clips 29

Icon Setting Description
Flash On The camera always flashes. If the light is
behind your subject, you can use this
setting to increase the light on the front of
your subject. (This is called “fill-flash.”)
Night The camera fires the flash to illuminate
objects in the foreground. It then
continues to expose as if the flash had not
fired to gather the background.
Night with
Red-eye
Reduction
The camera fires the flash, using red-eye
reduction if necessary, to illuminate
objects in the foreground. It then
continues to expose as if the flash had not
fired to gather the background.
NOTE Only the Flash On setting is available when you set the
Exposure Mode in the Capture menu to either Aperture
Priority or Shutter Priority. See Exposure mode on
page 35.
To turn the flash off, press the pop-up flash assembly down until
it snaps shut. When the flash is off, the Flash Off icon
appears at the top of the Live View screen.
Chapter 2: Taking pictures and recording video clips 30
 Loading...