

HP Photosmart 715xi, Photosmart 715 User Manual


hp photosmart 715 digital camera
user guide

Trademark and copyright information
© Copyright 2001 Hewlett-Packard Company
All rights are reserved. No part of this document may be
photocopied, reproduced, or translated to another language
without the prior written consent of Hewlett-Packard Company.
The information contained in this document is subject to change
without notice. Hewlett-Packard shall not be liable for errors
contained herein or for consequential damages in connection with
the furnishing, performance, or use of this material.
Microsoft®, Windows®, and Windows NT® are U.S. registered
trademarks of Microsoft Corporation.
Pentium® is a U.S. registered trademark of Intel Corporation.
Materials disposal
This HP product contains the following materials that might require
special handling at end-of-life:
Mercury in the fluorescent lamp in the liquid crystal display
Lead in solder
Alkaline manganese dioxide-zinc or lithium-iron disulfide AA
batteries that are included with the camera
Disposal of this material can be regulated because of
environmental considerations. For disposal or recycling
information, please contact your local authorities or the Electronic
Industries Alliance (EIA) (www.eiae.org
).
HP photosmart 715 user guideii

Contents
Chapter 1: Getting started
Camera parts . . . . . . . . . . . . . . . . . . . . . . . . . . . . . . . . . . . . . . . . . 2
Setup . . . . . . . . . . . . . . . . . . . . . . . . . . . . . . . . . . . . . . . . . . . . . . . 3
Step 1: Attach the wrist strap. . . . . . . . . . . . . . . . . . . . . . . . . . 3
Step 2: Install the batteries . . . . . . . . . . . . . . . . . . . . . . . . . . . 4
Step 3: Choose the camera language . . . . . . . . . . . . . . . . . . . 4
Step 4: Set the camera date and time . . . . . . . . . . . . . . . . . . . 4
Step 5: Install the CompactFlash card. . . . . . . . . . . . . . . . . . . 5
Chapter 2: Taking pictures
Taking a picture . . . . . . . . . . . . . . . . . . . . . . . . . . . . . . . . . . . . . . . 7
Previewing your pictures . . . . . . . . . . . . . . . . . . . . . . . . . . . . . . . . 8
Using automatic focus, macro focus, and automatic exposure . . . 9
Using focus lock . . . . . . . . . . . . . . . . . . . . . . . . . . . . . . . . . . . 9
Using the macro focus setting . . . . . . . . . . . . . . . . . . . . . . . . 10
Using the optical or digital zoom . . . . . . . . . . . . . . . . . . . . . . . . . 10
Using the self-timer . . . . . . . . . . . . . . . . . . . . . . . . . . . . . . . . . . . 11
Chapter 3: Managing images on the camera
Viewing your images . . . . . . . . . . . . . . . . . . . . . . . . . . . . . . . . . . 13
Deleting your images . . . . . . . . . . . . . . . . . . . . . . . . . . . . . . . . . . 14
Creating a print order . . . . . . . . . . . . . . . . . . . . . . . . . . . . . . . . . . 16
Viewing small versions (thumbnails) of your images . . . . . . . . . . 18
Magnifying your images. . . . . . . . . . . . . . . . . . . . . . . . . . . . . . . . 19
Locking your images . . . . . . . . . . . . . . . . . . . . . . . . . . . . . . . . . . 20
Chapter 4: Adjusting the camera settings
Using the flash . . . . . . . . . . . . . . . . . . . . . . . . . . . . . . . . . . . . . . . 21
Changing the image quality . . . . . . . . . . . . . . . . . . . . . . . . . . . . . 23
Setting Instant Review . . . . . . . . . . . . . . . . . . . . . . . . . . . . . . . . . 25
Changing the date and time. . . . . . . . . . . . . . . . . . . . . . . . . . . . . 26
Adjusting the image display brightness . . . . . . . . . . . . . . . . . . . . 27
Turning the system beep on and off . . . . . . . . . . . . . . . . . . . . . . 28
Changing the camera language. . . . . . . . . . . . . . . . . . . . . . . . . . 28
iiiTable of Contents

Chapter 5: Sharing and printing images
Using the camera with a Windows computer . . . . . . . . . . . . . . . . 30
System requirements for a Windows computer . . . . . . . . . . . 30
Installing the software on a Windows computer. . . . . . . . . . . 31
Connecting the camera to a Windows computer . . . . . . . . . . 31
Unloading images to a Windows computer . . . . . . . . . . . . . . 32
Using the camera with a Windows NT 4.0 computer . . . . . . . 33
Using the camera with a Macintosh computer . . . . . . . . . . . . . . . 35
System requirements for a Macintosh computer . . . . . . . . . . 35
Changing the USB protocol setting . . . . . . . . . . . . . . . . . . . . 35
Installing the software on the Mac OS . . . . . . . . . . . . . . . . . . 36
Connecting the camera to a Macintosh computer . . . . . . . . . 37
Unloading images to a Macintosh computer . . . . . . . . . . . . . 38
Unloading images without using the camera software . . . . . . . . . 39
Using a card reader . . . . . . . . . . . . . . . . . . . . . . . . . . . . . . . . . . . 40
Printing photos on a printer equipped with a card reader . . . . . . 40
Chapter 6: Maintaining your camera
Powering your camera . . . . . . . . . . . . . . . . . . . . . . . . . . . . . . . . . 41
Determining if the batteries need to be changed . . . . . . . . . . 41
Replacing batteries . . . . . . . . . . . . . . . . . . . . . . . . . . . . . . . . 43
Using an AC power adapter . . . . . . . . . . . . . . . . . . . . . . . . . . 43
Maintaining the CF memory card . . . . . . . . . . . . . . . . . . . . . . . . . 45
Formatting a CF memory card. . . . . . . . . . . . . . . . . . . . . . . . 45
Removing the CF memory card . . . . . . . . . . . . . . . . . . . . . . . 46
Caring for your camera and accessories . . . . . . . . . . . . . . . . . . . 46
Camera . . . . . . . . . . . . . . . . . . . . . . . . . . . . . . . . . . . . . . . . . 46
Lens adapter . . . . . . . . . . . . . . . . . . . . . . . . . . . . . . . . . . . . . 46
Safety precautions . . . . . . . . . . . . . . . . . . . . . . . . . . . . . . . . . . . . 47
Chapter 7: Troubleshooting
Problems and solutions . . . . . . . . . . . . . . . . . . . . . . . . . . . . . . . . 49
Getting assistance . . . . . . . . . . . . . . . . . . . . . . . . . . . . . . . . . . . . 56
Visiting HP Web sites. . . . . . . . . . . . . . . . . . . . . . . . . . . . . . . 56
Visiting related Web sites. . . . . . . . . . . . . . . . . . . . . . . . . . . . 56
Contacting HP Customer Support . . . . . . . . . . . . . . . . . . . . . 57
Obtaining support within the United States . . . . . . . . . . . . . . 57
Obtaining support worldwide . . . . . . . . . . . . . . . . . . . . . . . . . 58
Hewlett-Packard limited warranty statement . . . . . . . . . . . . . . . . 61
iv

Appendix A: Reference
Symbols on the status LCD . . . . . . . . . . . . . . . . . . . . . . . . . . . . . 63
Camera indicator lights (LEDs) . . . . . . . . . . . . . . . . . . . . . . . . . . 64
Camera menus . . . . . . . . . . . . . . . . . . . . . . . . . . . . . . . . . . . . . . 65
Camera specifications . . . . . . . . . . . . . . . . . . . . . . . . . . . . . . . . . 66
Index . . . . . . . . . . . . . . . . . . . . . . . . . . . . . . . . . . . . .69
vTable of Contents

vi
Getting started
1
Your HP photosmart 715 digital camera takes high-quality pictures
you can share with family and friends on the Internet or by e-mail.
It comes with software for manipulating, storing, and printing your
photos. Your camera includes the following features:
3.3 megapixel (MP) resolution
3x optical zoom or 2x digital zoom
point-and-shoot simplicity
automatic exposure
automatic focus
automatic flash with red-eye reduction
universal serial bus (USB) computer connection
color image display for previewing and reviewing pictures
economical “digital film” (reusable CompactFlash [CF] memory
card)
self-timer
macro mode
Getting started 1
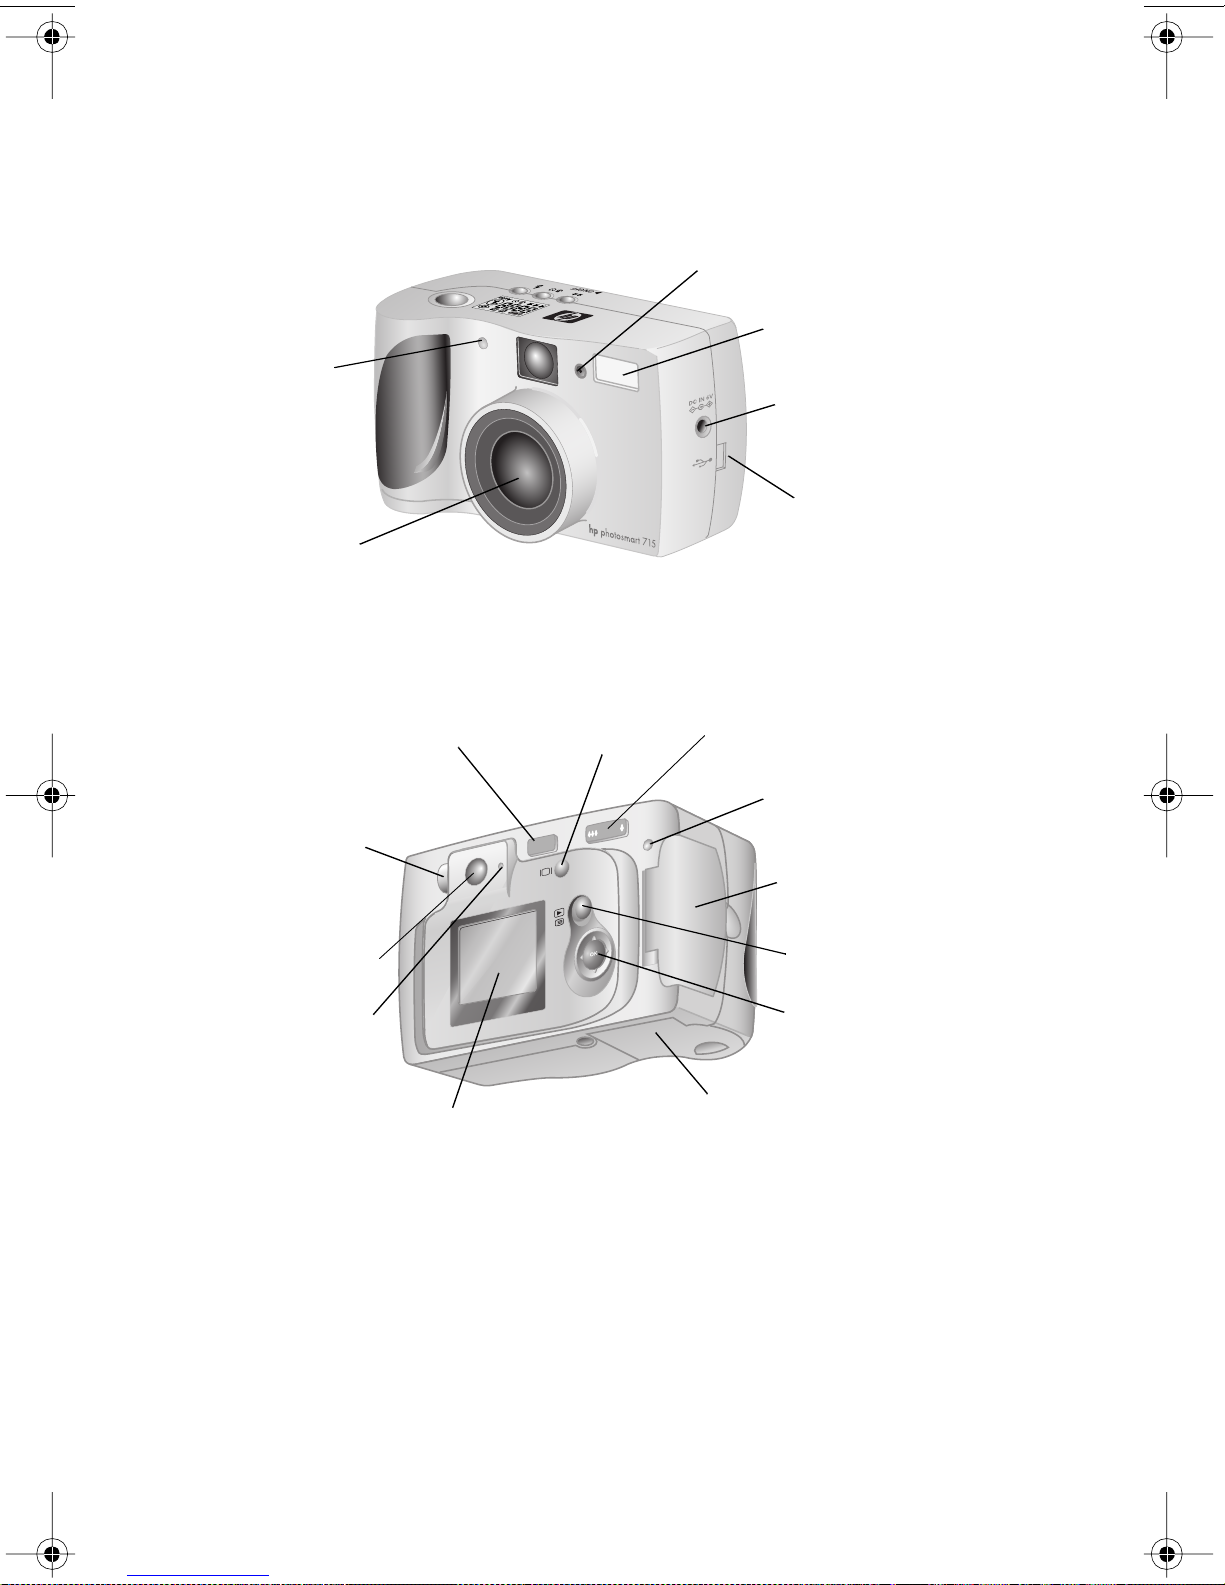
Camera parts
The following illustrations show the parts of the camera.
flash sensor
self-timer
LED
lens
flash
AC power
adapter
connection
USB
computer
connection
diopter
control
viewfinder
viewfinder
LED
ON/OFF POWER
switch
image
display
PREVIEW button
ZOOM button
CF card
access LED
CF memory
card door
PLAY/MENU button
5-WAY
controller
battery
compartment
door
HP photosmart 715 user guide2
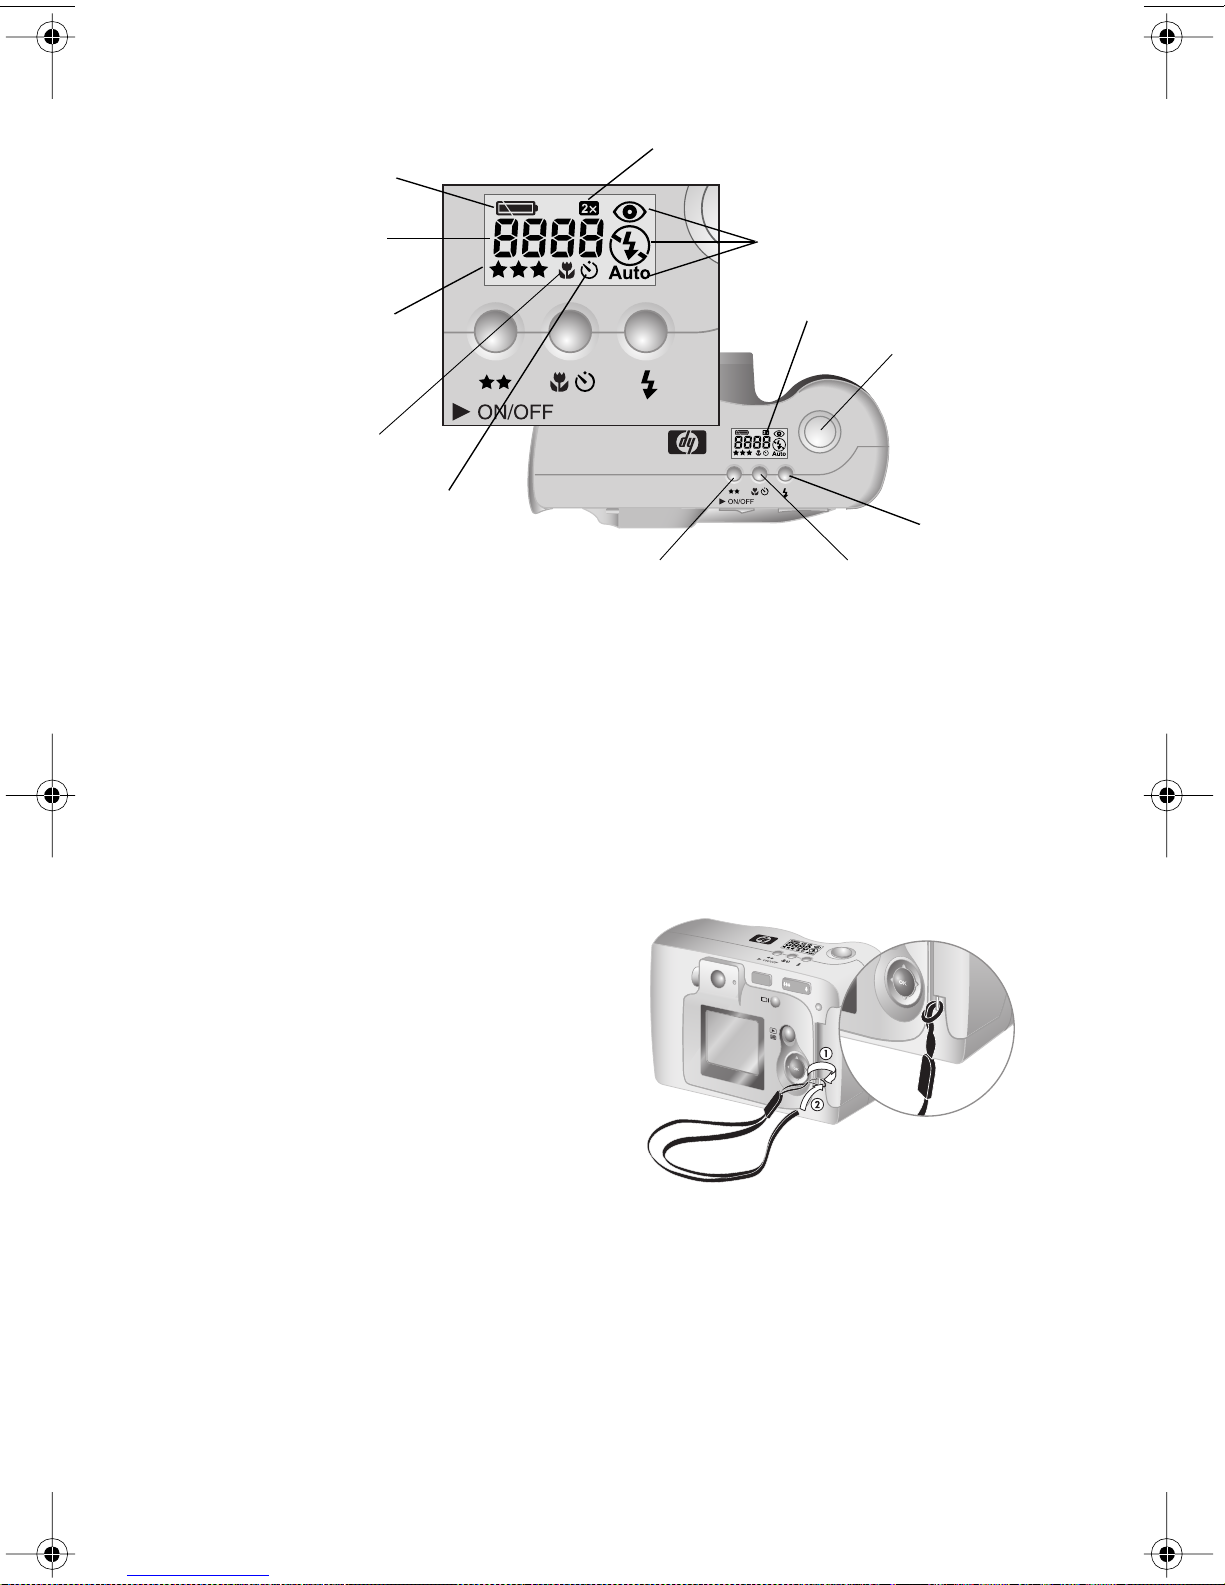
battery
symbol
digital zoom
images
remaining
image quality
symbol
macro
symbol
flash symbols
status LCD
SHUTTER
button
self-timer
symbol
IMAGE QUALITY
button
SELF-TIMER/MACRO
button
Setup
Setting up the digital camera is quick and easy—follow these
steps and you will be ready to take pictures.
FLASH
button
Step 1: Attach the wrist strap
1 Thread the short loop
through the wrist strap
attachment that is located
under the CF memory card
compartment door. You
might need to use a pointed
object, such as a paper clip,
to pull the end of the loop
through.
2 Pull the strap through the loop, and then pull the knot tight.
Getting started 3
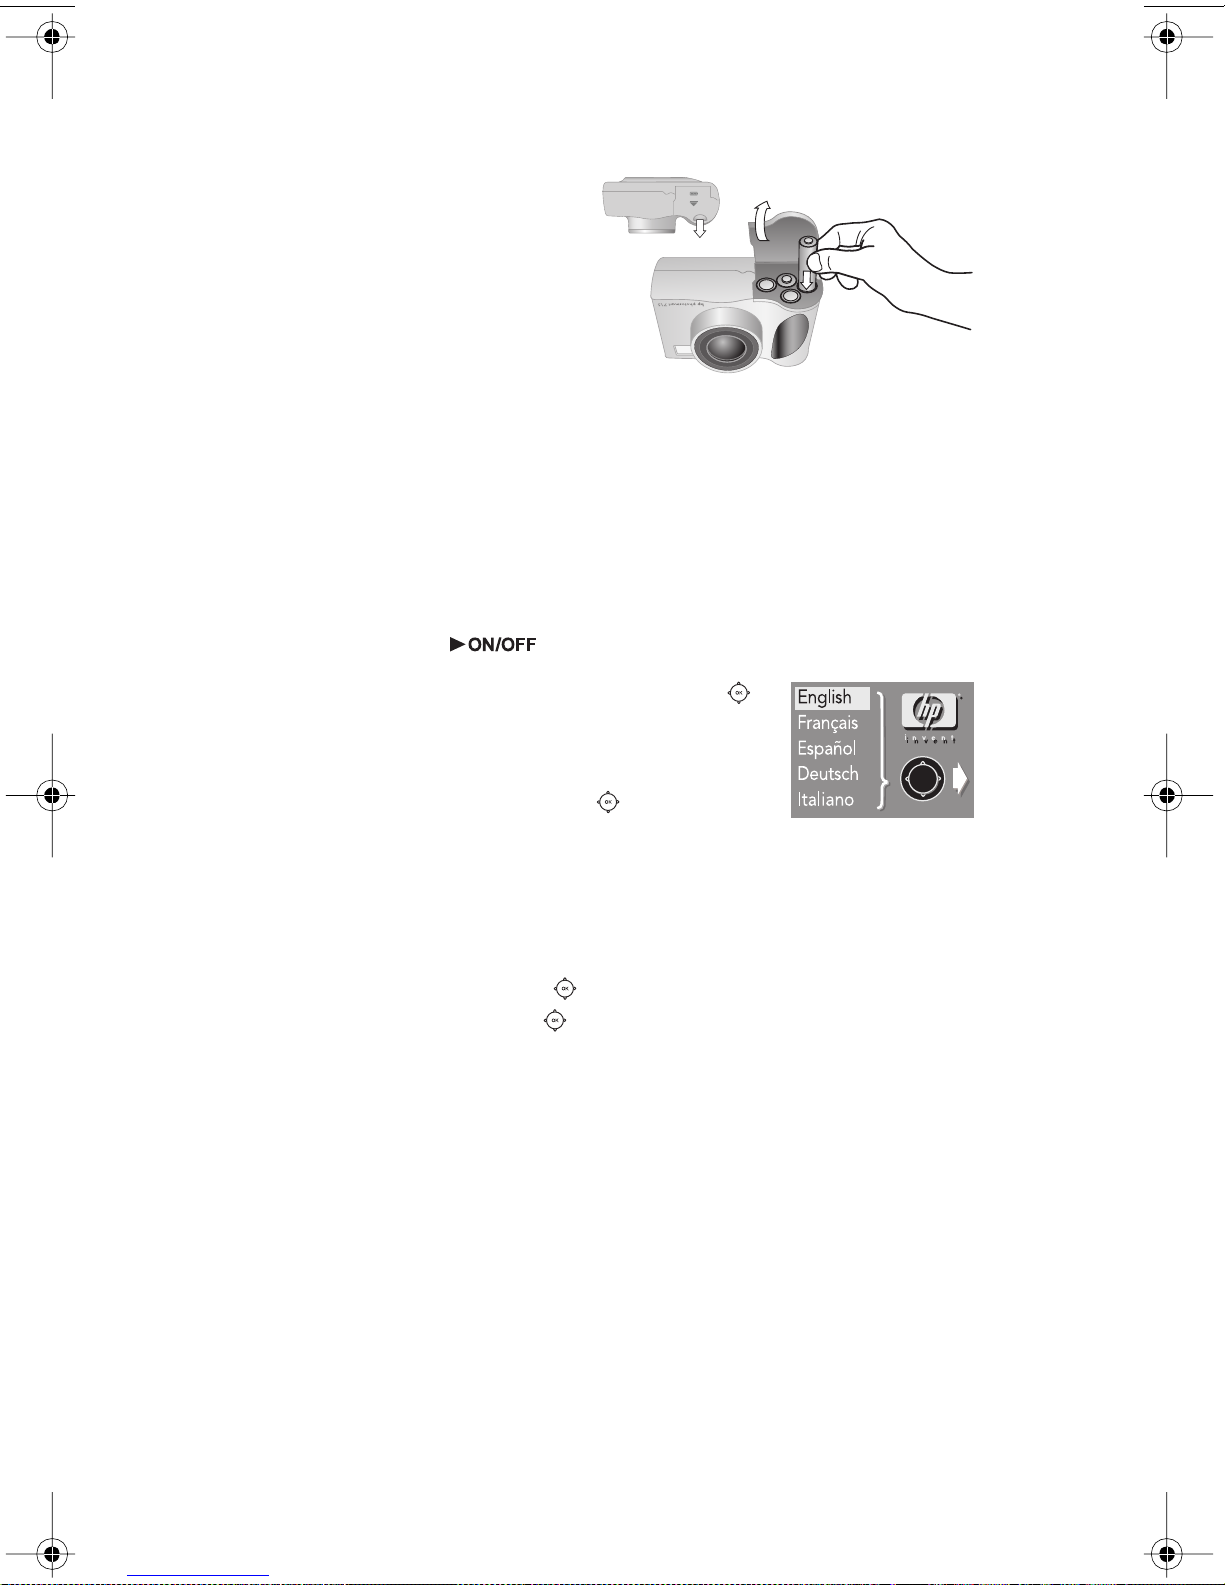
Step 2: Install the batteries
1 Locate the battery
compartment door on the
bottom of the camera.
Slide the door out, and
then lift it open.
2 Insert the batteries
according to the markings
inside the battery
compartment.
Step 3: Choose the camera language
1 Remove the lens cap from the camera and slide the
ON/OFF POWER ( ) switch to turn on the camera.
2 Press the right or left side of the 5-
WAY ()
controller until the language you want to use
is highlighted on the image display.
3 Press
OK in the center of the controller to
choose the language.
Step 4: Set the camera date and time
1 Press right or left on the controller to set the day, and then
press the bottom of the controller to select the next field.
2 Set the month, year, hour, minute, and date format using the
same method.
3 To confirm the date and time, press
OK.
OK
HP photosmart 715 user guide4
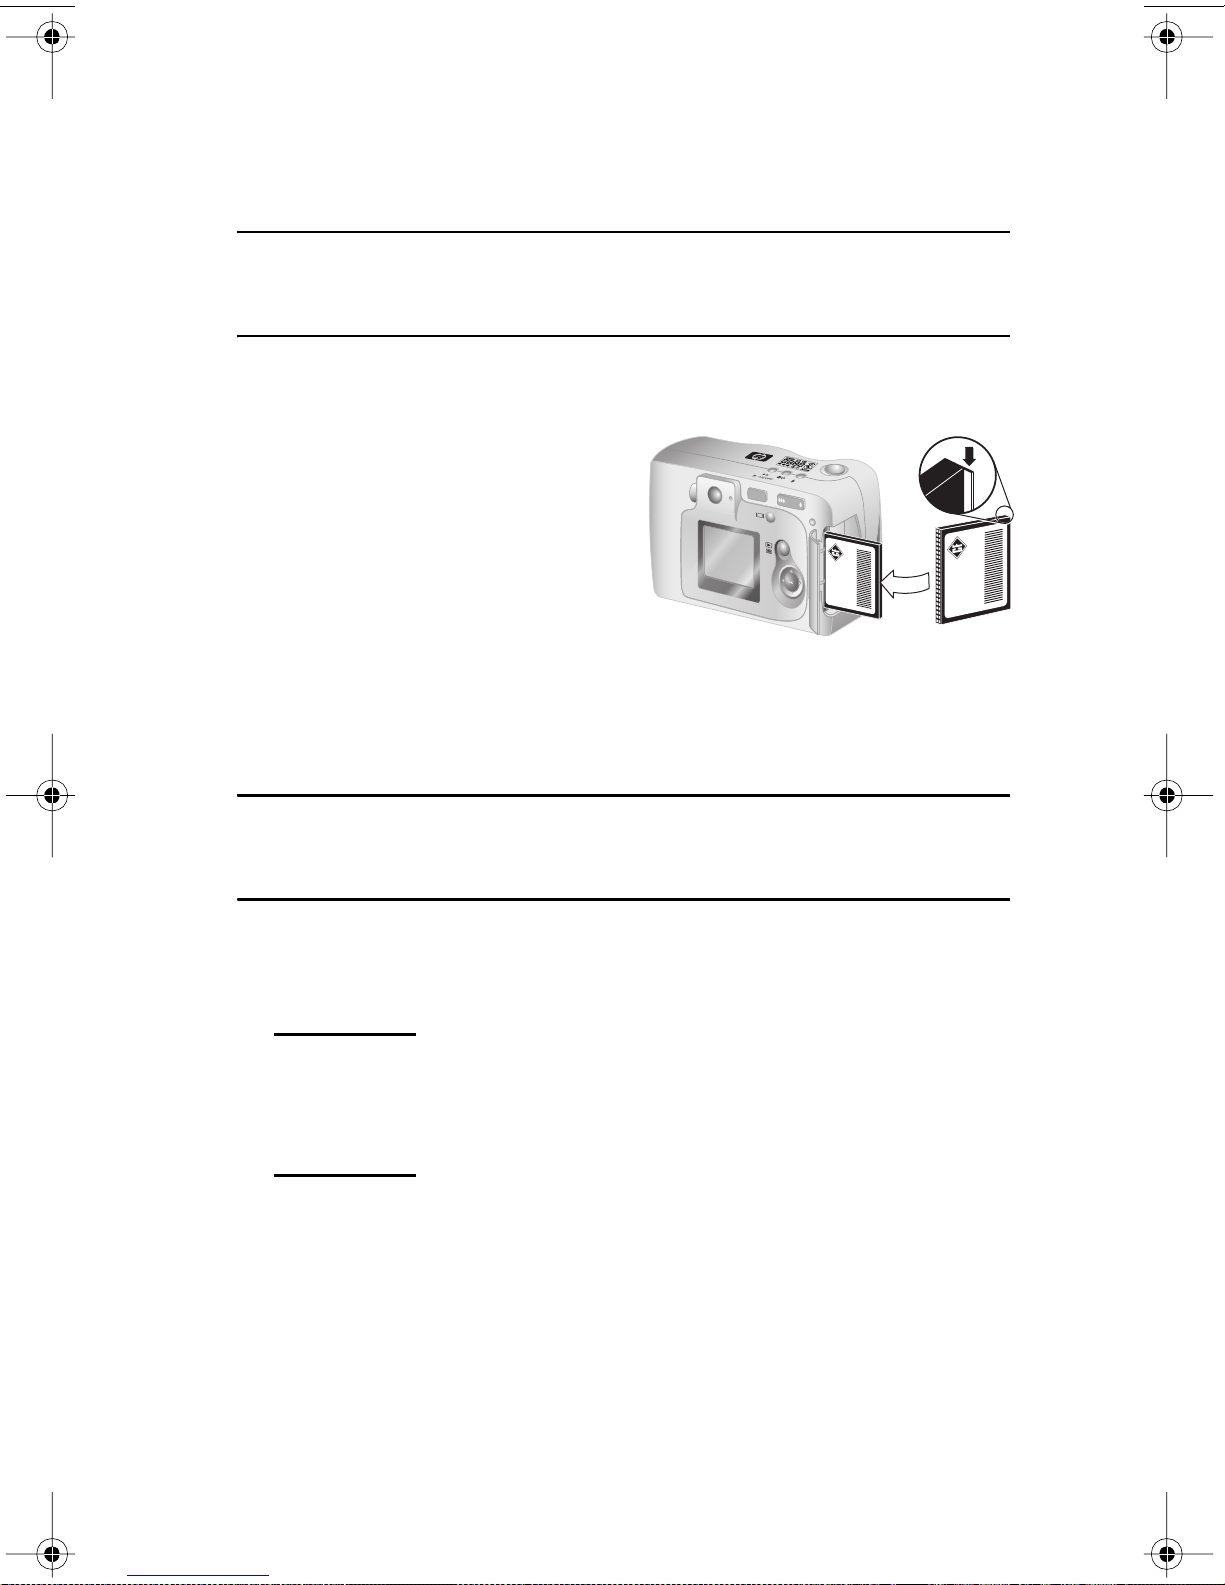
Step 5: Install the CompactFlash card
1 Turn the camera off.
CAUTION
Inserting or removing a CF memory card while the
camera is on could damage the existing card or result
in lost images.
2 Open the CF memory card door.
3 Hold the CF memory card
so that the tiny ledge on the
top rear of the card is
between your fingers and
the side with pinholes faces
the camera.
4 Insert the CF memory card
in the camera and gently push it all the way in. The gray card
ejection lever “pops up” when the card is seated correctly in the
slot.
CAUTION
The card should slide freely into the slot. If it stops
when it is only partially inserted, turn the card over and
try again. Do not force the card into the camera.
5 Fold the card ejection lever down against the card and close
the CF memory card door.
Tip If you cannot close the CF memory card door, you
might not have inserted the CF memory card
correctly. Remove the CF memory card and try
again.
Getting started 5

HP photosmart 715 user guide6

2
This chapter describes the basic process of taking pictures with
your digital camera and gives you tips for taking the best pictures.
It also describes how to use the optical or digital zoom and the
self-timer.
Note If the camera is on, you can take a picture anytime,
Taking pictures
even if the image display is off or shows a menu.
Taking a picture
1 With the camera on, frame your subject in the viewfinder.
2 Press and hold the
camera to adjust the focus and exposure.
3 When you see the steady green light to the right of the
viewfinder, press the
the picture. Wait for the beeps that indicate your picture has
been taken, and then release the
A red light appears next to the viewfinder to indicate that the
image is being processed. After the red light turns off, the CF
card access LED turns on to indicate that the image is copying
to the CF memory card. You can take another picture when the
CF card access indicator light turns off.
Note The Instant Review feature allows you to review an
image immediately after you take a picture. While
the image is shown on the image display, you can
choose to save or delete it. For more information,
see “Setting Instant Review” on page 25.
SHUTTER button halfway down to allow the
SHUTTER button all the way down to take
SHUTTER button.
Taking pictures 7

Previewing your pictures
Instead of looking through the viewfinder to frame a picture, you
can use the image display to preview a picture. The image display
shows exactly what your picture will look like, whereas the
viewfinder shows an image area smaller than what the camera
actually captures. Preview your picture on the image display when
precise framing is important, especially when you are taking a
close-up shot.
Note Using the image display consumes a lot of battery
power. To conserve battery power, the camera
automatically turns off the image display after 60
seconds if you do not press a button.
To preview a picture
1 Press the PREVIEW ( ) button to turn on the image display.
2 Frame your picture in the image display by pointing the camera
lens at your subject.
3 Press and hold the
SHUTTER button halfway down to allow the
camera to adjust the focus and exposure.
4 When you see the steady green light to the right of the
viewfinder, press the
SHUTTER button all the way down to take
the picture. Wait for the beeps that indicate that your picture
has been taken, and then release the
SHUTTER button.
To turn off the image display, press the button.
HP photosmart 715 user guide8

Using automatic focus, macro
focus, and automatic exposure
The camera adjusts the focus and exposure automatically for the
current lighting condition, but you are more likely to catch the
perfect shot, especially when you are photographing an active
subject, if you set the camera’s focus and exposure early. To do
this, press the
SHUTTER button all the way down at the exact moment you wish to
capture the image.
Note If the camera cannot find a focus or if the exposure
SHUTTER button halfway down, and then press the
will be longer than 1/30 second, a blinking green
light appears to the right of the viewfinder. You can
still take the picture, but the results might not be
optimal.
Using focus lock
The automatic focus feature focuses on the subject in the middle
of the picture and requires good contrast within that subject area.
If you do not want your subject to be in the middle of the image or
if the subject lacks contrast, use focus lock.
1 With the camera on, frame a subject that is the same distance
from the lens as your subject.
2 Press the
until you see a steady green light next to the viewfinder.
3 Keeping the
camera to frame your subject.
4 Press the
SHUTTER button halfway down to lock the focus. Wait
SHUTTER button pressed halfway down, move the
SHUTTER button all the way down to take the picture.
Taking pictures 9
Using the macro focus setting
For a subject that is very close to the camera (20 cm to 60 cm
[7.9 inches to 23.7 inches]), use the macro focus setting.
1 With the camera on, press the
macro symbol appears on the status LCD.
2 Press the
SHUTTER button to take the picture.
MACRO ( ) button until the
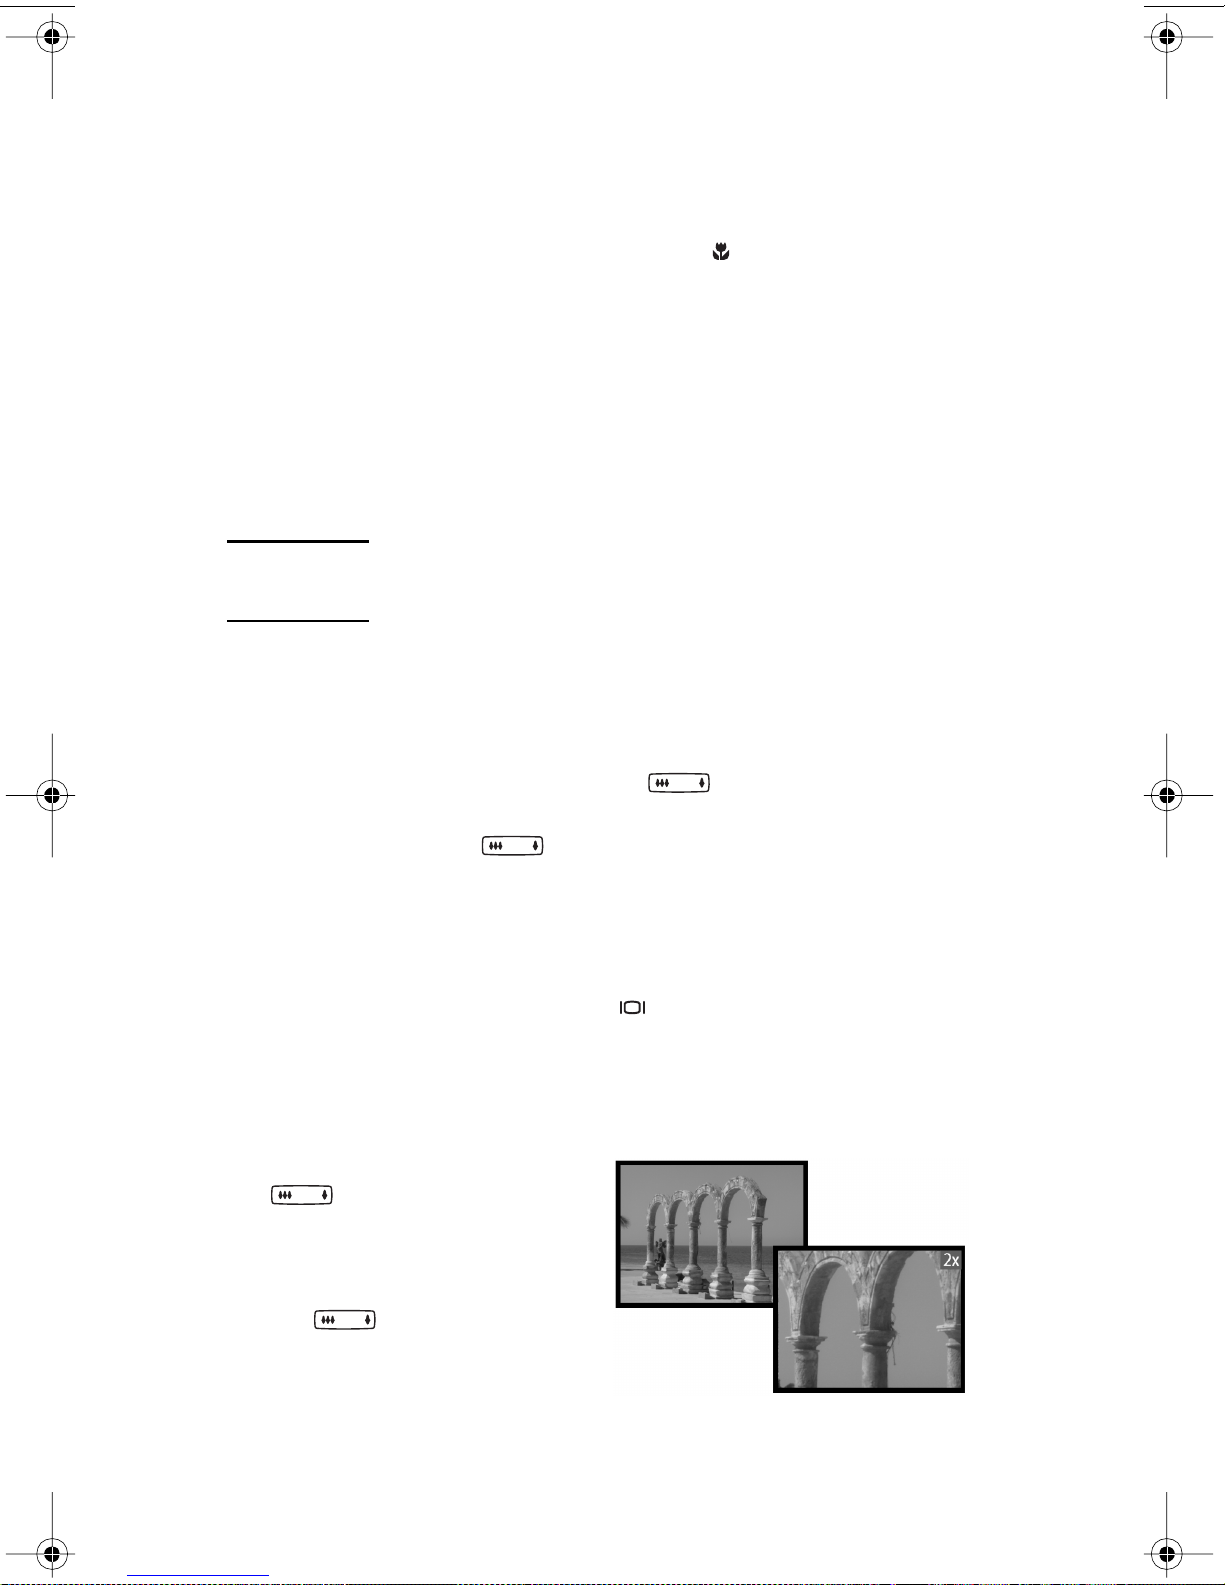
Using the optical or digital zoom
You can use the camera’s optical or digital zoom to make a subject
appear to be closer.
Note Digital zoom affects image quality. The more you
zoom in, the greater the reduction in image quality.
To use the optical zoom
1 With the camera on, frame your subject in the viewfinder.
2 Press the right side of the
to three times the normal view. To return to normal view, press
the left side of the button.
ZOOM ( ) button to zoom in up
3 Take your picture.
To use the digital zoom
1 With the camera on, press the button to turn on the image
display.
2 Frame your picture in the image display by pointing the camera
lens at your subject.
3 Press the right side of the
button to zoom in up
to two times the normal
view. To return to normal
view, press the left side of
the button.
4 Take your picture.
HP photosmart 715 user guide10
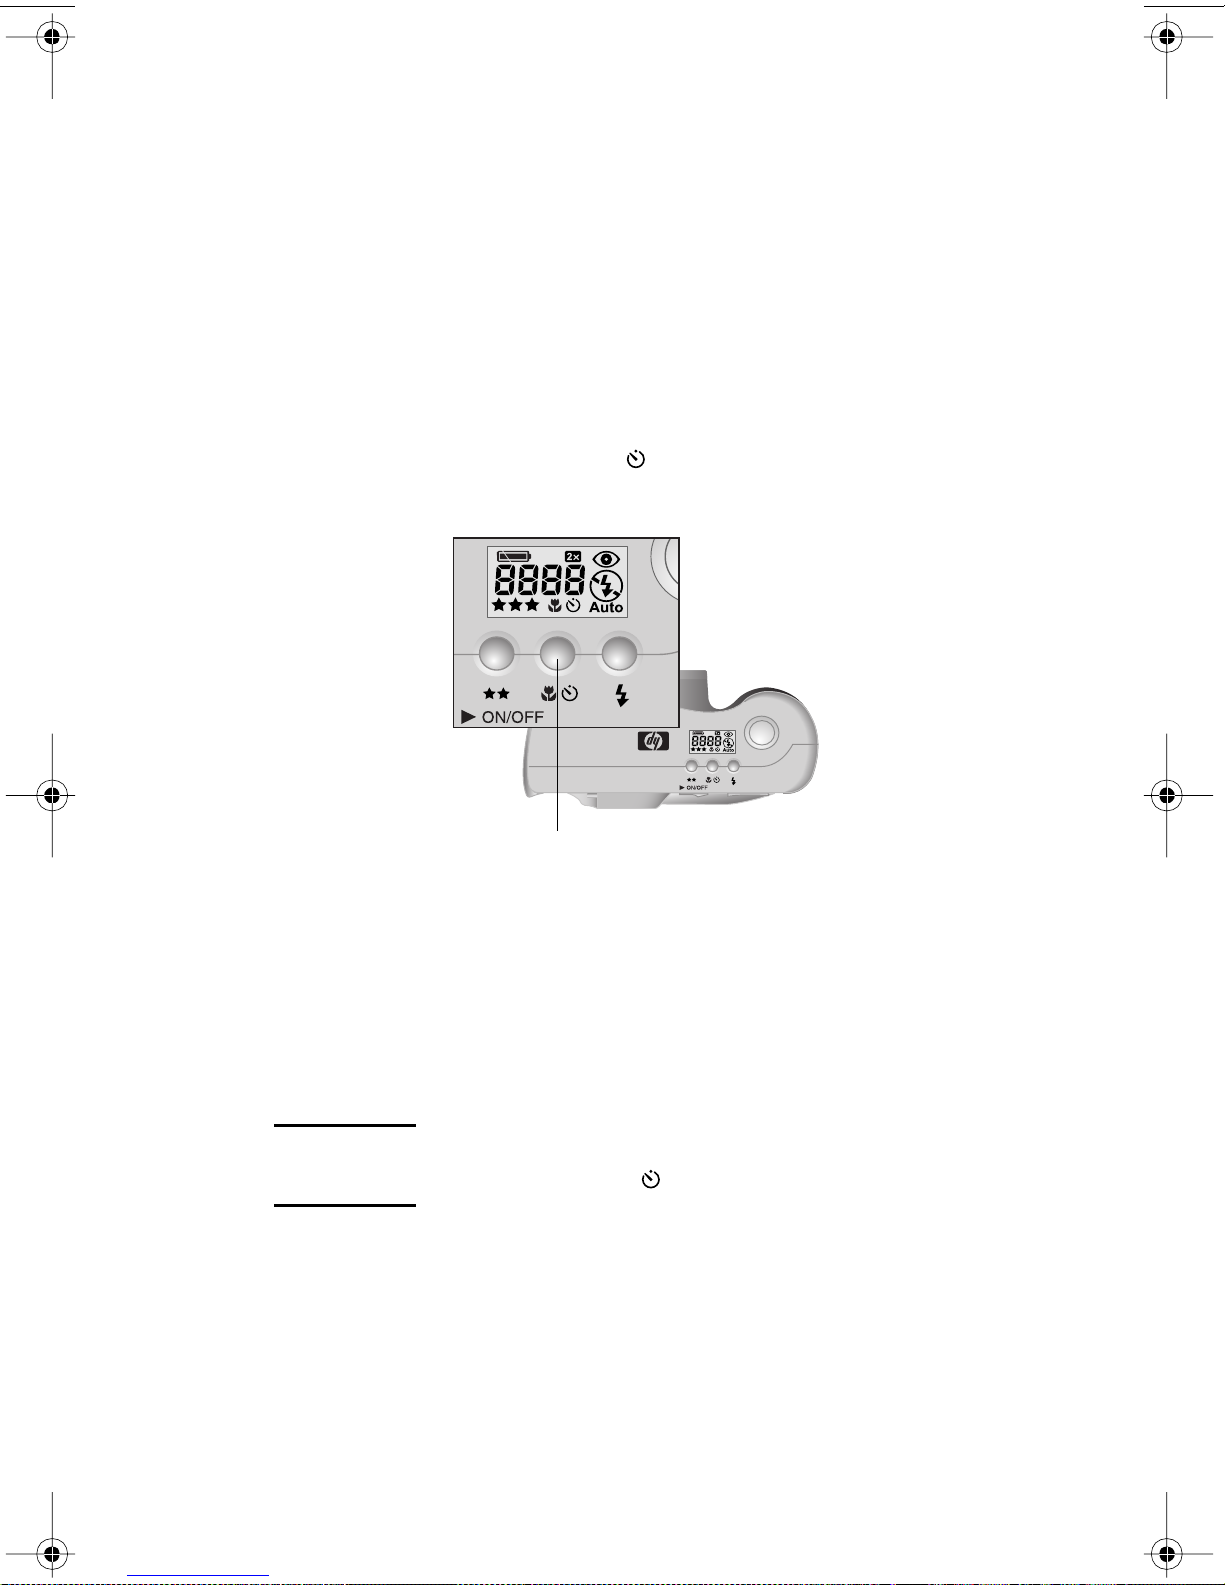
Using the self-timer
Use the self-timer to take a picture of yourself or a posed group.
After you turn on the self-timer and press the
camera waits 10 seconds before taking the picture.
To use the self-timer
1 Attach the camera to a tripod, or place it on a stable surface at
an appropriate distance and height from the subject.
2 With the camera on, frame your subject in the viewfinder, and
then press the
SELF-TIMER ( ) button until the self-timer
symbol appears on the status LCD.
SHUTTER button, the
self-timer button
3 Press the
SHUTTER button all the way down, and then release
it.
The red self-timer indicator light on the front of the camera
blinks for 10 seconds with an increasing frequency. After 10
seconds, the camera takes the picture and the self-timer turns
off automatically.
Note To cancel the self-timer before the camera takes the
picture, press the button again.
Taking pictures 11

HP photosmart 715 user guide12
Managing images
3
After you have taken some pictures, you can view them with the
camera’s image display. You can view a single image, portions of
an image (using the magnify feature), or a group of images (using
the display feature). You can also delete images, lock them (to
avoid accidental deletion), and create a print order to print a set of
photos at a later time.
Tip To preserve battery life, connect an AC power
on the camera
adapter (optional) while using the image display.
Viewing your images
1 Press the PLAY ( ) button to turn on the image display. The
last picture you took or viewed appears on the image display.
2 Use the controller to scroll through your images.
Each time a new image appears on the display, a status overlay
bar also appears for a few seconds.
The status overlay bar gives you the following information about
the current image:
Date and time the picture was taken
Image quality setting used to take the picture
Print order status (the Printer symbol appears only if an image
is marked for digital print order format [DPOF])
Lock status (the Lock symbol appears only if an image is
locked)
File name information from the CF memory card
Managing images on the camera 13
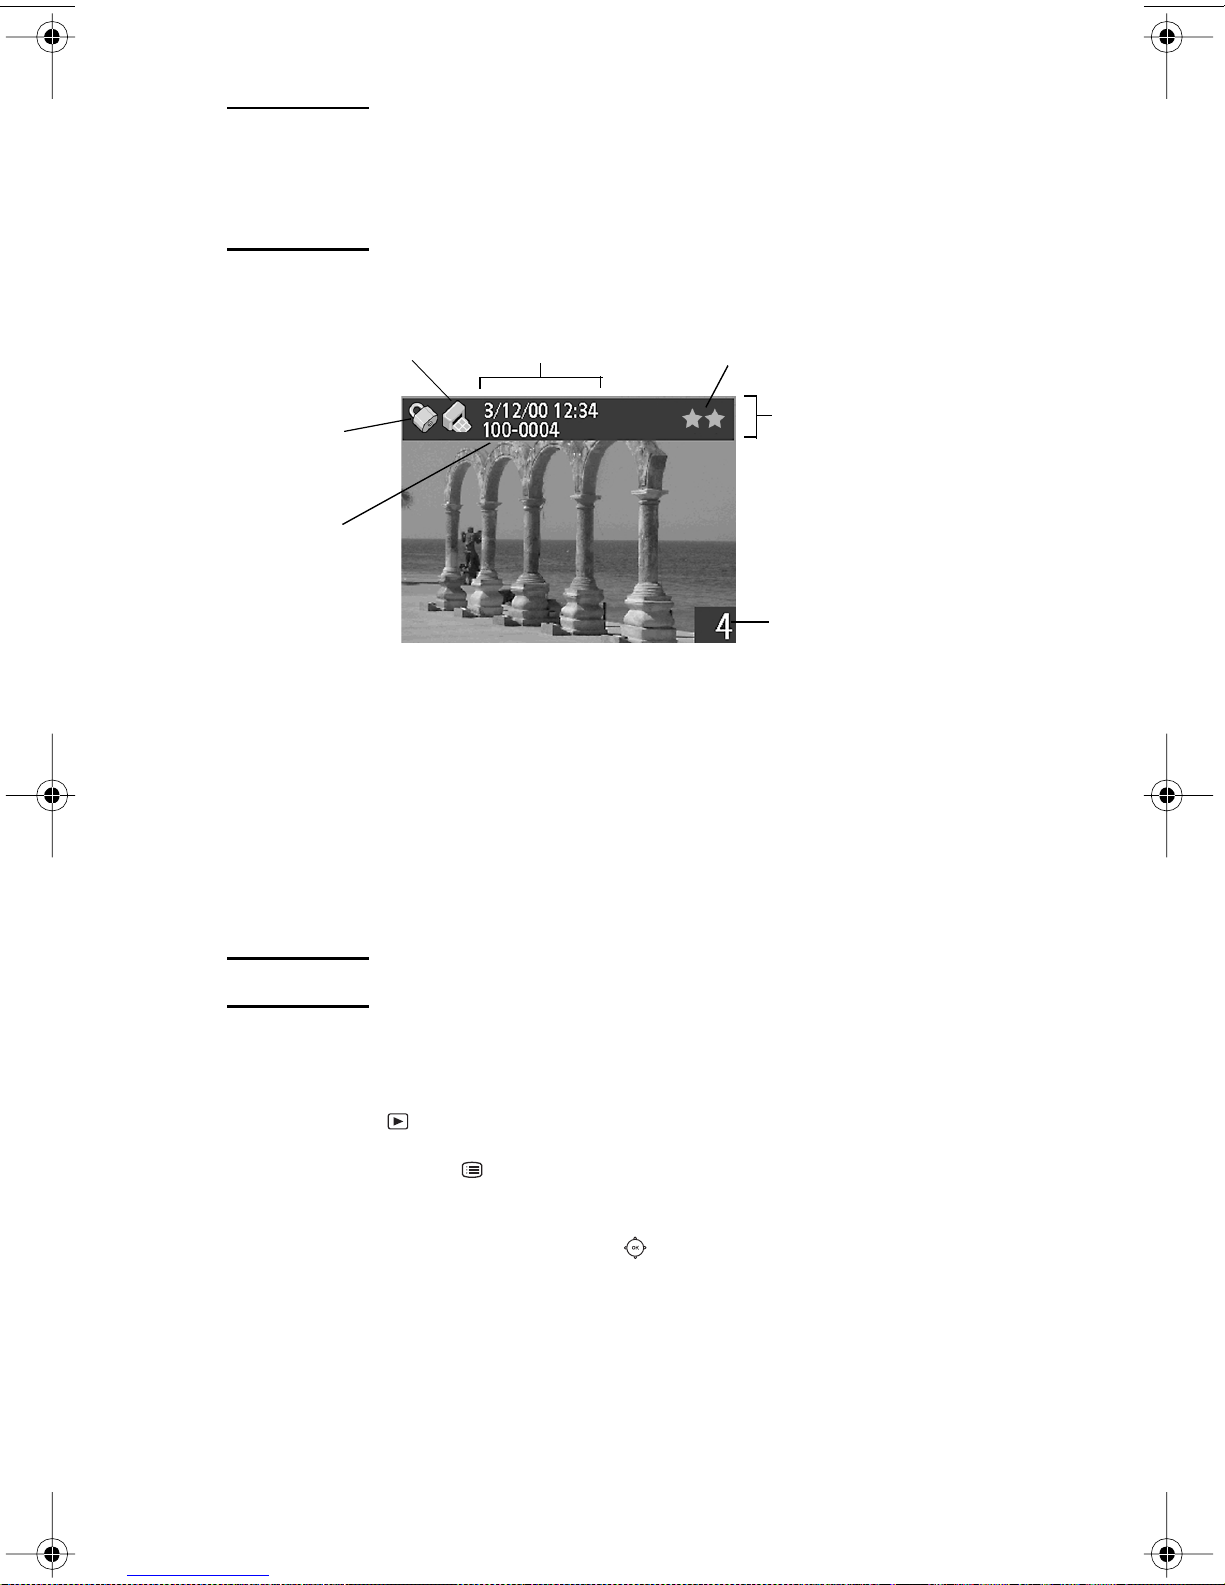
Note The number that appears in the lower-right corner of
each image is where in the sequence of images
stored on the CF memory card the picture was
taken.
date and time the
print order indicator
picture was taken
image quality indicator
lock indicator
mage file name
status overlay bar
number of the
image on the CF
memory card
When you have finished reviewing images, be sure to turn off the
image display to conserve battery power.
Deleting your images
You can delete a single image or all images from the CF memory
card. After an image has been deleted, it cannot be recovered.
Note Locked images cannot be deleted.
To delete one or more images
1 Press the button to turn on the image display.
2 Press the
press
MENU ( ) button to open the main menu, and then
OK to select the Delete menu.
3 Use the right or left side of the controller to scroll to the
image you want to delete.
HP photosmart 715 user guide14
Note Although you can delete all images by using the
Delete menu, it is recommended that you instead
format the CF memory to delete all images.
4 Use the up or down side of the controller to select Yes if
you want to delete the current image only.
5 If you want to delete another image, use the right or left side of
the controller to scroll to the next image you want to delete,
select Yes, and then press
OK. Repeat this step until you have
finished deleting images.
6 When you have finished deleting images, use the up or down
side of the controller to select Exit, and then press
OK.
To delete all images by formatting the CF memory card
1 Press the button to turn on the image display.
2 Press the button again to open the main menu, use the up
or down side of the controller to scroll to the Setup menu,
and then press
OK. Format CF should be highlighted.
3 Use the right or left side of the controller to select Yes, and
then press
OK.
4 To confirm, use the right or left side of the controller to
select Yes, and then press
OK.
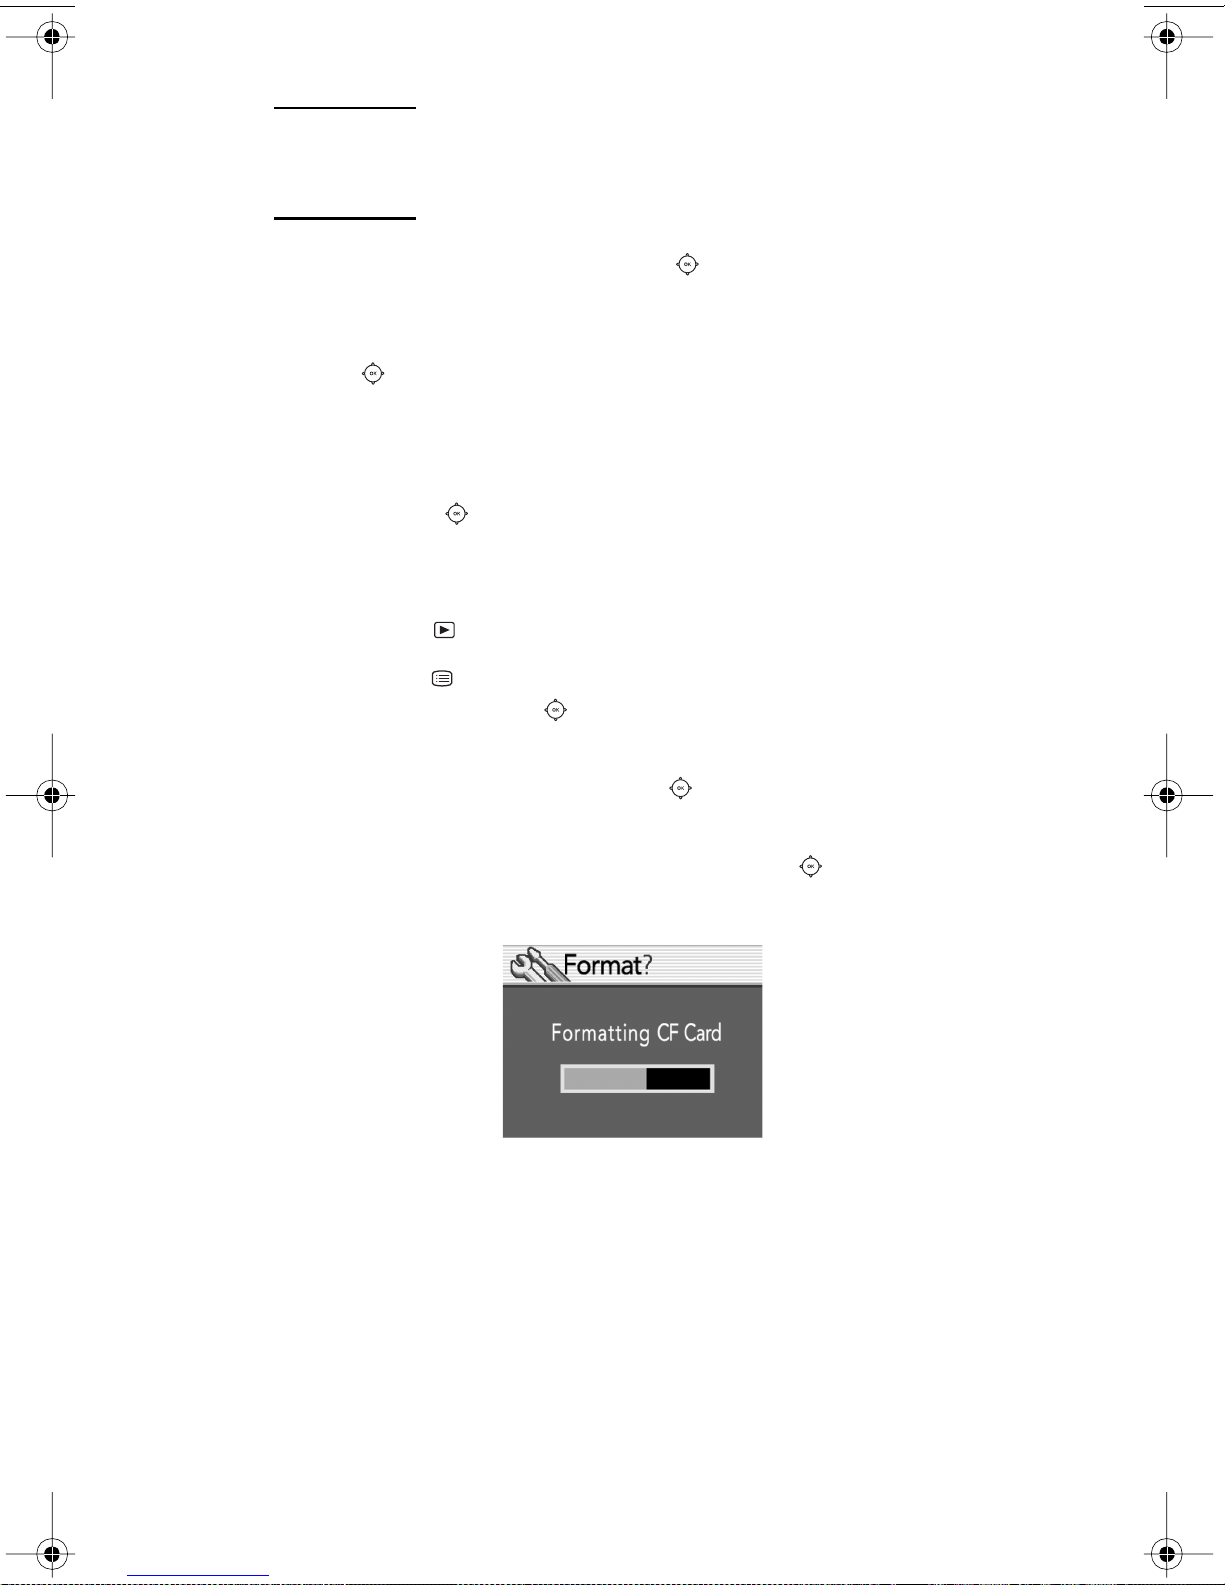
A progress bar appears on the image display to indicate that the
camera is formatting the CF memory card. To avoid damaging the
card, do not open the CF memory card door while the card is
being formatted.
Managing images on the camera 15
Creating a print order
You can use your camera to select the images that you want to
print. For example, when you gather with family and friends to
view your photos, you can keep track of the photos they want
copies of and then print the photos later.
With a print order you can:
select one image, several images, or all of the images that are
stored on the CF memory card.
select how many copies you want of each image or of all
images.
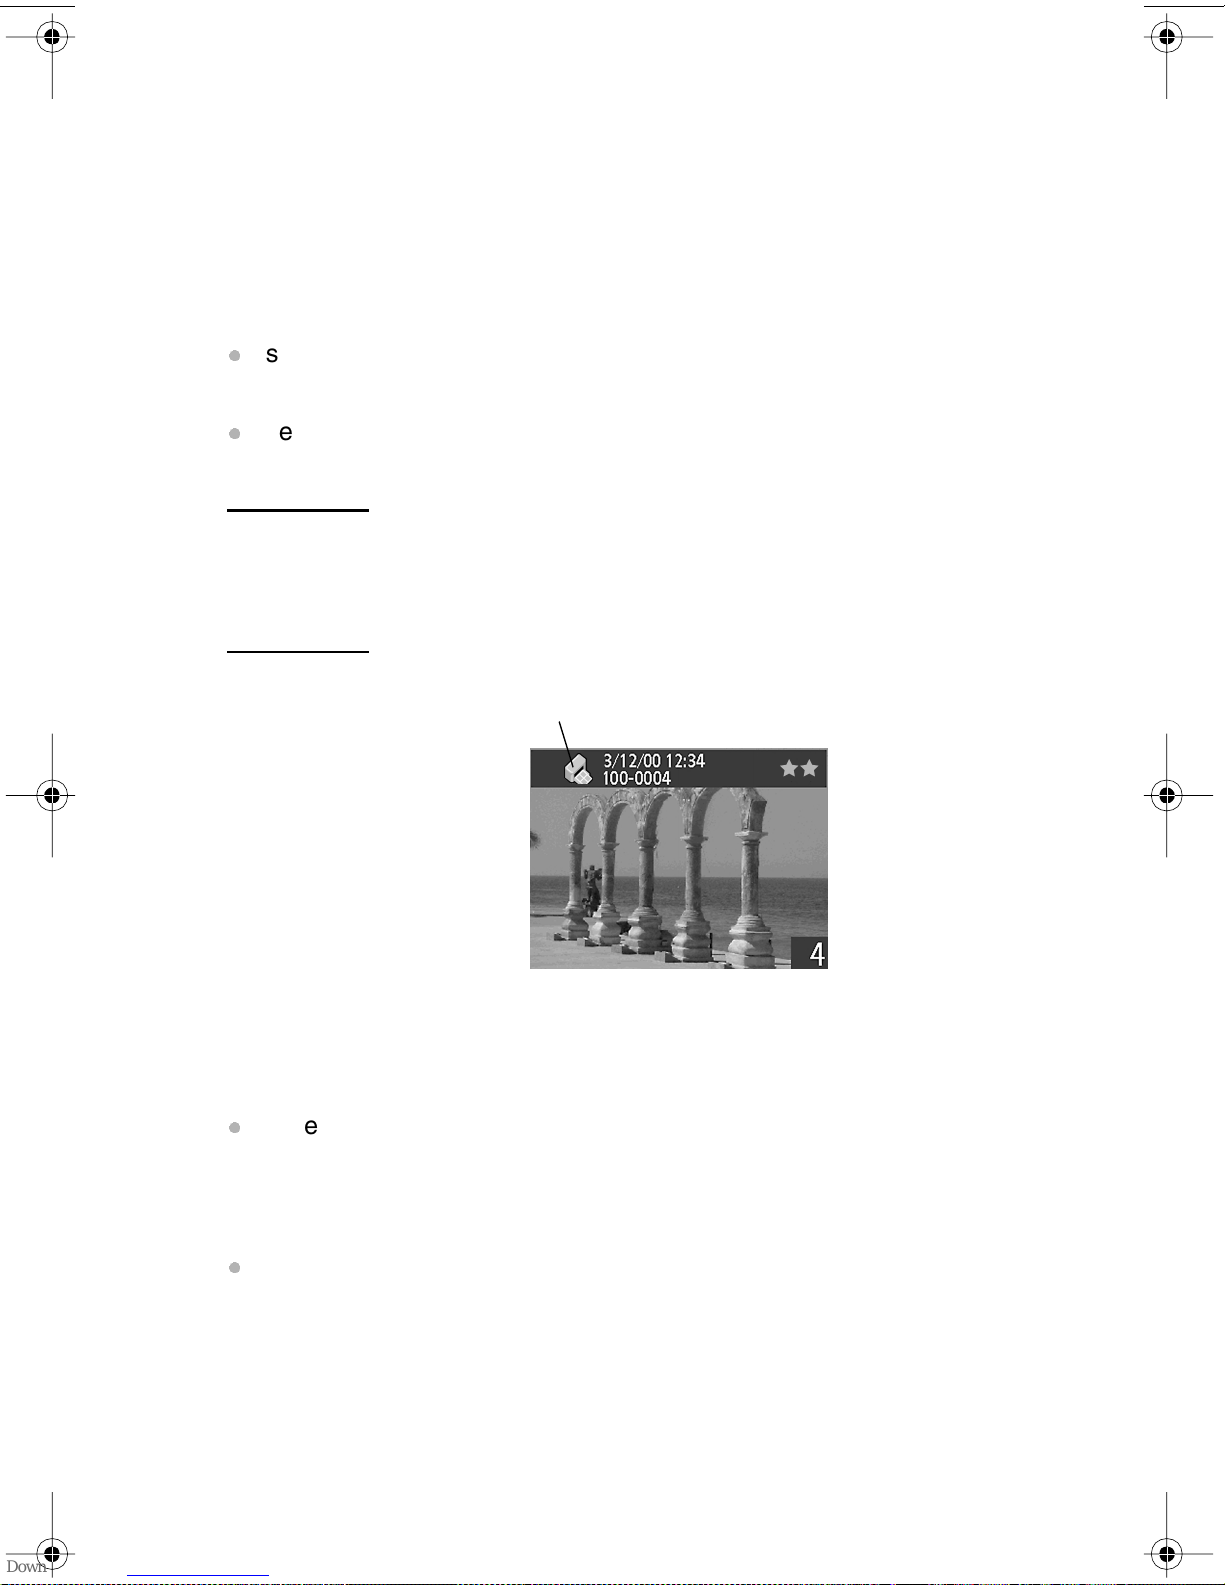
Note When you are reviewing images on the image
display, a printer icon appears on the leftmost side
of the status overlay bar for images that you have
added to the print order.
print order indicator
A print order creates a Digital Print Order Format (DPOF) file. This
file is stored with your images on the CF memory card.
You can print photos from your print order in one of two ways:
When you transfer your images from the camera to a
computer, the print order is copied along with them. When you
print your photos on a printer attached to the computer, the
printer reads the print order and prints the specified images.
You can insert the CF memory card directly into a
DPOF-compatible printer. The printer reads the print order and
prints the specified images.
HP photosmart 715 user guide16

Note A Macintosh computer does not recognize a DPOF
print order.
To create or edit a print order
1 Press the button to turn on the image display.
2 Press the button to open the main menu, use the up or
down side of the controller to select the Print (DPOF)
menu, and then press
OK.
3 If you are marking or unmarking a single image, use the
controller to scroll to the image you want to add to or remove
from the print order.
Note If you are marking or unmarking all images on the
CF memory card, it does not matter which image is
displayed on the image display.
4 Select Yes to mark a single image. If you want to mark or
unmark another image, use the right or left side of the
controller to scroll to the image, select Yes, and then press
Repeat this step until you have finished marking and
unmarking images. When you are finished, press
OK to exit.
-OrSelect Mark All or Clear All if you are marking or unmarking all
the images on the CF memory card, and then press
OK. You
are then asked to confirm. To confirm, use the up or down side
of the controller to select Yes, and then press
OK.
Note A DPOF file can contain up to 100 images. If you
choose to mark all images and more than 100
images are stored on the CF memory card, only the
first 100 images will be stored in the DPOF file.
OK.
Managing images on the camera 17
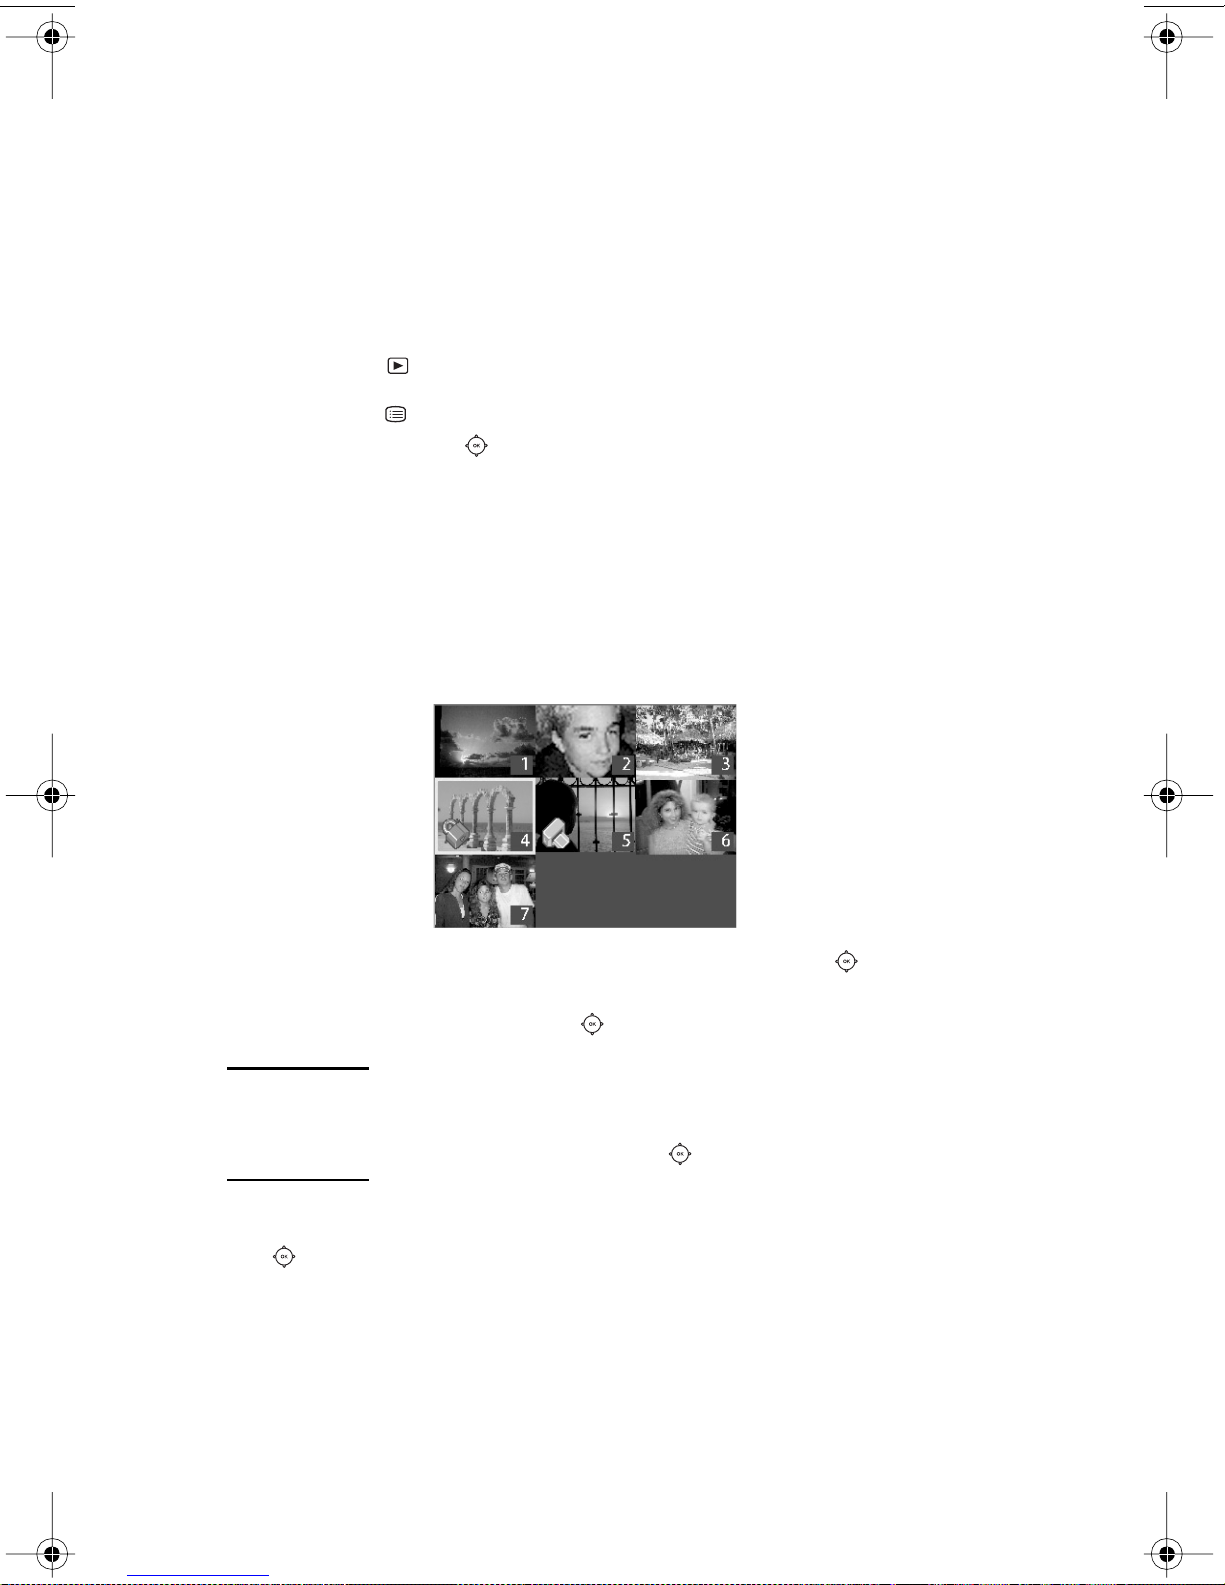
Viewing small versions
(thumbnails) of your images
You can view up to nine of your images at the same time on the
image display.
To look at thumbnails of your images
1 Press the button to turn on the image display.
2 Press the button to open the main menu, use the up or
down side of the controller to select the Display menu, and
then press
OK.
3 Press
The image display shows you up to nine of your images at one
time, depending on how many images you have stored on the
CF memory card. A yellow border frames the currently
selected image.
4 To advance to the next set of thumbnails, use the controller
to move the yellow border to the last image in the set, and then
press the down side of the controller.
Note To scroll to the previous set of thumbnails, move the
OK select Small.
yellow border to the first image in the set, and then
press the up side of the controller.
5 When you want to see one image in normal view, use the
controller to move the yellow border to the image, and then
press
OK.
HP photosmart 715 user guide18
 Loading...