

Page 1
hp
photosmart
620 series
digital
camera
user's manual
Page 2

Page 3

Trademark and copyright information
© Copyright 2002 Hewlett-Packard Company
All rights are reserved. No part of this document may be
photocopied, reproduced, or translated to another language
without the prior written consent of Hewlett-Packard Company.
The information contained in this document is subject to
change without notice. Hewlett-Packard shall not be liable for
errors contained herein or for consequential damages in
connection with the furnishing, performance, or use of this
material.
Microsoft® and Windows® are U.S. registered trademarks of
Microsoft Corporation.
Apple, Macintosh, and Mac are registered trademarks of
Apple Computer, Inc.
SD Logo is a trademark.
Materials disposal
This HP product contains the following materials that might
require special handling at end-of-life:
z Alkaline manganese dioxide-zinc or lithium-iron disulfide
AA batteries.
z Lead in the solder and some component leads.
Disposal of this material can be regulated because of
environmental considerations. For disposal or recycling
information, please contact your local authorities or the
Electronic Industries Alliance (EIA) (www.eiae.org).
Page 4

Page 5

Table of Contents
1-Getting started
1-Getting started
1-Getting started1-Getting started
Camera parts . . . . . . . . . . . . . . . . . . . . . . . . . . . . . . 8
Setup . . . . . . . . . . . . . . . . . . . . . . . . . . . . . . . . . . . 12
Attaching the wrist strap . . . . . . . . . . . . . . . . . . 12
Inserting the batteries . . . . . . . . . . . . . . . . . . . . 12
Inserting the memory card (optional) . . . . . . . . . 13
Turning on power. . . . . . . . . . . . . . . . . . . . . . . 13
Choosing the language. . . . . . . . . . . . . . . . . . . 14
Setting the date and time. . . . . . . . . . . . . . . . . . 14
Installing the software . . . . . . . . . . . . . . . . . . . . 15
Windows . . . . . . . . . . . . . . . . . . . . . . . . . 15
Macintosh. . . . . . . . . . . . . . . . . . . . . . . . . 15
2-Taking pictures
2-Taking pictures
2-Taking pictures2-Taking pictures
Taking still pictures . . . . . . . . . . . . . . . . . . . . . . . . . 17
Using focus lock . . . . . . . . . . . . . . . . . . . . . . . . 18
Using instant review . . . . . . . . . . . . . . . . . . . . . 18
Recording video clips. . . . . . . . . . . . . . . . . . . . . . . . 18
Using Preview mode . . . . . . . . . . . . . . . . . . . . . . . . 20
Using the self-timer . . . . . . . . . . . . . . . . . . . . . . . . . 20
Using zoom . . . . . . . . . . . . . . . . . . . . . . . . . . . . . . 21
Optical zoom. . . . . . . . . . . . . . . . . . . . . . . . . . 21
Digital zoom . . . . . . . . . . . . . . . . . . . . . . . . . . 21
Using the flash . . . . . . . . . . . . . . . . . . . . . . . . . . . . 22
Changing the image quality . . . . . . . . . . . . . . . . . . . 23
3-Using Playback and the Main menu
3-Using Playback and the Main menu
3-Using Playback and the Main menu3-Using Playback and the Main menu
Using Playback mode . . . . . . . . . . . . . . . . . . . . . . . 25
Reviewing images. . . . . . . . . . . . . . . . . . . . . . . 26
Reviewing video clips . . . . . . . . . . . . . . . . . . . . 26
Using the Main menu. . . . . . . . . . . . . . . . . . . . . . . . 27
Rotating images . . . . . . . . . . . . . . . . . . . . . . . . 27
Deleting images . . . . . . . . . . . . . . . . . . . . . . . . 28
3
Page 6

Viewing thumbnail images . . . . . . . . . . . . . . . . .29
Magnifying images . . . . . . . . . . . . . . . . . . . . . .29
Using the Setup menu . . . . . . . . . . . . . . . . . . . .30
Date & Time. . . . . . . . . . . . . . . . . . . . . . . .30
Welcome Screen . . . . . . . . . . . . . . . . . . . .30
USB Configuration . . . . . . . . . . . . . . . . . . .31
Move Images to Card . . . . . . . . . . . . . . . . .31
Language . . . . . . . . . . . . . . . . . . . . . . . . .32
Exit . . . . . . . . . . . . . . . . . . . . . . . . . . . . . .32
4-Using hp instant share
4-Using hp instant share
4-Using hp instant share4-Using hp instant share
Using hp instant share to print pictures. . . . . . . . . . . .35
Using the hp instant share e-mail service . . . . . . . . . .35
Adding, modifying, and removing e-mail
addresses . . . . . . . . . . . . . . . . . . . . . . . . . . . . .36
Selecting images to be e-mailed . . . . . . . . . . . . .37
Windows. . . . . . . . . . . . . . . . . . . . . . . . . .38
Macintosh . . . . . . . . . . . . . . . . . . . . . . . . .38
5-Unloading, printing, and displaying images
5-Unloading, printing, and displaying images
5-Unloading, printing, and displaying images5-Unloading, printing, and displaying images
Unloading to a computer . . . . . . . . . . . . . . . . . . . . .39
Printing images . . . . . . . . . . . . . . . . . . . . . . . . . . . .40
Displaying images on a TV . . . . . . . . . . . . . . . . . . . .41
Displaying a slideshow . . . . . . . . . . . . . . . . . . .41
6-Troubleshooting and support
6-Troubleshooting and support
6-Troubleshooting and support6-Troubleshooting and support
Problems and solutions . . . . . . . . . . . . . . . . . . . . . . .43
Error messages . . . . . . . . . . . . . . . . . . . . . . . . . . . .50
Error messages on the camera . . . . . . . . . . . . . .50
Error messages on the computer. . . . . . . . . . . . .53
Getting assistance . . . . . . . . . . . . . . . . . . . . . . . . . .53
Finding help on the web. . . . . . . . . . . . . . . . . . .53
HP product support. . . . . . . . . . . . . . . . . . .53
HP photosmart website . . . . . . . . . . . . . . . .53
HP accessibility website. . . . . . . . . . . . . . . .53
4 hp photosmart 620 user’s manual
Page 7

Contacting hp customer support. . . . . . . . . . . . . 54
How hp can help. . . . . . . . . . . . . . . . . . . . 54
Before you call . . . . . . . . . . . . . . . . . . . . . 54
Obtaining support in the United States . . . . . . . 54
Free telephone support for one year . . . . . . 54
After the first year . . . . . . . . . . . . . . . . . . . 55
Upgraded warranty options . . . . . . . . . . . . 55
Obtaining support worldwide . . . . . . . . . . . . . . 56
Hewlett-Packard limited warranty statement . . . . . . . . 58
Regulatory information . . . . . . . . . . . . . . . . . . . 60
Appendix A: Batteries and accessories
Appendix A: Batteries and accessories
Appendix A: Batteries and accessoriesAppendix A: Batteries and accessories
Managing batteries . . . . . . . . . . . . . . . . . . . . . . . . . 61
Extending battery life . . . . . . . . . . . . . . . . . . . . 62
Rechargeable batteries . . . . . . . . . . . . . . . . . . . 62
Power conservation. . . . . . . . . . . . . . . . . . . . . . 62
Purchasing accessories. . . . . . . . . . . . . . . . . . . . . . . 63
Appendix B:
Appendix B: Camera dock
Appendix B: Appendix B:
Camera dock
Camera dockCamera dock
Unloading images to a computer using the dock . . . . 67
Printing images using the dock . . . . . . . . . . . . . . . . . 68
Displaying images on a TV using the dock. . . . . . . . . 68
Appendix C: Reference
Appendix C: Reference
Appendix C: ReferenceAppendix C: Reference
Camera specifications . . . . . . . . . . . . . . . . . . . . . . . 69
5
Page 8

6 hp photosmart 620 user’s manual
Page 9

Getting started
1
The HP Photosmart 620 digital camera is a 2.1 mega-pixel
camera with 3x optical zoom and 4x digital zoom capability,
and 8 MB of internal memory. You can add additional memory
by purchasing an optional memory card.
You c an use the Share
print or e-mail. Then, you automatically e-mail or print your
selected pictures when you connect to your computer. You can
bypass the computer altogether and print your selected pictures
directly on certain HP printers.
You can enhance your experience by purchasing an
HP Photosmart 8881 Camera Dock. The Camera Dock allows
you to easily download images to a computer, send images to
a printer, or view images on a television (TV) individually or as
a slideshow.
NOTE A camera Dock Insert is
included in your camera box.
This insert enables your camera
(and others of the same model)
to use the HP Camera Dock.
Please do not use it without the
Camera Dock, and DO NOT discard it. Instructions for its
use are included with the Camera Dock as well as in
Appendix B of this manual.
Share menu to select images that you want to
ShareShare
1-Getting started 7
Page 10
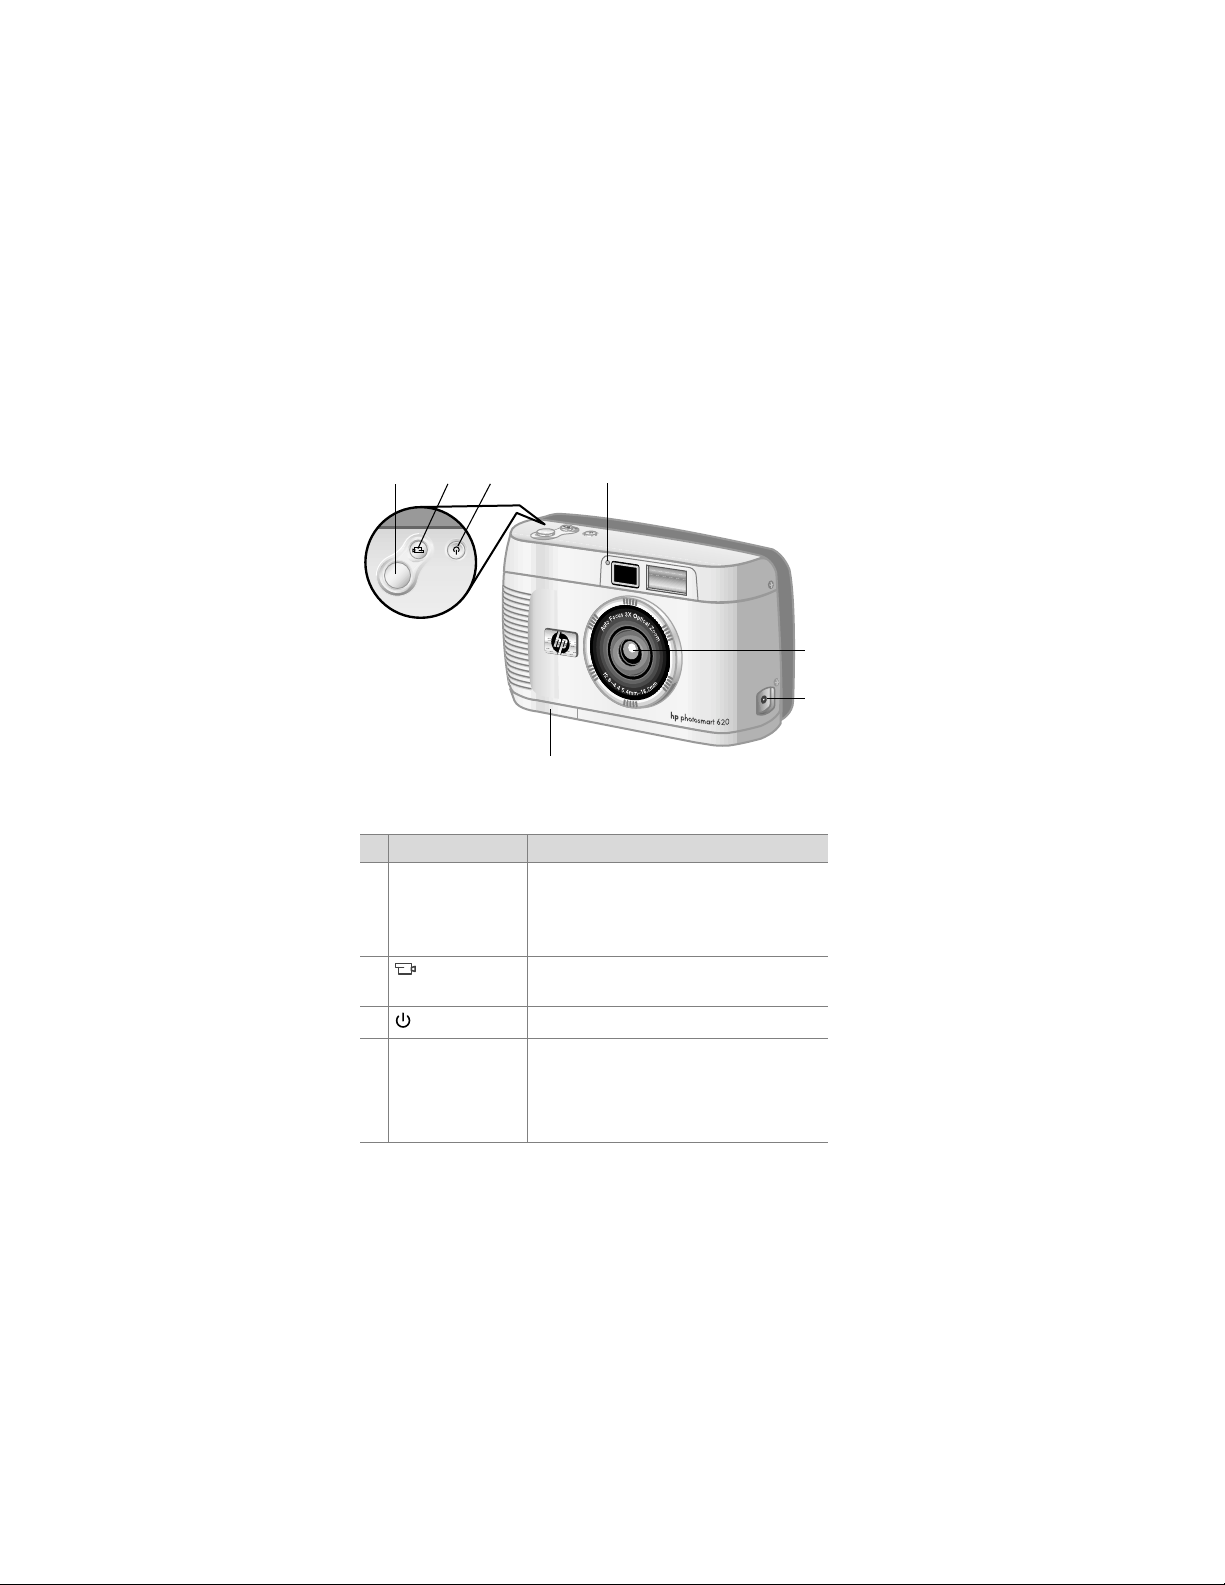
Camera parts
3
2
1
4
7
# Name Description
1 Shutter
Shutter button Focuses and locks the exposure of the
ShutterShutter
camera when pressed halfway down,
and takes the picture when pressed all
the way down
2
Video
Video button
Video Video
Records a video clip; press once to start
and press again to stop
3
Power
Power button
Power Power
4 Video/self-timer
light
Turns the camera power on and off
z Solid red indicates that the camera
is recording video
z Blinking red indicates that the self-
timer is activated
5
6
8 hp photosmart 620 user’s manual
Page 11

# Name Description
5 Zoom lens 3x optical zoom lens allows you to take
telephoto and wide angle pictures
6 Power adapter
connector
Allows you to connect an optional HP
AC power adapter to the camera to
operate the camera without batteries,
or to charge optional rechargeable
batteries
7 Battery door Allows access to the batteries
1-Getting started 9
Page 12
24
23
8910
11 12 13
14
15
16
22
21
20
19
18
17
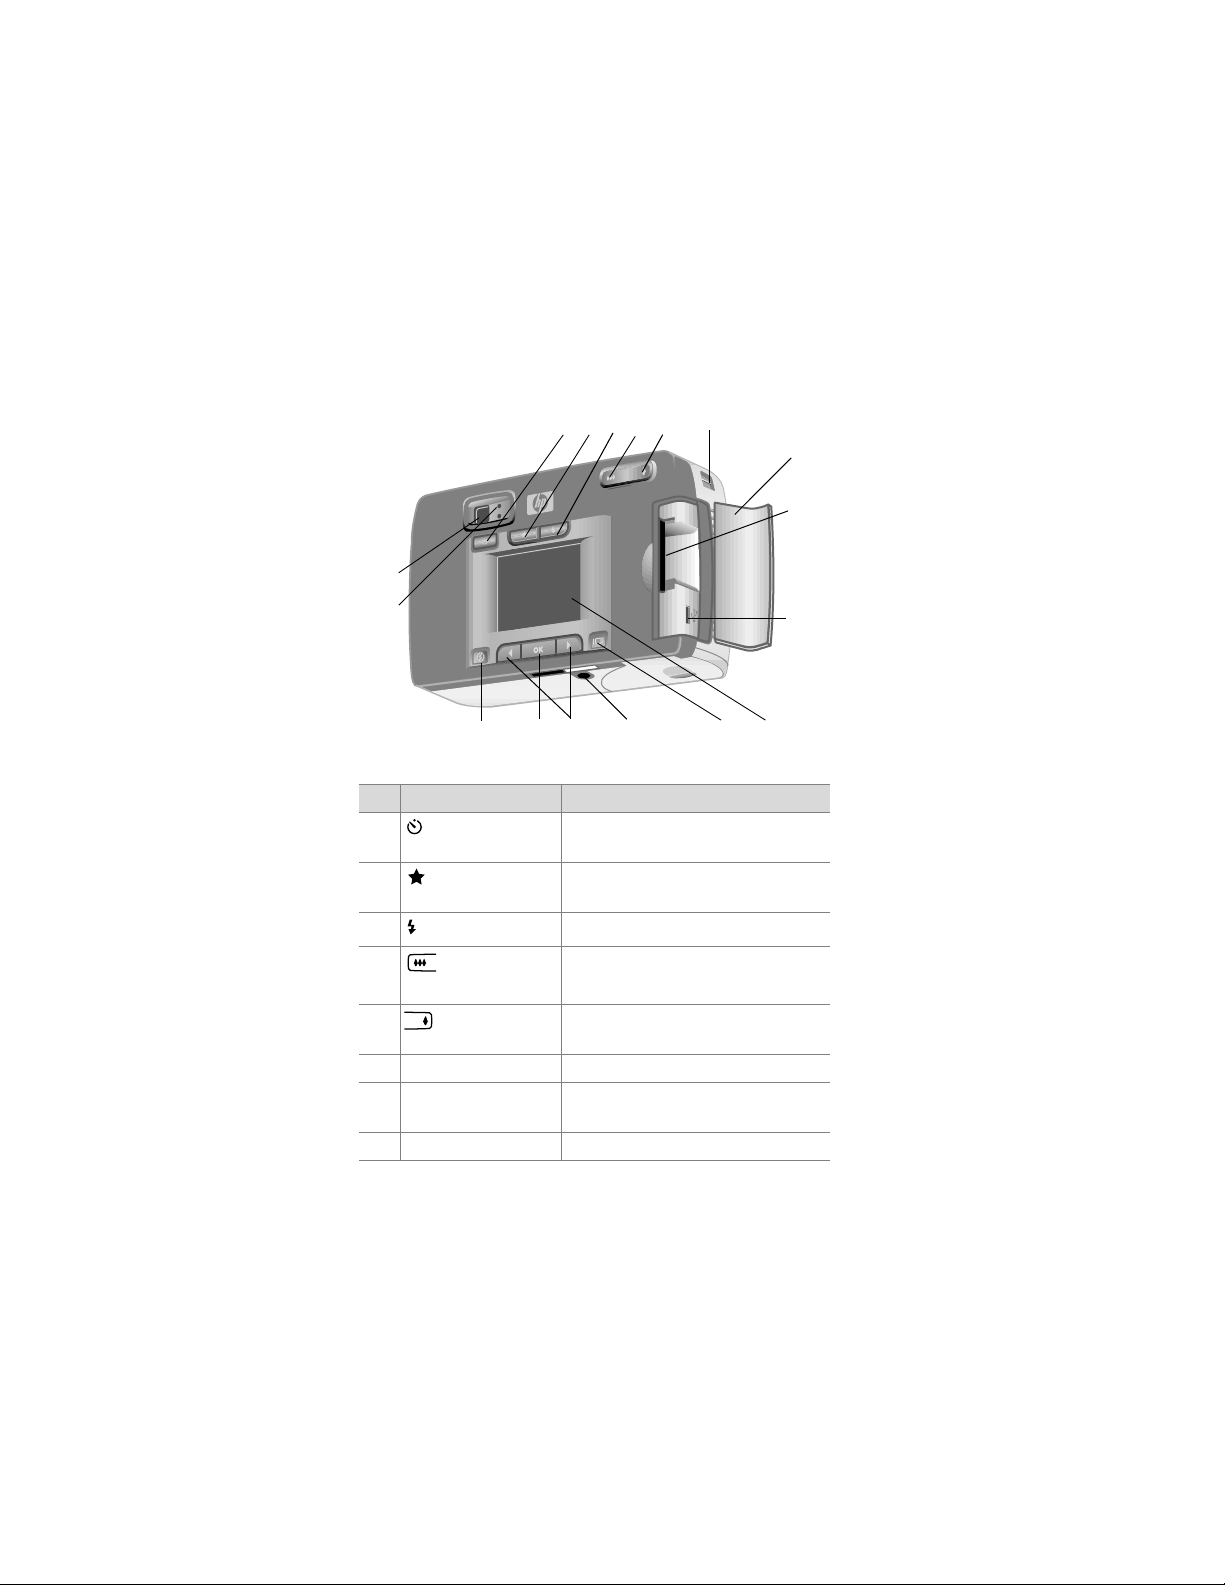
# Name Description
8
9
10
11
12
Self-timer
Self-timer button
Self-timerSelf-timer
Quality
Quality button
QualityQuality
Flash
Flash button
FlashFlash
Zoom Out
Zoom Out
Zoom OutZoom Out
button
Zoom In
Zoom In button
Zoom In Zoom In
Sets the 10 second self-timer for
pictures and video clips
Increases image quality from
Good
Good to Better
Good Good
Selects the Flash
Better to Best
Better Better
Best
BestBest
Flash setting
Flash Flash
Zooms the lens to wide angle
position
Zooms the lens to telephoto
position
13 Wrist strap mount Wrist strap attachment
14 Memory card door Provides access to the memory
card and USB connector
15 Memory card slot Slot where memory card is inserted
10 hp photosmart 620 user’s manual
Page 13

# Name Description
16 USB connector Provides connection to either a
computer or printer by using a USB
cable
17 Image display Provides menu information to
operate the camera; you can also
preview the picture before taking it
and review it afterward
18
Display
Display button
Display Display
Activates Preview mode or turns off
the image display
19 Tripod mount Allows camera to be mounted to a
tripod
20
Arrow
Arrow buttons
ArrowArrow
Move to menu options and
navigate through images
21
button
Switches to Playback mode and
selects menu options
22
Share
Share button
ShareShare
Turns the HP Instant Share
HP Instant Share menu
HP Instant ShareHP Instant Share
on and off
23 Viewfinder light
z Blinking orange indicates that
the camera is busy or is
experiencing an error
z Blinking green indicates that the
camera can’t focus or that you
need to hold it steady for a long
exposure
24 Optical viewfinder Allows you to frame the subject of
the picture
1-Getting started 11
Page 14
Setup
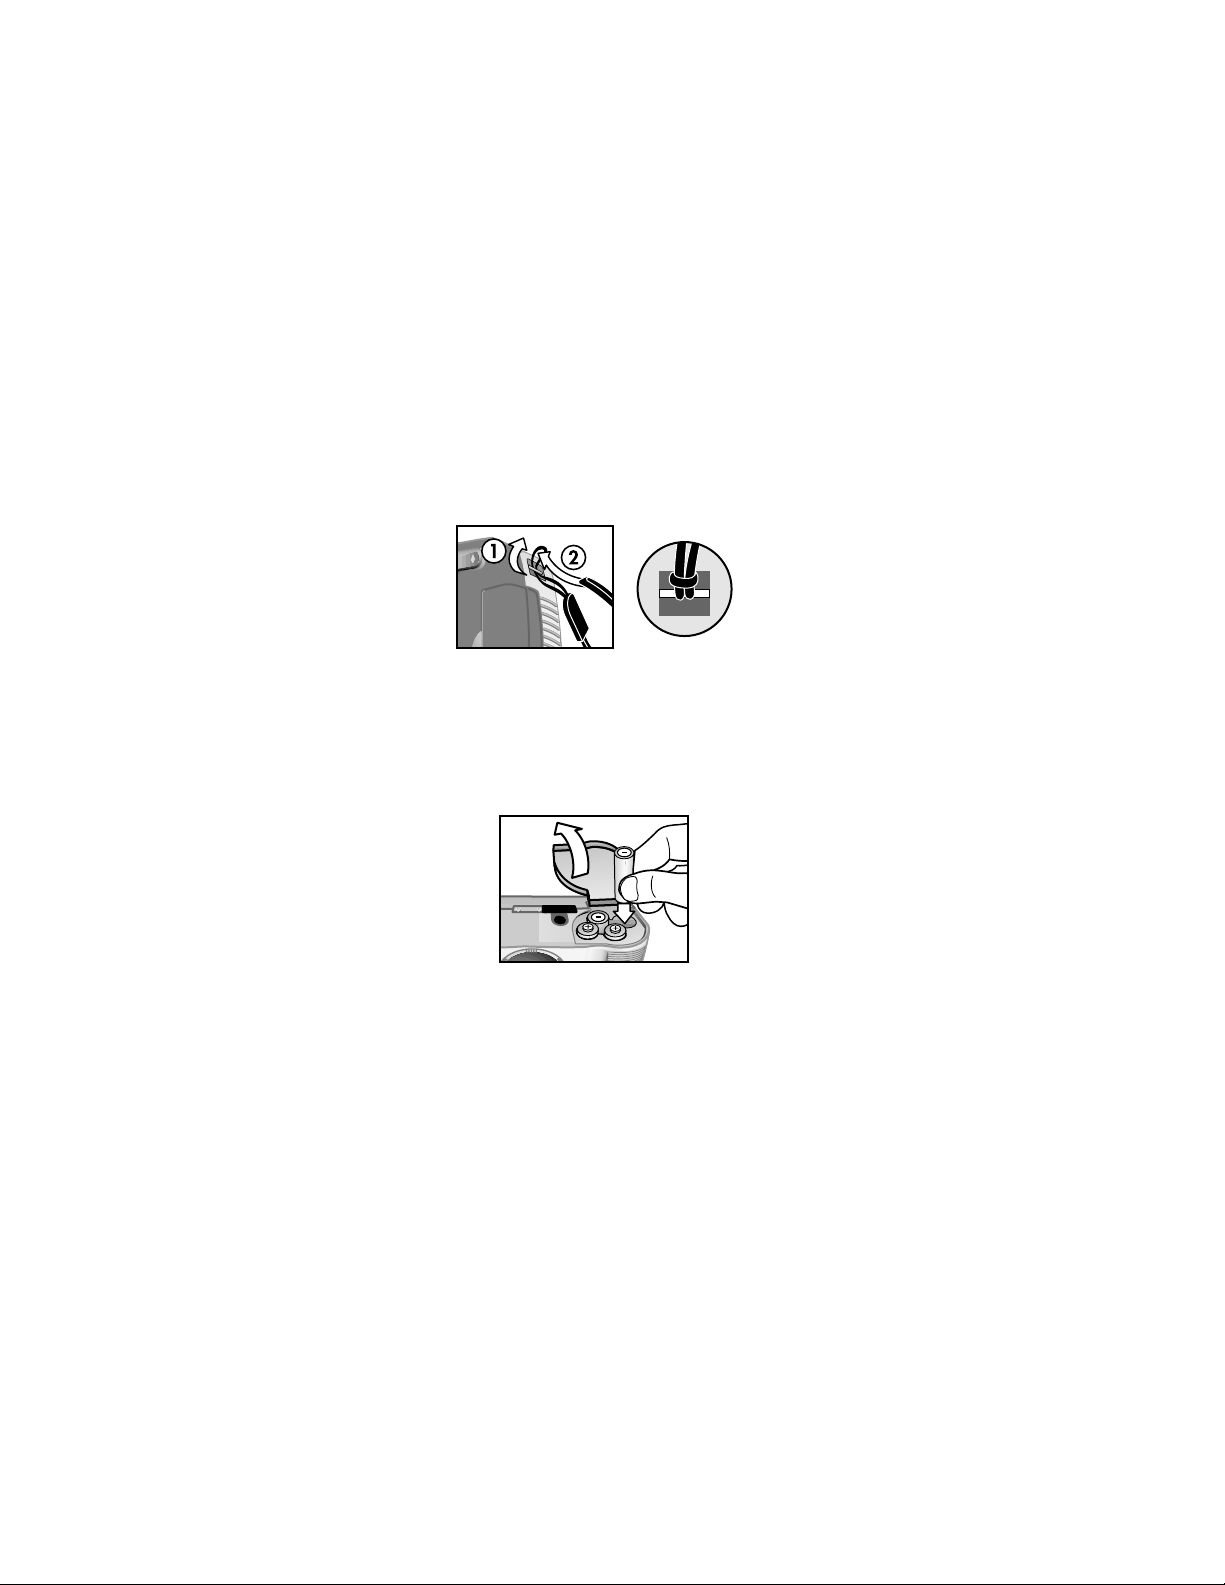
Attaching the wrist strap
Attach the wrist strap as shown in the illustration.
NOTE It is easiest to install the wrist strap by inserting it from
the bottom of the camera.
Inserting the batteries
1 Open the battery door on the bottom of the camera.
2 Insert the batteries as indicated.
NOTE For more information about batteries, see Appendix A:
Batteries and accessories
Batteries and accessories on page 61.
Batteries and accessoriesBatteries and accessories
Appendix A:
Appendix A: Appendix A:
12 hp photosmart 620 user’s manual
Page 15
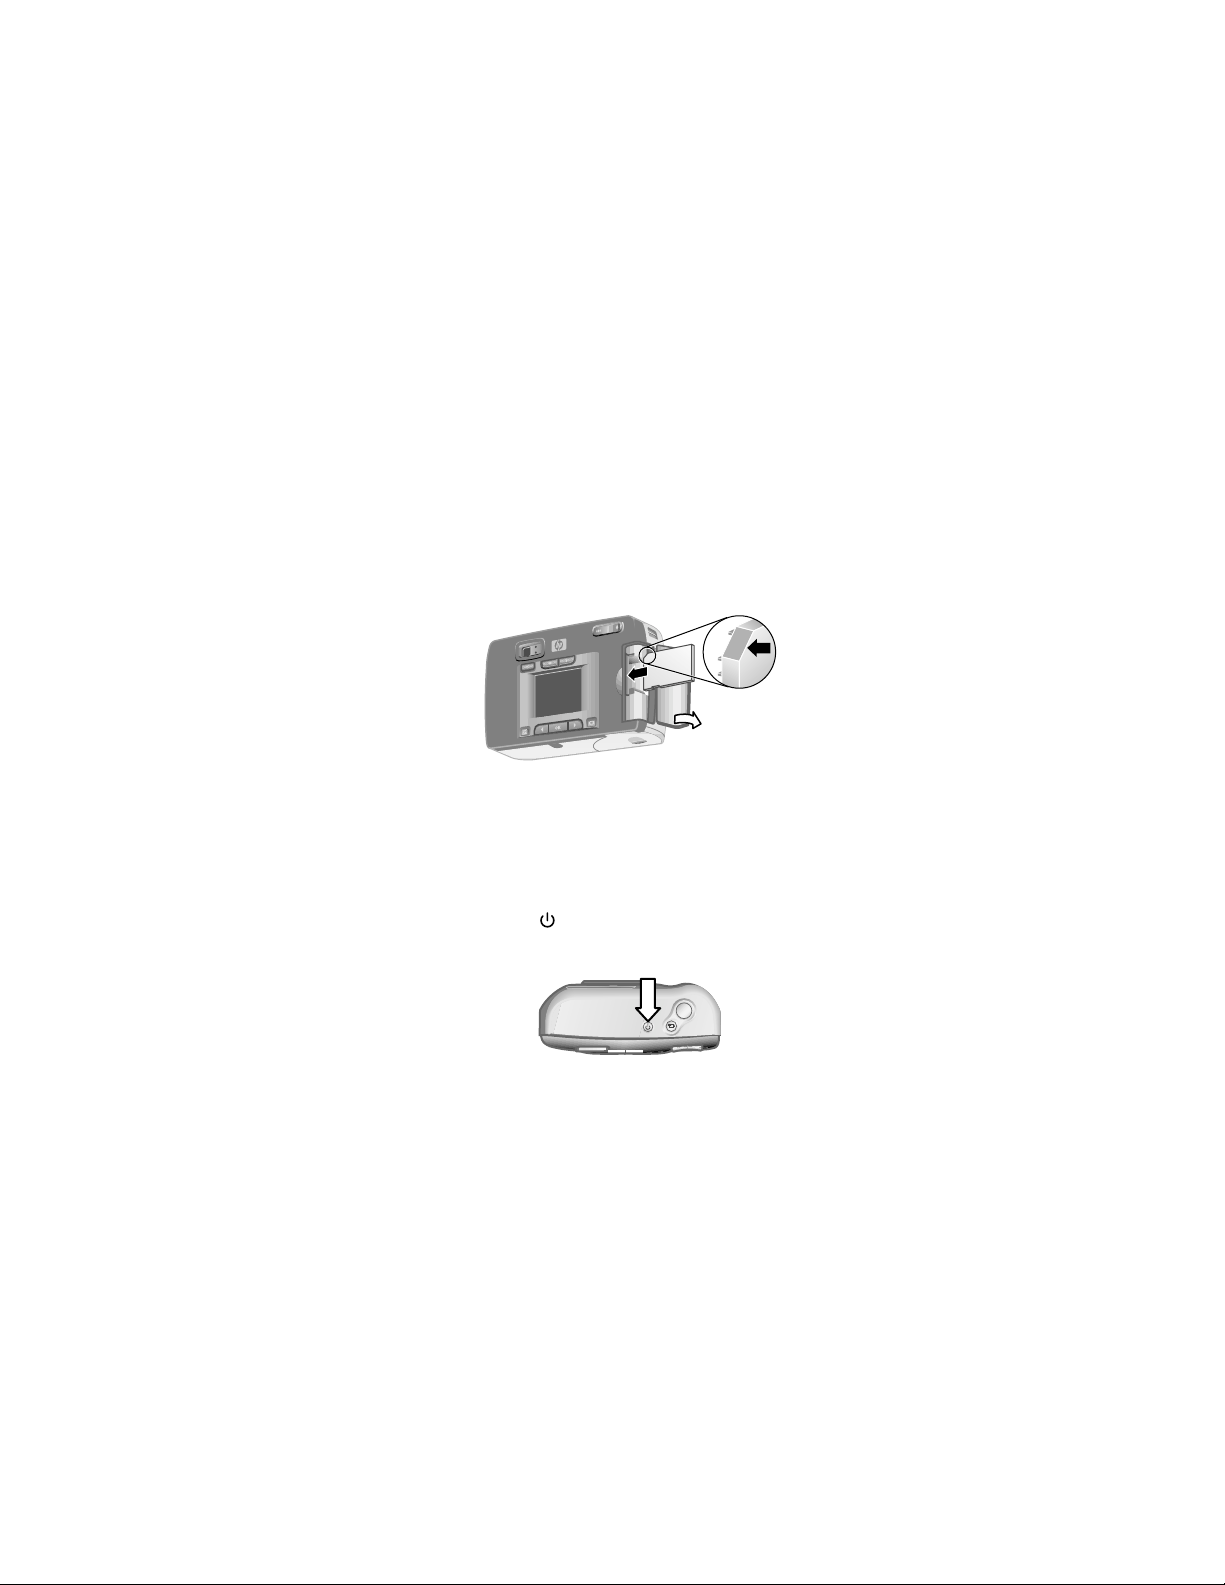
Inserting the memory card (optional)
Your digital camera contains 8 megabytes (MB) of internal
memory to store images and video clips. You can also use a
memory card (purchased separately) to store more images and
video clips. After you unload images to a computer, you can
reuse the card.
1 Open the memory card door.
2 Insert the memory card as shown.
3 Close the memory card door.
To remove the memory card, pull the card out.
Turning on power
z Press the Power
camera is ready, the orange viewfinder light is solid.
Power button to turn on the camera. When the
PowerPower
1-Getting started 13
Page 16
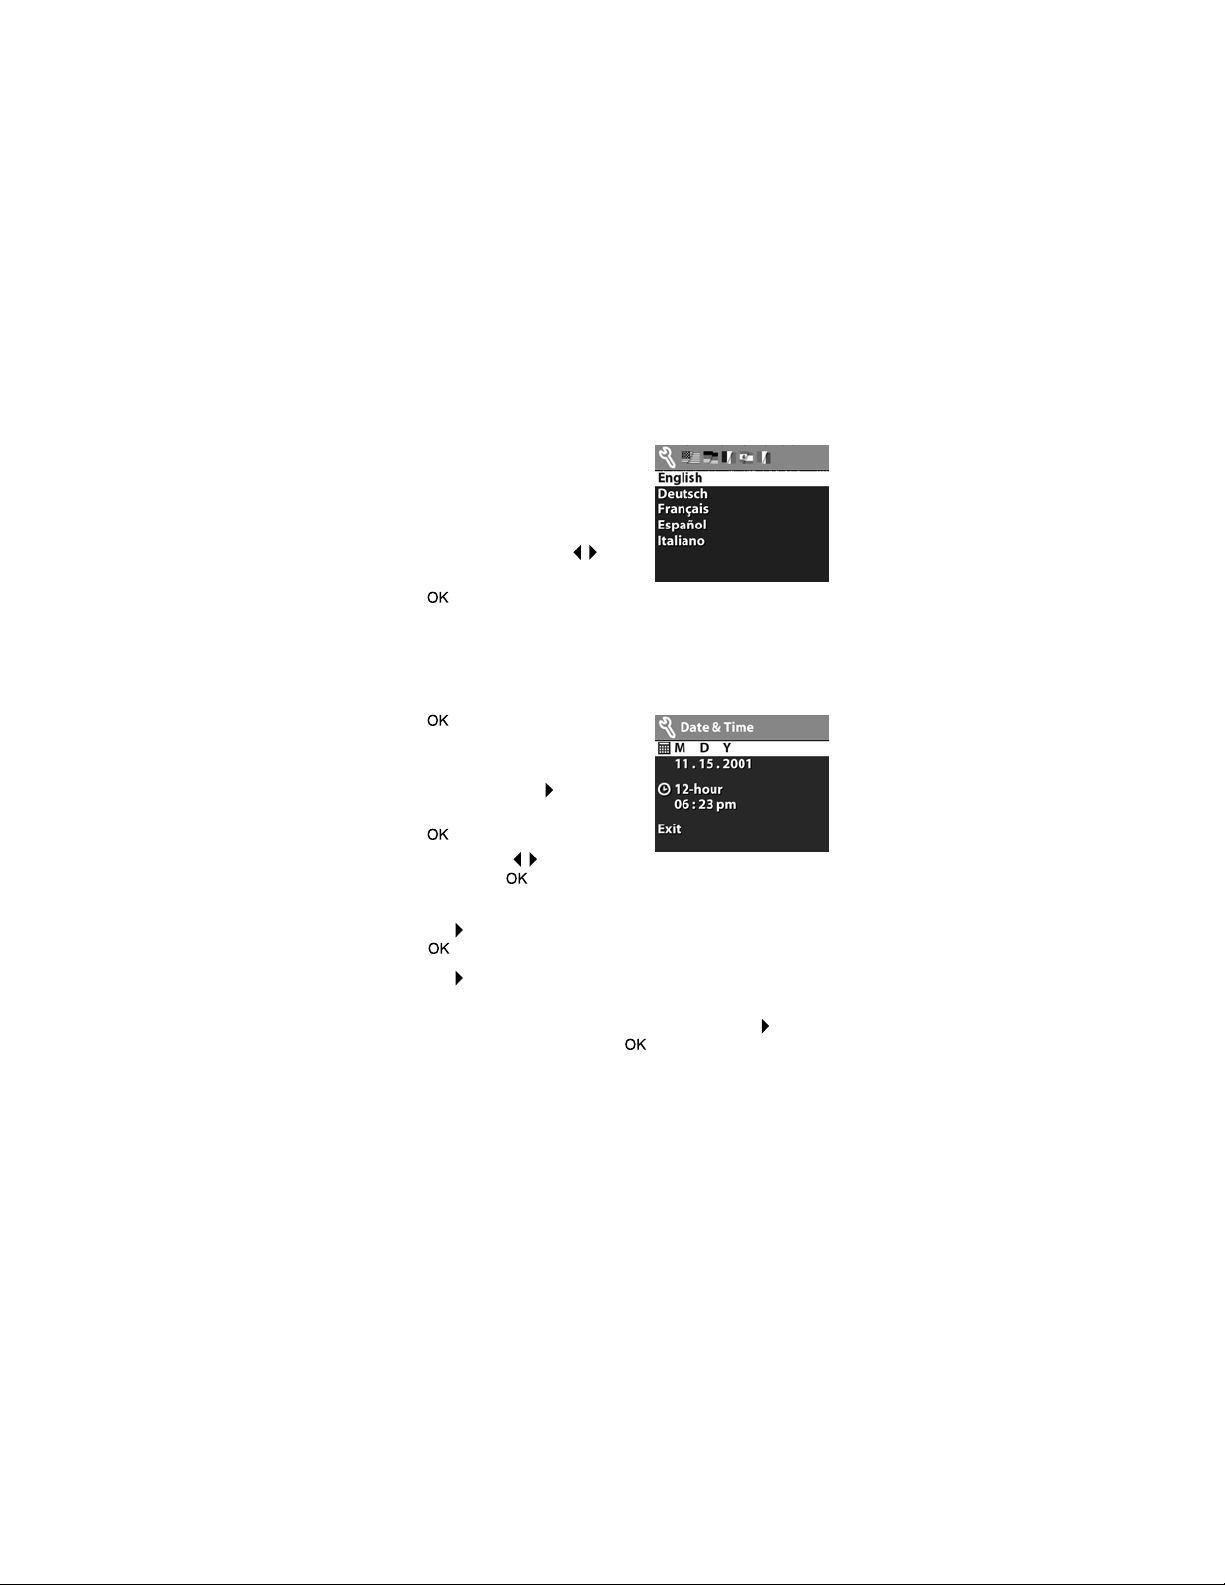
Choosing the language
The first time you turn the camera on,
the following screen appears and
prompts you to choose a language.
1 Scroll to the language that you
want by using the Arrow
buttons.
2 Press to select the highlighted
language.
Arrow
ArrowArrow
Setting the date and time
1 Press repeatedly until your
preferred date format appears
(M = month, D = day, Y = year).
Press the right Arrow
highlight the date.
2 Press to select the first value,
and then use the buttons to
change it. Press to confirm. Set the remaining values in
the same way.
3 Press the button to highlight the time format, and then
press if you want to change it.
4 Press the button to highlight the time. Set the time values
in the same way you set the date values in step 2.
5 When finished setting the date and time, press the button
to highlight Exit
If the batteries are removed from the camera for longer than
ten minutes, you might need to reset the date and time. For
more information about batteries, see Appendix A: Batteries
and accessories
and accessories on page 61.
and accessoriesand accessories
Arrow button to
ArrowArrow
Exit, and then press .
ExitExit
Appendix A: Batteries
Appendix A: Batteries Appendix A: Batteries
14 hp photosmart 620 user’s manual
Page 17

Installing the software
The software allows you to unload images from the camera,
view them, print them, and e-mail them. It also allows you to
configure the Share
Windows
1 Insert the HP Photo & Imaging CD into the CD drive of your
computer. The installation window automatically appears.
NOTE If the installation window does not appear, click Start
and then click Run
letter of your CD drive.
2 Click Next
install the software.
To install any bonus software
To install any bonus software
To install any bonus softwareTo install any bonus software
1 Click Start
X:\Bonus\setup.exe
drive).
2 Click OK
install the bonus software.
Macintosh
1 Insert the HP Photo & Imaging CD into the CD drive of your
computer.
2 Double-click the CD icon on the desktop.
3 Double-click the installer icon.
4 Follow the on-screen instructions to install the software.
Share menu on the camera.
ShareShare
Start,
StartStart
Run. Type
RunRun
Next, and then follow the on-screen instructions to
NextNext
Start, click Run
StartStart
OK, and then follow the on-screen instructions to
OKOK
Run, and in the Open
RunRun
X:\Setup.exe
(where X is the drive letter of your CD
, where X is the
Open box, type
OpenOpen
1-Getting started 15
Page 18

To install any bonus software
To install any bonus software
To install any bonus softwareTo install any bonus software
1 Double-click the installer icon located in the Bonus folder on
the CD.
2 Follow the on-screen instructions to install the bonus
software.
16 hp photosmart 620 user’s manual
Page 19

Taking pictures
2
Taking still pictures
You can take a picture with the image display on or off. To take
a picture:
1 Frame the subject that you want to photograph in the
viewfinder.
2 Hold the camera steady and press the Shutter
halfway down. The camera automatically adjusts exposure
and focus.
3 When the viewfinder light is solid green, press the Shutter
button all the way down to take the picture.
To achieve the best focus in low light conditions, secure the
camera to a tripod and make sure the focus area has sufficient
contrast.
To achieve the best exposure in low light conditions, turn on the
flash when the subject is less than 2 meters away. When the
subject or scenery is more than 2 meters away, turn the flash
off and secure the camera to a tripod to prevent blurring the
image. When the flash is turned off, the longer exposure will
make the image brighter.
Shutter button
ShutterShutter
Shutter
ShutterShutter
2-Taking pictures 17
Page 20

If the orange viewfinder light is blinking, you must wait before
taking a picture. This means that the camera is starting up, the
flash is charging, or another situation might exist. For
troubleshooting information, see Chapter 6: Troubleshooting
and support
and support on page 43.
and support and support
Chapter 6: Troubleshooting
Chapter 6: Troubleshooting Chapter 6: Troubleshooting
Using focus lock
Focus lock allows you to focus on a subject that is not in the
center of the image. It is also useful to verify that your image is
focused before taking the picture. To use focus lock:
1 Press the Shutter
and focus. When exposure and focus are locked, the green
viewfinder light is solid.
2 When exposure and focus are locked, continue to hold the
Shutter
Shutter button halfway down, and you can re-frame or
ShutterShutter
adjust your subject for proper positioning.
3 Press the Shutter
Shutter button halfway down to lock the exposure
ShutterShutter
Shutter button all the way down.
ShutterShutter
Using instant review
After you take a picture, the image display shows the image
while it is being saved to memory. You can delete the image
before it is saved by pressing the left Arrow
Arrow button.
ArrowArrow
Recording video clips
To record a video clip:
1 Frame the subject that you want to record.
18 hp photosmart 620 user’s manual
Page 21
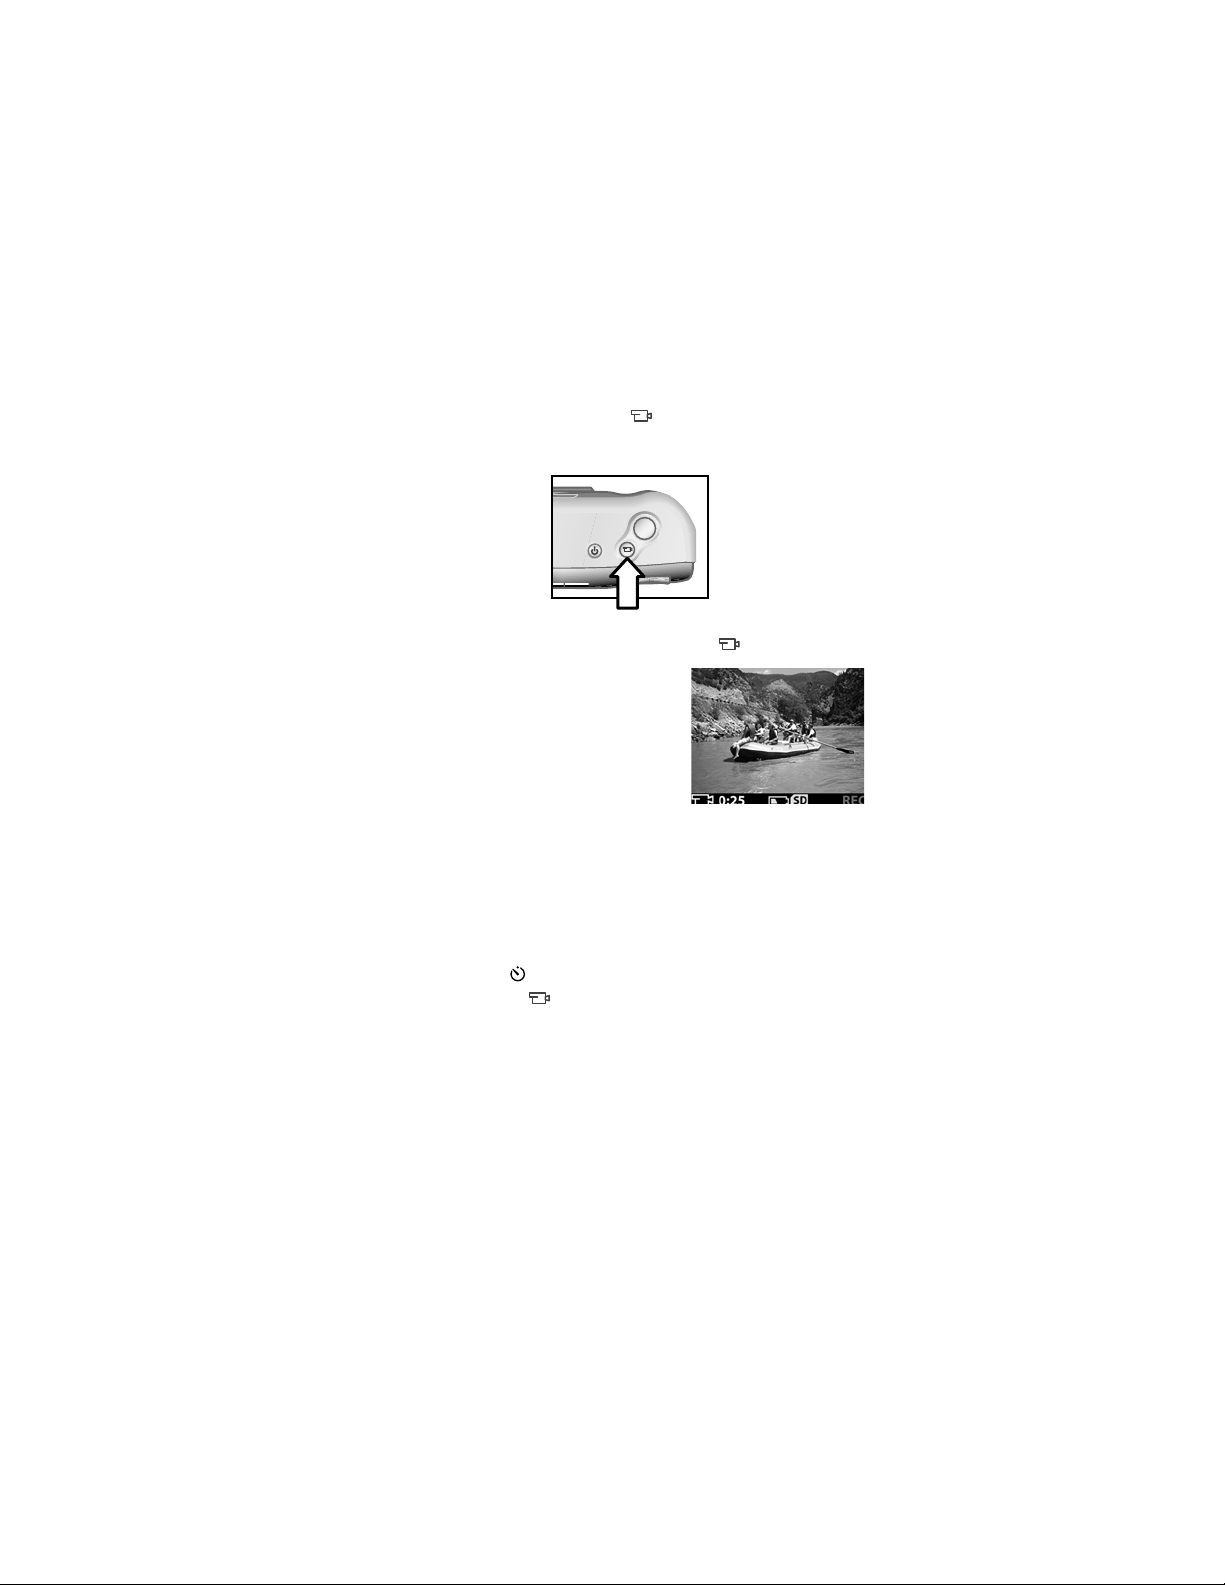
2 Press and release the Video
You will see REC
REC on the image display. No audio will be
RECREC
Video button to start recording.
VideoVideo
recorded.
3 To stop recording at any time, press the button again.
After recording has stopped, the last
frame of the video clip remains on
the image display during instant
review. During this time, the video
clip is saved to memory unless you
choose to delete it.
During recording, the green viewfinder light and the red
Video/self-timer light are solid. You can view the time
remaining for recording on the image display. The camera
automatically stops recording when the timer reaches zero.
NOTE To delay recording by 10 seconds, simply press the
Self-timer
Self-timer button to activate the self-timer before
Self-timerSelf-timer
pressing the button.
Although the maximum recording time for a video clip is
always 30 seconds, the number of video clips you can record
can be increased by using a memory card. Video clips can be
very large and use a lot of space on the memory card.
2-Taking pictures 19
Page 22

Using Preview mode
You can also use the image display
to preview a picture and show a
more accurate view of what your
picture will look like. This is useful
for close-up pictures and for
instances in which framing your
subject precisely is important.
To take a picture by using the image display:
1 Press the Display
2 Frame your subject in the image display, and then press the
Shutter
Shutter button.
Shutter Shutter
In addition to taking pictures and recording video clips, you
can zoom in on your subject, adjust the flash setting, determine
how many more pictures can be taken, or increase the quality
of your image—all from within Preview mode.
NOTE Using the image display consumes a large amount of
Display button to activate Preview mode.
DisplayDisplay
battery power.
Using the self-timer
To use the self-timer:
1 Secure the camera to a tripod or set it on a stable surface.
2 Frame your subject in the viewfinder or image display.
3 Press the button once. The self-timer icon appears on the
image display.
4 Press the Shutter
it. The Video/self-timer light and viewfinder light blink for
10 seconds before the picture is taken.
Shutter button all the way down, and then release
Shutter Shutter
20 hp photosmart 620 user’s manual
Page 23

Using zoom
Optical zoom
Use optical zoom to make your subject appear closer. To use
optical zoom:
z Press the Zoom Out/Zoom In
lens between wide angle and telephoto positions (1x to 3x).
Use the telephoto position for close-up pictures.
Optical zoom can be used for video clips, but you cannot
adjust the setting while recording.
Zoom Out/Zoom In button to move the
Zoom Out/Zoom InZoom Out/Zoom In
Digital zoom
To use digital zoom:
1 Press the button to activate Preview mode, and frame
the picture by using the image display.
2 Press and hold the right side of the button until you
reach maximum optical zoom, then release the button.
3 Press and hold the right side of the button again to
turn on digital zoom. (Digital zoom goes from 1.3x to 4x.)
A yellow cropping frame appears in the image display
showing the region captured.
To cancel digital zoom, press and hold the left side of the
button until zooming stops, and then release. You can
also cancel digital zoom by exiting Preview mode.
NOTE Digital zoom does not work when recording video
clips.
2-Taking pictures 21
Page 24

Using the flash
When the camera is turned on, the flash is automatically set to
Auto Flash
Auto Flash. If you change the flash setting, the camera will
Auto FlashAuto Flash
remain in that setting until you change it again or turn off the
camera. By using the Flash
the flash settings in the following order.
Icon Setting Description
Auto Flash
Auto Flash The camera measures light and uses the
Auto FlashAuto Flash
Red-eye
Red-eye
Red-eye Red-eye
reduction
reduction
reductionreduction
Flash On
Flash On The camera always flashes. If the light is
Flash OnFlash On
Flash Off
Flash Off The camera will not flash. Use this setting
Flash OffFlash Off
Flash button, you can move through
FlashFlash
flash if necessary.
The camera measures light and uses the
flash with red-eye reduction if necessary.
behind your subject, you can use the
flash to increase the light on the front of
your subject. This is also called “fillflash.”
when you do not want a flash (such as
with distant objects). This might result in
long exposures that will require a tripod.
22 hp photosmart 620 user’s manual
Page 25

Changing the image quality
The camera has three image quality settings: Good
Best
Best. You can view the current quality setting, as well as the
BestBest
number of pictures that can be taken, on the image display.
This setting determines the quality of the images and how
many images can be stored in internal memory or on the
memory card. Higher quality images take up more space in
memory. The following table identifies the approximate number
of pictures that you can take at each setting based on internal
memory or a 16 MB memory card with digital zoom off.
Setting Icon Description and capacity
Good
Good This is the most memory-efficient setting.
GoodGood
This is recommended for sending images in
e-mail or posting to the Internet.
Internal memory—87 images
16 MB memory card—200 images
Better
Better This setting produces high-quality images
BetterBetter
and requires less memory than Best
recommended for printing pictures
10 by 15 cm (4 by 6 inches). This is the
default quality setting.
Internal memory—14 images
16 MB memory card—32 images
Best
Best This setting produces the highest-quality
BestBest
images and uses the most memory. This is
recommended if you plan to enlarge
images, or print images that are
20 by 25 cm (8 by 10 inches) or larger.
Internal memory—7 images
16 MB memory card—17 images
Good, Better
Better, and
GoodGood
BetterBetter
Best. This is
BestBest
2-Taking pictures 23
Page 26

To change the image quality:
Press the Quality
Quality button until the setting you want appears
QualityQuality
on the image display. The settings change incrementally from
Good
Good to Better
GoodGood
Better, and then to Best
BetterBetter
Best.
BestBest
24 hp photosmart 620 user’s manual
Page 27
Using Playback and
3
the Main menu
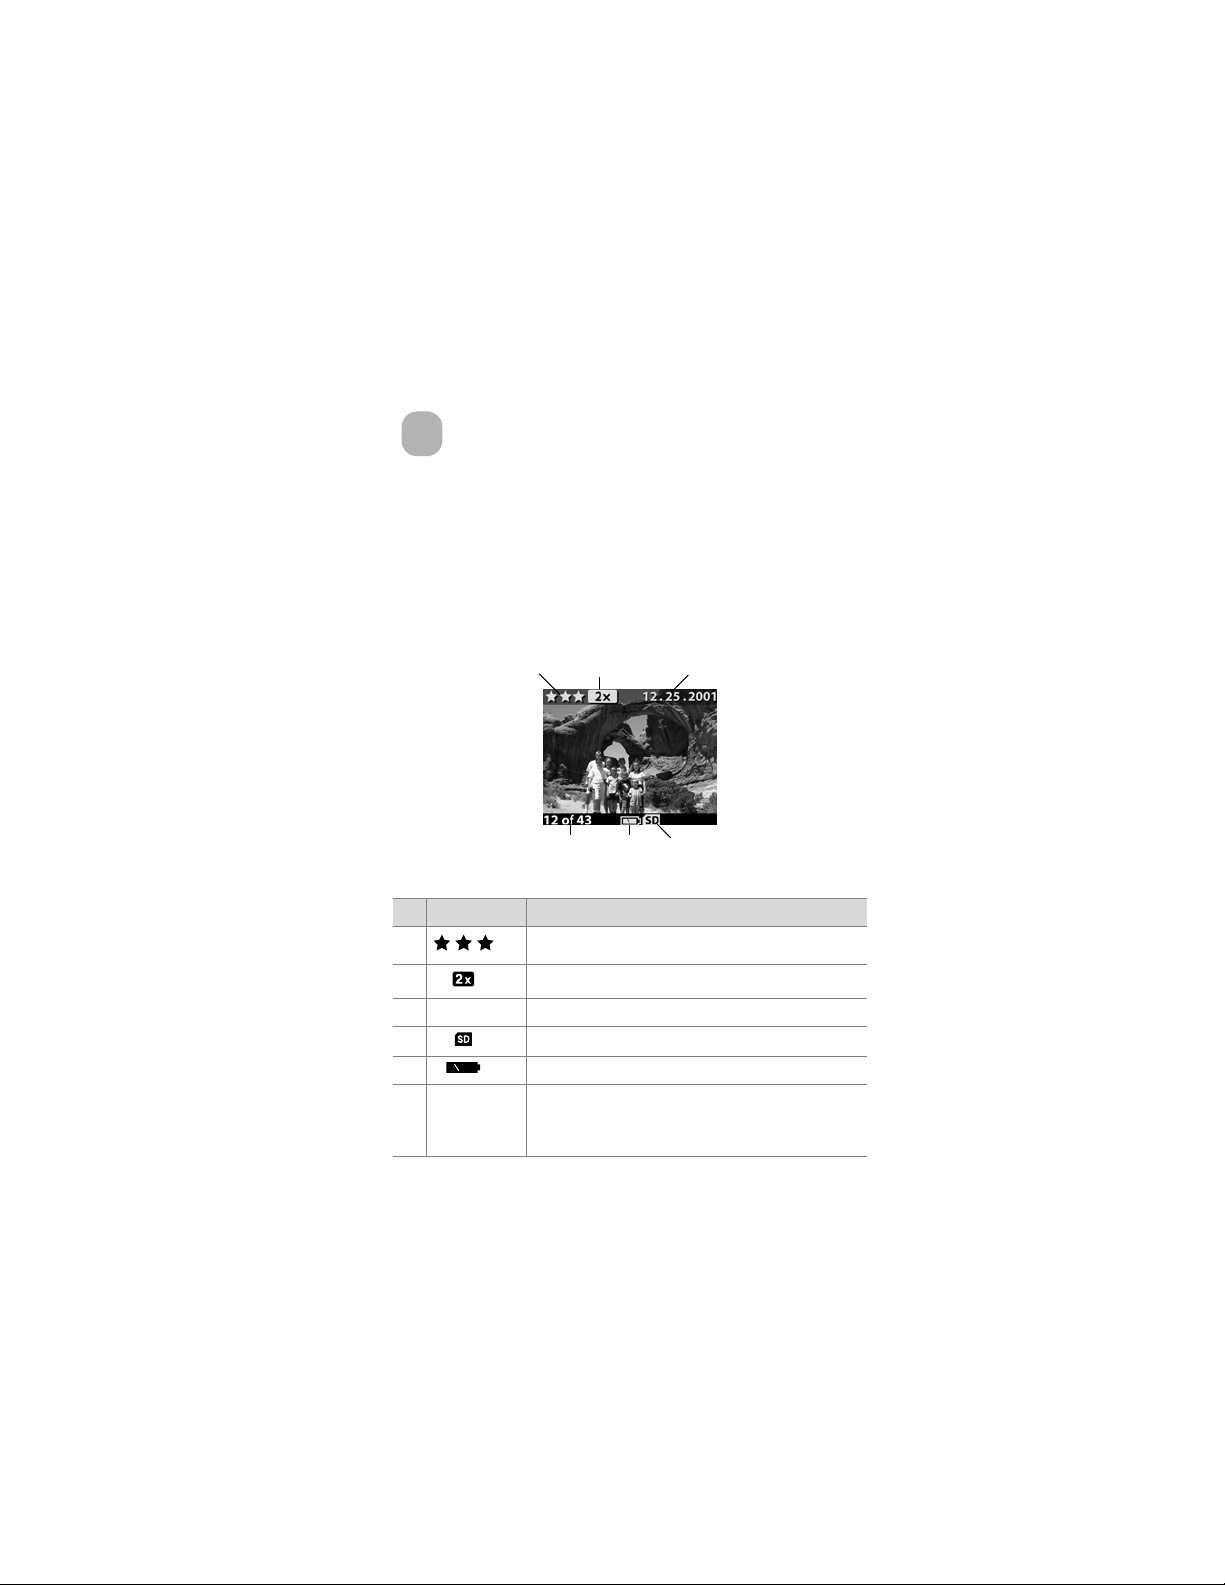
Using Playback mode
After you have taken some pictures and they are stored in the
camera, you can view them in Playback mode. You can also
view video clips.
12
6
# Icon Description
1 Indicates the quality setting of the image
2Indicates zoom level
3 12.25.2001 Date the image was taken
4 Visible if a memory card is inserted
5 Indicates battery level
6 12 of 43 Image number of total number of images
stored in the camera or on the memory card
(if inserted)
3-Using Playback and the Main menu 25
3
45
Page 28
Reviewing images
To review images that are stored in the camera’s memory:
1 Press or use the buttons to activate Playback mode.
2 Scroll through your images by using the buttons. Press
and hold the buttons to scroll automatically.
NOTE To preserve battery life, connect to an optional HP AC
adapter while reviewing your images. For more
information, see Appendix A: Batteries and accessories
on page 61.
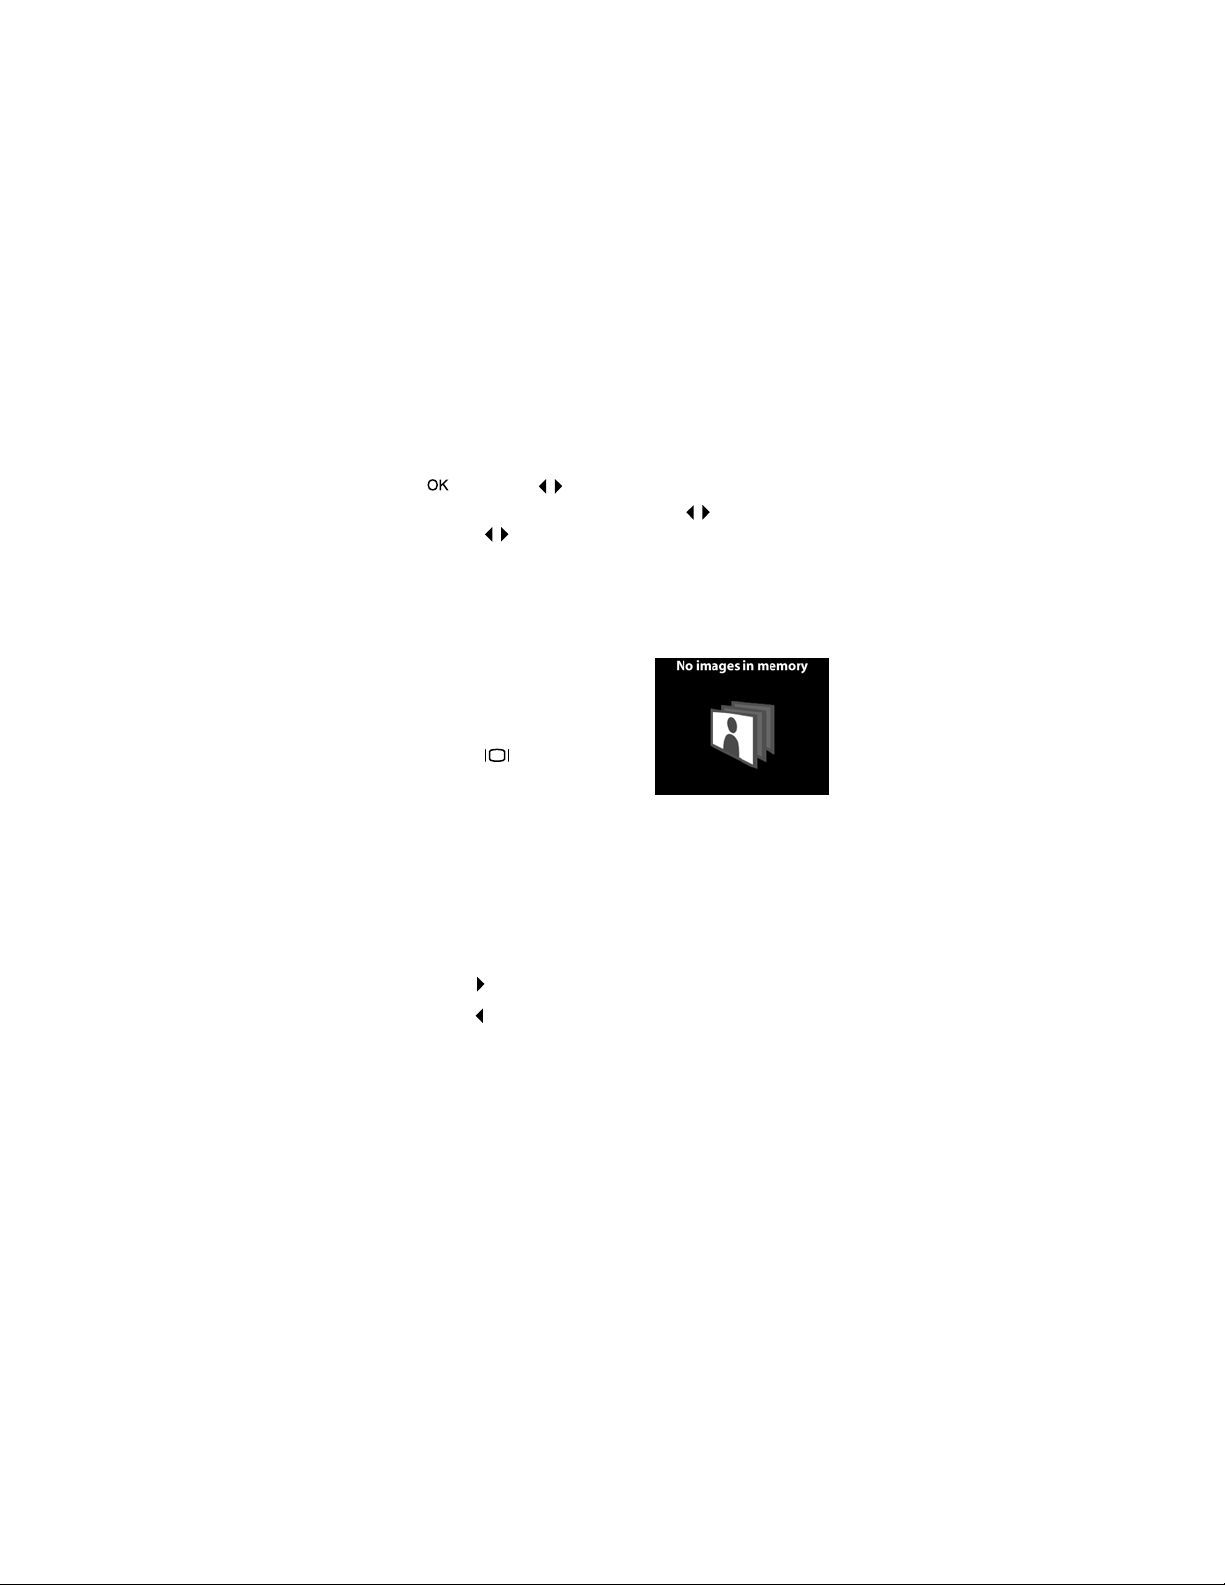
If you do not have images stored in
your camera or on the memory card,
the No images
No images screen appears on the
No imagesNo images
image display. To return to Preview
mode, press the button.
Appendix A: Batteries and accessories
Appendix A: Batteries and accessoriesAppendix A: Batteries and accessories
Reviewing video clips
You can review video clips the same way that you view images
on the camera. When a video clip is reviewed, a video icon
and progress bar appear in the lower-right corner of the image
display. Video clips begin playing automatically. When
reviewing video clips:
• Press the button to navigate to the next image.
• Press the button to reset the video clip to the first frame
or navigate to the previous image.
26 hp photosmart 620 user’s manual
Page 29
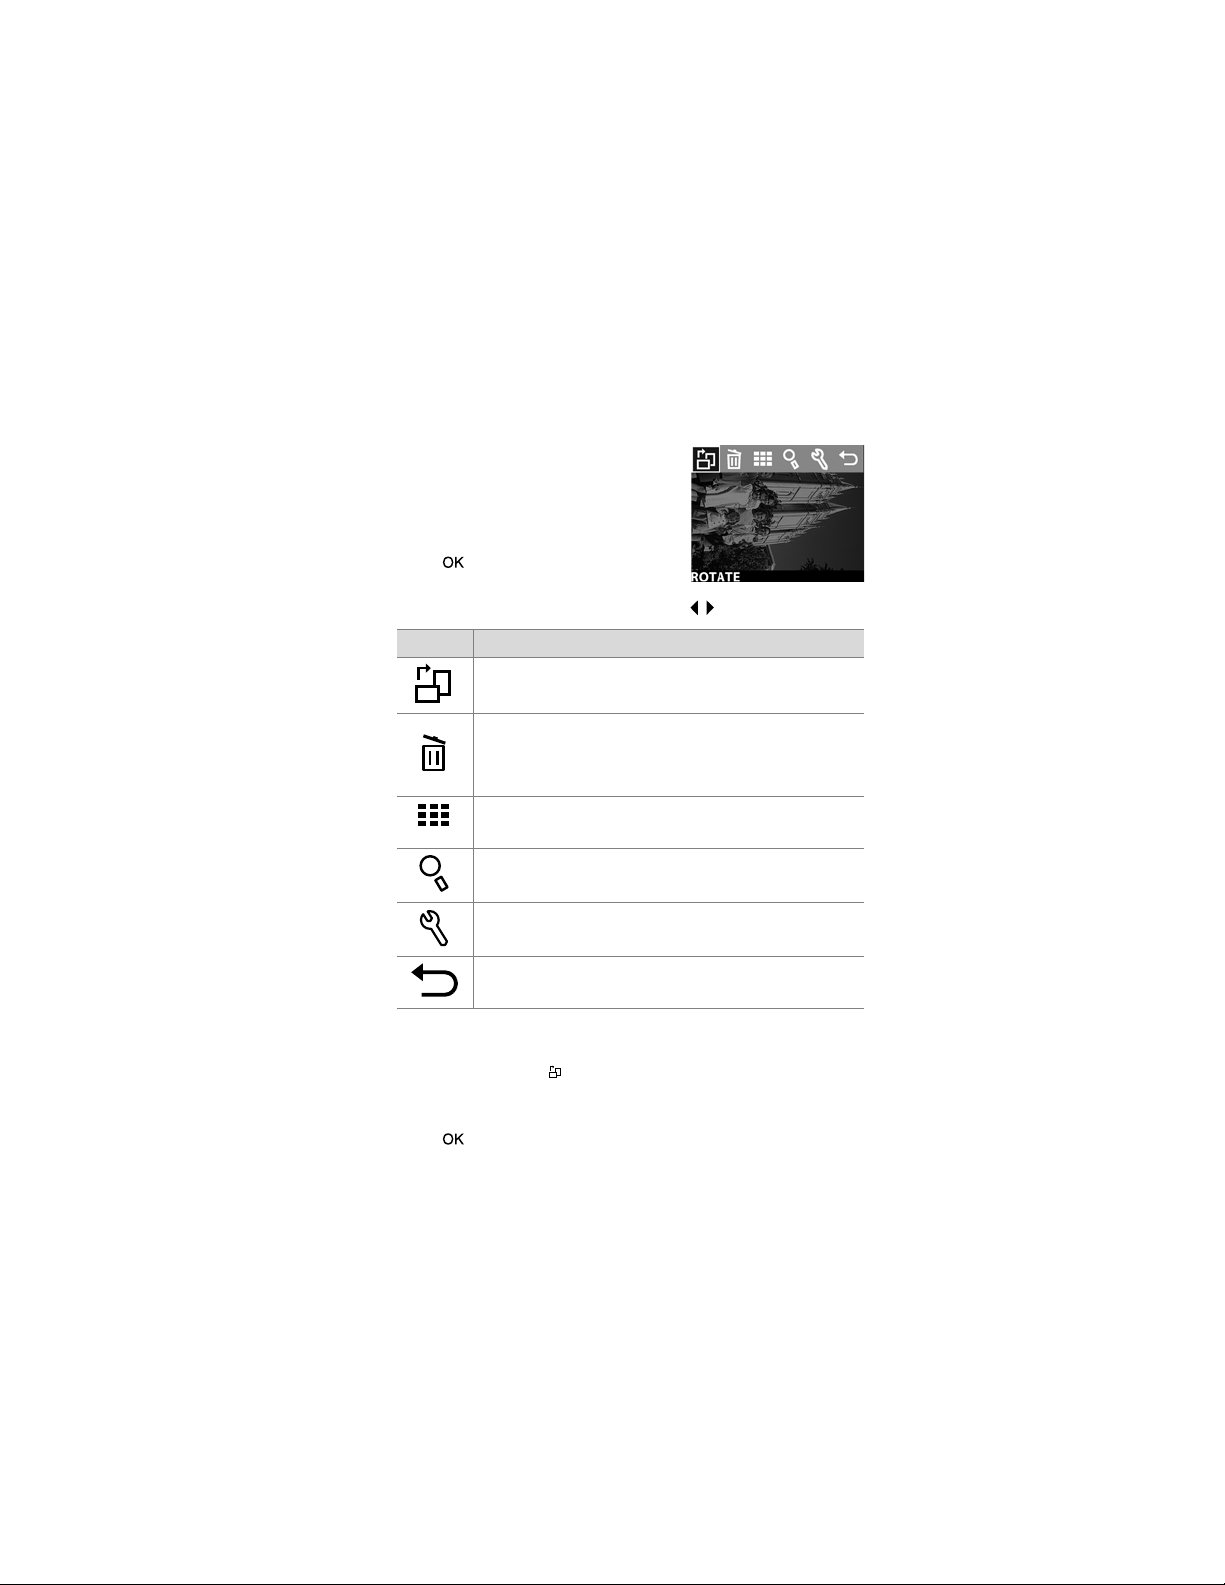
Using the Main menu
Use the Main
Main menu in Playback mode
MainMain
to rotate, delete, or magnify images.
You can also view thumbnails of your
images, or change the settings on the
camera. To view the Main
press twice (or just once if
Playback mode if activated). Scroll
through the menu options by using the buttons.
Icon Description
Rotates the image 90 degrees clockwise per
rotation
Deletes the current image or all images and files;
formats internal memory or the memory card
Undelete restores the last deletion you made
Displays images as thumbnails (nine at a time)
Magnifies the view of the current image
Allows you to adjust the camera settings
Main menu,
MainMain
Exits the Main
Main menu
Main Main
Rotating images
Selecting the Rotate
current image in 90-degree increments clockwise on the image
display. The image rotation is permanent. To rotate an image,
press and then select ROTATE
3-Using Playback and the Main menu 27
Rotate option from the Main
RotateRotate
ROTATE.
ROTATEROTATE
Main menu rotates the
MainMain
Page 30
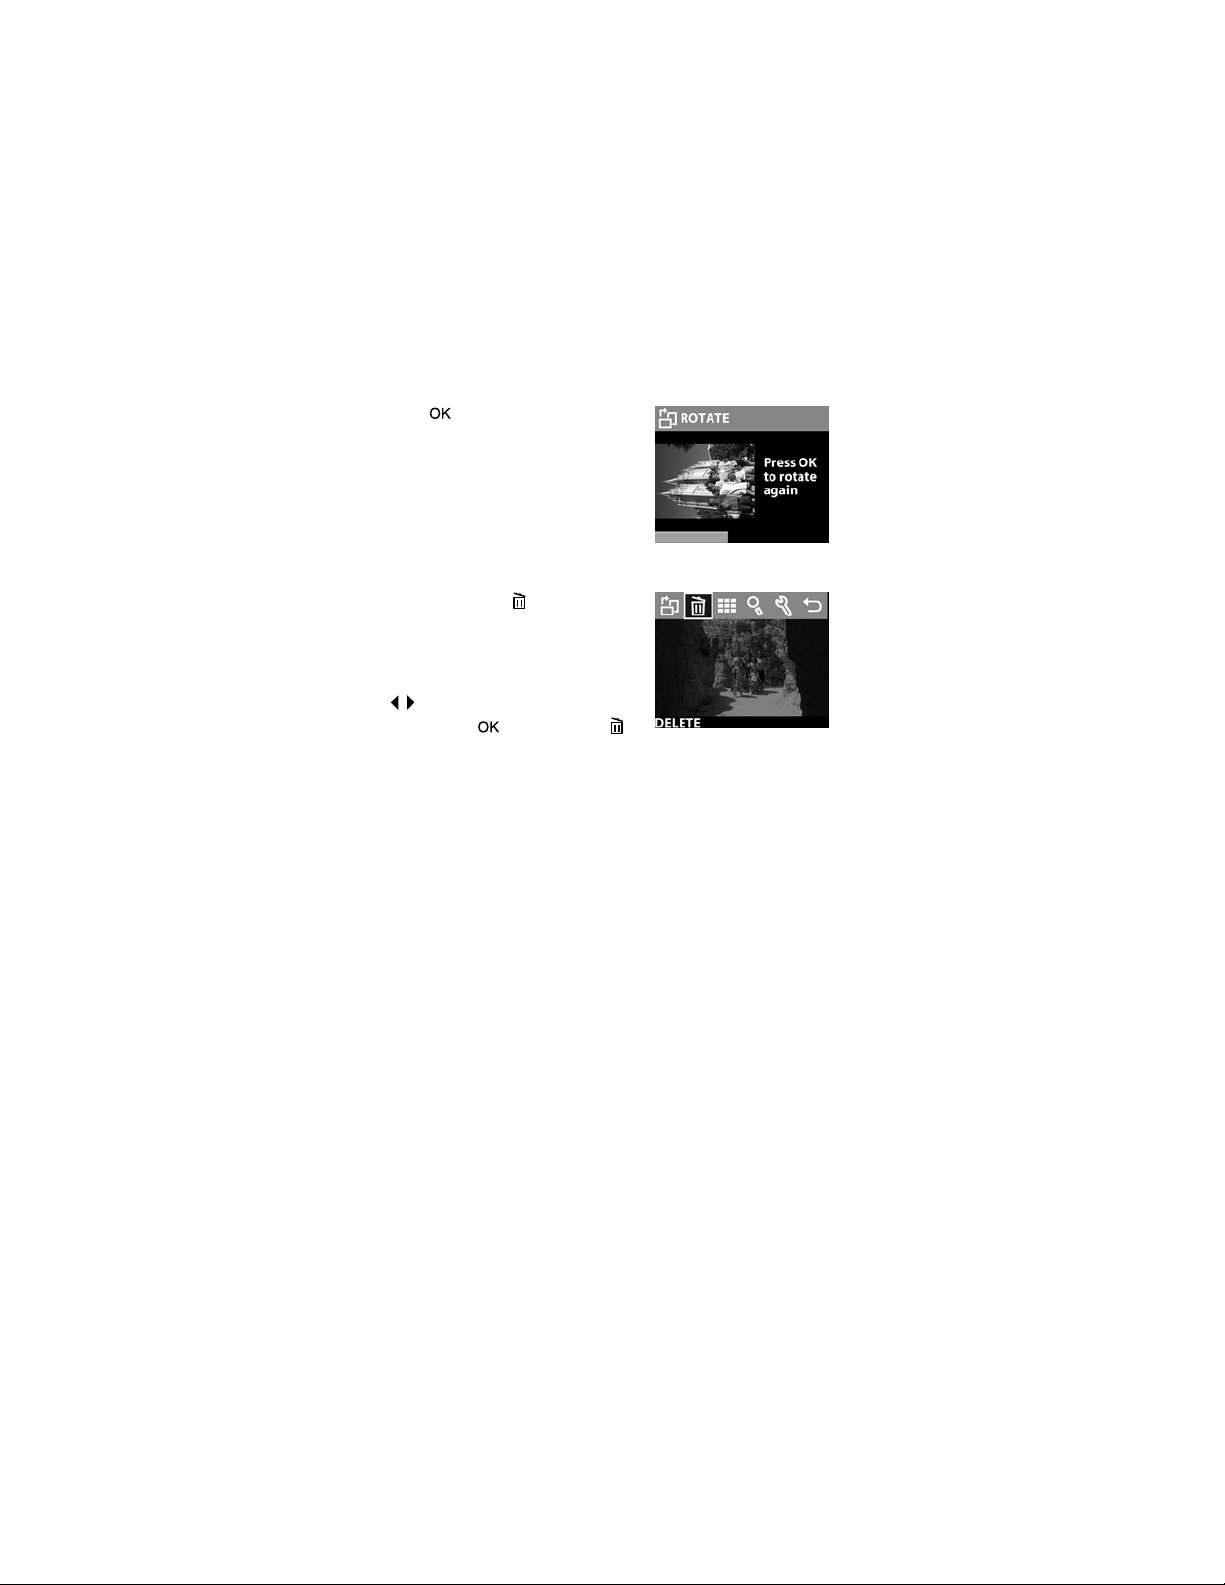
Pressing again rotates the image
an additional 90 degrees.
NOTE This option works only on still
images, not video clips.
Deleting images
Selecting the Delete
the Main
Main menu deletes the current
MainMain
Delete option from
DeleteDelete
image or all images.
Scroll to the image you want by using
the buttons. Highlight the image,
and then press . By using the
option, you can select:
z This Image
This Image - Deletes the current image.
This ImageThis Image
z All Images
All Images or All Images on Card
All ImagesAll Images
All Images on Card - Deletes all images from
All Images on CardAll Images on Card
internal memory or the memory card (if inserted).
z Format Memory
Format Memory or Format Card
Format MemoryFormat Memory
Format Card - Deletes all images and
Format CardFormat Card
files from internal memory or the memory card (if inserted),
and formats either internal memory or the memory card.
z Undelete
Undelete - Appears if you have deleted any images or video
UndeleteUndelete
clips. This option restores the last deletion you made. The
Undelete
Undelete option is available until another picture or video
UndeleteUndelete
clip is taken, another deletion occurs, or the camera is
turned off or connected to your computer.
z Exit
Exit - Exits the Delete
ExitExit
Delete menu.
Delete Delete
28 hp photosmart 620 user’s manual
Page 31
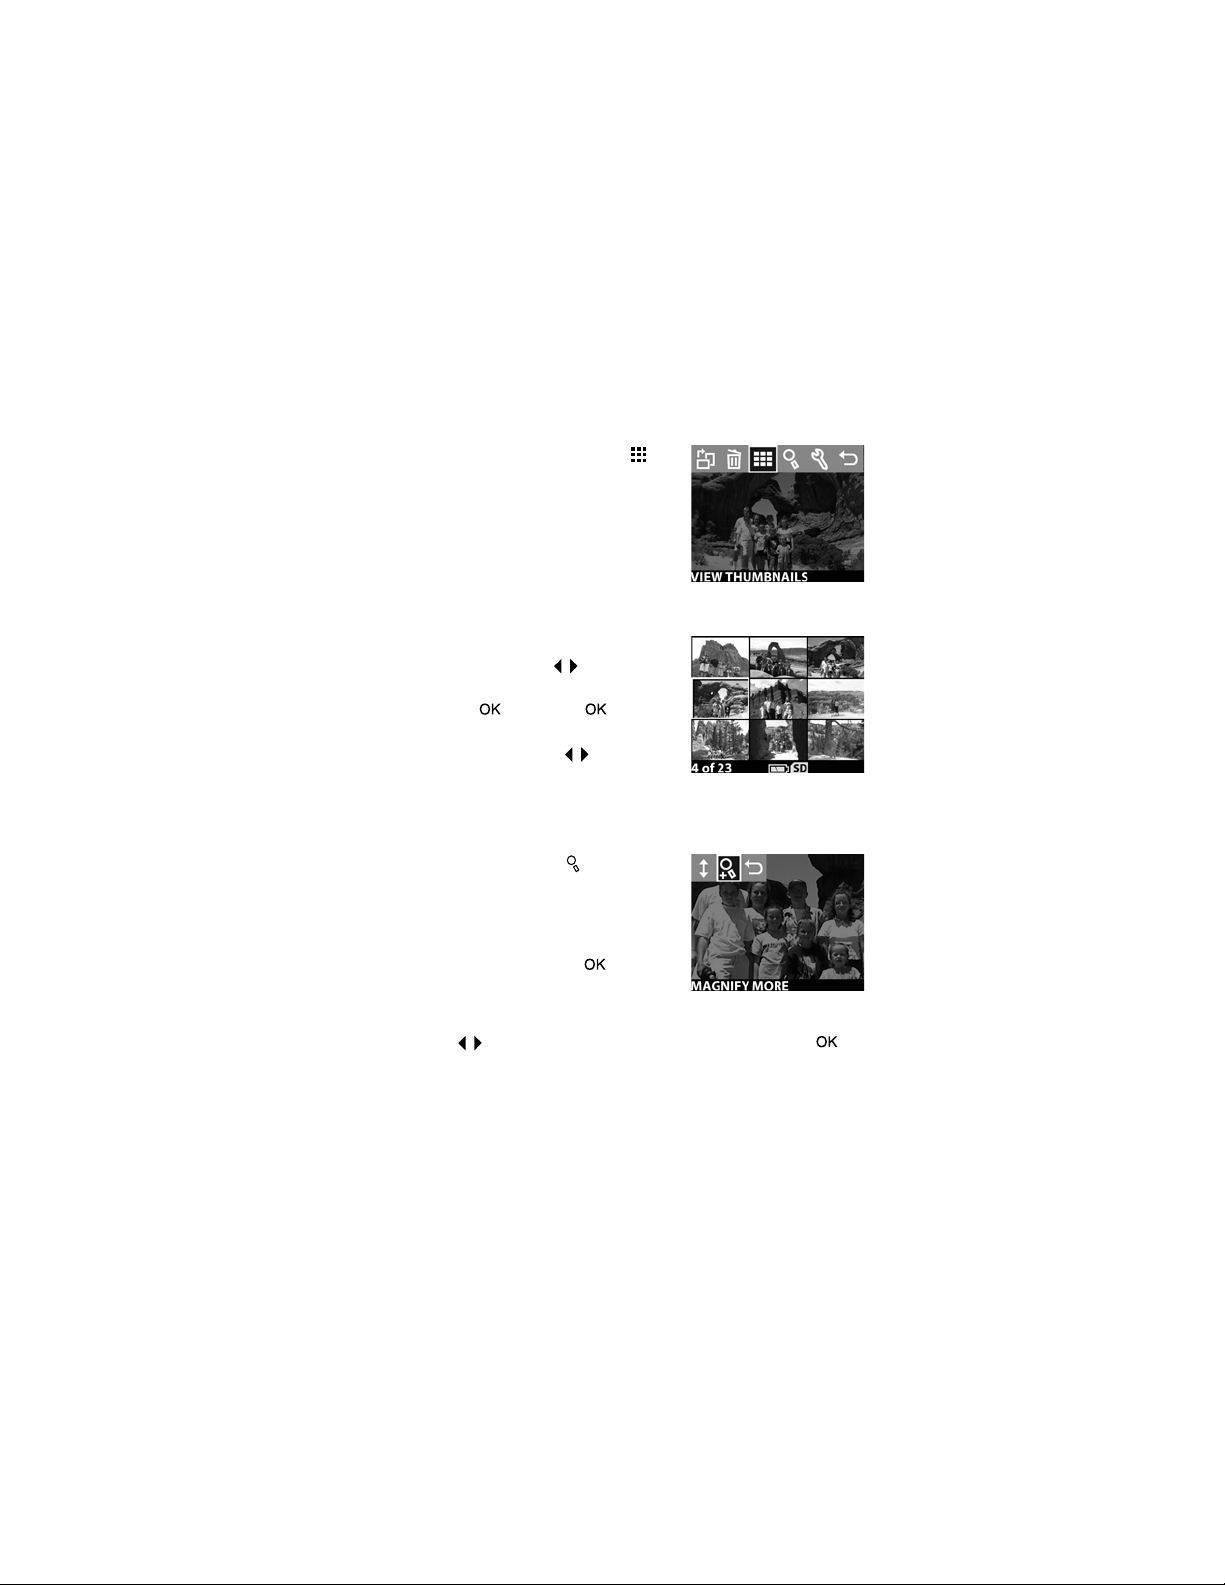
Viewing thumbnail images
Selecting the View Thumbnails
option from the Main
you to view up to nine thumbnail
images at a time on the image
display.
You can scroll through thumbnail
images by using the buttons. To
view an enlarged image, select it, and
then press (pressing also
exits this option). To move to the next
set of images, use the buttons.
View Thumbnails
View ThumbnailsView Thumbnails
Main menu enables
MainMain
Magnifying images
Selecting the Magnify
the Main
Main menu enlarges your images
MainMain
on the image display.
Select an image that you want to
magnify, and then press . A
progress bar is visible on the image
display as the image is magnified.
Use the buttons to scroll the magnified image. Press to
view the Magnify menu. The menu allows you to change the
scroll direction, change the magnification, or exit.
NOTE This option works only on still images, not video clips.
Magnify option from
MagnifyMagnify
3-Using Playback and the Main menu 29
Page 32
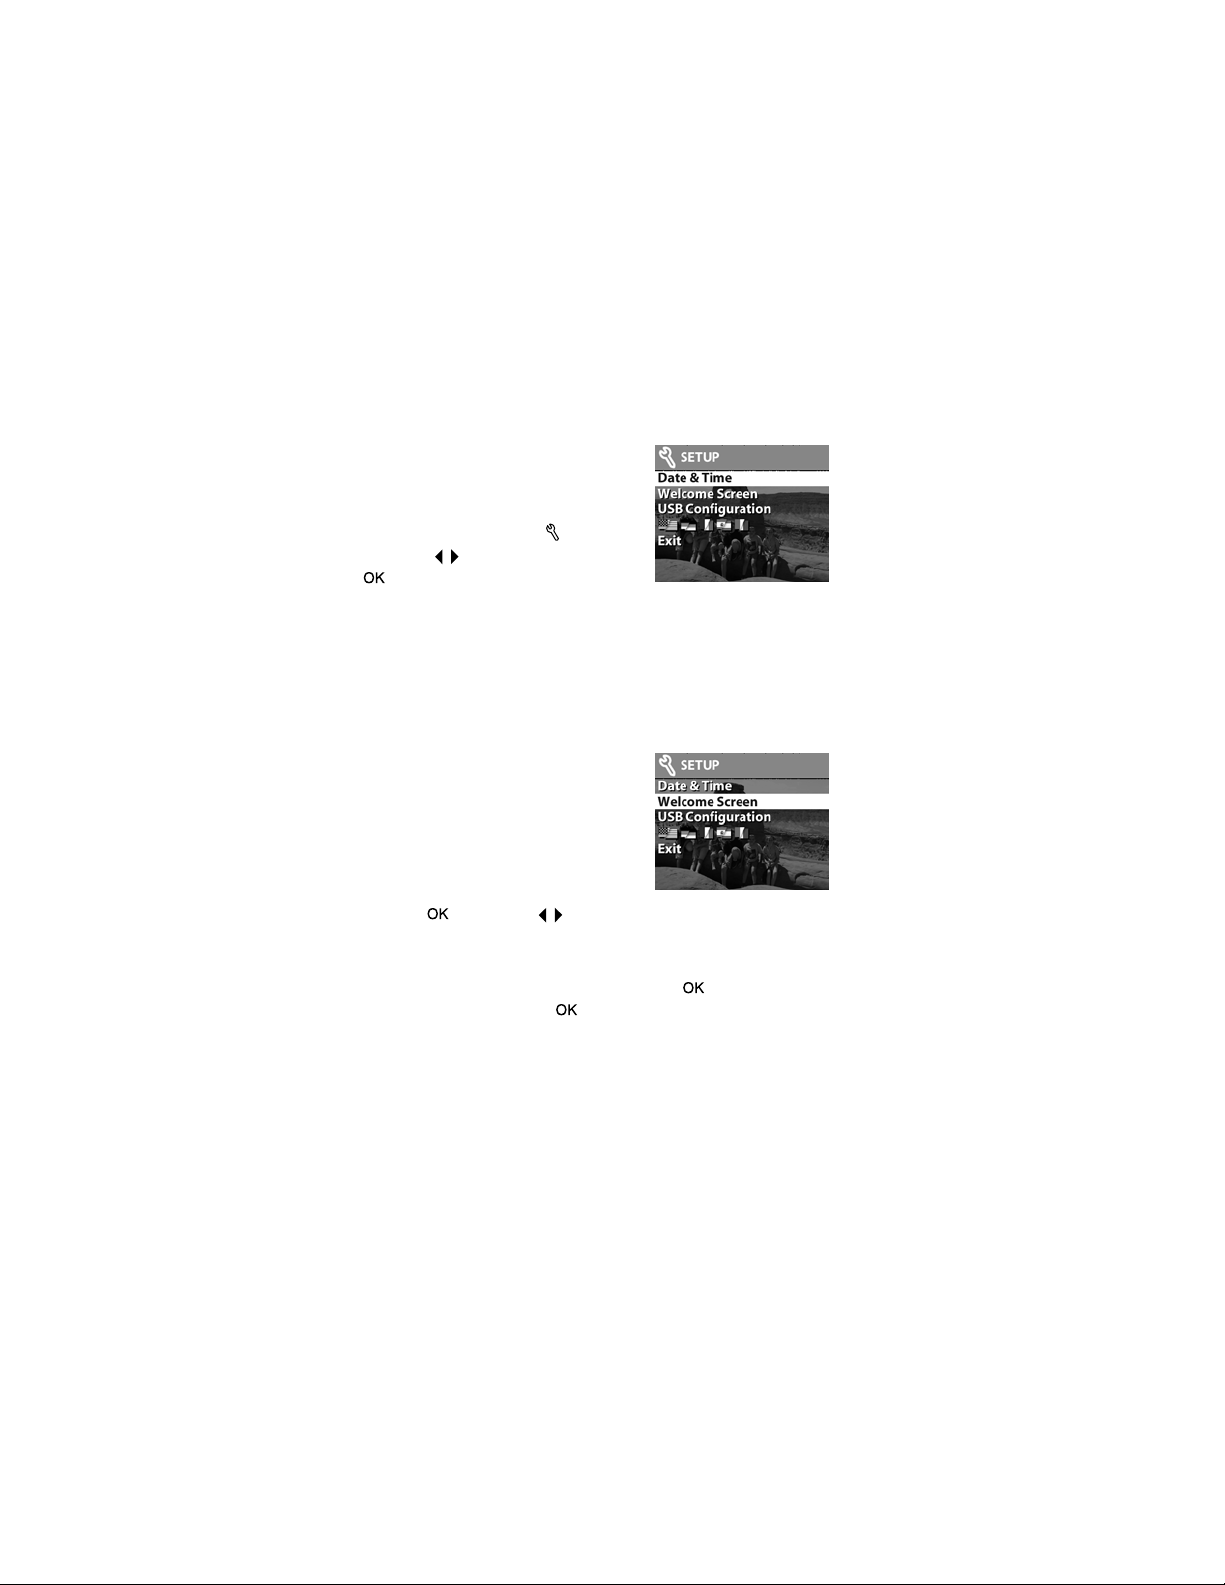
Using the Setup menu
Selecting this option from the Main
menu enables you to configure
preferences on the camera.
Move through the Setup
using the buttons, and then press
to make your selection.
Setup menu by
SetupSetup
Main
MainMain
Date & Time
This setting determines the current date and time for the
camera. For information about setting the date and time, see
Chapter 1:
Chapter 1: Getting started
Chapter 1: Chapter 1:
Getting started on page 7.
Getting startedGetting started
Welcome Screen
This setting determines the image that
appears when the camera is turned
on. You can set any image available
in the camera or the HP logo, which is
the default setting.
To set the Welcome Screen
1 Press or use the buttons to activate Playback mode.
2 Locate the image that you want, and navigate to the Setup
3 Select Welcome Screen
Welcome Screen:
Welcome ScreenWelcome Screen
menu.
Welcome Screen, and then press . Select This
Welcome ScreenWelcome Screen
Image
Image, and then press again.
ImageImage
Setup
Setup Setup
This
This This
30 hp photosmart 620 user’s manual
Page 33

USB Configuration
This setting determines how the camera appears when
connected to a computer. To change the connection setting:
1 Select USB Configuration
2 Using the buttons, make one
USB Configuration in the
USB ConfigurationUSB Configuration
Setup
Setup menu.
SetupSetup
of the following choices and press
.
• Digital Camera
Digital Camera - causes the
Digital Camera Digital Camera
computer to recognize the
camera as a digital camera (Picture Transfer Protocol
(PTP) standard). This is the default setting on the camera.
• Disk Drive
Disk Drive - causes the computer to recognize the camera
Disk DriveDisk Drive
as a disk drive (Mass Storage Device Class (MSDC)
standard). Use this setting for unloading and sharing on
a Macintosh computer or unloading to Windows
operating systems if no HP Photo & Imaging software is
loaded on the computer.
Move Images to Card
This option allows you to move
images from the camera’s internal
memory to a memory card. This
option appears only if you have a
memory card inserted and internal
memory contains at least one image.
3-Using Playback and the Main menu 31
Page 34

If the memory card can store all of the
images from internal memory, you are
prompted to move all images. If the
memory card is running out of space,
you can move only the number of
images that will fit on the card.
If you select Ye s
progress bar will appear on the
image display, showing the progress
of the move. The images previously
stored in internal memory are deleted
after they are moved to the memory
card.
NOTE When a memory card is inserted, only the images on
Yes to move images, a
YesYes
the card can be viewed. If you want to view the images
stored in internal memory, you must first remove the
memory card.
Language
This setting determines the language of the menus and the text
on the image display. For information about how to select a
language for your camera, see Chapter 1:
page 7.
Chapter 1: Getting started
Chapter 1: Chapter 1:
Getting started on
Getting startedGetting started
Exit
This option exits the Setup
Setup menu and returns to Playback mode.
SetupSetup
32 hp photosmart 620 user’s manual
Page 35

Using hp instant
4
share
This camera has an exciting feature called HP Instant Share
This feature lets you select images in the camera to be
automatically processed later when the camera is connected to
your computer or to certain HP printers.
For example, you can select images that you want to have
printed, then connect the camera to the computer or printer,
and the selected images will be printed automatically.
As another example, you can select images in the camera to
be automatically processed by HP’s e-mail service. When the
camera connects to your computer, the selected images are
e-mailed to family, friends, or any e-mail address that you
specify. The details about this are explained later in this
chapter.
When you press the Share
recently taken or reviewed image appears on the image
display, along with any e-mail or print destinations that have
been selected for the image. The buttons allow you to
scroll through the images to see destinations for the other
images in the camera.
Share button on the camera, the most
ShareShare
HP Instant Share.
HP Instant ShareHP Instant Share
4-Using hp instant share 33
Page 36
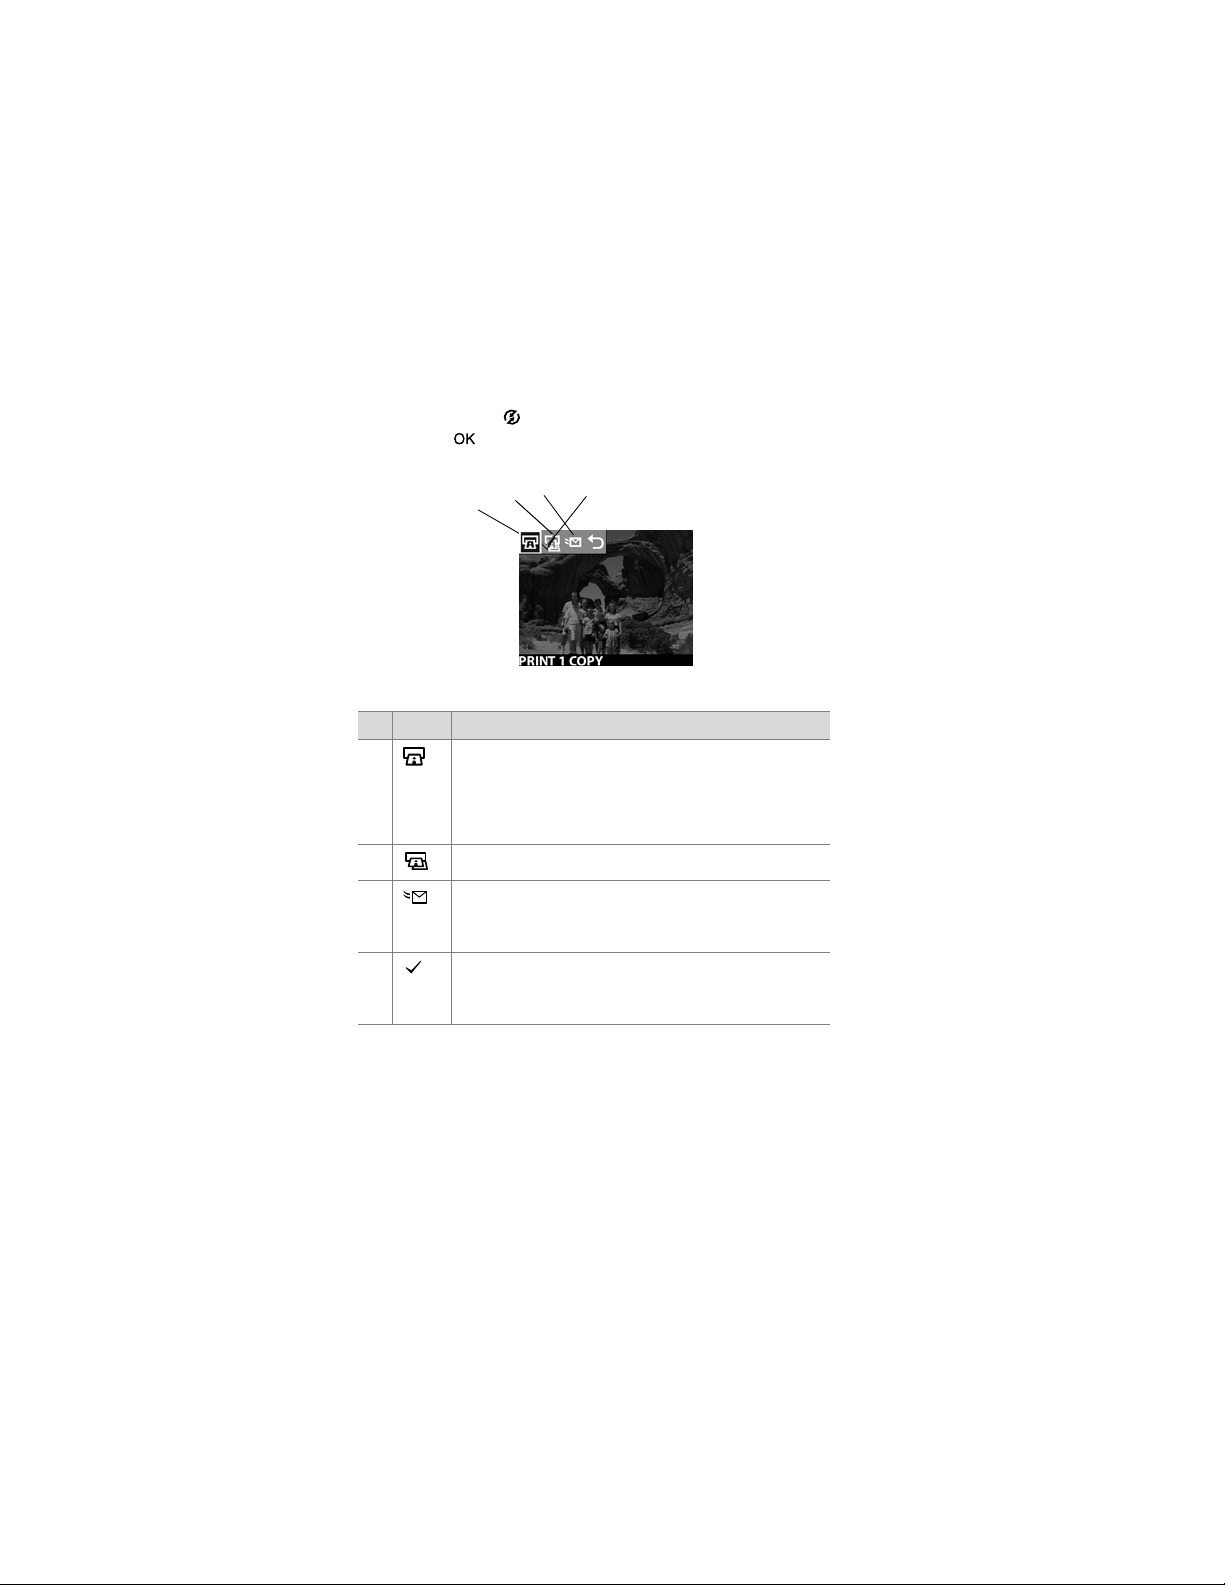
After you press the button, you can activate the Share
Share menu
ShareShare
by pressing . The following table provides information
about the Share
Share menu.
ShareShare
2
1
3
4
# Icon Description
1111 Print 1 copy
Print 1 copy of current image.
Print 1 copyPrint 1 copy
If paper size is 4 by 6 inches or 8.5 by 11 inches,
the picture is printed 4 by 6 inches. If paper size is
A4 or A6, the picture is printed at A6 size.
2222 Print 2 copies
Print 2 copies of current image.
Print 2 copiesPrint 2 copies
3333 E-mail...
E-mail... Lets you add e-mail addresses to the
E-mail...E-mail...
Share
Share menu. This procedure is explained later in
ShareShare
this chapter.
4444 Check mark indicates a destination has been
selected for the currently displayed image. (You
can select more than one destination per image.)
34 hp photosmart 620 user’s manual
Page 37

Using hp instant share to print
pictures
1 Turn on the camera, then press the button.
2 Use the buttons to scroll to the image you want to print.
Video clips cannot be selected for printing.
3 Press to activate the Share
buttons to scroll to the print option you want.
4 Press , and a appears next to that option.
5 Scroll to other images by using the buttons and repeat
steps 3 and 4 to select print options for each image.
6 When you are finished selecting all the images you want to
have printed, press the button.
7 The next time you connect the camera to your computer or a
compatible printer, the images you selected will be
automatically printed. See Chapter 5:
and displaying images
and displaying images on page 39 for information about
and displaying imagesand displaying images
connecting the camera to a computer or printer.
NOTE The Share
Share menu creates a standard Digital Print Order
ShareShare
Format (DPOF) file for print options.
Share menu, then use the
ShareShare
Chapter 5: Unloading, printing,
Chapter 5: Chapter 5:
Unloading, printing,
Unloading, printing, Unloading, printing,
Using the hp instant share
e-mail service
Using HP Instant Share to
HP Instant Share to e-mail images involves three steps:
HP Instant Share to HP Instant Share to
1 Adding e-mail addresses to the Share
(using your computer and the camera together).
2 Selecting images to be e-mailed (using the Share
the camera).
3 Connecting the camera to your computer to send selected
images.
Share menu on the camera
ShareShare
Share menu on
ShareShare
4-Using hp instant share 35
Page 38

Adding, modifying, and removing
e-mail addresses
NOTE You will need an internet connection to complete this
procedure.
1 Open the HP Director
select your camera in the Select Device
Settings
Settings menu, click Camera Share Menu Setup
Settings Settings
2 Turn on the camera and connect it to your computer (by
using a USB cable or an optional HP Camera Dock).
3 On the computer, click Retrieve from Camera
4 In the screen called Modify Share Menu
mail
mail is visible above the Add...
mailmail
button.
5 If you are using a Macintosh computer, skip to step 7. If you
are using a computer running Windows, you will be asked
to sign in to HP’s Passport program. HP Passport allows you
to use HP’s free e-mail service and other services that might
be available in the future. The first time you see this screen,
you will need to register as a new user. Follow the on-screen
instructions for doing that.
6 Once you have successfully registered, sign in to the HP
Passport program, and then the Photo E-mail Setup
will appear. Here, you can enter an e-mail address and
specify how you want it to appear in the camera’s Share
menu. You can also enter a subject and body text to go with
the e-mail that will be sent to that address. After completing
the form, click Next
click Finish
HP Director in the HP Photo & Imaging software,
HP DirectorHP Director
Select Device menu, then in the
Select DeviceSelect Device
Camera Share Menu Setup.
Camera Share Menu SetupCamera Share Menu Setup
Retrieve from Camera.
Retrieve from CameraRetrieve from Camera
Modify Share Menu, verify that Photo E-
Modify Share MenuModify Share Menu
Add... button, then click the Add...
Add...Add...
Photo E-mail Setup screen
Photo E-mail SetupPhoto E-mail Setup
Next. In the confirmation screen that appears,
NextNext
Finish.
FinishFinish
Photo E-
Photo E-Photo E-
Add...
Add...Add...
Share
ShareShare
36 hp photosmart 620 user’s manual
Page 39

7 Your newly added e-mail destination should now appear in
the Modify Share Menu
Modify Share Menu screen (in the Current Share Menu
Modify Share MenuModify Share Menu
section). To add additional e-mail addresses to the camera’s
Share
Share menu, repeat steps 4-6. You will not need to sign in to
ShareShare
the HP Passport program again.
8 When you have finished adding e-mail addresses, click on
Save to Camera
Save to Camera to add the new addresses to the camera’s
Save to CameraSave to Camera
Share
Share menu. When the computer confirms that the
ShareShare
addresses were saved to your camera, disconnect the
camera from the computer, and press the button to view
the new e-mail destinations in the Share
9 You are now ready to select images to be e-mailed. See the
next section for how to do this.
NOTE You can also start the process described above from
your camera, by selecting E-mail...
menu.
E-mail... on the Share
E-mail...E-mail...
Current Share Menu
Current Share MenuCurrent Share Menu
Share menu.
ShareShare
Share
ShareShare
Selecting images to be e-mailed
1 Turn on the camera, then press the button.
2 Use the buttons to scroll to an image you want to
e-mail. Video clips cannot be selected for e-mail.
3 Press to activate the Share
buttons to scroll to the e-mail destination that you want to
select.
4 Press to select the e-mail destination, and a check mark
appears next to that selection. (You can select more than
one e-mail destination or print option for an image.)
5 Scroll to other images by using the buttons and repeat
steps 3 and 4 to select e-mail destinations for each image.
6 When you are finished selecting all the images you want to
e-mail, press the button.
Share menu, then use the
ShareShare
4-Using hp instant share 37
Page 40

7 The next time you connect the camera to your computer,
images are unloaded to the computer, and the images
selected for e-mail will be sent to their respective
destinations.
The way in which the images are e-mailed works differently on
Windows and Macintosh computers.
Windows
Images are not e-mailed directly to anyone. Rather, a message
is sent to each e-mail address that you selected in the Share
menu. The message contains a thumbnail of each of the
images that were selected for that address, as well as a link to
a web page where the recipient can view the images. From that
web page, the recipient can do things like reply to you or print
the image. This makes it easy for people who use different
e-mail programs to be able to see your images without the
difficulty of dealing with e-mail attachments.
Share
ShareShare
Macintosh
Images are e-mailed directly to recipients using the default
e-mail program on your computer.
38 hp photosmart 620 user’s manual
Page 41
Unloading, printing,
5
and displaying
images
Once you have taken pictures, you can unload them from your
camera to a computer, print them directly to a printer, or
display them on a TV (using the optional HP Camera Dock).
Unloading to a computer
NOTE You can also use the optional HP Camera Dock to do
this task. See Appendix B:
details.
NOTE If you are using a Macintosh computer, switch the
camera to Disk Drive
found in the Setup
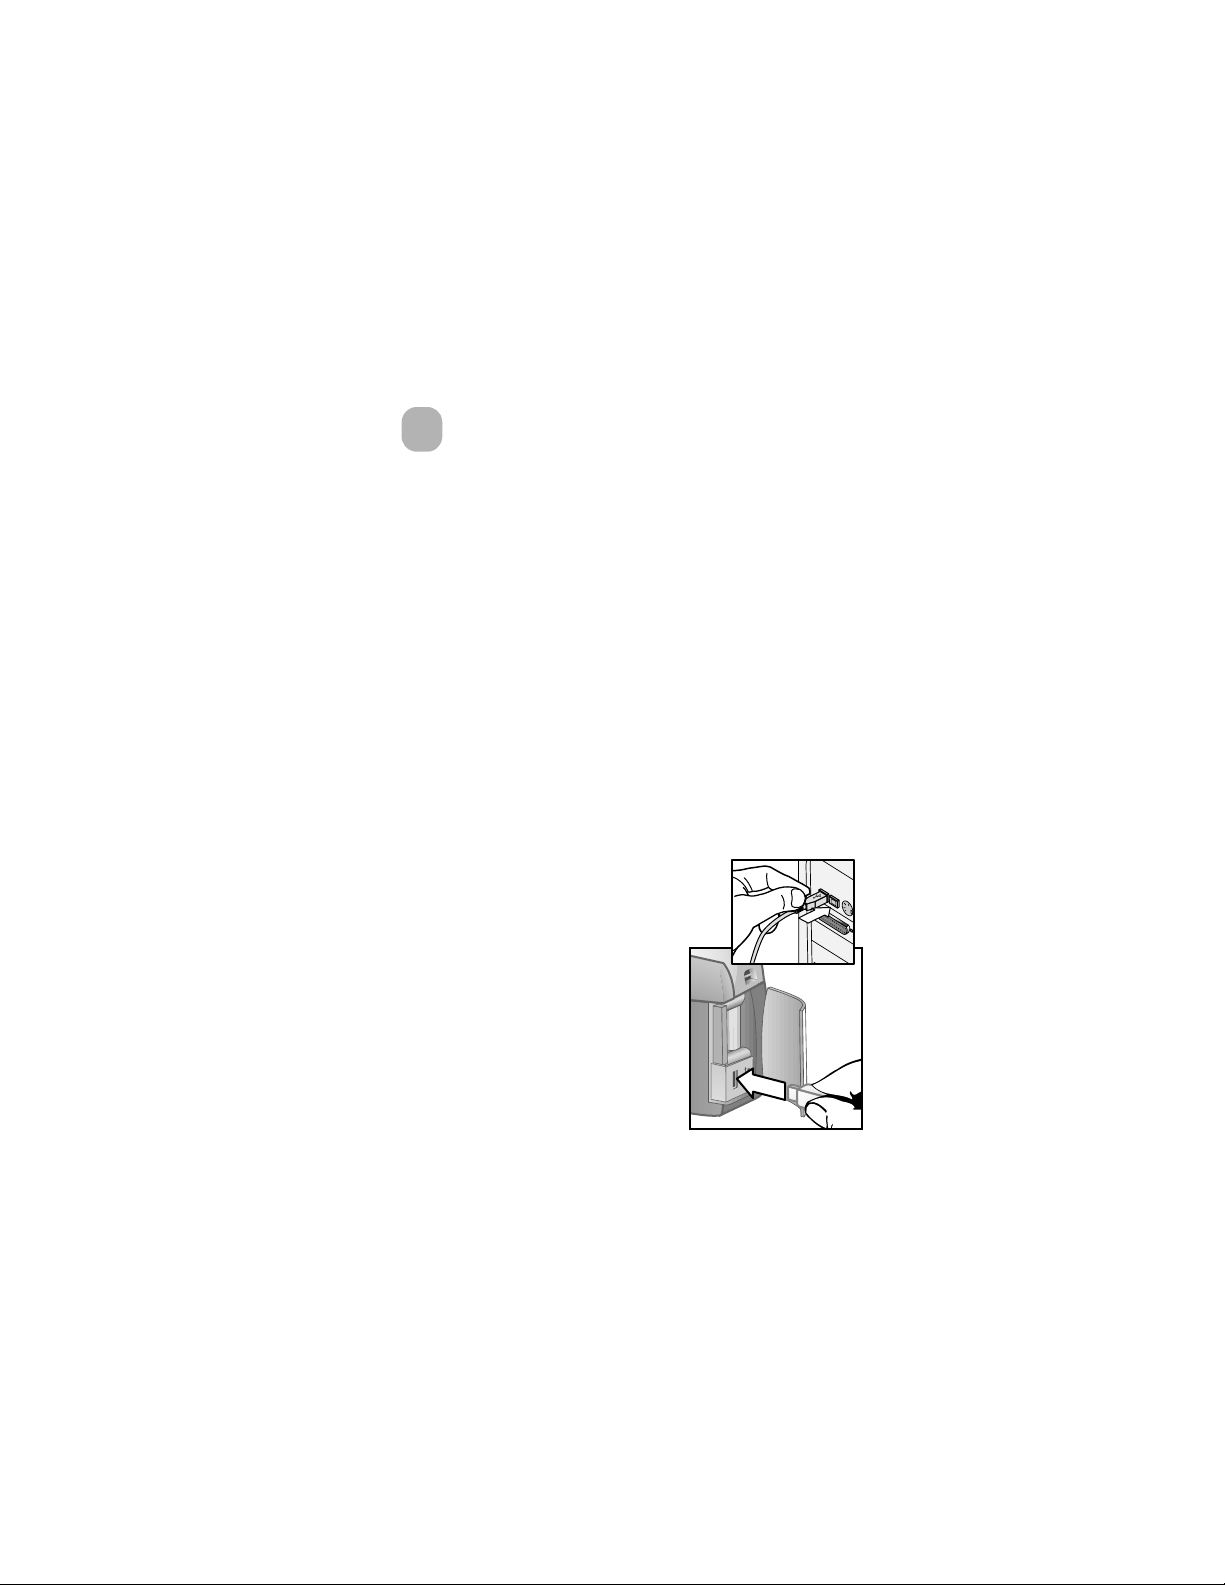
1 Your camera came with a special
USB cable for connecting the
camera to a computer. Connect
the larger end of that USB cable to
the computer.
2 Open the memory card door on
the side of the camera and
connect the small end of the USB
cable to the USB connector on the
camera.
Appendix B: Camera dock
Appendix B: Appendix B:
Disk Drive in the USB Configuration
Disk DriveDisk Drive
Setup menu.
SetupSetup
Camera dock on page 65 for
Camera dockCamera dock
USB Configuration menu
USB ConfigurationUSB Configuration
5-Unloading, printing, and displaying images 39
Page 42

3 Turn on the camera. The HP Image Unload software will
launch on your computer, and the images in the camera will
automatically unload to the computer. If there were any
images in the camera that were selected in the Share
for printing or e-mail, those actions are started after the
images have been unloaded to the computer.
4 When the unload screen on the computer says Finished
your images have been saved and shared. You can now
disconnect the camera from the computer.
NOTE To unload the camera images to a computer that does
not have the HP Photo & Imaging software installed on it,
switch the camera to Disk Drive
menu found in the Setup
appear as another disk drive on the computer.
Disk Drive in the USB Configuration
Disk DriveDisk Drive
Setup menu. This allows the camera to
SetupSetup
Share menu
ShareShare
Finished,
FinishedFinished
USB Configuration
USB ConfigurationUSB Configuration
Printing images
NOTE You can also use the optional HP Camera Dock to do
this task. See Appendix B:
To print images that have been unloaded to the computer, you
can use the HP Photo & Imaging software that was shipped
with the camera.
You can also connect the camera directly to any HP DeskJet or
Photosmart printer that has a USB connection, then print
images selected from the camera’s Share
in the camera.
Appendix B: Camera dock
Appendix B: Appendix B:
Camera dock on page 65.
Camera dockCamera dock
Share menu or all images
ShareShare
40 hp photosmart 620 user’s manual
Page 43
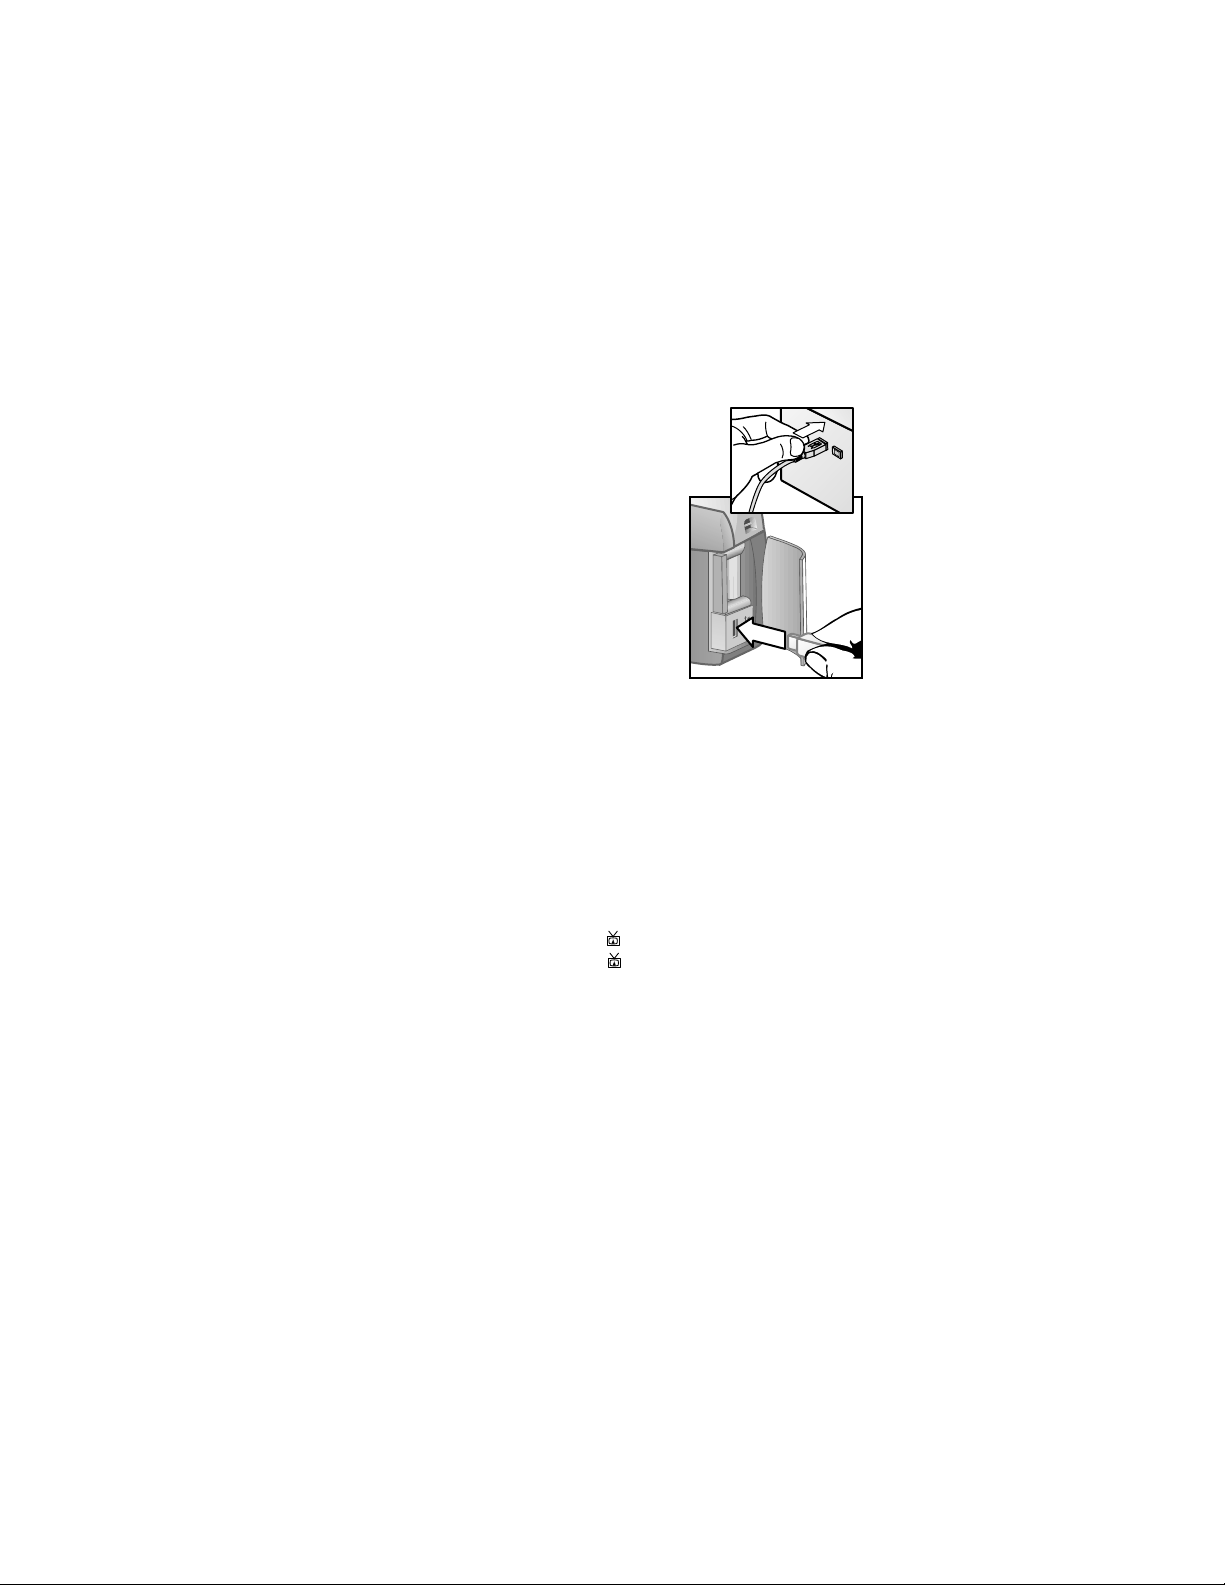
1 Your camera came with a special
USB cable for connecting the
camera directly to a printer.
2 Connect the square end of the USB
cable to the printer.
3 Open the memory card door on
the side of the camera and
connect the small end of the USB
cable to the USB connector on the
camera.
4 Adjust the settings in the Print
Setup
Setup menu on the camera to
SetupSetup
complete the printing process.
Print
Print Print
Displaying images on a TV
Images in your camera can easily be displayed as a slideshow
on almost any TV. You must use the optional HP Camera Dock
to do this task. See Appendix B:
Displaying a slideshow
Once the camera is connected to the TV with the optional HP
Camera Dock, you are ready to start.
1 Turn on the camera. The button on the Camera Dock
should light up. Press the button to display the Slideshow
menu. The menu choices are described in the following
table.
Appendix B: Camera dock
Appendix B: Appendix B:
Camera dock on page 65.
Camera dockCamera dock
Slideshow
SlideshowSlideshow
5-Unloading, printing, and displaying images 41
Page 44

Option Description
NTSC Television Used mostly in North America and
Japan
PAL Television Used mostly in Europe and Asia
5 Sec/Image Displays each image for 5 seconds
10 Sec/Image Displays each image for 10 seconds
Manual Advance Waits for you to advance each image
using the buttons on the camera
Begin Starts the slideshow
2 To change an option in the Slideshow
Slideshow menu, highlight the
SlideshowSlideshow
selection and press . Each time is pressed, the next
option is selected. All selections except Begin
Begin are stored in
BeginBegin
the camera and become the defaults until changed.
3 To start the slideshow, select Begin
Begin. The camera’s image
BeginBegin
display turns off and the slideshow starts on the TV. The
slideshow begins with the image last taken or reviewed and
displays each image in sequence. When the end is reached
the sequence moves to the beginning and continues. Video
clips are always played to completion, regardless of the rate
you specified in the Slideshow
Slideshow menu.
SlideshowSlideshow
4 To exit the slideshow, press the button on the dock or turn
off the camera.
At any time during the slideshow, you can press the
buttons to move forward or backward. Pressing and holding
these keys auto repeats similar to Playback mode.
NOTE The Main
Main menu and Share
MainMain
Share menu are available during
ShareShare
the slideshow. You can rotate, delete, view thumbnails,
magnify, share, etc. during the slideshow.
42 hp photosmart 620 user’s manual
Page 45

Troubleshooting and
6
support
Problems and solutions
Problem Possible cause Solution
The camera
The camera
The camera The camera
does not turn
does not turn
does not turn does not turn
on.
on.
on.on.
The batteries
are not
functioning
correctly.
The HP AC
adapter is not
functioning
correctly.
The HP AC
adapter is
connected to
the camera,
but it is not
connected to a
power outlet.
Use only photo-quality AA
lithium, alkaline, or
NiMH batteries.
Ensure the batteries are inserted
correctly.
The charge in the batteries can
be low or completely drained.
Try inserting new or recharged
batteries.
Ensure that the HP AC adapter is
not damaged or defective. If it
appears undamaged, plug it into
an electrical outlet with power.
If you want to use battery power,
disconnect the HP AC adapter
from the camera. If you want to
use AC power, connect the HP
AC adapter to a working
electrical outlet.
6-Troubleshooting and support 43
Page 46

Problem Possible cause Solution
The camera
The camera
The camera The camera
does not
does not
does not does not
respond when
respond when
respond when respond when
I press a
I press a
I press a I press a
button.
button.
button.button.
The camera
The camera
The camera The camera
does not take
does not take
does not take does not take
a picture when
a picture when
a picture when a picture when
I press the
I press the
I press the I press the
Shutter button.
Shutter button.
Shutter button.Shutter button.
The camera is
off.
The camera is
connected to a
computer.
The batteries
are drained.
The camera
has stopped
operating.
You d id not
press the
Shutter
Shutter button
ShutterShutter
hard enough.
Turn on the camera.
The camera buttons other than
the button do not respond
when the camera is connected to
a computer.
Replace or recharge the
batteries.
Remove and reinsert the
batteries. Replace the batteries if
necessary.
Press the Shutter
way down.
Shutter button all the
Shutter Shutter
44 hp photosmart 620 user’s manual
Page 47

Problem Possible cause Solution
I replace the
I replace the
I replace the I replace the
camera
camera
camera camera
batteries
batteries
batteries batteries
frequently.
frequently.
frequently.frequently.
The wrong
The wrong
The wrong The wrong
date and/or
date and/or
date and/or date and/or
time is shown.
time is shown.
time is shown.time is shown.
Extended
image display
use and
excessive use
of flash
consume a lot
of battery
power.
The NiMH
batteries you
are using were
recharged
incorrectly.
The batteries
died or were
removed from
the camera for
more than 10
minutes.
Use an HP AC adapter to power
the camera when you are using
the image display for an
extended period of time and
when you are unloading several
images to your computer.
Use the flash only when needed.
Do not use ordinary alkaline
batteries. Purchase higher-grade
batteries, such as “ultra” or
“premium” grade alkaline or
photo-lithium batteries, or switch
to rechargeable NiMH batteries.
You must recharge all NiMH
batteries after fully draining
them four times for the batteries
to reach their optimum capacity
and performance.
Reset the date and time by using
the camera menus.
6-Troubleshooting and support 45
Page 48

Problem Possible cause Solution
A long delay
A long delay
A long delay A long delay
occurs
occurs
occurs occurs
between the
between the
between the between the
time I press the
time I press the
time I press the time I press the
Shutter button
Shutter button
Shutter button Shutter button
and the
and the
and the and the
camera takes
camera takes
camera takes camera takes
a picture.
a picture.
a picture.a picture.
My image is
My image is
My image is My image is
blurry.
blurry.
blurry.blurry.
The camera
needs time to
focus and set
exposure.
The flash is
recharging.
The self-timer
is activated.
The camera is
still saving the
last picture you
took.
You r subject
was too close
to the camera
lens.
You move d the
camera while
you took the
picture.
The light is low
and the flash is
turned off.
Press the Shutter
down to let the camera focus,
then when you press all the way
down, there is much less delay.
Wait until the orange viewfinder
light stops blinking before taking
another picture.
Turn the self-timer off.
Wait a few seconds for the
camera to finish processing the
image, and then press the
Shutter
Shutter button.
ShutterShutter
The camera can store up to three
images in memory at a time.
Do not try to get closer than the
camera’s minimum focus range
of 20 cm (approximately 8
inches).
Hold the camera steady as you
press the Shutter
tripod.
In dim light, the camera requires
longer exposure. Use a tripod to
hold the camera steady, improve
lighting conditions, or use the
flash.
Shutter button halfway
ShutterShutter
Shutter button or use a
Shutter Shutter
46 hp photosmart 620 user’s manual
Page 49

Problem Possible cause Solution
My image is
My image is
My image is My image is
too dark.
too dark.
too dark.too dark.
There was not
enough light.
The shutter
speed was too
fast.
The flash was
on, but the
subject was
too far away.
A light shone
behind the
subject.
You r finger
blocked the
flash.
Before taking the picture, press
the Shutter
Shutter button halfway down
ShutterShutter
to adjust focus and exposure
automatically. Use the Flash Off
setting and hold the camera
steady. Wait for natural lighting
conditions to improve or add
indirect lighting.
Use the Flash Off
a longer exposure, and hold the
camera steady (or use a tripod).
Make sure your subject is within
3 meters (approximately 10 feet)
of the camera when you take the
picture using the flash.
Use the Flash On
brighten the subject when there
is a bright light such as the sun
or a window behind your
subject.
Be sure to move your fingers
away from the flash when you
take a picture.
Flash Off
Flash Off Flash Off
Flash Off setting to take
Flash OffFlash Off
Flash On setting to
Flash OnFlash On
6-Troubleshooting and support 47
Page 50

Problem Possible cause Solution
My image is
My image is
My image is My image is
too bright.
too bright.
too bright.too bright.
The flash
provided too
much light.
A natural or
artificial
source other
than the flash
provided too
much light.
You were too
close to the
subject to use
the flash.
Change the flash setting to Flash
Off
Off.
OffOff
Try taking the picture from a
different angle. Avoid pointing
the camera directly toward a
bright light or reflective surface
on a sunny day.
Move back from the subject or
set the flash to Flash Off
take the picture again.
Flash Off and
Flash OffFlash Off
Flash
Flash Flash
48 hp photosmart 620 user’s manual
Page 51

Problem Possible cause Solution
When I
When I
When I When I
connect the
connect the
connect the connect the
camera to my
camera to my
camera to my camera to my
computer, the
computer, the
computer, the computer, the
software says
software says
software says software says
it cannot find
it cannot find
it cannot find it cannot find
the camera.
the camera.
the camera.the camera.
When I
When I
When I When I
connect the
connect the
connect the connect the
camera to a
camera to a
camera to a camera to a
Macintosh
Macintosh
Macintosh Macintosh
computer, I do
computer, I do
computer, I do computer, I do
not get a Disk
not get a Disk
not get a Disk not get a Disk
Drive icon on
Drive icon on
Drive icon on Drive icon on
my desktop.
my desktop.
my desktop.my desktop.
The camera is
turned off.
The cable is
not connected
correctly.
The camera is
connected to
the computer
through a USB
hub and your
USB hub is not
compatible
with the
camera.
The camera is
not working
correctly.
The USB
USB
USB USB
Configuration
Configuration
ConfigurationConfiguration
setting is not
set to Disk
Disk
Disk Disk
Drive
Drive.
DriveDrive
Turn on the camera.
Make sure that the cable is firmly
connected at both ends.
Connect the camera directly to a
USB port on the computer.
Connect the camera to a USBenabled HP DeskJet or
HP Photosmart printer and print
an image. This will verify that the
image, memory, USB connection
to the camera, and USB cable
are functioning correctly.
Change the USB Configuration
setting to Disk Drive
USB Configuration
USB Configuration USB Configuration
Disk Drive.
Disk DriveDisk Drive
6-Troubleshooting and support 49
Page 52

Error messages
You might receive error messages on the camera’s image
display or on your computer screen.
Error messages on the camera
Message Possib le cause Solution
BATTERIES
BATTERIES
BATTERIES BATTERIES
DEPLETED
DEPLETED
DEPLETED DEPLETED
Camera is
Camera is
Camera is Camera is
shutting down
shutting down
shutting downshutting down
Batteries are too
Batteries are too
Batteries are too Batteries are too
low for Preview
low for Preview
low for Previewlow for Preview
Batteries are too
Batteries are too
Batteries are too Batteries are too
low to record a
low to record a
low to record a low to record a
video clip
video clip
video clipvideo clip
Unsupported card
Unsupported card Unusable or
Unsupported cardUnsupported card
The card requires
The card requires
The card requires The card requires
formatting
formatting
formattingformatting
Battery power is
too low to
continue
operation.
Battery power is
too low to use
Preview mode.
Battery power is
too low to record
a video clip.
corrupt memory
card is detected.
The memory
card needs to be
formatted.
Replace batteries, use an
optional HP AC adapter,
or recharge batteries by
using an optional Camera
Dock.
Switch to Playback mode
or continue taking pictures
in Display Off mode.
Replace batteries, use an
optional HP AC adapter,
or recharge batteries by
using an optional Camera
Dock.
Replace or recharge
batteries, or use an
optional HP AC adapter
during video recording.
Ensure that the memory
card is the proper type for
your camera.
Press to display the
Format Card
Format Card option in the
Format Card Format Card
Delete
Delete menu. This will
DeleteDelete
delete all data on the card.
50 hp photosmart 620 user’s manual
Page 53

Message Possible cause Solution
The card is locked
The card is locked The memory
The card is lockedThe card is locked
card is writeprotected.
The card is too full
The card is too full
The card is too full The card is too full
to move any
to move any
to move any to move any
images
images
imagesimages
Invalid date
Invalid date The date was set
Invalid dateInvalid date
Unsupported
Unsupported
Unsupported Unsupported
image file
image file
image fileimage file
Memory is too full
Memory is too full
Memory is too fullMemory is too full
OR
OR
OROR
The card is too full
The card is too full
The card is too fullThe card is too full
Unknown USB
Unknown USB
Unknown USB Unknown USB
device
device
devicedevice
Unsupported
Unsupported
Unsupported Unsupported
printer
printer
printerprinter
There is
insufficient room
on the memory
card to store
images.
incorrectly.
You are t rying to
magnify, rotate,
or print an
image file that
was not created
by the camera.
There is
insufficient
memory to rotate
an image.
The connected
USB device is not
a printer.
The printer is an
unsupported
device.
Press to cancel the
request. Unlock the
memory card or insert a
new one.
Unload images from the
memory card to your
computer, then delete all
images on the memory
card.
Enter the correct date.
You can only view or
delete images taken by a
different digital camera.
Unload the images from
the camera, delete
unwanted pictures, or
replace the memory card
with a new one.
Disconnect the current USB
connection and connect to
your printer.
Disconnect the USB cable,
and connect to an HP
printer, such as
HP Photosmart or
HP DeskJet.
6-Troubleshooting and support 51
Page 54

Message Possib le cause Solution
Unable to
Unable to
Unable to Unable to
communicate with
communicate with
communicate with communicate with
printer
printer
printerprinter
Disengage photo
Disengage photo
Disengage photo Disengage photo
tray
tray
traytray
Printer top cover
Printer top cover
Printer top cover Printer top cover
is open
is open
is openis open
Incorrect or
Incorrect or
Incorrect or Incorrect or
missing print
missing print
missing print missing print
cartridge
cartridge
cartridgecartridge
Printer has a
Printer has a
Printer has a Printer has a
paper jam
paper jam
paper jampaper jam
Printer is out of
Printer is out of
Printer is out of Printer is out of
paper
paper
paperpaper
Printing canceled
Printing canceled The print job has
Printing canceledPrinting canceled
The printer has a
problem.
The selected
paper size
cannot be used
with the printer
photo tray.
The printer is
open.
Ensure that you
have the correct
printer cartridge.
There is a paper
jam or the
printer carriage
has stalled.
Your printer is
out of paper.
been canceled.
Check the printer.
Disengage the printer
photo tray.
Close the top cover of the
printer.
Install a new printer
cartridge, turn the printer
off, then turn it back on.
Turn off the printer. Clear
the paper jam, and then
turn on the printer.
If OK
OK is visible on the
OKOK
image display, load paper
and then press .
Otherwise, load paper,
and then press OK
Continue
Continue on your printer.
ContinueContinue
Press on the camera.
Complete the print request
again.
OK or
OKOK
NOTE If you see a three-digit error number on the image
display, turn the camera off. If an error number reappears
when you turn the camera on, record that error number
and call customer support.
52 hp photo sma rt 62 0 user’s manual
Page 55

Error messages on the computer
Message Possible cause Solution
Connection
Connection
Connection Connection
between the
between the
between the between the
imaging device
imaging device
imaging device imaging device
and computer
and computer
and computer and computer
failed
failed
failedfailed
The camera
might be
connected to a
computer
through a USB
hub.
Make sure the camera is
on, try connecting the
camera directly to the
computer, or disconnect
other devices attached to
the hub.
Getting assistance
Finding help on the web
HP product support
Visit www.hp.com/cposupport/loc/regional.html
www.hp.com/cposupport/loc/regional.html, select your
www.hp.com/cposupport/loc/regional.htmlwww.hp.com/cposupport/loc/regional.html
language, and then type your camera model in the “quick
find” box to find information about setting up and using your
camera, downloading drivers, solving a problem, ordering,
and warranty information.
HP photosmart website
Visit www.hp.com/photosmart
www.hp.com/photosmart for tips on using your camera
www.hp.com/photosmartwww.hp.com/photosmart
more effectively and creatively as well as HP digital camera
driver updates and software.
HP accessibility website
Visit www.hp.com/hpinfo/community/accessibility/prodserv/
www.hp.com/hpinfo/community/accessibility/prodserv/
www.hp.com/hpinfo/community/accessibility/prodserv/www.hp.com/hpinfo/community/accessibility/prodserv/
if you have a disability and need help.
6-Troubleshooting and support 53
Page 56

Contacting hp customer support
In addition to the Web, you can contact HP by telephone or
mail for support and service for your camera. Prices,
availability, and hours of support are subject to change without
notice.
How hp can help
The HP support hotline can help resolve problems with setup,
installation, configuration, and operation. For help with non-HP
hardware or software, please contact the manufacturer.
Before you call
Review troubleshooting tips.
Have the following information ready before you call:
z serial number (found on the bottom of your camera)
z product name
z date of purchase
Obtaining support in the United
States
Free telephone support for one year
Within one year of your purchase, telephone support is
provided to you free of charge. If this is a long distance call for
you, long distance charges will apply.
Call (1) (208) 323-2551.
Our support staff is available from 6 am to 10 pm Mountain
Time, Monday through Friday, or 9 am to 4 pm Saturday.
54 hp photosmart 620 user’s manual
Page 57

If you think your HP product might need service, call
HP Customer Support, which can help determine if service is
required. Or, visit www.hp.com/cpso-support/guide/psd/
repairhelp.html
repairhelp.html for the nearest sales and service office.
repairhelp.htmlrepairhelp.html
www.hp.com/cpso-support/guide/psd/
www.hp.com/cpso-support/guide/psd/www.hp.com/cpso-support/guide/psd/
After the first year
Call (1) (208) 323-2551.
A fee of $25.00 per call (U.S.) will be charged to your credit
card. Charges begin only when you connect with a support
technician.
Upgraded warranty options
You can select one of the following upgraded warranty options
(available in the U.S. only):
z Standard Next Day Exchange
z Accidental Damage Protection with Next Day Exchange
Upgrade your standard factory warranty to three years with
the HP SupportPack. Service coverage begins on product
purchase date and the pack must be purchased within the first
180 days of product purchase. HP will determine the hardware
service offering based upon the outcome of system self-test
programs run by the customer through the initial call to the HP
Customer Care Center. If during your technical support call it is
determined that your product needs replacement, HP will ship
you this replacement product next business day free of charge.
Optional Accidental Damage Protection is also available. This
warranty upgrade protects against accidental breakage such
as spills, drops, or falls. Both of these warranty upgrades offer
maximized uptime and productivity, the convenience of doorto-door pickup with delivery, packaging and freight prepaid by
HP.
6-Troubleshooting and support 55
Page 58

For more information call 1-888-999-4747 or visit
www.homeandoffice.hp.com
www.homeandoffice.hp.com and select “warranty upgrades”
www.homeandoffice.hp.comwww.homeandoffice.hp.com
under “product support.”
Obtaining support worldwide
Telephone support is free for one year in Asia and the South
Pacific, and for 30 days in the Middle East and Africa.
The information contained in this document and the applicable
conditions for HP phone support are subject to change without
notice. Please check for the latest information and conditions at
www.hp.com/cposupport/loc/regional.html
www.hp.com/cposupport/loc/regional.html.
www.hp.com/cposupport/loc/regional.htmlwww.hp.com/cposupport/loc/regional.html
Alternatively, you can ask your dealer or call HP at the phone
number listed in this document. For English support in Europe,
contact +44 (0) 207 512 52 02.
Algeria
Algeria
+212 22404747
AlgeriaAlgeria
Argentina
Argentina
ArgentinaArgentina
Australia
Australia
AustraliaAustralia
Austria
Austria
AustriaAustria
Belgium
Belgium
BelgiumBelgium
Brazil
Brazil
Brazil Brazil
São Paulo)
Canada
Canada
CanadaCanada
877 621 4722 (for support after the warranty period)
Chile
Chile
ChileChile
China
China
ChinaChina
Colombia
Colombia
ColombiaColombia
Czech Republic
Czech Republic
Czech RepublicCzech Republic
Denmark
Denmark
DenmarkDenmark
Egypt
Egypt
Egypt Egypt
Finland
Finland
FinlandFinland
0810 555 5520
+63 (3) 8877 8000 (or local (03) 8877 8000)
+0810 00 6080
Dutch: +32 (0)2 626 8806 French: +32 (0)2 626 8807
3747 7799 (Grande São Paulo) 0800 157 751 (outside Grande
905 206 4663 (for support during the warranty period)
800 360 999 (Post-sales Home Computing)
+86 (10) 6564 5959
+9 800 114 726
+42 (0)2 6130 7310
+45 39 29 4099
02 532 5222
+358 (0)203 47 288
56 hp photosmart 620 user’s manual
Page 59

France
France
+33 (0)8 92 69 60 22 (Euro 0.34/min)
FranceFrance
Germany
Germany
GermanyGermany
Greece
Greece
GreeceGreece
Guatemala
Guatemala
Guatemala Guatemala
Hong Kong SAR
Hong Kong SAR
Hong Kong SAR Hong Kong SAR
Hungary
Hungary
HungaryHungary
India
India
IndiaIndia
Indonesia
Indonesia
IndonesiaIndonesia
Ireland
Ireland
IrelandIreland
Israel
Israel
Israel Israel
Italy
Italy
ItalyItaly
Korea, Republic of
Korea, Republic of
Korea, Republic ofKorea, Republic of
(outside Seoul)
Malaysia
Malaysia
MalaysiaMalaysia
Mexico
Mexico
MexicoMexico
Mexico City)
Middle East/Africa
Middle East/Africa
Middle East/AfricaMiddle East/Africa
Netherlands
Netherlands
NetherlandsNetherlands
New Zealand
New Zealand
New Zealand New Zealand
Norway
Norway
NorwayNorway
Peru
Peru
PeruPeru
Philippines
Philippines
PhilippinesPhilippines
Poland
Poland
PolandPoland
Por tug al
Por tug al
Por tug alPortugal
Puerto Rico
Puerto Rico
Puerto RicoPuerto Rico
Romania
Romania
RomaniaRomania
Russian Federation
Russian Federation
Russian FederationRussian Federation
(St. Petersburg)
Saudi Arabia
Saudi Arabia
Saudi ArabiaSaudi Arabia
Singapore
Singapore
SingaporeSingapore
+49 (0)180 52 58 143 (Euro 0.12/min)
+30 1 6073 603
1 800 995 5105
+852 3002 8555
+36 (0)1 382 1111
1 600 112267 or +91 11 682 6035
+62 (21) 350 3408
+353 (0)1 662 5525
+972 (0)9 952 48 48
+39 02 264 10350
+82 (2) 3270 0700 (Seoul) 0-80-999-0700
60 (3) 295 2566 (Penang) 03 2695 2566 (outside Penang)
52 58 9922 (Mexico City) 01-800-472-6684 (outside
+44 (0) 207 512 52 02
+31 (0)20 606 8751
+64 (9) 356 6640
+47 22 11 6299
0 800 10111
+63 (2) 867-3551
+48 22 865 98 00
+351 21 3176333
1 877 232 0589
+40 1 315 44 42 (or local 01 3154442)
+7 095 797 3520 (Moscow) +7 812 346 7997
800 897 14440
+65 272 5300
6-Troubleshooting and support 57
Page 60

Slovakia
Slovakia
+421-2-68208080
SlovakiaSlovakia
South Africa
South Africa
South AfricaSouth Africa
Spain
Spain
SpainSpain
Sweden
Sweden
SwedenSweden
Switzerland
Switzerland
SwitzerlandSwitzerland
Taiwan
Taiwan
TaiwanTaiwan
Thailand
Thailand
ThailandThailand
Turkey
Turkey
TurkeyTurkey
Ukraine
Ukraine
UkraineUkraine
United Arab Emirates
United Arab Emirates
United Arab EmiratesUnited Arab Emirates
United Kingdom (UK)
United Kingdom (UK)
United Kingdom (UK)United Kingdom (UK)
Venezu ela
Venezu ela
Venezu elaVenezuela
Viet Nam
Viet Nam
Viet NamViet Nam
086 000 1030 (RSA) +27-11 258 9301 (outside RSA)
+34 902 321 123
+46 (0)8 619 2170
+41 (0)848 80 11 11
0 800 01 0055
+66 (2) 661 4000
+90 216 579 71 71
+7 (380-44) 490-3520
971 4 883 8454
+44 (0) 207 512 52 02
0 800 4746 8368
+84 (0) 8 823 4530
Hewlett-Packard limited
warranty statement
The HP Photosmart 620 camera comes with a one year limited
warranty.
z HP warrants to you, the end-user customer, that HP hardware,
accessories, software, and supplies will be free from defects in
materials and workmanship after the date of purchase, for the
period specified above. If HP receives notice of such defects during
the warranty period, HP will, at its option, either repair or replace
products which prove to be defective. Replacement product may be
either new or equivalent in performance to new.
z HP warrants to you that HP software will not fail to execute its
programming instructions after the date of purchase, for the period
specified above, due to defects in material and workmanship when
properly installed and used. If HP receives notice of such defects
during the warranty period, HP will replace software which does
not execute its programming instructions due to such defects.
z HP does not warrant that the operation of HP products will be
uninterrupted or error free. If HP is unable, within a reasonable
58 hp photosmart 620 user’s manual
Page 61

time, to repair or replace any product to a condition as warranted,
you will be entitled to a refund of the purchase price upon prompt
return of the product.
z HP products may contain remanufactured parts equivalent to new in
performance or may have been subject to incidental use.
z Warranty does not apply to defects resulting from (a) improper or
inadequate maintenance or calibration, (b) software, interfacing,
parts or supplies not supplied by HP, (c) unauthorized modification
or misuse, (d) operation outside of the published environmental
specifications for the product, or (e) improper site preparation or
maintenance.
z TO THE EXTENT ALLOWED BY LOCAL LAW, THE ABOVE
WARRANTIES ARE EXCLUSIVE AND NO OTHER WARRANTY OR
CONDITION, WHETHER WRITTEN OR ORAL, IS EXPRESSED OR
IMPLIED AND HP SPECIFICALLY DISCLAIMS ANY IMPLIED
WARRANTIES OR CONDITIONS OF MERCHANTABILITY,
SATISFACTORY QUALITY, AND FITNESS FOR A PARTICULAR
PURPOSE. Some countries, states or provinces do not allow
limitations on the duration of an implied warranty, so the above
limitation or exclusion might not apply to you. This warranty gives
you specific legal rights and you might also have other rights that
vary from country to country, state to state, or province to province.
z HP’s limited warranty is valid in any country or locality where HP
has a support presence for this product and where HP has marketed
this product. The level of warranty service you receive may vary
according to local standards. HP will not alter form, fit or function of
the product to make it operate in a country for which it was never
intended to function for legal or regulatory reasons.
z TO THE EXTENT ALLOWED BY LOCAL LAW, THE REMEDIES IN
THIS WARRANTY STATEMENT ARE YOUR SOLE AND EXCLUSIVE
REMEDIES. EXCEPT AS INDICATED ABOVE, IN NO EVENT WILL
HP OR ITS SUPPLIERS BE LIABLE FOR LOSS OF DATA OR FOR
DIRECT, SPECIAL, INCIDENTAL, CONSEQUENTIAL (INCLUDING
LOST PROFIT OR DATA), OR OTHER DAMAGE, WHETHER BASED
IN CONTRACT, TORT, OR OTHERWISE. Some countries, states or
provinces do not allow the exclusion or limitation of incidental or
6-Troubleshooting and support 59
Page 62

consequential damages, so the above limitation or exclusion may
not apply to you.
z THE WARRANTY TERMS CONTAINED IN THIS STATEMENT,
EXCEPT TO THE EXTENT LAWFULLY PERMITTED, DO NOT
EXCLUDE, RESTRICT OR MODIFY AND ARE IN ADDITION TO THE
MANDATORY STATUTORY RIGHTS APPLICABLE TO THE SALE OF
THIS PRODUCT TO YOU.
Regulatory information
For regulatory information, see the regulatory_supplement.htm
file on the CD that came with your camera.
60 hp photosmart 620 user’s manual
Page 63

Appendix A: Batteries
and accessories
Managing batteries
When the batteries are removed from the camera, the date and
time settings are preserved for approximately ten minutes. If the
camera is without batteries for longer than ten minutes, the
clock is set to the last time and date at which it stopped. You
might be prompted to update the date and time.
NOTE If you do not intend to use the camera for extended
periods of time (more than a month), we strongly
recommend that you remove the batteries from the
camera.
The following battery levels are visible on the image display.
Level Icon Description
Full Batteries have 30-100% remaining
Partially
full
Empty Batteries have less than 10% remaining
N/A Camera is operating on AC power
Batteries have 10-30% remaining
and need to be recharged or replaced
The camera uses four AA batteries. Acceptable batteries
include alkaline, photo-lithium, and NiMH. For the best results
with your camera, use photo-lithium or NiMH batteries.
Appendix A: Batteries and accessories 61
Page 64

Extending battery life
z Use an optional HP AC adapter or HP Camera Dock when
unloading pictures to your computer, printing, or connecting
to the TV.
z Turn the camera off during a pause in picture taking.
z Use the Auto Flash
reduction
reduction.
reductionreduction
Auto Flash setting rather than Flash On
Auto FlashAuto Flash
Flash On or Red-eye
Flash OnFlash On
Red-eye
Red-eye Red-eye
Rechargeable batteries
NiMH batteries can be recharged by using a battery charger
or optional HP Camera Dock (both purchased separately).
Rechargeable batteries might be used either by recharging
outside the camera in a charger, or in the camera by
connecting to the dock or using the AC adapter. Both of these
accessories are optional.
NOTE Rechargeable batteries have a longer life if they are
fully discharged before charging occurs.
Power conservation
To conserve battery power, the image display turns off
automatically if there is no button activity for 60 seconds. If no
buttons are pressed for five minutes, the camera turns off
(unless it is printing or connected to a computer).
NOTE If the camera is connected to an AC adapter, power
conservation occurs after ten minutes.
62 hp photo sma rt 62 0 user’s manual
Page 65

Purchasing accessories
You can purchase additional accessories for your camera from
your local retailer or online at www.hpshopping.com
accessories for the HP Photosmart 620 digital camera are
listed below:
NOTE HP supports only HP AC adapters and other
accessories expressly approved by HP.
z HP AC power adapter
North America - C8875A #001
Outside of North America - C8875A #002
z HP Photosmart 8881 Camera Dock
z Secure digital (SD) memory card (128 MB is the maximum
usable card size)
z HP Digital Camera Accessory Kit (Y1788 for United States,
Y1789 for outside the United States). Contents include:
• Camera bag
• Rechargeable NiMH batteries
• Battery charger
z HP Digital Camera Accessory Kit (C8884A). Contents
include:
• Camera bag
• Rechargeable NiMH batteries
• Battery charger
• 32 MB SD memory card
• Tripod
www.hpshopping.com. Some
www.hpshopping.comwww.hpshopping.com
Appendix A: Batteries and accessories 63
Page 66

64 hp photosmart 620 user’s manual
Page 67

Appendix B: Camera
dock
NOTE The Camera Dock does not work without AC power. Be
sure to use ONLY
came with the Camera Dock.
1 Follow the setup instructions provided with the HP Camera
Dock. This includes installing the camera Dock Insert onto
the dock, inserting rechargeable batteries in the camera,
connecting the AC power source, and connecting the
Camera Dock to a computer, printer, and/or TV.
2 Make sure your camera is set up
correctly and remove any cables that
might be attached to it before putting
it in the dock.
3 Place the camera in the HP Camera
Dock with the rear of the camera
facing the front of the Camera Dock.
The Camera Dock has three I/O connectors on the back:
—Connects to the TV
—Connects directly to HP USB
DeskJet and Photosmart printers
ONLY the HP AC adapter and the cables that
ONLYONLY
—Connects to your computer
There is a sliding door over the
computer and printer connectors that
prevents you from using both connectors at the same time (the
Camera Dock is not a USB hub).
Appendix B: Camera dock 65
Page 68
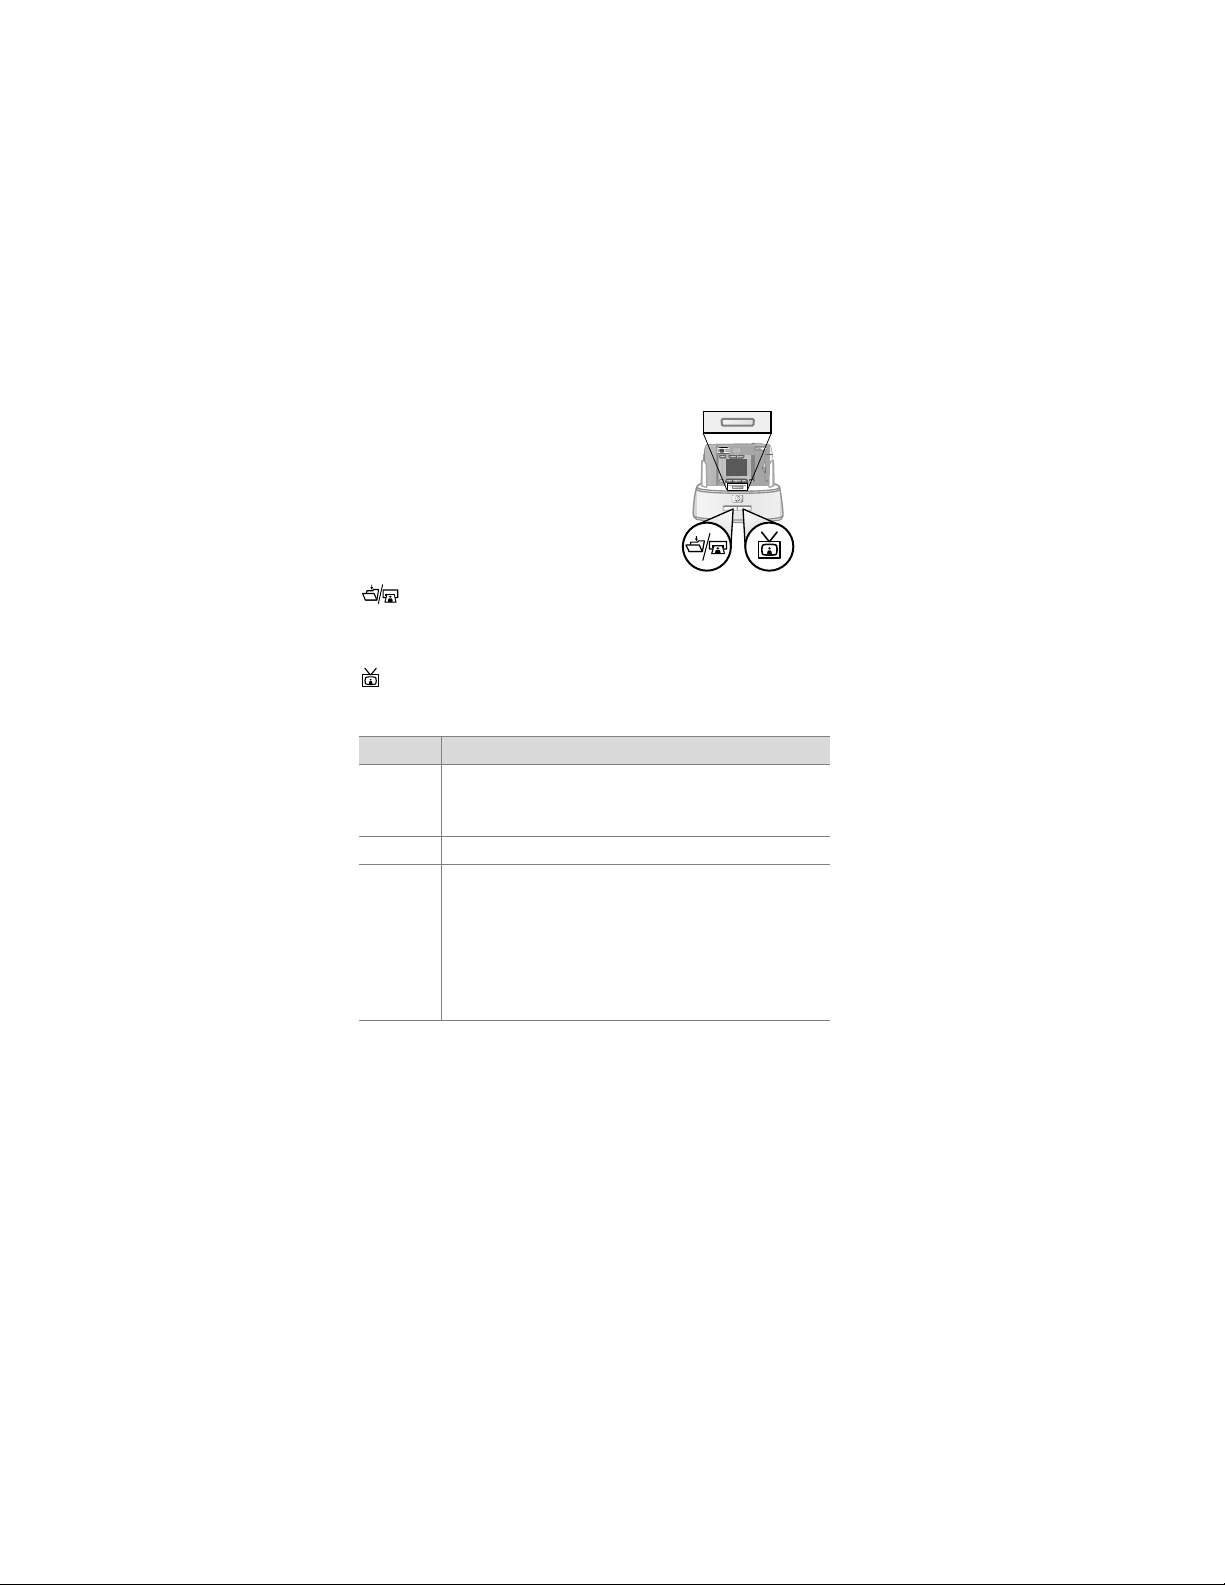
The Camera Dock has a light near
the top front that provides battery
charging status. A blinking light
indicates that batteries are charging.
There are two buttons on the front
that light up, showing the camera is
connected to the associated device.
—This button activates the
connection to the computer or the printer, depending on which
of those devices is connected to the dock.
—This button activates the TV connection.
The functions of the dock button lights are described below:
State Indication
On Camera Dock has power and a device is
connected. When you press a button for one
device, the other button device light goes out.
Blinking The associated device is active.
Off z The associated device is not connected to the
Camera Dock.
z The associated device is not available because
the other device is active.
z Camera Dock has no power or there is no
camera connected.
66 hp photosmart 620 user’s manual
Page 69

Unloading images to a
computer using the dock
NOTE If you are using a Macintosh computer, switch the
camera to Disk Drive
found in the Setup
1 Check that the HP Camera Dock is connected to your
computer.
2 Place the camera in the HP Camera Dock. It will turn on
automatically, and a dock intro screen will appear.
3 Press the button on the dock to start the unload
process. The HP Image Unload software will launch on your
computer, and the images in the camera will automatically
unload to the computer. If there were any images on the
camera that had been selected in the Share
printing or e-mail, those actions are started after the images
have been unloaded to the computer.
4 The camera will return to the dock intro screen when your
images have been saved and shared. You can now take the
camera out of the dock, or leave it there to recharge the
camera batteries.
Disk Drive in the USB Configuration
Disk DriveDisk Drive
Setup menu.
SetupSetup
USB Configuration menu
USB ConfigurationUSB Configuration
Share menu for
ShareShare
Appendix B: Camera dock 67
Page 70

Printing images using the dock
1 Check that the HP Camera Dock is connected to your
printer. (The dock cannot be connected directly to both a
computer and a printer at the same time).
2 Place the camera in the HP Camera Dock. It will turn on
automatically, and a dock intro screen will appear.
3 Press the button on the dock to start printing.
4 Adjust the settings in the Print Setup
complete the printing process.
5 The camera will return to the dock intro screen when
printing is complete. You can now take the camera out of
the dock, or leave it there to recharge the camera batteries.
Print Setup menu on the camera to
Print SetupPrint Setup
Displaying images on a TV
using the dock
1 Check that the HP Camera Dock is connected to your TV.
2 Refer to the documentation for your TV to determine how to
set the TV to take video input from your camera instead of
the antenna or cable TV.
3 Place the camera in the dock. It will turn on automatically,
and a dock intro screen will appear.
4 Press the button on the dock, and the Slideshow
will appear on the camera’s image display.
The rest of this procedure is described in Chapter 5:
Unloading, printing, and displaying images
Unloading, printing, and displaying images on page 39.
Unloading, printing, and displaying imagesUnloading, printing, and displaying images
Slideshow menu
SlideshowSlideshow
Chapter 5:
Chapter 5: Chapter 5:
68 hp photosmart 620 user’s manual
Page 71

Appendix C: Reference
Camera specifications
Feature Description
Sensor 2.1 MP
Color depth 30 bits (10 bits x 3 colors)
Resolution Good
Memory type 8 MB internal flash memory
Internal memory
capacity
Lens Focal Length
Zoom 3x optical zoom, 4x digital zoom
Capture methods Still and video
Good 0.3 MP (640 x 480)
GoodGood
Better
Better 2.0 MP (1632 x 1232)
BetterBetter
Best
Best 2.0 MP (1632 x 1232)
BestBest
Secure Digital (SD) memory card up to
128 MB
Quality Images Target File Size
Good 87 80 KB
Better 14 500 KB
Best 7 900 KB
• Wide - 5.4 mm
• Telephoto - 16.2 mm
F-Number
f
• Wide -
• Telephoto -
3x/6x Playback magnify
2.8 and f5.6
f
4.4 and f8.6
Appendix C: Reference 69
Page 72

Feature Description
Exposure control Auto exposure
Shutter speed 1/1000 second to 1/3 second
Video capture and
Video clip capture
playback
Audio None
Flash settings Auto Flash, Red-eye Reduction,
Flash On, Flash Off
Focus Auto focus range: 20 cm to infinity
ISO (Sensitivity) 100
Metering Average
White balance Daylight, overcast, sunset, tungsten,
fluorescent
Self-timer 10 second delay
Viewfinder Optical real image viewfinder
Flash working range Built-in flash with range up to 2 meters
Image LCD Backlit color TFT 1.5 inch
Compressed format JPEG
AVI (Motion JPEG) for video
Power 4 AA batteries (included) or optional
HP AC adapter (6V 2000 mA)
The camera has a maximum power
consumption of 1.5 W.
70 hp photosmart 620 user’s manual
Page 73

Feature Description
Interfaces z USB to computer or USB to
HP DeskJet and HP Photosmart
printers
z DC IN 6V
z Camera Dock
• Video to TV
Standards PTP
MSDC
NTSC/PAL
JPEG
DPOF
EXIF
DCF
Case material Plastic
Tripod mount Yes
Dimensions External Body Dimensions:
120 mm (L) x 50 mm (W) x 74 mm (H)
Weight 203 g
Appendix C: Reference 71
Page 74

72 hp photosmart 620 user’s manual
Page 75

Index
AAAA
AC power adapter
connector 9
purchasing 63
troubleshooting 43
accessories for camera 63
adjusting camera settings 27
Auto-Flash setting 22
BBBB
batteries
access door 9
extending life 62
inserting 12
level indicators 25
managing 61
messages 50
recharging 62
troubleshooting 43
types to use 61
battery charger 63
Best image quality 23
Better image quality 23
blinking lights
Camera Dock 66
green 11
orange 11
red 8
blurry images 46
bonus software 15
bright, image too 48
CCCC
Camera Dock
, 61
, 45, 50
, 18
, 16
connecting to computer,
printers, and TV 65
connectors 65
insert 7
printing images 68
purchasing 63
setting up 65
turning on and off 66
unloading images to a
computer 67
close-up pictures 9
color depth 69
compression format 70
computer
connecting to 65
unloading images to 39
unloading images to using
Camera Dock 67
connectors
Camera Dock 65
power adapter 9
, 39, 41
USB 11
conserving power 62
customer support.
DDDD
dark, image too 47
date and time
setting 14
troubleshooting 45
date image was taken 25
deleting
e-mail addresses 36
images 28
See
support
73Index
Page 76

digital zoom 21
dimensions of camera 71
disk drive, camera as 31
Display button 11
dock, camera.
doors
batteries 9
memory card 13
EEEE
e-mail
adding, changing, and
selecting images for 37
sending pictures by 34
error messages 50
exposure, locking 8
FFFF
fill-flash 22
flash
button 10
turning on and off 22
using 22
working range 70
focus
locking 18
range 70
formatting memory 27
GGGG
Good image quality 23
HHHH
HP Customer Support.
HP Instant Share
See
Dock
deleting addresses 36
Camera
, 53
, 18
, 28
support
See
, 35
description 33
turning menu on and off 11
34
HP SupportPack 55
IIII
image quality.
images
date taken 25
deleting 28
magnifying 27
moving from internal memory
previewing 20
printing 40
printing using Camera Dock
rotating 27
selecting destinations 34
selecting for automatic
selecting for e-mail 37
troubleshooting 46
turning on and off 11
unloading from Camera Dock
unloading to a computer 39
using instant review 18
viewing on TV 41
viewing on TV using Camera
viewing stored 26
viewing thumbnails 27
See also
insert for Camera Dock 7
inserting
batteries 12
camera in Camera Dock 65
See
quality
, 29
to memory card 31
68
processing 33
, 47, 48
to computer 67
Dock 68
pictures
, 29
,
74 I nd ex
Page 77

memory card 13
installing software 15
interfaces for camera 71
internal memory
capacity 23
deleting images 28
formatting 27
moving images to memory
ISO sensitivity 70
LLLL
language setting 14
LEDs.
lens specifications 69
lights
Camera Dock 66
self-timer 8
viewfinder 11
locked memory card 51
locking
exposure 8
focus 18
MMMM
Macintosh
e-mail from camera 38
installing software 15
troubleshooting connection
magnifying images 27
Mass Storage Device Class
memory card
capacity 23
deleting images 28
formatting 27
indicator 25
, 69
card 31
See
lights
, 18
49
(MSDC) 31
, 28
, 32
, 29
, 28
inserting 13
locked 51
moving images to from
internal memory 31
slot 10
too full 51
unsupported 50
messages, error 50
mounts
tripod 11
wrist strap 10
MSDC (Mass Storage Device
Class) 31
NNNN
navigating through images 11
OOOO
OK button 11
optical viewfinder 11
optical zoom 21
PPPP
phone support
United States 54
worldwide 56
See
photos.
Picture Transfer Protocol (PTP)
31
pictures
close-up 21
previewing 20
printing 34
sending by e-mail 34
taking 17
viewing stored 25
Playback mode
menu 27
, 53
pictures
, 35
, 35
75Index
Page 78

switching to 11
using 25
power
adapter 9
button 8
conserving 62
specifications 70
troubleshooting 43
turning on and off 13
Preview mode
turning on and off 11
using 20
printers
connecting Camera Dock to
troubleshooting 51
printing
images 40
images using Camera Dock
pictures 34
PTP (Picture Transfer Protocol)
purchasing accessories 63
QQQQ
quality
changing for images 23
settings 23
Quality button 10
RRRR
recharging batteries 62
recording video clips 18
red-eye reduction 22
regulatory information 60
resolution.
reviewing pictures.
65
68
31
, 63
See
, 35
quality
, 45, 50
, 52
See
viewing
rotating images 27
SSSS
self-timer
button 10
delay 70
light 8
using 20
See
Share
support
, 33
See
HP Instant
, 16
17
See
, 46
support
, 29
service.
Setup menu 30
Share button 11
Share menu.
shutter
button 8
speed 70
troubleshooting 44
slideshow, viewing 41
software
bonus 15
installing 15
specifications for camera 69
speed of shutter 70
standards for camera 71
support
United States 54
warranty options 55
Web sites 53
worldwide 56
TTTT
taking pictures
technical support.
telephone support
United States 54
worldwide 56
telephoto pictures 9
thumbnails, viewing 27
76 In de x
Page 79

time and date
setting 14
troubleshooting 45
tripod mount 11
troubleshooting problems 43
turning on and off
Camera Dock 66
flash 22
HP Instant Share menu 34
power 13
video clips 8
TV
connecting Camera Dock to
65
viewing images 41
viewing images using Camera
Dock 68
viewing slideshow 41
UUUU
Unloading images 39
USB
configuring 31
connector 11
unknown device 51
VVVV
Video button 8
video clips
increasing recording time 19
maximum recording time 19
recording 8
reviewing 26
Video/self-timer light 8
viewfinder
light 11
optical 11
viewing
, 39, 41
, 18
images 18
images on TV 41
images on TV using Camera
Dock 68
slideshow on TV 41
stored images 26
stored pictures 25
thumbnails 27
video clips 26
WWWW
warranty
options 55
statement 58
Web sites for support 53
weight of camera 71
Welcome Screen, setting 30
wide angle pictures 9
Windows
e-mail from camera 38
software installation 15
wrist strap 10
ZZZZ
zoom
digital 21
lens 9
optical 21
Zoom Out button 10
, 12
77Index
Page 80

www.hp.com/photosmart
Printed in Singapore 2002
*Q2170−90010*
Q2170-90010
 Loading...