

Model
MI700A
Pagewriter
Operating
XLi
Cardiograph
Guide
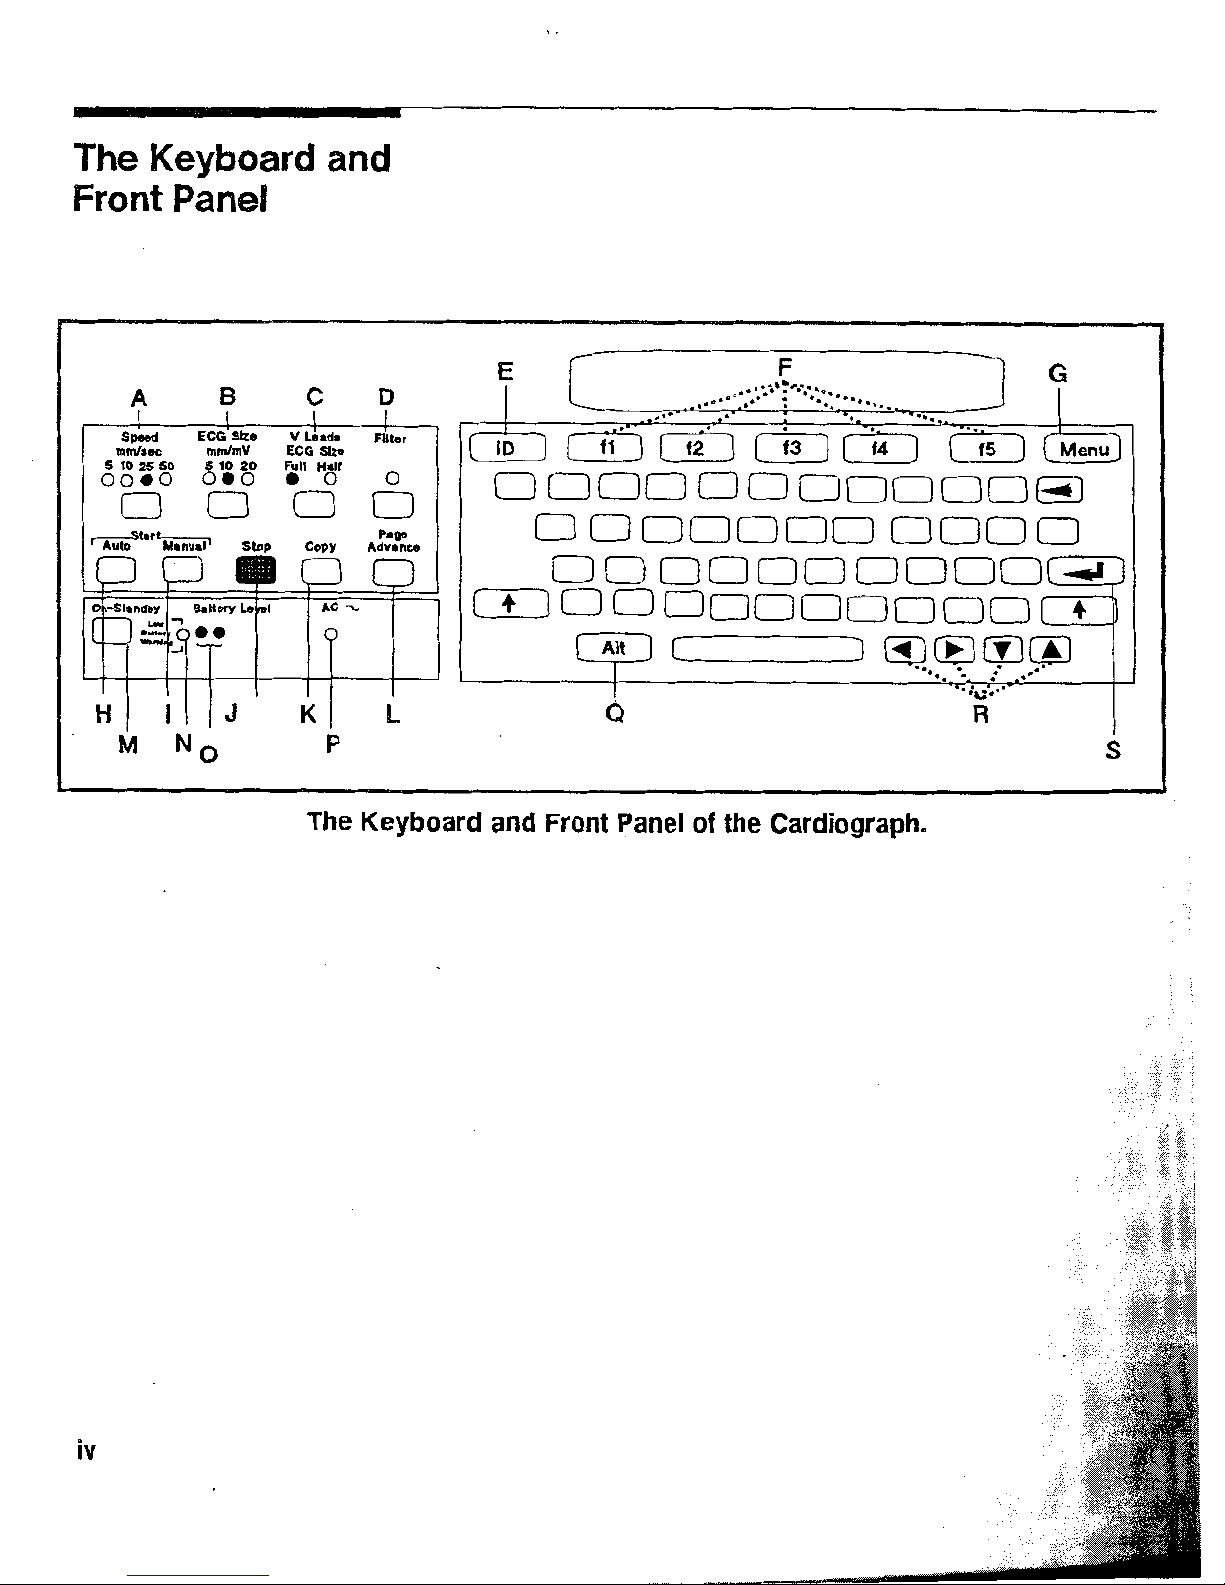
The
Keyboard
and
Front
Panel
Low
Battery
Battery Level
AC%
Changes the paper speed of the
ECG.
It switches between 5, 10,
25, and
50 mm/second for Manual and between
25
and 50 Auto.
Changes the limb and chest lead sensitivity between
5,
10, and 20
mm/mV.
Changes the chest Bead sensitivity between full and half size with
respect to the value set by the
key.
Turns artifact and baseline wander filters on and off depending on
which filter or filters are set in configuration.
Allows patient identification entry, review, and edit.
These five keys
(f1 - f5) directly beneath the display window
perform different functions at different times. For this reason, they
are called "softkeys." When the key is active, a label describing its
function appears above it
in
the display window.
Changes the
softkey selection between two main displays.
Starts an Auto
EGG recording.
Starts a Manual
EGG recording.
Halts any cardiograph function.
Prints
a
copy of an Auto ECG which has just been acquired.
Advances the paper to the beginning of the next page.
Switches the cardiograph between
On
and
Stadby.
When the.
cardiograph is in standby, it is
raot operational; but it is powered.
Light indicates that the cardiograph must be plugged in and
recharged.
Lights indicate the remaining capacity level of the battery. When
the battery is fully charged, all the lights are on.
Light
will
be on when the power cord is plugged into a wall outlet
and the
AC
switch is on. This indicates that the battery is
charging.
The
AC
switch
is
on the back of the cardiograph.
Pressed with
@
at power-on for cardiograph self-test.
Select leads on preview screen. When typing information,
@
@
move the cursor in patient
ID
entry and configuration. Shift
-
@
and arrow keys will adjust the contrast on the cardiograph
display.
The Enter key.
Safety
Summary
Safety
Symbols
The following symbols are used
on
the cardiograph or
Marked
an
the
the
carta
Cardiograph
Caution
-
See
operating instructions
-l@t
Type
CF,
defibrillation protected
%
Alternating current
0
Equipotential (this is
on
the
ground
lug)
B
The
maximum weight that the cart can hold.
Please see Chapter
4,
Maintariltaing
%he
Cardiograph,
for
further information about
operaling your cardiograph
safely.
Conventions
Used
in
This
Manual
Warning
Warning
statements
describe
conditions
or
actions
that
@
can
result
in
personal
injury
or
lass
of
life.
Caution
Caution statements describe conditions or actions that
can result
in
damage to the equipment or software.
Note
Notes contain additional information on cardiograph
represents the temporary key labels
that
appear on the display.
@
represents keys
on
the front panel.
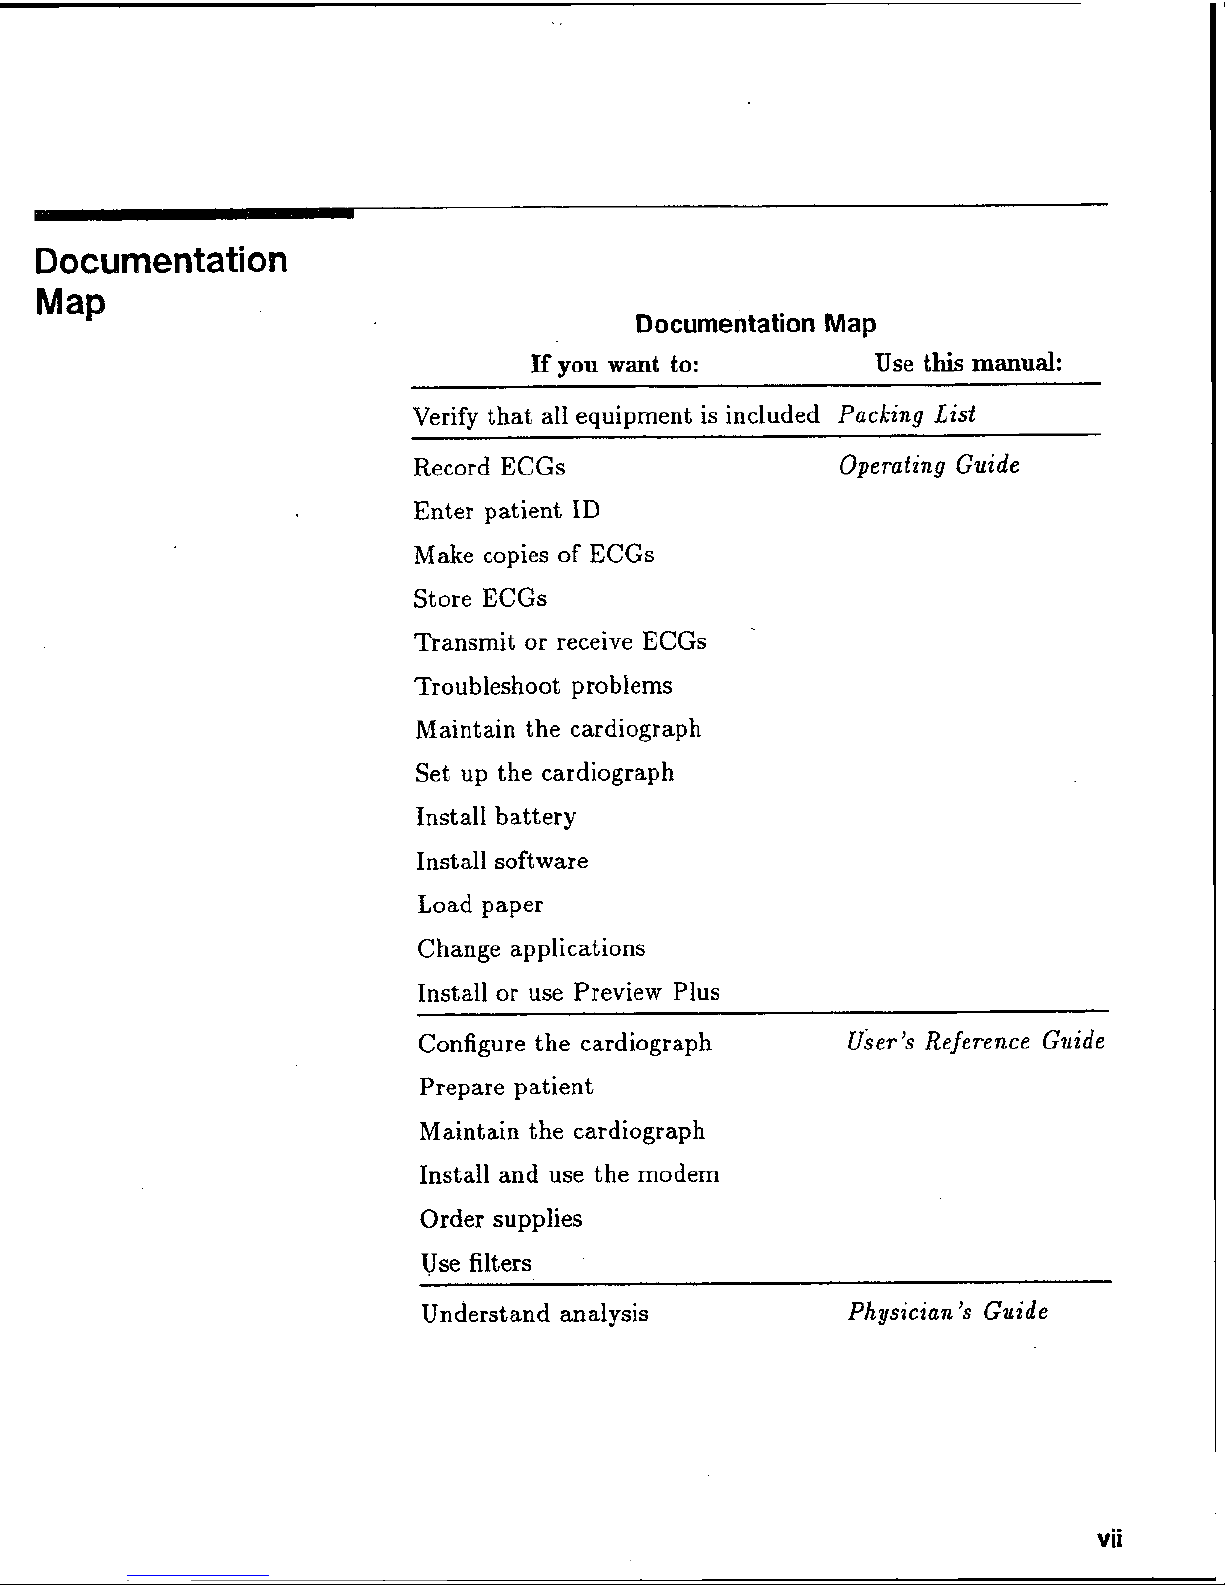
Documentation
Map
Documentation
Map
If
you
want
to:
Use
this
mmud:
Verify that all equipment is included
Packing
Lis-t
Record ECGs
Operaiing Guicle
Enter patient
ID
Make copies of ECGs
Store ECGs
Transmit or receive ECGs
Troubleshoot problems
Maintain the cardiograph
Set up the cardiograph
Install battery
Install software
Load
paper
Change applications
Install or use Preview Plus
Configure the cardiograph
User
'ti
Reference Guide
Prepare patient
Maintain the cardiograph
Install
and
use the modem
Order
supplies
Use filters
Underst
and
analysis
Physician's
Guide
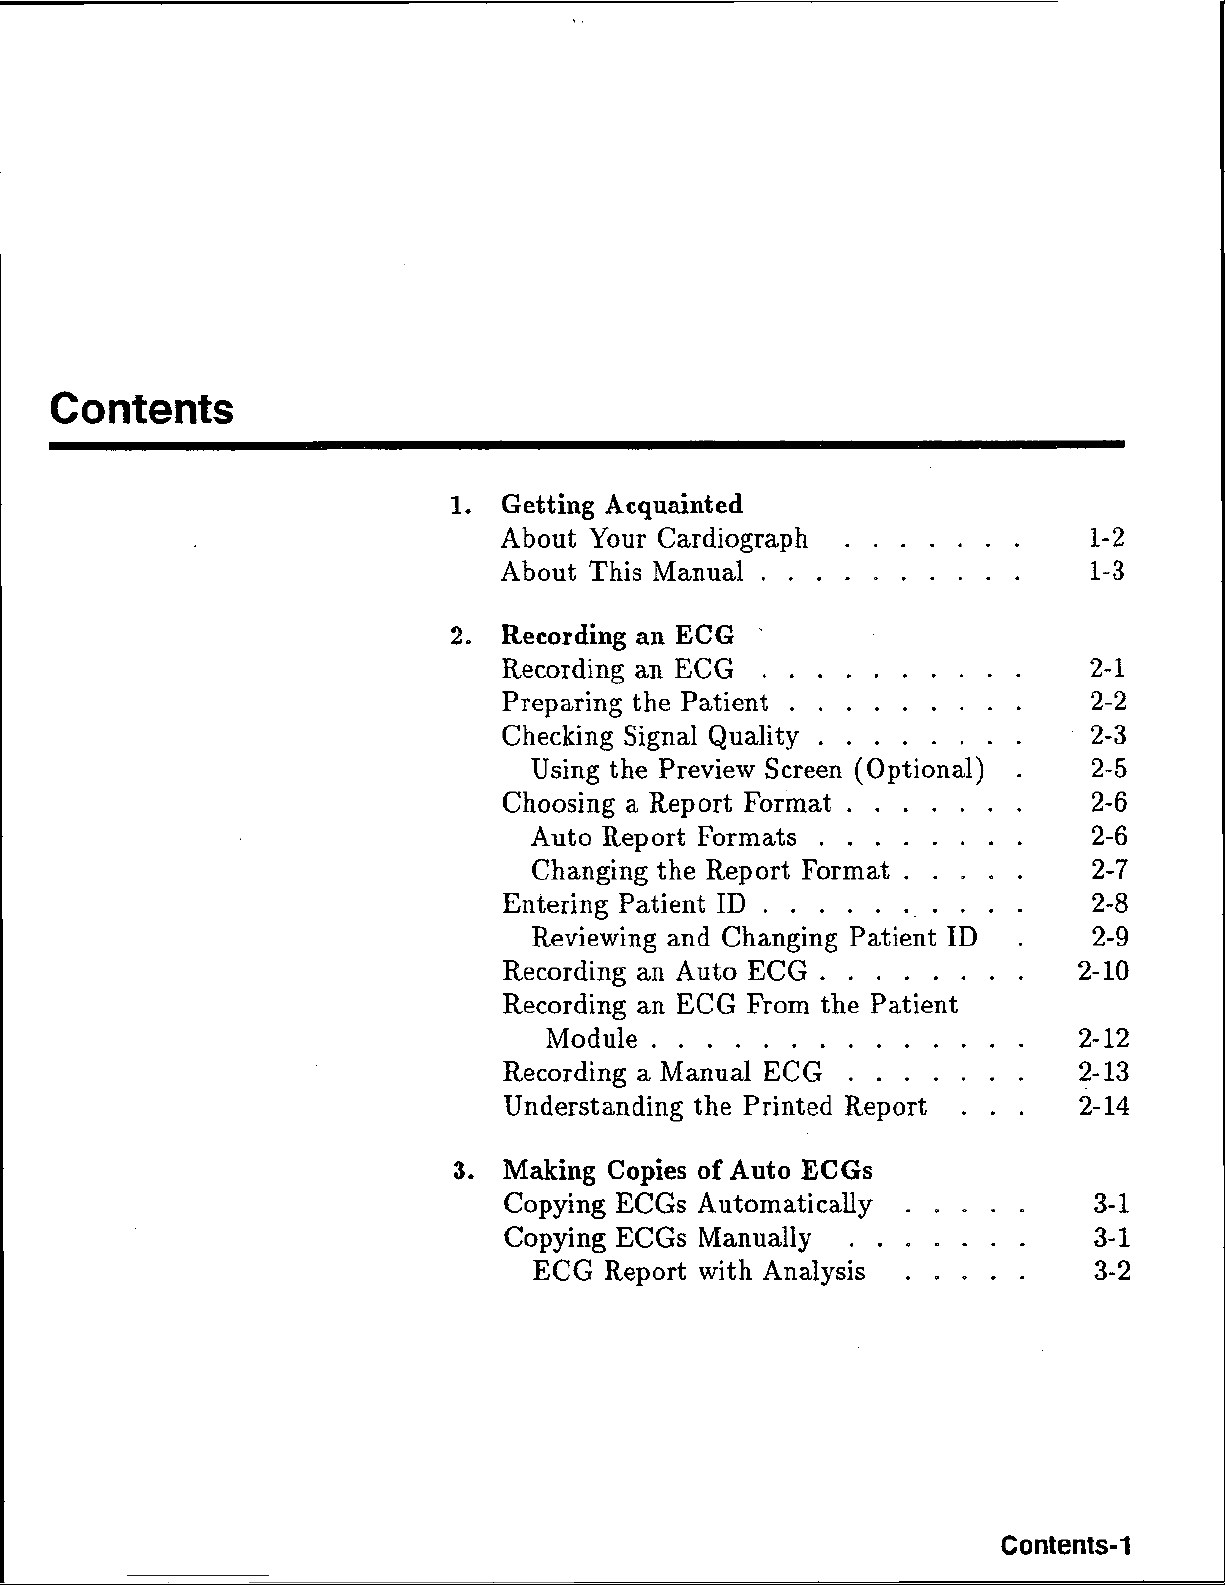
Contents
1.
Getting Acqueaiglted
About Your Cardiograph
. .
. .
. . .
1-2
About This Manual
.
a
a
a
.
a
1-
3
2,
Recording an
ECG
'
Recording an
ECG
.
.
.
- -
.
2-1
Preparing the Patient
+
-
a
2-2
Checking Signal Quality
.
.
.
.
. . . .
2-3
Using the Preview Screen (Optional)
a
2-
5
Choosing a Report Format
.
. .
..
. .
2-6
Auto Report Formats
.
a
a
.
2-
6
Changingthe Report Format
.
2-
7
Entering Patient
ID
.
a
a
2-8
Reviewing and Changing Patient
ID
-
2-
9
Recording an Auto ECG
.
*
a
a
2-10
Recording an
ECG
From the Patient
Module
.
2-12
Recording
a
Manual
ECG
. . . . . .
.
2-
13
Understanding the hinted
Report
.
. .
2-
14
3e
Making
Copies
of
Auto
ECGs
Copying ECGs Automatically
.
. . .
.
3-
1
Copying ECGs Manually
. . .
. . . .
3-
B
ECG
Report with Analysis
a
a
a a
3-2
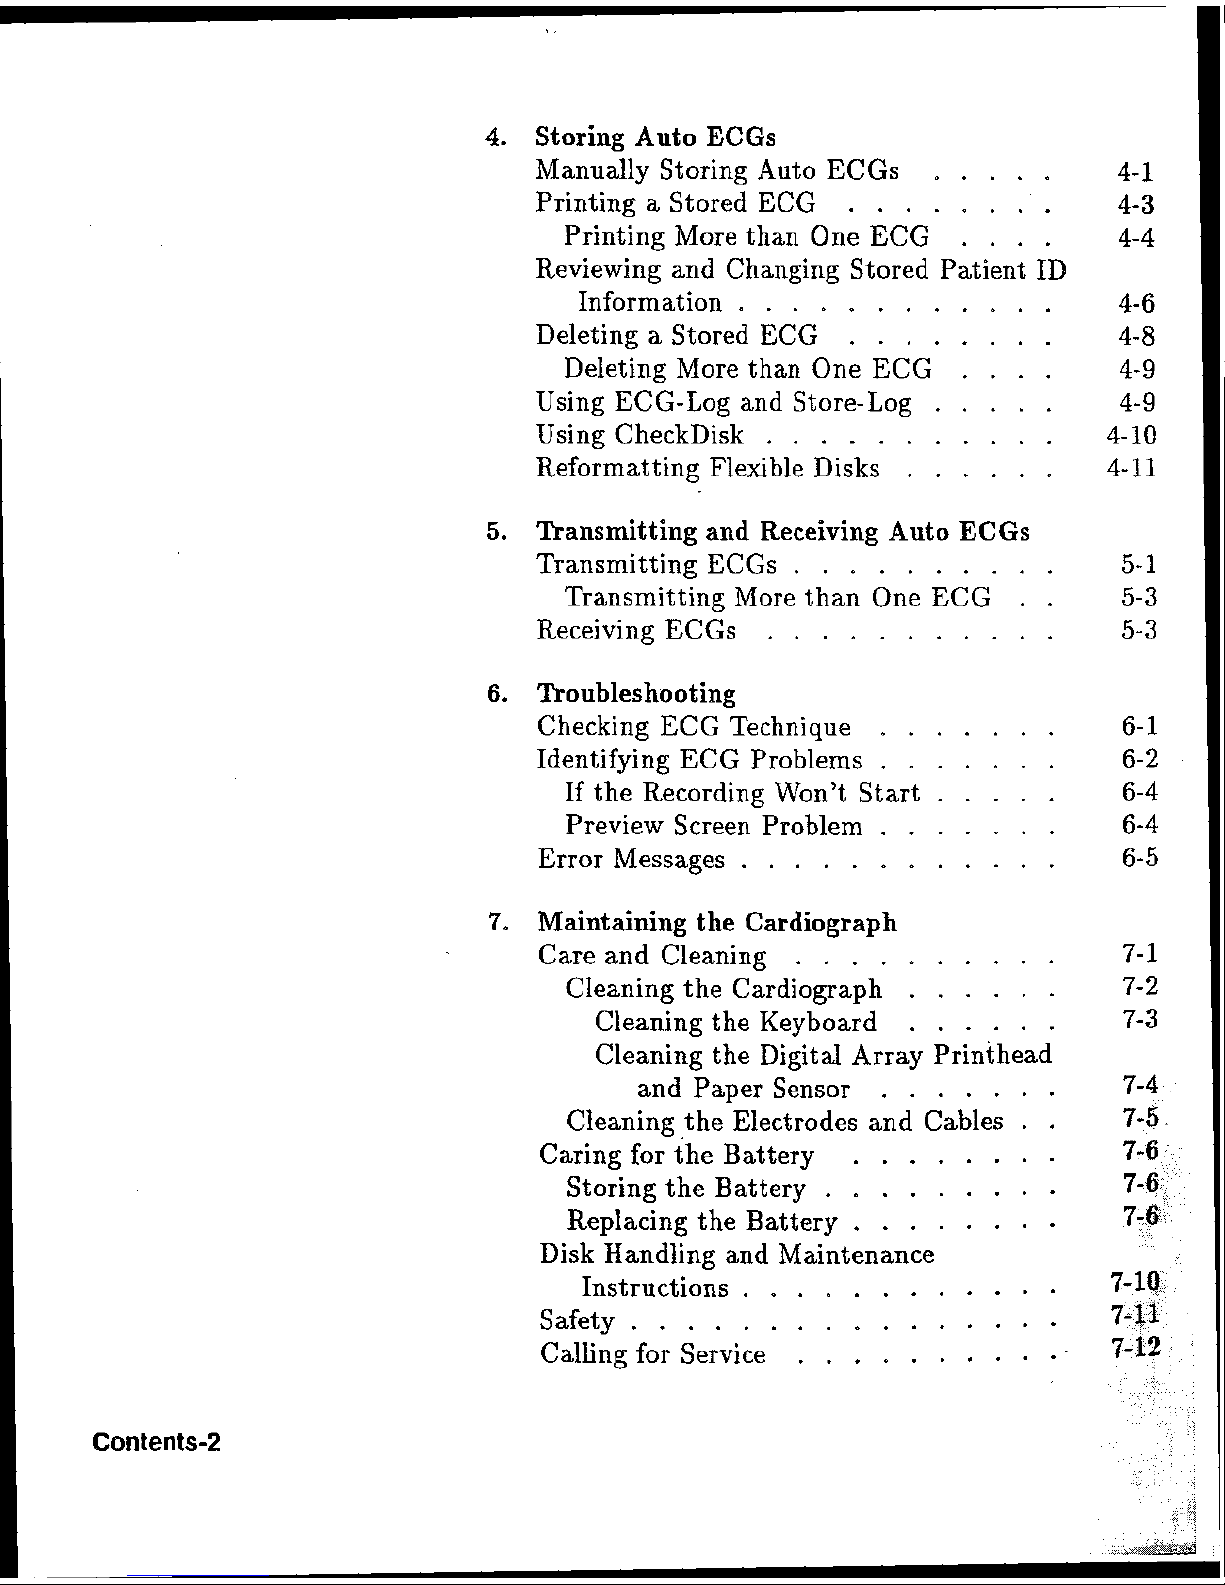
4,
Storing
Auto
ECGs
MmudEy
Storing Auto ECGs
.....
4-
1
Printing a Stored
ECG
a
-
4-3
Printing More than One
ECG
....
4-41.
Reviewing and Changing Stored Patient
ID
i[nformation
.
a
a a
4-
6
Deleting a Stored
ECG
-
.
4-
8
Deleting More than One
ECG
....
4-
9
Using ECG-Log and Store-Log
.....
4-
9
Using CheckDisk
a
*
4-
10
Reformatting Flexible Disks
......
4-
11
5.
nansitting
and
Receiving
Auto
EGGS
Transmitting ECGs .
- -
*
5-
1
Transmitting More than? One
ECG
a a
5-3
Receiving ECGs
+
a
*
5-
3
6.
nonblleshooting
Checking
ECG
Technique
.......
Identifying
ECG
Problems
.......
If
the Recording Won't Start
.....
Preview Screen Problem . a
Error Messages
............
'9,
M~ntGnirag
the
Cardiograph
Care and Cleaning
..........
Cleaning the Cardiograph ......
Cleaning the Keyboard
......
Cleaning the Digital Array Printhead
and Paper Sensor
a a a
-
Cleaning the Electrodes and Cables
.
Caring for the Battery
........
Storing the Battery
.........
Replacing
the
Battery
.......
Disk Handling and Maintenance
Instructions
...........
Safety.
..............
CalEng for Service ........
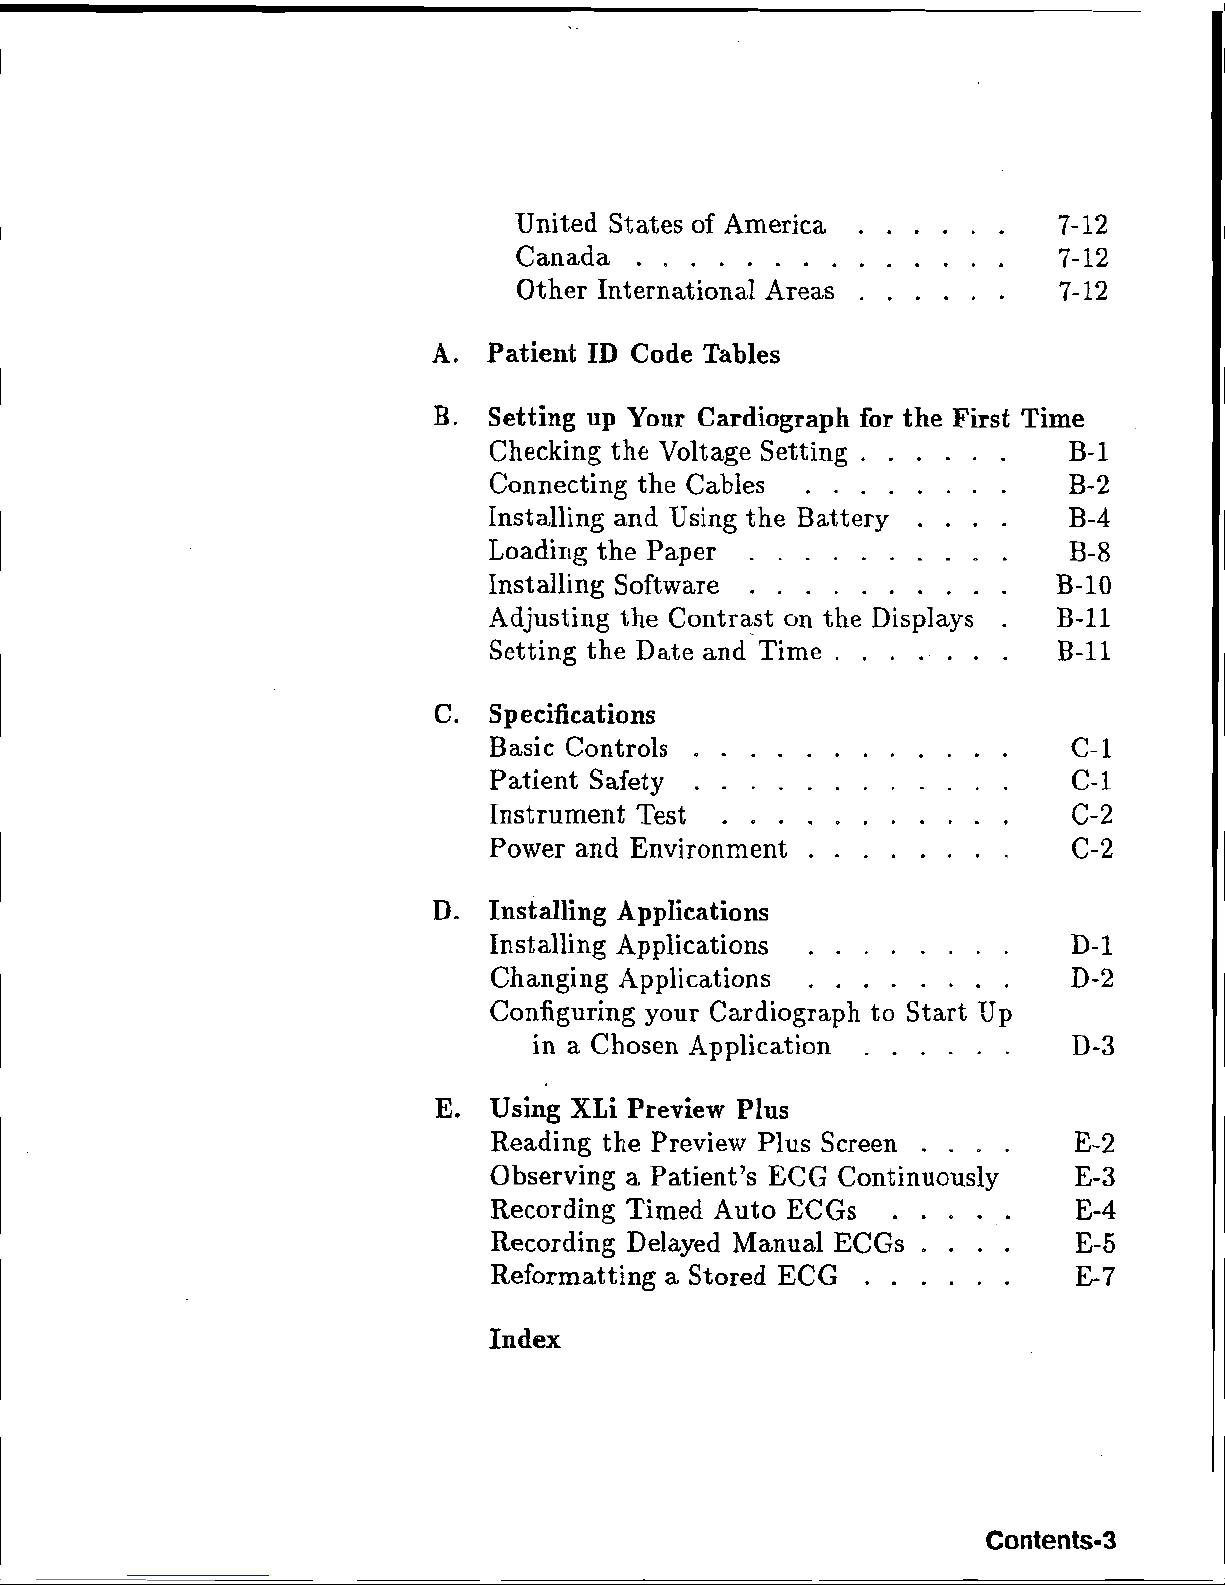
United States of America 7-12
Canada
7-12
Other International Areas 7-12
A.
Patient
ID
Code
Tables
B.
Setting
up
Your
Cardiograph for
the
First
Time
Checking the Voltage Setting
. .
.
. . .
B-
l
Connecting the Cables
. . . .
. .
.
.
B-2
Installing and Using the Battery
. . .
.
B-4
Loading the Paper
-
a
.
a
.
B-8
Installing Software
. .
.
. . .
. . . .
B-10
Adjusting the Contrast on the Displays
B-11
Setting the Date and'~ime
.
B-11
C.
Specifications
Basic Controls
.
a
a .
C-
l
Patient Safety
.
.
C-
1
Instrument Test
.
.
.
. . . . . . .
.
C-2
Power and Environment
.
.
. .
. . .
.
42-2
D.
Installing Applications
Installing Applications
D-
l
Changing Applications
.
.
. . . . . .
D-2
Configuring your Cardiograph
to
Start
Up
in a Chosen Application
-
D-3
E,
Using
XLi
Preview
Hus
Reading the Preview Plus Screen
. . . .
E-
2
Observing a Patient's ECG Continuously
E-
3
Recording Timed Auto ECGs
.
. .
.
.
E-4
Recording Delayed Manual ECGs
.
. .
.
E-
5
Reformatting a Stored
EGG
.
.
. .
.
.
E-
7
Index
Figures
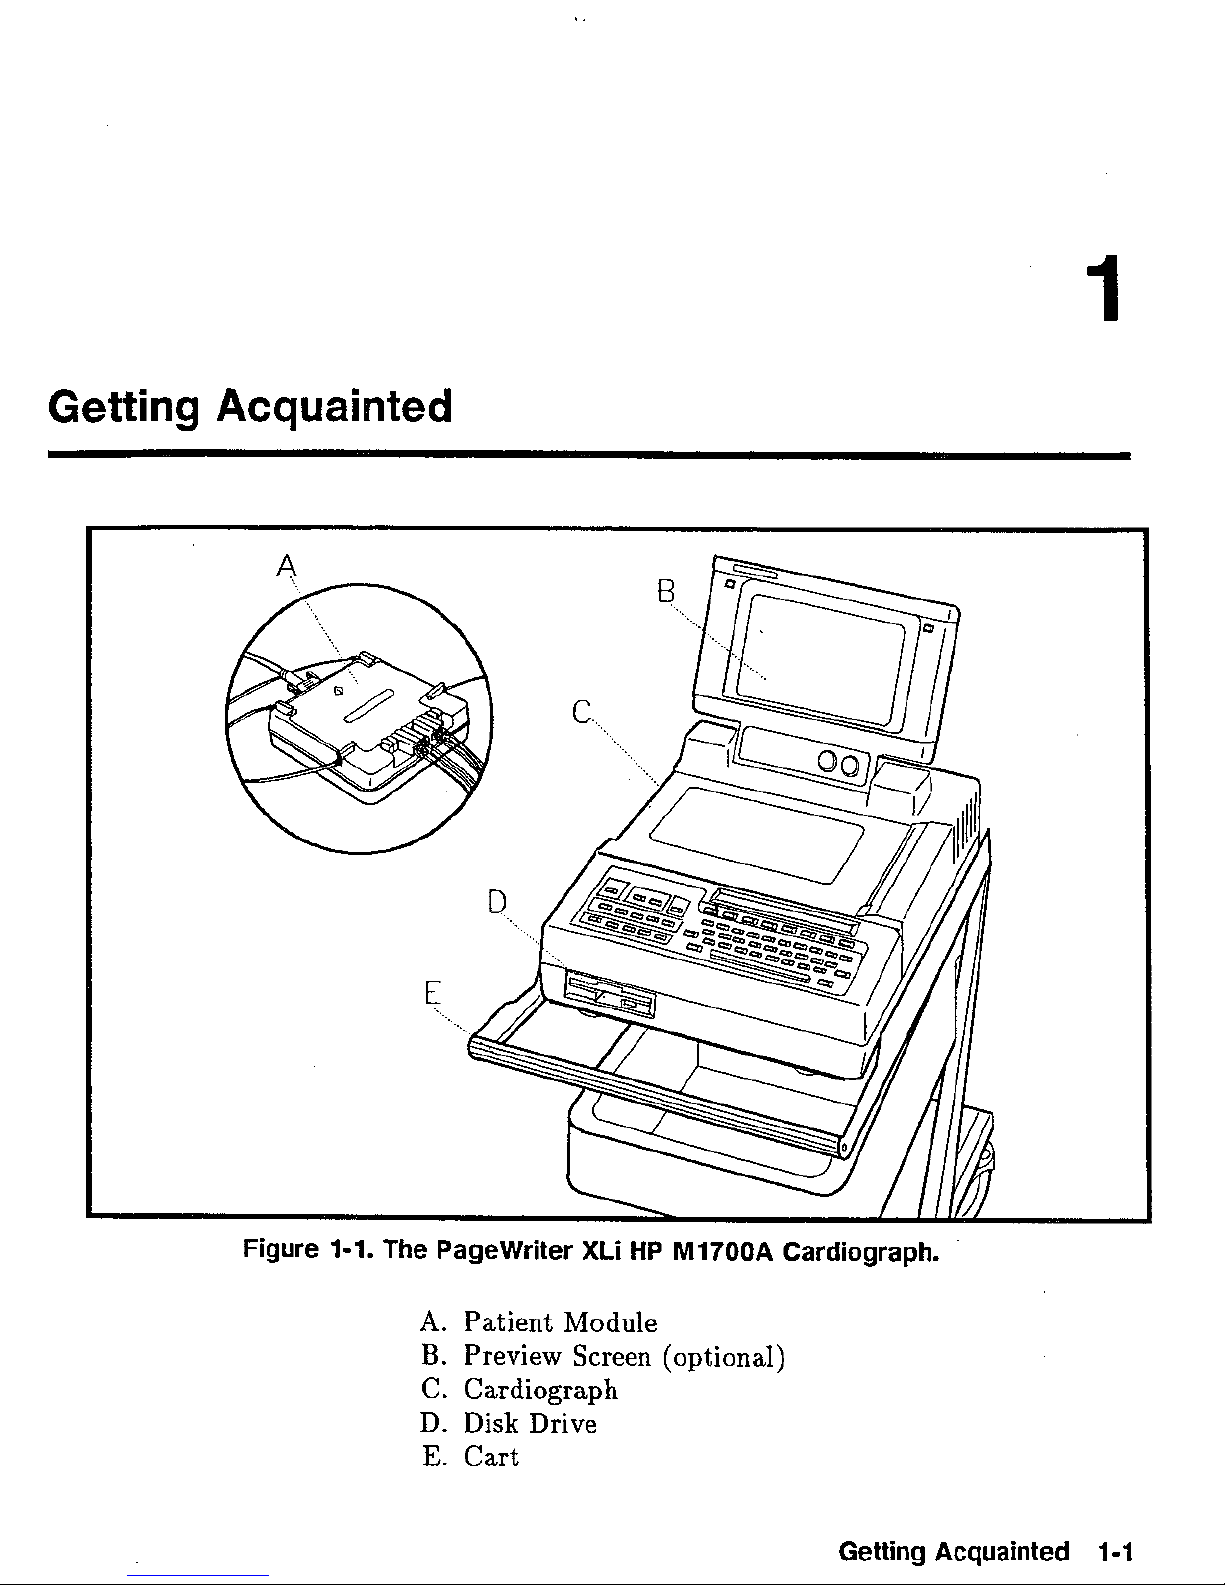
1-1.
The PageWriter
Xki
HP
MI700A
Cardiograph.
a
a
2-1.
The Patient Module.
a
-
2-2-
The
Preview Screen.
a
-
2-3. The
ECG
Report.
-
7-1.
Removing the Keyboard,
.
,
. . .
.
7-2.
Cleaning the Digital Array Printhead.
7-3.
Replacing the Battery.
. . .
. .
. .
7-4.
The Battery Assembly.
.
B-I. Connecting the Power Cord and Patient
Module Data Cable.
a
a
a
B-2. Connecting the Patient Module Lead
Wires and Data Cable.
.
-
-
B-3. Installing the Battery.
. . . . .
. . .
B-4. TheBatteryAssembly
..
a
B-5. Loading the Paper.
a
a
- -
B-6.
Inserting the Disk.
. .
. . . . . : .
E-1.
A Preview Plus Screen.
-
a
E-2.
A
Reformat Report Screen.
.
. . . .
2-1.
Patient Module Display Symbols
.
2-4
.........
2-2. Report Annotations
2-
15
.........
2-3.
Calibration Signals 2-16
6-1. ECG Problems
.
a
a
6-
2
A-1.
Patient
ID
Fields
,
a
a
A-2
A-2.
Medication and Diagnostic Codes
...
A-
3
A-3.
Race Codes
a
*
a a
A-
3
Getting
Acquainted
Figure
1-1.
The Pagewriter
A.
Patient
B.
Preview Screen
C.
Cardiograph
D.
Disk Drive
E.
Cart
XLI
HP
Module
M1700A
(optional)
Cardiograph.
Getting
Acquainted
1-1
Abut
Your
Your PageWrit er Xki cardiograph:
Cardiograph
Acquires up to
Analyzes and interprets the complete
m
Allows
or patient module before printing the ECG.
rn
Allows you to start an ECG recording from the
cardiograph
Provides select able formats (Auto and Manual).
Stores EGGS on a removable flexible disk.
Allows you to upgrade software simply.
r
Operates on rechargeable batteries as well as
power (with battery installed).
rn
Has a digital array printer with continuous-feed paper.
-r~
Displays signal quality and leads off conditions.
m
Provides the ability to transmit Auto ECGs via
modem, fax modern, or direct
you
16
leads simultaneously.
ECG.
to
check lead quality on the preview screea
or from the patient module.
AC
connection,
1-2
Getting
Acquainted

About
This
Manual
Keep this Operating Guide with your cardiograph in the
place provided on the cart. This guide contains concise
operating instructions for experienced
Pagewriter XLi
cardiograph users. If you are unfamiliar with using this
cardiograph, please view the videotape
tutorial,
Using
the
Hewlett-Packard Page Writer
XL
Cardiographs.
For
additional
help on using your cardiograph, refer to the
Page Writer
XEi
User's
Reference
Guide.
This manual describes how to perform the following
tasks:
Recording
an
EGG
as
Editing patient
ID
Making copies of Auto ECGs
as
Storing Auto ECGs
Deleting Auto
ECGs
rn
Transmitting and receiving Auto ECCs
Troubleshooting
rn
Caring for and maintaining the cardiograph
Preparing your cardiograph for use
Getting
Acquainted
1-3
Recording
Recording
an
an
ECG
ECG
This chapter contains the following information about
recording an
Preparing the patient
FB
Checking signal quality
Using the optional preview screen
im
Choosing a report format
Entering patient
Recording an
B
Understanding the printed report
To
record an
ECG
ECG:
on your Pagewriter XLi cardiograph.
ID
ECG
1.
2.
3.
The rest
ECGs,
If the cardiograph is not
Apply electrodes to the patient.
Press or
of this chapter will include details on recording
on,
press
to
record the ECG.
Recording
an
ECG
2-1
Preparing
Patient
the
For electrode placement information, refer to the label
on the top of your cardiograph.
technique, see the videotape
Page Writer
Page Writer XLi User js Refiaence Guide.
XL
Cardiographs.
For
tips
OW
proper
Using the Hewlett-Packard
Also refer to the
ECG
Note
3
Computerized ECG analysis should always be reviewed
by a qualified physician.
Proper patient preparation and electrode placement are
a
the most important elements in producing
ECG
1.
2,
3.
trace. Prepare the patient by:
Gently scrubbing the electrode site with gauze.
Attaching the electrodes secrare'ly.
Reassuring and relaxing the patient.
high quality
2-2
Recording an
ECG
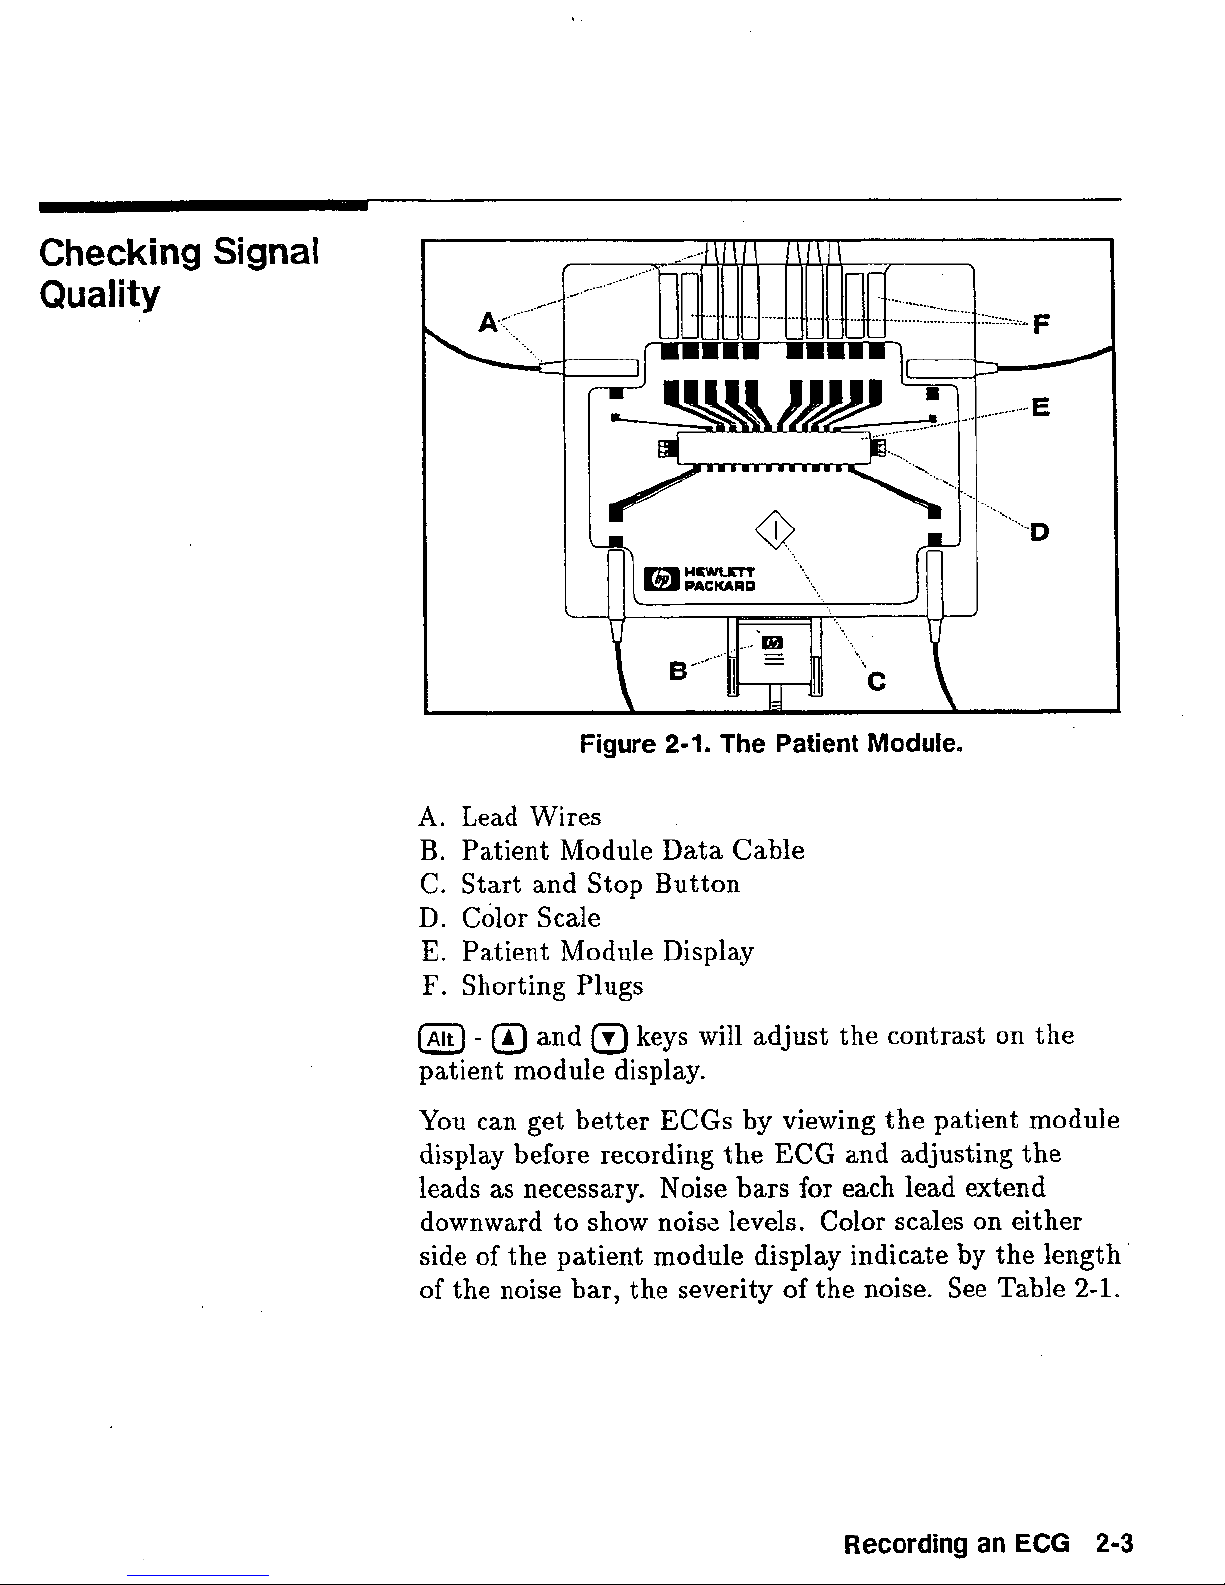
Checking
Quality
Signal
Figure
A.
Lead Wises
B.
Patient Module Data Cable
C.
Start and Stop Button
D,
Color Scale
E.
Patient Module Display
I?.
Shorting Plugs
@
-
@
and keys will adjust
patient module
You can get better ECGs
display before recording
leads as necessary. Noise bars for each lead extend
downward to show
side of the patient module display indicate
of the
noise bar, the severity of the noise.
2-1.
The
Patient
display-
by
viewing the patient module
the
ECG
noislz levels. Collos scales on either
Module.
the
contrast on the
and adjusting the
by
See
the length.'
Table
2-1.
Recording
an
ECG
2-3
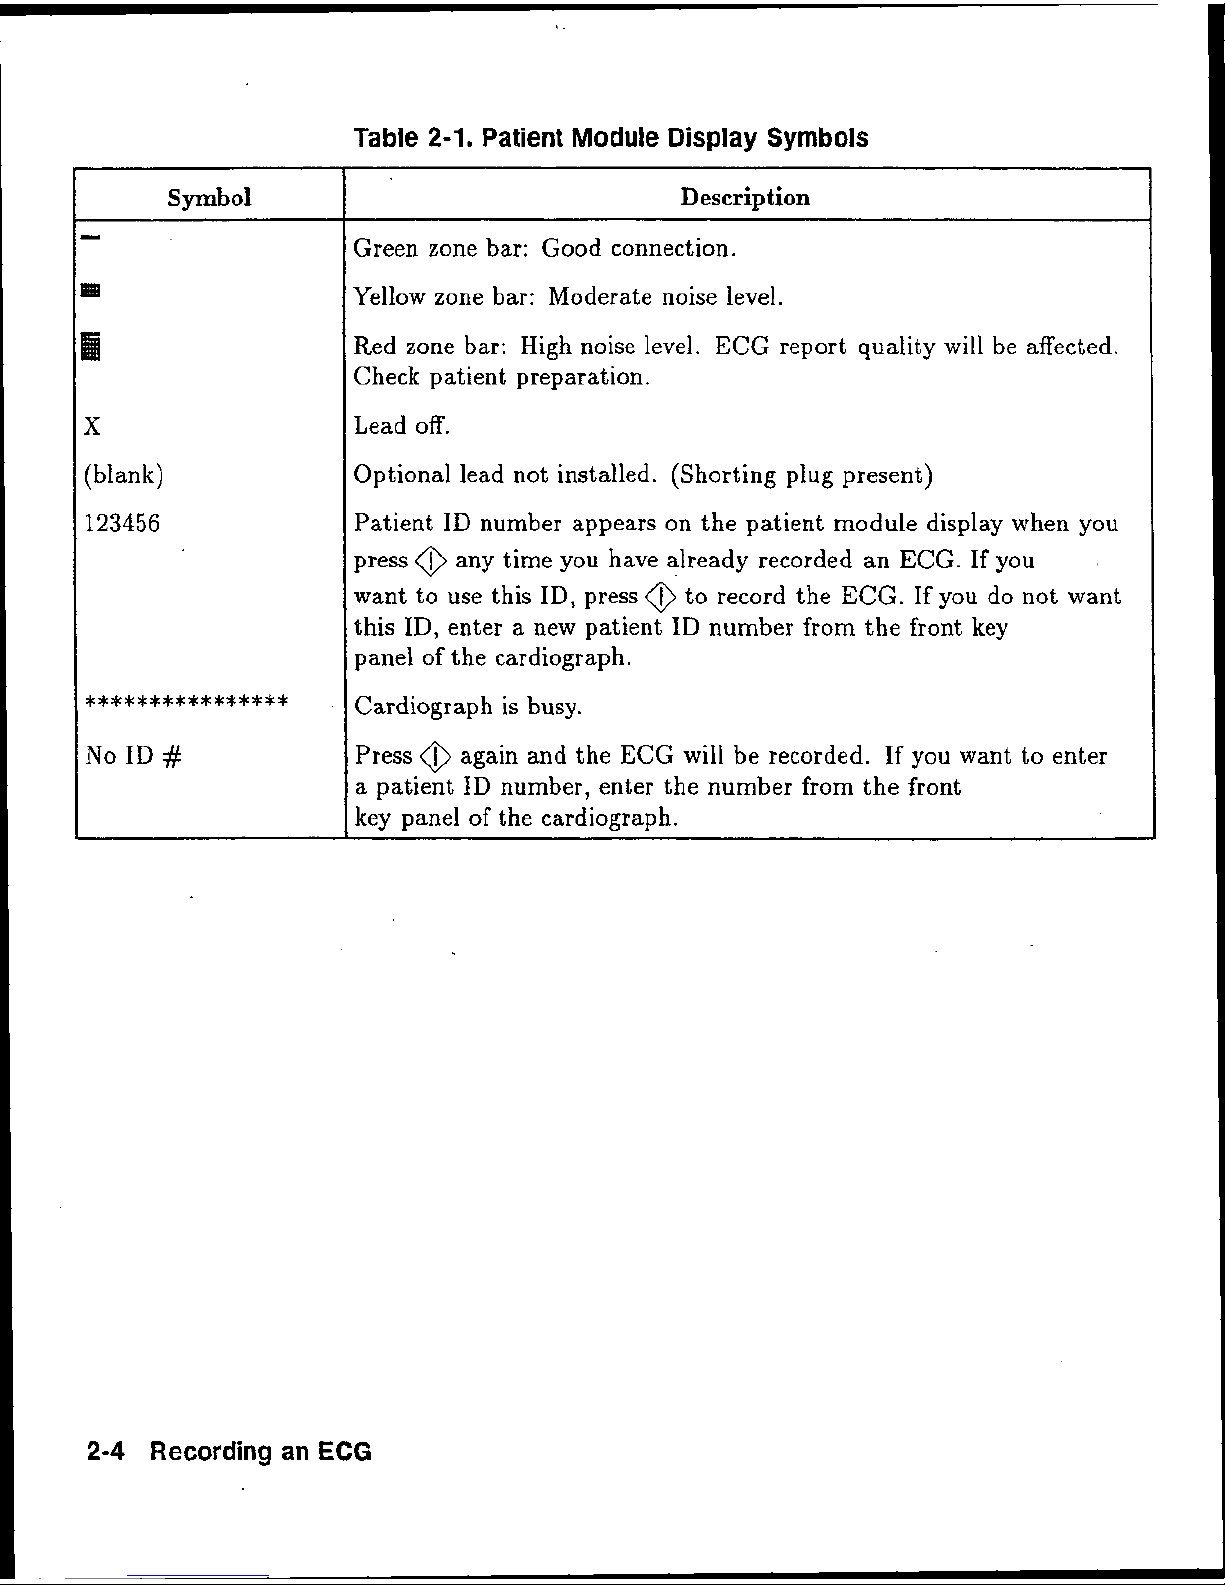
Table
2-1.
Patient
Module
Display
Symbols
Yellow zone bar: Moderate noise level.
Red zone bar:
High
noise level.
ECG
report quality
will
be
affected.
Check patient preparation.
Optional lead not installed. (Shorting plug present)
Patient
ID
number appears on the patient module display when you
press
@
any
time
you
have already recorded
an
ECG.
K
you
.
want to use this
ID,
press
@
to record the
ECG.
If you do not want
this
ID,
enter a new patient ID number from the front key
panel of the cardiograph.
***************t
Cardiograph is busy.
Press
@
again and the
ECG
will be recorded. If you want to enter
a
patient ID number, enter the number from the front
2-4
Recording
an
ECG

Using
the
Preview
Screen
(Optional)
Figure
2-2.
The
Pkev"sew
Screen.
A,
Brightness knob
B.
Contrast knob
The preview screen is another way besides the patient
module display to ensure that you record
a
good quality
ECG.
When the cardiograph is on, the preview screen
is
operating,
,
Before
you
connect the leads, the screen shows the
selected three Bead group. Each lead is shown as
a
dotted line indicating that the lead is
oK
H
As you connect the leads to
the
patient, lead
waveforms are displayed
on
the screen.
B
YOU
can select diflereaat lead groups to display
by
pressing the
@
and
Q
keys on the cardiograph's key
panel.
H
When you press the
key?
EECG
information is
acquired. A fixed display of the Auto
ECG
waveform
then appears.
B
You may halt the recording if you see artifact or other
ECG
waveform problems on the fixed display,
m
When vou mess the
'kev, there is a continuous
display of three
lead
waveforms ow the screen.
B
You can adjust the contrast and brightness
on
the
screen with the two knobs on the lower right
corner
of
the preview screen frame.
Note
If the preview screen is dark when you turn on the
cardiograph, turn the contrast
and brightness knobs for
the proper brightness.
Choosing
a
Report
Format
Auto
Report
Formats
If-lead Auto reports may be displayed in
3
x
4
or
6
x
2
formats. The
3
x
4
format displays shorter segments of
waveform information than the
6
x
2 format. Rhythm
strips may be added to display a longer segment of one
or three leads
in
the
3
x
4
format,
2-6
Recording
an
EGG
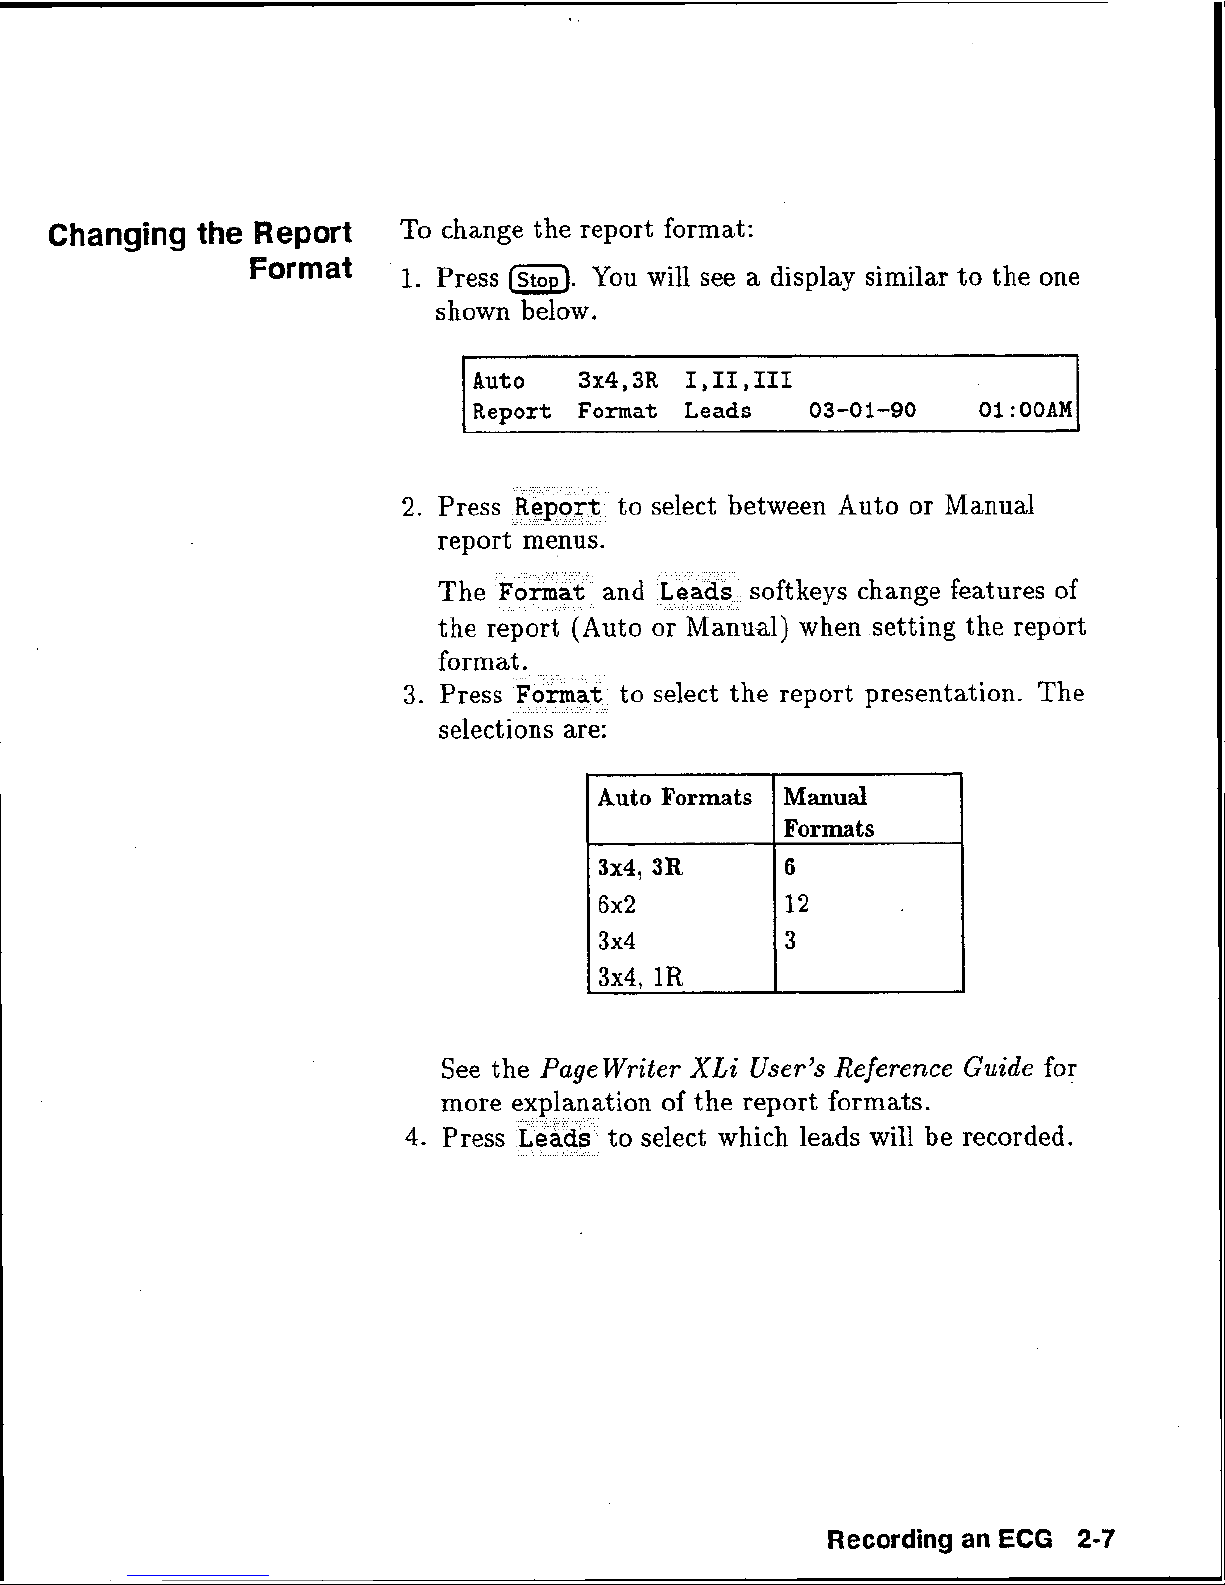
Changing
the
Report
To
change the report format:
Format
'
1.
press
.
You will see a display similar to the one
shown
below.
2.
Press
to select between Auto or Manual
report menus.
soft ke ys change features
of
)
when setting the report
to
select the report presentation. The
selections are:
See the
Page Writer Xki User's Reference Guide
for
more explanation of the report formats.
4.
Press to select which leads will. be recorded.
Recording
an
ECG
2-7

Entering
Patient
ID
You do not have to enter any patient identification
information to record an
ECG.
However, you must enter
a
patient
ID
number to store an Auto
ECG.
Another
reason to enter patient
ID
information is that some
ID
fields affect the interpretation of Auto ECGs.
Note
Your cardiograph may be configured so that patient
ID
is automatically checked for each time you start an
ECG*
If
you do not want patient
ID,
press
or
(depending on which report type was
originally selected)
again to override the request for patient
ID.
To enter patient identification:
1.
Press
@.
If
you have already entered a patient
ID
number or have not turned off the cardiograph
since recording an
ECG,
the question
New
Patient?
When you press
9
all of the patient
ID
information will be cleared. The question
Pat
iene
ID#?
appears.
If
you have not already entered
another patient
ID
number, this display also appears
when you press
a.
3-
Type the patient
ID
number and press th
softkey, The next display requests the
4.
Type the patient's name and press the
The next display requests the patient's age.
It
also
allows you to choose the age designation (Years,
Months, Weeks, Days, Hours or Year of Birth).
until the age
designati
the age and press the
2-8
Recording
an
ECG
The numbers in parentheses indicate acceptable
entries.
BB
Each time you press the
oftkey, the display
Reviewing
Changing
and
Patient
ID
moves to the next pa
preceding field, press ntil it appears.
a
There are many more patient
can supply other types of patient information. All
of the fields are shown in Table
this guide.
You can stop entering patient
time by pressing
including the currently displayed information.
To
review and change the current patient
information:
1.
Press the
appears.
2.
Press
can change any field.
@
key. The message
No
.
The current patient
Exit . This saves
.
To return to
ID
fields in which you
A-1
at
ID
information any
all
entries
ID
New
Patient?
ID
appears and you
a
the end of
Tips
3
To enter information more quickly, you can suppress
the request for information in unused
Page
the
information about configuring your cardiograph to
suppress display of unused
Writer
XLi
User9s
ID
Rejerence
fields.
ID
fields. See
Guide
for more
Recording
an
ECG
2-9
Recording
an
Auto
To record an Auto
ECG:
ECG
I.
Turn on the power on the cardiograph.
2.
Apply electrodes to
the
patient.
3.
Check each lead for signal and electrode connection
quality by observing
the
patient module display or the
preview screen.
4.
Press
on the front panel.
-
Note
Your
cardiograph may be configured so that patient
ID
is
automatically checked for each time you start an
ECG.
If
you do not want to enter patient
ID,
press again
to
override the request for patient
ID.
B
If
you entered the current patient's
ID
behre
you
pushed the
key, the
ECG
will
be recorded
without further prompts.
H
If
you have
not
entered any patient
ID
information
since turning on the cardiograph, the message
No
ID#
entered. Continue?
will appear. Press
to record the
EGG
without patient ID. Press
start entering patient ID.
ta
If you
have
entered patient
ID
information since the
cardiograph was turned on, the question
Continue
using
ID#?
appears.
If you have entered a patient identification
number and want to take more
ECGs from the
same patient, press
Yes
.
If you are taking an
ECG
from another patient
press
No.
The status messages
Acquiring
ECG,
a
variable signal
quality message, and
Printing
Auto
report
. . .
appear.
If
you have not entered the patient ID yet
and
Autostore has been turned on in configuration,
the following display
appears.
2-10
Recording
an
ECG
See Chapter
4,
Storing Auto
ECGs,
for information
about storing the
ECG.
Only Auto ECGs can be interpreted.
If you wish to suppress analysis or do not wish to have
the electronic analysis information appear on the printed
copy, you may configure the cardiograph for these
options. Refer to the
Pagewriter
XLi
Reference
Guide
for these procedures:
Recording
an
ECG
2-11
Recording
an
ECG
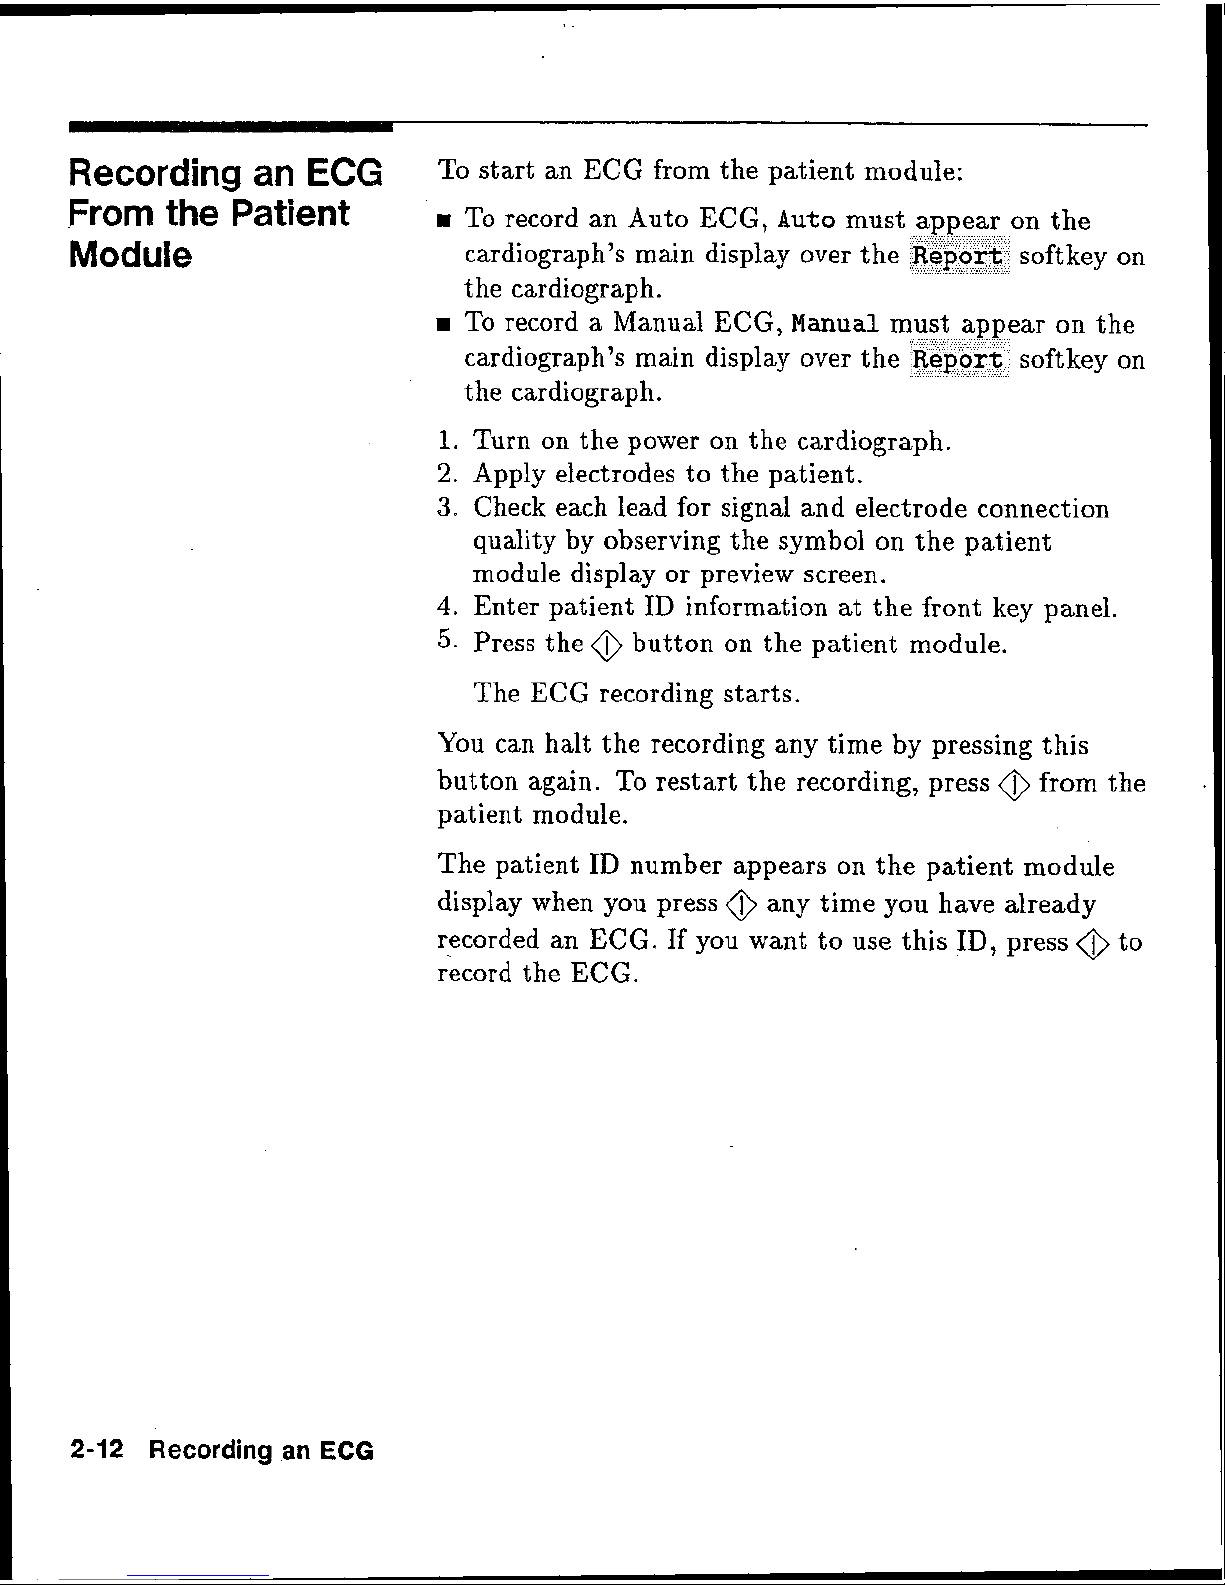
To start an
ECG
from the patient module:
From
the
patient
H
To record an Auto
ECG.
~uts
must appear on $Re
Module
,
cardiograph's main display over the
soft key
on
the cardiograph.
To record a Manual
EECG,
Manual
ar on the
cardiograph's main display over the soft key on
the cardiograph.
1.
Turn on the power on the cardiograph.
2.
Apply electrodes to the patient.
3.
Check each lead for signal and electrode connection
quality
by
observing the symbol on the patient
module
display
or
preview screen.
4.
Enter patient
ID
information at the front key panel.
5.
Press the @ button on the patient module.
The
ECG
recording starts.
Ir'ou can halt the recording any
the
by
pressing this
button again. To restart the recording, press
@
from the
patient
module.
The patient ID number appears on the patient nodule
display when you press
@
any time you have already
recorded an
ECG.
If you want to use this
ID,
press
@
to
ricord the
ECG.
2-12
Recording
an
ECG
Recording
a
'To record a Manual ECG:
Manual
ECG
1.
Turn on the power on the cardiograph.
2.
Apply electrodes to the patient.
3.
Check each lead for signal and electrode connection
quality by observing the preview screen or the patient
module display.
4,
Press
on the front panel.
Note
Your cardiograph may be configured so that patient
ID
is automaticaUy checked for each time you start an
ECG-
If
you do not want to enter patient
ID,
press
again to override the request for patient
ID.
The status message
Printing
Manual
report
.
.
.
appears. The cardiograph will print the
ECG
continuously until you press the
key or
the
@
button on the patient module.
Recording
an
ECG
2-13
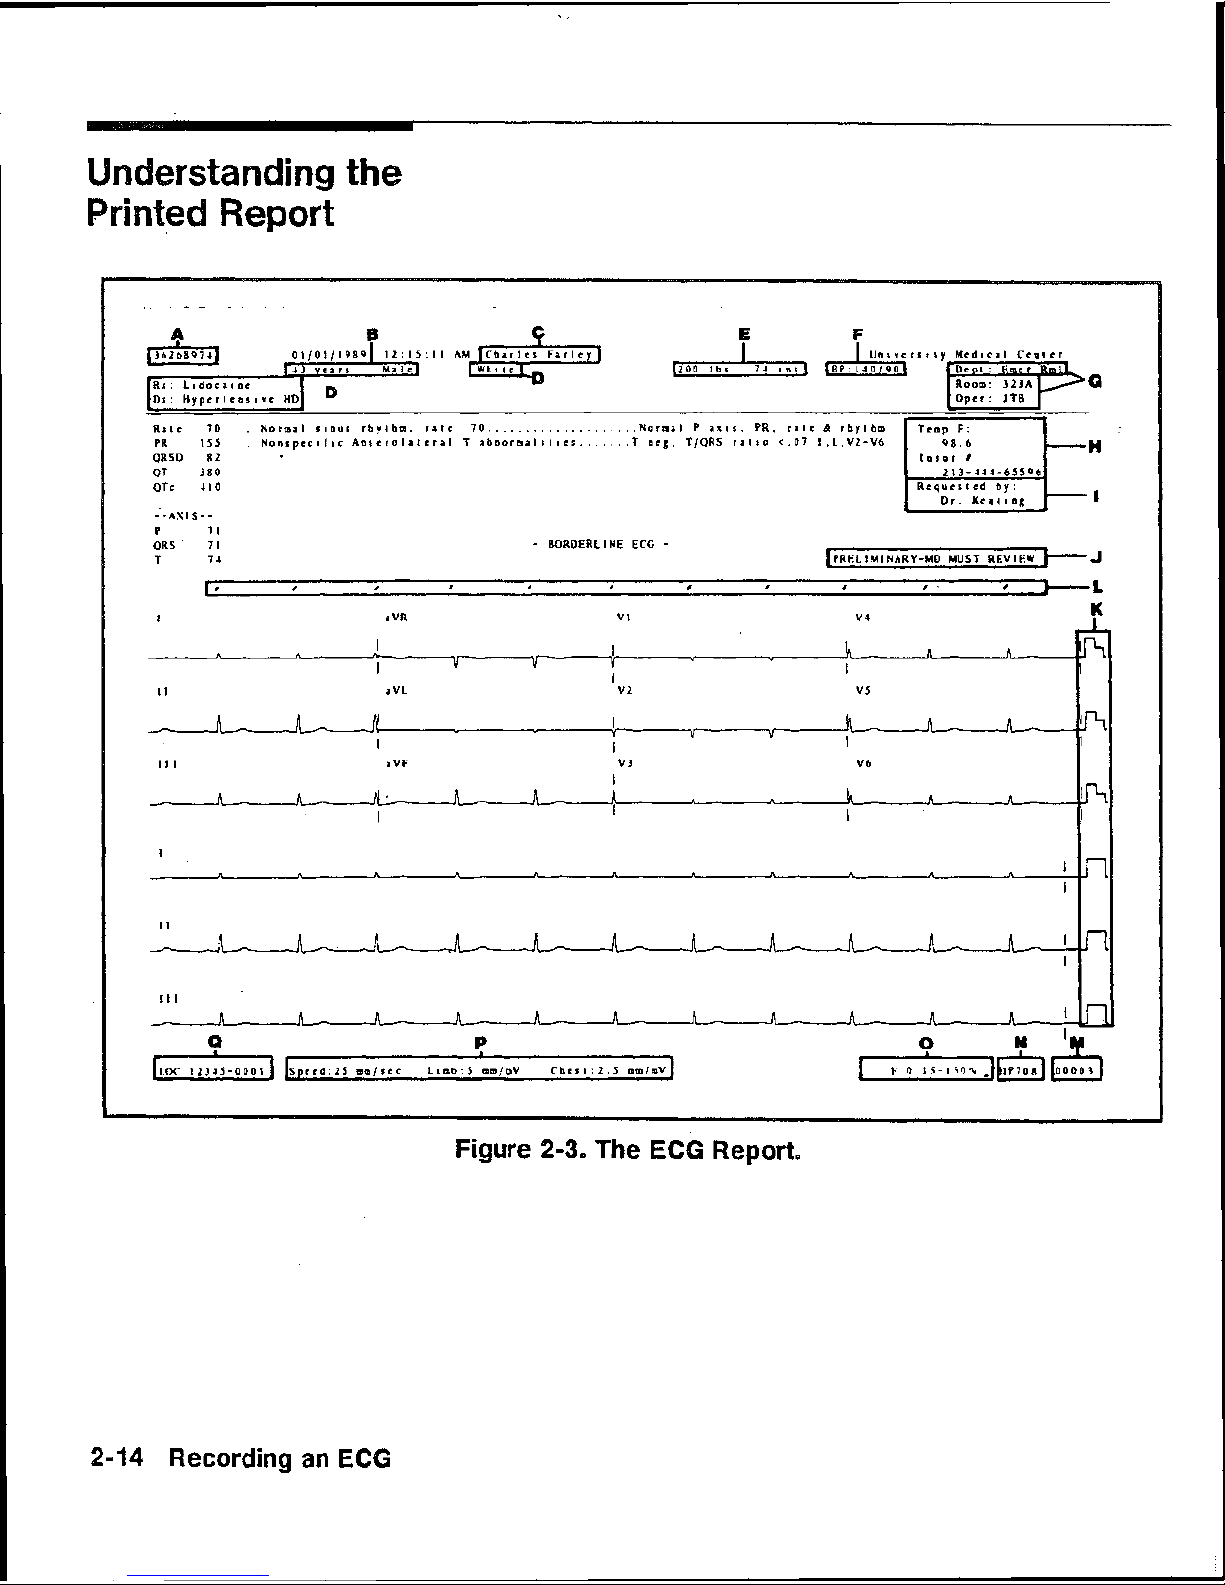
Understanding
the
Printed
Report
P
7
I
QRS
'
71
-
BORDERLINE ECC
-
I
a
QR
V
I
V4
I
I
aVL
v
2
Ill
I I
n-
Figure
2-3.
The
ECG
Report,

T~ble
2-2.
Report
Annotations
Systolic/DiastoIic Blood Pressure
(BP)
User-defined labels such as, smoker/nonsrnoker, temperature, or insurance number.
Referring physician.
Indication that
ECG
has not been overread.
Calibration signal. See Table
2-3.
Pacemaker pulse symbol,
(I),
if
present.
Sequence number
-
the total number of ECGs that have been recorded.
Adult or Pediatric criteria version
number.
*
Artifact filter
(F)
*
Frequency range
*
AC
line filter
(
"$8)
*
Baseline Wander filter
(W)
Recording
an
ECG
2-15
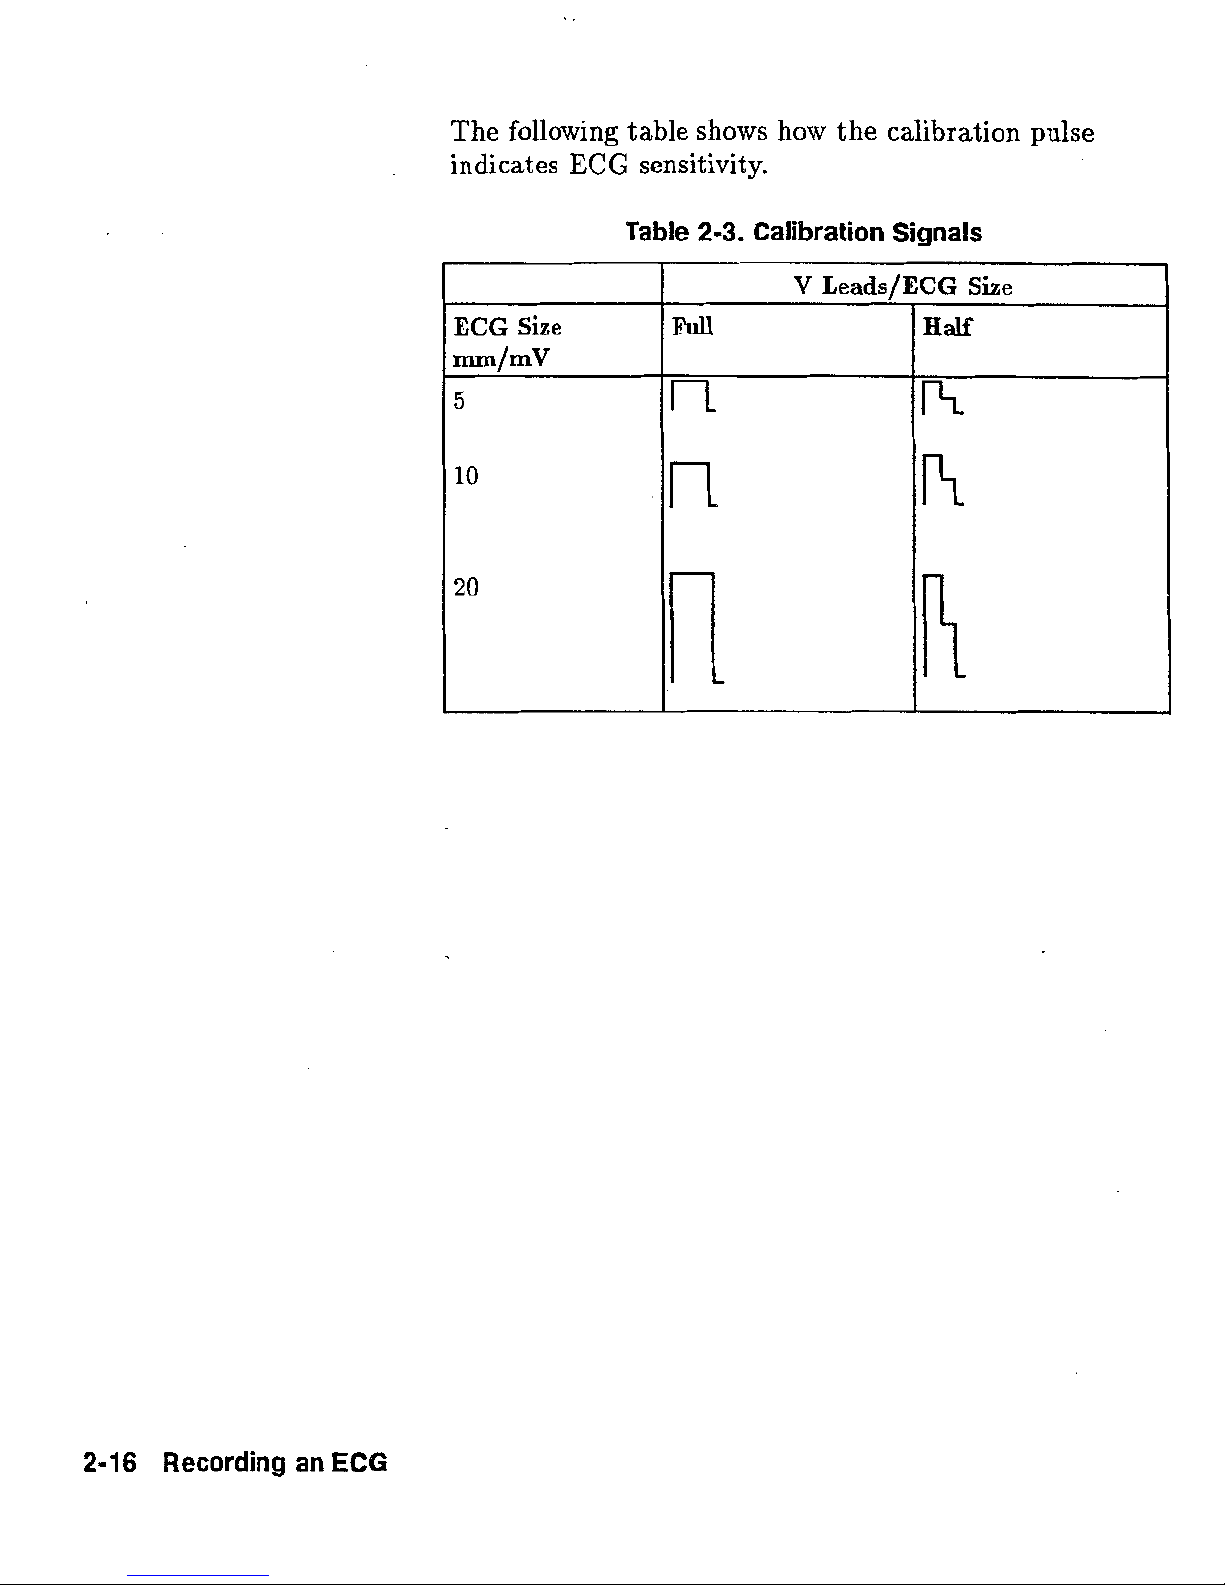
The
following
table
shows how
the
calibration
pulse
indicates
ECG
Table
sensittivitgr.
2-3.
Calibration
Signals
2-16
Recording
an
ECG
Making
Copies
of
Auto
This chapter contains information about copying ECGs
aut omatically and manually.
ECGs
Copying
ECGS
Automatically
Copying
ECGS
Manually
Note
Your cardiograph can be configured to automatically
provide additional copies of each Auto ECG after you
print it initially.
cardiograph for
User's Reference Guide.
If you
Stored
If
may manually copy the
You must copy the
wish
you require additional copies of an Auto ECG, you
to print a stored ECG, refer to
ECG
For information on configuring your
AutoCopy, refer to the
in the next chapter,
Page
Printing
ECG.
EGG
before the cardiograph has been
Writer XLi
a
To copy
1.
Press
Copying
printed.
an
Auto
on
auto
ECG
the
report
you have just recorde'd:
front
appears
Making
key panel. The message
and
the copy will
Copies of
Auto
ECGs
be
3-1
 Loading...