

HP Officejet 7310, Officejet 7310xi, Photosmart 2610, Photosmart 2610v, Photosmart 2610xi Network Guide
...Page 1

Network Guide
Page 2

HP all-in-one Network Guide
Page 3

© Copyright 2004 Hewlett-Packard
Development Company, L.P.
The information contained herein is
subject to change without notice.
Reproduction, adaptation or translation
without prior written permission is
prohibited, except as allowed under
copyright laws.
This product incorporates Adobe’s PDF
technology, which contains an
implementation of LZW licensed under
U.S. Patent 4,558,302.
Adobe and the
Acrobat logo are either registered
trademarks or trademarks of Adobe
Systems Incorporated in the United
States and/or other countries.
Portions Copyright © 1989-2003
Palomar Software Inc. The HP Officejet
5500 Series includes printer driver
technology licensed from Palomar
Software, Inc. www.palomar.com
Copyright © 1999-2003 Apple
Computer, Inc.
Apple, the Apple logo, Mac, Mac logo,
Macintosh, and Mac OS are
trademarks of Apple Computer, Inc.,
registered in the U.S. and other
countries.
Publication number: Q3450-90273
First edition: July 2004
Windows®, Windows NT®, Windows
ME®, Windows XP®, and Windows
2000® are U.S.-registered trademarks
of Microsoft Corporation.
Intel® and Pentium® are registered
trademarks of Intel Corporation.
notice
The only warranties for HP products
and services are set forth in the
express warranty statements
accompanying such products and
services. Nothing herein should be
construed as constituting an additional
warranty. HP shall not be liable for
technical or editorial errors or
omissions contained herein.
The Hewlett-Packard Company shall
not be liable for incidental or
consequential damages in connection
with, or arising out of the furnishing,
performance, or use of this document
and the program material which it
describes.
Note: Regulatory information can be
found in the technical information
chapter of this guide.
It is not lawful in many places to make
copies of the following items. When in
doubt, check with a legal
representative first.
● Governmental paper or
documents:
– Passports
– Immigration papers
– Selective service papers
– Identification badges,
cards, or insignias
● Governmental stamps:
Postage stamps
Food stamps
● Checks or drafts drawn on
Governmental agencies
● Paper currency, traveler’s
checks, or money orders
● Certificates of deposit
● Copyrighted works
safety information
Warning To prevent fire or
shock hazard, do not expose
this product to rain or any type
of moisture.
Always follow basic safety precautions
when using this product to reduce risk
of injury from fire or electric shock.
Warning Potential shock
hazard
1 Read and understand all
instructions in the setup poster.
2 Use only a grounded electrical
outlet when connecting the
device to a power source. If you
do not know whether the outlet is
grounded, check with a qualified
electrician.
3 Observe all warnings and
instructions marked on the
product.
4 Unplug this product from wall
outlets before cleaning.
5 Do not install or use this product
near water or when you are wet.
6 Install the product securely on a
stable surface.
7 Install the product in a protected
location where no one can step
on or trip over the line cord, and
where the line cord will not be
damaged.
8 If the product does not operate
normally, see the onscreen
Troubleshooting Help.
9 No operator-serviceable parts
inside. Refer servicing to
qualified service personnel.
10 Use in a well-ventilated area.
Page 4

Contents
1 Get started.............................................................................................................3
Choose a network type...........................................................................................3
Use the network management tools.......................................................................3
Switch from a USB connection to a network connection......................................... 3
Connect additional computers................................................................................4
Get HP support.......................................................................................................4
2 Choose a recommended Ethernet network........................................................5
Ethernet connection to a wired network with DSL or cable Internet access............5
Ethernet connection to a wired network with modem Internet access....................6
Ethernet connection to a wired network without Internet........................................7
Ethernet connection to a wireless network.............................................................7
3 Connect with an Ethernet cable..........................................................................9
What you need.......................................................................................................9
Connect your HP all-in-one...................................................................................10
4 Install the software.............................................................................................11
For Windows.........................................................................................................11
For Macintosh.......................................................................................................12
5 Manage your network.........................................................................................13
Use the HP all-in-one control panel......................................................................13
Use the Embedded Web Server...........................................................................15
6 Network troubleshooting...................................................................................17
Wired network setup troubleshooting...................................................................17
a Configuration page definitions..........................................................................21
General network settings......................................................................................21
Wireless network settings.....................................................................................23
Miscellaneous.......................................................................................................25
b Glossary..............................................................................................................27
Index...........................................................................................................................29
HP all-in-one Network Guide 1
Page 5

2
Page 6

1
Get started
This guide complements the information in the printed Setup Guide and the User Guide
that came with your HP all-in-one. It describes how to set up your HP all-in-one in a
network, which includes configuring and connecting the device, and installing the
software. This guide also provides examples of recommended networks, network
management information, and troubleshooting tips.
Connecting your HP all-in-one to a network enables you to share your HP all-in-one and
all of its capabilities with every computer on the network. However, if you do not intend
to connect to a network and want a direct USB connection instead, please see the
Setup Guide for information.
Use this chapter to help you find information on the following topics:
● Choose a network type
● Use the network management tools
● Switch from a USB connection to a network connection
● Connect additional computers
● Get HP support
Note For definitions of terms used in this guide, see the Glossary.
Choose a network type
There a number of different ways to set up an Ethernet network environment for your
HP all-in-one. For ideas, please see Choose a recommended Ethernet network.
Use the network management tools
For information on using the HP all-in-one management tools, see Manage your
network.
Switch from a USB connection to a network connection
If you first install your HP all-in-one with a USB connection, you can later switch to a
network connection.
To switch a USB connection to a network connection
1 Unplug the USB connection from the back of your HP all-in-one.
2 Connect your HP all-in-one, as described in Connect with an Ethernet cable.
3 Install the software, as described in Install the software.
4 When the installation is complete, access the printer icons on your computer as
follows:
– For Windows XP: Open the Printers and Faxes folder.
– For Windows 9.x or Windows 2000: Open the Printers folder.
– For Macintosh OS X: Open the Printer Setup Utility in the Utilities list.
5 Check to see if the USB printer icon for your HP all-in-one is there. If it is, delete it.
HP all-in-one Network Guide 3
Page 7

Chapter 1
Connect additional computers
If your HP all-in-one is connected to one of the recommended networks you can share
your HP All-in-One with additional computers on the network. For each additional
computer, you must install the HP all-in-one software, as described in Install the
software. During installation, the software will discover the SSID (network name) of the
existing network. Once you have set up your HP all-in-one on the network you will not
need to configure it again when you add additional computers.
Get HP support
For information on how to get HP customer support, please see the printed User Guide
that came with your HP all-in-one.
4
Page 8

2
Choose a recommended Ethernet network
Use this chapter to help you identify what kind of Ethernet network you already have in
place or want to set up. Each network shown here uses a device, such as an Ethernet
router, to connect the network elements. A network connected in this manner is called
an infrastructure network. An Ethernet network provides superior performance,
reliability, and network security.
Ethernet networks might or might not be connected to the Internet. If you place your
HP all-in-one on an Ethernet network connected to the Internet, it is recommended that
you use a gateway so that the HP all-in-one’s IP address is assigned dynamically
through Dynamic Host Configuration Protocol (DHCP). A gateway can either be a
router or a Windows computer running Internet Connection Sharing (ICS).
Note For definitions of terms not defined here, see the Glossary.
We recommend the wired LAN (local area network) configurations below to support
your HP all-in-one.
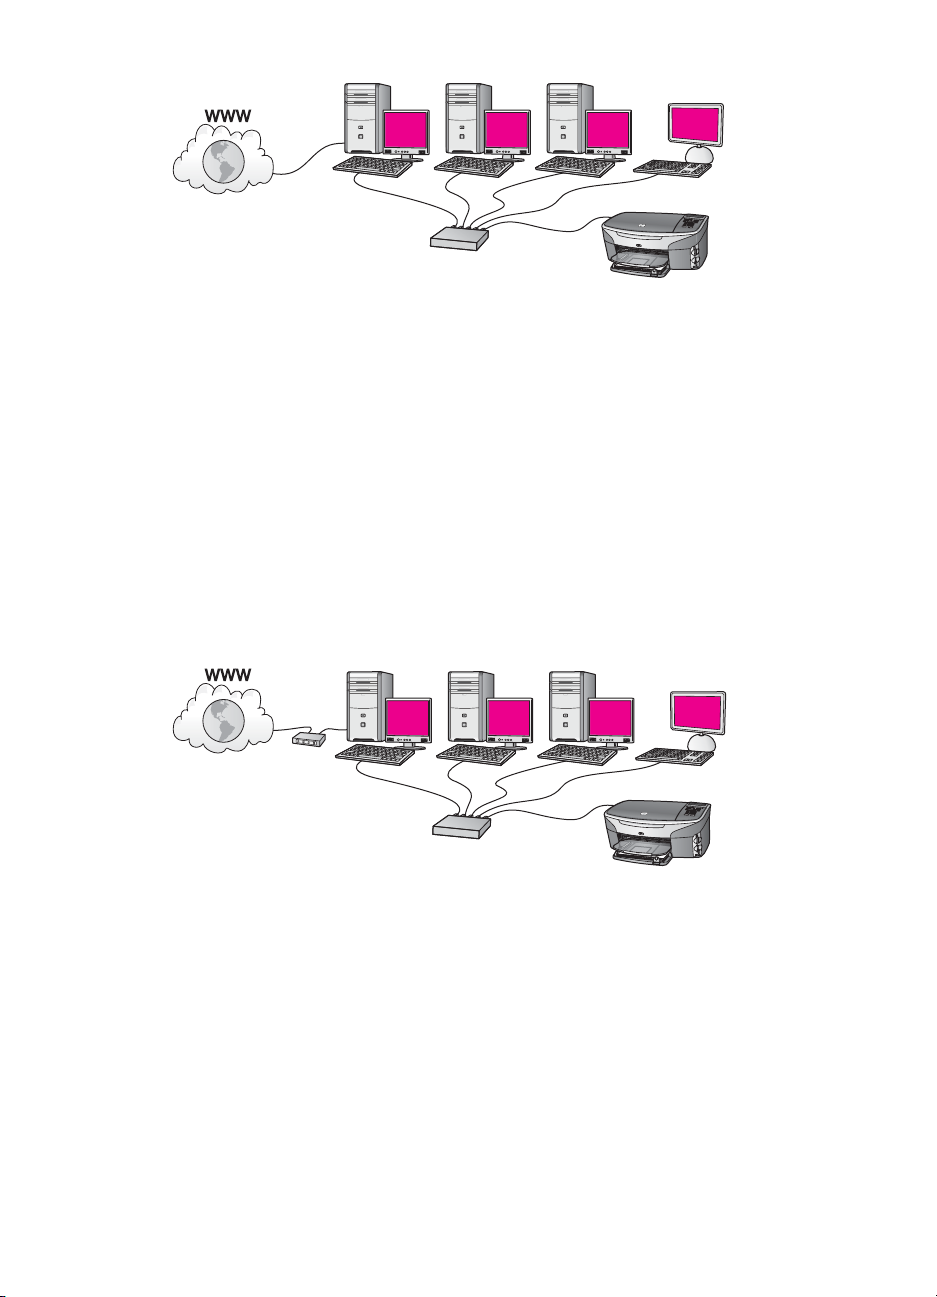
Ethernet connection to a wired network with DSL or cable Internet access
If your network has DSL or cable Internet access, you can use either a router or a
computer as the Internet gateway. With either DSL or cable, you are able to access the
full functionality of your HP all-in-one, including sharing pictures over the Internet with
HP Instant Share.
Router gateway
In this example, a router manages the network connections, and a DSL or cable modem
provides Internet access. If you use this configuration, connect your HP all-in-one to the
router with an Ethernet cable.
With this configuration, you are able to access the full functionality of the HP all-in-one,
including sharing pictures over the Internet . For connection instructions, see Connect
with an Ethernet cable.
Computer gateway
HP all-in-one Network Guide 5
Page 9
Chapter 2
In this example, the network devices are connected to a switch or router. A computer on
the network acts as the gateway between the network and the Internet. The gateway
computer uses Windows Internet Connection Sharing (ICS) or similar software to
manage the network connections and provide Internet access to the other devices.
Note If the computer acting as a gateway is turned off, the other computers on the
network will lose their Internet connection. The HP all-in-one will not support
Internet-related functions.
If you use this configuration, connect your HP all-in-one to the switch or router with an
Ethernet cable. For connection instructions, see Connect with an Ethernet cable.
Ethernet connection to a wired network with modem Internet access
In this example, the network devices are connected to a switch or router, and a modem
(shown here connected to the computer on the left) provides Internet access. The
modem is connected to the computer using a phone cord and jack. Only one computer
has Internet access. Neither the HP all-in-one nor any of the other computers on the
network have access to the Internet. If you use this configuration, connect your HP allin-one to the switch or router with an Ethernet cable. For connection instructions, see
Connect with an Ethernet cable.
Note In order to use the HP Instant Share features on your HP all-in-one, you will need
broadband Internet access, such as cable or DSL. For more information about
HP Instant Share, see the printed User Guide that came with your HP all-in-one.
6
Page 10
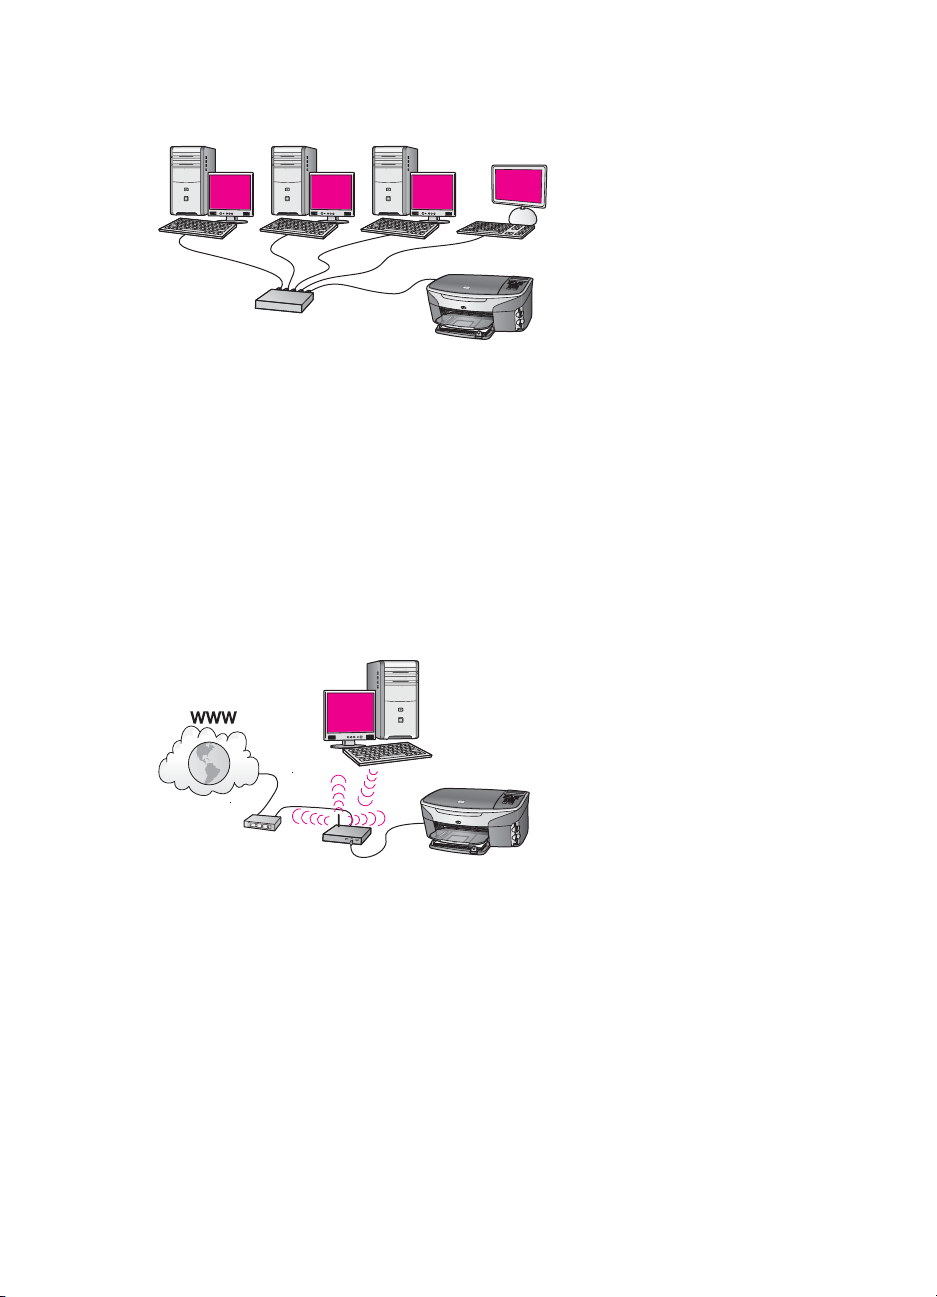
Ethernet connection to a wired network without Internet
In this example, the network devices are connected to a switch or router, and there is no
Internet connection. Devices use AutoIP, which means IP addresses are configured
automatically. If you have this configuration, connect your HP all-in-one to the switch or
router with an Ethernet cable. For connection instructions, see Connect with an
Ethernet cable.
Note In order to use the HP Instant Share features on your HP all-in-one, you will need
broadband Internet access, such as cable or DSL. For more information about
HP Instant Share, see the printed User Guide that came with your HP all-in-one.
Ethernet connection to a wireless network
Your access point connects a wired device to a wireless network. In this model, your
computer is configured for wireless networking using a wireless network adapter, and
transfers and receives data through the access point. Your HP all-in-one is configured
for wired networking and is connected with an Ethernet cable to the access point. A
DSL or cable modem can provide Internet access. For connection instructions, see
Connect with an Ethernet cable.
Note In this configuration, we recommend that you route the Internet connection
directly through the access point using an Ethernet cable.
HP all-in-one Network Guide 7
Page 11

Chapter 2
8
Page 12

3
Connect with an Ethernet cable
Use this chapter to connect your HP all-in-one to a router, switch, or access point using
an Ethernet cable.
For ideas on how to set up a wired network, see Choose a recommended Ethernet
network.
Note For definitions of terms not defined here, see the Glossary.
To connect your HP all-in-one to your computer, first see the next section for the things
you will need. When you are finished connecting your HP all-in-one, you will need to
install the software as described in Install the software.
What you need
● A functional Ethernet network that includes an Ethernet router, switch, or a wireless
access point with Ethernet ports.
● CAT-5 Ethernet cable. If the Ethernet cable provided is not long enough for your
network configuration, you might need to purchase a longer cable.
Although standard Ethernet cables look similar to standard telephone cables, they
are not interchangeable. There is a different number of wires in each one, and each
has a different connector. An Ethernet cable connector (also called an RJ-45
connector) is wider and thicker and always has 8 contacts on the end. A phone
connector has between 2 and 6 contacts.
● A desktop computer or laptop with either a wired or wireless connection to the
router or access point.
HP all-in-one Network Guide 9
Page 13
Chapter 3
Note The HP all-in-one supports both 10 Mbps and 100 Mbps Ethernet networks.
If you are purchasing, or have purchased, a network interface card (NIC),
make sure it can operate at either speed.
● Broadband Internet access such as cable or DSL (only if you want to access
HP Instant Share directly from the device). For more information on HP Instant
Share, see the printed User Guide that came with your HP all-in-one.
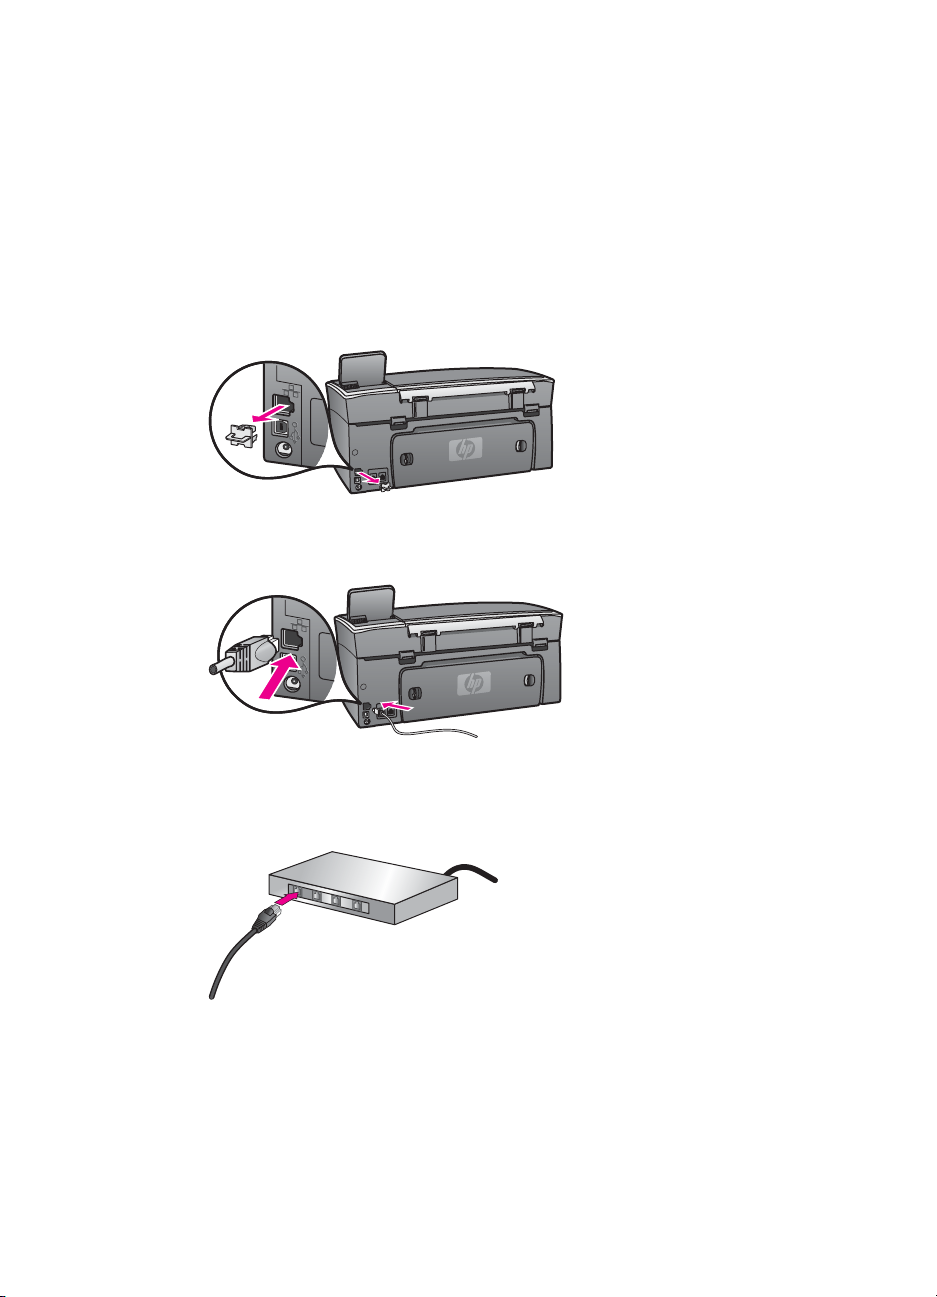
Connect your HP all-in-one
1 Remove the yellow plug from the back of the HP all-in-one.
2 Connect the Ethernet cable to the Ethernet port on the back of your HP all-in-one.
10
3 Connect the other end of the Ethernet cable to an available port on your Ethernet
router, switch, or wireless access point.
4 Once you have connected the HP all-in-one to the network, go to your computer to
install the software. See Install the software.
Page 14

4
Install the software
Use this chapter to install your HP all-in-one software on either a Windows or Macintosh
computer. However, before you install the software, make sure you have connected
your HP all-in-one as described in one of the previous chapters.
Note If your computer is configured to connect to a series of network drives, make
sure that your computer is currently connected to these drives before installing
the software. Otherwise, HP all-in-one installation software might take one of the
reserved drive letters, and you will not be able to access that network drive on
your computer.
See the instructions below for your Windows or Macintosh computer.
For Windows
The following instructions are for Windows computers only.
Note Installation time can range from 20 to 45 minutes depending on your operating
system, the amount of available space, and the processor speed of your
computer.
To install your HP all-in-one software
1 Quit all applications running on your computer, including the internal XP firewall
and any other firewall or virus detection software.
2 Insert the Windows CD that came with your HP all-in-one into your computer's
CD-ROM drive.
The Welcome screen appears.
Note Windows XP only: If the startup screen does not appear, double-click My
Computer, double-click the CD-ROM icon, and then double-click setup.exe.
3 Click Next on the installation screens for checking and preparing the system, and
for installing drivers, plug-ins, and software.
After several screens, the Connection Type screen appears.
4 On the Connection Type screen, select Through the network, and then click
Next.
The Searching screen appears as the Setup program searches for your HP all-inone on the network.
5
On the Printer Found screen, verify that the printer description is correct.
If more than one printer is found on the network, the Printers Found screen
appears. Select the device you wish to connect.
To see the device settings on your HP all-in-one:
a Go to the control panel on your device.
b Select View Network Settings on the Network Menu, and then select
Display Summary.
6 If the device description is correct, select Yes, install this printer.
7 At the prompt, restart your computer to finish the installation process.
HP all-in-one Network Guide 11
Page 15

Chapter 4
When you have finished installing the software, your HP all-in-one is ready for
service.
8 To test your network connection, go to your computer and print a test page to your
HP all-in-one. For more information, see the printed User Guide that came with
yourHP all-in-one.
For Macintosh
The following instructions are for Macintosh computers only.
Note Installation time can range from 20 to 45 minutes depending on your operating
system, the amount of available space, and the processor speed.
To install your HP all-in-one software
1 Quit all applications running on your computer.
2 Insert the Macintosh CD that came with your HP all-in-one into your computer's
CD-ROM drive.
3 Double-click the HP all-in-one installer icon.
12
Macintosh installer icon
4 On the Authentication screen, enter the Administrator pass phrase used to access
your computer or network.
The installer software looks for HP all-in-one devices, and then lists them.
5 On the Select Device, select your HP all-in-one.
6 Follow the onscreen instructions to complete all the installation steps, including the
Setup Assistant.
When you have finished installing the software, your HP all-in-one is ready for
service.
7 To test your network connection, go to your computer and print a test page to your
HP all-in-one. For more information, see the printed User Guide that came with
your device.
Page 16

5
Manage your network
This chapter describes how to use the network tools on the device control panel and the
Embedded Web Server. These tools enable you to view and edit network settings, and
add advanced security to your network.
Use the HP all-in-one control panel
The HP all-in-one control panel enables you to perform a variety of network
management tasks, including viewing the network settings, restoring the network
defaults, and changing the network settings.
View network settings
You can display a summary of the network settings on the device control panel. Or you
can print a more detailed configuration page.
Display a network summary
Choose whether to display a network summary or print a detailed report.
To display a network summary
1 On the control panel of the HP all-in-one, press the Setup button.
2 Press 8, and then press 1.
This displays the Network Menu and then selects View Network Settings.
3 Press 2.
This displays a summary of the network settings.
Print and view a network configuration page
The Network Configuration Page lists all of the important network settings such as the
IP address, link speed, DNS, and DNS-SD.
To print a network configuration page
1 On the control panel of the HP all-in-one, press the Setup button.
2 Press 8, and then press 1.
This displays the Network Menu and then selects View Network Settings.
3 Press 1.
This prints the network configuration page.
For definitions of the items on the configuration page, see Configuration page
definitions.
Restore network defaults
If necessary, you can reset the HP all-in-one network to factory defaults.
Note This will erase all wireless setup information that you have entered. In order to
restore this information, you will need to use the Wireless Setup Wizard again.
HP all-in-one Network Guide 13
Page 17

Chapter 5
To reset to factory defaults
1 On the control panel of the HP all-in-one, press the Setup button.
2 Press 8, and then press 2.
This displays the Network menu and then selects Restore Network Defaults.
3 Press 1 to confirm.
Advanced network settings
The Advanced Setup options enable you to change link speed, IP settings, and
memory card security.
Note Unless you are an advanced user, you should not change any of these settings.
Set link speed
You can change the speed at which data is transmitted over the network. The default is
Automatic.
To set the link speed
1 On the control panel of the HP all-in-one, press the Setup button.
2 Press 8, and then press 3.
This displays the Network menu and then selects Advanced Setup.
3 Press 1 to select Change Link Speed.
4 Press the number next to the link speed:
– 1. Automatic
– 2. 10-Full
– 3. 10-Half
– 4. 100-Full
– 5. 100-Half
14
Change IP settings
The default IP setting is Automatic. However, if necessary, you can manually change
the IP address, subnet mask, or the default gateway. To see the IP address and subnet
mask of your HP all-in-one, print a network configuration page from your HP all-in-one
(see Print and view a network configuration page). For a description of the items on the
configuration page, including the IP address and subnet mask, see Configuration page
definitions.
To change an IP setting
1 On the control panel of the HP all-in-one, press the Setup button.
2 Press 8, and then press 3.
This displays the Network menu and then selects Advanced Setup.
3 Press 2 to select IP Settings.
4 Press the number next to the IP setting:
– 1. IP Address
– 2. Subnet Mask
– 3. Default Gateway
5 Enter your changes, and then press OK when done.
Page 18

Change memory card security
The Memory Card Security option on the Advanced Setup menu enables you to set
the HP all-in-one so that it does not share memory card data with computers on a
wireless network. However, we do not recommended this security method for your
memory card because it prevents you from accessing your memory card from your
computer. Also, this feature does not work on an Ethernet network. All computers on an
Ethernet network can access the memory card on a HP all-in-one connected to the
network.
Use the Embedded Web Server
The best way to manage the general network settings for the HP all-in-one is through
the HP all-in-one control panel. However, for more advanced settings you can use the
Embedded Web Server (EWS). When you open the your web browser, you can monitor
status, configure HP all-in-one networking parameters, or access HP all-in-one
features. For more information about these and other features available in the EWS,
see the onscreen Help within the Embedded Web Server. To access Embedded Web
Server help, open the Embedded Web Server as described below, then click the Help
link under Other Links on the Embedded Web Server Home tab.
Access the Embedded Web Server
To access the Embedded Web Server
1
On the control panel of the HP all-in-one, press the Setup button.
2 Press 8, press 1, and then press 1.
This prints configuration page for your HP all-in-one, including the IP address. You
will use the IP address in the next step.
3 In the Address box in your web browser, enter the IP address of the HP all-in-one,
as shown on the network configuration page. For example, http://195.168.0.5.
The Embedded Web Server Home page appears, showing the HP all-in-one device
information.
Note If you are using a proxy server in your browser, you might need to disable it
to access the Embedded Web Server.
4 If you need to change the language displayed in the Embedded Web Server, do the
following:
a Click the Settings tab.
b Click Select Language in the Settings navigation menu.
c In the Select Language list, click the appropriate language.
d Click Apply.
5 Click the Home tab to access device and network information, or click the
Networking tab to access more network information or to modify network
information.
Caution Be very careful when changing the wireless network settings for the
print server; you could lose your network connection. If you lose your network
connection, you might need to use the new settings to reconnect. If the print
HP all-in-one Network Guide 15
Page 19

Chapter 5
server loses its network connection, you might need to reset it to factory-default
and reinstall the software.
Note Do not disable TCP/IP (Transmission Control Protocol/Internet Protocol) on your
computer. It is required for communication with the Embedded Web Server.
16
Page 20

6
Network troubleshooting
This section contains network troubleshooting information for the HP all-in-one. Specific
information is provided for installation and configuration issues.
Wired network setup troubleshooting
Use this section to solve wired network setup problems.
The Computer is unable to discover the HP all-in-one
Cause
Cables are not connected properly.
Solution
Check the following cables to ensure they are connected properly:
● Power cords to the HP all-in-one and the router
● Cables between the router and your computer
● Cables to and from your modem or HP all-in-one Internet connection (if
applicable)
Cause
Your Local Area Network (LAN) card (NIC) is not set up properly.
Solution
Make sure that your LAN card is set up properly.
To check your LAN card in Windows XP
1 Right-click My Computer.
2 In the System Properties dialog box, click the Hardware tab.
3 Click Device Manager.
4 Make sure your card shows up under Network Adapters.
5 Refer to the documentation that came with your card.
Cause
You do not have an active network connection.
Solution
Check to see if you have an active network connection.
To make sure your network connection is active
1 Check to see if the wired network icon (below on the left) is present on the
color graphics display. If the icon is present, the HP all-in-one is connected to
the network.
HP all-in-one Network Guide 17
Page 21

Chapter 6
The icon on the left shows an active wired network. The icon on the right
shows an inactive network.
Wired network icon
2 If the wired network icon is not present, check the cable connections from the
HP all-in-one to your gateway or router to ensure connections are secure.
3 Make sure the HP all-in-one is connected to the network with a CAT-5
Ethernet cable.
4 Check the two Ethernet indicator lights on the top and bottom of the RJ-45
Ethernet jack on the back of the HP all-in-one. The lights indicate the
following:
a Top light: If this light is a solid green, the device is properly connected to
the network, and communications have been established. If the top light is
off, there is no network connection.
b Bottom light: This yellow light flashes when data is being sent or received
by the device over the network.
5 If the connections are secure, turn off the power on your HP all-in-one, and
then turn it on again. On the control panel of the HP all-in-one, press the On
button to turn off the HP all-in-one, and then press it again to turn it on. Also,
turn off the power on your router and then turn it on again.
18
To establish an active network connection
1 If the wired network icon is not active, check the cable connections from the
HP all-in-one to your gateway or router to ensure connections are secure.
2 If the connections are secure, press the On button to turn off the HP all-in-
one, and then press it again to turn it on. Also, turn off the power on your
router and then turn it on again.
I received a System Requirements Error: No TCP/IP
Cause
Your Local Area Network (LAN) card (NIC) is not installed properly.
Solution
Make sure your LAN card is installed properly and set up for TCP/IP. See the
instructions that came with your LAN card.
The Printer Not Found screen appears during installation
Cause
The HP all-in-one is not turned on.
Page 22

Solution
Look at the color graphics display on HP all-in-one. If the color graphics display is
blank and the light next to the On button is not lit, the HP all-in-one is turned off.
Make sure the power cord is firmly connected to the HP all-in-one and plugged into a
power outlet. Press the On button to turn on the HP all-in-one.
Cause
You do not have an active network connection.
Solution
Make sure you have an active network connection. For more information, see You
do not have an active network connection.
Cause
Cables are not connected properly.
Solution
Check the following cables to ensure they are connected properly:
● Power cords to the HP all-in-one and the router
● Cables between the router and your computer
● Cables to and from your modem or HP all-in-one Internet connection (if
applicable)
I am using a cable modem without a router and I do not have IP addresses
Cause
If you have a PC with a cable modem, a separate Local Area Network (LAN) for
your other computers, and no DHCP or router, you must use AutoIP to assign IP
addresses to the other computers and to the HP all-in-one.
Solution
To obtain an IP address for the PC with the cable modem
➔
Your Internet Service Provider (ISP) assigns either a static or dynamic IP
address to the PC with the cable modem.
To assign IP addresses to the remaining computers and the HP all-in-one
➔
Use AutoIP to assign IP addresses to the remaining computers and the
HP all-in-one. Do not assign a static IP address.
HP all-in-one Network Guide 19
Page 23

Chapter 6
20
Page 24

a
Configuration page definitions
This appendix explains the items that appear on the network configuration page.
General network settings
The following table describes the general network settings shown on the network configuration
page.
Parameter
Network Status
Active
Connection Type
URL
Hardware
Address (MAC)
Firmware
Revision
Description
Status of the HP all-in-one:
● Ready: the HP all-in-one is ready to receive or transmit data.
● Offline: the HP all-in-one is offline.
Network mode of the HP all-in-one:
● Wired: the HP all-in-one is connected by Ethernet cable to an IEEE
802.3 network.
● Wireless: the HP all-in-one is connected wirelessly to an IEEE 802.11b
or g network.
● None: Both network connection types are disabled.
Note Only one connection type can be active at a time.
The web or IP address of the Embedded Web Server.
Note You will need to know this URL when you try to access the
Embedded Web Server.
The Media Access Control (MAC) address that uniquely identifies the
HP all-in-one. This is a unique 12-digit identification number assigned to
networking hardware for identification. No two pieces of hardware have the
same MAC address.
Note Some Internet service providers (ISPs) require that you register the
MAC address of the Network Card or LAN Adapter that was
connected to your cable or DSL modem during installation.
The internal networking component and device firmware revision code
separated by a hyphen.
Note If you call in for support, depending on the problem, you might be
asked to provide the firmware revision code.
Hostname
IP Address
HP all-in-one Network Guide 21
The TCP/IP name assigned by the install software to the device. By default,
this is the letters HP followed by the last 6 digits of the MAC address.
This address uniquely identifies the device on the network. IP addresses are
assigned dynamically through DHCP or AutoIP. You can also set up a static
IP address, though this is not recommended.
Note Manually assigning an invalid IP address during install will prevent
your network components from seeing the HP all-in-one.
Page 25

Appendix a
(continued)
Subnet Mask
A subnet is an IP address assigned by the install software to make an
additional network available as part of a larger network. Subnets are
specified by a subnet mask. This mask determines which of the HP all-in-one
IP address bits identify the network and subnet, and which bits identify the
device itself.
Note It is recommended that the HP all-in-one and the computers that use
it all reside on the same subnet.
Default
Gateway
Configuration
Source
DNS Server
A node on a network that serves as an entrance to another network. A node
in this instance can be a computer or some other device.
Note The address of the default gateway is assigned by the install
software.
The protocol used to assign the IP address to the HP all-in-one:
● AutoIP: the installation software automatically determines the
configuration parameters.
● DHCP: the configuration parameters are supplied by a dynamic host
configuration protocol (DHCP) server on the network. On small
networks, this could be a router.
● Manual: the configuration parameters are set manually, such as a
static IP address.
● Not Specified: the mode used when the HP all-in-one is initializing.
The IP address of the domain name service (DNS) for the network. When
you use the web or send an e-mail message, you use a domain name to do
it. For example, the URL http://www.hp.com contains the domain name hp.
com. The DNS on the Internet translates the domain name into an IP
address. Devices use the IP addresses to refer to one another.
● IP Address: the domain name server's IP address.
● Not Specified: the IP address is not specified, or the device is
initializing.
Note Check to see if a DNS IP address appears on the network
configuration page. If no address is shown, obtain the DNS IP
address from your Internet service provider (ISP). The DNS IP
address is required to use HP Instant Share from the device, and can
be entered through the Embedded Web Server.
22
mDNS
Admin
Password
Rendezvous is used with local and ad hoc networks that don't use central
DNS servers. To perform name services, Rendezvous uses a DNS
alternative called mDNS.
With mDNS, your computer can find and use any HP all-in-one connected to
your local area network. It can also work with any other Ethernet-enabled
device that appears on the network.
Status of the administrator's password for the Embedded Web Server:
● Set: password is specified. You must enter the password to make
changes to the Embedded Web Server parameters.
● Not Set: no password is set. A password is not required for making
changes to the Embedded Web Server parameters.
Page 26

(continued)
Link
Configuration
The speed at which data is transmitted over a network:
● 802.11b: for wireless network.
● 10TX-Full: for wired network.
● 10TX-Half: for wired network.
● 100TX-Full: for wired network.
● 100TX-Half: for wired network.
● None: networking is disabled.
Wireless network settings
The following table describes the wireless network settings shown on the network configuration
page.
Parameter
Wireless Status
Communication
Mode
Network Name
(SSID)
Signal Strength
(1-5)
Description
Status of the wireless network:
● Connected: the HP all-in-one is connected to a wireless LAN and
everything is working.
● Disconnected: the HP all-in-one is not connected to the wireless LAN
due to incorrect settings (such as the wrong WEP key), or the HP allin-one is out of range.
● Disabled: either the radio is turned off, or the Ethernet cable is plugged
in.
● Not applicable: this parameter does not apply to this network type.
An IEEE 802.11 networking framework in which devices or stations
communicate with each other:
● Infrastructure: the HP all-in-one communicates with other network
devices through a wireless access point, such as a wireless router or
base station.
● ad hoc: the HP all-in-one communicates directly with each device on
the network. No wireless access point is used. This is also called a
peer-to-peer network. On Macintosh networks, ad hoc mode is called
computer-to-computer mode.
● Not applicable: this parameter does not apply to this network type.
Service Set Identifier. A unique identifier (up to 32 characters) that
differentiates one wireless local area network (WLAN) from another. The
SSID is also referred to as the network name. This is the name of the
network to which the HP all-in-one is connected.
The transmitting or return signal graded on a scale of 1 to 5:
● 5: Excellent
● 4: Good
● 3: Fair
● 2: Poor
● 1: Marginal
● No signal: no signal detected on the network.
● Not applicable: this parameter does not apply to this network type.
Channel
HP all-in-one Network Guide 23
The channel number currently being used for wireless communication. This
depends on the network in use, and might differ from the requested channel
Page 27

Appendix a
(continued)
number. Value is from 1 to 14; countries/regions might limit the range of
approved channels.
● <number>: value ranging from 1 to 14, depending on country/region.
● None: no channel is in use.
● Not Applicable: the WLAN is disabled or this parameter does not apply
to this network type.
Note In ad hoc mode, if you are not able to receive or transmit data
between your computer and the HP all-in-one, make sure that you are
using the same communication channel on your computer and the
HP all-in-one. In infrastructure mode, the channel is dictated by the
access point.
Authentication
type
Type of authentication in use:
● None: no authentication in use.
● Open System (ad hoc and infrastructure): no authentication.
● Shared Key (infrastructure only): WEP key is required.
● WPA-PSK (infrastructure only): WPA with Pre-Shared Key.
● Not applicable: this parameter does not apply to this network type.
Authentication verifies the identity of a user or device before granting access
to the network, making it more difficult for unauthorized users to get at
network resources. This security method is common on wireless networks.
A network using Open System authentication does not screen network users
based on their identities. Any wireless user can have access from the
network. However, such a network might use WEP (Wired Equivalent
Privacy) encryption to provide a first level of security against casual
eavesdroppers.
A network using Shared Key authentication provides increased security by
requiring users or devices to identify themselves with a static key (a
hexadecimal or alphanumeric string). Every user or device on the network
shares the same key. WEP encryption is used along with shared key
authentication, using the same key for both authentication and encryption.
A network using server-based (WPA-PSK) authentication provides
significantly stronger security, and is supported in most wireless access
points and wireless routers. The access point or router verifies the identity of a
user or device requesting access to the network before granting that access.
Several different authentication protocols might be used on an authentication
server.
Note Shared key and WPA-PSK authentication can only be entered
through the Embedded Web Server.
24
Encryption
The type of encryption in use on the network:
● None: no encryption is in use.
● 64-bit WEP: a 5-character or 10-hex-digit WEP key is in use.
● 128-bit WEP: a 13-character or 26-hex-digit WEP key is in use.
● WPA-AES: Advanced Encryption Standard encryption is in use. This is
an encryption algorithm for securing sensitive but unclassified material
by US Government agencies.
● WPA-TKIP: Temporal Key Integrity Protocol, an advanced encryption
protocol, is in use.
Page 28

(continued)
● Automatic: AES or TKIP is in use.
● Not applicable: this parameter does not apply to this network type.
WEP aims to provide security by encrypting data over radio waves so that it
is protected as it is transmitted from one end point to another. This security
method is common on wireless networks.
Access Point HW
Address
Miscellaneous
The following table describes the data transmission and receipt information shown on the network
configuration page.
Parameter
Total Packets
transmitted
Total Packets
received
The hardware address of the access point on the network to which the
HP all-in-one is connected:
● <MAC address>: the unique MAC (media access control) hardware
address of the access point.
● Not applicable: this parameter does not apply to this network type.
Description
The number of packets transmitted by the HP all-in-one without error since it
has been turned on. The counter clears after the HP all-in-one is turned off.
When a message is transmitted over a packet-switching network, it is broken
up into packets. Each packet contains the destination address as well as the
data.
The number of packets received by the HP all-in-one without error since it
has been turned on. The counter clears after the HP all-in-one is turned off.
HP all-in-one Network Guide 25
Page 29

Appendix a
26
Page 30

b
Glossary
ASCII American Standard Code for Information Interchange. The standard for
autoIP A feature of the installation software, which determines the configuration
DHCP Dynamic Host Configuration Protocol. A server on the network that
DNS Domain Name Service. When you use the web or send an e-mail
DNS-SD See DNS. The SD portion stands for Service Discovery. This is part of a
DSL Digital Subscriber Line. A high-speed connection to the Internet.
Ethernet The most common local network technology that connects computers
Ethernet cable The cable used to connect network elements in a wired network. The
EWS Embedded Web Server. A browser-based utility that provides a simple
numbers used by computers to represent all the uppercase and lowercase
Latin letters, numbers, punctuation, etc.
parameters of devices on the network.
supplies configuration parameters to devices on the network. On small
networks, this could be a router.
message, you use a domain name to do it. For example, the URL http://
www.hp.com contains the domain name hp.com. The DNS on the
Internet translates the domain name into an IP address. Devices use the
IP addresses to refer to one another.
protocol developed by Apple that enables automatic discovery of
computers, devices, and services on IP networks.
using copper cabling.
CAT-5 Ethernet cable is also known as a straight-through cable. When
using an Ethernet cable, the network elements must be attached to a
router. The Ethernet cable uses an RJ-45 connector.
way to manage your HP all-in-one. You can monitor status, configure
HP all-in-one networking parameters, or access HP all-in-one features.
For more information, see Use the Embedded Web Server.
HEX Hexidecimal. The base 16 numbering system, which uses the digits 0-9
hub No longer used much in modern home networks, a hub takes its signal
IP address A number that uniquely identifies the device on the network. IP addresses
infrastructure An infrastructure network uses a router, switch, or access point to
HP all-in-one Network Guide 27
plus the letters A-F.
from each computer and sends it to all of the other computers connected
to the hub. Hubs, are passive; other devices on the network plug into the
hub in order to communicate with one another. A hub does not manage
the network.
are assigned dynamically through DHCP or AutoIP. You can also set up a
static IP address, though this is not recommended.
connect network elements.
Page 31

Appendix b
(continued)
MAC address Media Access Control (MAC) address that uniquely identifies the HP all-
in-one. This is a unique 12-digit identification number assigned to
networking hardware for identification. No two pieces of hardware have
the same MAC address.
NIC Network Interface Card. A card on your computer that provides an
RJ-45 connector The connector on the ends of an Ethernet cable. Although standard
SSID Service Set Identifier. A unique identifier (up to 32 characters) that
router A router provides a bridge between two or more networks. A router can
switch A switch makes it possible for several users to send information over a
Ethernet connection so that you can connect your computer to a network.
Ethernet cable connectors (RJ-45 connectors) look similar to standard
telephone cable connectors, they are not interchangeable. An RJ-45
connector is wider and thicker and always has 8 contacts on the end. A
phone connector has between 2 and 6 contacts.
differentiates one wireless local area network (WLAN) from another. The
SSID is also referred to as the network name. This is the name of the
network to which the HP all-in-one is connected.
link a network to the Internet, link two networks and connect both to the
Internet, and help secure networks through the use of firewalls and
assigning dynamic addresses. A router can also act as a gateway, while a
switch cannot.
network at the same time without slowing each other down. Switches allow
different nodes (a network connection point, typically a computer) of a
network to communicate directly with one another.
28
Page 32

Index
A
access point HW address
(wireless network settings) 25
additional computers 4
admin password (general
network settings) 22
advanced setup 14
authentication type (wireless
network settings) 24
B
broadband Internet 10
C
CAT-5 Ethernet cable 9
channel (wireless network
settings) 23
communication mode (wireless
network settings) 23
computer gateway 5
config source (general network
settings) 22
configuration page 13, 21
connect
using an Ethernet cable 9
connection type screen,
Windows 11
control panel 13
D
default gateway (general
network settings) 22
defaults, restoring 13
display summary 13
DNS server (general network
settings) 22
E
Embedded Web Server (EWS)
password settings 22
using 15
encryption
settings 24
Ethernet connection
Internet access 5
setting up 9
types of 5
wireless 7
EWS
password settings 22
using 15
F
factory defaults 13
firmware version (general
network settings) 21
G
gateway
computer 5
default setting 22
router 5
general network settings 21
H
hardware address (general
network settings) 21
hostname (general network
settings) 21
HP Instant Share
Ethernet connection 5
I
infrastructure network 5
install software
Macintosh 12
Windows 11
Instant Share, HP
Ethernet connection 5
Internet
broadband 10
DSL or cable with router
gateway 5
Internet access
modem 6
IP
address (general network
settings) 21
settings 14
L
link config (general network
settings) 23
link speed 14
M
Macintosh software
installation 12
mDNS service name (general
network settings) 22
Media Access Control (MAC)
address 21
memory card security 15
multiple computers 4
N
network configuration page 13
network connection type
(general network settings) 21
network name (wireless network
settings) 23
network troubleshooting. see
troubleshooting
network upgrade 3
P
password, Embedded Web
Server 22
printer found screen,
Windows 11
R
recommended networks 5
restore network defaults 13
RJ-45 plug 9, 27 28
router 5 10
S
set link speed 14
settings, restoring defaults 13
sharing 4
signal strength (wireless
network settings) 23
software installation
Macintosh 12
Windows 11
HP all-in-one Network Guide 29
Page 33

SSID
(wireless network
settings) 23
status (general network
settings) 21
subnet mask (general network
settings) 22
switch from USB to network 3
T
total packets received 25
total packets transmitted 25
troubleshooting
network 17
No TCP/IP (wired) 18
Printer not Found
(wired) 18
unable to discover device
(wired) 17
using a cable modem
without a router (wired) 19
wired network setup 17
U
upgrade from USB to
network 3
URL (general network
settings) 21
W
Windows software
installation 11
wired connection
setting up 9
troubleshooting 17
wireless status (wireless
network settings) 23
30
Page 34

Printed on at least 50% total recycled fiber
with at least 10% post-consumer paper
© 2004 Hewlett-Packard Development Company, L.P.
Electronic Edition
www.hp.com
*Q3450-90273*
*Q3450-90273*
Q3450-90273
 Loading...