

Page 1

H
.................................................................................................
HP OfficeJet Series 700
Setup Guide
for Hong Kong
Page 2

......................................................................................................................................................
© Copyright HewlettPackard Company 1998
All rights are reserved. No
part of the document may
be photocopied,
reproduced, or translated
to another language
without the prior written
consent of HewlettPackard Company.
OmniPage® Limited
Edition is a U.S. registered
trademark of Caere
Corporation. Microsoft®,
Windows®, and Windows
NT
® are U.S. registered
trademarks of Microsoft
Corporation.
Publication number:
C6662-90040
First Edition,
October 1998
Printed in Singapore
This product is
approved for use in
Hong Kong only. Local
country laws may prohibit
the use of this product
outside Hong Kong. It is
strictly forbidden by law in
virtually every country to
connect nonapproved
telecommunications
equipment (fax machines)
to public telephone
networks.
Safety Information
Always follow basic safety
precautions when using
this product to reduce risk
of injury from fire or
electric shock.
1. Read and understand
all instructions in the
User’s Guide.
WARNING:
Potential Shock Hazard
2. Use only a grounded
electrical outlet when
connecting the HP
OfficeJet to a power
source. If you don’t
know whether the
outlet is grounded,
check with a qualified
electrician.
3. Telephone lines can
develop hazardous
voltages. To avoid
electrical shock, do not
touch the contacts on
the end of the cord, or
any of the sockets on
the HP OfficeJet.
Replace damaged
cords immediately.
4. Never install telephone
wiring during a
lightning storm.
5. Observe all warnings
and instructions
marked on the product.
6. Unplug this product
from wall outlets and
telephone jacks before
cleaning.
7. Do not install or use
this product near water
or when you are wet.
8. Install the product
securely on a stable
surface.
9. Install the product in a
protected location
where no one can step
on or trip over line
cord, and the line cord
will not be damaged.
10. If the product does not
operate normally, see
Troubleshooting.
11. No operatorserviceable parts
inside. Refer servicing
to qualified service
personnel.
This product may contain
remanufactered parts that
have been fully tested to
meet 100% of original
performance
specifications.
Notice
The information contained
in this document is subject
to change without notice.
Hewlett-Packard shall not
be liable for errors
contained herein or for
consequential damages in
connection with the
furnishing, performance,
or use of this material.
Governmental regulations
regarding communication
can be found in the More
Information guide.
Complete the following information. You’ll need it if you contact your dealer or Hewlett-Packard Company:
Date of Purchase:
Serial Number:
(Located on the back of the machine.)
......................................................................................................................................................
Page 3

Setting Up the
HP OfficeJet
............................................................................................................
What’s in the Box? .............................................................................2
1. Install the Tray................................................................................3
2. Plug in the Line Connector.............................................................3
3. Connect the Printer Cable...............................................................4
4. Connect the Power Cord.................................................................4
5. Insert the Print Cartridges...............................................................5
6. Load the Paper Supply.................................................................... 6
7. Connect Your Office Equipment .................................................... 8
What should you connect?..........................................................8
How should you connect?......................................................... 10
8. Install the Software.......................................................................18
Install bonus software............................................................... 19
9. Set the Basic Fax Settings ............................................................ 19
Set the time and date.................................................................20
Set the fax header...................................................................... 20
Set the dial mode ...................................................................... 21
Set the rings to answer setting ..................................................21
Set the paper size ......................................................................21
10. Try It Out.................................................................................... 22
Print a report .............................................................................22
Receive a fax............................................................................. 22
Make a copy.............................................................................. 23
Scan a page to your PC.............................................................23
If You Change Your Office Equipment ............................................24
What’s Next? ....................................................................................24
.........................................................................................................................................
Page 4
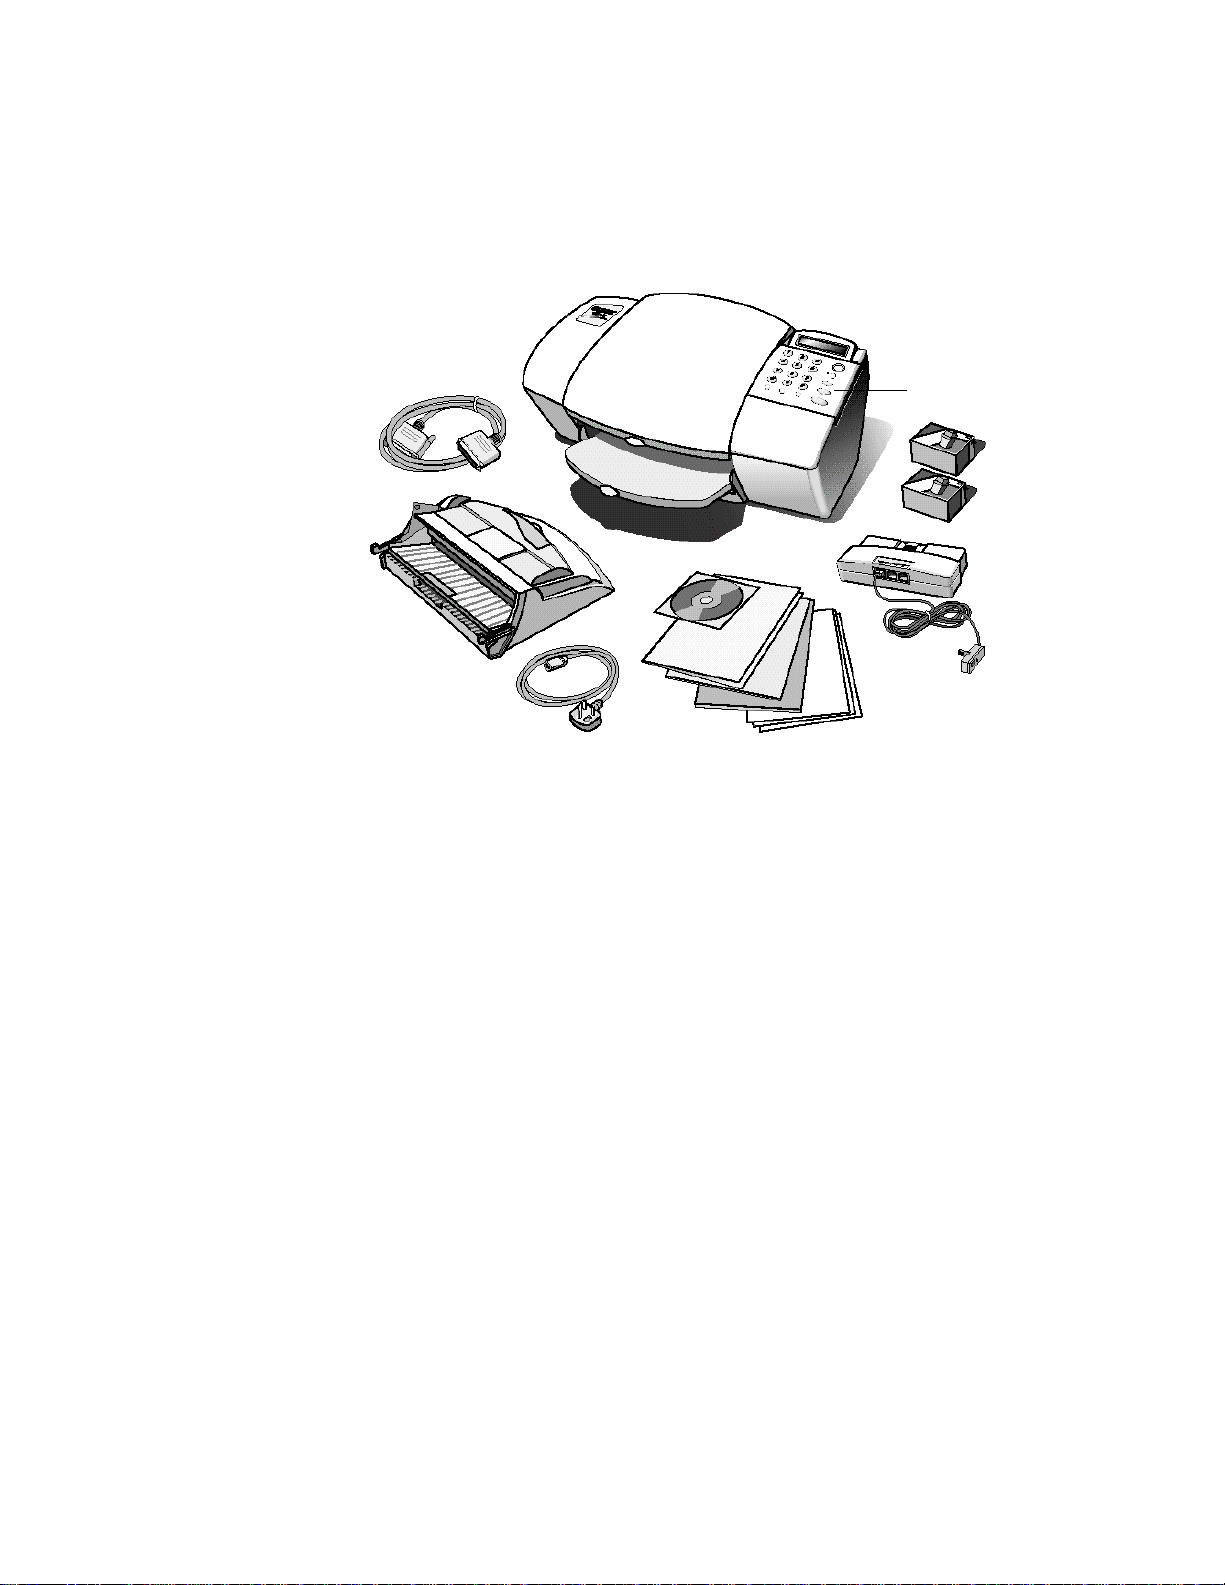
What’s in the Box?
a
b
c
d
a) HP OfficeJet Series 700
b) Bidirectional printer cable
c) Paper/Document tray
d) Power cord
e) HP OfficeJet Series 700
software on CD-ROM
f) User documentation with
warranty statement included
e
f
g
g) OmniPage® LE Optical
Character Recognition (OCR)
documentation
h) Scan/Copy sleeves
i) Fax/Phone line connector with
attached phone cord
j) Black and color print cartridges
k) Front panel overlay (already
installed in diagram)
k
j
i
h
.........................................................................................................................................
2
Page 5
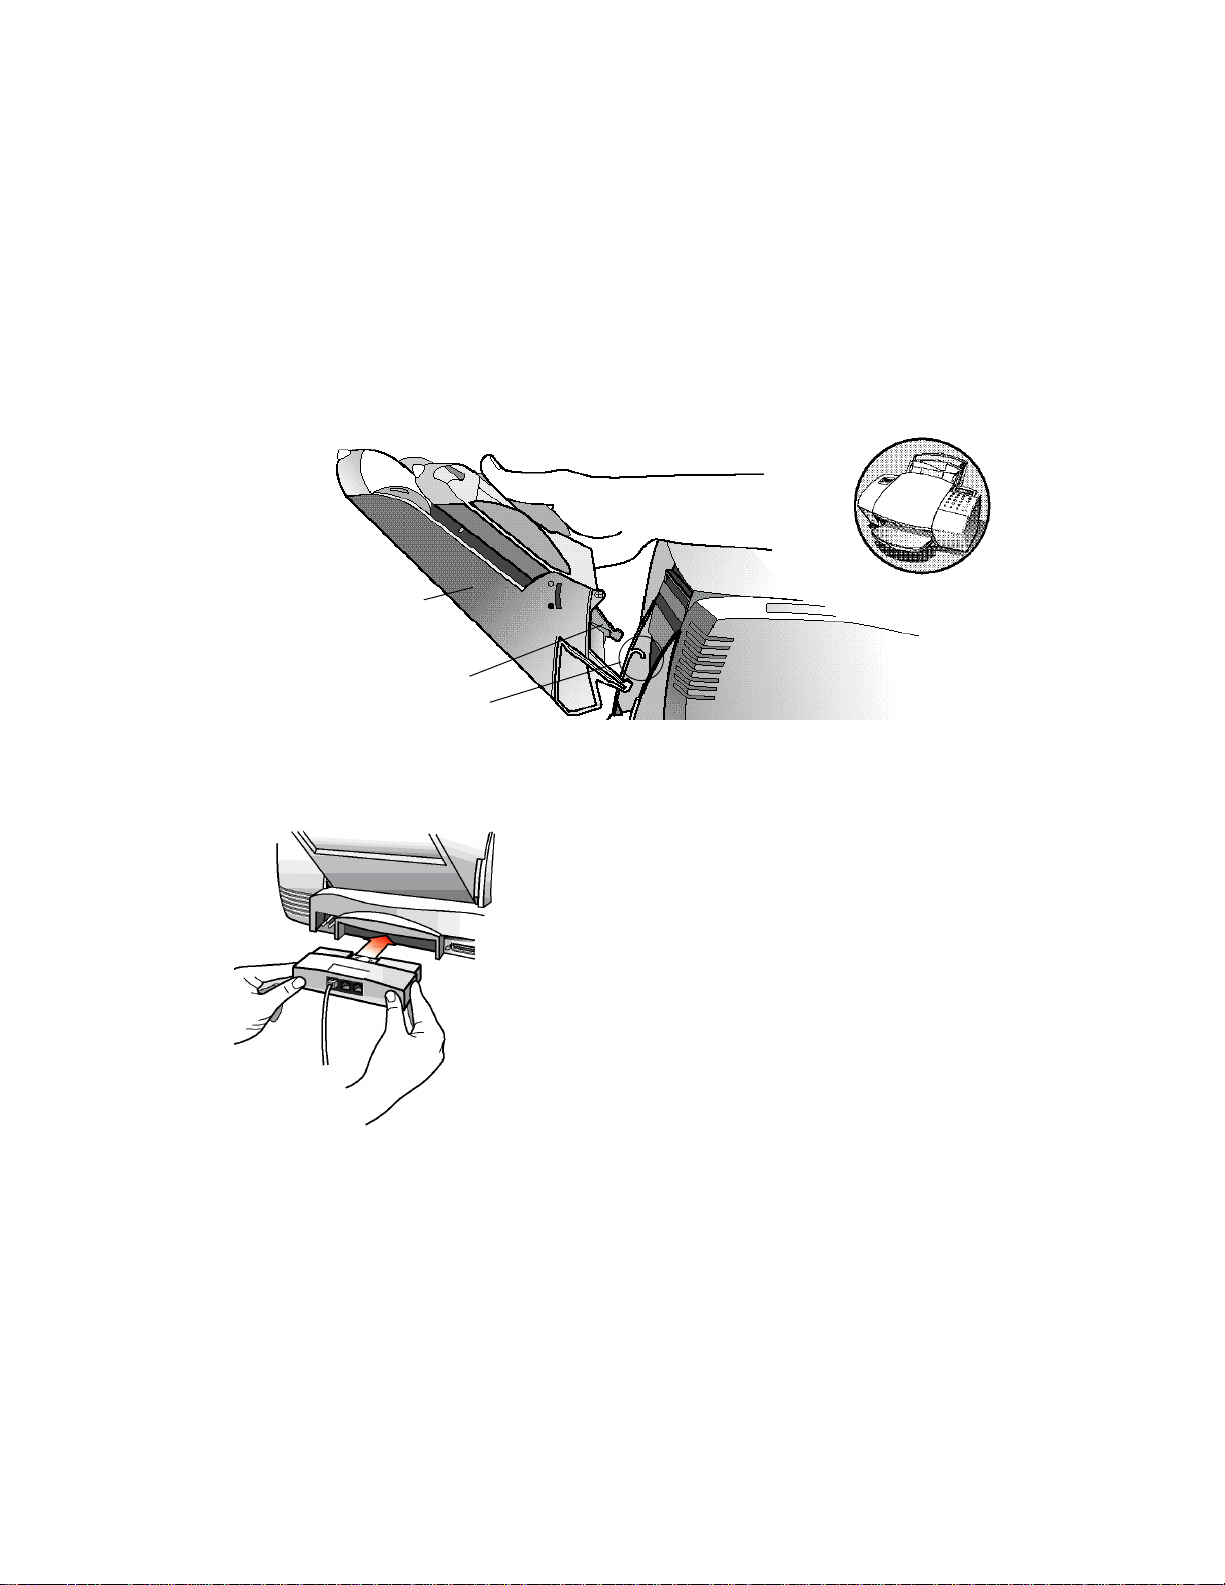
Remove the
tape from the
sides of the tray
Hold the sides
of the tray
Insert the
Bottom Tabs
into the Guides
Note: First, check if the front panel overlay is installed (see diagram
on page 2). If it is not, install it using the instructions included.
1. Install the Tray
The paper/document tray fits securely into the back of the HP
OfficeJet near the top as shown.
After proper
tray placement
2. Plug in the Line Connector
l Insert the fax/phone line connector into its housing
area on the back of the HP OfficeJet. Snap it firmly
into place.
l Plug the loose end of the phone cord into the tele-
phone wall jack you will use for your fax line.
Note: The HP OfficeJet must be the first cord plugged
into the wall jack.
.........................................................................................................................................
3
Page 6
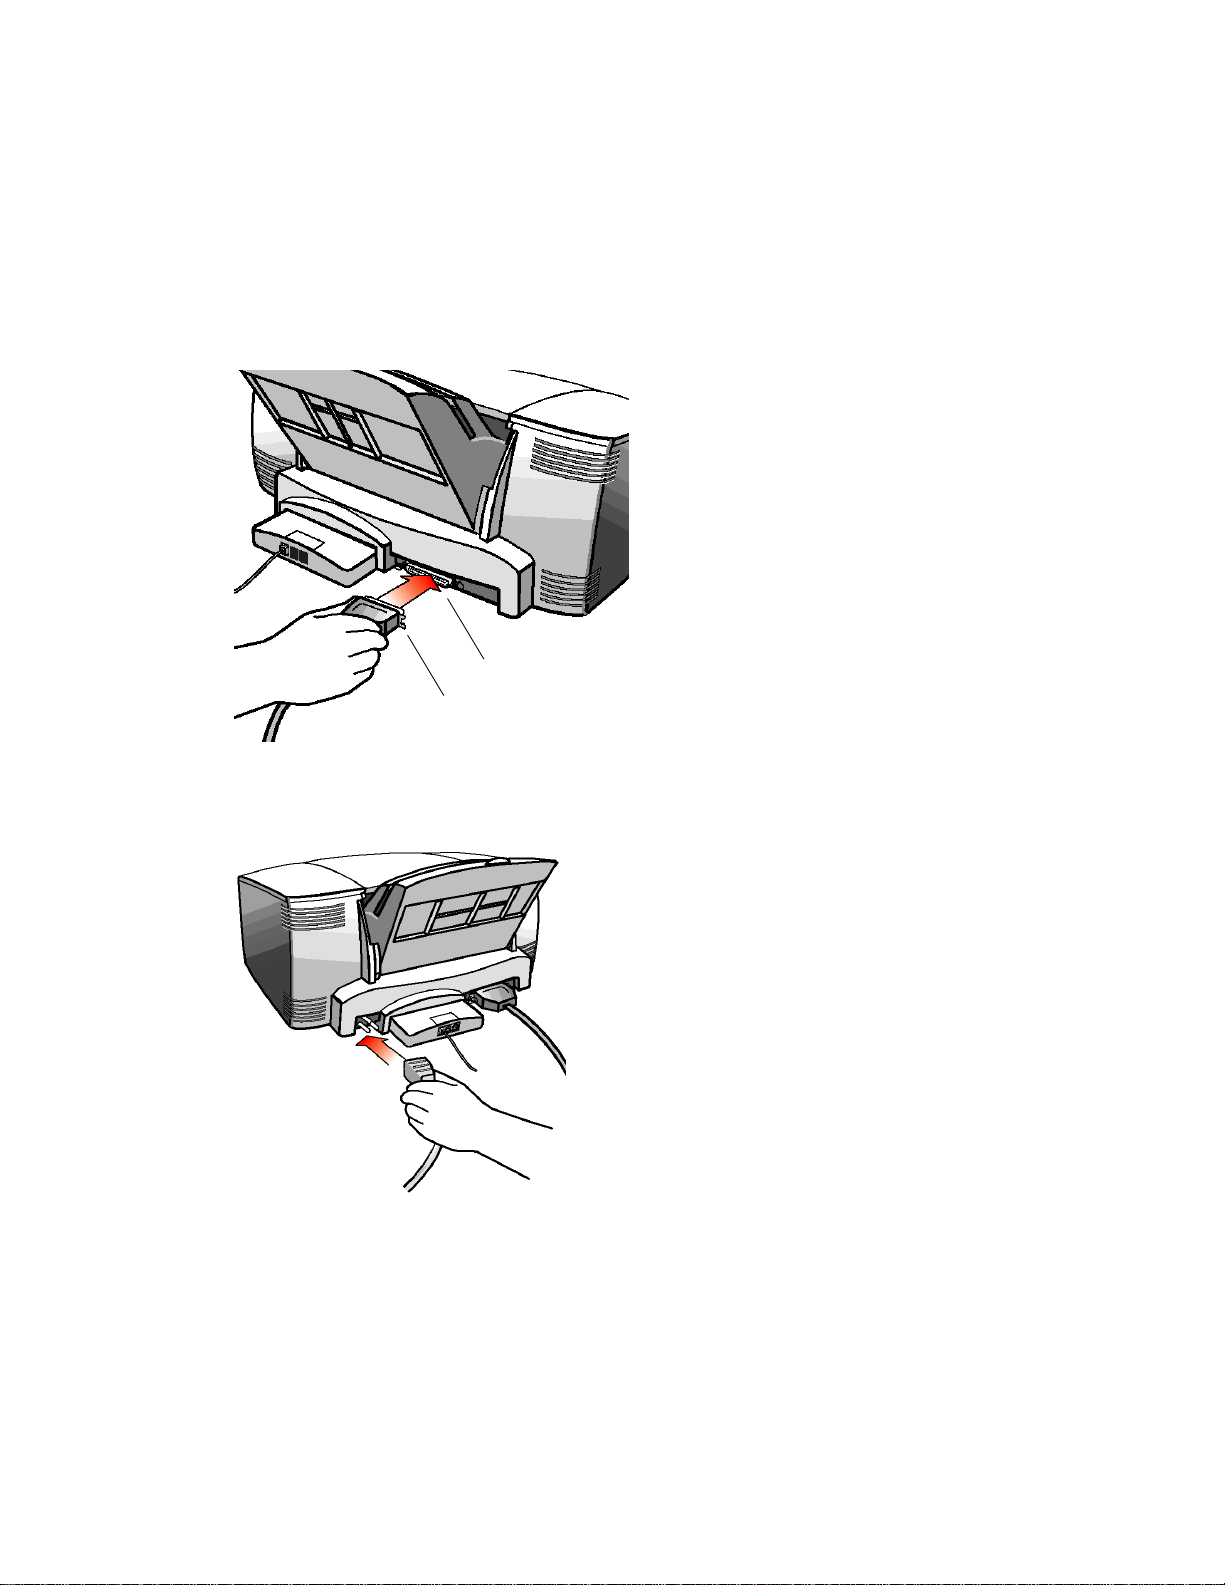
3. Connect the Printer Cable
of cable
If using your HP OfficeJet as a stand-alone fax/copier, skip to step 4.
Important: If you connect your HP OfficeJet to a PC, use the
enclosed bidirectional printer cable or it will not work.
l For safety, turn off your PC before
connecting the printer cable.
l Connect the notched end of the
printer cable firmly to the cable
port on the back of the HP
OfficeJet. Snap both metal clips
into the notches on the connector.
l Plug the other end of the cable into
the parallel (LPT1) port on the
back of your PC. Tighten the
connector screws.
Cable port
Notched end
4. Connect the Power Cord
l Plug the power cord firmly into the power
socket on the back of the HP OfficeJet.
l Plug the other end of the power cord into a
grounded electrical outlet.
Warning: To avoid the possibility of electrical
shock, plug the power cord into a grounded
electrical outlet only.
Caution: To disconnect power to the HP
OfficeJet, detach this cord. The On/Off button
does not completely disconnect the power.
.........................................................................................................................................
4
Page 7
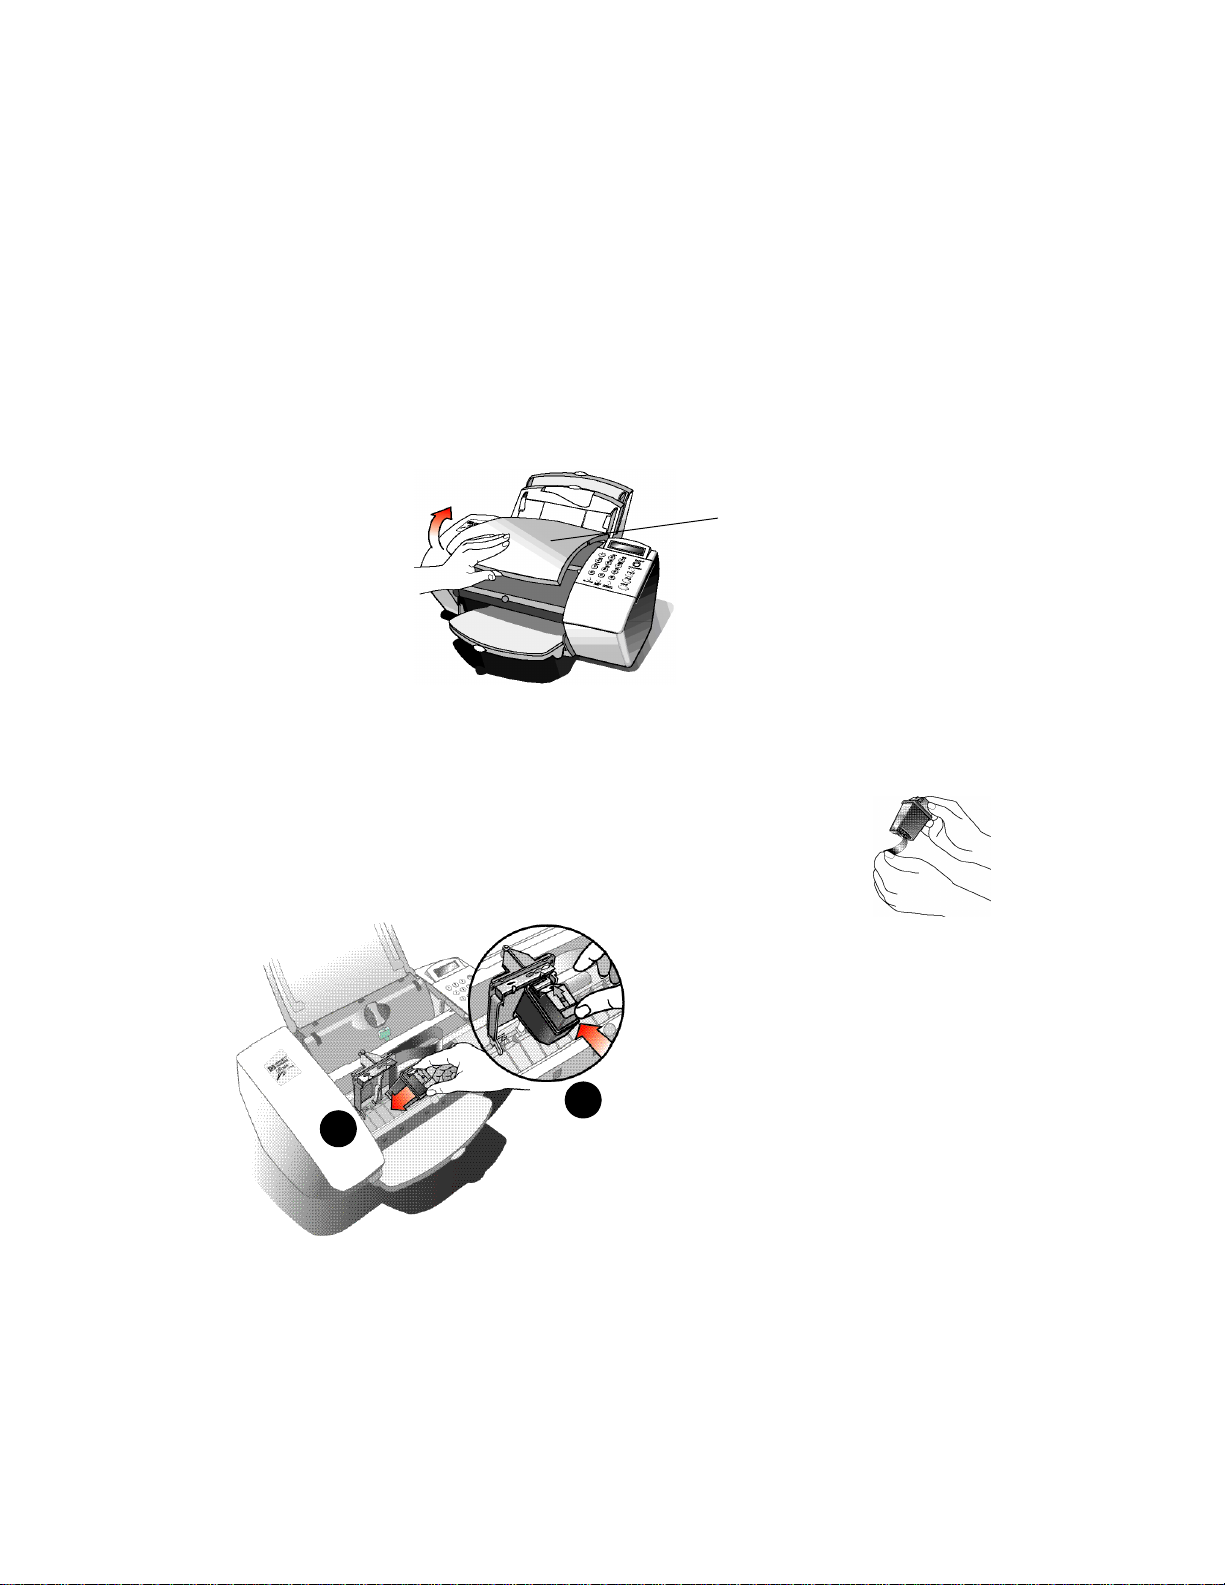
5. Insert the Print Cartridges
Important: Before inserting the print cartridges, you may be asked to
specify your country. On the HP OfficeJet keypad, press the number
corresponding to your country (shown on the display). (If you press
the wrong number, refer to “Country and Language” in the User’s
Guide.)
l After about 20 seconds the keypad display reads Insert color
cartridge.
Open the cover. The empty
print cartridge holder moves
into view.
Note: If the print cartridge holder moves out of sight before you
finish inserting both print cartridges, close the cover all the way,
then open it again; the holder comes back into view.
l Unwrap the color print cartridge. Holding the blue
top, gently peel off the tape over the ink nozzles.
Note: Do not touch the ink nozzles or the copper
contacts; fingerprints may damage them.
l Place the color print
cartridge into the right side of the
cartridge holder as shown:
l Slide the bottom in first until it
clicks into place.
l Then push the top forward
2
1
until the cartridge snaps into
place.
.........................................................................................................................................
5
Page 8

l Unwrap the black print cartridge. Remove both pieces of tape
covering the ink nozzles. Then place the black print cartridge
into the cartridge holder on the left and push it forward until
it snaps into place.
l Close the cover. The front panel display asks if the black print
cartridge is new or used. From the keypad, enter 1 for new or
2 for used.
Note: An optional HP OfficeJet photo cartridge produces very high
quality color prints. If you purchase the photo cartridge, refer to
“Using the photo cartridge” in the User’s Guide for instructions.
6. Load the Paper Supply
Now it’s time to load blank paper into the Paper Tray. First, a quick
description of the parts:
Paper Extension: Extend to support the paper.
Paper Tray: Load blank paper here.
Single Envelope Tray: Load single envelopes here.
Document Tray: Load your original documents and
photos here.
To load blank paper:
1
Pull the Document Tray completely
forward.
Document Tray
Paper Tray
.........................................................................................................................................
6
Page 9
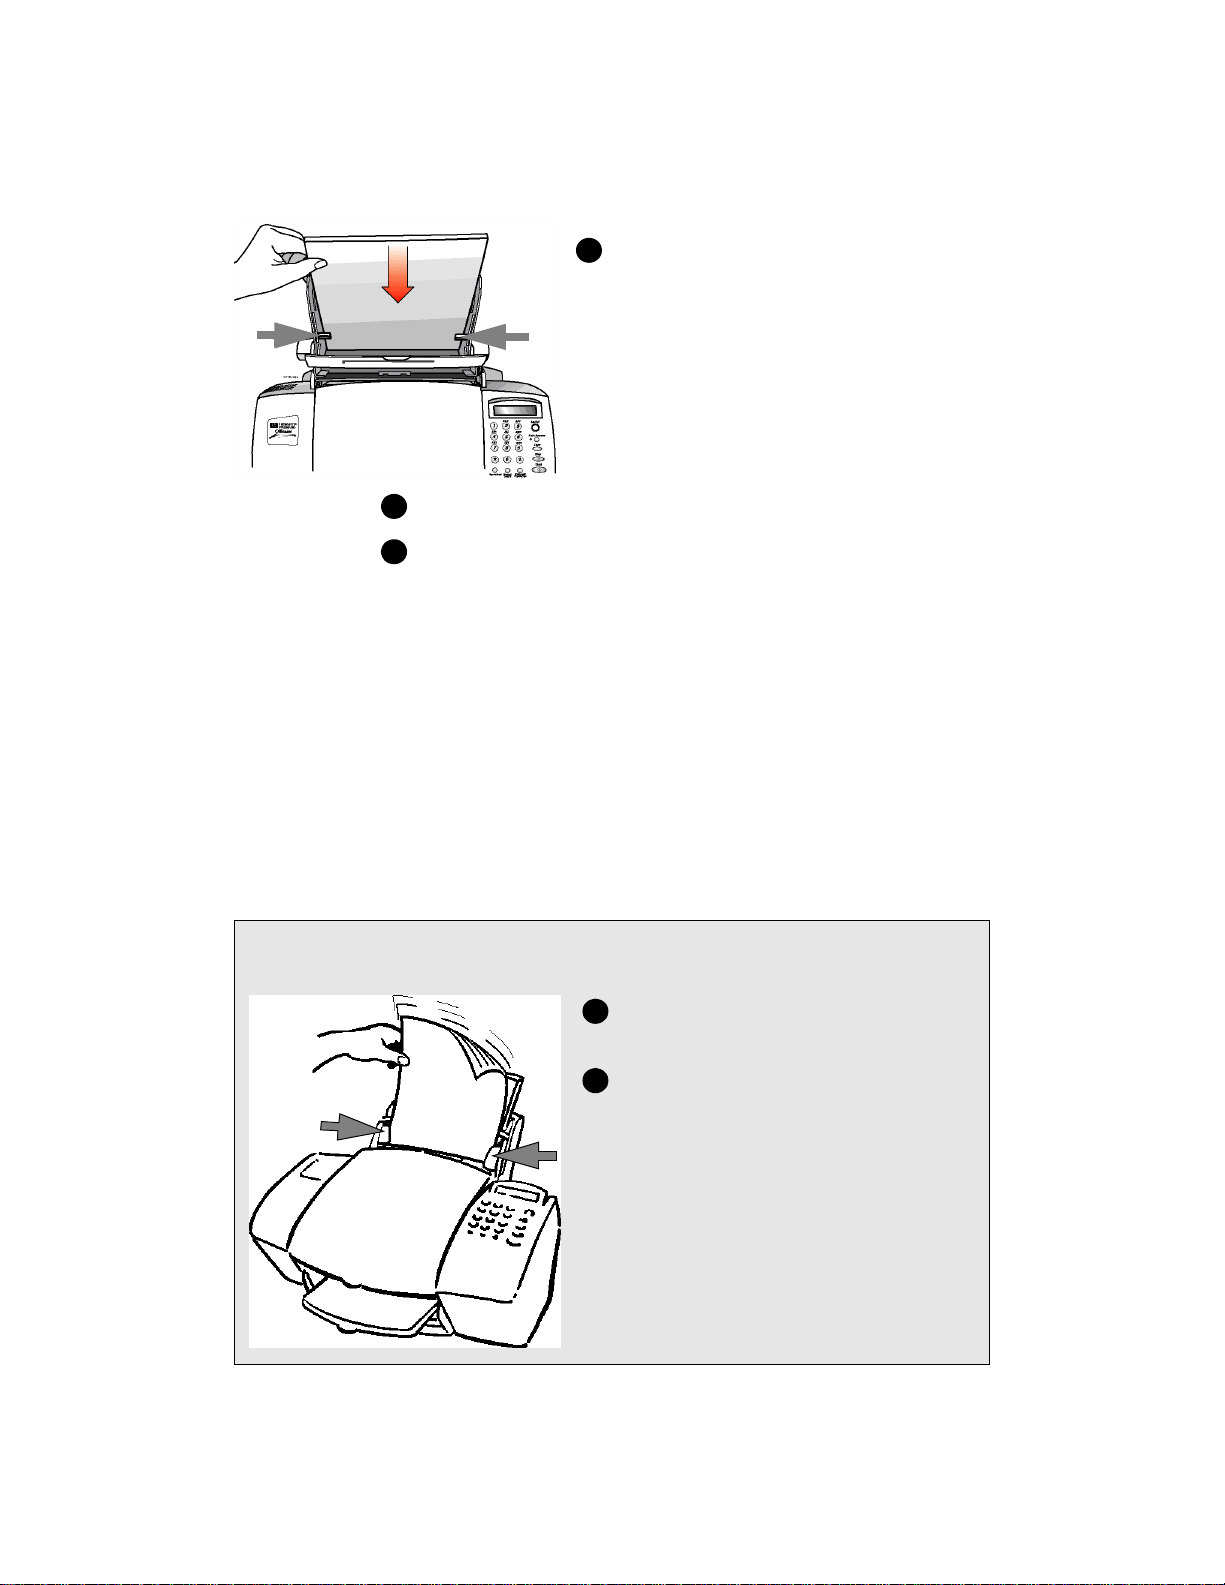
2
With the Document Tray forward, fit the
Stack
guides
paper behind the Stack Guides on the sides of
the tray.
Notes:
l Load about a 1/2-inch stack of paper into
the Paper Tray with the print side forward.
l If necessary, pinch and slide the left paper
guide to fit the paper.
3
Push the Document Tray back until it rests against the Paper Tray.
4
Extend the Output Tray (at the front of the HP OfficeJet) gently
until it stops.
Note: See “Paper Types” in the HP OfficeJet User’s Guide for
instructions on loading envelopes and other types of paper.
After setting up your HP OfficeJet, here’s how
to load your originals to fax, copy, and scan.
1
Adjust the Document Guides on the
Document Tray for the width of the paper.
2
Document
guides
Load your original document or photo in
the Document Tray, top down with the printed
side away from you.
.........................................................................................................................................
7
Page 10

7. Connect Your Office
Equipment
Phone plugs in Hong Kong do
not fit the two extra ports on the
back of the fax/phone line
connector which you connected
in step 2. Refer to the following
instructions to connect your
other office equipment at the
wall jack.
What should you
connect?
Based on your specific equipment and the number of telephone lines
you have, there is only ONE optimum way to connect. Please read the
questions in the table on the next page, circle your answers, then look
up the appropriate setup scenario in the section titled “How should
you connect?”
How to tell if you have a modem
You will be asked whether you have a modem. If you answer Yes to
any of the following questions, then you have a modem. Do you:
Not needed in
Hong Kong
l Send/receive faxes directly to/from your PC programs?
l Use electronic mail (email) on your PC?
l Access the Internet or the World Wide Web from your PC?
l Transfer data to or from other PCs?
How to tell if your modem is internal or external
If your modem is internal, you’ll have a phone cord from the back of
your PC to a telephone wall jack.
If your modem external, you’ll have a cable from the back of your PC
to the modem, and a phone cord from the modem to a telephone wall
jack.
.........................................................................................................................................
8
Page 11

Read these questions: Circle your answers:
1
Do you subscribe to a distinctive ring
service through your telephone company
on the same phone line to which you
connected your HP OfficeJet (in step 2)?
(This telephone service, unavailable in
many areas, enables two or three phone
numbers on the same line. Each number
has a different ring pattern so you can tell
the difference between incoming calls.)
2
Is the HP OfficeJet connected to a
separate phone line that’s dedicated to
sending and receiving your fax calls (no
voice calls received)?
3
Do you use an answering machine or a
voice mail feature in your PC to answer
voice calls on your shared phone line?
A. No, I do not have a distinctive ring
service.
Continue with question 2.
B. Yes, I have a distinctive ring service.
Refer to “Connect a phone with a
distinctive ring” on page 17 for
instructions.
C. Yes, the HP OfficeJet is connected to a
dedicated line.
Refer to “Connect no additional
equipment” on page 11 for instructions.
D. No, the HP OfficeJet is connected to a
shared phone line that receives both fax
and voice calls.
Continue with question 3.
E. I use an answering machine.
F. I use a voice mail feature in my PC.
(Your answer to question 4 will be H or I).
G. I neither use an answering machine nor
a voice mail feature in my PC.
4
Do you have a modem—either inside
or outside your PC—on the same phone
line you will use for the HP OfficeJet?
H. I have a modem inside my PC.
I. I have a modem external to my PC.
J. I don’t have a modem.
(If you’re not sure if you have a modem,
refer to the previous two sections.)
Now refer to “How should you connect?” to match your responses in this table to
the right setup scenario.
.........................................................................................................................................
9
Page 12

How should you connect?
List all your responses to the questions in “What should you
connect?” then refer to the appropriate setup case below. For
example, if you answered A to question 1, D to question 2, E to
question 3, and H to question 4, look up ADEH.
Response: Refer to this section for connection instructions:
AC “Connect no additional equipment” on page 11
ADEH “Connect an answering machine and a PC with an internal modem” on
page 16
ADEI “Connect an answering machine and a PC with an external modem” on
page 15
ADEJ “Connect an answering machine” on page 14
ADFH “Connect a PC with an internal modem” on page 13
ADFI “Connect a PC with an external modem” on page 12
ADGH “Connect a PC with an internal modem” on page 13
ADGI “Connect a PC with an external modem” on page 12
ADGJ “Connect no additional equipment” on page 11
B “Connect a phone with a distinctive ring” on page 17
Note: For all connection scenarios, it’s best to connect a (single-line)
phone to your HP OfficeJet. Connecting a phone has several benefits:
l To have a phone close to the HP OfficeJet so you can reach the
Start button when you receive faxes manually.
l To call someone who receives faxes manually. Here’s how: Call
and tell the person that you are sending a fax, then press Start.
You can hang up or stay on the line to talk after the fax finishes.
l To make outgoing phone calls.
.........................................................................................................................................
10
Page 13

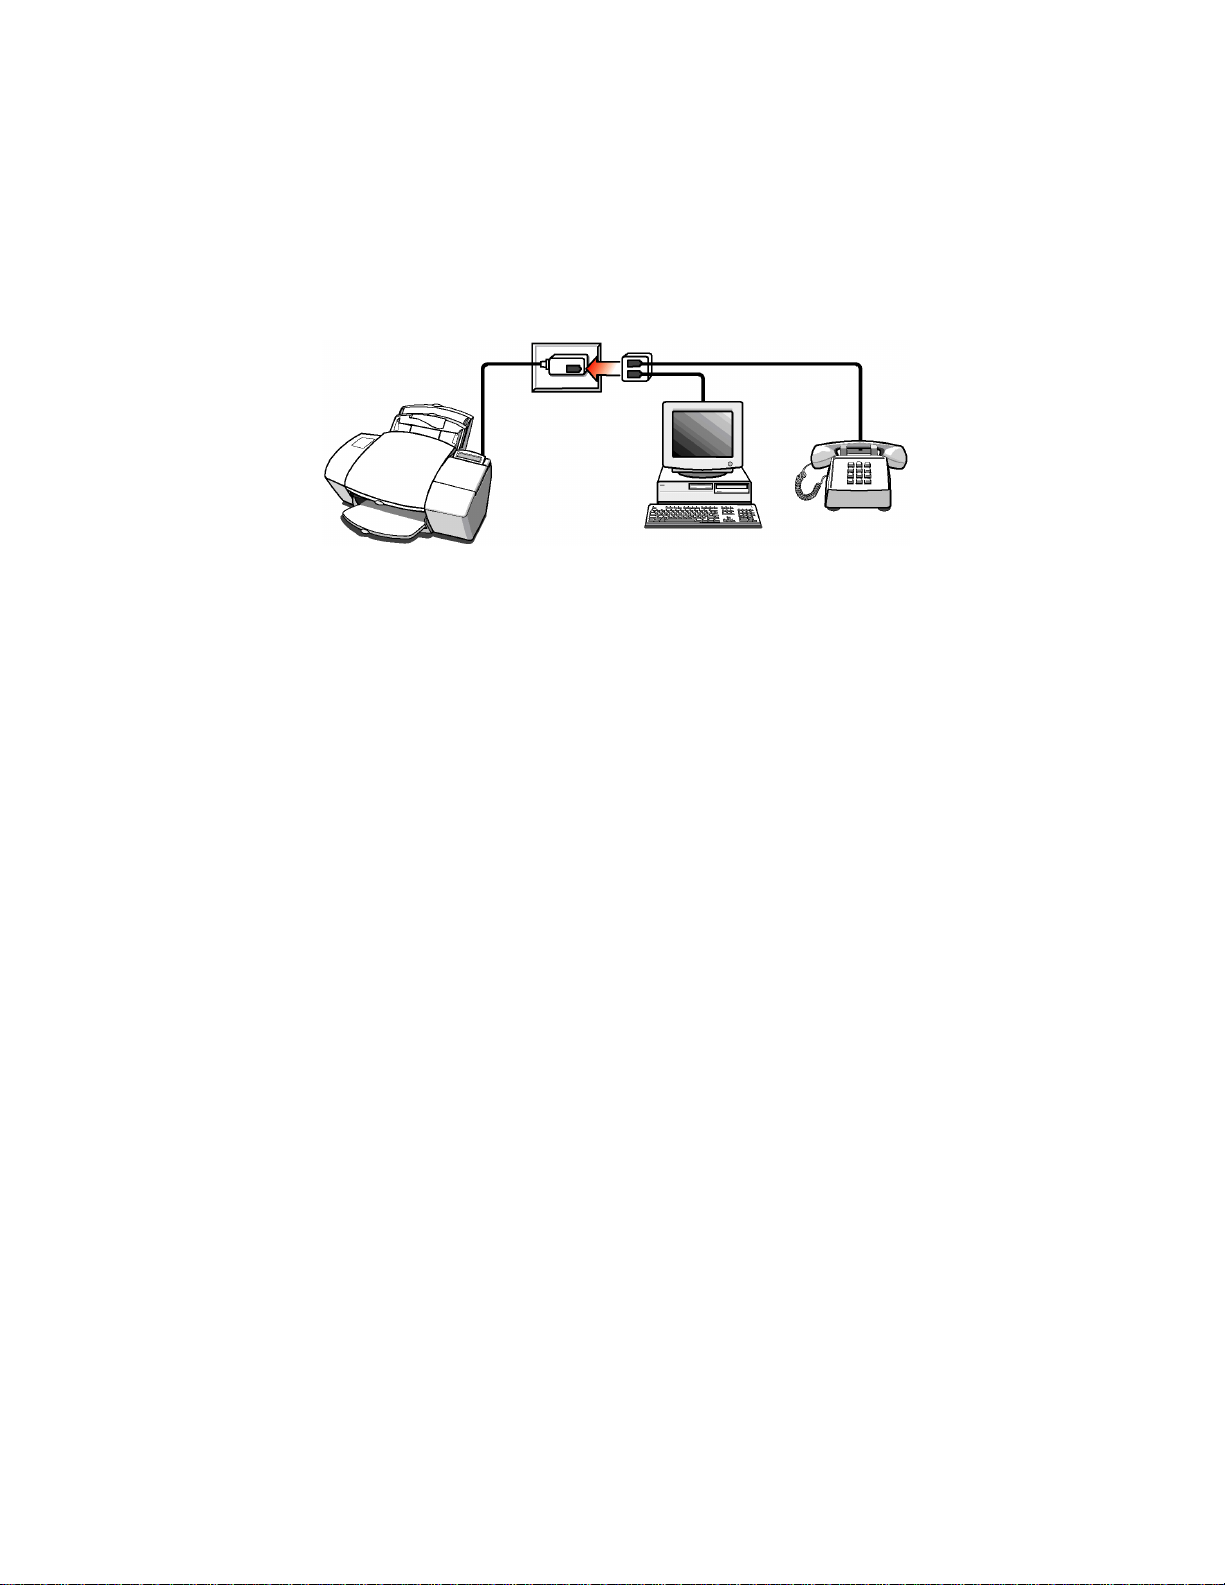
Connect no additional equipment
Case AC
Case ADGJ
If you connected the HP OfficeJet to either a dedicated phone line (no
voice calls received) or
fax calls) with no other office equipment connected, use this
connection diagram.
With a dedicated line, here’s how the HP OfficeJet will automatically receive faxes: Your fax line will ring once, then the HP Office-
Jet will answer and begin emitting fax tones to the sending machine.
With a shared line, you’ll need to receive faxes manually; the HP
OfficeJet will NOT answer incoming calls automatically. To
receive a fax manually: When the phone rings, pick it up and listen
for fax tones; if you hear fax tones, press the START button on the
HP OfficeJet, then hang up the phone.
a shared phone line (receives both voice and
Telephone
wall jack
Phone optional,
but recommended
Continue with step “8. Install the Software.”
.........................................................................................................................................
11
Page 14

Connect a PC with an external modem
Case ADGI
Case ADFI
If you connected the HP OfficeJet to a shared line (receives both
voice and fax calls) that also has an external modem connected to it,
use this connection diagram.
Telephone
wall jack
External
modem
Important: For both cases, if your external modem’s software is
Phone optional,
but recommended
set to automatically receive faxes to your PC, turn off that setting;
if you don’t, your HP OfficeJet will not receive faxes properly.
You will need to receive faxes manually; the HP OfficeJet will
NOT answer incoming calls automatically. To receive a fax manu-
ally: When the phone rings, pick it up and listen for fax tones; if you
hear fax tones, press the START button on the HP OfficeJet, then
hang up the phone.
Important: For Case ADFI, set your voice mail software to
answer calls after 4 or fewer rings, and make sure your outgoing
greeting is no longer than 30 seconds. If you don’t, you may not
receive faxes properly.
After you answer the Setup Wizard questions (in step 8) for Case
ADFI, here’s how the HP OfficeJet will automatically receive
faxes: Your PC voice mail will pick up the call after the number of
rings you’ve set, then the HP OfficeJet will “listen” while voice mail
plays its greeting. If the HP OfficeJet detects fax tones, it will cut off
the voice mail and receive the fax. If you don’t connect your PC
voice mail phone cord directly to the HP OfficeJet as described
here, you may not receive faxes properly.
Continue with step “8. Install the Software.”
.........................................................................................................................................
12
Page 15
Connect a PC with an internal modem
Case ADGH
Case ADFH
If you connected the HP OfficeJet to a shared line (receives both
voice and fax calls) that also has a PC with an internal modem
connected to it, use this connection diagram.
Telephone
wall jack
PC with internal
modem
Important: For both cases, if your internal modem’s software is
Phone optional,
but recommended
set to automatically receive faxes to your PC, turn off that setting;
if you don’t, your HP OfficeJet will not receive faxes properly.
You will need to receive faxes manually; the HP OfficeJet will
NOT answer incoming calls automatically. To receive a fax manu-
ally: When the phone rings, pick it up and listen for fax tones; if you
hear fax tones, press the START button on the HP OfficeJet, then
hang up the phone.
Important: For Case ADFH, set your voice mail software to
answer calls after 4 or fewer rings, and make sure your outgoing
greeting is no longer than 30 seconds. If you don’t, you may not
receive faxes properly.
After you answer the Setup Wizard questions (in step 8) for Case
ADFH, here’s how the HP OfficeJet will automatically receive
faxes: Your PC voice mail will pick up the call after the number of
rings you’ve set, then the HP OfficeJet will “listen” while the voice
mail plays it’s greeting. If the HP OfficeJet detects fax tones, it will
cut off the voice mail and receive the fax. If you don’t connect your
PC voice mail directly to the HP OfficeJet as described here, you
may not receive faxes properly.
Continue with step “8. Install the Software.”
.........................................................................................................................................
13
Page 16

Connect an answering machine
Case ADEJ
If you connected the HP OfficeJet to a shared phone line (receives
both voice and fax calls) that also has an answering machine
connected to it, use this connection diagram.
Telephone
wall jack
Answering
Machine
* Phone optional, but recommended if your answering machine has no phone handset.
Important: Set your answering machine to answer calls after 4 or
Phone*
fewer rings, and make sure your outgoing greeting is no longer
than 30 seconds. If you don’t, you may not receive faxes properly.
Here’s how the HP OfficeJet will automatically receive faxes:
Your answering machine will pick up the call after the number of
rings you’ve set, then the HP OfficeJet will “listen” while the
answering machine plays it’s greeting. If the HP OfficeJet detects
fax tones, it will cut off the answering machine and receive the fax.
If you don’t connect your answering machine directly to the HP
OfficeJet as described here, you may not receive faxes properly.
Continue with step “8. Install the Software.”
.........................................................................................................................................
14
Page 17

Connect an answering machine and a PC with an
Case ADEI
external modem
If you connected the HP OfficeJet to a shared phone line (receives
both voice and fax calls) that also has an external modem and an
answering machine connected to it, use this connection diagram.
Telephone
wall jack
External
Modem
* Phone optional, but recommended if your answering machine has no phone handset.
Important: If your external modem’s software is set to automati-
Answering
Machine
cally receive faxes to your PC, turn off that setting; if you don’t,
your HP OfficeJet will not receive faxes properly.
Important: Set your answering machine to answer calls after 4 or
fewer rings, and make sure your outgoing greeting is no longer
than 30 seconds. If you don’t, you may not receive faxes.
After you answer the Setup Wizard questions (in step 8) for Case
ADEI, here’s how the HP OfficeJet will automatically receive
faxes: Your answering machine will pick up the call after the num-
ber of rings you’ve set, then the HP OfficeJet will “listen” during
the answering machine’s greeting. If the HP OfficeJet detects fax
tones, it will cut off the answering machine and receive the fax. If
you don’t connect your answering machine directly to the HP
OfficeJet as described here, you may not receive faxes properly.
Continue with step “8. Install the Software.”
Phone*
.........................................................................................................................................
15
Page 18

Connect an answering machine and a PC with an
Case ADEH
internal modem
If you connected the HP OfficeJet to a shared phone line (receives
both voice and fax calls) that also has an internal modem and an
answering machine connected to it, use this connection diagram.
Telephone
wall jack
PC with Internal
Modem
* Phone optional, but recommended if your answering machine has no phone handset.
Important: If your internal modem’s software is set to automati-
Machine
cally receive faxes to your PC, turn off that setting; if you don’t,
your HP OfficeJet will not receive faxes properly.
Important: Set your answering machine to answer calls after 4 or
fewer rings, and make sure your outgoing greeting is no longer
than 30 seconds. If you don’t, you may not receive faxes.
After you answer the Setup Wizard questions (in step 8) for Case
ADEH, here’s how the HP OfficeJet will automatically receive
faxes: Your answering machine will pick up the call after the num-
ber of rings you’ve set, then the HP OfficeJet will “listen” during
the answering machine’s greeting. If the HP OfficeJet detects fax
tones, it will cut off the answering machine and receive the fax. If
you don’t connect your answering machine directly to the HP
OfficeJet as described here, you may not receive faxes properly.
Continue with step “8. Install the Software.”
Phone*Answering
.........................................................................................................................................
16
Page 19

Connect a phone with a distinctive ring
Case B
If you connected the HP OfficeJet to a phone line that uses a
distinctive ring service through your telephone company, use this
connection diagram.
The distinctive ring telephone service, which is unavailable in many
areas, allows you to have 2 or 3 phone numbers on the same phone
line. Each number has a ring with a different pattern so you can tell
the difference between incoming calls.
Telephone
wall jack
Phone optional,
but recommended
Important: If you have an answering machine for receiving voice
calls on this phone line (different phone number), set it to answer
after 3 or more rings. If you don’t, your HP OfficeJet will not receive
your fax calls.
Important: If you have an internal or external modem on this phone
line (different phone number), turn off the setting in the modem’s
software that automatically receives faxes to your PC; if you don’t,
your HP OfficeJet will not receive faxes properly.
Continue with step “8. Install the Software.”
.........................................................................................................................................
17
Page 20

8. Install the Software
If using your HP OfficeJet as a stand-alone fax/copier,
skip to step 9.
To use the PC-assisted features of your new HP OfficeJet,
you must now install the software.
Note: If you are upgrading, you must remove the previous
version of HP OfficeJet software before installing the new
version. Refer to “Uninstalling the software” in the HP
OfficeJet User’s Guide.
1
Turn on your PC. If the New Hardware Found screen appears,
close it by clicking Cancel or the X in the upper right corner.
2
Insert the HP OfficeJet CD into the CD-ROM drive; the HP
OfficeJet Welcome Screen appears after a few seconds. (If the
Welcome Screen does not appear, remove the CD and reinsert it.)
If you have floppy disks, insert Disk #1 into the floppy drive.
Select Run from the Windows Start menu, and type a:\setup.exe
where a: represents the letter of the floppy drive. Click OK.
Notes for Windows NT® users:
l If you don’t have administrative capability on Windows NT,
ask your system administrator to install the HP OfficeJet
software on your PC.
l If you are running with minimum system memory requirements
(64 MB RAM), you may need to increase the paging file for
virtual memory. On the control panel, double-click on the System
Icon and select the Performance tab.
Click on Change under the Virtual Memory section. Then select
the drive(s) that currently has paging files.
In the boxes under Paging File Size for Selected Drive, set the
initial size to at least 75 MB and the maximum size to at least 125
MB.
l Refer to the HP website (http://www.officejet-support.com) for
information about compatibility with future operating systems.
.........................................................................................................................................
18
Page 21

3
At the HP OfficeJet Welcome screen,
click one of the first two boxes depending
on if you have a PC or a notebook PC.
Follow all the instructions on the screen.
After the files are copied to your PC, you
can install the OmniPage LE software to
scan text for editing, or click Cancel to
continue with the software setup.
After software installation, you will be
prompted to restart your PC. Then use the
HP OfficeJet Setup Wizard to customize
your HP OfficeJet for your particular
office setup. Just follow its prompts.
Install bonus software
In the box, you will find bonus CD software you may want to use
with your HP OfficeJet. To install, insert the CD-ROM and follow the
setup instructions on the screen. Refer to the software manufacturer
for technical support.
9. Set the Basic Fax Settings
If using your HP OfficeJet with a PC, skip to step 10.
If you plan to use your HP OfficeJet as a stand-alone fax/copier, you
first need to enter some basic information using the front panel keypad.
You can press the Stop button any time during basic fax setup to exit
the menu or start over.
.........................................................................................................................................
19
Page 22

Start
Space
Stop
Menu
Set the time and date
The first time you set up the HP OfficeJet, the front panel display will
prompt you to set the time and date. Press the Start button on the
front panel to begin.
A series of prompts will ask for the month, day, year, hour, minute,
and AM/PM. Make each entry from the keypad. Use a leading zero
for single digit entries; use only the last two digits for the year (for
example, for May 7, 2000, you would enter 05 07 00). When finished,
the time and date will appear on the display.
Note: If you make an incorrect entry, press Stop, and start over again.
Set the fax header
To set your fax header, press the Menu button, then press 5 for Basic
Fax Setup, then press 2 for Fax Header.
Enter your name by pressing the keypad numbers corresponding to
the letters of your name.
#
Menu
ABC
2
Press a button multiple times to see its letters first in lowercase, then
in uppercase. For example, with the 2 button:
ABC
2
When the correct letter appears, press the right arrow button once,
then press the number corresponding to the next letter in your name.
Again, press multiple times until the correct letter appears.
When you finish entering your first name, press the Space (#) button
once to leave a space between names.
If you make an incorrect entry, simply press the left arrow button to
clear the entry, then make the correct entry. To backspace, press the
left arrow button multiple times.
These letters
correspond to
this number.
To get this character: a b c A B C 2
Press 2 this many times: 1 2 3 4 5 6 7
DEF
3
These letters
correspond to
this number, etc.
.........................................................................................................................................
20
Page 23

Symbols
*
When you finish entering your name, press the Start button, and the
Your Fax Number: prompt will appear. Using the keypad, enter your
fax number. To enter a symbol, such as a hyphen or parenthesis, press
the Symbols button multiple times to scroll through a list of symbols.
When you’ve entered your fax number, press the Start button.
Set the dial mode
From the time and date screen, press the Menu button, then press 5
for Basic Fax Setup, then press 3 to display Dial Mode choices.
Press either arrow button to toggle between tone and pulse mode.
With the correct dial mode displayed, press the Start button.
Note: The asterisk indicates the current setting.
Set the rings to answer setting
From the time and date screen, press the Menu button, then press 5
for Basic Fax Setup, then press 4 for the Rings to Answer setting.
Enter the number of the ring on which you would like the HP OfficeJet
to answer the phone (see note below). Then press the Start button.
Note:
l If you connect an answering machine, set it to answer before the
HP OfficeJet or you won’t receive voice messages. Refer to your
setup scenario in step 7 for information on how the HP OfficeJet
interacts with the answering machine.
l Refer to “Choosing automatic versus manual fax receiving” in the
User’s Guide to set the Auto Answer feature.
Set the paper size
From the time and date screen, press the Menu button, then press 5
for Basic Fax Setup, then press 5 again for the Paper Size setting.
Press either arrow button multiple times to view paper size choices.
With your choice displayed, press the Start button.
This completes basic fax setup. Refer to Chapter 2 of the User’s
Guide for more information on using your stand-alone fax/copier.
.........................................................................................................................................
21
Page 24

10. Try It Out
To make sure everything is working well—or for a quick start on
learning the basics—use the following instructions to print, fax, copy,
and scan, or if you are not connected to a PC, to fax and copy.
Print a report
Print the Self Test Report to test the printing feature. Here’s how:
1
On your Windows desktop, double-click HP OfficeJet Manager.
The HP OfficeJet Manager appears. (If you don’t see it, minimize
open applications.)
2
Click on Settings, and select
Settings and Maintenance.
The HP OfficeJet Series 700
Settings dialog box appears.
3
Click the Maintenance tab,
then click Self Test to print
the Self Test Report.
This report shows the current and
factory settings in your HP
OfficeJet, and can help diagnose
print cartridge problems.
Note (for stand-alone fax/copier users): To print the Self Test
Report, press the Menu button, then press 4, then press 4 again.
Receive a fax
To verify that you can receive faxes properly, ask a friend to send you
a fax. If you have trouble receiving the fax, review step “7. Connect
Your Office Equipment.” If you still have problems, first refer to
“Using the Help System” then to “Sources of Information and Help”
in the HP OfficeJet User’s Guide.
.........................................................................................................................................
22
Page 25

Make a copy
Make a color copy of the Self Test Report if your HP OfficeJet is
connected to a PC, or a black and white copy if you are a stand-alone
user. Here’s how:
1
Place the report in the document tray with the printed side
away from you.
2
Press the Copy button once, then enter the number of
copies you want.
3
Press the Copy button again to begin copying.
Note: To stop copying at any time, press the Stop button.
Scan a page to your PC
This feature does not apply to stand-alone fax/copier users.
Scan the Self Test Report to test the scanning feature. Here’s how:
1
Place the report in the document tray with the printed
side away from you. The HP OfficeJet Manager appears
on the screen. (If you don’t see it, minimize open
applications.)
2
On the HP OfficeJet Manager, Click Scan. The Scan
dialog box appears.
3
Click Text Only, then click Start Scan to begin
scanning. The scanned document appears on your PC
screen.
.........................................................................................................................................
23
Page 26

If You Change Your Office
1
2
3
Equipment
When you installed the software, the Setup Wizard asked you a series
of questions about your phone lines and equipment.
If you don’t change your office equipment setup after installing the
software (step 8), don’t change your answering settings. If you do add
or remove office equipment, you must update your fax receive
settings, or you may not receive faxes properly.
To update your fax receive settings:
Double-click
Click
Settings and select Fax Setup. Then select Fax Setup
Wizard.
Follow the instructions in all the Fax Setup Wizard screens,
updating where appropriate.
Refer to “Receiving faxes” in the
answering settings.
HP OfficeJet Manager on your Windows desktop.
User’s Guide for information on
What’s Next?
Chapter 1 of the HP OfficeJet User’s Guide describes in greater detail
how to load paper, and how to copy, fax, print, and scan with your HP
OfficeJet.
Chapter 2 provides instructions for using your HP OfficeJet as a
stand-alone fax/copier.
Chapter 3 covers maintenance and troubleshooting.
A separate guide, More Information, lists additional sources of help.
It also contains technical information, ordering information, and a
warranty.
.........................................................................................................................................
24
Page 27

H
Part Number C6662-90040
Printed in Singapore, 10/98
 Loading...