

Page 1
HP LaserJet P1000 and P1500 Series
Software Technical Reference
Page 2

Page 3

HP LaserJet P1000 and P1500 Series printer
Software Technical Reference
Page 4

Copyright and License
© 2007 Copyright Hewlett-Packard
Development Company, L.P.
Reproduction, adaptation, or translation
without prior written permission is prohibited,
except as allowed under the copyright laws.
The information contained herein is subject
to change without notice.
The only warranties for HP products and
services are set forth in the express warranty
statements accompanying such products
and services. Nothing herein should be
construed as constituting an additional
warranty. HP shall not be liable for technical
or editorial errors or omissions contained
herein.
Edition 1, 11/2007
Trademark Credits
Microsoft
®
, Windows®, and Windows NT
®
are U.S. registered trademarks of Microsoft
Corporation.
PostScript
®
is a registered trademark of
Adobe Systems Incorporated.
Page 5

Table of contents
1 Purpose and scope
Introduction ........................................................................................................................................... 1
Product configurations .......................................................................................................................... 2
Product features ................................................................................................................................... 3
Identify product parts ............................................................................................................................ 4
HP LaserJet P1000 Series .................................................................................................. 4
HP LaserJet P1500 Series .................................................................................................. 5
Printing-system software ...................................................................................................................... 7
In-box printing-system software ........................................................................................... 7
HP LaserJet P1000 and P1500 Series software CD, Windows partition ............ 7
Supported operating systems .............................................................................................. 7
Software for Windows .......................................................................................................... 8
Windows printer drivers ....................................................................................... 8
Printer preferences (driver) ................................................................. 8
Printer properties online Help ............................................................. 8
Print-setting priorities .......................................................................... 8
Additional Windows driver types (HP LaserJet P1500 network
models) ............................................................................................... 8
Install the Windows printer software ................................................... 9
Change printer-driver settings for Windows ....................................... 9
Embedded Web server (HP LaserJet P1500 network models only) ................... 9
Software for Macintosh ........................................................................................................ 9
Macintosh printer drivers ..................................................................................... 9
Install the Macintosh printer driver ...................................................... 9
Configure the Macintosh print driver ................................................. 10
CD language groupings ..................................................................................................... 10
Ordering software .............................................................................................................. 12
Documentation availability and localization ........................................................................................ 13
2 Software description
Introduction ......................................................................................................................................... 17
Windows printing-system software ..................................................................................................... 18
HP Easy Printer Care ......................................................................................................................... 19
HP Embedded Web Server (network-ready models only) .................................................................. 20
Information tab ................................................................................................................... 20
Device Status page ........................................................................................... 21
Device Configuration page ................................................................................ 21
Supplies Status page ........................................................................................ 22
Network Summary page .................................................................................... 23
ENWW iii
Page 6

Settings tab ........................................................................................................................ 24
Networking tab ................................................................................................................... 24
IPv4 Configuration page .................................................................................... 25
IPv6 Configuration page .................................................................................... 25
Advanced page ................................................................................................. 26
Bonjour page ..................................................................................................... 26
Password page ................................................................................................. 27
SNMP settings .................................................................................................. 27
Network Summary page .................................................................................... 28
HP Web Jetadmin .............................................................................................................................. 29
HP Extended Capabilities ................................................................................................................... 30
Internal Fonts ..................................................................................................................................... 31
3 Install Windows printing-system components
Installation overview .......................................................................................................................... 34
Windows installation instructions ........................................................................................................ 35
Installing the software before the printer is connected to the computer ............................ 35
Installing the software when the printer is already connected to a computer .................... 52
Installation options .............................................................................................................................. 62
Windows installation for direct connections ....................................................................... 62
Setting up Windows sharing (peer-to-peer networking) .................................... 62
Setting up the host computer running Windows 2000 ...................... 63
Setting up the host computer running Windows XP ......................... 63
Setting up client computers running Windows 2000 ......................... 63
Setting up client computers running Windows XP ............................ 64
Installation instructions for networked computers .............................................................. 64
Installing the software on networked computers (HP LaserJet P1505n
only) .................................................................................................................. 64
Installing the printer driver only .......................................................................................... 65
Printer-driver installation for Windows 2000 or Windows XP ............................ 65
Plug-n-Play ........................................................................................................................ 66
Add Printer Wizard ............................................................................................................. 66
Uninstall .............................................................................................................................................. 67
Uninstall instructions for Windows ..................................................................................... 67
Uninstalling using the HP program group (recommended) ............................... 67
Uninstalling using Windows Add/Remove programs feature ............................ 67
4 Host-based driver for Windows
Introduction to host-based printing ..................................................................................................... 74
Help system ........................................................................................................................................ 75
What's this? Help ............................................................................................................... 75
Context-sensitive Help ....................................................................................................... 75
Paper Type Warning .......................................................................................................... 75
Access to the driver ............................................................................................................................ 76
Properties tab set ............................................................................................................... 76
Printing Preferences tab set .............................................................................................. 76
Print Task Quick Sets ........................................................................................ 76
Document preview image .................................................................................. 77
Driver tabs .......................................................................................................................................... 78
Printing Preferences tab set .............................................................................................. 78
iv ENWW
Page 7

Advanced tab features ...................................................................................... 78
Paper/Output .................................................................................... 79
Printer Features ................................................................................ 79
Paper/Quality tab features ................................................................................ 80
Paper Options ................................................................................... 81
Use Different Papers/Covers ............................................................ 84
Print Quality ...................................................................................... 85
Effects tab features ........................................................................................... 86
Resizing Options .............................................................................. 86
Watermarks ...................................................................................... 88
Finishing tab features ........................................................................................ 92
Document Options ............................................................................ 92
Orientation ........................................................................................ 96
Services tab features ........................................................................................ 97
Internet Services ............................................................................... 97
Print Information Pages .................................................................... 98
Device Services ................................................................................ 98
Properties tab set ............................................................................................................... 98
Device Settings tab features ............................................................................. 99
Jam Recovery ................................................................................... 99
Status Messages .............................................................................. 99
Cleaning Page .................................................................................. 99
Courier Font Type ........................................................................... 100
Print Density ................................................................................... 100
Tray Assignment ............................................................................. 100
Allow Manual Duplexing ................................................................. 100
About tab features ........................................................................................... 100
Driver Files ..................................................................................... 101
Configuration Status ....................................................................... 101
5 Macintosh software and utilities
Introduction ....................................................................................................................................... 103
Macintosh printing-system software ................................................................................................. 104
Hardware requirements ................................................................................................... 104
Operating-system support ............................................................................................... 104
Availability ........................................................................................................................ 105
Printing-system software on the Web ............................................................. 105
Printing-system software ................................................................ 105
Software component availability ..................................................... 105
In-box printing-system software CDs .............................................................. 105
Macintosh partition ......................................................................... 106
CD versions .................................................................................... 106
Macintosh install and uninstall instructions ...................................................................................... 107
Macintosh component descriptions ................................................................................. 107
Macintosh drivers ............................................................................................ 107
HP Embedded Web Server (network-ready models only) .............................. 107
Install notes (Readme file) .............................................................................. 108
Online help ...................................................................................................... 108
Install the Macintosh printing system ............................................................................... 108
Installation options .......................................................................................... 108
ENWW v
Page 8

General installation for Macintosh operating systems ..................................... 108
Installation instructions for direct connections ................................ 108
Installation instructions for networked computers (network-ready
models only) ................................................................................... 109
Detailed Mac OS X installation ........................................................................ 109
Main Install dialog sequence .......................................................... 110
Printer setup .................................................................................................... 114
Set up a printer with Mac OS X v10.4.3 and above ........................ 114
Set up a printer with Mac OS X v10.3.9 ......................................... 116
Troubleshooting the printer setup ................................................... 117
Uninstall the Macintosh printing system .......................................................................... 118
HP Embedded Web Server (EWS, network-ready models only) ..................................................... 118
Access to the HP EWS .................................................................................................... 119
Information ....................................................................................................................... 120
Device Status .................................................................................................. 120
Device Configuration ....................................................................................... 121
Supplies Status ............................................................................................... 121
Network Summary ........................................................................................... 122
Settings ............................................................................................................................ 123
Networking ....................................................................................................................... 123
IPv4 Configuration ........................................................................................... 124
IPv6 Configuration ........................................................................................... 124
Advanced ........................................................................................................ 125
Bonjour ............................................................................................................ 125
Password ........................................................................................................ 126
SNMP .............................................................................................................. 126
Network Summary ........................................................................................... 127
6 Engineering details
Introduction ....................................................................................................................................... 129
Firmware updates ............................................................................................................................. 130
Media attributes ................................................................................................................................ 131
Media sizes ..................................................................................................................... 131
Media type and tray loading ............................................................................................. 133
Index ................................................................................................................................................................. 135
vi ENWW
Page 9

List of tables
Table 1-1 CD language groupings for Windows installation ............................................................................ 11
Table 1-2 User documentation availability and localization ............................................................................. 13
Table 4-1 Standard paper types and engine speed ......................................................................................... 83
Table 4-2 Page orientation ............................................................................................................................... 93
Table 5-1 CD language groupings for Macintosh installation ......................................................................... 106
Table 6-1 Supported media sizes ................................................................................................................... 131
Table 6-2 Tray 1 media information ............................................................................................................... 133
Table 6-3 Tray 2 media information ............................................................................................................... 134
ENWW vii
Page 10

viii ENWW
Page 11

List of figures
Figure 1-1 HP LaserJet P1000 Series, front view .............................................................................................. 4
Figure 1-2 HP LaserJet P1000 Series, back view .............................................................................................. 4
Figure 1-3 HP LaserJet P1500 Series, front view .............................................................................................. 5
Figure 1-4 HP LaserJet P1500 Series, back view .............................................................................................. 5
Figure 2-1 Getting Started Guide — Welcome screen .................................................................................... 18
Figure 2-2 HP EWS – Device Status page ....................................................................................................... 21
Figure 2-3 HP EWS – Device Configuration page ........................................................................................... 22
Figure 2-4 HP EWS – Supplies Status page .................................................................................................... 22
Figure 2-5 HP EWS – Network Summary page ............................................................................................... 23
Figure 2-6 HP EWS – Settings tab ................................................................................................................... 24
Figure 2-7 HP EWS – IPv4 Configuration page ............................................................................................... 25
Figure 2-8 HP EWS – IPv6 Configuration page ............................................................................................... 25
Figure 2-9 HP EWS – Advanced page ............................................................................................................. 26
Figure 2-10 HP EWS – Bonjour page .............................................................................................................. 26
Figure 2-11 HP EWS – Password page ........................................................................................................... 27
Figure 2-12 HP EWS – SNMP page ................................................................................................................ 27
Figure 2-13 HP EWS – Network Summary page ............................................................................................. 28
Figure 3-1 Driver Installation — Getting Started Guide — Welcome screen ................................................... 35
Figure 3-2 Driver Installation — Select Your Connection screen ..................................................................... 36
Figure 3-3 Driver Installation — Begin Setup screen ....................................................................................... 36
Figure 3-4 Driver Installation — Software Wizard — Welcome screen ............................................................ 37
Figure 3-5 Driver Installation — End User License Agreement screen ............................................................ 38
Figure 3-6 Driver Installation — Select the Printer screen ............................................................................... 38
Figure 3-7 Driver Installation — Printer Connections screen ........................................................................... 39
Figure 3-8 Driver Installation — Identify Printer screen .................................................................................... 40
Figure 3-9 Driver Installation — Firewall Detected ........................................................................................... 41
Figure 3-10 Driver Installation — Printer Not Found screen ............................................................................ 42
Figure 3-11 Driver Installation — Printer Found screen ................................................................................... 43
Figure 3-12 Driver Installation — Specify Printer screen ................................................................................. 44
Figure 3-13 Driver Installation — Check Printer Connection screen ................................................................ 45
Figure 3-14 Driver Installation — Confirm Network Settings screen ................................................................ 46
Figure 3-15 Driver Installation — Confirm Change Settings screen ................................................................ 47
Figure 3-16 Driver Installation — Change TCP/IP Settings screen ................................................................. 48
Figure 3-17 Driver Installation — Setup Settings screen ................................................................................. 49
Figure 3-18 Driver Installation — Exit Setup screen ........................................................................................ 49
Figure 3-19 Driver Installation — HP Extended Capabilities screen ................................................................ 50
Figure 3-20 Driver Installation — Setup Complete screen ............................................................................... 51
Figure 3-21 Driver Installation — Setup Complete screen 2 ............................................................................ 51
Figure 3-22 Driver Installation — Reboot screen ............................................................................................. 52
ENWW ix
Page 12

Figure 3-23 Add Printer Wizard — Welcome Screen ....................................................................................... 53
Figure 3-24 Add Printer Wizard — Local or Network Printer screen ................................................................ 54
Figure 3-25 Add Printer Wizard — Select the Printer Port screen ................................................................... 55
Figure 3-26 Add Printer Wizard — Manufacturer and model screen ............................................................... 56
Figure 3-27 Add Printer Wizard — Install from Disk ......................................................................................... 56
Figure 3-28 Add Printer Wizard — Locate File ................................................................................................. 57
Figure 3-29 Add Printer Wizard — Install From Disk, screen 2 ........................................................................ 57
Figure 3-30 Add Printer Wizard — Manufacturer and Model screen 2 ............................................................ 58
Figure 3-31 Add Printer Wizard — Name Your Printer screen ......................................................................... 58
Figure 3-32 Add Printer Wizard — Printer Sharing screen .............................................................................. 59
Figure 3-33 Add Printer Wizard — Print Test Page screen .............................................................................. 60
Figure 3-34 Add Printer Wizard — Completing the Add Printer Wizard screen ............................................... 61
Figure 3-35 Windows Control Panel screen ..................................................................................................... 68
Figure 3-36 Windows Change or Remove Programs screen ........................................................................... 68
Figure 3-37 Welcome to the LaserJet P1000 / P1500 series Uninstall Wizard dialog box .............................. 69
Figure 3-38 HP LaserJet P1000 / P1500 series Driver Uninstall Information dialog box ................................. 70
Figure 3-39 HP LaserJet P1000 / P1500 series Driver Uninstall Information dialog box, screen 2 ................. 71
Figure 3-40 Uninstall Complete dialog box ...................................................................................................... 72
Figure 4-1 Paper Type Warning message ....................................................................................................... 75
Figure 4-2 Advanced tab .................................................................................................................................. 78
Figure 4-3 Paper/Quality tab ............................................................................................................................ 80
Figure 4-4 Paper Options group box ............................................................................................................... 81
Figure 4-5 Custom Paper Size dialog box ........................................................................................................ 82
Figure 4-6 Use Different Paper/Covers options .............................................................................................. 84
Figure 4-7 Effects tab ..................................................................................................................................... 86
Figure 4-8 Preview images - Legal on Letter; Scale to Fit off (left) and on (right) .......................................... 87
Figure 4-9 Watermark Details dialog box ........................................................................................................ 89
Figure 4-10 Finishing tab .................................................................................................................................. 92
Figure 4-11 Print on Both Sides Instructions .................................................................................................... 93
Figure 4-12 Page-order preview images ......................................................................................................... 95
Figure 4-13 Services tab .................................................................................................................................. 97
Figure 4-14 Device Settings tab ....................................................................................................................... 99
Figure 4-15 About tab ..................................................................................................................................... 100
Figure 5-1 HP LaserJet P1000/P1500 CD-ROM icon .................................................................................... 110
Figure 5-2 HP LaserJet P1000/P1500 screen ............................................................................................... 110
Figure 5-3 Welcome to the HP LaserJet P1000/P1500 Series Installer dialog .............................................. 111
Figure 5-4 Software License Agreement dialog ............................................................................................. 111
Figure 5-5 Select a Destination dialog ........................................................................................................... 112
Figure 5-6 Easy Install dialog ......................................................................................................................... 113
Figure 5-7 Installation success message ....................................................................................................... 114
Figure 5-8 Printer list screen .......................................................................................................................... 115
Figure 5-9 Print & Fax screen ........................................................................................................................ 115
Figure 5-10 Printer List screen ....................................................................................................................... 116
Figure 5-11 Printer List screen ....................................................................................................................... 117
Figure 5-12 Device Status screen ..............................................................................................
Figure 5-13 HP EWS – Device Status page ................................................................................................... 120
Figure 5-14 HP EWS – Device Configuration page ....................................................................................... 121
Figure 5-15 HP EWS – Supplies Status page ................................................................................................ 121
Figure 5-16 HP EWS – Network Summary page ........................................................................................... 122
Figure 5-17 HP EWS – Settings tab ............................................................................................................... 123
.................... 119
x ENWW
Page 13

Figure 5-18 HP EWS – IPv4 Configuration page ........................................................................................... 124
Figure 5-19 HP EWS – IPv6 Configuration page ........................................................................................... 124
Figure 5-20 HP EWS – Advanced page ......................................................................................................... 125
Figure 5-21 HP EWS – Bonjour page ............................................................................................................ 125
Figure 5-22 HP EWS – Password page ......................................................................................................... 126
Figure 5-23 HP EWS – SNMP page .............................................................................................................. 126
Figure 5-24 HP EWS – Network Summary page ........................................................................................... 127
ENWW xi
Page 14

xii ENWW
Page 15

1 Purpose and scope
Introduction
Product configurations
●
Product features
●
Identify product parts
●
Printing-system software
●
Documentation availability and localization
●
This software technical reference (STR) provides information about and troubleshooting tips for the
printing-system software for the product.
This STR is prepared in an electronic format to serve as a quick-reference tool for Customer Care Center
(CCC) agents, support engineers, system administrators, management information systems (MIS)
personnel, and end users, as appropriate.
NOTE: This STR describes drivers that are shipped on the printing-system software CD that comes
with the product. This STR does not describe drivers that will become available on the Web.
The following information is included in this STR:
Descriptions of drivers, operating systems, and system environments
●
Procedures for installing and uninstalling the printing-system software components
●
For information about the location of information within chapters, see the table of contents. An index is
also provided in this STR.
ENWW Introduction 1
Page 16
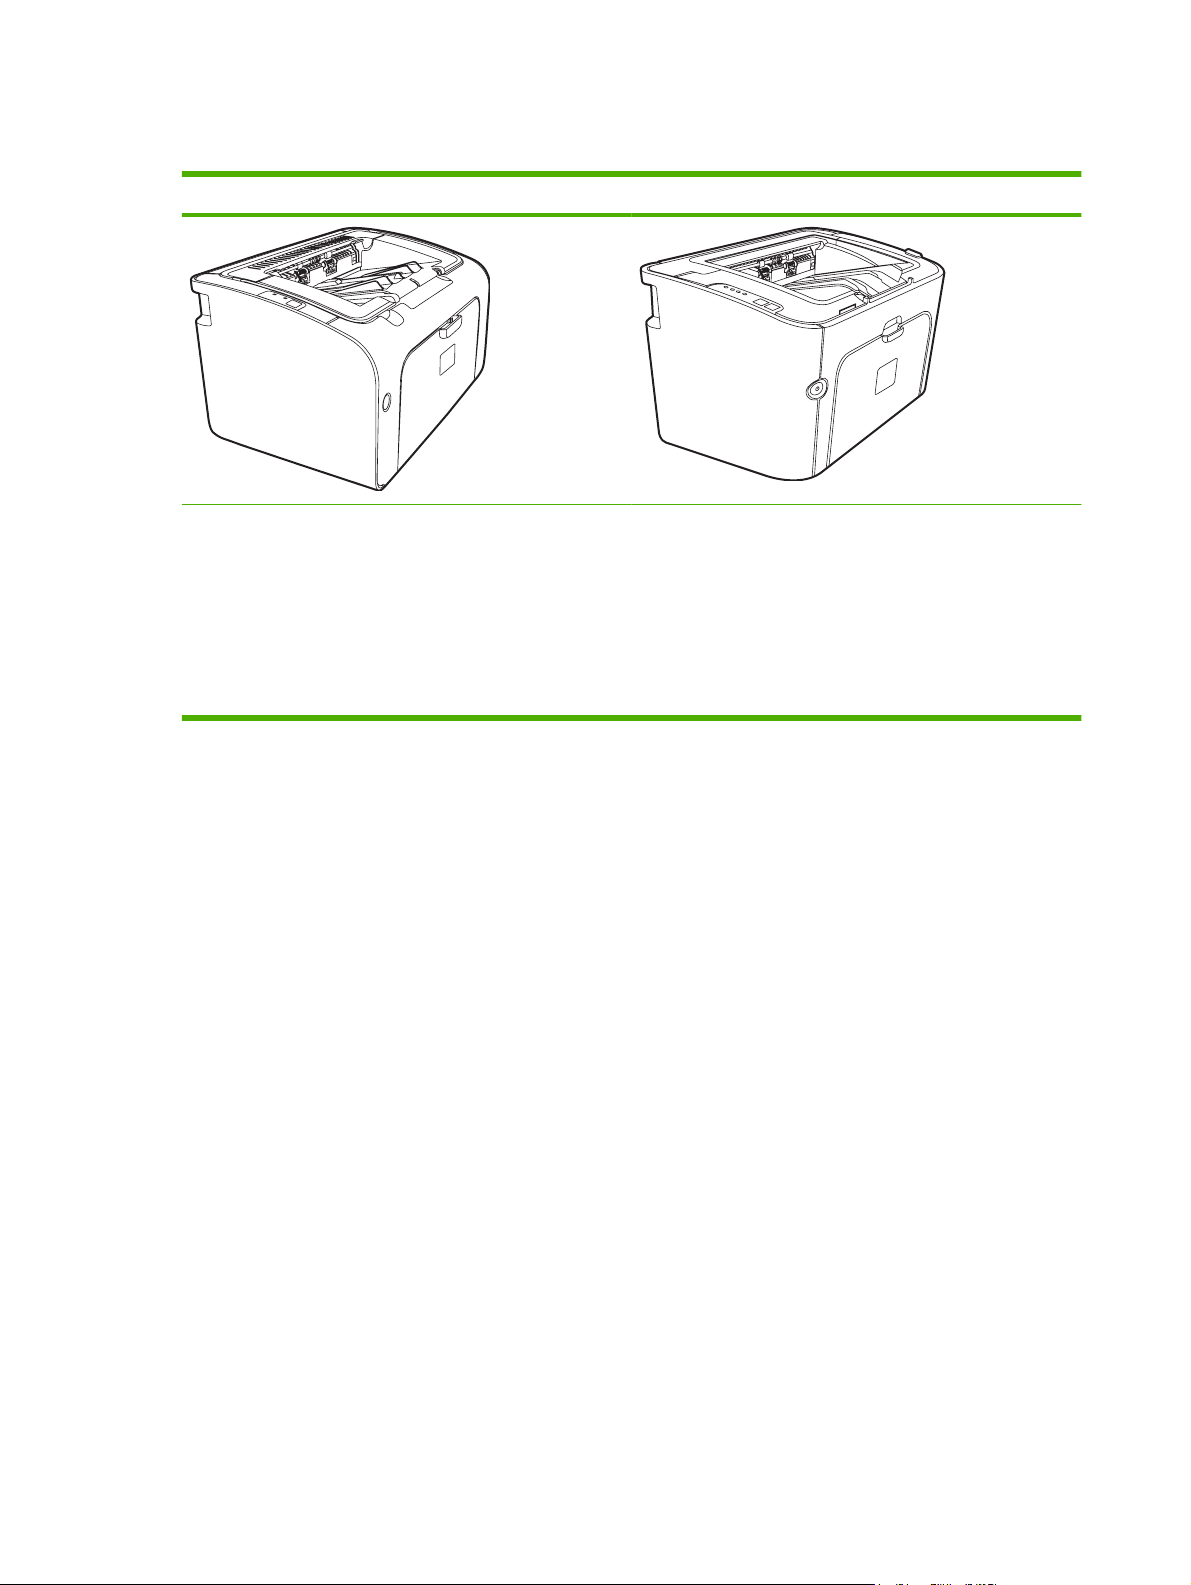
Product configurations
HP LaserJet P1000 Series HP LaserJet P1500 Series
First Page Out: < 8.5 seconds
●
Speed: 16 A4 pages per minute (ppm), 17 Letter-size
●
ppm.
Tray: 150 sheet universal tray.
●
Connectivity: Hi-Speed USB 2.0 port.
●
First Page Out: < 6.5 seconds
●
Speed: 22 A4 pages per minute (ppm), 24 Letter-size
●
ppm.
Trays: 10 sheet priority feed slot and a 250 sheet
●
universal tray
Connectivity: Hi-Speed USB 2.0 port. On-board
●
networking (not available on all models).
2 Chapter 1 Purpose and scope ENWW
Page 17

Product features
Benefit Supporting features
Excellent print quality
Ease of use
Flexible paper handling
Interface connections
Energy savings
HP print cartridges.
●
600 by 600 dots per inch (dpi) text and graphics.
●
Adjustable settings to optimize print quality.
●
The print cartridge is easy to install.
●
Convenient access to the print cartridge and to the paper path
●
through the cartridge door.
Adjust paper tray with one hand.
●
Main tray for letterhead, envelopes, labels, transparencies,
●
custom-sized media, postcards, and heavy paper.
Priority feed slot for letterhead, envelopes, labels,
●
transparencies, custom-sized media, postcards, and heavy
paper.
A 125-sheet top output bin.
●
Print on Both Sides (manually).
●
Hi-Speed 2.0 USB port.
●
Built-in internal print server for connecting to a 10/100Base-
●
T network. (not available on all models)
The device automatically conserves electricity by
●
substantially reducing power consumption when it is not
printing.
Economical printing
Archive printing
Supplies
Accessibility
Security
N-up printing (printing more than one page on a sheet)
●
features saves paper.
When printing pages that are to be stored long-term, this
●
option sets the device to a mode that reduces toner smearing
and dusting.
Select Archive as the paper type.
●
A Supplies Status page with print cartridge gauges that
●
estimate remaining supply level.
No-shake cartridge design.
●
Authentication for original HP print cartridges.
●
Easy ordering for replacement supplies.
●
Online user guide compatible with text screen-readers.
●
All doors and covers can be opened with one hand.
●
Kensington lock receptacle on back of device.
●
ENWW Product features 3
Page 18
Identify product parts
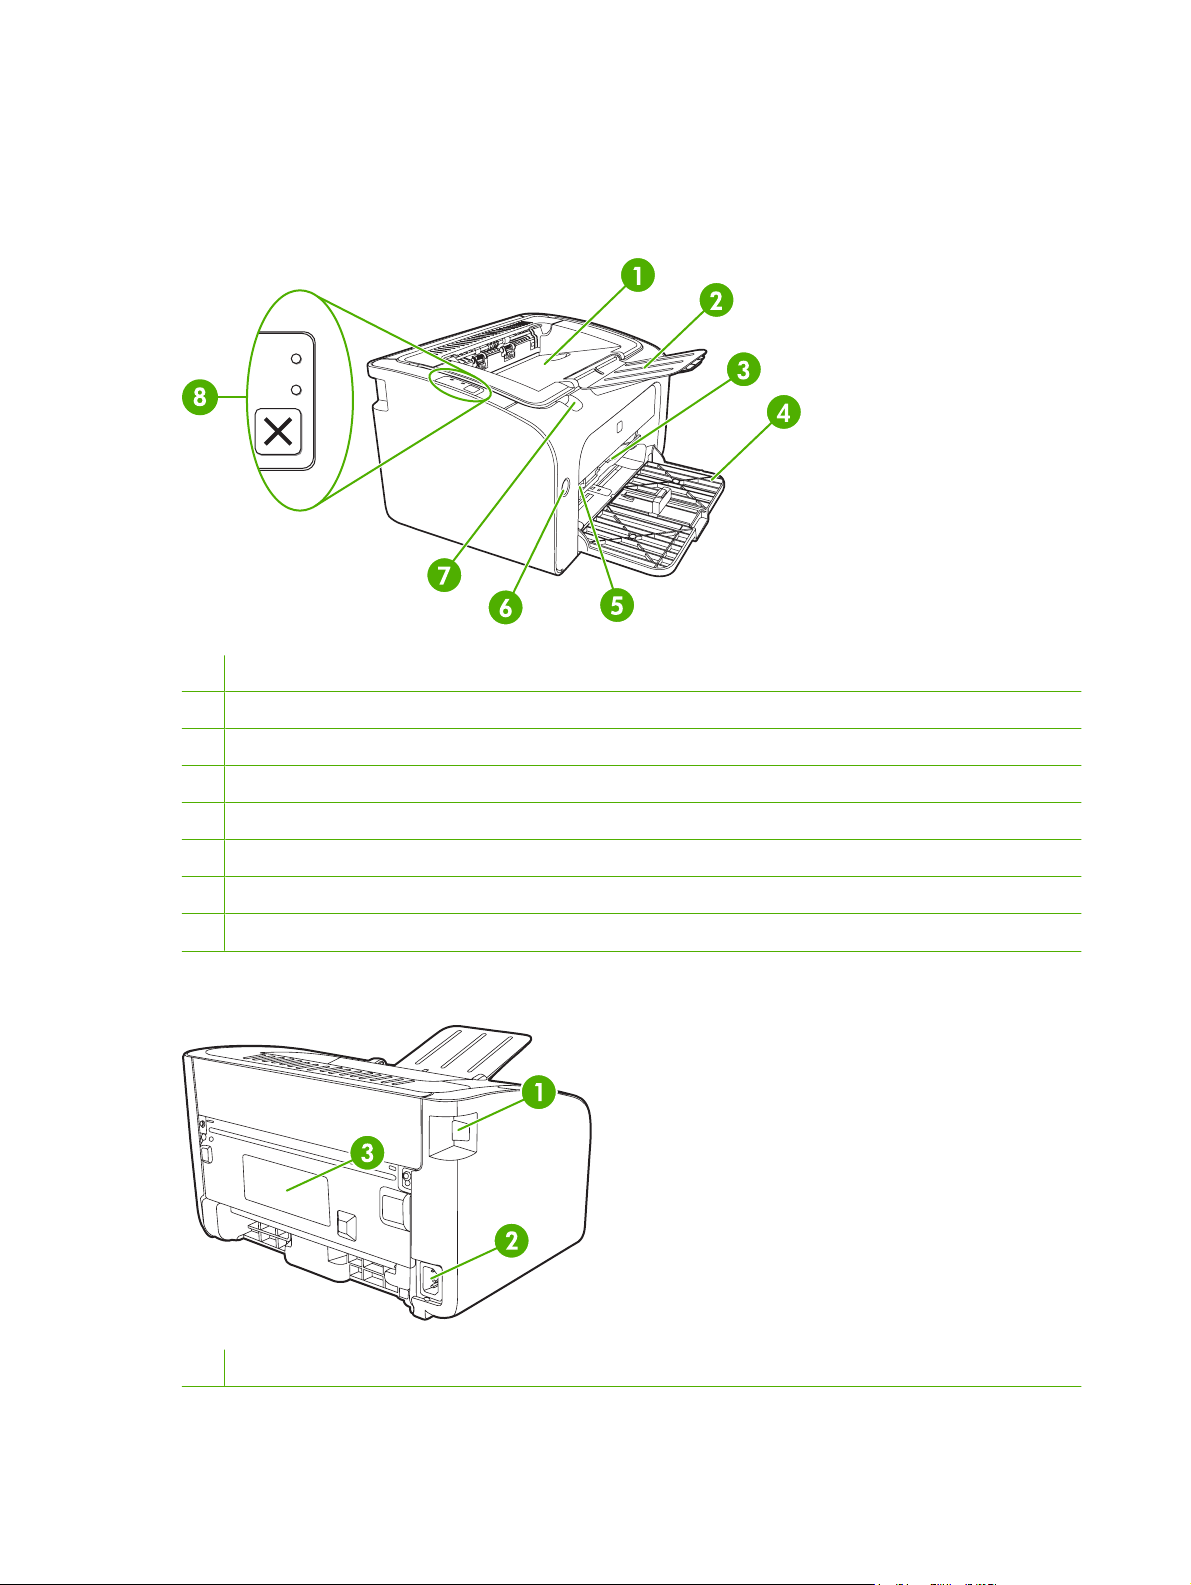
HP LaserJet P1000 Series
Figure 1-1 HP LaserJet P1000 Series, front view
1 Output bin
2 Foldable Output Tray Extension
3 Priority feed slot (not available on some models)
4 Foldable Main Input tray
5 Short Media Extender (not available on some models)
6 Power button
7 Cartridge door lift-tab
8 Control panel
Figure 1-2 HP LaserJet P1000 Series, back view
1 USB Port
4 Chapter 1 Purpose and scope ENWW
Page 19
2 Power receptacle
3 Serial number
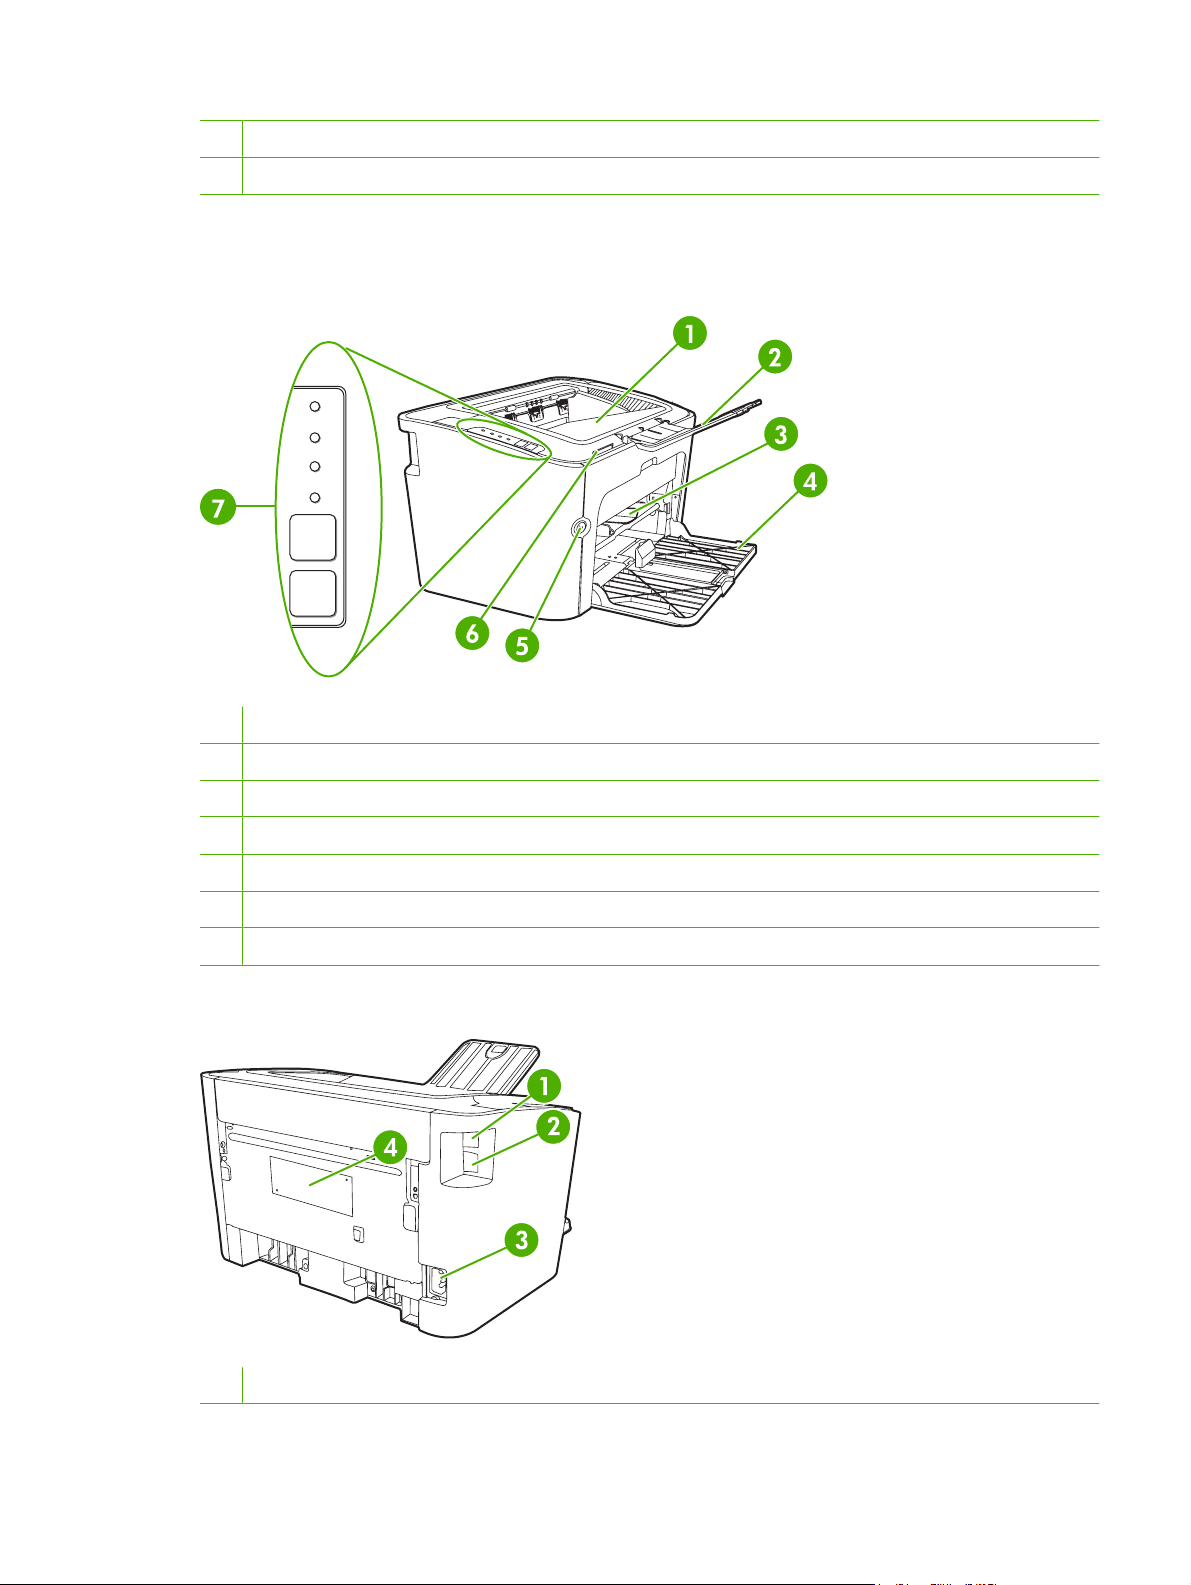
HP LaserJet P1500 Series
Figure 1-3 HP LaserJet P1500 Series, front view
1 Output bin
2 Foldable Output Tray Extension
3 Priority feed slot
4 Input tray
5 Power button
6 Cartridge door lift-tab
7 Control panel
Figure 1-4 HP LaserJet P1500 Series, back view
1 USB Port
ENWW Identify product parts 5
Page 20

2 HP internal network port (not available on some models)
3 Power receptacle
4 Serial Number
6 Chapter 1 Purpose and scope ENWW
Page 21

Printing-system software
The software CD for the HP LaserJet P1000 and P1500 Series contain a variety of files for installing the
printing-system software on your computer. This section describes the files that are available on the
software CD, as well as additional support and fulfillment information.
In-box printing-system software
The HP LaserJet P1000 and P1500 Series printing-system software consist of two partitions: one for
installation on Windows® operating systems and the other for Macintosh operating systems. The files
in each partition include both documentation files and files that are required to install and uninstall the
systems.
HP LaserJet P1000 and P1500 Series software CD, Windows partition
The HP LaserJet P1000 and P1500 Series printing-system software is delivered on a CD that is included
with the product. The CD include the following files:
Installation files
●
Uninstall files
●
Printer driver
●
Online Help
●
Order Reminder
●
.CHM version of the HP LaserJet P1000 and P1500 Series User Guide
●
.PDF version of the HP LaserJet P1000 and P1500 Series User Guide
●
Registration link
●
Readme
●
Status-message files
●
To view the directories and support files, insert the HP LaserJet P1000 and P1500 Series printingsystem software CD into the CD-ROM drive on your computer, right-click Start, click Explore, and then
select the CD-ROM drive.
Supported operating systems
The device comes with software for the following operating systems:
Windows 2000
●
Windows Server 2003 (32-bit and 64-bit)
●
For more information about upgrading from Windows 2000 Server to Windows Server 2003; using
Windows Server 2003 Point and Print; or using Windows Server 2003 Terminal Services and
Printing, go to
www.microsoft.com.
®
Windows
●
ENWW Printing-system software 7
XP (32-bit and 64-bit)
Page 22

Windows Vista (32-bit and 64-bit)
●
Macintosh OS X v10.3.9, and above
●
Software for Windows
Windows printer drivers
A printer driver is the software that provides access to printer features and provides the means for the
computer to communicate with the device.
Printer preferences (driver)
Printer preferences control the device. You can change the default settings, such as media size and
type, printing multiple pages on a single sheet of media (N-up printing), resolution, and watermarks. You
can access the printer preferences in the following ways:
Through the software application that you are using to print. This only changes the settings for the
●
current software application.
Through the Windows operating system. This changes the default settings for all future print jobs.
●
NOTE: Because many software applications use a different method of accessing the printer
properties, the following section describes the most common methods used in Windows 2000 and
Windows XP.
Printer properties online Help
The printer properties online Help, also called the driver Help, includes specific information about the
functions in the printer properties. This online Help guides you through the process of changing your
printer default settings. For some drivers, online Help provides context-sensitive help that describes the
options for the driver feature you are currently using.
To access the printer properties online Help
1. From the software application, click File, and then click Print.
2. Click Properties, and then click Help.
Print-setting priorities
There are two ways to change print settings for this device: in the software application or in the printer
driver. Changes made in the software application override settings changed in the printer driver. Within
a software application, changes made in the Page Setup dialog box override changes made in the
Print dialog box.
If more than one method is available to change a particular print setting, use the method that has the
highest priority.
Additional Windows driver types (HP LaserJet P1500 network models)
The HP LaserJet P1500 network models also feature an available PCL 5e printer driver. Use the Add
Printer feature to install the driver.
8 Chapter 1 Purpose and scope ENWW
Page 23

Install the Windows printer software
To install printer software for Windows Server 2003
See the operating system documentation for instructions on installing a printer driver.
To install printer software for Windows 2000 and XP
Insert the software CD that came with the device into the computer CD-ROM drive. Follow the onscreen
installation instructions to install the printer software.
NOTE: If the Welcome screen does not open, click Start on the Windows taskbar, click Run, type Z:
\setup (where Z is your CD drive letter), and click OK.
Change printer-driver settings for Windows
To change the settings for all print
jobs until the software program is
closed
1. On the File menu in the software
program, click Print.
2. Select the driver, and then click
Properties or Preferences.
The steps can vary; this procedure is
most common.
To change the default settings for all
print jobs
1. Click Start, click Settings, and then
click Printers (Windows 2000) or
Printers and Faxes (Windows XP
Professional and Server 2003) or
Printers and Other Hardware
Devices (Windows XP Home).
For Windows Vista, click Start, click
Control Panel, and then click
Printer.
2. Right-click the driver icon, and then
select Printing Preferences.
To change the device configuration
settings
1. Click Start, click Settings, and then
2. Right-click the driver icon, and then
3. Click the Device Settings tab.
Embedded Web server (HP LaserJet P1500 network models only)
You can use the embedded Web server to configure the device, view status information, and obtain
problem-solving information.
HP Embedded Web Server (network-ready models only) on page 20 for more information.
See
click Printers (Windows 2000) or
Printers and Faxes (Windows XP
Professional and Server 2003) or
Printers and Other Hardware
Devices (Windows XP Home).
For Windows Vista, click Start, click
Control Panel, and then click
Printer.
select Properties.
Software for Macintosh
Macintosh printer drivers
A printer driver is the software component that provides access to printer features and provides the
means for the computer to communicate with the device.
Install the Macintosh printer driver
This section explains how to install the printing system software for Macintosh OS X v10.3.9, and above.
1. Insert the software CD into the CD-ROM drive and run the installer.
2. Double-click the CD icon on the desktop
ENWW Printing-system software 9
Page 24

3. Double-click the Installer icon.
4. Follow the instructions on the computer screen.
5. Print a test page or a page from any software program to make sure that the software is correctly
installed.
If installation fails, reinstall the software. If this fails, see the Known Issues and Workarounds section of
the Install Notes. The Install Notes are located on the software CD or at the support Web site
www.hp.com/support/ljP1000 or www.hp.com/support/ljP1500).
(
Configure the Macintosh print driver
Use one of the following methods to open the Macintosh printer driver from your computer:
Operating System To change the settings for all
print jobs until the software
program is closed
Macintosh OS X
v10.3.9
Macintosh OS X
v10.4.3 and above
1. On the File menu, click
Print.
2. Change the settings that
you want on the various
pop-up menus.
1. On the File menu, click
Print.
2. Change the settings that
you want on the various
pop-up menus.
To change the print job default
settings (for example, turn on
Print on Both Sides by default)
1. On the File menu, click
Print.
2. Change the settings that
you want on the various
pop-up menus.
3. On the Presets pop-up
menu, click Save as and
type a name for the preset.
These settings are saved in the
Presets menu. To use the new
settings, you must select the
saved preset option every time
you open a program and print.
1. On the File menu, click
Print.
2. Change the settings that
you want on the various
pop-up menus.
3. On the Presets pop-up
menu, click Save as and
type a name for the preset.
4. These settings are saved in
the Presets menu. To use
the new settings, you must
select the saved preset
option every time you open
a program and print.
To change the configuration
settings (for example, add a
tray or enable/disable manual
two-sided printing)
1. Open Printer Setup Utility
by selecting the hard drive,
clicking Applications,
clicking Utilities, then
double-clicking Printer
Setup Utility.
2. Click the print queue.
3. On the Printers menu, click
Show Info.
1. Open Printer Setup Utility
by selecting the hard drive,
clicking Applications,
clicking Utilities, then
double-clicking Printer
Setup Utility.
2. Click the print queue.
3. On the Printers menu, click
Show Info.
CD language groupings
The following table presents the Windows language groups that are included on the software CD for the
product.
10 Chapter 1 Purpose and scope ENWW
Page 25

Table 1-1 CD language groupings for Windows installation
CD Languages
Rest of World CD
●
●
●
●
●
●
●
●
●
●
●
●
●
●
●
●
Arabic
Bulgarian
Catalan
Croatian
Czech
Danish
Dutch
English
Estonian
Finnish
French
German
Greek
Hebrew
Hungarian
Italian
Asia CD
Kazakh
●
Latvian
●
Lithuanian
●
Norwegian
●
Polish
●
Portuguese, Brazilian
●
Romanian
●
Russian
●
Serbian
●
Slovak
●
Slovenian
●
Spanish
●
Swedish
●
Turkish
●
Ukrainian
●
English
●
Korean
●
ENWW Printing-system software 11
Page 26

Table 1-1 CD language groupings for Windows installation (continued)
CD Languages
Ordering software
If you need a replacement CD or a newer version of the product software, go to the following Web site:
www.hp.com/support/ljP1000 or www.hp.com/support/ljP1500.
Click CD Order Page to order, or click Download drivers and software to get the software update.
To request the software CD by phone, see the following Web site for the correct contact number for your
country/region:
www.hp.com/country/us/en/wwcontact.html
Simplified Chinese
●
Thai
●
Traditional Chinese
●
Vietnamese
●
12 Chapter 1 Purpose and scope ENWW
Page 27

Documentation availability and localization
The documentation in the following table is available for the product.
Table 1-2 User documentation availability and localization
Document name Languages Location
HP LaserJet P1000 and P1500 Series
User Guide
●
●
●
●
●
●
●
●
●
●
●
●
●
●
●
●
Arabic
Bahasa
Bulgarian
Catalan
Croatian
Czech
Danish
Dutch
English
Estonian
Finnish
French
German
Greek
Hebrew
Hungarian
The HP LaserJet P1000 and P1500
Series User Guide is available in
electronic format on theHP LaserJet
P1000 and P1500 Series software CD.
This guide is also available by clicking
Manuals at the following Web sites:
www.hp.com/support/ljP1000 or
www.hp.com/support/ljP1500
Italian
●
Kazakh
●
Korean
●
Latvian
●
Lithuanian
●
Norwegian
●
Polish
●
Portuguese, Brazilian
●
Romanian
●
Russian
●
Simplified Chinese
●
Slovak
●
Slovenian
●
Spanish
●
ENWW Documentation availability and localization 13
Page 28

Table 1-2 User documentation availability and localization (continued)
Swedish
●
Thai
●
Traditional Chinese
●
Ukrainian
●
HP LaserJet P1000 and P1500 Series
Welcome Mat
●
●
●
●
●
●
●
●
●
●
●
●
●
●
●
●
Arabic
Bahasa
Bulgarian
Catalan
Croatian
Czech
Danish
Dutch
English
Estonian
Finnish
French
German
Greek
Hebrew
Hungarian
TheHP LaserJet P1000 and P1500
Series Welcome Mat is available in
electronic format on the HP LaserJet
P1000 and P1500 Series software CD.
This guide is also available by clicking
Manuals at the following Web site:
www.hp.com/support/ljP1000 or
www.hp.com/support/ljP1500
Italian
●
Kazakh
●
Korean
●
Latvian
●
Lithuanian
●
Norwegian
●
Polish
●
Portuguese, Brazilian
●
Romanian
●
Russian
●
Simplified Chinese
●
Slovak
●
Slovenian
●
Spanish
●
14 Chapter 1 Purpose and scope ENWW
Page 29

Table 1-2 User documentation availability and localization (continued)
Swedish
●
Thai
●
Traditional Chinese
●
Ukrainian
●
HP LaserJet P1000 and P1500 Series
Printing-System Install Notes
English The HP LaserJet P1000 and P1500
Series Printing-System Install Notes are
available in electronic format on the HP
LaserJet P1000 and P1500
Seriessoftware CD.
ENWW Documentation availability and localization 15
Page 30

16 Chapter 1 Purpose and scope ENWW
Page 31

2 Software description
Introduction
The HP LaserJet P1000 and P1500 Series printer comes with software and installers for Windows and
Macintosh systems. Linux systems also support the HP LaserJet P1000 and P1500 Series printer, and
software is available on the Web. For information about specific system installers, drivers, and
components, see the section that corresponds to that system.
Topics:
Windows printing-system software
●
HP Easy Printer Care
●
HP Embedded Web Server (network-ready models only)
●
HP Web Jetadmin
●
HP Extended Capabilities
●
Internal Fonts
●
ENWW Introduction 17
Page 32

Windows printing-system software
In Windows operating systems, insert the HP LaserJet P1000 and P1500 Series printing-system
software CD in the CD-ROM drive to open an interactive CD browser. Use the CD browser to install the
print drivers and related components, and to gain access to online user documentation and Adobe
Acrobat Reader software.
The following figure shows the main screen of the HP LaserJet P1000 and P1500 Series printing-system
software CD.
If the screen does not appear when you insert the software CD into the CD-ROM drive, follow these
steps to open the CD browser:
1. Click Start.
2. Click Run.
3. Click Browse…. and navigate to the root directory of the software CD.
4. Double-click the Setup.exe file to start the installer.
Figure 2-1 Getting Started Guide — Welcome screen
Click on your product to launch an animated setup demonstration and to install the software for your
product. For more information, see
on page 35.
18 Chapter 2 Software description ENWW
Installing the software before the printer is connected to the computer
Page 33

HP Easy Printer Care
HP Easy Printer Care software is designed for end users and for those who keep printers up and running
in small and large business groups. You can view the status of up to 15 supported HP LaserJet printers,
set up printer and supply alerts, generate printer-usage reports, and reorder supplies from HP or a choice
of resellers.
The HP Easy Printer Care Software is available through a link in the printing-system software CD, or
on the Web at the following Web site:
www.hp.com/go/easyprintercare
ENWW HP Easy Printer Care 19
Page 34

HP Embedded Web Server (network-ready models only)
The HP Embedded Web Server (HP EWS) is a Web-based application that allows users to control
settings on the HP LaserJet P1505n printer through a Web browser. To open the HP EWS, connect the
device to the network, open a Web browser, and type the IP address for the device in the address bar.
NOTE: If the HP LaserJet P1000 or P1500 Series printer is connected to the computer through the
USB port, you do not have access to the HP EWS.
The following tabs are available in the HP EWS:
Information tab
●
Settings tab
●
Networking tab
●
Information tab
Use the Information tab to access and print detailed information regarding device and supply status,
device configuration, network configuration, and usage.
The Information tab contains the following pages:
Device Status page
●
Device Configuration page
●
Supplies Status page
●
Network Summary page
●
20 Chapter 2 Software description ENWW
Page 35

Device Status page
The Device Status page shows device status messages. The Device Status page also shows some
pertinent device information and device settings.
Figure 2-2 HP EWS – Device Status page
ENWW HP Embedded Web Server (network-ready models only) 21
Page 36

Device Configuration page
The Device Configuration page shows the values of all of the settings that are available in the device.
The contents of this page are consistent with the configuration page that the firmware generates.
Figure 2-3 HP EWS – Device Configuration page
Supplies Status page
The Supplies Status page shows the status of all of the device supplies, including the print cartridges.
Figure 2-4 HP EWS – Supplies Status page
22 Chapter 2 Software description ENWW
Page 37

Network Summary page
The Network Summary page contains information about the network and its enabled features. Click
Network Summary on the Information tab to open the Network Summary page on the Networking
tab.
Figure 2-5 HP EWS – Network Summary page
ENWW HP Embedded Web Server (network-ready models only) 23
Page 38

Settings tab
Use the Settings tab to view and change print settings for the device.
Figure 2-6 HP EWS – Settings tab
Networking tab
Use the Networking tab to view and change settings for the network connection and communication
with the device. The following pages are available:
IPv4 Configuration page
●
IPv6 Configuration page
●
Advanced page
●
Bonjour page
●
Password page
●
SNMP settings
●
Network Summary page
●
24 Chapter 2 Software description ENWW
Page 39

IPv4 Configuration page
Figure 2-7 HP EWS – IPv4 Configuration page
IPv6 Configuration page
Figure 2-8 HP EWS – IPv6 Configuration page
ENWW HP Embedded Web Server (network-ready models only) 25
Page 40

Advanced page
Use the Advanced page to configure the enabled settings and other settings, such as link speed, for
the device.
Figure 2-9 HP EWS – Advanced page
Bonjour page
Use the Bonjour page to enable or disable the Bonjour settings for the device.
Figure 2-10 HP EWS – Bonjour page
26 Chapter 2 Software description ENWW
Page 41

Password page
Use this page to set or change the administrator password.
Figure 2-11 HP EWS – Password page
SNMP settings
Use this page to configure the simple network management protocol (SNMP) settings for the device.
Figure 2-12 HP EWS – SNMP page
ENWW HP Embedded Web Server (network-ready models only) 27
Page 42

Network Summary page
The Network Summary page contains information about the network and its enabled features.
Figure 2-13 HP EWS – Network Summary page
28 Chapter 2 Software description ENWW
Page 43

HP Web Jetadmin
Use the HP Web Jetadmin and a Web browser to manage HP Jetdirect-connected devices within an
intranet. HP Web Jetadmin is a browser-based management tool that should be installed only on a single
network-administration server.
To download a current version of HP Web Jetadmin, and for the latest list of host systems that support
HP Web Jetadmin, go to the following Web site:
www.hp.com/go/webjetadmin
ENWW HP Web Jetadmin 29
Page 44

HP Extended Capabilities
When you install the HP LaserJet P1000 and P1500 Series printing-system software, you have the
option of participating in HP's voluntary program for communication between your system and HP. This
feature, available through software that is included on the printing-system software CD, helps HP
monitor toner usage.
If you select the option to participate, you receive an invitation about two weeks later. It contains full
disclosure of the information to be communicated. Participation is entirely voluntary, and the impact on
processing and connecting speed is negligible. Personal information is never sent to HP without
permission. Network addresses are used only to enable the connection and for security purposes.
If you decline the invitation, the invitation dialog box does not appear again, and no data is gathered.
30 Chapter 2 Software description ENWW
Page 45

Internal Fonts
The following section lists the fonts that are internal to the HP LaserJet P1505n.
Albertus Extra Bold
●
Albertus Medium
●
CG Times
●
CG Times Bold
●
CG Times Bold Italic
●
CG Times Italic
●
Courier
●
Courier Bold
●
Courier Bold Italic
●
Courier Italic
●
Letter Gothic
●
Letter Gothic Bold
●
Letter Gothic Italic
●
Univers Bold
●
Univers Bold Condensed
●
Univers Bold Condensed Italic
●
Univers Bold Italic
●
Univers Medium
●
Univers Medium Condensed
●
Univers Medium Condensed Italic
●
Univers Medium Italic
●
Wingdings
●
ENWW Internal Fonts 31
Page 46

32 Chapter 2 Software description ENWW
Page 47

3 Install Windows printing-system
components
NOTE: This chapter covers information about the HP LaserJet P1000 and P1500 Series printing-
system software for Windows. For information about Macintosh installations, see
and utilities on page 103.
This chapter provides information about the following topics:
Installation overview
●
Windows installation instructions
●
Installation options
●
Uninstall
●
Macintosh software
ENWW 33
Page 48

Installation overview
The software for the HP LaserJet P1000 and P1500 Series is shipped on one CD. On Windows systems,
the Setup program installs the HP LaserJet P1000 or P1500 Series printing-system software from the
CD onto the hard disk and updates the Windows files.
On all of the supported platforms, a series of query dialog boxes guides you through the installation
process. You are asked to provide information about your computer environment. The Installer guides
you through the installation, whether you are configuring a directly-connected (USB) or a networked
product.
34 Chapter 3 Install Windows printing-system components ENWW
Page 49

Windows installation instructions
HP recommends that you install the software before connecting the product to the computer. However,
it is possible to install the software if the product is already connected by using Plug-n-Play option from
within the Add Printer Wizard. The following sections show the dialog box options that appear during
the HP LaserJet P1000 and P1500 Series printing-system software installation on Windows operating
systems.
Installing the software before the printer is connected to the computer
NOTE: HP recommends that you install the software before connecting the product to the computer
(software-first installation).
These instructions are intended to be used the first time that you install the HP LaserJet P1000 or P1500
Series printing-system software.
NOTE: Unless otherwise noted, the following installation instructions apply to all models of the HP
LaserJet P1000 and P1500 Series.
Figure 3-1 Driver Installation — Getting Started Guide — Welcome screen
STEP 1
Select your product (HP LaserJet P1000 Series or HP LaserJet P1500 Series) from the Getting
Started Guide — Welcome dialog box.
Selecting HP LaserJet P1000 Series takes you to the Software Wizard — Welcome dialog box (Step
4).
Selecting HP LaserJet P1500 Series takes you to the Select Your Connection dialog box (Step 2).
ENWW Windows installation instructions 35
Page 50

Figure 3-2 Driver Installation — Select Your Connection screen
STEP 2
Select the appropriate type of connection (USB or Network) for your product.
NOTE: This option is only available if you select the HP LaserJet P1500 Series printer.
Figure 3-3 Driver Installation — Begin Setup screen
36 Chapter 3 Install Windows printing-system components ENWW
Page 51

STEP 3
Home returns you to the Welcome dialog box (Step 1).
Install Printer Software skips the product setup process and opens the Software Wizard (Step 4).
View User Guide provides additional information about your product.
Begin Setup provides detailed instructions about how to setup your product.
NOTE: It may be necessary to reboot your computer at the end of the software installation process.
Ensure all applications are closed before installing the software.
Figure 3-4 Driver Installation — Software Wizard — Welcome screen
STEP 4
Documentation launches the Hewlett-Packard LaserJet P1000/P1500 Series Install Notes in your
Web browser.
Next takes you to the End User License Agreement dialog box (Step 5).
Cancel takes you to the Exit Setup dialog box (Step 18).
ENWW Windows installation instructions 37
Page 52

Figure 3-5 Driver Installation — End User License Agreement screen
STEP 5
Back returns you to the Welcome dialog box (Step 4).
Yes takes you to the Select the Printer dialog box (Step 6).
No takes you to the Exit Setup dialog box (Step 18).
Figure 3-6 Driver Installation — Select the Printer screen
38 Chapter 3 Install Windows printing-system components ENWW
Page 53

STEP 6
Back returns you to the End User License Agreement dialog box (Step 5).
Next takes you to the Setup Settings dialog box (Step 17) if you select the HP LaserJet P1005, HP
LaserJet P1006 or HP LaserJet P1505, or to the Printer Connections dialog box (Step 7). if you select
the HP LaserJet P1505n.
Cancel takes you to the Exit Setup dialog box (Step 18).
NOTE: Steps 7–16 are only available if you select the HP LaserJet P1505n.
Figure 3-7 Driver Installation — Printer Connections screen
STEP 7
Back returns you to the Select the Printer dialog box (Step 6).
Next takes you to the Setup Settings dialog box (Step 17) if you select Connect Directly to this
Printer, or to the Identify Printers dialog box (Step 8) if you select Connect Via the Network.
Cancel takes you to the Exit Setup dialog box (Step 18).
ENWW Windows installation instructions 39
Page 54

Figure 3-8 Driver Installation — Identify Printer screen
STEP 8
Help launches the Identify Printer troubleshooting tips in your Web browser.
Back returns you to the Printer Connections dialog box (Step 7).
Next takes you to the Specify Printer dialog box (Step 12) if you select Specify a Printer by
Address, or to one of the three following dialog boxes if you select Select from a List of Detected
Printers (Recommended):
The Firewall Detected dialog box (Step 9) may appear if the Window's Internet Connection Firewall
●
port used by the printer is closed.
The Printer Not Found dialog box (Step 10) may appear if the computer is unable to communicate
●
with the printer.
The Printer Found dialog box (Step 11) may appear if the computer is able to communicate with
●
the printer.
Cancel takes you to the Exit Setup dialog box (Step 18).
40 Chapter 3 Install Windows printing-system components ENWW
Page 55

Figure 3-9 Driver Installation — Firewall Detected
STEP 9
Help launches the Firewall Detected troubleshooting tips in your Web browser.
Back returns you to the Identify Printer dialog box (Step 8).
Next takes you to the Specify Printer dialog box (Step 12) if you select Specify a Printer by
Address, or to one of the three following dialog boxes if you select Select from a List of Detected
Printers (Recommended):
The Firewall Detected dialog box (Step 9) may appear if the Window's Internet Connection Firewall
●
port used by the printer is closed.
The Printer Not Found dialog box (Step 10) may appear if the computer is unable to communicate
●
with the printer.
The Printer Found dialog box (Step 11) may appear if the computer is able to communicate with
●
the printer.
Cancel takes you to the Exit Setup dialog box (Step 18).
ENWW Windows installation instructions 41
Page 56

Figure 3-10 Driver Installation — Printer Not Found screen
STEP 10
Help launches the Printer Not Found troubleshooting tips in your Web browser.
Back returns you to either the Identify Printer dialog box (Step 8) or the Firewall Detected dialog box
(Step 9) depending on the configuration of the Window's Internet Connection Firewall port.
Next takes you to the Check Printer Connection dialog box (Step 13).
Cancel takes you to the Exit Setup dialog box (Step 18).
42 Chapter 3 Install Windows printing-system components ENWW
Page 57

Figure 3-11 Driver Installation — Printer Found screen
STEP 11
Help launches the Printer Found troubleshooting tips in your Web browser.
Back returns you to either the Identify Printer dialog box (Step 8) or the Firewall Detected dialog box
(Step 9) depending on the configuration of the Window's Internet Connection Firewall port.
Next takes you to the Confirm Network Settings dialog box (Step 14) if you select Yes, or to the Check
Printer Connection dialog box (Step 13) if you select No.
Cancel takes you to the Exit Setup dialog box (Step 18).
ENWW Windows installation instructions 43
Page 58

Figure 3-12 Driver Installation — Specify Printer screen
STEP 12
Help launches the Specify Printer troubleshooting tips in your Web browser.
Back returns you to either the Identify Printer dialog box (Step 8) or the Firewall Detected dialog box
(Step 9) depending on the configuration of the Window's Internet Connection Firewall port.
Next takes you to the Printer Found dialog box (Step 11) if a valid Hardware Address, IP Address, or
IP Hostname is inserted and the computer can communicate with the printer, or to the Printer Not
Found dialog box (Step 10) if an invalid Hardware Address, IP Address, or IP Hostname is inserted or
the computer cannot communicate with the printer.
Cancel takes you to the Exit Setup dialog box (Step 18).
44 Chapter 3 Install Windows printing-system components ENWW
Page 59

Figure 3-13 Driver Installation — Check Printer Connection screen
STEP 13
Help launches the Check Printer Connection troubleshooting tips in your Web browser.
Back returns you to either the Printer Not Found dialog box (Step 10).
Next takes you to the Specify Printer dialog box (Step 12) if you select Specify a Printer by
Address, or will try again to detect your printer on the network if you select Search Again for All
Available Printers. If a printer can be found on the network, you will be taken to the Printer Found
dialog box (Step 11), or if one cannot be found, you will be taken to the Printer Not Found dialog box
(Step 10).
Cancel takes you to the Exit Setup dialog box (Step 18).
ENWW Windows installation instructions 45
Page 60

Figure 3-14 Driver Installation — Confirm Network Settings screen
STEP 14
Help launches the Confirm Network Settings troubleshooting tips in your Web browser.
Change Settings takes you to the Confirm Change Settings dialog box (Step 15).
Back returns you to the Printer Found dialog box (Step 11).
Next takes you to the Setup Settings dialog box (Step 17).
Cancel takes you to the Exit Setup dialog box (Step 18).
46 Chapter 3 Install Windows printing-system components ENWW
Page 61

Figure 3-15 Driver Installation — Confirm Change Settings screen
STEP 15
Help launches the Verify Settings troubleshooting tips in your Web browser.
Back returns you to either the Confirm Network Settings dialog box (Step 14).
Next takes you to the Change TCP/IP Settings dialog box (Step 16) if you select Yes, or to the Setup
Settings dialog box (Step 17) if you select No.
Cancel takes you to the Exit Setup dialog box (Step 18).
ENWW Windows installation instructions 47
Page 62

Figure 3-16 Driver Installation — Change TCP/IP Settings screen
STEP 16
Help launches the Change TCP/IP Settings troubleshooting tips in your Web browser.
Suggest Settings allows the installation utility to automatically enter the TCP/IP parameters.
Back returns you to the Confirm Change Settings dialog box (Step 15).
Next takes you to the Confirm Change Settings dialog box (Step 15).
Cancel takes you to the Exit Setup dialog box (Step 18).
48 Chapter 3 Install Windows printing-system components ENWW
Page 63

Figure 3-17 Driver Installation — Setup Settings screen
STEP 17
Back returns you to the Printer Connections dialog box (Step 7).
Next takes you to the HP Extended Capabilities dialog box (Step 19) once the software has been
installed.
Cancel takes you to the Exit Setup dialog box (Step 18).
Figure 3-18 Driver Installation — Exit Setup screen
STEP 18
Yes cancels the software installation.
No returns you to the last open screen of the software install utility.
ENWW Windows installation instructions 49
Page 64

Figure 3-19 Driver Installation — HP Extended Capabilities screen
STEP 19
More Information provides additional details about the HP Extended Capabilities program.
Back returns you to the Printer Connections dialog box (Step 7).
Next takes you to the Setup Complete dialog box (Step 20).
Cancel takes you to the Exit Setup dialog box (Step 18).
50 Chapter 3 Install Windows printing-system components ENWW
Page 65

Figure 3-20 Driver Installation — Setup Complete screen
STEP 20
You are given the options to register your product and print a test page. Select the desired options and
click Finish to be taken to the Setup Complete dialog box (Step 21)
Figure 3-21 Driver Installation — Setup Complete screen 2
STEP 21
ENWW Windows installation instructions 51
Page 66

Review the information in the dialog box and click OK to be taken to the Reboot dialog box (Step 22).
Figure 3-22 Driver Installation — Reboot screen
STEP 22
Yes allows the printer to shut down and restart in order to complete the software installation.
No exits the software installation wizard without restarting the computer.
NOTE: It is necessary to reboot the computer when prompted in order for the software to install
properly.
Installing the software when the printer is already connected to a computer
If the product is already connected to a computer when you begin installing the software, Windows
automatically detects the product and uses Plug-n-Play to install the printer driver. During this process,
Plug-n-Play calls the Add Printer Wizard to automatically install the printer driver and the USB port.
When Plug-n-Play completes, you are given the option to install the additional support files.
If you prefer, you can cancel Plug-n-Play and run the Add Printer Wizard manually to install the printer
driver.
At the end of the Add Printer Wizard, you are given the option to install the additional support files.
52 Chapter 3 Install Windows printing-system components ENWW
Page 67

This section shows the dialog box options that appear during the Add Printer Wizard.
Figure 3-23 Add Printer Wizard — Welcome Screen
STEP 1
Next takes you to the Local or Network Printer dialog box.
Cancel exits the Add Printer Wizard.
ENWW Windows installation instructions 53
Page 68

Figure 3-24 Add Printer Wizard — Local or Network Printer screen
STEP 2
Select Local printer if the product is connected directly to your computer.
Select Automatically detect and install my Plug and Play printer to have Windows automatically set
up the product.
Select Network printer if the product is connected to a network.
Back returns you to the Welcome screen (Step 1).
Next takes you to the Select the Printer Port screen (Step 3).
Cancel exits the Add Printer Wizard.
54 Chapter 3 Install Windows printing-system components ENWW
Page 69

Figure 3-25 Add Printer Wizard — Select the Printer Port screen
STEP 3
Select Use the following port to use an existing port on your computer.
Select Create a new port to add a new port.
Click Next to continue.
ENWW Windows installation instructions 55
Page 70

Figure 3-26 Add Printer Wizard — Manufacturer and model screen
STEP 4
Click Have Disk... to install the software from the CD-ROM.
Figure 3-27 Add Printer Wizard — Install from Disk
STEP 5
Click Browse to begin searching for the driver file that is on the CD-ROM.
56 Chapter 3 Install Windows printing-system components ENWW
Page 71

Figure 3-28 Add Printer Wizard — Locate File
STEP 6
Click the HPLJP1005.INF file, and then click Open.
Figure 3-29 Add Printer Wizard — Install From Disk, screen 2
STEP 7
Click OK to continue.
ENWW Windows installation instructions 57
Page 72

Figure 3-30 Add Printer Wizard — Manufacturer and Model screen 2
STEP 8
Select the correct HP LaserJet P1000 or P1500 Series printer model.
Click Next to continue.
Figure 3-31 Add Printer Wizard — Name Your Printer screen
58 Chapter 3 Install Windows printing-system components ENWW
Page 73

STEP 9
Type a name for the product.
Click Next to continue.
Figure 3-32 Add Printer Wizard — Printer Sharing screen
STEP 10
Select Do not share this printer if only one computer will use the product.
Select Share as: to enable Windows sharing (peer-to-peer networking)
Click Next to continue.
ENWW Windows installation instructions 59
Page 74

Figure 3-33 Add Printer Wizard — Print Test Page screen
STEP 11
Select Yes to print a test page after the software is installed.
Select No if you do not want to print a test page.
Click Next to continue.
60 Chapter 3 Install Windows printing-system components ENWW
Page 75

Figure 3-34 Add Printer Wizard — Completing the Add Printer Wizard screen
STEP 12
Click Finish to complete the Add Printer Wizard.
ENWW Windows installation instructions 61
Page 76

Installation options
The HP LaserJet P1000 and P1500 Series printing-system software can be used in the following
configurations:
You install theHP LaserJet P1000 or P1500 Series printing-system software on a computer that is
●
directly connected to the product through a USB port. On Windows systems, you can also share
yourHP LaserJet P1000 or P1500 Series printer with other users on your network.
You install the HP LaserJet P1500 Series printing-system software on a computer that has access
●
to a local area network (LAN). The HP LaserJet P1505n printer can connect to a LAN through an
internal HP network port.
HP recommends that you install the software before connecting the product to the computer (softwarefirst installation). However, if the product is already connected to the computer, you can install the
software by using the Plug-n-Play method or by using the Add Printer Wizard. For more information,
Plug-n-Play on page 66 and Add Printer Wizard on page 66.
see
Windows installation for direct connections
Use the following instructions to install the product software on a computer that is running Windows
2000 or Windows XP.
NOTE: Set up and turn on the product before installing the printing-system software. Do not connect
the product to the computer until the software installation program prompts you to do so.
NOTE: You must have administrator privileges to install the printing-system software on Windows
2000 or Windows XP.
1. Close all of the programs that are open on the computer.
2. Insert the HP LaserJet P1000 and P1500 Series printing-system software CD into the CD-ROM
drive.
NOTE: If your CD does not start automatically, click Start, click Run, and then browse to and
double-click the Setup.exe file in the root directory of the CD.
3. Click Next and follow the onscreen prompts until the installation is completed. For more information,
Installing the software before the printer is connected to the computer on page 35
see
Setting up Windows sharing (peer-to-peer networking)
NOTE: This section describes procedures for sharing a product using Microsoft Windows Sharing
(peer-to-peer networking). Peer-to-peer networking is a feature of Microsoft operating systems, not of
HP print drivers. If these procedures are not successful, or for more information about peer-to-peer
networking procedures, contact Microsoft at the following Web site:
This section contains instructions for using Windows sharing to make the product available to network
users when the product is directly connected to a host computer.
NOTE: Using Windows sharing, the person using the computer directly connected to the product can
allow other users on the network to print to the product.
http://www.microsoft.com.
When the product is shared, install the printer drivers on all of the computers that you want to print to
the product.
62 Chapter 3 Install Windows printing-system components ENWW
Page 77

When you have set up the host computer to share your product, you must also configure the client
computers. Perform the following steps at the computers of all other network users who want to print to
the product.
Setting up the host computer running Windows 2000
At the computer that is directly connected to the product, perform the following steps:
1. Click Start, click Settings, and then click Printers.
2. In the printer list, right-click the icon for your HP LaserJet P1000 or P1500 Series printer, and then
click Sharing.
3. On the Sharing tab, click the Share As option button, and then type a name for the product in the
Share Name field. Click OK.
Setting up the host computer running Windows XP
At the computer that is directly connected to the product, perform the following steps:
1. Click Start, and then click
Printers and Faxes (Windows XP Professional).
-or-
Printers and Other Hardware Devices (Windows XP Home).
2. In the printer list, right-click the icon for your HP LaserJet P1000 or P1500 Series printer, and then
click Sharing.
3. On the Sharing tab, click the Share this printer option button, and then type a name for the product
in the Share Name field. Click OK.
4. Click the Ports tab. Click to clear the Enable bidirectional support check box, and then click
OK.
Setting up client computers running Windows 2000
1. Click Start, click Settings, and then click Printers.
2. Double-click the Add Printer icon to open the Add Printer wizard.
3. Click Next to start the wizard.
4. Click the Network Printer option button, and then click Next.
5. Type in the path and share name of the HP LaserJet P1000 or P1500 Series printer to which you
want to connect.
- OR -
Click Browse
and navigate to find the HP LaserJet P1000 or P1500 Series printer to which you
want to connect.
Click Next.
ENWW Installation options 63
Page 78

6. Click the Yes or No option button when asked if you want to use this product as your default printer
for Windows-based programs, and then click Next.
7. Click Finish to complete the installation and close the Add Printer wizard.
NOTE: You might need the product software CD to complete the printer driver installations.
Setting up client computers running Windows XP
1. Click Start, and then click
Printers and Faxes (Windows XP Professional).
-or-
Printers and Other Hardware Devices (Windows XP Home).
2. On the left-hand column, under Printer Tasks, click Add a printer to open the Add Printer wizard.
3. Click Next to start the wizard.
4. Click the A network printer or a printer attached to another computer option button, and then
click Next.
5. Type in the path and share name of the HP LaserJet P1000 or P1500 Series printer to which you
want to connect.
- OR -
Click Browse and navigate to find the HP LaserJet P1000 or P1500 Series printer to which you
want to connect.
Click Next.
6. Click the Yes or No option button when asked if you want to use this product as your default printer
for Windows-based programs, and then click Next.
7. Click Finish to complete the installation and close the Add Printer wizard.
Installation instructions for networked computers
This section provides information about the following topics:
Installing the software on networked computers (HP LaserJet P1505n only)
●
Installing the print driver only
●
Installing the software on networked computers (HP LaserJet P1505n only)
Each computer that has the HP LaserJet P1505n printing-system software installed can use all of the
product features that are available over a network connection through the internal network port that
comes as standard equipment on the HP LaserJet P1505n models.
To install the HP LaserJet P1505n printing-system software on networked Windows operating systems,
follow these steps:
64 Chapter 3 Install Windows printing-system components ENWW
Page 79

NOTE: You must have administrator privileges to install the software on Windows 2000 or Windows
XP.
1. Close all of the programs that are open on the computer.
2. Insert the HP LaserJet P1000 and P1500 Series printing-system software CD into the CD-ROM
drive.
NOTE: If the CD does not start automatically, click Start, click Run, and then browse to and
double-click the Setup.exe file in the root directory of the CD.
3. Click Next and follow the onscreen prompts.
4. When the Installer software prompts you to select how the product will be connected, select
Connected via the network, and then click Next. Follow the instructions on the screen.
5. When the installation is nearly complete, a setup screen appears that asks whether or not you want
to print a test page. Click Yes.
6. If you are prompted to restart the computer, click Yes.
Installing the printer driver only
NOTE: If the product is directly connected to another user's computer, the product must be shared
from that computer by using Windows sharing.
Use the following instructions to install the printer driver only.
Printer-driver installation for Windows 2000 or Windows XP
1. From the Start menu, click
Settings, and then click Printers (Windows 2000).
-or-
Printers and Faxes (Windows XP Professional).
-or-
Printers and Other Hardware Devices (Windows XP Home).
2. Double-click Add Printer, and then click Next.
3. When asked if the product is a local or network printer, click Network Printer, and then click
Next.
4. You might need to first select the printer from the list of printers or type an IP address. If the printer
driver is not available, the Add Printer Wizard dialog box appears. Click Have Disk from the wizard
screen.
5. Insert the CD into the CD-ROM drive and navigate to your CD-ROM drive.
6. Double-click the .INF file.
7. Complete the installation. When prompted, print a test page to ensure that the printer driver is
installed properly.
ENWW Installation options 65
Page 80

Plug-n-Play
If the product is already connected to a computer when you begin installing the software, Windows
automatically detects the product and uses Plug-n-Play to install the product. During this process, Plugn-Play calls the Add Printer Wizard to automatically install the printer driver and the USB port. At the
end of the Add Printer Wizard, you are given the option to install the additional support files.
Add Printer Wizard
If the product is already connected to a computer when you begin installing the software, Windows
automatically detects the product and uses Plug-n-Play to install the printer driver. If you prefer, you can
cancel Plug-n-Play and run the Add Printer Wizard manually to install the printer driver. At the end of
the Add Printer Wizard, you are given the option to install the additional support files.
66 Chapter 3 Install Windows printing-system components ENWW
Page 81

Uninstall
This section provides information about the following topics:
Uninstall instructions for Windows
●
Uninstall instructions for Windows
Choose one of the following two methods to uninstall the HP LaserJet P1000 or P1500 Series printingsystem software:
Uninstalling using the HP program group (recommended)
●
Uninstalling using the Windows Add/Remove Program feature
●
Uninstalling using the HP program group (recommended)
NOTE: To uninstall the software from Windows 2000 or Windows XP, you must log on with
administrator privileges.
1. Close all of the programs that are open on the computer.
2. Click Start, click All Programs, select HP, select either HP LaserJet P1000 Series or HP LaserJet
P1500 Series, and then click either Uninstall HP LaserJet P1000 Series or Uninstall
HP LaserJet P1500 Series.
3. The Welcome to the HP LaserJet P1000 / P1500 series Uninstall Wizard dialog box appears.
Click Next to continue.
4. Select the model of printer you would like to uninstall and click Next.
5. The HP LaserJet P1000 / P1500 series Driver Uninstall Information dialog box appears to
confirm which product is being uninstalled. Click Next to continue.
6. The progress bar reflects the status of the uninstall process.
7. Click Restart to reboot your computer and finish the uninstall process.
Uninstalling using Windows Add/Remove programs feature
Follow these steps to uninstall theHP LaserJet P1000 or P1500 Series printing-system software by using
the Windows Add/Remove programs feature.
NOTE: Using this uninstall method, you do not need theHP LaserJet P1000 or P1500 Series printing-
system software CD.
NOTE: To uninstall the software from Windows 2000 or XP, you must log on with administrator
privileges.
1. Close all of the programs that are open on the computer.
ENWW Uninstall 67
Page 82

2. For Windows 2000, click Start, click Settings, click Control Panel, and then double-click Add/
Remove programs
For Windows XP, click Start, click Control Panel, and then double-click Add/Remove
programs.
Figure 3-35 Windows Control Panel screen
3. Click Change or Remove Programs, click HP LaserJet P1000 series or HP LaserJet P1500
series, and then click Change/Remove.
Figure 3-36 Windows Change or Remove Programs screen
68 Chapter 3 Install Windows printing-system components ENWW
Page 83

4. The Welcome to the LaserJet P1000 / P1500 series Uninstall Wizard dialog box appears.
Figure 3-37 Welcome to the LaserJet P1000 / P1500 series Uninstall Wizard dialog box
Click Next to begin the uninstall process.
ENWW Uninstall 69
Page 84

5. The Uninstalling the HP LaserJet P1000 / P1500 series dialog box appears.
Figure 3-38 HP LaserJet P1000 / P1500 series Driver Uninstall Information dialog box
Select the printer model you want to uninstall and click Next.
70 Chapter 3 Install Windows printing-system components ENWW
Page 85

6. The second Uninstalling the HP LaserJet P1000 / P1500 series dialog box appears.
Figure 3-39 HP LaserJet P1000 / P1500 series Driver Uninstall Information dialog box, screen 2
Review the information in the dialog box and then click Next.
The progress bar reflects the status of the uninstall process.
ENWW Uninstall 71
Page 86

7. The Uninstall Complete dialog box appears.
Figure 3-40 Uninstall Complete dialog box
Click Restart to reboot your computer and finish the uninstall process.
72 Chapter 3 Install Windows printing-system components ENWW
Page 87

4 Host-based driver for Windows
Topics:
Introduction to host-based printing
●
Help system
●
Access to the driver
●
Driver tabs
●
ENWW 73
Page 88

Introduction to host-based printing
The HP LaserJet P1000 and P1500 Series printers are host-based devices. Host-based printing differs
from PCL printing by rendering the print job on the host computer rather than on the device formatter.
As a host-based printing system, the HP LaserJet P1000 and P1500 Series print drivers use the
Windows operating system to convert the graphics device interface (GDI) or device driver interface (DDI)
calls from software programs into JBIG (standard-compression) compressed pages. These pages are
sent in “chunks” through the driver to the device formatter.
The HP LaserJet P1000 and P1500 Series print drivers also receive status messages from the formatter
firmware. These messages are passed to the Status Application, which displays them.
The HP LaserJet P1000 Series formatter has no read-only memory (ROM) and up to 8 MB of random
access memory (RAM). The amount of RAM varies based on the model of printer. Both the firmware
and the compressed page must fit into the amount of RAM installed in the printer.
Depending on the model of printer, the HP LaserJet P1500 Series formatter has up to 2 MB of readonly memory (ROM) and up to 32 MB of RAM. Both the firmware and the compressed page must fit into
the amount of RAM installed in the printer.
74 Chapter 4 Host-based driver for Windows ENWW
Page 89

Help system
The HP LaserJet P1000 and P1500 Series host-based drivers include a full-featured Help system to
provide assistance with printing and configuration options. The following Help options are available:
What's this? Help
●
Context-sensitive Help
●
Paper Type Warning
●
What's this? Help
"What's this?" Help is available in all of the supported operating systems. Access "What's this?" Help
messages in the following ways:
Right-click a control and click What's this?, and a pop-up Help window appears.
●
Click the ? button at the upper-right corner of the frame, to change the cursor to an arrow with a
●
question mark. Use this special cursor to select a control, and the pop-up Help window for that
feature appears.
Press the F1 key, and the Help window for the currently selected control appears.
●
Context-sensitive Help
Press the Help button on a driver tab or in a dialog box, and context-sensitive Help appears.
Paper Type Warning
Paper Type Warnings are unsolicited messages that appear in response to specific actions. These
messages appear in response to selections that could damage the device. For example, if you select
Bond in the Type is: drop-down menu, a message appears warning you to change the setting before
printing on other types of media.
Figure 4-1 Paper Type Warning message
ENWW Help system 75
Page 90

Access to the driver
To gain access to driver settings from within most software programs, click File, click Print, and then
click Properties. The appearance and names of the driver tabs that appear can vary, depending on the
operating system. These settings apply only while the software program is open.
You can also control the driver directly from the Printers folder. These settings change the default
settings for all software programs.
In Windows 2000, click Start, select Settings, select Printers, right-click the device name, and
●
then click Printing Preferences to gain access to the same set of driver tabs that the software
program controls.
In Windows XP, click Start, select Settings, select Printers and Faxes (Windows XP Professional)
●
or Printers and Other Hardware Devices (Windows XP Home), right-click the device name, and
then click Printing Preferences to gain access to the same set of driver tabs that the software
program controls.
Click Properties after right-clicking the device name to gain access to the Properties tab set, which
controls the driver behavior and driver connections.
Properties tab set
The Properties tab set contains information about and options for configuring the device.
NOTE: Windows also has tabs in the Properties tab set. For information about those tabs, see the
documentation that came with the computer.
Printing Preferences tab set
The HP LaserJet P1000 and P1500 Series printer host-based Printing Preferences tabs contain
options for formatting documents for the HP LaserJet P1000 and P1500 Series printers. Gain access
to the Printing Preferences tabs either through the software program or through the Windows
Printers folder.
The following tabs are included in Printing Preferences tab set:
Advanced
●
Paper/Quality
●
Effects
●
Finishing
●
Services
●
Print Task Quick Sets
Use the Print Task Quick Sets control to store the current combination of driver settings that are found
on all other Printing Preferences driver tabs. Print Task Quick Sets are either preset or user-defined
printing specifications, such as paper size and pages per sheet. The Print Task Quick Sets appear in
the upper-left corner of the Paper/Quality, Effects, and Finishing tabs.
76 Chapter 4 Host-based driver for Windows ENWW
Page 91

Document preview image
The document preview image is a line-drawn image of a page that represents graphics and text. The
document preview image is always oriented so that the contents of the page are right-side-up. The
document preview image appears in the upper-right corner of the Paper/Quality, Effects, and
Finishing tabs.
Switching between tabs does not change the location or appearance of the document preview image.
Move the mouse over the document preview image, and the mouse cursor changes from an arrow to a
gloved hand. Toggle between portrait and landscape page orientation by clicking on the image.
ENWW Access to the driver 77
Page 92

Driver tabs
Topics:
Printing Preferences tab set
●
Properties tab set
●
Printing Preferences tab set
Topics:
Advanced tab features
●
Paper/Quality tab features
●
Effects tab features
●
Finishing tab features
●
Services tab features
●
Advanced tab features
Use the Advanced tab to set the number of copies, collation, and print-job output options. The following
illustration shows the Advanced tab.
Figure 4-2 Advanced tab
78 Chapter 4 Host-based driver for Windows ENWW
Page 93

Paper/Output
The following settings are in the Paper/Output group box:
●
●
Collate
The Collate option becomes active if the Copy setting is greater than 1. Select Collate to collate multiple
copy print jobs.
Copy
This setting is useful for software programs that do not provide a copy count. If a copy count is available
in the software program, set the copy count in the software program. Copy specifies the number of
copies to print.
The requested number of copies appears in the Copy option. Select the number by typing in the box or
by using the up and down arrows to the right of the text box. For the HP LaserJet P1000 and P1500
Series printers, valid entries are numbers from 1 to 999. The copies value will not advance from the
maximum number (999) to 1 when the up arrow is used, or change from 1 to the maximum number
(999) when the down arrow is used.
When you click another group box or leave the Advanced tab, invalid entries into the edit box (such as
non-numerical input, numbers less than 1, or numbers greater than the maximum allowed) change to
the last valid value that appeared in the box. The default number of copies is 1.
Collate
Copy
Because the number of copies can be set from some software programs, conflicts can arise between
the software program and the driver. In most cases, the software program and the driver communicate
so that the number of copies set in one location (such as the program) appears in the other (such as
the driver). For some programs, this communication does not happen, and the copies values are treated
independently. For example, setting 10 copies in the program and then setting 10 copies in the driver
will result in 100 copies (10 x 10) being printed. Set the number of copies in the program, wherever
possible.
Printer Features
The following settings are in the Printer Features group box:
Print all Text as Black
●
REt
●
Print all Text as Black
Print all Text as Black is off by default. When selected, the driver prints all text as black regardless of
the original document text color. However, white text remains white as a fail-safe method of printing
reverse typeface against a dark background. This setting does not affect graphic images on the page.
Print all Text as Black remains selected only for the current print job.
REt
Resolution Enhancement technology (REt) refines the print quality of characters by smoothing out
jagged edges that can occur on the angles and curves of a printed image. It is On by default. Select
Off if graphics, particularly scanned images, are not printing clearly.
ENWW Driver tabs 79
Page 94

Paper/Quality tab features
Use the Paper/Quality tab to specify the size, type, and source of the media for the HP LaserJet P1000
and P1500 Series printers. You can also use this tab to indicate different paper-selection choices for
the first page, other pages, and back cover of the document. The following illustration shows the Paper/
Quality tab.
Figure 4-3 Paper/Quality tab
The Paper/Quality tab consists of the following sections:
Paper Options
●
Print Quality
●
80 Chapter 4 Host-based driver for Windows ENWW
Page 95

Paper Options
The settings specified in the Paper Options group box on the Paper/Quality tab apply to all of the
pages of the document. The following illustration shows the Paper Options group box and the selections
available.
Figure 4-4 Paper Options group box
The following are settings in the Paper Options group box:
●
●
●
Paper sizes:
The Paper sizes: setting is a drop-down menu that lists all of the supported media sizes.
Specify the size for all the settings in the Paper Options group box. You must use the same size of
media for the entire print job.
NOTE: Certain software programs can override the size command and specify different media sizes
within a single document.
For the Covers and Print pages on different paper settings, select a source (tray) and media type
that differ from the settings selected. If a conflict exists among media source, media size, and/or media
type, and you choose to keep the conflicting settings, the settings are processed in the following order:
media size, media type, and then media source.
Because driver settings are overridden by media-size settings in most software programs, use the driver
to set media size only for software programs that don't have a media-size setting, such as NotePad, or
when producing a book or a booklet that does not require different media sizes.
Paper sizes:
Paper source:
Paper type:
ENWW Driver tabs 81
Page 96

Custom Paper Size
Click the Custom button to open the Custom Paper Size dialog box.
Figure 4-5 Custom Paper Size dialog box
Use the Custom Paper Size dialog box to create or modify custom-paper-size information. The Custom
Paper Size dialog box contains the following options:
●
●
●
Click Save to save the custom size or click Close to return to the Paper/Quality tab.
Paper source:
The Paper source: setting specifies the source tray to use for printing a document.
The Paper source: drop-down menu can contain the following options:
●
●
Name field. Click the text box to type a name for the custom paper size or click the drop-down
menu to select a custom paper size that is already defined.
Paper Size group box. If you type in a size that is too large or too small, the driver automatically
adjusts the size.
Width: text box. Click in the text box to type the width.
◦
Height: text box. Click in the text box to type the height.
◦
Units group box. Select inches or millimeters to define the custom paper size.
Auto Select
Manual Feed
Tray 1
●
82 Chapter 4 Host-based driver for Windows ENWW
Page 97

The default setting is Auto Select. When this is selected, the device uses the source tray that supports
the selected media size. If you select a source tray other than Auto Select, make sure that the correct
media size is loaded in the source tray.
Paper type:
The Paper type: drop-down menu shows all the paper types that the HP LaserJet P1000 and P1500
Series printers support. The default setting is Plain Paper. If you select a different setting, make sure
that the correct media type is loaded in the tray selected in the Paper source: setting.
The following standard paper types appear in the list.
Table 4-1 Standard paper types and engine speed
Paper type Engine speed
Unspecified Full – 1:1
Plain
HP Multipurpose Paper Full – 1:1
HP Office Paper Full – 1:1
HP All-in-One Printing Paper Full – 1:1
HP LaserJet Paper Full – 1:1
HP Premium Choice LaserJet Paper Full – 1:1
Preprinted Full – 1:1
Letterhead Full – 1:1
Transparency Half – 1:2
Prepunched Full – 1:1
Labels Half – 1:2
Bond Half – 1:2
Recycled Full – 1:1
Color Full – 1:1
Light < 75 g/m
Heavy (90 to 105 g/m2)
2
Full – 1:1
Full – 1:1
Half – 1:2
Cardstock (105 to 176 g/m2)
Envelope Half – 1:2
Rough Half – 1:2
Vellum Full – 1:1
Archive Half – 1:2
1
Throughput for continuous printing might be reduced as a result of fuser heating limitations.
Half – 1:2
ENWW Driver tabs 83
Page 98

Use Different Papers/Covers
The Use Different Paper/Covers option allows you to print books that include different media types.
Use these options to include a blank or preprinted front cover or back cover on a document, or to select
an alternative media tray or type for the first page, other pages, or last page of a document. The following
illustration shows the appearance of the Paper Options group box when the Use Different Paper/
Covers check box is selected.
NOTE: Use the same size of media for the entire print job. All options selected from the available Use
Different Paper/Covers options use the size selected in the Size is: drop down menu.
Figure 4-6 Use Different Paper/Covers options
To enable Use Different Paper/Covers:
1. Check Use Different Paper/Covers.
NOTE: To print aFront Cover or Back Cover, the Add a Blank or Preprinted Cover option also
must be checked.
2. Select the appropriate option (Front Cover, First Page, Other Pages, Last Page, or Back
Cover) in the dialog box.
NOTE: The Back Cover options are not available when the Booklet Layout setting is enabled
on the Finishing tab. For two-page-per-sheet (2-up) booklet printing, include a cover by selecting
different media for the first page only. The back cover setting is unavailable, because this page
would be printed in the middle of a booklet.
3. Select the appropriate tray and type of media from the Source is: andType is: drop-down menus.
4. Click OK.
NOTE: When you change the type and source of the paper and covers, the settings remain configured
until you close the software program.
84 Chapter 4 Host-based driver for Windows ENWW
Page 99

Print Quality
The Print Quality group box contains the Print Quality drop-down box and the EconoMode check
box.
The Print Quality drop-down box controls the resolution, which refers to the number of dots per inch
(dpi) used to print the page. As resolution is increased, the quality (clarity and visual appeal) of print on
the page is improved. However, higher resolution might also result in longer printing times. The following
Print Quality options are available in the drop-down box:
●
●
The default setting for the Print Quality drop-down box is FastRes 600 for the HP LaserJet P1000
Series and 600 dpi for the HP LaserJet P1500 Series.
Select the EconoMode check box in conjunction with any of the print quality settings. When using
EconoMode, the device uses less toner on each page. Using this option might extend the life of the print
cartridge and can lower the cost per page, but also reduces print quality. Using the EconoMode feature
with non-HP print cartridges can result in toner spillage or device damage.
HP LaserJet P1000 Series: FastRes 1200 and FastRes 600
HP LaserJet P1500 Series: FastRes 1200 and 600 dpi
ENWW Driver tabs 85
Page 100

Effects tab features
Use the Effects tab to create unique media effects such as scaling and watermarks. The following
illustration shows the Effects tab.
Figure 4-7 Effects tab
The Effects tab contains the following controls:
Resizing Options
●
Watermarks
●
Resizing Options
The Resizing Options group box consists of the following controls:
Actual Size
●
Print Document On
●
Scale to Fit
●
86 Chapter 4 Host-based driver for Windows ENWW
 Loading...