

Page 1

HP LJ M3035mfp PCL6 - Printing
How do I Steps to perform
1 Access the printer driver.
2 Select a page size.
3 Select a paper source.
4 Select a paper type.
5 Get help for any printing option.
Click on File, Print in your application, and choose
Properties.
Click on the Paper/Quality tab, and then click the Paper
size drop-down menu, then select a paper size. Click
Custom if the paper size you want is not in the menu.
Click the Paper Source drop-down menu, then select a
paper tray. Use Manual Feed for printing special media
such as transparencies, labels, or envelopes.
Click the Paper Type drop-down menu, then select a
paper type.
Click the question mark (5a), then click on a print
control to display a pop-up help message for that control
or click Help (5b) for on-line help.
How do I Steps to perform
6 Scale a page to fit on a selected
paper size.
7 Print a watermark.
8 Add or edit watermarks (the printer
driver must be stored on your PC
for this to work).
Click on the Effects tab, click on the Print Document
On, select a paper size, and then click Scale to Fit.
Click on the Watermarks drop-down menu, and then
select an existing watermark.
Click Edit. Highlight an existing watermark and make
adjustments to its angle and font attributes. Click New to
add a new watermark, and then type in a new name.
Click OK to save the settings.
1
2
3
4
5a
5b
6
7
8
©2007 Copyright Hewlett-Packard
Development Company, L.P.
1
www.hp.com
Page 2
HP LJ M3035mfp PCL6 - Printing
How do I Steps to perform
9 Save a Quick Set (the printer driver
must be stored on your PC for this
to work).
10 Print on both sides manually
(Duplex).
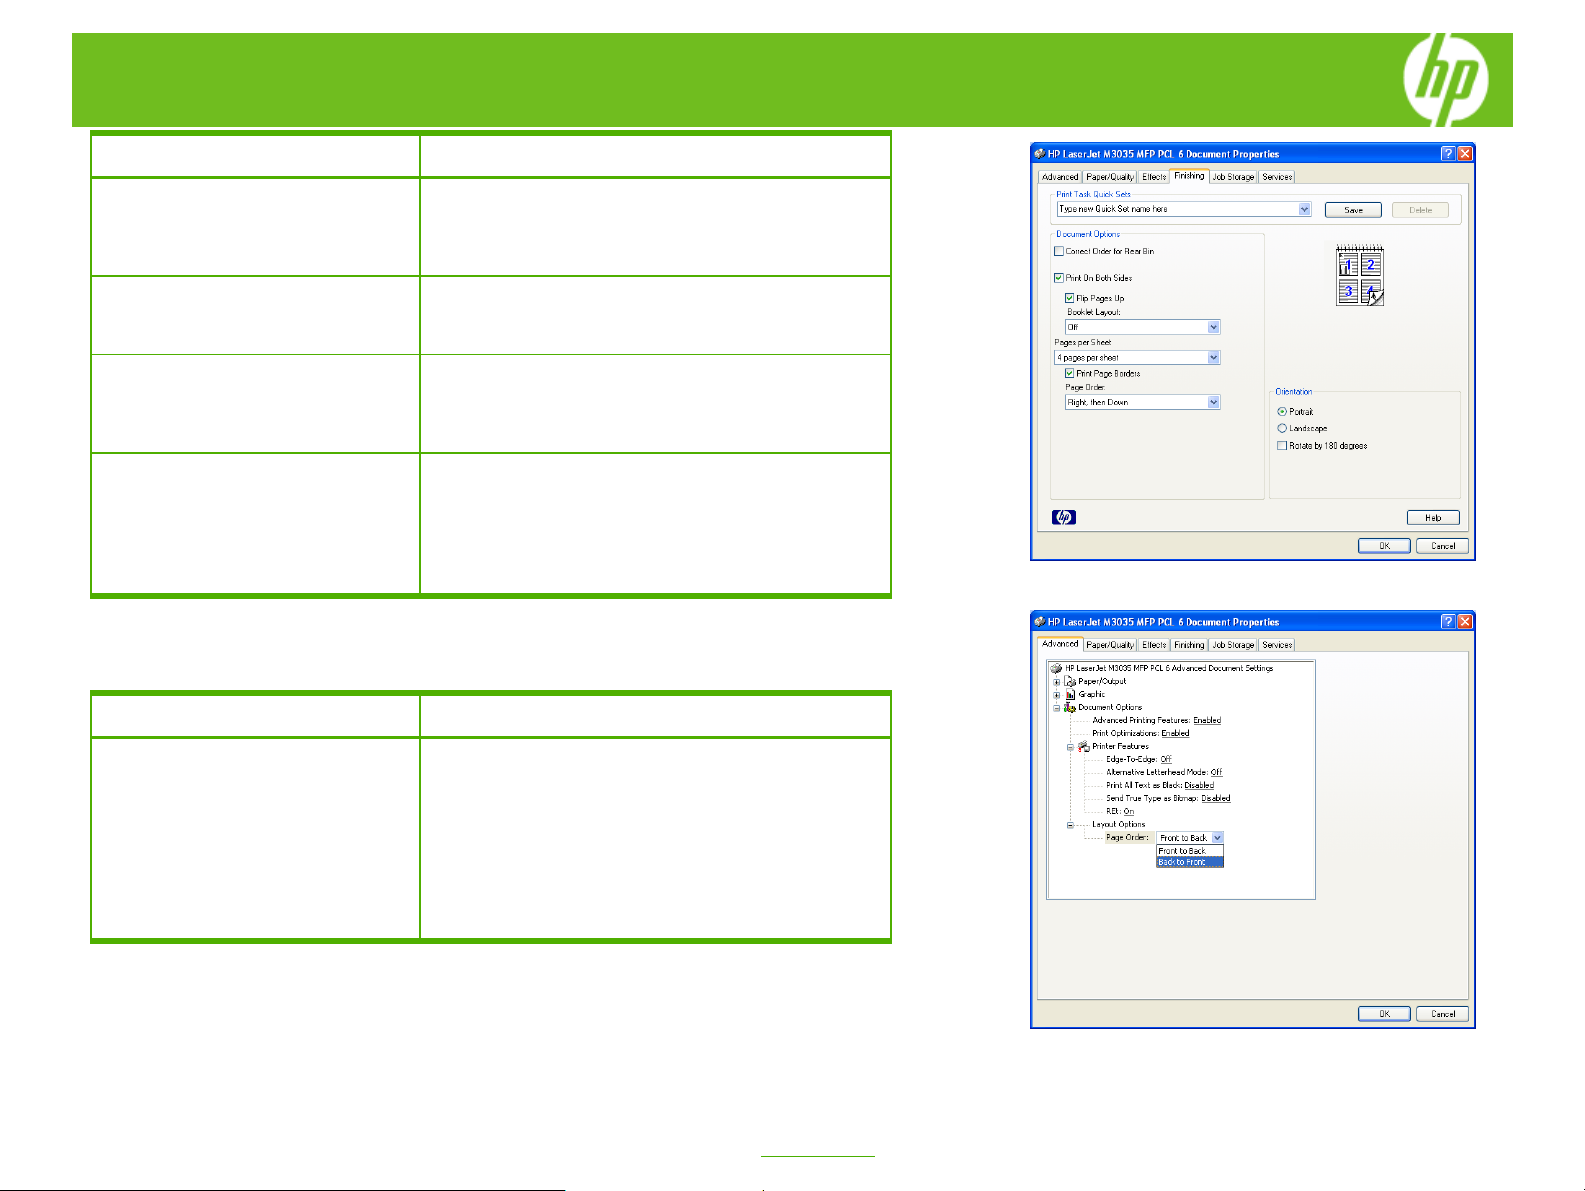
11 Print multiple pages per sheet.
12 Select page orientation.
Adjust settings on any or all tabs. To add a Quick Set,
type a name in the Print Task Quick Sets field and click
Save. To delete a Quick Set, display it in the Quick Sets
field and click Delete.
Click on the Finishing tab, and then click Print on Both
Sides (Manually). If you will bind the document along
the top, click Flip Pages Up.
Select a number (between 1 and 16) in the Pages Per
Sheet drop down menu. Click Print Page Borders to
add a box around each printed page. You can also
change the Page Order.
Select an option in the Orientation box. In addition to the
Portrait and Landscape orientation options, you can
select the Rotate by 180 degrees check box. This
creates a landscape or portrait orientation in which the
image is rotated 180°.This setting is useful for printing
prepunched paper.
How do I Steps to perform
13 Select advanced printing options.
Click on the Advanced tab. Select options under the
Paper/Output, Graphic, or Document Options
sections. Click a current setting to activate a drop-down
list or spin box where you can enter a new value. Click
OK when finished. For example, to change the order of
pages as they print, click the arrow by Layout Options,
and then select Page Order: Front to Back (page 1 is
on the top of the stack) or Back to Front (page 1 is on
the bottom of the stack).
9
10
11
12
13
©2007 Copyright Hewlett-Packard
Development Company, L.P.
2
www.hp.com
Page 3

HP LJ M3035mfp PCL6 - Printing
How do I Steps to perform
14 Print a proof and hold job (One
copy prints for you to proof).
15 Print a Private job (Nothing prints
until physically selected at the
printer using the control panel.).
16 Print a quick copy job (Jobs are
printed and then stored temporarily
on the hard disk.).
17 Print a stored job (Nothing prints
until physically selected at the
printer using the control panel. You
can optionally set a 4-digit PIN.).
Click on Job Storage tab, then select Proof and Hold.
Enter your name and a job name, then click OK.
Click on Job Storage tab, then select Private Job. Enter
your name and a job name, and a 4-digit Personal
Identification Number (PIN), then click OK.
Click on Job Storage tab, then select Quick Copy.
Enter your name and a job name, then click OK.
Click on Job Storage tab, then select Stored Job. Enter
your name and a job name. If you want to assign a PIN,
click Require PIN to Print then enter a 4-digit Personal
Identification Number (PIN). Click OK.
How do I Steps to perform
18 Run printer services.
Click on the Services tab and click any of the buttons.
Selecting a service opens a Web browser and displays
Services:
Online Diagnostic Tools – tools to help you diagnosis
device problems.
Support and Troubleshooting – to the hp support page
for the printer.
Product Manuals - to an hp support page where you
can view and download manuals.
Check for Driver Updates – to hp.com and checks to
see if you have the latest print driver.
Order Supplies – to an hp support page where you can
order supplies.
Show me how – to tips on how to use your device.
14
15
16
17
18
©2007 Copyright Hewlett-Packard
Development Company, L.P.
3
www.hp.com
 Loading...