

Page 1
HP Color LaserJet CP3505 Series
Printers
Getting Started Guide
הדובעה תליחתל ךירדמ
Page 2

Copyright and License
© 2007 Copyright Hewlett-Packard Development Company, L.P.
Reproduction, adaptation or translation without prior written
permission is prohibited, except as allowed under the
copyright laws.
The information contained herein is subject to change
without notice.
The only warranties for HP products and services are set
forth in the express warranty statements accompanying such
products and services. Nothing herein should be construed as
constituting an additional warranty. HP shall not be liable for
technical or editorial errors or omissions contained herein.
Part number: CB441-90906
Edition 1, 3/2007
FCC Regulations
This equipment has been tested and found to comply with the
limits for a Class B digital device, pursuant to Part 15 of the
FCC rules. These limits are designed to provide reasonable
protection against harmful interference in a residential
installation. This equipment generates, uses, and can radiate
radio-frequency energy. If this equipment is not installed and
used in accordance with the instructions, it may cause
harmful interference to radio communications. However, there is
no guarantee that interference will not occur in a particular
installation. If this equipment does cause harmful interference
to radio or television reception, which can be determined by
turning the equipment off and on, correct the interference by
one or more of the following measures:
• Reorient or relocate the receiving antenna.
• Increase separation between equipment and receiver.
• Connect equipment to an outlet on a circuit different from that
to which the receiver is located.
• Consult your dealer or an experienced radio/TV technician.
Any changes or modifications to the printer that are not
expressly approved by HP could void the user’s authority to
operate this equipment. Use of a shielded interface cable is
required to comply with the Class B limits of Part 15 of FCC
rules. For more regulatory information, see the
HP Color LaserJet CP3505 electronic user guide.
Hewlett-Packard shall not be liable for any direct, indirect,
incidental, consequential, or other damage alleged in
connection with the furnishing or use of this information.
Trademark Credits
Microsoft® and Windows® are U.S. registered trademarks of
Microsoft Corporation.
Page 3

1
21.5 Kg.
47.4 lbs.
22
9
m
m
(
9
in
)
89
m
m
(
3.
5 in
)
35
6
mm
(1
4 in
)
89
m
m
(
3.
5
in)
1
7
8
mm
(
7 in
)
17° - 25°C
(62.6° - 77°F)
• Unpack the printer.
.הזיראהמ תספדמה תא אצוה •
• Select a sturdy, well-ventilated, dust-free area to position the printer.
.תספדמה תא ביצהל ידכ קבא אללו ררוואמ ,ביצי רוזא רחב •
2
1
Page 4

3
• Remove all shipping tape.
.חולישה טרס תא רסה •
2
Page 5
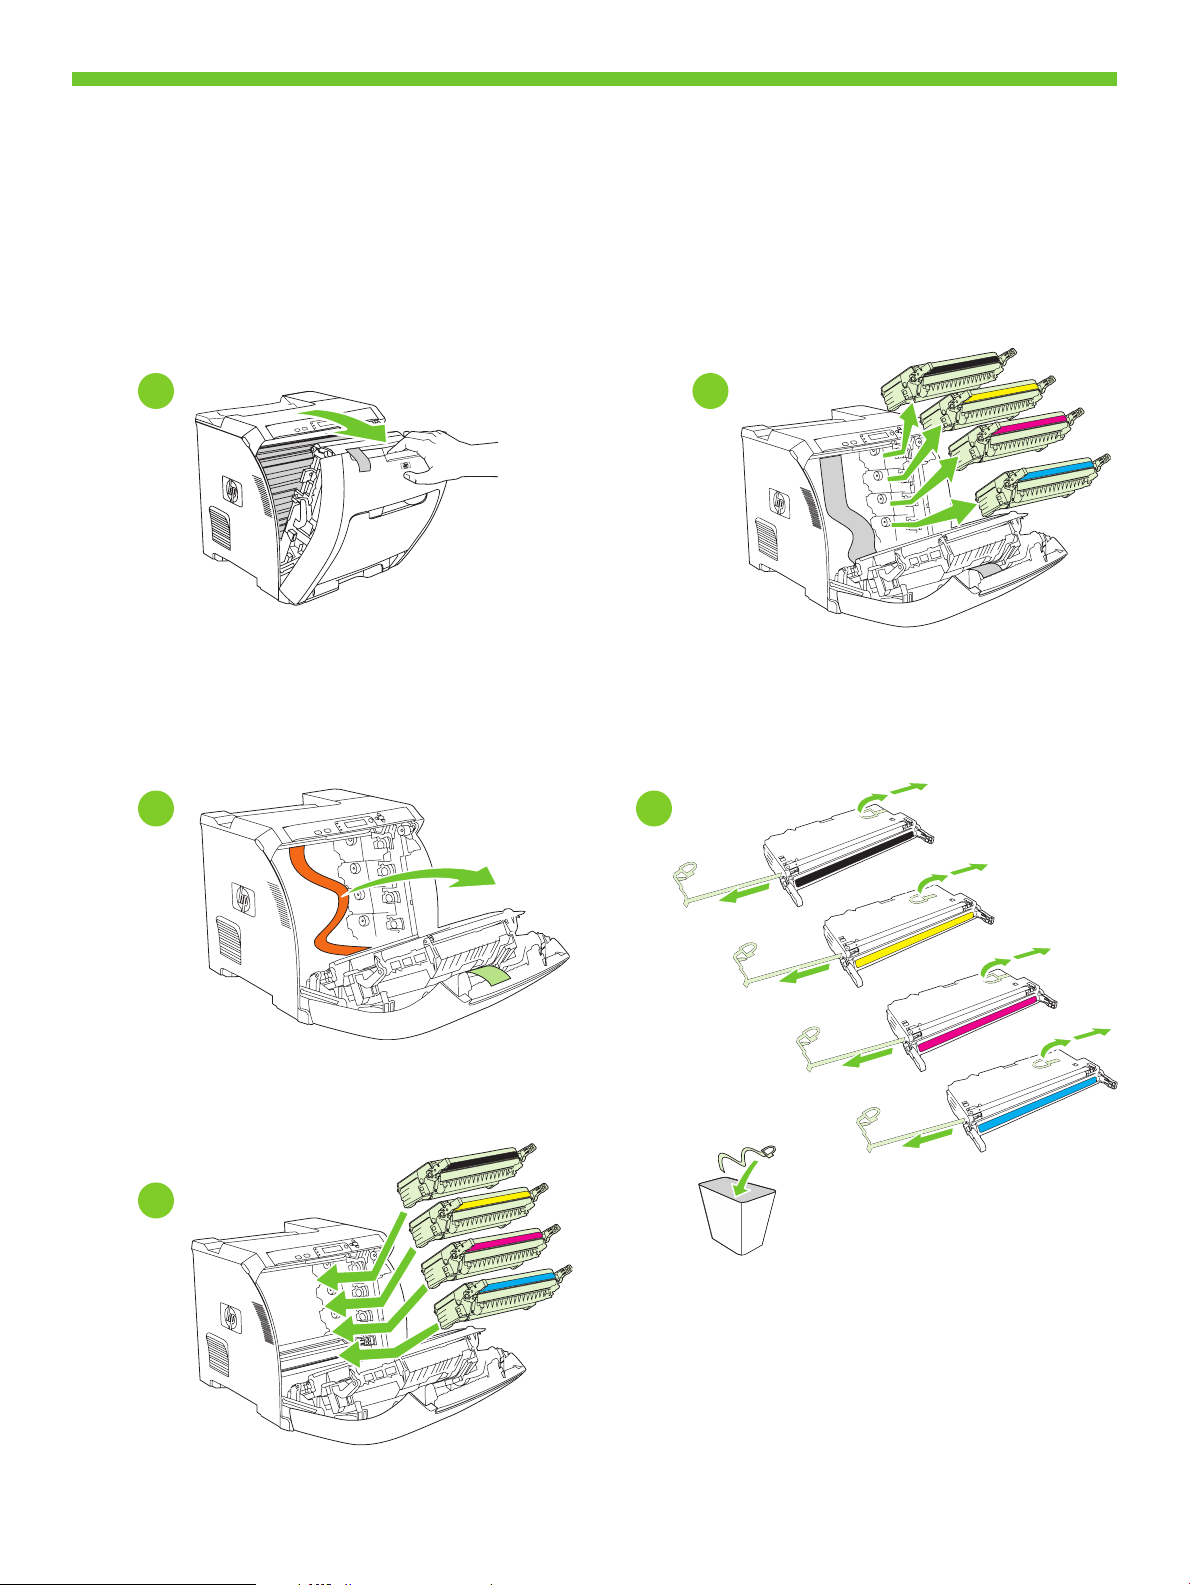
4
• Remove print cartridge shipping locks and reinstall cartridges.
.שדחמ ןתוא ןקתהו הספדהה תוינסחממ חולישה טרס תא רסה •
1 2
3 4
5
3
Page 6

5
• Adjust paper guides, and load print media.
.הספדה ירמוח ןעטו ריינה ינווכמ תא ןנווכ •
6
• Install the output bin.
.טלפה לס תא ןקתה •
4
Page 7
7
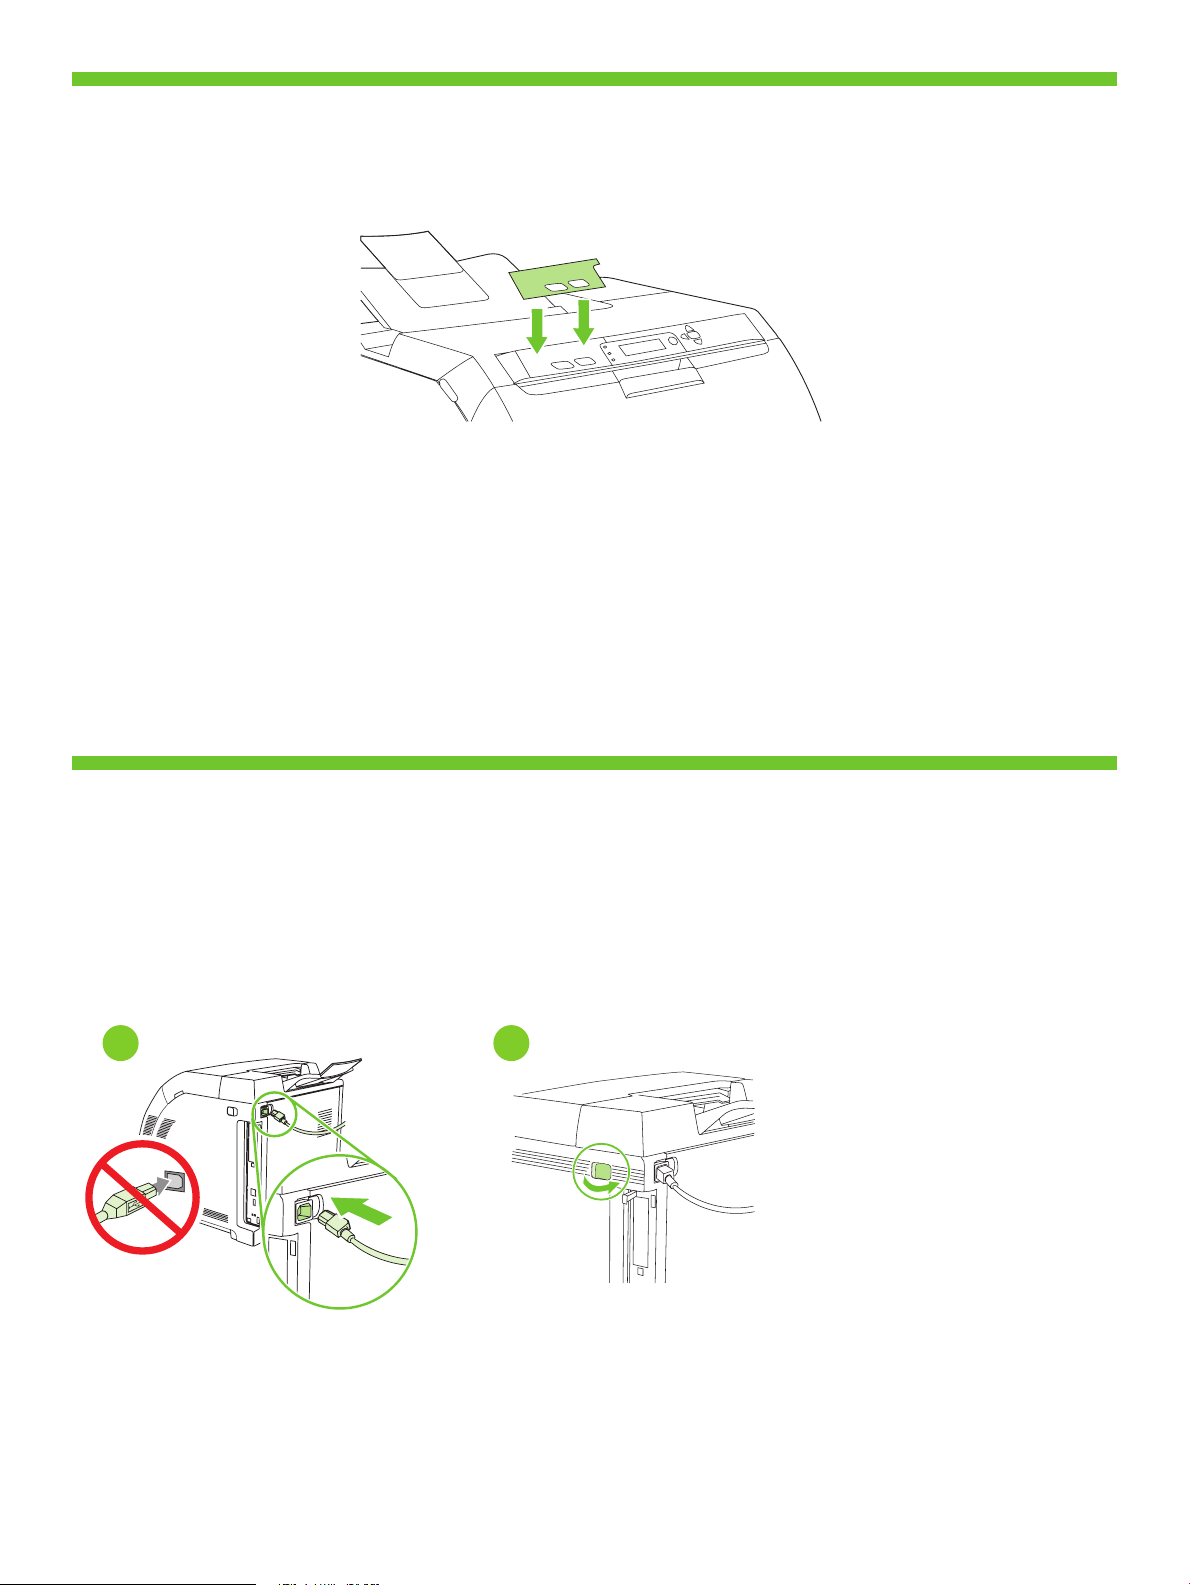
• Attach control panel overlay (if neccessary).
.)ךרוצה תעב( הרקבה חול הסכמ תא רבח •
• Connect the power cord and turn on the printer.
8
1 2
.תספדמה תא לעפהו חתמה לבכ תא רבח •
• Do not connect USB until the
software prompts you.
רשא דע USB-ה לבכ תא רבחת לא •
.הנכותה ידי-לע תאז תושעל החנות
5
Page 8
9
2
1
3
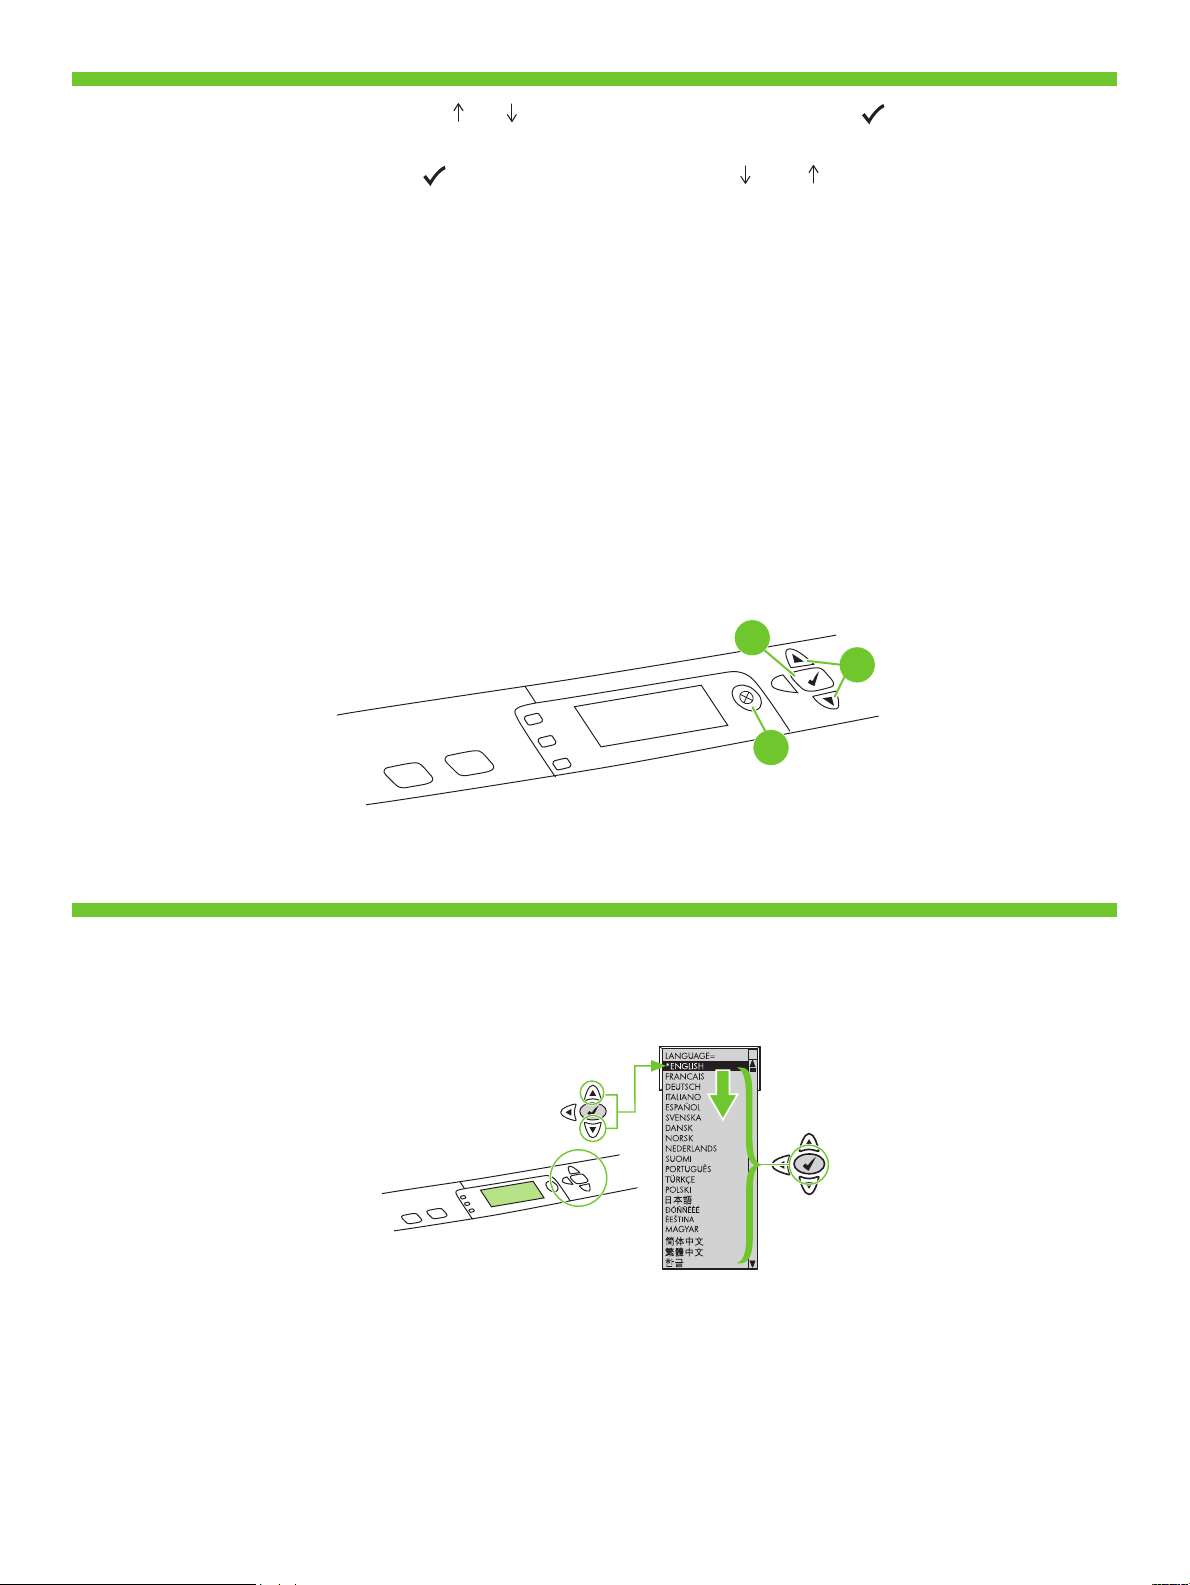
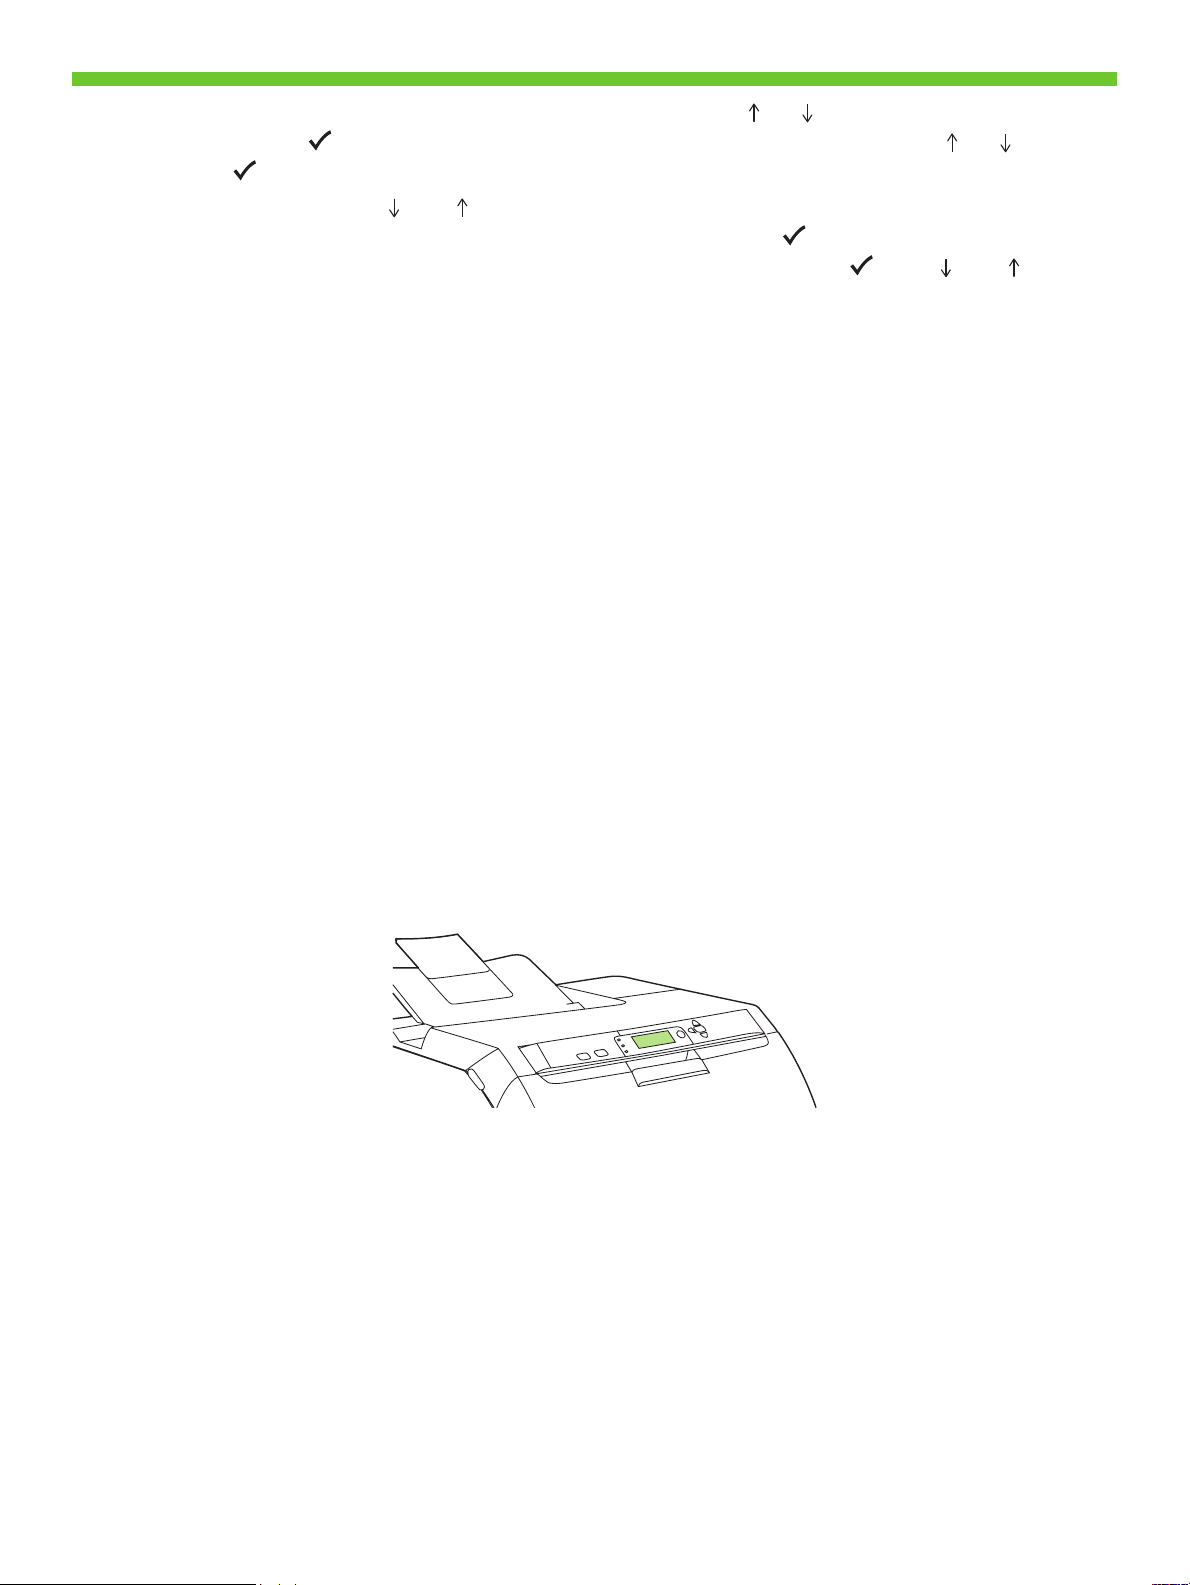
• Control-panel features. 1) Use the and buttons to select the menu options. 2) Press to accept the selection.
3) Press Cancel to return to the Ready screen.
לע ץחל (3 .הריחבה תא רשאל ידכ לע ץחל (2 .טירפתב תויורשפא רוחבל ידכ ןצחלבו ןצחלב שמתשה (1 .הרקבה חול ינייפאמ •
.(ןכומ) Ready ךסמל רוזחל ידכ (לוטיב) Cancel
10
• Set default language and location.
• Note: If control-panel display is blank with no light or text, go to step 37 (Blank Display).
.)הקיר הגוצת( 37 בלשל רובע ,טסקט וא רוא אלל ,הקיר הרקבה חול תגוצת םא :הרעה •
6
.לדחמ תרירב םוקימו הפש רדגה •
Page 9
11
• Set the media size and type. At the control-panel, press Menu, use the and buttons to scroll to Paper Handling,
and then press to select the tray to configure. Set the Type and Size for each tray by using the and buttons.
Press to select the settings.
Paper לא לולגל ידכ ןצחלבו ןצחלב שמתשה ,(טירפת) Menu לע ץחל ,הרקבה חולב .הספדה ירמוח לש לדוגו גוס רדגה •
תועצמאב שגמ לכל (לדוג) Size-ו (גוס) Type רדגה .הרוצת תרדגהל שגמ רוחבל ידכ לע ץחל ןכמ רחאלו ,(ריינב לופיט) Handling
.תורדגהה תא רוחבל ידכ לע ץחל . ןצחלבו ןצחלב שומיש
7
Page 10
12
Windows
Macintosh
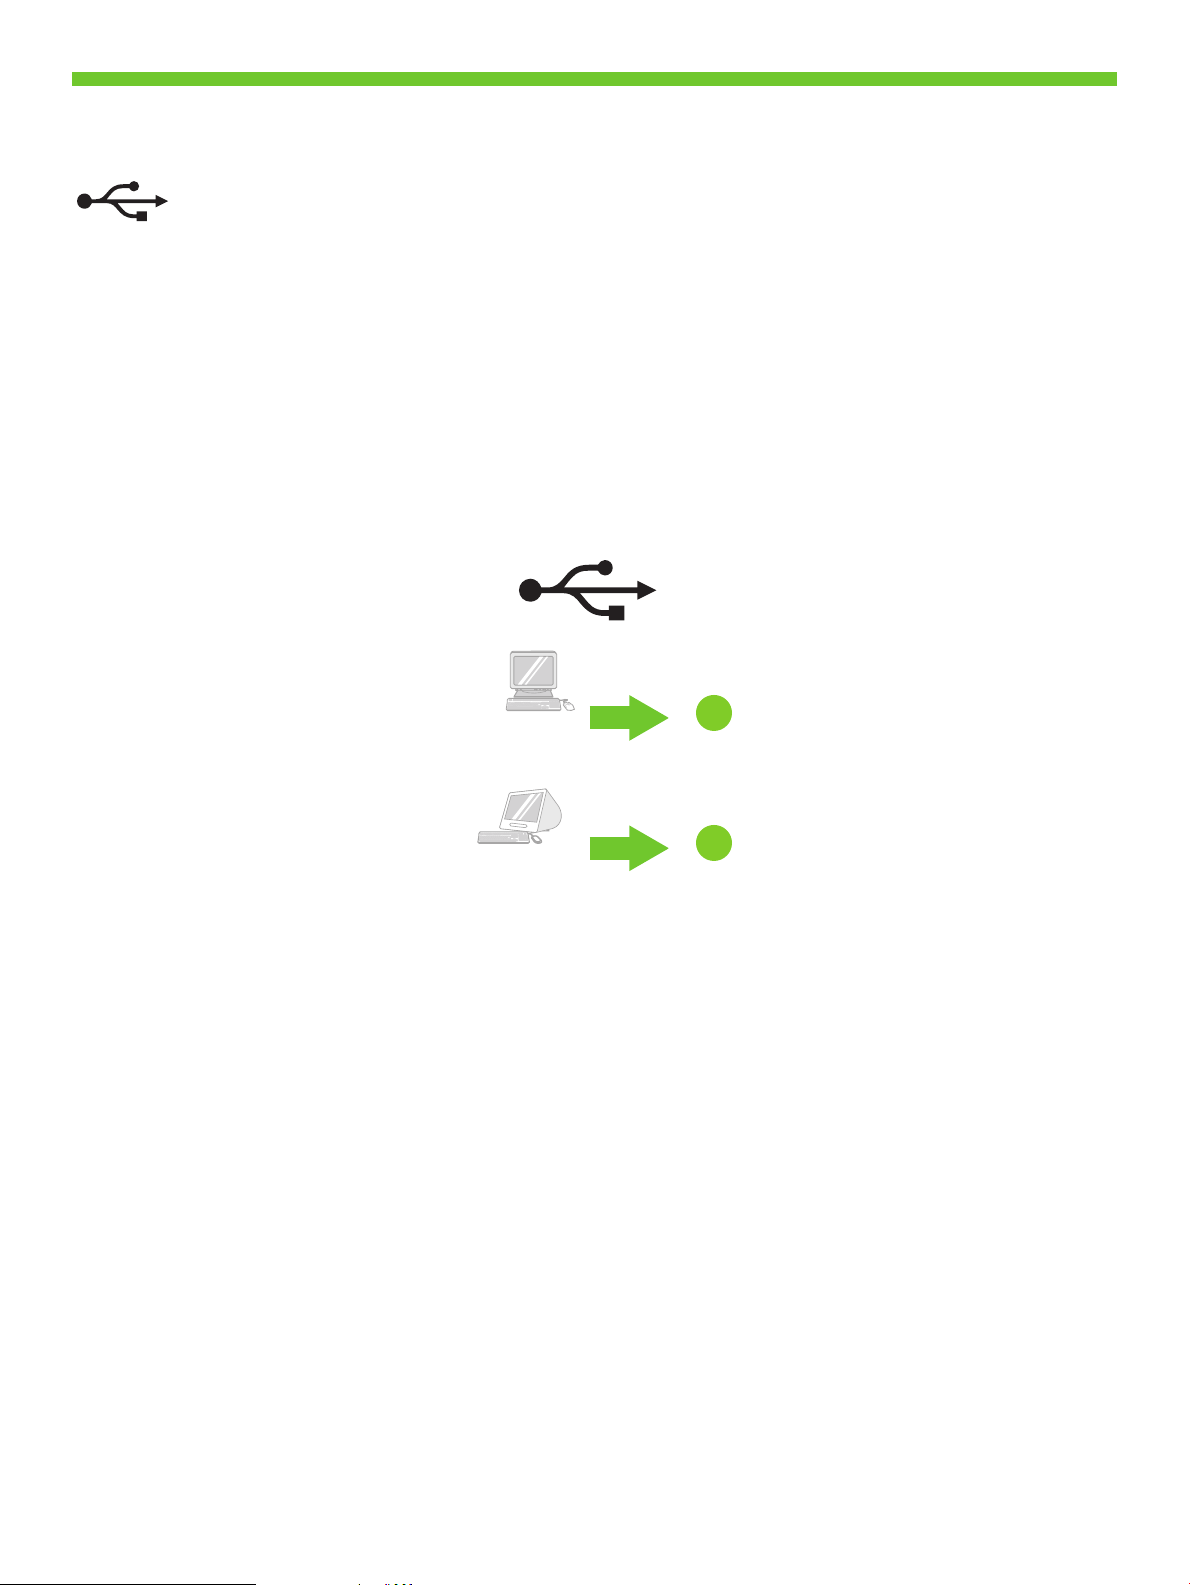
• USB Installation. To install software for Windows by using a direct connection (USB), go to step 14. To install software
for Macintosh by using a direct connection (USB), go to step 19.
Macintosh רובע הנכות תנקתהל .14 בלשל רובע ,)USB( רישי רוביחב שומיש ךות Windows רובע הנכות תנקתהל .USB תנקתה •
.19 בלשל רובע ,)USB( רישי רוביחב שומיש ךות
14
19
8
Page 11

13
Macintosh
Windows
Network
• Network Installation. To install software for Windows by using a network connection, go to step 23. To install
software for Macintosh by using a network connection, go to step 29.
ךות Macintosh רובע הנכות תנקתהל .23 בלשל רובע ,תשר רוביחב שומיש ךות Windows רובע הנכות תנקתהל .תשר תנקתה •
.29 בלשל רובע ,תשר רוביחב שומיש
23
29
9
Page 12

14
• Windows USB installation. Insert the CD, and follow the onscreen instructions. Do not plug in the USB cable until
prompted by the software. Note: If New Hardware Found appears, insert the CD and follow the onscreen instructions.
החנות רשא דע USB-ה לבכ תא רבחת לא .ךסמה יבג-לעש תוארוהל םאתהב לעפו רוטילקתה תא סנכה .Windows-ב USB תנקתה •
לעפו רוטילקתה תא סנכה ,(השדח הרמוח התהוז) New Hardware Found העדוהה העיפומ םא :הרעה .הנכותה ידי-לע תאז תושעל
.ךסמה יבג-לעש תוארוהל םאתהב
10
Page 13

15
• On the Welcome screen, click Install. If the welcome screen does not appear, click Start, click Run, type x:setup
(where x represents the CD-ROM drive letter), and then click OK.
לע ץחל ,(לחתה) Start לע ץחל ,)אבה ךורב( Welcome ךסמה עיפומ אל םא .(ןקתה) Install לע ץחל ,)אבה ךורב( Welcome ךסמב •
.(רושיא) OK לע ץחל ןכמ רחאלו ,)םירוטילקתה ןנוכ תוא תא גציימ x רשאכ( x:setup דלקה ,(הלעפה) Run
16
• Follow the onscreen instructions. When prompted, select Directly to this computer using a USB cable, and then
click OK.
בשחמל תורישי) Directly to this computer using a USB cable רחב ,תאז תושעל החנותשכ .ךסמה יבג-לעש תוארוהל םאתהב לעפ •
.(רושיא) OK לע ץחל ןכמ רחאלו (USB לבכ תועצמאב הז
11
Page 14

17
• When prompted, connect a USB cable that is no longer than 2 meters (6.5 feet) to the printer and the computer.
Note: HP does not recommend using USB hubs with this printer.
תוזכרב שומיש לע הצילממ הניא HP :הרעה .םירטמ 2 לע וכרואב הלוע וניאש USB לבכ בשחמלו תספדמל רבח ,תאז תושעל החנותשכ •
.וז תספדמ םע USB
18
• Click Finish. If prompted, restart the computer. Go to step 35.
.35 בלשל רובע .בשחמה תא שדחמ לעפה ,תאז תושעל החנות םא .(םויס) Finish לע ץחל •
12
Page 15

19
• Macintosh USB installation. A) Insert the CD and run the installer. B) Complete an Easy Install. C) Click Quit when the
installation is finished.
םויס םע Quit לע ץחל (ג .Easy Install עצב (ב .הנקתהה תינכות תא לעפהו רוטילקתה תא סנכה (א .Macintosh-ב USB תנקתה •
.הנקתהה
13
Page 16

20
• Connect the USB cable. A) Connect a USB cable that is no longer than 2 meters (6.5 feet) to the printer and the
computer. B) Restart the computer. Note: HP does not recommend using USB hubs with this printer.
.בשחמה תא שדחמ לעפה (ב .םירטמ 2 לע וכרואב הלוע וניאש USB לבכ בשחמלו תספדמל רבח (א .USB-ה לבכ תא רבח •
.וז תספדמ םע USB תוזכרב שומיש לע הצילממ הניא HP :הרעה
14
Page 17

21
• Go to the HD/Applications/Utilities/Printer Setup Utility or the Print Center. If the printer name appears in the Printer
List, the installation is complete. If the printer name does not appear in the Printer List, go to the next step.
םלשות ,Printer List-ב עיפומ תספדמה םש םא .Print Center לא וא HD/Applications/Utilities/Printer Setup Utility לא רובע •
.אבה בלשל רובע ,Printer List-ב עיפומ וניא וניא תספדמה םש םא .הנקתהה
15
Page 18

22
• Add the printer. A) In the HD/Applications/Utilities/Printer Setup Utility or Print Center, click Add. Click the dropdown menu, and select USB. B) In the Printer Model drop-down list, select HP. C) Under Printer Name, select the printer,
and then click Add. Go to step 35.
טירפתה לע ץחל .Add לע ץחל ,Print Center-ב וא HD/Applications/Utilities/Printer Setup Utility-ב (א .תספדמ תפסוה •
לע ץחל ןכמ רחאלו תספדמה תא רחב ,Printer Name תחת (ג .HP רחב ,Printer Model תחתפנה המישרב (ב .USB רחבו ,חתפנה
.35 בלשל רובע .Add
16
Page 19

23
HP Color LaserJet CP3505
User Guide
• Windows network installation. Connect a network cable to the printer. Note: Ensure that all cables are HP-compliant.
.HP-ל םימאות םילבכה לכש אדו :הרעה .תספדמל תשר לבכ רבח .Windows-ב תשר תנקתה •
17
Page 20

24
• Find the IP address by printing a Configuration Page. A) At the control-panel, press Menu, use the the and
buttons to scroll to Information, and then press to select. B) Use the and buttons to scroll to Print Configuration
and then press to select. C) On the printed Embedded JetDirect page (the second printed page) the IP address
appears under HP Direct Configuration. Note: Depending on the type of network that is installed, you might need to
assign at IP addres. See step 25.
ידכ ןצחלבו ןצחלב שמתשה ,(טירפת) Menu לע ץחל ,הרקבה חולב (א .הרוצת ףד תספדה תועצמאב IP-ה תבותכ תא רתא •
Print Configuration לא לולגל ידכ ןצחלבו ןצחלב שמתשה (ב .הריחבל לע ץחל ןכמ רחאלו ,(עדימ) Information לא לולגל
-ה תבותכ עיפות )ספדומה ינשה ףדה( Embedded JetDirect לש ספדומה ףדה לע (ג .הריחבל לע ץחל ןכמ רחאלו (הרוצת ספדה)
.25 בלשל רובע .IP תבותכ רידגהל ךילע היהיש ןכתיי ,תנקתומה תשרה גוסל םאתהב :הרעה .HP Direct Configuration תחת IP
18
Page 21

25
• Configure an IP address, if necessary. A) At the control panel, press Menu, use the the and buttons to scroll to
Configure Device, and then press . B) Scroll to IO and press . C) Scroll to Embedded JetDirect and press .
D) Scroll to TCP/IP, and press to select. Scroll to Config Method and press . E) Scroll to Manual and press .
F) Use the and buttons to increase or decrease the number, and then press to select the number when it is
correct. Repeat as neccessary.
Configure לא לולגל ידכ ןצחלבו ןצחלב שמתשה ,(טירפת) Menu לע ץחל ,הרקבה חולב (א .ךרוצה תעב IP תבותכ רדגה •
. לע ץחלו Embedded JetDirect לא לולג (ג . לע ץחלו IO לא לולג (ב . לע ץחל ןכמ רחאלו ,(ןקתה תרוצת רדגה) Device
(ינדי) Manual לא לולג (ה . לע ץחלו (הרוצת תרדגה תטיש) Config Method לא לולג .הריחבל לע ץחלו ,TCP/IP לא לולג (ד
רוזח .םיאתמה רפסמה תריחבל לע ץחל ןכמ רחאלו ,רפסמה תא ןיטקהל וא לידגהל ידכ ןצחלב ןצחלב שמתשה (ו . לע ץחלו
.שרדנכ הז בלש לע
19
Page 22

26
• Prepare for the software installation. Quit all programs (including terminate-and-stay resident [TSR], antivirus, and
firewall programs) on the print server or on each computer that will use the printer.
הספדהה תרשב )שא תמוח תוינכותו סוריו-יטנא ,]TSR[ ןורכיז תנכוש תינכות תוברל( תוינכותה לכ תא קספה .הנכותה תנקתהל תונכה •
.תספדמב שמתשיש בשחמ לכב וא
20
Page 23

27
• Install the software. A) Insert the CD. B) On the welcome screen, click Install. If the welcome screen does not appear,
click Start, click Run, type x:setup (where x represents the CD-ROM drive letter), and then click OK. C) Follow the
onscreen instructions. When prompted, select Through the Network, and then click Next. When the installer shows the
available printers, select the appropriate IP address. D) Click Finish. If prompted, restart the computer.
ךורב( Welcome ךסמה םא .(ןקתה) Install לע ץחל ,)אבה ךורב( Welcome ךסמב (ב .רוטילקתה תא סנכה (א .הנכותה תנקתה •
רחאלו ,)םירוטילקתה ןנוכ תוא תא גציימ x רשאכ( x:setup דלקה ,(הלעפה) Run לע ץחל ,(לחתה) Start לע ץחל ,עיפומ וניא )אבה
תועצמאב) Through the Network רחב ,תאז תושעל החנותשכ .ךסמה יבג-לעש תוארוהל םאתהב לעפ (ג .(רושיא) OK לע ץחל ןכמ
לע ץחל (ד .המיאתמה IP-ה תבותכ תא רחב ,תונימזה תוספדמה תא גיצת הנקתהה תינכותשכ .(אבה) Next לע ץחל ןכמ רחאלו ,(תשרה
.בשחמה תא שדחמ לעפה ,תאז תושעל החנות םא .(םויס) Finish
21
Page 24

28
• Go to step 35.
.35 בלשל רובע •
22
Page 25

29
HP Color LaserJet CP3505
User Guide
• Macintosh network installation. Connect the network cable to the printer. Note: Ensure that all cables are
HP-compliant
HP-ל םימאות םילבכה לכש אדו :הרעה .תספדמל תשרה לבכ תא רבח .Macintosh-ב תשר תנקתה •
23
Page 26

30
• Find the IP address or the Bonjour printer name by printing a Configuration Page. A) At the control-panel, press
Menu, use the the and buttons to scroll to Information, and then press to select. B) Use the and buttons
to scroll to Print Configuration and then press to select. C) On the printed Embedded JetDirect page (the second
printed page) the IP address appears under HP Direct Configuration. Note: Depending on the type of network that is
installed, you might need to assign at IP address. See step 31.
שמתשה ,Menu לע ץחל ,הרקבה חולב (א .הרוצת ףד תספדה תועצמאב Bonjour תספדמה םש תא וא IP-ה תבותכ תא רתא •
Print לא לולגל ידכ ןצחלבו ןצחלב שמתשה (ב .הריחבל לע ץחל ןכמ רחאלו ,Information לא לולגל ידכ ןצחלבו ןצחלב
)ספדומה ינשה ףדה( Embedded JetDirect לש ספדומה ףדה לע (ג .הריחבל לע ץחל ןכמ רחאלו (הרוצת ספדה) Configuration
רובע .IP תבותכ רידגהל ךילע היהיש ןכתיי ,תנקתומה תשרה גוסל םאתהב :הרעה .HP Direct Configuration תחת IP-ה תבותכ עיפות
.31 בלשל
24
Page 27

31
• Configure an IP address, if necessary. A) At the control-panel, press Menu, use the the and buttons to scroll to
Configure Device, and then press . B) Scroll to IO and press . C) Scroll to Embedded JetDirect and press .
D) Scroll to TCP/IP, and press to select. Scroll to Config Method and press . E) Scroll to Manual and press .
F) Use the and buttons to increase or decrease the number, and then press to select the number when it is
correct. Repeat as neccessary.
,Configure Device לא לולגל ידכ ןצחלב וא ןצחלב שמתשה ,Menu לע ץחל ,הרקבה חולב (א .ךרוצה תעב IP תבותכ רדגה •
לע ץחלו ,TCP/IP לא לולג (ד . לע ץחלו Embedded JetDirect לא לולג (ג . לע ץחלו IO לא לולג (ב . לע ץחל ןכמ רחאלו
ןצחלב שמתשה (ו . לע ץחלו (ינדי) Manual לא לולג (ה . לע ץחלו (הרוצת תרדגה תטיש) Config Method לא לולג .הריחבל
.שרדנכ הז בלש לע רוזח .םיאתמה רפסמה תריחבל לע ץחל ןכמ רחאלו ,רפסמה תא ןיטקהל וא לידגהל ידכ ןצחלב
25
Page 28

32
• Prepare for the software installation. Quit all programs (including terminate-and-stay resident [TSR], antivirus, and
firewall programs) on the print server or on each computer that will use the printer.
הספדהה תרשב )שא תמוח תוינכותו סוריו-יטנא ,]TSR[ ןורכיז תנכוש תינכות תוברל( תוינכותה לכ תא קספה .הנכותה תנקתהל תונכה •
.תספדמב שמתשיש בשחמ לכב וא
26
Page 29

33
• Install the software. Insert the CD, run the installer, and complete an Easy Install. Click Quit when the installation is
finished.
.הנקתהה םויס םע Quit לע ץחל .Easy Install עצבו ,הנקתהה תינכות תא לעפה ,רוטילקתה תא סנכה .הנכותה תנקתה •
27
Page 30

34
• Add the printer. A) Go to the HD/Applications/Utilities/Printer Setup Utility or the Print Center, and then click Add.
B) To add the printer by using the IP address, click IP Printer, type the IP address in the address field, and then click Add.
C) To add the printer by using the Bonjour printer name, click the drop-down menu and select Bonjour. Under Printer
Name, select the printer, and then click Add.
.Add לע ץחל ןכמ רחאלו Print Center לא וא HD/Applications/Utilities/Printer Setup Utility לא רובע (א .תספדמ תפסוה •
.Add לע ץחל ןכמ רחאלו תבותכה הדשב IP-ה תבותכ תא דלקה ,IP Printer לע ץחל ,IP תבותכב שומיש ךות תספדמה תפסוהל (ב
תא רחב ,Printer Name תחת .Bonjour רחבו חתפנה טירפתה לע ץחל ,Bonjour תספדמה םשב שומיש ךות תספדמה תפסוהל (ג
.Add לע ץחל ןכמ רחאלו תספדמה
28
Page 31

35
• Print a test page. Print a page from any program to make sure that the software is correctly installed.
.יוארכ תנקתומ הנכותהש אדוול ידכ איהש תינכת לכמ ףד ספדה .ןויסינ ףד ספדה •
36
• Congratulations! The printer is ready to use. The user guide is located on the CD and in the HP ToolboxFX.
Save the boxes and the packaging materials in case you need to transport the printer. Register the printer at
www.register.hp.com. Online registration is the quickest and easiest way to receive technical support updates,
enhanced support options, and ideas and ways to use your HP printer.
הזיראה ירמוח תאו תוזיראה תא רומש .HP ToolboxFX-בו רוטילקתב םקוממ שמתשמל ךירדמה .שומישל הנכומ תספדמה !וניתוכרב •
הריהמה ךרדה אוה ןווקמ םושיר .www.register.hp.com תבותכב תספדמה לש םושיר עצב .תספדמה תא ריבעהל ךרטצתש הרקמל
.HP תספדמב שומישל םיכרדו תונויערו תורפושמ הכימת תויורשפא ,תינכט הכימת ינוכדע תלבקל רתויב לקהו
29
Page 32

37
• Blank display after start up. A) Turn the printer off. B) Pull the formatter partially out (callouts1,2), then push the
formatter in until the black levers click into a secure position (callout 3). C) Turn the printer on. If the problem is not
resolved, call customer support.
תא ףוחד ,ןכמ רחאל ,)2 ,1 םירויא( יקלח ןפואב םאה חול תא ץוח יפלכ ךושמ (ב .תספדמה תא הבכ (א .הלעפה רחאל הקיר הגוצת •
.תוחוקלה תכימתל הנפ ,הרתפנ אל היעבה םא .תספדמה תא לעפה (ג .)3 רויא( תוביציב ולעניי תורוחשה תוידיה רשא דע םאה חול
1 2
3
30
Page 33

• Paper sizes
ריינ ילדוג •
216 x 356 mm
(8.5 x 14 inches)
216 x 356 mm
(8.5 x 14 inches)
216 x 356 mm
(8.5 x 14 inches)
148 x 210 mm
(5.83 x 8.27 inches)
148 x 210 mm
(5.83 x 8.27 inches)
148 x 210 mm
(5.83 x 8.27 inches)
• For supplies, please visit www.hp.com/support/cljcp3505.
• Part numbers
ט"קמ •
• Black
• Cyan
• Yellow
• Magenta
רוחש •
ןאיצ •
בוהצ •
הטנגמ •
.www.hp.com/support/cljcp3505 תבותכב רקב ,םילכתמ םירמוח תודוא עדימל •
CP3505
Q6470A
Q7581A
Q7582A
Q7583A
31
Page 34

HP Color LaserJet CP3505 Series printers
• Clearing Jams
ריינ תומיסח רורחש •
1
2
3
• Questions?
?תולאש •
http://www.hp.com/support/go/cljcp3505
http://www.hp.com/support/go/cljcp3505
http://www.hp.com/support/go/cljcp3505
32
Page 35

Page 36

© 2007 Hewlett-Packard Development Company, L.P.
www.hp.com
*CB441-90906*
*CB441-90906*
CB441-90906
 Loading...