

Page 1

HP
JetDirect
Print Servers
HP JetDirect 4000
Print Appliance
User's Guide
(J4107A)
Page 2

Page 3

User’s Guide
HP JetDirect 4000 Print Appliance
Page 4

© Hewlett-Packard Company 2000
All rights reserved
Reproduction, adap tation or translatio n
without prior written permission is
prohibited, except as allowed under the
copyright laws.
Publication nu m ber
5969-3506
First Edition, May 2000
Applicable Products:
J4107A
Trademark Credits
Microsoft
Windows NT
®
, MS-DOS®, Windows®,
®
are U.S . regi st er ed
trademarks of Microsoft Corporation .
Netscape
®
and Netscape Navigator are
U.S. registered trademarks of Netscape
Communications Corporation.
®
APC
and other names of APC products
referenced herein are trademarks or
registered trademarks of American
Power Conversion Corporation.
®
UNIX
is a registered trademark of The
Open Group.
Other product names are U.S.
trademarks or registered trademarks of
their respec t ive owners.
GNU Public License
This product include s softw are
licensed under the GNU General
Public License and other open source
licenses. Copies of these licenses and
information about o btain ing sou rce
code for software licensed under the
GNU GPL is availabl e b y acces sing
the Help function of the product’ s web
interface men u.
Warranty
The information contained in this
document is subject to change without
notice.
HEWLETT- P ACKARD COMPANY
MAKES NO W ARRANTY OF ANY KIND
WITH REGARD TO THIS MATERIAL,
INCLUDING, BUT NOT LI MITED TO ,
THE IMPLIED W ARRANTIES OF
MERCHANTABILITY AND FITNESS
FOR A PARTICULAR PURPOSE.
Hewlett-Packard shall not be liable for
errors contained he rein or for incidental
or consequential damages in connecti on
with the furnishing, performance or use
of this material.
A copy of the specific warranty terms
applicable to your HP product and
replacement parts can be obtained from
your HP Sales and Service Office or
Authorized dealer.
For warranty service information, see
Appendix C in this guide.
Safety Considerations
Prior to the installation and use of this
product, review all safety markings and
instructions.
Instruction Manual Symbol. If
the product is marked with this
!
symbol, refer to the product
manuals to protect the product
from damage.
CAUTION: Denotes a hazard that can
damage equipment or data.
Do not proceed beyond a CAUTION
notice until you have understood the
hazard and have taken any appropriate
steps.
Grounding. This product is installed
in a safety class 1 product that has a
protectiv e earthing ter mi nal. There
must be an uninterrupted safety earth
ground from the main power sou rce to
the product’s input wiring terminals,
power cord or supplied power cord set.
Whenever it is likely that the protection
has been impaired, disconnect the power
cord until the ground has been restored.
Register Now!
Register your HP JetDirect 4000 Print
Appliance now and receive:
• Technical support updates
• Special Hewlett-Packard offers
• Details on ne w p roducts an d
technologies
Go to URL:
http://www.hp.com/go/
printappliance_registration
Hewlett-Packard Company
8000 Foothills Boulevard
Roseville, California USA 95747-6588
Page 5

Contents
1 Introduction. . . . . . . . . . . . . . . . . . . . . . . . . . . 1-1
Operation and Management . . . . . . . . . . . . . . . . . . . . . . 1-2
Summary of Features and Benefits . . . . . . . . . . . . . . . . 1-2
For More Information . . . . . . . . . . . . . . . . . . . . . . . . . . . 1-2
2 Installation . . . . . . . . . . . . . . . . . . . . . . . . . . . . 2-1
1. Unpack the HP JetDirect 4000 . . . . . . . . . . . . . . . . . . 2-2
2. Connect the Components. . . . . . . . . . . . . . . . . . . . . . . 2-3
3. Configure IP Settings on the Front Panel . . . . . . . . . 2-5
4. Use the Web Interface to Configure the Device . . . . . 2-8
5. Back Up Settings . . . . . . . . . . . . . . . . . . . . . . . . . . . . 2-13
6. Set Up Access from Each Client . . . . . . . . . . . . . . . . 2-14
3 Front Panel . . . . . . . . . . . . . . . . . . . . . . . . . . . 3-1
Power Button . . . . . . . . . . . . . . . . . . . . . . . . . . . . . . . . . . 3-1
LEDs. . . . . . . . . . . . . . . . . . . . . . . . . . . . . . . . . . . . . . . . . 3-2
LCD Display. . . . . . . . . . . . . . . . . . . . . . . . . . . . . . . . . . . 3-2
Enter and Cancel buttons . . . . . . . . . . . . . . . . . . . . . . . . 3-3
Direction Buttons. . . . . . . . . . . . . . . . . . . . . . . . . . . . . . . 3-3
Numeric Keypad . . . . . . . . . . . . . . . . . . . . . . . . . . . . . . . 3-4
Front Panel Operations . . . . . . . . . . . . . . . . . . . . . . . . . . 3-4
Configuration . . . . . . . . . . . . . . . . . . . . . . . . . . . . . . . . . . 3-5
Change Password. . . . . . . . . . . . . . . . . . . . . . . . . . . . . . . 3-7
Resetting to Factory Defaults . . . . . . . . . . . . . . . . . . . . . 3-8
4 Web Interface. . . . . . . . . . . . . . . . . . . . . . . . . . 4-1
Supported Web Browsers . . . . . . . . . . . . . . . . . . . . . . . . 4-1
Accessing the Web Interface . . . . . . . . . . . . . . . . . . . . . . 4-1
Online Help . . . . . . . . . . . . . . . . . . . . . . . . . . . . . . . . . . . 4-2
Administrator Functions . . . . . . . . . . . . . . . . . . . . . . . . . 4-3
Date/Time. . . . . . . . . . . . . . . . . . . . . . . . . . . . . . . . . . . . . 4-5
Network Settings . . . . . . . . . . . . . . . . . . . . . . . . . . . . . . . 4-6
Administrator Account . . . . . . . . . . . . . . . . . . . . . . . . . . 4-9
Configuration Summary (Diagnostics) . . . . . . . . . . . . . 4-11
iii
Page 6

Install Upgrade . . . . . . . . . . . . . . . . . . . . . . . . . . . . . . . 4-14
Print Queues . . . . . . . . . . . . . . . . . . . . . . . . . . . . . . . . . 4-16
Back Up Settings . . . . . . . . . . . . . . . . . . . . . . . . . . . . . . 4-21
Restore Settings. . . . . . . . . . . . . . . . . . . . . . . . . . . . . . . 4-22
Restart JetDirect 4000. . . . . . . . . . . . . . . . . . . . . . . . . . 4-24
5 Frequently Asked Questions . . . . . . . . . . . . 5-1
6 Troubleshooting . . . . . . . . . . . . . . . . . . . . . . . 6-1
Hardware Problems. . . . . . . . . . . . . . . . . . . . . . . . . . . . . 6-1
Web Interface Configuration Problems . . . . . . . . . . . . . 6-2
Web Interface Operation Problems. . . . . . . . . . . . . . . . . 6-2
Client Setup Problems. . . . . . . . . . . . . . . . . . . . . . . . . . . 6-3
Printing Problems . . . . . . . . . . . . . . . . . . . . . . . . . . . . . . 6-4
Indicator Lights . . . . . . . . . . . . . . . . . . . . . . . . . . . . . . . . 6-5
Getting Help. . . . . . . . . . . . . . . . . . . . . . . . . . . . . . . . . . . 6-6
A Specifications. . . . . . . . . . . . . . . . . . . . . . . . . . A-1
Physical . . . . . . . . . . . . . . . . . . . . . . . . . . . . . . . . . . . . . .A-1
Environmental . . . . . . . . . . . . . . . . . . . . . . . . . . . . . . . . .A-1
Power . . . . . . . . . . . . . . . . . . . . . . . . . . . . . . . . . . . . . . . .A-1
B Regulatory Statements. . . . . . . . . . . . . . . . . . B-1
C Warranty Service and Customer Care . . . . C-1
Firmware Upgrades. . . . . . . . . . . . . . . . . . . . . . . . . . . . .C-4
HP Customer Care Numbers . . . . . . . . . . . . . . . . . . . . .C-4
iv
Page 7

1
Introduction
Thank you for purchasing the HP JetDirect 4000 Print Appliance.
This product is a state-of-the-art device for managing and
monitoring printing over a network. It has several distinct
advantages over conventional network printing configurations.
These advantages are discussed below.
This guide provides information about installing and operating the
HP JetDirect 4000.
1
Introduction
Note This user’s guide is intended for system
administrators and other persons who are familiar
with Windows operating systems, web browsers,
and general network operation and terminology.
The HP JetDirect 4000 is a network device designed to offload
printing from general purpose servers. This can res ult in improved
performance in both printing and file access.
In a typical network, general purpose servers manage both the
printing tasks and the file/application serving.
The HP JetDirect 4000 handles the spooling and network traffic
associated with printing, reducing the workload on the general
purpose server.
In conventional network printing, when printing takes place at
remote offices or other locations distant from the servers, the s peed
of printing can be degraded. A print appliance installed in a remote
office can dramatically increase printing performance by
Introduction 1-1
Page 8

eliminating the need for print requests to travel from the remote
office to the central site and back to a remote office printer.
An additional benefit is that if general purpose file/application
servers go down, remote office users can still print many jobs
directly, using the HP JetDirect 4000.
Operation and Management
The HP JetDirect 4000 contains a large disk drive for spooling print
jobs from clients. The jobs are stored in print queues on the disk
drive. The print appliance has been opt imized for a maximum of 32
queues.
Clients submit print jobs in the way th ey normally do.
Once the HP JetDirect 4000 is configured, virtually no management
tasks are required. However, system administrators can monitor
print activity, manage the queues or alter the configuration of the
print appliance from anywhere on the network, using the HP
JetDirect 4000’s web-based graphical user interface and a
supported browser.
Summary of Features and Benefits
• Easy to install
• Can be managed from any supported we b browser on the network
• Once installed, virtually no management required
• Supports uninterruptible power supplies (UPSs)
• Increases performance of general purpose servers
• Increases printing performance
• Reduces network traffic
• Transparent to client users
• Easy to pre-configure before shipping to a remote office
For More Information
For the latest information about the HP Jetdirect 4000 Print
Appliance and other HP products, visit the HP Web site online at:
http://www.hp.com/go/printappliance
1-2 Introduction
Page 9

2
Installation
To install the HP JetDirect 4000, you will need to complete these
steps:
1. Unpack the HP JetDirect 4000.
2. Connect the component s.
3. Configure IP settings on the front panel manuall y or via DHCP.
4. Use the Web Interface to configure the device.
5. Back up settings.
6. Set up access from each client.
These steps are explained in detail on the following pages.
Central Site Pre-Setup
You may pre-configure the HP JetDirect 4000 at your central site
and ship it to a remote office.
Simply complete steps 1-5 before shi pping the print appliance to the
remote site.
After the print appliance is re-connected at the remote site, a
qualified person must set up each remote client workstation
(step 6). Last, you can verify the configuration from the central IT
site.
2
Installation
Drop Ship to Remote Sites
You may ship the HP JetDirect 4000 directly to a remote site. This
works especially well if your network uses DHCP.
A qualified person at the remote site should complete steps 1-3. If
your network uses DHCP, the print appliance will acquire its IP
address. Alternately, you can ask the individual at the remote site
to enter an IP address manually.
Then, complete steps 4 and 5 from your location.
A qualified person must set up each remote client workstation
(step 6).
Note It is useful to verify the installation with a single
client before configuring multiple clients.
Installation 2-1
Page 10

1. Unpack the HP JetDirect 4000
The HP JetDirect 4000 carton contains the following:
Quick
Start
Guide
HP JetDirect 4000
Print Appliance
Power
Cable
User’s Guide
Rubber Feet
Rackmount Brackets
Unpack the carton, and make sure all parts are there and are
undamaged. If any parts are missing or damaged, contact HewlettPackard.
2-2 Installation
Page 11

2. Connect the Components
DB-9 Serial Port
Power Receptacle
RJ-45 Network
Jack
Desktop/Rack Shelf/Under-printer Ins tallation
Caution For under-printer installation, the HP JetDirect
4000 can support printers weighing up to 60
pounds. Do not place heavier printers on the HP
JetDirect 4000.
1. Turn the HP JetDirect 4000 print appliance so it rests on its top.
2. The HP JetDirect 4000 is shipped with a set of four self-adhesive
rubber “feet” on a paper backing sheet. Remove each foot from
the paper backing. Install each foot on the bottom of the HP
JetDirect 4000 in the indentation provided. Press each foot
firmly into place.
3. Turn the print appliance over so it rests on its rubber feet.
2
Installation
4. Locate the print appliance for easy access to a power source and
network connection. You may locate it on any solid surface, on a
rack shelf, or under a printer.
Rackmount Installation
The HP JetDirect 4000 print appliance may be rack-mounted into
industry-standard instrument/computer racks. The print appliance
is shipped with a pair of rack-mount brackets with screws for
attaching them to the device. There are also screws for mounting
the print appliance in the rack.
Installation 2-3
Page 12

The HP JetDirect 4000 print appliance requires 1.5 RU (rack units)
of vertical space. It does not require rails for rack mounting.
Note The rackmount installation should be performed by
an experienced individual, using appropriate tools
and exercising appropriate safety precautions.
1. Attach the rackmount brackets to the sides of the HP JetDirect
4000.
2. Position the print appliance in the rack.
3. Install the print appliance into the rack. Use all of the provided
screws in both vertical rails of the rack.
Cable Connections
1. Connect a twisted pair network cable (not included) with an
RJ-45 connector to the RJ-45 jack on the back of the print
appliance.
2. Connect the other end of the network cable to a network port.
3. If you are using an APC uninterruptible power supply (UPS),
connect a Simple Signaling cable (APC part # 940-0020B) from
the UPS to the DB-9 serial port on the back of the HP JetDirect
4000.
4. Connect the power cable to the power receptacle on the back of
the HP JetDirect 4000.
Note Make sure the air flow is not restricted around the
back of the unit.
5. Connect the other end of the power cable to a power source. If
you are using a UPS, connect the power cable to the UPS.
6. Power on the print appliance, by pressing the Power button on
the front panel.
7. Go to the next step, “Configure IP Settings on the Front Panel”.
2-4 Installation
Page 13

3. Configure IP Settings on the Front Panel
When the HP JetDi rect 400 0 pow ers on, it exe cut es a series o f se l f
tests. Then, messages, including “Booting... Configuring...
Validating... Extracting... Formatting...”, appear on the HP
JetDirect 4000’s LCD display.
Automatic (DHCP) IP Configuration
After bootup, the HP JetDirect 4000 will immediately request an
IP address from any DHCP ( Dynamic Host Configurati on Protocol)
server that resides on the network. If this request is successful, you
will see the following messages.
DHCP requesting
IP Address...
DHCP successful
10.1.2.3
HPMC60CAF
Mon Jan 10 2001
2
Installation
Note If, after one minute, there has no t been a successful
DHCP configuration, you will be notified via the
front-panel LCD display; then you will be prompted
to enter the IP address information manually.
The default Print Appliance Name, b ased on the device’s MAC
address, is displayed on the first line of the LCD.
After the initial IP address display, the IP address will continue to
appear on the LCD display on the second line of the LCD as part of
the HP JetDirect 4000 display cycle: date, time, IP address, version.
Write down the IP address, as you will need it for further
installation steps.
Installation 2-5
Page 14

Manual IP Configuration
If your network does not use DHCP, use the HP JetDirect 4000’s
front panel to manually enter the IP address, subnet mask, and
default gateway.
These instructions use the LCD Display, the Enter and Cancel
buttons, the direction buttons and numeric keypad.
LEDs LCD Display Numeric Keypad
Power Button Enter and Cancel Direction Buttons
You will see this message on the front-panel LCD.
1. After about 30 seconds,
DHCP requesting
IP Address...
2. Press
Press ✱ to begin
Buttons
the next message will
appear.
✱.
Initial Setup
3. Press
IP Config Mode
=Manual
4. Use the number buttons
IP Address:
=010.001.002.003
✱.
on the front panel of the
HP JetDirect 4000 to
enter the IP address.
✱.
Press
Do not duplicate an IP
address already in use
on your network.
(Note: the IP addressing shown is for illustration purposes only.)
2-6 Installation
Page 15

5. Use the number buttons
Subnet Mask:
=255.000.000.000
on the front panel of the
HP JetDirect 4000 to
enter the subnet mask.
".
Press
6. Use the number buttons
Default Gateway:
=010.001.002.003
7. Press
Setup complete
Press
8. Wait about 10 seconds.
Restarting
" to apply
Network...
HPMC60CAF
09:12AM
on the front panel of the
HP JetDirect 4000 to
enter the default
gateway. Press
".
The normal operating
messages will appear on
the LCD display.
The first line of the
display shows the
default Print Appliance
Name.
The second line of the
display alternates
between date, time, IP
address, and version.
".
2
Installation
9. Go to the next installation step, “Use the Web Interface to
Configure the Device”.
Installation 2-7
Page 16

4. Use the Web Interface to Configure the Device
1. At a workstation, open the web browser.
2. In the “Location” field (Netscape Navigator) or “Address” field
(Microsoft Internet Explorer), enter the HP JetDirect 4000’s IP
address in the following format:
http://nnn.nnn.nnn.nnn
The IP address is the address displayed on the HP JetDirect 4000’s
front panel.
3. Click Administration.
Note Click Help in the banner or on any screen to go to
online help.
2-8 Installation
Page 17

4. Log in, using “admin” as both user name and password.
5. Complete the registration screens.
6. Click Network Settings.
2
Installation
Installation 2-9
Page 18

7. Enter network settings.
Note Checking “Enable shared drive to store printer
device drivers” will create a space for managing
printer drivers. See chapter 3, “Network Settings”.
8. Click Apply.
2-10 Installation
Page 19

9. Click Print Queues.
10.Click Add Queue.
2
Installation
11.Enter queue information. Click OK.
Add as many queues as you want for the HP JetDirect 4000.
Installation 2-11
Page 20

However, the device works bes t with 32 or fewer queues.
To easily add more print queues, check the “Add another print
queue” check box, and click OK.
Note For detailed information about web interface
operations, see Chapter 4 of this manual.
12. Go to the next installation step, “Back Up Settings”.
2-12 Installation
Page 21

5. Back Up Settings
Use this page to save a copy of the HP JetDirect configuration
parameters. Configuration parameters include network settings
and print queue information.
2
Installation
Saving the configuration makes it easy to restore the configuration
parameters if the HP JetDirect 4000 must be replaced or if its
configuration values are accidentally changed or lost.
1. Click Backup Settings.
2. At the next screen, select Save Configuration.
3. Choose a filename, drive, and directory.
4. Click Save. The saved configuration is in binary format and
cannot be edited usin g a text editor.
Or, click Cancel to return to the Backup S ettings page withou t
saving the configuration.
5. Go to the next installation step, “Set Up Access From Each
Client”.
Installation 2-13
Page 22

6. Set Up Access from Each Client
Note Hewlett-Packard suggests you verify installation
with one client before configuring more clients. This
will confirm operation. It is easier to troubleshoot
settings on one client than many.
During setup, you may need the Windows CD or the driver disk
from the printer manufacturer.
1. Be sure the HP JetDirect 4000 is installed, queues set up, and
the printers turned on. Be sure the client workstation is
connected to the network.
2. At the client workstation, select Start from the task bar. Select
Setup and Printers.
3. Double click Add Printer.
4. Select Network printer server. Click Next.
2-14 Installation
Page 23

After a few seconds, the network will appear.
2
Installation
5. Enter the Universal Naming Convention (UNC) path directly
(for example “\\spooler1\queue1”). See Microsoft
documentation for more information about UNC. Or, locate and
select the print queue you established earlier. Click OK.
Installation 2-15
Page 24

6. Click OK.
7. Select a driver and click OK. If necessary, insert the printer
manufacturer’s driver disk and click Have Disk.
2-16 Installation
Page 25

8. Select Yes or No. Click Next.
9. Click Finish.
2
Installation
The installation is complete, and the client user will be able to
print from the client workstation.
You should now register your HP JetDirect 4000 Print Appliance.
When you do, you will receive:
• Technical support updates
• Special Hewl ett-Packard offers
• Details on new products and technologies
Go to URL:
http://www.hp.com/go/printappliance_registration
Installation 2-17
Page 26

2-18 Installation
Page 27

3
Front Panel
The HP JetDirect 4000’s front panel has the fol lowing components:
LEDs LCD Display Numeric Keypad
Power Button Enter and Cancel Direction Buttons
Buttons
These components are described in the following sections.
Power Button
Press the Power button to power up the HP JetDirect 4000. A bootup
process begins. When the devi ce is powered on, the Power On LED
is lit.
Press the Power button again to power down the print appliance.
The print appliance performs an orderly shutdown.
Note The print appliance continues t o draw some po wer
even if it is switched off.
If print jobs are printing when you power up the print appl iance,
the print jobs will not be completed.
Jobs in the print queues waiting to be printed will resume printing
when the print appliance is fully booted.
3
Front Panel
Front Panel 3-1
Page 28

LEDs
Power On LED Disk Activity LED
Network Activity LED Alert LED
Power On LED
(green)
Network Activity LED
(green)
Disk Activity LED
(green)
Alert LED
(amber)
When lit, the device is powered on.
Lit intermittently when data is
arriving at the HP JetDirect 4000, or
when data is being sent to the printers.
At other times, it is OFF.
Lit intermittently when disk I/O is
taking place. At other times, it is OFF.
Lit during power up and bootup. This
process lasts several minutes.
At other times, the Alert LED is lit
when the HP Je tDire ct is not wor king
correctly. Check the Troubleshooting
chapter of this manual to analyze and
correct the problem.
LCD Display
The LCD display has two rows, each con taining 16 characters and
spaces. It it used to display the status of the HP Jet Direct 4000 and
to display configuration information you enter at the front panel.
3-2 Front Panel
Subnet Mask
=255.000.000.000
Page 29

Choice Indicators
When these symbols appear in the LCD display, you can use
the Up and Down direction buttons to scroll through a
menu. The Up direction button will take you back, and the
Down direction button will take you forward.
When these symbols appear in the LCD display, you have
a choice of options. Press the Left or Right direction buttons
on the front panel to toggle through the choices.
Cursor
When the cursor appears, move it (using the Left or Right
direction buttons on the front panel) to the position where
you wish to enter a value. If you ar e changing just part of a
field, you do not need to re-key the entire field. Just move
the cursor on the value you want to change.
Enter and Cancel buttons
Enter. Press this button to accept the information
just entered.
✵ Cancel. Press this bu tton to c ancel info rmation j ust
entered or end an operation.
Direction Buttons
Up. Press this button to return to the previous menu
item or step of a procedure. If Enter hasn’t been
pressed, any changes made will be canceled.
Down. Press this button to adva nce to the next menu
item or step of a procedure.
3
Front Panel
Left. When there is a choice of optio ns (as indicat ed
in the LCD display), press this button to toggle
backward through the choices.
Right. When there is a choice of options (as in dicated
in the LCD display), press this button to toggle
forward through the choices.
Front Panel 3-3
Page 30

Numeric Keypad
The numeric keypad has buttons for the numbers 0-9. Above the
keys are letters of the alphabet, like the k e ypad on a telephone.
Use the numeric keypad to enter numeric values, such as IP
address, subnet mask , etc., when configuring the HP JetDirect
4000. The letters above the keys can be useful as a mnemonic aid
when you are entering the device’s password.
Making Entries
Use the Left and Right Direction Buttons on the front panel to
position the cursor (
the keypad. When th e entry is complete, press the Enter (
Button.
) in the LCD entry field. Enter numbers from
)
Front Panel Operations
Messages at Power-On
When you power on the HP JetDirect 4000, it executes a series of
self tests. It then displays a series of messages, including “Booting...
Configuring... Validating... Extracting... Formatting...” etc.
Messages During Normal Operations
When the startup process is complete, the HP JetDirect 4000
displays a repeating seri es of normal operating messages.
HPMC60CAF
09:12AM
The first line of the display shows the Print Appliance Name,
entered from the web interface during configuration. If you do not
enter a Print Appliance N ame via the web interface, the line
displays a name based on th e device’s MAC address.
The second line of the display shows date, time, IP address, and
firmware version in a repeating sequence.
3-4 Front Panel
Page 31

Starting Front Panel Operation
There are two front panel operations: Conf iguration and Password.
Press
once to begin front panel operations.
Configuration
Press to begin
If you press
function. If you press
function.
again, you will go to the Change Configuration
, you will go to the Change Password
Configuration
IP Config Mode
=Manual
The IP Config Mode screen has three options.
• The display shows Manual mode. Press the left or right direction
buttons (or ) to toggle between DHCP and manual modes.
• Press
• Press
&➵to cancel the operation and go to the main display.
to continue the configuration process. Pressing
no effect.
has
3
Front Panel
Manual Mode
If you toggle to Manual mode, you will see this display:
1. Use the number buttons
IP Address:
010.001.002.003
2. Use the number buttons
Subnet Mask:
255.000.000.000
on the front panel of the
HP JetDirect 4000 to
enter the IP address.
.
Press
on the front panel of the
HP JetDirect 4000 to
enter the subnet mask.
.
Press
Front Panel 3-5
Page 32

3. Use the numbers on the
Default Gateway:
010.001.002.003
front panel of the HP
JetDirect 4000 to enter
the default gateway.
.
Press
4. Press ".
Exit config
Press ✱ to exit
5. Press
✱ Apply changes
".
✵ Cancel changes
6. After a moment, you
Restarting
Network...
will return to the
display of normal
operating messages.
DHCP Mode
After you toggle to DHCP, you will see this display:
1. Press
IP Config Mode
DHCP
2. Press
IP Config Mode
=DHCP
"➵. The “=” will
appear in the display.
several times.
You will move through
the IP Address, Subnet
Mask and Default
Gateway scr e en s . You
will then see this
display.
3. Press
Exit config
Press ✱ to exit
4. Press
✱ Apply changes
✵ Cancel changes
3-6 Front Panel
".
".
Page 33

5. After a moment, you
Restarting
Network...
will return to the
display of normal
operating messages.
Change Password
The HP JetDirect 4000 ships with no front panel password. You
may want to supply the device with a password to prevent
unauthorized configuration changes.
Note that this password limits access to front panel functions. After
you set a password, you will need to enter it before performing
future configur ation tasks at the LCD front panel.
The front panel password is not the same as the password us ed for
management of the HP JetDirect 4000 using the web interface.
1. Press
Change Password
".
Press ✱ to begin
2. Enter a new password
New Password
3. Retype the new
Retype Password
4. The front panel displays
5. Press
Password set
Change Password
Press ✱ to begin
and press
password and press
this message briefly and
then shows the
following message:
operation an d the device
will return to the
display of no rm a l
operating messages.
Or, if you just wait, it
will return to the
display of no rm a l
operating messages.
".
".
& to end the
3
Front Panel
Front Panel 3-7
Page 34

Resetting to Factory Defaults
Once you configure your HP JetDirect 4000, the configuration
settings are retained in memory unless you manu ally reset them to
factory defaults.
This procedure will reset the HP JetDirect 4000 to its factory
defaults. All configuration information will be lost, including
network settings, queues, and any firmware upgrades. The
administrator account name and password will be reset to factory
defaults.
1. Make sure queues are empty and no printing activity is taking
place.
2. Press the Power button on the HP JetDirect 4000’s front panel
to power it down.
Caution Do not simply pull the plug! You may lose data if
you do.
3. Once the HP JetDirect 4000 has been powered down, power it
up by pressing the Power button again.
4. During the boot sequence, when the LCD display reads
Configuring... press the Down direction button. The display
should read:.
Reset defaults?
✱ =yes, ✵ =no
5. Press
✱✝to reset the HP JetDirect 4000 to its factor y defaults.
✵ to continue the boot process and retain all current
Press
configuration information. The HP JetDirect 4000 will then
finish its bootup.
Resetting...
(factory)
During bootup, the above message will be displayed if
pressed.
3-8 Front Panel
✱ was
Page 35

4
Web Interface
The HP JetDirect 4000 contains an embedded web server. The web
server allows you to manage the HP JetDirect 4000’s configuration
and review the status of the device and print jobs from your web
browser.
You can access the web server through any supported web browser
on an intranet.
Supported Web Browsers
The following web browsers are supported:
• Netscape Navigator 4.01 or greater
• Microsoft Internet Explorer 4.0 with update version SP1
For the latest list of supported web browsers, visit the HP Customer
Care web site (www.hp.com/support/printappliance).
Accessing the Web Interface
Open your web browser.
In the “Location” field (Netscape Navigator) or “Address” field
(Microsoft Internet Explorer), enter the HP JetDirect 4000’s IP
address, as displayed on the HP JetDirect 4000’s front panel LCD
display. Example:
http://10.1.2.3
Alternatively, you can enter the HP JetDirect 4000’s DNS name (if
your DNS server has been configured with the correct name entry).
The HP JetDirect 4000 web interface will display. Make selections
and enter information as you would with any other web application.
Web Interface 4-1
4
Web Interface
Page 36
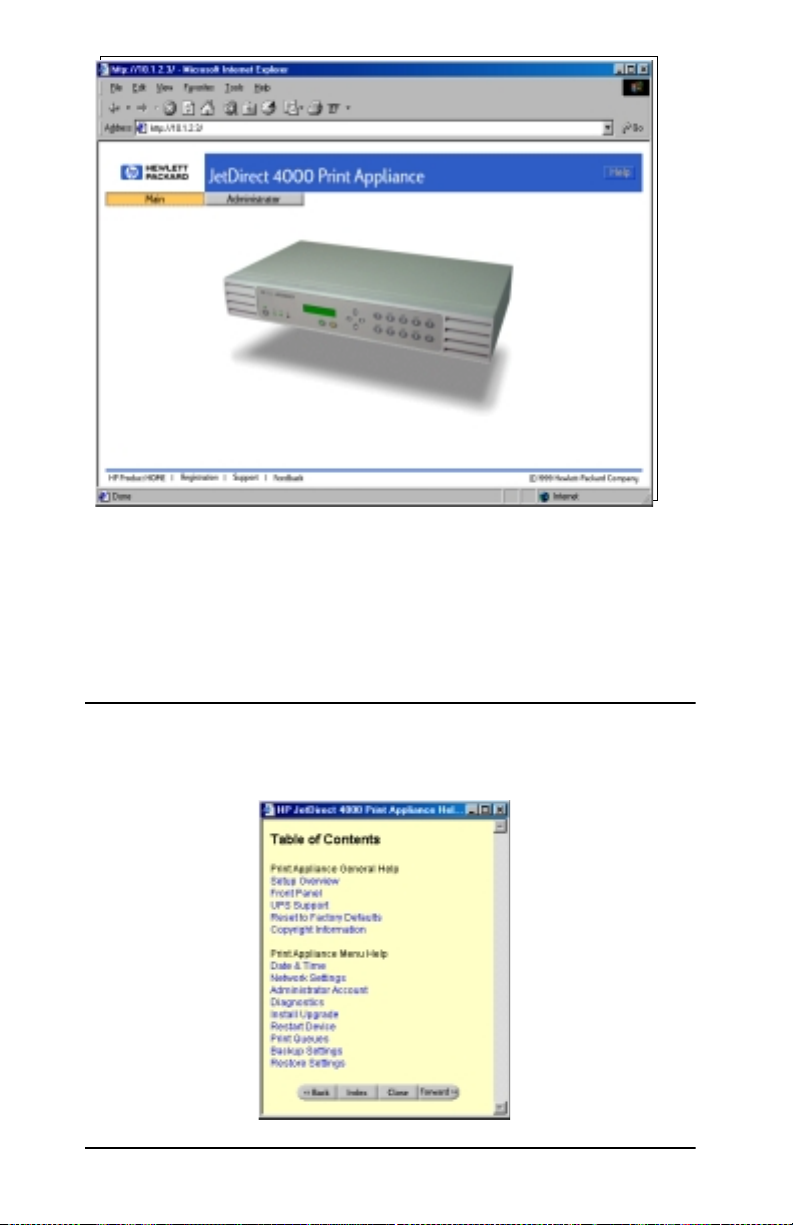
The screen contains three buttons: Main, Administrator, and
Help.
There are links in the bottom left-hand corner to HP Product
HOME, Registration, Support, and Feedback whic h require
Internet connectivity.
Online Help
To use online help, click Help. The help table of contents appears.
4-2 Web Interface
Page 37
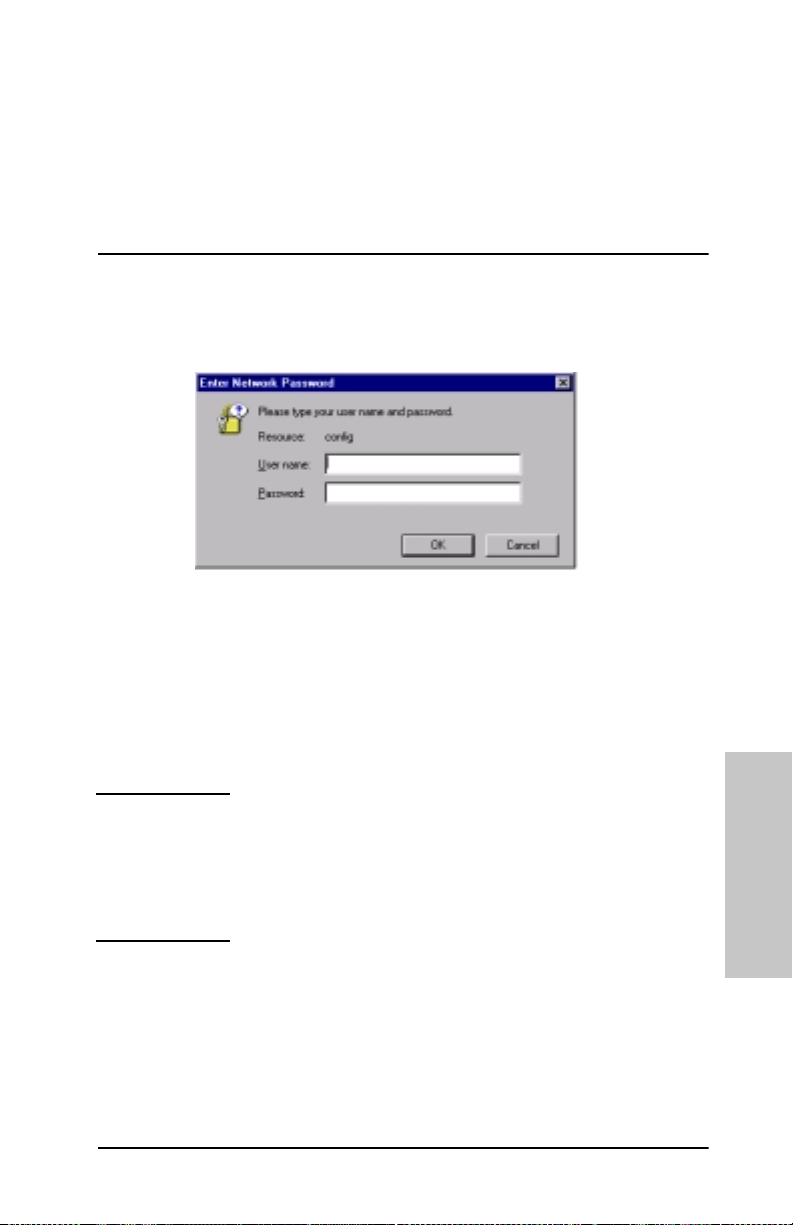
Click on the links to go to the different help topics.
Click Back, Index, or Forward to navigate the help system.
Click Close to exit online help.
Individual screens in the w eb interface also have a help button.
When you click Help in a particular screen, you will go to a help
screen for that topic.
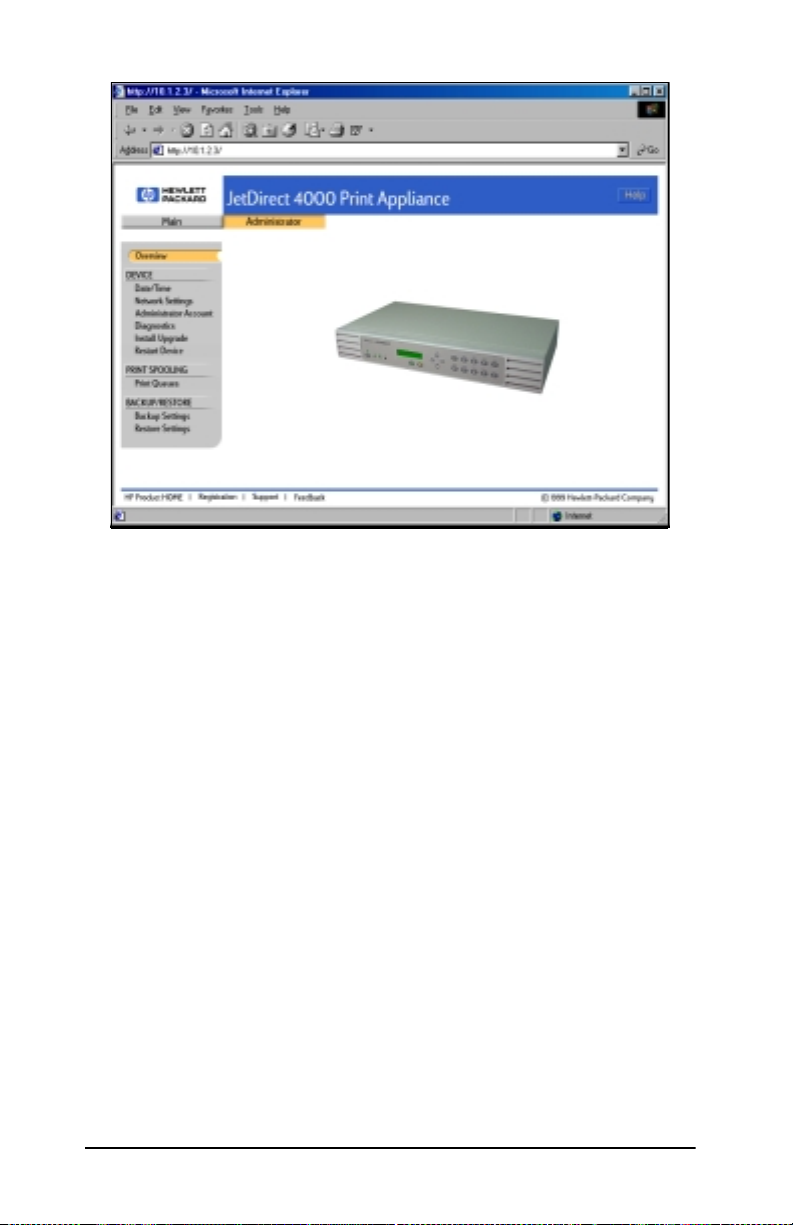
Administrator Functions
Click Administrator for access to HP JetDirect 4000
administrator functions.
The default User name is “admin”. The default Password is “admin”.
You can change the User name and Password by selecting
“Administrator Account” from the administrator functions.
If you check the check box on this screen, the browser will remember
your password for future logins.
Enter User name and Password. Click OK to continue.
Note If you forget your user name and/or password, you
can reset the HP JetDirect 4000 to its factory
defaults. This action will restore the default User
name and Password. “Resetting to Factory
Defaults” on page 3-8.
Web Interface 4-3
4
Web Interface
Page 38
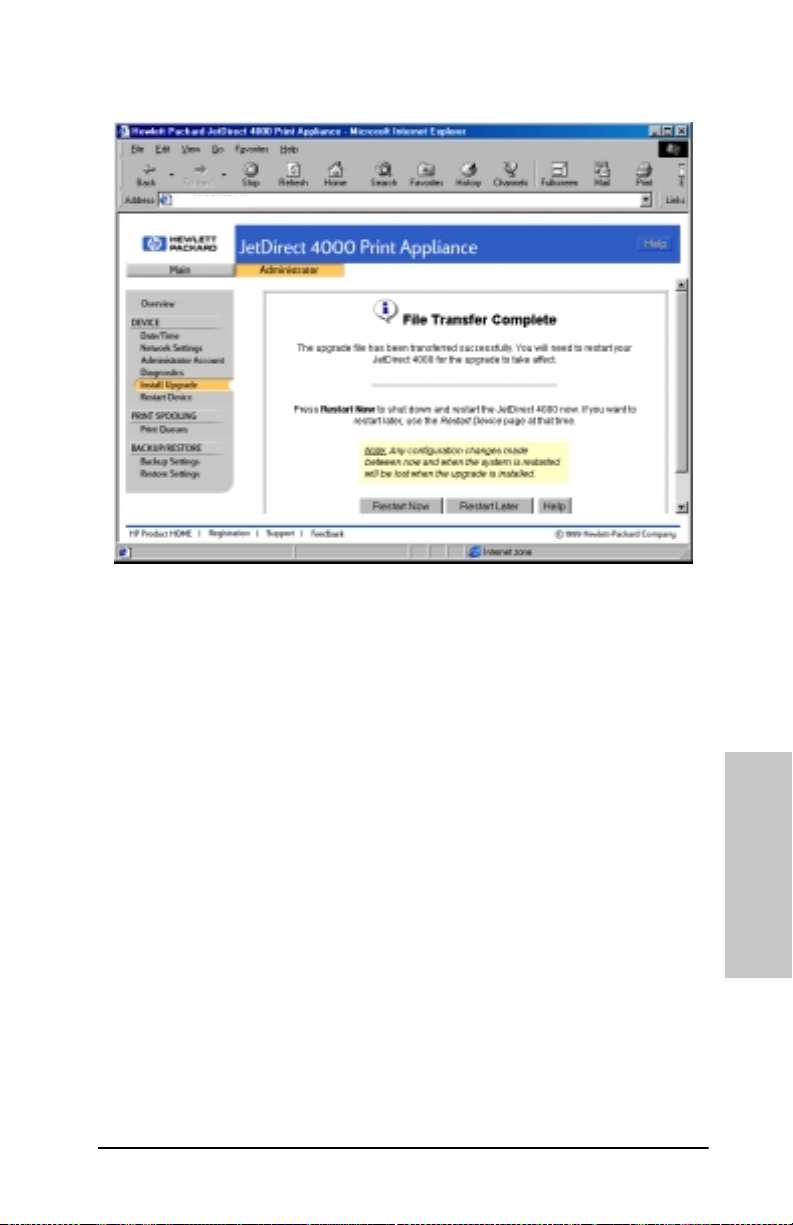
The Administrator screen provides access to all HP JetDirect 4000
management and monitoring functions.
These functions are described in the following sections.
4-4 Web Interface
Page 39

Date/Time
Use this page to set the HP JetDirect 4000's date and time.
Date Enter the date in the format mm/dd/yyyy. You must
specify the complete year. You may omit leading zeroes.
Examples: “1/1/1999” and “12/25/2001”.
Time Enter the time in the format hh:mm:ss. The seconds and
leading zeroes may be omitted. Examples: “5:35” and
“12:00:00”.
AM/PM Use the pulldown box to sele ct AM or PM. The 24- hour
time format is not supported.
Note Daylight savings time adjustments are not
automatic. It is necessary to manually change the
time using this page during daylight savings time
shifts.
Click Cancel to keep the time and date at their previous val ues.
Click Apply to set the date and time.
Web Interface 4-5
4
Web Interface
Page 40

Network Settings
Use this page to establish the HP JetDirect 4000’s network se ttings.
Print Appliance Name
Enter a name for the HP JetDirect 4000. This is the name that
will appear on each client workstation’s Network Neighborhood.
If your network uses DNS to identify network resources, this
name should match the DNS name. Otherwise, any name will
do. The name may contain up to 12 alphanumeric characters. It
may also contain underscore symbols (“_”). Once you make a
change here, it will appear on the HP JetDirect 4000’s front
panel LCD display
Obtain an IP Address automatically using DHCP
Select this option for the print appliance to be automatically
configured using DHCP. Ensure that a valid DHCP server and
address leases are available. If you choose DHCP, the IP
Address, Subnet Mask, and Default Gateway will be
automatically configured. All configuration informat ion received
4-6 Web Interface
Page 41

from the DHCP server will appear inside the shaded area of the
Network Settings page on the browser. All settings outside this
shaded area must be set manually.
Manually Specify IP Information
Select this option to manually spe cify the IP addres s information
for this print appliance. Each field must be entered manually.
IP Address
Enter an IP address without leading zeroes. Example: “10.1.2.3”.
Subnet Mask
Enter a subnet mask. Example: “255.0.0.0”.
Default Gateway
Enter the IP address of the default gateway used to access other
networks or subnets. This enables the print appliance to
communicate with devices (such as printers and PCs) on
different subnets. If a gateway is not available or you do not know
the gateway’s address, enter the same IP address used for the
HP JetDirect 4000, or leave this field blank.
Domain Name Server (DNS) Add ress
The DNS server enables you to speci fy network resources (such
as PCs and printers) by their friendly names instead of their IP
addresses. In order to use this functionality, you must specify
the DNS server by it s IP address, not by i ts friendly name . Once
the DNS server is specified, you may then use friendl y names
across other configuration areas of the HP JetDirect 4000 (such
as the queue configuration screen). If your networ k does not have
a DNS server, leave this field blank.
WINS Server Address
4
Similar to the concept of a DNS server, a WINS server enables
network resources such as the HP JetDirect 4000 to be browsable
across subnets, using Network Neighborhood. Enter the IP
address of the WINS server.
If your network does not have a WINS server configured, leave
this field blank. Withou t a WINS server configured, Windows 9x
clients may be unable to print to an HP JetDirect 4000 located
on a different subnet.
Web Interface 4-7
Web Interface
Page 42

Note The WINS Server Address must be manually
entered. It will not be automatically configured via
DHCP, and the IP a ddress rather th an the network
name must be used.
IP Domain Name
The IP domain name that the HP JetDirect 4000 belongs to.
Domain refers to a set of devices on a network that has been
assigned a group name. The domain name must match s tandard
naming conventions. The name must be alphanumeric. It may
also contain underscore symbols (“_”) or dashes (“-”). Example:
“mycompany.com”.
If your network does not have an IP domain name, enter
“defaultdomain” instead.
NT Domain or Workgroup
Specify the Windows domain or workg rou p th is HP JetDire ct
4000 belongs to. The HP JetDirect 4000 will appear under this
name in Network Neighborhood. Although the print appliance
is not able to authenticate users in a Microsoft Windows domain,
it is able to identify itself as a resource in that domain.
Enable shared drive to store printer device drivers
Check the checkbox t o create a fo lder on the pri nt app liance for
printer drivers. When created, it appears in Network
Neighborhood as a folder under the Print Appliance Name.
The print driver share folder is a convenient place for you to store
print drivers for later downloading to client workstations. The
administrator has read-write access to the folder (called
“@drivers”, while others have read-only access to the folder
(which appears to them as “drivers”).
When installing a printer driver at a client workstation, you may
find it convenient to click Have dis k and find t he d riv er i n t he
HP JetDirect 4000 printer driver folder.
If you restore the print appliance to its factory defaults, the
shared driver folder will be erased. The Save/Restore
Configuration option in the web interface does not save data
contained in the driver folder. Howev er, you can save data in the
folder to another device using common file management tools.
Click Apply to set the network settings. Click Cancel to keep the
network settings at their previous values.
4-8 Web Interface
Page 43

Administrator Account
Use this screen to change the administrator account name and
password that allows administrative access to the HP JetDirect
4000.
Standard user privileges are limi ted to print access, which does not
require web access. Administrative privileges grant permissions to
change the configuration of the HP JetDirect 4000 using the web
interface.
This name and password is not related to the HP JetDirect’s front
panel password.
Administrator Name
Enter the new administrator account name. The name may
contain up to 12 alphanumeric characte rs. The de faul t name is
“admin”. The administrator account name is case sensitive.
New Password
Enter the new password. The password may contain up to 12
alphanumeric characters. The default passw ord is “admin”. The
password is case sensitive.
Web Interface 4-9
4
Web Interface
Page 44

Note The HP JetDirect 4000 requires a password.
Leaving the password blank does not create a blank
password, but rather retains the previous
password.
Confirm New Password
Enter the new administrator password again to confirm.
Click Apply to change the administrator account name and
password to their new values.
Once the administrator account name and password have been
changed, the current browser session is no longer authenticated.
You will be prompted to re-connect, using the new administrator
account name and password.
Caution If you forget the password, t he only way to re cove r
is to reset the HP JetDirect 4000 to factory defaults.
After you reset to factory defaults, al l configuration
information will be lost, including network settings,
queues, and any recent firmware upgrades.
After a reset to factory defaults, you will need to
restore the last firmware upgrade and restore the
network settings. These procedures are described
in this chapter.
To reset to factory defaults, see “Resetting to
Factory Def au lts” on page 3-8.
4-10 Web Interface
Page 45

Configuration Summary (Diagnostics)
Use this page to view a summary of configuration parameters for
the HP JetDirect 4000. You may print this page by using your
browser’s print function.
General
Model Name HP JetDirect 4000 Print Appliance.
Model Number Model number of the print appliance.
Current Software Revision Current version of firmware running
on this HP JetDirect 4000.
Original (Factory) Software
Revision
BIOS Version Version of the device’s BIOS.
Manufacturing Date Code Manufacturing information for use
Serial Number Serial number of this unit, if any.
Operating System Restored Date and time of last restore.
Data Area Restored Date and time of last restore.
Spool Area Restored Date and time of last restore.
Version of firmware that was
shipped with this HP JetDirect 4000.
Upon a reset to factory def ault s, t he
HP JetDirect 40 00 will rever t to this
version of firmware.
by the factory.
Network Configuration
IP Configuration Mode How this unit was configured
(Manual or DHCP).
IP Address IP address of this HP Jet Direct 4000.
Subnet mask IP subnet mask of this H P JetDir ect
4000.
Default gateway Default gateway of this HP JetDirect
4000.
DNS address IP address of the DNS server.
WINS address IP address of the WINS server.
Web Interface 4-11
4
Web Interface
Page 46

Print Appliance Host Name Name of this HP JetDirect 4000. This
name should be entered in the DNS
table, if available.
IP Domain Name IP domain this HP JetDirect 4000
belongs to.
NT Domain or Workgroup Microsoft domain or workgroup this
HP JetDirect 4000 is on.
Administrator Name Administrative account name for
this HP JetDirect 4000.
Print Queues
This section lists the print queues currently configured on this unit
and the IP addresses of the printers servicing the queues.
Network Statistics
MAC Address Unique network hardware address
for this HP JetDirect 4000.
Total Packets Received Total number of network packets
this unit has received.
Total Packets Transmitted Total number of network packets
this unit has transmitted .
Bad Packets Received Total number of improperly
formatted network packets received.
A large number of bad packets may
indicate network problems.
Received Packets Dropped Number of packets dropped be cause
the receive buffer is full.
Framing Errors Received Number of improperly formatted
frames received.
Transmit Packet Errors Total number of errors that occurred
while attempting to transmit.
Transmit Packet Dropped Number of packets dropped while
attempting to transmit because the
receive buffer is full.
Transmit Packet Overruns Number of packets dropped while
attempting to transmit because the
receive buffer is full.
4-12 Web Interface
Page 47

Transmit Collisions Number of attempted transmit
packets dropped because of excessive
collisions.
SNMP
System contact SNMP-configured system contact
name.
System location SNMP-configured system location.
Click Refresh to update the information on the screen.
Click Cancel to return the overview.
Web Interface 4-13
4
Web Interface
Page 48

Install Upgrade
Use this page to upgrade the firmware on the HP JetDirect 4000.
You can downlo ad the lates t firmware ima ge from the HP web si te.
See “Firmware Upgrades” on page C-4.
1. Using the Backup Settings feature (page 4-21), save the current
configuration of the HP JetDirect 4000.
Caution This information should be automatically saved on
the HP JetDirect 4000, but if a catastrophic event
occurs during the upgrade (for example, a power
failure) , it is possib le that the con figurati on may be
lost. This step is precautionary.
2. Download the firmware image from the HP support web site.
3. Save the new firmware image on a local hard drive.
4. On this pa ge, type the complete path to the firmware image on
the local hard drive (Example: “c:\temp\upgrade.hp”) or click
Browse to find the firmware image saved on your hard drive.
4-14 Web Interface
Page 49
5. Click Install Upgrade to upload the file to the HP JetDirect
4000.
http://10.1.2.3
6. You should restart the print appliance immediately.
The restart process will take several minutes. During this time,
ensure that power is not removed from the HP JetDirect 4000.
On the LCD display, a series of messages will appear, including
“Shutdown in progress... Booting... Configuring... Verifying...
Validating... Uncompressing... Extracting...” etc.
The HP JetDirect 4000’s front panel LCD screen will then go to
its standard display.
7. When the print appliance is up and running, re-enter the
network address if necessary. Generally, if no errors occur
during the upgrade process, this is not necessary. All
configuration information is retained.
Web Interface 4-15
4
Web Interface
Page 50

Print Queues
This page displays all of the print queues configured on the HP
JetDirect 4000. It shows each queue’s status, the number of print
jobs in it, and the printer to which the jobs will be sent.
Queue Name, Printer, Status, Jobs
The name of each q ueue, each print er’s IP address, the status of
each queue (active or paused), and the number of jobs in the
queue (printing or to be printed).
Edit
Click Edit to change the properties of an existing print queue.
Delete
Click Delete to delete a queue and all jobs in the queue.
Jobs
Click Jobs to view, delete, or pause individual jobs in the queue.
Add Queue
Click Add Queue to bring up the queue creation screen.
4-16 Web Interface
Page 51
Refresh
Click Refresh to update the information on the screen. The
information on the screen is not automatically updated .
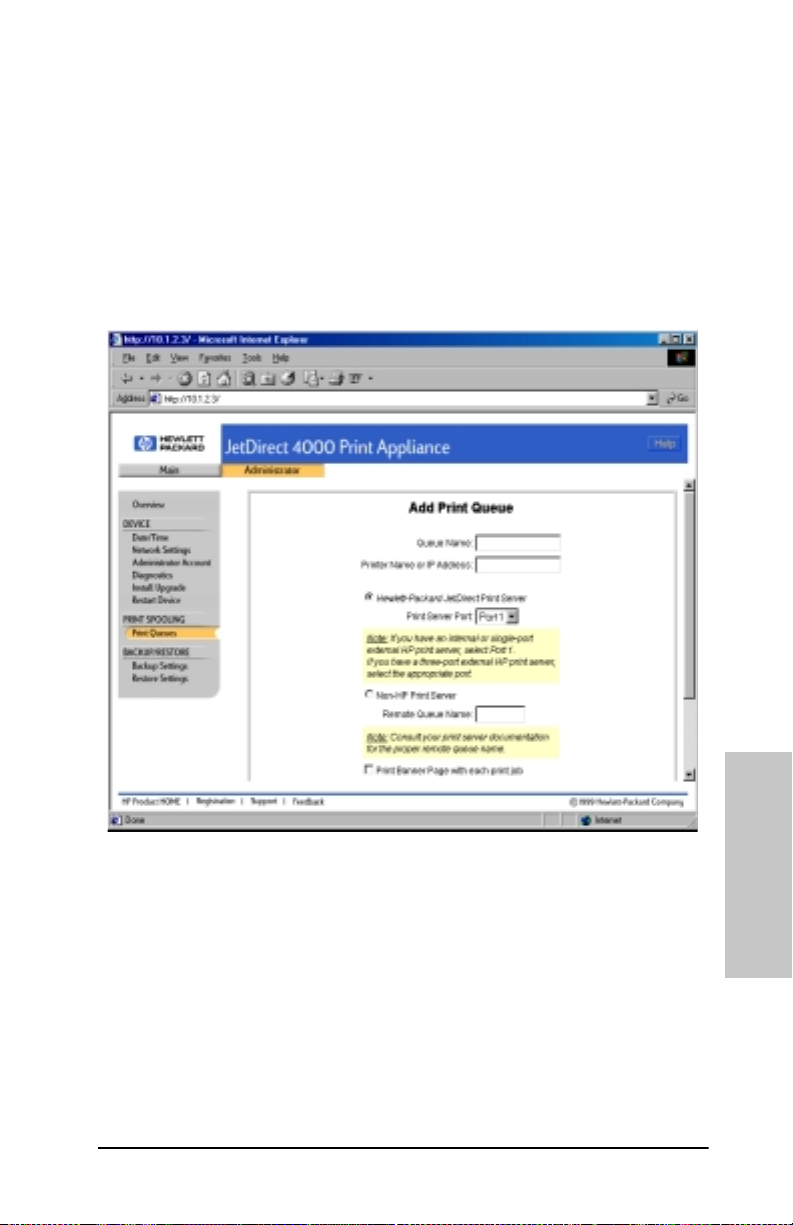
Add Print Queue
Use this page to create new print queues. There is no limit to the
number of queues you can create. However, printing performance
may degrade if there ar e many he avy-use q ueues on t he applia nce.
The recommended maximum number of queues on a single HP
JetDirect 4000 is 32.
Queue Name
The name of the qu eue. This name wi ll be displa yed in Network
Neighborhood as an available queue configured on the HP
JetDirect 4000. The name must be alphanumeric. It may also
contain underscore symbols (“_”) or dashes (“-”).
Printer Name or IP Address
The name or IP address of the printer that will be servicing the
print jobs in this queue. This may be the network printer’s DNS
name or the network printer's IP address. In order to use the
DNS name, a DNS server add ress must be confi gured on the HP
Web Interface 4-17
4
Web Interface
Page 52

JetDirect 4000 in the Network Settings screen. The name must
be alphanumeric. It may also contain underscore symbols (“_”)
or dashes (“-”).
Hewlett-Packard JetDirect Print Server
Select this option if the target print server is an HP JetDirect
print server.
Print Server Port
Some external print servers support more than one printer (for
example, the HP JetDirect 500X). For these cases, choose which
port the printer is connected to. For the following cases choose
Port 1.
• Target print server has an internal print server
• Target print server has an external sing le- po rt pr i n t serv er
• Target printer is attached to port 1 of a multi-port print server
Non-HP Print Server
Select this option if the target print server is not an HP JetDirect
print server. Many print servers will work well with the default
selection of Hewlett-Packard JetDirect Print Server and Port 1
selected as the print server port. If, however, your print jobs do
not appear on the printer, select Non-HP Print Server and
specify the remote queue name recommended by your print
server manufacturer.
Remote Queue Name
Refer to the lpr or UNIX
printing section of your print server
manual. Enter the remote queue name as specified.
Print Banner Page with each job
Select this option to insert a banner page at the beginning of
each print job.
Add another print queue
Select this option to create more print queues without having to
return to the previous Print Queues summary screen. After
adding the last queue, cl ick Cancel to return to the Print Queues
summary screen.
Click OK to add the new print queue.
Click Cancel to return to the print queues screen without creating
the new queue.
4-18 Web Interface
Page 53
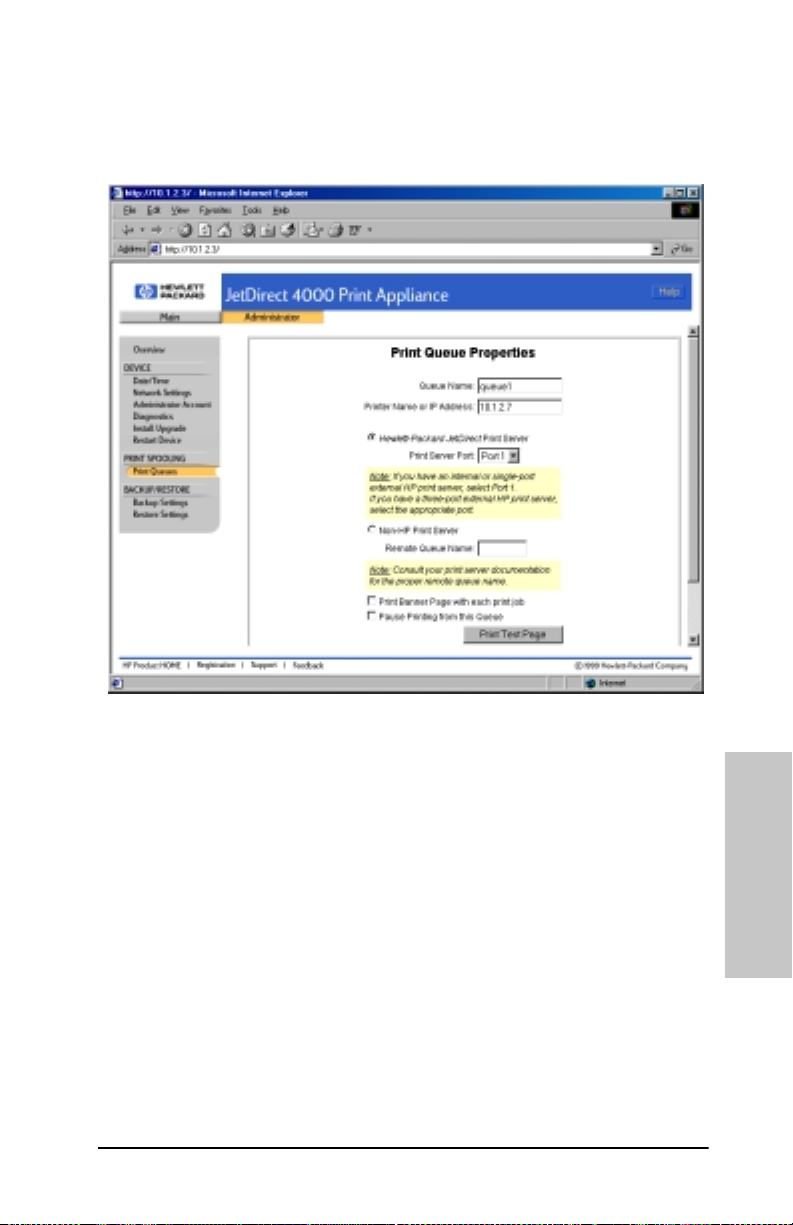
Print Queue Properties (Edit Queue)
This page appears when you click a queue’s Edit button on the Print
Queues page. Use this page to display the properties of a selected
print queue and to modify them. Use this page to pause and resume
printing from the print queue.
Pause Printing from this Queue
Check the “Pause Printing from this Queue” check box to pause
printing to pause printing from this queue.
To resume printing from a queue, un-check the “Pause
Printing from this Queue” check box.
Make other changes to properties as described in the Add Queues
section.
Click OK to save the changes to the print queue.
Click Cancel to return to the P rint Queues su mmary page wit hout
modifying the selected print queue.
Web Interface 4-19
4
Web Interface
Page 54
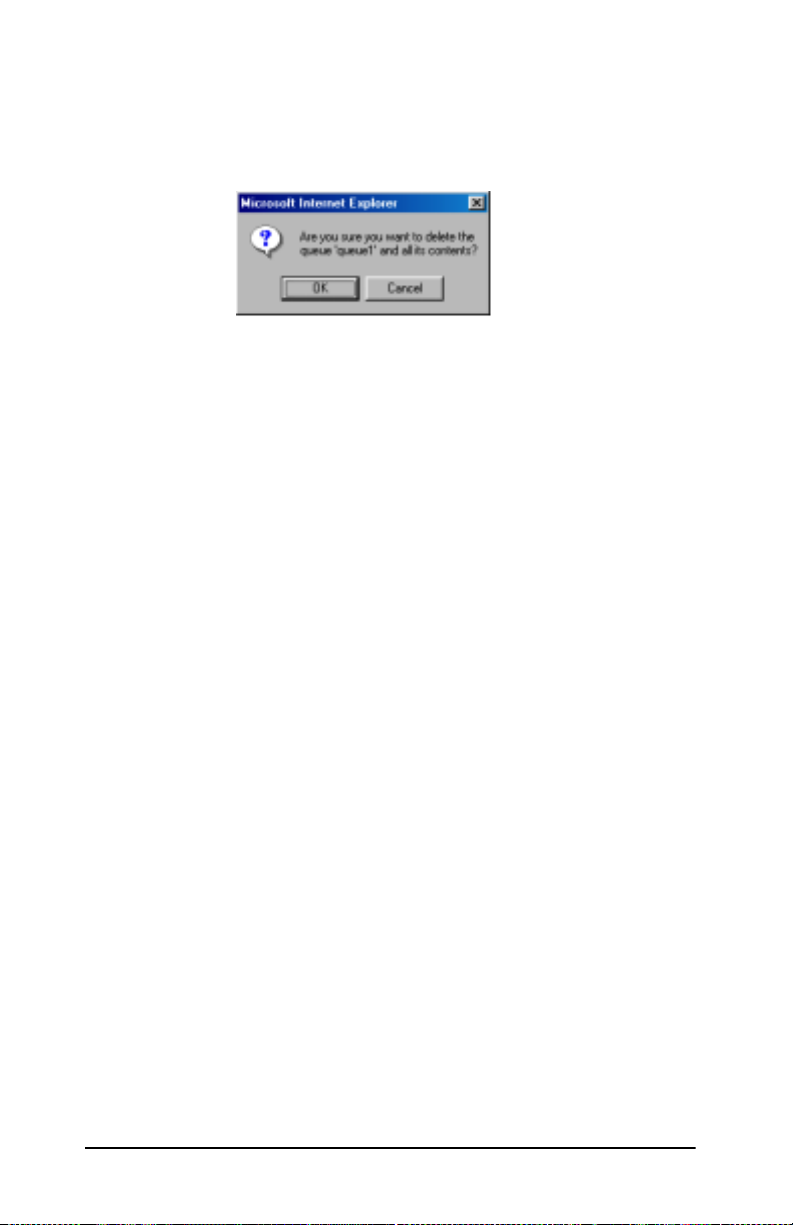
Delete Queue
This message appears when you click a queue’s Delete button on
the Print Queues page. This function will delete a selected print
queue and all the jobs currently in that queue.
Click OK to delete the selected print queue.
Click Cancel to return to the P rint Queues su mmary page wit hout
deleting the selected print queue.
Jobs (View Jobs)
This page appears when you click a queue’s Jobs button on the
Print Queues page. Use this page to view the jobs currently in a
selected print queue.
Print Jobs - queuename
The name of the selected queue appears in the title area of the
page.
File Name
The name of the file (print job) in the queue.
User
The name of the client user who submitted the print job to the
queue.
Size
The size of the print job, expressed in bytes.
Status
The status of the print job in the queu e. (“Printing” or “Queued”).
Click OK to return to the Print Queues summary page.
Click Refresh to update the information on the page. The
information on the screen is not automatically updated .
4-20 Web Interface
Page 55

Back Up Settings
Use this page to save the HP JetDirect 4000’s configuration
parameters. Configuration parameters include network settings
and print queue information.
Saving the configuration parameters makes it easy to restore the
configuration parameters if the print appliance must be replaced or
if its configuration values are accidentally changed or lost.
1. Click Save Configuration to begin the save proce s s. A Fil e
Download window will appear.
2. At the next screen, select Save this file to disk and click OK.
A Save As dialog box appears.
3. Choose a file name, drive, and directory to hold the saved
configuration.
4. Click Save. The saved configuration is in binary format and
cannot be edited usin g a text editor.
Or, click Cancel to return to the Backup S ettings page withou t
saving the configuration.
Web Interface 4-21
4
Web Interface
Page 56

Restore Settings
Use this page to restore a previously saved file of HP JetDirect 4000
configuration parameters. The configuration parameters include
network settings and print queue information.
You can restore a previously saved copy of the configuration
parameters to a replacement HP JetDirect 4000 or one in which
configuration values have accidentally bee n changed or lost.
1. Select which settings you want to restore. Select JetDirect 4000
Network Settings and/or Print Queues.
JetDirect 40 00 Network Settings restores all HP JetDirect
4000 address and name information. Print Queues restore all
queue definitions.
For settings that are not selected, current settings will be
retained.
2. Enter the full path and file name of the saved configuration. You
may type the path into the Configuration File field, or click
Browse... to locate and select the file.
3. Click Restore Configuration to begin the restore process.
4-22 Web Interface
Page 57

Or, click Cancel to return to the Restore Settings page without
restoring the configurations.
4. Click OK.
Web Interface 4-23
4
Web Interface
Page 58

Restart JetDirect 4000
Use this page to reboot the HP JetDirect 4000.
The restart process will take from 3 to 6 minutes. During this time,
the HP JetDirect 4000 will not be available and the connection to
this browser session may be lost.
Any print jobs actively being spooled from client users to the print
appliance will probably be lost and must be reprinted.
Any print jobs currently spooled on the print appl iance will be
retained.
Any print jobs currently bei ng de-spool ed from the p rint appl iance
to the printers may be restarted (automatically) once the HP
JetDirect 4000 is up and running again.
Click Restart to begin the reboot process.
Click Cancel to return to the overview screen.
4-24 Web Interface
Page 59

5
Frequently Asked Questions
1. How do I pre-configure the HP JetDirect 4000 for use at
a remote site?
Establish the front panel settings, establish the device’s
network settings using the web interface, and back up the
configuration (Steps 1 through 5 in Chapter 2). Then send the
HP JetDirect 4000 to the remote office to be connected. Printer
drivers will need to be added to client PCs at the remote office.
2. Is there a maximum size print job I can send to the HP
JetDirect 4000?
The HP JetDirect 4000 can process print jobs up to a maximum
size of 2GB.
3. How does the HP JetDirect 4000 work with my existing
print spooling strategy?
It can offload printing tasks from servers and localize print
traffic at remote sites. For details, see Chapter 1,
“Introduction”, page 1-1.
5
Frequently
Asked Questions
4. Where do the printer drivers reside?
The drivers reside on the client workstations. They must be
loaded on any PC from which printing is done. The HP
JetDirect 4000 will not automatically download a print driver;
you are responsible for print driver installation. This can be
done by following the pr ompts in the Windows Add Printer
Wizard to install the driver.
5. What happens if there is a power outage?
After a power outage the HP JetDirect 4000 will automatically
recover and rebuild its settings as necessary. (Se e questions 7
and 8 below.) To reduce the chance of data loss, the HP
JetDirect 4000 can be connected to a UPS. (See questions 9 and
10 below.)
6. What happens if I power down the HP JetDirect 4000?
The HP JetDirect 4000 will not be available on the network.
Any print jobs that were not printed will automatically resume
when the HP JetDirect 4000 is powered up again.
Frequently Asked Questions 5-1
Page 60

7. What happens if I unplug the HP JetDirect 4000 while
it is booting?
This could initially cause corruption of the data on the HP
JetDirect 4000 hard disk. However, the HP JetDirect 4000 is
designed to make internal data loss unlikely, since the
corrupted data will be automatically corrected during its next
uninterrupted bootup.
8. What happens if I unplug the HP JetDirect 4000 while
it is processing a print job?
A similar corruption can occur as in the preceding situation. In
addition, the print jobs that were in process of printing can
become corrupted as well. Spooled print jobs that had not yet
begun printing will not be lost. There is no guarantee about the
integrity of print jobs in the process of being submitted to the
HP JetDirect 4000 at the time the power was removed.
(Note that unplugging is not the same situation as powering
down the HP JetDirect 4000 with the Power button, which is
a more orderly shut down.)
9. How do I connect an uninterruptible power supply
(UPS)?
The print appliance supports AP C UPSs in the Simple
Signaling mode with a Simple Signaling cable. Connect the
UPS cable to the connector labeled UPS on the back of the print
appliance.
10. How does an uninterruptible powe r supply (UPS) work
with the HP JetDirect 4000 Print Appliance when the
power fails?
The DB9 cable enables the UPS to signal the print appliance
to perform an orderly shutdown in the event of a power failure.
During an orderly shutdown, pro cess es are cl os ed and d ata is
saved. No configuration is necessary to enable UPS support,
other than simply connecting the DB-9 cable.
11. Can I use Web JetAdmin to manage my HP JetDirect
4000?
No. However, Web JetAdmin will be able to discover a
configured HP JetDirect 4000 and allow you to launch the
embedded web server from the Web JetAdmin interface.
5-2 Frequently Asked Questions
Page 61

12. Can the HP JetDirect 4 000 accept print jobs from UNIX
clients‘?
Printing from UNIX is not supported.
13. Can I print from Macintosh clients on my network?
Printing from Macintosh computers is not supported.
14. Can I print over my network using Novell as the
network OS?
Yes. If the MS client is loaded and the IP address is properly
configured on the client and printer, the n you may us e the HP
However, the HP JetDirect 4000 will not appear as a Bindery
object or as an NDS object on the NetWare server.
15. We use proxies on our networks. C an the HP JetDi rect
4000 be used?
Yes. Web browsers used to interface with the HP JetDirect
4000 may be easily configured to support this. For details, see
your web browser’s online help.
16. Does the print appliance support bootp or rarp?
No. But the HP JetDirect 4000 does support DHCP.
5
Frequently
Asked Questions
17. Can the print appliance be configured via TELNET?
No. The configuration methods are DHCP, front panel, and web
browser.
18. What is inside the HP JetDirect 4000 Print Appliance?
The print appliance is a PC running LINUX with a 266 MHz
processor, 4+ GB hard drive, and 64 MB RAM.
19. What is the limit on the number of jobs that can be
spooled?
The number of jobs is limited by the disk space available on the
print appliance.
20. How are print jobs sent to the print appliance?
Clients send print jobs via SMB to the print appliance. SMB
stands for Server Message Block and it is the normal Microsoft
networking protocol.
Frequently Asked Questions 5-3
Page 62

21. How are print jobs sent from the print appl iance to the
printer
The HP JetDirect 4000 uses LPD to send the print job to the
printer.
22. Is the print appliance compatible with non-HP print
servers?
Yes. Any print server that supports LPD should work with the
print appliance. You may have to know the proper LPD remo te
queue name for the print server. Many print servers will work
without specifying a remote queue name (use the default HP
PRINT SERVER setting); however, some require a special
string in order to work. The LPD remote queue name can be
obtained from the print server vendor.
23. What kind of security does the print appliance employ?
The HP JetDirect 4000 has a front panel password to prevent
unauthorized front panel configuration. It also has a web
password required to configure the device or manage print
queues.
The print appliance is not compatible with NT domain security.
You can configure the NT domain name o n the print appliance,
and it will appear in that domain in Network Neighborhood,
but there will be no use r or group aut henticati on. Any user on
the domain will be able to print to queues on the print
appliance.
?
24. Why do I have to load a print driver on every client when
I use the HP JetDirect 4000 Print Applia nce and I didn't
with my NT print server?
Windows NT has a feature called point and print that will
download many print drivers from the NT print server to the
client automatically when a printer is configured on the client.
The HP JetDirect 4000 does not have this feature. When a
printer is configured on the client, you will be notified that “The
server on which the printer resides does not have a suitable
NULL printer driver installed. Click on OK if you wish to
install the driver on your local machine.”
You must select an appropriate print driver from the printer
installation dialog box or another source like a network drive
or the disk supplied with the printer.
5-4 Frequently Asked Questions
Page 63

25. My DHCP server automatically assigned an IP addres s
to a new printer I’ve added to the network. Where do I
find that address?
You can either print out a printer test page, or access the DHCP
server to display the scope of Active Leases.
5
Frequently
Asked Questions
Frequently Asked Questions 5-5
Page 64

5-6 Frequently Asked Questions
Page 65
6
Troubleshooting
If you encounter any problems while installing or operating the HP
JetDirect 4000 Print Appliance, here are some suggestions for
solving them.
First, generally identify the type of prob lem you are experiencing
from among these categories, and see the relevant Table:
• Hardware Setup Problems.......................................... page 6-1
• Web Interface Configuration Problems...................... page 6-2
• Web Interface Operation Problems ............................ page 6-2
• Client Setup Problems ................................................ page 6-3
• Printing Problems ....................................................... page 6-4
• Indicator Lights........................................................... page 6-5
If you are still unable to resolve the problem, see the Getting Help
section (page 6-6) to find out how you can receive further assistance.
Hardware Problems
Condition Possible Cause/Solution
The HP JetDirect 4000
does not power up.
I select DHCP and
initialization continues.
However, “DHCP No
Reply, Press
continue” appears on the
LCD display.
The Power On LED is lit, but
the Network LED does not
light.
The Power On LED is lit, but
the alert LED is lit.
✱ to
Bad power cable or AC outlet. Replace cable
and/or verify that the outlet is working properly.
The RJ-45 network cables are not connected.
Securely connect the network cables.
A DHCP server could not be found on the
network. Verify DHCP server configuration.
The RJ-45 network cables are not connected.
Securely connect the network cables.
The cable may be fault y. Se e if ano ther device
can communicate on the network using the
same cable.
The HP JetDirect 4000 is not fully boote d. Wait
for the bootup process to complete.
A critical defect has been detected. Power cycle
the unit to see if this corrects the problem.
6
Troubleshooting
Troubleshooting 6-1
Page 66

Condition Possible Cause/Solution
I can’t locate the HP
JetDirect 4000 on the
network.
The RJ-45 network cables are not connected.
Securely connect the network cables.
A network hub has lost AC power.
Re-establish AC power to the hub.
The HP JetDirect 4000 is not powered up.
Power up the print appliance on and let it boot
up.
(Also see Client Setup Problems below for
alternative causes/solutions.)
Web Interface Configuration Problems
Condition Possible Cause/Solution
I can’t print a test page. Incorrect printer IP address or DNS name.
Verify or correct the IP address.
Duplicate HP JetDire ct 4000 IP addres s. Verify
or correct the IP address.
Printer is offline or not presen t on the network .
Verify network connectivity and place printer
online.
I get browser errors when
trying to access the HP
JetDirect 4000.
You may be using a browser that is not
supported or has known limitations.
See Chapter 4, “Supported Web Browsers”,
page 4-1.
Web Interface Operation Problems
Condition Possible Cause/Solution
We had a power outage.
What do I need to do to
recover?
6-2 Troubleshooting
Jobs which were printing or being submitted
during the outage may need to be sent again
from the client PC, once the print appliance is
normally powered up again.
Jobs which were spooled but not yet printing
should require no act ion, as they w ill print onc e
the HP JetDirect 4000 is powered up again.
If print operations do not appear normal (new
jobs do not spool correctly) after the outage,
then power off and then power up the HP
JetDirect 4000.
Page 67

Condition Possible Cause/Solution
I have added a new printer
to the network. What
changes must I make to the
HP JetDirect 4000?
You must add a new queue w ith the printer’ s IP
address or DNS name in order to spool to the
new printer. See chapter 4, “Print Queues”,
page 4-16.
Client Setup Proble ms
Condition Possible Cause/Solution
I can’t locate the print
queue from the client.
When connected to a
printer that has been
configured for an HP
JetDirect 4000, I get the
message, “The server on
which the printer resides
does not have a suitable
NULL printer driver
installed. C lick OK if you
wish to install the driv er o n
your local machine”.
I can’t locate the HP
JetDirect 4000 on the
network.
The client is on a different subnet than the HP
JetDirect 4000. Verify that WINS is configured
correctly in “Network Settings”.
The Network Neighb orhood browser has not yet
updated. Try accessing the print appliance by
selecting Start from the task bar, and select
Find and Computer.
Click OK, and continue following the prompts to
perform the normal client printer driver
installation.
Network Neighborhood has not had enough
time to automaticall y update . This ma y take up
to 30 minutes. An alterna tive method is to select
the Windows Start button from the task bar,
select Find and Computer, and enter the name
or IP address of the HP JetDirect 4000.
You can also use the UNC path directly and
avoid browsing delays. (for example
\\spooler1\queue1).
Try accessing the print appliance with your
browser’s proxy server not enabled.
(Also see Hardware Se tup Problems abov e for
alternative causes/solutions.)
6
Troubleshooting
Troubleshooting 6-3
Page 68

Printing Problems
Condition Possible Cause/Solution
I can’t print from a client to
the intended printer,
although I have done so
previously.
I have not been able to print
from any client to the
intended printer.
A printer had to be taken off
the network for repair, and
it was replaced by one
having a different IP
address. Print jobs reach
the queue but never print.
The print applianc e is set up
to use DHCP. When I
powered it off and then
powered it back up again,
DHCP reassigned it to a
different IP address than it
had previously. Now the
clients can no longer print.
How can I avoid this?
I changed the print queue
name and now the clients
cannot print.
The selected queue may be paused. Unpause
the print queue. See Chapter 4, “Print Q ueues”,
page 4-16.
The IP address or queue name may not be
correctly configured for t he desired pri nter. See
Chapter 4, “Network Settings”, page 4-6.
First, pause the print que ue and then resume it.
If that is unsuccessful, delete the print queue
and then add the queue again.
When you add the queue, be sure you have
entered the new printer IP address, and
performed Add Printer on client machines.
Use a WINS server along with DHCP, so that
when the print applianc e powers up it will always
be reassigned the same IP address.
If you are not using WINS, you may alternati vely
set the print appliance IP add ress manually and
have the DHCP administrator select an IP
Address Pool range which excludes the print
appliance address.
Or, have the DHCP administrator supply the
print appliance with an “infinite lease” duration
for its assigned IP address.
You must use the Windo w s Add Printer wizard
at the clients and enter or browse to the new
queue name. You sho uld also delete t he client’s
old printer driver w hich refe rred to th e previ ous
queue name.
6-4 Troubleshooting
Page 69

Indicator Lights
There are four indicator lights (LEDs) on the front of the HP
JetDirect 4000 Print Appliance.
LED Normal Conditions
Power The Power LED should be ON when power is supplied
to the HP JetDirect 4000 Print Appliance.
Network The Network L ED should BLINK when there is
network activity between the HP JetDirect 4000 and
other network devices.
Disk The Disk LED should BLINK when there is disk
activity on the print appliance.
Alert The Alert LED should BLINK or be ON during initial
boot, but should turn OFF after bootup is complete.
If the Alert LED i s ON during normal operations, there
is a fault with the print appliance.
LED Problem Conditions
Condition Possible Cause/Solution
Power LED is not lit. Power failure. Restore AC power.
Bad power cord or power cord unplugged.
Verify and replace cord.
Network LED never blinks. Network connection is bad. Verify network
cable connections, replace cable.
Alert LED remains lit after
bootup is completed.
Critical failure is detected. Note the message on
LCD front panel. Power cycle the unit.
Contact HP.
6
Troubleshooting
Troubleshooting 6-5
Page 70

Getting Help
If the solutions described in this chapter don’t work, contact HP.
HP Customer Care Online
For online answers to questions about the HP JetDirect 4000 Print
Appliance, go to:
http://www.hp.com/support/printappliance
HP Customer Care Forum
To participate in a user forum discussing ideas and suggestions for
using the HP JetDirect 4000 Print Appliance, go to:
http://www.hp.com/go/forums
Select “Network Printing Support Forum”. Then select “HP
JetDirect Print Appliance”.
HP Customer Care by Phone
For assistance by telephone in the USA, call (208) 323-2551
(6am-6pm, M-F, MST).
For assistance by telephone outside the USA, use one of the
telephone numbers listed under “HP Customer Care Numbers” on
page C-4.
Or, to obtain a current global list of support telephone numbers and
services, you can go to:
http://www.hp.com/support/support_assistance
6-6 Troubleshooting
Page 71

Specifications
Physical
Dimensions 441 mm W x 63 mm H x 323 mm D
(17.4” W x 2.5” H x 12.7” D)
Weight 4.6 Kg (10.1 Lb)
Network Connection RJ-45
®
Serial Port DB-9. Supports all APC
supplies
Environmental
Temperature +5° to +40° C (41° to 104° F) operating
-40° to +70° C (-40° to 158° F) non-operating
Relative Humidity (%) 80% at 40° C
uninterruptible power
A
Power
Power 120/240 VAC 50/60 Hz
Power consumption 100-127 VAC – 1.0 A
200-240 VAC – .75 A
Power Connection IEC-320
Power Cable Standard IEC-320 female; terminated by male
plug appropriate for country of use
Specifications A-1
A
Specifications
Page 72

A-2 Specifications
Page 73

B
Regulatory Statements
FCC Statement (USA)
General Information. This device complies with Part 15 of the
FCC Rules. Operation is subject to the following two conditions: (1)
This device may not cause interference, and (2) this device must
accept any interference received, including interference that may
cause undesired operation.
Pursuant to Part 15.21 of the FCC Rules, any changes or
modifications to this equipment not expressly approved by the
Hewlett-Packard Company may cause interference and void the
FCC authorization to operate this equipment.
The Federal Communications Commission has prepared a booklet
titled Interference Handbook (1986), which may be helpful to you.
This booklet (stock number 004-000-004505-7) may be purchased
from the Superintendent of Documents, U.S. Government Printing
Office, Washington, D.C. 20402.
This equipment has been tested and found to comply with the limits
for a Class A digital device, pursuant to Part 15 of the FCC Rules.
These limits are desig ned to provide reasonable prot ection agains t
interference in a commercial environment. This equipment
generates, uses and can radiate ra dio fr eq uency energy a nd, if not
installed and used in accordance with the instructions, may cause
interference to radio communications.
Installing this equipment in an FCC Level B product results in an
FCC Level A Composite System (as defined in the FCC Rules and
Regulations) when attached to an Ethernet (IEEE 802.3/802.3u) or
Token Ring (IEEE 802.5) network.
Regulatory Statements B-1
B
Regulatory
Statements
Page 74

European Community
Note: This is a class A product. In a domestic
environment, this product may cause radio
interference, in which case the user may be required
to take adequate measures.
Electromagnetic Emissions
FCC part 15 Class A (U.S.A.), ICES-003 (Canada), CISPR-22/
EN55022 Class A, AS/NZS 3548 (Australia/New Zealand).
Note: For EU compliance, see the Declaration of
Conformity.
Safety
Products comply with:
IEC 950: (1991)+A1,A2,A3,A4/EN60950 (1992)+A1,A2,A3,A4
UL 1950
CSA 950
Australia
This equipment complies with Australian EMC
requirements.
Canada
This equipment complies with Canadian EMC Class-A
requirements.
B-2 Regulatory Statements
Page 75

Declaration of Conformity
The Declaration of Conformity complies with ISO/IEC Guide 22 and
EN45014. It identifies the product, the manufacturer's name and
address, and the applicable specifications that are recognized in the
European Community.
DECLARATION OF CONFORMITY
according to ISO/IEC Guide 22 and EN45014
Manufacturer' s Name: Hewlett-Packard Compan y
Manufacturer' s Address:
declares that the product:
Product Name:
Model Number:
conforms to the fo llowing Product Specifications:
Safety: EN60950 (1992) +A1,A2,A3,A4,AII / IEC 950 (1991) +A1,A2,A3,A4
EN60825-1 (1994) / IEC 825-1 (1993), Class 1
GB 4943 (1995)
EMC: EN 55022 (1994) +A1,A2 / CISPR-22 (1993) +A1,A2 Class A
GB 9254 (1988)
EN 61000-3-2
EN 61000-3-3
EN 55024 (1998)
IEC 61000-4-2 (1995); EN 61000-4-2 (1995)
IEC 61000-4-3 (1995); EN 61000-4-3 (1996)
IEC 61000-4-4 (1995); EN 61000-4-4 (1995)
IEC 61000-4-5 (1995); EN 61000-4-5 (1995)
IEC 61000-4-6 (1996); EN 61000-4-6 (1996)
IEC 61000-4-8 (1993); EN 61000-4-8 (1993)
IEC 61000-4-11 (1994); EN 61000-4-11 (1994)
Supplementary Information:
The product herewith complies with the requirements of the Low Voltage
Directive 73/23/EEC and the EMC Directive 89/336/EEC and carries th e CE
marking accordingly. Shielded cables are recommended to meet the above
specifications.
Tested with Hewlett-Packard Co. products only.
8000 Foothills Blvd.
Roseville, CA 95747-567 7
U.S.A.
HP Jetdirect 4000 Print Appliance
J4107A
B
Regulatory
Statements
Roseville, November 23, 1999
Grant Marten, Product Regulations Manager
European Contact: Your local Hewlett-Packard Sales and Service Office or Hewlett-Packard GmbH, Department TRE,
Herrenberger Strasse 130, D-71034 Böblingen (FAX:+49-7031-14-3143).
Regulatory Statements B-3
Page 76

B-4 Regulatory Statements
Page 77

C
W arranty S ervice and Customer Care
HEWLETT-PACKARD LIMITED
WARRANTY STATEMENT
HP JetDirect 4000 Print Appliance (J4107A)
To get information on service in or outside of the USA, access
the following URL:
http://www.hp.com/support/support_assistance
1. HP warrants to you, the end-user cust ome r, th at HP hardwa re,
accessories and supplies will be free from defects in materials and
workmanship after the date of purchase, for the period of one (1)
year. If HP receives notice of such defects during the warranty
period, HP will, at its option, e ither repai r or replac e products that
prove to be defective. Replacement products may be either new or
equivalent in performance to new.
2. HP warrants to you that HP software will not fail to execute its
programming instructions after the date of purchase, for a period
of NINETY (90) DAYS, due to defects in material and workmanship
when properly installed and used. If HP receives notice of such
defects during the NINETY (90) day period, HP will replace
software that does not execute its programming instructions due to
such defects.
3. You are responsible for restoring any configuration or data. I n no
event will HP or its affiliates, subcontractors or suppliers be liable
for any of the following: damages for loss of data, or software
restoration; damages relating to Customer's procurement of
substitute products or services (i.e., “cost of cover”); or incidental,
special or consequential damages (i ncluding downtime costs or lost
profits).
4. The remedies in this exhibit and HP’s terms and conditions of
sale and service are customer’s sole and exclusive remedies.
5. HP does not warrant that the operation of HP products will be
uninterrupted or error free. If HP is unable, within a reasonable
time, to repair or replace any product to a condition as warranted,
you will be entitled to a refund of the purchase price upon prompt
return of the product.
6. HP products may contain remanufactured parts equivalent to
new in performance or may have been subject to incidental use.
C
Warranty and
Customer Care
Warranty Service and Custom er C ar e C-1
Page 78

7. Warranty does not apply to defects resulting from (a) improper
or inadequate maintenance or calibration, (b) software, interfacing,
parts or supplies not supplied by HP, (c) unauthorized modi fication
or misuse, (d) operation outside of the published environmental
specifications for the product, or (e) improper site preparation or
maintenance.
8. TO THE EXTENT ALLOWED BY LOCAL LAW, THE ABOVE
WARRANTIES ARE EXCLUSIVE AND NO OTHER WARRANTY
OR CONDITION, WHETHER WRITTEN OR ORAL, IS
EXPRESSED OR IMPLIED AND HP SPECIFICALLY
DISCLAIMS ANY IMPLIED WARRANTIES OR CONDITIONS OF
MERCHANTABILITY, SATISFACTORY QUALITY, AND
FITNESS FOR A PARTICULAR PURPOSE. Some countries, states
or provinces do not allow limitations on the duration of an implied
warranty, so the above limitation or exclusion might not apply to
you. This warranty gives you specific legal rights and you might
also have other rights that vary from country to country, state to
state, or province to province.
9. HP will be liable for damage to tangible property per incident up
to the greater of $300,000 or the actual amount paid for the product
that is the subject of the claim, and for damages for bodily injury or
death, to the extent that all such damages are determined by a court
of competent jurisdiction to have been directly caused by a defective
HP product.
10. TO THE EXTENT AL LOWED BY LOCAL LAW, THE
REMEDIES IN THIS WARRANTY STATEMENT ARE YOUR
SOLE AND EXCLUSIVE REMEDIES. EXCEPT AS INDICATED
ABOVE, IN NO EVENT WILL HP OR ITS SUPPLIERS BE
LIABLE FOR LOSS OF DATA OR FOR DIRECT, SPECIAL,
INCIDENTAL, CONSEQUENTIAL (INCLUDING LOST PROFIT
OR DATA), OR OTHER DAMAGE, WHETHER BASED IN
CONTRACT, TORT, OR OTHERWISE. Some countries, states or
provinces do not allow the exclusion or limitation of incidental or
consequential damages, so the above lim itation or exclusion may
not apply to you.
THE WARRANTY TERMS CONTAINED IN THIS STATEMENT,
EXCEPT TO THE EXTENT LAWFULLY PERMITTED, DO NOT
EXCLUDE, RESTRICT OR MODIFY AND ARE IN ADDITION TO
THE MANDATORY STATUTORY RIGHTS APPLICABLE TO
THE SALE OF THIS PRODUCT TO YOU.
C-2 Warranty Service and Customer Care
Page 79

Your Authorized Dealer
If you encounter difficulty, begin by contacting t he person who sold
you the HP JetDirect print server to you. Your HP Authorized
Dealer will be familiar with your requirements and can provide
assistance.
During the warranty period, HP will replace the unit at no charge
provided the defective unit is returned. You may return the unit to
your HP Aut horize d Dealer or your local HP Sales and Service Office
representative. Be sure to include a copy of your purchase receipt.
For warranty service on HP JetDirect products, call the HP
Customer Care Center. When calling, please have the following
information ready:
HP JetDirect product you are calling about (HP JetDirect 4 000 Print
Appliance)
Model number of the product (J4107A)
Serial number of the product
Complete description of the problem
Proof of purchase of your product
Your shipping address
The HP Customer Care representative will help you with
troubleshooting, an d advise you on warranty service.
Service Billing (Out of Warranty)
When ordering a replacement unit for out-of-warranty service, you
may be charged a repair cost. See your HP Authorized Dealer or
your local HP Sales and Service Office representative. Or, you can
call HP at (800) 227-8164 (USA only).
Service Outside the USA
Customers outside the USA should contact their HP Authorized
Dealer or HP Sales and Service Office to obtain information on
prices, exchange unit availability and instructions.
Warranty Service and Custom er C ar e C-3
C
Warranty and
Customer Care
Page 80

Hewlett-Packard Year 2000 W arrant y
Subject to all of the terms and limitations of the HP Limited
Warranty Stat ement pr ovided with this HP Produc t, HP war rants
that this HP Product will be able to accurately process date data
(including, but not limited to, calculating, comparing, and
sequencing) from, into, and between the twentieth and twenty-first
centuries, and the years 1999 and 2000, including leap year
calculations, when used in accordance with the Product
documentation provided by HP (including any instructions for
installing patches or upgrades), provided that all other products
(e.g. hardware, software, firmware) used in combination with s uch
HP Product(s) properly exchang e date data with it. The durat ion of
the Year 2000 warranty extends through January 31, 2001.
Firmware Upgrades
Hewlett-Packard offers downloadable firmware upgrades for the
HP JetDirect 4000 Print Appliance. The firmware upgrades are
available on the World Wide Web, by FTP, and on disk.
Current information about drivers, software versions, and flash
images are available through the following means:
Customer Care Electronic Support Services
World Wide Web Access HP's Customer Care Center online at:
http://www.hp.com/support/printappliance
HP Software and
Accessories
Distribution Center
FTP Site Download printer drivers and upgrades from HP's
Order drivers and upg rades for HP printers by calling
the HP Software and Accessories Distribution Center
at (661) 257-5565 (USA only).
anonymous FTP site at:
ftp.hp.com/pub/networking/software
HP Customer Care Numbers
Netherlands + 31 (0)20 606 8751
United Kingdom + 44 (0)171 512 52 02
USA 208 323 2551
For all other countries, contact your reseller.
C-4 Warranty Service and Customer Care
Page 81

Index
A
Add print queue 4-17
Administrator account 4-9
Administrator functions 4-3
Administrator name 4-9
Alert LED 3-2
Automatic configuration 2-5
B
Back up settings 2-13, 4-21
Banner pa ge 4-18
Benefits 1-2
C
Cable connections 2-4
Cancel button 3-3
Change password
front panel 3-7
web interface 4-9
Choice indicators 3-3
Client access 2-14
Client setup problems 6-3
Components 2-2
Configuration
automatic 2-5
back up settings 2-13
backing up 4-21
client access 2-14
DHCP 2-5
front panel 3-5
IP settings 2-5
manual 2-6
restoring 4-22
web interface 2-8
Configuration Summary 4-11
Connections 2-4
Cursor 3-3
Customer Care
forum 6-6
online 6-6
phone 6-6
D
Date, setting 4- 5
Daylight savings time 4-5
Default gateway 4-7
Default password 4-3
Default user name 4-3
Delete queue 4-20
Desktop installation 2-3
DHCP 4-6
configuration 2-5
DHCP mode 3-6
obtaining IP address
automatically 4-6
Diagnostics 4-11
Direction buttons 3-3
Disk activity LED 3-2
Distribution center C-4
DNS address 4-7
DNS name
accessing the web interface
by 4-1
Domain name 4-8
Drivers 5-1
Drop shipping to remote sites 2-1
Duplicate IP address 2-6
E
Edit queue 4-19
Embedded web server 4-1
Enter button 3-3
F
Factory defaults 3-8
Features 1-2
Firmware upgrades C-4
Frequently asked questions 5-1
Front panel 3-1
making entries 3-4
operations 3-4
Front panel messages 3-4
FTP site C-4
Index-1
Page 82

H
Hardware problems 6-1
Help 4-2
HP Customer Care Center C-4
HP JetDirect 4000 1-1
HP JetDirect Print Server 4-18
I
Indicator lights 6-5
Install upgrade 4-14
Installation 2-1
desktop 2-3
rack shelf 2-3
rackmount 2-3
under-printer 2-3
Introduction 1-1
IP address 4-7
accessing the web interface
by 4-1
duplicate 2-6
entering manually 4-7
obtaining autom at ic all y 4 - 6
IP domain name 4-8
IP settings, configuring 2-5
J
Jobs 4-16, 4-20
L
LCD display 3-2
LEDs 3-2, 6-5
alert 3-2
disk activity 3-2
network activity 3-2
normal conditions 6-5
power on 3-2
problem conditions 6-5
M
Macintosh clients 5-3
Manual configuration 2-6
Manual mode (front panel) 3-5
Maximum size of print jobs 5-1
Messages
at power on 3-4
front panel 3-4
normal operations 3-4
N
Network activity LED 3-2
Network settings 4-6
Non-HP print server 4-18
Novell 5-3
NT domain 4-8
NULL driver message 2-16
O
Online help 4-2
Operations
front panel 3-4
general 1-2
P
Password
changing web interface 4-9
entering web inter fa ce 4- 3
front panel 3-7
web interface 4-3
Pause queue 4-19
Port, print server 4-18
Power button 3-1
Power consumption A-1
Power on LED 3-2
Power outages 5-1
Powering down 5-1
Pre-configuring for a remote site
5-1
Pre-setup 2-1
Print Appliance Name 4-6
Print jobs 4-16
maximum size 5-1
size 4-20
status 4-20
viewing 4-20
Print queue
add 4-17
add another 4-18
delete 4-20
Index-2
Page 83

pausing 4-19
properties 4-19
resuming 4-19
Print queues 4-16
Print server
HP JetDirect 4-18
non-HP 4-18
port 4-18
Printer address 4-16
Printer drivers 5-1
Printing problems 6-4
Problems
client setup 6-3
hardware 6-1
printing 6-4
web interfa c e co nf iguration
6-2
web interface operation 6-2
Proxies 5-3
Q
Queue
add 4-17
add multiple 4-18
delete 4-20
name 4-16
pausing 4-19
properties 4-19
resuming 4-19
status 4-16
Queues 4-16
S
Settings
backing up 4-21
date and time 4-5
network 4-6
restoring 4-22
Setup
client access 2-14
Size 4-20
Specifications A-1
environmental A-1
physical A-1
Status
print jobs 4-20
queue 4-16
Subnet mask 4-7
Supported web browsers 4-1
T
Time, setting 4 -5
U
Uninterruptible power supply
1-2, 5-2
UNIX clients 5-3
Unpacking 2-2
Unplugging 5-2
Upgrade, install 4-14
Upgrades C-4
UPS 1-2, 5-2
User name 4-3
R
Rack shelf installation 2-3
Rackmount installation 2-3
Rebooting (fron web interface)
4-24
Regulatory stateme n ts B-1
Resetting to factory defaults 3-8
to restore default password
4-3, 4-10
Restarting (from web interface)
4-24
Restore settings 4-22
Resume queue 4-19
V
View jobs 4-20
W
Warranty C-1
Web interface 4-1
accessing 4-1
configuration problems 6-2
operation problems 6-2
supported browsers 4-1
Web JetAdmin 5-2
Web server 4-1
Index-3
Page 84

WINS server address 4-7
Workgroup 4-8
World Wide Web 1-2, C-4
Index-4
Page 85

Index-5
Page 86

Index-6
Page 87

Page 88

©Copyright 2000
Hewlett-Packard Company
Printed in Singapore 5/2000
Manual Part Number
5969-3506
*5969-3506*
 Loading...