

Page 1

Page 2

Page 3

hp embedded web server
for hp LaserJet printers
user guide
user guide
user guideuser guide
Page 4

Trademark Credits
Microsoft ® is a U.S.
registered trademark of
Microsoft Corporation.
Netscape is a U.S. trademark
of Netscape Communications
Corporation.
UNIX ® is a registered
trademark of the Open Group.
Windows ® and
Windows NT ® are U.S.
registered trademarks of
Microsoft Corp.
Warranty
The information contained in
this document or software is
subject to change without
notice.
Hewlett-Packard makes no
warranty of any kind with
respect to this information.
HEWLETT-PACKARD
SPECIFICALLY DISCLAIMS
THE IMPLIED WARRANTY
OF MERCHANTABILITY AND
FITNESS FOR A
PARTICULAR PURPOSE.
Hewlett-Packard shall not be
liable for any direct, indirect,
incidental, consequential, or
other damage alleged in
connection with the furnishing
or use of this information.
©Copyright Hewlett-Packard
Company, 2001
All Rights Reserved.
Reproduction, adaptation, or
translation without prior written
permission is prohibited,
except as allowed under the
copyright laws.
First Edition, January 2001
Page 5

Contents
Introducing the HP Embedded Web Server ............................................... 3
Viewing Printer Status with the Home Pages............................................. 9
Configuring the Printer with the Device Pages......................................... 17
Managing the Network with the Networking Pages.................................. 41
Overview............................................................................................... 3
Features ...............................................................................................4
Additional Features with a Permanent Storage Device ................... 5
Introducing ChaiVM (Embedded Virtual Machine)...........................6
Accessing the HP Embedded Web Server ........................................... 7
System Requirements ..................................................................... 7
Viewing the HP Embedded Web Server.......................................... 7
Navigating the HP Embedded Web Server........................................... 8
Overview............................................................................................... 9
Printer Status...................................................................................... 10
Configuration Page.............................................................................11
Supplies Status................................................................................... 12
Event Log ...........................................................................................13
Usage Page........................................................................................ 14
Device Information..............................................................................15
Overview............................................................................................. 17
Configure Printer.................................................................................18
Selecting Paper Size.....................................................................20
Alerts ..................................................................................................21
Configuring Alert Notification......................................................... 23
Refining Event Notification ............................................................ 27
Email................................................................................................... 30
Configuring Outgoing Mail............................................................. 31
Configuring Incoming Mail............................................................. 32
Using Email Command and Response..........................................33
Security............................................................................................... 35
Other Links ......................................................................................... 36
Adding a Link.................................................................................37
Removing a Link............................................................................37
Device Information..............................................................................38
Language............................................................................................ 39
Overview............................................................................................. 41
Contents 1
Page 6

Appendix A – HP Web JetAdmin and the HP Embedded Web Server.....43
Appendix B – How Do I?.......................................................................... 45
Sharing Printer Information................................................................. 45
Setting Up the Printer to Send E-mail Messages................................ 46
Setting Up the Printer to Receive and Respond to E-mail Messages. 52
Index ........................................................................................................57
2 Contents
Page 7
Overview
Introducing the
Introducing the
Introducing theIntroducing the
HP
HP Embedded Web Server
HPHP
Embedded Web Server
Embedded Web Server Embedded Web Server
A
web server
much in the same way that an operating system, such as Windows,
provides an environment for programs to run on your PC. The output from
these programs can then be displayed by a web browser, such as
Microsoft Internet Explorer or Netscape Navigator.
When a web server is “embedded”, that means it resides on a hardware
device (such as a printer) or in firmware, rather than as software that is
loaded on a network server.
The advantage of an
to the printer that anyone with a network-connected PC and a standard
web browser can access. There is no special software to install or
configure.
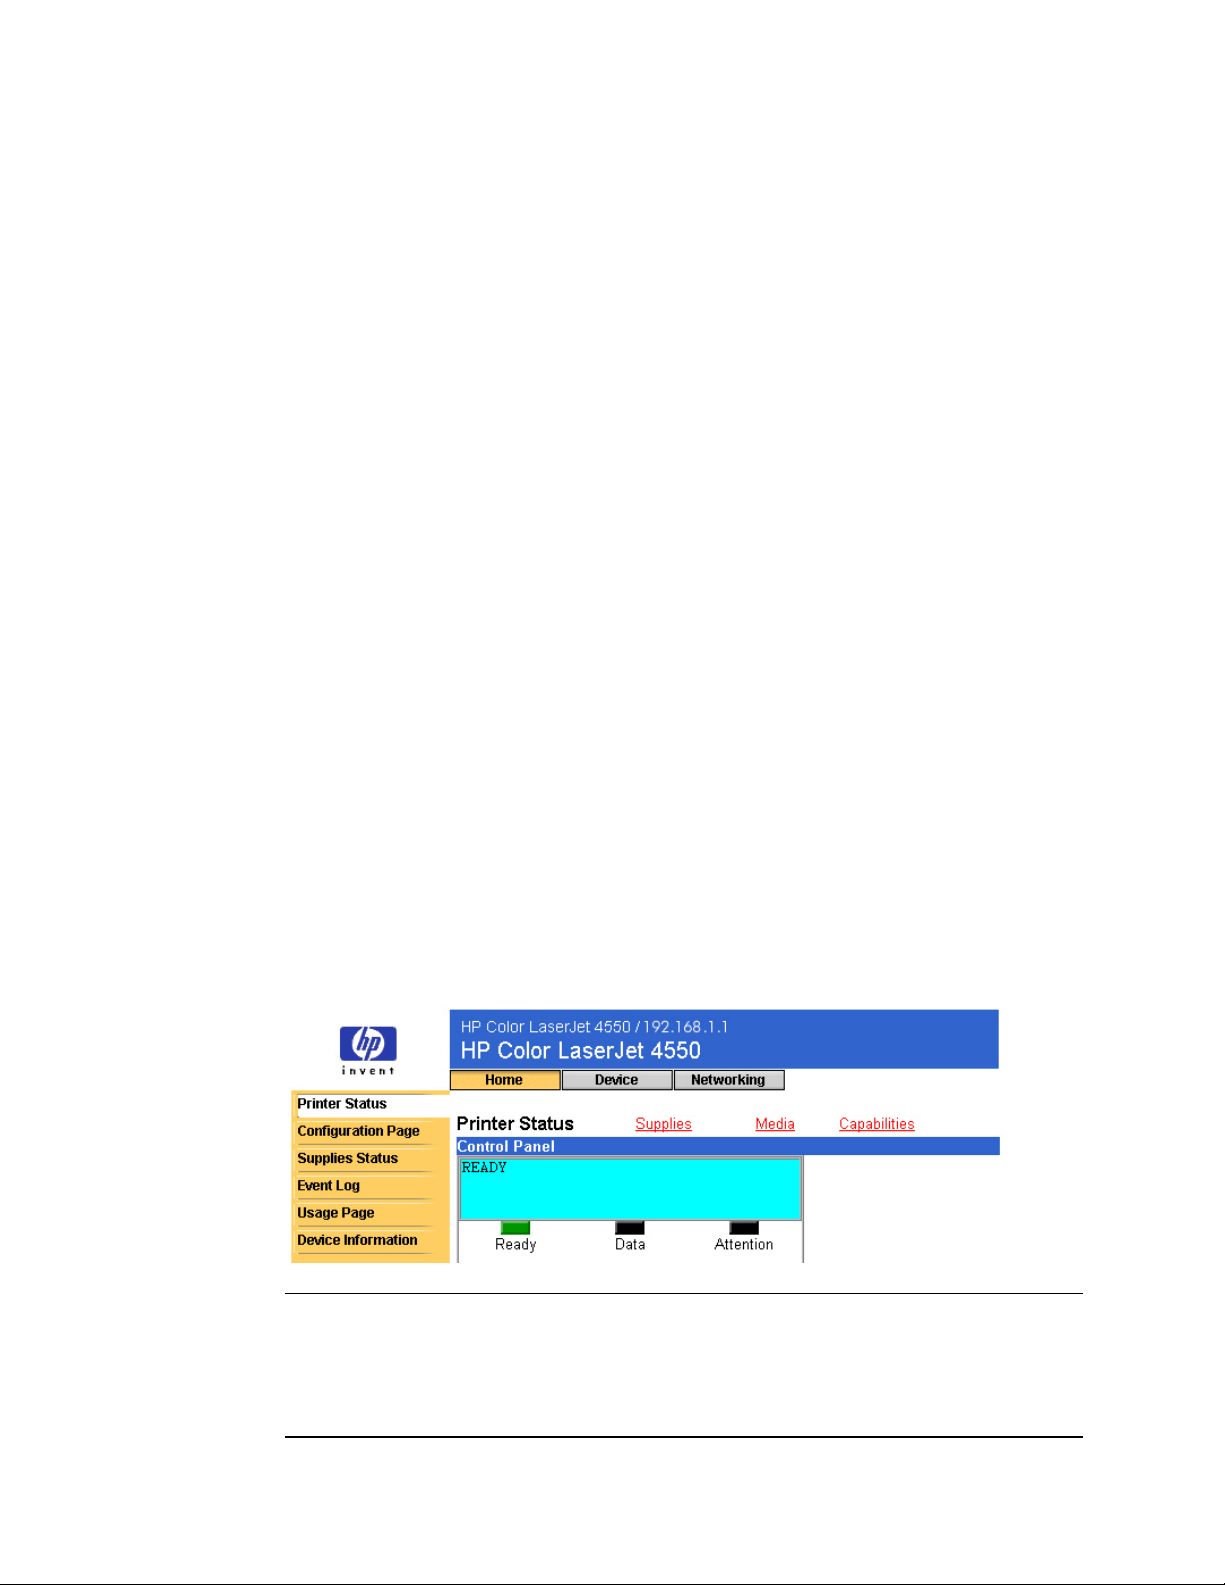
The HP Embedded Web Server helps you to display status information,
change settings, and manage the printer from the comfort of your PC.
The top of the Home page is shown below.
provides an environment in which web programs may run,
embedded web server
is that it provides an interface
Note
The HP Embedded Web Server screens shown in this guide are for the
HP Color LaserJet 4550 series printer. If you are using a different printer
model, you will notice slight variations in the embedded web server
appearance and features.
Introducing the HP Embedded Web Server 3
Page 8

Features
The HP Embedded Web Server allows you to view printer and network
card status and manage printing functions from your PC. With the
HP Embedded Web Server, you can do the following:
•
•
•
•
•
•
•
•
•
•
View printer control panel messages and status lights.
Determine the remaining life on all consumables.
Order consumables.
View and change tray configurations.
View and change the printer configuration.
View and print internal pages.
Receive notification of printer events.
Add or customize links to other web sites.
Select the language in which to display the embedded web server
pages.
View and change network card configuration.
4 Introducing the HP Embedded Web Server
Page 9

Additional Features with a Permanent Storage Device
If you have a permanent storage device installed in your printer (such as a
hard disk), you can view, set up, and retain additional information.
Usage Page
•
gives a page count for each size of media that has passed through the
printer and shows the average percentage of toner coverage per page
for each color; without the extra storage, the Usage Page is not
available.
Alerts
•
with up to 20 recipients on each of the four lists; without the extra
storage, you can send alerts to only two e-mail addresses.
Other Links
•
to the web sites of your choice; without the extra storage, you can add
one additional link.
A hard disk may have shipped with your printer, depending on your printer
model. To find out if you have a hard disk, print a configuration page. (Or
view the embedded web server Configuration Page. See page 11.) The
configuration page provides a summary of all installed accessories.
To print a configuration page:
1. On the printer control panel, press
displays.
2. Press
—With a hard disk, you can set up four different notification lists,
Item
—With a hard disk, you can view the Usage Page, which
—With a hard disk, you can add up to five additional links
Menu
until PRINT CONFIGURATION displays.
until INFORMATION MENU
3. Press
completed, the printer will return to the READY state.
If your printer does not have a hard disk, you can order one. For more
information, see the user guide that came with your printer, or go to:
http://www.hp.com/go/buy_hp (inside the United States) or
http://www.hp.com/country/us/eng/othercountriesbuy.htm.
Select
to print the configuration page. After the process is
Introducing the HP Embedded Web Server 5
Page 10

Introducing ChaiVM (Embedded Virtual Machine)
The printer also includes an embedded virtual machine for running
Java ™ applications, called ChaiVM. This infrastructure inside the printer
allows for development of extended solutions, helps solve problems, and
makes printer management easier. The embedded virtual machine has
been specifically designed to make communication over the network or
Internet easy.
Once you have this generic virtual machine operating system, you have
several new capabilities:
Applications can be developed on a PC with confidence that they will
•
run on the embedded virtual machine. No custom development
environment is required. A Java application that can run on ChaiVM
virtual machine in a Windows 98 environment can also run in a
Macintosh or a printer. This makes it easier and faster for developers
to create custom printer capabilities.
Printer firmware, or other applications, can be released and updated
•
later.
All of this can be done dynamically: an application can be sent to run
•
on the embedded virtual machine (a self-test diagnostic program, for
example), and the application can be deleted when it is done.
Applications don't have to be permanently stored on the printer.
These capabilities apply to all printers with ChaiVM.
6 Introducing the HP Embedded Web Server
Page 11
Accessing the HP Embedded Web Server
System Requirements
To use the HP Embedded Web Server, you must have the following:
a TCP/IP-based network
•
a web browser installed on your computer, preferably either Netscape
•
Navigator 4.7X or Microsoft Internet Explorer 5.0X and above
Note
The embedded web server can be accessed from any operating system
that supports the TCP/IP protocol and a web browser.
The embedded web server does not support IPX-based network printer
connections and cannot be accessed with a parallel cable.
You cannot view the embedded web server pages from outside a firewall.
Viewing the HP Embedded Web Server
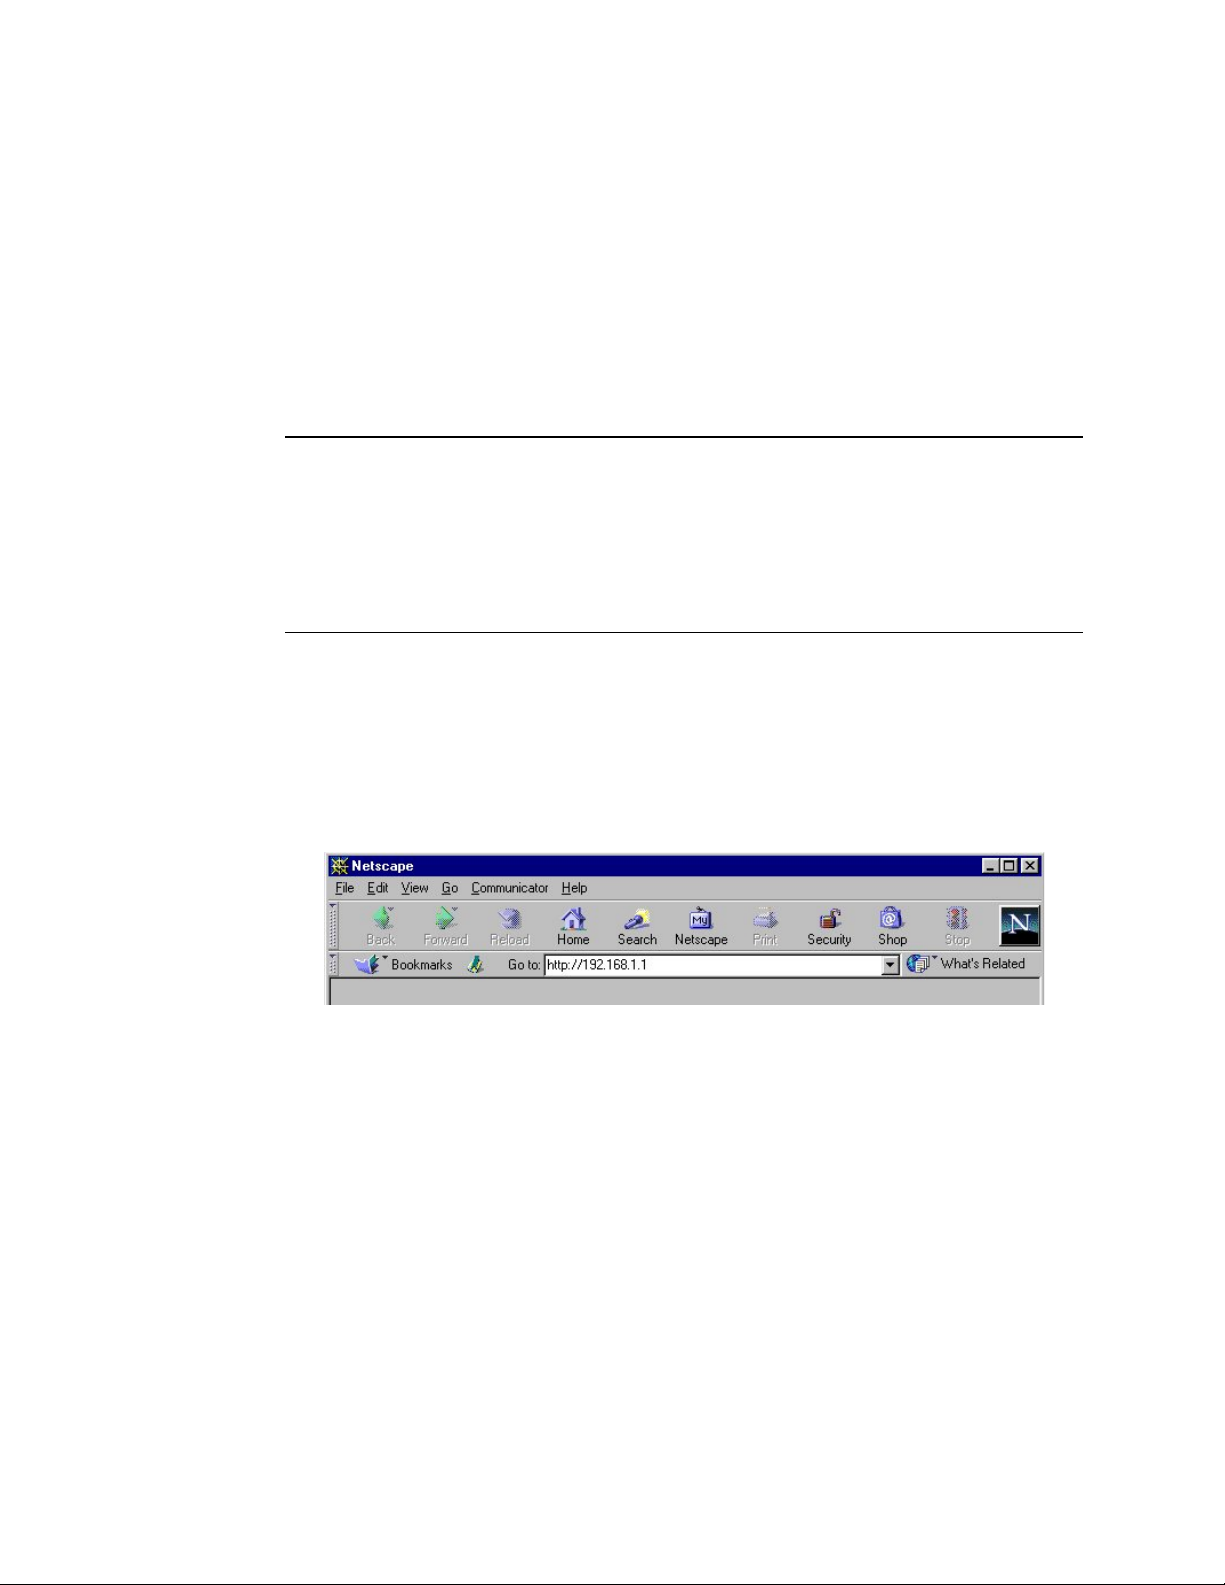
1. Launch your web browser.
2. In the
printer (for example: http://192.168.1.1) or the host name (for example:
http://myprinter).
If you do not know the IP address for the printer, it is listed on the
printer configuration page under Protocol Information in the TCP/IP
section.
To print a configuration page:
a. On the printer control panel, press
b. Press
c. Press
Address:
MENU displays.
Item
Select
completed, the printer will return to the READY state.
or
Go to:
until PRINT CONFIGURATION displays.
to print the configuration page. After the process is
field, type the IP address assigned to the
Menu
until INFORMATION
Introducing the HP Embedded Web Server 7
Page 12

Navigating the HP Embedded Web Server
The HP Embedded Web Server has three sets of internal web pages for
viewing printer information and for changing configuration options. You
can access these pages by clicking one of the following three tabs: Home,
Device, and Networking.
The
•
The
•
The
•
These pages may also provide additional links. For more information, see
“Other Links” on page 36.
Note
The HP Embedded Web Server screens shown in this guide are for the
HP Color LaserJet 4550 series printer. If you are using a different printer
model, you will notice slight variations in the embedded web server
appearance and features.
Home
cannot configure the printer from these pages. (For more information,
see page 9.)
Device
(For more information, see page 17.)
Networking
the printer’s network card from your PC. (For more information, see
page 41.)
pages are the informational pages for the printer. You
pages allow you to configure the printer from your PC.
pages allow you to view network status and configure
8 Introducing the HP Embedded Web Server
Page 13

Overview
The Home pages are the informational pages for the printer. You cannot
configure the printer from these pages. The table below lists each of the
Home pages and describes its features. For more information, see the
page indicated.
Home Page Features
Viewing Printer Status
Viewing Printer Status
Viewing Printer StatusViewing Printer Status
with
with the Home Pages
withwith
the Home Pages
the Home Pages the Home Pages
Printer Status
(page 10)
Configuration
Page (page 11)
Supplies Status
(page 12)
Event Log
(page 13)
Usage Page
(page 14)
Provides remote Go and Job Cancel functions;
displays control panel messages and status lights
(including help); allows you to set the refresh rate; and
displays consumable life levels, input tray
configurations, and installed accessories.
Displays all printer configuration settings.
Shows consumables levels and assists with
consumables ordering.
Shows the most recent printer events and errors.
Displays the printer’s name and serial number, gives a
page count for each size of media that has passed
through the printer, and shows the average
percentage of toner coverage per page for each color.
(This page is only available if your printer has a
permanent storage device installed.)
Device
Information
(page 15)
Viewing Printer Status with the Home Pages 9
Displays the device description, asset number,
company name, contact person, and the printer’s
IP address, model, number, and serial number.
Page 14
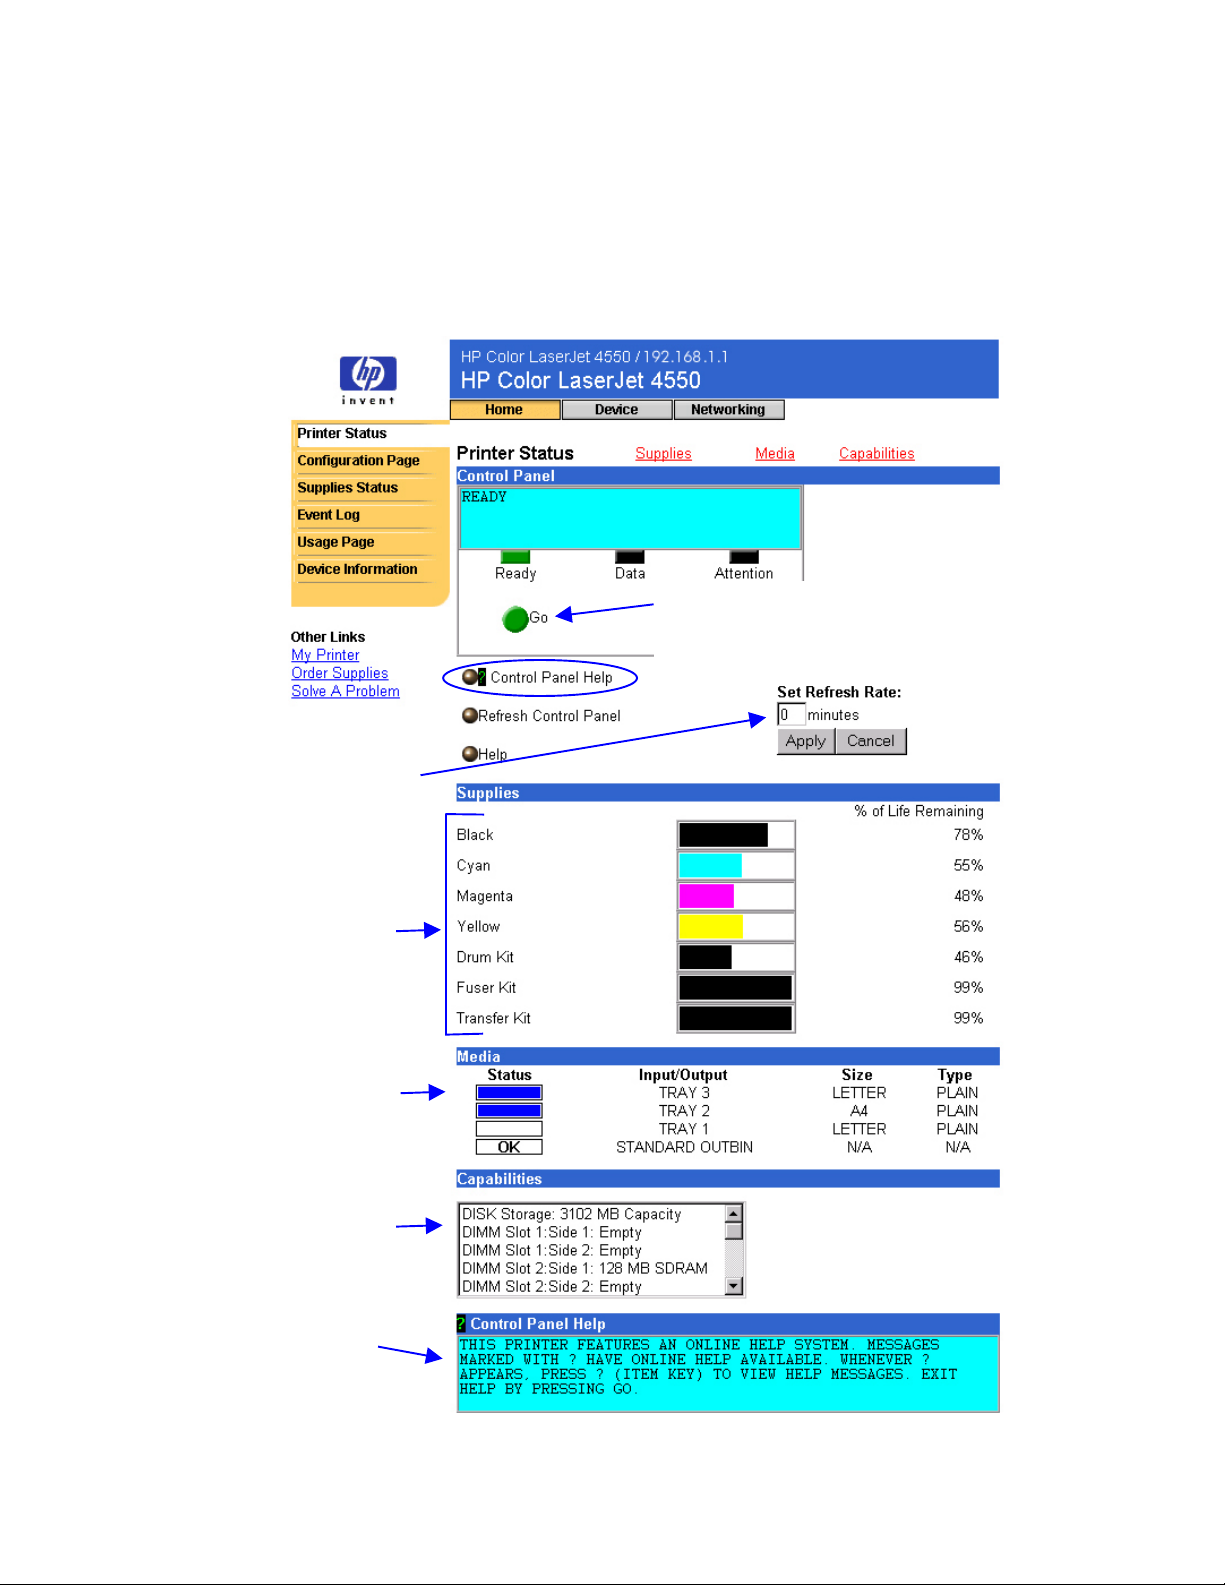
Printer Status
Under
Control Panel
appear on the printer control panel are displayed. Click
to view any help that is currently available on the printer control
Help
panel. (This appears at the bottom of the screen.)
You can set the rate at which
the embedded web server will
check the printer status.
(Enter the number of minutes
and click Apply.)
, the messages and status lights that currently
Control Panel
You can click the printer’s Go button to continue
printing or to begin a print job. The Job Cancel
button must be enabled from the Security page.
(From the top of the screen, click Device, then on
the left navigational bar, click Security.)
Displays the percentage of
life remaining for each
consumable.
Displays the status and
configuration information for
the input trays and output
bins.
Shows which accessories
are installed in the printer.
Displays any help that is
currently available on the
printer control panel when
you press
(Item key).
[?]
[?]
[?][?]
10 Viewing Printer Status with the Home Pages
Page 15
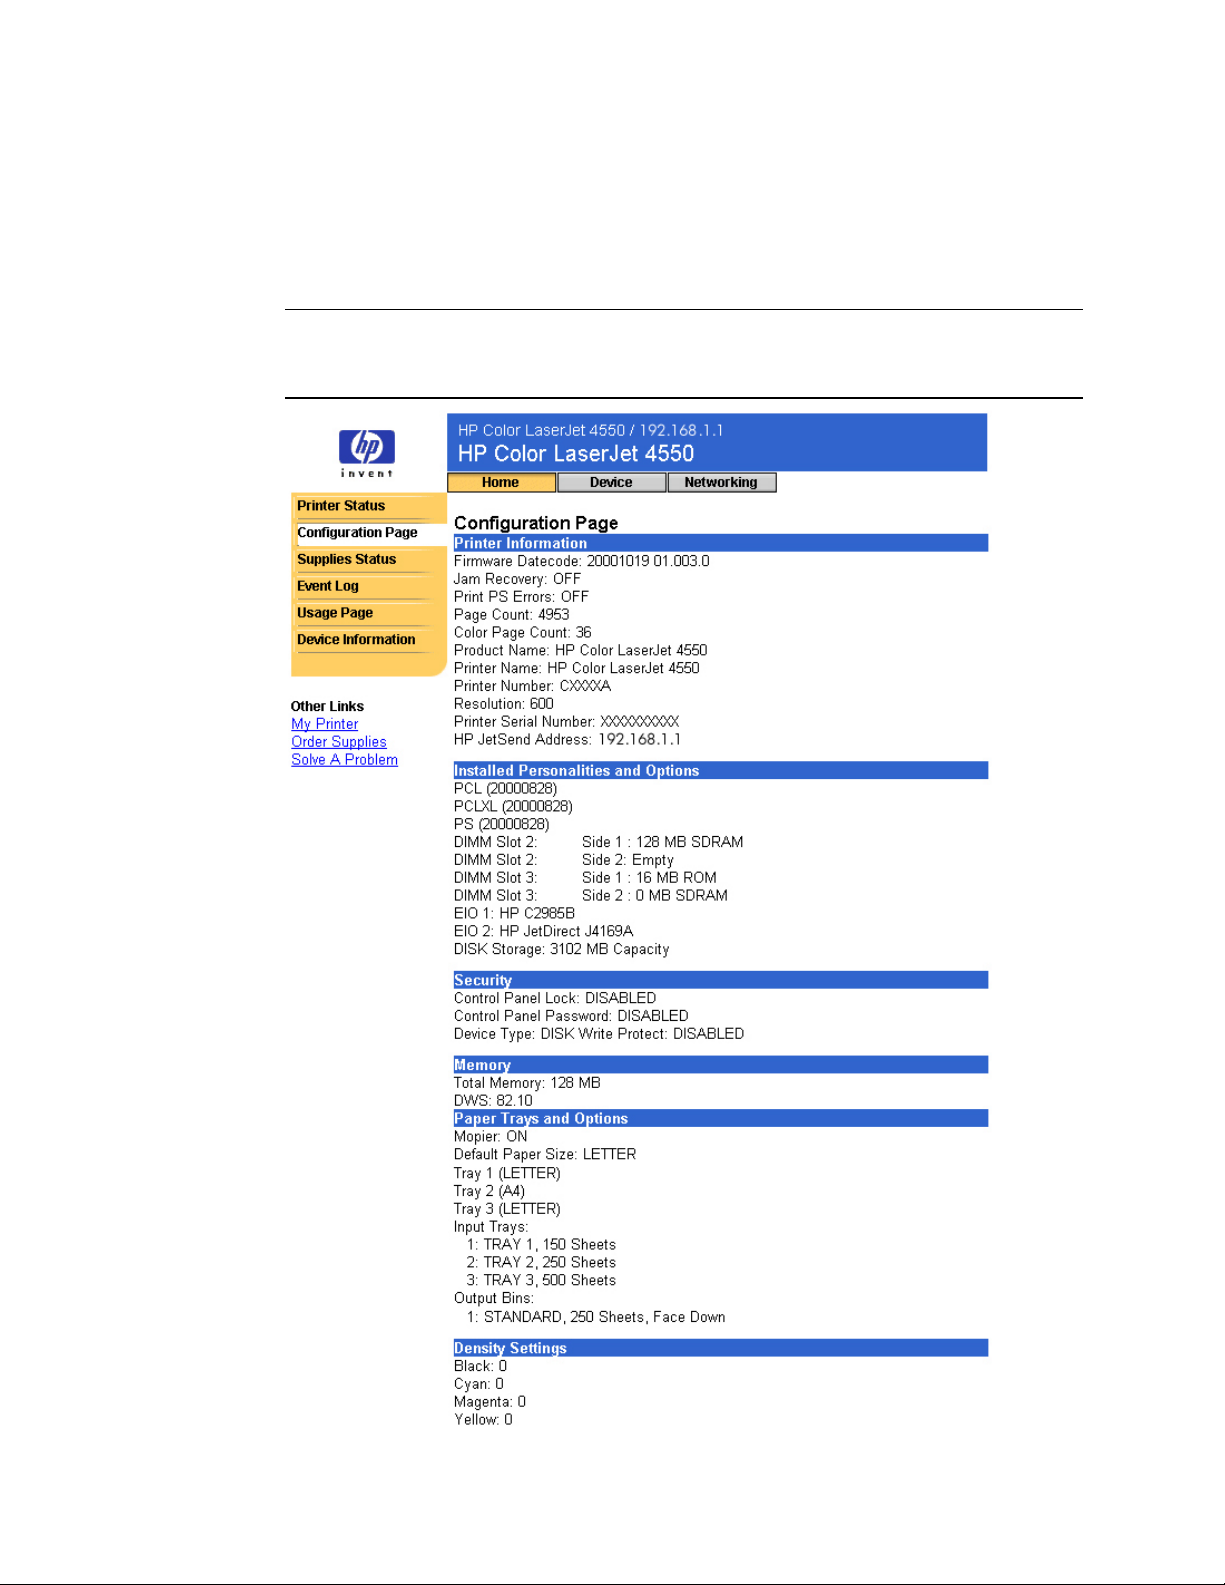
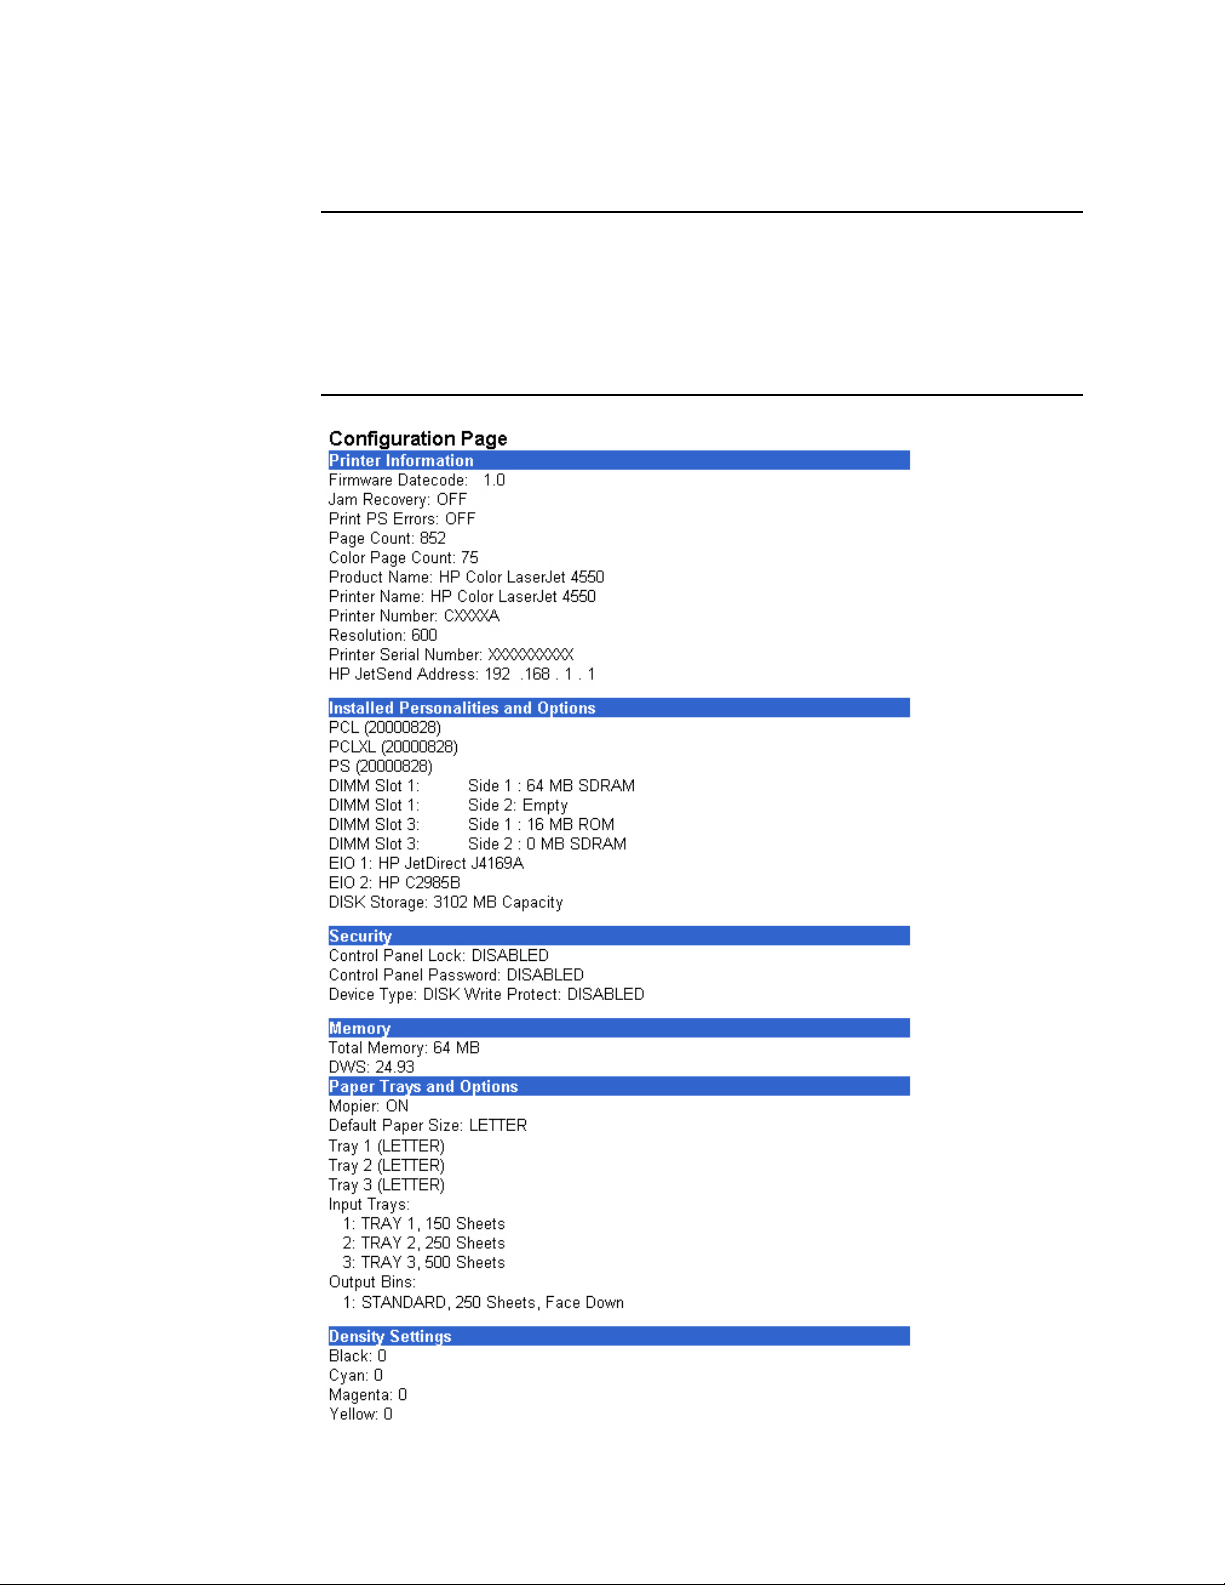
Configuration Page
Use the Configuration Page to view current printer settings, to help
troubleshoot printer problems, or to verify installation of optional
accessories, such as memory (DIMMs) or paper handling devices.
Note
You can send the Configuration Page to anyone you like via e-mail. See
page 45 for more information.
Viewing Printer Status with the Home Pages 11
Page 16
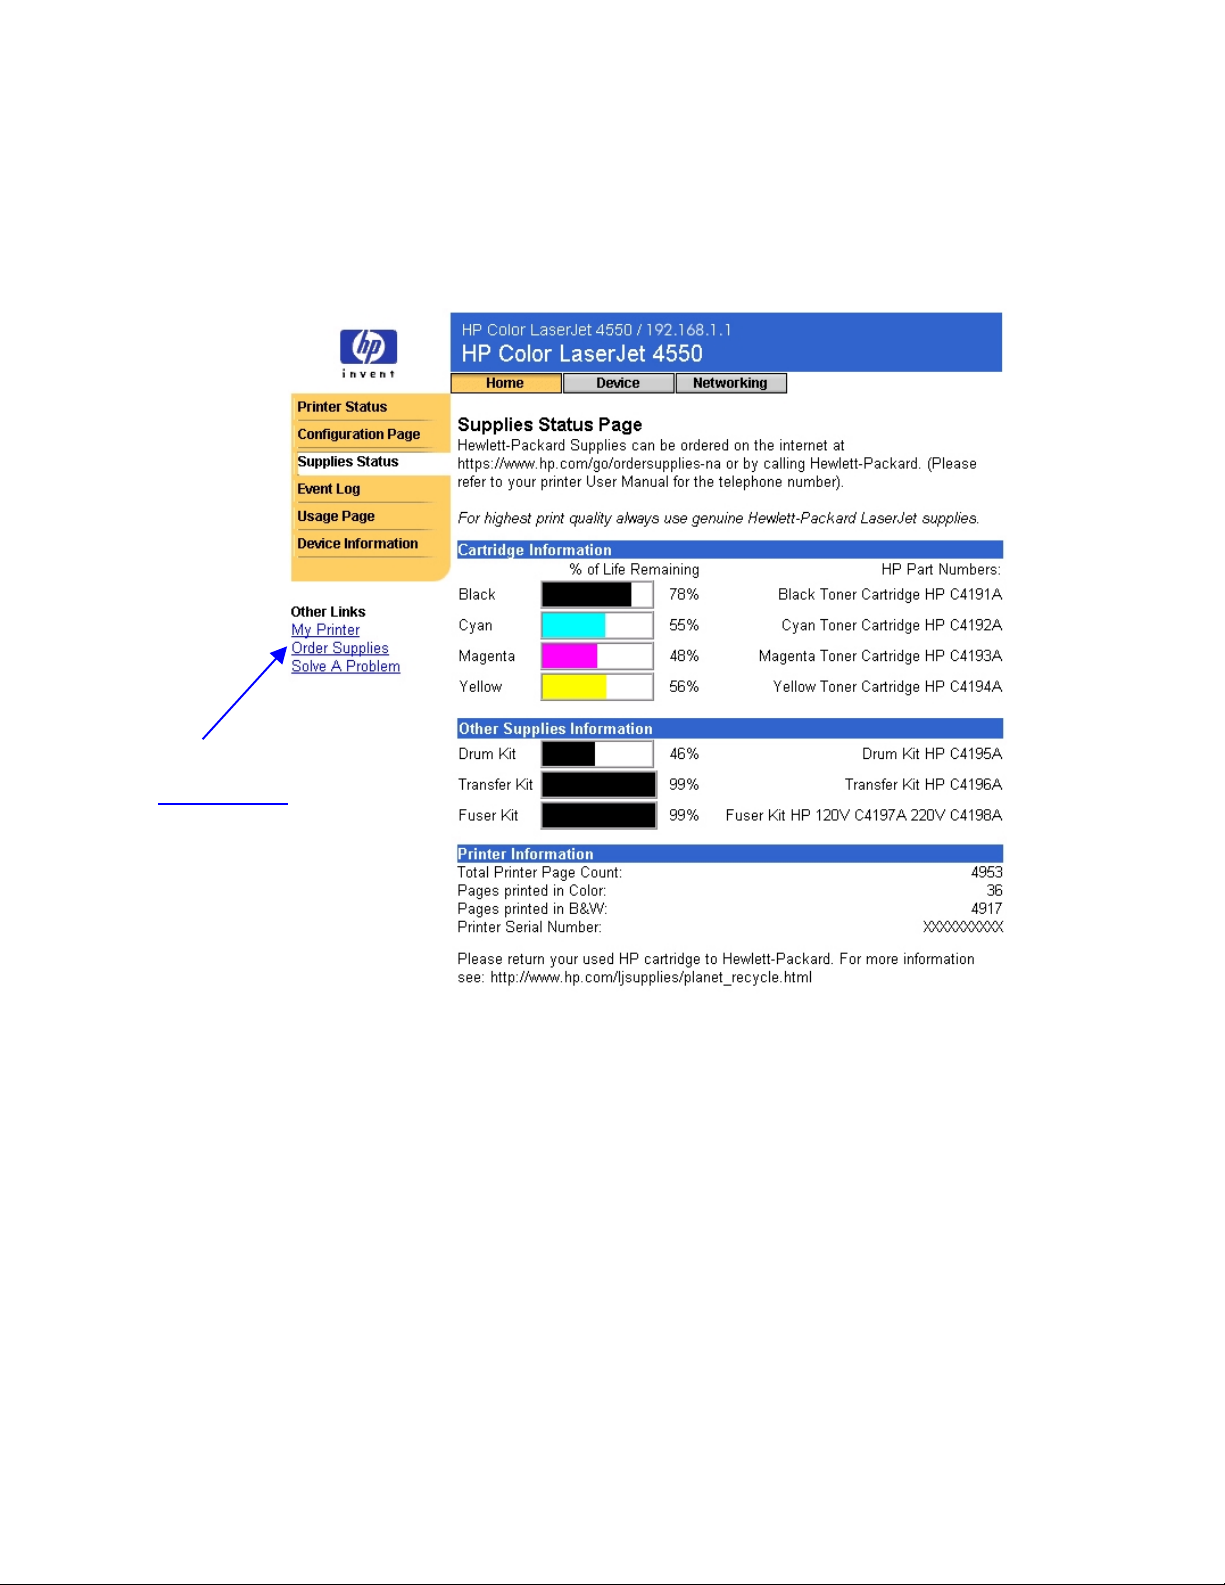
Supplies Status
The Supplies Status page shows the levels remaining for all consumables
and the HP Part Numbers for each consumable. (It is helpful to have the
part numbers available when it is time to order supplies.)
To order supplies over
the Internet, click the
Order Supplies link.
12 Viewing Printer Status with the Home Pages
Page 17
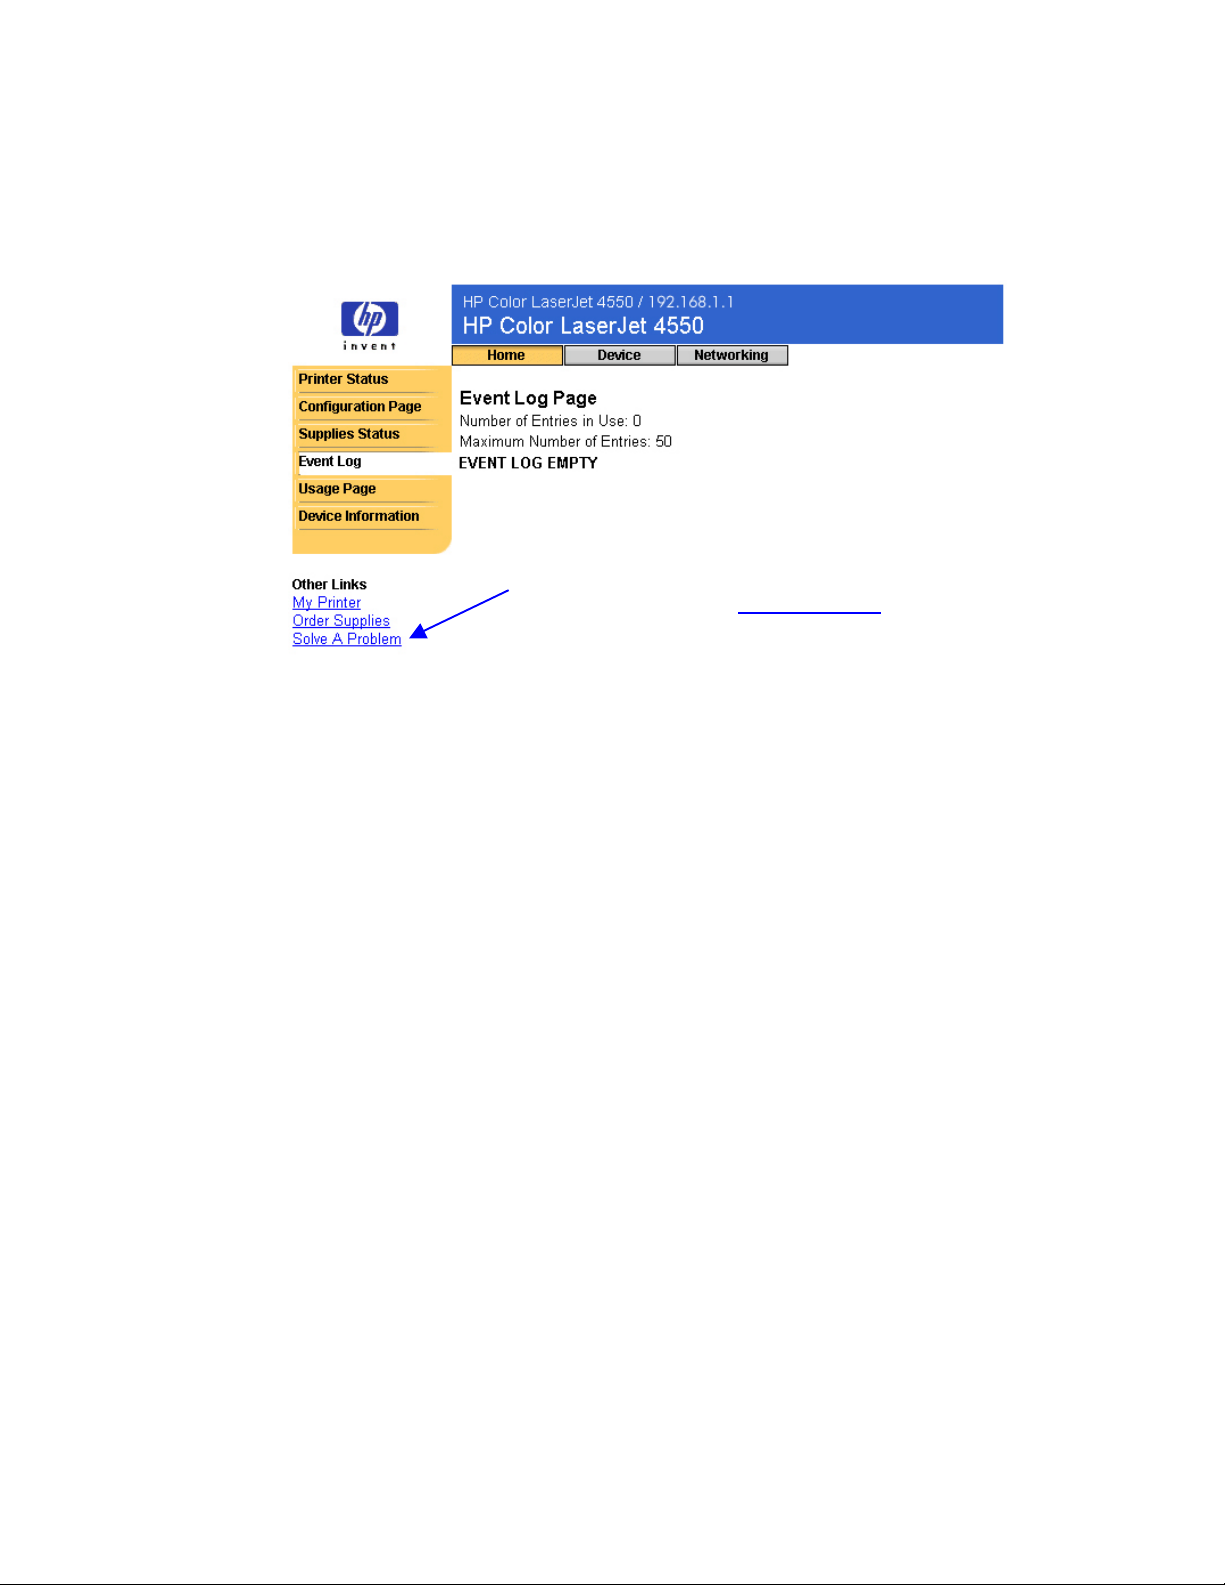
Event Log
The Event Log displays the most recent printer events, including printer
jams, service errors, and other printer errors.
For quick access to more information regarding
error messages, click the Solve A Problem link,
then select Error Messages. (This link takes you
to hp.com on the World Wide Web; it is not part
of the embedded web server.)
Viewing Printer Status with the Home Pages 13
Page 18
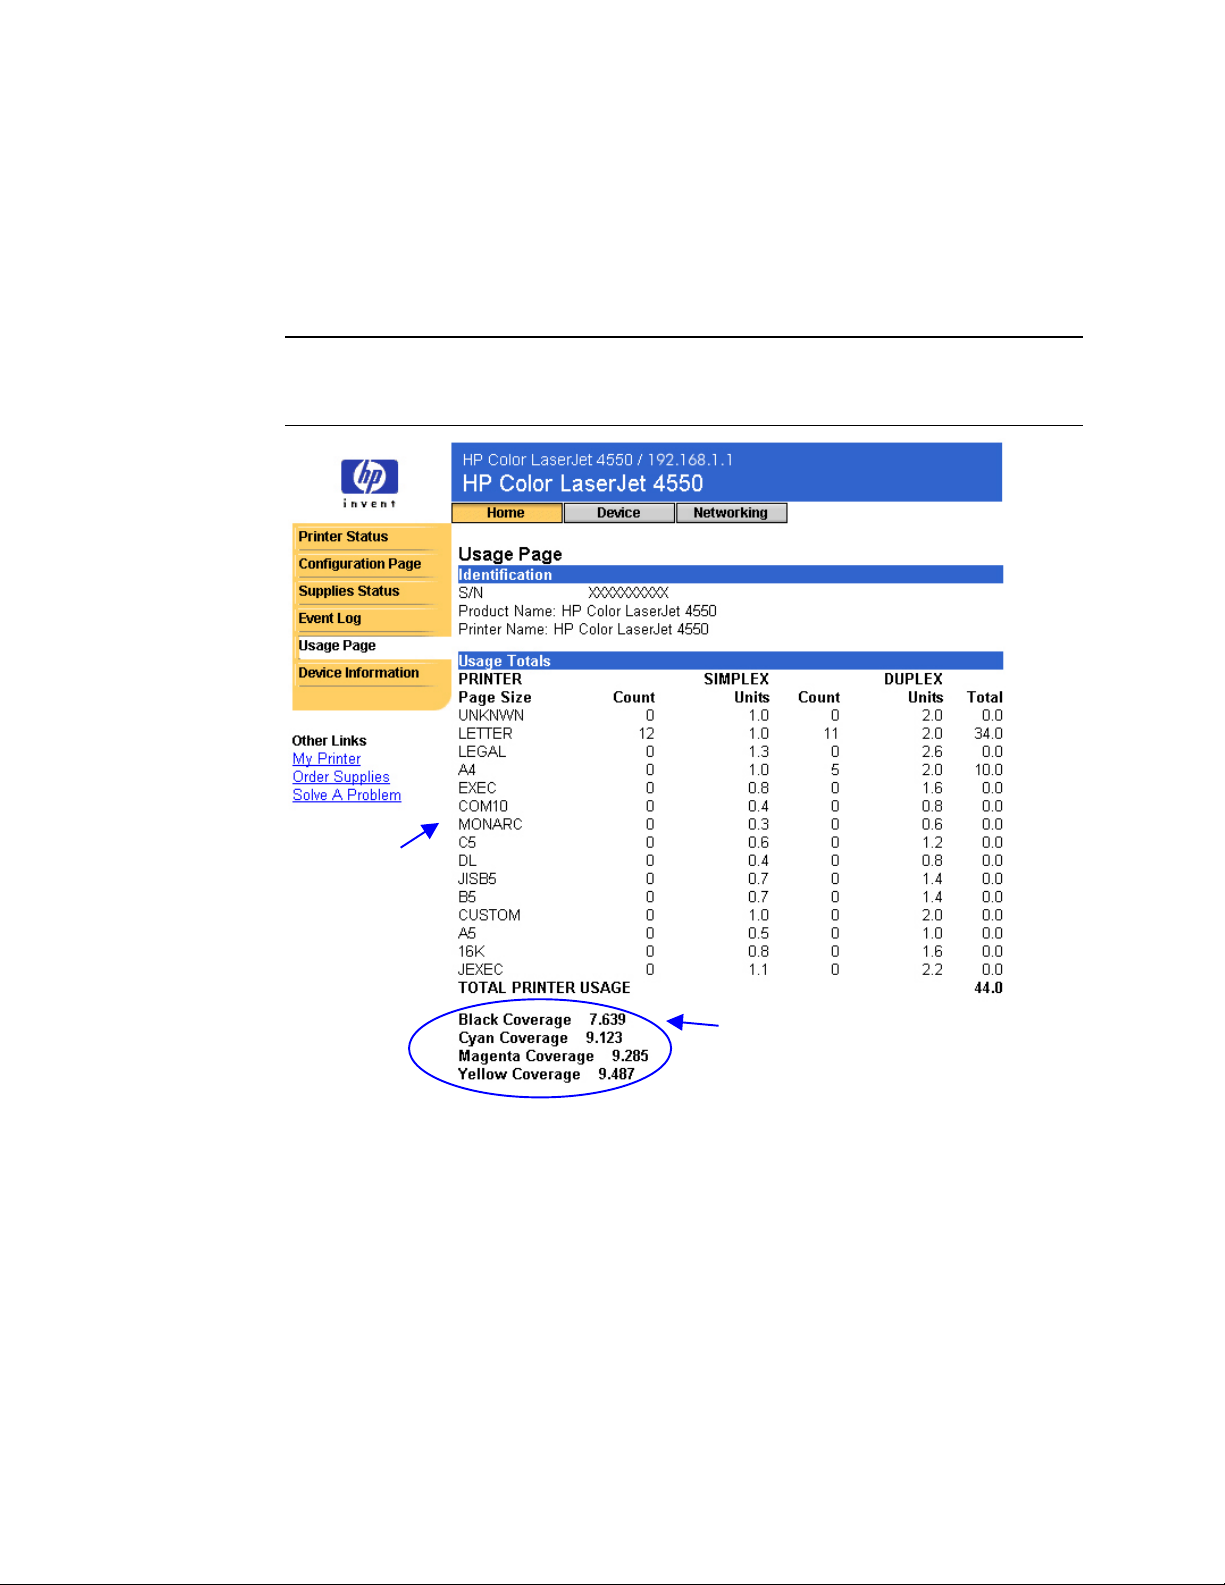
Usage Page
The Usage Page displays the printer’s name and serial number, gives a
page count for each size of media that has passed through the printer,
and shows the average percentage of toner coverage per page for each
color.
Note
The Usage Page is only available if your printer has a permanent storage
device (such as a hard disk) installed.
Usage totals are displayed
for each media size.
(Shows the number of
pages that were printed on
one side, the number that
were printed on two sides
(duplexed), and totals of
the two printing methods.)
Displays the average percentage of
toner coverage per page for each color.
(This value is not separated for color
and monochrome pages but is
combined into one value for all pages
printed.)
14 Viewing Printer Status with the Home Pages
Page 19
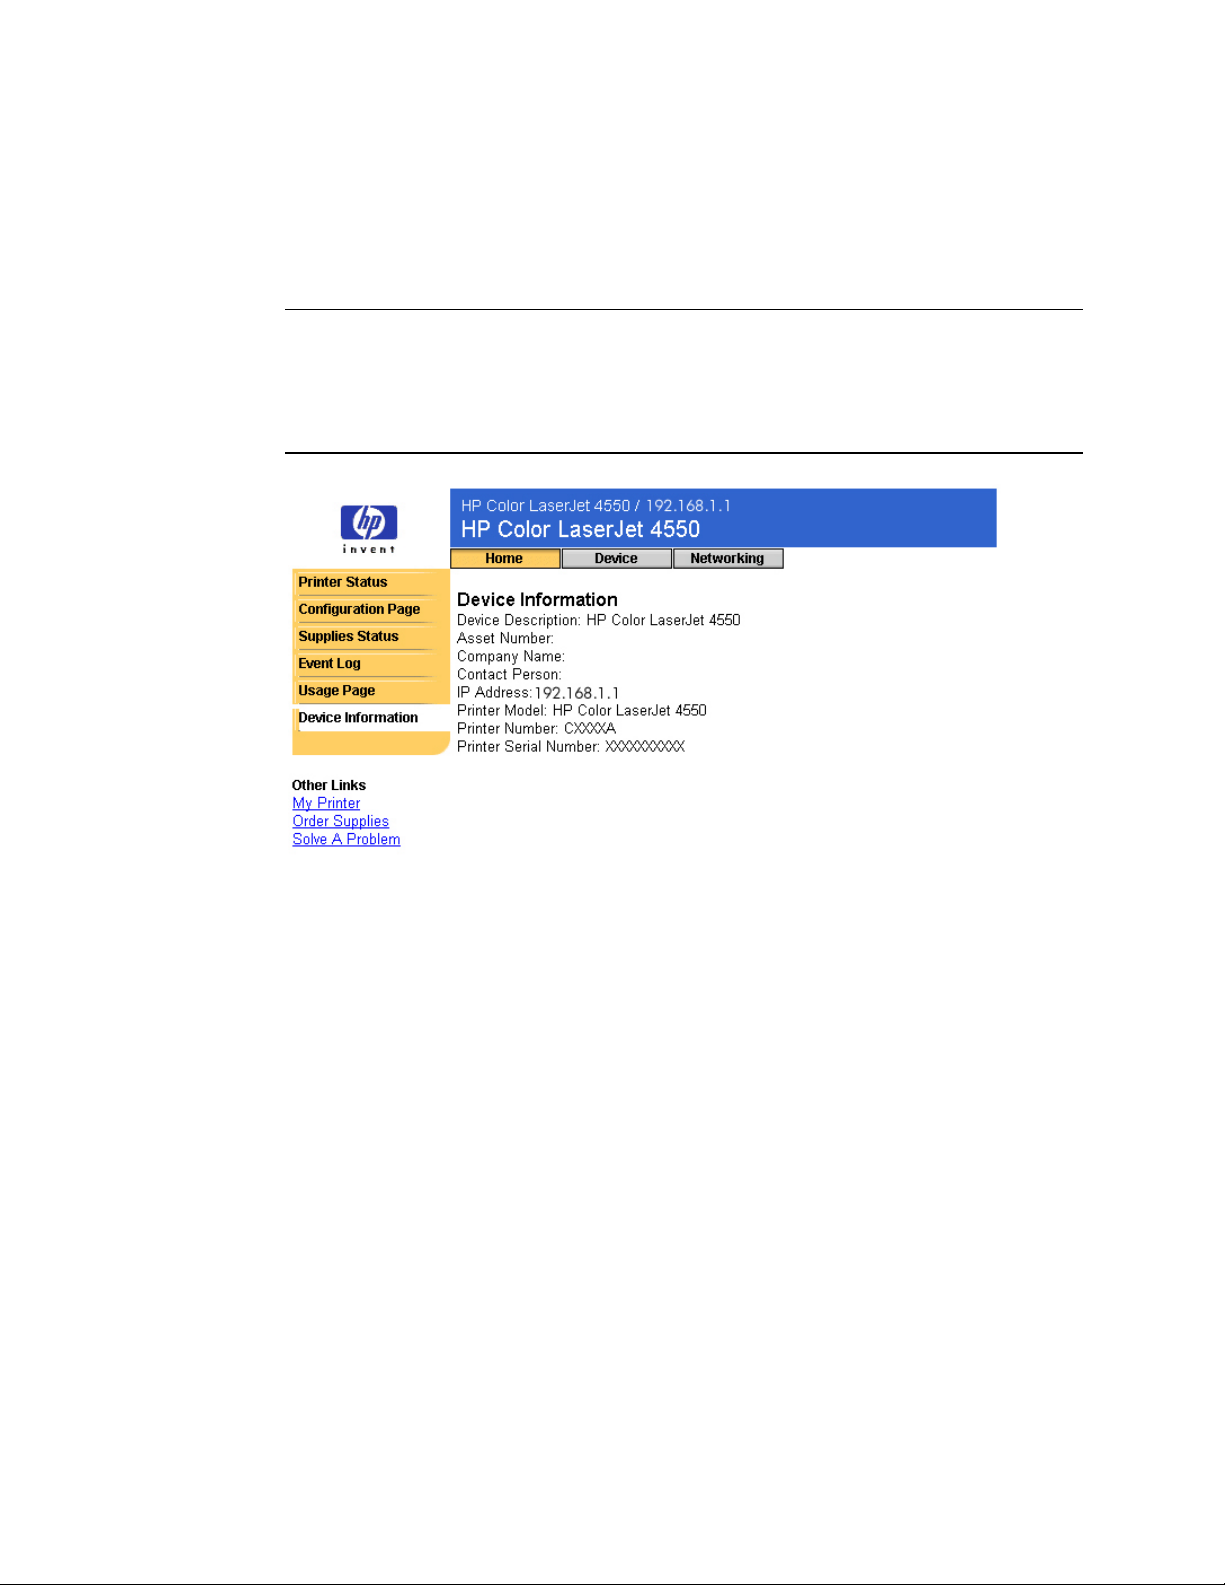
Device Information
The Device Information page displays the device description, asset
number, company name, contact person, and the printer’s IP address,
model, number, and serial number.
Note
The device description, asset number, company name, and contact
person must be entered from the Device pages. (From the top of the
screen, click
Information
Device
. See page 38 for more information.)
, then on the left navigational bar, click
Device
Viewing Printer Status with the Home Pages 15
Page 20

16 Viewing Printer Status with the Home Pages
Page 21

Overview
The Device pages allow you to configure the printer from your PC. The
table below lists each of the Device pages and describes its features. For
more information, see the page indicated.
Device Pages Features
Configuring the Printer
Configuring the Printer
Configuring the PrinterConfiguring the Printer with the Device Pages
with the Device Pages
with the Device Pageswith the Device Pages
Configure
Printer
(page 18)
Alerts
(page 21)
Email
(page 30)
Security
(page 35)
Other Links
(page 36)
Device
Information
(page 38)
Provides a list of menus that let you
internal printer pages and configure the printer.
Lets you set up the printer to send problem and status
alerts to anyone you choose via e-mail.
Lets you configure e-mail settings for outgoing and
incoming mail.
Lets you set a password to control who can remotely
cancel jobs or access the Device pages.
Lets you add or customize links to the web sites of your
choice. These links are displayed on the left
navigational bar throughout the embedded web server
pages.
Lets you name the printer and assign an asset number
to it. You can add the name of the primary contact for
information about the printer. This page also shows the
printer’s IP address, printer model, printer number, and
serial number.
remotely
print
Language
(page 39)
Configuring the Printer with the Device Pages 17
Lets you select which language is used to display the
embedded web server pages.
Page 22

Configure Printer
The Configure Printer page provides the capability to
remotely
print
internal printer pages and configure the printer. From the internal printer
pages, you can configure the paper trays and change other printer
settings.
Click the menu name to display a menu and remotely manage the printer.
These menus are similar to the menus that are available from your
printer's control panel. (Some of the printer control panel menus are not
available from the embedded web server.)
Note
The HP Embedded Web Server screens shown are for the HP Color
LaserJet 4550 series printer. If you are using a different printer model, you
will notice slight variations in the embedded web server appearance and
available features.
Select a menu name to
configure items within
that menu.
18 Configuring the Printer with the Device Pages
Page 23

The table below describes each of the menus.
Menu Name Description
Information Menu This menu contains printer information pages that
give details about the printer and its configuration.
Paper Handling
Menu
Printing Menu In this menu, you can select printing options, such
Configuration
Menu
I/O Menu Items in the I/O (input/output) Menu affect the
Resets Menu Use this menu with caution. You can lose buffered
Using this menu, you can set the type of paper in
each tray.
as number of copies. You can also configure
custom paper size.
Items in this menu affect the printer’s behavior. For
example, you can configure PowerSave and printer
personality settings from this menu.
communication between the printer and the
computer.
page data or printer configuration settings when you
select these items. Only reset the printer under the
following circumstances:
You want to restore the printer’s default settings.
•
Communication between the printer and
•
computer has been interrupted.
You are having problems with a port.
•
Note
If there isn't communication between the printer and
your computer, you won’t be able to reset the
printer.
The items in the Resets Menu will clear all memory
in the printer, while the Cancel Job button clears
only the current job. You can access the Cancel Job
button from the Security page. (For more
information, see page 35.)
Note
After performing a reset you will need to configure
the printer IP address.
Configuring the Printer with the Device Pages 19
Page 24

Selecting Paper Size
This procedure is provided as an example. Other menu items can be set
in a similar manner.
Note
Printer drivers and software applications frequently override selections
made in the Printing menu and the Paper Handling menu. For more
information, see the user guide that came with your printer.
Follow the steps below to select the paper size for Tray 1:
1. Click PAPER HANDLING MENU.
2. Next to TRAY 1 SIZE, select LETTER.
3. Click
Note
Any changes will be reflected on the Printer Status page, the
Configuration Page, and the Paper Handling menu.
Apply
to save the change.
1.
2.
3.
20 Configuring the Printer with the Device Pages
Page 25

Alerts
From the Alerts page, the system administrator can set up the printer to
send problem and status alerts to anyone through e-mail. More than one
individual can receive alerts, with each person receiving only specific
alerts. For example, an administrative assistant might be responsible for
keeping toner loaded in a printer or fixing paper jams, while major
consumables are handled by an external service provider. Alerts can be
set up so the administrative assistant gets advanced warning on toner low
situations, and the external service provider gets alerts on fusers, print
drums, and transfer belts.
Note
For step-by-step instructions on setting up the printer to send an e-mail
alert, see page 46.
Note
Some of the embedded web server features require a permanent storage
device (such as a hard disk) in order to set up and retain specific
information on a permanent basis. This applies to the Alerts feature, as
discussed below.
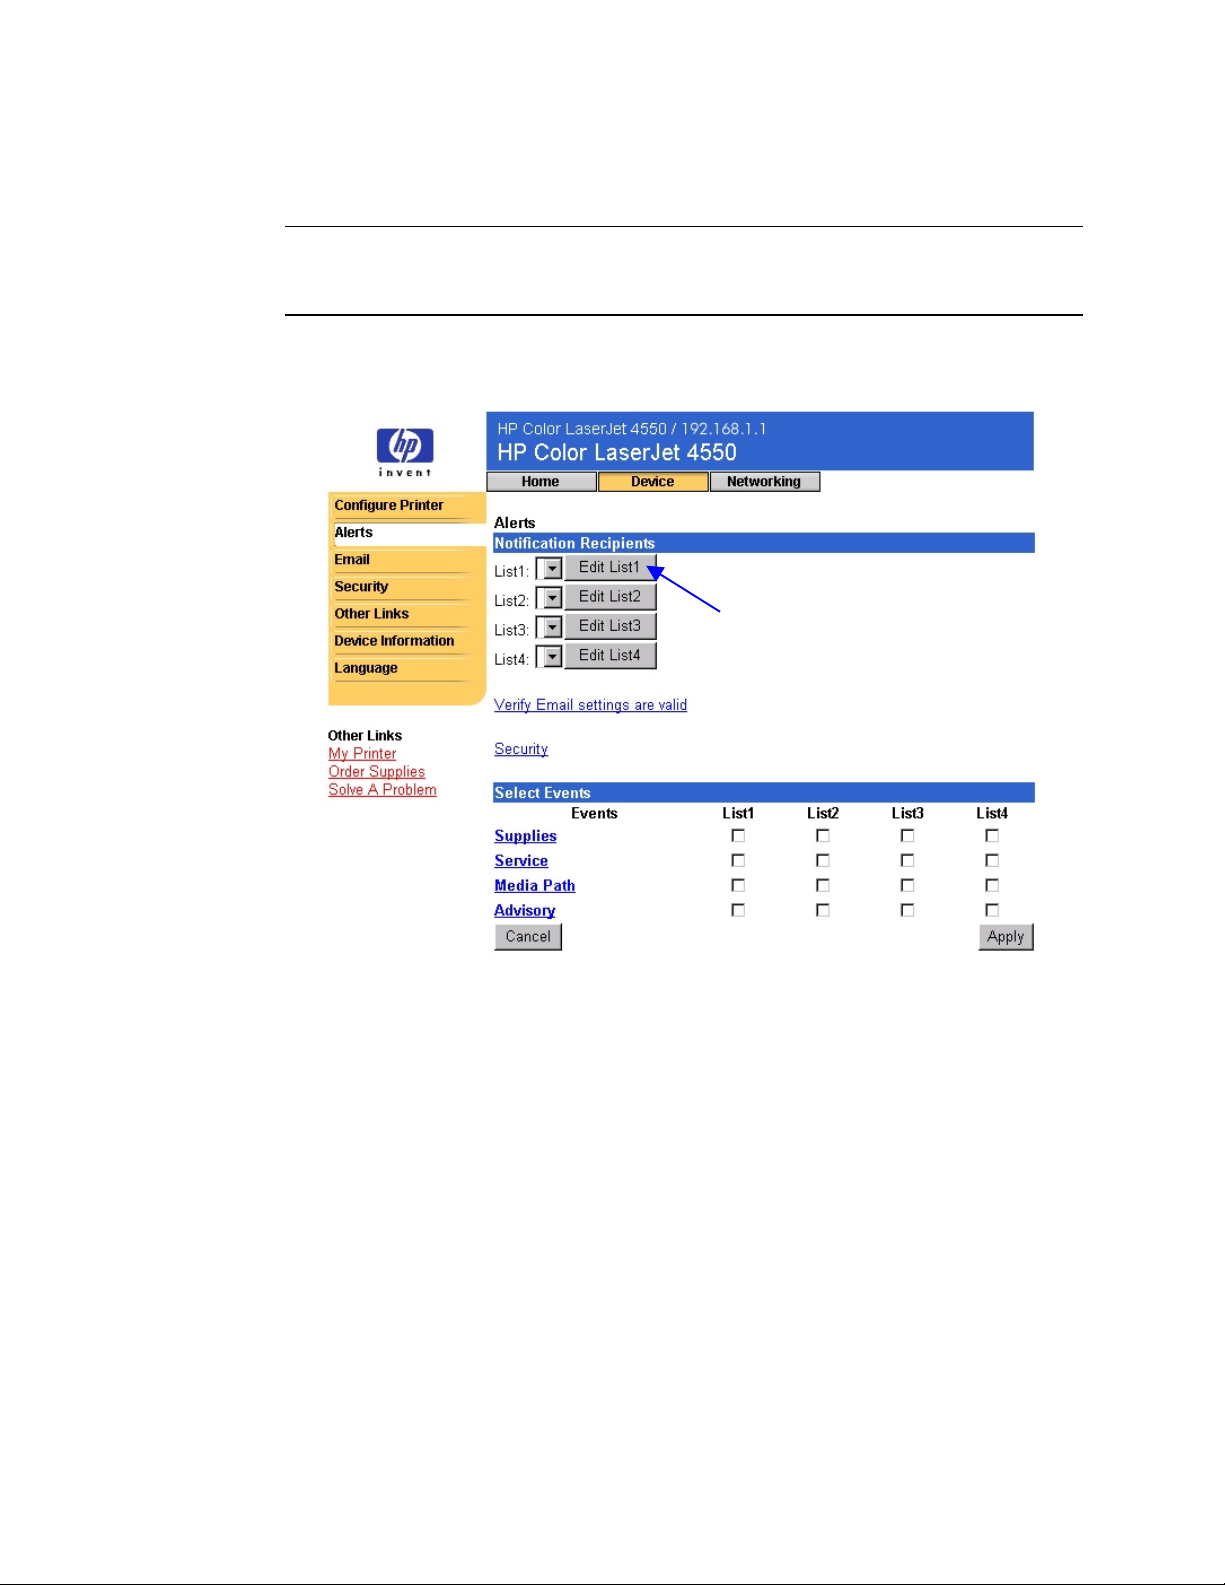
The screen below shows the Alerts page and options with a permanent
storage device. With a hard disk you can set up four different lists, with up
to 20 notification recipients on each of the four lists. For more information,
see page 24.
Opens a new window for the Email page. Here
you can verify that the SMTP (Simple Mail
Transfer Protocol) server is set up correctly.
(Alerts will not work if the SMTP server is not
set up correctly.) Exit the Email page to return
to the Alerts page.
Opens a new window for the Security Page.
Outgoing Mail must be selected on the
Security page for alerts to work. Exit the
Security page to return to the Alerts page.
Configuring the Printer with the Device Pages 21
Page 26

Without a hard disk, there is room for only two e-mail addresses. Since
there are no lists to edit, you add e-mail recipients directly on the Alerts
page. The screen below shows the Alerts page without a hard disk. For
more information, see page 23.
The table below describes each link under
information, see “Refining Event Notification” on page 27.
Event Name Description
Supplies Select specific supplies, such as toner, fuser kit, or
transfer kit.
Service Select specific events that require service, such as
“EIO not functional” or “Install drum kit”.
Media Path Select events associated with the media path, such
as removing a paper jam or loading a paper tray.
Advisory Select advisory events such as “Page too complex”
or “Insufficient Memory”.
Select Events
. For more
22 Configuring the Printer with the Device Pages
Page 27

Configuring Alert Notification
Configuring Alert Notification Without a Permanent Storage Device
Note
These steps apply to printers without a permanent storage device (such
as a hard disk).
To configure alert notification, follow the steps below:
1. Under
recipients.
2. Click the checkbox next to
Advisory
more information, see the table on page 22 or “Refining Event
Notification” on page 27.)
3. Click
Notification Recipients
for each recipient you would like to receive notification. (For
Apply
to save the information.
, enter e-mail addresses for two
Supplies, Service, Media Path
2.
, and
1.
3.
Note
For alerts to function, Outgoing Mail must be configured. To configure
Outgoing Mail, see “Email” on page 30.
After you have set up your lists, you can further refine event notification by
selecting specific details and options within each event. See “Refining
Event Notification” on page 27.
Configuring the Printer with the Device Pages 23
Page 28
Configuring Alert Notification With a Permanent Storage Device
Note
These steps apply to printers with a permanent storage device (such as a
hard disk).
To configure alert notification, follow the steps below:
1. Under
Notification Recipients
, click
Edit List1
1.
.
24 Configuring the Printer with the Device Pages
Page 29
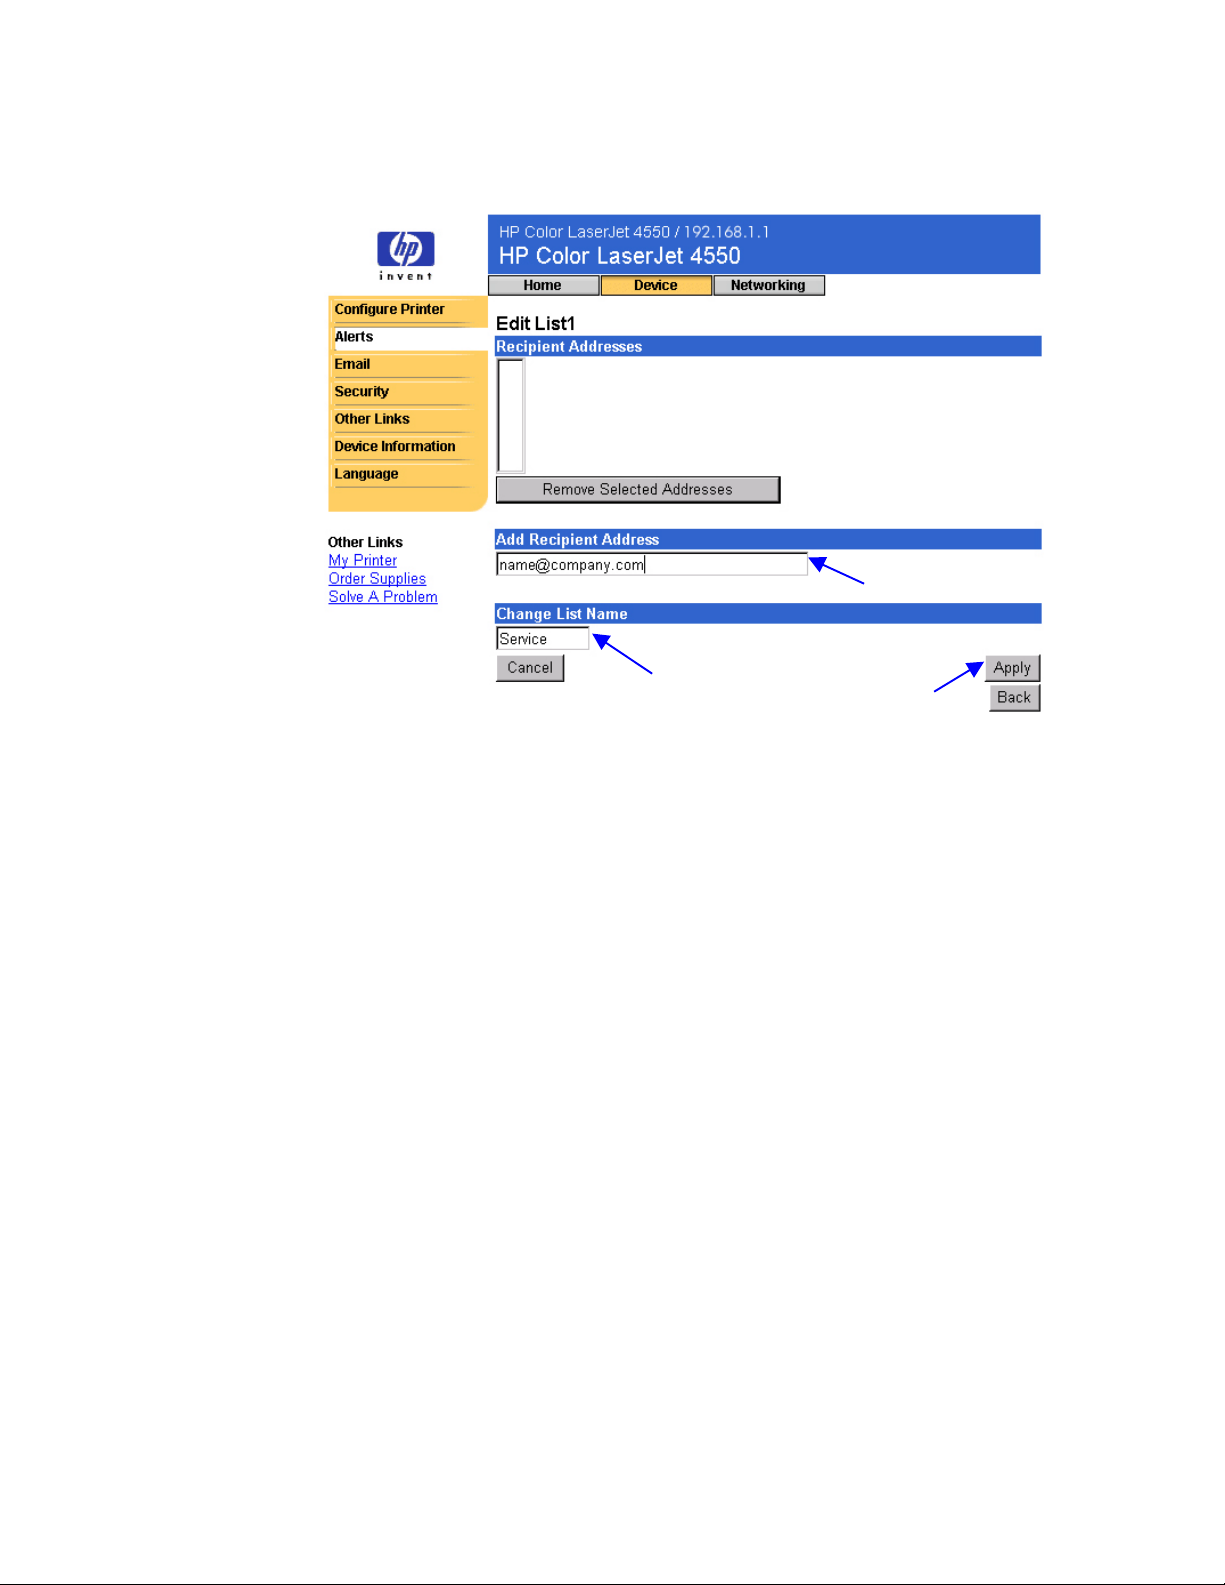
2. Under
(See the screen below.)
Change List Name
, enter a name, such as Service or Supplies.
3.
2.
3. Under
you would like to receive notification. In large environments, system
administrators can route e-mail addresses to list servers or URLs for
expanded notification.
4. Click
recipient address. When you have finished adding recipients, click
Back
Add Recipient Address
Apply
to return to the Alerts page.
to save the information. Repeat steps 3 and 4 for each
, enter e-mail addresses for anyone
4.
Configuring the Printer with the Device Pages 25
Page 30

5. From the Alerts page, click the checkbox next to
Media Path
notification. (For more information, see the table on page 22 or
“Refining Event Notification” on page 27.)
, and
Advisory
for each list you would like to receive
5.
Supplies, Service
,
6.
6. Click
7. Repeat steps 1-6 for each additional list.
Note
For alerts to function, Outgoing Mail must be configured. To configure
Outgoing Mail, see “Email” on page 30.
After you have set up your lists, you can further refine event notification by
selecting specific details and options within each event. See “Refining
Event Notification” on page 27.
Apply
to save the information.
26 Configuring the Printer with the Device Pages
Page 31

Refining Event Notification
After you have set up your lists, you can further refine event notification by
selecting specific details and options within each event. (See the table on
page 22 for a description of each event category.)
1. Under
Media Path, Advisory
Select Events
1.
, click an event category (
) to view the events that are available.
Supplies, Service
,
Configuring the Printer with the Device Pages 27
Page 32

2. For each event, select the lists (List 1 - 4) that you would like to be
notified. (The screen below shows the Supplies events.)
2.
3.
Note
Those events that are hyperlinked (underlined with blue) have additional
detail available.
28 Configuring the Printer with the Device Pages
Page 33

3. After you have refined your events, click
information you want to include with your e-mail alert. This information
may include Device Information, Contact Information, Supplies Status,
Usage Page, Help Resources, Configuration Page, and an Event Log.
Click the checkbox next to the information you would like to include.
Email Contents
to enter the
3.
4.
5.
4. Click
5. Click
Apply
Back
to save the information.
to return to the Alerts page.
Configuring the Printer with the Device Pages 29
Page 34
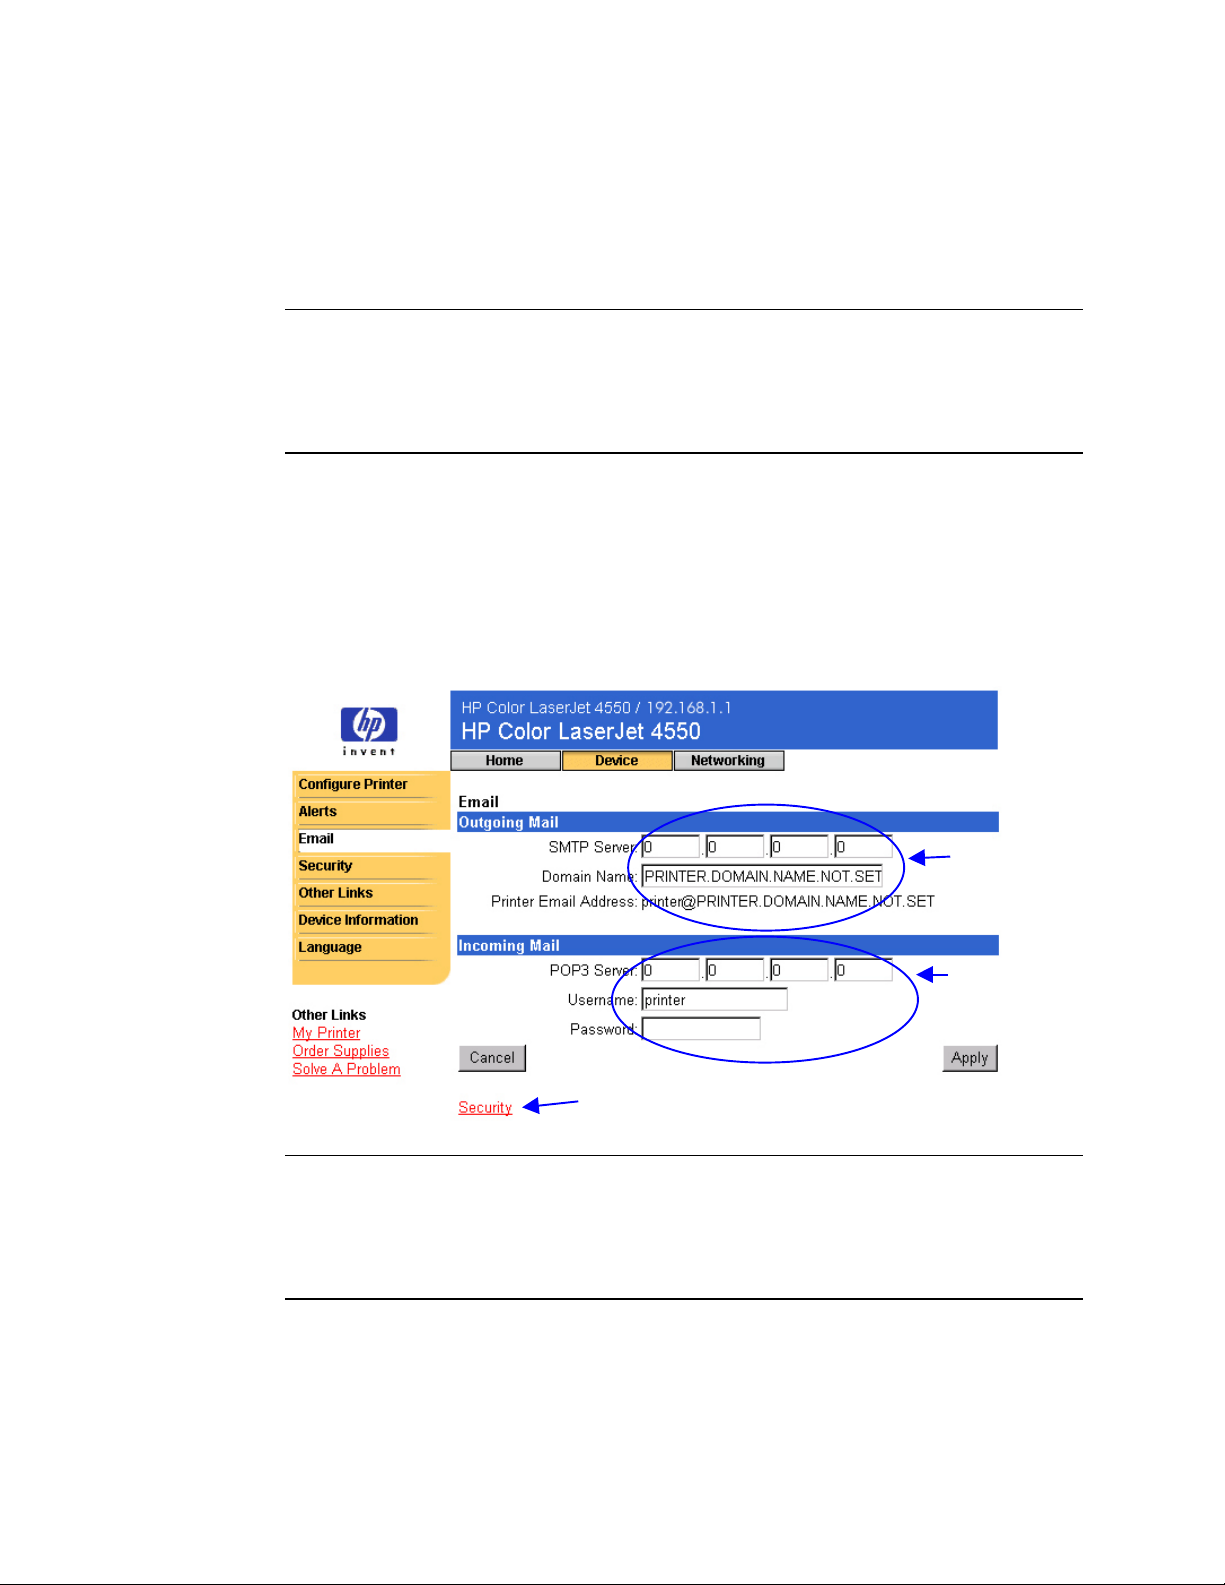
The Email page lets you configure e-mail settings for outgoing and
incoming mail. This enables you to use the printer's “send and receive”
capabilities.
Note
For step-by-step instructions on setting up the printer to send an outgoing
e-mail message, see page 46. For instructions on setting up the printer to
receive an incoming e-mail message and respond with an outgoing e-mail
message, see page 52.
Outgoing Mail
•
must be configured for Alerts and Email Command and
Response to function.
Incoming Mail
•
must be configured for Email Command and Response
to function. (You don't need to configure Incoming Mail for Alerts to
function.) With Email Command and Response, you can request
information from the printer, such as a configuration page or a supplies
status page. For more information, see page 33.
Configure
Outgoing
Mail here.
Configure
Incoming
Mail here.
Opens a new window for the Security page.
(Exit the Security page to return to the Alerts page.)
Note
Settings on the Email page and the Security page work together. For
outgoing and incoming mail to work properly, you need to select the
appropriate check box on the Security page. (For more information, see
“Security” on page 35.)
30 Configuring the Printer with the Device Pages
Page 35

Configuring Outgoing Mail
Note
It is only necessary to configure Outgoing Mail if you intend to use Alerts
and/or Email Command and Response. If you intend to use Email
Command and Response, you must also configure Incoming Mail (see
page 32).
To configure Outgoing Mail you will need the following:
The IP address of the SMTP mail server on your network.
•
The e-mail domain name suffix used for addressing e-mail messages
•
within your organization.
Note
Your organization’s network or e-mail administrator typically provides the
information required to configure Outgoing Mail.
1. Enter the SMTP Server IP address. The SMTP Server IP address is
used by the printer to relay e-mail messages to other computers.
1.
2.
3.
2. Enter the Domain Name. The domain name is combined with the
POP3 username (or “printer” by default) in the
messages sent from the printer. Typically, the printer’s domain name
will be the same as the portion of your own e-mail address after the
“@” symbol. For example, if your e-mail address is “jon_doe@hp.com”,
then the printer’s domain name would be “hp.com”.
3. Click
Note
For outgoing mail to work properly, you must also enable Outgoing Mail on
the Security page. See page 35 for more information.
Apply
to save changes on the Email page.
From:
field in e-mail
Configuring the Printer with the Device Pages 31
Page 36
Configuring Incoming Mail
Note
It is only necessary to configure Incoming Mail if you intend to use Email
Command and Response. You must also configure Outgoing Mail for the
Email Command and Response feature to work properly (see page 31).
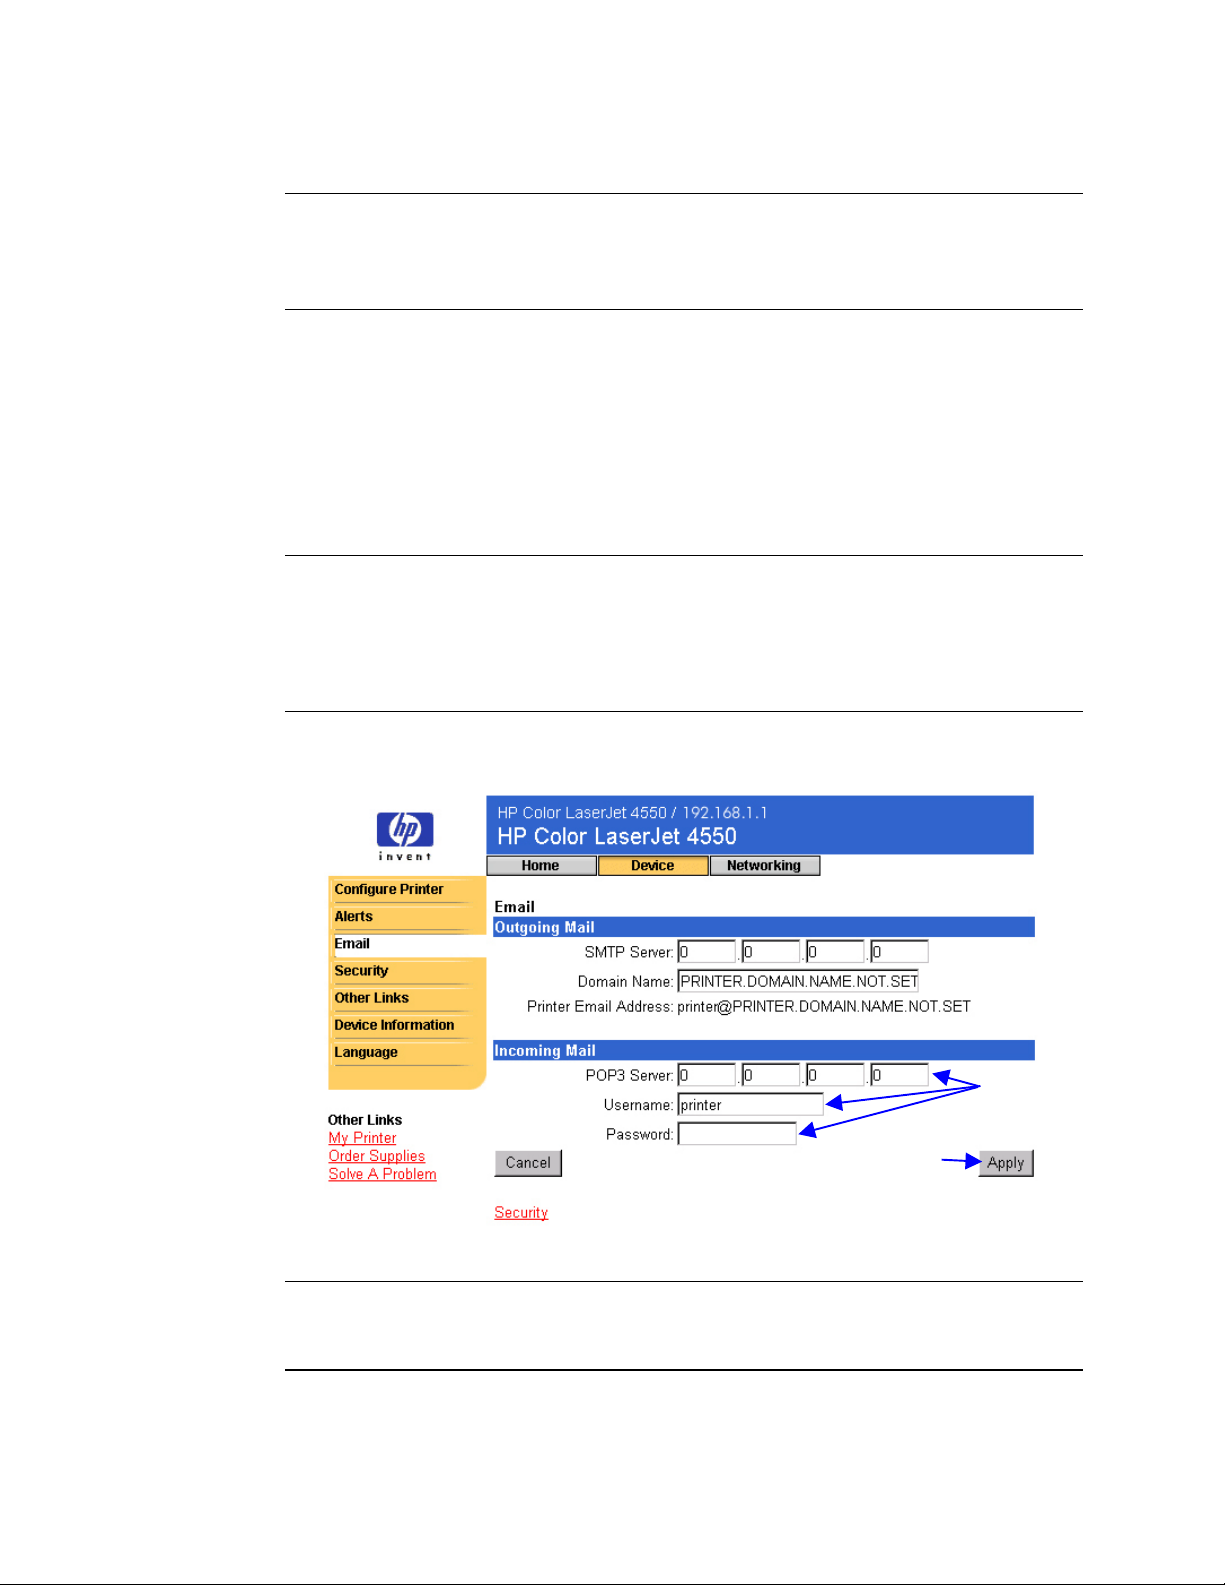
1. Establish a Post Office Protocol 3 (POP3) mailbox account for the
printer on a mail server within your organization’s network. Each POP3
account requires a username and a password. The username
combined with the printer’s domain name (specified in the Outgoing
Mail configuration) will become the e-mail address for the printer. For
example, if the POP3 mailbox account username is “printer” and the
domain name is “hp.com”, the printer’s e-mail address will be
“printer@hp.com”.
Note
Each printer that is configured for incoming mail must have its own POP3
mailbox account on your network’s e-mail server.
POP3 mailbox accounts are typically configured by your organization’s
network or e-mail administrator.
2. Enter the IP address of the POP3 mail server and the Username and
Password of the printer’s mailbox account.
2.
3.
3. Click
Note
For incoming mail to work properly, you must also enable Incoming Mail
on the Security page. See page 35 for more information.
32 Configuring the Printer with the Device Pages
Apply
to save changes on the Email page.
Page 37

Using Email Command and Response
When outgoing and incoming mail are configured, you can send an e-mail
message to the printer requesting a configuration page or a supplies
status page, and the printer will respond with an e-mail message. You can
use this capability to solve a problem or check the status of printer
consumables.
Note
For step-by-step instructions on setting up the printer to receive an
incoming e-mail message and respond with an outgoing e-mail message,
see page 52.
Composing a Message to the Printer
When composing a message to the printer, you must properly format the
To:, From:
, and
Subject:
fields in your e-mail application.
1. In the
e-mail address, from the top of the screen, click
left navigational bar, click
see the
2. The
application as your return e-mail address.
3. In the
information you would like returned (configuration page or supplies
status page) and the format of the message (HTML, XML, or Text).
The table below lists the
Format Configuration Page Supplies Status Page
HTML
XML
TEXT
field, enter the printer’s e-mail address. (To find the printer’s
To:
, then on the
, you should
Printer Email Address
From:
field should be filled in automatically by your e-mail
Subject:
field, using the table below, enter the type of
this.configpage?configpage
=email&format=html
this.configpage?configpage
=email&format=xml
this.configpage?configpage
=email&format=text
Email
Subject:
. Under
.)
Device
Outgoing Mail
field entries supported:
this.configpage?suppliespage
=email&format=html
this.configpage?suppliespage
=email&format=xml
this.configpage?suppliespage
=email&format=text
4. Click
Configuring the Printer with the Device Pages 33
Send
. (See the screen on the next page.)
Page 38

The screen below shows an e-mail message to the printer requesting that
a configuration page be returned in HTML format:
The printer will check for new e-mail messages once every three minutes.
When the printer receives the e-mail message, it will generate a reply and
send the requested information back to the sender's e-mail address (as
specified in the
Note
Depending on delays in the network and your organization’s mail server, a
response may take from one minute to several hours to arrive back in your
e-mail application’s Inbox.
From:
field of the original e-mail message).
If the
e-mail message, the printer will not send a message in response.
To:, From:
, and
Subject:
fields are not properly formatted in your
34 Configuring the Printer with the Device Pages
Page 39

Security
Select these
checkboxes to
display the Go
and Cancel
Job buttons on
the Printer
Status and
Configure
Printer pages.
Opens the Email page in a new window so you
can verify that the e-mail settings are correct.
(Alerts and Email Command and Response will
not work if the SMTP server is not set up
correctly.) Exit the Email page to return to the
Security page.
From the Security page, you can set a password to control who can
cancel jobs remotely or access the Device pages. The username is
already set as “laserjet”. Once the password has been set, users will be
prompted to enter a password when they access either the Device pages
or the Order Supplies link.
Select this
checkbox for
Alerts and
Email
Command
and
Response to
Select this
checkbox for Email
Command and
Response to work
properly.
work
properly.
Configuring the Printer with the Device Pages 35
Page 40

Other Links
The Other Links page lets you add or customize links to the web sites of
your choice. These links are displayed on the left navigational bar
throughout the embedded web server pages.
There are three permanent links:
My Printer connects to a set of web resources that will help you to
•
solve specific problems and determine what additional services are
available for your printer. (Detailed information including serial number,
error conditions, and status will be forwarded to Hewlett-Packard’s
Customer Care. Hewlett-Packard will treat this information as
confidential.)
Order Supplies lets you order printer supplies over the Internet. To find
•
out how to set a password for this page, see “Security” on page 35.
Solve a Problem gives you access to specific printer help from HP’s
•
web site.
The three
permanent
links appear
here, along
with any userdefined links.
Any new links you
add will appear
here.
Note
Some of the embedded web server features require a permanent storage
device (such as a hard disk) in order to set up and retain specific
information on a permanent basis.
With a hard disk, you can add up to five additional links; without the extra
storage, you can add one additional link. (You may want to add a link to
your company’s web site.)
36 Configuring the Printer with the Device Pages
Page 41
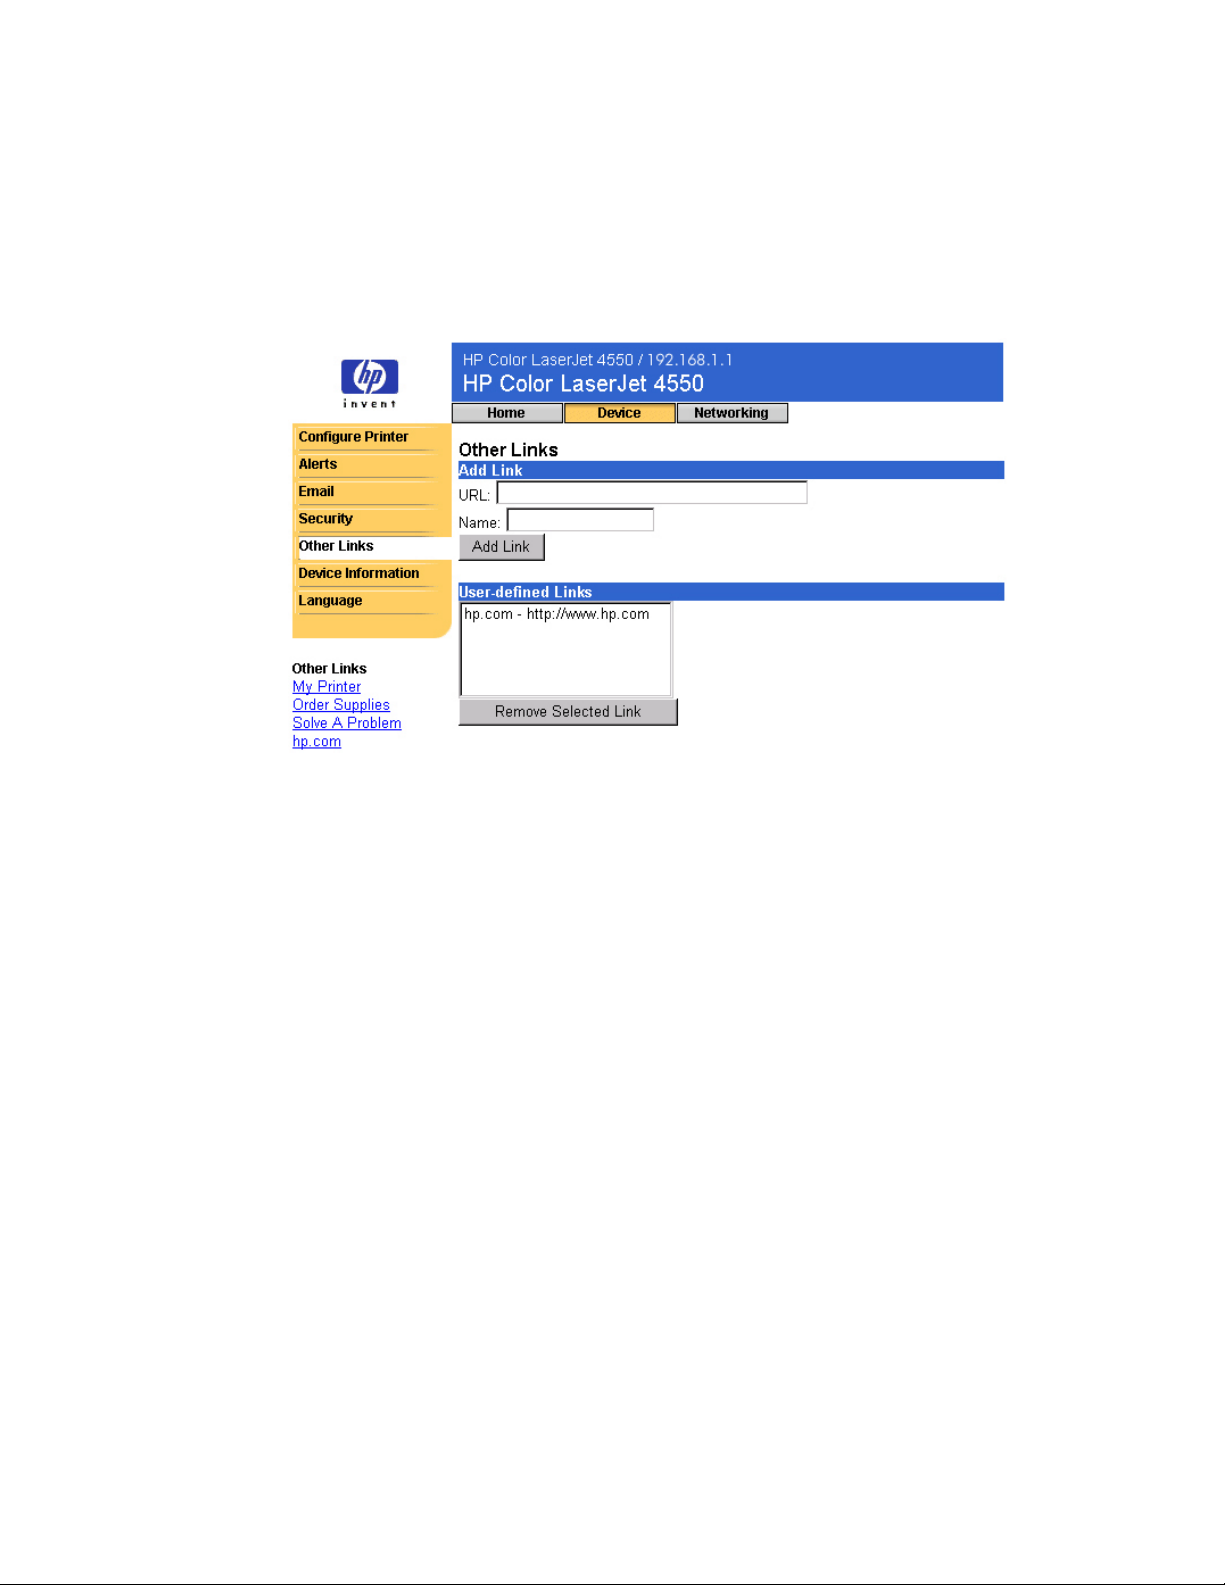
Adding a Link
1. Under
appear in the embedded web server pages.
2. Click
The screen below shows the Other Links page with one user-defined URL.
Add Link
Add Link
, enter the URL and the Name as you would like it to
.
Removing a Link
1. Under
2. Click
Remove Selected Link
User defined Links
, select the link you would like to remove.
.
Configuring the Printer with the Device Pages 37
Page 42

Device Information
The Device Information page lets you name the printer and assign an
asset number to it. You can add the name of the primary contact for
information about the printer. This page also shows the printer’s IP
address, printer model, printer number, and serial number.
Note
If you make any changes on the Device Information page, click
save those changes.
The information entered here appears on the Device Information page that
can be accessed from the Home tab. It also appears in e-mail messages
that are sent from the printer. This may be useful if you need to locate the
printer to replace supplies or fix a problem.
Apply
to
38 Configuring the Printer with the Device Pages
Page 43
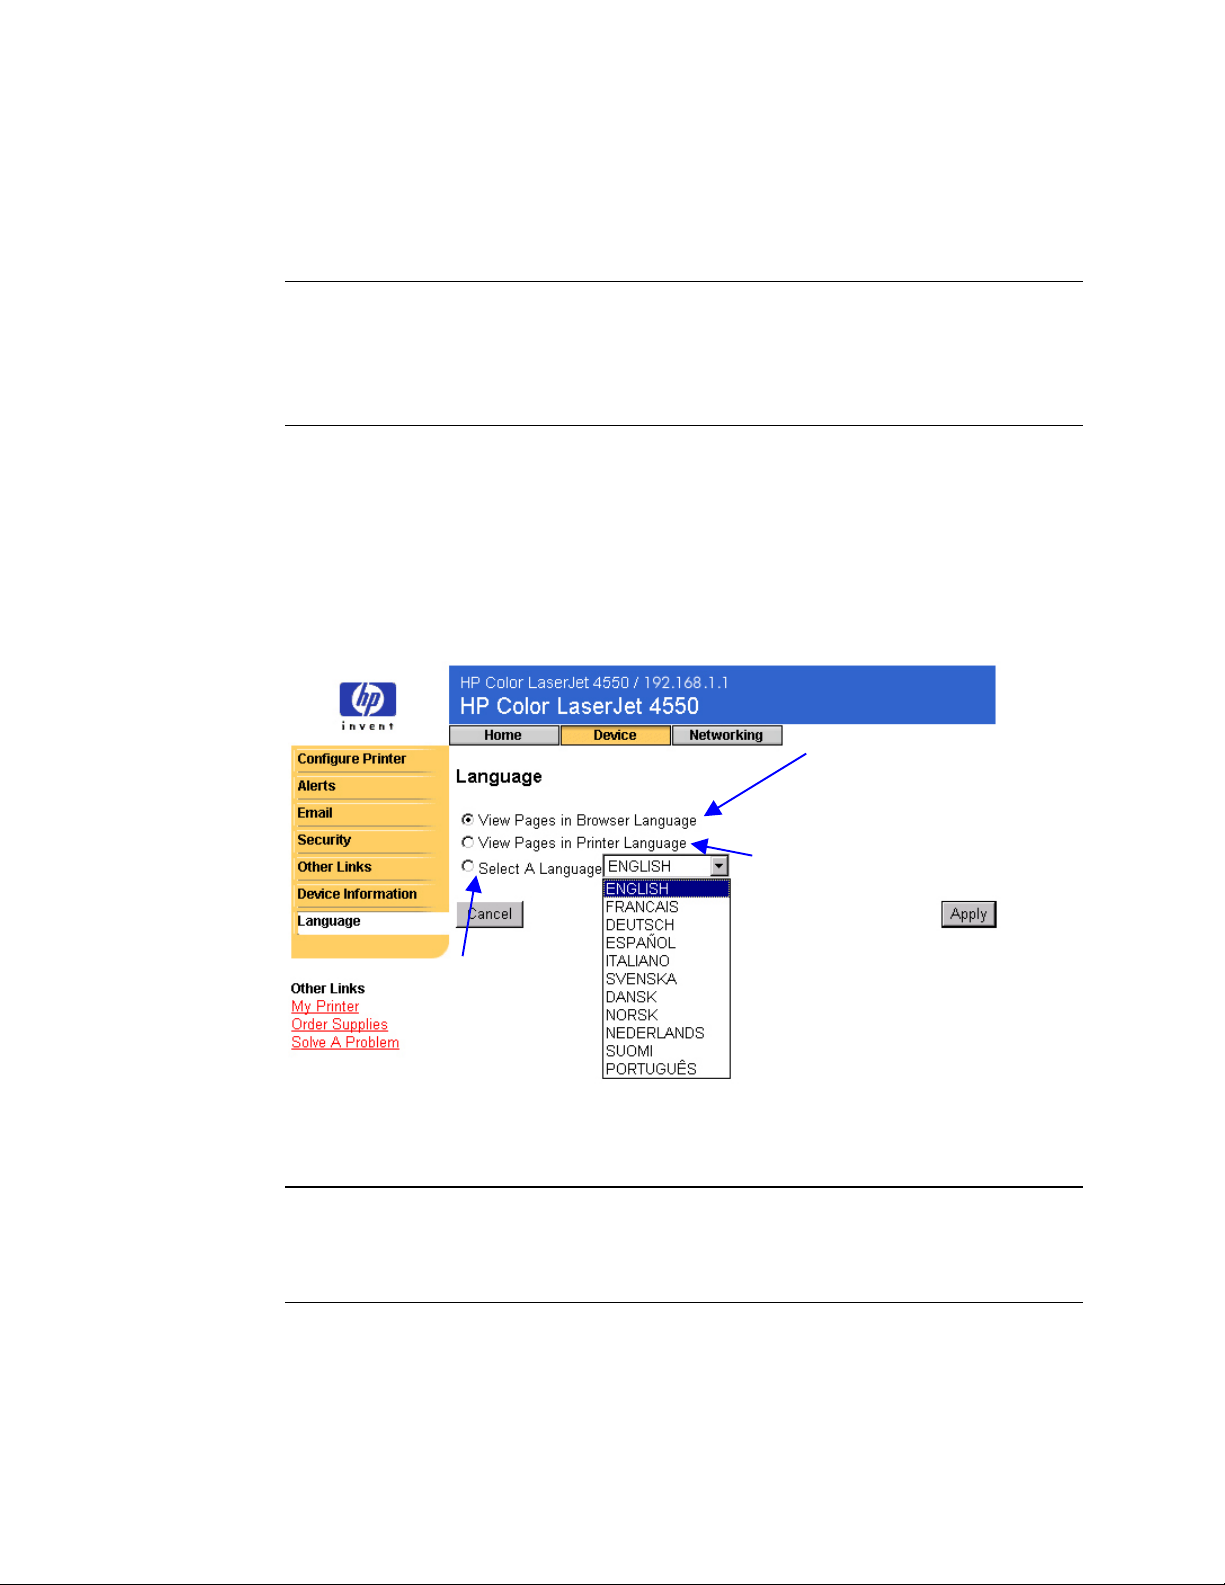
Language
The Language page lets you select which language is used to display the
embedded web server pages.
Note
The default language is the language currently in use by the web browser.
If your browser and printer control panel both use a language that is not
available for the embedded web server, English will be selected as the
default.
The following languages are available:
English
•
Italian
•
Spanish
•
Danish
•
Swedish
•
French
•
German
•
Portuguese
•
Displays the
embedded web
server pages in one
of the available
languages.
Dutch
•
Finnish
•
Norwegian
•
Detects which language has
been selected for your browser
and displays the embedded web
server pages in the same
language.
Detects which
language has been
selected for your
printer control
panel and displays
the embedded web
server pages in the
same language.
If you make any changes on the Language page, click
Apply
to save your
changes.
Caution
Choosing a setting other than “View Pages in Browser Language”
(the default) will change the language for everyone browsing the
embedded web server.
Configuring the Printer with the Device Pages 39
Page 44

40 Configuring the Printer with the Device Pages
Page 45

Overview
The Networking pages allow you to view network status and configure the
printer's network card from your PC. The Networking pages are not part of
the embedded web server in your printer; they reside on an embedded
web server that is included with your HP JetDirect EIO network card.
The appearance and features of the Networking pages will differ,
depending on the version of your HP JetDirect card. The following screen
is similar to what you might see when you click
navigational bar, click the Networking page that you want to view. (The
Network Settings page is shown below.)
Managing the Network
Managing the Network
Managing the NetworkManaging the Network
with
with the Networking Pages
withwith
the Networking Pages
the Networking Pages the Networking Pages
Networking
. From the left
Managing the Network with the Networking Pages 41
Page 46

Below are some of the tasks you may be able to perform from the
Networking pages:
Change network configuration settings for various types of network
•
connections.
Enable or disable printing protocols.
•
Set up a support contact and support URLs.
•
Set up a password to control who can remotely access the Networking
•
pages.
View general network status information, including network statistics
•
stored on the print server.
View protocol information for all supported network connections.
•
Display the HP JetDirect Configuration Page.
•
Set the frequency at which the embedded web server will check the
•
network status.
For more information about the Networking pages, refer to the following:
•
•
—On each Networking page, under
Help
there is a Help link that provides a description of the
networking features and helpful tips for using them.
Also, from the Help page you can access additional
help from HP’s web site.
HP JetDirect Print Server Administrator's Guide
be available on the software CD that shipped with your printer. To
download the most recent version of the guide, go to:
http://www.hp.com/support/net_printing.
Other Links
—This guide may
42 Managing the Network with the Networking Pages
Page 47

Appendix A –
Appendix A –
Appendix A –Appendix A –
HP Web JetAdmin and the
HP Web JetAdmin and the
HP Web JetAdmin and theHP Web JetAdmin and the
HP Embedded Web Server
HP Embedded Web Server
HP Embedded Web ServerHP Embedded Web Server
How does HP Web JetAdmin work together with the HP Embedded
Web Server?
HP’s Web JetAdmin is a web-based system management tool that
provides efficient installation and management of networked peripherals
from a web browser. It allows network administrators to manage their
network printers from virtually anywhere.
The HP Embedded Web Server and Web JetAdmin work together to meet
all your printer management needs.
The HP Embedded Web Server provides a simple, easy-to-use solution
for one-to-one printer management in environments with a limited number
of printers. However, environments with several printers may want to use
HP Web JetAdmin for group printer management. With HP Web JetAdmin
you can discover, manage, and configure multiple devices simultaneously.
HP Web JetAdmin is available from HP Customer Care Online
(http://www.hp.com/support/net_printing).
Appendix A – HP Web JetAdmin and the HP Embedded Web Server 43
Page 48

44 Appendix A – HP Web JetAdmin and the HP Embedded Web Server
Page 49

Appendix B –
Appendix B –
Appendix B –Appendix B – How Do I?
How Do I?
How Do I?How Do I?
Sharing Printer Information
How can I share my printer information without setting up e-mail
alerts?
Your web browser has a feature that is useful for sharing printer
information.
1. Browse to the embedded web server page that you want to share.
2. Follow the instructions below for your browser:
•
For Microsoft Internet Explorer:
then click
•
For Netscape Navigator:
An e-mail composition window will appear, with the selected
embedded web server page attached. You can send the e-mail to
anyone you wish.
For example, you might want to send the Configuration Page to
HP Customer Care to help troubleshoot a printer problem.
Page by E-mail
From the
.
From the
menu, click
File
menu, click
File
Send
Send Page
,
.
Appendix B – How Do I? 45
Page 50

Setting Up the Printer to Send E-mail Messages
How do I set up the embedded web server so that the printer can
send an outgoing e-mail message?
The following example shows how to configure the HP Color LaserJet
4550 printer to send you an e-mail alert anytime a printer door or cover
has been left open.
1. Launch your web browser.
2. In the
printer (for example: http://192.168.1.1) or the host name (for example:
http://myprinter).
(If you do not know the IP address for the printer, see page 7.)
3. The embedded web server Home page should appear. From the top of
the screen, click
Address:
or
Go to:
Device
field, type the IP address assigned to the
, then on the left navigational bar, click
Alerts
.
46 Appendix B – How Do I?
Page 51

4. Add your e-mail address (follow the appropriate instructions below).
If the Printer has a Permanent Storage Device
Note
These steps apply to printers with a permanent storage device (such
as a hard disk).
a. Under
b. Under
example: “name@company.com”.)
Notification Recipients
Add Recipient Address
, click
, enter your e-mail address. (For
Edit List1
a.
.
b.
c.
d.
c. Click
d. Click
Appendix B – How Do I? 47
Apply
Back
.
to return to the Alerts page.
Page 52

If the Printer DOES NOT have a Permanent Storage Device
Note
These steps apply to printers without a permanent storage device
(such as a hard disk).
a. Under
example: “name@company.com”.)
b. Click
5. Under
Notification Recipients
Apply
Select Events
.
, click
, enter your e-mail address. (For
Media Path
a.
b.
.
5.
48 Appendix B – How Do I?
Page 53

6. Select the
COVERS.
checkbox next to CLOSE DRAWERS/DOORS/
List1
6.
7. Click
Apply
. The following screen should appear. Click OK.
Appendix B – How Do I? 49
Page 54

8. On the left navigational bar, click
Email
.
8.
11.
12.
Note
Your organization’s network or e-mail administrator typically provides
the information required to configure outgoing mail. See page 31 for
more information.
9. Under
10.Under
11.Click
12.Click Security.
Outgoing Mail
Outgoing Mail
Apply
.
, enter the SMTP Server IP address.
, enter the Domain Name.
9.
10.
13.Under
14.Click
50 Appendix B – How Do I?
Security
Apply
, select the
.
Outgoing Mail
13.
checkbox.
14.
Page 55
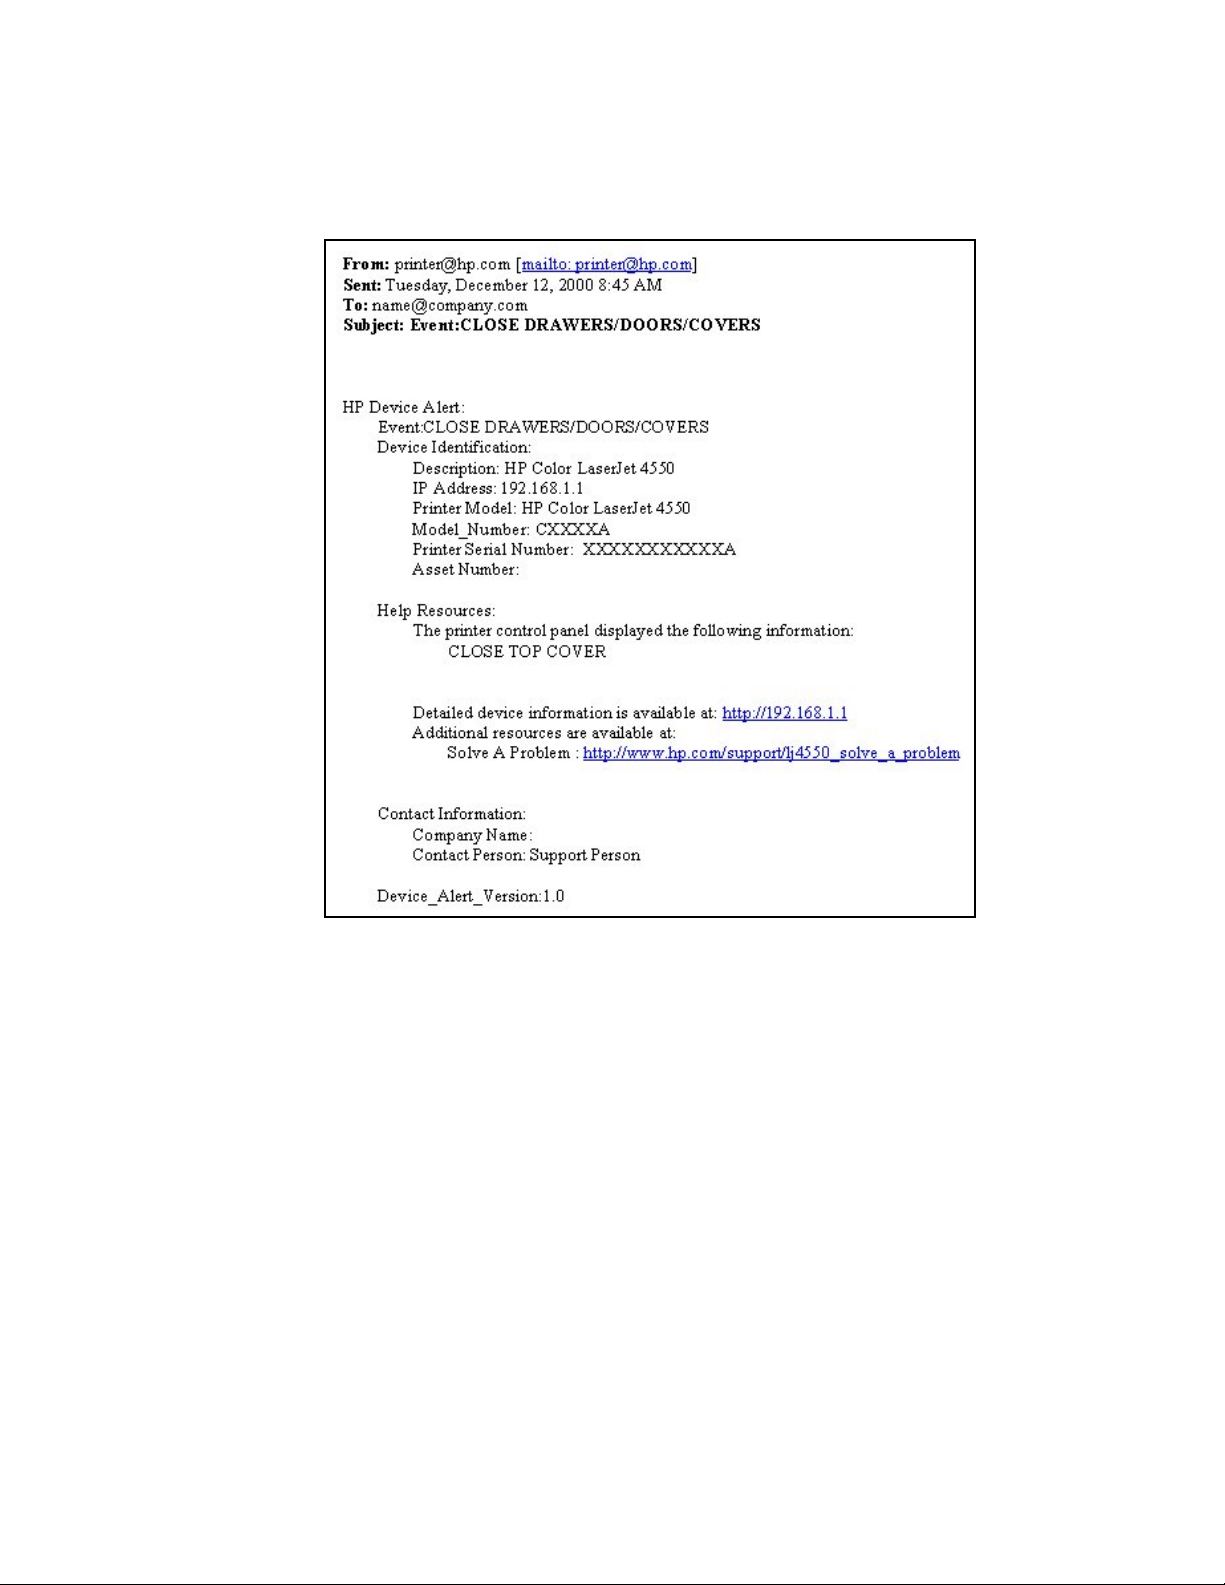
15.To test the configuration, open the top cover of the printer, then go to
your computer and verify that you have received an e-mail message
from the printer. (See the example below.)
Appendix B – How Do I? 51
Page 56

Setting Up the Printer to Receive and Respond to E-mail Messages
How do I set up the embedded web server so that the printer can
receive an incoming e-mail message and respond with an outgoing
e-mail message?
The following example shows how to configure the HP Color LaserJet
4550 printer so that you can send an e-mail message to the printer,
requesting a configuration page, and the printer will respond with an
e-mail message.
1. Launch your web browser.
2. In the
printer (for example: http://192.168.1.1) or the host name (for example:
http://myprinter).
(If you do not know the IP address for the printer, see page 7.)
3. The embedded web server Home page should appear. From the top of
the screen, click
Address:
or
Go to:
Device
field, type the IP address assigned to the
, then on the left navigational bar, click
Email
.
52 Appendix B – How Do I?
Page 57

Note
Your organization’s network or e-mail administrator typically provides
the information required to configure outgoing and incoming mail. See
pages 31-32 for more information.
4. Under
5. Under
6. Under
7. Under
account (for example, “printer”).
Outgoing Mail
Outgoing Mail
Incoming Mail
Incoming Mail
, enter the SMTP Server IP address.
, enter the Domain Name.
, enter the POP3 Server IP address.
, enter the Username of the printer’s mailbox
4.
5.
6.
7.
8.
9.
8. Click
9. Click Security.
Appendix B – How Do I? 53
Apply
.
Page 58

10.Under
checkboxes.
Security
, select the
Outgoing Mail
10.
and
Incoming Mail
11.
11.Click
12.From your e-mail application, compose a message to the printer,
Apply
following the steps below:
a. In the
printer’s e-mail address, from the top of the screen, click
then on the left navigational bar, click
you should see the
b. The
application as your return e-mail address.
c. In the
“this.configpage?configpage=email&format=html”
.
field, enter the printer’s e-mail address. (To find the
To:
. Under
.)
From:
Subject:
Email
Printer Email Address
field should be filled in automatically by your e-mail
field, enter:
Device
Outgoing Mail
,
,
Note
For more information about composing a message to the printer, see
page 33.
13.Click
54 Appendix B – How Do I?
Send
.
Page 59
14.You should receive an e-mail from the printer in your e-mail
application’s Inbox. (See the screen below.)
Note
Depending on delays in the network and your organization’s mail
server, a response may take from one minute to several hours to arrive
back in your e-mail application’s Inbox.
If the
To:, From:
your e-mail message, the printer will not send a message in response.
, and
Subject:
fields are not properly formatted in
Appendix B – How Do I? 55
Page 60

56 Appendix B – How Do I?
Page 61

Index
Index
IndexIndex
accessories, status, 10, 11
Alerts, 21
configure notification,
23, 24
refine notification, 27
setting up, 46
asset number, 15
browser, required, 7
Calibration Menu, 18
Cancel Job button, 10, 35
ChaiVM, 4
company name, 15
Configuration Menu, 18
Configuration Page, 11
configuration page,
printing, 6, 7
Configure Printer, 18
consumables
ordering, 36
status, 10
contact person, 15, 38
control panel
security, 11
status, 10
density settings, 11
Device Information page,
15, 38
Device pages, 8, 17–40
DIMMs
ordering, 36
status, 10, 11
drum kit
ordering, 36
status, 10, 12
duplex print jobs, 14
DWS, 11
EIO card
ordering, 36
status, 11, 41–42
e-mail
alerts, 21
embedded web server
page, 45
setting up incoming and
outgoing, 52
setting up outgoing, 46
Email page, 30
Command and
Response, 30
incoming mail, 32
outgoing mail, 31
setting up mail server,
30, 33
embedded virtual
machine, 4
embedded web server, 3
accessing, 7
features, 5
navigating, 8
error messages, 13
Event Log, 13
firewall, 7
firmware datecode, 11
fuser kit
ordering, 36
status, 10, 12
Index 57
Page 62

Go button, 10, 35
group printer
management, 43
hard disk, 6, 10
capabilites with, 22
ordering, 6, 36
help, 10, 36
network, 42
Home pages, 8, 9–15
host name, 7, 46, 52
HP JetDirect card, 41–42
HP JetDirect Print Server
Administrator's Guide
42
I/O Menu, 18
Information Menu, 18
IP address, 7, 11, 15, 46,
52
IP-based network, 7
IPX-based network, 7
jam recovery, 11
Java ™ applications, 4
Job Cancel button, 10, 35
Language page, 39
languages, 39.
printer languages
lights, 10
links, 36
maintenance kits
ordering, 36
status, 10, 12
media
ordering, 36
status, 10
memory
ordering, 36
status, 10, 11
menus, 18
messages
control panel, 10
error, 13
See also
,
model number, 11
mopier configuration, 11
network
address, 11, 15
required, 7
status, 41–42
Networking pages, 8, 41–
42
one-sided print jobs, 14
online help, 10, 36
network, 42
operating system, 7
ordering
additional storage, 6
supplies, 36
Other Links page, 36
output bin, 10, 11
page count, 11, 12, 14
page sizes printed, 14
Paper Handling Menu, 18
paper trays, 10, 11
parallel connection, 7
part number
printer, 38
supplies, 12
password, create, 35
PCL, 11
personalities, installed, 11
PJL storage, 10
print PS errors, 11
printer
configuration, 10
description, 15
information, 11, 15
languages, installed, 11
menus, 18
model, 15
name, 11, 14
number, 11, 15
settings, 18
Printer Status, 10
Printing Menu, 18
58 Index
Page 63

Private/Stored Jobs Menu,
18
problem
alerts, 21
solving, 36
PS, 11
Quick Copy Jobs Menu,
18
RAM DISK storage, 10, 11
recycle toner cartridge, 12
refresh rate, 10
network, 42
Resets Menu, 18
resolution, 11
security, 11
Security page, 35
serial number, 11, 12, 14,
15
share printer information,
45
simplex print jobs, 14
sizes printed, 14
status, 10, 12
alerts, 21
network, 41–42
supplies
ordering, 36
status, 10, 12
Supplies Status page, 12
system requirements, 7
toner cartridge
alerts, 21
recycling, 12
status, 10, 12
toner coverage, 14
total pages printed, 14
transfer kit
ordering, 36
status, 10, 12
trays, 10, 11
two-sided print jobs, 14
Usage Page, 14
virtual machine, 4
web browser, required, 7
Web JetAdmin, 43
write protection, 11
Index 59
 Loading...