

Page 1

Email Firewall
Installation Guide
Installation Guide for the 3Com® Email Firewall
Guide d’installation pour le 3Com® Email Firewall
3Com® Email Firewall – Installationsanleitung
Guida all’installazione di 3Com® Email Firewall
Guía de instalación de Firewall 3Com® Email
EN
FR
DE
IT
ES
http://www.3com.com/
Part No. DIA-MFA100-AAA01
Published January 2005
WORK
SHEET
Page 2

3Com Corporation
350 Campus Drive
Marlborough,
MA 01752-3064
Copyright © 2000-2005, BorderWare Technologies Inc. Used under license by 3Com Corporation. All rights
reserved. No part of this documentation may be reproduced in any form or by any means or used to make any
derivative work (such as translation, transformation, or adaptation) without written permission from
BorderWare Technologies Inc.
3Com Corporation and its licensors reserve the right to revise this documentation and to make changes in
content from time to time without obligation on the part of 3Com Corporation or its licensors to provide
notification of such revision or change.
3Com Corporation and its licensors provide this documentation without warranty, term, or condition of any
kind, either implied or expressed, including, but not limited to, the implied warranties, terms or conditions of
merchantability, satisfactory quality, and fitness for a particular purpose. 3Com Corporation and its licensors
may make improvements or changes in the product(s) and/or the program(s) described in this documentation
at any time.
If there is any software on removable media described in this documentation, it is furnished under a license
agreement included with the product as a separate document, in the hard copy documentation, or on the
removable media in a directory file named LICENSE.TXT or !LICENSE.TXT. If you are unable to locate a copy,
please contact 3Com and a copy will be provided to you.
UNITED STATES GOVERNMENT LEGEND
If you are a United States government agency, then this documentation and the software described herein are
provided to you subject to the following:
All technical data and computer software are commercial in nature and developed solely at private expense.
Software is delivered as “Commercial Computer Software” as defined in DFARS 252.227-7014 (June 1995) or
as a “commercial item” as defined in FAR
provided in 3Com’s standard commercial license for the Software. Technical data is provided with limited
rights only as provided in DFAR 252.227-7015 (Nov
applicable. You agree not to remove or deface any portion of any legend provided on any licensed program or
documentation contained in, or delivered to you in conjunction with, this Installation Guide.
Unless otherwise indicated, 3Com registered trademarks are registered in the United States and may or may not
be registered in other countries.
3Com and the 3Com logo are registered trademarks of 3Com Corporation.
BorderWare, the Powered by BorderWare Logo, and BorderWare Security Network are trademarks or
registered trademarks of BorderWare Technologies Inc. in the United States and other jurisdictions.
Microsoft and Windows are registered trademarks of Microsoft Corporation.
All other company and product names may be trademarks of the respective companies with which they are
associated.
ENVIRONMENTAL STATEMENT
It is the policy of 3Com Corporation to be environmentally-friendly in all operations. To uphold our policy, we
are committed to:
Establishing environmental performance standards that comply with national legislation and regulations.
Conserving energy, materials and natural resources in all operations.
Reducing the waste generated by all operations. Ensuring that all waste conforms to recognized
environmental standards. Maximizing the recyclable and reusable content of all products.
Ensuring that all products can be recycled, reused and disposed of safely.
Ensuring that all products are labelled according to recognized environmental standards.
Improving our environmental record on a continual basis.
End of Life Statement
3Com processes allow for the recovery, reclamation and safe disposal of all end-of-life electronic components.
Regulated Materials Statement
3Com products do not contain any hazardous or ozone-depleting material.
Environmental Statement about the Documentation
The documentation for this product is printed on paper that comes from sustainable, managed forests; it is
fully biodegradable and recyclable, and is completely chlorine-free. The varnish is environmentally-friendly, and
the inks are vegetable-based with a low heavy-metal content.
ENCRYPTION
This product contains encryption and may require U.S. and/or local government authorization prior to export
or import to another country.
2.101(a) and as such is provided with only such rights as are
1995) or FAR 52.227-14 (June 1987), whichever is
Page 3

CONTENTS
ABOUT THIS GUIDE
Conventions 6
Related Documentation 7
Documentation Comments 7
1 PRE-INSTALLATION TASKS
Registering your 3Com Email Firewall 9
Deploying the 3Com Email Firewall 10
Using the Configuration Worksheet 11
Network Modifications 11
Network and Mail Configuration Settings 11
Modifying the Firewall/Router Configuration 12
EN
2 INSTALLING THE 3COM EMAIL FIREWALL
Connect the 3Com Email Firewall to a Network 13
Connect to the 3Com Email Firewall via a Web Browser 14
Using the Setup Wizard 15
License Agreement 16
Anti-Virus License Agreement 16
Change Password 17
Set Time Zone 17
Network Configuration 18
Mail Configuration 19
Completion 20
Using the Licensing Wizard 21
3 POST-INSTALLATION TASKS
Checking the 3Com Email Firewall’s Status 25
Licensing 26
WORK
SHEET
Page 4

BorderWare Mail Security Services 26
Network Services 26
Modify Internal Mail Server 27
Exchange 5.5 27
Exchange 2000 27
Testing Outbound Mail Delivery 28
Testing Inbound Mail Delivery 29
A CONFIGURING YOUR COMPUTER’S IP ADDRESS
Windows XP 31
Windows 2000 33
Page 5
ABOUT THIS GUIDE
This guide describes how to initially install and configure your 3Com®
Email Firewall.
The instructions in this guide will help you quickly get your 3Com Email
Firewall setup on the network to accept and scan email messages.
This guide is intended for the system or network administrator who is
responsible for configuring, using, and managing the 3Com Email
Firewall. It assumes a working knowledge of TCP/IP network and email
communications protocols.
For more detailed information on 3Com Email Firewall configuration,
please see the accompanying User Guide.
EN
If release notes are shipped with your product and the information there
differs from the information in this guide, follow the instructions in the
release notes.
Most user guides and release notes are available in Adobe Acrobat
Reader Portable Document Format (PDF) or HTML on the 3Com
Wide Web site:
World
http://www.3com.com/products
Page 6
6 ABOUT THIS GUIDE
Conventions Table 1 and Table 2 list conventions that are used throughout this guide.
Table 1 Notice Icons
Icon Notice Type Description
Information note Information that describes important features or
instructions
Caution Information that alerts you to potential loss of data or
potential damage to an application, system, or device
Warning Information that alerts you to potential personal injury
Table 2 Text Conventions
Convention Description
Screen displays This typeface represents information as it appears on the
screen.
Syntax The word “syntax” means that you must evaluate the syntax
provided and then supply the appropriate values for the
placeholders that appear in angle brackets. Example:
To change your password, use the following syntax:
system password <password>
In this example, you must supply a password for <password>.
Commands The word “command” means that you must enter the
command exactly as shown and then press Return or Enter.
Commands appear in bold.
The words “enter”
and
“type”
Keyboard key names If you must press two or more keys simultaneously, the key
Words in
italics
When you see the word “enter” in this guide, you must type
something, and then press Return or Enter. Do not press
Return or Enter when an instruction simply says “type.”
names are linked with a plus sign (+). Example:
Press Ctrl+Alt+Del
Italics are used to:
■ Emphasize a point.
■ Denote a new term at the place where it is defined in the
text.
■ Identify menu names, menu commands, and software
button names. Examples:
From the
Help
menu, select
Contents
.
Click OK.
Page 7
Related Documentation
7
EN
Related
Documentation
Documentation
Comments
In addition to this guide, each 3Com Email Firewall documentation set
includes the following:
■
3Com Email Firewall User Guide
This guide contains:
■ Detailed information on 3Com Email Firewall configuration
■ Information on how to troubleshoot problems related to email
processing and communications
■
Release Notes
These notes provide information about the current software release,
including new features, modifications, and known problems.
Your suggestions are very important to us. They will help make our
documentation more useful to you. Please send comments about this
document to 3Com via the following URL:
http://www.3com.com/corpinfo/en_US/contactus/index.html
Please include the following information when contacting us:
■ Document title
■ Document part number (on the title page)
■ Page number (if appropriate)
Example:
■ 3Com Email Firewall Installation Guide
■ Part number: DIA-MFA100-AAA01
■ Page 25
Please note that we can only respond to comments and questions about
3Com product documentation. Questions related to technical support or
sales should be directed in the first instance to your network supplier.
Page 8

8 ABOUT THIS GUIDE
Page 9
1
EN
PRE-INSTALLATION TASKS
This chapter contains information on the pre-installation tasks that need
to be completed before installing the 3Com Email Firewall, and includes
the following topics:
■ Registering your 3Com Email Firewall
■ Deploying the 3Com Email Firewall
■ Using the Configuration Worksheet
■ Modifying the Firewall/Router Configuration
Registering your
3Com Email Firewall
Before installation, you must register your 3Com Email Firewall License
Key with 3Com. The License Key will be used during the installation
process to license and activate the 3Com Email Firewall.
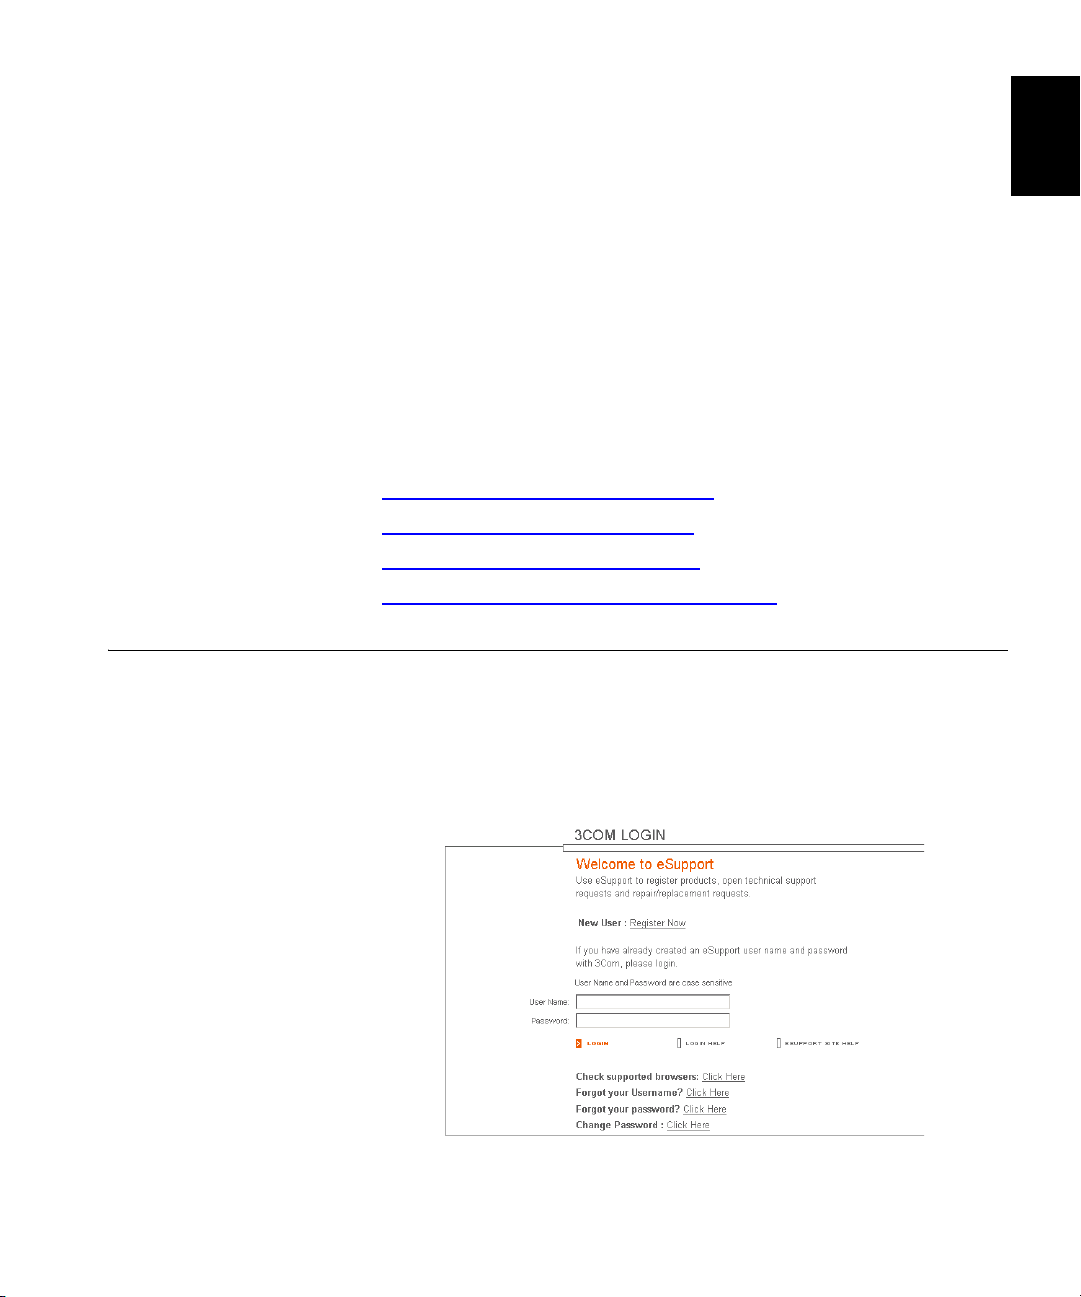
Using a web browser, go to the following URL:
http://esupport.3com.com
If you do not have an eSupport username and password, you must first
register by clicking the Register Now link.
Page 10
10 CHAPTER 1: PRE-INSTALLATION TASKS
After obtaining a username and password, login to 3Com eSupport and
follow the instructions to register your 3Com Email Firewall with the
License Key that came with your system.
Copy your License Key down on the included Configuration Worksheet.
You will enter this key during the licensing process.
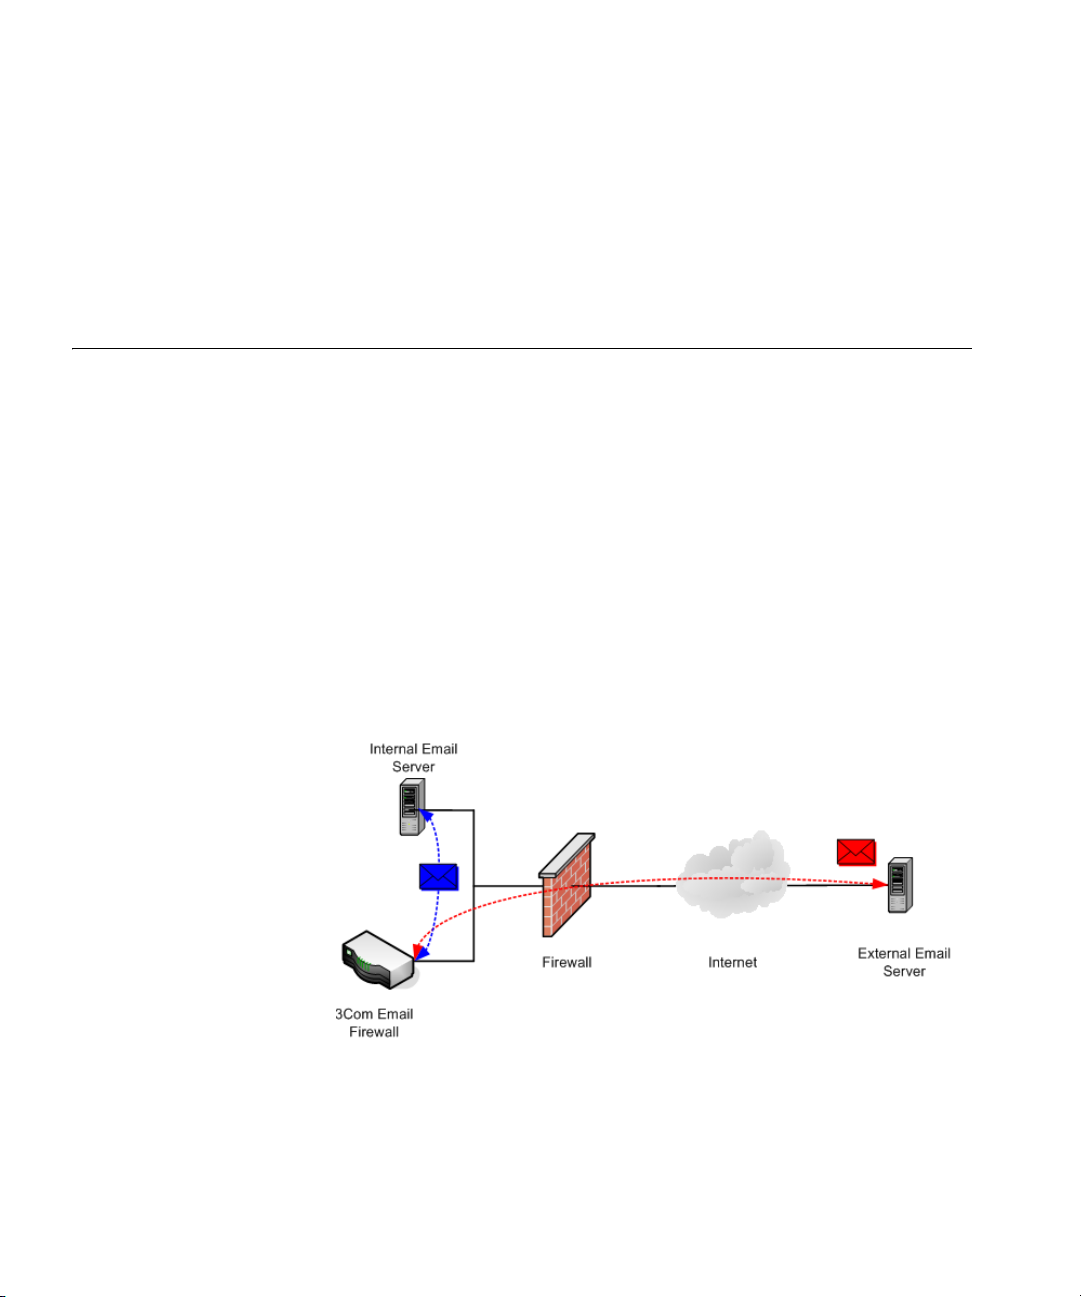
Deploying the 3Com
Email Firewall
The 3Com Email Firewall is designed to be situated between your mail
servers and the Internet so that there are no direct SMTP (Simple Mail
Transport Protocol) connections between external and internal servers.
The 3Com Email Firewall is installed behind the existing firewall on the
Internal network.
Inbound mail will be forwarded from the Firewall or Router to the 3Com
Email Firewall where it will be scanned, processed, and then sent to your
internal mail server for delivery.
Outbound mail will be sent from your internal mail server to the 3Com
Email Firewall to be scanned, processed, and then delivered to the
destination SMTP server on the Internet.
Page 11

Using the Configuration Worksheet
11
EN
Using the
Configuration
Worksheet
Your documentation package includes a Configuration Worksheet that
you will need to complete before continuing with the installation. The
worksheet is used to document your current network environment and
provide a list of your proposed changes when integrating the 3Com Email
Firewall into your network.
Network Modifications Before proceeding with the installation, the following information about
your environment needs to be gathered:
■ Document current network settings
■ Determine which ports or proxies need to be configured on the
Firewall or Router
■ Identify changes required to the internal mail servers to route
outbound mail to the 3Com Email Firewall.
Network and Mail
Configuration Settings
When installing the 3Com Email Firewall for the first time, you will need
to have the following information on hand. Use the included
Configuration Worksheet to record these items.
■ Hostname — The Hostname assigned to the 3Com Email Firewall,
mail
in
such as
■ Domain — The Domain Name associated with the assigned
mail.example.com
.
Hostname. This is typically the domain that email is being processed
for, such as
example.com
.
■ IP Address — Enter the IP address you will be using for this 3Com
Email Firewall. The default is 192.168.1.253 and you can use this
address if it does not conflict with any other internal systems.
■ Net Mask — Enter the appropriate net mask for your network. If your
IP address is 192.168.1.253, then the net mask will be
255.255.255.0.
■ Gateway — Enter the default gateway for this 3Com Email Firewall.
This is typically the hostname or IP address of your router.
■ Name Server — The IP address or hostname of your network’s DNS
server.
■ Internal Mail Server Address — The FQDN (Fully Qualified Domain
Name) or IP address of the internal Mail Server, such as
exchange.example.com
.
Page 12

12 CHAPTER 1: PRE-INSTALLATION TASKS
■ Administrator Email Address — Enter an email address for the
administrator of this 3Com Email Firewall. Notifications will go to this
email address.
■ Proxy — Enter an optional proxy server if you use one on your
network. If you use a proxy server, this is required for Anti-Virus,
Anti-Spam, and Licensing updates to work properly. Enter the address
in the format https://hostname:port, such as:
https://proxy.example.com:8080
■ Proxy Username and Password — Enter a username and password for
the proxy server.
Modifying the
Firewall/Router
Configuration
For the 3Com Email Firewall to function properly, various networking
ports or proxies must be configured on your firewall or router.
The following table describes the list of ports required:
Table 3 Firewall/Router Port Configuration
From
Port Description
21 FTP for
system
backups
25 SMTP ✓ ✓ ✓ ✓ TCP
53 DNS ✓ ✓ UDP/TCP
80 Anti-Virus
Updates
123 NTP
(Network
Time
Protocol)
443 Security
Connection
443 Secure
Admin
514 Syslog ✓ UDP
6277 DCC ✓ UDP
From
Internet
✓ ✓ TCP
To
Internet
✓ TCP
✓ ✓ UDP
✓ TCP
Internal
Network
To
Internal
Network Protocol
✓ TCP
Page 13
2
EN
INSTALLING THE 3COM EMAIL
FIREWALL
When you have completed your pre-installation tasks and have all the
information you need for the initial configuration of the 3Com Email
Firewall, you are now ready for the installation.
The installation includes the following steps:
■ Connect the 3Com Email Firewall to a Network
■ Connect to the 3Com Email Firewall via a Web Browser
■ Using the Setup Wizard
■ Using the Licensing Wizard
Connect the 3Com
Email Firewall to a
Network
Install and connect the 3Com Email Firewall as follows:
1 Unpack the 3Com Email Firewall, cables, and documentation.
2 Connect the power cable from a power source to your 3Com Email
Firewall.
3 To begin the installation and configuration of the 3Com Email Firewall,
you must first connect directly to it using another computer. This can be
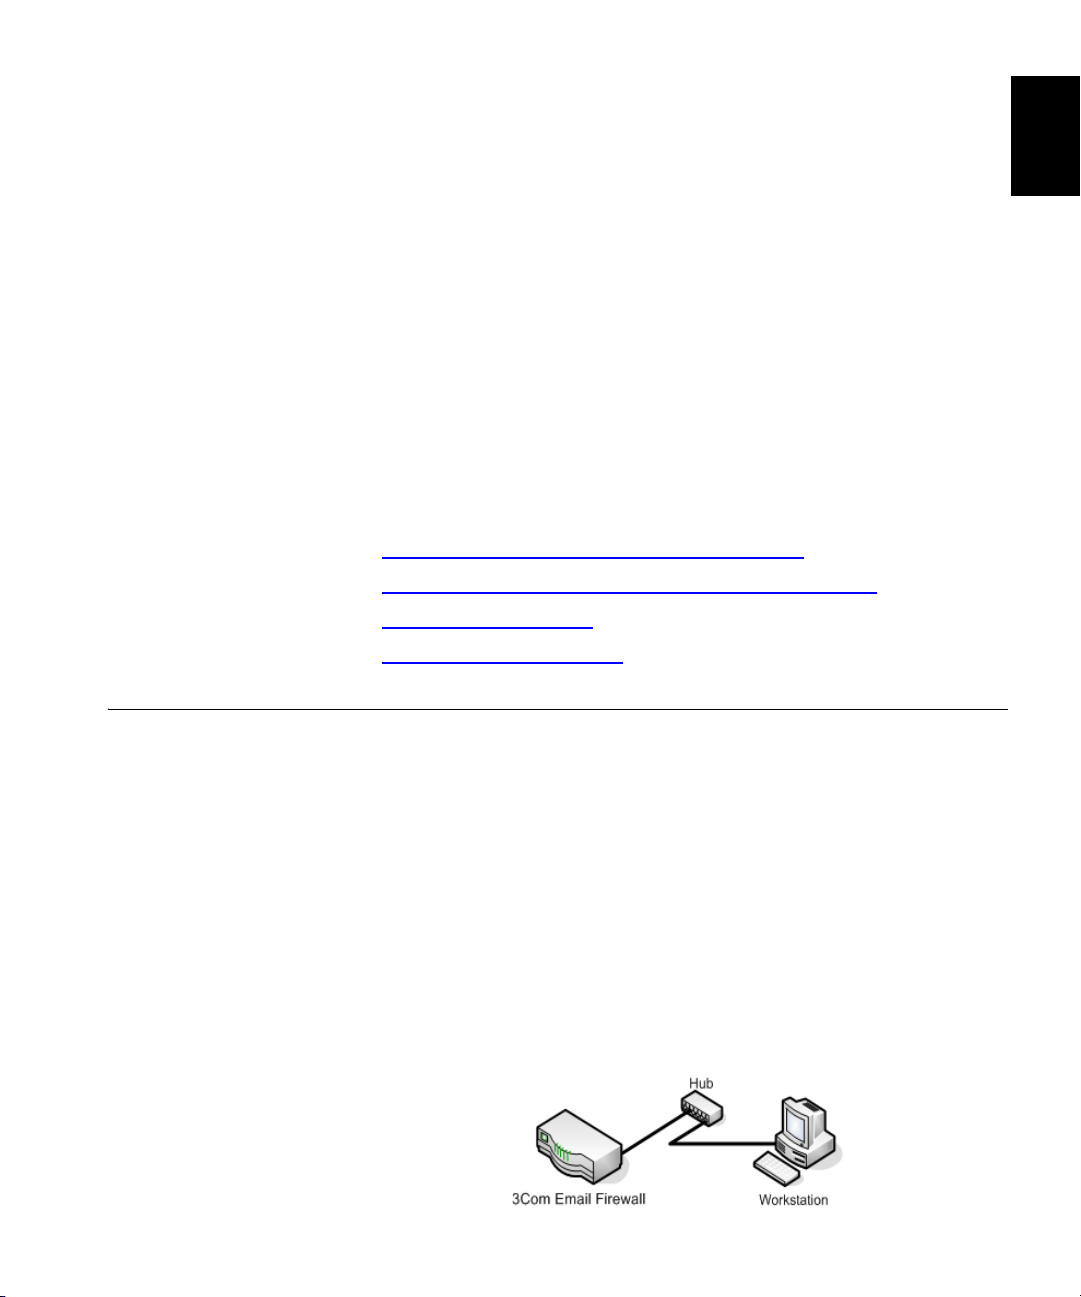
accomplished in two ways:
■ Connecting both your 3Com Email Firewall and computer to a
network hub or switch via a normal Ethernet network cable.
Page 14
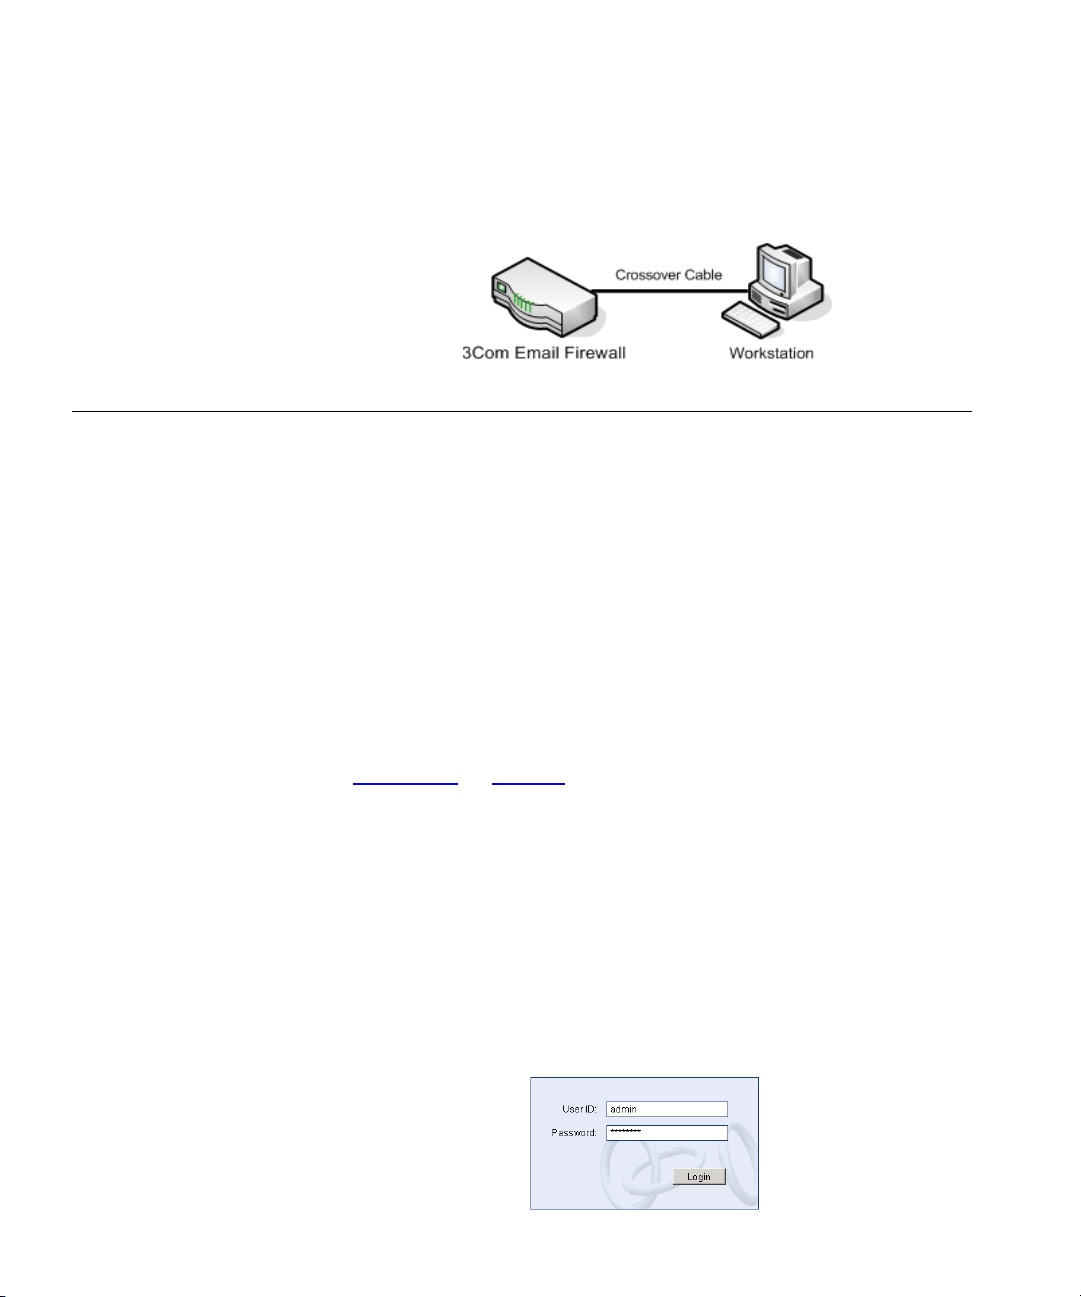
14 CHAPTER 2: INSTALLING THE 3COM EMAIL FIREWALL
■ Connecting your 3Com Email Firewall and computer directly using
a crossover cable.
Connect to the 3Com
Email Firewall via a
Web Browser
Connect to the 3Com Email Firewall from your configuration computer as
follows:
1 Ensure the 3Com Email Firewall and your computer are properly
connected on the network either directly or via a hub or switch.
2 Turn on the power of the 3Com Email Firewall. Wait at least 1 to 2
minutes for the system to fully start before trying to connect.
3 The default IP address used by the 3Com Email Firewall is 192.168.1.253.
Reconfigure your computer’s local network settings to use an address on
the same network. Use the IP address 192.168.1.252 with a subnet mask
of 255.255.255.0.
See Appendix A on page 31 for instructions on changing your computer’s
IP address.
If there are existing systems on the network using these addresses, use a
crossover Ethernet cable to connect the computer and 3Com Email
Firewall together as an isolated connection.
4 Launch a web browser on your computer and enter 192.168.1.253 as
the URL in the location bar.
5 Login using the username admin with the default password of admin.
The Welcome screen of the Setup Wizard will then be displayed.
Page 15
Using the Setup Wizard
15
EN
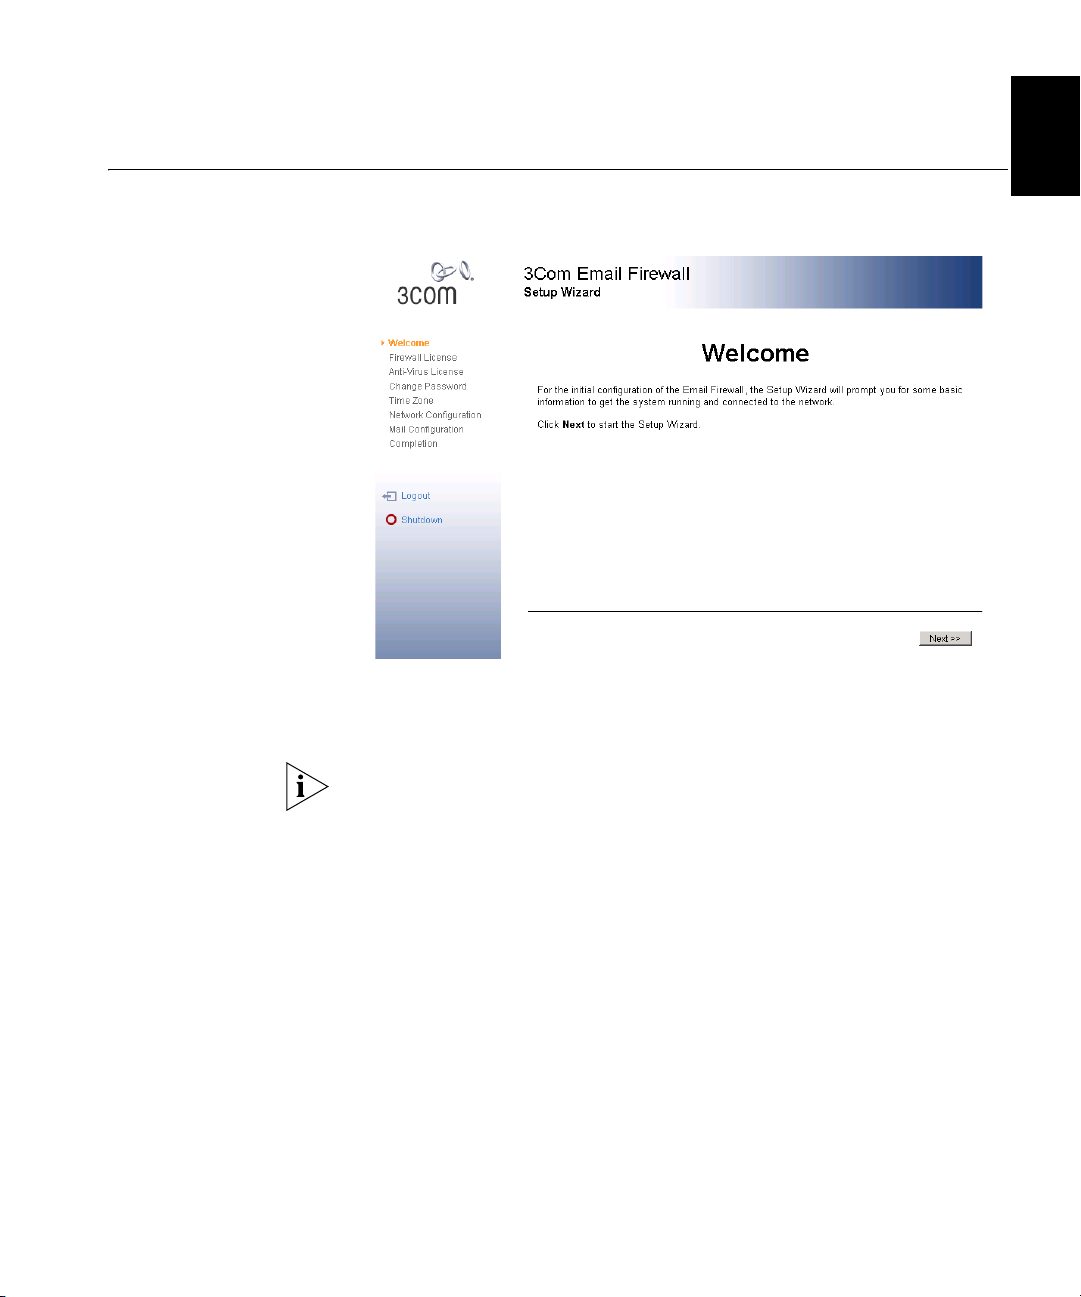
Using the Setup
Wizard
The Setup Wizard will guide you through the installation of the 3Com
Email Firewall.
Click the Next button to continue with the initial configuration of the
3Com Email Firewall.
During the installation, you can always go back to a previous screen by
clicking the Back button.
Page 16
16 CHAPTER 2: INSTALLING THE 3COM EMAIL FIREWALL
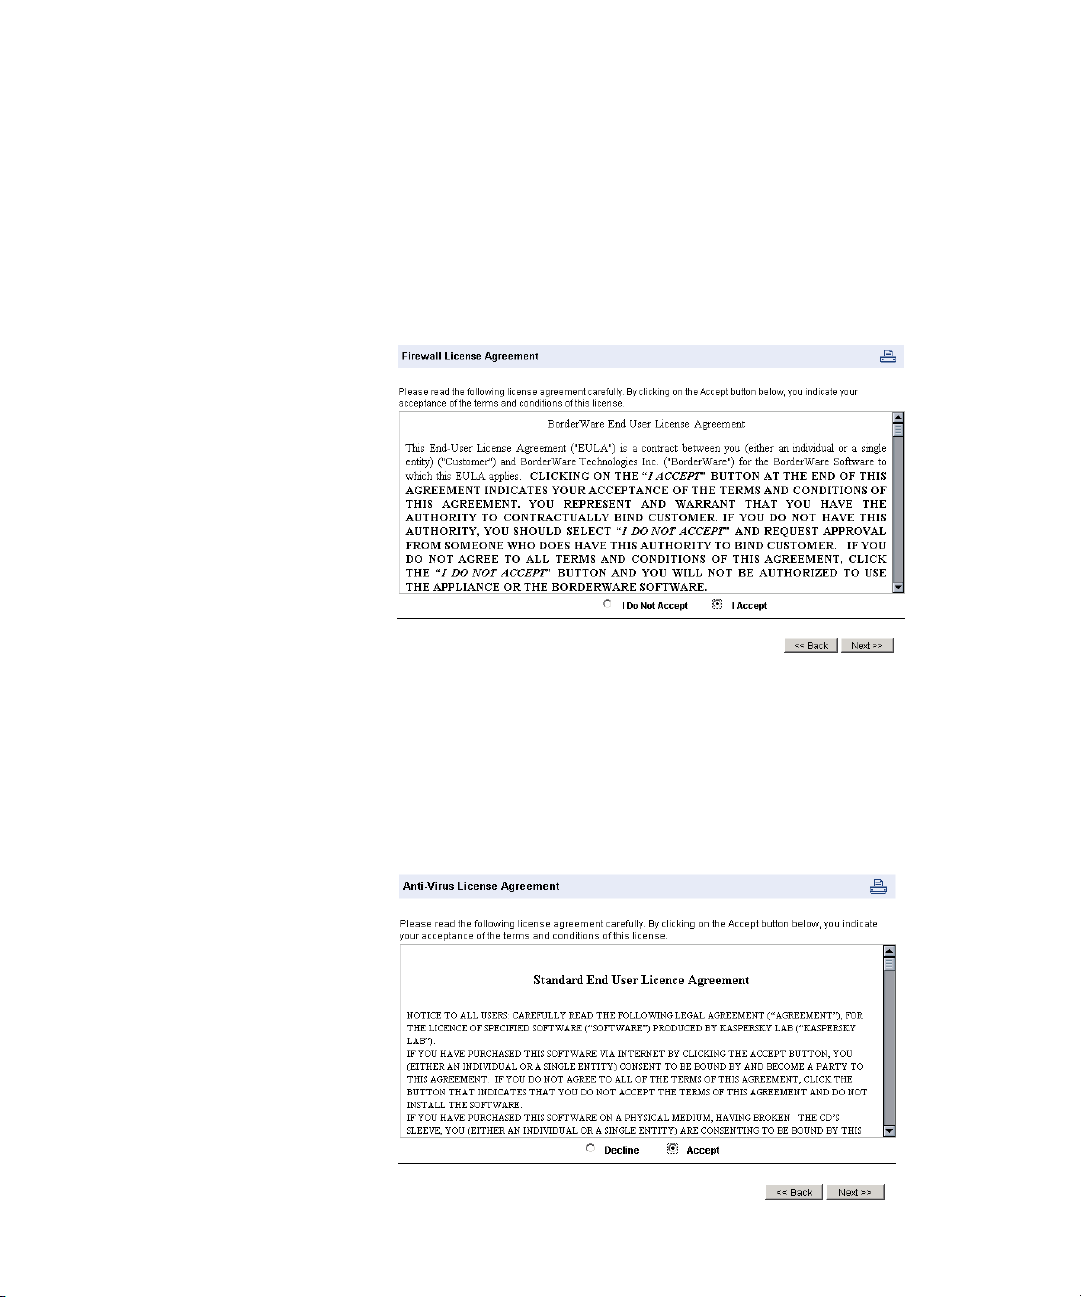
License Agreement When the 3Com Email Firewall is installed for the first time, you must
complete the initialization phase by reading and accepting the license
agreement.
Read the license agreement, select I Accept, and then click Next to
continue.
Anti-Virus License
Agreement
You must read and accept the Anti-Virus software license agreement
before continuing.
Read the license agreement, select Accept, and then click Next to
continue.
Page 17
Using the Setup Wizard
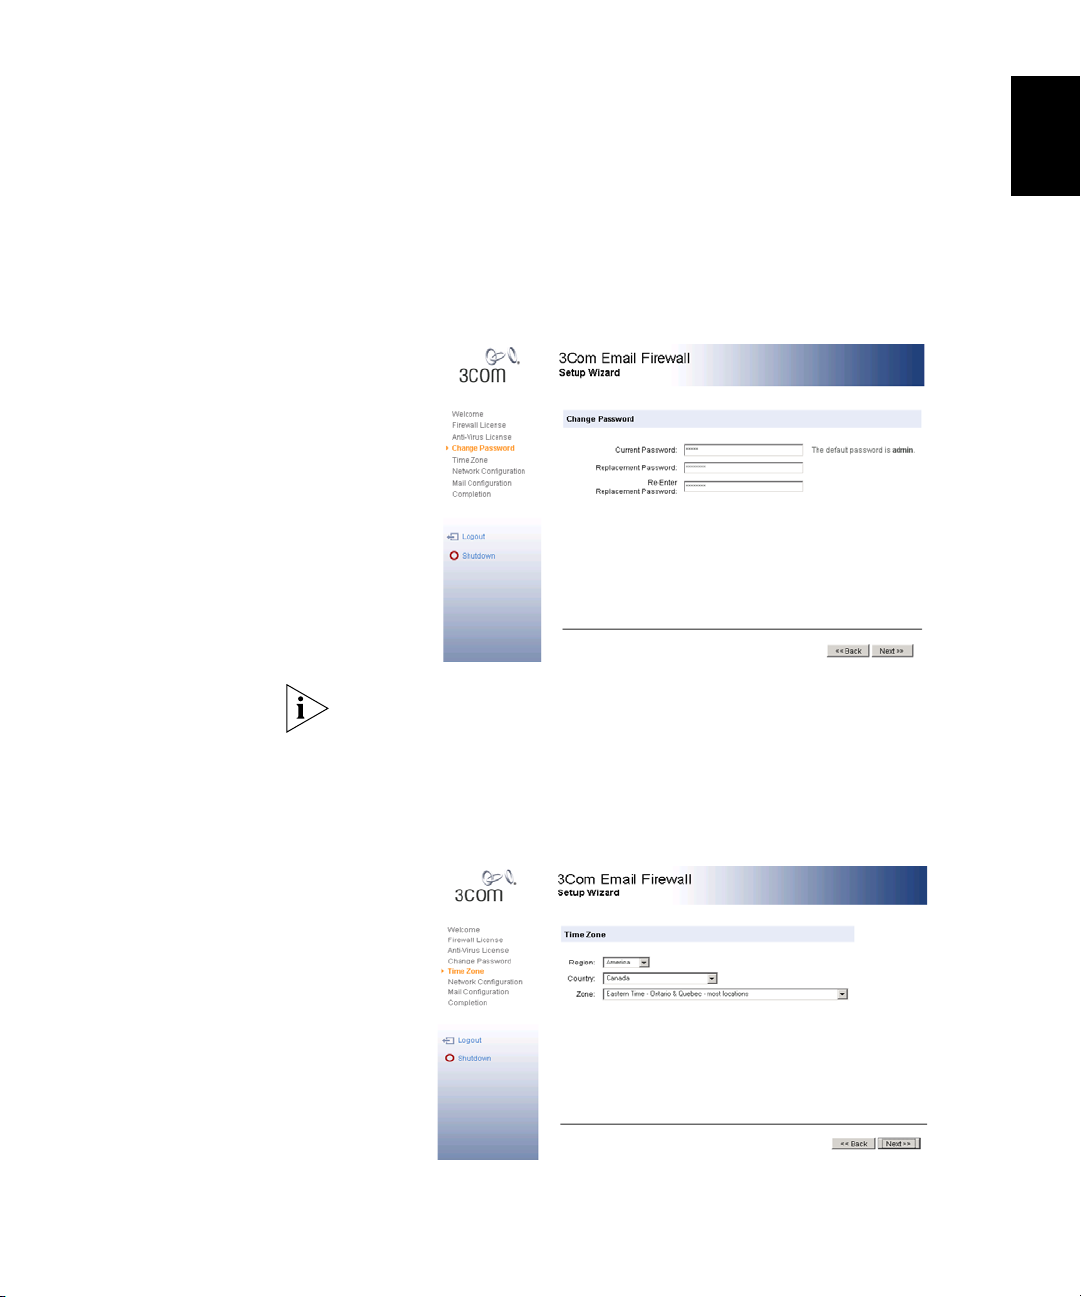
Change Password Change the default password of the 3Com Email Firewall by entering the
default password admin, and then enter and confirm a new password.
Choose a secure password of at least 8 characters in length, and include
a mixture of upper and lowercase alphabetic characters, numbers, and
special characters such as the “@” symbol.
17
EN
The password is case sensitive and you can use both upper and lower
case characters.
Click Next to continue.
Set Time Zone Set your region, country, and time zone. Click Next to continue.
Page 18
18 CHAPTER 2: INSTALLING THE 3COM EMAIL FIREWALL
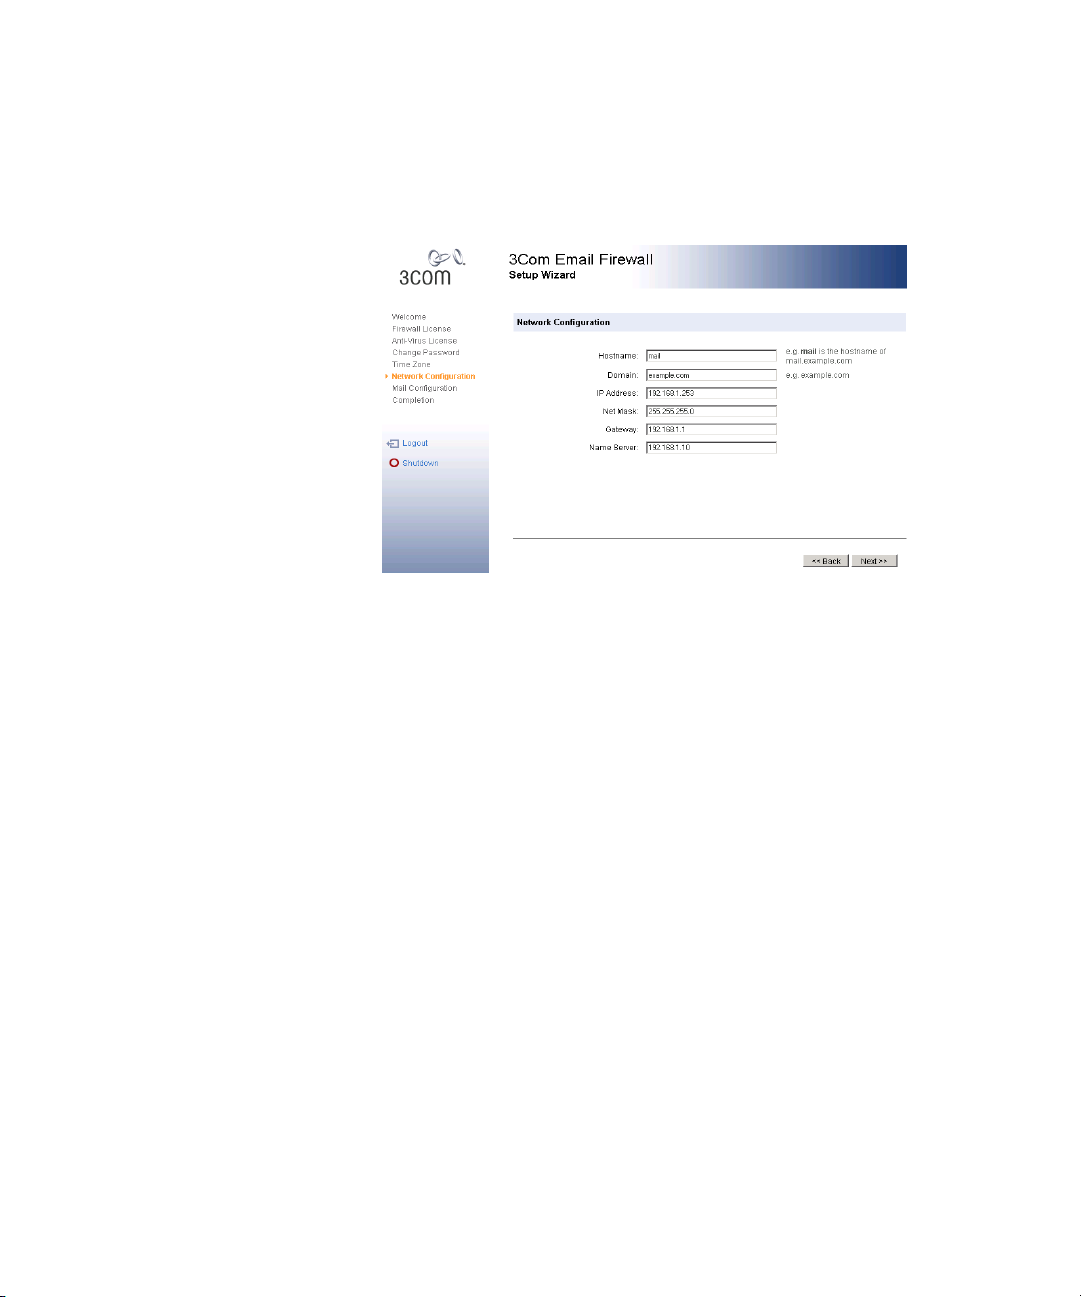
Network Configuration Enter the following required networking information from your
Configuration Worksheet.
■ Hostname — Enter the hostname (not the full domain name) of the
mail
in
3Com Email Firewall, such as
mail.example.com
.
■ Domain — Enter the domain name, such as
■ IP Address — Enter the IP address for this 3Com Email Firewall. The
example.com
.
default is 192.168.1.253 and you can use this address if it does not
conflict with any other internal systems.
■ Net Mask — Enter the appropriate net mask for your network. If your
IP address is 192.168.1.253, then the net mask will be
255.255.255.0.
■ Gateway — Enter the default gateway for this 3Com Email Firewall.
This is typically the hostname or IP address of your router.
■ Name Server — Enter the hostname or IP address of your DNS server.
Click Next to continue.
Page 19
Using the Setup Wizard
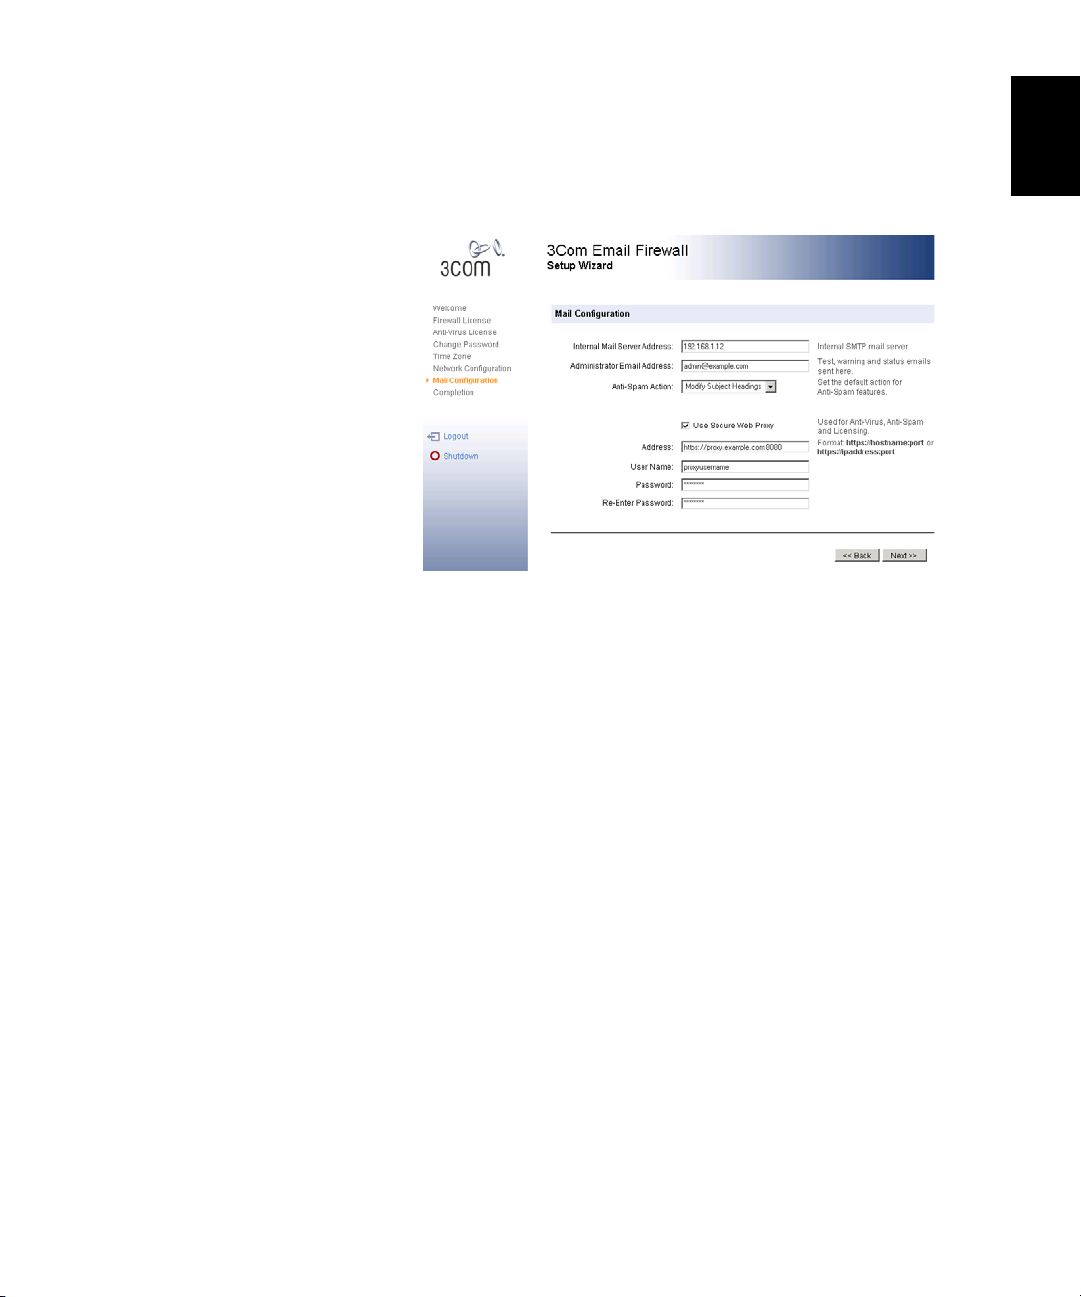
Mail Configuration Enter the following required mail configuration settings from your
Configuration Worksheet.
■ Internal Mail Server Address — Enter the IP Address or hostname of
the internal mail server where mail will be delivered after being
processed by the 3Com Email Firewall. If you have more than one
internal Mail Server, you can add additional addresses after the
installation is complete.
19
EN
■ Administrator Email Address — Enter an email address for the
administrator of this 3Com Email Firewall. Notifications will go to this
email address.
■ Anti-Spam Action — Set your default action for the 3Com Email
Firewall’s Anti-Spam features. The choices are as follows:
■ Disabled — The Anti-Spam features are disabled.
■ Modify Subject Headings — Anti-Spam features are enabled.
Messages determined to be spam will have their subject field
modified with text such as [SPAM].
■ User-Quarantine Mail — User Spam Quarantine Anti-Spam
features are enabled. Messages determined to be spam will be
redirected to the User Spam Quarantine. Action will be set to
Redirect To
with the 3Com Email Firewall hostname as the Action
Data.
Page 20
20 CHAPTER 2: INSTALLING THE 3COM EMAIL FIREWALL
■ Use Secure Proxy — Select the check box to enable use of a web proxy
server if you use one on your network. If you use a proxy server, this
setting is required for Anti-Virus, Anti-Spam, and Licensing updates to
work properly.
■ Address — Enter the proxy server address in the format
https://hostname:port.
■ User Name — Enter a valid user name for the proxy server.
■ Password — Enter and confirm a corresponding password for the user
name entered above.
Click Next to continue.
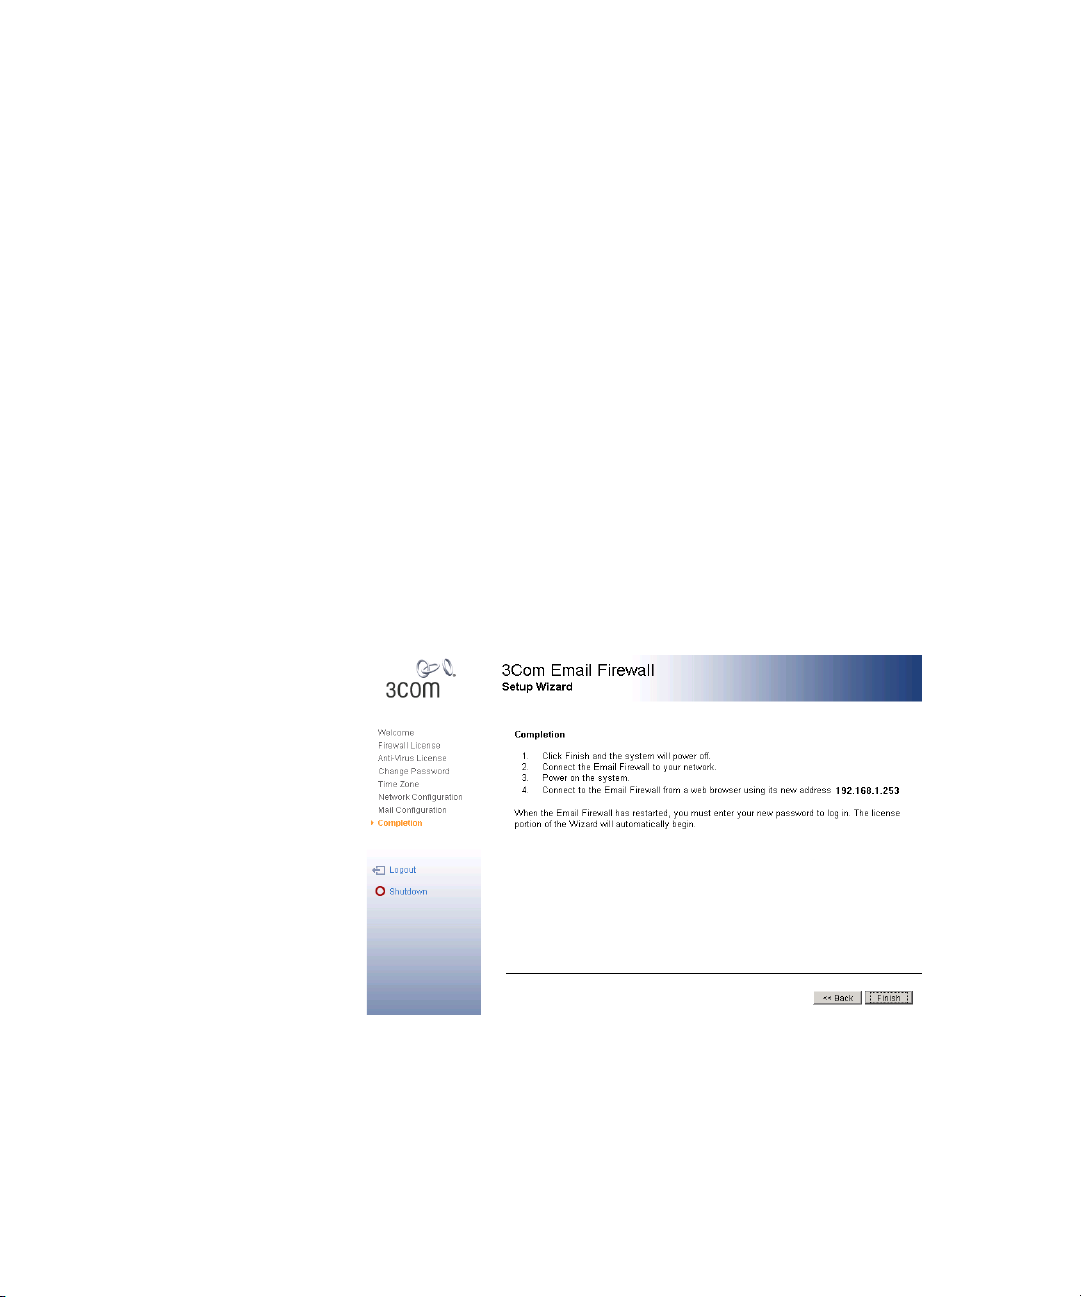
Completion You have completed the initial configuration of the 3Com Email Firewall.
Ensure that you read the final instructions on the Setup Wizard’s
Completion
screen.
Click Finish to shutdown the system.
When the 3Com Email Firewall is shutdown, connect the network
interface to a network that will be able to access the Internet.
The License Wizard will need to access the Internet to activate your
system with 3Com.
Page 21
Using the Licensing Wizard
21
EN
Using the Licensing
Wizard
After completing the initial configuration with the Setup Wizard and
restarting your 3Com Email Firewall, the License Wizard will guide you
through the procedure to license your system.
The 3Com Email Firewall must be registered at
before starting this procedure. See
Firewall” on page 9.
1 Ensure the 3Com Email Firewall is connected to a network that can
access the Internet. The 3Com Email Firewall will be using the new IP
address that you set during the network configuration.
2 Power on the 3Com Email Firewall. Wait at least 1 to 2 minutes for the
system to start before trying to connect.
3 Set the IP address of your configuration computer to an address used on
the same network. See
on changing your computer’s IP Address.
4 Launch a web browser on your computer and enter the new IP address of
the 3Com Email Firewall as the URL in the location bar.
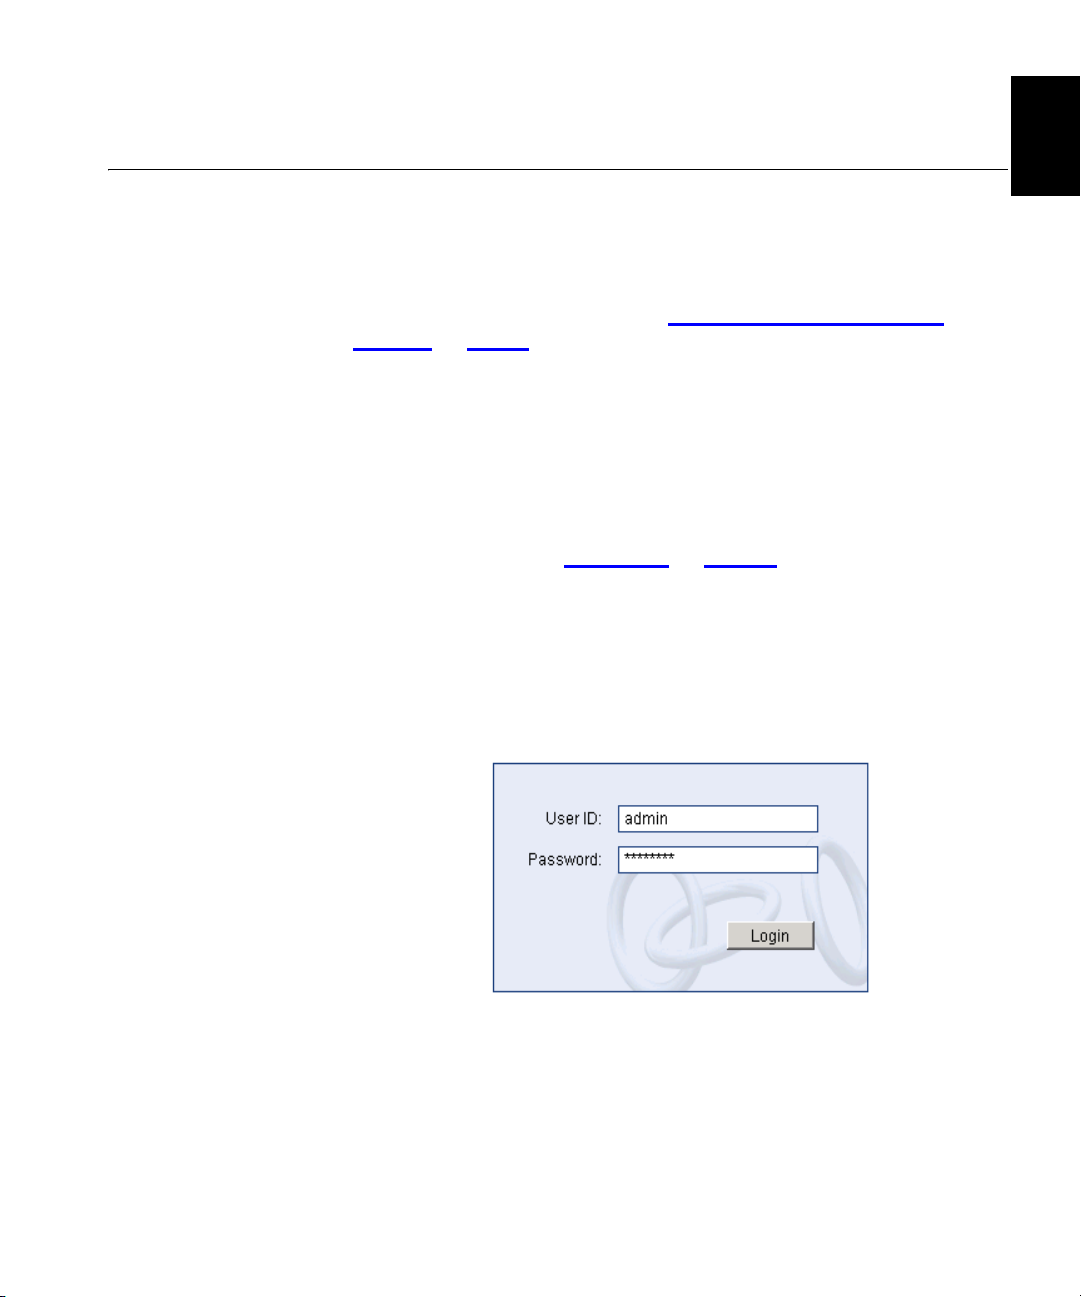
5 You will be prompted to login using the new password that you set
during the initial configuration.
Appendix A on page 31 for detailed information
“Registering your 3Com Email
esupport.3com.com
The Licensing Wizard will now begin.
Page 22
22 CHAPTER 2: INSTALLING THE 3COM EMAIL FIREWALL
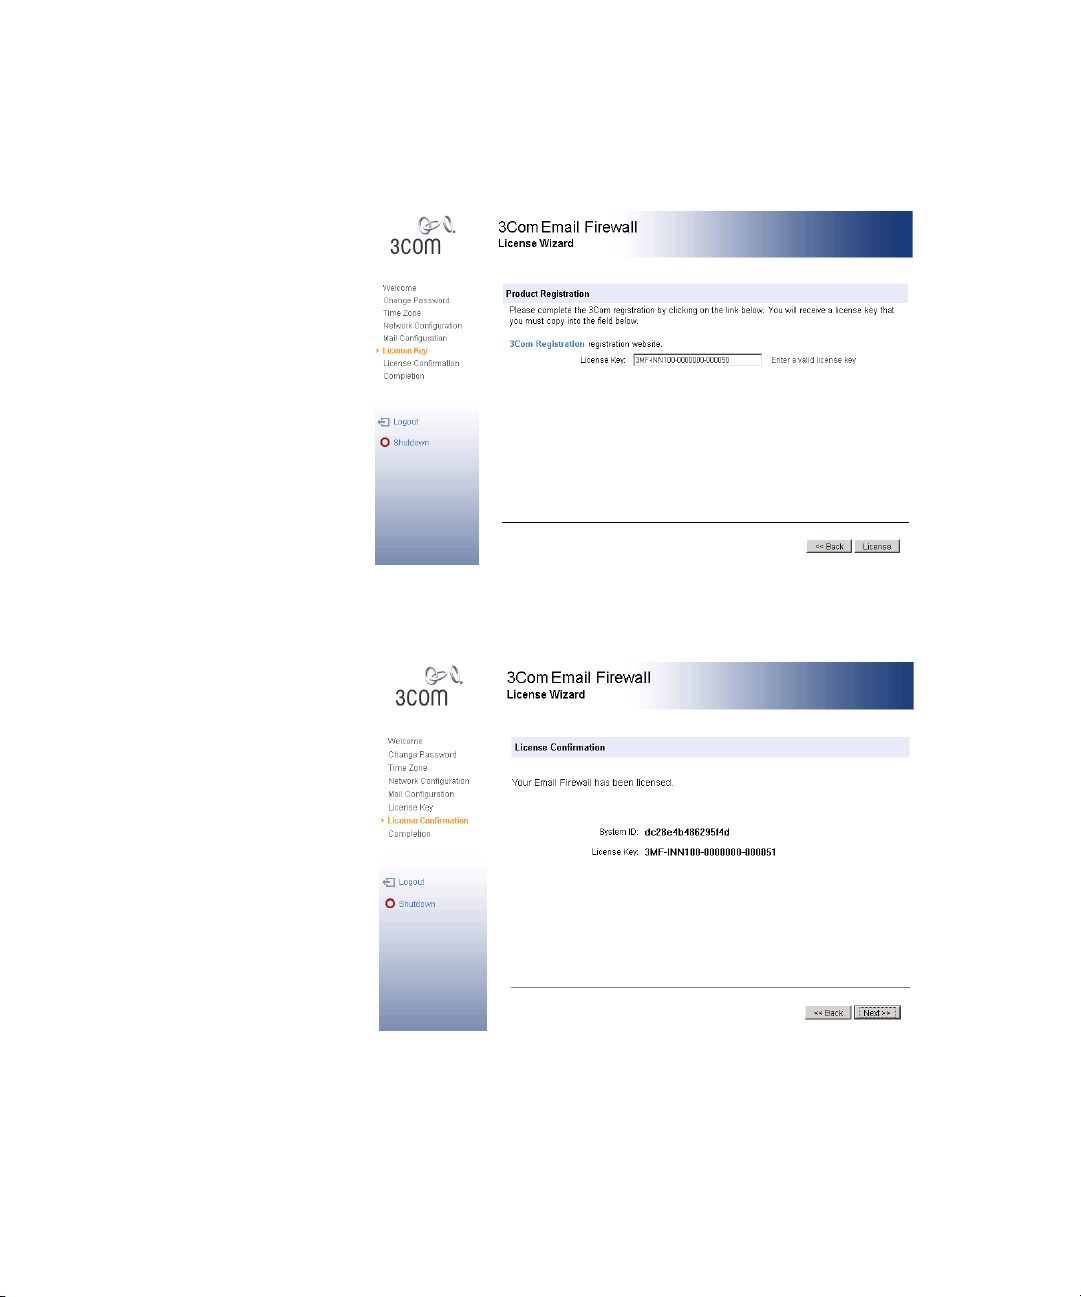
6 Enter your License Key and click Next to continue.
7 Confirm your registration information by ensuring your System ID and
License Key information are correct, and click Next to continue.
Page 23
Using the Licensing Wizard
8 The 3Com Email Firewall is now licensed and the installation is complete.
Click Finish to continue.
23
EN
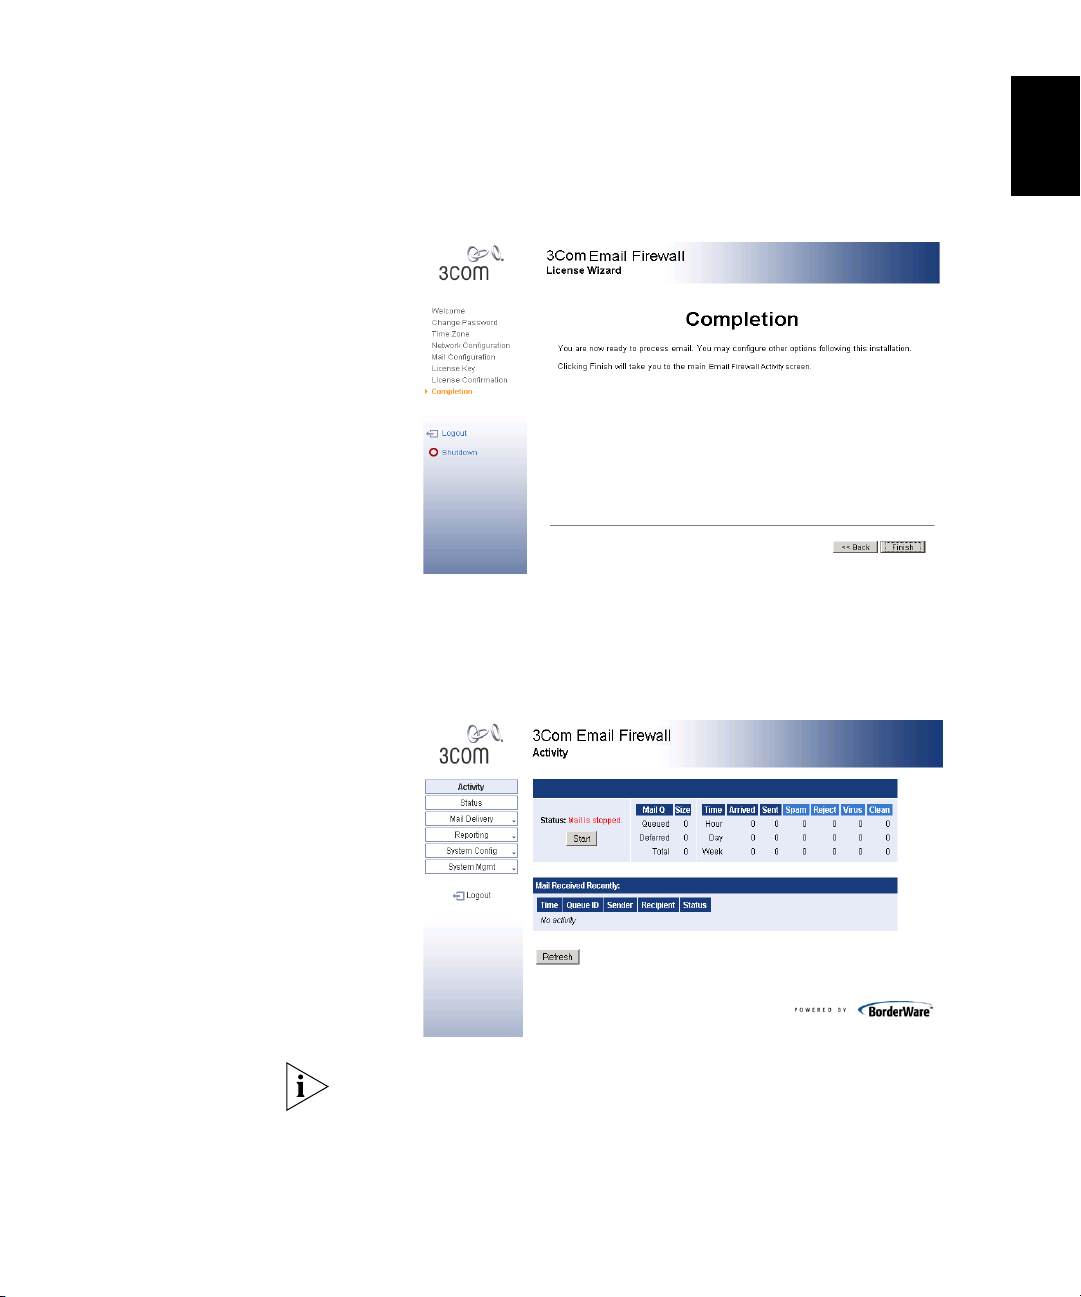
9 The main 3Com Email Firewall
The mail services are initially in a stopped state after installation. Click the
Start button to start the mail processing.
Activity
screen will now be displayed.
After clicking Start, you may receive a message that the Anti-Virus
updates have not been completed. After installation, the first update will
not occur for a default 60 minutes. You can go to Mail Delivery ->
Anti-Virus to initiate an immediate update.
Page 24

24 CHAPTER 2: INSTALLING THE 3COM EMAIL FIREWALL
Page 25
3
EN
POST-INSTALLATION TASKS
This chapter contains information on the post-installation tasks that need
to be completed after installing the 3Com Email Firewall, and includes the
following topics:
■ Checking the 3Com Email Firewall’s Status
■ Modify Internal Mail Server
■ Testing Outbound Mail Delivery
■ Testing Inbound Mail Delivery
Checking the 3Com
Email Firewall’s Status
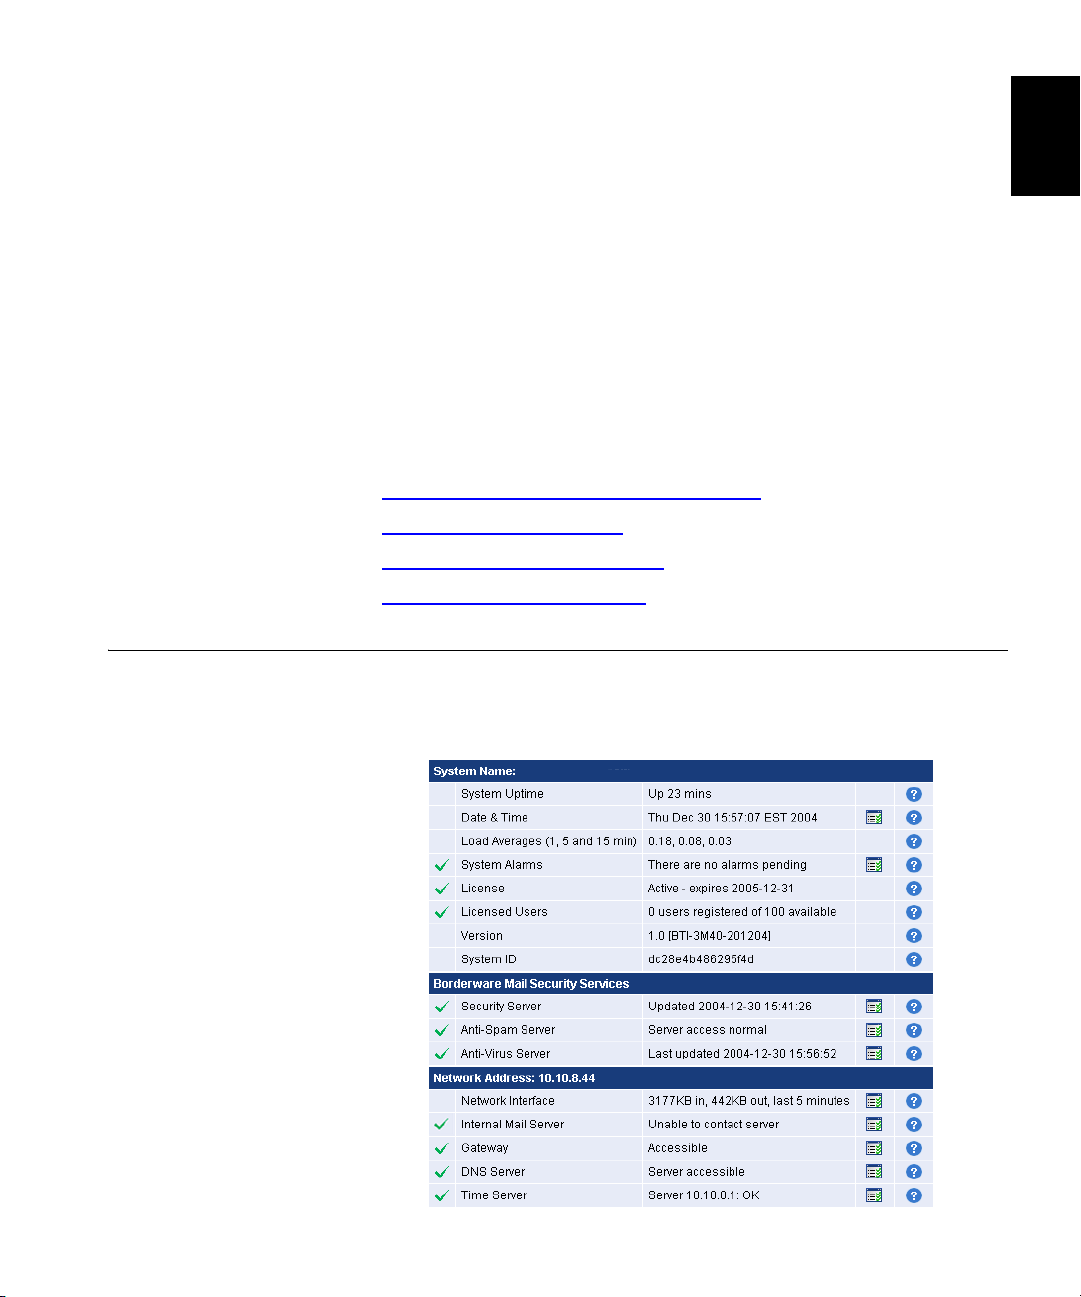
When the installation is complete, select Status from the main menu to
determine if all services and servers are functioning.
Page 26
26 CHAPTER 3: POST-INSTALLATION TASKS
Ensure that the following services are running:
Licensing ■ License — Displays your license information including the expiration
date. If this information is incorrect, or if you have installed a license
and it does not display as active, please contact 3Com support.
■ Licensed Users — Indicates the number of licensed users supported by
the 3Com Email Firewall. If this information is incorrect and you have
already installed a license, please contact 3Com support.
BorderWare Mail
Security Services
■ Security Server — Indicates the status of the Security Server and the
last time an update was retrieved.
■ Anti-Spam Server — Indicates the status of the Anti-Spam server.
■ Anti-Virus Server — Indicates the status of your Anti-Virus services and
the time of the last check for a pattern file update.
Network Services ■ Internal Mail Server — Indicates the status of your internal mail server.
If it is inaccessible, check the internal mail server to ensure that it is
running. Perform network tests to ensure you have connectivity
between the 3Com Email Firewall and the internal mail server.
■ Gateway — Indicates your connection to the local gateway, which is
typically your router. If the gateway is inaccessible, ensure that it is up
and running and perform network tests to ensure connectivity
between the 3Com Email Firewall and the gateway.
■ DNS Server — Indicates that DNS services are working properly. If the
server is inaccessible, check your DNS server to ensure it is running
and perform network tests between the 3Com Email Firewall and the
DNS server to ensure they are communicating.
■ Time Server — Indicates that your network time server is up and
running. If the server is inaccessible, check your NTP server to ensure it
is running and perform network tests between the 3Com Email
Firewall and the NTP server to ensure they are communicating.
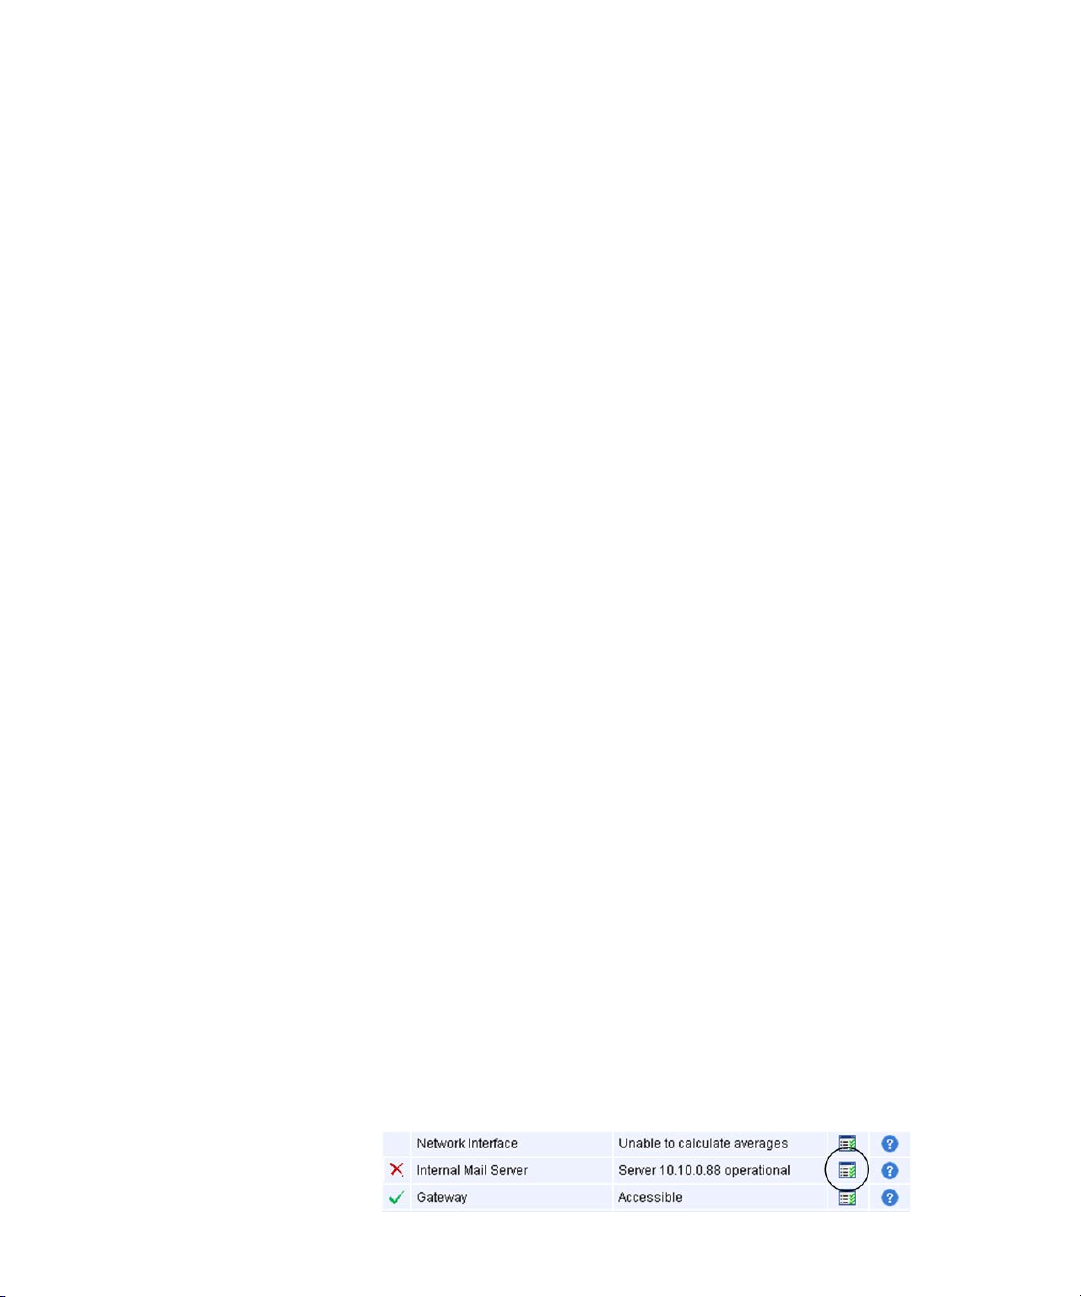
If there are issues with a certain service, you can click the service check
icon beside the help button to perform a test of that particular service.
Page 27

Modify Internal Mail Server
27
EN
Modify Internal Mail
Server
Exchange 5.5 For Exchange 5.5 systems, use the following procedure:
Exchange 2000 For Exchange 2000 systems, use the following procedure:
Changes are required to your existing internal mail server(s) to route
outbound mail through the 3Com Email Firewall. You must configure
your internal mail servers to use the 3Com Email Firewall hostname or IP
address for SMTP delivery.
This procedure depends on the type of internal mail server you are using.
The following instructions are for a Microsoft
1 Open Exchange Administrator.
2 Go to Organization -> Site -> Configuration -> Connections -> Internet
Mail Service Properties.
3 In the Connections tab, go to the Message Delivery section and in the
dialog box
3Com Email Firewall.
1 Open Exchange System Manager.
2 Go to Servers -> Exchange server name -> Protocols -> SMTP -> Default
SMTP virtual server -> Properties -> Delivery -> Advanced.
3 In the Smart host dialog box, enter the FQDN, such as
or IP address of the 3Com Email Firewall in brackets, such as:
Forward all messages to host
®
Exchange server.
, enter the IP address of the
mail.example.com
,
[192.168.1.253]
Page 28

28 CHAPTER 3: POST-INSTALLATION TASKS
Testing Outbound
Mail Delivery
To test your outbound mail path, use the following procedure to send an
email outside of your network:
1 From an internal client computer, send an email to an external user
outside of your network.
2 Check the
message shows up in the
Activity
page of the 3Com Email Firewall to ensure the mail
Mail Received Recently
section. Click the
Refresh button to provide an updated view.
3 Check the email mailbox of the destination external user to ensure the
mail was delivered.
In this scenario, the mail message should use the following route:
■ Internal mail client to your internal mail server
■ Internal mail server to the 3Com Email Firewall
■ 3Com Email Firewall to the Firewall/Router
■ Firewall/Router to the external destination mail client
If your message was not delivered, start with your internal mail client and
work your way along the route until the point at where the mail was not
delivered to the next point.
When you have isolated the problem, modify your configuration and
retry the test.
Page 29

Testing Inbound Mail Delivery
29
EN
Testing Inbound Mail
Delivery
When you have successfully tested an outbound mail message, you must
send an inbound message to ensure that your router or firewall is
properly configured to forward SMTP port 25 connections to the 3Com
Email Firewall.
1 Modify your Firewall or Router configuration to ensure that incoming
SMTP port 25 connections are forwarded to the hostname or IP address
of the 3Com Email Firewall.
2 From an external mail address, send an email to an internal mail client.
3 Check the
message shows up in the
Activity
page of the 3Com Email Firewall to ensure the mail
Mail Received Recently
section. Click the
Refresh button to provide an updated view.
In this scenario, the mail message should use the following route:
■ External mail client to your Firewall/Router
■ Firewall/Router to the 3Com Email Firewall
■ 3Com Email Firewall to the internal mail server
■ Internal mail server to the internal mail client
If your message was not delivered, start with your external mail client and
work your way along the route until the point at where the mail was not
delivered to the next point.
When you have isolated the problem, modify your configuration and
retry the test.
Page 30

30 CHAPTER 3: POST-INSTALLATION TASKS
Page 31

CONFIGURING YOUR COMPUTER’S IP
A
ADDRESS
When installing the 3Com Email Firewall for the first time, you must
connect to it from another computer via a web browser.
The initial default IP address for the 3Com Email Firewall is
192.168.1.253 and you must connect to it from a computer on the same
network.
The following instructions will guide you through the steps to change
your configuration computer’s IP address settings to connect to the 3Com
Email Firewall.
Windows XP To modify your network settings on a Windows XP system:
EN
1 Click the Start button and select Control Panel.
2 Click Network and Internet Connections and then double-click the
Network Connections icon.
3 Right-click on Local Area Connection and select Properties.
Page 32

32 APPENDIX A: CONFIGURING YOUR COMPUTER’S IP ADDRESS
4 Highlight Internet Protocol -> TCP/IP and then click the Properties button.
5 Copy down your current settings, as you will need to restore them when
the 3Com Email Firewall installation is complete.
6 Enter the IP Address 192.168.1.252 with a subnet mask of
255.255.255.0. Leave the other fields blank.
7 Click the OK button to complete the
8 Click OK button to complete the
Advanced
TCP/IP
setup.
setup.
Page 33

Windows 2000
Windows 2000 To modify your network settings on a Windows 2000 system:
1 Click the Start button and select Settings -> Control Panel.
2 Click Network and Dial-up Connections and then double-click the
Network Connections icon.
33
EN
3 Right-click on Local Area Connection and select Properties.
4 Select Use the following IP address, and enter 192.168.1.252 and
255.255.255.0 for the Subnet mask.
Page 34

34 APPENDIX A: CONFIGURING YOUR COMPUTER’S IP ADDRESS
5 Click OK. In the
6 Close the
Network and Dial-up Connections
Local Area Connection Properties
window.
dialog box, click OK.
Page 35

Guide d’installation
du Email Firewall
Guide d’installation pour le 3Com® Email Firewall
http://www.3com.com/
Pièce no DIA-MFA100-AAA01
Publié en janvier 2005
Page 36

3Com Corporation
350 Campus Drive
Marlborough,
MA 01752-3064
Copyright © 2000-2005, BorderWare Technologies Inc. Used under license by 3Com Corporation. All rights
reserved. No part of this documentation may be reproduced in any form or by any means or used to make any
derivative work (such as translation, transformation, or adaptation) without written permission from
BorderWare Technologies Inc.
3Com Corporation and its licensors reserve the right to revise this documentation and to make changes in
content from time to time without obligation on the part of 3Com Corporation or its licensors to provide
notification of such revision or change.
3Com Corporation and its licensors provide this documentation without warranty, term, or condition of any
kind, either implied or expressed, including, but not limited to, the implied warranties, terms or conditions of
merchantability, satisfactory quality, and fitness for a particular purpose. 3Com Corporation and its licensors
may make improvements or changes in the product(s) and/or the program(s) described in this documentation
at any time.
If there is any software on removable media described in this documentation, it is furnished under a license
agreement included with the product as a separate document, in the hard copy documentation, or on the
removable media in a directory file named LICENSE.TXT or !LICENSE.TXT. If you are unable to locate a copy,
please contact 3Com and a copy will be provided to you.
UNITED STATES GOVERNMENT LEGEND
If you are a United States government agency, then this documentation and the software described herein are
provided to you subject to the following:
All technical data and computer software are commercial in nature and developed solely at private expense.
Software is delivered as “Commercial Computer Software” as defined in DFARS 252.227-7014 (June 1995) or
as a “commercial item” as defined in FAR
provided in 3Com’s standard commercial license for the Software. Technical data is provided with limited
rights only as provided in DFAR 252.227-7015 (Nov
applicable. You agree not to remove or deface any portion of any legend provided on any licensed program or
documentation contained in, or delivered to you in conjunction with, this Installation Guide.
Unless otherwise indicated, 3Com registered trademarks are registered in the United States and may or may not
be registered in other countries.
3Com and the 3Com logo are registered trademarks of 3Com Corporation.
BorderWare, the Powered by BorderWare Logo, and BorderWare Security Network are trademarks or
registered trademarks of BorderWare Technologies Inc. in the United States and other jurisdictions.
Microsoft and Windows are registered trademarks of Microsoft Corporation.
All other company and product names may be trademarks of the respective companies with which they are
associated.
ENVIRONMENTAL STATEMENT
It is the policy of 3Com Corporation to be environmentally-friendly in all operations. To uphold our policy, we
are committed to:
Establishing environmental performance standards that comply with national legislation and regulations.
Conserving energy, materials and natural resources in all operations.
Reducing the waste generated by all operations. Ensuring that all waste conforms to recognized
environmental standards. Maximizing the recyclable and reusable content of all products.
Ensuring that all products can be recycled, reused and disposed of safely.
Ensuring that all products are labelled according to recognized environmental standards.
Improving our environmental record on a continual basis.
End of Life Statement
3Com processes allow for the recovery, reclamation and safe disposal of all end-of-life electronic components.
Regulated Materials Statement
3Com products do not contain any hazardous or ozone-depleting material.
Environmental Statement about the Documentation
The documentation for this product is printed on paper that comes from sustainable, managed forests; it is
fully biodegradable and recyclable, and is completely chlorine-free. The varnish is environmentally-friendly, and
the inks are vegetable-based with a low heavy-metal content.
ENCRYPTION
This product contains encryption and may require U.S. and/or local government authorization prior to export
or import to another country.
2.101(a) and as such is provided with only such rights as are
1995) or FAR 52.227-14 (June 1987), whichever is
Page 37

CONTENU
A PROPOS DE CE GUIDE
Système de référence 40
Documentation associée 41
Remarques sur la documentation 41
1 TÂCHES AVANT INSTALLATION
Enregistrement de votre coupe-feu 3Com Email Firewall 43
Mise en place du coupe-feu 3Com Email Firewall 44
Utilisation du formulaire de configuration 45
Modifications du réseau 45
Paramètres de configuration de réseau et de courrier 45
Modification de la configuration du coupe-feu/routeur 47
2 INSTALLATION DU COUPE-FEU 3COM EMAIL FIREWALL
Connexion du 3Com Email Firewall au réseau 49
Connexion au coupe-feu 3Com Email Firewall via un navigateur Web 50
Utilisation de l’assistant d’installation 51
Licence 52
Licence anti-virus 52
Modification du mot de passe 53
Réglage du fuseau horaire 54
Configuration du réseau 54
Configuration du courrier 55
Clôture de l’installation 57
Utilisation de l’assistant de licence 57
FR
WORK
SHEET
3 TÂCHES APRÈS INSTALLATION
Vérification de l’état du coupe-feu 3Com Email Firewall. 61
Concession de la licence 62
Page 38

Solutions de sécurité Borderware pour courrier 62
Interface réseau 62
Modification du serveur interne de courrier 63
Exchange 5.5 63
Exchange 2000 63
Essai de livraison du courrier sortant 64
Essai de livraison du courrier entrant 65
A CONFIGURATION DE L’ADRESSE IP DE VOTRE ORDINATEUR
Windows XP 67
Windows 2000 69
Page 39

A PROPOS DE CE GUIDE
FR
Ce guide décrit la méthode initiale d’installation et de configuration de
votre 3Com
Les instructions comprises dans ce guide vous aideront à installer
rapidement votre 3Com Email Firewall sur le réseau pour accepter et
balayer le courrier.
Ce guide a été écrit à l’intention de l’administrateur du système ou du
réseau responsable de la configuration, l’utilisation et la gestion du 3Com
Email Firewall. Ce guide sous-entend une connaissance pratique des
protocoles de réseau TCP/IP et de communication par courrier.
Pour de plus amples renseignements sur la configuration du 3Com Email
Firewall, veuillez consulter le guide de l’utilisateur fourni.
Veuillez suivre les instructions des mises à jour livrées avec votre produit si
celles-ci diffèrent des instructions du guide.
La plupart des guides utilisateur et des mises à jour publiés sont
disponibles en format de document portable d’Adobe Acrobat Reader
(PDF) ou format HTML sur le site Web de 3Com
http://www.3com.com/products
®
Email Firewall.
:
Page 40

40 A PROPOS DE CE GUIDE
Système de référence Le Tableau 1 et le Tableau 2 décrivent le système de référence utilisé tout
au long de ce guide.
Tableau 1 Icônes d’avertissement
Icône
Type
d’avertissement
Remarque
informative
Mise en garde Informations relatives à des pertes potentielles de
Danger Informations relatives à un risque potentiel de
Description
Informations relatives à des fonctions ou à des
instructions importantes
données ou à des dommages potentiels à une
application, à un système ou à un dispositif
blessures personnelles
Tableau 2 Système de format de texte
Système de référence Description
Affichage écran Ce style de caractère s’utilise pour représenter les
informations telles qu’elles apparaissent à l’écran.
Syntax Lorsque le mot « syntax » apparaît, vous devez évaluer la
Commands Vous devez saisir la commande exactement telle qu’illustrée
Les mots « enter » et
« type ».
Noms des
touches-clavier
syntaxe fournie puis saisir les valeurs appropriées dans les
paramètres substituables qui s’affichent entre les parenthèses
en chevron. Par exemple
Utilisez la syntaxe suivante pour modifier votre mot de passe :
system password <password>
Dans cet exemple, vous devez saisir un mot de passe dans
<password>.
puis appuyer sur la touche Return ou Enter lorsque le mot
« command » apparaît. Les commandes s’affichent en
caractères gras.
Vous devez saisir quelque chose puis appuyer sur la touche
Return ou Enter lorsque vous apercevez le mot «
ce guide. N’appuyez pas sur la touche Return ou Enter
lorsqu’une instruction indique simplement « type ».
Les noms de touche sont reliés par le symbole (+) si vous
devez enfoncer deux ou plusieurs touches simultanément. Par
exemple :
Appuyez sur les touches Ctrl+Alt+Del
:
enter » dans
Page 41

Tableau 2 Système de format de texte (suite)
Système de référence Description
Mots en
italique
L’italique s’utilise pour :
■ Mettre l’emphase sur un élément.
■ Indiquer un nouveau mot à l’endroit où il est défini dans le
texte.
■ Identifier les noms de menu et de boutons de logiciel ainsi
que les commandes de menu. Par exemple
Sélectionnez
Cliquez sur OK.
Contents
Documentation associée
à partir du menu
Help
41
FR
:
.
Documentation
associée
Remarques sur la
documentation
En plus de ce guide, la documentation du 3Com Email Firewall comprend
les articles suivants
■
Guide de l’utilisateur 3Com Email Firewall
:
Ce guide comprend :
■ des renseignements spécifiques sur la configuration du 3Com
Email Firewall
■ des instructions pour résoudre des problèmes reliés au traitement
du courrier et de la communication
■
Mises à jour
Ces informations de mise à jour fournissent les renseignements sur la
version actuelle du logiciel y compris les nouvelles fonctions, les
modifications et les problèmes connus.
Vos suggestions sont très importantes pour nous. Elles nous aideront à
rendre notre documentation plus pratique pour vous. Veuillez faire
parvenir vos remarques à propos de ce document à 3Com via l’URL
suivant
http://www.3com.com/corpinfo/en_US/contactus/index.html
:
Veuillez inclure les renseignements suivants dans votre correspondance :
■ Titre du document
■ Numéro de pièce du document (affiché sur la page titre)
■ Numéro de page (le cas échéant)
Page 42

42 A PROPOS DE CE GUIDE
Par exemple :
■ Guide d’installation 3Com Email Firewall
■ Pièce numéro : DIA-MFA100-AAA01
■ Page 25
Veuillez noter que nous pouvons répondre uniquement aux remarques et
aux questions relatives à la documentation des produits 3Com.
Communiquez avec votre fournisseur réseau pour les questions relatives
au soutien technique ou aux ventes.
Page 43

1
TÂCHES AVANT INSTALLATION
Ce chapitre comprend les renseignements relatifs aux tâches à compléter
avant l’installation du 3Com Email Firewall et comprend les rubriques
suivantes
■ Enregistrement de votre coupe-feu 3Com Email Firewall
■ Mise en place du coupe-feu 3Com Email Firewall
■ Utilisation du formulaire de configuration
■ Modification de la configuration du coupe-feu/routeur
:
FR
Enregistrement de
votre coupe-feu
3Com Email Firewall
Vous devez enregistrer la clé de la licence de votre coupe-feu 3Com Email
Firewall auprès de 3Com avant de débuter l’installation. Cette clé sera
utilisée au cours du processus d’installation pour licencier et activer le
coupe-feu 3Com Email Firewall.
Accédez à l’URL suivant à l’aide de votre navigateur :
http://esupport.3com.com
Page 44

44 CHAPITRE 1 : TÂCHES AVANT INSTALLATION
Si vous ne possédez pas un nom d’utilisateur et un mot de passe
eSupport, vous devez d’abord vous enregistrer en cliquant sur le lien
Register Now.
Une fois le nom d’utilisateur et le mot de passe reçus, démarrez une
session à la page eSupport de 3Com et suivez les instructions pour
l’enregistrement de votre coupe-feu 3Com Email Firewall. Utilisez la clé
fournie avec votre système.
Copiez votre clé sur le formulaire de configuration fourni.
Vous saisirez cette clé lors du processus d’enregistrement.
Mise en place du
coupe-feu 3Com
Email Firewall
Le coupe-feu 3Com Email Firewall est conçu pour servir d’interface entre
votre serveur de courrier et l’Internet pour éviter des connexions directes
SMTP (Simple Mail Transport Protocol) entre des serveurs externes et
internes.
Le 3Com Email Firewall s’installe derrière le coupe-feu existant sur le
réseau interne.
Le courrier entrant sera acheminé à partir du coupe-feu ou du routeur
vers le 3Com Email Firewall où il sera balayé, traité puis envoyé vers votre
serveur de courrier interne pour la livraison.
Le courrier sortant parviendra au coupe-feu 3Com Email Firewall à partir
de votre serveur de courrier interne pour un balayage, un traitement puis
une livraison au serveur de destination SMTP via Internet.
Page 45

Utilisation du formulaire de configuration
45
Utilisation du
formulaire de
configuration
La documentation fournie comprend un formulaire de configuration que
vous devrez compléter avant de continuer l’installation. Ce formulaire
s’utilise pour noter la configuration courante de votre réseau et fournir
une liste de vos changements suggérés lors de l’intégration du coupe-feu
3Com Email Firewall à votre réseau.
Modifications du réseau Les informations suivantes, à propos de votre environnement, doivent
être recueillies avant de débuter l’installation
■ Notez les paramètres actuels du réseau
■ Déterminez quels ports ou serveurs mandataires seront configurés sur
:
le coupe-feu ou routeur.
■ Identifiez les changements requis pour acheminer le courrier sortant
des serveurs internes de courrier vers le 3Com Email Firewall.
Paramètres de
configuration de réseau
et de courrier
Lors de la première installation du 3Com Email Firewall, vous aurez besoin
des renseignements suivants, facilement accessibles. Utilisez le formulaire
de configuration fourni pour noter ces données.
■ Hostname : l’adresse Internet attribuée au coupe-feu 3Com Email
mail
dans
Firewall, par exemple
■ Domain : le nom du domaine associé à l’adresse Internet attribuée. Ce
mail.example.com
.
nom est habituellement le domaine par lequel l’e-mail est traité tel
example.com
que
.
FR
■ IP Address : saisissez l’adresse IP que vous utiliserez pour ce coupe-feu
3Com Email Firewall. L’adresse par défaut est 192.168.1.253.
Utilisez-la si elle n’est pas en conflit avec tout autre système interne.
■ Net Mask : saisissez le masque de réseau approprié pour votre réseau.
Si votre adresse IP est 192.168.1.253, alors le masque de réseau sera
le 255.255.255.0.
■ Gateway : saisissez la passerelle par défaut pour ce coupe-feu 3Com
Email Firewall. Habituellement, la passerelle par défaut est l’adresse
Internet ou l’adresse IP de votre routeur.
■ Name Server : l’adresse IP ou l’adresse Internet de votre serveur DNS
de réseau.
■ Internal Mail Server Address : le nom de domaine complet (FQDN -
Fully Qualified Domain Name) ou l’adresse IP du serveur interne de
courrier, par exemple
exchange.example.com
.
Page 46

46 CHAPITRE 1 : TÂCHES AVANT INSTALLATION
■ Administrator Email Address : saisissez le courrier électronique de
l’administrateur de ce coupe-feu 3Com Email Firewall. Les
notifications seront acheminées à cet e-mail.
■ Proxy : saisissez un serveur mandataire si vous en utilisez un sur votre
réseau. Dans ce cas, cette information est requise pour le bon
fonctionnement de l’anti-virus, l’anti-spam et les mises à jour de
licences. Saisissez l’adresse suivant le format https://hostname:port,
par exemple
https://proxy.example.com:8080
■ Proxy Username and Password : saisissez un nom d’utilisateur et un
mot de passe pour le serveur mandataire.
:
Page 47

Modification de la configuration du coupe-feu/routeur
47
Modification de la
configuration du
coupe-feu/routeur
Divers ports et serveurs mandataires doivent être configurés sur votre
coupe-feu ou routeur pour le bon fonctionnement du 3Com Email
Firewall.
Le tableau suivant décrit les ports requis :
Tableau 3 Configuration ports p/coupe-feu/routeur
Du
Port Description
21 FTP pour les
systèmes
de secours
25 SMTP ✓ ✓ ✓ ✓ TCP
53 DNS ✓ ✓ UDP/TCP
80 Mises à jour
123 NTP
443 Connexion
443 Accès
514 Syslog ✓ UDP
6277 DCC ✓ UDP
anti-virus
(protocole
de
synchronisa-
tion
réseau)
de la
sécurité
admin
sécurisé
De
l’Internet
✓ ✓ TCP
Vers
l’Internet
✓ TCP
✓ ✓ UDP
✓ TCP
réseau
interne
Vers le
réseau
interne Protocole
✓ TCP
FR
Page 48

48 CHAPITRE 1 : TÂCHES AVANT INSTALLATION
Page 49

2
INSTALLATION DU COUPE-FEU 3COM
EMAIL FIREWALL
FR
Vous êtes maintenant prêt pour l’installation, une fois que vous avez
terminé les tâches avant installation et que vous avez en main tous les
renseignements dont vous aurez besoin pour la configuration initiale du
3Com Email Firewall.
L’installation comprend les étapes suivantes :
■ Connexion du 3Com Email Firewall au réseau
■ Connexion au coupe-feu 3Com Email Firewall via un navigateur Web
■ Utilisation de l’assistant d’installation
■ Utilisation de l’assistant de licence
Connexion du 3Com
Email Firewall au
réseau
Suivez les étapes suivantes pour installer et relier le coupe-feu 3Com
Email Firewall
1 Déballez le coupe-feu 3Com Email Firewall, les câbles et la
documentation.
2 Reliez le cordon d’alimentation à votre 3Com Email Firewall. Branchez-le
à une prise.
3 Vous devez d’abord relier directement le coupe-feu à un autre ordinateur
pour débuter l’installation et la configuration du 3Com Email Firewall.
Voici deux méthodes de connexions
:
:
Page 50

50 CHAPITRE 2 : INSTALLATION DU COUPE-FEU 3COM EMAIL FIREWALL
■ Reliez votre coupe-feu 3Com Email Firewall et l’ordinateur à un
concentrateur de réseau ou à un routeur à l’aide d’un câble normal
de réseau Ethernet.
■ Reliez directement votre coupe-feu 3Com Email Firewall à
l’ordinateur à l’aide d’un câble inverseur (croisé).
Connexion au
coupe-feu 3Com
Email Firewall via un
navigateur Web
Suivez les étapes suivantes pour accéder au coupe-feu 3Com Email
Firewall à partir de votre ordinateur de configuration
:
1 Assurez-vous que le coupe-feu 3Com Email Firewall et votre ordinateur
sont bien reliés sur le réseau soit directement, soit via un concentrateur
ou un routeur.
2 Mettez le 3Com Email Firewall sous tension. Attendez au moins 1 à 2
minutes pour que le système soit complètement fonctionnel avant
d’essayer de vous connecter.
3 Le 192.168.1.253 est l’adresse IP par défaut utilisée par le coupe-feu
3Com Email Firewall. Reconfigurez les paramètres du réseau local de
votre ordinateur pour utiliser une adresse sur le même réseau. Utilisez
l’adresse IP 192.168.1.252 avec un masque de sous-réseau
255.255.255.0.
Consultez l’Annexe A à la page 67 pour la méthode de modification de
l’adresse IP de votre ordinateur.
Page 51

Utilisation de l’assistant d’installation
Utilisez un câble inverseur Ethernet pour effectuer une connexion isolée
entre l’ordinateur et le 3Com Email Firewall s’il existe des systèmes sur le
réseau utilisant ces adresses.
51
Utilisation de
l’assistant
d’installation
4 Lancez le navigateur de votre ordinateur et saisissez le localisateur URL
192.168.1.253 dans la barre d’adresse.
5 Ouvrez une session avec le nom d’utilisateur admin et le mot de passe par
défaut admin. L’écran d’accueil de l’assistant d’installation s’affichera.
L’assistant d’installation vous guidera tout au long de l’installation du
coupe-feu 3Com Email Firewall.
FR
Cliquez sur le bouton Next pour poursuivre la configuration initiale du
3Com Email Firewall.
Vous avez toujours l’option de revenir à l’écran antérieur en cliquant sur
le bouton Back au cours de l’installation.
Page 52

52 CHAPITRE 2 : INSTALLATION DU COUPE-FEU 3COM EMAIL FIREWALL
Licence Lors de la première installation du 3Com Email Firewall, lisez et acceptez
les modalités de la licence pour compléter la phase d’initialisation.
Lisez les modalités de la licence, sélectionnez I Accept puis cliquez sur
Next pour poursuivre.
Licence anti-virus Lisez et acceptez les modalités de la licence du logiciel anti-virus avant de
poursuivre.
Lisez les modalités de la licence, sélectionnez Accept puis cliquez sur Next
pour poursuivre.
Page 53

Utilisation de l’assistant d’installation
53
Modification du mot de
passe
Modifiez le mot de passe par défaut du 3Com Email Firewall. Saisissez le
mot de passe par défaut admin puis saisissez et confirmez un nouveau
mot de passe.
Sélectionnez un mot de passe sûr, d’une longueur minimale de 8
caractères, composé de lettres majuscules et de minuscules, de nombres
et de symboles spéciaux comme le «
@ ».
Le mot de passe est sensible à la casse. Utilisez des lettres majuscules et
minuscules.
FR
Cliquez sur le bouton Next pour poursuivre.
Page 54

54 CHAPITRE 2 : INSTALLATION DU COUPE-FEU 3COM EMAIL FIREWALL
Réglage du fuseau
horaire
Configuration du
réseau
Sélectionnez votre région, pays et fuseau horaire. Cliquez sur le bouton
Next pour poursuivre.
Saisissez les informations suivantes requises à partir de votre formulaire
de configuration.
■ Hostname : saisissez l’adresse Internet (et non le nom du domaine
mail
complet) du 3Com Email Firewall telle que
mail.example.com
■ Domain : saisissez le nom du domaine tel que
■ IP Address : saisissez l’adresse IP pour ce coupe-feu 3Com Email
.
dans
example.com
.
Firewall. L’adresse par défaut est 192.168.1.253. Utilisez-la si elle
n’est pas en conflit avec tout autre système interne.
Page 55

Utilisation de l’assistant d’installation
■ Net Mask : saisissez le masque de réseau approprié pour votre réseau.
55
Si votre adresse IP est 192.168.1.253, alors le masque de réseau sera
le 255.255.255.0.
■ Gateway : saisissez la passerelle par défaut pour ce coupe-feu 3Com
Email Firewall. Habituellement, la passerelle par défaut est l’adresse
Internet ou l’adresse IP de votre routeur.
■ Name Server : saisissez l’adresse Internet ou l’adresse IP de votre
serveur DNS.
Cliquez sur le bouton Next pour poursuivre.
FR
Configuration du
courrier
Saisissez les paramètres de configuration du courrier requis suivants à
partir de votre formulaire de configuration.
■ Internal Mail Server Address : saisissez l’adresse IP ou l’adresse Internet
du serveur interne de courrier pour acheminer le courrier vers celui-ci
une fois le traitement effectué par le 3Com Email Firewall. Si votre
réseau comprend plus d’un serveur interne de courrier, additionnez les
adresses supplémentaires une fois l’installation complétée.
■ Administrator Email Address : saisissez le courrier de l’administrateur
de ce coupe-feu 3Com Email Firewall. Les notifications seront
acheminées à ce courrier.
■ Anti-Spam Action : sélectionnez la réponse par défaut de l’anti-spam
du 3Com Email Firewall parmi celles offertes. Sélectionnez parmi les
options suivantes
■ Disabled : les fonctions anti-spam sont désactivées.
:
Page 56

56 CHAPITRE 2 : INSTALLATION DU COUPE-FEU 3COM EMAIL FIREWALL
■ Modify Subject Headings : les fonctions anti-spam sont activées. Le
champ du sujet du courrier identifié comme spam sera modifié et
affichera le texte [SPAM].
■ User-Quarantine Mail : les fonctions anti-spam de quarantaine
spam de l’utilisateur sont activées. Le courrier identifié comme
spam sera redirigé vers la quarantaine spam de l’utilisateur.
L’action sera réglée sur
Email Firewall comme données d’action.
■ Use Secure Proxy : sélectionnez la case à cocher pour activer
l’utilisation d’un serveur mandataire si vous en utilisez un sur votre
réseau. Dans ce cas, ce réglage est requis pour le bon fonctionnement
de l’anti-virus, l’anti-spam et les mises à jour de licence.
■ Address : saisissez l’adresse du serveur mandataire selon ce format
https://hostname:port.
■ User Name : saisissez un nom d’utilisateur valide pour le serveur
mandataire.
■ Password : saisissez et confirmez un mot de passe correspondant pour
le nom de l’utilisateur saisi ci-dessus.
Trfitrvy Yo
avec l’adresse Internet de 3Com
Cliquez sur le bouton Next pour poursuivre.
Page 57

Utilisation de l’assistant de licence
Clôture de l’installation Vous avez terminé la configuration initiale du coupe-feu 3Com Email
Firewall. Lisez bien les dernières instructions de l’assistant d’installation à
l’écran
Completion
.
57
Cliquez sur le bouton Finish pour éteindre le système.
Une fois le coupe-feu 3Com Email Firewall éteint, reliez l’interface réseau
à un réseau qui sera en mesure d’accéder à l’Internet.
L’assistant de licence aura besoin de cet accès Internet pour activer votre
système auprès de 3Com.
FR
Utilisation de
l’assistant de licence
Une fois la configuration initiale terminée à l’aide de l’assistant
d’installation et le redémarrage de votre coupe-feu 3Com Email Firewall
effectué, l’assistant de licence vous guidera lors de la procédure de
concession de licence de votre système.
Page 58

58 CHAPITRE 2 : INSTALLATION DU COUPE-FEU 3COM EMAIL FIREWALL
Enregistrez le 3Com Email Firewall à la page
de lancer cette procédure. Consultez la rubrique
esupport.3com.com
“Enregistrement de
avant
votre coupe-feu 3Com Email Firewall” à la page 43.
1 Assurez-vous que le 3Com Email Firewall est bien relié à un réseau qui
accède l’Internet. Le 3Com Email Firewall utilisera la nouvelle adresse IP
attribuée lors de la configuration réseau.
2 Mettez le 3Com Email Firewall sous tension. Attendez au moins 1 à 2
minutes pour que le système soit fonctionnel avant d’essayer de vous
connecter.
3 Modifiez l’adresse IP de votre ordinateur de configuration. Saisissez une
adresse utilisée sur le même réseau. Consultez l’
Annexe A à la page 67
pour les renseignements spécifiques à la modification de l’adresse IP de
votre ordinateur.
4 Démarrez le navigateur Web de votre ordinateur. Saisissez la nouvelle
adresse IP (URL) du 3Com Email Firewall à la barre d’adresse.
5 Vous devrez ouvrir une session à l’aide du nouveau mot de passe saisi au
préalable lors de la configuration initiale.
Maintenant, l’assistant de licence démarrera.
Page 59

Utilisation de l’assistant de licence
6 Saisissez la clé de votre licence et cliquez sur le bouton Next pour
poursuivre.
7 Confirmez votre information d’enregistrement en vérifiant l’exactitude de
votre ID système et la clé de votre licence puis cliquez sur le bouton Next
pour poursuivre.
59
FR
Page 60

60 CHAPITRE 2 : INSTALLATION DU COUPE-FEU 3COM EMAIL FIREWALL
8 Le coupe-feu 3Com Email Firewall est maintenant licencié et l’installation
est complète. Cliquez sur le bouton Finish pour poursuivre.
9 L’écran principal du 3Com Email Firewall
Après l’installation, les services de courrier sont inactifs. Cliquez sur le
bouton Start pour lancer le traitement du courrier.
Activity
s’affichera maintenant.
Après avoir cliqué sur le bouton Start, vous pouvez recevoir un message
indiquant que les mises à jour de votre anti-virus sont incomplètes. Il
existe un délai par défaut de 60 minutes après l’installation pour le
lancement automatique de la première mise à jour. Accédez au Mail
Delivery -> Anti-Virus pour lancer immédiatement une mise à jour.
Page 61

3
TÂCHES APRÈS INSTALLATION
Ce chapitre comprend les renseignements relatifs aux tâches à compléter
après l’installation du 3Com Email Firewall et comprend les rubriques
suivantes
■ Vérification de l’état du coupe-feu 3Com Email Firewall.
■ Modification du serveur interne de courrier
■ Essai de livraison du courrier sortant
■ Essai de livraison du courrier entrant
:
FR
Vérification de l’état
du coupe-feu
Email Firewall.
3Com
A partir du menu principal, sélectionnez Status pour contrôler si tous les
services et serveurs sont opérationnels après l’achèvement de
l’installation.
Page 62

62 CHAPITRE 3 : TÂCHES APRÈS INSTALLATION
Vérifiez l’état opérationnel des services suivants :
Concession de la licence ■ Licence : affiche l’information de votre licence y compris la date
d’échéance. Veuillez communiquer avec le soutien 3Com si cette
information est erronée ou si vous avez effectué l’enregistrement
d’une licence et que celle-ci reste inactive.
■ Licensed Users : affiche le nombre d’utilisateurs autorisés par la licence
du 3Com Email Firewall. Veuillez communiquer avec le soutien 3Com
si cette information est erronée et si vous avez déjà installé une
licence.
Solutions de sécurité
Borderware pour
courrier
■ Security Server : affiche l’état du serveur de sécurité ainsi que la date
de la dernière mise à jour.
■ Anti-Spam Server : affiche l’état du serveur anti-spam.
■ Anti-Virus Server : affiche l’état de vos services anti-virus ainsi que
votre dernière vérification pour une mise à jour du fichier.
Interface réseau ■ Internal Mail Server : affiche l’état de votre serveur interne de courrier.
En cas d’inaccessibilité, vérifiez si le serveur interne de courrier
fonctionne. Effectuez les tests de réseau pour contrôler la connexion
entre le 3Com Email Firewall et le serveur interne de courrier.
■ Gateway : affiche votre connexion à la passerelle locale qui est
habituellement votre routeur. En cas d’inaccessibilité, contrôlez-en son
bon fonctionnement puis effectuez les tests de réseau pour contrôler
la connexion entre le 3Com Email Firewall et la passerelle.
■ DNS Server : indique si les services DNS fonctionnent correctement. En
cas d’inaccessibilité, vérifiez le bon fonctionnement de votre serveur
DNS puis effectuez les tests de réseau pour contrôler la
communication entre le 3Com Email Firewall et le serveur DNS.
■ Time Server : indique que votre serveur temporel de réseau est
initialisé et activé. En cas d’inaccessibilité, vérifiez le bon
fonctionnement de votre serveur NTP puis effectuez les tests de
réseau pour contrôler la communication entre le 3Com Email Firewall
et le serveur NTP.
Page 63

Modification du serveur interne de courrier
S’il existe des problèmes avec un certain service, cliquez sur l’icône de
vérification de service à côté du bouton d’aide pour effectuer un test de
ce service spécifique.
63
FR
Modification du
serveur interne de
courrier
Exchange 5.5 Suivez la procédure suivante pour les systèmes Exchange 5.5 :
Exchange 2000 Suivez la procédure suivante pour les systèmes Exchange 2000 :
Des modifications à votre(vos) serveur(s) interne(s) sont requises pour
acheminer le courrier sortant vers le 3Com Email Firewall. Configurez les
serveurs internes de courrier pour qu’ils utilisent l’adresse Internet ou
l’adresse IP du 3Com Email Firewall pour la livraison SMTP.
Cette procédure varie selon le type de serveur interne de courrier que
vous utilisez. Les instructions ci-dessous s’appliquent à un serveur
Microsoft
1 Accédez à l’administrateur Exchange.
2 Puis cliquez sur Organization -> Site -> Configuration -> Connections ->
Internet Mail Service Properties.
3 Sous l’onglet Connections, dirigez-vous vers la section Message Delivery
puis saisissez l’adresse IP du 3Com Email Firewall dans la boîte de
dialogue
1 Accédez à l’administration système de l’Exchange.
2 Puis cliquez sur Servers -> Exchange server name -> Protocols -> SMTP ->
Default SMTP virtual server -> Properties -> Delivery -> Advanced.
®
Exchange.
Forward all messages to host
.
3 Dans la boîte de dialogue de l’hôte Smart, saisissez le FQDN tel que
mail.example.com
tel que démontré
[192.168.1.253]
ou l’adresse IP du 3Com Email Firewall entre crochets
:
Page 64

64 CHAPITRE 3 : TÂCHES APRÈS INSTALLATION
Essai de livraison du
courrier sortant
Suivez la procédure suivante pour envoyer un e-mail à l’extérieur du
périmètre de votre réseau pour tester le chemin de votre courrier sortant.
1 Envoyez un e-mail à un utilisateur à l’extérieur de votre réseau à partir
d’un ordinateur client interne.
2 Accédez à la page
la présence du courrier dans la section
Activity
du coupe-feu 3Com Email Firewall pour vérifier
Mail Received Recently
. Cliquez sur
le bouton Refresh pour mettre la page à jour.
3 Contrôlez la boîte d’entrée de l’utilisateur de destination externe pour
vérifier la livraison de ce courrier.
Selon ce scénario, le courrier devrait suivre le chemin suivant :
■ Courrier de l’ordinateur client interne vers le serveur interne de
courrier
■ Serveur interne de courrier vers le 3Com Email Firewall
■ 3Com Email Firewall vers le coupe-feu/routeur
■ Coupe-feu/routeur vers l’ordinateur de destination du client externe
Si votre courrier n’est pas livré, débutez la vérification à partir de votre
ordinateur client interne et parcourez le chemin du courrier jusqu’au
point où celui-ci est resté bloqué.
Modifiez votre configuration une fois le problème isolé puis testez à
nouveau.
Page 65

Essai de livraison du courrier entrant
65
Essai de livraison du
courrier entrant
Une fois le test d’acheminement d’un courrier sortant réussi, envoyez un
courrier entrant pour contrôler la bonne configuration de votre routeur
ou coupe-feu afin que celui-ci achemine le SMTP port 25 vers le 3Com
Email Firewall.
1 Modifiez la configuration de votre coupe-feu ou routeur. Les connexions
entrantes SMTP port 25 devraient s’acheminer vers l’adresse Internet ou
l’adresse IP du 3Com Email Firewall.
2 Envoyez un e-mail à un ordinateur client interne à partir d’une adresse de
courrier externe.
3 Accédez à la page
la présence du courrier dans la section
Activity
du coupe-feu 3Com Email Firewall pour vérifier
Mail Received Recently
. Cliquez sur
le bouton Refresh pour mettre la page à jour.
Selon ce scénario, le courrier devrait suivre le chemin suivant :
■ Ordinateur client externe vers votre coupe-feu/routeur
■ Coupe-feu/routeur vers le 3Com Email Firewall
■ 3Com Email Firewall vers le serveur interne de courrier
■ Serveur interne de courrier vers l’ordinateur client interne
Si votre courrier n’est pas livré, débutez la vérification à partir de votre
ordinateur client externe et parcourez le chemin du courrier jusqu’au
point où celui-ci est resté bloqué.
FR
Modifiez votre configuration une fois le problème isolé puis testez à
nouveau.
Page 66

66 CHAPITRE 3 : TÂCHES APRÈS INSTALLATION
Page 67

CONFIGURATION DE L’ADRESSE IP DE
A
VOTRE ORDINATEUR
Lors de la première installation du 3Com Email Firewall, vous devez vous
connecter au matériel à partir d’un autre ordinateur via un navigateur
Web.
Le 192.168.1.253 est l’adresse IP initiale par défaut du 3Com Email
Firewall. Vous devez vous y connecter à partir d’un ordinateur relié au
même réseau.
Les instructions ci-dessous vous guideront parmi les étapes à suivre pour
effectuer les modifications nécessaires des paramètres d’adresse IP de
votre ordinateur de configuration afin que vous puissiez vous relier au
3Com Email Firewall.
Windows XP Pour modifier vos paramètres réseau sur un système Windows XP :
FR
1 Cliquez sur le bouton Start puis sélectionnez Control Panel.
2 Cliquez sur Network and Internet Connections puis cliquez deux fois sur
l’icône Network Connections.
Page 68

68 ANNEXE A: CONFIGURATION DE L’ADRESSE IP DE VOTRE ORDINATEUR
3 Cliquez à droite sur Local Area Connection puis sélectionnez Properties.
4 Surlignez Internet Protocol -> TCP/IP puis cliquez sur le bouton Properties.
5 Notez bien vos paramètres actuels car vous les utiliserez plus tard pour les
restaurer une fois l’installation du 3com Email Firewall complétée.
6 Saissez l’adresse IP 192.168.1.252 avec le masque de sous-réseau
255.255.255.0. Laissez les autres champs en blanc.
7 Cliquez sur le bouton OK pour terminer l’installation
8 Cliquez sur le bouton OK pour terminer l’installation
Advanced
TCP/IP
.
.
Page 69

Windows 2000
Windows 2000 Pour modifier vos paramètres réseau sur un système Windows 2000 :
1 Cliquez sur le bouton Start puis sélectionnez Settings -> Control Panel.
69
2 Cliquez sur Network and Dial-up Connections puis cliquez deux fois sur
l’icône Network Connections.
3 Cliquez à droite sur Local Area Connection puis sélectionnez Properties.
4 Sélectionnez Use the following IP address, puis saisissez le 192.168.1.252
et le masque de sous-réseau 255.255.255.0.
FR
Page 70

70 ANNEXE A: CONFIGURATION DE L’ADRESSE IP DE VOTRE ORDINATEUR
5 Cliquez sur OK. Cliquez sur OK dans la boîte de dialogue
Connection Properties
6 Fermez la fenêtre
.
Network and Dial-up Connections
.
Local Area
Page 71

Email Firewall
Installationsanleitung
3Com® Email Firewall – Installationsanleitung
http://www.3com.com/
Teilnr. DIA-MFA100-AAA01
Veröffentlicht im Januar 2005
Page 72

3Com Corporation
350 Campus Drive
Marlborough,
MA 01752-3064
Copyright © 2000-2005, BorderWare Technologies Inc. Used under license by 3Com Corporation. All rights
reserved. No part of this documentation may be reproduced in any form or by any means or used to make any
derivative work (such as translation, transformation, or adaptation) without written permission from
BorderWare Technologies Inc.
3Com Corporation and its licensors reserve the right to revise this documentation and to make changes in
content from time to time without obligation on the part of 3Com Corporation or its licensors to provide
notification of such revision or change.
3Com Corporation and its licensors provide this documentation without warranty, term, or condition of any
kind, either implied or expressed, including, but not limited to, the implied warranties, terms or conditions of
merchantability, satisfactory quality, and fitness for a particular purpose. 3Com Corporation and its licensors
may make improvements or changes in the product(s) and/or the program(s) described in this documentation
at any time.
If there is any software on removable media described in this documentation, it is furnished under a license
agreement included with the product as a separate document, in the hard copy documentation, or on the
removable media in a directory file named LICENSE.TXT or !LICENSE.TXT. If you are unable to locate a copy,
please contact 3Com and a copy will be provided to you.
UNITED STATES GOVERNMENT LEGEND
If you are a United States government agency, then this documentation and the software described herein are
provided to you subject to the following:
All technical data and computer software are commercial in nature and developed solely at private expense.
Software is delivered as “Commercial Computer Software” as defined in DFARS 252.227-7014 (June 1995) or
as a “commercial item” as defined in FAR
provided in 3Com’s standard commercial license for the Software. Technical data is provided with limited
rights only as provided in DFAR 252.227-7015 (Nov
applicable. You agree not to remove or deface any portion of any legend provided on any licensed program or
documentation contained in, or delivered to you in conjunction with, this Installation Guide.
Unless otherwise indicated, 3Com registered trademarks are registered in the United States and may or may not
be registered in other countries.
3Com and the 3Com logo are registered trademarks of 3Com Corporation.
BorderWare, the Powered by BorderWare Logo, and BorderWare Security Network are trademarks or
registered trademarks of BorderWare Technologies Inc. in the United States and other jurisdictions.
Microsoft and Windows are registered trademarks of Microsoft Corporation.
All other company and product names may be trademarks of the respective companies with which they are
associated.
ENVIRONMENTAL STATEMENT
It is the policy of 3Com Corporation to be environmentally-friendly in all operations. To uphold our policy, we
are committed to:
Establishing environmental performance standards that comply with national legislation and regulations.
Conserving energy, materials and natural resources in all operations.
Reducing the waste generated by all operations. Ensuring that all waste conforms to recognized
environmental standards. Maximizing the recyclable and reusable content of all products.
Ensuring that all products can be recycled, reused and disposed of safely.
Ensuring that all products are labelled according to recognized environmental standards.
Improving our environmental record on a continual basis.
End of Life Statement
3Com processes allow for the recovery, reclamation and safe disposal of all end-of-life electronic components.
Regulated Materials Statement
3Com products do not contain any hazardous or ozone-depleting material.
Environmental Statement about the Documentation
The documentation for this product is printed on paper that comes from sustainable, managed forests; it is
fully biodegradable and recyclable, and is completely chlorine-free. The varnish is environmentally-friendly, and
the inks are vegetable-based with a low heavy-metal content.
ENCRYPTION
This product contains encryption and may require U.S. and/or local government authorization prior to export
or import to another country.
2.101(a) and as such is provided with only such rights as are
1995) or FAR 52.227-14 (June 1987), whichever is
Page 73

INHALT
ZU DIESER ANLEITUNG
Richtlinien 76
Zugehörige Dokumentation 77
Dokumentations-
Anmerkungen 77
1 AUFGABEN VOR DER INSTALLATION
Registrieren Ihrer 3Com Email Firewall 79
3Com Email Firewall starten 80
Verwendung des Konfigurations-
Arbeitsblatts 81
Netzwerkänderungen 81
Netzwerk- und Mail-Konfigurations-
Einstellungen 81
Verändern der Firewall/Router-Konfiguration 83
DE
2 3COM EMAIL FIREWALL INSTALLIEREN
3Com Email Firewall an ein Netzwerk anschließen 85
Über einen Webbrowser Verbindung zur 3Com Email Firewall
aufnehmen 86
Verwendung des Setup-Assistenten 87
Lizenzvereinbarung 88
Antivirus-Lizenzverein-
barung 88
Kennwort ändern 89
Zeitzone einstellen 90
Netzwerkkonfiguration 90
Mail-Konfiguration 91
Abschluss 93
Verwendung des Lizenz-Assistenten 93
WORK
SHEET
Page 74

3 AUFGABEN NACH DER INSTALLATION
Prüfen des Status der 3Com Email Firewall 97
Lizenzierung 98
BorderWare Mail Sicherheitsservice 98
Netzwerk-Service 98
Internen Mail-Server ändern 99
Exchange 5.5 99
Exchange 2000 99
Testen der Ausgangs-MailAuslieferung 100
Testen der Eingangs-MailAuslieferung 101
A KONFIGURATION DER IP-ADRESSE IHRES PCS
Windows XP 103
Windows 2000 105
Page 75

ZU DIESER ANLEITUNG
Diese Anleitung beschreibt die Einrichtung und Konfiguration Ihrer
®
3Com
Die Anweisungen in dieser Anleitung werden Ihnen dabei helfen, Ihre
3Com Email Firewall rasch im Netz einzurichten und Emails zu erhalten
und zu scannen.
Diese Anleitung wurde für den System- bzw. Netzwerkadministrator
konzipiert, der für die Konfiguration, Verwendung und Verwaltung der
3Com Email Firewall verantwortlich ist. Sie setzt Kenntnis von
TCP/IP-Netzwerk- und Email-Kommunikationsprotokollen voraus.
Weitere Informationen zur 3Com Email Firewall-Konfiguration finden Sie
in der beiliegenden Bedienungsanleitung.
Wenn Ihr Produkt mit Versionsinformationen ausgeliefert wurde und die
darin enthaltenen Informationen jenen in dieser Anleitung nicht
entsprechen, befolgen Sie bitte die Anweisungen in den
Versionsinformationen.
Email Firewall.
DE
Die meisten Bedienungsanleitungen und Versionsinformationen sind im
Acrobat Reader (PDF)- oder HTML-Format auf der 3Com Webseite
einzusehen:
http://www.3com.com/products
Page 76

76 ZU DIESER ANLEITUNG
Richtlinien Tabelle 1 und Tabelle 2 zeigen Richtlinien auf, die in dieser Anleitung
verwendet werden.
Tabelle 1 Hinweissymbole
Symbol Hinweistyp Beschreibung
Informationshinweis Informationen, die wichtige Funktionen bzw.
Anweisungen beschreiben
Vorsicht Informationen, die auf potenziellen Datenverlust
Warnung Informationen, die auf potenzielle
Tabelle 2 Textrichtlinien
Richtlinie Beschreibung
Bildschirmanzeigen Diese Schriftart zeigt die Informationen so, wie sie auf
Syntax Der Begriff „syntax“ bedeutet, dass Sie die vorhandene
Befehle Das Wort „command“ bedeutet, dass Sie den Befehl
Die Worte „enter“
und
„type“
TastenfeldTastenbezeichnungen
bzw. potenzielle Schäden an der Anwendung, dem
System oder dem Gerät hinweisen
Verletzungsgefahren hinweisen
dem Bildschirm erscheinen.
Schreibweise deuten und anschließend die
entsprechenden Werte in die Platzhalter in der spitzen
Klammer einfügen müssen. Beispiel:
Verwenden Sie den folgenden Syntax, um Ihr Kennwort
zu ändern:
system password <password>
In diesem Beispiel müssen Sie für <password> ein
Kennwort eingeben.
genau so wie vorgegeben eingeben und dann die
Eingabetaste betätigen müssen. Befehle sind fett
gedruckt.
Wenn Sie in dieser Anleitung den Begriff „enter“ sehen,
bedeutet dies, dass Sie etwas eingeben und anschließend
mit der Eingabetaste bestätigen müssen. Wenn die
Anleitungen nur „type“ vorgeben, die Eingabetaste nicht
betätigen.
Wenn Sie zwei oder mehr Tasten gleichzeitig betätigen
müssen, sind die Tastenbezeichnungen durch das
Pluszeichen (+) verbunden. Beispiel:
Drücken Sie Strg+Alt+Entf
Page 77

Tabelle 2 Textrichtlinien (Fortsetzung)
Richtlinie Beschreibung
Worte in
kursiv
Kursivschrift wird verwendet, um:
■ etwas zu betonen;
■ an jener Stelle einen neuen Begriff herauszuheben, an
der er im Text erscheint;
■ Menünamen, Menübefehle und Software-Tastenbe-
zeichnungen zu kennzeichnen. Beispiele:
Wählen Sie
Klicken Sie OK.
Zugehörige Dokumentation
Contents
aus dem Menü
Help
77
.
DE
Zugehörige
Dokumentation
DokumentationsAnmerkungen
Neben dieser Anleitung enthält jedes Dokumentationsset der 3Com Email
Firewall noch folgendes:
■
3Com Email Firewall Bedienungsanleitung
Diese Anleitung enthält:
■ Detaillierte Informationen zur Konfiguration der 3Com Email
Firewall
■ Informationen zur Fehlersuche von Problemen, die mit der
Email-Verarbeitung und -kommunikation zusammen hängen
■
Versionsinformationen
Hier handelt es sich um Informationen zur aktuellen Softwareversion,
einschließlich neuen Funktionen, Änderungen und bekannten
Problemen.
Ihre Vorschläge sind uns sehr wichtig. Diese helfen dabei, Ihnen unsere
Dokumentation näher zu bringen. Bitte senden Sie Ihre Anmerkungen
über den folgenden URL an 3Com:
http://www.3com.com/corpinfo/en_US/contactus/index.html
Bitte geben Sie dabei an:
■ Titel des Dokuments
■ Teilnummer des Dokuments (auf der Titelseite)
■ Seitennummer (sofern zutreffend)
Page 78

78 ZU DIESER ANLEITUNG
Beispiel:
■ 3Com Email Firewall Installationsanleitung
■ Teilnummer: DIA-MFA100-AAA01
■ Seite 25
Wir weisen darauf hin, dass wir ausschließlich auf Bemerkungen und
Fragen zur 3Com Produktdokumentation antworten können. Fragen zu
technischem Support oder Vertrieb bitte zunächst an Ihren Netzwerkadministrator richten.
Page 79

1
AUFGABEN VOR DER INSTALLATION
Dieses Kapitel enthält Informationen zu den Aufgaben, die vor der
Installation der 3Com Email Firewall erfüllt werden müssen. Es umfasst
folgende Themen:
■ Registrieren Ihrer 3Com Email Firewall
■ 3Com Email Firewall starten
■ Verwendung des Konfigurations- Arbeitsblatts
■ Verändern der Firewall/Router-Konfiguration
DE
Registrieren Ihrer
3Com Email Firewall
Vor der Installation müssen Sie Ihren 3Com Email Firewall Lizenzschlüssel
bei 3Com registrieren. Dieser Lizenzschlüssel wird während des
Installationsprozesses zur Lizenzierung und Aktivierung Ihrer 3Com Email
Firewall verwendet.
Gehen Sie in Ihrem Webbrowser auf die folgende URL:
http://esupport.3com.com
Wenn Sie keinen eSupport Benutzernamen und kein Kennwort haben,
müssen Sie erst auf den Link
Register Now
klicken, um sich zu registrieren.
Page 80

80 KAPITEL 1: AUFGABEN VOR DER INSTALLATION
Nachdem Sie einen Benutzernamen und ein Kennwort erhalten haben,
loggen Sie sich bei 3Com eSupport ein und befolgen Sie die
Anweisungen, um Ihre 3Com Email Firewall mit dem mit Ihrem System
ausgelieferten Lizenzschlüssel zu registrieren.
Notieren Sie Ihren Lizenzschlüssel auf dem beiliegenden
Konfigurations-Arbeitsblatt. Sie geben diesen Schlüssel während des
Lizenzierungsverfahrens ein.
3Com Email Firewall
starten
Die 3Com Email Firewall ist zur Positionierung zwischen Ihren
Mail-Servern und dem Internet vorgesehen, so dass keine direkten SMTP
(Simple Mail Transport Protocol)-Verbindungen zwischen den externen
und internen Servern bestehen.
Die 3Com Email Firewall wird hinter der vorhandenen Firewall auf dem
internen Netzwerk installiert.
Eingehende Mails werden von der Firewall oder dem Router an die 3Com
Email Firewall weitergeleitet, wo sie gescannt, verarbeitet und
anschließend zur Auslieferung an Ihren internen Mailserver gesendet
werden.
Die Ausgangs-Mail wird vom internen Mail-Server an die 3Com Email
Firewall gesendet. Dort wird sie gescannt, verarbeitet und an den
SMTP-Zielserver im Internet gesendet.
Page 81

Verwendung des Konfigurations- Arbeitsblatts
81
Verwendung des
KonfigurationsArbeitsblatts
Ihr Dokumentationspaket enthält ein Konfigurations-Arbeitsblatt, das Sie
ausfüllen müssen, bevor Sie mit der Installation fortfahren. Das
Arbeitsblatt wird zur Dokumentation Ihrer aktuellen Netzwerkumgebung
verwendet und enthält eine Liste Ihrer vorgeschlagenen Änderungen bei
der Integration der 3Com Email Firewall in Ihr Netzwerk.
Netzwerkänderungen Bevor Sie mit der Installation fortfahren, müssen folgende Informationen
zu Ihrer Umgebung gesammelt werden:
■ Aktuelle Netzwerkeinstellungen dokumentieren
■ Feststellen, welche Ports oder Proxies an der Firewall bzw. dem Router
konfiguriert werden müssen
■ An den internen Mail-Servern erforderliche Änderungen identifizieren,
um die Ausgangs-Mail zur 3Com Email Firewall zu leiten.
Netzwerk- und
Mail-Konfigurations-
Einstellungen
Wenn die 3Com Email Firewall zum ersten Mal installiert wird, müssen Sie
folgende Informationen zur Hand haben. Notieren Sie diese
Informationen auf dem beigefügten Konfigurations-Arbeitsblatt.
■ Hostname — Der der 3Com Email Firewall zugeordnete Hostname,
mail
bei
wie z. B.
■ Domain — Der Domainname, der zum zugeordneten Hostnamen
mail.example.com
.
gehört. Dies ist gewöhnlich das Domain, für das die Email verarbeitet
wird, wie z. B.
example.com
.
DE
■ IP Address — Die IP-Adresse eingeben, die Sie für diese 3Com Email
Firewall verwenden. Die Standardadresse ist 192.168.1.253 und Sie
können diese Adresse verwenden, wenn sie keine Konflikte mit
anderen internen Systemen verursacht.
■ Net Mask — Geben Sie die entsprechende Netmaske für Ihr Netzwerk
ein. Wenn Ihre IP-Adresse 192.168.1.253 ist, ist Ihre Netmaske
255.255.255.0.
■ Gateway — Geben Sie die Standard-Gateway für die 3Com Email
Firewall ein. Dies ist gewöhnlich der Hostname bzw. die IP-Adresse
Ihres Routers.
■ Name Server — Die IP-Adresse oder der Hostname des DNS-Servers in
Ihrem Netzwerk.
Page 82

82 KAPITEL 1: AUFGABEN VOR DER INSTALLATION
■ Internal Mail Server Address — Der FQDN (Fully Qualified Domain
Name) oder die IP-Adresse des internen Mail-Servers, wie z. B.
exchange.example.com
■ Administrator Email Address — Geben Sie eine Email-Adresse für den
Administrator dieser 3Com Email Firewall ein. Benachrichtigungen
werden an diese Email-Adresse gesendet.
■ Proxy — Geben Sie einen optionalen Proxy-Server ein, wenn Sie einen
in Ihrem Netzwerk verwenden. Wenn Sie einen Proxy-Server
verwenden, muss dieser eingegeben werden, damit die Antivirus-,
Anti-Spam und Lizenzierungs-Updates vorschriftsmäßig funktionieren.
Geben Sie die Adresse in folgendem Format ein
https://hostname:port.
https://proxy.example.com:8080
■ Proxy Username and Password — Geben Sie einen Benutzernamen
und ein Kennwort für den Proxy-Server ein.
.
Page 83

Verändern der Firewall/Router-Konfiguration
83
Verändern der
Firewall/Router-Konfi
guration
Es müssen diverse Netzwerk-Ports oder Proxies an Ihrer Firewall bzw.
Ihrem Router konfiguriert werden, damit die 3Com Email Firewall
vorschriftsmäßig funktioniert.
In der folgenden Tabelle wird die Liste der erforderlichen Ports
beschrieben:
Tabelle 3 Firewall/Router-Portkonfiguration
Zum
Vom
Port
21 FTP für
25 SMTP ✓ ✓ ✓ ✓ TCP
53 DNS ✓ ✓ UDP/TCP
80 Anti-Virus
123 NTP
443 Sichere
443 Sichere
514 Syslog ✓ UDP
6277 DCC ✓ UDP
Beschreibung
Systemsicherungen
Updates
(Network
Time
Protocol)
Verbindung
Admin
Vom
Internet
✓ ✓ TCP
Zum
Internet
✓ TCP
✓ ✓ UDP
✓ TCP
internen
Netzwerk
internen
Netzwerk Protokoll
✓ TCP
DE
Page 84

84 KAPITEL 1: AUFGABEN VOR DER INSTALLATION
Page 85

2
3COM EMAIL FIREWALL
INSTALLIEREN
Wenn Sie Ihre Aufgaben vor der Installation erledigt und alle
Informationen, die Sie für die erste Installation der 3Com Email Firewall
benötigen, gesammelt haben, sind Sie jetzt bereit für die Installation.
Die Installation beinhaltet die folgenden Schritte:
■ 3Com Email Firewall an ein Netzwerk anschließen
■ Über einen Webbrowser Verbindung zur 3Com Email Firewall
aufnehmen
■ Verwendung des Setup-Assistenten
■ Verwendung des Lizenz-Assistenten
DE
3Com Email Firewall
an ein Netzwerk
anschließen
Die 3Com Email Firewall wie folgt installieren und anschließen:
1 Packen Sie die 3Com Email Firewall, die Kabel und die Dokumentation
aus.
2 Das Netzkabel von einer Stromversorgung an die 3Com Email Firewall
anschließen.
3 Sie müssen sich zuerst von einem anderen Computer aus direkt an die
3Com Email Firewall anschließen, um mit ihrer Installation und
Konfiguration zu beginnen. Dies kann auf zwei Arten geschehen:
■ Sie schließen sowohl Ihre 3Com Email Firewall und Ihren PC über
ein normales Ethernet-Netzwerkkabel an einen Netzwerk-Hub oder
-schalter an.
Page 86

86 KAPITEL 2: 3COM EMAIL FIREWALL INSTALLIEREN
■ Sie schließen Ihre 3Com Email Firewall und Ihren PC direkt über ein
Überkreuzungskabel an.
Über einen
Webbrowser
Verbindung zur
3Com Email Firewall
aufnehmen
Stellen Sie wie folgt eine Verbindung zwischen Ihrem Konfigurations-PC
und der 3Com Email Firewall her:
1 Stellen Sie sicher, dass die 3Com Email Firewall und Ihr PC korrekt im
Netzwerk verbunden sind – entweder direkt oder über einen Hub oder
Schalter.
2 Schalten Sie die Stromzufuhr zur 3Com Email Firewall ein. Warten Sie
mindestens 1 bis 2 Minuten ab, bis das System vollständig gestartet ist,
bevor Sie versuchen, eine Verbindung herzustellen.
3 Die Standard-IP-Adresse der 3Com Email Firewall ist 192.168.1.253.
Konfigurieren Sie die lokalen Netzwerkeinstellungen Ihres PCs erneut,
sodass eine Adresse im gleichen Netzwerk verwendet wird. Verwenden
Sie die IP-Adresse 192.168.1.252 mit der Subnet-Maske 255.255.255.0.
Siehe Anhang A auf Seite 103 bzgl. Anweisungen zur Änderung der
IP-Adresse Ihres PCs.
Wenn es im Netzwerk vorhandene Systeme mit diesen Adressen gibt,
verwenden Sie zum Anschluss des PCs an die 3Com Email Firewall als
isolierte Verbindung ein Überkreuzungs-Ethernetkabel.
4 Starten Sie einen Webbrowser auf Ihrem PC und geben Sie in der
Adressenzeile 192.168.1.253 als URL ein.
Page 87

Verwendung des Setup-Assistenten
5 Loggen Sie sich mit dem Benutzernamen admin mit dem
Standard-Kennwort admin ein. Nun erscheint der
Willkommensbildschirm des Setup-Assistenten.
87
DE
Verwendung des
Setup-Assistenten
Der Setup-Assistent führt Sie nun durch die Installation der 3Com Email
Firewall.
Klicken Sie Next, um mit der ersten Konfiguration der 3Com Email
Firewall fortzufahren.
Während der Installation können Sie jederzeit zum vorigen Bildschirm
zurückkehren, indem Sie die Schaltfläche Back klicken.
Page 88

88 KAPITEL 2: 3COM EMAIL FIREWALL INSTALLIEREN
Lizenzvereinbarung Wenn die 3Com Email Firewall zum ersten Mal installiert wird, müssen Sie
die Aktivierungsphase abschließen, indem Sie die Lizenzvereinbarung
lesen und akzeptieren.
Lesen Sie die Lizenzvereinbarung und wählen Sie I Accept und klicken Sie
anschließend auf Next, um fortzufahren.
Antivirus-Lizenzverein-
barung
Sie müssen die Antivirus-Lizenzvereinbarung lesen und akzeptieren, bevor
Sie fortfahren.
Lesen Sie die Lizenzvereinbarung und wählen Sie Accept und klicken Sie
anschließend auf Next, um fortzufahren.
Page 89

Verwendung des Setup-Assistenten
Kennwort ändern Ändern Sie das Standardkennwort der 3Com Email Firewall. Geben Sie
hierzu das Standardkennwort admin und ein neues Kennwort ein und
bestätigen Sie dieses.
Wählen Sie ein sicheres Kennwort mit einer Zeichenlänge von mindestens
8 Zeichen ein. Das Kennwort kann eine Mischung aus Groß- und
Kleinbuchstaben, Zahlen und Sonderzeichen wie z. B. „@“ enthalten.
89
DE
Das Kennwort ist groß-/kleinschreibungsabhängig und Sie können
sowohl Groß- als auch Kleinschreibung verwenden.
Klicken Sie Next, um fortzufahren.
Page 90

90 KAPITEL 2: 3COM EMAIL FIREWALL INSTALLIEREN
Zeitzone einstellen Stellen Sie Ihre Region, Ihr Land und Ihre Zeitzone ein. Klicken Sie Next,
um fortzufahren.
Netzwerkkonfiguration Geben Sie die folgenden erforderlichen Netzwerk-Informationen aus
Ihrem Konfigurations-Arbeitsblatt ein.
■ Hostname — Geben Sie den Hostnamen (nicht den vollständigen
mail
Domain-Namen) der 3Com Email Firewall ein, wie z. B.
mail.example.com
■ Domain — Geben Sie den Domain-Namen ein, wie z. B.
.
bei
example.com
.
Page 91

Verwendung des Setup-Assistenten
■ IP Address — Geben Sie die IP-Adresse für diese 3Com Email Firewall
ein. Die Standardadresse ist 192.168.1.253 und Sie können diese
Adresse verwenden, wenn sie keine Konflikte mit anderen internen
Systemen verursacht.
■ Net Mask — Geben Sie die entsprechende Netmaske für Ihr Netzwerk
ein. Wenn Ihre IP-Adresse 192.168.1.253 ist, ist Ihre Netmaske
255.255.255.0.
■ Gateway — Geben Sie die Standard-Gateway für die 3Com Email
Firewall ein. Dies ist gewöhnlich der Hostname bzw. die IP-Adresse
Ihres Routers.
■ Name Server — Geben Sie den Hostnamen oder die IP-Adresse Ihres
DNS-Servers ein.
Klicken Sie Next, um fortzufahren.
Mail-Konfiguration Geben Sie die folgenden erforderlichen Mail-Konfigurations-
informationen aus Ihrem Konfigurations-Arbeitsblatt ein.
91
DE
■ Internal Mail Server Address — Geben Sie die IP-Adresse oder den
Hostnamen des internen Mail-Servers ein, an den die Mails gesendet
werden, nachdem sie von der 3Com Email Firewall verarbeitet
wurden. Wenn Sie mehr als einen internen Mail-Server haben, können
Sie nach der Installation weitere Adressen hinzufügen.
■ Administrator Email Address — Geben Sie eine Email-Adresse für den
Administrator dieser 3Com Email Firewall ein. Benachrichtigungen
werden an diese Email-Adresse gesendet.
Page 92

92 KAPITEL 2: 3COM EMAIL FIREWALL INSTALLIEREN
■ Anti-Spam Action — Stellen Sie Ihre Standardaktion für die
Anti-Spam-Funktionen der 3Com Email Firewall ein. Sie können aus
folgenden Möglichkeiten wählen:
■ Disabled — Die Anti-Spam-Funktionen sind deaktiviert.
■ Modify Subject Headings — Die Anti-Spam-Funktionen sind
deaktiviert. Bei Nachrichten, die als Spam ausgewiesen werden,
steht in der Betreffzeile ein Text wie z. B. [SPAM].
■ User-Quarantine Mail — Die
Benutzer-Quarantäne-Antispamfunktionen sind aktiviert.
Nachrichten, die als Spam erkannt werden, werden in den
Benutzer-Spam-Quarantäneordner umgeleitet. Die Aktion wird auf
Redirect To
Hostname gleich den Aktionsdaten.
■ Use Secure Proxy — Markieren Sie dieses Kästchen, um die
Verwendung eines Web-Proxyservers zu aktivieren, falls Sie einen
solchen in Ihrem Netzwerk verwenden. Wenn Sie einen Proxy-Server
verwenden, ist diese Einstellung erforderlich, damit die Antivirus-,
Anti-Spam und Lizenzierungs-Updates vorschriftsmäßig funktionieren.
eingestellt. Hierbei ist der 3Com Email Firewall
■ Address — Geben Sie die Proxyserver-Adresse in folgendem Format
ein https://hostname:port.
■ User Name — Geben Sie einen gültigen Benutzernamen für den
Proxy-Server ein.
■ Password — Geben Sie ein zum obigen Benutzernamen passendes
Kennwort ein und bestätigen Sie dieses.
Klicken Sie Next, um fortzufahren.
Page 93

Verwendung des Lizenz-Assistenten
Abschluss Sie haben nun die erste Konfiguration der 3Com Email Firewall
abgeschlossen. Lesen Sie bitte die letzten Anweisungen auf dem
Bildschirm
Klicken Sie Finish, um das System herunterzufahren.
Completion
des Setup-Assistenten.
93
DE
Verwendung des
Lizenz-Assistenten
Wenn die 3Com Email Firewall heruntergefahren wird, schließen Sie die
Netzwerk-Schnittstelle an das Netzwerk an, über das Sie sich mit dem
Internet verbinden können.
Der Lizenz-Assistent muss mit dem Internet verbunden sein, um Ihr
System mit 3Com zu aktivieren.
Nach Abschluss der ursprünglichen Konfiguration mit dem SetupAssistenten und dem Neustart der 3Com Email Firewall, führt Sie der
Lizenz-Assistent durch das Verfahren, mit dem Sie Ihr System lizenzieren.
Bevor Sie dieses Verfahren starten, muss die 3Com Email Firewall bei
esupport.3com.com
Firewall” auf Seite 79.
registriert sein. Siehe “Registrieren Ihrer 3Com Email
Page 94

94 KAPITEL 2: 3COM EMAIL FIREWALL INSTALLIEREN
1 Vergewissern Sie sich, dass die 3Com Email Firewall an ein Netzwerk
angeschlossen ist, mit dem man Internet-Zugang hat. Die 3Com Email
Firewall verwendet die IP-Adresse, die Sie während der NetzwerkKonfiguration eingestellt haben.
2 Schalten Sie die 3Com Email Firewall ein. Warten Sie mindestens 1 bis 2
Minuten, bis das System startet, bevor Sie versuchen, mit dem Internet
Verbindung aufzunehmen.
3 Stellen Sie die IP-Adresse Ihres Konfigurations-PCs auf eine Adresse ein,
die auf dem gleichen Netzwerk verwendet wird. Siehe
Seite 103 bzgl. detaillierter Informationen zum Ändern der IP-Adresse
Ihres PCs.
4 Starten Sie einen Webbrowser auf Ihrem PC und geben Sie die neue
IP-Adresse der 3Com Email Firewall als URL in die Adressenleiste ein.
5 Sie werden aufgefordert, mit dem neuen Kennwort, das Sie bei der
ursprünglichen Konfiguration eingestellt haben, einzuloggen.
Anhang A auf
Nun startet der Lizenz-Assistent.
Page 95

Verwendung des Lizenz-Assistenten
6 Geben Sie Ihren Lizenzschlüssel ein und klicken Sie Next, um
fortzufahren.
7 Bestätigen Sie Ihre Registrierungsinformationen, indem Sie die Richtigkeit
Ihrer System-ID und Ihres Lizenzschlüssels prüfen und klicken Sie Next,
um fortzufahren.
95
DE
Page 96

96 KAPITEL 2: 3COM EMAIL FIREWALL INSTALLIEREN
8 Die 3Com Email Firewall ist nun lizenziert und die Installation ist
abgeschlossen. Klicken Sie Finish, um fortzufahren.
9 Nun erscheint der 3Com Email Firewall-Bildschirm
Der Mail-Service ist direkt nach der Installation zunächst unterbrochen.
Klicken Sie Start, um die Mail-Verarbeitung zu beginnen.
Activity
.
Nachdem Sie Start geklickt haben, erscheint u. U. eine Meldung, dass die
Anti-Virus-Updates noch nicht durchgeführt wurden. Nach der
Installation wird der erste Update erst nach 60 Minuten durchgeführt. Sie
können zu Mail Delivery -> Anti-Virus gehen, um einen sofortigen Update
zu starten.
Page 97

3
AUFGABEN NACH DER INSTALLATION
Dieses Kapitel enthält Informationen zu den Aufgaben, die nach der
Installation der 3Com Email Firewall erfüllt werden müssen. Es umfasst
folgende Themen:
■ Prüfen des Status der 3Com Email Firewall
■ Internen Mail-Server ändern
■ Testen der Ausgangs-Mail- Auslieferung
■ Testen der Eingangs-Mail- Auslieferung
DE
Prüfen des Status der
3Com Email Firewall
Wenn die Installation abgeschlossen ist, wählen Sie Status auf dem
Hauptmenü, um zu prüfen, ob alle Funktionen und Server funktionieren.
Page 98

98 KAPITEL 3: AUFGABEN NACH DER INSTALLATION
Vergewissern Sie sich, dass die folgenden Services laufen:
Lizenzierung ■ License — Zeigt Ihre Lizenzinformationen einschließlich des
Ablaufdatums an. Wenn diese Information nicht stimmt oder wenn
Sie eine Lizenz installiert haben und diese nicht als aktiv angezeigt
wird, wenden Sie sich bitte an den 3Com Kundendienst.
■ Licensed Users — Zeigt die Anzahl der lizenzierten Benutzer an, die
von der 3Com Email Firewall unterstützt werden. Wenn diese
Information nicht stimmt und Sie bereits eine Lizenz installiert haben,
wenden Sie sich bitte an den 3Com Kundendienst.
BorderWare Mail
Sicherheitsservice
■ Security Server — Zeigt den Status des Sicherheitsservers und das
letzte Mal an, als der Update abgerufen wurde.
■ Anti-Spam Server — Zeigt den Status des Anti-Spam-Servers an.
■ Anti-Virus Server — Zeigt den Status Ihres Antivirus-Services sowie das
letzte Mal an, als Sie nach Musterdatei-Updates gesucht haben.
Netzwerk-Service ■ Internal Mail Server — Zeigt den Status Ihres internen Mail-Servers an.
Ist dieser nicht zugriffsbereit, prüfen Sie, ob der interne Mail-Server
läuft. Führen Sie Netzwerktests durch, um sicherzustellen, dass eine
Verbindung zwischen der 3Com Email Firewall und dem internen
Mail-Server besteht.
■ Gateway — Zeigt Ihre Verbindung zum lokalen Gateway an. Dies ist
gewöhnlich Ihr Router. Wenn nicht auf das Gateway zugegriffen
werden kann, stellen Sie sicher, dass diese vorschriftsmäßig
funktioniert und führen Sie Netzwerktests durch, um die Verbindung
zwischen der 3Com Email Firewall und dem Gateway zu bestätigen.
■ DNS Server — Zeigt, dass die DNS-Services vorschriftsmäßig
funktionieren. Wenn nicht auf den Server zugegriffen werden kann,
prüfen Sie Ihren DNS-Server, um sicherzustellen, dass dieser
vorschriftsmäßig läuft und führen Sie Netzwerktests zwsichen der
3Com Email Firewall und dem DNS-Server durch, um sicherzustellen,
dass Kommunikation besteht.
■ Time Server — Zeigt, dass Ihr Netzwerk-Zeitserver vorschriftsmäßig
funktioniert. Wenn nicht auf den Server zugegriffen werden kann,
prüfen Sie Ihren NTP-Server, um sicherzustellen, dass dieser
vorschriftsmäßig läuft und führen Sie Netzwerktests zwischen der
3Com Email Firewall und dem NTP-Server durch, um sicherzustellen,
dass Kommunikation besteht.
Page 99

Internen Mail-Server ändern
Wenn ein bestimmter Service nicht vorschriftsmäßig funktioniert, können
Sie das Servicecheck-Symbol neben der Hilfe-Schaltfläche anklicken, um
den jeweiligen Service zu prüfen.
99
Internen Mail-Server
ändern
Exchange 5.5 Bei Exchange 5.5 Systemen das folgende Verfahren anwenden:
Exchange 2000 Bei Exchange 2000 Systemen das folgende Verfahren anwenden:
An den(m) vorhandenen internen Mail-Server(n) erforderliche
Änderungen identifizieren, um die Ausgangs-Mail durch die 3Com Email
Firewall zu leiten. Sie müssen Ihre internen Mail-Server auf die
Verwendung des Hostnamens bzw. der IP-Adresse Ihrer 3Com Email
Firewall konfigurieren, damit die SMTP-Auslieferung funktioniert.
Dieses Verfahren hängt vom Typ des internen Mail-Servers ab, den Sie
verwenden. Die folgenden Anweisungen gelten für einen Microsoft
Exchange-Server.
1 Öffnen Sie den Exchange Administrator.
2 Gehen Sie auf Organization -> Site -> Configuration -> Connections ->
Internet Mail Service Properties.
3 Auf der Registerkarte Connections auf den Abschnitt Message Delivery
gehen und im Dialogfeld
3Com Email Firewall eingeben.
1 Öffnen Sie den Exchange System Manager.
2 Gehen Sie auf Servers -> Exchange server name -> Protocols -> SMTP ->
Default SMTP virtual server -> Properties -> Delivery -> Advanced.
Forward all messages to host
, die IP-Adresse der
®
DE
3 Geben Sie das FQDN, wie z. B.
3Com Email Firewall in Klammern wie folgt in das Dialogfeld „Smart
Host“ ein, wie z. B.:
[192.168.1.253]
mail.example.com
, oder die IP-Adresse der
Page 100

100 KAPITEL 3: AUFGABEN NACH DER INSTALLATION
Testen der
Ausgangs-MailAuslieferung
Wenden Sie das folgende Verfahren an, um eine Email aus Ihrem
Netzwerk zu senden, um Ihren Ausgangs-Mailpfad zu testen:
1 Senden Sie eine Email von einem internen Client-PC an einen externen
Benutzer außerhalb Ihres Netzwerks.
2 Sehen Sie auf der Seite
im Abschnitt
Mail Received Recently
Activity
der 3Com Email Firewall nach, ob die Mail
erscheint. Klicken Sie Refresh, um
einen aktuellen Status abzurufen.
3 Prüfen Sie die Mailbox (den Posteingang) des externen
Empfangs-Benutzers, um sicherzustellen, dass die Mail ankam.
In diesem Szenario müsste die Mail das System wie folgt durchlaufen:
■ Interner Mail-Client zu Ihrem internen Mail-Server
■ Interner Mail-Server zur 3Com Email Firewall
■ 3Com Email Firewall zur Firewall/zum Router
■ Firewall/Router zum externen Empfangs-Mail-Client
Wenn Ihre Mail nicht ausgeliefert wurde, beginnen Sie bei Ihrem
Mail-Client und arbeiten Sie sich entlang des Pfads durch, bis Sie an den
Punkt gelangen, an dem die Mail nicht zum nächsten Punkt weiter
geleitet wurde.
Wenn Sie das Problem erkannt haben, ändern Sie Ihre Konfiguration und
führen Sie obigen Test erneut durch.
 Loading...