

Page 1

HP Deskjet F4200 All-in-One series
Basics Guide
Guide d’utilisation
Page 2

Hewlett-Packard Company notices
The information contained in this document is subject to change without notice.
All rights reserved. Reproduction, adaptation, or translation of this material is prohibited without prior written permission of Hewlett-Packard, except
as allowed under copyright laws. The only warranties for HP products and services are set forth in the express warranty statements accompanying
such products and services. Nothing herein should be construed as constituting an additional warranty. HP shall not be liable for technical or editorial
errors or omissions contained herein.
© 2007 Hewlett-Packard Development Company, L.P.
Windows, Windows 2000, and Windows XP are U.S. registered trademarks of Microsoft Corporation.
Windows Vista is either a registered trademark or trademark of Microsoft Corporation in the United States and/or other countries.
Intel and Pentium are trademarks or registered trademarks of Intel Corporation or its subsidiaries in the United States and other countries.
Avis publiés par la société Hewlett-Packard
Les informations contenues dans ce document peuvent faire l'objet de modifications sans préavis.
Tous droits réservés. La reproduction, l'adaptation ou la traduction de ce matériel est interdite sans l'accord écrit préalable de Hewlett-Packard, sauf
dans les cas permis par la législation relative aux droits d'auteur. Les seules garanties relatives aux produits et services HP sont décrites dans les
déclarations de garantie expresse accompagnant lesdits produits et services. Aucun élément de ce document ne constitue une garantie
supplémentaire. Hewlett-Packard ne saurait être tenu pour responsable des erreurs ou omissions techniques ou rédactionnelles de ce document.
© 2007 Hewlett-Packard Development Company, L.P.
Windows, Windows 2000 et Windows XP sont des marques déposées de Microsoft Corporation aux Etats-Unis.
Windows Vista est une marque déposée ou une marque de Microsoft Corporation aux Etats-Unis et/ou dans d'autres pays.
Intel et Pentium sont des marques ou des marques déposées d'Intel Corporation ou de ses filiales aux Etats-Unis et dans d'autres pays.
Page 3

HP Deskjet F4200 All-in-One Series
Basics Guide
English
Page 4

Contents
1 HP All-in-One overview
The HP All-in-One at a glance....................................................................................................2
Control panel buttons.................................................................................................................3
Status light overview...................................................................................................................3
Load originals for scanning and copying....................................................................................5
Make a copy...............................................................................................................................5
Scan an original..........................................................................................................................6
2 Troubleshooting and support
Uninstall and reinstall the software.............................................................................................7
Hardware setup troubleshooting.................................................................................................7
Clear paper jams......................................................................................................................10
Print cartridge troubleshooting..................................................................................................10
Find more information...............................................................................................................10
Setup Guide........................................................................................................................10
Onscreen Help....................................................................................................................10
HP Web site........................................................................................................................11
HP support................................................................................................................................11
HP support by phone..........................................................................................................11
Phone support period...................................................................................................11
After the phone support period.....................................................................................11
Before calling HP Support..................................................................................................11
Technical information...............................................................................................................11
System requirements..........................................................................................................12
Paper specifications...........................................................................................................12
Physical specifications........................................................................................................12
Power specifications...........................................................................................................12
Environmental specifications..............................................................................................12
Notice to Windows 2000, Windows XP x64 Edition, and Windows XP Starter Edition
users...................................................................................................................................12
Regulatory notices..............................................................................................................13
Regulatory model identification number.......................................................................13
Warranty.............................................................................................................................14
English
1
Page 5

1 HP All-in-One overview
The HP Deskjet F4200 All-in-One Series is a versatile device that gives you easy-to-use
copying, scanning, and printing. For information about the full range of features and
functions, see the onscreen Help.
The HP All-in-One at a glance
English
Label Description
1 Control panel
2 Front access door
3 Paper-width guide
4 Input tray
5 Tray extender
6 Print cartridge door
7 Glass
8 Lid backing
9 Rear access door
10 Rear USB port
11 Power connection
* Use only with the power adapter supplied by HP.
2 HP Deskjet F4200 All-in-One Series
*
Page 6
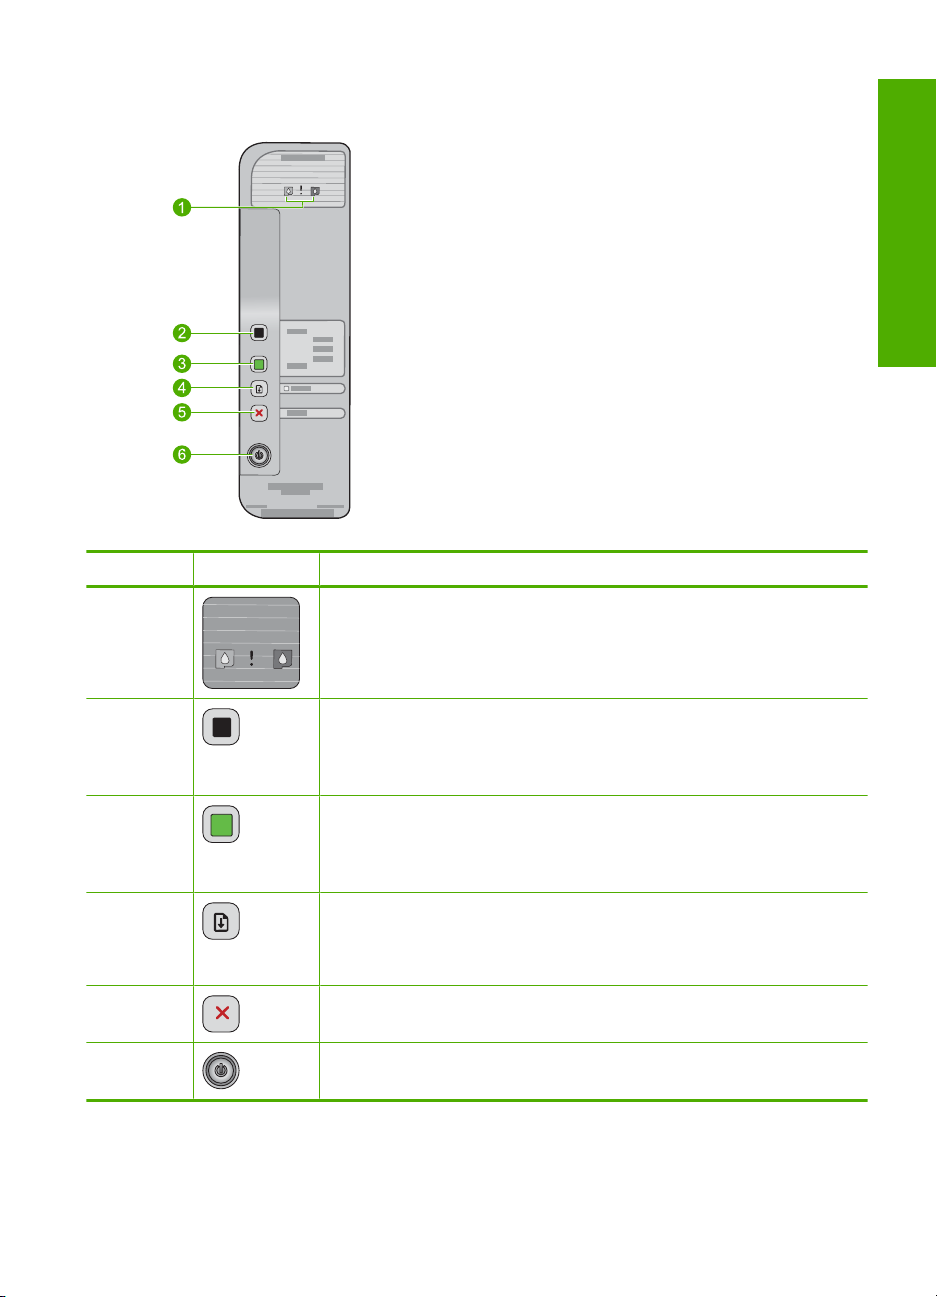
Control panel buttons
Label Icon Name and Description
English
1 Check Print Cartridge lights: Indicates the need to reinsert the specified print
2 Start PC Copy Black: Starts a black-and-white copy job.
3 Start PC Copy Color: Starts a color copy job.
4 Resume: Instructs the HP All-in-One to continue after a problem is solved
5 Cancel: Stops a print, copy, or scan job.
6 On: Turns the HP All-in-One on or off. The On button is lit when the
cartridge, replace the print cartridge, or close the print cartridge door. The
Black ink icon light indicates that the problem is with the black print cartridge,
and the Color ink icon light indicates that the problem is with the tri-color print
cartridge.
NOTE: To make copies, the HP All-in-One and computer must be
connected and turned on. The HP Photosmart Software must also be
installed and running on your computer prior to copying.
NOTE: To make copies, the HP All-in-One and computer must be
connected and turned on. The HP Photosmart Software must also be
installed and running on your computer prior to copying.
or a print cartridge alignment is initiated.
A blinking Resume light next to the Resume button indicates the need to
load paper or clear a paper jam.
HP All-in-One is powered on.
Status light overview
Several indicator lights inform you of the status of the HP All-in-One.
Status light overview 3
Page 7

English
Chapter 1
Label Description
1 Check Print Cartridge lights
2 Resume light
3 On light
The following table describes common situations and explains what the lights mean.
Light status What it means
All lights are off. The HP All-in-One is turned off. Press the On button to turn on the
The On light is blinking. The HP All-in-One is busy printing, scanning, copying, or aligning the
The On light blinks quickly for 3
seconds and then is on steady.
The Resume light is blinking.
The Check Print Cartridge light is
blinking.
The On, Resume, and Check Print
Cartridge lights are blinking.
The Resume and Check Print
Cartridge lights are blinking.
product.
print cartridges.
You pressed a button while the HP All-in-One is already busy printing,
scanning, copying, or aligning the print cartridges.
The HP All-in-One is out of paper.
•
The HP All-in-One has a paper jam.
•
The print cartridge door is open.
•
The print cartridges are missing or not seated correctly.
•
The tape was not removed from the print cartridge.
•
The print cartridge is not intended for use in this HP All-in-One.
•
The print cartridge might be defective.
•
Scanner failure.
Turn off the HP All-in-One, then turn it on again. If the problem persists,
contact HP Support.
The print cartridge carriage is stalled.
4 HP Deskjet F4200 All-in-One Series
Page 8
(continued)
Light status What it means
All lights are blinking. The HP All-in-One has a fatal error.
1. Turn off the product.
2. Unplug the power cord.
3. Wait a minute, then plug the power cord back in.
4. Turn on the product.
If the problem persists, contact HP Support.
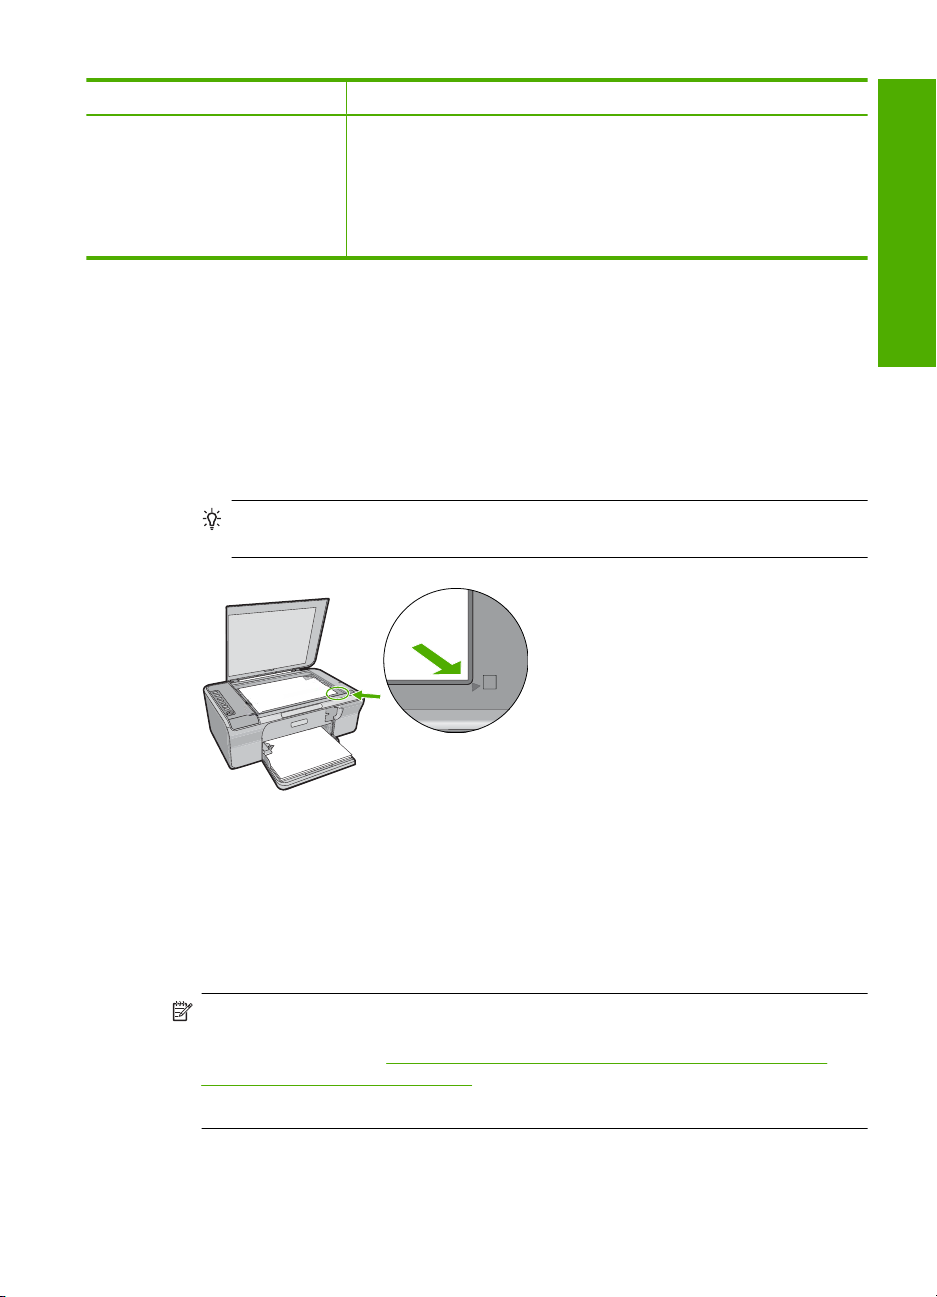
Load originals for scanning and copying
You can load many different types and sizes of paper in the HP All-in-One, including letter
or A4 paper, photo paper, transparencies, and envelopes. For more information, see the
onscreen Help.
To load an original on the glass
1. Lift the lid to the open position.
2. Load your original print side down on the right front corner of the glass.
TIP: To get the correct copy size, make sure that there is no tape or other foreign
object on the glass.
3. Close the lid.
Make a copy
English
To make copies, the HP All-in-One and computer must be connected and turned on. The
HP Photosmart Software must also be installed and running on your computer prior to
copying.
NOTE: If you are using the device with a computer running Windows 2000, Windows
XP Starter Edition, or Windows XP x64, some features might not be available. For
more information, see “
Windows XP Starter Edition users” on page 12.
To make a copy, scan the document or image and then print it.
Notice to Windows 2000, Windows XP x64 Edition, and
Make a copy 5
Page 9

Chapter 1
To make a copy
1. Make sure you have paper loaded in the input tray.
2. Load your original print side down on the right front corner of the glass.
3. Press Start PC Copy Black or Start PC Copy Color.
English
Scan an original
For original documents or images placed on the glass, you can start a scan from your
computer using the HP Solution Center software. To use the scan features, the
HP All-in-One and computer must be connected and turned on. The HP Photosmart
Software must also be installed and running on your computer prior to scanning.
NOTE: If you are using the device with a computer running Windows 2000, Windows
XP Starter Edition, or Windows XP x64, use the Windows Scanner wizard instead of
the HP Solution Center software.
To scan to a computer
1. Load your original print side down on the right front corner of the glass.
NOTE: If you are using Windows, the product makes one copy and launches the
HP Copy software so you can make additional copies.
If you are using a Mac, refer to your computer for a preview of your copy. If
necessary, edit the preview image, then click Accept and print your copies.
TIP: For quality copies, ensure that the scanner glass is clean and that there are
no foreign materials adhering to it.
2. Click the HP Digital Imaging Monitor (PC) or HP Device Manager (Mac) icon.
3. Scan the image using the HP Solution Center (PC) or HP Scan Pro (Mac) software
installed on your computer.
4. Make any edits to the preview image, and then click Accept when you are finished.
6 HP Deskjet F4200 All-in-One Series
Page 10

2 Troubleshooting and support
This chapter contains troubleshooting information for installation and configuration issues and some
operational topics. For more troubleshooting information, see the onscreen Help.
Many issues are caused when the product is connected to the computer using a USB cable before
the HP Photosmart software is installed on the computer. If you connected the product to your
computer before the software installation screen prompts you to do so, you must follow these steps:
To troubleshoot software installation
1. Disconnect the USB cable from the computer.
2. Uninstall the software (if you have already installed it). For more information, see “
reinstall the software” on page 7.
3. Restart your computer.
4. Turn off the product, wait one minute, then restart it.
5. Reinstall the HP Photosmart software.
CAUTION: Do not connect the USB cable to the computer until prompted by the software
installation screen.
For support contact information, see the inside back cover of this guide.
Uninstall and reinstall the software
If your installation is incomplete, or if you connected the USB cable to the computer before prompted
by the software installation screen, you might need to uninstall and then reinstall the software. Do
not simply delete the HP All-in-One application files from your computer. Make sure to remove them
properly using the uninstall utility provided when you installed the software that came with the
HP All-in-One.
To uninstall from a Windows computer and then reinstall
1. Open the Windows control panel and double-click Add or Remove Programs.
2. Select HP Deskjet All-in-One Driver Software, and then click Change/Remove.
Follow the onscreen instructions.
3. Disconnect the product from your computer.
4. Restart your computer.
Uninstall and
English
NOTE: It is important that you disconnect the product before restarting your computer. Do
not connect the product to your computer until after you have reinstalled the software.
5. To reinstall the software, insert the product CD-ROM into your computer’s CD-ROM drive and
follow the instructions on the startup screen to install the software.
If the startup screen does not appear, double-click My Computer, double-click the CD-ROM
icon with the HP logo, and then double-click setup.exe
6. Follow the onscreen instructions and the instructions provided in the Setup Guide that came
with the product.
When the software installation is complete, the HP Digital Imaging Monitor icon appears in the
Windows system tray.
To verify that the software is properly installed, print a test page. For printing a test page, see the
onscreen Help.
For Macintosh users: Uninstall and reinstall directions are in the Readme file and in the Help files
for the software.
Hardware setup troubleshooting
This section contains hardware troubleshooting information for the HP All-in-One.
Hardware setup troubleshooting 7
Page 11
English
Chapter 2
The product will not turn on
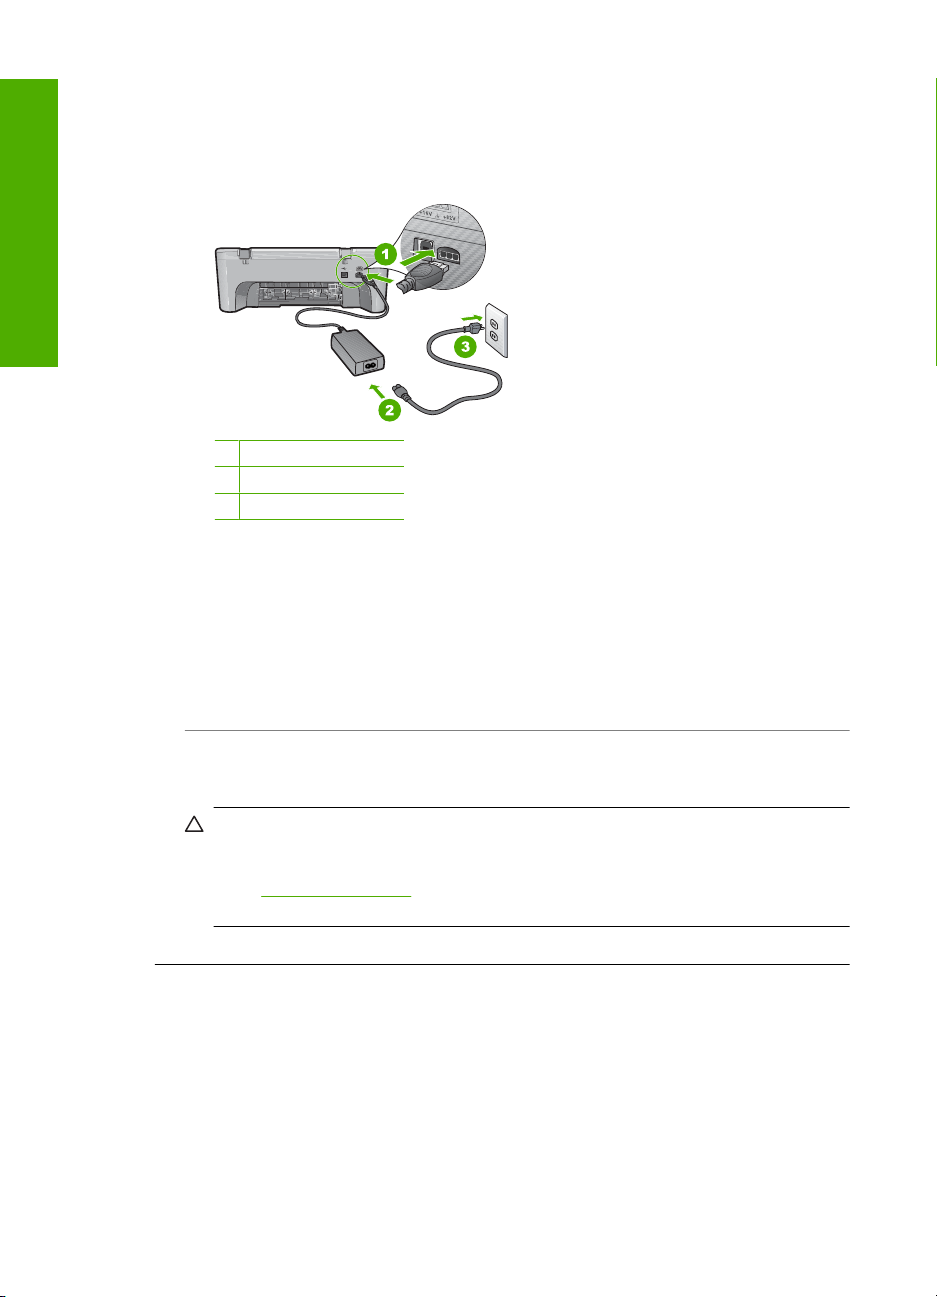
Solution
• Make sure the power cord is firmly connected to both the product and the power adapter.
Plug the power cord into a power outlet, surge protector, or power strip.
1 Power connection
2 Power cord and adapter
3 Power outlet
• If you are using a power strip, make sure the power strip is on. Or, try plugging the product
directly into a power outlet.
• Test the power outlet to make sure it is working. Plug in an appliance that you know works,
and see if the appliance has power. If not, then there might be a problem with the power
outlet.
• If you plugged the product into a switched outlet, make sure the outlet is switched on. If it
is switched to on but still does not work, then there might be a problem with the power outlet.
Cause: The product was not being used with the power cord it was shipped with.
Solution: The product might not respond if you press the On button too quickly. Press the
On button once. It might take a few seconds for the product to turn on. If you press the On button
again during this time, you might turn the product off.
CAUTION: If the product still does not turn on, it might have a mechanical failure. Unplug
the product from the power outlet.
Contact HP support for service.
Go to: www.hp.com/support. If prompted, choose your country/region, and then click
Contact HP for information on calling for technical support.
Cause: You pressed the On button too quickly.
I connected the USB cable, but I am having problems using the HP All-in-One with
my computer
Solution: You must first install the software that came with the product before connecting the
USB cable. During installation, do not plug in the USB cable until prompted by the onscreen
instructions. Connecting the USB cable before prompted can cause errors.
Once you have installed the software, connecting your computer to the product with a USB cable
is straightforward. Simply plug one end of the USB cable into the back of your computer and the
other into the back of the product. You can connect to any USB port on the back of your
computer.
8 HP Deskjet F4200 All-in-One Series
Page 12

For more information on installing the software and connecting the USB cable, see the Setup
Guide that came with the HP All-in-One.
The HP All-in-One does not print
Solution: If the product and computer are not communicating with each other, try the following:
• Look at the On button located on the product. If it is not lit, the product is turned off. Make
sure the power cord is firmly connected to both the product and the power adapter and
plugged into a power outlet. Press the On button to turn on the product.
• Make sure the print cartridges are installed.
• Make sure you have paper loaded in the input tray.
• Make sure that the product does not have a paper jam.
• Check that the print carriage is not jammed.
Open the front access door to access the print carriage area. Remove any objects that are
blocking the print carriage, including any packing materials. Turn the product off and then
turn it on again.
• Print a test page to see if the product can print and is communicating with the computer.
For more information, see the onscreen Help.
• Make sure that the print queue is not paused. If it is, choose the appropriate setting to
resume printing. For more information about accessing the print queue, see the
documentation that came with the operating system installed on your computer.
• Check the USB cable. If you are using an older cable, it might not be working properly. Try
connecting it to another product to see if the USB cable works. If you experience problems,
the USB cable might need to be replaced. Also verify that the cable does not exceed 3
meters (9.8 feet) in length.
• Make sure your computer is USB ready and that you are using a supported operating
system. For more information, see the Readme file.
• Check the connection from the product to your computer. Verify that the USB cable is
securely plugged into the USB port on the back of the product. Make sure the other end of
the USB cable is plugged into a USB port on your computer. After the cable is connected
properly, turn the product off and then on again.
English
Hardware setup troubleshooting 9
Page 13

English
Chapter 2
• If you are connecting the product through a USB hub, make sure the hub is turned on. If the
hub is on, try connecting directly to your computer.
• Check other printers or scanners. You might need to disconnect older products from your
computer.
• Try connecting the USB cable to another USB port on your computer. After you check the
connections, try restarting your computer. Turn the product off and then on again.
• After you check the connections, try restarting your computer. Turn the product off and then
on again.
• If necessary, remove and then install the software you installed with the product again.
For more information on setting up the HP All-in-One and connecting it to your computer, see
the Setup Guide that came with the HP All-in-One.
Clear paper jams
For information about clearing a paper jam, see the onscreen Help. For instructions on accessing
the onscreen Help, see “
Onscreen Help” on page 10.
Print cartridge troubleshooting
For information about troubleshooting print cartridges, see the onscreen Help. For instructions on
accessing the onscreen Help, see “
Onscreen Help” on page 10.
Find more information
A variety of resources, both printed and onscreen, provide information about setting up and using
the HP All-in-One.
Setup Guide
The Setup Guide provides instructions for setting up your HP All-in-One and installing software.
Make sure you follow the steps in the Setup Guide in order.
If you have problems during setup, see Troubleshooting in the last section of the Setup Guide, or
see “
Troubleshooting and support” on page 7 in this guide.
Onscreen Help
The onscreen Help provides detailed instructions on features of your HP All-in-One that are not
described in this guide, including features that are only available using the software you installed
with your HP All-in-One. The onscreen help also provides regulatory and enviornmental information.
10 HP Deskjet F4200 All-in-One Series
Page 14

To access the onscreen Help
• Windows: Click Start > All Programs > HP > Deskjet F4200 series > Help.
• Macintosh: Click Help > Mac Help, then click Library > HP Product Help.
HP Web site
If you have Internet access, you can get help and support from the HP Web site at www.hp.com/
support. This Web site offers technical support, drivers, supplies, and ordering information.
HP support
You can contact HP Support by phone and online. Support options and availability vary by product,
country/region, and language.
HP support by phone
For a list of support phone numbers, see the inside back cover of this guide.
Support options and availability vary by product, country/region, and language.
Phone support period
One year of phone support is available in Latin America (including Mexico). To determine the duration
of phone support in North America, Eastern Europe, the Middle East, Asia Pacific, and Africa, go to
www.hp.com/support.
Standard phone company charges apply.
After the phone support period
After the phone support period, help is available from HP at an additional cost.
Contact your HP dealer or call the support phone number for your country/region to learn more about
support options.
To install the onscreen Help, insert the software CD in your computer and follow the onscreen
instructions.
English
Before calling HP Support
1. Make sure that:
a. The HP All-in-One is plugged in and turned on.
b. The specified print cartridges are installed correctly.
c. The recommended paper is properly loaded in the input tray.
2. Reset the HP All-in-One:
a. Turn off the HP All-in-One by pressing the On button.
b. Unplug the power cord from the back of the HP All-in-One.
c. Plug the power cord back into the HP All-in-One.
d. Turn on the HP All-in-One by pressing the On button.
3. Have the following information available:
a. Specific name of the HP All-in-One, as it appears on the control panel.
b. Print a self-test report. For more information, see the onscreen Help.
c. Be prepared to describe your problem in detail.
d. Have your serial number and service ID ready, found on the self-test report.
e. Be near the HP All-in-One printer when you call HP Support.
Technical information
The technical specifications and international regulatory information for the HP All-in-One are
provided in this section. For additional regulatory and environmental specifications, see the onscreen
help.
For additional regulatory and environmental information, including the Declaration of Conformity
statement, see the onscreen Help.
Technical information 11
Page 15

Chapter 2
System requirements
Software system requirements are located in the Readme file.
Paper specifications
• Input tray capacity: Plain paper sheets: Up to 80 (65-90 gsm (16-24 lb.) paper)
• Output tray capacity: Plain paper sheets: Up to 20 (65-90 gsm (16-24 lb.) paper)
NOTE: For a complete list of supported media sizes, see the printer software.
English
Physical specifications
• Height: 161.5 mm (6.36 inches)
• Width: 437.5 mm (17.22 inches)
• Depth (Input tray up): 290.4 mm (11.43 inches)
• Weight: 4.9 kg (10.8 pounds)
Power specifications
• Power consumption
◦ Average when ready: Less than 4 watts
◦ Average when printing: 17 watts
◦ Average in sleep mode: Less than 3 watts
◦ Time to sleep mode: 10 minutes
◦ OFF: Less than 1 watt
• Input voltage: AC 100 to 240 V ~ 1 A 50–60 Hz
• Output voltage: DC 32 V===375 mA, 16 V===500mA
• Power supply: 0957-2242, AC 100-240 V (±10%), 50-60 Hz (±3 Hz)
• Power supply: 0957-2250, AC 200-240 V (±10%), 50-60 Hz (±3 Hz)
NOTE: Use only with the power adapter supplied by HP.
Environmental specifications
• Maximum operating conditions
◦ Temperature: 5° to 40°C (41° to 104°F)
◦ Humidity: 15% to 80% RH non-condensing
• Recommended operating conditions
◦ Temperature: 15° to 30°C (59° to 86°F)
◦ Humidity: 20% to 80% RH non-condensing
• Maximum shipping (storage) conditions
◦ Temperature: -40° to 60°C (-40° to 140°F)
◦ Humidity: 5% to 90% RH non-condensing
• In the presence of high electromagnetic fields, it is possible the output from the HP All-in-One
may be slightly distorted
• HP recommends using a USB cable less than or equal to 3 m (10 feet) in length to minimize
injected noise due to potential high electromagnetic fields
Notice to Windows 2000, Windows XP x64 Edition, and Windows XP Starter Edition users
This product provides limited functionality for Windows 2000, Windows XP Starter Edition, and
Windows XP x64. Only printer drivers, scanner drivers, and the Toolbox are available. The following
describes some of the limited functionality users can expect:
12 HP Deskjet F4200 All-in-One Series
Page 16

• Copying is not supported.
• The HP Photosmart Software is not available.
• The onscreen Help is not installed, but it is available as a Web download at
support.
www.hp.com/
Regulatory notices
The HP All-in-One meets product requirements from regulatory agencies in your country/region. For
a complete listing of regulatory notices, see the onscreen Help.
Regulatory model identification number
For regulatory identification purposes, your product is assigned a Regulatory Model Number. The
Regulatory Model Number for your product is VCVRA-0811. This regulatory number should not be
confused with the marketing name (HP Deskjet F4200 All-in-One Series, etc.) or product numbers
(CB656A, etc.).
English
Technical information 13
Page 17

English
Chapter 2
Warranty
HP product Duration of limited warranty
Software Media 90 days
Printer 1 year
Print or Ink cartridges Until the HP ink is depleted or the “end of warranty” date printed
on the cartridge has been reached, whichever occurs first. This
Accessories 1 year unless otherwise stated
A. Extent of limited warranty
1. Hewlett-Packard (HP) warrants to the end-user customer that the HP products specified above will be free from defects
in materials and workmanship for the duration specified above, which duration begins on the date of purchase by the
customer.
2. For software products, HP’s limited warranty applies only to a failure to execute programming instructions. HP does not
warrant that the operation of any product will be interrupted or error free.
3. HP's limited warranty covers only those defects that arise as a result of normal use of the product, and does not cover
any other problems, including those that arise as a result of:
a. Improper maintenance or modification;
b. Software, media, parts, or supplies not provided or supported by HP;
c. Operation outside the product's specifications;
d. Unauthorized modification or misuse.
4. For HP printer products, the use of a non-HP cartridge or a refilled cartridge does not affect either the warranty to the
customer or any HP support contract with the customer. However, if printer failure or damage is attributable to the use of
a non-HP or refilled cartridge or an expired ink cartridge, HP will charge its standard time and materials charges to
service the printer for the particular failure or damage.
5. If HP receives, during the applicable warranty period, notice of a defect in any product which is covered by HP's
warranty, HP shall either repair or replace the product, at HP's option.
6. If HP is unable to repair or replace, as applicable, a defective product which is covered by HP's warranty, HP shall,
within a reasonable time after being notified of the defect, refund the purchase price for the product.
7. HP shall have no obligation to repair, replace, or refund until the customer returns the defective product to HP.
8. Any replacement product may be either new or like-new, provided that it has functionality at least equal to that of the
product being replaced.
9. HP products may contain remanufactured parts, components, or materials equivalent to new in performance.
10. HP's Limited Warranty Statement is valid in any country where the covered HP product is distributed by HP. Contracts
for additional warranty services, such as on-site service, may be available from any authorized HP service facility in
countries where the product is distributed by HP or by an authorized importer.
B. Limitations of warranty
TO THE EXTENT ALLOWED BY LOCAL LAW, NEITHER HP NOR ITS THIRD PARTY SUPPLIERS MAKES ANY
OTHER WARRANTY OR CONDITION OF ANY KIND, WHETHER EXPRESS OR IMPLIED WARRANTIES OR
CONDITIONS OF MERCHANTABILITY, SATISFACTORY QUALITY, AND FITNESS FOR A PARTICULAR
PURPOSE.
C. Limitations of liability
1. To the extent allowed by local law, the remedies provided in this Warranty Statement are the customer's sole and
exclusive remedies.
2. TO THE EXTENT ALLOWED BY LOCAL LAW, EXCEPT FOR THE OBLIGATIONS SPECIFICALLY SET FORTH IN
THIS WARRANTY STATEMENT, IN NO EVENT SHALL HP OR ITS THIRD PARTY SUPPLIERS BE LIABLE FOR
DIRECT, INDIRECT, SPECIAL, INCIDENTAL, OR CONSEQUENTIAL DAMAGES, WHETHER BASED ON
CONTRACT, TORT, OR ANY OTHER LEGAL THEORY AND WHETHER ADVISED OF THE POSSIBILITY OF
SUCH DAMAGES.
D. Local law
1. This Warranty Statement gives the customer specific legal rights. The customer may also have other rights which vary
from state to state in the United States, from province to province in Canada, and from country to country elsewhere in
the world.
2. To the extent that this Warranty Statement is inconsistent with local law, this Warranty Statement shall be deemed
modified to be consistent with such local law. Under such local law, certain disclaimers and limitations of this Warranty
Statement may not apply to the customer. For example, some states in the United States, as well as some governments
outside the United States (including provinces in Canada), may:
a. Preclude the disclaimers and limitations in this Warranty Statement from limiting the statutory rights of a consumer
(e.g., the United Kingdom);
b. Otherwise restrict the ability of a manufacturer to enforce such disclaimers or limitations; or
c. Grant the customer additional warranty rights, specify the duration of implied warranties which the manufacturer
cannot disclaim, or allow limitations on the duration of implied warranties.
3. THE TERMS IN THIS WARRANTY STATEMENT, EXCEPT TO THE EXTENT LAWFULLY PERMITTED, DO NOT
EXCLUDE, RESTRICT, OR MODIFY, AND ARE IN ADDITION TO, THE MANDATORY STATUTORY RIGHTS
APPLICABLE TO THE SALE OF THE HP PRODUCTS TO SUCH CUSTOMERS.
Dear Customer,
You will find below the name and address of the HP entity responsible for the performance of the HP Limited Warranty in your
country.
You may have additional statutory rights against the seller based on your purchase agreement. Those rights are not
in any way affected by this HP Limited Warranty.
Ireland: Hewlett-Packard Ireland Ltd. 30 Herbert Street IRL-Dublin 2
United Kingdom: Hewlett-Packard Ltd, Cain Road, Bracknell, GB-Berks RG12 1HN
warranty does not cover HP ink products that have been refilled,
remanufactured, refurbished, misused, or tampered with.
HP Limited Warranty
14 HP Deskjet F4200 All-in-One Series
Page 18

Tout-en-un HP Deskjet série F4200
Guide d'utilisation
Français
Page 19

Sommaire
1 Présentation de l'appareil HP Tout-en-un
L'appareil HP Tout-en-un en un coup d'œil..............................................................................17
Boutons du panneau de commande.........................................................................................18
Présentation des voyants d'état................................................................................................19
Chargement d'originaux pour la numérisation et la copie.........................................................20
Création d'une copie.................................................................................................................20
Numérisation d'un original........................................................................................................21
2 Dépannage et assistance
Désinstallation et réinstallation du logiciel................................................................................22
Dépannage de la configuration du matériel..............................................................................23
Élimination de bourrages papier...............................................................................................25
Résolution des problèmes concernant les cartouches d'impression........................................25
Recherche d'informations supplémentaires..............................................................................25
Guide de configuration.......................................................................................................25
Aide en ligne.......................................................................................................................26
Français
Site Web HP.......................................................................................................................26
Assistance HP..........................................................................................................................26
Assistance téléphonique HP...............................................................................................26
Période d'assistance téléphonique...............................................................................26
Après la période d'assistance téléphonique.................................................................26
Avant de contacter le service d'assistance HP...................................................................26
Renseignements techniques....................................................................................................27
Configurations système minimales.....................................................................................27
Spécifications relatives au papier.......................................................................................27
Spécifications physiques....................................................................................................27
Spécifications électriques...................................................................................................27
Conditions d'exploitation.....................................................................................................28
Remarque à l'attention des utilisateurs de Windows 2000, Windows XP Édition x64 et
Windows XP Starter Edition...............................................................................................28
Déclarations de conformité.................................................................................................28
Numéro d'identification réglementaire de modèle........................................................28
Garantie..............................................................................................................................29
16 Tout-en-un HP Deskjet série F4200
Page 20

1 Présentation de
l'appareil HP Tout-en-un
L'appareil Tout-en-un HP Deskjet série F4200 est un périphérique polyvalent qui vous
offre des fonctions de copie, de numérisation et d'impression faciles à utiliser. Pour plus
d'informations sur l'ensemble des fonctionnalités disponibles, reportez-vous à l'aide en
ligne.
L'appareil HP Tout-en-un en un coup d'œil
Français
Numéro Description
1 Panneau de commande
2 Trappe d'accès avant
3 Guide de largeur
4 Bac d'alimentation
5 Rallonge du bac
6 Trappe d'accès aux cartouches d'impression
7 Vitre
8 Intérieur du capot
9 Trappe d'accès arrière
10 Port USB arrière
11 Connexion de l'alimentation
* Utilisez exclusivement l'adaptateur secteur fourni par HP.
*
L'appareil HP Tout-en-un en un coup d'œil 17
Page 21

Chapitre 1
Boutons du panneau de commande
Intitulé Icône Nom et description
Français
1 Voyant Vérifier cartouche d'impression : indique que vous devez réinsérer la
cartouche d'impression spécifiée, la remplacer ou fermer la porte d'accès
aux cartouches d'impression. Le voyant Noir indique que l'incident concerne
la cartouche d'impression noir et blanc ou photo, tandis que le voyant
Couleur indique que l'incident affecte la cartouche trichromique.
2 Lancer la copie PC, Noir : permet de lancer une copie en noir et blanc.
Remarque Pour permettre la réalisation de copies, l'appareil
HP Tout-en-un et l'ordinateur doivent être connectés et sous tension. Le
logiciel HP Photosmart doit également être installé et en cours d’exécution
sur l’ordinateur avant la copie.
3 Lancer la copie PC, Couleur : permet de lancer une copie en couleur.
Remarque Pour permettre la réalisation de copies, l'appareil
HP Tout-en-un et l'ordinateur doivent être connectés et sous tension. Le
logiciel HP Photosmart doit également être installé et en cours d’exécution
sur l’ordinateur avant la copie.
4 Poursuivre : ordonne à l'appareil HP Tout-en-un de poursuivre l'opération
5 Effacer : annule une impression, une copie ou une numérisation.
6 Marche/arrêt : allume ou éteint l'appareil HP Tout-en-un. Le bouton Marche/
18 Tout-en-un HP Deskjet série F4200
lorsqu'un incident a été résolu ou qu'un alignement des cartouches
d'impression a été lancé.
Un voyant clignotant Poursuivre à côté du bouton Poursuivre indique la
nécessité de charger du papier ou de résoudre un problème de bourrage
papier.
arrêt est allumé lorsque l'appareil HP Tout-en-un est sous tension.
Page 22

Présentation des voyants d'état
Plusieurs voyants vous informent de l'état de l'appareil HP Tout-en-un.
Libellé Description
1 Voyant Vérifier cartouche d'impression
2 voyant Poursuivre
3 Voyant Marche/arrêt :
Le tableau suivant décrit les situations les plus fréquentes et donne la signification de
ces voyants.
État des voyants Signification
Tous les voyants sont éteints. L'appareil HP Tout-en-un est hors tension. Appuyez sur le bouton
Le voyant Marche/arrêt clignote. L'appareil HP Tout-en-un est en train d'imprimer, de numériser, de copier
Le voyant Marche/arrêt clignote
rapidement pendant 3 secondes et
reste ensuite allumé.
Le voyant Poursuivre clignote.
Le voyant de vérification des
cartouches clignote.
Marche/arrêt pour mettre le produit sous tension.
ou d'aligner les cartouches d'impression.
Vous avez appuyé sur un bouton pendant que l'appareil HP Tout-en-un
était en train d'imprimer, de numériser, de copier ou d'aligner les
cartouches d'impression.
L'appareil HP Tout-en-un manque de papier.
•
Un bourrage papier est survenu dans l'appareil HP Tout-en-un.
•
La porte d'accès aux cartouches d'impression est ouverte.
•
Les cartouches d'impression sont manquantes ou ne sont pas
•
correctement installées.
L'adhésif protecteur n'a pas été retiré de la cartouche d'impression.
•
Français
Présentation des voyants d'état 19
Page 23

Chapitre 1
(suite)
État des voyants Signification
La cartouche d'impression n'est pas conçue pour cet appareil
•
HP Tout-en-un.
La cartouche d'impression est peut-être défectueuse.
•
Les voyants Marche/arrêt,
Poursuivre et Vérifier cartouches
d'impression clignotent.
Les voyants Poursuivre et Vérifier
cartouches d'impression
clignotent.
Tous les voyants clignotent. L'appareil HP Tout-en-un a subi une erreur fatale.
Défaillance du scanner.
Mettez l'appareil HP Tout-en-un hors tension, puis à nouveau sous
tension. Si le problème persiste, contactez le centre d'assistance HP.
Le chariot des cartouches d'impression est bloqué.
1. Mettez le produit hors tension.
2. Débranchez le cordon d'alimentation.
3. Patientez environ une minute, puis rebranchez le cordon
d'alimentation.
4. Mettez le produit sous tension.
Si le problème persiste, contactez le centre d'assistance HP.
Chargement d'originaux pour la numérisation et la copie
Français
Vous pouvez charger de nombreux types et formats de papier différents dans l'appareil
HP Tout-en-un, y compris du papier au format A4 ou Lettre, du papier photo, des
transparents et des enveloppes. Pour plus d'informations, reportez-vous à l'aide en ligne.
Pour positionner un original sur la vitre
1. Mettez le capot en position ouverte.
2. Chargez l'original, face à imprimer vers le bas, dans l'angle avant droit de la vitre.
Conseil Pour obtenir la taille de copie appropriée, assurez-vous que la vitre est
exemple de bande adhésive ou d'autre corps étranger.
3. Fermez le capot.
Création d'une copie
Pour permettre la réalisation de copies, l’appareil HP Tout-en-un et l’ordinateur doivent
être connectés et sous tension. Le logiciel HP Photosmart doit également être installé et
en cours d’exécution sur l’ordinateur avant la copie.
20 Tout-en-un HP Deskjet série F4200
Page 24

Remarque Si vous utilisez le périphérique avec un ordinateur exécutant Windows
2000, Windows XP Starter Edition ou Windows XP x64, il se peut que certaines
fonctionnalités soient indisponibles. Pour plus d'informations, voir «
l'attention des utilisateurs de Windows 2000, Windows XP Édition x64 et Windows
XP Starter Edition, » page 28.
Pour réaliser une copie, numérisez d'abord le document ou l'image, puis effectuezen l'impression.
Piur réaliser une copie
1. Assurez-vous que le bac d'alimentation contient du papier.
2. Chargez l'original, face à imprimer vers le bas, dans l'angle avant droit de la vitre.
3. Appuyez sur Lancer la copie PC, Noir ou Lancer la copie PC, Couleur.
Remarque Si vous utilisez Windows, le produit réalise une copie et lance le
logiciel Copie HP pour vous permettre d'effectuer des copies supplémentaires.
Si vous utilisez un Mac, reportez-vous aux indications données par l'ordinateur
pour prévisualiser votre copie. Si nécessaire, éditez l'aperçu de l'image, puis
cliquez sur Accepter et imprimez vos copies.
Numérisation d'un original
Dans le cas de documents ou d'images originaux placés sur la vitre, vous pouvez lancer
la numérisation à partir de votre ordinateur, via le logiciel Centre de solutions HP. Pour
permettre l'utilisation des fonctions de numérisation, l’appareil HP Tout-en-un et
l’ordinateur doivent être connectés et sous tension. Le logiciel HP Photosmart doit
également être installé et en cours d’exécution sur l’ordinateur avant la numérisation.
Remarque à
Français
Remarque Si vous utilisez le périphérique avec un ordinateur exécutant Windows
2000, Windows XP Starter Edition ou Windows XP x64, utilisez l'assistant scanner
de Windows au lieu du Centre de solutions HP.
Pour numériser vers un ordinateur
1. Chargez l'original, face à imprimer vers le bas, dans l'angle avant droit de la vitre.
Conseil Pour obtenir des copies de qualité, assurez-vous que la vitre du scanner
est propre et qu'aucun corps étranger n'y adhère.
2. Cliquez sur l'icône HP Digital Imaging Monitor (PC) ou Gestionnaire de
périphériques HP (Mac).
3. Pour numériser l'image, utilisez le logiciel Centre de solutions HP (PC) ou HP Scan
Pro (Mac) installé sur votre ordinateur.
4. Modifiez l'aperçu, puis cliquez sur Accepter lorsque vous avez terminé.
Numérisation d'un original 21
Page 25

2 Dépannage et assistance
Le présent chapitre contient des informations sur les problèmes liés à l'installation, à la configuration
et à certains aspects de l'utilisation. Pour plus d'informations sur le dépannage, reportez-vous à
l'aide en ligne.
Plusieurs problèmes peuvent se produire si l'appareil est connecté à l'ordinateur via un câble USB
avant l'installation du logiciel HP Photosmart. Si vous avez connecté l'appareil à l'ordinateur avant
d'avoir été invité à le faire par le biais de l'écran d'installation du logiciel, procédez comme suit :
Pour dépanner l'installation du logiciel
1. Débranchez le câble USB de l'ordinateur.
2. Désinstallez le logiciel (si vous l'avez déjà installé). Pour de plus amples renseignements, voir
«
Désinstallation et réinstallation du logiciel, » page 22.
3. Redémarrez l'ordinateur.
4. Mettez le produit hors tension, attendez une minute, puis redémarrez-le.
5. Réinstallez le logiciel de l'appareil HP Photosmart.
Attention Ne branchez pas le câble USB avant d'y avoir été invité par le biais de l'écran
d'installation du logiciel.
Pour plus d'informations sur le service d'assistance, reportez-vous à la quatrième de couverture de
ce guide.
Français
Désinstallation et réinstallation du logiciel
Si l'installation est incomplète ou que vous avez connecté le câble USB à l'ordinateur avant d'y être
invité par l'écran d'installation du logiciel, il peut être nécessaire de désinstaller, puis de réinstaller
le logiciel. Ne supprimez pas simplement les fichiers de l'application de l'appareil HP Tout-en-un de
votre ordinateur. Assurez-vous de les désinstaller à l'aide de l'utilitaire prévu à cet effet, lequel est
fourni lors de l'installation du logiciel fourni avec l'appareil HP Tout-en-un.
Désinstallation sur un ordinateur Windows, puis réinstallation
1. Ouvrez le Panneau de configuration de Windows et double-cliquez sur Ajout/Suppression de
programmes.
2. Sélectionnez Logiciel de pilote HP Deskjet Tout-en-un et cliquez sur Modifier/Supprimer.
Suivez les instructions qui s'affichent à l'écran.
3. Déconnectez le produit de l'ordinateur.
4. Redémarrez l'ordinateur.
Remarque Il est important de déconnecter le produit avant de redémarrer l'ordinateur. Ne
connectez pas le produit à l'ordinateur avant d'avoir réinstallé le logiciel.
5. Pour réinstaller le logiciel, insérez le CD-ROM dans le lecteur de CD-ROM de l'ordinateur et
suivez les instructions d'installation du logiciel indiquées sur l'écran de démarrage.
Si l'écran de démarrage n'apparaît pas, cliquez deux fois sur Poste de travail, puis sur l'icône
CD-ROM portant le logo HP, et enfin sur setup.exe.
6. Suivez les instructions à l'écran et celles fournies dans le Guide de configuration livré avec le
produit.
Une fois l'installation du logiciel terminée, l'icône HP Digital Imaging Monitor apparaît dans la barre
d'état système de Windows.
Afin de vérifier que le logiciel a été correctement installé, imprimez une page de test. Pour imprimer
une page de test, consultez l'aide à l'écran.
Utilisateurs Macintosh : Les instructions de désinstallation et de réinstallation figurent dans le fichier
Lisezmoi, ainsi que dans l'aide du logiciel.
22 Tout-en-un HP Deskjet série F4200
Page 26

Dépannage de la configuration du matériel
Cette section contient des informations sur la résolution des problèmes de matériel liés à l'appareil
HP Tout-en-un.
L'appareil ne s'allume pas.
Solution
• Assurez-vous que le cordon d'alimentation est correctement branché au produit et à
l'adaptateur secteur. Branchez le cordon d'alimentation à une prise de courant, un
parasurtenseur ou une prise multiple.
1 Branchement de l'alimentation
2 Cordon d'alimentation et adaptateur secteur
3 Prise de courant
• Si vous utilisez une prise multiple, assurez-vous que l'interrupteur dont elle est équipée est
en position de marche. Vous pouvez aussi brancher le produit directement à une prise
secteur.
• Testez la prise d'alimentation pour vérifier qu'elle est en bon état. Branchez un appareil dont
vous être sûr du bon fonctionnement et vérifiez s'il est alimenté. Si ce n'est pas le cas, la
prise d'alimentation est très certainement défectueuse.
• Si vous avez branché le produit sur une prise à interrupteur, assurez-vous que l'interrupteur
est en position de marche. S'il est sous tension mais ne fonctionne toujours pas, il se peut
que la prise de courant ait un problème.
Cause: Le produit n'était pas utilisé avec le cordon d'alimentation fourni.
Solution: Il se peut que le produit ne réponde pas si vous appuyez trop rapidement sur le
bouton Marche/arrêt. Appuyez une fois sur le bouton Marche/arrêt. Il faut parfois quelques
minutes pour mettre le produit sous tension. Si vous appuyez à nouveau sur le bouton Marche/
arrêt pendant cette période, vous risquez de mettre le produit hors tension.
Attention Si l'appareil ne parvient toujours pas à se mettre sous tension, il est peut-être
en panne. Débranchez l'appareil de la prise de courant.
Contactez l'assistance HP pour la maintenance.
Consultez le site : www.hp.com/support. Si le système vous y invite, choisissez votre pays/
région, puis cliquez sur Contacter HP pour obtenir des informations sur les appels à
l'assistance technique.
Cause: Vous avez appuyé sur le bouton Marche/arrêt trop vite.
Français
Dépannage de la configuration du matériel 23
Page 27

Français
Chapitre 2
J'ai branché le câble USB mais je rencontre des problèmes d'utilisation de
l'appareil HP Tout-en-un avec mon ordinateur
Solution: Vous devez installer le logiciel fourni avec le produit avant de brancher le câble USB.
Durant l'installation, ne branchez pas le câble USB avant d'y être invité par les instructions
affichées à l'écran. La connexion du câble USB avant l'invite peut engendrer des erreurs.
Une fois le logiciel installé, il est très simple de connecter votre ordinateur au produit via un câble
USB. Branchez simplement une extrémité du câble USB à l'arrière de l'ordinateur et l'autre à
l'arrière du produit. Vous pouvez effectuer la connexion sur n'importe quel port USB à l'arrière
de votre ordinateur.
Pour plus d'informations sur l'installation du logiciel et la connexion du câble USB, reportez-vous
au Guide de configuration fourni avec l'appareil HP Tout-en-un.
L'appareil HP Tout-en-un n'imprime pas
Solution: Si le produit et votre ordinateur ne communiquent pas l'un avec l'autre, procédez
comme suit :
• Observez le bouton Marche/arrêt situé sur le produit. S'il n'est pas allumé, le produit est
hors tension. Assurez-vous que le cordon d'alimentation est correctement branché au
produit et à l'adaptateur secteur, ainsi qu'à une prise d'alimentation électrique. Appuyez sur
le bouton Marche/arrêt pour mettre le produit sous tension.
• Assurez-vous que les cartouches d’impression sont installées.
• Assurez-vous que le bac d'alimentation contient du papier.
• Assurez-vous qu'il n'y a aucun bourrage papier dans le produit.
• Vérifiez que le chariot d'impression n'est pas bloqué.
Ouvrez la porte d'accès frontale pour accéder à la zone du chariot d'impression. Retirez les
objets qui bloquent le chariot d'impression, y compris les éventuels matériaux d'emballage.
Mettez le produit hors tension, puis de nouveau sous tension.
• Imprimez une page de test afin de déterminer si le produit peut imprimer et communiquer
avec l'ordinateur. Pour plus d'informations, reportez-vous à l'aide en ligne.
• Assurez-vous que la file d'attente d'impression n'est pas en mode pause. Si c'est le cas,
choisissez le paramètre approprié pour relancer l'impression. Pour plus d'informations sur
l'accès à la file d'attente d'impression, consultez la documentation fournie avec le système
d'exploitation installé sur votre ordinateur.
• Vérifiez le câble USB. Si vous utilisez un vieux câble, il se peut qu'il ne fonctionne pas
correctement. Connectez-le à un autre appareil pour vérifier son bon fonctionnement. En
cas de problème, vous devez remplacer le câble USB. Vérifiez que la longueur du câble ne
dépasse pas 3 mètres.
• Assurez-vous que votre ordinateur est compatible avec la norme USB et que votre système
d'exploitation est pris en charge. Pour plus de détails, reportez-vous au fichier Lisezmoi.
• Vérifiez la connexion du produit à l'ordinateur. Vérifiez que le câble USB est correctement
branché au port USB à l'arrière du produit. Assurez-vous que l'autre extrémité du câble USB
24 Tout-en-un HP Deskjet série F4200
Page 28

est branchée à un port USB de votre ordinateur. Une fois le câble correctement branché,
mettez le produit hors tension, puis à nouveau sous tension.
• Si le produit est connecté via un concentrateur USB, assurez-vous que ce dernier est sous
tension. Si tel est le cas, essayez de vous connecter directement à votre ordinateur.
• Vérifiez les autres imprimantes ou numériseurs. Il se peut que vous deviez déconnecter les
produits plus anciens de votre ordinateur.
• Essayez de brancher le câble USB à un autre port USB de votre ordinateur. Une fois les
connexions vérifiées, redémarrez l'ordinateur. Éteignez, puis rallumez le produit.
• Une fois les connexions vérifiées, redémarrez l'ordinateur. Éteignez, puis rallumez le
produit.
• Si nécessaire, désinstallez et réinstallez le logiciel installé avec le produit.
Pour plus d'informations sur la configuration de l'appareil HP Tout-en-un et sa connexion à votre
ordinateur, reportez-vous au Guide de configuration fourni avec l'appareil HP Tout-en-un.
Français
Élimination de bourrages papier
Pour plus d'informations sur l'élimination des bourrages papier, reportez-vous à l'aide en ligne. Pour
obtenir des instructions sur l'accès à l'aide en ligne, reportez-vous à la section «
page 26.
Aide en ligne, »
Résolution des problèmes concernant les cartouches d'impression
Pour plus d'informations sur le dépannage des cartouches d'impression, reportez-vous à l'aide en
ligne. Pour obtenir des instructions sur l'accès à l'aide en ligne, reportez-vous à la section «
ligne, » page 26.
Aide en
Recherche d'informations supplémentaires
Diverses ressources, imprimées et en ligne, fournissent des informations sur la configuration et
l'utilisation de votre appareil HP Tout-en-un.
Guide de configuration
Le Guide de configuration fournit des instructions sur la configuration de votre
appareil HP Tout-en-un et l'installation du logiciel. Assurez-vous de suivre les instructions du Guide
de configuration dans l'ordre indiqué.
Si vous rencontrez des problèmes lors de la configuration, consultez les conseils de dépannage
dans la dernière section du Guide de configuration ou reportez-vous au chapitre «
assistance, » page 22 du présent guide.
Recherche d'informations supplémentaires 25
Dépannage et
Page 29

Chapitre 2
Aide en ligne
L'aide en ligne fournit des instructions détaillées relatives aux fonctionnalités de votre appareil
HP Tout-en-un qui ne sont pas décrites dans ce guide, notamment les fonctionnalités uniquement
disponibles via le logiciel que vous avez installé avec l'appareil HP Tout-en-un. L'aide en ligne fournit
également des informations sur les aspects réglementaires et environnementaux.
Pour accéder à l'aide en ligne
• Windows : Cliquez sur Démarrer > Tous les programmes > HP > Deskjet série F4200 >
Aide.
Pour installer l'aide en ligne, insérez le CD du logiciel dans votre ordinateur et suivez les
instructions à l'écran.
• Macintosh : Cliquez sur Aide > Aide sur le Mac, puis sur Bibliothèque > Aide sur le produit
HP.
Site Web HP
Si vous disposez d'un accès à Internet, vous pouvez obtenir de l'aide sur le site Web HP à l'adresse
www.hp.com/support. Vous y trouverez une assistance technique, des pilotes, des fournitures et
des informations pour passer des commandes.
Assistance HP
Vous pouvez contacter le service d'assistance HP par téléphone ou en ligne. Les options
d'assistance et leur disponibilité varient selon le produit, le pays/la région et la langue.
Français
Pour obtenir la liste des numéros de téléphone d’assistance, reportez-vous à la troisième de
couverture de ce guide.
Les options d'assistance et leur disponibilité varient selon le produit, le pays/la région et la langue.
Période d'assistance téléphonique
Assistance téléphonique HP
Les pays/régions d'Amérique latine (y compris le Mexique) bénéficient d'un an d'assistance
téléphonique. Pour déterminer la durée de l’assistance téléphonique en Amérique du Nord, en
Europe, au Moyen-Orient, dans la région Asie/Pacifique et en Afrique, visitez le site www.hp.com/
support.
Les tarifs standard de l'opérateur sont applicables.
Après la période d'assistance téléphonique
Une fois la période d'assistance téléphonique expirée, toute aide apportée par HP vous sera
facturée.
Contactez votre revendeur HP ou appelez l'assistance téléphonique de votre pays/région pour plus
d'informations sur les options d'assistance disponibles.
Avant de contacter le service d'assistance HP
1. Assurez-vous que :
a. L'appareil HP Tout-en-un est branché et sous tension.
b. Les cartouches d’impression spécifiées sont correctement installées.
c. Le type de papier recommandé est correctement chargé dans le bac d'entrée.
2. Reconfigurez l'appareil HP Tout-en-un :
a. Mettez l'appareil HP Tout-en-un hors tension à l'aide du bouton Marche/arrêt.
b. Débranchez le cordon d'alimentation situé à l'arrière de l'appareil HP Tout-en-un.
26 Tout-en-un HP Deskjet série F4200
Page 30

c. Rebranchez-le sur l'appareil HP Tout-en-un.
d. Allumez l'appareil HP Tout-en-un à l'aide du bouton Marche/arrêt.
3. Assurez-vous d'avoir les informations suivantes à portée de main :
a. Le nom spécifique de l'appareil HP Tout-en-un tel qu'il apparaît sur le panneau de
commande.
b. Imprimez un rapport d'auto-test. Pour plus d'informations, reportez-vous à l'aide en ligne.
c. Soyez prêt à décrire votre problème en détails.
d. Relevez le numéro de série et l'identificateur de service de l'appareil en imprimant un rapport
d'auto-test.
e. Tenez-vous à proximité de l'appareil HP Tout-en-un au moment de l'appel du service
d'assistance HP.
Renseignements techniques
Cette section contient les spécifications techniques et les informations légales internationales de
l'appareil HP Tout-en-un. Pour connaître les caractéristiques réglementaires et environnementales,
reportez-vous à l'aide en ligne.
Pour plus d'informations d'ordre réglementaire ou environnemental, y compris la déclaration de
conformité, reportez-vous à l'aide en ligne.
Configurations système minimales
La configuration requise concernant le logiciel est incluse dans le fichier LisezMoi.
Spécifications relatives au papier
• Capacité du bac d'alimentation : Feuilles de papier ordinaire : Jusqu'à 80 (papier de 65 à 90 g/
m²)
• Capacité du bac de sortie : Feuilles de papier ordinaire : Jusqu'à 20 (papier de 65 à 90 g/m²)
Remarque Pour obtenir la liste complète des formats de support pris en charge, reportez-vous
au logiciel d'impression.
Français
Spécifications physiques
• Hauteur : 161,5 mm
• Largeur : 437,5 mm
• Profondeur (bac d'alimentation en position relevée) : 290,4 mm
• Poids : 4,9 kg
Spécifications électriques
• Consommation électrique
◦ Moyenne à l'état prêt : Inférieure à 4 watts
◦ Moyenne en cours d'impression : 17 watts
◦ Moyenne en mode veille : Inférieure à 3 watts
◦ Délai d'activation du mode veille : 10 minutes
◦ Désactivé : Inférieure à 1 watt
• Tension d'entrée : 100 à 240 V CA ~ 1 A 50 à 60 Hz
• Tension de sortie : 32 V CC===375 mA, 16 V===500mA
• Alimentation : 0957-2242, 100-240 V c.a. (±10 %), 50-60 Hz (±3 Hz)
• Alimentation : 0957-2250, 200-240 V c.a. (±10 %), 50-60 Hz (±3 Hz)
Remarque Utilisez uniquement l'adaptateur secteur fourni par HP.
Renseignements techniques 27
Page 31

Français
Chapitre 2
Conditions d'exploitation
• Conditions de fonctionnement maximales
◦ Température : 5 à 40 °C
◦ Humidité : 15 à 80 % d'humidité relative sans condensation
• Conditions de fonctionnement recommandées
◦ Température : 15 à 30 °C
◦ Humidité : De 20 à 80 % d'humidité relative sans condensation
• Conditions d'expédition (entreposage) maximales
◦ Température : -40 à 60 °C
◦ Humidité : De 5 à 90% d'humidité relative sans condensation
• En présence de champs électromagnétiques, la sortie de l'appareil HP Tout-en-un peut être
légèrement déformée.
• HP recommande d'utiliser un câble USB de 3 m au maximum, afin de réduire les interférences
pouvant être produites par les champs électromagnétiques élevés
Remarque à l'attention des utilisateurs de Windows 2000, Windows XP Édition x64 et
Windows XP Starter Edition
Ce produit dispose de fonctionnalités limitées sous Windows 2000, Windows XP Starter Edition et
Windows XP x64. Seuls les pilotes de l'imprimante et du scanner, ainsi que la boîte à outils, sont
disponibles. La section suivante décrit certaines des limitations de fonctionnalités auxquelles les
utilisateurs peuvent être confrontés :
• La copie n'est pas prise en charge.
• Le logiciel HP Photosmart n'est pas disponible.
• L'aide n'est pas installée, mais peut être téléchargée à partir du site
www.hp.com/support.
Déclarations de conformité
L'appareil HP Tout-en-un respecte les exigences définies par les organismes de réglementation de
votre pays/région. Pour obtenir une liste complète des déclarations de conformité aux
réglementations, reportez-vous à l'aide en ligne.
Numéro d'identification réglementaire de modèle
Un numéro de modèle réglementaire a été attribué à votre produit dans un souci d'identification et
de respect de la réglementation. Le numéro de modèle réglementaire de votre produit est le
VCVRA-0811. Vous ne devez pas confondre ce numéro réglementaire avec le nom commercial du
produit (Tout-en-un HP Deskjet série F4200, etc.) ou le numéro du produit (CB656A, etc.).
28 Tout-en-un HP Deskjet série F4200
Page 32

Garantie
Produit HP Durée de la garantie limitée
Supports logiciels 90 jours
Imprimante 1 an
Cartouches d'encre Jusqu'à épuisement de l'encre HP ou jusqu'à expiration de la
Accessoires 1 an, sauf indication contraire
A. Extension de garantie limitée
1. Hewlett-Packard (HP) garantit au client utilisateur final que les produhits HP décrits précédemment sont exempts de défauts de matériaux
et malfaçons pendant la durée indiquée ci-dessus, à compter de la date d'achat par le client.
2. Pour les logiciels, la garantie limitée HP est valable uniquement en cas d'impossibilité d'exécuter les instructions de programmation. HP ne
garantit pas que le fonctionnement du logiciel ne connaîtra pas d'interruptions ni d'erreurs.
3. La garantie limitée HP ne couvre que les défauts qui apparaissent dans le cadre de l'utilisation normale du produit et ne couvre aucun
autre problème, y compris ceux qui surviennent du fait :
a. d'une mauvaise maintenance ou d'une modification ;
b. de logiciels, de supports, de pièces ou de consommables non fournis ou non pris en charge par HP ;
c. du fonctionnement du produit hors de ses caractéristiques ; ou
d. d'une modification non autorisée ou d'une mauvaise utilisation.
4. Pour les imprimantes HP, l'utilisation d'une cartouche d'un autre fournisseur ou d'une cartouche rechargée n'entraîne pas la résiliation de la
garantie ni d'un contrat de support HP. Toutefois, si la panne ou les dégâts peuvent être attribués à l'utilisation d'une cartouche d'un autre
fournisseur, d'une cartouche rechargée ou d'une cartouche périmée, HP facturera les montants correspondant au temps et au matériel
nécessaires à la réparation de l'imprimante.
5. Si, pendant la période de garantie applicable, HP est informé d'une défaillance concernant un produit couvert par la garantie HP, HP
choisira de réparer ou de remplacer le produit défectueux.
6. Si HP est dans l'incapacité de réparer ou de remplacer, selon le cas, un produit défectueux couvert par la garantie HP, HP devra, dans un
délai raisonnable après avoir été informé du défaut, rembourser le prix d'achat du produit.
7. HP ne sera tenu à aucune obligation de réparation, de remplacement ou de remboursement tant que le client n'aura pas retourné le
produit défectueux à HP.
8. Tout produit de remplacement peut être neuf ou comme neuf, pourvu que ses fonctionnalités soient au moins équivalentes à celles du
produit remplacé.
9. Les produits HP peuvent contenir des pièces, des composants ou des matériels reconditionnés équivalents à des neufs en termes de
performances.
10. La garantie limitée HP est valable dans tout pays dans lequel le produit HP couvert est distribué par HP. Des contrats apportant des
services de garantie supplémentaires, tels que la réparation sur site, sont disponibles auprès des services de maintenance agréés par HP
dans les pays dans lequel le produit est distribué par HP ou par un importateur agréé.
B. Restrictions de garantie
DANS LA MESURE OÙ LES LOIS LOCALES L'AUTORISENT, HP OU SES FOURNISSEURS TIERS NE FONT AUCUNE AUTRE
GARANTIE OU CONDITION, EXPRESSE OU IMPLICITE, EN CE QUI CONCERNE LES PRODUITS HP ET NIENT TOUTE GARANTIE
IMPLICITE DE COMMERCIALISATION, DE QUALITÉ SATISFAISANTE OU D'ADAPTATION À UN BUT PARTICULIER.
C. Restrictions de responsabilité
1. Dans la mesure où les lois locales l'autorisent, les recours énoncés dans cette déclaration de garantie constituent les recours exclusifs du
client.
2. DANS LA MESURE OÙ LES LOIS LOCALES L'AUTORISENT, EXCEPTION FAITE DES OBLIGATIONS SPÉCIFIQUEMENT ÉNONCÉES
DANS LA PRÉSENTE DÉCLARATION DE GARANTIE, HP OU SES FOURNISSEURS TIERS NE POURRONT ÊTRE TENUS POUR
RESPONSABLES DE DOMMAGES DIRECTS, INDIRECTS, SPÉCIAUX OU ACCIDENTELS, QU'ILS SOIENT BASÉS SUR UN
CONTRAT, UN PRÉJUDICE OU TOUTE AUTRE THÉORIE LÉGALE, QUE CES DOMMAGES SOIENT RÉPUTÉS POSSIBLES OU
NON.
D. Lois locales
1. Cette déclaration de garantie donne au client des droits juridiques spécifiques. Le client peut également posséder d'autres droits selon les
états des Etats-Unis, les provinces du Canada, et les autres pays ou régions du monde.
2. Si cette déclaration de garantie est incompatible avec les lois locales, elle sera considérée comme étant modifiée pour être conforme à la
loi locale. Selon ces lois locales, certaines renonciations et limitations de cette déclaration de garantie peuvent ne pas s'appliquer au client.
Par exemple, certains états des Etats-Unis, ainsi que certains gouvernements hors des Etats-Unis (y compris certaines provinces du
Canada), peuvent :
a. exclure les renonciations et limitations de cette déclaration de garantie des droits statutaires d'un client
(par exemple au Royaume-Uni);
b. restreindre d'une autre manière la possibilité pour un fabricant d'imposer ces renonciations et limitations ; ou
c. accorder au client des droits de garantie supplémentaires, spécifier la durée des garanties implicites que le fabricant ne peut nier, ou
ne pas autoriser les limitations portant sur la durée des garanties implicites.
3. EXCEPTÉ DANS LA MESURE AUTORISÉE PAR LA LÉGISLATION, LES TERMES DE LA PRÉSENTE DÉCLARATION DE GARANTIE
N'EXCLUENT, NE LIMITENT NI NE MODIFIENT LES DROITS STATUTAIRES OBLIGATOIRES APPLICABLES À LA VENTE DES
PRODUITS HP AUXDITS CLIENTS, MAIS VIENNENT S'Y AJOUTER.
Cher client,
Vous trouverez, ci-après, les coordonnées de l’entité HP responsable de l'exécution de la garantie fabricant relative à votre matériel HP dans votre pays.
En vertu de votre contrat d’achat, il se peut que vous disposiez de droits légaux supplémentaires à l’encontre de votre vendeur. Ceux-ci ne sont aucunement affectés par la présente garantie du
fabricant HP.
En particulier, si vous êtes un consommateur domicilié en France (départements et territoires d’outre-mer (DOM-TOM) inclus dans la limite des textes qui leur sont applicables), le vendeur reste tenu à
votre égard des défauts de conformité du bien au contrat et des vices rédhibitoires hhdans les conditions prévues aux articles 1641 à 1649 du Code civil.
Code de la consommation :
"Art. L. 211-4. - Le vendeur est tenu de livrer un bien conforme au contrat et répond des défauts de conformité existant lors de la délivrance.
Il répond également des défauts de conformité résultant de l'emballage, des instructions de montage ou de l'installation lorsque celle-ci a été mise à sa charge par le contrat ou a été réalisée sous sa responsabilité."
"Art. L. 211-5. - Pour être conforme au contrat, le bien doit :
1° Etre propre à l'usage habituellement attendu d'un bien semblable et, le cas échéant correspondre à la description donnée par le vendeur et posséder les qualités que celui-ci a présentées à l'acheteur sous forme
d'échantillon ou de modèle ;
- présenter les qualités qu'un acheteur peut légitimement attendre eu égard aux déclarations publiques faites par le vendeur, par le producteur ou par son représentant, notamment dans la publicité ou l'étiquetage ;
2° Ou présenter les caractéristiques définies d'un commun accord par les parties ou être propre à tout usage spécial recherché par l'acheteur, porté à la connaissance du vendeur et que ce dernier a accepté."
"Art. L.211-12. – L’action résultant du défaut de conformité se prescrit par deux ans à compter de la délivrance du bien. "
Code civil :
"Code civil Article 1641 : Le vendeur est tenu de la garantie à raison des défauts cachés de la chose vendue qui la rendent impropre à l’usage auquel on la destine, ou qui diminuent tellement cet usage, que
l’acheteur ne l’aurait pas acquise, ou n’en aurait donné qu’un moindre prix, s’il les avait connus.
"Code civil Article 1648 : L’action résultant des vices rédhibitoires doit être intentée par l’acquéreur dans un délai de deux ans à compter de la découverte du vice."
France : Hewlett-Packard France, SAS, 80, rue Camille Desmoulins, 92788 Issy les Moulineaux Cedex 9
Belgique : Hewlett-Packard Belgium BVBA/SPRL, 1, rue de l'Aéronef, B-1140 Brussels
Luxembourg : Hewlett-Packard Luxembourg SCA, 7a, rue Robert Stümper, L-2557 Luxembourg-Gasperich
date de garantie imprimée sur la cartouche (selon le cas qui se
produira en premier). Cette garantie ne couvre pas les produits
utilisant de l'encre HP qui ont été reconditionnés, mal utilisés ou
altérés.
Garantie du fabricant HP
Renseignements techniques 29
Français
Page 33

Chapitre 2
Français
30 Tout-en-un HP Deskjet série F4200
Page 34

 Loading...