

Page 1
HP Deskjet F4100 All-in-One series
⸔ⶹ䆚ݠ
Basics Guide
Page 2
Hewlett-Packard Company notices
The information contained in this document is subject to change without notice.
All rights reserved. Reproduction, adaptation, or translation of this material is prohibited without prior written permission of Hewlett-Packard, except
as allowed under copyright laws. The only warranties for HP products and services are set forth in the express warranty statements accompanying
such products and services. Nothing herein should be construed as constituting an additional warranty. HP shall not be liable for technical or editorial
errors or omissions contained herein.
© 2007 Hewlett-Packard Development Company, L.P.
Windows, Windows 2000, and Windows XP are U.S. registered trademarks of Microsoft Corporation.
Windows Vista is either a registered trademark or trademark of Microsoft Corporation in the United States and/or other countries.
Intel and Pentium are trademarks or registered trademarks of Intel Corporation or its subsidiaries in the United States and other countries.
Page 3

HP Deskjet F4100 All-in-One series
基础知识手册
简体中文
Page 4

目录
1
简体中文
2
HP All-in-One 概述
HP All-in-One 总览......................................................................................................5
控制面板按钮...............................................................................................................6
状态指示灯概述...........................................................................................................7
放入准备扫描和复印的原件.........................................................................................8
复印.............................................................................................................................9
扫描原件......................................................................................................................9
疑难排解和支持
卸载并重新安装软件..................................................................................................10
硬件安装问题疑难排解...............................................................................................11
清除卡纸....................................................................................................................13
墨盒疑难排解.............................................................................................................13
查找更多信息.............................................................................................................13
安装手册...............................................................................................................13
屏幕帮助...............................................................................................................13
HP 网站................................................................................................................14
墨水使用量...........................................................................................................14
HP 支持.....................................................................................................................14
HP 电话支持.........................................................................................................14
电话支持期......................................................................................................14
电话支持期过后...............................................................................................14
致电 HP 之前........................................................................................................14
3
技术信息
系统要求....................................................................................................................15
纸张规格....................................................................................................................15
物理规格....................................................................................................................15
电源规格....................................................................................................................15
环境规格....................................................................................................................15
规范声明....................................................................................................................15
标准型号...............................................................................................................15
保修...........................................................................................................................16
4 HP Deskjet F4100 All-in-One series
Page 5
1
HP All-in-One 概述
HP Deskjet F4100 All-in-One series 是一种通用设备,它可以让您轻松进行复
印、扫描和打印。有关其所有特征和功能的信息,请参见屏幕帮助。
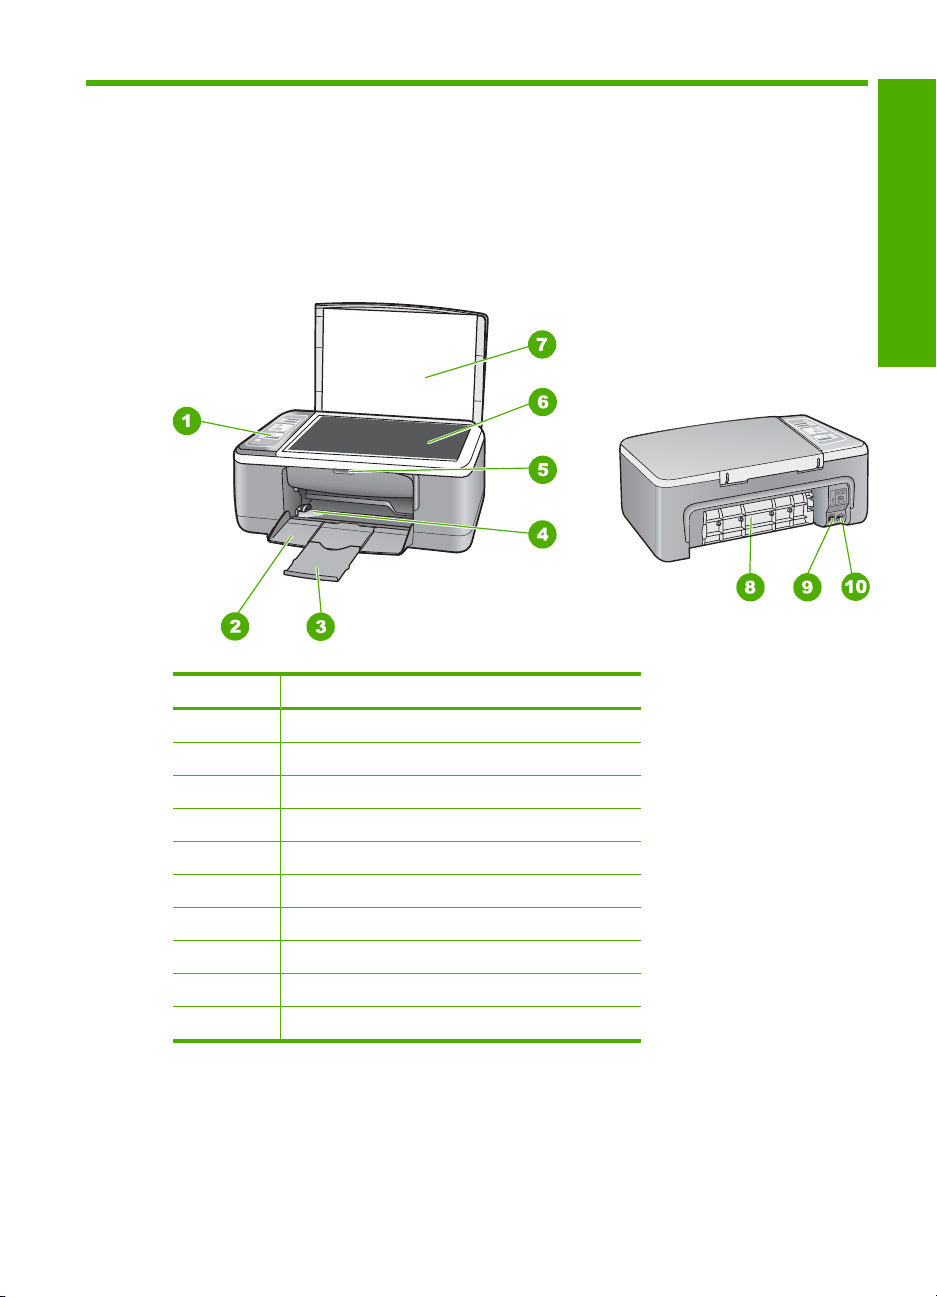
HP All-in-One 总览
标签 说明
简体中文
1
2
3
4
5
6
7
8
9
10
*
只用于 HP 提供的电源适配器
控制面板
进纸盒
纸盒延长板
纸张宽度导轨
墨盒盖
玻璃板
盖子衬板
后门
后置 USB 端口
电源接口
*
HP All-in-One 概述
5
Page 6
第 1 章
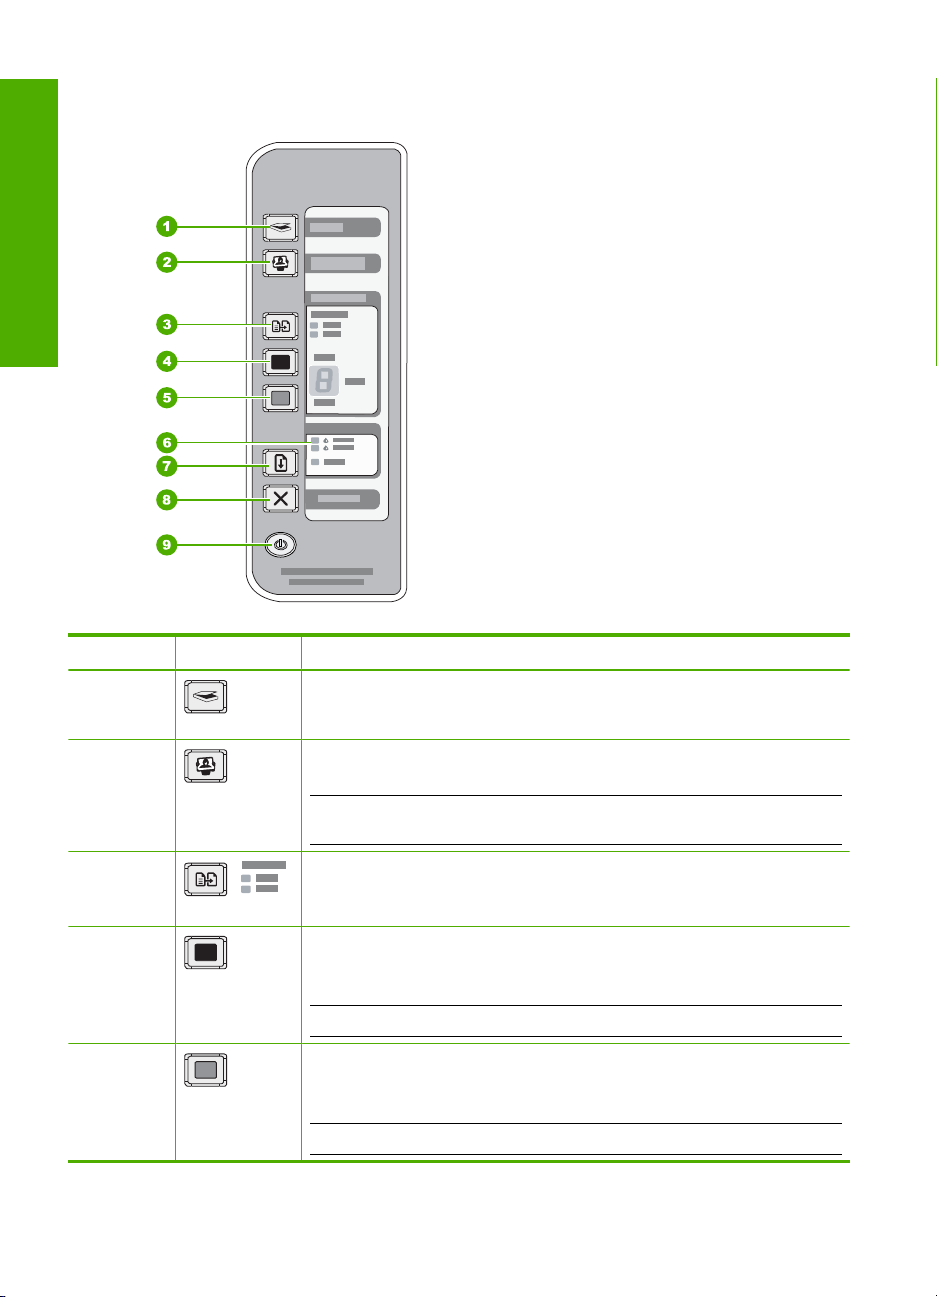
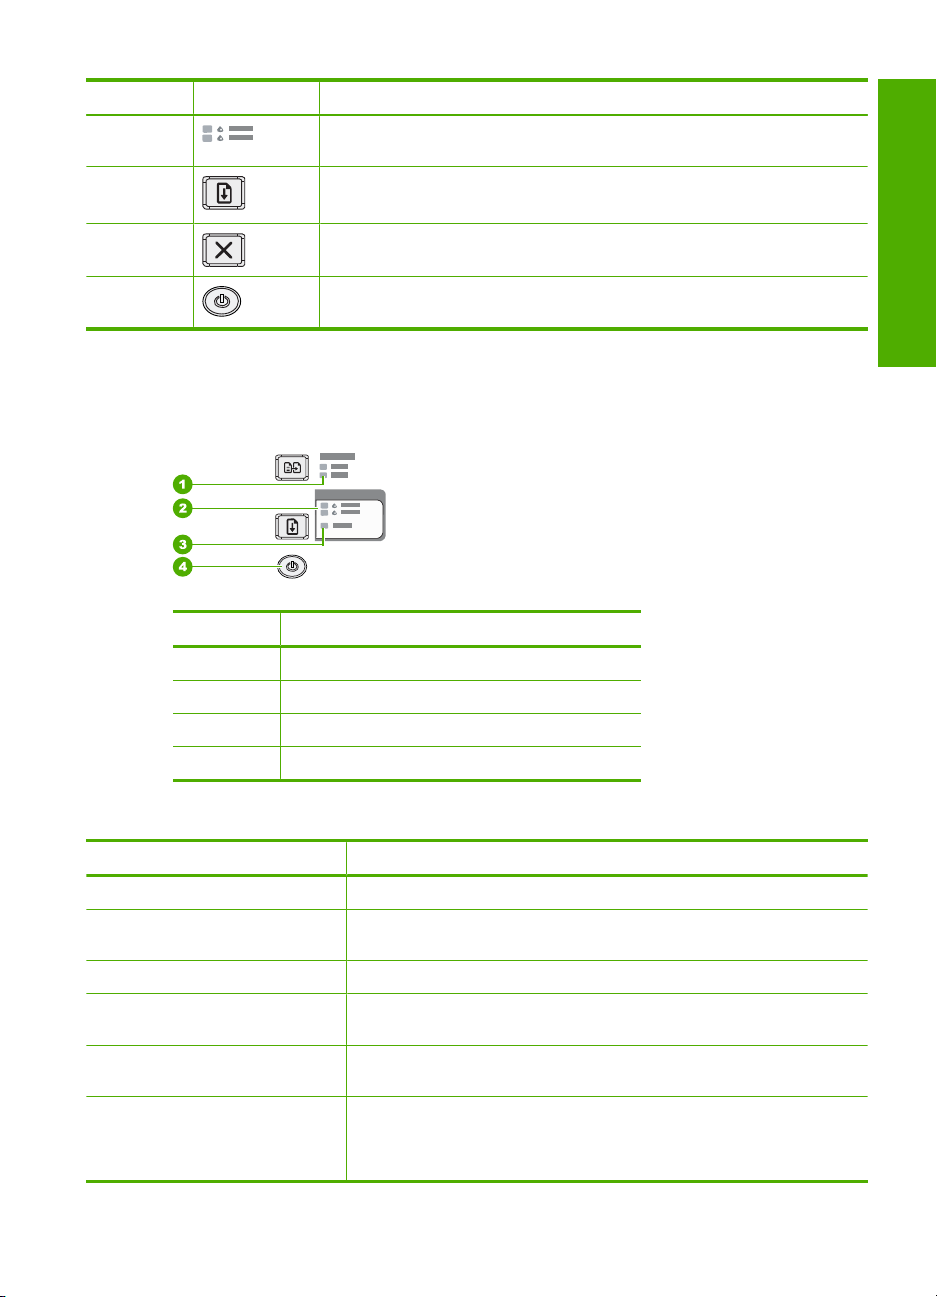
控制面板按钮
简体中文
编号 图标 名称和描述
1
2
3
4
5
扫描:开始扫描当前在玻璃板上的原件。 如果 HP All-in-One 忙于其他作
业,则会忽略“扫描”命令。“扫描”命令仅当计算机处于开启状态时才起
作用。
Photosmart Essential 按钮:启动 HP Photosmart 软件以打印、编辑和共
享照片。
注意 如果计算机上未安装 HP Photosmart 软件,则 Photosmart
Essential 按钮将不起作用。
纸张类型:将纸张类型设置更改为普通纸或照片纸。确保进纸盒中放入了合
适纸张类型的纸张。默认纸张类型设置为“普通纸”。
“纸张类型”指示灯表示当前所选的纸张类型:“普通纸”或“照片纸”。
开始复印/黑白:开始进行黑白复印作业。
重复按此按钮以指定要进行黑白复印的份数。选中份数之后,打印机将很快
开始打印。要打印的份数显示在此按钮的右侧。
提示 使用控制面板最多可以复印 9 份(因机型而异)。
开始复印/彩色:开始进行彩色复印作业。
重复按此按钮以指定要进行彩色复印的份数。选中份数之后,打印机将很快
开始打印。要打印的份数显示在此按钮的右侧。
提示 使用控制面板最多可以复印 9 份(因机型而异)。
6 HP Deskjet F4100 All-in-One series
Page 7
(续)
编号 图标 名称和描述
6
7
8
9
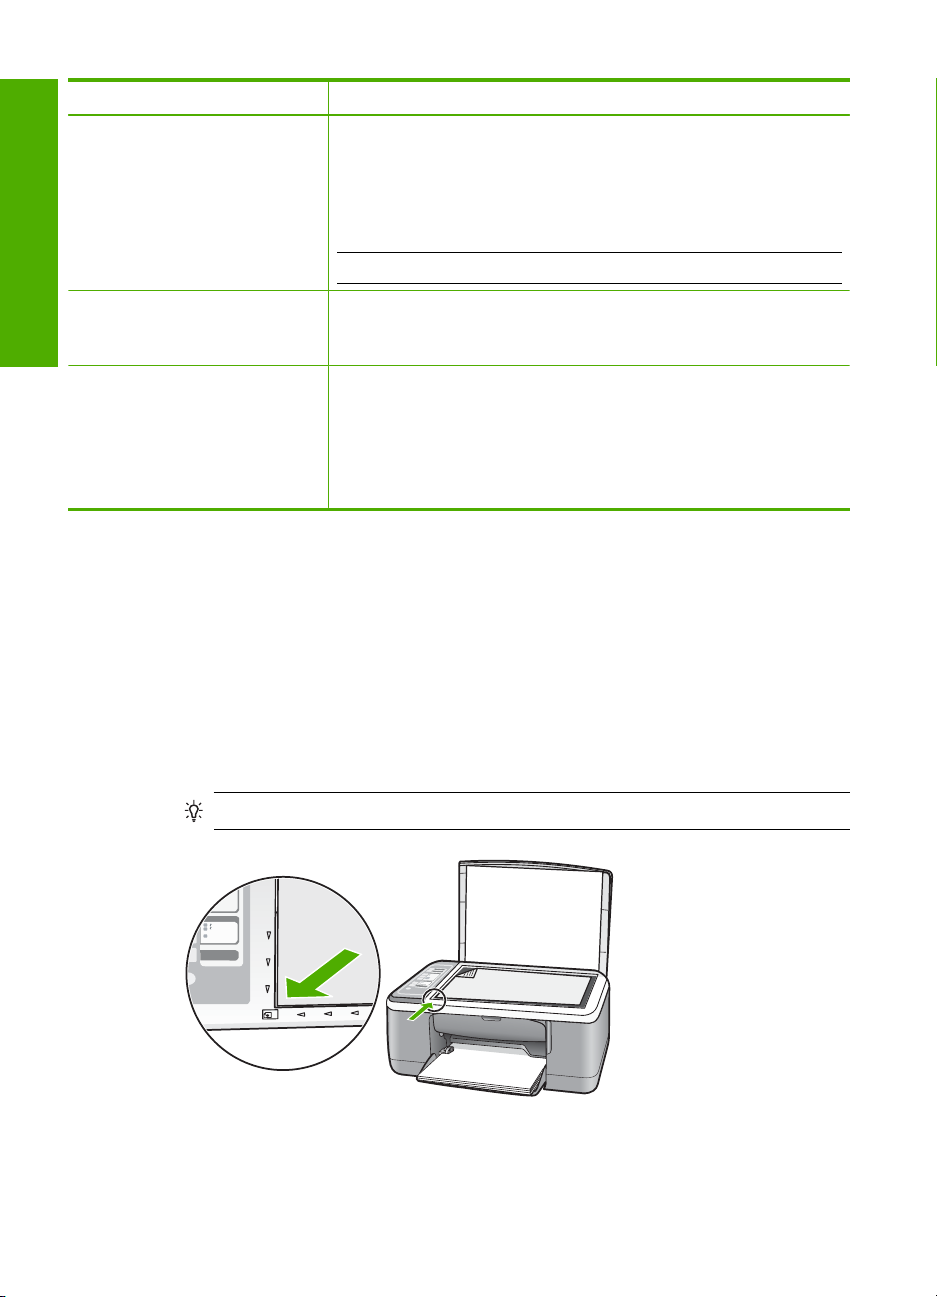
状态指示灯概述
指示灯可以表示 HP All-in-One 的状态。
标签 说明
1
2
3
4
“检查墨盒”指示灯:指示是否需要重新安装指定的墨盒、更换墨盒或合上墨
盒舱盖。
重新开始:在问题解决后指示 HP All-in-One 继续。
重新开始旁边的重新开始指示灯闪烁表示需要放入纸张或清除卡纸。
取消:停止打印、复印或扫描作业。
开/关机:打开或关闭 HP All-in-One。打开 HP All-in-One 时,开/关机按钮点
亮。
简体中文
纸张类型指示灯(用于纸张类型按钮)
“检查墨盒”指示灯
重新开始指示灯
开/关机按钮
下表介绍了一些常见情况并解释了指示灯的含义。
指示灯状态 含义
所有指示灯均不亮。 HP All-in-One 关机。按下开/关机按钮打开设备。
开/关机指示灯以及其中一个“纸张
类型”指示灯打开。
开/关机指示灯闪烁。 HP All-in-One 忙于打印、扫描、复印或校准墨盒。
开/关机指示灯快速闪烁 3 秒钟,然
后趋于稳定。
开/关机指示灯闪烁 20 秒钟,然后
趋于稳定。
重新开始指示灯闪烁。
HP All-in-One 已为执行打印、扫描或复印作业准备就绪。
在 HP All-in-One 忙于打印、扫描、复印或校准墨盒时按下按钮。
按下扫描按钮,计算机没有任何响应。
HP All-in-One 缺纸。
•
HP All-in-One 卡纸。
•
复印软件中的纸张尺寸设置与进纸盒中检测到的纸张尺寸不匹配。
•
状态指示灯概述
7
Page 8
第 1 章
(续)
指示灯状态 含义
“检查墨盒”指示灯闪烁。
简体中文
开/关机、重新开始 和“检查墨
盒”指示灯闪烁。
所有指示灯均闪烁。 HP All-in-One 发生致命错误。
墨盒盖打开。
•
没有墨盒或墨盒放置不正确。
•
没有撕下墨盒上的胶带。
•
墨盒与 HP All-in-One 不兼容。
•
墨盒可能有问题。
•
注意 您的打印机包装中可能只有一个三色墨盒。
扫描仪故障。
关闭 HP All-in-One,然后重新打开。如果问题仍然存在,请与 HP 支持
联系。
1. 关闭 HP All-in-One。
2. 拔掉电源线。
3. 等待一分钟,然后再插上电源线。
4. 重新启动 HP All-in-One。
如果问题仍然存在,请与 HP 支持联系。
放入准备扫描和复印的原件
可以在 HP All-in-One 中放入多种类型和尺寸的纸张,包括 letter 或 A4 纸、照片
纸、投影胶片和信封。
有关放入标准尺寸纸张的信息,请参见《安装手册》。有关放入其他尺寸纸张的
信息,请参见屏幕帮助。
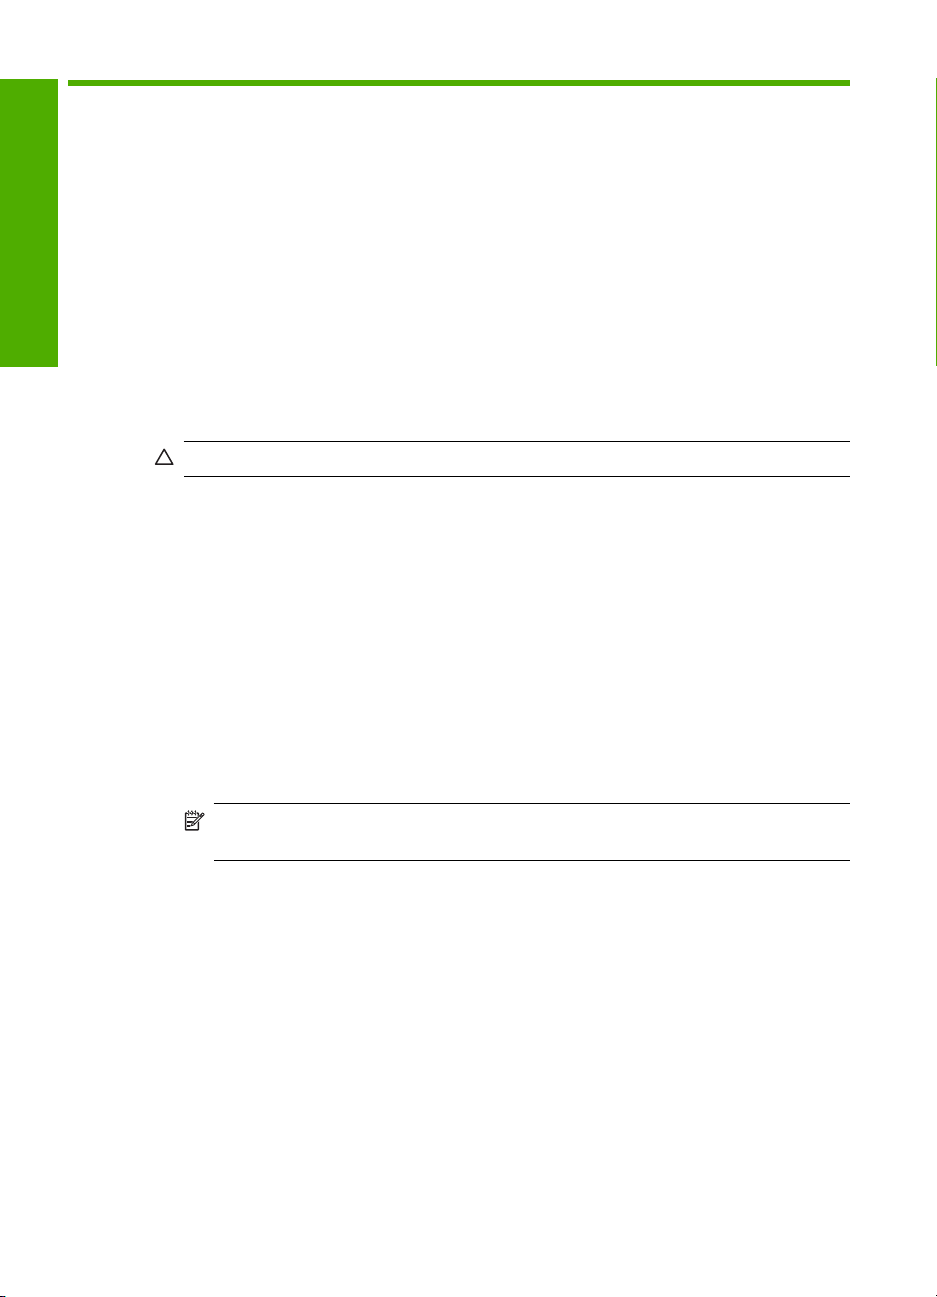
将原件放到玻璃板上
1. 拿起 HP All-in-One 上的盖子。
2. 将原件打印面或扫描面朝下,放在玻璃板的左前角上。
提示 要使复印的大小正确,请确保玻璃板上没有磁带或其他异物。
3. 合上盖子。
8 HP Deskjet F4100 All-in-One series
Page 9

复印
可以从控制面板进行高质量复印。
从控制面板复印
1. 确保进纸盒中有纸。
2. 将原件打印面或扫描面朝下,放在玻璃板的左前角上。
3. 按纸张类型按钮以设置纸张类型。
4. 按开始复印/黑白或开始复印/彩色。
扫描原件
对于玻璃板上的原始文档或图像,可以从您的计算机或 HP All-in-One 开始扫
描。要使用扫描功能,HP All-in-One 必须已经与计算机连接并已打开。同时,
扫描前,HP Photosmart 软件必须已经安装并在计算机上运行。
扫描到计算机
1. 将原件打印面或扫描面朝下,放在玻璃板的左前角上。
2. 按下扫描。
3. 对预览图像进行任何编辑,然后在完成时单击“接受”。
简体中文
提示 为了保证复印质量,请确保扫描仪的玻璃板清洁且没有异物粘在上
面。
如果原件是照片,则扫描结果的预览图像将出现在计算机上,您可以对其进
行编辑。您所作的任何编辑仅应用于当前扫描会话。
复印
9
Page 10
2
简体中文
疑难排解和支持
本章提供了有关安装和配置问题的疑难排解信息,以及一些可操作的主题。有关疑难排解
的更多信息,请参阅屏幕帮助。
如果在计算机上安装 HP All-in-One 软件之前,已经用 USB 电缆将 HP All-in-One 连接到
计算机上,这会引起许多问题。如果在软件安装屏幕提示连接前已经将 HP All-in-One 连
接到计算机上,则必须执行下列操作:
疑难排解常见安装问题
1. 从计算机上拔下 USB 电缆。
2. 卸载软件(如果软件已安装)。
3. 重新启动计算机。
4. 关闭 HP All-in-One,等候一分钟,然后在重新打开设备。
5. 重新安装 HP All-in-One 软件。
小心 在软件安装屏幕提示您连接 USB 电缆之前,不要将电缆连接到计算机上。
有关支持联系信息,请参阅本手册封底内页。
卸载并重新安装软件
如果安装不完全,或者在软件安装屏幕出现提示之前就将 USB 电缆连接到了计算机,则
可能需要卸载然后重新安装软件。不要只是简单地从计算机中删除 HP All-in-One 应用程
序文件。一定要使用安装 HP All-in-One 随附的软件时提供的卸载工具进行正确卸载。
从 Windows 计算机上卸载然后重新安装
1. 在 Windows 任务栏中,单击“开始”,然后单击“控制面板”。
2. 双击“添加/删除程序”。
3. 选择 “HP Deskjet All-in-One 驱动程序软件”,然后单击“更改/删除”。
按照屏幕上的说明执行操作。
4. 断开 HP All-in-One 与计算机的连接。
5. 重新启动计算机。
注意 重新启动计算机前,一定要断开 HP All-in-One 的连接。重新安装完软件
后,才能将 HP All-in-One 连接到计算机上。
6. 将 HP All-in-One 的 CD-ROM 插入计算机的 CD-ROM 驱动器,然后启动“安装”程
序。
7. 遵循屏幕说明和 HP All-in-One 随附的《安装手册》中提供的说明进行操作。
软件安装完成后,“HP 数码成像监视器”图标将出现在 Windows 系统任务栏中。
要确认软件已正确安装,请双击桌面上的 HP 解决方案中心图标。如果 HP 解决方案中心
显示基本图标(“扫描图片”和“扫描文档”),则说明软件已正确安装。
从 Mac 计算机上卸载然后重新安装
1. 断开 HP All-in-One 与 Mac 的连接。
2. 打开“应用程序”:“Hewlett-Packard”文件夹。
3. 连按“HP Uninstaller”。
根据屏幕上的说明执行操作。
10 HP Deskjet F4100 All-in-One series
Page 11

4. 软件卸载后,断开 HP All-in-One 的连接,然后重新启动计算机。
注意 重新启动计算机前,一定要断开 HP All-in-One 的连接。重新安装完软件
后,才能将 HP All-in-One 连接到计算机上。
5. 要重新安装软件,请将 HP All-in-One 的 CD-ROM 放入计算机的 CD-ROM 驱动器
中。
6. 在桌面上打开 CD-ROM,然后双击“HP All-in-One Installer”。
7. 遵循屏幕说明和 HP All-in-One 随附的《安装手册》中提供的说明进行操作。
硬件安装问题疑难排解
本节包含 HP All-in-One 的硬件疑难排解信息。
HP All-in-One 无法启动
原因: HP All-in-One 没有正确连接到电源上。
解决方法
•
确保电源线牢固地连接到 HP All-in-One 和电源适配器上。将电源线插到电源插
座、电涌保护器或电源板上。
简体中文
1
电源接头
2
电源线和适配器
3
电源插座
•
如果使用电源板,则请确保电源板的开关已打开。或者,试着将 HP All-in-One 的
电源线直接插到电源插座上。
•
测试电源插座,确保其工作正常。插上一台可正常工作的设备,看设备是否有
电。如果没电,则电源插座可能有问题。
•
如果将 HP All-in-One 插入到开关插座中,则请确保开关插座的开关已打开。如果
将开关转到打开,仍然未工作,则可能是电源插座出了问题。
原因: 您按开/关机按钮的速度太快了。
解决方法: 如果将开/关机按钮按得太快,HP All-in-One 可能会没有响应。按下开/关
机按钮一次。开启 HP All-in-One 可能需要几秒钟。如果此时再次按开/关机按钮,可
能会将设备关闭。
硬件安装问题疑难排解
11
Page 12

简体中文
第 2 章
小心 如果仍然无法打开 HP All-in-One,可能是因为出现机械故障。请从电源插
座中拔出 HP All-in-One 电源线并联系 HP:
www.hp.com/support。如出现提示,
请选择您所在国家/地区,然后单击“联系 HP”,以了解如何致电技术支持。
连接了 USB 电缆,但是无法从计算机使用 HP All-in-One
解决方法: 连接 USB 电缆之前,必须首先安装 HP All-in-One 随附的软件。在安装
过程中,除非屏幕说明提示您插入 USB 电缆,否则请不要将其插入。在看到提示之
前就插入 USB 电缆会导致错误。
安装完软件之后,即可使用 USB 电缆将计算机连接到 HP All-in-One。只需将 USB
电缆的一端插入到计算机的背面,将另一端插入到 HP All-in-One 的背面。可以连接
到计算机背面的任何一个 USB 端口中。
有关安装软件和连接 USB 电缆的详细信息,请参阅 HP All-in-One 随附的《安装手
册》。
HP All-in-One 不打印
解决方法: 如果 HP All-in-One 和计算机无法进行相互通信,请尝试执行以下操作:
•
查看位于 HP All-in-One 前面的开/关机指示灯。如果该指示灯未点亮,则表示
HP All-in-One 已关机。请确保电源线已牢固地连接到 HP All-in-One 上,并且已
插入电源插座中。按下开/关机按钮打开 HP All-in-One。
•
确保墨盒已安装。
•
确保进纸盒中有纸。
•
检查 HP All-in-One 是否卡纸。
•
检查墨盒托架是否卡纸。打开墨盒盖,以便对墨盒托架区域进行维修。取出卡住
墨盒托架的所有物体,包括包装材料。关闭 HP All-in-One,然后重新打开设备。
•
请检查 HP All-in-One 打印队列没有被暂停或脱机 (Windows) 或停止 (Mac)。如
果被暂停或脱机了,请选择正确的设置来恢复打印。有关访问打印队列的详细信
息,请参阅安装在计算机上的操作系统的附带文档。
•
检查 USB 电缆。如果使用的电缆太旧,该电缆本身可能已经损坏。试着将 USB
电缆连接到其他产品上,看它是否完好。如果有问题,则可能需要更换 USB 电
缆。另外,请确认电缆的长度不超过 3 米 。
•
检查 HP All-in-One 和计算机之间的连接。确认 USB 电缆已牢固地插入到
HP All-in-One 后面的 USB 端口中。确保 USB 电缆的另一端插入到计算机的 USB
端口。正确连接电缆后,请关闭 HP All-in-One,然后重新打开。
12 HP Deskjet F4100 All-in-One series
Page 13

•
如果通过 USB 集线器连接 HP All-in-One,请确保集线器的电源已打开。如果集
线器的电源已打开,请尝试直接连接到计算机。
•
检查其他打印机或扫描仪。可能需要从计算机上拔掉旧产品。
•
试着将 USB 电缆连接到计算机的另一个 USB 端口上。检查完连接之后,请尝试
重新启动计算机。关闭 HP All-in-One,然后重新打开设备。
•
如果 HP All-in-One 脱机,请关闭 HP All-in-One,然后重新打开该设备。开始打
印作业。
•
如有必要,请卸载然后安装与 HP All-in-One 一同安装的软件。
有关安装 HP All-in-One 并将其与计算机相连的详细信息,请参阅 HP All-in-One 随附
的《安装手册》。
清除卡纸
有关清除卡纸的更多信息,请参见屏幕帮助。
墨盒疑难排解
如果出现打印问题,则其中一个墨盒可能有问题。
墨盒问题疑难排解
1. 从右侧的插槽中取下黑色墨盒。请勿触摸墨嘴或铜色触点。检查铜色触点或墨嘴是否
损坏。
确保已经撕下塑料胶带。如果墨嘴处仍有塑料胶带,请捏住粉红标签,轻轻地撕下胶
带。
2. 重新放入墨盒,将墨盒向前滑入槽中。向前推墨盒,直到其卡住。
3. 对于左侧的三色墨盒,重复第 1 步和第 2 步。
4. 如果问题仍然存在,则可能需要打印一份自检报告或清洁墨盒。详细信息,请参阅屏
幕帮助。
简体中文
查找更多信息
在很多印刷和屏幕资源中都提供了 HP All-in-One 的安装和使用信息。
安装手册
《安装手册》提供了 HP All-in-One 和软件的安装说明。请务必依次执行《安装手册》中
的步骤。
如果在安装过程中遇到问题,请参阅《安装手册》最后一节中的“疑难排解”,或者参阅
本手册中的位于第 10 页的“
屏幕帮助
屏幕帮助详细介绍了本手册中没有描述的 HP All-in-One 功能,包括那些只有在使用
HP All-in-One 随附的软件时才可用的功能。
疑难排解和支持”。
清除卡纸
13
Page 14

第 2 章
简体中文
HP 支持
在 Windows 计算机上访问“HP Photosmart 软件帮助”软件
1. 在 HP 解决方案中心中,单击 HP All-in-One 的选项卡。
2. 在“设备支持”区域中,单击“屏幕指南”或“疑难排解”。
HP 网站
如果能访问 Internet,可以从 HP 网站
www.hp.com/support 获得帮助和支持。该网站提
供技术支持、驱动程序、耗材和订购信息。
墨水使用量
在多种情况下,都会在打印过程中使用墨盒中的墨水,这类情况包括准备打印用的设备和
墨盒的初始化过程,以及保持打印喷嘴清洁和出墨顺畅的打印头维护。此外,墨水使用后
会在墨盒中留下余墨。有关详细信息,请参见
www.hp.com/go/inkusage。
可以通过电话或互联网联系 HP 支持。支持的选项和可用性随产品、国家/地区和语言的
不同而不同。
HP 电话支持
有关支持的电话号码列表,请参阅本指南封面内页的内容。
支持的选项和可用性随产品、国家/地区和语言的不同而不同。
电话支持期
亚太地区和拉丁美洲(包括墨西哥)可享有一年电话支持服务。要确定北美、东欧、中东
和非洲的电话支持期,请访问
www.hp.com/support。
您需要支付电话公司的标准电话费。
电话支持期过后
电话支持期过后,仍可获得 HP 的支持,但需要支付一定的费用。
请与 HP 经销商联系或拨打所在国家/地区的支持电话号码,以了解更多支持选项。
致电 HP 之前
1. 确保:
a. HP All-in-One 已插上电源且已打开。
b. 指定的墨盒安装正确。
c. 已经将推荐的纸张正确放入进纸盒中。
2. 重置 HP All-in-One:
a. 按下开/关机按钮关闭 HP All-in-One。
b. 拔掉 HP All-in-One 后面的电源线。
c. 重新插上 HP All-in-One 的电源线。
d. 按下开/关机按钮打开 HP All-in-One。
3. 可获得下列信息:
a. HP All-in-One 的具体名称,即控制面板上显示的名称。
b. 打印自检报告。(有关更多信息,请参见“使用手册”。)
c. 准备详细的问题描述。
d. 准备好您的序列号和服务 ID(这些信息可从自检报告中获得)。
e. 应在 HP All-in-One 打印机旁边给 HP 支持打电话。
14 HP Deskjet F4100 All-in-One series
Page 15

3
系统要求
纸张规格
物理规格
电源规格
技术信息
本节提供了有关 HP All-in-One 的技术规格以及国际规范信息。
可以在自述文件中找到软件的系统要求。
•
进纸盒容量:普通纸最多 100 张(20 磅纸)
•
出纸盘容量:普通纸最多 50 张(20 磅纸)
注意 有关支持的介质尺寸的完整列表,请参阅打印机软件。有关纸张重量的完整列
表,请参阅屏幕帮助。
•
高度:18.05 厘米
•
宽度:42.57 厘米
•
厚度:26.74 厘米
•
重量:4.26 公斤
•
功耗:打印时平均 20 W
•
输入电压:AC 100 至 240 V ~ 1 A 50 - 60 Hz
•
输出电压:DC 32 V===375 mA, 16 V===500mA
•
电源:0957-2231, AC 100 至 240 V ~ 1 A 50–60 Hz
简体中文
环境规格
规范声明
标准型号
注意 只使用 HP 提供的电源适配器。
•
推荐的工作温度范围:15º 至 30º C(59º 至 86º F)
•
允许的工作温度范围:10º 至 35º C(50º 至 95º F)
•
湿度:15% 至 80% RH 无冷凝
•
非工作(存储)温度范围:-20º 至 50º C(-4º 至 122º F)
•
在电磁场强的区域,HP All-in-One 的打印结果可能会稍微变形
•
HP 建议使用长度小于或等于 3 米(10 英尺)的 USB 电缆,以便将电磁场的干扰降
至最低程度
HP All-in-One 符合您所在的国家(地区)的产品规范要求。有关规范声明的完整列表,
请参阅屏幕帮助。
为了便于识别,为产品指定了一个“标准型号”。本产品的标准型号为 VCVRA-0706。
不要将此标准型号与产品的市场名称(如 HP Deskjet F4100 All-in-One series 等)或产
品编号(如 CB580A 等)相混淆。
技术信息
15
Page 16

简体中文
第 3 章
保修
16 HP Deskjet F4100 All-in-One series
Page 17

HP Deskjet F4100 All-in-One series
Basics Guide
English
Page 18

Contents
1 HP All-in-One overview
The HP All-in-One at a glance....................................................................................................3
Control panel buttons.................................................................................................................4
Status light overview...................................................................................................................5
Load originals for scanning and copying....................................................................................6
Make a copy...............................................................................................................................7
Scan an original..........................................................................................................................7
2 Troubleshooting and support
Uninstall and reinstall the software.............................................................................................8
Hardware setup troubleshooting.................................................................................................9
Clear paper jams......................................................................................................................11
Print cartridge troubleshooting..................................................................................................11
Find more information...............................................................................................................11
Setup Guide........................................................................................................................12
Onscreen Help....................................................................................................................12
English
HP Web site........................................................................................................................12
............................................................................................................................................12
HP support................................................................................................................................12
HP support by phone..........................................................................................................12
Phone support period...................................................................................................12
After the phone support period.....................................................................................12
Before calling HP Support..................................................................................................12
3 Technical information
System requirements................................................................................................................14
Paper specifications.................................................................................................................14
Physical specifications..............................................................................................................14
Power specifications.................................................................................................................14
Environmental specifications....................................................................................................14
Regulatory notices....................................................................................................................14
Regulatory model identification number.............................................................................14
Warranty...................................................................................................................................15
2 HP Deskjet F4100 All-in-One series
Page 19

1 HP All-in-One overview
The HP Deskjet F4100 All-in-One series is a versatile device that gives you easy-to-use
copying, scanning, and printing. For information about the full range of features and
functions, see the onscreen Help.
The HP All-in-One at a glance
English
Label Description
1 Control panel
2 Input tray
3 Tray extender
4 Paper-width guide
5 Print cartridge door
6 Glass
7 Lid backing
8 Rear door
9 Rear USB port
10 Power connection
* HP
*
HP All-in-One overview 3
Page 20

Chapter 1
Control panel buttons
English
Label Icon Name and Description
1 Scan: Starts scanning the original currently on the glass. The Scan command
2 Photosmart Essential button: Launches the HP Photosmart Software for
3 Paper Type: Changes the paper type setting to either plain or photo paper.
4 Start Copy Black: Starts a black-and-white copy job.
5 Start Copy Color: Starts a color copy job.
is ignored if the HP All-in-One is busy with any other job. The Scan command
functions only when the computer is on.
printing, editing, and sharing photos.
NOTE: If the HP Photosmart Software is not installed on your computer,
the Photosmart Essential button will not do anything.
Make sure the appropriate paper type is loaded in the input tray. The default
paper type setting is Plain.
The Paper Type lights indicate the currently selected paper type, Plain or
Photo.
Press this button multiple times to specify multiple black copies. The printer
will start printing shortly after the number of copies have been selected. The
number of copies to be printed is shown to the right of this button.
TIP: You can make up to 9 copies using the control panel (varies by model).
Press this button multiple times to specify multiple color copies. The printer
will start printing shortly after the number of copies have been selected. The
number of copies to be printed is shown to the right of this button.
4 HP Deskjet F4100 All-in-One series
Page 21

(continued)
Label Icon Name and Description
TIP: You can make up to 9 copies using the control panel (varies by model).
6 Check Print Cartridge lights: Indicates the need to reinsert the specified print
cartridge, replace the print cartridge, or close the print cartridge door.
7 Resume: Instructs the HP All-in-One to continue after a problem is solved.
A blinking Resume light next to the Resume button indicates the need to
load paper or clear a paper jam.
8 Cancel: Stops a print, copy, or scan job.
9 On: Turns the HP All-in-One on or off. The On button is lit when the
HP All-in-One is powered on.
Status light overview
Several indicator lights inform you of the status of the HP All-in-One.
Label Description
1 Paper Type lights (for the Paper Type button)
2 Check Print Cartridge lights
3 Resume light
4 On button
English
The following table describes common situations and explains what the lights mean.
Light status What it means
All lights are off. The HP All-in-One is turned off. Press the On button to turn on the device.
The On light and one of the Paper
Type lights are on.
The On light is blinking. The HP All-in-One is busy printing, scanning, copying, or aligning the
The On light blinks quickly for 3
seconds and then is on steady.
The On light blinks for 20 seconds
and then is steady.
The HP All-in-One is ready for printing, scanning, or copying.
print cartridges.
You pressed a button while the HP All-in-One is already busy printing,
scanning, copying, or aligning the print cartridges.
You pressed the Scan button and there was no response from the
computer.
Status light overview 5
Page 22

Chapter 1
(continued)
Light status What it means
The Resume light is blinking.
The Check Print Cartridge light is
blinking.
The On, Resume, and Check Print
Cartridge lights are blinking.
All lights are blinking. The HP All-in-One has a fatal error.
English
The HP All-in-One is out of paper.
•
The HP All-in-One has a paper jam.
•
The paper size setting in the copy software does not match the paper
•
size detected in the input tray.
The print cartridge door is open.
•
The print cartridges are missing or not seated correctly.
•
The tape was not removed from the print cartridge.
•
The print cartridge is not intended for use in this HP All-in-One.
•
The print cartridge might be defective.
•
NOTE: Your printer might be packaged with only a tri-color print
cartridge.
Scanner failure.
Turn off the HP All-in-One, then turn it on again. If the problem persists,
contact HP Support.
1. Turn the HP All-in-One off.
2. Unplug the power cord.
3. Wait a minute, then plug the power cord back in.
4. Turn the HP All-in-One back on.
If the problem persists, contact HP Support.
Load originals for scanning and copying
You can load many different types and sizes of paper in the HP All-in-One, including letter
or A4 paper, photo paper, transparencies, and envelopes.
For information about loading full-size paper, see the Setup Guide. For information about
loading other paper sizes, see the onscreen Help.
To load an original on the glass
1. Lift the lid on the HP All-in-One.
2. Place your original with the side you want to copy or scan face down on the left front
corner of the glass.
TIP: To get the correct copy size, make sure that there is no tape or other foreign
object on the glass.
6 HP Deskjet F4100 All-in-One series
Page 23

3. Close the lid.
Make a copy
You can make quality copies from the control panel.
To make a copy from the control panel
1. Make sure you have paper loaded in the input tray.
2. Place your original with the side you want to copy or scan face down on the left front
corner of the glass.
3. Press the Paper Type button to set the paper type.
4. Press Start Copy Black or Start Copy Color.
Scan an original
For original documents or images placed on the glass, you can start a scan from your
computer or from the HP All-in-One. To use the scan features, the HP All-in-One and
computer must be connected and turned on. The HP Photosmart Software must also be
installed and running on your computer prior to scanning.
To scan to a computer
1. Place your original with the side you want to copy or scan face down on the left front
corner of the glass.
TIP: For quality copies, ensure that the scanner glass is clean and that there are
no foreign materials adhering to it.
2. Press Scan.
If the original is a photo, a preview image of the scan appears on your computer,
where you can edit it. Any edits that you make apply to the current scan session only.
3. Make any edits to the preview image, and then click Accept when you are finished.
English
Make a copy 7
Page 24

2 Troubleshooting and support
This chapter contains troubleshooting information for installation and configuration issues and some
operational topics. For more troubleshooting information, see the onscreen Help.
Many issues are caused when the HP All-in-One is connected to the computer using a USB cable
before the HP All-in-One software is installed on the computer. If you connected the HP All-in-One
to your computer before the software installation screen prompts you to do so, you must follow these
steps:
Troubleshooting common setup issues
1. Disconnect the USB cable from the computer.
2. Uninstall the software (if you have already installed it).
3. Restart your computer.
4. Turn off the HP All-in-One, wait one minute, then restart it.
5. Reinstall the HP All-in-One software.
CAUTION: Do not connect the USB cable to the computer until prompted by the software
installation screen.
For support contact information, see the inside back cover of this guide.
Uninstall and reinstall the software
English
If your installation is incomplete, or if you connected the USB cable to the computer before prompted
by the software installation screen, you might need to uninstall and then reinstall the software. Do
not simply delete the HP All-in-One application files from your computer. Make sure to remove them
properly using the uninstall utility provided when you installed the software that came with the
HP All-in-One.
To uninstall from a Windows computer and then reinstall
1. On the Windows taskbar, click Start, and then click Control Panel.
2. Double-click Add/Remove Programs.
3. Select HP Deskjet All-In-One Driver Software, and then click Change/Remove.
Follow the onscreen instructions.
4. Disconnect the HP All-in-One from your computer.
5. Restart your computer.
NOTE: It is important that you disconnect the HP All-in-One before restarting your
computer. Do not connect the HP All-in-One to your computer until after you have reinstalled
the software.
6. Insert the HP All-in-One CD-ROM into your computer’s CD-ROM drive and then start the Setup
program.
7. Follow the onscreen instructions and the instructions provided in the Setup Guide that came
with the HP All-in-One.
When the software installation is complete, the HP Digital Imaging Monitor icon appears in the
Windows system tray.
To verify that the software is properly installed, double-click the HP Solution Center icon on the
desktop. If the HP Solution Center shows the essential icons (Scan Picture and Scan
Document), the software has been properly installed.
To uninstall from a Mac and then reinstall
1. Disconnect the HP All-in-One from your Mac.
2. Open the Applications:Hewlett-Packard folder.
8 HP Deskjet F4100 All-in-One series
Page 25

3. Double-click HP Uninstaller.
Follow the onscreen instructions.
4. After the software is uninstalled, disconnect the HP All-in-One, and then restart your computer.
NOTE: It is important that you disconnect the HP All-in-One before restarting your
computer. Do not connect the HP All-in-One to your computer until after you have reinstalled
the software.
5. To reinstall the software, insert the HP All-in-One CD-ROM into your computer’s CD-ROM drive.
6. On the desktop, open the CD-ROM and then double-click HP All-in-One Installer.
7. Follow the onscreen instructions and the instructions provided in the Setup Guide that came
with the HP All-in-One.
Hardware setup troubleshooting
This section contains hardware troubleshooting information for the HP All-in-One.
The HP All-in-One will not turn on
Cause: The HP All-in-One is not properly connected to a power supply.
Solution
• Make sure the power cord is firmly connected to both the HP All-in-One and the power
adapter. Plug the power cord into a power outlet, surge protector, or power strip.
English
1 Power connection
2 Power cord and adapter
3 Power outlet
• If you are using a power strip, make sure the power strip is on. Or, try plugging the
HP All-in-One directly into a power outlet.
• Test the power outlet to make sure it is working. Plug in an appliance that you know works,
and see if the appliance has power. If not, then there might be a problem with the power
outlet.
• If you plugged the HP All-in-One into a switched outlet, make sure the switch is on. If it is
switched to on but still does not work, then there might be a problem with the power outlet.
Cause: You pressed the On button too quickly.
Solution: The HP All-in-One might not respond if you press the On button too quickly. Press
the On button once. It might take a few seconds for the HP All-in-One to turn on. If you press
the On button again during this time, you might turn the device off.
Hardware setup troubleshooting 9
Page 26

Chapter 2
English
CAUTION: If the HP All-in-One still does not turn on, it might have a mechanical failure.
Unplug the HP All-in-One from the power outlet and contact HP. Go to:
support. If prompted, choose your country/region, and then click Contact HP for information
on calling for technical support.
www.hp.com/
I connected the USB cable, but I am having problems using the HP All-in-One with
my computer
Solution: You must first install the software that came with the HP All-in-One before
connecting the USB cable. During installation, do not plug in the USB cable until prompted by
the onscreen instructions. Connecting the USB cable before prompted can cause errors.
Once you have installed the software, connecting your computer to the HP All-in-One with a
USB cable is straightforward. Simply plug one end of the USB cable into the back of your
computer and the other into the back of the HP All-in-One. You can connect to any USB port on
the back of your computer.
For more information on installing the software and connecting the USB cable, see the Setup
Guide that came with the HP All-in-One.
The HP All-in-One does not print
Solution: If the HP All-in-One and computer are not communicating with each other, try the
following:
• Look at the On light located on the front of the HP All-in-One. If it is not lit, the HP All-in-One
is turned off. Make sure the power cord is firmly connected to the HP All-in-One and plugged
into a power outlet. Press the On button to turn on the HP All-in-One.
• Make sure the print cartridges are installed.
• Make sure you have paper loaded in the input tray.
• Check that the HP All-in-One does not have a paper jam.
• Check that the print carriage is not jammed. Open the print cartridge door to access the
print carriage area. Remove any objects that are blocking the print carriage, including any
packing materials. Turn the HP All-in-One off and then turn it on again.
• Check that the HP All-in-One print queue is not paused or offline (Windows) or stopped
(Mac). If it is, choose the appropriate setting to resume printing. For more information about
accessing the print queue, see the documentation that came with the operating system
installed on your computer.
10 HP Deskjet F4100 All-in-One series
Page 27

• Check the USB cable. If you are using an older cable, it might not be working properly. Try
connecting it to another product to see if the USB cable works. If you experience problems,
the USB cable might need to be replaced. Also verify that the cable does not exceed 3
meters (9.8 feet) in length.
• Check the connection from the HP All-in-One to your computer. Verify that the USB cable
is securely plugged into the USB port on the back of the HP All-in-One. Make sure the other
end of the USB cable is plugged into a USB port on your computer. After the cable is
connected properly, turn the HP All-in-One off and then on again.
• If you are connecting the HP All-in-One through a USB hub, make sure the hub is turned
on. If the hub is on, try connecting directly to your computer.
• Check other printers or scanners. You might need to disconnect older products from your
computer.
• Try connecting the USB cable to another USB port on your computer. After you check the
connections, try restarting your computer. Turn the HP All-in-One off and then on again.
• If the HP All-in-One is offline, turn the HP All-in-One off and on again. Start a print job.
• If necessary, remove and then install the software you installed with the HP All-in-One again.
For more information on setting up the HP All-in-One and connecting it to your computer, see
the Setup Guide that came with the HP All-in-One.
Clear paper jams
For more information about clearing a paper jam, see the onscreen Help.
Print cartridge troubleshooting
If you are experiencing problems with printing, you might have a problem with one of the print
cartridges.
To troubleshoot print cartridges
1. Remove the black print cartridge from the slot on the right. Do not touch the ink nozzles or the
copper-colored contacts. Check for possible damage to the copper-colored contacts or ink
nozzles.
Make sure the plastic tape has been removed. If it is still covering the ink nozzles, gently remove
the plastic tape by using the pink pull tab.
2. Reinsert the print cartridge by sliding it forward into the slot. Then push the print cartridge forward
until it clicks into the socket.
English
3. Repeat steps 1 and 2 for the tri-color print cartridge on the left side.
4. If the problem persists, you may need to print a self-test report or clean the print cartridges. For
more information, see the onscreen Help.
Find more information
A variety of resources, both printed and onscreen, provide information about setting up and using
the HP All-in-One.
Clear paper jams 11
Page 28

Chapter 2
English
HP support
Setup Guide
The Setup Guide provides instructions for setting up your HP All-in-One and installing software.
Make sure you follow the steps in the Setup Guide in order.
If you have problems during setup, see Troubleshooting in the last section of the Setup Guide, or
see “
Troubleshooting and support” on page 8 in this guide.
Onscreen Help
The onscreen Help provides detailed instructions on features of your HP All-in-One that are not
described in this guide, including features that are only available using the software you installed
with your HP All-in-One.
To access the HP Photosmart Software Help on a Windows computer
1. In the HP Solution Center, click the tab for the HP All-in-One.
2. In the Device Support area, click Onscreen Guide or Troubleshooting.
HP Web site
If you have Internet access, you can get help and support from the HP Web site at www.hp.com/
support. This Web site offers technical support, drivers, supplies, and ordering information.
Ink usage
Ink from the cartridges is used in the printing process in a number of different ways, including in the
initialization process, which prepares the device and cartridges for printing, and in printhead
servicing, which keeps print nozzles clear and ink flowing smoothly. In addition, some residual ink
is left in the cartridge after it is used. For more information, see
You can contact HP Support by phone and online. Support options and availability vary by product,
country/region, and language.
www.hp.com/go/inkusage.
HP support by phone
For a list of support phone numbers, see the inside front cover of this guide.
Support options and availability vary by product, country/region, and language.
Phone support period
One year of phone support is available in Asia Pacific and Latin America (including Mexico). To
determine the duration of phone support in North America, Eastern Europe, the Middle East, and
Africa, go to
Standard phone company charges apply.
www.hp.com/support.
After the phone support period
After the phone support period, help is available from HP at an additional cost.
Contact your HP dealer or call the support phone number for your country/region to learn more about
support options.
Before calling HP Support
1. Make sure that:
a. The HP All-in-One is plugged in and turned on.
b. The specified print cartridges are installed correctly.
c. The recommended paper is properly loaded in the input tray.
2. Reset the HP All-in-One:
a. Turn off the HP All-in-One by pressing the On button.
b. Unplug the power cord from the back of the HP All-in-One.
c. Plug the power cord back into the HP All-in-One.
d. Turn on the HP All-in-One by pressing the On button.
12 HP Deskjet F4100 All-in-One series
Page 29

3. Have the following information available:
a. Specific name of the HP All-in-One, as it appears on the control panel.
b. Print a self-test report. (For more information, see the User Guide.)
c. Be prepared to describe your problem in detail.
d. Have your serial number and service ID ready, found on the self-test report.
e. Be near the HP All-in-One printer when you call HP Support.
English
HP support 13
Page 30

3 Technical information
The technical specifications and international regulatory information for the HP All-in-One are
provided in this section.
System requirements
Software system requirements are located in the Readme file.
Paper specifications
• Input tray capacity: Plain paper sheets: Up to 100 (20 lb. paper)
• Output tray capacity: Plain paper sheets: Up to 50 (20 lb. paper)
NOTE: For a complete list of supported media sizes, see the printer software. For a complete
list of paper weights, see the onscreen Help.
Physical specifications
• Height: 18.05 cm (7.11 inches)
• Width: 42.57 cm (16.76 inches)
• Depth: 26.74 cm (10.53 inches)
• Weight: 4.26 kg (9.39 pounds)
English
Power specifications
• Power consumption: 20 watts (average printing)
• Input voltage: AC 100 to 240 V ~ 1 A 50–60 Hz
• Output voltage: DC 32 V===375 mA, 16 V===500mA
• Power supply: 0957-2231, AC 100 to 240 V ~ 1 A 50–60 Hz
NOTE: Use only with the power adapter supplied by HP.
Environmental specifications
• Recommended operating temperature range: 15º to 30º C (59º to 86º F)
• Allowable operating temperature range: 10º to 35º C (50º to 95º F)
• Humidity: 15% to 80% RH non-condensing
• Non-operating (Storage) temperature range: –20º to 50º C (–4º to 122º F)
• In the presence of high electromagnetic fields, it is possible the output from the HP All-in-One
may be slightly distorted
• HP recommends using a USB cable less than or equal to 3 m (10 feet) in length to minimize
injected noise due to potential high electromagnetic fields
Regulatory notices
The HP All-in-One meets product requirements from regulatory agencies in your country/region. For
a complete listing of regulatory notices, see the onscreen Help.
Regulatory model identification number
For regulatory identification purposes, your product is assigned a Regulatory Model Number. The
Regulatory Model Number for your product is VCVRA-0706. This regulatory number should not be
confused with the marketing name (HP Deskjet F4100 All-in-One series, etc.) or product numbers
(CB580A, etc.).
14 HP Deskjet F4100 All-in-One series
Page 31

Warranty
English
Warranty 15
Page 32

English
Chapter 3
16 HP Deskjet F4100 All-in-One series
Page 33

 Loading...