

Page 1
Congratulations on
the purchase of your
HP DeskJet printer!
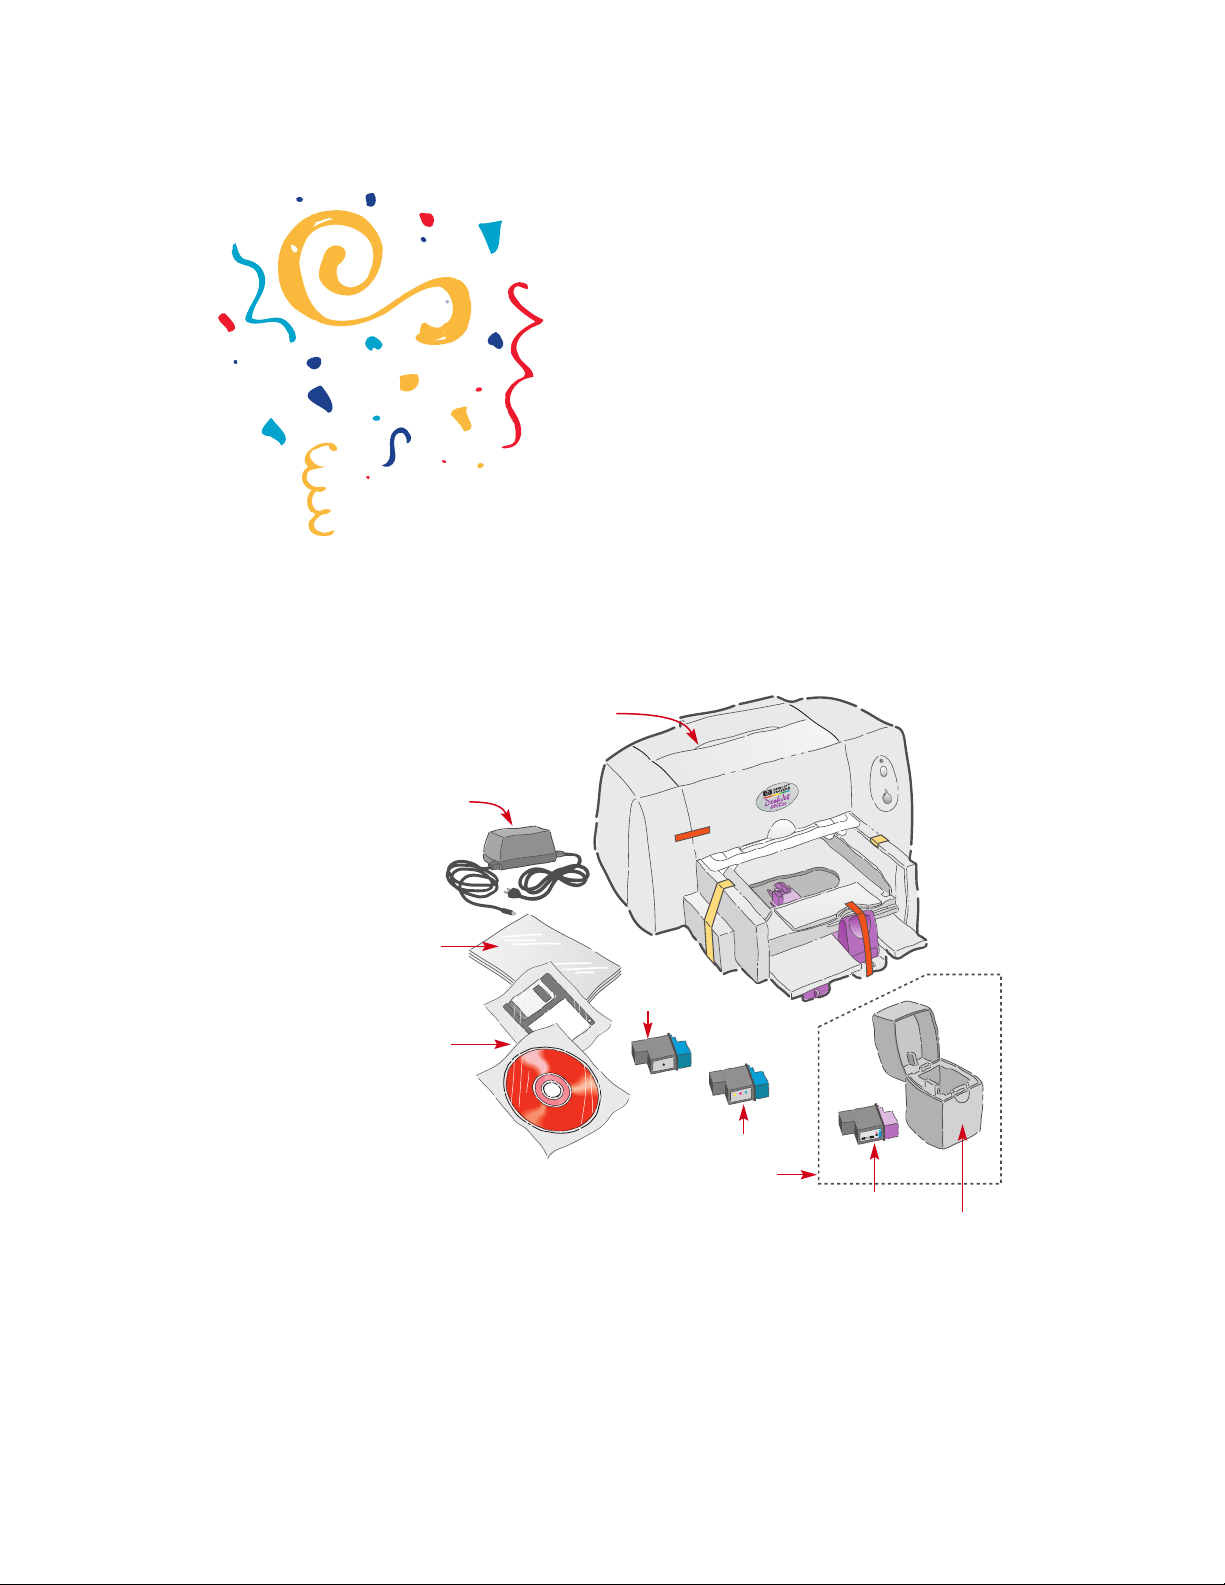
Here’s what comes in the box. If anything’s missing,
talk to your HP dealer or call HP customer support.
See page 50 in the user’s guide for the phone number
nearest you.
Printer
Power module
Booklets about your printer
Printer software
(CD and/or disks)
You need to buy a
printer cable, such as the
HP IEEE-1284-compliant
Parallel Interface Cable
(bidirectional).
Black print cartridge
Tri-Color print cartridge
A photo cartridge and/or storage container
might be included with the printer,
depending upon the model purchased.
Your printer works with any computer system that meets the minimum
requirements, as listed on page 59 in the user’s guide.
If your computer does not have a CD-ROM drive and disks were not
included with your printer, see page 49 of the user’s guide for
information on getting printer software.
Photo cartridge
Storage container
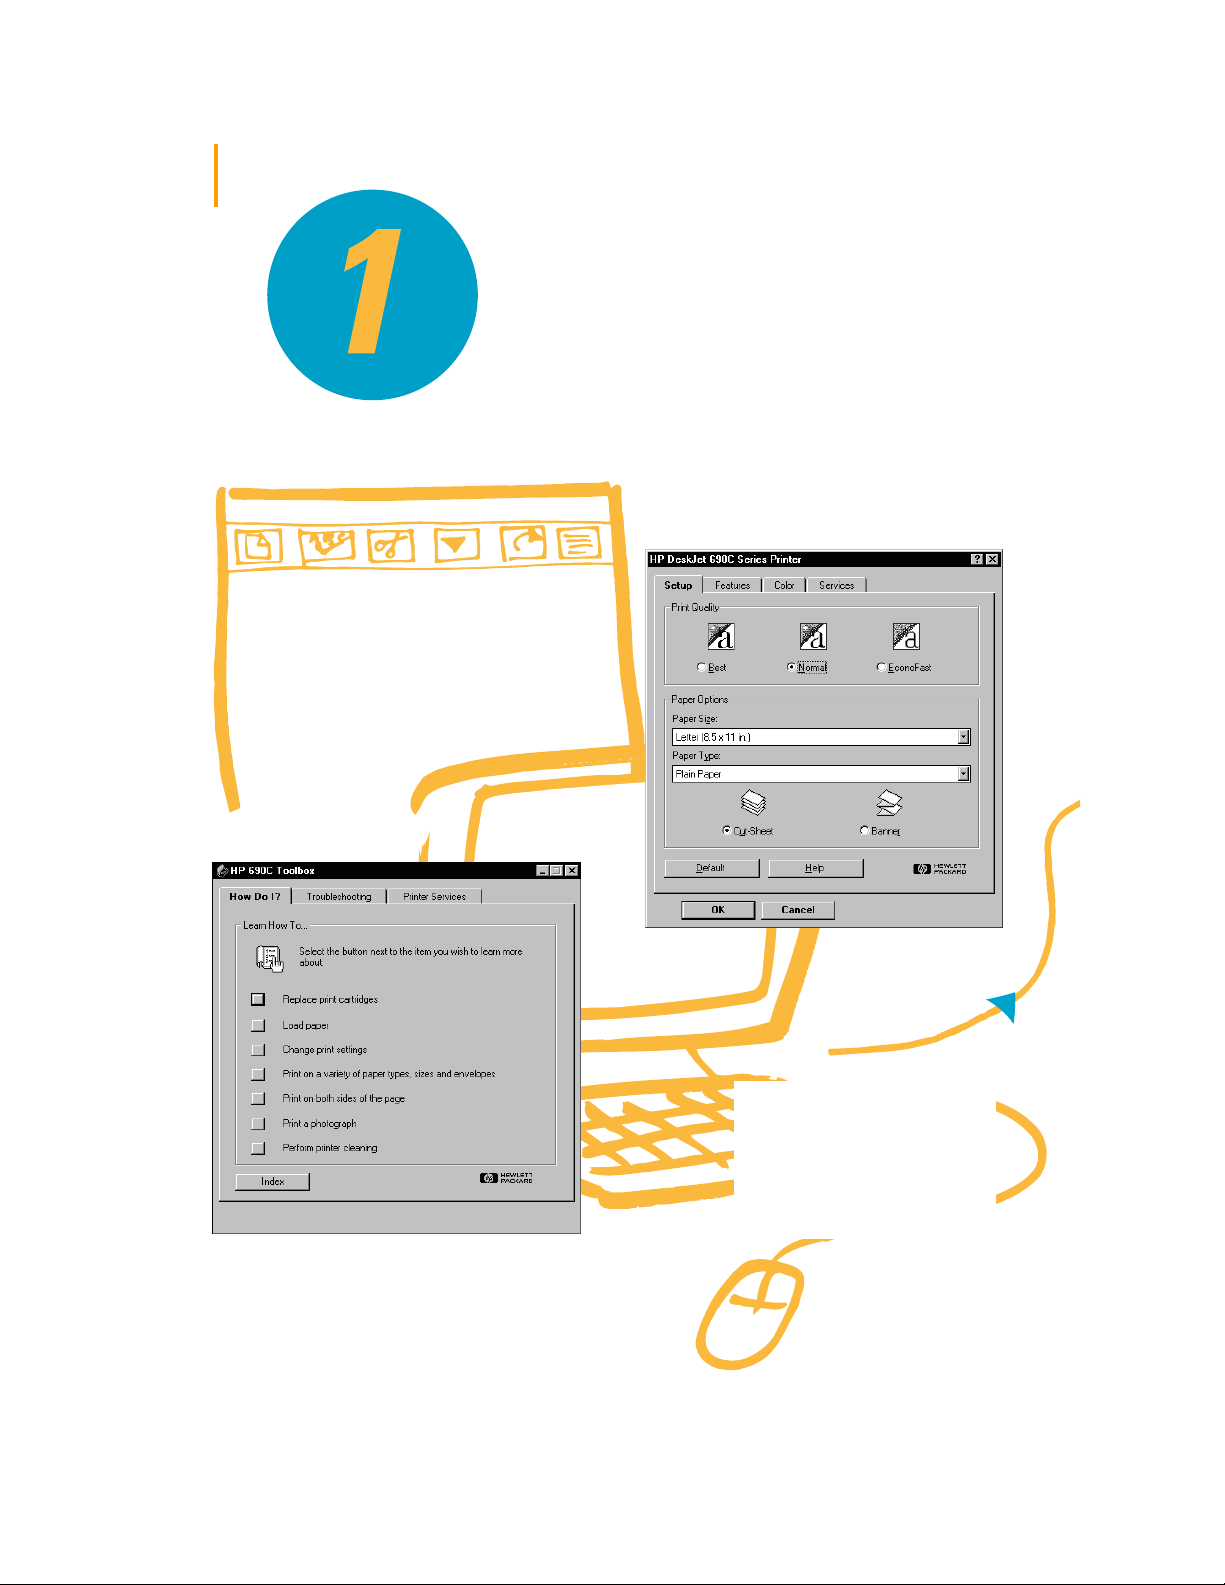
1
Page 2
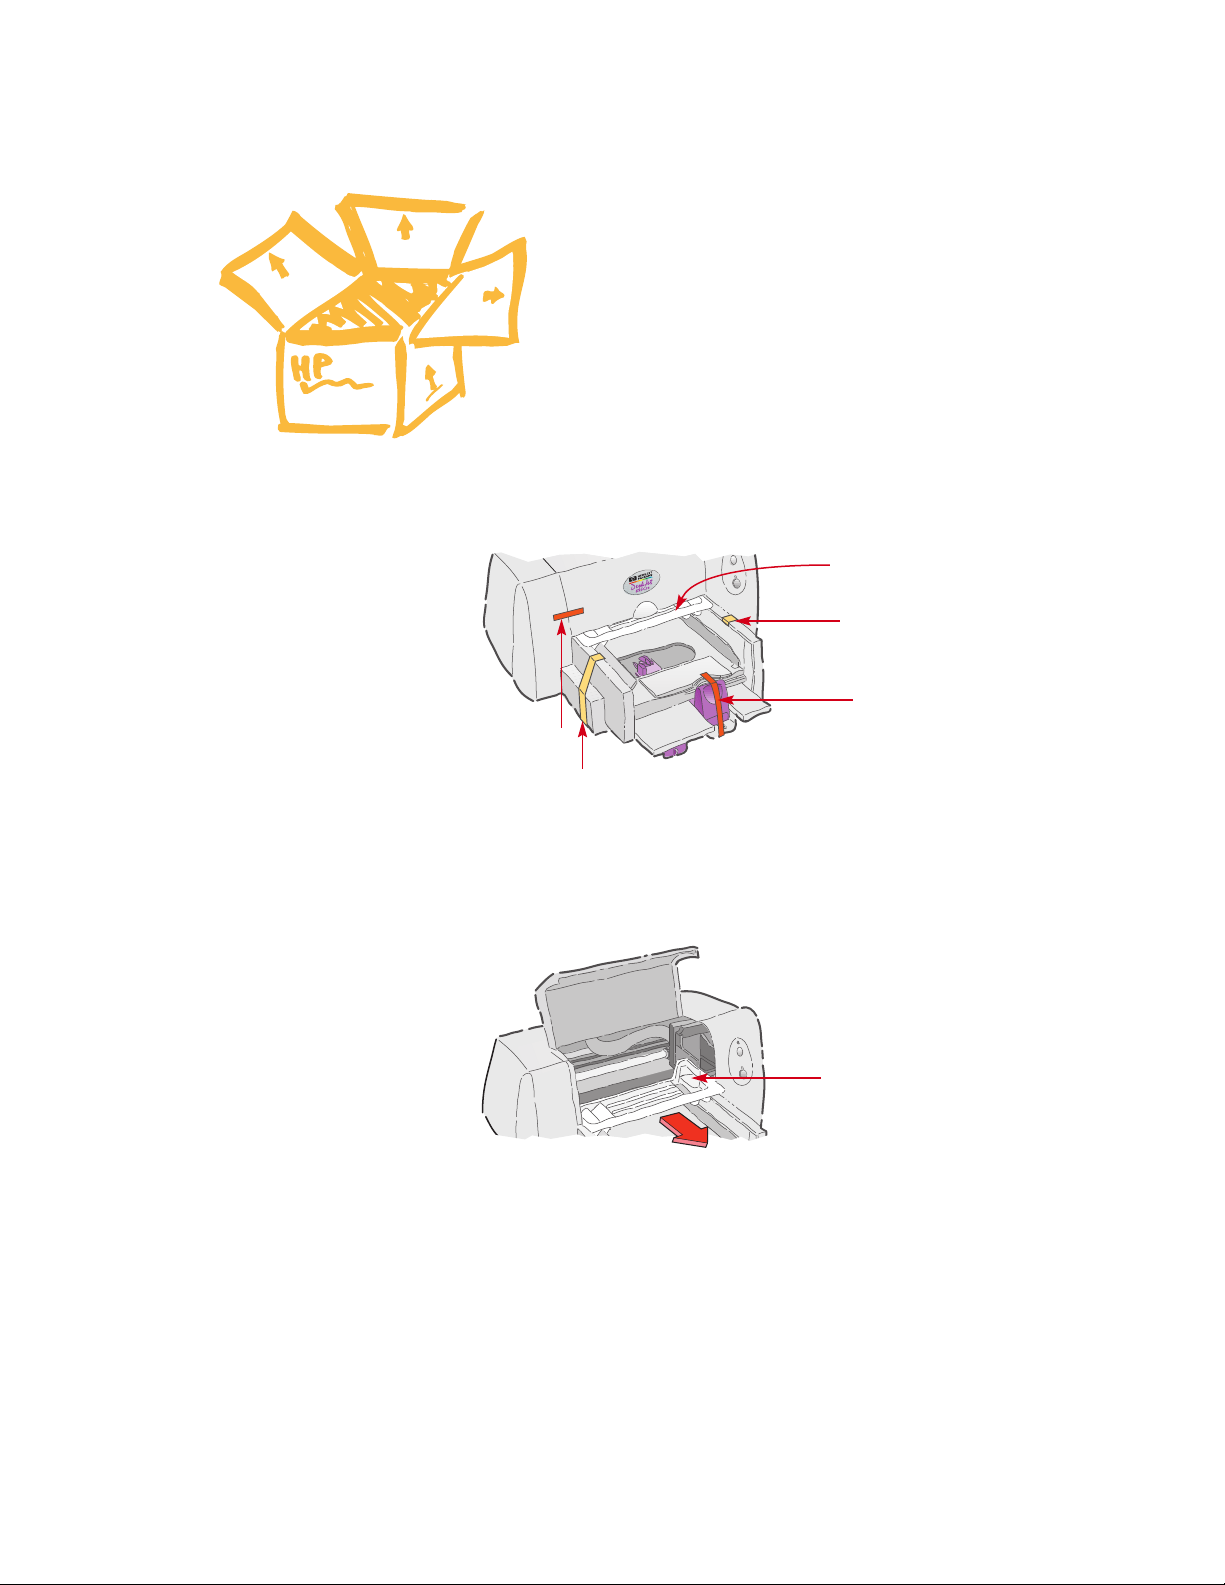
1
Unpack your printer
Remove the packing material and the packing tape
1
from the outside of the printer.
Packing material
Tape
Tape
Tape
Tape
Now would be a good time
to take a second and make
note of the serial number on
the bottom of your printer.
Write the serial number in
the blank provided inside
the front cover of your
user’s guide. This way you
can easily access the serial
number when you need it.
2
2
Open the top cover and remove the plastic packing
material from the inside of the printer.
Packing material
Page 3
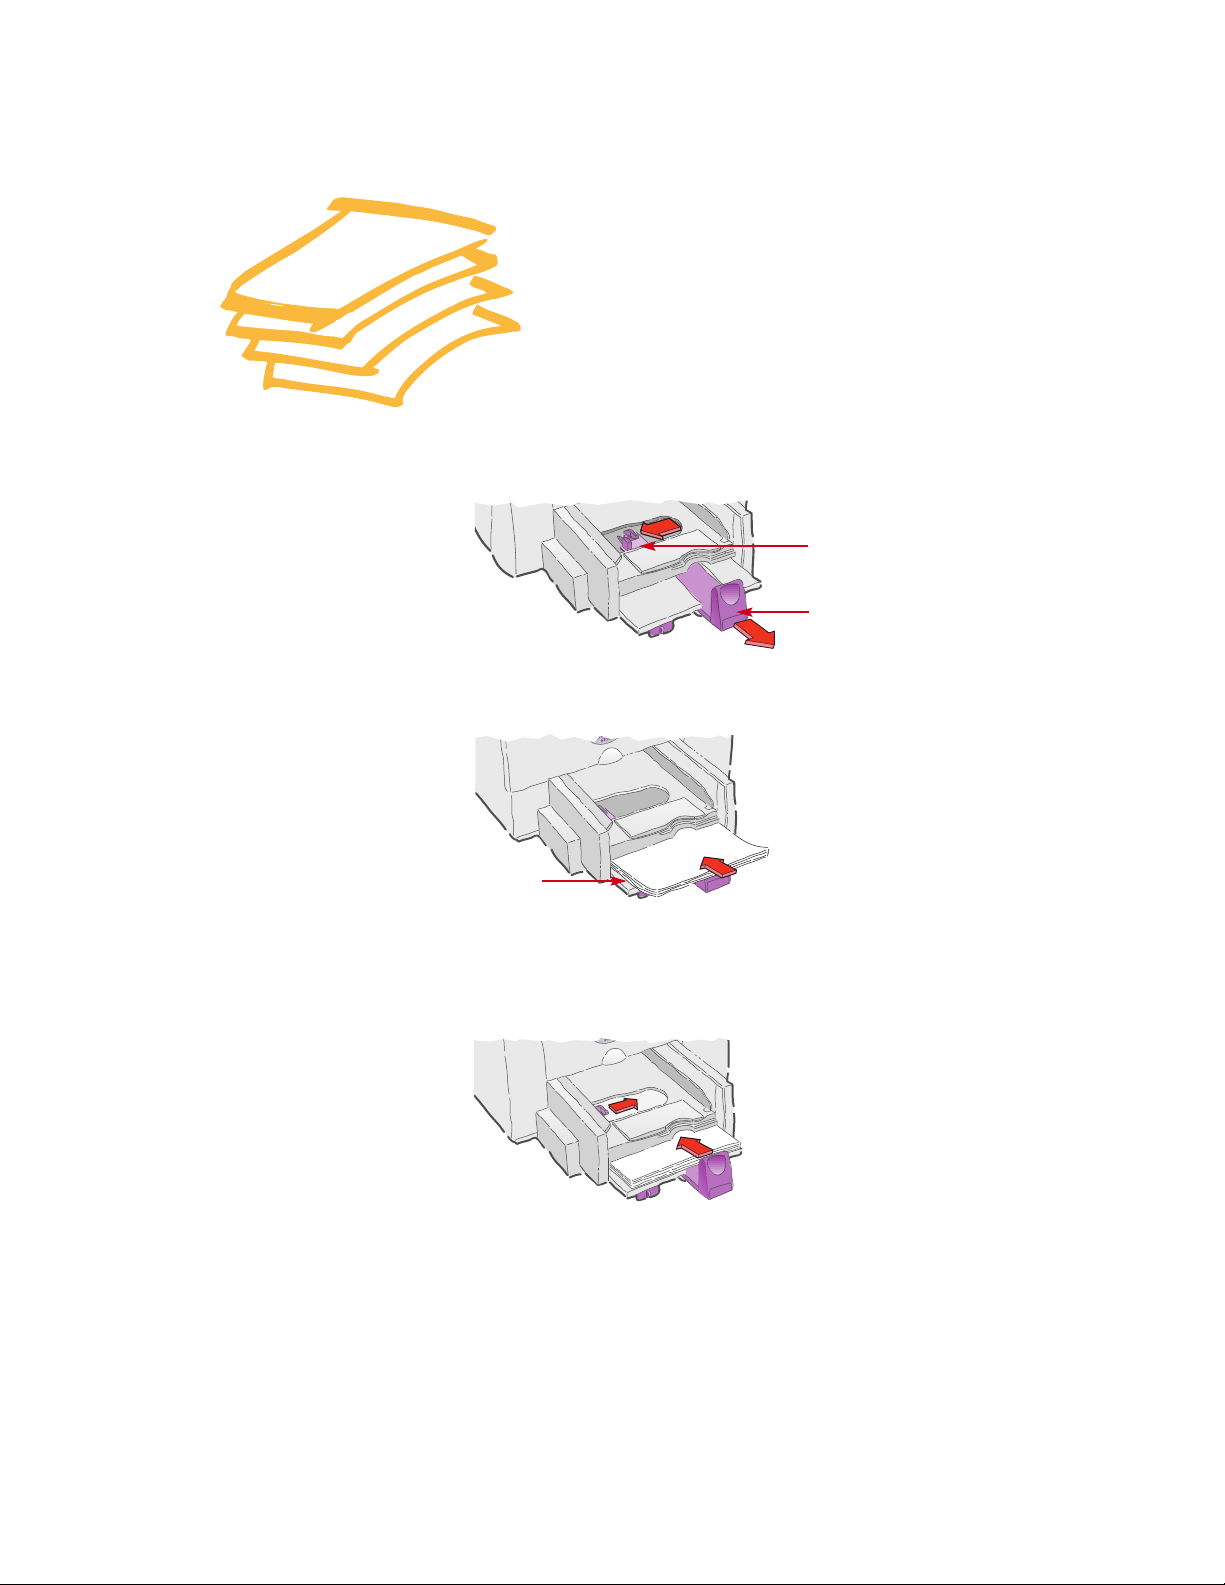
2
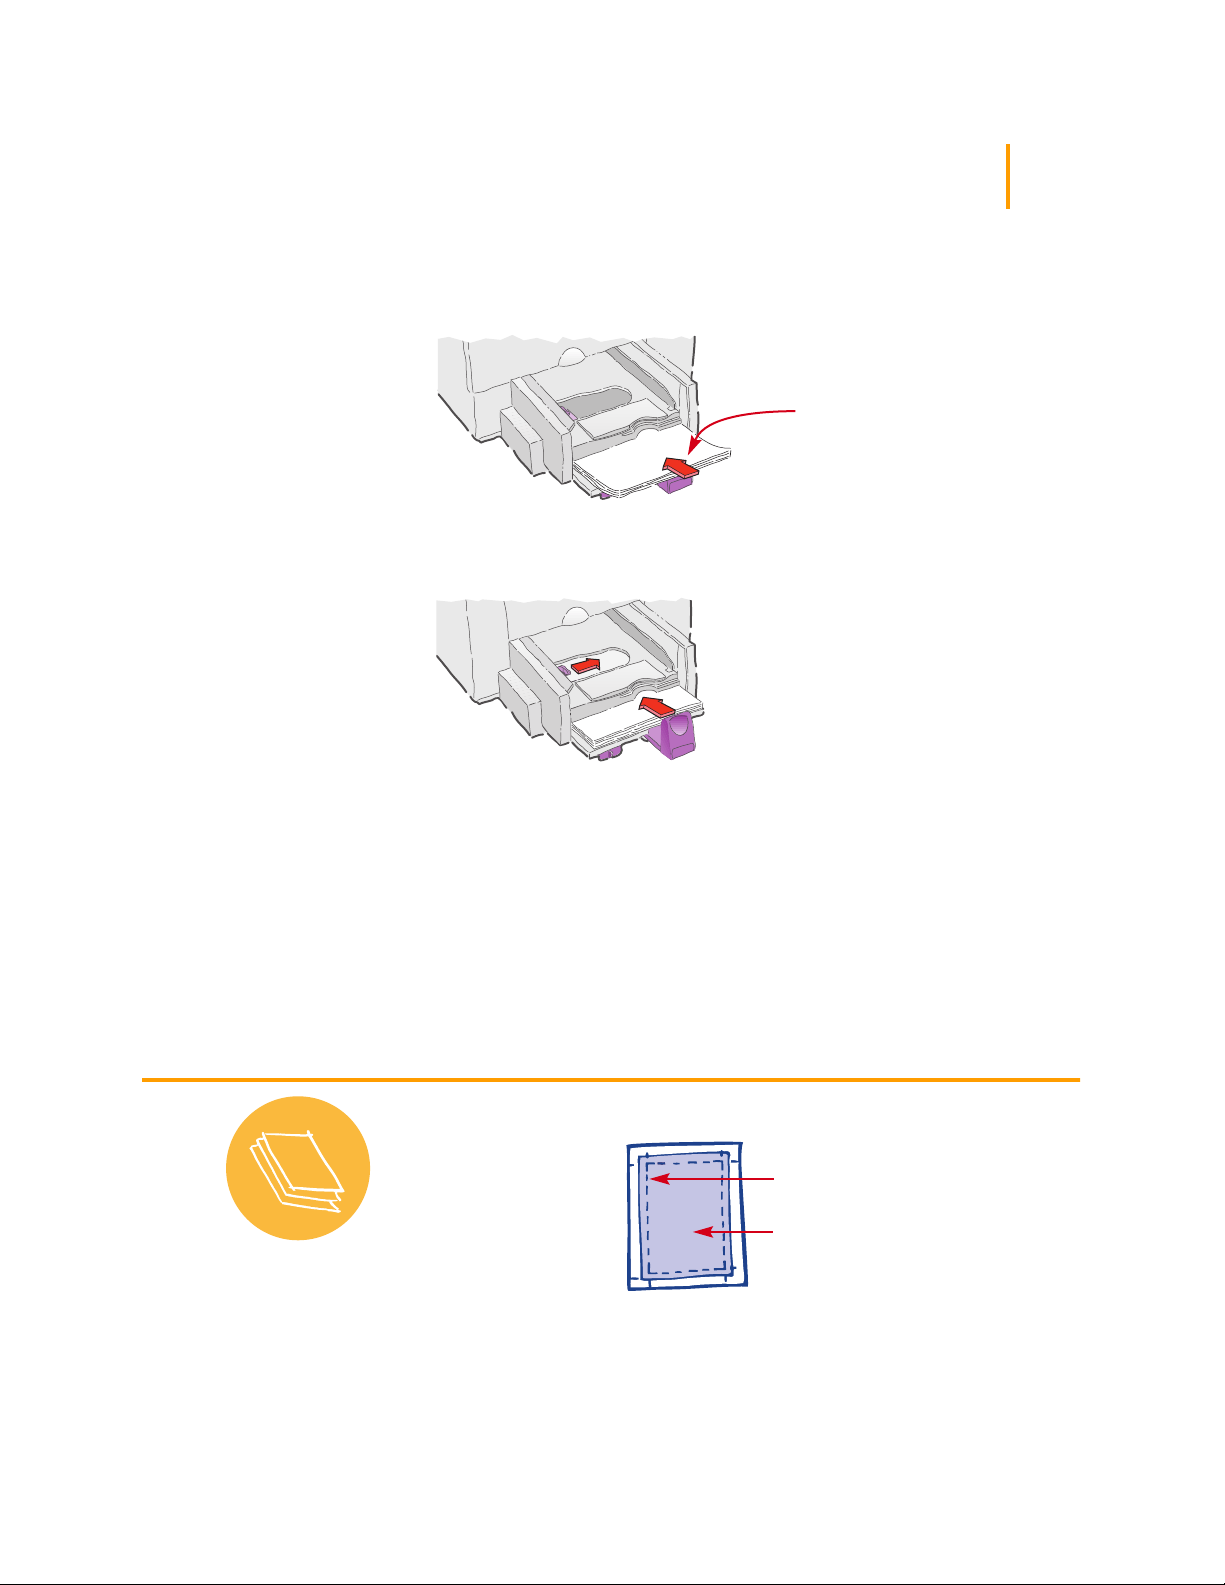
Put paper in your
printer
Slide out the paper adjusters as far as possible.
1
Paper-width adjuster
Paper-length adjuster
2 Put the paper in the lower (IN) tray, print side down.
IN tray
3 Slide in the paper adjusters to fit snugly against the
paper’s edges.
3
Page 4
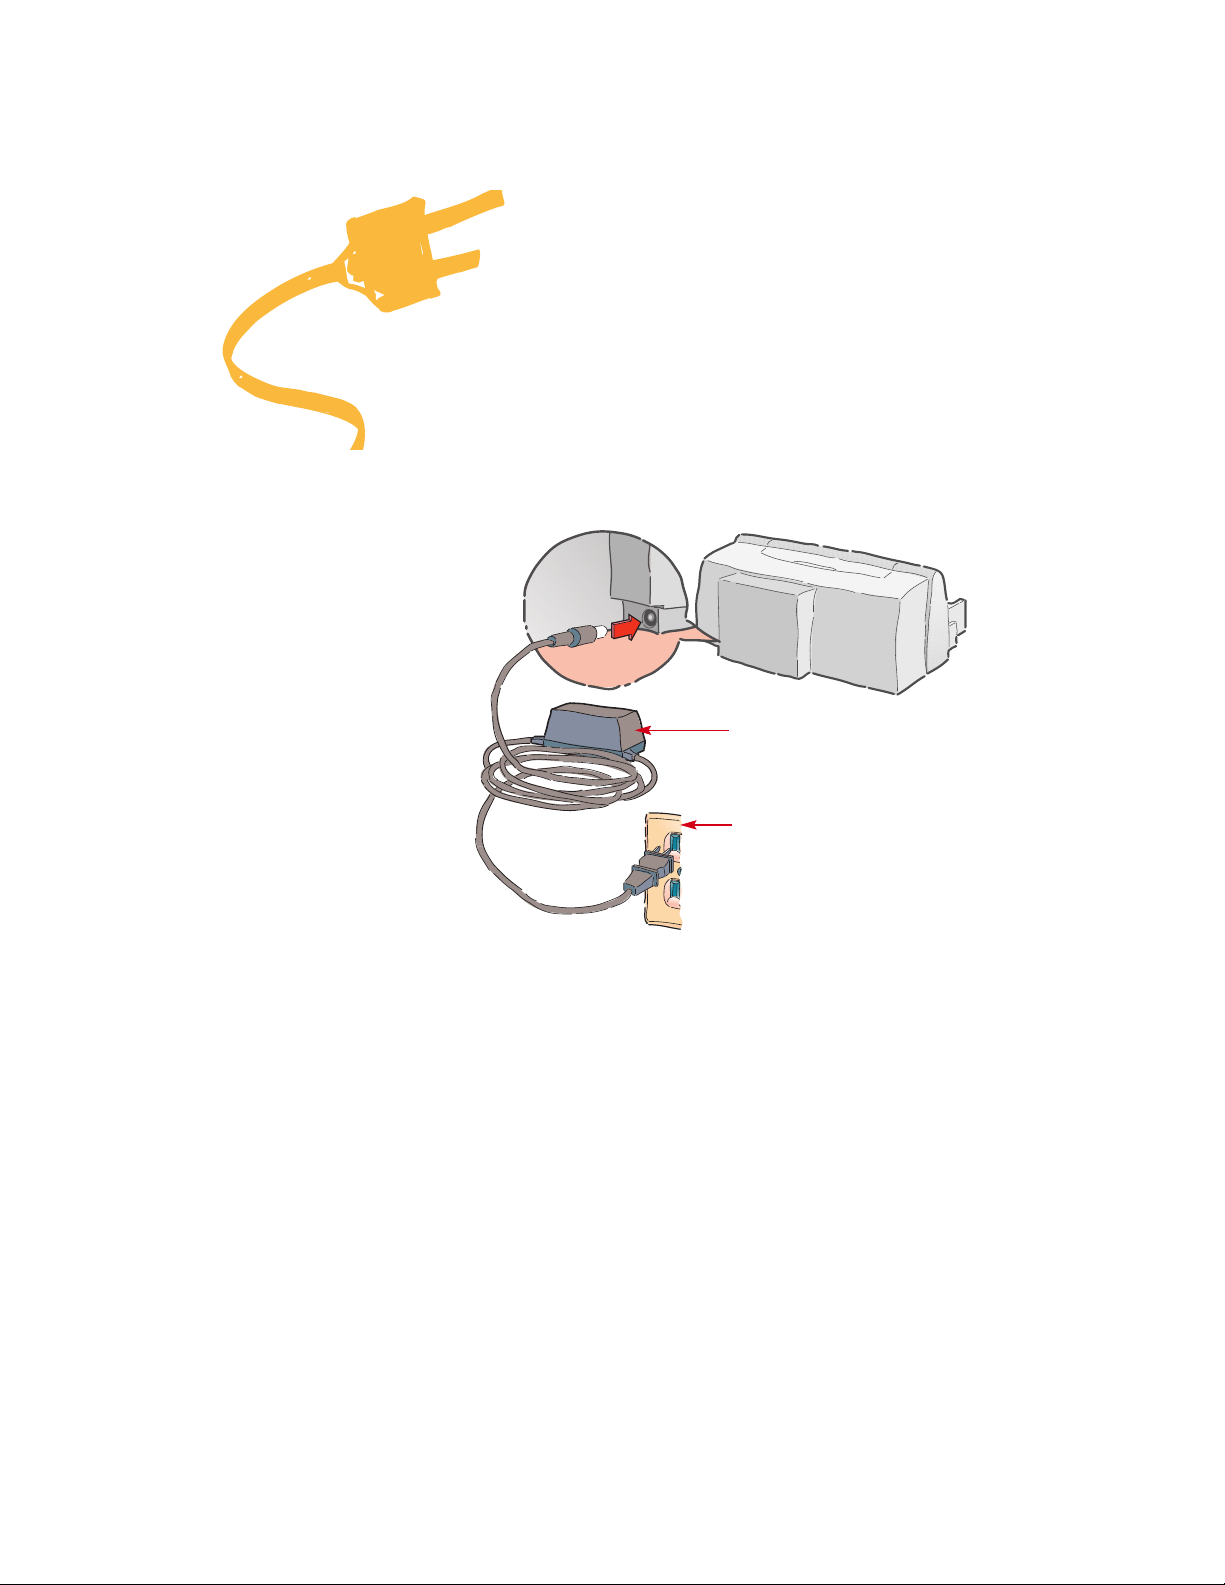
3
Plug in your printer
Plug one end of the power module firmly into the
1
back of the printer.
Power module
Electrical outlet
2 Plug the other end into an electrical outlet.
4
Page 5
4
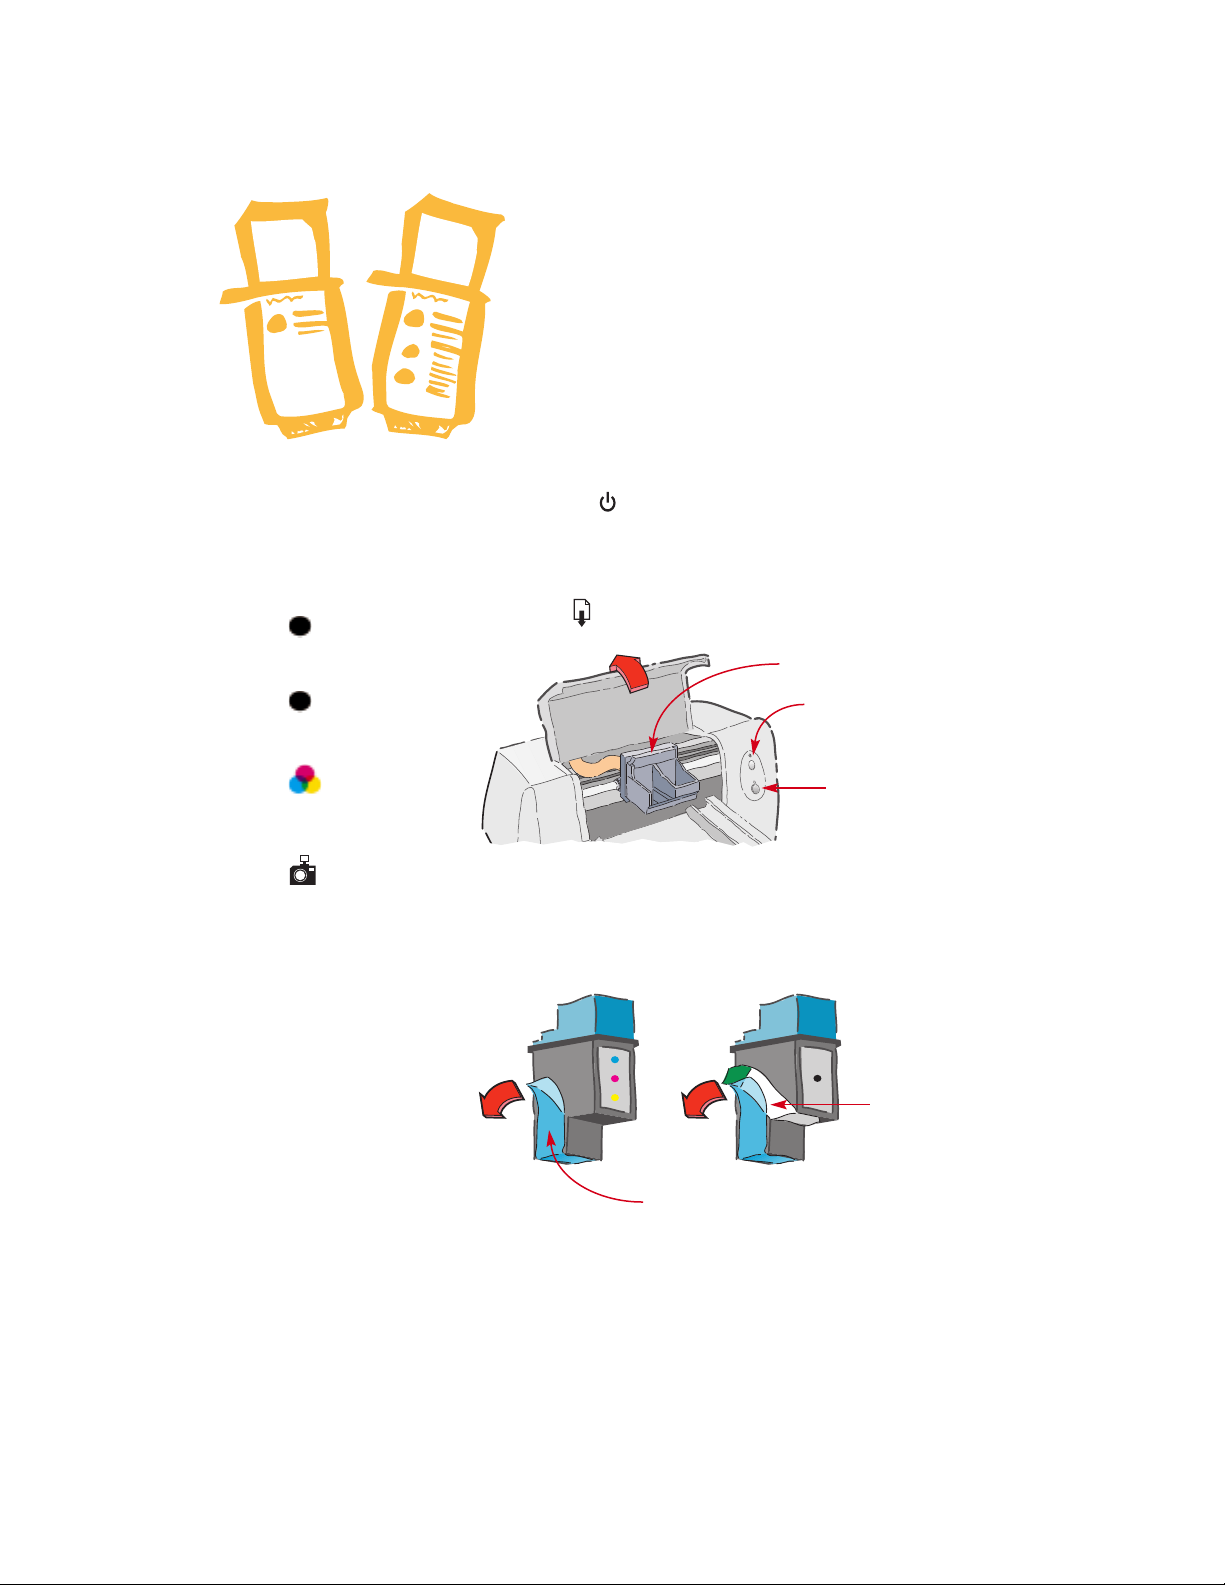
Insert the print
cartridges
Press the Power button to turn on the printer.
1
When buying print
cartridges, check the part
numbers carefully to
make sure you buy
the right ones:
Black
HP 51629G
Large Black
HP 51629A
Tri-Color
HP 51649A
Photo Cartridge
HP C1816A
These print cartridges are
specifically designed to
work with your printer.
The Power light comes on.
2
Open the top cover.
The cartridge cradles move to the center of the printer.
The Resume
light flashes.
Cartridge cradles
Resume light (flashing)
Power light (on)
3 Carefully remove the tape from the color and black
print cartridges.
Be sure not to touch the ink nozzles or the electrical contacts.
Remove tape
Remove tape
5
Page 6
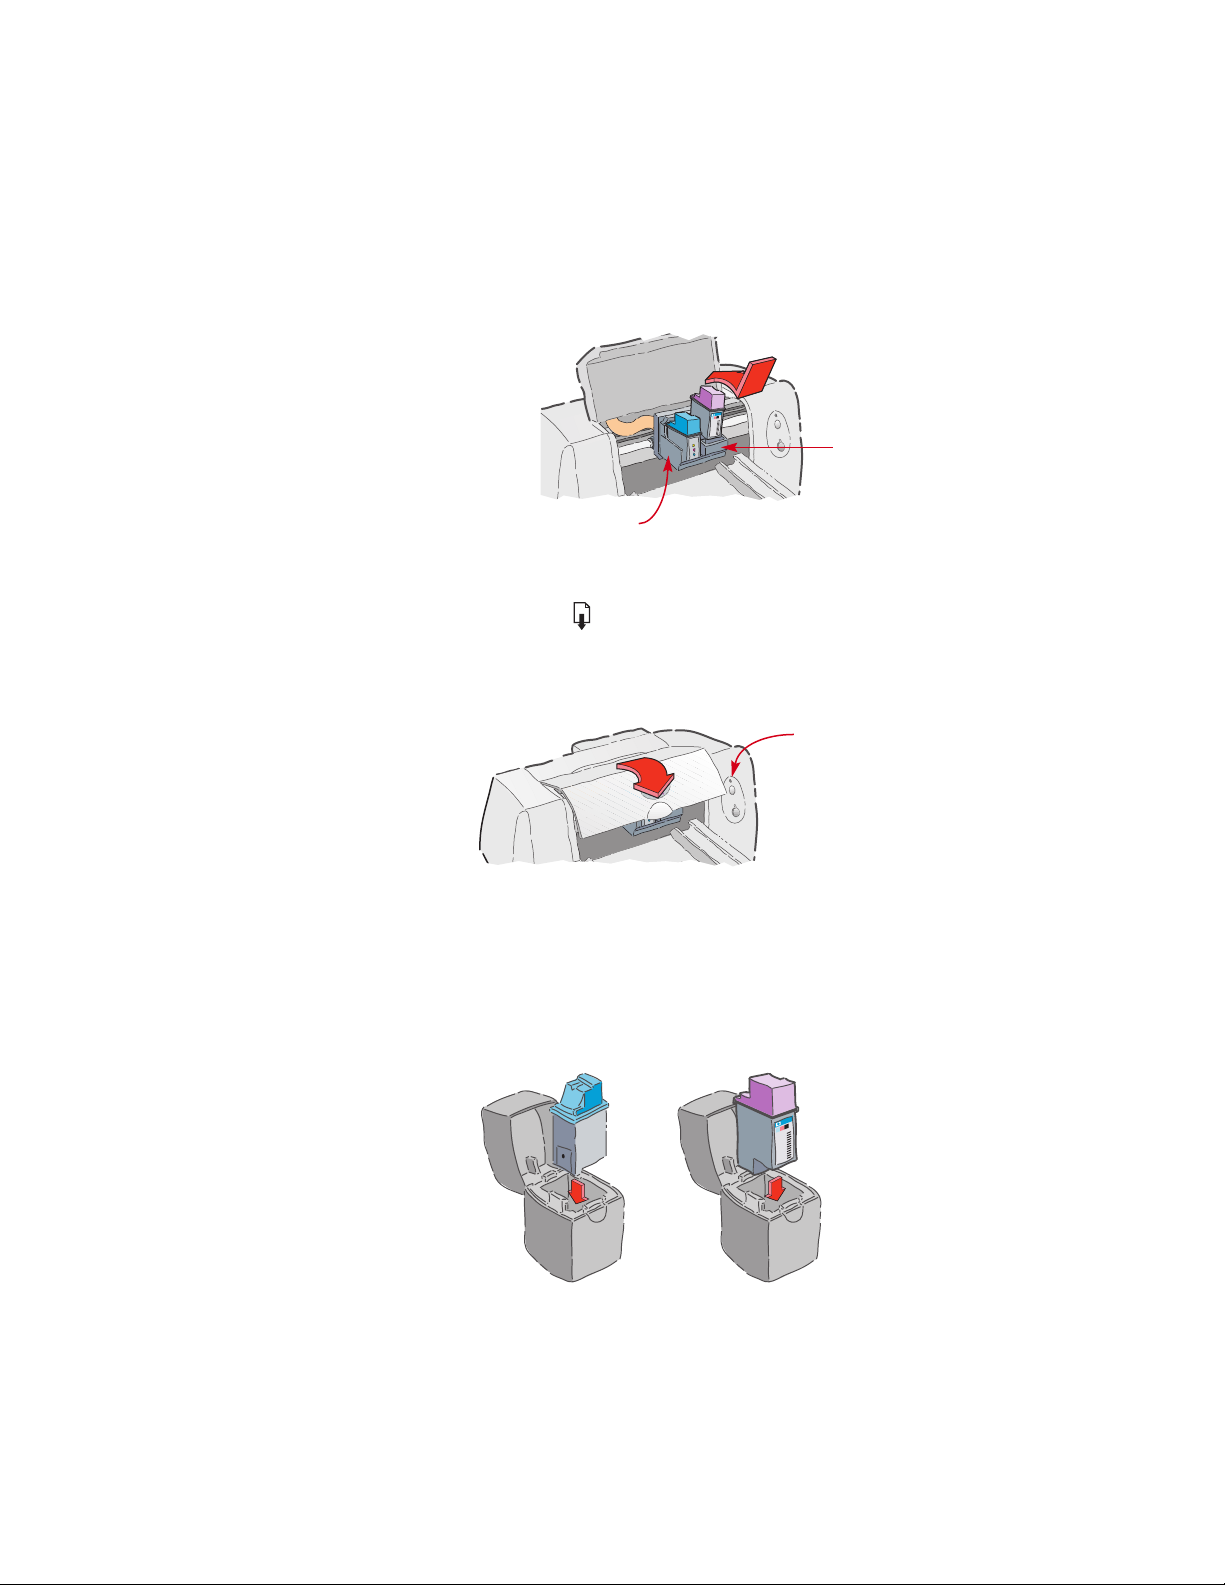
4 Place both cartridges into the cradles as shown, and
then push both cartridges back into position.
Insert the black print
cartridge in the right
cradle and insert the
tri-color print cartridge
in the left cradle.
If the Resume light
continues to flash or if the
cradle does not move to the
right side of the printer, take
out both cartridges and
reinsert them.
You hear a click when the cartridges sit snugly in their cradles. You
must put in two cartridges for the printer to operate.
Black or photo
cartridge cradle
Tri-Color cartridge cradle
5
Close the printer cover.
The Resume light continues to flash for awhile and then goes
off. (You’ll hear the cartridges return to their home position on the
right side of the printer.)
Resume light
(flashing)
For most printing, you’ll
use the black and tri-color
print cartridges. But
when you want to print
photographs, replace the
black cartridge with the
photo cartridge. (For more
information about printing
photographs, see page 21
in the user’s guide.)
6
Storing extra cartridges
To keep the ink from drying out, store an extra cartridge in the
storage container as shown below.
Black Print Cartridge Photo Cartridge
Page 7
5
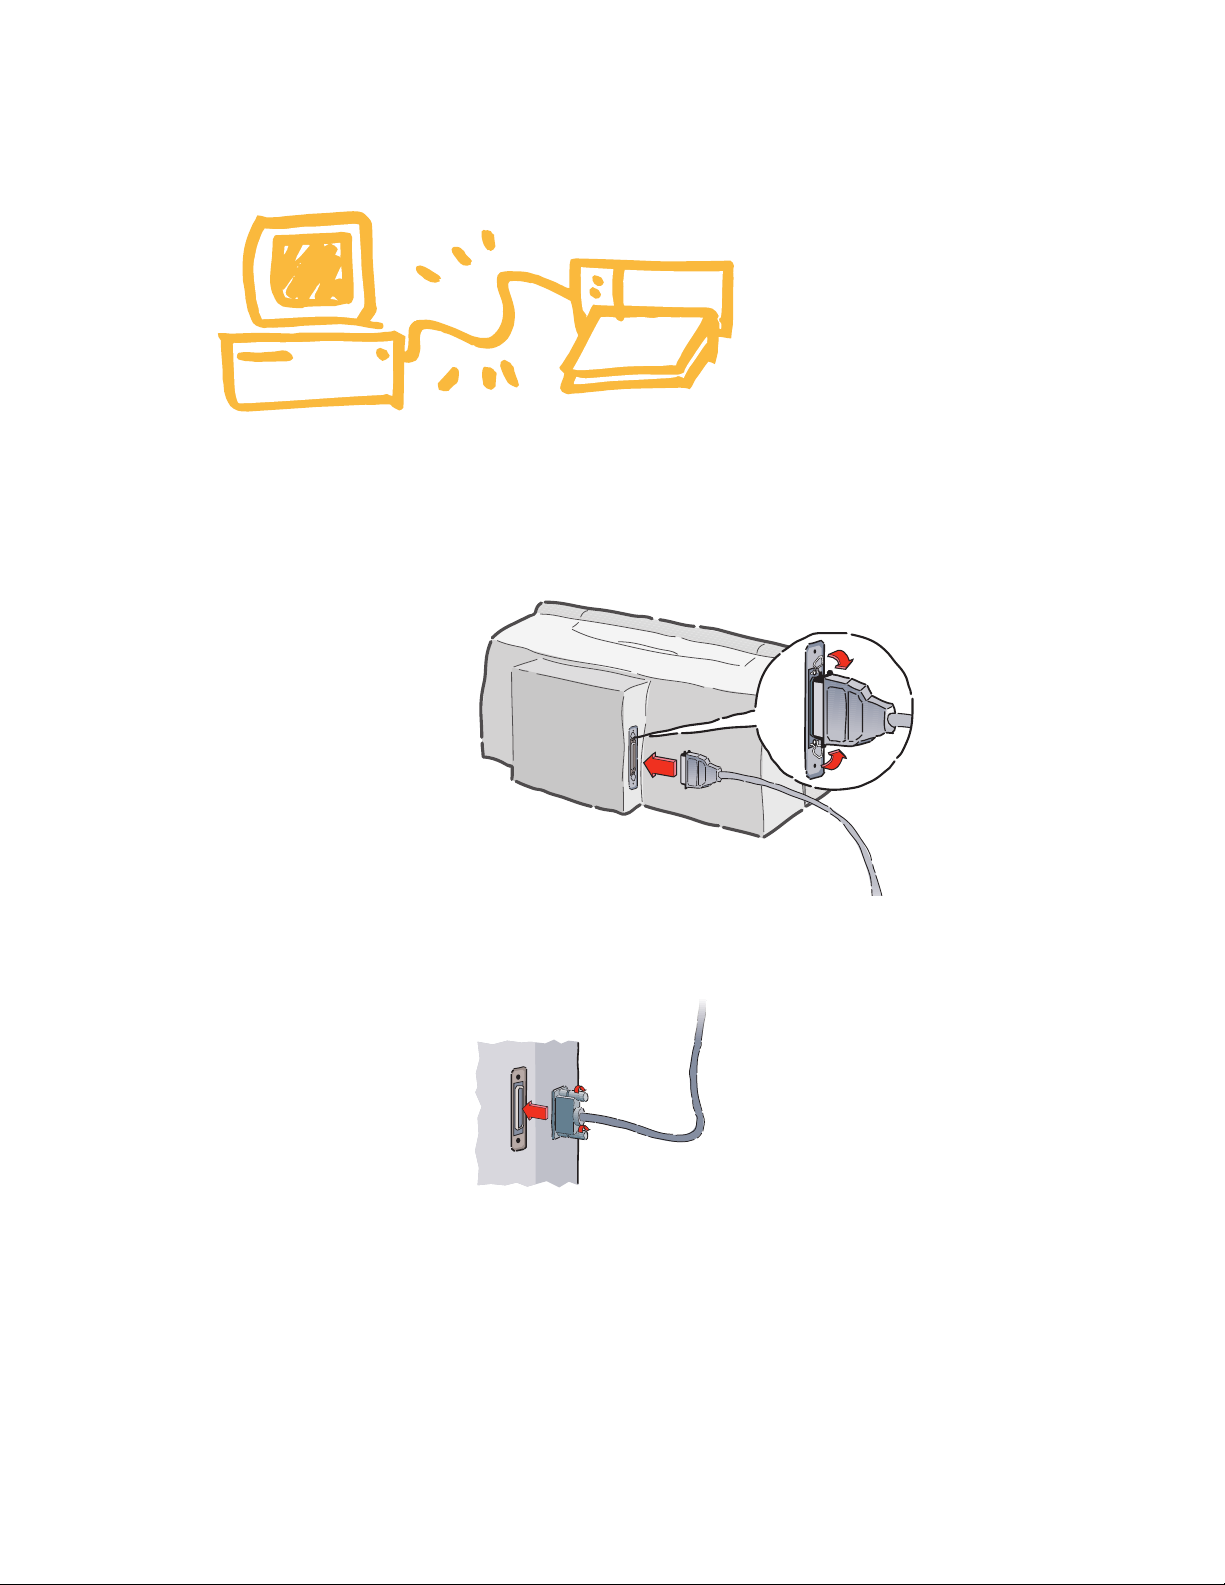
Connect your printer to
your computer
1 Make sure both the printer and the computer are
turned off.
2 Plug the notched end of the cable into the printer and
snap both clips into the notches.
Make sure that the
printer is connected directly
to the computer and that no
other peripherals, such as a
zip drive, are connected
to the printer cable.
3 Plug the other end of the cable into the computer and
tighten the screws.
7
Page 8

6
Install the printer
software
Before you can use your new HP DeskJet printer, you must install the
printer software. HP recommends that you install from the CD. If your
computer does not have a CD-ROM drive and disks were not included
with your printer, see page 49 in the user’s guide for information on
obtaining printer software.
To ensure successful installation of the
printer software:
1
Make sure your computer is fully set up and
operational.
2 Check that the printer is properly set up and ready
to print using the instructions in this setup guide.
3
Make sure that the printer is connected directly to
the computer (remove any switch boxes or other
devices using the same port) and check that all
cable connections are firm.
4
Make sure the computer and the printer are turned
on.
5
Close any virus protection programs or other
software programs that are running on your computer
(see page 13 for instructions).
Beginning on page 9, follow the installation instructions for the
operating system on your computer.
8
Page 9
Installing from the CD
(recommended method of installation)
If the “New Hardware
Found” dialog box
appears at any time
during the installation,
click in the upper-right
corner of the box, or
click Cancel.
Depending upon
the operating system on
your computer, your boxes
might differ from the
Windows 95 boxes shown
throughout this document
and the user’s guide.
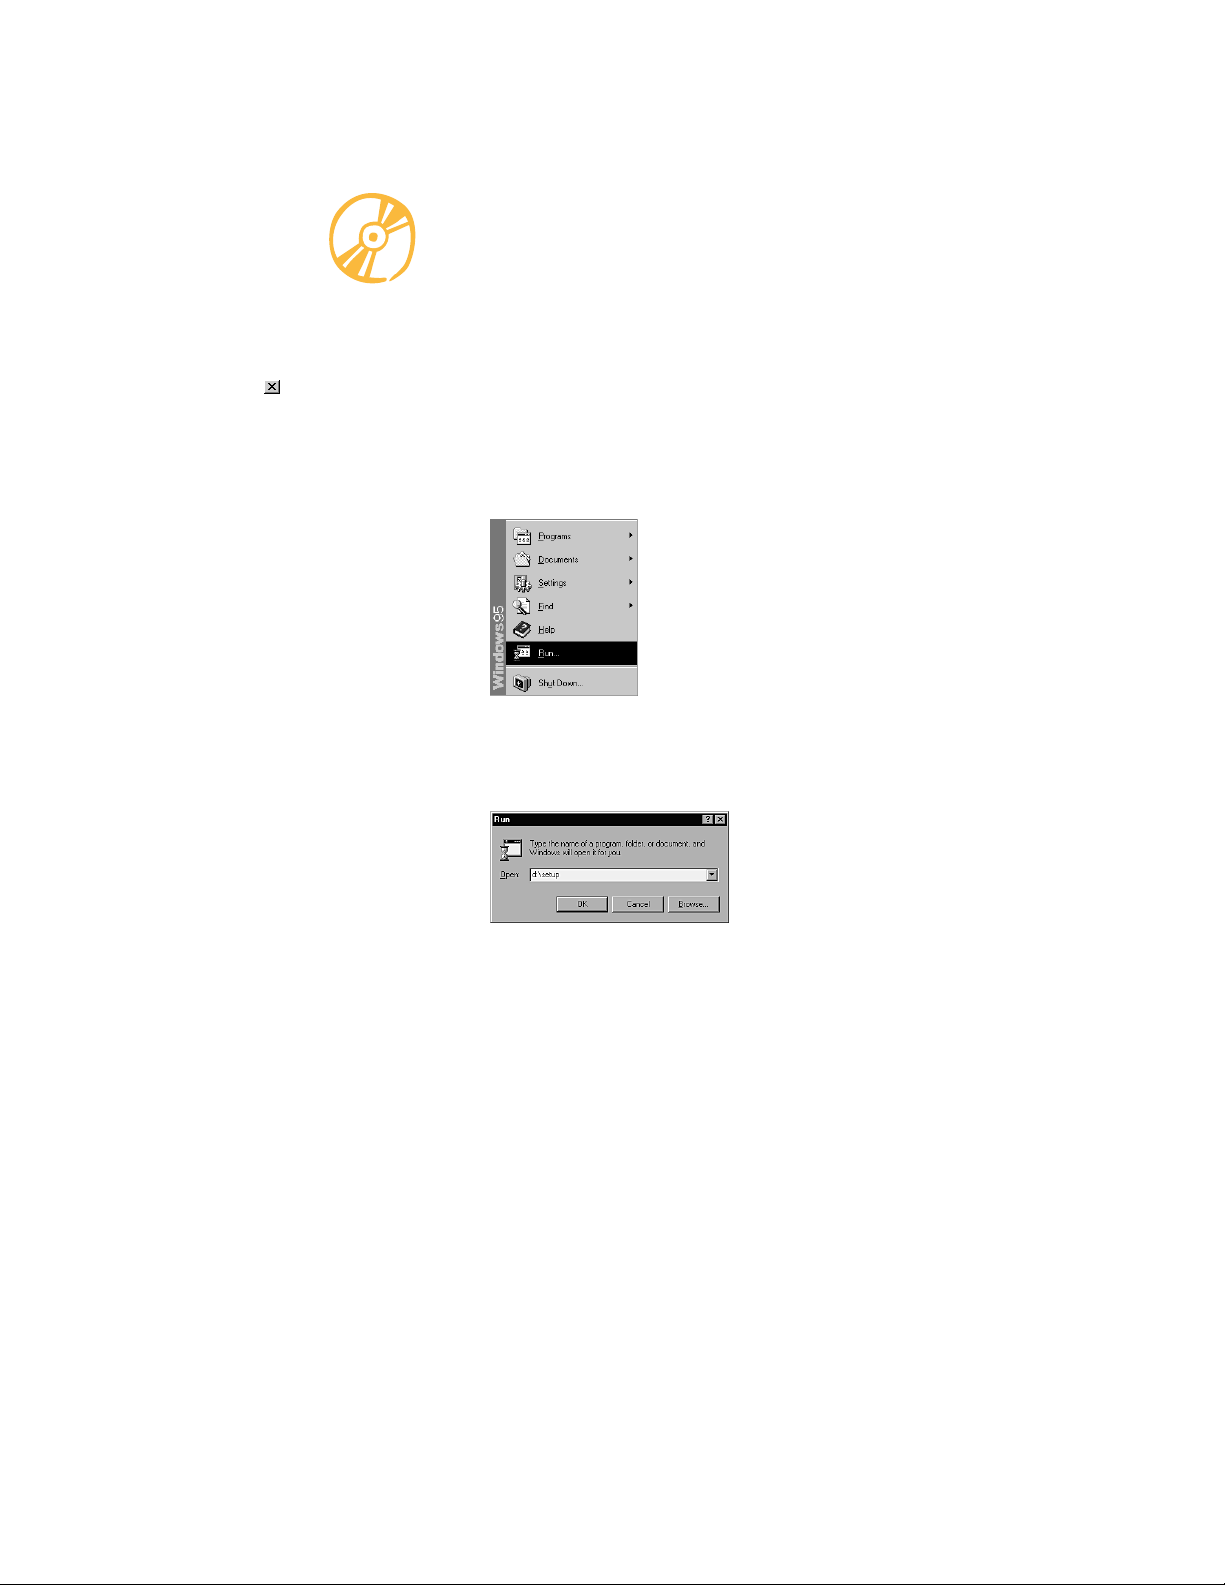
Windows 95, Windows 98, Windows NT 4.0
Insert the CD into your CD-ROM drive.
6
After a few seconds, the HP DeskJet opening screen appears.
If the opening screen does not appear, do the
7
following:
a. Click Start on the taskbar, and then click Run.
b. Type d:\setup and click OK.
If your CD-ROM drive is assigned to a letter other than “d:,
type that letter instead.
Windows NT 4.0 users:
You need to set the
HP DeskJet 690C Series
Printer as the default
printer. See page 13
for instructions.
When the opening screen appears, click Install the
8
HP DeskJet 690C Series Software on your PC and
follow the instructions on the screen.
If something goes wrong, see page 14.
9 When the installer instructs you to restart Windows,
the installation is complete. Remove the CD from
your CD-ROM drive and restart Windows.
9
Page 10
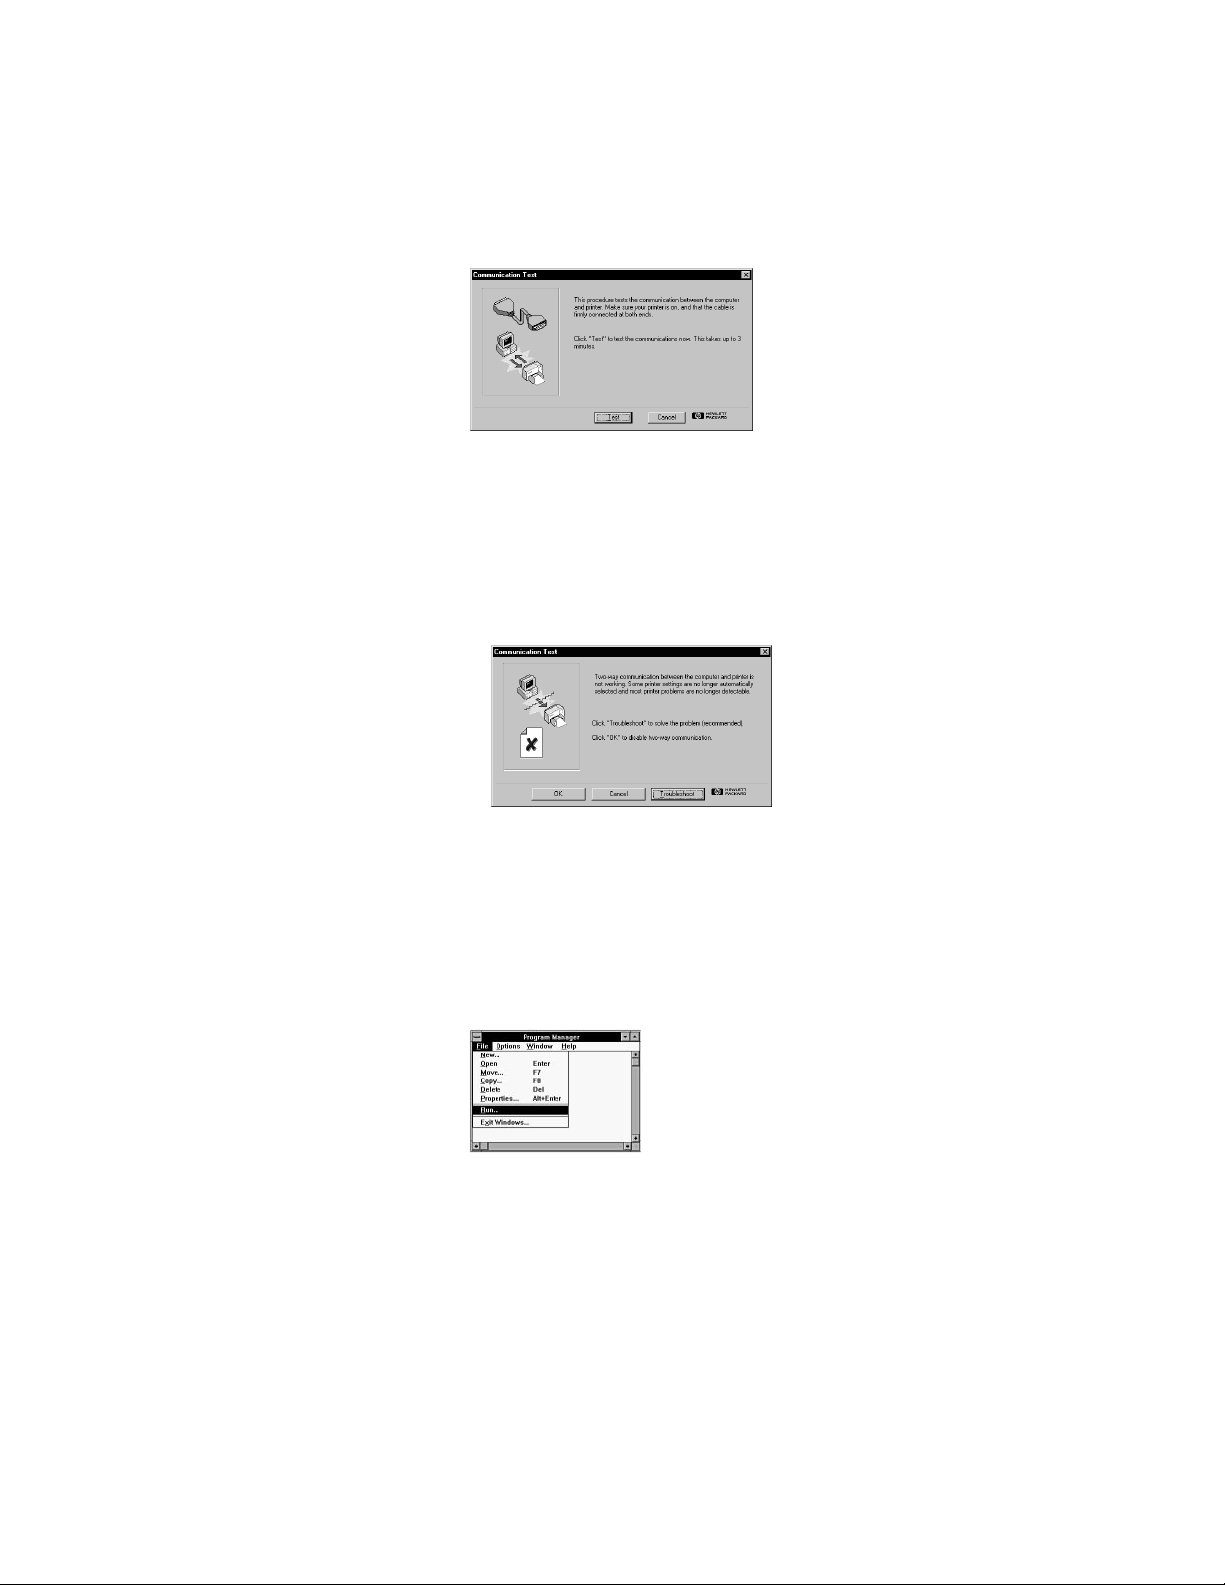
10 When the Communication Test dialog box appears,
click Test.
11 Do one of the following:
• If the test is successful, skip the rest of this section and go to
page 15.
• If the test is not successful, click Troubleshoot and try to correct
this problem. If you cannot correct this problem, click OK. For
more information about printer communications, see page 13.
10
Windows 3.1x
6 Insert the CD into your CD-ROM drive.
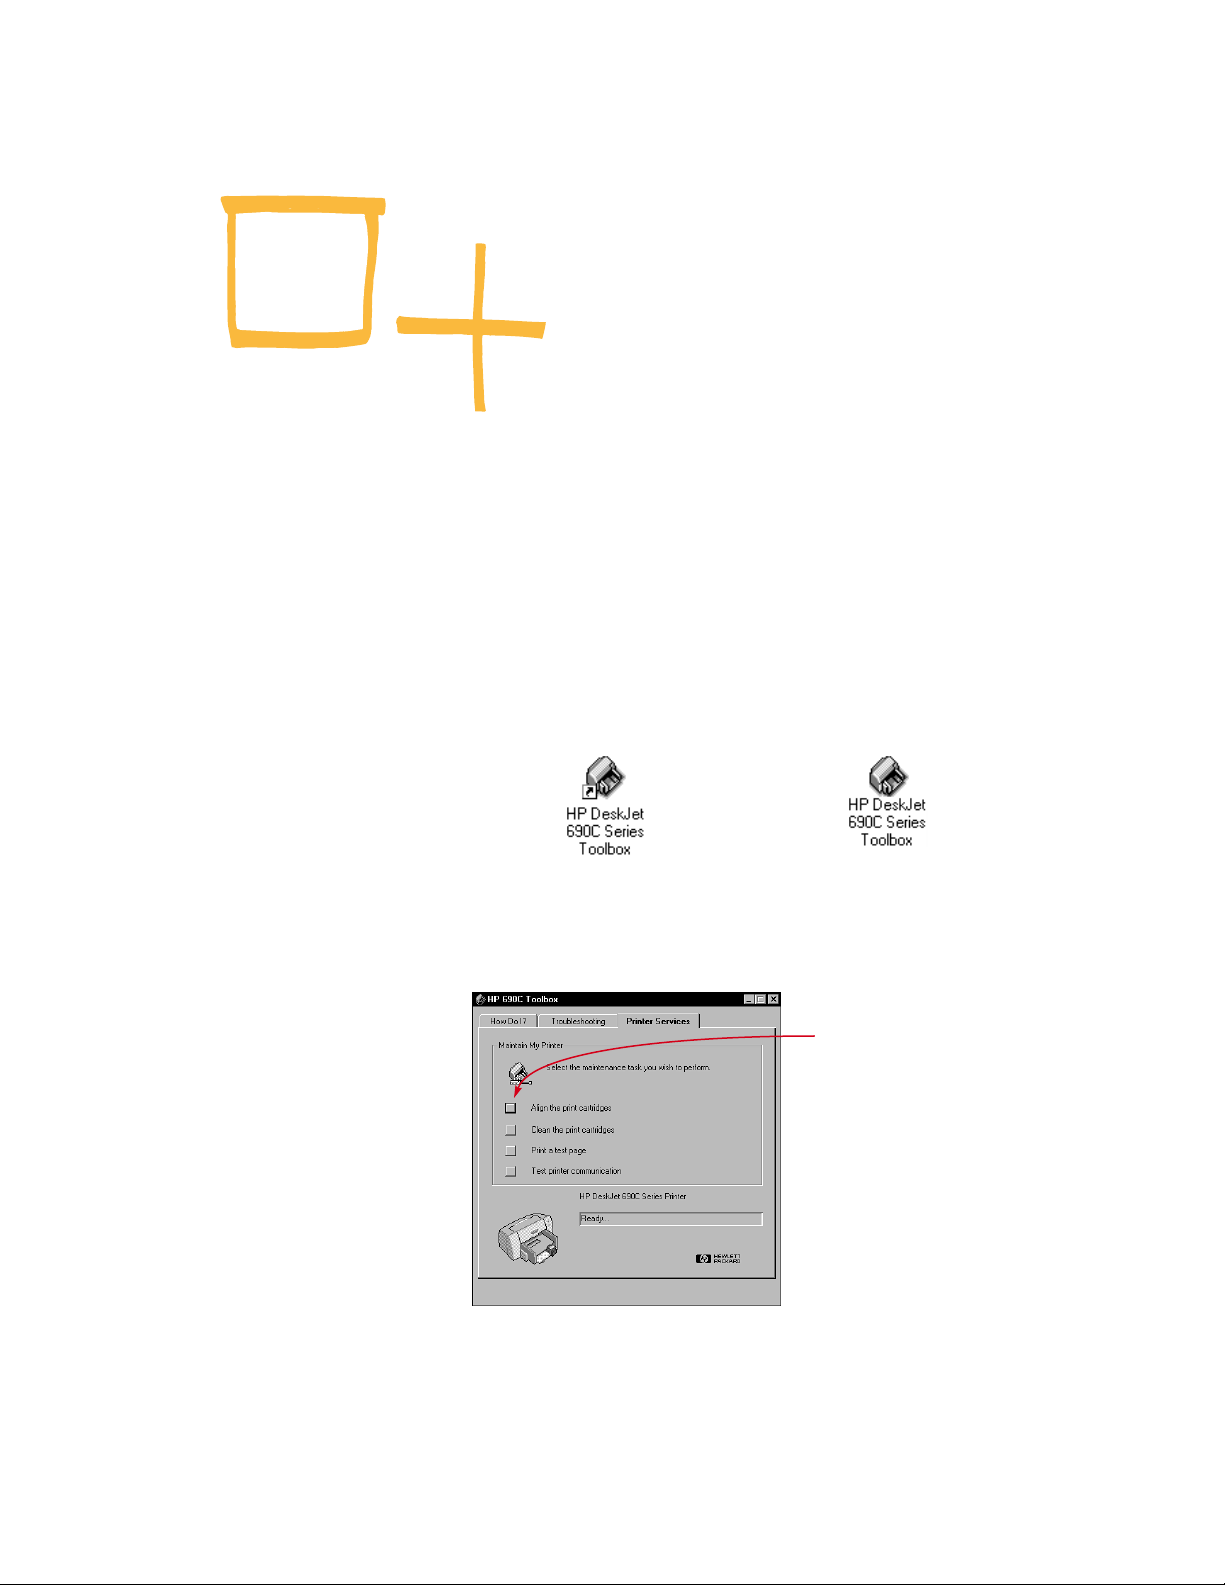
7 In the Program Manager, click File and then click
Run.
Page 11
8 Type d:\setup and click OK.
If your CD-ROM drive is assigned to a letter other than “d”, type
that letter instead.
9 When the opening screen appears, click Install the
HP DeskJet 690C Series Software on your PC and
follow the instructions on the screen.
If something goes wrong, see page 14.
10 When the installer instructs you to restart Windows,
the installation is complete. Remove the CD from
your CD-ROM drive and restart Windows.
11 When the Communication Test screen appears,
click Test.
12 Do one of the following:
• If the test is successful, skip the rest of this section and go to
page 15.
• If the test is not successful, click Troubleshoot and try to correct
this problem. If you cannot correct this problem, click OK. For
more information about printer communications, see page 13.
11
Page 12

Installing from Disks
Windows 95, Windows 98, and Windows 3.1x
6 Insert Disk 1 into the disk drive.
7 Windows 95 and Windows 98 users: click Start on the
taskbar and then click Run.
Windows 3.1x users: in the Program Manager, click
File, and then click Run.
8 Type a:\setup and click OK.
If your disk drive is assigned to a letter other than “a”, type that
letter instead.
9 When the opening screen appears, click Install the
HP DeskJet 690C Series Software on your PC and
follow the instructions on the screen.
If something goes wrong, see page 14.
10 When the installer instructs you to restart Windows,
the installation is complete. Remove the disk from
your disk drive and restart Windows.
11 When the Communication Test dialog box appears,
click Test.
12 Do one of the following:
• If the test is successful, skip the rest of this section and go to
page 15.
• If the test is not successful, click Troubleshoot and try to correct
this problem. If you cannot correct this problem, click OK. For
more information about printer communications, see page 13.
12
Page 13

Additional information about
installing your printer software
If you are installing
printer software, close all
software programs except
the HP DeskJet installer.
When all software
programs are closed, only
Program Manager appears.
Closing software programs
In Windows 3.1x:
1 While holding down ALT, press TAB to locate an open
software program.
2 When you locate an open software program, release
both keys.
3 Click File, and then click Exit.
4 Repeat steps 1 through 3 for each open software
program.
In Windows 95, Windows 98, and Windows NT 4.0:
1 Right-click the software program on the taskbar and
click Close.
2 Repeat step 1 for each open software program.
Setting your printer as the default
To set your printer as the default in Windows NT 4.0:
1 Click Start on the taskbar, click Settings, and then
click Printers.
2 Right-click the HP DeskJet 690C Series Printer icon
and choose Set As Default.
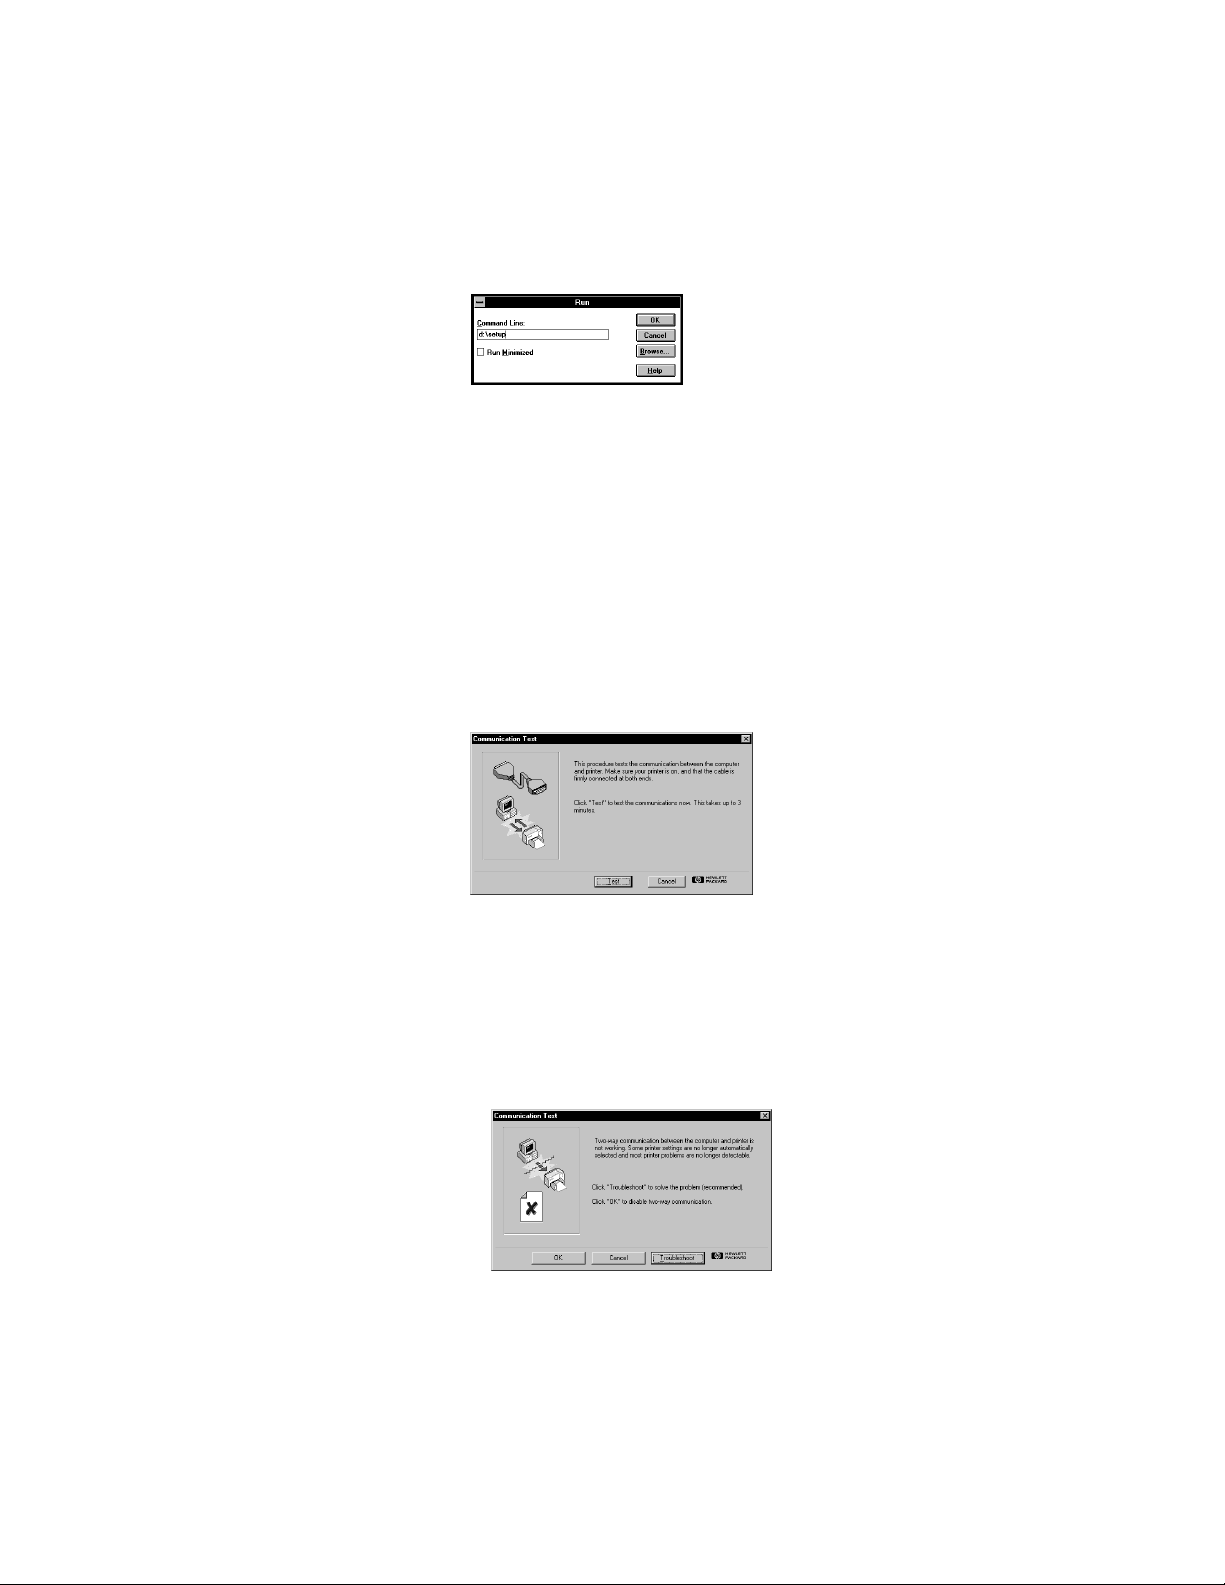
Communications test and two-way
communications
The printer software tests the communication between your computer
and your printer and tells you if you have two-way communication.
Two-way communication allows communication between your printer
and the computer and gives you access to all the features of your
HP Deskjet printer. The cable between your printer and computer
must be bidirectional to allow two-way communication– the HP IEEE1284-compliant Parallel Interface Cable (C2950A) is best. If you do not
have two-way communication, your printer cannot send messages to
the computer. However, you can still print.
13
Page 14

If you have problems installing
1 Make sure your printer is on and all connections
are firm. Ensure that no other peripherals are
connected to the printer cable. Make sure your
cable is IEEE-1284-compliant.
2 Exit your software program and turn off the computer
and the printer. Turn on the printer and then turn on
the computer.
3 Close any virus protection programs that are running
on your computer. Right-click the virus protection
program icon in the taskbar status area, and then
click Disable.
4 Uninstall the printer software using the instructions
on page 66 of the user’s guide.
5 Try the installation process again.
6 If you get a message that two-way communication is
not working, click OK and continue with the rest of
the installation. For more information on the
communication test, see page 13.
14
If you’re still having problems with the installation
Try the installation process again. If you still have problems, call an
authorized HP dealer or call your HP Customer Support representative.
For the phone number nearest you, see page 50 in the user’s guide.
Page 15
7
Align the print
cartridges
To ensure that you get the best print quality, align the print
cartridges for the final step in setting up your printer. Be sure to
align the cartridges whenever you install a new cartridge.
1 Be sure the printer’s IN tray contains plain paper.
Don’t waste your HP Photo Paper or HP Premium Glossy paper by
using them to align the cartridges.
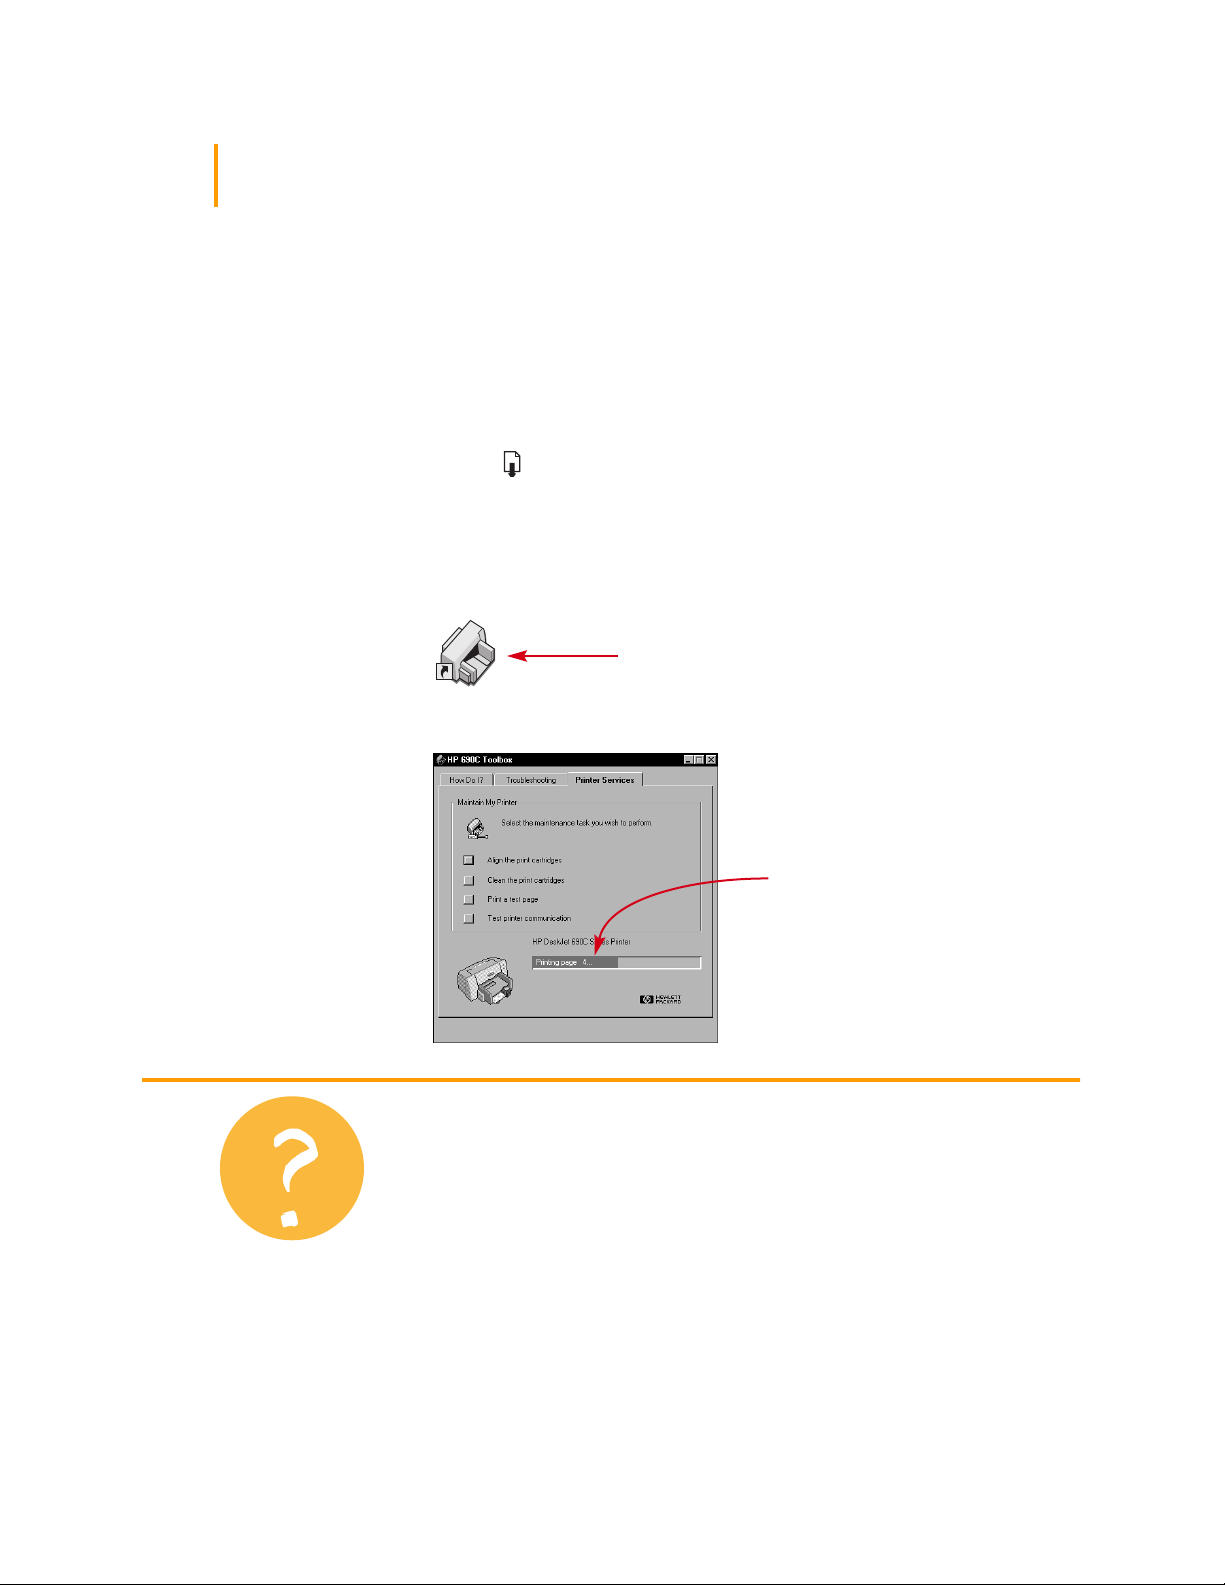
2 Double-click the HP Toolbox icon on the computer
screen.
Windows 95, Windows 98, & NT 4.0 Windows 3.1x
3 Select the Printer Services tab, and then click
Align the print cartridges. Follow the directions
on the screen.
Click here to align the
print cartridges.
15
Page 16
Print a Page
You’re done setting up your printer! While you still have
the HP Toolbox open, you can try printing a page, just to
see what your printer can do.
1 On the Printer Services tab of the HP Toolbox, click
Print a test page.
Click here to
print a test page.
16
2 Check out the results!
You’re ready to print your own work. For instructions, tips, and some
fun suggestions, see the user’s guide.
Page 17

Support and Registration
For product support and printer registration, please refer to the HP DeskJet
Support Web site:
http://www.hp.com/support/deskjet
HP is dedicated to giving you fast and accurate customer support. So that we
can give you the best service possible, please have the following information
available:
● What is the serial number of your __________________________
printer? (The serial number label is on the
bottom of the printer.)
● What model of printer do you have? __________________________
● What brand and model is __________________________
your computer?
● What version of printer software __________________________
are you using? (See your Printer Setup
dialog box for the name of the selected driver.)
HP DeskJet 695C/697C
Page 18

English
HP DeskJet 695C/697C Series Printer
User’s Guide
Page 19

Acknowledgments
Microsoft®, Windows® and Windows NT® are U.S. registered trademarks of Microsoft
Corporation. Screenshot(s) reprinted by permission from Microsoft Corporation.
Notice
The information contained in this document is subject to change without notice.
Hewlett-Packard makes no warranty of any kind with regard to this material, including,
but not limited to, the implied warranties of merchantability and fitness for a particular
purpose.
Hewlett-Packard shall not be liable for errors contained herein or for incidental or
consequential damages in connection with the furnishing, performance, or use of this
material.
No part of this document may be photocopied, reproduced, or translated to another
language without the prior written consent of Hewlett-Packard Company.
Printing History
Edition 1, April 1998
© Copyright 1998 by Hewlett-Packard Company
Page 20

Table of Contents
1 How Printing Works 2
2 Printing Basics 4
How to choose paper 5
How to put the paper in the printer 6
How to print on standard paper sizes 8
How to print on nonstandard paper sizes 12
How to print on both sides of the paper 14
How to flip a document 16
About color 18
About photographs and pictures 19
How to print a photograph 21
3 Printing on Different Kinds of Paper 24
Banners 25
Envelopes 29
Transparencies 33
Labels 36
Cards 38
1
4 How to Get the Most Out of Your Printer 41
5 Getting Help When Things Go Wrong 43
The HP Toolbox 44
Troubleshooting with the HP Toolbox 45
What the buttons and lights do 48
HP Customer Support 49
6 More About Your Printer 52
System requirements 53
Print cartridges 54
Minimum printing margins 59
Product specifications 59
Ordering supplies and accessories 61
Printing from MS-DOS 64
Uninstalling the printer software 66
Additional symbol sets and fonts 66
Limited Warranty Statement 68
Legal information 69
Index 70
Page 21
2
How Printing Works
1 You lay out the page and choose the text,
pictures, fonts, and colors from your
software program (such as a word
processor or drawing program).
2 You select settings such as paper type, paper
size, orientation, and print quality in the
HP print settings dialog box.
3 You check your print job status, and get
help on printing and solving your print
problems in the HP Toolbox.
4 Your software program and
the printer software send
information to the printer,
where it is translated into dots
of ink on the page.
Page 22
5 The printer sends information to the computer about
the printing progress, as well as any errors which
display on your screen.
3
OUT tray
IN tray
6 The printer picks up the
top sheet from the stack in
the lower (IN) tray, prints
on it, passes it to the upper
(OUT) tray, then picks up
the next top sheet from the
stack in the IN tray.
7 Your printer prints at different speeds, depending on the complexity of the job and the
print quality you have chosen. Graphics and color printing takes longer than black
and white printing.
To learn more about what your printer can do for you, see these pages:
Banners
See page 25.
Cards
See page 38.
Envelopes
See page 29.
Labels
See page 36.
Paper
See page 5.
Photographs
See page 19.
Transparencies
See page 33.
Page 23

4
Printing Basics
How to choose paper
How to put the paper in the printer
How to print on standard paper sizes
How to flip a document
About color
About photographs and pictures
In this chapter
Although your printer can do some pretty fancy stuff, most of the time you’ll
be printing words and pictures on paper. The process is simple: just choose
the paper you want to use, put it in your printer, and print from the software
program you’re using on your computer.
If you want to know more about the printing basics, including how to print a
photograph, read on.
Page 24
How to choose paper
Most plain photocopy paper works fine in your printer, particularly paper that is
marked for use in inkjet printers. To get the best results, use one of the HewlettPackard papers, which were developed especially for HP inks and your printer.
What to consider:
● Size..
..
You can use any size paper that fits easily within the paper adjusters of
the printer.
width = 5 to 8.5 inches
(127 to 215 mm)
length = 6 to 14 inches
(152 to 356 mm)
5
Paper Pointer
● Weight..
..
You can choose from a wide range of paper weights. Use 20-24 lb or
75-90 g/m2 plain paper for multipurpose, everyday use.
● Brightness..
..
Some papers are whiter than others and produce sharper, more
vibrant colors. Use HP Photo Paper or HP Premium Photo Paper for printing
photographs and documents with photographs; use white paper, such as HP
Bright White Inkjet Paper for everyday color printing.
● Surface smoothness..
..
The smoothness of the paper affects how crisp the
printing looks on the paper. Paper with a high cotton content (25% to 100%)
tends to offer greater surface smoothness. Glossy, coated paper works well for
pictures and charts (where you want crisp lines with intense, high-quality
colors) and for photocopying.
● Opacity..
..
Opacity refers to the degree to which printing on one side of the
paper shows through to the other side. Use paper high in opacity (or thicker
paper) for two-sided printing.
Get the right paper
Use Hewlett-Packard paper
when you want the most
vivid color and the sharpest
text; it’s an especially good
investment when you plan
to make copies. Look for
it at any office or computer
supply store, or call HP
Direct. See page 62 for the
phone number nearest you.
For something beyond pure
white, explore local office
supply and paper stores.
Or browse computer
magazines for the names
of companies that offer
paper by mail. Most mail
order companies sell a
sampler kit of every paper
they stock to give you a
library of papers that fit
most any need.
The best paper for
photographs
Use HP Photo Paper or
HP Premium Photo Paper
for the best-looking printed
photographs.
Page 25
6
How to put the paper in the printer
The lower (IN) tray is the printer’s launch pad. Careful preparation ensures a
successful journey. Make sure all the paper in the tray is the same size and is
stacked neatly and snugly for a smooth take-off.
Let’s walk through the process step-by-step:
1 Slide out the paper-width and paper-length adjusters to make room for the
paper.
Do this no matter what size paper you’re using.
Paper-width adjuster
Paper-length adjuster
2 Fan the edges of the paper stack to separate the pages. Then tap the stack on a
flat surface to even it.
Paper Pointer
Paper that won’t work
● Highly-textured stock,
such as linen, might not
print evenly; the ink
might bleed into these
papers.
● Extremely smooth,
shiny, or coated papers
not specifically
designed for an inkjet
printer might jam the
printer and might
actually repel ink.
● Multi-part forms (such
as duplicate or triplicate
forms) could wrinkle in
the printer or get stuck;
the ink is also more
likely to smear.
● Paper in poor
condition—with tears,
dust, wrinkles, or
curled or bent edges, or
that doesn’t lie flat—
could jam the printer.
Page 26
3 Put the paper in the lower (IN) tray, print side down.
Most paper prints better on one side than on the other. The print side is
usually indicated on the paper package.
IN tray
4 Slide the paper adjusters so that they fit snugly against the edges of the paper.
Make sure the paper still lies flat in the tray.
7
Paper Pointer
Printing zone
Your printer can’t print
right to the edge of the
paper. Be sure to set the
margins so that the
document falls within the
printable area, or part of it
might be cut off. For
details, see page 59.
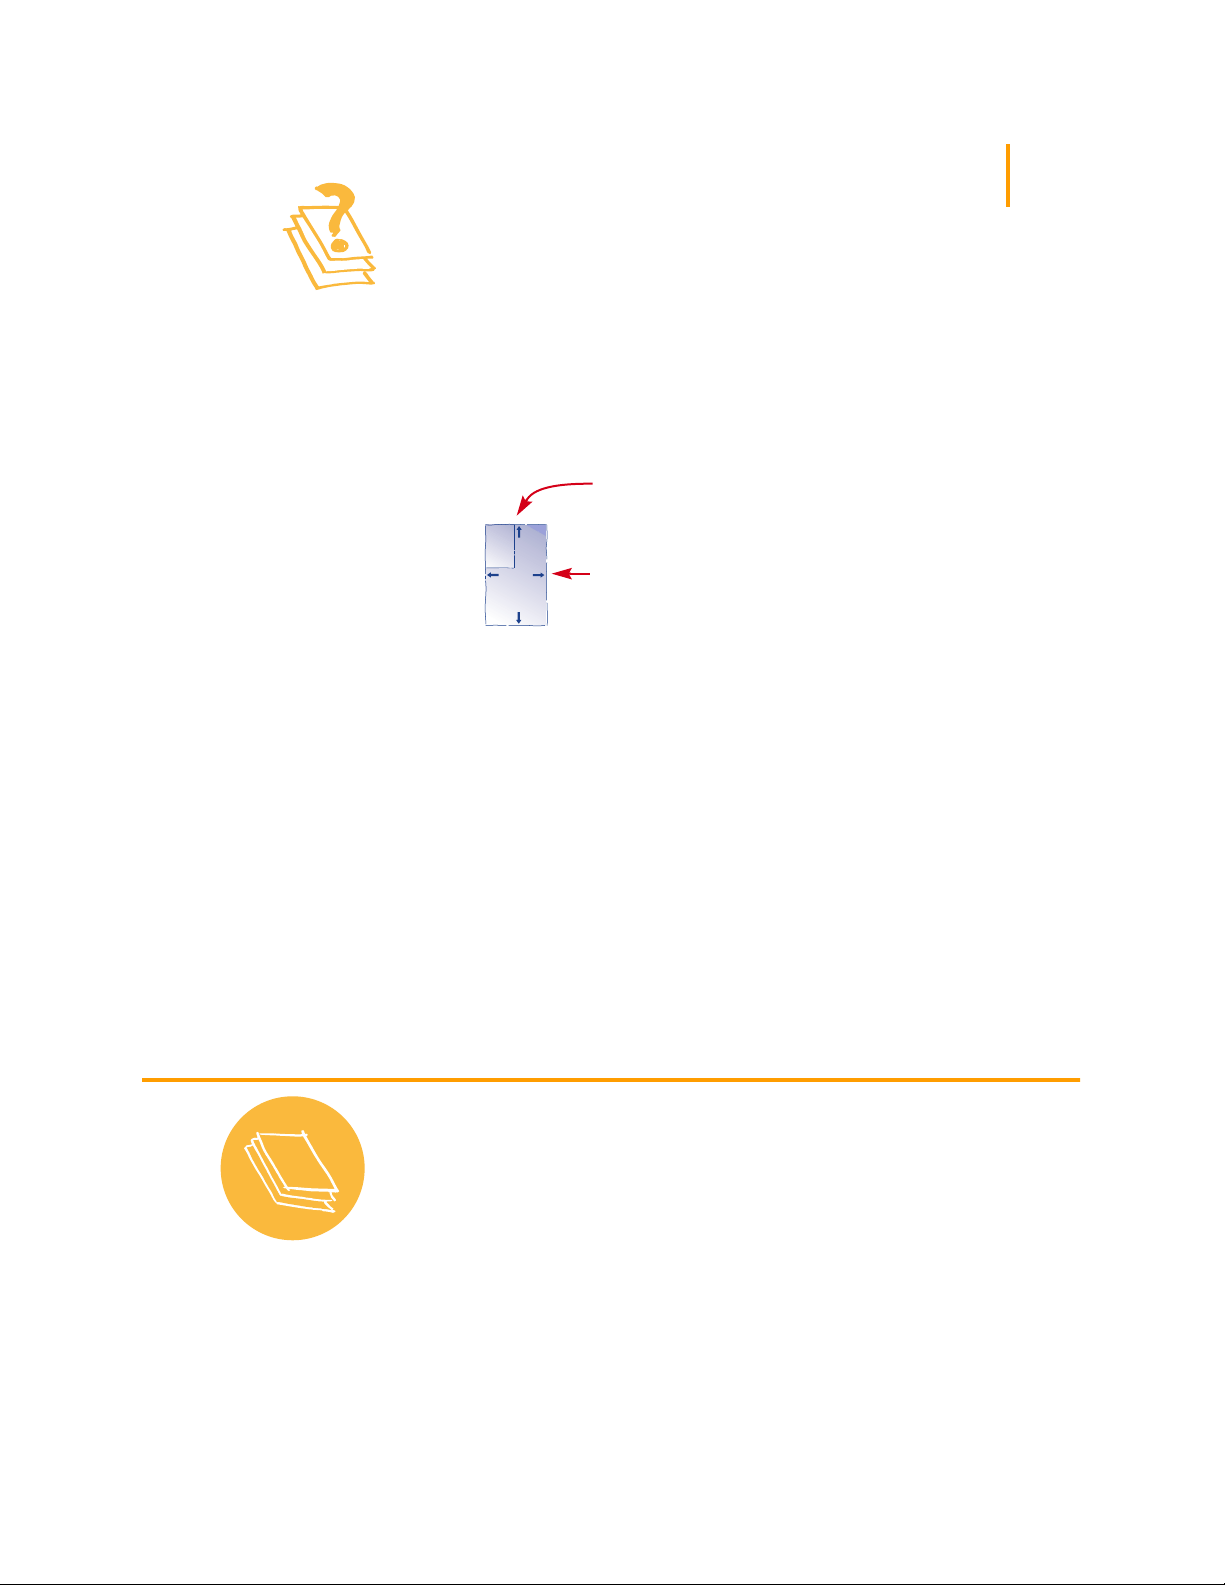
Document margins
Area in which the printer can print
Page 27

8
See page 41
How to print on standard paper sizes
1 Check your print settings.
Choose your print settings in the HP print settings dialog box. (See
page 41 to find out how to get to the box.)
Choose color options on the Color tab.
Click the Color tab.
Depending on the
operating system on
your computer, your
boxes might differ from
the Windows 95 boxes
shown throughout
this document and
the setup guide.
Handy Hints
Choose print quality, paper size, paper type, and banner printing, on the
Setup tab.
Click the Setup tab.
First click the down arrow, and then
click your selection.
Printing from MS-DOS
For information about
printing from MS-DOS
software programs, see
.
page 64
Click ‘n’ go
Look for this Print button at
the top of your screen in
your software programs —
simply click it to print one
copy using the last print
settings.
Page 28

Choose two-sided printing, orientation, and flip horizontal options on the
Features tab.
Click the Features tab.
Click OK to save.
2 Click OK in the Print box of your software program to save your settings and
start printing.
You might need to click File and then click Print to reach the Print box.
9
Handy Hints
Click OK.
That’s all there is to it. The printer prints one page at a time until it finishes,
delivering each printed page neatly into the printer’s upper (OUT) tray.
Seeing fonts close up
Most software programs
only give you a peek at the
way a font looks. But if
you’re working in
Windows 95, Windows 98,
or Windows NT 4.0, it’s
easy to print a sample page
of each font. Simply click
Start and then click
Settings. Click Control
Panel and then double-
click Fonts. Double-click
any font for which you
want to preview and print
a sample.
Page 29
10
While you’re printing
It takes a few moments for the printing to start, because the printer is receiving
information from the computer. During printing, the printer might pause
occasionally to receive more information. (Don’t worry, it’s normal.)
If you run out of paper before you’re finished
The printer prompts you to add more paper. Put the paper in the lower (IN) tray and
press Resume .
If you want to check the printing progress
Double-click the HP Toolbox icon, which appears at the bottom of the screen in the
taskbar (Windows 95, Windows 98, and Windows NT 4.0) or on the desktop
(Windows 3.1x) every time you start a print job.
HP Toolbox icon
Click the Printer Services tab to see which page is printing.
What If
The paper is stuck in
the printer
First, turn the printer off
and click Cancel Printing
(if a message appears on
your screen). Pull all the
jammed or torn paper from
the printer. Turn the printer
back on, and print the
document again.
Printing information
You just get black and
shades of gray instead
of color
Perhaps the color printing
is turned off. On the Color
tab of the HP print settings
dialog box, make sure the
Print in Grayscale check
box is not selected (does
not contain a “✓”).
Page 30

or sn ame jstujn de
ut labore qusft vo
sed kitft ghocknor
See page 44
11
If something goes wrong
Sometimes, in spite of your best efforts, something goes wrong during printing.
Maybe a sheet of paper jams in the printer or nothing happens at all.
● If the printer detects a problem, it displays a message on your screen.
● If you notice that something is wrong, click the Troubleshooting tab in the
HP Toolbox and follow the instructions on the screen. (See page 44 to find out
how to get to the HP Toolbox.)
Click the Troubleshooting tab.
What If
The printouts are
smeared or uneven
First, check the print
cartridges—they might be
dirty or low on ink. To find
out how to clean or replace
them, see the instructions
beginning on page 55.
Page 31

12
See page 41
How to print on nonstandard paper sizes
Most of the time, when you print on plain paper, cards, labels, and envelopes,
you select one of the standard sizes in the Paper Size box on the Setup tab of the
HP print settings dialog box. However, you’re not limited to the sizes listed. Just
make sure that the size of the paper falls within the following dimensions (so both
of the printer rollers can pick up the paper):
Width: 5 to 8.5 inches (127 to 215 mm) with card guide down
4 to 8.5 inches (100 to 215 mm) with card guide up
Length: 6 to 14 inches (152 to 356 mm)
Then follow these steps:
1 In the HP print settings dialog box, click the Setup tab, and then select
Custom in the Paper Size list. (See page 41 to find out how to get to the
HP print settings dialog box.)
Click Custom.
Paper Pointer
Make your own
notepads
Design and print your own
notepad; then copy it and
trim the paper into the right
size sheets. Have your local
copy center turn them into
pads or pad them yourself.
Look under Printing
Supplies in your telephone
directory to find a source
for the special glue called
“padding compound.”
Page 32

2 Type the dimensions of the paper in the Custom Paper Size dialog box, and
click OK.
3 Put the paper in the printer, and print as you would for normal paper sizes.
AFTER PRINTING
Change the paper size back to Letter, or A4, or whatever paper size you
plan to print on next.
13
Page 33

14
See page 41
How to print on both sides of the paper
The easiest way to save paper is to print on both sides. Just put the paper through
the printer twice: the first time through it prints the odd-numbered pages and the
second time through it prints the even.
1 Put the paper in the lower (IN) tray.
Make sure that there’s no paper in the upper (OUT) tray.
2 In the HP print settings dialog box, click the Setup tab, and click Plain Paper
or HP Photo Paper as the paper type. (See page 41 to find out how to get to the
HP print settings dialog box.)
3 Click the Features tab and then click Book or Tablet.
Click the Features tab.
Click Book so the sheets can be
bound on the left.
Click Tablet so the sheets can
be bound at the top.
What paper works best
for double-sided
printing
Look for any paper in
which pictures and text
printed on one side don’t
show through on the other.
Collect samples that
are heavier than 24 lb (90
2
) paper, and test
g/m
them to make sure they
meet your needs.
4 Print your document.
The printer automatically prints only the odd-numbered pages.
What If
The second side
printed like this
● You might have chosen
Tablet instead of Book
on the HP print settings
dialog box. (See step 3
above.)
● You might have
forgotten to rotate
the paper after the
first side printed. Print
the document again,
carefully following
the directions on
your screen.
Page 34

5 Put the printed pages back in the lower (IN) tray of the printer.
A message on your screen tells you which direction to put the printed
pages back in the printer. The following illustration shows how to put the
paper back in the printer for portrait orientation and the Book option.
Book option
Odd-numbered pages print first. Reload to print the even-numbered pages.
Tablet option
15
What If
Odd-numbered pages print first. Reload to print the even-numbered pages.
6 When the paper is ready, click Continue.
AFTER PRINTING
Change the Two-Sided Printing option back to None.
Both pages printed on
one side of the paper
Y ou put the paper print side
down when you replaced it
in the printer. Print your
document again, carefully
following the message on
your screen.
The ink smeared
The ink might not have
dried completely, so wait a
little longer before you
print the second side. You
can shorten drying times by
reducing the quality of the
printing—for example,
from Normal to EconoFast
mode. (Directions for
changing print quality
begin on page 41.)
Page 35

16
See page 33
See page 41
How to flip a document
When you print a flipped document, the text and pictures are reversed, so they’ll be
correct when transferred. (See the bottom of this page for some ideas about using
flipped documents.)
The original The flipped document
1 Put the paper in the lower (IN) tray, print side down.
If you’re using transparencies or special paper, you might need to follow
additional directions. (See page 33 for information about printing
transparencies.)
2 In the HP print settings dialog box, click the Features tab, and then click
Flip Horizontal. (See page 41 to find out how to get to the HP print settings
dialog box.)
Handy Hints
Better than a card
Make a t-shirt for that
special birthday or your
child’s team. Use a
photograph you took or a
design of your own. And
why stop at t-shirts?
Transfer images to aprons,
pillow covers, or lightweight jackets.
Call a computer or office
supply store for HP IronOn T -Shirt Transfers. Get
a 100%-cotton or poly-
Click Flip Horizontal.
cotton t-shirt—light colors
work best. Then put your
photograph or design in a
computer document. (To
find out how to do this, see
page 19.)
Now print using the Flip
Horizontal option. Be sure
to place the transfer paper
blank side down in the
printer. Use the color and
photo cartridges with Plain
P aper or HP Premium
Inkjet Paper print settings.
Page 36

3 Print your document.
The text and pictures are backwards. Hold it up to a mirror to see how the
final product will look.
AFTER PRINTING
1 In the Features tab of the HP print settings dialog box, click Flip Horizontal to
remove the checkmark.
2 If you used transparencies or special paper, replace it with your everyday
paper.
17
Handy Hints
Protect your
transparencies
Sometimes you want to
make notes right on a
transparency as you talk,
but you risk damaging it. If
you print the transparency
as a flipped document,
you’ll be able to project it
so you can make your
notations on the back. Now ,
it’s easy to wipe off the
notes without scratching
the original.
What If
The letters on my
transfer aren’t reversed
You forgot to click Flip
Horizontal on the Features
tab of the print settings
dialog box. Repeat step 2
on the previous page, and
print the transfer again.
Page 37

18
About color
Believe it or not, your color printer prints with only four colors—cyan, magenta,
yellow, and black. By printing overlapping dots of different intensity and color, it
creates practically any color you can imagine.
BlackCyan YellowMagenta
Your printer is especially smart about printing color. (That’s why HP called the
technology ColorSmart™!) When you print a document in color, the printer marks
each element in your document—text, full-color photographs, and graphics (such
as pie charts with solid blocks of color)—and renders each at its vivid best. (If you
use the photo cartridge when you print color photographs, you’ll get photo-quality
images!) Not only is the color quality high, for whatever you’re printing, but it’s also
less expensive than making color copies at a copy shop.
How to turn off color
What If
The color text and pictures that you create in your documents automatically print
in color. You can print drafts of your color documents in grayscale if you’re going
to photocopy them or if you want to save time and ink.
● In the HP print settings dialog box, click the Color tab, and then click Print in
Grayscale.
A “✓” means that color is turned off.
Now your color documents print in shades of gray until you change the setting.
For faster draft printing in grayscale, use the black print cartridge, not the photo
cartridge.
The printed colors
don’t match the screen
colors
Because of the physics of
how color is made on
screen (with light) and at
the printer (with dyes and
pigments), there might
always be a slight
mismatch.
However, if the differences
are dramatic the wrong
cartridge might be in the
printer—insert the photo
cartridge for printing
photographs; insert the
black print cartridge for
printing other pictures
and text.
The colors aren’t
as vivid as they
should be
The printer might be low
on ink. Or you might be
printing on the wrong side
of the paper. If turning the
paper over makes no
difference, change the
quality of printing to Best.
If you’re using a special
paper, change the Paper
Type setting to match the
paper. (Step 1 in How to
print on standard paper
sizes on page 8 tells how.)
Page 38

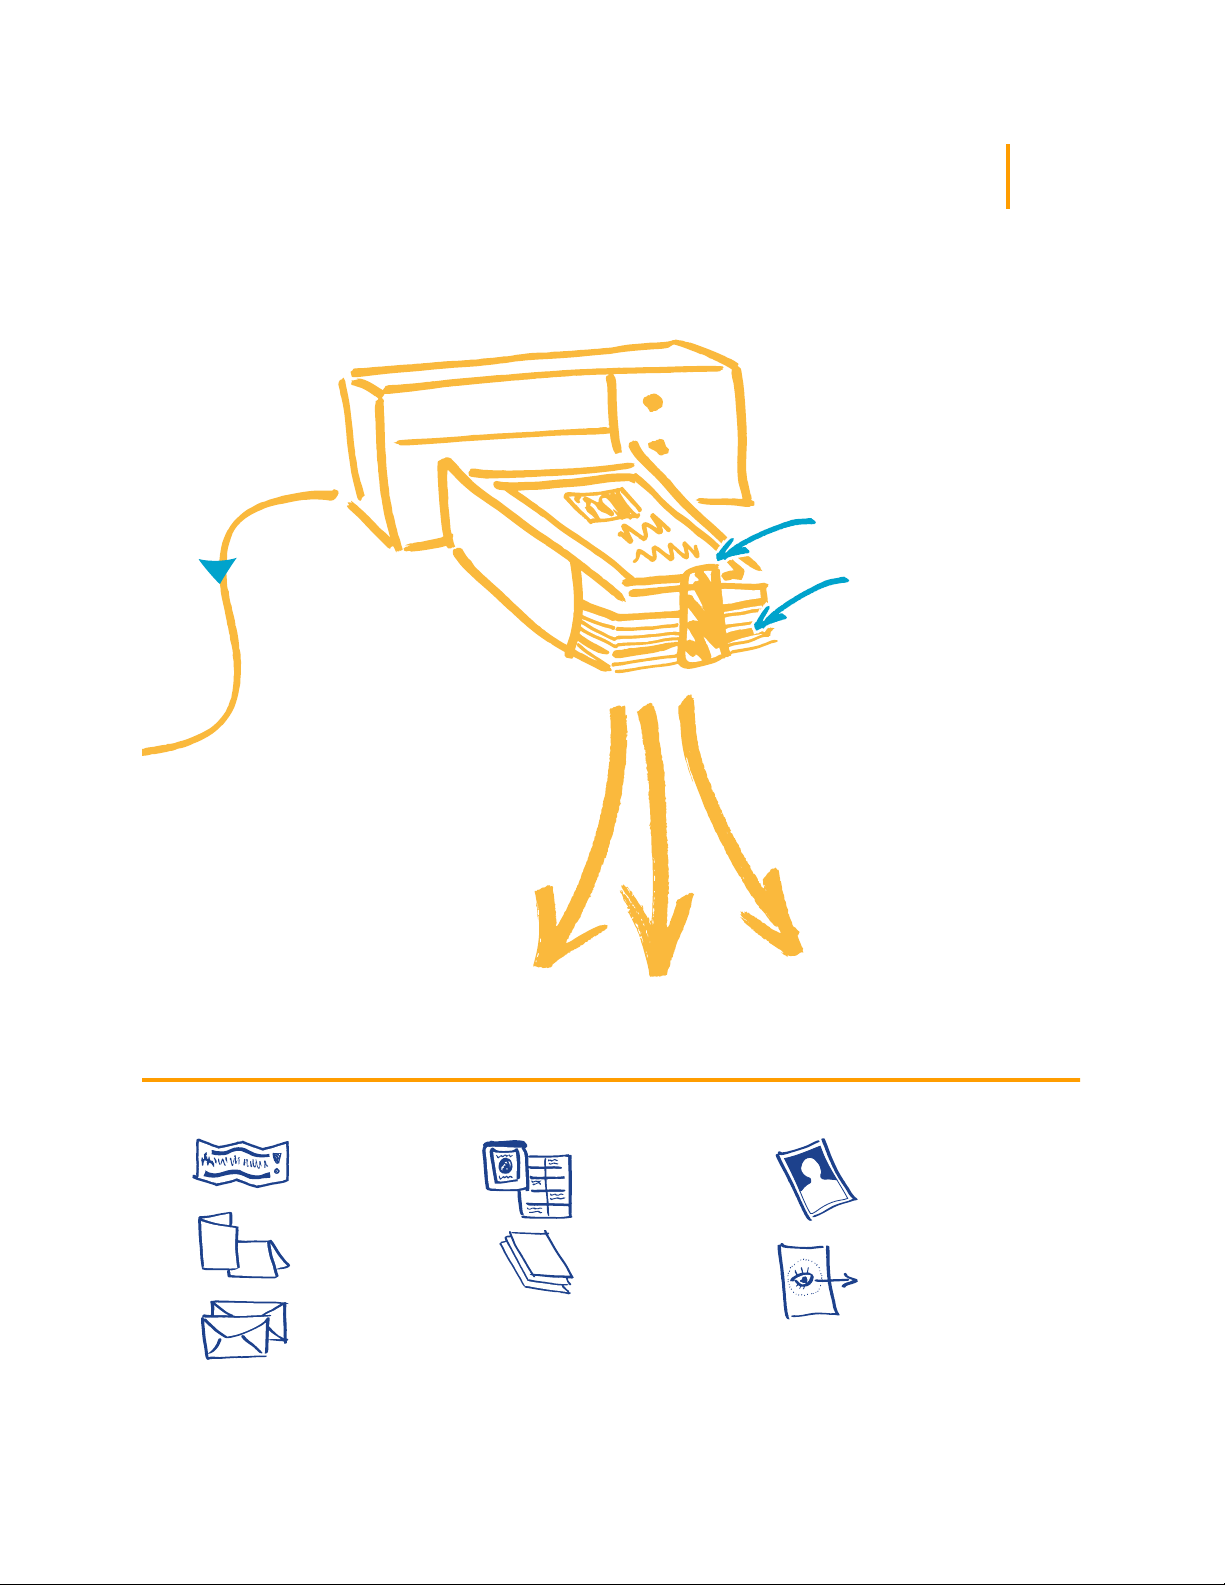
About photographs and pictures
Pictures (also called graphics) include photographs, illustrations, charts, and
decorative elements.
Photographs Charts and Graphs Decorative elements Illustrations
How to get a picture on your computer
To put a picture in a computer document, you first need to convert it into an
electronic form (a computer file). Then it’s simple to copy it into a document—the
guide for the application you’re using tells you how. Here are some possibilities for
getting your pictures into an electronic form:
● Draw the pictures, using the drawing tools in a software application.
19
Handy Hints
● Use ready-made clip art. You can purchase libraries of clip art from a variety of
sources or browse the Internet for what’s available there. See “Need a picture?”
below for more ideas.
Need a picture?
Look through computer
magazines for the names of
companies that sell clip art.
They’ll be happy to send
you full-color pictures of
their extensive offerings.
The only limits will be
your desire and pocketbook! Or browse in the
art sections of bookstores
for books of copyright-free
pictures such as oldfashioned illustrations,
engravings, or elaborate
alphabets.
Remember that it is against
the law to copy any
photograph unless you
have been given specific
permission to do so by the
person or company who
owns the negative.
Page 39

20
● Scan the pictures yourself. Use your own scanner or gather your pictures
together and rent a scanner at a local copy shop.
● Get your photos scanned at your local camera shop. For a small fee, you can
have an entire roll of photos put on a CD. Be sure to ask your camera shop to
also put a CD-viewing program on the CD with your photos.
● Take a digital photo. A digital camera bypasses film entirely and turns the
photo into a computer file. Call a full-service copy shop or a camera supply
store about renting one.
Paper Pointer
Make a good
impression
Use HP Photo Paper or HP
Premium Photo Paper for
best results when you’re
printing with the photo
cartridge. HP Photo Paper
is heavyweight and ideal
for two-sided photo
projects. HP Premium
Photo Paper looks and feels
like traditional photo paper.
It is ideal for family
portraits, reprints, and
enlargements. Look for
them at any office or
computer supply store,
or call HP Direct. See
page 62 for the phone
number nearest you.
Wrap it up
For a small gift, design and
make your own wrapping
paper by copying your
company logo or your
child’s drawing over an
entire page.
Page 40

How to print a photograph
Each time you print photographs, you replace the black print cartridge with the
photo cartridge. Therefore, it makes sense to save photographs and print them in
a single printing session.
First, put the photo cartridge in the printer:
1 With the printer turned on, open the top cover.
The cartridge cradles move to the center of the printer and the
Resume light flashes.
2 Pull the top of the black print cartridge toward you until it pops loose. Then lift
it from its cradle.
21
Handy Hints
3 Store the black print cartridge in the print cartridge storage container.
Protect your cartridges
Always store the cartridge
that you’re not using in the
storage container. It’s
specially designed to
protect the ink nozzles
from damage and to keep
the ink from drying out.
Make a great calendar
The sturdy quality of
HP Photo Paper makes it
ideal for a photographic
calendar. Print the
photographs on the glossy
side and the monthly grid
on the matte side. Then
take the printed pages to a
copy shop to have them
bound with a spiral or
comb binding.
Glossy
side
Matte
side
Page 41

22
4 Place the photo cartridge into the now-empty cartridge cradle, and push it
back into position.
You hear a click when the cartridge sits snugly in its cradle.
5 Close the printer’s top cover.
The cradles return to their home position on the right side of the printer
and the Resume light stops flashing.
Next, align the cartridges:
● If you’re using a new cartridge, align the cartridges as described in step 7 of the
setup guide.
● Use plain paper when aligning the cartridges to save your HP Photo Paper.
What If
Pictures take longer
than you expect to
print, or they don’t
print at all
Be patient. Because of
their complexity, pictures
(particularly color
photographs) can take a
long time to print.
If you’re printing a draft,
you can speed up printing
by using EconoFast print
quality (directions begin on
page 41), though the
quality won’t be the best.
Or you can turn off color
altogether and use the
black print cartridge for a
fast, inexpensive black
draft.
Page 42

See page 41
23
Now, print your photograph:
1 If you are using HP Photo Paper or HP Premium Photo Paper: In the Setup tab
of the HP print settings dialog box, click HP Photo Paper or HP Premium Photo
Paper for the Paper Type. (See page 41 to find out how to get to the HP print
settings dialog box.)
2 Put the HP Photo Paper in the lower (IN) tray, ensuring that the side on which
you want to print is facing down.
3 Print your document containing the photographs.
AFTER PRINTING
1 Remove the photo cartridge out of the printer and replace it with the black
print cartridge. Store the photo cartridge in the storage container.
2 If you used any special paper, remove it from the lower (IN) tray and replace it
with plain paper.
3 Reset the printer’s other options for whatever you’ll be printing next.
What If
The colors in the
photograph aren’t what
you expected and the
shadows are missing
Be sure you put the photo
cartridge in the printer.
Follow the steps on pages
21–23 and print the
photograph again.
Pictures don’t look as
crisp as the scanned
original
● The picture might have
been scanned at a
higher number of dots
per inch (dpi) than your
printer can print. To get
the best results, scan
photographs at 150 or
300 dpi. If you scan
them at a higher dpi, the
print quality is not
improved and the
pictures actually take
longer to print.
● You might be printing
photographs with the
black print cartridge
rather than the photo
cartridge.
Page 43

24
Printing on Different
Kinds of Paper
Banners
Envelopes
Transparencies
Labels
Cards
In this chapter
With the printing basics down, you’re ready for some fun. Here’s more of
what your printer can do:
● Print banners to welcome back the home team.
● Print a stack of envelopes or print one envelope at a time.
● Print transparencies for that important presentation.
● Print labels—a quick way to get those monthly mass mailings out
the door.
● Print your favorite family recipes on index cards.
Page 44

Banners
25
In general, the color
and black print
cartridges are used when
printing a banner.
See page 41
We encourage you to use HP Banner Paper for the very best results. However, if
you use computer or z-fold paper for your banners, we recommend that you use
20 lb or 75 g/m2 paper. Always do a good job of fanning the paper before
loading it.
1 Create your banner in any software program that lets you make banners.
2 Click the Setup tab and then click Banner in the HP print settings dialog box.
(See page 41 for how to get to the HP print settings dialog box.)
Click Banner.
Click OK to save.
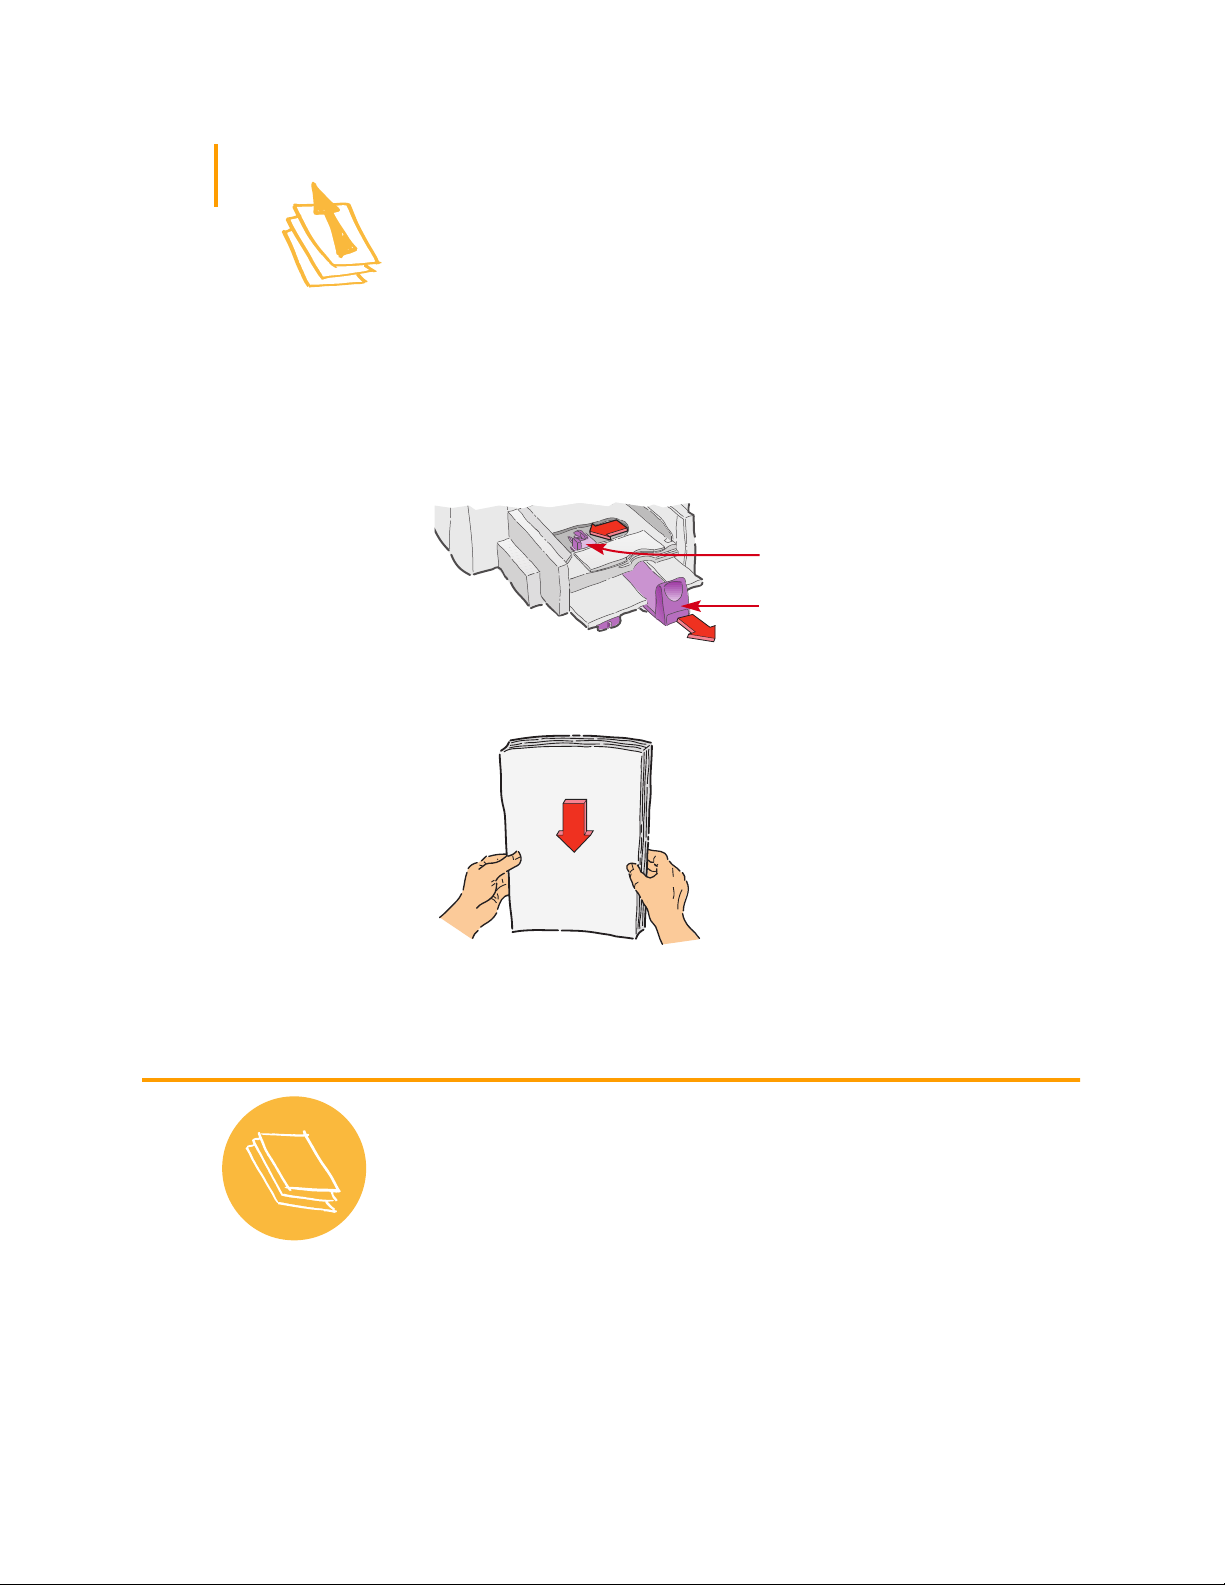
3 Slide the banner lever to the right until it clicks into place.
Paper Pointer
Your best bet
If you use HP Banner
Paper, your banners print
with fewer paper jams,
brighter color and denser
blacks. It’s easy to use,
too—you don’t have
to tear off those pesky
perforated strips! Look
for HP Banner Paper at
any office supply store, or
call HP Direct. See page 62
for the phone number
nearest you.
Slide the banner lever to the right.
If you don’t use HP Banner
Paper, use 20 lb or 75
2
paper. Expect
g/m
problems with lighter or
heavier paper.
Banner paper that
won’t work
Avoid coated paper—for
example, paper that’s
colored on one side and
not on the other.
Page 45

26
4 Remove all paper from the lower (IN) tray and flip up the banner support in the
upper (OUT) tray.
Flip up the banner support.
5 Get the banner paper ready for the printer:
● From the stack of banner paper, tear off at least one more sheet than
you need to print the banner. The stack of banner paper must contain
a minimum of 10 sheets.
● Tear off the perforated strips, if any exist.
● Unfold and refold the stack so the pages don’t stick together in the
printer.
What If
The banner has a big
gap or a crease where
you don’t expect it
The printer may be picking
up more than one sheet of
paper at a time. Take the
paper out and then unfold
and refold the stack. Make
sure you have at least 10
sheets of paper in the
printer. Also be sure the top
and bottom margins are set
to zero in your banner
program. Print it again.
The printer jams while
printing the banner
● You did not select
Banner in the HP print
settings dialog box.
Follow the directions in
step 2 on page 25, and
try printing again.
● Try putting in more
than 10, but less than 20
sheets of paper into the
lower (IN) tray.
● Make sure the banner
support is up.
Page 46

6 Put the paper in the lower (IN) tray so that the torn edge is at the top of the
stack, and facing into the printer.
Torn edge
7 Print your banner.
You’ll notice that the printer and banner paper go through some start-up
movements—don’t worry, it’s normal. Also, banner printing takes a while;
it might be several minutes before you see the results.
8 After your banner prints, press Resume as many times as needed until all
the banner paper is out of the printer.
Resume button
27
What If
You get a message that
says you’re out of
paper, but you’re not
You did not push in the
paper-length adjuster all
the way. Make sure it’s
snug against the paper, and
then try printing again.
The text is fuzzy after
printing a banner
If the print quality seems
especially poor when you
switch from banner
printing, you might have
forgotten to reset the
printer for cut-sheet paper.
Page 47

28
AFTER PRINTING
Reset both the printer and the printer settings for plain paper or for whatever you’ll
be printing next:
● In the Setup tab of the HP print settings dialog box, click Cut-Sheet, and then
click OK to save the setting.
Click Cut-Sheet.
Click OK.
● Slide the banner lever to the left until it clicks into place.
● Lower the banner support.
● Put plain paper in the lower (IN) tray.
Handy Hints
Think big!
● When you make a
banner, remember that
it is meant to be seen
from a distance.
Delicacy, intimate
details, and subtlety
often disappear at a
distance.
● Keep the banner
simple—try using just
a few words, one big
picture, and large,
bold fonts.
● Use high-contrast
pictures without a lot
of detail.
Page 48

Envelopes
29
Many programs include
a feature for printing
envelopes. In that case,
follow the program’s
instructions for setup and
for placing the envelopes
in the printer.
See page 41
Your printer provides two methods for printing envelopes:
● If you’re printing a single envelope, you can use the single-envelope slot and
leave your paper in the lower (IN) tray. This allows you to print the envelope
and then a letter.
● If you’re printing a stack of envelopes, use the lower (IN) tray.
How to print a single envelope
1 In the HP print settings dialog box, click the Setup tab, and then select an
envelope size in the Paper Size drop-down box. (See page 41 for how to get to
the HP print settings dialog box.)
Select an envelope.
Click OK.
Paper Pointer
Envelopes that
won’t work
Steer clear of shiny or
embossed envelopes, or
those that have clasps or
windows. (For these types
of envelopes, use
transparent labels instead.)
Also, envelopes with thick,
irregular, or curled edges
or with areas that are
wrinkled, torn, or
otherwise damaged could
get stuck in the printer.
Wrap a letter
An envelope is like gift
wrap: It can impress and
intrigue, provoking the
receiver to open it. You can
buy envelopes made from
recycled, out-of-date maps
or recycled art magazine
pages. Browse a large
stationery or paperspecialty store for them.
Page 49

30
See page 41
2 Slide the envelope into the single-envelope slot, as shown here, until it stops.
Make sure there’s paper in the lower (IN) tray.
Flap side up and flap
to the right.
3 Print the envelope.
How to print a stack of envelopes
1 In the HP print settings dialog box, click the Setup tab, and then select the
envelope you’re printing on as the Paper Size. (See page 41 for how to get to
the HP print settings dialog box.)
What If
The envelope won’t
come out of the printer
It might be stuck on the
card guide or banner
support—make sure it’s
lying flat. If you’re printing
one envelope at a time,
make sure paper is in the
lower (IN) paper tray.
Select an envelope size.
Click OK.
Your envelopes print
like this
You might have put the
envelope in wrong. Or you
might not have selected an
envelope in the Setup tab of
the HP print settings dialog
box. Or you might not have
made a special adjustment
required by your word
processor—see the word
processor’s guide for
instructions.
Page 50

2 Slide both paper adjusters out.
Make sure the lower (IN) tray is empty.
3 Put a stack of up to 20 envelopes in the printer, as shown below. (If you’re
using thick envelopes, you might need to reduce the quantity.)
Flap side up and flap
to the right.
31
What If
You can’t get the return
address to print close
to the left edge of the
envelope
Your printer can’t print all
the way to the left edge.
You can avoid this problem
by using envelopes
preprinted with your return
address, by printing the
address on a label, or by
stamping it on.
left = 0.84 inch (21 mm)
right = 0.04 inch (1 mm)
top = 0.125 inch (3.2 mm)
bottom = 0.125 inch (3.2 mm)
Page 51

32
4 Slide the paper adjusters so that they fit snugly against the edges of the
envelope.
If you’re printing on small envelopes such as Invitation A2 or C6, you
need to lower the handle on the paper-length adjuster so that it slides
under the upper (OUT) tray.
Press the lower-inside
portion of the handle to
release it.
Handy Hints
5 Print the envelopes.
AFTER PRINTING
● Reset the Paper Size and Paper Type on the Setup tab of the HP print settings
dialog box for whatever you’ll be printing on next.
HP on the Web
You can get the latest
product information,
troubleshoot problems,
and download the latest
printer software from
the HP Web site at
http://www.hp.com
or
http://www.hp.com/go/
peripherals.
Page 52

See page 41
33
Transparencies
For best results, use HP Premium Inkjet Rapid-Dry Transparencies, or transparencies
specifically designed for inkjet printers, for your overhead presentations.
1 In the HP print settings dialog box, click the Setup tab, then select HP
Transparency as the Paper Type. (See page 41 for how to get to the
HP print settings dialog box.)
Select HP Transparency.
Paper Pointer
Your best bet
The film coating on
HP Premium Inkjet
Rapid-Dry Transparencies
is especially developed to
work with HP inks, giving
you crisp images and text
and the fastest drying time.
In addition, they won’t jam
your printer. Look for them
at any office supply store,
or call HP Direct. See
page 62 for the phone
number nearest you.
Page 53

34
2 Make sure Best is selected as the Print Quality.
It isn’t absolutely necessary to use the Best Print Quality, but it’ll give you
the best results. If you’re in a hurry, use Normal Print Quality.
Best print quality.
Click OK.
3 Put the transparencies in your printer with the rough side down and the
adhesive strip forward. (You can peel off the adhesive strip after printing.)
Adhesive strip forward;
tape side up
What If
The ink never dries or
there are cracks in the
solid blocks of color
Rough side down
● You printed on the
wrong side of the
transparency. Make
sure to put it in the
printer with the rough
side down.
● You might be printing
on a transparency that
wasn’t designed for an
inkjet printer.
Page 54

4 Slide in the paper adjusters, just as you would for plain paper.
5 Print the transparency.
6 Be patient.
Because the printer uses more ink, lays the colors down more slowly,
and allows for a longer drying time between sheets, transparencies take
awhile to print.
AFTER PRINTING
● Remember to change the Paper Type back to Plain Paper or whatever
you’ll be printing on next.
● Remember to change the Print Quality back to Normal or whatever is
appropriate for what you’ll be printing next.
35
What If
The quality isn’t what
you were expecting
You might not have chosen
the right paper type and
print quality. Follow the
steps on pages 33–35, and
try printing again.
Page 55

36
See page 41
Some programs
provide a mailing-label
feature that you can
use to automatically
Labels
You can use your HP DeskJet printer to print sheets of labels. We recommend Avery
InkJet Labels which are designed for your inkjet printer.
1 Click the Setup tab in the HP print settings dialog box. Then select Plain Paper
as the Paper Type and Letter or A4 as the Paper Size. (See page 41 for how to
get to the HP print settings dialog box.)
2 Then select Normal as the Print Quality.
Click Normal.
format labels.
Select Letter or A4.
Select Plain Paper.
Click OK.
Paper Pointer
3 Fan the edges of the label sheets to separate them.
Labels that work
Use only U.S. letter- or
A4-size sheets of labels.
It’s particularly important
to pick labels that are
made especially for inkjet
printers. Otherwise, labels
could peel off in your
printer or the ink might
not dry.
Labels that won’t work
Sheets of labels that are
folded, curled, wrinkled, or
partially used can get stuck
in the printer.
Labels that are over two
years old or that have been
exposed to extreme
temperatures might not
stick well because the glue
has deteriorated.
Save on labels
To save on label sheets,
print a test on ordinary
paper. Then put the paper
on top of the label sheet.
Hold them up to the light
to see how the text aligns
on the label(s). Make
adjustments as needed
before printing on the
label sheets.
Page 56

4 In the lower (IN) tray, place up to 25 label sheets on top of about 5 sheets of
plain paper of the same size.
Label sheets; label
side down
Plain paper
5 Slide the paper adjusters to fit snugly against the stack.
6 Print the labels.
AFTER PRINTING
You can leave the settings as they are if you’re going to be printing on plain paper.
You might want to change the Print Quality to EconoFast for printing drafts.
37
Ship it
Scan your logo in full
color, and add it to your
company address to print
distinctive (and
inexpensive!) labels for
packages and manila
envelopes. Avery makes
both white and clear
shipping labels for inkjet
printers.
Zany stickers
Page-size label paper is
great stuff:
● Make a long sticker by
printing across the
width of the label. (In
your software program,
set the orientation to
Landscape.) Just make
sure the label is made
for use in inkjet
printers.
● Make a bunch of
stickers and print them.
Cut out special shapes
with wacky scissors
available at most craft
or art supply stores.
Page 57

38
See page 41
Cards
Use your printer to print on index cards or postcards—or any card size included in
the Paper Size list on the Setup tab shown below. (You can print on other sized cards,
too. The tip at the bottom of this page tells you how.)
1 In the HP print settings dialog box, click the Setup tab, and then select a card as
the Paper Size. (See page 41 for how to get to the HP print settings dialog box.)
Select a card type.
Click Ok.
Paper Pointer
2 Remove the upper (OUT) tray and raise the card guide.
Raise the card guide.
Printing nonstandard
cards
If the dimensions of your
card aren’t the same as
those shown in step 1
above, print it as for a
nonstandard paper size
(see page 12).
Card stock
You can choose from
literally hundreds of cards
with preprinted designs for
every occasion—you just
add your own personal
message.
Remove the upper
(OUT) tray.
You’ll also find letter-sized
sheets of perforated
business cards. Postcards
come this way, too.
Some of the cards have
pre-printed designs for
added style.
Page 58

3 Put a stack of up to 30 cards in the lower (IN) tray.
Make sure the right edge of the card stack rests against the raised card
guide.
4 Lower the handle on the paper-length adjuster so that it doesn’t interfere when
replacing the upper (OUT) tray.
Short edge forward
Press the lower-inside portion of the
handle to release it.
5 Slide the paper adjusters so that they fit snugly against the cards.
39
Paper Pointer
Making folded cards
HP makes Greeting Card
Paper with 20 blank white
sheets and matching
envelopes. Create your o wn
design and message in a
program that can make
folded cards. Print
following the directions for
printing on standard paper
sizes on page 8. Then fold
the paper into a card. Look
for the HP Greeting Card
Paper Kit at any office or
computer supply store, or
call HP Direct. See page 62
for the phone number
nearest you.
Page 59

40
6 Replace the upper (OUT) tray.
You might need to lift up the top cover a little to do this.
7 Print the cards.
AFTER PRINTING
● Return the card guide to the down position.
● Change the Paper Type and Paper Size in the HP print settings dialog box to
match whatever you’ll be printing next.
What If
The cards jam the
printer
They might be caught on
the banner support even
though the support is lying
flat. Try putting a few
sheets of paper in the upper
(OUT) tray of the printer to
solve the problem.
You want your cards to
print sideways
Change the orientation of
the page to Landscape in
your software program.
(The software program
guide tells you how.)
Page 60

How to Get the Most
Out of Your Printer
Open the HP print settings dialog box...
Where is it? The way you get to the box (labeled HP DeskJet 690C Series Printer)
varies depending on the software program and the operating system you’re using.
Try these strategies from the File menu of your document, and you’re sure to
get there.
Try This
1 Click File and then click Print.
41
2 Then click whichever button you see—Properties,
Setup, or Printer.
…Or Try This
1 If Print isn’t there, click Printer
or Print Setup.
Setup
3 If you still don’t see the box, click Setup, Options,
or Properties.
2 Then click whichever button you see—Setup
or Options.
Page 61

42
Save time and
Click here to print
drafts of color
documents in
shades of gray.
color ink.
...then click a tab, and then click a setting.
Save time and ink.
Click EconoFast
print quality.
Show your finished
work at its best.
Click Best print quality.
Select the
appropriate
settings.
Choose the
correct paper
size and type
for the job.
Fine-tune your printing.
Pick options to create the effect
you want.
Save money and
trees.
Print on both sides
of the paper.
Print clearly.
Align your black and color print cartridges,
and clean them when necessary.
Page 62

Getting Help When
Things Go Wrong
The HP Toolbox
Troubleshooting with the HP Toolbox
What the buttons and lights do
43
HP Customer Support
In this chapter
You will find information on how to troubleshoot and solve problems
with your printer. If you need additional assistance, this chapter tells you
everything you need to know about contacting HP Customer Support.
Page 63

44
The HP Toolbox
The HP Toolbox tells you how to print and how to troubleshoot your printing
problems. It even aligns and cleans your print cartridges for you. For each Windows
system, here are a couple of places to find it.
Windows 95, Windows 98, and Windows NT 4.0
Double-click the HP
Toolbox shortcut
icon. This shortcut is
always on your
desktop.
If you close the HP
Toolbox, it reappears
when you’re printing.
You can also doubleclick the HP Toolbox
icon in the HP
DeskJet Utilities
group in the
Program Manager.
Click the HP Toolbox
taskbar button. This
button appears on the
taskbar at the bottom
of the screen when
the HP Toolbox is
open and whenever
you’re printing.
Windows 3.1x
Double-click the HP
Toolbox icon. It’s on
your desktop when
you start your
computer.
Page 64

Troubleshooting with the HP Toolbox
When problems occur, the quickest way to find a solution is to use the “online”
troubleshooting feature. With a few clicks of the mouse, you’ll find your specific
problem and details on how to fix it.
1 Double-click the HP Toolbox shortcut (or
icon) on your desktop!
2 Then click the
Troubleshooting tab.
45
3 Click the appropriate
category (see the next
page for an overview).
5 Explore the possibilities!
4 What seems to be the problem?
Page 65

46
Troubleshooting
The print quality is poor The text or graphics are in
Cartridges. If ink is smearing,
streaking, or is splotchy:
● You might need to clean the print
cartridges. See pages 55–56.
● You might need to replace the
print cartridges, as described in
Step 4 of the setup guide
.
Banner lever. Make sure the
banner lever is pushed to the left
unless you’re printing banners.
Paper. If the printing is faded or the
colors are dull or bleeding into each
other, make sure you’re using paper
intended for inkjet printers and that
you’ve loaded the paper print side
down.
Ink.
You can control the amount of
ink on the page by changing the
Print Quality (on the
HP print settings dialog box).
Setup
tab of the
the wrong place
Paper orientation. If the printing is
positioned incorrectly on the page,
make sure you’ve selected the
correct orientation (Portrait or
Landscape) on the
Features
tab of
the HP print settings dialog box.
Alignment. If the color ink and
black ink don’t line up on the printed
page, align the print cartridges. In
the HP Toolbox, click the Printer
Services tab, and then click Align the
print cartridges.
Loading. If the printing is slanted or
skewed, try reloading the paper.
Margin settings.
off the edge of the page:
● Make sure the margins are set
correctly in your software
program.
● Make sure the elements in your
document fit within the printable
area of the page. (See page 59 for
more information about your
printer.)
● Make sure you’ve selected the
right paper size on the
of the HP print settings dialog
box.
If text is running
Setup
tab
Something on the page is
wrong or missing
Margin settings. If the printing is
cut off around the edges, check your
software application:
● The correct margins are set.
● The elements are scaled
correctly.
Colors. If the colors are wrong or
missing:
● Clean your tri-color print
cartridge. In the HP Toolbox, click
Printer Services tab, and then
the
click
Clean the print cartridges.
● Replace the tri-color print
cartridge, as described in Step 4
of the setup guide
● Clear the Print in Grayscale
option on the
HP print settings dialog box.
Communications.
characters are printing on your
page, the computer might have lost
communication with your printer.
Try turning your computer and
printer off and then turn them on
again. If the problem persists, make
sure all cables are plugged
in tightly. Make sure you’re using a
bidirectional cable. To test the cable,
in the HP Toolbox, click the Printer
Services tab, and then click Test
printer communication.
.
Color tab of the
If meaningless
Page 66

Troubleshooting
47
No page came out of the
printer
Be patient. Complex documents,
such as color photographs, take a
while to print. Check the power light;
if it’s blinking, the printer is
processing information.
Power. Make sure the printer is on
(the Power light on the front of your
printer should be on) and that all
connections are firm.
Cover. Make sure the top cover of
the printer is closed.
Paper. Make sure you put the paper
in the lower (IN) tray correctly.
Communications. If you see a
“Printer not responding” message on
your screen, you might be using the
wrong cable. (The bidirectional HP
IEEE-1284-compliant Parallel
Interface Cable is recommended.)
Print cartridges. Make
sure both print cartridge cradles
contain properly installed cartridges
with the correct HP part number.
(See page 61 for part numbers.)
Banner lever. Make sure the
banner lever is pushed to the left,
unless you’re printing banners.
A blank page came out of
the printer
Tape. Make sure you’ve removed
the protective pieces of tape on the
print cartridges.
Default printer. Make sure you’ve
selected the HP DeskJet 690C
Series printer as the default printer.
To check your default printer, click
the Troubleshooting tab in the HP
Toolbox, and then click A blank
page came out. Under Wrong printer
selected, click the button for
complete instructions on setting
a default printer and follow the
instructions on your screen.
Ink.
You might have run out of ink.
Replace the cartridges as shown in
step 4 of the setup guide.
You’re having trouble
printing a banner
Print settings. If the printer backs
the paper up into the lower (IN) tray
when you try to print, make sure
you’ve selected Banner on the
tab of the HP print settings dialog
box.
Setup
Setup. If the paper jams, make sure
you slide the banner lever to the
right until it clicks into place and
that you flip up the banner support
in the upper (OUT) tray.
Loading. If several sheets feed into
the printer at once, be sure at least
10 sheets of banner paper are
loaded in the lower (IN) tray. Also try
unfolding and folding the paper to
get more air between the sheets.
Paper. If the paper creases as it
passes through the printer, the paper
might be inappropriate for banner
printing. HP Banner Paper is highly
recommended.
Margin gap. If you see gaps in
the printing at the ends of the sheets,
the problem might exist in your
software program. See the online
troubleshooting help for more
information.
Page 67

48
What the buttons and lights do
The Resume and Power buttons and lights are on the front of the printer. In
general, the lights indicate when the printer is operating correctly and when it needs
attention from you. The buttons are used to control the printer.
When these lights are... You need to...
Turned off and Turned off Press Power to turn on the printer.
Steadily lit and Turned off Send a document to the printer. The printer is in
the ready-to-print state.
Steadily lit and Blinking If you just installed a print cartridge, make sure
the cartridge is securely snapped into the printer
with the arrow aligned with the dots on the top of
the print cartridge cradle.
Close the top cover of the printer if it is open.
Check the lower (IN) tray to make sure it contains
paper and that the paper is correctly loaded in the
tray.
Press Resume
Then check your computer screen for any
reported error message and corrective action
instructions.
to clear the error condition.
Blinking and Turned off No action required. This indicates that either the
computer is sending a document to the printer or
that the printer is currently busy printing a
document.
Blinking and Blinking Press Power to turn off the printer. At the
computer, cancel any documents awaiting
printing. Press Power
printer.
again to turn on the
Steadily lit and Steadily lit See the Troubleshooting tab in the HP Toolbox. A
problem exists with your printer.
Page 68

HP Customer
49
Support
If you have questions, either general ones
regarding how your printer works or specific ones
regarding a problem you’re having, you have
several possibilities for getting the answers.
Electronic support
information
If you have a modem connected to your computer
and subscribe to an online service or have direct
access to the Internet, you can obtain a wide variety
of information about your printer.
User Forums
You can get friendly help from knowledgeable
users and system operators in the CompuServe
(Go HPPER) and America Online (keyword: HP) user
forums. In the user forums, you can leave your
question and check back later for ideas and
solutions suggested by other users. You can read
through old messages left by other users to see if
anyone else has had a problem similar to yours and
has provided the solution online.
HP Web site
Printer software
Printer software (also referred to as a printer driver)
allows your printer to talk with your computer.
HP provides printer software and software upgrades
for Windows 3.1x, Windows 95, Windows 98, and
Windows NT 4.0. For MS-DOS printer software,
contact the manufacturer of your software
program. You have several options for getting
printer software:
● Download the printer software by accessing
CompuServe, America Online, or HP’s Web site
(http://www.hp.com/support/deskjet).
● If you are in the U.S., setting up your printer
for the first time, and do not have a CD-ROM
drive, you can order the software on 3.5 inch
disks by calling the toll-free phone number
listed on the printer software CD case. Disks
are delivered to you the next day free of
charge.
● If you are in the U. S. and need a software
upgrade, you can order it by calling
(805) 257-5565. Software upgrades are
available for the cost of the disks plus
shipping.
● If you are outside the U.S. and cannot
download the driver from HP’s Web site,
call HP Customer Support.
If you have access to the Internet, you can check
out HP’s Web site for support documentation and the
latest news from HP at:
http://www.hp.com/support/deskjet.
Page 69

50
Repairing your printer
To speak to someone to verify that your printer
needs repair, please call the HP Telephone Support
Center. If your printer requires repair, the HP
Support Agent coordinates that process. This
service is free of charge during the warranty period
of your printer. Beyond the warranty period, repairs
are charged on a time and materials basis.
Free support for 90 days
Within 90 days from the time of your purchase,
telephone support is provided to you free of
charge. Before placing a call for help, please make
sure that:
● You have checked your user’s guide and
online troubleshooting for installation
troubleshooting tips.
● You are seated in front of your computer with
your printer nearby.
● You have the following information available:
● Your printer’s serial number (the label is on
the back of the printer).
● Your printer’s model number (the label is
on the front of the printer).
● The model of the computer.
● The version of the printer driver and
software program (if applicable).
A note about letters
If you need technical help from a technical support
person, we recommend that you call us while
you’re in front of your computer and printer, rather
than writing a letter to us. That way we can help you
with your questions immediately!
Calling HP Customer Support
To speak with someone for online technical
assistance, call one of the following numbers. This
service is free of charge during the warranty period
of your printer. However, if you are calling long
distance, the usual long-distance charges apply.
● Africa/Middle East 41 22/780 71 11
● Argentina 541781-4061/69
● Australia 61 3 92728000
● Austria 43 (0)660 6386
● Belgium (Dutch) 32 (0)2 62688 06
● Belgium (French) 32 (0)2 6268807
● Brazil 55 11 709-1444
● Canada (English) (208) 344-4131
● Canada (French) (905) 206-4383
● China 86 10 6505 3888-5959
● Czech Republic 42 (2) 471 7321
● Denmark 45 (0)39 294099
● Finland 385 (0)203 47288
● France 33 (0) 143623434
● German 49 (0) 180 5258 143
● Greece 30 1 689 64 11
● Hong Kong (800) 96 7729
● Hungary 36 (1) 252 4505
● India 91 11 682 60 35
● Indonesia 6221 350 3408
● Ireland 353 (0) 1662 5525
● Italy 39 (0)2 264 10350
● Japan, Tokyo 81 3 3335-8333
● Japan, Osaka 81 6 838 1155
● Korea 82 2 3270 0700
● Malaysia 03 2952566
● Mexico D.F. 326 46 00
● Mexico, Guadalajara 669 95 00
● Mexico, Monterey 378 42 40
● Middle East/Africa 41 22/780 71 11
● Netherlands 31 (0)20 606 8751
● New Zealand (09) 356-6640
● Norway 47 (0)22 116299
Page 70

● Philippines 65 272 5300
● Poland 48 22 37 50 65
● Portugal 351 (0) 144 17 199
● Russia 7095 923 50 01
● Singapore 65 272 5300
● Spain 34 (9) 02321 123
● Sweden 46 (0)8 6192170
● Switzerland 41 (0)84 8801111
● Taiwan 886 2-2717-0055
● Thailand (66-2) 661 4011
● Turkey 90 1 224 59 25
● United Kingdom 44 (0) 171 512 5202
● U.S. (208) 344-4131
● Venezuela 58 2 239 5664
After the warranty
● You can still get help from HP for a fee. Prices
are subject to change without notice. (Online
help is always available for free!)
● For quick questions in the United States only,
call (900) 555-1500. The charges are $2.50 per
minute and begin when you connect with a
support technician.
● For calls from Canada, or for calls in the U.S.
that you anticipate might be longer than ten
minutes in length, call (800) 999-1148. The fee
is US $25 per call, charged to your Visa or
MasterCard.
● If during your phone call, it is determined that
your printer requires repair, and you are within
your printer’s hardware warranty period, your
phone charges will be reversed.
51
Page 71

52
More About Your
Printer
System requirements
Print cartridges
Minimum printing margins
Product specifications
Ordering supplies and accessories
Printing from MS-DOS
Uninstalling the printer software
Additional symbol sets and fonts
Limited Warranty Statement
Legal information
In this chapter
If you want to know more of the working details about your printer, check
out the technical information in this chapter.
Page 72

53
System requirements
For your printer to work at its best, your computer
must meet the following system requirements:
For Windows NT 4.0
● 80486/66 MHz CPU
● 16 MB of RAM
For Windows 3.1x, Windows 95,
and Windows 98
● 80486/33 MHz CPU
● 8 MB of RAM
For MS-DOS
● MS-DOS version 3.3 (or later)
● 80386/16 MHz CPU
● 4 MB of RAM
Note
The HP DeskJet 690C Series printer is a
personal printer and is not supported in
network configurations.
Printer communications
Your printer does not include a printer cable.
The HP IEEE-1284-compliant Parallel Interface
Cable is best for your printer. Make sure the
cable is bidirectional—that it allows two-way
communication between your printer and the
computer. This type of cable allows you to access
all your printer’s features.
If you don’t know whether or not your printer
cable is bidirectional, you can find out by following
these steps:
1 Make sure the printer cable is firmly connected
to both the printer and the computer.
2 Make sure both the printer and the computer are
turned on.
3 In the HP print settings dialog box, click the
Printer Services tab. (To find the HP print settings
dialog box, turn to page 41.)
4 Click Test printer communication.
The printer software tests the communication
between your computer and your printer
and tells you if you have bidirectional
communication.
If the cable is bidirectional, you should have
access to all the features of your HP DeskJet
printer.
If the cable is not bidirectional, the printer is
unable to send messages to the computer
screen, but it can still print.
Page 73

54
Print cartridges
Print and photo cartridges
To get the best performance from your printer, Hewlett-Packard
recommends using only genuine HP supplies in HP inkjet printers,
including only HP print and photo cartridges. Damage resulting from
the modification or refilling of HP cartridges is specifically excluded
from coverage of HP printer warranties.
Refilling an HP cartridge pushes the electronic and mechanical
components of the cartridge past their normal life cycle, creating many
potential problems, such as the following:
Poor print quality
● Non-HP ink can contain components that cause nozzles to become
clogged, resulting in streaked copy and graying or fuzzy characters.
● Non-HP inks can contain components that corrode the cartridge’s
electrical components, resulting in poor printouts.
Potential damage
● If ink from a refilled cartridge leaks, the excess ink might damage
the service station that caps the cartridge while it is in the printer but
not in use. Because this service station maintains the health of the
cartridge, quality problems might occur with this cartridge.
● If ink from a refilled cartridge leaks onto the electrical components
in your printer, severe printer damage can occur, causing downtime
and repair costs.
Caution Damage resulting from the modification or refilling
of HP cartridges is specifically excluded from the
coverage of HP printer warranties.
Note When buying replacement print cartridges, check the part
numbers carefully so that you buy the right cartridges
for your printer:
Black Large Black Tri-Color Photo Cartridge
HP 51629G HP 51629A HP 51649A HP C1816A
Page 74

Cleaning the print cartridges
e
r
Cleaning your print cartridges can improve the quality of printing.
If your printed page is missing lines or dots, perform Procedure 1 below. If
your printed page contains streaked ink, perform Procedure 2.
Procedure 1: Correcting missing lines or dots
Clean the print cartridges when you notice that the lines or dots are
missing from your printed text and graphics, as shown in the left margin.
The print cartridges can be cleaned from the HP Toolbox.
55
Note Do not clean the print
cartridges unnecessarily,
as this wastes ink and shortens
the life of the print cartridge.
Note MS-DOS users can
clean print cartridges from
the HP DeskJet Control Panel
for MS-DOS (see page 64).
r sn ame jstujn d
diam noft juestk
ut labore qusft vo
ed kitft ghockno
To clean the print cartridges from the HP Toolbox:
1 Double-click the HP Toolbox icon on the computer screen.
2 Click the Printer Services tab.
3 Click Clean the print cartridges and follow the directions on
the screen.
If the preceding procedure does not improve the print quality, your
print cartridges might be low on ink. Replace the print cartridges.
Procedure 2: Eliminating ink streaks
Customers using HP DeskJet printers in dusty environments might
occasionally experience ink streaks or smearing because of a small
accumulation of debris inside the printer. This debris can include dust,
hair, carpet, or clothing fibers. Ink streaking is easily prevented or
corrected by doing scheduled cleaning to three areas of the printer:
the print cartridges, the print cartridge cradle, and the service station.
HP recommends that you perform this cleaning every 3 months.
Materials you will need
Before you begin, make sure you have the following materials available:
● Cotton swabs or any soft material that will not come apart or leave
fibers (for example, a piece of clean cotton cloth).
● Distilled, filtered, or bottled water (tap water might contain
contaminants that can damage the print cartridges).
● Scrap paper or paper towels to set the print cartridges on while you
are working.
Caution Be careful not to get ink on your hands or clothing.
Page 75

56
c
a
Steps to clean your printer
1 Remove the print cartridges
a. Turn the printer on and lift the printer’s top cover.
The print cartridges move to the center of the printer.
b. After the print cartridges have moved to the center of the printer,
unplug the black power cord from the back of the printer.
c. Remove the print cartridges and place them on their sides on a
scrap piece of paper.
b
Caution Once you’ve removed the print cartridges, make
sure that they are not outside of the printer for
more than 30 minutes.
WARNING Keep new and used print cartridges out of the
reach of children.
2 Clean the print cartridges
a. Dip a clean cotton swab into distilled water and squeeze any
excess water from the swab.
b. Grasp the black print cartridge by the colored cap.
c. Clean the face and edges of the print cartridge as shown.
DO NOT wipe the nozzle plate.
Clean here.
DO NOT clean
nozzle plate.
d. Hold the print cartridge up to the light to inspect for fibers on
the face and edges. If fibers are still present, repeat steps 2a
through 2c.
e. Repeat steps 2a through 2d with the tri-color print cartridge using
a clean, moistened cotton swab to avoid any contamination.
Page 76

3 Clean the print cartridge cradle
a. Position yourself at eye level with the printer.
b. Locate the cradle that holds the print cartridges, then locate the
three black, hook-shaped arms on the bottom of the cradle.
c. Using clean, moistened swabs, wipe the flat surfaces (shaded
area) on the undersides of each arm from back to front. Repeat
until no ink residue is seen on a clean swab.
4 Clean the service station
a. Using a clean, moistened swab, clean the rim of the sponge
holder.
b. Remove any built-up ink and fibers from the top of the sponge. If
the sponge is higher than the rim, use the cotton swab to push it
below the rim.
c. Using a clean, moistened swab, clean wiper 1 and the top surface
of cap 1.
Caution Use light force when cleaning the print cartridge
caps. Heavy force might unseat the caps, eventually
causing damage to the print cartridges.
d. Using a clean, moistened swab, clean wiper 2 and the top surface
of cap 2.
Cap 2
Wiper 2
Cap 1
Wiper 1
Sponge
57
Rim
Page 77

58
5 Reinstall the print cartridges
a. Reinstall the print cartridges and close the printer’s top cover.
b. Reinsert the power cord into the back of the printer.
c. Print a test page. On the Printer Services tab of the HP Toolbox,
click Print a test page.
d. Examine the printout for ink streaking.
Note This procedure should remove all fibers that would cause ink
to streak on a printout. However, fibers can be missed. If the
printout still shows streaking, repeat the procedure until the
test printout is clear and sharp. HP recommends that you
perform this procedure every 3 months. This procedure and
additional maintenance tips are located on HP’s Web site at:
http://www.hp.com/support/deskjet/maintenance.
Page 78

59
Minimum printing margins
The printer cannot print outside a certain area of the
page, so you must make sure the contents of your
document fall within the printable area—that is,
within the top, bottom, left, and right margins
available for the specific size paper on which you are
printing.
Paper Size Margins Margin
U.S. Letter 8.5 x 11 in 0.25 in 0.59 in
U.S. letter banner 8.5 x 11 in 0.25 in 0.00 in
U.S. legal 8.5 x 14 in 0.25 in 0.59 in
A4 size 210 x 297 mm 3.4 mm 14.9 mm
A4 banner 210 x 297 mm 6.3 mm 0.00 mm
A5 size 148 x 210 mm 3.2 mm 21.2 mm
B5 size 182 x 257 mm 4.2 mm 21.2 mm
Executive 7.25 x 10.5 in 0.25 in 0.59 in
U.S. cards 4 x 6 in 0.125 in 0.84 in
U.S. cards 5 x 8 in 0.125 in 0.84 in
A6 cards 105 x 148 mm 3.2 mm 21.2 mm
Hagaki postcards 100 x 148 mm 4.2 mm 21.2 mm
Note: The top margin is 0.04 inches (1 mm) for all paper sizes (except for
banner paper).
Envelope Size Margin Margin
U.S. No. 10 4.12 x 9.5 in 0.84 in 0.04 in
DL 110 x 220 mm 21 mm 1 mm
C6 114 x 162 mm 21 mm 1 mm
Invitation A2 4.37 x 5.75 in 0.84 in 0.04 in
Note: The top and bottom margins are 0.125 inches (3.2 mm) for all envelope
sizes.
Note
MS-DOS margins can vary. See the manual
for the specific MS-DOS program for more
information.
Left/Right Bottom
Left Right
Product specifications
Printers
HP DeskJet 695C printer model number C4562B
HP DeskJet 697C printer model number C4562C
Print technology
Drop-on-demand thermal inkjet printing
Four colors standard; six colors with HP Photo Cartridge.
Black print speed
Best mode: 1 page per minute
Normal mode: 3 pages per minute
Normal mode (MS-DOS): 134 cps at 10 cpi
EconoFast: 5 pages per minute
EconoFast (MS-DOS): 270 cps at 10 cpi
Color print speed (black and color cartridges)
Best mode: .3 pages per minute
Normal mode: .8 pages per minute
EconoFast: 1.7 pages per minute
Color print speed (tri-color and photo
cartridges)
up to 4 minutes per page (5 x 7 photo)
Black resolution
Best mode: 600 x 600 dpi
Normal mode: 600 x 300 dpi
EconoFast: 300 x 300 dpi
Color resolution (black and color cartridges)
300 x 300 dpi on plain paper
600 x 300 dpi black and color (on glossy paper, premium paper,
photo paper, and transparency film)
Color resolution (tri-color and photo cartridges)
600 x 300 dpi with 6 inks, using HP PhotoRET Technology and all
paper types (Best and Normal modes)
MS-DOS (graphics)
Full-page 75, 150, 300 dpi
Printer command language
HP PCL Level 3
Standard Character Sets
United Kingdom (ISO 4), German (ISO 21), French (ISO 69), Italian
(ISO 15), Danish/Norwegian (ISO 60), Swedish (ISO 11), Spanish
(ISO 17), ANSI ASCII (ISO 6), Legal, PC-8, Roman-8, PC-850, PC-8
Danish/Norwegian, ECMA-94, Latin 1 (ISO 8859/1), PC-852, Latin
2 (ISO 8859/2), Latin 5 (ISO 8859/9), and PC-8 Turkish
Software compatibility
Microsoft Windows-compatible
Compatible with an extensive range of MS-DOS software
programs
✳
✳
✳
✳Approximate figures. Exact speed varies depending on the system configuration,
software program, and document complexity.
Page 79

60
Vertical alignment
± 0.002 in
Built-in (internal) fonts
Courier (portrait and landscape orientations)
Pitch: 5, 10, 16.67, 20 cpi
Point size: 6, 12, 24 pt
Style: Upright (Italic: 5, 10, 20 cpi)
Stroke weight: Normal, Bold
CG Times (portrait and landscape orientations)
Pitch: Proportional
Point size: 5, 6, 7, 8, 10, 12, 14 pt
Style: Upright, Italic
Stroke weight: Normal, Bold
Letter Gothic (portrait and landscape orientations)
Point and pitch: 6, 12, and 24 pt for 6, 12 and 24 cpi
(Upright only): 4.75, 9.5, and 19 pt
for 16.67 cpi
Style: Upright
Stroke weight: Normal, Bold
Univers (portrait and landscape orientations)
Pitch: Proportional
Point size: 5, 6, 7, 8, 10, 12, 14 pt
Style: Upright (Italic: 5, 6, 10, 12 pt)
Stroke weight: Normal, Bold
Recommended media weight
Paper: 60 to 135 g/m2 (16 to 36 lb)
Continuous (banner) paper: 75 g/m2 (20 lb)
Envelopes: 75 to 90 g/m2 (20 to 24 lb)
Cards: 110 to 200 g/m2 (110 lb index
max.; 8.5 pt max. thickness)
Media Handling (Built-In Feeders)
Sheets: up to 100 sheets
Banners: up to 20 sheets
Multiple envelopes: up to 20 envelopes
Single envelope: only 1 envelope
Cards: up to 30 cards
Transparencies: up to 50 sheets
Labels: up to 25 sheets of Avery paper
labels. Use only U.S. letter or A4
size sheets. Use only Avery paper
labels specifically designed for
use with HP InkJet printers.
OUT tray capacity: up to 50 sheets
Buttons/lights
Resume and Power
I/O Interface
Centronics parallel, IEEE-1284-compliant with 1284-B receptacle
Printer memory
512 KB built-in RAM
32 KB receive buffer
Media size
U.S. letter 8.5 x 11 in
Banner U.S. letter 8.5 x 11 in
U.S. legal 8.5 x 14 in
Executive 7.25 x 10.5 in
Banner European A4 210 x 297 mm
European A4 210 x 297 mm
European A5 148 x 210 mm
B5-JIS 182 x 257 mm
Custom size: Width: 100 to 216 mm
Length: 148 to 356 mm
U.S. No. 10 envelope 4.12 x 9.5 in
Invitation A2 envelope 4.37 x 5.75 in
European DL envelope 220 x 110 mm
European C6 envelope 114 x 162 mm
Index card 101.6 x 152.4 mm
Index card 127 x 203.2 mm
European A6 card 105 x 148 mm
Japanese Hagaki Postcard 100 x 148 mm
4.0 to 8.5 in
5.83 to 14 in
4 x 6 in
5 x 8 in
Dimensions
Width: 436 mm (17.2 in)
Height: 199 mm (7.9 in)
Depth: 405 mm (16 in)
Weight
5.3 kg (11.6 lb)
Power consumption
2 watts maximum when off
4.5 watts maximum nonprinting
12 watts maximum printing
Operating environment
Maximum operating temperature: 5° C (41° F) to 40° C (104° F)
Humidity: 10-80% RH noncondensing
Recommended operating conditions for best print quality: 15° C
(59° F) to 35° C (95° F), 20 to 80% RH noncondensing
Storage temperature: -40° C (-40° F) to 60° C (140° F)
Noise Levels per ISO 9296:
Normal
Mode
Sound Power, L
*
Sound Pressure, L
*
Bystander positions
: 6.3 B (A)
wAd
: 50 dB (A)
pAm
Page 80

61
Ordering supplies and
accessories
For ordering information, see page 62.
Parts/ HP Reorder
Supplies/Accessories Number
Print Cartridge
Black print cartridge
Large capacity 51629A
Tri-Color print cartridge 51649A
Photo cartridge C1816A
HP Photo Color Kits
Asian HP Photo Color Kit C4583
European HP Photo Color Kit C4584
Latin American HP Photo Color Kit C4590
U.S. HP Photo Color Kit C4585
HP DeskJet 695C/697C Series Manual
Printer Documentation Kits Kits
Arabic C4562-60264
Czech C4562-60265
Danish C4562-60266
Dutch C4562-60267
English C4562-60287
Finnish C4562-60268
French C4562-60269
German C4562-60270
Greek C4562-60271
Hebrew C4562-60272
Hungarian C4562-60273
Italian C4562-60275
Japanese C4562-60276
Korean C4562-60288
Norwegian C4562-60277
Polish C4562-60278
Portuguese C4562-60279
Russian C4562-60280
Simplified Chinese C4562-60281
Spanish C4562-60282
Swedish C4562-60283
Thai C4562-60285
Traditional Chinese C4562-60284
Turkish C4562-60286
✳
51629G
Parts/ HP Reorder
Supplies/Accessories Number
Paper Media
HP Banner Paper
HP Premium Inkjet Heavyweight Paper
HP Premium Inkjet Transparency Film
HP Premium Inkjet Paper
HP Premium Inkjet Rapid-Dry Transparencies
HP Greeting Card Paper
HP Glossy Greeting Card Paper
HP Premium Photo Paper
HP Photo Paper
HP Bright White Inkjet Paper
✳✳
U.S. letter, 100 sheets C1820A
European A4, 210 x 297 mm, 100 sheets C1821A
U.S. letter, 100 sheets C1852A
European A4, 100 sheets C1853A
U.S. letter, 50 transparencies C3834A
U.S. letter, 20 transparencies C3828A
European A4, 50 transparencies C3835A
European A4, 20 transparencies C3832A
U.S. letter, 200 sheets 51634Y
European A4, 200 sheets 51634Z
U.S. letter, 50 transparencies C6051A
European A4, 50 transparencies C6053A
Prescored for quarter-fold
U.S. letter: 20 sheets, 20 envelopes C1812A
European A4: 20 sheets, 20 envelopes C6042A
Prescored for half-fold
U.S. letter: 10 sheets, 10 envelopes C6044A
U.S. letter, 15 sheets C6039A
European A4, 15 sheets C6040A
Asian A4, 15 sheets C6043A
U.S. letter, 20 sheets C1846A
European A4, 20 sheets C1847A
Asian A4, 20 sheets C6765A
U.S. letter, 500 sheets C1824A
U.S. letter, 200 sheets C5976A
European A4, 500 sheets C1825A
European A4, 200 sheets C5977A
Transfer Media
HP Iron-On T-Shirt Transfers
U.S. letter, 10 sheets C6049A
European A4, 10 sheets C6050A
✳
When you buy replacement cartridges, check the part numbers
carefully so that you buy the right one.
✳✳
Availability of special media varies by country.
Page 81

62
Parts/ HP Reorder
Supplies/Accessories Number
HP IEEE-1284-compliant Parallel Interface Cable
(with one 1284-A connector for the computer port and one
1284-B connector for the printer port)
2-meter length C2950A
3-meter length C2951A
Power Module
U.S., Canada, Mexico 120 V/60 Hz 9100-5124 (C2175A)
Korea, 220 V/60 Hz 9100-5126 (C2182A)
Australia, 240 V/50 Hz 9100-5127 (C2181A)
South Africa, 220 V/50 Hz 9100-5128 (C2180A)
China, Argentina, 220 V/50 Hz 9100-5129 (C2179A)
Japan, 100 V/50/60 Hz 9100-5130 (C2178A)
U.K., 240 V/50 Hz 9100-5131 (C2177A)
Europe (except U.K.), 230 V/50 Hz 9100-5132 (C2176A)
Top Cover (Access Door) C6417-40002
Base Foot Assembly (1 ea.) C2162-60098
Nameplate (DJ 695C) C6417-40004
Nameplate (DJ 697C) C6417-40009
Instruction Label C6417-80021
Paper Tray Assembly C4549-60003
Ordering information
To order printer supplies or accessories, call your
nearest HP dealer or call HP DIRECT at the following
numbers for fast shipping service:
● Argentina: (54 1) 787-7100
Fax: (54 1) 787-7213
Hewlett-Packard Argentina, Montañeses 2150
1428 Buenos Aires, Argentina
● Australia/New Zealand: (03) 895-2895
China Resources Bldg.
26 Harbour Road
Wanchai, Hong Kong
● Belgium: 02/778 3092 (or 3090, 3091)
Fax: 02/778 3076
Hewlett-Packard Belgium SA/NV
100 bd. de la Woluwe/Woluwedal
1200 BRUXELLES
● Brazil: 55-11-7296-4991
Fax: 55-11-7296-4967
Edisa Hewlett-Packard SA, R. Aruana 125, Tambore, Barueri, São
Paulo, Brazil, 06460-010
● Canada: (800) 387-3154, (905) 206-4725
Fax: (905) 206-3485/-3739
Hewlett-Packard (Canada) Ltd., 5150 Spectrum Way
Mississauga, Ontario L4W 5G1
● Toronto: (416) 671-8383
● Chile: (56 2) 203-3233
Fax: (56 2) 203-3234
Hewlett-Packard de Chile SA
Av. Andres Bello 2777, Oficina 1302
Los Condes, Santiago, Chile
● Denmark: 45 99 14 29
Fax: 42 81 58 10
Hewlett-Packard A/S
Kongevejen 25, 3460 BIRKEROD
● Finland: (90) 8872 2397
Fax: (90) 8872 2620
Hewlett-Packard Oy
Varaosamyynti, Piispankalliontie 17
02200 ESPOO
● France: (1) 40 85 71 12
Fax: (1) 47 98 26 08
EuroParts, 77 101 avenue du Vieux Chemin de Saint-Denis
92625 GENNEVILLIERS
● Germany: 07031-145444
Fax: 07031-141395
Hewlett-Packard GmbH, HP Express Support
Ersatzteil-Verkauf, Herrenberger Str. 130
71034 BOEBLINGEN
Page 82

63
● International Sales Branch: (41) 22 780 4111
Fax: (41) 22 780-4770
Hewlett-Packard S. A., ISB
39, rue de Veyrot
1217 MEYRIN 1, GENEVE - SUISSE
● Italy: 02/9212.2336/2475
Fax: 02/92101757
Hewlett-Packard Italiana S. P. A.
Ufficio Parti di ricambio
Via G. Di Vittorio, 9
20063 Cernusco s/N (MI)
● Japan: (03) 3335-8333
Hewlett-Packard Japan Ltd.
29-21 Takaido-Higashi 3-chome, sugninami-ku
Tokyo 168-8585
● Latin America Headquarters: (305) 267-4220
Fax: (305) 267-4247
5200 Blue Lagoon Drive, Suite 950
Miami, FL 33126
● Mexico: (52 5) 258-4600
Fax: (54 1) 258-4362
Hewlett-Packard de México, S.A. de C.V
Prolongación Reforma #700
Colonia Lomas de Santa Fe, C.P. 01210 México, D.F.
● Netherlands: 0 33 450 1808
Fax: 0 33 456 0891
Hewlett-Packard Nederland B. V., Parts Direct Service
Basicweg 10
3821 BR AMERSFOORT
● Norway: 22735926
Fax: 22735611
Hewlett-Packard Norge A/S, Express Support
Drammensveien 169-171
0212 Oslo
● Austria-South-East Area: (43-0222) 25 000, ext. 755
Fax: (43-0222) 25 000, ext. 610
Hewlett-Packard Ges.m.b.H.
Ersattzteilverkauf
Lieblg. 1
A-1222 Wien
● Spain: 1 6 31 14 81
Fax: 1 6 31 12 74
Hewlett-Packard Espanola S.A.
Departamento de Venta de Piezas
Ctra N-VI, Km. 16,500
28230 LAS ROZAS, Madrid
● Sweden: 8-4442239
Fax: 8-4442116
Hewlett-Packard Sverige AB
Skalholtsgatan 9, Box 19
164 93 KISTA
● Switzerland: 056/279 286
Fax: 056/279 280
Elbatex Datentechnik AG
Schwimmbastrasse 45, 5430 WETTINGEN
● United Kingdom:
+44 1765 690061, Fax: +44 1765 690731
Express Terminals, 47 Allhallowgate
Ripon, North Yorkshire
+44 181 568 7100, Fax: +44 181 568 7044
Parts First, Riverside Works
Isleworth, Middlesex, TW7 7BY
+44 1734 521587, Fax: +44 1734 521712
Westcoast, 28-30 Richfield Avenue
Reading, Berkshire, RG1 8BJ
● United States: (800) 227-8164
● Venezuela: (58 2) 239-4244/4133
Fax: (58 2) 207-8014
Hewlett-Packard de Venezuela C.A.
Tercera Transversal de Los Ruices Norte, Edificio
Segre, Caracas 1071, Venezuela
Apartado Postal 50933, Caracas 1050
Elsewhere in the world
● Hewlett-Packard Company
Intercontinental Headquarters
3495 Deer Creek Road
Palo Alto, CA 94304, U.S.A.
Page 83

64
Printing from MS-DOS
When you print from MS-DOS programs, you can
control print settings, such as print quality, page
orientation, paper size, and so on, by using the
printer driver for the HP DeskJet 690C Series
printer that comes with your software program.
(A printer driver is a program that allows you to
control print settings from within your word
processor, spreadsheet, or other software program.)
However, many software manufacturers might not
have developed a printer driver specifically for the
HP DeskJet 690C Series printers. In that case, you
can use an alternate printer driver as listed below,
or use the HP DeskJet Control Panel for MS-DOS
for improved printer control.
Using the HP DeskJet Control
Panel for MS-DOS
Use the HP DeskJet Control Panel to choose print
settings that might not be available from some
MS-DOS programs, or if you can’t get a printer
driver that works with your software program.
Installing the HP DeskJet
Control Panel
Before you install the HP DeskJet Control Panel,
make sure you have followed all the steps in the
setup guide.
1 Turn on your computer and your printer.
2 Put Installation Disk #3 into your computer’s
disk drive.
3 At the MS-DOS command line (C:\>), type
A:\INSTALL and press ENTER.
If your disk drive is different than “A”, substitute
the correct letter for “A”.
4 Follow the instructions on the screen.
Note
If a message indicates that the installation of
the Control Panel was unsuccessful, try the
installation again. If it’s still unsuccessful, or if
the Control Panel software is damaged or
missing, contact your authorized HP dealer.
Cleaning the print cartridges
Clean the print cartridges when you notice that
lines or dots are missing from your printed text
and graphics. However, don’t clean them
unnecessarily as this wastes ink and shortens the
print cartridge life.
1 At the MS-DOS command line, type DJCP and
press ENTER.
The Control Panel appears.
2 Click Clean Print Cartridge, then follow the
instructions on the screen.
Aligning the print cartridges
Align the print cartridges when you notice that color
ink does not properly line up with black ink.
1 At the MS-DOS command line, type DJCP and
press ENTER.
The Control Panel appears.
2 Click Align Print Cartridge, then follow the
instructions on the screen.
Page 84

Using the right MS-DOS
printer driver
Printer drivers are supplied by the manufacturers of
MS-DOS software programs. Whenever possible, use
the one designed specifically for the HP DeskJet
690C Series printers. However, if one isn’t available,
you can get satisfactory results using one of the
drivers listed below. If you are using a program that’s
not listed, contact the manufacturer of the software
program to get a printer driver that is compatible
with your new printer.
65
MS-DOS Program Version Printer Driver
Word Perfect 5.1, 5.1+, 6.x HP DeskJet 600,
Harvard Graphics 3.0 HP DeskJet 540
Lotus 1-2-3 2.x, 3.x, 4.0 HP DeskJet 540
Microsoft Word 5.5, 6.0 HP DeskJet 560C
Recommended
660C, or 850C
Installing a MS-DOS
printer driver
Follow the instructions supplied by the software
manufacturer. Contact them if you have any
questions or concerns about the performance of
your printer when using one of their drivers.
Page 85

66
Uninstalling the
printer software
If you need to uninstall the printer driver for your
HP DeskJet printer for any reason, perform one
of the steps listed for your operating system.
If something unexpected happened during
installation, it is safest to run the uninstall utility
directly from the CD or disks rather than from
the uninstall program that was placed on your
hard drive.
For Windows 3.1x, do one of
the following:
● In
Program
Series group. Double-click the Uninstall icon
to uninstall your printer software.
OR
● Insert the driver disk (either driver disk #1
or your CD) into your computer and run
Setup.exe. Select the third option to “Remove
the HP DeskJet 690C Series software from
your PC.”
Manager, locate your HP DeskJet
Additional symbol sets and
fonts
Additional symbol sets and fonts might have been
included with your printer on a separate disk. This
“Regional Font Support” disk contains custom
files for use with the HP DeskJet Control panel for
MS-DOS, allowing access to special character sets.
Supported languages
You only need to install the one file that supports
your particular language. If you are uncertain which
language is included in your printer, check the serial
number label on the back of the printer for one of
the following codes:
ARB=Arabic
GRK=Greek
LTV=Latvian
THA=Thai
CYR=Cyrillic
HBR=Hebrew
LIT=Lithuanian
For Windows 95, Windows 98,
and Windows NT 4.0, do one
of the following:
● From the Start menu, click Programs, click
HP DeskJet 690C Series, and then click HP
DeskJet 690C Series Uninstaller.
OR
● From the Start menu, click Settings, click
Control Panel, and then click Add/Remove
Programs. Select HP DeskJet 690C Series
(Remove only).
OR
● Insert the driver disk (either driver disk #1
or your CD) into your computer and run
Setup.exe. Select the third option to “Remove
the HP DeskJet 690C Series software from
your PC.”
Installing a special symbol set
or font
1 First install the printer software as described in the
setup guide.
2 Put the Regional Font Support disk into the
disk drive.
3 From the MS-DOS command line (C:\>), type
A:DIR then press ENTER to display the
subdirectories on the Regional Font Support disk.
If your disk drive is different that “A”, substitute the
correct letter for “A”.
Page 86

67
Copy the appropriate Symsets.dat file from the
subdirectory for the language of your printer to
your \Deskjet directory. For example, to copy the
file for the Cyrillic language, at the C:\ prompt
type the following and then press ENTER:
COPY A:\CYRILLICS\SYMSETS.DAT C:\DESKJET
4 Remove the Regional Font Disk from the disk
drive when the copying process is complete.
Available symbol sets and fonts
See the appropriate language option in the
following list.
Hebrew
Symbol Sets: Latin/Hebrew (ISO-8859/8)
PC Hebrew (CP-862)
Fonts:
Proportional Spaced Point Sizes
David PS 5, 6, 7, 8, 10, 12, 14
NarkisTam 5, 6, 7, 8, 10, 12, 14
Miriam PS 5, 6, 7, 8, 10, 12, 14
Miriam PS Italic 5, 6, 10, 12
Fixed Space Point Sizes Pitches
Courier 6, 12, 24 5, 10, 16.67, 20
Courier Italic 6, 12, 24 5, 10, 20
Miriam 6, 12, 24 6, 12, 24
Miriam Italic 6, 12, 24 6, 12, 24
David 6, 12, 24 5, 10, 16.67, 20
Arabic
Symbol Sets: HP Arabic-8
PC Arabic (CP-864)
Fonts:
Proportional Spaced Point Sizes
Ryadh 5, 6, 7, 8, 10, 12, 14
Fixed Space Point Sizes Pitches
Naskh 6, 12, 24 5, 10, 20
Naskh 7, 14, 28 8.5, 17
Koufi 6, 12, 24 6, 12, 24
Cyrillic
Symbol Sets: PC-Cyrillic (CP-866)
Latin Cyrillic (ISO-8859/5)
Fonts:
Proportional Spaced Point Sizes
CG Times 5, 6, 7, 8, 10, 12, 14
CG Times Italic 5, 6, 7, 8, 10, 12, 14
Univers 5, 6, 7, 8, 10, 12, 14
Univers Italic 5, 6, 10, 12
Fixed Space Point Sizes Pitches
Courier 6, 12, 24 5, 10, 16.67, 20
Courier Italic 6, 12, 24 5, 10, 20
Letter Gothic 6, 12, 24 6, 12, 24
Letter Gothic Italic 6, 12, 24 6, 12, 24
Greek
Symbol Sets: PC-8 Greek (CP-866)
onts:
F
Proportional Spaced Point Sizes
CG Times 5, 6, 7, 8, 10, 12, 14
CG Times Italic 5, 6, 7, 8, 10, 12, 14
Univers 5, 6, 7, 8, 10, 12, 14
Univers Italic 5, 6, 10, 12
Fixed Space Point Sizes Pitches
Courier 6, 12, 24 5, 10, 16.67, 20
Courier Italic 6, 12, 24 5, 10, 20
Letter Gothic 6, 12, 24 6, 12, 24
Letter Gothic Italic 6, 12, 24 6, 12, 24
Latin/Greek (ISO-8859/7)
Baltic
Symbol Sets: PC Latvian/Russian
Fonts:
Proportional Spaced Point Sizes
CG Times 5, 6, 7, 8, 10, 12, 14
CG Times Italic 5, 6, 7, 8, 10, 12, 14
Univers 5, 6, 7, 8, 10, 12, 14
Univers Italic 5, 6, 10, 12
Fixed Space Point Sizes Pitches
Courier 6, 12, 24 5, 10, 16.67, 20
Courier Italic 6, 12, 24 5, 10, 20
Letter Gothic 6, 12, 24 6, 12, 24
Letter Gothic Italic 6, 12, 24 6, 12, 24
PC Lithuanian/Russian
PC Lithuanian (CP-772)
Thai
Symbol Sets: TIS (TAPIC23)
Fonts:
Fixed Space Point Sizes Pitches
Thai Courier, Courier Bold, 12 10
Courier Italic, and Bold Italic
Thai Courier, Courier Bold, 10 12
and Courier Italic
Thai Courier, Courier Bold, 24 6
and Courier Italic
Thai Line Printer 8.5 16
Page 87

68
Limited Warranty
Statement
HP Product Duration of
Limited Warranty
Software 90 Days
Print cartridges 90 Days
Printheads 1 Year
Printer and Related HP Hardware 1 Year
A. Extent of Limited Warranty
1. Hewlett-Packard (HP) warrants to the end-user customer that
the HP products specified above will be free from defects in
materials and workmanship for the duration specified above,
which duration begins on the date of purchase by the
customer. Customer is responsible for maintaining proof of
date of purchase.
2. For software products, HP’s limited warranty applies only
to a failure to execute programming instructions. HP does
not warrant that the operation of any product will be
uninterrupted or error free.
3. HP’s limited warranty covers only those defects which arise
as a result of normal use of the product, and do not apply to
any:
a. Improper or inadequate maintenance or modification;
b. Software, interfacing, media, parts, or supplies not provided
or supported by HP; or
c. Operation outside the product’s specifications.
4. For HP printer products, the use of a non-HP ink cartridge or
a refilled ink cartridge does not affect either the warranty to
the customer or any HP support contract with the customer.
However, if printer failure or damage is attributable to the
use of a non-HP or refilled ink cartridge, HP will charge its
standard time and materials charges to service the printer for
the particular failure or damage.
5. If HP receives, during the applicable warranty period, notice
of a defect in any software, media, or ink cartridge product
which is covered by HP’s warranty, HP shall replace the
defective product. If HP receives, during the applicable warranty period, notice of a defect in any hardware product
which is covered by HP’s warranty, HP shall either repair or
replace the defective product, at HP’s option.
6. If HP is unable to repair or replace, as applicable, a defective
product which is covered by HP’s warranty, HP shall, within a
reasonable time after being notified of the defect, refund the
purchase price for the product.
7. HP shall have no obligation to repair, replace, or refund until
the customer returns the defective product to HP.
8. Any replacement product may be either new or like-new,
provided that it has functionality at least equal to that of the
product being replaced.
9. HP’s limited warranty is valid in any country where the
covered HP product is distributed by HP except for the
Middle-East, Africa, Argentina, Brazil, Mexico, Venezuela,
and France’s “Departments d’Outre-Mer”; for those excepted
areas, the warranty is valid only in the country of purchase.
Contracts for additional warranty services, such as on-site
service, may be available from any authorized HP service
facility in countries where the product is distributed by HP
or by an authorized importer.
B. Limitations of Warranty
1. TO THE EXTENT ALLOWED BY LOCAL LAW, NEITHER HP NOR
ITS THIRD PARTY SUPPLIERS MAKE ANY OTHER WARRANTY
OR CONDITION OF ANY KIND, WHETHER EXPRESS OR
IMPLIED, WITH RESPECT TO THE HP PRODUCTS, AND
SPECIFICALLY DISCLAIM THE IMPLIED WARRANTIES OR
CONDITIONS OF MERCHANTABILITY, SATISFACTORY
QUALITY, AND FITNESS FOR A PARTICULAR PURPOSE.
C. Limitations of Liability
1. To the extent allowed by local law, the remedies provided in
this Warranty Statement are the customer’s sole and exclusive
remedies.
2. TO THE EXTENT ALLOWED BY LOCAL LAW, EXCEPT FOR THE
OBLIGATIONS SPECIFICALLY SET FORTH IN THIS WARRANTY
STATEMENT, IN NO EVENT SHALL HP OR ITS THIRD PARTY
SUPPLIERS BE LIABLE FOR DIRECT, INDIRECT, SPECIAL,
INCIDENTAL, OR CONSEQUENTIAL DAMAGES, WHETHER
BASED ON CONTRACT, TORT, OR ANY OTHER LEGAL
THEORY AND WHETHER ADVISED OF THE POSSIBILITY OF
SUCH DAMAGES.
D. Local Law
1. This Warranty Statement gives the customer specific legal
rights. The customer may also have other rights which vary
from state to state in the United States, from province to
province in Canada, and from country to country elsewhere in
the world.
2. To the extent that this Warranty Statement is inconsistent with
local law, this Warranty Statement shall be deemed modified
to be consistent with such local law. Under such local law,
certain disclaimers and limitations of this Warranty Statement
may not apply to the customer. For example, some states in
the United States, as well as some governments outside the
United States (including provinces in Canada), may:
a. Preclude the disclaimers and limitations in this Warranty
Statement from limiting the statutory rights of a consumer
(e.g., the United Kingdom);
b. Otherwise restrict the ability of a manufacturer to enforce
such disclaimers or limitations; or
c. Grant the customer additional warranty rights, specify the
duration of implied warranties which the manufacturer
cannot disclaim, or not allow limitations on the duration of
implied warranties.
3. FOR CONSUMER TRANSACTIONS IN AUSTRALIA AND NEW
ZEALAND, THE TERMS IN THIS WARRANTY STATEMENT,
EXCEPT TO THE EXTENT LAWFULLY PERMITTED, DO NOT
EXCLUDE, RESTRICT, OR MODIFY, AND ARE IN ADDITION TO,
THE MANDATORY STATUTORY RIGHTS APPLICABLE TO THE
SALE OF HP PRODUCTS TO SUCH CUSTOMERS.
Page 88

Legal information
Regulatory notices
FCC statement (USA)
The United States Federal Communications Commission (in 47 CFR 15.105) has specified that the following notice be brought to the
attention of users of this product:
This equipment has been tested and found to comply with the limits for a Class B digital device, pursuant to part 15 of the FCC Rules.
These limits are designed to provide reasonable protection against harmful interference in a residential installation. This equipment
generates, uses, and can radiate radio frequency energy and, if not installed and used in accordance with the instructions, may cause
harmful interference to radio communications. However, there is no guarantee that interference will not occur in a particular installation.
If this equipment does cause harmful interference to radio or television reception, which can be determined by turning the equipment off
and on, the user is encouraged to try to correct the interference’s by one or more of the following measures:
• Reorient or relocate the receiving antenna.
• Increase the separation between the equipment and the receiver.
• Connect the equipment into an outlet on a circuit different from that to which the receiver is connected.
• Consult the dealer or an experienced radio/TV technician for help.
Use of a shielded cable is required to comply within Class B limits of Part 15 of FCC Rules.
Pursuant to Part 15.21 of the FCC Rules, any changes or modifications to this equipment not expressly approved by Hewlett-Packard
Company may cause harmful interference and void the FCC authorization to operate this equipment.
LED Indicator Statement
The display LEDs meet the requirements of EN 60825-1.
69
Power Module Statement
The power module cannot be repaired. If it is defective it should be discarded or returned to the supplier.
Page 89

70
Index
Symbols
(Black cartridge) 54
(Photo cartridge) 54
(Power button) 48
(Resume button) 10, 21, 22, 27, 48
(Tri-Color cartridge) 54
A
accessories, ordering 61–63
address, return 31
addresses for ordering 62
aligning cartridges 46, 64
America Online 49
art, printing 19–20
Avery labels 36, 37, 60
B
banner lever 25, 28, 46, 47
banner support 25, 27
banners
edge strips 26
margins 26, 59
option 9
paper for 25, 47
paper jams 26, 47
paper types to avoid 25
print settings 25
printing 25–28
problems 27, 47
Best mode 34, 42
print speed 59
bidirectional cable 53
bidirectional communication 46, 47, 53
black and white printing See grayscale
blank page 47
bleeding ink 6
Book option 14
boxes See HP print settings dialog box
and HP Toolbox
brightness, paper 5
business cards 38
buttons
Power 48
Resume 10, 48
C
cable
bidirectional 46, 53
parallel 47, 53
printer 53
calendars, making 21
cancelling printing 10
card guide 38, 39
cards
minimum margins 59
nonstandard sizes 38
paper for 38
paper jams 40
print settings 38
printing 40
problems 40
types of 38, 39
cartridges
See print cartridges
photo 21, 23
CD, photo 20
charts 5, 19
cleaning cartridges 46, 64
cleaning service station 55
clearing jammed paper 10
clip art 19
coated paper 5, 6, 25
Page 90

71
color
dull 18
how it works 18
matching screen and printer 18
missing 10, 23, 46
paper choices 5
print settings 8
printing 5, 9
turning off 18, 42
wrong 46
communication, bidirectional 46
communications 46, 53
CompuServe 49
Control Panel See HP Control Panel for MS-DOS
copyright law 19
custom paper sizes 12
customer support 49
Cut Sheet option 9, 28
D
decorative elements 19
dialog boxes See HP print settings dialog box and
HP Toolbox
different kinds of paper 24
digital photographs 20
door
top cover 62
DOS See MS-DOS
double-sided printing
choosing paper 5, 14
how it works 14–15
draft mode See EconoFast mode
drawing pictures 19
drivers
printer software 49
duplicate forms 6
E
EconoFast mode
print speed 59
setting print quality 34, 42
when to use 15, 22, 34, 42, 46
edge strips, banner paper 26
edge, printing to 7, 59
electronic files, creating 19–20
electronic support 49
envelopes
choosing 29
margins 31, 59
multiple 30–32
print settings 29, 30
problems 29, 30, 31
return address 31
single 29–30
sizes 29, 32, 59
small 32
stacking 30–32
stuck 29
types to avoid 29
window 29
error messages 11
even-numbered pages 14
F
Features tab (HP print settings dialog box)
Book option 14
finding 41–42
Flip Horizontal option 16
Tablet option 14
fibers on cartridges 55
files, electronic 19–20
Flip Horizontal 16
flipped printing 16–17
fonts
additional 66
built-in (internal) 60
previewing 9
forms, paper 6
fuzzy printing 27, 46
G
glossy paper 5, 6
graphics See pictures and photographs
grayscale
as alternative to color printing 18, 42
inadvertent 10, 46
turning on and off 18, 42
greeting cards 39
Page 91

72
H
halftoning 20
help
See Troubleshooting
HP Toolbox 45
online 11, 32, 43
technical support 49
types of assistance 11, 32, 43
Hewlett-Packard, reaching online 49
HP ColorSmart 18
HP Control Panel for MS-DOS 64
HP DIRECT, ordering from 5, 62
HP Greeting Card Paper Kit 39
HP Inkjet print cartridges See print cartridges
HP papers 5, 20, 25, 33, 61
HP Photo Color Kits 61
HP print settings dialog box
Banner option 25
Book option 14
color options 8
Cut Sheet option 28
double-sided printing 14
finding 8, 41–42
Flip Horizontal option 16
grayscale 18
intensity 8
margins 46
Paper Size option 8, 12, 29, 30, 36, 38
Paper Type option 8, 33, 36
Setup tab 8, 18, 33, 36, 42
Tablet option 14
HP Toolbox
as help resource 45
finding 44
icon 10
Printer Services tab 11, 46
Troubleshooting tab 11, 45
HP Web site 49
I
IN tray 3, 6–7, 10, 14–15, 60
index cards 38
ink
bleeding 6, 46
misaligned colors 46
non-HP 54
refilling cartridges 54
saving 46
smearing 15, 46
ink streaks 55
Internet, accessing HP’s Web site 32, 49
Invitations 32
iron-on transfers 16
J
jammed paper
banners 26
card stock 40
clearing 10
envelopes 29
labels 36
types of paper to avoid 6
L
labels 36–37
landscape orientation 37, 40, 46
law, copyright 19
legal information 69
lights 48
loading paper
after running out 10
banner paper 25–28
basic instructions 6–7
card stock 38–40
envelopes 29–32
labels 36–37
transparencies 33–35
M
mailing labels 36–37
mail-ordering paper 5, 38
manuals, ordering 61
margins
banners 26, 59
cards 59
envelopes 31, 59
minimum allowable 59
paper size 46, 59
printable area 7, 59
problems 46
matching colors 18
messages 11
mirror printing 16–17
missing lines 55
modes, printing
Best 34, 42, 59
EconoFast 15, 22, 34, 42, 46, 59
Normal 15, 36, 59
printing speeds 59
Page 92

73
MS-DOS
character sets 59
HP Control Panel for MS-DOS 64
printing from 8, 64
multiple envelopes 30–32
N
nonstandard paper sizes 12
Normal mode
changing to 15
print speed 59
printing labels 36
notepads, making 12
novelty paper 5, 29, 38
O
odd-numbered pages 14
online help 11, 32, 43
online user forums 49
opacity, paper 5
options See HP print settings dialog box
ordering
accessories and supplies 61–63
addresses for 62
HP photo color kits 61
manuals 61
paper 61
transfer media 61
orientation, paper 37, 40, 46
Out of Paper message 10, 11, 27
OUT tray 3, 9, 14–15, 60
output, none 47
P
page, blank 47
paper
banner 25, 47
brightness of 5
card stock 38
choosing 5–6, 20, 38, 46
coated 5, 6, 25
condition of 6
double-sided printing 5, 14
ejection problems 10, 47
for photocopies 5
for pictures 5, 20
how to load printer 6–7
iron-on transfers 16
jams See jammed paper
mail order sources 5, 38
novelty 5, 29, 38
opacity of 5
ordering 61–63
orientation 37, 40, 46
printable area 7, 59
problems 6
size 5
size options 8, 12, 29, 30, 36, 38, 60
specifications 60
textured 5, 6
trays 3, 6–7, 9, 10, 14–15, 60
types 5–6, 8, 12, 14, 25
types to avoid 6, 25, 29, 33
weight of 5, 25, 60
wrapping 20
wrinkling 6
perforated strips, banner paper 26
photo cartridge 21, 23, 61
photo paper 5
photographs
as digital files 20
iron-on transfers 16
paper for 5, 20
printing 21–23
printing speed 22, 47
problems 22, 23
scanning 20
pictures
as computer files 19–20
iron-on transfers 16
paper for 5
printing 21–23
printing speed 22, 47
problems 22, 23, 46
scanning 20
sources for 19
portrait orientation 46
postcards 38
power module 62
preferences See HP print settings dialog box
print cartridges
aligning 46, 64
cleaning 46, 64
ordering 61, 62
photo 61
problems 46
purchasing 61
refilling 54
replacing 46, 54
storing 21
Page 93

74
print quality
See also modes, printing
and refilled cartridges 54
Best 42
EconoFast 42
problems 18, 27, 46, 54
print queue 10
print resolution 59
print settings
See HP print settings dialog box
envelopes 30
print speed
factors influencing 3
for photographs 22, 47
for pictures 22, 47
specifications 59
printer
cable for 46, 53
deciphering error messages 11
loading paper 6–7
paper trays 3, 6–7, 10, 14–15, 60
resetting 13, 15, 17, 23, 32, 35, 37
software for See software
specifications 59
trays 3
printer cable 53
printer drivers 49, 64, 66
Printer Services tab (HP Toolbox) 11, 46
printer software 49, 64
printing
banners 25–28
basic instructions 8–9
cancelling 10
cards 38
color 8–9
double-sided 5, 14–15
flipped 16–17
from MS-DOS 64
how it works 2–3
mirror 16–17
photographs 21–23
pictures 21–23
simple 4
transparencies 33–35
programs See software
Q
quality See print quality
R
refilling cartridges 54
regulatory notice 69
repair, customer 50
replacing cartridges 46, 54
resetting printer 13, 15, 17, 23, 32, 35, 37
resolution 59
Resume button 10, 27
return address 31
S
scanning pictures 20
settings, print See HP print settings dialog box
Setup tab (HP print settings dialog box) 8, 18, 33,
42
Banner option 25
Cut Sheet option 28
finding 41–42
HP Transparency option 33
Paper Size option 9, 29, 30, 36, 38
Paper Type option 9, 33, 36
shiny paper 6
single envelopes 29–30
size, paper 5
See also banners, cards, envelopes
custom 12
nonstandard 12
selecting 8, 12
specifications 60
small envelopes 32
smooth paper 5, 6
software
HP Control Panel for MS-DOS 64
MS-DOS printer drivers 64
ordering 49
printer 49, 64
Windows printer drivers 49
specifications 59
speed, printing 3, 22, 47, 59
splotchy printouts 11, 46
stacking envelopes 30–32
stickers 37
stopping printing 10
storing cartridges 21
streaking ink 46, 58
stuck paper See jammed paper
supplies, ordering 61–63
Page 94

75
support, customer 49
symbol sets, available 67
system requirements, minimum 53
T
Tablet option 14
taskbar 10
technical support 49
testing printer cable 46, 53
textured paper 5, 6
toolbox See HP Toolbox
transparencies
ink drying times 35
print settings 33
printing 33–35
printing as flipped documents 17
problems 34
using EconoFast mode 34
writing on 17
trays
capacity of 60
IN 3, 6–7, 10, 14–15, 60
OUT 3, 9, 14–15, 60
triplicate forms 6
troubleshooting 45–50
See also help
banners 27, 47
blank page 47
cartridges 46
colors missing or wrong 10, 46
communications 53
double-sided documents 14, 15
envelopes 29, 30, 31
fuzzy printing 27, 46
labels 36
margins 46
misaligned inks 46
misplaced text or graphics 46
missing text or graphics 46
online 45
on-screen error messages 11
paper not ejecting 10, 47
paper types to avoid 6
photographs 23
pictures 23
poor print quality 18, 27, 46, 54
printing 10–11, 45, 46–47
splotchy printing 11, 46
transparencies 34
uneven printing 11
Troubleshooting tab (HP Toolbox) 11, 45
t-shirts 16
two-sided printing 5, 14–15
two-way communication 46, 47, 53
types, paper 5
U
uneven printing 11
uninstalling the printer software 66
user forums, online 49
W
warranty statement 68
Web site, HP 32, 49
weight, paper 5, 25, 60
window envelopes 29
Windows
HP print settings dialog box 8
HP Toolbox 45
printer drivers 49
system requirements 53
Windows 3.1x 44, 49
Windows 95 9, 44, 49
Windows 98 9, 44, 49
Windows NT 4.0 9, 44, 49
wrapping paper 20
wrinkling paper 6
WWW support 49
Page 95

Reduce, Reuse, Recycle
Protecting the Environment
Hewlett-Packard continuously improves the
design and production processes of HP DeskJet
and DeskWriter printers to minimize the negative
impact on the office environment and on the
communities where the printers are manufactured,
shipped, and used. Hewlett-Packard has also
developed processes to minimize the negative
impact of the disposal of the printers at the end of
printing life.
Reduction and Elimination
Printer Packaging: Packaging materials, cushions,
accessories, and boxes have been reduced, saving
roughly 50% in fuel and, therefore, fuel
emissions. Boxes used to ship printers from the
distribution centers are whitened without
using chlorine.
Ozone: All ozone-depleting chemicals (CFCs, for
example) have been eliminated from HewlettPackard manufacturing processes.
Recycling
Printer Packaging: The boxes used to ship
printers from the distribution centers, the
expanded polystyrene packaging inserts, and the
clear polyethylene bags containing the printer
drivers are 100% recyclable.
Energy Consumption
HP DeskJet and DeskWriter printers use only 4.5
watts in stand-by mode, which easily qualifies them
as energy-saving computer printers under the U.S.
Environmental Protection Agency’s Energy Star
Computers program. The EPA estimates that if all
desktop PCs and peripherals in the U.S. were to
qualify, the overall savings in electricity could
amount to over $1 billion each year. It could also
prevent the emission of 20 million tons of carbon
dioxide per year (the equivalent output of 5
million cars).
The Energy Star emblem does not represent EPA
endorsement of any product or service.
Plastic Parts: Major manufactured plastic parts
are marked as to the plastic content to facilitate
product recycling.
Manuals: The manuals in this kit are printed on
recycled paper.
Reduction and Reuse
Ink Packaging: The packaging for the ink
cartridges was significantly reduced and
made recyclable.
 Loading...