

Page 1

HP Deskjet 6600 series printer
To find an answer to a question, click the appropriate topic
below:
● Notices
● Special features
● Getting started
● Connecting to the printer
● Printing photos from a digital camera
● Printing photos from a computer
● Printing other documents
● Printing tips
● Printer software
● Maintenance
● Troubleshooting
● Optional accessories
● Specifications
● Supplies
Page 2

Notices
● Notices and acknowledgements
● Terms and conventions
● Accessibility
Page 3

Notices and acknowledgements
Hewlett-Packard company notices
Reproduction, adaptation, or translation without prior written
permission is prohibited, except as allowed under the
copyright laws.
The information contained herein is subject to change
without notice.
The only warranties for HP products and services are set
forth in the express warranty statements accompanying such
products and services. Nothing herein should be construed as
constituting an additional warranty. HP shall not be liable for
technical or editorial errors or omissions contained herein.
Acknowledgements
Microsoft, MS, MS-DOS, and Windows are registered
trademarks of Microsoft Corporation.
TrueType is a U.S. trademark of Apple Computer, Inc.
Adobe, AdobeRGB, and Acrobat are trademarks of Adobe
Systems Incorporated.
PictBridge is a trademark of the Camera & Imaging Products
Association (CIPA).
© 2004 Copyright Hewlett-Packard Development
Company, L.P.
Page 4
Terms and conventions
The following terms and conventions are used in this user's
guide.
Terms
The HP Deskjet printer is also referred to as the HP printer
or printer.
Cautions, warnings, and notes
A Caution indicates possible damage to the HP Deskjet
printer or to other equipment. For example:
Caution: Do not touch the print cartridge ink nozzles
or copper contacts. Touching these parts will result in
clogs, ink failure, and bad electrical connections.
A Warning indicates possible harm to you or to others. For
example:
Warning: Keep both new and used print cartridges out
of the reach of children.
A Note indicates that additional information is provided. For
example:
Note:
For great results use HP products.
Page 5

Accessibility
Your HP printer provides a number of features that make it
accessible for people who have disabilities.
Visual
The printer software is accessible for users with visual
impairments or low vision through the use of Windows®
accessibility options and features. The printer software also
supports most assistive technology such as screen readers,
Braille readers, and voice-to-text applications. For users who
are color blind, colored buttons and tabs that are used in the
software and on the HP printer have simple text or icon
labels that convey the appropriate action.
Mobility
For users who have mobility impairments, the printer
software functions can be completed through keyboard
commands. The software also supports Windows accessibility
options such as StickyKeys, ToggleKeys, FilterKeys, and
MouseKeys. The printer doors, buttons, paper trays, and
paper guides can be operated by users who have limited
strength and reach.
Support
More details about the accessibility of this product and HP's
commitment to product accessibility are available at the HP
Web site
www.hp.com/accessibility.
Page 6

Special features
Congratulations! You have purchased an HP Deskjet printer
that is equipped with several exciting features:
● Built-in networking capabilities: Connect to a wired
network without using an external print server.
● Ink-backup mode: Ink-backup mode lets you continue
printing with one print cartridge when the other print
cartridge has run out of ink.
● Print Cancel button: Cancel print jobs at the touch of a
button.
● Print multiple pages on a single sheet of paper: Use
the
printer software to print up to 16 pages on a single
sheet of paper.
● Borderless printing: Use the entire page surface when
printing photos and cards by using the
borderless printing
feature.
● Digital photo printing: Use the enhanced digital photo
printing capabilities.
● Six-ink upgradeable printing: Enhance photo printing
with a
● Direct camera printing: Use the PictBridge port on the
photo print cartridge.
front of the printer to print photographs directly from a
digital camera.
● Optional Automatic Two-Sided Printing Accessory:
Purchase a
Automatic Two-Sided Printing Accessory to print
Page 7
two-sided documents automatically.
● Optional Auto Two-Sided Print Accessory with Small
Paper Tray: Purchase a
Optional Auto Two-Sided Print
Accessory with Small Paper Tray to print two-sided
documents automatically and load small media from the
back of the printer.
● Optional 250-Sheet Plain Paper Tray Accessory:
Purchase an optional
250-Sheet Plain Paper Tray Accessory
and expand the printer's paper-handling capability.
Page 8
Getting started
For an overview of the printer features, see the printer
features page.
Click the appropriate topic below for a description of a printer
feature:
● Buttons and lights
● Print Cartridge Status lights
● Paper trays
● Photo/envelope feeder
● Print cartridges
● Ink-backup mode
● Automatic Paper Type Sensor
● PictBridge port
For a description of the optional accessories, see the optional
accessories page.
Page 9
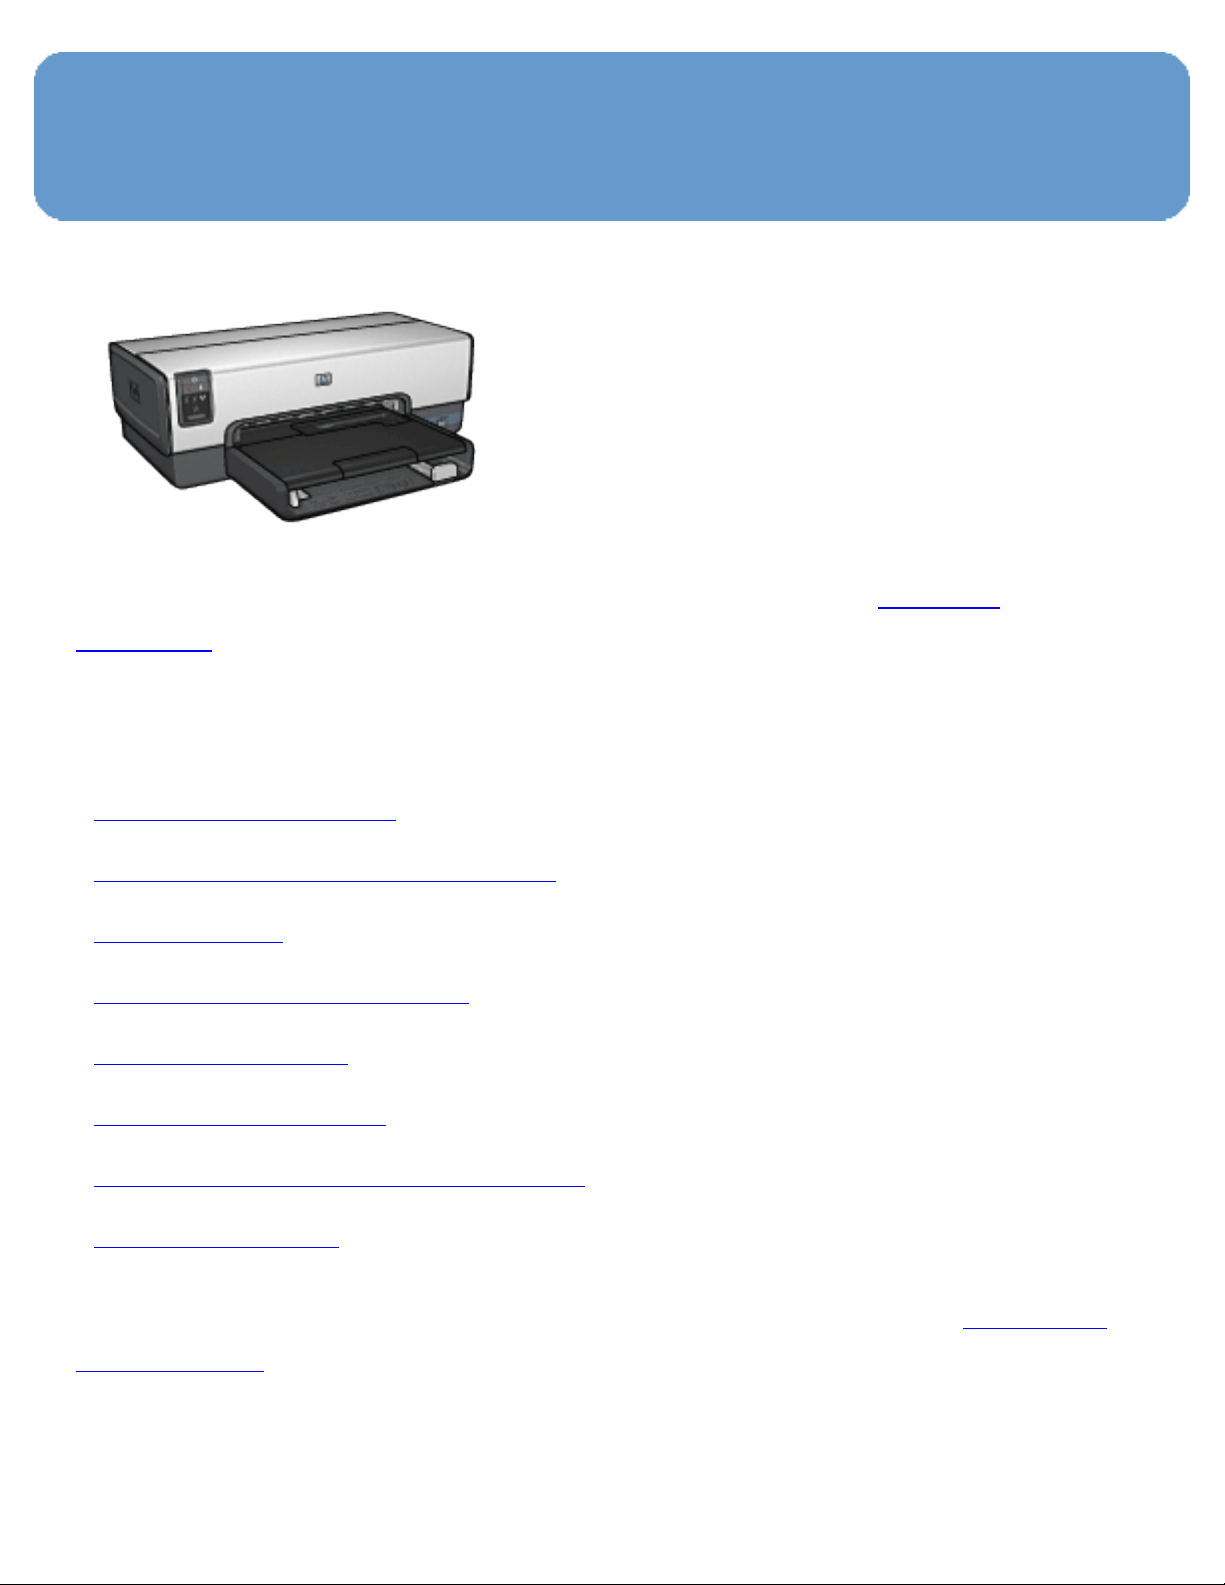
Printer features
The HP printer has several features to make printing easier
and more efficient.
1. Buttons and lights
2. Paper trays
3. Photo/envelope feeder
4. PictBridge port
1. Print cartridges
Automatic Paper-Type Sensor (not illustrated)
2.
Ink-backup mode (not illustrated)
3.
Page 10
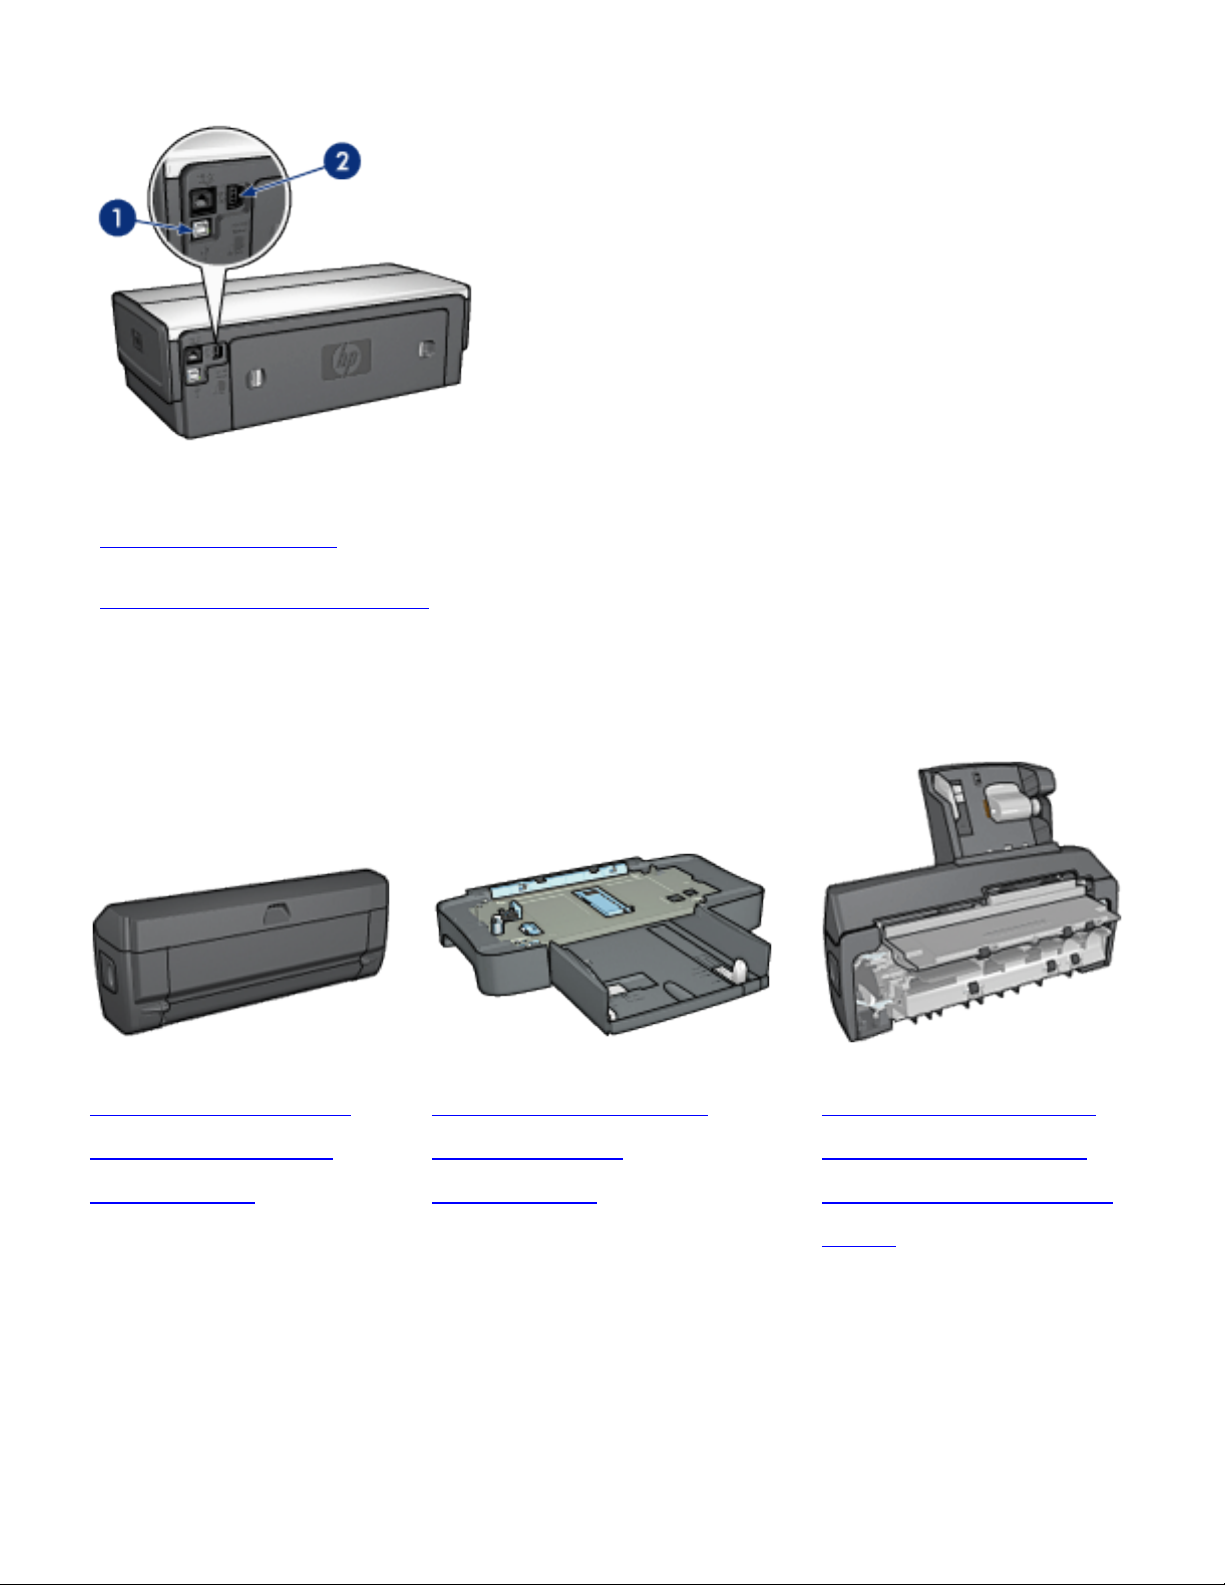
1. Rear USB port
2. Wired Ethernet port
Optional accessories
Automatic TwoSided Printing
Accessory
(optional)
250-Sheet Plain
Paper Tray
Accessory (optional)
Auto Two-Sided
Print Accessory
with Small Paper
Tray (optional)
Page 11
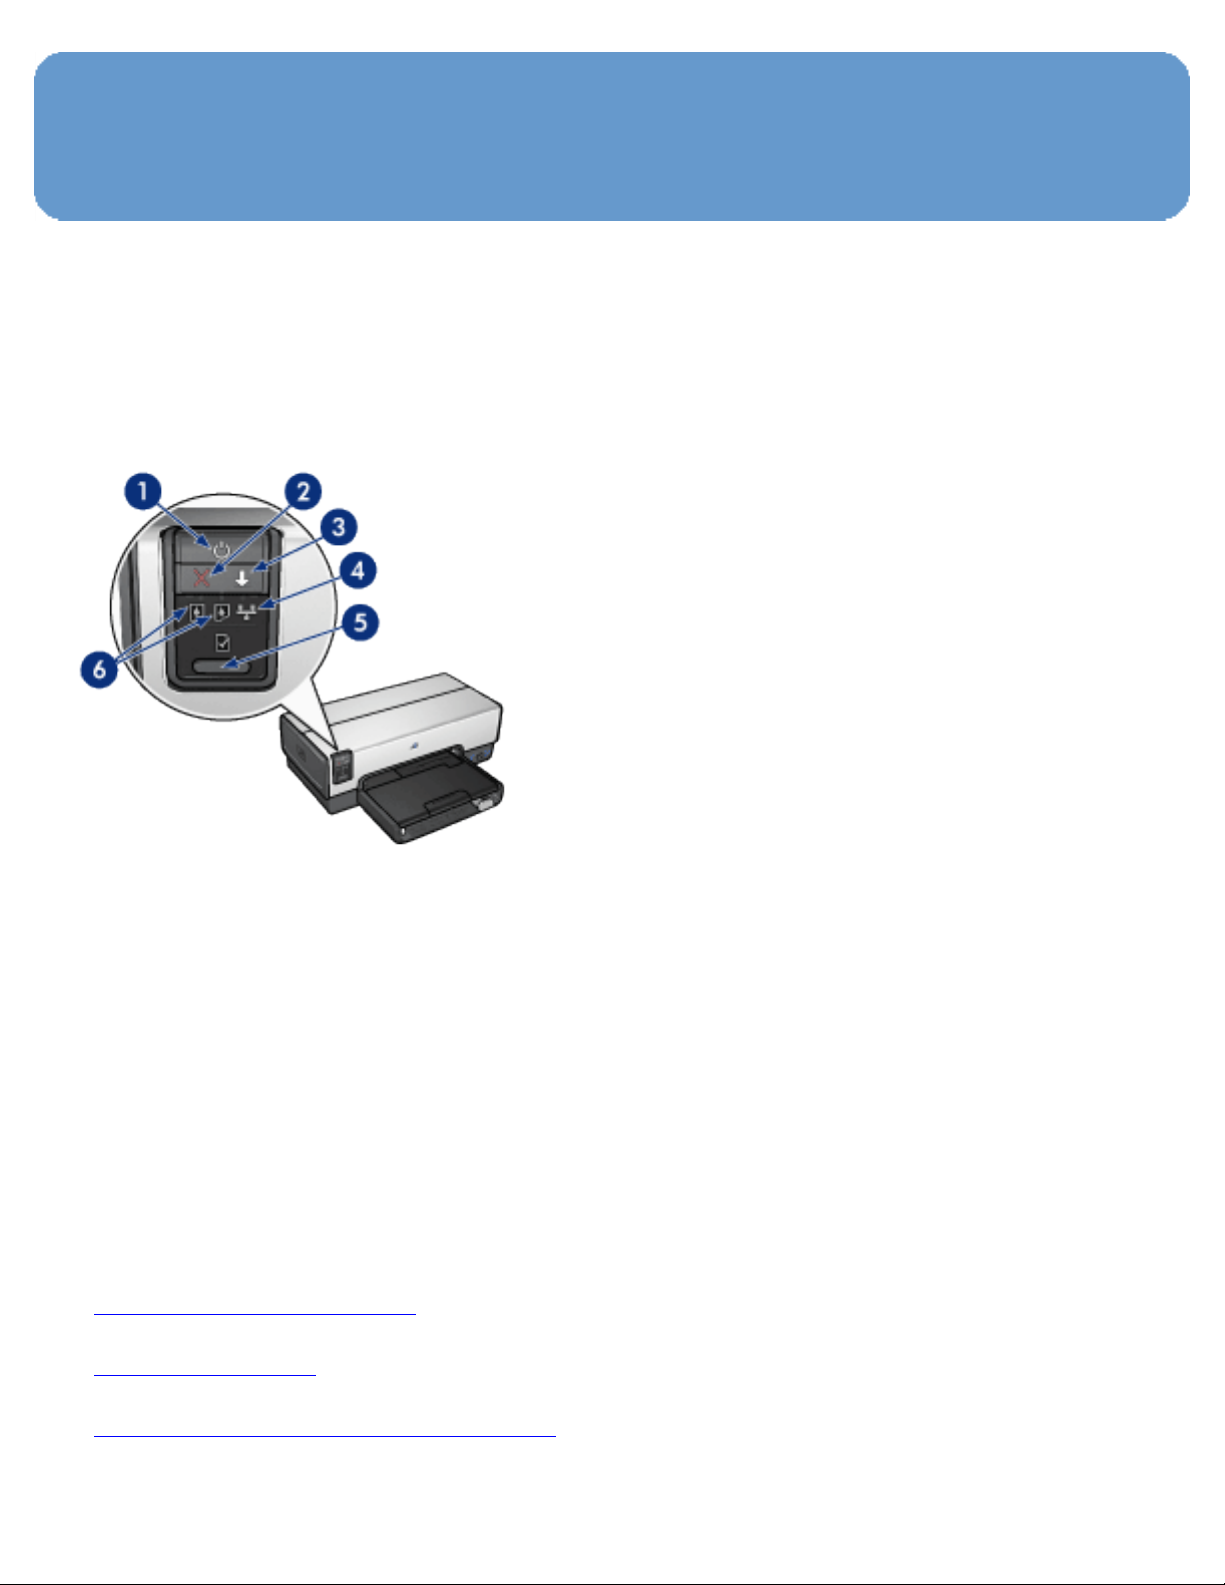
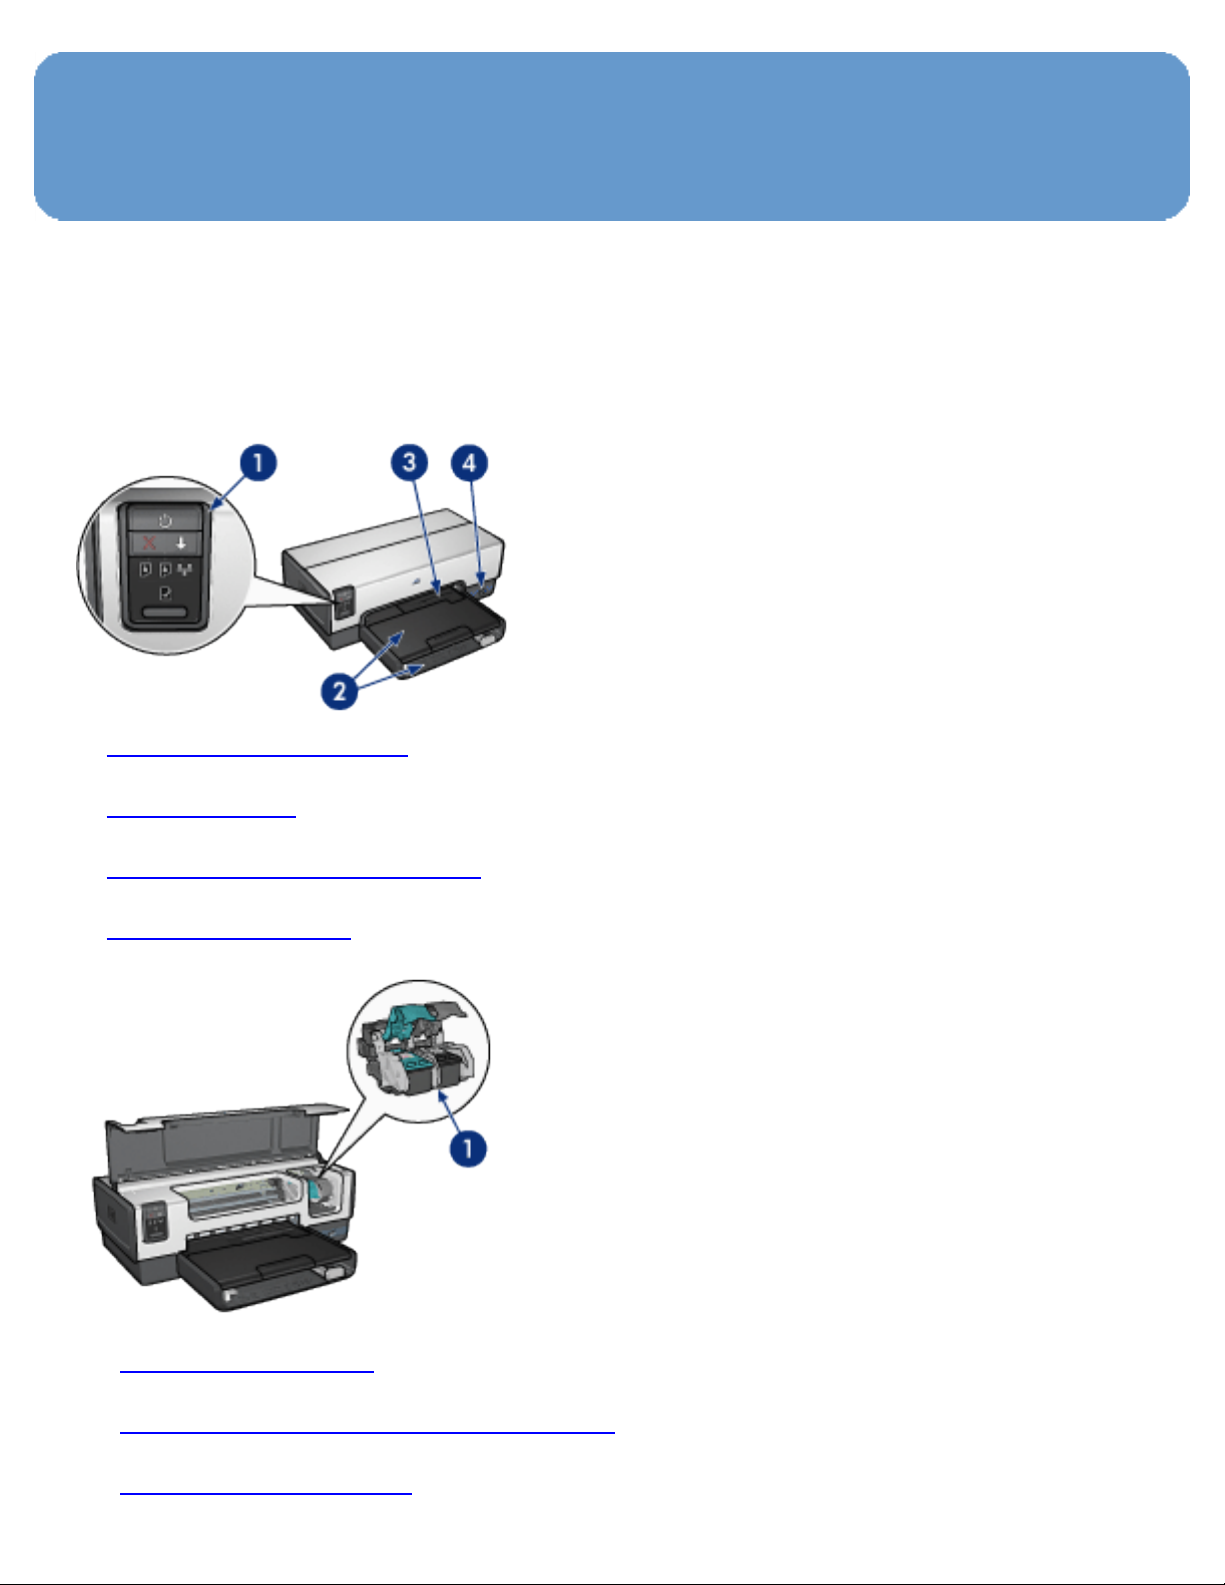
Buttons and lights
Use the printer buttons to turn the printer on and off, cancel
a print job, and restart a job. The printer lights give you
visual cues about the status of the printer.
1. Power button and light
2. Print Cancel button
3. Resume button and light
4. Network light
5. Report Page button
6. Print Cartridge Status lights
For a description of the following buttons and lights, click the
appropriate option:
● Report Page button
● Network light
● Print Cartridge Status lights
Page 12

Power button and light
The Power button turns the printer on and off. It might take
a few seconds for the printer to turn on after you press the
Power button.
The Power light flashes when the printer is processing.
Caution: Always use the Power button to turn the
printer on and off. Using a power strip, surge protector,
or a wall-mounted switch to turn the printer on and off
can cause printer failure.
Print Cancel button
Pressing the Print Cancel button cancels the current print job.
Resume button and light
The Resume light flashes when an action is required, such as
loading paper or clearing a paper jam. When the problem is
solved, press the Resume button to continue printing.
Page 13
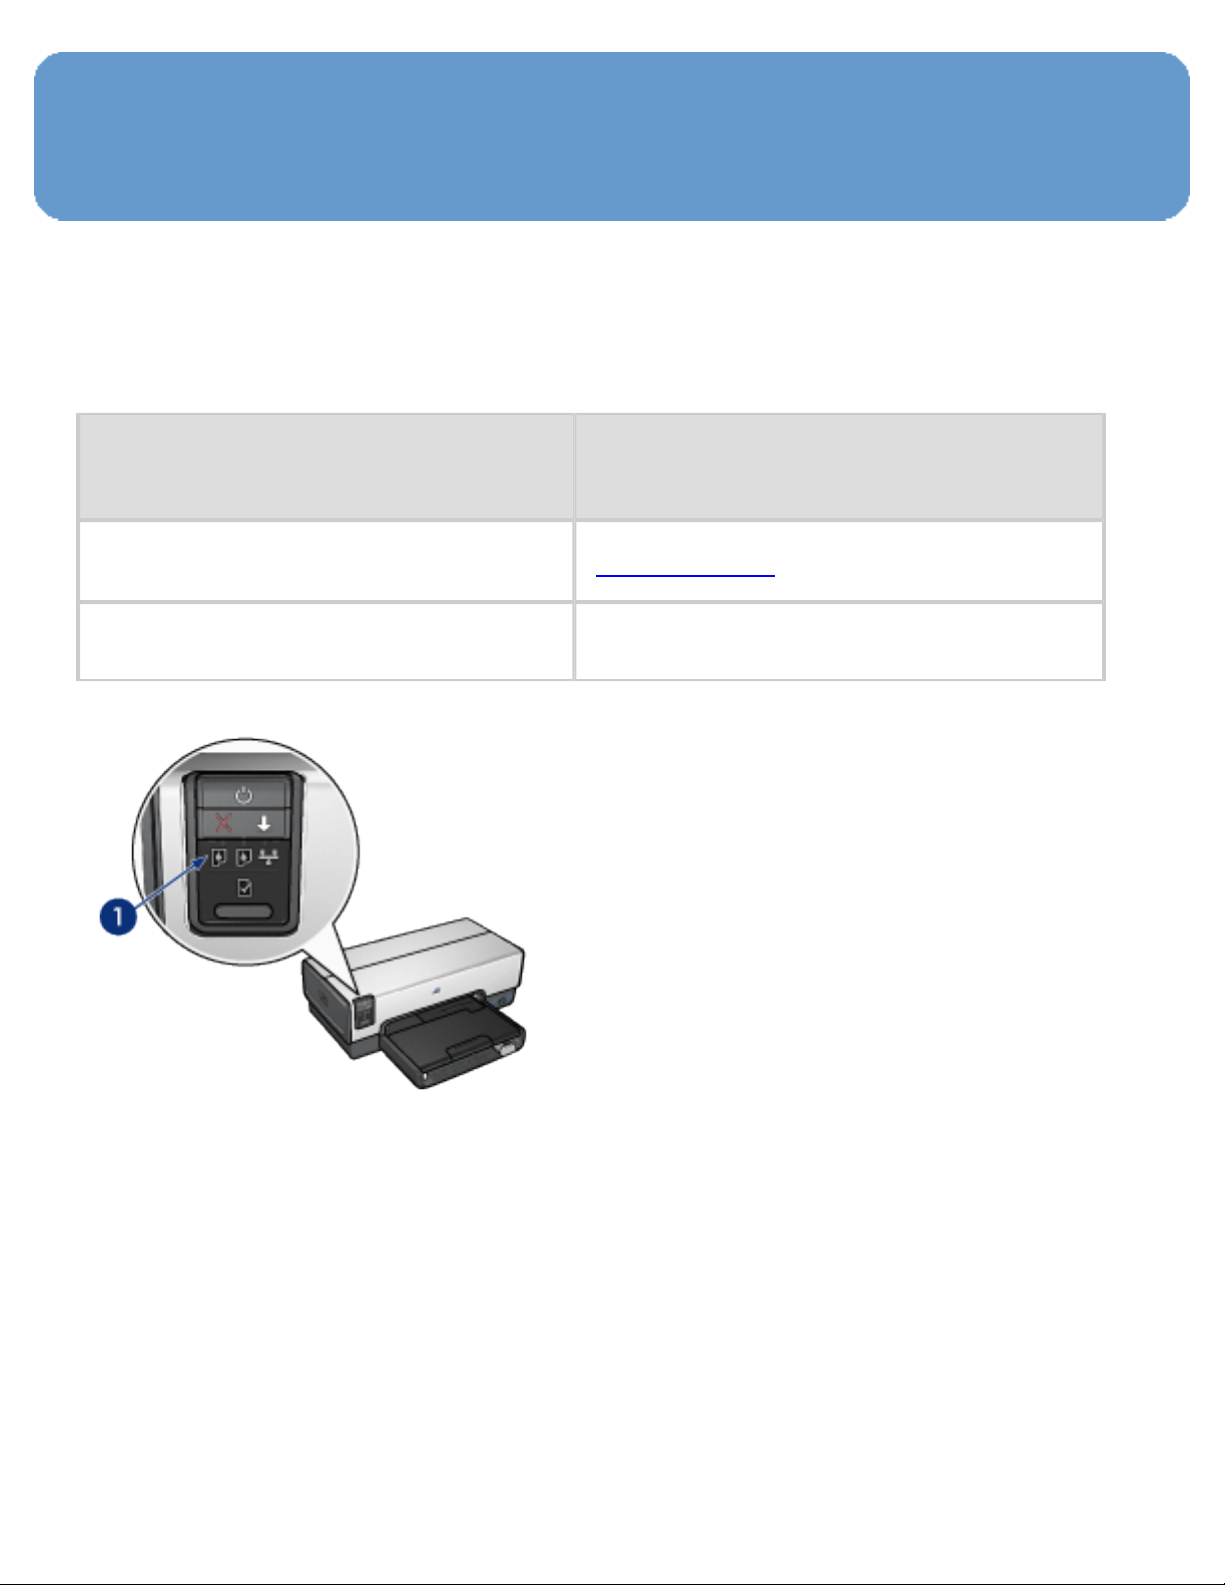
Print Cartridge Status lights
The Print Cartridge Status lights indicate the status of the
print cartridges.
Status of the Print
Cartridge Status lights
On and solid
Flashing
Status of the print
cartridges
Low on ink
Service required
1. Print Cartridge Status lights
Page 14
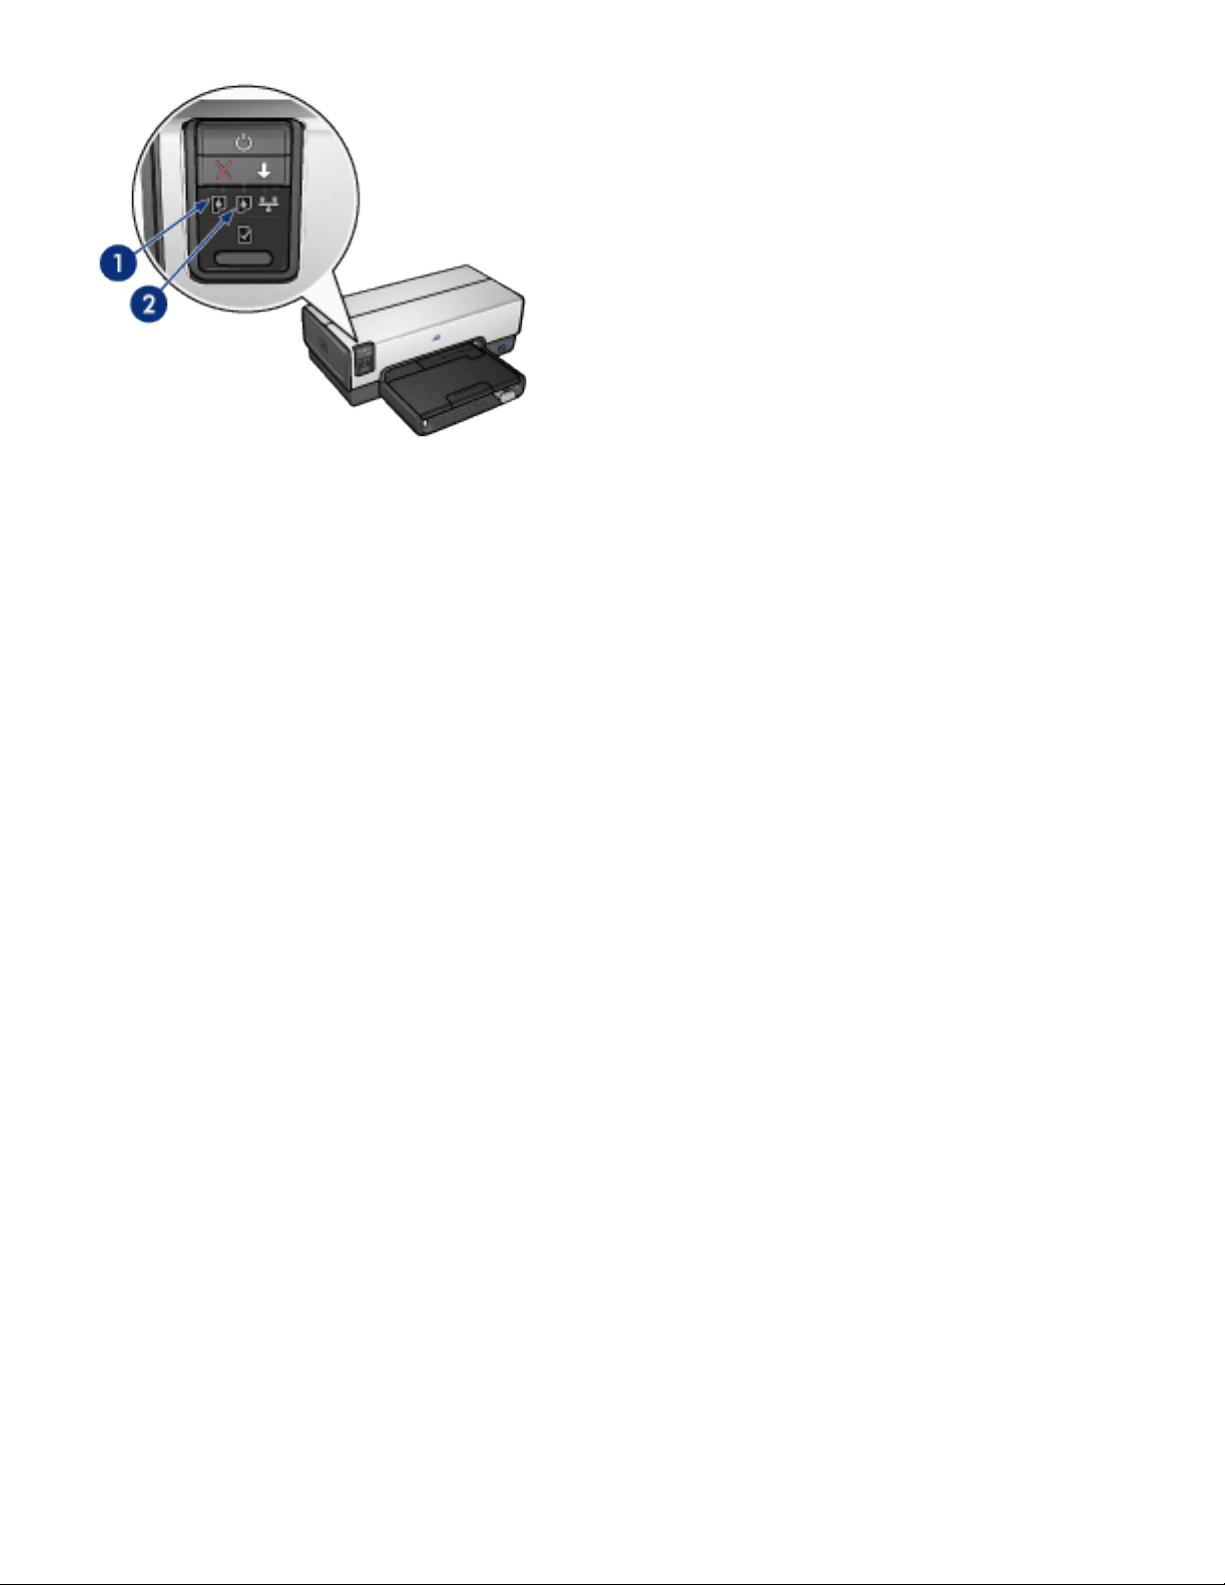
1. The left status light represents the tri-color print
cartridge.
2. The right status light represents the print cartridge
that is installed in the compartment on the right side of
the print cartridge cradle. That print cartridge can be the
black print cartridge, the photo print cartridge, or the gray
photo print cartridge.
Page 15
Paper trays
The printer has two paper trays:
● In tray
● Out tray
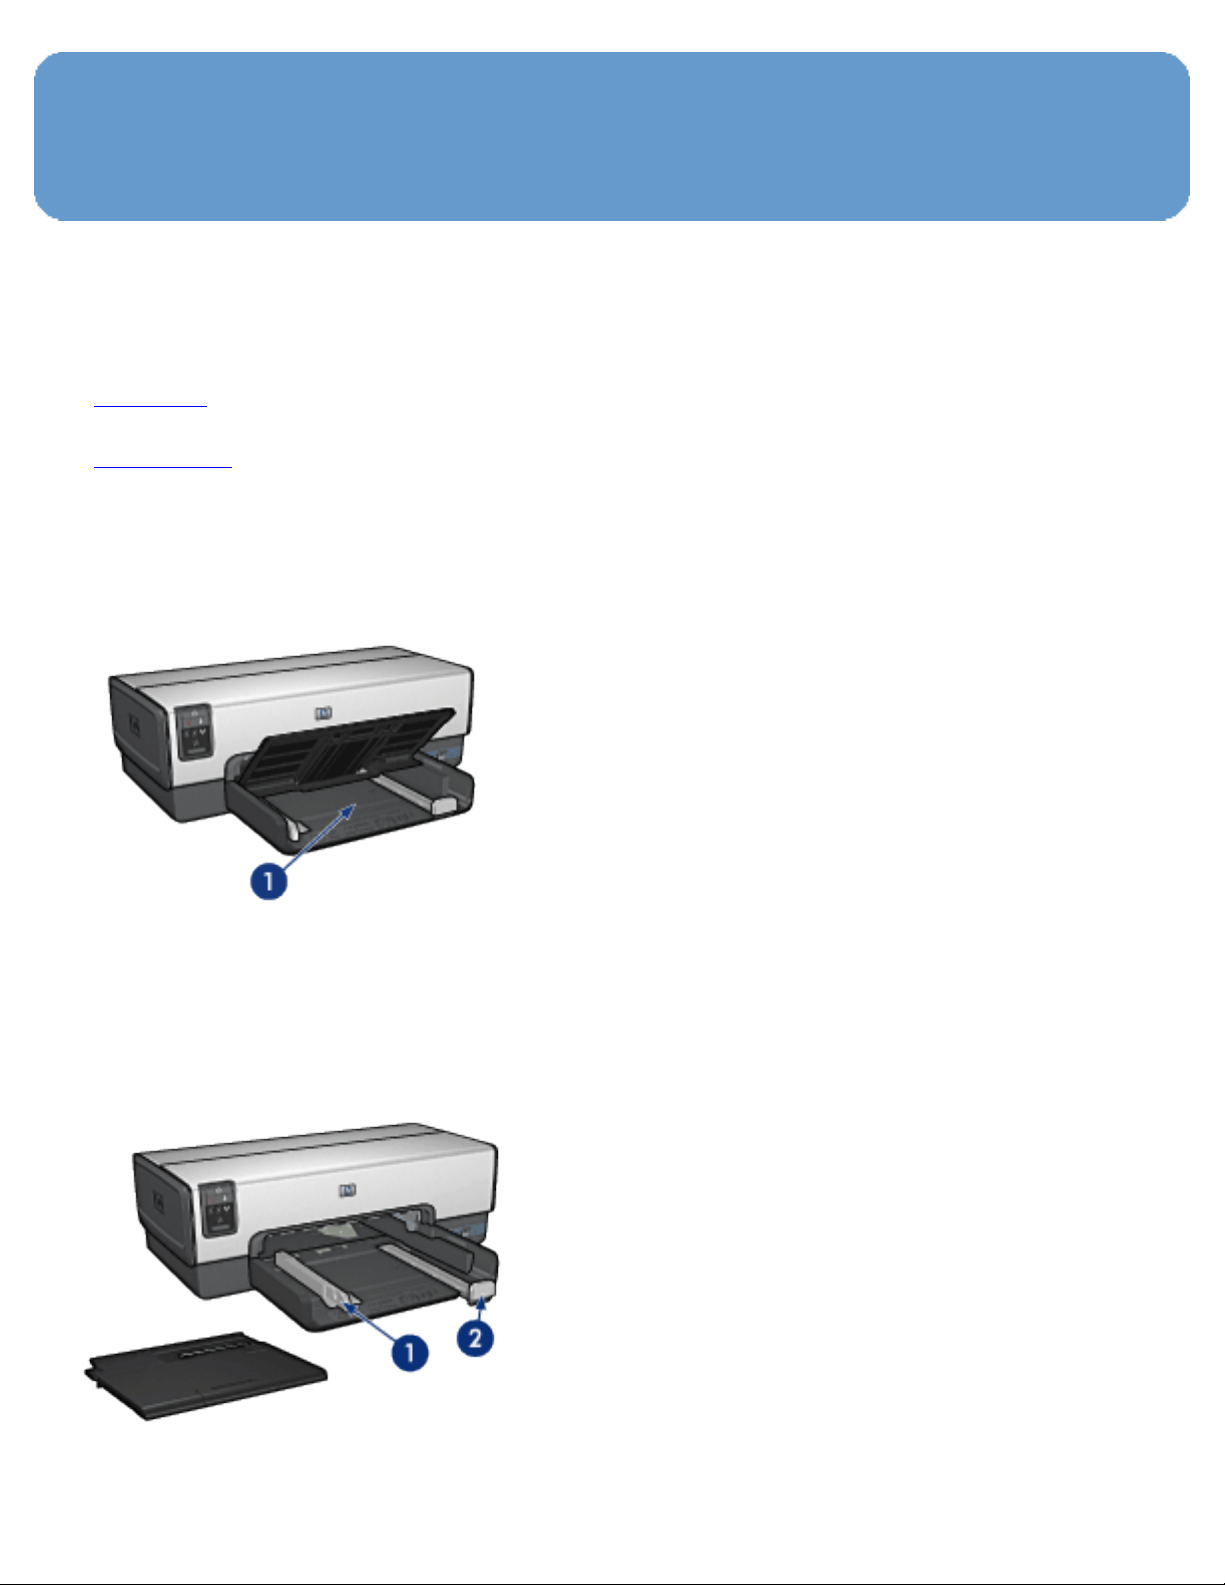
In tray
The In tray holds paper or other media to be printed.
1. In tray
Slide the paper guides firmly against the edges of the media
on which you are printing.
1. Paper-width guide
2. Paper-length guide
Page 16
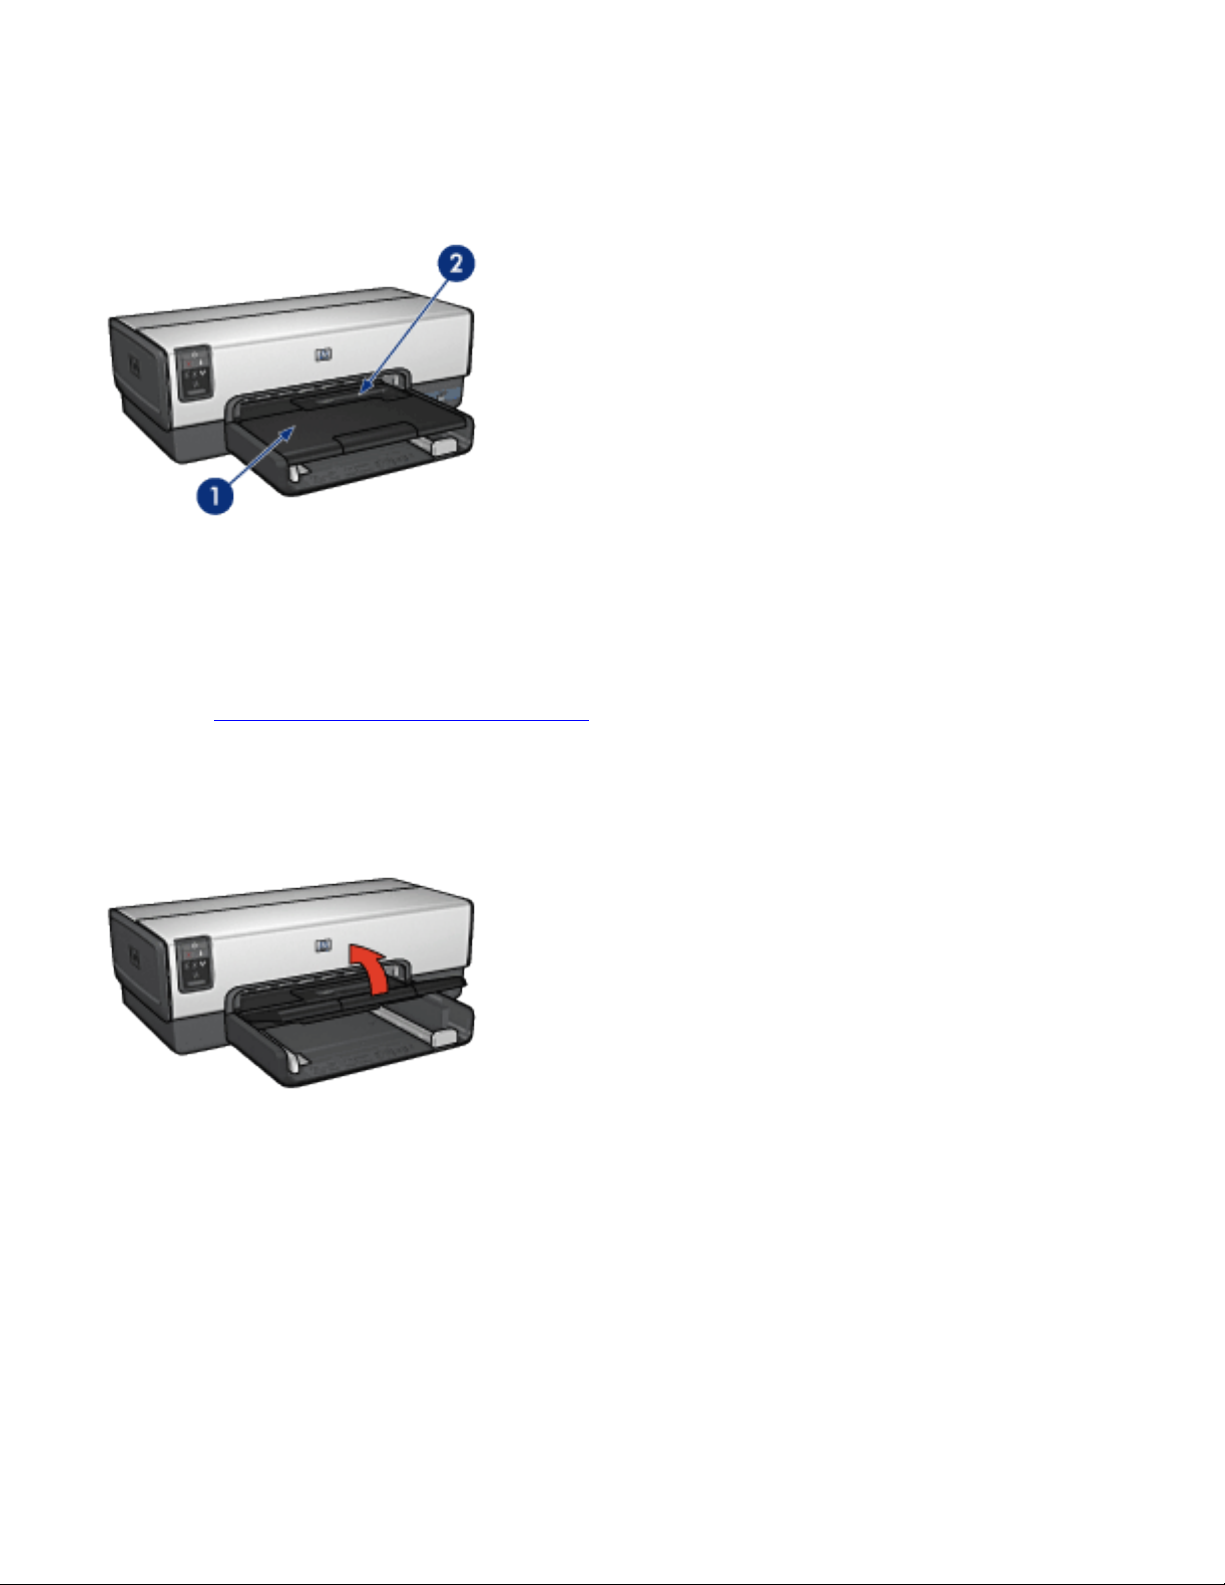
Out tray
Printed pages are deposited in the Out tray.
1. Out tray
2. Photo/envelope feeder
Use the photo/envelope feeder to print single envelopes,
small photos, and cards.
Raise the Out tray to load paper.
To prevent paper from falling out of the Out tray, pull out the
Out-tray extension, and then unfold the Out-tray extension
stop.
Page 17
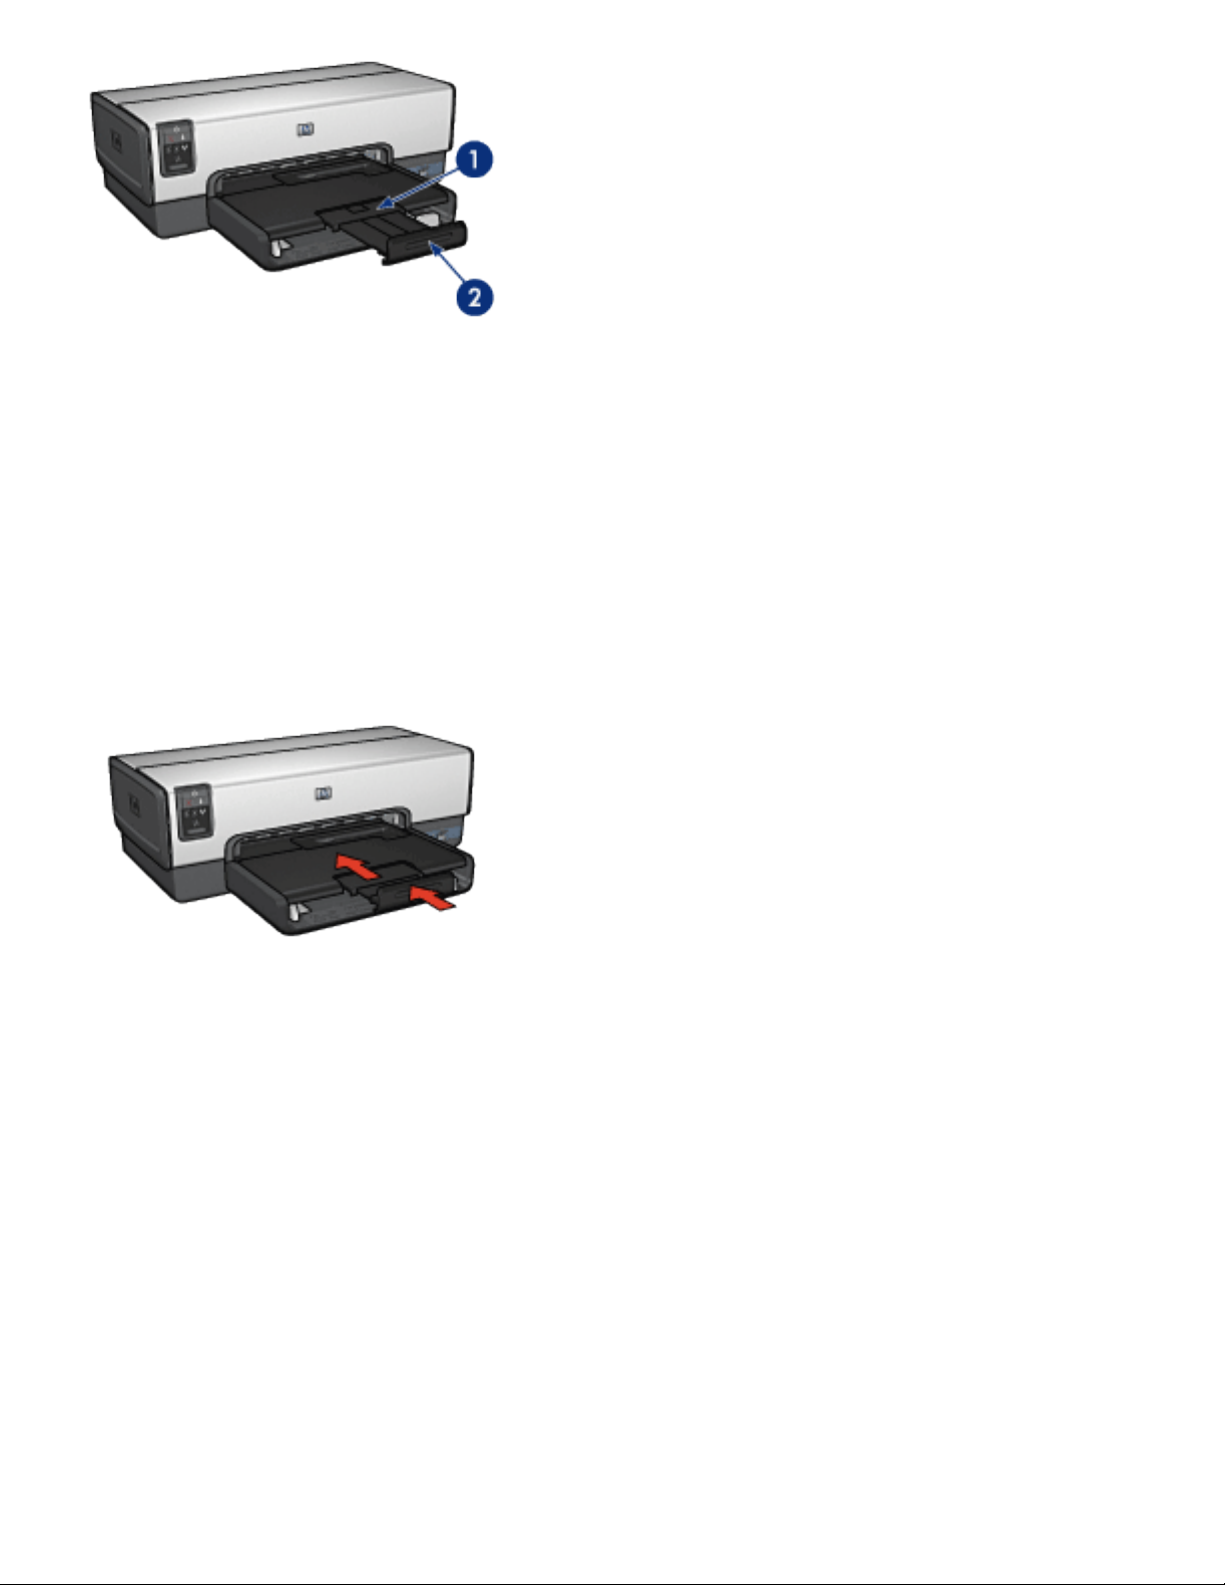
1. Out-tray extension
2. Out-tray extension stop
Do not unfold the Out-tray extension stop when printing on
legal paper.
After the print job is complete, fold the Out-tray extension
stop, and then push the Out-tray extension into the Out tray.
Page 18
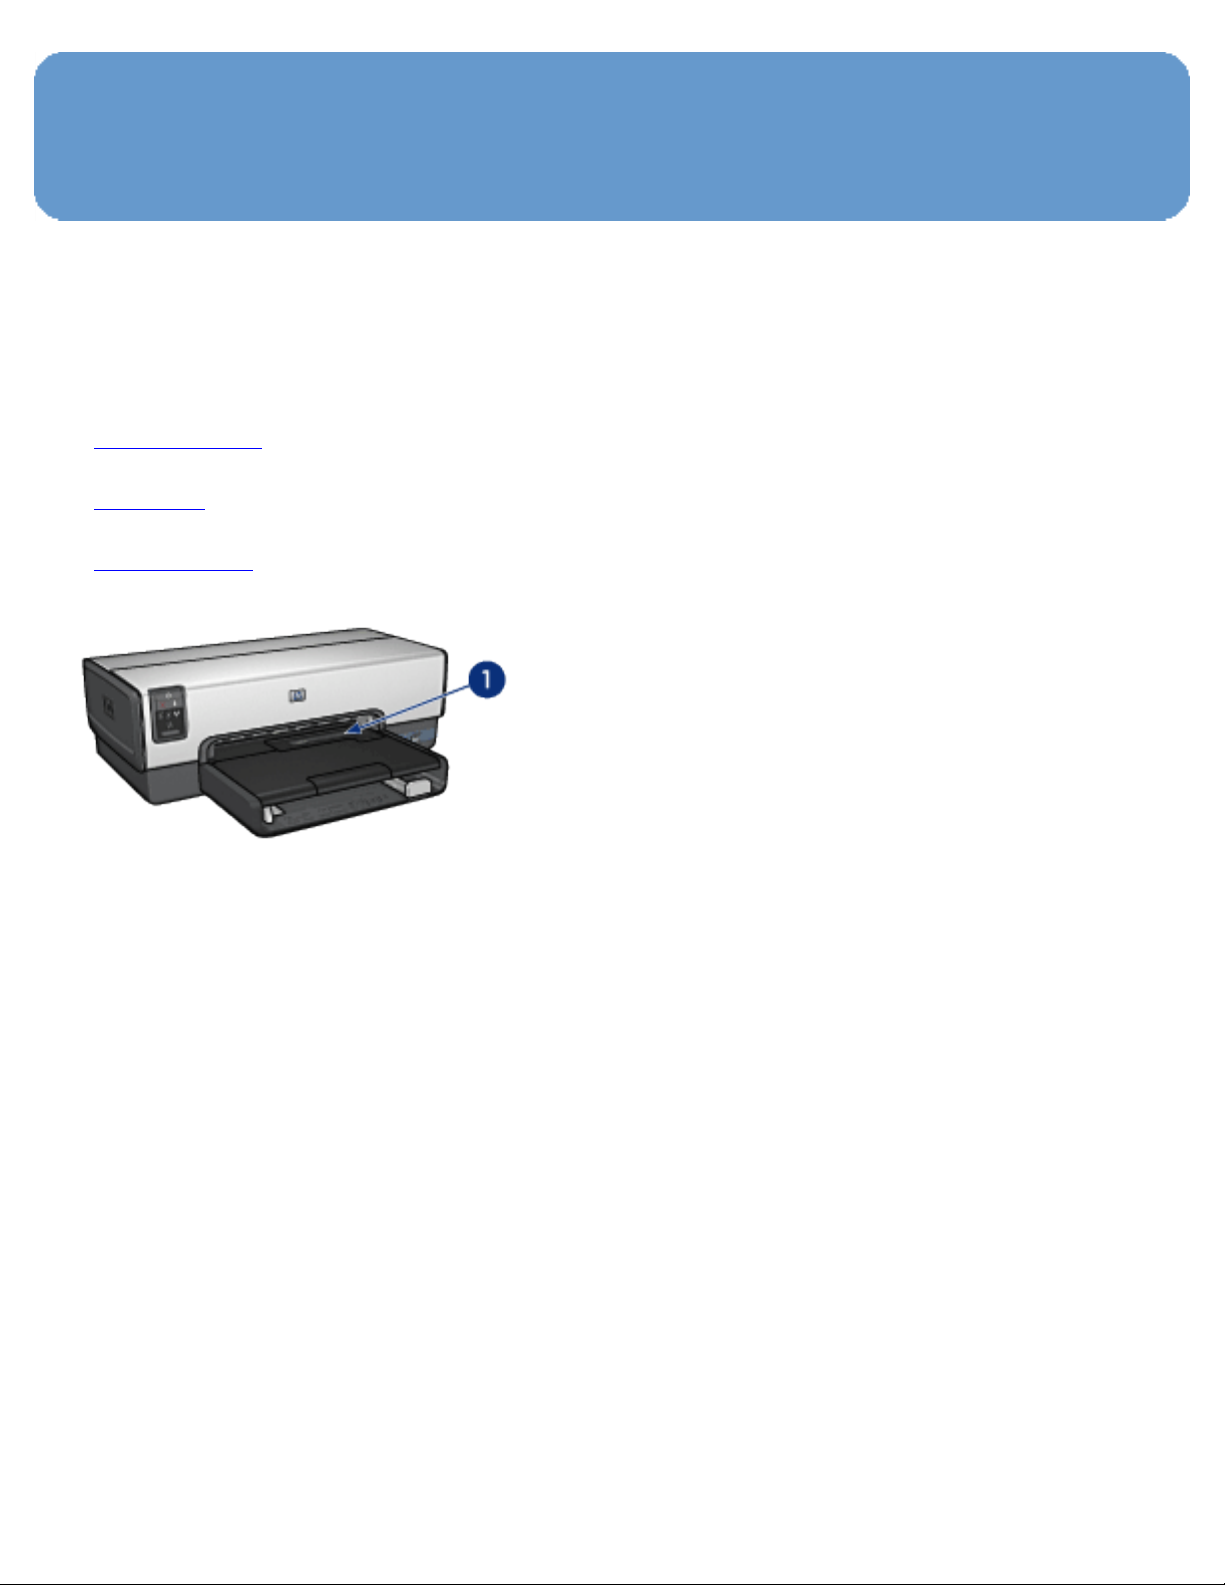
Photo/envelope feeder
Use the photo/envelope feeder to print the following
documents:
● Envelopes
● Photos
● Postcards
1. Photo/envelope feeder
Envelopes
Follow these steps to use the photo/envelope feeder for
single envelopes:
1. Insert the envelope with the side to be printed on facing
down and the flap to the left.
Page 19
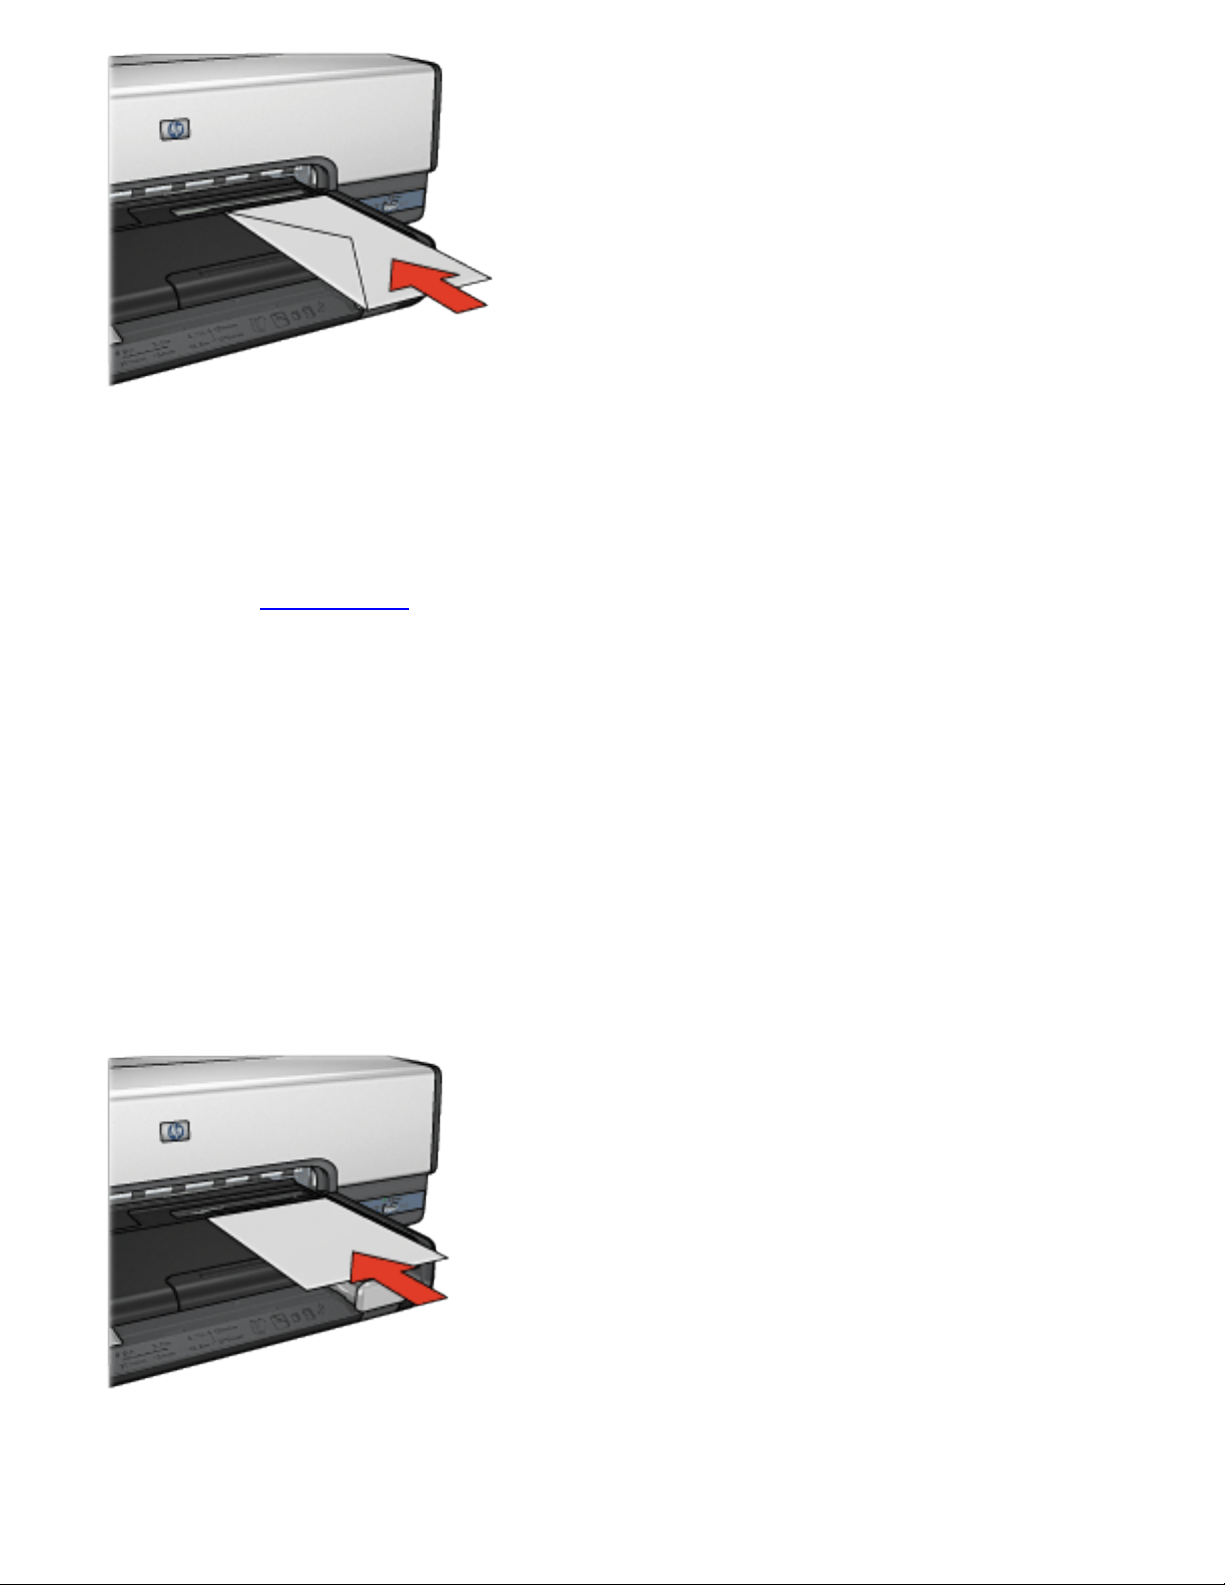
2. Push the envelope into the printer as far as it will go
without bending.
3. Print the envelope.
Photos
Follow these steps to use the photo/envelope feeder to print
a single photo:
1. Insert the photo paper into the photo/envelope feeder with
the side to be printed on facing down.
2. Gently push the photo paper into the photo/envelope
feeder as far as it will go without bending.
Page 20
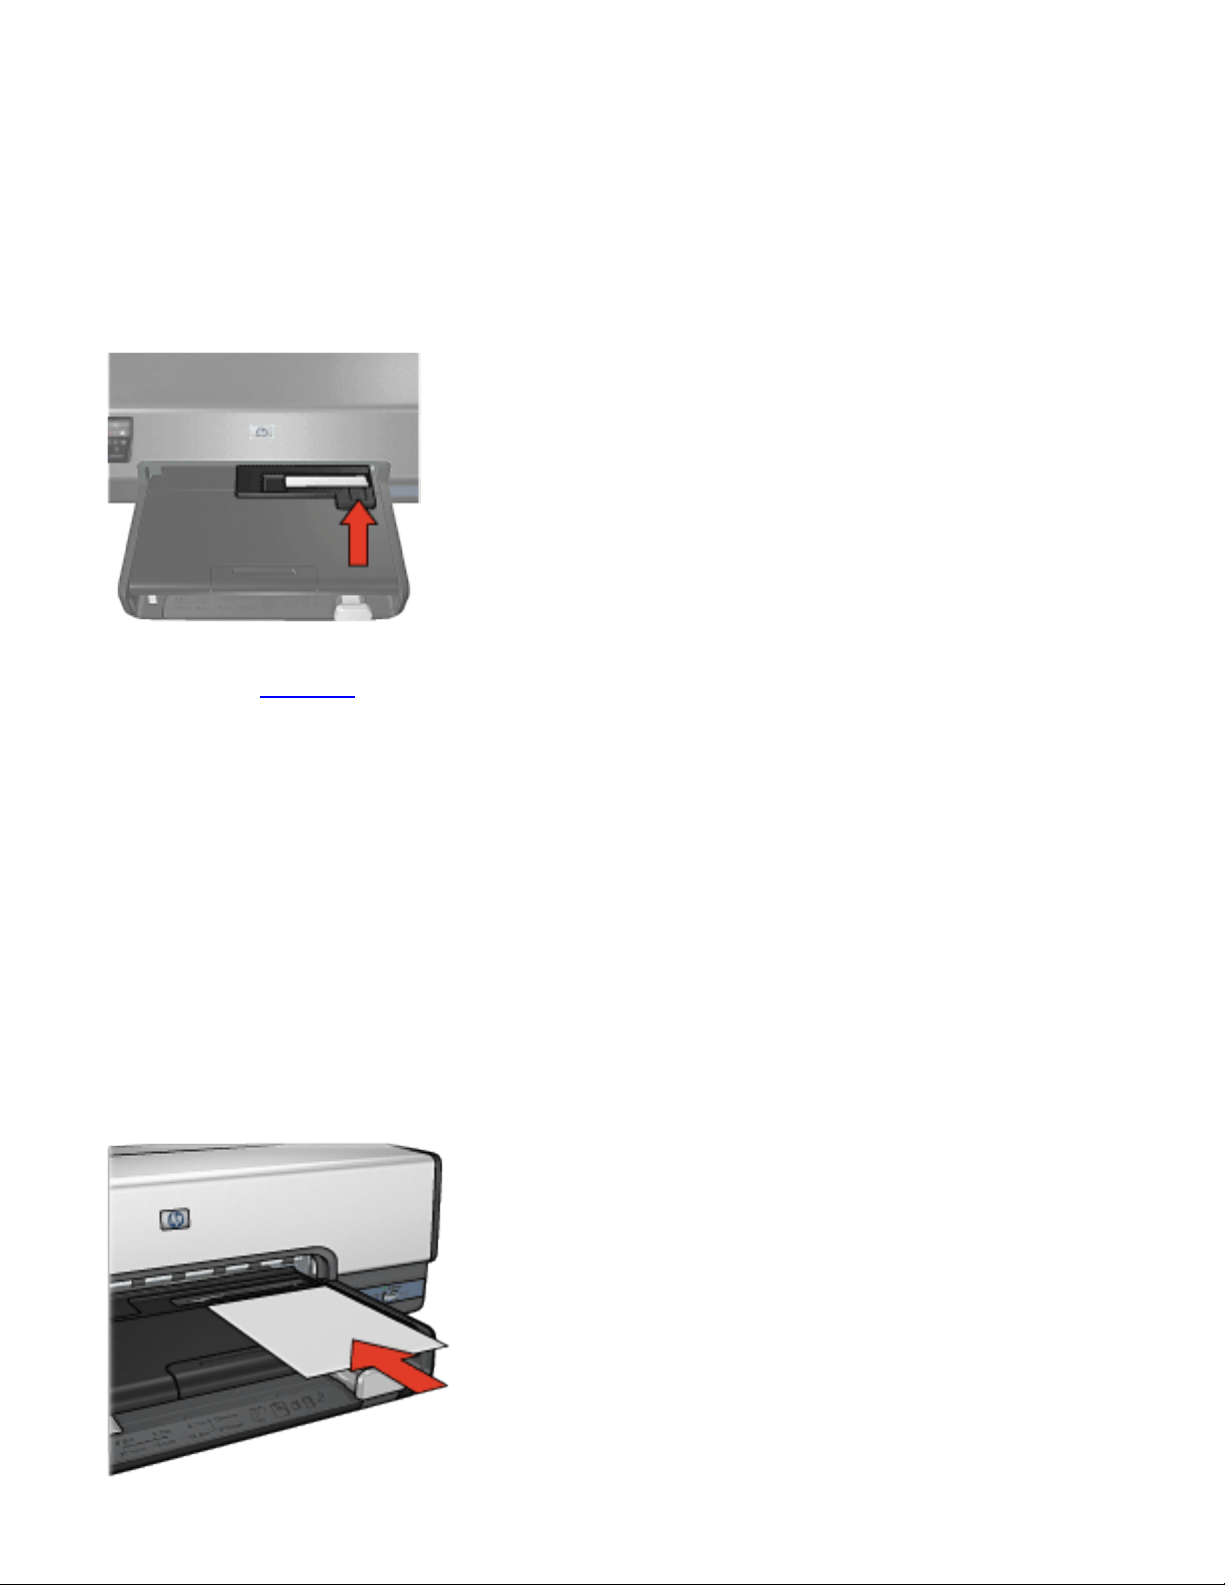
3. Slide the photo/envelope feeder forward as far as it will
comfortably go.
Note:
If the photo paper touches the back of the paper
tray, you have pushed the feeder in as far as it
needs to go.
4. Print the photo.
Postcards
Follow these steps to use the photo/envelope feeder to print
a single postcard:
1. Insert the postcard into the photo/envelope feeder with the
side to be printed on facing down.
2. Gently push the postcard into the photo/envelope feeder as
far as it will go without bending.
Page 21

3. Slide the photo/envelope feeder forward as far as it will go.
4. Print the postcard.
Page 22
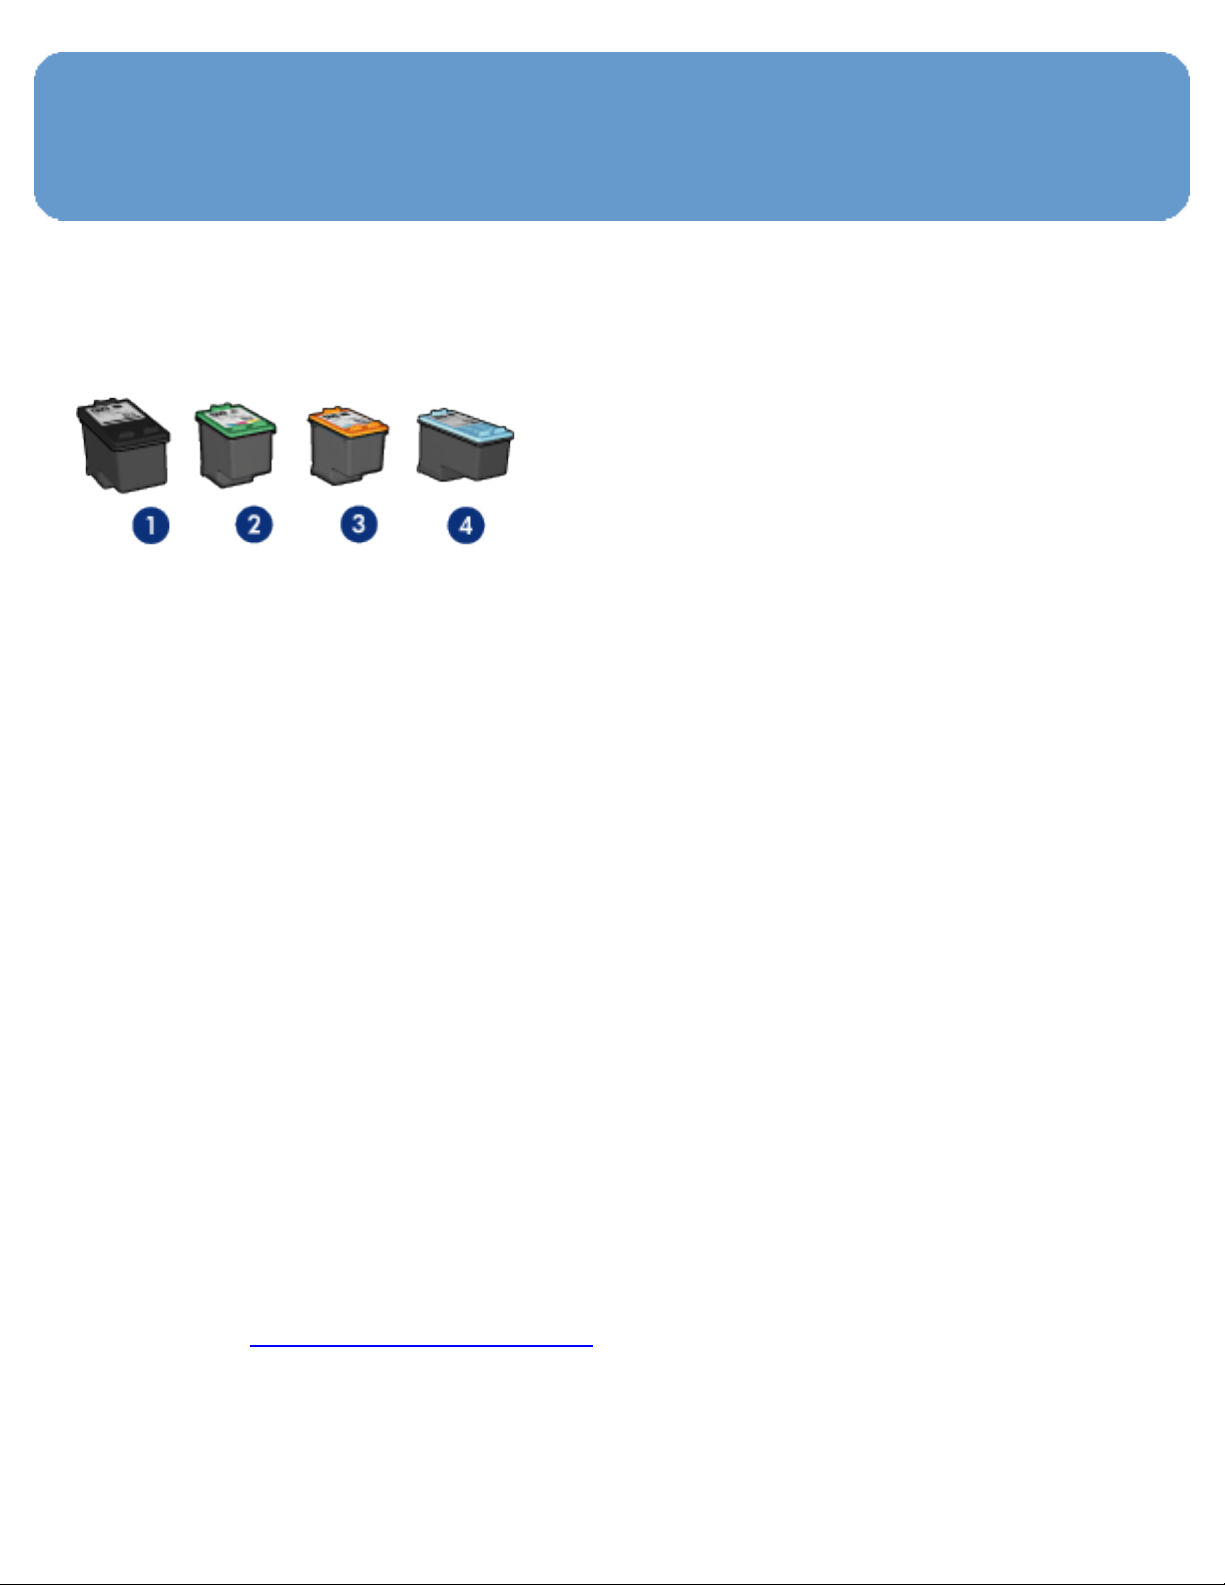
Print cartridges
Four print cartridges are available for use with the printer.
1. Black
2. Tri-color
3. Photo
4. Gray photo
Note:
The availability of print cartridges varies by
country/region.
Using print cartridges
Everyday printing
Use the black and tri-color print cartridges for everyday print
jobs.
Quality color photos
For more vibrant colors when printing color photographs or
other special documents, remove the black print cartridge
and use a
photo print cartridge in combination with the tri-
color print cartridge.
Page 23
Quality black and white photos
For outstanding black and white photographs, remove the
black print cartridge and use a
gray photo print cartridge in
combination with the tri-color print cartridge.
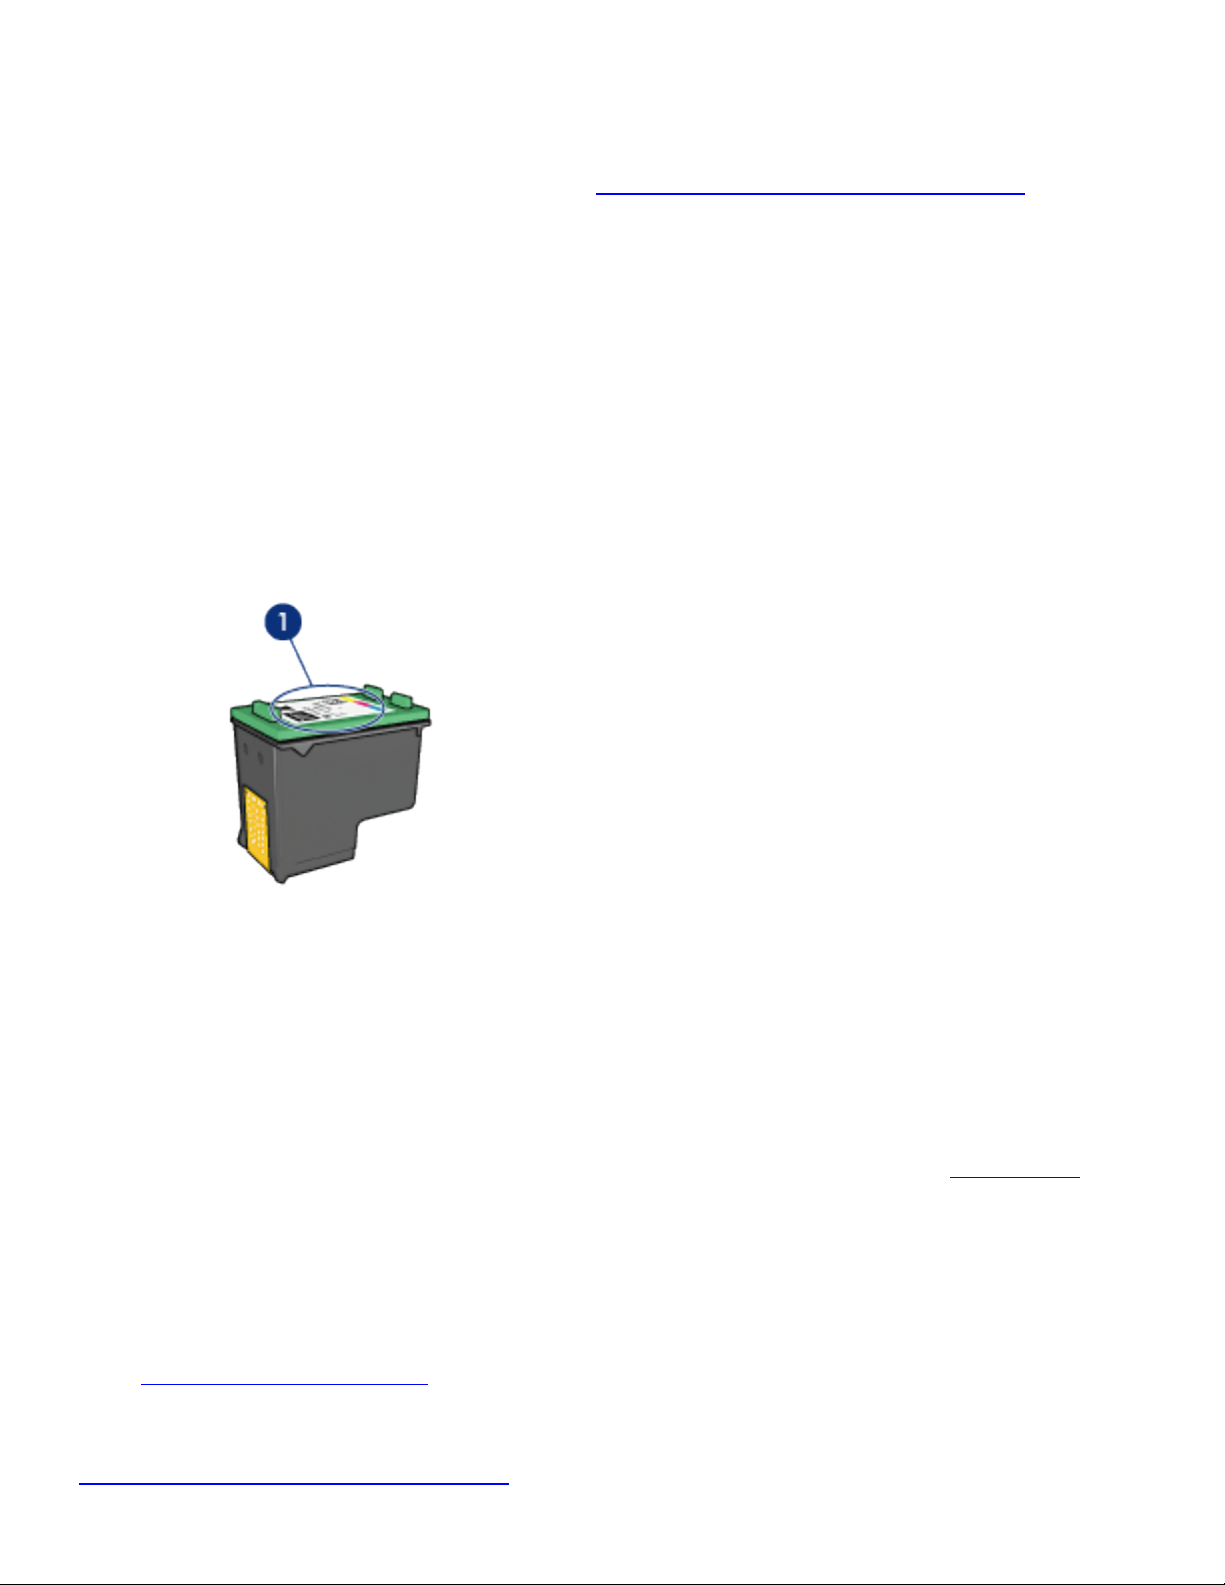
Replacing print cartridges
When buying print cartridges, look for the print cartridge
selection number.
You can find the selection number in three places:
● Selection number label: Look at the label on the print
cartridge that you are replacing.
1. Selection number label
● Printer documentation: For a list of print cartridge selection
numbers, see the reference guide that came with the
printer.
● Print Cartridge Ordering Information dialog box: For a list of
print cartridge selection numbers, open the printer
Toolbox,
click the Estimated Ink Level tab, and then click the Print
Cartridge Ordering Information button.
If a print cartridge runs out of ink, the printer can operate in
the
ink-backup mode.
For information about installing a print cartridge, see the
print cartridge installation page.
Page 24

Ink-backup mode
In the ink-backup mode, the printer operates by using only
one print cartridge. The ink back-up mode is initiated when a
print cartridge is removed from the print cartridge cradle.
To remove a print cartridge, see the print cartridge
installation page.
Ink-backup mode output
Printing in ink-backup mode slows the printer and affects the
quality of printed documents.
Installed print cartridge Result
Colors are printed as
Black print cartridge.
grayscale.
Colors print but black is
Tri-color print cartridge.
grayed and is not a true
black.
Colors are printed as
Photo print cartridge.
grayscale.
Colors are printed as
Gray photo print cartridge.
grayscale.
Note:
It is recommended that you do not use the photo
print cartridge or the gray photo print cartridge for
ink-backup mode.
Page 25

Exiting ink-backup mode
Install two print cartridges in the printer to exit the inkbackup mode.
To install a print cartridge, see the print cartridge installation
page.
Page 26

Automatic Paper-Type Sensor
The Automatic Paper-Type Sensor automatically selects the
appropriate print settings for the media that is being printed
on, particularly HP media.
When the Automatic Paper-Type Sensor is engaged, the
printer scans the first page of a document with a red optical
sensor light to determine the best paper-type setting. After
the printer determines the paper-type setting, the page is
printed.
Do not place the printer in direct sunlight. Direct sunlight can
interfere with the Automatic Paper-Type Sensor.
To use the Automatic Paper-Type Sensor, see the paper-type
selection page.
Note:
The Automatic Paper-Type Sensor is not available
for documents that are printed from the 250-Sheet
Plain Paper Tray Accessory or the Auto Two-Sided
Print Accessory with Small Paper Tray.
Page 27

Connecting to the printer
● Connecting to a digital camera
● USB
● Wired Ethernet networking
❍ Ethernet basics
❍ Ethernet network examples
❍ Installing the printer on an Ethernet network
❍ Connecting the printer to an Ethernet network
❍ Installing the printer software
❍ Ethernet lights
❍ Report Page button
❍ Network light
❍ HP Report page
❍ Embedded Web server (EWS)
❍ Resetting the printer to the factory default settings
❍ Networking glossary
Page 28

Printing photos from a digital camera
Learn how to print photos directly from a digital camera:
● PictBridge description
● PictBridge printing instructions
● PictBridge troubleshooting
● Using the Auto Two-Sided Print Accessory with Small Paper
Tray and PictBridge
Page 29
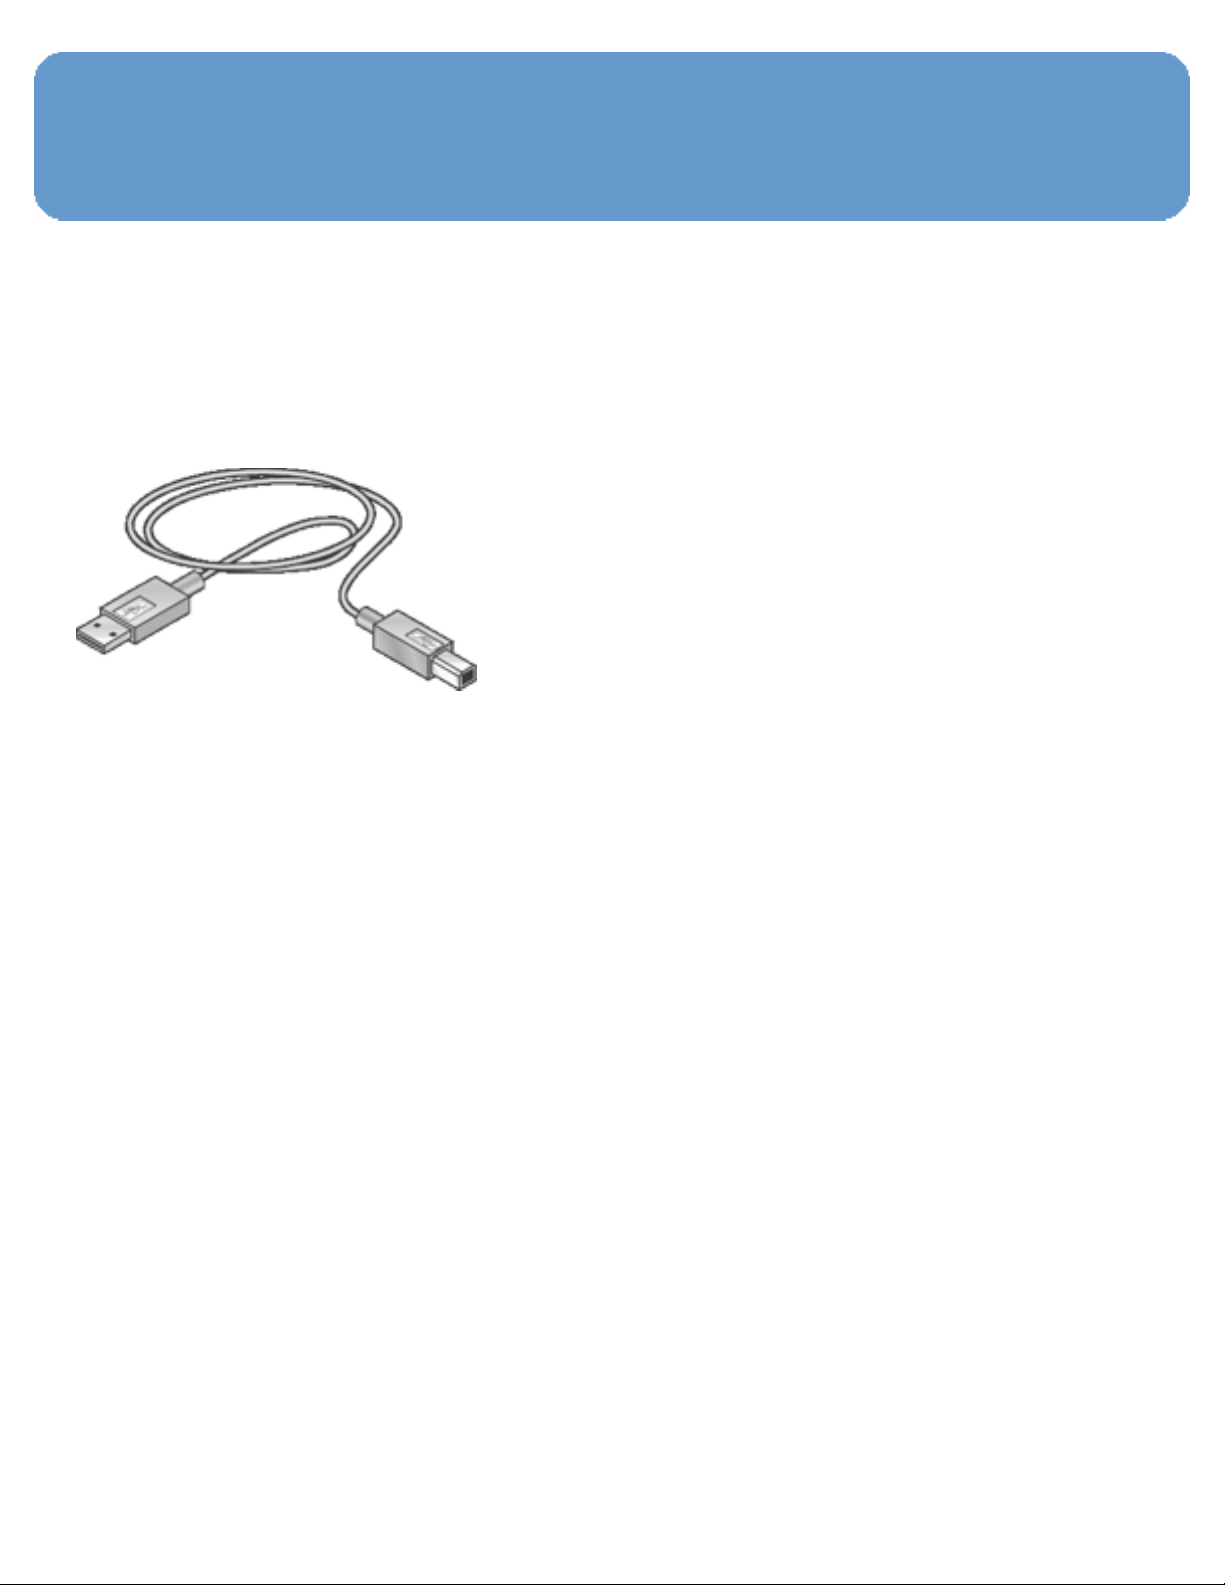
USB
The printer connects to the computer with a universal serial
bus (USB) cable. The computer must be running Windows 98
or later to use a USB cable.
For instructions about connecting the printer with a USB
cable, see the setup poster that came with the printer.
Page 30

Wired Ethernet networking
For setup information, click one of the following options:
● Ethernet basics
● Installing the printer on an Ethernet network
For a description of the printer's Ethernet feature, click one
of the following options:
● Ethernet lights
● Report Page button
● Network light
● HP Report page
● Embedded Web server (EWS)
Other information:
● Resetting the printer to the factory defaults
● Troubleshooting
● Glossary
Page 31

Ethernet basics
The printer's built-in Ethernet feature allows you to connect
the printer directly to a
10/100 Base-T Ethernet network
without the aid of an external print server.
To install the printer on an Ethernet network, follow the
Ethernet installation instructions.
Hardware
Hubs, switches, and routers
On an Ethernet network, devices, such as computers and
printers, are each connected to a network
hub, switch, or
router.
Hubs, switches, and routers may look similar, but there are
important differences:
● Hubs are passive. Other devices on the network plug into
the hub in order to communicate with one another. A hub
does not manage the network.
● A switch allows devices on a network to communicate
directly with one another in a smooth and efficient manner.
A switch monitors and directs network traffic in order to
allow each transmission the most possible bandwidth. By
monitoring network traffic, a switch minimizes collisions and
maximizes speed.
● Routers primarily connect different networks (for example,
connecting a home network to the Internet). Routers are
active. Routers have network administration tools, such as
Page 32

firewalls and DHCP. A router can act as a gateway, while a
hub and a switch cannot.
Cables
Use a CAT-5 Ethernet cable to connect the printer to an
Ethernet network. Ethernet cables have an RJ-45 plug.
1. RJ-45 plug
Network communication
TCP/IP
Devices on a network communicate with one another using a
“language” called a
operate on networks that use a popular protocol called
TCP/IP.
IP address
Each device on a network identifies itself with a unique IP
address. Most networks use a software tool, such as
AutoIP, to automatically assign IP addresses.
protocol. The printer is designed to
DHCP or
Internet connections
Networks may or may not be connected to the Internet.
If you place the printer on a network connected to the
Internet, it is recommended that you use a
gateway so that
Page 33

the printer's IP address is assigned through DHCP.
A gateway can either be a router or a Windows computer
running
information about ICS, see the documentation that came
with the Windows computer.
Internet Connection Sharing (ICS). For more
Ethernet network examples
To see some examples of Ethernet networks, see the
Ethernet network examples page.
Printing
Computers on the network send print jobs directly to the
printer, which prints them in the order received.
The printer can accept print jobs sent simultaneously from
four users.
For example, if five users each send a print job to the printer
at the same time, the printer accepts four of the print jobs
and rejects the fifth. The user who sent the fifth print job
should wait a few minutes and then resend the print job.
Page 34

Ethernet network examples
These are some common Ethernet network configurations:
Shared Internet connection with a router
acting as a gateway
In this example, a router manages the network connections
and acts as a
Internet.
gateway between the network and the
Shared internet connection with a PC acting as
a gateway
In this example, the network devices are connected to a hub.
A computer on the network acts as the
network and the Internet. The gateway computer uses
Windows Internet Connection Sharing (ICS) to manage the
network connections and provide Internet access to the other
devices.
gateway between the
Page 35

DSL or cable Internet connection without a
gateway
This example looks similar to the first example. However, in
this example, the network devices are connected to a
rather than a
Internet.
Caution: HP does not recommend this configuration. If
possible, use a gateway to manage your network's
Internet access in order to limit exposure to viruses and
guard against unwanted entry.
router. The hub is directly connected to the
Ethernet network without an Internet
connection
hub,
In this example, the network devices are connected to a hub.
Devices use
AutoIP to obtain IP addresses.
Page 36

Installing the printer on an Ethernet network
Installing the printer on an Ethernet network is a two-part
process.
First you must connect the printer to the network. Then you
must install the printer software on each computer that will
use the printer.
● Connecting the printer to an Ethernet network
● Installing the printer software
Page 37

Connecting the printer to an Ethernet network
Follow these steps to connect the printer to an Ethernet
network:
1. If necessary, set up the printer hardware.
For printer hardware setup instructions, see the setup
poster that came with the printer.
2. Verify that the printer is powered on.
3. Connect the Ethernet cable to an available port on the
network
Note:
4. Connect the Ethernet cable to the Ethernet port on the
hub or router.
Do not plug the Ethernet cable into a port labeled
WAN or Uplink.
back of the printer.
Page 38

5. Do one of the following:
State of the Link
light
On
Task
Go to step 6.
Repeat steps 2 through 4. If
the lights are still off, then
verify the following items:
Off
❍ The printer is powered on.
❍ The network hub or router is
powered on.
❍ All cable connections are
secure.
❍ You are using an Ethernet
cable.
6. Print an HP Report page.
7. Install the printer software on each computer that will use
the printer.
Caution: It is recommended that the printer and the
computers that use it be on the same subnet. Printer
installation across subnets can be problematic
depending on the type of router used.
Page 39

Installing the printer software
Before installing the printer software on a networked
computer, verify the following items:
● The printer is set up and powered on.
● The network hub, switch, or router is powered on and
functioning properly.
● All computers on the network are powered on and
connected to the network.
● The printer is installed on the network.
Previous installations
If the printer software was previously installed on the
computer, you must use the printer software CD to install an
Ethernet version of the printer driver on the computer. Follow
the steps below. The printer software installation wizard will
guide you through the installation process.
Caution: It is recommended that the printer and the
computers that use it be on the same subnet. Printer
installation across subnets can be problematic
depending on the type of router used.
Page 40

Software installation
Follow these steps to install the printer software on the
computer:
1. Close all applications running on the computer.
2. Insert the printer software CD in the computer's CD-ROM
drive.
3. Follow the onscreen instructions. On the Connection Type
screen, select Wired Network.
4. After the installation has completed, follow the onscreen
instructions to print a test page.
Page 41

Ethernet lights
The printer's Ethernet lights indicate the status of the
printer's Ethernet connection.
Link light
The Link light is solid when the printer is connected to an
Ethernet network and powered on.
State of the Link light State of the printer
On
Off
Connected to an Ethernet
network and powered on.
Not connected to an Ethernet
network or powered off.
Page 42

Activity light
The Activity light flashes when the printer is receiving or
transmitting data over the Ethernet connection.
State of the Activity light State of the printer
Flashing
Receiving or transmitting
data over the Ethernet
connection.
Off
Not receiving or
transmitting data over the
Ethernet connection.
Page 43

Report Page button
Use the Report Page button to do the following:
● Print an HP Report page
● Reset the printer to the factory defaults
1. Report Page button
Page 44

Network light
The Network light illuminates when the printer is connected
to an
Status of the light
Ethernet network.
Status of the
printer network
connection
Connected to an
On
Off
Ethernet network.
Not connected to an
Ethernet network.
Page 45

HP Report page
The HP Report page supplies useful information about the
printer's
wired and PictBridge connections.
Printing an HP Report page
To print an HP Report page, verify that the printer is powered
on and idle, and then press the Report Page button once.
If the printer has just been connected to a network, wait a
few minutes before printing the HP Report page to allow the
printer to obtain valid settings.
Selecting the language
The default language for the HP Report page is English.
Follow these steps to print the page in another language:
1. Press the Report Page button to print the English version
of the page.
2. On the lower portion of the page, find the language that
you want.
Page 46

3. To print the page in that language, follow the instructions
that correspond to the language.
For example, to print the page in French, press and hold
down the Report Page button, press the Resume button
twice, and then release the Report Page button.
Understanding the HP Report page
The HP Report page lists the following information that you
might frequently need to know:
General information
General information applies to Ethernet networks:
Item Meaning
The printer's network status:
● Ready: The printer is ready
Network Status
to print.
● Offline: The printer is not
connected to a network.
The type of network the printer
is connected to:
● Wired: The printer is
Active Connection
Type
connected to an Ethernet
network.
● Disabled: The printer is not
connected to a network.
Page 47

The address to use in order to
URL
Hardware Address
(MAC)
Firmware Revision
Host Name
IP Address
open the printer's embedded
Web server.
The printer's Media Access
Control (MAC) address.
Revision number of the printer's
internal software.
This item may be requested by
HP Service and Support.
The printer's host name on the
network.
The printer's current IP address
on the network.
Subnet Mask
Default Gateway
Configuration Source
DNS Server
The printer's subnet mask.
The printer's gateway address.
How the printer obtained its IP
address:
● Automatic: AutoIP or DHCP
● Manual: Static IP address
The IP address of the printer's
domain name server. Not
Specified means that no IP
address has been set. This
setting does not apply to the
printer.
Page 48

The printer's mDNS service
name on the network.
mDNS
Admin Password
This name is used by Apple
Rendezvous to identify the
printer on Mac OS X v10.2.3
and higher.
Indicates whether the printer's
embedded Web server is
password protected.
● Set: A password is required.
● Not Set: A password is not
required.
The network link configuration:
Link Config
● 10T-Full
● 10T-Half
● 100TX-Full
● 100TX-Half
Page 49

802.11 wireless
The 802.11 wireless information does not apply to the HP
Deskjet 6600 series printer.
Miscellaneous
The Miscellaneous section contains information that applies
to Ethernet networks and PictBridge connections:
Item Meaning
Number of packets sent without
Total Packets
Transmitted
Total Packets
Received
PictBridge Status
error.
This item may be requested by
HP Service and Support.
Number of packets received
without error.
This item may be requested by
HP Service and Support.
● Connected: The printer is
connected to a digital camera.
● Error: Something is wrong with
the PictBridge connection.
PictBridge Last Error
The last known error to occur in
the printer PictBridge function
since the printer was last turned
on.
Page 50

Embedded Web server (EWS)
The embedded Web server (EWS) provides a simple way to
manage your printer on a network.
Use the printer's EWS to do the
following:
● Check the printer's status.
● Adjust the printer's network
configuration.
● Check estimated ink levels in the
print cartridges.
● View network statistics.
● Visit HP's Web site for support
information and to purchase
supplies.
Caution: It is recommended that the printer and the
computers that use it be on the same subnet. Printer
installation across subnets can be problematic
depending on the type of router used.
Before using the EWS, verify that the printer and the
computer are powered on and connected to the network.
Page 51

Follow these steps to open the EWS:
1. Launch your Internet browser.
Use Microsoft Internet Explorer 5.0 or higher or Netscape
4.75 or higher.
2. Enter either the printer's IP address or host name in the
browser's address box.
Note:
If the printer is on a different subnet than your
computer, enter the printer's IP address (for
example: http://15.252.32.234) in the browser's
address box to open the embedded Web server.
Also, if your computer uses a proxy server to access
the Internet, you might need to configure your
browser to by-pass the proxy server in order to
access the EWS.
If you don't know the printer IP address or host name, print
an HP Report page.
Note:
For instructions on using the printer's EWS, see the
online help. To open the online help, click Help
under the Other Links heading.
Caution: If you lose your connection, you may need
to use the new settings to reconnect. If the printer
loses its network connection, you may need to reset it
to factory defaults and reinstall the software.
Page 52

Resetting the printer to the factory default settings
Once the printer is configured for a network, its configuration
settings are saved in its memory.
Resetting the printer to its factory default settings will clear
all the settings from the printer's memory for your network.
This should only be done as a last resort when
troubleshooting the printer.
Also, resetting the printer to its factory default settings
erases the
password.
Resetting the printer to its factory default settings may
require you to reinstall the printer software. Additionally, you
will also have to reconfigure the printer's security settings.
Follow these steps to reset the printer to the factory default
settings:
1. Verify that the printer is powered on.
2. Press and hold down the Report Page button.
3. While holding down the Report Page button, press the
Cancel button three times.
embedded Web server (EWS) administrator
4. Release the Report Page button.
Page 53

Networking glossary
numbers a b c d e f g h i j k l m n o p q r s t u v w x y z
numbers
10/100 Base-T: A technical term for Ethernet. 10/100
refers to the speed at which the Ethernet network functions.
10 indicates 10 megabits per second (Mb/s) for normal
Ethernet, and 100 indicates 100 Mb/s for Fast Ethernet.
a
AutoIP: A process by which a device on a network
automatically assigns an IP address to itself.
b
BOOTP: Bootstrap Protocol (BOOTP) is an Internet protocol
that enables a device to discover its own IP address, the IP
address of a BOOTP server on the network, and a file to be
loaded into memory to boot the machine. This enables the
device to boot without requiring a hard or floppy disk drive.
Broadcast packet: A packet sent from one device on a
network to all devices on the network.
c
d
DHCP (Dynamic Host Configuration Protocol): A
protocol used to automatically assign an IP address to each
device on a network.
Page 54

e
EAP: Extensible Authentication Protocol (EAP) is a general
protocol for authentication that also supports multiple
authentication methods, such as token cards, one-time
passwords, certificates, and public key authentication.
Ethernet: A popular form of wired computer networking for
Local Area Networks.
Ethernet cable: There are two types of Ethernet cables. A
straight-through cable is the most common and is used to
connect devices on a network to a hub or router. A crossover
cable is used to connect two devices that have Ethernet ports
but that are not hubs or routers. Use a CAT-5 cable with an
RJ-45 plug to connect the printer to an Ethernet network.
f
Firewall: A combination of hardware and software tools that
protects a network from unwanted entry.
g
Gateway: A dedicated device (router or computer) that
connects two different networks. For example, a computer on
an Ethernet network may act as a gateway between the
network and the Internet.
h
Host name: The name by which the printer identifies itself
on the network. The printer's host name appears on the HP
Report page. Use the host name to open the printer's
embedded Web server (EWS).
Hub: A simple device that acts as the center of an Ethernet
network. Other devices on the network are connected to the
hub.
Page 55

i
ICS (Internet Connection Sharing): A Windows program
that allows a computer to act as a gateway between the
Internet and a network. ICS uses DHCP to assign IP
addresses. See Windows documentation for more information
about ICS.
Internet Sharing: A Macintosh OSX program that allows a
computer to act as a gateway between the Internet and a
network. See Macintosh documentation for more information
about Internet Sharing.
IP address (Internet Protocol address): A unique
number that identifies a device on a network. The IP address
is often automatically assigned by DHCP or AutoIP. However,
a device can be manually assigned a static IP address.
j
k
l
LAN (Local Area Network): A high-speed type of computer
network that connects devices that are a relatively short
distance from one another. An Ethernet network is one type
of LAN.
m
MAC address (Media Access Control address): The
hardware address for a device on a network. The printer's
MAC address appears on the HP Report page.
Mb/s (megabits per second): The measure for the rate at
which a network functions. For example, 1 Mb/s equals
1,000,000 bits per second (or 125,000 bytes per second).
mDNS: As an alternative to a Domain Name Server, a device
Page 56

issues a Multicast Domain Name Server (mDNS) notification
to provide information regarding its service. The notification
includes the type of service (such as printing), the name of
the service (such as “your printer”), IP and port addresses,
and other necessary information. Each device on the network
receives the notification and stores the information in a
personal DNS server.
n
o
p
Packet: A message sent from one device on a network to
other devices on the network.
Protocol: A language that devices on a network use to
communicate with each other. A popular network protocol is
TCP/IP.
q
r
RJ-45: The type of plug at the end of an Ethernet cable.
Router: A complex networking device that directs packets
from one network to another network. A router can act as a
gateway between a LAN and the Internet.
s
Static IP address: An IP address that is manually assigned
to a device on a network. A static IP address remains fixed
until changed manually. Alternative methods for assigning IP
address are DHCP and AutoIP.
Subnet: A small network that acts as part of a large
network. It is recommended that the printer and the
Page 57

computers that use the printer all be on the same subnet.
Subnet mask: A number that identifies the IP addresses
that belong to a subnet.
Switch: A network device that manages network traffic in
order to minimize collisions and maximize speed.
t
TCP/IP: Transmission Control Protocol/Internet Protocol
(TCP/IP) is the network communication protocol used on the
Internet. The printer's built-in networking feature supports
LANs that use TCP/IP.
u
Unicast packet: A packet sent from one device on a
network to another device on the network.
v
w
x
y
z
Page 58

PictBridge
With a PictBridge-enabled camera, you do not need a
computer to print digital photographs. Just plug the camera
into the printer's PictBridge port.
1. PictBridge port
Note:
When two PictBridge devices communicate, they
provide only the services that they have in
common. For example, some cameras might allow
photos formatted as either TIFFs or JPEGS to be
printed over a PictBridge connection, but, since the
printer does not support TIFFs over a PictBridge
connection, only JPEGS can be printed.
When a camera is connected to the PictBridge port, the
default printer settings will print a 4 x 6 inch borderless
photo with portrait orientation. For detailed information on
printing from the camera, consult the documentation that
came with your camera.
Page 59

PictBridge printing
In order to print photos directly from a digital camera, you
need the following items:
● A PictBridge-compatible camera
● A digital camera USB cable
Check the documentation that came with your camera to
ensure that your camera supports PictBridge.
Printing
Follow these steps to print photos from a PictBridgecompatible camera:
1. Load photo paper into the printer.
For instructions about loading photo paper, select one of
the following options:
❍ Small photos
❍ Large photos
❍ Small photos from the Auto Two-Sided Print Accessory with
Small Paper Tray
2. Connect your camera to the PictBridge port on the front of
the printer using the USB cable supplied with your camera.
Page 60

3. Turn on your camera, and then set it to PictBridge mode.
If you do not know how to set the camera to PictBridge
mode, see the documentation that came with the camera.
Note:
When the camera is connected correctly, the
Connection light is illuminated. The Connection
light blinks green when printing from the camera.
If the camera is not PictBridge-compatible or is
not in PictBridge mode, the Error light flashes.
After you successfully connect the camera to the printer,
you can print your photos. Be sure the size of the paper
loaded in the printer matches the setting on your camera.
Refer to the documentation that came with your camera for
detailed information on printing from the camera.
Page 61

PictBridge problems
Images in a connected digital camera do not
print
There are several reasons why images in a connected digital
camera do not print:
● The digital camera is not PictBridge-compatible.
● The digital camera is not in PictBridge mode.
● The images are not in a supported format.
● You did not select any photos on the camera for printing.
Check the documentation that came with your camera to
ensure it supports PictBridge.
If the camera does support PictBridge, make sure the camera
is set to PictBridge mode. For instructions on setting the
camera to PictBridge mode, see the documentation that
came with the camera.
Verify that the digital camera is saving photos in a file format
that the PictBridge transfer feature supports:
● EXIF/JPEG
● JPEG
Before you connect the digital camera to the PictBridge port
on the printer, select a few photos on the camera for
printing.
Page 62

PictBridge lights are flashing
State of the lights Task
Connection light and the Error
light are flashing
Connection light is on and the
Error light is flashing
The printer has lost
connection with the
camera while printing.
Check the USB
connection.
The camera has lost
power.
Replace the camera
batteries or connect it
to a power supply.
Connection light is on and the
Error light flashes twice
The camera has
requested an
unsupported
command.
Page 63

Using the Auto Two-Sided Print Accessory with Small Paper Tray when printing from a digital camera
In order to use the Auto Two-Sided Print Accessory with
Small Paper Tray when printing directly from a digital
camera, you might need to configure the printer to feed
paper from the accessory rather than the In tray.
Configuring the printer to feed paper from the
accessory
Follow these steps to configure the printer to feed paper from
the accessory:
1. Press and hold down the Report Page button.
2. While holding down the Report Page button, press the
Cancel button twice.
3. Release the Report Page button.
Page 64

After configuring the printer to feed paper from the
accessory,
follow the
Note:
load the photo paper into the accessory and then
PictBridge printing instructions.
For printing PictBridge photos, the printer only
needs to be configured to feed paper from the Auto
Two-Sided Print Accessory with Small Paper Tray
once. After being configured, the printer will
attempt to print from the accessory until the printer
is configured to use the In tray for PictBridge
photos.
Re-configuring the printer to feed paper from
the In tray
Follow these steps to re-configure the printer to feed paper
from the In tray for PictBridge photos:
1. Press and hold down the Report Page button.
2. While holding down the Report Page button, press the
Cancel button twice, and then press the Resume button
once.
3. Release the Report Page button.
Page 65

Printing photos from a computer
Select the type of photograph that you want to print:
Borderless Photos
Small borderless
photo
Large borderless
photo
Panoramic
borderless photo
Photos with a white border
Small photowith a
white border
Enhancing your photos
Learn how to enhance your photographs by using the
printer's
PictBridge
photo printing features.
Large photowith a
white border
Panoramic photo
with a white
border
Use the printer PictBridge port to print photos directly from a
digital camera.
Page 66

Enhancing your photos
The printer software offers several features to make printing
digital photos easier and improve photo quality:
● Get the best combination of speed and quality by using
PhotoREt.
● Use the HP digital photography options to touch up photos.
● Achieve the highest resolution with Maximum dpi.
● Print an Exif-formatted photo if you have Exif-enabled
software.
● Use HP Everyday Photo Paper, Semi-gloss to save money
and ink when printing photos.
Learn how to add professional touches to your digital
photographs:
● Use the photo print cartridge for great colors.
● Use these software options to improve printed colors:
❍ Advanced color settings
❍ Color management
● Use the gray photo print cartridge for outstanding black-and-
white photos.
● Print black-and-white photos.
● Print to the edges of the photo paper with borderless
printing.
To prevent photo paper from curling, follow the photo paper
storage guidelines.
Page 67

PhotoREt
PhotoREt offers the best combination of print speed and
quality for your image.
Follow these steps to print with PhotoREt technology:
1. Open the Printer Properties dialog box.
2. Click the Printing Shortcuts tab or the Paper/Quality
tab.
3. Click Best in the Print quality drop-down list.
4. Select any other print settings that you want, and then
click OK.
Page 68

HP digital photography options
The printer has several features to enhance the quality of
digital photographs.
Opening the HP digital photography options
dialog box
Follow these steps to open the HP digital photography
options dialog box:
1. Open the Printer Properties dialog box.
2. Click the Printing Shortcuts tab or the Paper/Quality
tab, and then click the HP digital photography button.
Using the HP digital photography options
dialog box
Use the HP digital photography options dialog box to set
these options:
Page 69

1. Red eye removal: Click On to remove or reduce red-eye
in the photograph.
2. Contrast enhancement: Adjust the contrast to your
preference. Click Automatic to allow the printer driver to
automatically balance the contrast.
3. Digital flash: Adjust the exposure in dark areas of photos
to bring out detail. Click Automatic to allow the printer
driver to automatically balance lightness and darkness.
4. SmartFocus: Enhance the image quality and clarity. Click
On to allow the printer driver to automatically sharpen
details in the image.
5. Sharpness: Adjust the image sharpness to your
preference. Click Automatic to allow the printer driver to
automatically set the level of sharpening for the image.
6. Smoothing: Soften an image. Click Automatic to allow
the printer driver to automatically set the level of
smoothing for the image.
Page 70

Maximum dpi
The Maximum dpi print quality setting offers 4800 x 1200
optimized dpi printing.
The 4800 x 1200 optimized dpi print mode is the highest
quality resolution for this printer. When 4800 x 1200
optimized dpi is selected in the printer driver, the tri-color
print cartridge prints in the 4800 x 1200 optimized dpi mode
(up to 4800 x 1200 optimized dpi color and 1200-input dpi).
If a
photo print cartridge is also installed, the print quality is
enhanced. A photo print cartridge can be purchased
separately if it is not included with your printer.
Note:
Use an HP premium photo paper when printing in
the Maximum dpi print quality setting in order to
enhance color matching and detail in the photo.
Follow these steps to print in the 4800 x 1200 optimized dpi
mode:
1. Open the Printer Properties dialog box.
2. Click the Paper/Quality tab.
3. Click Maximum dpi in the Print quality drop-down list.
Note:
The Maximum dpi setting temporarily uses a lot
of disk space and may print slowly.
4. Select any other print settings that you want, and then
click OK.
Page 71

Exif Print
Exif Print (Exchangeable Image File Format 2.2) is an
international digital imaging standard that simplifies digital
photography and enhances printed photographs. When a
photograph is taken with an Exif Print-enabled digital
camera, Exif Print captures information such as exposure
time, type of flash, and color saturation, and stores it in the
image file. The HP Deskjet printer software then uses this
information to automatically perform image-specific
enhancements, to create outstanding photographs.
Printing Exif Print-enhanced photos requires the following
equipment:
● A digital camera that supports Exif Print
● Exif Print-enabled photo software
Follow these steps to print Exif Print-enhanced photos:
1. Open the file that you want the Exif Print-enabled photo
software to print.
2. Open the Printer Properties dialog box.
3. Click the Printing Shortcuts tab or the Paper/Quality
tab.
Note:
On the Printing Shortcuts tab, select either
Photo printing-borderless or Photo printingwith white borders.
4. Click Normal or Best in the Print quality drop-down list.
Page 72

5. Select any other print settings that you want, and then
click OK.
The printer software automatically optimizes the printed
image.
Page 73

Printing borderless photos
Use borderless printing to print to the edges of certain paper
types and on a range of standard and custom paper sizes
from 101 x 152 mm (4x6 in) photo paper to a 210 x 594 mm
( 8.5 x 23.4 in) custom photo size.
Guidelines
● Do not print borderless documents in ink-backup mode.
Always have two print cartridges installed in the printer.
● Open the file in a software application and assign the image
size. Ensure that the size corresponds to the paper size on
which you want to print the image.
Printing
1. Open the file that you want to print.
2. Open the Printer Properties dialog box.
3. On the Printing Shortcuts tab, click Photo printing-
borderless in the drop-down list.
Page 74

4. Select the appropriate print setting for the photo that you
want to print.
5. If you want to use them, set the HP digital photography
options.
6. Select any other print settings that you want, and then
click OK.
If you printed on photo paper that has a tear-off tab,
remove the tab to make the document completely
borderless.
Page 75

Photo print cartridge
The photo print cartridge, used in conjunction with the tricolor print cartridge, provides six-ink, virtually grain-free
photos that have exceptional fade resistance.
The photo print cartridge can be purchased separately if it is
not included with your product.
Installing the photo print cartridge
To install the photo print cartridge, remove the black print
cartridge from the printer, and then install the photo print
cartridge in the compartment on the right of the print
cartridge cradle.
For more information, see the print cartridge installation
page.
Using the photo print cartridge
Follow these steps to print in six-ink color print mode:
1. Open the Printer Properties dialog box.
2. Click the Printing Shortcuts tab or the Paper/Quality
tab.
Page 76

Note:
On the Print Shortcuts tab, select either Photo
printing-borderless or Photo printing-with
white borders.
3. Find the appropriate drop-down list:
Tab Drop-down list
Printing Shortcuts
Paper/Quality
Note:
You do not need to set the print quality on both
tabs.
Paper type
Type is
4. Click the appropriate photo paper type in the drop-down
list.
5. Click Normal, Best, or Maximum dpi in the Print quality
drop-down list.
6. Select any other print settings that you want, and then
click OK.
Storing the photo print cartridge
To maintain the health of the print cartridge, follow the print
cartridge storage guidelines.
Page 77

Using advanced color settings
Use the Advanced Color Settings dialog box to adjust how
printed colors appear on your printout.
Adjusting these settings causes the printed colors to differ
from the colors that appear on your computer monitor.
Follow these steps to specify advanced color settings:
1. Open the Printer Properties dialog box.
2. Click the Color tab.
3. Click the Advanced color settings button.
The Advanced color settings dialog box appears.
Page 78

4. Adjust the following settings as appropriate:
❍ General color settings: Adjust the Saturation,
Brightness, and Color tone to affect how overall colors
are printed.
❍ Specific color settings: Adjust the Cyan, Magenta,
Yellow, and Black sliders to specify the level of each color
that is used in printing.
5. After specifying the color settings, click OK.
6. Select any other print settings that you want, and then
click OK.
Use the What's This? help to learn about the features that
you see in the Printer Properties dialog box.
Page 79

Color management
Color management defines the range of colors that can be
printed. The printer software translates the colors of your
document from their current color settings to the colormanagement option that is selected.
Follow these steps to select a color-management option:
1. Open the Printer Properties dialog box.
2. Click the Color tab.
Page 80

3. Click one of the following options in the Color
management drop-down list:
❍ ColorSmart/sRGB: ColorSmart/sRGB is an appropriate
option for most print jobs. It is used for most Web-based
documents and current imaging devices.
❍ AdobeRGB: When printing from a professional application
with AdobeRGB, turn off the color management in the
application and allow the printer software to manage the
color space. Use the AdobeRGB setting for documents or
photos that were originally created in the AdobeRGB color
space.
❍ Managed by application: This option allows the
application from which you are printing manage the color
of the document.
4. Select any other print settings that you want, and then
click OK.
Page 81

Gray photo print cartridge
The gray photo print cartridge, used in conjunction with the
tri-color print cartridge, prints high-quality black-and-white
photographs.
The gray photo print cartridge can be purchased separately if
it is not included with your product.
Installing the gray photo print cartridge
To install the gray photo print cartridge, remove the black
print cartridge from the printer, and then install the gray
photo print cartridge in the compartment on the right of the
print cartridge cradle.
For more information, see the print cartridge installation
page.
Using the gray photo print cartridge
To use the gray photo print cartridge, follow the steps to
print a black-and-white photo.
Storing the gray photo print cartridge
To maintain the health of the print cartridge, follow the print
cartridge storage guidelines.
Page 82

Printing black-and white-photos
You can perform the following tasks with the printer:
● Print a black-and-white photo
● Print a color photo in black-and-white
For great black-and-white photos, install a gray photo print
cartridge and a tri-color printer cartridge in the printer.
Printing a black-and-white photo
To print a photo that is already black and white, simply follow
the instructions for the
type and size of photo that you want
to print.
Printing a color photo in black and white
Follow these steps to print a color photo in black and white:
1. Open the Printer Properties dialog box.
2. Click the Color tab.
Page 83

3. Select the Print in grayscale check box.
4. Click the High quality option.
5. Select any other print settings that you want, and then
click OK.
Page 84

Storing and handling photo paper
Follow these instructions to maintain the quality of your HP
brand photo paper.
Storage
● Keep unused photo paper in a resealable plastic bag, in the
box in which it was originally packaged. Store the packaged
photo paper on a flat surface in a cool place.
● When you are ready to print, remove only the paper that
you plan to use immediately from the plastic bag. When you
have finished printing, return any unused photo paper to
the plastic bag.
● Do not leave unused photo paper in the printer paper tray.
The paper might start to curl, which can reduce the quality
of your photographs.
Handling
● Always hold photo paper by its edges. Fingerprints on photo
paper can reduce print quality.
● Verify that the photo paper is not curled. If the photo paper
is curled, place the paper in a plastic bag and gently bend it
the opposite direction of the curl until the paper lies flat. If
the problem persists, use photo paper that is not curled.
Page 85

Saving money when printing photos
HP Everyday Photo Paper
To save money and ink when printing photos, use HP
Everyday Photo Paper, Semi-gloss and set the Print
quality to Normal.
HP Everyday Photo Paper, Semi-gloss is designed to
create quality photos with less ink.
Note:
For higher-quality photos, use HP Premium Plus
Photo paper and set the Print quality to Best or
Maximum dpi.
Page 86

Small borderless photos
Guidelines
● For high-quality results, use a photo print cartridge in
combination with the tri-color print cartridge.
● For maximum fade resistance, use HP Premium Plus Photo
Paper and install a photo print cartridge in the printer.
● To learn how to use the photo printing features, see the
photo enhancing page.
● Use HP Everyday Photo Paper, Semi-gloss to save money
and ink when printing photos.
● Verify that the photo paper that you are using is flat. For
information about preventing photo paper from curling, see
the
● Do not exceed the In-tray capacity: up to 25 sheets.
photo paper storage instructions.
Preparing to print
To print a single photo, use the photo/envelope feeder.
To print multiple photos, follow these steps:
1. Verify that the printer is turned on.
2. Remove the Out tray, and then remove all of the paper
from the In tray.
3. Slide the paper-width guide all the way to the left, and then
pull out the paper-length guide.
4. Verify that the photo paper is flat.
Page 87

If the photo paper is not flat, see the photo paper storage
instructions.
5. Place the photo paper in the In tray with the side to be
printed on facing down. If you are using a photo paper that
has a tear-off tab, verify that the tab is pointing away from
the printer.
6. Slide the paper guides firmly against the paper.
7. Replace the Out tray.
Printing
Note:
1. Open the Printer Properties dialog box.
2. On the Printing Shortcuts tab, select Photo printing-
borderless as the type of document, and then select the
following options:
If your software program includes a photo printing
feature, follow the instructions that are provided
with the software program. Otherwise, follow these
instructions.
❍ Print quality: Normal or Best
❍ Paper size: The appropriate borderless photo paper size
❍ Paper type: The appropriate photo paper type
❍ Orientation: Portrait or Landscape
Page 88

3. Set the following options as appropriate:
❍ HP digital photography options
❍ Advanced color settings
❍ Color management
❍ Grayscale quality
4. Select any other print settings that you want, and then
click OK.
Use the What's This? help to learn about the features that
you see in the Printer Properties dialog box.
Page 89

Large borderless photos
Guidelines
● For high-quality results, use a photo print cartridge in
combination with the tri-color print cartridge.
● For maximum fade resistance, use HP Premium Plus Photo
Paper and install a photo print cartridge in the printer.
● To learn how to use the photo printing features, see the
photo enhancing page.
● Use HP Everyday Photo Paper, Semi-gloss to save money
and ink when printing photos.
● Verify that the photo paper that you are using is flat. For
information about preventing photo paper from curling, see
the
● Do not exceed the In-tray capacity: up to 25 sheets.
photo paper storage instructions.
Preparing to print
1. Verify that the printer is turned on.
2. Raise the Out tray, and then remove all of the paper from
the In tray.
3. Slide the paper-width guide all the way to the left, and then
pull out the paper-length guide.
4. Verify that the photo paper is flat.
If the photo paper is not flat, see the
instructions.
photo paper storage
Page 90

5. Place the photo paper in the In tray with the side to be
printed on facing down.
6. Slide the paper guides firmly against the paper.
7. Lower the Out tray.
Printing
Note:
If your software program includes a photo printing
feature, follow the instructions that are provided
with the software program. Otherwise, follow these
instructions.
1. Open the Printer Properties dialog box.
2. On the Printing Shortcuts tab, select Photo printing-
borderless as the type of document, and then select the
following options:
❍ Print quality: Normal or Best
❍ Paper size: The appropriate borderless photo paper size
❍ Paper type: The appropriate photo paper type
❍ Orientation: Portrait or Landscape
3. Set the following options as appropriate:
❍ HP digital photography options
❍ Advanced color settings
Page 91

❍ Color management
❍ Grayscale quality
4. Select any other print settings that you want, and then
click OK.
Use the What's This? help to learn about the features that
you see in the Printer Properties dialog box.
Page 92

Panoramic borderless photos
Guidelines
● For high-quality results, use a photo print cartridge in
combination with the tri-color print cartridge.
● For maximum fade resistance, use HP Premium Plus Photo
Paper and install a photo print cartridge in the printer.
● To learn how to use the photo printing features, see the
photo enhancing page.
● Use HP Everyday Photo Paper, Semi-gloss to save money
and ink when printing photos.
● Verify that the photo paper that you are using is flat. For
information about preventing photo paper from curling, see
the
● Do not exceed the In-tray capacity: up to 25 sheets.
photo paper storage instructions.
Preparing to print
1. Verify that the printer is turned on.
2. Raise the Out tray, and then remove all of the paper from
the In tray.
3. Slide the paper-width guide all the way to the left, and then
pull out the paper-length guide.
4. Verify that the photo paper is flat.
If the photo paper is not flat, see the
instructions.
photo paper storage
Page 93

5. Place the photo paper in the In tray with the side to be
printed on facing down.
6. Slide the paper guides firmly against the paper.
Note:
Some panoramic paper sizes may extend beyond
the edge of the In tray. When printing on such
papers, be sure to slide the paper width-guide
firmly against the edge of the paper.
7. Lower the Out tray.
Printing
Note:
1. Open the Printer Properties dialog box.
If your software program includes a photo printing
feature, follow the instructions that are provided
with the software program. Otherwise, follow these
instructions.
2. On the Printing Shortcuts tab, click Photo printing-
borderless as the type of document, and then select the
following options:
❍ Print quality: Normal or Best
❍ Paper size: The appropriate the panoramic borderless
photo paper size
❍ Paper type: The appropriate photo paper type
❍ Orientation: Portrait or Landscape
Page 94

3. Set the following options as appropriate:
❍ HP digital photography options
❍ Advanced color settings
❍ Color management
❍ Grayscale quality
4. Select any other print settings that you want, and then
click OK.
Use the What's This? help to learn about the features that
you see in the Printer Properties dialog box.
Page 95

Small photos with a white border
Guidelines
● For high-quality results, use a photo print cartridge in
combination with the tri-color print cartridge.
● For maximum fade resistance, use HP Premium Plus Photo
Paper and install a photo print cartridge in the printer.
● To learn how to use the photo printing features, see the
photo enhancing page.
● Use HP Everyday Photo Paper, Semi-gloss to save money
and ink when printing photos.
● Verify that the photo paper that you are using is flat. For
information about preventing photo paper from curling, see
the
● Do not exceed the In-tray capacity: up to 25 sheets.
photo paper storage instructions.
Preparing to print
To print a single photo, use the photo/envelope feeder.
To print multiple photos, follow these steps:
1. Verify that the printer is turned on.
2. Remove the Out tray, and then remove all of the paper
from the In tray.
3. Slide the paper-width guide all the way to the left, and then
pull out the paper-length guide.
4. Verify that the photo paper is flat.
Page 96

If the photo paper is not flat, see the photo paper storage
instructions.
5. Place the photo paper in the In tray with the side to be
printed on facing down. If you are using a photo paper that
has a tear-off tab, verify that the tab is pointing away from
the printer.
6. Slide the paper guides firmly against the paper.
7. Replace the Out tray.
Printing
Note:
1. Open the Printer Properties dialog box.
2. On the Printing Shortcuts tab, click Photo printing-with
white borders as the type of document, and then select
the following options:
If your software program includes a photo printing
feature, follow the instructions that are provided
with the software program. Otherwise, follow these
instructions.
❍ Print quality: Normal or Best
❍ Paper size: The appropriate photo paper size
❍ Paper type: The appropriate photo paper type
❍ Orientation: Portrait or Landscape
Page 97

3. Set the following options as appropriate:
❍ HP digital photography options
❍ Advanced color settings
❍ Color management
❍ Grayscale quality
4. Select any other print settings that you want, and then
click OK.
Use the What's This? help to learn about the features that
you see in the Printer Properties dialog box.
Page 98

Large photos with a white border
Guidelines
● For high-quality results, use a photo print cartridge in
combination with the tri-color print cartridge.
● For maximum fade resistance, use HP Premium Plus Photo
Paper and install a photo print cartridge in the printer.
● To learn how to use the photo printing features, see the
photo enhancing page.
● Use HP Everyday Photo Paper, Semi-gloss to save money
and ink when printing photos.
● Verify that the photo paper that you are using is flat. For
information about preventing photo paper from curling, see
the
● Do not exceed the In-tray capacity: up to 25 sheets.
photo paper storage instructions.
Preparing to print
1. Verify that the printer is turned on.
2. Raise the Out tray, and then remove all of the paper from
the In tray.
3. Slide the paper-width guide all the way to the left, and then
pull out the paper-length guide.
4. Verify that the photo paper is flat.
If the photo paper is not flat, see the
instructions.
photo paper storage
Page 99

5. Place the photo paper in the In tray with the side to be
printed on facing down.
6. Slide the paper guides firmly against the paper.
7. Lower the Out tray.
Printing
Note:
If your software program includes a photo printing
feature, follow the instructions that are provided
with the software program. Otherwise, follow these
instructions.
1. Open the Printer Properties dialog box.
2. On the Printing Shortcuts tab, click Photo printing-with
white borders as the type of document, and then select
the following options:
❍ Print quality: Normal or Best
❍ Paper size: The appropriate photo paper size
❍ Paper type: The appropriate photo paper type
❍ Orientation: Portrait or Landscape
3. Set the following options as appropriate:
❍ HP digital photography options
❍ Advanced color settings
Page 100

❍ Color management
❍ Grayscale quality
4. Select any other print settings that you want, and then
click OK.
Use the What's This? help to learn about the features that
you see in the Printer Properties dialog box.
 Loading...