

Page 1
HP Deskjet 3740 series printer
1 HP Deskjet 3740 series printer
To find an answer to a question, select one of the following topics:
• Notices
• Special features
• Getting started
• Connecting to the printer
• Printing photos
• Printing other documents
• Printing tips
• Printer software
• Maintenance
• Troubleshooting
• Specifications
• Supplies
1
Page 2
HP Deskjet 3740 series printer
2 Special features
Congratulations! You have purchased an HP Deskjet printer that is equipped with
several exciting features:
• User friendly: Easy to install and operate.
• Borderless printing: Print 4 x 6 inch photos to the edges of the paper by using
the borderless printing feature.
• Print cancel: Save paper and ink by cancelling print jobs quickly and easily with
the onscreen print cancel feature.
• Ink level indicator: Know the approximate ink level of each print cartridge with
the onscreen ink level indicator.
• Ink-backup mode: Use Ink-backup mode to continue printing with one print
cartridge when the other print cartridge has run out of ink.
2
Page 3

HP Deskjet 3740 series printer
3 Getting started
For an overview of the printer features, see the printer features page.
Click the appropriate topic below for a description of a printer feature:
• Power button and light
• Paper tray
• Print cartridges
• Ink-backup mode
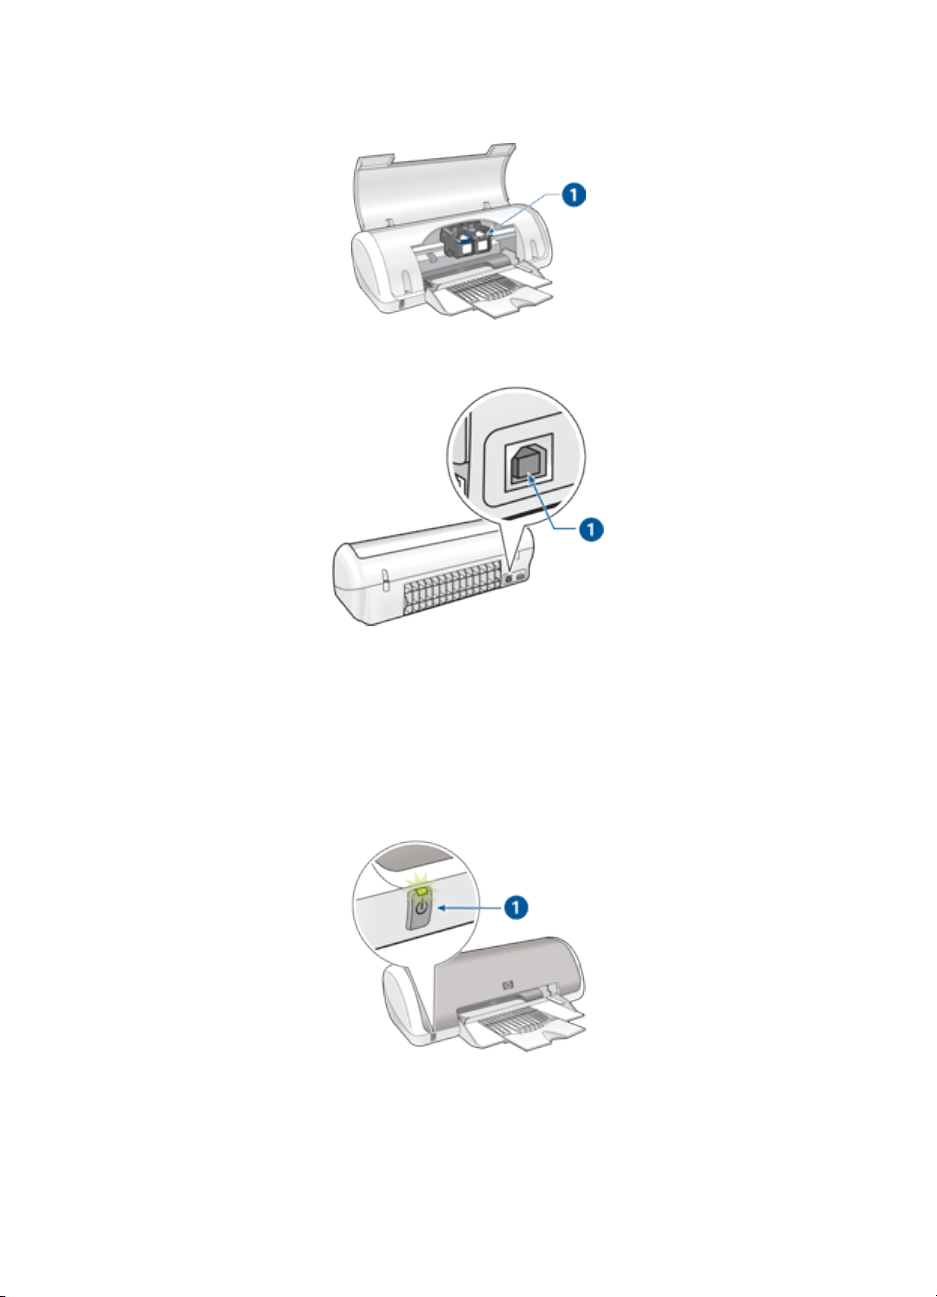
3.1 Printer features
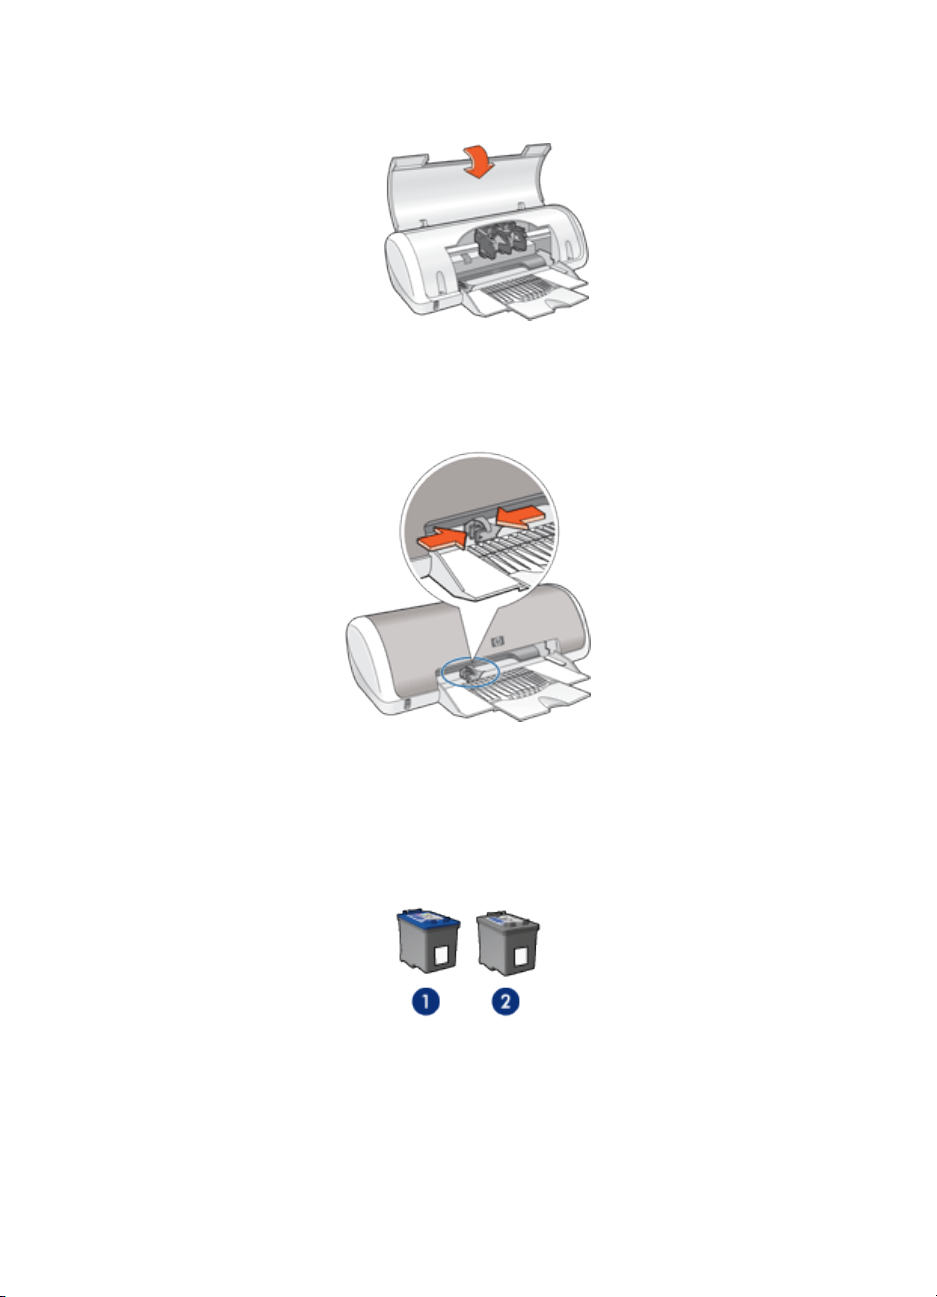
The printer has several features to make printing easier and more efficient.
1. Power button and light
2. Paper tray
3
Page 4
HP Deskjet 3740 series printer
1. Print cartridges
1. USB port
3.2 Power button and light
The Power button turns the printer on and off. It can take a few seconds for the
printer to turn on after you press the Power button. The light on the Power button
flashes when the printer is processing a job.
1. Power button and light
4
Page 5
HP Deskjet 3740 series printer
Caution: Always use the Power button to turn the printer on and off. Using
a power strip, a surge protector, or a wall-mounted switch to turn the printer
on and off can cause printer failure.
3.3 Paper tray
The fold-out paper tray holds paper and other media to be printed. Unfold the paper
tray before printing.
Unfolding the paper tray
Follow these steps to unfold the paper tray:
1. Raise the printer cover.
2. Lower the paper tray.
3. Fold out the tray extension.
4. Lower the printer cover.
5
Page 6
HP Deskjet 3740 series printer
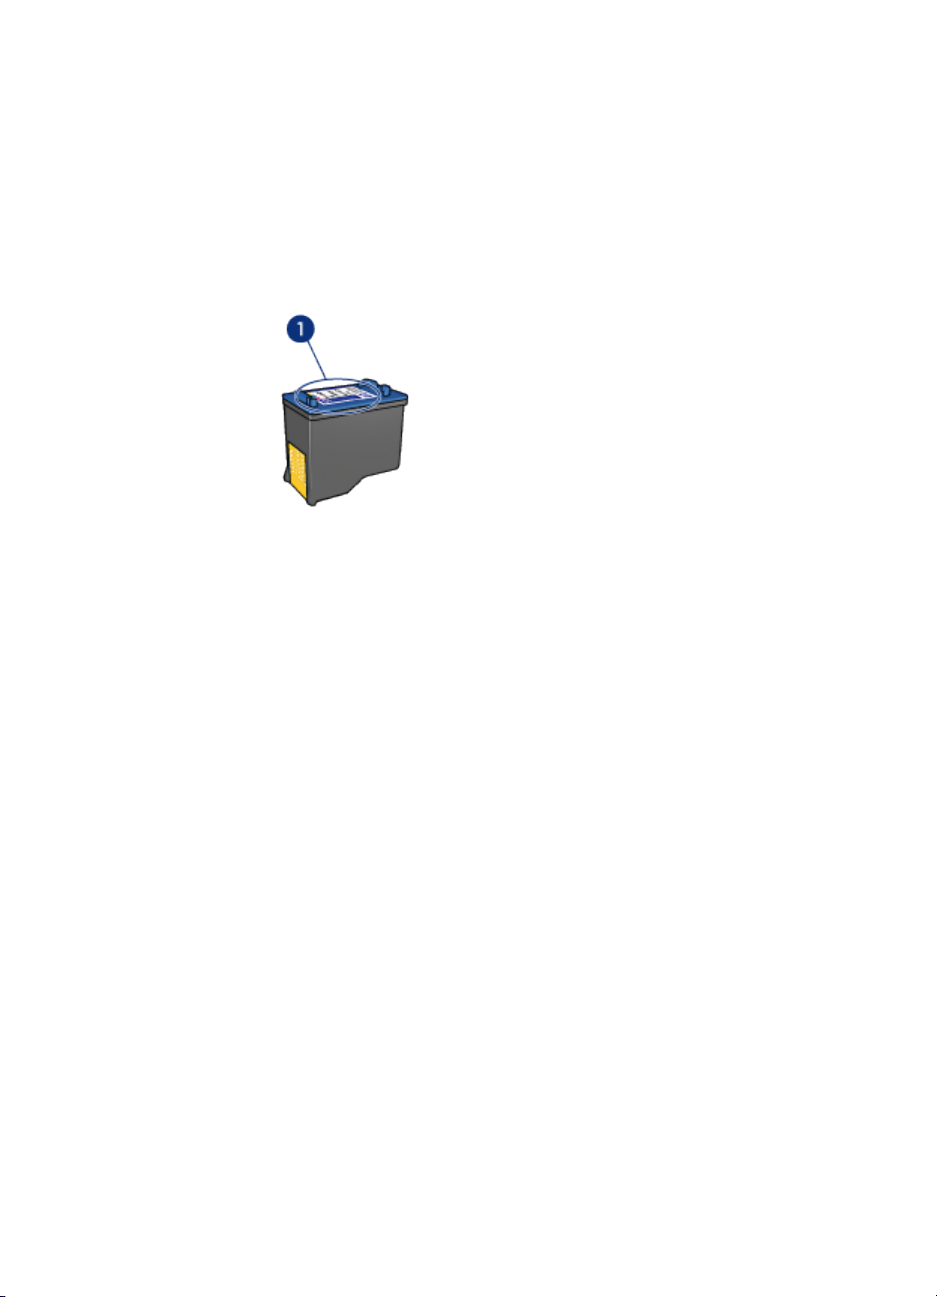
Using the paper tray
Print different sizes of media by sliding the paper guide to the right or left. The printer
deposits printed pages on the top of the paper tray.
Note: The print cartridges must be installed before printing.
3.4 Print cartridges
Two print cartridges are available for use with the printer.
1. Tri-color print cartridge
2. Black print cartridge
6
Page 7
HP Deskjet 3740 series printer
Replacing print cartridges
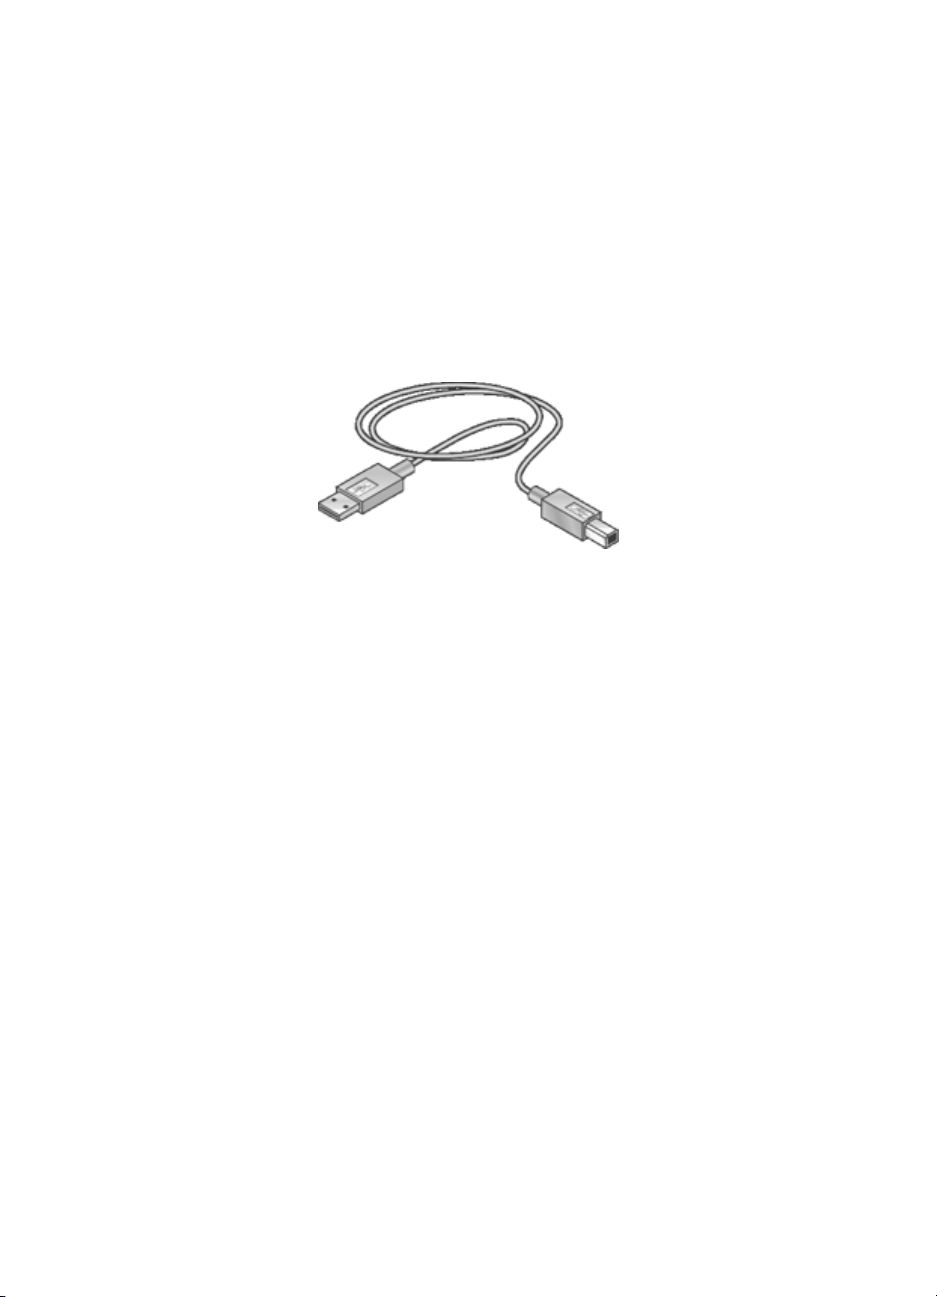
When buying print cartridges, look for the print cartridge selection number.
You can find the selection number in three places:
• Selection number label: Look at the label on the print cartridge that you are
replacing.
1. Selection number label
• Printer documentation: For a list of print cartridge selection numbers, see the
reference guide that came with the printer.
• Print Cartridge Ordering Information dialog box: For a list of print cartridge
selection numbers, open the printer Toolbox, click the Estimated Ink Level tab,
and then click the Print Cartridge Ordering Information button.
If a print cartridge runs out of ink, the printer can operate in the ink-backup mode.
For information about installing a print cartridge, see the print cartridge installation
page.
3.5 Ink-backup mode
In the ink-backup mode, the printer operates by using only one print cartridge. The
ink-backup mode is initiated when a print cartridge is removed from the print
cartridge cradle.
For instructions about removing a print cartridge, see the print cartridge
installation page.
Ink-backup mode output
Printing in ink-backup mode slows the printer and affects the quality of printouts.
7
Page 8

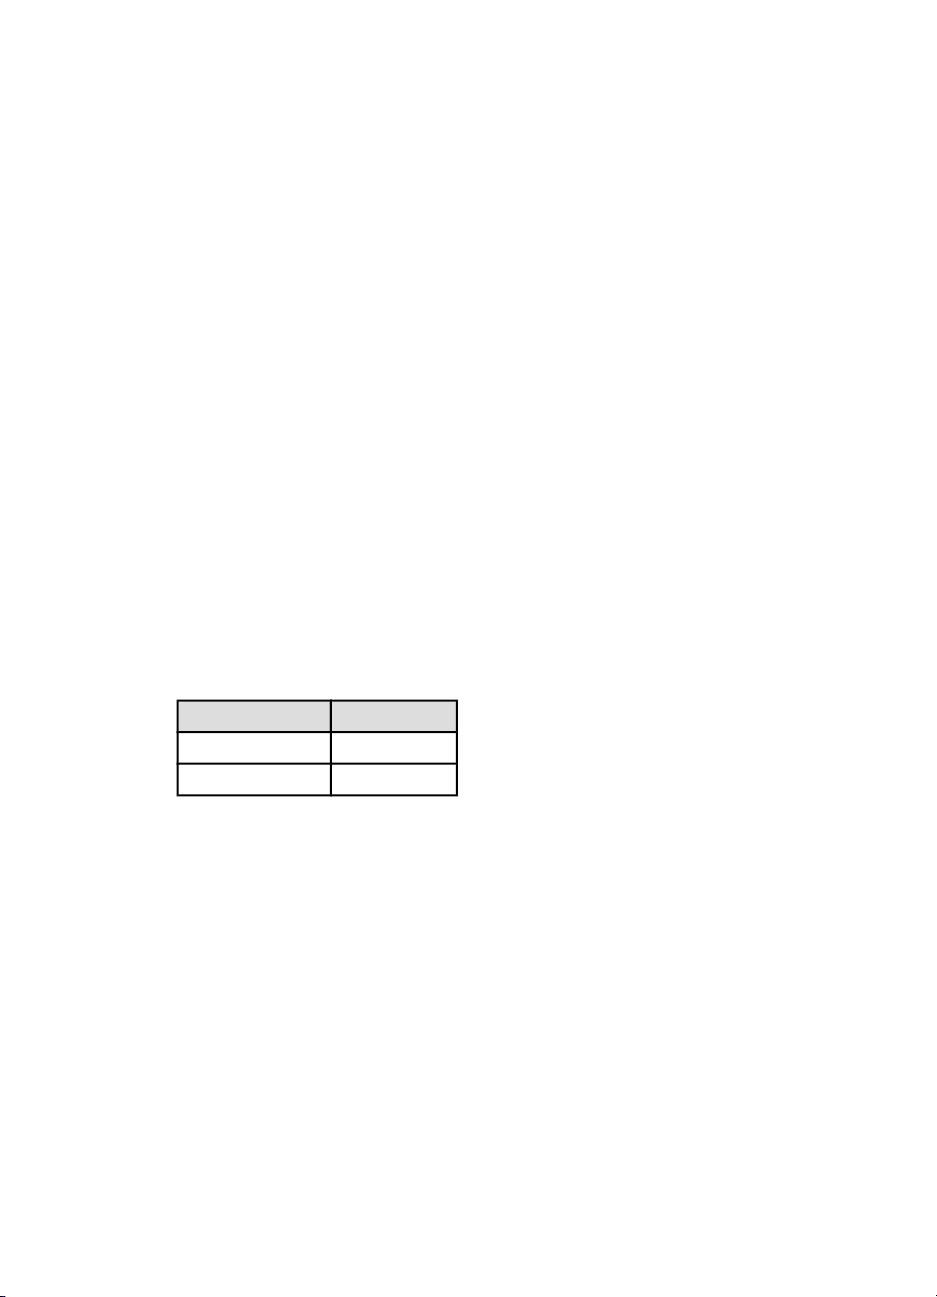
HP Deskjet 3740 series printer
Installed print cartridge Result
Black print cartridge. Colors are printed as grayscale.
Tri-color print cartridge. Colors print but black is grayed and is not a true black.
Exiting ink-backup mode
Install two print cartridges in the printer to exit the ink-backup mode.
For instructions about installing a print cartridge, see the print cartridge installation
page.
8
Page 9
HP Deskjet 3740 series printer
4 Connecting to the printer
• USB
4.1 USB
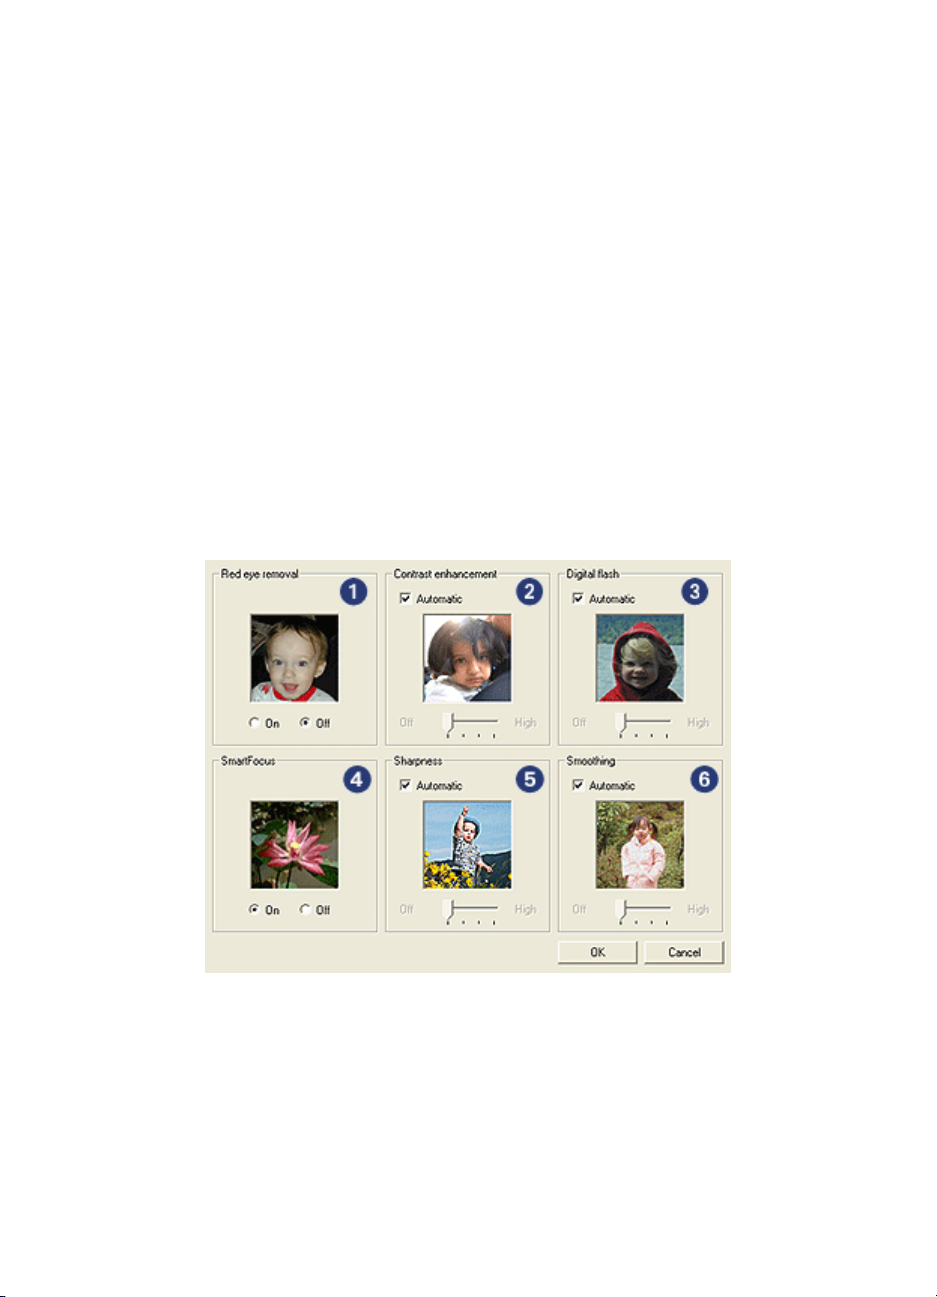
The printer connects to the computer with a universal serial bus (USB) cable. The
computer must be running Windows 98 or later to use a USB cable.
For instructions about connecting the printer with a USB cable, see the setup poster
that came with the printer.
9
Page 10

HP Deskjet 3740 series printer
5 Printing photos
Select the type of photograph that you want to print:
Large photo
with a white border
Enhancing your photos
Learn how to enhance your photographs by using the printer's photo printing
features.
Small photo
with a white border
Borderless photo
5.1 Enhancing your photos
The printer software offers several features to make printing digital photos easier
and improve photo quality:
• Get the best combination of speed and quality by using PhotoREt.
• Use the HP digital photography options to touch up photos.
• Achieve the highest resolution with Maximum dpi.
• Print an Exif-formatted photo if you have Exif-enabled software.
• Use HP Everyday Photo Paper, Semi-gloss to save money and ink when
printing photos.
Learn how to add professional touches to your digital photographs:
• Print black-and-white photos.
• Print to the edges of the photo paper with borderless photo printing.
To prevent photo paper from curling, follow the photo paper storage guidelines.
5.2 PhotoREt
PhotoREt offers the best combination of print speed and quality for your image.
Follow these steps to print with PhotoREt technology:
1. Open the Printer Properties dialog box.
2. Click the Printing Shortcuts tab or the Paper/Quality tab.
10
Page 11
HP Deskjet 3740 series printer
3. Click Best in the Print quality drop-down list.
4. Select any other print settings that you want, and then click OK.
5.3 HP digital photography options
The printer has several features to enhance the quality of digital photographs.
Opening the HP digital photography options dialog box
Follow these steps to open the HP digital photography options dialog box:
1. Open the Printer Properties dialog box.
2. Click the Printing Shortcuts tab or the Paper/Quality tab, and then click the HP
digital photography button.
Using the HP digital photography options dialog box
Use the HP digital photography options dialog box to set these options:
1. Red eye removal: Click On to remove or reduce red-eye in the photograph.
2. Contrast enhancement: Adjust the contrast to your preference. Click
Automatic to allow the printer driver to automatically balance the contrast.
3. Digital flash: Adjust the exposure in dark areas of photos to bring out detail.
Click Automatic to allow the printer driver to automatically balance lightness
and darkness.
11
Page 12
HP Deskjet 3740 series printer
4. SmartFocus: Enhance the image quality and clarity. Click On to allow the printer
driver to automatically focus the image.
5. Sharpness: Adjust the image sharpness to your preference. Click Automatic to
allow the printer driver to automatically set the level of sharpening for the image.
6. Smoothing: Soften an image. Click Automatic to allow the printer driver to
automatically set the level of smoothing for the image.
5.4 Maximum dpi
The Maximum dpi print quality setting offers 4800 x 1200 optimized dpi printing.
The 4800 x 1200 optimized dpi is the highest quality resolution for this printer. When
4800 x 1200 optimized dpi is selected in the printer driver, the tri-color print cartridge
prints in the 4800 x 1200 optimized dpi mode (up to 4800 x 1200 optimized dpi color
and 1200-input dpi).
Follow these steps to print in the 4800 x 1200 optimized dpi mode:
1. Open the Printer Properties dialog box.
2. Click the Printing Shortcuts tab or the Paper/Quality tab.
Note: On the Printing Shortcuts tab, select either Photo printing-borderless or
Photo printing-with white borders.
3. Find the appropriate drop-down list:
Tab Drop-down list
Printing Shortcuts Paper type
Paper/Quality Type is
Note: You do not need to set the print quality on both tabs.
4. Select the appropriate photo paper type from the drop-down list.
5. Click Maximum dpi in the Print quality drop-down list.
Note: The Maximum dpi setting temporarily uses a lot of disk space and will
print slowly.
6. Select any other print settings that you want, and then click OK.
12
Page 13

HP Deskjet 3740 series printer
5.5 Exif Print
Exif Print (Exchangeable Image File Format 2.2) is an international digital imaging
standard that simplifies digital photography and enhances printed photographs.
When a photograph is taken with an Exif Print-enabled digital camera, Exif Print
captures information such as exposure time, type of flash, and color saturation, and
stores it in the image file. The HP Deskjet printer software then uses this information
to automatically perform image-specific enhancements, to create outstanding
photographs.
Printing Exif Print-enhanced photos requires the following equipment:
• A digital camera that supports Exif Print
• Exif Print-enabled photo software
Follow these steps to print Exif Print-enhanced photos:
1. Open the file that you want the Exif Print-enabled photo software to print.
2. Open the Printer Properties dialog box.
3. Click the Printing Shortcuts tab or the Paper/Quality tab.
Note: On the Printing Shortcuts tab, select either Photo printing-borderless or
Photo printing-with white borders.
4. Click Normal or Best in the Print quality drop-down list.
5. Select any other print settings that you want, and then click OK.
The printer software automatically optimizes the printed image.
5.6 Printing black-and-white photos
You can perform the following tasks with the printer:
• Print a black-and-white photo
• Print a color photo in black-and-white
Printing a black-and-white photo
To print a photo that is already black-and-white, simply follow the instructions for
the type and size of photo that you want to print.
Printing a color photo in black-and-white
Follow these steps to print a color photo in black-and-white:
1. Open the Printer Properties dialog box.
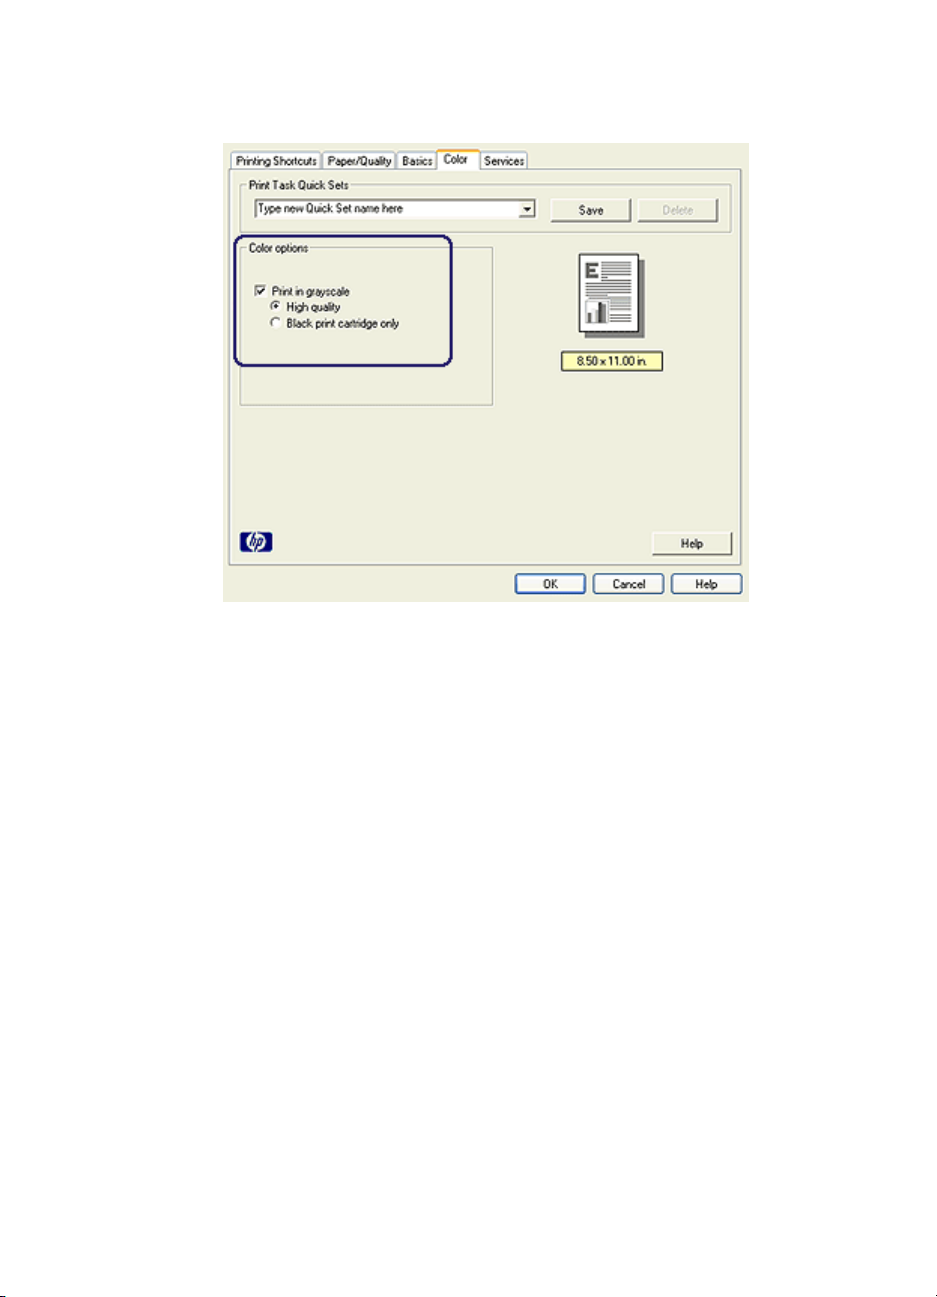
2. Click the Color tab.
13
Page 14
HP Deskjet 3740 series printer
3. Click Print in grayscale.
4. Select one of the following options:
• High quality: Use this option for photos and other high-quality printouts.
• Black print cartridge only: Use this option for fast, economical printing.
5. Select any other print settings that you want, and then click OK.
5.7 Storing and handling photo paper
Follow these instructions to maintain the quality of your HP brand photo paper.
Storage
• Keep unused photo paper in a resealable plastic bag, in the box in which it was
originally packaged. Store the packaged photo paper on a flat surface in a cool
place.
• When you are ready to print, remove only the paper that you plan to use
immediately from the plastic bag. When you have finished printing, return any
unused photo paper to the plastic bag.
• Do not leave unused photo paper in the printer paper tray. The paper might
start to curl, which can reduce the quality of your photographs.
14
Page 15

HP Deskjet 3740 series printer
Handling
• Always hold photo paper by its edges. Fingerprints on photo paper can reduce
print quality.
• Verify that the photo paper is not curled. If the photo paper is curled, place the
paper in a plastic bag and gently bend it the opposite direction of the curl until
the paper lies flat. If the problem persists, use photo paper that is not curled.
5.8 Saving money when printing photos
HP Everyday Photo Paper
To save money and ink when printing photos, use HP Everyday Photo Paper, Semigloss and set the Print quality to Normal.
HP Everyday Photo Paper, Semi-gloss is designed to create quality photos with less
ink.
Note: For higher-quality photos, use HP Premium Plus Photo paper and set the
Print quality to Best or Maximum dpi.
5.9 Large photos with a white border
Guidelines
• To learn how to use the photo printing features, see the photo enhancing page.
• Use HP Everyday Photo Paper, Semi-gloss to save money and ink when
printing photos.
• Verify that the photo paper that you are using is flat. For information about
preventing photo paper from curling, see the photo paper storage instructions.
• Do not exceed the paper tray capacity: Up to 15 sheets.
Preparing to print
1. Slide the paper guide to the left.
2. Place the paper with the side to be printed on facing down in the tray, and then
push it into the printer until it stops.
The paper will extend over the edge of the tray.
15
Page 16

HP Deskjet 3740 series printer
3. Slide the paper guide firmly against the edge of the paper.
Printing
Note: If your software program includes a photo printing feature, follow the
instructions that are provided with the software program. Otherwise, follow
these instructions.
1. Open the Printer Properties dialog box.
2. On the Printing Shortcuts tab, select Photo printing-with white borders as the
type of document, and then select the following options:
• Print quality: Normal, Best, or Max dpi
• Paper type: The appropriate photo paper type
• Paper size: The appropriate photo paper size
• Orientation: Portrait or Landscape
3. Click OK to print the photographs.
Use the What's This? help to learn about the features that you see in the Printer
Properties dialog box.
5.10 Small photos with a white border
Guidelines
• To learn how to use the photo printing features, see the photo enhancing page.
• Use HP Everyday Photo Paper, Semi-gloss to save money and ink when
printing photos.
• Verify that the photo paper that you are using is flat. For information about
preventing photo paper from curling, see the photo paper storage instructions.
• Do not exceed the paper tray capacity: Up to 15 sheets.
Preparing to print
1. Slide the paper guide to the left.
16
Page 17
HP Deskjet 3740 series printer
2. Place the photo paper, with the side to be printed on facing down and the short
edge pointing towards the printer, in the right side of the tray. Push the paper
into the printer until it stops.
3. Slide the paper guide firmly against the edge of the paper.
Printing
Note: If your software program includes a photo printing feature, follow the
instructions that are provided with the software program. Otherwise, follow
these instructions.
1. Open the Printer Properties dialog box.
2. On the Printing Shortcuts tab, select Photo printing-with white borders as the
type of document, and then select the following options:
• Print quality: Normal, Best, or Max dpi
• Paper type: The appropriate photo paper type
• Paper size: The appropriate photo paper size
• Orientation: Portrait or Landscape
3. Click OK to print the photographs.
Use the What's This? help to learn about the features that you see in the Printer
Properties dialog box.
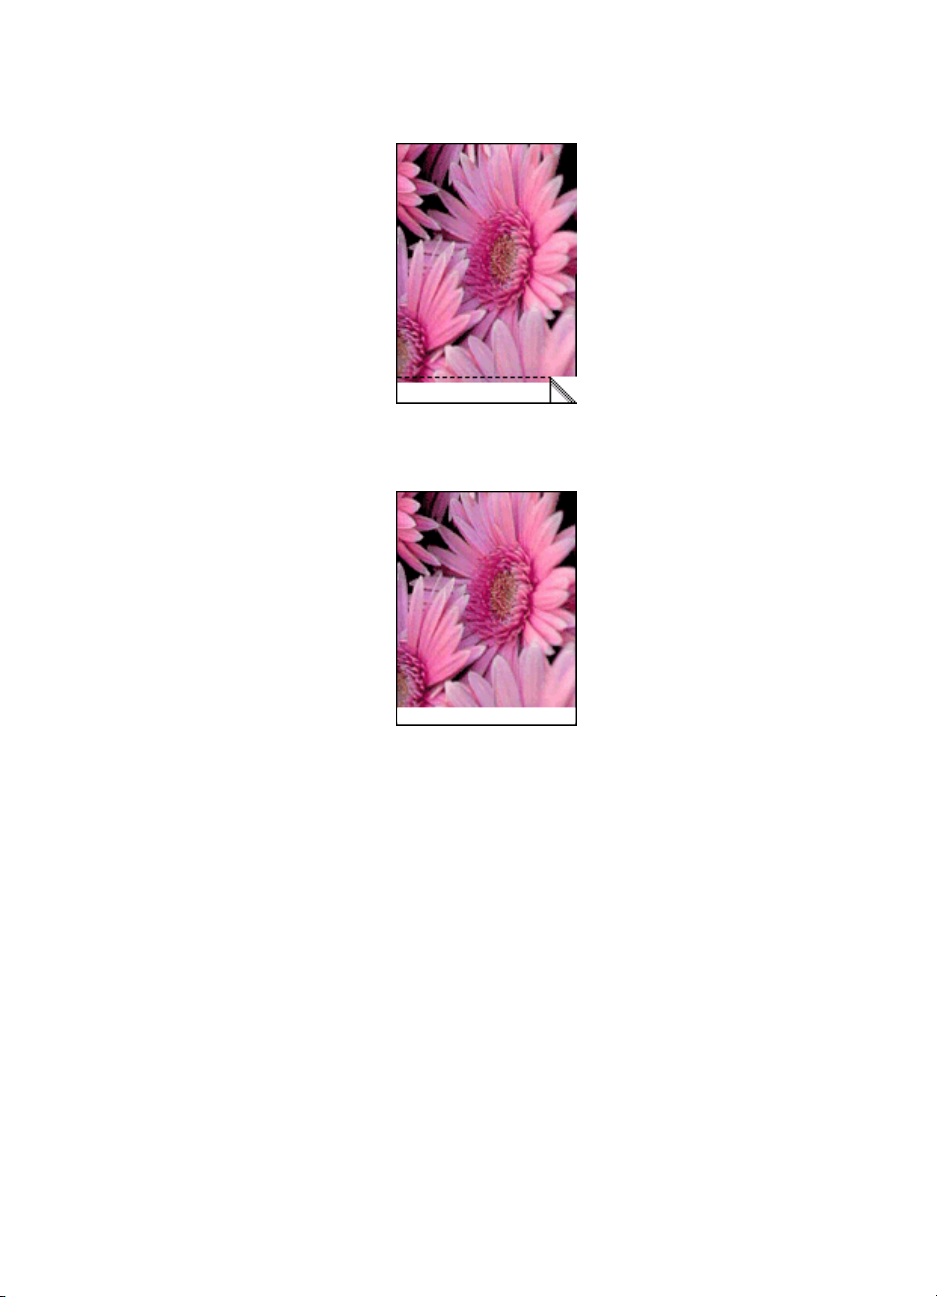
5.11 Borderless photos
Guidelines
• The printer prints borderless photos measuring 4 x 6 inches or less.
• To learn how to use the photo printing features, see the photo enhancing page.
• Use HP Everyday Photo Paper, Semi-gloss to save money and ink when
printing photos.
• Verify that the photo paper that you are using is flat. For information about
preventing photo paper from curling, see the photo paper storage instructions.
17
Page 18
HP Deskjet 3740 series printer
• Do not print borderless photos in ink-backup mode. Always have two print
cartridges installed in the printer.
• Do not exceed the paper tray capacity: Up to 15 sheets.
Preparing to print
1. Slide the paper guide to the left.
2. Place the photo paper, with the side to be printed on facing down and the short
edge pointing towards the printer, in the right side of the tray. If you are using
photo paper that has a tear-off tab, verify that the tab is pointing away from the
printer. Push the paper into the printer until it stops.
3. Slide the paper guide firmly against the edge of the paper.
Printing
Note: If your software program includes a photo printing feature, follow the
instructions that are provided with the software program. Otherwise, follow
these instructions.
1. Open the Printer Properties dialog box.
2. On the Printing Shortcuts tab, select Photo printing-borderless as the type of
document, and then select the following options:
• Print quality: Normal, Best, or Max dpi
• Paper type: The appropriate photo paper type
• Paper size: The appropriate photo paper size
• Orientation: Portrait or Landscape
3. Click OK to print the photographs.
When you print on 4 x 6 inch photo paper with tear-off tabs, the printout is
completely borderless after the tear-off strip is removed.
18
Page 19
HP Deskjet 3740 series printer
When you print on 4 x 6 inch photo paper without tear-off tabs, the printout is
borderless on three sides and has a border on the bottom.
Use the What's This? help to learn about the features that you see in the Printer
Properties dialog box.
19
Page 20

HP Deskjet 3740 series printer
6 Printing other documents
E-mail Letters Documents Envelopes
Labels Brochures Greeting cards Transparencies
Index cards Iron-on transfers
Printing tips
Minimize your cost and effort while maximizing the quality of your printouts using
these printing tips.
Printer software
Learn about the printer software.
6.1 E-mail
Guidelines
Do not exceed the paper tray capacity: Up to 80 sheets.
Preparing to print
1. Slide the paper guide to the left.
2. Place the paper with the side to be printed on facing down in the tray, and then
push it into the printer until it stops.
The paper will extend over the edge of the tray.
20
Page 21

HP Deskjet 3740 series printer
3. Slide the paper guide firmly against the edge of the paper.
Printing
1. Open the Printer Properties dialog box.
2. On the Printing Shortcuts tab, click General everyday printing or Fast/
economical printing, and then specify the following print settings:
• Paper size: The appropriate paper size
• Paper type: Plain paper
• Select the print quality setting as appropriate.
3. Select any other print settings that you want, and then click OK.
Use the What's This? help to learn about the features that you see in the Printer
Properties dialog box.
6.2 Letters
Guidelines
• For help printing an envelope, see the envelopes page.
• Do not exceed the paper tray capacity: Up to 80 sheets.
Preparing to print
1. Slide the paper guide to the left.
2. Place the paper with the side to be printed on facing down in the tray, and then
push it into the printer until it stops.
The paper will extend over the edge of the tray.
21
Page 22

HP Deskjet 3740 series printer
3. Slide the paper guide firmly against the edge of the paper.
Printing
1. Open the Printer Properties dialog box.
2. On the Printing Shortcuts tab, click General everyday printing, and then specify
the following print settings:
• Paper size: The appropriate paper size
• Paper type: Plain paper
• Select the print quality setting as appropriate.
3. Select any other print settings that you want, and then click OK.
Use the What's This? help to learn about the features that you see in the Printer
Properties dialog box.
6.3 Documents
Guidelines
• For draft documents, use Fast/economical printing.
• Do not exceed the paper tray capacity: Up to 80 sheets.
Preparing to print
1. Slide the paper guide to the left.
2. Place the paper with the side to be printed on facing down in the tray, and then
push it into the printer until it stops.
The paper will extend over the edge of the tray.
22
Page 23

HP Deskjet 3740 series printer
3. Slide the paper guide firmly against the edge of the paper.
Printing
1. Open the Printer Properties dialog box.
2. On the Printing Shortcuts tab, click General everyday printing, and then specify
the following print settings:
• Paper size: The appropriate paper size
• Paper type: Plain paper
• Select the print quality setting as appropriate.
3. Select any other print settings that you want, and then click OK.
Use the What's This? help to learn about the features that you see in the Printer
Properties dialog box.
6.4 Envelopes
Guidelines
• Avoid using envelopes that have the following features:
• Have clasps or windows
• Have thick, irregular, or curled edges
• Are shiny or embossed
• Are wrinkled, torn, or otherwise damaged
• Align the envelope edges before inserting them in the paper tray.
• Do not exceed the paper tray capacity: Up to 10 envelopes.
Preparing to print
1. Slide the paper guide to the left.
2. Place the envelopes, with the side to be printed on facing down and the flap to
the left, in the paper tray and to the right. Push the envelopes into the printer
until they stop.
23
Page 24

HP Deskjet 3740 series printer
3. Slide the paper guide firmly against the edge of the envelopes.
Printing
1. Open the Printer Properties dialog box.
2. Click the Paper/Quality tab, and then select the following print settings:
• Size is: The appropriate envelope size
• Type is: Plain paper
3. Select any other print settings that you want, and then click OK.
Use the What's This? help to learn about the features that you see in the Printer
Properties dialog box.
6.5 Labels
Guidelines
• Use only labels that are designed specifically for inkjet printers.
• Use only full sheets of labels.
• Verify that the labels are not sticky, wrinkled, or pulling away from the protective
backing.
• Do not exceed the paper tray capacity: Up to 15 sheets of labels (use only lettersize or A4-size sheets).
Preparing to print
1. Slide the paper guide to the left.
2. Fan the edges of the label sheets to separate them, and then align the edges.
3. Place the label sheets with the label side facing down in the tray, and then push
the sheets into the printer until they stop.
24
Page 25

HP Deskjet 3740 series printer
4. Slide the paper guide firmly against the edge of the sheets.
Printing
1. Open the Printer Properties dialog box.
2. On the Printing Shortcuts tab, click General everyday printing or Fast/
economical printing, and then specify the following print settings:
• Paper size: The appropriate paper size
• Paper type: Plain paper
• Select the print quality setting as appropriate.
3. Select any other print settings that you want, and then click OK.
Use the What's This? help to learn about the features that you see in the Printer
Properties dialog box.
6.6 Brochures
Guidelines
• For great results, use HP Brochure & Flyer Paper.
• Do not exceed the paper tray capacity: Up to 30 sheets.
Preparing to print
1. Slide the paper guide to the left.
2. Place the paper with the side to be printed on facing down in the tray, and then
push it into the printer until it stops.
The paper will extend over the edge of the tray.
25
Page 26

HP Deskjet 3740 series printer
3. Slide the paper guide firmly against the edge of the paper.
Printing
1. Open the Printer Properties dialog box.
2. On the Printing Shortcuts tab, click General everyday printing, and then specify
the following print settings:
• Paper size: The appropriate paper size
• Paper type: The appropriate brochure paper type
• Select the print quality setting as appropriate.
3. Select any other print settings that you want, and then click OK.
Use the What's This? help to learn about the features that you see in the Printer
Properties dialog box.
6.7 Greeting cards
Guidelines
• Unfold prefolded cards, and then place them in the paper tray.
• For great results, use HP Greeting Card Paper.
• Do not exceed the paper tray capacity: Up to 20 cards.
Preparing to print
1. Slide the paper guide to the left.
2. Fan the edges of the greeting cards to separate them, and then align the edges.
3. Place the greeting cards, with the side to be printed on facing down, in the paper
tray. Push the cards into the printer until they stop.
26
Page 27

HP Deskjet 3740 series printer
4. Slide the paper guide firmly against the edge of the paper.
Printing
Note: If your software program includes a greeting card printing feature, follow the
instructions that are provided with the software program. Otherwise, follow
the instructions below.
1. Open the Printer Properties dialog box.
2. Click the Paper/Quality tab, and then specify the following print settings:
• Size is: The appropriate card size
• Type is: The appropriate card type
• Select the print quality setting as appropriate.
3. Select any other print settings that you want, and then click OK.
Use the What's This? help to learn about the features that you see in the Printer
Properties dialog box.
6.8 Transparencies
Guidelines
• For great results, use HP Premium Inkjet Transparency Film.
• Do not exceed the paper tray capacity: Up to 20 transparencies.
Preparing to print
1. Slide the paper guide to the left.
2. Place the transparencies, with the side to be printed on facing down and the
adhesive strip toward the printer, in the tray.
27
Page 28

HP Deskjet 3740 series printer
3. Carefully push the transparencies into the printer until they stop so that none
of the adhesive strips catch on one another.
4. Slide the paper guide firmly against the edge of the transparencies.
Printing
1. Open the Printer Properties dialog box.
2. On the Printing Shortcuts tab, click General everyday printing, and then specify
the following print settings:
• Paper size: The appropriate paper size
• Paper type: The appropriate transparency film
• Select the print quality setting as appropriate.
3. Select any other print settings that you want, and then click OK.
Use the What's This? help to learn about the features that you see in the Printer
Properties dialog box.
6.9 Index cards and other small media
Guidelines
• Use only cards and small media that meet the printer's paper-size
specifications. For specifications, see the reference guide that came with the
printer.
• Do not exceed the paper tray capacity: Up to 20 cards.
Preparing to print
1. Slide the paper guide to the left.
2. Place the cards, with the side to be printed on facing down and the short edge
pointing towards the printer, in the tray and to the right. Push the cards into the
printer until they stop.
28
Page 29

HP Deskjet 3740 series printer
3. Slide the paper guide firmly against the edge of the paper.
Printing
1. Open the Printer Properties dialog box.
2. Click the Paper/Quality tab, and then specify the following print settings:
• Size is: The appropriate paper size
• Type is: The appropriate paper type
• Select the print quality setting as appropriate.
3. Select any other print settings that you want, and then click OK.
Use the What's This? help to learn about the features that you see in the Printer
Properties dialog box.
6.10 Iron-on transfers
Guidelines
• Use HP Iron-on Transfers for great results.
• When printing a mirror image, the text and the pictures are horizontally reversed
from what appears on the computer screen.
• Do not exceed the paper tray capacity: Up to 10 iron-on transfer papers.
Preparing to print
1. Slide the paper guide to the left.
2. Place iron-on transfer paper with the side to be printed on facing down in the
paper tray, pushing the paper into the printer until it stops.
The paper will extend over the edge of the tray.
29
Page 30

HP Deskjet 3740 series printer
3. Slide the paper guide firmly against the edge of the paper.
Printing
Note: If your software program includes an iron-on transfer printing feature, follow
the instructions that are provided with the software program. Otherwise,
follow the instructions below.
1. Open the Printer Properties dialog box, and then select the following:
2. Click the Paper/Quality tab, and then specify the following print settings:
• Size is: The appropriate paper size
• Type is: Plain paper
• Print quality: Normal or Best
3. Click the Basics tab, and then specify the following print setting:
• Orientation: Mirror image
4. Select any other print settings that you want, and then click OK.
Use the What's This? help to learn about the features that you see in the Printer
Properties dialog box.
30
Page 31

HP Deskjet 3740 series printer
7 Printing tips
Save time
• Use the Printing Shortcuts tab.
• Create print task quick sets for documents that you print often.
• Set the printer default settings for options that you use often.
• Print from front to back.
Save money
• Use Fast/economical printing.
• Use HP Everyday Photo Paper to save money and ink when printing photos.
Enhance the quality of printouts
• Preview the document before printing it.
• Select the right paper type.
• Select the right print quality.
• Print on a custom paper size.
7.1 Printing shortcuts
The Printing Shortcuts tab makes it easy to set the printing options for the
documents that you want to print.
31
Page 32

HP Deskjet 3740 series printer
Use the Printing Shortcuts tab for the following print tasks:
• General everyday printing
• Printing borderless photos
• Printing photos with white borders
• Fast/economical printing
7.1.1 General everyday printing
Use General everyday printing to print quickly.
• Documents
• E-mail
7.2 Fast/economical printing
Use Fast/economical printing to produce draft-quality printouts quickly.
Follow these steps to use Fast/economical printing:
1. Open the Printer Properties dialog box.
2. On the Printing Shortcuts tab, select Fast/economical printing from the dropdown list.
32
Page 33

HP Deskjet 3740 series printer
3. Specify the printing settings that you want to use.
4. After specifying the print settings, click OK
Use the What's This? help to learn about the features that you see in the Printer
Properties dialog box.
7.3 Print task quick sets
Use print task quick sets to print with or save print settings that you use often.
For example, if you frequently print on envelopes, you can create a print task that
contains the paper size, print quality, and orientation setting that you normally use
for envelopes. After creating the print task, simply select it when printing on
envelopes rather than setting each of the print settings separately.
Create your own print task or use the specially designed print tasks that are available
in the Print Task Quick Sets drop-down list.
Using a print task quick set
Follow these steps to use a print task quick set:
1. Open the Printer Properties dialog box.
2. Select the print task that you want to use from the drop-down list.
33
Page 34

HP Deskjet 3740 series printer
3. Click OK.
Note: To restore default print settings, click Default print settings in the Print Task
Quick Sets drop-down list, and click OK.
Creating a print task quick set
Follow these steps to create a print task quick set:
Note: The printer software can save up to 25 print task quick sets.
1. Open the Printer Properties dialog box.
2. Select the options that you want to include in the new print task.
3. Type a name for the new print task in the Print Task Quick Sets drop-down list,
and then click Save.
The print task quick set is added to the drop-down list.
Note: If you add more options to the print task, you must rename the print task,
and then click OK.
Deleting a print task quick set
Follow these steps to delete a print task quick set:
1. Open the Printer Properties dialog box.
2. Select the print task that you want to delete from the drop-down list, and then
click Delete.
Note: Some print task quick sets cannot be deleted.
7.4 Setting the printer default settings
The printer uses the default settings for all documents unless you open the Printer
Properties dialog box and specify other settings.
To save time when printing, set the printer default settings to options that you use
often. That way, you do not have to specify the options every time you use the
printer.
Follow these steps to change the printer default settings:
1. Click the printer task tray icon.
34
Page 35

HP Deskjet 3740 series printer
1. Printer task tray icon
The Printer Properties dialog box appears.
2. Select the options that you want to use as the default settings.
3. Click OK.
A dialog box appears stating that the new settings will be used every time you
print. If you do not want to see this dialog box again, select Don't show me this
message again.
4. Click OK to save the new default print settings.
7.5 Setting the page order
Setting the page order determines the order in which your document will be printed.
Often when it is complete, it is convenient to have the first page of a document
printed last so that the complete document is lying face-up.
Follow these step to set the page order:
1. Open the Printer Properties dialog box.
2. Click the Basics tab.
35
Page 36

HP Deskjet 3740 series printer
3. Select one of the following options:
• Back to front: Prints the last page of the document first. Saves time when
printing because you do not have to reorder the printed pages. This is the
appropriate setting for most print jobs.
• Front to back: Prints the first page of the document first.
4. Select any other print settings that you want, and then click OK.
Use the What's This? help to learn about the features that you see in the Printer
Properties dialog box.
7.6 Print preview
To save time and money when printing, preview the document on your computer
before printing it. If the print preview does not look the way that you want it to, close
the preview window and make the necessary adjustments to your document.
Follow these steps view a preview of a document:
1. Open the Printer Properties dialog box.
2. Click the Basics tab.
36
Page 37

HP Deskjet 3740 series printer
3. Select the Show print preview check box.
4. Select any other print settings that you want, and then click OK.
Before the document prints, a preview appears.
5. Do one of the following:
• Click File, and then click Print to HP Deskjet to print the document.
• Click File, and then click Cancel Printing to cancel the print job. Adjust the
print settings as needed before trying to print the document again.
7.7 Selecting a paper type
Follow these steps to select a specific paper type:
1. Open the Printer Properties dialog box.
2. Click the Printing Shortcuts tab or the Paper/Quality tab.
3. Find the appropriate drop-down list:
Tab Drop-down list
Printing Shortcuts Paper type
Paper/Quality Type is
37
Page 38

HP Deskjet 3740 series printer
Note: You do not need to set the paper type on both tabs.
4. Click the paper type in the drop-down list.
5. Select any other print settings that you want, and then click OK.
7.8 Selecting a print quality
Follow these steps to select a print quality:
1. Open the Printer Properties dialog box.
2. Click the Printing Shortcuts tab or the Paper/Quality tab.
3. Select one of the following from the Print quality drop-down list:
Note: The print quality options available on the Printing Shortcuts tab vary
depending on the type of document you are printing.
• FastDraft: Prints at the fastest printing speed while using the least amount
of ink.
• Fast Normal: Prints more quickly than Normal mode and at a higher print
quality than FastDraft.
• Normal: Provides the best balance between print quality and speed. This
is the appropriate setting for most documents.
• Best: Provides high-quality printing.
• Maximum dpi: Provides the highest quality printing but takes longer to print
than Best mode and requires a large amount of disk space.
7.9 Setting a custom paper size
Use the Custom paper size dialog box to print on a special paper size.
Defining a custom paper size
Follow these steps to define a custom paper size:
1. Open the Printer Properties dialog box.
2. Click the Paper/Quality tab.
3. Click the Custom button.
The Custom paper size dialog box appears.
38
Page 39

HP Deskjet 3740 series printer
4. Click a custom paper size name in the Name drop-down list.
5. Type the paper dimensions in the Width and Length boxes.
The minimum and maximum paper dimensions appear beneath each of the
boxes.
6. Click the unit of measurement: Inches or Millimeters.
7. Click Save to save the custom paper size.
8. Click OK to exit the Custom paper size dialog box.
39
Page 40

HP Deskjet 3740 series printer
8 Printer software
Learn how to use these software features:
• Use the Printer Properties dialog box to select printing options.
• Use the Printing Shortcuts tab to specify print settings quickly.
• Use the What's This? help to learn more about specific printing options.
• Use the Device Status window to view useful information.
8.1 Printer Properties dialog box
The printer is controlled by software that is installed on your computer. Use the
printer software, also known as the
document.
To change the print settings, open the Printer Properties dialog box.
Printer Preferences dialog box
The Printer Properties dialog box is also referred to as the Printing Preferences
dialog box.
Opening the Printer Properties dialog box
Follow these steps to open the Printer Properties dialog box:
1. Open the file that you want to print.
2. Click File, click Print, and then click Properties or Preferences.
The Printer Properties dialog box appears.
printer driver
, to change the print settings for a
40
Page 41

HP Deskjet 3740 series printer
What's This? help
Use the What's This? help to learn about the features you see in the Printer
Properties dialog box.
8.2 Using What's This? help
Use What's This? help to learn more about the available printing options.
1. Move the cursor over the feature that you want to learn more about.
2. Click the right mouse button.
The What's This? box appears.
3. Move the cursor over the What's This? box, and then click the left mouse button.
An explanation of the feature appears.
41
Page 42

HP Deskjet 3740 series printer
8.3 Device Status window
The Device Status window appears each time the printer prints a file.
The following items appear in the Device Status window:
1. Ink levels: Approximate ink level of each print cartridge.
2. Device status: The status of the printer. For example, Spooling or Printing.
3. Document properties: Information about the current print job:
• Document: Name of the document that is currently printing
• Print quality: Print quality setting that is being used
42
Page 43

HP Deskjet 3740 series printer
• Paper type: Type of paper in use
• Paper size: Size of paper in use
4. Ordering information: Link to the HP Web site for ordering printer supplies and
accessories.
If you do not want to see the Device Status window every time you print, select the
Don't show this again check box.
To cancel a print job, click Cancel print.
To close the Device Status window, click Close window.
43
Page 44

HP Deskjet 3740 series printer
9 Maintenance
• Installing print cartridges
• Aligning print cartridges
• Automatically cleaning print cartridges
• Manually cleaning print cartridges
• Printing a test page
• View estimated ink levels
• Removing ink from skin and clothing
• Maintaining print cartridges
• Maintaining the printer body
• Printer toolbox
9.1 Installing print cartridges
Print cartridges
Always install the tri-color print cartridge in the
compartment.
Install the black print cartridge in the
Selection numbers
Before buying replacement print cartridges, verify the correct selection numbers in
the reference guide that came with the printer.
You can also find the selection number on the print cartridge you are replacing.
right
left
print cartridge cradle
print cartridge cradle compartment.
1. Selection number label
44
Page 45

HP Deskjet 3740 series printer
Ink back-up mode
The printer can operate with only one print cartridge installed. For more information,
see the ink back-up mode page.
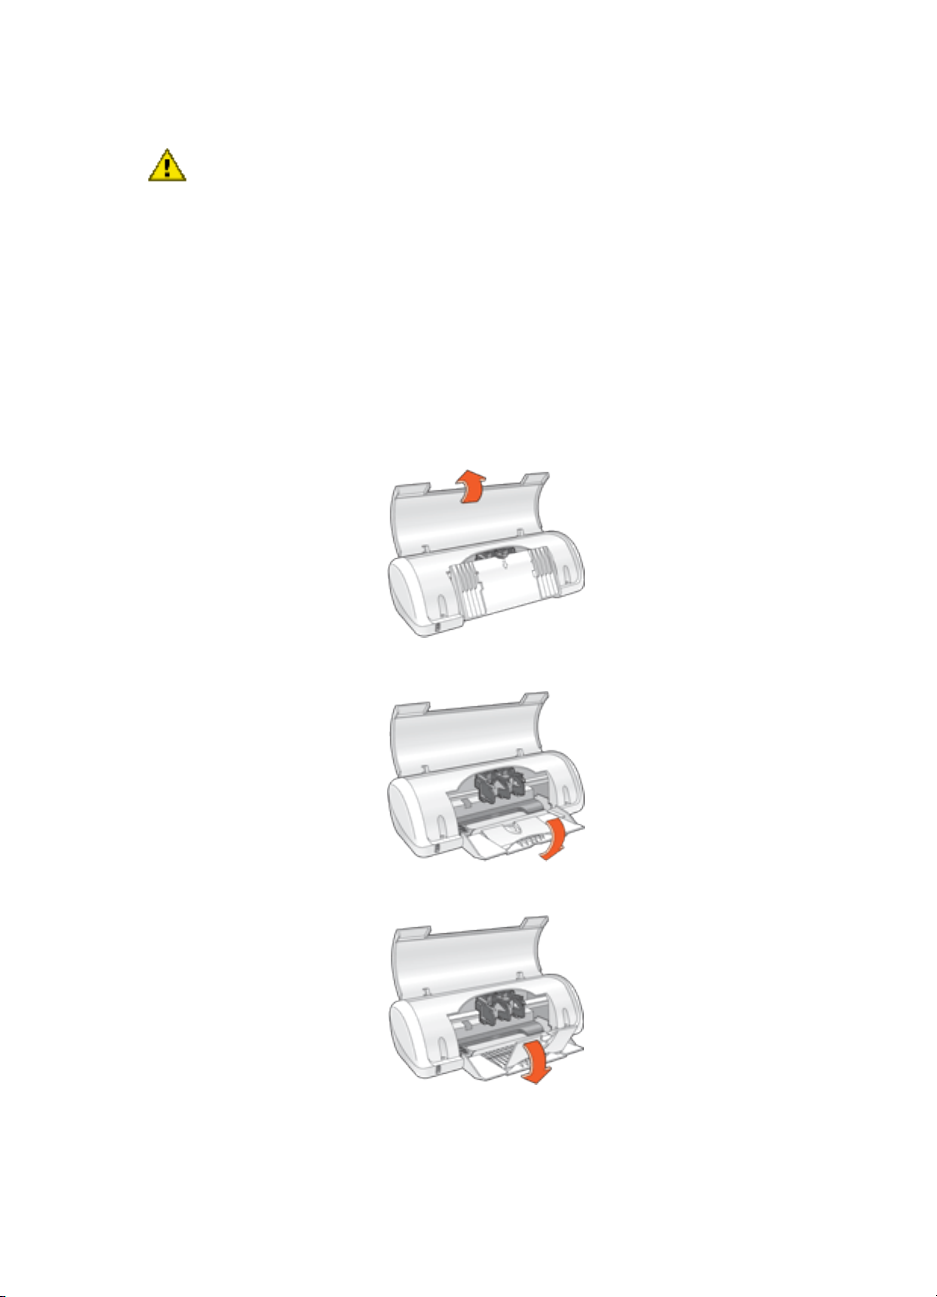
Installation instructions
To install a print cartridge:
1. Press the Power button to turn on the printer.
2. Open the printer cover.
The cradle moves to the center of the printer.
3. Push down on the print cartridge and slide it out of the print cartridge cradle.
1. Press power button
2. Lift printer cover
3. Push down on print cartridge
4. Slide print cartridge out of cradle
4. Remove the replacement print cartridge from its packaging and carefully
remove the plastic tape. Hold the print cartridge so that the copper strip is on
the bottom and facing toward the printer.
45
Page 46

HP Deskjet 3740 series printer
1. Remove the pink tape only
Caution: Do not touch the print cartridge ink nozzles or copper contacts.
Touching these parts will result in clogs, ink failure, and bad electrical
connections. Do not remove the copper strips. They are required
electrical contacts.
1. Ink nozzles
2. Copper contacts
5. Slide the print cartridge firmly into the cradle at a slight upward angle until you
feel resistance.
46
Page 47

HP Deskjet 3740 series printer
6. Push the cartridge into the cradle.
You hear a snap when the print cartridge is correctly positioned.
7. Close the printer cover.
8. Calibrate the printer for optimum print quality.
For information about storing print cartridges, see the print cartridge storage page.
For information about recycling empty print cartridges, see the print cartridge
recovery page.
Warning: Keep both new and used print cartridges out of the reach of
children.
9.2 Aligning print cartridges
After installing a print cartridge, calibrate the print cartridges to ensure the best print
quality.
To calibrate print cartridges:
1. Load plain white paper in the paper tray.
2. Open the printer Toolbox.
3. Click Align the Printer.
4. Click Align, and then follow the onscreen instructions.
9.3 Automatically cleaning print cartridges
If your printed pages are missing lines or dots, or if they contain ink streaks, the print
cartridges might be low on ink or might need to be cleaned.
If the print cartridges are not low on ink, follow these steps to clean the print
cartridges automatically:
1. Open the printer Toolbox.
2. Click Clean the Print Cartridges.
3. Click Clean, and then follow the onscreen instructions.
If your documents are still missing lines or dots after cleaning, replace the print
cartridges.
Caution: Clean print cartridges only when necessary. Unnecessary cleaning
wastes ink and shortens the life of the cartridge.
47
Page 48

HP Deskjet 3740 series printer
9.4 Manually cleaning print cartridges
If the printer is used in a dusty environment, a small amount of debris might
accumulate inside the case. This debris can include dust, hair, carpet, or clothing
fibers. When debris gets on the print cartridges and cradle, ink streaks and smudges
might appear on printed pages. Ink streaking is easily corrected by manually
cleaning the cartridges and cradle.
Gathering cleaning supplies
You will need the following items to clean the print cartridges and cradle.
• Distilled water
• Cotton swabs or other soft, lint-free material that will not stick to the cartridges
Be careful not to get ink on your hands or clothing as you clean.
Preparing to clean
1. Press the Power button to turn on the printer, and then raise the printer cover.
The cradle moves to the center of the printer.
2. Disconnect the power cord form the back of the printer.
3. Remove the print cartridges and place them on a piece of paper with the nozzle
plate facing up.
1. Nozzle plate
Caution: Do not leave the print cartridges outside the printer for more
than 30 minutes.
Cleaning instructions
1. Lightly moisten a cotton swab with distilled water and squeeze any excess
water from the swab.
48
Page 49

HP Deskjet 3740 series printer
2. Wipe the face and edges of the first print cartridge with the cotton swab.
Caution: Do not wipe the nozzle plate. Touching the ink nozzles will
result in clogs, ink failure, and bad electrical connections.
1. Nozzle plate
2. Face and edges of print cartridge
3. Inspect the face and edges of the print cartridge for fibers.
Repeat steps 1 and 2 if fibers are still present.
4. Repeat steps 1 through 3 for the second cartridge.
5. Wipe the underside of the print cartridge cradle walls with clean, moistened
cotton swabs.
Repeat this process until no ink residue or dust appears on a clean swab.
49
Page 50

HP Deskjet 3740 series printer
1. Print cartridge cradle
2. Print cartridge cradle walls
6. Insert the print cartridges in the printer, and then close the printer cover.
7. Connect the power cord to the back of the printer.
8. Print a test page.
9. Repeat the cleaning procedure if ink streaks continue to appear on printed
pages.
9.5 Printing a test page
Follow these steps to print a test page:
1. Open the printer Toolbox.
2. Click the Print a Test Page button, and then follow the onscreen instructions.
9.6 View estimated ink levels
Follow these steps to view the estimated ink levels of the print cartridges that are
installed in the printer:
1. Open the printer Toolbox.
2. Click the Estimated Ink Level tab.
9.7 Removing ink from skin and clothing
Follow these instructions to remove ink from skin and clothing:
Surface Remedy
Skin Wash the area with an abrasive soap.
White fabric Wash the fabric in cold water and use chlorine bleach.
Color fabric Wash the fabric in cold water and use sudsy ammonia.
Caution: Always use cold water to remove ink from fabric. Warm or hot water
can set the ink into the fabric.
9.8 Maintaining print cartridges
The following tips will help maintain HP print cartridges and ensure consistent print
quality:
50
Page 51

HP Deskjet 3740 series printer
• Keep all print cartridges in their sealed packages until they are needed. Print
cartridges should be stored at room temperature (15 to 35 degrees C or 59 to
95 degrees F).
• Do not remove the plastic tape covering the ink nozzles until you are ready to
install the print cartridge in the printer. If the plastic tape has been removed
from the print cartridge, do not attempt to reattach it. Reattaching the tape
damages the print cartridge.
9.9 Maintaining the printer body
Because the printer ejects ink onto the paper in a fine mist, ink smudges will
eventually appear on the printer case and adjacent surfaces. To remove smudges,
stains, or dried ink from the exterior of the printer, use a soft cloth moistened with
water.
When cleaning your printer, keep these tips in mind:
• Do not clean the interior of the printer. Keep all fluids away from the interior.
• Do not use household cleaners or detergent. In the event that a household
cleaner or detergent is used on the printer, wipe the printer's exterior surfaces
with a soft cloth that has been moistened with water.
• Do not lubricate the support rod that the print cartridge cradle uses to slide back
and forth. Noise is normal when the cradle moves back and forth.
9.10 Printer toolbox
The printer Toolbox contains a number of useful tools to enhance the printer
performance.
Use the printer tools to perform the following tasks:
• Clean the print cartridges
• Align the print cartridges
• Print a test page
• View estimated ink levels
To use the tools, open the Printer Properties dialog box, click the Services tab, and
then click the Service this device button.
51
Page 52

HP Deskjet 3740 series printer
10 Troubleshooting
• Printer is not printing
• Paper jam
• Paper problems
• Print quality is poor
• Document is misprinted
• Photos are not printing correctly
• Borderless printing problems
• Error messages
• Power light is flashing
• Document prints slowly
• If you continue to have problems
10.1 Printer is not printing
Verify the following
• The printer is connected to the power source.
• The cable connections are secure.
• The printer is turned on.
• The print cartridges are correctly installed.
• The paper or other media is correctly loaded in the paper tray.
• The printer cover is closed.
• The rear access door is attached.
Check the power light
If the Power light is flashing, there might exist an error.
See Power light is flashing for more information.
Check the printer cable connection
If the printer cable is attached to a USB hub, a printing conflict might exist. Use one
of these methods for solving the conflict:
• Attach the printer USB cable directly to your computer.
• When printing, do not use other USB devices that are attached to the hub.
52
Page 53

HP Deskjet 3740 series printer
If the printer does not turn on
The printer might have drawn too much power.
1. Disconnect the power cord from the electrical outlet.
2. Wait approximately 10 seconds.
3. Reconnect the power cord.
4. Press the Power button to turn on the printer.
If the printer still does not turn on, try the following solutions:
• Plug the printer into a different electrical outlet.
• Plug the printer directly into an electrical outlet rather than into a surge
protector.
If the printer still does not print
Select the topic below that best describes the problem:
• Paper jam
• Out of paper message
10.2 Paper jam
Follow each of these steps until the paper jam is cleared.
1. Remove the paper from the paper tray.
2. If you are printing labels, verify that a label did not become detached from the
label sheet while passing through the printer.
3. Remove the rear access door. Press the handle to the right, and then pull out
the door.
53
Page 54

HP Deskjet 3740 series printer
4. Remove the paper jam from the back of the printer, and then replace the rear
access door.
5. Reload paper in the paper tray.
6. Reprint the document.
10.3 Paper problems
Printer prints on multiple sheets at once
Paper weight
The printer might print on multiple sheets of paper at once if the paper is under the
recommended paper weight. Use paper that meets the recommended paper weight.
For paper weight specifications, see the reference guide that came with the printer.
Paper is loaded improperly
The printer might print on multiple sheets of paper at once if the paper is loaded too
far toward the back of the printer. Reload paper into the paper tray, pushing the
paper until you feel resistance.
The printer also might print on multiple sheets if different paper types are loaded in
the printer. For example, photo paper might be mixed with plain paper. Empty the
paper tray and load only the paper type that is appropriate for the document that
you are printing.
Other paper problems
• For information on clearing a paper jam, see the paper jam page.
• If an out of paper message appears, see the error messages page.
54
Page 55

HP Deskjet 3740 series printer
10.4 Print quality is poor
Streaks and missing lines
If your printed pages are missing lines or dots, or if streaks appear, the print
cartridges might be low on ink or might need to be cleaned.
Print is faded
• Verify that neither of the print cartridges is low on ink.
If a print cartridge is low on ink, consider replacing the print cartridge when the
print quality lessens.
If the print cartridge is not low on ink, clean the print cartridge.
• Verify that a black print cartridge is installed.
If the black text and images on your printouts are faded, you might be printing
with only the tri-color print cartridge. Insert a black print cartridge, in addition to
the tri-color print cartridge, for optimal black print quality.
• Verify that the protective piece of plastic tape has been removed from the print
cartridges.
1. Plastic tape
• Consider selecting a higher print quality.
Blank pages print
• The protective piece of plastic tape might still be attached to the print cartridges.
Verify that the plastic tape has been removed from the print cartridges.
• The print cartridges might be out of ink. Replace one or both empty print
cartridges.
55
Page 56

HP Deskjet 3740 series printer
10.5 Document is misprinted
Text and images are misaligned
If the text and images on your printouts are misaligned, then align the print
cartridges.
Document is printed off-center or at an angle
1. Verify that only one type of paper is placed in the paper tray, and that the paper
has been placed in the tray correctly.
2. Verify that the paper guide fits firmly against the paper.
3. Reprint the document.
Envelope is printed at an angle
1. Slide the flap inside the envelope before loading it in the paper tray.
2. Confirm that the paper guide fits firmly against the envelope.
3. Reprint the envelope.
Parts of the document are missing or printed in the wrong place
Open the Printer Properties and confirm the following options:
Tab Setting
Basics Orientation: The appropriate orientation
Paper/Quality Size is: The appropriate paper size
Document does not reflect the new print settings
The printer default settings might differ from the software-program print settings.
Select the appropriate print settings within the software program.
10.6 Photos are not printing correctly
Check the paper tray
1. Verify that the photo paper is placed in the paper tray with the side to be printed
on facing down.
2. Slide the paper forward until it stops.
3. Slide the paper guide firmly against the paper.
56
Page 57

HP Deskjet 3740 series printer
Check the printer properties
Open the Printer Properties dialog box and verify the following options:
Tab Setting
Size is: The appropriate size
Paper/Quality
Type is: The appropriate photo paper type
Print quality: Best
10.7 Borderless printing problems
• Verify that the paper size that is specified in the Paper size drop-down list on
the Printing Shortcuts tab matches the size of the paper that is loaded in the
paper tray.
• Select the appropriate paper type in the Paper type drop-down list on the
Printing Shortcuts tab.
• If printing in grayscale, select High quality under Print in grayscale on the
Color tab.
• Do not print borderless documents in ink-backup mode. Always have two print
cartridges installed in the printer.
Edge of the photograph is faded
Verify that the photo paper is not curled. If the photo paper is curled, place the paper
in a plastic bag and gently bend it the opposite direction of the curl until the paper
lies flat. If the problem persists, use photo paper that is not curled.
For instructions about preventing photo paper from curling, see the photo paper
storage page.
57
Page 58

HP Deskjet 3740 series printer
Image is printed at an angle
Follow these steps if the image is printed at an angle:
1. Remove all paper from the paper tray.
2. Load the photo paper correctly in the paper tray.
3. Verify that the paper guide fits firmly against the edge of the paper.
Printout has an unwanted border
The following conditions can create an unwanted border.
For small photo paper
If the printout has an unwanted border, try the following solutions:
• Align the print cartridges
• Open the Printer Properties dialog box, click the Paper/Quality tab, and verify
that the selected paper size matches both the paper size that the photo is
formatted for and the size of the paper that is loaded in the printer.
• Open the Printer Properties dialog box, click the Paper/Quality tab, and then
select the Borderless auto fit check box.
58
Page 59

HP Deskjet 3740 series printer
• Verify that the software application you are using supports borderless printing.
For small photo paper with a tear-off tab
If the border appears below the tear-off tab, then remove the tab.
If the border appears above the tear-off tab, then align the print cartridges.
10.8 Error messages
Out of paper message
Follow the appropriate steps for the condition that exists.
If the paper tray is loaded
1. Verify the following:
• A sufficient amount of paper is loaded in the paper tray (at least ten sheets).
• The paper tray is not overly full.
• The paper stack is touching the back of the paper tray.
59
Page 60

HP Deskjet 3740 series printer
2. Slide the paper guide so that it fits firmly against the edge of the paper.
3. Click Continue to resume printing.
If the paper tray is empty
1. Load paper in the paper tray.
2. Push the paper forward until it stops.
3. Slide the paper guide so that it fits firmly against the edge of the paper.
4. Click Continue to resume printing.
An error message appears while the Power light is flashing
Read the error message explaining the problem and its solution.
For more information, see Power light is flashing.
The error message 'there was an error writing to USB port' appears
The printer might not be receiving correct data from another USB device or USB
hub. Connect the printer directly to the USB port on the computer.
The error message 'there was an error writing to LPT1' appears
The printer is connected to the computer with a USB cable but the cable may not
have been attached before installing the software.
Uninstall, and then reinstall, the software.
The error message 'two-way communication cannot be established' or 'printer not responding' appears
The printer might not be able to communicate with the computer if the USB cable is
too long.
If you receive this error message, ensure the USB cable is not greater than five
meters (approximately 16 feet, 5 inches) in length. Connect the printer directly to
the USB port on the computer and not to a USB hub.
10.9 Power light is flashing
• If the Power light is on, the printer is either printing or ready to print.
• If the Power light is off, the printer is off.
• If the Power light is flashing, see below.
60
Page 61

HP Deskjet 3740 series printer
1. Power light
What the flashing light means
The Power light can flash for several reasons:
• The printer cover is open.
• The printer is out of paper.
• A problem exists with the printer, such as a paper jam or a problem with a print
cartridge.
If an error message appears
Read the error message that explains the problem and its solution.
If no error message appears
Check the status of the printer by using the printer tools. To gain access to the tools,
open the Printer Properties dialog box, click the Services tab, and then click the
Service this device button.
Use the printer tools to perform the following tasks:
• View estimated ink levels.
• Clean the print cartridges.
• Calibrate the printer.
• Print a test page.
• Perform other functions as needed.
10.10 Document prints slowly
Several variables can slow the printer's performance.
61
Page 62

HP Deskjet 3740 series printer
Multiple software applications are open
The computer does not have sufficient resources for the printer to print at its
optimum speed.
To increase printer speed, close all unnecessary software programs when printing.
Best or maximum dpi print mode is selected
The printer prints more slowly when Best or Maximum dpi is selected as the print
quality. To increase the printer speed, select a different print-quality mode.
Printer driver is outdated
An outdated printer driver might be installed.
For information about updating the printer driver, visit the HP Web site www.
hp.com/support.
Computer does not meet system requirements
If your computer does not have enough RAM or does not have a large amount of
free space on the hard drive, the printer processing time will be longer.
1. Verify that the computer hard disk space, RAM, and processor speed meet the
system requirements.
For the system requirements, see the reference guide that came with the
printer.
2. Make space available on the hard drive by deleting unneeded files.
Printer is in ink-backup mode
The printer might print more slowly if it is in ink-backup mode.
To increase the print speed, use two print cartridges in the printer.
10.11 If you continue to have problems
If you continue to have problems after investigating the troubleshooting topics, turn
off and then restart your computer.
If you still have problems after restarting your computer, go to HP customer support
at www.hp.com/support.
62
Page 63

HP Deskjet 3740 series printer
11 Supplies
• Paper
• USB cables
• Print cartridges
Note: The availability of supplies and accessories varies by country/region.
11.1 Paper supplies
This list is subject to change. For an updated list, go to HP customer support at
www.hp.com/support.
Note: The availability of supplies varies by country/region.
HP Bright White Inkjet Paper
HPB250 Letter, 250 sheets
HPB1124 Letter, 500 sheets
C5977B A4, 250 sheets
C1825A A4, 500 sheets (Europe/Asia)
HP Premium Paper
51634Y Letter, 200 sheets
51634Z A4, 200 sheets
HP Brochure & Flyer Paper, Matte
C5445A Letter, 100 sheets
HP Brochure & Flyer Paper, Gloss
C6817A Letter, 50 sheets
C6818A A4, 50 sheets
HP Tri-Fold Brochure Paper, Gloss
C7020A Letter, 100 sheets
Q2525A A4, 50 sheets
63
Page 64

HP Deskjet 3740 series printer
HP Tri-Fold Brochure Paper, Matte
Q5543A Letter, 100 sheets
HP Premium Inkjet Transparency Film
C3828A Letter, 20 sheets
C3834A Letter, 50 sheets
C3832A A4, 20 sheets
C3835A A4, 50 sheets
HP Premium Plus Photo Paper, Glossy
Q2502A 4x6 in, 60 sheets (U.S.)
Q2502AC 4x6 in, 60 sheets (Canada)
Q2503A 10x15 cm, 20 sheets (Europe)
Q2504A 10x15 cm, 20 sheets (Asia Pacific)
C6831A Letter, 20 sheets (U.S.)
Q1785A Letter, 50 sheets (U.S.)
Q5493A Letter, 100 sheets (U.S.)
C6831AC Letter, 20 sheets (Canada)
C6832A A4, 20 sheets (Europe)
Q1786A A4, 50 sheets (Europe)
Q1951A A4, 20 sheets (Asia Pacific)
Q1933A A4, 20 sheets (Japan)
HP Premium Plus Photo Paper (with tear-off tab)
Q1977A 4x6 in, 20 sheets (U.S.)
Q1978A 4x6 in, 60 sheets (U.S.)
Q5431A 4x6 in, 100 sheets (U.S.)
Q1977AC 4x6 in, 20 sheets (Canada)
Q1978AC 4x6 in, 60 sheets (Canada)
Q1979A 10x15 cm, 20 sheets (Europe)
Q1980A 10x15 cm, 60 sheets (Europe)
Q1952A 10x15 cm, 20 sheets (Asia Pacific)
64
Page 65

HP Deskjet 3740 series printer
Q1935A 10x15 cm, 20 sheets (Japan)
HP Premium Plus Photo Paper, Matte
Q2506A 4x6 in, 60 sheets (U.S.)
Q2507A 10x15 cm, 20 sheets (Europe)
Q2508A 10x15 cm, 60 sheets (Europe)
C6950A Letter 20 sheets (U.S.)
Q5450A Letter, 50 sheets (U.S.)
C6950AC Letter, 20 sheets (Canada)
C6951A A4, 20 sheets (Europe)
Q1934A A4, 20 sheets (Japan)
HP Photo Paper, Glossy (with tear-off tab)
C7890A 4x6 in, 20 sheets (North America)
C7893A 4x6 in, 60 sheets (North America)
Q7891A 10x15 cm, 20 sheets (Europe)
Q7894A 10x15 cm, 60 sheets (Europe)
HP Photo Paper, Glossy
C1846A Letter, 25 sheets (U.S.)
C7896A Letter, 50 sheets (U.S.)
Q5437A A4, 25 sheets (Europe)
Q7897A A4, 50 sheets (Europe)
C6765A A4, 20 sheets (Asia Pacific)
C7898A A4, 20 sheets (Japan)
HP Premium Photo Paper, Glossy
Q5477A 4x6 in, 60 sheets (U.S.)
Q5477A 5x7 in, 20 sheets (U.S.)
Q5479A 10x15 cm, 20 sheets (Europe)
Q5480A 13x18 cm, 20 sheets (Europe)
C6039A Letter, 15 sheets (U.S.)
C6979A Letter, 50 sheets (U.S.)
65
Page 66

HP Deskjet 3740 series printer
Q5494A Letter, 100 sheets (U.S.)
Q5447A Letter, 120 sheets (U.S.)
C6039AC Letter, 15 sheets (Canada)
C6979AC Letter, 50 sheets (Canada)
Q2519A A4, 20 sheets (Europe)
C7040A A4, 50 sheets (Europe)
HP Premium Photo Paper, Glossy (with tear-off tab)
Q1988A 4x6 in, 20 sheets (U.S.)
Q1989A 4x6 in, 60 sheets (U.S.)
Q1990A 4x6 in, 100 sheets (U.S.)
Q1988AC 4x6 in, 20 sheets (Canada)
Q1989AC 4x6 in, 60 sheets (Canada)
Q1991A 10x15 cm, 20 sheets (Europe)
Q1992A 10x15 cm, 60 sheets (Europe)
HP Premium Photo Paper, Matte (with tear-off tab)
Q5435A 4x6 in, 60 sheets (U.S.)
Q5436A 10x15 cm, 20 sheets (Europe)
HP Premium Photo Paper, Matte
Q1993A Letter, 15 sheets (U.S.)
Q1994A Letter, 50 sheets (U.S.)
Q5433A A4, 20 sheets (Europe)
C5434A A4, 50 sheets (Europe)
HP Premium High Gloss Film
Q1973A Letter, 20 sheets (U.S.)
C3836A Letter, 50 sheets (U.S.)
C3836AC Letter, 50 sheets (Canada)
Q1981A Letter, 20 sheets (Europe)
C3837A Letter, 50 sheets (Europe)
Q1958A A4, 10 sheets (Japan)
66
Page 67

HP Deskjet 3740 series printer
HP Everyday Photo Paper, Semi-gloss (with tear-off tab)
Q5440A 4x6 in, 100 sheets (U.S.)
Q5440AC 4x6 in, 100 sheets (Canada)
Q5441A 10x15 cm, 100 sheets (Europe)
Q5442A 10x15 cm, 100 sheets (Asia Pacific)
HP Everyday Photo Paper, Semi-gloss
Q5498A Letter, 25 sheets (U.S.)
Q2509A Letter, 100 sheets (U.S.)
Q2509AC Letter, 100 sheets (Canada)
Q5451A A4, 25 sheets (Europe)
Q2510A A4, 100 sheets (Europe)
Q2511A A4, 100 sheets (Asia Pacific)
HP Advanced Photo Paper, Glossy
Q5461A 4x6 in, 60 sheets (U.S.)
Q5454A Letter, 25 sheets (U.S.)
Q5510A Letter, 50 sheets (U.S.)
HP Advanced Photo Paper, Glossy (with tear-off tab)
Q5508A 4x6 in, 20 sheets (U.S.)
Q5509A 4x6 in, 60 sheets (U.S.)
HP Matte Greeting Cards, White, Quarter-Fold
C6042A A4, 20 sheets (Europe)
HP Matte Greeting Cards, White, Half-Fold
C7018A Letter, 20 sheets (U.S.)
HP Photo Greeting Cards, Half-Fold
C6044A Letter, 10 sheets (U.S.)
C6045A A4, 10 sheets (Europe)
67
Page 68

HP Deskjet 3740 series printer
HP Textured Greeting Cards, Ivory, Half-Fold
C6828A 20 sheets
HP Textured Greeting Cards, Cream, Half-Fold
C6829A 20 sheets
HP Textured Greeting Cards, White, Half-Fold
C7019A 20 sheets
HP Linen Greeting Cards, White, Half-Fold
C1788A 20 sheets
HP Linen Greeting Cards, Ivory, Half-Fold
C1787A 20 sheets
HP Iron-On Transfers (for white fabrics)
C6049A Letter, 12 sheets (U.S.)
C6050A A4, 12 sheets (Europe)
C6055A A4, 12 sheets (Asia Pacific)
C7917A A4, 12 sheets (Japan)
HP Iron-On Transfers for Dark Fabric
C1974A 6 sheets
HP Matte Photo and Project Paper
Q5499A Letter, 50 sets
11.2 USB cables
Note: The availability of supplies varies by country/region.
C6518A HP USB A-B 2 M cable
68
Page 69

HP Deskjet 3740 series printer
12 Specifications
• Printer specifications
• Environmental statement
• Print cartridge recovery
12.1 Printer specifications
See the reference guide that came with your printer for complete printer
specifications, including the following information:
• Types, sizes, and weights of paper and other printing media that can be used
with your printer
• Print speeds and resolutions
• Power requirements
12.2 Environmental statement
Hewlett-Packard continuously improves the design processes of its deskjet printers
to minimize the negative impact on the office environment and on the communities
where printers are manufactured, shipped, and used.
Reduction and elimination
Paper use: This equipment is suitable for using recycled paper (in accordance with
EN 12281:2002).
Recycled paper: All paper documentation for this printer is printed on recycled
paper.
Ozone: Ozone-depleting chemicals such as CFCs have been eliminated from
Hewlett-Packard's manufacturing processes.
Recycling
Design for recycling has been incorporated into this printer. The number of materials
has been kept to a minimum while ensuring proper functionality and reliability.
Dissimilar materials have been designed to separate easily. Fasteners and other
connections are easy to locate, access, and remove using common tools. Highpriority parts have been designed to gain access to quickly for efficient disassembly
and repair.
69
Page 70

HP Deskjet 3740 series printer
Printer packaging: The packaging materials for this printer have been selected to
provide maximum protection for the least cost possible, while attempting to minimize
environmental impact and facilitate recycling. The rugged design of the HP Deskjet
printer assists in minimizing both packaging materials and damage rates.
Plastic parts: All major plastics and plastic parts are marked according to
international standards. All plastic parts used in the printer housing and chassis are
technically recyclable and all use a single polymer.
Product longevity: To ensure the longevity of your HP Deskjet printer, HP provides
the following:
• Extended warranty: Details can be found in the reference guide that came with
your printer.
• Product take-back: To return this product to HP at the end of its useful life, go
to www.hp.com/recycle. To return empty print cartridges to HP, see print
cartridge recovery.
Note: The extended warranty and product take-back options are not available
in all countries/regions.
Energy consumption
Energy consumption in standby mode: See the reference guide for energy
consumption specifications.
Energy consumption in off-mode: When the printer is off, an amount of energy is
still being consumed. Energy consumption can be prevented by turning the printer
power off, then disconnecting the end of the printer power cord from the electrical
source.
12.3 Print cartridge recovery
Customers interested in recycling their genuine HP print cartridges can participate
in HP's Planet Partner's Program for inkjet cartridges. HP offers this program in more
countries/regions than any other inkjet cartridge manufacturer in the world. This
program is provided as a free service to HP customers as an environmentally sound
solution for these products at end-of-life.
To participate, simply follow the directions provided on the HP Web site at this
address: www.hp.com/recycle. This service is not available in all countries/regions.
Customers may be asked for their name, phone number, and address.
70
Page 71

HP Deskjet 3740 series printer
Because HP's unique recycling processes are very sensitive to material
contamination, we cannot take back and recycle cartridges from other
manufacturers. The end products of the recycling process are used in the
manufacture of new products, and HP must ensure the composition of the material
is consistent. To do that, we recycle only HP original cartridges. This program does
not extend to refilled cartridges.
Returned cartridges are separated for purification into raw materials for use in other
industries to manufacture new products. Examples of products made from recycled
HP print cartridge materials include automobile parts, trays used in microchip
fabrication processes, copper wire, steel plates, and the precious materials used in
electronics. Depending on the model, HP is able to recycle up to 65% of the print
cartridge by weight. The remaining parts that cannot be recycled (ink, foam, and
composite parts) are disposed of in an environmentally responsible manner.
71
Page 72

HP Deskjet 3740 series printer
13 Notices
• Notices and acknowledgements
• Terms and conventions
13.1 Notices and acknowledgements
Hewlett-Packard company notices
Reproduction, adaptation, or translation without prior written permission is
prohibited, except as allowed under the copyright laws.
The information contained herein is subject to change without notice.
The only warranties for HP products and services are set forth in the express
warranty statements accompanying such products and services. Nothing herein
should be construed as constituting an additional warranty. HP shall not be liable
for technical or editorial errors or omissions contained herein.
Acknowledgements
Microsoft, MS, MS-DOS, and Windows are registered trademarks of Microsoft
Corporation.
TrueType is a U.S. trademark of Apple Computer, Inc.
Adobe, AdobeRGB, and Acrobat are trademarks of Adobe Systems Incorporated.
� 2004 Copyright Hewlett-Packard Development Company, L.P.
13.2 Terms and conventions
The following terms and conventions are used in this user's guide.
Terms
The HP Deskjet printer is also referred to as the HP printer or printer.
Cautions, warnings, and notes
A Caution indicates possible damage to the HP Deskjet printer or to other
equipment. For example:
72
Page 73

HP Deskjet 3740 series printer
Caution: Do not touch the print cartridge ink nozzles or copper contacts.
Touching these parts will result in clogs, ink failure, and bad electrical
connections.
A Warning indicates possible harm to you or to others. For example:
Warning: Keep both new and used print cartridges out of the reach of
children.
A Note indicates that additional information is provided. For example:
Note: For great results use HP products.
73
 Loading...