

Page 1

HP DeskJet 3700 All-in-One series
Page 2

Page 3

Table of contents
1 HP DeskJet 3700 series Help ........................................................................................................................... 1
2 Get started .................................................................................................................................................... 3
Printer parts ........................................................................................................................................................... 4
Control panel features ........................................................................................................................................... 5
Control panel lights and display icons status ....................................................................................................... 7
Load media .......................................................................................................................................................... 10
Change the default paper size detected by printer ............................................................................................. 14
Paper basics ......................................................................................................................................................... 15
Open the HP printer software (Windows) ............................................................................................................ 18
Sleep mode .......................................................................................................................................................... 19
Quiet Mode ........................................................................................................................................................... 20
Auto-O ............................................................................................................................................................... 21
3 Print ........................................................................................................................................................... 23
Print documents .................................................................................................................................................. 24
Print photos ......................................................................................................................................................... 26
Print envelopes .................................................................................................................................................... 27
Print using the maximum dpi .............................................................................................................................. 28
Print from mobile devices .................................................................................................................................... 29
Tips for print success ........................................................................................................................................... 30
4 Use Web Services ......................................................................................................................................... 33
What are Web Services? ....................................................................................................................................... 34
Set up Web Services ............................................................................................................................................. 35
Print with HP ePrint ............................................................................................................................................. 36
Remove Web Services .......................................................................................................................................... 37
5 Copy and scan .............................................................................................................................................. 39
Copy documents .................................................................................................................................................. 40
Scan using the HP printer software ..................................................................................................................... 41
ENWW iii
Page 4

Scan using Webscan ............................................................................................................................................ 45
Tips for copy and scan success ............................................................................................................................ 46
6 Manage cartridges ....................................................................................................................................... 47
Check estimated ink levels .................................................................................................................................. 48
Order ink supplies ................................................................................................................................................ 49
Replace cartridges ............................................................................................................................................... 50
Use single cartridge mode ................................................................................................................................... 52
Cartridge warranty information .......................................................................................................................... 53
Tips for working with cartridges ......................................................................................................................... 54
7 Connect your printer .................................................................................................................................... 55
Connect your printer to a wireless network with a router .................................................................................. 56
Connect wirelessly to the printer without a router ............................................................................................. 59
Wireless settings ................................................................................................................................................. 62
Connect your printer to your computer with a USB cable (non-network connection) ....................................... 63
Change from a USB connection to a wireless network ....................................................................................... 64
Advanced printer management tools (for networked printers) ......................................................................... 65
Tips for setting up and using a networked printer ............................................................................................. 67
8 Solve a problem ........................................................................................................................................... 69
Jams and paper-feed issues ................................................................................................................................ 70
Cartridge issues ................................................................................................................................................... 74
Printing issues ..................................................................................................................................................... 76
Copy issues .......................................................................................................................................................... 84
Scan issues ........................................................................................................................................................... 85
Network and connection issues .......................................................................................................................... 86
Printer hardware issues ....................................................................................................................................... 88
Control panel error codes and status .................................................................................................................. 89
HP support ........................................................................................................................................................... 94
Appendix A Technical information ................................................................................................................... 97
HP Company notices ............................................................................................................................................ 98
Specications ....................................................................................................................................................... 99
Regulatory notices ............................................................................................................................................. 101
Environmental product stewardship program .................................................................................................. 108
Index ........................................................................................................................................................... 115
iv ENWW
Page 5

1 HP DeskJet 3700 series Help
Learn how to use your HP DeskJet 3700 series.
●
Get started on page 3
●
Print on page 23
●
Use Web Services on page 33
●
Copy and scan on page 39
●
Manage cartridges on page 47
●
Connect your printer on page 55
●
Technical information on page 97
●
Solve a problem on page 69
ENWW 1
Page 6

2 Chapter 1 HP DeskJet 3700 series Help ENWW
Page 7

2 Get started
●
Printer parts
●
Control panel features
●
Control panel lights and display icons status
●
Load media
●
Change the default paper size detected by printer
●
Paper basics
●
Open the HP printer software (Windows)
●
Sleep mode
●
●
Quiet Mode
Auto-O
ENWW 3
Page 8
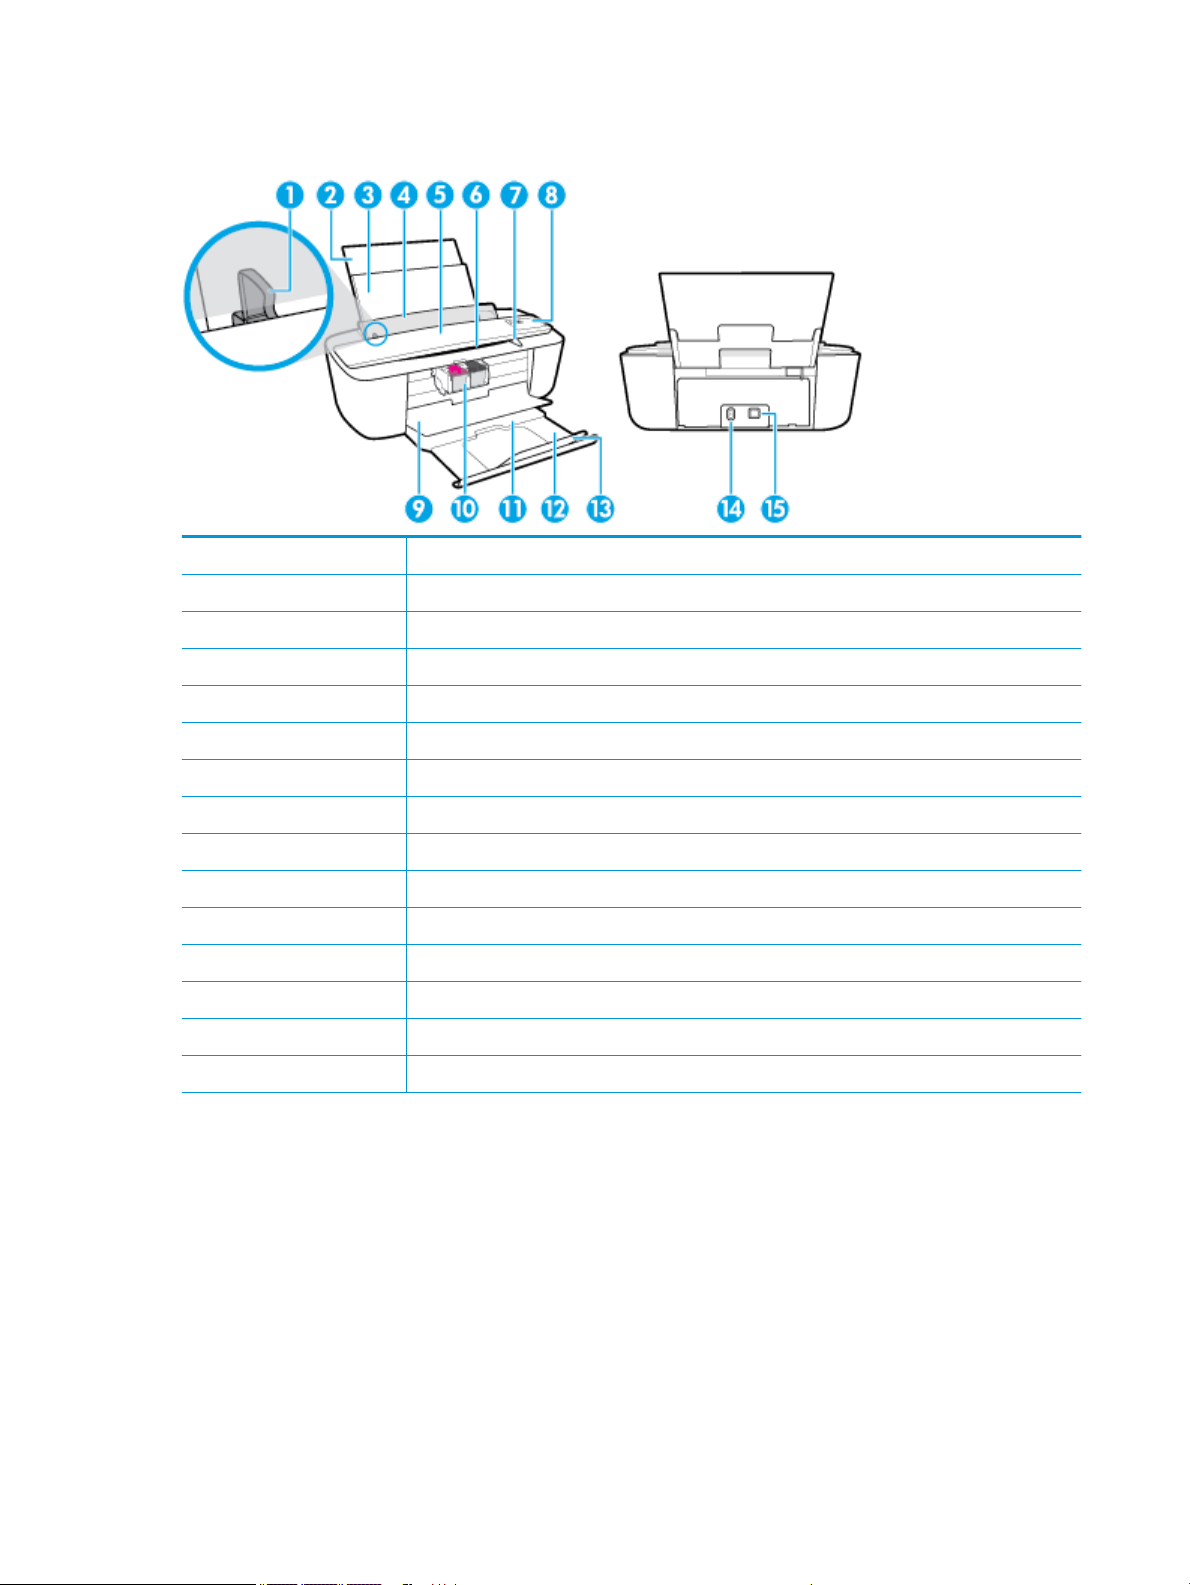
Printer parts
1 Paper-width guide
2 Input tray extender
3 Input tray
4 Input tray shield
5 Scanner
6 Scan path
7 Scan light
8 Control panel
9 Cartridge access door
10 Cartridges
11 Output tray
12 Output tray extender (also referred to as the tray extender)
13 Paper catch
14 Power connection
15 USB port
4 Chapter 2 Get started ENWW
Page 9
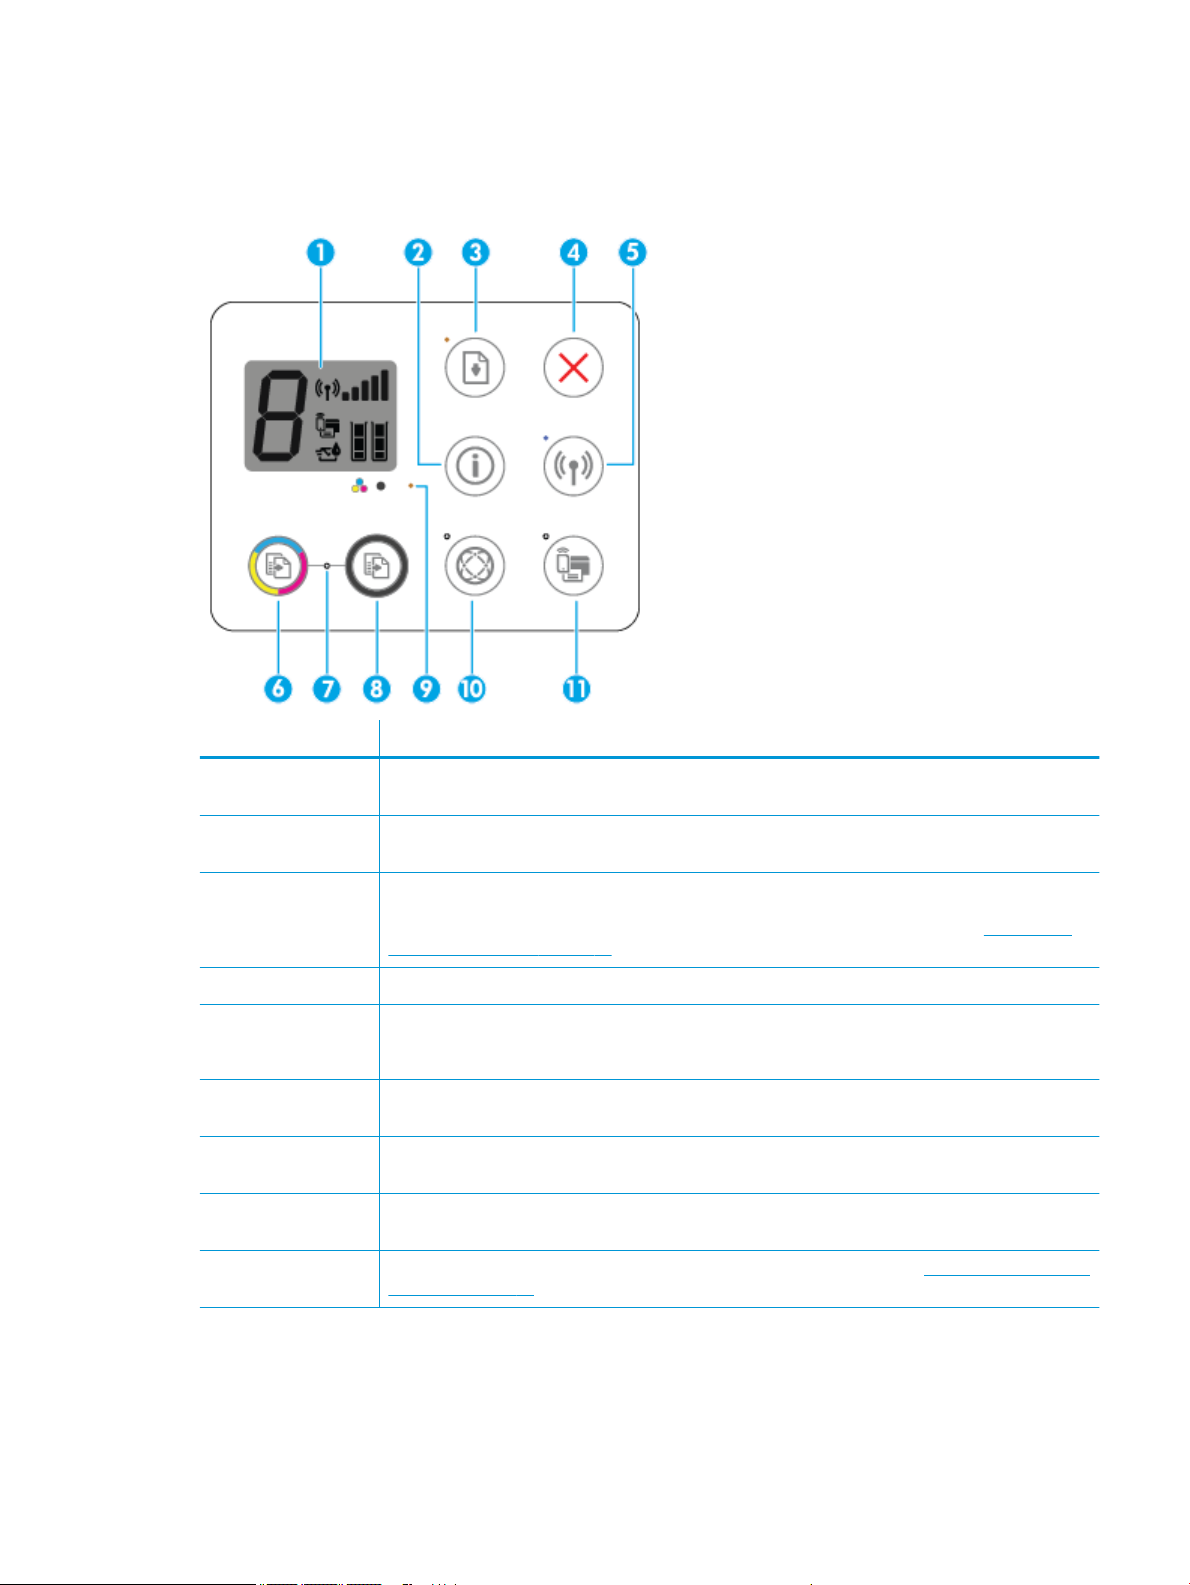
Control panel features
Overview of buttons and lights
Feature Description
1 Control panel display : Indicates number of copies, media errors, wireless status and signal strength, Wi-Fi
Direct status, and ink levels.
2 Information button: Prints out a printer information page. Press the button in combination with the
Wireless button, or the Wi-Fi Direct button to get more specic help pages tied to each of these buttons.
3 Resume button: Resumes a job after a disruption (for example, after loading paper or clearing a paper jam).
Resume light: Indicates the printer is in a warning or error state. For more information, see Control panel
error codes and status on page 89.
4 Cancel button: Stops the current operation.
5 Wireless button: Turns on or o the printer wireless capabilities.
Wireless light: Indicates whether the printer is connected to a wireless network.
6 Start Copy Color button: Starts a color copy job. To increase the number of color copies, press the button
multiple times fast.
7 Start Copy light: A blinking light indicates the Start Copy Color and Start Copy Black buttons are ready for
use.
8 Start Copy Black button: Starts a black-and-white copy job. To increase the number of black-and-white
copies, press the button multiple times fast.
9 Ink Alert light: Indicates low ink or cartridge problems. For more information, see Control panel error codes
and status on page 89.
ENWW Control panel features 5
Page 10
Feature Description
10 Web Services button: Prints a diagnostic page to help troubleshooting Web Services issues if Web Services
light is blinking.
Web Services light: A blinking light indicates a problem with the connection to Web Services.
11 Wi-Fi Direct button: Turns on or o Wi-Fi Direct.
Wi-Fi Direct light: Indicates the on or o status of Wi-Fi Direct.
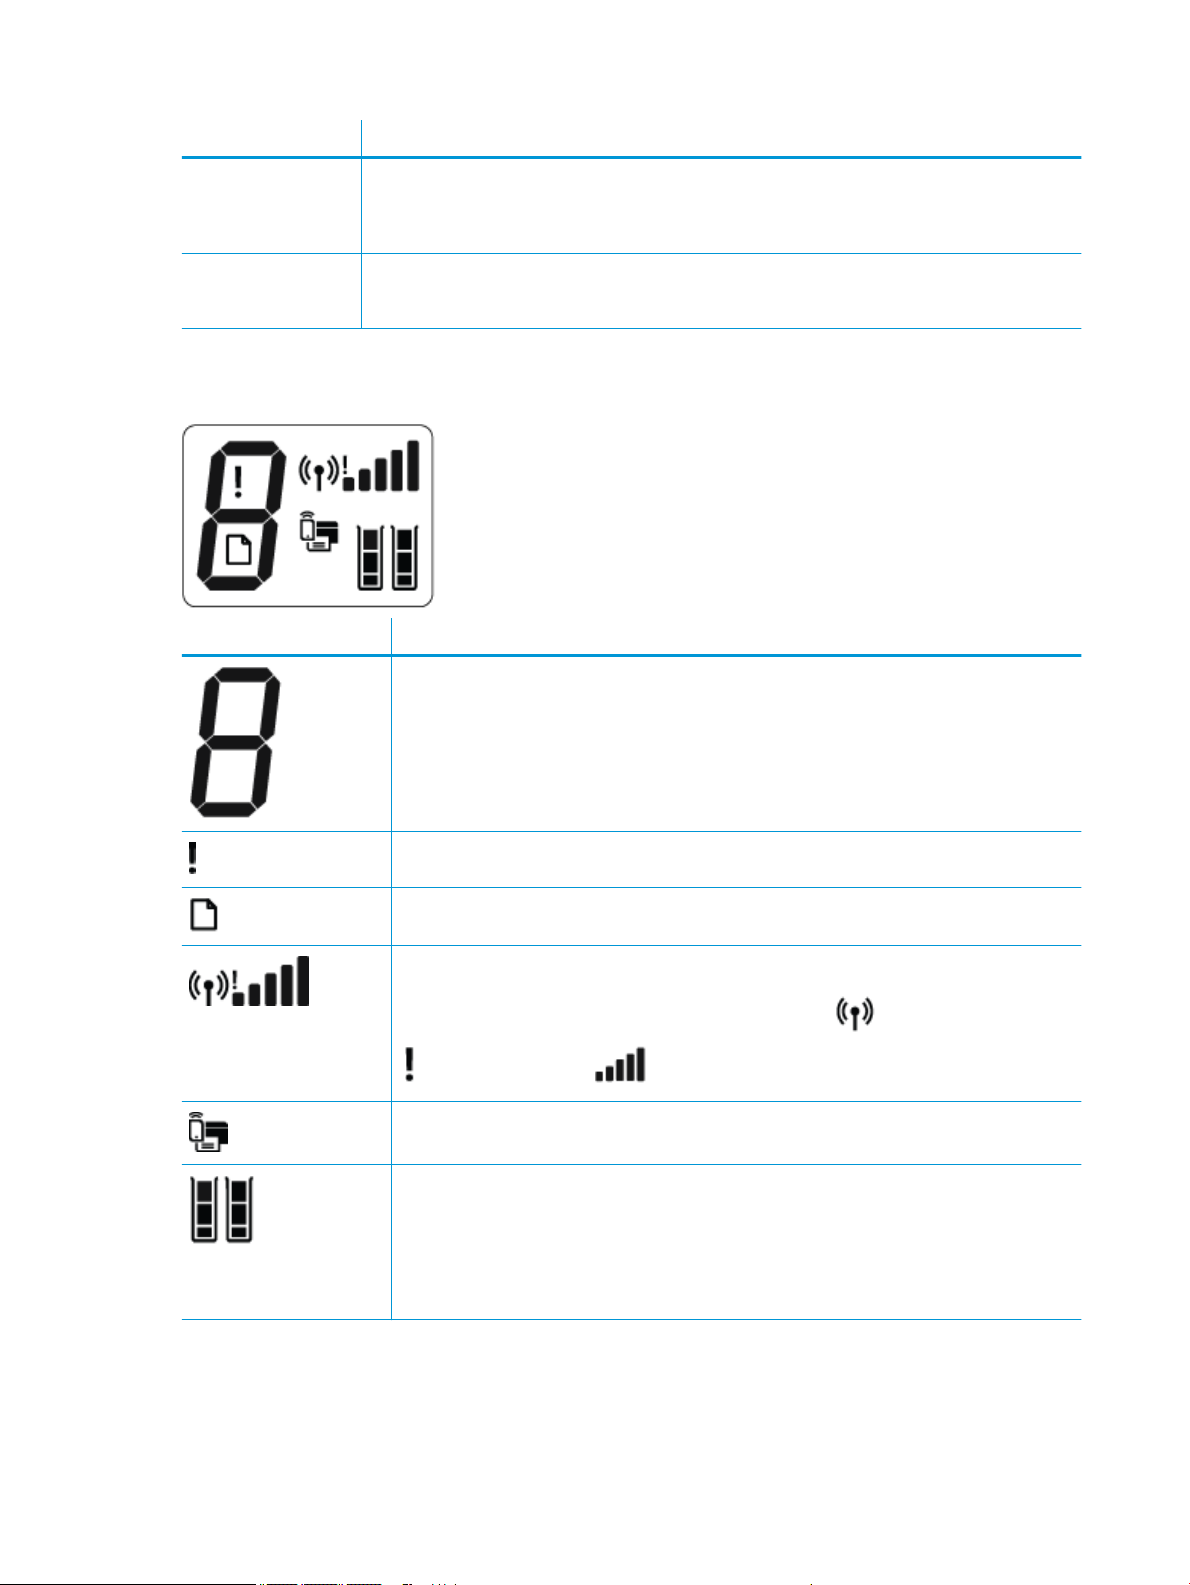
Control panel display icons
Icon Description
Number of copies icon: Shows the number of copies when you are copying documents, and alternates
between the letter E and a number when the printer is in an error state.
Error icon: Indicates an error.
Paper Error icon: Indicates a paper-related error.
Wireless status icons: Show the status of a wireless connection.
The wireless status icons consist of three icons, the Wireless icon ( ), the Wireless Attention icon
( ), and the Signal Bars icon ( ).
Wi-Fi Direct icon: Indicates Wi-Fi Direct is on or is in the process of being connected.
Ink Level icons: The left ink icon shows the estimated ink level of the tri-color cartridge, and the right
icon shows the estimated ink level of the black cartridge.
NOTE: Ink level warnings and indicators provide estimates for planning purposes only. When you
receive a low-ink warning message, consider having a replacement cartridge available to avoid
possible printing delays. You do not need to replace cartridges until the print quality becomes
unacceptable.
6 Chapter 2 Get started ENWW
Page 11
Control panel lights and display icons status
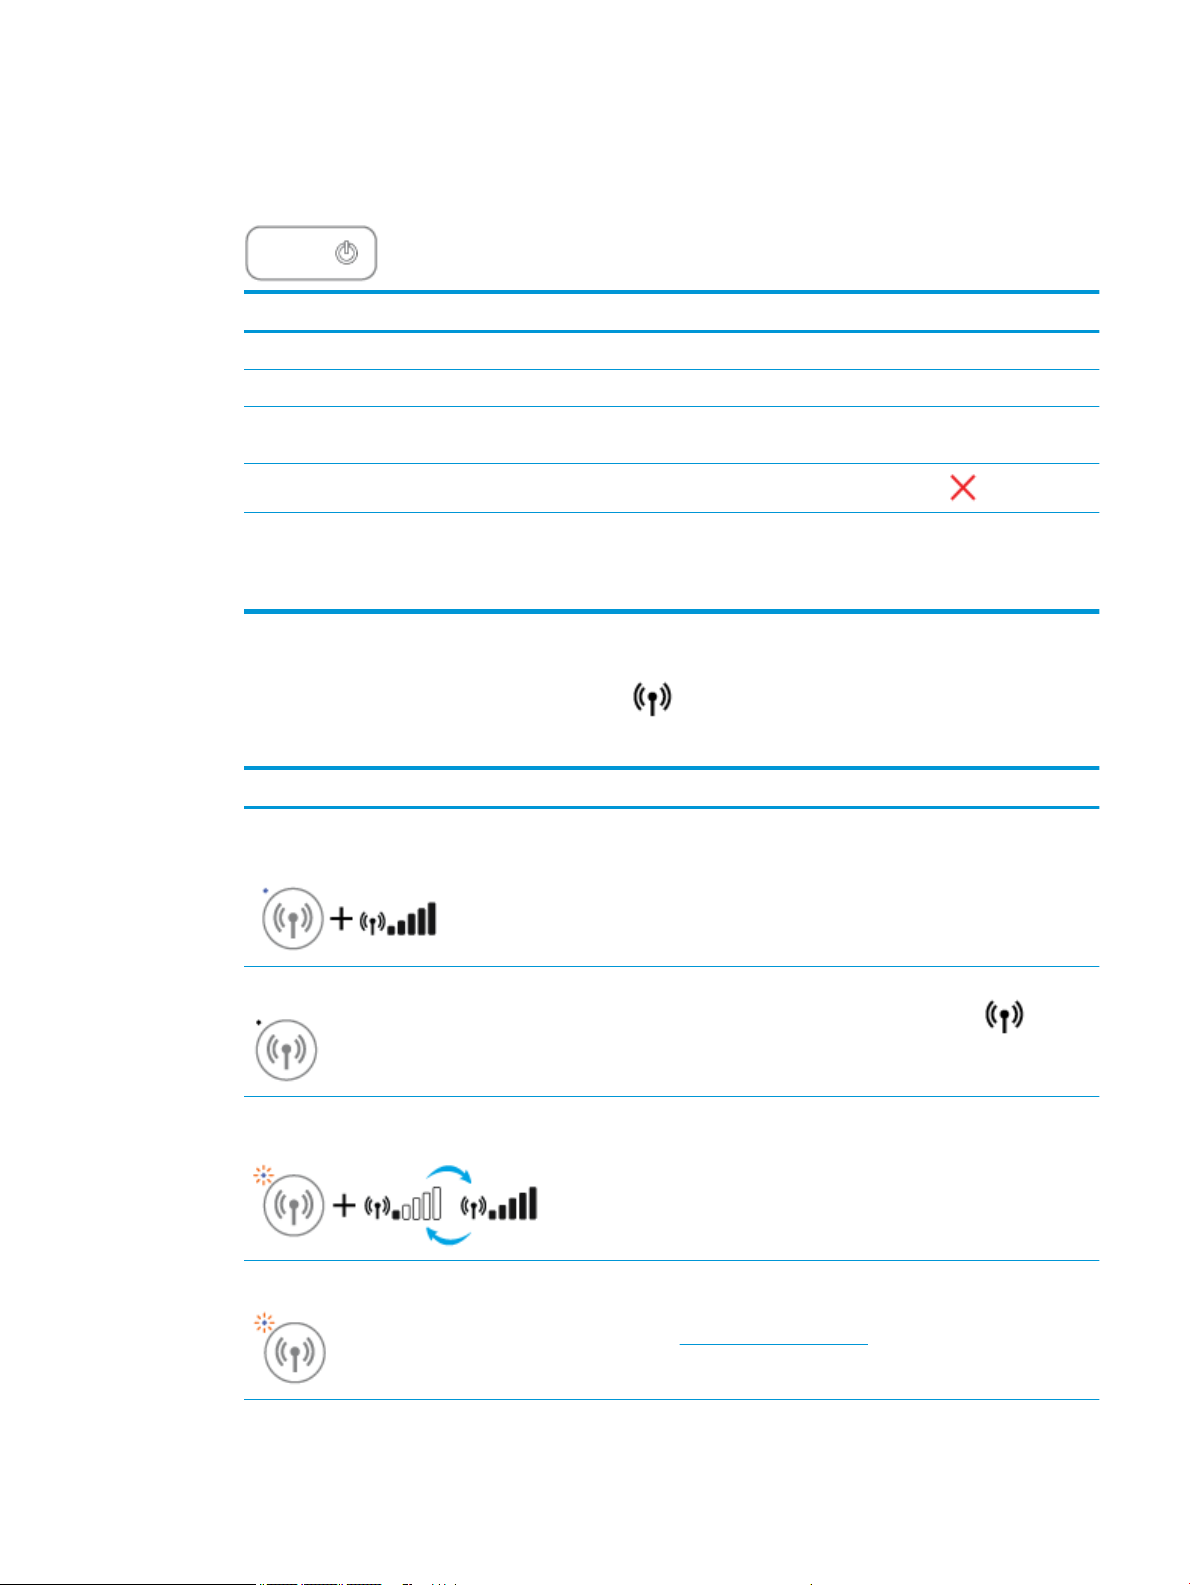
Power button light
●
Status Description
On The printer is on.
O The printer is powered o.
Dimmed Indicates the printer is in Sleep mode. The printer automatically enters Sleep mode after ve
minutes of inactivity.
Blinking
Blinking fast If the cartridge access door is open, close it. If the cartridge access door is closed and the light
Wireless light and icons
●
The Wireless light next to the Wireless button ( ) and the wireless status icons on the control panel
display work together to indicate the status of a wireless connection.
Status Description
The Wireless light, the Wireless icon, and the Signal Bars icon
are on.
The Wireless light is o. The wireless capability of the printer is o. To turn on the
The printer is processing a job. To cancel the job, press the Cancel button ( ).
is blinking fast, the printer is in an error state that you can resolve by following the onscreen
messages from the computer. If you do not see any onscreen messages, try printing a
document to generate an onscreen message.
The printer is connected to a wireless network.
wireless capability, press the Wireless button ( ).
The Wireless light is blinking, the Wireless icon is on, and the
Signal Bars icon are cycling.
The Wireless light blinks for three seconds and then turns o. The wireless capability of the printer is disabled.
The printer is connecting to a wireless network or is in the WiFi Protected Setup (WPS) push mode.
Change the wireless settings. For more information, see
Wireless settings on page 62.
ENWW Control panel lights and display icons status 7
Page 12
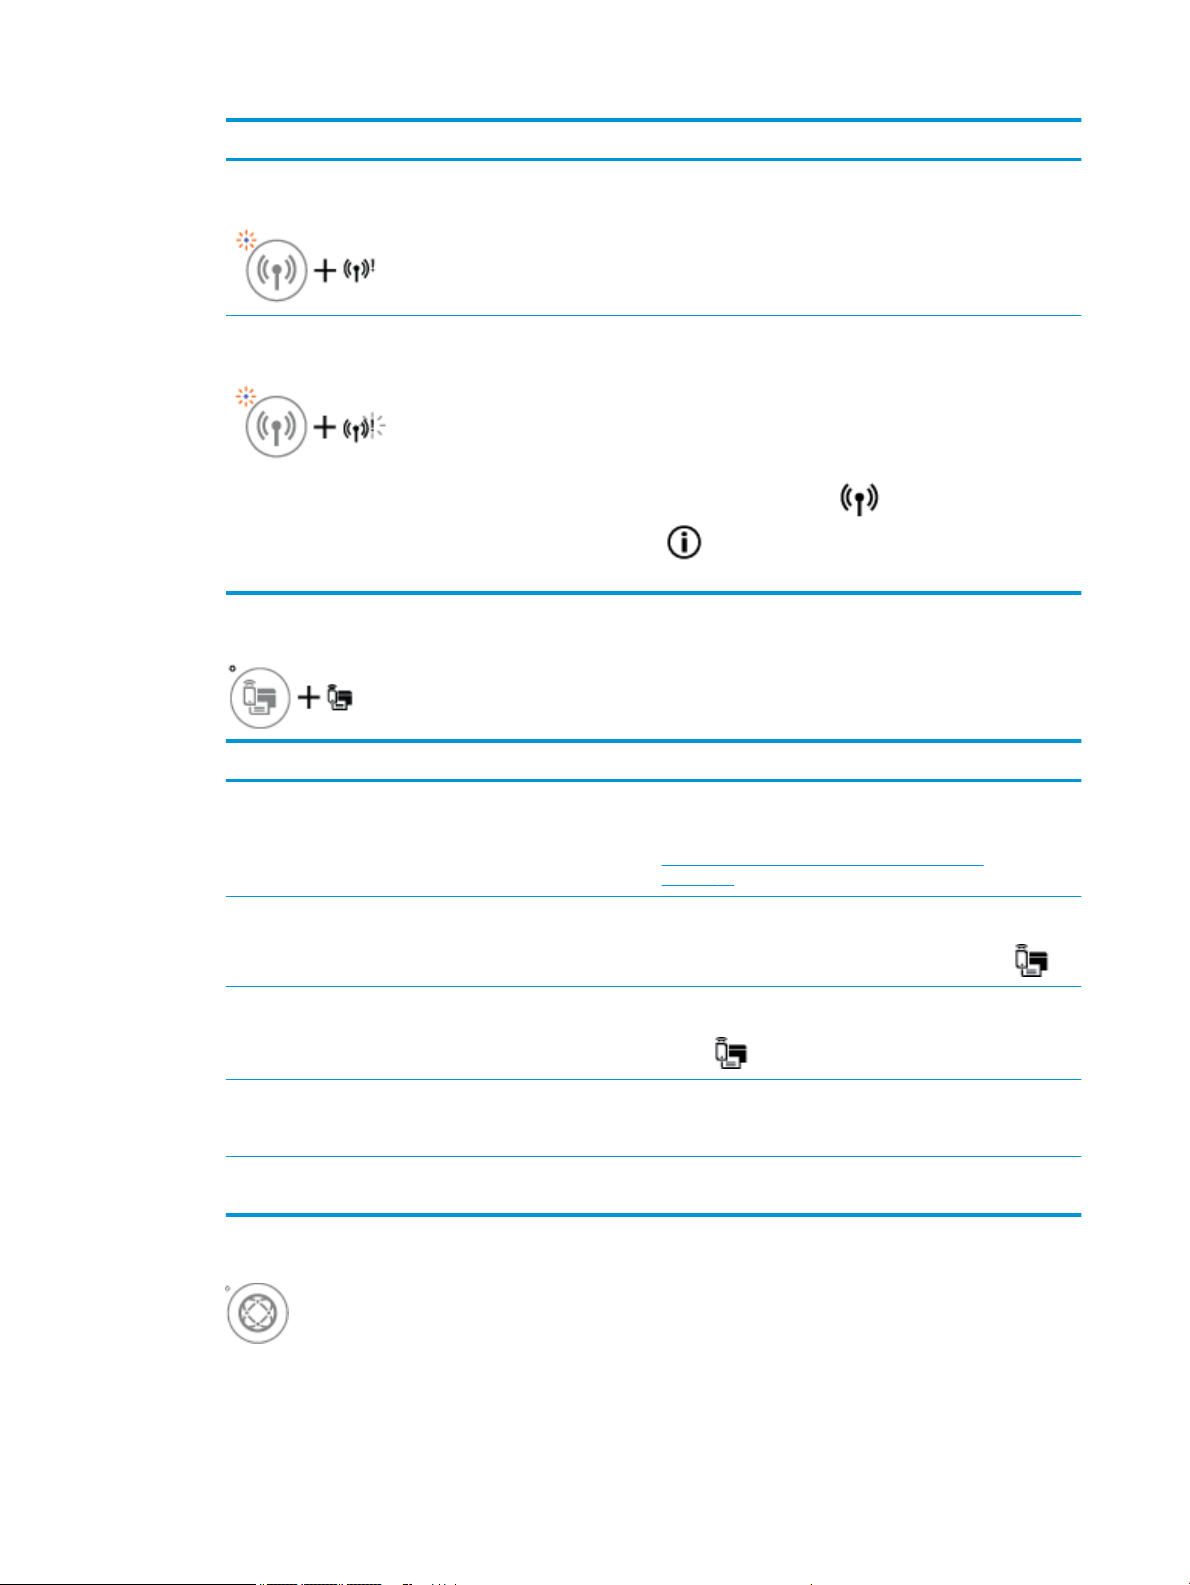
Status Description
The Wireless light is blinking, and the Wireless icon and
Wireless Attention icon are on.
The Wireless light is blinking, the Wireless icon is on, and the
Wireless Attention icon is blinking.
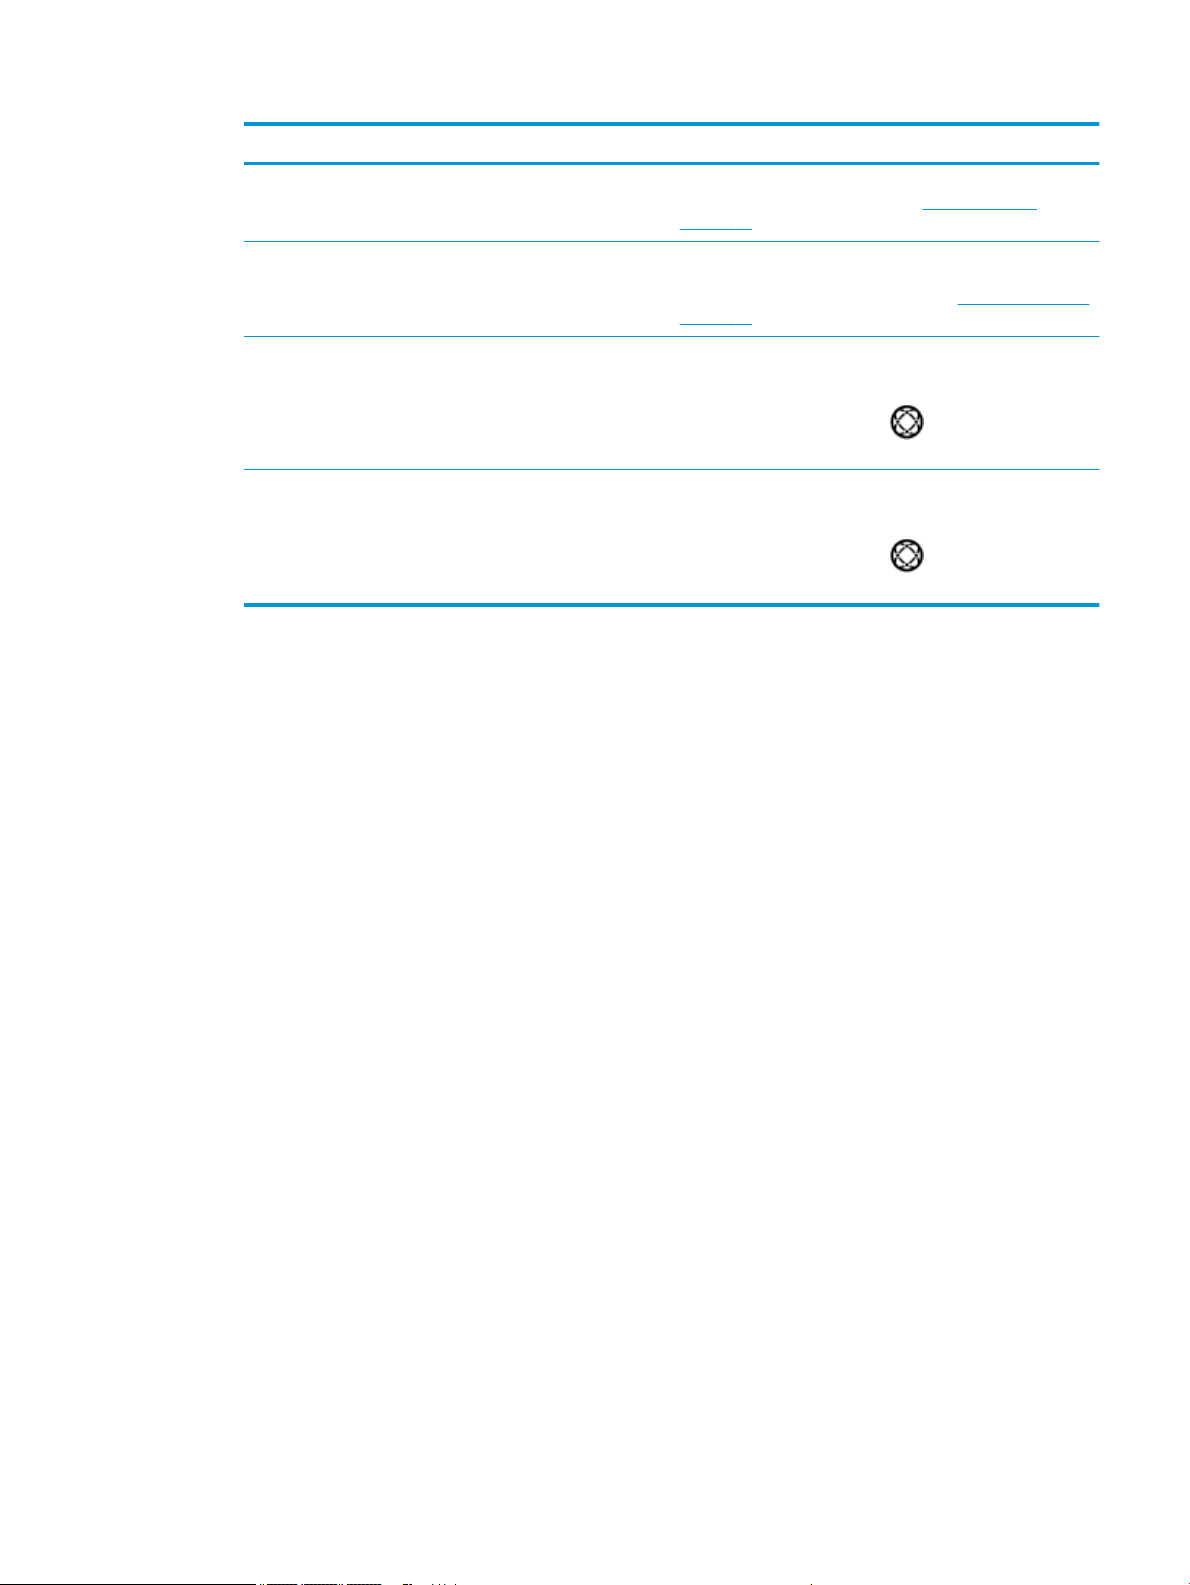
Wi-Fi Direct light and icon
●
There is no wireless signal.
—
Make sure your wireless router or access point is
powered on.
—
Move the printer closer to the wireless router.
One of the following might have occurred.
—
The printer has a problem connecting to the wireless
network.
—
An error occurs or an overlap session is detected when
using WPS.
Press the Wireless button ( ) and the Information button
( ) together to run the wireless test, and then review the
test report for information on how to solve the problem.
Web Services light
●
Status Description
The Wi-Fi Direct light and icon are on. Wi-Fi Direct is turned on and ready to use.
To learn how to connect to your printer using Wi-Fi Direct, see
Connect wirelessly to the printer without a router
on page 59.
The Wi-Fi Direct light and icon are o. Wi-Fi Direct is o.
To turn on Wi-Fi Direct, press the Wi-Fi Direct button ( ).
The Wi-Fi Direct light is blinking. The printer is connecting to a mobile device in the Wi-Fi
Protected Setup (WPS) push mode. Press the Wi-Fi Direct
button ( ) to nish connecting.
The Wi-Fi Direct light blinks fast for three seconds, and then
stays on.
The Wi-Fi Direct light blinks fast for three seconds, and then
turns o.
The printer already has the maximum number of Wi-Fi Direct
connection and another device is trying to connect to the
printer with Wi-Fi Direct.
Wi-Fi Direct is disabled. For more information, contact the
person who sets up the printer.
8 Chapter 2 Get started ENWW
Page 13
Status Description
The Web Services light is white and on. The Web Services feature is on and ready to use. For
information about Web Services, see Use Web Services
on page 33.
The Web Services light is o. The Web Services feature is not registered.
To learn how to register Web Services, see Set up Web Services
on page 35.
The Web Services light is white and keeps blinking. The Web Services feature has been registered, but there is a
connectivity issue.
Press the Web Services button ( ) to print a diagnostic
page, and then follow the instructions on the page.
The Web Services light is amber and keeps blinking. The Web Services feature is turned on, but a job is being
blocked because of an error.
Press the Web Services button ( ) to print a diagnostic
page, and then follow the instructions on the page.
ENWW Control panel lights and display icons status 9
Page 14
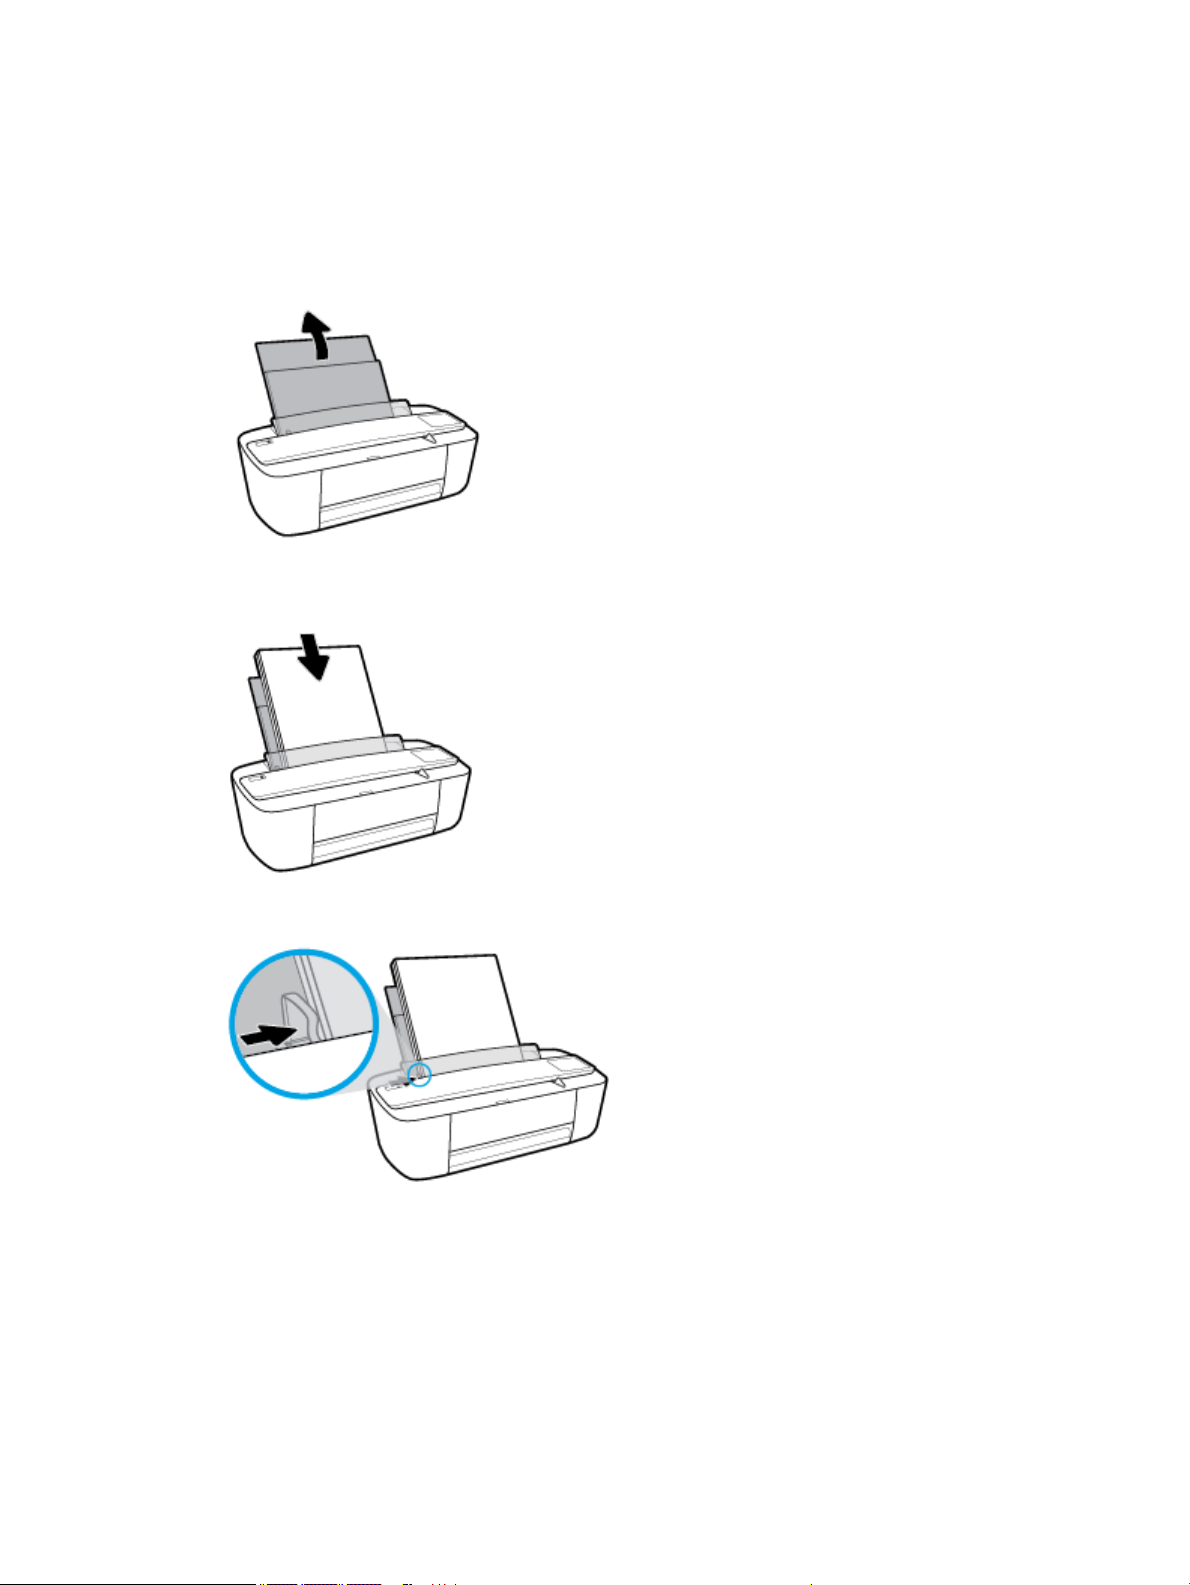
Load media
Select a paper size to continue.
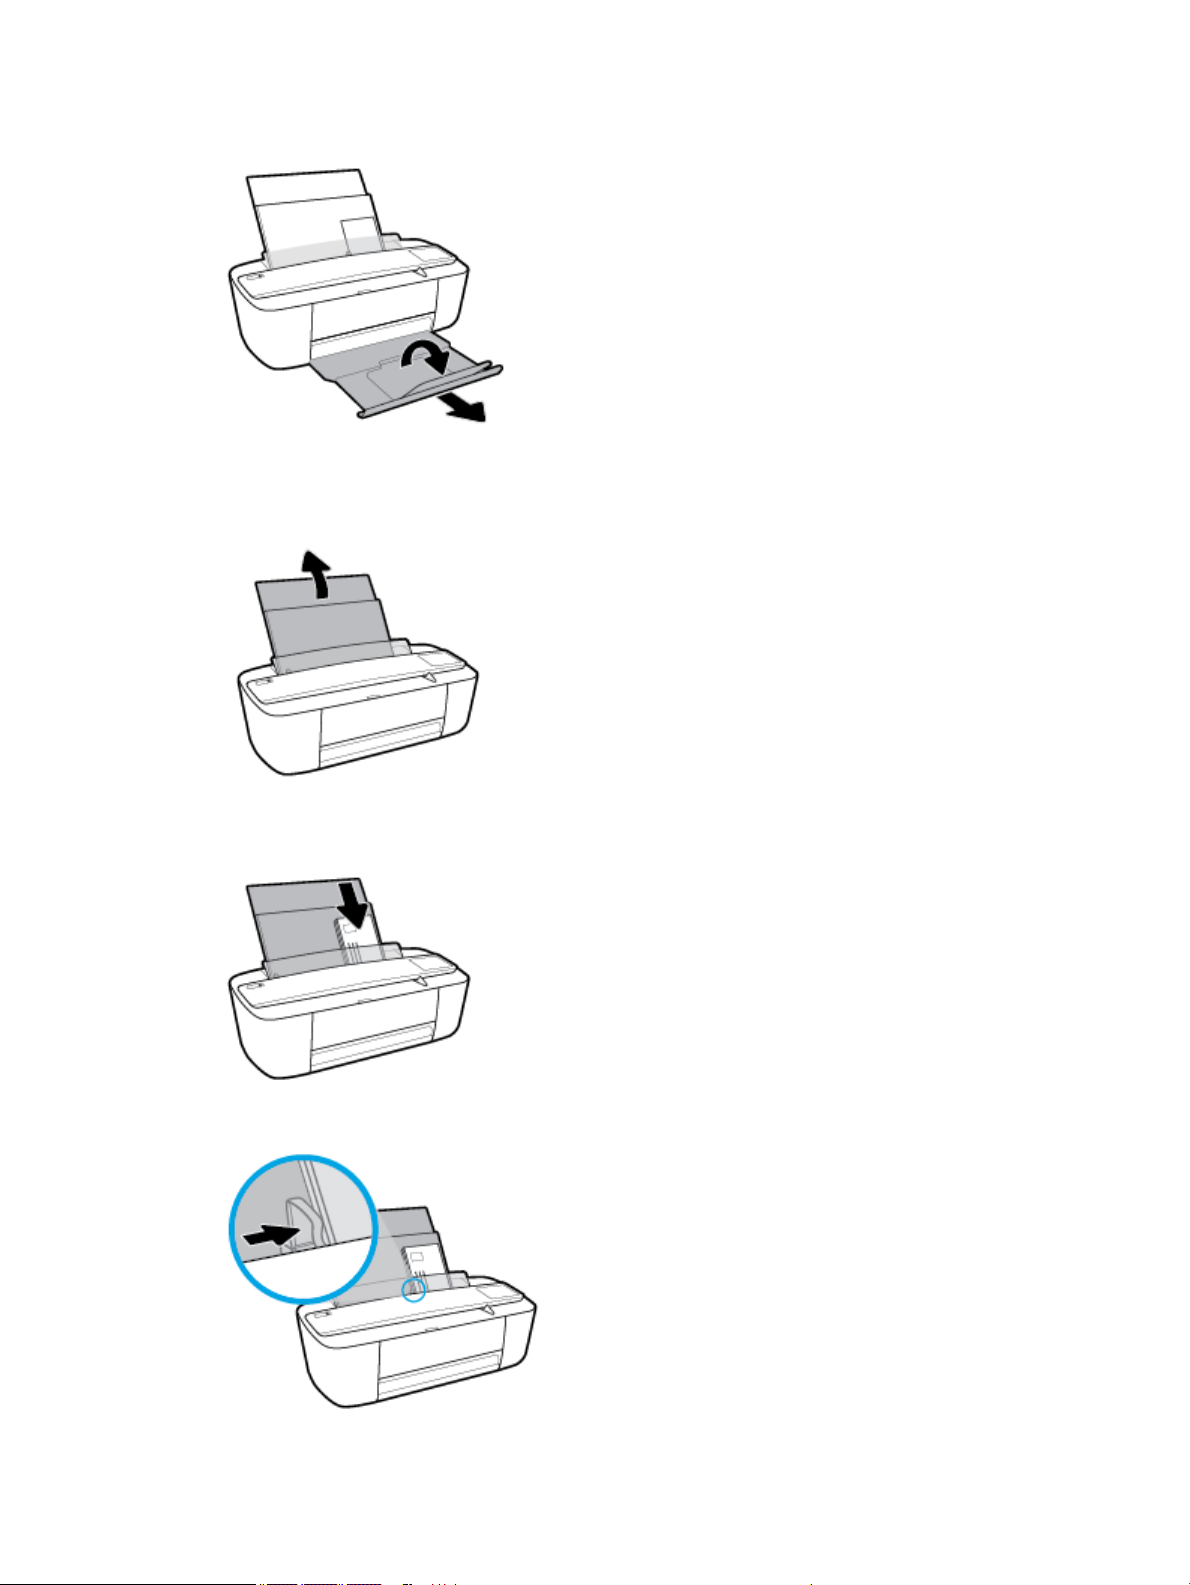
To load full-size paper
1. Raise the input tray and input tray extender.
2. Insert a stack of paper into the input tray with the short edge down and the print side up, and slide the
stack of paper down until it stops.
3. Slide the paper-width guide to the right until it stops at the edge of the paper.
10 Chapter 2 Get started ENWW
Page 15
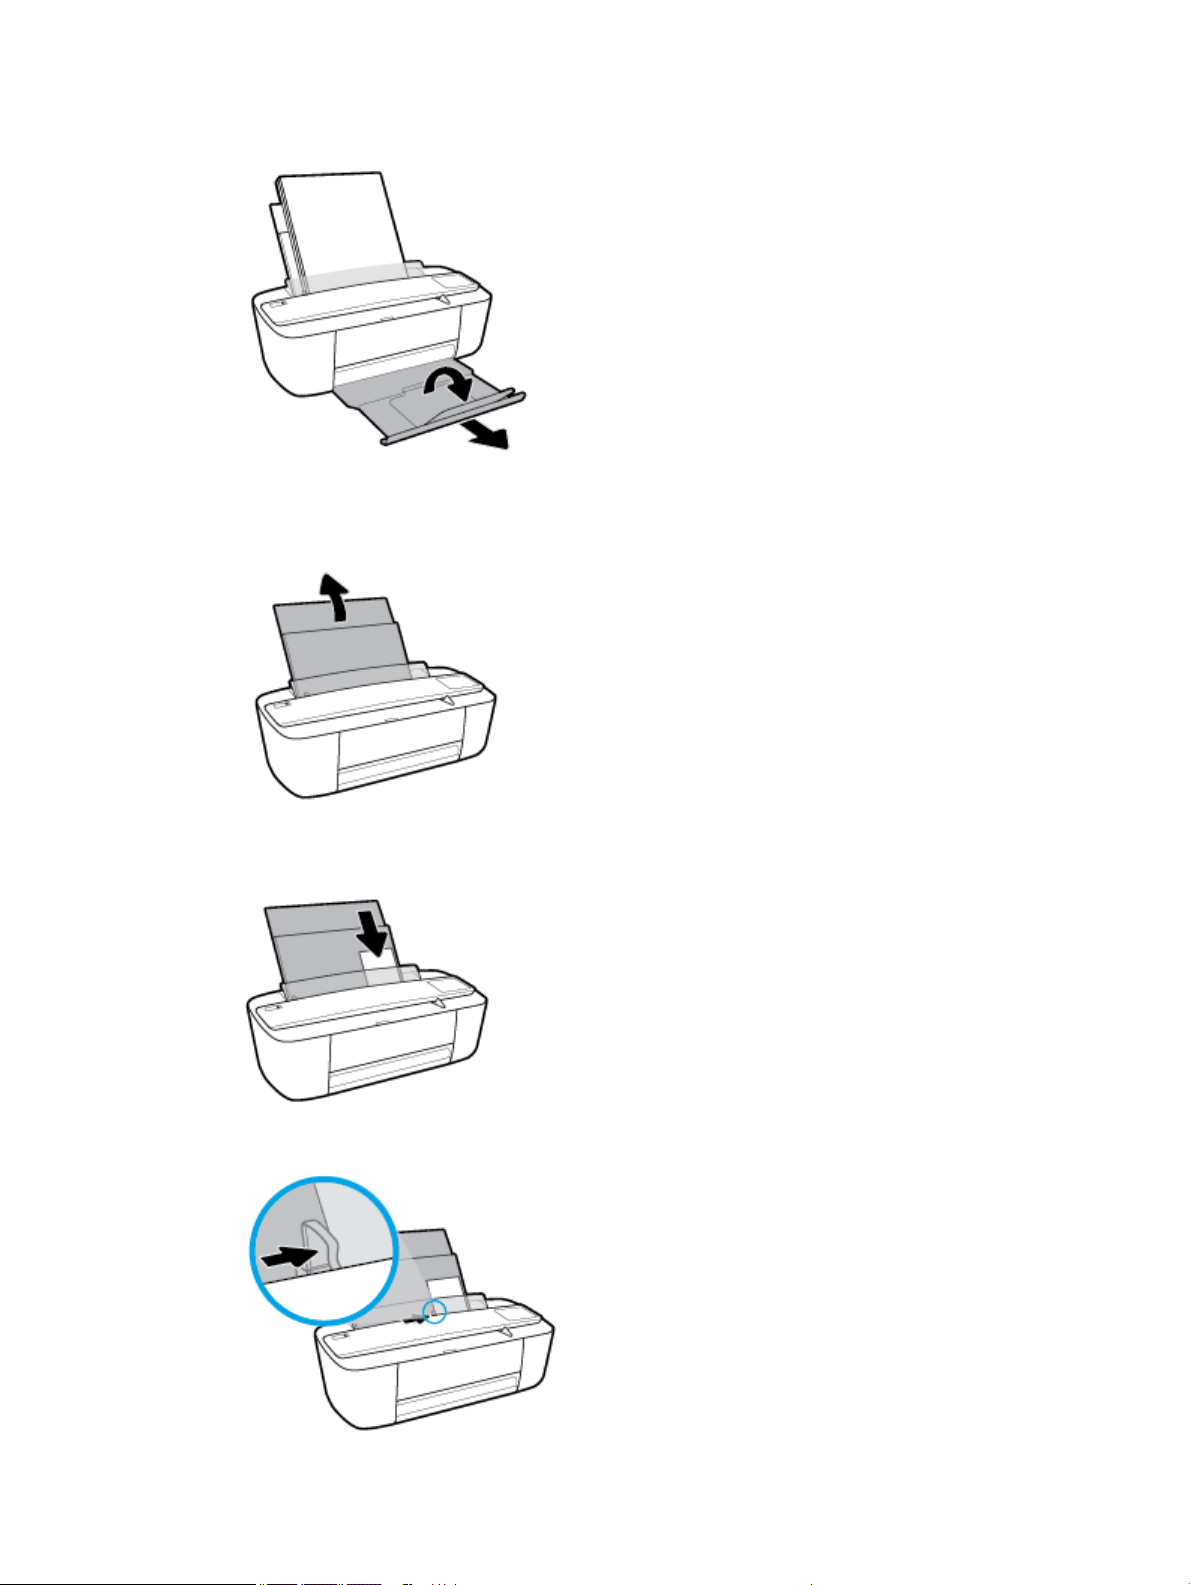
4. Pull out the output tray and the output tray extender, and then lift the paper catch.
To load small-size paper
1. Raise the input tray and input tray extender.
2. Insert a stack of photo paper into the far-right side of the input tray with the short edge down and the
print side up, and slide the stack of paper down until it stops.
3. Slide the paper-width guide to the right until it stops at the edge of the paper.
ENWW Load media 11
Page 16
4. Pull out the output tray and the output tray extender, and then lift the paper catch.
To load envelopes
1. Raise the input tray and input tray extender.
2. Insert one or more envelopes into the far-right side of the input tray and slide the stack of envelopes
down until it stops. The side to be printed on should face up.
3. Slide the paper-width guide to the right against the stack of envelopes until it stops.
12 Chapter 2 Get started ENWW
Page 17
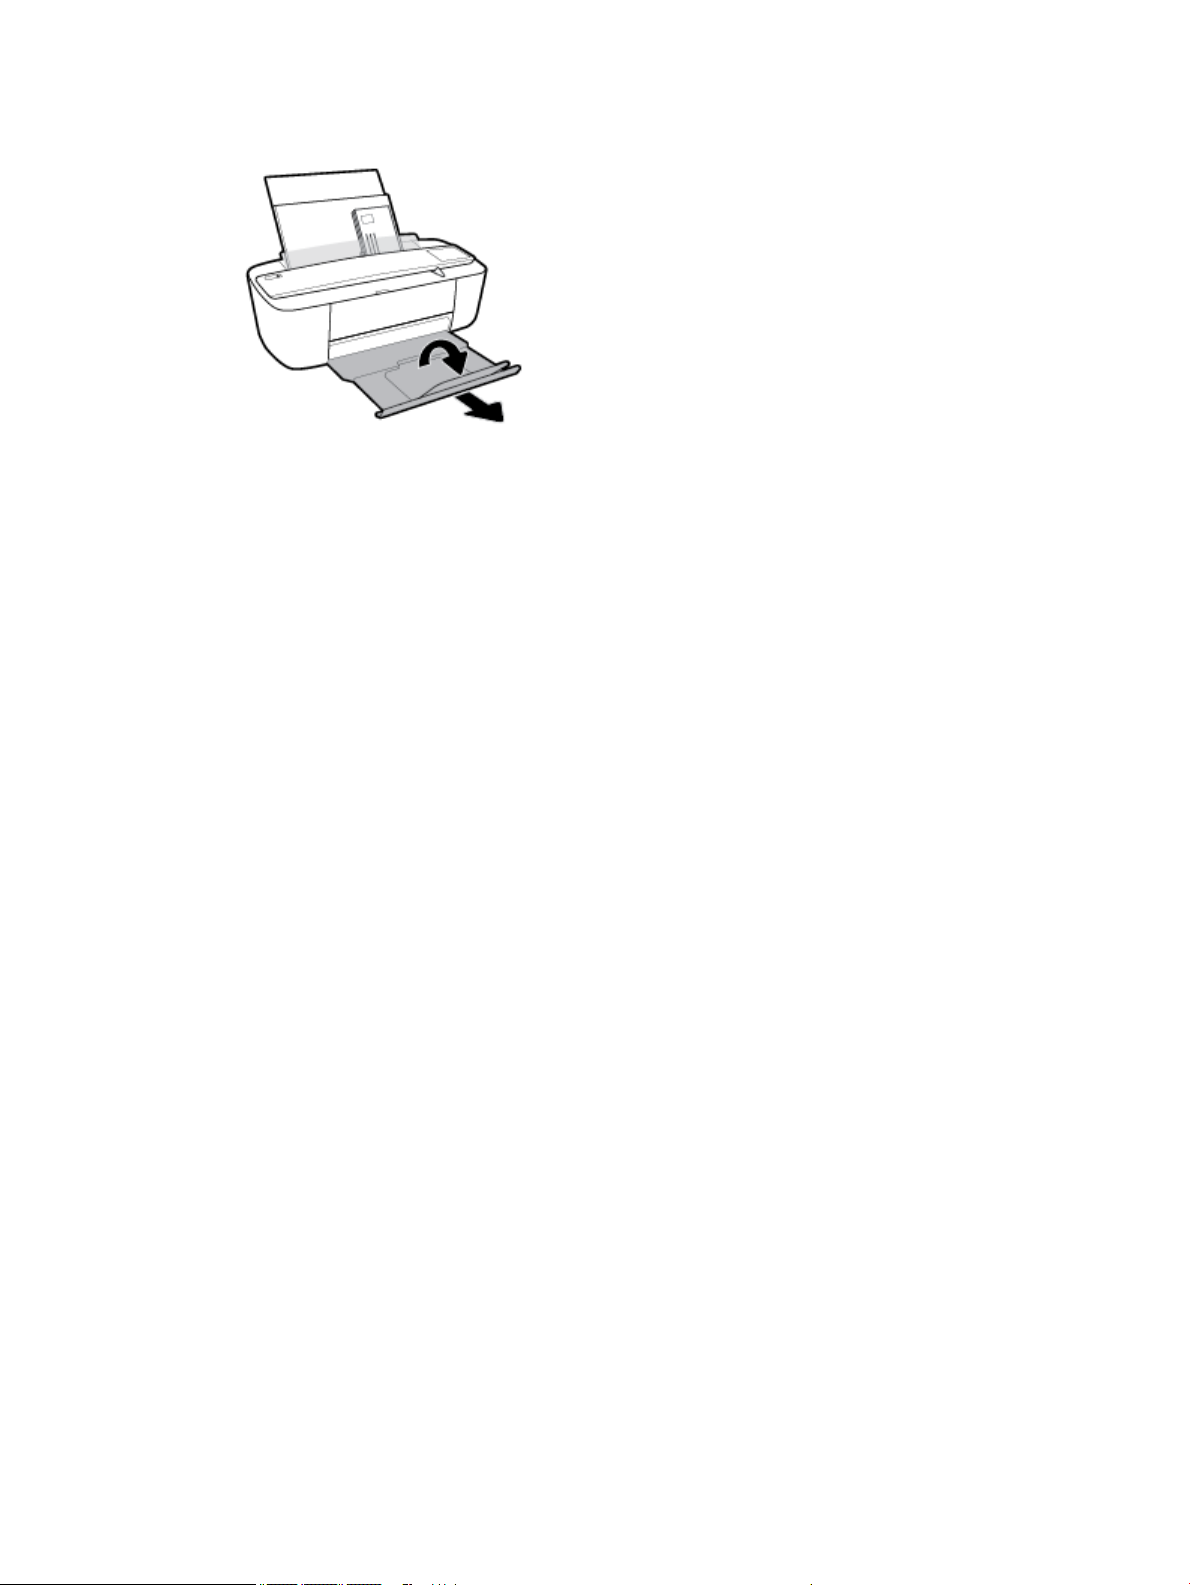
4. Pull out the output tray and the output tray extender, and then lift the paper catch.
ENWW Load media 13
Page 18

Change the default paper size detected by printer
The printer can automatically detect whether the input tray has paper loaded and detect whether the loaded
paper is large, small, or medium width. You can change the default large, medium, or small paper size
detected by the printer.
To change the default paper size detected by the printer
1. Open the embedded web server (EWS). For more information, see Open the embedded web server
on page 65.
2. Click the Settings tab.
3. In the Preferences section, click Tray and Paper Management, and then select the desired option.
4. Click Apply.
14 Chapter 2 Get started ENWW
Page 19

Paper basics
The printer is designed to work well with most types of oice paper. It is best to test a variety of print paper
types before buying large quantities. Use HP paper for optimum print quality. Visit the HP website at
www.hp.com for more information about HP paper.
HP recommends plain papers with the ColorLok logo for printing everyday documents. All
papers with the ColorLok logo are independently tested to meet high standards of
reliability and print quality, and produce documents with crisp, vivid color, bolder blacks,
and that dry faster than ordinary plain papers. Look for papers with the ColorLok logo in
a variety of weights and sizes from major paper manufacturers.
This section contains the following topics:
●
Recommended papers for printing
●
Order HP paper supplies
Recommended papers for printing
If you want the best print quality, HP recommends using HP papers that are specically designed for the type
of project you are printing.
Depending on your country/region, some of these papers might not be available.
Photo printing
●
●
●
HP Premium Plus Photo Paper
HP Premium Plus Photo Paper is HP’s highest-quality photo paper for your best photos. With HP
Premium Plus Photo Paper, you can print beautiful photos that are instant-dry so you can share them
right o the printer. It is available in several sizes, including A4, 8.5 x 11 inches (216 x 279 mm), 4 x 6
inches (10 x 15 cm), and 5 x 7 inches (13 x 18 cm), and in two nishes - glossy or soft gloss (semi-gloss).
Ideal for framing, displaying, or gifting your best photos and special photo projects. HP Premium Plus
Photo Paper delivers exceptional results with professional quality and durability.
HP Advanced Photo Paper
This glossy photo paper features an instant-dry nish for easy handling without smudging. It resists
water, smears, ngerprints, and humidity. Your prints have a look and feel comparable to a storeprocessed photo. It is available in several sizes, including A4, 8.5 x 11 inches (216 x 279 mm), 4 x
6 inches (10 x 15 cm), and 5 x 7 inches (13 x 18 cm). It is acid-free for longer lasting documents.
HP Everyday Photo Paper
Print colorful, everyday snapshots at a low cost, using paper designed for casual photo printing. This
aordable photo paper dries quickly for easy handling. Get sharp, crisp images when you use this paper
with any inkjet printer. It is available in glossy nish in several sizes, including A4, 8.5 x 11 inches (216 x
279 mm), 5 x 7 inches (13 x 18 cm), and 4 x 6 inches (10 x 15 cm). It is acid-free for longer lasting
documents.
●
HP Photo Value Packs
ENWW Paper basics 15
Page 20

HP Photo Value Packs conveniently package original HP ink cartridges and HP Advanced Photo Paper to
save you time and take the guesswork out of printing aordable, lab-quality photos with your HP
printer. Original HP inks and HP Advanced Photo Paper have been designed to work together so your
photos are long lasting and vivid, print after print. Great for printing out an entire vacation's worth of
photos or multiple prints to share.
Business documents
●
HP Premium Presentation Paper 120g Matte or HP Professional Paper 120 Matt
This paper is a heavy two-sided matte paper perfect for presentation, proposals, reports, and
newsletters. It is heavyweight for an impressive look and feel.
●
HP Brochure Paper 180g Glossy or HP Professional Paper 180 Glossy
These papers are glossy-coated on both sides for two-sided use. They are the perfect choice for nearphotographic reproductions and business graphics for report covers, special presentations, brochures,
mailers, and calendars.
●
HP Brochure Paper 180g Matte or HP Professional Paper 180 Matt
These papers are matte-coated on both sides for two-sided use. They are the perfect choice for nearphotographic reproductions and business graphics for report covers, special presentations, brochures,
mailers, and calendars.
Everyday printing
All the papers listed for everyday printing feature ColorLok Technology for less smearing, bolder blacks, and
vivid colors.
●
HP Bright White Inkjet Paper and Color Inkjet Paper
HP Bright White Inkjet Paper and Color Inkjet Paper deliver high-contrast colors and sharp text. They are
opaque enough for two-sided color usage with no show-through, making them ideal for newsletters,
reports, and yers.
●
HP Multipurpose and All-in-One Printing Paper
HP Multipurpose and All-in-One Printing Paper is a high-quality multifunction paper. It produces
documents that look and feel more substantial than documents printed on standard multipurpose or
copy paper. It is acid-free for longer lasting documents.
●
HP Oice, Copy, and Copy & Print Paper
These varieties of HP paper high-quality multifunction paper are suitable for copies, drafts, memos, and
other everyday documents. They are acid-free for longer lasting documents.
●
HP Oice Recycled Paper
HP Oice Recycled Paper is a high-quality multifunction paper made with 30% recycled ber.
Order HP paper supplies
The printer is designed to work well with most types of oice paper. Use HP paper for optimum print quality.
To order HP papers and other supplies, go to www.hp.com . At this time, some portions of the HP website are
available in English only.
16 Chapter 2 Get started ENWW
Page 21

HP recommends plain papers with the ColorLok logo for printing and copying of everyday documents. All
papers with the ColorLok logo are independently tested to meet high standards of reliability and print quality,
and produce documents with crisp, vivid color, bolder blacks and shorter dry-time than ordinary plain papers.
Look for papers with the ColorLok logo in a variety of weights and sizes from major paper manufacturers.
ENWW Paper basics 17
Page 22

Open the HP printer software (Windows)
After installing the HP printer software, double-click the printer icon on the desktop or do one of the following
to open the printer software:
●
Windows 10: From the computer desktop, click Start, select All apps, click HP, and then select the icon
with the printer name.
●
Windows 8.1: Click the down arrow in lower left corner of the Start screen, and then select the printer
name.
●
Windows 8: Right-click an empty area on the Start screen, click All Apps on the app bar, and then select
the printer name.
●
Windows 7, Windows Vista, and Windows XP: From the computer desktop, click Start, select All
Programs, click HP, click the folder for the printer, and then select the icon with the printer name.
18 Chapter 2 Get started ENWW
Page 23

Sleep mode
●
Power usage is reduced while in Sleep mode.
●
After initial setup of printer, the printer will enter Sleep mode after 5 minutes of inactivity.
To change the time to Sleep mode
1. Open the embedded web server (EWS). For more information, see Open the embedded web server
on page 65.
2. Click the Settings tab.
3. In the Power Management section, click Energy Save Mode, and select the desired option.
4. Click Apply.
ENWW Sleep mode 19
Page 24

Quiet Mode
Quiet Mode slows down printing to reduce overall noise without aecting print quality. Quiet Mode only works
for printing with Normal print quality on plain paper. To reduce printing noise, turn on Quiet Mode. To print at
normal speed, turn Quiet Mode o. Quiet Mode is o by default.
NOTE: In Quiet Mode, if you print on plain paper with the Draft or Best print quality, or if you print photos or
envelopes, the printer works in the same way as when Quiet Mode is o.
To turn Quiet Mode on or o from the printer software (Windows)
1. Open the HP printer software. For more information, see Open the HP printer software (Windows)
on page 18.
2. Click the Quiet Mode tab.
3. Click On or O.
4. Click Save Setting.
To turn Quiet Mode on or o from the printer software (OS X)
1. Open HP Utility.
NOTE: HP Utility is located in the HP folder in the Applications folder.
2. Select the printer.
3. Click Quiet Mode .
4. Select On or O .
5. Click Apply Now.
To turn Quiet Mode on or o from the Embedded Web Server (EWS)
1. Open the EWS. For more information, see Open the embedded web server on page 65.
2. Click the Settings tab.
3. In the Preferences section, select Quiet Mode, and then select On or O.
4. Click Apply.
20 Chapter 2 Get started ENWW
Page 25

Auto-O
This feature turns the printer o after 2 hours of inactivity to help reduce energy use. Auto-O turns the
printer o completely, so you must use the Power button to turn the printer back on. If your printer
supports this energy saving feature, Auto-O is automatically enabled or disabled depending on printer
capabilities and connection options. Even when Auto-O is disabled, the printer enters Sleep mode after 5
minutes of inactivity to help reduce energy use.
●
●
Auto-O is enabled when the printer is turned on, if the printer does not have network or fax capability,
or is not using these capabilities.
Auto-O is disabled when a printer’s wireless or Wi-Fi Direct capability is turned on or when a printer
with fax, USB, or Ethernet network capability establishes a fax, USB, or Ethernet network connection.
ENWW Auto-O 21
Page 26

22 Chapter 2 Get started ENWW
Page 27

3 Print
●
Print documents
●
Print photos
●
Print envelopes
●
Print using the maximum dpi
●
Print from mobile devices
●
Tips for print success
ENWW 23
Page 28

Print documents
Before printing documents, make sure you have paper loaded in the input tray and the output tray is open.
For more information about loading paper, see Load media on page 10.
To print a document (Windows)
1. From your software, select Print.
2. Make sure your printer is selected.
3. Click the button that opens the Properties dialog box.
Depending on your software application, this button might be called Properties, Options, Printer Setup,
Printer Properties, Printer, or Preferences.
4. Select the appropriate options on the Printing Shortcut tab.
To change other print settings, click the other tabs.
For more printing tips, see Tips for print success on page 30.
NOTE: If you change the paper size, ensure that you have loaded the correct paper in the input tray.
5. Click OK to close the Properties dialog box.
6. Click Print or OK to begin printing.
To print documents (OS X)
1. From the File menu in your software, choose Print.
2. Make sure your printer is selected.
3. Set the print options.
If you do not see options on the Print dialog, click Show Details.
●
Choose the appropriate paper size in the Paper Size pop-up menu.
NOTE: If you change the paper size, ensure that you have loaded the correct paper.
●
Select the orientation.
●
Enter the scaling percentage.
4. Click Print.
To print on both sides of the page (Windows)
1. From your software, select Print.
2. Make sure your printer is selected.
3. Click the button that opens the Properties dialog box.
Depending on your software application, this button might be called Properties, Options, Printer Setup,
Printer Properties, Printer, or Preferences.
24 Chapter 3 Print ENWW
Page 29

4. On the Printing Shortcut tab, select the Two-sided (Duplex) Printing shortcut.
To change other print settings, click the other tabs.
For more printing tips, see Tips for print success on page 30.
NOTE: If you change the paper size, ensure that you have loaded the correct paper in the input tray.
5. After you print the rst side, follow the onscreen instructions to reload the paper, and then click
Continue.
6. Click OK to print.
To print on both sides of the page (OS X)
1. From the File menu in your software, choose Print.
2. In the Print dialog, choose Paper Handling from the pop-up menu and set Page Order to Normal.
3. Set Pages to Print to Odd Only.
4. Click Print.
5. After all of the odd numbered pages have printed, remove the document from the output tray.
6. Reload the document so that the end that came out of the printer is now going into the printer and the
blank side of the document is facing toward the front of the printer.
7. In the Print dialog, return to the Paper Handling pop-up menu and set the page order to Normal and the
pages to print to Even Only.
8. Click Print.
ENWW Print documents 25
Page 30

Print photos
Before printing photos, make sure you have photo paper loaded in the input tray and the output tray is open.
For more information about loading paper, see Load media on page 10.
To print a photo on photo paper (Windows)
1. From your software, select Print.
2. Make sure your printer is selected.
3. Click the button that opens the Properties dialog box.
Depending on your software application, this button might be called Properties, Options, Printer Setup,
Printer Properties, Printer, or Preferences.
4. Select the appropriate options on the Printing Shortcut tab.
To change other print settings, click the other tabs.
For more printing tips, see Tips for print success on page 30.
NOTE: If you change the paper size, ensure that you have loaded the correct paper in the input tray.
5. Click OK to return to the Properties dialog box.
6. Click OK, and then click Print or OK in the Print dialog box.
NOTE: After the printing is nished, remove unused photo paper from the input tray. Store the photo paper
so it does not start to curl, which could reduce the quality of your printout.
To print a photo from the computer (OS X)
1. From the File menu in your software, choose Print.
2. Make sure your printer is selected.
3. Set the print options.
If you do not see options on the Print dialog, click Show Details.
●
Choose the appropriate paper size in the Paper Size pop-up menu.
NOTE: If you change the paper size ensure that you have loaded the correct paper.
●
Select the orientation.
4. From the pop-up menu, choose Paper Type/Quality, and then choose the following settings:
●
Paper Type: The appropriate photo paper type
●
Quality: Select the option that provides the best quality or maximum dpi.
●
Click the Color Options disclosure triangle, and then choose the appropriate Photo Fix option.
—
O: applies no changes to the image.
—
On: automatically focuses the image; moderately adjusts image sharpness.
5. Select any other print settings you want, and then click Print.
26 Chapter 3 Print ENWW
Page 31

Print envelopes
Before printing envelopes, make sure you have envelopes loaded in the input tray and the output tray is open.
You can load one or more envelopes into the input tray. Do not use shiny or embossed envelopes or envelopes
that have clasps or windows. For more information about loading envelopes, see Load media on page 10.
NOTE: For specic details on how to format text for printing on envelopes, consult the help les in your
word application.
To print an envelope (Windows)
1. From your software, select Print.
2. Make sure your printer is selected.
3. Click the button that opens the Properties dialog box.
Depending on your software application, this button might be called Properties, Options, Printer Setup,
Printer Properties, Printer, or Preferences.
4. Select the appropriate options.
●
On the Layout tab, select Portrait or Landscape orientation.
●
On the Paper/Quality tab, select the appropriate paper type from the Media drop-down list in the
Tray Selection area, select the appropriate print quality in the Quality Settings area, and then
select the appropriate color in the Color area.
●
Click Advanced to select the appropriate envelope size from the Paper Size drop-down list.
5. Click OK, and then click Print or OK in the Print dialog box.
To print envelopes (OS X)
1. From the File menu in your software, choose Print.
2. Make sure your printer is selected.
3. Select the appropriate envelope size from the Paper Size pop-up menu.
If you do not see options on the Print dialog, click Show Details.
NOTE: If you change the paper size, ensure that you have loaded the correct paper.
4. From the pop-up menu, choose Paper Type/Quality, and verify the paper type setting is set to Plain
Paper.
5. Click Print.
ENWW Print envelopes 27
Page 32

Print using the maximum dpi
Use maximum dots per inch (dpi) to print high-quality, sharp images on photo paper.
Printing in maximum dpi takes longer than printing with other settings and requires a large amount of disk
space.
For a list of supported print resolutions, visit the product support website at www.support.hp.com.
To print in maximum dpi mode (Windows)
1. From your software, select Print.
2. Make sure your printer is selected.
3. Click the button that opens the Properties dialog box.
Depending on your software application, this button might be called Properties, Options, Printer Setup,
Printer Properties, Printer, or Preferences.
4. Click the Paper/Quality tab.
5. From the Media drop-down list, select an appropriate paper type.
6. Click the Advanced button.
7. Select the appropriate paper size from the Paper Size drop-down list.
8. In the Printer Features area, select Yes from the Print in Max DPI drop-down list.
9. Click OK to close the advanced options.
10. Conrm Orientation on the Layout tab, and then click OK to print.
To print using maximum dpi (OS X)
1. From the File menu in your software, choose Print.
2. Make sure your printer is selected.
3. Set the print options.
If you do not see options on the Print dialog, click Show Details.
●
Choose the appropriate paper size in the Paper Size pop-up menu.
NOTE: If you change the paper size ensure that you have loaded the correct paper.
●
Select the orientation.
4. From the pop-up menu, choose Paper Type/Quality, and then choose the following settings:
●
Paper Type: The appropriate paper type
●
Quality: Maximum dpi
5. Select any other print settings that you want, and then click Print.
28 Chapter 3 Print ENWW
Page 33

Print from mobile devices
You can print documents and photos directly from your mobile devices, including iOS, Android, Windows
Mobile, Chromebook and Amazon Kindle.
To print from mobile devices
1. Make sure your printer is connected to the same network as your mobile device.
2. Enable printing on your mobile device:
●
iOS: Use the Print option from the Share menu. No setup is required since iOS AirPrint is
preinstalled.
NOTE: Devices running iOS 4.2 or later have AirPrint preinstalled.
●
Android: Download the HP Print Service Plugin (supported by most Android devices) from the
Google Play Store and enable it on your device.
NOTE: Devices running Android 4.4 or later are supported by the HP Print Service Plugin. Devices
running Android 4.3 or earlier can print using the HP ePrint app, available in the Google Play Store.
●
Windows Mobile: Tap Print from the Device menu. No setup is required since the software is
preinstalled.
NOTE: If your printer is not listed, you might need to do a one-time setup of the printer using the
Add Printer wizard.
●
Chromebook: Download and install the HP Print for Chrome app from the Chrome Web Store to
enable both Wi-Fi and USB printing.
●
Amazon Kindle Fire HD9 and HDX: The rst time you select Print on your device, the HP Print
Service Plugin is automatically downloaded to enable mobile printing.
NOTE: For detailed information about enabling printing from your mobile devices, visit
www.hp.com/go/mobileprinting. If a local version of this website is not available in your country/region
or language, you might be directed to the HP Mobile Printing website in another country/region or
language.
3. Make sure the loaded paper matches the paper settings of the printer (see Load media on page 10 for
more information). Accurately setting the paper size for the paper that is loaded enables your mobile
device to know what paper size it is printing.
ENWW Print from mobile devices 29
Page 34

Tips for print success
To print successfully, the HP cartridges should be functioning properly with suicient ink, the paper should be
loaded correctly, and the printer should have the appropriate settings.
Print settings do not apply to copying or scanning.
Ink tips
●
Use original HP cartridges.
●
Install both the black and tri-color cartridges correctly.
For more information, see Replace cartridges on page 50.
●
Check the estimated ink levels in the cartridges to make sure there is suicient ink.
For more information, see Check estimated ink levels on page 48.
●
If the print quality is not acceptable, see Printing issues on page 76 for more information.
Paper loading tips
●
Load a stack of paper (not just one page). All of the paper in the stack should be in the same size and
type to avoid a paper jam.
●
Load the paper with side to be printed on facing up.
●
Ensure that paper loaded in the input tray lays at, and the edges are not bent or torn.
●
Adjust the paper-width guide in the input tray to t snugly against all paper. Make sure the paper-width
guide does not bend the paper in the input tray.
For more information, see Load media on page 10.
Printer settings tips (Windows)
●
To change default print settings, open the HP printer software, click Print & Scan , and then click Set
Preferences. For information how to open the printer software, see Open the HP printer software
(Windows) on page 18.
●
To select the number of pages to print per sheet, on the Layout tab, select the appropriate option from
the Pages per Sheet drop-down list.
●
To view more printing settings, on the Layout or Paper/Quality tab, click the Advanced button to open
the Advanced Options dialog box.
—
Print in Grayscale: Allows you to print a black and white document using the black ink only. Select
Black Ink Only, and then click OK . It also allows you to print a high quality black and white image.
Select High Quality Grayscale, and then click OK .
—
Pages per Sheet Layout: Helps you specify the order of the pages if you print the document with
more than two pages per sheet.
NOTE: The preview on the Layout tab cannot reect what you select from the Pages per Sheet
Layout drop-down list.
—
HP Real Life Technologies: This feature smooths and sharpens images and graphics for improved
print quality.
30 Chapter 3 Print ENWW
Page 35

—
Booklet: Allows you to print a multiple-page document as a booklet. It places two pages on each
side of a sheet that can then be folded into a booklet in half size of the paper. Select a binding
method from the drop-down list, and then click OK.
○
Booklet-LeftBinding: The binding side after folded into a booklet appears at the left side.
Select the option if your reading habit is from left to right.
○
Booklet-RightBinding: The binding side after folded into a booklet appears at the right side.
Select the option if your reading habit is from right to left.
NOTE: The preview on the Layout tab cannot reect what you select from the Booklet drop-
down list.
—
Pages to Print: Allows you to print the odd pages only, print the even pages only, or print all pages.
—
Page Borders: Allows you to add borders to the pages if you print the document with two or more
pages per sheet.
NOTE: The preview on the Layout tab cannot reect what you select from the Page Borders
drop-down list.
●
You can use printing shortcut to save time setting printing preferences. A printing shortcut stores the
setting values that are appropriate for a particular kind of job, so that you can set all the options with a
single click. To use it, go to the Printing Shortcut tab, select one printing shortcut, and then click OK.
To add a new printing shortcut, after making settings on the Layout or Paper/Quality tab, click the
Printing Shortcut tab, click Save As and enter a name, and then click OK.
To delete a printing shortcut, select it, and then click Delete.
NOTE: You cannot delete the default printing shortcuts.
Printer settings tips (OS X)
●
On the Print dialog, use the Paper Size pop-up menu to select the size of paper loaded in the printer.
●
On the Print dialog, choose the Paper Type/Quality pop-up menu and select the appropriate paper type
and quality.
●
To print a black and white document using only black ink, choose the Paper Type/Quality from the pop-
up menu and choose Grayscale from the Color pop-up menu.
Notes
●
Original HP cartridges are designed and tested with HP printers and papers to help you easily produce
great results, time after time.
NOTE: HP cannot guarantee the quality or reliability of non-HP supplies. Product service or repairs
required as a result of using a non-HP supply will not be covered under warranty.
If you believe the purchased original HP cartridges, go to:
www.hp.com/go/anticounterfeit
●
You can print your document on both sides of the paper manually.
ENWW Tips for print success 31
Page 36

32 Chapter 3 Print ENWW
Page 37

4 Use Web Services
●
What are Web Services?
●
Set up Web Services
●
Print with HP ePrint
●
Remove Web Services
ENWW 33
Page 38

What are Web Services?
The printer oers innovative, web-enabled solutions that can help you quickly access the Internet, obtain
documents, and print them faster and with less hassle—and all without using a computer.
NOTE: To use these web features, the printer must be connected to the Internet (using wireless
connection). You cannot use these web features if the printer is connected using a USB cable.
HP ePrint
●
HP ePrint is a free service from HP that allows you to print to your HP ePrint-enabled printer anytime,
from any location. It's as simple as sending an email to the email address assigned to your printer when
you enable Web Services on the printer. No special drivers or software are needed. If you can send an
email, you can print from anywhere, using HP ePrint.
Once you have signed up for an account on HP Connected (might not be available in all countries/
regions), you can sign in to view your HP ePrint job status, manage your HP ePrint printer queue, control
who can use your printer's HP ePrint email address to print, and get help for HP ePrint.
34 Chapter 4 Use Web Services ENWW
Page 39

Set up Web Services
Before you set up Web Services, make sure your printer is connected to the Internet using a wireless
connection.
To set up Web Services
1. Open the embedded web server (EWS). For more information, see Open the embedded web server
on page 65.
2. Click the Web Services tab.
3. In the Web Services Settings section, click Setup , click Continue, and follow the onscreen instructions
to accept the terms of use.
4. If prompted, choose to allow the printer to check for and install printer updates.
NOTE: If a printer update is available, the printer downloads and installs the update, and then restarts.
Repeat the instructions from step 1 to set up Web Services.
NOTE: If prompted for proxy settings and if your network uses proxy settings, follow the onscreen
instructions to set up a proxy server. If you do not have the proxy details, contact your network
administrator or the person who set up the network.
5. When the printer is connected to the server, the printer prints an information page. Follow the
instructions on the information page to nish the setup.
ENWW Set up Web Services 35
Page 40

Print with HP ePrint
HP ePrint allows you to print to your HP ePrint-enabled printer anytime, from any location.
Before you can use HP ePrint, make sure the printer is connected to an active network providing Internet
access.
To print a document using HP ePrint
1. Make sure you have set up Web Services.
For more information, see Set up Web Services on page 35.
2.
Press the Information button ( ) to print an information page, and then nd the email address for
your printer from the page.
3. Email your document to the printer.
a. On your computer or mobile device, open your email application.
NOTE: For information about using the email application on your computer or mobile device, see
the documentation provided with the application.
b. Create a new email and attach the document to print.
c. Send the email to the printer email address.
The printer prints the attached document.
NOTE: Enter only the HP ePrint email address in the "To" eld. Do not enter any additional email
addresses in the other elds. The HP ePrint server does not accept email print jobs if there are multiple
addresses in the "To" eld or any address in the "Cc" eld."
NOTE: The email will be printed once it is received. As with any email, there is no guarantee when or
whether it will be received. You can check the print status on HP Connected (might not be available in all
countries/regions).
NOTE: Documents printed with HP ePrint may appear dierent from the original. Style, formatting,
and text ow may dier from the original document. For documents that need to be printed with a
higher quality (such as legal documents), we recommend that you print from the software application
on your computer, where you will have more control over what your printout looks like.
36 Chapter 4 Use Web Services ENWW
Page 41

Remove Web Services
To remove Web Services, complete the following steps:
1. Open the embedded web server (EWS). For more information, see Open the embedded web server
on page 65.
2. Click the Web Services tab, and then click Remove Web Services in the Web Services Settings section.
3. Click Remove Web Services.
4. Click Yes to remove Web Services from your printer.
ENWW Remove Web Services 37
Page 42

38 Chapter 4 Use Web Services ENWW
Page 43

5 Copy and scan
●
Copy documents
●
Scan using the HP printer software
●
Scan using Webscan
●
Tips for copy and scan success
ENWW 39
Page 44

Copy documents
NOTE: All documents are copied in normal quality print mode. You cannot change the print mode quality
when copying.
To copy documents
1. Load paper in the input tray.
For information about how to load paper, see Load media on page 10.
2. Load the original print side up, fully justied to the right side of the scanner, until it feeds into the scan
path and the scan light turns on.
3.
Press either the Start Copy Black button ( ) or the Start Copy Color button ( ) to make a copy.
You can increase the number of copies by pressing the button multiple times fast within two seconds.
If the original is not pulled in, push it into the scan path by hand until it moves on its own.
The scanner automatically feeds the original for scanning. Printing for copy starts after scanning is
complete.
40 Chapter 5 Copy and scan ENWW
Page 45

Scan using the HP printer software
●
Scan to a computer
●
Create a new scan shortcut (Windows)
●
Change scan settings (Windows)
Scan to a computer
Before scanning to a computer, make sure you have already installed the HP recommended printer software.
The printer and computer must be connected and turned on.
To scan a document or photo to a le (Windows)
1. Load the original print side up, fully justied to the right side of the scanner, until it feeds into the scan
path and the scan light turns on.
2. Double-click the printer icon on the desktop or do one of the following to open the printer software:
●
Windows 10: From the computer desktop, click Start, select All apps, click HP, and then select the
icon with the printer name.
●
Windows 8.1: Click the down arrow in lower left corner of the Start screen, and then select the
printer name.
●
Windows 8: Right-click an empty area on the Start screen, click All Apps on the app bar, and then
select the printer name.
●
Windows 7, Windows Vista, and Windows XP: From the computer desktop, click Start, select All
Programs, click HP, click the folder for the printer, and then select the icon with the printer name.
3. In the printer software, click Scan , and then click Scan a Document or Photo .
4. Select the type of scan you want and then click Scan .
●
Choose Save as PDF to save the document (or photo) as a PDF le.
●
Choose Save as JPEG to save the photo (or document) as an image le.
NOTE: The initial screen allows you to review and modify basic settings. Click the More link at the top
right corner of the Scan dialog to review and modify detailed settings.
For more information, see Change scan settings (Windows) on page 43.
If Show Viewer After Scan is selected, you can make adjustments to the scanned image in the preview
screen.
To scan a document or photo to email (Windows)
1. Load the original print side up, fully justied to the right side of the scanner, until it feeds into the scan
path and the scan light turns on.
2. Double-click the printer icon on the desktop or do one of the following to open the printer software:
ENWW Scan using the HP printer software 41
Page 46

●
Windows 10: From the computer desktop, click Start, select All apps, click HP, and then select the
icon with the printer name.
●
Windows 8.1: Click the down arrow in lower left corner of the Start screen, and then select the
printer name.
●
Windows 8: Right-click an empty area on the Start screen, click All Apps on the app bar, and then
select the printer name.
●
Windows 7, Windows Vista, and Windows XP: From the computer desktop, click Start, select All
Programs, click HP, click the folder for the printer, and then select the icon with the printer name.
3. In the printer software, click Scan , and then click Scan a Document or Photo .
4. Select the type of scan you want and then click Scan .
Choose Email as PDF or Email as JPEG to open your email software with the scanned le as an
attachment.
NOTE: Click the More link at the top right corner of the Scan dialog to review and modify settings for
any scan.
For more information, see Change scan settings (Windows) on page 43.
If Show Viewer After Scan is selected, you can make adjustments to the scanned image in the preview
screen.
To scan an original from HP printer software (OS X)
1. Open HP Easy Scan.
HP Easy Scan is located in the Applications folder.
2. Choose the type of scan prole you want.
3. Click Scan.
Create a new scan shortcut (Windows)
You can create your own scan shortcut to make scanning easier. For example, you might want to regularly
scan and save photos in PNG format, rather than JPEG.
1. Load the original print side up, fully justied to the right side of the scanner, until it feeds into the scan
path and the scan light turns on.
2. Double-click the printer icon on the desktop or do one of the following to open the printer software:
●
Windows 10: From the computer desktop, click Start, select All apps, click HP, and then select the
icon with the printer name.
●
Windows 8.1: Click the down arrow in lower left corner of the Start screen, and then select the
printer name.
●
Windows 8: Right-click an empty area on the Start screen, click All Apps on the app bar, and then
select the printer name.
●
Windows 7, Windows Vista, and Windows XP: From the computer desktop, click Start, select All
Programs, click HP, click the folder for the printer, and then select the icon with the printer name.
42 Chapter 5 Copy and scan ENWW
Page 47

3. In the printer software, click Scan , and then click Scan a Document or Photo .
4. Click Create New Scan Shortcut .
5. Enter a descriptive name, choose an existing shortcut on which to base your new shortcut, and then click
Create .
For example, if you are creating a new shortcut for photos, choose either Save as JPEG or Email as
JPEG . This makes available the options for working with graphics when scanning.
6. Change the settings for your new shortcut to meet your needs, and then click the save icon to the right
of the shortcut.
NOTE: Click the More link at the top right corner of the Scan dialog to review and modify settings for
any scan.
For more information, see Change scan settings (Windows) on page 43.
Change scan settings (Windows)
You can modify any of the scan settings either for a singular use or save the changes to use permanently.
These settings include options such as page size and orientation, scan resolution, contrast, and the folder
location for saved scans.
1. Load the original print side up, fully justied to the right side of the scanner, until it feeds into the scan
path and the scan light turns on.
2. Double-click the printer icon on the desktop or do one of the following to open the printer software:
●
Windows 10: From the computer desktop, click Start, select All apps, click HP, and then select the
icon with the printer name.
●
Windows 8.1: Click the down arrow in lower left corner of the Start screen, and then select the
printer name.
●
Windows 8: Right-click an empty area on the Start screen, click All Apps on the app bar, and then
select the printer name.
●
Windows 7, Windows Vista, and Windows XP: From the computer desktop, click Start, select All
Programs, click HP, click the folder for the printer, and then select the icon with the printer name.
3. In the printer software, click Scan , and then click Scan a Document or Photo .
4. Click the More link in the top right corner of the HP Scan dialog.
The detailed settings pane appears on the right. The left column summarizes the current settings for
each section. The right column allows you to change the settings in the highlighted section.
5. Click each section at the left of the detailed settings pane to review the settings in that section.
You can review and change most settings using drop-down menus.
Some settings allow greater exibility by displaying a new pane. These are indicated by a + (plus sign) at
the right of the setting. You must either accept or cancel any changes on this pane to return to the
detailed settings pane.
6. When you have nished changing settings, do one of the following.
ENWW Scan using the HP printer software 43
Page 48

●
Click Scan . You are prompted to save or reject the changes to the shortcut after the scan is
nished.
●
Click the save icon to the right of the shortcut, and then click Scan .
Go online to learn more about using the HP Scan software. Learn how to:
●
customize scan settings, such as image le type, scan resolution, and contrast levels.
●
scan to network folders and cloud drives.
●
preview and adjust images before scanning.
44 Chapter 5 Copy and scan ENWW
Page 49

Scan using Webscan
Webscan is a feature of the embedded web server that lets you scan photos and documents from your printer
to your computer using a web browser.
This feature is available even if you did not install the printer software on your computer.
NOTE: By default, Webscan is o. You can enable this feature from the EWS.
If you are unable to open Webscan in the EWS, your network administrator might have turned it o. For more
information, contact your network administrator or the person who set up your network.
To enable Webscan
1. Open the embedded web server. For more information, see Open the embedded web server
on page 65.
2. Click the Settings tab.
3. In the Security section, click Administrator Settings.
4. Select Webscan from EWS to enable Webscan.
5. Click Apply.
To scan using Webscan
Scanning using Webscan oers basic scan options. For additional scan options or functionality, scan from the
HP printer software.
1. Load the original print side up, fully justied to the right side of the scanner, until it feeds into the scan
path and the scan light turns on.
2. Open the embedded web server. For more information, see Open the embedded web server
on page 65.
3. Click the Scan tab.
4. Click Webscan in the left pane, change any settings, and then click Start Scan .
ENWW Scan using Webscan 45
Page 50

Tips for copy and scan success
Use the following tips to copy and scan successfully:
●
Load single sheet of original to the scanner at a time.
●
Do not scan originals with staples or paper clips attached.
●
Do not scan originals containing wet materials (such as crayons, markers, or other painted items).
●
Remove original from the scan path once scan is complete.
●
Do not put the scanner in direct sunlight, bright lighting, or dusty environment.
●
If you see vertical streaks in your copied or scanned documents, use a compressed air duster to blow air
into the scan path where the streaks appear.
●
To make a large copy of a small original, scan the original into the computer, resize the image in the
scanning software, and then print a copy of the enlarged image.
●
To avoid incorrect or missing scanned text, make sure the brightness is set appropriately in the
software.
46 Chapter 5 Copy and scan ENWW
Page 51

6 Manage cartridges
This section contains the following topics:
●
Check estimated ink levels
●
Order ink supplies
●
Replace cartridges
●
Use single cartridge mode
●
Cartridge warranty information
●
Tips for working with cartridges
ENWW 47
Page 52

Check estimated ink levels
You can easily check the ink supply level to determine how soon you might need to replace a cartridge. The
ink supply level shows an estimate of the amount of ink remaining in the cartridges.
NOTE: If you have installed a relled or remanufactured cartridge, or a cartridge that has been used in
another printer, the ink level indicator might be inaccurate or unavailable.
NOTE: Ink level warnings and indicators provide estimates for planning purposes only. When you receive a
low-ink warning message, consider having a replacement cartridge available to avoid possible printing
delays. You do not have to replace the cartridges until the print quality is unacceptable.
NOTE: Ink from the cartridges is used in the printing process in a number of dierent ways, including in the
initialization process, which prepares the printer and cartridges for printing, and in printhead servicing, which
keeps print nozzles clear and ink owing smoothly. In addition, some residual ink is left in the cartridge after
it is used. For more information, see www.hp.com/go/inkusage.
To check the ink levels from the printer control panel
●
The Ink Level icons on the printer display show an estimate of ink remaining in the cartridges.
To check the ink levels from the HP printer software (Windows)
1. Open the HP printer software. For more information, see Open the HP printer software (Windows)
on page 18.
2. In the printer software, click the Estimated Levels tab.
To check the ink levels from the HP printer software (OS X)
1. Open HP Utility.
NOTE: HP Utility is located in the HP folder in the Applications folder.
2. Select the HP DeskJet 3700 series from the list of devices at the left of the window.
3. Click Supplies Status.
The estimated ink levels appear.
4. Click All Settings to return to the Information and Support pane.
48 Chapter 6 Manage cartridges ENWW
Page 53
Order ink supplies
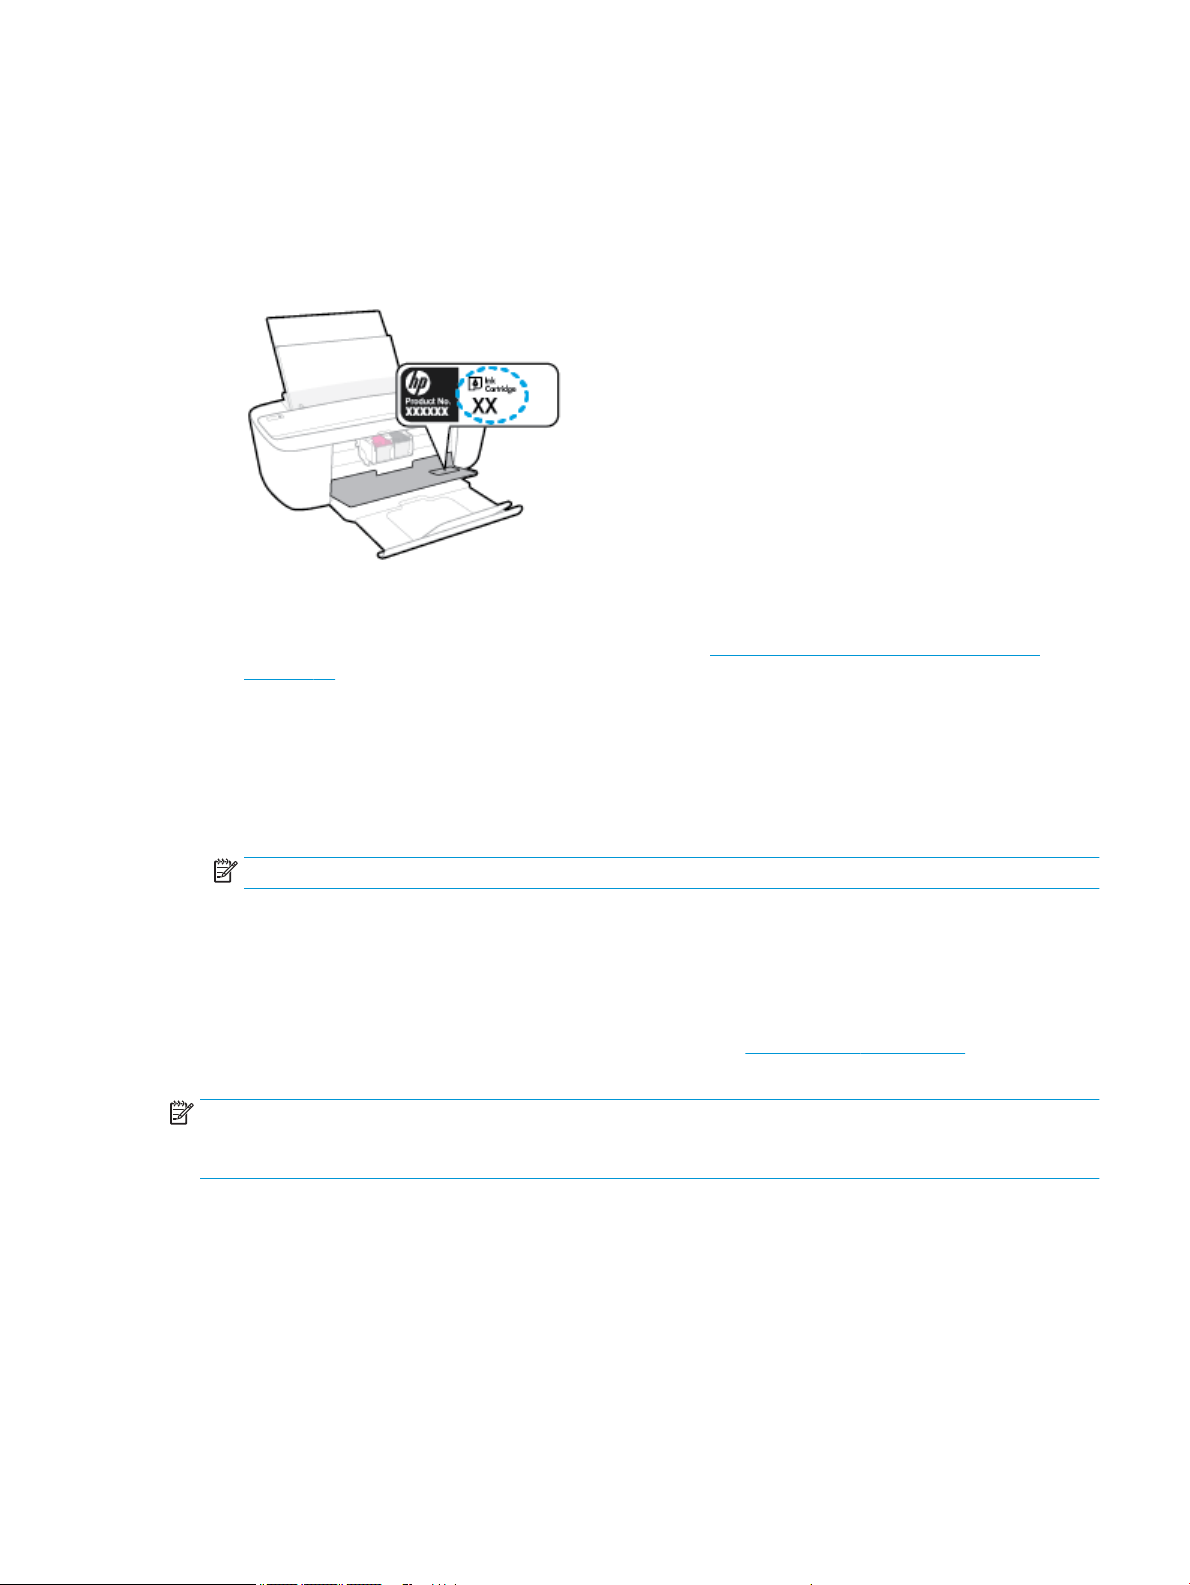
Before ordering cartridges, locate the correct cartridge number.
To locate the cartridge number on the printer
●
The cartridge number is located inside the cartridge access door.
To locate the cartridge number from the printer software (Windows)
1. Open the HP printer software. For more information, see Open the HP printer software (Windows)
on page 18.
2. In the printer software, click Shop, click Shop For Supplies Online, and then follow the onscreen
instructions.
To nd the print cartridge reorder numbers (OS X)
1. Open HP Utility.
NOTE: HP Utility is located in the HP folder in the Applications folder.
2. Click Supplies Info.
The print cartridge ordering numbers appear.
3. Click All Settings to return to the Information and Support pane.
To order original HP supplies for the HP DeskJet 3700 series, go to www.hp.com/buy/supplies . If prompted,
choose your country/region, and then follow the prompts to nd the right cartridges for your printer.
NOTE: Ordering cartridges online is not supported in all countries/regions. If it is not available in your
country/region, you may still view supplies information and print a list for reference when shopping at a local
HP reseller.
ENWW Order ink supplies 49
Page 54

Replace cartridges
To replace the cartridges
1. Check that power is on.
2. Remove the cartridge.
a. Open the cartridge access door and wait for the print carriage to move to the center of the printer.
b. Press down to release the cartridge, and then pull it toward you out of the slot.
3. Insert a new cartridge.
a. Remove the cartridge from the packaging.
50 Chapter 6 Manage cartridges ENWW
Page 55

b. Remove the plastic tape using the pull tab.
NOTE: Do not touch the electrical contacts on the cartridge.
c. Slide the cartridge into the slot at a slight upward angle, and then push up on the cartridge until it
clicks into place.
d. Close the cartridge access door.
ENWW Replace cartridges 51
Page 56

Use single cartridge mode
Use the single cartridge mode to operate the printer with only one cartridge. The single cartridge mode is
initiated when one of the following occurs.
●
There is only one cartridge installed in the carriage.
●
A cartridge is removed from the carriage if there are two cartridges installed previously.
NOTE: If the printer enters the single cartridge mode when two cartridges are installed in the printer,
verify that the protective piece of plastic tape has been removed from each cartridge. When the plastic
tape covers the cartridge contacts, the printer cannot detect that the cartridge is installed. If there is no
plastic tape on the cartridges, try cleaning the cartridge contacts. For information about cleaning
cartridge contacts, see Cartridge issues on page 74.
To exit the single cartridge mode
●
Install both the black and tri-color cartridges in the printer.
52 Chapter 6 Manage cartridges ENWW
Page 57

Cartridge warranty information
The HP cartridge warranty is applicable when the cartridge is used in its designated HP printing device. This
warranty does not cover HP cartridges that have been relled, remanufactured, refurbished, misused, or
tampered with.
During the warranty period, the cartridge is covered as long as the HP ink is not depleted and the end of
warranty date has not been reached. The end of warranty date, in YYYY/MM/DD format, may be found on the
cartridge as indicated:
For a copy of the HP Limited Warranty Statement, see the printed documentation that came with the printer.
ENWW Cartridge warranty information 53
Page 58

Tips for working with cartridges
Use the following tips to work with cartridges:
●
To protect the cartridges from drying out, always turn the printer o using the Power button, and wait
until the Power button light goes out.
●
Do not open or untape cartridges until you are ready to install them. Leaving tape on the cartridges
reduces ink evaporation.
●
Insert the cartridges into the correct slots. Match the color and icon of each cartridge to the color and
icon for each slot. Make sure the cartridges snap into place.
●
Align the printer for best print quality. See Printing issues on page 76 for more information.
●
When the Estimated Cartridge Levels screen shows one or both cartridges in a low state, consider
getting replacement cartridges to avoid possible printing delays. You do not need to replace the
cartridges until print quality becomes unacceptable. See Replace cartridges on page 50 for more
information.
●
If you remove a cartridge from the printer for any reason, try to replace it again as soon as possible.
Outside of the printer, if unprotected, cartridges begin to dry out.
54 Chapter 6 Manage cartridges ENWW
Page 59

7 Connect your printer
●
Connect your printer to a wireless network with a router
●
Connect wirelessly to the printer without a router
●
Wireless settings
●
Connect your printer to your computer with a USB cable (non-network connection)
●
Change from a USB connection to a wireless network
●
Advanced printer management tools (for networked printers)
●
Tips for setting up and using a networked printer
ENWW 55
Page 60
Connect your printer to a wireless network with a router
TIP: To print a wireless quick start guide, press the Information button ( ) for three seconds.
●
Connect your printer to a wireless network using Wi-Fi Protected Setup (WPS)
●
Connect your printer to a wireless network using HP printer software
Connect your printer to a wireless network using Wi-Fi Protected Setup (WPS)
Before you can connect your printer to a wireless network using WPS, make sure you have following:
●
A wireless 802.11b/g/n network that includes a WPS-enabled wireless router or access point.
NOTE: The printer only supports connections using 2.4GHz.
●
A computer connected to the wireless network that you intend to connect the printer to. Be sure you
have installed the HP printer software on the computer.
If you have a WPS router with a WPS push button, follow the Push Button method. If you are not certain your
router has a push button, follow the PIN method.
To use the Push Button Conguration (PBC) method
1.
Press and hold the Wireless button ( ) on the printer for more than three seconds to start WPS push
mode. The Wireless light starts blinking.
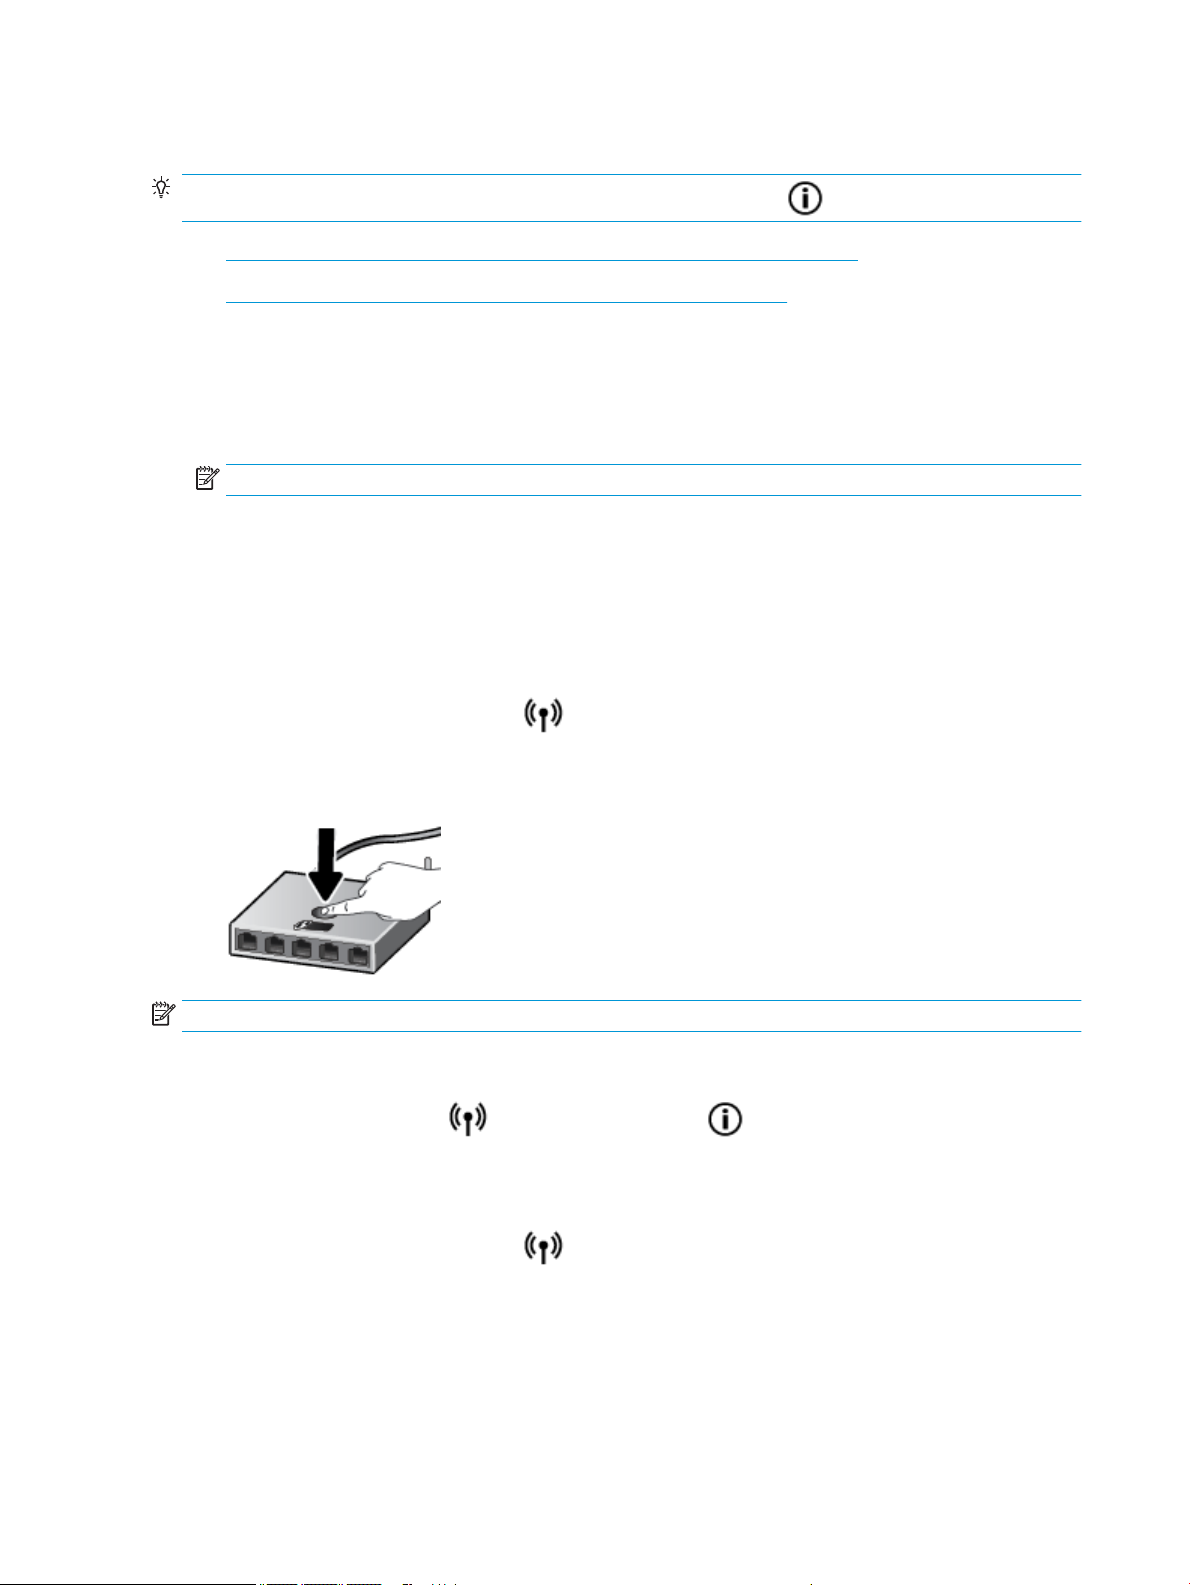
2. Press the WPS button on your router.
NOTE: The product begins a timer for approximately two minutes while a wireless connection is established.
To use the PIN method
1.
Press the Wireless button ( ) and Information button ( ) at the same time to print the network
conguration page, and then locate a WPS PIN.
The WPS PIN is printed at the top of the printed information page.
2.
Press and hold the Wireless button ( ) from the printer control panel for more than three seconds.
The wireless light starts blinking.
3. Open the conguration utility or software for the wireless router or wireless access point, and then enter
the WPS PIN.
56 Chapter 7 Connect your printer ENWW
Page 61

NOTE: For more information about using the conguration utility, see the documentation provided
with the router or wireless access point.
Wait for about two minutes. If the printer connects successfully, the Wireless light stops blinking but remains
lit.
Connect your printer to a wireless network using HP printer software
To connect the printer to an integrated wireless WLAN 802.11 network, you will need the following:
●
A wireless 802.11b/g/n network that includes a wireless router or access point.
NOTE: The printer only supports connections using 2.4GHz.
●
A computer connected to the wireless network that you intend to connect the printer to.
●
Network name (SSID).
●
WEP key or WPA Passphrase (if needed).
To connect your printer using HP printer software (Windows)
1. Depending on whether you have installed the HP printer software or not, do one of the following:
If you have not installed the HP printer software on your computer
a. Visit 123.hp.com to download and install the printer software.
NOTE: During the software installation, a USB cable might be required for temporary connection
between the printer and the computer. Do not connect the USB cable until the printer software
prompts to do so.
b. When you are prompted, select Wireless, and then follow the onscreen instructions.
If you have the HP printer software installed on your computer
a. Open the printer software. For more information, see Open the HP printer software (Windows)
on page 18.
b. In the printer software, click Tools.
c. Click Device Setup & Software.
d. Click Connect a new device, click Wireless, and then follow the onscreen instructions.
2. After the printer connects successfully, the blue Wireless light stops blinking and remains on.
To connect your printer using HP printer software (OS X)
1. Depending on whether you have installed the HP printer software or not, do one of the following:
If you have not installed the HP printer software on your computer
▲
Visit 123.hp.com to download and install the printer software.
ENWW Connect your printer to a wireless network with a router 57
Page 62

If you have the HP printer software installed on your computer
a. Double-click HP Utility in the HP folder in the Applications folder.
b. On the menu bar at the top of the screen, choose Setup New Device from the Devices menu, and
then follow the onscreen instructions.
2. After the printer connects successfully, the blue Wireless light stops blinking and remains on.
To connect a new printer (Windows)
1. Open the printer software. For more information, see Open the HP printer software (Windows)
on page 18.
2. In the printer software, click Tools.
3. Select Device Setup & Software.
4. Select Connect a new device. Follow the onscreen instructions.
To connect a new printer (OS X)
1. Open System Preferences .
2. Depending on your operating system, click Printers & Scanners .
3. Click + below the list of printers at the left.
4. Select the new printer from the list.
58 Chapter 7 Connect your printer ENWW
Page 63

Connect wirelessly to the printer without a router
With Wi-Fi Direct, you can print wirelessly from a computer, smart phone, tablet, or other wireless-capable
device—without connecting to an existing wireless network.
Guidelines for using Wi-Fi Direct
●
Make sure your computer or mobile device has the necessary software.
—
If you are using a computer, make sure you have installed the HP printer software.
If you have not installed the HP printer software on the computer, connect to Wi-Fi Direct rst and
then install the printer software. Select Wireless when prompted by the printer software for a
connection type.
—
If you are using a mobile device, make sure you have installed a compatible printing app. For more
information, visit the HP Mobile Printing website at www.hp.com/go/mobileprinting. If a local
version of this website is not available in your country/region or language, you might be directed to
the HP Mobile Printing website in another country/region or language.
●
Make sure Wi-Fi Direct for your printer is turned on.
●
Up to ve computers and mobile devices can use the same Wi-Fi Direct connection.
●
Wi-Fi Direct can be used while the printer is also connected either to a computer using a USB cable or to
a network using a wireless connection.
●
Wi-Fi Direct cannot be used to connect a computer, mobile device, or printer to the Internet.
To turn Wi-Fi Direct on or o
On the printer control panel, press the Wi-Fi Direct button ( ).
●
When Wi-Fi Direct is turned on, the Wi-Fi Direct light is on steady. To nd the Wi-Fi Direct name and
password, press the Information button ( ) to print a printer information page.
NOTE: When you turn on Wi-Fi Direct the rst time, the printer automatically prints a Wi-Fi Direct
guide. The guide provides instructions about how to use Wi-Fi Direct. After that, you can press the Wi-Fi
Direct button ( ) and the Information button ( ) together to print the Wi-Fi Direct guide. The
guide may not be available in all languages.
●
When Wi-Fi Direct is turned o, the Wi-Fi Direct light is o.
●
For more information about the Wi-Fi Direct light status, see Control panel lights and display icons
status on page 7.
To print from a wireless-capable mobile device that supports Wi-Fi Direct
Make sure you have installed the latest version of HP Print Service Plugin on your mobile device. You can
download this plugin from the Google Play application store.
1. Make sure you have turned on Wi-Fi Direct on the printer.
2. Turn on Wi-Fi Direct on your mobile device. For more information, see the documentation provided with
the mobile device.
ENWW Connect wirelessly to the printer without a router 59
Page 64

3. From your mobile device, select a document from a print enabled application, and then select the option
to print the document.
The list of available printers appears.
4. From the list of available printers, choose the Wi-Fi Direct name shown such as DIRECT-**-HP DeskJet
3700 series (where ** are the unique characters to identify your printer).
●
If the Wi-Fi Direct connection security for the printer is Automatic (the default setting), the mobile
device will connect to the printer automatically and send the print job.
●
If the Wi-Fi Direct connection security for the printer is set to Manual, do one of the following to
connect to the printer and print.
—
If the Wi-Fi Direct light on the printer control panel keeps blinking, press the Wi-Fi Direct
button ( ). The light will stop blinking and stay on.
—
If the printer prints out a page with a PIN code, follow the instruction on the page.
TIP: You can change the Wi-Fi Direct connection security setting for the printer from the embedded
web server (EWS). For more information, see Open the embedded web server on page 65.
To print from a wireless-capable mobile device that does not support Wi-Fi Direct
Make sure you have installed a compatible printing app on your mobile device. For more information, visit the
HP Mobile Printing website at www.hp.com/go/mobileprinting. If a local version of this website is not
available in your country/region or language, you might be directed to the HP Mobile Printing website in
another country/region or language.
1. Make sure you have turned on Wi-Fi Direct on the printer.
2. Turn on the Wi-Fi connection on your mobile device. For more information, see the documentation
provided with the mobile device.
NOTE: If your mobile device does not support Wi-Fi, you are not able to use Wi-Fi Direct.
3. From the mobile device, connect to a new network. Use the process you normally use to connect to a
new wireless network or hotspot. Choose the Wi-Fi Direct name from the list of wireless networks
shown such as DIRECT-**-HP DeskJet 3700 series (where ** are the unique characters to identify your
printer).
Enter the Wi-Fi Direct password when prompted.
4. Print your document.
To print from a wireless-capable computer (Windows)
1. Make sure you have turned on Wi-Fi Direct on the printer.
2. Turn on the computer's Wi-Fi connection. For more information, see the documentation provided with
the computer.
NOTE: If your computer does not support Wi-Fi, you are not able to use Wi-Fi Direct.
60 Chapter 7 Connect your printer ENWW
Page 65

3. From the computer, connect to a new network. Use the process you normally use to connect to a new
wireless network or hotspot. Choose the Wi-Fi Direct name from the list of wireless networks shown
such as DIRECT-**-HP DeskJet 3700 series (where ** are the unique characters to identify your printer).
Enter the Wi-Fi Direct password when prompted.
4. Proceed to step 5 if the printer has been installed and connected to the computer over a wireless
network. If the printer has been installed and connected to your computer with a USB cable, follow the
steps below to install the printer software using the HP Wi-Fi Direct connection.
a. Depending on your operating system, do one of the following:
●
Windows 10: From the computer desktop, click Start, select All apps, click HP, and then
select the icon with the printer name.
●
Windows 8.1: Click the down arrow in lower left corner of the Start screen, and then select
the printer name.
●
Windows 8: Right-click an empty area on the Start screen, click All Apps on the app bar, and
then select the printer name.
●
Windows 7, Windows Vista, and Windows XP: From the computer desktop, click Start, select
All Programs, click HP, click the folder for the printer, and then select the icon with the printer
name.
b. In the printer software, click Tools.
c. Click Device Setup & Software, and then select Connect a new device.
d. When the Connection Options software screen appears, select Wireless.
Select your HP printer software from the list of detected printers.
e. Follow the onscreen instructions.
5. Print your document.
To print from a wireless-capable computer (OS X)
1. Make sure you have turned on Wi-Fi Direct on the printer.
2. Turn on Wi-Fi on the computer.
For more information, see the documentation provided by Apple.
3. Click the Wi-Fi icon and choose the Wi-Fi Direct name, such as DIRECT-**-HP DeskJet 3700 series (where
** are the unique characters to identify your printer).
If Wi-Fi Direct is turned on with security, enter the password when prompted.
4. Add the printer.
a. Open System Preferences .
b. Depending on your operating system, click Printers & Scanners .
c. Click + below the list of printers at the left.
d. Select the printer from the list of detected printers (the word “Bonjour” is listed the right column
beside the printer name), and click Add.
ENWW Connect wirelessly to the printer without a router 61
Page 66

Wireless settings
You can set up and manage your printer wireless connection and perform a variety of network management
tasks. This includes printing information about network settings, turning the wireless function on or o, and
changing wireless settings.
To turn on or o the wireless capability of the printer
Press the Wireless button ( ) to turn on or o the printer wireless capabilities.
●
If the printer has an active connection to a wireless network, the Wireless light is on solid blue, and the
printer display shows the Wireless icon and the Signal Bars icon.
●
If wireless is turned o, the Wireless light is o.
●
For more information about the wireless status, see Control panel error codes and status on page 89.
To print the wireless network test report and network conguration page
Press the Wireless button ( ) and the Information button ( ) at the same time.
●
The wireless network test report shows the diagnostics results for the status of the wireless network,
wireless signal strength, detected networks, and more.
●
The network conguration page shows the network status, hostname, network name, and more.
To change wireless settings (Windows)
This method is available if you have already installed the printer software.
NOTE: This method requires a USB cable. Do not connect the USB cable until prompted to do so.
1. Open the HP printer software. For more information, see Open the HP printer software (Windows)
on page 18.
2. In the printer software, click Tools.
3. Click Device Setup & Software.
4. Select Recongure Wireless Settings. Follow the onscreen instructions.
To restore network settings to default settings
●
Press the Wireless button ( ) and the Cancel button ( ) from the printer control panel at the same
time, and then hold them for three seconds.
62 Chapter 7 Connect your printer ENWW
Page 67

Connect your printer to your computer with a USB cable (nonnetwork connection)
The printer supports a rear USB 2.0 High Speed port for connection to a computer.
To connect the printer with the USB cable
1. Visit 123.hp.com to download and install the printer software.
NOTE: Do not connect the USB cable to the printer until you are prompted to do so.
2. Follow the onscreen instructions. When you are prompted, connect the printer to the computer by
selecting USB on the Connection Options screen.
3. Follow the onscreen instructions.
If the printer software has been installed, the printer will operate as a plug-and-play device.
ENWW Connect your printer to your computer with a USB cable (non-network connection) 63
Page 68

Change from a USB connection to a wireless network
If you rst set up your printer and installed the software with a USB cable, directly connecting the printer to
your computer, you can easily change to a wireless network connection. You will need a wireless 802.11b/g/n
network that includes a wireless router or access point.
NOTE: The printer only supports connections using 2.4GHz.
Before changing from a USB connection to a wireless network, make sure that:
●
The printer is connected to your computer with the USB cable until you are prompted to disconnect the
cable.
●
The computer is connected to the wireless network that you intend to install the printer on.
Change from a USB connection to a wireless network (Windows)
1. Open the HP printer software. For more information, see Open the HP printer software (Windows)
on page 18.
2. In the printer software, click Tools.
3. Click Device Setup & Software.
4. Select Convert a USB connected printer to wireless. Follow the onscreen instructions.
To change from a USB connection to a wireless network (OS X)
1. Connect the printer to your wireless network.
2. Use 123.hp.com to change the software connection to wireless for this printer.
64 Chapter 7 Connect your printer ENWW
Page 69

Advanced printer management tools (for networked printers)
When the printer is connected to a network, you can use the embedded web server (EWS) to view status
information, change settings, and manage the printer from your computer.
NOTE: You can open and use the EWS without being connected to the Internet. However, some features are
not available.
NOTE: To view or change some settings, you might need a password.
●
Open the embedded web server
●
About cookies
Open the embedded web server
You can use one of the following ways to open the embedded web server.
To open the embedded web server through a network
1.
From the printer control panel, press the Wireless button ( ) and the Information button ( )
together to print the network conguration page.
2. Find out the IP address or hostname of the printer from the network conguration page.
3. In a supported web browser on your computer, type the IP address or hostname assigned to the printer.
For example, if the IP address is 192.168.0.12, type the following address into a Web browser: http://
192.168.0.12.
To open the embedded web server from the HP printer software (Windows)
1. Open the printer software. For more information, see Open the HP printer software (Windows)
on page 18.
2. Click Print & Scan , and then click Printer Home Page (EWS).
To open the embedded web server through Wi-Fi Direct
1.
If the Wi-Fi Direct light is o, press the Wi-Fi Direct button ( ) to turn it on. To nd the Wi-Fi Direct
name and password, press the
2. From your wireless computer, turn wireless on, search for and connect to the Wi-Fi Direct name, for
example: DIRECT-**-HP DeskJet 3700 series. Enter the Wi-Fi Direct password when prompted.
3. In a supported web browser on your computer, type the following address: http://
192.168.223.1.
Information button ( ) to print a printer information page.
About cookies
The embedded Web server (EWS) places very small text les (cookies) on your hard drive when you are
browsing. These les let the EWS recognize your computer the next time you visit. For example, if you have
congured the EWS language, a cookie helps remember which language you have selected so that the next
time you access the EWS, the pages are displayed in that language. Some cookies (such as the cookie that
stores customer-specic preferences) are stored on the computer until you clear them manually.
ENWW Advanced printer management tools (for networked printers) 65
Page 70

You can congure your browser to accept all cookies, or you can congure it to alert you every time a cookie is
oered, which allows you to decide which cookies to accept or refuse. You can also use your browser to
remove unwanted cookies.
NOTE: Depending on your printer, if you disable cookies, you also disable one or more of the following
features:
●
Starting where you left the application (especially useful when using setup wizards)
●
Remembering the EWS browser language setting
●
Personalizing the EWS Home page
For information about how to change your privacy and cookie settings and how to view or delete cookies, see
the documentation available with your Web browser.
66 Chapter 7 Connect your printer ENWW
Page 71

Tips for setting up and using a networked printer
Use the following tips to set up and use a networked printer:
●
When setting up the wireless networked printer, make sure your wireless router or access point is
powered on. The printer searches for wireless routers, then lists the detected network names on the
computer.
●
If your computer is connected to a Virtual Private Network (VPN), you need to disconnect from the VPN
before you can access any other device on your network, including the printer.
●
Learn more about conguring your network and the printer for wireless printing. Click here to go online
for more information.
●
Learn how to nd your network security settings. Click here to go online for more information.
●
Learn about the HP Print and Scan Doctor. Click here to go online for more information.
NOTE: This utility is only available for Windows operating system.
●
Learn how to change from a USB to wireless connection. Click here to go online for more information.
●
Learn how to work with your rewall and antivirus programs during printer setup. Click here to go online
for more information.
ENWW Tips for setting up and using a networked printer 67
Page 72

68 Chapter 7 Connect your printer ENWW
Page 73

8 Solve a problem
This section contains the following topics:
●
Jams and paper-feed issues
●
Cartridge issues
●
Printing issues
●
Copy issues
●
Scan issues
●
Network and connection issues
●
Printer hardware issues
●
Control panel error codes and status
●
HP support
ENWW 69
Page 74

Jams and paper-feed issues
What do you want to do?
Clear a paper jam
Solve paper jam issues. Use an HP online troubleshooting wizard.
Instructions for clearing paper jams and resolving issues with paper or the paper feed.
NOTE: The HP online troubleshooting wizards may not be available in all languages.
Read general instructions in the Help for clearing paper jams
Paper jams can occur in several locations.
To clear a paper jam from the input tray
1.
Press the Cancel button ( ) to try to clear the jam automatically. If this does not work, complete the
following steps to clear the jam manually.
2. Pull the paper gently out of the input tray.
3. Make sure there is no foreign object in the paper path, and then reload paper.
NOTE: The input tray shield can prevent foreign debris from falling into the paper path and causing
serious paper jams. Do not take down the input tray shield.
4.
Press the Resume button ( ) on the control panel to continue the current job.
To clear a paper jam from the output tray
1.
Press the Cancel button ( ) to try to clear the jam automatically. If this does not work, complete the
following steps to clear the jam manually.
70 Chapter 8 Solve a problem ENWW
Page 75

2. Pull the paper gently out of the output tray.
3.
Press the Resume button ( ) on the control panel to continue the current job.
To clear a paper jam from the cartridge access area
1.
Press the Cancel button ( ) to try to clear the jam automatically. If this does not work, complete the
following steps to clear the jam manually.
2. Remove the jammed paper.
a.
Press the Power button ( ) to turn o the printer.
b. Open the cartridge access door.
c. If the print carriage is in the center of the printer, slide it to the right.
ENWW Jams and paper-feed issues 71
Page 76
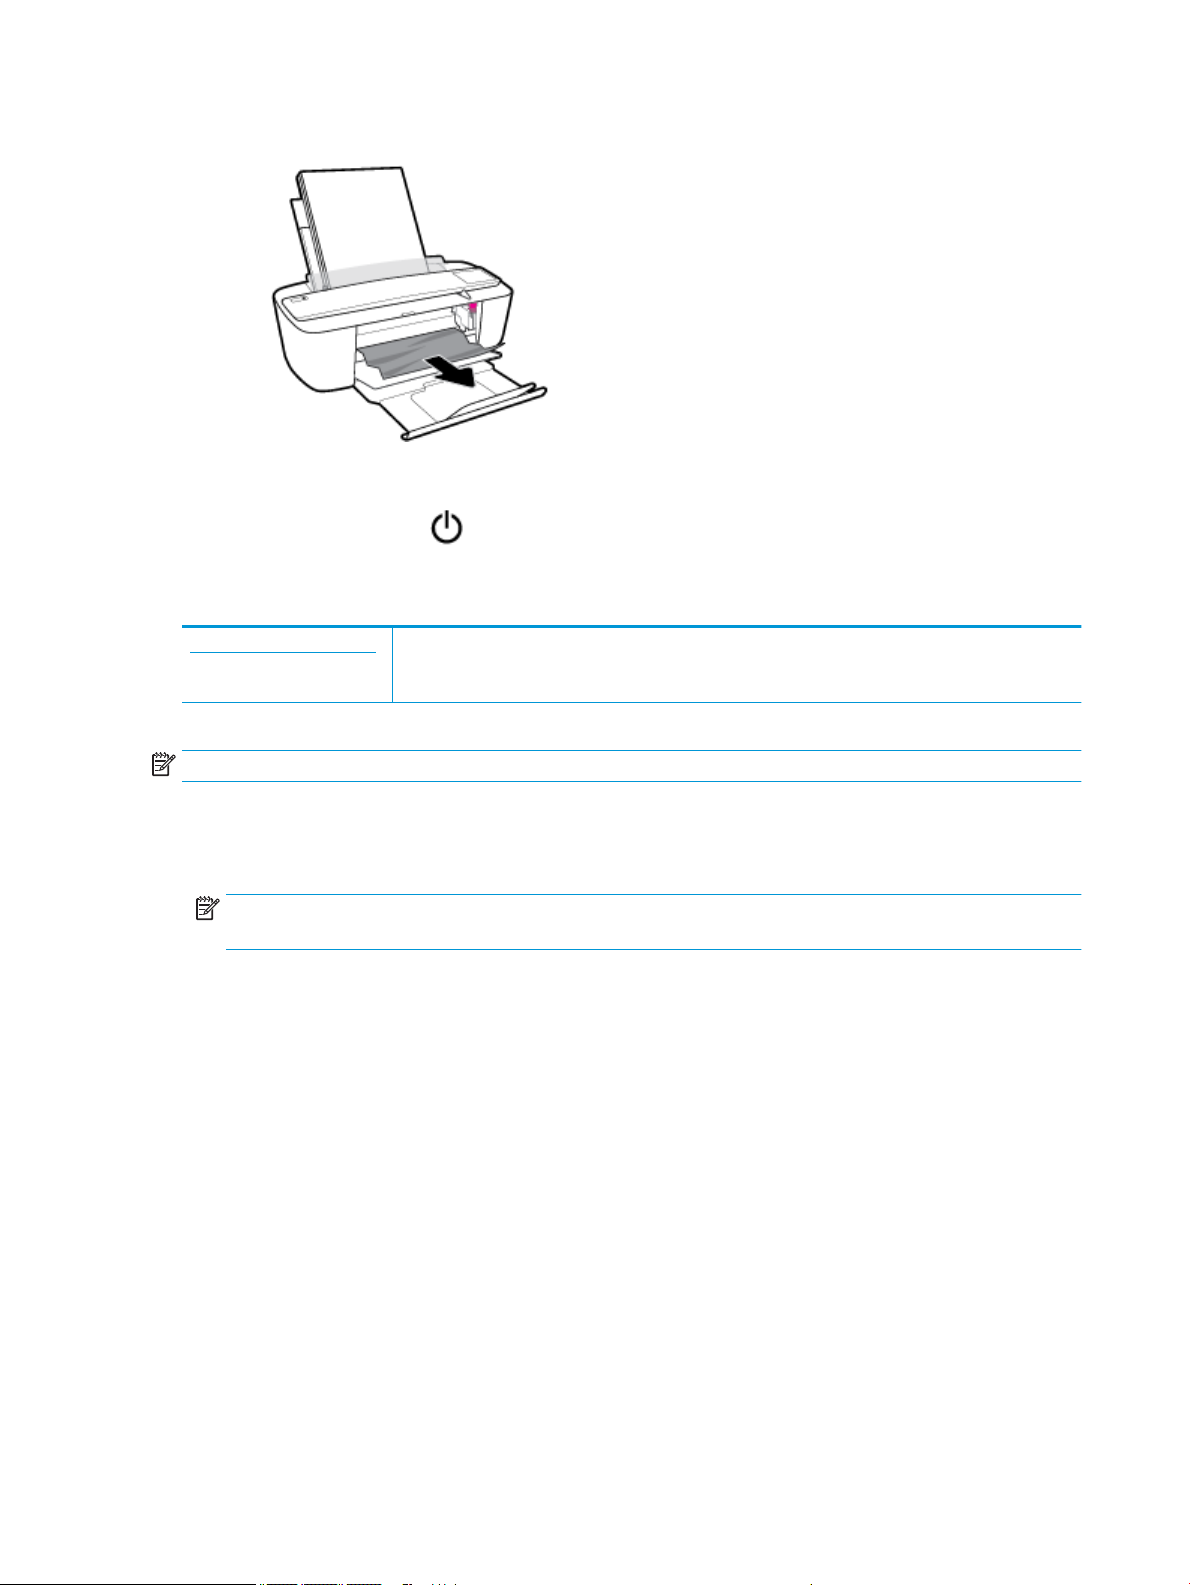
d. Remove the jammed paper.
e. Close the cartridge access door.
3.
Press the Power button ( ) to turn on the printer.
Clear a print carriage jam
Resolve a print carriage jam. Use an HP online troubleshooting wizard.
If something is blocking the print carriage or it does not move easily, get step-by-step instructions.
NOTE: The HP online troubleshooting wizards may not be available in all languages.
Read general instructions in the Help for clearing a print carriage jams
▲
Remove any objects, such as paper, that are blocking the print carriage.
NOTE: Do not use any tools or other devices to remove jammed paper. Always use caution when
removing jammed paper from inside the printer.
Learn how to avoid paper jams
To help avoid paper jams, follow these guidelines.
●
Do not overll the input tray.
●
Remove printed papers from the output tray frequently.
●
Ensure that paper loaded in the input tray lays at, and the edges are not bent or torn.
●
Do not combine dierent paper types and paper sizes in the input tray; the entire stack of paper in the
input tray must be the same size and type.
●
Adjust the paper-width guide in the input tray to t snugly against all paper. Make sure the paper-width
guide does not bend the paper in the input tray.
●
Do not force paper too far down in the input tray.
●
Do not add paper while the printer is printing. If the printer is about to run out of paper, wait until the out
of paper message appears before adding paper.
72 Chapter 8 Solve a problem ENWW
Page 77

Solve paper-feed problems
What kind of problem are you having?
●
Paper is not picked up from the input tray
—
Make sure paper is loaded in the input tray. For more information, see Load media on page 10.
—
Adjust the paper-width guide in the input tray to t snugly against all paper. Make sure the paperwidth guide does not bend the paper in the input tray.
—
Make sure paper in the input tray is not curled. Uncurl paper by bending it in the opposite direction
of the curl.
●
Pages are skewing
—
Make sure the paper is loaded in the far-right side of the input tray and the paper-width guide is t
against the left side of the paper.
—
Load paper into the printer only when it is not printing.
●
Multiple pages are being picked up
—
Adjust the paper-width guide in the input tray to t snugly against all paper. Make sure the paperwidth guide does not bend the paper in the input tray.
—
Make sure the input tray is not overloaded with paper.
—
Make sure the pieces of the loaded paper are not sticking together.
—
Use HP paper for optimum performance and eiciency.
ENWW Jams and paper-feed issues 73
Page 78
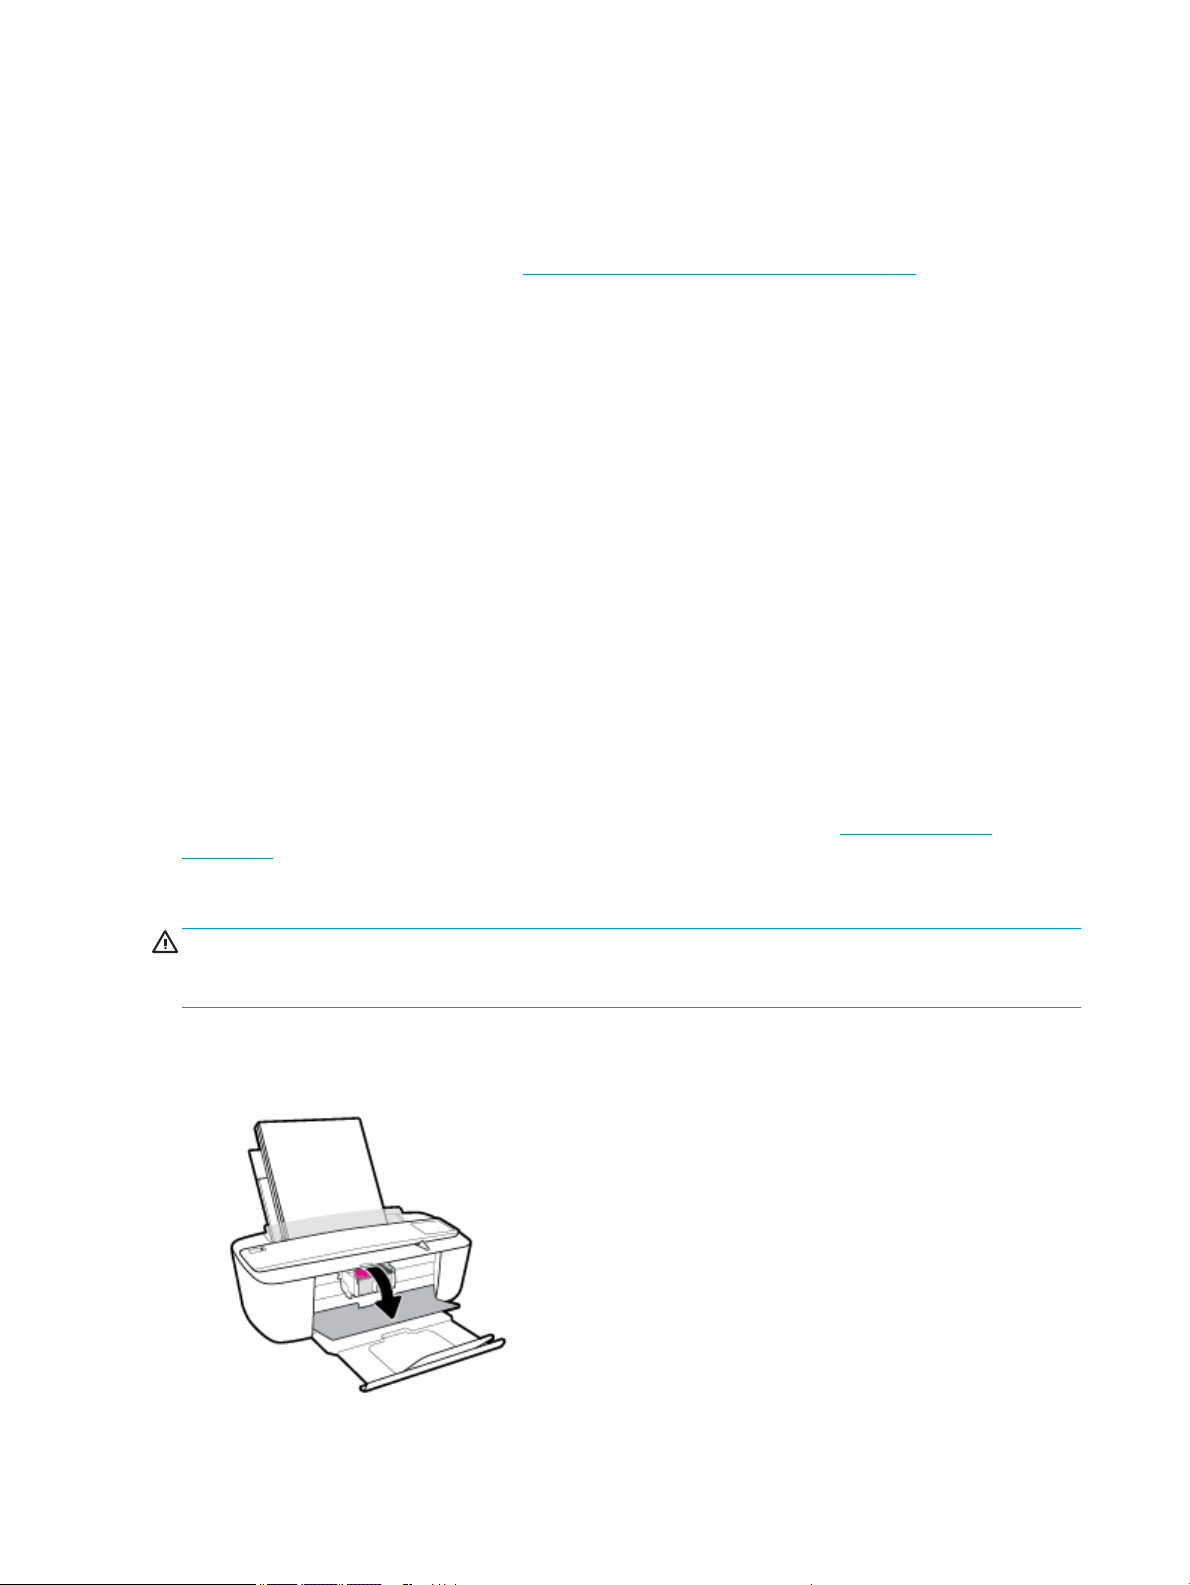
Cartridge issues
Identify whether a cartridge has a problem
To identify whether a cartridge has a problem, check the status of the Ink Alert light and the corresponding
Ink Level icon. For more information, see Control panel error codes and status on page 89.
If you get a cartridge problem message from the printer software that states at least one of the cartridges
has a problem, do the following to identify whether a cartridge has a problem.
1. Remove the black cartridge and then close the cartridge access door.
●
If the Ink Level icon for the tri-color cartridge blinks, the tri-color cartridge has a problem.
●
If the Ink Level icon for the tri-color cartridge does not blink, the tri-color cartridge does not have a
problem.
2. Install the black cartridge back in the printer, remove tri-color cartridge, and then close the cartridge
access door.
●
If the Ink Level icon for the black cartridge blinks, the black cartridge has a problem.
●
If the Ink Level icon for the black cartridge does not blink, the black cartridge does not have a
problem.
Fix cartridge problems
If an error occurs after a cartridge is installed, or if a message indicates a cartridge problem, try removing the
cartridges, verifying the protective piece of plastic tape has been removed from each cartridge, and then
reinserting the cartridges. If this does not work, clean the cartridge contacts. If the problem is still not
resolved, replace the cartridges. For information about replacing cartridges, see Replace cartridges
on page 50.
To clean cartridge contacts
CAUTION: The cleaning procedure should take only a few minutes. Make sure that the cartridges are
reinstalled in the printer as soon as possible. It is not recommended to leave the cartridges outside of the
printer longer than 30 minutes. This could result in damage to the printhead or the cartridges.
1. Check that power is on.
2. Open the cartridge access door and wait for the print carriage to move to the center of the printer.
74 Chapter 8 Solve a problem ENWW
Page 79
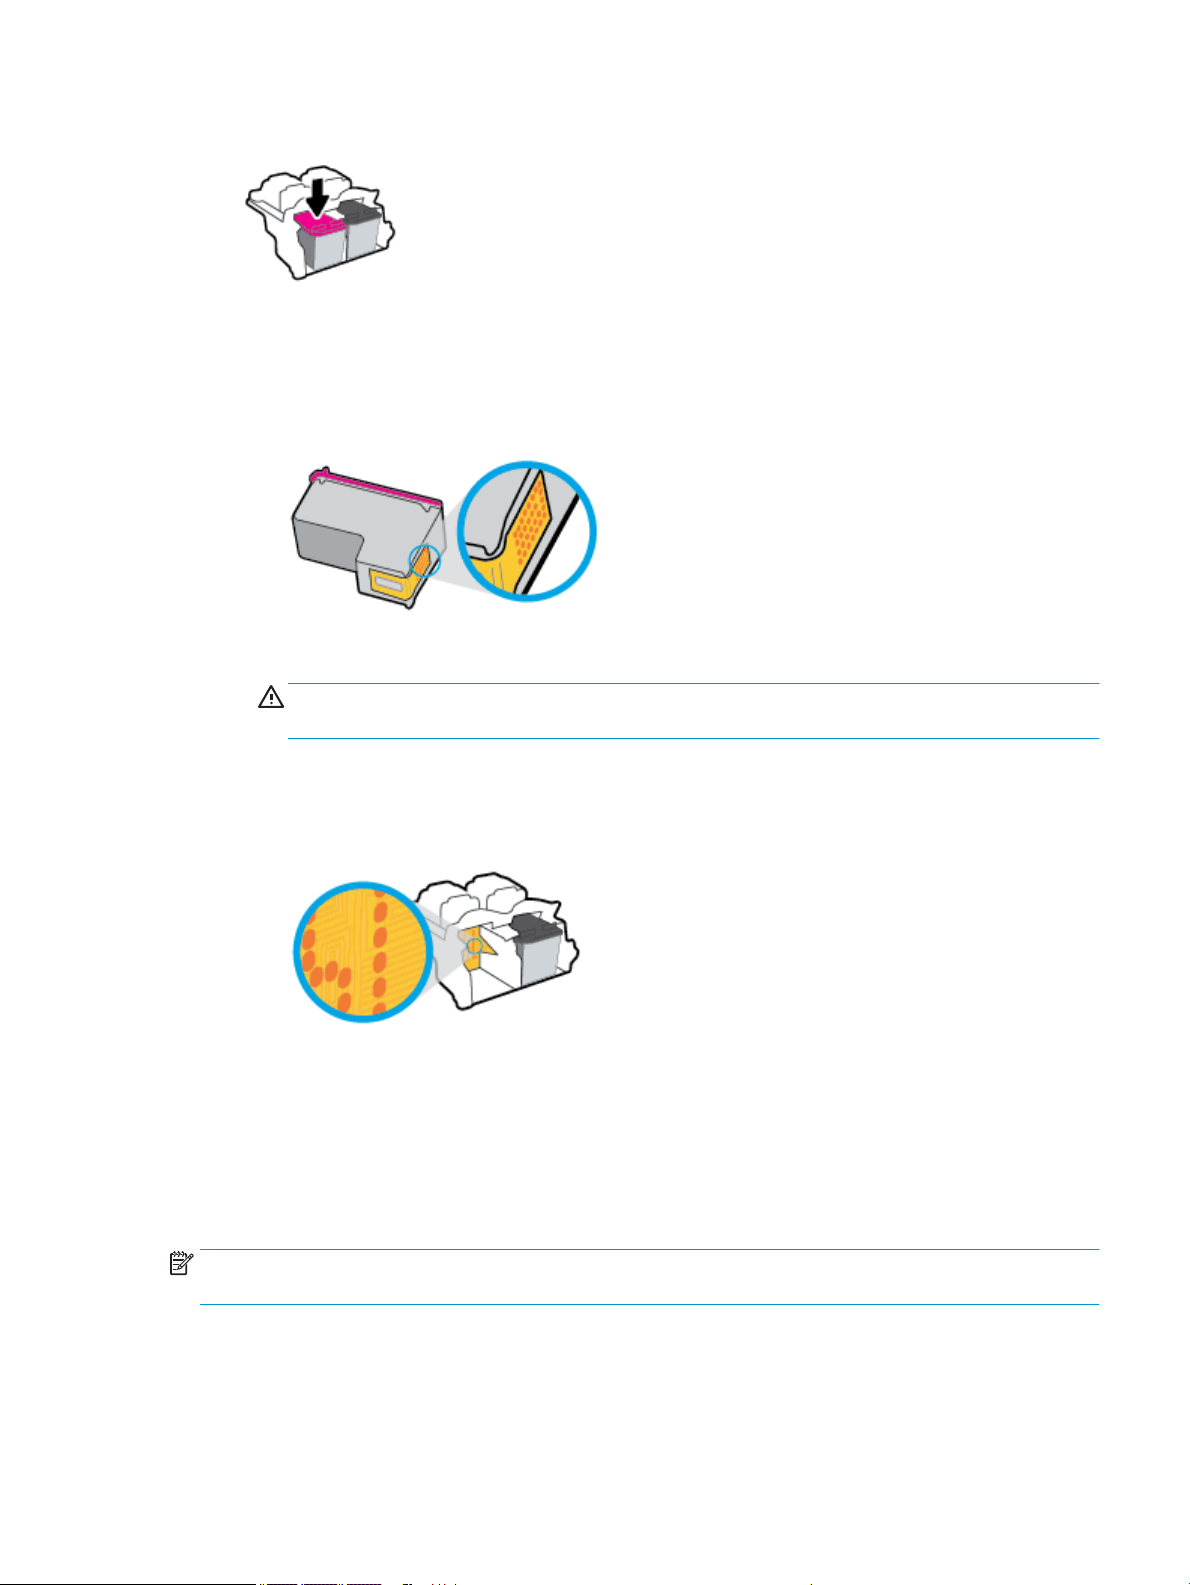
3. Remove the cartridge indicated in the error message.
4. Clean the cartridge contacts and printer contacts.
a. Hold the cartridge by its sides with the bottom pointing up and locate the electrical contacts on the
cartridge.
The electrical contacts are the small gold-colored dots on the cartridge.
b. Wipe only the contacts with a dry swab or lint-free cloth.
CAUTION: Be careful to wipe only the contacts, and do not smear any of the ink or other debris
elsewhere on the cartridge.
c. On the inside of the printer, locate the contacts for the cartridge.
The printer contacts are the set of gold-colored bumps positioned to meet the contacts on the
cartridge.
d. Use a dry swab or lint-free cloth to wipe the contacts.
5. Reinstall the cartridge.
6. Close the cartridge access door.
7. Check if the error message has gone away. If you still receive the error message, turn the printer o, and
then on.
NOTE: If one cartridge is causing problems, you can remove it and use the single cartridge mode to operate
the printer with only one cartridge.
ENWW Cartridge issues 75
Page 80

Printing issues
What do you want to do?
Fix problems with page not printing (unable to print)
HP Print and Scan Doctor The HP Print and Scan Doctor is a utility that will try to diagnose and x the issue automatically.
NOTE: This utility is only available for Windows operating system.
Troubleshoot problems with
print jobs not printing.
NOTE: The HP Print and Scan Doctor and the HP online troubleshooting wizards may not be available in all
languages.
Use an HP online troubleshooting wizard.
Get step-by-step instructions if the printer is not responding or printing.
Read general instructions in the Help for unable to print issues
To resolve print issues (Windows)
Make sure that the printer is turned on and that there is paper in the input tray. If you are still unable to print,
try the following in order:
1. Check for error messages from the printer software and resolve them by following the onscreen
instructions.
2. If your computer is connected to the printer with a USB cable, disconnect and reconnect the USB cable. If
your computer is connected to the printer with a wireless connection, conrm that the connection is
working.
3. Verify that the printer is not paused or oine.
To verify that the printer is not paused or oine
a. Depending upon your operating system, do one of the following:
●
Windows 10: From the Windows Start menu, click All apps, select Windows System, Control
Panel, and then click View devices and printers under Hardware and Sound menu.
●
Windows 8.1 and Windows 8: Point to or tap the upper-right corner of the screen to open the
Charms bar, click the Settings icon, click or tap Control Panel, and then click or tap View
devices and printers.
●
Windows 7: From the Windows Start menu, click Devices and Printers.
●
Windows Vista: From the Windows Start menu, click Control Panel, and then click Printers.
●
Windows XP: From the Windows Start menu, click Control Panel, and then click Printers and
Faxes.
b. Either double-click the icon for your printer or right-click the icon for your printer and select See
what's printing to open the print queue.
76 Chapter 8 Solve a problem ENWW
Page 81

c. On the Printer menu, make sure there are no check marks next to Pause Printing or Use Printer
Oine.
d. If you made any changes, try to print again.
4. Verify that the printer is set as the default printer.
To verify that the printer is set as the default printer
a. Depending upon your operating system, do one of the following:
●
Windows 10: From the Windows Start menu, click All apps, select Windows System, Control
Panel, and then click View devices and printers under Hardware and Sound menu.
●
Windows 8.1 and Windows 8: Point to or tap the upper-right corner of the screen to open the
Charms bar, click the Settings icon, click or tap Control Panel, and then click or tap View
devices and printers.
●
Windows 7: From the Windows Start menu, click Devices and Printers.
●
Windows Vista: From the Windows Start menu, click Control Panel, and then click Printers.
●
Windows XP: From the Windows Start menu, click Control Panel, and then click Printers and
Faxes.
b. Make sure the correct printer is set as the default printer.
The default printer has a check mark in a black or green circle next to it.
c. If the wrong printer is set as the default printer, right-click the correct printer and select Set as
Default Printer.
d. Try using your printer again.
5. Restart the print spooler.
To restart the print spooler
a. Depending upon your operating system, do one of the following:
Windows 10
i. From the Windows Start menu, click All apps, and then click Windows System.
ii. Click Control Panel, System and Security, and then click Administrative Tools.
iii. Double-click Services.
iv. Right-click the Print Spooler, and then click Properties.
v. On the General tab, next to Startup type, make sure that Automatic is selected.
vi. If the service is not already running, under Service status, click Start, and then click OK.
Windows 8.1 and Windows 8
i. Point to or tap the upper-right corner of the screen to open the Charms bar, and then click the
Settings icon.
ii. Click or tap Control Panel, and then click or tap System and Security.
ENWW Printing issues 77
Page 82

iii. Click or tap Administrative Tools, and then double-click or double-tap Services.
iv. Right-click or touch and hold Print Spooler, and then click Properties.
v. On the General tab, next to Startup type, make sure that Automatic is selected.
vi. If the service is not already running, under Service status, click or tap Start, and then click or
tap OK.
Windows 7
i. From the Windows Start menu, click Control Panel, System and Security, and then
Administrative Tools.
ii. Double-click Services.
iii. Right-click the Print Spooler, and then click Properties.
iv. On the General tab, next to Startup type, make sure that Automatic is selected.
v. If the service is not already running, under Service status, click Start, and then click OK.
Windows Vista
i. From the Windows Start menu, click Control Panel, System and Maintenance,
Administrative Tools.
ii. Double-click Services.
iii. Right-click the Print Spooler service, and then click Properties.
iv. On the General tab, next to Startup type, make sure that Automatic is selected.
v. If the service is not already running, under Service status, click Start, and then click OK.
Windows XP
i. From the Windows Start menu, right click My Computer.
ii. Click Manage, and then click Services and Applications.
iii. Double-click Services, and then select Print Spooler.
iv. Right-click Print Spooler, and click Restart to restart the service.
b. Make sure the correct printer is set as the default printer.
The default printer has a check mark in a black or green circle next to it.
c. If the wrong printer is set as the default printer, right-click the correct printer and select Set as
Default Printer.
d. Try using your printer again.
6. Restart the computer.
7. Clear the print queue.
To clear the print queue
a. Depending upon your operating system, do one of the following:
78 Chapter 8 Solve a problem ENWW
Page 83

●
Windows 10: From the Windows Start menu, click All apps, select Windows System, Control
Panel, and then click View devices and printers under Hardware and Sound menu.
●
Windows 8.1 and Windows 8: Point to or tap the upper-right corner of the screen to open the
Charms bar, click the Settings icon, click or tap Control Panel, and then click or tap View
devices and printers.
●
Windows 7: From the Windows Start menu, click Devices and Printers.
●
Windows Vista: From the Windows Start menu, click Control Panel, and then click Printers.
●
Windows XP: From the Windows Start menu, click Control Panel, and then click Printers and
Faxes.
b. Double-click the icon for your printer to open the print queue.
c. On the Printer menu, click Cancel all documents or Purge Print Document, and then click Yes to
conrm.
d. If there are still documents in the queue, restart the computer and try printing again after the
computer has restarted.
e. Check the print queue again to make sure it is clear, and then try to print again.
To resolve print issues (OS X)
1. Check for error messages and resolve.
2. Disconnect and reconnect the USB cable.
3. Verify that the product is not paused or oine.
To verify that the product is not paused or oine
a. In System Preferences, click Printers & Scanners .
b. Click the Open Print Queue button.
c. Click a print job to select it.
Use the following buttons to manage the print job:
●
Delete: Cancel the selected print job.
●
Hold: Pause the selected print job.
●
Resume: Continue a paused print job.
●
Pause Printer: Pause all print jobs in the print queue.
d. If you made any changes, try to print again.
4. Restart the computer.
Fix print quality issues
Step-by-step instructions for resolving most print quality issues.
ENWW Printing issues 79
Troubleshoot print quality issues online.
Page 84

Read general instructions in the Help for resolving print quality issues
NOTE: To protect the cartridges from drying out, always turn the printer o using the Power button, and
wait until the Power button light goes out.
To improve print quality (Windows)
1. Make sure you are using original HP cartridges.
2. Check the paper type.
For best print quality, use high quality HP paper, or papers that adhere to the ColorLok® standard. For
more information, see Paper basics on page 15.
Always make sure the paper you are printing on is at. For best results when printing images, use HP
Advanced Photo Paper.
Store specialty paper in its original packaging inside a resealable plastic bag on a at surface in a cool,
dry place. When you are ready to print, remove only the paper you plan to use immediately. When you
have nished printing, return any unused photo paper to the plastic bag. This prevents the photo paper
from curling.
3. Check the printer software to make sure you have selected the appropriate paper type from the Media
drop-down list and print quality from the Quality Settings drop-down list.
In the printer software, click Print & Scan and then click Set Preferences to access the print properties.
4. Check the estimated ink levels to determine if the cartridges are low on ink.
For more information, see Check estimated ink levels on page 48. If the cartridges are low on ink
consider replacing them.
5. Align the cartridges.
To align the cartridges
a. Load letter or A4 unused plain white paper into the input tray.
b. Open the printer software. For more information, see Open the HP printer software (Windows)
on page 18.
c. In the printer software, click Print & Scan and then click Maintain Your Printer to access the
printer toolbox.
The printer toolbox appears.
d. Click Align Cartridges on the Device Services tab.
The printer prints an alignment page.
e. Follow the onscreen instructions to align the cartridges. Recycle or discard the cartridge alignment
sheet later.
6. Print a diagnostics page if the cartridges are not low on ink.
80 Chapter 8 Solve a problem ENWW
Page 85

To print a diagnostics page
a. Load letter or A4 unused plain white paper into the input tray.
b. Open the printer software. For more information, see Open the HP printer software (Windows)
on page 18.
c. In the printer software, click Print & Scan and then click Maintain Your Printer to access the
printer toolbox.
d. Click Print Diagnostic Information on the Device Reports tab to print a diagnostics page.
e. Review the blue, magenta, yellow, and black boxes on the diagnostics page.
7. Clean the cartridges, if the diagnostic page shows steaks or missing portions of the color and black
boxes.
To clean the cartridges
a. Load letter or A4 unused plain white paper into the input tray.
b. Open the printer software. For more information, see Open the HP printer software (Windows)
on page 18.
c. In the printer software, click Print & Scan and then click Maintain Your Printer to access the
printer toolbox.
d. Click Clean cartridges on the Device Services tab. Follow the onscreen instructions.
ENWW Printing issues 81
Page 86

To improve print quality (OS X)
1. Make sure you are using original HP cartridges.
2. Check the paper type.
For best print quality, use high quality HP paper, or papers that adhere to the ColorLok® standard. For
more information, see Paper basics on page 15.
Always make sure the paper you are printing on is at. For best results when printing images, use HP
Advanced Photo Paper.
Store specialty paper in its original packaging inside a resealable plastic bag on a at surface in a cool,
dry place. When you are ready to print, remove only the paper you plan to use immediately. When you
have nished printing, return any unused photo paper to the plastic bag. This prevents the photo paper
from curling.
3. Make sure you have selected the appropriate paper type and print quality in the Print dialog.
4. Check the estimated ink levels to determine if the cartridges are low on ink.
Consider replacing the print cartridges if they are low on ink.
5. Align the printhead.
To align the printhead from the software
a. Load Letter or A4 plain, white paper in the input tray.
b. Open HP Utility.
NOTE: HP Utility is located in the HP folder in the Applications folder.
c. Select your printer from the list of devices at the left of the window.
d. Click Align.
e. Click Align and follow the onscreen instructions.
f. Click All Settings to return to the Information and Support pane.
6. Print a test page.
To print a test page
a. Load Letter or A4 plain, white paper in the input tray.
b. Open HP Utility.
NOTE: HP Utility is located in the HP folder in the Applications folder.
c. Select your printer from the list of devices at the left of the window.
d. Click Test Page.
e. Click the Print Test Page button, and follow the onscreen instructions.
7. If the diagnostic page shows steaks or missing portions of the text or colored boxes, clean the printhead
automatically.
82 Chapter 8 Solve a problem ENWW
Page 87

To automatically clean the printhead
a. Load Letter or A4 plain, white paper in the input tray.
b. Open HP Utility.
NOTE: HP Utility is located in the HP folder in the Applications folder.
c. Select your printer from the list of devices at the left of the window.
d. Click Clean Printheads.
e. Click Clean, and follow the onscreen instructions.
CAUTION: Clean the printhead only when necessary. Unnecessary cleaning wastes ink and
shortens the life of the print head.
NOTE: If print quality still seems poor after you complete cleaning, try aligning the printhead. If
print quality problems persist after cleaning and aligning, contact HP support.
f. Click All Settings to return to the Information and Support pane.
ENWW Printing issues 83
Page 88

Copy issues
Troubleshoot copy problems. Use an HP online troubleshooting wizard.
NOTE: The HP online troubleshooting wizards may not be available in all languages.
Tips for copy and scan success on page 46
Get step-by-step instructions if the printer does not create a copy, or if your printouts are low quality.
84 Chapter 8 Solve a problem ENWW
Page 89

Scan issues
HP Print and Scan
Doctor
Solve scan problems Use an HP online troubleshooting wizard.
The HP Print and Scan Doctor is a utility that will try to diagnose and x the issue automatically.
NOTE: This utility is only available for Windows operating system.
Get step-by-step instructions if you cannot create a scan or if your scans are low quality.
NOTE: The HP Print and Scan Doctor and the HP online troubleshooting wizards may not be available in all
languages.
Tips for copy and scan success on page 46
ENWW Scan issues 85
Page 90

Network and connection issues
What do you want to do?
Fix wireless connection
Choose one of the following troubleshooting options.
HP Print and Scan Doctor The HP Print and Scan Doctor is a utility that will try to diagnose and x the issue automatically.
NOTE: This utility is only available for Windows operating system.
Use an HP online
troubleshooting wizard
●
Troubleshoot your wireless problem, whether your printer has never been connected or it was
connected and is no longer working.
●
Troubleshoot a rewall or antivirus issue, if you suspect that it is preventing your computer from
connecting to the printer.
NOTE: The HP Print and Scan Doctor and the HP online troubleshooting wizards may not be available in all
languages.
Read general instructions in the Help for wireless troubleshooting
▲
Press the Wireless button ( ) and the Information button ( ) at the same time to print the
wireless network test report and network conguration page.
Find network settings for wireless connection
Choose one of the following troubleshooting options.
HP Print and Scan Doctor The HP Print and Scan Doctor is a utility that can tell you the network name (SSID) and
password (network key).
NOTE: This utility is only available for Windows operating system.
Use an HP online troubleshooting
wizard
Learn how to nd your network name (SSID) and wireless password.
NOTE: The HP Print and Scan Doctor and the HP online troubleshooting wizards may not be available in all
languages.
Fix Wi-Fi Direct connection
Use an HP online troubleshooting wizard
NOTE: The HP online troubleshooting wizards may not be available in all languages.
86 Chapter 8 Solve a problem ENWW
Troubleshoot your Wi-Fi Direct problem or learn how to congure Wi-Fi Direct.
Page 91

Read general instructions in the Help for Wi-Fi Direct troubleshooting
1. Make sure that the Wi-Fi Direct light on the printer control panel is on. If the light is o, press the Wi-Fi
Direct button ( ) to turn it on.
2. From your wireless computer or mobile device, turn on the Wi-Fi connection, and then search for and
connect to the Wi-Fi Direct name of your printer.
3. Enter the Wi-Fi Direct password when prompted.
4. If you are using a mobile device, make sure you have installed a compatible printing app. For more
information, visit the HP Mobile Printing website at www.hp.com/go/mobileprinting. If a local version of
this website is not available in your country/region or language, you might be directed to the HP Mobile
Printing website in another country/region or language.
ENWW Network and connection issues 87
Page 92
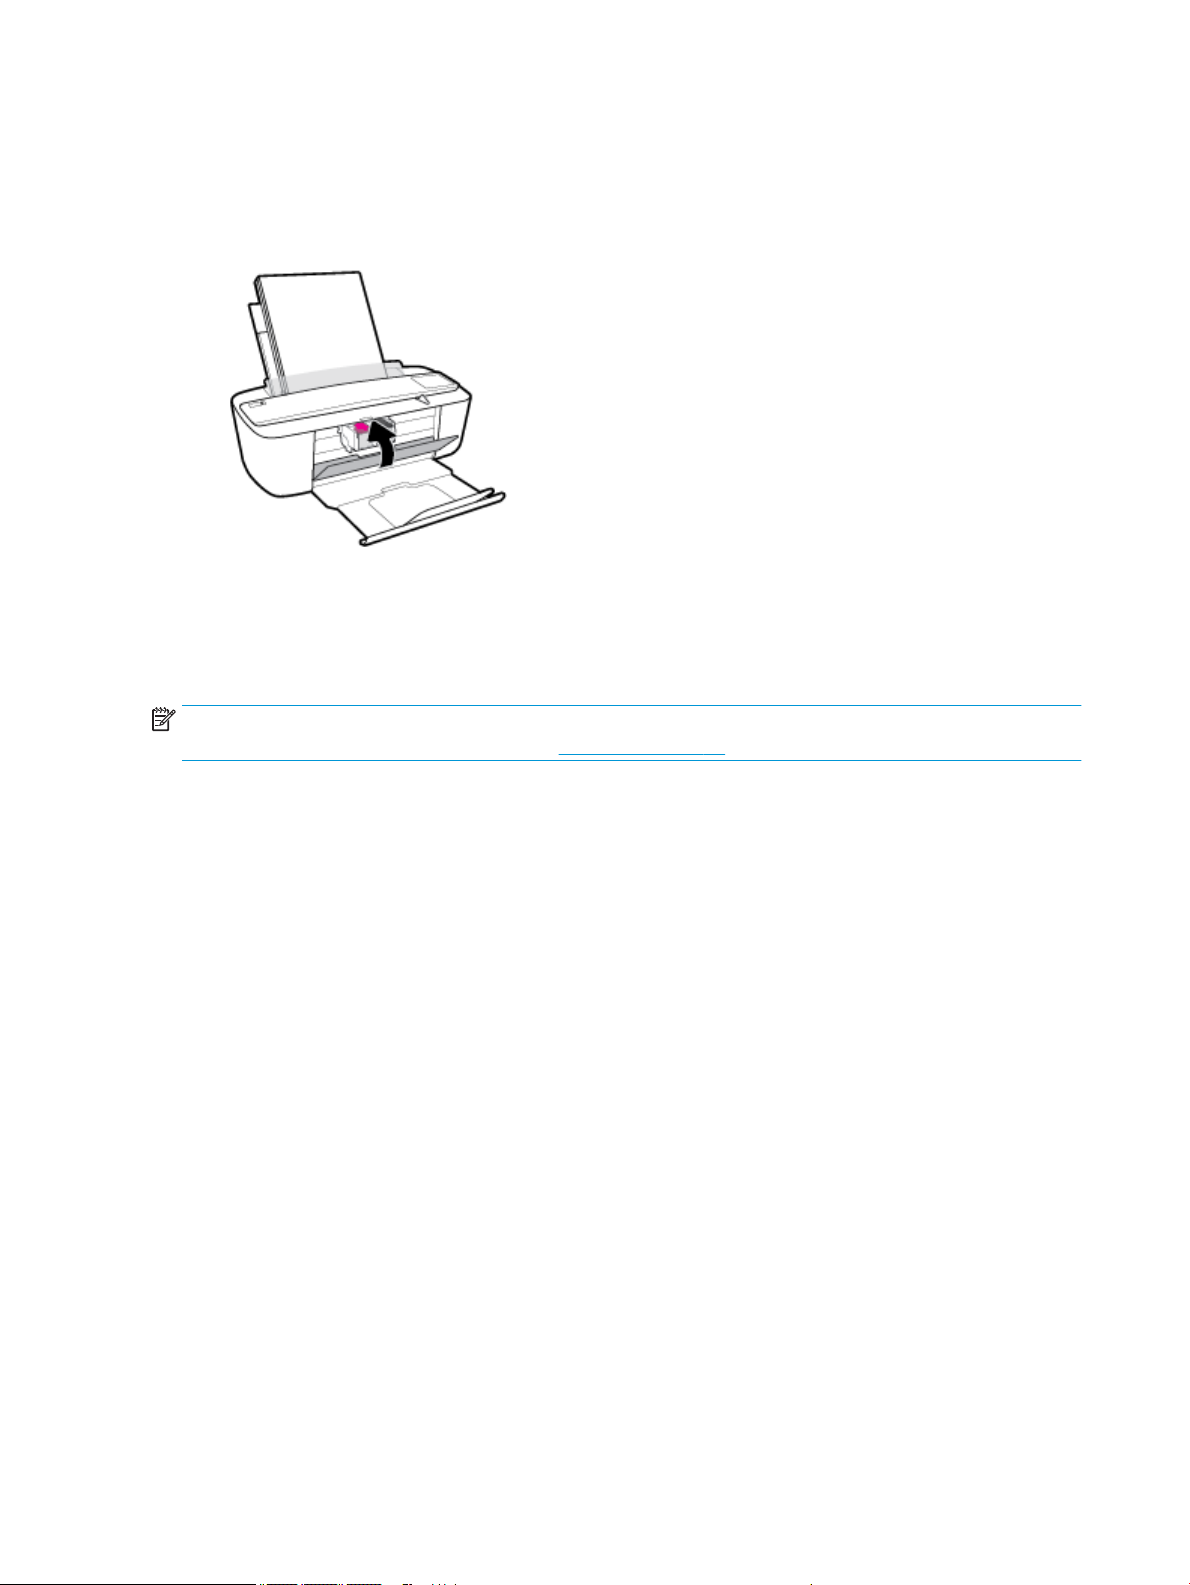
Printer hardware issues
Close cartridge access door
●
Cartridge door must be closed to begin printing.
The printer shuts down unexpectedly
●
Check the power and power connections.
●
Make sure the power cord of the printer is connected rmly to a functioning power outlet.
NOTE: When Auto-O is enabled, the printer will automatically turn o after 2 hours of inactivity to help
reduce energy use. For more information, see Auto-O on page 21.
Resolve printer failure
●
Turn the printer o, then on. If that does not resolve the problem, contact HP.
88 Chapter 8 Solve a problem ENWW
Page 93
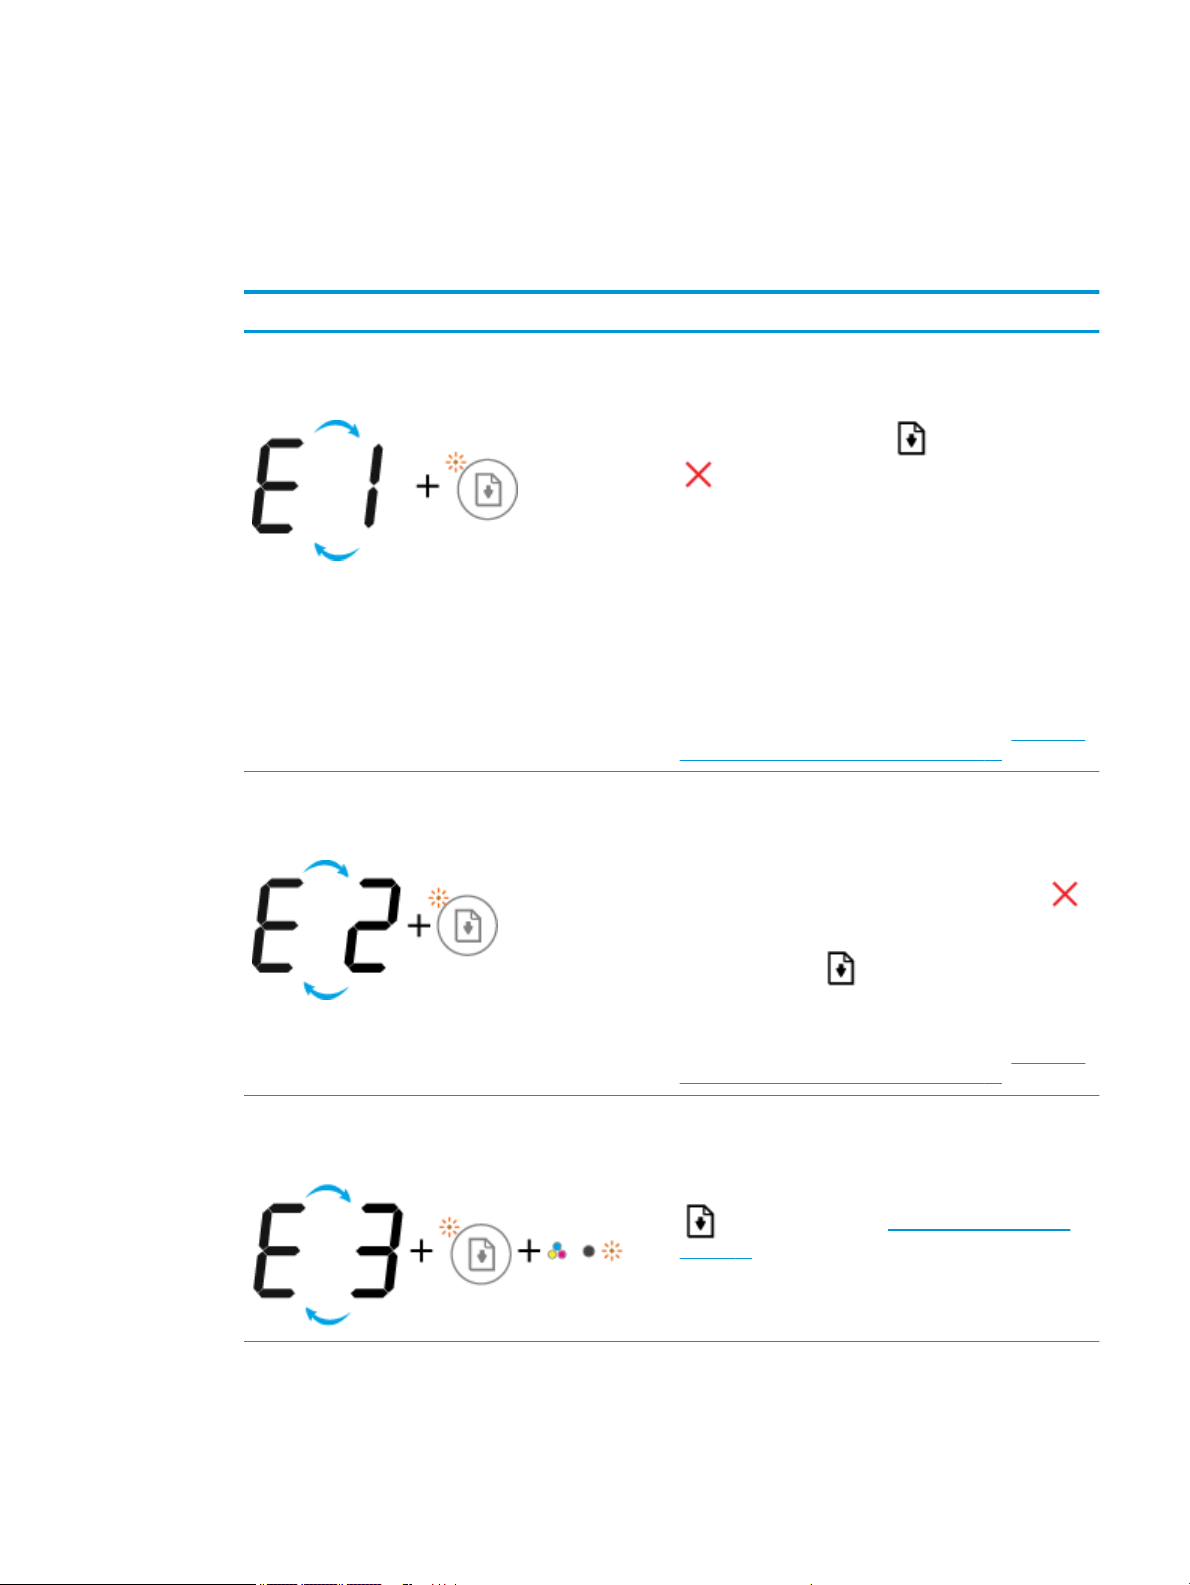
Control panel error codes and status
Control panel error codes
●
If the Number of copies icon on the printer display is alternating between the letter E and a number, it
indicates the printer is in an error state. The letter E and the number work as error codes.
Light behavior Cause and Solution
The Number of copies icon is alternating between the letter E
and the number 1. At the same time, the Resume light is
blinking.
The Number of copies icon is alternating between the letter E
and the number 2. At the same time, the Resume light is
blinking.
The printer receives a printing job, starts feeding paper, and
detects that the paper width for the printing job is bigger than
the width of the loaded paper.
Press either the Resume button ( ) or the Cancel button
( ) to cancel the printing job and eject paper.
To avoid the paper size mismatch problem, do one of the
following before printing.
—
Change the paper size setting for the printing job to
match the paper loaded.
—
Remove all paper from the input tray, and then load
paper that matches the paper size setting for the
printing job.
TIP: You can change the default paper size automatically
detected by the printer. For more information, see Change the
default paper size detected by printer on page 14.
The printer receives a multipage printing job, detects that the
paper length for the printing job does not match the length of
the loaded paper, and then prints out the rst page of the job
with errors.
—
To cancel the printing job, press the Cancel button ( ).
—
To continue printing the remaining pages, press the
Resume button ( ). The remaining pages will have
the same errors as the rst page.
TIP: You can change the default paper size automatically
detected by the printer. For more information, see Change the
default paper size detected by printer on page 14.
The Number of copies icon is alternating between the letter E
and the number 3. At the same time, the Resume light and the
Ink Alert light are blinking.
The carriage inside the printer has stalled.
Open the cartridge access door and make sure the carriage is
not obstructed. Move the carriage to the right, close the
cartridge access door, and then press the Resume button
) to continue printing. See Jams and paper-feed issues
(
on page 70 for more information.
ENWW Control panel error codes and status 89
Page 94

Light behavior Cause and Solution
The Number of copies icon is alternating between the letter E
and the number 4. At the same time, the Resume light is
blinking.
The Number of copies icon is alternating between the letter E
and the number 5. At the same time, all lights on the control
panel are blinking.
The Number of copies icon is alternating between the letter E
and the number 6.
There is a paper jam.
Clear the jam, and then press the Resume button ( ) to
continue printing.
For more information, see Jams and paper-feed issues
on page 70.
The scanner is not working.
Turn o and turn on the printer.
If the problem persists, contact HP. The printer still prints even
if the scanner is not working.
The printer is in an error state.
1. Turn o the printer.
2. Unplug the power cord.
Control panel ink error status
●
Light behavior Cause and Solution
One of the Ink Level icons is blinking with no segment, and the
Ink Alert light is on.
3. Wait a minute, and then plug the power cord back in.
4. Turn on the printer.
If the problem persists, contact HP.
One of the following might have occurred.
—
The corresponding cartridge is missing.
If one of the cartridges is missing, the printer enters
single cartridge mode. To exit the single cartridge mode,
insert the corresponding cartridge. For more information
about the single cartridge mode, see Use single cartridge
mode on page 52.
—
The corresponding cartridge is installed improperly, or
still has plastic tape on it.
Remove the corresponding cartridge, make sure there is
no plastic tape on it, and then reinsert the cartridge
securely. For more information, see Replace cartridges
on page 50.
90 Chapter 8 Solve a problem ENWW
Page 95

Light behavior Cause and Solution
Both Ink Level icons are blinking with no segment, and the Ink
Alert light is blinking.
One of the following might have occurred.
—
Both cartridges are missing.
—
Both cartridges are installed improperly, or still have
plastic tape on them.
—
Both cartridges are incompatible or damaged.
Try the following solutions to solve the problem.
—
If there is no cartridge installed in the printer, install the
cartridges.
—
If both cartridges are installed in the printer, remove the
cartridges, make sure there is no plastic tape on them,
and then reinsert the cartridges securely.
—
Make sure that you are using the correct HP cartridges
for your printer.
—
If the error persists, replace the cartridges. For
information about how to replace cartridges, see Replace
cartridges on page 50.
ENWW Control panel error codes and status 91
Page 96

Light behavior Cause and Solution
One of the Ink Level icons is blinking with no segment, the Ink
Alert light is on, and the Resume light is blinking.
Both Ink Level icons are blinking with no segment, the Ink
Alert light is on, and the Resume light is blinking.
One of the following might have occurred.
—
Both cartridges are missing.
—
Both cartridges are installed improperly, or still have
plastic tape on them.
—
Both cartridges are incompatible or damaged.
Try the following solutions to solve the problem.
—
If the corresponding cartridge is newly installed, it might
be counterfeit or previously used. Refer to the message
in the HP printer software for more information.
—
If the corresponding cartridge is not newly installed, it is
very low on ink. Press the Resume button ( ) to
continue printing, and replace the cartridge when the
print quality is no longer acceptable. For information
about how to replace cartridges, see Replace cartridges
on page 50.
One of the following might have occurred.
—
The counterfeit or previously used cartridges are
installed.
—
Both of the cartridges are very low on ink.
Try the following solutions to solve the problem.
—
If the cartridges are newly installed, they might be
counterfeit or previously used. Refer to the message in
the HP printer software for more information.
—
If the cartridges are not newly installed, they are very
low on ink. Press the Resume button ( ) to continue
printing, and replace the cartridges when the print
quality is no longer acceptable. For information about
how to replace cartridges, see Replace cartridges
on page 50.
92 Chapter 8 Solve a problem ENWW
Page 97

Control panel paper error status
●
Light behavior Cause and Solution
The Error icon, the Paper Error icon, and the Resume light are
on.
The Error icon, the Paper Error icon, and the Resume light are
blinking.
There is no paper in the input tray.
Load paper in the input tray.
For information about how to load paper, see Load media
on page 10.
The printer receives a printing job, and detects that there is no
paper in the input tray.
Load paper, and then press the Resume button ( ) to
continue printing.
For information about how to load paper, see Load media
on page 10.
ENWW Control panel error codes and status 93
Page 98

HP support
For the latest product updates and support information, visit the product support website at
www.support.hp.com. HP online support provides a variety of options for help with your printer:
Contact HP
If you need help from an HP technical support representative to solve a problem, visit the Contact Support
website. The following contact options are available at no cost for in-warranty customers (HP agent-assisted
support for out-of warranty customers may require a fee):
Drivers & downloads: Download software drivers and updates, as well as product manuals and documentation
that came in the box with your printer.
HP support forums: Visit HP Support Forums for answers to common questions and issues. You can view
questions posted by other HP customers, or sign in and post your own questions and comments.
Troubleshooting: Use HP online tools to detect your printer and nd recommended solutions.
Chat with an HP support agent online.
Call an HP support agent.
When contacting HP support, be prepared to provide the following information:
●
Product name (Located on the printer, such as HP DeskJet 3700)
●
Product number (located inside the cartridge access door)
●
Serial number (located on the back or bottom of the printer)
Register printer
By taking just a few quick minutes to register, you can enjoy quicker service, more eicient support, and
product support alerts. If you did not register your printer while installing the software, you can register now
at http://www.register.hp.com.
94 Chapter 8 Solve a problem ENWW
Page 99

Additional warranty options
Extended service plans are available for the HP DeskJet 3700 series at additional costs. Go to
www.support.hp.com , select your country/region and language, then explore the extended warranty options
available for your printer.
ENWW HP support 95
Page 100

96 Chapter 8 Solve a problem ENWW
 Loading...