

Page 1

Printing Specifications
Product: HP Designjet 820mfp Quick Reference Guide
Part number: Q6685-90001 EN
TEXT
PAGES
Page Count 44
Paper Type HP standard 50# book (69 to 80g/m ) recycled offset or equivalent
Ink 4-color process (CMYK)
Co
verage 4/4
COVER PAGES
Page Count 2 front and back, supplied together on the 1st page with spine
Paper
Type Up to DCs: whatever is normally used for QRGs (170/200g)
Ink 4-color
Coverage 4/4
Fini
sh Up to DCs
2
FINISH
Page Trim Size A5
Bindery SS or as prefered
ing Instruction None
Fold
Special
Instruc
tions
If the print location is different from the location stated, change the print location to the
appropriate
If recycled paper is used, add the recycled paper logo and text.
Refer to the Pantone Matching System for accurate spot color reproduction.
location.
Printed on recycled
paper
Do not print this page. This page is for reference only.
Page 2

11.65mm SPINE 148mm X 210mm FRONT COVER148mm X 210mm BACK COVER
HP Designjet 820mfp Quick Reference Guide
HP Designjet 820mfp
Quick Reference Guide
Q6685-90001
Printed on at least 50% total recycled fiber
with at least 10% post-consumer paper
© 2006 Hewlett-Packard Development Company, L.P.
Printed in XXXXXX Imprimé en XXXXXX Stampato in XXXXXX
www.hp.com
HP Medium
Blue
PMS 640 c
Page 3

HP Designjet 820mfp Scanner
Quick reference guide
Page 4

Legal notices
The information contained in this document
is subject to change without notice.
Hewlett-Packard makes no warranty of any
kind with regard to this material, including,
but not limited to, the implied warranties of
merchantability and fitness for a particular
purpose.
Hewlett-Packard shall not be liable for
errors contained herein or for incidental or
consequential damages in connection with
the furnishing, performance, or use of this
material.
No part of this document may be
photocopied or translated to another
language without the prior written consent
of Hewlett-Packard Company.
Page 5

Table of contents
1 Introduction
2 How do I...
Using this guide.................................................................................................................................2
Introduction.................................................................................................................2
How do I ....................................................................................................................2
The problem is ...........................................................................................................2
Legal information........................................................................................................2
Index..........................................................................................................................2
Scanner software...............................................................................................................................2
Calibrate the scanner.........................................................................................................................6
Calibrate the touch screen pointer.....................................................................................................6
Create a new media profile................................................................................................................7
Copy a document...............................................................................................................................7
Scan a document to a file................................................................................................................10
Print a file.........................................................................................................................................11
View or delete a file.........................................................................................................................11
Scan heavyweight paper or cardboard.............................................................................................12
Preview copies................................................................................................................................13
Zoom all...................................................................................................................14
Zoom in....................................................................................................................14
Zoom out..................................................................................................................14
One-to-one pixel viewing..........................................................................................14
Resize paper frame..................................................................................................14
Move tool..................................................................................................................15
Position the paper frame...........................................................................................15
Align left and align right............................................................................................15
Add a new printer.............................................................................................................................16
Save files on a CD or DVD..............................................................................................................17
Access the shared folder from my computer....................................................................................17
Accessing the shared folder from Windows XP........................................................18
Accessing the shared folder from Windows 2000.....................................................18
Accessing the shared folder from Windows 98.........................................................18
Accessing the shared folder from Mac OS X............................................................18
Adjust color......................................................................................................................................19
Enable or disable scanner accounts................................................................................................19
Collate copies..................................................................................................................................20
Clean the glass................................................................................................................................20
Set sleep and wake-up timers..........................................................................................................20
ENWW iii
Page 6

3 The problem is...
The diagnostics light is flashing.......................................................................................................24
The wait light is flashing...................................................................................................................24
The wait and diagnostics lights are both flashing.............................................................................24
The scanner displays a warning message.......................................................................................25
The scanner software is in the wrong language...............................................................................25
The scanner software does not start................................................................................................25
The CD or DVD cannot be read by my computer.............................................................................26
A media profile cannot be generated...............................................................................................26
Streaks in the scanned image..........................................................................................................26
4 Legal information
Worldwide Limited Warranty—HP Designjet 820mfp Scanner.........................................................28
A. Extent of HP Limited Warranty.............................................................................28
B. Limitations of liability............................................................................................29
C. Local law..............................................................................................................30
Regulatory notices...........................................................................................................................31
Regulatory Model Number........................................................................................31
ELECTROMAGNETIC COMPATIBILITY (EMC).......................................................31
FCC statements (U.S.A.)..........................................................................................31
Shielded cables........................................................................................................31
Normes de sécurité (Canada)...................................................................................32
DOC statement (Canada).........................................................................................32
Korean EMI statement..............................................................................................32
VCCI Class A (Japan)...............................................................................................32
Safety power cord warning.......................................................................................32
Taiwanese EMI statement........................................................................................32
Chinese EMI statement............................................................................................32
Sound.......................................................................................................................33
DECLARATION OF CONFORMITY.................................................................................................34
declares that the product..........................................................................................34
conforms to the following product specifications.......................................................34
Additional information...............................................................................................35
Local contacts for regulatory topics only...................................................................35
Index......................................................................................................................................................................37
iv ENWW
Page 7

1 Introduction
Using this guide
●
● Scanner software
Introduction
ENWW 1
Page 8
Using this guide
Introduction
This guide is organized into the following chapters.
Introduction
This chapter provides a brief introduction to the scanner and its documentation for new users.
How do I ...
This chapter helps you to carry out various common procedures.
The problem is ...
This chapter helps you to solve problems that may occur while scanning.
Legal information
This chapter contains HP's limited warranty statement, regulatory notices, and declaration of conformity.
Index
In addition to the table of contents, there is an alphabetical index to help you to find topics quickly.
Scanner software
The scanner software is installed in the scanner's touch screen, and will run automatically when you
switch on the touch screen. The first page that you see can be divided into two main sections:
The viewing section on the left, for viewing scanned images
●
The control section on the right
●
NOTE Some details of this screen may vary depending on which printer is connected to the
scanner.
2 Chapter 1 Introduction ENWW
Page 9

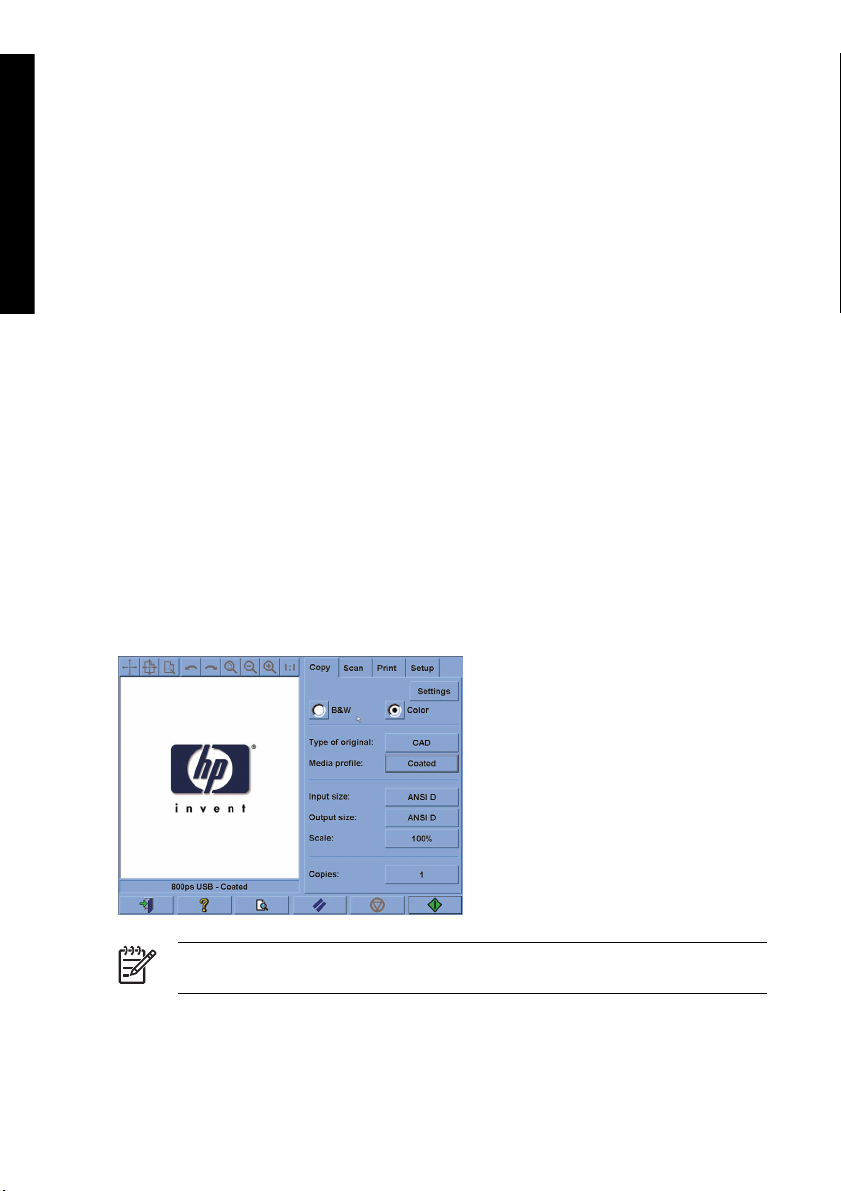
The preview window fills most of the viewing section. Above it is the image toolbar, with nine buttons
that can be used to change the preview in some way (see
The control section contains four tabs: Copy, Scan, Print, and Setup. Each tab provides options that you
can set when performing copy, scan, print, or setup tasks.
At the bottom of the page are six larger buttons. From left to right:
1. Quit : shuts down or restarts the touch screen
2. Online help : provides more information on some topics than this document
3. Preview : scans the document to preview the image and select the area of interest
4. Reset : resets settings to default values
5. Stop : cancels the current activity
6. Copy, Scan, or Print depending on the selected tab
NOTE If you connect an HP Designjet 4500 series printer to the scanner, you will see an
additional Print Queue button at the bottom of the page, which allows you to view and manage
the printer's job queue.
Preview copies).
Introduction
ENWW Scanner software 3
Page 10

Introduction
4 Chapter 1 Introduction ENWW
Page 11

2 How do I...
Calibrate the scanner
●
● Calibrate the touch screen pointer
● Create a new media profile
Copy a document
●
Scan a document to a file
●
● Print a file
● View or delete a file
Scan heavyweight paper or cardboard
●
Preview copies
●
● Add a new printer
● Save files on a CD or DVD
Access the shared folder from my computer
●
Adjust color
●
● Enable or disable scanner accounts
Collate copies
●
Clean the glass
●
● Set sleep and wake-up timers
How do I...
ENWW 5
Page 12
Calibrate the scanner
Your scanner should be recalibrated once a month to maintain the best scan quality.
1. Before calibrating, read the scanner's online guide on how to clean the scan area. Then turn off the
scanner and clean the scan area. Calibration will not work well if the scan area is not clean.
2. When you have finished cleaning the scan area, turn on the scanner and leave it on for at least an
hour before proceeding to the next step.
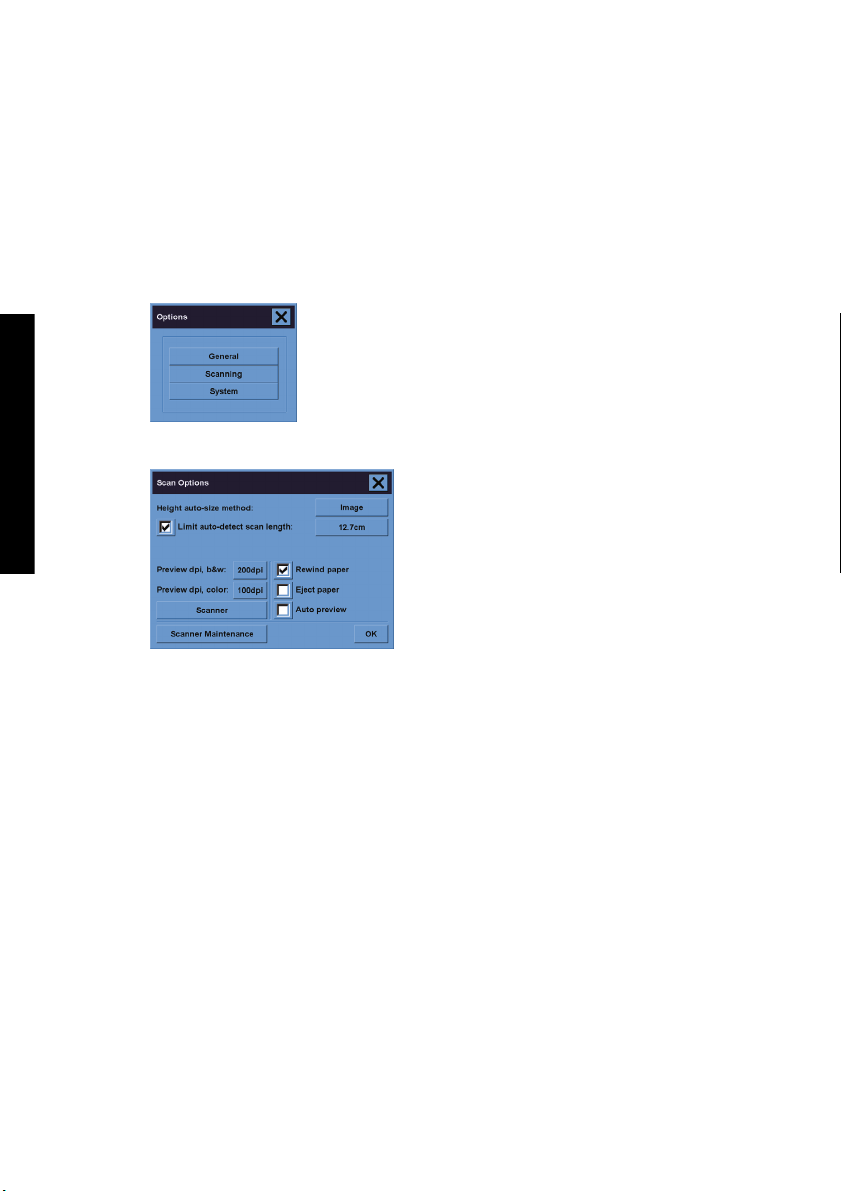
3. Press the Options button in the Setup tab.
How do I...
4. Press the Scanning button in the Options box.
5. Press the Scanner Maintenance button in the Scan Options box.
6. The Maintenance Wizard will guide you step by step through the procedures of camera alignment,
stitching, and calibration. You will need the Maintenance Sheet that came with your scanner.
Calibrate the touch screen pointer
1. Press the Setup tab.
2. Press the Options button.
3. Press the System button.
4. Press the Calibrate Touch Screen button and follow the instructions on the screen.
Calibration is done by pressing the targets that appear in different positions on the screen. Press each
target with whatever pointer you normally use to operate the touch screen (your finger, or some other
object) and keep pressing until the target disappears.
6 Chapter 2 How do I... ENWW
Page 13

Create a new media profile
Before starting this procedure, make sure you have calibrated the scanner (see Calibrate the scanner)
and loaded the correct paper type into the printer.
1. Press the Setup tab.
2. If the correct printer is not already selected, press the Printer button to select it.
3. Press the Media Profile button. You will see a list of previously created media profiles. If one of
them is currently selected, it is greyed out.
4.
Press the Tool button.
5. Press the Calibrate RIP button.
6. When the RIP calibration has finished, press the Print Color Sheet button.
7. When the color sheet has printed, press the Media Profile button.
NOTE The Media Setup window varies according to the printer model.
8. Load the color sheet into the scanner face down, centering the sheet on the scanner as usual.
9. Press the Name and Scan Sheet button.
10. Close the window when the color sheet has been scanned.
The media profile is now in the list of available media profiles.
You can use the Delete button to delete media profiles. Only user-created profiles can be deleted.
Copy a document
How do I...
1. If you do not already have a media profile for the paper type you are planning to print on, you must
create one. See
2. Insert your document.
a. Place the document face down with the top edge forward in the scanner insertion slot. Align
the center of the document with the centre of the insertion slot.
b. Slide the document gently into the insertion slot until you feel it pulled into the start position.
3. Select color or black-and-white copying.
Your selection determines which type-of-original templates will be available in the following step.
ENWW Create a new media profile 7
Create a new media profile.
Page 14
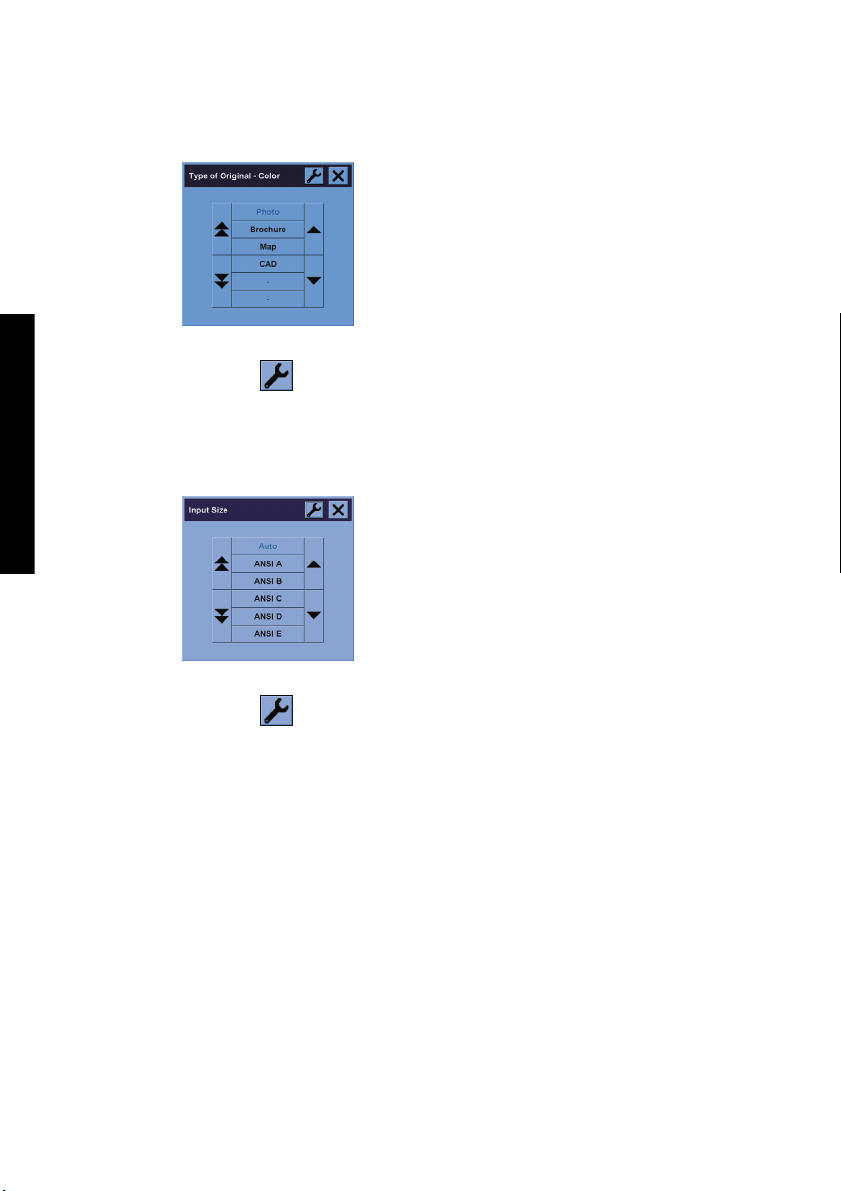
4. Select the type-of-original template..
a. Press the Type of original button in the Copy tab.
b. If you would like to change the settings of these options or create a new option, press the
How do I...
Tool button.
c. Select a type-of-original template that best describes your current input.
5. Select the input size.
a. Press the Input size button in the Copy tab.
b. If you would like to change the settings of these options or create a new option, press the
Tool button.
c. Select from the list the size that fits your original. Auto-detection of width and length can also
be selected.
8 Chapter 2 How do I... ENWW
Page 15

6. Select the output size.
a. Press the Output size button in the Copy tab.
b. If you would like to change the settings of these options or create a new option, press the
Tool button.
c. Select from the list the size that you want for your output copy.
If you have selected an output size that differs from the input size, the scanner will calculate the
scaling percentage and display it on the Scale button in the Copy tab after the first preview.
Alternatively, you can select a scaling percentage yourself by pressing the button.
7. Set the number of copies.
a. Press the Copies option if you want to make more than one copy of the loaded document.
b. Enter the number of copies in the edit field.
This option allows you to leave the system working unattended.
8. Start copying.
How do I...
The Copy button
You can use the Stop button
Press the Reset button
default values.
ENWW Copy a document 9
starts the copy process with the settings you chose.
to cancel the current preview or copy process.
to clear your own settings and reset the program to all of the scanner's
Page 16

Scan a document to a file
1. Select the Scan tab and set your scan options: type of original, size, filename, etc. To set the file
format (TIFF, JPEG), press the Settings button to display the Scan Settings dialog.
How do I...
Options such as margins, layout, and media profile can be set later in the Setup tab before you
print from the file.
2. Press the File destination button to select the destination folder on the hard disk or the CD drive.
3. Press the File name button to enter a new name. The default filename is the current date and time.
Use the arrows to find the folder you want in the list.
●
Press the button with three dots (...) to move up to the parent folder.
●
● Press a folder name to enter a folder.
● Create a new folder within the current folder with the New Folder button.
Click the OK button to return to the Scan tab.
●
4.
Press the Scan to file button
5. To view or delete the resulting file, see
10 Chapter 2 How do I... ENWW
to start the scan.
View or delete a file.
Page 17

Print a file
Printing your files is set up and controlled through a convenient print list. You can set the number of
copies you want by defining the number for each file individually, by determining the number of sets
(how many times the whole list will be printed), or by using a combination of both.
1. If you do not already have a media profile for the paper type you are planning to print on, you must
create one. See
2. Press the Print tab.
When you enter the Print dialog, the Copy button changes to the Print button.
The Print list group displays the files currently selected for printing. If the list is empty or it needs
changing, you can select files by pressing the Add to List button.
3. Check or change your Setup tab settings. The current Setup tab settings, such as margins, layout,
printer and media profile, will apply to the whole print job.
4.
Press the Print button
Create a new media profile.
How do I...
to send the listed files to the printer.
NOTE The Print tab is designed for printing files created with the Scan tab; it cannot be used
to print files from other sources.
View or delete a file
1. Press the Print tab.
2. Press the Add to List button.
3. Press the name of the file in the list.
4. Press the View or Delete button.
ENWW Print a file 11
Page 18

Scan heavyweight paper or cardboard
Your scanner is capable of scanning heavyweight coated paper and cardboard.
WARNING! Other thick materials are not supported and could cause damage. Remove
staples and any other abrasive attachment before scanning.
1. Press the Automatic Thickness Adjustment Control key on your scanner's control panel.
2. Press and hold the arrow up key to increase the height of the insertion slot until there is enough
room to insert the document. You can change the insertion slot height from 2 to 15 mm (0.08 to
0.59 inches).
How do I...
3. Insert the document.
4. Press and hold the arrow down key until the insertion slot stops adjusting itself.
5. Make a test scan to check for errors. Errors will be easier to see in an image with a clear diagonal
line.
NOTE A large document may need to be supported with both hands on its way in and
out of the scanner.
If lines seem uneven, proceed as follows:
1. In the Setup tab, select the Options button, then the Scanning button.
2. In the Scan Options dialog, press the Scanner button.
12 Chapter 2 How do I... ENWW
Page 19
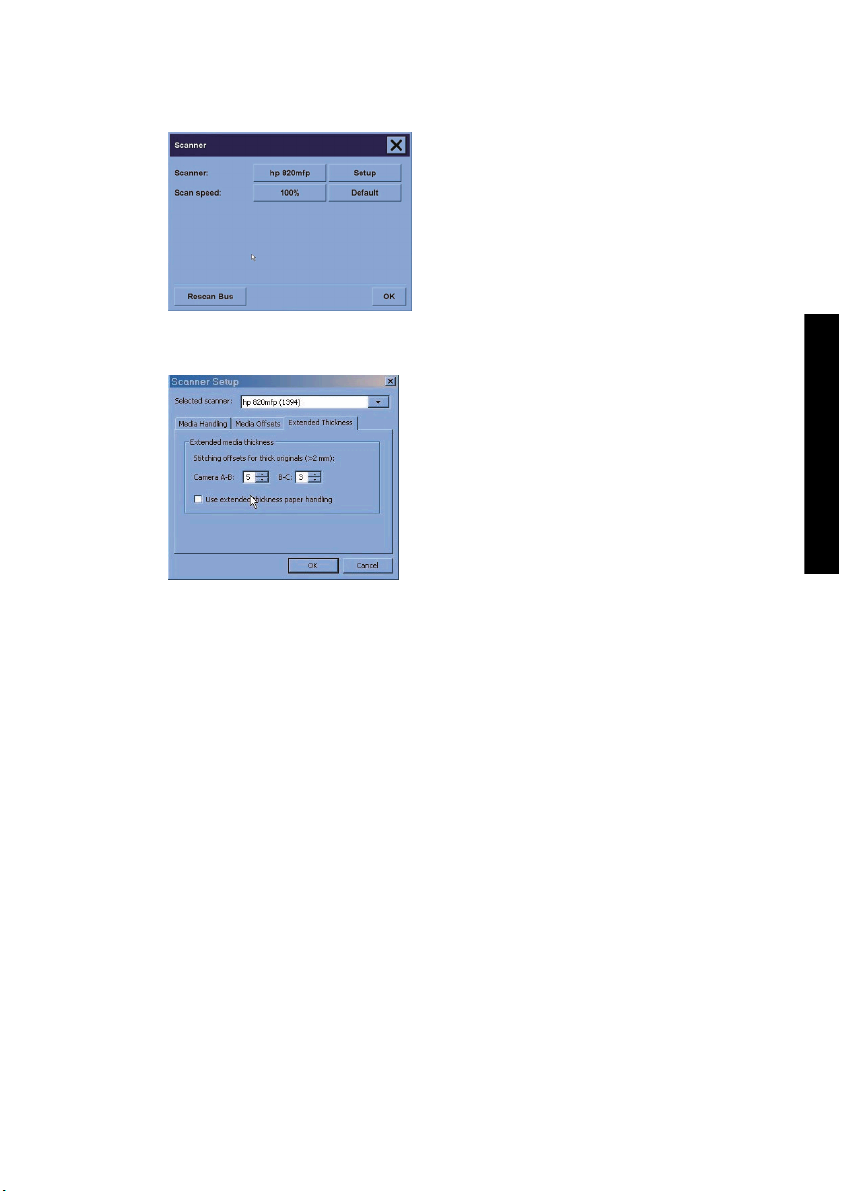
3. In the Scanner dialog, press the Setup button.
4. Select the Extended Thickness tab, and check the box labeled “Use extended thickness paper
handling”.
5. Change the value for each of the scanner’s cameras. Normally, only positive values should be used.
6. Make test scans and readjust the values until you are satisfied that the lines are stitched correctly.
7. Click OK to accept your settings.
Repeat this procedure until you are satisfied with the results.
To return the insertion slot height to its normal position:
1. Remove all material from the insertion slot.
2. Press the Automatic Thickness Adjustment Control key.
3. Press and hold the arrow down key until the insertion slot has stopped adjusting itself.
Try to avoid leaving the insertion slot set above minimum height for long periods of time. The scanner
periodically performs an automatic self-adjustment procedure, but only when the insertion slot height is
at minimum.
How do I...
Preview copies
The previewing feature allows you to control your document size and margins visually and readjust or
relocate the paper frame on the image. Its size is determined by the size settings made in the Copy tab
dialog. The paper frame’s size and thickness in the preview window will be determined by the Input
Size, Output Size, and Margins settings.
ENWW Preview copies 13
Page 20

How do I...
Press the Preview button to load a fresh preview.
Zoom all
Setting size and margins, you need a view of the whole image. Resize the image so that it exactly fits in
the preview window.
Zoom in
The zoom in axis is in the center of the preview window. Continue to press the Zoom In button to the
required level of detail.
Zoom out
The zoom out axis is in the center of the preview window. Continue to press the Zoom Out button to the
required level of detail.
One-to-one pixel viewing
View the image with one scanned pixel shown as one screen pixel.
Resize paper frame
The Resize Paper Frame tool is especially useful for copying non-standard paper sizes.
When activated, the Resize Paper Frame Tool partitions the areas around the paper frame into
sections. When a section is touched, the closest frame side or corner is resized to the new position.
14 Chapter 2 How do I... ENWW
Page 21

Move tool
Move the image to get any part of it centered or visible in the preview window.
There are two ways to move the image:
By dragging anywhere in the image window.
●
Touch a point on the screen, and that point will then be centered in the preview window.
●
Position the paper frame
You can position the paper frame directly in the preview and visually set your copy area.
There are three ways to move the frame:
● By dragging anywhere on the screen. Imagine you are gripping the frame and dragging it around
over the image.
● Touch a point on the screen, and that point then becomes the new center for the paper frame.
This method is especially useful when you are making spot test strips for printing. It lets you
continuously and rapidly reposition the frame on important areas that you want tested.
● Dragging the edges will resize the paper frame and is an alternative to the Resize Paper Frame tool.
Align left and align right
How do I...
The original appears crooked in the Preview Window. You do not need to reload the original. Press the
align buttons to align the image with the paper frame.
ENWW Preview copies 15
Page 22

How do I...
Alternatively, press the Settings button in the Copy tab or in the Scan tab, and select the Auto-align
option. This will align your image automatically. If you’re not satisfied with the result, press the Reset
alignment button, press OK, and align the image manually with the Align Left and Align Right buttons.
Add a new printer
To add a new HP Designjet printer to the printer list in your scanner software:
1. In the Setup tab, press the Options button.
16 Chapter 2 How do I... ENWW
Page 23

2. Press the System button.
3. Press the button with the name of the printer that you want to add.
4. Follow the instructions on the screen.
Save files on a CD or DVD
Your HP Designjet is capable of writing to CDs or DVDs in the same easy way as it writes to any other
storage medium.
1. Insert a blank CD or DVD into the touch screen’s CD/DVD drive. You may also be able to write to a
partly-used CD or DVD, if the disc has not been ‘closed’.
2. Follow the normal steps for scanning or copying, but send the files to drive E: (the CD/DVD drive).
3. When you have finished, the disc will normally be ejected automatically. Otherwise, press the eject
button on the drive to eject it. There will be a delay of about 45 seconds before the disc is ejected.
Access the shared folder from my computer
The scanner system provides a shared folder D:\images that can be accessed from other computers
over a network. For security reasons, no other folders on the scanner system can be accessed over a
network. Therefore, in order to access scanned images from other computers, you must save them in D:
\images.
In order to establish a connection over the network, you will need to know the IP address of your
scanner system. You can obtain this from the scanner's touch screen, as follows:
1. Press the Setup tab on the touch screen.
2. In the Setup tab, press the Options button.
3. In the Options box, press the General button.
4. In the General box, press the About button.
5. You will find the scanner's IP address among the information in the About box.
How do I...
ENWW Save files on a CD or DVD 17
Page 24

How do I...
Accessing the shared folder from Windows XP
1. On your computer's desktop, double-click My Network Places.
2. In the Network Places window, double-click Add Network Place.
3. In the Add Network Place Wizard window, click Choose another network location, then click Next.
4.
In the Internet or network address field, enter http://scanner_ip/images, where scanner_ip
is the IP address of your scanner system, then click Next.
5. Enter your own choice of name by which you will refer to the folder on this computer, then click Next.
To access the shared folder subsequently, double-click My Network Places, and you will see the new
folder in the Network Places window. You can, if you like, drag the folder to your desktop for easier
access.
Accessing the shared folder from Windows 2000
1. On your computer's desktop, double-click My Network Places.
2. In the Network Places window, double-click Add Network Place.
3.
In the Add Network Place Wizard window, enter http://scanner_ip/images, where scanner_ip
is the IP address of your scanner system, then click Next.
4. Enter your own choice of name by which you will refer to the folder on this computer, then click
Finish.
To access the shared folder subsequently, double-click My Network Places, and you will see the new
folder in the Network Places window. You can, if you like, drag the folder to your desktop for easier
access.
Accessing the shared folder from Windows 98
1. On your computer's desktop, double-click My Computer.
2. In the My Computer window, double-click Web Folders.
3. In the Web Folders window, double-click Add Web Folder.
4.
In the Add Web Folder window, enter http://scanner_ip/images, where scanner_ip is the IP
address of your scanner system, then click Next.
5. Enter your own choice of name by which you will refer to the folder on this computer, then click
Finish.
To access the shared folder subsequently, double-click My Computer and then Web Folders, and you
will see the new folder in the Web Folders window. You can, if you like, drag the folder to your desktop
for easier access.
Accessing the shared folder from Mac OS X
1. Select the Connect to Server option from the Go menu.
2.
In the Connect to Serve window, enter http://scanner_ip/images, where scanner_ip is the IP
address of your scanner system, then click Connect.
18 Chapter 2 How do I... ENWW
Page 25

Adjust color
If you press the Type of Original button in the Copy or Scan tab, the Type of Original Setup box gives
you various options to adjust the colors of your scanned images.
Press the Save button to save the changes you have made.
NOTE The changes are saved in your current media profile.
Enable or disable scanner accounts
1. Press the Setup tab.
2. Press the Account button.
3.
Press the Tool button
4. In the Accounting box:
● Press the Delete button to delete the current account (the one whose name is displayed in
the box).
● Press the New button to create a new account, then enter a name for the new account. The
new account will automatically become the current account.
● Press the Rename button to rename the current account.
● Press the Reset button to reset the current account (all figures return to zero).
After pressing any of the above buttons, you will be asked to give the administrator's password.
if necessary.
How do I...
ENWW Adjust color 19
Page 26

Collate copies
1. Press the Print tab.
2. Press the Add to List button.
3. Using the check boxes, select multiple files for printing.
4. Press the Number of Sets button and select the number of copies you wish to print.
5. Press the Print button.
The files that you selected form a set, which is printed the number of times that you selected.
Clean the glass
How do I...
1. Turn the scanner power off and disconnect the scanner power cable.
2. Push down on the two lever buttons found near the insertion slot on each side of the scanning area
lid. The scanning area lid locking mechanism should now be disengaged.
3. As you hold both lever buttons down, place your free fingers in the insertion slot and flip the
scanning area lid open. The scanning area is now exposed for cleaning.
4. Gently wipe the glass plate with a lint-free cloth dampened with a mild, streak-free, glass cleaner.
CAUTION Do not use abrasives, acetone, benzene, or fluids that contain these
chemicals. Do not spray liquids directly onto the scanner's glass plate or anywhere else
in the scanner.
The lifespan of the glass plate depends on the paper types that pass across it. Abrasive
papers such as mylar may cause premature deterioration, in which case the replacement
of the plate is the customer's responsibility.
5. Dry the glass completely using a separate clean, dry lint-free cloth like the one provided with the
maintenance kit.
Set sleep and wake-up timers
1. Press the Setup tab.
2. Press the Options button.
3. Press the System button.
20 Chapter 2 How do I... ENWW
Page 27

4. Press the WIDEsystem button.
● To activate automatic power-on, select the check box for the day in the On column.
To modify the time, select the hours digits and press the up or down buttons and then select
the minutes digits and repeat the process. Select AM or PM, and press the up or down buttons.
● To activate automatic power off, select the check box for the day in the Off column, then set
the time as described above.
5. Press the Apply button to confirm your changes and continue or press the OK button to confirm
changes and exit WIDEsystem.
How do I...
ENWW Set sleep and wake-up timers 21
Page 28

How do I...
22 Chapter 2 How do I... ENWW
Page 29

3 The problem is...
If you notice problems with the scanner other than those described below, consult the scanner's online
guide for further advice.
The diagnostics light is flashing
●
The wait light is flashing
●
● The wait and diagnostics lights are both flashing
● The scanner displays a warning message
The scanner software is in the wrong language
●
● The scanner software does not start
● The CD or DVD cannot be read by my computer
A media profile cannot be generated
●
Streaks in the scanned image
●
ENWW 23
The problem is...
Page 30
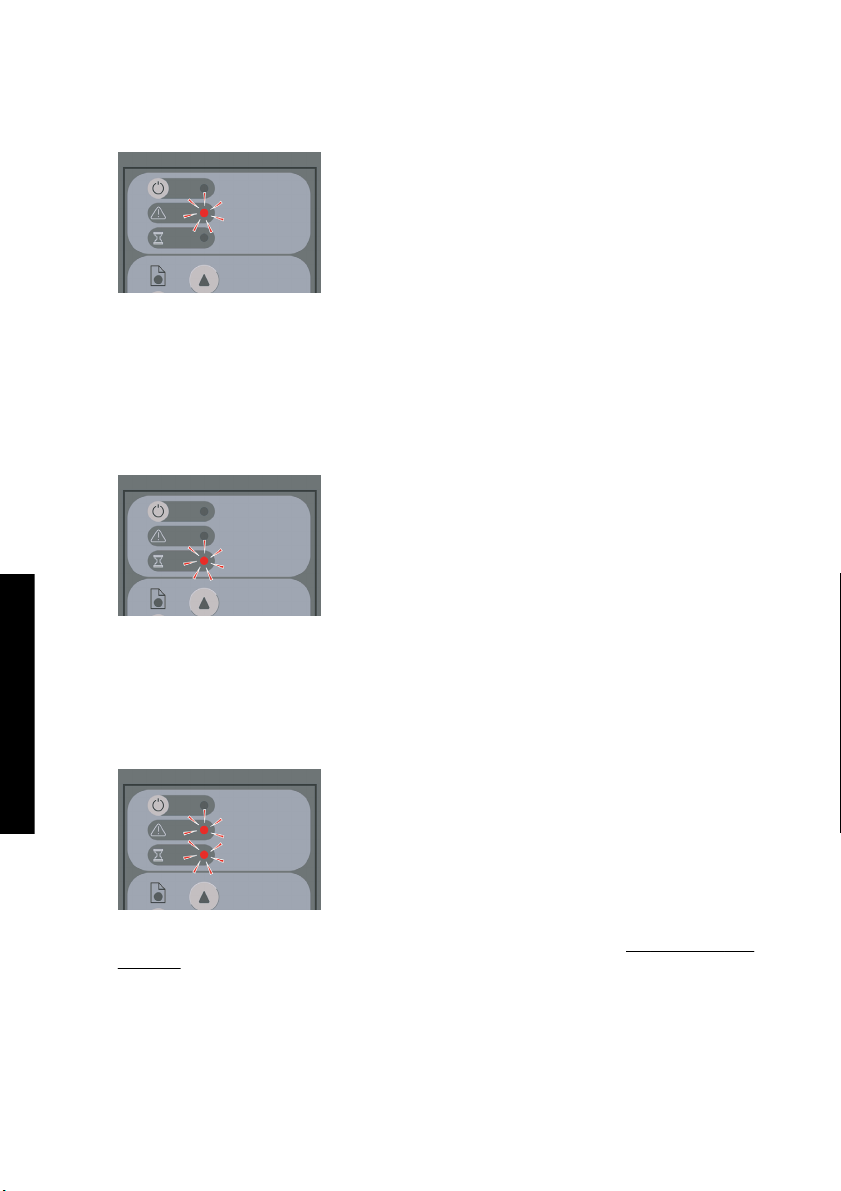
The diagnostics light is flashing
The most likely explanation is that the scanning area needs cleaning. Perform the routine maintenance
procedures explained in your online guide, which include cleaning. Restart the scanner when you have
finished the maintenance procedures.
If the light continues to flash, there may be camera position errors. In this case, contact HP Support.
The wait light is flashing
The problem is...
This indicates that the scanner needs to make some readjustment but is unable to do so. Remove all
paper from the scanner, ensure the insertion slot height is set to minimum, and wait for the light to turn
off.
The wait and diagnostics lights are both flashing
In this case, disregard the wait light and respond only to the diagnostics light. See The diagnostics light
is flashing.
24 Chapter 3 The problem is... ENWW
Page 31

The scanner displays a warning message
The scanner may recommend performing maintenance in some circumstances:
● Scanner Maintenance has not been run for 30 days.
Lamp quality fails. The filter should be replaced at the same time.
●
● Glass plate quality fails.
● Original background quality fails.
If you see any of these warnings displayed, consult the scanner's online guide for information on
recommended maintenance procedures.
The scanner software is in the wrong language
If your scanner software is in the wrong language for any reason, you can easily change the language
as follows:
1. In the Setup tab, press the Options button.
2. Press the System button.
3. Press the Advanced button and give the administrator’s password.
4. Press the Change Language button.
5. Select your preferred language.
You will now have to wait a short time while the system shuts down and restarts.
The scanner software does not start
If your scanner system software does not start up when you turn on the touch screen, trying turning it off
and then on again.
If it persistently fails to start up, you may need to reinstall the software, using the ’System Recovery’
DVD that came with your scanner system.
1. With the system on, insert the System Recovery DVD in the DVD drive.
2. Power off the touch screen and then power it on again.
3. Follow the instructions on the screen.
4. When the software has been reinstalled, you will be prompted to remove the DVD and restart the
touch screen.
5. When the touch screen restarts, it will ask you to calibrate the position of the pointer. Please do so
by touching the targets that will appear three times. To obtain a good and consistent calibration,
you should be standing in your normal position and using whatever pointer you normally use to
operate the touch screen (your finger, or some other object).
The problem is...
ENWW The scanner displays a warning message 25
Page 32

6. After touching the three targets, you will be asked to touch any part of the touch screen. If you are
happy with the result of the calibration, press the Yes button. If you are prompted to restart the
system, press No.
7. The language selection screen should appear. Select the language you want to use for the
Designjet Scan application. The touch screen will automatically restart in the selected language.
8. Allow time for the operating system to be reloaded. The process has finished when the touch
screen shows the Copy tab of the Designjet Scan application.
The CD or DVD cannot be read by my computer
The scanner creates CDs and DVDs compliant with the ISO 9660 standard plus Joliet Extension. This
standard is commonly supported but it cannot be guaranteed that all computers will be able to read it.
A media profile cannot be generated
Check that the scanner and the printer are both switched on and ready for normal operation.
Streaks in the scanned image
If the problem is visible when previewing the image on screen, it may be due to dirt or scratches on the
glass. First try to clean the glass (see
the glass.
The problem is...
Clean the glass). If the problem persists, you may need to replace
26 Chapter 3 The problem is... ENWW
Page 33

4 Legal information
Worldwide Limited Warranty—HP Designjet 820mfp Scanner
●
● Regulatory notices
● DECLARATION OF CONFORMITY
ENWW 27
Legal information
Page 34

Worldwide Limited Warranty—HP Designjet 820mfp Scanner
HP product Limited Warranty Period
Scanner 1 year (from the date of purchase by the customer)
Touch screen 1 year (from the date of purchase by the customer)
Software 90 days (from the date of purchase by the customer)
A. Extent of HP Limited Warranty
1. This Hewlett-Packard (HP) Limited Warranty gives you, the end-customer, express limited
warranty rights from HP, the manufacturer. In addition, you may also have other legal rights under
the applicable local law or special written agreement with HP.
2. HP warrants to you that the HP products specified above will be free from defects in materials and
workmanship in normal use during the Limited Warranty Period specified above. The Limited
Warranty Period starts on the date of purchase. Your dated sales or delivery receipt, showing the
date of purchase of the product, is your proof of purchase date. You may be required to provide
proof of purchase as a condition of receiving warranty service. You are entitled to warranty service
according to the terms and conditions of this document if a repair or replacement of your HP
Products is required within the Limited Warranty Period.
3. For software products, HP’s Limited Warranty applies only to a failure to execute programming
instructions. HP does not warrant that the operation of any product will be uninterrupted or error
free.
4. HP’s Limited Warranty does not apply to any:
a. Product that experiences problems resulting from misuse, improper or inadequate
maintenance or modification;
b. Software, interfacing, or parts not provided or supported by HP;
c. Operation outside the product’s specifications;
d. White background and glass plate products that exhibit wear from ordinary use.
Routine maintenance operations in the HP Designjet 820mfp Scanner, such as cleaning and
preventive maintenance services (including parts contained in any preventive maintenance kit and
HP service engineer visits), are not covered by HP’s Limited Warranty.
5. YOU SHOULD MAKE PERIODIC BACKUP COPIES OF THE DATA STORED ON THE TOUCH
SCREEN'S HARD DISK OR OTHER STORAGE DEVICES AS A PRECAUTION AGAINST
POSSIBLE FAILURES, ALTERATION, OR LOSS OF THE DATA. BEFORE RETURNING ANY
Legal information
UNIT FOR SERVICE, BE SURE TO BACK UP DATA AND REMOVE ANY CONFIDENTIAL,
PROPRIETARY, OR PERSONAL INFORMATION. HP IS NOT RESPONSIBLE FOR DAMAGE TO
OR LOSS OF ANY FILES, STORED BY YOU ON THE TOUCH SCREEN'S HARD DISK OR
OTHER STORAGE DEVICES. HP IS NOT RESPONSIBLE FOR THE RECOVERY OF LOST
FILES OR DATA.
28 Chapter 4 Legal information ENWW
Page 35

6. Your exclusive remedies for defective HP products are the following:
a. During the Limited Warranty Period, HP will replace any defective HP software or consumable
product which is covered by this Limited Warranty, and deliver another product to you to
replace the defective one.
b. During the Limited Warranty Period, HP, at its sole discretion, shall either repair on site or
replace any defective hardware product or component part. If HP elects to replace any
component part, HP will provide to you (i) a replacement part, in return for the defective one,
and (ii) remote part installation assistance, if needed.
c. In the unlikely event that HP is unable to repair or replace, as applicable, a defective product
which is covered by this Limited Warranty, HP shall, within a reasonable time after being
notified of the defect, refund the purchase price of the product.
7. HP shall have no obligation to replace or refund until you return the defective consumable, media,
hardware product or component part to HP. All components, parts, consumables, media or
hardware products removed under this Limited Warranty become the property of HP.
Notwithstanding the above mentioned, HP may waive the requirement for you to return the
defective part.
8. Unless otherwise stated, and to the extent permitted by local law, HP products may be
manufactured using new materials or new and used materials equivalent to new in performance
and reliability. HP may repair or replace products (i) with equivalent products to the products being
repaired or replaced but which may have been subject to prior use; or (ii) with an equivalent
product to an original product that has been discontinued.
9. THIS LIMITED WARRANTY IS APPLICABLE IN ALL COUNTRIES AND MAY BE ENFORCED IN
ANY COUNTRY WHERE HP OR ITS AUTHORIZED SERVICE PROVIDERS OFFER WARRANTY
SERVICE AND HP HAS MARKETED THIS PRODUCT, SUBJECT TO THE TERMS AND
CONDITIONS SET FORTH IN THIS LIMITED WARRANTY. HOWEVER, WARRANTY SERVICE
AVAILABILITY AND RESPONSE TIME MAY VARY FROM COUNTRY TO COUNTRY. HP WILL
NOT ALTER FORM, FIT, OR FUNCTION OF THE PRODUCT TO MAKE IT OPERATE IN A
COUNTRY FOR WHICH IT WAS NEVER INTENDED TO FUNCTION FOR LEGAL OR
REGULATORY REASONS.
10. Contracts for additional services may be available for any authorized HP service facility where the
listed HP product is distributed by HP or an authorized importer.
11. TO THE EXTENT ALLOWED BY LOCAL LAW, EXCEPT AS EXPRESSLY SET FORTH IN THIS
LIMITED WARRANTY NEITHER HP NOR ITS THIRD PARTY SUPPLIERS MAKE ANY OTHER
WARRANTY OR CONDITION OF ANY KIND, WHETHER EXPRESS OR IMPLIED, WITH
RESPECT TO THE HP PRODUCTS, AND SPECIFICALLY DISCLAIM THE IMPLIED
WARRANTIES OR CONDITIONS OF MERCHANTABILITY, SATISFACTORY QUALITY, AND
FITNESS FOR A PARTICULAR PURPOSE.
12. These HP Limited Warranty entitlements are specific to the HP products specified above. They
supersede any limited warranty terms (apart from separately negotiated terms on a specific written
agreement with HP) that may be found online, in any documentation or materials contained in the
HP printer product packaging.
B. Limitations of liability
TO THE EXTENT ALLOWED BY LOCAL LAW, EXCEPT FOR THE OBLIGATIONS SPECIFICALLY
SET FORTH IN THIS LIMITED WARRANTY, IN NO EVENT SHALL HP OR ITS THIRD PARTY
SUPPLIERS BE LIABLE FOR DIRECT, INDIRECT, SPECIAL, INCIDENTAL, OR CONSEQUENTIAL
DAMAGES (INCLUDING ANY LOSS OF PROFITS OR SAVINGS), WHETHER BASED ON
ENWW Worldwide Limited Warranty—HP Designjet 820mfp Scanner 29
Legal information
Page 36

CONTRACT, TORT, OR ANY OTHER LEGAL THEORY AND WHETHER ADVISED OF THE
POSSIBILITY OF SUCH DAMAGES.
C. Local law
1. This Limited Warranty gives you specific legal rights. You may also have other rights which vary
from state to state in the United States, from province to province in Canada, and from country to
country elsewhere in the world. You are advised to consult applicable state, province, or national
laws for full determination of your rights.
2. To the extent that this Warranty Statement is inconsistent with local law, this Warranty Statement
shall be deemed modified to be consistent with such local law. THE WARRANTY TERMS
CONTAINED IN THIS LIMITED WARRANTY, EXCEPT TO THE EXTENT LAWFULLY
PERMITTED, DO NOT EXCLUDE, RESTRICT, OR MODIFY AND ARE IN ADDITION TO THE
MANDATORY STATUTORY RIGHTS APPLICABLE TO THE SALE OF THIS PRODUCT TO YOU.
Revision: January 25th, 2006
Legal information
30 Chapter 4 Legal information ENWW
Page 37

Regulatory notices
This HP product contains a lithium battery located on the main board of the touch screen that may
require special handling at the end of its life.
You can obtain current Material Safety Data Sheets for the ink systems used in the printer by mailing a
request to this address: Hewlett-Packard Customer Information Center, 19310 Pruneridge Avenue,
Dept. MSDS, Cupertino, CA 95014, U.S.A.
There is also a Web page:
Regulatory Model Number
For regulatory identification purposes, your product is assigned a Regulatory Model Number (RMN).
The Regulatory Model Number for your product is:
RMN Product number Product family
BCLAA-0503 Q6685X HP Designjet 820mfp
The Regulatory Model Number (RMN) should not be confused with the marketing name (HP Designjet
820mfp) or product number (Q6685X, where X is any single letter).
ELECTROMAGNETIC COMPATIBILITY (EMC)
WARNING! This is a class A product. In a domestic environment this product may cause
radio interference, in which case the user may be required to take adequate measures.
FCC statements (U.S.A.)
The U.S. Federal Communications Commission (in 47 cfr15.105) has specified that the following notices
be brought to the attention of users of this product.
http://www.hp.com/hpinfo/community/environment/productinfo/psis_inkjet.htm
Shielded cables
Use of shielded data cables is required to comply with the Class A limits of Part 15 of the FCC Rules.
CAUTION Pursuant to Part 15.21 of the FCC Rules, any changes or modifications to this
equipment not expressly approved by the Hewlett-Packard Company may cause harmful
interference and void the FCC authorization to operate this equipment.
This equipment has been tested and found to comply with the limits for a Class A digital device,
pursuant to part 15 of the FCC Rules. These limits are designed to provide reasonable protection
against harmful interference in a commercial environment. This equipment generates, uses, and can
radiate radio frequency energy and, if not installed and used in accordance with the instructions, may
cause harmful interference to radio communications. Operation of this equipment in a residential area is
likely to cause harmful interference, in which case users will be required to correct the interference at
their own expense.
ENWW Regulatory notices 31
Legal information
Page 38

Normes de sécurité (Canada)
Le présent appareil numérique n'émet pas de bruits radioélectriques dépassant les limites applicables
aux appareils numériques de Classe A prescrites dans le réglement sur le brouillage radioélectrique
édicté par le Ministére des Communications du Canada.
DOC statement (Canada)
This digital apparatus does not exceed the Class A limits for radio noise emissions from digital
apparatus set out in the Radio Interference Regulations of the Canadian Department of Communications.
Korean EMI statement
VCCI Class A (Japan)
Safety power cord warning
Taiwanese EMI statement
Chinese EMI statement
Legal information
32 Chapter 4 Legal information ENWW
Page 39

Sound
Geräuschemission (Germany) LpA < 70 dB, am Arbeitsplatz, im Normalbetrieb, nach DIN45635 T. 19.
ENWW Regulatory notices 33
Legal information
Page 40

DECLARATION OF CONFORMITY
according to ISO/IEC Guide 22 and EN 45014
Supplier’s name: Hewlett-Packard Company
Supplier’s address: Avenida Graells, 501
08174 Sant Cugat del Vallès
Barcelona, Spain
declares that the product
Regulatory Model
Product family: HP Designjet 820mfp
Product options: All
conforms to the following product specifications
Safety: IEC 60950-1:2001 / EN 60950–1:2001
EMC: CISPR 22:1997+A1:2000+A2:2002 / EN 55022:1998+A1:2000+A2:2003 Class A
(3)
: BCLAA-0503
(1)
EN 55024:1998+A1:2001
+A2:2003
EN 61000-3-2:2000
EN 61000-3-3:1995+A1:2001
FCC Title 47 CFR, Part 15 Class A
(2)
Legal information
34 Chapter 4 Legal information ENWW
Page 41

Additional information
The product herewith complies with the requirements of the Low-Voltage Directive 73/23/EEC and the
EMC Directive 89/336/EEC, and carries the CE marking accordingly.
1. The product was tested in a typical configuration with HP Personal Computer systems and
peripherals.
2. This device complies with Part 15 of the FCC Rules. Operation is subject to the following two
conditions:
This device may not cause harmful interference.
●
● This device must accept any interference received, including interference that may cause
undesired operation.
3. The product is assigned a Regulatory Model Number which stays with the regulatory aspect of the
design. The Regulatory Model Number is the main product identifier in the regulatory
documentation and test reports; this number should not be confused with the marketing name or
the product numbers.
Josep-Maria Pujol
Hardware Quality Manager
Sant Cugat del Vallès (Barcelona)
June 27th, 2005
Local contacts for regulatory topics only
European contact: Hewlett-Packard GmbH, HQ-TRE, Herrenberger Strasse 140, 71034 Böblingen,
Germany.
United States contact: Hewlett-Packard Company, Corporate Product Regulations Manager, 3000
Hanover Street, Palo Alto, CA 94304, USA. Tel: 650-857-1501.
Australian contact: Hewlett-Packard Australia Ltd, Product Regulations Manager, 31–41 Joseph
Street, Blackburn, Victoria, 3130, Australia.
ENWW DECLARATION OF CONFORMITY 35
Legal information
Page 42

Legal information
36 Chapter 4 Legal information ENWW
Page 43

Index
A
accessing the shared folder 17
adding a printer 16
adjusting color 19
B
both lights flashing 24
C
calibration 6
can't make media profile 26
CD, saving files on 17
cleaning the glass 20
collating copies 20
copying a document 7
creating a media profile 7
D
Declaration of Conformity 34
delete file 11
diagnostics light flashing 24
does not start 25
DVD, saving files on 17
E
enabling/disabling accounts 19
G
guarantee 28
printing a scanned document 11
R
regulatory notices 31
S
saving files on CD or DVD 17
scanning a document to a file 10
scanning heavyweight paper or
cardboard 12
setting timers 20
software introduction 2
streaks in the image 26
T
thick materials 12
touch screen calibration 6
U
unreadable CD/DVD 26
using this guide 2
V
view file 11
W
wait light flashing 24
warranty statement 28
wrong language 25
M
maintenance warnings 25
media profiles 7
P
previewing copies 13
printer configuration 16
printing a file 11
ENWW Index 37
Page 44

38 Index ENWW
Page 45

Page 46

 Loading...