

Page 1

hp digital copier
series
510/610
reference guide
Page 2

© Copyright Hewlett-Packard Company 2002
All rights are reserved. No part of the document may be
photocopied, reproduced, or translated to another language
without the prior written consent of Hewlett-Packard
Company.
Portions Copyright © 1989-2001 Palomar Software Inc. The
HP Digital Copier Series includes printer driver technology
licensed from Palomar Software, Inc. www.palomar.com
Publicati on nu mber: C7296-90280
First edition: January 2002
Printed in U.S.A., Mexico, Germany, Singapore, or China
®
Windows
and Windows 2000
Microsoft Corporation.
Intel® and Pentium® are registered trademarks of Intel
Corporation.
, Windows NT®, Windows ME®, Windows XP®,
®
are U.S.-registered trademarks of
notice
The information contained in this document is subject to
change without notice and should not be construed as a
commitment by the Hewlett-Packard Company.
Hewlett-Packard assumes no responsibility for
any errors that may appear in this document, nor
does it make expressed or implied warranty of
any kind with regard to this material, including,
but not limited to, the implied warranties of
merchantability and fitness for a particular
purpose.
The Hewlett-Packard Company shall not be liable for
incidental or consequential damages in connection with, or
arising out of the furnishing, performance, or use of this
document and the program material which it describes.
Note: Regulatory information can be found in the
“Technical information” section of the Support and
Specifications Booklet.
It is not lawful in many places to make copies of the
following items. When in doubt, check with a legal
representative first.
• Governmental paper or documents:
- Passports
- Immigration papers
- Selective service papers
- Identification badges, cards, or insignias
•Governmental stamps:
-Postage stamps
- Food stamps
• Checks or drafts drawn on Governmental agencies
• Paper currency, traveler’s checks, or money orders
• Certificates of deposit
• Copyrighted works safety information
Warning! To
prevent fire or shock
hazard, do not
expose this product
to rain or any type of
moisture.
Always follow basic safety precautions when using this
product to reduce risk of injury from fire or electric shock.
WARNING: potential shock hazard
1 Read and understand all instructions in the setup poster.
2 Use only a grounded electrical outlet when connecting
the unit to a power source. If you do not know whether
the outlet is grounded, check with a qualified
electrician.
3 Observe all warnings and instructions marked on the
product.
4 Unplug this product from wall outlets before cleaning.
5 Do not install or use this product near water or when
you are wet.
6 Install the product securely on a stable surface.
7 Install the product in a protected location where no one
can step on or trip over the line cord, and where the line
cord will not be damaged.
8 If the product does not operate normally, see the online
Troubleshooting help.
9 No operator-serviceable parts inside. Refer servicing to
qualified service personnel.
10 Use in a well-ventilated area.
Page 3

contents
1 review the front panel. . . . . . . . . . . . . . . . . . . . . . . . . . . . . 1
front panel features . . . . . . . . . . . . . . . . . . . . . . . . . . . . . . . . . . . . . 1
menu functions . . . . . . . . . . . . . . . . . . . . . . . . . . . . . . . . . . . . . . . . 3
menu options . . . . . . . . . . . . . . . . . . . . . . . . . . . . . . . . . . . . . . . . . 4
2 get help . . . . . . . . . . . . . . . . . . . . . . . . . . . . . . . . . . . . . . . 5
3 load originals and paper. . . . . . . . . . . . . . . . . . . . . . . . . . . 7
load originals . . . . . . . . . . . . . . . . . . . . . . . . . . . . . . . . . . . . . . . . . 7
load originals on the glass . . . . . . . . . . . . . . . . . . . . . . . . . . . . . . 7
load originals in the automatic document feeder . . . . . . . . . . . . . . . 8
avoid paper jams . . . . . . . . . . . . . . . . . . . . . . . . . . . . . . . . . . . . . . 9
load paper . . . . . . . . . . . . . . . . . . . . . . . . . . . . . . . . . . . . . . . . . . . 9
load the main paper tray . . . . . . . . . . . . . . . . . . . . . . . . . . . . . . . 9
load the optional 250-sheet plain paper tray . . . . . . . . . . . . . . . . 11
recommended paper types . . . . . . . . . . . . . . . . . . . . . . . . . . . . . . . 11
papers to avoid. . . . . . . . . . . . . . . . . . . . . . . . . . . . . . . . . . . . . . . 12
tips for loading other types of paper in the main tray . . . . . . . . . . . . . 12
choose the paper tray and set the paper type . . . . . . . . . . . . . . . . . . 13
set the paper size . . . . . . . . . . . . . . . . . . . . . . . . . . . . . . . . . . . . . 13
4 use copier features . . . . . . . . . . . . . . . . . . . . . . . . . . . . . . 15
make copies . . . . . . . . . . . . . . . . . . . . . . . . . . . . . . . . . . . . . . . . . 15
before you begin . . . . . . . . . . . . . . . . . . . . . . . . . . . . . . . . . . . 15
make a copy . . . . . . . . . . . . . . . . . . . . . . . . . . . . . . . . . . . . . . 16
increase copy speed or quality . . . . . . . . . . . . . . . . . . . . . . . . . . 16
reduce or enlarge a copy. . . . . . . . . . . . . . . . . . . . . . . . . . . . . . 16
make copies lighter or darker. . . . . . . . . . . . . . . . . . . . . . . . . . . 17
change color intensity . . . . . . . . . . . . . . . . . . . . . . . . . . . . . . . . 17
copy using photo mode . . . . . . . . . . . . . . . . . . . . . . . . . . . . . . . 17
enhance text sharpness and photo colors. . . . . . . . . . . . . . . . . . . 18
contents
iii
Page 4

hp digital copier series
set the number of copies . . . . . . . . . . . . . . . . . . . . . . . . . . . . . . 18
change settings for all copy tasks . . . . . . . . . . . . . . . . . . . . . . . . 18
perform special copy jobs . . . . . . . . . . . . . . . . . . . . . . . . . . . . . . . 19
copy a photo . . . . . . . . . . . . . . . . . . . . . . . . . . . . . . . . . . . . . . 19
fit a copy to the page . . . . . . . . . . . . . . . . . . . . . . . . . . . . . . . . 19
print several copies on one page . . . . . . . . . . . . . . . . . . . . . . . . 20
print two originals on one page . . . . . . . . . . . . . . . . . . . . . . . . . 21
shift image to increase the margin. . . . . . . . . . . . . . . . . . . . . . . . 22
make two-sided copies . . . . . . . . . . . . . . . . . . . . . . . . . . . . . . . 22
collate copies. . . . . . . . . . . . . . . . . . . . . . . . . . . . . . . . . . . . . . 23
make a poster . . . . . . . . . . . . . . . . . . . . . . . . . . . . . . . . . . . . . 23
prepare a color T-shirt transfer . . . . . . . . . . . . . . . . . . . . . . . . . . 24
create a mirror image copy . . . . . . . . . . . . . . . . . . . . . . . . . . . . 25
stop copying. . . . . . . . . . . . . . . . . . . . . . . . . . . . . . . . . . . . . . . . . 25
copy setup menu options . . . . . . . . . . . . . . . . . . . . . . . . . . . . . . . . 25
5 accessories . . . . . . . . . . . . . . . . . . . . . . . . . . . . . . . . . . . .27
automatic document feeder (ADF) . . . . . . . . . . . . . . . . . . . . . . . . . . 27
install the ADF . . . . . . . . . . . . . . . . . . . . . . . . . . . . . . . . . . . . . 27
install the ADF input tray . . . . . . . . . . . . . . . . . . . . . . . . . . . . . . 28
replace an existing ADF lid . . . . . . . . . . . . . . . . . . . . . . . . . . . . 29
use the ADF . . . . . . . . . . . . . . . . . . . . . . . . . . . . . . . . . . . . . . . 29
two-sided printing accessory . . . . . . . . . . . . . . . . . . . . . . . . . . . . . . 29
attach the two-sided printing accessory . . . . . . . . . . . . . . . . . . . . 29
optional hp 250-sheet plain paper tray . . . . . . . . . . . . . . . . . . . . . . 30
assemble the 250-sheet plain paper tray . . . . . . . . . . . . . . . . . . . 30
set the paper size . . . . . . . . . . . . . . . . . . . . . . . . . . . . . . . . . . . 31
load paper in the optional 250-sheet plain paper tray. . . . . . . . . . 33
attach the optional 250-sheet plain paper tray to the unit. . . . . . . . 34
6 maintain your hp digital copier. . . . . . . . . . . . . . . . . . . . . .35
clean the glass . . . . . . . . . . . . . . . . . . . . . . . . . . . . . . . . . . . . . . . 35
clean the lid backing . . . . . . . . . . . . . . . . . . . . . . . . . . . . . . . . . . . 35
clean the exterior. . . . . . . . . . . . . . . . . . . . . . . . . . . . . . . . . . . . . . 36
maintain printheads and ink cartridges. . . . . . . . . . . . . . . . . . . . . . . 36
check the ink level. . . . . . . . . . . . . . . . . . . . . . . . . . . . . . . . . . . 36
handle printheads. . . . . . . . . . . . . . . . . . . . . . . . . . . . . . . . . . . 36
verify a printhead needs to be replaced. . . . . . . . . . . . . . . . . . . . .37
replace the printheads. . . . . . . . . . . . . . . . . . . . . . . . . . . . . . . . 38
handle ink cartridges. . . . . . . . . . . . . . . . . . . . . . . . . . . . . . . . . 40
replace the ink cartridges. . . . . . . . . . . . . . . . . . . . . . . . . . . . . . 41
align the printheads . . . . . . . . . . . . . . . . . . . . . . . . . . . . . . . . . 43
clean the printheads . . . . . . . . . . . . . . . . . . . . . . . . . . . . . . . . . 43
iv
contents
Page 5

hp digital copier series
clean the ink cartridge contacts. . . . . . . . . . . . . . . . . . . . . . . . . . 43
clean the printhead contacts. . . . . . . . . . . . . . . . . . . . . . . . . . . . 45
replacement alternatives . . . . . . . . . . . . . . . . . . . . . . . . . . . . . . 46
perform color calibration . . . . . . . . . . . . . . . . . . . . . . . . . . . . . . 47
override the ink level gauge . . . . . . . . . . . . . . . . . . . . . . . . . . . . 48
set the country/region or language . . . . . . . . . . . . . . . . . . . . . . . . . 49
set the power save mode time . . . . . . . . . . . . . . . . . . . . . . . . . . . . . 50
set the ring and beep volume . . . . . . . . . . . . . . . . . . . . . . . . . . . . . 50
maintenance menu options . . . . . . . . . . . . . . . . . . . . . . . . . . . . . . . 51
7 troubleshooting tips . . . . . . . . . . . . . . . . . . . . . . . . . . . . . 53
paper problems. . . . . . . . . . . . . . . . . . . . . . . . . . . . . . . . . . . . . . . 53
paper jams. . . . . . . . . . . . . . . . . . . . . . . . . . . . . . . . . . . . . . . . 53
paper does not feed from the paper tray . . . . . . . . . . . . . . . . . . . 55
several pages advance at the same time . . . . . . . . . . . . . . . . . . . 55
paper type is not correct or not supported . . . . . . . . . . . . . . . . . . 56
out of paper . . . . . . . . . . . . . . . . . . . . . . . . . . . . . . . . . . . . . . . 56
paper is too narrow or paper size errors . . . . . . . . . . . . . . . . . . . 56
failure to copy. . . . . . . . . . . . . . . . . . . . . . . . . . . . . . . . . . . . . . . . 56
hp digital copier is not responding . . . . . . . . . . . . . . . . . . . . . . . 56
hp digital copier fails to power on . . . . . . . . . . . . . . . . . . . . . . . 58
hp digital copier will not make copies . . . . . . . . . . . . . . . . . . . . . 58
copies do not look right . . . . . . . . . . . . . . . . . . . . . . . . . . . . . . . . . 59
copies are faded, colors are incorrect or dull . . . . . . . . . . . . . . . . 59
entire copy is slanted or skewed . . . . . . . . . . . . . . . . . . . . . . . . . 60
a blank page came out . . . . . . . . . . . . . . . . . . . . . . . . . . . . . . . 60
orientation of copy is wrong. . . . . . . . . . . . . . . . . . . . . . . . . . . . 61
colors are bleeding into each other . . . . . . . . . . . . . . . . . . . . . . . 61
copy has horizontal streaks . . . . . . . . . . . . . . . . . . . . . . . . . . . . 61
copy is fuzzy or blurry. . . . . . . . . . . . . . . . . . . . . . . . . . . . . . . . 62
copy has vertical streaks or is missing vertical lines . . . . . . . . . . . . 62
parts of the original are cut off . . . . . . . . . . . . . . . . . . . . . . . . . . 62
copies are too light or too dark. . . . . . . . . . . . . . . . . . . . . . . . . . 64
ink is not filling the text or graphic completely . . . . . . . . . . . . . . . 64
ink cartridge and printhead problems. . . . . . . . . . . . . . . . . . . . . . . . 65
ink cartridges or printheads have problems . . . . . . . . . . . . . . . . . 65
error message when you insert new ink cartridge or printheads . . . 65
ink cartridge error. . . . . . . . . . . . . . . . . . . . . . . . . . . . . . . . . . . 66
ink cartridge is low or out of ink . . . . . . . . . . . . . . . . . . . . . . . . . 66
ink cartridge is missing, or incorrect cartridge is installed. . . . . . . . 66
need printhead alignment . . . . . . . . . . . . . . . . . . . . . . . . . . . . . 67
create a self-test report for cartridges and printheads. . . . . . . . . . . 67
printhead has failed . . . . . . . . . . . . . . . . . . . . . . . . . . . . . . . . . 68
v
Page 6

hp digital copier series
ink carriage is stalled . . . . . . . . . . . . . . . . . . . . . . . . . . . . . . . . 68
other copier problems and errors. . . . . . . . . . . . . . . . . . . . . . . . . . . 69
ink is not drying . . . . . . . . . . . . . . . . . . . . . . . . . . . . . . . . . . . . 69
cover or door will not close . . . . . . . . . . . . . . . . . . . . . . . . . . . . 69
copier is in factory mode . . . . . . . . . . . . . . . . . . . . . . . . . . . . . . 69
copier is initializing. . . . . . . . . . . . . . . . . . . . . . . . . . . . . . . . . . 69
improper power off. . . . . . . . . . . . . . . . . . . . . . . . . . . . . . . . . . 69
mechanism error. . . . . . . . . . . . . . . . . . . . . . . . . . . . . . . . . . . . .70
8 support services and warranty . . . . . . . . . . . . . . . . . . . . . .71
register your product . . . . . . . . . . . . . . . . . . . . . . . . . . . . . . . . . . . 71
support from the internet. . . . . . . . . . . . . . . . . . . . . . . . . . . . . . . . . 71
hp customer support. . . . . . . . . . . . . . . . . . . . . . . . . . . . . . . . . . . . 71
returning your hp digital copier for service. . . . . . . . . . . . . . . . . . 72
call in the U.S. during warranty . . . . . . . . . . . . . . . . . . . . . . . . . .74
call elsewhere in the world. . . . . . . . . . . . . . . . . . . . . . . . . . . . . .74
call in Australia post-warranty. . . . . . . . . . . . . . . . . . . . . . . . . . . .76
hp distribution center. . . . . . . . . . . . . . . . . . . . . . . . . . . . . . . . . .76
express service . . . . . . . . . . . . . . . . . . . . . . . . . . . . . . . . . . . . . . . .76
limited warranty statement . . . . . . . . . . . . . . . . . . . . . . . . . . . . . . . 77
environmental statement . . . . . . . . . . . . . . . . . . . . . . . . . . . . . . . . . 79
hp printhead and ink cartridge limited warranty . . . . . . . . . . . . . . . . 79
warranty upgrades . . . . . . . . . . . . . . . . . . . . . . . . . . . . . . . . . . . . 80
limited global warranty statement for hp digital copier products . . . . . 80
9 technical information . . . . . . . . . . . . . . . . . . . . . . . . . . . . .83
hp digital copier series specifications. . . . . . . . . . . . . . . . . . . . . . . . 83
margin specifications. . . . . . . . . . . . . . . . . . . . . . . . . . . . . . . . . 83
paper specifications . . . . . . . . . . . . . . . . . . . . . . . . . . . . . . . . . 84
additional specifications . . . . . . . . . . . . . . . . . . . . . . . . . . . . . . 86
order printheads and ink cartridges . . . . . . . . . . . . . . . . . . . . . . . . . 86
additional hp digital copier accessories . . . . . . . . . . . . . . . . . . . . . . 86
environmental product stewardship program. . . . . . . . . . . . . . . . . . . .87
protecting the environment. . . . . . . . . . . . . . . . . . . . . . . . . . . . . .87
ozone production . . . . . . . . . . . . . . . . . . . . . . . . . . . . . . . . . . . .87
energy consumption . . . . . . . . . . . . . . . . . . . . . . . . . . . . . . . . . .87
paper use . . . . . . . . . . . . . . . . . . . . . . . . . . . . . . . . . . . . . . . . .87
plastics . . . . . . . . . . . . . . . . . . . . . . . . . . . . . . . . . . . . . . . . . . .87
material safety data sheets. . . . . . . . . . . . . . . . . . . . . . . . . . . . . .87
materials that require special handling . . . . . . . . . . . . . . . . . . . . .87
recycling program . . . . . . . . . . . . . . . . . . . . . . . . . . . . . . . . . . .87
vi
contents
Page 7

review the front panel
The front panel of your new HP Digital Copier has several buttons and
indicators that allow you to change settings and perform a wide range of
copy functions.
front panel features
The front panel is divided into the following main regions:
•Keypad
• Shared buttons and front panel display
•Copy area
• On button
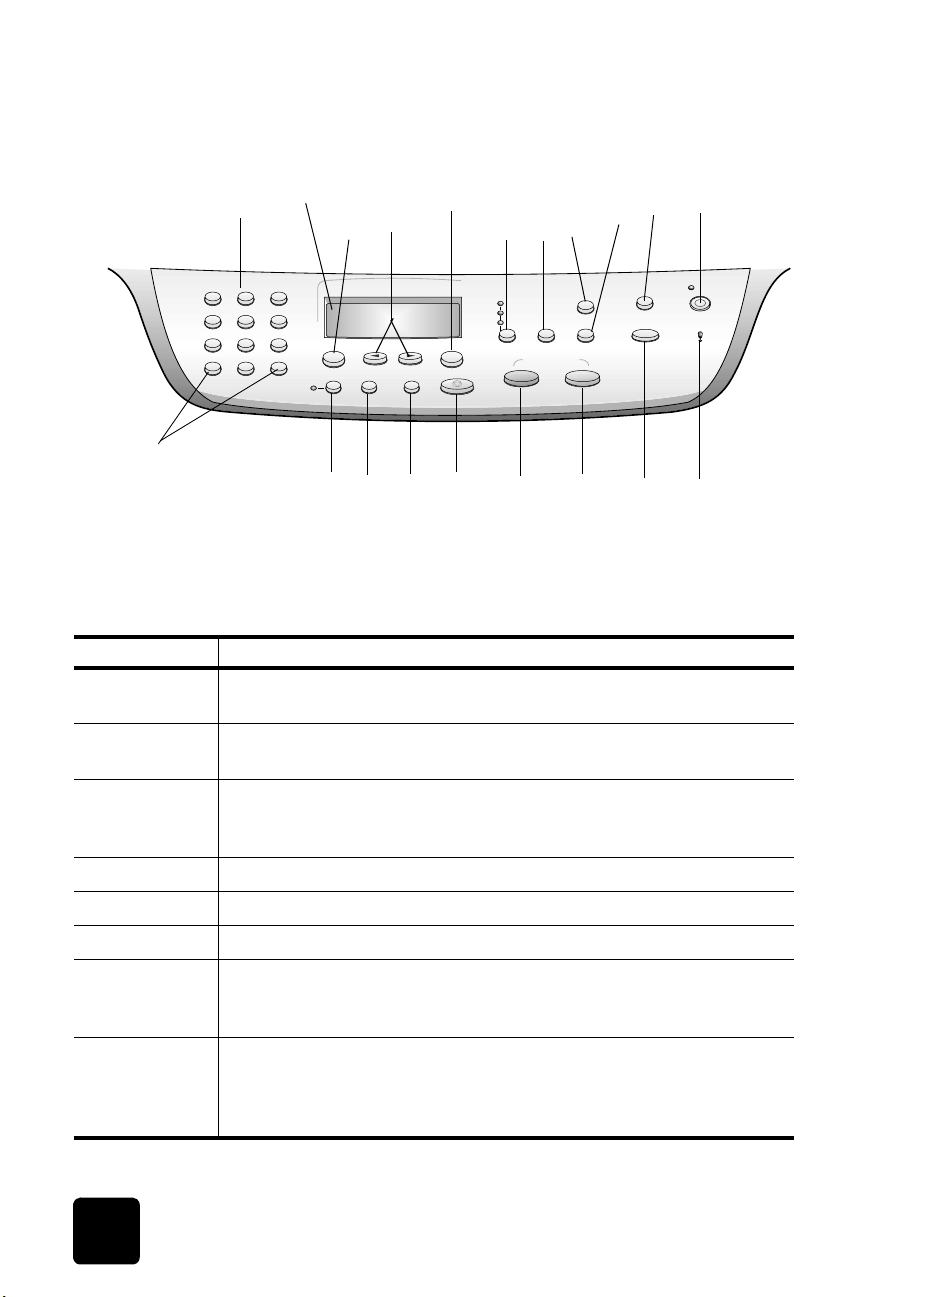
The following page shows a close-up of the front panel with the parts
labeled.
1
review the front panel
1
Page 8
hp digital copier series
1
12
feature purpose
1 Keypad: use to enter numbers such as the quantity of copies or
percentages when reducing or enlarging.
2 Front Panel Display: use to view the active function and access the menu
system.
2
3
13
14
5
4
15
16
6
7
17
9
8
18
19
10
11
20
3 Menu: use to access the menu system. Available menus depend upon
which model of the HP Digital Copier you have. Menu options include
Copy Setup, Print Report, and Status & Maintenance.
4 Arrows: use to scroll through menu settings or options within settings.
5 Enter: use to select or save the displayed setting.
6 Quality: use to select the quality of the copy from Best, Normal, or Fast.
7 Number of Copies: use to change the number of copies for the active copy
job. This button can be used in conjunction with the arrow keys or the
keypad to make as many as 99 copies.
8 Reduce/Enlarge: use to reduce or enlarge an original to a specified
image size on paper loaded in the selected tray. The original may be
placed on the glass or fed from the automatic document feeder (ADF), if
installed.
2
review the front panel
Page 9
feature purpose
9 Special Features: use to access options that let you reduce or enlarge to
a specified copy image size on paper loaded in the selected tray. The
options are Normal, Fit to Page, Which Size?, Poster, 2 on 1, MarginShift
and Mirror.
10 Fit to Page: use to turn the Fit to Page feature on and off.
11 On: use to turn your HP Digital Copier on and off.
12 + /- Keypad Buttons: use + to scroll forward and - to scroll backward
through numeric values.
13 Two-Sided Copy: use to make hands-free two-sided copies. This is
available only if your copier includes the two-sided printing accessory
and the automatic document feeder (ADF).
14 Tray Select/Paper Type: use to select paper type. The main paper tray
supports plain paper and specialty papers. If your HP Digital Copier has
the optional 250-sheet plain paper tray, use this button to select both the
paper type and the paper tray to use.
15 Lighter/Darker: use to adjust the lightness and darkness of your copies.
16 Cancel: use to stop an active copy job, exit a menu, or exit button settings.
17 Start Copy - Black: use to start a black and white copy.
hp digital copier series
18 Start Copy - Color: use to start a color copy.
19 Photo Mode: use to enhance light colors that might otherwise appear
white when copying photographs or pictures.
20 Warning Light: warns of error conditions that require attention, such as
paper jams or low ink levels. Check the front panel display for a
description.
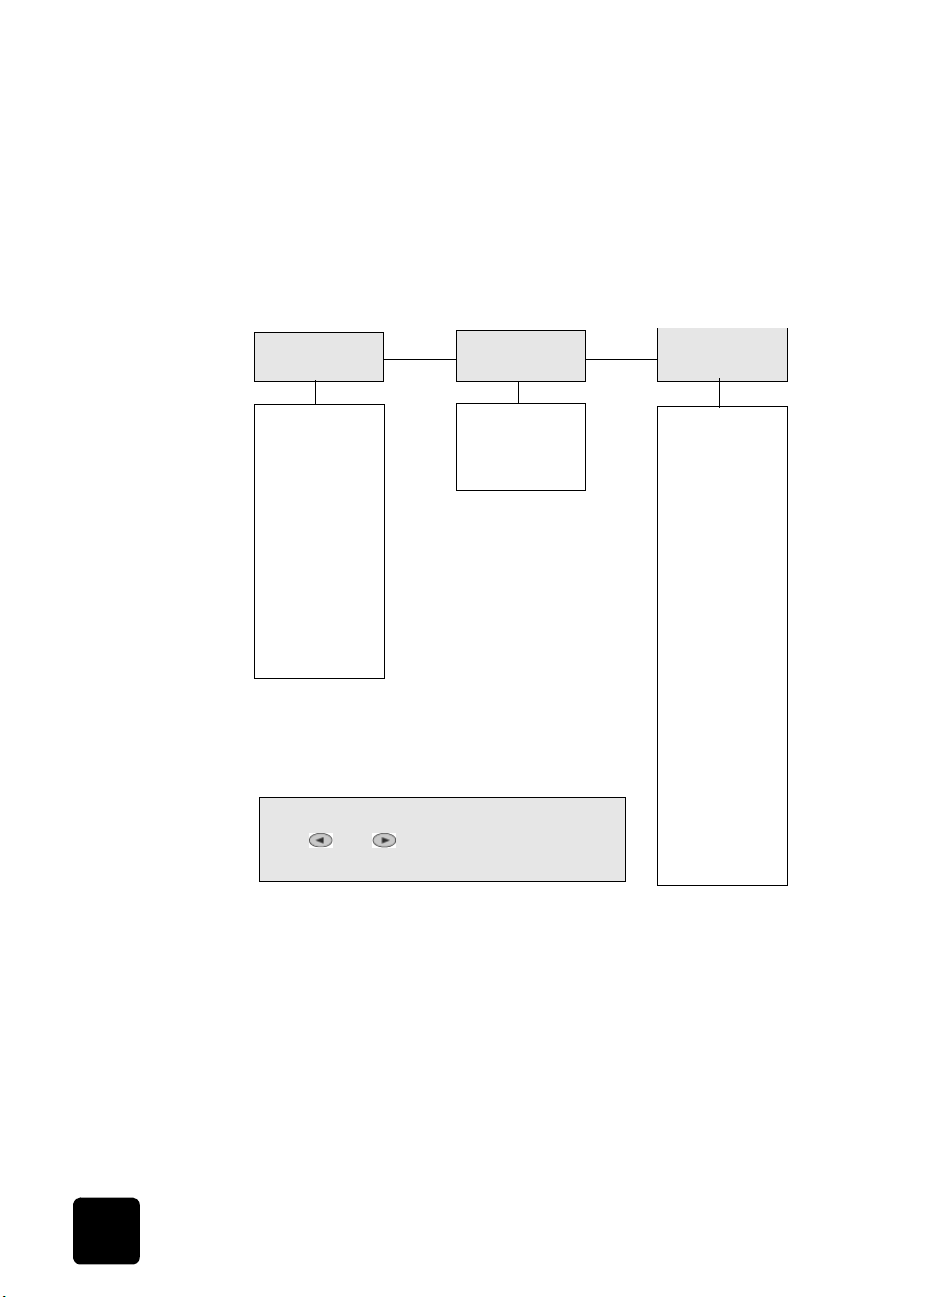
menu functions
review the front panel
The Menu button lets you enter the menu system to change copy settings,
print reports, and perform maintenance.
Press Menu.
1
The first submenu displays.
Repeatedly press Menu or
2
The submenus are as follows:
–1:Copy Setup
– 2:Print Report
– 3:Status and Maintenance
Press Cancel to clear the front panel display, if desired.
3
and
to view all the submenus.
3
Page 10
hp digital copier series
menu options
You can also access Menu functions by pressing the number that
corresponds to a menu option. For example, to set the language and
country/region, press Menu, then press 3 and 7. This automatically selects
the Status and Maintenance menu (3), then the Set Country and Language
option (7).
The following Menu functions are available.
1:Copy Setup
0:Collation
(model 610 only)
1:Enhancements
2:Paper Size
3:Color Intensity
4:Set Copy
Defaults
5:Restore Copy
Press Menu
Press
Press
to display the Copy Setup options.
and to move to the setting you want.
to select the displayed setting.
Enter
2:Print Report
1:Menu Settings
2:Report Self-Test
3:Status and
Maintenance
1:Check Ink
Level
2:Clean
PrintHeads
3:Align
PrintHeads
4:Perform Color
Calibration
5:Restore
Factory Defaults
6:Set Power
Save Mode Time
7:Set Country
and Language
8:Ring and Beep
Volume
4
review the front panel
Page 11

get help
help description
Setup Poster
Reference Guide
Internet help and
technical support
The Setup Poster provides instructions for setting up and configuring your
HP Digital Copier.
This printed Reference Guide contains everything you need to know about
using your HP Digital Copier. The Reference Guide includes
troubleshooting assistance, instructions for ordering supplies and
accessories, technical specifications, and information regarding support
and warranty.
If you have Internet access, you can get help from the HP website at:
www.hp.com/go/copiers
The website also provides answers to frequently asked questions.
2
5
Page 12

hp digital copier series
6
get help
Page 13

load originals and
load originals
load originals on the glass
paper
You can copy many types of originals onto different paper types, weights,
and sizes, including transparency film. It is important, however, that you
choose the right paper and make sure that it is loaded correctly and not
damaged.
There are two ways to load originals to your HP Digital Copier:
• Position the originals on the glass
• Feed originals into the ADF, if one is attached
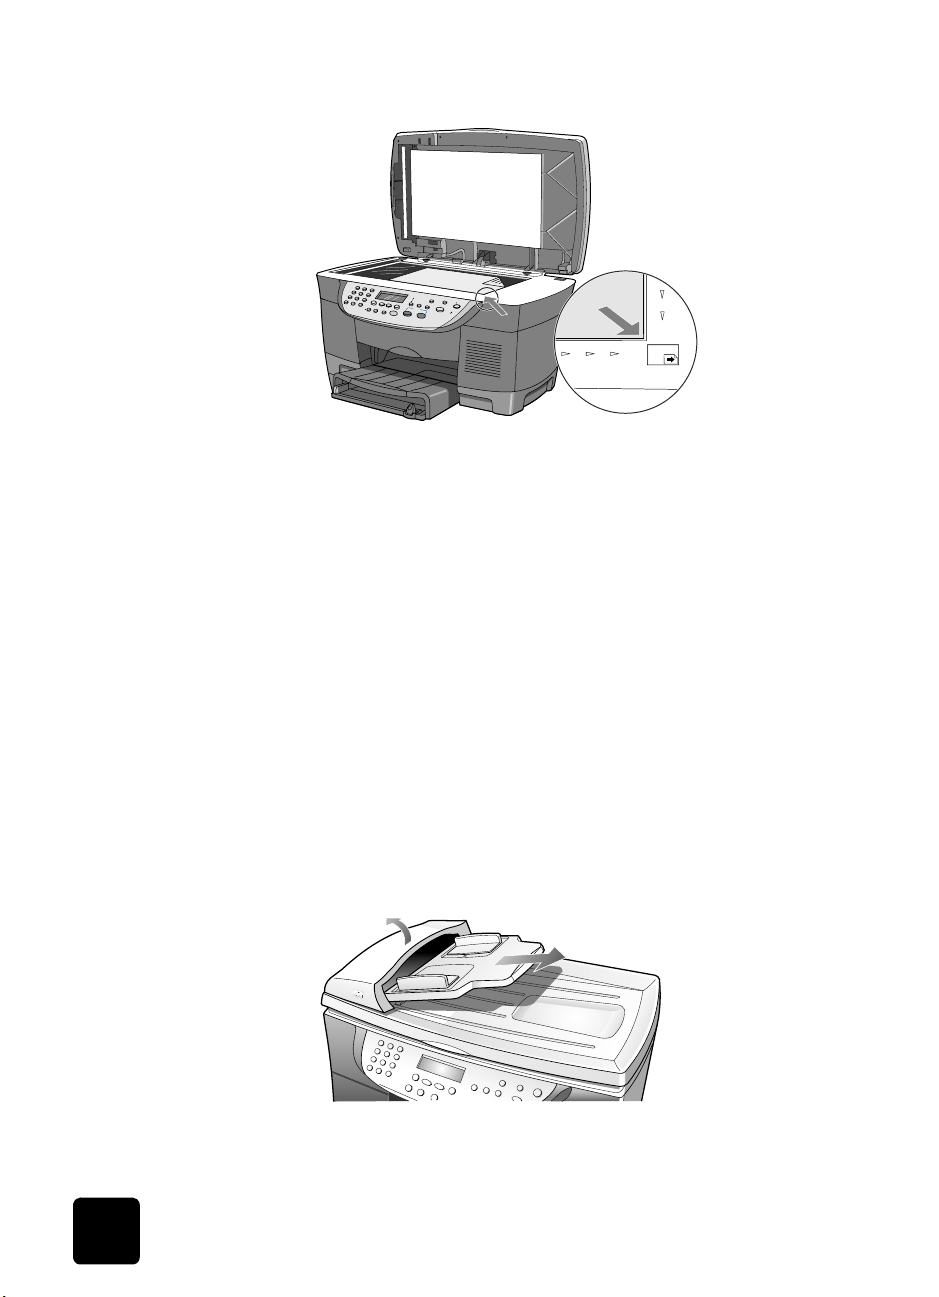
You can copy almost any type of original by placing it directly on the glass.
Many of the Special Features options, such as
Which Size? or Poster, will not work correctly if the
glass and lid backing are not clean. For more
information, see clean the glass and clean the lid
backing on page 35.
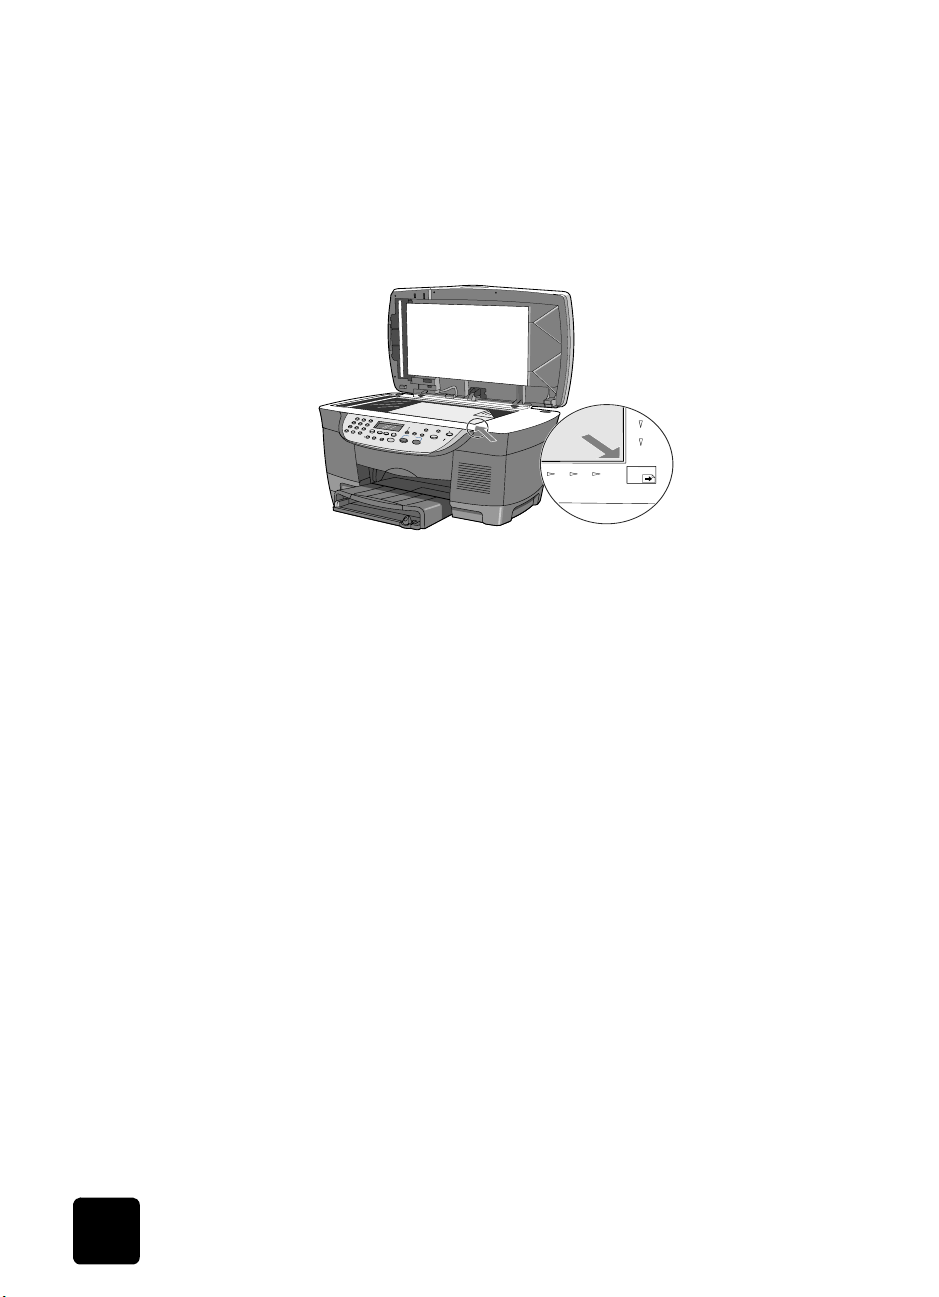
Lift the lid and place the original face down on the glass, positioning
1
it in the bottom-right corner with its sides touching the right and
bottom edges.
It is important to place the original the bottom-right corner.
3
load paper and originals
Tip! If your original is printed on transparency film, place a
blank piece of paper on top of the transparency for better
quality.
Close the lid.
2
7
Page 14
hp digital copier series
top edge of
original
load originals in the automatic document feeder
If your HP Digital Copier is equipped with an ADF, you can load up to 50
originals, printed side up, of the following paper types:
• Plain Paper
16 to 24lb. long grain only
• Specialty Paper
– HP Premium Inkjet Paper
– HP Bright White Inkjet Paper
Caution! Make sure you do not leave an original on the glass
when you use the ADF. This causes a paper jam.
You can also use the ADF to load the following types of originals, but you
must load them one sheet at a time:
• Other specialty papers, such as glossy paper
• Overhead transparencies, such as HP Premium Inkjet Transparency
Media
• Photo paper, such as Kodak EktaColor Edge-5 (glossy)
• Real Estate paper (single sheet only)
8
load originals and paper
Page 15

avoid paper jams
To avoid paper jams, be sure to not overload the input trays. Make sure
your paper edges are not bent or crumpled in any way. Additionally, it is
a good idea to remove papers from the output tray frequently. The output
tray capacity is affected by the type of paper and the amount of ink you
are using. For more information about output tray capacity, see on
page 84.
load paper
Following is the basic procedure for loading paper. There are specific
considerations for loading certain types of paper, transparency film, and
envelopes. After you review this procedure, see tips for loading other types
of paper in the main tray on page 12.
For best results, adjust the paper settings each time you change paper types
or paper sizes. For more information, see choose the paper tray and set the
paper type on page 13.
If you have the optional 250-sheet plain paper tray, you can load paper
into both the main paper tray and the optional 250-sheet plain paper tray.
If you have the optional 250-sheet plain paper tray, you should use it for
plain paper only. See load paper in the optional 250-sheet plain paper tray
on page 33 for more information.
You must also have the two-sided printing accessory installed to use the
optional 250-sheet plain paper tray. For more information, see attach the
two-sided printing accessory on page 29.
hp digital copier series
load the main paper tray
load paper and originals
Make sure that the unit is on a flat, level surface.
1
Make sure that the input tray is pushed completely into the unit.
2
Make sure that the loaded paper is pushed completely back against
3
the backstop of the paper tray.
Lift the output tray up until it catches in the raised position, and slide
4
the paper-width and paper-length guides to their outermost positions.
9
Page 16

hp digital copier series
Tap the stack on a flat surface to align the edges of the paper, and
5
then check the paper for the following:
– Make sure it is free of rips, dust, wrinkles, and curled or bent
edges.
– Make sure all the paper in the stack is the same size and type,
unless you are working with photo paper.
Insert paper into the main tray print-side down until it stops. If you are
6
using letterhead, insert the top of the page first.
Be careful not to use too much or too little paper. Check that the stack
of paper contains several sheets but is no higher than the top of the
paper-length guide.
Slide the paper-width and paper-length guides in until they stop at the
7
edges of the paper. Make sure that the paper stack lies flat in the
main tray and fits under the tab of the paper-length guide.
Lower the output tray.
8
To prevent printed paper from falling off the tray, fully extend the
9
output-tray extender.
10
load originals and paper
Page 17

hp digital copier series
load the optional
250-sheet plain
` See load paper in the optional 250-sheet plain paper tray on
page 33 for more information.
paper tray
recommended paper types
Following is a list of HP papers you can use for copying:
• HP Bright White Inkjet Paper delivers high-contrast colors and sharp
text. It is opaque enough for two-sided color usage, with no showthrough, which makes it ideal for newsletters, reports, and flyers.
• HP Photo Paper, HP Premium Photo Paper, HP Everyday Photo Paper
and HP Premium Plus Photo Paper are high-quality, semi-gloss finish
or matte-finish, photo-based inkjet papers. They look and feel like
photographs and can be mounted under glass or in an album. Photo
papers dry rapidly and resist fingerprints and smudges.
• HP Iron-On T-shirt Transfers can be used to transfer your designs or
photos onto T-shirts, sweatshirts, and fabric crafts.
• HP Premium Inkjet Transparency Film makes your color presentations
vivid and even more impressive. This film is easy to use and handle
and dries quickly without smudging.
• HP Premium Inkjet Heavyweight Paper is matte-coated on both sides
for two-sided copying. It is the perfect choice for near-photographic
reproductions and business graphics for report covers, special
presentations, brochures, mailers, and calendars.
• HP Premium Inkjet Paper is the ultimate coated paper for high-
resolution usage. A smooth, matte finish makes it ideal for your
special documents.
• HP Professional Brochure and Flyer paper is matte-coated or glossy-
coated on both sides for two-sided use. It is the perfect choice for
near-photographic reproductions and business graphics, for report
covers, special presentations, brochures, mailers, and calendars.
• 16 to 24 lb. (60 to 135 gsm) copier paper or letterhead.
load paper and originals
11
Page 18

hp digital copier series
papers to avoid
We do not recommend the following papers:
• Any size paper other than letter, A4, or legal
• Banner paper
• 4 x 6 Photo Paper
• Paper heavier than 24 lb. (135 gsm) or lighter than 16 lb. (60 gsm)
• Paper with perforations
• Photo paper other than HP Photo Papers
• Envelopes
• Transparency film other than HP Premium
• Heavyweight paper other than HP Premium
• Multiple-part forms or label stock
tips for loading other types of paper in the main tray
The following table provides guidelines for loading certain types of paper
and transparency film. For best results, adjust the paper settings each time
you change paper types and paper sizes. For more information, see choose
the paper tray and set the paper type on page 13.
paper tips
HP papers
Legal-size paper Fully extend the paper-length guide and make sure that the main tray is
12
• HP Premium Inkjet Paper: Locate the gray arrow on the nonprinting
side of the paper, and then insert paper with the arrow side facing up.
• HP Premium or Premium Plus Photo Paper: Load the glossy (print) side
down. Always load at least five sheets of regular paper in the main
tray first, and then place the photo paper on top of the regular paper.
• HP Premium Inkjet Transparency Film: Insert the film so that the white
transparency strip (with arrows and the HP logo) is on top and is
going into the tray first.
• HP Iron-On T-shirt Transfers: Flatten the transfer sheet completely
before using it; do not load curled sheets. (To prevent curling, keep
transfer sheets sealed in the original package until you are ready to
use them.) Manually feed one sheet at a time, with the unprinted side
facing down (the blue stripe faces up).
• HP Greeting Cards, Glossy Greeting Cards, or Textured Greeting
Cards: Insert a small stack of HP greeting-card paper, with the printside down into the main tray until it stops.
pushed in all the way.
load originals and paper
Page 19

choose the paper tray and set the paper type
If you have installed the optional 250-sheet plain paper tray, it becomes the
default paper tray used for copying. To use a type of paper other than plain
paper, such as transparency film, load that paper in the main tray. Adjust
the settings for paper type to ensure the best quality and specify which
paper tray to use.
Caution! You must have the two-sided printing accessory
installed to use the 250-sheet plain paper tray.
When you change copy settings on the front panel, the settings are reset to
the defaults two minutes after the unit completes the copy job.
HP recommends adjusting paper type settings for the type of paper you’re
using.
Press Tray Select/Paper Type.
1
If you have both paper trays, press Tray Select/Paper Type until the
2
desired paper tray is selected, as indicated by the dot on the left.
When copying from the main tray, press until the appropriate
3
paper type appears.
Press Enter to choose the displayed paper type.
4
set the paper size
hp digital copier series
load paper and originals
To modify paper size:
Press Menu.
1
Press 1, then press 2.
2
This selects Copy Setup, then selects Paper Size.
If you have the optional 250-sheet paper tray installed, press
3
to select the upper or lower tray, then press Enter to select.
Press until the desired size appears, then press Enter to select it.
4
and
13
Page 20

hp digital copier series
14
load originals and paper
Page 21

use copier features
make copies
4
Your HP Digital Copier lets you do the following:
• Produce high-quality color and black-and-white copies using a variety
of paper types and sizes, including iron-on transfers.
• Reduce or enlarge the size of the copies you make from 25% to
400% of the copy’s original size. (Percentages may vary between
models.)
• Make the copy lighter or darker, adjust the color intensity, select the
number of copies, and specify the quality of the copies you make.
• Use special copying features to create a poster, make many sizes of
photos, make high-quality copies of photos using special photo
paper, or to create transparencies.
• Make two-sided copies or copy from two-sided documents (on some
models).
All copy settings that you select on the front panel are reset two minutes
after the HP Digital Copier completes a copy, unless you save the settings
as the default settings. For more information, see change settings for all
copy tasks on page 18.
before you begin
use copier features
Do the following:
• Follow the instructions in the Setup Poster to set up your HP Digital
Copier.
• Make sure paper is loaded in the main tray. If you need more
information, see load paper on page 9.
15
Page 22
hp digital copier series
make a copy 1
increase copy speed or quality
Load your original on the glass or into the ADF, if available. If you are
placing your original on the glass, open the lid of your HP Digital
Copier and place the document face down in the bottom-right corner
of the glass with the sides of the picture touching the right and bottom
edges.
Press Start Copy - Black or Start Copy - Color.
2
top edge of
original
The HP Digital Copier has three settings that determine copy speed and
quality.
• Best produces the highest quality for all paper and eliminates the
banding (striping) effect that sometimes occurs in solid areas. Best
copies more slowly than the other quality settings.
• Normal delivers high-quality output and is the recommended setting
for most of your copying. Normal copies faster than Best.
• Fast copies faster than the Normal setting. The text is of comparable
quality to the Normal setting, but the graphics may be of lower
quality. Using Fast also cuts down on the frequency of replacing your
ink cartridges, because it uses less ink.
reduce or enlarge a copy
16
to change the quality of your copy
Load your original on the glass or into the ADF.
1
Press Quality until the green light in front of the desired quality is lit.
2
Press Start Copy - Black or Start Copy - Color.
3
You can reduce or enlarge a copy of an original with the Reduce/Enlarge
button or the Special Features buttons. This section explains the Reduce/
Enlarge features only.
For more information about Special Features options, see perform special
copy jobs on page 19 for information about using Fit to Page, Which Size?,
Poster, 2 on 1, Margin Shift, or Mirror.
use copier features
Page 23

hp digital copier series
Press Reduce/Enlarge to choose one of the following:
1
– Custom 100%— lets you enter the percentage to reduce or
enlarge your copy.
– Full Page 91% — lets you reduce an original to 91% of its original
size, which prevents cropping that may occur if you make a fullsize (100%) copy.
– Legal/Letter 72% — reduces an original to 72% of its original
size, which lets you copy a legal-sized original to letter-sized
paper.
If you are using the Custom option, press or to reduce or
2
enlarge the copy.
You can also enter a number using the keypad or press the +/-
buttons on the keypad.
Press Start Copy - Black or Start Copy - Color.
3
make copies lighter or darker
change color intensity
copy using photo mode
Use Lighter/Darker to adjust the lightness and darkness of the copies you
make.
Press Lighter/Darker.
1
Press to lighten the copy or to darken it.
2
The circle moves to the left or right, depending on the button you
press.
Press Start Copy - Black or Start Copy - Color.
3
You can adjust color intensity to make colors on your copy more vivid or
more subtle.
Press Menu.
1
Press 1 and then press 3.
2
This selects Copy Setup, and then selects Color Intensity.
Press to make the image more pale or to make the image
3
more vivid.
The range of color intensity values appears as a circle on a scale on
the front-panel display.
Press Enter to select an option.
4
Press Start Copy - Black or Start Copy - Color.
5
Use Photo Mode when copying photographs or pictures to enhance light
colors that may otherwise appear white.
Press the Photo Mode button.
1
Press until Photo Mode On appears.
2
Press Enter to select the option.
3
Press Start Copy - Black or Start Copy - Color.
4
use copier features
17
Page 24

hp digital copier series
enhance text sharpness and photo colors
set the number of copies
Use Text enhancements to sharpen edges of black text. Text enhancement
is the default option. You can turn off Text enhancement by selecting Photo
or None if the following occur:
• Stray dots of color surround some text on your copies.
• Large, black typefaces look splotchy (not smooth).
• Thin, colored objects or lines contain black sections.
• Horizontal grainy or white bands appear in light- to medium-gray
areas.
Press Menu.
1
Press 1, then press 1.
2
This selects Copy Setup, and then selects Enhancements.
Press until the desired enhancement (Text, Photo, Text and Photo,
3
or None) appears.
Press Enter to select an option.
4
Press Start Copy - Black or Start Copy - Color.
5
You can set the number of copies using the front panel.
Press Number of Copies.
1
Do any one of the following to enter a number:
2
a. Press until the desired number of copies appears.
b. Enter a number with the keypad.
c. Use the +/- buttons until the desired number of copies appears.
Press Enter.
3
Press Start Copy - Black or Start Copy - Color.
4
change settings for all copy tasks
18
Save the copy settings you use most often by setting them as the default.
You can save changes to Copy Setup options in the menu system, as well
as other Copy area settings.
Make any desired changes to the Copy Setup options.
1
Make any desired changes to the button settings in the Copy Area.
2
Press Menu.
3
Press 1, then press 4.
4
This selects Copy Setup, and then selects Set Copy Defaults.
You may also use or to make your selections.
Wait or press Enter to confirm. Your settings are saved.
5
use copier features
Page 25

perform special copy jobs
In addition to supporting standard copying, your HP Digital Copier can
also do the following, depending on model and options:
• copy a photo
• fit a copy to the page
• print several copies on one page
• print two originals on one page
• shift image to increase the margin
• make two-sided copies
• collate copies
• prepare a color T-shirt transfer
hp digital copier series
copy a photo 1
fit a copy to the page
Load a photo on the glass.
If you are using photo paper, you must load it in the main paper tray.
2
If you have the optional 250-sheet plain paper tray, do not load
photo paper into that tray.
Press Tray Select/Paper Type until the Upper Tray is selected, as
3
shown by the dot.
If you do not have the HP 250-sheet plain paper tray, the upper tray
(main tray) is selected by default.
When Upper Tray is selected, press until the desired photo paper
4
option appears, then press Enter to select it.
Tip! To enlarge a photo automatically to a full page, press
Special Features until Fit to Page appears, then press Enter.
For more information, see below.
Press Menu.
5
Press 1, then press 1 again.
6
This selects Copy Setup, and then selects Enhancements.
Press or until Photo appears, then press Enter to select it.
7
Press Start Copy - Black or Start Copy - Color.
8
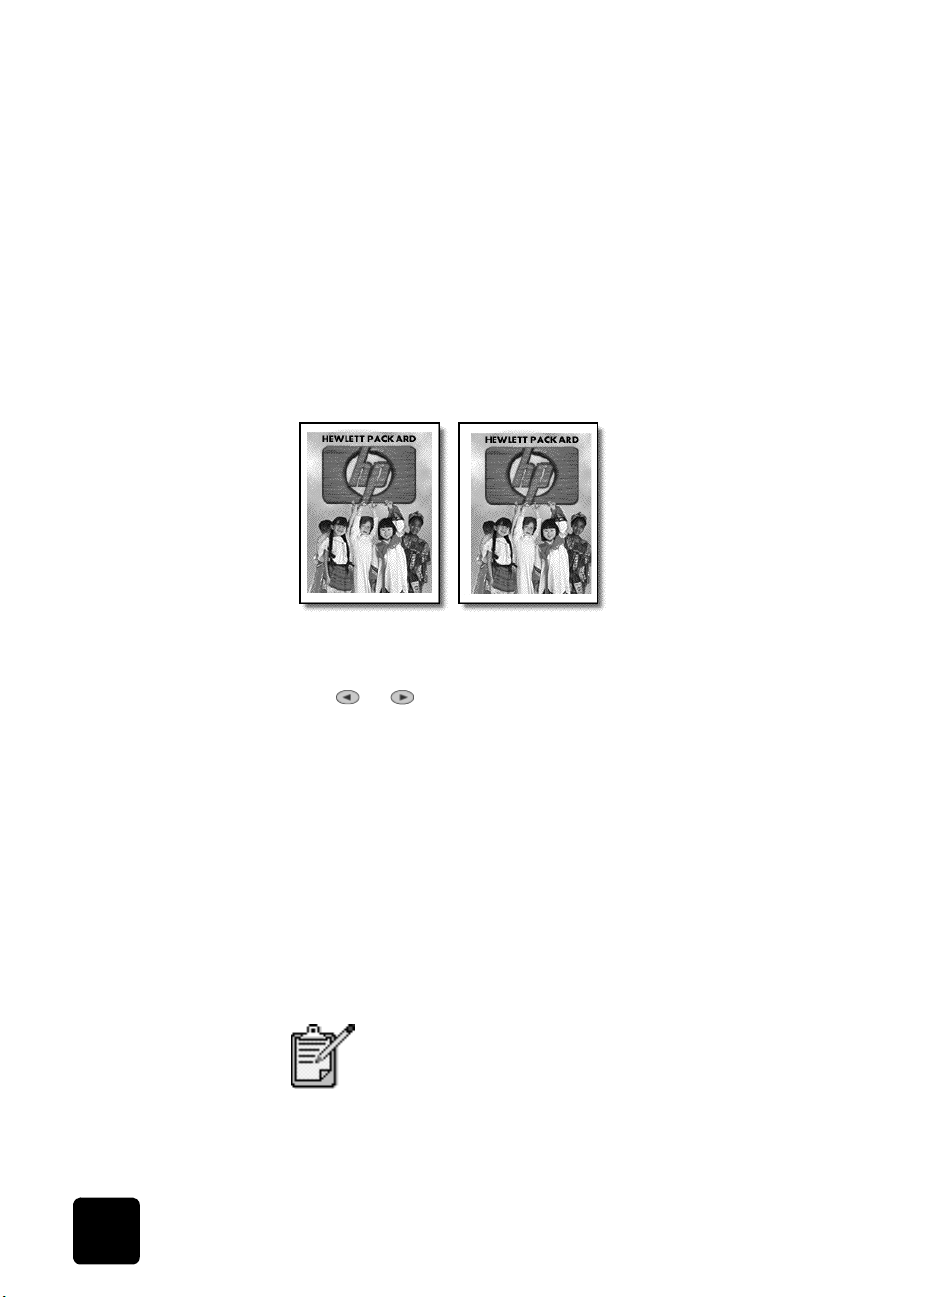
Use Fit to Page when you want to automatically enlarge or reduce your
original to fit the paper size you have loaded. This feature is available in
the Special Features menu or by a button on the front panel.
use copier features
Tip! Make sure that the glass is clean and that the original is
placed in the bottom-right corner of the glass. You cannot use
the ADF for this feature.
19
Page 26

hp digital copier series
Original
to do this through the special features menu
Load the original on the glass.
1
Load the appropriate paper.
2
Press Special Features until Fit to Page appears.
3
Press Enter.
4
Press Start Copy - Black or Start Copy - Color.
5
to do this with the fit to page button
Load the original on the glass.
1
Load the appropriate paper.
2
Press Fit to Page.
3
Press or until the On default appears.
4
Press Enter.
5
Press Start Copy - Black or Start Copy - Color.
6
Fit to Page
print several copies on one page
20
Tip! To prevent the edges of a full page copy from being cut
off when you copy, select Fit to Page, which will slightly
shrink your full page copy to fit within the borders of a lettersized page.
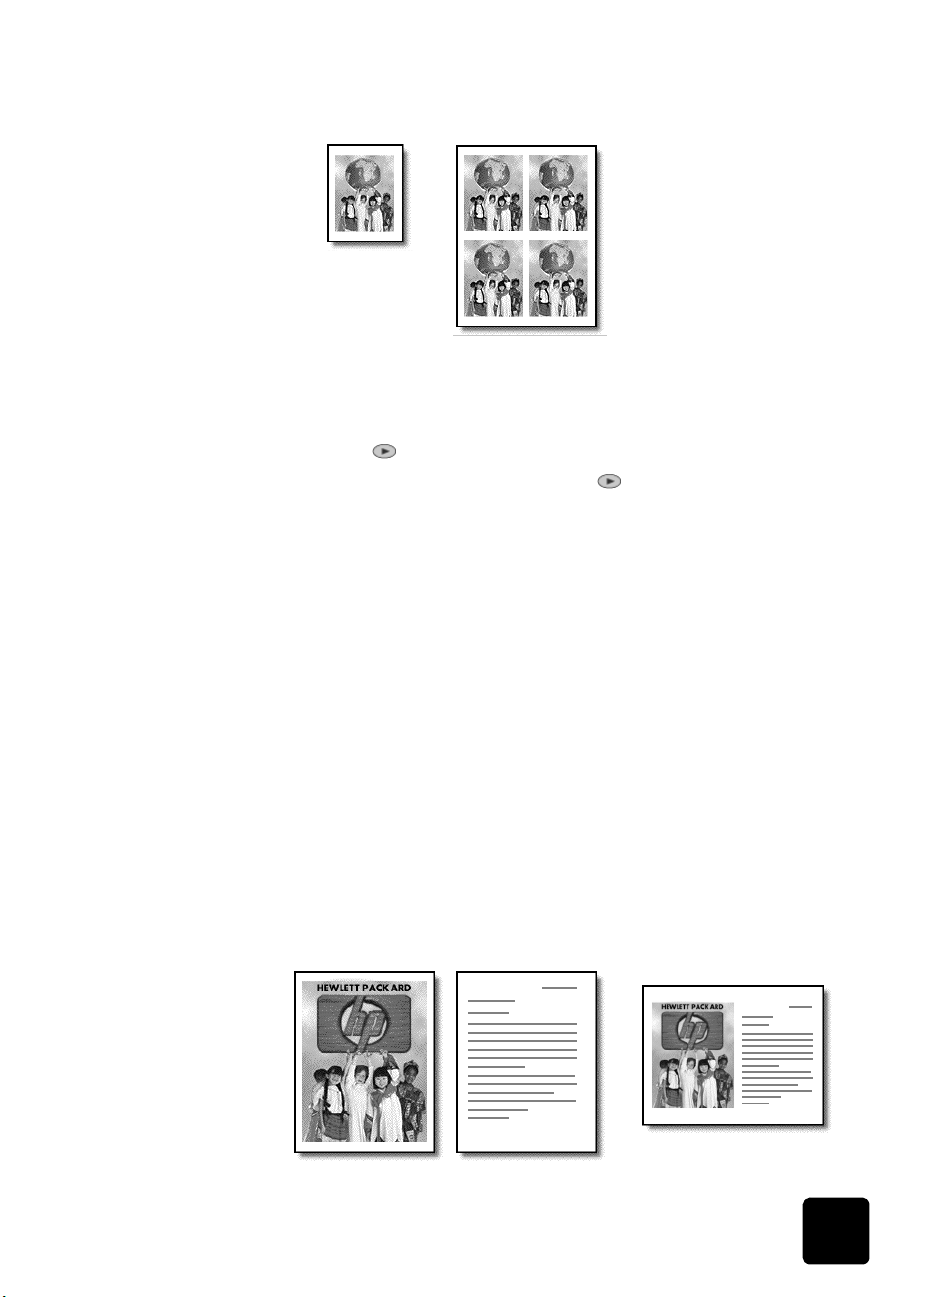
You can place multiple copies of an original on one page by selecting a
photo size and then selecting the number of copies you want.
There are several common photo sizes available from the Which Size?
option, which you access from the Special Features button. After you select
one of the available sizes, you may be prompted to select one of the preset
page configurations.
use copier features
Page 27
hp digital copier series
l
l
Origina
Load the original on the glass.
1
Load the appropriate paper in the main tray.
2
Press Special Features until Which Size? appears.
3
Press until the desired photo size appears, then press Enter.
4
When How Many? appears, press to select the number of images
5
that will fit on a page.
Some larger sizes do not prompt you for a number of images.
Press Enter to select the number of photos you want to appear on a
6
page.
Press Start Copy - Black or Start Copy - Color.
7
Tip! If the number of copies of the photo on a single page
does not come out as expected, try turning the original on the
glass 90 degrees and start the copy again.
Copy
print two originals on one page
use copier features
You can print two different letter- or A4-sized originals on one page using
the 2 on 1 feature. The copied images will appear side by side on the page
in a landscape format. You can use the automatic document feeder (ADF)
to load the originals or place them directly on the glass.
You cannot collate when making a 2 on 1 copy. Clipping may occur with
legal-size originals.
This feature can be used with the Two-Sided Copy button to make 2 on 1,
two-sided copies. See make two-sided copies on page 22.
Two OriginalsTwo origina
s on one page
21
Page 28
hp digital copier series
l
Place the first original on the glass. If you are using the ADF, load
1
both originals there.
Press Special Features until 2 on 1 59% appears, then press Enter.
2
Press Start Copy - Black or Start Copy - Color.
3
If you placed your first original on the glass you will be prompted to
4
Place 2nd original on glass, then press Enter.
shift image to increase the margin
The Margin Shift feature lets you shift the image to the left or right to
increase the margin for binding. You can also adjust the reduction/
enlargement percentage in this mode by entering a number on the numeric
keypad.
Origina
Load the original on the glass or in the ADF.
1
Press Special Features until MarginShift 100% appears.
2
Press or to shift the margin to the left or to the right.
3
Each step is a ¼-inch (6.35 mm) shift.
If you wish to change the reduction/enlargement percentage as well,
4
enter a number using the keypad, then press Enter.
Tip! If you do not wish to change the reduction/enlargement
percentage, press Enter after you have selected the amount
of Margin Shift you want.
MarginShift
make two-sided
copies
22
Press Start Copy - Black or Start Copy - Color.
5
The Two-Sided Copy button on the front panel lets you automatically make
two-sided copies from single-sided or double-sided originals that are letteror A4-sized.
You can make two-sided copies automatically only if
your HP Digital Copier has an HP two-sided printing
accessory. The two-sided copying accessory is standard
equipment with some models or can be purchased
separately. See attach the two-sided printing accessory
on page 29 for more information.
use copier features
Page 29

hp digital copier series
Load your letter- or A4-sized originals in the ADF.
1
Tip! You cannot make legal-sized two-sided copies. For more
information on how to reduce legal-sized originals to lettersized copies, see reduce or enlarge a copy on page 16.
Press the Two-Sided Copy button repeatedly until the desired option
2
appears, or choose one of the following by pressing until the
desired setting appears and then press Enter.
– 1-sided original, 1-sided copy
This option produces a standard single-sided copy from a
single-sided original.
– 1-sided original, 2-sided copy
This option takes 2 single-sided originals and produces a
two-sided copy.
– 2-sided original, 1-sided copy
This option produces single-sided copies of a two-sided original.
– 2-sided original, 2-sided copy
This option produces a two-sided copy from a two-sided original.
Press Start Copy - Black or Start Copy - Color.
3
collate copies
make a poster
The collate feature lets you produce sets of copies in the exact order that
the original is loaded into the ADF. The collate feature is only available on
a HP 610 Digital Copier that is equipped with an ADF.
You must copy more than one original to use the collate feature.
Load originals in the ADF.
1
Press Menu.
2
Press 1, then press 0.
3
This selects Copy Setup, then selects Collation.
Press until the desired setting (On or Off) appears, then press
4
Enter.
If you turn the feature on, the front panel displays Collation On.
Press Start Copy - Black or Start Copy - Color.
5
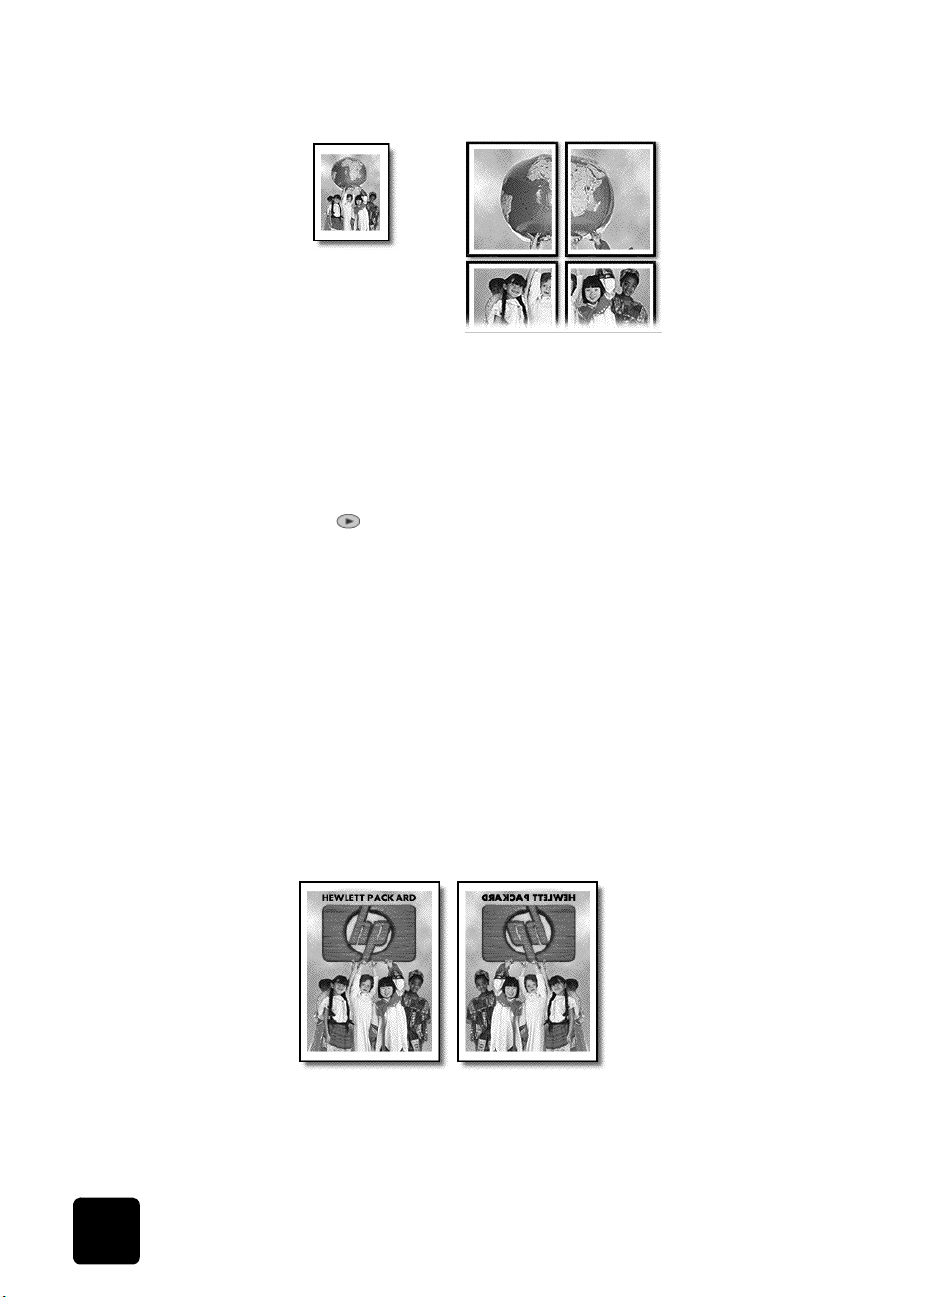
When you use the Poster feature you divide your original into sections, then
enlarge the sections so you can assemble them into a poster.
use copier features
23
Page 30
hp digital copier series
l
l
Origina
Load the original on the glass.
1
Poster
Tip! You cannot use the ADF when making a poster.
Load the appropriate paper in the main tray.
2
Press Special Features until Poster appears.
3
The option Poster 2 pages Wide appears by default.
Press to select how wide you want the poster to be.
4
Press Enter to confirm your selection.
5
Press Start Copy - Black or Start Copy - Color.
6
Tip! After you select the poster width, the HP Digital Copier
adjusts the length automatically to maintain the proportions
of the original. If the original cannot be enlarged to the
selected poster size, an error message appears that tells you
the number of pages wide that are possible. Select a smaller
poster size and make the copy again.
prepare a color T-shirt transfer
24
Use the Iron-On feature to reverse text and images so that they appear
backwards. After you iron a transfer onto a T-shirt, the picture appears
properly on the shirt.
Origina
Iron-On
Tip! We recommend that you practice applying a T-shirt
transfer on an old garment first.
use copier features
Page 31

hp digital copier series
Load the original on the glass or in the ADF.
1
Load the T-shirt transfer paper in the main tray.
2
If you have installed the optional 250-sheet plain paper tray, press
3
Tray Select/Paper Type until the Upper Tray is selected.
Press until Iron-On appears and then press Enter to select it.
4
Selecting this option automatically activates the Mirror function.
Press Start Copy - Black or Start Copy - Color.
5
create a mirror image copy
to create a mirror image copy of an original
Place the first original on the glass. If you are using the ADF, load
1
both originals there.
Press Special Features until Mirror appears, then press Enter.
2
If you wish to change the reduction/enlargement percentage as well,
3
enter a number using the keypad, or press or to adjust.
Press Enter.
4
Tip! If you do not wish to change the reduction/enlargement
percentage, press Enter after you have selected the amount
of Mirror Image you want.
Press Start Copy - Black or Start Copy - Color.
5
stop copying
` To stop copying, press Cancel on the front panel.
copy setup menu options
The following options are available in the Copy Setup menu.
use copier features
25
Page 32

hp digital copier series
1: Copy Setup
0:Collation
1:Enhancements
2:Paper Size
3:Color Intensity
4:Set Copy
Defaults
5:Restore Copy
Factory Settings
Press Menu
and to move to the setting you want.
Press
Press
Enter
to display the Copy Setup options.
to select the displayed setting.
26
use copier features
Page 33

accessories
You can upgrade your HP Digital Copier by adding the following:
automatic document feeder (ADF)
1
optional 250-sheet plain paper tray
2
two-sided printing accessory
3
automatic document feeder (ADF)
The automatic document feeder (ADF) is standard on some HP Digital
Copier models and is available as an accessory on the others.
You can use the ADF to perform unattended copying. This means that you
can load and copy a multi-page document without raising the copier lid to
individually position each page on the glass.
5
install the ADF
accessories
It’s easy to replace the standard flat lid with an ADF lid.
to remove the standard flat lid
Turn off the HP Digital Copier.
1
Unplug the power cord from the outlet.
1
Open the lid.
2
Gently lift the standard flat lid straight up.
3
27
Page 34

hp digital copier series
to attach the ADF lid
On the ADF lid, unfold the hinges.
1
Pull up both tabs.
2
Insert the ADF lid straight down into the unit.
3
tab above
each hinge
Push down both tabs until they click.
4
Gently close the ADF lid.
5
Caution! To prevent damaging the unit, do not allow the ADF
lid to fall onto the flatbed surface. Always close the ADF lid
when the product is not in use.
hinges
install the ADF input tray
28
Align the two tabs on the input tray with the two grooves in the ADF
1
cover.
Slide the tray into the grooves as shown until the tray snaps into
2
place.
grooves
ADF input tray
ADF cover
tab
Replug the power cord into a grounded AC outlet.
3
accessories
Page 35

hp digital copier series
replace an existing ADF lid
use the ADF
If you remove the ADF lid for any reason, you can easily replace it.
to remove the ADF lid
Gently pull the ADF input tray straight out.
1
Open the ADF lid.
2
Pull up both tabs.
3
Remove the ADF lid by gently pulling it slightly forward as you lift.
4
tab above
each hinge
hinges
Follow the steps, above, labeled “to install the ADF.”
5
Place all originals in the ADF input tray print-side up.
1
Adjust the paper-width guide to fit the size of your original.
2
A message appears on the display indicating that the originals are
loaded.
two-sided printing accessory
This accessory can be used with or without the optional 250-sheet plain
paper tray to provide dual-sided copying capability and dual paper tray
capacity. The 250-sheet plain paper tray can handle 250 sheets of copier
letterhead and bond paper. You must use the main paper tray to load
transparency film, photo paper, or other coated stock.
Tip! You must have the two-sided printing accessory installed
to use the optional 250-sheet plain paper tray.
attach the twosided printing
accessory
accessories
Turn the knob on the rear access door of your HP Digital Copier
1
counterclockwise, then remove the door.
29
Page 36

hp digital copier series
Tip! Put the rear access door in a safe place. If you decide to
remove the two-sided printing accessory in the future, you
must replace the rear access door for your HP Digital Copier
to operate.
Insert the two-sided printing accessory into the back of the unit.
2
Tip! Turn the two-sided printing accessory so the button is on
top.
optional hp 250-sheet plain paper tray
assemble the 250-sheet plain paper tray
30
Unpack the accessory and the inner tray.
1
Remove the inner tray.
2
accessories
Page 37

hp digital copier series
Remove shipping tape from paper-width fence.
3
set the paper size
The 250-sheet plain paper tray can hold letter, legal, and A4 paper. To
specify the paper size for the 250-sheet plain paper tray, you must set all
three size adjustments located on the inner tray.
➊
the paper-width guide
➋
the paper-width fence
➌
the paper-length guide
Caution! If you change the paper size, for example, from
letter to A4, you must remove the inner tray completely and
reset all three size adjustments.
accessories
31
Page 38

hp digital copier series
Set the paper-width guide by sliding it until the arrow is even with the
1
correct setting.
Set the width to LTR to use legal-size paper.
2
Set the paper-width fence by carefully snapping it into the slots for the
3
paper size.
Tip! The slots for letter width paper are in the sides of the
inner tray. Use the LTR setting for legal-size paper also.
32
Set the paper-length guide by pulling it until the arrow lines up with
4
the paper size.
accessories
Page 39

hp digital copier series
Tip! There is no marking for legal-size paper. Pull the paperlength guide out beyond the edge of the tray and push it back
up against the edge of the paper.
load paper in the optional 250-sheet plain paper tray
Load the paper by dropping it into the inner tray.
1
Re-insert the inner tray, pushing it firmly until it is completely inserted.
2
Tip! The next time you need to load paper, simply remove the
inner tray.
accessories
stack of paper should be
shorter than length
guide
33
Page 40

hp digital copier series
attach the
optional 250sheet plain
paper tray to
the unit
Caution! You must attach the HP two-sided printing
accessory to your HP Digital Copier before attaching the
optional 250-sheet plain paper tray.
Place the 250-sheet plain paper tray where you want your HP Digital
1
Copier to be situated.
Turn off the copier.
2
Lift the copier unit and position it directly over the optional 250-sheet
3
plain paper tray.
Gently lower the printer onto the optional 250-sheet plain paper tray.
4
Slide the main paper tray (with hinged cover) into the slot above the
5
optional 250-sheet plain paper tray. The main paper tray and copier
both rest on top of the 250-sheet plain paper tray accessory.
34
Power on the copier and resume normal use.
6
accessories
Page 41

maintain your
hp digital copier
This section provides instructions for keeping your HP Digital Copier in top
working condition. Perform these maintenance procedures as necessary.
clean the glass
If the glass on your unit becomes dirty from fingerprints, smudges, hair, and
so on, the performance is slowed down and the accuracy of special
features, such as Fit to Page and Copy, is adversely affected.
Turn off the unit, unplug the power cord, and raise the lid.
1
Clean the glass with a soft cloth or sponge slightly moistened with a
2
nonabrasive glass cleaner.
Caution! Do not use abrasives, acetone, benzene, or carbon
tetrachloride on the glass; these can damage it. Do not place
liquids directly on the glass. They may seep under it and
damage the unit.
Dry the glass with a chamois or cellulose sponge to prevent spotting.
3
clean the lid backing
6
Minor debris can accumulate on the white document backing that is located
underneath the unit’s lid.
1
2
3
4
5
maintain your digital copier
Turn off the unit, unplug the power cord, and raise the lid.
Clean the white document-backing with a soft cloth or sponge slightly
moistened with a mild soap and warm water.
Wash the backing gently to loosen debris; do not scrub the backing.
Dry the backing with a chamois or soft cloth.
Caution! Do not use paper-based wipes as these may scratch
the backing.
If this does not clean the backing well enough, repeat the previous
steps using isopropyl (rubbing) alcohol, and wipe the backing
thoroughly with a damp cloth to remove any residual alcohol.
35
Page 42

hp digital copier series
clean the exterior
Use a soft, damp, lint-free cloth to wipe dust, smudges, and stains off the
case. The interior of the unit does not require cleaning. Keep fluids away
from the interior of the unit as well as the front panel.
maintain printheads and ink cartridges
As you discovered when you installed your HP Digital Copier, the ink
delivery system consists of both ink cartridges, which contain the ink and
printheads that control copy quality. To ensure the best quality from your
HP Digital Copier, you will need to perform some simple maintenance
procedures, and when prompted by a front-panel message or warning
light, replace the ink cartridges and printheads.
check the ink level
handle printheads
You can easily check the ink supply level from the front panel.
Press Menu.
1
Press 3, then press 1.
2
This selects the Status and Maintenance menu, then selects the Check
Ink Level option.
A message in the front-panel display lets you know how much ink you
have left, for both black and tri-color ink cartridges.
Press Cancel to exit the menu.
3
Before you replace or clean a printhead, you should know the part name
and how to handle the printhead.
Printhead handle
Ink nozzles
Printhead tower
Copper contacts
Plastic tape
36
Do not touch the copper contacts, the ink nozzles, or the printhead tower.
maintain your hp digital copier
Page 43

hp digital copier series
verify a printhead needs to be replaced
If a printhead error message appears on the front-panel display, verify that
the printhead needs to be replaced.
Turn the unit off and then turn it on.
1
If the error message still appears, continue with the following steps.
Open the print-carriage access door by lifting the handle until the
2
door locks into place.
The print carriage will move to the center of the copier.
After the print carriage stops moving, release the gray print carriage
3
latch and then lift the print carriage to access the printheads.
4
maintain your digital copier
Remove the old printhead by lifting the printhead handle and pulling
upward.
37
Page 44

hp digital copier series
Pull the printhead handle upward
If there is plastic tape on the failed printhead, remove the plastic tape.
5
Push the failed printhead firmly down into the appropriate slot using
6
the printhead handle. Do not touch the printhead tower, and do not
remove the printhead handle.
replace the printheads
38
Move the print carriage latch down, and make sure the loops catch
7
the hooks. Snap the latch into place, then close the print carriage
access door.
If the error message still appears, remove and reinsert the printhead
8
again and close the print carriage access drawer.
If the error message still appears, replace the printhead as described
9
in the following section.
If you experience problems with that quality of your copies that cannot be
resolved by cleaning your printheads, you may need to replace them. You
may also see front-panel display messages that indicate when an individual
printhead needs to be replaced.
See order printheads and ink cartridges on page 86 for information on
ordering replacement printheads.
Turn on the unit, then open the print-carriage access door by lifting
1
the handle until the door locks into place.
The print carriage moves to the center of the unit.
maintain your hp digital copier
Page 45

hp digital copier series
After the print carriage stops moving, release the gray print carriage
2
latch and then lift the print carriage to access the printheads.
3
maintain your digital copier
Caution! To avoid damaging the copier, remove a printhead
only when a replacement is available. If a printhead is
removed without being replaced:
– Close the print carriage and the print-carriage access door.
– Replace the printhead within 24 hours.
– Never remove an ink cartridge and a printhead at the same time.
Remove the old printhead by lifting the printhead handle and pulling
upward.
Pull the printhead handle upward
39
Page 46

hp digital copier series
Remove the new printhead from its packaging and, being careful to
4
touch only the black plastic, gently remove the plastic tape.
Caution! Do not touch the copper contacts, the printhead
tower, or the ink nozzles.
Printhead tower
Copper contacts
Ink nozzles
removing the plastic tape from the printhead
Match the color on the top of the printhead to the color on the
5
printhead carriage.
Push the new printhead firmly down into the appropriate slot using the
6
printhead handle. Do not touch the printhead tower, and do not
remove the printhead handle.
Move the print carriage latch down, and make sure the loops catch
7
the hooks. Snap the latch into place, then close the print carriage
access door.
After the message appears in the front-panel display, press Enter to
8
align the printheads.
Plastic tape
handle ink cartridges
40
Before you replace or clean ink cartridges, you should know the part names
and how to handle them.
maintain your hp digital copier
Page 47

Copper
contacts
hp digital copier series
Release button
Plastic tape
Do not touch the copper contacts, and hold the
cartridge away from you as you remove the plastic
tape so the ink does not spill on you or your clothing.
replace the ink cartridges
Front-panel display messages appear under the following conditions to let
you know that you should replace your ink cartridges.
• Low ink levels
• Ink cartridges are approaching their expiration dates
Caution! If you ignore the messages and do not replace the
ink cartridges, eventually the HP Digital Copier will stop
working to avoid damaging the printheads.
To determine the expiration date of a cartridge, print a Self-Test Report. For
more information, see create a self-test report for cartridges and printheads
on page 67.
See order printheads and ink cartridges on page 86 for information on
ordering replacement ink cartridges.
Turn on the unit, then open the print-carriage access door by lifting
1
the handle until the door locks into place.
The print carriage moves to the center of the unit.
maintain your digital copier
41
Page 48

hp digital copier series
After the carriage stops moving, press the gray button to release the
2
ink cartridge, then pull it up and out of its slot.
Caution! To avoid damaging the copier, remove an ink
cartridge only when a replacement is available. If an ink
cartridge is removed without being replaced:
– Close the print carriage and the print-carriage access door.
– Replace the ink cartridge within 24 hours.
– Never remove an ink cartridge and a printhead at the same time.
Remove the new ink cartridge from its packaging and, being careful
3
to touch only the black plastic, gently remove the plastic tape.
Caution! Hold the cartridge away from you as you remove
the plastic tape so the ink does not spill on you or your
clothing.
42
Caution! Do not touch the copper contacts.
Push the new ink cartridge firmly down into the appropriate slot until it
4
clicks into place.
Note the color bars on the print carriage.
The ink-cartridge label should be face-up after the cartridge is
inserted.
maintain your hp digital copier
Page 49

hp digital copier series
Color bars
Close the print-carriage access door.
5
Press Enter to align the printheads.
6
For more information, see align the printheads on page 43.
align the printheads
clean the printheads
clean the ink cartridge contacts
The HP Digital Copier prompts you to align the printheads every time you
install or replace a printhead or ink cartridge. Aligning the printheads
ensures high-quality output.
To align the printheads after the message appears on the display, press
Enter on the front panel.
To align the printheads at any other time do the following:
Press Menu.
1
Press 3, then press 3.
2
This selects the Status and Maintenance menu, then selects the Align
PrintHeads option.
If you notice streaking or white lines through any colored areas on your
copies, you may need to clean the printheads. Do not clean printheads
unnecessarily. This wastes ink and shortens the life of your printheads.
Press Menu.
1
Press 3, then press 2.
2
This selects the Status and Maintenance menu, then selects the Clean
PrintHeads option.
If copy quality still seem poor after you clean the printheads, replace
the printhead that is affected.
Clean the ink cartridge contacts only if you get repeated front panel
messages prompting you to check a cartridge after you already have.
Caution! Do not remove both ink cartridges at the same time.
Remove and clean them one at a time.
maintain your digital copier
43
Page 50

hp digital copier series
Make sure you have the following materials available:
• A clean, lint-free cloth
• Distilled, filtered, or bottled water (do not use tap water, as it may
contain contaminants that can damage the printheads)
Caution! Be careful not to get ink on your hands or clothing.
Turn the unit on and open the print-carriage access door.
1
The print carriage moves to the center.
After the print carriage has moved to the center, unplug the power
2
cord from the back of the unit.
Warning! It is very important that you disconnect the
copier from its electrical power source before touching
the ink cartridge contacts. Electrical shock or severe
damage to the copier can occur if you touch the
contacts while there is electrical power to the copier. Do
not use the On button to turn the copier off.
Press the gray button to release the ink cartridge, then pull it up and
3
out of its slot.
Inspect the ink cartridge contacts and the contacts inside the ink
4
cartridge socket for ink and debris buildup.
Clean any visible ink deposits with a clean, soft, lint-free cloth.
5
If necessary, moisten the cloth with one drop of water.
44
Place the ink cartridge back into the holder.
6
Repeat if necessary for the other ink cartridge.
7
Close the door and plug in the unit.
8
Because you removed an ink cartridge from its holder, the HP Digital
Copier needs to align the printheads.
After the message appears in the front-panel display, press Enter to
9
align the printheads.
maintain your hp digital copier
Page 51

hp digital copier series
clean the printhead contacts
Clean the printhead copper contacts only if you get repeated front panel
messages prompting you to check a printhead after you already have.
Caution! Do not remove all printheads at the same time.
Remove and clean them one at a time.
Make sure you have the following materials available:
• A clean, lint-free cloth
• Distilled, filtered, or bottled water (do not use tap water, as it may
contain contaminants that can damage the printheads).
Caution! Be careful not to get ink on your hands or clothing.
Turn the unit on and open the print-carriage access door.
1
The print carriage moves to the center.
After the print carriage has moved to the center, unplug the power
2
cord from the back of the unit.
Warning! It is very important that you disconnect the
printer from its electrical power source before touching
the printhead contacts. Electrical shock or severe
damage to the printer can occur if you touch the
contacts while there is electrical power to the printer. Do
not use the On button to turn the printer off.
Release the gray print carriage latch and then lift the print carriage to
3
access the printheads.
Remove the printhead by lifting the printhead handle and pulling
4
upward.
Inspect the copper contacts and the contacts inside the printhead
5
socket for ink and debris buildup.
Clean any visible ink deposits with the clean, soft, lint-free cloth.
6
If necessary, moisten the cloth with one drop of water.
Caution! Clean only the copper contacts in the front of the
printhead, and wipe upwards only. Do not clean the ink
nozzles on the under side of the printhead. They can become
damaged or clogged by this type of cleaning.
maintain your digital copier
45
Page 52

hp digital copier series
Do not touch the printhead
tower.
Do not touch the
ink nozzles on the
underside of the
printhead.
Place the printhead back into the holder.
7
Repeat cleaning of other printheads, if necessary.
8
Move the print carriage latch down, and make sure the loops catch
9
Clean only the copper
contacts in the front of the
printhead.
Clean only the copper
contacts in the back of the
print carriage.
the hooks. Snap the latch into place, then close the print-carriage
access door.
Close the door and plug in the unit.
10
After cleaning the contacts, you should align the printheads.
Press Menu.
11
Press 3, then press 3.
12
This selects the Status and Maintenance menu, then selects the Align
PrintHeads option.
replacement alternatives
46
To get the best performance from your HP Digital Copier, we recommend
using only genuine Hewlett-Packard supplies. For more information, see
order printheads and ink cartridges on page 86.
Caution! Damage that results from modifying or refilling HP
ink cartridges or the use of non-HP ink is specifically excluded
from the warranty coverage for the copier and copier
supplies.
maintain your hp digital copier
Page 53

hp digital copier series
non-hp ink cartridges
The Ink Level Gauge may not work properly with a non-HP ink cartridge. If
you choose to use a non-HP ink cartridge, you may not know when the
cartridge is running low or empty. Copying with an empty ink cartridge
may seriously damage the printheads.
Any damage resulting from the use of a non-HP ink cartridge is not the
responsibility of Hewlett-Packard.
refilled ink cartridges
To install a refilled HP ink cartridge, you must override the Ink Level Gauge.
For more information, see override the ink level gauge on page 48.
perform color calibration
The Color Calibration option prints out a report that lets you manually
improve your color printing or copying. You should perform this procedure
only if you see problems with color tints, such as noticeably incorrect flesh
tones.
Press Menu.
1
Press 3, then press 4.
2
This selects the Status and Maintenance menu, then selects the
Perform Color Calibration option.
A Color Calibration report is printed.
maintain your digital copier
47
Page 54

hp digital copier series
Follow the instructions on the report to determine the correct Color
3
Patch Number.
At the prompt on the front-panel display, enter the Color Patch
4
Number, then press Enter.
to cancel a color calibration
Press Menu.
1
Press 3, then press 5.
2
This selects the Status and Maintenance menu, then selects the Restore
Factory Defaults option.
override the ink level gauge
Overriding the Ink Level Gauge disables the printer’s ink level tracking
feature, but allows you to use a refilled cartridge.
Caution! If you use the override sequence described below,
you will disable the Ink Level Gauge for your ink cartridge. If
you choose to continue copying with an ink cartridge that has
had its Ink Level Gauge disabled, you will not know when the
cartridge is running low or empty. Copying with an empty
cartridge will seriously damage your printheads. Damage
that results from continued use of an ink cartridge with a
disabled Ink Level Gauge is not the responsibility of
Hewlett-Packard. Damage that results from the use of non-HP
ink is not the responsibility of Hewlett-Packard.
The Ink Level Gauge is automatically reset when a different ink cartridge is
installed in the copier.
Overriding the Ink Level Gauge does not affect ink cartridge expiration
dates. The copier cannot use an expired ink cartridge.
Follow these steps to override the Ink Level Gauge:
to override the ink level gauge for the black ink cartridge
Press and at the same time, then release.
1
On the keypad, press in order, 7, 8, 9.
2
When the prompt appears asking if you want to override the ink level
3
gauge, press 1 for Yes, or 2 for No.
to override the ink level gauge for the tri-color ink cartridge
Press and at the same time, then release.
1
On the keypad, press in order, 4, 5, 6.
2
When the prompt appears asking if you want to override the ink level
3
gauge, press 1 for Yes, or 2 for No.
Always install an ink cartridge before performing an Ink Level Gauge
override.
48
maintain your hp digital copier
Page 55

set the country/region or language
Usually, the language and country/region are set when you install the
HP Digital Copier. If you need to reset them, use the following procedure.
Tip! If you accidentally choose the wrong language and are
unable to read the front-panel display, simply repeat the first
three steps to choose the correct language. You may also
consider printing a Self-Test report to identify the country/
region and language that have been selected.
Press Menu.
1
Press 3, then press 7, then press Enter.
2
This selects the Status and Maintenance menu, then selects the Set
Country/Region and Language option.
To select the language, you can do the following:
3
– Press until the desired language appears.
– Wait until the desired language appears on the front panel
display.
Enter the two-digit number corresponding to the language on the
4
keypad.
For example: for English, enter 11.
After entering the language, you are prompted to confirm that the
5
language you selected is the one you want.
Press 1 for Yes and 2 for No.
6
After you select a language, you are prompted to select a country/
7
region based on your selected language.
To select the country/region, you can:
8
– Press until the desired country/region appears.
– Wait until the desired country/region appears on the front panel
display.
Enter the two-digit number corresponding to the country/region on
9
the keypad.
For example: for USA, enter 10.
After entering the country/region, you are prompted to confirm your
10
selection.
Press 1 for Yes or 2 for No.
11
hp digital copier series
maintain your digital copier
49
Page 56

hp digital copier series
set the power save mode time
The bulb in your HP Digital Copier remains on for a specified period so that
the unit is immediately ready to respond to your request. When the
HP Digital Copier has not been used within that specified period, it turns
the bulb off to preserve power and displays Power Save On in the frontpanel display.
Tip! You can exit this mode by pressing any button on the
front panel.
Your unit is automatically set to enter power-save mode after 12 hours.
Follow these steps if you want the HP Digital Copier to enter this mode
earlier.
Press Menu.
1
Press 3, then press 6.
2
This selects the Status and Maintenance menu, then selects the Set
Power Save Mode Time option.
Press until the desired time appears, then press Enter.
3
set the ring and beep volume
The volume of the button beeps on your HP Digital Copier is preset, but you
can easily change the volume.
Press Menu.
1
Press 3, then press 8.
2
This selects the Status and Maintenance menu, then selects the Ring
and Beep Volume option.
Press to select Soft, Loud, or Off, then press Enter.
3
50
maintain your hp digital copier
Page 57

maintenance menu options
hp digital copier series
3:Status and
Maintenance
Use
menu options.
Press and to move to the setting you want.
Press
to display the
Menu
to select the displayed setting.
Enter
Status and Maintenance
1:Check Ink
Level
2:Clean
PrintHeads
3:Align
PrintHeads
4:Perform Color
Calibration
5:Restore
Factory Defaults
6:Set Power
Save Mode Time
7:Set Country
and Language
8:Ring and Beep
Volume
maintain your digital copier
51
Page 58

hp digital copier series
52
maintain your hp digital copier
Page 59

troubleshooting tips
Troubleshooting provides tips for solving problems and improving the
quality of your copies. Look for your problem in the following
troubleshooting topics.
For additional information on your HP Digital Copier, see:
www.hp.com/go/copiers
paper problems
The following issues relate to the paper path and paper types used in your
HP Digital Copier.
You can avoid many paper jams by loading paper properly in the input
tray. For more information, see load the main paper tray on page 9.
7
paper jams
troubleshoot your digital copier
check all paths
• main paper tray or optional 250-sheet plain paper tray
• automatic document feeder (ADF) tray and cover
• two-sided printing accessory
• back of unit
paper tray jams
1
2
3
4
Always start by removing the back access door or the two-sided
printing accessory. Gently remove any paper jams from the back of
the unit.
If this does not work, remove the input tray, then gently remove any
paper jams from the input tray opening of the unit.
If necessary, remove the main paper tray and the optional 250-sheet
plain paper tray.
Last, open the top of the unit and gently remove any paper jams from
the print carriage area.
53
Page 60

hp digital copier series
adf tray jams
If paper is jammed at the top of the unit, carefully remove the ADF
1
input tray.
ADF cover
Gently pull out any paper.
2
Snap the ADF tray back into place.
3
It might also be necessary to lift the ADF cover to remove a paper jam.
Tip! Avoid this type of paper jam by making sure that the
glass is clear of originals before using the ADF.
back of unit jams
If the paper has crumpled and jammed in the back of the HP Digital
1
Copier, unlock and remove the back door.
Gently pull the paper out of the rollers.
2
Replace and lock the back door.
3
Remove the back door.
4
If the paper has jammed where it exits the HP Digital Copier, grasp the
leading edge of the paper and pull the paper out through the output tray.
ADF input tray
54
two-sided printing accessory jams
You may need to remove the two-sided printing accessory.
Press the button on top of the accessory to open the accessory door
1
and check for paper.
Press the side buttons to remove the accessory, and check for paper.
2
Tip! If you turned the HP Digital Copier off before clearing
the paper jam, turn it back on, and then restart your printing
or copying job.
tips to avoid paper jams
Make sure that you properly load the paper tray.
1
For more information, see load the main paper tray on page 9.
2
troubleshooting tips
Page 61

hp digital copier series
Make sure the input tray is not overfilled. The input tray capacity
3
varies depending on the type of paper you are using.
Check that the input tray is in place.
4
Do not add paper to the input tray while the HP Digital Copier is
5
printing.
Use recommended paper types
6
Do not let paper stack up in the output tray. The paper type and the
7
amount of ink used affects the output tray capacity.
For more information, see load originals on page 7.
paper does not feed from the paper tray
several pages advance at the same time
are you using the main paper tray?
Make sure it is selected. Paper is automatically picked up from the optional
250-sheet plain paper tray if attached.
To make sure the correct paper tray is selected, press the Tray Select/Paper
Type button on the front panel.
do you have enough paper?
If the HP Digital Copier is out of paper or if it has only a few sheets
remaining, load more paper in the tray. If there is paper in the tray, remove
it, tap the stack against an even surface, and reload it. To continue your
job, press Enter on the front panel of the HP Digital Copier.
For more information, see load paper on page 9.
do you have the correct tray selected?
If you have an optional 250-sheet plain paper tray, the paper is picked
from there first. Make sure you have the correct tray selected. On the front
panel, press the Tray Select/Paper Type button. Make sure you have the
correct tray selected.
is the paper loaded correctly in the input tray?
Make sure the paper tray is not overfilled. The paper must fit comfortably
within the guides. Make sure the guides do not inhibit how the paper
moves.
Reinsert the paper.
1
Remove the stack of paper, and then tap the stack on a hard, even
2
surface.
Fan the stack, then replace the stack in the input tray, and then push it
3
back into place.
have you loaded too much paper?
The paper must fit comfortably within the guides. Overfilling the input tray
causes paper jams or other paper advance problems.
For more information, see avoid paper jams on page 9.
troubleshoot your digital copier
55
Page 62

hp digital copier series
paper type is not correct or not supported
out of paper
Your HP Digital Copier is designed to work well on most paper types. Test
a variety of paper types before buying large quantities. Find a paper type
that works well and is easy to purchase. HP Premium Papers are designed
for the best quality results.
• Paper that is too thin, slick, or "stretches" easily can feed incorrectly
through the paper path.
• Paper that is heavily textured can cause graphics or text to not fill
properly.
• To ensure that paper feeds properly, always use only one type of
paper at a time in the input tray.
• Try printing the same document on a type of paper that has previously
worked well.
In addition to paper type, the condition of your ink cartridges has a strong
effect on the quality of copies.
For more information, see recommended paper types on page 11.
do you have paper loaded in the selected paper tray?
If you have a 250-sheet plain paper tray, the paper is picked from there
first. Make sure you have the correct tray selected.
On the front panel, press the Tray Select/Paper Type button. Make sure to
select the correct tray.
is the back door or the two-sided printing accessory off?
If you have removed either the back door or the two-sided printing
accessory to clear a paper jam, replace it.
For more information, see avoid paper jams on page 9.
paper is too narrow or paper size errors
failure to copy
hp digital copier is not responding
56
is the unit on an even surface?
Make sure that the unit is not resting on cords or other objects. This can
prevent the unit from detecting paper in the paper trays.
The paper you have loaded for printing is not the correct size. Copying
requires letter, legal, or A4 paper.
For more information, see recommended paper types on page 11
The following issues relate to mechanical problems that prevent your HP
Digital Copier from performing properly.
do you have a paper jam?
Check the HP Digital Copier for a paper jam.
For more information, see paper problems on page 53.
troubleshooting tips
Page 63

hp digital copier series
is the hp digital copier turned on?
Look on the HP Digital Copier display. If the display is blank, the HP Digital
Copier is not on. Make sure the HP Digital Copier is connected to a power
outlet, then press the On button.
is your original placed correctly on the glass?
Make sure you place your original in the bottom right corner of the glass.
is original placed correctly in the automatic document feeder (ADF)?
Make sure the original is loaded as far is it can go into the ADF so that it
can be grabbed by the feeding mechanism.
did you load the correct paper type in the input tray?
Do not use the HP Digital Copier to copy onto envelopes or other small
papers.
is the main tray inserted properly?
• Make sure the main tray is completely and correctly inserted into the
• Make sure the guides are adjusted for the type of paper you are
troubleshoot your digital copier
HP Digital Copier.
using.
57
Page 64

hp digital copier series
hp digital copier fails to power on
hp digital copier will not make copies
did you check the electrical connection to the hp digital copier?
Make sure the power cord is firmly connected to both the HP Digital
1
Copier and the power supply box. Plug the power cord into a
grounded power outlet, surge protector, or power strip.
If you are using a power strip, make sure the power strip is on. Or try
2
plugging the HP Digital Copier directly into the power outlet.
Test the power outlet to make sure it is working.
3
If you have plugged the HP Digital Copier into a switched outlet,
4
make sure the switch is on.
Warning! If the HP Digital Copier still does not power on, there may be a
mechanical failure. Unplug the HP Digital Copier from the power outlet and
contact HP. See hp customer support on page 71.
did you press the On button too quickly?
The HP Digital Copier may not respond if you press the On button too
quickly. Press the On button once slowly.
have your ink cartridges expired?
When ink cartridges expire, the unit stops operating and a front panel
message lets you know which ink cartridge is expired. To protect against
deteriorated print quality and damage to your HP Digital Copier, the HP
Digital Copier monitors the age of the ink cartridges.
Warning! Do not remove the ink cartridges until replacement cartridges
are available or attempt to replace a printhead at the same time you are
replacing an ink cartridge.
58
troubleshooting tips
Page 65

If you install ink cartridges before the “Must Install Before” date (see
1
the back of the ink cartridge packaging), the ink cartridges expire 18
months after being installed in the HP Digital Copier.
If you install the ink cartridges after the “Must Install Before” date, the
2
cartridges expire in less than 18 months.
The expiration period is the maximum time for which an ink cartridge can
be used. It is not a warranty period. To determine the expiration period of
the ink cartridge in your unit, print a Self-Test Report.
For more information, see create a self-test report for cartridges and
printheads on page 67.
For more information, see maintain printheads and ink cartridges on
page 36 and check the ink level on page 36.
copies do not look right
The following issues relate to copies that look differently than expected.
hp digital copier series
copies are faded, colors are incorrect or dull
If you notice that colors are not what you expect, such as faces appearing
with strong red undertones rather than flesh tones, then you may need to
perform a color calibration. However, do not perform a color calibration
unless necessary.
For more information, see perform color calibration on page 47.
do you need to replace an ink cartridge or printhead?
Print a Self-Test Report to make sure all six colors are available. If a color
is missing, try cleaning the ink cartridge contacts. After cleaning, try
printing again. If the problem persists, replace the color ink cartridge.
Warning! To avoid damaging the HP Digital Copier, remove an ink
cartridge or a printhead only when a replacement is available.
For more information, see create a self-test report for cartridges and
printheads on page 67, clean the ink cartridge contacts on page 43 and
replace the ink cartridges on page 41.
do you need to adjust the hue and tint?
As ink cartridges age, some colors fade. If your ink cartridges are old (over
8 months), adjust the color intensity.
On the front panel, press Menu, then press 1.
1
Use the arrow keys to adjust the color intensity.
2
When you replace the ink cartridges in the future, you may need to move
the slider back.
do you have the lighter/darker feature set correctly?
For more information, see make copies lighter or darker on page 17.
troubleshoot your digital copier
59
Page 66

hp digital copier series
are you using the highest possible copy quality?
Check the copy Quality setting. Use a high print quality (Normal or Best)
for your project.
are you using the right type of paper for your project?
If the paper you are using is too fibrous, the ink may not cover the print
surface. Make sure you are using a paper that is appropriate for your HP
Digital Copier.
For more information, see recommended paper types on page 11.
are you trying to copy newspaper or an original on thin paper?
Copying a picture of poor quality, such as a newspaper photo, causes
moiré patterns, such as bands, checks, or stripes, to appear.
To reduce moiré patterns, try placing one or more clear plastic sheet
protectors directly on the glass, and then place the original face down on
top of the plastic sheet.
do you need to clean the unit?
Debris may be stuck on the glass or document lid backing, which causes
poor copy quality and slows down processing. Unplug the unit before
cleaning. Use a soft cloth to wipe the glass and document lid backing.
For more information, see clean the glass and clean the lid backing on
page 35.
entire copy is slanted or skewed
a blank page came out
60
is the paper loaded correctly?
Make sure the paper is feeding correctly.
For more information, see load originals on page 7.
is there more than one paper type loaded in the input tray?
Load only one type of paper at a time.
did you load the original correctly?
Make sure that you placed your original on the glass print-side down.
troubleshooting tips
Page 67

hp digital copier series
If you are using the ADF, make sure that you place the original print-side up.
For more information, see load originals on page 7.
do you need to clean or replace the ink cartridges or printheads?
Print a Self-Test Report to determine the condition of the ink cartridges and
printheads. If the report has missing colors, clean the ink cartridges.
Warning! To avoid damaging the HP Digital Copier, remove an ink
cartridge or a printhead only when a replacement is available.
For more information, see create a self-test report for cartridges and
printheads on page 67, clean the ink cartridge contacts on page 43 and
replace the ink cartridges on page 41.
orientation of copy is wrong
colors are bleeding into each other
copy has horizontal streaks
is the paper size set correctly?
The paper-size setting might not match the size of paper you are using.
Custom-sized paper requires special settings for paper size and
orientation. If you are trying to print on these paper types, check the print
settings.
For more information, see tips for loading other types of paper in the main
tray on page 12.
is the setting correct for the type of document you are printing?
Color documents can use excess ink. Try using the Normal setting or use
HP Premium Papers.
is the paper type suitable for this unit?
For more information, see recommended paper types on page 11.
are you using the highest possible print quality?
Use a high print quality (Best) for your project.
For more information, see create a self-test report for cartridges and
printheads on page 67, clean the ink cartridge contacts on page 43 and
replace the ink cartridges on page 41.
do you need to clean or replace the ink cartridges or printheads?
If your copy has horizontal smears as if something had brushed against the
wet ink, check for a build up of fibers on the underside of the ink cartridges.
If the problem persists, replace the ink cartridges.
If your copy has white streaks across it, the nozzles may be clogged. Use
a Self-Test Report to determine the problem. If the Self-Test Report has
streaks, clean the printhead. If cleaning the printhead does not help,
printhead may need to be replaced.
Warning! To avoid damaging the HP Digital Copier, remove an ink
cartridge or a printhead only when a replacement is available.
troubleshoot your digital copier
61
Page 68

hp digital copier series
For more information, see create a self-test report for cartridges and
printheads on page 67, clean the ink cartridge contacts on page 43 and
replace the ink cartridges on page 41.
copy is fuzzy or blurry
copy has vertical streaks or is missing vertical lines
are you using the right type of paper for your project?
For most documents, plain paper works well. For more dense documents,
such as high-contrast graphics or photographs, use HP Premium paper for
best results.
For more information, see recommended paper types on page 11.
are you using the highest possible quality?
Use a high print quality (Best) for your project.
did you select the correct paper type?
Press the Tray Select/Paper Type button on the front panel.
1
Press the arrow keys to scroll through the lists of paper types.
2
Press Enter to select a paper type.
3
does the unit need to be cleaned?
Debris may be stuck on the glass or document lid backing causing a vertical
white streak through the image. Unplug the unit before cleaning. Use a soft
cloth to wipe the glass and document lid backing.
For more information, see clean the glass on page 35 and clean the lid
backing on page 35.
does your original contain thin lines?
If your original contains lines that are too thin, they may disappear in
places when you copy it. Make the lines on your original darker.
is your original wrinkled?
If your original is heavier than 24 lb. and is wrinkled, some lines could be
missed during copying. Flatten the original document, and copy it again.
parts of the original are cut off
62
is your original positioned correctly?
Make sure that your original is placed in the bottom right corner of the
glass.
troubleshooting tips
Page 69

hp digital copier series
If you are using the ADF, make sure that you insert the original print-side up.
does your original fill the margins?
If the image or text on your original fills the entire page without leaving a
margin, use the Fit to Page feature.
For more information, see fit a copy to the page on page 19.
is the original larger than the paper size in the tray?
• Verify that you are copying to the same size paper as the original.
This problem is most common when copying a legal-size paper onto
letter-size paper.
• Verify that you have selected the proper paper size for your project.
Make sure that you have loaded the correct paper size in the tray and
that the tray is properly installed.
troubleshoot your digital copier
63
Page 70

hp digital copier series
are the paper guides positioned correctly?
The paper guides should be close to the edges of the paper in the input
tray, but must not bend the paper. Remove the paper, and then move the
left paper guide all the way to the left. Insert the paper, and then move the
front paper guide even with the paper. Move the left paper guide to the
edge of the paper.
For more information, see load originals on page 7.
copies are too light or too dark
ink is not filling the text or graphic completely
do you have the Lighter/Darker feature adjusted correctly?
For more information, see make copies lighter or darker on page 17.
are the ink cartridges over 8 months old?
If copies are too light, you may need to replace the ink cartridges.
are you copying a photo?
For more information, see copy a photo on page 19.
is the paper type set correctly?
When using transparencies or other special papers, make sure the unit has
set the correct paper type.
On the front panel, press the Tray Select/Paper Type button. Use the arrow
keys to change the paper type.
do the ink cartridges or printheads need to be cleaned or replaced?
First, print a Self-Test Report to check the status of the ink cartridges and
printheads. Use the report to determine whether the ink or printheads need
to be replaced.
For more information, see create a self-test report for cartridges and
printheads on page 67, clean the ink cartridge contacts on page 43 and
replace the ink cartridges on page 41.
64
troubleshooting tips
Page 71

ink cartridge and printhead problems
The following issues relate to problems with the ink cartridges and
printheads inside your HP Digital Copier.
hp digital copier series
ink cartridges or printheads have problems
For best results, use only HP ink cartridges and printheads. Refilled ink
cartridges may damage your unit. The following tips help maintain HP ink
cartridges and ensure consistent print quality:
• Keep all ink cartridges in the original sealed packages until they are
needed.
• Ink cartridges should be stored at room temperature (60 –78 degrees
F or 15.6 –26.6 degrees C).
• If the protective tape has been removed from the printhead, do not
reattach it. Reattaching the tape may damage the printhead. Place
the printhead in an airtight, plastic container.
• Once ink cartridges are installed in the print carriage, do not remove
them until replacements are available.
The ink cartridges have microscopic nozzles that can clog when exposed
to the air for more than a few minutes. The HP Digital Copier is designed
to prevent nozzles from drying out under normal use.
Caution! Be sure to turn the HP Digital Copier off from the
front panel, and not from a power strip.
A printhead that is not used for a long time can also clog. This causes a
noticeable decrease in print quality. To unclog the nozzles, clean the
printhead.
Caution! Do not clean the printhead unnecessarily. This
wastes ink and shortens the life of the cartridges and
printhead.
For more information, see clean the printhead contacts on page 45.
error message when you insert new ink cartridge or printheads
troubleshoot your digital copier
do you have the correct ink cartridges or printheads?
To avoid damaging the HP Digital Copier, remove an ink cartridge or a
printhead only when a replacement is available.
The HP Digital Copier does not recognize other ink cartridges. For
replacement information, see the support and warranty, or see:
did you remove the tape?
Make sure that you removed the tape from the printhead.
Warning! Be careful not to touch the copper contacts or tower. Exposing
ink cartridges and printheads to air reduces their life. Do not remove the
ink cartridges and printheads at the same time.
www.hp.com/go/copiers
65
Page 72

hp digital copier series
Reinsert the print cartridges and verify that they are fully inserted and
locked in place.
For more information, see handle ink cartridges and replace the ink
cartridges on page 41.
did you clean the contacts?
For more information, see clean the ink cartridge contacts on page 43.
If the error reappears, replace the ink cartridge indicated in the error
message. If the cartridge was a new, return it to the place of purchase with
the receipt or contact HP Support and Services to obtain a replacement.
All HP ink cartridges have an “install by” date that is printed on the box.
Ink cartridges also have a 90-day warranty against defects in parts or
workmanship, provided that the cartridge is installed before the “install by”
date.
Cartridges that are out of ink are not covered under this warranty. Refilled
cartridges may damage the unit.
ink cartridge error
ink cartridge is low or out of ink
ink cartridge is missing, or incorrect cartridge is installed
Turn the HP Digital Copier off, and then on again by pressing the power
button.
If the problem persists, remove and then reinsert the ink cartridges. Do not
leave ink cartridges out for an extended time.
If you continue to receive this error, your ink cartridge is probably defective.
If this is a new ink cartridge, return it in the original packaging to the store
where it was purchased.
Replace the ink cartridge. Do not use the defective cartridge.
For more information, see replace the ink cartridges on page 41.
Warning! To avoid damaging the HP Digital Copier, do not let the unit sit
longer than 24 hours without an ink cartridge.
The ink cartridge is low or out of ink. Remove the used cartridge and
replace it with a new one.
To avoid damaging the HP Digital Copier, remove an ink cartridge or a
printhead only when a replacement is available.
For more information, see replace the ink cartridges on page 41.
is the ink cartridge installed correctly?
If one or both of the ink cartridges are not installed or are installed
incorrectly, remove and reinsert the cartridges, making sure to snap them
into their holders.
For more information, see replace the ink cartridges on page 41.
did you remove the protective tape from the ink cartridge?
Carefully remove the tape from the ink cartridge.
66
troubleshooting tips
Page 73

hp digital copier series
need printhead alignment
create a selftest report for
cartridges and
printheads
If you have installed new printheads, you must align the printheads to
ensure excellent print quality.
After you insert a new printhead, close the unit.
1
A message on the front panel display appears to let you know to
align the printheads.
Press Enter.
2
An alignment page is printed.
Caution! The alignment page requires a clean sheet of plain
white paper in the input tray, otherwise even a slight
imperfection detected on the paper can cause the unit to misalign the printheads.
The Self-Test Report provides detailed information concerning the status of
the ink cartridges and printheads.
Print a Self-Test Report when you:
• Encounter print quality problems
• Want to view information about printheads and ink cartridges
• Want to check ink levels
• Want to see the expiration dates on your ink cartridges
• Want to see the serial number of your HP Digital Copier
• Plan to call HP Support (if possible)
to print a self-test report
Make sure you have paper loaded.
1
Press the Menu button.
2
Press 2, and then 2, and then press Enter.
3
The page that prints out provides information on the ink cartridges.
troubleshoot your digital copier
67
Page 74

hp digital copier series
printhead has failed
ink carriage is stalled
When a printhead error is detected, a message appears on the front panel
display that indicates the color of the failed printhead. The HP Digital
Copier continues to print; however, the failed printhead may affect print
quality and speed.
If several printheads fail, the HP Digital Copier may stop working.
For more information, see replace the printheads on page 38.
is the hp digital copier on?
Look on the HP Digital Copier display. If the display is blank, the HP Digital
Copier is turned off. Check the connections.
are you using the hp digital copier for the first time?
Make sure that you have removed all packing materials from the HP Digital
Copier.
are you using the ink cartridge for the first time?
Make sure that you have removed the protective tape from the nozzles on
both ink cartridges. Do not touch the gold contacts.
For more information, see handle ink cartridges on page 40.
did you remove the packing material?
Lift the door and check for tape or packing materials.
68
troubleshooting tips
Page 75

other copier problems and errors
The following issues relate to other miscellaneous problems and errors that
might occur.
hp digital copier series
ink is not drying
cover or door will not close
copier is in factory mode
copier is initializing
improper power off
If you are copying transparencies or other media, they require a longer
than normal drying time. Leave the media in the output tray until dry.
If necessary, carefully remove the copied media. Hold them from the
underside or the edges, and then place them on a flat surface to dry.
For more information, see recommended paper types on page 11.
Make sure the HP Digital Copier is on an even surface. Make sure there is
nothing blocking the door from closing.
The settings on your HP Digital Copier are not correct. Call HP for
instructions.
If you see this message on the front panel, wait until the HP Digital Copier
finishes its start-up routine.
If you see this message, your HP Digital Copier was not turned off properly
the last time it was used.
Press the On button on the front panel of the HP Digital Copier whenever
you need to shut down the unit. This allows the print carriage to be properly
parked in the print station on the right. If HP Digital Copier is turned off
troubleshoot your digital copier
69
Page 76

hp digital copier series
using a power-strip switch or by removing the power plug from the back of
the unit, the print carriage may not return to the correct position, which can
allow the ink cartridges to dry out.
mechanism error
did you remove the protective tape from the ink cartridges and printheads
when you set up your unit?
Check each cartridge and printhead, and remove the tape if it is still
covering the ink nozzle. Do not touch the copper contacts.
For more information, see handle printheads on page 36 and handle ink
cartridges on page 40.
do you have a paper jam?
Clear the paper jam. Turn HP Digital Copier off and then on again.
For more information, see avoid paper jams on page 9.
is the print carriage blocked?
Remove any objects that are blocking the print carriage, and then turn the
HP Digital Copier off and on. Make sure you have removed all packing
materials.
70
troubleshooting tips
Page 77

support services and
warranty
This section contains customer support, service and warranty information
for your HP Digital Copier.
If you cannot find the answer you need in this guide, contact one of the
HP Support Services listed on the following pages. Some support services
are available only in the U.S. and Canada. If a support service number is
not listed for your area, contact your nearest authorized HP dealer for help.
register your product
Registering your HP product allows HP to provide you with the best possible
service. To register, please go to:
www.register.hp.com
support from the internet
If you have I nternet access, yo u can get h elp from the following HP website:
http://www.hp.com/go/copiers
The website offers technical support, supplies, and ordering information.
8
hp customer support
If you need to contact HP Customer Support, do the following before you
call.
Make sure that:
1
a. Your unit is plugged in and turned on.
b. The specified print heads and ink cartridges are installed
c. The recommended paper is properly loaded in the input tray.
Reset your unit:
2
a. Turn off the unit using the On button located on the unit’s front
support and warranty information
correctly.
panel.
71
Page 78

hp digital copier series
b. Unplug the power adapter connector from the back of the unit for
10 seconds.
c. Plug the power adapter connector back into the unit.
d. Turn on the unit using the On button.
For more information, check the HP Support website at:
3
http://www.hp.com/go/copiers
If you are still experiencing problems and need to speak with an
4
HP Customer Support representative:
– Have your serial number and service ID ready. To display your
service ID, on the front panel, press Enter and Start Copy, Color at
the same time, until SERV ID: and the number appear in the frontpanel display. Press the key to display the serial number.
– Print a Self-Test Report. To print a Self-Test Report from the front
panel, press Menu until Print Report appears. Press Enter. Press
Menu until Report Self Test appears. Press Enter.
– Make a color copy.
– Be prepared to describe your problem in detail.
Call HP Customer Support. Be near your unit when you call.
5
returning your hp digital copier for service
Before returning your HP Digital Copier for service, you must call
HP Customer Support. See hp customer support on page 71 for steps to
take before calling Customer Support.
If HP Customer Support asks you to send in your unit for service, please
follow the power-off and rebox steps below to avoid further damage to the
HP product.
Verify that the top of the paper tray is down.
1
Turn on the HP Digital Copier.
2
Disregard steps 2 through 8 if your unit will not turn on and the
carriage is in the home position. You will not be able to remove the
ink cartridges or printheads. Proceed to step 9.
Open the access door.
3
The carriage will move to the center of the printer.
Remove the ink cartridges.
4
a. Press the release button on the black ink cartridge, and lift the ink
cartridge out of the carriage.
b. Press the release button on the tri-color ink cartridge, and lift the
ink cartridge out of the carriage.
Caution! Be sure to remove both ink cartridges. Failure to do
so may damage your unit.
Remove the printheads.
5
a. Lift the print carriage latch, and open the print carriage.
72
support services and warranty
Page 79

hp digital copier series
b. Grip the handle of the first printhead, and lift the print head out of
the print carriage. Repeat this process to remove the remaining
printheads.
c. Lower the print carriage, and push down on the print carriage
latch until it clicks into place.
Place the ink cartridges and printheads in an airtight bag so they will
6
not dry out, and put them aside (do not send them with the unit, unless
instructed to by the HP Customer Support representative).
Close the access door.
7
Turn off the unit.
8
If available, pack the unit for shipment using the original packaging
9
materials.
If you do not have the original packaging materials, you can request
a replacement package set from HP Customer Support. Shipping
damage caused by improper packaging is not covered under the
warranty.
Place the return shipping label on the outside of the box.
10
Include the following items in the box:
11
– A brief description of symptoms for service personnel (samples of
– A copy of the sales slip or other proof of purchase to establish the
– Your name, address, and a phone number where you can be
support and warranty information
print quality problems are helpful).
warranty coverage period.
reached during the day.
73
Page 80

hp digital copier series
call in the U.S. during warranty
call elsewhere in the world
Call (208) 323-2551 Monday through Friday from 6:00 A.M. to
10:00 P.M. Mountain Standard Time (MST) and Saturdays from 9:00 A.M.
to 4:00 P.M. MST. This service is free during the warranty period; however,
your standard long-distance phone charges still apply. A fee may apply
outside the warranty period.
The numbers listed below are current as of the printing date of this guide.
For a list of current international HP Support Service numbers, visit this
address and choose your own country, region, or language:
http://www.hp.com/go/copiers
You can call the HP Support Center in the following countries or regions. If
your country or region is not listed, contact your local dealer or nearest
HP Sales and Support office to find out how to obtain services.
Support service is free during the warranty period; however, your standard
long-distance phone charges will apply. In some cases, a flat fee per single
incident will also apply.
For phone support in Europe, please check for the details and conditions of
phone support in your country or region by consulting the following
website:
http://www.hp.com
Select the Country/Region.
1
Select Contact HP.
2
Alternatively, you can ask your dealer or call HP at the phone numbers
indicated in this manual.
Check the HP website for updated support and service information.
country/region hp technical support country/region hp technical support
Argentina 0810-555-5520, ext.
4778 or 8380
Argentina (Buenos
Aires)
Australia +61 3 8877 8000
Austria +43 (0) 810 00
Bahrain (Dubai) 800 728 Norway +47 22 11 6299
Belgium (Dutch) +32 (0)2 6268806 Oman +971 4 883 8454
Belgium (French) +32 (0)2 6268807 Palestine +971 4 883 8454
Brazil 55 11 829 6612
74
(5411) 4778-8380 Mexico (Mexico City) 5258-9922
1902 910 910
6080
800-15-77-51
Mexico 01-800-472-6684
Netherlands +31 (0) 20 606 8751
New Zealand (09) 356 6640
Peru 0-800-10111
support services and warranty
Page 81

hp digital copier series
country/region hp technical support country/region hp technical support
Brazil (Sao Paulo) 55 (11) 3747-7799 Philippines 632-867-3551
Canada during
(905) 206 4663 Poland +48 22 519 06 00
warranty
Canada post-warranty
1-877-621-4722 Portugal +351 (0)21 3176333
(per-call charge)
Chile 123-800-360-999 Puerto Rico 1-877-232-0589
Columbia 9-800-91-9477 Qatar +971 4 883 8454
Czech Republic +42 (0) 2 6130 7310 Romania +40 1 315 44 42
01 3154442
Denmark +45 39 29 4099 Russia, Moscow +7 095 797 3520
Egypt 02 532 5222 Russia, St. Petersburg +7 812 346 7997
Europe (English) +44 (0) 207 512
Saudi Arabia 800 897 14440
5202
Finland +358 (0) 203 47 288 Singapore (65) 272-5300
France +33 (0) 143623434 South Africa (RSA) 086 000 1030
Germany (0.24 DM/
min)
+49 (0) 180 52 58
143
South Africa, Outside
Republic
+27 (0) 11 258 9301
Greece +30 1 60 73 603 Spain +34 902 321 123
Guatemala 999-5305 Sweden +46 (0)8 619 2170
Hong Kong (852) 300-28-555 Switzerland (French) +41 (0) 84 880 1111
Hungary +36 (0) 1 382 1111 Switzerland (German) +41 (0) 84 880 1112
India 91-11-682-6035 Taiwan 886 -2-2717-0055
Indonesia 62-21-350-3408 Thailand (662) 661-4000
Ireland +353 (0) 1 662 5525 Turkey +90 (216) 579 71 71
Israel +972 (0) 9 9524848 Ukraine +7 (380-44) 490-
3520
Italy +39 0226410350 United Arab Emirates +971 4 883 8454
Jordan +971 4 883 8454 United Kingdom +44 (0) 207 512 52
02
Korea +82 (2) 3270 0700 Venezuela 800-47-777
Kuwait +971 4 883 8454 Venezuela (Caracas) (502) 207-8488
Lebanon +971 4 883 8454 Vietnam 84-8-823-4530
support and warranty information
75
Page 82

hp digital copier series
country/region hp technical support country/region hp technical support
Malaysia 03-2952566 Yemen +971 4 883 8454
call in
Australia postwarranty
hp distribution
center
If your product is not under warranty, you can call 03 8877 8000. A perincident, out-of-warranty support fee of $27.50 (inc GST) will be charged
to your credit card. You can also call 1902 910 910 ($27.50 charged to
your phone account) from 9:00 A.M. to 5:00 P.M. Monday through Friday.
(Charges and support hours are subject to change without notice.)
To order HP Digital Copier software, if applicable, a copy of the printed
Reference Guide, a setup poster, or other customer-replaceable parts, call
the appropriate number.
• In the U.S. or Canada, dial (661) 257-5565.
• In Europe, dial +49 180 5 290220 (Germany) or +44 870 606
9081 (U.K.).
• For other countries/regions, call the following:
.
country/region number for ordering
U.S. (661) 257-5565
Argentina 541 14 778-8380
Asia Pacific 65 272 5300
Australia/New Zealand 61 3 8877 8000
Brazil 55-11-829-6612
Chile 123-800-360-999
Europe +49 180 5 290220
Europe +44 870 606 9081
South Africa +27 (0)11 8061030
Mexico 01-800-472-6684
Venezuela 800-47-777
Venezuela (Caracas) (502) 207-8488
express service
To obtain HP express repair service, the customer must contact an
HP service offic0e or an HP Customer Support Center for basic
troubleshooting first. See hp customer support on page 71 for steps to take
before calling Customer Support.
76
support services and warranty
Page 83

If a customer unit needs a minor part replacement and these parts can
normally be replaced by the customer, the customer-replaceable
components may be serviced through expedited part shipment. In this
event, HP will prepay shipping charges, duty and taxes; provide telephone
assistance on replacement of the component; and pay shipping charges,
duty, and taxes for any part that HP asks to be returned.
The HP Customer Support Center may direct customers to designated
authorized service providers who are certified by HP to service the HP
product.
limited warranty statement
This section contains important warranty information for your HP Digital
Copier and its parts and accessories. The warranties are as follows:
HP Digital Copier Limited warranty
Two-Sided Printing Accessory 90 days
250-Sheet Plain Paper Tray 90 days
Automatic Document Feeder (ADF) 90 days
Hewlett-Packard (“HP”) warrants to the end-user customer
1
(“Customer”) that the HP Digital Copier accessories specified above
will be free from defects in materials and workmanship for the
duration of the limited warranty, which begins on the date of
purchase by the customer. Customer is responsible for maintaining
proof of date of purchase.
For software products, HP’s limited warranty applies only a failure to
2
execute programming instructions. HP does not warrant that the
operation of any product will be uninterrupted or error free.
HP’s limited warranty covers only those defects which arise as a result
3
of normal use of the products, and does not apply to any:
– Improper or inadequate maintenance or modification;
– Operation outside the product’s specifications.
For HP printer products, the use of a non-HP ink cartridge or a refilled
4
ink cartridge does not affect either the warranty to the customer or
any HP support contract with the customer. However, if printer failure
or damage is attributable to the use of a non-HP or refilled ink
cartridge, HP will charge its standard time and materials charges to
service the printer for the particular failure or damage.
If HP receives, during the applicable warranty period, notice of a
5
defect in any software, media, or ink cartridge product which is
covered by HP’s warranty, HP shall replace the defective product. If
HP receives, during the applicable warranty period, notice of a
defect in any hardware product which is covered by HP’s warranty,
HP shall either repair or replace the defective product, at HP’s option.
hp digital copier series
support and warranty information
77
Page 84

hp digital copier series
If HP is unable to repair or replace, as applicable, a defective
6
product which is covered by HP’s rewritten, HP shall, within a
reasonable time after being notified of the defect, refund the purchase
price of the product.
HP shall have no obligation to repair, replace, or refund until the
7
customer returns the defective product to HP.
Any replacement product may be either new or like-new, provided
8
that it has functionality at least equal to that of the product being
replaced.
HP’s limited warranty is valid in any country where the covered HP
9
product is distributed by HP except for the Middle-East, Africa,
Argentina, Brazil, Mexico, Venezuela, and France’s “Departments
d’Outre-Mer”; for those excepted areas, the warranty is valid only in
the country of purchase. Contracts for additional warranty services,
such as on-site service, may be available from any authorized HP
service facility in countries where the product is distributed by HP or
by an authorized importer.
Limitations of Warranty
TO THE EXTENT ALLOWED BY LOCAL LAW, NEITHER HP NOR ITS
1
THIRD PARTY SUPPLIERS MAKE ANY OTHER WARRANTY OR
CONDITION OF ANY KIND, WHETHER EXPRESS OR IMPLIED, WITH
RESPECT TO THE HP PRODUCTS, AND SPECIFICALLY DISCLAIM THE
IMPLIED WARRANTIES OR CONDITIONS OF MERCHANTABILITY,
SATISFACTORY QUALITY, AND FITNESS FOR A PARTICULAR
PURPOSE.
78
Limitations of Liability
To the extent allowed by local law, the remedies provided in this
1
Warranty Statement are the customer’s sole and exclusive remedies.
TO THE EXTENT ALLOWED BY LOCAL LAW, EXCEPT FOR THE
2
OBLIGATIONS SPECIFCALLY SET FORTH IN THIS WARRANTY
STATEMENT, IN NO EVENT SHALL HP OR ITS THIRD PARTY
SUPPLIERS BE LIABLE FOR DIRECT, INDIRECT, SPECIAL, INCIDENTAL,
OR CONSEQUENTIAL DAMAGES, WHETHER BASED ON
CONTRACT, TORT, OR ANY OTHER LEGAL THEORY AND
WHETHER ADVISED OF THE POSSIBILITY OF SUCH DAMAGES.
Local Law
This Warranty Statement gives the customer specific legal rights. The
1
customer may also have other rights which vary from state to state in
the United states, from province to province in Canada, and from
country to country elsewhere in the world.
To the extent that this Warranty Statement is inconsistent with local
2
law, this Warranty Statement shall be deemed modified to be
consistent with such local law. Under such local law, certain
disclaimers and limitations of this Warranty Statement may not apply
support services and warranty
Page 85

to the customer. For example, some states in the United States, as well
as some governments outside the United States (including provinces in
Canada), may:
a. Preclude the disclaimers and limitations in this Warranty
Statement from limiting the statutory rights of a consumer (e.g., the
United Kingdom);
b. Otherwise restrict the ability of a manufacturer to enforce such
disclaimers or limitations; or
c. Grant the customer additional warranty rights, specify the
duration of implied warranties which the manufacturer cannot
disclaim, or not allow limitations on the duration of implied
warranties.
FOR CONSUMER TRANSACTIONS IN AUSTRALIA AND NEW
3
ZEALAND, THE TERMS IN THIS WARRANTY STATEMENT, EXCEPT
TO THE EXTENT LAWFULLY PERMITTED, DO NOT EXCLUDE,
RESTRICT, OR MODIFY, AND ARE IN ADDITION TO, THE
MANDATORY STATUTORY RIGHTS APPLICABLE TO THE SALE OF HP
RPOODUCTS TO SUCH CUSTOMERS.
environmental statement
These products were designed to be environmentally friendly.
hp digital copier series
hp printhead and ink cartridge limited warranty
digital copier supplies limited warranty
All HP Digital Copier supplies are warranted to be free from defects in
material and workmanship during the warranty period.
warranty period
Each HP Digital Copier product is warranted until the End-of-Warranty
date, which is printed on each product. Refer to the individual product
inserts for the location of the End-of-Warranty date.
limitations on copier supplies warranty
The warranty does not cover empty or refilled products, printer expired
products, or products that have been tampered with or misused.
installed-by date
Every HP Digital Copier supply features an Install-by-Date printed on the
product’s box. The product must be installed by this date for best printing
results.
returning an hp inkjet product
If a problem occurs with an product supply, contact HP Customer Support.
See hp customer support on page 71 for contact information.
support and warranty information
79
Page 86

hp digital copier series
using non-hp inkjet products
If a non-HP Inkjet product is found to be the direct cause of the printer failure
or damage, HP will not cover the repair related to that non-HP product.
warranty upgrades
Upgrade your standard factory warranty to a total of three years with the
HP SUPPORTPACK. Service coverage begins on product purchase date
and the pack must be purchased within the first 180 days of product
purchase. This program offers phone support from 6:00 A.M. to
10:00 P.M. Mountain Standard Time (MST) Monday through Friday and
9:00 A.M. to 4:00 P.M. (MST) on Saturdays. If during your technical
support call it is determined that you need a replacement product, then HP
will ship you this product next business day free of charge. Available in
U.S. only.
For more information, please call 1-888-999-4747 or visit the following
HP website:
http://www.hp.com/go/hpsupportpack
limited global warranty statement for hp digital copier products
extent of limited warranty
Hewlett-Packard (“HP”) warrants to the end-user customer (“Customer”) that
each HP Digital Copier product (“Product”), including related software, if
applicable, accessories, media, and supplies, shall be free from defects in
material and workmanship for the duration, which duration begins on the
date of purchase by the Customer.
For each hardware Product, the duration of HP’s limited warranty is one
year for parts and one year for labor. For all other Products, the duration
of HP’s limited warranty for both parts and labor is ninety days.
For each software Product, HP’s limited warranty applies only to a failure
to execute programming instructions. HP does not warrant that the
operation of any Product shall be uninterrupted or error free.
HP’s limited warranty covers only those defects which arise as a result of
normal use of a Product, and does not cover any other problems, including
those which arise as a result of (a) improper maintenance or modification,
(b) accessories, media, or supplies not provided or supported by HP, or (c)
operation outside the Product’s specifications.
For any hardware Product, the use of a non-HP ink cartridge or a refilled
ink cartridge does not affect either the warranty to the Customer or any HP
support contract with the Customer. However, if Product failure or damage
is attributable to the use of a non-HP or refilled ink cartridge, HP shall
charge its standard labor and materials charges to service the Product for
the failure or damage.
80
support services and warranty
Page 87

hp digital copier series
If HP receives, during the applicable warranty period, notice of a defect in
any Product, HP shall either repair or replace the defective Product, at HP’s
option. Where labor charges are not covered by HP’s limited warranty,
repairs shall be at HP’s standard charges for labor.
If HP is unable to repair or replace, as applicable, a defective Product
which is covered by HP’s warranty, HP shall, within a reasonable time after
being notified of the defect, refund the purchase price for the Product.
HP shall have no obligation to repair, replace, or refund until the Customer
returns the defective Product to HP.
Any replacement product may be either new or like-new, provided that it
has functionality at least equal to that of the Product being replaced.
HP products, including each Product, may contain remanufactured parts,
components, or materials equivalent to new in performance.
HP's limited warranty for each Product is valid in any country or locality
where HP has a support presence for the Product and where HP has
marketed the Product. The level of warranty service may vary according to
local standards. HP shall have no obligation to alter the form, fit, or function
of the Product in order to make it operate in a country or locality for which
the Product was never intended to operate.
limitations of warranty
TO THE EXTENT ALLOWED BY LOCAL LAW, NEITHER HP NOR ITS THIRD
PARTY SUPPLIERS MAKE ANY OTHER WARRANTY OR CONDITION OF
ANY KIND, WHETHER EXPRESS OR IMPLIED, WITH RESPECT TO THE
COVERED HP PRODUCTS, AND SPECIFICALLY DISCLAIM THE IMPLIED
WARRANTIES OR CONDITIONS OF MERCHANTABILITY, SATISFACTORY
QUALITY, AND FITNESS FOR A PARTICULAR PURPOSE.
limitations of liability
To the extent allowed by local law, the remedies provided in this Limited
Warranty Statement are the Customer’s sole and exclusive remedies.
TO THE EXTENT ALLOWED BY LOCAL LAW, EXCEPT FOR THE
OBLIGATIONS SPECIFICALLY SET FORTH IN THIS LIMITED WARRANTY
STATEMENT, IN NO EVENT SHALL HP OR ITS THIRD PARTY SUPPLIERS BE
LIABLE FOR DIRECT, INDIRECT, SPECIAL, INCIDENTAL, OR
CONSEQUENTIAL DAMAGES, WHETHER BASED ON CONTRACT,
TORT, OR ANY OTHER LEGAL THEORY AND WHETHER ADVISED OF THE
POSSIBILITY OF SUCH DAMAGES.
local law
This Limited Warranty Statement gives the Customer specific legal rights.
The Customer may also have other rights which vary from state to state in
the United States, from province to province in Canada, and from country
to country elsewhere in the world.
support and warranty information
81
Page 88

hp digital copier series
To the extent this Limited Warranty Statement is inconsistent with local law,
this Statement shall be deemed modified to be consistent with such local
law. Under such local law, certain disclaimers and limitations of this
Statement may not apply to the Customer. For example, some states in the
United States, as well as some governments outside the United States
(including provinces in Canada), may:
Preclude the disclaimers and limitations in this Statement from limiting the
statutory rights of a consumer (e.g. the United Kingdom);
Otherwise restrict the ability of a manufacturer to enforce such disclaimers
or limitations; or
Grant the Customer additional warranty rights, specify the duration of
implied warranties which the manufacturer cannot disclaim, or not allow
limitations on the duration of implied warranties.
FOR CONSUMER TRANSACTIONS IN AUSTRALIA AND NEW ZEALAND,
THE TERMS IN THIS LIMITED WARRANTY STATEMENT, EXCEPT TO THE
EXTENT LAWFULLY PERMITTED, DO NOT EXCLUDE, RESTRICT, OR
MODIFY, AND ARE IN ADDITION TO, THE MANDATORY STATUTORY
RIGHTS APPLICABLE TO THE SALE OF THE COVERED HP PRODUCTS TO
SUCH CUSTOMERS.
82
support services and warranty
Page 89

technical information
hp digital copier series specifications
The following specifications are subject to change without notice.
• Digital image processing
• Up to 99 copies from original
• Digital zoom from 25 to 400%
• Fit to Page, Poster, Clone, Mirror, Photo Mode, 2-on-1, and Margin Shift
• Up to 18 cpm black, 16 cpm color
• Copy speeds vary according to the complexity of the document
speed
mode speed from the glass (ppm)
Best Black 1.3
Color 1.3
Normal Black 7.0
Color 7.0
Fast Black 18.0
Color 16.0
* Black text document.
† Document with mixed text and color graphics.
*
†
*
†
9
margin specifications
top
(leading edge)
sheet paper
U.S. Letter .07 in.
U.S. Legal .07 in.
ISO A4 .07 in.
technical information
(1.8 mm)
(1.8 mm)
(1.8 mm)
bottom
(trailing edge)
.44 in.
(8.7 mm)
.44 in.
(8.7 mm)
.44 in.
(8.7 mm)
left right
.25 in.
(6.4 mm)
.25 in.
(6.4 mm)
.13 in.
(3.4 mm)
.25 in.
(6.4 mm)
.25 in.
(6.4 mm)
.13 in.
(3.4 mm)
83
Page 90

hp digital copier series
paper specifications
top
(leading edge)
sheet paper
U.S. Letter .07 in.
U.S. Legal .07 in.
ISO A4 .07 in.
* This margin is not LaserJet-compatible, however, the total writing area is compatible. The writing area is offset
from center by .21 inches (5.4 mm), which causes asymmetric top and bottom margins.
(1.8 mm)
(1.8 mm)
(1.8 mm)
bottom
(trailing edge)
.44 in.
(8.7 mm)
.44 in.
(8.7 mm)
.44 in.
(8.7 mm)
left right
*
.25 in.
(6.4 mm)
.25 in.
(6.4 mm)
.13 in.
(3.4 mm)
paper weight and paper tray capacities
type paper weight input tray
main paper tray
Plain paper 16 to 24 lb.
Labels N/A 30 sheets
Transparencies/Photo
media
(60 to 90 gsm)
N/A 30 sheets 30 sheets
automatic document feeder (ADF)
Paper 16 to 24 lb.
Transparencies, Photo
media, and Photos
(60 to 90 gsm)
two-sided printing accessory (available as an optional accessory on some models)
Plain paper 16 to 24 lb.
(60 to 90 gsm)
250-sheet plain paper tray (available as an optional accessory on some models)
Plain paper 16 to 28 lb.
* Maximum capacity.
† Output tray capacity is affected by the type of paper and the amount of ink you are using. HP recommends
emptying the tray frequently.
(60 to 105 gsm)
*
150 sheets 50 black, 20 color
50 sheets 50 sheets
Not Supported
150 sheets 50 black, 20 color
250 sheets N/A
output tray
.25 in.
(6.4 mm)
.25 in.
(6.4 mm)
.13 in.
(3.4 mm)
†
paper sizes
main paper tray
84
type size
Paper Letter: 8.5 x 11 in. (215.9 x 279.4 mm)
Transparency films Letter: 8.5 x 11 in. (215.9 x 279.4 mm)
Legal: 8.5 x 14 in. (215.9 x 355.6 mm)
A4: 210 x 297 mm
A4: 210 x 297 mm
technical information
Page 91

paper sizes (continued)
type size
Labels Letter: 8.5 x 11 in. (215.9 x 279.4 mm)
automatic document feeder (ADF)
Paper Letter: 8.5 x 11 in. (215.9 x 279.4 mm)
two-sided printing accessory (available as an optional accessory on some models)
Paper Letter: 8.5 x 11 in. (215.9 x 279.4 mm)
Custom media
250-sheet plain paper tray (available as an optional accessory on some models)
Paper Letter: 8.5 x 11 in. (215.9 x 279.4 mm)
A4: 210 x 297 mm
Legal: 8.5 x 14 in. (215.9 x 355.6 mm)
Executive: 7.25 x 10.5 in. (184.2 x 266.7 mm)
US Personal: 5.5 x 8.5 in. (139.7 x 215.9 mm)
A4: 210 x 297 mm
A5: 148 x 210 mm
B5: 182 x 257 mm
A4: 210 x 297 mm
3 x 5 in. up to 8.5 x 11.7 in. (76.2 x 127 up to 216 x 297 mm)
Legal: 8.5 x 14 in. (215.9 x 355.6 mm)
A4: 210 x 297 mm
phycical specifications
hp digital copier with
automatic document feeder
(ADF)
Height 13.3 in. (33.8 cm) 13.3 in. (33.8 cm) 15.8 in. (40.0 cm)
Width 21.85 in. (55.5 cm) 21.85 in. (55.5 cm) 21.85 in. (55.5 cm)
Depth 16.3 in. (41.5 cm) 16.3 in. (41.5 cm) 16.3 in. (41.5 cm)
Weight 30.8 lbs. (14.0 kg) 32.4 lbs. (14.7 kg) 34.4 lbs. (15.6 kg)
hp digital copier with an (ADF)
and a two-sided printing
accessory
hp digital copier with an (ADF), a twosided printing accessory, and a 250sheet plain paper tray
hp digital copier series
power specifications
international P/N C7296-60043 domestic P/N C7296-60024
Power consumption 100W 100W
Source (input voltage) 100-240VAC 120-127VAC
Input frequency 50-60Hz 60Hz
Current 2.5A max 2.2A max
environmental specifications
temperature humidity
%
Maximum operating conditions 41º to 104º F, or 5º to 40º C15
Recommended operating conditions
for best copy quality
º to 95º F, or 15º to 35º C
59
20
technical information
% RH non-condensing
to 80
% to 80% RH non-condensing
85
Page 92

hp digital copier series
environmental specifications
temperature humidity
Storage conditions -40
º to 158º F, or -40º to 60º C
additional specifications
sound level copy color copy b&w
Sound Power, LwAd
(1B=10dB)
Sound Pressure, LpAm
(bystander positions)
5.3 B(A) 5.9 B(A)
44.3 dB(A) 50.5 dB(A)
To obtain sound level specifications, visit the following HP website:
http://www.hp.com
order printheads and ink cartridges
printheads hp reorder number
HP black printhead #14, C4920A
HP cyan printhead #14, C4921A
HP magenta printhead #14, C4922A
HP yellow printhead #14, C4923A
ink cartridges hp reorder number
HP black ink cartridge #14, C5011A
HP color ink cartridge #14, C5010A
If you have Internet access, you can get more information from the HP Support
website at:
http://www.hp.com/go/copiers
additional hp digital copier accessories
The table below shows the accessories that are included with each model. If you
would like to order an additional accessory for your HP Digital Copier, please visit
the following website:
http://www.hp.com/go/copiers
accessory and part number 510 610
Automatic document feeder (ADF) optional included
250-sheet plain paper tray ph7816
(C7310A)
Two-sided printing accessory ph6437
(C6437A)
86
optional optional
optional included
technical information
Page 93

environmental product stewardship program
hp digital copier series
protecting the environment
ozone production
energy consumption
paper use
Hewlett-Packard is committed to providing quality products in an environmentally
sound manner. This product has been designed with several attributes to minimize
impacts on our environment.
For more information, visit HP’s Commitment to the Environment website at:
http://www.hp.com/hpinfo/community/environment
This product generates no appreciable ozone gas (O3).
Energy usage drops significantly while in ENERGY STAR® mode, which saves
natural resources, and saves money without affecting the high performance of this
product. This product qualifies for ENERGY STAR, which is a voluntary program
established to encourage the development of energy-efficient office products.
ENERGY STAR is a U.S. registered service mark of the U.S. EPA. As an ENERGY
STAR partner, HP has determined that this product meets ENERGY STAR guidelines
for energy efficiency.
For more information on ENERGY STAR guidelines, visit the following website:
http://www.epa.gov/energystar
This product is suited for the use of recycled paper according to DIN 19309.
plastics
material safety data sheets
materials that require special handling
recycling program
technical information
Plastic parts over 25 grams are marked according to international standards that
enhance the ability to identify plastics for recycling purposes at the end of the
product’s life.
Material safety data sheets (MSDS) can be obtained from the HP website at:
http://www.hp.com/go/msds
Customers without Internet access should contact their local HP Support Center. For
contact information see
This product contains the following materials that may require special handling at the
end of the product’s life:
• Lead in the solder
HP offers an increasing number of product return and recycling programs in many
countries, as well as partnering with some of the largest electronic recycling centers
throughout the world. HP also conserves resources by refurbishing and reselling
some of its most popular products.
call in the U.S. during warranty
on page 51.
87
Page 94

hp digital copier series
88
technical information
Page 95

index
Numerics
2 on 1 feature
250-sheet plain paper tray
attach
21
3, 9, 13, 30
34
A
accessories
250-sheet plain paper tray
standard flat lid
ADF
install the
54
jams
8, 29
use the
adjust settings
18
copy
align printheads
2
arrows
automatic document feeder
load originals in
use for two-sided copies
automatic document feeder (ADF)
27
27
43
8
30
22
B
best copy quality
blank page
buttons
cancel
keypad
lighter/darker
2
menu
number of copies
quality
reduce/enlarge
special features
tray select/paper type
two-sided copy
16
60
3
2
3, 17
2, 18
2, 16
2, 16
3, 21, 22, 23
3, 24
22
27
C
cancel
3
button
25
copy
cancel color calibration
cartridge
check ink level
clean contacts
replace ink cartridges
change paper tray
clean
ink cartridge contacts
printhead contacts
printheads
the exterior
the glass
the lid backing
clean the lid backing on page 31
collate copies
color
improve printing
improve quality
intensity of copy
color calibration
cancel
contrast, enhance photo colors
copies
making
copy
2 on 1
an original
change default settings
color intensity
correcting problems
darken
defaults
43
36
35
23
48
15
21
20
3, 17
18
48
36
43
41
13
43
45
35
47
61
17
18
17
60
7
18
index
89
Page 96

hp digital copier
enhancements
enlarge
fit to page
lighten
make a copy
make a poster
mirror image
newpapers or thin paper
19
photo
quality
reduce
set number of copies
several copies on a page
special jobs
16
speed
25
stop
T-shirt transfer
two-sided copies
copy photos
copy problems
country/region setup
customer support
18
16
19
3, 17
16
23
25
2, 16, 60
16
18
19
24
3, 22
17
56, 61
49
71
D
darken a copy
default settings
change for copy
double-sided copies
17
18
22
E
enhancements
enlarge a copy
environmental specifications
express service
18
2, 16, 19
76
F
factory defaults
change for copying
failure to copy
fast copy quality
fit to page
fit to page feature
flat lid
front panel
front panel display
front panel features
19
27
overview
set language
2
18
56
16
3
1, 2
49
1
60
85
20
G
glass cleaning
greeting cards, load
35
12
H
5
help
hp Customer Support
hp distribution center
hp papers, tips on loading
hp two-sided printing accessory
71
76
12
I
image, shift
ink cartridges
check ink level
clean
expired
low
refill
replace
troubleshooting
ink level
check
low
override gauge
inkjet paper, load
input tray
intensity of color copy
iron-on
22
36
43
58
66
47
41
65
36
41
48
12
30
17
24
K
keypad
1, 2
L
lamp power save mode
language setup
legal-size paper
copy from
tips on loading
lid
install
lid backing, clean
27
lids
light power save mode
lighten or darken copies
load
250-sheet plain paper tray
change the paper type
ink cartridges
16
27
50
49
12
35
50
3, 17, 64
13
41
22
9
90
index
Page 97

hp digital copier
main paper tray
original in the ADF
9
paper
printheads
set the paper size
12
tips
load originals
load originals on the glass
load paper
lower paper tray,
9
8
38
13
7
7
7
see
250-sheet plain paper tray
M
main paper tray
12
load
load paper in
main paper tray, load
maintenance
align printheads
clean the exterior
clean the glass
clean the lid backing
clean the printheads
power save mode time
printhead replacement verification
replace ink cartridges
replace printheads
margin specifications
margins, increase
menu functions
menu options
menus
copy setup
print reports
status and maintenance
mirror image
missing lines
9
9
43
36
35
35
43
50
41
38
83
22
3
4
25
51
51
25
62
N
normal copy quality
number of copies
18
set
16
2
O
on button
order print cartridges
originals
output tray
1
86
7
how to place in the ADF
multiple copies
print two on one page
20
8
21
37
extender
10
P
paper
9
54
53
13
38
56
84
34
55
3
84
3, 17
19
43, 67
43, 45
31
13
8, 9
13
84
12
56
54
54
54
56
18
64
23
see
ink cartridges
13
31
19
85
50
50
85
47
adjust size
change default size for copy
change the type
load
recommended
set the size
specifications
tips on loading
wrong size
paper jams
ADF
back of unit
how to avoid
two-sided printing accessory
paper size, change for copy
paper sizes
paper tray
ADF tray jams
adjust paper size
jams
optional
out of paper
problems
select
set
paper trays
capacity
phone numbers - support services
photo mode
photo mode enhancement
photos
copy
enhance copy
troubeshooting
physical specifications
poster, copy to
power save mode setup
power save mode time
power specifications
print
color calibration report
print cartridges,
printheads
align
clean
load
13
54
71
index
91
Page 98

hp digital copier
38
replace
replacement verification
troubleshooting
65
37
Q
16
quality
quality of copies
60
R
reduce a copy
replace the flat lid with an ADF
reports
color calibration
restore factory defaults
returning your hp digital copier
ring and beep volume
2, 16, 19
47
48
50
S
set
country and language
number of copies
power save mode
settings
best copy quality
copy a photo
copy color intensity
copy defaults
copy quality
copy speed
country/region and language
darken a copy
enlarge a copy
fast copy quality
lighten a copy
normal copy quality
paper tray
power save mode
reduce a copy
save copy
text enhancement
shift margins
special features
limitations
standard flat lid
stickers, load
stop
25
copy
61, 62
streaks
supply, check ink level
support services
19
18
16
16
13
18
22
3, 21, 22, 23, 25
7
27
12
71
49
18
50
16
17
17
16
16
17
16
50
16
18
36
27
72
49
T
telephone numbers
text
enhance
transparency film
recommend choices
tips on loading
troubleshoot
paper jams
paper not feeding correctly
troubleshoot ink cartridges and printheads
troubleshoot paper types
troubleshooting
blurred copy
color are bleeding
copies do not look right
copy color
copy problems
cut off copy
even surfaces
failure to copy
failure to power-on
horizontal streaks
improve copy appearance
ink cartridges
missing lines
out of paper
paper orientation
printhead alignment
printheads
slanted or skewed copy
too light or dark
unfilled text or graphics
unit does not copy
unit is not responding
vertical streaks
wrong size paper
troubleshooting tips
T-shirt transfer
12
load
tutorial
before you begin
two-sided copies
two-sided printing accessory
29
attach
54
jams
71
18
9
12
53
55
56
62
61
59
59
56
62
56
58
58
61
59
61, 65
62
56
61
67
61, 65
60
64
64
56
56
62
56
53
24
15
3, 22
29
W
warning light
warranty
3
71
65
92
index
Page 99

hp digital copier
warranty on copier
warranty upgrades
80
80
93
Page 100

hp digital copier
94
index
 Loading...