

Page 1

Introduction
This User’s Reference Guide explains how to use your D/A1 size or A0+/E+ size HP Designjet 500 Plus Printer.
The Introduction Tab contains these topics:
• Introducing the Documentation
Introduces your printer’s documentation.
• Introducing Your
Contains a brief overview of the printer. It contains information about the printer’s features and what is
included with the printer.
• Front View of Printer
Contains a view of the front of the printer showing the location of the printer’s consumable items.
• Printer Connections
Shows all the connections to the printer: power, parallel interface, USB and optional network interface.
HP Designjet 500 Plus Printer
Page 2
Introducing the Documentation
You have the following resources to help you in using your HP Designjet 500 Plus printer.
•The Assembly and Set-up Poster comes with your printer and shows step-by-step information on how to
prepare your printer for use.
•This User’s Reference Guide explains the
details of using your printer. For more day-to-day
guidance you can refer to the Pocket Guide.
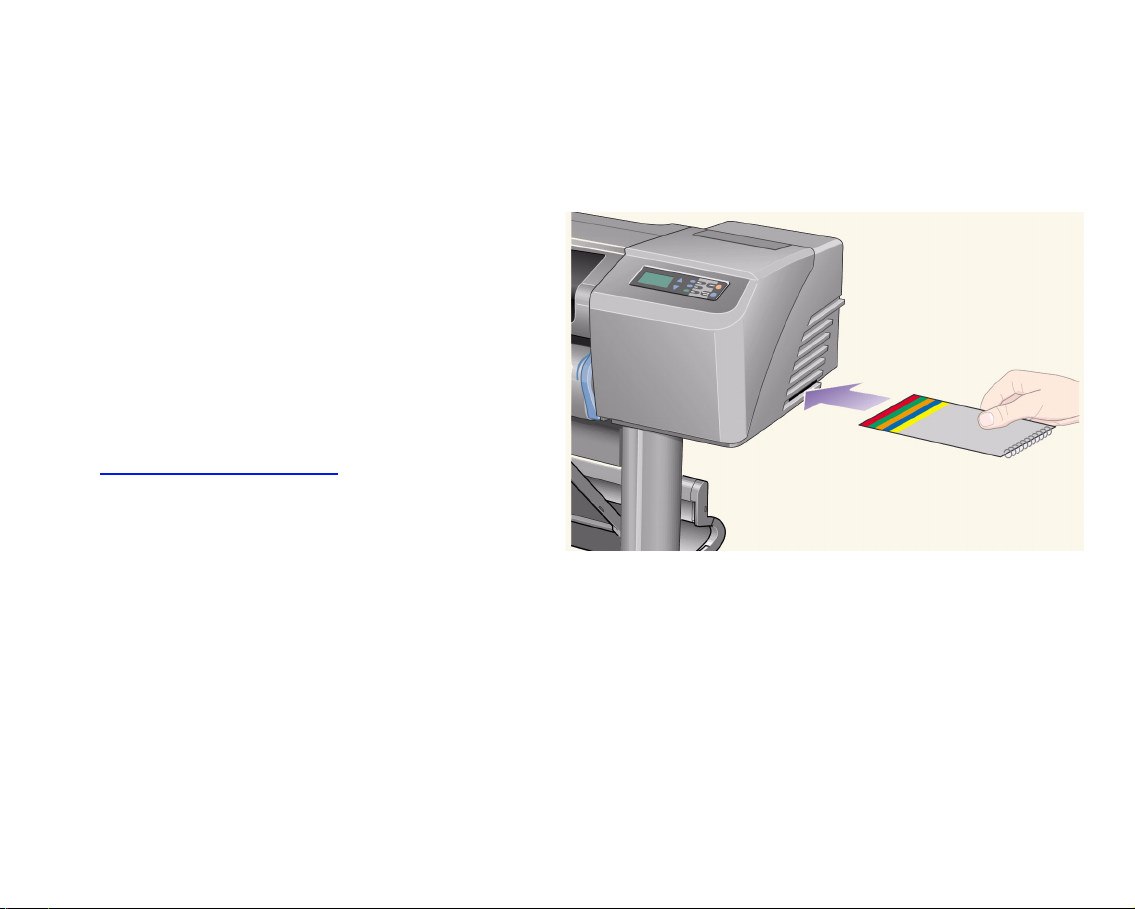
•The Pocket Guide can be found in a slot on the
right-hand side of the printer (as shown). It gives
information that you are most likely to need for
printer operation on a daily basis, such as
loading paper or replacing ink supplies.
• You can also visit us on our Web page:
www.hp.com/go/designjet
.
Pocket Guide location
Page 3

Introducing Your HP Designjet 500 Plus Printer
• Your Printer’s Main Features
A general overview of the major features of your printer.
• HP Ink Supplies
A description of the HP Ink Supplies required for your printer.
• Print Resolution
Specifications of the print resolution for your printer.
• Media
A description of the different types of media available for your printer.
• User Interface
A description of the printer’s user interface.
• Memory
Details of internal memory and memory options available with your printer.
• Drivers
Details of the drivers delivered with your printer.
Page 4

Your Printer’s Main Features
The HP Designjet 500 Plus printing system is specially designed for individuals or small work-groups in
Architecture, Engineering and Construction (AEC) and mechanical CAD design.
For the complete printing solution, HP also offers a wide range of media including HP Heavyweight Coated Paper
with fade-resistant photo-quality output and HP High-Gloss Photo Paper for high-quality long-lasting prints that
produce a professional look and feel. And with the HP Complementary Media Program, HP provides users with a
wide spectrum of choice and flexibility in their media selection.
The HP Designjet 500 Plus printer comes in two sizes: A0+/E+ size (42 inches/1066.8 mm) and D/A1 size
(24 inches/609.6 mm) models. Both models have roll-feed capabilities and come with an HP-GL/2
Card. The A0+/E+ size model also includes legs and a media bin.
• Ultimate Photo Image Quality and Excellent Line Quality: The HP Designjet 500 Plus printer delivers ultimate
line quality with a true resolution of 1200×600-dpi, using HP’s color layering technology, which layers multiple
color ink drops on a single drop, on coated paper. This excellent line quality is achieved due to the fact that
each one-half inch/12.7mm printhead contains 304 nozzles, producing miniscule 18-picoliter black pigmented
ink drops and four picoliter color dye-based drops, that are idea for engineering and architectural applications.
In addition, the HP Designjet 500 Plus printer delivers excellent photo quality for renders and photographs,
providing continuous tones and smooth transitions.
• Unattendedness: The HP Designjet 500 Plus printing system includes a modular ink delivery system, with
69-cc cartridge capacity, and long life printheads which last, on average, through ten black ink cartridges and
six color ink cartridges, depending on use. This modular system allows users to replace individual ink supplies
separately, as needed and also provide automatic alignment and cutting and stacking of finished prints in the
media bin, enabling continuous and unattended printing. In addition, the HP Designjet 500 Plus printer
includes smart chips that are embedded into each individual printhead and ink cartridge that alert the user if it
time to replace the printhead and continuously monitor ink levels.
• Ease-of-use: The HP Designjet 500 Plus printing system is a true out-of the box solution and provides the
user with everything he or she needs to install and use the printer. The HP Designjet 500 Plus printer
includes a control-display panel for simple navigation, straightforward media loading and easy-to-install
drivers.
More…
Accessory
Page 5

• HP Premium Printing Material: The HP Designjet 500 Plus A0+/E+ size and D/A1 size printing systems
accept a wide range of roll and sheet media from 24 inches/609.6 mm (D/A1 size) to 42 inches/1066.8 mm
(A0+/E+ size) wide including HP Satin Poster Paper, HP High-Gloss Photo Paper and HP Heavyweight
Coated Paper. In addition, the HP Designjet 500 Plus printer accepts a wide range of media for technical
applications.
• Complementary Media Program (CMP
): The CMP helps HP customers grow their businesses by referencing
third-party printing material choices to ensure maximum HP Designjet printer flexibility and printing solutions.
Page 6

HP Ink Supplies
HP Ink Supplies for your printer contain two components: printheads and ink cartridges. Your HP Designjet 500
Plus printer uses the following HP Ink Supplies:
• Black Ink Cartridges are HP No 10 Supplies.
• Cyan, Magenta and Yellow Cartridges are HP No 82 Supplies.
• All Printheads are HP No 11 Supplies.
Each 600-dpi thermal inkjet printhead applies thousands of ink droplets onto the paper. The printer automatically
refills the printhead as it prints, enabling continuous uninterrupted printing. The ink is supplied to each printhead
from a separate large capacity ink cartridge.
There is more information available in a pamphlet which comes with the printheads and in Print Times for a
Selected Print Quality.
Page 7
Print Resolution
Your HP Designjet 500 Plus printer provides two different print modes that change the print resolutions of each of
the print quality modes. These different print modes are optimized for: Line Drawings/Text or Images.
You can then choose between three levels of print quality for each of the print modes: Best, Normal or Fast from
your software or from the printer's front panel.
With the best mode selected you have an additional selection available to provide maximum detail for your printed
image by increasing the resolution of your job above the default resolution.
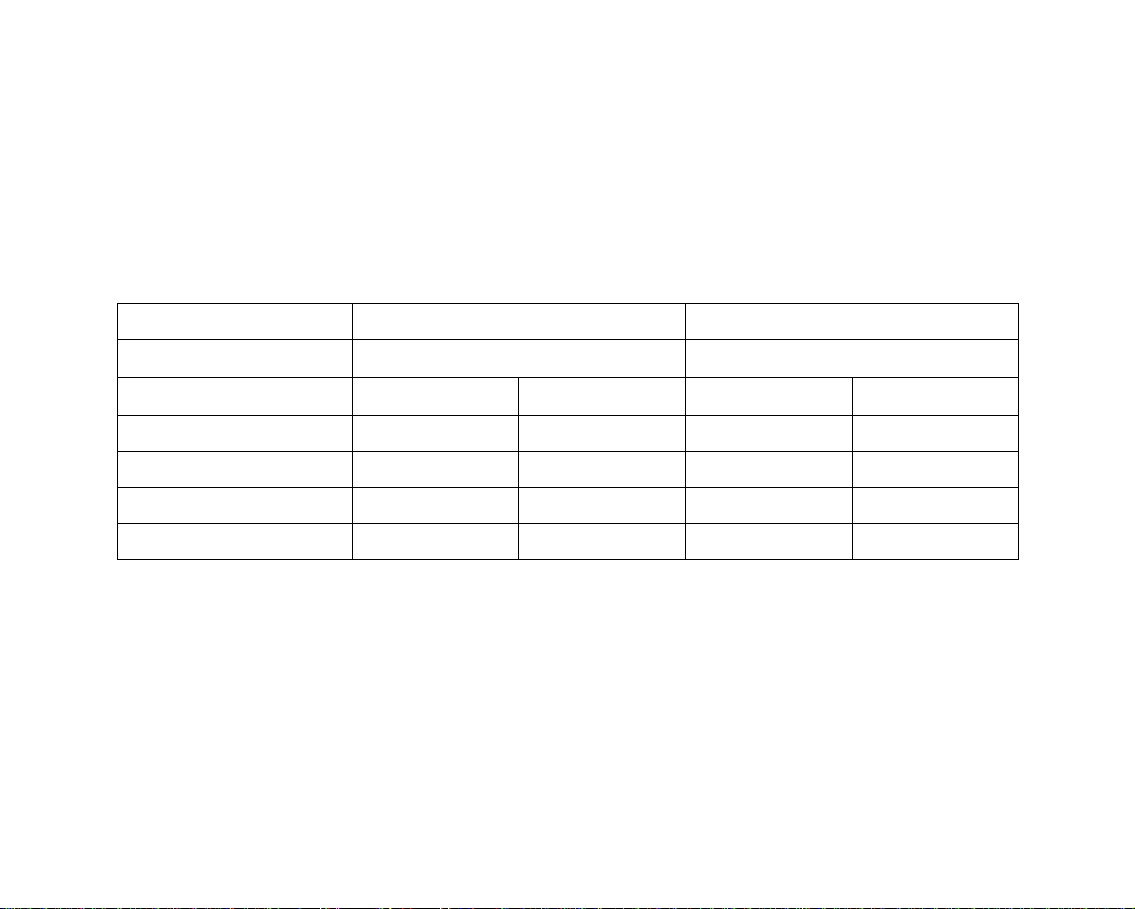
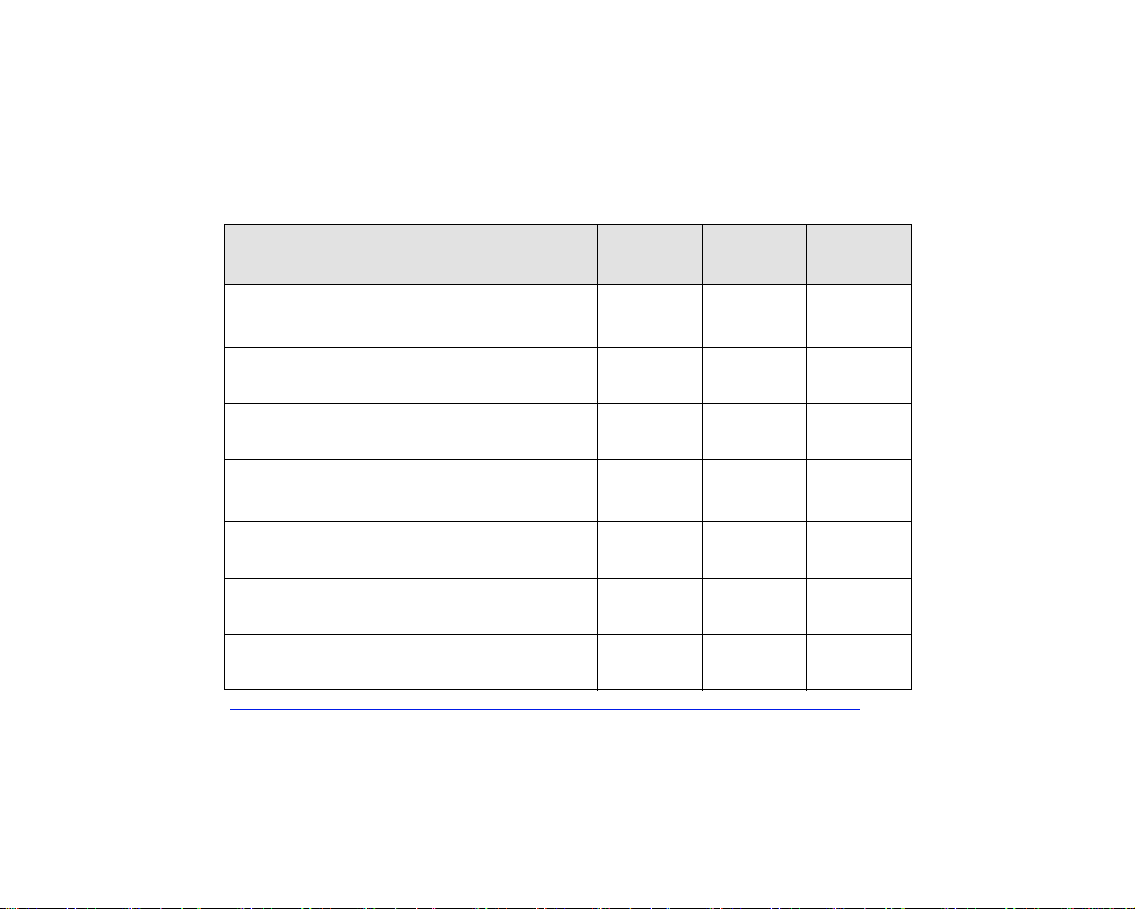
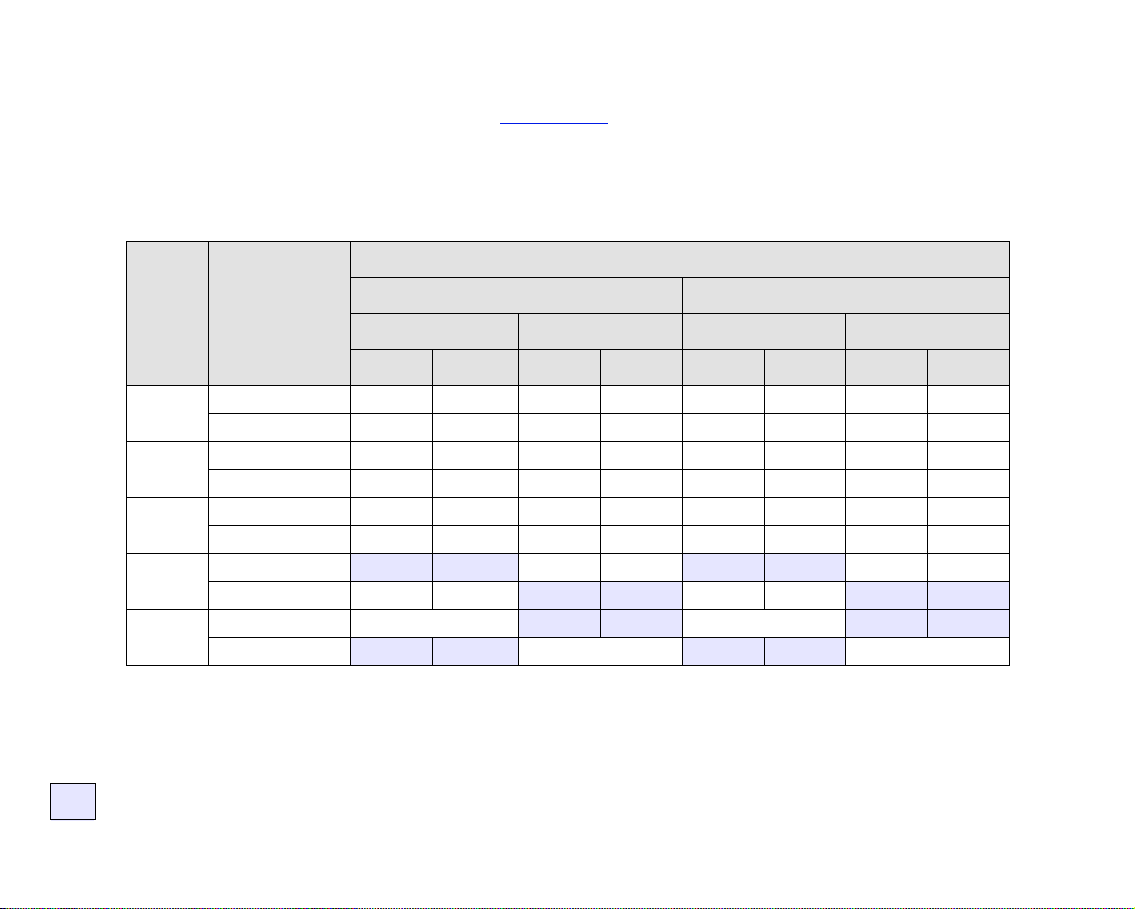
Print Quality Setting Optimized for Line Drawing/Text Optimized for Images
Resolution in dpi Resolution in dpi
Re0×nder Halftone Render Halftone
Fast 300×300 600×300 150×150 600×300
Normal 600×600 600×600 300×300 600×600
Best (default) 600×600 600×600 600×600 600×600
Best (maximum detail) 600×600 1200×600 600×600 1200×600
Use Fast to get draft copies of your prints at maximum throughput. Normal is optimized so that you get the best
line quality with the fastest throughput. Select Best if you want to get the best quality for images and renderings.
Page 8
Media
You can print on roll media or sheet media up to 42 inches (1066.8 mm) wide with the A0+/E+ size HP Designjet
500 Plus printer and up to 24 inches (609.6 mm) with the D/A1 size model.
The following media types are supported on the HP Designjet 500 Plus printer:
• HP Bright White Inkjet Paper (Bond) • HP Paper-Based Semi-Gloss
• HP Vellum • HP Clear film
• HP Natural Tracing Paper • HP Translucent bond
• HP Coated Paper • HP Studio Canvas
• HP Heavyweight Coated Paper • HP Satin Poster Paper
• HP Matte film • HP Banners with Tyvek®
• HP High-Gloss Photo Paper • HP Colorfast Adhesive Vinyl
• HP Semi-Gloss Photo Paper
Page 9
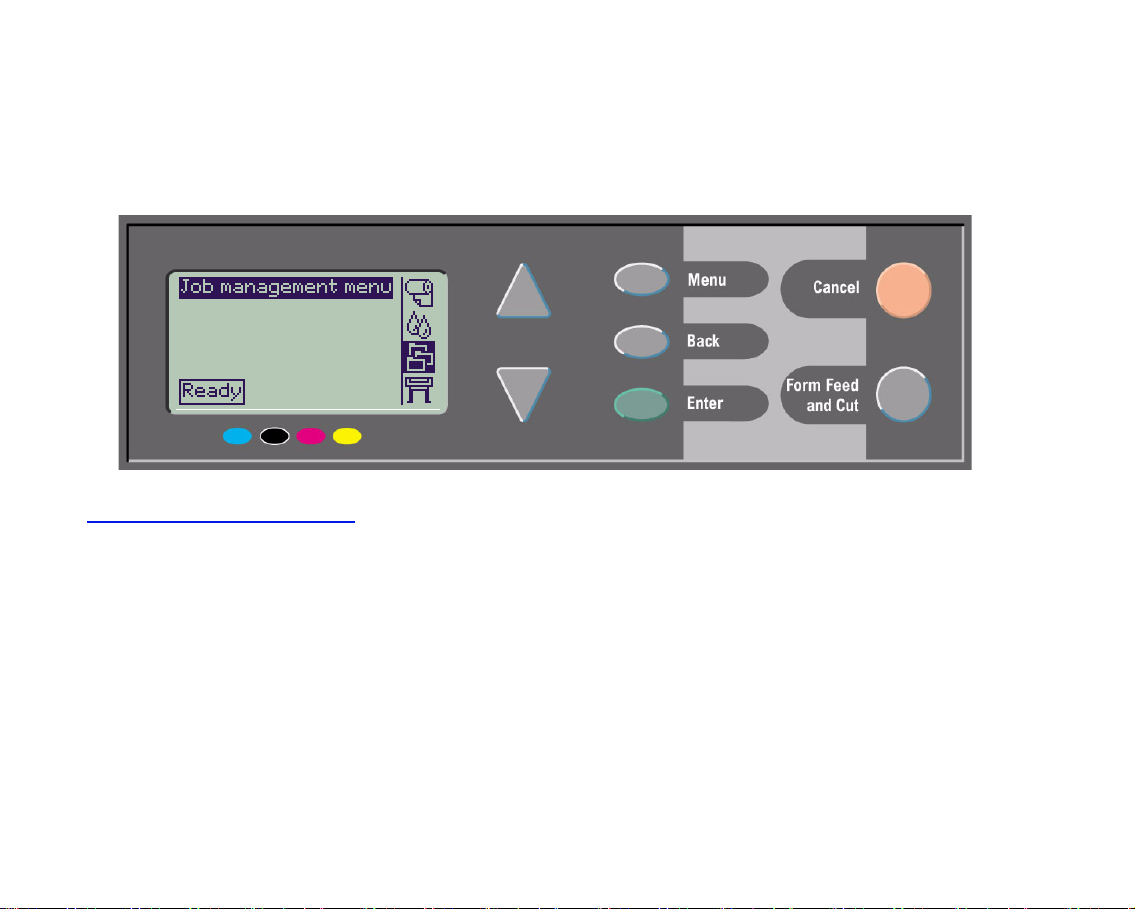
User Interface
The printer’s front panel includes an easy-to-use interface with a display, giving you access to a comprehensive
set of printer functions.
See Navigating the Menu System
description of internal prints.
, for a short tutorial to teach you how to navigate through the menus and a
Page 10

Memory
The D/A1 size and A0+/E+ size HP Designjet 500 Plus printers come with 32 MB of internal Random Access
Memory (RAM). Additional memory can be added to the HP-GL/2
can add 64 MB (part number C2387A) or 128 MB (part number C2388A) of memory for large file processing and
improved printing.
Accessory card that came with your printer. You
Page 11

Drivers
Always use the right driver (configured correctly) for the combination of your application software and your printer
to ensure that your printer prints exactly what you were expecting in terms of: size, position, orientation, color and
quality.
NOTE: Many software applications include their own drivers.
Your HP Designjet 500 Plus printer comes supplied with:
• Windows drivers
• Mac OS X drivers
• AutoCAD drivers for Windows
NOTE: If AutoCAD drivers are available for the specific AutoCAD release you are using, it is strongly
recommended that you install them to print from AutoCAD.
Page 12
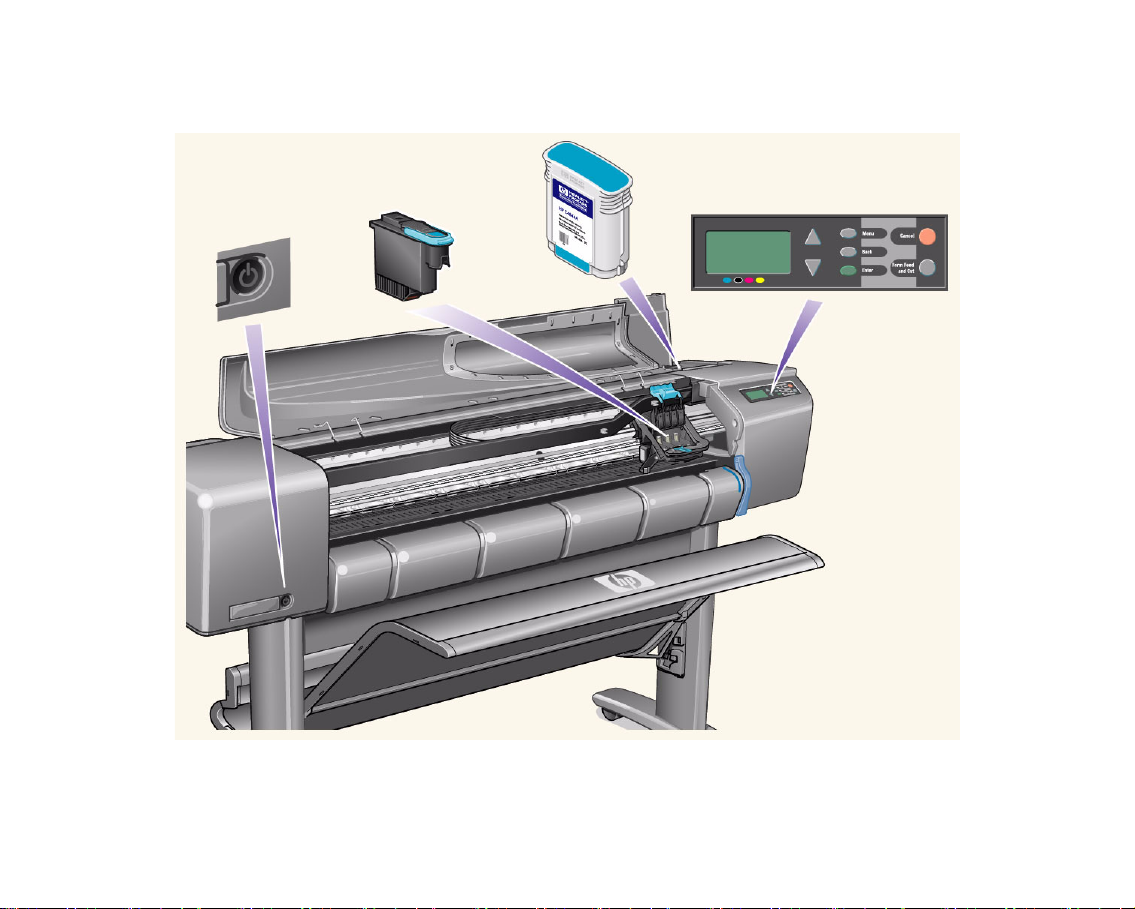
Front View of Printer
Ink Cartridge
Power
Switch/Indicator
Printhead
Front Panel
Page 13
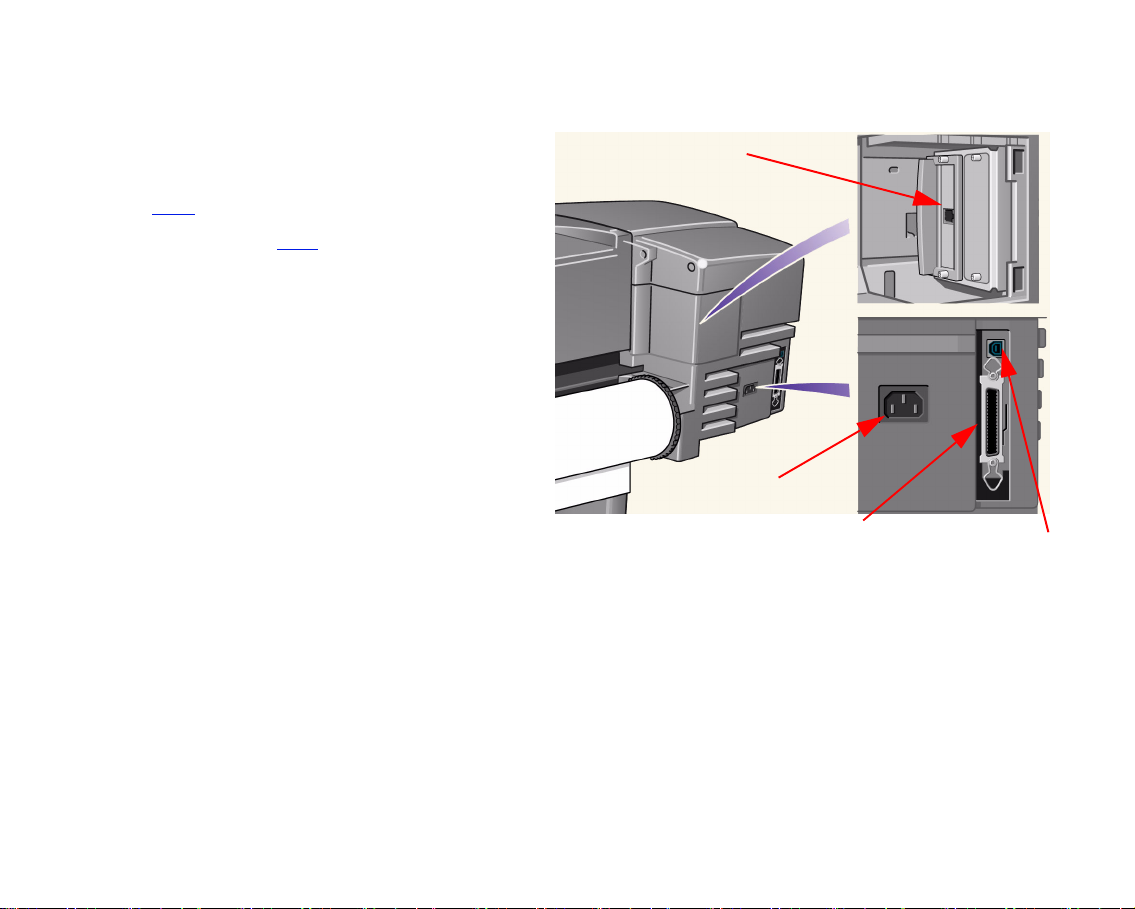
Printer Connections
Your HP Designjet 500 Plus printer can be
connected directly to your computer via the
traditional parallel interface or through the Universal
Serial Bus (USB
For Local Area Network (LAN
printer can be fitted with an optional HP JetDirect
Print Server Fast Ethernet 10/100 base TX network
interface card.
See the Assembly and Set-up Poster for information
on connecting your printer to a computer or network.
) port.
) connection your
Connection
Power socket
Parallel Port
USB Connection
Page 14

Media & Ink
The D/A1 size and A0+/E+ size format HP Designjet 500 Plus Printers use a variety of media. The
recommended media are engineered to use with your printer and your printer’s ink system to give you the best
results.
The Media & Ink Tab contains these topics:
• Media Choice
needs is an essential step in ensuring good image quality.
• Roll Media
• Sheet Media
• Ink System
optimum use.
• Ink Cartridges
replacing ink cartridges.
• Printheads
and aligning printheads.
explains how to choose the correct media type. Choosing the correct paper type for your
details the procedures used for loading and unloading your roll media.
details the procedures used for loading and unloading your sheet media.
gives you an overview of the printer’s ink system, with some warnings and precautions for its
details the procedures used for: obtaining information, interpreting errors, checking levels and
details the procedures used for: obtaining information, interpreting errors, replacing printheads
Page 15

Media Choice
• Choosing Paper or Other Media
Your printer supports several types of paper. Choosing the best paper type for your needs is an essential
step in ensuring good image quality. These topics help you to select the best media for your particular
printing task.
• Paper Types
Detailed information concerning the different types of media available for your printer. This includes
information on: the types of paper supported, their physical characteristics, quality selection, handling and
how to obtain information.
• Print Times for a Selected Print Quality
Typical Printing Times for color and black lines and images on different types of paper.
• Printable Area
The dimensions for all the printable areas for all paper and other types of media formats.
Page 16

Choosing Paper or Other Media
For best printing results, use only genuine Hewlett-Packard paper or other type of media, whose reliability and
performance have been developed and thoroughly tested. All Hewlett-Packard printing components (printer, ink
system, and paper/other media) have been designed to work together to give trouble-free performance and optimal
image quality. For detailed information on Hewlett-Packard paper, see Paper Types
You should also take note of some important points about paper and other types of media:
• This printer supports many types of paper. However, the quality of some images may be reduced if you do not
use the correct paper for your application. For example, images with large regions of intense color, where
many ink drops are needed to fully saturate the color, will not print well on HP Bright White InkJet Paper. On
HP Coated paper
printheads, smearing your print and risking damage to the printhead. See Combinations of Media Type and
Print Quality Selection.
• Whenever you load a roll or a sheet, the printer’s front-panel display prompts you to specify the paper type
you are loading. It is absolutely essential to specify this correctly for good image quality. The Physical Charac-
teristics of Paper Types table gives you all the information you need. If paper is already loaded and you are
unsure which paper type was specified, go to the Paper Menu and press Enter; see Obtaining Roll or Sheet
Paper Information.
• Make sure the appropriate print-quality setting (Best, Normal or Fast) is selected. You can set the print qual-
ity either from your software or from the printer’s front panel (software driver settings override any print-quality
settings made on the front panel). The combination of paper type and print-quality settings tells the printer
how to place the ink on the paper—for example, the ink density, dithering method, and number of passes of
the printheads. For more details, see Combinations of Media Type and Print Quality Selection
• Included with this printer is the Hewlett-Packard Printing Materials catalog which gives ordering details for
Hewlett-Packard paper supplies. To get the latest version of this document, contact your local Hewlett-Packard Sales and Support office.
, the same images might cause the paper to wrinkle and then come into contact with the
.
.
Page 17

Paper Types
The following topics address the various types of media available, their particular use and how to obtain
information about them.
• Physical Characteristics of Paper Types
Details the physical characteristics of each of the supported paper types.
• Combinations of Media Type and Print Quality Selection
Gives guidelines for selecting the correct Print Quality selection for the type of paper or other type of media
you are using.
• Handling Your Paper or Type of Media
Explains the precautions to take when handling paper or other type of media.
• Obtaining Roll or Sheet Paper Information
Page 18
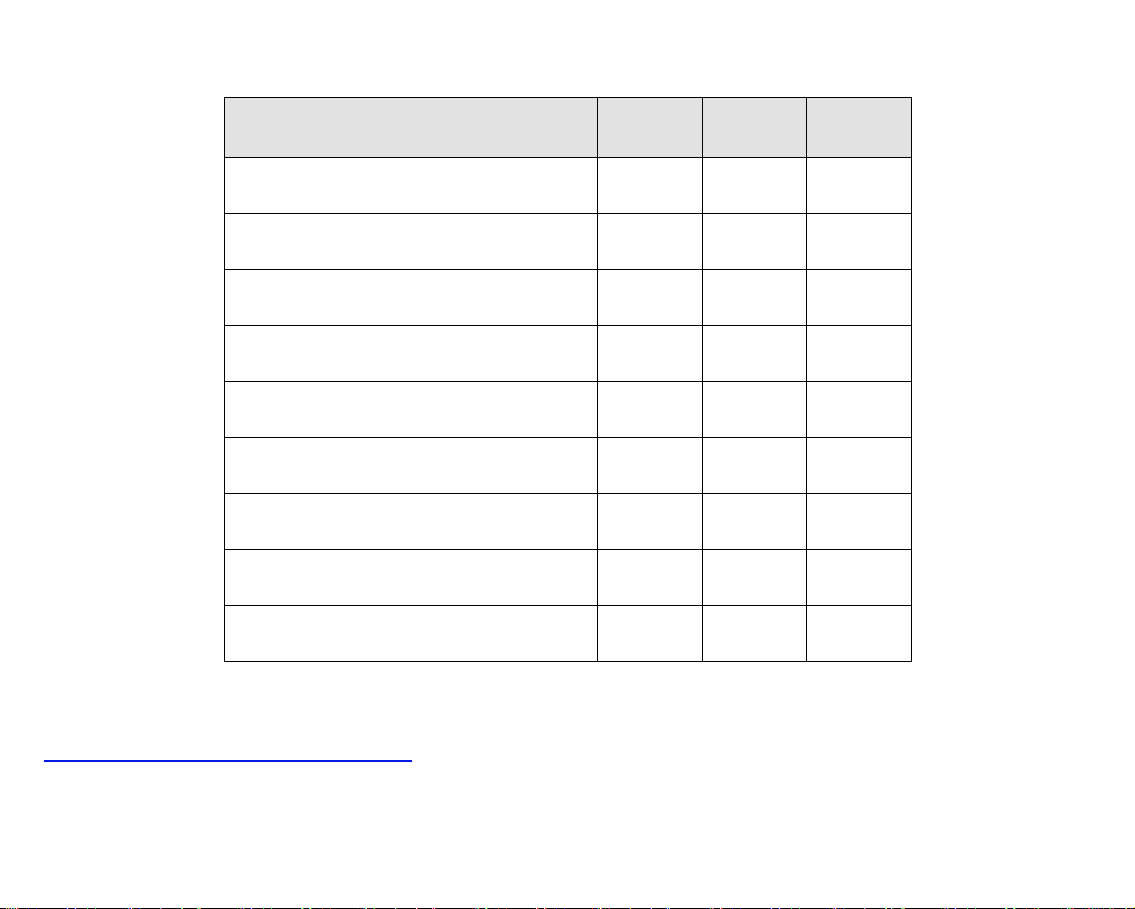
Physical Characteristics of Paper Types
The following table lists the physical characteristics and selection numbers of supported HP Premium Printing
Material. Always print on the image side with the special coating. Image side faces outward on roll products from
Hewlett-Packard.
Physical Characteristics of Paper and Other Media
HP Premium Printing Material
HP Bright White Inkjet Paper (Bond)
24 lb. (90g/m2) - 150 ft. (45m)
24 inch
610 mm
C1860A
C6035A
a
b
36 inch
914 mm
C1861A
C6036A
42 inch
1067 mm
a
b
HP Vellum C3862A C3861A
3 mil (75g/m2) - 150 ft. (45m)
HP Natural Tracing Paper C3869A C3868A
3 mil (90g/m2) - 150 ft. (45m)
HP Coated Paper C6019B C6020B
26 lb. (98g/m2) - 150 ft. (45m)
C6559B
C6567B
HP Heavyweight Coated Paper C6029C C6030C C6569C
35 lb. (130g/m2) - 100 ft. (30m)
HP Matte film 51642A 51642B
5 mil (198g/m2) - 120 ft. (36m)
HP High-Gloss Photo Paper C6813A C6814A
8 mil (207g/m2) - 100 ft. (30m)
Click on the Next Page Icon to see more Paper and Other Media Types
a
b
Page 19
Physical Characteristics of Paper and Other Media (Continued)
HP Premium Printing Material
HP High-Gloss Photo Paper C3882A C3881A
6 mil (158g/m2) - 100 ft. (30m)
HP Semi-Gloss Photo Paper C3884A C3883A
6 mil (158g/m2) - 100 ft. (30m)
HP Paper-Based Semi-Gloss C6782A C6783A
6 mil (158g/m2) - 100 ft. (30m)
HP Clear film C3876A C3875A
4 mil (174g/m2) - 75 ft. (22m)
HP Translucent bond C3860A C3859A
3 mil (67g/m2) - 75 ft. (45m)
HP Studio Canvas C6771A
20 mil (368g/m2) - 35 ft. (10m)
HP Satin Poster Paper C7011A
5.5 mil (162g/m2) - 100 ft. (30m)
HP Banners with Tyvek® C6786A C6787A
10 mil (140g/m2) - 50 ft. (15m)
HP Colorfast Adhesive Vinyl C6775A
10 mil (140g/m2) - 50 ft. (15m)
a. Available in United States, Canada and Latin America
b. Available in Europe, Asia and Japan
24 inch
610 mm
36 inch
914 mm
42 inch
1067 mm
Additional Information About Paper Types
Page 20

Additional Information About Paper Types
The following HP Premium Printing Material can be used to perform the printhead alignment, see Printhead
Alignment.
• HP Bright White Inkjet Paper (Bond)
• HP Coated Paper
• HP Heavyweight Coated Paper
• HP High-Gloss Photo Paper
• HP Satin Poster Paper
You can also use Plain Paper in addition to the above.
To order any of the HP Premium Printing Material, see the pamphlet Hewlett-Packard Printing Materials.
From time to time, new paper types may become available. For up-to-date information, please contact your
Hewlett-Packard dealer, local Hewlett-Packard Sales and Support Office or the Designjet Online
Web site.
Page 21

Combinations of Media Type and Print Quality Selection
Use the following tables, given by application, to guide you when choosing your paper and selecting the print
quality setting (Fast, Normal, Best).
• CAD Drawings—Mono
• CAD Drawings and GIS—Color (Lines and low density)
• CAD Rendering, GIS and Images—Color and CAD (high ink density).
As a general guide:
• Fast is best for draft copies of your prints at maximum throughput
• Normal is optimized so that you get the best line quality with the fastest throughput
• Best is for when you want to get the best quality for images and renderings.
Page 22
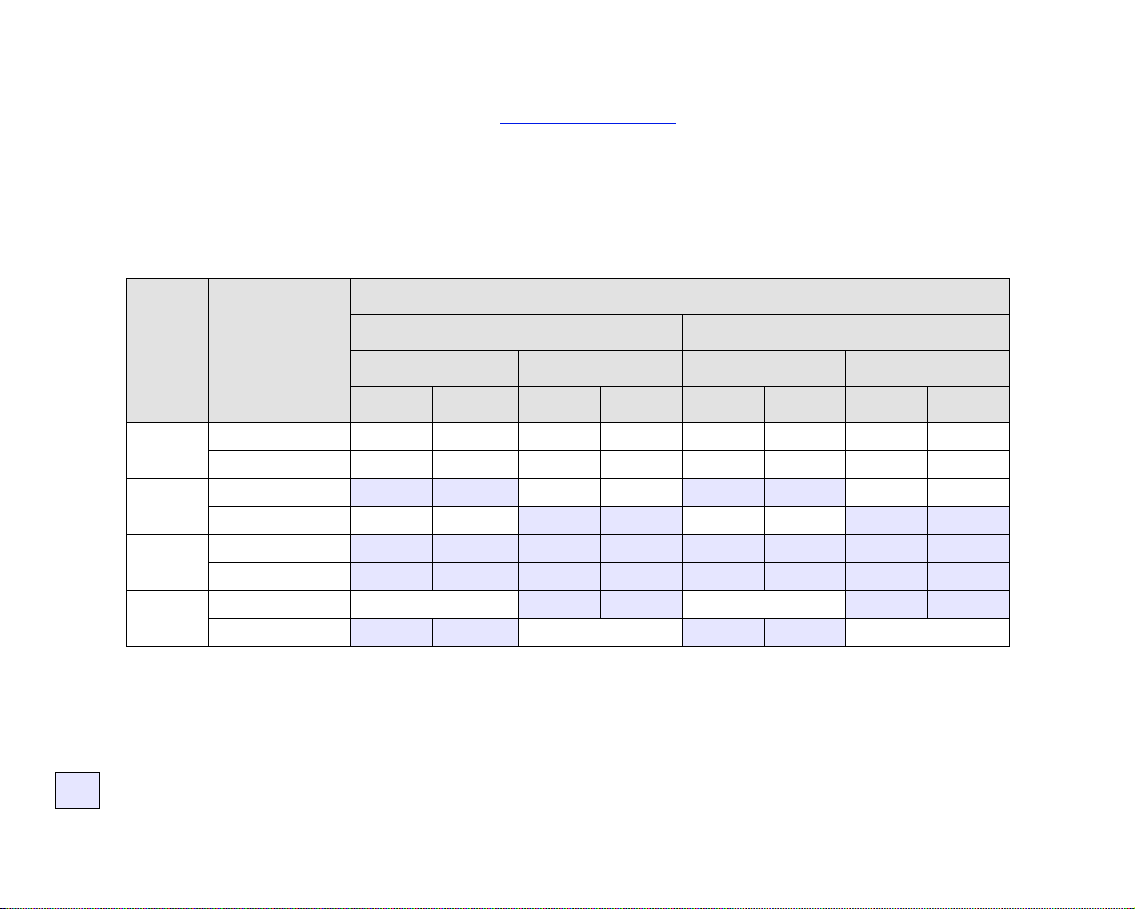
CAD Drawings—Mono
The following table lists the recommended print quality settings for specific usage with typical media.
Supported Paper Types—Mono
Usage Typical Media Selection Recommended Print Quality Setting
Drafts Plain Paper
Bright Inkjet Paper
Natural Tracing Paper
Translucent Bond
Final Versions Plain Paper
Bright Inkjet Paper
Natural Tracing Paper
Translucent Bond
Coated paper
Heavy Coated Paper
Matte Film
Clear film
Archives Vellum
Matte Film
Clear Film
Diazo Translucent Bond
Natural Tracing Paper
Vellum
Matte Film
Fast or normal
Normal or Best
Best
Normal or Best
Page 23
CAD Drawings and GIS—Color (Lines and low density)
The following table lists the recommended print quality settings for specific usage with typical media.
Supported Paper Types—Color
Usage Typical Media Selection Recommended Print Quality Setting
Drafts Plain Paper
Bright Inkjet Paper
Natural Tracing Paper
Translucent Bond
Final Versions Plain Paper
Bright Inkjet Paper
Coated paper
Heavy Coated Paper
Matte Film
Clear film
Archives Matte Film
Clear Film
Transparencies Clear Film Normal or Best
Fast or Normal
Normal or Best
Best
Page 24

CAD Rendering, GIS and Images—Color and CAD (high ink density)
The following table lists the recommended print quality settings for specific usage with typical media.
Supported Paper Types—Color and CAD
Usage Typical Media Selection Recommended Print Quality Setting
Matte Paper Heavy Coated Paper Normal or Best
Glossy High Gloss Photo Paper Normal or Best
Transparencies Clear Film Best
Page 25

Handling Your Paper or Type of Media
Take the following precautions when handling paper or other type of media:
• Handle film and glossy paper by the edges or wear cotton gloves. Skin oils can interact with the ink and cause
it to smear.
• Although the ink systems supplied with this printer have good light fastness, colors will eventually fade or
change if exposed to sunlight over a long period of time.
• Rewrap partially used rolls if they are not being used and do not stack rolls.
• Always keep unused rolls in their plastic wrappings to prevent discoloration.
Page 26
Obtaining Roll or Sheet Paper Information
If roll media or sheet media is loaded, the type of media is displayed when you select the Paper menu on the front
panel.
Bright White Inkjet Paper
Plain Paper
Vellum
Natural Tracing Paper
Translucent Bond
Clear Film
Matte Film
Coated Paper
Heavy Coated Paper
High-Gloss Photo
Canvas
Poster Paper
If there is no paper loaded the front panel display shows the following message and you will need to load roll or
sheet media.
Roll or Sheet
Page 27
Print Times for a Selected Print Quality
The following table lists some typical printing times for D/A1 size paper.
Typical Printing Times
Print Quality Time (in seconds)
Mono Lines
on Bond
Fast 96 96 234 480
Normal 216 216 550 690
Best 360 285 940 990
Color Lines
on Coated
Paper
Images
on Coated
Paper
Images
on Glossy
Paper
More Printing Times
Page 28

Printable Area
The following topics detail the printable areas for each of the different paper size systems:
• ANSI Paper
The American National Standards Institute imperial paper sizing system.
• Architectural Paper
The Architectural paper sizing system.
• ISO Paper
The International Standards Organization metric paper sizing system, which is the size system commonly
used in Europe.
Page 29
ANSI Paper
The following table lists the printable area for the ANSI paper size system. The left and right margins are
0.2 inches (5 mm) and the leading and trailing edge margins are 0.7 inches (17 mm).
Where
:
Printable area Paper Size Margins–=
Printable Areas for ANSI paper
Printable area (width × height) by Image Orientation
Paper
size
A Portrait 9.7 8.1 8.1 9.7 245 206 206 245
B Portrait 15.7 10.6 10.6 15.7 398 269 269 398
C Portrait 20.7 16.6 16.6 20.7 525 422 422 525
D Portrait
E Portrait N/A
Orientation of
paper in
printer
Landscape 7.2 10.6 10.6 7.2 182 269 269 182
Landscape 9.7 16.6 16.6 9.7 245 422 422 245
Landscape 15.7 21.6 21.6 15.7 398 549 549 398
Landscape 20.7 33.6
Landscape
Landscape Portrait Landscape Portrait
Width Height Width Height Width Height Width Height
32.7 21.6 21.6 32.7 830 549 549 830
32.7 43.6 N/A 830 1108 N/A
Inches Millimeters
33.6 20.7 525 854 854 525
33.6 42.7 N/A 854 1084
Indicates this printable area is only available if you are using the A0+/E+ size format
HP Designjet 500 Plus printer
Page 30
Architectural Paper
The following table lists the printable area for the Architectural paper size system.
The left and right margins are 0.2 inches (5 mm) and the leading and trailing edge margins are 0.7 inches
(17 mm).
Where:
.
Printable area Paper Size Margins–=
Printable Areas for Architectural paper
Printable area (width × height) by Image Orientation
Paper
size
C Portrait 22.7 17.6 17.6 22.7 576 447 447 576
D Portrait
E1 Portrait
E Portrait N/A
Orientation of
paper in
printer
Landscape 16.7 23.6 23.6 16.7 423 600 600 423
Landscape 22.7 35.6
Landscape
Landscape
Landscape Portrait Landscape Portrait
Width Height Width Height Width Height Width Height
34.7 23.6 23.6 34.7 880 600 600 880
40.7 29.6 29.6 40.7 1033 752 752 1033
28.7 41.6 41.6 28.7 728 1057 1057 728
34.7 47.6 N/A 880 1209 N/A
Inches Millimeters
35.6 22.7 576 904 904 576
35.6 46.7 N/A 904 1185
Indicates this printable area is only available if you are using the A0+/E+ size format
HP Designjet 500 Plus printer
Page 31

ISO Paper
The following table lists the printable area for the ISO paper size system.
The left and right margins are 0.2 inches (5 mm) and the leading and trailing edge margins are 0.7 inches
(17 mm).
Where:
Printable area Paper Size Margins–=
Printable Areas for ISO paper
Printable area (width × height) by Image Orientation
Paper
size
A4 Portrait 10.4 7.9 7.9 10.4 263 200 200 263
A3 Portrait 15.2 11.3 11.3 15.2 386 287 287 386
A2 Portrait 22.0 16.1 16.1 22.0 560 410 410 560
A1 Portrait
A0 Portrait N/A
Orientation of
paper in
printer
Landscape 6.9 11.3 11.3 6.9 176 287 287 176
Landscape 10.4 16.1 16.1 10.4 263 410 410 263
Landscape 15.2 23.0 23.0 15.2 386 584 584 386
Landscape 22.0 32.7
Landscape Portrait Landscape Portrait
Width Height Width Height Width Height Width Height
31.7 23.0 23.0 31.7 806 584 584 806
Inches Millimeters
32.7 22.0 560 830 830 560
32.7 45.4 N/A 830 1154
Indicates this printable area is only available if you are using the A0+/E+ size format
HP Designjet 500 Plus printer
Page 32

Roll Media
The following procedures are described in detail, with animations where appropriate:
• Installing a New Roll on the Printer
• Loading Roll Media
• Unloading Roll Media
• Removing Roll Media from the Spindle
• Cutter Replacement
Page 33

Installing a New Roll on the Printer
The animation sequence shows how to install a new roll
of paper on the printer.
CAUTION: Make sure the printer wheels are locked
(the brake lever on each wheel is
pressed Down) to prevent the printer
from moving.
If you are a regular user of different types of roll paper,
you can change the paper quicker if you have more
than one spindle. This allows you to do the following:
1. Pre-load the different types of paper onto the spindles.
2. Remove and replace the spindle with the new type
of paper.
NOTE: Additional spindles are available from
Hewlett Packard as accessories.
Click on this icon to run the animation sequence. A printable version
that you can take the key illustrations to the printer, if it is remote from your computer.
of the sequence is also available so
Page 34

Loading Roll Media
The animation sequence shows how to lo ad a new r oll
of paper on the printer.
NOTE: You must have installed
paper on the printer before you can load
it.
The front-panel menu items are:
Select (using the keys)
1. Paper Enter
2. Load Roll Enter
3. Select Roll Type Enter
Click on the icon to run the animation
sequence. A printable version
available so that you can take the key illustrations to the printer, if it is remote from your computer.
of the sequence is also
a new roll of
Then Press:
Page 35

Unloading Roll Media
The animation sequence shows how to unload a roll of
paper from the printer.
Click on the icon to run the animation
sequence. A printable version
available so that you can take the key illustrations to the
printer, if it is remote from your computer.
of the sequence is also
Page 36

Removing Roll Media from the Printer
The animation sequence shows how to remove a roll of
paper from the printer.
NOTE: You must have unloaded
paper from the printer before you can
remove it.
Click on the icon to run the animation
sequence. A printable version
available so that you can take the key illustrations to the
printer, if it's remote from your computer.
of the sequence is also
the roll of
Page 37

Removing Roll Media from the Spindle
The animation sequence shows how to remove a roll of
paper from the roll spindle
.
NOTE: Y ou must have removed
from the printer before you can remove it
from the spindle.
Click on the icon to run the animation
sequence. A printable version
available so that you can take the key illustrations to the
printer, if it is remote from your computer.
of the sequence is also
the roll of paper
Page 38

Cutter Replacement
The animation sequence shows the complete
procedure for the replacement of the paper cutter in
your printer.
Prerequisites
Before attempting to replace the cutter you must
contact your local HP Customer Care
• Order the replacement cutter.
• Receive instructions on how to access the Front
Panel Service Menu.
Important Information
• The cutter unit is attached to the printer by a black
cutter holder that runs along the metal guide rail,
and is hooked onto the edge of the platen
front of the printer.
• The cutting wheel is inside the cutter unit.
• Do not remove the cutter holder.
• When inserting the new cutter, with the cutter holder raised to about 45 degrees, partially insert the cutter so it
rests in the cutter holder, but do NOT clip it in at this stage.
CAUTION: Be very careful when replacing the cutter because you can easily break the cutter holder if you
apply too much force.
center to:
at the
Click on the icon to run the animation sequence. A printable version
that you can take the key illustrations to the printer, if it is remote from your computer.
of the sequence is also available so
Page 39

Sheet Media
• Which Side Up?
Instructs you how to identify which side of the sheet media should be printed on.
• Which Edge First?
Explains which edge of the sheet should be loaded first (short edge or long edge).
• Loading Sheet Media
Details the sheet media loading procedure.
• Unloading Sheet Media
Details the sheet media unloading procedure.
Page 40

Which Side Up?
The printer prints on the side of the paper that faces up. It may be important to load the sheet with the correct side
facing up. See the table below.
Print Side for Media Types
Media Type Matte or Glossy
HP Bright White Inkjet Paper (Bond) Both sides are the same. If sheet
HP Vellum
Natural Tracing Paper
Coated Paper Load with the coated side up.
Heavy Coated Paper
Matte Film Load with the matte side up.
High-Gloss Photo Load with the glossy side up.
Clear Film
Translucent Bond Both sides are the same. If sheet
Canvas
Poster Paper
Plain Paper Both sides are the same. If sheet
is curled, load with curl down.
is curled, load with curl down.
is curled, load with curl down.
Page 41

Which Edge First?
You can load sheet paper in either portrait or landscape orientation. Unless you are using the Rotate option,
always load the sheet in the same orientation as you have specified in your software.
Landscape (long edge first)
Portrait (short edge first)
Page 42

Loading Sheet Media
The animation sequence shows how to load a new
sheet of paper on the printer.
Important
• If you have a roll of paper loaded on the printer you
must first unload
• Make sure the correct side of the sheet is facing up
when you load it.
The front panel menu selections are:
it from the printer.
Select (using the keys)
1. Paper Enter
2. Load sheet Enter
3. Select Sheet T ype Enter
Click on the icon to run the animation sequence. A printable version
that you can take the key illustrations to the printer, if it's remote from your computer.
Then Press:
of the sequence is also available so
Page 43

Unloading Sheet Media
The animation sequence shows how to unload a sheet
of paper from the printer.
Important
• To give the ink time to dry the printer holds the
paper for some time.
Click on the icon to run the animation
sequence. A printable version
available so that you can take the key illustrations to the
printer, if it is remote from your computer.
of the sequence is also
Page 44

Ink System
These topics cover the various elements of the Ink System.
• What are HP Ink Supplies?
Details the elements of the HP Ink Supplies supplies.
• Component identification
Shows you where to find the various elements of the Ink System.
• Ink Supply Guidelines
Explains how to obtain the best results from your Ink System.
• Precautions
Details the specific precautions you must take to avoid damaging the components of your Ink System.
• Color Calibration
Explains how to calibrate the ink system for the type of media loaded
• Drying Time
Explains drying time function and details how to use it to ensure you obtain the highest quality print under all
conditions.
Page 45

What are HP Ink Supplies?
For each of the four ink colors used in the printer, there are two separate components, the printhead and the
ink cartridge
selection number to help you reorder the correct replacement. Your HP Designjet 500 Plus printer uses the
following HP Ink Supplies:
• Black Ink Cartridges are HP No 10 Supplies.
• Cyan, Magenta and Yellow Cartridges are HP No 82 Supplies.
• All Printheads are HP No 11 Supplies.
Ink Cartridges
The Hewlett-Packard ink cartridges for your printer require no maintenance or cleaning. As long as each ink
cartridge is inserted correctly into its slot, the ink will flow to the printheads. Because the printheads control the
amount of ink transferred to the page, you will continue to see high-quality printing results, even when the ink
levels are getting low.
The front panel notifies you when an ink cartridge’s ink level is low. You can also check the ink levels of all the ink
cartridges to determine if an ink cartridge needs to be replaced, see Ink Cartridge Information
. These components are called the HP Ink Supplies and are coded with a Hewlett-Packard No.
.
If the ink cartridge is empty, the printer stops printing. See Ink Cartridge Replacement
.
Printheads
The Hewlett-Packard printheads are extremely durable and do not need to be replaced every time an ink cartridge
is replaced. They are independent of the ink cartridges and will continue giving excellent image quality results
even if the ink cartridges are low in ink.
If you notice a decline in print quality such as lines or dots missing from text or graphics, see Stepped Lines
.
Page 46

Component identification
The following illustration will help you identify the components of the HP Ink Supplies.
Printheads
Ink Cartridges
The Hewlett-Packard selection number on the ink cartridges and printheads makes it easy for you to find the
correct HP Ink Supplies for your printer. Determine the color of the printhead or ink cartridge you need, then make
sure you purchase or order the correct Hewlett-Packard printhead or ink cartridge. Each ink cartridge and
printhead can be purchased separately from your usual Hewlett-Packard retailer. See Ordering Accessories
.
Page 47

Ink Supply Guidelines
For optimum results from your printer and the ink system, always follow these guidelines when handling HP Ink
Supplies:
• Always install the ink cartridges and printheads before the expiry date, which is on the packaging.
• Install ink cartridges and printheads in their color-coded slots.
• Follow the instructions on the front panel during installation.
• Avoid unnecessary removal of the ink cartridges and printheads.
• When turning off your printer, always use the power-off button on the front panel. The printheads are then
parked correctly which prevents them from drying out.
• The ink cartridges should never be removed while the printer is printing. They should only be removed when
the printer is ready for you to replace them. The front panel will guide you through the removal and installation
procedure. See When to Replace
CAUTION: When you first received your printer it was supplied with a set of four setup printheads installed
in the printhead carriage. These setup printheads are used for the priming of the tubes in the
modular ink delivery system. Do not remove the setup printheads from the carriage without
following the procedures in the Assembly and Set-up Poster.
HP Ink Supplies.
Page 48

Precautions
Handle HP Ink Supplies with care. In particular, the printhead, which is a high-precision device, must be handled
carefully.
CAUTION: Do not touch, wipe or attempt to clean the printhead nozzles. This can damage the printhead.
• Do not put the printhead down on the nozzles.
• Do not be rough when handling the printheads.
Always set them down gently.
• Do not drop the printheads. Proper handling will
assure optimum performance throughout the printhead life.
• Do not touch the end of the ink cartridge which is
inserted into the printer as there may be a small
amount of ink on the connection.
• Avoid storing partly used ink cartridges on their
ends.
Page 49

Color Calibration
You can calibrate the ink system for the specific media loaded in your printer. Doing this ensures the printed
output matches the colors of the original image as closely as possible. The printer stores the calibration data for
each type of media you have calibrated it for since it was powered up. Once the printer has been powered down,
the next time you use it only the last calibration made will be available and it will print using this calibration data.
To color calibrate your printer, first make sure you have the correct type of media loaded and then make the
following front-panel selections:
Select (using the keys)
1. Ink Enter
2. Color calibration Enter
3. Calibrate Paper Enter
Then Press:
The printer prints a calibration pattern and scans it to create the calibration data for the type of media loaded.
If you want to check the color calibration status of your printer, make the following front-panel selections:
Select (using the keys)
1. Ink Enter
2. Color calibration Enter
3. Status Enter
Then Press:
The front panel display shows what types of media the ink system is currently calibrated for.
To remove all the calibrations and reset the printer to its factory values choose
Color calibration > Reset from the Ink menu.
Page 50

Drying Time
The following topics detail the drying time function and how to use it to ensure you obtain the highest quality print
under all conditions.
• Drying Time Settings
Describes how to set the required drying times from the front panel.
• Typical Drying Times
Lists typical drying times for Hewlett-Packard tested paper at approximately 25°C with 50% relative humidity.
• Drying Procedure
Details how the drying procedure operates.
Page 51

Drying Time Settings
With some paper types and environmental conditions the ink needs time to dry before the paper is unloaded. The
printer has three settings which you can choose through the front panel. See Navigation Example
Manual
The printer holds in place paper which has a specific drying time, and displays a “drying time to go” countdown on
the front panel. You can change this time from one minute to 99 minutes in one minute increments.
Automatic
The printer automatically determines the appropriate drying time, based on the type of paper you have selected
and the current temperature. If there is any drying time the printer displays a “drying time to go” countdown on the
front panel.
None
With this setting, when the printer has finished printing an image, the paper will fall into the paper bin under the
printer.
CAUTION: Changing the drying time to speed up the printer could result in damage to your printed image
or reduce the quality of your print.
for more help.
Page 52

Typical Drying Times
The following table shows the typical drying times for Hewlett-Packard tested paper at approximately 25°C with
50% relative humidity.
Drying Times by Paper Types
Hewlett Packard Tested Paper
Type
HP Bright White Inkjet Paper (Bond) 0 25
HP Vellum
HP Natural Tracing Paper
HP Coated Paper 0 60
HP Heavyweight Coated Paper 0 60
HP Matte film 60
HP High-Gloss Photo Paper 120
HP Semi-Gloss Photo Paper
HP Paper-Based Semi-Gloss
HP Clear film 60
HP Translucent bond 60 120 180
HP Studio Canvas 6000
HP Satin Poster Paper 60
HP Banners with Tyvek®
HP Colorfast Adhesive Vinyl
Fast Normal Best
Drying Time (seconds)
60 120 180
180
Page 53

Drying Procedure
The drying procedure operates as follows:
1. The printed image emerges from beneath the printer window and a vacuum holds it on the platen
of the
printer.
2. The front panel displays:
The countdown
timer indicates
how much
drying time
remains
3. You can press the Cancel or the Form Feed & Cut key to cancel the drying time and release the paper.
4. After the drying time has elapsed:
For roll media the printer cuts the media and turns off the vacuum so the printed image can drop into the
printer bin.
For sheet media the vacuum is turned off and the printed image drops into the printer bin.
Page 54

Ink Cartridges
• Ink Cartridge Errors
Details the error messages that could be displayed on the front panel for the Ink Cartridges.
• Ink Cartridge Levels
Details the information about levels that can be displayed on the front panel for the Ink Cartridges.
• Ink Cartridge Information
Shows you how to display the current status of the Ink Cartridges on the front-panel display.
• Ink Cartridge Replacement
Details the Ink Cartridge replacement procedure.
Page 55

Ink Cartridge Errors
The Front Panel can display the following error messages for the ink cartridges:
Cartridge
Missing
Faulty
Cartridge
NOTE: If a cartridge has actually passed its expiry date, it will be shown as a faulty cartridge and will
have to be replaced.
Cartridge
Nearly
Reached
End of Life
Cartridge
Empty
The printer will also display the Ink Cartridge Levels
.
Page 56

Ink Cartridge Levels
The Front Panel will tell you when your ink supply is low, very low or empty. This means you know current status
of your HP Ink Supplies all the time:
Cartridge
Full
Cartridge
Empty
NOTE: Depending on type of print jobs, a cartridge with a Low Ink Warning may in fact last quite a long
time (for example, with line drawings).
NOTE: The Ink Cartridges levels information can also be selected with
Ink menu > Information > Ink Cartridges > Ink Levels if it is not automatically shown in the Ink
menu.
Low Ink
Warning
Page 57

Ink Cartridge Information
Use the following procedure to display the Ink Cartridge Information screen on the front panel.
The front-panel menu items are:
Select (using the keys)
1. Ink Enter
2. Information Enter
3. Ink Cartridges Enter
4. Cyan, Magenta, Yellow or Black
Ink cartridge
Then Press:
Enter
The front panel displays the following information for the selected ink cartridge:
• Color: Cyan, Magenta, Yellow or Black.
• Model: Hewlett-Packard No 82 (Cyan, Magenta and Yellow) or Hewlett-Packard No 10 (Black).
• Status: inserted, low on ink, out of ink, missing, expired and faulty.
• Expiration date.
• Serial Number.
• Ink Level: in cc and % used.
Page 58

Ink Cartridge Replacement
The animation sequence opposite shows how to
replace an Ink Cartridge.
WARNING: Make sure the printer wheels are locked
(the brake lever is pressed down) to
prevent the printer from moving.
CAUTION: Only remove an ink cartridge if you are
replacing it.
CAUTION: Do not replace cartridges while the
printer is printing because doing this will
cancel the current print job.
Y ou would need to change cartridges either if prompted
to do so on the Front Panel because the printer has
detected a cartridge is out of ink or the cartridge is low
and you want to replace it before it runs out.
Click on the icon to run the animation
sequence.
A printable version
remote from your computer.
of the sequence is also available so that you can take the key illustrations to the printer, if it is
Page 59

Printheads
• Printhead Errors
Details the different error messages that could be displayed on the front panel for the Printheads.
• Printhead Information
Shows you how to display the current status of the Printheads on the front panel display.
• Printhead Replacement
Details the Printhead Replacement procedure.
• Printhead Alignment
Details the Printhead Alignment procedure.
Page 60

Printhead Errors
The Front Panel can display the following error messages for the printheads:
Printhead
Missing
Faulty
Printhead
NOTE: An unknown error is displayed when one of the printheads is causing a problem but the system
cannot detect which one it is. Refer to Unknown Printhead Error
Printhead
Worn Out
Unknown
Error
to solve this problem.
Page 61

Printhead Information
Use the following procedure to display the Printheads Information screen on the front panel.
The front panel menu selections are:
Select (using the keys)
1. Ink Enter
2. Information Enter
3. Printhead Enter
4. Cyan, Magenta, Yellow or Black
printhead
Then Press:
Enter
The front panel displays the following information for the selected printhead:
• Color: Cyan, Magenta, Yellow or Black
• Model: Hewlett-Packard No 11 and Warranty (In warranty or Out of warranty)
• Status: inserted, missing, faulty worn-out and unknown.
If there is a problem the system displays an action: missing -> insert, unknown -> troubleshoot,
faulty, worn out -> replace.
• Expiration date.
• Serial Number.
• Ink Used: in cc and % used.
• Paper Jams.
• If the printheads are aligned and color calibrated.
Page 62

Printhead Replacement
The animation sequence shows how to replace a
printhead in the printer.
The front-panel menu selections are:
Select (using the keys)
1. Ink Enter
2. Replace Printheads Enter
Click on the icon to run the animation
sequence. A printable version
available.
Once you have replaced the printhead, if you have
media loaded, the printer prompts you to start the
Printhead Alignment
the printer prompts you to load paper and then automatically starts the alignment. The alignment takes several
minutes to complete and then printer will then prompts you to run the Color Calibration
procedure. If no media is loaded
of the sequence is also
Then Press:
procedure.
Page 63

Printhead Alignment
You should have one of the following types of paper loaded before attempting to align the printheads: HP Bright
White Inkjet Paper (Bond), HP Coated Paper, HP Heavyweight Coated Paper, HP High-Gloss Photo Paper, HP
Satin Poster Paper or Plain Paper. If you try to do this with any other type of paper loaded, the printer will prompt
you to load a different type of paper before letting you align the printheads.
From time to time you may be required to align the printheads to ensure maximum print quality. To select
Printhead Alignment manually, make sure you have the correct type of roll or sheet media loaded.
There are two types of alignment: Standard which will take about 4½ minutes; and Special which takes about
11 minutes. Standard alignment is recommended for normal use and requires paper of at least A4/Letter-size,
loaded in landscape mode. Special alignment should be used to correct pen to paper spacing variations which
would be show by variations in vertical line quality, particularly in wide plots and fast print modes. Special
alignment requires paper of at least A3/B-size, loaded in landscape mode. Two separate prints are made.
Then use the following front panel menu selections to start the alignment:
Select (using the keys)
1. Ink Enter
2. Align Printheads Enter
3. Standard (4.5 minutes)
Special (11 minutes)
Once you have made this selection the printer starts the alignment process which then takes several minutes.
The printer will also automatically use the standard alignment process to align its printheads after
Printhead Replacement
prompts you to ask if you want to run the Color Calibration
. When the alignment procedure completes after a printhead replacement, the printer
procedure.
Then Press:
Enter
Page 64

Solutions
These topics guide you through the different procedures required to troubleshoot and find the solutions to various
problems you could encounter while using your printer.
The Solutions Tab contains these topics:
• Solving Problems
where you can get further information.
• Image Quality Problems
you through the troubleshooting procedure step-by-step.
• Ink Supply Problems
cartridges and printheads.
• Media Problems
also what to do if you have a media jam.
• Image Error
you expected.
• Other Problems
• Getting Help
of the steps to take to contact the Hewlett-Packard Customer Care Center.
helps you to quickly troubleshoot your specific problem; it also contains instructions on
helps you to solve any image quality problems you may be experiencing. It takes
guides you when you have problems installing the consumable ink items: the ink
contains information on what to do if you have image smears or marks on your media, and
contains information on what to do if the image that your printer printed is incorrect, or not what
covers miscellaneous problems you could face.
explains what to do if you cannot solve the problem you are having. It also provides full details
Page 65

Solving Problems
• To find the meaning of front-panel messages, see Message Descriptions.
• If you know the problem is related to a certain task, first check the relevant section in this manual, for step-bystep procedures. Use this manual’s index or table of contents to find the section. For example, if you are having difficulty with page formatting, refer to Page Format
• If the problem is directly related to the quality of your printed images, refer first to Image Quality Problems
• Refer to the appropriate topic:
– Ink Supply Problems
– Media Problems
– Communication Problems
– Image Error
– Other Problems
• If the problem could be related to your software driver, and you are using an HP driver, refer to the driver’s
troubleshooting documentation and the on-line help in your application software.
• If the problem has no obvious cause, refer to Finding the Source of Your Problem
• If you still cannot solve the problem, see Getting Help
.
.
.
.
Page 66

Finding the Source of Your Problem
1. Look at the front-panel display for messages. See Message Descriptions for a full explanation of front-panel
messages.
2. Test the printer.
– Switch the printer off on the front of the printer. Make sure that the power cord is firmly inserted in the
printer and plugged in to an outlet that you know works.
– Switch the printer on and make sure the front-panel display shows the HP welcome screen followed by
Main Menu after a short initialization period.
3. Test your computer hardware and interface.
– Make sure that you have the correct interface cable between the computer and the printer and that it is
firmly connected to the correct ports (see the Assembly and Set-up Poster).
Page 67

Image Quality Problems
Your HP Designjet 500 Plus printer provides a full troubleshooting utility to ensure you can always quickly
overcome any image problems you encounter. You should use this utility whenever you (and not the printer)
perceive a problem with print quality.
Often what you believe to be a print quality problem is in fact caused by incorrect configuration of the printer for
the type of image you are trying to print. Always check Configuration Correction
the cause of your problem.
If a message, such as “PRINTHEADS not functional” appears on the front-panel of your printer, follow the
instructions given for the particular message (see Message Descriptions
The types of problems you could possibly encounter are:
• Stepped Lines
• Incomplete Lines
• Color Accuracy
• Horizontal Banding
• Color Alignment
Whenever you see any of these problems work through the Troubleshooting Procedure replying to the questions
displayed on the front panel. This will lead you to correct remedial action required to solve your image quality
problem.
as your first diagnostic task to find
).
Page 68

Configuration Correction
Before attempting the image quality diagnostic procedures contained in this section, you should first check that
the printer is correctly configured to print what you want. Many problems concerned with image quality can be
solved by correcting the way the printer is configured.
1. To achieve the best performance from your printer, only use genuine HP accessories and supplies, whose
reliability and performance have been thoroughly tested to give trouble-free performance and best-quality
prints. For details of HP media, see Paper Types
2. Make sure that the Type of paper selected in the front panel is the same type of paper loaded into the printer.
To check this go to the Roll or Sheet menu in the front panel and press Enter.
3. To ensure the maximum print quality use HP certified media only. For details of HP media see Physical
Characteristics of Paper Types. You can also look at the Web page http://www.hp.com/go/designJet for the
most up-to-date information.
4. Make sure that the Print quality (Fast, Normal, Best) used for your printer is correct. This is set in the Print
Setup dialog box of the printer driver or in the front panel from the Set-up menu. The printer driver setting
overrides the front panel setting.
5. Select Best print mode for maximum print quality.
6. For Non-HP drivers, set front panel media settings to match the media type loaded in the printer. The
documentation that came with your software should provide information about media type/print quality
settings.
.
7. If your image quality problem is color accuracy related, go to Color Accuracy
for further configuration help.
Page 69

Troubleshooting Procedure
Working through the Troubleshooting procedure should always be your first action when you encounter image
quality problems. Refer to the Troubleshooting Flow Chart
complete troubleshooting procedure.
It is important that the paper loaded for this procedure is exactly that used when you encountered image quality
problems, type (for example, glossy paper) and size. If you use a different kind of paper or a different size, you
stand less likelihood of resolving the problem.
Running the Troubleshooting Utility
1. From the main front-panel menu, select the Ink menu ( ) and press Enter.
2. Select Troubleshooting and press Enter.
3. The printer first checks to see whether the
printheads are aligned. Misalignment of the
printheads is a common cause of image quality
problems. If they are not aligned, you are prompted
to accept Printhead Alignment
requires a few centimeters of paper loaded and takes several minutes to perform.
NOTE: Note that you do not have to interpret the patterns printed by the Printhead Alignment routine.
4. If the printheads do not seem to require alignment, the printer prints Diagnostic Print A. See Diagnostic Print
A Interpretation for full details of how to use this diagnostic print.
. This procedure
for a description of the sequence of processes used to
Page 70

Diagnostic Print A Interpretation
Diagnostic Print A
Diagnostic Print A contains several blocks of color and a block of thin black
broken lines (the lines are actually very much closer than those represented
here).
1. Examine the broken lines in Diagnostic Print A carefully and indicate whether
there are problems with them. The sorts of problems to look for here are:
• Jaggedness or serrations in the thin lines, like this:
; the thin lines should be straight,
though not necessarily perfectly aligned. The irregularities that are significant
extend along the whole of the length of the lines. Shorter irregularities,
arranged in columns, can be ignored at this stage.
Ignore this
black bar
2. Examine the blocks of color in Diagnostic Print A carefully and indicate whether
there are problems with them. The sorts of problems to look for here are:
• White streaks or bands in the solid blocks.
3. If you indicate that there is a problem with the dashed lines in Diagnostic Print A,
you are prompted to use the Advance Calibration
routine; your printer will be at step 3 of the routine (if you don’t
want to continue with calibration, press the Cancel key).
4. If there are problems in the blocks of color in Diagnostic Print A, for example white streaks or bands, the printer will
try to clean the printheads that have the problem. A printhead can be cleaned up to three times this way; after that
it cannot be cleaned and you will be told; the Troubleshooting routine will finish. In that case we recommend that
you try to reprint your print, and then, if necessary, start the Troubleshooting routine again.
After cleaning the printheads, the printer reprints the blocks of color (but not the black lines) in Diagnostic Print A,
and asks you to examine it again (as in step 1).
5. If there are no problems the first time you print Diagnostic Print A, the printer prints Diagnostic Print B. See
Diagnostic Print B Interpretation
for full details of how to use this diagnostic print.
Page 71

Diagnostic Print B Interpretation
1. For each color in the pattern in Diagnostic Print B, you are asked about the
Diagnostic Print B
quality—look for missing lines. If you answer that a color is defective, the
printer tries to clean that printhead.
If the printhead cleaning process completes, Diagnostic Print B is printed
again and you are asked the same questions again.
2. Afterwards, if problems with images remain, use the Troubleshooting
procedure again.
Ignore these
solid bars
If none of the patterns or blocks in the two Diagnostic Prints shows any problem, it could be that your image
quality problem is caused by a wrong setting in your software, or perhaps the job should have been printed with
the Print quality set to Best instead of Normal or Draft.
If the Troubleshooting routine didn’t indicate that printhead alignment was necessary, you can select Align
printheads in the Ink menu to try to solve any further image quality problems.
Page 72

Troubleshooting Flow Chart
The following diagram shows the flow of the troubleshooting procedure.
Star t
Printer checks
whether Printhead
Alignment is required
No
Printer prints
Diagnostic Print A
including black lines
Ye s
Printer recommends
Printhead Alignment
(Standard or Special)
Printer prints
Diagnostic Print A
without black lines
Wrong paper advance.
Printer recommends
Advance Calibration
Indicates that
troubleshooting has
completed but further
procedures are required
to solve the problem
Indicates that
troubleshooting has
completed successfully
and there no problems
Troubleshooting
completed successfully
Printer asks questions
about Diagnostic
Printheads are OK
Yes
after first printing of
Diagnostic Print A
Printer prints
Diagnostic Print B
without black lines
Printer asks if Cyan,
Magenta, Yellow and
Diagnostic Print B are
No problems detected
Print A
No
Black Patterns in
OK
Yes
Diagnostic Print B
No
If possible printer tries
to clean printheads
Printer prints
Printheads need
cleaning. If possible
printer tries to clean
printheads
If printheads have
been cleaned three
time Troubleshooting
finishes
Page 73

Advance Calibration
It is important that the paper loaded for this calibration is exactly that used for normal printing, both in quality (for
example, glossy paper) and in width (for example, A0 or 36-inch). Either roll or sheet paper can be used.
The routine prints a pattern and then cuts the roll (the cutter must be set to On—see Controlling the Cutter
ejects the sheet; it requires paper that is at least 65 cm/25.5 inches long and at least 50 cm/19.7 inches wide. You
must then reload that piece of paper as a sheet, so that the printer can accurately measure the pattern, and make
whatever adjustments are appropriate to the amount it advances between printing swaths of data. (See Loading
Sheet Media)
The pattern printed is solely for the use of the printer; you are not expected to relate any of its characteristics to the
quality of your images.
1. From the main front-panel menu, with the correct paper loaded, select the Paper menu ( ) and press Enter.
2. Select Advance calibration and press Enter.
3. Select Create pattern and press Enter.
The printer prints its calibration pattern (as represented here) and
cuts or ejects the paper.
4. Load the sheet printed side up with the dotted line at the top (that is,
rotated 90º).
5. Now select Measure pattern and press Enter.
The printer reads the calibration pattern and makes the appropriate
Direction of paper while
printing (creating pattern)
internal adjustments.
) or
These Advance Calibration Values
are used whenever you print on the
same type of media until you have used the Advance calibration twice
more with different types of media.
Direction of paper when
loading (measuring pattern)
Page 74

Advance Calibration Values
The printer stores the advance calibration values of the last two
different types of media used for the calibration. When you print the
printer ties to match the media you have selected to the stored
values. If there is a match the printer applies the stored Advance
calibration values.
If the type of media you are using has not been used for either of the
last two Advance calibrations the printer uses a set default values for
your media.
The Restore factory option of the Advance calibration menu erases any stored advance calibration values from
the printer memory. This means that until you run the advance calibration again the printer will use the factory
default values for all types of media.
Page 75

Stepped Lines
When you look at the image you have printed there are ‘stepped lines’ in the borders of arrows and diagonal
lines. The lines should be straight with no stepping.
The following is an example of what you might see if you have problems with stepped lines.
To solve this problem:
1. Increase the dpi setting by changing the print quality to Best in the front panel and driver software.
2. The problems may be inherent in the image you are trying to print. Try to improve the image with the
application that generated the file.
Page 76

Incomplete Lines
TEST
When you look at the image you have printed there are:
• Missing or faint lines.
• Printed characters having missing parts to them.
The following is an example of what you might see if you have problems with incomplete lines.
Missing parts of text; this
should say TEST
See the Troubleshooting Procedure
for instructions on how to solve this problem.
Page 77

Color Alignment
When you look at the image you have printed:
The colored lines are printed
double and they are the wrong
colors
The borders of colored blocks
are overlapped and the
overlapping areas have
different colors in them.
See the Troubleshooting Procedure
Vertical lines are misaligned or
fuzzy (not smooth)
for instructions on how to solve this problem.
Page 78

Horizontal Banding
When you look at the image you have printed there are light or dark lines on the image, these are particularly
highlighted in high density ink areas. This problem is known as banding.
IMPORTANT Banding can occur to a certain degree in Fast and Normal mode when printing high
density prints. To obtain the best image always print in Best Mode.
The following is an example of what you might see if you have problems with banding.
80
Expanding Possibilities
80
Ironk
Pojfdjop ernk aure
Pojfdjop ernk Chorme
Pojfdjop ernk aure
See the Troubleshooting Procedure
80
Expanding Possibilities
80
Ink erov
Caps
Ink cartridge
kheuhg sfrfefg
kheuhg sfrfefg
80
for instructions on how to solve this problem.
Page 79

Color Accuracy
These are the areas you should review when troubleshooting a color accuracy problem:
Media
Ensure the media loaded is genuine HP media and the correct media type selected on the front panel and in the
driver.
Related Topics
• Color Consistency problems
• Long Term Color Bleeding (Glossy Papers)
• Color Accuracy Configuration
• Additional Color Accuracy Information
Page 80

Color Consistency problems
• Some media may discolor or change with age. Check that your media is fresh and has been stored correctly.
• If the environmental conditions you are printing in change rapidly, you may see changes in the color consis-
tency. By reducing the time the print stays in extreme environmental conditions after being printed (especially
very high humidity) you can reduce the color consistency problems.
• There may be color changes between images printed on your HP Designjet 500 Plus and other types HP
Designjet printers. This is quite normal because the other printers use different ink.
Long Term Color Bleeding (Glossy Papers)
High ambient humidity at your location could cause the colors to bleed into the paper making the lines fuzzy and
bleary.
• Change the paper that you are printing with or remove the printer from the high humidity conditions.
Page 81

Color Accuracy Configuration
The configurations of the printer defines how ink is applied to each type of media. Use the information in the
following table to configure your printer and software for best color accuracy.
Location of
Setting
Ink Menu Color Calibration > Calibrate
Setting Description Selection
Paper
Set to match the media type loaded in the printer.
See Paper Types
.
Page 82

Additional Color Accuracy Information
The means of accurately managing the colors printed by your printer vary with the software application and driver
being used. Refer to the following documentation:
• On-line documentation in the drivers shipped with your printer.
• If you cannot find any reason for the discrepancy, before getting help, find out for which CMYK printer inks the
colors have been specified.
Page 83

Ink Supply Problems
Most of the problems that you could encounter when working with HP Ink Supplies are solved with guidance from
the front panel. The only exception to this is the Unknown Printhead Error
supplied in Message Descriptions
.
Printhead Problems after Replacement
If, after replacing the printheads, the printer complains about wrong or missing printheads, perform the following
steps:
• Check that you have removed the protective tape from the printhead.
• Insert the printhead into the carriage assembly, but this time close the cover using the latch.
• Replace the printhead with a new one, see Printhead Replacement
Problems Inserting the Ink Cartridge
1. Make sure that you have the correct HP Ink Supplies ink cartridge.
2. Make sure that the cartridge is the correct color for that slot.
3. Make sure the cartridge is in the correct orientation, with the color coded label at the top.
CAUTION: Never clean inside the ink cartridge slots.
Problems Inserting the Printhead
1. Make sure that you have the correct HP Ink Supplies printhead.
2. Make sure that the printhead is the correct color for that slot.
. A full list of front messages are
.
3. Make sure that the printhead is the correct orientation.
See Printhead Replacement
for further details.
Page 84

Unknown Printhead Error
An unknown printhead error occurs when the one of the printheads is causing a
problem but the system cannot detect which one it is. Whenever this happens the
front panel displays this error message. The number of printheads with unknown
errors will either be all the color printheads or all the printheads.
Use the following procedure to isolate the faulty printhead.
1. Select Replace Printheads from the front panel.
2. Open the carriage cover and remove ALL the printheads.
3. Reinsert the Cyan printhead only and close the carriage cover and the window.
4. Check the front panel—if the status of the Cyan printhead is X or ?, the conclusion is that the Cyan printhead
is faulty and must be replaced. If the status of the Cyan printhead is OK, the conclusion is that the Cyan
printhead is working correctly. Repeat the process from step 1 for the other color printheads to identify which
one is failing.
Page 85

Media Problems
• Media
Details the general rules to follow to avoid media problems.
• Clearing a Media Jam
Describes how to clear a media jam.
• Ink Marks on the Media
Details the way to solve ink mark problems: warped lines, blurred lines, marks or scratches on glossy paper.
• Media Loading Problems
Explains what to do when the front panel keeps indicating that media is misaligned or incorrectly positioned.
• Media Output Problems
Explains what to do when the prints fall on the floor or do not stack correctly in the media bin.
Page 86

Media
Always make sure that you are using the appropriate media for your image and that it is consistent with your
software application. To ensure color accuracy and print-quality performance of the printer, use only media types
that have been certified for your printer.
Use of non-HP media or HP media not certified for your printer may significantly reduce the color and print quality
of your images. For details of HP media, see Paper Types
.
Page 87

Clearing a Media Jam
If the front panel displays this message:
There is probably paper jammed in the printer. Paper jams can have
various causes:
• The paper is too thick or too thin for the printer, or is otherwise not
supported.
• The paper is creased or misaligned or is bubbled.
• Too much ink is being placed on the paper causing it to cockle or bubble.
• The end of the roll of paper is glued to the core and won’t advance further.
• Pieces of paper or paper powder are clogging up the cutter guide or other moving parts.
See Removing Jammed Paper
for full instructions on how to clear jammed paper.
Page 88

Removing Jammed Paper
1. Open the window.
2. Switch the printer off at the front.
3. If necessary, carefully move the printhead carriage out of the way—if possible all the way to the enclosed area
on the left or the right. Which way you are able to move it depends on where the paper is jammed.
CAUTION: When moving the printhead carriage, touch only the black plastic parts.
4. If necessary, carefully move the paper cutter out of the way to the left,
or to the right depending on where the paper is jammed (though if
moved right it may block the paper path).
CAUTION: The cutter is easily moved by holding it as close as
possible to the guide running across the width of the
printer. Be careful not to touch the metal slider bar that
runs across the printer.
5. If necessary, lift the blue paper lever, to release any trapped paper.
Remember to lower it again when you have finished.
6. Carefully remove any of the jammed paper which you can easily lift up and out from the top of the printer.
7. Carefully pull the rest of the roll or sheet down and out of the printer. You may need to cut the edge of the roll
with scissors.
8. Check that the printing zone, including the cutter guide, the paper path, and the area where the printhead
carriage is parked, is clear and clean; remove any paper powder by brushing it away or with a vacuum
cleaner.
Slider bar
Guide
More …
Page 89

Removing Jammed Paper (continued)
CAUTION: The area where the printhead carriage is parked can get quite dirty; be careful not to get ink on
your hands.
9. Close the window and switch on the printer.
10. Wait for the printer to finish initializing.
11. Press the Form Feed and Cut key on the front panel to eject any small pieces of paper that are still in the
paper path.
12. Reload the paper as normal (see Loading Roll Media
may need to trim the edge first, to ensure that it is straight.
NOTE: If there is still paper left in the paper path, try loading a sheet of stiff or rigid paper into the
printer, such as heavy coated or matte film; this will help to force out any paper jammed in the
paper path.
13. If the cutter seems to be causing the problem, check in Paper Types
printer. Try disabling the cutter from the front panel; use → Cutter → Off.
You are strongly recommended to align the printheads (see Printhead Alignment
the problem may have caused the printheads to be misaligned.
Back …
or Loading Sheet Media). If you are using roll paper you
that the type of paper is supported by the
) after clearing a paper jam, as
Page 90

Ink Marks on the Media
• Warped Lines
• Blurred Lines (Ink “Bleeds” from Lines)
• Marks or Scratches on Glossy Paper after Printing
• Smears or Scratching on Your Printed Media
Page 91

Warped Lines
• The media itself may be warped. This can happen if it has been used or not been stored in the correct environmental conditions.
• For all environmental specifications, see Enviromental Specifications
.
Blurred Lines (Ink “Bleeds” from Lines)
• Perhaps you have adjusted the drying time in the front-panel menu to speed up the printer output. Set “Drying
time” to “Automatic”.
For details of drying time adjustments, see Ink System
.
Marks or Scratches on Glossy Paper after Printing
Glossy paper may be extremely sensitive to the bin or anything that it comes into contact with directly after
printing. This will depend on the amount of ink printed and the environmental conditions that are present at the
time of printing. Avoid any contact with the paper and handle the print with care until quite some time has elapsed.
NOTE: Included with HP media is a book “Printer Tips” that includes a section on troubleshooting
paper problems.
Page 92

Smears or Scratching on Your Printed Media
This problem can appear on paper-based coated media if a lot of ink is printed quickly. The media cannot absorb
the ink quickly enough and becomes distorted. As the printheads move over the media, the printheads and the
media come into contact with each other and the printed image is smeared.
1. Press the Cancel key on the front panel; if you continue to print, the paper may damage the printheads.
2. Cancel the print job from your computer application.
3. In order to obtain better results perform the following:
• Use HP recommended media. If the image you are printing has intense color, use HP Heavy Coated
Paper.
• Try to increase the print margins by relocating the image in the page from your software applications.
If the above fails to solve the problem of smears and scratching, change the media you are using to a non-paper
based media such as HP Clear film.
Page 93

Media Loading Problems
The front panel keeps indicating that media is misaligned or incorrectly positioned.
Roll media
• The roll media may be loaded the wrong way. The paper should load over the roll towards you, see Loading
Roll Media.
• The paper may be skewed. The right-hand edge must be parallel to the blue line on the front media deflector.
• Ensure that the paper is wrapped tightly on the roll.
• Check that the paper is correctly loaded onto the spindle, see Installing a New Roll on the Printer
Sheet media
• The sheet media must be loaded with the right-hand edge against the blue line on the printer platen and the
front edge against the blue line just after the pinch rollers, see Loading Sheet Media
• The media may be crumpled or warped or may have irregular edges.
• If you are using hand-cut media, the edges may not form a right-angle or they may be rough. Do not use
hand-cut media. Use only purchased sheet media.
• If the media is curled with the curl up it will be very difficult to load. It is easier to load it with the curl down
.
.
Page 94

Media Output Problems
Prints Fall on the Floor After Being Cut
• Make sure the media bin is open.
• Do not let more than twenty prints accumulate in the bin.
• Make sure roll media is loaded correctly. If the paper is loaded incorrectly, the natural curl of the media may
cause it to miss the bin and fall to the floor.
Prints Do Not Stack Properly in the Media Bin
• The printer may be too close to the end of the roll. The natural curl near the end of the roll can cause stacking
problems. Load a new roll or remove prints manually as they are completed.
• If you are mixing prints or nesting sets of several different sizes, you may have stacking problems because of
the different sizes of media in the bin.
Page 95

Image Error
• Image is Incomplete
Details the actions to take when the print is: Blank, Partial or has suffered clipping.
• Printed Image Incorrect
Explains why the image is:
- In one portion of the printing area.
- Unexpectedly rotated.
- Mirrored.
- Distorted or unintelligible.
- Overlaid with another image.
- Does not obey Page Format and Rotate commands.
• Other Sources of Information
Lists others sources of information for image problems.
Page 96

Image is Incomplete
• Output Contains Only a Partial Print
• Image is Clipped
• Long-Axis Print Is Clipped
Output Contains Only a Partial Print
• Did you press Cancel or Form Feed and Cut before all the data was received by the printer?
If so, you have ended the data transmission and will have to print the page again (you normally don’t need to
press Form Feed and Cut to unload the print).
• The I/O Setup > I/O Timeout setting may be too short. From the front-panel menu you can increase the
I/O Timeout setting to a longer period and then send the print again.
• The file may be too large for the printer’s memory.
You can install extra memory on the HP-GL/2 Accessory Card in your printer, see Memory
• There may be a communications problem between your computer and the printer.
Check your interface cable.
• Check to make sure that your software settings are correct for your current page size (for example, long-axis
prints).
.
Page 97

Image is Clipped
• This normally indicates a discrepancy between the actual printing area on the loaded media and the printing
area as understood by your software. For general advice on printing areas and page size, see Printable Area
• Check the actual printing area for the media size you have loaded (printing area = media size – margins). For
media size and margins, see Printable Area
• Check what your software understands to be the printing area (which it may call “printable area” or “imagable
area”). For example, some software applications assume standard printing areas that are larger than those
used in this printer.
• You may have asked to rotate the page from portrait to landscape on media that is not wide enough, for
example a D/A1-size page rotated on a D/A1-size roll.
• If necessary, change the printing area in your software.
• The file may be too large for the printer’s memory.
.
Long-Axis Print Is Clipped
• Does your software support long-axis prints?
• Have you specified an appropriate media size in your software?
• There may not be sufficient memory.
.
Page 98

Printed Image Incorrect
• Image is in One Portion of the Printing Area
• Print is Distorted or Unintelligible
• One Image Overlays Another on the Same Sheet
Page 99

Image is in One Portion of the Printing Area
• Is the page size configured in the software too small?
• Are you sure that your software doesn’t believe the image to be in one quadrant of the page?
• Otherwise, this indicates an incompatibility between the software and the printer:
• Is your software configured for this printer? For general advice, see the Assmebly and Set-up Poster. For
advice specific to your software, see the documentation supplied with the driver.
Image is Unexpectedly Rotated
• Check the front-panel Paper > Page format > Rotate setting.
• For an explanation of image rotation, see Rotating an Image
.
Page 100

Print is Distorted or Unintelligible
• The interface cable between your computer and the printer could be faulty. Try another cable to see if the
problem is corrected.
• If you have connected your computer to the parallel port on the printer, make sure you are using a genuine HP
parallel interface cable.
• Depending on the software, drivers and RIPs you are using with your printer, there will be different solutions to
solving this problem. Refer to the Vendor’s User Documentation for details.
One Image Overlays Another on the Same Sheet
• The I/O Setup / I/O Timeout setting may be too long. From the front-panel menu decrease the setting and print
again.
 Loading...