

Page 1

?
file:///D|/hydra/ug_loc/final_hydra/Frame_files/figs/print.jpg
how do I…
pocket guide
i
hp designjet 500 series printers
hp designjet 800 series printers
Page 2
Contents—How Do I...
file:///D|/hydra/ug_loc/final_hydra/Frame_files/figs/print.jpg
Navigate the Front Panel 4
The Front-Panel Display 4
Alphabetical List of Front-Panel
Menus 6
Examples of How to Use the Front
Panel 17
Manage Prints 23
Cancelling a Page that is Being
Printed 23
Cancelling the Drying Time for a
Printed Page 24
Managing Pages that have Not Yet
been Printed 25
Prioritizing a Job in the Queue
(“Move to Front”) 27
Deleting a Job from the Queue 27
Manage Prints (continued)
Making Copies of a Job in the
Queue 28
Avoiding Paper Waste by Nesting
Pages 29
Replace Ink Cartridges and
Printheads 31
Replacing Ink Cartridges 33
Replacing Printheads 36
Load a Sheet of Paper 45
Unloading a Sheet of Paper 52
Load a Roll of Paper 53
Installing a New Roll on the
Printer 53
Loading a Roll of Paper 56
Unloading a Roll of Paper 62
Page 3
More
file:///D|/hydra/ug_loc/final_hydra/Frame_files/figs/print.jpg
Information...
You can find more about
the following topics in
the User’s Reference
Guide, which is on the
Using Your Printer CD:
• Paper types; more about loading
• Ink supplies
• Page formatting
• Printer configuration
• Care of your printer
• Accessories
• More about solving problems
• General index; Glossary of terms.
Many of the procedures in the User’s
Reference Guide are animated.
You may also find other information
about HP DesignJet printers, associated
software and support on the HP websites at:
www.hp.com/go/designjet
or
www.designjet-online.com.
See the other side of this Pocket Guide
for information about troubleshooting
problems.
© 2000 Hewlett-Packard Company
Hewlett-Packard Company,
Inkjet Commercial Division,
Avda. Graells, 501,
08190 Sant Cugat del Vallès,
Barcelona, Spain
Page 4
The Front-Panel Display
file:///D|/hydra/ug_loc/final_hydra/Frame_files/figs/print.jpg
The panel on the front of your printer is the principal way of changing the printer’s
behavior, apart from controls provided by the software you use.
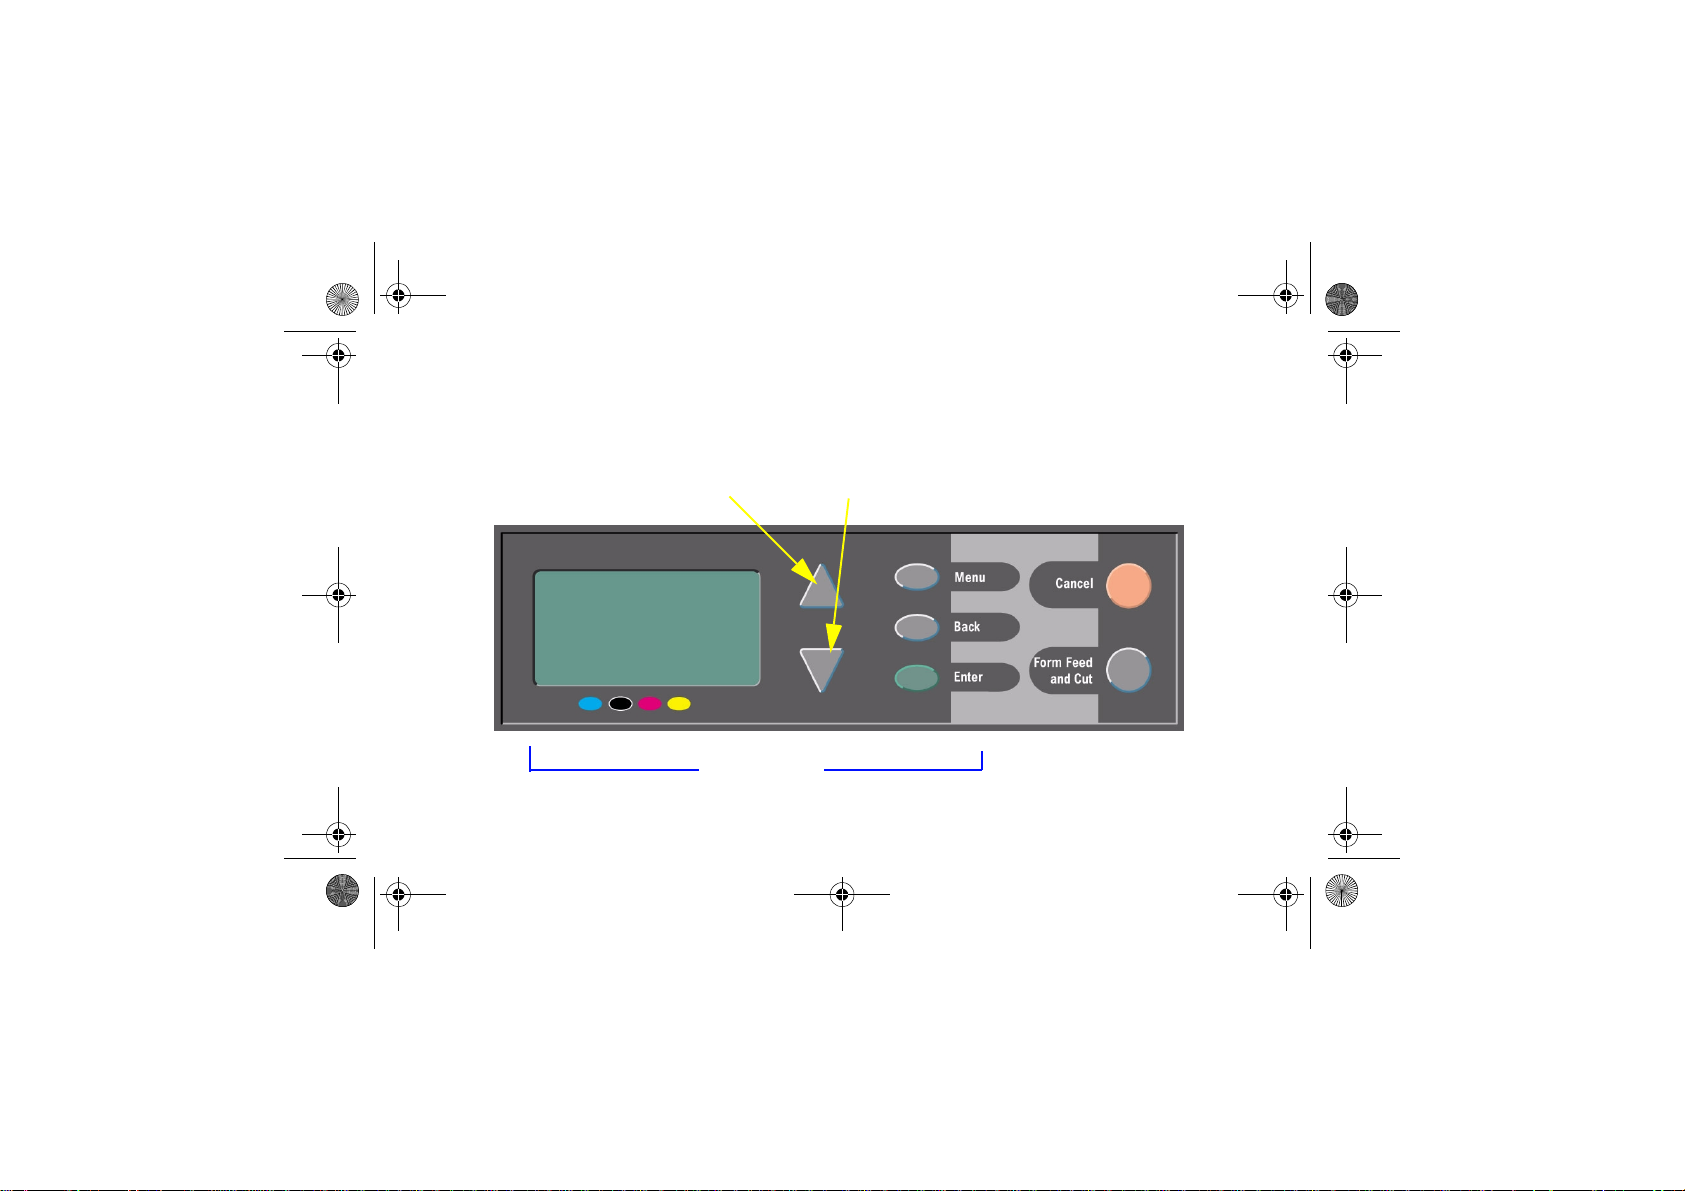
Up (∆) and Down (∇) keys
Display area Action keys
4 The Front-Panel Display
Page 5
Display-Area Keys
file:///D|/hydra/ug_loc/final_hydra/Frame_files/figs/print.jpg
• Up (∆) and Down (∇) let you navigate
through the items in a menu list. If there
are more options than can be shown on
the front panel, a vertical scroll bar
appears on the right side of the panel.
If further choices can be made for a menu
item, the symbol “ ” appears to its right. A
selected setting is shown by a tick (“√”).
• Menu takes you to the main screen. It
cancels
selected by pressing Enter.
• Back takes you to the previous screen,
also cancelling
selected with Enter.
• Enter selects the item in the menu list and
makes it current. If there are further
any choices that have not yet been
any choices not yet
The Front-Panel Display 5
selections to be made, Enter takes you to
them, shown by the arrows (
that starts on page 6.
→) in the table
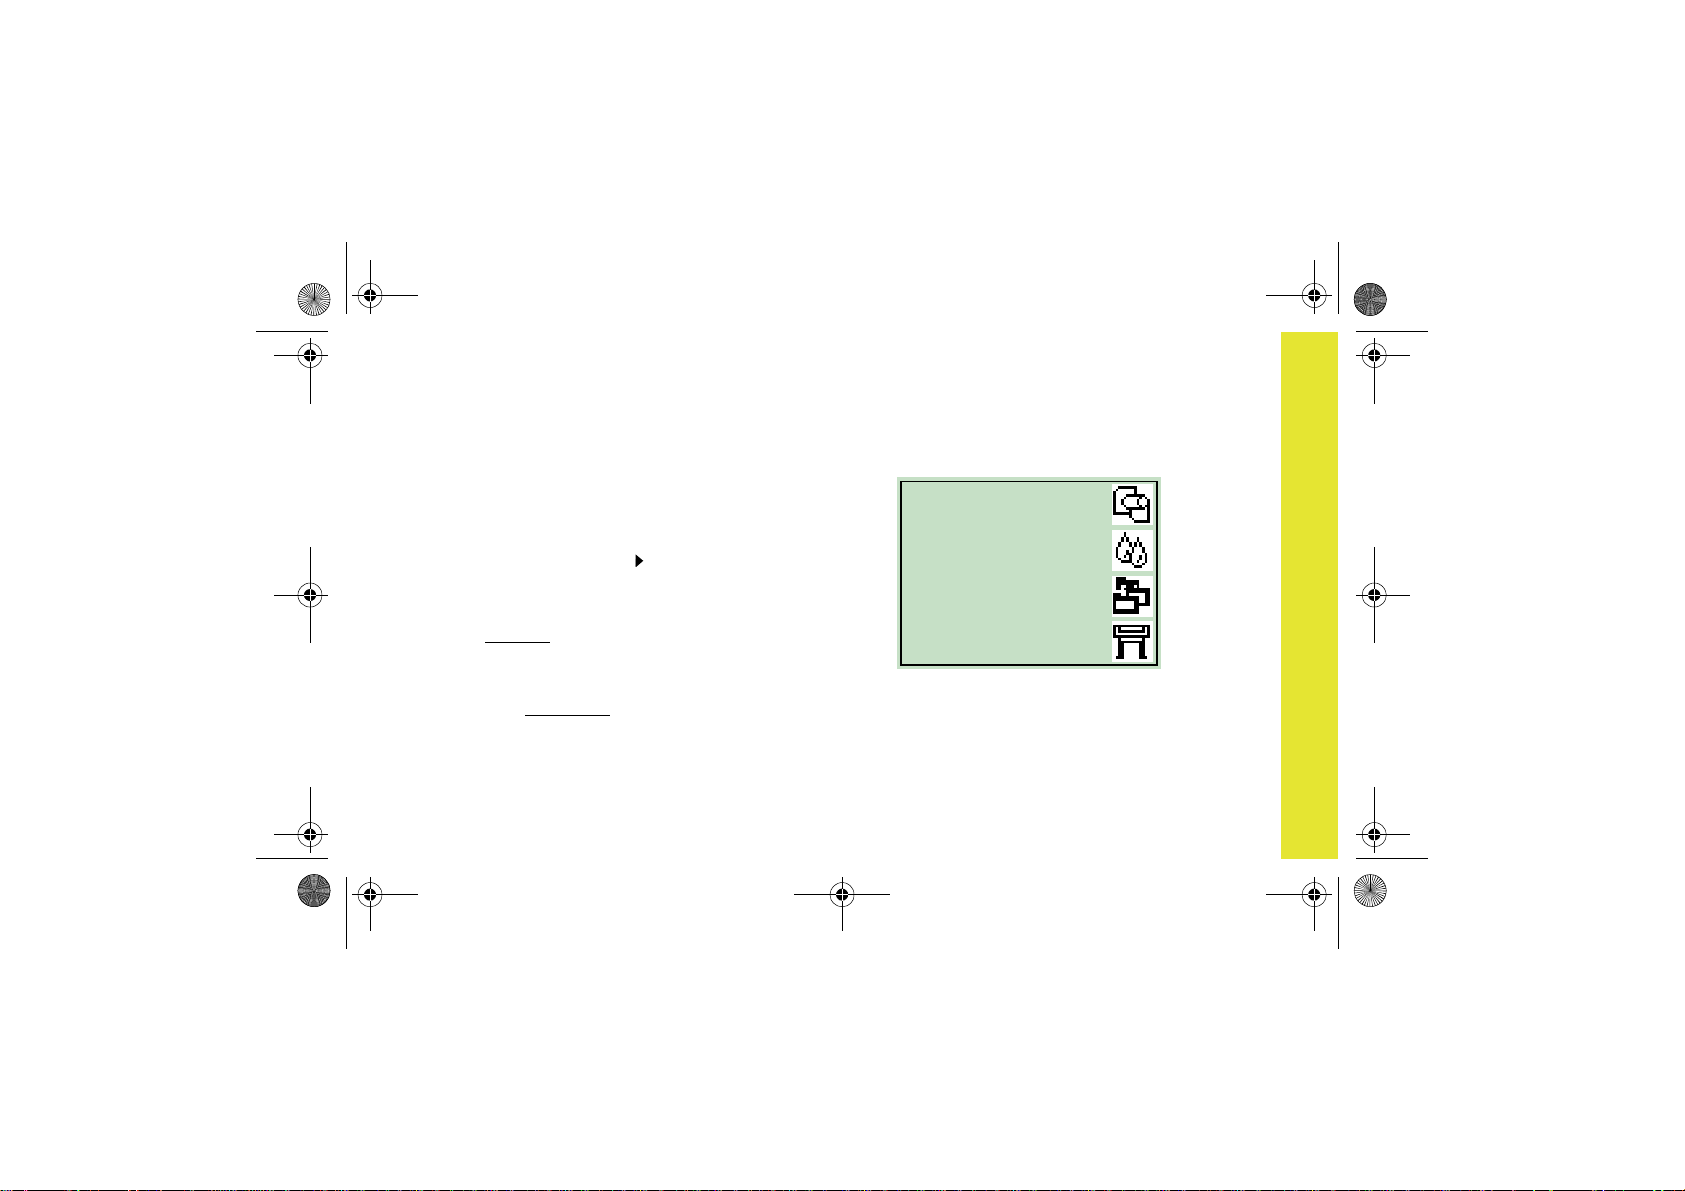
Display-Area Screen: Menu Icons
There are four main
front-panel menus,
each with a different
icon highlighted.
You can always reach
a main menu by
pressing Menu and
then scrolling (∆ or ∇).
Paper
Ink
Job man agement
Set-up
Action Keys
• Cancel cancels the current operation
(printing or preparing for printing).
• Form Feed and Cut causes a sheet to be
ejected or the roll to be advanced and cut.
navigate the front panel
Page 6
Alphabetical List of Front-Panel Menus
file:///D|/hydra/ug_loc/final_hydra/Frame_files/figs/print.jpg
Key to the List of Front-Panel Menus
On pages 7 through 16 are the printer’s frontpanel menus, listed alphabetically. The key
to the list is on the right.
In the User’s Reference Guide (on the
Using Your Printer CD) they are listed
according to the structure of the menus.
For examples of how to use the menus, see
page 17.
Note: PostScript functions in the HP
DesignJet 500PS printer are available
through the supplied PostScript driver, and
are not available from the printer’s front panel.
6 Alphabetical List of Front-Panel Menus
There is more in this Pocket Guide on
23
the page indicated in black or in red if it
is on the reverse (“The Problem Is...”).
There is more in the User’s Reference
Guide, some sections with animations.
Only available when PostScript or HP-GL/2
is available on the printer
(HP DesignJet 500 [with HP-GL/2 Accessory
card], 800 and 800PS printers).
Only available when PostScript is available
on the printer (HP DesignJet 800PS printer).
Only available when HP-GL/2 is available on
the printer (HP DesignJet 500 [with HP-GL/2
Accessory card], 800 and 800PS printers).
Page 7
→ Advance
file:///D|/hydra/ug_loc/final_hydra/Frame_files/figs/print.jpg
calibration
→ Align
printheads
→ Altitude
→ Page format→ Size→ ANSI sizes
22
42
→ Graphic language→ Automatic
[HP DesignJet 800 series printers only]
→ Page format→ Size→ Automatic
→ PS settings→
Encoding→ Automatic
→ Print quality→ Best
→ I/O setup→ Appletalk
Card ID→ (depends on card)
→ Page format→ Size→ ARCH sizes
→ PS settings→
Encoding→ ASCII
→ Drying time→ Automatic
Alphabetical List of Front-Panel Menus 7
→ Advanced options→ Best quality
settings
→ PS settings→
Encoding→ Binary
→ Color settings→
Color/Monochrome→ True Black
→ Front Panel→ Buzzer (on/off)
navigate the front panel
Page 8
→ Color calibration→ Calibrate now
file:///D|/hydra/ug_loc/final_hydra/Frame_files/figs/print.jpg
→ Color calibration
→ Replace Ink
cartridges
→ Color settings→ CMYK
33
→ Calibration
(paper advance)
22
→ Graphic Language→ CALS/G4
[HP DesignJet 800 series printers only]
→ Queue/copies→ Cancel
# Jobname→ (print in progress
23
or waiting) [HP DesignJet 800 series printers only]
→ I/O setup→ Card ID
→ I/O setup→ Card setup
→ Information→ Ink cartridges
8 Alphabetical List of Front-Panel Menus
→ Color settings→ Color/
Monochrome
→ Color calibration
→ Color settings
(RGB, CMYK, etc.)
→ Color settings→
Rendering intent→ Colorimetric
→ Front Panel→ Contrast
→ Queue/copies→ Reprints/
# Jobname→ copies
[HP DesignJet 800 series printers only]
28
Page 9
→ Cutter (on/off)
file:///D|/hydra/ug_loc/final_hydra/Frame_files/figs/print.jpg
→ Defects in
images (Troubleshooting)
→ HP-GL/2 settings→ Define palette
15
→ Drying time
(none, automatic, manual)
→ PS settings→ Encoding
(ASCII, Binary, Automatic)
→ Log→ Errors
17
→ Queue/copies→ Delete (print
# Jobname→ already printed)
[HP DesignJet 800 series printers only]
→ Advanced options→
Best quality settings→Maximum detail
→ Color settings→
CMYK→ DIC
→ I/O setup→ DNS name
Card ID→ (depends on card)
→ Advanced options→
Optimize for→ Drawings/text
Alphabetical List of Front-Panel Menus 9
27
→ Color settings→
CMYK→ Euroscale
→ Page format→ Size→ Extra print sizes
→ Advance calibration Restore factory
settings
→ Print quality→ Fast
→ Advanced options→ Fast quality
settings
[HP DesignJet 800 series printers only]
navigate the front panel
Page 10
→ PS settings→
file:///D|/hydra/ug_loc/final_hydra/Frame_files/figs/print.jpg
PS Scale→ Fit to page
→ Front Panel
(language, buzzer, contrast)
→ Graphic language
(PS, HP-GL/2, CALS/G4, Automatic)
[HP DesignJet 800 series printers only]
→ Color settings→
Color/Monochrome→ Grayscale
→ Help
→ Graphic Language→ HP-GL/2
[HP DesignJet 800 series printers only]
→ HP-GL/2 settings
→ I/O setup→ HW address
Card ID→ (depends on card)
10 Alphabetical List of Front-Panel Menus
→ I/O setup
→ I/O setup→ I/O timeout
→ Image quality
(Troubleshooting
→ Advanced options→
Optimize for→ Images
→ Information (ink
cartridges, printheads)
→ Printer
Information
→ Information→ Ink cartridges
Replace Ink
cartridges
)
15
33
Page 11
Ink menu
file:///D|/hydra/ug_loc/final_hydra/Frame_files/figs/print.jpg
→ Information→
Ink cartridges→ Ink levels
→ Page format→ Size→ Inked area
→ I/O setup→ IP address
Card ID→ (depends on card)
→ Page format→ Size→ ISO sizes
→ Page format→ Size→ JIS sizes
→ Graphic Language
[HP DesignJet 800 series printers only]
→ Front Panel→ Language
(national)
→ Load roll
→ Load sheet
56
45
Job management
Queue/copies→ Job name (and
number of copies)
[printers with formatter card only]
Alphabetical List of Front-Panel Menus 11
→ Log
(printheads, errors)
→ Drying time→ Manual
→ Select paper
( Media) type
17
navigate the front panel
Page 12
→ HP-GL/2 settings→ Merge (on/off)
file:///D|/hydra/ug_loc/final_hydra/Frame_files/figs/print.jpg
→ Page format→ Mirroring
→ Color settings→ Color/
Monochrome
→ Queue/copies→ Move print to
# Jobname→ top
[HP DesignJet 800 series printers only]
→ Color settings→
CMYK→ Native CMYK
→ Color settings→
RGB→ Native RGB
→ Nest settings→ Nest (on/off)
[HP DesignJet 800 series only]
12 Alphabetical List of Front-Panel Menus
27
29
→ Nest settings→ Nest
wait time
[HP DesignJet 800 series printers only]
→ Print quality→ Normal
→ Advanced options→ Optimize for
(drawings/text/images)
→ Page format→ Size→ Oversize prints
→ Page format
→ HP-GL/2 settings→ Palette
(define, select)
Paper (load, type)
→ Page format→ Paper size
29
Page 13

→ Select paper type
file:///D|/hydra/ug_loc/final_hydra/Frame_files/figs/print.jpg
→ Advance calibration→ Pattern
(create, measure)
→ HP-GL/2 settings→
Define palette→...→ Pen width, color
→ Color settings→
Rendering intent→ Perceptual
→ Graphic Language→ PostScript
[HP DesignJet 800PS printers only]
→ Queue/copies→
# Jobname→ Print cancel
[HP DesignJet 800 series printers only]
→ Page format→ Print (paper) size
22
23
Alphabetical List of Front-Panel Menus 13
→ Print quality
(best, normal, draft;
also Set-Up→Advanced Options)
→ Print quality
(poor) (Troubleshooting)
→ Page format→ Size→ Printed area
– see Inked area
→ Printer
information
→ Information→ Printheads
→ Printheads
(align,
replace)
→ PS settings→ PS scale
(PostScript)
15
36
navigate the front panel
Page 14
→ Print Quality
file:///D|/hydra/ug_loc/final_hydra/Frame_files/figs/print.jpg
(best, normal, draft)
→ Quality of
images (Troubleshooting)
→ Queue
(on/off)
[HP DesignJet 800 series printers only]
→ Queue/
copies
[HP DesignJet 800 series printers only]
→ Advanced options→
Fast quality settings→ Reduced speed
[HP DesignJet 800 series printers only]
→ Color settings→ Rendering intent
14 Alphabetical List of Front-Panel Menus
15
25
25
→ Replace ink
cartridges
→ Replace
printheads
→ Queue/copies→ Reprints/
# Jobname→ copies
→ I/O setup→ Card
setup→ Advanced→ Reset card
→ Color settings→ RGB
→ Roll
(load,
unload)
36
36
28
56
Page 15
→ Page format→ Rotate (0°, 90°,
file:///D|/hydra/ug_loc/final_hydra/Frame_files/figs/print.jpg
→ Color settings→
Rendering intent→ Saturation
→ PS settings→ PS Scale
(PostScript)
→ Select paper type
→ Sheet
→ Page format→ Size (of paper)
→ Page format→ Software
Size→ (Automatic)
180°, 270°)
(load,
unload)
45
Alphabetical List of Front-Panel Menus 15
→ Advanced options→
Fast quality settings→Reduced speed
[HP DesignJet 800 series printers only]
→ Color settings→
RGB→ sRGB
→ Color settings→
CMYK→ SWOP
→ Advanced options→
Optimize for→ Drawings/Tex t
→ I/O setup→ I/O Timeout
→ Color settings→
CMYK→ TOYO
→ Troubleshooting
(image quality)
→ Select paper type
15
navigate the front panel
Page 16
→ Unload roll
file:///D|/hydra/ug_loc/final_hydra/Frame_files/figs/print.jpg
62
→ Unload
sheet
→ Nest settings→ Wait time
16 Alphabetical List of Front-Panel Menus
52
29
Page 17
Examples of How to Use the Front Panel
file:///D|/hydra/ug_loc/final_hydra/Frame_files/figs/print.jpg
The keys you should press on the front panel are highlighted here in yellow.
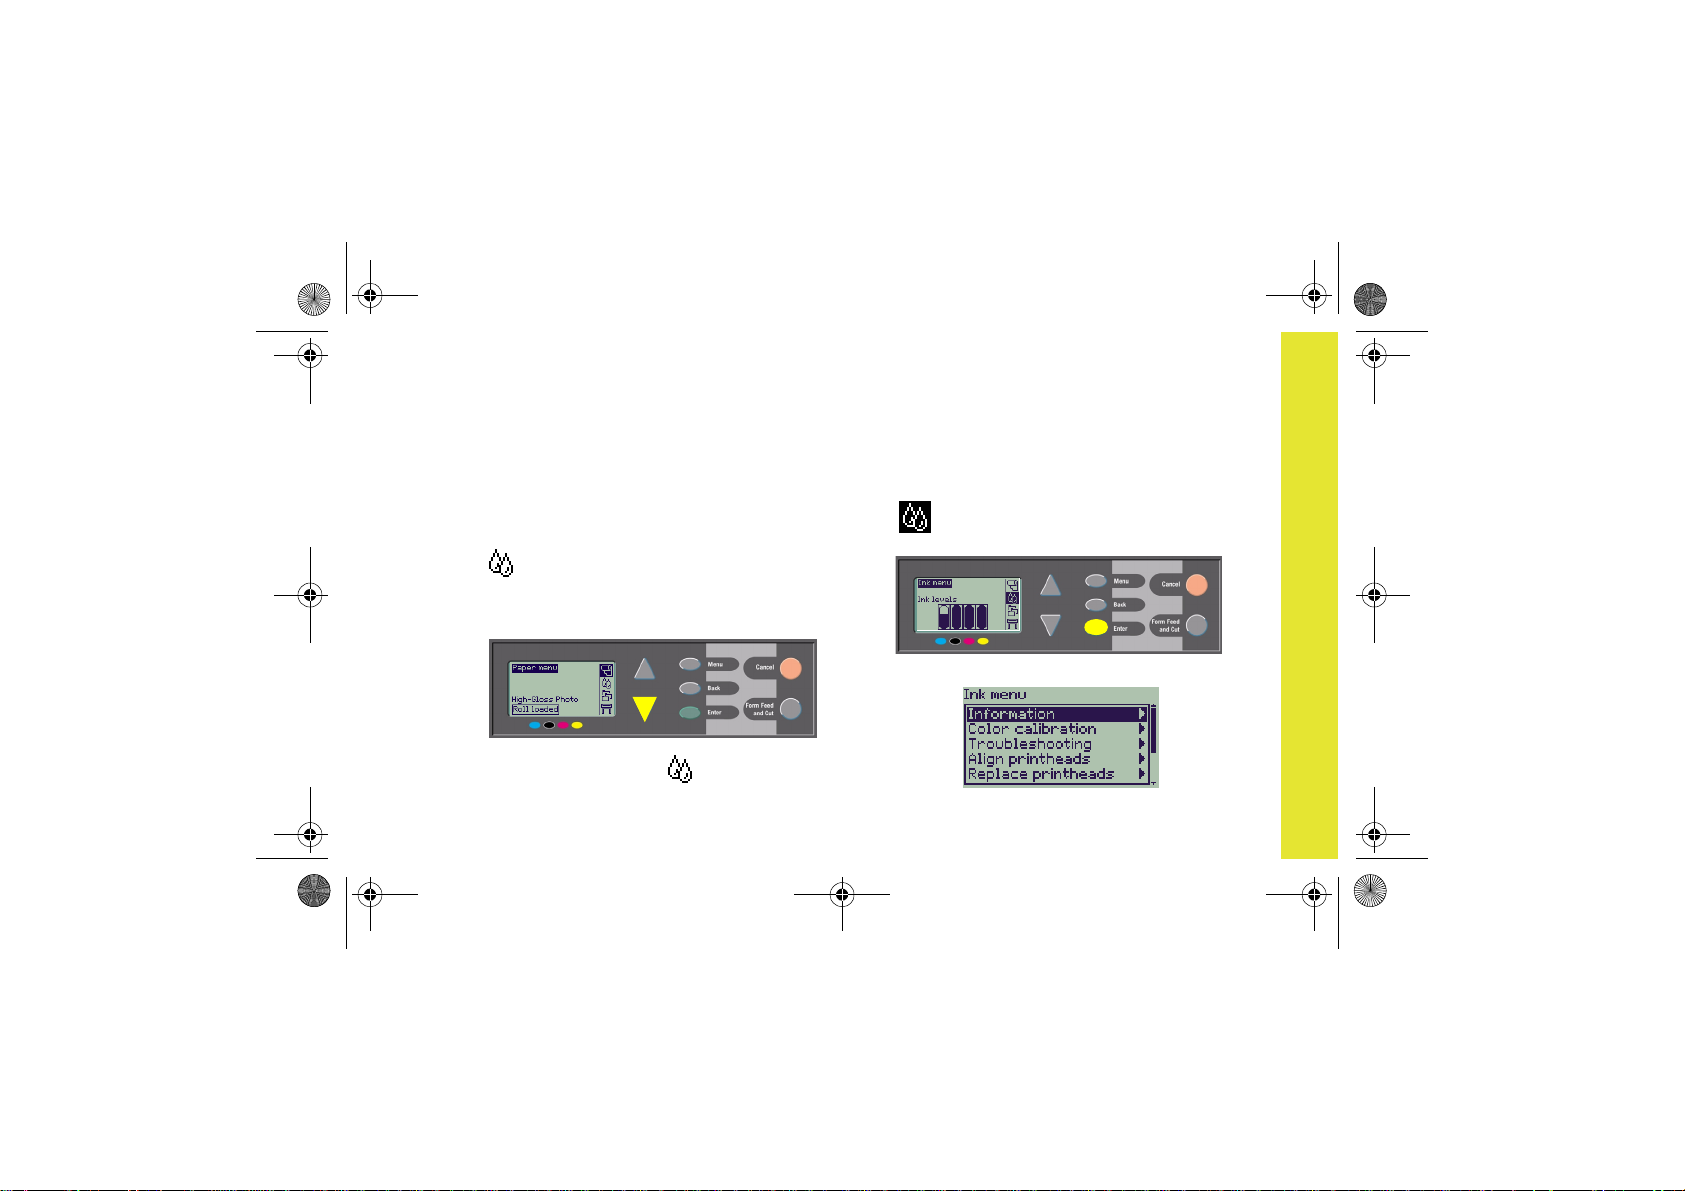
Setting the Ink-Drying Time to Two Minutes
1 From the table on page 9, the menu
structure is shown as:
→ Drying time
2 Starting from the main Paper menu, press
the Down key (∇) once...
...until the Ink menu ( ) is highlighted
Examples of How to Use the Front Panel 17
( ); then press the Enter key...
...to enter the Ink menu:
navigate the front panel
Page 18
The scroll bar at the right indicates that the
file:///D|/hydra/ug_loc/final_hydra/Frame_files/figs/print.jpg
list of available options is longer than can
be displayed at a time.
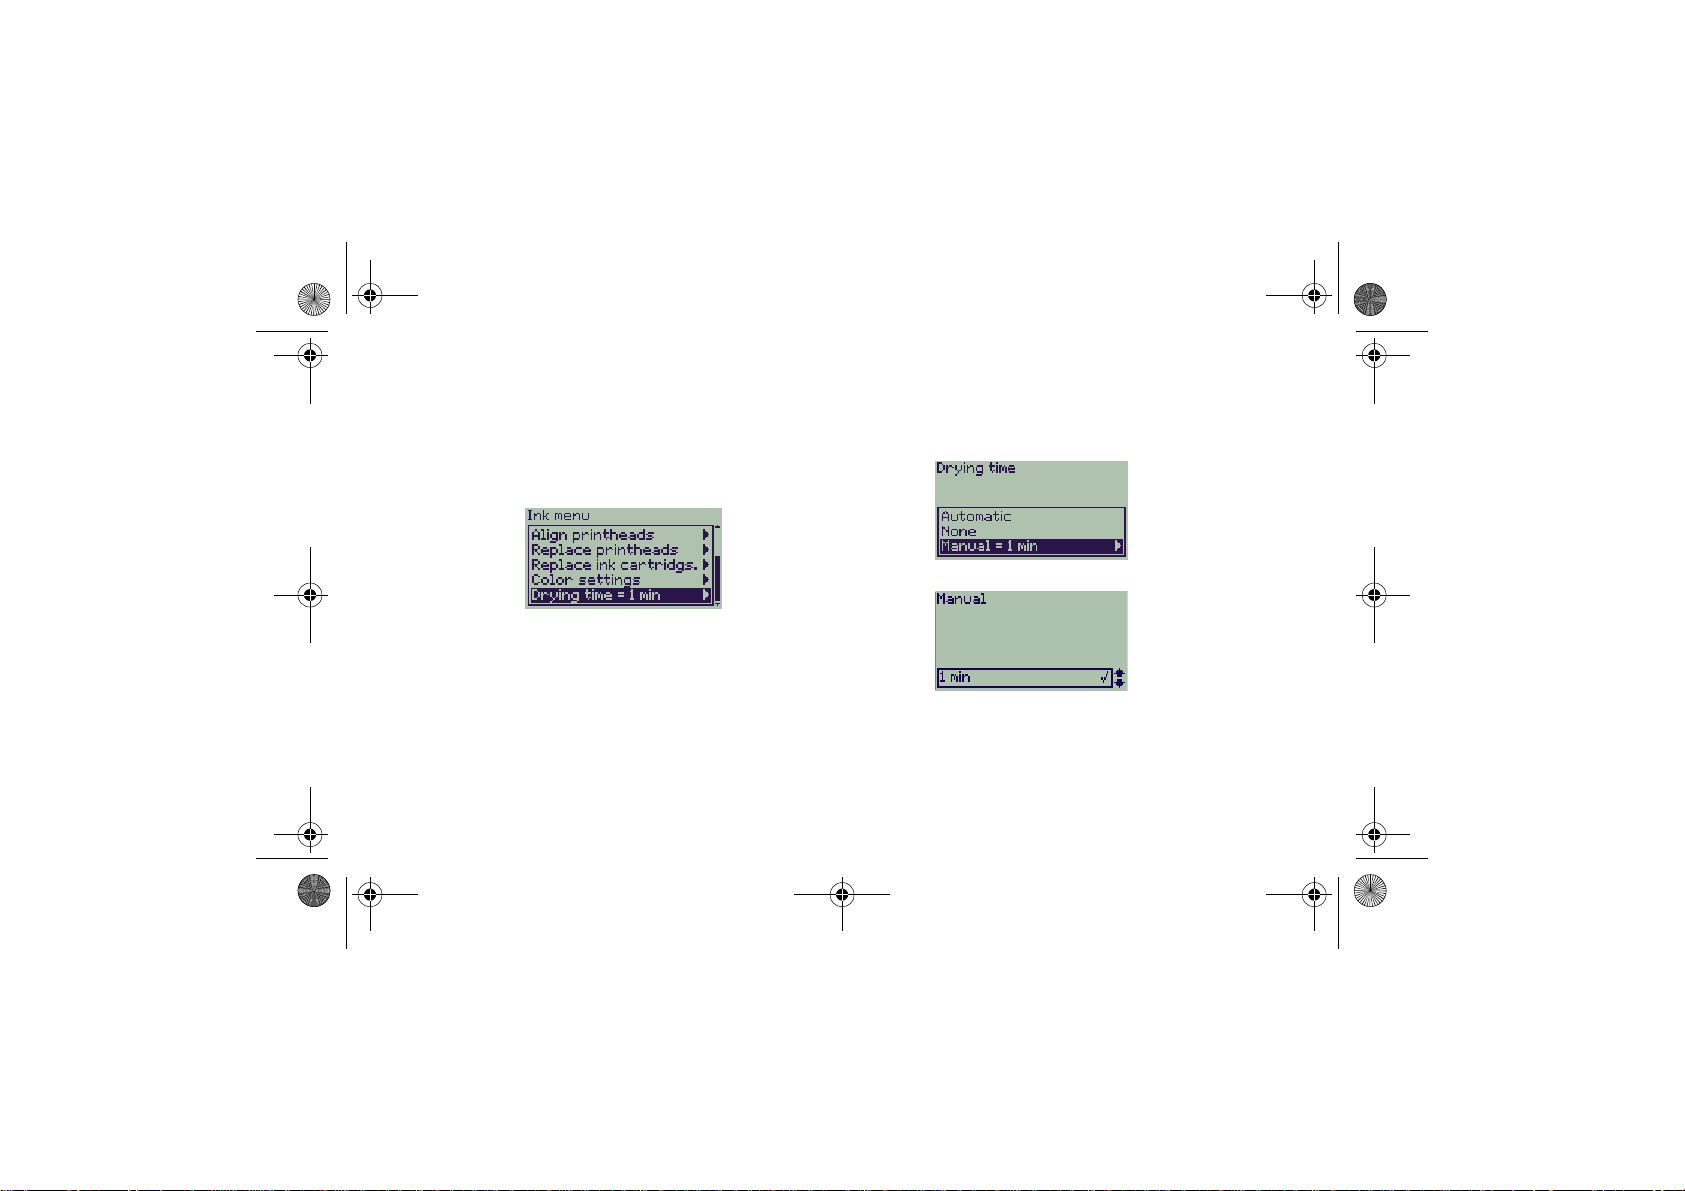
3 Press the Down key (∇) several times until
Drying time is highlighted.
The number of times you have to press the
Down key depends on:
• which model of printer–HP DesignJet
500 or 800 series,
• whether you have an accessory card
installed on an HP DesignJet 500 series
printer,
• which options were recently used.
18 Examples of How to Use the Front Panel
4 Then press Enter.
5 Press Down (∇) twice to highlight Manual,
and then press Enter again...
...to select Manual drying time:
Page 19
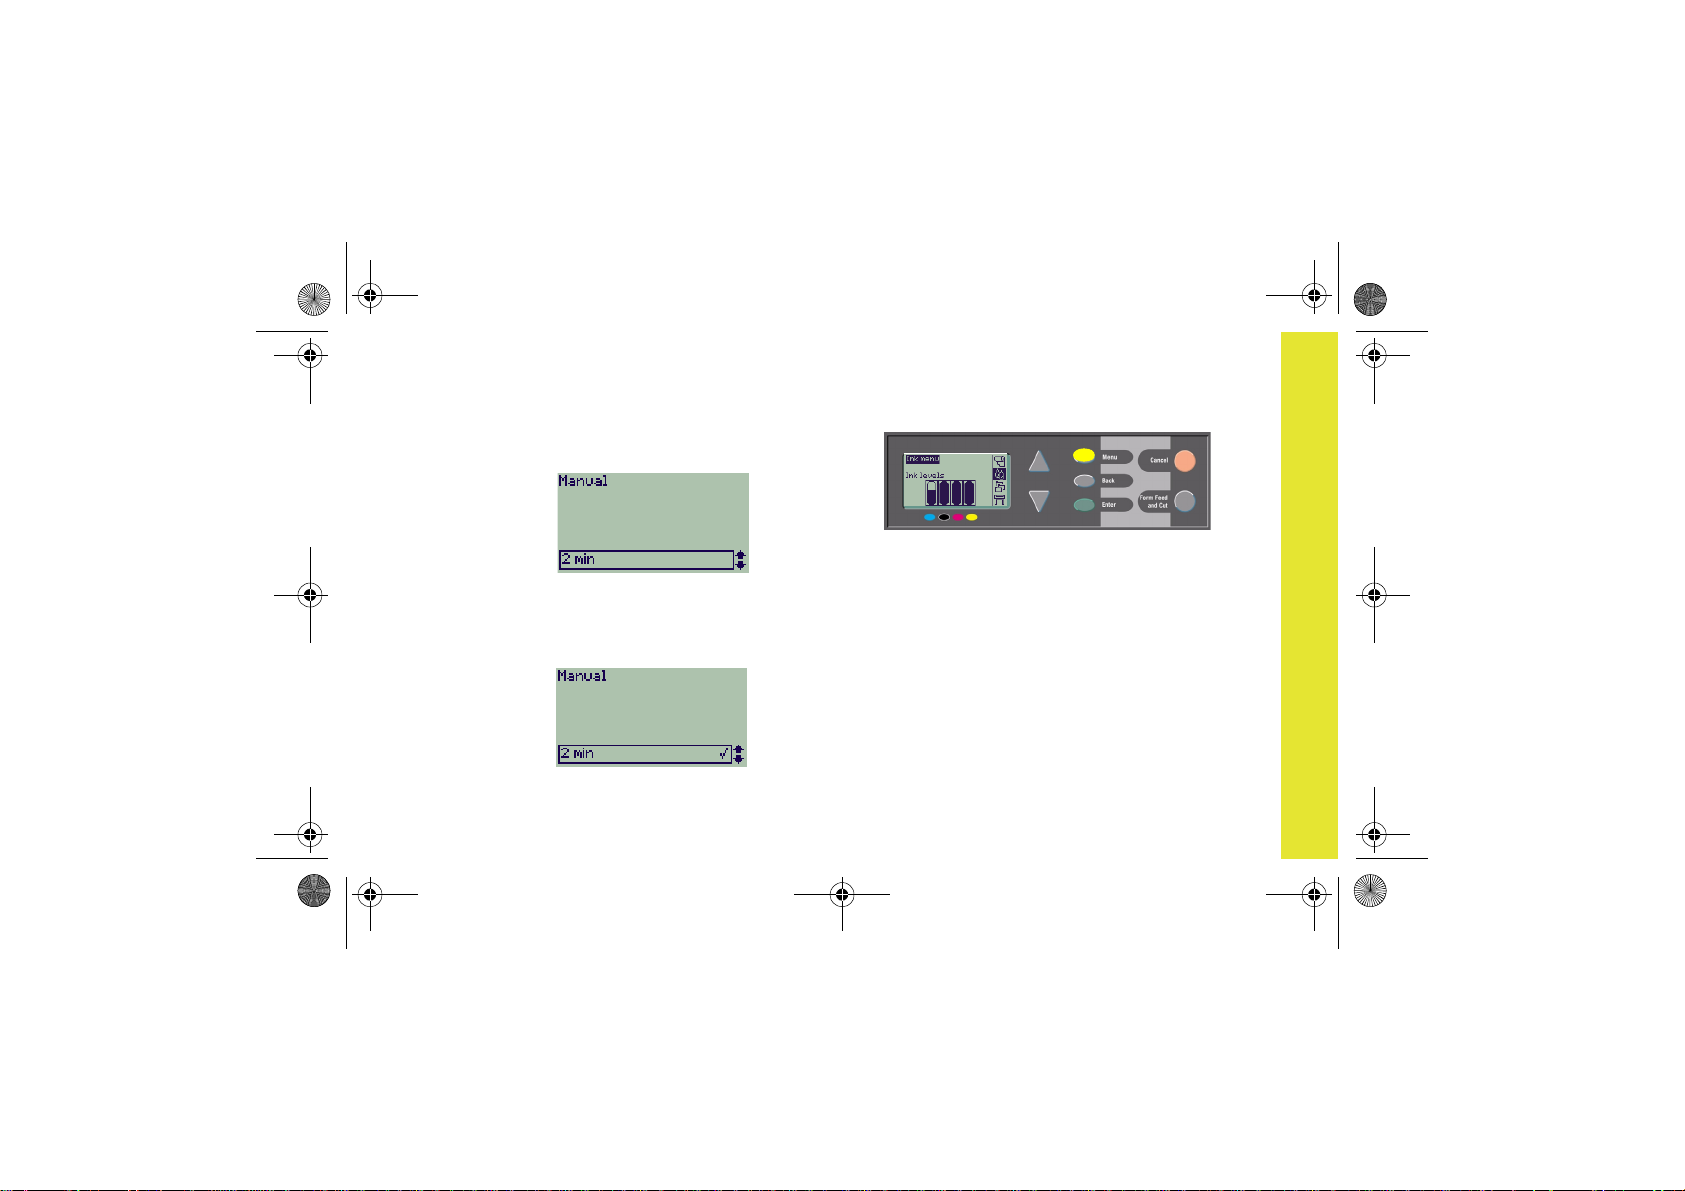
6 Press the Up key (∆) to change the drying
file:///D|/hydra/ug_loc/final_hydra/Frame_files/figs/print.jpg
time selection from 1 to 2 minutes. Then
press Enter to set the two-minute drying
time.
If the front-panel Buzzer is set On, there
will be a short ‘beep’ to confirm the
change. The value will be confirmed by a
tick mark at the right (“√”).
Examples of How to Use the Front Panel 19
7 Finally, press the Menu key to return to the
main menu.
navigate the front panel
Page 20
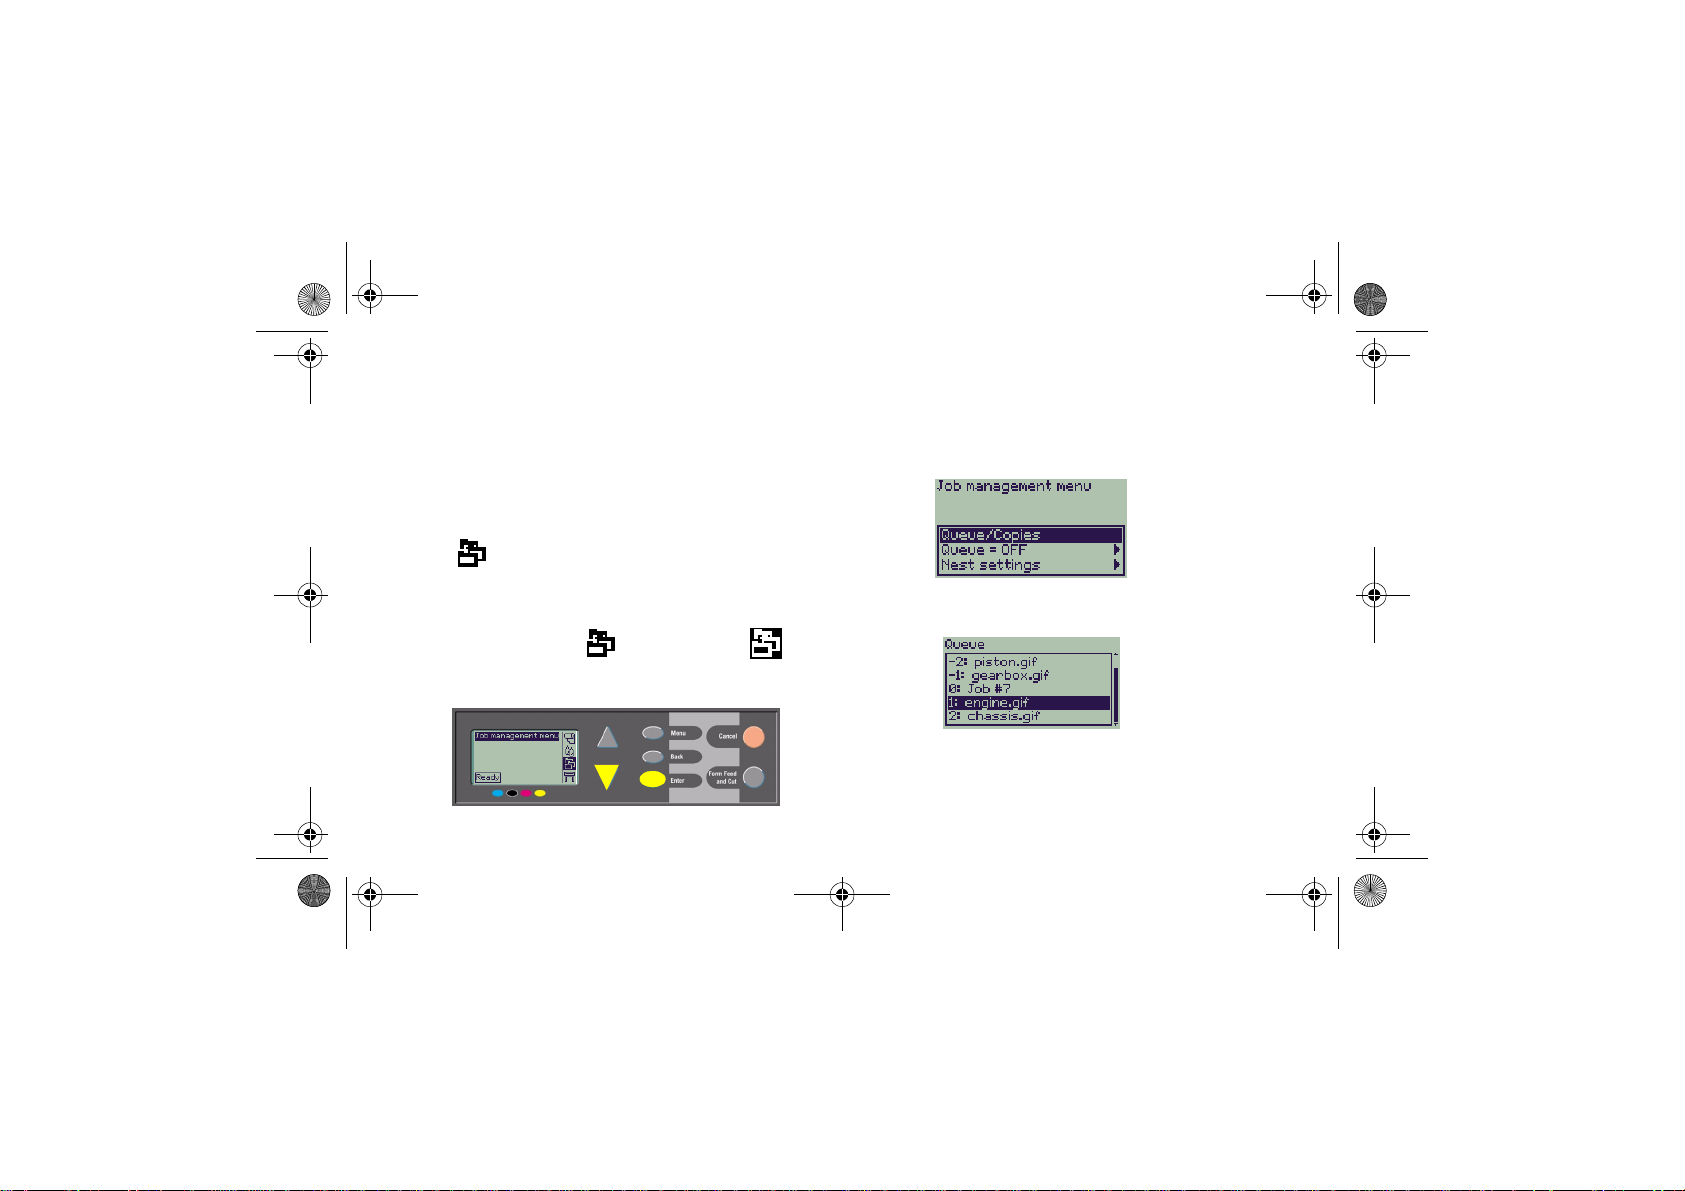
Printing Three Additional Copies of a Job that has Already been Printed
file:///D|/hydra/ug_loc/final_hydra/Frame_files/figs/print.jpg
This applies to HP DesignJet 800 and 800PS
printers only; see page 22 for the HP
DesignJet 500 Series with an Accessory card.
Ensure that the highlighting is on Queue/
copies, by pressing the Up (∆) or Down
key (∇) if necessary.
1 From the table on page 8, the menu
structure is shown as:
→ Queue/Copies
2 Starting from the main Paper menu, press
the Down key (∇) twice until Job
management ( ) is highlighted ( );
and then press Enter to enter the Job
management menu.
20 Examples of How to Use the Front Panel
3 Press Enter to enter the Queue/copies
menu.
You will see a list of jobs that are in the
print queue. Jobs that have already been
printed have negative numbers; jobs that
Page 21
are waiting to be printed have positive
file:///D|/hydra/ug_loc/final_hydra/Frame_files/figs/print.jpg
numbers.
Suppose the list of jobs are as shown in
the diagram. The job that is currently
being printed is number 0, whose job
name is “Job #7”.
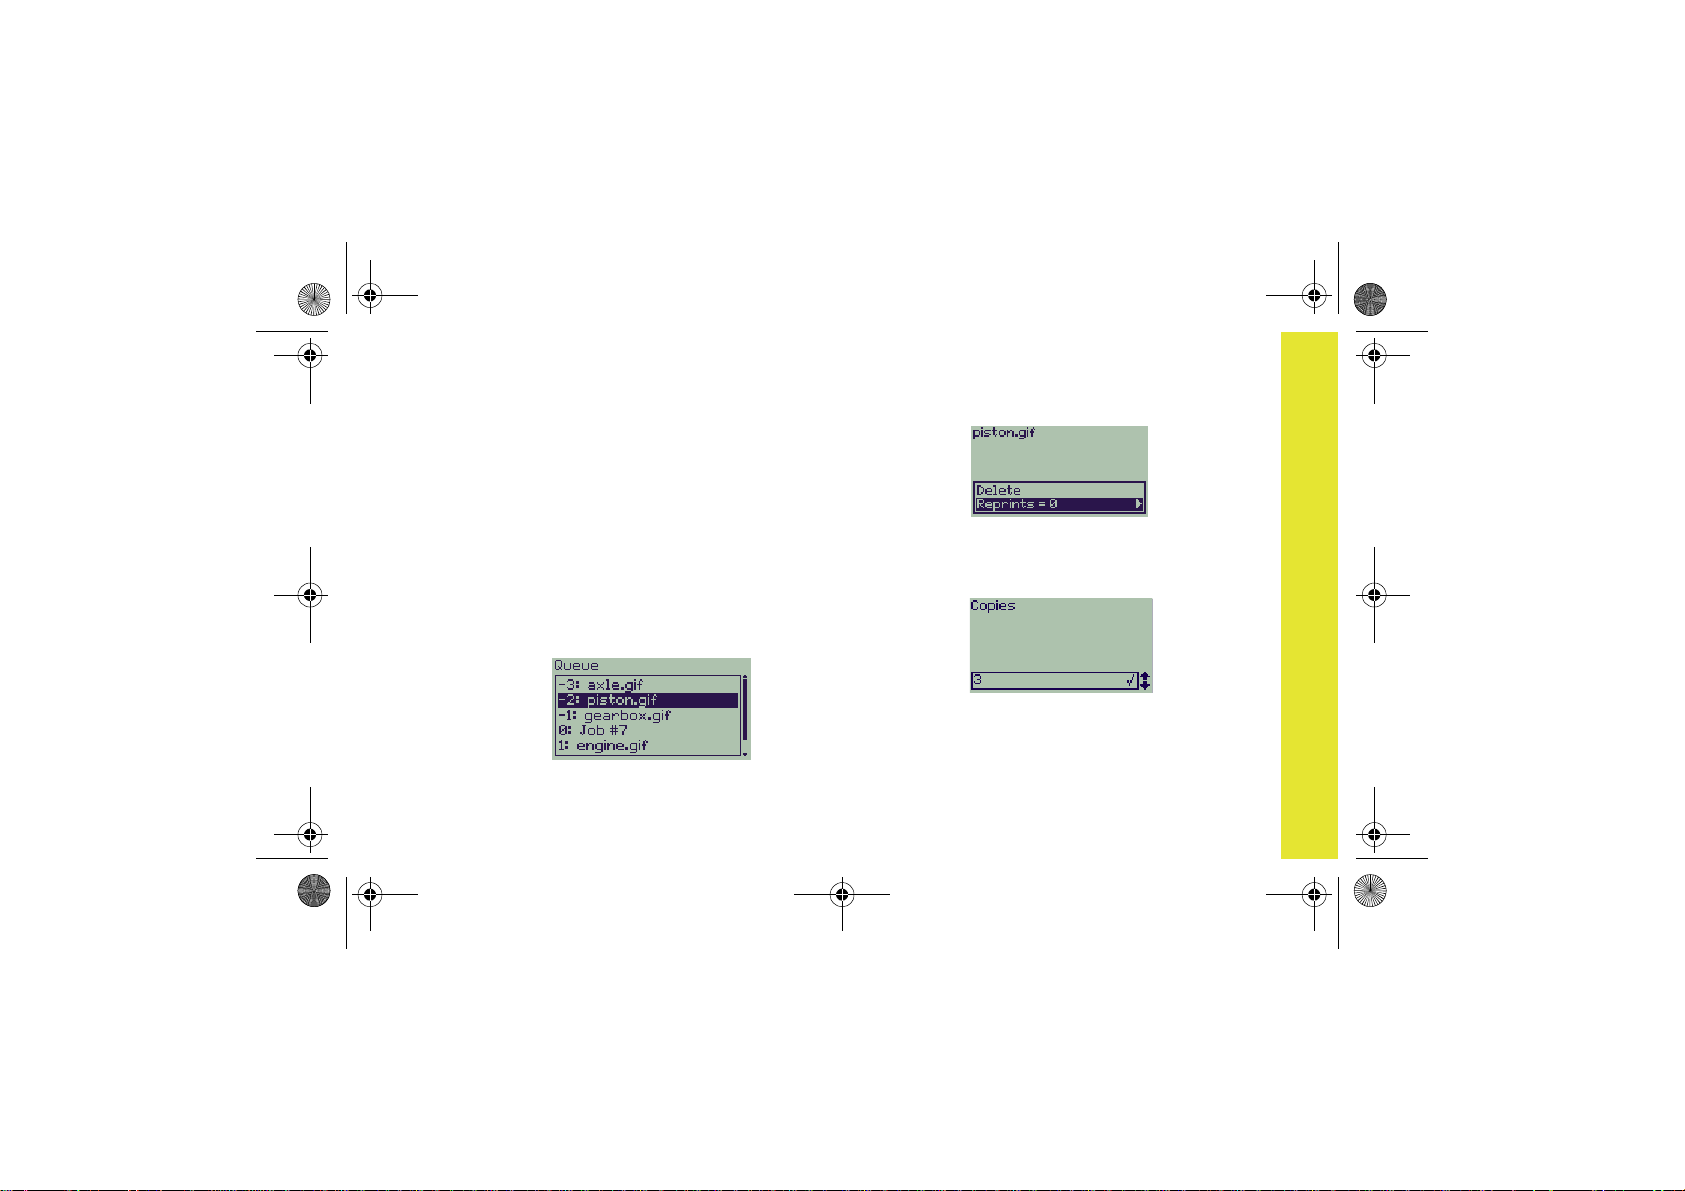
4 Suppose that the job you want to print
again is number -2, “piston.gif”.
Press Up (∆) or Down (∇) sufficient times
to highlight it; and then press Enter to
select this job.
Examples of How to Use the Front Panel 21
5 The options available for the job are listed;
select Reprints and press Enter again.
6 Press the Up key (∆) to select three
reprints, and then press Enter to set the
number of reprints to 3;
the earlier screen is shown, with available
options.
The reprint is automatically moved to the
front of the queue.
navigate the front panel
Page 22
7 Finally, press the Menu key to return to the
file:///D|/hydra/ug_loc/final_hydra/Frame_files/figs/print.jpg
top-level menu.
See page 25 for more about Queueing
and Nesting prints.
Reprints with the HP DesignJet 500
Series Printers
You must have an accessory card installed in
an HP DesignJet 500 Series printer to obtain
extra copies; proceed as follows:
1 With Job management highlighted ( ),
press Enter.
You can navigate to any of the
settings in the table that starts
on page 6 in a similar way.
22 Examples of How to Use the Front Panel
2 You will either see the message Queue is
empty, or the name of your job. In the
latter case, press Enter to see the options
available (including Reprints), and
continue as in Step 5 on page 21.
Page 23
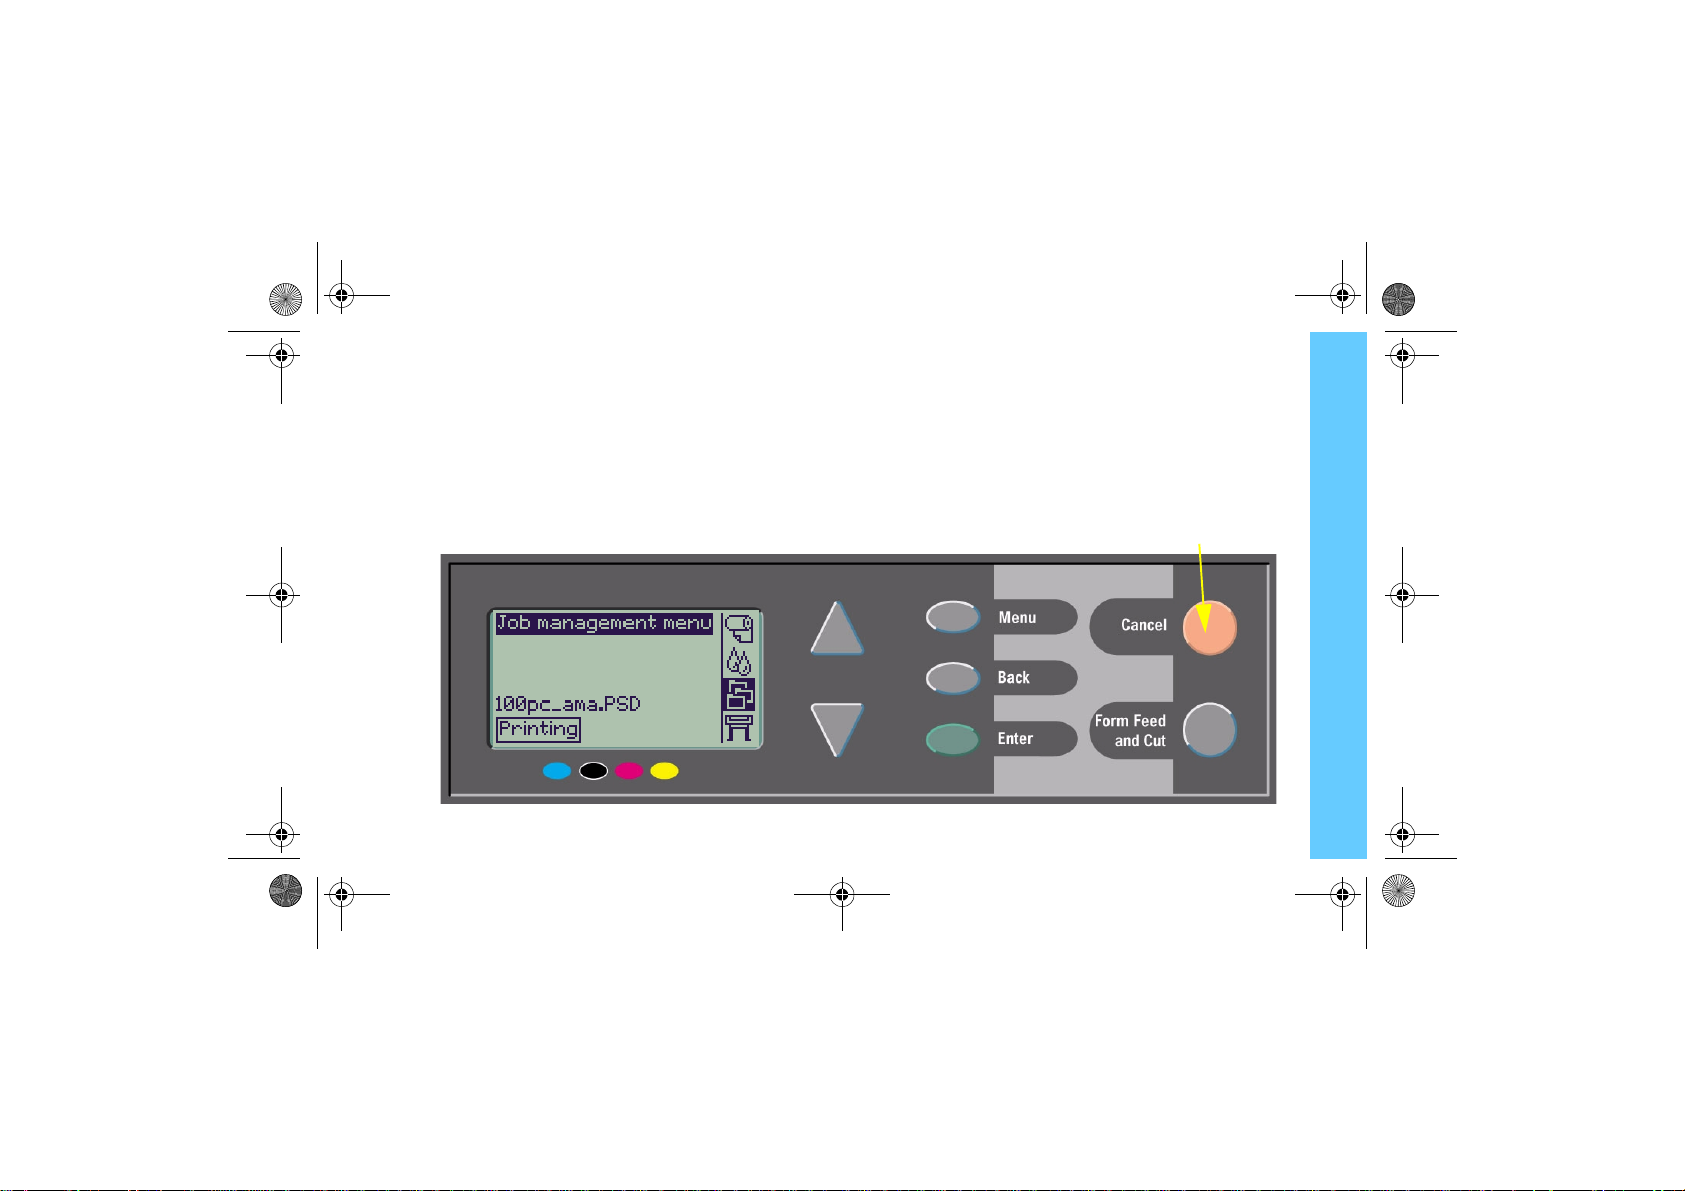
Cancelling a Page that is Being Printed
file:///D|/hydra/ug_loc/final_hydra/Frame_files/figs/print.jpg
1 Press the Cancel key on the front panel.
The printer advances the paper as though the
print were finished.
Cancelling a Page that is Being Printed 23
A multi-page job or a big file may take longer
to stop printing than other files.
Cancel key
manage prints
Page 24
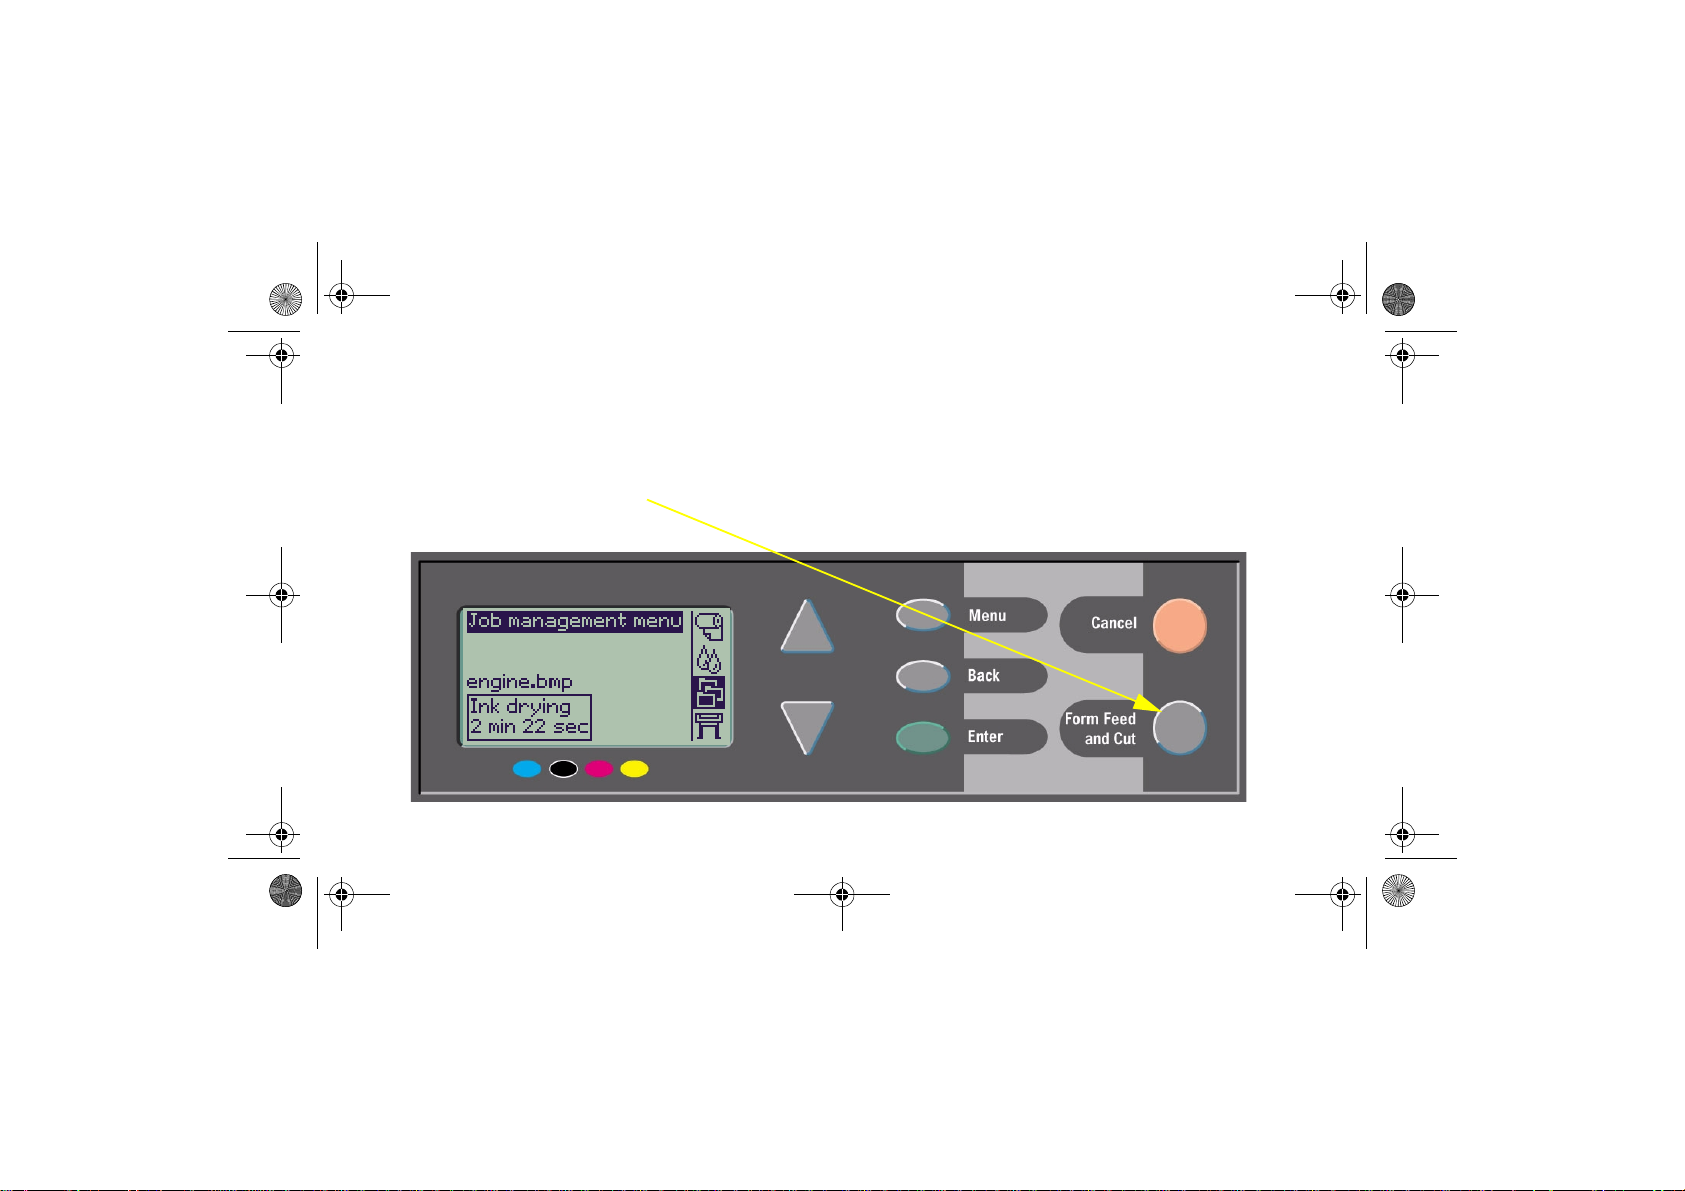
Cancelling the Drying Time for a Printed Page
file:///D|/hydra/ug_loc/final_hydra/Frame_files/figs/print.jpg
Use caution when performing this procedure as an image which has had insufficient time to dry could
get damaged.
1 Press the Form Feed and Cut key on the
front panel.
24 Cancelling the Drying Time for a Printed Page
2 The printer will release the paper and it will
fall into the paper bin.
Page 25
Managing Pages that have Not Yet been Printed
file:///D|/hydra/ug_loc/final_hydra/Frame_files/figs/print.jpg
Queueing and nesting are only available on the
HP DesignJet 800 Series. (On the 500 Series,
you can obtain reprints if an accessory card is
installed; see page 22).
Change the Queueing setting by selecting
Queue On or Off from the Job Management
( ) menu.
To change the Nesting setting, see page 30,
Turning Nesting On and Off.
If the printer is turned off with unprinted files in
the queue, the files are lost and must be resent.
With Queueing Turned ON
When Queueing is On and the printer receives
print files, the files are stored in the queue in the
Managing Pages that have Not Yet been Printed 25
order they are received. If Nesting is Off, the files
are printed as soon as possible, in the order they
are received. If Nesting is On, files are printed
when the time-out period expires or there are
enough files to fill a page width. You can reprint
files which have already been printed. See also
page 29, Avoiding Paper Waste by Nesting
Pages.
• You can send pages to the printer without
waiting for the current page to finish printing.
• Pages are stored in the queue in the order
they are received.
• You can manipulate the pages in the queue,
for example prioritizing them and reprinting
them.
• You can use nesting, the printer’s paper-
manage prints
Page 26
saving feature (see page 29).
file:///D|/hydra/ug_loc/final_hydra/Frame_files/figs/print.jpg
• While one page is printing, the printer will
accept and start processing the next file.
With Queueing Turned OFF
If Queueing is Off and the printer receives files,
they are printed as they are received, and are not
stored in the queue. Nesting settings have no
effect.
• Files are printed as they are received, and are
not stored in the queue.
• The printer will not accept another file sent
from the computer until the current page has
finished printing and the printer is ready.
• You cannot use nesting.
If you turn queueing off while pages are still in the
queue, they will be printed and (if nesting is on)
nested, until the queue is empty.
26 Managing Pages that have Not Yet been Printed
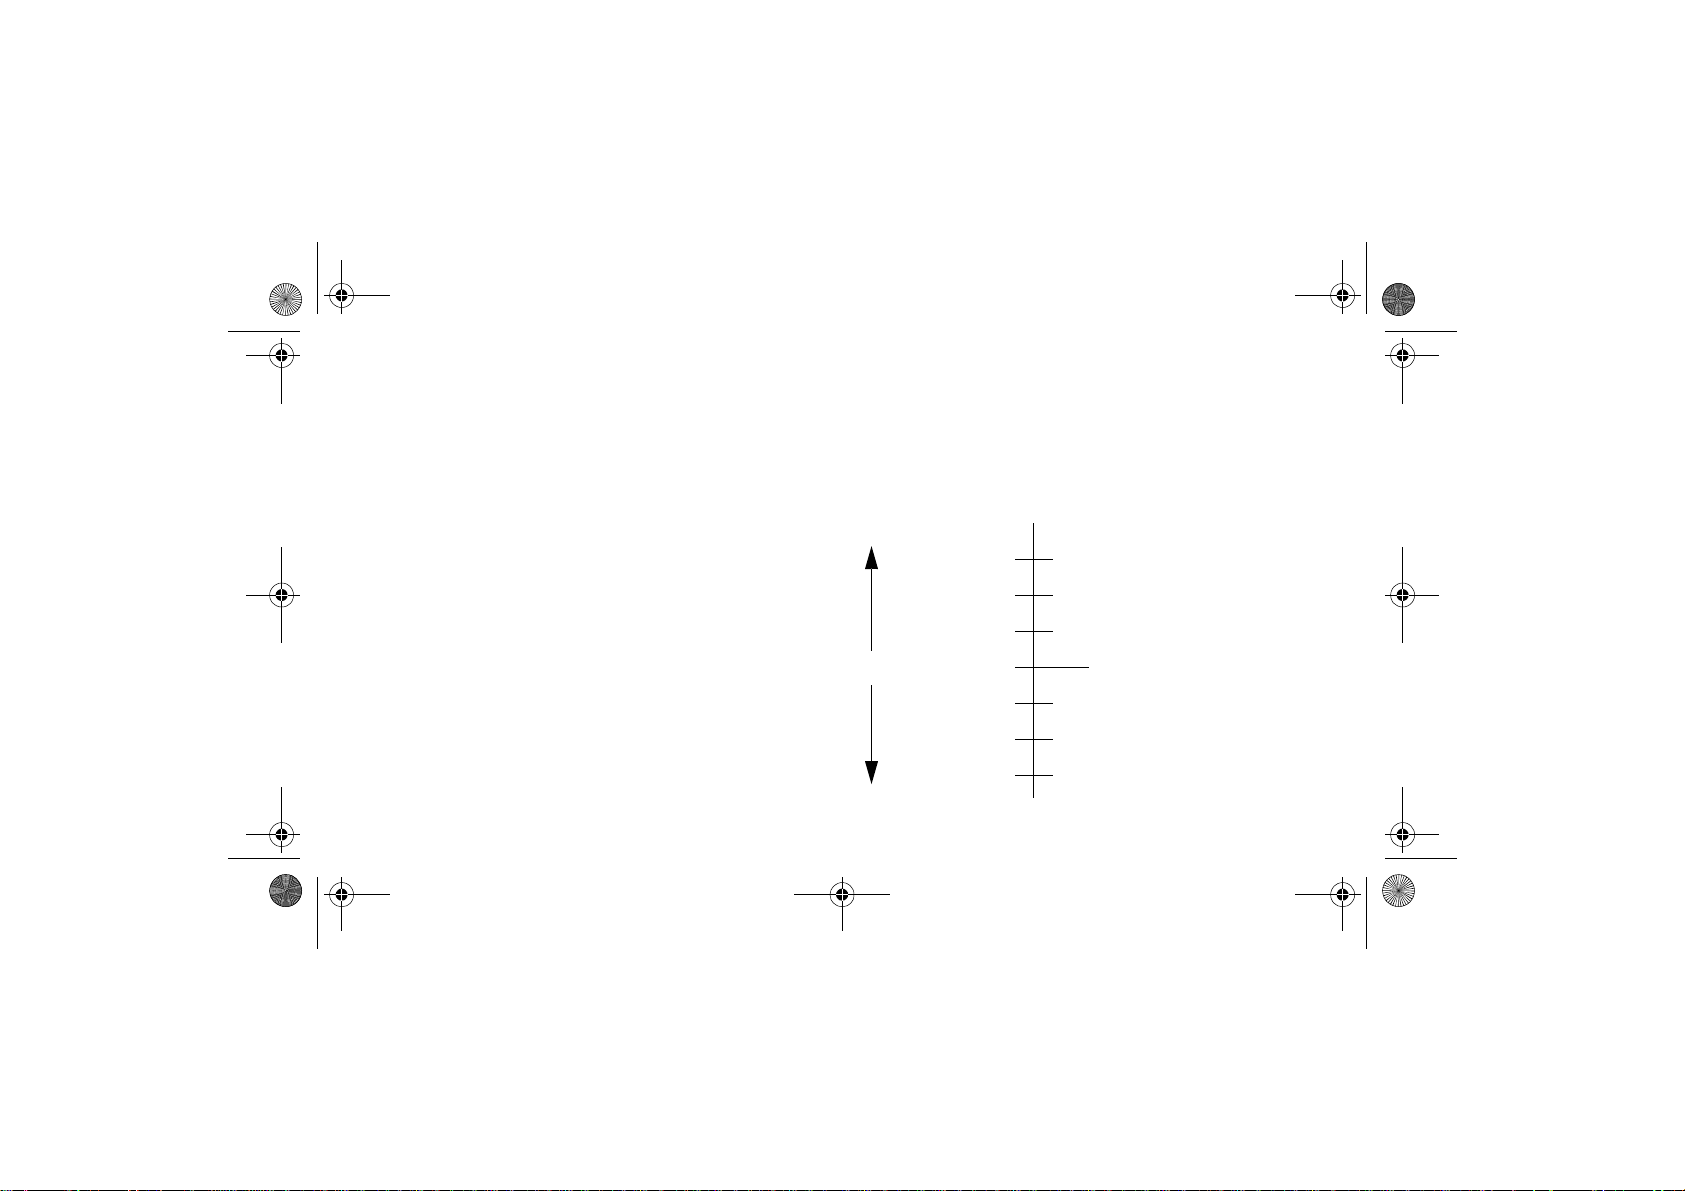
Position in Queue
The job currently being printed is in position 0.
The next job to be printed is in position 1, the one
after in position 2, and so on. The previous job
printed is in position –1, the one before that in
position –2, and so on.
up to 16 jobs
–3
–2
–1
0
1
2
3
jobs already printed
current job
jobs yet to be printed
Page 27
Prioritizing a Job in the Queue
file:///D|/hydra/ug_loc/final_hydra/Frame_files/figs/print.jpg
(“Move to Front”)
To make any job in the queue the next one to be
printed, select it and choose Move to front.
If nesting is turned on (see page 29, Avoiding
Paper Waste by Nesting Pages) the prioritized
job may still be nested with others. If you really
want this job to be printed next and on its own on
the roll, then first turn Nesting Off and then use
Move to front to move it to the top of the queue.
Managing Pages that have Not Yet been Printed 27
Deleting a Job from the Queue
Under normal circumstances, there is no need to
delete a job from the queue after printing it, as it
will just “fall off the end” of the queue as more
files are sent. However, if you have sent a file in
error and want to avoid any chance of it being
reprinted, you can delete it by selecting it and
choosing Cancel.
To remove a job that has not yet been printed,
simply identify it by its position in the queue (see
page 26, Position in Queue) and delete it, by
choosing Cancel and pressing the Enter key.
If the job is currently being printed (its queue
position is 0), and you want both to cancel the job
and to delete it from the queue, first press the
Cancel key and then cancel it from the queue.
manage prints
Page 28
Making Copies of a Job in the Queue
file:///D|/hydra/ug_loc/final_hydra/Frame_files/figs/print.jpg
Has the job already
been printed?
Yes
No
In all cases, the job must still be in the queue.
What to do
Use Reprints
(see right)
Use Copies
(see right)
28 Making Copies of a Job in the Queue
Copies and Reprints
Having selected the job and chosen Copies or
Reprints (from the Job Management (
menu), use the scrolling keys to specify the
number of copies required, and press Enter. The
number you enter is the actual number of pages
to be printed; for example, choosing 2 for a page
not yet printed means you will get the one original
and one additional; choosing 2 for a page already
printed once will result in a total of three (the
original one and two more). The maximum
number you can specify is 99.
• The setting you specify in this option overrides
any value set by your software.
• If Rotate was on when you sent the file, every
copy will be rotated also.
)
Page 29

Avoiding Paper Waste by Nesting Pages
file:///D|/hydra/ug_loc/final_hydra/Frame_files/figs/print.jpg
Nesting can only be used with roll paper.
Nesting means placing pages side-by-side on the
paper (rather than one after the other), to avoid
wasting paper.
The Printer Tries to Nest Pages When...
• The printer is loaded with roll paper rather
than sheet paper; and
• In the front-panel menus,
default). See page 25, Managing Pages that
have Not Yet been Printed; and
• In the front-panel menus,
set to a value from 1 to 99 minutes). See page
30, Turning Nesting On and Off.
Queue is On (the
Nest is On (that is,
Avoiding Paper Waste by Nesting Pages 29
To be in the Same Nest, Pages Must Satisfy
All the Following Conditions...
• All must be Color or all Grayscale.
Grayscale may include a color page rendered
in grayscale.
• All must be at the same dots-per-inch setting.
• All have the same print quality setting (Best,
Normal, Draft).
• All have the same Margin sizes.
• All must be HP-GL/2 prints or all PostScript.
• All must have the same Page accuracy.
Nesting does not cause any automatic rotation of
pages.
manage prints
Page 30
Turning Nesting On and Off Which Pages cannot be Rotated?
file:///D|/hydra/ug_loc/final_hydra/Frame_files/figs/print.jpg
Apart from obvious physical limitations on the roll,
Nest Setting
Selected
Off The printer will not nest pages.
99, ... 2, 1
The number
represents
the number of
minutes that
the printer
waits, after
receiving a
file, before it
starts
printing.
Printer’s Response
Choose one of these values if
you want to use the least
amount of paper. The printer will
search all through the queue for
suitable pages. It will nest the
pages according to an algorithm
that, for most combinations of
page sizes, saves the most
paper. The resulting nesting
pattern may still vary, depending
on the size of the first page.
30 Avoiding Paper Waste by Nesting Pages
any HP-GL/2 page containing raster data will not
be rotated.
Page 31

Ink Cartridges and Printheads
file:///D|/hydra/ug_loc/final_hydra/Frame_files/figs/print.jpg
The ink cartridges are the reservoirs that contain
the four colored inks that are used for printing. They
are located under the cover on the right side of the
printer, towards the back (see next page).
An Ink Cartridge A Printhead
Ink Cartridges: Your printer uses HP No. 10 Black and HP No. 82 Cyan, Magenta and Yellow
Printheads: Your printer uses HP No. 11 Black, Cyan, Magenta and Yellow
The printheads are the components that place
minute droplets of ink onto the paper. They are
located under the main window at the top of the
printer.
Note: Setup printheads are special nonprinting components
required only before installing the printer.
Ink Cartridges and Printheads 31
replace ink cartridges and printheads
Page 32

The frequency with which you need to change ink
file:///D|/hydra/ug_loc/final_hydra/Frame_files/figs/print.jpg
cartridges depends on the workload of your HP
DesignJet printer. Printheads should not need
replacing so often, only when problems of image
quality occur. If you find problems with the image
quality, follow the procedure on page 16 in The
Problem Is...Image Quality in this Pocket Guide.
32 Ink Cartridges and Printheads
Location of Printheads and Ink Cartridges
Page 33

Replacing Ink Cartridges
file:///D|/hydra/ug_loc/final_hydra/Frame_files/figs/print.jpg
If the printer detects that an ink cartridge needs
replacing, you will see a message with four icons
(explained below), referring from left to right to the
Cyan (•), Black (•), Magenta (•) and Yellow (•)
cartridges.
The icons may be any of the following:
The cartridge is OK; the approximate level of
the ink is indicated—a full cartridge has the
whole interior black;
Flashing; the cartridge is missing, and the
correct one must be inserted as indicated in
subsequent steps;
Flashing exclamation mark; the cartridge is
low on ink, and needs replacing at the
earliest opportunity; the ink level may show up
1
/8 full, and for some CAD drawings this
to
can be adequate for an appreciable time;
Flashing pump; the cartridge is out of ink,
and must be replaced before any further
printing can be done;
Flashing cross; the wrong cartridge is
installed, and must be replaced before any
further printing can be done.
Replacing Ink Cartridges 33
replace ink cartridges and printheads
Page 34

1 To replace a cartridge*, first open the ink cartridge
file:///D|/hydra/ug_loc/final_hydra/Frame_files/figs/print.jpg
cover.
* Don’t replace cartridges during printing.
34 Replacing Ink Cartridges
2 Then remove the ink cartridge.
Page 35

3 Insert the ink cartridge into its correct position,
file:///D|/hydra/ug_loc/final_hydra/Frame_files/figs/print.jpg
pushing it down until it clicks into place. Colored
labels on the ink cartridges must correspond with
the same colored labels on the printer. Arrows on
the cartridges point towards the front of the
printer.
4 When all cartridges have been successfully
installed the icons will stop flashing; press Enter
on the front panel (or await the time-out).
5 Finally close the ink cartridge cover. You will see
the front-panel message “HP ink cartridges
successfully installed“
Replacing Ink Cartridges 35
replace ink cartridges and printheads
Page 36

Replacing Printheads
file:///D|/hydra/ug_loc/final_hydra/Frame_files/figs/print.jpg
If there is an error with one or more printheads, the
printhead status is shown by four icons, referring
from left to right to the Cyan (•), Black (•),
Magenta (•) and Yellow (•) printheads.
In this example, three of the
printheads are OK but the magenta
one is missing (the icon flashes).
In the second example, the magenta
printhead is faulty (the cross
flashes).
If you identified a printhead as being faulty during
the Troubleshooting routine (see page 16 on the
reverse of this Pocket Guide), the icon shows a
flashing exclamation mark.
If the printer is unable to determine which of several
printheads are faulty, the front panel shows three or
four flashing question marks.
36 Replacing Printheads
Printhead Status
1 To determine the status of the printheads, from
the main front-panel menu, select Ink System
( ) and press Enter.
2 Select Information and press Enter.
3 Select Printheads and press Enter. You can
then call up the information about any of the
printheads by selecting it and pressing Enter.
Page 37

Follow these Steps to Replace Printheads
file:///D|/hydra/ug_loc/final_hydra/Frame_files/figs/print.jpg
1 From the main front-panel menu, select Ink
System ( ) and press Enter.
2 Select Replace Printheads and press Enter.
3 Wait for the front panel to display “Open window
to replace printheads”. Then open the window
and locate the carriage assembly.
Replacing Printheads 37
replace ink cartridges and printheads
Page 38

4 Release the latch on the printhead cover. You
file:///D|/hydra/ug_loc/final_hydra/Frame_files/figs/print.jpg
may need to hold this latch up out of the way
during the next steps.
38 Replacing Printheads
5 Lift up the printhead cover; this will give you
access to the printheads.
Page 39

6 To remove a printhead, lift up the blue handle. 7 With controlled force, pull the blue handle
file:///D|/hydra/ug_loc/final_hydra/Frame_files/figs/print.jpg
upwards until the printhead is released from the
carriage assembly.
Replacing Printheads 39
replace ink cartridges and printheads
Page 40

8 Remove the tape from the new printheads. 9 Insert a new printhead, ensuring that the colored
file:///D|/hydra/ug_loc/final_hydra/Frame_files/figs/print.jpg
label on the printhead corresponds to that on the
printhead slot.
40 Replacing Printheads
Page 41

10 When you have replaced all printheads that need
file:///D|/hydra/ug_loc/final_hydra/Frame_files/figs/print.jpg
replacing, pull the printhead cover down over the
printheads.
11 Close the latch on the printhead cover by
catching the hook over the latch and moving the
handle towards the back.
Replacing Printheads 41
replace ink cartridges and printheads
Page 42

12 Finally close the window.
file:///D|/hydra/ug_loc/final_hydra/Frame_files/figs/print.jpg
After the replacement of the printheads, the
printer checks that they are all functioning
correctly; this may take several minutes..
You will see the front-panel message “HP No. 11
printheads successfully installed”.
Then the printhead alignment procedure starts,
see the next section.
42 Replacing Printheads
Aligning Printheads
The printhead alignment procedure requires paper to
be loaded, and will take several minutes to perform.
You can start the procedure yourself, for example,
after clearing a paper jam, as follows:
1 From the main front-panel menu, select Ink
System ( ) and press Enter.
2 Select Align Printheads and press Enter.
3 Choose either Standard (which will take about
4½ minutes, and which is recommended for
normal use) or Special (which takes about
Page 43

11 minutes and can correct problems that occur
file:///D|/hydra/ug_loc/final_hydra/Frame_files/figs/print.jpg
with alignment across the width of the paper);
press Enter.
Standard alignment requires paper of at least A4/
Letter-size, loaded in landscape mode.
Special alignment requires paper of at least A3/
B-size, loaded in landscape mode. Two separate
prints are made.
Not all paper types are supported for alignment;
the printer will tell you if you load the wrong type.
Among those supported are: Bright White Inkjet
Paper, Coated Paper, Heavy Coated Paper and
Plain paper.
Color Calibration
Color calibration is the process of matching the ink
with the paper. When new printheads have been
installed, we recommend you use the Color
Calibration routine to ensure that the quality of your
images is optimized.
You can discover what paper the ink system is
currently calibrated for, as follows:
1 From the main front-panel menu, select Ink
System ( ) and press Enter.
2 Select Color calibration and press Enter.
Replacing Printheads 43
replace ink cartridges and printheads
Page 44

3 Choose Status and press Enter.
file:///D|/hydra/ug_loc/final_hydra/Frame_files/figs/print.jpg
You will see something like the following:
4 If the paper loaded is not as shown, choose
Calibrate paper.
44 Replacing Printheads
5 The printer will print and use a small calibration
pattern to ensure an optimal match between the
paper and the ink.
Page 45

Loading a Sheet of Paper
file:///D|/hydra/ug_loc/final_hydra/Frame_files/figs/print.jpg
1 Using the Menu and the ∆ or ∇ keys, select the
Paper menu; the following message will appear:
2 Press Enter. The following prompt will appear:
Loading a Sheet of Paper 45
3 Use the ∆ or ∇ key to select Load sheet and press
the Enter key. The following message will appear,
with a list of paper types:
4 Select the type of paper you are loading (using the ∆
and ∇ keys) and press Enter. The default selection is
whatever you used last time.
5 The front panel displays:
load a sheet of paper
Page 46

Open the window; the vacuum—which will hold the
file:///D|/hydra/ug_loc/final_hydra/Frame_files/figs/print.jpg
paper in place—comes on.
46 Loading a Sheet of Paper
6 The front panel displays:
Lift the blue lever up to lift the rollers.
Page 47

7 If you are using large sheets of paper, make sure that
file:///D|/hydra/ug_loc/final_hydra/Frame_files/figs/print.jpg
the bin is in its unfolded position by pulling it out if
necessary, so that the sheet can rest inside it.
Loading a Sheet of Paper 47
8 The front panel displays:
load a sheet of paper
Page 48

Hold the paper as shown in the following diagram;
file:///D|/hydra/ug_loc/final_hydra/Frame_files/figs/print.jpg
load the sheet of paper by performing these steps.
48 Loading a Sheet of Paper
8a Place the sheet of paper onto the platen. Make sure
it is perfectly flat and the front edge of the paper is
straight. Air suction holds the paper onto the printer
throughout the next few steps.
Page 49

8b Follow the instructions in the diagram below to load the paper.
file:///D|/hydra/ug_loc/final_hydra/Frame_files/figs/print.jpg
Push the paper under these rollers up to the blue line
Align the paper with this blue line
Loading a Sheet of Paper 49
load a sheet of paper
Page 50

8c Lower the blue lever.
file:///D|/hydra/ug_loc/final_hydra/Frame_files/figs/print.jpg
9 The front panel displays:
10 The front panel displays:
Close the window.
50 Loading a Sheet of Paper
Page 51

11 The front panel displays:
file:///D|/hydra/ug_loc/final_hydra/Frame_files/figs/print.jpg
The printer now:
• loads the sheet
• checks the alignment of the paper.
If the sheet is correctly aligned, the printer accepts
the single sheet and gives a “beep”.
If it is not correctly aligned, the sheet is ejected; the
front panel displays help instructions.
Loading a Sheet of Paper 51
12 When the front panel displays the following, the
printer is ready to print. If the print is large, open the
paper bin.
load a sheet of paper
Page 52

Unloading a Sheet of Paper
file:///D|/hydra/ug_loc/final_hydra/Frame_files/figs/print.jpg
To unload a sheet, press the Form Feed and Cut key
on the front panel.
Use caution when performing this procedure as an
image which has had insufficient time to dry could get
damaged.
52 Unloading a Sheet of Paper
Page 53

Installing a New Roll on the Printer
file:///D|/hydra/ug_loc/final_hydra/Frame_files/figs/print.jpg
1 If your printer has legs, make sure the printer wheels are
locked (the brake lever is pressed down) to prevent the
printer from moving.
Installing a New Roll on the Printer 53
2 At the back of the printer, remove the empty spindle by
pulling firmly on each end as indicated below.
The spindle has a stop at each end to keep the roll in
position. The stop that is colored blue can be removed to
mount a new roll; it slides along the spindle to hold rolls
of different widths.
load a roll of paper
Page 54

3 Remove the blue colored stop from the end of the
file:///D|/hydra/ug_loc/final_hydra/Frame_files/figs/print.jpg
spindle, and stand the spindle vertically, with the fixed
stop on the floor (see right).
4 Slide the new roll of paper on to the spindle. Make sure
the orientation of the paper is loaded exactly as shown.
If it is not, remove the roll, turn it through 180 degrees
vertically and slide it back on to the spindle.
54 Installing a New Roll on the Printer
Removable
Fixed
5 Put the removable stop on to the upper end of the
spindle, and push it down as far as it will go.
Page 55

6 With the blue colored roll stop on the right (as seen from
file:///D|/hydra/ug_loc/final_hydra/Frame_files/figs/print.jpg
the back of the printer), slide the spindle into the printer
left and then right, as shown by the arrows. The paper
should be oriented on the roll exactly as shown below.
Installing a New Roll on the Printer 55
load a roll of paper
Page 56

Loading a Roll of Paper
file:///D|/hydra/ug_loc/final_hydra/Frame_files/figs/print.jpg
1 Using the Menu and the ∆ or ∇ keys, select the Paper
menu; the following message will appear:
2 Press Enter. The following message will appear:
56 Loading a Roll of Paper
3 Select Roll load and press Enter. The following
message will appear, with a list of paper types. The
default selection is whatever you used last time.
4 Select the type of paper (using the ∆ and ∇ keys) and
press Enter.
5 The front panel displays:
Page 57

Lift the blue paper-load lever. 6 The front panel displays:
file:///D|/hydra/ug_loc/final_hydra/Frame_files/figs/print.jpg
From the front of the printer, lean over the top and feed
the paper towards you into the slot at the back of the
printer, as shown on the next page. (You may find it
easier if the media bin is pushed back out of the way.)
Try to avoid touching the paper in the middle (keep your
fingers as close as possible to each edge). Handle film
and glossy paper by the edges or wear cotton gloves.
Skin oils can interact with the ink and cause it to smear.
Loading a Roll of Paper 57
load a roll of paper
Page 58

file:///D|/hydra/ug_loc/final_hydra/Frame_files/figs/print.jpg
58 Loading a Roll of Paper
Page 59

7 The front panel displays: At the front of the printer, align the paper against the
file:///D|/hydra/ug_loc/final_hydra/Frame_files/figs/print.jpg
blue line as shown here:
Loading a Roll of Paper 59
load a roll of paper
Page 60

Lower the blue paper-load lever. 8 The front panel displays:
file:///D|/hydra/ug_loc/final_hydra/Frame_files/figs/print.jpg
The printer checks the alignment of the paper.
If it is not correctly aligned, the front panel displays help
instructions.
9 The printer trims the edge of the roll...
60 Loading a Roll of Paper
Page 61

10 ...and then displays:
file:///D|/hydra/ug_loc/final_hydra/Frame_files/figs/print.jpg
If there is an excess of loose paper, wrap it back onto the
roll by turning the roll; then press Enter.
Loading a Roll of Paper 61
11 When the front panel displays the following, the printer is
ready to print. If the print is large, open the paper bin.
load a roll of paper
Page 62

Unloading a Roll of Paper
file:///D|/hydra/ug_loc/final_hydra/Frame_files/figs/print.jpg
To cut the roll, press the Form Feed and Cut key on the
front panel. Use caution when performing this procedure as
an image which has had insufficient time to dry could get
damaged.
To unload a roll from the printer: select Unload roll from the
front-panel Paper menu; lift the blue paper lever; pull the
paper through to the back of the machine until it is free;
wind the paper back onto the roll; then lower the blue lever.
62 Unloading a Roll of Paper
Page 63

qrg2cov.fm Page 1 Friday, June 16, 2000 3:04 PM
file:///D|/hydra/ug_loc/final_hydra/Frame_files/figs/print.jpg
the problem is…
!
pocket guide
i
hp designjet 500 series printers
hp designjet 800 series printers
printed in the European Union
Page 64

Contents—The Problem Is...
file:///D|/hydra/ug_loc/final_hydra/Frame_files/figs/print.jpg
Paper is Jammed 3
No Output or Very Slow Output 7
Unexpected Output 11
Image Quality 15
The Troubleshooting Procedure 16
Advance Calibration Routine 22
Front-Panel Error Messages 25
You may also find other information
about HP DesignJet printers, associated
software and support on the HP websites at:
www.hp.com/go/designjet
or
www.designjet-online.com.
See the on-line
User’s Reference
Guide, which is on
the Using Your
Printer CD, for
further information
about using your HP
DesignJet 500 or
800 Series printer.
The other side of this Pocket Guide
contains information about how to:
• Navigate the Front Panel (page 4)
• Manage Prints (page 23)
• Replace Ink Cartridges and
Printheads (page 31)
• Load/Unload Sheet Media (page 45)
• Load/Unload Roll Media (page 53)
Page 65

Removing Jammed Paper
file:///D|/hydra/ug_loc/final_hydra/Frame_files/figs/print.jpg
If the front panel displays:
there is probably paper jammed in the printer.
Paper jams can have various causes:
• The paper is too thick or too thin for the
printer, or is otherwise not supported
• The paper is creased or misaligned or is
bubbled
• Too much ink is being placed on the paper
causing it to cockle or bubble
• The end of the roll of paper is glued to the
Removing Jammed Paper 3
core and won’t advance further
• Pieces of paper or paper powder are
clogging up the cutter guide or other
moving parts.
To remove jammed paper:
1 Open the window.
paper jam
Page 66

2 Switch the printer off at the front.
file:///D|/hydra/ug_loc/final_hydra/Frame_files/figs/print.jpg
3 If necessary, carefully move the printhead
carriage out of the way—if possible all the
way to the enclosed area on the left or the
right. Which way you are able to move it
depends on where the paper is jammed.
CAUTION When moving the printhead
carriage, touch only the black plastic parts.
4 If necessary, carefully move the paper
cutter out of the way to the left, or to the
right depending on where the paper is
4 Removing Jammed Paper
jammed (though if moved right it may block
the paper path).
CAUTION The cutter is easily moved by
holding it as close as possible to the guide
running across the width of the printer. Be
careful not to touch the metal slider bar that
runs across the printer.
Slider bar
Guide
Page 67

5 If necessary, lift the blue paper lever, to
file:///D|/hydra/ug_loc/final_hydra/Frame_files/figs/print.jpg
release any trapped paper. Remember to
lower it again when you have finished.
6 Carefully remove any of the jammed paper
which you can easily lift up and out from
the top of the printer.
7 Carefully pull the rest of the roll or sheet
down and out of the printer. You may need
to cut the edge of the roll with scissors.
Removing Jammed Paper 5
8 Check that the printing zone, including the
cutter guide, the paper path, and the area
where the printhead carriage is parked, is
clear and clean; remove any paper powder
by brushing it away or with a vacuum
cleaner.
CAUTION The area where the printhead
carriage is parked can get quite dirty; be
careful not to get ink on your hands.
9 Close the window and switch on the
printer.
paper jam
Page 68

10 Wait for the printer to finish initializing.
file:///D|/hydra/ug_loc/final_hydra/Frame_files/figs/print.jpg
11 Press the Form Feed and Cut key on the
front panel to eject any small pieces of
paper that are still in the paper path.
12 Reload the paper as normal. If you are
using roll paper you may need to trim the
edge first, to ensure that it is straight.
Note If there is still paper left in the paper
path, try loading a sheet of stiff or rigid
paper into the printer, such as heavy
coated or matte film; this will help to force
out any paper jammed in the paper path.
13
If the cutter seems to be causing the
problem, check in the User’s Reference
Guide on the Using Your Printer CD that
the type of paper is supported by the
6 Removing Jammed Paper
printer. Try disabling the cutter from the
front panel; use → Cutter → Off.
14 You are strongly recommended to use the
Align Printheads procedure (see page 42
on the reverse of this Pocket Guide) after
clearing a paper jam, as the problem may
have caused the printheads to be
misaligned. (Select → Align
Printheads → Standard alignment.)
Note that you do not have to interpret the
patterns printed by the Printhead
Alignment routine.
Page 69

No Output or Slow Output
file:///D|/hydra/ug_loc/final_hydra/Frame_files/figs/print.jpg
If the printer won’t print, or its output appears to
be too slow, there may be a communications
problem. Some symptoms of this type of problem
are:
• The front-panel display does not show
evidence of any activity in the Job
Management [ ] menu.
• Your computer displays an error message
when you are trying to print.
• Your computer or printer “hangs” (stays idle)
while communication is taking place.
• Your printed output shows random or
inexplicable errors (misplaced lines, partial
graphics etc.)
No Output or Slow Output 7
Items to start checking are:
• Have you selected the correct interface port in
your software?
• Does the printer work correctly when receiving
files from other software?
• If the printer is connected to a network, try
using it when connected directly to your
computer.
• If the printer is connected to your computer
through any other intermediate devices, such
as switch boxes, buffer boxes, cable adapters,
cable converters, and so on, try using it
connected directly to your computer.
• Try another interface cable.
no output or slow output
Page 70

If the Printer does not Print
file:///D|/hydra/ug_loc/final_hydra/Frame_files/figs/print.jpg
• You may have a power problem. If there is no
activity at all from the printer, and nothing on
the front panel, check the power button light,
that the power cable is connected correctly,
and that there is power available at the socket.
• If you are using a Macintosh and the print job
does not print, ensure the printer language is
set to Postscript or Automatic. See the
→ Graphic Language setting on the front
panel.
• You may have a problem with your application
driver. Is your software configured for this
printer? For general advice, see the Setup
Poster. For advice specific to your software,
see the documentation supplied with the
driver.
8 No Output or Slow Output
• If you have connected your computer to the
printer’s parallel port and tried to print a
binary-encoded PostScript file it will not print.
The parallel port will only accept ASCIIencoded PostScript print files. The front panel
will display the message “Error processing
job. Flushing rest of job”. Connect your
computer to the HP JetDirect Print Server and
send the print file again.
• The file may be too large for the printer’s
memory. This is the case if the front panel
displays “Out of memory. Data was lost”. Look
on your computer screen for any error
message; some drivers allow you to choose a
different printing mode—try to resend the file.
• If you continue to have problems, see
the “Solutions” section of the User’s
Reference Guide.
Page 71

If the Printer Seems Too Slow
file:///D|/hydra/ug_loc/final_hydra/Frame_files/figs/print.jpg
• Did you specify Best print quality level on the
front panel? Best quality prints are produced
more slowly. See → Print quality.
Did you additionally specify Maximum detail
on the front panel? This option means that
best quality prints are produced even more
slowly. See → Advanced options →
Best quality settings → Maximum detail.
(Note that these settings are usually controlled
by the driver or software you are using.)
• Did you specify the right media type when
loading the media? See → Select paper
type.
• The printhead may need replacing. See
page 36 on the reverse of this Pocket Guide.
No Output or Slow Output 9
• Did you specify a Manual drying time in the
front panel?
Try → Drying time → Automatic.
• If the printer is in Normal mode and the file it
is printing contains high-density inked areas
the printer will need to slow down to
compensate.
If the Printer Waits Too Long to Print a Nest
• Change the Nest wait setting.
See → Nest → Nest wait.
no output or slow output
Page 72

file:///D|/hydra/ug_loc/final_hydra/Frame_files/figs/print.jpg
10 No Output or Slow Output
Page 73

Unexpected or Wrong Output
file:///D|/hydra/ug_loc/final_hydra/Frame_files/figs/print.jpg
• Check that the Processing HP-GL/2 or
Processing PS messages in the front panel are
as you expect them to be.
• Ensure that your printer understands the graphic
language you use. See → Graph. Lang.
Typical problems are:
• The print is completely blank
– Try changing the → Graph. Lang setting.
• The output contains only a partial print
– Don’t press Cancel or Form Feed and Cut
before all the data is received by the printer;
– Try increasing the → I/O Setup → I/O
Timeout setting or any timeout setting in your
network software;
Unexpected or Wrong Output 11
– Try installing extra memory in your printer—
extra memory is installed on the formatter
(accessory) card, for PostScript or HP-GL/2,
that is installed at the back of the printer;
– Check the interface cable between your
computer and the printer;
– Check the software settings for the page size.
• The image is clipped
– Check the printing area in your software and
that on the printer; don’t forget any margins;
– Check the media orientation assumed by your
software; check the → Page format →
Rotate option;
– Try installing extra memory in your printer’s
formatter card (see above).
unexpected or wrong output
Page 74

• A long-axis print is clipped
file:///D|/hydra/ug_loc/final_hydra/Frame_files/figs/print.jpg
– Does your software support long-axis prints?
– Have you specified an appropriate media size
in your software?
– Unless it is a PostScript file, make sure that
→ Page format → Size → Inked area is
set.
• An HP-GL job prints incorrectly or not at all
– HP-GL is not supported by these printers.
• The entire image is in one quadrant of the correct
printing area
– Is the page size configured in the software too
small?
– Are you sure that your software doesn’t
believe the image to be in one quadrant of the
page?
12 Unexpected or Wrong Output
– Try changing the language setting.
See → Graph. Lang.
• The image is unexpectedly rotated
– Check the → Page format → Rotate
option.
• The print is a mirror image of your image
– Check the → Page format → Mirroring
setting.
• The print is distorted or unintelligible
– Check and if necessary replace the interface
cable between your computer and the printer;
– Try changing the language setting.
See → Graph. Lang.
– Refer to the vendor’s user documentation for
details of other software or drivers.
Page 75

• One image overlays another on the same sheet
file:///D|/hydra/ug_loc/final_hydra/Frame_files/figs/print.jpg
– Try reducing the → I/O Setup → I/O
Timeout setting. (This normally does not
apply to HP-GL/2 printing.)
• Pen settings seem to have no effect
– Have you changed them in →
HP-GL/2 settings → Define palette?
Check that the palette is selected in
→ HP-GL/2 settings → Palette.
– Do you expect software-driven pen settings?
Check that → HP-GL/2 settings →
Palette is set to Software.
– Have you changed the setting in the front
panel but this has been ignored because the
driver setting has not been changed.
• The printer produces a black-and-white print
when you expected a color print
– Check the front-panel Color/monochrome
setting, and the equivalent setting in your
software. See → Color settings → Color
/ monochrome → Color / Grayscale / True
black.
• Page format or Rotate does not work
– These options are available only on the HP
DesignJet 800 Series, or if you have an
HP-GL/2 accessory card installed in your HP
DesignJet 500 Series printer;
– Try installing extra memory in your printer’s
formatter card (see page 11);
– The printer cannot rotate raster images.
Unexpected or Wrong Output 13
unexpected or wrong output
Page 76

• The print is not the one you were expecting
file:///D|/hydra/ug_loc/final_hydra/Frame_files/figs/print.jpg
– You may have printed an internal print (for
example, a printhead alignment print).
There is a further list of problems and how to fix
them in the on-line User’s Reference Guide, on
the Using Your Printer CD.
14 Unexpected or Wrong Output
Page 77

Image Quality Problems
file:///D|/hydra/ug_loc/final_hydra/Frame_files/figs/print.jpg
Follow these guidelines if there are problems with the
quality of your prints. The sort of problems you might
notice are:
• Horizontal streaks on lines:
or
• Jagged vertical or horizontal lines
Image Quality Problems 15
• Horizontal banding or horizontal white streaks
80
Expanding Possibilities
80
Ironk
Pojfdjop ernk aure
Pojfdjop ernk Chorme
Pojfdjop ernk aure
Expanding Possibilities
80
Ink erov
Caps
Ink cartridge
80
80
kheuhg sfrfefg
kheuhg sfrfefg
However, if a message, like “Problems detected in INK
CARTRIDGES” appears in the front panel of your
printer, follow the instructions given for that message in
the “Front-Panel Error Messages” section starting on
page 25 of this Pocket Guide.
The following guide applies to situations where you (and
not the printer) perceive a problem with image quality.
image quality
Page 78

Note: It is important that the paper loaded for the
file:///D|/hydra/ug_loc/final_hydra/Frame_files/figs/print.jpg
troubleshooting procedure is exactly the same type (for
example, glossy paper) as the one you used when you
encountered image quality problems. If you use a
different kind of paper, you stand less likelihood of
resolving the problem. However, you must use a roll of
paper (not a sheet) for this procedure.
Pages 20 and 21 show the overall
flow in the Troubleshooting
procedure, and indicate the main
actions that take place.
16 The Troubleshooting Procedure
The Troubleshooting Procedure
Run the Troubleshooting procedure as follows:
1 From the main front-panel menu, select the Ink
menu ( ) and press Enter.
2 Select Troubleshooting
and press Enter.
3 The printer first checks to
see whether the printheads
are aligned. Misalignment
of the printheads is a common cause of image quality
problems. If they are not aligned, you are prompted
Page 79

to accept their alignment now. This procedure
file:///D|/hydra/ug_loc/final_hydra/Frame_files/figs/print.jpg
requires a few centimeters of paper loaded and takes
several minutes to perform. (Note that you do not
have to interpret the patterns printed by the
Printhead Alignment routine.) See page 42 on the
reverse of this Pocket Guide.
4 If the printheads do not seem to require alignment,
the printer prints Diagnostic Print A, several blocks
of color and a block of thin black broken lines (the
lines are actually very much closer than those
represented here).
5 Examine the broken lines in Diagnostic Print A
carefully and indicate whether there are problems
(Ignore this black bar)
with them.
The sorts of problems to look for here are:
• Jaggedness or serrations in the thin lines, like
this: ;
the thin lines should be straight, though not
necessarily perfectly aligned.
The irregularities that are significant extend along
The Troubleshooting Procedure 17
Diagnostic Print A
image quality
Page 80

the whole of the length of the lines. Shorter
file:///D|/hydra/ug_loc/final_hydra/Frame_files/figs/print.jpg
irregularities, arranged in columns, can be
ignored at this stage.
6 Examine the blocks of color in Diagnostic Print A
carefully and indicate whether there are problems
with them. The sorts of problems to look for here are:
• White streaks or bands in the solid
blocks.
7 If you indicate that there is a problem
with the dashed lines in Diagnostic
Print A, you are prompted to use the Advance
Calibration routine; your printer will be at step 3 of
the routine on page 22 (if you don’t want to continue
with calibration, press the Cancel key).
8 If there are problems in the blocks of color in
Diagnostic Print A, for example white streaks or
bands, the printer will try to clean the printheads that
18 The Troubleshooting Procedure
have the problem. A printhead can be cleaned up to
three times this way; after that it cannot be cleaned
and you will be told; the Troubleshooting routine will
finish. In that case we recommend that you try to
reprint your print, and then, if necessary, start the
Troubleshooting routine again.
After cleaning the printheads, the printer reprints the
blocks of color (but not the black lines) in Diagnostic
Print A, and asks you to examine it again (as in step
5 on page 17).
9 If there are no problems the first time you print
Diagnostic Print A, the printer prints Diagnostic
Print B.
10 For each color in the pattern in Diagnostic Print B,
you are asked about the quality—look for missing
lines. If you answer that a color is defective, the
printer tries to clean that printhead.
Page 81

Diagnostic Print B
file:///D|/hydra/ug_loc/final_hydra/Frame_files/figs/print.jpg
(Ignore these
solid bars)
If the printhead cleaning process completes,
Diagnostic Print B is printed again and you are
asked the same questions again.
11 Afterwards, if problems with images remain, use the
Troubleshooting procedure again.
The Troubleshooting Procedure 19
If none of the patterns or blocks in the two
Diagnostic Prints shows any problem, it could be
that your image quality problem is caused by a wrong
setting in your software, or perhaps the job should
have been printed with the Print quality set to Best
instead of Normal or Draft.
If the Troubleshooting routine didn’t indicate that
printhead alignment was necessary, you can select
Align printheads in the Ink menu to try to solve any
further image quality problems.
image quality
Page 82

O
verview of the Troubleshooting Procedure
file:///D|/hydra/ug_loc/final_hydra/Frame_files/figs/print.jpg
START HERE
Printer checks
whether
Printhead Alignment
(a likely cause of
problems) is required
Printhead Alignment is
required
Printer recommends
Aligning Printheads
(Standard or Special)
If possible,
printer tries to
Clean
Printheads
If printheads have
been cleaned 3
times,
Troubleshooting
finishes
End
Printhead Alignment
isn’t required
Printer prints
Diagnostic Print A
including black lines
Printer prints
Diagnostic Print A
with no black lines
Printer asks
questions about
Diagnostic Print A
Printheads need cleaning
20 The Troubleshooting Procedure
Printheads are OK
Wrong paper
advance
(subsequent
printing of Print A)
(first printing
of Print A)
Printer recommends
Advance Calibration
Page 83

If printheads have been
file:///D|/hydra/ug_loc/final_hydra/Frame_files/figs/print.jpg
cleaned 3 times,
Troubleshooting finishes
If possible, printer tries to Clean Printheads
No
and Magenta,
Yellow and Black
Printer prints
Diagnostic Print B
Are Cyan patterns
in Diagnostic
Print B OK?
The Troubleshooting Procedure 21
Yes
(all OK)
No problems detected
image quality
Page 84

Advance Calibration Routine
file:///D|/hydra/ug_loc/final_hydra/Frame_files/figs/print.jpg
It is important that the paper loaded for this calibration is
exactly that used for normal printing, both in quality (for
example, glossy paper) and in width (for example, A0 or
36-inch). Either roll or sheet paper can be used.
The routine prints a pattern and then cuts the roll or
ejects the sheet; it requires paper that is at least 65 cm
long and at least 50 cm wide. You must then reload that
piece of paper as a sheet, so that the printer can
accurately measure the pattern, and make whatever
adjustments are appropriate to the amount it advances
between printing swaths of data. (See page 45, “Load a
Sheet of Paper” on the reverse of this Pocket Guide.)
The pattern printed is solely for the use of the printer;
you are not expected to relate any of its characteristics
to the quality of your images.
22 Advance Calibration Routine
1 From the main front-panel menu, with the correct
paper loaded, select the Paper menu ( ) and
press Enter.
2 Select Advance
calibration and press
Enter.
3 Select Create pattern and
press Enter. The printer
prints its calibration pattern
(as represented opposite)
and cuts or ejects the paper.
Page 85

Direction of paper while printing
file:///D|/hydra/ug_loc/final_hydra/Frame_files/figs/print.jpg
4 Load the sheet printed side up with the dotted line at
the top (that is, rotated 90º).
5 Now select Measure
pattern and press Enter.
The printer reads the
calibration pattern and
makes the appropriate
internal adjustments.
(creating pattern)–step 3
Direction of paper when loading
image quality
(measuring pattern)–step 5
Advance Calibration Routine 23
Page 86

file:///D|/hydra/ug_loc/final_hydra/Frame_files/figs/print.jpg
24 Advance Calibration Routine
Page 87

Front-Panel Error Messages
file:///D|/hydra/ug_loc/final_hydra/Frame_files/figs/print.jpg
This is a list of the error messages in the front-panel display. If an action is needed, it is shown in italics in the Explanation
and Action column. The messages are listed in alphabetical order. Other front-panel messages, such as prompts, are
included in the descriptions of the relevant procedures elsewhere in this Pocket Guide (in the How Do I... part) or in the
User’s Reference Guide (indicated by the symbol
Message Explanation and Action
), which you can find on the Using Your Printer CD.
Alignment error
Press ENTER to continue
Alignment error due to
printheads.
Press ENTER to see faulty
printheads
The printer was aligning its printheads, but encountered an error. Alignment has
stopped.
Press the Enter key.
The printer was aligning its printheads, but encountered an error due to some
printheads not printing properly. Alignment has stopped.
Press the Enter key.
Front-Panel Error Messages 25
front-panel error messages
Page 88

Message Explanation and Action
file:///D|/hydra/ug_loc/final_hydra/Frame_files/figs/print.jpg
Cartridges will expire in days: nnOne or more of the cartridges are about to expire. nn is the number of days until
expiry date of the cartridge that will expire first. The cartridges that are about to expire
are indicated below this message.
For details of the replacement procedure, see page 33 on the reverse of this
Pocket Guide.
Color calibration error
Press ENTER to continue
Error
Select Replace Printheads
The printer was performing a calibration of its color system, but encountered an error.
Press the Enter key.
The printer has detected that one or more of the printheads is missing or has an error,
as indicated by flashing crosses. The four icons refer from left to right to the Cyan (•),
Black (•), Magenta (•) and Yellow (•) printheads.
For an explanation of the replacement procedure, see page 36 on the reverse of
this Pocket Guide.
26 Front-Panel Error Messages
Page 89

Message Explanation and Action
file:///D|/hydra/ug_loc/final_hydra/Frame_files/figs/print.jpg
Error processing job.
Flushing rest of job
HP is not responsible for
damage from use of non-HP
ink.
Replace
Continue
The file format is wrong and the printer cannot process the job.
Check the graphic language setting on the front panel (select Graphic Language in
the Set-up menu. Check that the format of the file is correct, for example, that a
PostScript file is encoded in ASCII, not in binary.
The printer has determined that one or more of the ink cartridges is not an HP
product. Your product warranty only applies when you use HP ink. Any damage
caused to your printer resulting from the use of non-HP ink cartridges is not the
responsibility of Hewlett-Packard.
If you want to replace the non-HP ink cartridges, select Replace and press the Enter
key. Otherwise, select Continue and press Enter to continue.
Front-Panel Error Messages 27
front-panel error messages
Page 90

Message Explanation and Action
file:///D|/hydra/ug_loc/final_hydra/Frame_files/figs/print.jpg
HP is not responsible for
damage from use of non-HP
printheads.
Replace
Continue
Ink cartridge replacement
required
The printer has determined that one or more of the printheads is not an HP product.
Your product warranty only applies when you use HP printheads. Any damage
caused to your printer resulting from the use of non-HP printheads is not the
responsibility of Hewlett-Packard.
If you want to replace the non-HP printheads, select Replace and press the Enter
key. Otherwise, select Continue and press Enter to continue.
The printer has detected that one or more of the ink cartridges is missing or has an
error, as indicated by flashing crosses. The four icons refer from left to right to the
Cyan (•), Black (•), Magenta (•) and Yellow (•) cartridges.
For an explanation of the icons and details of the replacement procedure, see
page 33 on the reverse of this Pocket Guide.
28 Front-Panel Error Messages
Page 91

Message Explanation and Action
file:///D|/hydra/ug_loc/final_hydra/Frame_files/figs/print.jpg
INK CARTRIDGES need to be
functional.
Replace before replacing
printheads
Install missing cartridges and
replace empty cartridges
before replacing printheads
You have attempted to replace printheads, but the printer has detected that there are
ink cartridges that are wrong. The ink cartridges must be replaced before the
printheads can be replaced.
First replace the faulty, empty or missing ink cartridges and then replace the
printheads. See “Replacing Ink Cartridges” on page 33 and “Replacing
Printheads” on page 36 on the reverse of this Pocket Guide.
You are replacing printheads, but the printer has detected that some cartridges are
empty and some are missing. The empty cartridges must be replaced and the
missing ones inserted before the printheads are replaced.
Follow the procedure for replacing empty cartridges, described on page 36 on
the reverse of this Pocket Guide.
Press the Enter or Cancel key to continue.
Front-Panel Error Messages 29
front-panel error messages
Page 92

Message Explanation and Action
file:///D|/hydra/ug_loc/final_hydra/Frame_files/figs/print.jpg
Install missing cartridges
before replacing printheads
Normal printheads found
Open window and replace with
SETUP printheads
You are replacing printheads, but the printer has detected that one or more cartridges
are missing. The missing cartridges must be installed before the printheads are
replaced.
Follow the procedure for inserting cartridges, described on page 33 on the
reverse of this Pocket Guide.
Press the Enter or Cancel key to continue.
This message is displayed when normal printheads are detected during installation
and the printer requires them to be replaced with the setup printheads.
Remove the normal printheads and install the setup printheads. The procedure
is described on page 33 on the reverse of this Pocket Guide.
30 Front-Panel Error Messages
Page 93

Message Explanation and Action
file:///D|/hydra/ug_loc/final_hydra/Frame_files/figs/print.jpg
Open window and check
printhead cover is properly
closed
Open window and check
proper installation of setup
printheads
You have replaced one or more printheads and the printer’s check has found that the
printhead cover is not securely closed.
Open the window and check the printhead cover. The procedure is described on
page 36 on the reverse of this Pocket Guide.
Note: This message may also appear following a paper jam, as the printer cannot
detect the exact reason for the problem. In this case you may have to resort to
powering off the printer or even removing the power cable from the machine, in order
to recover from the problem. See “Removing Jammed Paper” on page 3.
During system start-up, which occurs when you first install the printer, you need to
install the setup printheads. These special printheads cannot be used for printing, but
must be used when the printer has been powered off. The printer has detected that
the setup printheads have not been installed correctly.
Open the window and follow subsequent instructions to reinstall or relocate the setup
printheads. Contact HP for advice if the setup printheads are missing or cannot be
installed correctly.
Front-Panel Error Messages 31
front-panel error messages
Page 94

Message Explanation and Action
file:///D|/hydra/ug_loc/final_hydra/Frame_files/figs/print.jpg
Option not available now You have selected an option in the menu that is not available at the moment. (The
printer may be busy, out of ink, out of paper, etc.)
Out of memory.
Data was lost
The file is too large to be processed by the printer.
Simplify the print and try resending the job. Try setting the Print Quality (in the Setup menu) to Fast or Normal instead of Best. If the problem persists, you may have to
add more memory to the formatter card that is installed in the back of the printer.
Out of paper The printer ran out of paper while printing the calibration pattern.
Load a sheet or roll that is at least 65 cm (25 inches) long and 50 cm (20 inches)
wide.
32 Front-Panel Error Messages
Page 95

Message Explanation and Action
file:///D|/hydra/ug_loc/final_hydra/Frame_files/figs/print.jpg
Paper advance calibration is
recommended. Load paper
and select Paper advance
calibration.
Press ENTER to finish
Paper advance calibration is
recommended.
Press ENTER to calibrate
Paper loaded with too much
skew
Press ENTER to retry
Press CANCEL to abort
You are recommended to perform the Advance calibration routine, to ensure the
optimum print quality.
Load a sheet or roll of paper and then select Advance calibration from the Paper
menu. See “Advance Calibration Routine” on page 22.
You are recommended to perform the Advance calibration routine, to ensure the
optimum print quality.
Press the Enter key to create the calibration pattern. See “Advance Calibration
Routine” on page 22.
During the loading of paper, the printer has detected that the paper is skewed too
much, that is, it has not been loaded straight enough. (‘Skew’ is the angle between
the actual paper edge and the correct line.)
Either: Press the Enter key to restart the loading procedure;
Or: Press the Cancel key to cancel paper loading.
Front-Panel Error Messages 33
front-panel error messages
Page 96

Message Explanation and Action
file:///D|/hydra/ug_loc/final_hydra/Frame_files/figs/print.jpg
Paper mispositioned The paper is not properly positioned in the printer. Either it is out of the load line
margins or it has moved too much from its previous position.
Reload the paper following the normal procedure, to solve this problem. See “Loading
a Sheet of Paper” on page 45 and “Loading a Roll of Paper” on page 56 on the
reverse of this Pocket Guide.
Paper not found
Press ENTER to retry
Press CANCEL to abort
Paper not present.
Load paper to print calibration
pattern
During the loading of paper, the printer has detected that no paper has been loaded.
Either: Press the Enter key to restart the loading procedure;
Or: Press the Cancel key to cancel paper loading.
The paper axis calibration routine has been triggered with out having paper loaded.
Load paper; see “Advance Calibration Routine” on page 22 for details of the routine.
34 Front-Panel Error Messages
Page 97

Message Explanation and Action
file:///D|/hydra/ug_loc/final_hydra/Frame_files/figs/print.jpg
Paper too big
Press ENTER to retry
Press CANCEL to abort
Paper too big to scan the
pattern after printing it
Paper too small
Press ENTER to retry
Press CANCEL to abort
Paper too small for a
diagnostic print
While loading paper into the printer (roll or sheet), the printer has found that it is either
too wide or too long (only for sheet) to be loaded properly.
Press the Enter key to load smaller paper, or the Cancel key to stop the load.
During the paper loading for the Calibration routine, the printer has detected that the
paper will not be loadable later when it will be needed for scanning. The minimum
size required for the print is 65 cm (25 inches) long and 50 cm (20 inches) wide.
Load a smaller sheet that satisfies this minimum requirement.
While loading paper into the printer (roll or sheet), the printer has found that it is either
too narrow or too short (only for sheet) to be loaded properly.
Press the Enter key to load larger paper, or the Cancel key to stop the load process.
The Troubleshooting utility has found that the single sheet loaded in the printer is too
small for a Diagnostic Print.
Load a roll of paper, or a sheet that is A3-size or larger.
Front-Panel Error Messages 35
front-panel error messages
Page 98

Message Explanation and Action
file:///D|/hydra/ug_loc/final_hydra/Frame_files/figs/print.jpg
Paper too small to align The paper loaded is not big enough to contain the alignment pattern.
Unload the paper (select Unload roll or Unload sheet from the Ink menu) and then
load paper that is large enough—at least A4/Letter-size in landscape mode for
Standard alignment, or A3/B size in landscape mode for Special alignment.
Paper too small to print the
pattern
Pattern not found
Reload it again, please
The paper loaded is not big enough to contain the paper axis calibration pattern.
Load a roll or sheet that is at least 65 cm (25 inches) long and 50 cm (20 inches)
wide.
The printer is trying to perform a scan of the calibration pattern, but the pattern was
not found.
Reload the sheet that was printed by the Create pattern part of the calibration
routine.
36 Front-Panel Error Messages
Page 99

Message Explanation and Action
file:///D|/hydra/ug_loc/final_hydra/Frame_files/figs/print.jpg
Possibly a paper jam
1. Open window
2. Switch power off
3. Clear paper path
4. Switch power on
5. Align printheads
Printhead replacement not
available now. Cancel print
jobs before replacement
There may be paper jammed in the printer. (The printer has detected that a motor is
blocked and the likely cause is a paper jam; however, it may be due to some other
cause.)
Follow these steps to check the paper path, as described in “Removing Jammed
Paper” on page 3. When the jammed paper has been cleared, you are strongly
recommended to align the printheads, as they are quite likely to have become
misaligned as a result of the paper jam.
You have requested the printer to replace one or more printheads, but the printer is
busy printing a job and cannot honor the request now.
Either: press the Cancel key to cancel the job that is currently printing, and then
again select Replace Printheads (from the Ink system menu).
Or: wait until the job has finished printing (and there are no more jobs in the print
queue), and then again select Replace Printheads (from the Ink system menu).
Front-Panel Error Messages 37
front-panel error messages
Page 100

Message Explanation and Action
file:///D|/hydra/ug_loc/final_hydra/Frame_files/figs/print.jpg
Printhead warning
Poor print quality
PRINTHEADS not functional
Replace printheads
Cancel print
A problem has occurred with one or more printheads. The printheads are still
functional. The problem was detected either during printhead alignment or during
troubleshooting. If you have completed the routine, the system was unable to clean
the printheads fully.
You should use the Troubleshooting routine (see page 16) to correct any image
quality problems that may be apparent; alternatively, you should replace the
printheads (see page 36 on the reverse of this Pocket Guide).
The printer is attempting to print a job, but finds that there is a problem with the
printheads. You may either replace the printheads at this stage or cancel the print.
Select the required option and press the Enter key. If you decide to replace them, you
will be told which ones are failing or missing.
38 Front-Panel Error Messages
 Loading...