

Page 1
Introduction
The User’s Reference Guide Introduction To Your Printer Printer with Ta ke-Up Reel Printer with Bin Assembly
Media & Ink Front-Panel Other
Solutions
Printer
Options
Index
Introduction
The User’s Reference Guide
This section explains how to use this guide.
Introduction To Your Printer
This section explains some of the functionality of
the printer and its features.
Printer with Take-Up Reel
A front view of the HP Designjet 5000PS.
Printer with Bin Assembly
A front view of the HP Designjet 5000.
Page 2

Introduction
The User’ s Reference Guide Introduction To Y our Printer Printer with Ta ke-Up Reel Printer with Bin Assembly
Media & Ink Front-Panel Other
Solutions
Printer
Options
Index
The User’s Reference Guide
Overview
This is a general overview on how to use this User’s
Reference Guide and its structure.
The “Tabs”
An explanation of the tabs found at the top of each
page.
The “Buttons”
An explanation of what the navigation buttons do along
the side of the page.
Animation
Explains how to start the animations included in this
User’s Reference Guide.
Page 3
Introduction
The User’ s Reference Guide Introduction To Y our Printer Printer with Ta ke-Up Reel Printer with Bin Assembly
Media & Ink Front-Panel Other
Solutions
Printer
Options
Index
Overview
This Us er’s Reference Guide explains in detail how to
use the HP Designjet 5000PS and the HP Designjet
5000 Printers.
This guide is designed as a detailed reference guide to
your printer. For more day-to-day guidance you can
refer to the Pocket Guide. This can be found at the back
of the printer.
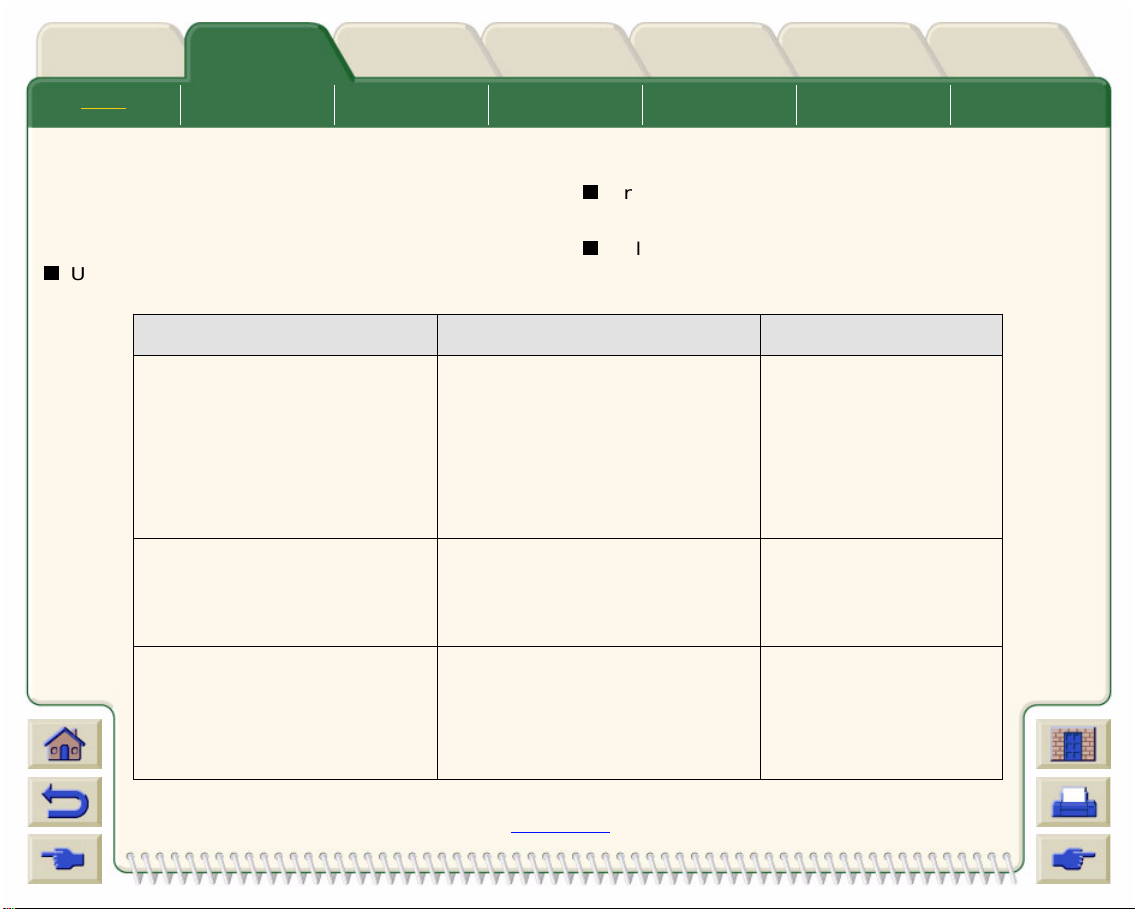
How to Navigate
The “Tabs”
There are seven “Tabs” at the top of this guide. Each
tab contains information for the printer. The first page of
every tab wi ll explain what information you can expect
to find and where to obt ain related information.
The “Sections”
Underneath the tabs are sections. The sections here,
for example, are: The User’s Reference Guide,
Introduction To Your Printer , Printer with Take
Up Reel and Printer w ith Bin Assembly.
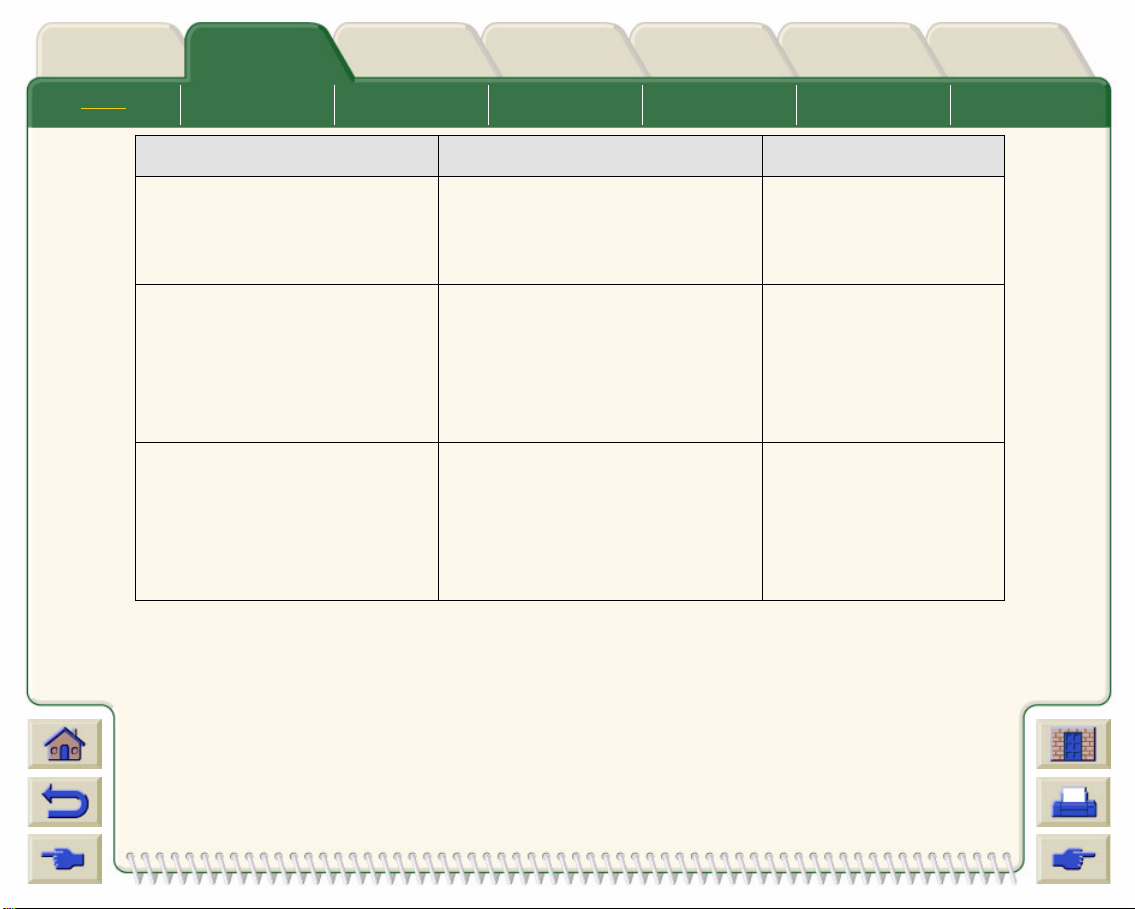
The “Buttons”
To Navigate around the User’s Reference Guide use
the buttons on either side of the screen.
The Home button
This button will take you back to
the main menu.
Back Button
Click on this button and it will take
you to the previous screen page.
Forwa rd Button
Click on this button and it will take
you to the next screen page.
Page 4
Introduction
The User’ s Reference Guide Introduction To Y our Printer Printer with Ta ke-Up Reel Printer with Bin Assembly
Media & Ink Front-Panel Other
Solutions
Printer
Options
Index
Print Button
Click on this button and it will take
you to the print option.
Quit Button
Click on this button and it will take
you out of this application.
Return Button
Click on this button and it will
return you back to where you
were before.
Animation
When it is possible, an animation will actually show you
how to perform the procedures. Click on this button to
start the animation, you can also click in the screen to
start the animation.
Related Topics:
The Setup Instruction s contain:
Step-by-step information on how to prepare your printer
for use.
The Pocket Guide contains:
Information that you are most likely to need for printer
operation on a day-by-day basis, such as loading paper
or replacing ink supplies.
Web Page
Also you can visit us on our web page:
www.hp.com/go/de signjet
Throughout this User’s Reference Guide
any information that is only relevant to a
particular model of printer is shown in a
box like this.
Page 5
Introduction
The User’ s Reference Guide Introduction To Y our Printer Printer with Take-Up Reel Printer with Bin Assem bly
Media & Ink Front-Panel Other
Solutions
Printer
Options
Index
Introduction To Your Printer
Your Printer’s Main Features
Overview of the printers features and benefits.
The HP No. 81 and HP No. 83 Supplies
An explanation of the HP No. 81 and HP No. 83
Supplies which can be installed in your printer.
Print Resolution
This is an overview of what print resolution you can
expect to attain from your printer.
User Interface
An overview of what interface you have with the printer.
Media
This is a list of the media that your printer is designed to
use.
HP Designjet WebAccess
An overview of the WebAccess too l that you have with
your printer.
Connections
The connections you have with your printer.
Memory
This section tel ls you what memor y you have already
installed in the printer.
Applicatio ns and Drivers
This section tel ls you whic h ap plica tions are s upp or te d
by your printer. Also, which drivers come with your
printer.
Switching Your Printer On and Off
Switch of your printer using the power switch located at
the back of the printer.
Page 6
Introduction
The User’ s Reference Guide Introduction To Y our Printer Printer with Take-Up Reel Printer with Bin Assem bly
Media & Ink Front-Panel Other
Solutions
Printer
Options
Index
Your Printer’s Main Features
Your printer is a color inkjet printer designed for printing high-quality, maps and images. Some major f eatures of
the printer are shown below:
Your HP Designjet Printer is able to attain
2
Production speeds of 569ft
/hour using Coated
Media with the Max. Speed setting.
Ultimate Photo Quality using six inks and HP Color
Layering Technology.
Unattended printing using big 680cc ink cartridges.
High productivity features such as Queueing and
Nesting, Job Previewing using the HP Designjet
WebAccess web server.
Exact ink and media usage information available via
the HP Designjet WebAccess web server.
Great Media and Ink flexibility for any Indoor and
Outdoor application.
HP No. 81 Dye Based Ink for indoor use.
HP No. 83 UV Ink for outdoor use.
Accurate and consi stent col or repro duction features:
– Automatic Pantone Calibration™,
– Press emulations,
– ICC profiles for Macintosh and Windows,
– RGB Calibration a nd more.
– Automatic Closed Loop Color calibration.
Page 7
Introduction
The User’ s Reference Guide Introduction To Y our Printer Printer with Take-Up Reel Printer with Bin Assem bly
Media & Ink Front-Panel Other
Solutions
Printer
Options
Index
The HP No. 81 and HP No. 83 Supplies
The HP No. 81 and HP No. 83 supplies are designed to
work together with your HP Designjet 5000PS or 5000
printer. The type of supplies you receive with your
printer depends on the type of ink system you
specified; normal dye based ink or pigment-based UV
ink. The components of the normal dye based ink are
called the HP No. 81 Supplies and the component of
the pigment-based UV ink are called the HP No. 83 UV
Ink Supplies.
HP No. 81 Ink Supplies (Dye based)
The HP No. 81 Ink Supplies also referred to as Imaging
Ink, they are designed to deliver sharp brilliant images
with ultimate image quality performance.
HP No. 83 Ink Supplies (UV)
The HP No. 83 ink supplies also referred to as UV
Pigmented Inks, they are designed to deliver bright and
colorful outdoor light fast signs and posters that are
resistant to ultra violet light.
The Components
Both ink systems consist of three
components: printheads with their printhead
cleaners and the ink cartridges. The printer
uses six of each.
Each 600-dpi thermal inkjet printhead applies
thousands of ink droplets onto the pap er. The printer
automatically refills the printhead as it prints, enabling
continuous uninterrupted printing. The ink is supplied
to each printhead from a separate large capacity ink
cartridge. The colors are Light Cyan, Light M agenta,
Yellow, Cyan, Magenta and Black.
The printer uses printhead cleaners to clean and
maintain the printheads, to ensure best possible image
quality, and to seal the printheads when they are not in
use to ensure long life.
Printhead life is warranted to 700ml of ink consumed.
However, on average the anticipated life expectancy of
the printheads is two or t hree times this. This is
provided that the printhead is used under normal
operating conditions (using HP ink cartridges only) and
its “install before date” has not lapsed. However results
vary depending on the print mode setting you use.
Page 8

Introduction
The User’ s Reference Guide Introduction To Y our Printer Printer with Take-Up Reel Printer with Bin Assem bly
Media & Ink Front-Panel Other
Solutions
Printer
Options
Index
Print Resolution
You can choose between three levels of print mode:
Max. Quality, Pro ductivity or Max. Speed from your
software or from the printer's front-panel.
Print r e solution for Max. Quality print mode is 600 x
600 dots per inch, or 1200 x 600 dots per inch on
Glossy media if you use the Enhanced resolu tion
setting.
Print resolution for Productivity print mode and Max.
Speed print mode is 300 x 300 dots per inch, or 600 x
600 dots per inch if you use the Enhanced resolution
setting.
Use Max. Speed to get draft copies of your prints at
maximum throughput. Productivity is optimized so
that you get great image quality with the quickest
throughput. Select Max. Quality if you want to get the
best quality for images and renderings.
User Interface
The Front-Panel
The printer's front-panel includes an easy-to-use
interface with a display, giving you access to a
comprehensive set of printer functions and to a number
of useful internal prints. See Navigation
tutorial to teach you how to navigate through the menus
and a description of internal prints.
, for a short
Page 9
Introduction
The User’ s Reference Guide Introduction To Y our Printer Printer with Take-Up Reel Printer with Bin Assem bly
Media & Ink Front-Panel Other
Solutions
Printer
Options
Index
Media
The following paper types are supported for your
printer and the HP No. 81/HP No. 83 Ink Supplies:
HP Coated Paper
HP Heavyweight Coated Paper
HP Banners with Tyvek™
Photo Imaging Gloss
Photo Imaging Satin
HP Paper Based Semi-Gloss
HP Studio Canvas
HP Colorfast Adhesive Vinyl
Colorlucent Backlit UV
HP Satin Poster Paper
For detailed information on Hewlett-Packard Media,
see Physical Characteristics of Media Types
.
HP Designjet WebAccess
WebAccess reports in detail on the status and history
of your printer , and in some cases allows you to change
the printer status.
To Use WebAccess
Start your Web browser and give the address of your
printer, as follows:
http://<address>/
where <address> is the IP address of the printer. You
can find out the IP address of the printer from the frontpanel, as follows:
1. From the Printer setup options, select IO setu p.
2. From IO setup, select Card ID.
3. Under Card ID, find the li ne starting with IP=. The
remainder of that line is the IP address of the printer.
As an alternative to the IP address, you may give the
DNS name of the printer. However, you will not be able
to find the DNS name in the front-panel; ask your
network administrator if you would like to use it.
Each status display is static: it does not automatically
update itself as time goes by. To update it,
click on the Update icon. The following
facilities are provided by the menu on the left
side of the HP Designjet WebAccess
window.
Page 10
Introduction
The User’s Reference Guide Introduction To Your Printer Printer with Take -Up Reel Print er wi th Bin Assembly
Media & Ink Front-Panel Other
Solutions
Printer
Options
Index
Pending shows a list of jobs waiting to be printed or
currently being printed.
Stored shows a list of jobs already printed.
Accounting shows a list of jobs already printed, with
statistics.
Supplies shows the status of the ink cartridges,
printheads, cleaners, and paper.
Usage shows statistics about the printer.
Configuration details the printer's configuration.
User password enables you to change your
HP Designjet WebAccess password. The password
can be us ed to restrict job management permissions
and change the number of logged jobs for accounting.
If a password is set, you will be asked to enter it when
you try to access the ‘User password’ page. Once you
have reached this page, you are allowed to change the
password.
If you forget your password, use the ‘Reset WebAccess
password’ on the printer's front-panel to reset it.
About the printer shows a page that contains the
printer's Pocket Guide in PDF format. In the Pending
and Stored windows, additional facilities are provided
by icons nea r the top of the wi ndow.
5000PS
If you request a Preview from a Pending or Stored
window, the same icons are displayed in the
preview window that were displayed in the parent
window.
Page 11
Introduction
The User’s Reference Guide Introduction To Your Printer Printer with Take -Up Reel Print er wi th Bin Assembly
Media & Ink Front-Panel Other
Solutions
Printer
Options
Index
Connections
Your printer comes with the HP JetDirect 610N10/100 Base-TX Print Server for network connections, as well as
a parallel interface for a direct connection to your computer. It is highly recommended that you use a network
connection, this will enable you to obtain much quicker data transfer speeds. See the Setup Instructions for
information on connecting your printer to a computer or network.
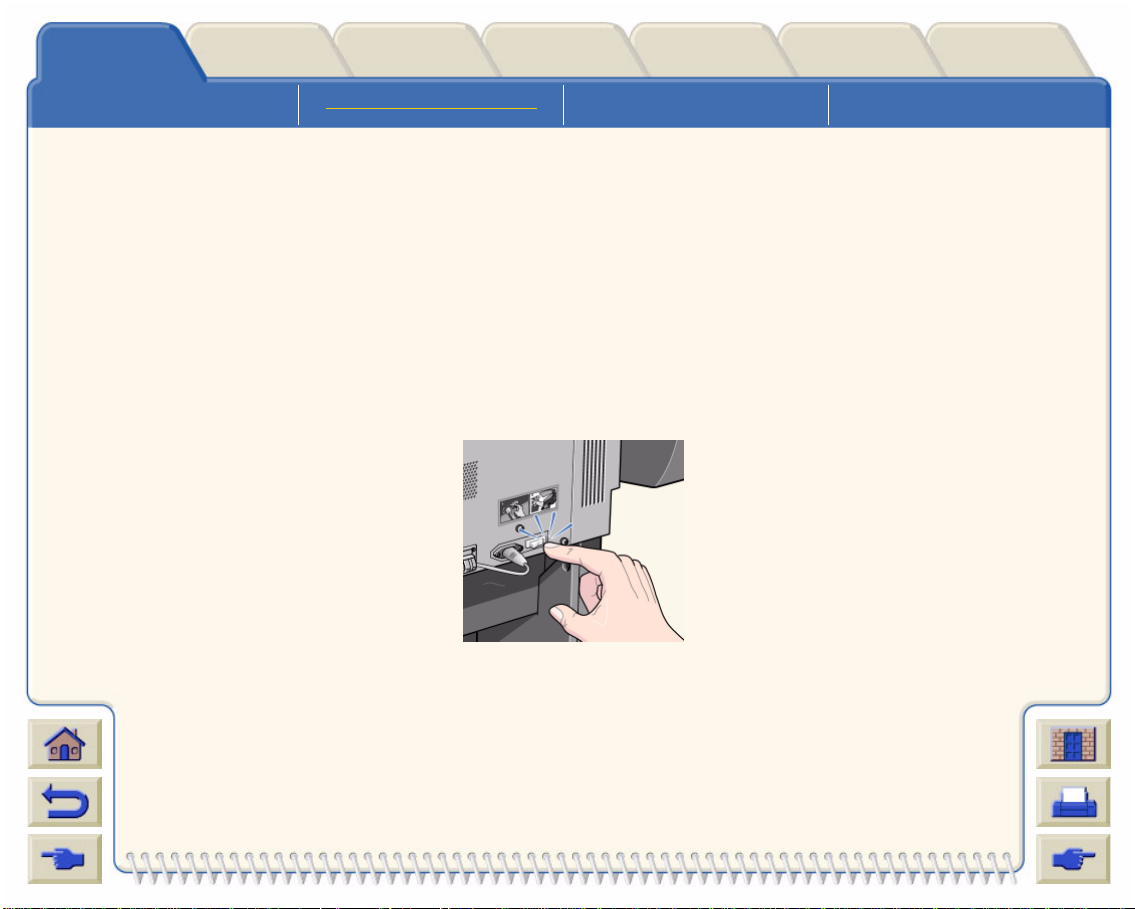
Switching Your Printer On and Off
When you are not using your printer for any length of time switch Off the printer using the power switch at the
back of the printer.
Page 12
Introduction
The User’s Reference Guide Introduction To Your Printer Printer with Take -Up Reel Print er wi th Bin Assembly
Media & Ink Front-Panel Other
Solutions
Printer
Options
Index
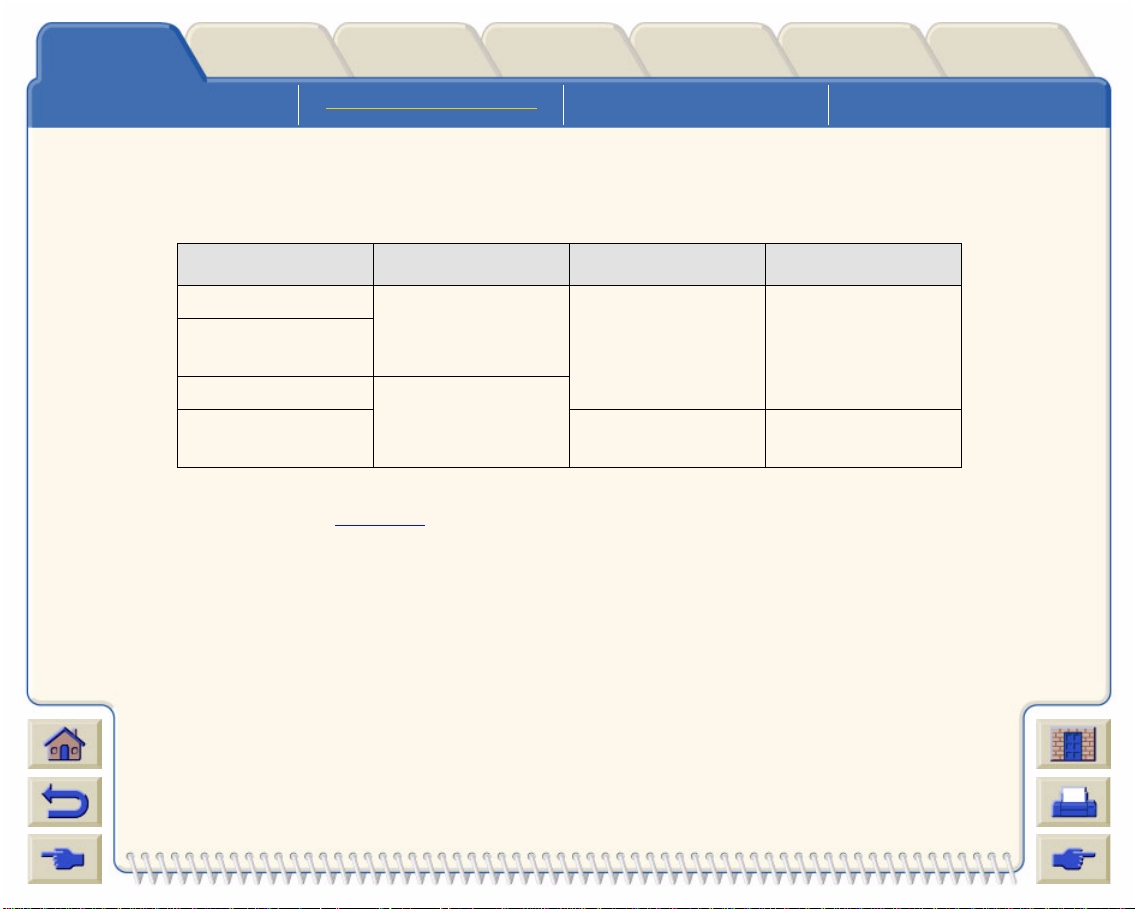
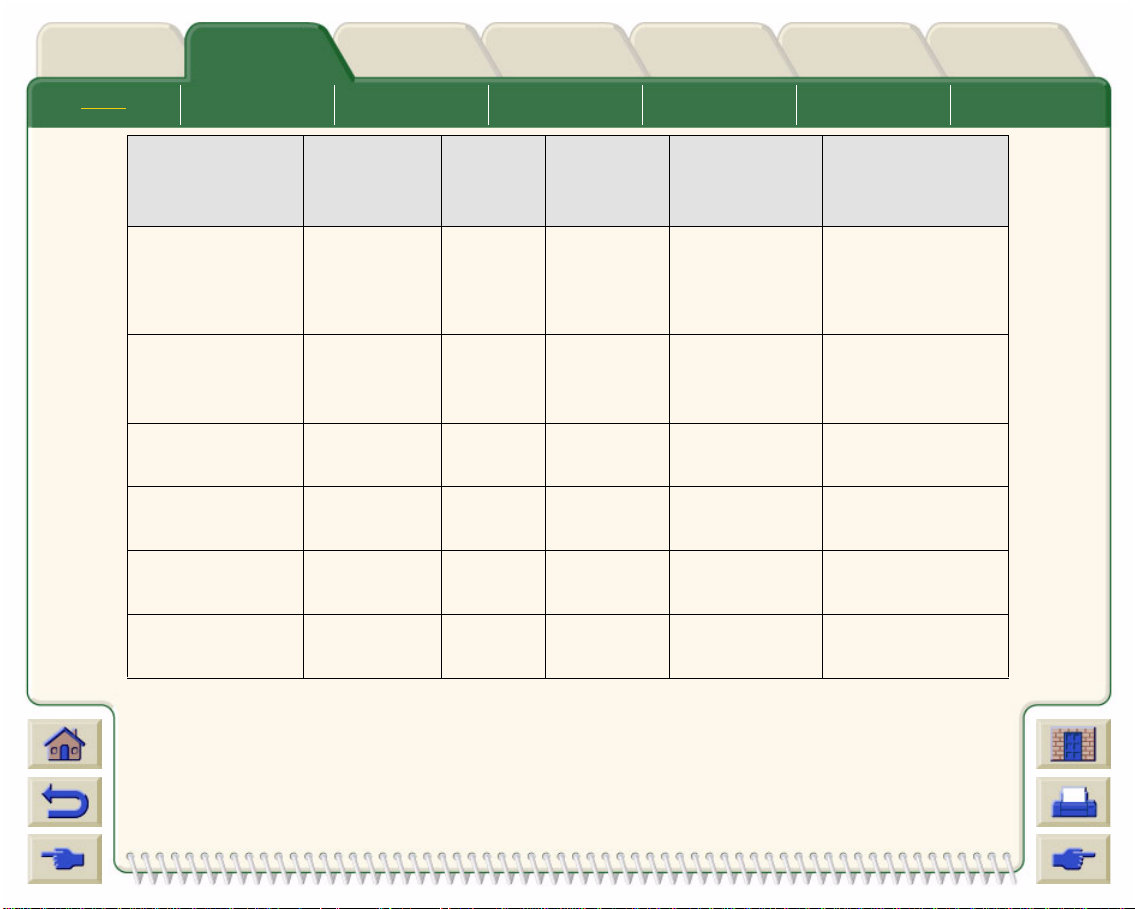
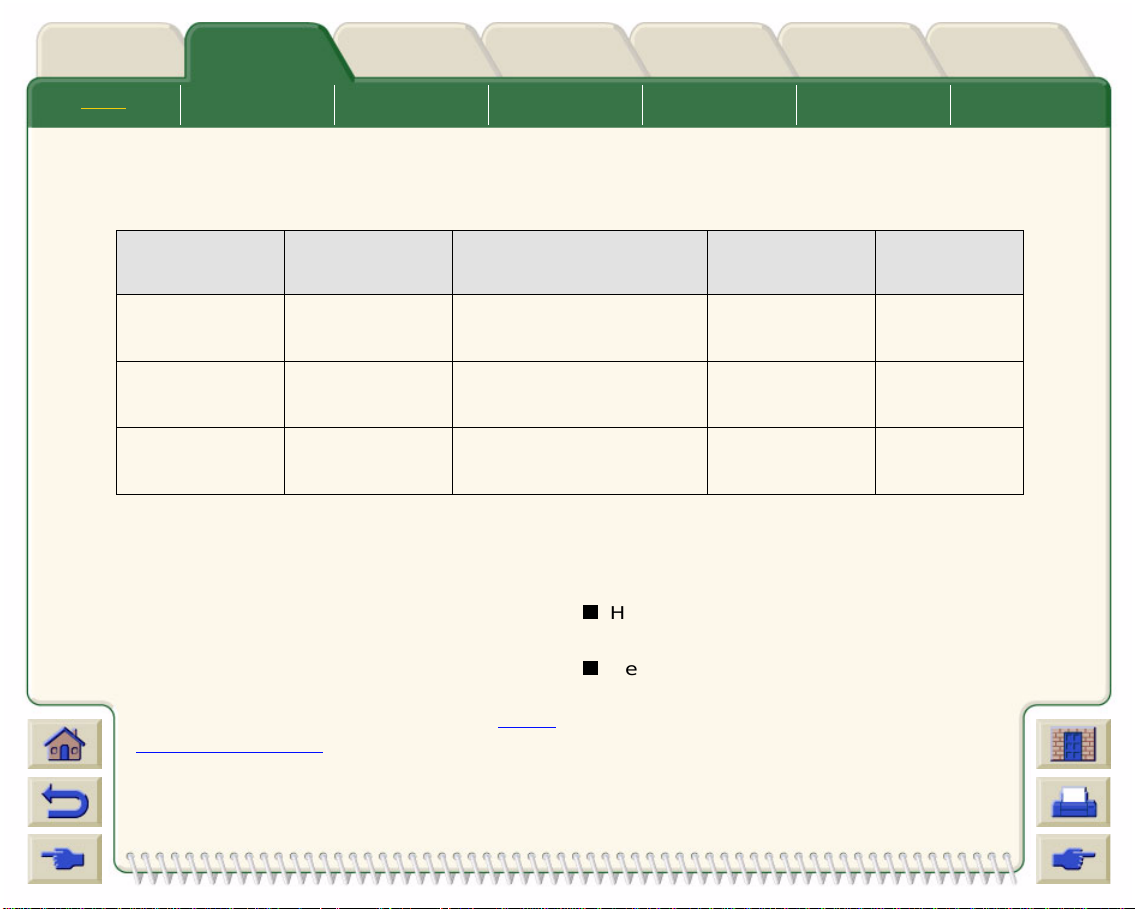
Memory
The following table shows the memory size and hard disk size for the different models of HP Designjet 5000
printers.
Printer Type Size Memory (DRAM)
Hard Disk
HP Designjet 5000
HP Designjet
5000PS
42 inch / 1. 07m
128 Mbyte
a
5 Gb Hard Disk
HP Designjet 5000
HP Designjet
60 inch / 1. 52m
192 Mbyte 20 Gb Hard Disk
5000PS
a.You can expand this memory by installing additional 64-MB or 128 MB. For part
numbers see Hardware
Page 13

Introduction
The User’s Reference Guide Introduction To Your Printer Printer with Take -Up Reel Print er wi th Bin Assembly
Media & Ink Front-Panel Other
Solutions
Printer
Options
Index
Applications and Drivers
To ma ke sure that your printer prints exactl y what you
were expecting—in terms of size, position, orientati on,
color and quality—use the correct driver for the
combination of your application software and your
printer, and make sure that it is configured correctly.
5000PS
Your printer comes supplied with:
PostScript® drivers for Macintosh®
PostScript® drivers for Microsoft®
Windows™ 9x/NT 4.0/2000
HP Designjet HPGL/2 Raster driver for
Windows
HP developed drivers for AUTOCAD.
Some printer functions behave differently when the
printer receives a PostScript file as opposed to files
formatted in other printer languages (HP-GL/2 or RTL).
Throughout this manual, references to “PostScript files”
mean files sent to the printer using the HP Designj et
PostScript driver supplied with the printer and installed
by you on your Macintosh or Windows PC.
If AutoCAD drivers are available for the specific
AutoCAD release you are using, it is strongly
recommend ed that you install them to print from
AutoCAD.
5000
Your prin ter comes supplied with:
HP Designjet HPGL/2 Raster driver
for Windows
HP developed drivers for AUTOCAD.
Page 14
Introduction
The User’s Ref e rence Guide Introduction To Your Printer Printer with Take-Up Reel Printer with Bin Assembly
Media & Ink Front-Panel Other
Solutions
Printer
Options
Index
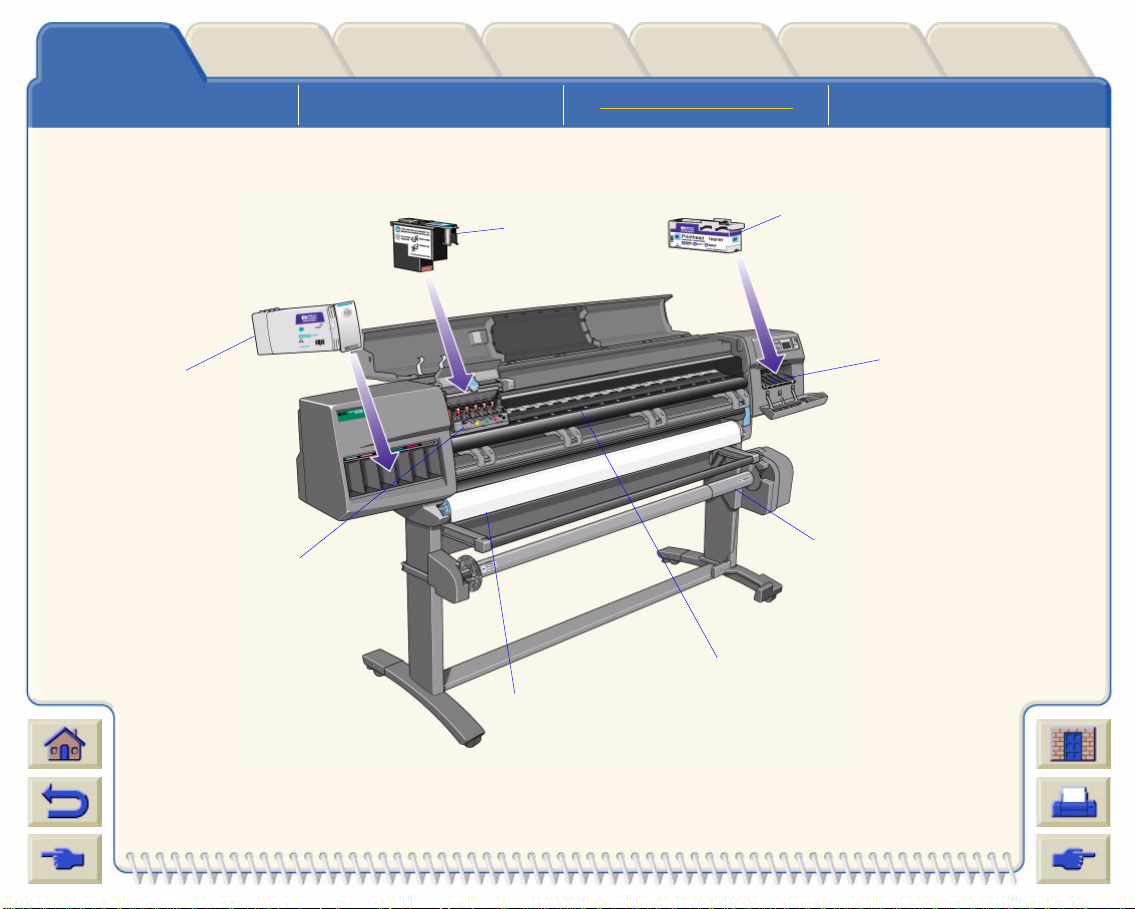
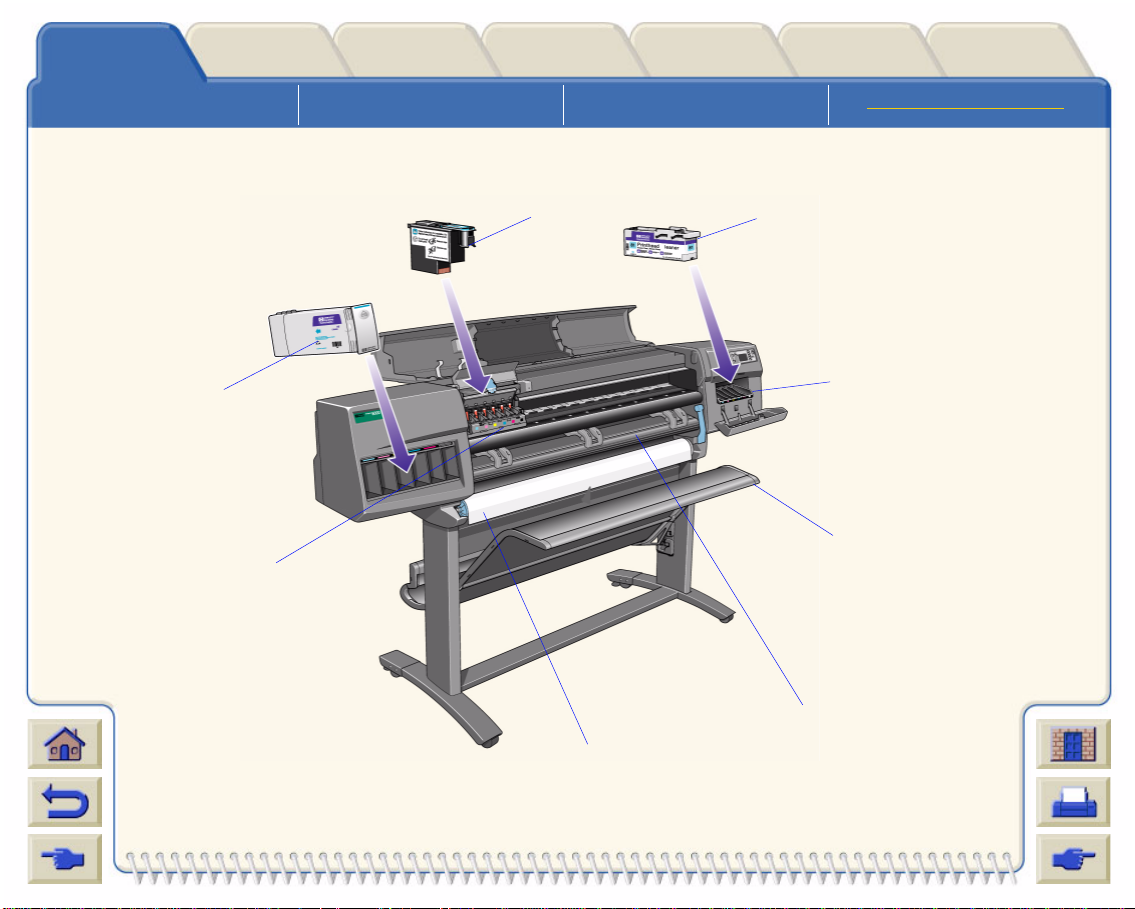
Printer with Take-Up Reel
Ink Cartridge
Carriage
Assembly
Printhead
Media Roll
Printhead Cleaner
Service
Station
Take Up Reel
Platen
Page 15
Introduction
The User’s Ref e rence Guide Introduction To Your Printer Printer with Take-Up Reel Printer with Bin Assembly
Media & Ink Front-Panel Other
Solutions
Printer
Options
Index
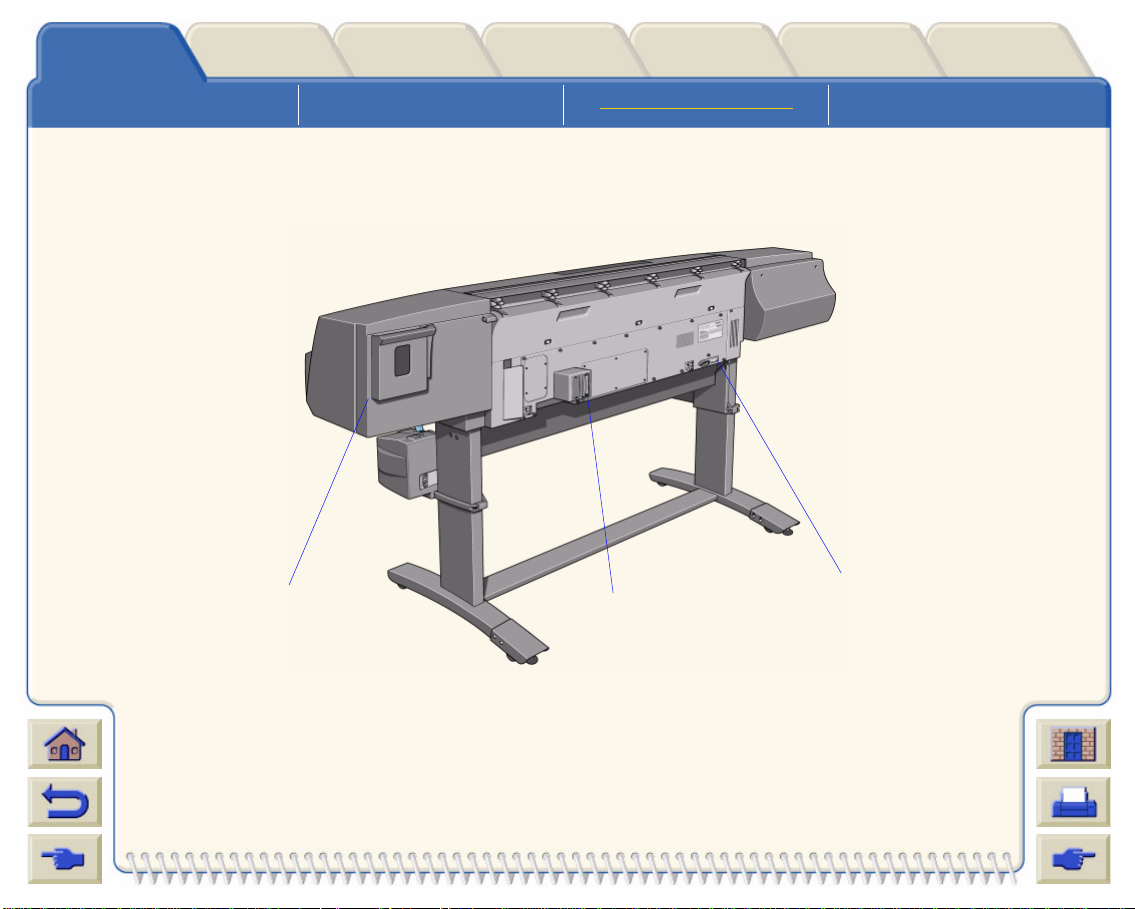
Rear View
Pocket Guide
Power Switch
Network
Communication
Page 16
Introduction
The User’s Ref e rence Guide Introduction To Your Printer Printer with Take-Up Reel Printer with Bin Assembly
Media & Ink Front-Panel Other
Solutions
Printer
Options
Index
Printer with Bin Assembly
Ink Cartridge
Carriage
Assembly
Printhead
Media Roll
Printhead Cleaner
Service
Station
Media Bin
Platen
Page 17
Media & InkIntroduction Front-Panel Other
Media Roll Media Sheet Media The Ink System
Solutions
Media & Ink
Printer
Options
The Ink
Cartridge
The Printhead
Index
The Prin t hea d
Cleaner
The HP Designjet 5000PS Printer and HP Designje t
5000 Printer use a variety of media. The recommended
media is engineered for use with your printer and your
printer’s ink system to give you the best results.
The Media & Ink tab contains seven sections:
Media
Choosing the correct media type for your needs is
an essential step in ensuri ng good image quality.
This sectio n explains how to choose the correct
media type from the list of HP Supported Types of
Media.
Roll Media
This section explains how to load and unload a roll
of media.
Sheet Medi a
This section explains how to load and unload a
sheet of media.
The Ink System
This section gives you an overview of the printer’s
ink system.
The Ink Cartridge
This section shows you how to replace an ink
cartridge.
The Printhead
This section shows you how to replace a
printhe ad. When ever you remove a printhead and
replace it with a new printhead, you must also
replace the corresponding printhead cleaner.
The Printhead Cleaner
This section shows you how to replace a printhead
cleaner.
Page 18

Media & InkIntroduction Front-Panel Other
Media Roll Media Sheet Media The Ink System
Solutions
Media
Printer
Options
The Ink
Cartridge
The Printhead
Index
The Prin t hea d
Cleaner
Choosing Media
Your printer supports several types of media. Choosing
the correct media type for your needs is an essential
step in ensuring good image quality.
Physical Characteristics of Media Types
Each m edia has its own physical characteristics.
Shown in this section are the HP Supported Types of
Media with their charac teri stic s.
Print Speeds and Print Mode Selection
Some typical printing times with a selection of HP
supported types of media.
Printable A rea
The figures for all the printable areas for selected
media.
Media Profile Downloading
From time to time new media types will become
available and the printer will not have their media
profiles. You must obtain the profiles and add them to
the printer’s software.
Roll/Sheet Media Information
To obtain information about your roll or sheet of media
you have loaded in the printer, follow the procedure
which is detailed in this section.
Drying Time Settings
The drying time settings are described in this section.
Drying Times with HP Tested Media
Some se lected types of media with their drying times.
Page 19
Media & InkIntroduction Front-Panel Other
Media Roll Media Sheet Media The Ink System
Solutions
Choosing Media
Printer
Options
The Ink
Cartridge
The Printhead
Index
The Prin t hea d
Cleaner
Your printer supports several types of media. Choosing
the correct media type for your needs is an essential
step in ensuring good image quality. For best printing
results, use only genuine Hewlett-Packard media,
whose reliability and performance have been
developed and thoroughly tested . All HP printing
components (printer, ink system, and media) have
been designed to work together to give trouble-free
performance and optimal image quality.
For information on Hewlett-Packard media, see
Physical Characteristics of Media Types
.
Some Important Points about Media Types
This printer supports many types of media.
However, the quality of some images may be
reduced if you do not use the correct media for your
image. See Print Speeds and Print Mode Selection
Whenever you load a roll or a sheet, the printer's
front-panel display prompts you to specify the media
type you are loading. It is absolutely
essential to specify this correctly for good
image quality. The table on Physical
Characteristics of Media Types, gives you
all the information you need. If media is
already loaded and you are unsure which
media type was specified, go to the roll /sheet menu
icon and press Enter, see Roll/Sheet Media
Information.
Make sure the appropriate print-quality setting (Max.
Quality, Productivity or Max.Speed) is selec ted. You
can set the print quali ty either from your software or
from the printer's front panel. Software driver
settings overr ide any print-quality settings made on
the front panel. The combination of media type and
print-quality settings tells the printer how to place the
ink on the media—for example, the ink density, half
toning method, and number of passes of the
printheads. For more details, see the table on Print
Speeds and Print Mode Selection.
Some media is designed to be printed on both sides.
Further information is available via the Technical
.
Support section of your printer’s WebAccess tool.
Page 20

Media & InkIntroduction Front-Panel Other
Media Roll Media Sheet Media The Ink System
Solutions
Printer
Options
The Ink
Cartridge
The Printhead
Index
The Prin t hea d
Cleaner
Physical Characteristics of Media Type s
The following table lists the physical characteristics of the supported HP Premium Printing Materials.
NOTE: Always print on the image side which has the special c oating; the image side always faces outward on roll
products from HP.
NOTE: From time to time new media types will become available and the printer will not have their media profiles.
You must obtai n th e profi les and add th em to the p r inter ’s software usi ng th e System M ain tena nc e App lic ati on.
Refer to Media Profile Downloading
.
Displayed on
the Front-panel
Grammage/
Thickness
Coated Paper 26lb.
(98g/m
HW Coated
(Economy) &
35lb
(130g/m
HW Coated
Paper
Photo Imaging
Gloss
Photo Imaging
Satin
7 mil
(178g/m
7 mil
(178g/m
Ink
System
Length Available
Widths in
Inches
Available
Widths in
Millimeters
Dye 150ft (45m) 24, 36, 42, 54 610, 914, 1067,
2
)
1372
300ft (91m) 36 914
Dye & UV 100ft (30m) 24, 36, 42, 54,
2
)
60,
610, 914, 1067,
1372, 1524
Dye 100ft (30m) 36, 42, 60, 914, 1067, 1524
2
)
Dye 100ft (30m) 36, 42, 60 914, 1067, 1524
2
)
Continued
Page 21
Media & InkIntroduction Front-Panel Other
Media Roll Media Sheet Media The Ink System
Solutions
Printer
Options
The Ink
Cartridge
The Printhead
Index
The Prin t hea d
Cleaner
Displayed on
the Front-panel
Paper SemiGloss (see note
Grammage/
Thickness
6 mil
(160g/m
2
)
below)
Banners with
Tyvek™
Colorlucent
Backlit UV
10 mil (140g/
2
)
m
6 mil (200g/
2
m
Studio Canvas 20 mil (368g/
2
m
)
Colorfast Vinyl 6 mil (328g/
2
)
m
1
Poster Paper
5.5 mil (162g/
2
m
)
1. Excellent for two-sided printing
Ink
System
Length Available
Widths in
Inches
Available
Widths in
Millimeters
Dye 100ft (30m) 24, 36, 42, 54 610, 914, 1067,
1372
UV 50ft (15m) 24, 36, 54 610, 914, 1372
UV 100ft (30m) 36, 54, 60
Dye & UV 35ft (10m) 36, 54 914, 1372
Dye & UV 40ft (12m) 36, 54 914, 1372
Dye 100ft (30m) 36 914
Page 22
Media & InkIntroduction Front-Panel Other
Media Roll Media Sheet Media The Ink System
Solutions
Printer
Options
The Ink
Cartridge
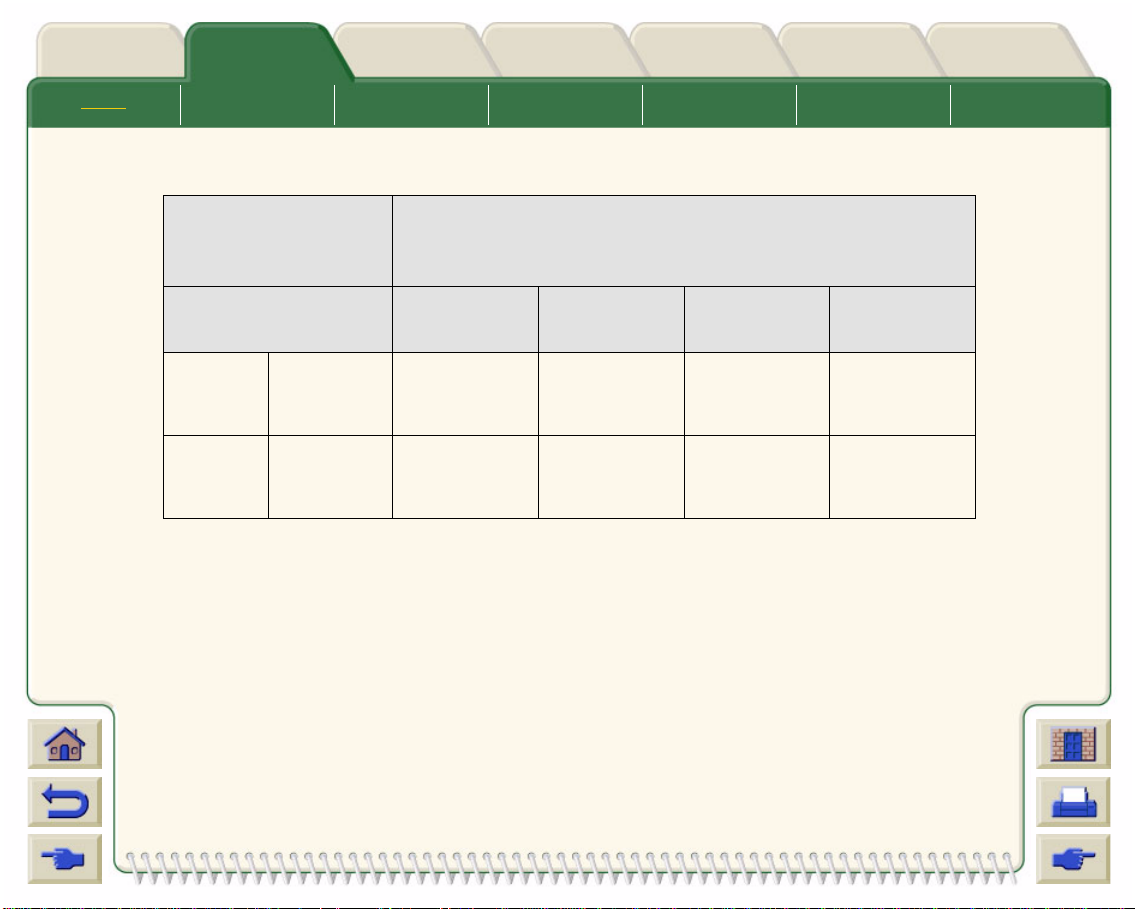
Print Speeds and Print Mode Selection
The print times shown below are for the HP Designjet 5000PS 60 inch/1.57m Printer.
The Printhead
Index
The Prin t hea d
Cleaner
Print Mode Coated Paper Heavyweight Coated
Paper Economy
Max. Speed
Productivity
Max. Quality
2
569 ft
52.86 m
2
100 ft
9.29 m
2
/hour
76 ft
7.06 m
/hour
2
/hour
/hour
2
/hour
2
/hour
2
288 ft
26.76 m
2
100 ft
9.29 m
2
/hour
76 ft
7.06 m
/hour
2
/hour
/hour
2
/hour
2
/hour
NOTE: The Max. Speed that can be attained on Glossy
media and some other types of media could be
determined by the amount of drying time required.
NOTE: From time to time new media types will become
available and the printer will not have their media
profiles. You must obtain the profiles and add them to
the printer’s software using the System
Maintenance Application. Refer to Media
Profile Downloading.
Heavyweight
Glossy Media
Coated Paper
2
288 ft
26.76 m
2
/hour
76 ft
7.06 m
2
/hour
60 ft
2
5.57m
/hour
2
/hour
2
/hour
/hour
100 ft
9.29 m
2
76 ft
7.06 m
2
60 ft
5.57m
2
/hour
2
/hour
/hour
2
/hour
/hour
2
/hour
Heavyweight Coated Paper
In the front panel there are two types of Heavyweight
Coated Paper.
Heavyweight Coated Paper Economy is optimized
for efficiency in terms of speed and ink usage.
Heavyweight Coated Paper is optimized for the best
image quality.
Page 23
Media & InkIntroduction Front-Panel Other
Media Roll Media Sheet Media The Ink System
Solutions
Printable Area
Printer
Options
The Ink
Cartridge
The Printhead
Index
The Prin t hea d
Cleaner
Printable area =
Printing Area (Width x Height) by Orientation of Image
media size minus
normal margins
Media Size landscape
(inches)
ANSI
media
ISO
media
C
D
E
A2
A1
A0
21.46 x 15.36
33.46 x 20.36
43.46 x 32.36
22.86 x 14.86
32.56 x 21.76
46.26 x 31.46
portrait
(inches)
16.46 x 20.36
21.46 x 32.36
33.46 x 42.36
15.96 x 21.76
22.86 x 31.46
32.56 x 45.16
landscape
(mm)
545 x 390
845 x 517
1100 x 821
580 x 377
827 x 552
1175 x 799
portrait (mm)
241 x 517
545 x 821
850 x 517
405 x 553
580 x 799
827 x 1147
Page 24
Media & InkIntroduction Front-Panel Other
Media Roll Media Sheet Media The Ink System
Solutions
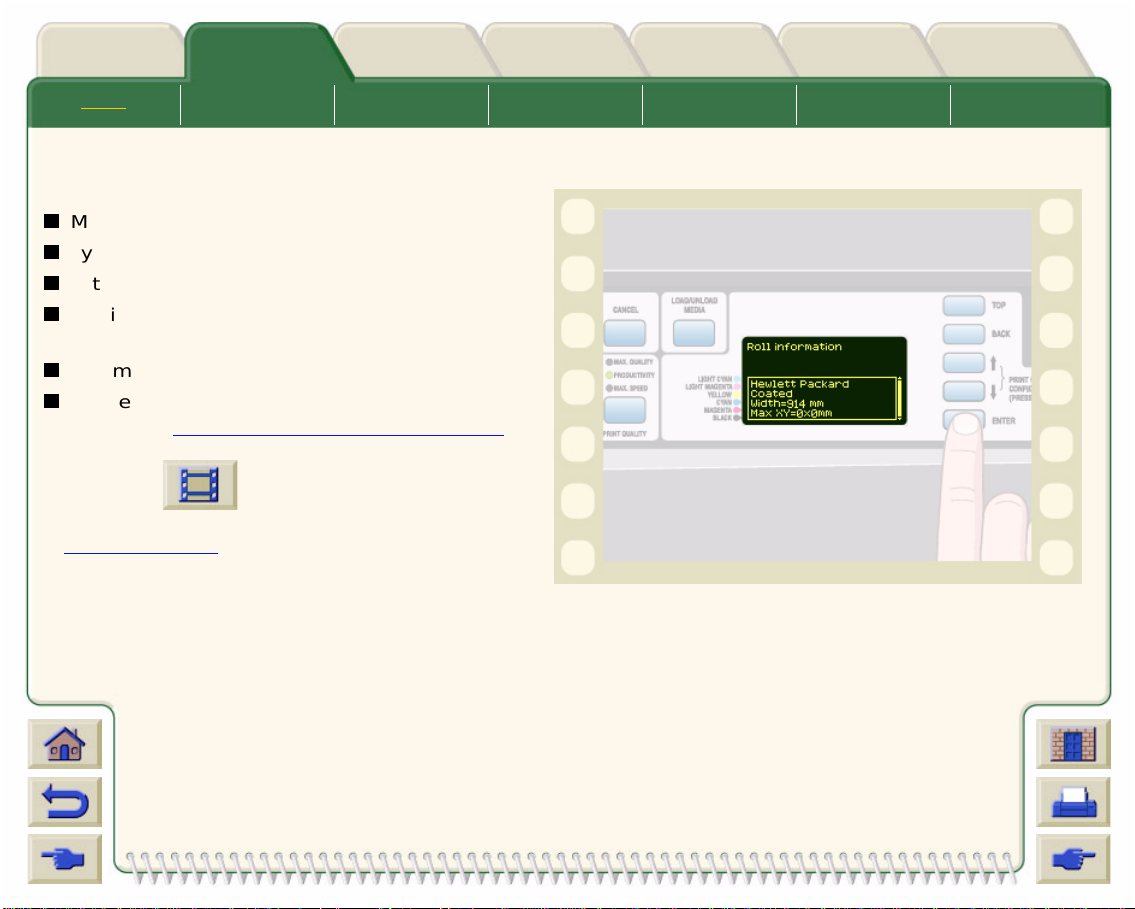
Roll/Sheet Media Information
The information supplied in this screen is:
Manufacturer’s name
Type of media that you have selected
Total width of the roll of media in millimeters
Maximum pri ntable area that the media has to
print on.
The media profile revision
For detailed inst ructions on how to load a roll of
media see Installing Roll Media into the Printer
Click on this icon to run the animation
sequenc e.
A printable version
so that you can take the key illustrations to the
printer, if it is remote from your computer.
of the sequence is also available
Printer
Options
The Ink
Cartridge
The Printhead
Index
The Prin t hea d
Cleaner
Page 25
Media & InkIntroduction Front-Panel Other
Media Roll Media Sheet Media The Ink System
Solutions
Media Profile Downloading
Printer
Options
The Ink
Cartridge
The Printhead
Index
The Prin t hea d
Cleaner
Each supported media has it own characteristics; refer
to Physical Characteristics of Media Types
. For
optimum image quality the printer changes the way it
prints onto each different media. Some may need more
ink and some may require a longer drying time for
example. So the printer must be given a description of
how each media should be printed upon. This
description is called th e “Media Profile”. Existing media
profiles for your printer’s media are already installed in
the printers’ software.
However, from time to time new media types will
become availa ble and the printer will not have their
media profiles. You must obtain the profiles and add
them to the printer.
Using Hewlett-Packard provided media profiles for your
media assures optimal col or reproduction from your
printer. These profiles can be obtained from
http://www.hp.com/go/designjet
.
Click on the CD icon for drivers and select “Printing
Material”. This will le ad y ou t o th e dri v er s and
profiles for your particular printer. Follow the
on-screen instructions.
In addition to the HP range there are other
manufacturers of media that HP recommend for use
with your printer. The media profiles for these can also
be downloaded from the Internet or CD- ROM.
Open System Maintenance Application
When you have the media profile(s) downloaded to
your PC or Apple Macintosh, open the HP a pplication:
“System Maintenance Application”.
Select the media profile download option and follow the
on-screen comm and s.
This program takes the media profile which you
previously downloade d from the web page and insta lls
it onto the printer’s software. The System Maintenance
Applicatio n is supplied on a CD-ROM which is
delivered with your printer.
Page 26

Media & InkIntroduction Front-Panel Other
Media Roll Media Sheet Media The Ink System
Solutions
Drying Time Settings
Printer
Options
The Ink
Cartridge
The Printhead
Index
The Prin t hea d
Cleaner
With some media types and environmental conditions
the ink needs some time to dry before the media is
unloaded. If you experience ink drying problems with
your printed image, try changing the drying time to
Automatic.see Changing the Drying Time
for an
animation to show you how to change setting in the
front panel.
None ( Default)
With this setting, when the printer has finished pri nting
an image the media will be released from the printer. It
is the quick est settings, but you must handle the printed
image with care, the image may not necessar ily be
ready for use.
Manual
In some cases with this setting the drying time may not
be sufficient, the ink may not be dry, so c are is needed
when handling the media. This setting is changeable by
you through the front panel. See Changing the Dr yi ng
Time
Automatic
The printer automatically determines the appropriate
drying time, based on the type of media you have
selected and the current temperature and humidity. If
there is any drying time, a “drying time to go”
countdown will be displayed on the front panel.
Page 27

Media & InkIntroduction Front-Panel Other
Media Roll Media Sheet Media The Ink System
Solutions
Printer
Options
The Ink
Cartridge
The Printhead
Index
The Prin t hea d
Cleaner
Drying Times with HP Tested Media
Below is a table showing the typical drying times to handle the media for some selected HP tested media at
approximatel y 23
°C with 50% relative humidity.
HP Tested Media type Drying Time in minutes
Max. Image
Quality
Productivity/
Max. Speed
HP Photo Imaging Gloss 4 2
HP Paper-Based Semi-Gloss 6 5
HP Studio Canvas 9 5
HP Heavyweight Coated 1 1
HP Colorfast Adhesive Vinyl 1 1
HP Poster Paper 1 1
HP Colorlu cent Backl it UV 40 9
HP DuraImaging UV 1 1
HP Banners with TYV EK ® 11
3M® Changeable Opaque Imaging Media 5 4
Page 28
Media & InkIntroduction Front-Panel Other
Media Roll Media Sheet Media The Ink System
Solutions
Types of Media and Application
Printer
Options
The Ink
Cartridge
The Printhead
Index
The Prin t hea d
Cleaner
Use this table to guide you when choosing your media
and selecting the print quality setting (Max Speed,
Productivity, Max. Quality). As a guide remember:
Use Max.Speed to get draft copies of your prints at
maximum throughput.
Product Name Application Media Description
HP Photo Imaging Gloss
HP Photo Imaging Satin
Photographic images and
graphics, high-end, point-of-
purchase & retail signs, trade
Front Panel Name:
HP Photo Imaging Gloss
HP Photo Imaging Satin
show exhibits, indoor promotional
and display, industrial design
illustrations, MCAD renderings,
Maps & GIS display.
HP Studio Canvas
Photographic reproductions, fine
art repr oduct ions, heavy duty
Front Panel Name:
indoor signs, banners.
HP Studio Canvas
HP Banners with Tyvek™
Durable in door and outdoor
banners, trade-show graphic s,
Front Panel Name:
Banners with Tyvek
window displays, murals,
backdrops and theatrical sets
Productivity is optimized so that you get the
excellent quality with the fastest throughput.
Select Max. Quality if you want to get the best
quality for images and render ings.
Exceptional
lightfastness w ith dye
inks, maximum color
gamut, brillian t images
with sharp lines
Accurate color matching,
excellent lightfastness,
dense, black and color
images.
Light-fast, waterresistant, no lamination
required, grommitable,
you can sew with it and
its drapable.
Continued
Page 29

Media & InkIntroduction Front-Panel Other
Media Roll Media Sheet Media The Ink System
Solutions
Printer
Options
The Ink
Cartridge
Product Name Applicat ion Media De scrip t ion
The Printhead
Index
The Prin t hea d
Cleaner
HP Colorfast Adhesive Vinyl
Front Panel Name:
HP Colorfast Vinyl
HP Coated Paper
Front-Panel Name:
HP Coated Paper
Promotional signs, low-cost
indoor posters, short term, indoor
signs.
Proofs, layouts, low-cost indoor
posters, short-term, indoor signs,
color line drawings, color maps.
Accurate color matching,
dense, black images,
accurate spot colors , low
cost per copy.
Accurate color matching,
low cost per copy,
dense, black images,
accurate spot colors,
fine lines.
Continued
Page 30
Media & InkIntroduction Front-Panel Other
Media Roll Media Sheet Media The Ink System
Solutions
Printer
Options
The Ink
Cartridge
Product Name Applicat ion Media De scrip t ion
The Printhead
Index
The Prin t hea d
Cleaner
HP Paper Based Semi-Gloss
Front-Panel Name:
HP Paper Based Semi-Gloss
HP Satin Poster Paper
Front-Panel Name:
HP Poster Paper
HP Heavyweight Coated Paper
Front-Panel Name:
HP HW Coated Paper
Photographic presentations,
point-of-purchase signs, dro p-in
signs, ceiling-hanging banners.
Indoor short-term point-ofpurchase displays, ceilinghanging banners.
Proofs, layouts, low-cost indoor
posters, short term, indoor signs,
color line drawings, color maps.
Low-cost alternative to
photo paper , economical
photo quality
High-volume print
production, low-cost
poster paper for frequent
print replacement,
laminateable for longerterm sign.
Heavier paper, accurate
color matching, low cost
per copy, dense, black
images, accurate spot
colors, low cost per
copy, fine lines.
Page 31

Media & InkIntroduction Front-Panel Other
Media Roll Media Sheet Media The Ink System
Solutions
Printer
Options
The Ink
Cartridge
The Printhead
Index
The Prin t hea d
Cleaner
Handling Your Media
Handle film and glossy media by the edges or wear cotton gloves. Skin oils can be transferred to the media
leaving finger print marks.
Although the ink systems supplied with this printer have good lightfastness, colors will eventually fade or
change if exposed to sunlight over a long period of time.
Rewrap partially used rolls if they are not being used and do not stack rolls.
Always keep unused rolls wrapped in the plastic wrap to prevent discoloration.
Keep the media tightly wound on the roll throughout the loading and unloading procedures. If the media starts
to unwind, it can become difficult to handle.
Page 32

Media & InkIntroduction Front-Panel Other
Media Roll Media Sheet Media The Ink System
Solutions
Roll Media
Printer
Options
The Ink
Cartridge
The Printhead
Index
The Prin t hea d
Cleaner
Loading Roll Media Guidelines
Hints and tips on loading the media. Including how to
install three inch adapters.
Installing Roll Media into the Printer
This section shows you how to:
– Install media onto a spindle.
– Install the roll of media in the correct orientation
into the printer.
Trimming the Media
Before loading media into the printer, make sure the
edge is straight. T he an imation shows you how to tr im
manually the media.
Loading Roll Media
This section shows you how to load media into the
printer and the Take Up Reel.
Printing of Both Sides of the Media
This section shows you how to print on both sides of
the media.
Unload Media from Take Up Reel
This section shows you how to unload the media from
the Take Up Reel.
Unloading Roll Media
This section shows you how to unload the media from
the printers’ internal media path.
Change the Core Tube
This section shows you how to unload the media from
the core tube. The core tube is the tube which the T ake
Up Reel winds media onto as it prints.
Media Length Tracking
This section describes how to turn on and off the media
length tracking function.
Page 33

Media & InkIntroduction Front-Panel Other
Media Roll Media Sheet Media The Ink System
Solutions
Loading Roll Media Guidelines
Printer
Options
The Ink
Cartridge
The Printhead
Index
The Prin t hea d
Cleaner
There are three steps to loading media into the printer.
1. Load media onto the media spindle and install the
loaded spindle into the printer.
2. Insert the media into the printers’ media path and
set the media type in the front panel.
3. Install the media onto the take up reel (if you have
one).
Into the Printer
In the initial stages of loading media you may want to
open the window, but this is optional. If you are an
experienced user for example, you can leave the
window closed, thus saving time.
NOTE: Always start the procedure through the front
panel.
When loading media into the printer check:
The media is wound onto the spindle tightly.
Ensure the media spindle is loaded
correctly, with the media guides installed
firmly onto the spindle.
If you are using a three-inch cardboard core, make
sure the core adaptors supplied with the printer,
have been installed. See below
The spindles
If you are a regular user of different types of media, you
can change the media over quicker if you have more
than one spindle loaded with media. Perform the
following:
Pre-load the different types of media onto the
spindles.
Remove and replace the spindle with the new type
of media.
Extra spindles are available from HP see
Ordering Accessories
Continued
Page 34

Media & InkIntroduction Front-Panel Other
Media Roll Media Sheet Media The Ink System
Solutions
Onto th e Take Up Reel
When loading media onto the Take Up Reel:
Check the leading edge as it unwinds from the
spool. If it is not evenly cut or if it is skewed, trim the
media as shown in the animation.
Check the media is straight when it is attached to the
take up reel, otherwise the media will skew as it is
wound onto the core.
The core tube on the take-up reel must be the sa me
width as the media you are using.
Make sure the take-up core is pushed firmly into
both media guides.
If you need to feed more media from the printer and
the “Move Media” screen is no longer displayed, go
to the media menu and press Enter. Then select
“Move Media”.
If you are usin g a three-inch cardboard core, make
sure the core adaptors supplied with the printer,
have been installed. See below.
Printer
Options
The Ink
Cartridge
The Printhead
Index
The Prin t hea d
Cleaner
The Take Up Reel as an Accessory
For the HP Designjet 60inch/1.57m printer the Take UP
Reel is supplied as standard. For the HP Designjet
42inch/1.07m printer it is an optional accessory which
you can order, see Ordering Accessories
.
Help with Loading
When loading media there is information available
from:
The Pocket Guide installed at the back of the printer.
The labels located on the printer and on the
spindles.
The front panel which will guide you through all the
procedures step-by-step.
Page 35

Media & InkIntroduction Front-Panel Other
Media Roll Media Sheet Media The Ink System
Solutions
Installing Roll Media into the Printer
This procedure shows you how to load media on to
the spindle and into the printer’s spindle hubs.
NOTE: Make sure the printer wheels are locked (the
brake lever is pressed down) to prevent the printe r
from moving.
NOTE: The media roll may be very wide, rest the
spindle horizontally on a table and load the media on
the table.
NOTE: The media should hang down from the roll
exactly as shown.
Click on this icon to run the animation
sequenc e.
Printer
Options
The Ink
Cartridge
The Printhead
Index
The Prin t hea d
Cleaner
A printable version
of the sequence is also available so
that you can take the key illustrations to the printer, if it
is remote from your computer.
Page 36

Media & InkIntroduction Front-Panel Other
Media Roll Media Sheet Media The Ink System
Solutions
Trimming the Media
WARNING The knife used in the animation is sharp.
Keep fingers clear of the cutting path.
Keep the knife away from children.
NOTE: You can also trim the media automatically
when you h ave loaded the med ia. Go to the M edia
Setup Menu/Form Feed & Cut.
Click on this icon to run the animation
sequenc e.
A printable version
so that you can take the key illustrations to the
printer, if it is remote from your computer.
of the sequence is also available
Printer
Options
The Ink
Cartridge
The Printhead
Index
The Prin t hea d
Cleaner
Page 37

Media & InkIntroduction Front-Panel Other
Media Roll Media Sheet Media The Ink System
Solutions
Loading Roll Media
This pr o ce d ure shows yo u how to inst al l me dia onto
the printer. It includes references to the Take Up
Reel.
Front panel messages which are only applicable
if you have a Take Up Reel installed are
highli g h te d in gr e en .
If your printer is the HP Designjet 42inch/ 1.07m
the Take Up Reel is an optional accessory. See
Ordering Accessories
To start this procedure you need to have a roll of
media installed on to the printer spindle. See
Installing Roll Media into the Printer
The animation shows the Media Length tracking
function turned On. To switch Off the tracking,
see Media Len gth Tracking
.
.
.
Printer
Options
The Ink
Cartridge
The Printhead
Index
The Prin t hea d
Cleaner
Read Loading Roll Media Guidelines and then click on this icon to run the animation sequence.
A printable version of the sequence is also available so that you can take the key illustrations
to the printer, if it is remote from your computer.
Page 38

Media & InkIntroduction Front-Panel Other
Media Roll Media Sheet Media The Ink System
Solutions
Printing of Both Sides of the Media
This procedure shows you how to install media so
you can print on both sides.
Click on this icon to run the animation
sequenc e.
Printer
Options
The Ink
Cartridge
The Printhead
Index
The Prin t hea d
Cleaner
Page 39

Media & InkIntroduction Front-Panel Other
Media Roll Media Sheet Media The Ink System
Solutions
Unload Media from Take Up Reel
NOTE: Ensure that the ink is dry.
Click on this icon to run the animation
sequenc e.
A printable version
so that you can take the key illustrations to the
printer, if it is remote from your computer.
of the sequence is also available
Printer
Options
The Ink
Cartridge
The Printhead
Index
The Prin t hea d
Cleaner
Page 40

Media & InkIntroduction Front-Panel Other
Media Roll Media Sheet Media The Ink System
Solutions
Unloading Roll Media
If you have a Take Up Reel
You must first unload media from the Take Up Reel
before performing this procedure. See Unload
Media from Take Up Reel.
If media length tracking is switched O n, the printer
will first print the rema ining media onto the roll
before the printer unloads.
Click on this icon to run the animation
sequenc e.
Printer
Options
The Ink
Cartridge
The Printhead
Index
The Prin t hea d
Cleaner
A printable version
of the sequence is also available
so that you can take the key illustrations to the
printer, if it is remote from your computer.
Page 41

Media & InkIntroduction Front-Panel Other
Media Roll Media Sheet Media The Ink System
Solutions
Change the Core Tube
Click on this icon to run the animation
sequenc e.
A printable version
so that you can take the key illustrations to the
printer, if it is remote from your computer.
of the sequence is also available
Printer
Options
The Ink
Cartridge
The Printhead
Index
The Prin t hea d
Cleaner
Page 42

Media & InkIntroduction Front-Panel Other
Media Roll Media Sheet Media The Ink System
Solutions
Media Length Tracking
Media length tracking is a function which enables
the printer to keep track of how much media remains
on the roll.
The remaining length is displayed on the front panel
and printed on the end of the roll whenever you
unload the roll.
Click on this icon to run the animation
sequenc e.
A printable version
so that you can take the key illustrations to the
printer, if it is remote from your computer.
of the sequence is also available
Printer
Options
The Ink
Cartridge
The Printhead
Index
The Prin t hea d
Cleaner
Page 43

Media & InkIntroduction Front-Panel Other
Media Roll Media She et Medi a The Ink S ystem
Solutions
Sheet Media
This section contains animations on how to load and
unload sheet media into your printer.
NOTE: Th e minimum size you can load is a A2/C size
sheet in portrait orientation. To ensure this size of media
loads correctly make sure it’s leadi ng edge is as clo se
as possible to the pinch wheels during loading.
Loading Sheet Media
Unloading Shee t Medi a
Printer
Options
The Ink
Cartridge
The Printhead
Index
The Prin t hea d
Cleaner
Page 44

Media & InkIntroduction Front-Panel Other
Media Roll Media She et Medi a The Ink S ystem
Solutions
Loading Sheet Media
The minimum size you can load is a A2/C size sheet
in portrait orientation.
Click on this icon to run the animation
sequenc e.
A printable version
so that you can take the key illustrations to the
printer, if it is remote from your computer.
of the sequence is also available
Printer
Options
The Ink
Cartridge
The Printhead
Index
The Prin t hea d
Cleaner
Page 45

Media & InkIntroduction Front-Panel Other
Media Roll Media She et Medi a The Ink S ystem
Solutions
Unloading Sheet Media
Click on this icon to run the animation
sequenc e.
A printable version
so that you can take the key illustrations to the
printer, if it is remote from your computer.
of the sequence is also available
Printer
Options
The Ink
Cartridge
The Printhead
Index
The Prin t hea d
Cleaner
Page 46

Media & InkIntroduction Front-Panel Other
Media Roll Media Sheet Media The Ink System
Solutions
The Ink System
Printer
Options
The Ink
Cartridge
The Printhead
Index
The Prin t hea d
Cleaner
The HP No. 81 and HP No. 83 Supplies are designed
to work together with your HP Designjet 5000P S or
5000 printer.
The supplies comprise of three components:
printheads, with their printhead cleaners, and the ink
cartridges.
What are the Supplies?
This section describes the ink components of your
printer.
Component Identification
This section s hows you what the c ompon ents look like
and where each one is installed in the printer.
Precautions
A list of precautions and guidelines to follow when using
the supplies.
When to Replace
When to change your HP No. 81 or
HP N o. 83 suppli es is mostly determ ined by
you with guidance from the front panel.
Switching Ink Types
If you have purchased t he o ption al HP Ink U pgrad e Kit
you can switch the between dye based ink system or
the pigment-based UV ink system whenever you like.
Page 47

Media & InkIntroduction Front-Panel Other
Media Roll Media Sheet Media The Ink System
Solutions
What are the Supplies?
Printer
Options
The Ink
Cartridge
The Printhead
Index
The Prin t hea d
Cleaner
For each of the six ink colors used in the printer, there
are three separate components. The printhead and the
printhead cleaner are supplied together, the ink
cartridge is supplied separately. Two types of ink
supplies are available, dye based ink and pigmentbased UV ink. The components of the normal dye
based ink are called the HP No. 81 Supplies and the
components of the pigment-based UV ink are called
the HP No. 83 UV Ink Supplie s
. The ink supplies are
coded with an HP No. 81/HP No. 83 selection number
to help you reorder the correct replacement supplies.
They also each have a distinctive icon to aid
identification. See Identifying Ink Supp lies
Ink Cartridges
The ink cartridges for your printer require no
maintenance or cleaning. As long as each ink cartridge
is inserted correctly into its slot, the ink will flow to the
printheads. Because the printheads control the amount
of ink transferred to the page, you wi ll continue to see
high-quali ty printing results, even when the
ink levels are getting low.
The front panel notifies you when an ink
cartridge’s ink level is low. You can also
check the ink leve ls of all the ink cartridges to
determine if an ink cartridge needs to be
replaced, see Ink Cartridge Statistics
. If the ink
cartridge is empty, the printer stops printing. See The
Ink System.
Printheads
The printheads are extremely durable and do not need
to be replaced every time an ink cartridge is replaced.
They are independent of the ink cartridges and will
continue giving excellent image quality results even if
the ink cartridges are low in ink. See The Ink System
.
If you notice a decline in print quality, refer to Image
Quality Problems located in the “Solutions” tab.
Printhead Cleaners
The printhead cleaners keep the printheads in good
condition and they prevent them from being damaged
when the printer is not active. They service the
printhead, making sure it is always ready to be used
and prevent them fr om drying out when not in use.
Printhead cleaners come with the printheads when you
purchase them. When you replace a
printhead always replace the printhead
cleaner. Leaving the old printhead cleaner in
the printer will shorten the new printhead’s
life and possibly damage the printer.
Page 48

Media & InkIntroduction Front-Panel Other
Media Roll Media Sheet Media The Ink System
Solutions
HP No. 83 UV Ink Supplies
HP No. 83 UV ink supplies are the pigment-based
printheads, cleaners and ink cartridges for the
HP Designjet 5000 Series printers. Like the HP No. 81
Dye ink su pplies, the HP No. 83 UV ink supplies
feature HP's JetExpre ss pr inthe ad tec hno logy, sm art
chips and six colors, with the same speed,
performance and image quality advantages of these
technol ogies. The difference is that they are pigmentbased and therefore can be weather-durable outdoors
and fade-resistant indoors for extended periods when
used with selected pri nting material.
Printer
Options
The Ink
Cartridge
The Printhead
Index
The Prin t hea d
Cleaner
HP Ink Upgrade Kit
There is an accessory available from your HewlettPackard dealer see HP Ink Upgrade Kit
. This is
accessory is needed to switch from one ink system to
the other.
HP Printhead Storage Container
There is a Storage container available from your
Hewlett-Packard dealer see HP Printhead Storage
Container. This is to store partially used ink system
components whe n switching bet ween ink systems.
Page 49

Media & InkIntroduction Front-Panel Other
Media Roll Media Sheet Media The Ink System
Solutions
Identifying Ink Supplies
The appearance of both types of Ink Supplies,
HP No. 81 Dye based and HP No. 83 UV is very
similar.
To help you easily identify each type of ink supply the
each component is marked with one of the following
symbols.
HP No. 81 Dye based Ink Supplies Symbol:
HP No. 83 UV Ink Supplies Symbol:
Printer
Options
The Ink
Cartridge
The Printhead
Index
The Prin t hea d
Cleaner
Page 50

Media & InkIntroduction Front-Panel Other
Media Roll Media Sheet Media The Ink System
Solutions
Printer
Options
The Ink
Cartridge
The Printhead
Index
The Prin t hea d
Cleaner
Component Identification
The following illustration will help you identify the components of the HP No. 81/HP No. 83 supplies and where
they are installed in the printer.
Printhead
Printhead Cleaner
Ink Cartridge
The selection number HP No. 81 or HP No. 83 on the ink cartridges, printheads and printhead cleaners makes
it easy for you to find the correct HP printing supplies for your printer. Determine the color of the printhead or ink
cartridge you need, then make sure you purchase or order an HP N o. 81 or HP No. 83
printhead with printhead cleaner or ink cartridge. Each ink cartridge and printhead with
printhead cleaner can be purchased separately from your usual HP retailer. See Ordering
Accessories and The Ink System.
Page 51

Media & InkIntroduction Front-Panel Other
Media Roll Media Sheet Media The Ink System
Solutions
Ink Supply Guidelines
Printer
Options
The Ink
Cartridge
The Printhead
Index
The Prin t hea d
Cleaner
For optimum results from your printer and the ink
system, always follow these guide lin es whe n
handling the HP supplies:
Install the ink cartridges, printheads and printhead
cleaners before the install by date, which is printed
on the packag ing.
Install a new printhead cleaner every time you
change a printhead.
Allow the printer and printhead cleaners to
automatically clean the printheads.
Install ink cartridges, printheads and printhead
cleaners in their color-coded slots.
Follow the instructions on the front panel during
installation.
Avoid unnecessary removal of the ink cartridges and
printheads.
When turning off your printer always use the Power
Off button on the front panel. The printheads are
then stored correctly which prevents them from
drying out.
The ink cartridges should never be removed while
the printer is printing. They should only be removed
when the printer is ready for you to replace them .
The front panel will guide you through the removal
and insta llation procedure. See The Ink Cartridge
.
CAUTION When you first received your printer it was
supplied with a set of six setup printheads
installed in the printhead carriage. These
setup printheads are used for the priming of
the tubes in the modular ink delivery
system. Do not remove the setup
printheads from the carriage witho u t
following the procedures in the Setup
Instructions.
Page 52

Media & InkIntroduction Front-Panel Other
Media Roll Media Sheet Media The Ink System
Solutions
Precautions
Printer
Options
The Ink
Cartridge
The Printhead
Index
The Prin t hea d
Cleaner
Do not touch, wipe or attempt to clean the printhead
nozzles. This can damage the printhead.
Do not touc h, wipe or attempt
to clean th e printhead nozz les.
This can damage the printhead.
Handle the HP No. 81/HP No. 83 supplies with care. In
particular the printhead, which is a high precision
device and must be handled carefully.
Do not touch the printhead nozzles.
Do not put the printhead down on the nozzles.
Do not be rough when handling the
printheads. Always set them down gently.
Do not drop the printheads.
Proper handling will assure optimum
performance throughout the printhead life.
The printhead cleaner should always be
handled and stored upright to avoid a potential
spillage of ink.
Do not touch the end of the ink cartridge which is
inserted into the printer as there may be a small
amount of ink on the connection.
Avoid storing partially used ink cartridges on their
ends.
Support bar
The support bar at the left side of the printer, shown
below, is for use when you are working in a confined
space and the window will not open fully so that it rests
at the back of the printer.
Page 53

Media & InkIntroduction Front-Panel Other
Media Roll Media Sheet Media The Ink System
Solutions
Printer
Options
The Ink
Cartridge
The Printhead
Index
The Prin t hea d
Cleaner
When to Replace
When to change your HP No. 81/HP No. 83 supplies is mostly determined by you with guidance from the front
panel. In conjunction with the messages displayed in the front panel and the message explanations in Message
Descriptions, you will be able to choose for yourself when is the right time (for your particular case) to change
the HP No. 81 /HP No. 8 3 sup plie s.
The front panel will also display the ink level and will tell you when your ink supply is low, very low or empty.
This means you have constantly updated information about your HP No. 81/HP No. 83 supplies.
Printhead life is warranted to 700ml of ink consumed. However, on average the anticipated life expectancy of
the printheads is two or three times this. This is provided that the printhead is used under normal operating
conditions (using HP ink cartridge s only) and its “install before date” has not lapsed. However results vary
depending on the print mode setting you use .
When you repl ace the printhead always replace th e corresponding printhead cleaner.
Page 54

Media & InkIntroduction Front-Panel Other
Media Roll Media Sheet Media The Ink System
Solutions
Switching Ink Types
Switching between the dye based ink system
(HP No. 81) and the pigment-based UV ink system
(HP No. 83) involves the following steps:
Ink System Removal
Ink System Installation
Storing Ink Supplies and Ink Tubes
Printer
Options
The Ink
Cartridge
The Printhead
Index
The Prin t hea d
Cleaner
Page 55

Media & InkIntroduction Front-Panel Other
Media Roll Media Sheet Media The Ink System
Solutions
Ink System Removal
Either click on movie icon opposite to run
the animation sequence for the complete
removal procedure (this takes several
minu tes ) o r c li ck on th e mo vi e i cons be lo w
to see the i ndividual procedures.
1. Removal of the ink supplies:
Printheads, Printhead Cleaners and
Cartridges.
2. Removal of the ink tubes.
3. Storing Ink Supplies and Ink Tubes
Printer
Options
The Ink
Cartridge
The Printhead
Index
The Prin t hea d
Cleaner
Page 56

Media & InkIntroduction Front-Panel Other
Media Roll Media Sheet Media The Ink System
Solutions
Ink System Installation
Click on movie icon opposite to run the
animation sequence for the complete
installation proc edu re (this takes several
minutes) or click on the movie icons
below to see the individual procedures.
1. Installation of ink tubes.
2. Installati on of the ink supplies for the
type of ink tubes installed.
3. Storing Ink Supplies and Ink Tubes
Printer
Options
The Ink
Cartridge
The Printhead
Index
The Prin t hea d
Cleaner
Page 57

Media & InkIntroduction Front-Panel Other
Media Roll Media Sheet Media The Ink System
Solutions
Storing Ink Supplies and Ink Tubes
Whenever you change the ink system you must
store the Ink Tubes and Ink Supplies you have
removed from the printer in their respective storage
containers. The Ink Cartridges do not have a
specific storage container so they should be stored
in accordance with instructions given on their
packaging.
1. Click on movie icon opposite to run
animation sequence for storing
HP No. 81/HP No. 83 Ink Supplies.
2. Click on movie icon opposite to run
animatio n sequence for storing
HP No. 81/HP No. 83 Ink Tubes
Storage.
Printer
Options
The Ink
Cartridge
The Printhead
Index
The Prin t hea d
Cleaner
Page 58

Media & InkIntroduction Front-Panel Other
Media Roll Media Sheet Media The Ink System
Solutions
The Ink Cartridge
This section contains animations showing you how to
obtain ink cartridge information and how to remove and
install an ink cartr idge. See Ink Cartridge Error
Messages if you have any problems with replacing the
ink cart r i dges.
Ink Cartridge Statistics
Ink Cartridge Removal
Ink Cartridge Installation
Printer
Options
The Ink
Cartridge
The Printhead
Index
The Prin t hea d
Cleaner
Page 59

Media & InkIntroduction Front-Panel Other
Media Roll Media Sheet Media The Ink System
Solutions
Ink Cartridge Statistics
The information supplied is:
The manufacture rs of the ink cartridge
(HP No. 81 or HP No. 83 is recommended).
The percentage of ink remaining.
Original capacity of the ink cartridge in milliliters.
Re-order part number of the ink cartridge.
The month and year that the ink cartridge was
manufactured.
Click on this icon to run the animation
sequenc e.
A printable version
so that you can take the key illustrations to the
printer, if it is remote from your computer.
of the sequence is also available
Printer
Options
The Ink
Cartridge
The Printhead
Index
The Prin t hea d
Cleaner
Page 60

Media & InkIntroduction Front-Panel Other
Media Roll Media Sheet Media The Ink System
Solutions
Ink Cartridge Removal
CAUTION Only remove an ink cartridge if you are
replacing it and always use the f ront
panel menu to replace the cartridge as
shown.
There are two reasons for ink cartridge removal:
The ink cartridge is very low and you want to
replace the i n k cartridge with a full one for
unattended printing, with the view to replacing it
again and us ing until empty.
The ink cartridge is empty and the front panel
tells you to replace the ink cartr idge.
Click on this icon to run the animation
sequenc e.
A printable version
remote from your computer.
of the sequence is also available so that you can take the key illustrations to the printer, if it is
Printer
Options
The Ink
Cartridge
The Printhead
Index
The Prin t hea d
Cleaner
Page 61

Media & InkIntroduction Front-Panel Other
Media Roll Media Sheet Media The Ink System
Solutions
Ink Cartridge Installation
NOTE: Each ink cartridge slot has a colored label
above it. This shou ld ma tch t he col ored l ab el o n th e
new ink cartridge.
NOTE: T he ink car t ridge is de signed to prevent you
from inser ting the wrong ink type or into the wr ong
color slot. If you have difficulty inserting the ink
cartridge, do not attempt to force it. Check again that
the color of the ink cartridge matches the color of the
ink car trid ge slot, also that the c olored m arker is at
the top of the ink cartridge.
NOTE: Avoid storing partially used ink cartridge s on
their ends.
NOTE: If the front panel di splays an error mes sage
see Ink Cartridge Error Messages
.
Printer
Options
The Ink
Cartridge
The Printhead
Index
The Prin t hea d
Cleaner
Click on this icon to run the animation sequence.
A printable version
of the sequence is also available so that you can take the key illustrations
to the printer, if it is remote from your computer.
Page 62

Media & InkIntroduction Front-Panel Other
Media Roll Media Sheet Media The Ink System
Solutions
The Printhead
When to change your HP No. 81/HP No. 83 supplies is
mostly determined by you with guidance from the front
panel. In c onjunction with the messages displayed in
the front panel and the message explanations in
Printhe ad Statu s Messa ges
Printhe ad Stati stic s
Printhe ad Rem oval
Printhe ad Instal lation
.
Printer
Options
The Ink
Cartridge
The Printhead
Index
The Prin t hea d
Cleaner
Page 63

Media & InkIntroduction Front-Panel Other
Media Roll Media Sheet Media The Ink System
Solutions
Printhead Statistics
The information supplied is:
The manufacturer of the ink cartri dge (HP No. 81
or HP No. 83 is reco mmended).
The status.
Warranty status.
Re-order part number.
The amount of time the printhead has been in the
printer and powered on.
The amou nt of ink consumed.
Click on this icon to run the animation
sequenc e.
A printable version
so that you can take the key illustrations to the
printer, if it is remote from your computer.
of the sequence is also available
Printer
Options
The Ink
Cartridge
The Printhead
Index
The Prin t hea d
Cleaner
Page 64

Media & InkIntroduction Front-Panel Other
Media Roll Media Sheet Media The Ink System
Solutions
Printhead Removal
Printhead replacement must be performed with the
printer switched on at the Power Isolation Switch
which is located at the rear of the printer.
Click on this icon to run the animation
sequenc e.
A printable version
so that you can take the key illustrations to the
printer, if it is remote from your computer.
of the sequence is also available
Printer
Options
The Ink
Cartridge
The Printhead
Index
The Prin t hea d
Cleaner
Page 65

Media & InkIntroduction Front-Panel Other
Media Roll Media Sheet Media The Ink System
Solutions
Printhead Installation
The printhead is designed to prevent you from
accidentally inserting it into the wrong position.
Check that the colored label on the printhead
matches the colored label of the carriage assembly
position that the printhead is to be inserted in. Do
not confuse the light cyan printhead with the dark
cyan position in the carriage.
Before you replace the printhead, it is
recommended that you clean the carriage
assembly as shown in Carriage Interconnect
Wiper.
If the front panel displays an error message, see
Printhead Status Messages
Whenever you install a printhead the printer will
automatically perform the alignment procedure.
.
Printer
Options
The Ink
Cartridge
The Printhead
Index
The Prin t hea d
Cleaner
Click on this icon to run the animation sequence.
A printable version
of the sequence is also available so that you can take the key illustrations
to the printer, if it is remote from your computer.
Page 66

Media & InkIntroduction Front-Panel Other
Media Roll Media Sheet Media The Ink System
Solutions
The Printhead Cleaner
This section contains animations showing you how to
remove and install a printhead cleaner.
CAUTION Leaving the old printhead cleaner in the
printer will shorten the new printh ead’s life
and possibly damage the printer.
Printhe ad Clean er Removal
Printhe ad Clean er Installat io n
Printer
Options
The Ink
Cartridge
The Printhead
Index
The Prin t hea d
Cleaner
Page 67

Media & InkIntroduction Front-Panel Other
Media Roll Media Sheet Media The Ink System
Solutions
Printhead Cleaner Removal
When removing the printhead cleaners:
Be careful not to get ink on your hands. There
may be ink on, ar ound and inside the replaced
printhead cleaner.
Do not lay the replaced printhead cleaner on its
side or turn it upside down, as ink may leak out.
Always handle and store the replaced printhead
cleaner upright to avoid spilling any ink.
CAUTION When replacing a printhead always
replace the correspondi ng printhead
cleaner. Leaving the old printhead
cleaner i n the printer will seriously
shorten the new printhead’s life and
possibly damage the printer.
Printer
Options
The Ink
Cartridge
The Printhead
Index
The Prin t hea d
Cleaner
Click on this icon to run the animation sequence.
A printable version
of the sequence is also available so that you can take the key illustrations
to the printer, if it is remote from your computer.
Page 68

Media & InkIntroduction Front-Panel Other
Media Roll Media Sheet Media The Ink System
Solutions
Printhead Cleaner Installation
NOTE: The printer needs all the ink cartridges,
printh eads and pr inthead cleaners ins talled before it
can continue.
NOTE: If the front panel displays an error messa ge
see Printhead Cleaner Error Messages
After you replace a printhead and printhead cleaner,
the printer will:
Perform tests on the printhead nozzles to ensure
correct operation.
Align the printheads.
Click on this icon to run the animation
sequenc e.
A printable version
of the sequence is also available
so that you can take the key illustrations to the
printer, if it is remote from your computer.
.
Printer
Options
The Ink
Cartridge
The Printhead
Index
The Prin t hea d
Cleaner
Printhead Alignment
The alignment procedure requires an A1 or D-size paper width.
When the front panel displays Ready , y ou are
ready to print.
NOTE: Make sure the printe r window and the r ight door are clos ed after you replace th e HP
supplies. The printer will not print while these are ope n.
Page 69

Solving
Problems
Media & InkIntroduction Front-Panel Other
Image Q ual i ty
Problems
Solutions
Ink Supply
Problems
Media Problems Image Error Other Problems Getting Help
Printer
Options
Index
Solutions
The solutions tab contains all the informati o n for
solving problems that you may encounter as you use
the printer.
The Solutions tab contains seven sections:
Solving Problems
This section is an overview of the process of
troubleshooting, it also tells you where you can get
further information.
Image Quality Problem s
This section helps you to solve any image quality
problems you may be experiencing. It takes you
through the troubleshooting procedure step-bystep.
Ink Supply Problems
This section guides you when you have problems
installing the ink consumable. The ink cartridge,
the printhead with its accomp anying
printhead cleaner. There is also a topic
on how to clean the printhead so that
you do not damage it and inside the
carriage assembly.
This section contains information on what to do if
you have image smears and/or marks on your
media and also what to do if you have a media
jam.
Image Error
This section contains information on what to do if
the image that your printer printed is incorrect, or
not what you expected.
Other Problems
This section is a section for miscellaneous
problems.
Getting He lp
This section explains what to do if you cannot
solve the problem you are having. Also included is
how to get in contact with Hewlett-Packard.
Media Problems
Page 70

Solving
Problems
Media & InkIntroduction Front-Panel Other
Image Q ual i ty
Problems
Solutions
Ink Supply
Problems
Media Problems Image Error Other Problems Getting Help
Solving Problems
Troubleshooting
A brief explanation on troubles hooting the printer.
Help in S olving Problems
included in this se ction are areas you can go to that will
help you solve problems you may encounter.
Finding the Source of Your Problem
How to get to the root of the problem.
Printer
Options
Index
Page 71

Solving
Problems
Media & InkIntroduction Front-Panel Other
Image Q ual i ty
Problems
Solutions
Ink Supply
Problems
Media Problems Image Error Other Problems Getting Help
Troubleshooting
Much of the troubleshooting information contained in
this section is provided to complement the printer’s own
internal checking features.
Fault Tolerant Print Modes.
Image Quality Consistency.
Continuous Printing.
Color Emulation .
Out of Ink Detection.
Printhead end of life detection.
Troubleshooting should be an intuitive process with the
printer either correcting its own faults or conveying a
fault message via the front-panel display, prompting
you to take corrective action. You should therefore only
need to refer to these procedures if the printer does not
correct the problem itself.
Printer
Options
Index
Page 72

Solving
Problems
Media & InkIntroduction Front-Panel Other
Image Q ual i ty
Problems
Solutions
Ink Supply
Problems
Help in Solving Problems
To find the meaning of front-panel messages, see
section Message Descriptions
If you know the problem is related to a certain task,
first check the relevant section in this manual, for
step-by-step procedures. Use this manual's index
to find the section. For example, If the problem is
related to the quality of your printed images, refer
first to the section: Image Quality Problems
If the problem could be related to your software
driver, and you are using an HP driver, refer to the
driver’s troubleshooting documentation and the
on-line help in your application software.
If the problem has no obvious cause, refer to
Finding the Source of You r Problem
If you still cannot solve the problem, see Getting
Help.
.
.
Printer
Options
Media Problems Image Error Other Problems Getting Help
Index
.
Page 73

Solving
Problems
Media & InkIntroduction Front-Panel Other
Image Q ual i ty
Problems
Solutions
Ink Supply
Problems
Media Problems Image Error Other Problems Getting Help
Printer
Options
Index
Finding the Source of Your Problem
1. Look at the front-panel display for messages. See
Message Descriptions
panel messag es.
2. Tes t the printer:
Switch the printer off with the power switch at the
back of the printer.
Make sure that the power cord is firmly inserted in
the printer and plugged in to an outlet that you
know works.
If the front-panel displays an error message while
initializing, make a note of the error message and
refer to Message Descriptions
Switch the printer On, if the printer reaches the
Ready status, try and print a Demo Print. See
Internal Prints
. If this pri n ts correctly, the problem
is not with the printer. Test your computer
hardware and interface.
Make sure that you have the correct
interface cable between the computer
and the printer and that it is firmly
connected to the correct ports.
Check that your printer's graphics
for an explanation of front-
.
language setting (in Device setup / Lang) matches
the requirements of your software.
If you have changed your interface, switch the
printer off and then on again before try ing to print.
Page 74

Solving
Problems
Media & InkIntroduction Front-Panel Other
Image Q ual i ty
Problems
Solutions
Ink Supply
Problems
Media Problems Image Error Other Problems Getting Help
Printer
Options
Index
Image Quality Problems
Before attempting the diagnostic procedures contained
in this section to solve any print quality problems, it is
important to first check that the printer is correctly
setup to print what you want. Many problems
concerned with print quality can be solved by
correcting the way the printer is configur ed.
Correcting the Configuratio n
If you have image quali ty problems the first plac e you
should go is to check the configuration setup.
Using the Image Quality Print
The Image Quality Pr int is a diagno stic pri nt designed
to highl ight for you the root cause of your image quality
problems. Follow the procedures step-by-step.
Color Accuracy
This section helps you to solve color problems you may
have with the printer. More help on this subject is
available from the H P web site whic h you can access
with H P Designjet WebAcc ess
.
Accuracy Calibration
This pro cedure de tails how to re-cal ibrate your p rinter
for the media you are using. This should not normally be
necessar y, however if your working u nder significantly
different environmental conditions, use this procedure.
Aligning the Printh eads
The printhead alignment selection caus es the printer to
align the printheads immediately. If you are having
image quality problems and you suspect the root cause
to be the printhead(s), use this procedure.
Calibrating the Color Output
Color calibration improves color consistency between
prints, and from one printer to another.
Printhead Recovery Procedure
Recovering the printhead(s) means that th e
printer automatically cleans and tests the
printhead(s).
Page 75

Solving
Problems
Media & InkIntroduction Front-Panel Other
Image Q ual i ty
Problems
Solutions
Ink Supply
Problems
Media Problems Image Error Other Problems Getting Help
Printer
Options
Index
Correcting the Configuration
1. To achieve the best performance from your
printer, only use genuine HP accessories and
supplies, whose reliability and performance have
been thoroughly tested to give trouble-free
performance and best-quality prints. For details of
HP media, see Physical Characteristics of Media
Types. You can also look at the web page http://
www.hp. com/go/designJet for the most up to
date information.
2. Make sure that the type of media selected in the
front-panel is the same type of media loaded into
the printer. To check this go to the Roll or Sheet
menu in the front-panel and press Enter.
3. Make sure that the print mode (Max Quality,
Productivity, Max. Speed) is correct. Check it in
the front-panel and the driver.
4. Select Max Quality print mode for maximum print
quality.
5. For Non-HP drivers, set media settings
to match the media type loaded in the
printer. See the documentation that
came with your software for information.
6. If your image quality problem is color accuracy
related, go to Color Accuracy Conf igurat ion
for
further configuration help.
Page 76

Solving
Problems
Media & InkIntroduction Front-Panel Other
Image Q ual i ty
Problems
Solutions
Ink Supply
Problems
Media Problems Image Error Other Problems Getting Help
Printer
Options
Index
Using the Image Quality Print
The Image Quality Print helps you determine if you
have image quality problems, and if you do, what the
cause of the problem is and how to resolve it. The print
contains patterns which are designed to highlight any
image quality problems.
Before printing and analyzing the Image Quality Print, it
is recommended that you check the following:
Printhead Status Check
Check the printhead status in the front-panel, using the
and down keys select the printhead icon, the frontpanel wi ll then display the printhead status.
Replacing
If the printhead needs replacing, go to Printhead
Removal and replace the printhead.
Recovering
If the printhead needs recovering, go to Printhead
Recovery Procedure.
How to Print the Image Qualit y Print
Before you print the Image Quality Print you must
ensure that you have A2 or C size media (or larger)
loaded into the printer.
To print the Image Quality Print use the front-panel. Go
to Utilities> Test Prints>Print Quality and press the
Enter key.
Page 77

Solving
Problems
Media & InkIntroduction Front-Panel Other
Image Q ual i ty
Problems
Solutions
Ink Supply
Problems
Media Problems Image Error Other Problems Getting Help
Printer
Options
Index
How to Use the Image Quality Print
1. Use the same media type and image qu ality
setting as you were using when you discovered
the image quality problem.
2. Study each of the test patterns in the order that
they are shown, that is,1 through 4
Shown here is what the Image Quality Print looks like:
Page 78

Solving
Problems
Media & InkIntroduction Front-Panel Other
Image Q ual i ty
Problems
Solutions
Ink Supply
Problems
Media Problems Image Error Other Problems Getting Help
Printer
Options
Index
Analyzing the Image Quality Print
Test Pattern 1: Primary Colors
The purpose of the particular part of the i mage Quality
Print is to test the overall quality of the document with
regards to dense colors.
The colored stripes are in the same order as they
appear on the printer as if you are facing it, that is, Light
Cyan first and Black last.
Each pair of colors is printed by only one printhead. So
it’s easy to find the root cause of the image quality
problem.
This array of colored stripes is designed to check for
certain defects with the printer. It should not be used to
check for color consistency or accuracy.
1
However, if you do see problems with this print and the
image quality is not acceptable, you will need to
perform some corrective actio ns.
Banding
Banding is when you see repetitive horizontal bands
within the printed image. They can appear as light or
dark bands.
Banding is c aused by problems with:
The printhead(s).
Media advance.
If your printer is functioning correctly this part
of the pri nt wi ll ha v e no prob l ems . T her e is no
banding in any of the colors.
Page 79

Solving
Problems
Media & InkIntroduction Front-Panel Other
Image Q ual i ty
Problems
Solutions
Ink Supply
Problems
Media Problems Image Error Other Problems Getting Help
Printer
Options
Index
Problems with the Printhead(s)
Banding caused by problems with the printhead(s) will
be highlighted in the Image Quality Print because the
banding i s not in all of the colors, the colored strip that
has banding was caused by the same colored
printhead. The colored stripes are in the same order as
they appear on the printer as if you are facing it, that is,
Light Cyan first and Black last.
For example, the Image Quality Print shown below was
printed with a printer that has a cyan printhead
problem.
Corrective Action
1. Perform the Printhead Recovery Procedure
if you
have not already done so.
2. If there is no improvement in print quality, replace
the printhead with a problem.
Page 80

Solving
Problems
Media & InkIntroduction Front-Panel Other
Image Q ual i ty
Problems
Solutions
Ink Supply
Problems
Media Problems Image Error Other Problems Getting Help
Printer
Options
Index
Problems with Media Advance
If the printer has media advance problems you will see
banding in all the colors.
For example, the Image Quality Print shown below was
printed with a printer that has a media advance.
problem.
Note: The bands appear light because the roller has
advanced too much. The opposite could also be true,
the bands could appear dark because the media has
not advanced sufficiently.
In high quality modes, media advance problems may
not appear as lines of banding, they may appear grainy
instead. The banding or graininess will appear in all the
colors.
Corrective Action
1. If the image is grainy, this could also be a
symptom of problems with the bi-directional
alignment. Refer to Test Pattern 3: Bi-directional
Alignment If this pattern is OK, go to step 2.
2. Perform the Accuracy Calibration
with the s ame
media you were experiencing unacceptable image
quality.
3. If there is no improvement in print quality, contact
Hewlett Packard.
NOTE: It is also po ssible tha t this k ind of ba nding was
caused because you were using non-HP supported
media. The perfor man ce ca n only be gua rant eed if you
use suppo rted HP media.
Page 81

Solving
Problems
Media & InkIntroduction Front-Panel Other
Image Q ual i ty
Problems
Solutions
Ink Supply
Problems
Media Problems Image Error Other Problems Getting Help
Printer
Options
Index
Test Pattern 2: Color-to-color Alignm ent
If the printer has color-to-color alignm ent problems
then the Image Quality Print in test pattern 2 (shown
below) has misaligned colors.
Corrective Action
1. Perform the Aligning the Printheads
with the
same media you were experiencing unacceptable
image quality.
2. If there is no improvement in print quality, contact
Hewlett Packard.
Test Pattern 3: Bi-directional Alignment
If a printer has bi-directional alignment problems, lines
are not straight and/or fuzzy. The pattern seen below is
designed to highlight this kind of problem. Check the
lines on this test pattern, if they have any defects like
the ones des cribed above perform the corrective
action.
Corrective Action
1. Perform the Aligning the Printheads
with the
same media you were experiencing unacceptable
image quality.
2. If there is no improvement in print quality, contact
Hewlett-Packard.
Page 82

Solving
Problems
Media & InkIntroduction Front-Panel Other
Image Q ual i ty
Problems
Solutions
Ink Supply
Problems
Media Problems Image Error Other Problems Getting Help
Printer
Options
Index
Test Pattern 4: Ver tic al Line Stra ightn ess
If a printer has Vertical Line Straightness problems,
lines are not straight or are fuzzy. The pattern seen
below is designed to highlight this kind of problem.
Check the lines on this test pattern, if they have any
defects like the ones described above perform the
corrective acti on.
Corrective Action
1. Perform the Aligning the Printheads
with the
same media you were experiencing unacceptable
image quality.
2. If there is no improvement in print quality, contact
Hewlett-Packard.
No Defects Found in the Image Quality Print
If the entire Image Quality Print contains no defects
and you still experience image quality problems, listed
below are some things to check:
The print mode in the printer is incorrect see
Changing the Print Mode
Check the driver you are using to print with, if it is a
non-HP driver, go to
http://www.hp.com/go/designjet
and download the correct HP driver.
The settings in the non-HP RIP are incorrect.
Refer to the documentation which came w ith the
RIP.
The software applications you are using have the
wrong settings.
.
Page 83

Solving
Problems
Media & InkIntroduction Front-Panel Other
Image Q ual i ty
Problems
Solutions
Ink Supply
Problems
Media Problems Image Error Other Problems Getting Help
Printer
Options
Index
Color Accuracy
These are two areas you should review when
troubleshootin g a color accuracy problem:
Configuration
Check the color emulation selected in the driver. Make
sure the color information is adjusted for the c urrent
color setup. See Color Accuracy Configuration
Printing color with PostScript (HP Designjet
5000PS)
Most graphic design applications can define color using
three methods:
CMYK.
RGB.
Pantone.
CMYK Workflows
Traditional workflows define the color in the
CMYK space. To obtain optimal results,
CMYK must be adapted t o the target printer
which receives the data, different printers will
produce different color from the sam e CMYK
data.
.
In some situations the CM YK data in your docume nt
will not be suited to your printer. Two typical situations
are:
The document was optimized for a certain printer,
and now it has to be produced on a different
printing device.
The document is being optimized for a printing
press, but it is necessary to produce a check print
using a less-expensive printing device.
To process CMYK data which is not intended for the
printer, the HP Desi gnje t prin ters provide color
emulation modes. The emulation must be enabled in
the PostScri pt driv er, in t he “Printer color management”
dialog box:
Standard emulation s :
– SWOP (United States),
– EuroScale (Europe) ,
– DIC (Japan) and
– Toyo (Japan).
CMYK data is frequently designed for these standards.
If there is no information as to how the
CMYK data was defined, these standards
are a good assumption.
Page 84

Solving
Problems
Media & InkIntroduction Front-Panel Other
Image Q ual i ty
Problems
Solutions
Ink Supply
Problems
Media Problems Image Error Other Problems Getting Help
Printer
Options
Index
Custom emulation
This mode can emulate any CMYK printer. You will
need the ICC profile for the printer for which the CMYK
data is intended. The ICC profile is a standard which
defines which color would come out of that printer. The
HP Designjet uses this information to produce the
same color.
RGB Workflows
RGB is a device-independent definition of color. Bein g
device-independent implies that RGB has to be
converted to the printer-centric CMYK data which
drives the printer. And this transformation depends on
the target printer.
The transformation from RGB to CMYK requires an
ICC profile for the printer. The profile describes which
CMYK i s a good reproduc tion of a certain RGB.
Because the color which comes out of the printer
depends on the printer setup—such as the type of
paper and the quality level—you must select the ICC
profile for the intended printing cond itio ns.
HP Designjet printers come with ICC profiles
for multiple types of paper.
Even if RGB is printer-centric, RGB data does not
always produce the same color. There are a few
frequently used types of RGB color such as sRGB,
Apple RGB, Adobe RGB, or ColorMatch RGB. An RGB
profile describes what an RGB color looks like.
Your printing application should be set up with the
correct ICC profiles for the RGB and CMYK data.
Newer applications such as PhotoShop 5 and
Illustrator 8 allow you to do this. Your application will
use these ICC profiles to convert RGB to CMYK.
If your design application does not support ICC
profiles, you don't have control over the conversion
from RGB to CMYK. So, always convert data into
CMYK before putting it into the application. Make sure
that the CMYK has been optimized for the printer which
is going to handle the data—see the recommendations
in the previous section.
Some applications send unidentified RGB data instead
of CMYK. In such case, the printer will ca rry out the
conversion from RGB to CMYK. You must select the
type of RGB data in the PostScript driver, in the “Printer
color management/RGB e mulation” option.
For applications such as Adobe PhotoShop
which do identify the RGB they are using,
this setting will have no effect.
Page 85

Solving
Problems
Media & InkIntroduction Front-Panel Other
Image Q ual i ty
Problems
Solutions
Ink Supply
Problems
Media Problems Image Error Other Problems Getting Help
Printer
Options
Index
Pantone Workflow
Pantone colors are identified by their name, and the
appearance for the color is defined by Pantone.
Pantone calibrates HP Designjet printers so that they
can produce the best match of a Pantone color.
When an application sends a Pantone color to the
printer, it can use two methods
Pantone colors as spot are defined with their
name, so that the printer can select how to best
emulate that Pantone color.
Pantone colors as composite colors are defined
with a CMYK value.
Since CMYK values are device-dependent, the CMYK
for the Pantone composite color must be adapted to the
target printer. Most applications contain CMYK
definitions of Pantone colors optimized for the SWOP
or EuroScale standards. If the application does not
allow sele ction of this CMY K, and the printer CMYK
does not emulate these standards, the output will not
match well with the Pantone c o lors.
If the Pantone colors are defined as spot colors, the
HP Designjet printer will produce the best match
through the Automatic Pantone Calibration mechanism.
If the best CMYK for the Pantone is not known, it is
recommended that Pantone colors are defined as s pot.
Only Pantone Coated colors are reproduced in an
HP Designjet.
Using ICC Profiles
The International Color Consortium (ICC) color profiles
that are provided with the HP Designjet 5000PS are
identical to the color profiles that the internal PS RIP
uses, although the latter converts them to PostScript
Color Rendering Dictionaries internally. To use the ICC
profiles ou tside of the internal PS RIP, the application
and the driver must be configured correctly for good
results. Make sure the ICC profile for the correct printer
model (DJ 5000PS), ink type (imaging or UV), media,
and print quality is selected in your application, and that
it is being used to convert RGB or CIELab images to
CMYK. Choose the correct rendering intent for your
type of job: Perceptual for photographic type images,
Colorimetric for logos and proofing, and
Saturation for computer graphics type
images. Make sure the application is sending
device CMYK colors to the printer, not
calibrated col or. For instance when printing
from Phot oShop 5.x, select the profile and
Page 86

Solving
Problems
Media & InkIntroduction Front-Panel Other
Image Q ual i ty
Problems
Solutions
Ink Supply
Problems
Media Problems Image Error Other Problems Getting Help
Printer
Options
Index
rendering intent in the CYMK setup, select “CMYK” as
the output color space, and un-select the “Postscript
Color Management” check box. In the printer driver,
make sure that Automatic Black Replacement is
disabled <insert reference>, and that no CMYK
emulations are being use d <insert reference>. If all of
these c onditions are met, the results of using a
provided ICC profile externally or internally will be
very similar.
Creating ICC Profiles
If you want to create your own ICC profiles for use with
the HP Designjet 5000PS (using any of the
commercially available profiling software packages),
the most important thing is to make sure that you use
exactly
the same configuration of application(s) and driver to
print and measure the calibration target(s) as you will
use later on when applying the profile. HP recommends
using N ative mode without Automatic Black
Replacement, making sure that the application is
sending device CMYK colors without any further
conversions being applied. Black generation
is one of the most important aspects of
printer profile generation, but differs
considerable from one profiling tool to
another. If possible, HP recommends
using the following black generation parameters for the
HP Designjet 5000PS: K ink start 35%; maximum K ink
100%; GCR type curve; total area coverage 280%.
Good results can also be obtained with other settings,
depending o n the profiling software used. Six ink
printers with light Cyan and light
Magenta col orants in general require the start of K ink
to be delayed compared to traditional four color
printers, in order to avoid the grainy appearance
caused by black dots in highlights and midtones.
Automatic Black Replacement will do this for colors
defined as device CMYK, but should not be used in
conjunction with a profile that is itself already defining K
ink start and other black generation parameters. When
using the internal profiles with ABR enabled, the
internal PS RIP will not apply ABR to colors generated
by the profile (defined by the application as RGB or
CIELab), but will apply ABR to colors defined by the
application as device CMYK. For externally applied
profiles the internal RIP cannot make this distinction,
hence ABR should be disabled in this case.
Page 87

Solving
Problems
Media & InkIntroduction Front-Panel Other
Image Q ual i ty
Problems
Solutions
Ink Supply
Problems
Media Problems Image Error Other Problems Getting Help
Printer
Options
Index
Color Consistency Problems
Some media may discolor or change with age.
Check that your media is fresh and has been
stored correctly.
Check to make sure that color calibration is turned
on. Refer to Calibrating the Color Output
If the environmental conditions you are printing in
change rapidly, you may see changes in color
consistency. By reducing the time the print stays in
extreme environmental conditions after being
printed (especially very high humidity) you can
reduce color consistency problems.
Long Term Color Bleeding (Glossy Papers)
If you see the colors are bleeding into the paper, that is,
the color i s soaking into the paper making the lines
fuzzy and bleary. This is because of the humidity
conditions that you are working under:
Change the paper that you are printing with.
or
Remove the printer from the high humidity
conditions.
or
Do not cover or stack the printed images after
printing.
Page 88

Solving
Problems
Media & InkIntroduction Front-Panel Other
Image Q ual i ty
Problems
Solutions
Ink Supply
Problems
Media Problems Image Error Other Problems Getting Help
Printer
Options
Index
Color Accuracy Configuration
The configurations of the pri nter, the driver, and RIPs define how ink is applied to each type of media. Use the
information in the following table to con figure your printer and software for best color accuracy.
Location of Setting Setting Description Selection
Printer Front-Panel
Menu
Non-HP dri vers
(external software or
hardware RIPs)
Media
Ink Emulation Mode
RGB
CMYK (PS 5000PS
only)
Calibrating the Co lor
Output
Media or equivalent
setting
Color correction optio n
or equivalent
Set to match the media type
loaded in the printer. See
Physical Characteristics of
Media Types.
Set the type of colors that
your software generates.
Set to ON.
Set to match the media type
loaded in the pri nter. See the
documentation that came
with your software for
information.
Perform the color correction
calibration if one is available.
Page 89

Solving
Problems
Media & InkIntroduction Front-Panel Other
Image Q ual i ty
Problems
Solutions
Ink Supply
Problems
Media Problems Image Error Other Problems Getting Help
Where to Find Additional Information
The means of accurately managing the colors printed
by your printer vary with the software application and
driver being used. Refer to the following
documentation:
There is a tutorial available from the HP web site,
use the HP Designjet WebAccess
On-line documentation in the drivers shipped with
your printer.
Non-Pos tScript
NOTE: Additionally, remember that for your printer may
be configured to use one of its internal pen palettes
instead of your software's palette (which is the default).
See the sec tion starting on Pen Widths and Co lors in
the Internal Palettes.
to go there.
Printer
Options
Index
Page 90

Solving
Problems
Media & InkIntroduction Front-Panel Other
Image Q ual i ty
Problems
Solutions
Ink Supply
Problems
Media Problems Image Error Other Problems Getting Help
Printhead Recovery Procedure
Recovering the printhead(s) means that the printer
automatically cleans and tests the printhead(s).
If you are not sure which printhead to recover select
“All Printheads”.
Click on this icon to run the animation
sequenc e.
A printable version
so that you can take the key illustrations to the
printer, if it is remote from your computer.
of the sequence is also available
Printer
Options
Index
Page 91

Printer
Options
Solving
Problems
Media & InkIntroduction Front-Panel Other
Image Q ual i ty
Problems
Solutions
Ink Supply
Problems
Media Problems Image Error Other Problems Getting Help
Accuracy Calibration
Your pri nter was calibrated at the factory to ensure
that it operates with the greates t accurac y in norm al
environmental conditions. If you are operating under
significantly different conditions, you should
recalibrate the printer as explained here. The printer's
environmental specifications are given on
Environmental Specifications
recalibrate the printer if you have image quality
problems. Before recalibrating the printer, you should
always use the Image Quality Print to verify that you
do actual ly have image quality problems caused by
media advance problems.
Click on this icon to run the animation
sequenc e.
A printable version
of the sequence is also available
so that you can take the key illustrations to the printer, if it is remote from your computer.
. You may also need to
Index
To Restore the Factory's Calibratio n
NOTE: If you notice that afte r the calibration
the results are wor se than before, return the
setting of the media back to the original
setting. Go to Utilities/Calibrations/Accuracy/
Restore Factor y.
Page 92

Solving
Problems
Media & InkIntroduction Front-Panel Other
Image Q ual i ty
Problems
Solutions
Ink Supply
Problems
Media Problems Image Error Other Problems Getting Help
Aligning the Printheads
The printhead alignment selection causes the printer
to align the printheads immediately, or if an image is
being printed, as soon as the current print job is
finished. The alignment procedure requires a
minimum media size of A1/D-size (24 inches).
The printer will automatically perform an alignment
when printheads are replaced. You can use this
feature if the print quality prin t indicate s an alignme nt
error. Refer to Image Quality Problems
Click on this icon to run the animation
sequenc e.
A printable version
of the sequence is also available
so that you can take the key illustrations to the printer,
if it is remote from your computer.
.
Printer
Options
Index
Page 93

Solving
Problems
Media & InkIntroduction Front-Panel Other
Image Q ual i ty
Problems
Solutions
Ink Supply
Problems
Media Problems Image Error Other Problems Getting Help
Calibrating the Color Output
Color calibration improves color consistency between
prints, and from one printer to another. The printer
calibrates the color by printing a ‘calibration strip’ and
then scanning the strip with a built-in optical sensor.
The printer will then calculate the color correction
required, which is then applied to all the subsequent
prints. The Color Calibration is performed whenever a
printhead is replaced, for each newly introduced media
type that has not previously been calibrated for the
current set of printheads. This can be turned off
however and a default color correction is used for each
of the media that is known.
Printer
Options
Index
The menu settings for Color calibration are:
On T he printer uses the calibration the printer
has performed before printing a page. The
printer performs the calibration whenever
you introduce a new media type that has
not been calibrated yet with the current set
of printheads. A color calibration can also
be triggered manually via the Calibrations
menu.
Off The printer uses a default color correction,
different for each media type and print
quality setting.
Go to Menu Setup/Internal RIP Settings/Color
Calibration. Refer to Internal RIP Settings Menu
the menu.
to see
Page 94

Solving
Problems
Media & InkIntroduction Front-Panel Other
Image Q ual i ty
Problems
Solutions
Ink Supply
Problems
Media Problems Image Error Other Problems Getting Help
Ink Supply Problems
Problems Inserting the Ink Supplies
Carriage Interconnect Wiper
Most of the problems that you could encounter when
working with the HP No.81/83 supplies are solved with
guidance from the front-panel. A full list of front
messages are supplied in Message Descriptions
.
Printer
Options
Index
Page 95

Solving
Problems
Media & InkIntroduction Front-Panel Other
Image Q ual i ty
Problems
Solutions
Ink Supply
Problems
Media Problems Image Error Other Problems Getting Help
Printer
Options
Index
Problems Inserting the Ink Supplies
Problems Reseating the Printhead
If you have inserted the printhead into the printhead
carriage assembly and the printer does not “beep”,
perform the following steps.
Check that you have removed the protective tape
from the printhead .
Insert the printhead into the carriage assembly but
this time close the cover using the latch.
Clean the electrical contacts on both the
printheads and the printhead carriage assembly
using the carriage interconnect wiper procedure
refer to Carriage Interconnect Wiper
Replace the printhead with a new one.
Problems Inserting the Ink Cartridge
1. Ensure that you have the correct HP No.81or HP
No.83 ink cartridge.
2. Ensure that the cartridge is the correct
color for that slot.
3. Ensure that the cartridge is the correct
orientation, with the color coded label at
the top.
.
CAUTION Never clean inside the ink cartridge
slots.
Problems Inserting the Printhead
1. Ensure that you have the correct HP No.81 or HP
No.83 printhead.
2. Ensure that you have removed the protective cap
from the printhead.
3. Ensure that the printhead is the correct color for
that slot.
4. Ensure that the printhead is the correct
orientation.
See the section Printhead Instal lation
for details.
Problems Inserting the Printhead Cleaner
1. Ensure that you have the correct HP No.81 or HP
No.83 printhead.
2. Ensure that the printhead cleaner is the correct
color for that slot.
3. Ensure that the printhead cleaner is the
correct orientation.
See Printhead Cleaner Installation
for details
Page 96

Solving
Problems
Media & InkIntroduction Front-Panel Other
Image Q ual i ty
Problems
Solutions
Ink Supply
Problems
Media Problems Image Error Other Problems Getting Help
Carriage Interconn ect Wiper
Whenever you repla ce the printhead, check the
empty slots to see if the carriage interconnect needs
cleaning. In extreme cases it is possible that the
printer will not recognize a printhead when it has
been installed. This is due to the build-up of ink
deposit s on the electrical connections between the
printhead and the printhead carriage.
Include d with your HP Designjet printer, is a
Carriage Interconnec t Wiper. This must be used for
cleaning the electrical interconnects of both the
printhead carriage and the printhead.
If the front-panel persistently displays the mes sage
“Reseat” next to the printhead try performing the
procedu re shown here.
Click on this icon to run the animation
sequenc e.
A printable version
remote from your computer.
of the sequence is also available so that you can take the key illustrations to the printer, if it's
Printer
Options
Index
NOTE: Do n ot touch, wipe or attempt to clean the printhead nozz les. This can damage the
printhead and reduce print quality.
NOTE: After waiting a few moments to allow both connectors to dry, replace the printhead into
the carriage assembly Printhead Installation
.
Page 97

Media & InkIntroduction Front-Panel Other
Solving
Problems
Image Q ual i ty
Problems
Media Problems
Media
Handling Your Media
Clear ing a Media Jam
Ink Marks on the Media
Solutions
Ink Supply
Problems
Media Problems
Printer
Options
Image Error Other Problems Getting Help
Index
Page 98

Solving
Problems
Media & InkIntroduction Front-Panel Other
Image Q ual i ty
Problems
Solutions
Ink Supply
Problems
Media Problems
Printer
Options
Image Error Other Problems Getting Help
Index
Media
Always make sure that you are using the appropriate
media for your image and that it is consistent with your
software application. To ensure color accuracy and
print-quality performance of the printer, use only media
types that have been certified for your printer. Use of
non-HP media or HP media not certified for your printer
may significantly reduce the color and print quality of
your images. For details of HP media, see Physical
Characteristics of Media Types.
Handling Your Media
Handle film and glossy media by the edges or wear
cotton gloves. Skin oils can be transferred to the
media leaving finger print marks.
Although the ink systems supplied with this printer
have good light fastness, colors will eventually fade
or change if exp osed to sunlight over a long period
of time.
Rewrap partially used rolls if they are not
being used and do not stack rolls.
Always keep unused rolls wrapped in the
plastic wrap to prevent discoloration.
Keep the media tightly wound on the roll
throughout the loading and unloading
procedures. If the media sta rts to unwind, it can
become di fficult to handle.
Page 99

Solving
Problems
Media & InkIntroduction Front-Panel Other
Image Q ual i ty
Problems
Solutions
Ink Supply
Problems
Clearing a Media Jam
The “Switch Power Off” message is usually shown
when there is a media jam.
Media Problems
Printer
Options
Image Error Other Problems Getting Help
Index
!
Switch Power off
Check printhead path
Check media path
!
Switch power off
(x)(x)
Internal error code
The printer must be cleared before the printer can
operate again. There are two types of media jam:
A jam that prevents the carriage from moving from
one side of the printer to the other. This is called
Printhead path jam. See Check Printhead Path
procedure.
A jam that prevents the media from advancing into
the printer correctly. This is called a Media Path Jam. See Check Media Path
Click on this icon to run the animation sequence.
A printable version
of the sequence is also available so that you can take the key illustrations
to the printer, if it is remote from your computer.
Continued.
.
Page 100

Solving
Problems
Media & InkIntroduction Front-Panel Other
Image Q ual i ty
Problems
Solutions
Ink Supply
Problems
Media Problems
Printer
Options
Image Error Other Problems Getting Help
Index
Check Printhead Path
1. Switch the printer off at the rear of the printer and
open the window.
2. Look in the area where the printer was printing at
the time of the jam, this is where the media is most
likely to be jammed.
3. Lift the media load lever.
4. Carefully remove any of th e jammed media which
you can lift up and out from the top of the printer.
5. Carefully pull the rest of the roll or sheet down and
out of the printer.
6. If you are using a roll of media trim the media with
a knife as shown on Trimming the Med ia
7. Reload the media see Loading Roll Media
.
.
8. Switch the printer On.
9. If there is some media left behind in the media
path, loadin g paper can become difficult. This can
be cleared by loading a rigid paper type
through the printer media path.
10. If you have image quality problems after a paper
jam, this could indicate that the printheads have
been moved from their correct position in the
carriage. To correct this perform the “Aligning the
Printheads” procedure.
Check Media Path
1. Switch the printer off at the rear of the printer.
2. Check that the roll of media has not almost
finished and is stuck to the empty cardboard core.
3. Load a new roll.
Contact Hewlett-Packard
If after performing all of these procedures the frontpanel displays the “Switch Power Off” message again,
make a note of the message with the error code and
contact HP.
 Loading...