


FH50130

®
OWNER'S
MANUAl
Operating and Servicing
Instructions
Espafiol - p_gina EI / Frances - pag FI
www.hoover.com
_ lease visit Hoover.com
for video instructions
for this cleaner.
IMPORTANT:READCAREFULLYBEFOREASSEMBLYANDUSE.
Questionsor concerns?Forassistance,pleasecallCustomerServiceat
1-800-944-9200Mon-Fri8am-7pmESTbeforereturningthisproducttothe store.
THIS PRODUCTIS INTENDEDFORHOUSEHOLDUSEONLY.
IF USEDCOMMERCIALLYWARRANTYIS VOID.
@2012 Techtronic Floor Care Technology Limited. All rights reserved, #961151062 ID106115-R0
Thankyou for choosing a HOOVER° product.
Please enter the complete model and Manufacturing
Code in the spaces provided.
MODEL
MFG. CODE
Hint: Attach your sales receipt to this owner's manual.
Verification of date of purchase may be required for
warranty service of your HOOVER _ product.
Be sure to register your product online at Hoover.corn or
call 1-800-944-9200 to register by phone.
Important Safeguards .............................................................................................. 3
Carton Contents ....................................................................................................... 5
How To Assemble ..................................................................................................... 6
Features .................................................................................................................... 7
How To Use ............................................................................................................... 8
On-Off Pedal ....................................................................................................... 8
Handle Release Pedal ........................................................................................ 8
Transporting ........................................................................................................ 8
Carry Handles ..................................................................................................... 8
Clean Water/Solution Tank ................................................................................. 8
Dirty Water Tank ................................................................................................. 9
How To Clean ............................................................................................................ 10
Tools .......................................................................................................................... 12
Maintenance .............................................................................................................. 15
Nozzle ................................................................................................................. 15
Brushes ............................................................................................................... 15
Service ....................................................................................................................... 16
Troubleshooting ....................................................................................................... 17
Cleaning Solutions ................................................................................................... 18
Warranty .................................................................................................................... 19
Techtronic Floor Care Technology Umited
VACUUM CIEANER/ASPIRATEUR!ASPI RADORA
MODEL/MOUEIE/MUUELO XXXXXXX
Myu.oo°EX_XXXX °®_
12Gv. 60Hz.. !_ A u_
HOUSEHOLD _ E MENAUER!TIPO OOMESTICU
Distributed _V HO ER,Inc. Gle,wiUow OH44139
Made hi C hllla
SEUIES/SEUIE/S_E XY, XX X 2_sG
MANUFACTURINGCODE
Label located on rear of cleaner)
If you need assistance:
Visit our website at hoover.com for more information or for video instruction fot this carpet washer.
Follow the authorized dealer Iocator link to find the Hoove¢ "_authorized dealer nearest you or call 1-800-
944-9200 for an automated referral of Hoover _ authorized dealer locations (U.S. only) or to speak with
a customer service representative; Mon- Fri 8am- 7pm EST.
PLEASE DO NOT RETURN THIS PRODUCT TO THE STORE.
2
SAVETHESEINSTRUCTIONS
When using an electrical appliance, basic precautions should always be
followed, including the following:
READ ALL INSTRUCTIONS BEFORE USING THIS APPLIANCE.
WARNING:TOREDUCETHERISKOFFIRE,
ELECTRICSHOCKORINJURY:
• Fullyassemble before operating.
• Operatecleaner only at voltage specified on data plate on lower handle of cleaner.
• Donot leave appliance when plugged in. Unplug from outlet when not in use and
before cleaning or servicing.
• Useindoors only.
• Do not immerse. Use only on carpet moistened by cleaning process.
• Use only HOOVER_ cleaning products intended for use with this machine. (See
the "Cleaning Products" section of this manual.)
• Do not allow to be used as a toy. Not intended for use by children age 12 and
under. Close supervision is necessary when used near children. To avoid injury
or damage, keepchildren away from product, and do not allow children to place
fingers or other objects into any openings.
• Use only as described in this manual. Use only manufacturer's recommended
attachments and products.
• Do not use with damaged cord or plug. If appliance is not working as it should,
has been dropped, damaged, left outdoors, or dropped into water, take it to a
service center prior to continuing use.
• Do not pull or carry by cord, use cord as a handle, close a door on cord, or pull
cord around sharp edges or corners. Do not place product on cord. Do not run
appliance over cord. Keep cord away from heated surfaces.
• Do not unplug by pulling on cord. To unplug, grasp the plug, not the cord.
• Do not handle plug or appliance with wet hands.
• Do not put any object into openings. Do not use with any opening blocked; keep
free of dust, lint, hair, and anything that may reduce air flow.
• Keephair, loose clothing, fingers, and all parts of body away from openings and
moving parts.
• Turn off all controls before unplugging.
• Useextra carewhen cleaningon stairs. To avoid personal injury or damage,and to
preventthe cleanerfrom falling, always placecleanerat bottom of stairs or on floor.
Donot placecleaneron stairs or furniture, as it may result in injury or damage.
• Do not use to pick up flammable or combustible materials, such as gasoline, or
fine wood sandings, or use in areas where they may be present.
• Connectto a properly grounded outlet only. See Grounding Instructions.
• Unplug before connecting SpinScrub_)Hand Tool.
• Donot pick up anything that is burning or smoking, such as cigarettes, matches,
or hot ashes.
• Do not usewithout Tanks or Filters in place.
• Do not clean over floor electrical outlets.
• WARNING:Thisproduct containschemicalsknown to theStateof Californiato cause
cancer,birth defects or reproductive harm. WASHHANDSAFfER HANDLING.
3
CAUTION- TOREDUCETHERISKOFDAMAGE:
• Avoid picking up hard, sharpobjects with this product, asthey may causedamage.
• Store appropriately indoors in a dry place. Do not expose machine to freezing
temperatures.
• Do not use sharp objects to clean out hose as they can cause damage.
• Toassist in reducing drying time, becertain the area iswell ventilated when using
detergents and other cleaners with this machine.
• To help prevent matting and resoiling, avoid contact with carpets until they are
dry. Keep children and pets away from carpets until they are completely dry.
• Do not store extractor with solution in tanks.
• With brushes on, do not allow cleaner to sit in one location for an extended
period of time, as damage to the floor can result.
• Do not use this extractor and accessories on hard floors. Using this machine on
hard floors without proper attachment may scratch or damage your floor.
• Water will drip from the brushes and underside of the product after useand may
puddle. To avoid damage to wood and laminate flooring and to avoid potential
slip hazard, after use (a) do not leavethe product on wood and laminate surfaces
and remove to a hard surface and (b) place unit on absorbent material (such as
a towel) to soak up drips.
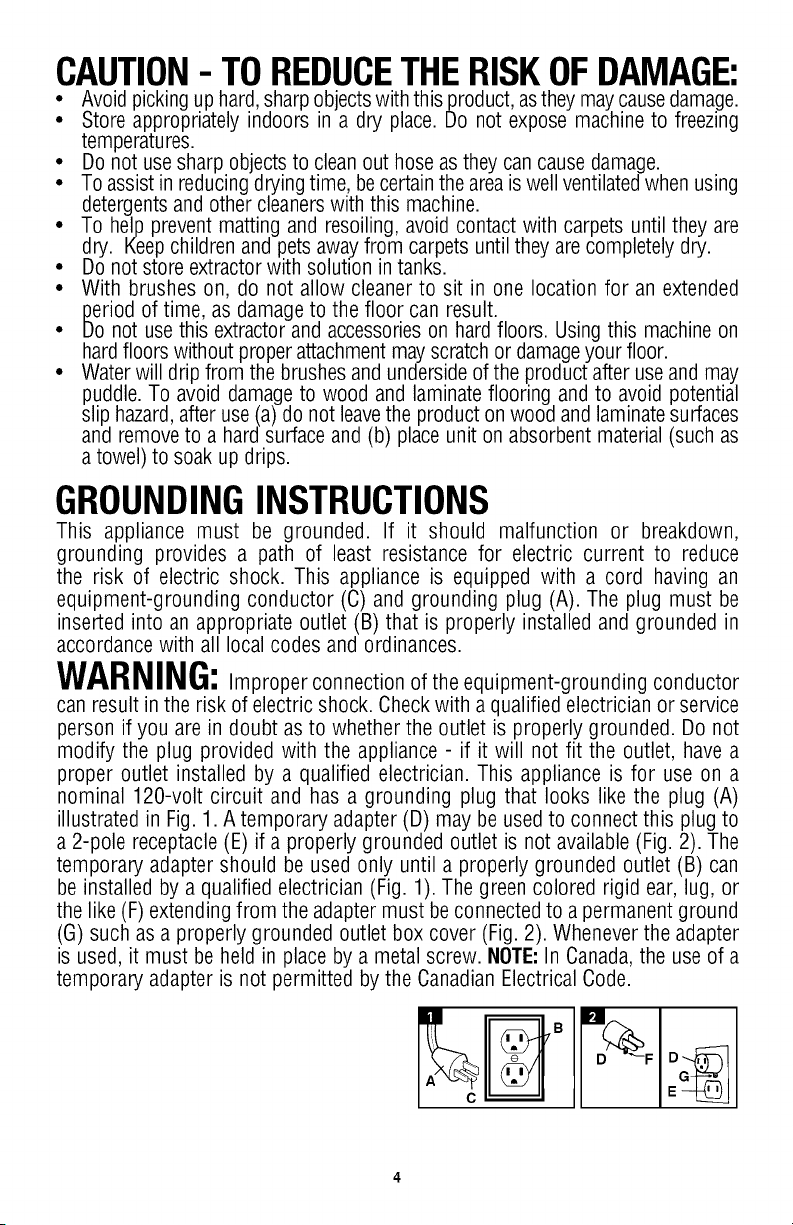
GROUNDINGINSTRUCTIONS
This appliance must be grounded. If it should malfunction or breakdown,
grounding provides a path of least resistance for electric current to reduce
the risk of electric shock. This appliance is equipped with a cord having an
equipment-grounding conductor (C) and grounding plug (A). The plug must be
inserted into an appropriate outlet (B) that is properly installed and grounded in
accordance with all local codes and ordinances.
WARNING:Improper connection of the equipment-grounding conductor
can result in the risk of electric shock. Check with a qualified electrician or service
person if you are in doubt as to whether the outlet is properly grounded. Do not
modify the plug provided with the appliance - if it will not fit the outlet, have a
proper outlet installed by a qualified electrician. This appliance is for use on a
nominal 120-volt circuit and has a grounding plug that looks like the plug (A)
illustrated in Fig. 1. A temporary adapter (D) may be used to connect this plug to
a 2-pole receptacle (E) if a properly grounded outlet is not available (Fig. 2). The
temporary adapter should be used only until a properly grounded outlet (B) can
be installed by a qualified electrician (Fig. 1). The green colored rigid ear, lug, or
the like (F) extending from the adapter must be connected to a permanent ground
(G) such as a properly grounded outlet box cover (Fig. 2). Whenever the adapter
is used, it must be held in place by a metal screw. NOTE:In Canada, the use of a
temporary adapter is not permitted by the Canadian Electrical Code.
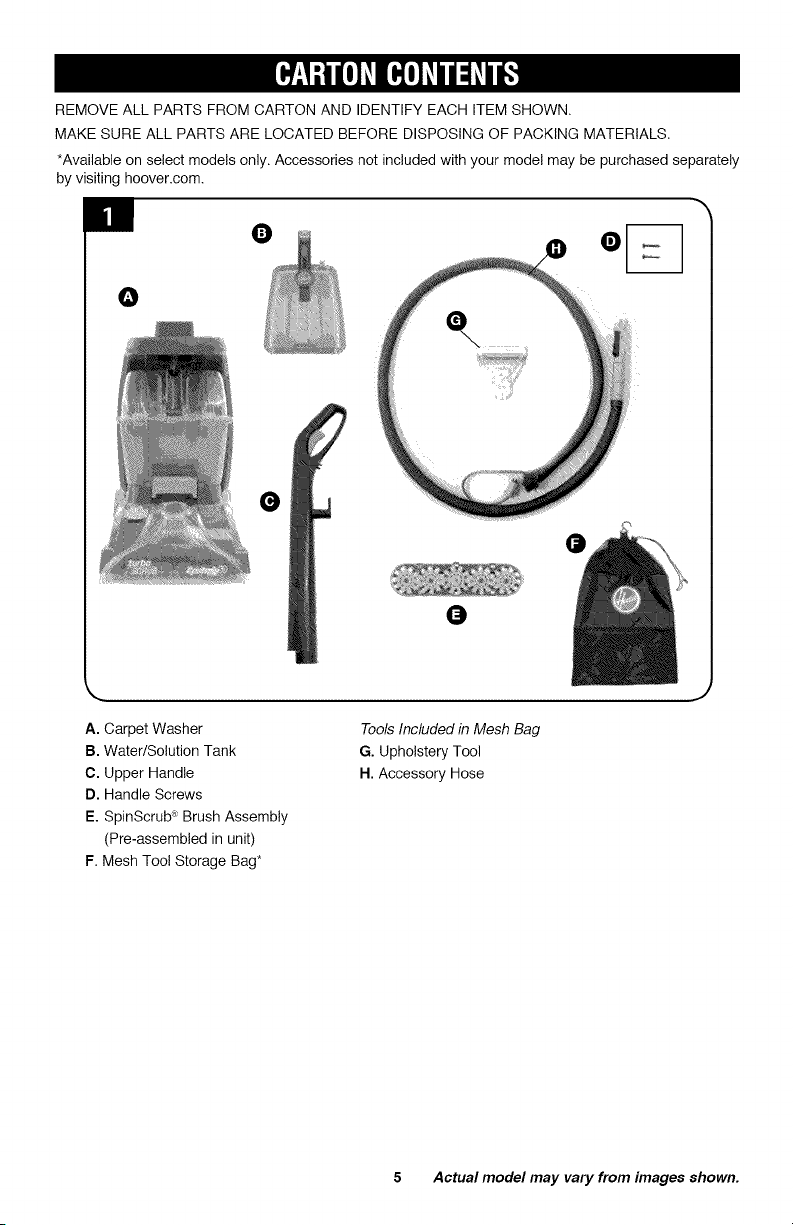
REMOVE ALL PARTS FROM CARTON AND IDENTIFY EACH ITEM SHOWN.
MAKE SURE ALL PARTS ARE LOCATED BEFORE DISPOSING OF PACKING MATERIALS.
*Available on select models only. Accessories not included with your model may be purchased separately
by visiting hoover.com.
O
e
O
A. Carpet Washer
B. Water/Solution Tank
C. Upper Handle
D. Handle Screws
E. SpinScrub_ Brush Assembly
(Pre-assembled in unit)
F. Mesh Too! Storage Bag*
Tools Included in Mesh Bag
G. Upholstery Tool
H. Accessory Hose
5 Actual model may vary from images shown.
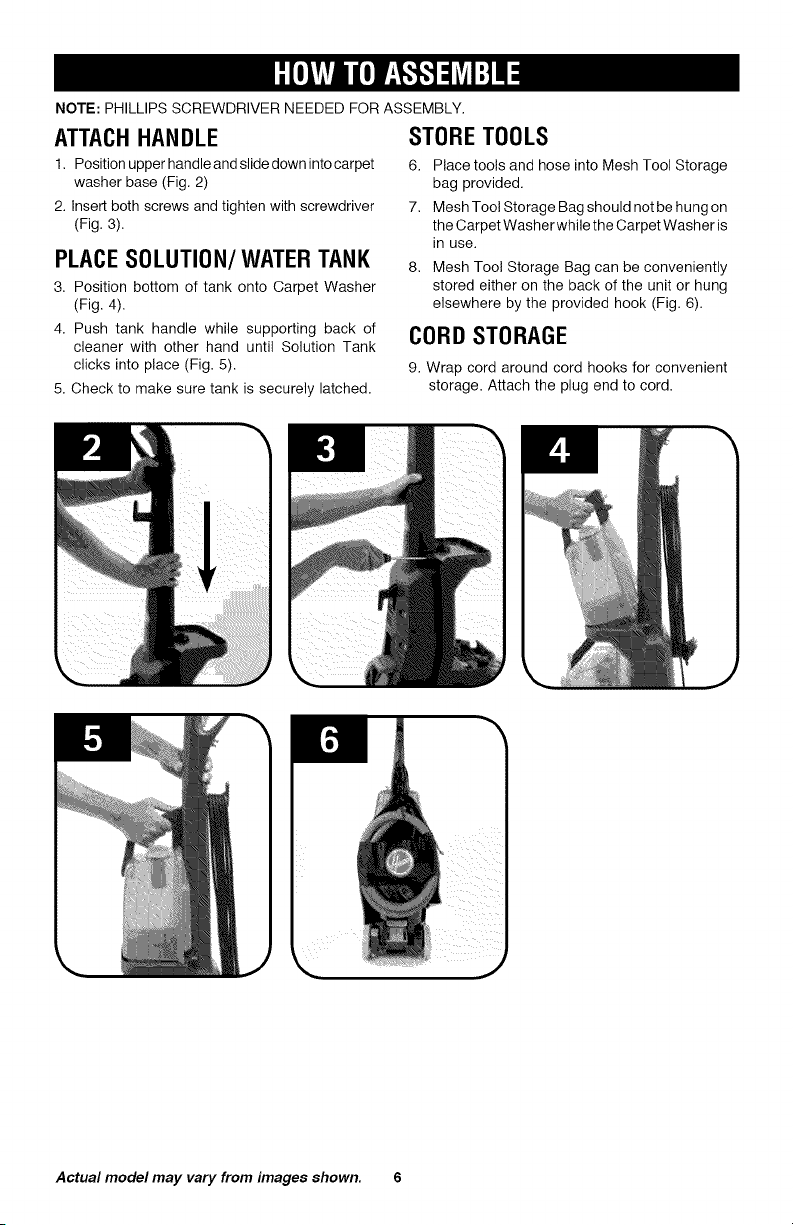
NOTE: PHILLIPS SCREWDRIVER NEEDED FOR ASSEMBLY.
ATTACHHANDLE
1. Position upper handleand slide down intocarpet
washer base (Fig. 2)
2. Insert both screws and tighten with screwdriver
(Fig. 3).
PLACESOLUTION/WATER TANK
3. Position bottom of tank onto Carpet Washer
(Fig. 4).
4. Push tank handle while supporting back of
cleaner with other hand until Solution Tank
clicks into place (Fig. 5).
5. Check to make sure tank is securely latched,
STORETOOLS
6. Place tools and hose into Mesh Tool Storage
bag provided.
7. Mesh Tool Storage Bag should not be hung on
theCarpet Washer while the Carpet Washer is
in use.
8. Mesh Tool Storage Bag can be conveniently
stored either on the back of the unit or hung
elsewhere by the provided hook (Fig. 6).
CORD STORAGE
9. Wrap cord around cord hooks for convenient
storage. Attach the plug end to cord.
Actual model may vary from images shown. 6
 Loading...