

Page 1
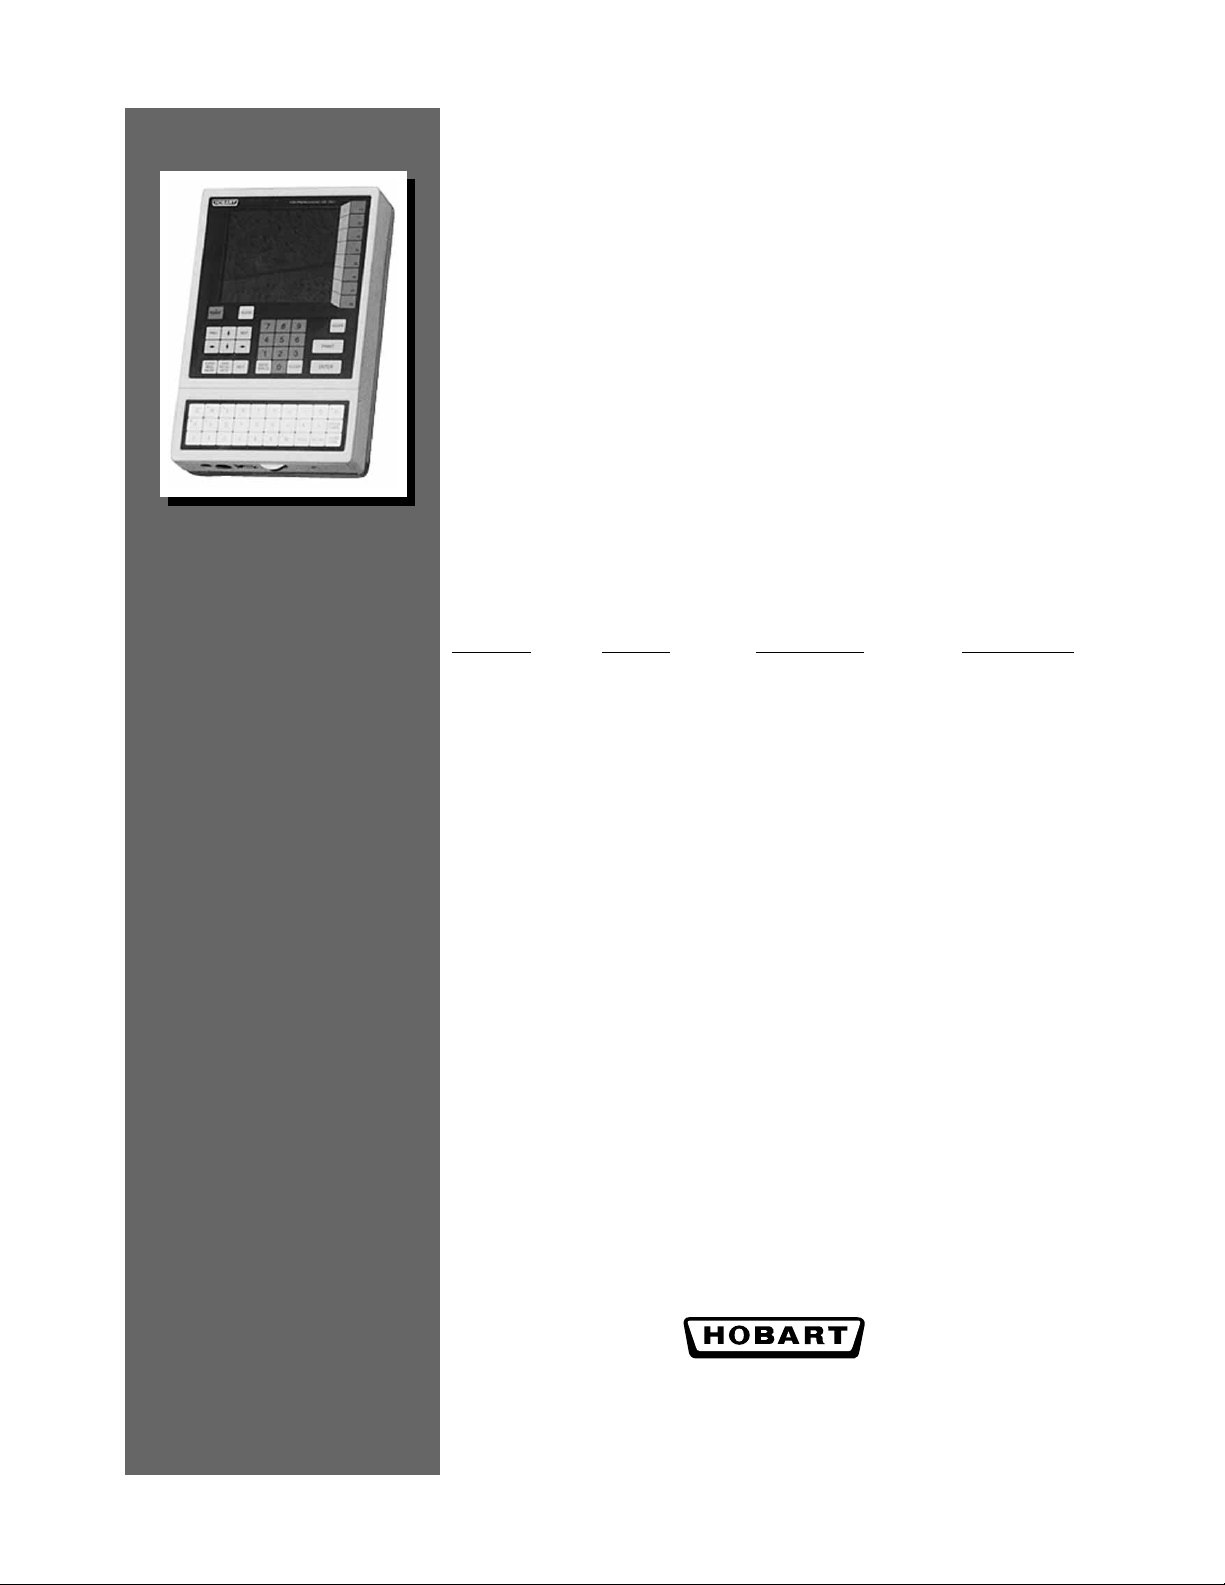
Ultima System
Operator Manual
COP GMO Product Service
Device # Models
Ultimc4-1 U2000CP1 Control Panel (30) ML – 28811
Ultimc2-1 U2000CP2 Control Panel (30) ML – 28821
Ultimc3-1 U2000CP3 Control Panel (102) ML – 28810
Ultimc1-1 U2000CP4 Control Panel (102) ML – 28820
Ultimp1-1 U2000P1 Printer ML – 28812
Ultimp2-2 U2000P2 Printer ML – 28819
Ultimsp-1 U2000P3 2
Ultimsa-1 U2000S1 Stand Alone Scale ML – 28808
Ultimsn-1 U2000S2 NSW Scale ML – 28816
Ultimsc-2 U2000S3 Scale Conveyor ML – 28859
Description Reference #
nd
Printer ML – 28813
701 S. RIDGE AVENUE
TROY, OHIO 45374
www.hobartcorp.com
F-34319 (10-99)
Page 2

Page 3

Ultima System
Table of Contents
INTRODUCTION...........................................................................................................................1-2
FCC Note............................................................................................................................................1-3
Verify Correctness of Weight & Price...........................................................................................1-3
Operator Manual Overview...........................................................................................................1-3
UNDERSTANDING THE SYSTEM...........................................................................................2-2
Electrical Connections .....................................................................................................................2-2
Communication Connections.........................................................................................................2-3
Using the Console.............................................................................................................................2-3
The Keypad ..................................................................................................................................2-4
User Display.................................................................................................................................2-6
Loading Labels..................................................................................................................................2-7
Removing and Replacing the Label Cassette............................................................................2-11
START-UP PROCEDURES...........................................................................................................3-2
Powering Up the System.................................................................................................................3-2
Setting the Date & Time ..................................................................................................................3-2
Understanding the Start a Run Screen .........................................................................................3-3
Verifying Zero Weight................................................................................................................3-4
Rezeroing the Scale .....................................................................................................................3-4
Weigh Types.................................................................................................................................3-4
Totals Types..................................................................................................................................3-5
Selecting Weigh and Totals Types ...........................................................................................3-5
Entering Operator IDs................................................................................................................3-5
HELP Key Functions........................................................................................................................3-6
Help on "F" Keys..........................................................................................................................3-6
About the Keyboard ...................................................................................................................3-6
Basic Help.....................................................................................................................................3-6
Moving Through the System.....................................................................................................3-7
Accessing the On Screen Library...................................................................................................3-7
USING THE ULTIMA SYSTEM..................................................................................................4-2
Weighing, Printing and Applying (Auto Weigh).......................................................................4-2
Auto Repeat.......................................................................................................................................4-3
Weighing, Printing and Applying (Semi Auto Weigh)............................................................4-4
Semi Auto Repeat.............................................................................................................................4-5
Weighing and Printing (Manual Weigh) .....................................................................................4-5
Manual Repeat..................................................................................................................................4-6
Copyright Hobart Corporation 1999
Page 4

Ultima System
Printing Totals and Subtotals.........................................................................................................4-6
Setting the Countdown ...................................................................................................................4-8
Entering the Sell By or Best Before Dates ..................................................................................4-10
Changing Product Information (Temporarily).........................................................................4-12
Using Forced Price.........................................................................................................................4-13
Using Forced Tare..........................................................................................................................4-14
Using Platter Tare...........................................................................................................................4-15
CLEANING AND MAINTAINING YOUR SYSTEM............................................................5-2
Hygiene Requirements for Cleaning and Sanitizing.................................................................5-2
Cleaning the Printhead....................................................................................................................5-3
TROUBLESHOOTING..................................................................................................................6-2
Reviewing System Errors................................................................................................................6-2
INDEX................................................................................................................................................7-2
ii
Page 5

Chapter One: Introduction
♦ Introduction
♦ FCC Note
♦ Verify Correctness of Weight & Price
♦ Operator Manual Overview
Ultima System
1 - 1 Introduction
Page 6
Ultima System
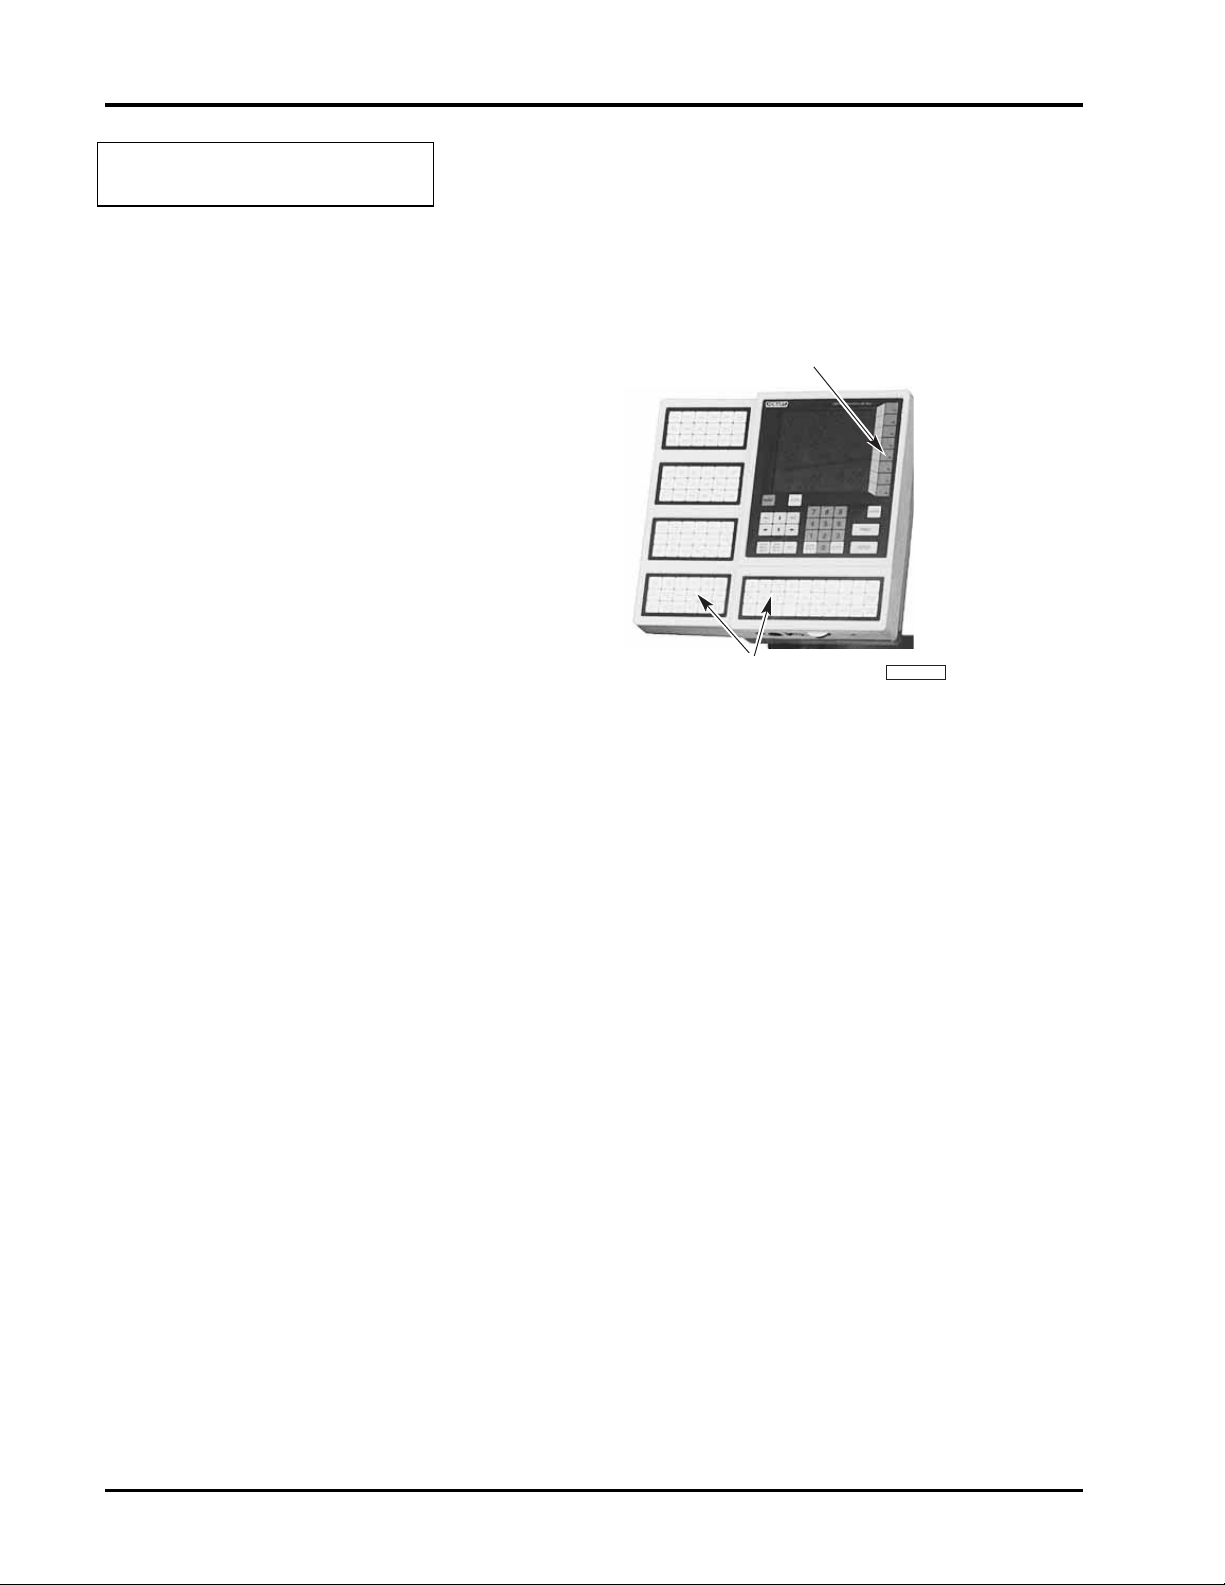
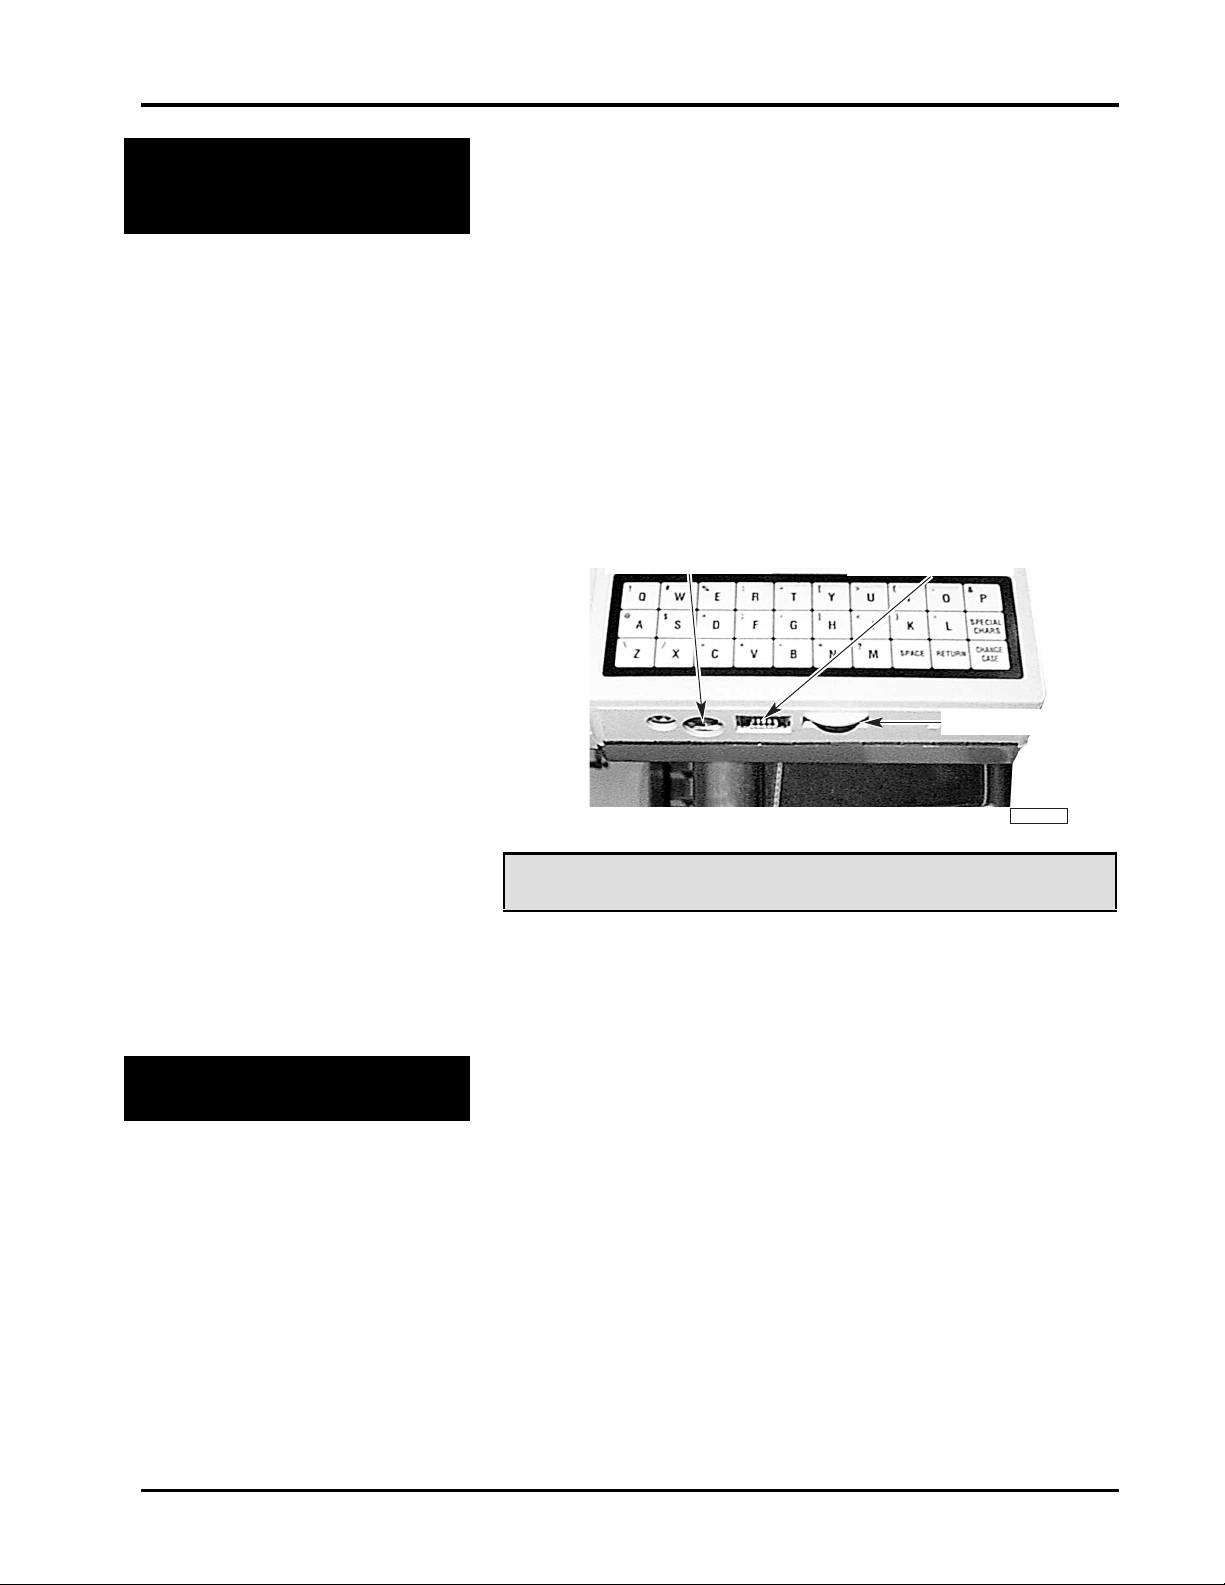
PL-41341-1
FUNCTION KEYS
SPEED KEYS
Introduction
The Ultima Scale Printer System can handle a broad variety
of products for meat, produce, fish, cheese, or bakery
departments. It functions as a prepack system with Hobart
wrapping and labeling equipment. It gives you
merchandising capabilities with multiple fonts, graphics,
and label types and allows for flexibility in label design.
Ultima 2000
The easy to use control panel allows for productive
operation. All necessary operator data appears on the screen
and Function Keys (F1-F8) provide easy access to PLU
information. Speed Keys can be used for the most frequently
used PLUs. An optional panel is available with 72 additional
Speed Keys.
This Operator Manual describes product weighing and label
printing. The companion Supervisor Manual covers
programming and setup.
Introduction 1 - 2
Page 7

Ultima System
FCC Note
Verify Correctness of
Weight & Price
This equipment has been tested and found to comply with
the limits for a Class A digital device, pursuant to Part 15 of
the FCC Rules. These limits are designed to provide
reasonable protection against harmful interference when the
equipment is operated in commercial environment. This
equipment generates, uses, and can radiate radio frequency
energy and, if not installed and used in accordance with the
instruction manual, may cause harmful interference to radio
communications. Operation of this equipment in a
residential area is likely to cause harmful interference; in
which case, the user will be required to correct the
interference at his own expense.
Verification of information on labels should be made
routinely. Check the multiplication of price-per-pound times
weight, and check the indicated weight against printed
weight. Weigh the same package several times to verify
consistency. Keep in mind that some packages which weigh
near the middle of the .01 lb. increment will normally vary
up or down by .01 lb. Greater variation than .01 lb. indicates
a need for adjustment of the system. In such cases, or
whenever necessary, contact your authorized Hobart service
representative.
Operator Manual
Overview
This manual will use the following methods to explain
keystrokes and data entry procedures:
♦ The word PRESS means to press a key on the Control
Panel.
♦ The word TYPE means to press a series of keys on the
Control Panel followed by the [ENTER] key.
♦ The word SELECT means to choose an item from the
display.
♦ The word ENTER means to press the [ENTER] key on
the Control Panel. Be aware that, in normal operation,
the [ENTER] key and [DOWN ARROW] key perform
the same function.
♦ Words in uppercase enclosed in brackets (for example
[ENTER]) represent specific keys.
1 - 3 Introduction
Page 8
Ultima System
The following special instructions are used in the manual:
☛ Note
A note is information that you need to know, but it is not an
actual step in the procedures.
✎ Tip
A tip is additional information that may be useful when you
are using the system.
Look At This
Look At This is information to alert you that you may be
doing something that will permanently alter your system.
Introduction 1 - 4
Page 9

Chapter Two: Understanding the System
♦ Electrical Connections
♦ Communication Connections
♦ Using the Console
• The Keypad
• User Display
♦ Loading Labels
♦ Removing and Replacing the Label Cassette
Ultima System
2 - 1 General Information
Page 10
Ultima System
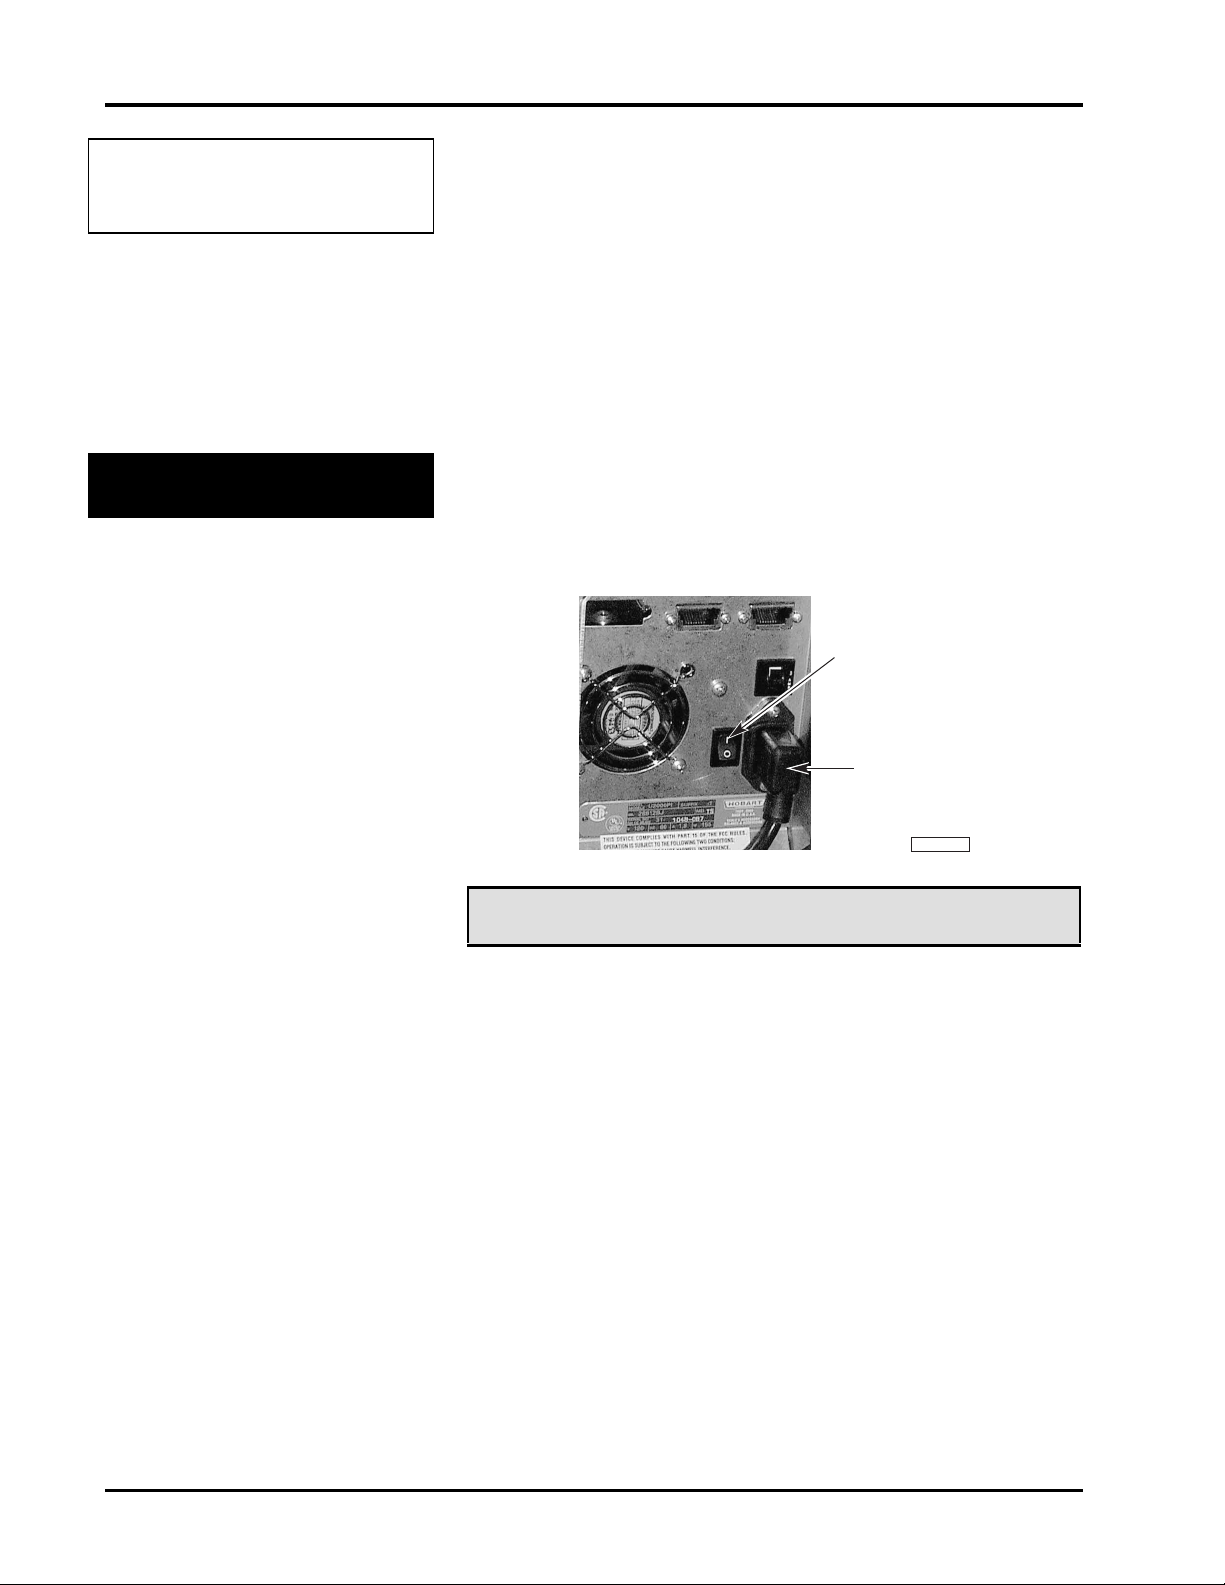
PL-41340-1
POWER CORD
POWER SWITCH
Understanding the
System
Electrical Connections
Utilizing memory from 1 MB expandable to 6 MB, the
system can store information on thousands of products. This
information includes NutriFacts and Safe Handling
instructions (which enable you to meet labeling law
requirements), Expanded Text (which is used for
Ingredients), Health Tips, Meal Planners, Recipes and
Cooking Instructions, as well as, Merchandising Graphics.
The Ultima System should be installed or moved only by
qualified Hobart Service Technicians. It can operate in a
temperature range from 32˚F to 104˚F (0˚C to 40˚C).
A Power Cord and Main Power Switch are located at the
back of the printer. An electric power of 120 volts, 60Hz,
Phase 1 (3-wire plus ground) is required. The Main Power
Switch turns the system ON (I) and OFF (O).
☛ Note
The POWER key on the console is used to turn the User
Display on or off only. This does not impact the system
power. The Power key should be used at the end of the day,
not the Main Power Switch.
General Information 2 - 2
Page 11
Ultima System
PL-41347-1
EXTERNAL DISK DRIVE
CONTRAST KNOB
IBM–AT/PS KEYBOARD
yp
Communication
Connections
In addition to the electrical connections, there are up to four
(4) additional communication connections. There are several
ports which can be configured for peripherals.
At the rear of the printer:
♦ Disk Player/Recorder & Cassette Player/Recorder
(RS232)
♦ Parallel Port for Printer (80 column Dot Matrix) –
Optional
♦ RJ-11 Jack for RS-485 Communications (ScaleMaster)
♦ RJ-45 Jack for Ethernet 10BaseT Connector (TCP/IP)
(Wireless TCP/IP – Symbol wireless Ethernet card)
At the front of the printer:
♦ External Disk Drive or Secondary Printer (MODNET)
♦ IBM-AT/PS keyboard
Using the Console
☛ Note
You can use an IBM-AT/PS keyboard in place of the
keypad. To purchase the keyboard kit or the interface cable,
contact your local Hobart Representative.
The console consists of:
♦ User Display - displays all information to the user.
♦ Ke
♦ Speedkey Panel (Optional) - adds 72 additional
ad - enables you to enter information into any field.
Speedkeys.
2 - 3 General Information
Page 12
Ultima System
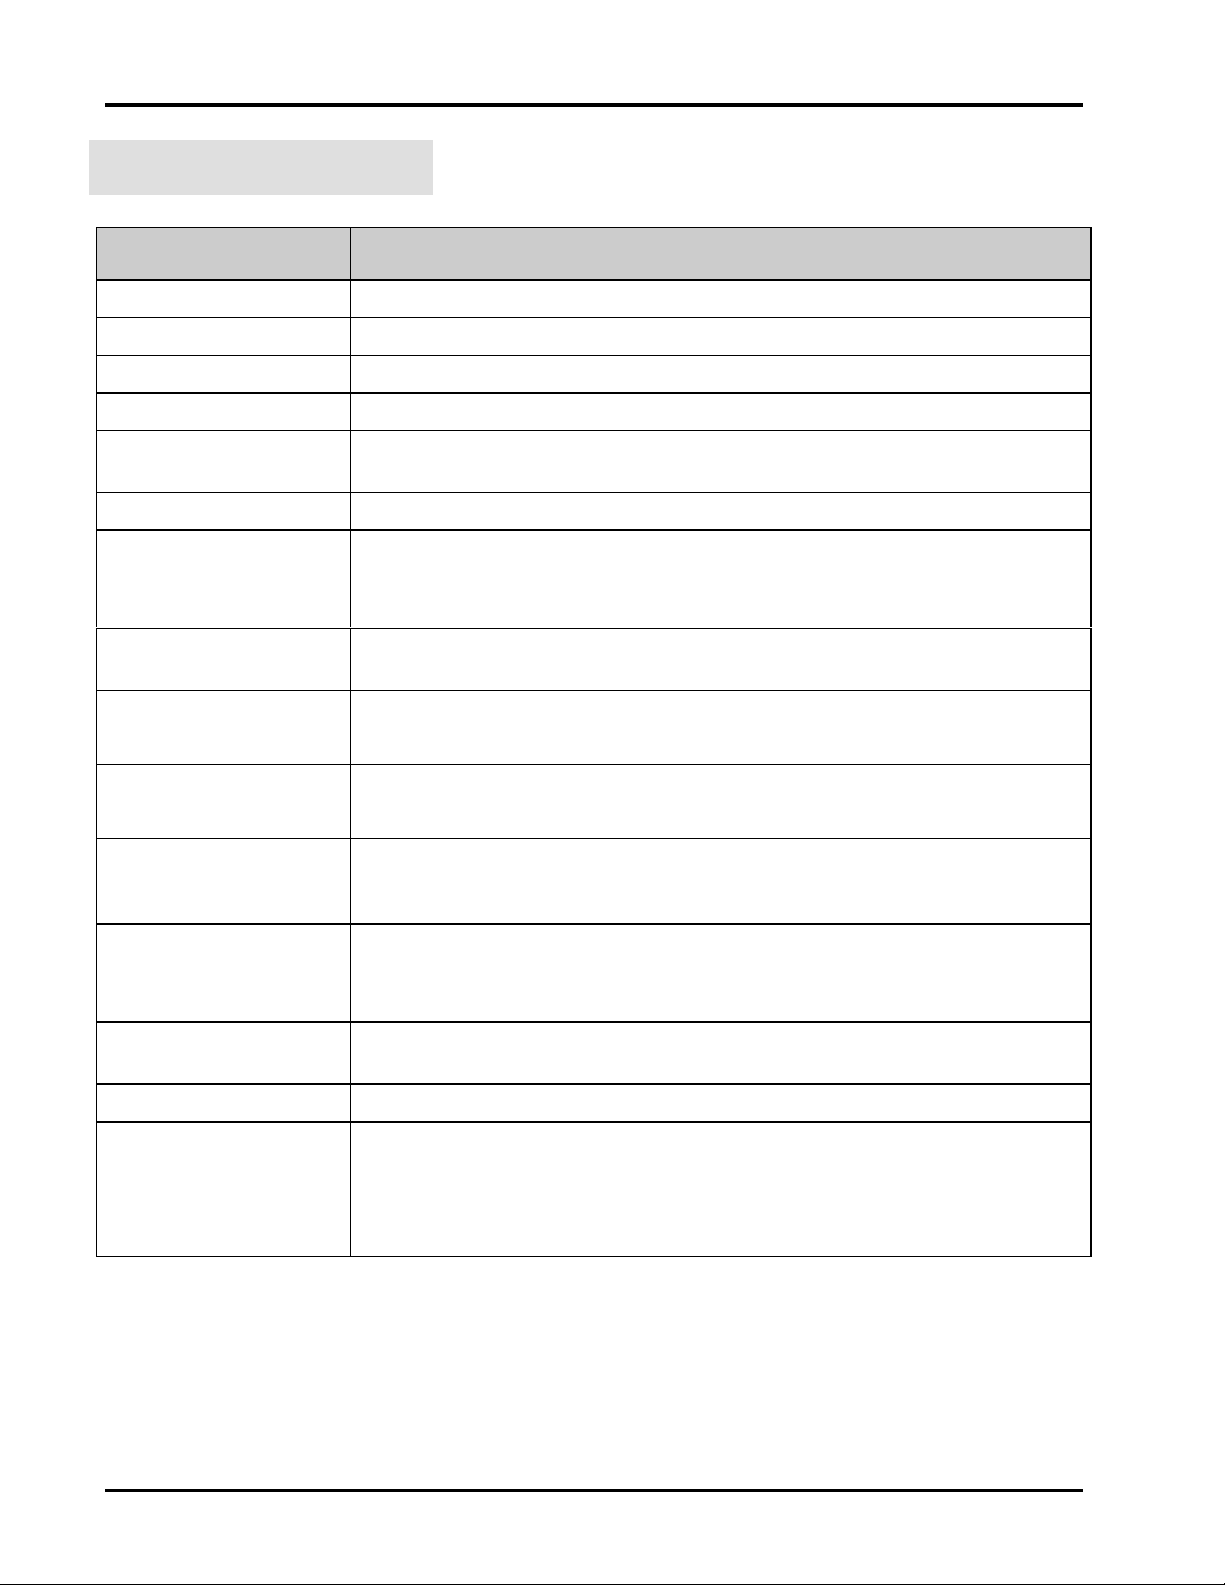
The Keypad
Refer to the following table for specific key descriptions.
Key/Highlight Function
POWER Turns the screen and the keyboard ON/OFF.
Function Keys (F1-F8) Enables you to make selections from the menu screens.
Numeric Keypad Enables you to enter numeric data.
BACKSPACE Enables you to remove the character to the left of the cursor.
CLEAR
Enables you to reset a numeric field to zero. This key is not active in a text
field.
ESCAPE Enables you to return to the previous screen.
PRINT Enables you to print a label or report.
NOTE: This is only available in specific modes; Manual Weigh,
Manual Repeat and Supervisor.
ENTER
Enables you to accept the selected data and advance to the next field or
screen.
PREV (Previous) Moves you back one page.
NOTE: This can also be used to print Subtotals.
NEXT Moves you to the next page.
NOTE: This can also be used to print Totals.
ARROW KEYS UP and DOWN Arrow Keys enable you to move the cursor from field-to-
field or LEFT and RIGHT Arrow Keys enable you to move the cursor
from character-to-character within a field.
SAVE/RECALL
Press this key to have the system remember a series of keystrokes which
can be recalled later by entering a reference number (Macro ID).
NOTE: This key should be used in Supervisor mode only.
SUPER MENU
Enables you to access the Supervisor Menu.
ON/OFF
REZERO Enables you to set the scale to 0.00 pounds/0.000 grams.
HELP
Enables you to access the Help Screens. The system is equipped with
context sensitive Help Screens to assist you in quick, efficient operation.
From the Run Screen in the Operate mode, it enables you to access the On
Screen Library and select a PLU. Refer to the Glossary for a complete
description of the On Screen Library.
General Information 2 - 4
Page 13
Key/Highlight Function
Ultima System
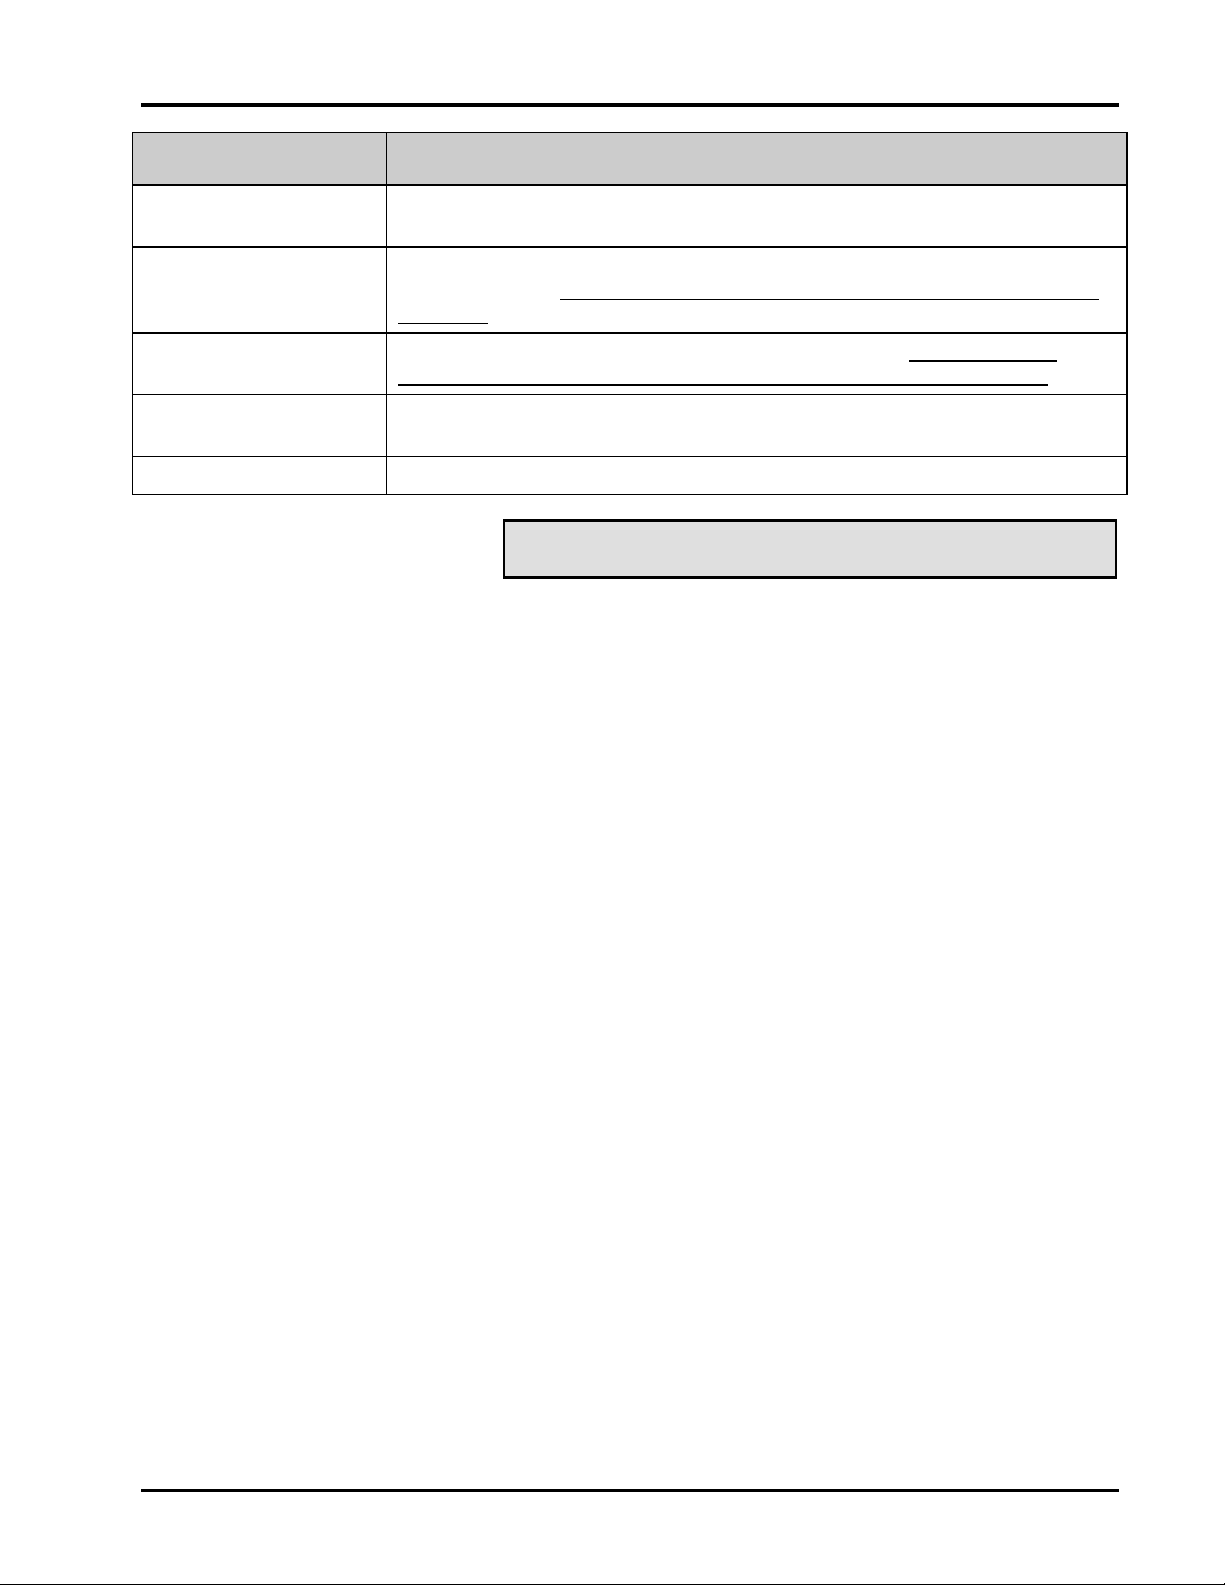
ALPHA
CHARACTERS
SPECIAL CHARS. Press this key to type a special character (found in the upper left corner of
CHANGE CASE
RETURN
SPACE Enables you to type (add) a space between words and characters.
Enables you to enter upper case or lower case alpha characters while in a
text field.
each alpha-key). You must press Special Chars. For each special character
you type.
Enables you to switch between Upper or Lower case. You must press
Change Case each time you want to change the case in the text field.
Advances the cursor to the next field or inserts the End-of-Line in a text
field.
✎ Tip
The optional keyboard interface cable is REQUIRED for
programming on a remote keyboard.
The optional IBM AT/PS keyboard is helpful when entering
large amounts of data at one time.
2 - 5 General Information
Page 14
Ultima System
User Display
The Ultima System’s User Display has several common
screen highlights that assist you in interacting with the
system. The highlights act the same regardless of your
screen location.
Highlight Description
Active Field A box surrounding text or numeric fields
indicates that the field is active. If you
begin typing from the keyboard or
control panel, data is entered into this
field.
Bar Cursor
Block Cursor
Changeable Fields If a field has a dotted line (.............)
Grayed Fields
A bar cursor (❚) indicates that the field is
a text field.
A block cursor (■) indicates that the field
is a numeric field.
under it, the field can be changed or
edited.
If a field or selection is grayed, it is not
available for that particular screen or
transaction.
Prompt Line The Prompt Line is white text, reversed
out of a black box. It is typically located
at the bottom portion of the screen. It
prompts you on what your next step
should be. (Depending on your
configuration, it may be black text
reversed out of a white box.)
Screen Title The Screen Title identifies the screen
name and function that you are
attempting to complete. It is typically
located at the top left corner of the
screen.
General Information 2 - 6
Page 15
Ultima System
PL-41338
PL-41339
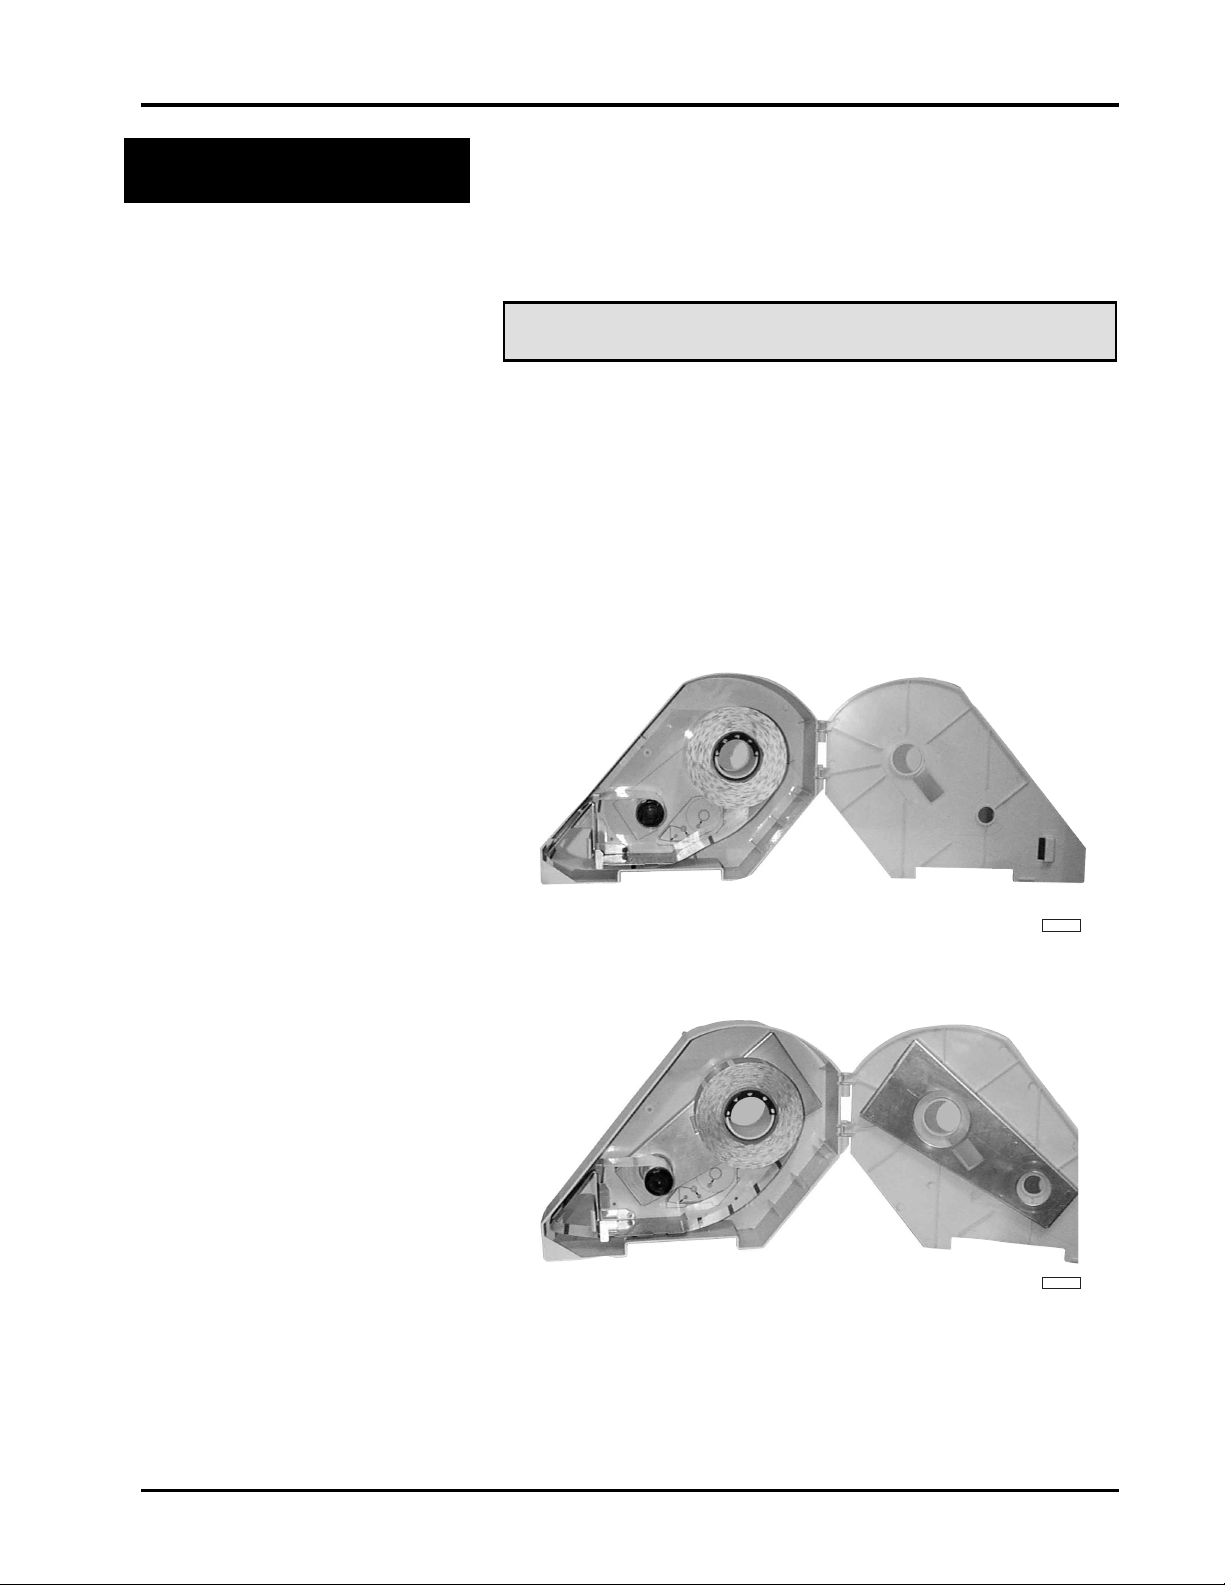
Loading Labels
In order to accommodate different label stock widths the
system uses different label cassettes.
The Ultima 2000 uses a cassette for standard label stock and
another cassette for narrow label stock.
☛ Note
If you want to change label stock, contact your local Hobart
Service Office to make the necessary adjustments.
Your Hobart Representative can create custom labels to
accommodate your unique merchandising needs.
The Ultima 2000 uses:
• A Standard Label Cassette for standard (2.25”) wide
label stock.
• A Narrow Label Cassette for narrow (1.5”) wide label
stock.
2 - 7 General Information
Page 16
Ultima System
PL-41342-1
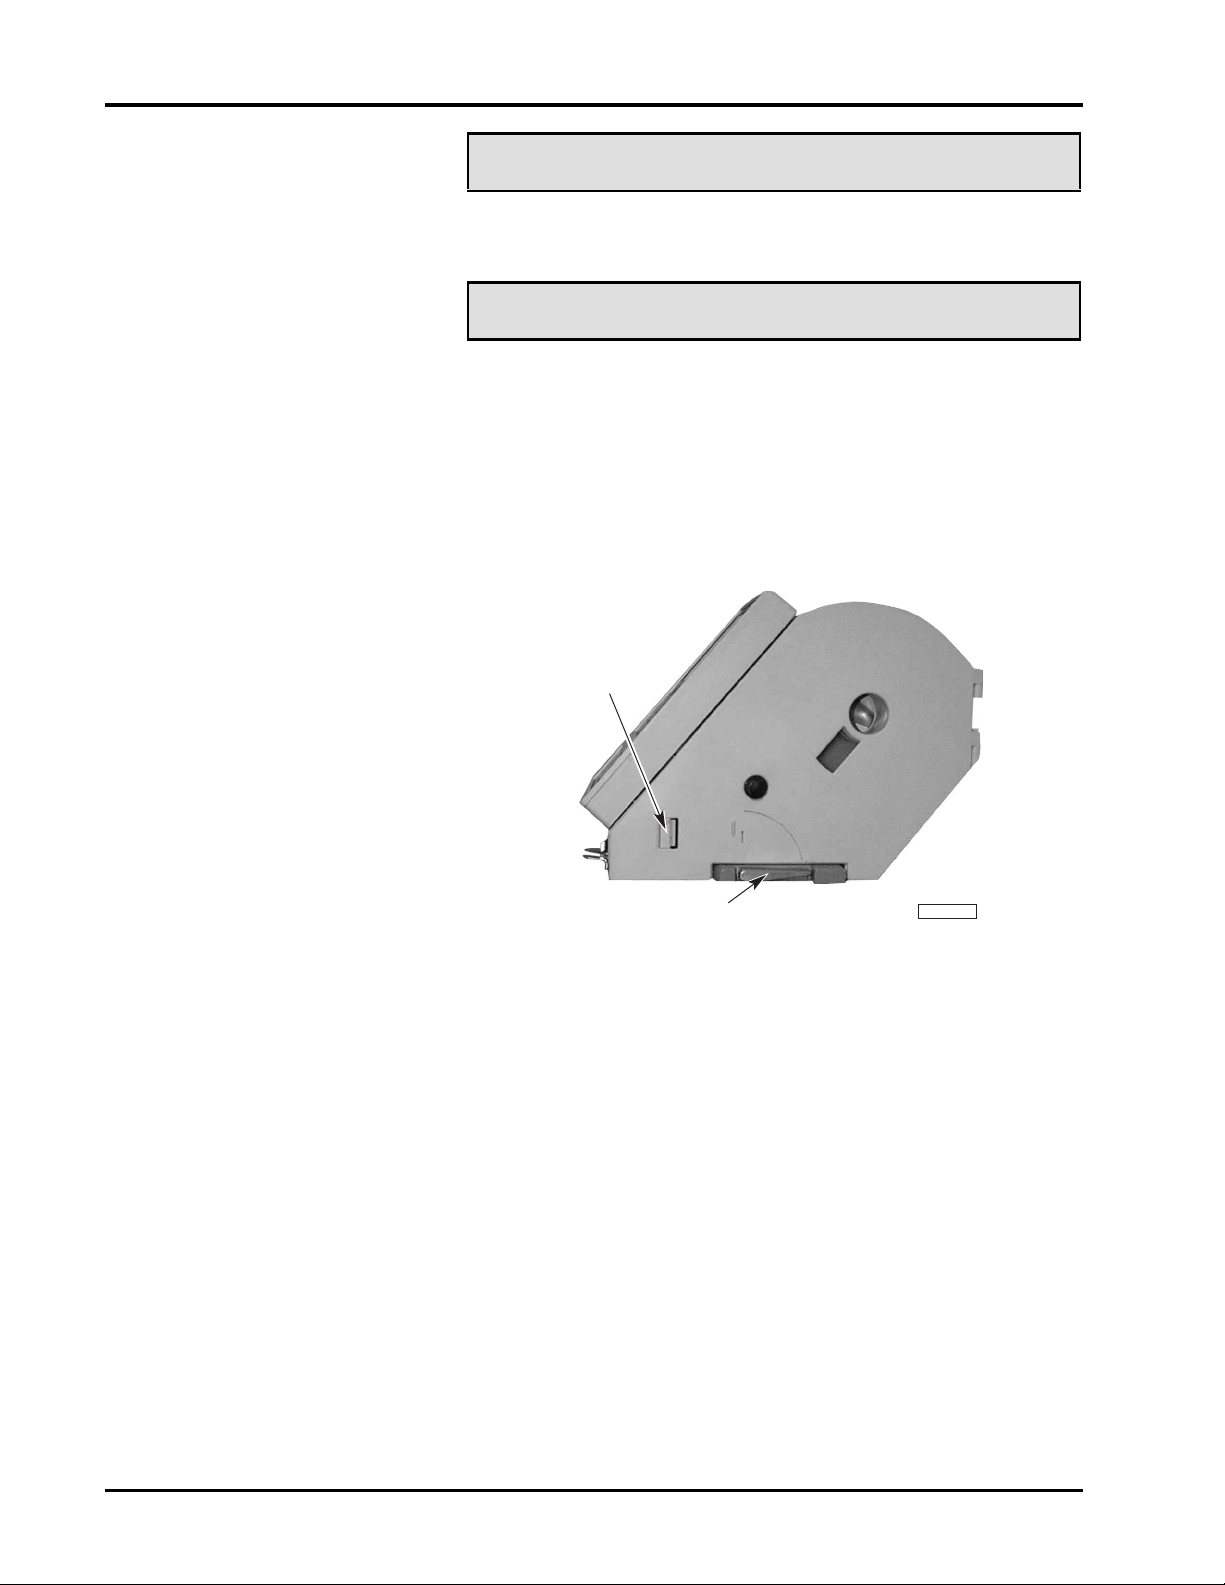
DOOR LATCH
PRINTHEAD LEVER
(UNLOCKED POSITION)
✎ Tip
To promote cleanliness and sanitation, Hobart recommends
you do not remove the label cassette to load labels.
☛ Note
Labels load the same for a narrow cassette and standard
cassette. The following are photos of the standard cassette.
To load labels:
1. Open the label cassette door.
2. Rotate the printhead lever clockwise to the unlocked
position.
3. Push the door latch in while opening the cassette door
from the bottom.
General Information 2 - 8
Page 17
Ultima System
PL-41338-1
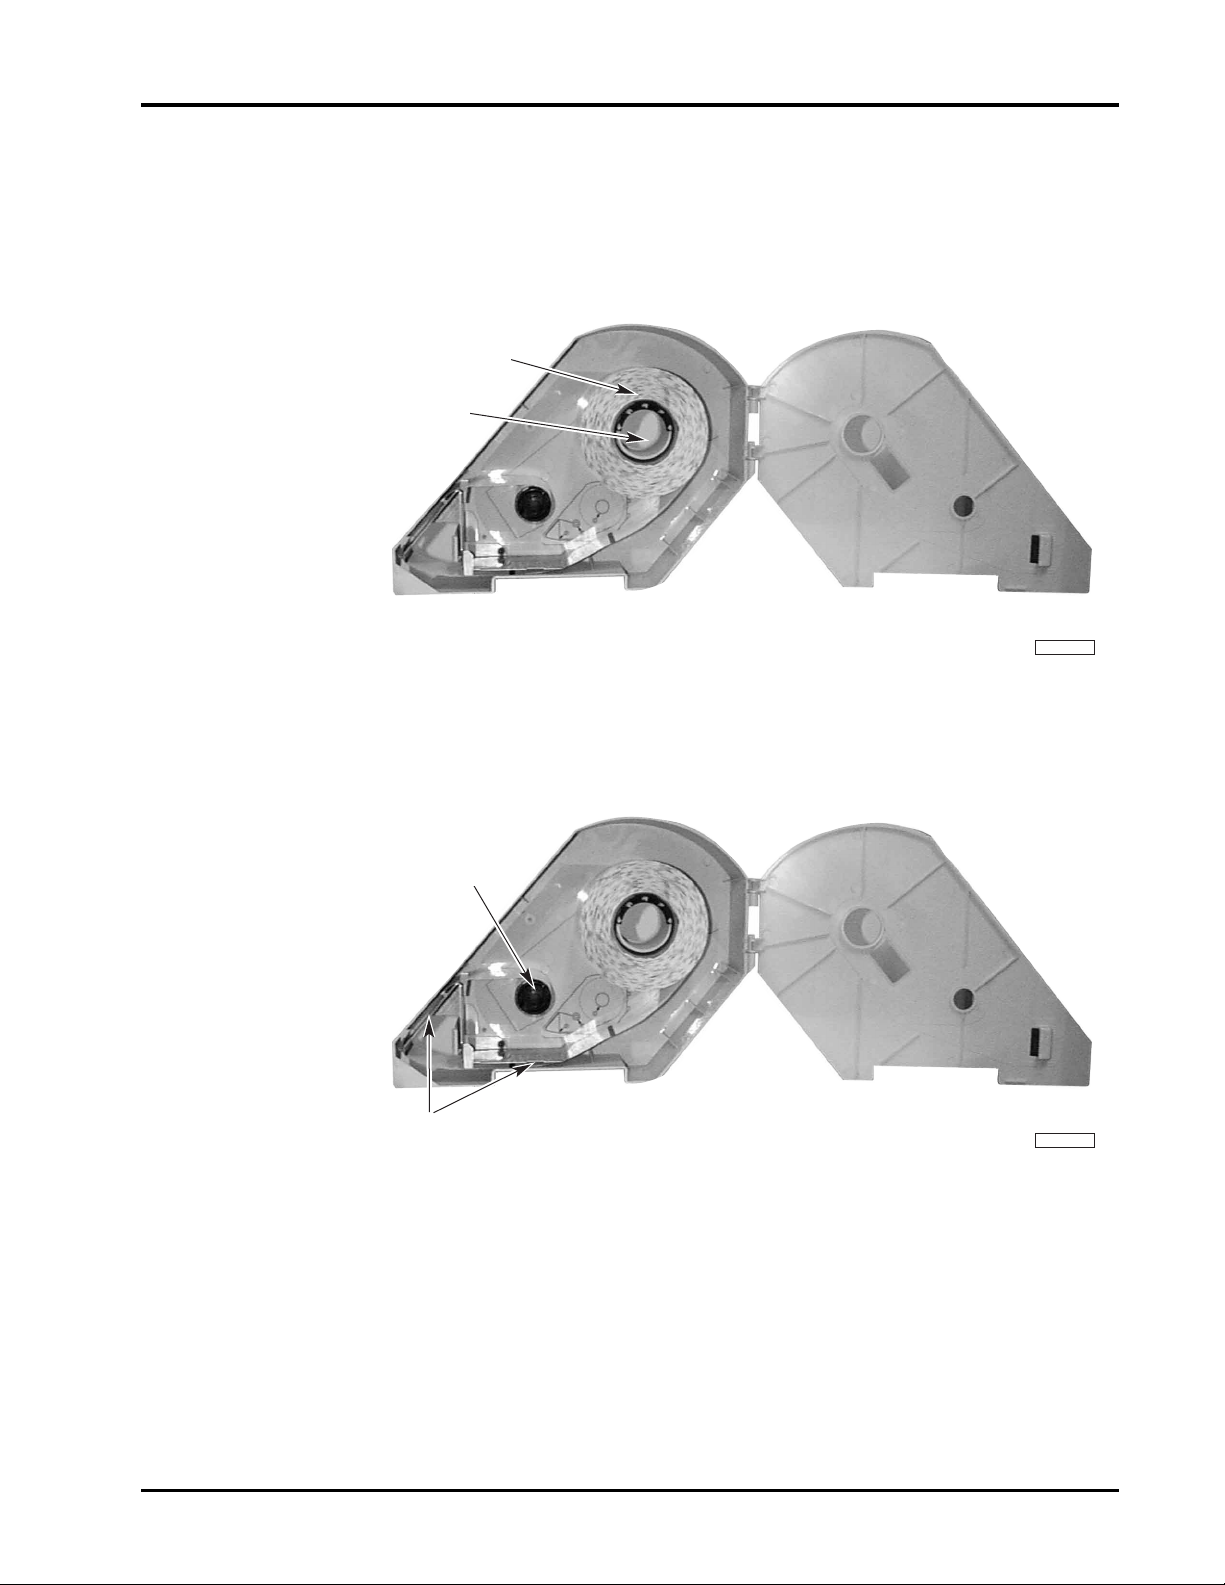
LABEL ROLL
HUB
PL-41338-2
TAKE-UP
REEL KNOB
PAPER GUIDES
4. Remove labels from the first eighteen (18) inches of the
label roll. This creates a leader which attaches to the
take-up reel.
5. Place the label roll on the hub in the cassette. (The leader
feeds from the bottom of the roll in a clockwise
direction.)
6. Thread the leader around the paper guides, as shown on
the label instructions on the inside of the cassette.
7. Pull out the take-up reel knob.
2 - 9 General Information
Page 18

Ultima System
PL-41338-3
TAKE-UP REEL
LEADER
CASSETTE
HOUSING
PL-41344-1
PRINTHEAD
LEVER
(LOCKED POSITION)
8. Fold about 1/2” of the leader and insert the leader into
the slot on the take-up reel.
9. Align the leader until it is straight.
10. Push in the take-up reel knob.
11. Wind the remaining leader without labels onto the
take-up reel.
12. Tighten the take-up reel by turning the knob clockwise.
Be sure the leader is flush against the cassette housing.
13. Close the cassette door.
14. Rotate the printhead lever counterclockwise to the
locked position. One or two blank labels are issued as
the system determines the size of the labels.
Note
☛
You should clean the printhead and pressure roller when
refilling the label supply. Refer to Cleaning the Printhead for
detailed procedures.
General Information 2 - 10
Page 19

Ultima System
PL-41343-1
ROLLER
CASSETTE
SUPPORT
TAKE–UP SHAFT
CASSETTE
GUIDE
PRINTHEAD
Removing and
Replacing the Label
Cassette
To remove label cassette:
1. Rotate the printhead lever clockwise to the down
position.
2. Push the label cassette up while pulling it towards you.
To replace label cassette:
1. Align the cassette guide with the open base at the
bottom of the cassette.
2. Carefully slide the cassette into place making sure the
cassette is aligned with the cassette support and take-up
shaft. Also, the label leader should be in between the
roller and printhead.
3. Rotate the printhead lever counterclockwise to the
locked position. One or two blank labels are issued as
the system determines the size of the labels.
2 - 11 General Information
Page 20

Page 21

Chapter Three: Start-Up Procedures
♦ Powering Up the System
♦ Setting the Date & Time
♦ Understanding the Start a Run Screen
• Verifying Zero Weight
• Rezeroing the Scale
• Weigh Types
• Totals Types
• Selecting Weigh and Totals Types
• Entering Operator IDs
♦ HELP Key Functions
• Help on “F” Keys
• About the Keyboard
• Basic Help
• Moving Through the System
♦ Accessing the On Screen Library
Ultima System
3 - 1 Start-Up Procedures
Page 22

Ultima System
Start-up Procedures
Powering Up the
System
In this section, you will learn how to:
♦ Power up the System
♦ Set the Date and Time (on Initial Setup)
♦ Check the Date and Time
♦ Understanding & Using the Start a Run Screen
To power up the system:
1. Verify that Power Cord is connected and Power Switch
is turned on.
2. Remove any objects from the scale platter/weigher.
3. At the console, PRESS [POWER] to begin the Power-up
Sequence. The System Screen displays Power-up test in
progress. The Start a Run Screen displays when the scale
is ready. There may be a slight delay (depending on
room temperature) until the Zero weight appears on the
screen.
☛ Note
Power Key on console should be used to turn console on
and off at the beginning and at the end of each day, not the
Main Power Switch.
Setting the Date &
Time
QUICK STEPS
From the Start a Run Screen:
1. PRESS [F1]
2. TYPE the Current Date
3. PRESS [ENTER] or [▼]
4. TYPE the Current Time
and PRESS [F1] - If Needed
5. PRESS [ESC]
To set the Date and Time:
1. From the Start a Run Screen, PRESS [F1].
2. With the cursor in the Date field, TYPE the current Date.
Enter the Date as a six-digit number (MM/DD/YY).
Start-Up Procedures 3 - 2
Page 23

Ultima System
3. PRESS [ENTER] or [DOWN ARROW (▼)] to move the
cursor to the Time field.
4. Enter the Time as a four-digit number (HH:MM). If you
need to change AM or PM, PRESS [F1] to select the
correct time of day.
5. PRESS [ESC] to save the changes and return to the Start a
Run Screen.
Understanding the
Start a Run Screen
☛ Note
If designated during Scale Setup, any operator may be
permitted to change the Date/Time.
The Start a Run Screen is the initial Operator location. All
operations begin and end from this screen. The following
lists the keystrokes you can use to move around on the Start
a Run Screen:
♦ To move the cursor use the UP ARROW (▲) and DOWN
ARROW (▼) Keys.
♦ To move the cursor between Weigh type and Total type,
use the LEFT ARROW (
Keys.
♦ The “active” column is shown in Reverse Video (White
letters on a Black field).
♦ PRESS [ENTER] to select the task.
) and RIGHT ARROW ( )
☛ Note
If your system requires an Operator ID, the Operator ID
block displays at the bottom right corner of the Start a Run
Screen.
3 - 3 Start-Up Procedures
Page 24

Ultima System
Verifying Zero Weight
Rezeroing the Scale
Weigh Types
Verify zero weight before you begin operation. To verify
zero weight, from the Start a Run Screen, check the top, left
side of the screen to see if Zero Weight: 0.00 lb displays. Zero
Weight: 0.00 lb must display before you enter a PLU.
If Zero Weight: 0.00 lb doesn’t display on the screen, you must
REZERO the scale.
To rezero the scale:
1. Remove any item(s) from the weighing mechanism.
2. PRESS [REZERO].
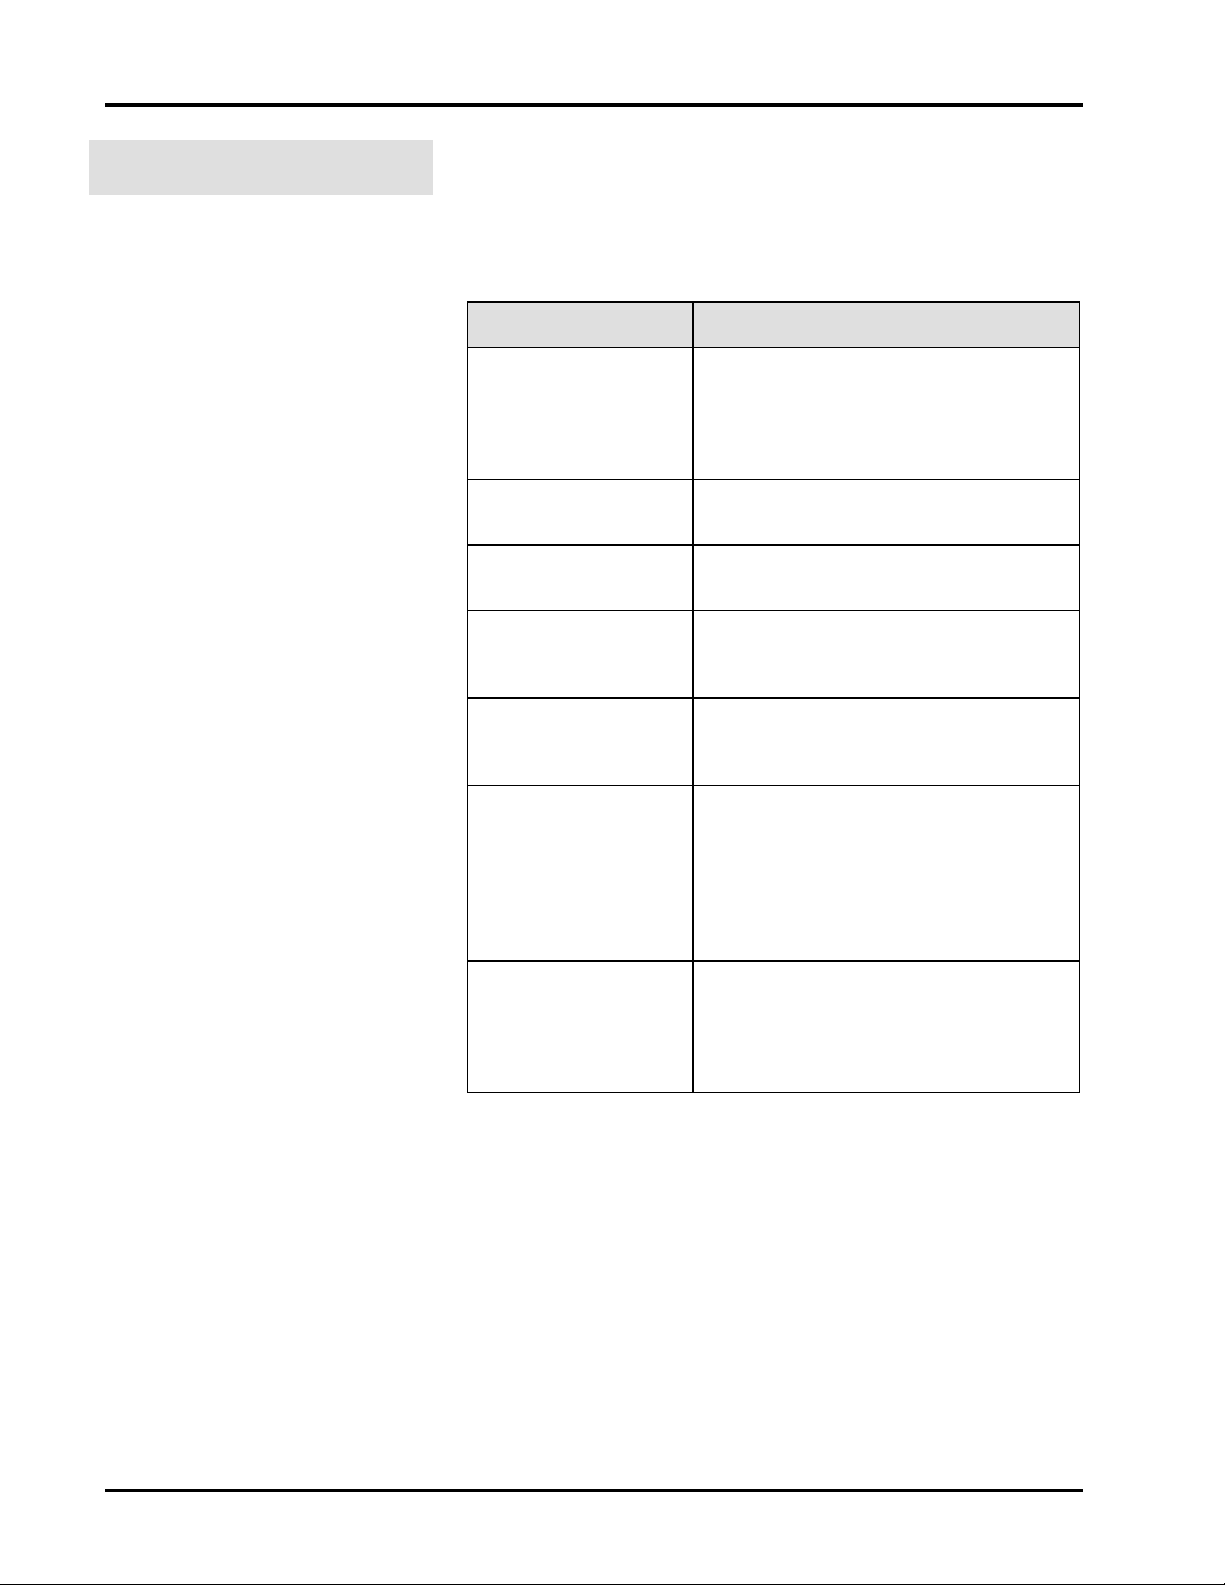
The following list gives you a brief overview of how each
Weigh Type selection functions within an operation. Use the
UP ARROW (▲) and DOWN ARROW (▼) keys to move the
cursor to the Weigh Type you require.
Weigh Type Description
Auto Weigh Enables you to weigh, print
and apply a label. If used
with a fully automatic
system, the package is also
wrapped.
Auto Repeat Enables you to print
duplicate labels
automatically while a fully
automatic system is running.
Semi-Auto Weigh
Semi-Auto Repeat
Manual Weigh Enables you to control label
Manual Repeat
Countdown Enables you to specify the
Enables you to weigh, print
and apply a label on prepackaged products.
Enables you to print
duplicate labels
automatically.
generation. You must PRESS
[PRINT] for the system to
issue a label.
Enables you to continually
duplicate labels.
amount to be labeled by
weight, value, or packages
and the number of cartons.
Start-Up Procedures 3 - 4
Page 25

Ultima System
Totals Types
Selecting Weigh and Totals
Types
All Totals Types, except Production, are created by the
Supervisor and enable reporting of totals information. For
example, you could keep track of items on sale this week.
The list below provides you a list of additional examples for
Totals Types you may want to track.
♦ Production
♦ Ad Items *
♦ Manager’s Specials *
♦ Coupon Items *
Use the ARROW Keys to move the cursor to the Totals Type.
☛ Note
* Totals Types marked with an asterisk are examples only.
To select the weigh and totals type:
1. PRESS the [UP ARROW (▲)] or [DOWN ARROW (▼)]
key to select your choice of Weigh Types.
2. PRESS the [RIGHT ARROW (
to the Totals Type column. Pressing the [LEFT ARROW
(
)] key will move you back to the Weigh Type column.
3. PRESS the [UP ARROW (▲)] or [DOWN ARROW (▼)]
key to select your choice of Totals Types.
4. PRESS [ENTER] to select the Weigh and Totals Type
required for your operation. The Run Screen displays.
)] key to move the cursor
Entering Operator IDs
QUICK STEPS
From the Start a Run Screen:
1. TYPE your Operator ID
2. PRESS [ENTER]
Although you selected a Weigh Type and Totals Type, you
may also be required to enter your identification number
prior to beginning a task.
To enter the Operator ID:
1. From the Start a Run Screen, type your Operator ID
number.
2. PRESS [ENTER].
3 - 5 Start-Up Procedures
Page 26

Ultima System
HELP Key Functions
Help on “F” Keys
The system is equipped with context sensitive Help Screens
to assist you in quick, efficient scale operation. The HELP
Function has four (4) levels of assistance.
♦ Help of “F” Keys
♦ About the Keyboard
♦ Basic Help
♦ Moving Through the System
☛ Note
In addition to assisting you with scale operation, you can
also press HELP to access the On Screen Library.
To access Help Screens from the Start a Run Screen:
1. PRESS [HELP].
2. PRESS desired function key [F1 - F4].
3. PRESS [ESCAPE] to exit Help Screen.
By pressing [F1] on the Help Screen, you get an explanation
of the functions that can be performed when you select the
various “F” Keys available for the current function (i.e., the
function for which you pressed HELP). An explanation of
Date/Time is the only “F” Key available on that screen.
About the Keyboard
Basic Help
By pressing [F2] to select “About the Keyboard,” you get a
detailed explanation of the following keys:
♦ ENTER
♦ ESCAPE
♦ ARROW KEYS
♦ BACKSPACE
♦ CLEAR
♦ POWER
When you press [HELP], the default automatically sends
you to the Basic Help Screen(s) for the selected function or
field. As you might suspect, Basic Help gives you a brief
description of the function or selected field, including notes
to help you process the transaction better. From any other
HELP selection, PRESS [F3] to access Basic Help.
♦ PRINT
♦ NEXT
♦ REZERO
♦ SAVE/RECALL
♦ SPEEDKEYS
♦ SUPER MENU ON/OFF
Start-Up Procedures 3 - 6
Page 27

Ultima System
Moving Through the System
Accessing the On
Screen Library
QUICK STEPS
From the Run Screen:
1. PRESS [HELP]
2. PRESS [▲] or [▼]
3. PRESS the [RIGHT
ARROW]
4. PRESS [▲] or [▼] - Repeat
Step 4 as needed
5. PRESS [ENTER]
6. Weigh as applicable
Moving Through the System is found by pressing [F4] while
in the HELP mode. When you select [F4], you get an
explanation of how to:
♦ Return to the Previous Screen
♦ Execute a Forced Operator Log-on
♦ Access the Supervisor Menu
To access the On Screen Library:
1. From the Run Screen, PRESS [HELP]. The On Screen
Library displays with Class Numbers shown in [ ]
brackets.
2. PRESS the [UP ARROW (▲)] or [DOWN ARROW (▼)]
key until the Class is highlighted.
3. PRESS the [RIGHT ARROW (
Subclasses or PLUs.
4. To move through the list, use the [UP ARROW (▲)] or
[DOWN ARROW (▼)] key until the SubClass or PLU is
highlighted.
5. PRESS [ENTER]. Product information for the PLU
displays.
6. Weigh the product as applicable.
)] key to view the
3 - 7 Start-Up Procedures
Page 28

Page 29

Chapter Four: Using the Ultima System
♦ Weighing, Printing and Applying (Auto Weigh)
♦ Auto Repeat
♦ Weighing, Printing and Applying (Semi Auto Weigh)
♦ Semi Auto Repeat
♦ Weighing and Printing (Manual Weigh)
♦ Manual Repeat
♦ Printing Subtotals and Totals
♦ Setting the Countdown
♦ Entering the Sell By or Best Before Dates
♦ Changing Product Information (Temporarily)
♦ Using Forced Price
♦ Using Forced Tare
♦ Using Platter Tare
Ultima System
4 - 1 Using the System
Page 30

Ultima System
Using the
Ultima System
Weighing, Printing and
Applying
(Auto Weigh)
The following sections explain how to:
♦ Weigh, print and apply (auto weigh)
♦ Weigh, print and apply duplicate labels (auto repeat)
♦ Weigh, print and apply (semi auto weigh)
♦ Weigh, print and apply duplicate labels (semi auto
repeat)
♦ Weigh and print (manual weigh)
♦ Weigh and print duplicate labels (manual repeat)
♦ Print subtotals and totals
♦ Set the countdown value
♦ Enter the sell by or best before dates
♦ Change product information (temporarily)
♦ Use forced price
♦ Use forced tare
♦ Use platter tare
Auto Weigh is used to weigh a package, print a label, and
apply the label to the package.
This mode is used most often for a fully automatic system.
When used with a fully automatic system, the package is
also wrapped.
QUICK STEPS
From the Start a Run Screen:
1. Highlight Auto Weigh and
PRESS [ENTER]
2. Enter the Operator ID, if
applicable
3. Enter the PLU
4. Place the package on the
weighing platform
To weigh, print and apply:
1. At the console, from the Start a Run Screen, highlight
Auto Weigh and PRESS [ENTER].
Using the System 4 - 2
Page 31

Ultima System
2. Enter your Operator ID (if required). The Run Screen
displays.
3. Enter the PLU number (PRESS the speed key, Type the
PLU number or select from the On Screen Library). The
PLU information displays. If Auto Lookup is not on, you
may have to PRESS [ENTER].
Auto Repeat
4. Place the package on the weighing platform. A label will
automatically print.
5. Place the next package on the weighing platform.
--OR--
Enter another PLU.
--OR--
PRESS [ESCAPE] to return to the Start a Run Screen.
Auto Repeat works the same as auto weigh, but it also
enables you to print duplicate labels automatically. It is used
to weigh a package, print duplicate labels, and apply the
labels to the package.
This mode is used most often for a fully automatic system.
When used with a fully automatic system, the package is
also wrapped.
4 - 3 Using the System
Page 32

Ultima System
Weighing, Printing and
Applying
(Semi Auto Weigh)
QUICK STEPS
From the Start a Run Screen:
1. Highlight Semi Auto
Weigh and PRESS
[ENTER]
2. Enter Operator ID, if
required
3. Enter the PLU
4. Place the package on the
weighing platform
Semi Auto Weigh is the mode most often used with semiautomatic systems (CLA) for pre-packaged products. It
weighs a package, prints a label, and applies the label to the
package.
To weigh, print and apply:
1. At the console, from the Start a Run Screen, highlight
Semi Auto Weigh and PRESS [ENTER].
2. Enter your Operator ID (if required). The Run Screen
displays.
3. Enter the PLU number (PRESS the speed key, type the
PLU number or select from the On Screen Library). The
PLU information displays. If Auto Lookup is not on, you
may have to PRESS [ENTER].
4. Place the package on the weighing platform. A label will
print automatically.
5. Place the next package on the weighing platform.
--OR--
Enter another PLU.
--OR-PRESS [ESCAPE] to return to the Start a Run Screen.
Using the System 4 - 4
Page 33

Ultima System
Semi Auto Repeat
Weighing and Printing
(Manual Weigh)
QUICK STEPS
From the Start a Run Screen:
1. Highlight Manual Weigh
and PRESS [ENTER]
2. Enter Operator ID, if
required
3. Enter the PLU
4. Place the package on the
weighing platform
5. PRESS [PRINT]
Semi Auto Repeat works the same as Semi Auto Weigh, but
it enables you to print duplicate labels automatically. It
weighs a package, prints duplicate labels, and applies the
labels to the package.
Manual Weigh is used for weighing a package and printing
a label. You would use this to create labels for large
prepackaged items.
To weigh and print:
1. At the console, from the Start a Run Screen, highlight
Manual Weigh and PRESS [ENTER].
2. Enter your Operator ID (if required). The Run Screen
displays.
3. Enter the PLU number (PRESS the speed key, Type the
PLU number or select from the On Screen Library). The
PLU information displays. If Auto Lookup is not on, you
may have to PRESS [ENTER].
4 - 5 Using the System
Page 34

Ultima System
4. Place the package on the weighing platform. The system
weighs the package.
5. PRESS [PRINT] to print the label.
6. Place the next package on the weighing platform.
--OR--
Enter another PLU.
--OR-PRESS [ESCAPE] to return to the Start a Run Screen.
Manual Repeat
Printing Subtotals and
Totals
QUICK STEPS
From the Start a Run Screen:
1. Select a Weigh Type
2. PRESS [ENTER]
3. Enter a PLU
4. Place the package on the
weighing platform.
5. Continue weighing
packages
6. PRESS [PREV] to print a
Subtotal label
7. Repeat steps 4 thru 6.
8. PRESS [NEXT] to print a
Totals label
9. PRESS [ESCAPE]
Manual Repeat works similar to manual weigh. It is used to
continually duplicate labels.
You can use Subtotal and Total to print one label for
multiple packages. For example, you can print a label that
subtotals all of your packages, then print a label that totals
all of your subtotals.
To print Subtotals and Totals:
1. From the Start a Run Screen, use the [UP ARROW (▲)]
and [DOWN ARROW (▼)] keys to select a Weigh Type.
A Weigh Type is selected when it is highlighted.
☛ Note
Subtotal and Total is not available when you select Manual
Repeat and Countdown Weigh Types.
Using the System 4 - 6
Page 35

Ultima System
2. PRESS [ENTER]. The Run Screen displays.
3. Enter the PLU number (PRESS the speed key, type the
PLU number or select from the On Screen Library). The
PLU information displays. If Auto Lookup is not on, you
may have to PRESS [ENTER].
4. Place the package on the weighing platform.
a. If you selected Auto Weigh or Semi Auto Weigh as
your weigh type, a label will automatically print.
b. If you selected Manual Weigh as your weigh type,
PRESS [PRINT] to print a label.
5. Continue weighing packages until you are ready to
subtotal the packages.
6. PRESS [PREV] to print the subtotal label.
7. Repeat steps 4 thru 6 to print subtotals for other groups of
packages.
8. PRESS [NEXT] to print a Totals label of all of the groups
weighed for that PLU number.
☛ Note
If labels are queued to be printed or labels are waiting to be
taken from one of the printers, a beep will alert the operator
that the [PREV] or [NEXT] key will not print a Subtotal or
Totals label.
9. Enter another PLU number.
--OR-PRESS [ESCAPE] to return to the Start a Run Screen.
☛ Note
A subtotal value will rezero once a subtotal label is printed.
A totals label will continue to calculate totals until you
escape from the Run Screen or type in a new PLU number.
4 - 7 Using the System
Page 36

Ultima System
Setting the Countdown
QUICK STEPS
From the Start a Run Screen:
1. Select Countdown
2. PRESS [ENTER]
3. Enter a PLU
4. Enter the kilograms
5. Enter the number of
cartons
6. Modify product fields, if
applicable
7. Weigh the product
8. PRESS [PRINT] or
[ESCAPE]
9. Continue weighing
10. PRESS [PRINT] or
[ESCAPE]
Setting the countdown allows you to specify the amount to
be labeled by weigh type and the number of cartons.
One of the following weigh types will be set by your
supervisor:
• By Weight
• By Value
• By Packages
Before you begin this procedure ask your supervisor to
verify that your Ultima is set up to countdown by weight.
To set the countdown by weight:
1. From the Start a Run Screen, select Countdown.
2. PRESS [ENTER]. The Run Screen displays, with the
Product Number field highlighted.
3. Enter a PLU. The appropriate field information displays.
Using the System 4 - 8
Page 37

☛ Note
can range from 0 to 99.99 pounds or 0 to 99.999 kilograms.
If you do not know the PLU number:
a. With your cursor at the Product Number field, PRESS
[HELP].
b. Select the product you want.
The PLU number and product description display in the
appropriate fields.
4. In the Countdown - Enter Weight field, enter the
minimum amount of weight from which you want to
countdown. This is the amount of weight per carton and
Ultima System
5. In the Countdown - Enter Cartons field, enter the number
of cartons. You can enter up to 9999 cartons per run.
6. Modify product fields, if applicable.
7. Weigh the product. When you reach or exceed the
amount of weight that you specified, the Carton
Complete message displays.
4 - 9 Using the System
Page 38

Ultima System
8. PRESS [PRINT] to print a carton label. The carton label
displays total net weight, the number of packages, and
the total price of the product contained in the carton.
--OR--
PRESS [ESCAPE] to skip the carton label.
9. Continue weighing the product until all cartons are
complete. The Run Complete message displays.
Entering the Sell By or
Best Before Dates
10. PRESS [PRINT] to print a run label. The run label
displays total net weight of all cartons, the total number
of packages and the total price of all cartons.
--OR--
PRESS [ESCAPE] to skip the run label.
11. PRESS [ENTER] to set up another countdown run.
--OR--
PRESS [ESCAPE] to return to the Start a Run Screen.
This enhancement enables you to modify the Sell By or Best
Before Dates directly from the appropriate field on the Run
Screen. These dates are also automatically calculated by
entering a number of days in the Shelf Life or Product Life
field.
Using the System 4 - 10
Page 39

Ultima System
QUICK STEPS
From the Start a Run Screen:
1. Select a Weigh Type
2. PRESS [ENTER]
3. Enter a PLU
4. Enter the date in the
appropriate field
To enter the Sell By Date:
1. From the Start a Run Screen, use the [UP ARROW (▲)]
and [DOWN ARROW (▼)] keys to select a Weigh Type.
A Weigh Type is selected when it is highlighted.
2. PRESS [ENTER]. The Run Screen displays.
3. Enter a PLU in the Product Number field. The
appropriate field information displays.
☛ Note
If you do not know the PLU number:
a. With your cursor at the Product Number field,
PRESS [HELP].
b. Select the product you want.
The PLU number and product description display in the
appropriate fields.
4 - 11 Using the System
Page 40

Ultima System
4. Use the [UP ARROW (▲)] or [DOWN ARROW (▼)] key
to select the Sell By or Best Before field.
5. Type the appropriate date and PRESS [ENTER]. The
date you enter displays and the cursor moves to the next
field.
☛ Note
Changing Product
Information
(Temporarily)
If you change the Sell By date, the Best Before date will
automatically update. However, if you change the Best
Before date, the Sell By date will not update.
Temporarily change the value of any of the fields listed next
to the “F” Keys, unless they are grayed. They are modifiable
depending on the type of PLU you have selected (i.e.
Random Weight, Fixed Weight, etc.).
♦ Unit Price/Lb. for Price
♦ Tare
♦ Shelf Life/Select Shelf Life
♦ Label & Graphic Type & Rotation
♦ By Count
♦ Total Price
♦ Net Weight (Oz.)
♦ Volume (Fluid Oz.)
Look At This
All changes to product information are recorded in the
Supervisor Mode and listed by Operator ID (if configured).
Using the System 4 - 12
Page 41

QUICK STEPS
From the Run Screen:
1. Move the cursor to the field
you want
2. TYPE the temporary values
Ultima System
To change product information:
1. From the Run Screen, move the cursor to the field you
want to change.
2. TYPE the temporary value(s), label type, or graphic ID.
(You may need to PRESS [ESC] to return to the PLU
screen.)
When the label is generated, the new information prints.
The changes revert to their original value when you enter a
new PLU or PRESS [ESC].
☛ Note
Fixed Weight products do not use the scale weight to
calculate Total Price or Net Weight.
☛ Note
If the UPC Numbering System for a Fixed Weight or Fluid
Ounce PLU equals 0, 6 or 7, you will not be able to edit any
of the fields that affect the price (i.e., Net Weight [Oz.],
Volume [Fluid Oz.], By Count or Total Price).
Using Forced Price
Random Weight PLUs 1. Enter your Operator ID (if required).
Your Supervisor may have set-up a PLU that requires you to
enter an item’s price. For example, you may sell three grades
of ground beef, all with a different price, but use the same
PLU Number. When you enter the PLU Number, the system
prompts you to enter the Unit Price or Total Price for the
grade the customer wants. The following explanation gives
you details for using Forced Price.
2. Enter the PLU Number (Type PLU number or select
from the On Screen Library). You are now on the Run
Screen. If Auto Lookup is not on, you will have to PRESS
[ENTER].
3. There is an audible beep and the cursor moves to the
Unit Price field. You cannot do anything else until you
enter a valid Unit Price.
4. TYPE the Unit Price and PRESS [ENTER].
5. To complete the transaction, follow the steps based on
your mode of operation.
4 - 13 Using the System
Page 42

Ultima System
Random Weight - By Count PLUs 1. Enter your Operator ID (if required).
2. Enter the PLU Number (Type PLU number or select
from the On Screen Library). You are now on the Run
Screen. If Auto Lookup is not on, you will have to PRESS
[ENTER].
3. There is an audible beep and the cursor moves to the
Total Price field. You cannot do anything else until you
enter a valid Total Price.
4. TYPE the Total Price and PRESS [ENTER].
5. To complete the transaction, follow the steps based on
your mode of operation.
Fixed Weight PLUs 1. Enter your Operator ID (if required).
2. Enter the PLU Number (Type PLU number or select
from the On Screen Library). You are now on the Run
Screen. If Auto Lookup is not on, you will have to PRESS
[ENTER].
3. There is an audible beep and the cursor moves to the
Total Price field. You cannot do anything else until you
enter a valid Total Price.
4. TYPE the Total Price and PRESS [ENTER].
5. To complete the transaction, follow the steps based on
your mode of operation.
Using Forced Tare
For PLUs that require a tare value, the PLU can be set-up to
require you to enter a tare value. This feature might be used
if different sized trays are used for the same product, but the
trays all weigh differently. By using the Forced Tare option,
only one PLU Number is required.
To enter the forced tare:
1. Enter your Operator ID (if required).
2. Enter the PLU Number. (Type a PLU number or select
from the On Screen Library). You are now on the Run
Screen. If Auto Lookup is not on, you will have to PRESS
[ENTER].
3. There is an audible beep and the cursor moves to the
Tare field. You cannot do anything until you enter a
valid Tare value.
4. TYPE the Tare value.
5. PRESS [ENTER] or [DOWN ARROW (▼)]. The cursor
then moves to the next active field, Product Number.
6. To complete the transaction, follow the steps based on
your mode of operation.
✎ Tip
A PLU can be set-up to require Forced Price and Forced
Tare. In the event this is the case, you will enter the Forced
Price first, followed by Forced Tare.
Using the System 4 - 14
Page 43

Ultima System
Using Platter Tare
During the initial scale set-up, the scale may be configured
for Platter Tare. This simply means that you can enter the
Tare value by placing the “container” on the platter (when
the cursor is on the Tare field) and pressing Enter or Down
Arrow to accept the weight value.
To enter the platter tare value:
1. Enter your Operator ID (if required).
2. Enter the PLU Number (Type PLU number or select
from the On Screen Library). You are now on the Run
Screen.
3. PRESS [ENTER] or [DOWN ARROW (▼)].
4. Move the cursor to the Tare field by pressing the Arrow
Keys.
5. When you are on the Tare field, the Softkey changes to
“Platter Tare” or “Keyboard Tare.” PRESS [F4] to select
Platter Tare.
6. Place the container on the platter.
7. PRESS [ENTER] or [DOWN ARROW (▼)] to accept the
Tare value. Notice that the field and Softkey now read
“Tare.”
8. To complete the transaction, follow the steps based on
your mode of operation.
4 - 15 Using the System
Page 44

Page 45

Ultima System
Chapter Five: Cleaning & Maintaining your System
♦ Hygiene Requirements for Cleaning & Sanitizing
♦ Cleaning the Printhead
5 - 1 Cleaning
Page 46

Ultima System
Cleaning and
Maintaining your
System
Hygiene Requirements
for Cleaning &
Sanitizing
Do Don’t
DO cover the complete system during
clean up and hose down of
surrounding areas.
DO use mild soap and water solution
to clean the exterior of the Ultima
(Palmolive Green or Ivory are
recommended).
This durable Ultima System has been designed and
manufactured to resist scratches, stains, alkaline, protein
and food acid when cared for properly. Improper care can
permanently damage the electronics and printer.
Proper cleaning prolongs the life and productivity of the
machine. This machine should be cleaned routinely during
the day and thoroughly cleaned at the end of the day. If the
system is not cleaned daily it will not run consistently and
will cause service problems. Improper cleaning and
sanitation will adversely effect performance of the
equipment.
Carefully clean the exterior of the Ultima with a clean
sponge or cloth and warm water solution.
Refer to the following Cleaning and Sanitizing guidelines.
DON’T dampen labels, electronic parts, or
connections.
DON’T use steam or a pressure (water) hose
to clean the system.
DO apply EPA-registered sanitizer
according to label directions to
disinfect surfaces.
DON’T allow water to enter the openings in
the housing.
DON’T use a hose or pour water in any area.
DON’T operate and/or store the system in
an environment with relative humidity levels
consistently in excess of 70%.
DON’T use:
• Chloride-Based cleaners
• Formula 409
• Glass Cleaners (i.e. Scotty’s Glass
Cleaner)
• Citrus-Based Cleaners (i.e. Citro-Sol or
Bio-T)
• Caustic Cleaners with high pH (i.e.
Butchers Block, concentrated Lysol or
Pinsol)
DON’T exceed EPA and registered
recommended concentrations for detergent
or sanitizer.
Cleaning 5 - 2
Page 47

Ultima System
Cleaning the Printhead
The printhead should be cleaned approximately once each
week, or whenever unclear labels are printed. It is a good
idea to clean the Printhead Roller whenever a new roll of
labels is installed. To obtain a Printhead Cleaning Kit,
contact your local Hobart office; request Part Number
00-184326.
Look At This
Do not use a metal tool on the printhead. This could scratch or
break the printhead. In addition, labels should not become
stuck on machine parts. If they do, remove the labels at once
following the instructions in the Printhead Cleaning Kit.
To clean the printhead:
1. Check printhead for labels or adhesive before inserting
every roll of labels. Clean the printhead as needed.
2. Turn power off to the printer.
3. Remove the label cassette.
4. Use the plastic “Lil’ ChiZler” to remove stuck on label
stock.
5. To remove burned-on adhesive, gently rub the printhead
surface with the eraser.
6. Soak the cotton swab tip with the Printhead Cleaning
Solution.
7. Scrub the printhead with the swab until all residue is
removed.
8. Moisten the swab as needed.
9. Allow the printhead to dry.
10. Return the Cleaning Kit to its holding box.
5 - 3 Cleaning
Page 48

Page 49

Chapter Six: Troubleshooting
¨ Possible System Problems
Ultima System
6 - 1 Troubleshooting
Page 50

Ultima System
y
Troubleshooting
In the event that your Ultima System does not operate as
expected, please read through the following troubleshooting
steps before calling for service.
Possible System
Problems
If you are experiencing problems with the label applier or
printer, review the following scenarios.
Problem Possible Cause Action/Solution
When I press
[POWER] the system
does not respond.
The Scale Warm-Up
message wonÕt go
away.
The Operator ID was
not accepted.
The system wonÕt
accept the date &
time.
When I press
[REZERO] the system
responds Outside Zero
Maintenance.
Over gross weight
displays on screen.
PLU not found You may have entered an invalid PLU
You may not have power running to the
system.
Weight may be on the platter. Make sure the platter/weigher is clear.
You may have entered the wrong ID. Verify that you are entering the proper
You may have entered information in
an incorrect format.
There is weight on the platter.
There is too much weight on the
platter/weigher.
number.
Verify that the system is plugged in and
the power switch, located on the back of
the printer, is turned on.
Power the printer down and up using
the switch on the back.
ID. If correct, have your Supervisor
check the ID number.
Verify that you are entering a valid date
& time.
1. At the console, PRESS [ESC] and
[POWER] to turn power OFF.
2. Make sure nothing is touching the
platter/weigher.
3. PRESS [POWER] to turn power ON.
Make sure the platter/weigher is clear
and PRESS [REZERO].
Verify PLU Number.
System prompts you
to take label and no
label is present.
Partial non-printed
label is exposed.
Out of Labels message
displays.
System prints blank
labels or partially
printed labels.
Troubleshooting 6 - 2
A portion of the label may be ÔhiddenÕ
in the label exit.
The labels may be improperly threaded.
No labels are loaded.
The labels may be improperly threaded
or the printhead or pressure roller may
be dirty.
Make sure that the label exit is clear.
Verif
that labels are properly threaded.
Load new labels.
Check to see that labels are threaded
properly. If the problem persists, clean
the Printhead with the Hobart
Printhead Cleaning kit.
Page 51

Chapter Seven: Index
Ultima System
7 - 1 Index
Page 52

Ultima System
— A —
About the Keyboard, 3-6
Accessing the On Screen Library, 3-7
Applying (Semi Auto Weigh), Weighing,
Printing and, 3-4, 4-4
Applying (Auto Weigh), Weighing, Printing
and, 3-4, 4-2
Auto Repeat, 3-4, 4-3
Auto Weigh, Weighing, Wrapping, Printing
and Applying, 3-4, 4-2
— B —
Basic Help, 3-6
Best Before Dates, Enter the Sell By or, 4-10
— C —
Changing Product Information (Temporarily),
4-12
CLEANING AND MAINTAINING YOUR
SYSTEM, 5-2
Cleaning the Printhead, 5-3
Cleaning & Sanitizing, Hygiene
Requirements for, 5-2
Communication Connections, 2-3
Connections, Communication, 2-3
Connections, Electrical, 2-2
Console, Using the, 2-3
Countdown, Setting the, 4-8
— D —
Date & Time, Setting the, 3-2
Display, User, 2-6
— E —
Electrical Connections, 2-2
Entering Operator IDs, 3-5
Entering the Sell By Date or Best Before
Dates, 4-10
Ñ F —
ÒFÓ Keys, Help on, 3-6
FCC Note, 1-3
Forced Price, Using, 4-13
Forced Tare, Using, 4-14
Function Keys, 1-2, 2-4
— H —
HELP Key Functions, 3-6
Help on "F" Keys, 3-6
Help, Basic, 3-6
Hygiene Requirements for Cleaning &
Sanitizing, 5-2
— I —
INTRODUCTION, 1-2
— K —
Keyboard, About the, 3-6
Keypad, The, 2-4
— L —
Label Cassette, Narrow, 2-7
Label Cassette, Removing and Replacing, 2-11
Label Cassette, Standard, 2-7
Labels, Loading, 2-7
Loading Labels, 2-7
Label Stock, Narrow, 2-7
Label Stock, Standard, 2-7
— M —
Main Power Switch, 2-2
MAINTAINING YOUR SYSTEM,
CLEANING AND, 5-2
Manual Overview, 1-3
Manual Repeat, 3-4, 4-6
Manual Weigh, Weighing and Printing,
3-4, 4-5
Moving Through the System, 3-7
Index 7 - 2
Page 53

Ultima System
— N —
Narrow Label Cassette, 2-7
Narrow Label Stock, 2-7
— O —
On Screen Library, Accessing the, 3-7
Operator IDs, Entering, 3-5
Operator Manual Overview, 1-3
Overview, Operator Manual 1-3
— P —
Platter Tare, Using, 4-15
Possible System Problems, 6-2
Power Cord, 2-2
Power Key, 2-4
Power Switch, Main, 2-2
Powering Up the System, 3-2
Printhead, Cleaning the, 5-3
Printing (Manual Weigh), Weighing and,
3-4, 4-5
Printing and Applying (Semi Auto Weigh),
Weighing, 3-4, 4-4
Printing and Applying (Auto Weigh),
Weighing, 3-4, 4-2
Printing Subtotals and Totals, 4-6
Problems, Possible System, 6-2
Product Information, Changing
(Temporarily), 4-12
Subtotals and Totals, Printing, 4-6
System, Powering Up, 3-2
SYSTEM, UNDERSTANDING THE, 2-2
— T —
Time, Setting the Date and, 3-2
Totals, Printing Subtotals and, 4-6
Totals Types, 3-5
Totals Types, Selecting Weigh and, 3-5
TROUBLESHOOTING, 6-2
Types, Totals, 3-5
Types, Weigh, 3-4
— U —
Understanding the Start a Run Screen, 3-3
UNDERSTANDING THE SYSTEM, 2-2
User Display, 2-6
Using Forced Price, 4-13
Using Forced Tare, 4-14
Using Platter Tare, 4-15
Using the Console, 2-3
USING THE ULTIMA SYSTEM, 4-2
— V —
Verify Correctness of Weight & Price, 1-3
Verifying Zero Weight, 3-4
— R —
Rezeroing the Scale, 3-4
— S —
Sanitizing, Hygiene Requirements for
Cleaning and, 5-2
Selecting Weigh and Totals Types, 3-5
Sell By or Best Before Dates, Entering, 4-10
Semi Auto Repeat, 3-4, 4-5
Semi Auto Weigh, Weighing, Printing and
Applying, 3-4, 4-4
Setting the Countdown, 4-8
Setting the Date & Time, 3-2
Speed Keys, 1-2
Standard Label Cassette, 2-7
Standard Label Stock, 2-7
Start a Run Screen, Understanding the, 3-3
START-UP PROCEDURES, 3-2
— W —
Weigh and Totals Types, Selecting, 3-5
Weigh Types, 3-4
Weighing and Printing (Manual Weigh),
3-4, 4-5
Weighing, Printing and Applying (Semi Auto
Weigh), 3-4, 4-4
Weighing, Printing and Applying (Auto
Weigh), 3-4, 4-2
— Z —
Zero Weight, Verifying, 3-4
7 - 3 Index
Page 54

Page 55

Page 56

F-34319 (10-99)
 Loading...