

Page 1
HT Access System
Operator Manual
ML-44242 EPCP-5HTi
ML-44243 EPCP-5HTs
ML-44244 EPCP-5HTx
701 S. RIDGE AVENUE
TROY, OHIO 45374
www.hobartcorp.com
F-35553 (December 2014)
Page 2

Page 3

HT Access System Operator Manual
TABLE OF CONTENTS
Chapter 1: Introduction. . . . . . . . . . . . . . . . . . . . . . . . . . . . . . . . . . . . . . . . . . . . . . . . . . . . . . . . . . . . . . .1-1
Welcome. . . . . . . . . . . . . . . . . . . . . . . . . . . . . . . . . . . . . . . . . . . . . . . . . . . . . . . . . . . . . .1-1
FCC Note . . . . . . . . . . . . . . . . . . . . . . . . . . . . . . . . . . . . . . . . . . . . . . . . . . . . . . . . . . . . .1-1
Industry Canada Note . . . . . . . . . . . . . . . . . . . . . . . . . . . . . . . . . . . . . . . . . . . . . . . . . . . .1-1
Verify Correctness of Weight and Price. . . . . . . . . . . . . . . . . . . . . . . . . . . . . . . . . . . . . .1-2
Operator Manual Terminology. . . . . . . . . . . . . . . . . . . . . . . . . . . . . . . . . . . . . . . . . . . . .1-2
Chapter 2: Understanding the System . . . . . . . . . . . . . . . . . . . . . . . . . . . . . . . . . . . . . . . . . . . . . . . . . . .2-1
Electrical Connections . . . . . . . . . . . . . . . . . . . . . . . . . . . . . . . . . . . . . . . . . . . . . . . . . . .2-1
Communication Connections . . . . . . . . . . . . . . . . . . . . . . . . . . . . . . . . . . . . . . . . . . . . . .2-1
Operator Screens Overview . . . . . . . . . . . . . . . . . . . . . . . . . . . . . . . . . . . . . . . . . . . . . . .2-2
Menu Icon Features . . . . . . . . . . . . . . . . . . . . . . . . . . . . . . . . . . . . . . . . . . . . . . . . . . . . .2-6
Keypad and Keyboard Icons. . . . . . . . . . . . . . . . . . . . . . . . . . . . . . . . . . . . . . . . . . . . . . .2-8
Chapter 3: Using the HT Access System . . . . . . . . . . . . . . . . . . . . . . . . . . . . . . . . . . . . . . . . . . . . . . . . .3-1
Power Up the System . . . . . . . . . . . . . . . . . . . . . . . . . . . . . . . . . . . . . . . . . . . . . . . . . . . .3-1
Reboot Button. . . . . . . . . . . . . . . . . . . . . . . . . . . . . . . . . . . . . . . . . . . . . . . . . . . . . . . . . .3-1
Logging onto the System . . . . . . . . . . . . . . . . . . . . . . . . . . . . . . . . . . . . . . . . . . . . . . . . .3-2
Shutting Down the System . . . . . . . . . . . . . . . . . . . . . . . . . . . . . . . . . . . . . . . . . . . . . . . .3-3
Center Operator Screen . . . . . . . . . . . . . . . . . . . . . . . . . . . . . . . . . . . . . . . . . . . . . . . . . .3-4
Right Operator Screen . . . . . . . . . . . . . . . . . . . . . . . . . . . . . . . . . . . . . . . . . . . . . . . . . . .3-5
Modifying the Operator Screens. . . . . . . . . . . . . . . . . . . . . . . . . . . . . . . . . . . . . . . . . . . .3-6
Operation Mode . . . . . . . . . . . . . . . . . . . . . . . . . . . . . . . . . . . . . . . . . . . . . . . . . . . . . . .3-10
Running a Product . . . . . . . . . . . . . . . . . . . . . . . . . . . . . . . . . . . . . . . . . . . . . . . . . . . . .3-13
Using Create COOL . . . . . . . . . . . . . . . . . . . . . . . . . . . . . . . . . . . . . . . . . . . . . . . . . . . .3-15
Modifying the Printer Settings . . . . . . . . . . . . . . . . . . . . . . . . . . . . . . . . . . . . . . . . . . . .3-16
Viewing Expiration Label History . . . . . . . . . . . . . . . . . . . . . . . . . . . . . . . . . . . . . . . . .3-17
Selecting Total Types . . . . . . . . . . . . . . . . . . . . . . . . . . . . . . . . . . . . . . . . . . . . . . . . . . .3-18
Voiding a Transaction . . . . . . . . . . . . . . . . . . . . . . . . . . . . . . . . . . . . . . . . . . . . . . . . . .3-18
Rezero the Weigher . . . . . . . . . . . . . . . . . . . . . . . . . . . . . . . . . . . . . . . . . . . . . . . . . . . .3-19
Using the Search Function . . . . . . . . . . . . . . . . . . . . . . . . . . . . . . . . . . . . . . . . . . . . . . .3-20
Viewing Product Notes. . . . . . . . . . . . . . . . . . . . . . . . . . . . . . . . . . . . . . . . . . . . . . . . . .3-21
Viewing Operator Note . . . . . . . . . . . . . . . . . . . . . . . . . . . . . . . . . . . . . . . . . . . . . . . . .3-22
Viewing Weights & Measures Information . . . . . . . . . . . . . . . . . . . . . . . . . . . . . . . . . .3-23
Viewing About Scale Information . . . . . . . . . . . . . . . . . . . . . . . . . . . . . . . . . . . . . . . . .3-24
Help . . . . . . . . . . . . . . . . . . . . . . . . . . . . . . . . . . . . . . . . . . . . . . . . . . . . . . . . . . . . . . . .3-25
Using the Flashkey Editor . . . . . . . . . . . . . . . . . . . . . . . . . . . . . . . . . . . . . . . . . . . . . . .3-26
Modifying the Wrapper Settings . . . . . . . . . . . . . . . . . . . . . . . . . . . . . . . . . . . . . . . . . .3-28
Modifying the Label Placement . . . . . . . . . . . . . . . . . . . . . . . . . . . . . . . . . . . . . . . . . . .3-29
F-35553 (December 2014) i Table of Contents
Page 4

HT Access System Operator Manual
Chapter 4: Maintenance & Cleaning . . . . . . . . . . . . . . . . . . . . . . . . . . . . . . . . . . . . . . . . . . . . . . . . . . . .4-1
Loading Labels . . . . . . . . . . . . . . . . . . . . . . . . . . . . . . . . . . . . . . . . . . . . . . . . . . . . . . . . .4-3
Setting the Label Size Plate . . . . . . . . . . . . . . . . . . . . . . . . . . . . . . . . . . . . . . . . . . . . . . .4-5
Cleaning the Printhead . . . . . . . . . . . . . . . . . . . . . . . . . . . . . . . . . . . . . . . . . . . . . . . . . . .4-6
Troubleshooting . . . . . . . . . . . . . . . . . . . . . . . . . . . . . . . . . . . . . . . . . . . . . . . . . . . . . . . .4-7
Index: . . . . . . . . . . . . . . . . . . . . . . . . . . . . . . . . . . . . . . . . . . . . . . . . . . . . . . . . . . . . . . . . . . . . . . . . . . . . I-1
Table of Contents ii F-35553 (December 2014)
Page 5

HT Access System Operator Manual
HT ACCESS SYSTEM SOFTWARE LICENSE AGREEMENT
This license Agreement describes important rights and obligations governing your use of the software installed on the
HT Access System ("Product") and related documentation (the 'Software'), which you should read carefully.
LICENSE: You are granted a nonexclusive, non-transferable (except as provided herein), nonsublicenseable, limited
license to use the Software in your own business, only installed upon a single Product at any given time. You are permitted to one copy of the Software, only for backup to reinstall the software on the scale or archive purposes in connection with use on the same single Product.
LIMITATIONS; RESTRICTIONS: You have no right to reproduce the Software except for backup or archive purposes as stated above, and no right to distribute the Software or prepare derivative works based on it. You may not use
the Software on more than one Product. You shall not, by any leasing, external time-sharing, service bureau or similar
arrangement, permit the use of the Software in any business other than your own business. You shall not reverse engineer the Software in any manner, including, without limitation, through decompilation or disassembly.
PROPRIETARY RIGHTS; CONFIDENTIALITY: The Software and all proprietary rights therein, including copyrights and rights under the trade secret laws of any jurisdiction, are the property of ITW Food Equipment Group LLC
("FEG") or the third party owner identified on the Software. You shall not create derivative works based on the Software, it being understood that FEG shall have all right, title or interest in and to all derivative works based upon the
Software. Your rights in the Software are limited to those expressly licensed hereby. Any copies which you make of
the Software must include all copyright and other proprietary notices included in the original without alteration. You
agree not to disclose or otherwise make available the Software to any person other than your employees who require
such access in connection with the Software, and shall establish reasonable security precautions to prevent unauthorized disclosure.
TRANSFER: You may transfer the Software to another party only if (i) it is transferred with the Product upon which
it was originally installed or accompanied upon delivery; (ii) such party agrees to all terms of this Agreement; (iii)
you receive FEG's consent; and (iii) you do not retain any copies of the Software Any other attempted assignment,
sublicense or other transfer of the license granted hereby shall be void.
TERMINATION: The license granted hereby shall terminate upon any failure on your part to comply with the terms
hereof. Upon termination, you shall have no further right to use the Software and shall immediately return to FEG or
destroy all copies of the Software in your possession. Your obligation of confidentiality with respect to the Software
shall survive any such termination.
WARRANTY: Software which is proprietary to FEG is warranted for a period of one year from the date of shipment
to function generally in accordance with its documentation, but such functioning is not warranted to be uninterrupted
or error-free. Third party Software is warranted for the same period and to the same extent that our licensor has warranted to us. EXCEPT AS EXPRESSLY PROVIDED HERIN, FEG MAKES NO WARRANTIES, EXPRESS OR
IMPLIED, WITH RESPECT TO THE SOFTWARE, INCLUDING WITHOUT LIMITATION ANY IMPLIED
WARRANTIES OF MERCHANTABILITY OR FITNESS FOR A PARTICULAR USE.
F-35553 (December 2014) iii Table of Contents
Page 6

HT Access System Operator Manual
LIABILITY: FEG's sole liability, and your exclusive remedy, for matters relating to the Software shall be the repair or
replacement of any software which fails to satisfy the warranty set forth above. You by acceptance of the Software
assume liability for any damages which may result from use or misuse of the Software by you or your employees, or
by others. EXCEPT AS EXPRESSLY SET FORTH HEREIN, FEG SHALL HAVE NO LIABILITY, IN CONTRACT, TORT OR OTHERWISE, FOR ANY MATTER RELATED TO THE SOFTWARE. IN PARTICULAR,
WITHOUT LIMITATION OF THE FOREGOING, FEG SHALL HAVE NO LIABILITY FOR ANY INJURY TO
PERSON OR PROPERTY, LOSS OF PROFITS, OR OTHER INDIRECT, INCIDENTAL, SPECIAL OR CONSEQUENTIAL DAMAGES.
CHOICE OF LAW: This Agreement and all acts and transactions pursuant hereto shall be construed and the legal
relations between the parties hereto determined in accordance with the laws of the State of Illinois, without regard to
the conflicts of laws rules thereof and without regard to the United Nations Convention on the International Sale of
Goods.
©
Hobart, A division of ITW Food Equipment Group LLC 2014
Table of Contents iv F-35553 (December 2014)
Page 7
HT Access System Operator Manual
Chapter 1: Introduction
Introduction
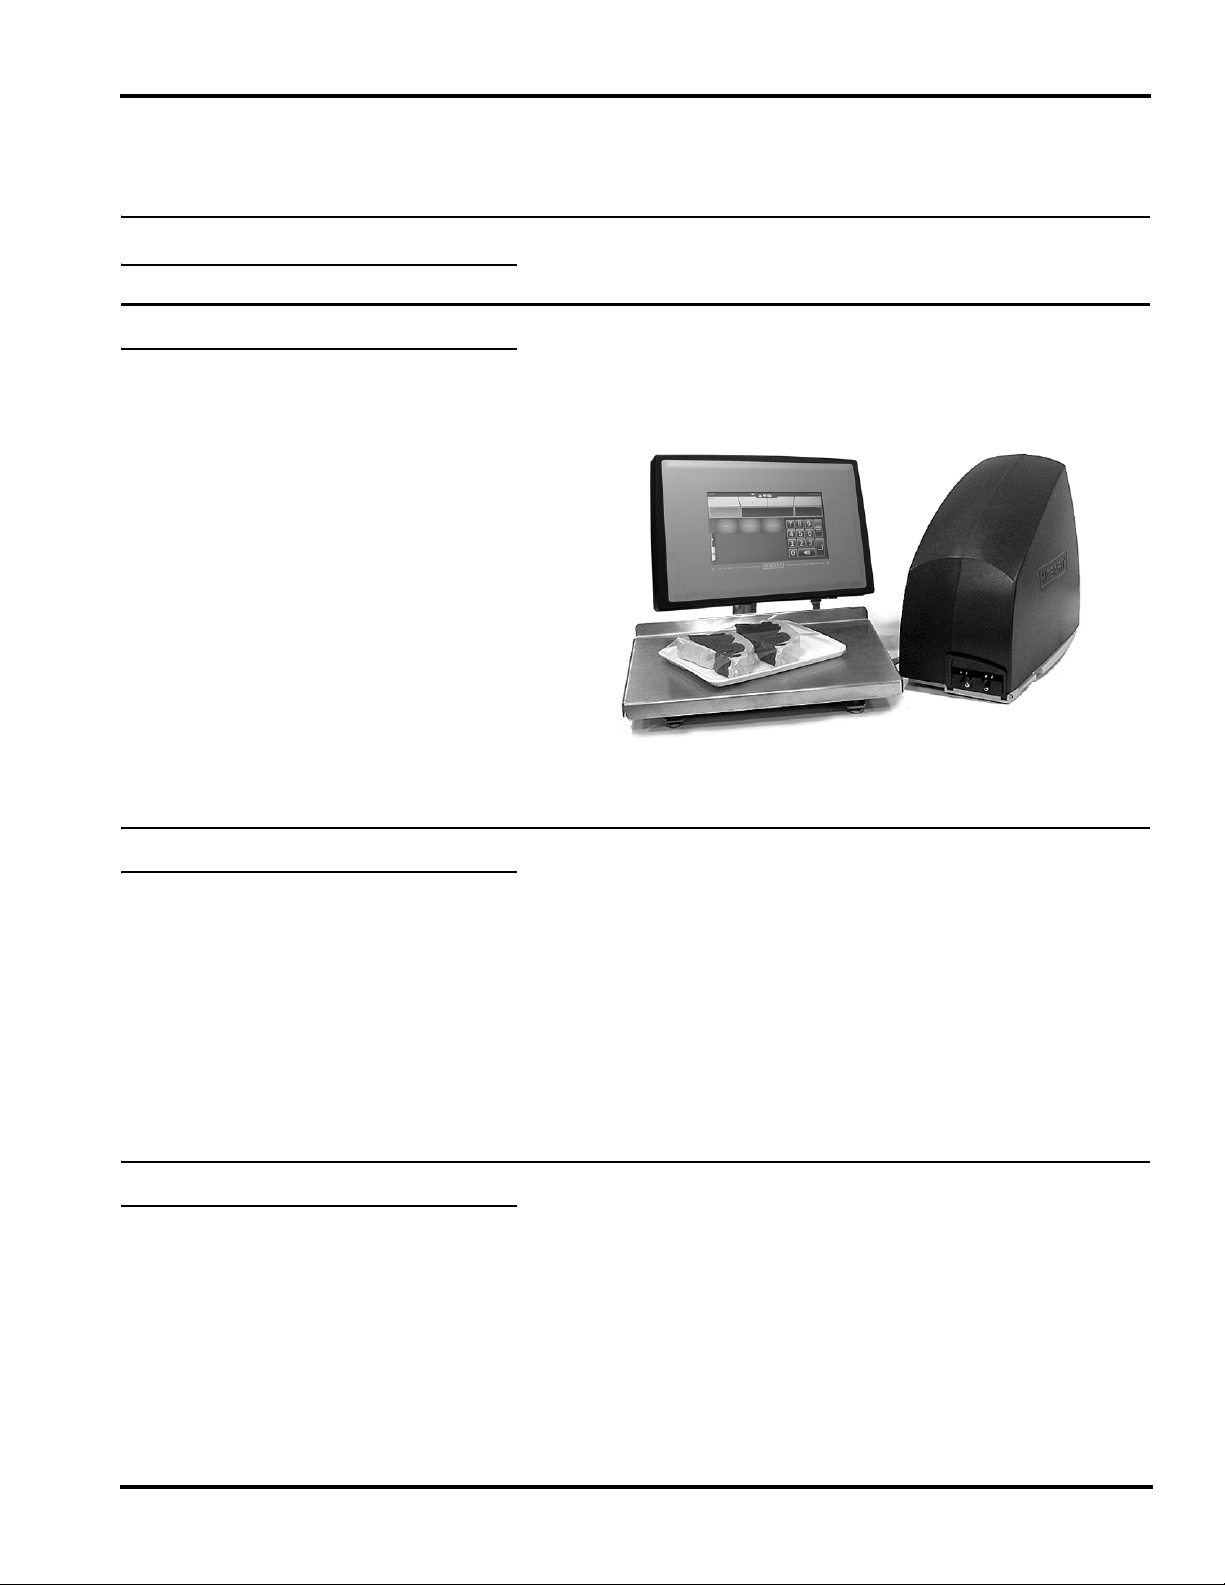
Welcome The HT Access System was designed as a meat room or produce
back room scale. It gives you merchandising capabilities with multiple fonts, graphics, and label types.
All necessary operator data appears on the touch screen.
FCC Note
This equipment has been tested and found to comply with the limits
for a Class A digital device, pursuant to Part 15 of the FCC rules.
These limits are designed to provide reasonable protection against
harmful interference when the equipment is operated in a commercial environment. This equipment generates, uses and can radiate
radio frequency energy and, if not installed and used in accordance
with the instruction manual, may cause harmful interference to
radio communications. Operation of this equipment in a residential
area is likely to cause harmful interference, in which case, the user
will be required to correct the interference at their own expense.
Industry Canada Note The term “IC:” before the equipment certification number signifies
that the Industry Canada Technical Specifications were met.
F-35553 (December 2014) 1-1 Introduction
Page 8

HT Access System Operator Manual
Verify Correctness of
Weight and Price
Routinely verify label information. Check the multiplication of
price per pound times weight, and check the scale weight against
printed label weight. Weigh the same package several times to verify outcome consistency. Packages that weigh near the middle of the
0.005 lb. increment will vary up or down by 0.005 lb. Variation
greater than 0.005 lb indicates the need for weigher adjustment. In
such a case, or whenever necessary, contact your local Hobart Representative.
Operator Manual Terminology This manual uses the following terminology for keystrokes and data
manipulation procedures:
• The word TYPE means to touch a series of keys on the Numeric
Keypad or QWERTY Keyboard.
• The word TOUCH means to activate an entry shown on the display screen.
• The word SELECT means to choose one item from a list
brought up on the current screen.
• The word SWIPE means to touch the screen or the area below
the screen and drag in a direction.
The following special instructions are used in the manual:
NOTE: A Note is information that you need to know, but is not an
actual step in the process.
A NOTICE is information to alert you that you may be
doing something that will permanently alter your system.
A WARNING indicates a hazardous situation
which, if not avoided, could result in serious injury or death .
Introduction 1-2 F-35553 (December 2014)
Page 9
HT Access System Operator Manual
Chapter 2: Understanding the System
Understanding the System The HT Access System can store information on thousands of
products. Retail store information required for product handling and
processing, such as PLU number, UPC number, Pricing, Tare, and
Shelf Life can be added. Consumer information describing
products, such as NutriFacts, Safe Handling, Expanded Text, Health
Tips, Meal Planners, Recipes, Cooking Instructions, and
Merchandising Graphics can also be added.
The system should be installed and/or moved only by a
qualified Hobart Service Technician. The system can operate in a
temperature range from 14°F to 104°F (-10°C to 40°C).
Electrical Connections A power cord is provided and connects to the back of the printer.
Electric power of 120 V., 60 Hz., 1 phase (2-wire plus ground) is
required.
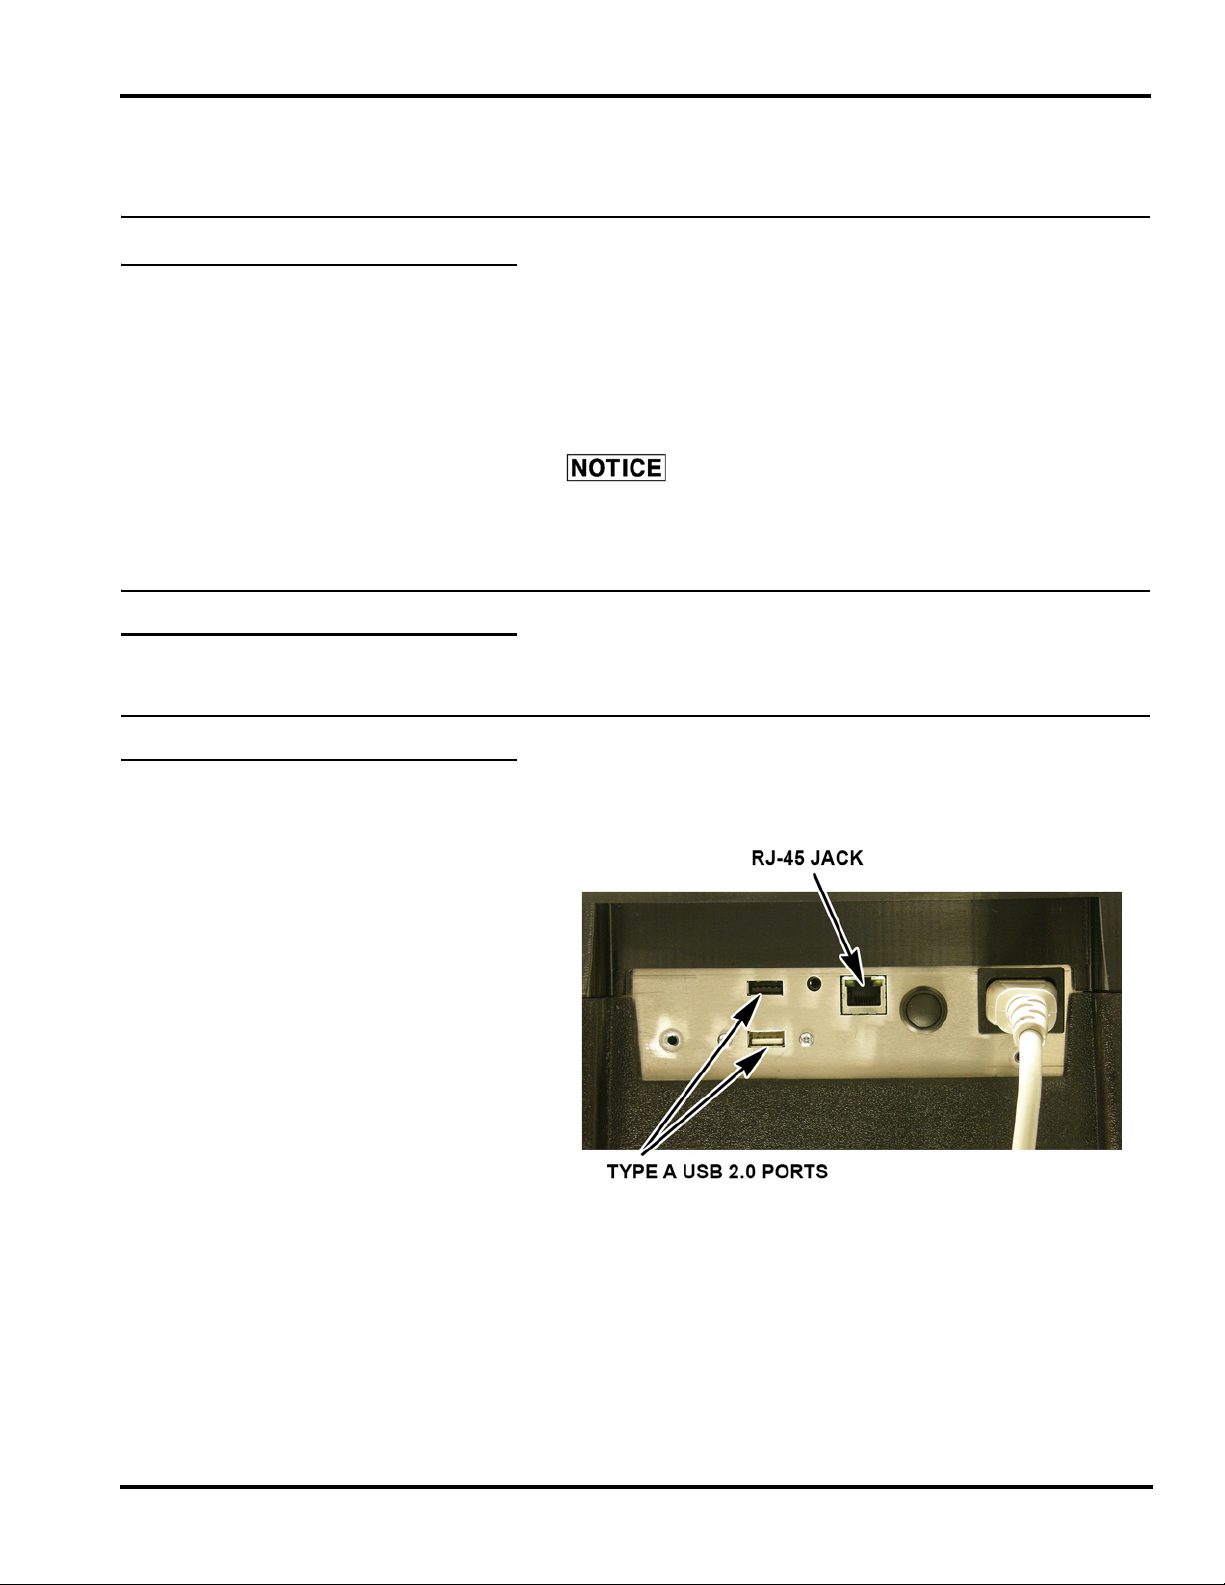
Communication Connections There are several ports that are available.
• Two Type A USB 2.0 Ports
• RJ-45 Jack for an Ethernet Connector (TCP/IP)
F-35553 (December 2014) 2-1 Understanding the System
Page 10
HT Access System Operator Manual
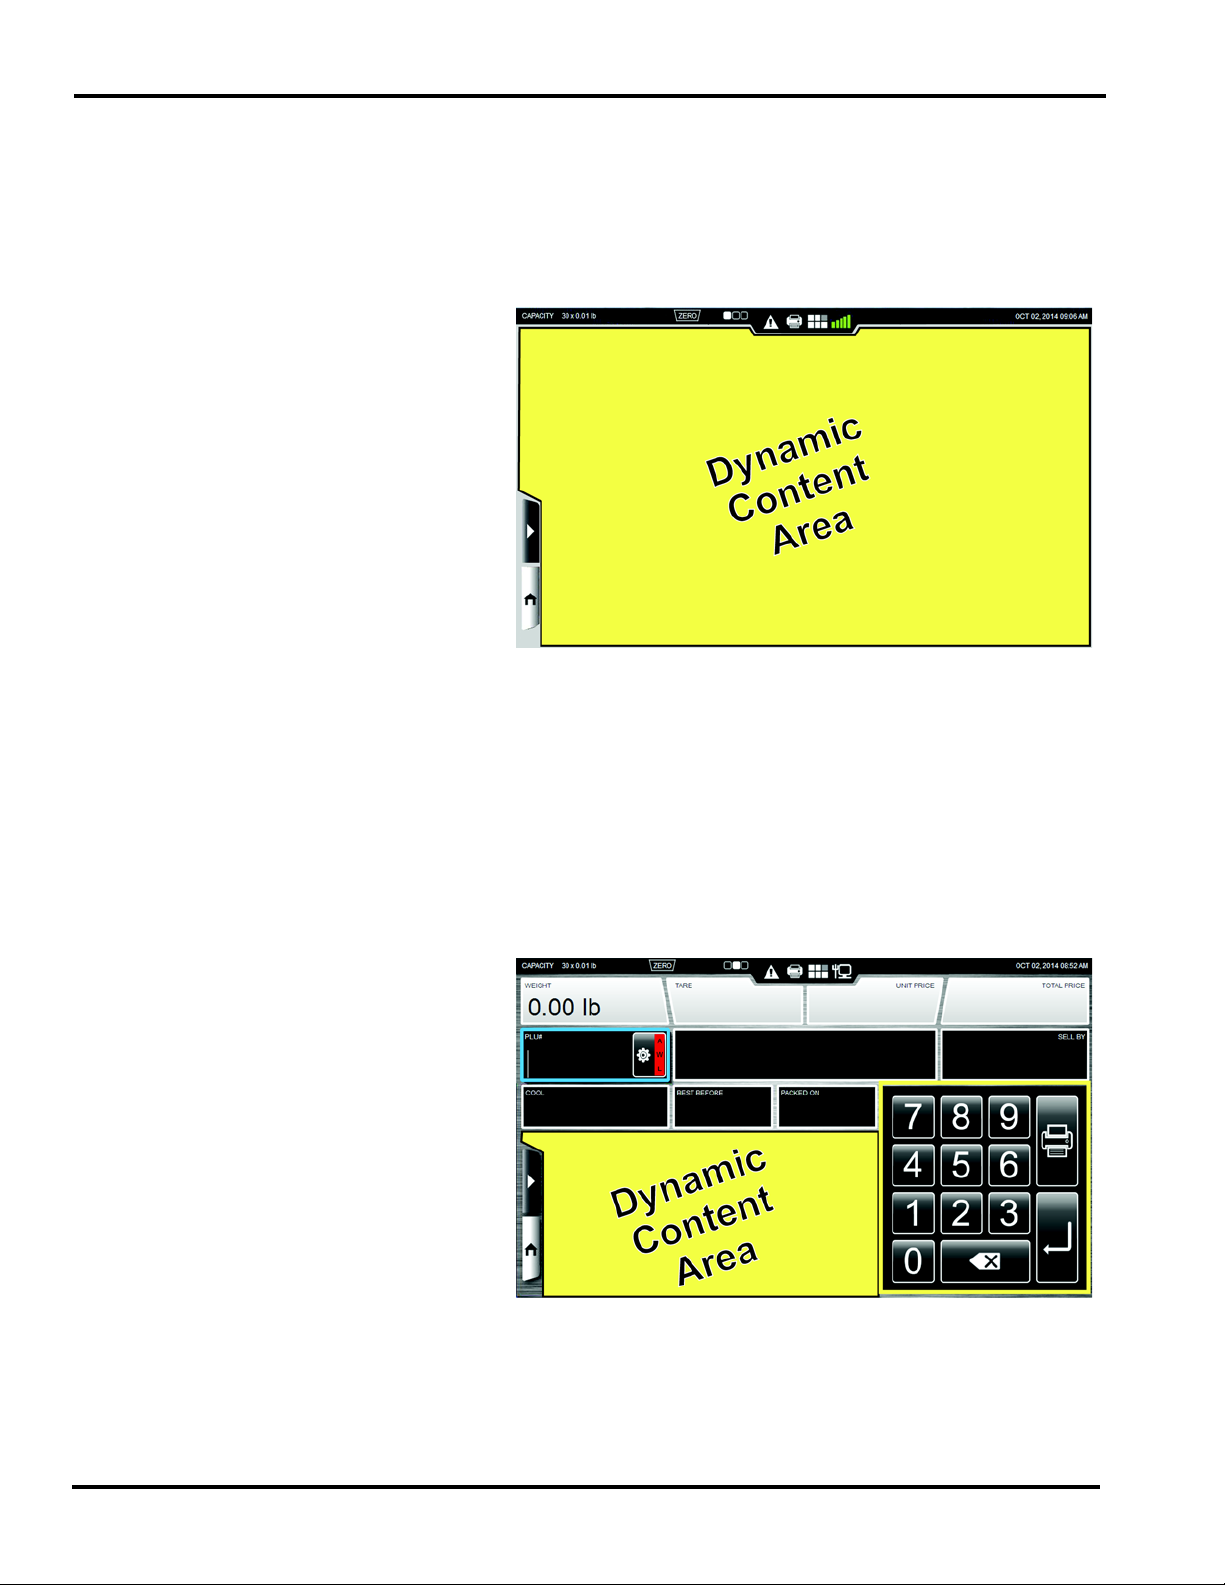
Operator Screens Overview The Operator Screens are touch screens that enable you to enter
information and move through the scale features. There are three
screens as indicated by the Screen View Location icon. TOUCH the
left square of the icon to move to the left or the right square to move
to the right. You can also TOUCH and SWIPE left to right to move
to the left screen or TOUCH and SWIPE right to left to move to the
right screen.
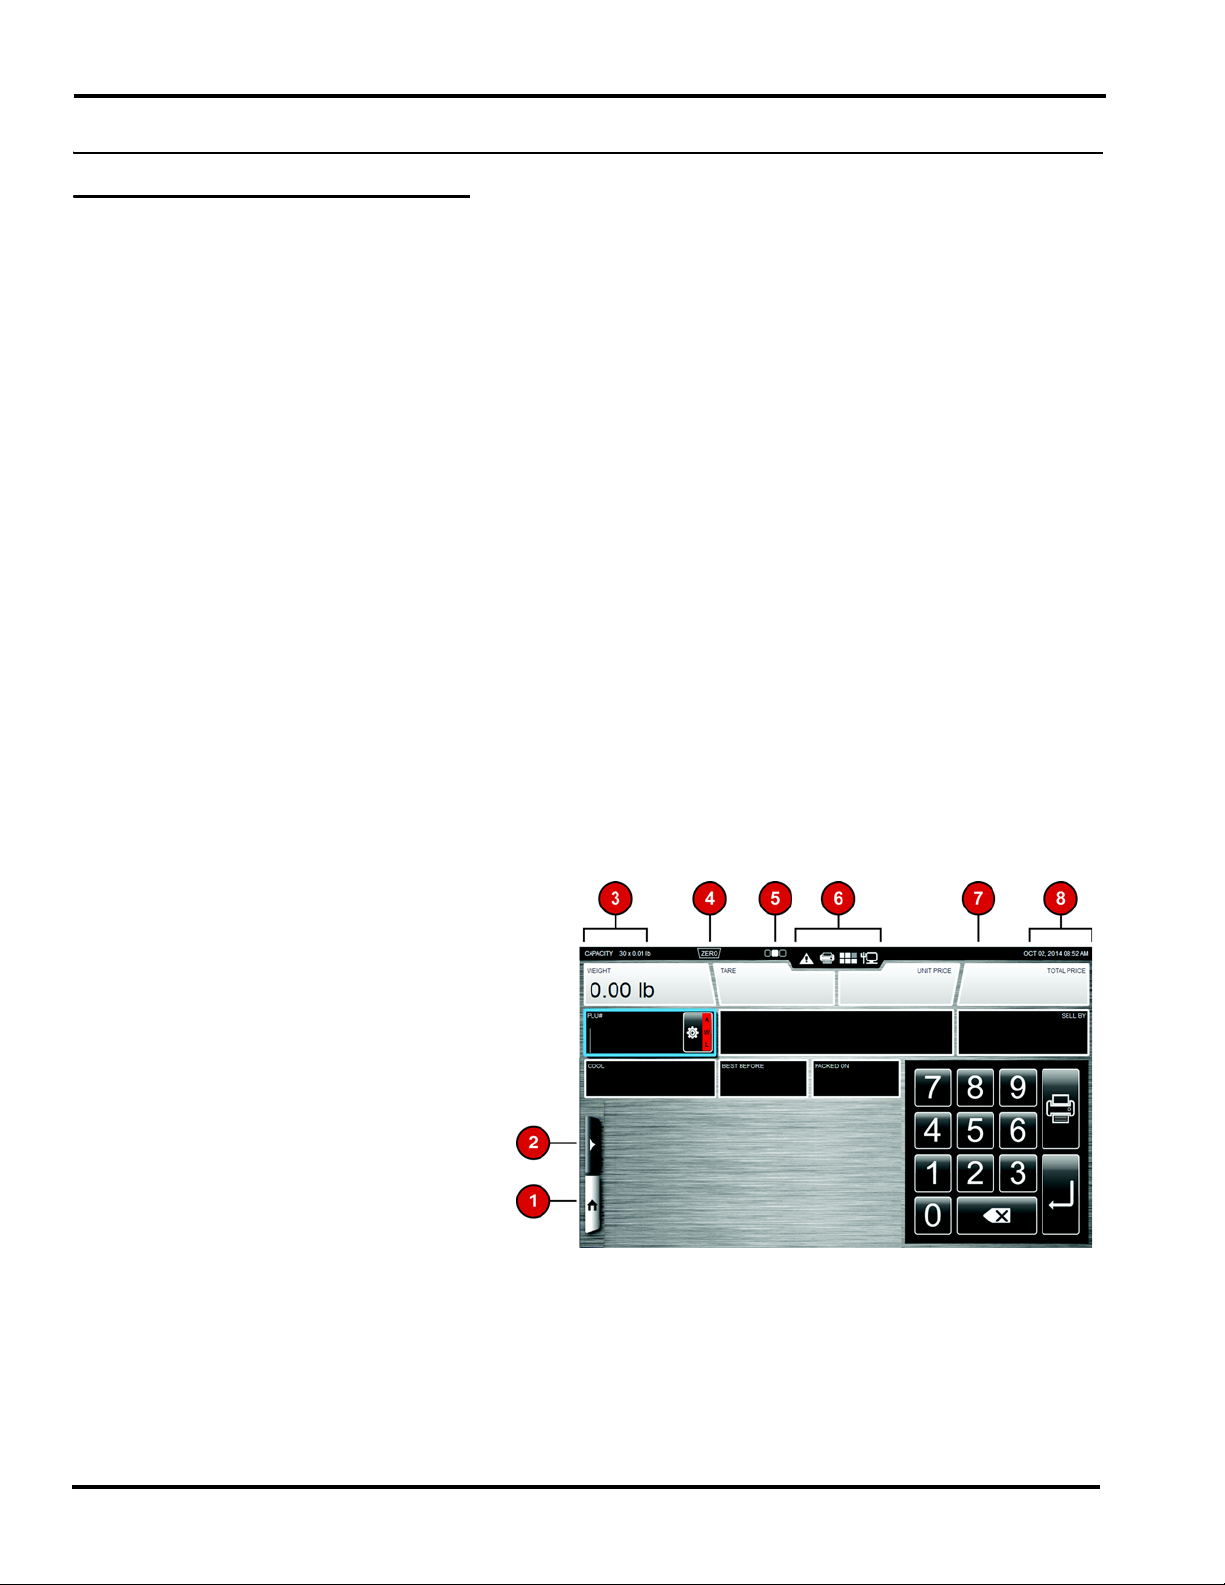
The following items will appear on all three screens in the same
location. See the Fixed Features on the Operator Screen table for
detailed information about each feature. The center screen is shown.
1. Home Icon
2. Menu Icon
3. Capacity Information
4. Zero Indicator
5. Screen View Location
6. Alert Section
7. Operator Name, if operator login required
8. Date and Time
NOTE: The location of the information bar across the top can be
configured to display across the bottom of the screen. The Menu
icon and Home icon can be configured to display on the right side of
the screen.
Understanding the System 2-2 F-35553 (December 2014)
Page 11
HT Access System Operator Manual
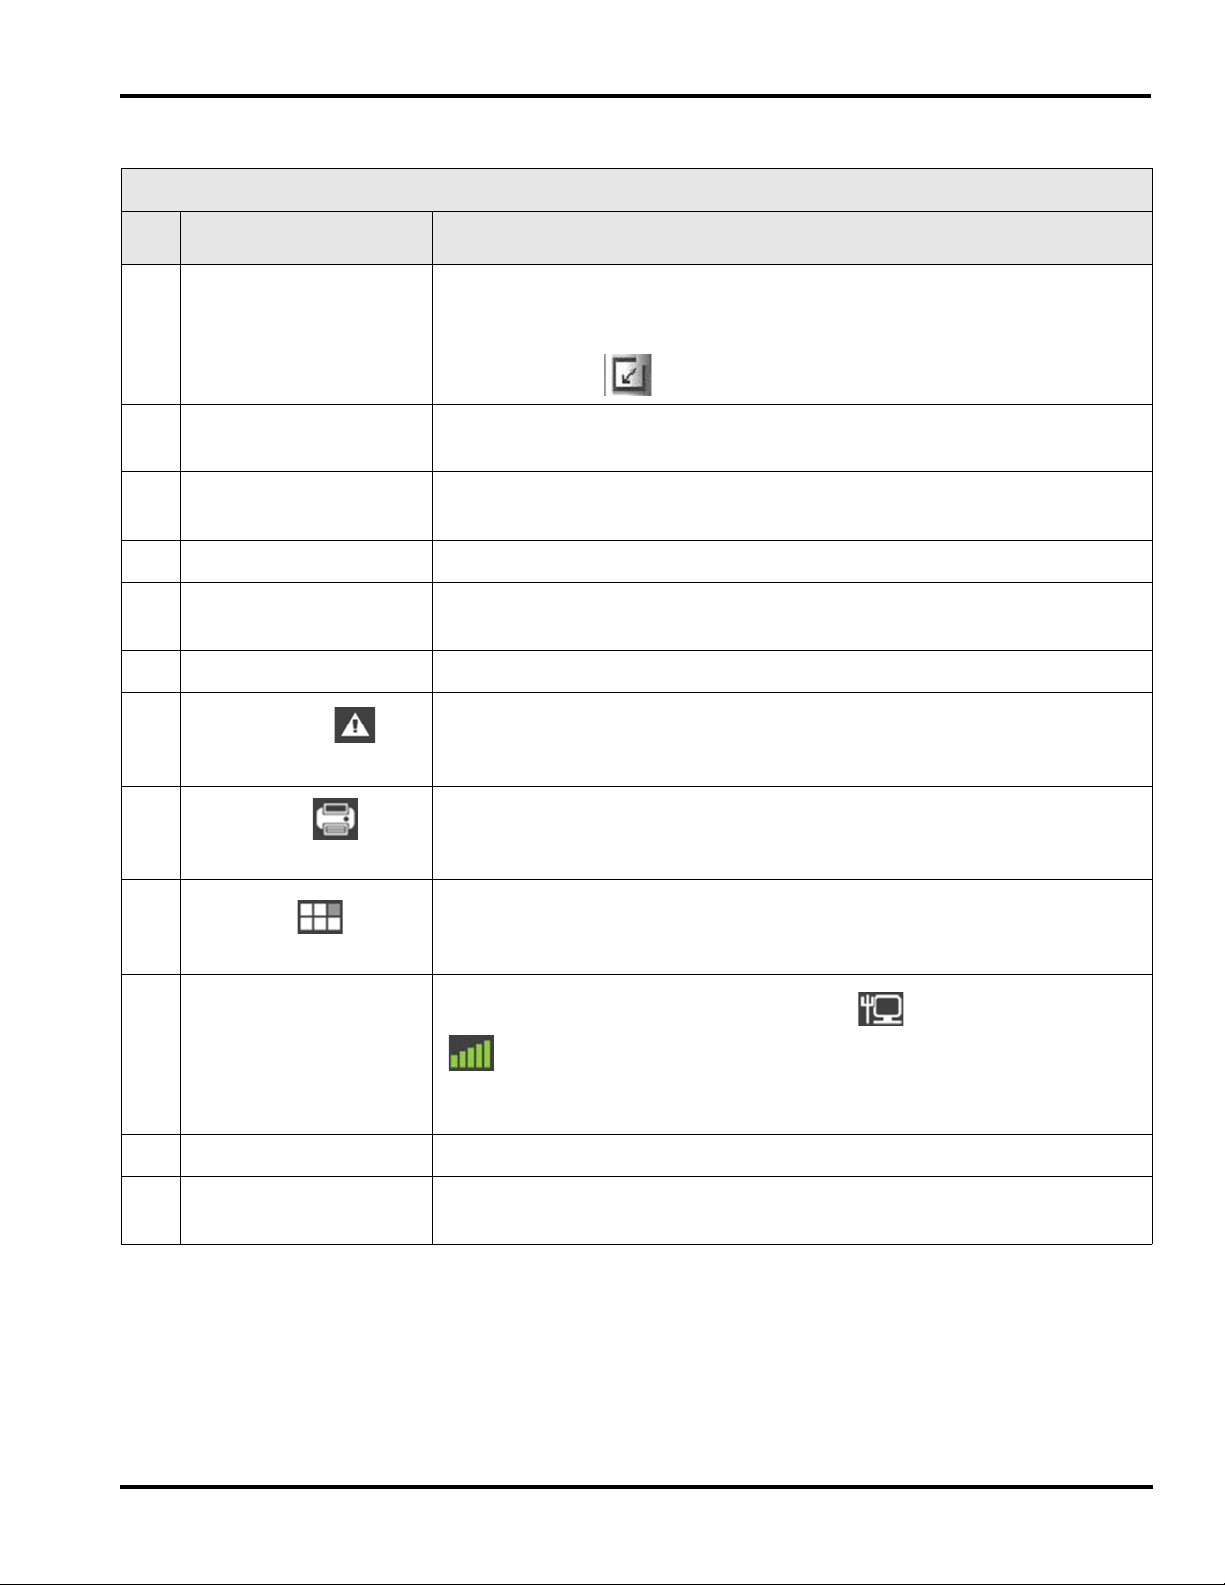
Fixed Features on the Operator Screen
No. Feature Description
1. Home Icon This icon will return you to the main page. The main page can either be the left
or center screen. This is configured in supervisor mode. If the Home Icon has a
small square with an arrow in it, that means that a multimedia file is open.
TOUCH the icon to access the multimedia.
2. Menu Icon This icon is the access point to additional scale features. See Menu Icon Features
for more information.
3. Capacity Information This area shows the scale capacity. Current capacity range is shown within a
trapezoid.
4. Zero Indicator This icon appears when no weight is on the scale and the scale is zeroed.
5. Screen View Location This icon shows which of the three screens is displayed. A solid square indicates
the current screen.
6. Alert Section This section displays four different alerts.
Product Recall
Printer Alert
Planogram
Network Connectivity
7. Operator Name This area shows the operator name, if login is required.
8. Date and Time This area shows the current date and time. This information is provided by the
This icon will flash red when a product recall message is available. TOUCH the
icon to display the message. The icon will remain white when there are no active
recalls.
This icon will flash red when there is a printer issue such as the label cassette is
open or the printer is out of labels. TOUCH the icon to display the message. The
icon will remain white when no message exists.
This icon will flash red when a planogram message is available. TOUCH the
icon to display the message. The icon will remain white after the planogram has
been viewed.
This area will either display a hard wired icon or will show bar strength
for a wireless connection. If connectivity is lost, the background of the
scale application will be red and the icon will be red and flashing. TOUCH to
view network details if enabled.
operating system.
F-35553 (December 2014) 2-3 Understanding the System
Page 12
HT Access System Operator Manual
The left Operator Screen contains the Fixed Features and an area for
dynamic content. The dynamic content area can be configured by
the scale supervisor. See Using the Flashkey Editor for more information about dynamic content areas.
Left Operator Screen
The center Operator Screen contains the Fixed Features, a numeric
keypad if configured, product information, run totals if configured,
Operation Mode settings, and an area for dynamic content. Some
information fields such as COOL, Best Before, and Packed On can
be turned off by the scale supervisor. The dynamic content area and
numerical keypad can be configured by the scale supervisor. See
Using the Flashkey Editor for more information about dynamic
content areas.
Center Operating Screen
Understanding the System 2-4 F-35553 (December 2014)
Page 13
HT Access System Operator Manual
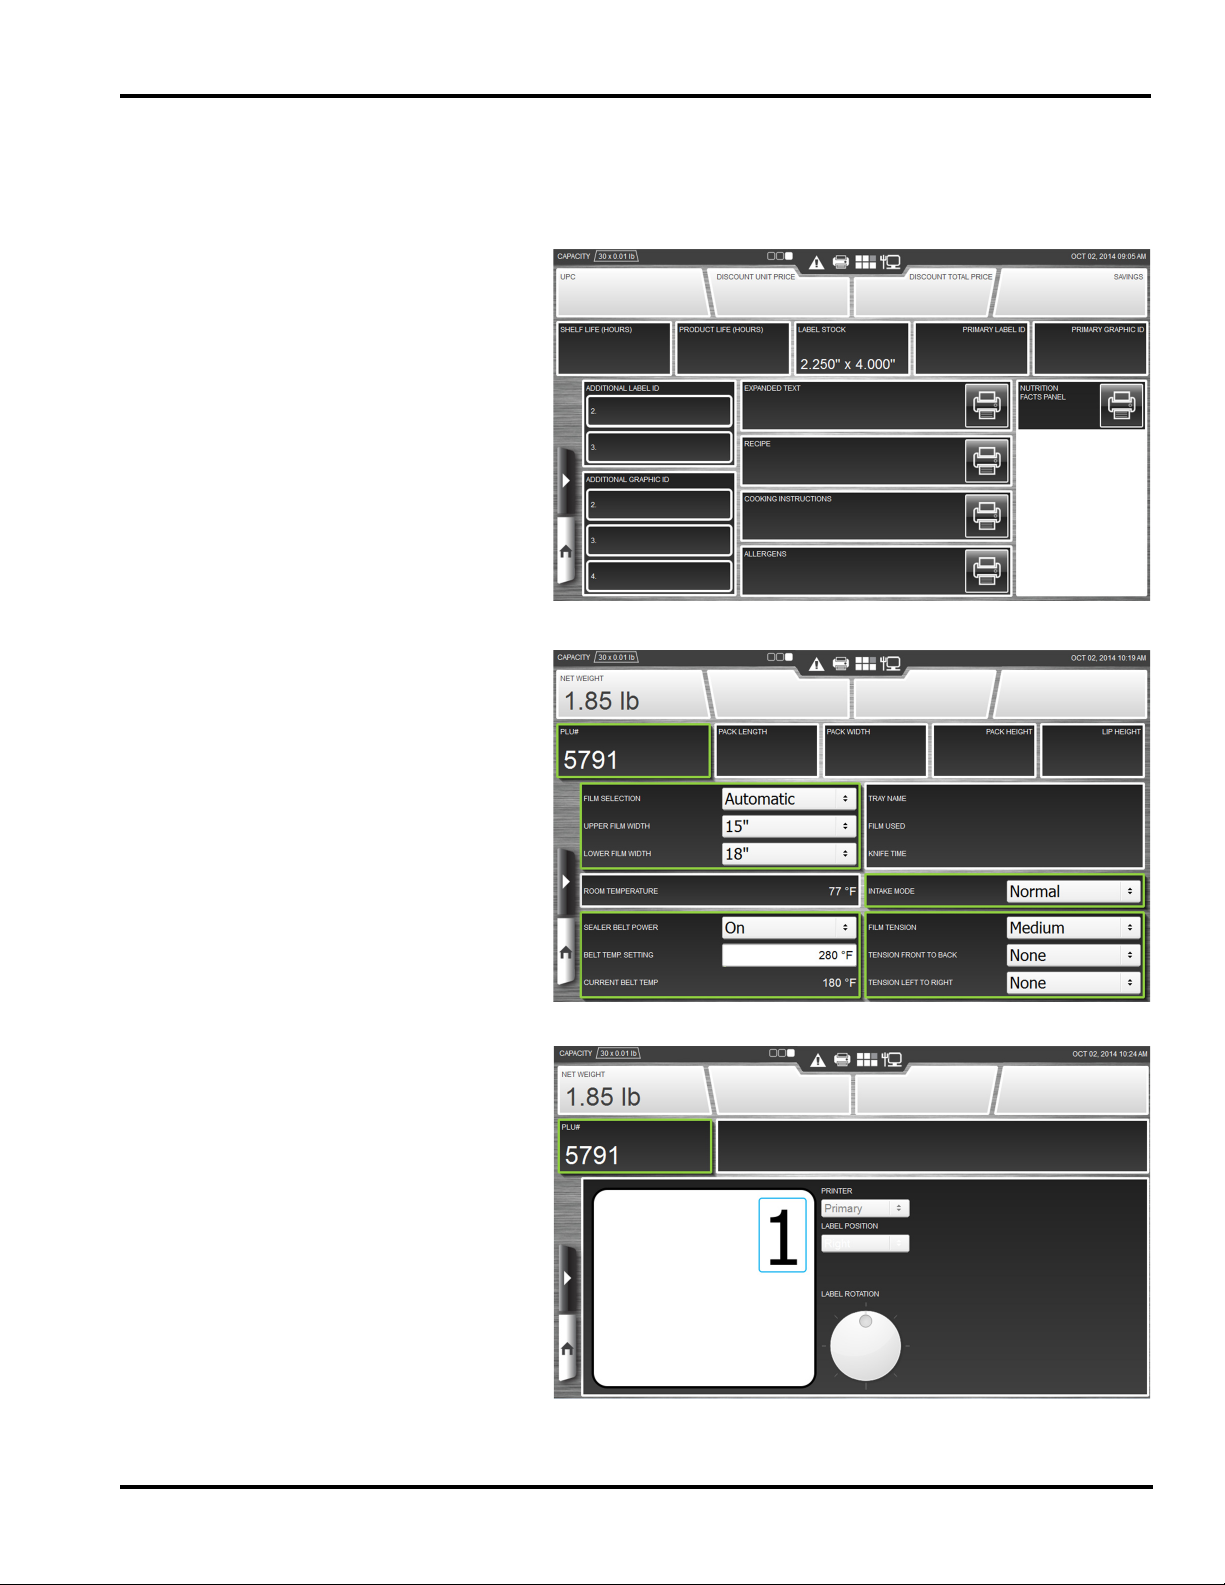
The right Operator Screen can be configured three different ways by
the scale supervisor. Each option will contain the Fixed Features
along with either the wrapper settings, label placement settings, or
product and label information.
Right Operator Screen (with product and label information)
Right Operator Screen (with wrapper settings)
Right Operator Screen (with label placement)
F-35553 (December 2014) 2-5 Understanding the System
Page 14
HT Access System Operator Manual
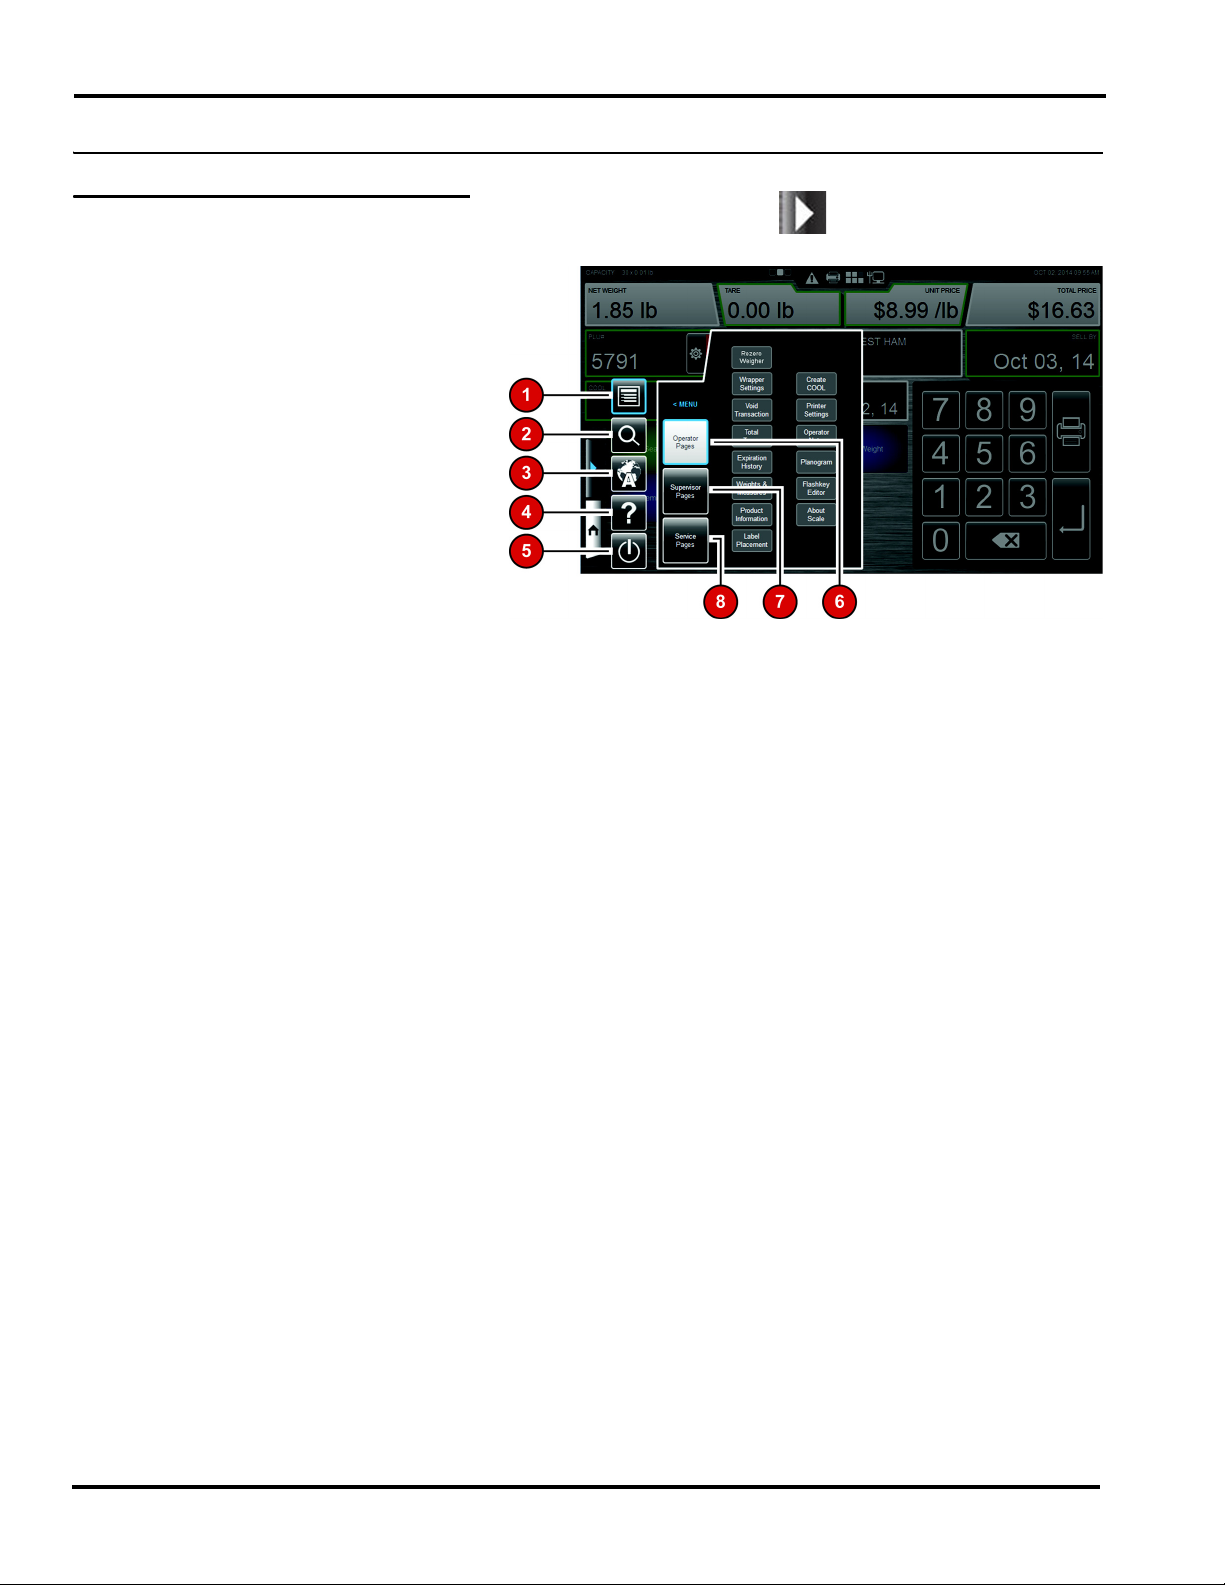
Menu Icon Features The Menu Icon provides the user access to various features of the
scale. TOUCH the Menu Icon . You should now see the
Menu Window.
The following items will appear on the Menu Window. See the
Menu Icon Features table for detailed information about each
feature.
1. Menu
2. Search
3. Language Toggle
4. Help
5. Shutdown Icon
6. Operator Pages
7. Supervisor Pages
8. Service Pages
A blue highlight around the box indicates the feature is selected.
Understanding the System 2-6 F-35553 (December 2014)
Page 15
HT Access System Operator Manual
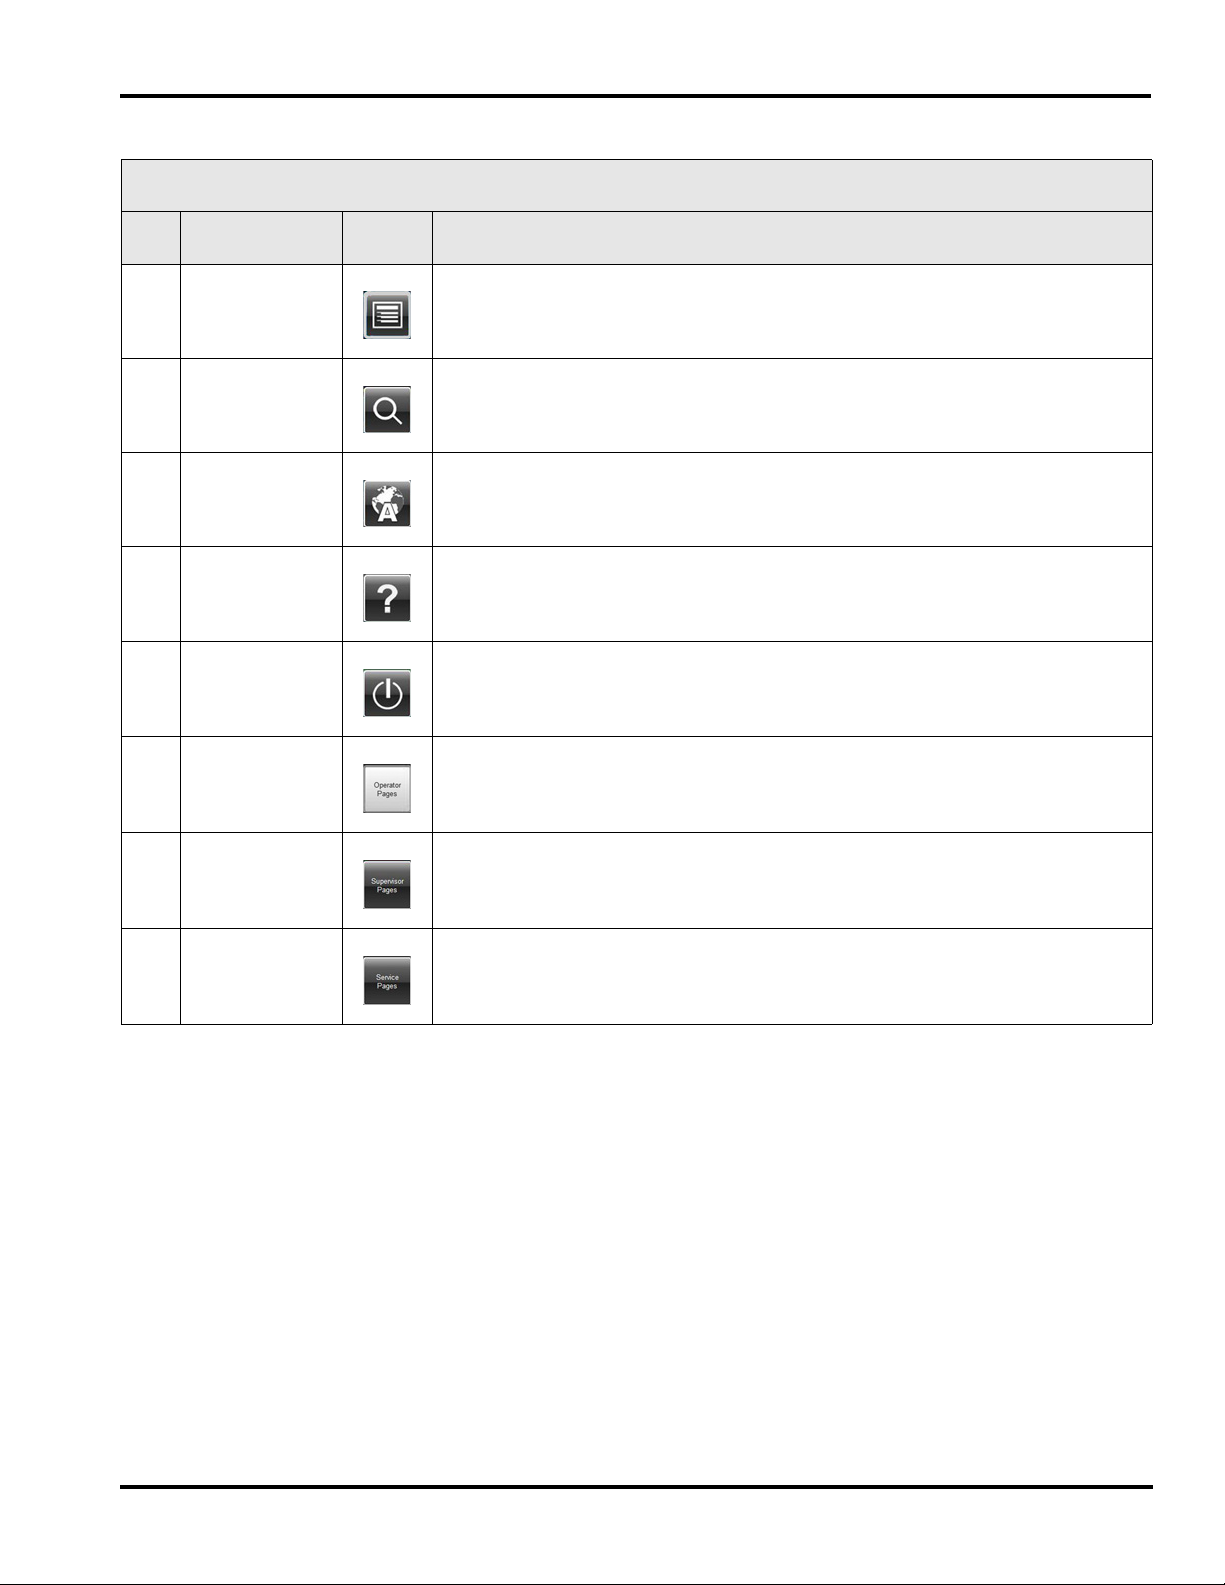
Menu Icon Features
No. Feature Icon Description
1. Menu Default icon to access Operator Pages, Supervisor Pages, or Service Pages.
2. Search TOUCH this icon to search for a PLU by name, number, or key word. See Using
the Search Function for more detailed information.
3. Language
Toggle
TOUCH this icon to toggle between the available languages on the scale. Scales
can be configured to toggle between English/Spanish or English/French. If you
have questions about this feature, contact your local Hobart Representative.
4. Help TOUCH this icon to access the Operator Manual and training videos.
5. Shutdown TOUCH this icon to shutdown or reboot the scale operating system. See Shutting
Down the System for more information.
6. Operator Pages TOUCH this box to access various operator functions.
7. Supervisor
Pages
TOUCH this box to access supervisor level functions. Detailed information
about the Supervisor level functions can be found in the HT Access System
Supervisor Manual.
8. Service Pages This feature is only available to authorized Hobart Service Representatives.
F-35553 (December 2014) 2-7 Understanding the System
Page 16
HT Access System Operator Manual
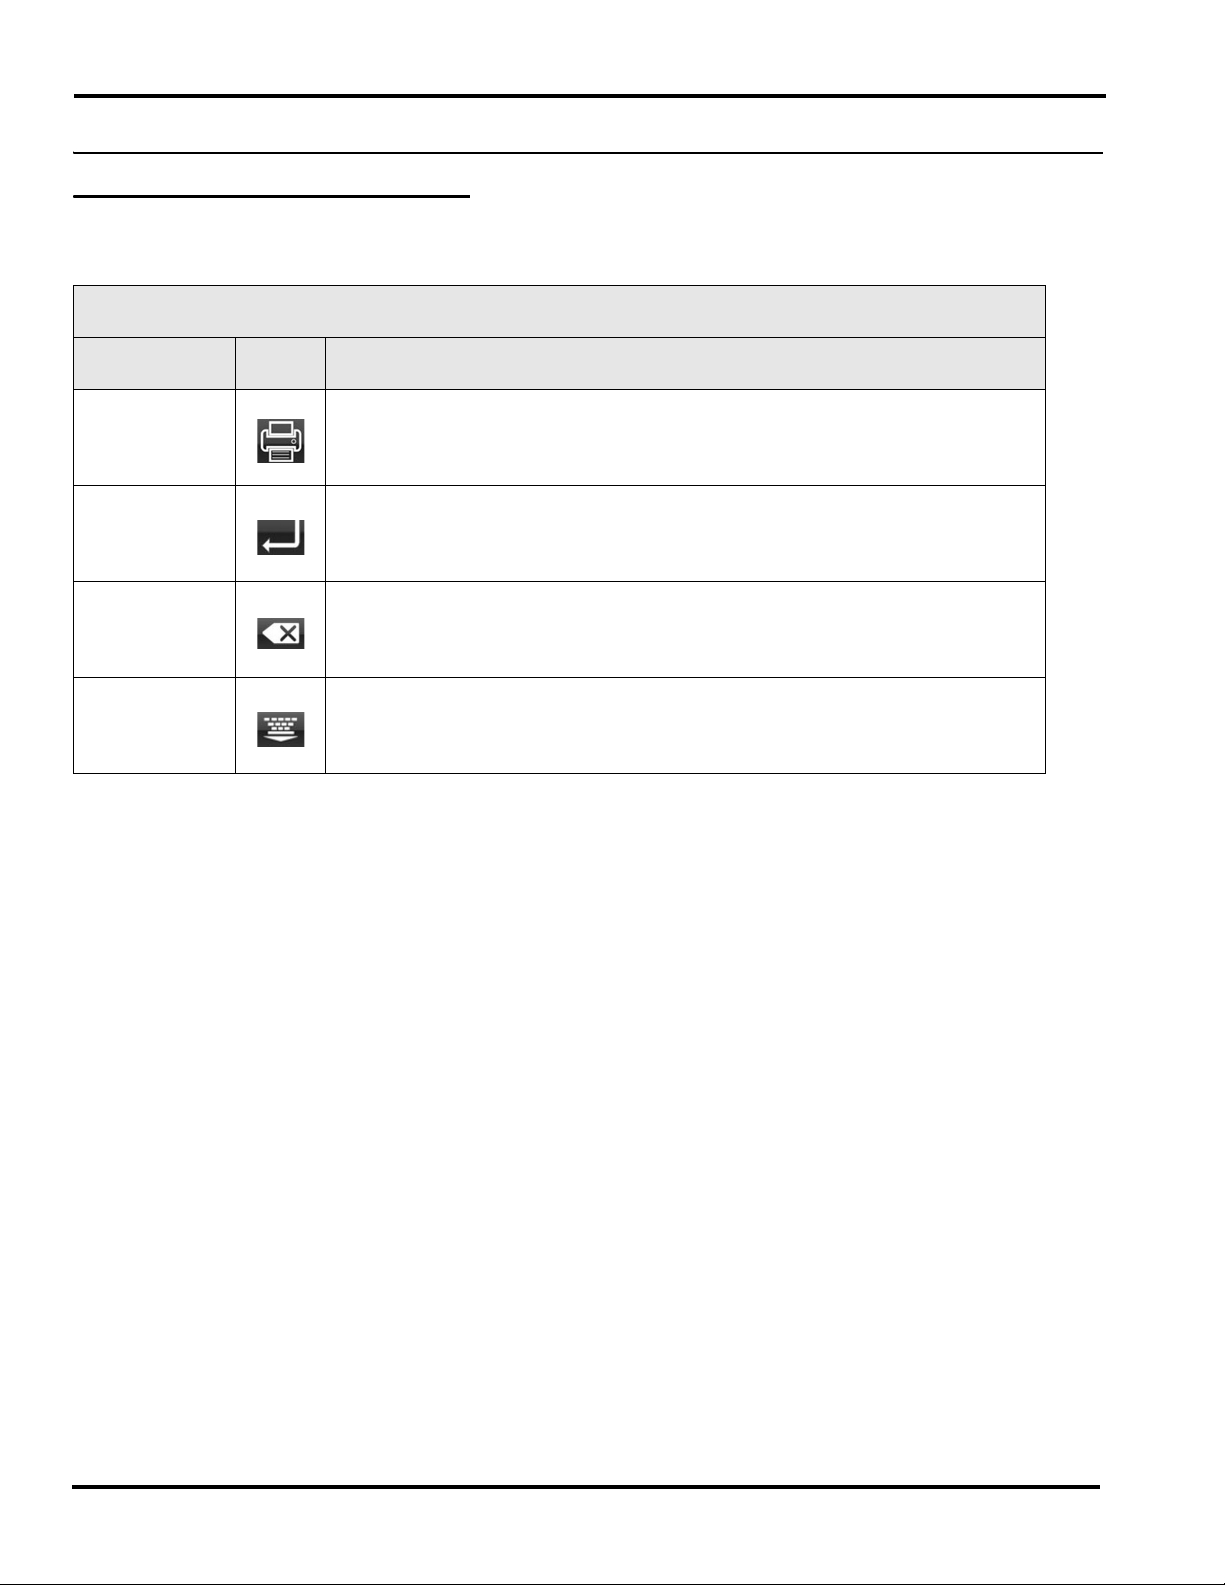
Keypad and Keyboard Icons Use the following chart to identify icons that appear on the keypad
or keyboard. The Keypad is the numerical pad. The Keyboard is the
alpha-numeric pad visible when using the search function.
Menu Icon Features
Feature Icon Description
Print TOUCH this icon to print the label.
Enter TOUCH this icon to accept information.
Delete TOUCH this icon to delete entered information. One touch will delete one
character. If you touch and hold, it will delete all characters.
Keyboard Close TOUCH this icon to close the QWERTY keyboard.
Understanding the System 2-8 F-35553 (December 2014)
Page 17
HT Access System Operator Manual
Chapter 3: Using the HT Access System
Using the HT Access System The instructions for using the HT Access System are detailed in this
chapter.
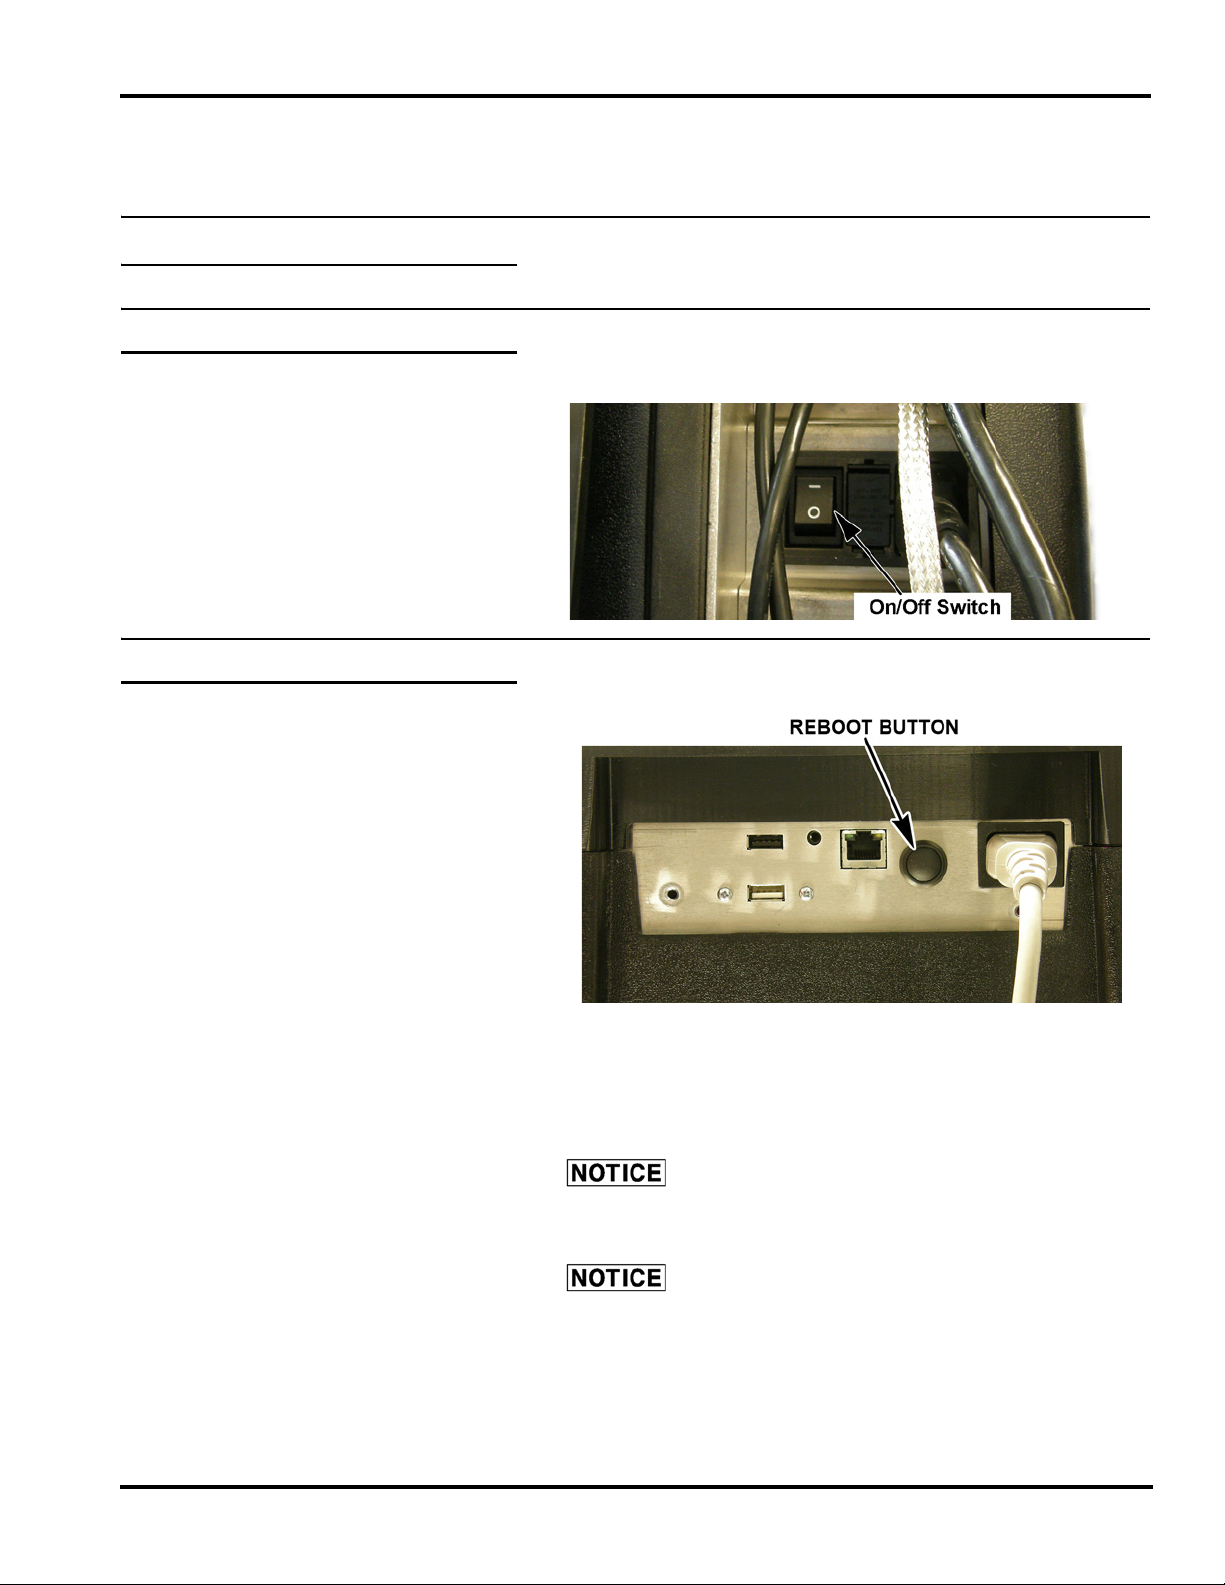
Power Up the System To power up the HT Access System, use the on/off switch located
on the back of the printer.
Reboot Button Located on the bottom of the console is the Reboot Button.
Press and hold the Reboot Button. A screen will appear and say,
“The scale is shutting down.”
In the unlikely event the scale stops responding, use the Reboot
Button to reboot the scale.
Pressing the Reboot Button should only be used when
the scale has stopped responding.
The reboot button on the console shuts down the
operating system only. Power will still be supplied to the console.
Do not remove power from the system by unplugging it. Always
use the on/off switch on the back of the printer to power down the
system.
F-35553 (December 2014) 3-1 Using the HT Access System
Page 18

HT Access System Operator Manual
Logging onto the System The HT Access System may require an operator to login before
printing a label. Not all systems are set up to require an operator to
login.
NOTE: The Operator Login Screen can be configured to show a
popup keypad or a full keyboard.
If required to login
: TYPE the Operator ID and TOUCH OK.
Using the HT Access System 3-2 F-35553 (December 2014)
Page 19

HT Access System Operator Manual
Shutting Down the System The Shutdown feature is designed to stop all internal functions.
Shutdown is required before power can be disconnected from the
system.
To Shutdown the System:
1. TOUCH the Menu Icon .
2. TOUCH the Shutdown Icon .
3. Screen will appear and ask “Are you sure you want to
shutdown?
4. TOUCH OK.
5. When the system is ready to shutdown, a screen will appear
and say, “The scale application is ready to shutdown. Press the
Shutdown button to power down the scale or Reboot to restart.”
TOUCH Shutdown.
DO NOT disconnect power to the system during
shutdown.
6. Wait for the scale system to shutdown (the screen will go
black).
7. Remove power by using the on/off switch on the back of the
printer.
F-35553 (December 2014) 3-3 Using the HT Access System
Page 20

HT Access System Operator Manual
Center Operator Screen The Center Operator Screen displays product information for the
PLU that is entered. The type of data displayed depends upon the
product weigh type of the PLU.
The Center Operator Screen displays the following information, if
applicable:
1. Weight (or will display By Count if PLU is sold by count)
2. Tare
3. Unit Price
4. Total Price
5. PLU Number
6. Description
7. Sell by date
8. Country of Origin Label (COOL) Text & Tracking Number
(optional)
9. Best before date (optional)
10. Packed on date (optional)
11. Operation Mode
NOTE: System configuration may show different options.
Using the HT Access System 3-4 F-35553 (December 2014)
Page 21

HT Access System Operator Manual
Right Operator Screen The Right Operator Screen displays wrapper settings, label
placement, or product and label information for the PLU that is
entered. The type of data displayed depends upon the data loaded
for the PLU. See Modifying the Wrapper Settings or Modifying the
Label Placement for information displayed on those screens.
The Right Operator Screen displays the following information, if
applicable:
1. UPC Number
2. Discount Unit Price
3. Discount Total Price
4. Savings
5. Shelf Life (Hours)
6. Product Life (Hours)
7. Label Stock
8. Primary Label ID
9. Primary Graphic ID
10. Additional Label IDs
11. Additional Graphic IDs
12. Nutrition Facts Panel
13. Expanded Text
14. Recipe
15. Cooking Instructions
16. Allergens
NOTE: System configuration may show different options.
F-35553 (December 2014) 3-5 Using the HT Access System
Page 22

HT Access System Operator Manual
Modifying the Operator Screens The operator can modify certain settings that display on the
Operator Screens once a PLU is entered. Only text fields with a
green highlight around the box can be modified. Text fields with a
blue highlight indicate the field is active and input from the keypad
will modify the contents of the field. Text fields with a white border
cannot be edited and provide information only.
NOTE: Changes made on the Operator Screens, other than certain
COOL information, will be in effect for the current run only. The
scale will revert to the system default settings when a different PLU
is entered.
To change Field values: TOUCH the field and TYPE the change on
the Keypad. TOUCH Enter. The value change will be displayed in
the field. This applies to Unit Price, PLU#, and By Count on the
Center Operator Screen. This applies to Shelf Life (Hours), Product
Life (Hours), Primary Label, and Additional Labels IDs on the
Right Operator Screen.
To change Tare field
: TOUCH the Tare field. TYPE the tare on the
keypad or TOUCH the desired value from the tare grid as shown.
NOTE: The Tare Grid, shown above in the dynamic content area,
is a feature that can be configured by the supervisor or operator.
Using the HT Access System 3-6 F-35553 (December 2014)
Page 23

HT Access System Operator Manual
To change COOL: TOUCH the COOL field. You should now see
the COOL Window.
NOTE: See Using Create COOL for information about modifying
COOL. The setting changes made will be displayed on the Operator
Screens.
SELECT the COOL text from the list available. TOUCH Done.
NOTE: “No COOL Text” means Do Not Print COOL on the label.
NOTE: These fields can only be changed in Operate Mode if you
have the proper allowances.
F-35553 (December 2014) 3-7 Using the HT Access System
Page 24

HT Access System Operator Manual
To change the Sell By date or Best Before date: TOUCH the Sell
By or Best Before field to activate. You should now see the Calendar Window.
The current date will display in blue. Use the arrows next to the
month to change to the next or prior month. Select the date OR
TYPE the number of days on the Keypad. The maximum is 998
days. If you do not want this information to appear on the label,
TOUCH the Do Not Print circle. A black dot will appear in the circle when selected.
NOTE: Adding days to the Sell By field will automatically add
days to the Best Before field in proportion to the days configured
for that PLU.
NOTE: This screen is used to temporarily change the product and
shelf life fields that will be printed on the label. It may be used to
select which fields not to print on the label. These changes are temporary and will be lost when a new product is selected.
Using the HT Access System 3-8 F-35553 (December 2014)
Page 25

HT Access System Operator Manual
To change or add a graphic to the label: TOUCH the Primary
Graphic ID and SELECT a graphic from the list or SELECT None
from the list to remove the graphic. For additional graphics, use the
same process for the Additional Graphic ID fields.
To print additional label information
: Additional information, such
as Expanded Text, Recipes, Allergens, Nutrition Facts Panel, and
Cooking Instructions can be printed on separate labels. TOUCH the
printer icon next to the field to be printed.
NOTE: Changing or adding a graphic to the Label and printing
additional label information can be located on Screen 3 of the scale.
NOTE: Nutrition Facts Panel includes high level information.
Additional information may be included on the label.
F-35553 (December 2014) 3-9 Using the HT Access System
Page 26

HT Access System Operator Manual
Operation Mode The HT Access System can be configured to be used in different
ways according to the needs of your operation. The Operation Mode
feature will allow the system to be set up to operate in manual or
automatic mode.
NOTE: There are different automatic modes available for use with
the HT Access System. If your system is attached to an automatic
wrapper, you will have more functions available.
TOUCH the Operation Mode area.
You should now see the Operation Mode Setup Screen.
Using the HT Access System 3-10 F-35553 (December 2014)
Page 27

HT Access System Operator Manual
To set the system to automatically wrap the product and print and
apply a label: TOUCH the Apply, Wrap, and Label buttons until the
buttons are green. TOUCH anywhere outside the Operation Mode
Setup Screen to exit.
The A, W, & L in the Operation Mode area will change to green and
the PLU# area will be green. A product is placed on the wrapper
scale. The product will run through the wrapper and will be
wrapped. A label will be printed when a stable weight has been
sensed by the scale. The label will be applied to the product as the
product emerges from the wrapper.
To set the system to automatically print a label
: TOUCH the Label
button until the button is green. TOUCH the Apply and Wrap buttons until the buttons are red. TOUCH anywhere outside the Operation Mode Setup Screen to exit.
The L in the Operation Mode area will change to green and the
PLU# area will be black. Place the product on the wrapper scale. A
label will print automatically when a stable weight has been sensed
by the scale. The label will not be applied to the product. Manually
remove the label from the printer and apply to the product.
To set the system to automatically print and apply label (No Wrap)
TOUCH the Apply and Label buttons until the buttons are green.
TOUCH the Wrap button until the button is red. TOUCH anywhere
outside the Operation Mode Setup Screen to exit.
:
The A & L in the Operation Mode area will change to green and the
PLU# area will be yellow. Place the prepackaged product on the
wrapper scale. A label will print automatically when a stable weight
has been sensed by the scale. The product will travel through the
wrapper and the label will be applied. The product will not be
wrapped.
F-35553 (December 2014) 3-11 Using the HT Access System
Page 28

HT Access System Operator Manual
To set the system to automatically wrap only: TOUCH the Wrap
button until the button is green. TOUCH the Apply and Label buttons until the buttons are red. TOUCH anywhere outside the Operation Mode Setup Screen to exit.
The W in the Operation Mode area will change to green and the
PLU# area will be black. A product is placed on the wrapper scale.
The product will run through the wrapper and will be wrapped.
To set the system to manual mode
: TOUCH the Apply, Wrap, and
Label buttons until the buttons are red. TOUCH anywhere outside
the Operation Mode Setup Screen to exit.
The A, W, & L in the Operation Mode area will change to red and
the PLU# area will be black. A product is placed on the wrapper
scale. TOUCH Print to print a label.
Using the HT Access System 3-12 F-35553 (December 2014)
Page 29

HT Access System Operator Manual
Running a Product Running a product is the basic function of the operator. This func-
tion allows the operator to enter the PLU, weigh, wrap, print, and
apply the label.
NOTE: If the PLU number is not known, use the search feature to
find the desired product. See Using the Search Function for more
information.
NOTE: The PLU# is the default field for the keypad.
From the Operator Screen, TOUCH a Flashkey –OR– TYPE the
product number on the Numeric Keypad. You may need to TOUCH
enter to populate the Screen. You should now see the product
information on the Operator Screen.
To run in Manual mode
the Print Icon to print the label.
To run in Automatic mode
See Operation Mode. Place the product on the scale. The automatic
functions will begin when a stable weight has been sensed by the
scale.
F-35553 (December 2014) 3-13 Using the HT Access System
: Place the product on the scale. TOUCH
: Select the automatic setting for this run.
Page 30

HT Access System Operator Manual
Some PLU's may require information to be entered before the run
can start or the print icon can be used. This is called a forced field. It
can be identified by the red field with a blue highlight. Enter the
required information. The example shown requires the Unit Price to
be entered before the product label can be printed.
Using the HT Access System 3-14 F-35553 (December 2014)
Page 31

HT Access System Operator Manual
Using Create COOL From any screen, TOUCH the Menu Icon . TOUCH Create
COOL. You should now see the Create COOL Window.
To create COOL text
: SELECT the appropriate production step
from those listed in the Production Steps box. Repeat this procedure
to SELECT the country from the list in the Countries box in which
the production step was performed. The production step and country selected will be displayed in the COOL Text name box.
TOUCH the Add To Shortlist button to create this COOL option. If
needed, TOUCH the Clear button to delete the COOL text.
To exit this window
: TOUCH anywhere outside of the Create
COOL Window or the Operator Pages box. TOUCHING the Home
button will result in losing the current PLU information.
F-35553 (December 2014) 3-15 Using the HT Access System
Page 32

HT Access System Operator Manual
Modifying the Printer Settings From any screen, TOUCH the Menu Icon . TOUCH Printer
Settings.
You should now see the Printer Settings Window.
To change the Printer Type
Primary, Second, Third, or None.
To change the Print Contrast
SELECT a number from 0-7. TOUCH the Apply Changes & Print
Label button to save changes and print a sample label.
NOTE: Use the lowest contrast level that produces acceptable print
to preserve print head life. A value of 0 is the lightest and 7 is the
darkest.
To change the Horizontal Print Position
buttons to move the print to the left or the right on the label.
TOUCH the Apply Changes & Print Label button to save changes
and print a sample label.
To change the Vertical Print Position
buttons to move the print up or down on the label. TOUCH the
Apply Changes & Print Label button to save changes and print a
sample label.
To exit this window
Window. All changes made will be saved when the window is
exited.
Using the HT Access System 3-16 F-35553 (December 2014)
: TOUCH anywhere outside the Printer Settings
: TOUCH the Printer field and SELECT
: TOUCH the Print Contrast field and
: TOUCH the Left or Right
: TOUCH the Up or Down
Page 33

HT Access System Operator Manual
Viewing Expiration Label History This screen is used to view the Expiration Label History Records.
An Expiration Label can be printed for an opened item (i.e. a deli
meat loaf). This page will show the user the items that have had
expiration labels printed. Additionally, it will show what items have
expired in the past two days and those about to expire.
From any screen, TOUCH the Menu Icon . TOUCH Expira-
tion History. You should now see the Expiration Label History
Window.
Red text Items
: These are products whose shelf life have expired.
The red text makes the items easily identifiable.
Blue text Items
: These are products that have not yet expired, but
have less than 24 hours until they do expire. The blue text make the
items easily identifiable in order for the Operator to select the items
for proactive solutions. This may include discounts and sample platters in order to push the items.
Black text Items
: These are products that have Shelf Life Expira-
tion dates of more than one day.
PLU # Column
: The Product Number of the item that an Operator
has printed a shelf Life Expiration Label.
Expiration Day Column
: The date, in days, when the product
expires.
Time Column:
Description Column
The time of day when the product expires.
: The product description of the item that had a
Shelf Life Expiration Label printed.
To exit this window
: TOUCH anywhere outside of the Expiration
Label History Window.
F-35553 (December 2014) 3-17 Using the HT Access System
Page 34

HT Access System Operator Manual
Selecting Total Types From any screen, TOUCH the Menu Icon . TOUCH Total
Types. You should now see the Total Types Window.
To select a Total Type
Total Type.
To exit this window
Window.
: TOUCH the Total Type field and SELECT a
: TOUCH anywhere outside the Total Types
Voiding a Transaction From any screen, TOUCH the Menu Icon . TOUCH Void
Transaction. You should now see the Void Transaction Window.
To Void a Transaction
(multiple transactions can be selected if desired) and TOUCH the
Void button. ALL the highlighted transactions will be voided. There
will be no further indication on the screen that the transaction has
been completed. Void does not remove the item from the database.
To exit this window
Transaction Window.
Using the HT Access System 3-18 F-35553 (December 2014)
: TOUCH the Transaction to highlight it
: TOUCH anywhere outside the Void
Page 35

HT Access System Operator Manual
Rezero the Weigher Ensure that nothing is on the scale platter. From any screen,
TOUCH the Menu Icon . TOUCH Rezero Weigher.
A message box will appear briefly; no other action is required.
If system message does not automatically dismiss, TOUCH OK to
dismiss message.
F-35553 (December 2014) 3-19 Using the HT Access System
Page 36

HT Access System Operator Manual
Using the Search Function From any screen, TOUCH the Menu Icon . TOUCH the
Search Icon .
You should now see the Search Window. A search can be per-
formed by a product number or by a product description.
To perform a Search by PLU
TYPE the PLU number using the keyboard.
To perform a Search by Description
on the keyboard describing the product. As you enter characters the
search will begin automatically.
TOUCH the scroll bar arrows to the right of the box containing the
product list to scroll up or down and view all of the products listed.
SELECT the desired product on the list. The Operator Screen for
the selected product will be displayed.
To exit this window
Search Window.
Using the HT Access System 3-20 F-35553 (December 2014)
: TOUCH anywhere outside of the keyboard or
: TOUCH the PLU Search check box.
: TYPE the letters or numbers
Page 37

HT Access System Operator Manual
Viewing Product Notes If a product note is available, a Product Note message will appear
when the PLU is entered.
To exit this window
: TOUCH OK.
F-35553 (December 2014) 3-21 Using the HT Access System
Page 38

HT Access System Operator Manual
Viewing Operator Note From any screen, TOUCH the Menu Icon . TOUCH Operator
Note.
You should now see the Operator Note Window. This is only avail-
able if there is a note.
To exit this window
Using the HT Access System 3-22 F-35553 (December 2014)
: TOUCH OK.
Page 39

HT Access System Operator Manual
Viewing Weights & Measures
Information From any screen, TOUCH the Menu Icon . TOUCH Weights
& Measures.
You should now see the Weights & Measures Window.
NOTE: The information on this screen will vary depending on the
peripherals attached. An example screen is shown below.
To exit this window: TOUCH OK.
F-35553 (December 2014) 3-23 Using the HT Access System
Page 40

HT Access System Operator Manual
Viewing About Scale Information From any screen, TOUCH the Menu Icon . TOUCH About
Scale.
You should now see the About Scale Window.
To exit this window
Using the HT Access System 3-24 F-35553 (December 2014)
: TOUCH anywhere outside of the window.
Page 41

HT Access System Operator Manual
Help This scale has an Operator Manual loaded on the scale.
To access the Operator Manual
TOUCH the Help Icon .
You should now see the Operator Manual and the Multimedia icon
will appear on the Home button. Multimedia files are items
such as videos or manuals.
: TOUCH the Menu Icon .
To minimize
should stay on the Home button.
To exit this window
or anywhere outside of the window.
F-35553 (December 2014) 3-25 Using the HT Access System
: TOUCH the Home button. The Multimedia icon
: TOUCH the check mark in upper right corner
Page 42

HT Access System Operator Manual
Using the Flashkey Editor The Flashkey Editor allows the operator to set up quick and easy
access to various scale functions and frequently used PLU's. The
flashkeys will appear in the dynamic content area of the center operator screen. Additional flashkey features can be configured in
supervisor mode.
From any screen, TOUCH the Menu Icon . TOUCH Flashkey
Editor.
Using the HT Access System 3-26 F-35553 (December 2014)
Page 43

HT Access System Operator Manual
You should now be on the Flashkey Editor Screen.
NOTE: TOUCHING a flashkey will cause a description of that
flashkey to populate in the Function Description box.
To add a flashkey
: SELECT a flashkey from the list on the right
and drag the flashkey to the desired location on the grid. TOUCH
the scroll bar arrows to the right of the box containing the flashkeys
to scroll up or down and view all of the flashkeys listed.
To remove a flashkey
: TOUCH, hold, and drag the flashkey to the
trash can.
To change the background color
: TOUCH Change Background
Color on the upper right side of the screen. You should now see a
list of background colors available.
To use the Best Sellers
: TOUCH Use Best Sellers check box in the
upper right of the screen. A check will appear in the check box
when Best Sellers is activated. The scale automatically determines
the best-seller keys based on sales data from that individual scale.
NOTE: The background color for best-seller keys cannot be
changed.
To exit the Flashkey Editor
: TOUCH home icon.
F-35553 (December 2014) 3-27 Using the HT Access System
Page 44

HT Access System Operator Manual
Modifying the Wrapper Settings
From any screen, TOUCH the Menu Icon . TOUCH Wrapper
Settings.
You should now see the Wrapper Settings Screen.
NOTE: Depending on the configuration of the wrapper, there may
be only one film width listed.
To change the Film Width
SELECT either Upper, Lower, or Automatic.
To load Film
button.
To cut the Film
To turn on/off the Sealer Belt Power
Power field and SELECT either On or Off.
To change the Belt Temperature
Setting field. The Numeric Keypad will be displayed. TYPE the
Belt Temperature Setting on the Numeric Keypad. TOUCH Enter.
Using the HT Access System 3-28 F-35553 (December 2014)
: SELECT the film width and TOUCH the Load Film
: TOUCH the Cut Film button.
: TOUCH the Film Selection field and
: TOUCH the Sealer Belt
: TOUCH the Belt Temperature
Page 45

HT Access System Operator Manual
To change the Intake Mode: TOUCH the Intake Mode field and
bring up the Intake Mode drop-down selections, either Normal,
None, or Gentle.
Modifying the Label Placement
To change Film Tension
SELECT either High, Medium, or Low.
To exit the Wrapper Settings
From any screen, TOUCH the Menu Icon . TOUCH Label
Placement.
: TOUCH the Film Tension field and
: TOUCH home icon.
You should now see the Label Placement Screen.
To change the Printer Selected
printer drop-down selections of Primary and Secondary will be displayed. SELECT the printer. The default settings for the selected
printer will be displayed.
: TOUCH the Printer field. The
F-35553 (December 2014) 3-29 Using the HT Access System
Page 46

HT Access System Operator Manual
NOTE: If only a Primary printer is available, the Primary printer
text box will be disabled.
To change the Label Position
: TOUCH the Label Position and
SELECT Right or Left.
To change the Label Rotation
: TOUCH the Label Rotation dial
until the label shown on the screen is in the desired orientation. The
following chart shows the options available.
To exit the Label Placement screen
Using the HT Access System 3-30 F-35553 (December 2014)
: TOUCH home icon.
Page 47

HT Access System Operator Manual
Chapter 4: Maintenance & Cleaning
Removing Labels To remove labels from the printer:
1. Open the printer label access door.
2. Pull the printhead positioning lever toward the printhead to
lower the printhead.
NOTE: The EPP-3 printer does not use the label door release. Pull
on the label door to release.
3. Push and hold in the label door release located on the interior
back wall behind the roller and lower the label door.
F-35553 (December 2014) 4-1 Maintenance & Cleaning
Page 48

HT Access System Operator Manual
4. Remove the take-up spool key.
5. Remove the label backing paper from the take-up spool and the
label roll from the hub.
Maintenance & Cleaning 4-2 F-35553 (December 2014)
Page 49

HT Access System Operator Manual
Loading Labels NOTE: Before loading labels:
•See Cleaning the Printhead.
•See Setting the Label Size Plate.
To load labels in the printer:
1. Remove labels from the first 12 inches of the new label roll.
This will create a leader to attach to the take-up spool.
2. Pull the printhead positioning lever toward the printhead to
lower the printhead.
3. Push and hold in the label door release, located on the interior
back wall behind the roller, and lower the label door.
F-35553 (December 2014) 4-3 Maintenance & Cleaning
Page 50

HT Access System Operator Manual
4. Place the label roll on the hub. The leader feeds from the bottom of the roll in a clockwise direction.
5. Remove the take-up spool key.
6. Wrap the leader under the black label guide, around the roller
and the take-up spool, and insert the take-up spool key. Insert
the short side of the key first and catch the leader under the
long side of the key.
7. Take up the leader slack and align the leader on the spool.
Maintenance & Cleaning 4-4 F-35553 (December 2014)
Page 51

HT Access System Operator Manual
8. Close the label door on the front of the printer.
9. Pull the printhead positioning lever away from the printhead to
raise the printhead into position. The printer will automatically
advance the labels through the printhead setting the labels in
the ready position.
10. Close the printer label access door.
Setting the Label Size Plate To set the label size plate:
1. Lift the label plate and set it in the slots for the size labels being
used.
2. Move the lever on the hub to the slot for the size labels being
used.
NOTE: If you change the label size, make sure to adjust the printer
settings (see Modifying the Printer Settings).
F-35553 (December 2014) 4-5 Maintenance & Cleaning
Page 52

HT Access System Operator Manual
Cleaning the Printhead The printhead of your HT Access System Printer should be cleaned
approximately once each week, or whenever labels are obstructed
due to a residue buildup on the printhead and/or roller. It is a good
idea to clean the printhead roller whenever a new roll of labels is
installed. To obtain a Printhead Cleaning Kit, contact your local
Hobart Representative; request Part Number 00-913096-00001.
Due to shipping restrictions, the 70% Isopropyl Alcohol must now
be purchased locally.
Do not use a metal tool on the printhead. This could
scratch or break the printhead. In addition, monitor the printer to
look for labels stuck on the printer parts. If found, remove these
labels at once following the instructions given below. Cleaning of
the Printer Unit is a customer responsibility and will not be covered
by Hobart Warranty.
To clean the printhead
1. With the label door lowered, the labels removed, and the print-
head in the lowered position, check to see if the printhead is
clean and free of label stock and label adhesive.
2. Use the scraper from the Printhead Cleaning Kit to remove
stuck-on label stock.
:
3. To remove burnt-on adhesive, gently rub the printhead surface
with the eraser from the Printhead Cleaning Kit.
4. Using the cleaner and a swab from the Printhead Cleaning Kit,
scrub the printhead until all of the residue is removed.
5. Clean the roller with the cleaner and swabs.
6. Allow the printhead and roller to dry before loading labels.
Maintenance & Cleaning 4-6 F-35553 (December 2014)
Page 53

HT Access System Operator Manual
Troubleshooting In the event that your HT Access System does not operate as
expected, please reference the following troubleshooting steps
before calling for service.
If you are experiencing problems with the system, the following
scenarios may be of help
Problem Possible Cause Action/Solution
There is no display on the
display unit.
The Operator ID was not
accepted.
Product number was not
found.
System prompts you to take
a label. No label is present.
You may not have power running to the
system.
You may have entered the wrong ID. Verify that you are entering the proper
You may have entered an invalid product number.
A portion of the label may be ‘hidden’
in the label exit.
Verify the following connections:
• Power switch on back of printer
may be turned off.
• Power cord is plugged into a working electrical outlet.
• Power cord is plugged into the
rear of the printer.
• Display unit power cord is plugged
into the printer.
• Display unit power cord is plugged
into the display unit.
• USB cable is plugged into the
printer.
• USB cable is plugged into the
display unit.
ID. If correct, have your supervisor
check the ID number.
Verify the product number.
Make sure that the label exit is clear.
Partial non-printed label is
exposed.
System prints blank labels,
partially printed labels, or
prints across multiple labels.
F-35553 (December 2014) 4-7 Maintenance & Cleaning
The labels may be improperly
threaded.
The labels may be improperly threaded
or the printhead or roller may be dirty.
Verify that labels are properly
threaded.
Check to see that labels are threaded
properly. If the problem persists,
clean the printhead using the Hobart
Printhead Cleaning Kit.
Page 54

HT Access System Operator Manual
Maintenance & Cleaning 4-8 F-35553 (December 2014)
Page 55

Index
HT Access System Operator Manual
C
Center Operator Screen, 3-4
Cleaning the Printhead, 4-6
Communication Connections, 2-1
E
Electrical Connections, 2-1
F
FCC Note, 1-1
Fixed Features on the Operator, 2-3
H
Help, 3-25
HT Access, 1-1
K
Keypad and Keyboard Icons, 2-8
L
Loading Labels, 4-3
Logging onto the System, 3-2
M
Menu Icon Features, 2-6
Modifying the Label Placement, 3-29
Modifying the Operator Screens, 3-6
Modifying the Printer Settings, 3-16
Modifying the Wrapper Settings, 3-28
O
Operation Mode, 3-10
Operator Manual Terminology, 1-2
Operator Screens Overview, 2-2
P
Power Up the System, 3-1
Printhead Cleaning Kit, 4-6
Printhead cleaning kit part number, 4-6
R
Reboot Button, 3-1
Removing Labels, 4-1
Right Operator Screen, 3-5
Running a Product, 3-13
S
Search by Description, 3-20
Search by PLU, 3-20
Select a Total Type, 3-18
Setting the Label Size Plate, 4-5
Shutting Down the System, 3-3
T
Troubleshooting, 4-7
U
Understanding the System, 2-1
Using Create COOL, 3-15
Using the Flashkey Editor, 3-26
Using the HT System, 3-1
V
Verify Correctness of Weight and Price, 1-2
Viewing Operator Note, 3-22
Viewing Product Notes, 3-21
Viewing Weights & Measures Information, 3-23
Void a Transaction, 3-18
F-35553 (December 2014) I-1 Index
Page 56

HT Access System Operator Manual
Printed in U.S.A. I-2 F-35553 (December 2014)
 Loading...