Hobart DX50 Installation Manual

0 (0)

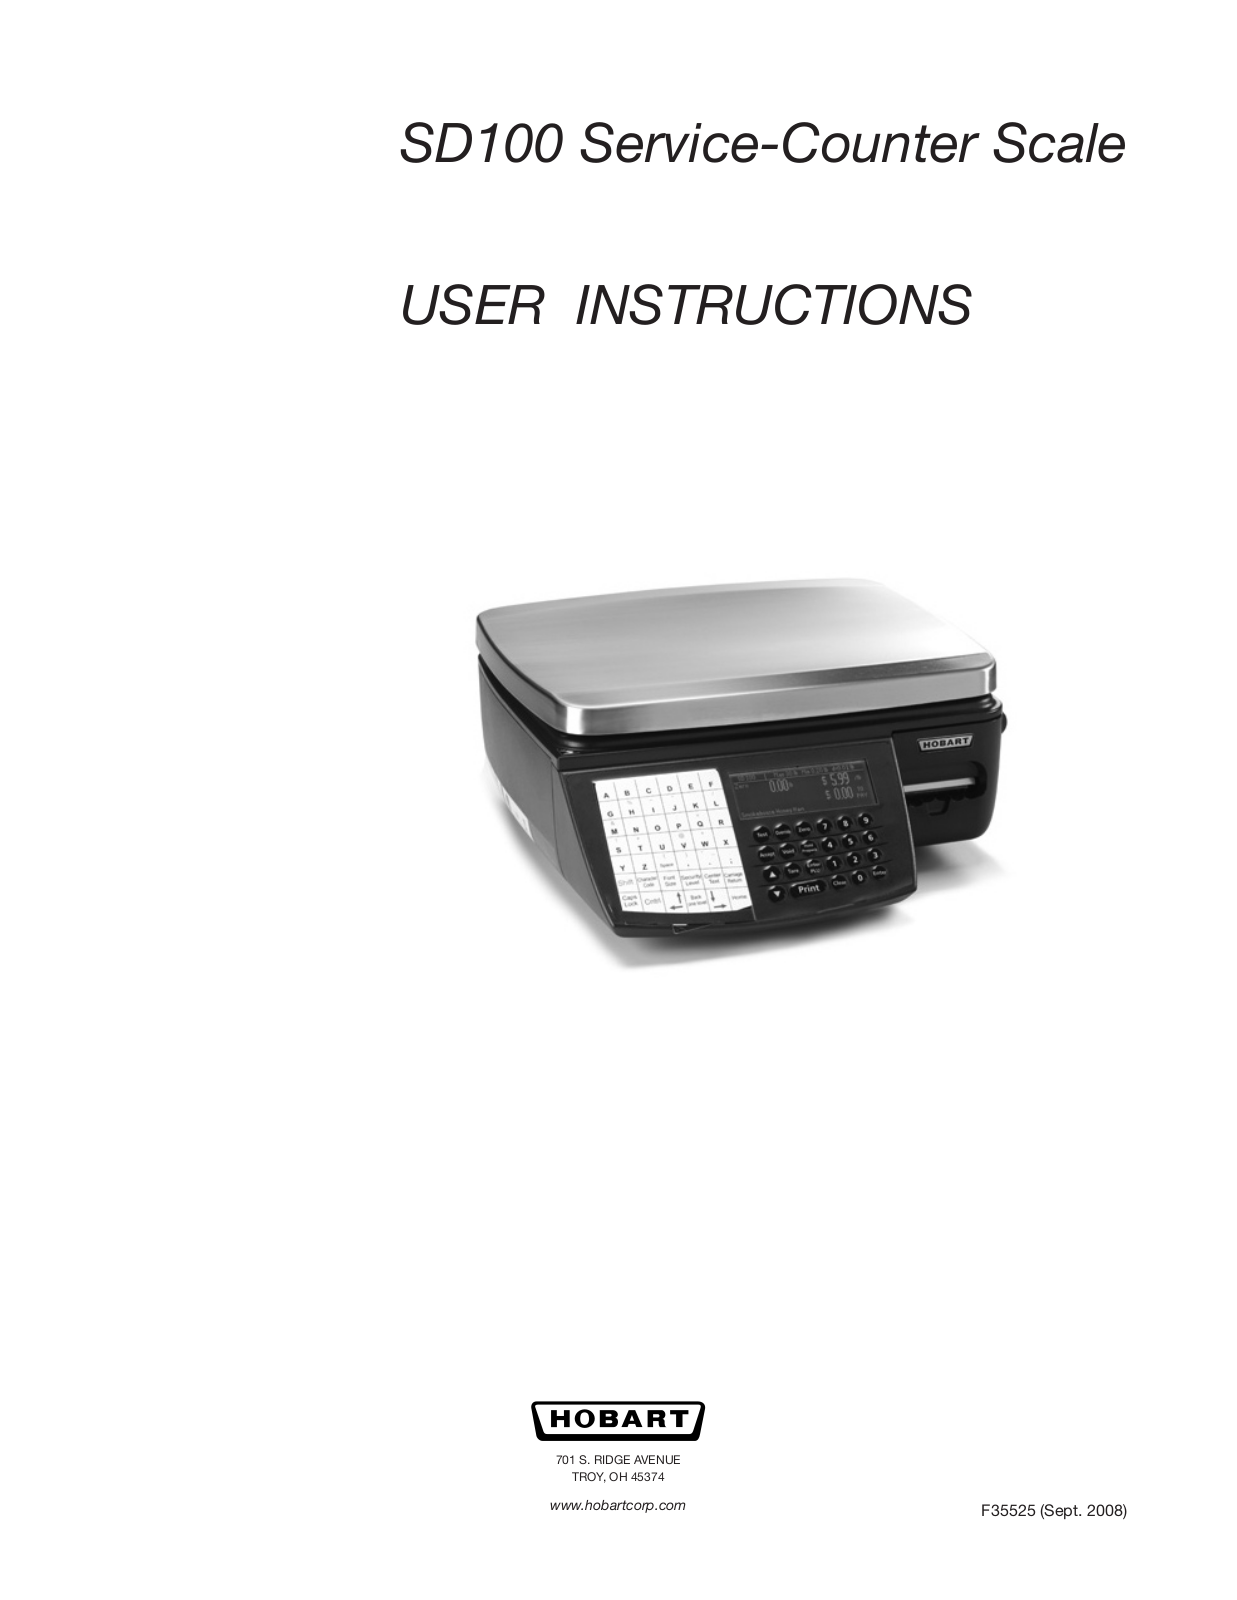
SD100 Service-Counter Scale

User Instructions 

701 S. Ridge Avenue

Troy, OH 45374

www.hobartcorp.com

F35525 (Sept. 2008)


Verify Correctness of Weight and Price

Verification of information on labels should be made routinely. Check the multiplication of price-per-pound times weight and check the indicated weight against printed weight. Weigh the same package several times to verify consistency. Bear in mind that some packages which weigh near the middle of the

.01 lb. increment will normally vary up or down by .01 lb. Greater variations than

.01 lb. indicate a need for adjustment of the system. In such cases, or whenever necessary, call your authorized Hobart service representative.

2

© Hobart, 2008

Table of Contents

General. . . . . . . . . . . . . . . . . . . . . . . . .

.


6

SD100 Service-Counter Scale. . . . . . . . . . . . . . . . .


.

6

Radio Interference. . . . . . . . . . . . . . . . . . . . .


.

6

Label Source. . . . . . . . . . . . . . . . . . . . . . .


.

6

Graphical Symbols. . . . . . . . . . . . . . . . . . . . .


.

6

Installation . . . . . . . . . . . . . . . . . . . . . . .

.


7

Handling / Leveling / Weights & Measures Requirement.


7

Connections / Electrical Connection / Switching On & Off.


7

Speedkeys, Display & Operator Keys / Programming Keys. . . . . . .


.

8

Operator Keys / Speedkeys (PLUs) . . . . . . . . . . . . . . .


.

9

Solving Problems.


10

Printing / Advancing the Printer Roll. . . . . . . . . . . . . . .


11

Printer Roll Dimensions. . . . . . . . . . . . . . . . .

.

12

Changing the Printer Paper or Label Roll. . . . . . . . . . .

.

12

  Rewinding the Backing Paper .


13

Cleaning the Print Head. . . . . . . . . . . . . . . . .

.

14

Programming. . . . . . . . . . . . . . . . . . . . . . .


15

Keyboard Overlay / Revealing the Programming Overlay. . . . . . .

.

15

Entering Manager Mode. . . . . . . . . . . . . . . . . . .


16

Manager Menu System.


17

Create and Edit Text. . . . . . . . . . . . . . . . . . . .

.

18

Setting the Date and Time. . . . . . . . . . . . . . . . . .

.

20

Creating Product Groups.


20

Setting Up the ADD Label. . . . . . . . . . . . . . . . . .

.

20

Creating Messages.


21

Programming Operators. . . . . . . . . . . . . . . . . . .


22

Setting Function Security Levels .


24

Printing Data Reports.


25

SCALE SETUP.


26

Direct Access Speedkeys or Hot Keys.


26

Speedkeys. . . . . . . . . . . . . . . . . . . . . . .

.

27

Printer Setup. . . . . . . . . . . . . . . . . . . . . . .


28

Assigning a Bar Code Format. . . . . . . . . . . . . . . . .


29

Adjusting the Display Brightness.


30

Machine Operating Modes .


30

Setting Alarms. . . . . . . . . . . . . . . . . . . . . .

.

31

3

PROGRAMMING PRODUCTS . . . . . . . . . . . . . . . . .

.

.

32

Customizing the Menus. . . . . . . . . . . . . . . . .

. .


32

Changing Prices. . . . . . . . . . . . . . . . . . . .

.

.

33

Creating and Editing PLUs. . . . . . . . . . . . . . . . .

.

.

33

Deleting PLUs . . . . . . . . . . . . . . . . . . . . .

.

.

38

Copying PLUs. . . . . . . . . . . . . . . . . . . . .

.

.

38

Promotions. . . . . . . . . . . . . . . . . . . . . .

.

.

38

Creating a Nutritional Panel . . . . . . . . . . . . . . . .

.

.

40

SERVING CUSTOMERS.


41

Basic Operations .


41

  Logging On / Off.


41

Operator PIN.


41

Changing Your PIN . . . . . . . . . . . . . . . . .

. .


41

Security Level. . . . . . . . . . . . . . . . . . .

. .


41

Printing Labels.


42

  Advancing the Printer Roll .


42

Printing a Label. . . . . . . . . . . . . . . . . . .

.

.

42

Label Streaming. . . . . . . . . . . . . . . . . . .

.

.

42

Price Override . . . . . . . . . . . . . . . . . . . . .

.

.

42

Using PLUs.


43

Promotional PLUs. . . . . . . . . . . . . . . . . . .

. .


44

Price Override . . . . . . . . . . . . . . . . . . . . .

.

.

44

Using Tares .


45

Using the Hold Prepack Key. . . . . . . . . . . . . . . .

.

.

47

Prepack OperationS. . . . . . . . . . . . . . . . . . .

.

.

48

Setting the Scale to Prepack .


48

Using PLUs.


49

Using Tares .


50

Multiple Labels. . . . . . . . . . . . . . . . . . . . .

.

.

53

Bar Codes.


54

Bar Code Types . . . . . . . . . . . . . . . . . . . .

.

.

55

Bar Code Formats. . . . . . . . . . . . . . . . . . .

. .


56

Bar Code Scanning.


59

Creating a Bar Code Reference. . . . . . . . . . . . . . .

.

.

60

4

PRODUCT TRACEABILITY — COOL. . . . .

. .

. . . . . .

. .

. .

61

Using Traceability.


61

Traceability Schemes.


62

Printing the Information . . . . . . . .

. .

. . . . . .

. .

.

63

Programming Traceability Codes.


64

Setting Up the Scale. . . . . . . . .

. .

. . . . . .

. .

. .

64

Table of Substitution Codes. . . . . . .

. .

. . . . . .

. .

.

66

REPORTS. . . . . . . . . . . . . . .

. .

. . . . . .

. .

.

68

Configuring Reports / Totals Reports . . .

. .

. . . . . .

. .

. .

68

COMMUNICATIONS.


71

Setting Up a Network . . . . . . . . .

. .

. . . . . .

. .

.

71

Operating Mode / Auto Configure. . . . .

. .

. . . . . .

. .

.

72

Setting Scale ID / Network Map. . . . .

. .

. . . . . .

. .

. .

73

Backup Server. . . . . . . . . . .

. .

. . . . . .

. .

. .

74

Dealing With Network Faults. . . . . . .

. .

. . . . . .

. .

.

75

Local Mode.


76

Network Dump / Machine Setup Dump. . .

. .

. . . . . .

. .

.

77

Advanced Setup. . . . . . . . . . .

. .

. . . . . .

. .

.

78

Data BaCKUP . . . . . . . . . . . . .

. .

. . . . . .

. .

.

80

Dumping or Loading Data. . . . . . .

. .

. . . . . .

. .

. .

80

HELP . . . . . . . . . . . . . . . .

. .

. . . . . .

. .

.

82

Setup Mode . . . . . . . . . . . .

. .

. . . . . .

. .

.

82

Error Messages . . . . . . . . . . .

. .

. . . . . .

. .

.

83

If Things Go Wrong.


85

APPENDIX.


86

Substitution Codes .


86

Dewey Substitution Codes .


87

Using Dewey Substitution Codes. . . . .

. .

. . . . . .

. .

.

92

Nutrient Facts . . . . . . . . . . .

. .

. . . . . .

. .

. .

93

List of Countries. . . . . . . . . . .

. .

. . . . . .

. .

.

96

PRELOADED DATA FILES & LABEL FORMATS.


98

Preloaded Data Files. . . . . . . . .

. .

. . . . . .

. .

. .

98

Preloaded Label Formats.


99

5

GENERAL

SD100 Service-Counter Scale

Radio Interference

This scale is a class A device. In a domestic environment, this device may cause radio interference in which case the user may be required to take adequate preventive measures.

Label Source

To order labels, please call 1-800-695-0036 and speak with an ITW label representative.

Graphical Symbols

Become familiar with the graphical symbols used in the documentation.

Scale

Switch scale On.

Switch scale Off.


Press


Container

Scale is beeping

Weighed items

Non-weighed item with By Count items


Manufacturer’s


Bar Code

Put in container

Number keys

7

8

9

Alpha or character keys


C


4

5

6


À

Ä C


1

2

3

Å

Á

BÆ

Í


0


%


g

A


G


Function keys

Speed keys

Flashing character

Hold


E

Zero Tare Prepack Clear


Bubble level indicator

Call service


technician.


6

Installation

Handling

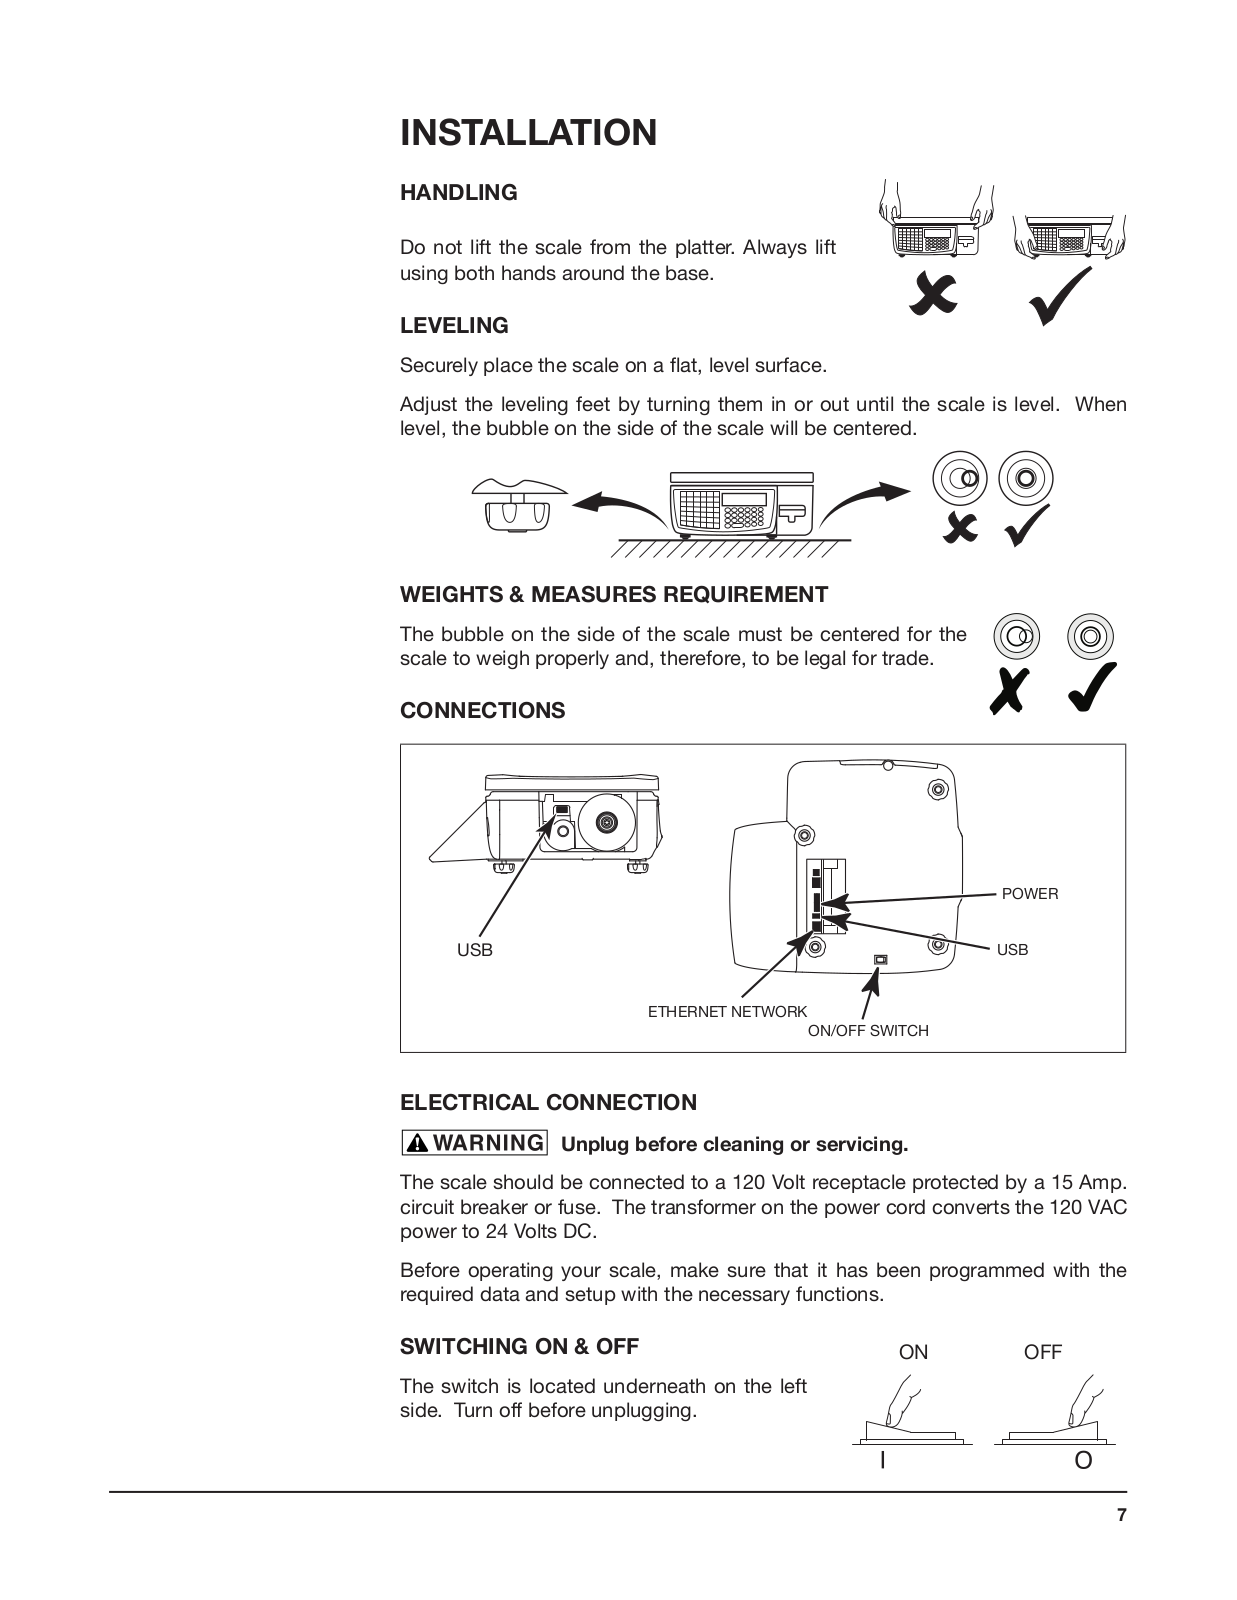
Do not lift the scale from the platter. Always lift using both hands around the base.

Leveling

Securely place the scale on a flat, level surface.

Adjust the leveling feet by turning them in or out until the scale is level. When level, the bubble on the side of the scale will be centered.

Weights & Measures Requirement

The bubble on the side of the scale must be centered for the


scale to weigh properly and, therefore, to be legal for trade.


Connections

POWER

USB

USB

ETHERnET nETWORK

On/OFF SWITCH

Electrical Connection

Unplug before cleaning or servicing.

The scale should be connected to a 120 Volt receptacle protected by a 15 Amp. circuit breaker or fuse. The transformer on the power cord converts the 120 VAC power to 24 Volts DC.

Before operating your scale, make sure that it has been programmed with the required data and setup with the necessary functions.

Switching On & Off

    ON

  OFF

The switch is located underneath on the left side. Turn off before unplugging.

7

Speed Keys

Display & Operator Keys


Test Override Zero

Hold

Accept Void Prepack

Enter

Tare PLU

Enter

Print Clear

Programming Keys

8

Operator Keys

Zero

Tare

Hold

Prepack

Clear

Print

Enter

Enter

PLU

Override

Accept

Test

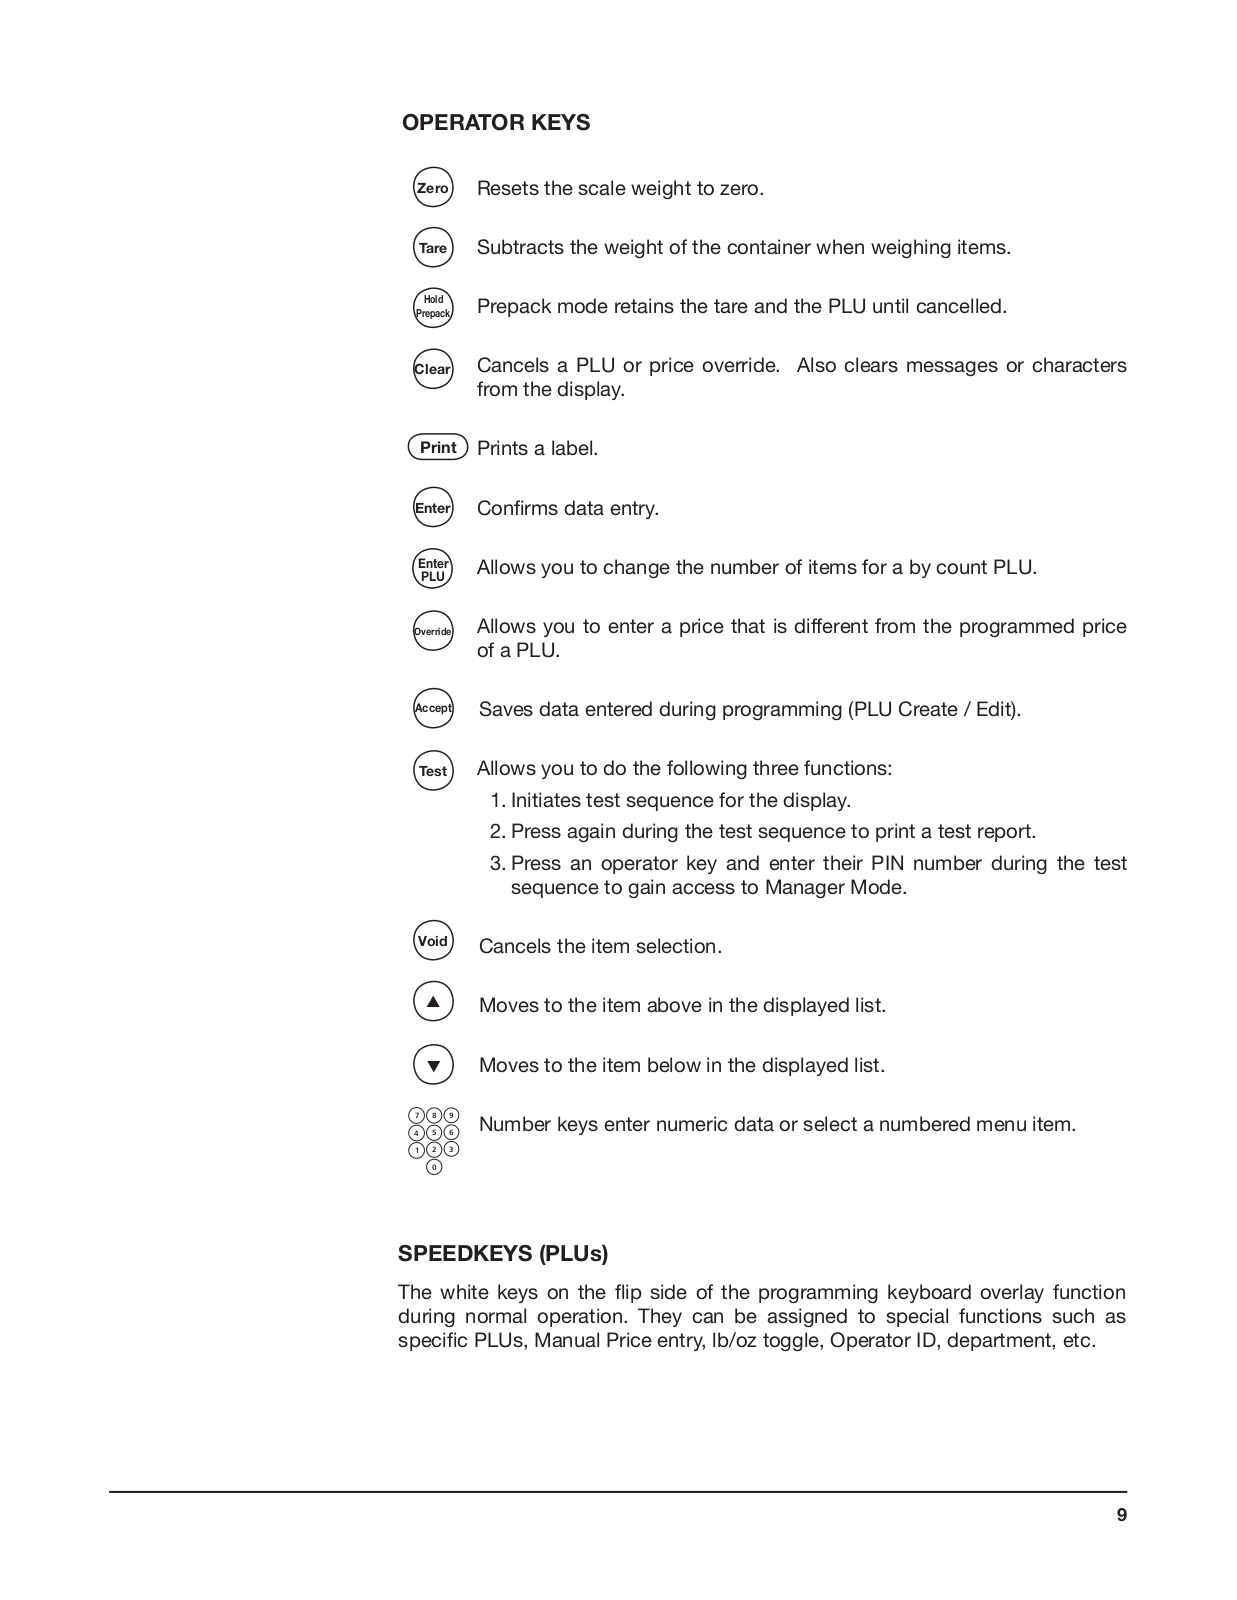
Resets the scale weight to zero.

Subtracts the weight of the container when weighing items.

Prepack mode retains the tare and the PLU until cancelled.

Cancels a PLU or price override. Also clears messages or characters from the display.

Prints a label.

Confirms data entry.

Allows you to change the number of items for a by count PLU.

Allows you to enter a price that is different from the programmed price of a PLU.

Saves data entered during programming (PLU Create / Edit). Allows you to do the following three functions:

1.Initiates test sequence for the display.

2.Press again during the test sequence to print a test report.

3.Press an operator key and enter their PIN number during the test sequence to gain access to Manager Mode.

Void Cancels the item selection.

σMoves to the item above in the displayed list.

σ

7 8 9

4 5 6

1 2 3

0

Moves to the item below in the displayed list.

Number keys enter numeric data or select a numbered menu item.

Speedkeys (PLUs)

The white keys on the flip side of the programming keyboard overlay function during normal operation. They can be assigned to special functions such as specific PLUs, Manual Price entry, lb/oz toggle, Operator ID, department, etc.

9

Solving Problems

If your do not see the correct display, check the following: Remove any product and rezero.

Make sure there is no debris on the platter.

Check the bubble level indicator to make sure it is centered.

Make sure there is no vibration at the scale.

n

Act on any error message displayed — refer to pages 83 - 84.

If the scale beeps continuously, contact your local Hobart service technician.

10

Printing

SD scales are supplied with a label printer. The printer will accept label or continuous paper rolls that have either one of two core diameters.

The printer is fitted with a small hub to take continuous paper or label rolls with the small core diameter.

A sleeve is provided to slip over the small hub for use with continuous paper or label rolls having the larger core diameter.

Check that the correct size of hub is installed before loading the continuous paper or label roll. Change the printer hub if necessary.

Before you use your scale you should check that the appropriate type of printer roll is loaded and adjust the label width guide if you load a printer roll of a different width.

Note: The printer automatically adjusts to accommodate labels having different lengths.

Should labels become stuck in the printer, under no circumstances use a metal object to clear the blockage.

Do not use sharp or metal objects to remove accumulated debris.

The use of non-approved printer rolls may reduce the life of the print head and invalidate your warranty.

Approved labels and paper rolls are available from a number of suppliers, whose addresses can be obtained from your Hobart sales/service office. Refer to Label Source, page 6.

If ‘Out of Paper’ displays, the label or printer roll is depleted. Replace roll when needed.

If ‘Label Feed Error’ displays, labels are jamming in the printer. Clear jam and refeed paper roll through the printhead.

Advancing the Printer Roll

• To advance the paper roll, or print a blank label, press Print when either ‘Enter PLU’ or ‘Prepack’ is displayed and both unit price and total price are zero.

11

Printer Roll Dimensions

These dimensions are approximate and for guidance only. Refer to the appropriate Thermal Label/Receipt Material Specifications for further information.

Paper roll

Thermal, 50 - 60mm wide


Labels

Standard width


59mm standard


49mm standard


38mm optional


Height 40mm to 160mm


Roll diameter

120mm maximum


Cleaning

Daily, using specified kit.


To order labels or speak with an ITW label representative, refer to Label Source on page 6.

Changing the Printer Paper or Label Roll

Note: To rewind the backing paper, follow the instructions on the next page.

j

k Release print head catch.

m

nFeed paper over rewind spindle, under guide bar and beneath paper guide.

Paper guide

Paper width guide

oClose print head.

12

Hobart DX50 Installation Manual

Rewinding the Backing Paper

j

k Release print head catch.

Tear paper then remove core and backing paper.

mTurn knob on rewind spindle to position 2 and remove backing paper from rewind spindle.

position 1

position 2

n

o


pFeed paper over rewind spindle, under guide bar and beneath paper guide.

Paper guide

Paper width guide

Rewind spindle

qTurn knob on rewind spindle to position 2 and feed backing paper through outer slots.


position 2

r Close print head

s

To order labels or speak with an ITW label representative, refer to Label Source on page 6.

13

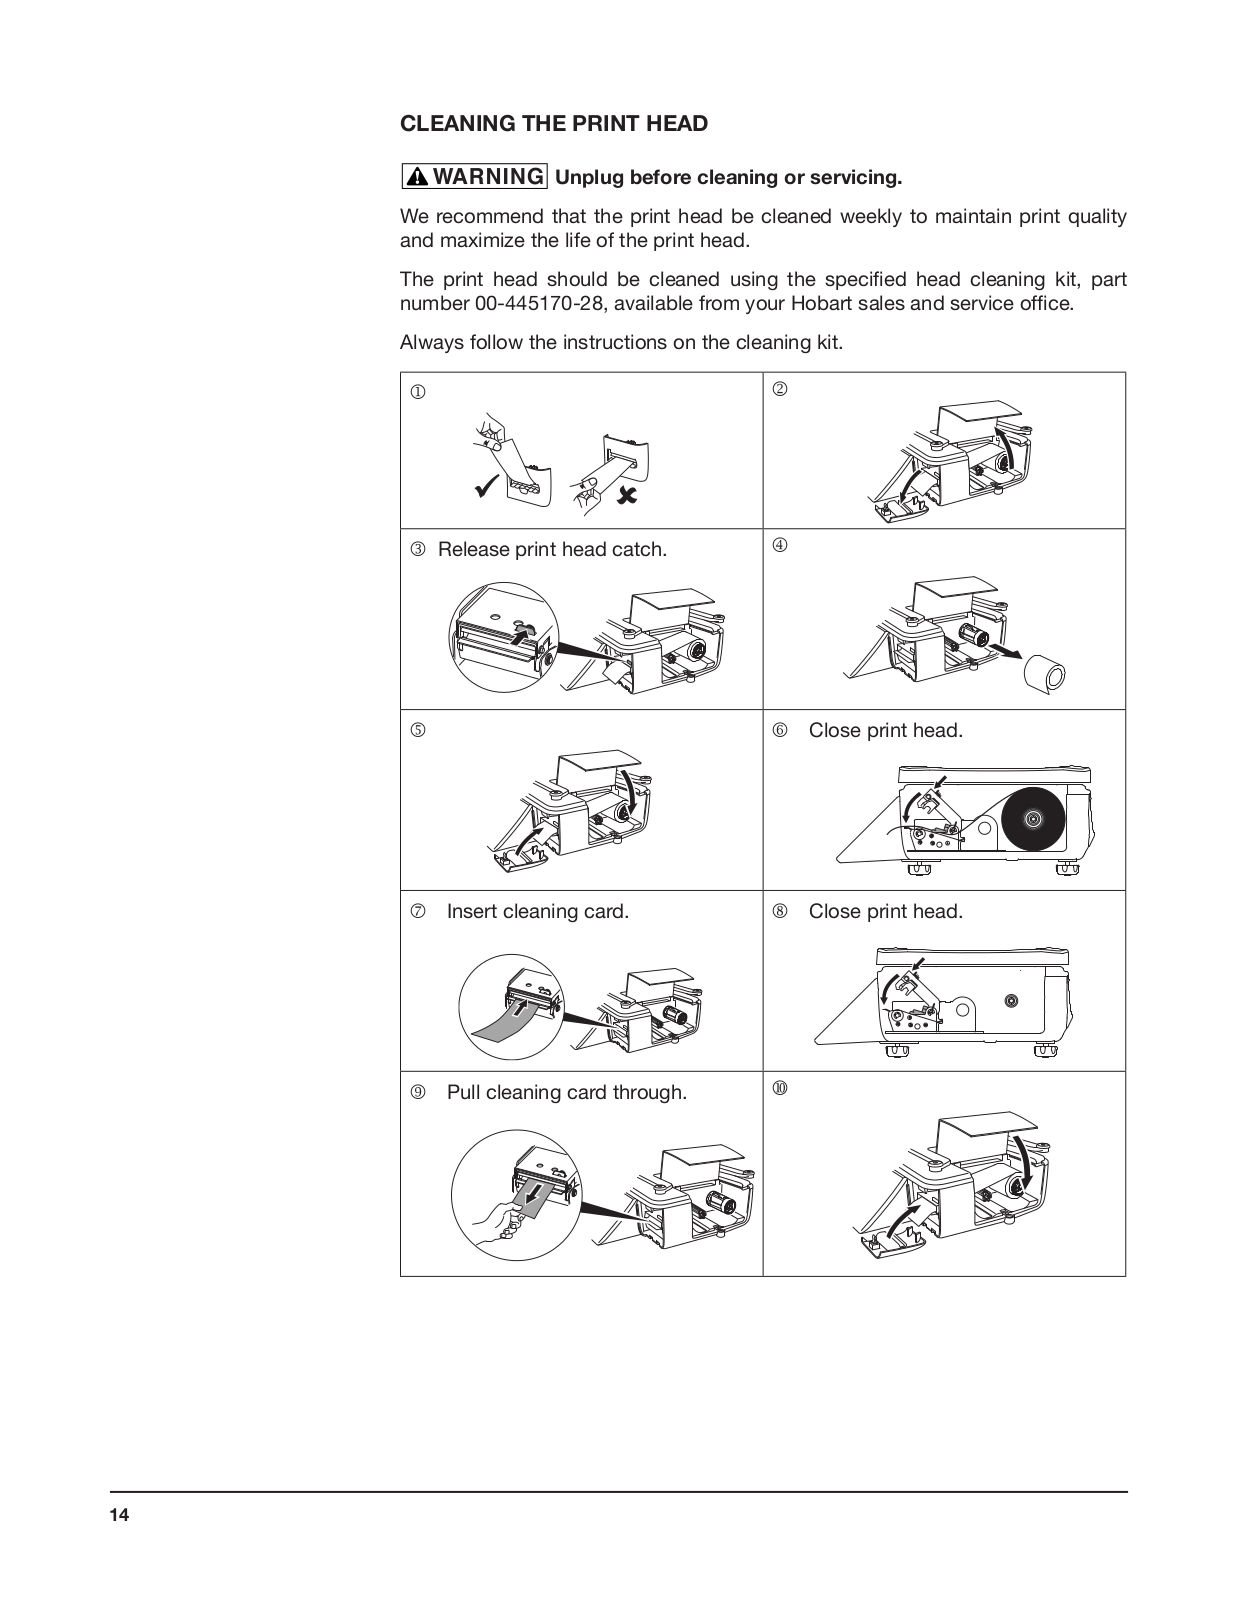
Cleaning the Print Head

Unplug before cleaning or servicing.

We recommend that the print head be cleaned weekly to maintain print quality and maximize the life of the print head.

The print head should be cleaned using the specified head cleaning kit, part number 00-445170-28, available from your Hobart sales and service office.

Always follow the instructions on the cleaning kit.

j

k

• Release print head catch.

m

n

o Close print head.

p Insert cleaning card.

q Close print head.

r Pull cleaning card through.

s

14

Programming

You must first be in Manager Mode to do any programming.

Keyboard Overlay

Your machine is supplied with a reversible keyboard overlay. One side shows operator function keys; the other side shows programming keys.

Revealing the Programming Overlay

1.Hold the overlay by the tab and slide it down to remove it from behind the protective cover.

2.Reverse the overlay to reveal the programming side.

3.Slide the top edge of the overlay up under the protective cover until the bottom edge rests on the supports.

15

ENTERING Manager Mode

To enter Manager Mode, press Test and follow steps 2 through 6 below.

j

Test


k


88888888888

nter


88888888888

While the test display


Test display begins.

is in progress


7

8

9

m


4

5

6


1

2

3


0


nter


Enter the Operator Number 0 - 99


n

7

8

9

o


4

5

6


1

2

3

nter


0


Enter the PIN


NOTE: Each operator has an access code called a PIN. The factory preset PIN number for Operator 1 is 4296 and is set for security level 2. All other operators will have factory default settings of PIN 0 and security level 0 unless you change them.

For instructions on how to change an operator PIN and security level, refer to Programming Operators on pages 22 - 23.

Navigating the Programming Displays

Use the Programming Keys to move around the programming screen or Manager Mode Menus, to select menu items and to select programming options.

Certain keys on the programming keyboard overlay allow you to go directly to some of the menu items.

Enter

Back one level

^ ^

^ ^

Accept

Home

Selects the menu displayed or the menu item displayed.

Moves back up one menu level.

Moves to the menu item above.

Moves to the menu item below.

Saves data entered up to this point.

Press ‘Home’ once to move to the top level of a menu.

Press ‘Home’ twice to exit Manager Mode from within a menu.

pqr

mno Number keys select the numbered menu item.

jk• i

16

Manager Menu System

SD100Sd

| Max 30 lb Min 0.20 lb d=0.01lb

Function List

5 Communication

6 USB Backup

7 Audit Mode

Selected Function

The following is a general outline or map of Manager Mode menus.

1 System Data

1 Products

1 Change Price

2 Create & Edit PLU

3 Delete PLU

4 Copy PLU

5 Customize Menu

2 Departments

3 Operators

4 Messages

5 Tables

6 Add Label

7 Date + Time

8 Function Security

9 Nutri Facts

2

Reports


1

Totals Report


2

Data Report


3

Trans Reports


4

Define Filters


3

System Setup


1

Interlock Setup


2

Security Setup


3 Promo Setup


4

Machine Setup


1 Keyboard Setup

5 Machine Mode


2

Printer Setup


6 Alarms


3

Machine Barcode


4

Display Adjust


5

Communication


1

Auto Configure

5 M/c Setup Dump


2

Machine ID


6 Advanced Setup


3 Network Map


4 Network Dump


6 USB Backup


1

Save File


2

Load File


7

Audit Mode


Audit On/Off

Enter

Enable Audit / Disable Audit

17

inverted text

Create and Edit Text

To Create and Edit Text, use the programming keys.

To type the upper mark shown on the character keys press Shift and release for characters printed in red, or press Cntrl and release for characters printed in blue followed by pressing the appropriate character key.

To create upper case text, press CapsLock followed by a string of characters.

Press

Caps

a second time to revert to lower case text.


Lock


The text editor will automatically word wrap PLU label text to ensure that a word is not split over two lines. Word wraps occurs after punctuation marks , - : ; (but not after the apostrophe). You should not enter spaces when creating a list of ingredients. The text editor also centers all printed label text.

Press Enter

Press Shift followed by Enter to re-center the text.

Selecting the Size of Printed Text

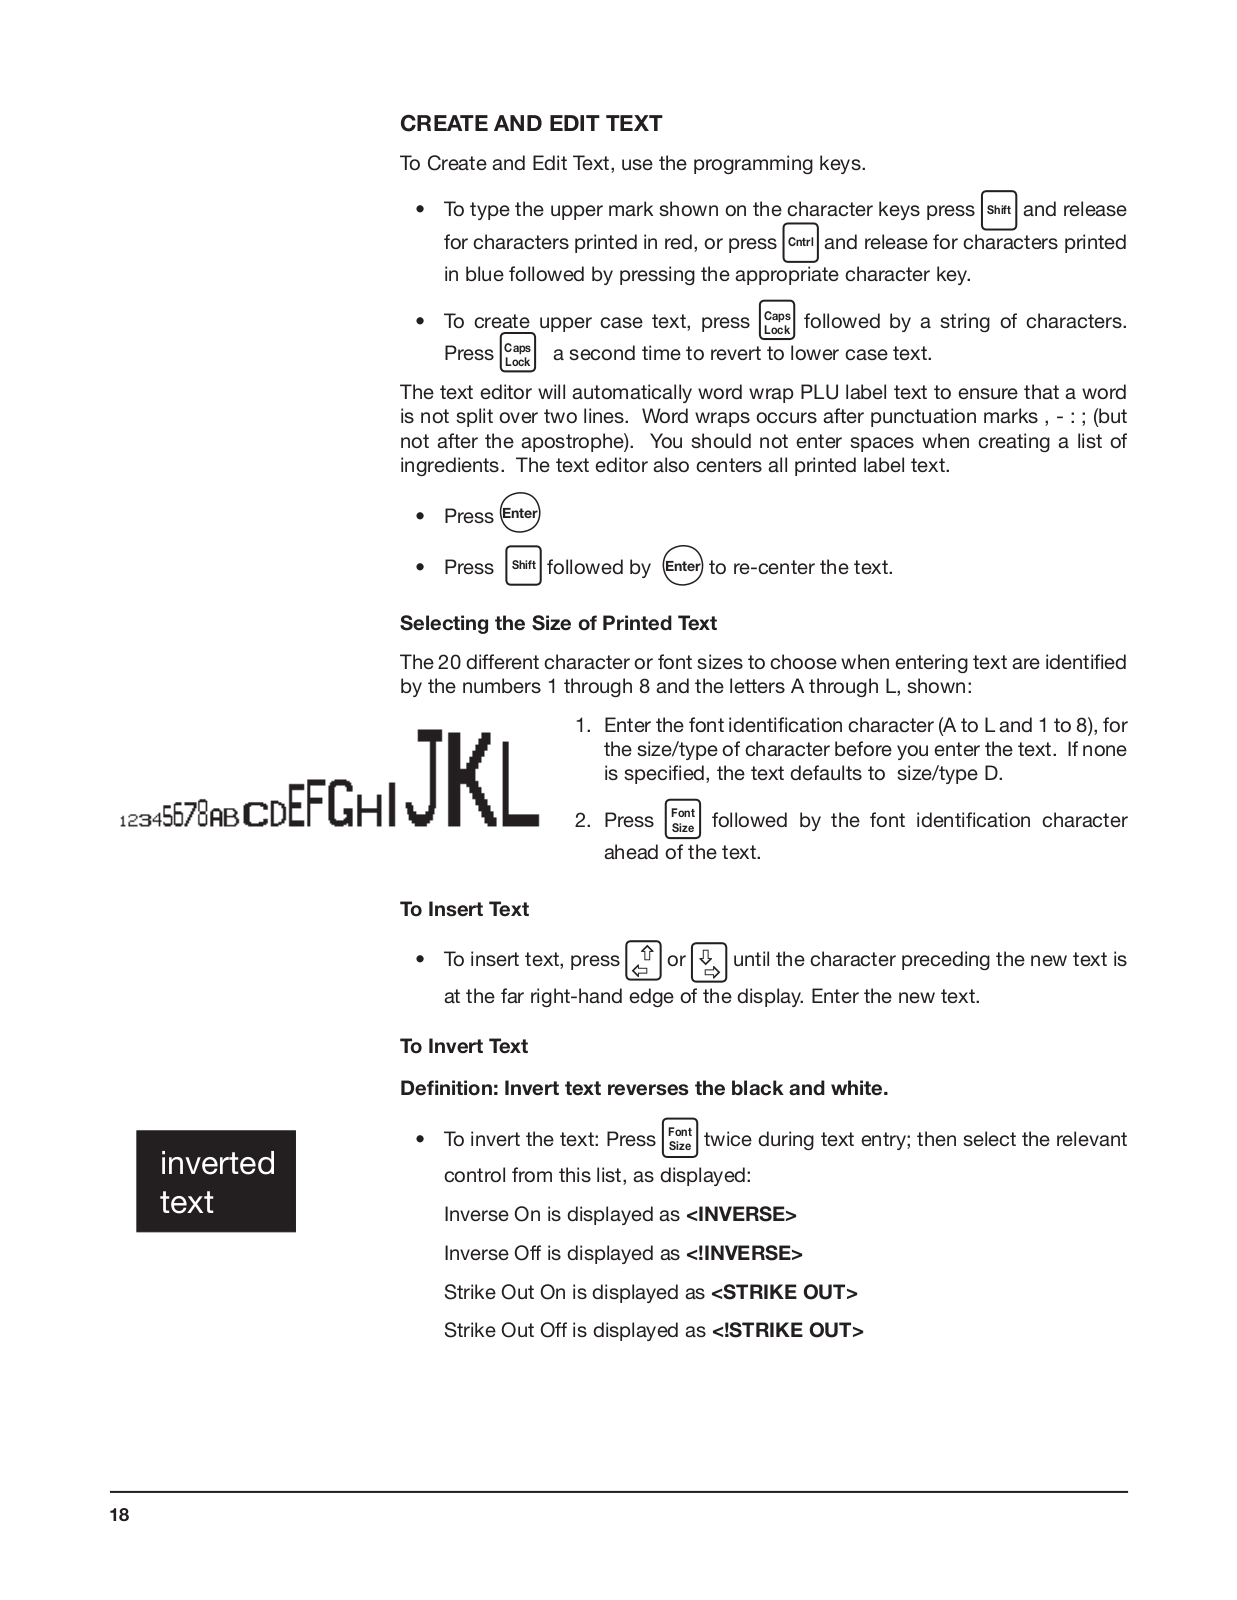
The 20 different character or font sizes to choose when entering text are identified by the numbers 1 through 8 and the letters A through L, shown:

1.Enter the font identification character (A to L and 1 to 8), for the size/type of character before you enter the text. If none is specified, the text defaults to size/type D.

2.Press FontSize followed by the font identification character ahead of the text.

To Insert Text


• To insert text, press

^ or

^

until the character preceding the new text is


^

^


at the far right-hand edge of the display. Enter the new text.

To Invert Text

Definition: Invert text reverses the black and white.

To invert the text: Press FontSize twice during text entry; then select the relevant control from this list, as displayed:

Inverse On is displayed as <INVERSE> Inverse Off is displayed as <!INVERSE> Strike Out On is displayed as <STRIKE OUT>

Strike Out Off is displayed as <!STRIKE OUT>

18

Tares

Ref. 1  0.01 lb Ref. 2  0.02 lb Ref. 3  0.03 lb Ref. 4  0.04 lb Ref. 5  0.05 lb Ref. 6  0.06 lb Ref. 7  0.07 lb Ref. 8  0.08 lb Ref. 9  0.09 lb

Displaying Text

When you recall already entered text, the display shows either the entire text, if it is 16 characters or less, or the first 16 characters of a long description.

Press Shift ^^ to move to the previous line feed or the start of displayed text.

• Press Shift

^

to move to the next line feed or the end of the displayed

text.

^


Correcting the Last Character Displayed

With the cursor just past the character to be deleted, press Clear . Then type the character to be inserted.

Deleting a Character

1. Press

^

or

^

^

^ until the character is at the right hand end of the display.

2. Press Clear to delete the last character.

Clearing the Entire Text Entered

• Press Shift then Clear . Do not press any other key. Enter new text if needed.

PLU Display Text

The PLU display text allows up to 60 characters (30 characters, two lines). The second line may be used to display the product text in a different language.

NOTE: The promotional message (if any) will replace the second line of the product text.

Extended Character Set

You can create additional text characters using the extended character facility and entering the appropriate numeric code for the character.

• Press CharacterCode followed by the numeric code required.

Tare Weight (Stored Tare)

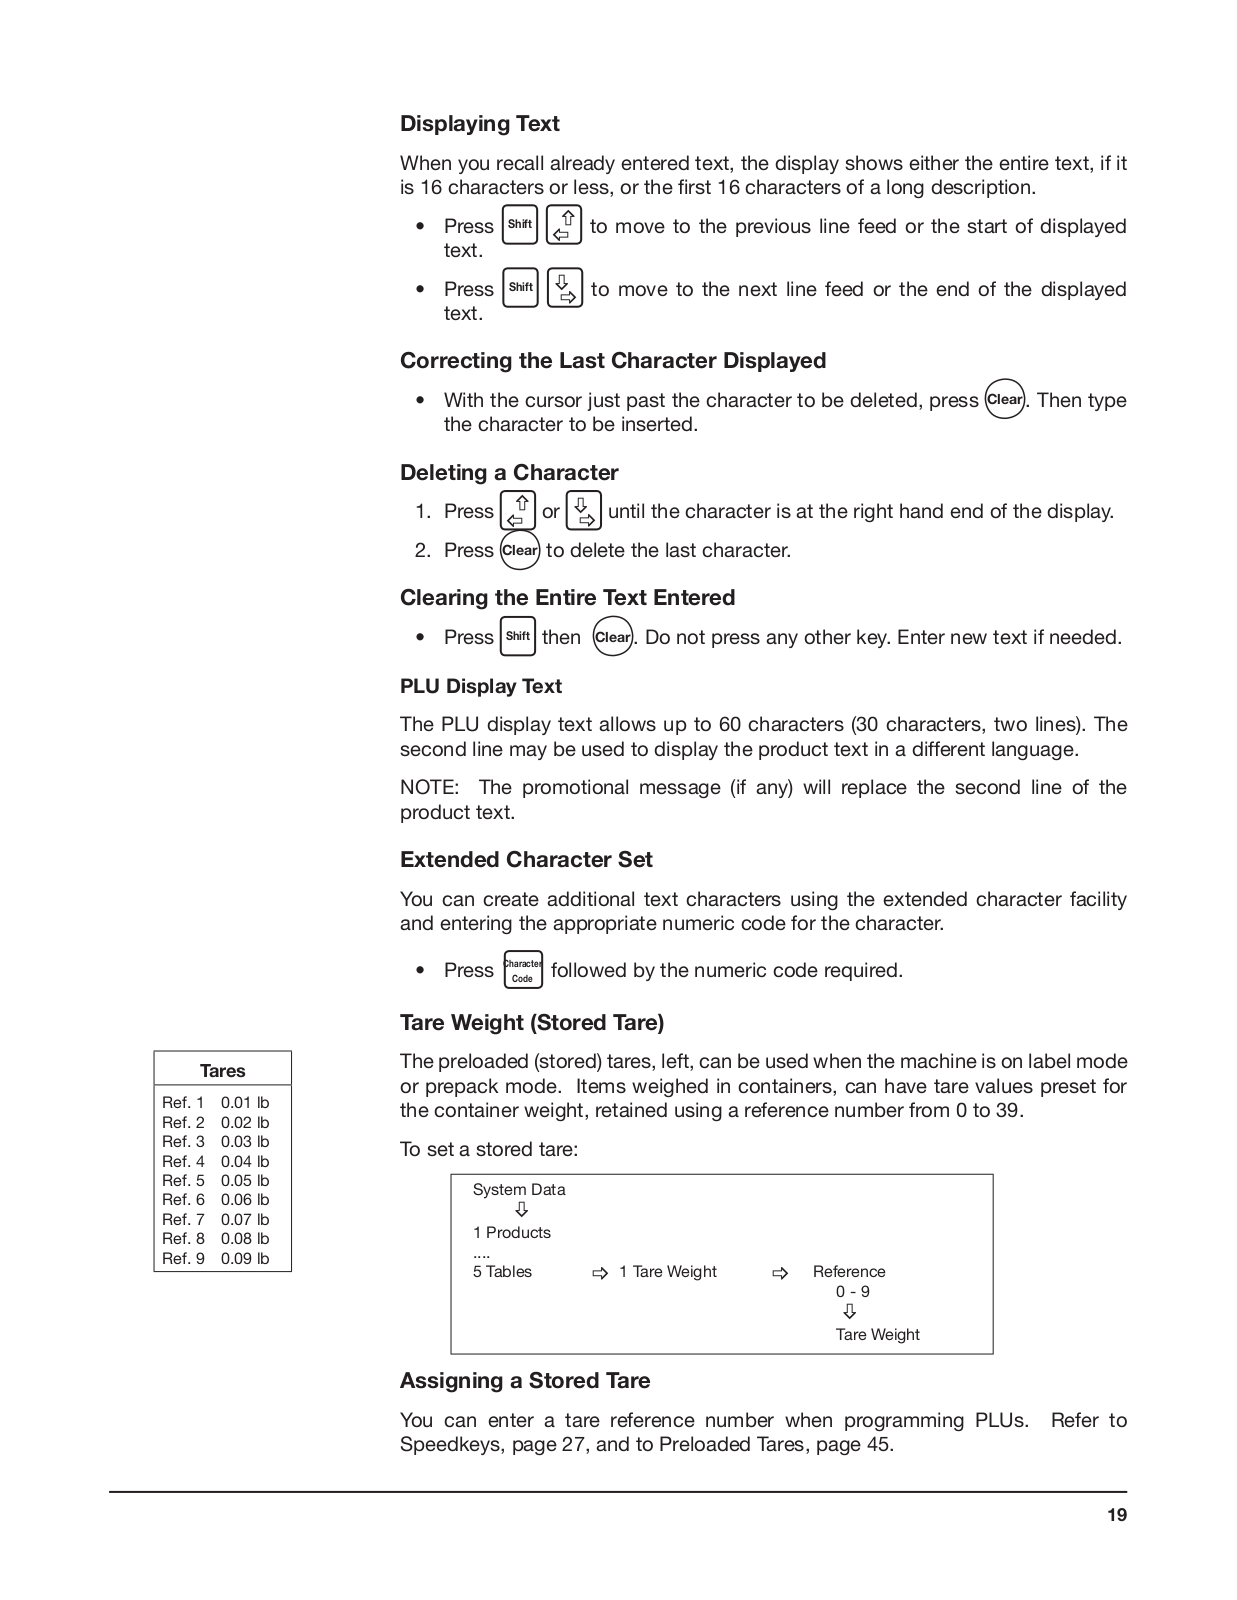
The preloaded (stored) tares, left, can be used when the machine is on label mode or prepack mode. Items weighed in containers, can have tare values preset for the container weight, retained using a reference number from 0 to 39.

To set a stored tare:

System Data


^


1

Products


....


5

Tables

^

1 Tare Weight

^

Reference


0 - 9


^


Tare Weight

Assigning a Stored Tare

You can enter a tare reference number when programming PLUs. Refer to Speedkeys, page 27, and to Preloaded Tares, page 45.

19

Group Names

1.GRAND TOTALS

2.MEAT

3.DELI

4.BAKERY

5.PRODUCE

Setting the Date and Time

The scale has an internal clock; it retains the date and time in accessible memory. The clock date and time is used to calculate sell-by dates printed on labels and to print the date and time on printouts and reports. Note the following:

The default format for the date is day/month/year.

The time is displayed to the right of the date in hours/minutes (24 hour). You can only change the digit which flashes.

• Press

^

or

^

^

^ to move along the display.

• Press Enter when all the digits are set appropriately.

Creating Product Groups

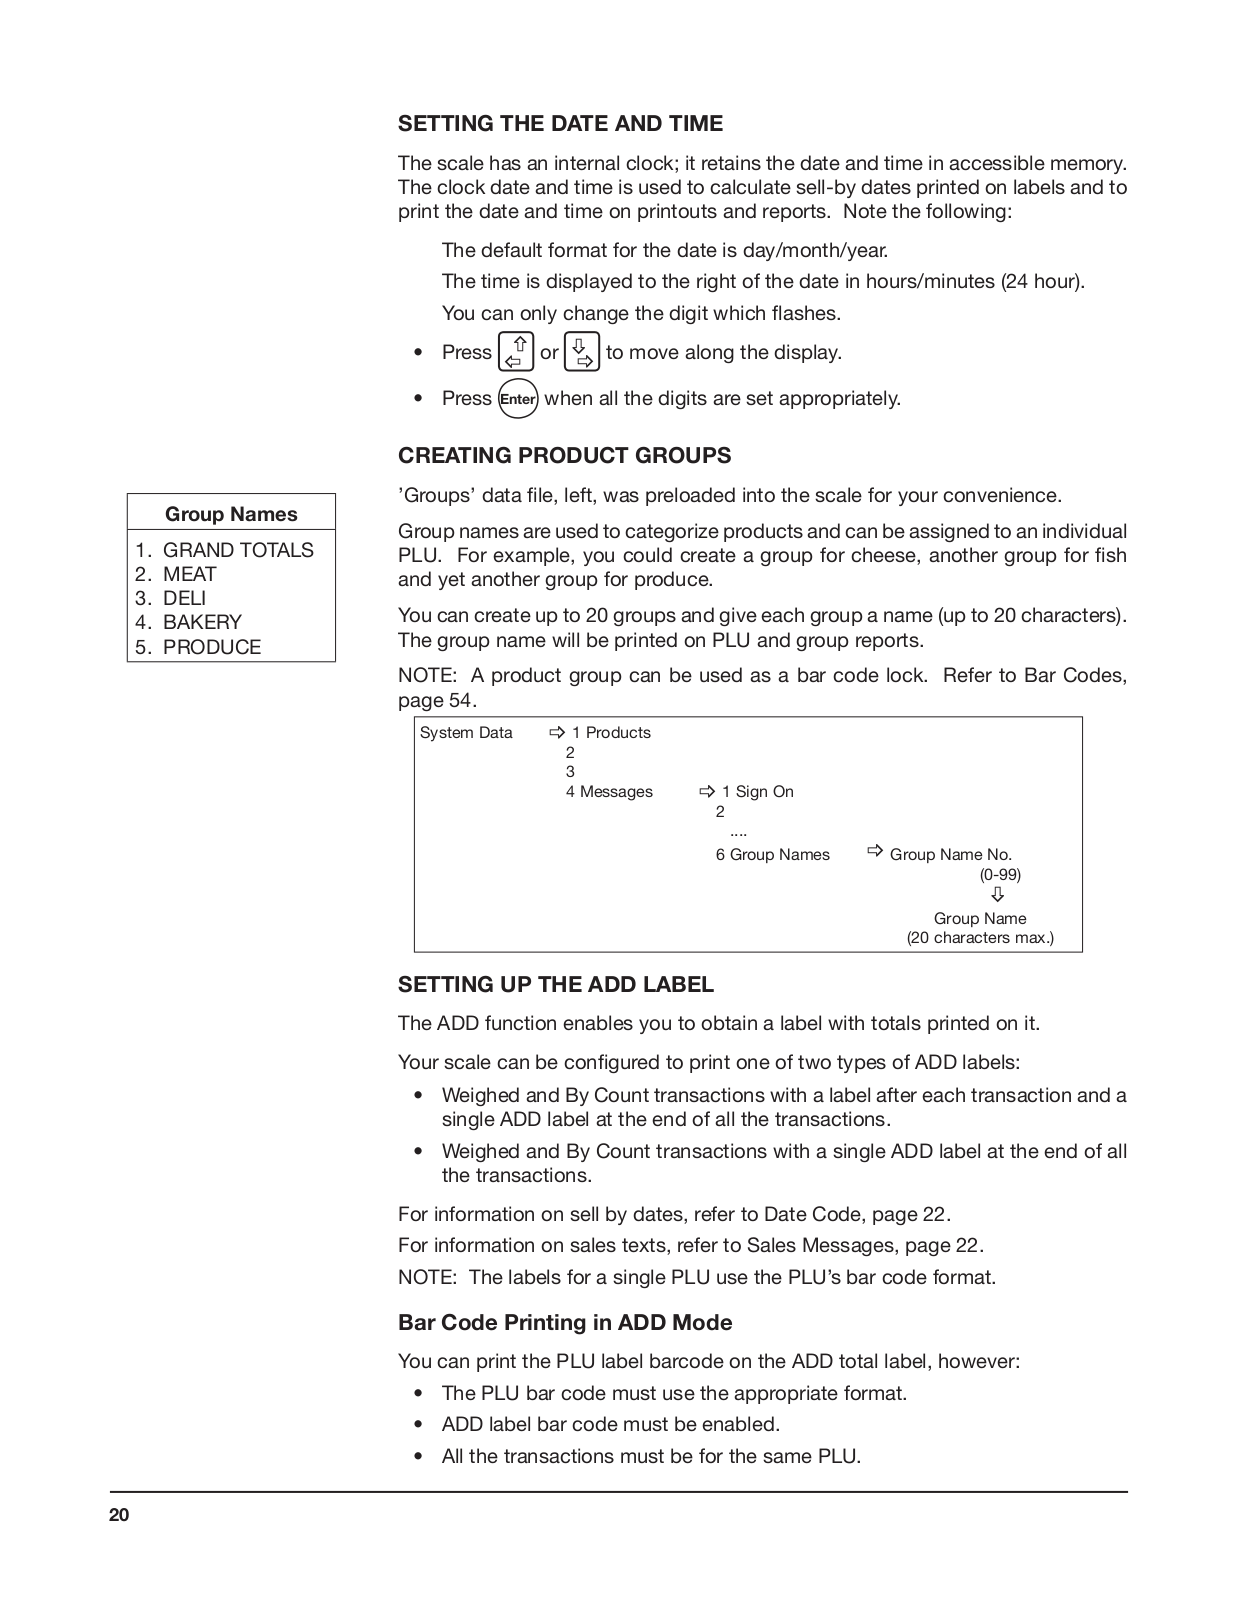
’Groups’ data file, left, was preloaded into the scale for your convenience.

Group names are used to categorize products and can be assigned to an individual PLU. For example, you could create a group for cheese, another group for fish and yet another group for produce.

You can create up to 20 groups and give each group a name (up to 20 characters). The group name will be printed on PLU and group reports.

NOTE: A product group can be used as a bar code lock. Refer to Bar Codes, page 54.

System Data

^ 1 Products


2


3


4 Messages

^ 1 Sign On


2


....


6 Group Names

^ Group Name No.


(0-99)


^


Group Name


(20 characters max.)


Setting Up the ADD Label

The ADD function enables you to obtain a label with totals printed on it.

Your scale can be configured to print one of two types of ADD labels:

Weighed and By Count transactions with a label after each transaction and a single ADD label at the end of all the transactions.

Weighed and By Count transactions with a single ADD label at the end of all the transactions.

For information on sell by dates, refer to Date Code, page 22. For information on sales texts, refer to Sales Messages, page 22. NOTE: The labels for a single PLU use the PLU’s bar code format.

Bar Code Printing in ADD Mode

You can print the PLU label barcode on the ADD total label, however:

The PLU bar code must use the appropriate format.

ADD label bar code must be enabled.

All the transactions must be for the same PLU.

20

Creating Messages

Five different types of messages can be created: scroll message, store name, sales message, sign on / sign off text and group names.

Refer to Create and Edit Text, page 18, and Creating Product Groups, page 20.

Substitution Codes

You can include substitution codes in text messages for printing sales information.

For a complete list of Hobart and Dewey Decimal substitution codes available and how to use them, refer to Substitution Codes, pages 86 - 95.

Scroll Message

This is a trading message which appears on the customer and vendor displays when the machine is not in use. The message blanks as soon as you press a key during normal operation or when the weight is disturbed.

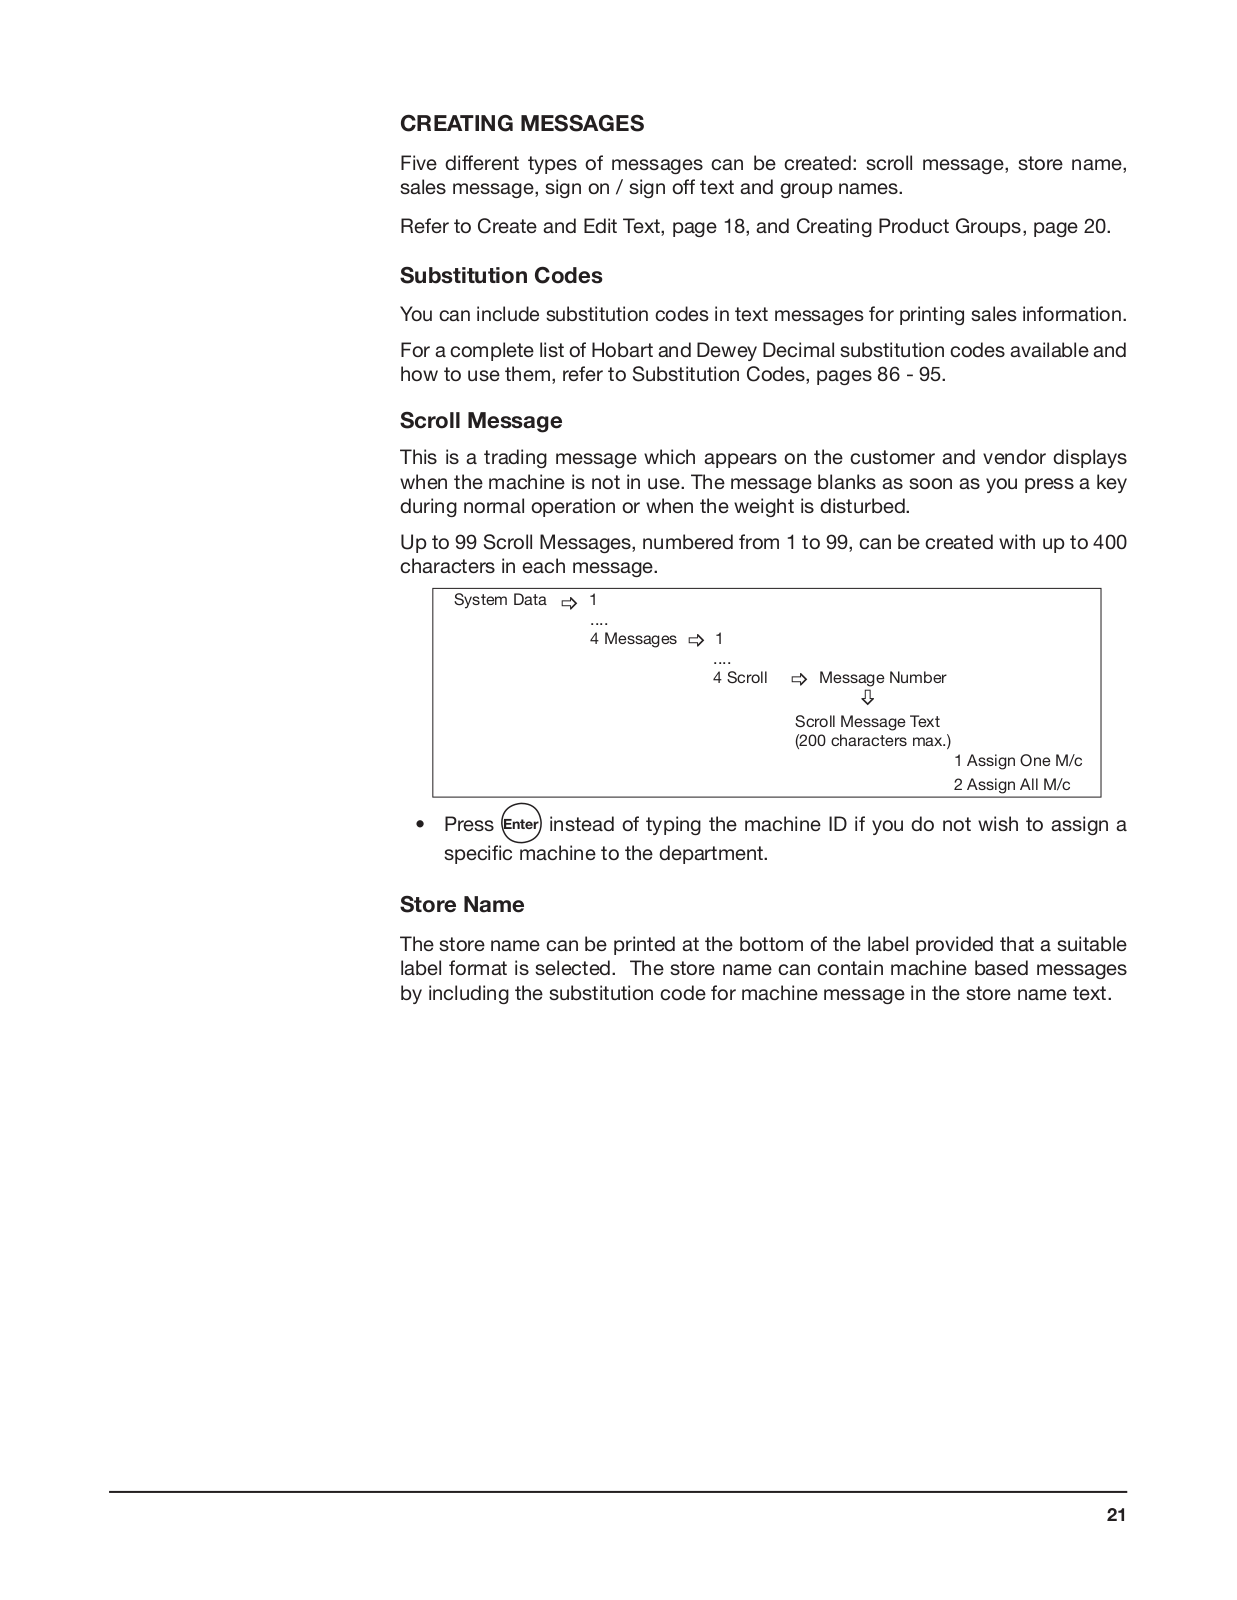
Up to 99 Scroll Messages, numbered from 1 to 99, can be created with up to 400 characters in each message.

System Data

^

1

....

4 Messages

^

1

....

4 Scroll

^

Message Number

^


Scroll Message Text (200 characters max.)

1 Assign One M/c

2 Assign All M/c

Press Enter instead of typing the machine ID if you do not wish to assign a specific machine to the department.

Store Name

The store name can be printed at the bottom of the label provided that a suitable label format is selected. The store name can contain machine based messages by including the substitution code for machine message in the store name text.

21

Sales Messages

1.Packed On

2.Best Before

3.Sell By

4.Net Wt/Ct

5.Unit Price

6.Total Price

7.Net Weight

8.KEEP REFRIGERATED

9.$

10.%%+3.2%%

Sales Messages

The preloaded ‘Sales Messages’ file, at left, is provided.

A sales message is a message that can be assigned to a PLU and will be printed on labels if the label format has an appropriate sales message field.

The position of the message depends on the label format selected for the scale. Each label format can have up to two sales message fields.

You can create up to 20 sales messages with up to 200 characters in each. A sales message can include substitution codes in the text message such as:

%%+4.1%% or %%D

  prints the current date

%%+4.3%% or %%Z1

  prints the time in the format 12:59

%%+4.4%% or %%Z2

  prints the time in the format 1259

%%+4.4%% or %%Z3

  prints the time in the format 125

%%+7.3#pp%% or %%Rpp

prints the sales message numbered  ‘pp’.

%%+3.1%% or %%V1

  prints the current operator number.

%%+3.2%% or %%V1

  prints the current operator name.

%%+7.1%% or %%M

  prints the sales message at machines


  associated with that message.

Date Code

Use the date code to print the date as the number of days from the start of the current year (01 January). You can set an offset (999,999 max.) to add a chosen number of days to the calculation.

%%+4.1%% or %%DC prints the date 01/02/02 as 32. %%+4.2#10%% or %%DC+10 prints the date 01/02/02 as 42. %%+7.1%% or %%DC prints the date 31/12/02 as 365.

Programming Operators

Operators can be uniquely identified and you can set the status of an operator for either trading or training. The operator’s status can be changed if there are no outstanding transactions against the operator. Operator numbers 0 - 20 are available; each can be used to identify an operator name of up to 16 characters.

Operators


^


Operator No.


0 - 20


^


Operator Name


(0 - 16 Characters)


^


Enter Text


^


PIN


^


Security Level


^


Trading

^

Training

^


^

Logged On/Off


Enter Text


^


Logged On/Off


22

Operator Names

Operator names are printed on the operator totals report.

The operator name or number can be printed on a label if a suitable label format is selected and the appropriate substitution code is included. Refer to Substitution Codes, pages 86 - 95, for the sales message text.

Operator PIN

The factory default setting for operator 1 PIN is 4296 and for operator 1 security level is 2 (Full Access).

All other operators will have factory default settings of PIN 0 and security level 0 unless you change them.

Each operator may be assigned a PIN between 0 and 99999999 which must be entered when logging on or off. If the PIN is left at 0, a PIN is not required when logging on or off.

• If you make a mistake while entering the number press Clear and reenter.

Changing Operator PIN

If you have set up and assigned a dedicated PIN key, the operator can change his or her PIN. Refer to Logging On/Off, page 41.

Always make sure that at least one operator has a security level set high enough to be able to change PINs and operator security in Manager Mode. If you accidentally set all the security levels too low, refer to Setup Mode, page 82.

Operator Security Level

There are three security levels: 0, 1 or 2.

Security level determines which scale functions can be accesed by the operator.

An operator can access a function if the operator’s security level is the same or higher than the security level required for the function.

Operator Status

The default operator mode is trading. You can change the operator mode from trading to training (or back again from training to trading) provided that there are no outstanding transactions against that operator.

If there are any current transactions you will see the message Print Trans displayed briefly and the machine will revert to the previous mode.

If there are totals outstanding you will see the message ‘Clear Trans. No.?’.

Press Clear , or press Enter to return to the previous mode without clearing transactions for the operator.

23

Setting Function Security Levels

There are three security levels: 0, 1 or 2.

Security level determines which scale functions can be accesed by the operator.

An operator can access a function if the operator’s security level is the same or higher than the security level required for the function.

If ‘Call Supervisor’ is displayed, your security level is not high enough. Security level 0 means that any operator can access that function. The following functions have factory preset security levels, as follows:

Sales Functions

Preset Security Level

Void

1

UP/PLU

0

Positive non weighed

0

Negative non weighed

0

Receipt/label selection

0

Dual capacity

0

Override

1

Price base

0

Returns

1

Refunds

1

No Sale

0

Float

0

Pick Up

0

Paid Out

0

Manager Functions

You can assign a security level to most of the manager functions or you can change the level set, provided that your own security level is the same or higher than the function security.

Always make sure that you have at least one operator with a security level high enough to change Operator PIN and security level settings.

It is possible to inadvertently set all users security levels so that security levels can no longer be modified and no user has access to any sales or manager functions. If this happens refer to Setup Mode, page 82.

Example: Setting the security level for creating tables

j Manager Mode

k

nter

System Data

^ ^ Tables

m

7

8

9


4

5

6

Enter

Shift

Security

1

2

3


0


Level


security level 0 - 2

24

Printing Data Reports

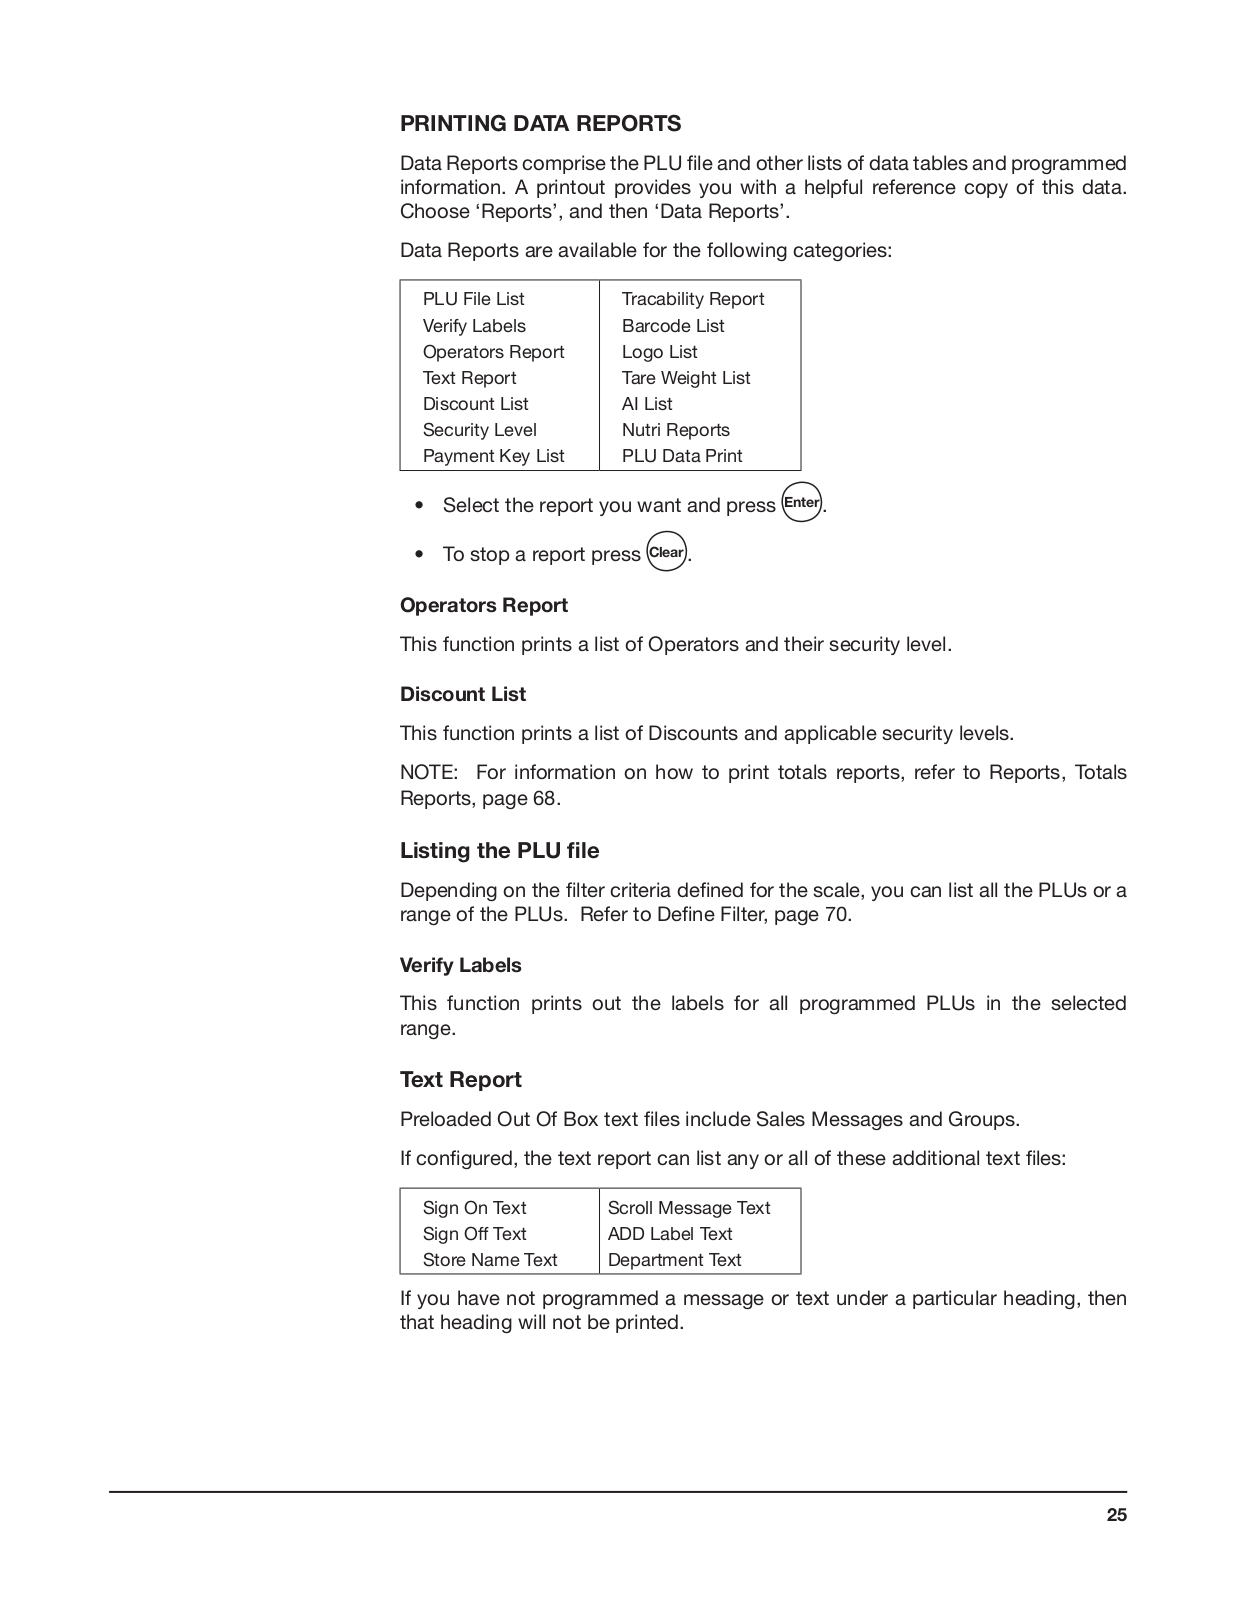
Data Reports comprise the PLU file and other lists of data tables and programmed information. A printout provides you with a helpful reference copy of this data. Choose ‘Reports’, and then ‘Data Reports’.

Data Reports are available for the following categories:

PLU File List

Tracability Report

Verify Labels

Barcode List

Operators Report

Logo List

Text Report

Tare Weight List

Discount List

AI List

Security Level

Nutri Reports

Payment Key List

PLU Data Print


Select the report you want and press Enter .

To stop a report press Clear .

Operators Report

This function prints a list of Operators and their security level.

Discount List

This function prints a list of Discounts and applicable security levels.

NOTE: For information on how to print totals reports, refer to Reports, Totals Reports, page 68.

Listing the PLU file

Depending on the filter criteria defined for the scale, you can list all the PLUs or a range of the PLUs. Refer to Define Filter, page 70.

Verify Labels

This function prints out the labels for all programmed PLUs in the selected range.

Text Report

Preloaded Out Of Box text files include Sales Messages and Groups.

If configured, the text report can list any or all of these additional text files:

Sign On Text

Scroll Message Text

Sign Off Text

ADD Label Text

Store Name Text

Department Text


If you have not programmed a message or text under a particular heading, then that heading will not be printed.

25

Scale Setup

To customize the way your scale operates, select function keys, programming them for quick access to functions and specify criteria for printing labels.

You must be in Manager Mode to perform any programming operation. Refer to Entering Manager Mode, page 16.

Direct Access Speedkeys or Hot Keys

Some functions have keys associated with them to give direct access to the function instead of stepping through the menus. This helps you perform manager functions more quickly

The default keys set up for the machine and their relative positions on the keyboard are shown below.

Speedkeys

To program keys for other menus with associated ‘hot’ keys:

1. Navigate to the menu for which you require quick access.

2. Hold down the key you want to use until you hear a series of short bleeps followed by a long bleep.

‘Entry Accepted’ will display when the key has been assigned.

NOTE: Customized speedkey assignments are not saved when you perform a machine dump, nor are they restored with a machine load. The default direct access keys are restored.

26

Speedkeys

Speedkeys can be assigned to any of the programmable keys on the keyboard. You can label the speedkey positions according to your own requirements.

The diagram shows how to assign a speedkey for PLU 117. The procedure is similar for any other type of dedicated key.

NOTE: If you are assigning a key to a position previously assigned to a function key, hold down the key until you hear a series of short beeps followed by a long beep.

Speedkeys can be allocated to Departments, Groups, Tares, or other references that do not have a dedicated key on the keyboard.

To set up a speedkey, do not enter a reference number for the key before assigning it to the keyboard.

Manager Mode

^


1


2


3


4 Machine Setup

^ ^

5

1 Keyboard Setup

62

73

4

Standard Keys

Standard keys are:

^ ^

^ ^

1 Key Assign

2 Key Unassign

1 Standard Assign


2 ECR Assign


3 Funct Key Assign

^


1 PLU


^


Dept Number 0


^


Enter PLU 117


^


Assign Key


PLU

Tare

#


Operator

Prop. Tare

UP/PLU


Log

Dual Capacity

Positive Non-weighed


PIN


Negative Non-weighed


Department


Override

You may have keys set up that are different from the ones shown above depending on your requirements. For example, you may have several operator keys.

Override Key

This key allows you to individually price either a weighed or by-count item.

27

Printer Setup

This group of functions enable you to customize the way that your scale generates and prints labels.

Label Setup

These appearance options for labels also have options that select how labels are generated and printed.

Label Type

Labels can be either separate or continuous.

Continuous Labels

Continuous labels can be printed on a tally roll or on a continuous label roll. If you use varying lengths or formats for labels, printing on a continuous label roll uses the printer roll more economically.

Separate Labels

When using separate labels, the labels must be appropriately sized for the format assigned to the PLU, the department and the scale.

Label Format

The label format can be either open or closed. Twelve standard label formats and four nutritional label formats are available. Any format can be set to suit your requirements.

With the open label format, labels are printed according to the format that is stored in the PLU record.

With a closed label format, labels are printed according to the label format that has been assigned to the scale.

If the Override key has been selected, the label prints according to the format assigned to the scale.

Tare Interlock

If the Tare Interlock is enabled, you must select a tare in order to print a label.

Print Modes

You can select one of three ways to print labels, print on request, print immediate or prepack.

Print on Request

• Press your operator key or Print to obtain the label.

Weighed and non-weighed transactions will be assigned to the default operator number.

Print Immediate

The machine issues a label as soon as the weight on the machine becomes steady. It does not retain the PLU or tare.

Weighed transactions will be assigned to the default operator number.

• You cannot use Override .

28

Prepack

All labels will be assigned to the default operator number.

The machine retains the PLU and tare (if set up) and issues a label each time the weight becomes steady.

Default Operator

• When selecting the print mode you will be asked to enter an operator number. This number will be assigned to the Print key.

Machine Message

You can assign a message reference to a machine. The substitution code %%M can be programmed into a PLU text field, sales message or store name. The code is replaced by the assigned message which is printed in the appropriate text field on the label.

Print Speed and Print Density Settings

You can enter a print speed between 50mm/s and 80mm/s. A slower print speed may improve print quality on low specification paper. Low print speed may also help if you have peel off problems with some types of label.

You can set the print density between 0% and 100%. The default setting is 100% but you may want to decrease the density when using a slow print speed.

Assigning a Bar Code Format

To print Bar Code on a label, a format must have been assigned to the scale.

On label machines the format assigned to the machine is used unless the PLU has a programmed barcode. Enter a bar code reference number from 0 to 11.

For more information on creating and selecting bar code formats, refer to Bar Codes, page 54.

Manager Mode


^


1


2


3


4 Machine Setup

^ ^


5


1


6

2


7

3 Machine Barcode 

^ ^


4

1 Label

^

Barcode Format


2 Barcode Height


Reference 0 - 9


^


Height B/C


5 - 20 mm


Bar Code Height

Barcode height option allows you to set the height of barcodes on receipts and talons to be programmable in the range of 5 - 20 mm in 1 mm increments. The default height is 20 mm.

29

Adjusting the Display Brightness

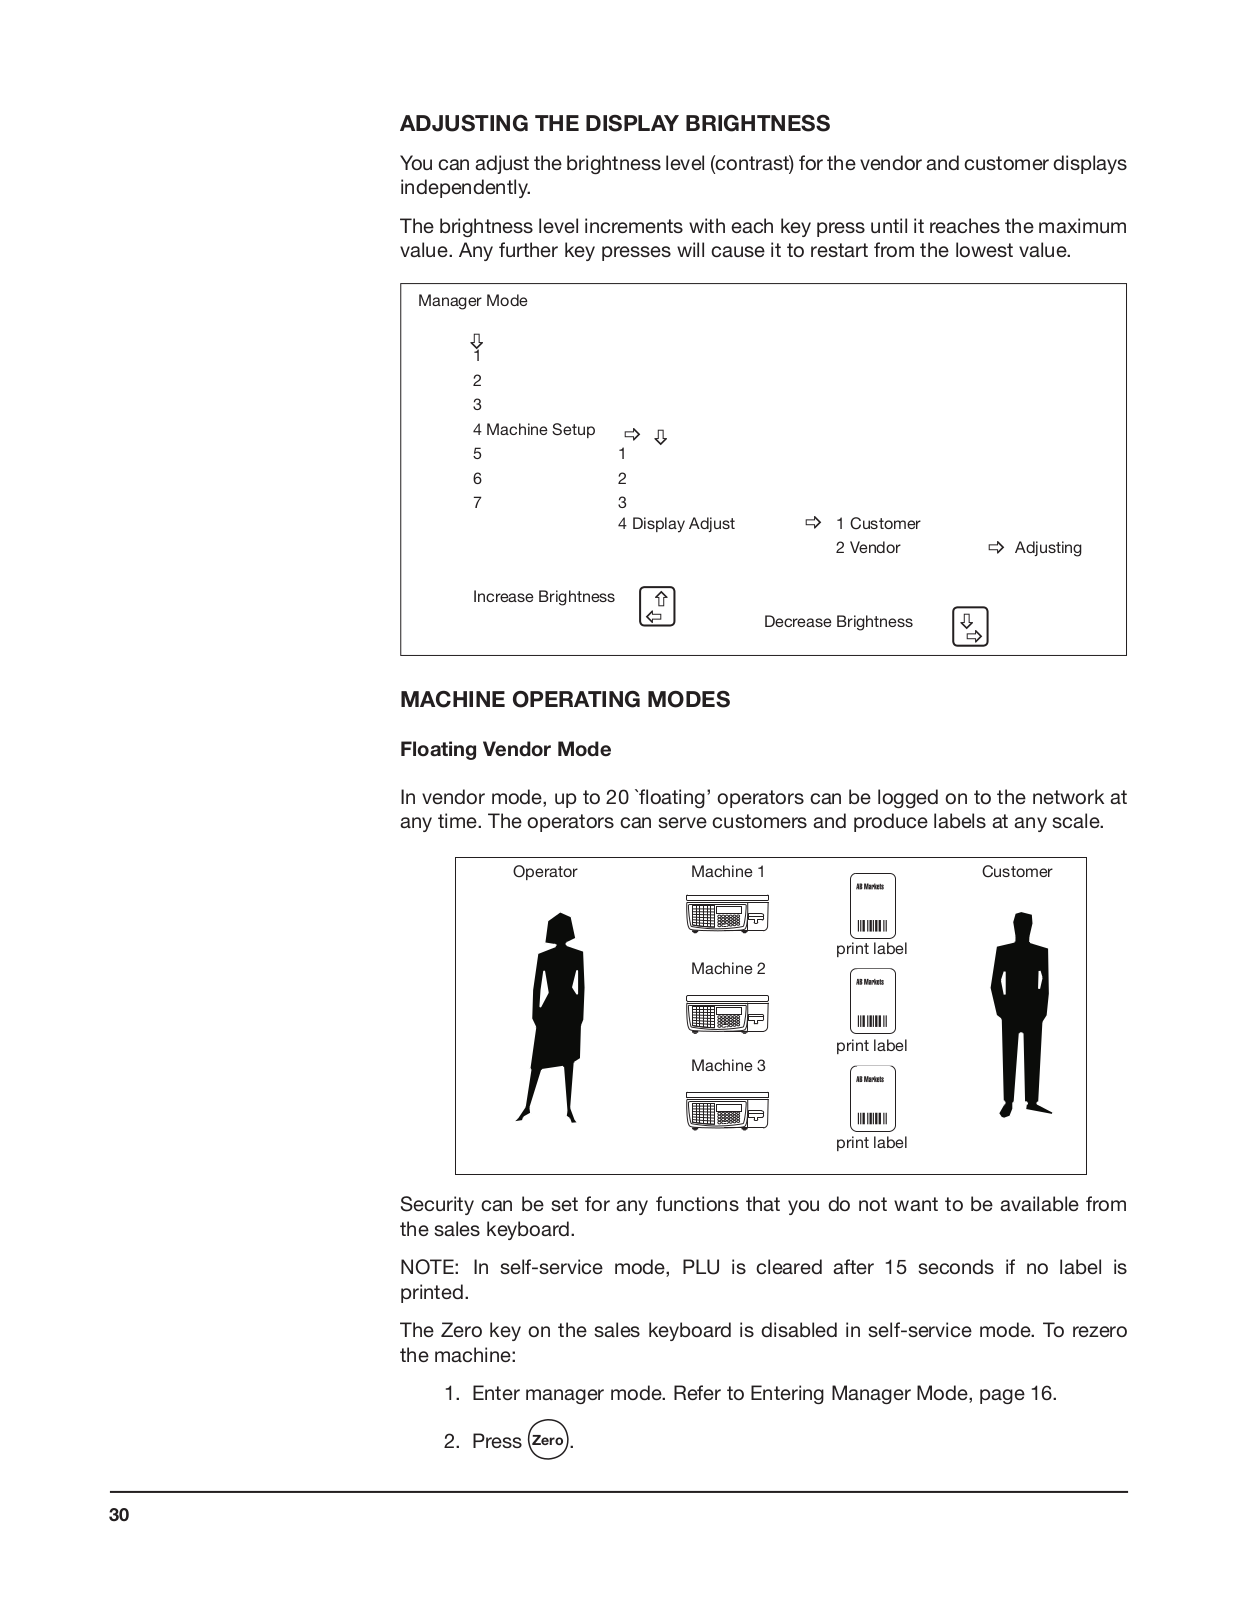
You can adjust the brightness level (contrast) for the vendor and customer displays independently.

The brightness level increments with each key press until it reaches the maximum value. Any further key presses will cause it to restart from the lowest value.

Manager Mode

^


1


2


3


4 Machine Setup

^

^


5


1


6

2


7

3


4 Display Adjust

^

1 Customer


2 Vendor

Increase Brightness


^


^Decrease Brightness

Machine Operating Modes

Floating Vendor Mode

^ Adjusting

^ ^

In vendor mode, up to 20 `floating’ operators can be logged on to the network at any time. The operators can serve customers and produce labels at any scale.

    Operator

Machine 1

Customer


print label

Machine 2

print label

Machine 3

print label

Security can be set for any functions that you do not want to be available from the sales keyboard.

NOTE: In self-service mode, PLU is cleared after 15 seconds if no label is printed.

The Zero key on the sales keyboard is disabled in self-service mode. To rezero the machine:

1.Enter manager mode. Refer to Entering Manager Mode, page 16.

2.Press Zero .

30

Loading...
+ 74 hidden pages